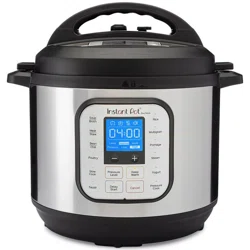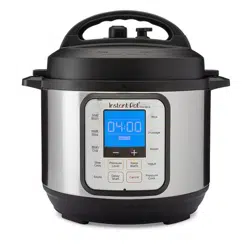

INSTANT POT
®
DUO
®
PLUS
USER MANUAL

to your new Instant Pot
®
Duo
®
Plus!
This Instant Pot Duo Plus multifunction cooker can help you cook
healthy, delicious meals more easily and in less time. We hope you
fall in love with Instant Pot cooking, and enjoy it in your kitchen for
years to come!
Get started with your new Duo Plus!
OM.
Welcome

CONTENTS
Important safeguards 2
What’s in the box 8
Using your Duo Plus 10
Initial setup 14
Using the lid 20
Slow Cook 26
Rice 28
Steam 30
Sauté 31
Yogurt 33
Sous Vide 35
Cake 37
Keep Warm 39
Cleaning 40
Troubleshooting 41
Error codes 43
Learn more 45
Warranty 46

2
User Manual
IMPORTANT
SAFEGUARDS
READ ALL INSTRUCTIONS
Placement
DO place the appliance on a countertop only. Always operate the
appliance on a stable, non-combustible, level surface.
DO make sure all parts are dry and free of food debris before placing
the cooking pot on the cooker base.
DO NOT place the appliance on or close to a hot gas or electric
burner, or a heated oven.
DO NOT use the appliance near water or flame.
DO NOT use outdoors. Keep out of direct sunlight.
DO NOT place on anything that may block the vents on the bottom
of the appliance.
General Use
The removable inner cooking pot is extremely hot during use, and
can be extremely heavy when full of ingredients.
DO use oven mitts when handling the inner cooking pot and
removing accessories.
DO place hot accessories on a heat-resistant surface or cooking plate.
DO use care when lifting the cooking pot from the cooker base to
avoid burn injury.
DO use extreme caution when the cooking pot contains hot food, hot
oil or other hot liquids.

3
User Manual
DO use only the Instant Pot lid that came with this cooker base. Using
any other pressure cooker lids may cause personal injury and/or
property damage.
DO NOT use the appliance without the removable inner cooking pot
installed.
DO NOT touch the metal portion of the lid, the appliance’s hot surfaces,
or any accessories during or immediately after cooking because they
will be hot. Only use the side handles for carrying or moving.
DO NOT use this appliance for deep frying or pressure frying with oil.
DO NOT move the appliance while it is in use and use extreme
caution when disposing of hot grease.
DO NOT allow children or persons with reduced physical, sensory
or mental capabilities to operate this appliance. Close supervision
is necessary when any appliance is used by or near children and
persons with reduced physical, sensory or mental capabilities.
Children should not play with this appliance.
DO NOT use the appliance for anything other than household use.
It is not intended for commercial use.
DO NOT leave the appliance unattended while in use.
Pressure Cooking
This appliance cooks under pressure. Allow the appliance to
depressurize naturally or release all excess pressure before opening.
Inappropriate use may result in burns, personal injury and/or
property damage.
DO make sure the appliance is properly closed before operating.
DO check that the steam release valve is installed.
DO use the pressure cooking lid when pressure cooking. For
instructions on how to use the lid, see the User Manual or Getting
Started Guide.

4
User Manual
DO turn the appliance off if steam escapes from the steam release
valve and/or float valve in a steady stream for longer than 3 minutes.
If steam escapes from the sides of the lid, turn the appliance off and
make sure the sealing ring is properly installed.
DO check the steam release valve, steam release pipe, anti-block
shield and float valve for clogging before use.
DO NOT remove the pressure cooking lid with unprotected hands.
DO NOT attempt to force the lid off the Instant Pot cooker base.
DO NOT move the appliance when it is under pressure.
DO NOT cover or obstruct the steam release valve and/or float valve
with cloth or other objects.
DO NOT attempt to open the appliance until it has depressurized,
and all internal pressure has been released. Attempting to open the
appliance while it is still pressurized may lead to sudden release of
hot contents and may cause burns, personal injuries and/or
property damage.
DO NOT place your face, hands or exposed skin over the steam
release valve or float valve when the appliance is in operation or has
residual pressure, and do not lean over the appliance when removing
the lid.
Overfill During Pressure Cooking
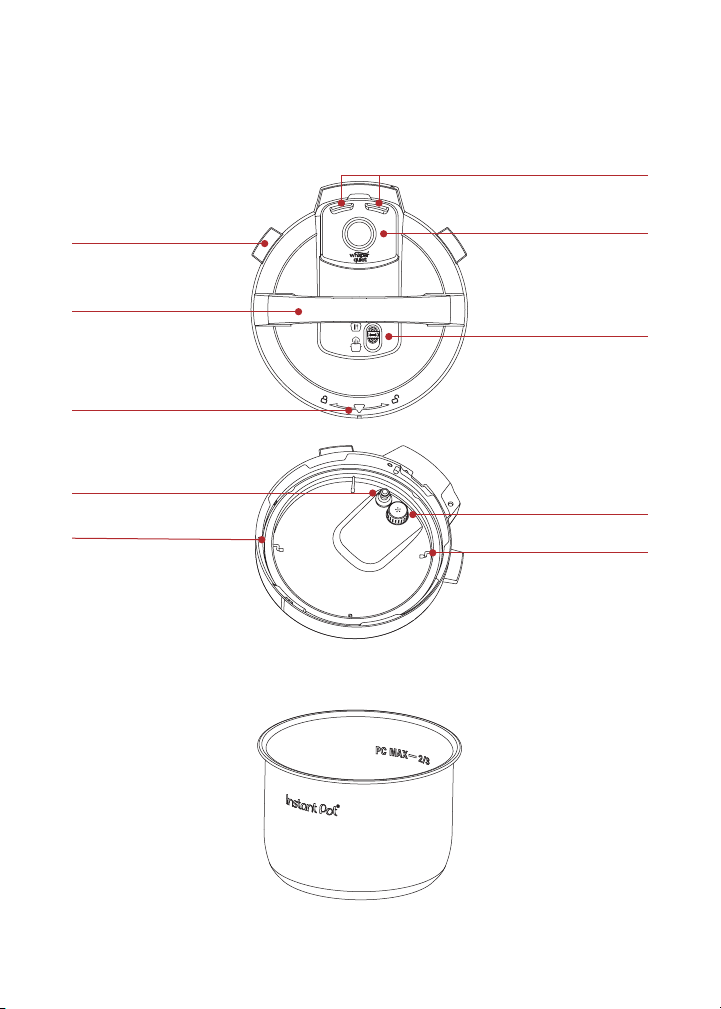
Overfilling may cause a risk of clogging the steam release pipe and
developing excess pressure.
DO NOT fill the inner cooking pot over the line labeled ‘PC MAX — 2/3’.
DO NOT fill the inner cooking pot over the line labeled ‘— 1/2’ when
cooking foods that expand during cooking such as rice, dried beans
or dried vegetables.

5
User Manual
DO be aware that certain foods, such as applesauce, cranberries,
pearl barley, oatmeal or other cereals, split peas, noodles, macaroni,
rhubarb, or spaghetti can foam, froth, sputter, and clog the pressure
release device (steam vent). DO NOT fill the cooking pot higher than
the “1/2” line when cooking these foods.
DO NOT place oversized foods into the inner cooking pot as they
may cause risk of fire, personal injury, and property damage.
DO check that the sealing ring is properly installed.
Accessories
DO use only accessories or attachments authorized by Instant
Brands. The use of parts, accessories or attachments not
recommended by the manufacturer may cause a risk of personal
injury, property damage, fire, or electric shock.
DO use only an authorized stainless-steel Instant Pot inner cooking
pot to reduce the risk of pressure leakage.
DO only replace the sealing ring with an authorized Instant Pot
sealing ring to prevent personal injury, property damage and
damage to the appliance.
DO NOT use the included accessories in a microwave, toaster oven,
convection or conventional oven, or on a ceramic cooktop, electric
coil, gas range or outdoor grill.
Care and Storage
DO let the appliance cool to room temperature before cleaning or
storage.
DO NOT store any materials, other than the multicooker cooking
pot, in the cooker base when not in use.
DO NOT place any combustible materials in the cooker base, such as
paper, cardboard, plastic, Styrofoam or wood.

6
User Manual
Power Cord
A short power-supply cord is used to reduce the risk resulting from it
being grabbed by children, becoming entangled in, or tripping over a
longer cord.
WARNING: Spilled food can cause serious burns. Keep appliance
and cord away from children. Never drape cord over edge of
counter, never use outlet below counter, and never use with an
extension cord.
DO NOT let the power cord touch hot surfaces or open flame,
including the stovetop.
DO NOT use with power converters or adapters, timer switches or
separate remote-control systems.
This appliance has a 3-prong grounding plug. To reduce the risk of
electric shock:
ONLY plug the power cord into a grounded electrical outlet.
DO NOT remove ground.
If the unit includes a detachable power cord:
To connect, always attach the power cord to the appliance first, then
plug the power cord into the wall outlet.
Electrical Warning
The cooker base contains electrical components that are an
electrical shock hazard. Failure to follow these instructions may
result in electric shock.
To protect against electrical shock:
To disconnect, select Cancel, then remove plug from power source.
Always unplug when not in use, as well as before adding or removing
parts or accessories, and before cleaning. To unplug, grasp the plug
and pull from the outlet. Never pull from the power cord.

7
User Manual
DO regularly inspect the appliance and power cord. DO NOT
operate the appliance if the power cord or plug is damaged, or
after the appliance malfunctions or is dropped or damaged in
any manner. For assistance, contact Customer Care by email at
support@instanthome.com.
DO NOT attempt to repair, replace or modify components of the
appliance, as this may cause electric shock, fire, personal injury, and/
or property damage and will void the warranty.
DO NOT tamper with any of the safety mechanisms, as this may
result in personal injury or property damage.
DO NOT put liquid or food of any kind into cooker base without the
inner cooking pot.
DO NOT immerse power cord, plug or the appliance in water or
other liquid.
DO NOT use the appliance in electrical systems other than
120 V ~ 60 Hz for North America.
DO NOT clean the appliance by rinsing it under a faucet.
SAVE THESE
INSTRUCTIONS
8
User Manual
WHAT’S IN THE BOX
Lid
Stainless Steel Inner Cooking Pot
Whisper quiet lid cover
Sealing ring rack
Steam release valve and
Anti-Block Shield
Float valve
Sealing ring
Steam release switch
Handle
Lid fins
Steam release vents
Lid position marker
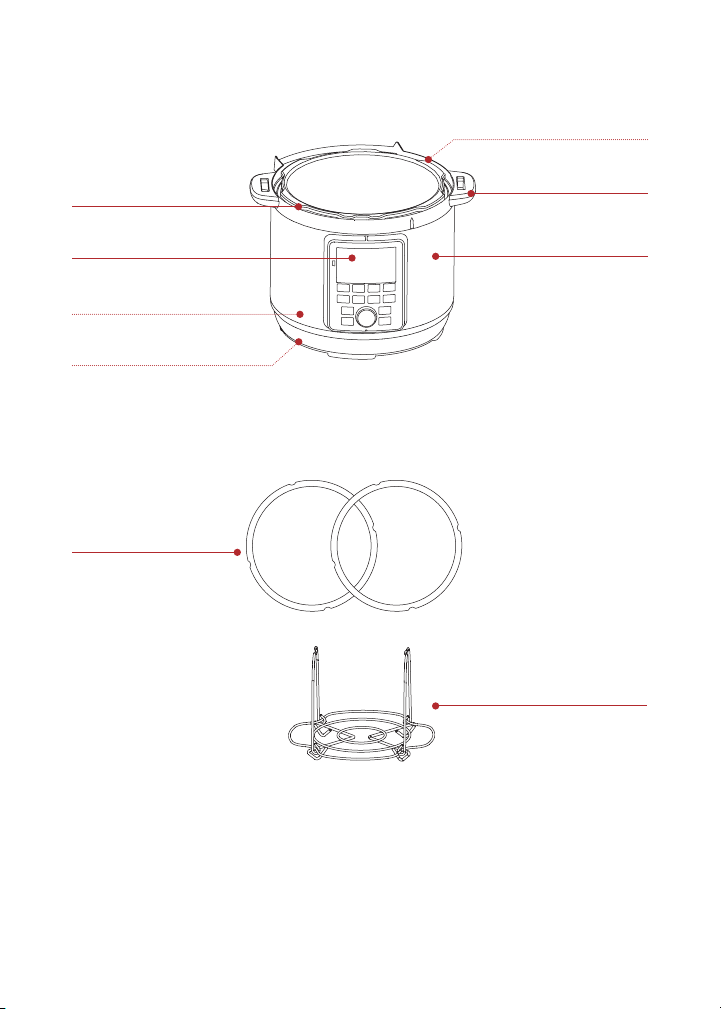
9
User Manual
Cooker Base
Parts + Accessories
Illustrations are for reference only and may differ from the actual product.
Remember to recycle!
We designed this packaging with sustainability in mind. Please recycle
everything that can be recycled where you live.
Heating element (inside)
Cooker handles
Stainless steel exterior
Condensation collector (rear)
Power cord (rear, 8-quart
model has attached cord)
Condensation rim
Control panel
Sealing ring (extra)
1 sealing ring
comes installed
Stainless steel steam rack
with handles
10
User Manual
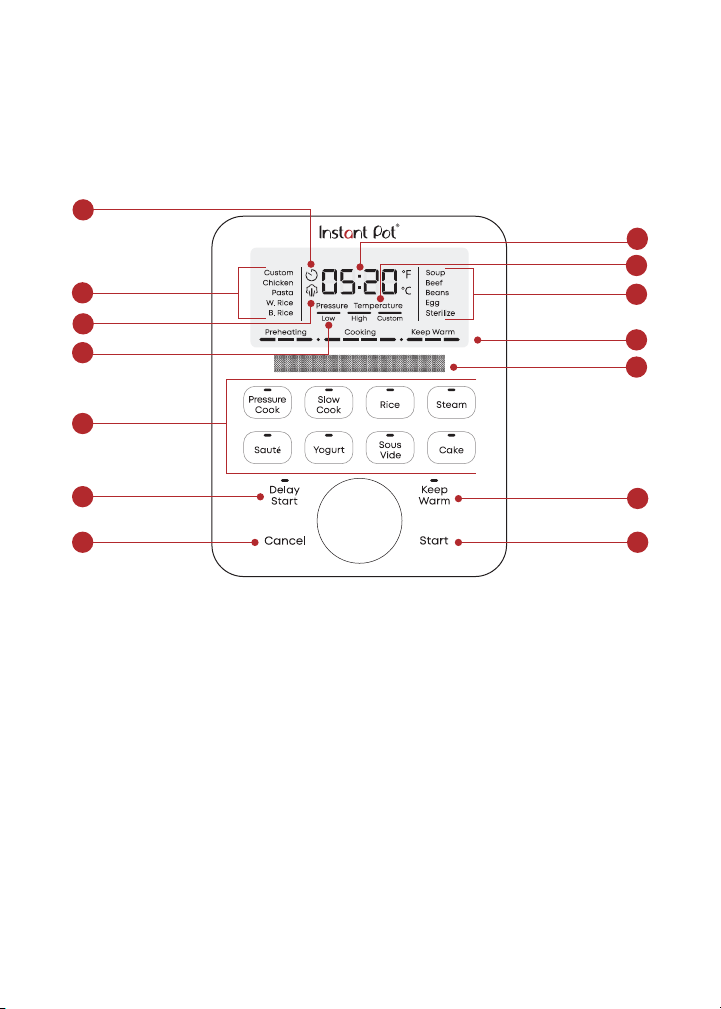
USING YOUR DUO PLUS
Control panel
We’ve designed the control panel to be simple to use and easy to read.
1. Smart Program Settings
• Cooking presets
2. Time
• Cooking time
• Delay Start time
• Keep Warm time
3. Delay Start Indicator
• Shows Delay Start is active
4. Pressure Indicator
• When lit, shows the pressure
level selected
5. Temperature Indicator
• When lit, shows the
temperature selected
6. Progress Bar
• Shows cooking progress
7. Message Display
• Shows cooking instructions
8. Cooking Programs
• Active program will be lit
9. Delay Start
• Light shows ON
10. Keep Warm
• Light shows ON
11. Cancel
12. Start
13. Steam Icon
• When lit, there is pressure in
the multi-cooker
1
9
11 12
10
6
5
7
2
4
8
8
3
13
11
User Manual
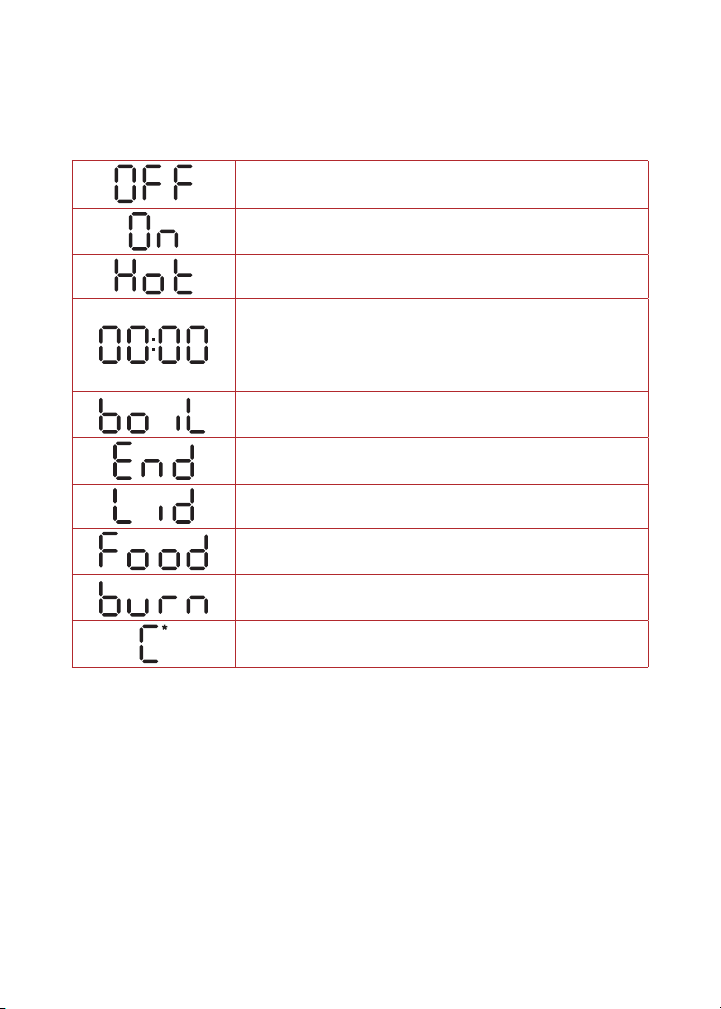
Status messages
The control panel shows information you need to know when using
your Instant Duo Plus.
Standby mode
Preheat mode
Sauté Smart Program is ready to add food
Time
• Smart Program: cooking time remaining
• Delay Start: time until Smart Program starts
• Keep Warm: time food has been warming
Yogurt Smart Program is in pasteurizing cycle
Smart Program ended (Keep Warm is off)
Lid is not on the unit or is not properly secured
The cooker is overheating due to insufficient liquid.
See Troubleshooting.
The cooker is overheating due to insufficient liquid.
See Troubleshooting.
An error has occurred. See Troubleshooting.
Turning the sound On or Off
Turn sound on
When in Ready mode, press and hold Delay Start and Keep Warm for
5 seconds. The message display shows Sound Off.
Turn sound off
When in Ready mode, press and hold Delay Start and Keep Warm for
5 seconds. The message display shows Sound On
Audible safety alerts (beeps) cannot be turned off.

12
User Manual
Changing the temperature scale
Set to Fahrenheit
When in Ready mode (and scale is set to Celsius), press and hold the
Control Dial for 5 seconds. The message display shows Temp Unit F.
Set to Celsius
When in Ready mode (and scale is set to Fahrenheit), press and hold the
Control Dial for 5 seconds. The message display shows Temp Unit C.
Delay the start of cooking
You can set a Delay Start timer for a minimum of 10 minutes or a
maximum of 24 hours.
1. Select a Smart Program, adjust the settings as you want, then press
Delay Start.
2. When the minutes field flashes, turn the Control Dial to set the
minutes (in 10 minute increments) and press the Start to select.
3. Delay Start begins automatically and the timer counts down.
4. When Delay Start ends, the Smart Program begins.
Set a timer (without cooking)
You can set a timer for a minimum of 1 minute or a maximum of
60 minutes.
1. When the unit is on and the message display shows Ready, press
Delay Start.
2. When the minutes field flashes, turn the Control Dial to set the
minutes (in 1 minute increments).
3. Press Start to begin the timer.

13
User Manual
Cancel cooking
When in Preheating, Cooking or Keep Warm modes, press Cancel.
The message display shows Ready.
Reset unit to original settings
Reset individual programs
• With the cooker in Ready mode, press and hold one program button
for over 3 seconds. The message display shows Ready.
The Program’s pressure level, cooking time and temperature are restored
to the factory default setting.
Reset individual programs during cooking
• With the cooker in Cooking mode, press and hold that program’s
button for over 3 seconds. The display returns to the Cooking
program in progress, but with the factory default settings.
The Program’s pressure level, cooking time and temperature are restored
to the factory default setting.
Reset all program settings
• With the cooker in Ready mode, press and hold Cancel for over
3 seconds. The message display shows Ready.
The unit’s settings are restored to the factory default.
14
User Manual
INITIAL SETUP
Clean before use
1. Wash the inner cooking pot with hot water and soap. Rinse and use
a soft cloth to dry the outside. Or you can wash the inner cooking
pot in the dishwasher.
2. Wipe the heating element inside the cooker base with a soft cloth
to ensure there are no stray packaging particles.
Setting up the condensation collector
The condensation collector sits at the back of the cooker base and
accumulates overflow moisture from the condensation rim. It should be
installed before cooking, then emptied and rinsed out after each use.
Remove the condensation collector
• Pull the condensation collector away from the cooker base; do
not pull down.
Note the tabs on the cooker base and the grooves on the condensation collector.
15
User Manual
Install the condensation collector
• Align the grooves on the condensation collector with the tabs on the
back of the cooker base and slide the condensation collector into place.
Using the Sealing Ring
When the lid is closed, the sealing ring installed on the underside of the
lid creates an air-tight seal between the lid and the cooker base.
• The sealing ring must be installed before using the cooker and
should be cleaned after each use.
• Install 1 sealing ring at a time; use one for sweet dishes and one
for savory.
• Sealing rings stretch over time with normal use. To keep your
product safe, replace the sealing ring every 12 to 18 months.
Replace sooner if you notice stretching, deformation, or damage.
16
User Manual
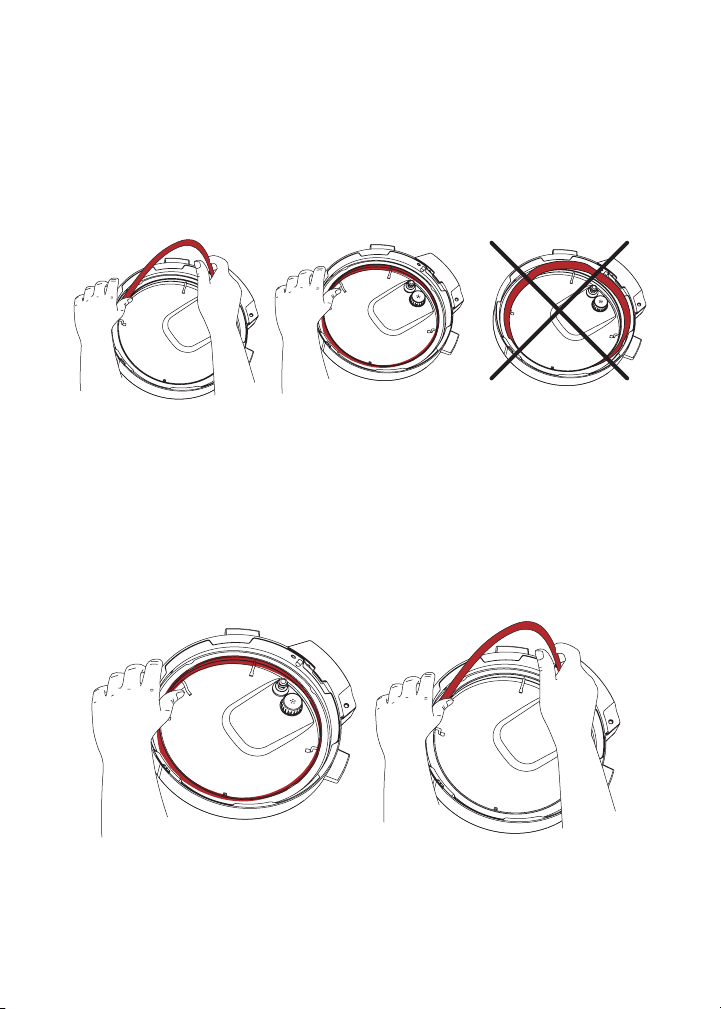
Install the Sealing Ring
1. Place the sealing ring over the sealing ring rack and press it into
place. Press down firmly to ensure there is no puckering.
2. The sealing ring should be snug and should not fall out when the lid
is turned over.
Remove the Sealing Ring
1. Grip the edge of the sealing ring and pull it out from behind the
sealing ring rack.
2. Inspect the rack to ensure it is secured, centered, and an even
height all the way around the lid. If the sealing ring rack is
deformed, do not try to repair it.
17
User Manual
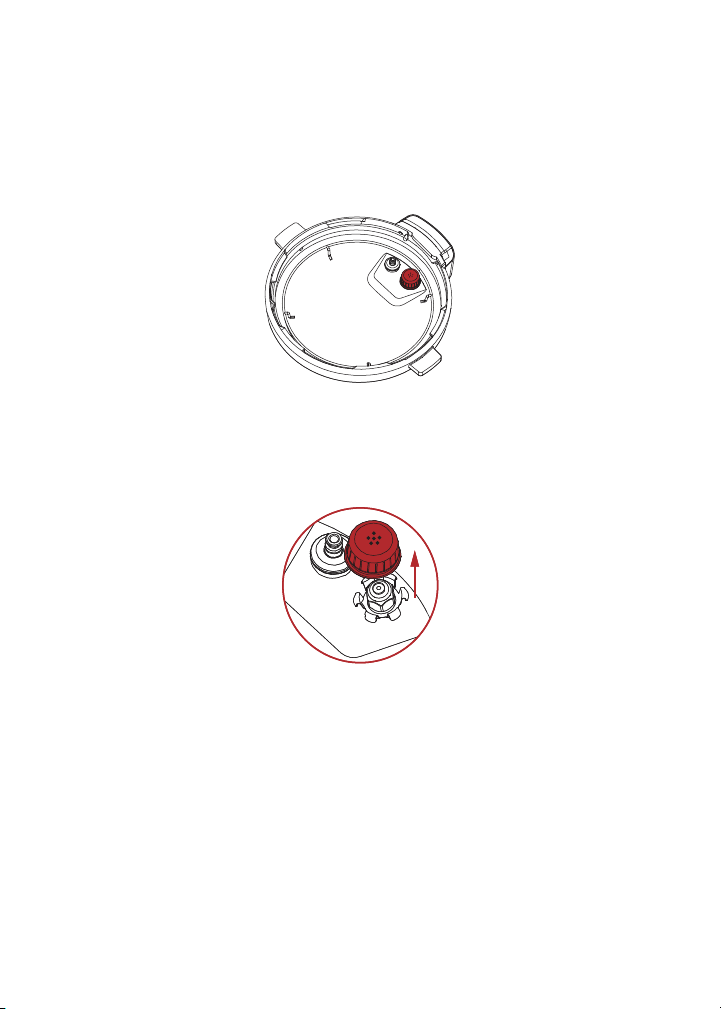
Anti-Block Shield
The anti-block shield prevents food particles from coming up through
the steam release pipe, assisting with pressure regulation.
As an integral part of product safety, the anti-block shield must be
installed before use and cleaned frequently.
Remove the Anti-Block Shield
• Grip the lid like a steering wheel and use your thumbs to press
firmly against the side of the anti-block shield (pressing towards
the side of the lid and up) until it pops off the prongs underneath.

18
User Manual
Install the Anti-Block Shield
•
Place anti-block shield over prongs and press down until it snaps
into position. Do not attempt to operate the pressure cooker
without the anti-block shield installed.
Plug in cord (6QT model)
•
When you’re ready to use your Instant Pot Duo Plus, plug the
electrical cord into the power socket on the back of the unit.
The 8QT model has an electrical cord that is always connected to the unit.

19
User Manual
Test run
Setting up your new Instant Pot Duo Plus for a test run is a great way
to familiarize yourself with how the unit works before you actually cook
a meal.
To perform a test run:
1.
Add 3 cups water to the inner cooking pot.
2.
Place the inner cooking pot into the cooker base.
3.
Place the lid on top of the cooker base and lock the lid.
See ‘How to lock the lid’ below
4.
Press Pressure Cook on the Control Panel.
5.
Press the Control Dial, then turn the Control Dial to set the cooking
time to 5 minutes.
6.
Press Keep Warm to turn off the Keep Warm setting.
7.
Press Start to begin. The message display shows Preheating.
8. When cooking is done, the display shows DO NOT OPEN LID.
9. Release steam by moving the steam release switch to the
Vent
position. When steam is completely released, the message
display shows OK to Open Lid and End alternatively.
See ‘How to release steam’ below for complete instructions
10. Unlock and open the lid.
See ‘How to unlock the lid’ below
11. Discard any remaining water, and then wash and dry the inner
cooking pot.
Now you’re ready to cook a meal in your Instant Pot Duo Plus!
20
User Manual
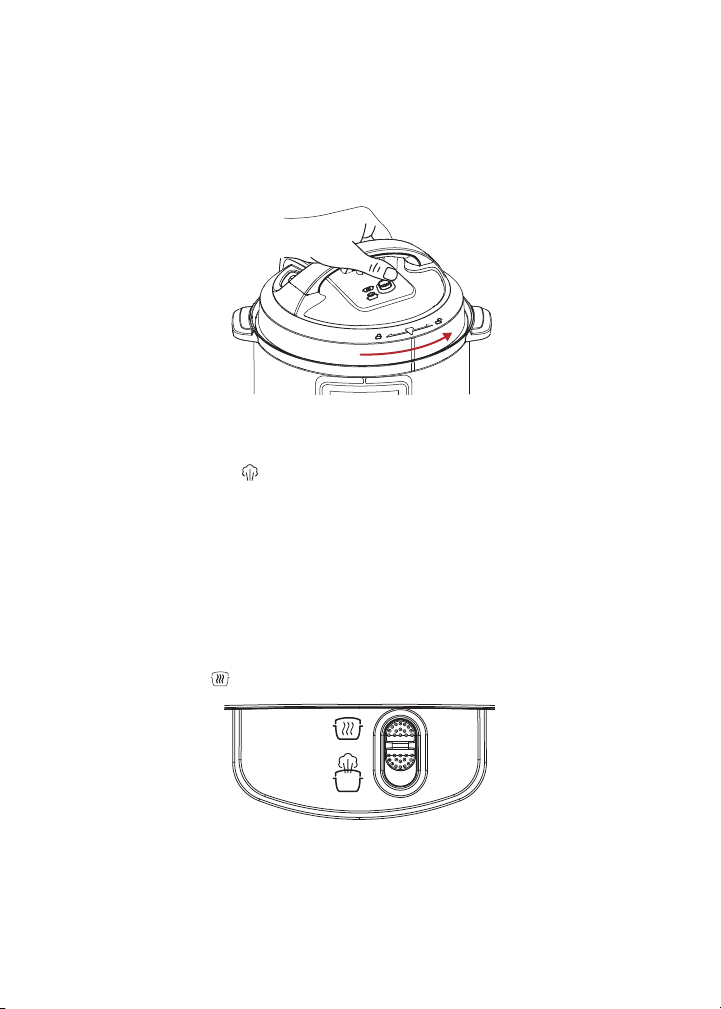
USING THE LID
You’ll use the pressure cooking lid for most cooking programs, and
especially for pressure cooking. Always use the pressure cooking lid
that came with this Instant Pot Duo Plus cooker base.
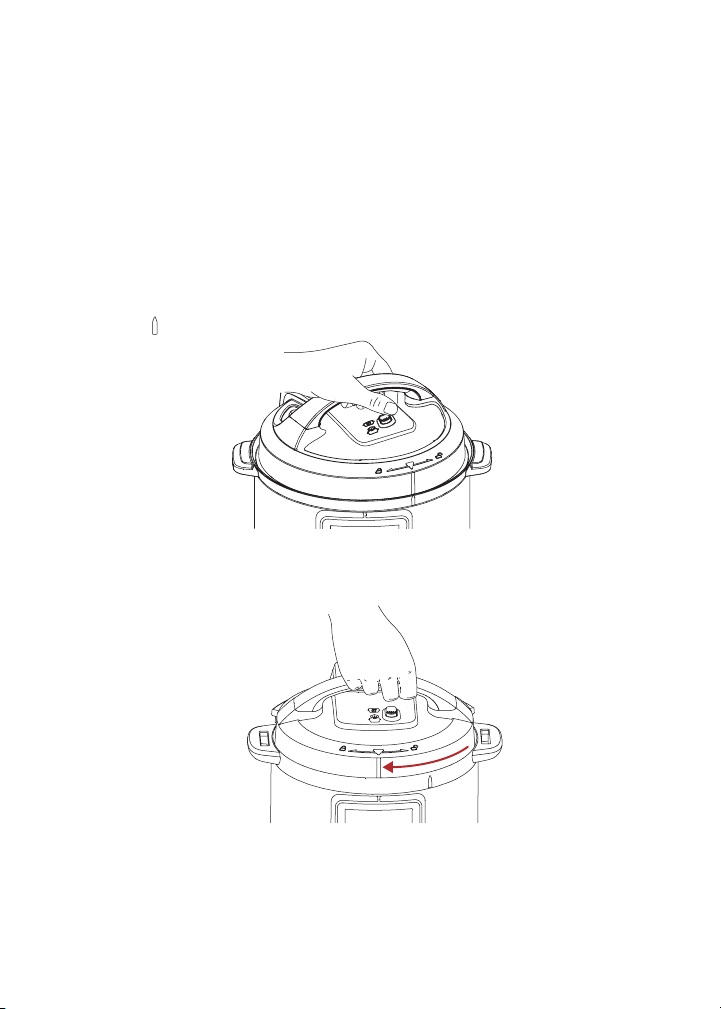
How to close and lock the lid
For pressure cooking, the lid must be securely locked into place to
prevent steam from escaping. When you place the lid on the cooker base:
1. Line up line on the lid with the arrow at the side of the control
panel
.
2. Turn the lid clockwise until the line on the lid lines up with the line
on the control panel.
If the lid is not closed and locked when you start a cooking program, the
message display will show Turn to Lock Lid and the unit will not start
pressurizing.
21
User Manual
How to unlock and open the lid
Once steam is completely released, you must unlock the lid before
opening it:
1. Turn the lid counterclockwise until the line on the lid lines up with
the arrow on the side of the control panel.
2. Carefully lift the lid up and off the cooker base.
When a cooking program is finished and steam has been released, the steam
icon on the display will disappear and the message display will show END
and OK to Open Lid.
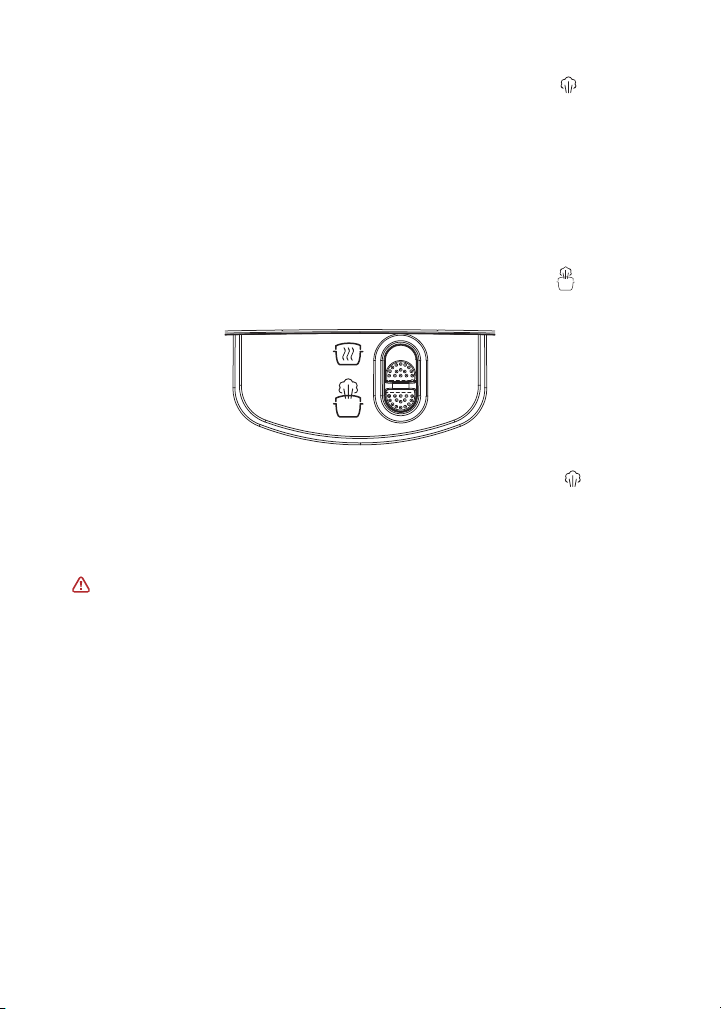
How to release steam
Instant Pot Duo Plus can release steam naturally or quickly. Use the
one that best fits the type of food you’re cooking.
Natural steam release
1. After cooking, leave the steam release switch in the
Seal position
until all pressure is released.
22
User Manual
2. When pressure is released the steam icon on the display
disappears and the message display shows OK to Open Lid, remove
the lid.
Quick steam release
Quickly releases steam after you move the steam release switch to
the Vent position. Use for: Foods that tend to overcook, like vegetables
and seafood.
1. After cooking, set steam release switch to Vent position
position and wait for all pressure to release.
2. When pressure is released, the steam icon on the display
will disappear and the message display shows OK to Open Lid,
remove the lid.
Pressure Cooking Caution
This appliance uses pressure to cook. Allow the appliance to release
all excess pressure and steam before opening the lid. Opening the lid
before pressure is released may result in burns, personal injury and/or
property damage. Read more in the Safety, Maintenance and Warranty
document.

23
User Manual
Pressure Cook
Pressure cooking uses pressurized steam to cook foods quickly and
evenly. Each specific Smart Program is designed to pressure cook a
specific type of food. You can adjust the settings as your recipe directs.
Choose from these Smart Programs:
Program Default Cook
Time
Min Cook
Time
Max Cook
Time
Default
Pressure Level
Custom 10 minutes
(00:10)
0 minute
(00:00)
8 hours
(08:00)
High
Chicken 10 minutes
(00:10)
0 minute
(00:00)
4 hours
(04:00)
High
Pasta 1 minute
(00:01)
0 minute
(00:00)
1 hour
(01:00)
High
Soup 30 minutes
(00:30)
0 minute
(00:00)
4 hours
(04:00)
High
Beef 30 minutes
(00:30)
0 minute
(00:00)
4 hours
(04:00)
High
Beans 20 minutes
(00:20)
0 minute
(00:00)
4 hours
(04:00)
High
Egg 5 minutes
(00:05)
0 minute
(00:00)
10 minutes
(00:10)
Low
Sterilize 10 minutes
(00:10)
0 minute
(00:00)
30 minutes
(00:30)
High
Other settings
• Automatic Keep Warm is set to ON by default for all Pressure
Cook programs.
• Delay Start is available for all Pressure Cook programs.

24
User Manual
How to pressure cook
Prep
Cut, chop, season or marinate your ingredients according to your recipe.
Preheat
1. Add ingredients to the inner cooking pot and place the inner
cooking pot into the cooker base.
2. Place the lid on top of the cooker base and lock the lid.
3. Press Pressure Cook on the Control Panel.
4. Turn the Control Knob to highlight the Smart Program you want to
use, then press the Control Knob to select it.
5. The default cooking time flashes. To select it, press the Control
Dial. Or turn the Control Dial to change it, then press the Control
Dial to select it.
6. The default pressure level flashes. To select it, press the Control
Dial. Or turn the Control Dial to change it, then press the Control
Dial to select it.
7. To delay cooking, press Delay Start, then turn the Control Knob to
select the delay time.
8. Keep Warm setting is ON by default. Press Keep Warm to turn it off.
9. Press Start. The message display shows Preheating and the unit
builds pressure.
It can take 10-15 minutes to reach the pressure setting for cooking. Frozen foods
increase the preheating time.
Cook
1. When the pressure is ready, the message display shows Do Not
Open Lid. Cooking starts, and the progress bar shows Cooking.
2. The cooking time starts counting down.
You can press Cancel to stop cooking at any time.

25
User Manual
Stop cooking
1. When cooking time reaches 00:00, cooking stops.
2. If Keep Warm is ON, the time starts counting up.
Release steam
Choose the steam release method that works for your recipe.
See ‘How to release steam’ above for full details.
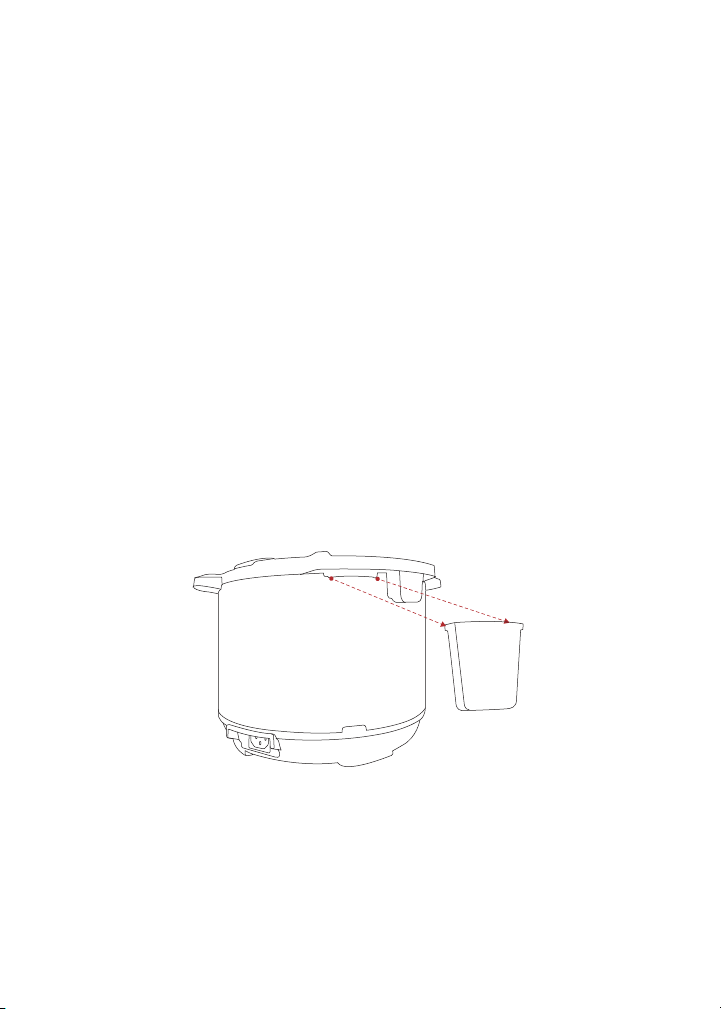
Using liquid to create steam
Pressure cooking requires liquid in the inner cooking pot to produce
the steam needed. Depending on the size of your Instant Pot Duo Plus,
here are the minimum amounts you’ll need:
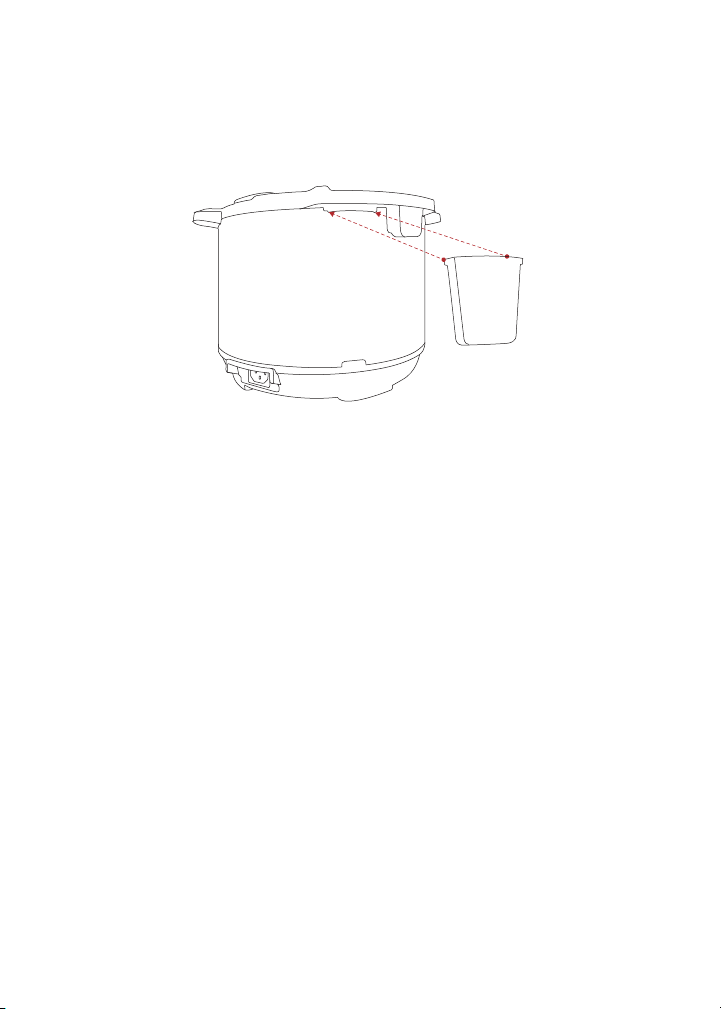
Instant Pot Size Minimum Liquid for Pressure Cooking*
6 Quarts / 5.7 Litres 1 1⁄2 cups (12 oz / 375 mL)
8 Quarts / 7.6 Litres 2 cups (16 oz / 500 mL)
*Unless otherwise specified in recipe.
Pressure cooking liquids should be water-based, such as broth, stock, soup or juice.
If using canned, condensed, or cream-based soup, add water as directed above.

26
User Manual
SLOW COOK
Slow cooking lets you make your favorite simmering and stewing
recipes — just like grandma used to make. This program does not use
pressure to cook food.
Choose from these Smart Programs:
Program Default Cook
Time
Min Cook
Time
Max Cook
Time
Default
Temperature
Custom 4 hours
(04:00)
30 minutes
(00:30)
99 hours,
30 minutes
(99:30)
High
Chicken 4 hours
(04:00)
30 minutes
(00:30)
99 hours,
30 minutes
(99:30)
High
Pasta 3 hours
(03:00)
30 minutes
(00:30)
99 hours,
30 minutes
(99:30)
High
Soup 6 hours
(06:00)
30 minutes
(00:30)
99 hours,
30 minutes
(99:30)
High
Beef 6 hours
(06:00)
30 minutes
(00:30)
99 hours,
30 minutes
(99:30)
High
Beans 8hours
(08:00)
30 minutes
(00:30)
99 hours,
30 minutes
(99:30)
High
Other settings
• Automatic Keep Warm is set to ON by default for all Slow
Cook programs.
• Delay Start is available for all Slow Cook programs.

27
User Manual
How to slow cook
Prep
Cut, chop, season or marinate your ingredients according to your recipe.
Cook
1. Add ingredients to the inner cooking pot and place the inner
cooking pot into the cooker base.
2. Place the lid on top of the cooker base and lock the lid.
3. Press Slow Cook.
4. Turn the Control Knob to highlight the Smart Program you want
to use, then press the Control Knob to select it.
5. The default cooking time flashes. To select it, press the Control
Dial. Or to change it, turn the Control Dial to change it, then press
the dial to select it.
6. The default cooking temperature flashes. To select it, press the
Control Dial. Or to change it, turn the Control Dial to change it.
7. You can delay cooking if you want. Press Delay Start, then turn the
Control Knob to select the delay time.
8. Keep Warm setting is ON by default. Press Keep Warm to turn it off.
9. Press Start. Preheating starts. When ready, cooking starts, and the
progress bar shows Cooking.
10. The cooking time starts counting down.
You can press Cancel to stop cooking at any time.
Stop cooking
1. When cooking time reaches 00:00, cooking stops.
2. If Keep Warm is ON, the time starts counting up.

28
User Manual
RICE
The Rice program uses pressurized steam to cook rice quickly and
evenly. You can adjust the settings as your recipe directs.
Choose from these Smart Programs:
Program Default Cook
Time
Min Cook
Time
Max Cook
Time
Default
Pressure Level
Custom 12 minutes
(00:12)
0 minute
(00:00)
1 hour
(01:00)
Low
White Rice 12 minutes
(00:12)
0 minute
(00:00)
30 minutes
(00:30)
Low
Brown Rice 30 minutes
(00:30)
0 minute
(00:00)
1 hour
(01:00)
High
Other settings
• Automatic Keep Warm is set to ON by default for all Rice programs.
• Delay Start is available for all Rice programs.
How to cook rice
1. Add ingredients to the inner cooking pot and place the inner
cooking pot into the cooker base.
2. Place the lid on top of the cooker base and lock the lid.
3. Press Rice on the Control Panel.
4. Turn the Control Knob to highlight the Smart Program you want to
use, then press the Control Knob to select it.
5. The default cooking time flashes. To select it, press the Control
Dial. Or to change it, turn the Control Dial to change it, then press
the dial to select it.
6. The default pressure level flashes. To select it, press the Control
Dial. Or to change it, turn the Control Dial to change it.
7. You can delay cooking if you want. Press Delay Start, then turn the
Control Knob to select the delay time.

29
User Manual
8. Keep Warm setting is ON by default. Press Keep Warm to turn it off.
9. Press Start. The message display shows Preheating and the unit
builds pressure.
It can take 10-15 minutes to reach the pressure setting for cooking.
Cook
1. When the pressure is ready, the message display shows Do Not
Open Lid. Cooking starts, and the progress bar shows Cooking.
2. The cooking time starts counting down.
You can press Cancel to stop cooking at any time.
Stop cooking
1. When cooking time reaches 00:00, cooking stops.
2. If Keep Warm is ON, the time starts counting up.
Release steam
Choose the steam release method that works for your recipe.
See ‘How to release steam’ above for full details

30
User Manual
STEAM
The Steam program cooks food using steam but no pressure; it’s especially
useful for vegetables like broccoli, zucchini, carrots, and others. You can
adjust the settings as your recipe directs or to your taste.
Program Default Cook
Time
Min Cook
Time
Max Cook
Time
Default
Temperature
Custom 10 minutes
(00:10)
1 minute
(00:01)
1 hour
(01:00)
High
Other settings
• Automatic Keep Warm is not available.
• Delay Start is not available.
How to steam
Prep
Cut or chop the ingredients according to your recipe.
Cook
1. Add ingredients to the inner cooking pot and place the inner
cooking pot into the cooker base.
2. Place the lid on top of the cooker base and lock the lid.
3. Press Steam and ‘Custom’ flashes on the control panel.
4. The default cooking time flashes. To select it, press the Control
Dial. Or to change it, turn the Control Dial to change it, then press
the dial to select it.
5. The default cooking temperature flashes. To select it, press the
Control Dial. Or to change it, turn the Control Dial to change it.
6. Press Start. Preheating starts. When ready, cooking starts, and the
progress bar shows Cooking.
7. The cooking time starts counting down.
You can press Cancel to stop cooking at any time.
Stop cooking
• When cooking time reaches 00:00, cooking stops.

31
User Manual
SAUTÉ
Use Sauté in place of a frying or saucepan. Sautéing can deepen the
flavors of your food, or can simmer, thicken or reduce sauces.
Choose from these Smart Programs:
Program Cook Temperature
(Fixed)
Default Cook
Time
Min Cook
Time
Max Cook
Time
Low 221° F
(105° C)
30 minutes
(00:30)
1 minute
(00:01)
1 hour
(01:00)
High 375° F
(190° C)
30 minutes
(00:30)
1 minute
(00:01)
1 hour
(01:00)
Custom 1 203° F
(95° C)
30 minutes
(00:30)
1 minute
(00:01)
1 hour
(01:00)
Custom 2 230° F
(110° C)
30 minutes
(00:30)
1 minute
(00:01)
1 hour
(01:00)
Custom 3 275° F
(135° C)
30 minutes
(00:30)
1 minute
(00:01)
1 hour
(01:00)
Custom 4 320° F
(160° C)
30 minutes
(00:30)
1 minute
(00:01)
1 hour
(01:00)
Custom 5 375° F
(190° C)
30 minutes
(00:30)
1 minute
(00:01)
1 hour
(01:00)
Other settings
• Automatic Keep Warm is OFF by default.
• Delay Start is not available.
How to sauté
Prep
Cut, chop, season or marinate your ingredients according to your
recipe.
Preheat
1. Place the empty inner cooking pot into the cooker base. Do not
close the lid.
2. Press Saute and the Custom Smart Program flashes.

32
User Manual
3. The default cooking time flashes. To select it, press the Control
Dial. Or to change it, turn the Control Dial to change it, then press
the dial to select it.
4. The default cooking temperature flashes. To select it, press the
Control Dial. Or to change it, turn the Control Dial to change it.
5. Press Start. Cooking starts, and the progress bar shows Preheating.
Cook
1. When the message display shows Hot, add the ingredients but do
not close the lid.
2. The cooking time starts counting down.
You can press Cancel to stop cooking at any time.
Stop cooking
• When cooking time reaches 00:00, cooking stops.
Sautéing before Pressure or Slow Cooking
Quite often, you’ll want to sauté foods to brown them before further
cooking them.
1. Sauté ingredients
2. Press Cancel
You can deglaze the inner cooking pot now before switching to Pressure
Cook or Slow Cook (see Deglazing below)
3. Select the Smart Program you want to use to finish cooking.
Deglazing
Deglazing is the process of adding a liquid to a hot pan, releasing all of
the delicious, caramelized pieces stuck to the bottom.
1. Remove food from inner pot
2. Add water, broth, or wine
3. Use wooden spoon or silicone spatula to loosen food stuck to
bottom of the inner cooking pot

33
User Manual
YOGURT
You can use your Instant Pot Duo Plus to easily make delicious,
fermented dairy and non-dairy yogurt.
Choose from these settings in the Yogurt Smart Program:
Process Default
Cook Time
Default
Temperature
Custom
Time Range
Pasteurize 3 minutes
(00:03)
High NA
Ferment (dairy) 8 hours
(08:00)
Low NA
Ferment
(non-dairy, custom)
8 hours
(08:00)
(adjustable)
Low
(adjustable)
Minimum 30 minutes
(00:30)
Maximum 99 hours,
30 minutes
(99:30)
Other settings
• Automatic Keep Warm not available.
• Delay Start is not available.
How to make yogurt
Pasteurizing Milk
1. Add milk to the inner cooking pot and place the inner cooking pot
into the cooker base.
2. Place the lid on top of the cooker base and lock the lid.
3. Press Yogurt and the Custom Smart Program flashes.
4. The default cooking time flashes. Press the Control Dial to select
a custom setting.
5. Using the Control Dial, change the default temperature to High.
The display shows bOIL.
6. Press Start. Cooking starts, and the progress bar shows Preheating.
7. When pasteurization finishes, display shows End.
Milk must reach a minimum of 161°F / 72°C for pasteurization to occur.

34
User Manual
Adding Culture/Starter
1. Allow pasteurized milk to cool to 43°C / 110°F.
2. Add a starter culture to the milk according to package instructions.
If using plain yogurt as a starter, ensure that it contains an active culture.
Mix in 2 tbsp (30 mL) of yogurt per 1 gallon (3.7 L) of milk or follow a
trusted recipe.
3. Place and close lid.
Ferment
1. Press Yogurt.
2. Cycle to Normal by pressing Yogurt again; display shows 8 hours
(08:00).
3. The default fermentation time flashes. To select it, press the
Control Dial. Or to change it, turn the Control Dial to change it,
then press the dial to select it.
4. After 10 seconds the cooker begins heating; display shows timer
counting up from 00:00.
5. When fermentation completes, the unit beeps and the display
shows End.
A longer fermentation period will produce tangier yogurt.
6. Allow yogurt to cool.
7. Place in the fridge for 12–24 hours to develop flavors.
How much to make?
Instant Pot Size Minimum Milk Volume Maximum Milk Volume
6 Quarts / 5.7 Liters
4 Cups
(32 oz / 1000 mL)
4 Quarts
(128 oz / 3.8 L)
8 Quarts / 7.6 Liters
6 Cups
(48 oz / 1500 mL)
6 Quarts
(192 oz / 5.7 L)

35
User Manual
SOUS VIDE
Sous Vide cooks food underwater in an air-tight, food-safe bag, for a
long period of time. Food cooks in its own juices and comes out delicious
and very tender. This program does not use pressure to cook food.
You should use the pressure cooking lid to maintain an accurate temperature.
Choose from these Smart Programs:
Program Default
Temperature
Default Cook Time Max Cook Time
Custom 56°C
133°F
3 hours
(03:00)
99 hrs, 30 min
(99:30)
Chicken 60°C
140°F
2 hours
(02:00)
99 hrs, 30 min
(99:30)
Beef 54°C
130°F
2 hours
(02:00)
99 hrs, 30 min
(99:30)
Egg 70°C
158°F
30 minutes
(00:30)
24 hrs
(24:00)
Other settings
• Automatic Keep Warm is OFF by default.
• Delay Start is not available.
What you need to sous vide
• Tongs
• Food safe, airtight, re-sealable food pouches
OR
• Vacuum sealer and food-safe vacuum bags

36
User Manual
How to sous vide
Prep
1. Cut, chop, season or marinate your ingredients according to your recipe.
2. Add the ingredients to the cooking bag or pouch and seal tightly.
Preheat
1. Place the empty inner cooking pot into the cooker base and close
and lock the lid.
2. Press Sous Vide on the Control Panel.
3. Turn the Control Knob to highlight the Smart Program you want to
use, then press the Control Knob to select it.
4. The default cooking time flashes. To select it, press the Control
Dial. Or to change it, turn the Control Dial to change it, then press
the dial to select it.
5. The default temperature flashes. To select it, press the Control Dial.
Or to change it, turn the Control Dial to change it.
6. Press Start. The message display display Preheating and the unit
starts heating.
Cook
1. When the message display shows Hot, unlock and open the lid.
2. Add the sealed cooking bag or pouch to the inner cooking pot and
reclose and lock the lid.
3. The cooking time starts counting down.
4. When cooking time reaches 00:00, cooking stops.
You can press Cancel to stop cooking at any time.
Remove food
When cooking completes, the display shows End. Open the lid and use
the tongs to carefully remove the cooking pouch.

37
User Manual
CAKE
The Cake Smart Program uses pressurized steam to bake cakes quickly
and evenly, especially cheesecakes. You can adjust the settings as your
recipe directs.
Program Default Cook
Time
Min Cook
Time
Max Cook
Time
Default
Pressure Level
Custom 30 minutes
(00:30)
1 minute
(00:01)
4 hours
(04:00)
High
Other settings
• Automatic Keep Warm is set to ON by default.
• Delay Start is available.
How to pressure cook
Prep
Prepare the ingredients according to your recipe.
Preheat
1. Add ingredients to the inner cooking pot and place the inner
cooking pot into the cooker base.
2. Place the lid on top of the cooker base and lock the lid.
3. Press Cake and the Custom Smart Program flashes.
4. The default cooking time flashes. To select it, press the Control
Dial. Or to change it, turn the Control Dial to change it, then press
the dial to select it.
5. The default pressure level flashes. To select it, press the Control
Dial. Or to change it, turn the Control Dial to change it.
6. You can delay cooking if you want. Press Delay Start, then turn the
Control Knob to select the delay time.

38
User Manual
7. Keep Warm setting is ON by default. Press Keep Warm to turn it off.
8. Press Start. The display shows Preheating and the Instant Pot Duo
Plus is building pressure
It can take 10–15 minutes to reach the pressure setting for cooking.
Cook
1. When the pressure is ready, the message display shows Do Not
Open Lid. Cooking starts, and the progress bar shows Cooking.
2. The cooking time starts counting down.
You can press Cancel to stop cooking at any time.
Stop cooking
1. When cooking time reaches 00:00, cooking stops.
2. If Keep Warm is ON, the time starts counting up.
Release steam
Choose the steam release method that works for your recipe.
See ‘How to release steam’ above for full details

39
User Manual
KEEP WARM
You can choose to allow Keep Warm to turn on automatically after
cooking on many Smart Programs, and you can also use Keep Warm
separately to reheat food.
Keep warm after cooking
1. When cooking is finished, automatic warming begins. The timer
shows the time passed, up to 10 hours.
2. To turn automatic warming off (either during cooking or during
automatic warming), press Keep Warm and the light above the
button turns off.
Reheat food
1. When in Standby mode, press Keep Warm.
2. The default cooking time flashes. To select it, press the Control
Dial. Or to change it, turn the Control Dial to change it, then press
the dial to select it.
3. The default temperature level flashes. To select it, press the Control
Dial. Or to change it, turn the Control Dial to change it.
Program Default Cook
Time
Default
Temperature
Min/Max Cook
Time
Manual 10 hours
(10:00)
High 30 min / 10 hrs
(00:30 / 10:00)

40
User Manual
CLEANING
Clean your Instant Pot Duo Plus after each use. Always unplug the unit
and let all parts cool to room temperature before cleaning. Before use
or storing, make sure all surfaces are dry.
Part Cleaning instructions
Accessories
• Steam Rack
• Condensation
Collector
• Sealing Ring
• Wash after each use
• Hand wash with hot water and mild dish soap or wash in
dishwasher, top rack
• Never use harsh chemical detergents, powders or scouring
pads on accessories
• Empty and rinse condensation collector after each use
Lid and Parts
• Anti-Block
Shield
• Sealing Ring
• Steam
Release Vent
• Silicone Cap
• Steam
Release Cover
• Hand wash with hot water and mild dish soap or wash in
dishwasher, top rack
• Remove all small parts from lid before washing.
• With steam release valve and anti-block shield removed,
clean interior of steam release pipe to prevent clogging.
• To drain water from the lid after dishwashing, grasp the lid
handle and hold the lid vertically over a sink, then turn it all
the way around
• After cleaning, store the lid upside down on the cooker base
• Store sealing rings in a well-ventilated area to disperse odor
• To eliminate odors from sealing ring, add 1 cup (8 oz / 250
mL) water and 1 cup (8 oz / 250 mL) white vinegar to inner
cooking pot, and run Pressure Cook for 5–10 minutes, then
use Quick Steam Release
Inner Cooking
Pot
• Wash after each use.
• Hand wash with hot water and mild dish soap or wash
in dishwasher*
• Hard water stains may need a vinegar-dampened sponge
and scrubbing to remove
• For tough or burned food residue, soak in hot water for
a few hours before cleaning
• Dry all exterior surfaces before placing in cooker base
Power cord • Use a barely-damp cloth to wipe any particles off cord
Cooker base • Wipe the inside of the cooker base as well as the condensation
rim with a barely-damp cloth, and allow to air dry
• Clean the outside of the cooker base and the control panel
with a soft, barely-damp cloth or sponge
*Some discoloration may occur after machine washing, but this will not affect the cooker’s
safety or performance.

41
User Manual
TROUBLESHOOTING
Problem Cause Solution
Difficulty closing lid Sealing ring not
properly installed
• Reposition sealing ring,
ensure it is snug behind
sealing ring rack.
Contents in cooker are
still hot
• Set Steam Release switch
to Vent, then lower lid
onto cooker base
Difficulty opening lid Pressure inside
the cooker
• Release pressure
according to recipe; only
open lid after float valve
has dropped down.
Inner pot is stuck to lid
when cooker
Cooling of inner pot may
create suction, causing
inner pot to adhere to
the lid
• To release the vacuum, set
Steam Release to Vent.
Steam leaks from
side of lid
No sealing ring in lid • Install sealing ring.
Sealing ring damaged or
not properly installed
• Replace sealing ring.
Food debris attached to
sealing ring
• Remove sealing ring and
clean thoroughly.
Lid not closed properly • Open, then close lid.
Sealing ring rack is
warped or off-center
• Remove sealing ring from
lid, check sealing ring
rack for bends or warps.
Contact Consumer Care.
Inner cooking pot rim
may be misshapen
• Check for deformation and
contact Consumer Care.
Minor steam leaking/
hissing from steam
release vent during
cooking cycle
Cooker is regulating
excess pressure
• This is normal; no
action required.

42
User Manual
Problem Cause Solution
Steam gushes from
steam release vent
when Steam Release
switch is in Seal position
Not enough liquid in the
inner pot
• Add thin, water-based
liquid to the inner pot
according to its size:
6 Quart: 1 1/2 cups
(12 oz / 375 mL)
8 Quart: 2 cups
(16 oz / 500 mL)
Pressure sensor
control failure
• Contact Consumer Care.
Internal steam release
valve not seated properly
• Check Steam Release
switch to ensure it’s
set to Seal.
Display remains blank
after connecting the
power cord
Bad power connection
or no power
• Inspect power cord for
damage. If damage is
noticed, contact
Consumer Care.
• Check outlet to ensure it
is powered.
Cooker’s electrical fuse
has blown
• Contact Consumer Care.
Occasional clicking or
light cracking sound
The sound of power
switching and expanding
pressure board when
changing temperatures
• This is normal; no
action needed.
Bottom of the inner
pot is wet
• Wipe exterior surfaces of
inner pot. Ensure heating
element is dry before
inserting inner pot into
cooker base.
Error code appears
on display and cooker
beeps continuously
There is an issue with
the cooker
• Read “Error Codes” for
instructions.

43
User Manual
ERROR CODES
If the control panel displays an error code from this list, there is an
issue with the Duo Plus. Here are the actions you should take to fix
the problem.
Problem Cause Solution
C1 C2 C6 C6H C6L Faulty sensor • Contact Consumer Care.
C5 Temperature is too high
because inner pot is not
placed in the cooker base
• Press Cancel and wait for
heating element to cool;
ensure there are no foreign
objects in cooker base; insert
or reposition inner pot in
cooker base and re-enter
commands.
C5 Temperature is too high
because there is no water
in inner pot
• Check for scorching on
bottom of inner pot. Add thin,
water-based liquid to the inner
pot according to its size:
• 3 Quart: 1 cup (8 oz / 250 mL)
6 Quart: 1 1/2 cups (12 oz /
375 mL) 8 Quart: 2 cups
(16 oz / 500 mL)
C7 or NoPr Heat element has failed • Contact Consumer Care.
C7 or NoPr Not enough liquid • Add thin, water-based liquid
to the inner pot according to
its size:
• 3 Quart: 1 cup (8 oz / 250 mL)
6 Quart: 1 1/2 cups (12 oz /
375 mL) 8 Quart: 2 cups
(16 oz / 500 mL)
C7 or NoPr Quick release button is in
the Vent position
• Check Steam Release switch
to ensure it’s set to Seal.
Lid Lid is not in the correct
position for the selected
program
• Open and close the lid.
Do not use a lid when
using Sauté.

44
User Manual
Problem Cause Solution
Food burn High temperature
detected at bottom
of inner pot; cooker
automatically reduces
temperature to
avoid overheating
• Starch deposits at the bottom
of the inner pot may have
blocked heat dissipation.
• Turn the cooker off, release
pressure according to the
recipe, and inspect the bottom
of the inner pot.
PrSE Pressure has
accumulated during
a non-pressure
cooking program
• Set Steam Release switch
to Vent.

45
User Manual
LEARN MORE
There’s a whole world of Instant Pot information and help just waiting
for you. Here are some of the most helpful resources.
Register your product
Instanthome.com/register
Contact Consumer Care
In the Instant Brand Connect app
Instanthome.com/customer-care-center
support@instanthome.com
Instant Brands Connect App with 1000+ recipes
Instanthome.com
iOS and Android app stores
Cooking charts and more recipes
Instanthome.com
How-to videos, tips and more
Instanthome.com
Replacement parts and accessories
Instanthome.com
Join the community
Product specifications
Model Volume Wattage Power Weight Dimensions
Duo Plus
60 v4
6 Quarts
5.7 Litres
1000 W 120V/
60Hz
12.3 lb
5.58 kg
in: 13.43 L x 13.35 W x 12.76 H
cm: 34.1 L x 34 W x 32.4 H
Duo Plus
80 v4
8 Quarts
7.6 Litres
1200 W 120V/
60Hz
15.90 lb
7.21 kg
in: 14.53 L x 14.53 W x 13.98 H
cm: 37 L x 37 W x 35.5 H

46
User Manual
WARRANTY
One (1) Year Limited Warranty
This One (1) Year Limited Warranty applies to purchases made from authorized retailers
of Instant Brands LLC (“Instant Brands”) by the original appliance owner and is not
transferable. Proof of original purchase date and, if requested by Instant Brands, return
of your appliance, is required to obtain service under this Limited Warranty. Provided the
appliance was used in accordance with the use & care instructions, Instant Brands will,
in its sole and exclusive discretion, either: (i) repair defects in materials or workmanship;
or (ii) replace the appliance. In the event that your appliance is replaced, the Limited
Warranty on the replacement appliance will expire twelve (12) months from the date of
receipt. Failure to register your product will not reduce your warranty rights. The liability
of Instant Brands, if any, for any allegedly defective appliance or part will not exceed the
purchase price of a comparable replacement appliance.
What is not covered by this warranty?
• Products purchased, used, or operated outside of the United States and Canada.
• Products that have been modified or attempted to be modified.
• Damage resulting from accident, alteration, misuse, abuse, neglect, unreasonable
use, use contrary to the operating instructions, normal wear and tear, commercial
use, improper assembly, disassembly, failure to provide reasonable and necessary
maintenance, fire, flood, acts of God, or repair by anyone unless directed by an
Instant Brands representative.
• Use of unauthorized parts and accessories.
• Incidental and consequential damages.
• The cost of repair or replacement under these excluded circumstances.
EXCEPT AS EXPRESSLY PROVIDED HEREIN AND TO THE EXTENT PERMITTED BY
APPLICABLE LAW, INSTANT BRANDS MAKES NO WARRANTIES, CONDITIONS OR
REPRESENTATIONS, EXPRESS OR IMPLIED, BY STATUTE, USAGE, CUSTOM OF TRADE
OR OTHERWISE WITH RESPECT TO THE APPLIANCES OR PARTS COVERED BY THIS
WARRANTY, INCLUDING BUT NOT LIMITED TO, WARRANTIES, CONDITIONS, OR
REPRESENTATIONS OF WORKMANSHIP, MERCHANTABILITY, MERCHANTABLE QUALITY,
FITNESS FOR A PARTICULAR PURPOSE OR DURABILITY.

47
User Manual
Some states or provinces do not allow for: (1) the exclusion of implied warranties of
merchantability or fitness; (2) limitations on how long an implied warranty lasts; and/or
(3) the exclusion or limitation of incidental or consequential damages; so these
limitations may not apply to you. In these states and provinces, you have only the implied
warranties that are expressly required to be provided in accordance with applicable
law. The limitations of warranties, liability, and remedies apply to the maximum extent
permitted by law. This limited warranty gives you specific legal rights, and you may also
have other rights which vary from state to state or province to province.
Product Registration
Please visit
www.instanthome.com/register to register your new Instant Brands
appliance. Failure to register your product will not diminish your warranty rights. You
will be asked to provide the store name, date of purchase, model number (found on the
back of your appliance) and serial number (found on the bottom of your appliance) along
with your name and email address. The registration will enable us to keep you up to date
with product developments, recipes and contact you in the unlikely event of a product
safety notification. By registering, you acknowledge that you have read and understand
the instructions for use, and warnings set forth in the accompanying instructions.
Warranty Service
To obtain warranty service, please contact our Consumer Care Department by email
to
support@instanthome.com. You can also create a support ticket online at
www.instanthome.com. If we are unable to resolve the problem, you may be asked to
send your appliance to the Service Department for quality inspection. Instant Brands
is not responsible for shipping costs related to warranty service. When returning your
appliance, please include your name, mailing address, email address, phone number,
and proof of the original purchase date as well as a description of the problem you are
encountering with the appliance.

48
User Manual
NOTES

49
User Manual
NOTES

Distributed by Instant Brands LLC
3025 Highland Parkway, Suite 700
Downers Grove, IL 60515 U.S.
instanthome.com
© 2022 Instant Brands LLC
112-0169-01
Art release date
11/15/2022
INSTANT, INSTANT POT
and DUO
are registered trademarks of
Instant Brands Holdings Inc.