
Write the model and serial
numbers here:
Model # _________________
Serial # _________________
Find these numbers inside the
beverage center/wine chiller
on the left side.
GE is a trademark of the General Electric Company. Manufactured under trademark license.
OWNER’S MANUAL
& INSTALLATION
INSTRUCTIONS
WINE CENTER/BEVERAGE
AND WINE CENTER
49-1000352 Rev. 4 01-20 GEA
SAFETY INFORMATION .........3
USING THE APPLIANCE
Controls ..............................5
GVS04 Beverage and Wine Center .......6
GWS04 Wine Center ...................7
CARE AND CLEANING .............8
Replacing the Light Bulb ...............9
INSTALLATION INSTRUCTIONS . . 10
GVS04BD Models Only ................ 11
TROUBLESHOOTING TIPS ......12
LIMITED WARRANTY ...........15
CONSUMER SUPPORT ..........16
GWS04 Wine Center
GVS04 Beverage
and Wine Center
ENGLISH / FRANÇAIS /
ESPAÑOL

2 49-1000352 Rev. 4
THANK YOU FOR MAKING GE APPLIANCES A PART OF YOUR HOME.
Whether you grew up with GE Appliances, or this is your first, we’re happy to have you in the family.
We take pride in the craftsmanship, innovation and design that goes into every GE Appliances
product, and we think you will too. Among other things, registration of your appliance ensures that we
can deliver important product information and warranty details when you need them.
Register your GE appliance now online. Helpful websites and phone numbers are available in the
Consumer Support section of this Owner’s Manual. You may also mail in the pre-printed registration
card included in the packing material.
49-1000352 Rev. 4 3
READ AND SAVE THESE INSTRUCTIONS
IMPORTANT SAFETY INFORMATION
READ ALL INSTRUCTIONS BEFORE USING THE APPLIANCE
SAFETY INFORMATION
CAUTION
To reduce the risk of injury when using your refrigerator, follow these basic safety
precautions.
Ŷ 'RQRWFOHDQJODVVVKHOYHVRUFRYHUVZLWKZDUP
water when they are cold. Glass shelves and
covers may break if exposed to sudden temperature
changes or impact, such as bumping or dropping.
Tempered glass is designed to shatter into many
small pieces if it breaks.
Ŷ .HHSILQJHUVRXWRIWKH³SLQFKSRLQW´DUHDV
clearances between the doors and between the
doors and cabinet are necessarily small. Be careful
closing doors when children are in the area.
WARNING
To reduce the risk of fire, explosion, electric shock, or injury when using your
refrigerator, follow these basic safety precautions:
Ŷ 7KLVUHIULJHUDWRUPXVWEHSURSHUO\LQVWDOOHG
and located in accordance with the Installation
Instructions before it is used.
Ŷ 8QSOXJWKHUHIULJHUDWRUEHIRUHPDNLQJUHSDLUV
replacing a light bulb, or cleaning.
NOTE: Power to the refrigerator cannot be
disconnected by any setting on the control panel.
NOTE: Repairs must be performed by a qualified
Service Professional.
Ŷ 5HSODFHDOOSDUWVDQGSDQHOVEHIRUHRSHUDWLQJ
Ŷ 'RQRWVWRUHRUXVHJDVROLQHRURWKHUIODPPDEOH
vapors and liquids in the vicinity of this or any other
appliance.
Ŷ 'RQRWVWRUHH[SORVLYHVXEVWDQFHVVXFKDVDHURVRO
cans with a flammable propellant in this appliance.
Ŷ 'RQRWXVHDQH[WHQVLRQFRUG
Ŷ 7RSUHYHQWVXIIRFDWLRQDQGHQWUDSPHQWKD]DUGV
WRFKLOGUHQUHPRYHWKHIUHVKIRRGDQGIUHH]HU
doors from any refrigerator before disposing of it or
discontinuing its use.
Ŷ 7RDYRLGVHULRXVLQMXU\RUGHDWKFKLOGUHQVKRXOGQRW
stand on, or play in or with the appliance.
Ŷ &KLOGUHQDQGSHUVRQVZLWKUHGXFHGSK\VLFDOVHQVRU\
or mental capabilities or lack of experience and
knowledge can use this appliance only if they are
supervised or have been given instructions on safe
XVHDQGXQGHUVWDQGWKHKD]DUGVLQYROYHG
Ŷ 7KLVDSSOLDQFHLVLQWHQGHGWREHXVHGLQKRXVHKROG
and similar applications such as: staff kitchen areas
LQVKRSVRIILFHVDQGRWKHUZRUNLQJHQYLURQPHQWV
IDUPKRXVHVE\FOLHQWVLQKRWHOVPRWHOVEHG
EUHDNIDVWDQGRWKHUUHVLGHQWLDOHQYLURQPHQWV
catering and similar non-retail applications.
Ŷ 'RQRWDSSO\KDUVKFOHDQHUVWRWKHUHIULJHUDWRU
Certain cleaners will damage plastic which may
cause parts such as the door or door handles to
detach unexpectedly. See the Care and Cleaning
section for detailed instructions.
WARNING
EXPLOSION HAZARD Flammable Refrigerant
This appliance contains isobutane refrigerant,
R600a, a natural gas with high environmental
compatibility. However, it is also combustible.
Adhere to the warnings below to reduce the risk of
injury or property damage.
1. When handling, installing and operating the
appliance, care should be taken to avoid damage to
the refrigerant tubing.
2. 6HUYLFHVKDOORQO\EHSHUIRUPHGE\DXWKRUL]HG
VHUYLFHSHUVRQQHO8VHRQO\PDQXIDFWXUHUDXWKRUL]HG
service parts.
3. 'LVSRVHRIUHIULJHUDWRULQDFFRUGDQFHZLWK)HGHUDO
DQG/RFDO5HJXODWLRQV)ODPPDEOHUHIULJHUDQWDQG
insulation material used require special disposal
procedures. Contact your local authorities for the
environmentally safe disposal of your refrigerator.
4. .HHSYHQWLODWLRQRSHQLQJVLQWKHDSSOLDQFH
enclosures or in the built-in structure clear of
obstruction.
5. 'RQRWXVHPHFKDQLFDOGHYLFHVRURWKHUPHDQVWR
accelerate the defrosting process.
6. 'RQRWGDPDJHUHIULJHUDQWFLUFXLW
7. 'RQRWXVHHOHFWULFDODSSOLDQFHVLQVLGHWKHIRRG
storage compartment of the appliance.
4 49-1000352 Rev. 4
SAFETY INFORMATION
IMPORTANT SAFETY INFORMATION
READ ALL INSTRUCTIONS BEFORE USING THE APPLIANCE
READ AND SAVE THESE INSTRUCTIONS
WARNING
SUFFOCATION AND ENTRAPMENT HAZARD
)DLOXUHWRIROORZWKHVHGLVSRVDOLQVWUXFWLRQVFDQUHVXOWLQGHDWKRUVHULRXVLQMXU\
IMPORTANT: Child entrapment and suffocation
are not problems of the past. Junked or abandoned
UHIULJHUDWRUVRUIUHH]HUVDUHVWLOOGDQJHURXVHYHQLIWKH\
ZLOOVLWIRU³MXVWDIHZGD\V´,I\RXDUHJHWWLQJULGRI\RXU
ROGUHIULJHUDWRURUIUHH]HUSOHDVHIROORZWKHLQVWUXFWLRQV
below to help prevent accidents.
Before You Throw Away Your Old Appliance
Ŷ7DNHRIIWKHIUHVKIRRGDQGIUHH]HUGRRUV
Ŷ Leave the shelves in place so that children may not
easily climb inside.
PROPER DISPOSAL OF YOUR OLD REFRIGERATOR
Do not, under any circumstances, cut or remove the third (ground) prong from the power cord. For
personal safety, this appliance must be properly grounded.
The power cord of this appliance is equipped with a
3-prong (grounding) plug which mates with a standard
SURQJJURXQGLQJZDOORXWOHWWRPLQLPL]HWKH
SRVVLELOLW\RIHOHFWULFVKRFNKD]DUGIURPWKLVDSSOLDQFH
Have the wall outlet and circuit checked by a qualified
electrician to make sure the outlet is properly
grounded.
Where a standard 2-prong wall outlet is encountered, it
is your personal responsibility and obligation to have it
replaced with a properly grounded 3-prong wall outlet.
'RQRWXVHDQDGDSWHU
The refrigerator should always be plugged into its own
individual electrical outlet which has a voltage rating
that matches the rating plate.
$9ROW$&+]RUDPSIXVHGJURXQGHG
electrical supply is required. This provides the best
performance and also prevents overloading house
ZLULQJFLUFXLWVZKLFKFRXOGFDXVHDILUHKD]DUGIURP
overheated wires.
Never unplug your refrigerator by pulling on the power
cord. Always grip plug firmly and pull straight out from
the outlet.
Immediately discontinue use of a damaged supply
cord. If the supply cord is damaged, it must be
replaced by a qualified service professional with an
DXWKRUL]HGVHUYLFHSDUWIURPWKHPDQXIDFWXUHU
When moving the refrigerator away from the wall, be
careful not to roll over or damage the power cord.
CONNECTING ELECTRICITY
WARNING
ELECTRICAL SHOCK HAZARD
Plug into a grounded 3-prong outlet
'RQRWUHPRYHWKHJURXQGSURQJ
'RQRWXVHDQDGDSWHU
'RQRWXVHDQH[WHQVLRQFRUG
)DLOXUHWRIROORZWKHVHLQVWUXFWLRQVFDQUHVXOWLQGHDWKILUHRUHOHFWULFDOVKRFN
Refrigerant and Foam Disposal:
'LVSRVHRIUHIULJHUDWRULQDFFRUGDQFHZLWK)HGHUDODQG/RFDO5HJXODWLRQV)ODPPDEOHUHIULJHUDQWDQGLQVXODWLRQ
material used require special disposal procedures. Contact your local authorities for the environmentally safe
disposal of your refrigerator.
INSTALLATION
WARNING
EXPLOSION HAZARD
.HHSIODPPDEOHPDWHULDOVDQGYDSRUVVXFKDVJDVROLQHDZD\IURPUHIULJHUDWRU)DLOXUHWRGRVRFDQUHVXOWLQILUH
explosion, or death.

49-1000352 Rev. 4 5
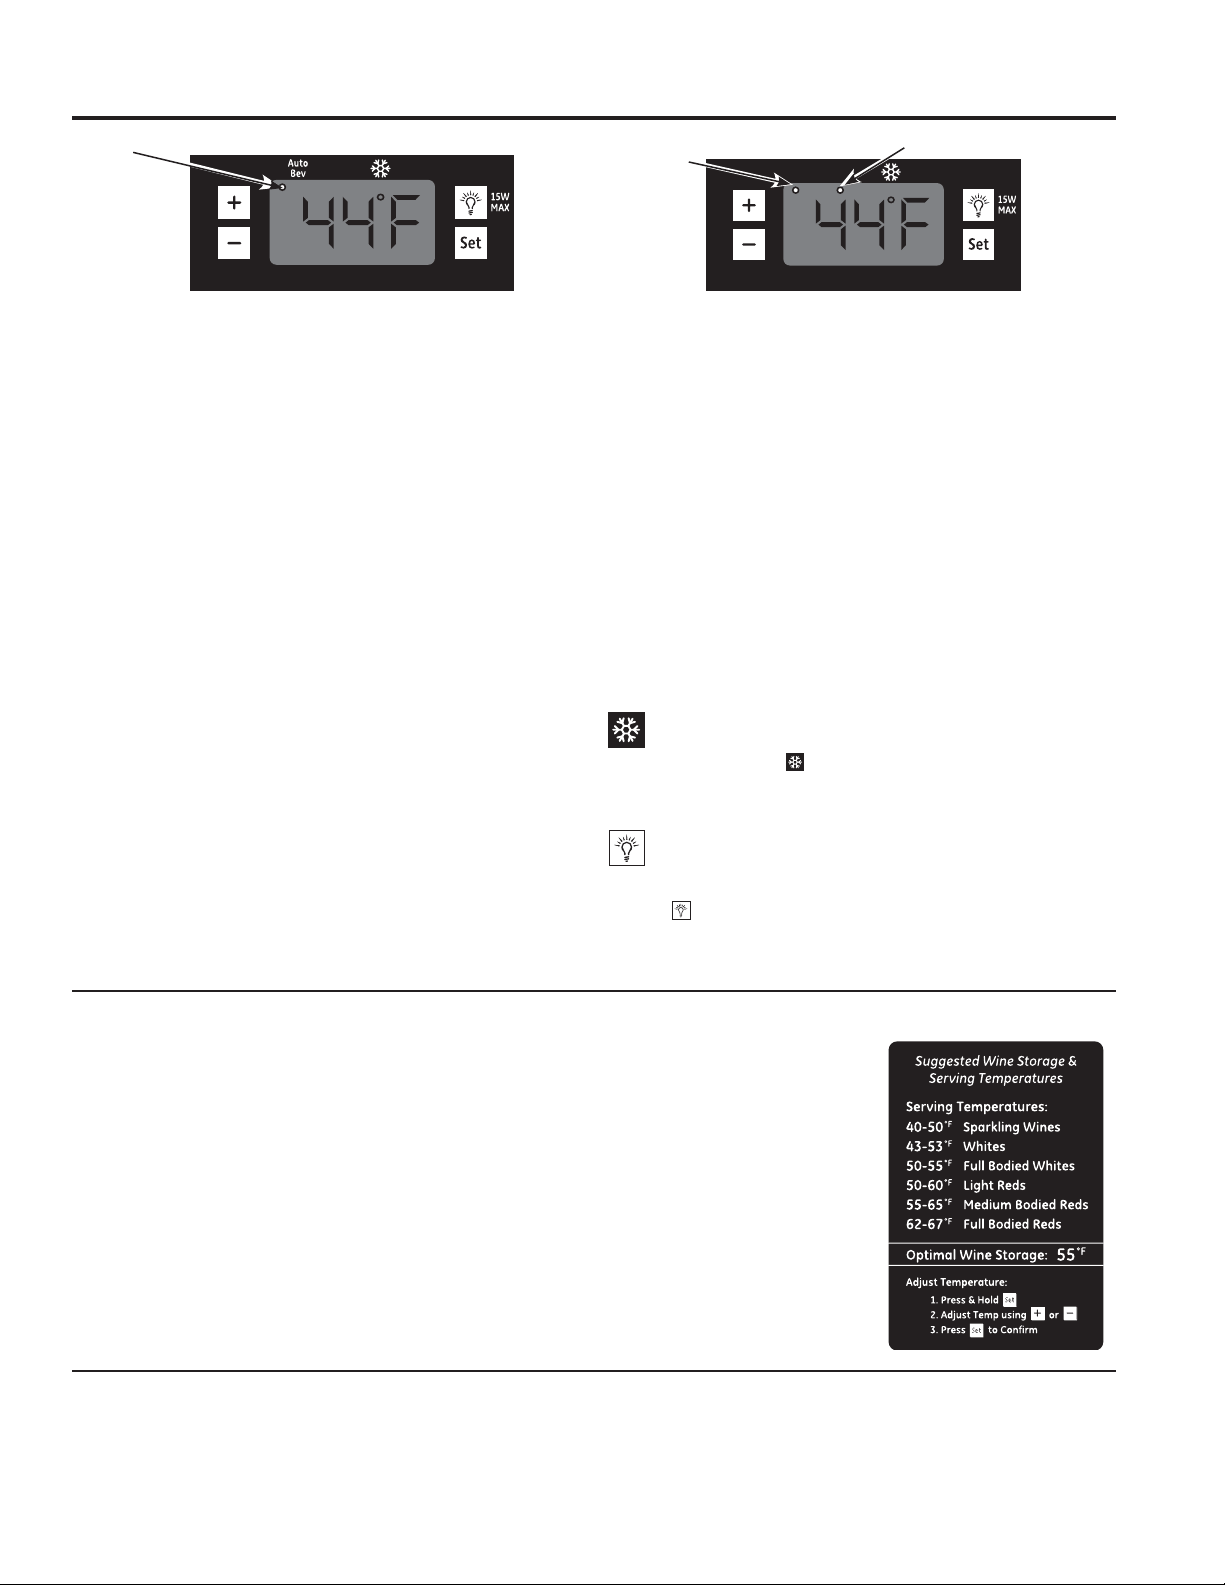
Control Settings
The temperature range of GVS04 Beverage and Wine
&HQWHULVLQWHQGHGIRU)&WR)&7KH
temperature range of GWS04 Wine Chiller is intended
IRU)&WR)&7KHGLVSOD\VKRZVWKH
average temperature of the appliance. It is normal for the
actual temperature to vary slightly during operation.
Auto Temperature Setting
For GVS04 Beverage and Wine Center: When the
DSSOLDQFHLVSOXJJHGLQRUWKH³´SDGLVSUHVVHGWKH
DSSOLDQFHUXQVRQWKH³$XWR%HY´VHWWLQJRI)&
DQGWKH³$XWR%HY´LQGLFDWRUOLJKWLQWKHXSSHUOHIWFRUQHU
stays lit.
For GWS04 Wine Chiller: When the appliance is
plugged in, the display shows the factory default
WHPSHUDWXUHRI)&%\SUHVVLQJWKH³´RU
³´SDG\RXFDQFKDQJHWKHWHPSHUDWXUHVHWWLQJ:KHQ
WKHWHPSHUDWXUHLVVHWIURP)&WR)&
WKH³:KLWH´ZLQHLQGLFDWRUOLJKWZLOOEHRQ:KHQWKH
WHPSHUDWXUHLVVHWIURP)&WR)&
WKH³5HG´ZLQHLQGLFDWRUOLJKWZLOOEHRQ
NOTE: 'LVSOD\ZLOOIODVKZKHQWKH³´SDGLVSUHVVHG
Normal Temperature Setting
The temperature of the appliance can be set anywhere
ZLWKLQLWVWHPSHUDWXUHUDQJHE\WKH³´DQG³´SDGV
1. Press and hold the SET pad. You will hear a series of
2 beeps.
$IWHUWKHVHFRQGEHHSSUHVVWKH³´DQG³±´SDGV
to increase or decrease the desired temperature in
LQFUHPHQWVRIRQHGHJUHH'XULQJWKLVWLPHWKHGLVSOD\
will flash.
3. Press SET to confirm your choice. The display will stop
flashing. If no confirmation is made in ten seconds, the
unit will automatically accept your change.
NOTE: When you change the temperature setting, there
may be a 5-minute delay until the compressor starts to run.
Fahrenheit and Celsius
The temperature display can be changed between
)DKUHQKHLWDQG&HOVLXVE\SUHVVLQJDQGKROGLQJWKH³´
pad for approximately 5 seconds.
Indicator Light
The indicator is lit when the compressor is running to
cool your unit. It will not be lit when the compressor is
idle.
Interior Light
To switch the interior light on/off, simply press the pad.
When the Wine Center/Beverage and Wine Center is Plugged In
After plugging in the wine center/beverage and wine
center and setting the desired temperature, allow the
appliance to reach the set temperature before loading
your wine. The temperature may take up to 12 hours to
FRPSOHWHO\VWDELOL]H
After loading the wine and/or beverages, you may notice
the actual temperature rise. This is normal. The actual
temperature will continue to change as the wine and/
or beverages are cooled to the set temperature. The
temperature may take up to 12 hours to completely
VWDELOL]H
A guide with wine serving
temperature suggestions is
located on the inside right
portion of the unit. It gives
recommended temperatures
for different wines, as well
as instructions on adjusting
the temperature of the wine
center/beverage and wine
center
NOTE: The exterior of the
cabinet may get warm. This
is normal.
Interior Light
You can turn the light ON or OFF by pushing the light
switch located on the right side of the control panel
housing.
If the interior light is left on, it will raise the inside
temperature.
Controls
USING THE APPLIANCE: Controls
Auto Bev
Indicator Light
Red White
Red Wine
Indicator Light
White Wine Indicator Light
GVS04 Beverage and Wine Center GWS04 Wine Chiller

6 49-1000352 Rev. 4
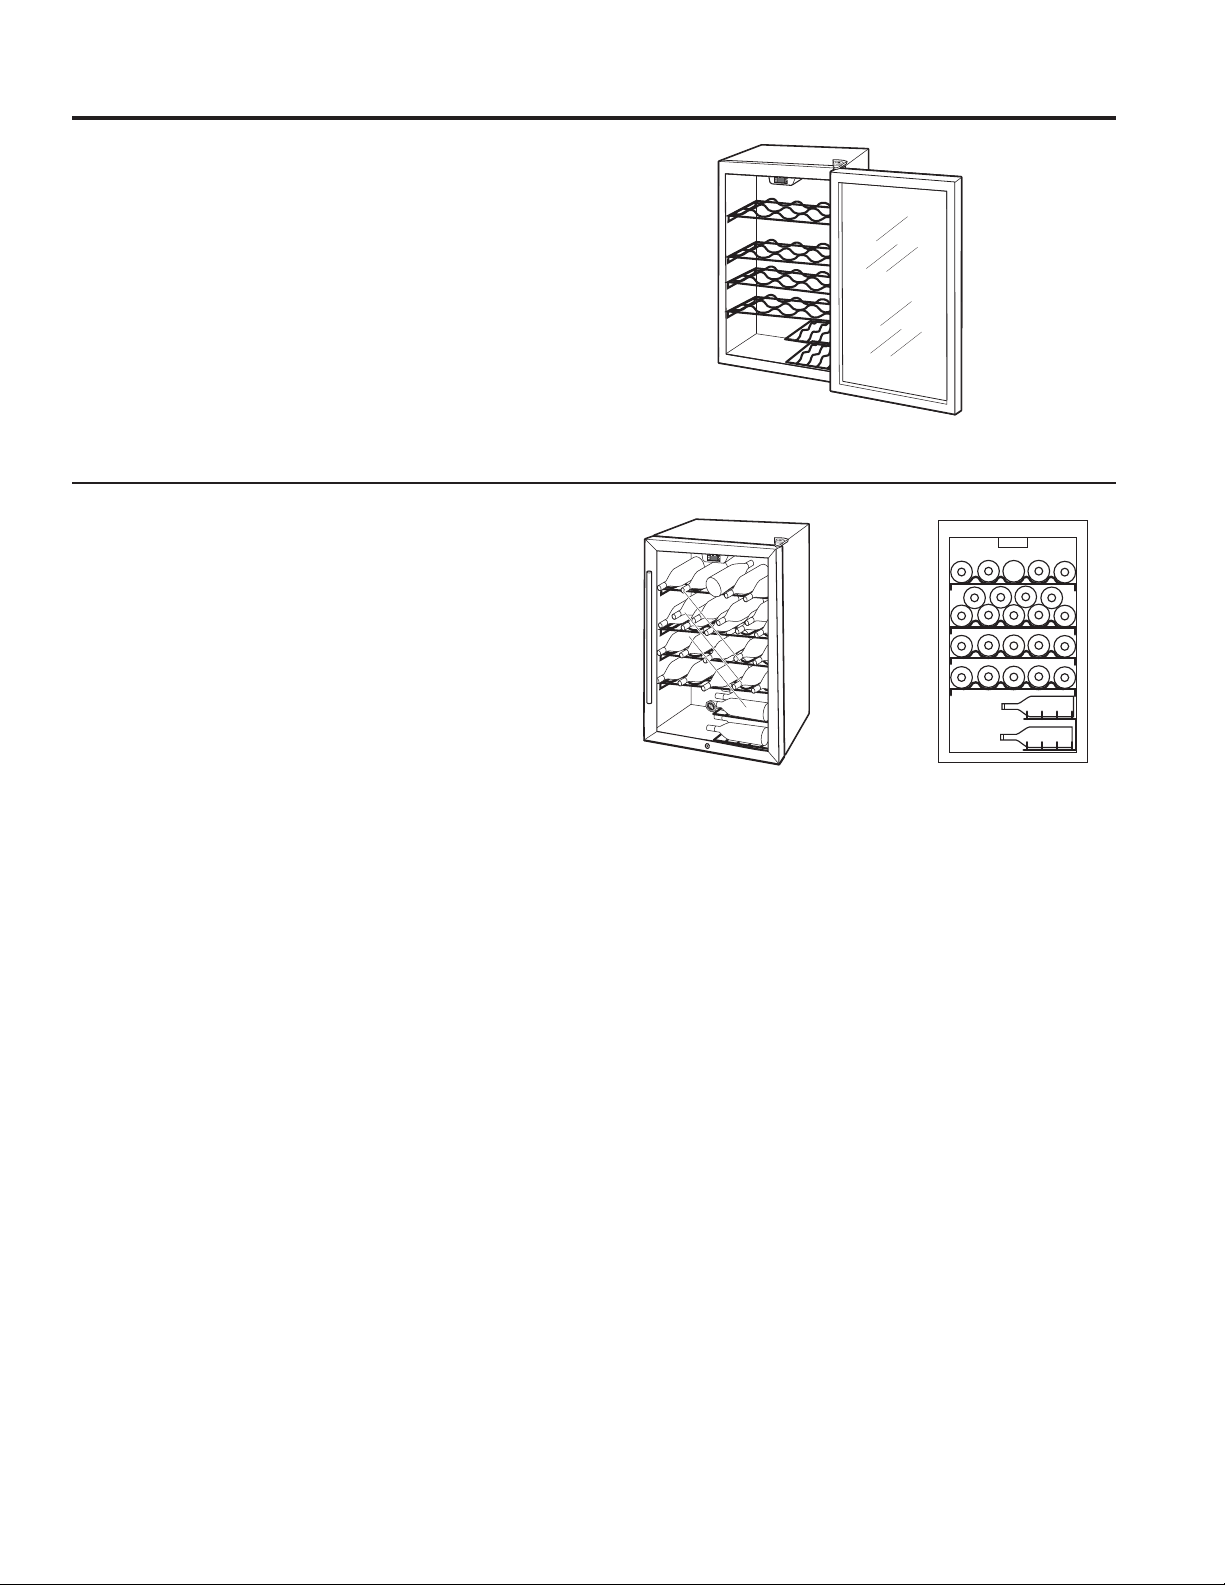
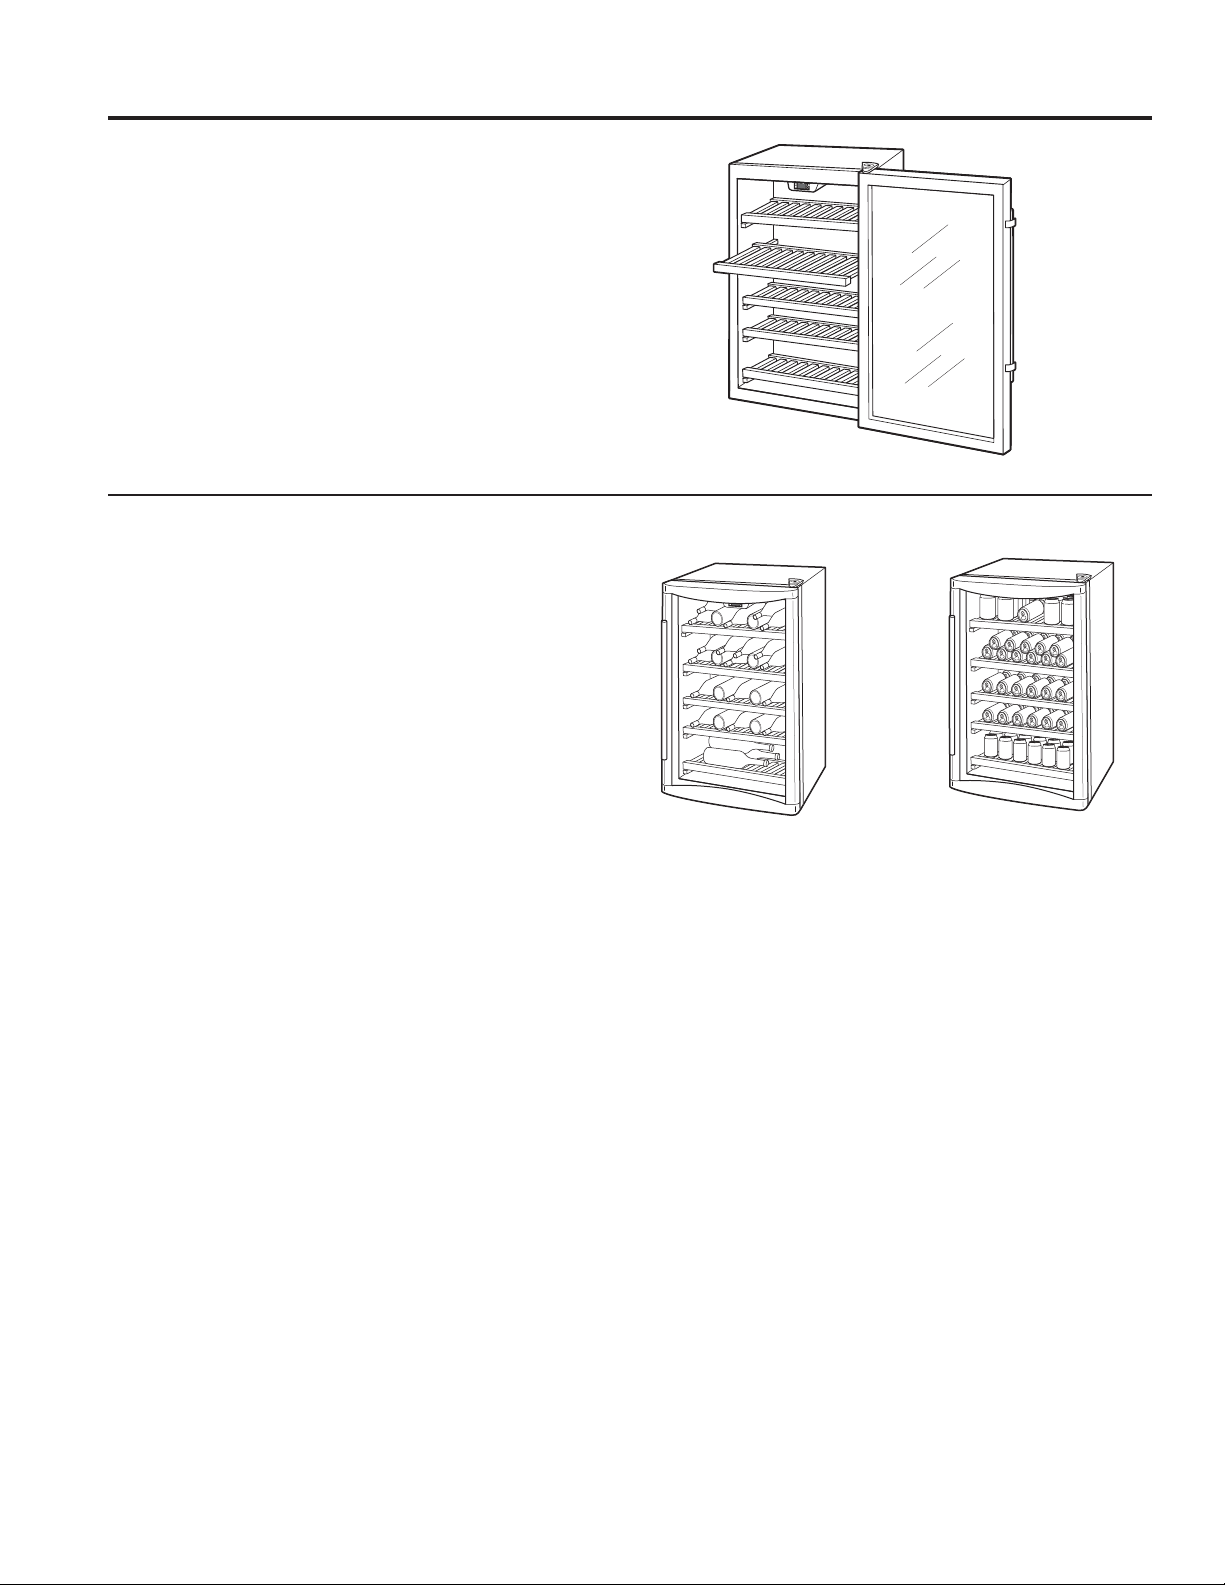
GVS04 Beverage and Wine Center Only
USING THE APPLIANCE: GVS04 Beverage and Wine Center
Wooden Shelves
Wooden shelves in the beverage and wine center are
removable for easy cleaning and for storing larger items.
To remove a shelf, open the door completely to avoid
potential damage to the shelf. Lift slightly and pull the
shelf forward. The shelf may fit tightly in the track.
To replace a shelf, open the door completely to avoid
potential damage to the shelf. Slide the shelf into the
tracks along the sides of the cabinet until it stops.
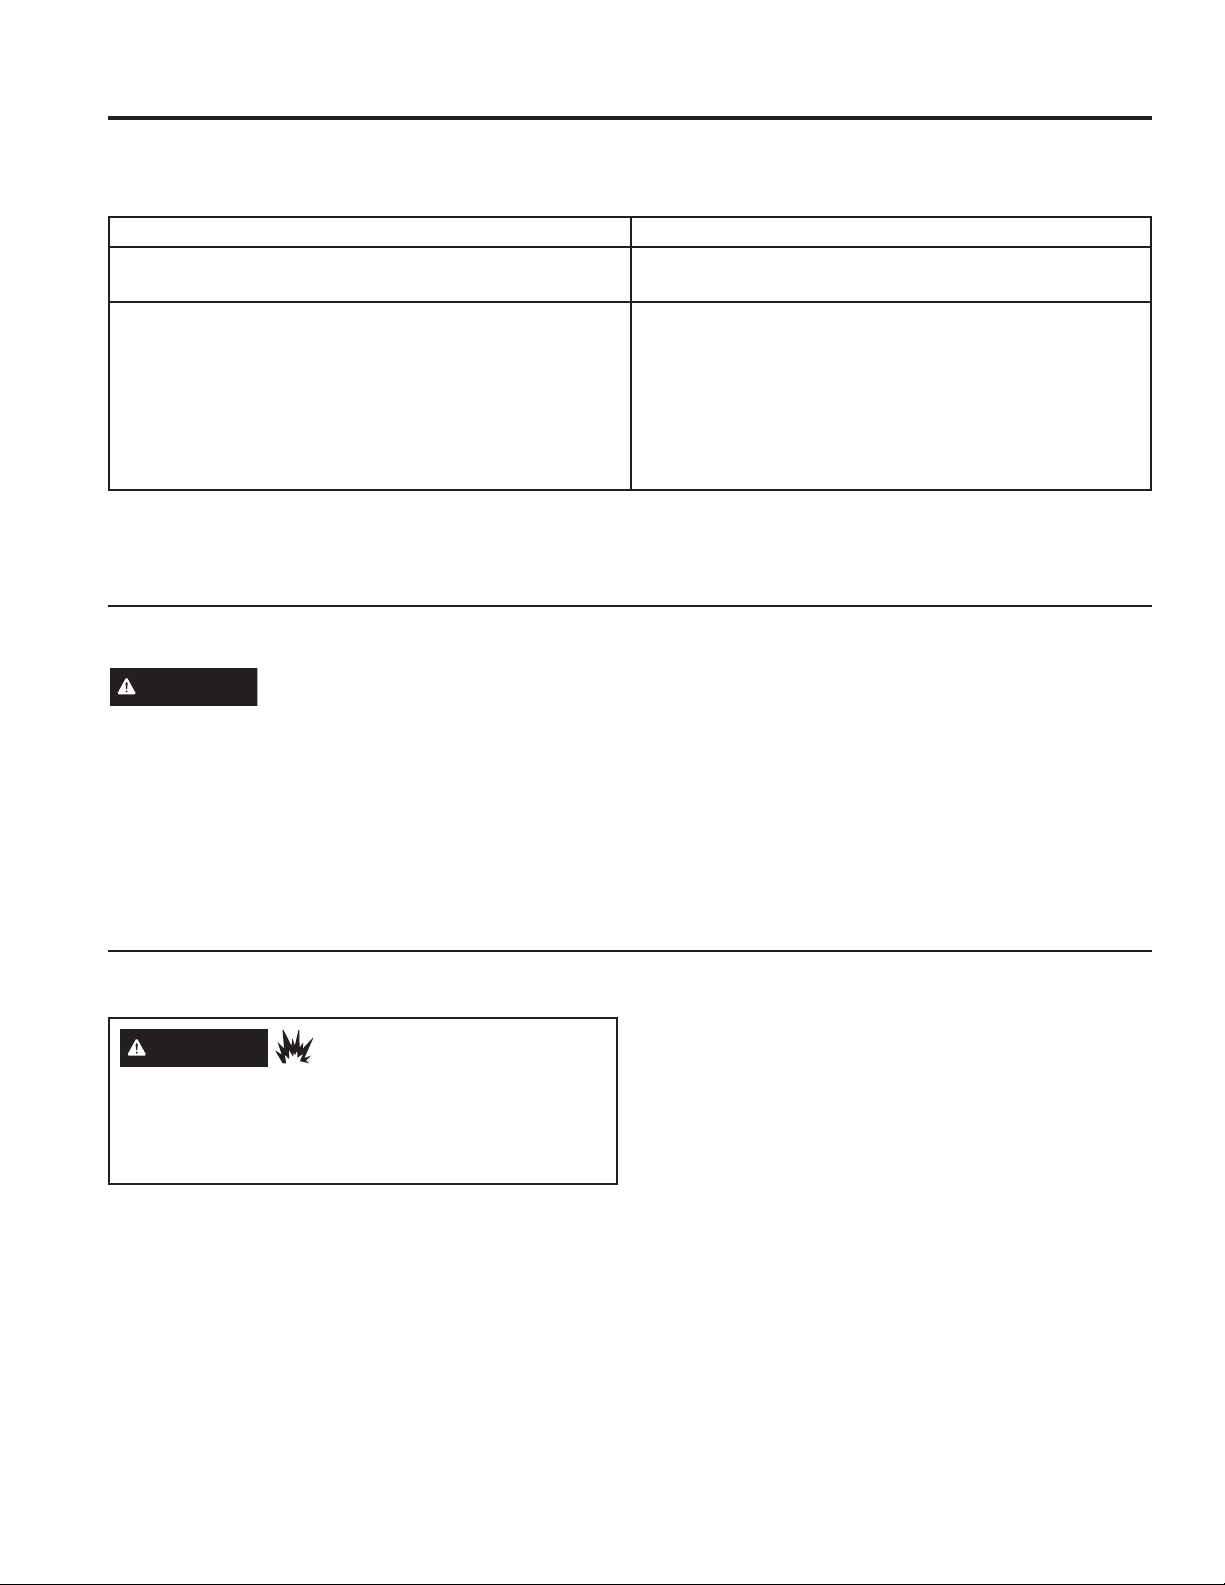
Wine and Beverage Loading
As with any refrigeration product, there is a slight
temperature variance at different locations within the
cabinet.
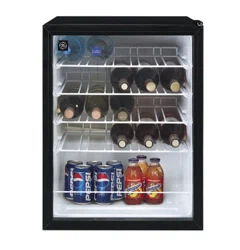
Suggested bottle
DUUDQJHPHQWIRUZLQH±
full load (holds 31 wine
bottles)
Suggested arrangement
IRURWKHUEHYHUDJHV±
standard load (holds 109
cans). Additional storage
possible (up to 125 cans
if a shelf is removed).
49-1000352 Rev. 4
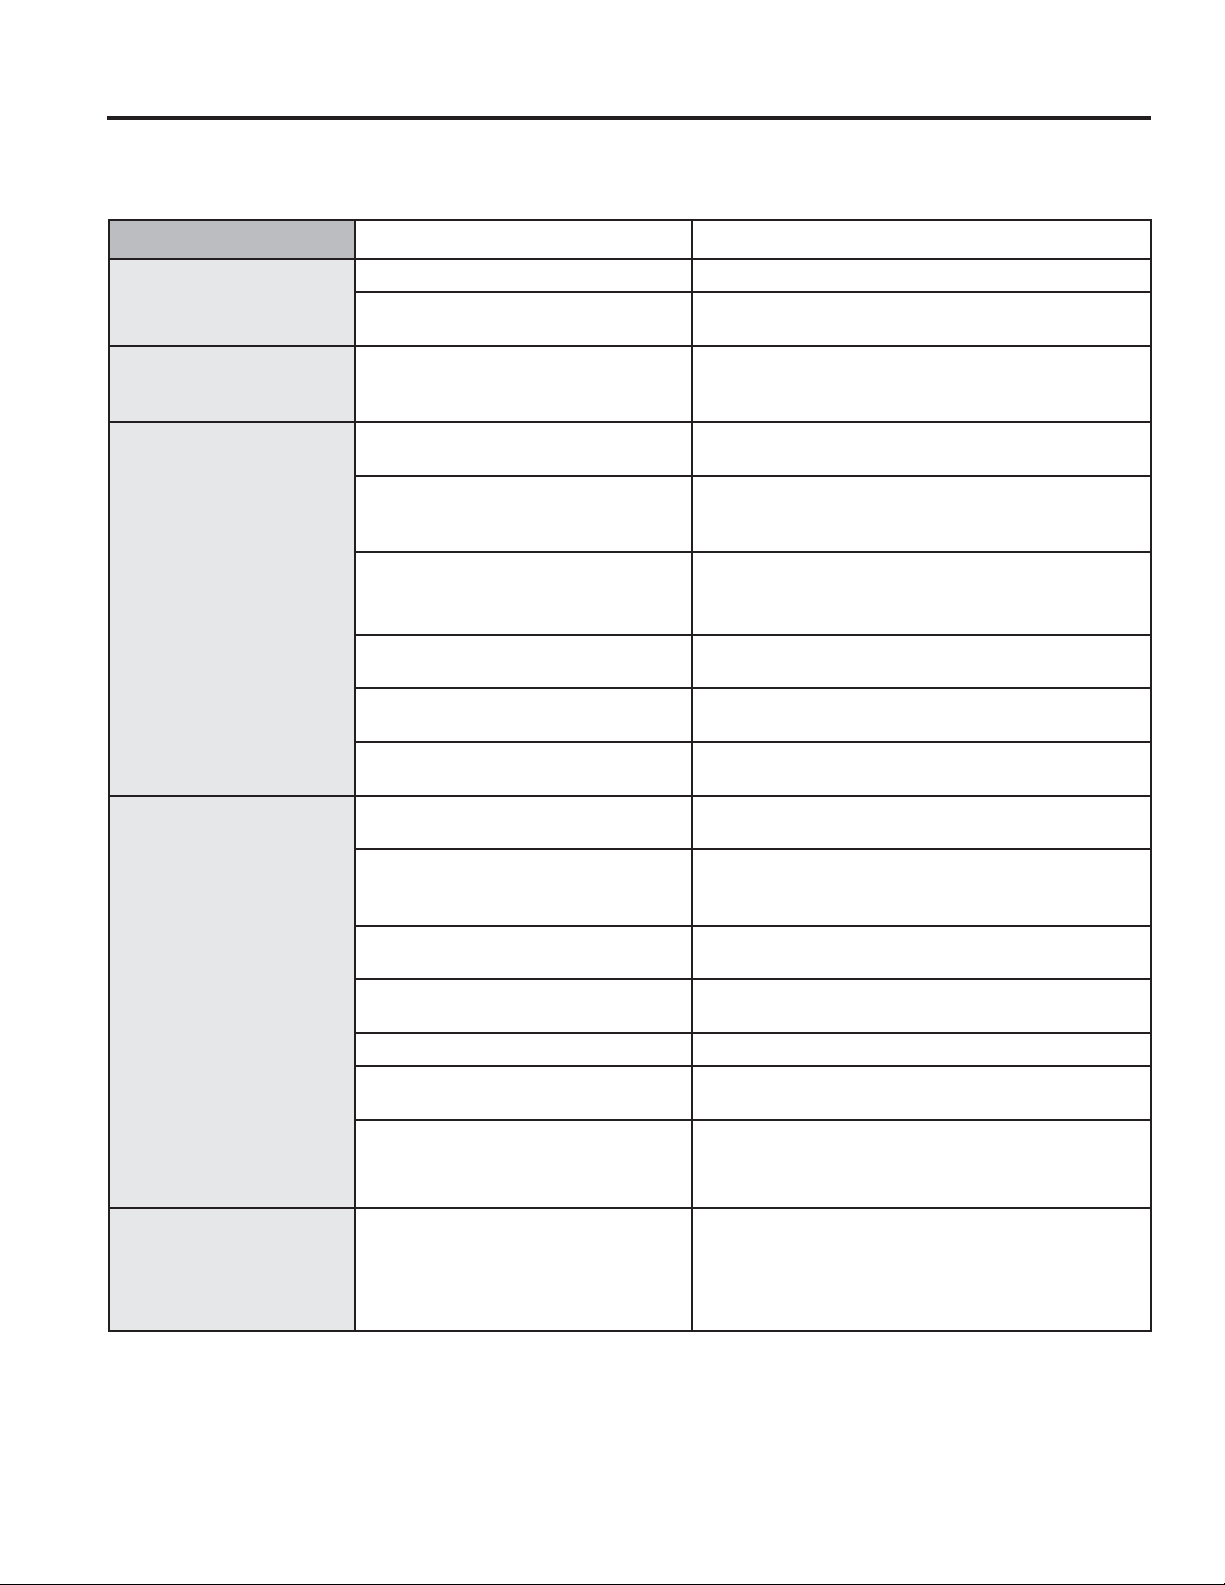
Wine Racks
Wine racks in the wine center are removable for easy
cleaning and for storing larger items.
To remove a shelf, open the door completely to avoid
potential damage to the shelf. Lift slightly and pull the
shelf forward. The shelf may fit tightly in the track.
To replace a shelf, open the door completely to avoid
potential damage to the shelf. Slide the shelf into the
tracks along the sides of the cabinet until it stops.
Wine Loading
As with any refrigeration product, there is a slight
temperature variance at different locations within the
cabinet.
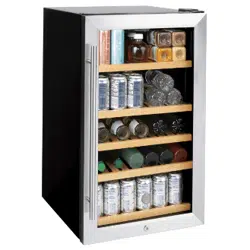
This wine center holds 30 bottles at full capacity. The
second wine rack is designed with extra height. This
allows the storage of larger magnum bottles or the
VWDFNLQJRIW\SLFDOVL]HGERWWOHV
GWS04 Wine Center Only
USING THE APPLIANCE: GWS04 Wine Center
Suggested
bottle
arrangement
for wine.
8 49-1000352 Rev. 4
Care and Cleaning
Cleaning the Outside
Cleaning the Inside
WARNING
Beverage Center must be unplugged
WRDYRLGHOHFWULFDOKD]DUGIURPSRZHUVRXUFHZKHQ
defrosting unit.
To clean the inner liner and racks, use a warm water
and baking soda solution—about one tablespoon (15
ml) of baking soda to a quart (1 liter) of water. This both
FOHDQVDQGQHXWUDOL]HVRGRUV&OHDQZLWKDGDPSFORWK
The vinyl door gasket may be cleaned with mild soap
and water or a baking soda solution.
'RQRWXVHGHWHUJHQWVVFRXULQJSRZGHUVVSUD\
cleaners or other harsh chemicals to clean the interior.
For GVS04 Models: To avoid water stains on the wood
shelves, clean up and dry any liquid spills immediately.
:LSHWKHFRQWUROSDQHOZLWKDGDPSFORWK'U\
WKRURXJKO\'RQRWXVHFOHDQLQJVSUD\VODUJHDPRXQWV
of soap and water, abrasives or sharp objects on the
panel—they can damage it. Some paper towels can also
scratch the control panel.
Automatic Defrosting
The model uses the compressor on/off cycling to defrost
automatically (compressor stop, temperature rises).
Never use a heater of any kind, scraper or sharp
instrument to remove frost as it may damage the wine
center/beverage and wine center.
NOTE: The drain pan above the compressor may be
full following defrost. Check to make sure no water spills
when moving the unit.
CARE AND CLEANING
WARNING
EXPLOSION HAZARD
Flammable Refrigerant
7RDYRLGGDPDJHWRWKHUHIULJHUDWLRQFLUFXLW'R1RWXVH
mechanical devices or other means to accelerate the
defrosting process.
Directions for Cleaning Outside Surfaces, Door Handles, and Trim
DO USE DO NOT USE
Soft, clean cloth or sponge Abrasive cloths, scrubbing sponges, scouring or steel
wool pads
Mild detergent mixed with warm water
$SSURYHGVWDLQOHVVVWHHOFOHDQHUV9LVLWWKH&DIp
Appliances parts store for approved stainless steel
cleaners: geapplianceparts.com RUFDOO
&OHDQHUVZLWKR[DOLFDFLGVXFKDV%DU.HHSHUV)ULHQG6RIW
Cleanser™ can be used to remove surface rust, tarnish
and small blemishes on stainless steel surfaces only.
Abrasive powders or sprays
Window Sprays or Ammonia
Citrus or plant oil-based cleaners
Acidic or vinegar-based cleaners
Oven cleaners
Cleaners containing acetone (propanone)
Any cleaner with WARNING about plastic contact
NOTE: DO NOT allow stainless steel cleaner to come in contact with any plastic parts such as trim pieces, handle
hardware and liners. If unintentional contact of cleaners with plastic parts does occur, clean plastic part with a
sponge and mild detergent mixed with warm water.
49-1000352 Rev. 4 9
In the Event of a Power Failure
If the power fails, open the door as infrequently as
possible to maintain the temperature. A gradual rise in
temperature should not have any adverse effect on the
wine.
If it is extremely hot, you may want to unload the wine
from the beverage center/wine chiller and move the wine
to a cooler location until power is restored.
The controls may maintain your temperature settings
when the power has been restored. If your settings
are not correct, reset according to the Control Settings
section.
Preparing to Move
8QORDGWKHZLQHWKHQVHFXUHWKHUDFNVE\WDSLQJWKHP
in place to prevent damage.
Be sure the beverage center/wine chiller stays in an
upright position during the move.
CARE AND CLEANING
Care and Cleaning
Replacing the Bulb
WARNING
Before replacing a burned-out light
bulb, the refrigerator should be unplugged in order to
avoid contact with a live wire filament. (A burned-out
light bulb may break when being replaced.)
7XUQLQJWKHFRQWUROWRWKH2))SRVLWLRQGRHVQRWUHPRYH
power to the light circuit.
8QSOXJWKHZLQHFHQWHUEHYHUDJHDQGZLQHFHQWHU
2. Remove any beverages and shelves as needed for
access.
3. The light bulb is located behind a light shield in the
ceiling of the wine center/beverage and wine center
near the back. To remove the light shield, remove the
screw on the right side of the light shield.
4. Pull down on the back of the light shield to release
the two front tabs.
8QVFUHZWKHOLJKWEXOEIURPWKHVRFNHW
6. Replace with a 15 watt, 120 volt bulb. This type of
bulb is available at most hardware and automotive
parts stores.
WARNING
8VLQJDEXOEUDWHGKLJKHUWKDQZDWWV
may damage the electronic controls on the wine center/
beverage and wine center.
5HLQVWDOOWKHOLJKWVKLHOG
8. Replace the top shelf and beverages.
9. Plug in the wine center/beverage and wine center
Light Shield
Screw
10 49-1000352 Rev. 4
Installation
Instructions
Models GVS04 and GWS04
Questions? Call 800.GE.CARES (800.432.2737) or visit our Website at: GEAppliances.com
In Canada, call 1.800.561.3344 or visit our Website at: geappliances.ca
REMOVING THE PACKAGING
Before using the Wine Center/Beverage and Wine
Center, be sure all packing materials and tape have
been removed, including the protective film covering
the control and any film protecting the cabinet.
If you are discarding an old refrigeration product,
remove the doors to reduce the danger of children
EHLQJWUDSSHGLQVLGH5HIHUWR3URSHU'LVSRVDORI
Your Old Refrigerator section for instructions.
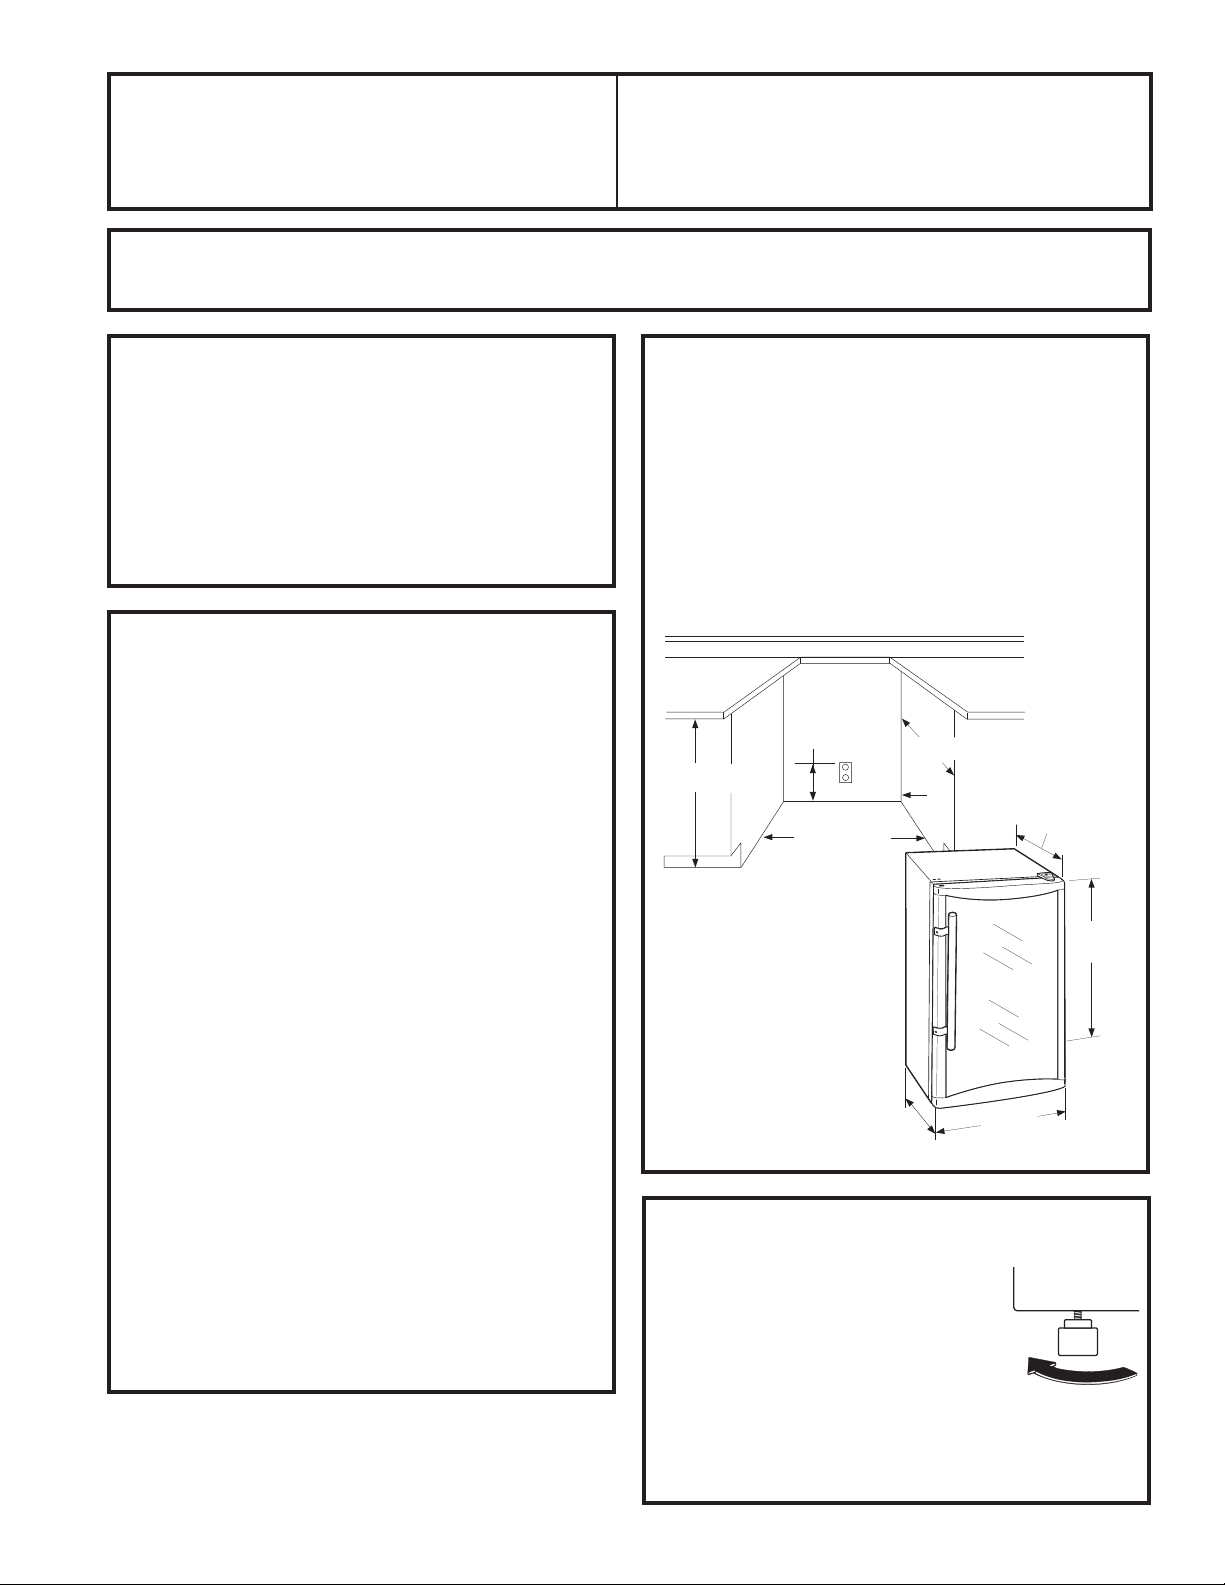
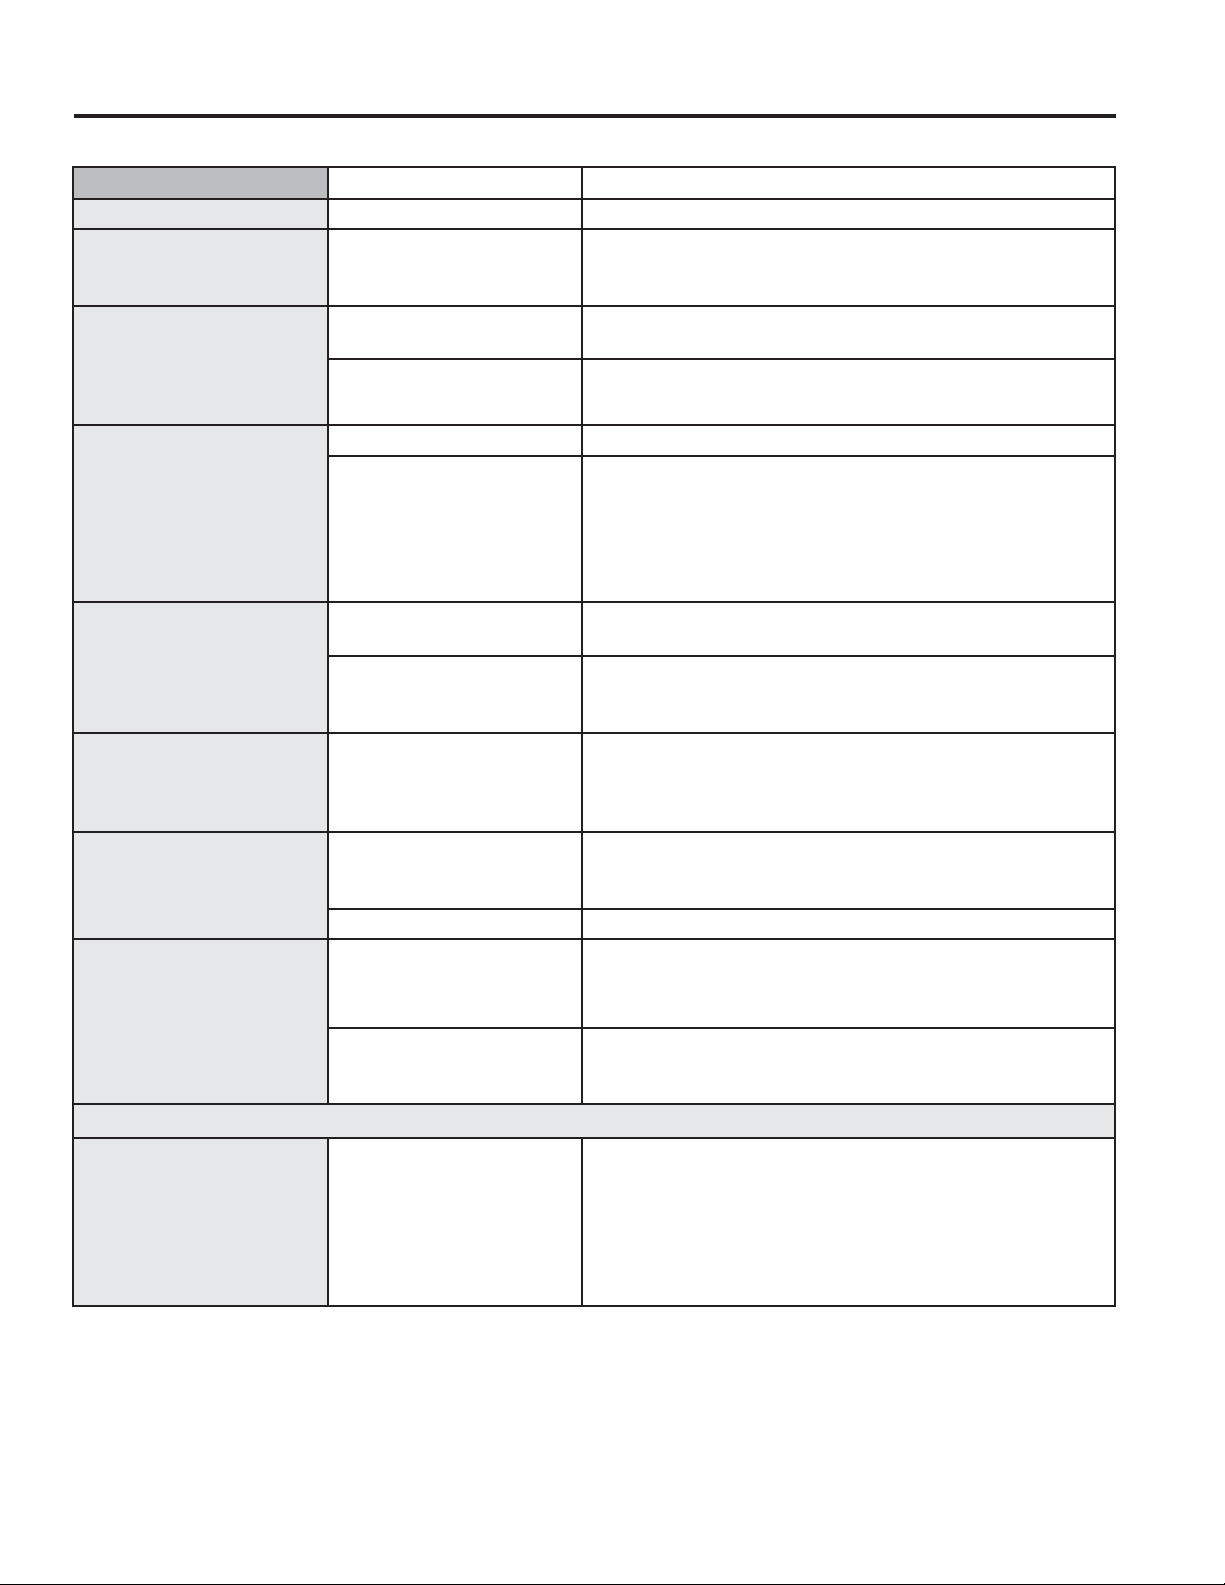
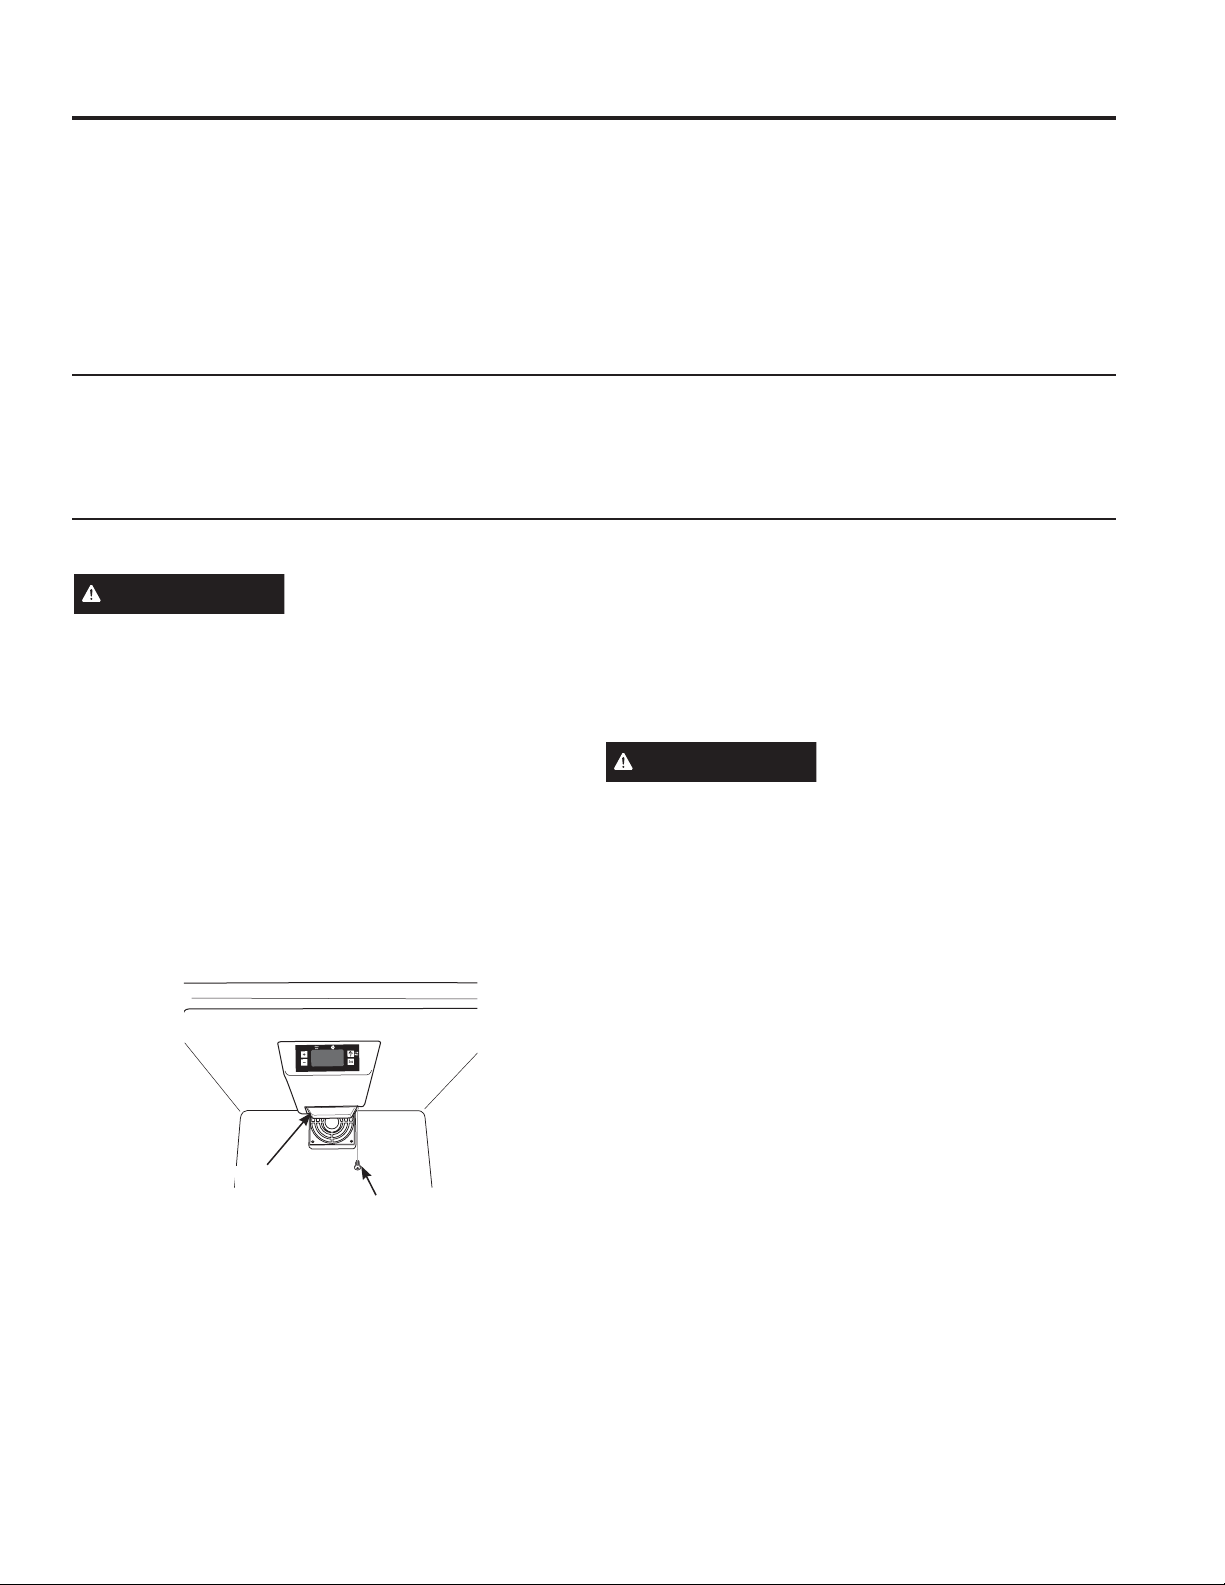
LEVELING LEGS
Adjustable legs at the front corners of the Wine
Center/Beverage and Wine Center
should be set so the Wine Center/
Beverage and Wine Center is firmly
SRVLWLRQHGRQWKHIORRUZLWKD´WLOW
to the back to help the door closure.
To adjust the leveling legs, turn the
legs counterclockwise to raise the
beverage center/wine chiller, clockwise
to lower it.
BUILT-IN INSTALLATION
The cutout dimension shown, allows for door swing
and access to the pull-out shelves when installed as
a built-in appliance. If installing between frameless
FDELQHWVDò´ZLGHILOOHUVWULSRUVLGHSDQHOPD\EH
needed on hinge side. The filler strip will act as a
spacer between the appliance case and adjacent
cabinet door swing. The width of the opening must
include the filler strip.
NOTE: 7KHGRRUVKRXOGSURWUXGH´EH\RQGWKH
surrounding cabints.
INSTALLATION GUIDELINES
Ŷ7KH:LQH&HQWHU%HYHUDJHDQG:LQH&HQWHUU
can be freestanding or can be installed under the
counter, with proper clearances.
Ŷ$OORZWKHIROORZLQJFOHDUDQFHVIRUHDVHRI
installation, proper air circulation and electrical
connections:
(DFKVLGH ´
7RS ´
%DFN ´
Ŷ%HIRUHFRQQHFWLQJWKHDSSOLDQFHWRWKHSRZHU
source, let it stand upright for approximately
2 hours. This will reduce the possibility of a
malfunction in the cooling system from handling
during transportation.
Ŷ'RQRWLQVWDOOWKH:LQH&HQWHU%HYHUDJHDQG
Wine Center where the temperature will go below
)&RUDERYH)&,IWKHURRP
temperature is below the temperature setting,
the Wine Center/Beverage and Wine Center will
QRWRSHUDWHIRULQVWDQFHLIWKHURRPLVDW)
&DQGWKHVHWWLQJLV)&WKHXQLW
will not run).
Ŷ,QVWDOOLWRQDOHYHOIORRU
Ŷ'RQRWLQVWDOOWKH:LQH&HQWHU%HYHUDJHDQG:LQH
Center where it will be subject to direct sunlight,
heat or moisture.
Ŷ'RQRWVWRUHRULQVWDOOWKLVDSSOLDQFHRXWGRRUV
19"
482.6 mm19-1/2" Min.
495.3 mm Min.
22-1/2"
569 mm
including door
19"
495.3 mm
6" Max.
152 mm Max.
33-1/2" Min.
851 mm Min.
23-1/2" Min
597mm Min.
33"
838 mm
Locate Outlet
To raise the
appliance
INSTALLATION INSTRUCTIONS
49-1000352 Rev. 4 11
INSTALLATION INSTRUCTIONS
Installation Instructions
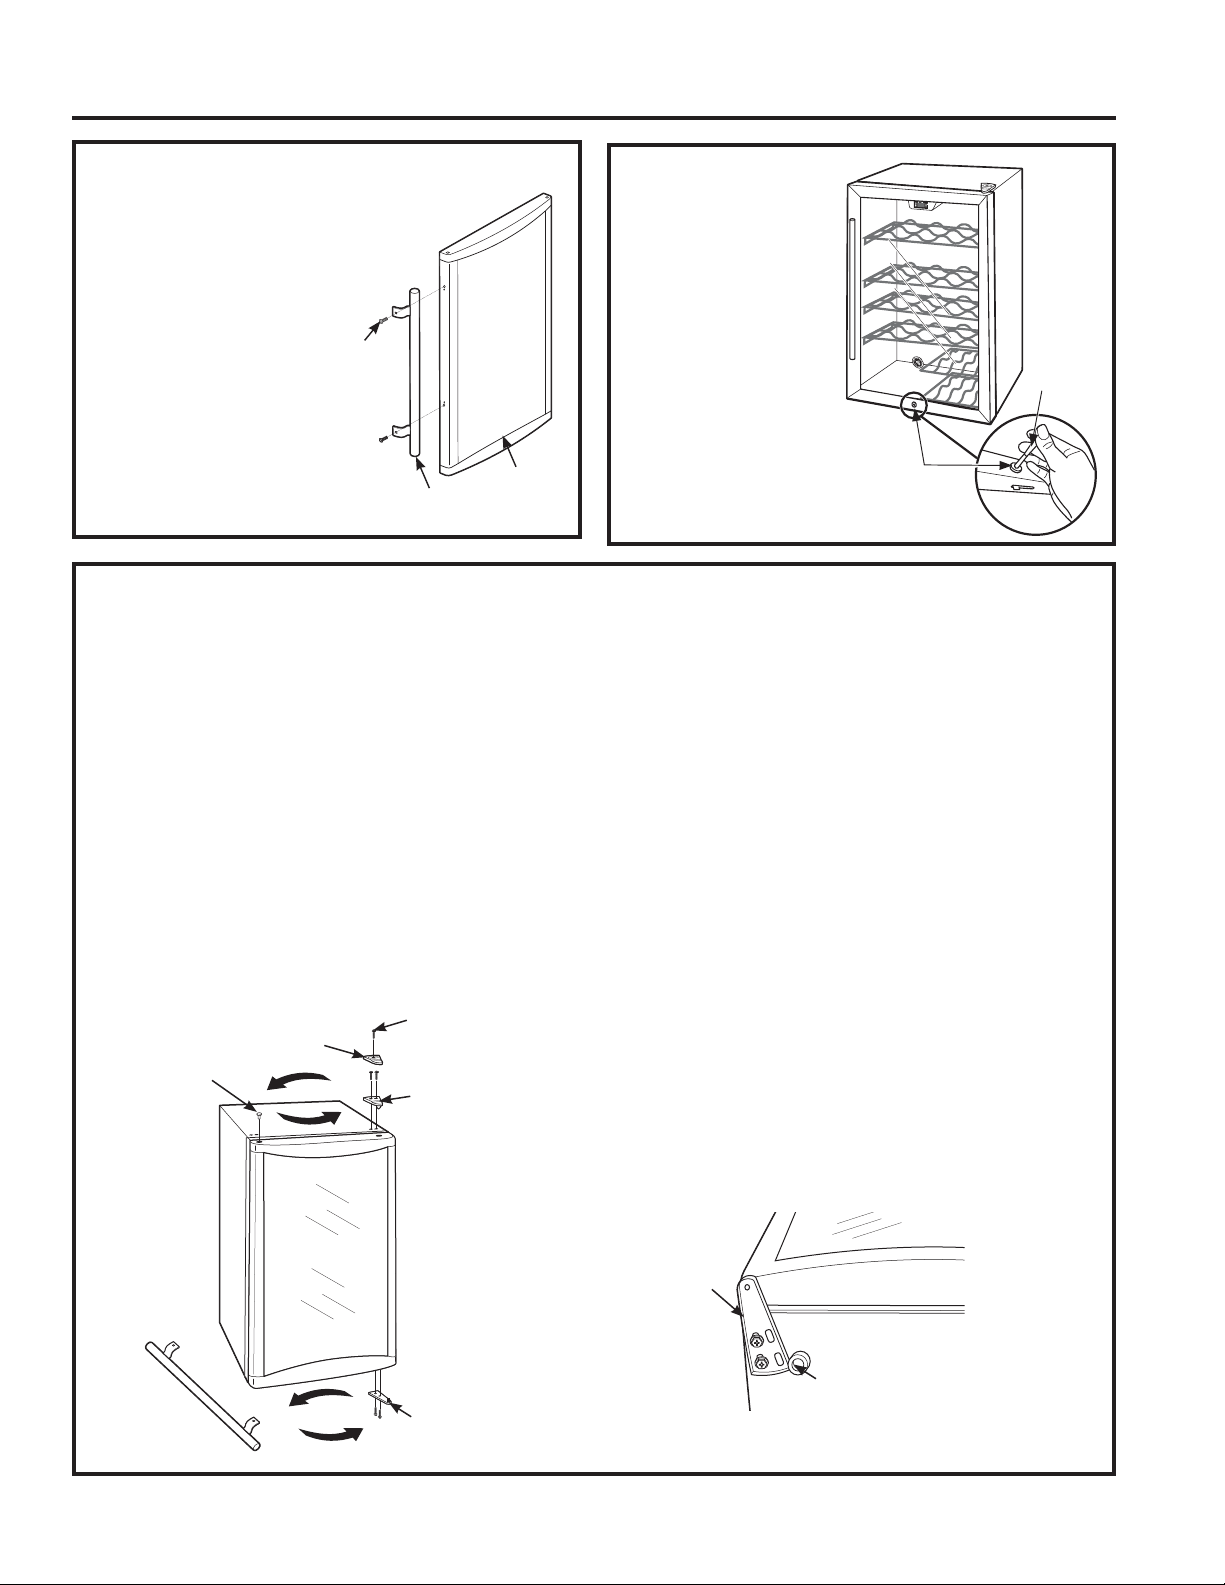
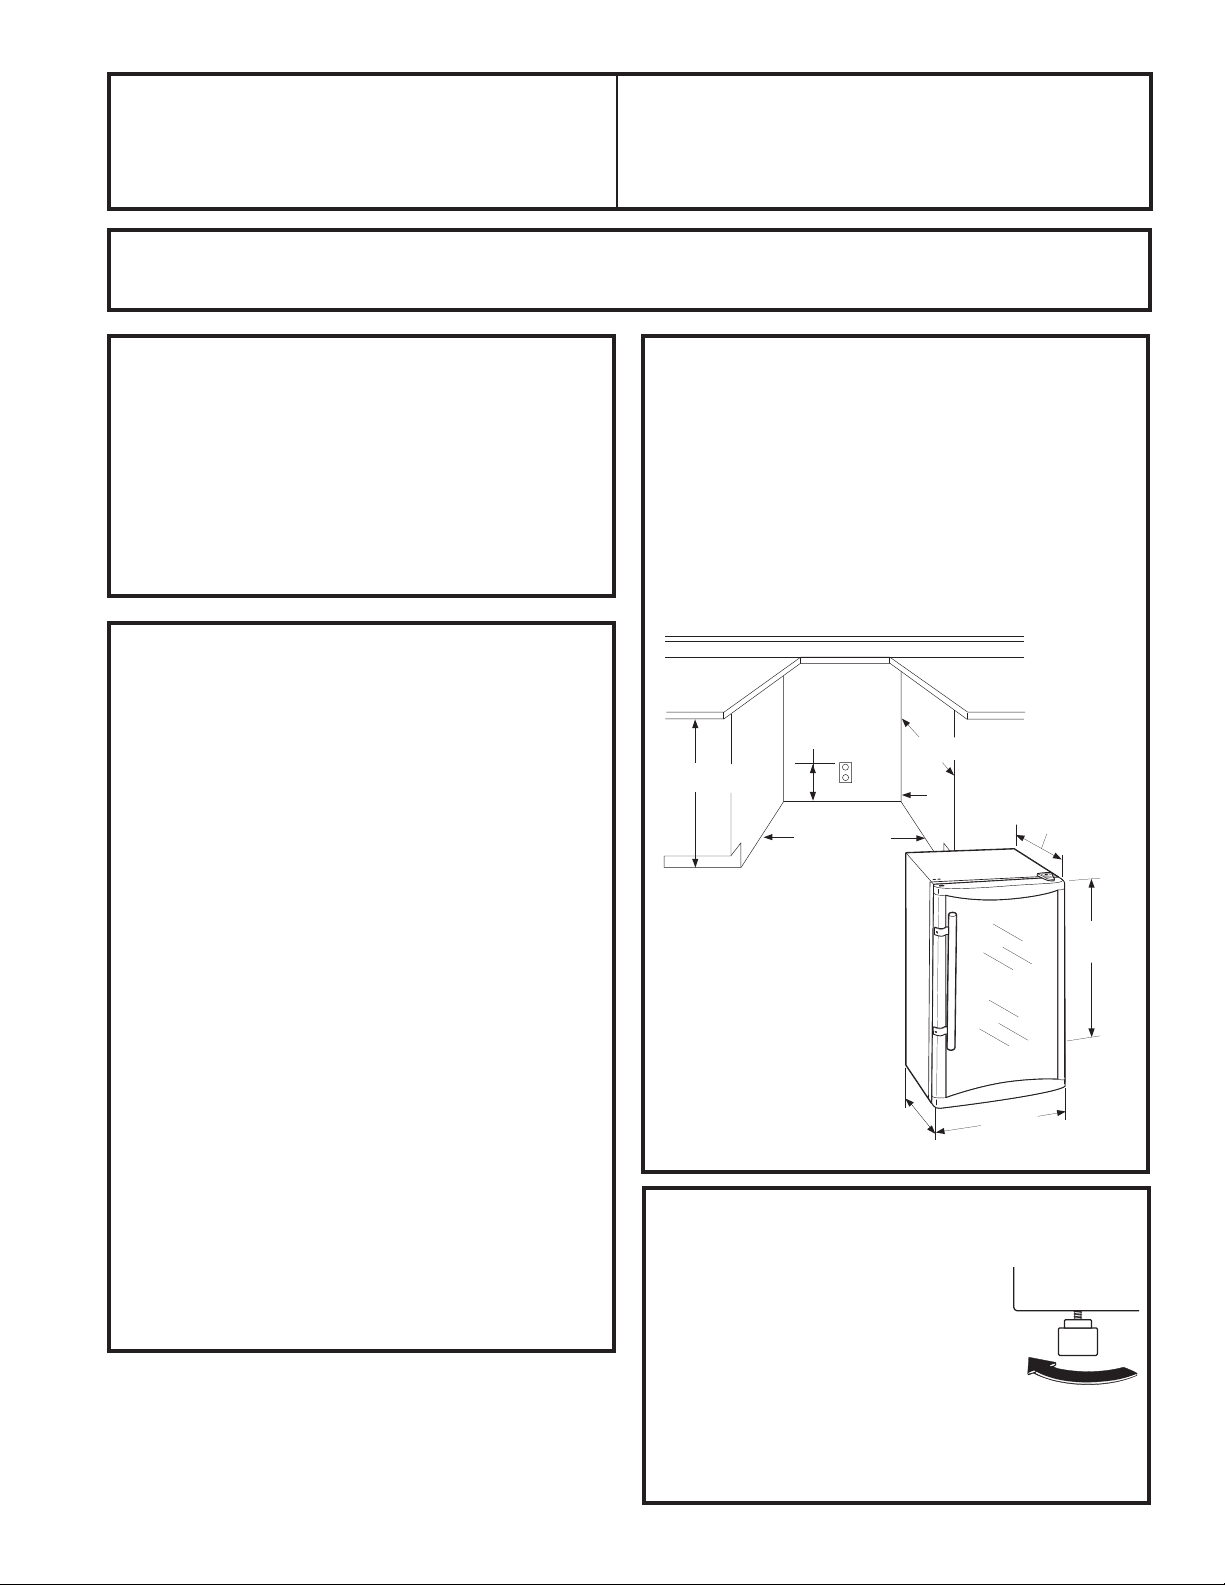
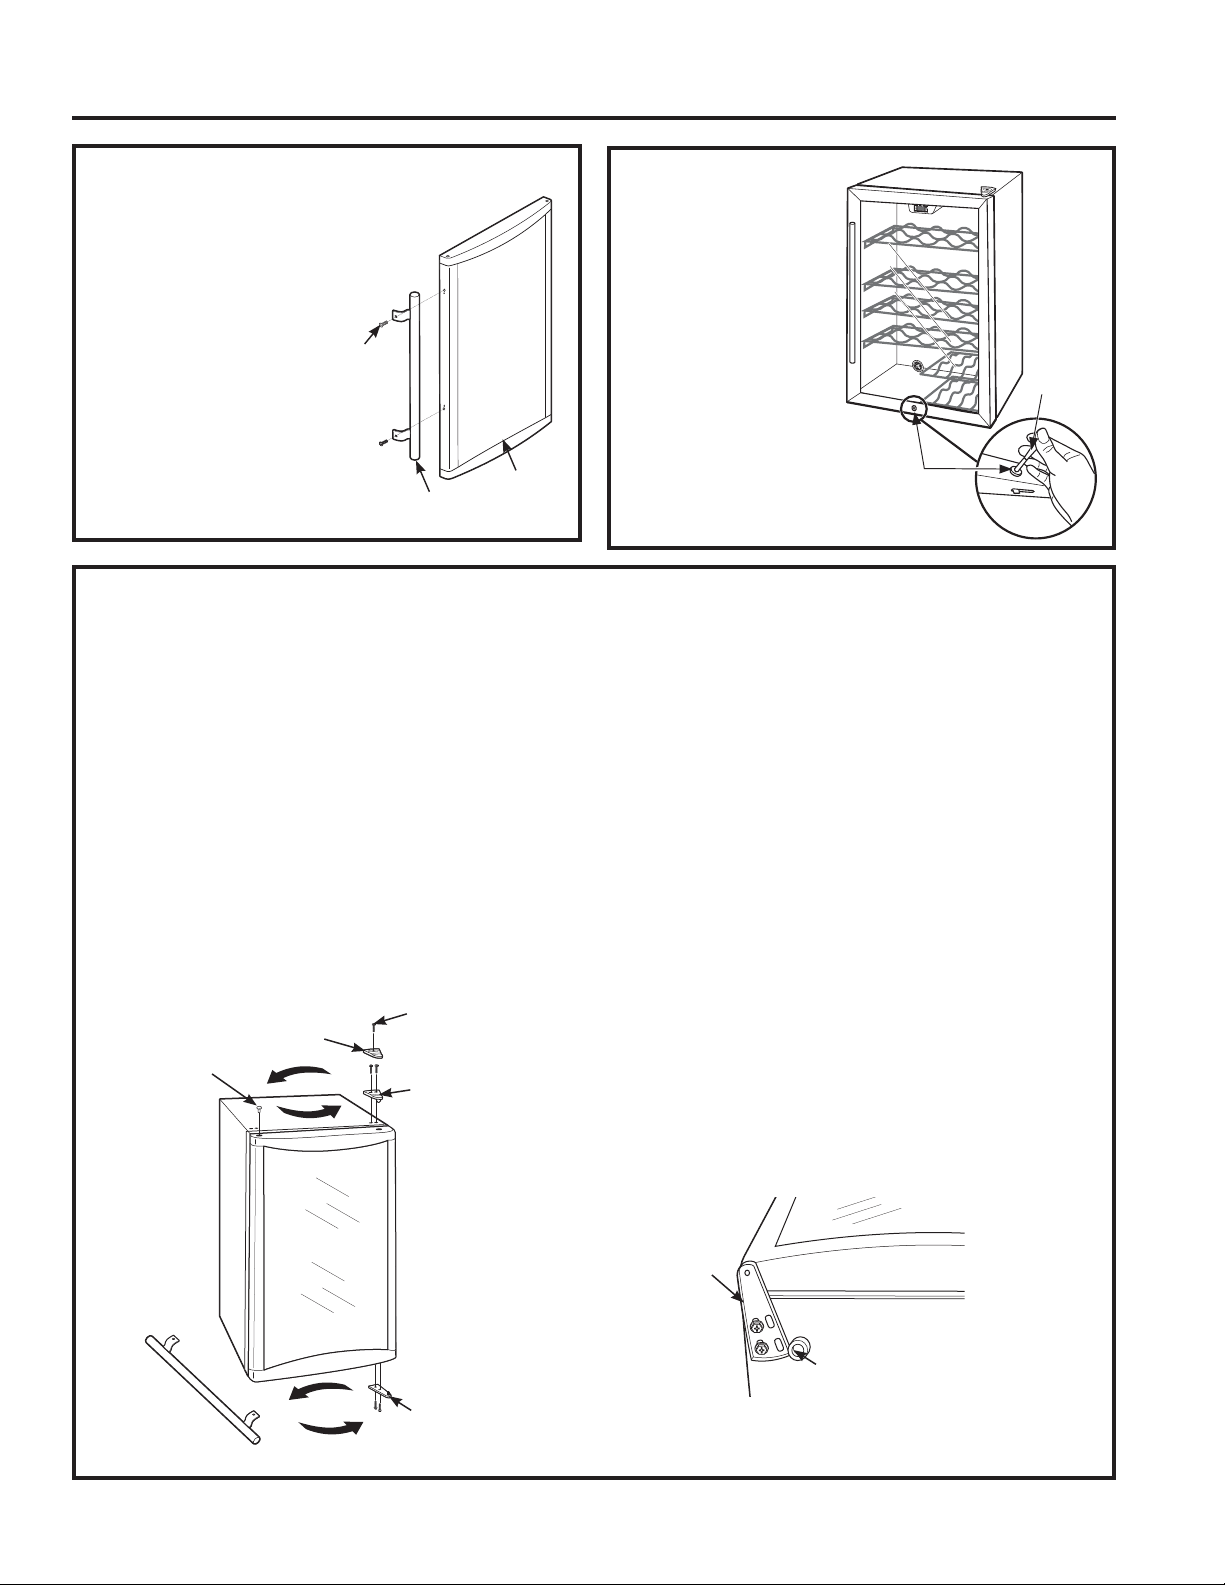
DOOR HANDLE - GVS04BD model only
The door handle and screws
are shipped in a hardware
bag attached to one of the
shelves inside the cabinet.
Locate the door handle and
two screws. Secure the door
handle to the side of the
door as shown.
REVERSING THE DOOR - GVS04BD model only
8QSOXJWKHEHYHUDJHDQGZLQHFHQWHU
2. Tape the door shut with masking tape to secure
alignment.
3. Remove the top hinge cover by removing the screw.
4. Remove the 2 screws securing the top hinge to the
frame.
5. Lean the beverage center backward to access the
bottom hinge.
6. Remove the 2 screws securing the bottom hinge
assembly to the frame.
NOTE: If you lay the unit on its back, be sure
to let it stand upright for at least 2 hours before
FRQQHFWLQJWRWKHSRZHUVRXUFHWKLVZLOOUHGXFHWKH
possibility of a malfunction in the cooling system.
5HPRYHWKH3OXJ%XWWRQIURPWKHWRSOHIWVLGHRIWKH
door.
8. Install the Plug Button into the hinge hole on the
right side. Press firmly to secure.
9. If the handle has been installed, remove it and
LQVWDOOLWRQWKHRSSRVLWHVLGH5HIHUWR'RRU+DQGOH
section for instructions.
10. Hold the door securely in place and install the
bottom hinge on the opposite side.
11. Install the top hinge and cover on the opposite
side. Make sure the door is aligned with the cabinet
before tightening the screws.
12. Remove the tape. Open and close the door to check
alignment with the cabinet. If necessary, loosen the
screws on the bottom hinge, realign the door, and
retighten the screws.
13. Plug in the beverage and wine center.
NOTE: If you had to lay the unit on its back, be
sure to let it stand upright for at least 2 hours before
FRQQHFWLQJLWWRWKHSRZHUVRXUFHWKLVZLOOUHGXFH
the possibility of a malfunction in the cooling system.
14. Set the temperature controls to the desired setting.
DOOR LOCK
- on some models
To secure the door lock,
push the key in and
rotate 90° clockwise.
To unlock, push the
key in and rotate 90°
counter-clockwise.
Screw
'RRU
Handle
.H\
Lock
Hinge
cover
Top
Hinge
Bottom
Hinge
Plug
Button
Screw
Bottom
Hinge
Leveling Leg
12 49-1000352 Rev. 4
Troubleshooting Tips... Before you call for service
Save time and money! Review the charts on the following pages first and you may not need to call for service. If
needed, service can be scheduled by visiting us online GEAppliances.comRUFDOOLQJ*(&$5(6
In Canada visit GEAppliances.ca or call 800.561.3344.
Problem Possible Causes What to Do
Appliance does not
operate and the
display is blank
Appliance is unplugged. Push the plug completely into the outlet.
The home circuit breaker is
tripped/the fuse is blown.
Replace fuse or reset the breaker.
Vibration or rattling
(slight vibration is
normal)
Appliance is on an uneven
surface.
See the Leveling Legs section.
Motor operates for
long periods or cycles
Normal when appliance is first
plugged in.
Wait 12 hours for the appliance to completely
cool down.
Often occurs when large
amounts of wine are placed in
appliance.
This is normal.
Door left open. 'RRULVQRWVHOIFORVLQJ$OZD\VPDNHVXUHWKDW
the door is closed after opening.
Check to see if a bottle is holding door open.
Hot weather or frequent door
openings.
This is normal.
Temperature control set at the
coldest setting.
See About the control and settings.
Appliance is too close to the
wall.
See the Installation Guidelines section for the
correct clearances.
Appliance too warm Normal when appliance is first
plugged in.
Wait 12 hours for the appliance to completely
cool down.
Often occurs when large
amounts of wine are placed in
appliance.
This is normal.
Temperature control not set cold
enough.
See About the control and settings.
Warm weather or frequent door
openings.
Set the temperature control one step colder.
See About the control and settings.
Appliance is too close to the
wall.
See the Installation Guidelines section for the
correct clearances.
Door left open. 'RRULVQRWVHOIFORVLQJ$OZD\VPDNHVXUHWKDW
the door is closed after opening.
Check to see if a bottle is holding door open.
Appliance does
not operate, but
the display is lit
and functioning
temperature.
Setting is above room
temperature.
This is normal. If wine and/or beverages are
too warm, change the temperature setting to a
lower.
TROUBLESHOOTING TIPS
49-1000352 Rev. 4 13
TROUBLESHOOTING TIPS
Troubleshooting Tips... Before you call for service
Problem Possible Causes What To Do
Appliance has odor Interior needs cleaning. See Care and cleaning.
Moisture forms on
outside of appliance
Not unusual during
periods of high
humidity.
Wipe surface dry.
Moisture collects inside
(in humid weather, air
carries moisture into
appliance when door is
opened)
Too frequent or too
long door openings.
Wine bottles touching
the back wall.
Reposition bottles.
Frost forms on interior
surfaces of appliance
This is normal. See the Defrosting section.
Door left open. Excessive frost may form if the door is left open. See the
Defrosting section.
'RRULVQRWVHOIFORVLQJ$OZD\VPDNHVXUHWKDWWKHGRRU
is closed after opening.
Check to see if a bottle is holding door open.
Appliance too cold Temperature control is
set too cold.
See About the control and settings.
The room temperature
wherethe appliance is
located is too cold.
)RUSURSHURSHUDWLRQWKHURRPWHPSHUDWXUHVKRXOG
be equal to or greater than the set temperature of the
appliance.
Temperature in the
display is not the
temperature that was
just set.
This is normal. After you set the temperature, the display will go back to
showing the actual temperature.
Condensation on front
of door
Appliance is located
in a high humidity
environment.
Wipe off the condensation with a clean, dry cloth.
Locate the appliance in a lower humidity environment.
Water on floor behind
appliance
Door left open. 'RRULVQRWVHOIFORVLQJ$OZD\VPDNHVXUHWKDWWKHGRRU
is closed after opening.
Check to see if a bottle is holding door open.
Tilting unit when
moving.
This is normal. The drain pan above the compressor may
be full following defrost. Check to make sure no water
spills when moving the unit.
GWS04 Wine Center Only
Rust, tarnish, or grime
on stainless steel doors
Moist environment or
salt air.
Clean stainless steel with cleaners containing oxalic acid
HJ%DU.HHSHUV)ULHQG6RIW&OHDQVHUZLOOUHPRYHUXVW
lime, DQGRWKHUWDUQLVK'RQRWZLSHWKHappliance with a
VRLOHGGLVKFORWKRUZHWWRZHO'RQRWXVHVFRXULQJSDGV
powdered cleaners, bleach or cleaners containing bleach
because these products can scratch and ruin the brush
¿QLVKRIWKHVWDLQOHVVVWHHO

14 49-1000352 Rev. 4
Notes
NOTES
49-1000352 Rev. 4 15
LIMITED WARRANTY
Staple your receipt here. Proof of the original purchase
date is needed to obtain service under the warranty.
Wine Center/Beverage and Wine Center Limited Warranty
For US Customers, DOOZDUUDQW\VHUYLFHSURYLGHGE\RXU)DFWRU\6HUYLFH&HQWHUVRUDQDXWKRUL]HG&XVWRPHU&DUH
®
technician. To schedule service, on-line, 24 hours a day, visit us at GEAppliances.com, or call 800.GE.CARES
3OHDVHKDYHVHULDOQXPEHUDQGPRGHOQXPEHUDYDLODEOHZKHQFDOOLQJIRUVHUYLFH
In Canada, call 800.561.3344.
Ŷ Service trips to your home to teach you how to
use the product.
Ŷ Improper installation, delivery or maintenance.
Ŷ Failure of the product if it is abused, misused, or
used for other than the intended purpose or used
commercially.
Ŷ Loss of food due to spoilage.
Ŷ Replacement of house fuses or resetting of circuit
breakers.
Ŷ Damage caused after delivery.
Ŷ Replacement of the water filter cartridge, if
included, due to water pressure that is outside
the specified operating range or due to excessive
sediment in the water supply.
Ŷ Replacement of the light bulbs, if included, or
water filter cartridge, if included, other than as
noted above.
Ŷ Damage to the product caused by accident, fire,
floods or acts of God.
Ŷ Incidental or consequential damage caused by
possible defects with this appliance.
Ŷ Product not accessible to provide required service.
Ŷ Damage to finish, such as surface rust, tarnish, or
small blemishes not reported within 48 hours of
delivery.
Ŷ Products which are not defective, broken, or which
are working as described in the owner’s manual.
What is Not Covered:
For US Customers: This limited warranty is extended to the original purchaser and any succeeding owner for
SURGXFWVSXUFKDVHGIRUKRPHXVHZLWKLQWKH86$,IWKHSURGXFWLVORFDWHGLQDQDUHDZKHUHVHUYLFHE\D*(
$SSOLDQFHV$XWKRUL]HG6HUYLFHULVQRWDYDLODEOH\RXPD\EHUHVSRQVLEOHIRUDWULSFKDUJHRU\RXPD\EHUHTXLUHG
WREULQJWKHSURGXFWWRDQ$XWKRUL]HG*($SSOLDQFHV6HUYLFHORFDWLRQIRUVHUYLFH,Q$ODVNDWKHOLPLWHGZDUUDQW\
excludes the cost of shipping or service calls to your home.
Some states do not allow the exclusion or limitation of incidental or consequential damages. This limited warranty
gives you specific legal rights, and you may also have other rights which vary from state to state. To know what your
legal rights are, consult your local or state consumer affairs office or your state’s Attorney General.
Warrantor US: GE Appliances, a Haier company
Louisville, KY 40225
EXCLUSION OF IMPLIED WARRANTIES—Your sole and exclusive remedy is product repair
as provided in this Limited Warranty. Any implied warranties, including the implied warranties
of merchantability or fitness for a particular purpose, are limited to one year or the shortest
period allowed by law.
For the Period of: GE Appliances Will Replace
One Year
)URPWKHGDWHRIWKH
original purchase
Any part of the refrigerator which fails due to a defect in materials or workmanship.
'XULQJWKHlimited one-year warranty, GE Appliances will also provide, free of
charge, all labor and related service to replace the defective part.
For Customers in Canada: This limited warranty is extended to the original purchaser and any succeeding owner
for products purchased in Canada for home use within Canada. In-home warrant service will be provided in areas
where it is available and deemed reasonable by Mabe to provide.
Warrantor Canada: MC Commercial, Burlington, Ontario, L7R 5B6
Servicing your refrigerator may require the use of the onboard data port for diagnostics. This gives a GE Appliances
)DFWRU\6HUYLFHWHFKQLFLDQWKHDELOLW\WRTXLFNO\GLDJQRVHDQ\LVVXHVZLWK\RXUDSSOLDQFHDQGKHOSVLPSURYHLWV
products by providing information on your appliance. If you do not want your appliance data to be sent to GE
Appliances, please advise your technician NOT to submit the data at the time of service.

16 49-1000352 Rev. 4
GE Appliances Website
Have a question or need assistance with your appliance? Try the GE Appliances Website 24 hours a day, any day
of the year! You can also shop for more great GE Appliances products and take advantage of all our on-line support
VHUYLFHVGHVLJQHGIRU\RXUFRQYHQLHQFH,QWKH86GEAppliances.com In Canada: GEAppliances.ca
Register Your Appliance
Register your new appliance on-line at your convenience! Timely product registration will allow for enhanced
communication and prompt service under the terms of your warranty, should the need arise. You may also mail in
the pre-printed registration card included in the packing material.
,QWKH86GEAppliances.com/register
In Canada: Prodsupport.mabe.ca/crm/Products/ProductRegistration.aspx
Schedule Service
Expert GE Appliances repair service is only one step away from your door. Get on-line and schedule your service at
\RXUFRQYHQLHQFHDQ\GD\RIWKH\HDU,QWKH86GEAppliances.com/service RUFDOOGXULQJQRUPDO
business hours.
In Canada: GEAppliances.ca/en/support/service-request or call 800.561.3344
Extended Warranties
Purchase a GE Appliances extended warranty and learn about special discounts that are available while your
warranty is still in effect. You can purchase it on-line anytime. GE Appliances Services will still be there after your
warranty expires.
,QWKH86GEAppliances.com/extended-warranty or call 800.626.2224 during normal business hours.
In Canada: GEAppliances.ca/en/support/purchase-extended-warranty or call 800.290.9029
Remote Connectivity
)RUDVVLVWDQFHZLWKZLUHOHVVQHWZRUNFRQQHFWLYLW\IRUPRGHOVZLWKUHPRWHHQDEOH
visit our website at GEAppliances.com/connectRUFDOOLQWKH86RQO\
Parts and Accessories
Individuals qualified to service their own appliances can have parts or accessories sent directly to their homes
9,6$0DVWHU&DUGDQG'LVFRYHUFDUGVDUHDFFHSWHG2UGHURQOLQHWRGD\KRXUVHYHU\GD\
,QWKH86GEApplianceparts.comRUE\SKRQHDWGXULQJQRUPDOEXVLQHVVKRXUV
Instructions contained in this manual cover procedures to be performed by any user. Other servicing
generally should be referred to qualified service personnel. Caution must be exercised, since improper
servicing may cause unsafe operation.
Customers in Canada should consult the yellow pages for the nearest Mabe service center, visit our website at
GEAppliances.ca/en/products/parts-filters-accessories or call 800.661.1616.
Contact Us
If you are not satisfied with the service you receive from GE Appliances, contact us on our Website with all the
details including your phone number, or write to:
,QWKH86*HQHUDO0DQDJHU&XVWRPHU5HODWLRQV_*($SSOLDQFHV$SSOLDQFH3DUN_/RXLVYLOOH.<
GEAppliances.com/contact
,Q&DQDGD'LUHFWRU&RQVXPHU5HODWLRQV0DEH&DQDGD,QF_6XLWH)DFWRU\/DQH_0RQFWRQ1%(&0
GEAppliances.ca/en/contact-us
CONSUMER SUPPORT
Consumer Support
Printed in China

Escriba el modelo y los números de
serie a continuación:
Modelo No: ______________
Serie No: ________________
Encuentre estos números al interior
del enfriador de vinos, al lado
izquierdo.
GE es una marca registrada de General Electric Company. Fabricado bajo licencia de marca.
MANUAL DEL
PROPIETARIO Y
INSTALACIÓN
CENTRO DE VINOS/CENTRO
DE BEBIDAS Y VINOS
49-1000352 Rev. 4 01-20 GEA
INFORMACIÓN DE SEGURIDAD 2
INSTRUCCIONES
DE INSTALACIÓN
Controles .............................4
GVS04 Centro de Bebidas y Vinos .......6
GWS04 Centro de Vinos ................7
CUIDADO Y LIMPIEZA .............8
Reemplazo de la bombilla ..............9
INSTRUCCIONES
DE iNSTALACIÓN ...............10
Modèles GVS04BD uniquement. . . . . . . . . 11
SOLUCIONAR PROBLEMAS ....12
GARANTÍA LIMITADA ..........15
SOPORTE AL CONSUMIDOR ...16
Centro de Vinos GWS04
Centro de Bebidas
y Vino GVS04
ESPAÑOL

2 49-1000352 Rev. 4
GRACIAS POR HACER QUE GE APPLIANCES SEA PARTE DE SU HOGAR.
Ya sea que haya crecido usando GE Appliances, o que ésta es su primera vez, nos complace
tenerlo en la familia.
Sentimos orgullo por el nivel de arte, innovación y diseño de cada uno de los electrodomésticos de
GE Appliances, y creemos que usted también. Entre otras cosas, el registro de su electrodoméstico
asegura que podamos entregarle información importante del producto y detalles de la garantía
cuando los necesite.
Registre su electrodoméstico GE ahora a través de Internet. Sitios Web y números telefónicos útiles
están disponibles en la sección de Soporte para el Consumidor de este Manual del Propietario.
También puede enviar una carta en la tarjeta de inscripción preimpresa que se incluye con
el material embalado.
49-1000352 Rev. 4 3
LEA Y GUARDE ESTAS INSTRUCCIONES
INFORMACIÓN DE SEGURIDAD
INFORMACIÓN IMPORTANTE DE SEGURIDAD
LEA TODAS LAS INSTRUCCIONES ANTES DE USAR
PRECAUCIÓN
A fin de reducir el riesgo de lesiones al usar el refrigerador, siga estas precauciones básicas.
Ŷ 1ROLPSLHHVWDQWHVGHYLGULRQLWDSDVFRQDJXDFDOLHQWH
cuando estén fríos. Los estantes de vidrio y las tapas
se pueden romper si son expuestos a cambios de
temperatura repentinos o impactos, tales como sacudones
o caídas. El vidrio templado está diseñado para destruirse
en pequeñas piezas en caso de rotura.
Ŷ 0DQWHQJDORVGHGRVIXHUDGHORVHVSDFLRVGH³ULHVJRGH
lastimaduras”; los despejes entre las puertas y entre las
puertas y el gabinete son necesariamente pequeños.
Tenga el cuidado de cerrar las puertas cuando los niños
se encuentren en el área.
ADVERTENCIA
A fin de reducir el riesgo de incendio, explosión, descargas eléctricas o lesiones al usar su
refrigerador, siga estas precauciones básicas de seguridad:
Ŷ (VWHUHIULJHUDGRUVHGHEHUiLQVWDODU\XELFDU
adecuadamente de acuerdo con las Instrucciones de
Instalación antes de ser usado.
Ŷ 'HVHQFKXIHHOUHIULJHUDGRUDQWHVGHKDFHUUHSDUDFLRQHV
reemplazar una lámpara de luz o hacer una limpieza.
NOTA: La corriente que va al refrigerador no puede ser
desconectada por ninguna configuración del panel de
control.
NOTA: Las reparaciones deberán ser realizadas por un
Profesional del Servicio Técnico calificado.
Ŷ 5HHPSODFHWRGDVODVSLH]DV\SDQHOHVDQWHVGHOXVR
Ŷ 1RJXDUGHQLXVHJDVROLQDXRWURVYDSRUHVLQIODPDEOHV\
líquidos cerca de este u otros electrodomésticos.
Ŷ 1RJXDUGHVXVWDQFLDVH[SORVLYDVWDOHVFRPRODWDV
de aerosoles con propelentes inflamables en este
electrodoméstico.
Ŷ 1RXVHXQSURORQJDGRU
Ŷ $ILQGHHYLWDUULHVJRVGHTXHORVQLxRVVXIUDQDVIL[LDR
queden atrapados, retire las puertas de comidas frescas y
del freezer de cualquier refrigerador antes de deshacerse
o dejar de usar el mismo.
Ŷ 3DUDHYLWDUOHVLRQHVJUDYHVRODPXHUWHORVQLxRVQRVH
deberán parar sobre ni jugar en o con el electrodoméstico.
Ŷ /RVQLxRV\ODVSHUVRQDVFRQFDSDFLGDGItVLFD
sensorial o mental reducida o con falta de experiencia y
conocimiento podrán usar este electrodoméstico sólo si
son supervisados o les fueron dadas instrucciones sobre
un uso seguro y entienden los riesgos involucrados.
Ŷ (VWHHOHFWURGRPpVWLFRIXHGLVHxDGRSDUDXVRKRJDUHxR
y para aplicaciones similares tales como: áreas de
personal de cocina en tiendas, oficinas y otros espacios
laborales; casas de campo; por clientes en hoteles,
moteles, hostales y otros espacios residenciales, catering
y aplicaciones no minoristas similares.
Ŷ 1RDSOLTXHOLPSLDGRUHViVSHURVVREUHHOUHIULJHUDGRU
Ciertos limpiadores dañarán el plástico, lo cual podrá
hacer que ciertas piezas tales como la puerta o las
manijas de las puertas se separen de forma inesperada.
Para acceder a instrucciones detalladas, lea la sección de
Cuidado y Limpieza.
ADVERTENCIA
PELIGRO DE EXPLOSIÓN Refrigerantes Inflamables
Este electrodoméstico cuenta con refrigerante isobutano,
R600a, un gas natural con alto nivel de compatibilidad
medioambiental. Sin embargo, también es combustible.
Siga las advertencias que figuran a continuación, a fin de
reducir el riesgo de lesiones o daños sobre la propiedad.
1. Al mover, instalar y operar el electrodoméstico, se deberá
tener cuidado de no dañar la tubería del refrigerante.
2. El servicio técnico sólo debe ser realizado por personal
autorizado del servicio. Use sólo piezas del servicio
autorizadas por el fabricante
3. 'HVFDUWHHOHOHFWURGRPpVWLFRGHDFXHUGRFRQODV
Regulaciones Federales y Locales. El refrigerante
inflamable y el material aislante inflamable usados
requieren procedimientos de descarte especiales.
Comuníquese con las autoridades locales para descartar
su refrigerador de forma ambientalmente segura.
4. Mantenga las aberturas de ventilación en el espacio
de protección del electrodoméstico o en la estructura
incorporada libres de obstrucción.
5. 1RXVHGLVSRVLWLYRVPHFiQLFRVXRWURVPHGLRVSDUD
acelerar el proceso de descongela miento.
6. 1RGDxHHOFLUFXLWRGHOUHIULJHUDQWH
7. 1RXVHGLVSRVLWLYRVHOpFWULFRVGHQWURGHOFRPSDUWLPLHQWRGH
almacenamiento de comida del electrodoméstico.
4 49-1000352 Rev. 4
INFORMACIÓN DE SEGURIDAD
LEA Y GUARDE ESTAS INSTRUCCIONES
INFORMACIÓN IMPORTANTE DE SEGURIDAD
LEA TODAS LAS INSTRUCCIONES ANTES DE USAR
CONEXIÓN DE LA ELECTRICIDAD
Nunca, bajo ninguna circunstancia, corte o elimine el tercer cable (tierra) del cable de corriente. Para su seguridad
personal, este electrodoméstico debe estar adecuadamente conectado a tierra.
El cable de corriente de este electrodoméstico contiene un
enchufe de 3 cables (conexión a tierra) que se conecta a un
tomacorriente de pared estándar de 3 cables (conexión a
tierra) para minimizar la posibilidad de riesgos de descargas
eléctricas por parte del mismo.
Contrate a un electricista calificado para que controle el
tomacorriente y el circuito eléctrico, a fin de asegurar que el
enchufe esté correctamente conectado a tierra.
En caso de contar con un tomacorriente de pared de 2
cables, es su responsabilidad y obligación reemplazarlo
por un tomacorriente de pared de 3 cables correctamente
FRQHFWDGRDWLHUUD1RXVHXQDGDSWDGRU
El refrigerador debería estar siempre conectado a un enchufe
específico con un índice de voltaje equivalente al que figura
en su etiqueta de características técnicas.
Se requiere un suministro eléctrico con fusible y conexión
a tierra de 115 voltios de CA, 60 Hz, 15 o 20 amperes.
Esto garantiza el mejor funcionamiento y además previene
la sobrecarga de los circuitos del hogar, lo cual podría
ocasionar riesgos de incendio debido al recalentamiento de
cables.
1XQFDGHVHQFKXIHHOUHIULJHUDGRUWLUDQGRGHOFDEOHGH
corriente. Siempre tome su enchufe firmemente y empuje el
mismo hacia afuera para retirarlo.
Inmediatamente interrumpa el uso de un cable de suministro
de corriente dañado. Si el cable de corriente se encuentra
dañado, su reemplazo deberá ser realizado por un
profesional calificado del servicio técnico, utilizando una
pieza del servicio técnico autorizada por el fabricante.
Al alejar el refrigerador de la pared, se deberá tener cuidado
de que no ruede sobre ni dañe el cable de corriente.
ADVERTENCIA
RIESGO DE DESCARGA ELÉCTRICA
Enchufe en un tomacorriente con conexión a tierra de 3 cables.
1RHOLPLQHHOFDEOHGHFRQH[LyQDWLHUUD
1RXVHXQDGDSWDGRU
1RXVHXQSURORQJDGRU
Si no se siguen estas instrucciones se podrá producir a muerte, incendios o descargas eléctricas.
FORMA ADECUADA DE DESCARTAR SU ANTIGUO REFRIGERADOR
ADVERTENCIA
PELIGRO DE SUFFOCATION Y ENTRAPMENT
El incumplimiento de estas instrucciones de eliminación puede causar la muerte o lesiones graves.
IMPORTANTE: Que un niño quede atrapado o que sufra
una asfixia no son problemas del pasado. Los refrigeradores
antiguos o abandonados aún son peligrosos, incluso aunque
VHFRQVHUYHQSRU³VyORXQRVSRFRVGtDV´6LVHGHVKDUiGH
su antiguo refrigerador, siga las siguientes instrucciones a fin
de evitar accidentes.
Antes de descartar su antiguo aparato:
Ŷ5HWLUHODVSXHUWDVGHFRPLGDVIUHVFDV\GHOIUHH]HU
Ŷ'HMHORVHVWDQWHVHQVXOXJDUGHPRGRTXHORVQLxRVQR
puedan trepar dentro con facilidad.
Cómo Eliminar Refrigerantes y Gomaespumas:
'HVFDUWHHOHOHFWURGRPpVWLFRGHDFXHUGRFRQODV5HJXODFLRQHV)HGHUDOHV\/RFDOHV(OUHIULJHUDQWHLQIODPDEOH\HOPDWHULDO
aislante inflamable usados requieren procedimientos de descarte especiales.. Comuníquese con las autoridades locales para
descartar su electrodoméstico de forma ambiental mente segura.
INSTALACIÓN
ADVERTENCIA
RIESGO DE EXPLOSIÓN
Mantenga cualquier material y vapores inflamables, tales como gasolina, alejados del refrigerador. Si no se cumple con esto
se podrá producir una explosión, incendio o la muerte.
49-1000352 Rev. 4 5
Controles y ajustes
El rango de temperatura del centro de bebidas está previsto
entre 41°F (5°C) y 61°F (16,1°C). El rango de temperatura
del Refrigerador de Vino GWS04 está programado entre 41°F
(5°C) y 61°F (16.1°C). La pantalla muestra la temperatura
promedio del electrodoméstico. Es normal que la temperatura
actual varíe levemente durante el funcionamiento.
Ajuste de temperatura automática
Para el Centro de Bebidas y Vino GVS04: Cuando el aparato
VHHQFKXIDRVHSUHVLRQDODWHFOD³´HOHOHFWURGRPpVWLFR
IXQFLRQDHQHODMXVWH³$XWR%HY´EHELGDDXWRPiWLFDGH)
&\ODOX]LQGLFDGRUDGH³$XWR%HY´XELFDGDHQHOH[WUHPR
superior izquierdo se mantiene encendida.
Para el Refrigerador de Vino GWS04: Cuando se enchufe
el electrodoméstico, la pantalla mostrará la temperatura de
IiEULFDSRURPLVLyQGH)&$OSUHVLRQDUODWHFOD³´
R³³XVWHGSXHGHPRGLILFDUODFRQILJXUDFLyQGHWHPSHUDWXUD
Cuando la temperatura se configure entre 41°F(5°C) y 50°F
&VHHQFHQGHUiODOX]LQGLFDGRUDGHYLQR³%ODQFR´
Cuando la temperatura se configure entre 51°F (10.5°C) y
)&VHHQFHQGHUiODOX]LQGLFDGRUDGHYLQR³7LQWR´
NOTA: /DSDQWDOODGHVWHOODUiFXDQGRVHSUHVLRQHODWHFOD³´
Ajuste de temperatura normal
La temperatura del electrodoméstico se podrá configurar en
FXDOTXLHUQLYHODWUDYpVGHODVWHFODV\
1. Presione y sostenga la tecla SET (ajustar). Escuchará una
serie de 2 pitidos.
'HVSXpVGHOVHJXQGRSLWLGRSUHVLRQHODVWHFODV³´\³±´
para subir o bajar la temperatura deseada en unidades de
XQJUDGR'XUDQWHHVWHWLHPSRODSDQWDOODGHVWHOODUi
3. Presione SET (ajustar) para confirmar su elección.
La pantalla dejará de destellar. Si no se realiza una
confirmación en diez segundos, la unidad aceptará su
cambio en forma automática.
NOTA: Cuando se modifica el ajuste de temperatura, puede
haber un retardo de 5 minutos hasta que el compresor
comience a funcionar.
Fahrenheit y Celsius
La pantalla de temperatura puede cambiarse entre Fahrenheit
\&HOVLXVSUHVLRQDQGR\VRVWHQLHQGRODWHFOD³´SRU
aproximadamente 5 segundos.
Luz indicadora
The La luz indicadora
se enciende cuando el compresor
HVWiIXQFLRQDQGRSDUDHQIULDUVXXQLGDG1RVHHQFLHQGH
cuando el compresor no está en funcionamiento.
Luz interior
Para encender o apagar la luz interior, simplemente presione
la tecla
.
Al conectar el centro de bebidas y enfriador de vinos
'HVSXpVGHHQFKXIDUHOFHQWURGHEHELGDV\HQIULDGRUGHYLQRV
y ajustar la temperatura deseada, permita
que el centro de bebidas y enfriador de vinos alcance la
temperatura establecida antes de cargar el vino. Esto puede
tomar hasta doce horas para estabilizarse completamente.
'HVSXpVGHFDUJDUHOYLQRREHELGDVTXL]iVREVHUYHTXHOD
temperatura real aumenta. Esto es normal. La temperatura
actual seguirá cambiando a medida que el vino y las bebidas
se enfríen hasta la temperatura configurada. Esto puede tomar
hasta doce horas para estabilizarse completamente.
Hay una guía con sugerencias
de temperaturas de servicio del
vino ubicada en la parte interna
derecha de la unidad. Ofrece
temperaturas recomendadas
para diferentes vinos, además
de instrucciones sobre el ajuste
de la temperatura del centro de
bebidas y enfriador de vinos.
NOTA: La parte externa del
gabinete puede calentarse. Esto
es normal.
Luz interior
Usted puede encender (ON) o apagar (OFF) la luz
presionando el interruptor de luz ubicado en el lado derecho
del panel de control. Si la luz interior se deja encendida, la
temperatura será más elevada.
Controles
USO DEL ELECTRODOMÉSTICO: Controles
Luz
indicadora
$XWR%HY
Red White
Luz
Indicadora de
Vino Tinto
/X],QGLFDGRUDGH9LQR%ODQFR
Centro de Bebidas y Vino GVS04 Refrigerador de Vino GWS04
6 49-1000352 Rev. 4
Centro de Bebidas y Vino GVS04 Únicamente
USO DEL ELECTRODOMÉSTICO: &HQWURGH%HELGDV\9LQR*96ÒQLFDPHQWH
Estantes de madera
/RVHVWDQWHVGHPDGHUDGHO&HQWURGH%HELGDV\9LQRVRQ
desmontables para facilitar la limpieza y para poder almacenar
elementos más grandes.
Para quitar un estante, abra la puerta por completo para
evitar daños potenciales al estante. Levántelo un poco y
tire del mismo hacia delante. El estante puede hallarse bien
ajustado en la guía.
Para reemplazar un estante, abra la puerta por completo para
HYLWDUGDxRVSRWHQFLDOHVDOHVWDQWH'HVOLFHHOHVWDQWHGHQWUR
de las guías a lo largo del gabinete hasta que se detenga.
Carga de vino y de bebidas
Al igual que con cualquier producto de refrigeración, existe
una ligera varianza de temperatura en diferentes ubicaciones
dentro del gabinete.
'LVSRVLFLyQVXJHULGDGH
botellas de vino—carga
completa (capacidad para 31
botellas de vino)
'LVSRVLFLyQVXJHULGD
de botellas de otras
EHELGDV carga estándar
(capacidad para 109 latas).
Almacenamiento adicional
posible (hasta 125 latas si
se retira un estante).

49-1000352 Rev. 4 7
Estantes de vino
Los estantes para vinos del gabinete son extraíbles para una
fácil limpieza y para poder guardar artículos de mayor tamaño.
Para quitar un estante, abra la puerta por completo para
evitar daños potenciales al estante. Levántelo un poco y
tire del mismo hacia delante. El estante puede hallarse bien
ajustado en la guía.
Para reemplazar un estante, abra la puerta por completo para
HYLWDUGDxRVSRWHQFLDOHVDOHVWDQWH'HVOLFHHOHVWDQWHGHQWUR
de las guías a lo largo del gabinete hasta que se detenga.
Carga de vino y de bebidas
Al igual que con cualquier producto de refrigeración, existe
una ligera varianza de temperatura en diferentes ubicaciones
dentro del gabinete.
Este gabinete para vinos cuenta con una capacidad máxima
de almacenamiento de 30 botellas. El segundo estante
de vinos está diseñado con altura adicional. Esto permite
almacenar botellas mágnum más grandes o apilar botellas de
tamaño típico.
Centro de Vinos GWS04 Únicamente
USO DEL ELECTRODOMÉSTICO: Centro de Vinos GWS04
Orden
sugerido de
las botellas
de vino.
8 49-1000352 Rev. 4
Cuidado y limpieza
Limpieza del exterior
Limpieza del interior
ADVERTENCIA
El enfriador de vinos debe estar
desenchufado, a fin de evitar riesgos eléctricos de la fuente de
corriente al descongelar la unidad.
Para limpiar los estantes y el interior, use agua tibia y una
solución de bicarbonato de soda; una cucharada (15 ml) de
bicarbonato de soda por un cuarto (un litro) de agua. Esto
limpia y neutraliza los olores. Limpie con un paño húmedo.
Se puede limpiar el empaque de vinilo de la puerta con jabón
suave y agua o una solución de bicarbonato de soda.
1RXVHGHWHUJHQWHVOLPSLDGRUHVHQSROYROLPSLDGRUHVHQ
atomizador u otros químicos fuertes para limpiar el interior.
Para los Modelos GV04: Para evitar manchas de agua en los
estantes de madera, limpie y seque los derrames de agua
inmediatamente.
Limpie el panel de control con un paño húmedo. Seque bien.
1RXWLOLFHSXOYHUL]DGRUHVGHOLPSLH]DJUDQGHVFDQWLGDGHVGH
jabón y agua, productos abrasivos u objetos filosos sobre
el panel, ya que pueden dañarlo. Algunas toallas de papel
también pueden rayar el panel de control.
Descongelación automática
El modelo utiliza el cyclo de compresor (encendido / apagado)
para descongelar automáticamente (cuando el compresor se
para se eleva la temperatura).
1XQFDXVHXQFDOHQWDGRUGHQLQJXQDFODVHHVSiWXODRXQ
instrumento punzante para retirar la escarcha ya que puede
GDxDUHO&HQWURGH9LQRV&HQWURGH%HELGDV\9LQRV
NOTA: La bandeja de desagüe por encima
del compresor puede encontrarse llena después del
descongelado. Verifique que no haya derrames de agua
cuando desplace la unidad.
CUIDADO Y LIMPIEZA
ADVERTENCIA
PELIGRO DE
EXPLOSIÓN Refrigerantes Inflamables
3DUDHYLWDUGDxRVHQHOFLUFXLWRGHUHIULJHUDFLyQ1RXVH
dispositivos mecánicos u otros medios para acelerar el
proceso de descongelación.
,QVWUXFFLRQHVSDUDOD/LPSLH]DGH6XSHU¿FLHV([WHULRUHV0DQLMDVGH3XHUWDV\%RUGHV
USE NO USE
Telas suaves y limpias o esponjas Telas abrasivas, esponjas de fregar, almohadillas de estropajo o
de lana de acero
'HWHUJHQWHVXDYHPH]FODGRFRQDJXDFDOLHQWH
Limpiadores de acero inoxidable aprobados. Visite la tienda
de piezas de Café Appliances para acceder a limpiares de
acero inoxidable aprobados: GEApplianceparts.com o de
forma telefónica al 877.959.8688
/RVOLPSLDGRUHVFRQiFLGRR[iOLFRWDOHVFRPR%DU.HHSHUV
Friend Soft Cleanser™ podrán ser usados para eliminar el
óxido, deslustres y pequeñas manchas de las superficies de
acero inoxidable únicamente.
Polvos o rociadores abrasivos
Rociadores de Ventana o Amoníaco
Limpiadores a base de cítrico o aceite vegetal
Limpiadores ácidos o a base de vinagre
Limpiadores de horno
Limpiadores que contengan acetona (propanona)
&XDOTXLHUOLPSLDGRUFRQ$'9(57(1&,$6VREUHHOFRQWDFWRFRQ
el plástico
NOTA: 12SHUPLWDTXHHOOLPSLDGRUGHDFHURLQR[LGDEOHHQWUHHQFRQWDFWRFRQFXDOTXLHUSDUWHSOiVWLFDWDOFRPRSDUWHVGHERUGHV
materiales de manijas y cobertores. Si se produce un contacto no intencional de los limpiadores con las partes plásticas, limpie
estas últimas con una esponja y un detergente suave mezclado con agua caliente.
49-1000352 Rev. 4 9
En el evento de una falla de energía
Si la energía falla, abra las puertas lo menos que pueda
para mantener la temperatura. Un aumento gradual en la
temperatura no debería causar ningún efecto adverso en el
vino.
Si hace calor extremo, descargar el vino del centro de bebidas
y enfriador de vinos y trasladarlo a un sitio más frío hasta que
se restablezca la energía.
Los controles pueden mantener los ajustes de temperatura
cuando se reestablece el suministro de energía. Si los ajustes
no son correctos, vuelva a configurarlos de acuerdo con la
sección Ajustes de los controles.
Cómo prepararse para un traslado
'HVFDUJXHHOYLQROXHJRDVHJXUHORVHVWDQWHVFRQFLQWDHQVX
lugar para evitar cualquier daño.
Asegúrese de que el centro de bebidas y enfriador de vinos
per
manezca en posición vertical durante el traslado.
CUIDADO Y LIMPIEZA
Cuidado y limpieza
Cómo reemplazar la bombilla
ADVERTENCIA
Antes de reemplazar una lámpara
quemada, el refrigerador deberá ser desenchufado a fin de
evitar el contacto con el filamento de un cable con corriente.
(Existe riesgo de que una lámpara quemada se rompa durante
su reemplazo).
Girar el control a la posición OFF no desconecta la corriente
del circuito de la luz.
'HVFRQHFWHHO&HQWURGH9LQRV&HQWURGH%HELGDV\9LQRV
2. Quite las bebidas y los estantes necesarios para poder
lograr el acceso.
3. La bombilla está ubicada detrás de un protector de la
bombilla en el techo del Centro de Vinos/ Centro de
%HELGDV\9LQRVFHUFDDODSDUWHSRVWHULRU3DUDTXLWDUHO
protector de la bombilla, quite el tornillo ubicado en el lado
derecho del protector de la bombilla.
4. Empuje la parte posterior del protector de la bombilla hacia
abajo para liberar las dos lengüetas delanteras.
'HVHQURVTXHODERPELOODGHOX]GHOUHFHSWiFXOR
6. Reemplace con una bombilla de 15 vatios, 120 voltios. Este
tipo de bombilla se encuentra disponible en la mayoría de
las ferreterías y tiendas de repuestos para automotores.
ADVERTENCIA
Usar una bombilla de más de
15 vatios puede dañar los controles eléctricos del Centro de
9LQRV&HQWURGH%HELGDV\9LQRV
7. Vuelva a instalar el protector de la bombilla.
8. Vuelva a colocar el estante superior y las bebidas.
9. Conecte nuevamente el centro de bebidas y enfriador de
vinos.
Protector de
la bombilla
Tornillo
10 49-1000352 Rev. 4
Instrucciones de
Instalación
Modelos GVS04 y GWS04
¿Preguntas? Llame a 800.GE.CARES (800.432.2737) o visite nuestro sitio web en: GEAppliances.com
En Canadá, llame al 1.800.561.3344 o visite nuestro Sitio Web en: GEAppliances.ca
RETIRAR EL EMPAQUE
$QWHVGHXVDUHO&HQWURGH9LQRV&HQWURGH%HELGDV
y Vinos, asegúrese de que se hayan retirado todos los
materiales de empaque y la cinta, incluyendo la película de
protección que cubre el control y protege el gabinete.
Si está cambiando un aparato antiguo de refrigeración,
retire las puertas para reducir el peligro de que los niños
puedan quedarse atrapados al interior. Consulte la sección
Forma adecuada de descartar su antiguo refrigerador para
obtener instrucciones.
CÓMO NIVELAR LAS PATAS
Se deben colocar las patas ajustables en las esquinas
GHODQWHUDVGHO&HQWURGH9LQRV&HQWURGH%HELGDV\9LQRV
de forma que se posicione firmemente
sobre el piso con una inclinación de 1/8”
hacia la parte posterior para ayudar a que
la puerta se cierre.
Para ajustar las patas de nivelación,
voltee las patas en el sentido contrario
para levantar el Centro de Vinos/ Centro
GH%HELGDV\9LQRV\HQVHQWLGRGHODV
manecillas del reloj para bajarlo.
INSTALACIÓN INCORPORADA
La dimensión del recorte mostrada permite que la puerta se
balance y da a acceso a los estantes para carga cuando se
instala como un electrodoméstico incorporado. Si se instala
entre gabinetes sin marcos, es posible que se necesite
una tira de relleno de ½” de ancho o un panel lateral sobre
el lado de la bisagra. La tira de relleno actuará como
espaciador entre la estructura del electrodoméstico y el
balanceo de la puerta del gabinete adyacente. El ancho de
la abertura debe incluir los una tira relleno.
NOTA: La puerta debe sobresalir 1” más que los gabinetes
circundantes.
PAUTAS PARA LA INSTALACIÓN
Ŷ(O&HQWURGH9LQRV&HQWURGH%HELGDV\9LQRVVHSXHGH
instalar de manera independiente o debajo del mostrador,
permitiendo los espacios adecuados.
Ŷ'HMHORVVLJXLHQWHVHVSDFLRVSDUDIDFLOLWDUODLQVWDODFLyQ
permitir una circulación apropiada del aire y las
conexiones eléctricas:
A cada costado 0”
Parte superior 0”
Parte posterior 0”
Ŷ$QWHVGHFRQHFWDUHODSDUDWRDODIXHQWHGHHQHUJtD
déjelo reposar en posición vertical por aproximadamente
2 horas. Esto reducirá la posibilidad de un mal
funcionamiento del sistema de enfriamiento debido a la
manipulación durante el transporte.
Ŷ1RLQVWDOHHO&HQWURGH9LQRV&HQWURGH%HELGDV\9LQRV
donde la temperatura baje de 55°F (13°C) o suba por
encima de 90°F (32°C). Si la temperatura ambiente se
encuentra por debajo de la configuración de temperatura,
HO&HQWURGH9LQRV&HQWURGH%HELGDV\9LQRVQR
funciona (por ejemplo, si la habitación se halla a 55°F
(13°C) y la configuración es de 60°F (15,6°C), la unidad
no funcionará).
Ŷ,QVWiOHORHQXQSLVRQLYHODGR
Ŷ1RLQVWDOHHO&HQWURGH9LQRV&HQWURGH%HELGDV\
Vinos donde esté sujeto a la luz directa del sol, calor o
humedad.
Ŷ1RDOPDFHQHRLQVWDOHHVWHDSDUDWRHQHOH[WHULRU
Para levantar
el enfriador de
vinos.
INSTRUCCIONES DE INSTALACIÓN
19"
482.6 mm19-1/2" Min.
495.3 mm Min.
22-1/2"
569 mm
including door
19"
495.3 mm
6" Max.
152 mm Max.
33-1/2" Min.
851 mm Min.
23-1/2" Min
597mm Min.
33"
838 mm
Locate Outlet
Puerta incluida
Ubicación de
tomacorriente
49-1000352 Rev. 4 11
INSTRUCCIONES DE INSTALACIÓN
Instrucciones de Instalación
MANIJA DE LA PUERTA - modelo GVS04BD
solamente
La manija de la puerta y los
tornillos se envían dentro
de una bolsa con piezas de
ferretería sujeta a uno de los
estantes del gabinete.
Ubique la manija de la puerta
y los dos tornillos. Sujete la
manija de la puerta hacia el
costado de la puerta como
puede verse.
CÓMO INVERTIR EL VAIVÉN DE LA PUERTA - modelo GVS04BD solamente
'HVHQFKXIHHOFHQWURGHEHELGDV\YLQR
2. Cierre la puerta con cinta adhesiva para asegurar la
alineación correcta.
3. Quite la tapa de la bisagra superior quitando el tornillo.
4. Quite los 2 tornillos que sujetan la bisagra superior al
marco.
5. Incline el centro de bebidas hacia atrás para poder
acceder a la bisagra inferior.
6. Quite los 2 tornillos que sujetan la bisagra inferior
al marco.
NOTA: Si coloca la unidad sobre su parte trasera, asegúrese
de dejarla reposar en posición vertical por lo menos durante
2 horas antes de conectarla a la fuente de energía; esto
reducirá la posibilidad de un mal funcionamiento del sistema
de enfriamiento.
7. Quite el tapón del lado superior izquierdo de la puerta.
8. Instale el botón dentro del orificio de la bisagra sobre el
lado derecho. Presione firmemente para asegurar.
9. Si la manija ha sido instalada, quítela e instálela en el
lado opuesto. Consulte la sección Manija de la puerta
para obtener instrucciones.
10. Sostenga la puerta firmemente en su lugar e instale la
bisagra inferior sobre el lado opuesto.
11. Instale la bisagra superior y la tapa en el lado opuesto.
Verifique que la puerta esté alineada con el gabinete
antes de ajustar los tornillos.
12. Quite la cinta. Abra y cierre la puerta para verificar su
alineación con el gabinete. Si fuera necesario, afloje los
tornillos de la bisagra inferior, vuelva a alinear la puerta y
ajuste los tornillos.
13. Enchufe el centro de bebidas y vino.
NOTA: Si ha tenido que apoyar la unidad sobre la parte
trasera, asegúrese de dejarla reposar en posición vertical
por lo menos durante 2 horas antes de conectarla a la
fuente de energía; esto reducirá la posibilidad de un mal
funcionamiento del sistema de enfriamiento.
14. Configure los controles de temperatura en el ajuste
deseado.
TRABA DE LA
PUERTA- en algunos
modelos
Para asegurar la traba de
la puerta, presione la perilla
y gire la misma 90º en
dirección de las agujas del
reloj.
Para destrabar la misma,
presione la perilla y gire
la misma 90º en dirección
contraria a las agujas del
reloj.
Screw
'RRU
Handle
interruptor
Traba
Tornillo
%LVDJUD
superior
%LVDJUD
inferior
Tapón
Tornillo
%LVDJUD
inferior
Pata de
nivelación
12 49-1000352 Rev. 4
¡Ahorre tiempo y dinero! Primero revise los cuadros que aparecen en las siguientes páginas y es posible que no necesite solicitar
UHSDUDFLRQHV'HVHUQHFHVDULRSRGUiSURJUDPDUHOVHUYLFLRWpFQLFRYLVLWiQGRQRVHQ GEAppliances.com o llamando al 800.
GECARES 800.432.2737. En Canadá, visite GEAppliances.ca o llame al 800.561.3344.
Problema Posibles causas Qué hacer
El aparato de vinos no
funciona y la pantalla
está en blanco
El aparato de vinos está
desconectado.
Empuje el enchufe completamente dentro del
toma corriente.
El
aparato
doméstico
se saltó/el
fusible se quemó.
Reemplace el fusible o vuelva a iniciar el
interruptor.
Vibración o cascabeleo
(una vibración ligera es
normal)
El aparato se encuentra en una
superficie desnivelada.
Consulte la sección Patas de nivelación.
El motor funciona
por períodos o ciclos
prolongados
Es normal cuando el aparato de
vinos se conecta por primera vez.
Espere 12 horas para que el aparato se enfríe
refroidi completamente.
Ocurre a menudo cuando grandes
cantidades de vino se almacenan
en el aparato.
Esto es normal.
La puerta se dejó abierta. La puerta no se cierra sola. Siempre cerciórese de
cerrar la puerta después de abrirla.
Revise si una botella está sosteniendo la puerta
abierta.
Estación calurosa o la puerta se
abre frecuentemente.
Esto es normal.
El control de temperatura está en
el nivel más frío.
Consulte la sección Acerca de los controles y
ajustes.
El aparato está muy cerca de la
pared.
Consulte la sección Pautas para la instalación
para los aislamientos correctos.
El aparato está
demasiado caliente
Es normal cuando el aparato se
conecta por primera vez.
Espere 12 horas para que el aparato se enfríe
refroidi completamente.
Ocurre a menudo cuando grandes
cantidades de vino se almacenan
en el aparato.
Esto es normal.
El control de temperatura no está
en un nivel suficientemente frío.
Consulte la sección Acerca de los controles y
ajustes.
Estación cálida o la puerta se abre
frecuentemente.
Mueva el control de la temperatura a un nivel más
frío. Consulte la sección Acerca de los controles y
ajustes.
El aparato está muy cerca de la
pared.
Consulte la sección Pautas para la instalación
para los aislamientos correctos.
La puerta se dejó abierta. La puerta no se cierra sola. Siempre cerciórese
de que la puerta esté cerrada después de
abrirla.
Revise si una botella está sosteniendo la puerta
abierta.
El aparato no funciona,
pero
está
encendida
y en
funcionamiento
La configuración se encuentra
por encima de la temperatura
ambiente.
Esto es normal. Si los vinos o las bebidas no se
encuentran bien frías, cambie la configuración de
temperatura a una más baja.
SOLUCIÓN DE PROBLEMAS
Consejos para la Solución de Problemas... Antes de solicitar el servicio técnico
49-1000352 Rev. 4 13
SOLUCIÓN DE PROBLEMAS
Problème Cause possible Que faire
El aparato produce un
olor
El interior necesita
limpieza.
Consulte la sección Cuidado y limpieza.
Se forma humedad en el
exterior el aparato
No es extraño durante
los períodos de humedad
alta.
Seque la superficie.
Se forma humedad
al interior (en climas
húmedos, el aire lleva
humedad hacia el aparato
cuando la puerta está
abierta)
La puerta se abre con
demasiada frecuencia o
por mucho tiempo.
Las botellas de vino
están tocando la pared
posterior.
Vuelva a colocar las botellas.
Se forma escarcha en las
superficies interiores del
aparato
Esto es normal. &RQVXOWDUODVHFFLyQ'HVFRQJHODFLyQ
La puerta se dejó abierta. Se puede formar escarcha excesiva si la puerta se deja
DELHUWD&RQVXOWDUODVHFFLyQ'HVFRQJHODFLyQ
La puerta no se cierra sola. Siempre cerciórese de que la
puerta esté cerrada después de abrirla.
Revise si una botella está sosteniendo la puerta abierta.
El aparato está
demasiado frío
El control de temperatura
está en un nivel
demasiado frío.
Consulte la sección Acerca de los controles y ajustes.
La temperatura del
cuarto donde se
encuentra el aparato está
demasiado fría.
Para una operación correcta, la temperatura del cuarto debe
ser igual o superior a la temperatura establecida del aparato.
La temperatura en
la pantalla no es la
temperatura que se
estableció
Esto es normal. 'HVSXpVGHHVWDEOHFHUODWHPSHUDWXUDODSDQWDOODUHJUHVDD
la temperatura real.
Condensación al de la
puerta
El aparato está localizado
en un ambiente de alta
humedad.
Limpie la condensación con un paño limpio y seco.
Coloque el aparato en un ambiente de menor humedad.
Agua en piso detrós el
aparato
La puerta se dejó abierta. La puerta no se cierra sola. Siempre cerciórese de que la
puerta esté cerrada después de abrirla.
Revise si una botella está sosteniendo la puerta abierta.
Inclinar la unidad cuando
se la desplaza.
Esto es normal. La bandeja de desagüe por encima
del compresor puede encontrarse llena después del
descongelado. Verifique que no haya derrames de agua
cuando desplace la unidad.
Centro de Vinos GWS04 Únicamente
Óxido, deslustre o
suciedad en puertas de
acero inoxidable
Ambiente húmedo o
aire salino.
Limpie el acero inoxidable con limpiadores que
contengan ácido oxálico (tal como un Limpiador Suave
GHODPDUFD%DU.HHSHUV)ULHQGHVWRVHOLPLQDUiQHO
y[LGRFDOXRWURVGHVOXVWUHV1ROLPSLHHOUHIULJHUDGRUFRQ
una tela sucia para platos o con una tela o toalla mojada.
1RXVHHVWURSDMRVOLPSLDGRUHVHQSROYREODQTXHDGRUHV
ni limpiadores que contengan blanqueador, ya que estos
productos pueden rayar y arruinar la terminación del
acero inoxidable.
Consejos para la Solución de Problemas... Antes de solicitar el servicio técnico

14 49-1000352 Rev. 4
Notas
NOTAS
49-1000352 Rev. 4 15
GARANTÍA LIMITADA
Grape aquí su recibo. Se requiere facilitar prueba de la fecha
de compra original para obtener un servicio bajo la garantía.
Garantía Limitada del Centro de Vinos/ Centro de Bebidas y Vinos
Todo el servicio de garantía es provisto por nuestros Centros de Servicio de Fabricación, o un técnico autorizado de
Servicio al Cliente (Customer Care®). Para programar una visita del servicio técnico, visítenos en GEAppliances.com,
o comuníquese al 800.GE.CARES (800.432.2737). Cuando llame para solicitar el servicio, tenga los números de serie
y modelo disponibles.
Ŷ 9LDMHVGHOWpFQLFRGHOVHUYLFLRDVXKRJDUSDUDHQVHxDUOH
sobre cómo usar el producto.
Ŷ ,QVWDODFLyQHQWUHJDRPDQWHQLPLHQWRLQDGHFXDGRV
Ŷ )DOODVGHOSURGXFWRHQFDVRGHDEXVRPDOXVRRXVRSDUD
propósitos diferentes al original o uso comercial.
Ŷ 3pUGLGDGHDOLPHQWRVSRUPDOHVWDGR
Ŷ 5HHPSOD]RGHIXVLEOHVGHODFDVDRUHLQLFLRGHGLV\XQWRUHV
Ŷ 'DxRFDXVDGRGHVSXpVGHODHQWUHJD
Ŷ 5HHPSOD]RGHOFDUWXFKRGHOILOWURGHDJXDVLVHLQFOX\H
debido a la presión del agua que está fuera del rango de
funcionamiento específico o debido a exceso de sedimentos
en el suministro de agua.
Ŷ 5HHPSOD]RGHERPELOODVGHOX]VLVHLQFOX\HQRGHO
cartucho del filtro de agua, si se incluye, a diferencia de lo
detallado anteriormente.
Ŷ 'DxRVRFDVLRQDGRVVREUHHOSURGXFWRSRUDFFLGHQWH
incendio, inundaciones o catástrofes naturales.
Ŷ 'DxRVFRQVHFXHQWHVRLQFLGHQWDOHVFDXVDGRVSRUSRVLEOHV
defectos de este producto.
Ŷ3URGXFWRQRDFFHVLEOHSDUDEULQGDUHOVHUYLFLRUHTXHULGR
Ŷ&XDOTXLHUGDxRVREUHODWHUPLQDFLyQGHEHUiVHU
informado dentro de las 48 horas luego de la entrega del
electrodoméstico.
Ŷ3URGXFWRVTXHQRSUHVHQWHQGHIHFWRVQLHVWpQURWRVRTXH
estén funcionando de acuerdo con lo descrito en el Manual
del Propietario.
Lo que no está cubierto
EXCLUSIÓN DE GARANTÍAS IMPLÍCITAS—Su único y exclusivo derecho es la reparación del
producto, tal y como se indica en esta Garantía limitada. Cualquier garantía implícita, incluyendo las
garantías implícitas de comerciabilidad o adecuación para un fin determinado, están limitadas a un
año o el período de tiempo más breve permitido por la ley.
Por el período de:
GE Appliances reemplazará
Un año
A partir de la fecha de la
compra original
Cualquier parte del refrigerador que falle debido a defectos en los materiales o en la
IDEULFDFLyQ'XUDQWHHVWDJDUDQWtD limitada de un año, GE Appliances también proporcionará,
sin costo alguno, toda la mano de obra y el servicio relacionado para reemplazar partes
defectuosas.
Para realizar el servicio técnico de su refrigerador se podrá requerir el uso de datos del puerto de abordaje
para su diagnóstico. Esto da al técnico del Servicio de Fábrica de GE Appliances la habilidad de diagnosticar
de forma rápida cualquier problema con su electrodoméstico, y de ayudar a GE Appliances a mejorar sus
productos al brindarle a GE Appliances la información sobre su electrodoméstico. Si no desea que los datos de su
HOHFWURGRPpVWLFRVHDQHQYLDGRVD*($SSOLDQFHVVROLFLWDPRVTXHOHLQGLTXHDVXWpFQLFR12HQWUHJDUORVGDWRVD
GE Appliances en el momento del servicio.
Para los clientes de EE.UU. Esta garantía limitada se extiende al comprador original y a cualquier dueño subsiguiente de
productos comprados para uso hogareño dentro de EE.UU. Si el producto está en un área donde no se encuentra disponible un
Proveedor Autorizado del Servicio Técnico de GE Appliances, usted será responsable por el costo de un viaje o se podrá requerir
que traiga el producto a una ubicación del Servicio Técnico de GE Appliances Autorizado para recibir el servicio. En Alaska, la
garantía limitada excluye el costo de envío o llamadas del servicio a su hogar.
Algunos estados no permiten la exclusión o limitación de daños fortuitos o consecuentes. Esta garantía limitada le da derechos
legales específicos y es posible que tenga otros derechos legales que varían entre un estado y otro. Para conocer cuáles son
sus derechos legales, consulte a la oficina de asuntos del consumidor local o estatal o al Fiscal de su estado.
Garante US: GE Appliances, a Haier company
Louisville, KY 40225
Para Clientes en Canadá: Esta garantía se extiende al comprador original y a cualquier dueño subsiguiente de productos
comprados para uso hogareño dentro de Canadá. El servicio técnico hogareño de la garantía será brindado en áreas donde MC
Commercial Inc. se encuentre disponible y lo considere apropiado.
Warrantor Canada: MC Commercial Inc., Burlington, Ontario, L7R 5B6

16 49-1000352 Rev. 4
Soporte para el Consumidor
SOPORTE PARA EL CONSUMIDOR
Sitio Web de GE Appliances
¢'HVHDUHDOL]DUXQDFRQVXOWDRQHFHVLWDD\XGDFRQVXHOHFWURGRPpVWLFR"£,QWHQWHDWUDYpVGHO6LWLR:HEGH*($SSOLDQFHVODV
24 horas del día, cualquier día del año! Usted también puede comprar más electrodomésticos maravillosos de GE Appliances y
aprovechar todos nuestros servicios de soporte a través de Internet, diseñados para su conveniencia.
En EE.UU.: GEAppliances.com En Canadá: GEAppliances.ca
Registre su Electrodoméstico
¡Registre su electrodoméstico nuevo a través de Internet, según su conveniencia! Un registro puntual de su producto permitirá
una mejor comunicación y un servicio más puntual de acuerdo con los términos de su garantía, en caso de surgir la necesidad.
También puede enviar una carta en la tarjeta de inscripción preimpresa que se incluye con el material embalado.
En EE.UU.: GEAppliances.com/register
En Canadá: Prodsupport.mabe.ca/crm/Products/ProductRegistration.aspx
Servicio Programado
El servicio de reparación de expertos de GE Appliances está a sólo un paso de su puerta. Conéctese a través de Internet y programe
su servicio a su conveniencia cualquier día del año. En EE.UU.: GEAppliances.com/service o comuníquese al 800.432.2737
durante el horario de atención comercial.
En Canadá: GEAppliances.ca/en/support/service-request
o comuníquese al
800.561.3344
Garantías Extendidas
Adquiera una garantía extendida de GE Appliances y conozca los descuentos especiales que están disponibles mientras su
garantía aún está vigente. La puede adquirir en cualquier momento a través de Internet. Los servicios de GE Appliances aún
estarán allí cuando su garantía caduque.
En EE.UU.: GEAppliances.com/extended-warranty o comuníquese al 800.626.2224 durante el horario de atención comercial.
En Canadá: GEAppliances.ca/en/support/purchase-extended-warranty o comuníquese al 800.290.9029
Conectividad Remota
Para solicitar asistencia para la conectividad de red inalámbrica (para modelos con acceso remoto),
visite nuestro sitio web en GEAppliances.com/connect o comuníquese al 800.220.6899 en EE.UU.
Piezas y Accesorios
Aquellos individuos calificados para realizar el servicio técnico de sus propios electrodomésticos podrán solicitar el envío de
SLH]DVRDFFHVRULRVGLUHFWDPHQWHDVXVKRJDUHVVHDFHSWDQODVWDUMHWDV9,6$0DVWHU&DUG\'LVFRYHU2UGHQHKR\DWUDYpVGH
Internet durante las 24 horas, todos los días. En EE.UU.: GEApplianceparts.com o de forma telefónica al 877.959.8688 durante
el horario de atención comercial.
Las instrucciones que figuran en este manual cubren los procedimientos que serán realizados por cualquier usuario.
Otros servicios técnicos generalmente deben ser derivados a personal calificado del servicio. Se deberá tener cuidado,
ya que una reparación indebida podrá hacer que el funcionamiento no sea seguro.
Los clientes de Canadá deberán buscar el centro de servicios Mabe más cercano en las páginas amarillas;
visite nuestro sitio
web en GEAppliances.ca/en/products/parts-filters-accessories o comuníquese al 800.661.1616.
Contáctenos
Si no se encuentra satisfecho con el servicio que recibió de GE Appliances, comuníquese con nosotros a través de nuestro sitio
Web con todos los detalles, incluyendo su número telefónico, o escriba a:
(Q((88*HQHUDO0DQDJHU&XVWRPHU5HODWLRQV_*($SSOLDQFHV$SSOLDQFH3DUN_/RXLVYLOOH.<
GEAppliances.com/contact
En Canadá: Director, Consumer Relations, Mabe Canada Inc. | Suite 310, 1 Factory Lane | Moncton, N.B. E1C 9M3
GEAppliances.ca/en/contact-us
Impreso en China