Instruction Manual For Induction Hob
Manuale di istruzioni per piano cottura a induzione
Bedienungsanleitung für Induktionskochfeld
Thank you for purchasing the Candy induction hob. Please read this instruction manual
MODEL: CIFS85MCTT/1
carefully before using the hob and keep it in a safe place for future reference.
Instrukcja obsługi płyty indukcyjnej
POLSKI
DEUTSCH
ITALIAN
ENGLISH


EN-1
Safety Warnings
Your safety is important to us. Please read this
information before using your cooktop.
Installation
Electrical Shock Hazard
• Disconnect the appliance from the mains
electricity supply before carrying out any work
or maintenance on it.
• Connection to a good earth wiring system is
essential and mandatory.
• Alterations to the domestic wiring system must
only be made by a qualified electrician.
• Failure to follow this advice may result in
electrical shock or death.
Cut Hazard
• Take care - panel edges are sharp.
• Read these instructions carefully before
installing or using this appliance.
• Failure to use caution could result in injury or
cuts.
Important safety instructions
• No combustible material or products
should be
placed on this appliance at any time.
• Please make this information available to the
person responsible for installing the appliance
as it could reduce your installation costs.
• In order to avoid a hazard, this appliance must
be installed according to these instructions for
installation.
• This appliance is to be properly installed and
earthed only by a suitably qualified person.
• This appliance should be connected to a circuit
which incorporates an isolating switch
providing full disconnection from the power
supply.
• Failure to install the appliance correctly could
invalidate any warranty or liability claims.
Operation and maintenance
Electrical Shock Hazard
• Do not cook on a broken or cracked cooktop. If
the cooktop surface should break or crack, switch
the appliance off immediately at the mains power
supply (wall switch) and contact a qualified
technician.
• Switch the cooktop off at the wall before
cleaning or maintenance.
• Failure to follow this advice may result in
electrical shock or death.
Health Hazard
EN-2

EN-3
• This appliance complies with electromagnetic
safety standards.
• However, persons with cardiac pacemakers or
other electrical implants (such as insulin
pumps) must consult with their doctor or
implant manufacturer before using this
appliance to make sure that their implants will
not be affected by the electromagnetic field.
• Failure to follow this advice may result in death.
Hot Surface Hazard
• During use, accessible parts of this appliance
will become hot enough to cause burns.
• Do not let your body, clothing or any item other
than suitable cookware contact the Induction
glass until the surface is cool.
• Metallic objects such as knives, forks, spoons
and lids should not be placed on the hob surface
since they can get hot
• Keep children away.
• Handles of saucepans may be hot to touch.
Check saucepan handles do not overhang other
cooking zones that are on. Keep handles out of
reach of children.
• Failure to follow this advice could result in
burns and scalds.
Cut Hazard
• The razor-sharp blade of a cooktop scraper is
exposed when the safety cover is retracted. Use
with extreme care and always store safely and
out of reach of children.
• Failure to use caution could result in injury or
EN-4
cuts.
Important safety instructions
• Never leave the appliance unattended when in
use. Boilover causes smoking and greasy
spillovers that may ignite.
• Never use your appliance as a work or storage
surface.
• Never leave any objects or utensils on the
appliance.
• Do not place or leave any magnetisable objects
(e.g. credit cards, memory cards)or electronic
devices (e.g. computers, MP3 players) near the
appliance, as they may be affected by its
electromagnetic field.
• Never use your appliance for warming or
heating the room.
• After use, always turn off the cooking zones
and the cooktop as described in this manual (i.e.
by using the touch controls). Do not rely on the
pan detection feature to turn off the cooking
zones when you remove the pans.
• Do not allow children to play with the appliance
or sit, stand, or climb on it.
• Do not store items of interest to children in
cabinets above the appliance. Children climbing
on the cooktop could be seriously injured.
• Do not leave children alone or unattended in
the area where the appliance is in use.
• Children or persons with a disability which

EN-5
limits their ability to use the appliance should
have a responsible and competent person to
instruct them in its use. The instructor should be
satisfied that they can use the appliance without
danger to themselves or their surroundings.
• Do not repair or replace any part of the
appliance unless specifically recommended in the
manual. All other servicing should be done by a
qualified technician.
• Do not use a steam cleaner to clean your
cooktop.
• Do not place or drop heavy objects on your
cooktop.
• Do not stand on your cooktop.
• Do not use pans with jagged edges or drag pans
across the Induction glass surface as this can
scratch the glass.
• Do not use scourers or any other harsh
abrasive cleaning agents to clean your cooktop,
as these can scratch the Induction glass.
• If the supply cord is damaged, it must be
replaced by the manufacturer, its service agent
or similarly qualified persons in order to avoid a
hazard.
• This appliance is intended to be used in
household and similar applications such as:
-staff kitchen areas in shops, offices and other
working environments; -farm houses; -by
clients in hotels, motels and other residential
type environments; -bed and breakfast type
environments.
EN-6
• WARNING: The appliance and its accessible
parts become hot during use.
Care should be taken to avoid touching heating
elements.
Children less than 8 years of age shall be kept
away unless continuously supervised.
• This appliance can be used by children aged
from 8 years and above and persons with
reduced physical, sensory or mental capabilities
or lack of experience and knowledge if they have
been given supervision or instruction concerning
use of the appliance in a safe way and
understand the hazards involved.
• Children shall not play with the appliance.
Cleaning and user maintenance shall not be
made by children without supervision.
• WARNING: Unattended cooking on a hob with
fat or oil can be dangerous and may result in fire.
NEVER try to extinguish a fire with water, but
switch off the appliance and then cover flame e.g.
with a lid or a fire blanket.
• WARNING: Danger of fire: do not store items on
the cooking surfaces.
• Warning: If the surface is cracked, switch off
the appliance to avoid the possibility of electric
shock, for hob surfaces of glass-ceramic or
similar material which protect live parts
• A steam cleaner is not to be used.
EN-7
• The appliance is not intended to be operated by
means of an external timer or separate
remote-control system.
CAUTION: The cooking process has to be
supervised. A short term cooking process has to
be supervised continuously.
WARNING: In order to prevent tipping of the
appliance, this stabilizing means must be
installed. Refer to the instructions for
installation.
WARNING: Use only hob guards designed by the
manufactuer of the cooking appliance or
indicated by the manufacture of the appliance in
the instruction for use as suitable or hob guards
incorporated in the appliance. The use of
inappropriate guards can cause accidents.
This appliance incorporates an earth connection
for functional purposes only.
Congratulations on the purchase of your new Induction Hob.
We recommend that you spend some time to read this Instruction / Installation
Manual in order to fully understand how to install correctly and operate it.
For installation, please read the installation section.
Read all the safety instructions carefully before use and keep this Instruction /
Installation Manual for future reference.
EN-8
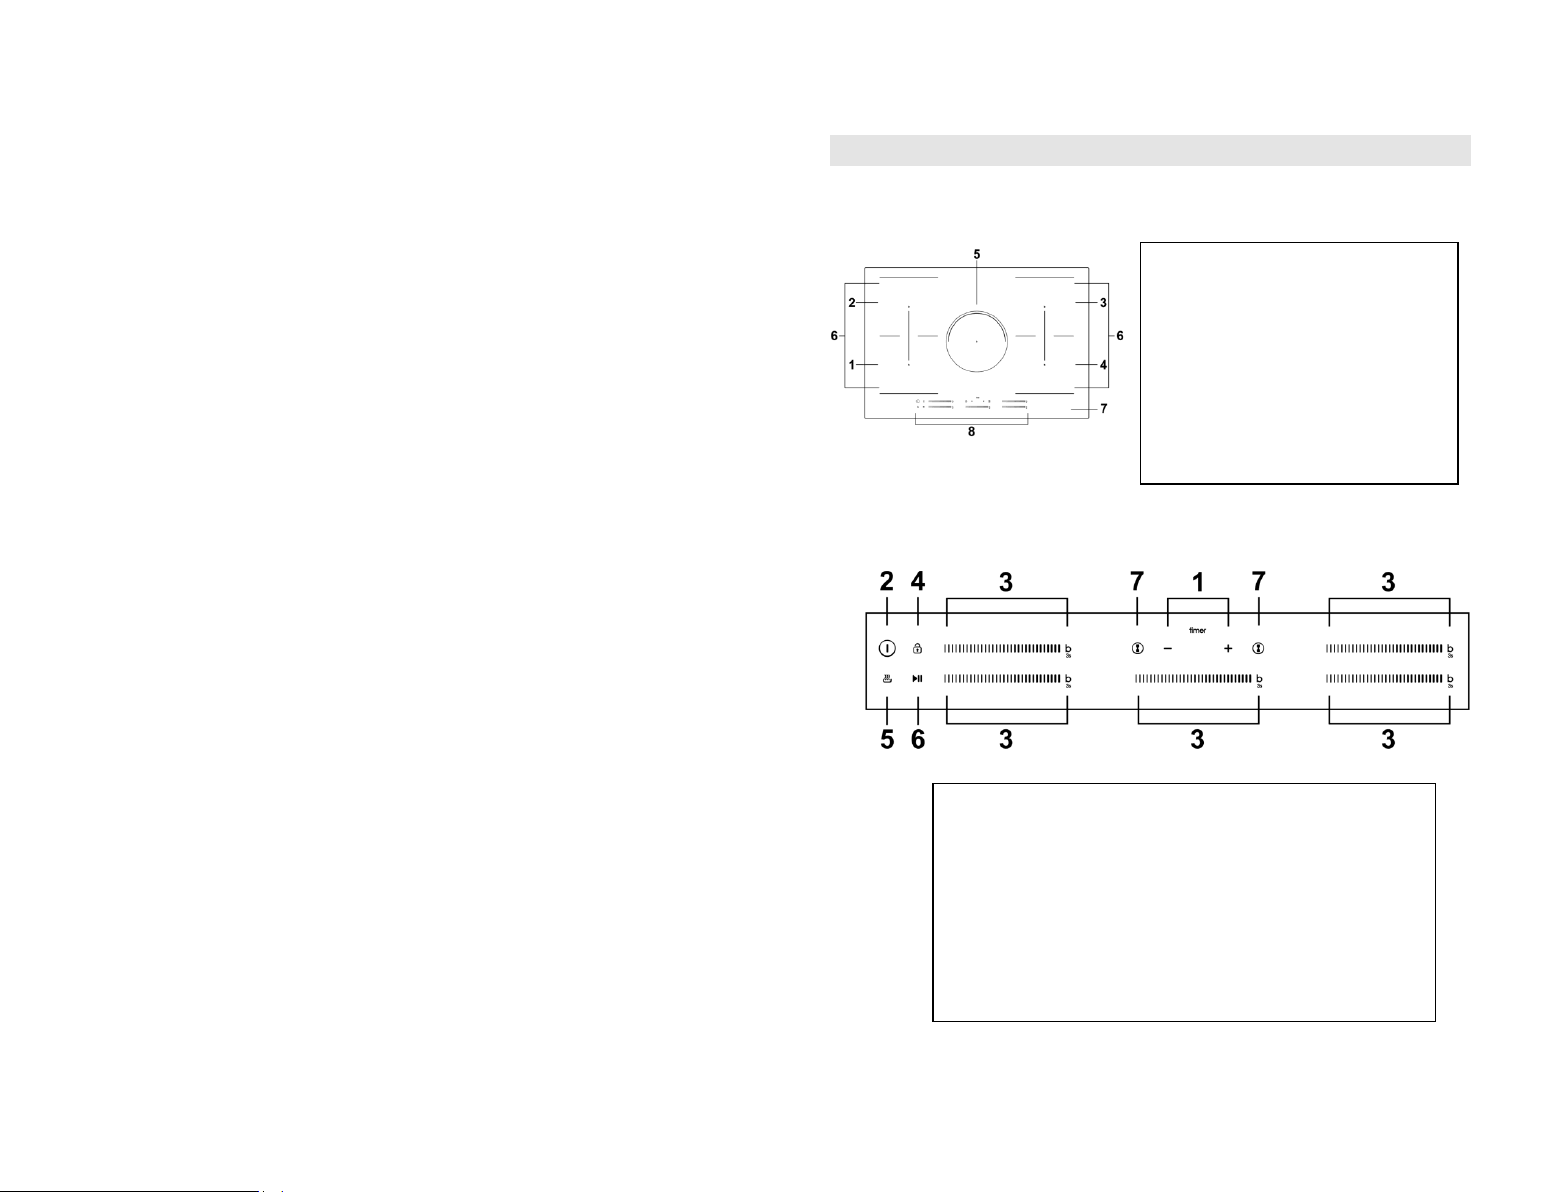
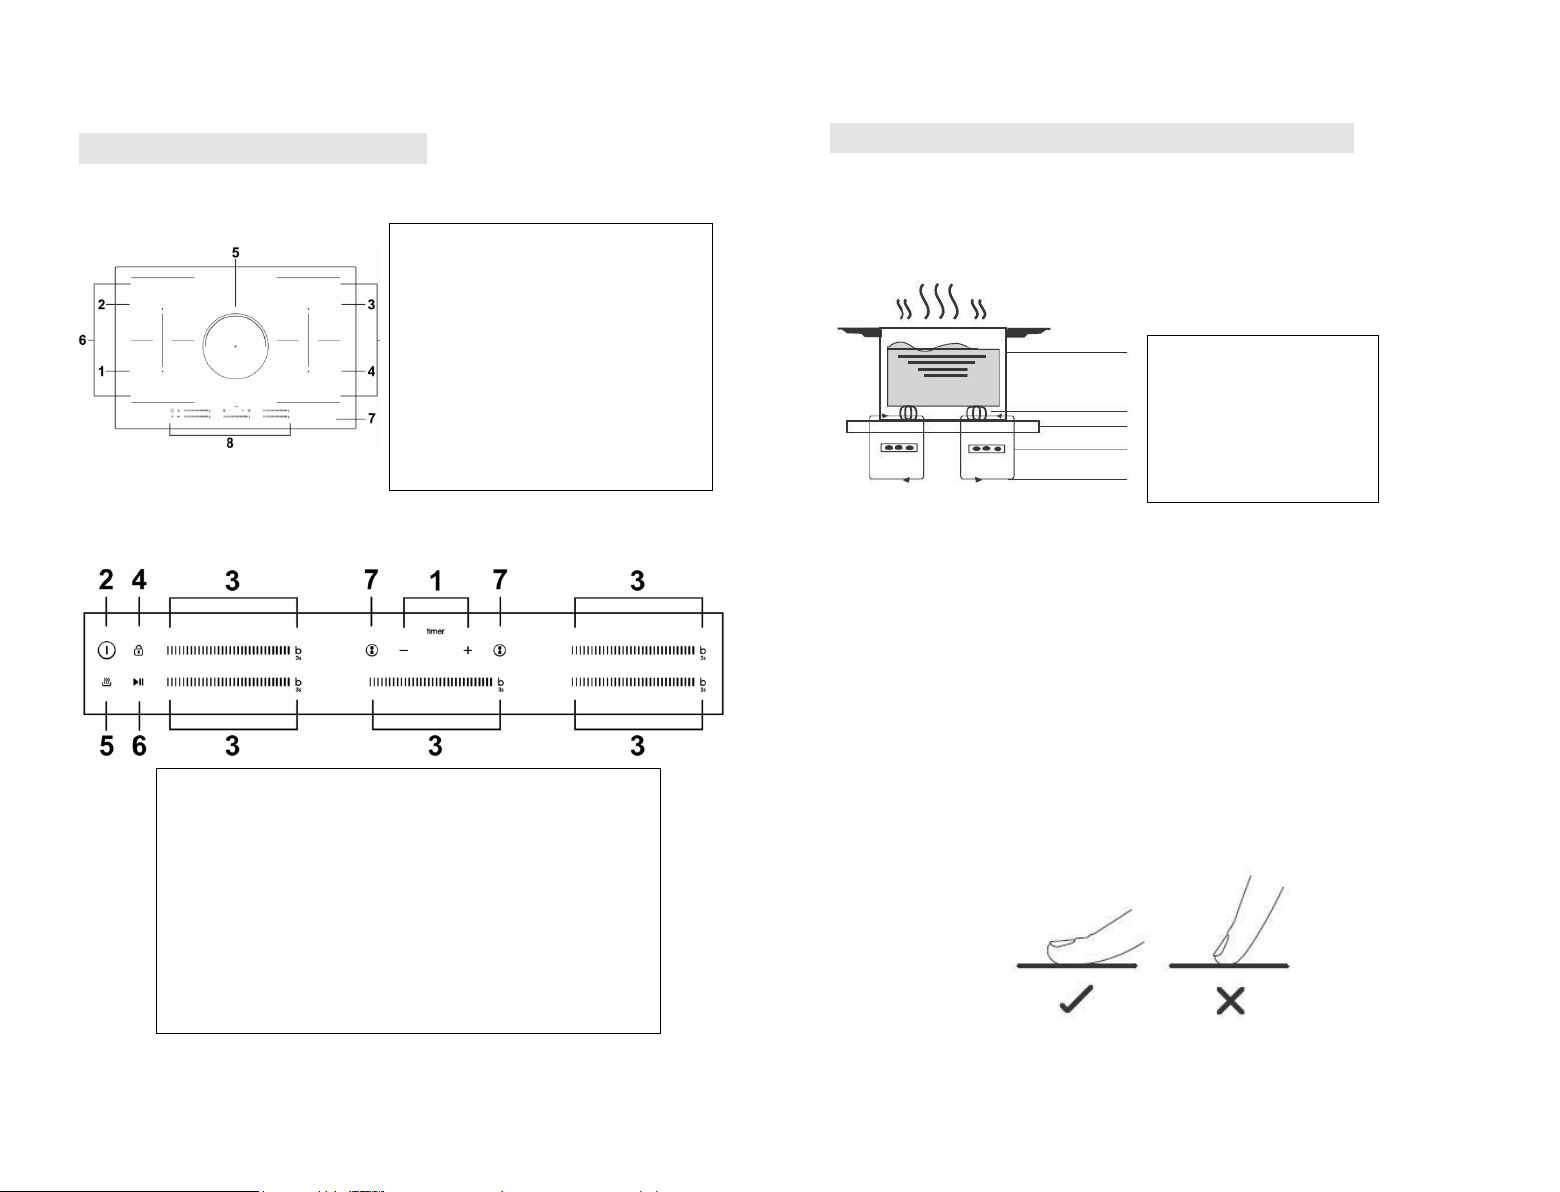
1.2000 W zone, boost to 2600W
2.1500 W zone, boost to 2000W
3.2000 W zone, boost to 2600W
4.1500 W zone, boost to 2000W
5. 2000 W zone, boost 2600W
6. Flex zone, 2800W boost 3500W
7. Glass plate
8. Control panel
1. Timer control
2. ON/OFF control
3. Power regulating key/booster function control
4. keylock control
5. Keep warm function
6.Pause function control
7. Flex zone
Product Overview
Top View
Control Panel
EN-9
iron pot
magnetic circuit
ceramic glass plate
induction coil
induced currents
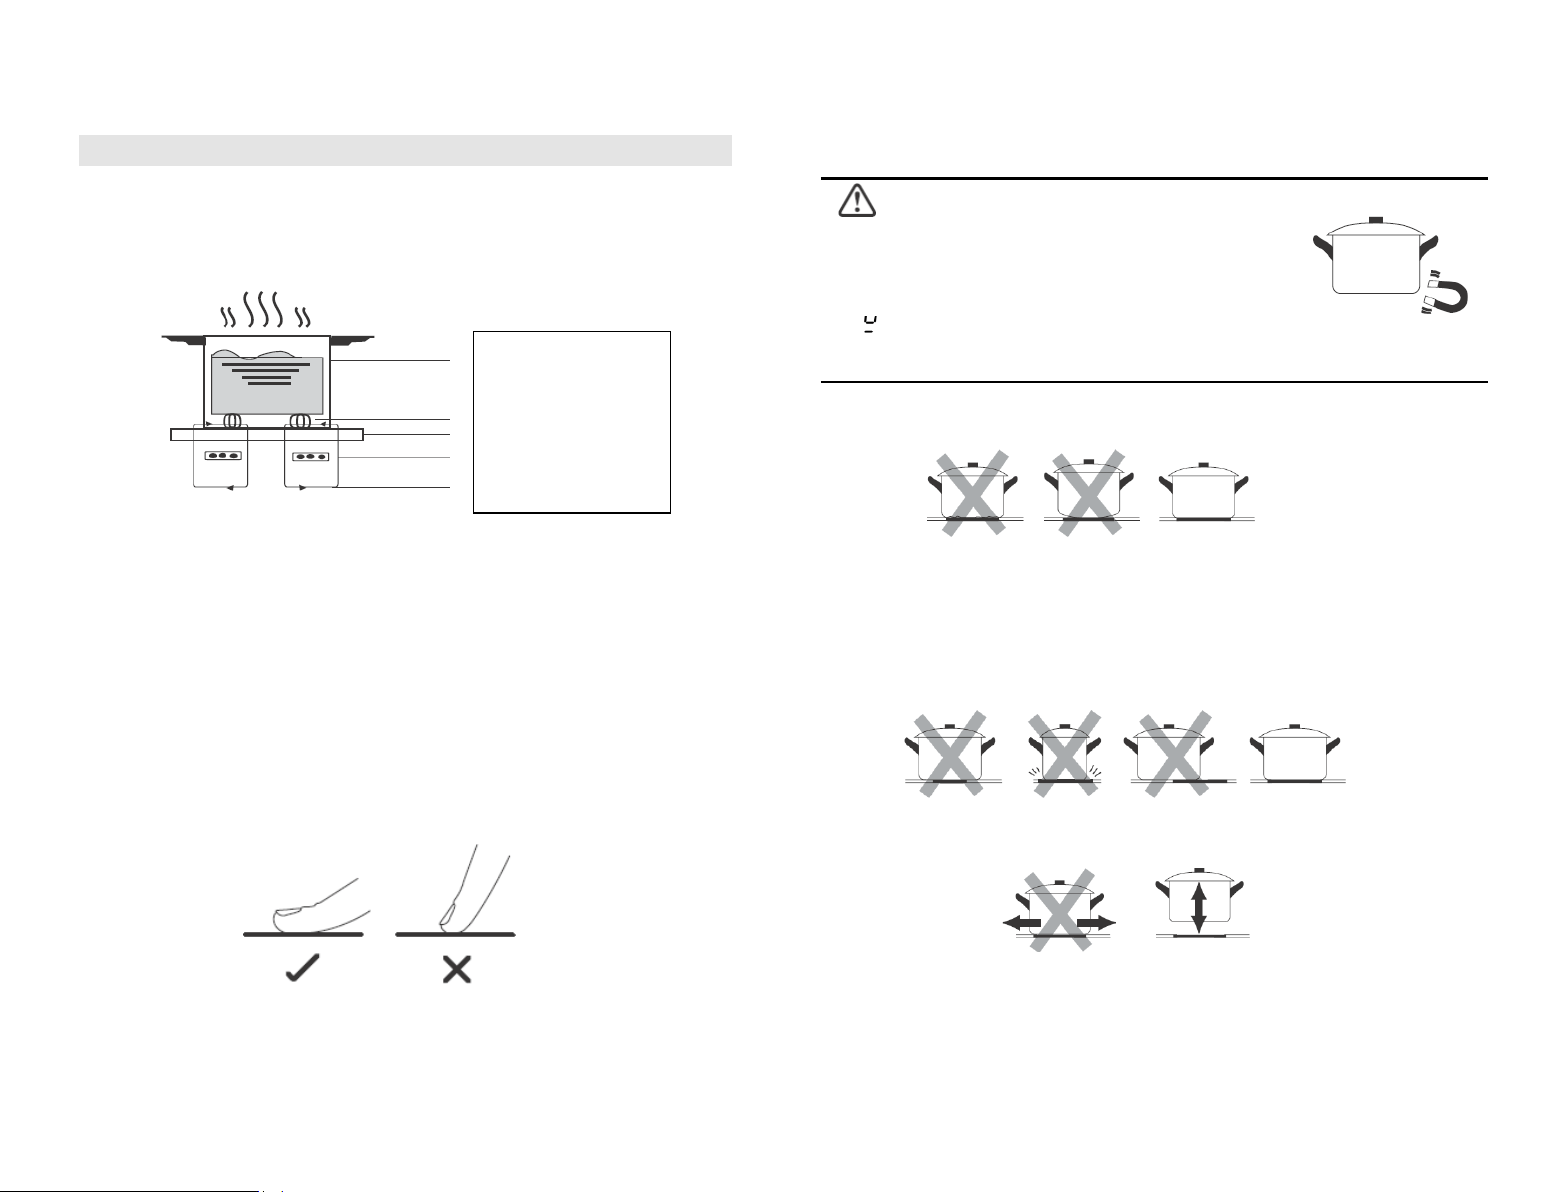
A Word on Induction Cooking
Induction cooking is a safe, advanced, efficient, and economical cooking
technology. It works by electromagnetic vibrations generating heat directly in the
pan, rather than indirectly through heating the glass surface. The glass becomes
hot only because the pan eventually warms it up.
Before using your New Induction Hob
• Read this guide, taking special note of the ‘Safety Warnings’ section.
• Remove any protective film that may still be on your Induction hob.
Using the Touch Controls
• The controls respond to touch, so you don’t need to apply any pressure.
• Use the ball of your finger, not its tip.
• You will hear a beep each time a touch is registered.
• Make sure the controls are always clean, dry, and that there is no object (e.g. a
utensil or a cloth) covering them. Even a thin film of water may make the
controls difficult to operate.
EN-10
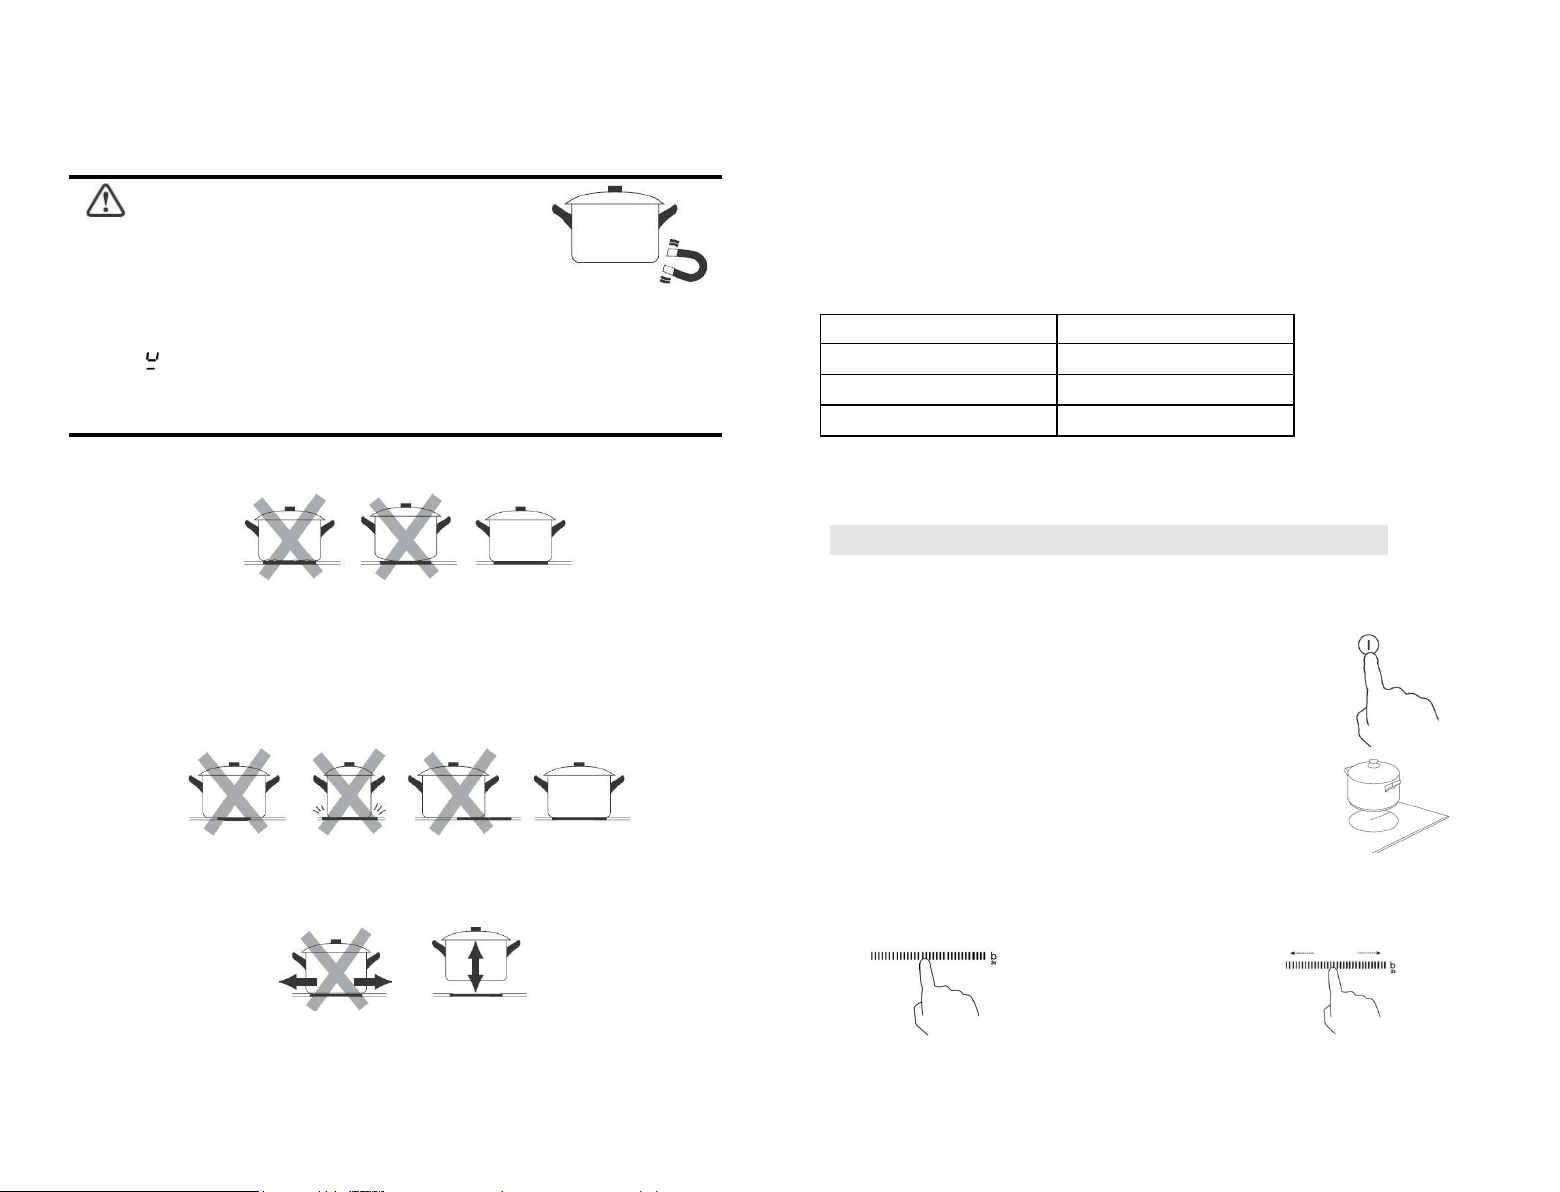
• Only use cookware with a base suitable for induction
cooking. Look for the induction symbol on the
Choosing the right Cookware
packaging or on the bottom of the pan.
• You can check whether your cookware is suitable by carrying out
a magnet test. Move a magnet towards the base of the pan. If it
is attracted, the pan is suitable for induction.
• If you do not have a magnet:
1. Put some water in the pan you want to check.
2.
If does not flash in the display and the water is heating, the pan is suitable.
• Cookware made from the following materials is not suitable: pure stainless steel, aluminium or
copper without a magnetic base, glass, wood, porcelain, ceramic, and earthenware.
Do not use cookware with jagged edges or a curved base.
Make sure that the base of your pan is smooth, sits flat against the glass, and is
the same size as the cooking zone. Use pans whose diameter is as large as the
graphic of the zone selected. Using a pot a slightly wider energy will be used at its
maximum efficiency. If you use smaller pot efficiency could be less than expected.
Always centre your pan on the cooking zone.
Always lift pans off the Induction hob – do not slide, or they may scratch the glass.
EN-11
Pan dimensions
The cooking zones are up to a limit, automatically adapted to the diameter of the
pan. However the bottom of this pan must have a minimum of diameter according
to the corresponding cooking zone. To obtain the best efficiency of your hob,
please place the pan in the centre of the cooking zone.
The base diameter of induction cookware
Cooking zone
Minimum (mm)
1, 2, 3, 4(180mm)
120
5 (210mm)
140
Flex zone
240 or 160*270
The above may vary according to the quality of the pan used.
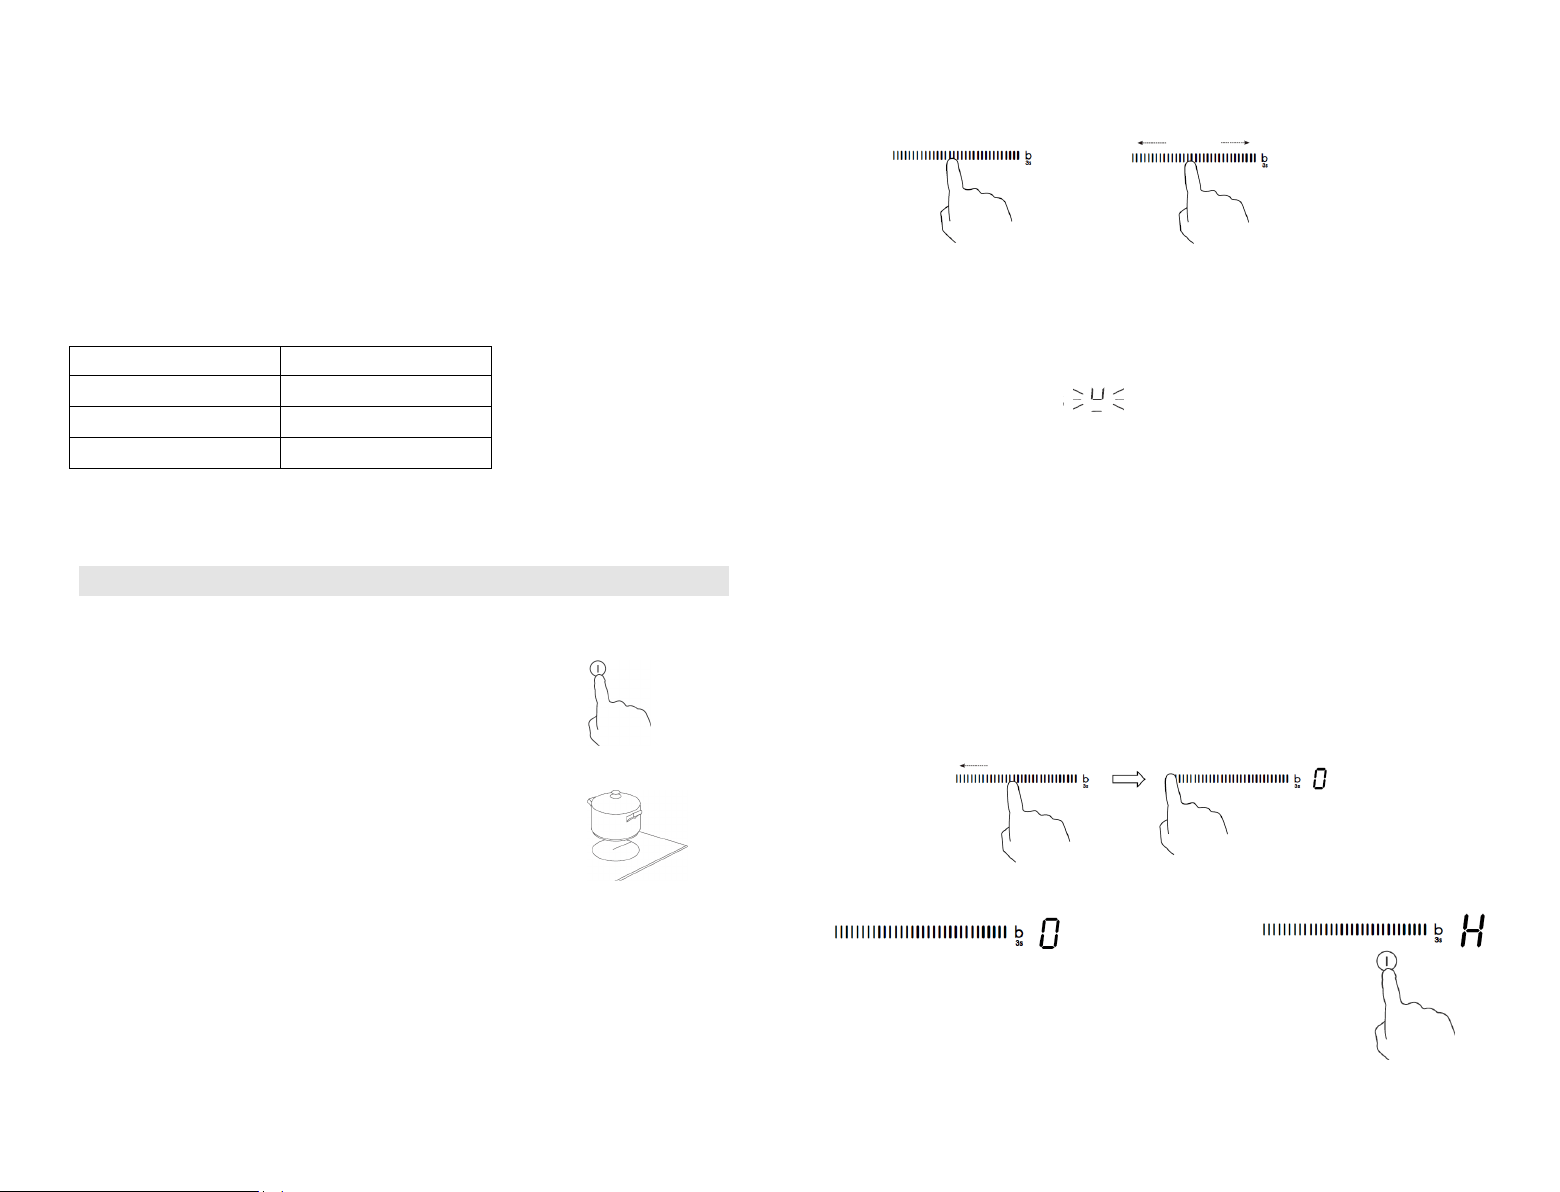
Using your Induction Hob
To start cooking
1. Touch the ON/OFF control.
After power on, the buzzer beeps once, all displays
show “ – “ or “ – – “, indicating that the induction
hob has entered the state of standby mode.
2. Place a suitable pan on the cooking zone that
you wish to use.
• Make sure the bottom of the pan and the surface
of the cooking zone are clean and dry.
3. Set a power level by touching the slider, or slide along the “—”control, or just
touch any point of the “—”.
EN-12
Or
a. If you don’t set the power within 1 minute, the induction hob will
automatically switch off. You will need to start again at step 1.
b. You can modify the heat setting at any time during cooking.
c. If slide along the “—”, power will vary from stage 1 to stage 9.
If the display flashes alternately with the heat
setting
This means that:
• you have not placed a pan on the correct cooking zone or,
• the pan you’re using is not suitable for induction cooking or,
• the pan is too small or not properly centred on the cooking zone.
No heating takes place unless there is a suitable pan on the cooking zone.
The display will automatically turn off after 1 minutes if no suitable pan is placed
on it.
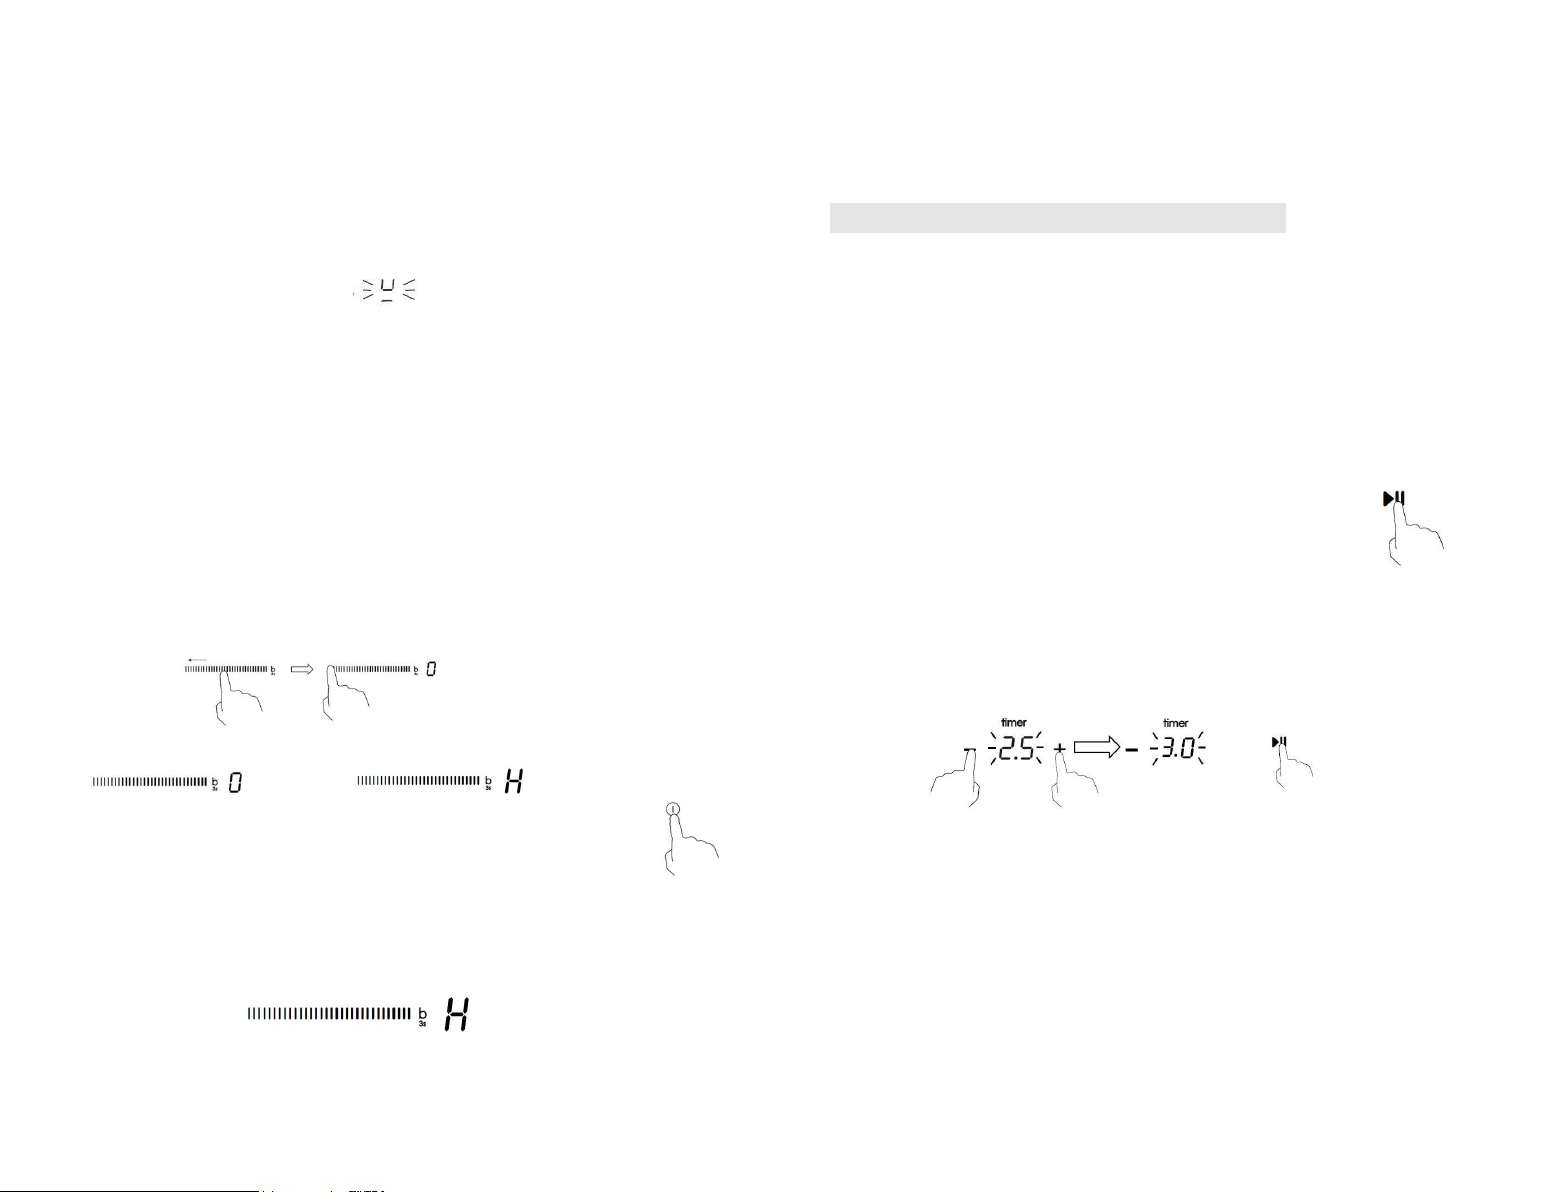
When you have finished cooking
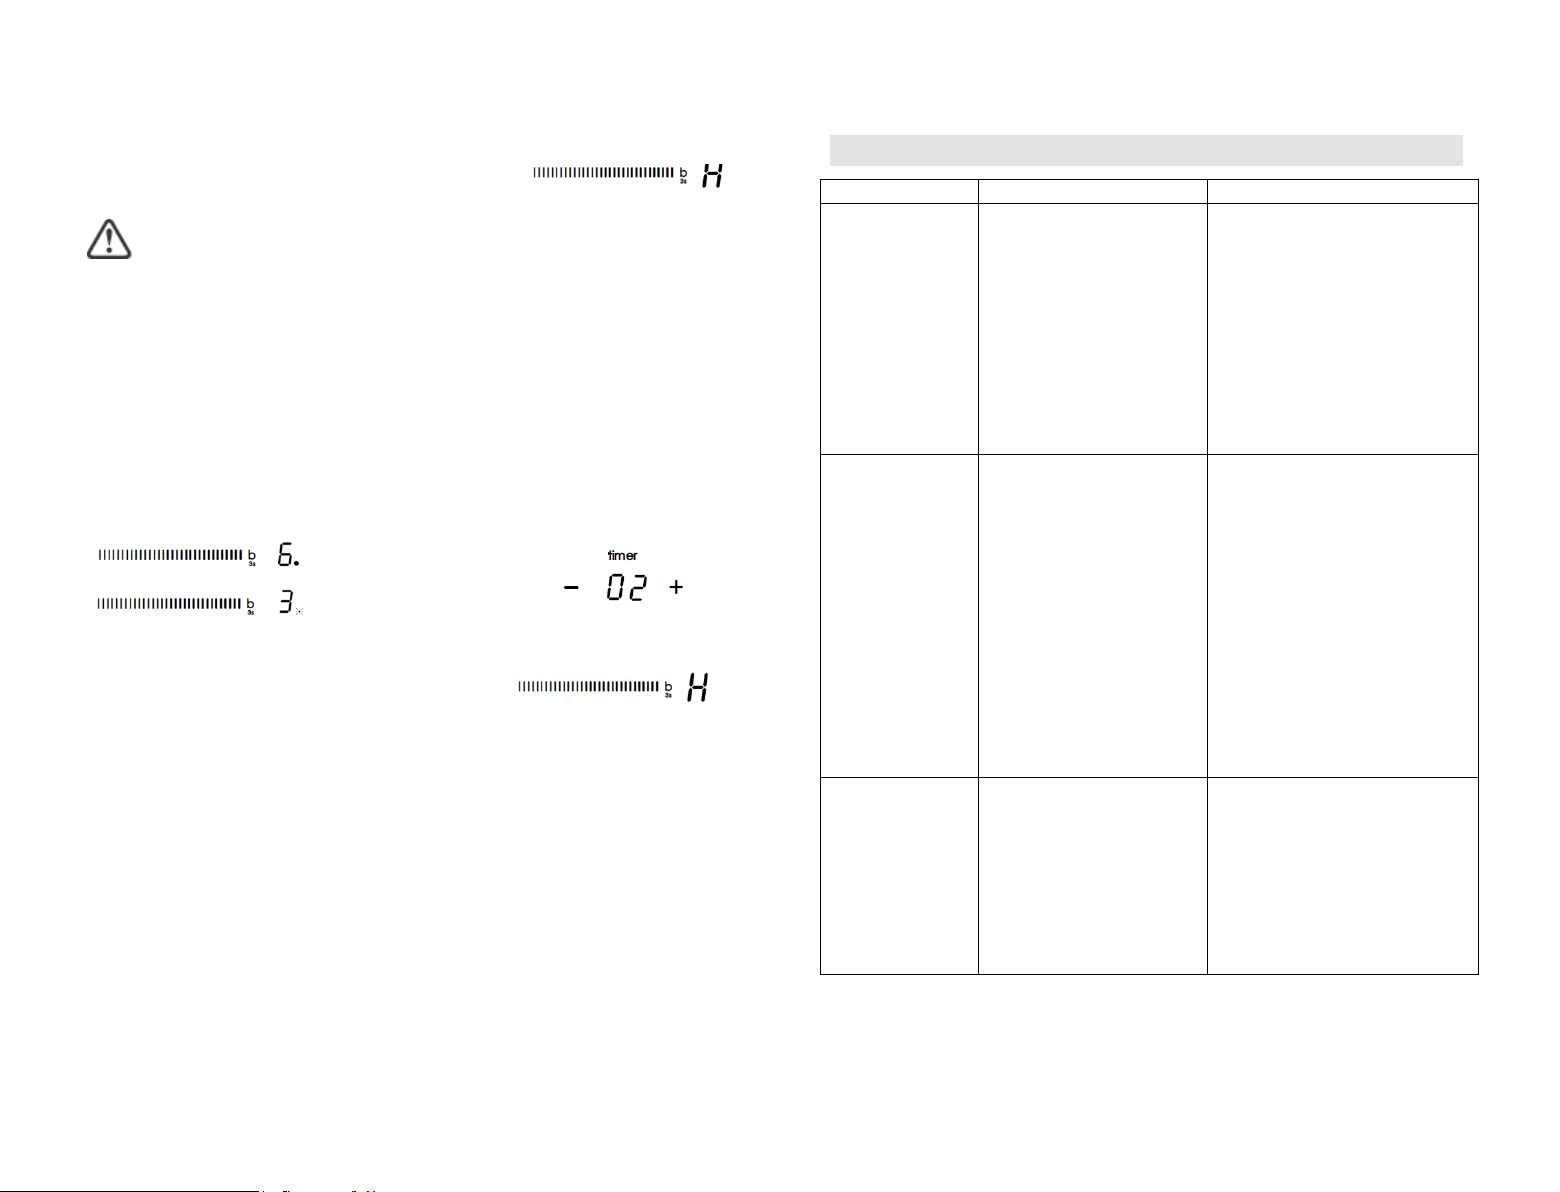
1. Turn the cooking zone off by slide along the “—” to the left point, and then hold
for 1 second.
Make sure the power display shows “0”, then shows “H”.
and then
3. Turn the whole cooktop off by touching the ON/OFF control.
4. Beware of hot surfaces
EN-13
‘H’ will show which cooking zone is hot to touch. It will disappear when the
surface has cooled down to a safe temperature. It can also be used as an
energy saving function if you want to heat further pans, use the hotplate that
is still hot.
In case of a power interruption while "H" is on, please pay attention to not touch
the cooking surface even if "H" is no longer shown when the power is back.
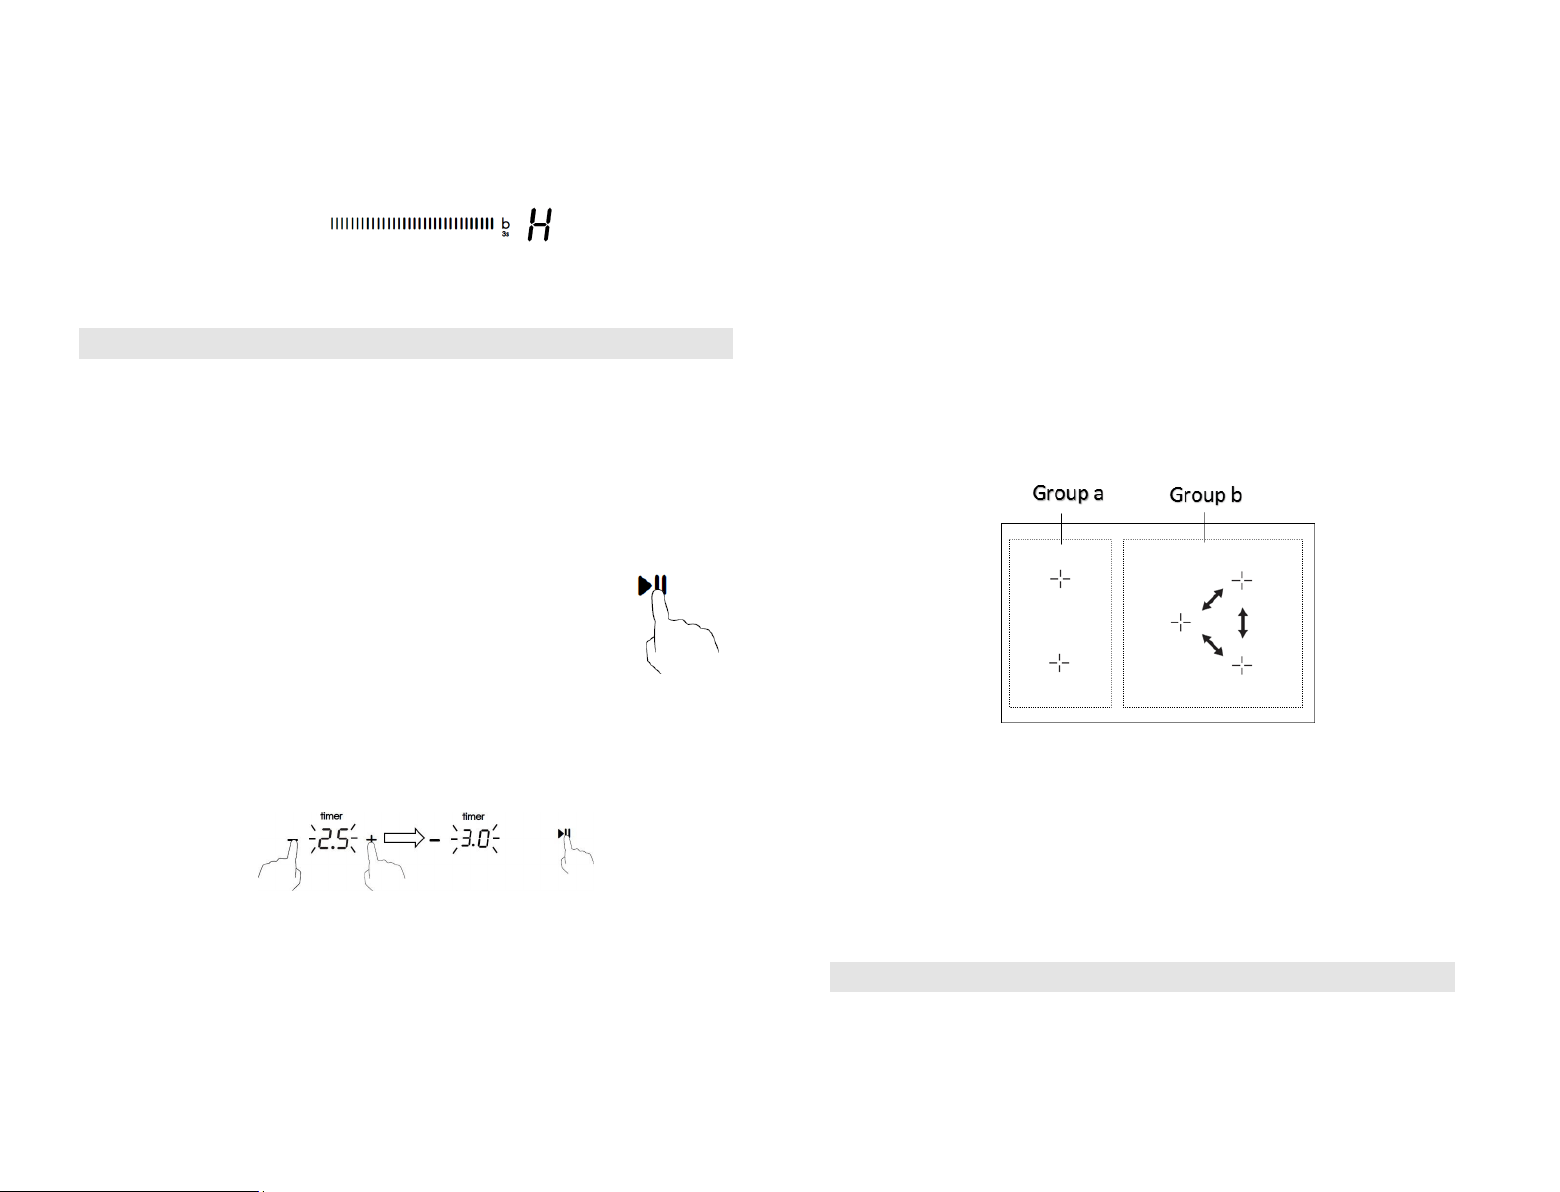
Using the Power Management
Using power management you can set the total power to 2.5kW/ 3.0kW/ 4.5kW/
6.5kW and 7.4kW. The default total power setting is the maximum power level.
Setting the total power level to fit your requirement
1. Make sure the cooktop is turned off.
Note: you can only set power management when the cooktop is turned off.
2. Touch the button “Pause function” and hold for 5 seconds.
You can hear the buzzer beeps one time.
3. After you hear the beep, touch “+” and “-” button at the same
time and hold for 3 second, the timer indicator will show flashing previous total
power level, e.g. ‘2.5’. Touch and hold ” +” and ”-” for 1 second again to switch to
other power level, for example 3.0. When the power that you want is flashing,
touch the button “Pause function” and hold for 5 seconds. The buzzer will beep 10
times. It means you have finished the setting.
Note:
1. After step 2, you must touch the “+” and “-” within 3 seconds after you hear
the beep. Otherwise you will need to start again from step 2.
2. Once finish setting, wait till the end of 10 beeps. Do not touch any button during
this period. Otherwise the setting will be invalid.
Power management Rules
EN-14
If total power exceeds the limitation of 2.5kw, 3.0kw, 4.5kw, 6.5kw,7.4kw
(depending on which level you’ve set), you are not able to increase power stage
of any zone.
If you increase it, the cooktop will beep 3 times and indicator will show a flashing
‘Pn’. Thus you need to decrease power stage of other zones before increasing the
power of objective zone.
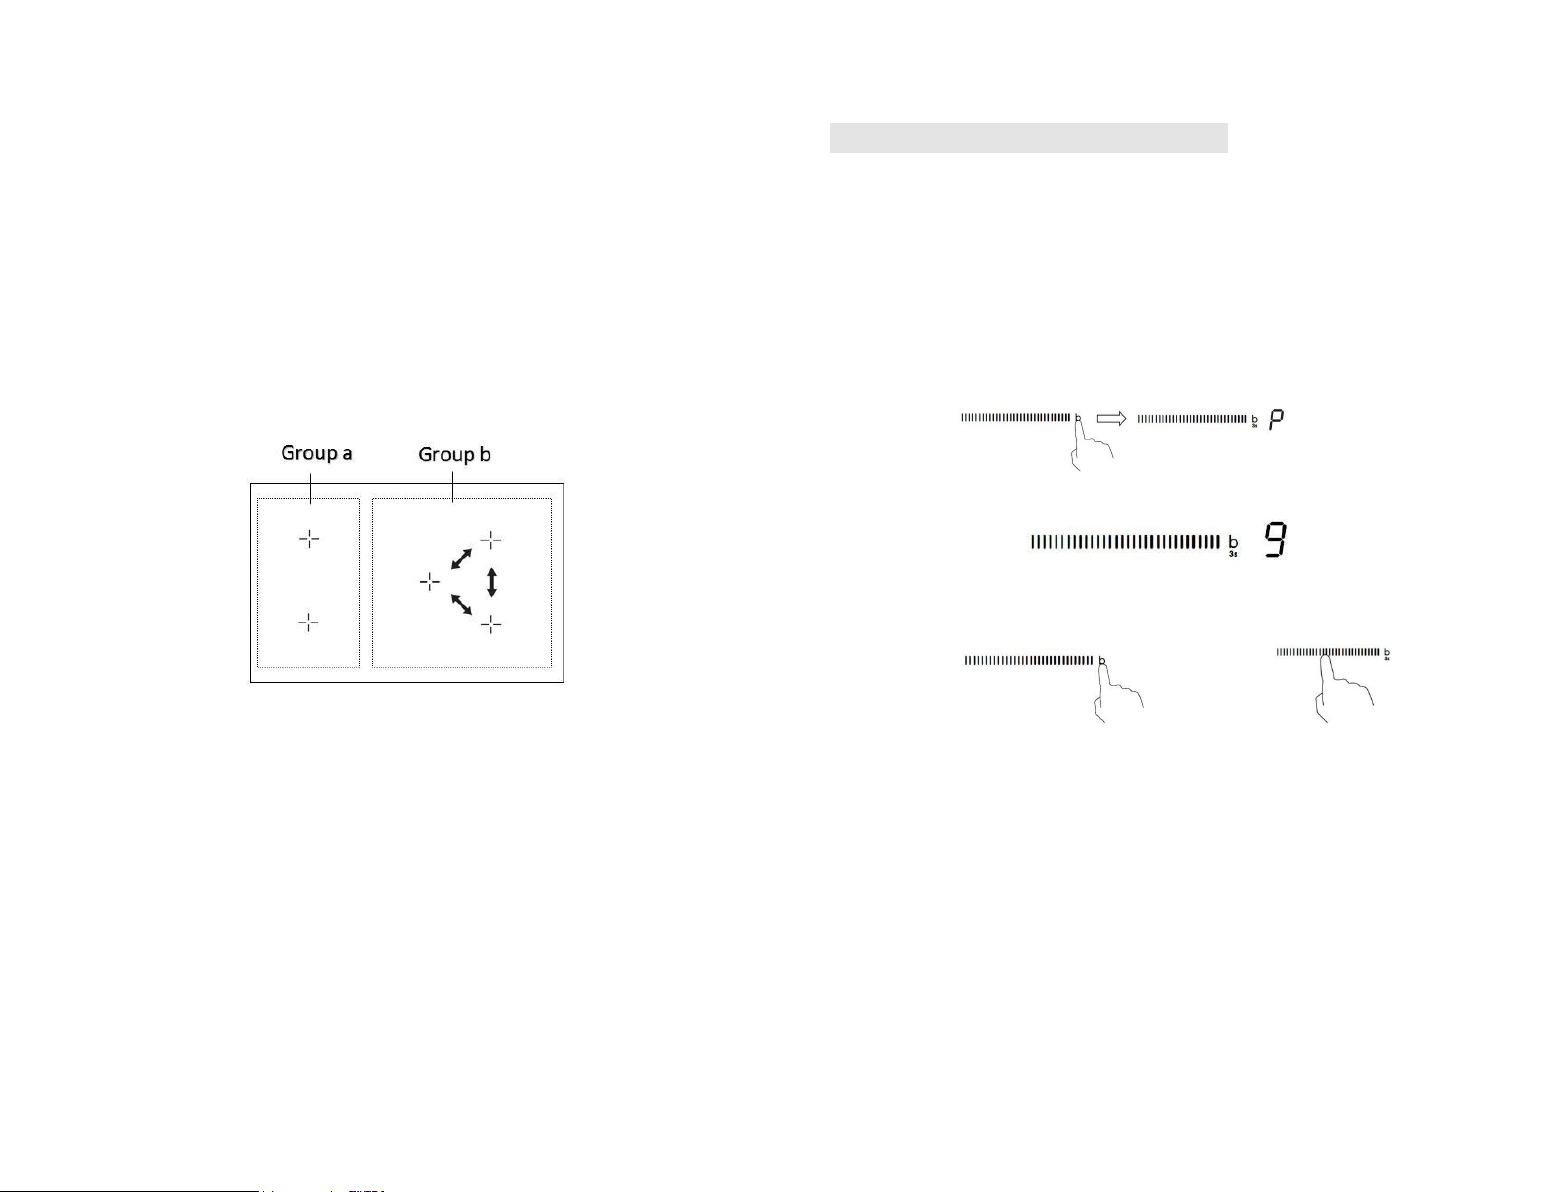
Power Limitation in centre and right zones
• Cooking zones are divided into two groups. Each group has a maximum
electricity loading of 3600 W.
• The limitation decreases the power to the other cooking zones.
• The heat setting display of the reduced zones changes between two levels.
e. g. if all zones are on, the biggest power level of three zones are decrease to
7-level, 7-level, 7-level.
In Group a both two zones can work at level 9 at the same time because they
are 3500 W in total.
In Group b if 3 zones are working, the max power level which each zone can
reach is 7. If the rear zone of the Group b is turned off, the other two zones can
reach at maximum power level 8.
If you want one of the zone of Group b works at the highest power level, only 2
zones should be tuned on. The hob automatically reduces the power of the first
zone you turned on.
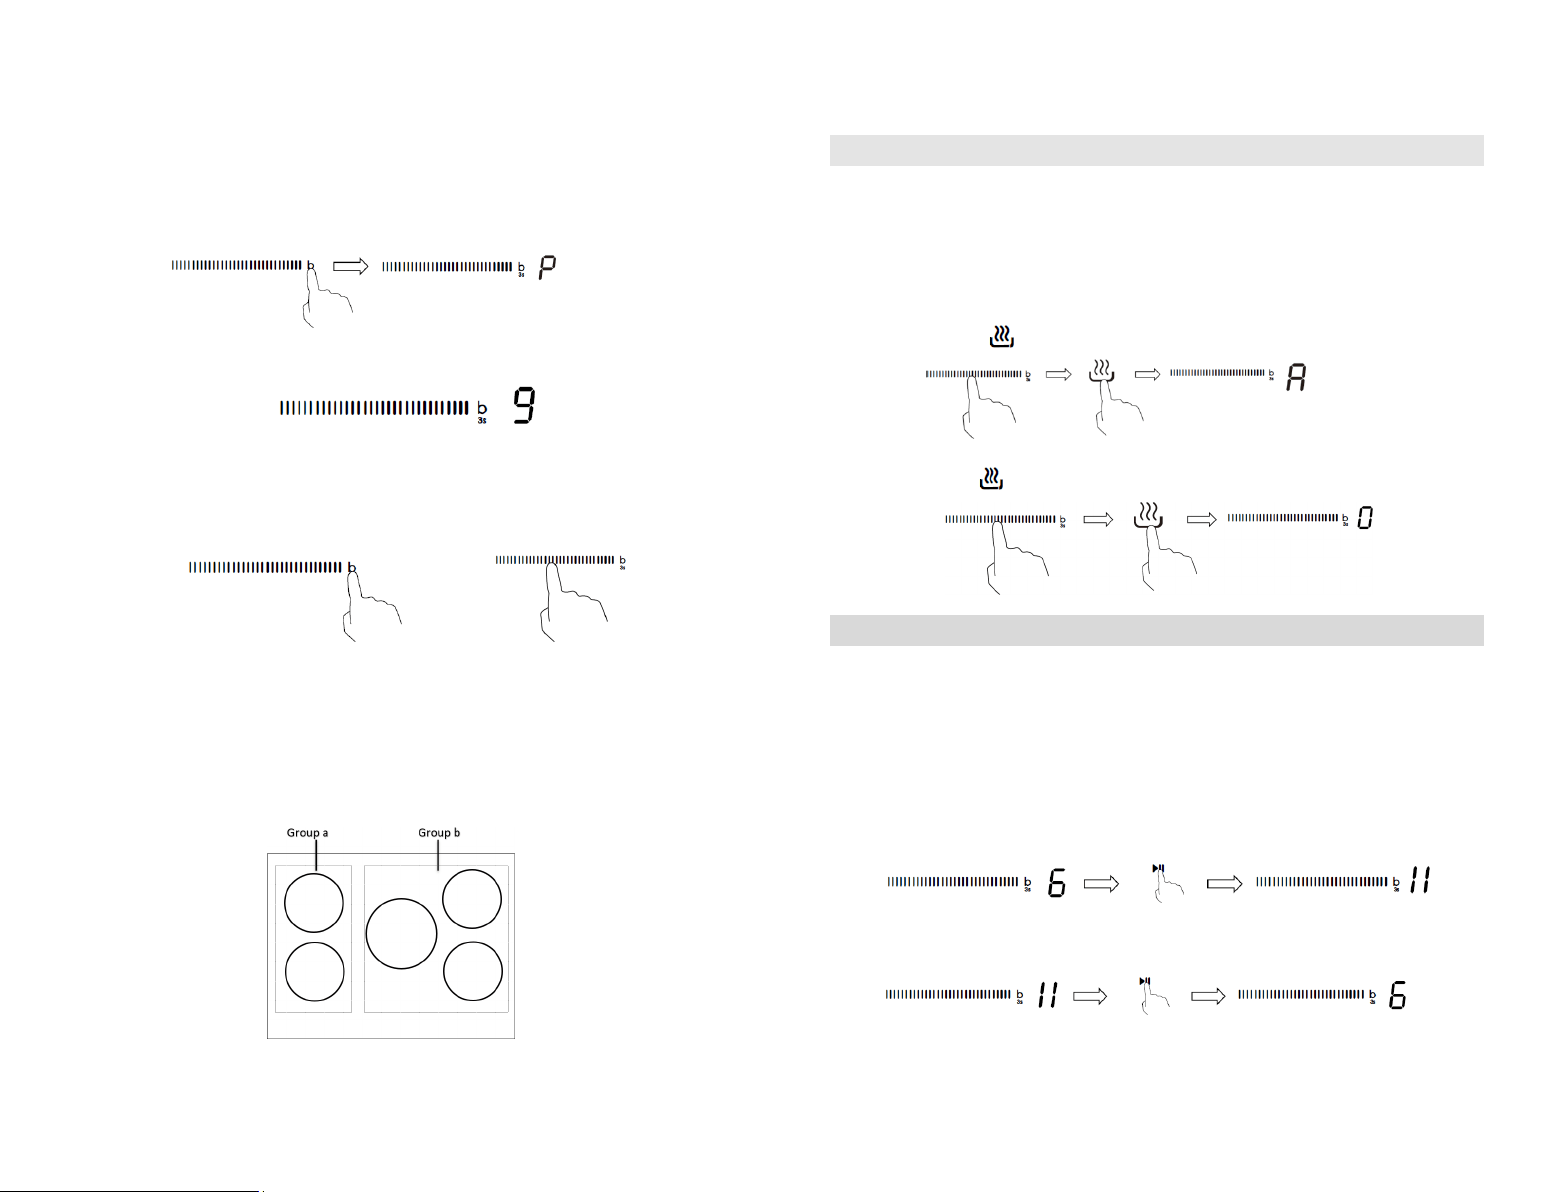
Using the Boost
Boost is the function that one zone rising to a larger power in one second and
EN-15
lasting for 5 minutes. Thus you can get a more powerful and faster cooking.
Using the Boost to get larger power
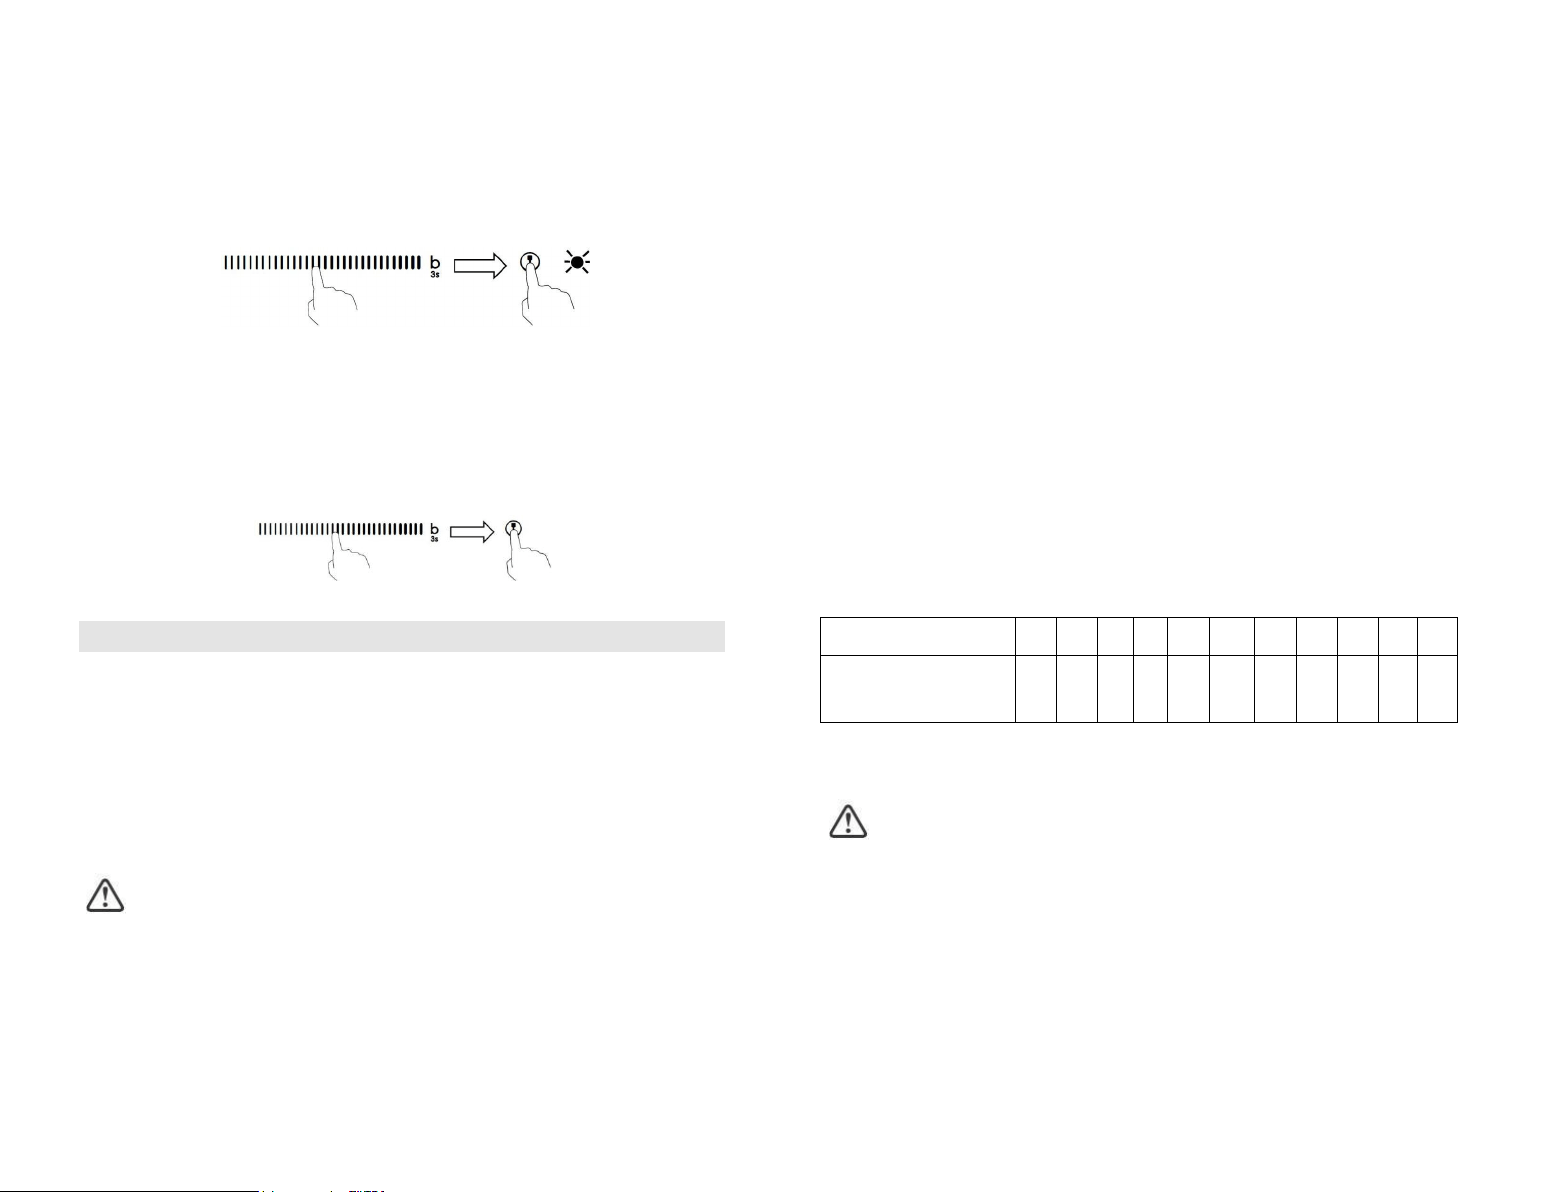
1. Touch the control panel button that you wish to boost, then hold the “b” for 3
second. The power display will show “P” to indicate that the zone is boosting.
2. The Boost power will last for 5 minutes and then the zone will go back to the “9”
power stage.
3. If you want to cancel the Boost during this 5 minutes, touch the “B” button for
twice. The heating zone will go back to “9” power stage. Or slide along the “—” to
the left point, the heating zone will go back to the power stage in which you
touched.
or
Restrictions when using
The five zones were divided into two groups. In one group, if use boost on one
zone, first make sure that the other zone is working on/below power level 5.
In Group b, if one zone is working at boost mode, at the same time there is only
one other zone can work.
EN-16
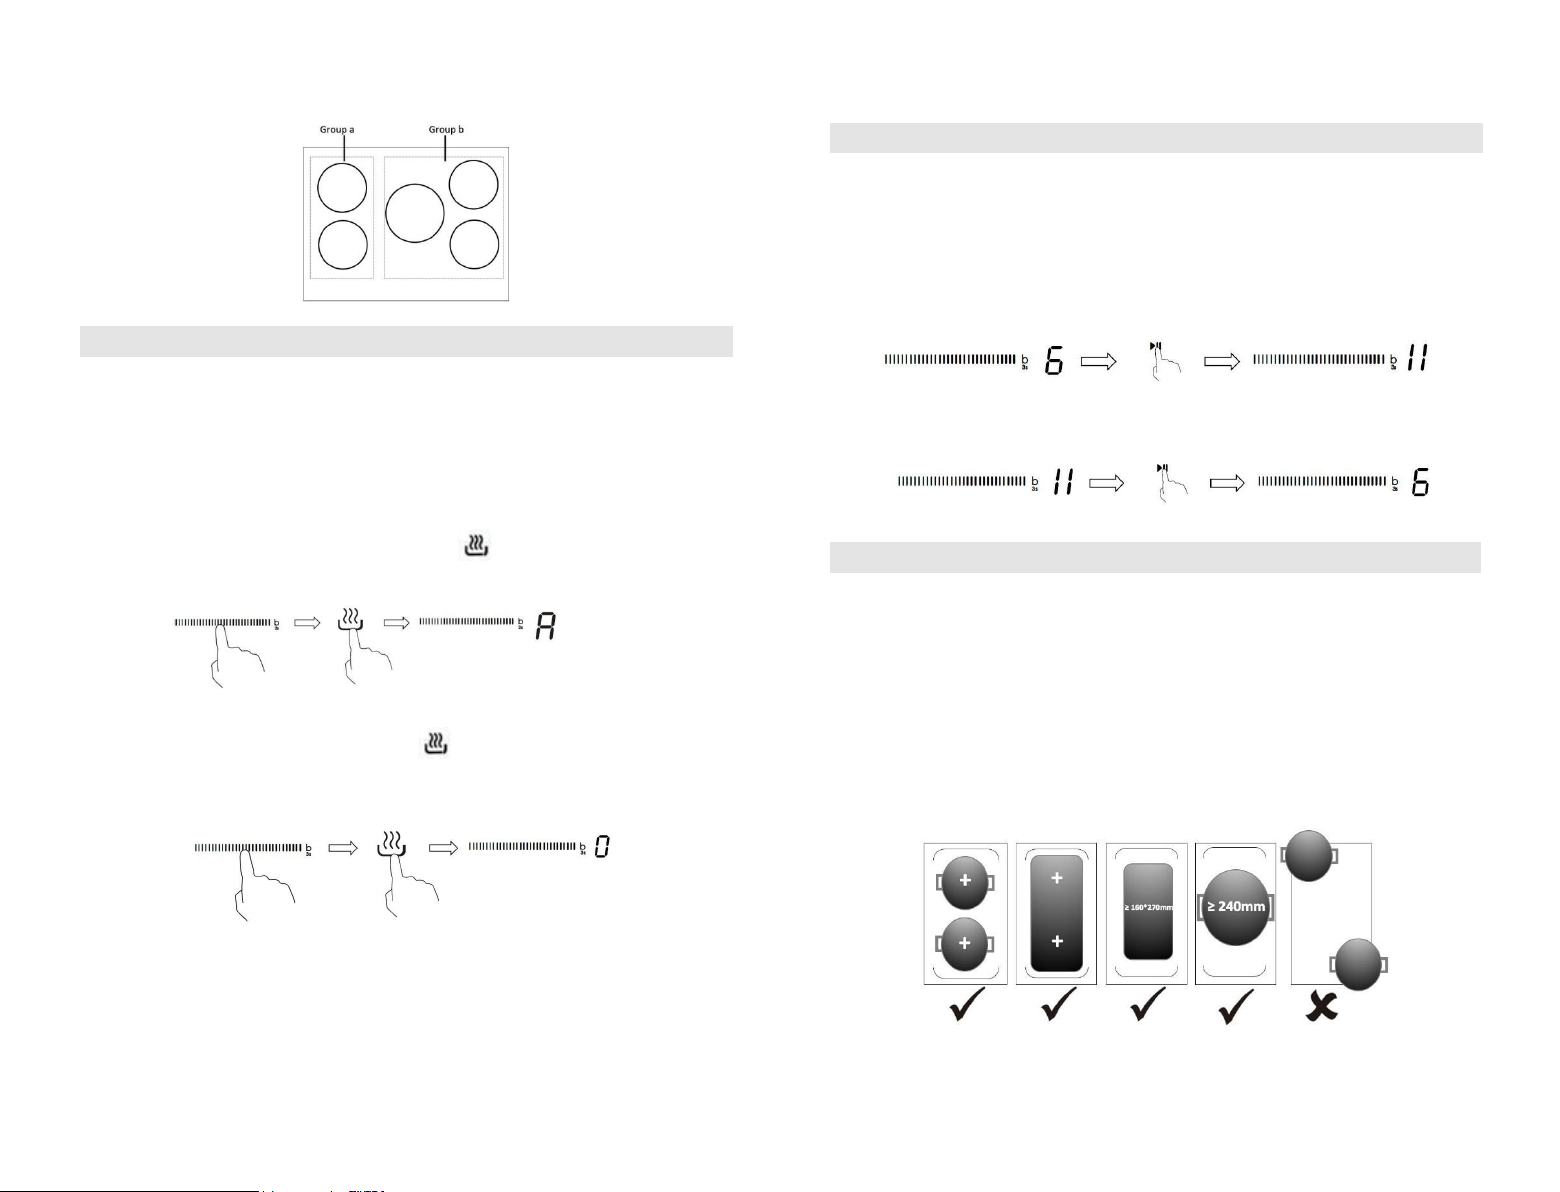
Using the Keep warm
Keep warm is the function that one zone keep a lower power to make the
temperature stable.
Using the Keep warm to get stable temperature
1. Touch the slider of the heating zone that you wish to keep warm, then touch the
keep warm button , the cooking zone indicator will display “A”.
2. If you want to cancel the keep warm, touch the slider of the heating zone, then
touch the button , the heating zone will go back to “0” power stage.
Using the Pause function
Pause function can be used at any time during cooking. It allows to stop the
induction cooktop and come back to it.
1. Make sure the cook zone is working.
2. Touch the button Pause function, the cooking zone indicator will show “ll”.
And then the operation of the induction cooktop will be deactivate within the scope
of all cooking zones, except the Pause , on/off and lock keys.
3. To cancel the pause status, touch the Pause function, then the cooking zone
will go back to the power stage which you set before.
times working default The cooking. your off turn to forget you ever if automatically
down shut It hob. induction your for function protection safety a is down shut Auto
Auto Shutdown Protection
a further 1 minute.
for hob induction the down cooking keep will fan The minute. 1 in standby to on go
automatically hob the hob, the on left been has key) fork, knife, (e.g. item small
magnetic pan (e.g. aluminium), or some other -When an unsuitable size or non
Detection of Small Articles
on). accidentally turning the cooking zones
You can lock the controls to prevent unintended use (for example children
• When the controls are locked, all the controls except the ON/OFF control are
disabled.
To lock the controls
Touch the keylock control. The timer indicator will show “ Lo “.
To unlock the controls
1. Make sure the Induction hob is turned on.
2. Touch and hold the keylock control for 3 seconds
3.
When the hob is in the lock mode, all the controls are disable except the ON/OFF,
you can always turn the induction hob off with the ON/OFF control in an emergency,
but you shall unlock the hob first in the next operation.
Over-Temperature Protection
A temperature sensor equipped can monitor the temperature inside the Induction
hob. When an excessive temperature is monitored, the Induction hob will stop
operation automatically.
Over-spillage Protection
Over-spillage protection is a safety protection function. It switch off the hob
automatically within 10s if the water flow to the control panel, while buzzer will
beep 1 second.
You can now start using your Induction hob.
•
Controls theLocking
button will disappear.
18-ENEN-17
Flex Zone
• This area can be used as a single zone or as two different zones, accordingly to
the cooking needs anytime.
• Flexible area is made of two independent inductors that can be controlled
separately.
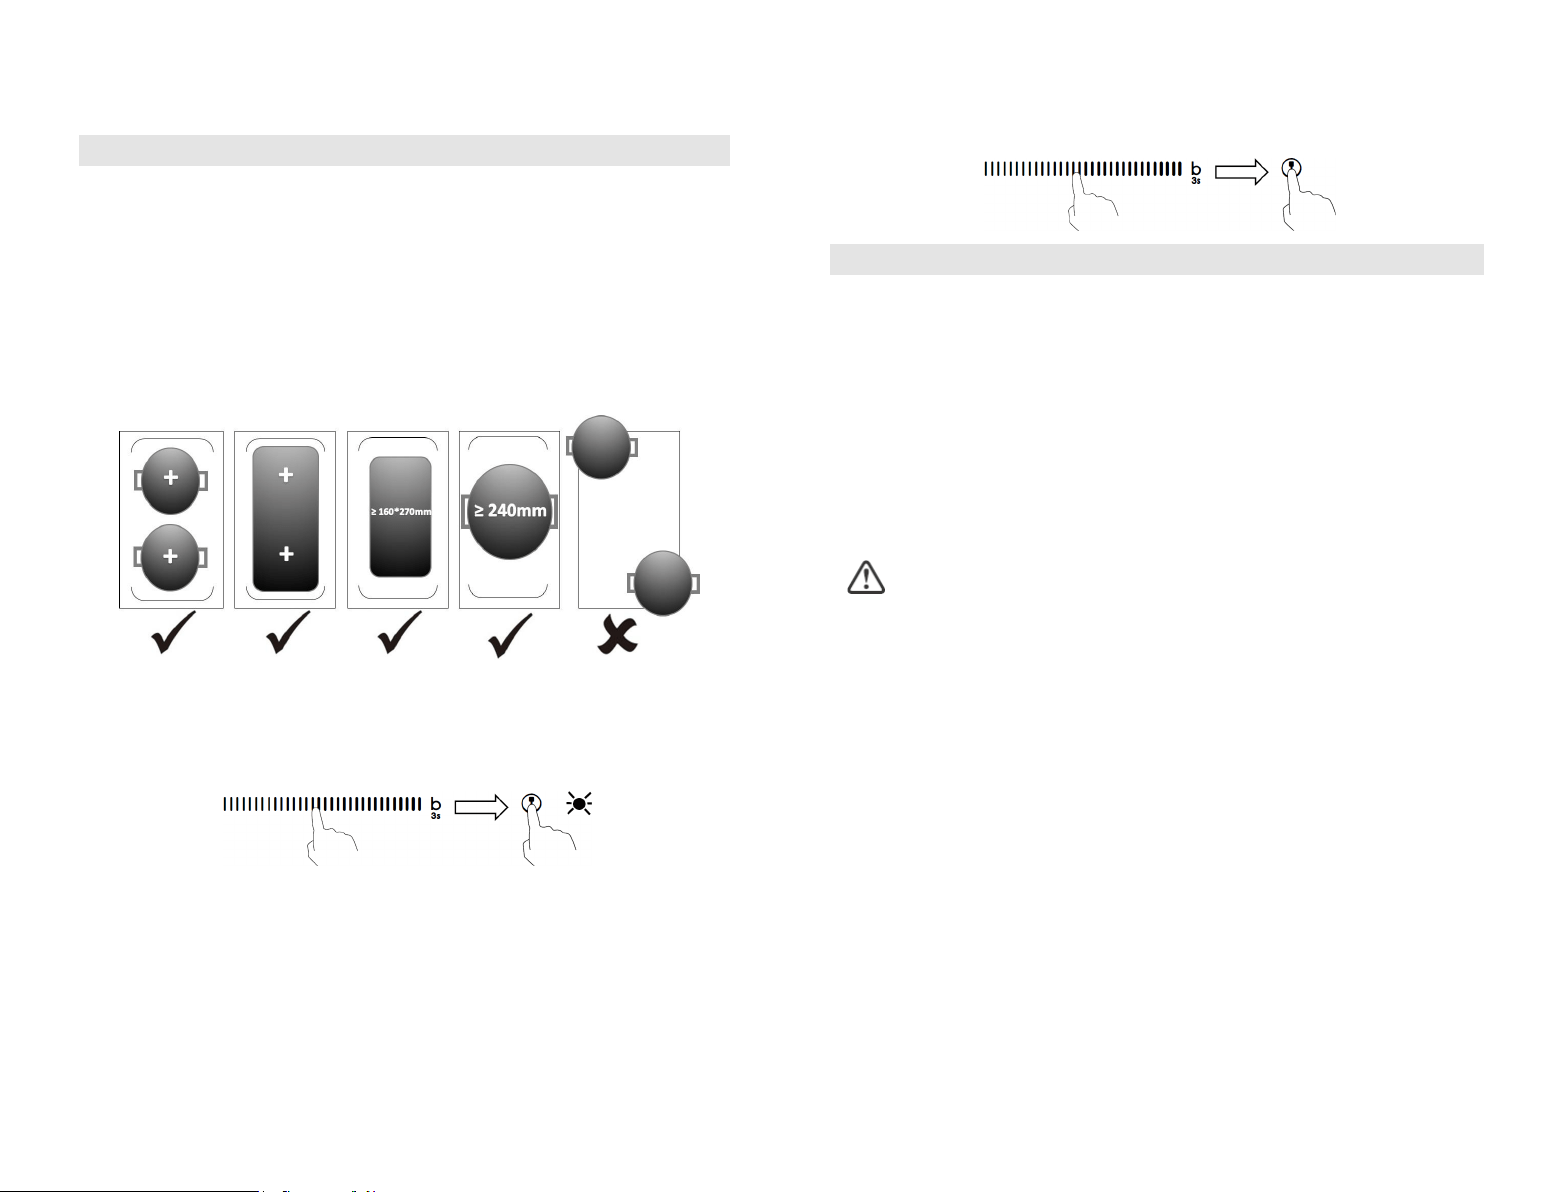
• Important: Make sure to place the cookwares centered on the single cooking
zone. In case of big pot, oval, rectangular and elongated pans make sure to place
the pans centered on the cooking zone covering both cross.
Examples for good and bad pot placements:
As big zone
1. Touch the slider of the heating zone (left side) that you wish to go into
flexizone, then touch the flex zone selection button to activate the flexible
area as a single big zone, the indicator next key will be on.
2. Touch the slide along the “—” control, or just touch any point of the “—” to
adjust the power level.
As two independent zones
1. If you want to cancel the flex zone, touch the slider of the heating zone again,
then touch the flex zone selection button, the indicator next to the flex zone

illuminate indicating that zone is selected.
NOTE: The red dot next to power level indicator will
seconds. flash for 5
indicator timer the and time remaining the show will display The
immediately. down count to begin will it set, is time the When 5.
”.--“ display, and then
’ or ‘+’of “Timer”, the timer is cancelled, and the “00” will show in the minute -‘
the touch then and control, selection the of slider the touch timer, the cancel To 4.
minute.
will automatically return to 0 If the setting time exceeds 99 minutes, the timer
minutes.
” or “+” control, the timer will decrease or increase by 10-Touch and hold the “
” or “+” control once will decrease or increase by 1 minute.-Hint: Touch the “
control. ” or “+”-y touching the “Set the time b 3.
for.
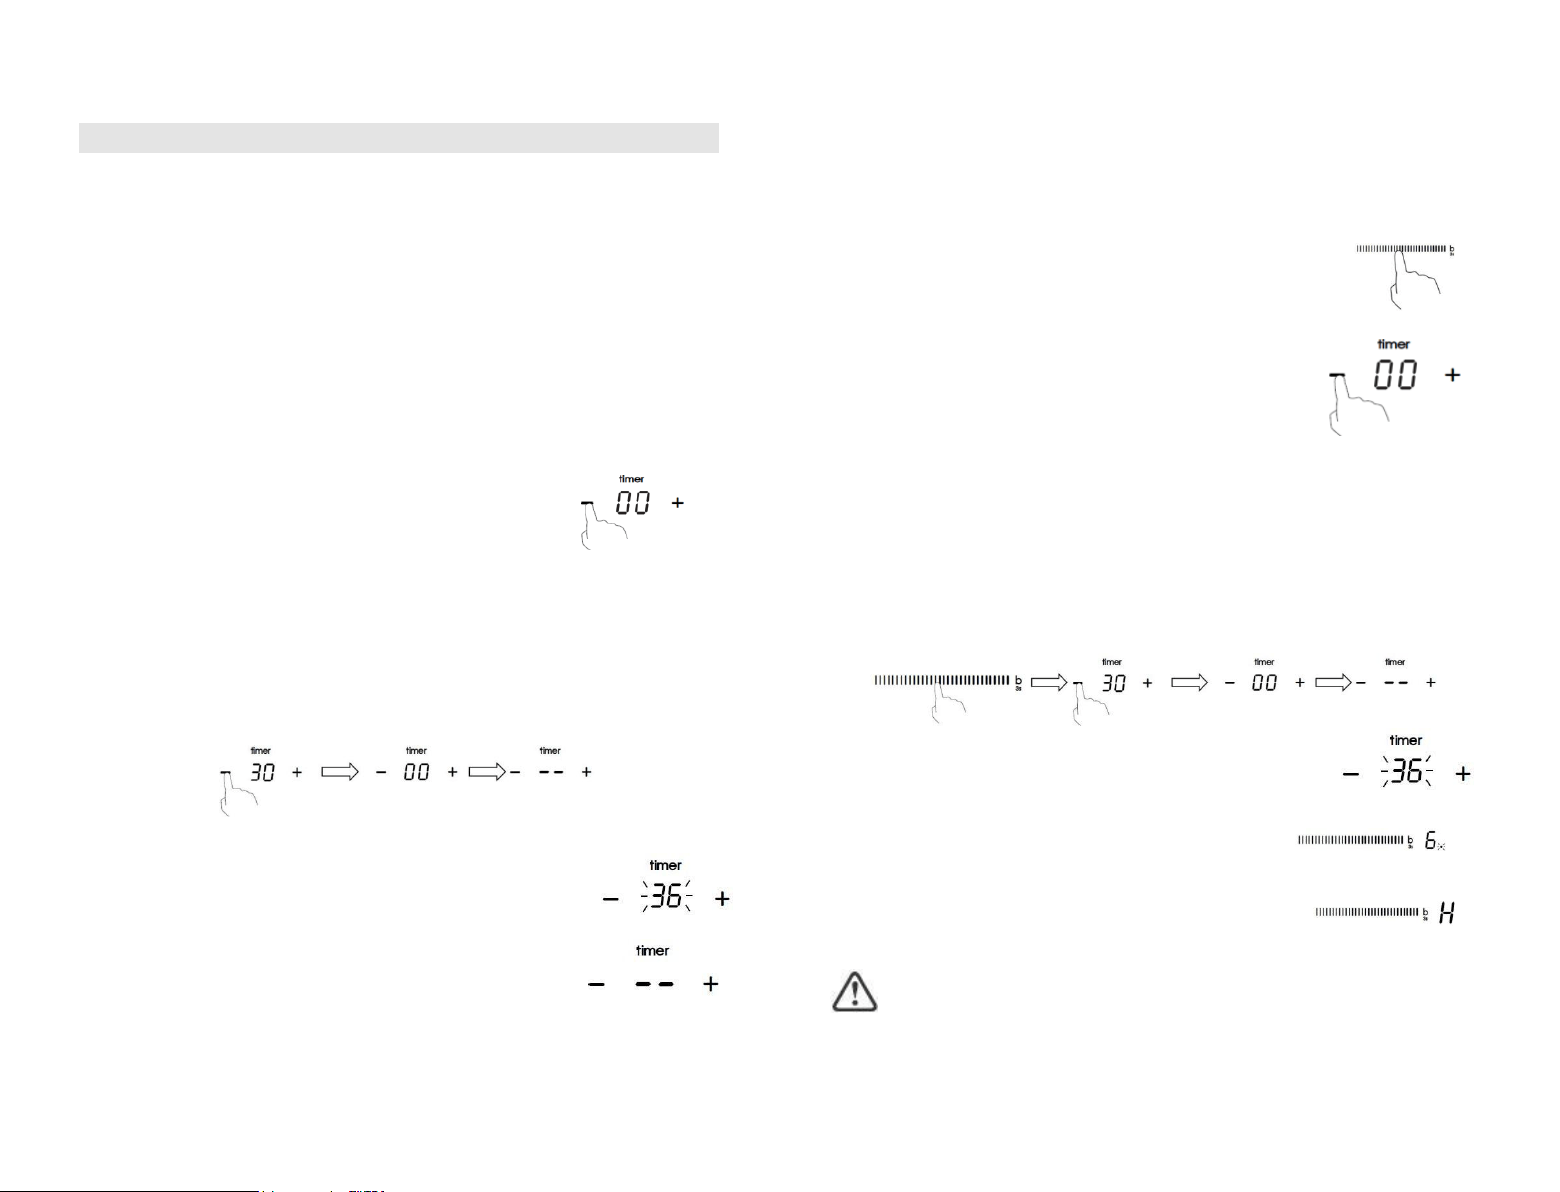
2. Touch “-’ or “+” of the timer control, the minder indicator
will start flashing and “00” will show in the timer display.
the timer
Touching the slider of the heating zone that you want to set 1.
Cooking zones set for this feature will:
Setting the timer to turn one cooking zone off
finished. “ when the setting time - -shows “
Buzzer will bips for 30 seconds and the timer indicator 6.
seconds. indicator will flash for 5
the timer and The display will show the remaining time
immediately. down count to begin will it set, is time the When 5.
20-ENEN-19
for various power levels are shown in the below table:
Power level 1 2 3 4 5 6 7 8 9 A II
Default working timer
(hour)
8 8 8 4 4 4 2 2 2 2 2
When the pot is removed, the induction hob can stop heating immediately and the
hob automatically switch off after 2 minutes.
People with a heart pace maker should consult with their doctor before
using this unit.
Using the Timer
You can use the timer in two different ways:
• You can use it as a minute minder. In this case, the timer will not turn any
cooking zone off when the set time is up.
• You can set it to turn one cooking zone off after the set time is up.
• You can set the timer up to 99 minutes
Using the Timer as a Minute Minder
If you are not selecting any cooking zone
1. Make sure the cooktop is turned on.
3. Set the time by touching the “-” or “+”
Note: you can use the minute minder even if you’re not
selecting any cooking zone.
2. Touch “-’ or “+” of the timer control, the minder indicator will
start flashing and “00” will show in the timer display.
control,
Hold the “-” or “+” control of the timer to decrease or increase by 10
minutes.
If the setting time exceeds 99 minutes, the timer will automatically return to 0
Hint: Touch the “-” or “+” control once to decrease or increase by 1 minute.
minute.
4. Cancel the time by touching the “-” of timer and scrolling down to “0”.
EN-21
6. When cooking timer expires, the corresponding
cooking zone will be automatically switch off and show
“H”.
Other cooking zone will keep operating if they are turned on previously.
Setting the timer to turn more than one cooking zone
off
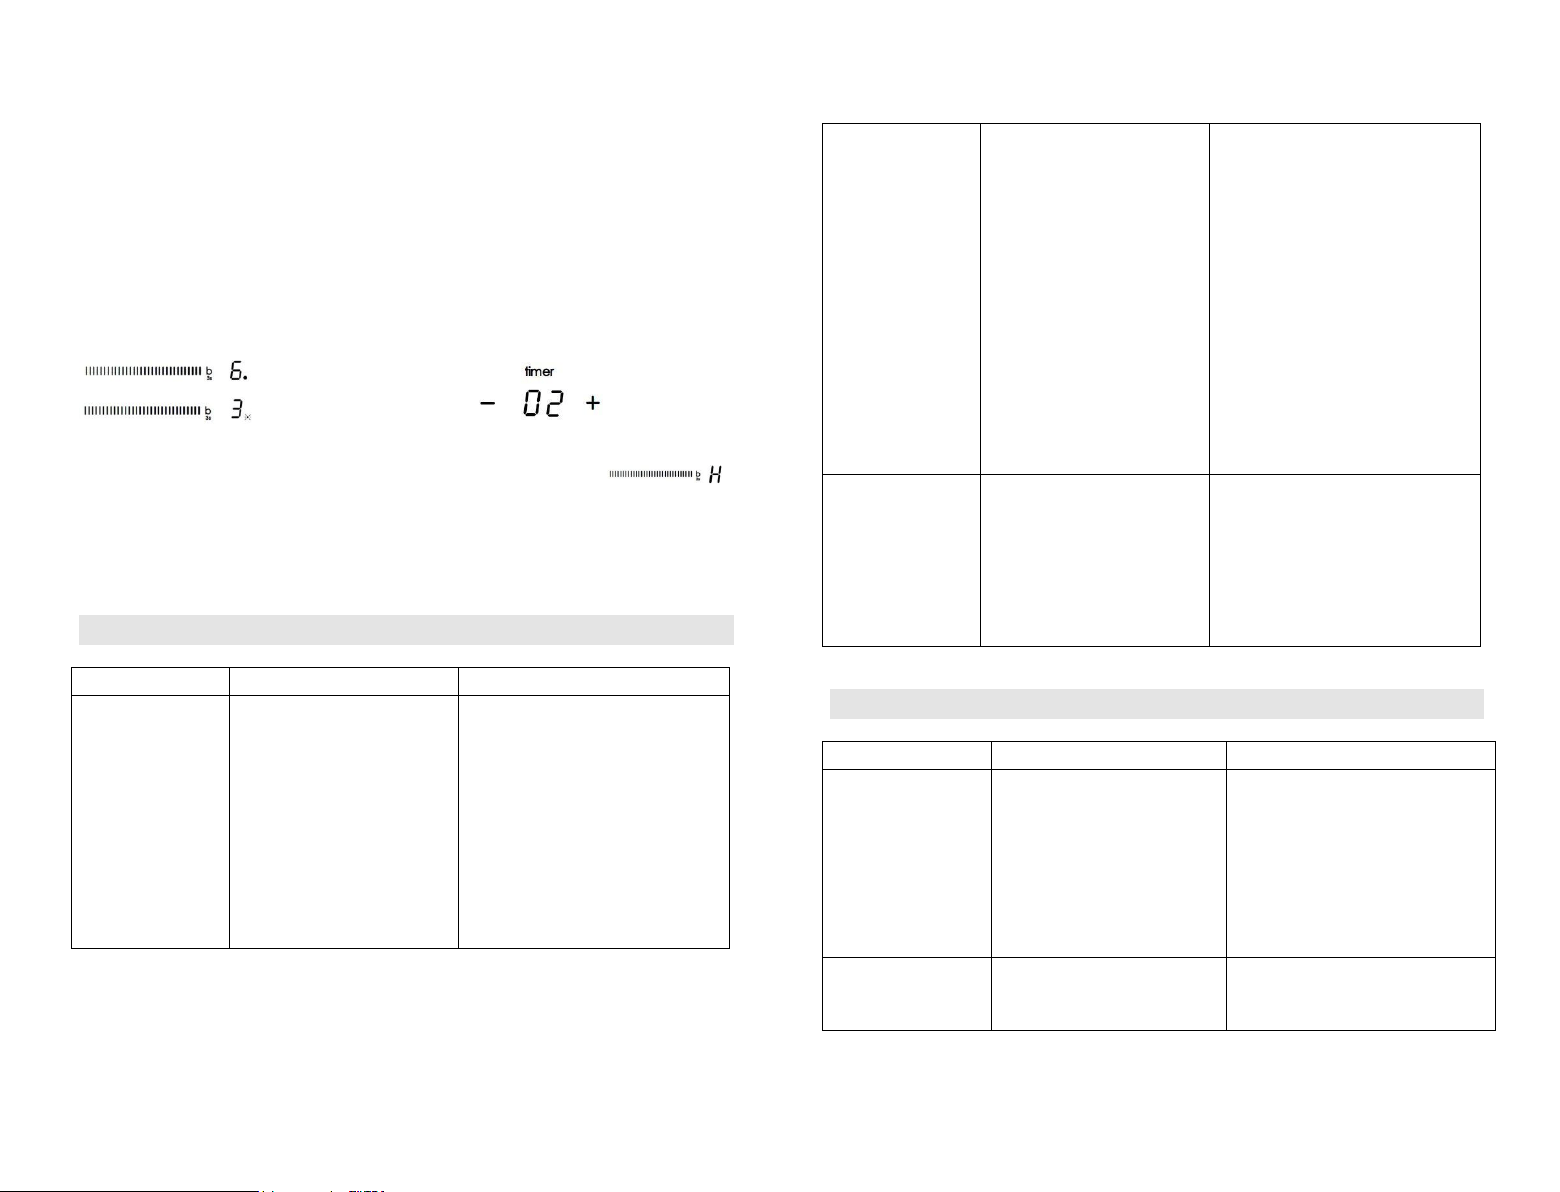
1. If use this function to more than one heating zone, the timer indicator will show
the shortest time.
(e.g. zone 1# setting time of 2 minutes, zone 2# setting time of 5 minutes,
the timer indicator shows “2”.)
NOTE: The flashing red dot next to power level indicator means the timer
indicator is showing time of the heating zone.
If you want to check the set time of other heating zone, touch the heating
zone slide control one time. The timer will indicate its set time.
(set to 5 minutes)
(set to 2 minutes)
2. When cooking timer expires, the corresponding heating zone will be
automatically switch off and show “H”.
NOTE: If you want to change the time after the timer is set, you have to start
from step 1
EN-22
Care and Cleaning
What?
How?
Important!
Everyday soiling on
glass (fingerprints,
marks, stains left by
food or non-sugary
spillovers on the
glass)
1. Switch the power to the
cooktop off.
2. Apply a cooktop cleaner
while the glass is still warm
(but not hot!)
3. Rinse and wipe dry with a
clean cloth or paper towel.
4. Switch the power to the
cooktop back on.
• When the power to the cooktop is
switched off, there will be no ‘hot
surface’ indication but the cooking
zone may still be hot! Take extreme
care.
• Heavy-duty scourers, some nylon
scourers and harsh/abrasive
cleaning agents may scratch the
glass. Always read the label to
check if your cleaner or scourer is
suitable.
• Never leave cleaning residue on the
cooktop: the glass may become
stained.
Boilovers, melts,
and
hot sugary spills on
the glass
Remove these immediately
with a fish slice, palette knife or
razor blade scraper suitable for
Induction glass cooktops, but
beware of hot cooking zone
surfaces:
1. Switch the power to the
cooktop off at the wall.
2. Hold the blade or utensil at a
30° angle and scrape the
soiling or spill to a cool area
of the cooktop.
3. Clean the soiling or spill up
with a dish cloth or paper
towel.
4. Follow steps 2 to 4 for
‘Everyday soiling on glass’
above.
• Remove stains left by melts and
sugary food or spillovers as soon
as possible. If left to cool on the
glass, they may be difficult to
remove or even permanently
damage the glass surface.
• Cut hazard: when the safety cover
is retracted, the blade in a scraper
is razor-sharp. Use with extreme
care and always store safely and
out of reach of children.
Spillovers on the
touch controls
1. Switch the power to the
cooktop off.
2. Soak up the spill
3. Wipe the touch control area
with a clean damp sponge or
cloth.
4. Wipe the area completely
dry
with a paper towel.
5. Switch the power to the
cooktop back on.
• The cooktop may beep and turn
itself off, and the touch controls
may not function while there is
liquid on them. Make sure you wipe
the touch control area dry before
turning the cooktop back on.
60Hz-240V~, 50-220
Supply Voltage
5 Zones
Cooking Zones
CIFS85MCTT/1
Cooking Hob
Specification Technical
to the induction hob.
Please do not disassemble the unit by yourself to avoid any dangers and damages
inspection of common failures.The above are the judgment and
cools down.
Please restart after the hob
temperature sensor
High temperature of the IGBT E5
Please contact the supplier.
coil temperature sensor
High temperature of the induction E3
supply is normal.
on after the powerPower
supply is normal.
Please inspect whether power Abnormal supply voltage E1/E2
Please contact the supplier.
failure.
Temperature sensor of the IGBT
F9/FA
Please contact the supplier.
induction coil failure
Temperature sensor of the F3/F4
What to do Possible causes Problem
automatically and display corresponding protective codes:
If an abnormality comes up, the induction hob will enter the protective state
Inspection Failure Display and
qualified technician.
off at the wall, and contact a
hob the power to the induction
letters and numbers, switch
Please note down the error Technical fault.
display).
in the cooking timer
with one or two digits
(typically alternating
code is displayed
sounds and an error
unexpectedly, a tone
turned itself off
has cooking zone
The induction hob or a
24-ENEN-23
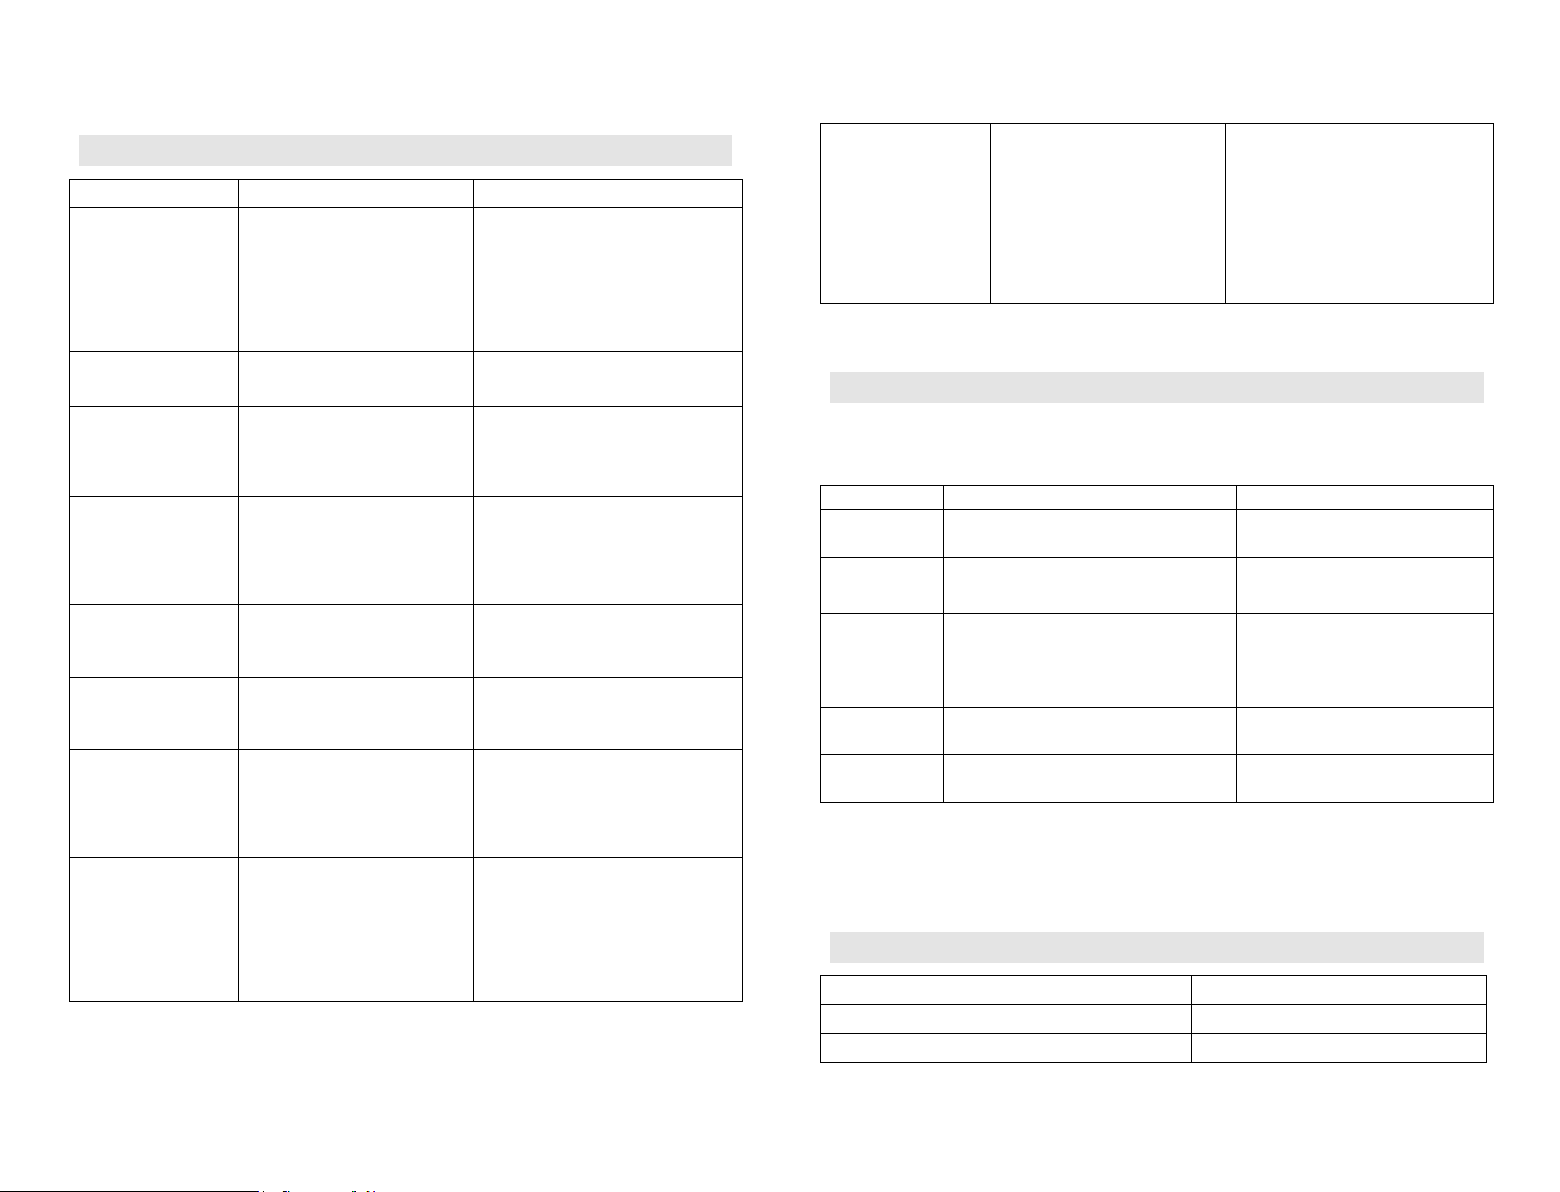
Hints and Tips
Problem Possible causes What to do
The induction hob
cannot be turned on.
No power. Make sure the induction hob is
connected to the power supply
and that it is switched on.
Check whether there is a power
outage in your home or area. If
you’ve checked everything and the
problem persists, call a qualified
technician.
The touch controls are
unresponsive.
The controls are locked.
Unlock the controls. See section
‘Using your induction cooktop’ for
instructions.
The touch controls are
difficult to operate.
There may be a slight film of
water over the controls or you
may be using the tip of your
finger when touching the
controls.
Make sure the touch control area is
dry and use the ball of your finger
when touching the controls.
The glass is being
scratched.
Rough-edged cookware.
Unsuitable, abrasive scourer or
cleaning products being used.
Use cookware with flat and smooth
bases. See ‘Choosing the right
cookware’.
See ‘Care and cleaning’.
Some pans make
crackling or clicking
noises.
This may be caused by the
construction of your cookware
(layers of different metals
vibrating differently).
This is normal for cookware and
does not indicate a fault.
The induction hob
makes a low humming
noise when used on
a high heat setting.
This is caused by the technology
of induction cooking.
This is normal, but the noise should
quieten down or disappear
completely when you decrease the
heat setting.
Fan noise coming from
the induction hob.
A cooling fan built into your
induction hob has come on to
prevent the electronics from
overheating. It may continue to
run even after you’ve turned the
induction hob off.
This is normal and needs no action.
Do not switch the power to the
induction hob off at the wall while the
fan is running.
Pans do not become
hot and appears in the
display.
The induction hob cannot
detect the pan because it is not
suitable for induction cooking.
The induction hob cannot detect
the pan because it is too small
for the cooking zone or not
properly centred on it.
Use cookware suitable for induction
cooking. See section ‘Choosing the
right cookware’.
Centre the pan and make sure that its
base matches the size of the cooking
zone.
EN-25
Installed Electric Power
2.5kw:2250-2750W or
3.0 kw:2700-3300W or
4.5kw:4050-4950W or
6.5kw:5850-7150W or
7.4kw:6600-7400W
Product Size L×W×H(mm)
770X520X60
Building-in Dimensions A×B (mm)
740X490
Weight and Dimensions are approximate. Because we continually strive to
improve our products we may change specifications and designs without prior
notice.
Installation
Selection of installation equipment
Cut out the work surface according to the sizes shown in the drawing.
For the purpose of installation and use, a minimum of 5 cm space shall be
preserved around the hole.
Be sure the thickness of the work surface is at least 30mm. Please select
heat-resistant work surface material to avoid larger deformation caused by the
heat radiation from the hotplate. As shown below:
L(mm)
W(mm)
H(mm)
D(mm)
A(mm)
B(mm)
X(mm)
770
520
60
56
740
+5
490
+5
50 mini
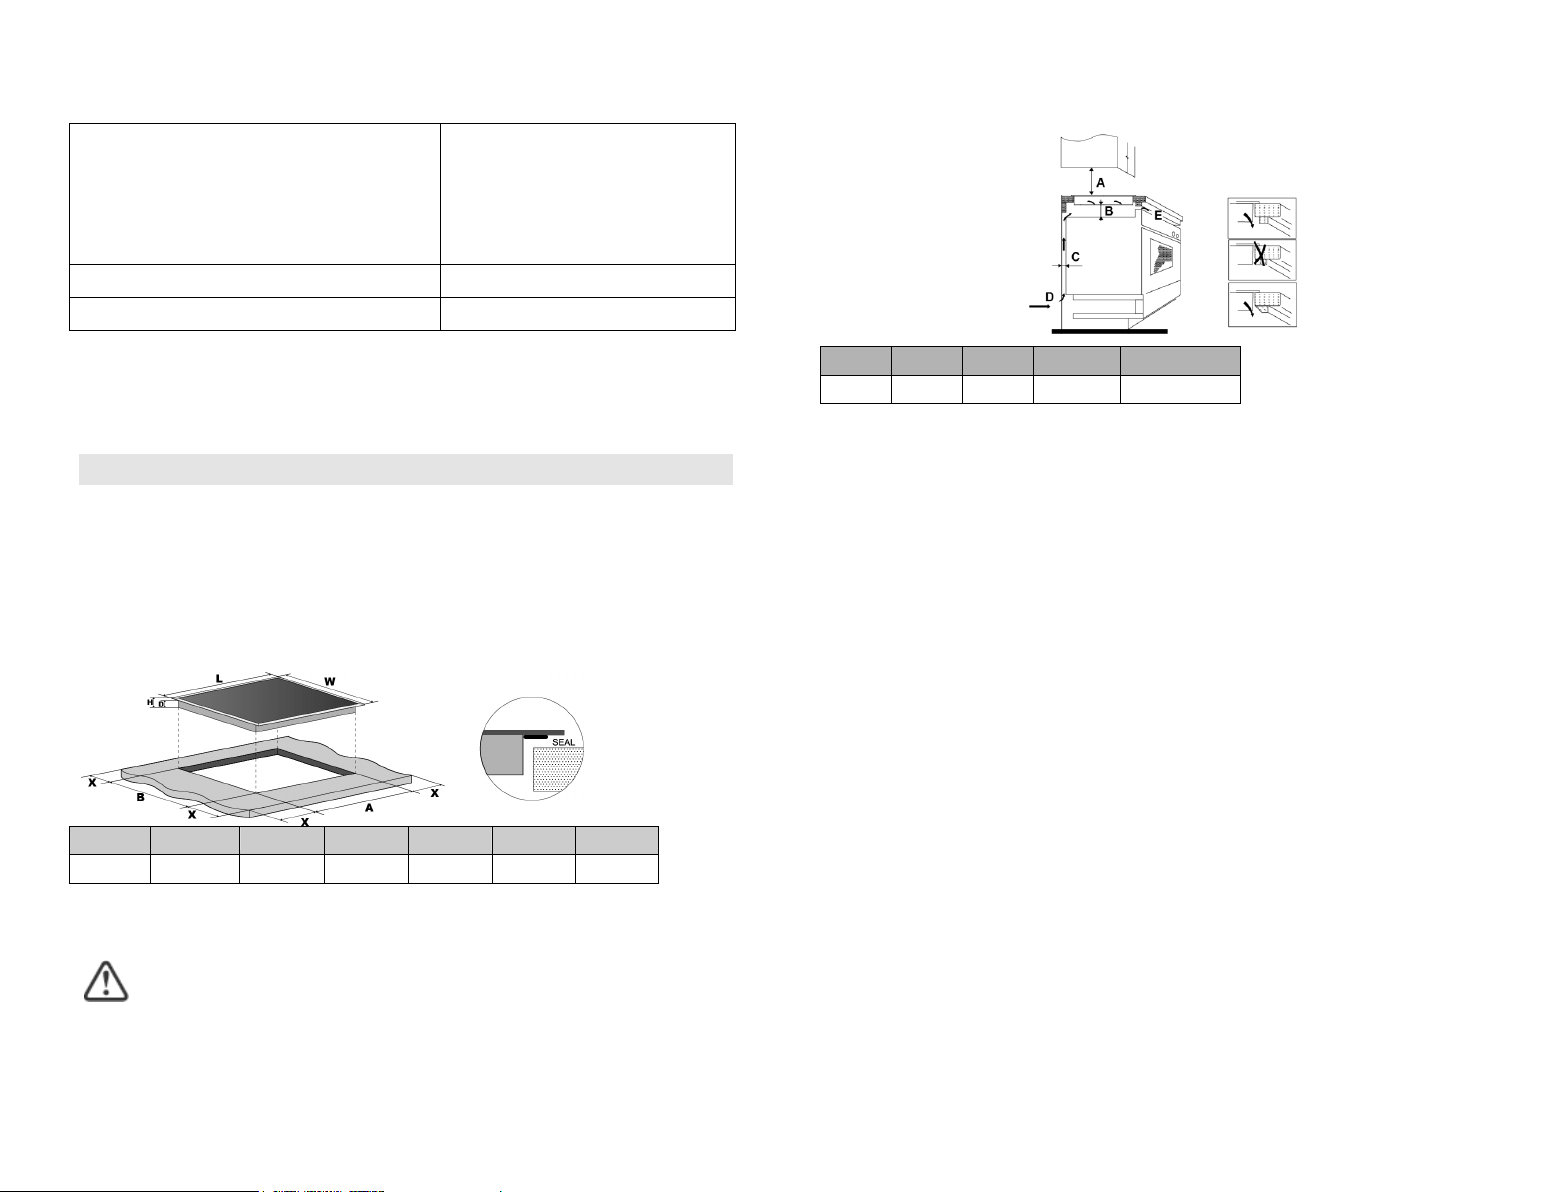
Under any circumstances, make sure the Induction cooker hob is well ventilated
and the air inlet and outlet are not blocked. Ensure the Induction cooker hob is in
good work state. As shown below
Note: The safety distance between the hotplate and the cupboard above
the hotplate should be at least 760mm.
EN-26
A(mm)
B(mm)
C(mm)
D
E
760
50 mini
20 mini
Air intake
Air exit 5mm
Before you install the hob, make sure that
• the work surface is square and level, and no structural members interfere with
space requirements
• the work surface is made of a heat-resistant material
• if the hob is installed above an oven, the oven has a built-in cooling fan
• the installation will comply with all clearance requirements and applicable
standards and regulations
• a suitable isolating switch providing full disconnection from the mains power
supply is incorporated in the permanent wiring, mounted and positioned to
comply with the local wiring rules and regulations.
The isolating switch must be of an approved type and provide a 3 mm air gap
contact separation in all poles (or in all active [phase] conductors if the local
wiring rules allow for this variation of the requirements)
• the isolating switch will be easily accessible to the customer with the hob
installed
• you consult local building authorities and by-laws if in doubt regarding
installation
• you use heat-resistant and easy-to-clean finishes (such as ceramic tiles) for the
wall surfaces surrounding the hob.
When you have installed the hob, make sure that
• the power supply cable is not accessible through cupboard doors or drawers
• there is adequate flow of fresh air from outside the cabinetry to the base of the
hob
• if the hob is installed above a drawer or cupboard space, a thermal protection
barrier is installed below the base of the hob
only.
technicians The cable must be checked regularly and replaced by authorised •
compressed. The cable must not be bent or •
regulations. and that it is compliant with safety
installer must ensure that the correct electrical connection has been made The •
contacts.
breaker must be installed with a minimum opening of 3mm between -circuit
If the appliance is being connected directly to the mains an omnipolar •
pole circuit breaker. The method of connection is shown below.-or a single
• If the cable is damaged or to be replaced, the operation must be carried out the
by after-sale agent with dedicated tools to avoid any accidents.
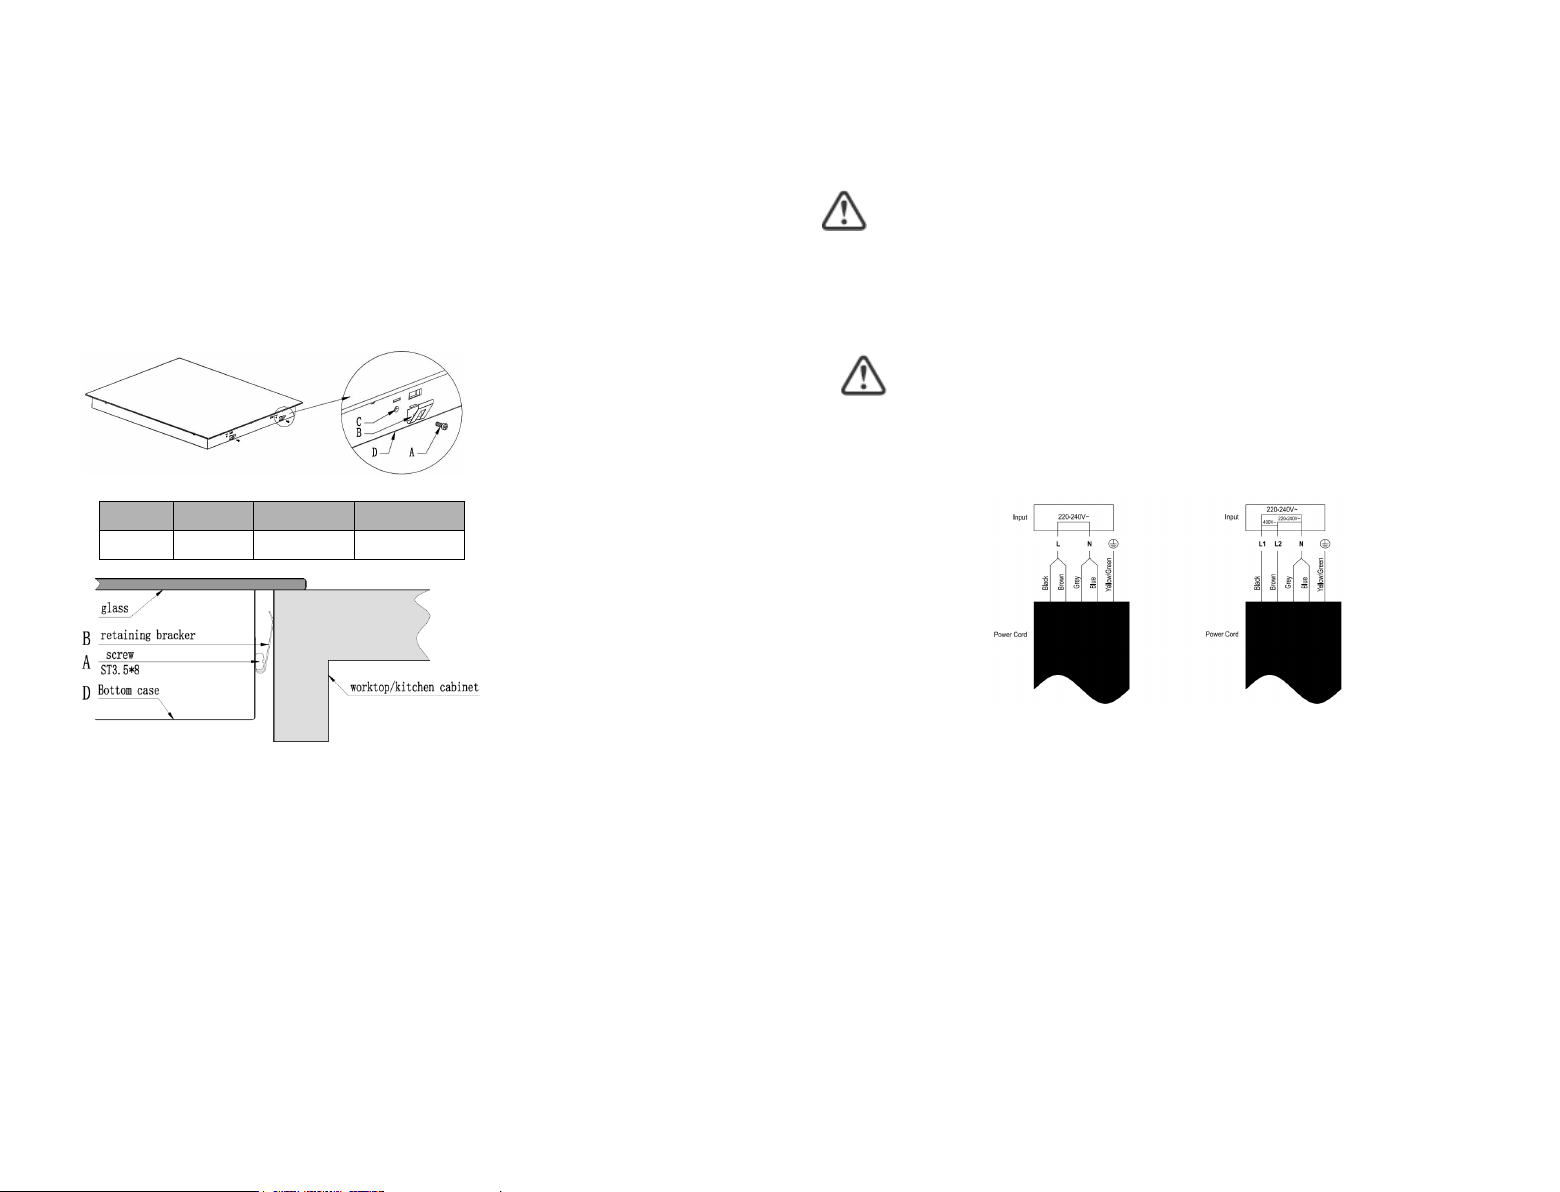
The power supply should be connected in compliance with the relevant standard,
electrician. must only be made by a qualifiedalterations. Any alterations
Check with an electrician whether the domestic wiring system is suitable without
temperature will not exceed 75˚C at any point.
The power supply cable must not touch any hot parts and must be positioned so that its
fire. devices, as they can cause overheating and
branching or reducers, adapters, use not do supply, power mains the to hob the connect To
the power supply cable sections can withstand the load specified on the rating plate. 3.
plate value given in the rating the voltage corresponds to the 2.
hob. the domestic wiring system is suitable for the power drawn by the 1.
that: Before connecting the hob to the mains power supply, check
person. qualified suitably a by only supply power mains the to connected be must hob This
Connecting the hob to the mains power supply
28-ENEN-27
• the isolating switch is easily accessible by the customer
Before locating the fixing brackets
The unit should be placed on a stable, smooth surface (use the packaging). Do not
apply force onto the controls protruding from the hob.
Adjusting the bracket position
Fix the hob on the work surface by screw 4 brackets on the bottom case of hob
(see picture) after installation.
A B C D
Screw Bracket Screw hole Bottom case
Cautions
1. The induction hotplate must be installed by qualified personnel or technicians.
We have professionals at your service. Please never conduct the operation by
yourself.
2. The hob will not be installed directly above a dishwasher, fridge, freezer,
washing machine or clothes dryer, as the humidity may damage the hob
electronics
3.The induction hotplate shall be installed such that better heat radiation can be
ensured to enhance its reliability.
4. The wall and induced heating zone above the table surface shall withstand heat.
5. To avoid any damage, the sandwich layer and adhesive must be resistant to
heat.
cm
-
W
L
Central left
cm
0,20
0,20
W
L
Rear right
cm
-
W
L
Rear central
cm
0,20
0,20
W
L
Rear left
nearest 5mm
or area, rounded to the cooking zone
surface area per electric heated
areas: length and width of useful
circular cooking zones or -For non
cm - Ø Front right
cm - Ø Front central
cm - Ø Front left
cm - Ø Central right
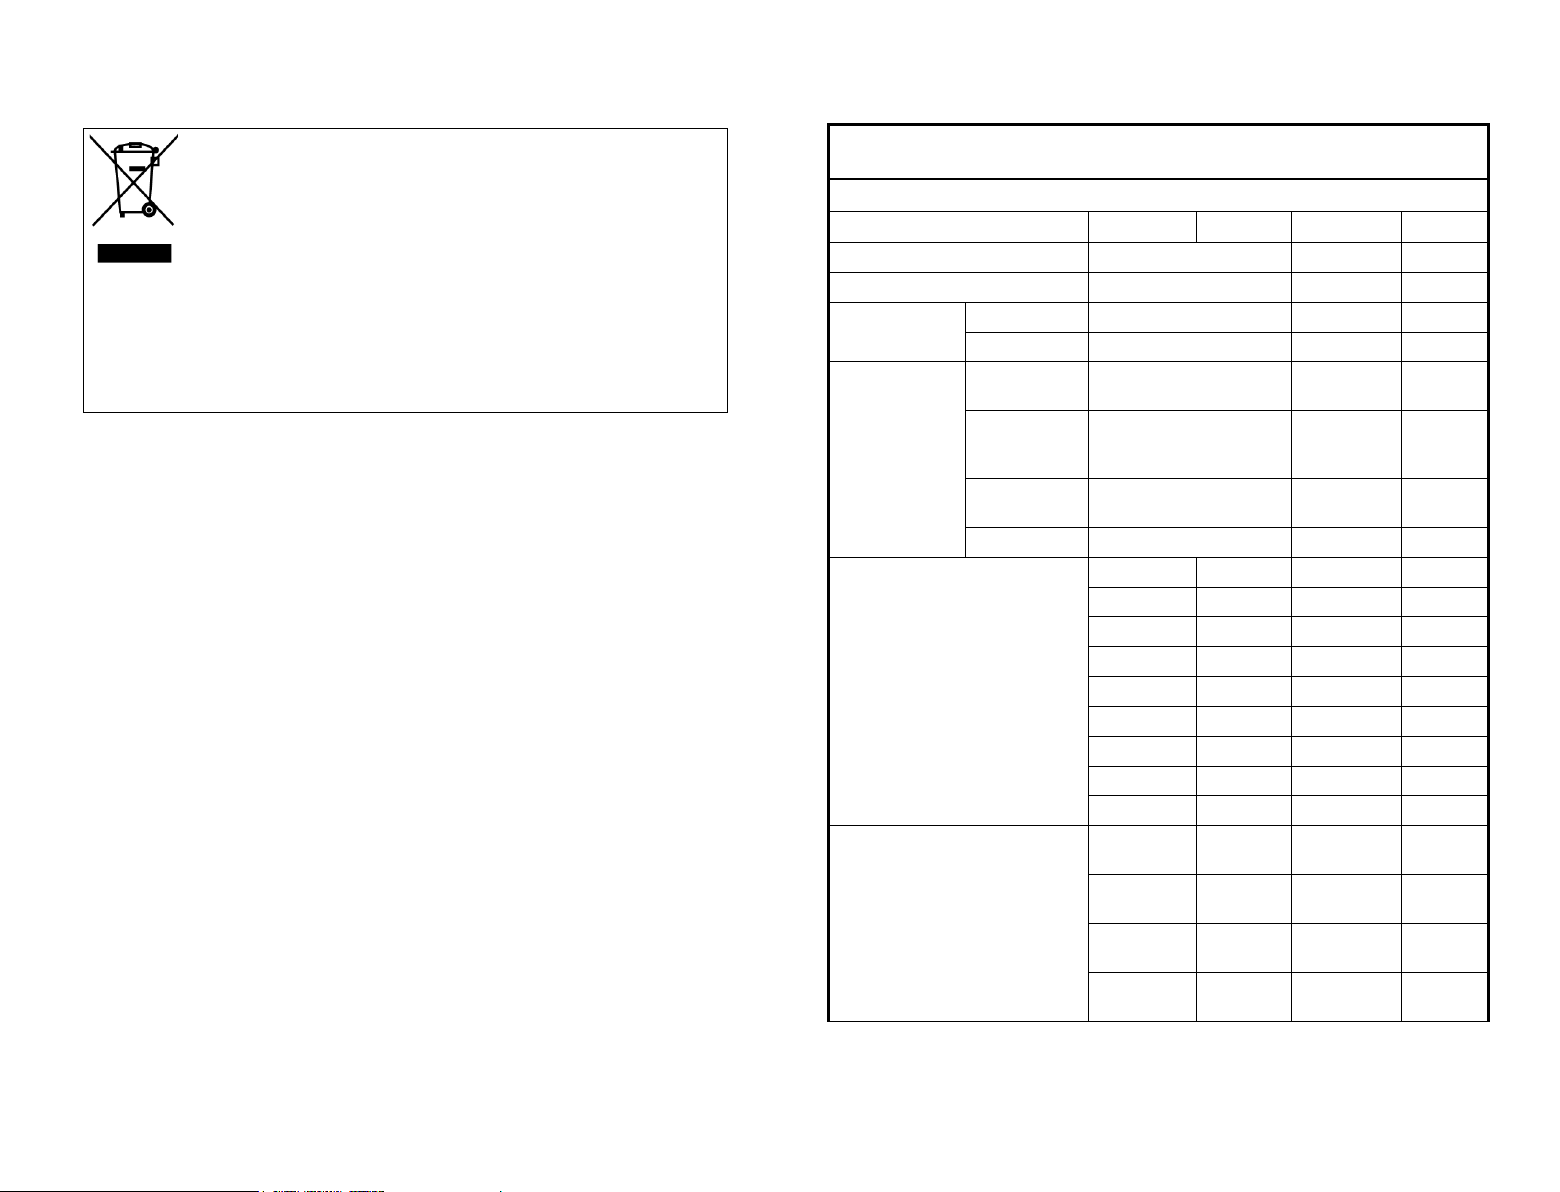
cm 21,0 Ø Central central
cm - Ø Central left
cm - Ø Rear right
cm - Ø Rear central
cm - Ø Rear left
5mm to the nearest
rounded
electric heated cooking zone,
diameter of useful surface area per
For circular cooking zones or areas:
solid plates
zones
radiant cooking
areas cooking
cooking
Induction
X
zones
cooking
Induction
plates)
solid
cooking zones,
areas, radiant
zones and cooking
(induction cooking
Heating technology
areas
5
zones
zones and/or areas
Number of cooking
Electric Hob
Type of hob:
CIFS85MCTT/1
Model identification
Unit Value Symbol Position
66/2014
Product Information for Domestic Electric Hobs Compliant to Commission Regulation (EU) No
30-ENEN-29
This appliance is labelled in accordance with European Directive 2012/19/EU
regarding electric and electronic appliances (WEEE). The WEEE contain both
polluting substances (that can have a negative effect on the environment) and
base elements (that can be reused). It is important that the WEEE undergo
specific treatments to correctly remove and dispose of the pollutants and
recover all the materials. Individuals can play an important role in ensuring
that the WEEE do not become an environmental problem; It is essential to
follow a few basic rules:
-the WEEE should not be treated as domestic waste;
-the WEEE should be taken to dedicated collection areas managed by the town council or a
registered company.
In many countries, domestic collections may be available for large WEEEs. When you buy a
new appliance, the old one can be returned to the vendor who must accept it free of charge as
a one-off, as long as the appliance is of an equivalent type and has the same functions as the
purchased appliance.
EN-31
Central central
L
W
-
cm
Central right
L
W
-
cm
Front left
L
W
20,0
20,0
cm
Front central
L
W
-
cm
Front right
L
W
20,0
20,0
cm
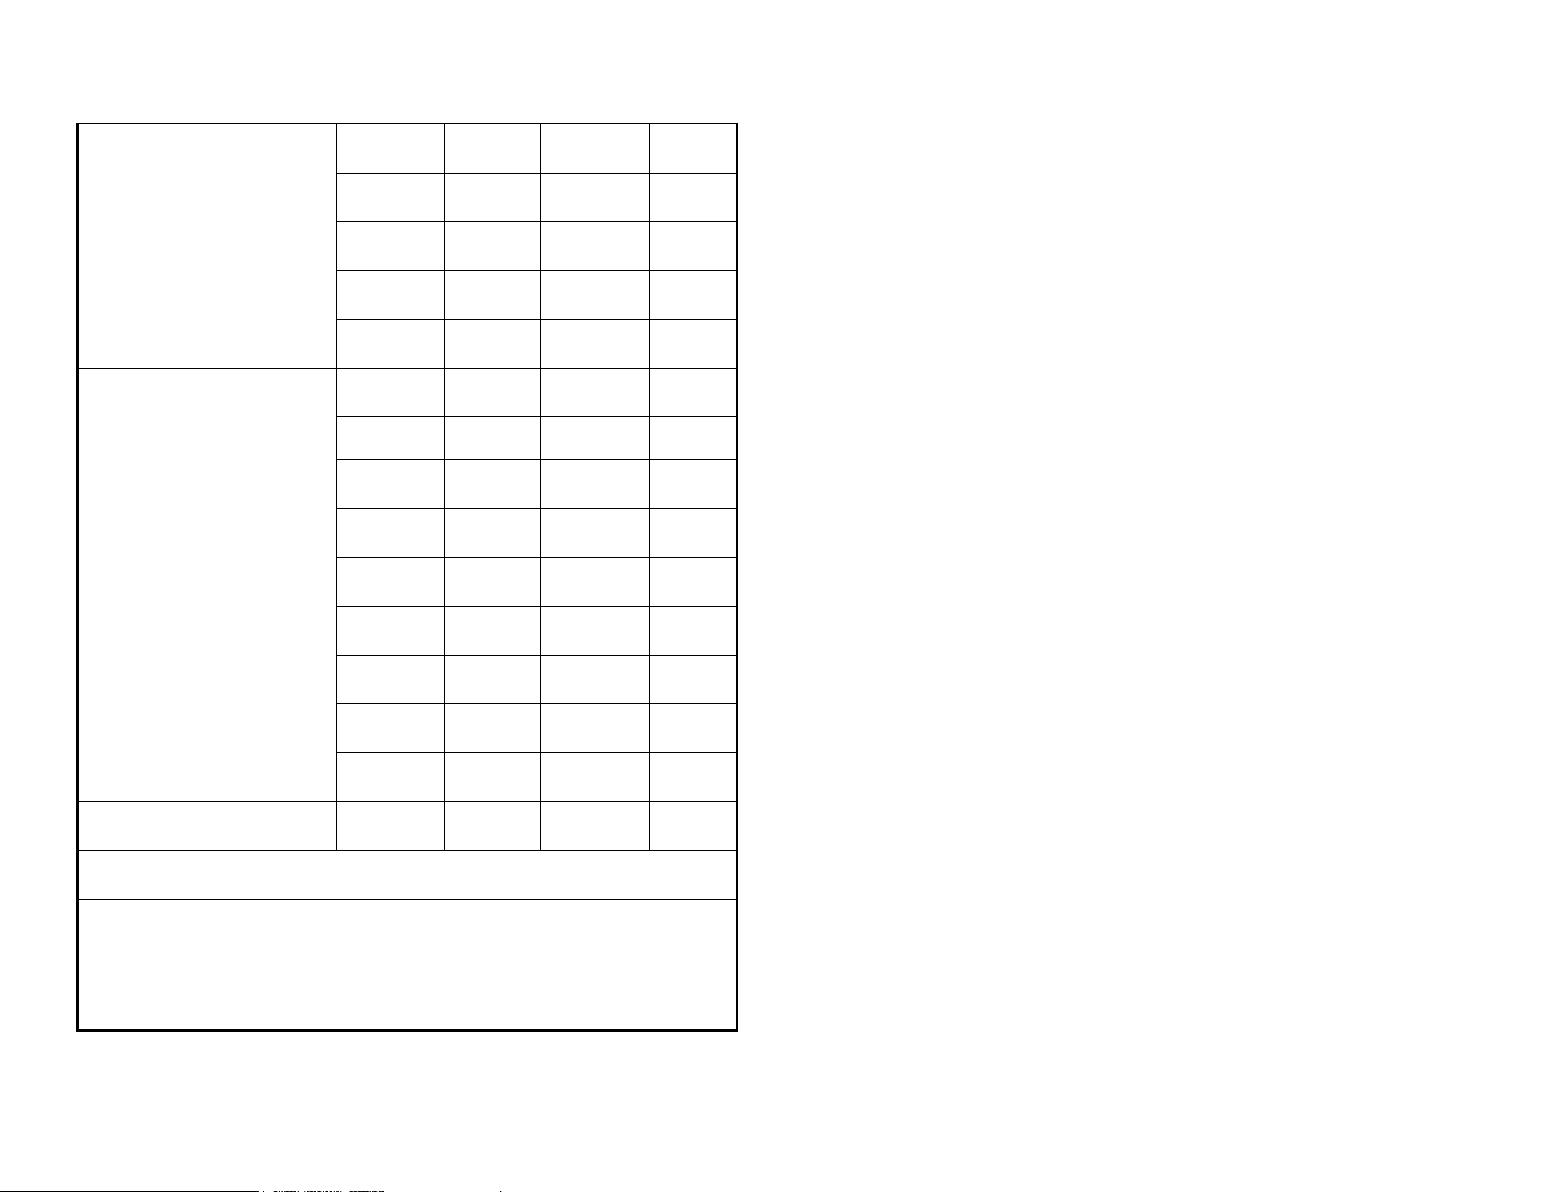
Energy consumption for cooking zone
or area calculated per kg
Rear left
ECelectric
cooking
186,5
Wh/kg
Rear central
ECelectric
cooking
-
Wh/kg
Rear right
ECelectric
cooking
187,3
Wh/kg
Central left
ECelectric
cooking
-
Wh/kg
Central central
ECelectric
cooking
186,6
Wh/kg
Central right
ECelectric
cooking
-
Wh/kg
Front left
ECelectric
cooking
187,3
Wh/kg
Front central
ECelectric
cooking
-
Wh/kg
Front right
ECelectric
cooking
186,5
Wh/kg
Energy consumption for the hob
calculated per kg
ECelectric
hob
186,8
Wh/kg
Standard applied: EN 60350-2 Household electric cooking appliances - Part 2: Hobs - Methods for
measuring performance
Suggestions for Energy Saving:
• To obtain the best efficiency of your hob, please place the pan in the centre of the cooking zone.
• Using a lid will reduce cooking times and save energy by retaining the heat.
• Minimise the amount of liquid or fat to reduce cooking times.
• Start cooking on a high setting and reduce the setting when the food has heated through.
• Use pans whose diameter is as large as the graphic of the zone selected.
IT-1
Avvertenze di sicurezza
La sua sicurezza è estremamente importante per
noi. Legga sempre queste istruzioni prima di
utilizzare il piano di cottura.
Installazione
Rischio di elettrocuzione
• Staccare l'elettrodomestico dalla rete di
alimentazione elettrica principale prima di
effettuare lavori o operazioni di manutenzione
sullo stesso.
• Il collegamento ad un sistema di messa a terra
funzionante è essenziale e obbligatorio.
• Le eventuali modifiche al sistema di cablaggio
domestico devono essere apportate
unicamente da un tecnico qualificato.
• Il mancato rispetto di queste precauzioni
implica il rischio di elettrocuzione o addirittura
di morte.
Rischio di lesioni da taglio
• Prestare la massima attenzione, gli spigoli dei
pannelli sono taglienti.
• La mancata attenzione può provocare lesioni o
tagli.

IT-2
Importanti istruzioni di sicurezza
• Leggere attentamente le istruzioni prima di
installare ed utilizzare questo
elettrodomestico.
• Non appoggiare mai materiale o prodotti
combustibili sull'elettrodomestico.
• Comunicare queste informazioni alla persona
responsabile dell'installazione
dell'elettrodomestico in quanto potrebbe
ridurre i costi di installazione.
• Per evitare pericoli, questo elettrodomestico
deve essere montato secondo queste istruzioni
di installazione.
• Questo elettrodomestico deve essere
installato correttamente e messo a terra solo
da personale qualificato.
• Questo elettrodomestico deve essere
collegato ad un circuito dotato di un
interruttore sezionatore che effettui lo stacco
completo dall'alimentazione elettrica.
• La mancata installazione dell'elettrodomestico
nel rispetto delle istruzioni di cui sopra può
rendere non più valide le rivendicazioni di
reclamo e garanzia.
Funzionamento e manutenzione
Rischio di elettrocuzione
• Non cuocere se la superficie del piano di
cottura è rotta o crepata. • Se la superficie
IT-3
del piano di cottura si rompe o crepa, spegnere
l'elettrodomestico immediatamente
nell'alimentazione principale (interruttore a
parete) e contattare un tecnico qualificato.
• Spegnere il piano di cottura tramite
l'interruttore a parete prima di qualsiasi
operazione di pulizia o manutenzione.
• Il mancato rispetto di queste precauzioni
implica il rischio di elettrocuzione o addirittura
di morte.
Rischi per la salute
• Questo elettrodomestico rispetta le normative
di sicurezza per i dispositivi elettromagnetici.
• Tuttavia, le persone portatrici di pacemaker o
altri impianti elettrici (quali pompe per insulina)
possono usare questo elettrodomestico solo
sotto il controllo del proprio medico, per
accertarsi che gli impianti non vengano
influenzati dal campo elettromagnetico.
• Il mancato rispetto di queste precauzioni
implica il rischio di morte.
Pericolo: superficie surriscaldata
• Durante l'uso, i componenti accessibili di
questo elettrodomestico si surriscaldano a
sufficienza da provocare ustioni.
• Fino a quando la superficie del vetro a
induzione non si è raffreddata, non toccarla con
parti del corpo, indumenti o altri oggetti che
non siano recipienti di cottura appositi.

IT-4
• Oggetti metallici come coltelli, forchette,
cucchiai o coperchi non devono essere posti
sulla superficie del piano di cottura perché
possono scaldarsi.
• Mantenere a distanza i bambini.
• I manici delle pentole possono surriscaldarsi.
Controllare che i manici delle pentole non
sporgano su altre zone di cottura accese.
Tenere i manici al di fuori della portata dei
bambini.
• Il mancato rispetto di queste precauzioni
implica il rischio di bruciature e ustioni.
Rischio di lesioni da taglio
• La lama affilata di un raschietto del piano di
cottura resta esposta quando viene rimosso il
coperchio di sicurezza. Prestare la massima
attenzione e riporre sempre in un luogo sicuro,
al di fuori della portata dei bambini.
• La mancata attenzione può provocare lesioni o
tagli.
Importanti istruzioni di sicurezza
• Mai lasciare incustodito l’elettrodomestico
durante l’uso. Un'eccessiva bollitura genera
vapori e schizzi di grasso che potrebbero
prendere fuoco.
• Non utilizzare mai l'elettrodomestico come
superficie di lavoro o per appoggiare oggetti.
• Non lasciare mai oggetti o utensili
sull'elettrodomestico.
IT-5
• Non mettere o lasciare oggetti magnetizzabili
(ad esempio carte di credito, schede di
memoria) o dispositivi elettronici (ad esempio
computer, lettori MP3) vicino
all'elettrodomestico, in quanto potrebbero
essere influenzati dal campo elettromagnetico.
• Non utilizzare mai l'elettrodomestico per
riscaldare la stanza.
• Dopo l'uso, spegnere sempre le zone di
cottura e il piano di cottura come descritto nel
presente manuale (ad esempio utilizzando i
tasti di controllo). Non basarsi sulla funzione di
rilevamento pentole per spegnere le zone di
cottura quando si tolgono le pentole.
• Non permettere ai bambini di giocare con
l’apparecchio, di sedersi o arrampicarsi su di
esso.
• Non riporre oggetti che possano attirare
l'attenzione dei bambini nei mobiletti al di
sopra dell'elettrodomestico. Se i bambini si
arrampicano sul piano di cottura possono
subire gravi lesioni.
• Non lasciare i bambini incustoditi o da soli
nell'area in cui viene utilizzato
l'elettrodomestico.
• I bambini o le persone con una disabilità tale
da limitare la capacità di utilizzare
l'elettrodomestico devono essere istruiti
sull'uso da una persona responsabile e

IT-6
competente. La persona che fornisce le
istruzioni deve essere convinta di averli istruiti
in modo tale da potere utilizzare
l'elettrodomestico senza rischio per se stessi o
per le persone che si trovano nelle aree
circostanti.
• Non riparare o sostituire parti
dell'elettrodomestico a meno che ciò non sia
specificatamente consigliato all'interno del
manuale. Tutte le altre operazioni di
manutenzione devono essere effettuate da un
tecnico qualificato.
• Non utilizzare getti di vapore per pulire il piano
di cottura.
• Non posizionare o lasciare cadere oggetti
pesanti sul piano di cottura.
• Non salire sulla superficie del piano di cottura.
• Non utilizzare pentole con fondi ruvidi e non
trascinare pentole sul piano in vetro a
induzione, in quanto si rischia di graffiarlo.
• Non utilizzare spugnette metalliche o altri
detergenti fortemente abrasivi per pulire il
piano di cottura, in quanto si rischia di graffiare
il vetro a induzione.
• Se il cavo di alimentazione
dell’elettrodomestico dovesse essere
danneggiato, farlo sostituire dal produttore, dal
suo servizio tecnico o da un tecnico qualificato,
per evitare rischi.
IT-7
• Questo elettrodomestico è destinato ad essere
utilizzato in applicazioni domestiche e simili,
come ad esempio:
- in cucine per il personale in negozi, uffici e
altri ambienti di lavoro;
- in agriturismi;
- da clienti in alberghi, motel e altri ambienti di
tipo residenziale;
- in ambienti di tipo bed and breakfast.
• AVVERTENZA: L'elettrodomestico e le sue parti
accessibili diventano calde durante l’uso.
Prestare attenzione ad evitare qualsiasi
contatto con le resistenze di riscaldamento.
Mantenere lontani i bambini di età inferiore agli
8 anni, a meno che non siano continuamente
supervisionati.
• Questo elettrodomestico può essere utilizzato
da bambini di età superiore a 8 anni e da
persone con ridotte capacità fisiche, sensoriali
o mentali, oppure prive di esperienza e
conoscenza, se supervisionati o istruiti
riguardo all’uso dell’elettrodomestico in
sicurezza, e se comprendono i rischi che
derivano dall'uso dello stesso.
• I bambini non devono giocare con
l’elettrodomestico. La pulizia e la
manutenzione da parte dell'utente non
possono essere effettuate da bambini senza
supervisione.

IT-8
• AVVERTENZA: La cottura senza sorveglianza su
un piano di cottura in presenza di grasso o olio
nella pentola può essere pericolosa, con rischio
di incendi. NON cercare MAI di spegnere un
incendio con acqua, bensì spegnere
l’elettrodomestico e coprire la fiamma con un
coperchio o una coperta antifiamma.
• AVVERTENZA: Pericolo di incendio: non
appoggiare nulla sulle superfici di cottura.
• Avvertenza: Se la superficie è crepata,
spegnere l'elettrodomestico per evitare il
rischio di elettrocuzione, in caso di superfici del
piano di cottura in vetroceramica o materiali
simili che proteggono i componenti sotto
tensione
• Si sconsiglia l'utilizzo di una pulitrice a vapore.
• L’elettrodomestico non è concepito per
funzionare con temporizzatori esterni o con
sistemi di comando a distanza separati.
ATTENZIONE: Il processo di cottura deve essere
supervisionato. Un processo di cottura breve
deve essere supervisionato di continuo.
AVVERTENZA: Per evitare il ribaltamento
dell'elettrodomestico, è necessario installare
mezzi di stabilizzazione. Fare riferimento alle
istruzioni per l'installazione.
AVVERTENZA: utilizzare unicamente protezioni
per piani di cottura progettate dal produttore
della cucina o indicate dal produttore
IT-9
dell'elettrodomestico nelle istruzioni d'uso come
adatte, o ancora protezioni incorporate
nell'elettrodomestico. L'utilizzo di protezioni non
adatte può provocare incidenti.
Questo elettrodomestico incorpora un
collegamento a terra solo per scopi funzionali.
Desideriamo ringraziarla per l'acquisto del nuovo piano di cottura
a induzione.
Si consiglia di leggere attentamente questo manuale di istruzioni e di montaggio
per comprendere pienamente come montarlo correttamente e farlo funzionare al
meglio.
Per il montaggio, si consiglia di leggere la parte relativa al montaggio.
Consigliamo di leggere con attenzione tutte le istruzioni di sicurezza prima dell'uso
e di conservare questo Manuale d'Uso e Montaggio conservandolo con cura per
poterlo consultare in futuro in caso di necessità.
IT-10
1. Controllo timer
2. Tasto ON/OFF
3. Tasto di regolazione della potenza/controllo della
funzione boost
4. Blocco comandi
5. Controllo della funzione Keep Warm
6. Controllo Pausa
7. Controllo zona flessibile
Panoramica del prodotto
Vista dall’alto
Pannello comandi
1. Zona 2000 W, aumento a 2600 W
2. Zona 1500 W, aumento a 2000 W
3. Zona 2000 W, aumento a 2600 W
4. Zona 1500 W, aumento a 2000 W
5. Zona 2000 W, aumento a 2600 W
6. Zona flessibile, 2800w fino a 3500w
7. Piatto in vetro
8. Pannello comandi
IT-11
pentola di ferro
circuito magnetico
piastra di vetroceramica
bobina ad induzione
correnti indotte
Come funziona la cottura a induzione
La tecnologia della cottura a induzione è un metodo sicuro, tecnologicamente
avanzato, efficiente ed economico. Funziona tramite vibrazioni elettromagnetiche
che generano il calore direttamente nella pentola invece che indirettamente
riscaldando la superficie in vetro. Il vetro si surriscalda perché si riscalda anche la
pentola.
Prima di utilizzare il vostro nuovo piano di cottura a
induzione
• Leggere questa guida, prestando particolare attenzione alla sezione delle
"Avvertenze di Sicurezza".
• Togliere la pellicola protettiva che potrebbe essere presente sul piano di cottura
a induzione.
Utilizzo dei tasti a sfioro
• I comandi rispondono allo sfioramento, quindi non è necessario premerli.
• Utilizzare il polpastrello del dito e non la punta.
• Ogni volta che viene registrato il contatto, viene emesso un segnale acustico.
• Accertarsi che i comandi siano sempre puliti, asciutti e privi di oggetti (ad
esempio utensili o asciugapiatti) appoggiati su di essi. Anche un leggero strato
di acqua può rendere difficoltoso l'utilizzo dei comandi.
IT-12
Scelta dei recipienti di cottura più appropriati
•
Utilizzare solamente recipienti di cottura adatti per la
cottura a induzione. Verificare che sia presente il
simbolo di induzione sull'imballaggio o sul fondo della
pentola.
• È possibile verificare se il recipiente di cottura è adatto
effettuando una prova magnetica. Avvicinare un magnete al
fondo della pentola. Se questa viene attratta, è adatta per la
cottura ad induzione.
• Se non disponete di un magnete:
1.
Mettete un certo quantitativo di acqua nella pentola che volete controllare.
2.
Se
non lampeggia sul display e l'acqua si sta riscaldando, la pentola si può usare.
• Non si possono utilizzare recipienti di cottura realizzati con i seguenti materiali: acciaio
inossidabile puro, alluminio o rame senza base magnetica, vetro, legno, porcellana, ceramica
e terracotta.
Non utilizzare recipienti di cottura con fondo ruvido o base curva.
Accertarsi che la base della pentola sia liscia, si appoggi uniformemente sul vetro
ed abbia le stesse dimensioni della zona di cottura. Utilizzare pentole con diametro
corrispondente al grafico della zona selezionata. Con una pentola leggermente più
grande l'energia viene utilizzata alla massima efficienza. Se si utilizza invece una
pentola più piccola l'efficienza potrebbe essere inferiore a quanto previsto.
Centrare sempre la pentola nella zona di cottura.
Togliere sempre le pentole dal piano di cottura a induzione sollevandole - non farle
strisciare, in quanto si rischia di graffiare il vetro.
IT-13
Dimensioni pentola
Le zone di cottura vengono adattate automaticamente, fino ad un limite massimo,
al diametro della pentola. Tuttavia, il fondo di questa padella deve avere un
diametro minimo in funzione della zona di cottura corrispondente. Per ottenere la
massima efficienza dal piano cottura, posizionare la pentola al centro della zona
cottura.
Diametro base dei recipienti di cottura a induzione
Zona di cottura
minimo (mm)
1, 2, 3, 4(180mm)
120
5 (210mm)
140
Zona Flessibile
240 Oppure 160*270
Quanto sopra può variare in relazione alla qualità della pentola utilizzata.
Utilizzo del piano di cottura a induzione
Per iniziare la cottura
1. Toccare il tasto a sfioro ON/OFF.
Dopo l'accensione, l'avvisatore acustico si attiva una
volta, tutti i display visualizzano "–" o "– –", ad indicare
che il piano di cottura a induzione è in modalità standby.
2. Collocare una pentola apposita sulla zona di cottura che
si vuole utilizzare.
• Accertarsi che il fondo della pentola e la superficie della
zona di cottura siano pulite e asciutte.
3. Selezionare una zona di riscaldamento e impostare un livello di potenza
toccando il cursore, o scorrendo lungo il comando "—", o semplicemente
toccando qualsiasi punto del "—".
Oppure
IT-14
a. Se entro 1 minuto non si sceglie un'impostazione di riscaldamento il piano di
cottura a induzione si spegnerà automaticamente. In questo caso è necessario
ripartire dalla fase 1.
b. L'impostazione di riscaldamento si può modificare in qualsiasi momento
durante la cottura.
c. Se si scorre lungo il "—", la potenza varierà dallo stadio 1 allo stadio 9.
Se sul display compare il simbolo lampeggiante alternato
all'impostazione di riscaldamento
Questo significa quanto segue:
• la pentola è stata collocata nella zona di cottura sbagliata, oppure
• la pentola che state utilizzando non è adatta per cottura a induzione, oppure
• la pentola è troppo piccola o non è centrata correttamente sulla zona di cottura.
Il piano non si riscalda se sulla zona di cottura non è stata collocata una pentola
adatta.
Il display si spegnerà automaticamente dopo 1 minuti se non viene posizionato
un recipiente idoneo.
Al termine della cottura
1. Spegnere la zona di cottura facendo scorrere il "—" fino al punto di sinistra,
quindi tenere premuto per 1 secondo.
2. Accertarsi che il display della potenza mostri "0", quindi "H".
e poi
3. Spegnere l'intero piano di cottura toccando il tasto a sfioro ON/OFF.
4. Prestare attenzione alle superfici calde
Verrà visualizzata una "H" per indicare quale zona di cottura è calda e non può
essere toccata. Scomparirà quando la superficie si è raffreddata fino ad una
temperatura adeguata. Può essere utilizzato anche come funzione di risparmio
energetico se si desidera riscaldare ulteriori pentole, usando la piastra calda
che è ancora surriscaldata.
IT-15
In caso di interruzione di corrente mentre il simbolo “H" è attivo, prestare
attenzione a non toccare la superficie di cottura anche se "H" non viene più
visualizzato a seguito del ripristino dell'alimentazione.
Uso della gestione della potenza
Utilizzando la gestione della potenza si può impostare la potenza totale a 2,5 kW/
3,0 kW/ 4,5 kW/ 6,5 kW e 7,4 kW. L'impostazione predefinita di potenza totale è
il livello di potenza massima.
Impostazione del livello di potenza totale in base alle
proprie esigenze
1. Accertarsi che il piano di cottura sia spento.
Nota: è possibile impostare la gestione della potenza solo quando il piano cottura
è spento.
2. Toccare il tasto "Pausa" e tenerlo premuto per 5 secondi. Il
segnale acustico si attiva una volta.
3. Dopo aver sentito il segnale acustico, toccare contemporaneamente i tasti "+"
e "-" e tenerli premuti per 3 secondi, l'indicatore del timer mostrerà il livello di
potenza totale precedente lampeggiante, ad esempio '2.5'. Tenere premuto " +" e
"-" per 1 secondo per passare ad un altro livello di potenza, ad esempio 3.0.
Quando la potenza desiderata lampeggia, toccare il tasto "Pausa" e tenerlo
premuto per 5 secondi. Il segnale acustico suonerà 10 volte. Ciò significa che
l'impostazione è terminata.
Nota:
1. Dopo la fase 2, toccare i pulsanti "+" e "-" entro 3 secondi dal segnale
acustico. Altrimenti sarà necessario ripartire dalla fase 2.
2. Una volta terminata l'impostazione, attendere la fine dei 10 segnali acustici.
Non toccare alcun tasto durante questo periodo. In caso contrario, l'impostazione
non sarà valida.
Regole di gestione potenza
Se la potenza totale supera il limite di 2,5 kW, 3,0 kW, 4,5 kW, 6,5 kW,7,4kW, (a
seconda del livello impostato), non è possibile aumentare la potenza di nessuna
IT-16
zona. Se la si aumenta toccando "+", il piano di cottura emette 3 segnali acustici e
l'indicatore lampeggia 'Pn'. Quindi è necessario diminuire la potenza di altre zone
prima di aumentare la potenza della zona richiesta.
Limitazione di potenza nelle zone centrale e destra
• Le zone di cottura sono divise in due gruppi. Ogni gruppo ha un carico massimo
di energia elettrica di 3600 W.
• La limitazione riduce la potenza alle altre zone di cottura.
• La visualizzazione dell'impostazione di riscaldamento delle zone ridotte cambia
tra due livelli.
Ad esempio, se tutte le zone sono accese, il livello di potenza più grande di tre
zone viene ridotto a livello 7, livello 7, livello 7.
Nel Gruppo a entrambe le zone possono lavorare a livello 9
contemporaneamente perché sono 3500 W in totale.
Nel Gruppo b se si accendono tutte e 3 le zone, il massimo livello che può
raggiungere ogni zona è 7. Se si spegne la zona dietro del Gruppo b, le altre due
zone possono raggiungere al massimo il livello 8.
Per ottenere la massima potenza su una zona del Gruppo b, devono essere
accese al massimo due zone e il piano riduce di conseguenza la potenza della
prima zona accesa.
IT-17
Utilizzo della funzione boost
Boost è la funzione che permette l'aumento di una zona ad una potenza maggiore
in un secondo e dura 5 minuti. In questo modo è possibile ottenere una cottura più
potente e più veloce.
Utilizzo della funzione boost per ottenere una potenza
maggiore
1. Toccare il tasto del pannello di controllo che si desidera aumentare, quindi
tenere premuto il tasto "b" per 3 secondi. Il display della potenza mostrerà "P" per
indicare che la zona è in aumento.
2. La potenza di boost durerà per 5 minuti e poi la zona tornerà allo stadio di
potenza impostato prima dello stadio di potenza "9".
3. Se si desidera annullare il boost durante questi 5 minuti, toccare due volte il
tasto"B". La zona di riscaldamento tornerà allo stadio di potenza "9". Oppure
scorrere lungo il "—" fino al punto di sinistra, la zona di riscaldamento tornerà alla
fase di potenza in cui si è toccato.
Oppure
Limitazioni durante l'uso
Le cinque zone sono state divise in due gruppi. In un gruppo, se si usa la funzione
boost in una zona, assicurarsi prima che l'altra zona stia lavorando al livello di
potenza 5 o al di sotto di tale livello.
Nel Gruppo b, se una zona funziona in modalità boost, allo stesso tempo c'è solo
un'altra zona che può funzionare.
IT-18
Uso della funzione mantenimento temperatura
Keep Warm è la funzione che mantiene una zona ad una potenza inferiore per
rendere stabile la temperatura.
Utilizzo della funzione Keep Warm per ottenere una
temperatura stabile
1. Toccare il cursore della zona di riscaldamento che si desidera mantenere calda,
quindi tenere premuto il pulsante Keep Warm , l'indicatore della zona di
cottura visualizzerà "A".
2. Se si desidera annullare la funzione Keep Warm, toccare il cursore della zona di
riscaldamento, quindi toccare il pulsante , la zona di riscaldamento tornerà
alla fase di potenza "0".
IT-19
Utilizzo della funzione Pausa
La funzione Pausa può essere utilizzata in qualsiasi momento durante la cottura.
Permette di disattivare il piano cottura a induzione e poi riattivarlo.
1. Accertarsi che la zona di cottura sia in funzione.
2. Toccare il tasto Pausa, l'indicatore della zona di cottura mostrerà "ll". Quindi
il funzionamento del piano cottura a induzione viene disattivato in tutte le zone
di cottura, ad eccezione dei tasti Pausa, ON/OFF e di blocco.
3. Per annullare lo stato di pausa, toccare la funzione Pausa, poi la zona di
cottura tornerà allo stadio di potenza impostato in precedenza.
Zona Flessibile
• Quest’area può essere usata come zona singola o come due zone differenti, a
seconda delle esigenze di cottura.
• L’area flessibile è composta da due induttori indipendenti che possono essere
controllati separatamente.
• Importante: assicurati di posizionare le pentole al centro della singola zona
cottura. In caso di pentole grandi, ovali, rettangolari, e allungate assicurati di
posizionarle al centro della zona coprendo entrambe le croci.
Esempi di corretti ed errati posizionamenti delle pentole:
IT-20
Come zona grande
1. Toccare il cursore della zona di riscaldamento (lato sinistro) che si desidera
passare in zona flessibile, quindi toccare il pulsante di selezione della zona
flessibile per attivare la zona flessibile come una singola grande zona, il pulsante
vicino all'indicatore successivo sarà acceso.
2. Toccare il cursore sul comando "—", o semplicemente toccare un punto
qualsiasi del "—" per regolare il livello di potenza.
Come due zone indipendenti
1.Se si desidera annullare la zona flessibile, toccare di nuovo il cursore della zona
di riscaldamento, quindi toccare il pulsante di selezione della zona flessibile,
l'indicatore accanto al pulsante della zona flessibile si spegne.
Blocco dei comandi
• I comandi si possono bloccare per evitare un uso involontario (ad esempio
accensione involontaria delle zone di cottura da parte di bambini).
• Quando i comandi sono bloccati, sono tutti disabilitati tranne il tasto di ON/OFF.
Per bloccare i comandi
Toccare il blocco comandi. L'indicatore sul timer riporta "Lo" (basso).
Per sbloccare i comandi
1. Accertarsi che il piano di cottura ad induzione sia acceso.
2. Toccare e mantenere premuto il blocco comandi per un breve periodo.
3. A questo punto il piano di cottura a induzione si può utilizzare nuovamente.
Quando il piano di cottura è in modalità di bloccaggio, tutti i comandi sono
disabilitati ad esclusione del tasto ON/OFF, è sempre possibile spegnere il
piano di cottura ad induzione con il tasto ON/OFF in caso di emergenza, ma
prima dell'utilizzo successivo è necessario sbloccare il piano di cottura stesso.
IT-21
Protezione contro il surriscaldamento
Un sensore di temperatura controlla la temperatura all'interno del piano di cottura
a induzione. Se la temperatura supera il livello di sicurezza, il piano di cottura ad
induzione si spegne automaticamente.
Protezione contro le fuoriuscite
La protezione da fuoriuscite è una funzione di protezione di sicurezza. Spegne
automaticamente il piano cottura entro 10 secondi se l'acqua scorre verso il
pannello di controllo, mentre l'avvisatore acustico si attiva per 1 secondo.
Segnalazione di oggetti di piccole dimensioni
Se sul piano di cottura resta appoggiata una pentola con dimensioni non corrette
o non magnetica (ad esempio in alluminio) o altri piccoli oggetti (ad esempio
coltelli, forchette, chiavi), la zona entra automaticamente in standby per un
minuto. La ventola continua a raffreddare il piano di cottura a induzione per un
ulteriore minuto.
Protezione tramite autospegnimento
L'autospegnimento è una funzione di sicurezza per il piano di cottura a induzione.
Si attiva automaticamente ogni volta che si dimentica acceso il piano di cottura. I
tempi di funzionamento di default per i vari livelli di intensità di potenza sono
indicati sulla tabella che segue:
Livello di potenza
1
2
3
4
5
6
7
8
9
A
II
Timer di
funzionamento di
default (ore)
8
8
8
4
4
4
2
2
2
2
2
Quando la pentola viene rimossa il piano di cottura a induzione smette
immediatamente di riscaldarsi e si spegne automaticamente dopo due minuti.
Le persone portatrici di pacemaker possono utilizzare questo
elettrodomestico solo sotto il controllo del proprio medico.
accese in precedenza.
funzionare se erano state Le altre zone di cottura continueranno a
automaticamente e mostra "H".
spegne la zona di cottura corrispondente si
finisce, cottura di timer sul impostato tempo il Quando 6.
selezionata.
stata è zona la che indicare ad accende si potenza
di livello Il punto rosso a fianco dell'indicatore delNOTA:
secondi.
restante e l'indicatore del timer lampeggia per 5
immediatamente. Il display visualizza il tempo
Dopo aver impostato il tempo il conteggio inizierà 5.
".--" viene visualizzato "00", quindiannullato e sul display dei minuti
, il timer viene ed attivare lo scorrimento fino a "0"" o il "+" del timer -toccare il "
toccare il cursore del comando di selezione, quindi timer, Per annullare il 4.
automaticamente a 0 minuti.
l timer si riposiziona Se il tempo impostato è superiore a 99 minuti, i
minuti. di 10
aumenta o diminuisce timer il "+", o "-" sfioro a tasto il premuto tenere e Toccare
valore di un minuto.
" o "+" una volta per diminuire o aumentare il -Consiglio: Usare il tasto a sfioro "
"+". " o-Impostare il tempo toccando il tasto " 3.
l’indicatore del contaminuti timer, " o "+" del -"Toccare 2.
timer.
inizia a lampeggiare e il display del timer" visualizza
"00".
riscaldamento per la quale si vuole impostare il
cursore di selezione della zona di il Toccare 1.
Le zone di cottura impostate per questa funzione funzionano come segue:
cottura
Impostazione del timer per spegnere una zona di
23-ITIT-22
Utilizzo del timer
Il timer si può utilizzare in due modi diversi:
• Si può utilizzare come contaminuti. In questo caso, il timer non spegne alcuna
zona di cottura quando il tempo impostato è attivo.
• Si può impostare per spegnere una zona di cottura al termine del tempo
impostato.
• Il timer si può impostare fino a 99 minuti.
Utilizzo del timer come contaminuti
Se non viene selezionata nessuna zona di cottura
1. Accertarsi che il piano di cottura sia acceso.
Nota: è possibile utilizzare il contaminuti anche se non si seleziona una zona di
cottura.
3. Impostare il tempo toccando il tasto "-" o
2. Toccare "-" o "+" del timer, l’indicatore del contaminuti
inizia a lampeggiare e il display del timer visualizza "00".
"+".
Consiglio: Usare il tasto a sfioro "-" o "+" una volta per diminuire o aumentare
il valore di un minuto.
Tenere premuto il tasto a sfioro "-" o "+" del timer per diminuire o
aumentare il valore di 10 minuti.
Se il tempo impostato è superiore a 99 minuti, il timer si riposiziona
automaticamente a 0 minuti.
4. Annullare il tempo toccando il "-" del timer e scorrendo verso il basso fino a "0".
5. Dopo aver impostato il tempo il conteggio inizierà immediatamente. Il display
visualizza il tempo restante e
l'indicatore del timer lampeggia per 5 secondi.
6. L'avvisatore acustico si attiva per 30 secondi e l'indicatore
del timer visualizza "- -" al termine del tempo impostato.
IT-24
Impostazione del timer per spegnere più di una zona di
cottura
1. Se si utilizza questa funzione per più di una zona di riscaldamento, l'indicatore
del timer mostrerà il tempo più breve.
(es. tempo di impostazione della zona 1# di 2 minuti, tempo di impostazione
della zona 2# di 5 minuti, l'indicatore del timer mostra "2".)
NOTA: Il punto rosso lampeggiante accanto all'indicatore del livello di potenza
significa che l'indicatore del timer indica l'ora della zona di riscaldamento.
Se si desidera controllare l'ora impostata di un'altra zona di riscaldamento,
toccare il comando a scorrimento della zona di riscaldamento una volta. Il
timer indicherà l'ora impostata.
(impostato a 3 minuti)
(impostato a 2 minuti)
2. Quando il tempo impostato sul timer di cottura finisce, la
zona di riscaldamento corrispondente si spegne
automaticamente e mostra "H".
NOTA: Se si vuole cambiare l'ora una volta impostato il timer, è necessario
ripartire dalla fase 1.
Cura e pulizia
Che cosa?
Come?
Importante!
Sporco quotidiano
sul vetro (impronte,
segni, macchie di
cibo e schizzi non
zuccherini sul vetro)
1.
Togliere l'alimentazione
elettrica del piano di cottura.
2.
Applicare un detergente per
piano di cottura quando il
vetro è ancora tiepido (ma
non caldo!)
3.
Sciacquare ed asciugare con
uno straccio pulito o un
panno di carta.
4.
Ridare alimentazione al
piano di cottura.
•
Quando viene ridata alimentazione
al piano di cottura non ci saranno
indicazioni di "superficie calda",
tuttavia la zona di cottura può
essere ancora calda! Prestare la
massima attenzione.
•
Spugnette metalliche dure, alcune
spugnette in nylon e detergenti
forti/abrasivi possono graffiare il
vetro. Leggere sempre l'etichetta
per verificare se il vostro detergente
o la spugnetta metallica sono adatti.
•
Non lasciare mai residui dei prodotti
di pulizia sul piano di cottura: il vetro
si potrebbe macchiare.
IT-25
Schizzi di acqua
bollente, ingredienti
fusi e schizzi
zuccherini caldi sul
vetro.
Toglierli immediatamente con
una paletta per pesce, un
coltello a paletta o un raschietto
a lama adatti al piano di cottura
ad induzione, prestando sempre
attenzione alle superfici calde
della zona di cottura:
1.
Togliere alimentazione dal
piano di cottura dalla presa a
parete.
2.
Tenere la lama o l'utensile ad
un angolo di 30° e raschiare
la sporcizia o i residui verso
una parte fredda del piano di
cottura.
3.
Pulire i residui o gli schizzi
con un asciugapiatti o un
panno di carta.
4.
Effettuare le fasi da 2 a 4 per
lo "sporco quotidiano sul
vetro" come sopra indicato.
•
Togliere al più presto possibile le
macchie lasciate da ingredienti fusi,
cibo zuccherino o schizzi. Se questi
residui vengono lasciati seccare sul
vetro, possono risultare in seguito
difficili da togliere o addirittura
danneggiare in modo permanente la
superficie del vetro.
•
Rischio di tagli: quando il coperchio
di sicurezza viene fatto rientrare, la
lama del raschietto è tagliente come
quella di un rasoio. Prestare la
massima attenzione e riporre
sempre in un luogo sicuro, al di fuori
della portata dei bambini.
Schizzi sui tasti a
sfioro
1.
Togliere l'alimentazione
elettrica del piano di cottura.
2.
Asciugare gli schizzi
3.
Ripulire la zona dei tasti a
sfioro con una spugna umida
pulita o uno straccio.
4.
Asciugare completamente
l'area con un panno di carta.
5.
Ridare alimentazione al
piano di cottura.
•
Il piano di cottura può emettere dei
segnali acustici e spegnersi e i tasti
a sfioro possono non funzionare
quando è presente liquido su di essi.
Accertarsi di asciugare la zona dei
tasti a sfioro prima di riaccendere il
piano di cottura.
Consigli e accorgimenti
Problema
Possibili cause
Rimedio
Il piano di cottura a
induzione non si
accende.
Mancanza di alimentazione.
Accertarsi che il piano di cottura ad
induzione sia
collegato all'alimentazione elettrica
e che sia acceso.
Controllare se c'è una
interruzione di servizio a casa o in
zona. Se
dopo avere effettuato tutti questi
controlli, il problema persiste,
rivolgersi ad un
tecnico qualificato.
I tasti a sfioro non
rispondono.
I comandi sono bloccati.
Sbloccare i comandi. Vedere la
sezione
"Utilizzo del piano di cottura ad
induzione" per le relative istruzioni.
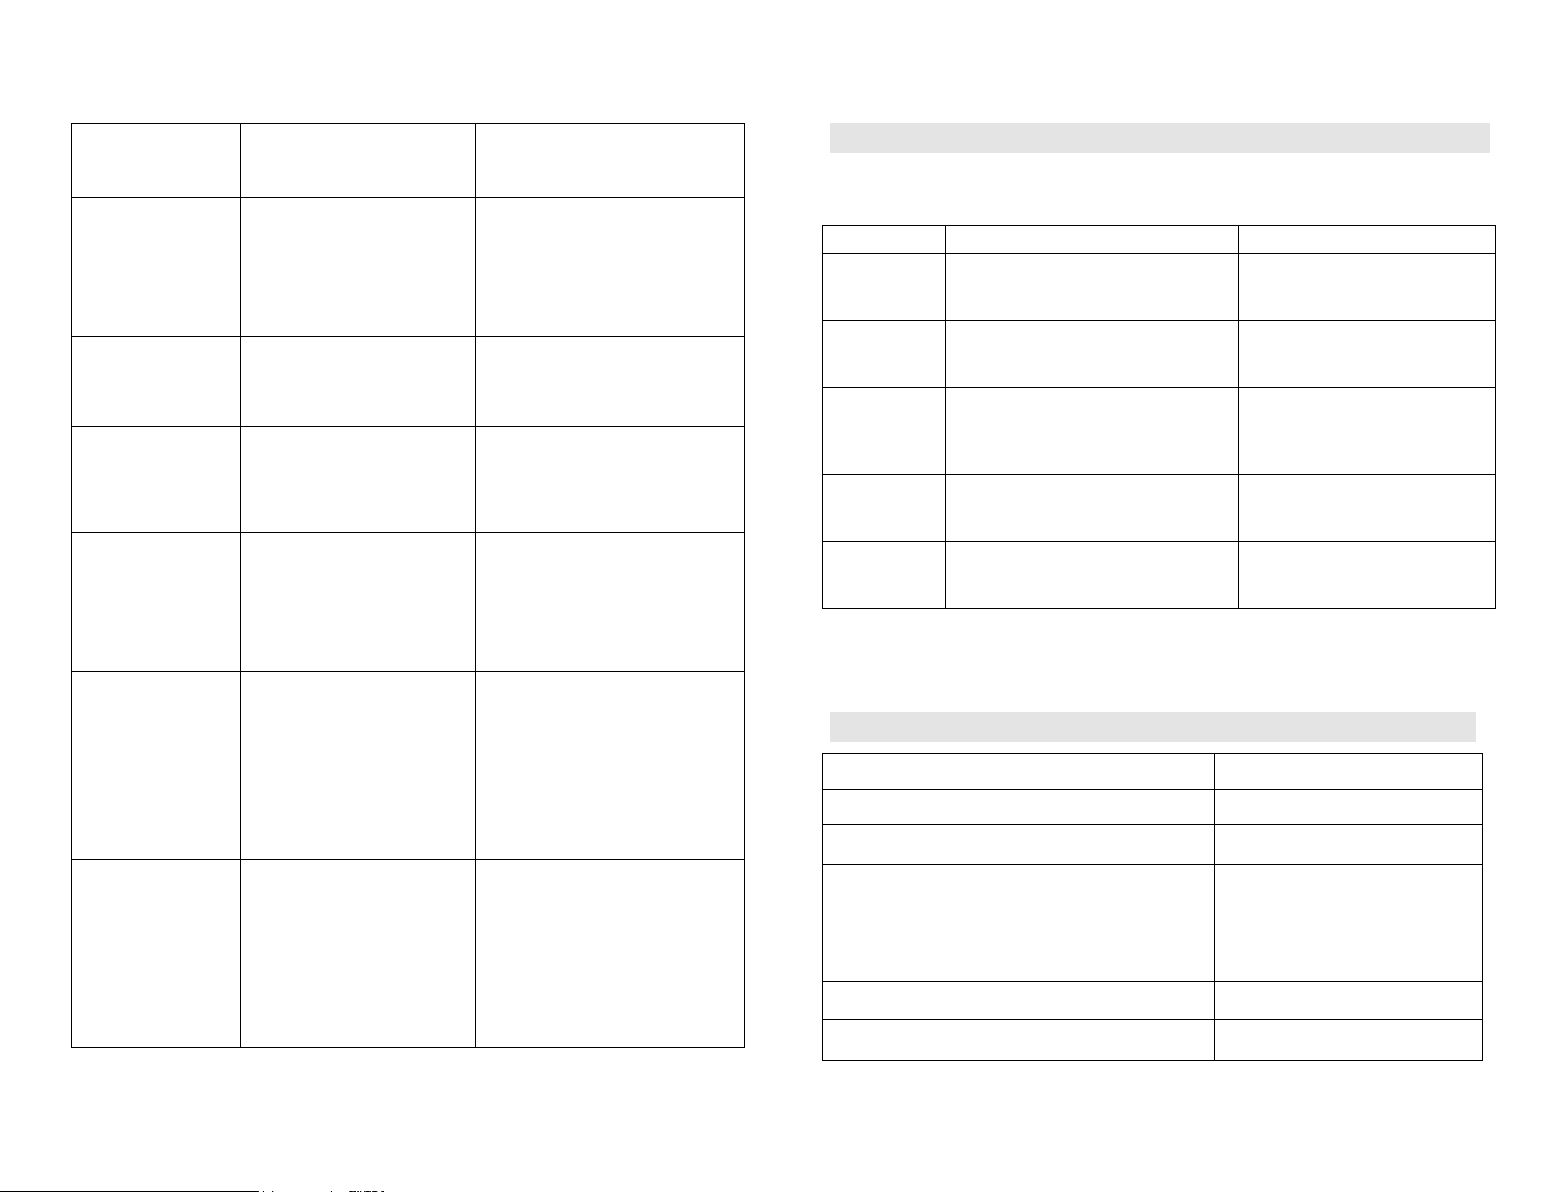
740X490
Dimensioni con incasso AxB (mm)
770X520X60
Dimensioni prodotto LunxLarxAlt (mm)
7400 W-7,4 kW: 6600
o 7150 W-58506,5 kW:
o 4950 W-4,5 kW: 4050
o 3300 W-3,0 kW: 2700
o 2750 W-2,5 kW: 2250
Potenza elettrica installata
60 Hz-240 V~, 50-220
Tensione di alimentazione
5 zone
Zone di cottura
CIFS85MCTT/1
Piano cottura
tecniche Specifiche
cottura ad induzione.
o di Non smontare da soli l'elettrodomestico per evitare rischi e danni al pian
anomalie comuni.
Le considerazioni di cui sopra derivano dalla valutazione e dal controllo delle
è raffreddato.
piano di cottura a induzione si
Fare ripartire una volta che il
IGBTtemperatura
Alta temperatura del sensore di E5
Contattare il fornitore.
induzione
temperatura della bobina ad
Alta temperatura del sensore di E3
l'alimentazione è normale.
L'accensione dopo
l'alimentazione è normale.
Si prega di controllare se anomalaTensione d’alimentazione E1/E2
Contattare il fornitore.
induzione IGBT.
temperatura del riscaldatore a
Anomalia del sensore di F9/FA
Contattare il fornitore.
induzione
temperatura della bobina a
Anomalia del sensore di F3/F4
Rimedio Possibili cause Problema
autoprotezione automaticamente e visualizza i seguenti codici di protezione:
Se si evidenzia un'anomalia, il piano di cottura a induzione si posiziona in
controllo Display di anomalie e
27-ITIT-26
I tasti a sfioro si
attivano a fatica.
Potrebbe esserci una sottile
pellicola di acqua sui comandi,
oppure state utilizzando la punta
delle dita per attivare i comandi.
Accertarsi che la zona dei tasti a sfioro
sia asciutta e utilizzare il polpastrello
delle vostre dita per attivare i
comandi.
Il vetro è graffiato. Recipienti di cottura con bordi
irregolari.
Si stanno utilizzando spugnette
metalliche o detergenti abrasivi
e non adatti.
Utilizzare recipienti di cottura con basi
piane e regolari. Vedere "Scelta dei
recipienti di cottura adatti".
Vedere "Cura e pulizia".
Alcune pentole fanno
rumori tipo crepitio o
schiocco.
Questo fenomeno potrebbe
essere causato dalla struttura
dei recipienti di cottura (strati di
diversi metalli che vibrano
diversamente).
Questo è normale per i recipienti di
cottura e non indica un'anomalia.
Il piano di cottura a Questo fenomeno è causato È del tutto normale, ma il rumore
induzione emette un dalla tecnologia della cottura a dovrebbe attutirsi o scomparire
piccolo rumore sordo induzione. completamente quando si diminuisce
quando viene utilizzato
l'impostazione di riscaldamento.
con l'impostazione di
riscaldamento.
Rumore della ventola
del piano di cottura a
induzione.
Una ventola di raffreddamento
presente all'interno del piano di
cottura a induzione si è accesa
per evitare che l'elettronica si
surriscaldi. Può continuare a
funzionare anche una volta
spento il piano di cottura a
induzione.
È un fenomeno normale e non
richiede alcun intervento. Non togliere
e ridare alimentazione al piano di
cottura a induzione dalla parete se la
ventola sta funzionando.
Le padelle non si
riscaldano e vengono
visualizzate sul
display.
Il piano di cottura a induzione
non è in grado di rilevare la
padella in quanto questa non è
adatta per la cottura a induzione.
Utilizzare recipienti di cottura adatti
per la cottura a induzione. Vedere la
sezione "Scelta dei recipienti di
cottura adatti".
Il piano di cottura a induzione
non è in grado di rilevare la
padella perché questa è troppo
piccola per la zona di cottura
oppure non è perfettamente
centrata su di essa.
Centrare la padella ed accertarsi che
la base corrisponda alle dimensioni
della zona di cottura.
Il piano di cottura a Guasto tecnico. Annotare le lettere e i numeri
induzione o la zona di
dell'errore, togliere alimentazione al
cottura si sono spenti
piano di cottura a induzione dalla
inaspettatamente, si
parete e contattare un tecnico
attiva un segnale
qualificato.
acustico e viene
visualizzato un codice
di errore (di solito
alternato con una o
due cifre sul display del
timer di cottura).
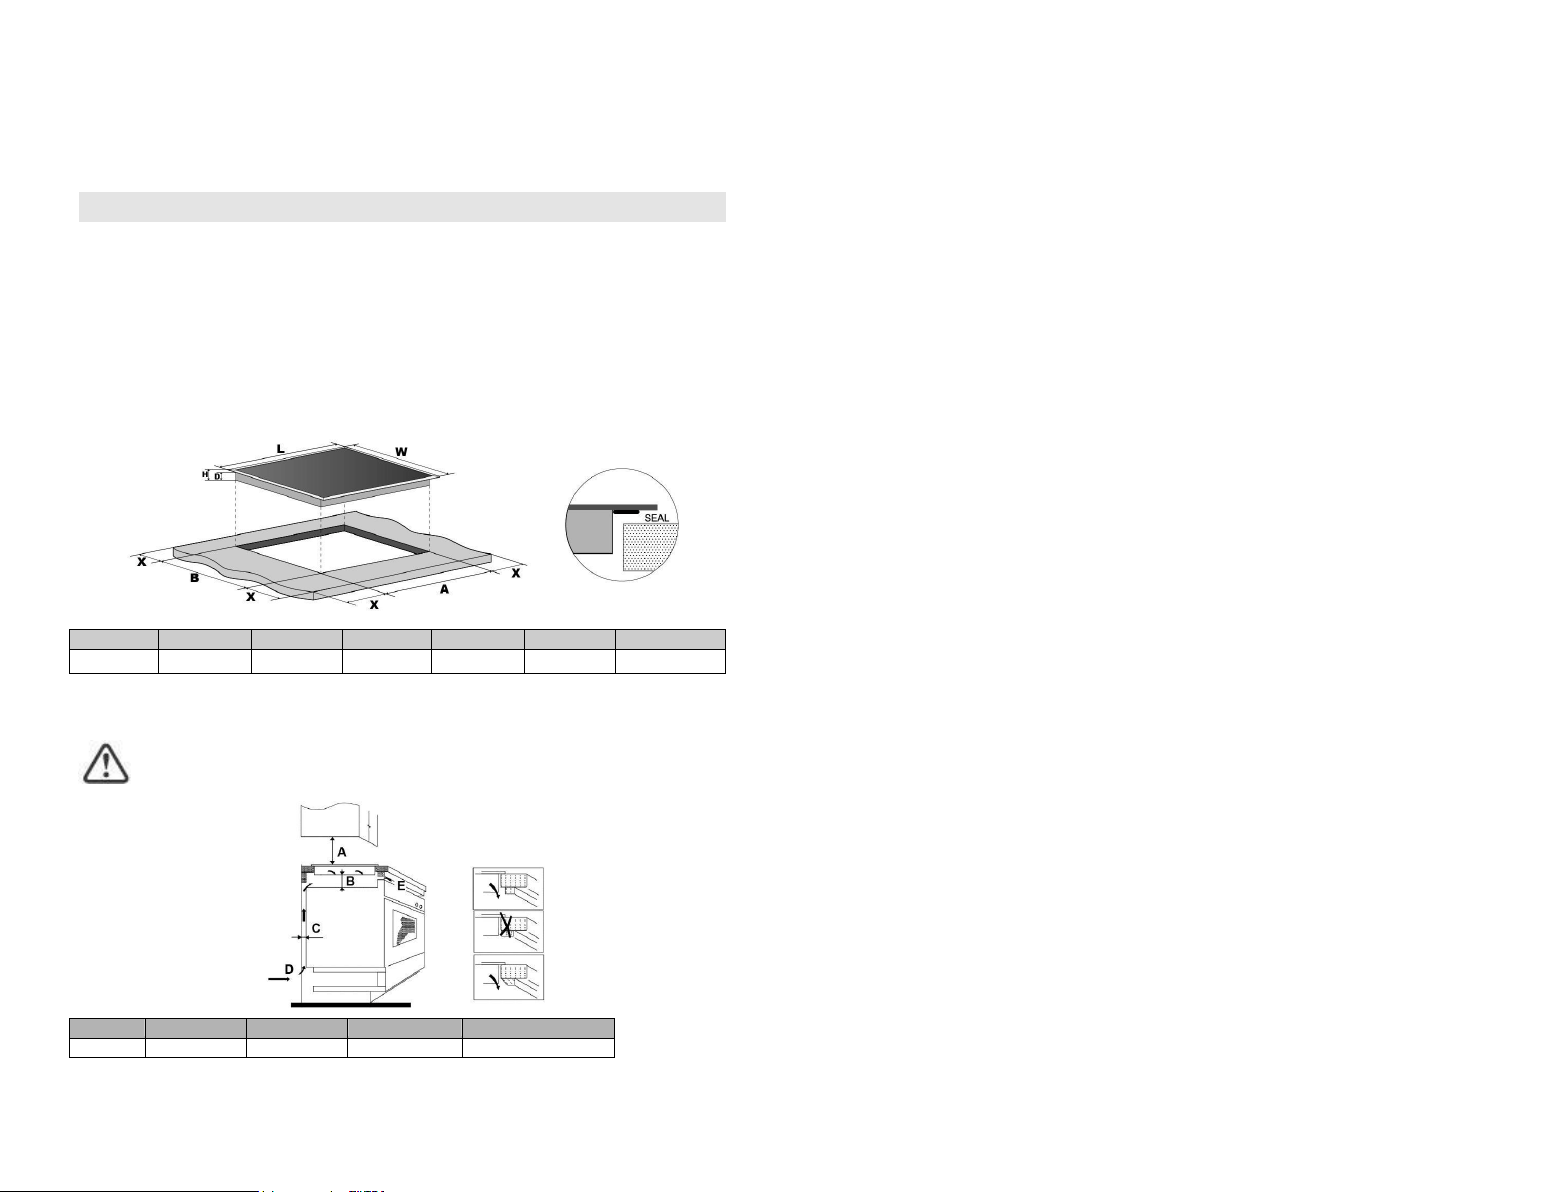
IT-28
Il peso e le dimensioni sono approssimativi. Le specifiche e il design potranno
variare senza preavviso in quanto siamo sempre impegnati nella ricerca di
continue innovazioni dei nostri prodotti.
Installazione
Scelta delle attrezzature di installazione
Tagliare la superficie di lavoro rispettando le misure indicate sul disegno.
Per l'installazione e l'uso è necessario lasciare uno spazio libero intorno al foro pari
ad almeno 5 cm.
Assicurarsi che lo spessore della superficie di lavoro corrisponda ad almeno 30 mm.
Selezionare il materiale del supporto in modo che sia resistente alle alte
temperature per evitare che si deformi a causa del calore proveniente dal piano di
cottura. Come illustrato qui di seguito:
L (mm)
W (mm)
H (mm)
D (mm)
A (mm)
B (mm)
X (mm)
770
520
60
56
740
+5
490
+5
minimo 50
Assicurarsi sempre che il piano di cottura a induzione sia ben ventilato e che
entrata ed uscita dell'aria non siano ostruite. Assicurarsi che il piano di cottura a
induzione sia in buone condizione operative. Come illustrato qui di seguito
Nota: Tra il piano di cottura e l'eventuale elemento superiore deve
essere prevista una distanza di sicurezza pari ad almeno 760 mm.
A (mm)
B (mm)
C (mm)
D
E
760
minimo 50
minimo 20
Entrata aria
Uscita aria 5 mm
IT-29
Prima di montare il piano di cottura, assicurarsi che
• il supporto sia squadrato e livellato e che non ci siano elementi strutturali che
possano interferire con i requisiti di spazio
• il supporto sia realizzato in materiale resistente al calore
• se il piano di cottura è installato al di sopra di un forno, il forno sia dotato di una
ventola di raffreddamento incorporata
• l'installazione sia conforme a tutti i requisiti di ingombro, oltre che a tutte le
normative e le disposizioni
• sia stato incorporato nel cablaggio permanente un apposito interruttore
sezionatore che permetta di staccare completamente l'elettrodomestico dalla
rete di alimentazione principale; tale interruttore deve essere montato e
posizionato in accordo con le normative e le disposizioni locali.
L'interruttore sezionatore deve essere di tipo approvato e deve fornire una
separazione dei contatti con intercapedine di 3 mm in tutti i poli (o in tutti i
conduttori attivi [fase] se le normative sugli impianti elettrici locali permettono
questa variazione rispetto alle specifiche)
• l'interruttore sezionatore sia facilmente raggiungibile dal cliente una volta
installato il piano di cottura
• in caso di dubbi relativi al montaggio, contattare le autorità locali e consultare le
normative vigenti
• si utilizzino rivestimenti resistenti al calore e facili da pulire (quali ad esempio
piastrelle ceramiche) per le pareti circostanti il piano di cottura.
Una volta montato il piano di cottura, assicurarsi che
• il cavo di alimentazione elettrica non sia accessibile attraverso gli sportelli o i
cassetti dei mobiletti
• sia presente un flusso adeguato di aria fresca dall'esterno dei mobiletti verso la
base del piano di cottura
• se il piano di cottura è montato sopra ad una cassettiera o a dei mobiletti, sia
stata installata una barriera di protezione termica al di sotto della base del piano
di cottura
• l'interruttore sezionatore sia facilmente accessibile per il cliente.
Prima di posizionare le staffe di fissaggio
L'elettrodomestico deve essere collocato su una superficie piana e stabile
(utilizzare l'imballaggio). Non forzare i comandi che sporgono dal piano di cottura.
Regolazione della posizione della staffa
Fissare il piano di cottura sul supporto avvitando 4 staffe sul fondo del piano di
cottura stesso (vedere figura) dopo il montaggio.
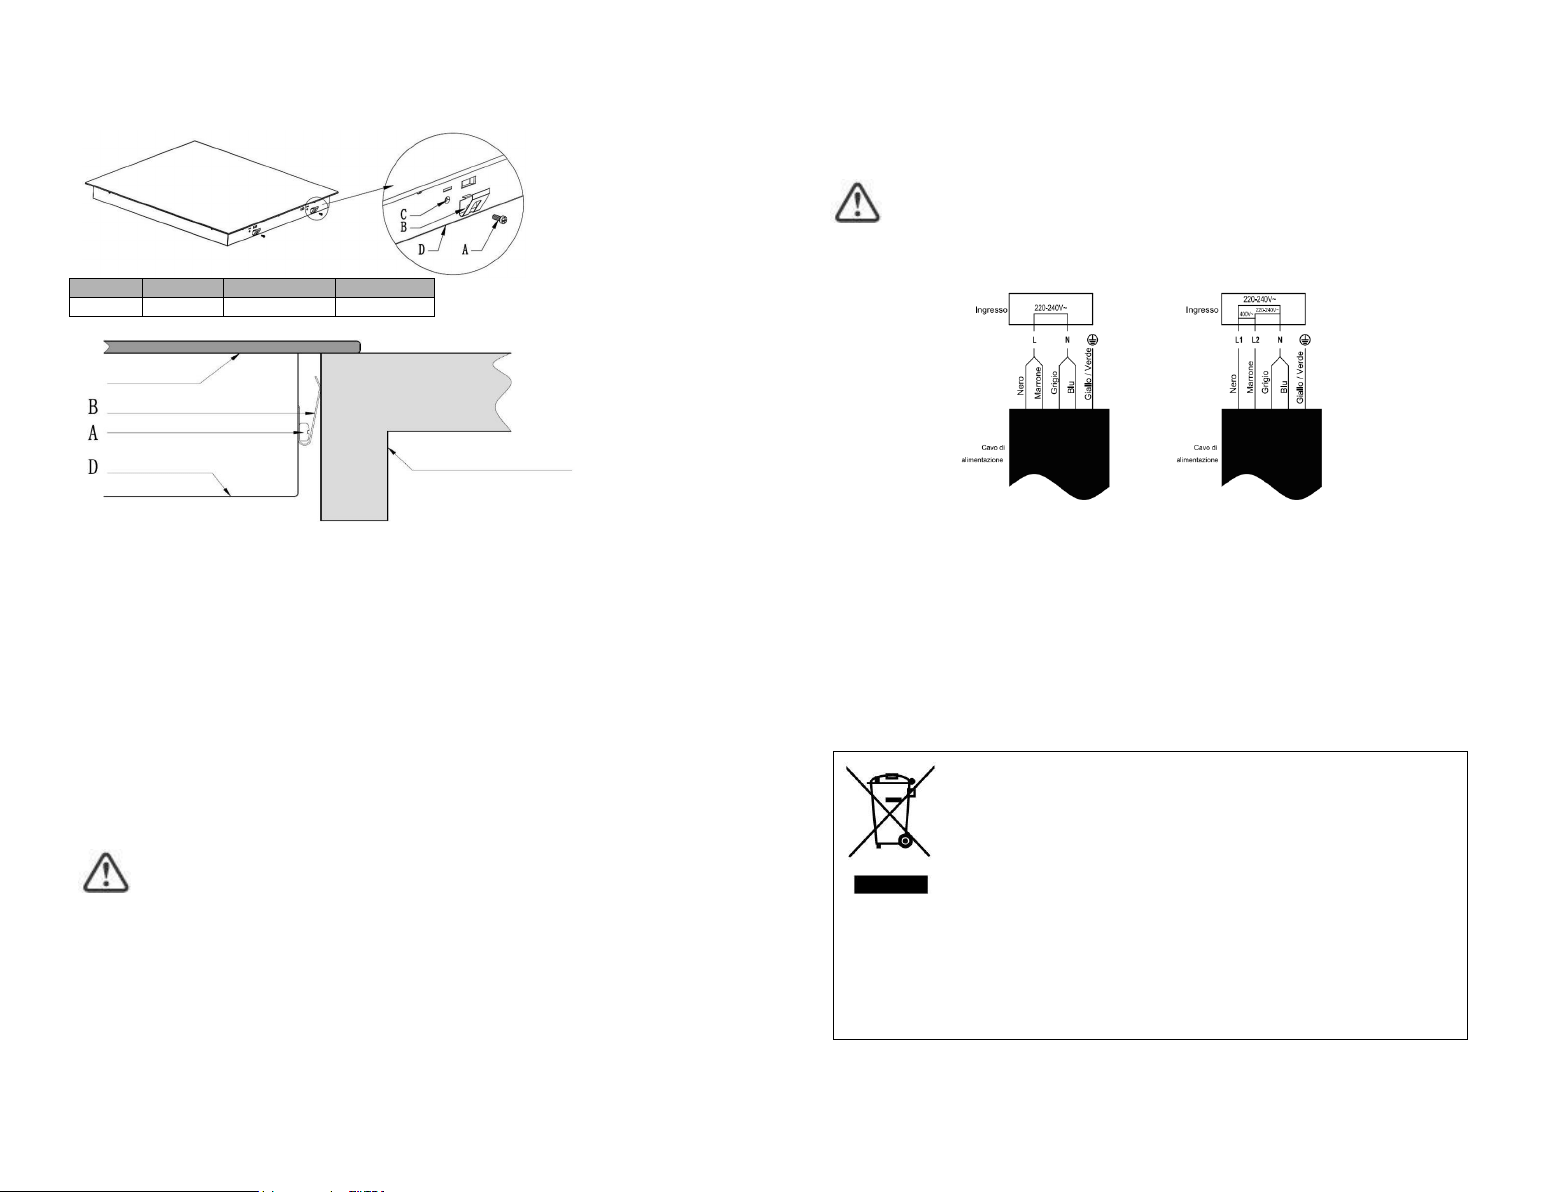
izzati.autor
tecnici da unicamente sostituito e regolarità con controllato essere deve cavo Il •
schiacciato. Il cavo non deve essere piegato o •
sicurezza. conforme alle normative di
sia che e corretto sia elettrico collegamento il che accertarsi deve L'installatore •
contatti. tra i
mm 3 almeno di spazio uno con multipolare sezionatore un montare necessario
Se l'elettrodomestico è collegato direttamente all'alimentazione di rete è •
incidente.
qualsiasi vendita con attrezzi dedicati, per evitare-agente posteffettuata da un
Se il cavo è danneggiato o deve essere sostituito, l'operazione deve essere •
seguito.
di qui illustrato è collegamento di metodo Il polare.uni sezionatore un o normativa
L'alimentazione elettrica deve essere collegata in conformità con la relativa
da un elettricista qualificato.
necessità di modificarlo. Le eventuali modifiche dovranno sempre essere effettuate
senza corretto è dell'abitazione cablaggio di l'impianto se elettricista un con Verificare
mai, in nessun punto, i 75°C.
surriscaldati e deve essere collocato in modo tale che la sua temperatura non superi
cavo di alimentazione elettrica non deve entrare in contatto con componenti Il
acquistato.
condizione che l'elettrodomestico sia di tipo simile ed abbia le stesse funzioni di quello
gratuitamente in un'unica soluzione, a restituito al venditore che lo deve accettare
domicilio. Durante l'acquisto di un nuovo elettrodomestico, quello vecchio può essere
In molti stati, nel caso di RAEE di grandi dimensioni sono disponibili servizi di prelievo a
omuni o da società autorizzate.dai c
gestite specifiche, smaltimento di aree nelle portati essere devono RAEE i
-
i RAEE non devono essere trattati come rifiuti domestici;
-
specifiche da rispettare:
diventino un problema a livello ambientale. Esistono alcune regole
garantire che i RAEE non tutti i materiali. Spetta ai singoli individui
in modo da togliere e smaltire in modo corretto gli inquinanti e recuperare
riutilizzati). È importante che i RAEE siano sottoposti a trattamenti specifici
sull'ambiente) sia elementi base (che possono essere effetto negativo
(RAEE). I RAEE contengono sia sostanze inquinanti (che possono avere un
europea 2012/19/CE in materia di apparecchi elettrici ed elettronici
Questo elettrodomestico dispone di contrassegno ai sensi della direttiva
31-ITIT-30
A B C D
Vite Staffa Foro per vite Fondo
vetro
staffa di fissaggio
vite
ST3. 5x8
Fondo
Piano di lavoro/mobiletto
della cucina
Avvertenza
1. Il piano di cottura a induzione deve essere montato da personale o tecnici
qualificati. La nostra società ha un team di professionisti a disposizione dei
clienti. Non operare mai da soli.
2. Il piano di cottura non può essere montato direttamente sopra ai seguenti
elettrodomestici: lavastoviglie, frigorifero, freezer, lavatrice o asciugatrice, in
quanto l'umidità può danneggiare l'elettronica del piano di cottura stesso.
3.Il piano di cottura a induzione dovrà essere montato in modo tale da garantire
un migliore irraggiamento del calore e un livello di affidabilità più elevato.
4. La parete e la zona di cottura indotta al di sopra della superficie del piano
dovranno essere resistenti al calore.
5. Per evitare danni, lo strato intermedio e l'adesivo devono essere resistenti al
calore.
Collegamento del piano di cottura alla rete di
alimentazione elettrica
Questo piano di cottura deve essere collegato alla rete di alimentazione elettrica solo
da una persona appositamente addestrata.
Prima di collegare il piano di cottura alla rete di alimentazione elettrica, verificare
che:
1.
il cablaggio interno dell'abitazione sia adeguato alla potenza consumata dal piano
di cottura.
2.
la tensione corrisponda al valore riportato sulla targhetta delle caratteristiche
tecniche
3.
le sezioni del cavo di alimentazione elettrico possano sopportare il carico
specificato sulla targhetta delle caratteristiche tecniche.
Per collegare il piano di cottura alla rete di alimentazione elettrica non utilizzare
adattatori, riduttori o deviatori in quanto sussiste il pericolo di surriscaldamenti e
incendi.
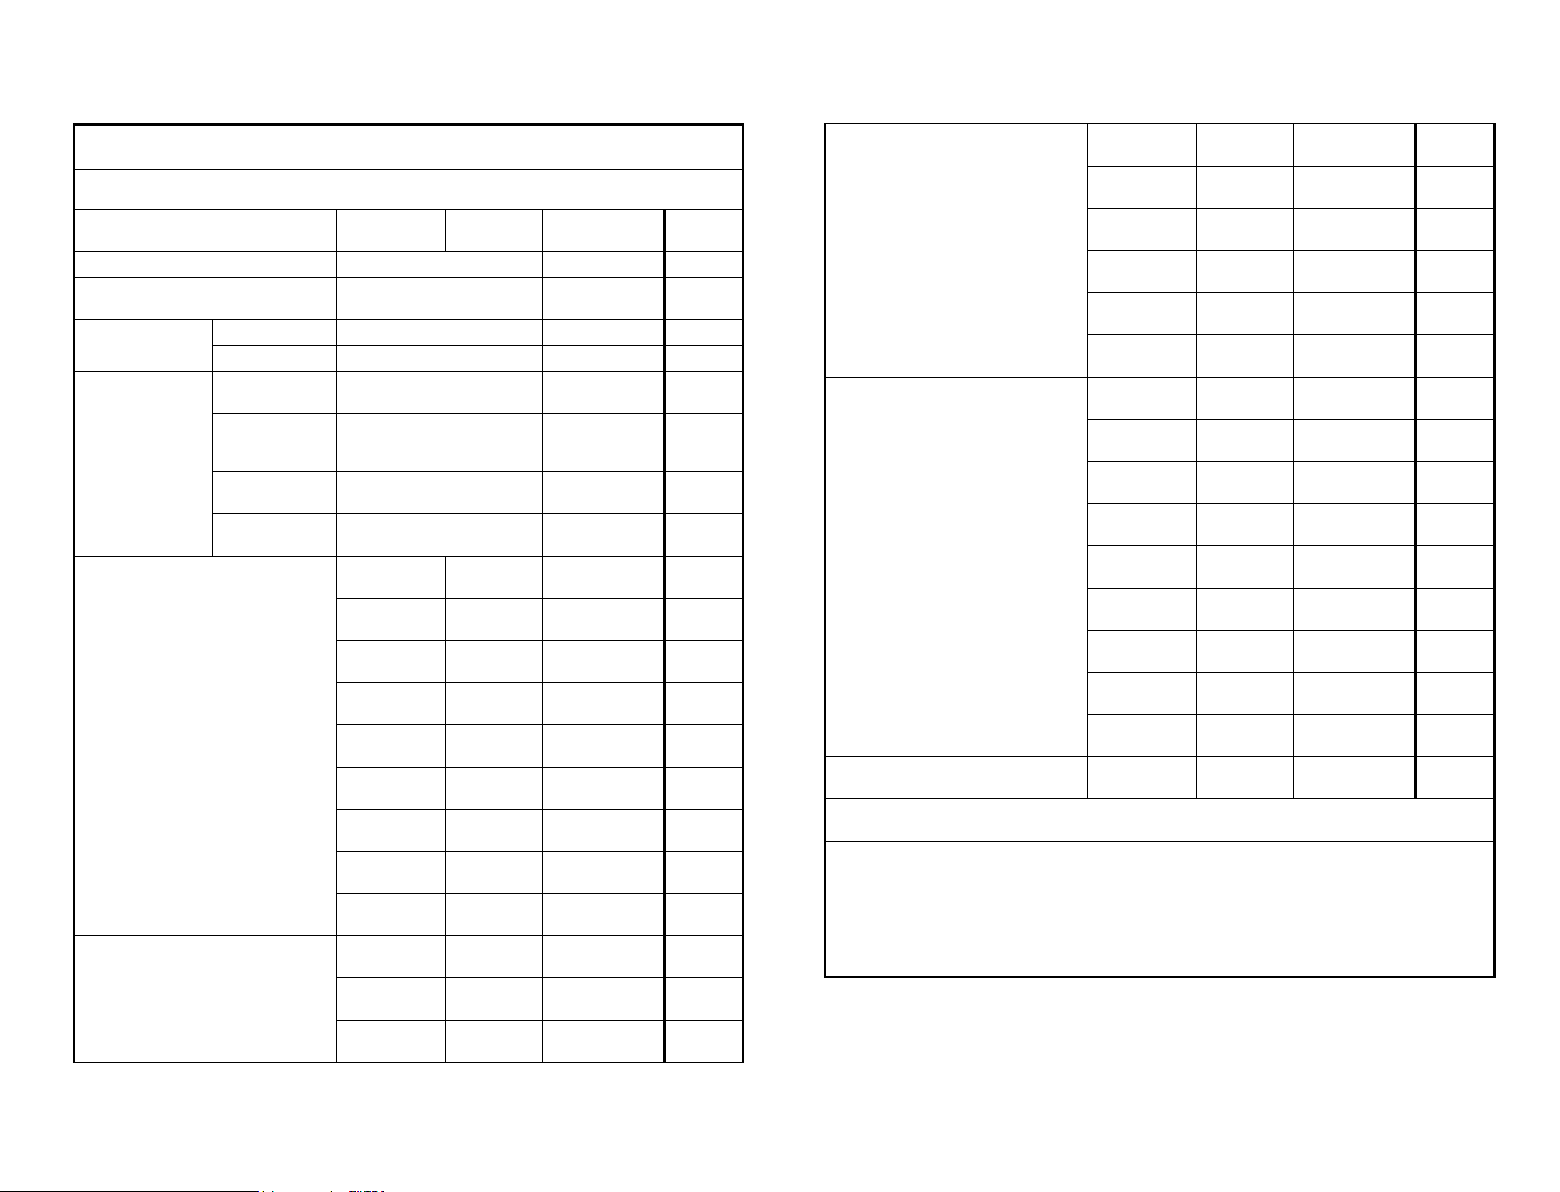
selezionata. Utilizzare pentole con diametro corrispondente al grafico della zona
•
riscaldato. i èIniziare la cottura con temperatura elevata, quindi ridurla quando il cibo s
•
cottura. Ridurre al minimo la quantità di liquido o grasso per diminuire i tempi di
•
calore. L'utilizzo di un coperchio riduce i tempi di cottura e risparmia energia trattenendo il
•
cottura.
Per ottenere la massima efficienza dal piano cottura, posizionare la pentola al centro della zona
•
Consigli per il risparmio energetico:
Metodi di misurazione delle prestazioni -cottura
Parte 2: Piani -cottura elettrici per uso domestico 2 Apparecchi di -Norma applicata: EN 60350
Peso/kg
8,681
hob
ECelectric
calcolato per kg
cottura Consumo energetico del piano
Peso/kg
5,618
cooking
ECelectric
destra
Anteriore
Peso/kg
-
cooking
ECelectric
Centrale
Anteriore
Peso/kg
187,3
cooking
ECelectric
sinistra
Anteriore
Peso/kg
-
cooking
ECelectric
destra
Centrale
Peso/kg
186,6
cooking
ECelectric
centrale
Centrale
Peso/kg
-
cooking
ECelectric
sinistra
Centrale
Peso/kg
3,187
cooking
ECelectric
destra
Posteriore
Peso/kg
-
cooking
ECelectric
centrale
Posteriore
Peso/kg
186,5
cooking
ECelectric
sinistra
Posteriore
di cottura calcolato al kg
Consumo energetico per zona o area
cm
0,20
0,20
W
L
destra
Anteriore
cm
-
W
L
Centrale
Anteriore
cm
0,20
0,20
W
L
sinistra
Anteriore
cm
-
W
L
destra
Centrale
cm
-
W
L
centrale
Centrale
cm
-
W
L
sinistra
Centrale
33-ITIT-32
Informazione prodotto per piani di cottura elettrici conformi al Regolamento della Commissione
(UE) nº 66/2014
Posizione Simbolo Valore
Unità di
misura
Identificativo del modello
CIFS85MCTT/1
Tipologia di piano cottura:
Piano cottura
elettrico
Numero di zone e/o
aree di cottura
zone
5
aree
Tecnologia di
riscaldamento
(zone di cottura e
aree di cottura a
induzione, zone di
cottura radianti,
piastre metalliche)
Zone di cottura a
induzione
X
Aree di cottura
con cottura a
induzione
zone di cottura
radianti
piastre
metalliche
Per le zone o le aree di cottura
circolari: diametro della superficie
utile per ciascuna zona di cottura
elettrica, arrotondata ai 5 mm più
vicini
Posteriore
sinistra
Ø
-
cm
Posteriore
centrale
Ø
-
cm
Posteriore
destra
Ø
-
cm
Centrale
sinistra
Ø
-
cm
Centrale
centrale
Ø
21,0 cm
Centrale
destra
Ø
-
cm
Anteriore
sinistra
Ø
-
cm
Anteriore
Centrale
Ø
-
cm
Anteriore
destra
Ø
-
cm
Per le zone o le aree di cottura non
circolari: lunghezza e larghezza della
superficie utile per ciascuna zona di
cottura elettrica, arrotondata ai 5 mm
più vicini
Posteriore
sinistra
L
W
20,0
20,0
cm
Posteriore
centrale
L
W
-
cm
Posteriore
destra
L
W
20,0
20,0
cm

DE-1
• Trennen Sie das Gerät von der Stromversorgung,
bevor Sie Arbeiten oder Wartung an dem Gerät
vornehmen.
• Der Anschluss an ein gutes Erdungssystem ist
lebenswichtig und zwingend vorgeschrieben.
• Änderungen am Hausstromnetz dürfen nur von
einem qualifizierten Elektroinstallateur
durchgeführt werden.
• Die Nichtbeachtung dieser Anweisung kann
Stromschlag oder Tod zur Folge haben.
Gefahr durch Schneiden
• Vorsicht - Kanten des Geräts sind scharf.
• Nichtbeachten von Vorsichtsmaßnahmen kann zu
Verletzungen oder Schnittwunden führen.
Wichtige Sicherheitsanweisungen
• Lesen Sie diese Anweisungen sorgfältig durch,
bevor Sie das Gerät installieren oder verwenden.
• Legen Sie niemals brennbare Stoffe oder
Gegenstände auf diesem Gerät ab.
• Bitte stellen Sie diese Informationend der Person,
die für die Installation Ihres Geräts zuständig ist,
Sicherheitshinweise
Ihre Sicherheit ist uns wichtig. Bitte lesen Sie diese
Informationen, bevor Sie Ihr Kochfeld benutzen.
Installation
Gefahr von Stromschlägen
DE-2
zur Verfügung, dadurch können Installationskosten
gespart werden.
• Um Gefahren zu vermeiden, muss dieses Gerät
entsprechend den vorliegenden Installations-
anweisungen installiert werden.
• Dieses Gerät sollte nur von einer entsprechend
qualifizierten Person ordnungsgemäß installiert
und geerdet werden.
• Dieses Gerät sollte an ein Stromnetz mit einem
Trennschalter angeschlossen werden, der eine
vollständige Abschaltung von der Stromversorgung
gewährleistet.
• Die nicht ordnungsgemäße Installation des Geräts
kann zu Verlust von Garantie- und
Haftungsansprüchen führen.
Betrieb und Wartung
Gefahr von Stromschlägen
• Kochen Sie nicht auf einem gebrochenen oder
geplatzten Kochfeld. Sollte die Kochfeldoberfläche
brechen oder platzen, schalten Sie das Gerät sofort
von der Hauptstromversorgung (Wandschalter) ab
und kontaktieren Sie einen qualifizierten Techniker.
• Schalten Sie das Kochfeld an der Wand aus, bevor
Sie Reinigungs- oder Wartungsarbeiten
durchführen.
• Die Nichtbeachtung dieser Anweisung kann
Stromschlag oder Tod zur Folge haben.
Gesundheitsrisiko
• Dieses Gerät entspricht den elektromagnetischen
Sicherheitsstandards.
• Jedoch müssen Personen mit Herzschrittmachern

DE-3
oder anderen elektrischen Implantaten (wie z.B.
Insulinpumpe) vor der Benutzung dieses Geräts
ihren Arzt oder den Hersteller ihres Implantats um
Rat fragen, um zu gewährleisten, dass ihre
Implantate nicht vom elektromagnetischen Feld
beeinträchtigt werden.
• Die Nichtbeachtung dieses Hinweises kann den Tod
zur Folge haben.
Gefahr durch heiße Oberflächen
• Während der Benutzung können zugängliche Teile
dieses Geräts ausreichend heiß werden, um
Verbrennungen hervorzurufen.
• Lassen Sie Ihren Körper, Ihre Kleidung oder andere
Gegenstände, mit Ausnahme von geeignetem
Kochgeschirr, nicht mit der Glasoberfläche des
Kochfeldes in Berührung kommen, bis die
Oberfläche abgekühlt ist.
• Metallische Gegenstände wie Messer, Gabeln, Löffel
und Deckel sollten nicht auf der Kochfeldoberfläche
abgelegt werden, da sie heiß werden können.
• Kinder fernhalten.
• Griffe von Kochtöpfen können beim Anfassen heiß
sein. Stellen Sie sicher, dass Griffe von Kochtöpfen
andere Kochzonen, die eingeschaltet sind, nicht
überlagern. Halten Sie Griffe außerhalb der
Reichweite von Kindern.
• Nichtbeachten dieses Hinweises kann zu
Verbrennungen und Verbrühungen führen.
Gefahr durch Schneiden
• Die messerscharfe Klinge eines Glasschabers ist
ungeschützt, wenn die Schutzhülle entfernt wurde.
Benutzen Sie ihn mit äußerster Sorgfalt und
DE-4
bewahren Sie ihn sicher und außerhalb der
Reichweite von Kindern auf.
• Nichtbeachten von Vorsichtsmaßnahmen kann zu
Verletzungen oder Schnittwunden führen.
Wichtige Sicherheitsanweisungen
• Lassen Sie das Gerät nicht unbeaufsichtigt, wenn
es gerade in Betrieb ist. Überkochen verursacht
rauchende und fettige Spritzer, die sich entzünden
können.
• Benutzen Sie Ihr Gerät niemals als Arbeitsfläche
oder Ablage.
• Lassen Sie niemals Gegenstände oder Utensilien
auf dem Gerät liegen.
• Platzieren oder lassen Sie keine magnetisierbaren
Gegenstände (z.B. Kreditkarten, Speicherkarten)
oder elektronischen Geräte (z.B. Computer,
MP3-Player) in der Nähe des Geräts liegen, da
diese von seinem elektromagnetischen Feld
beeinträchtigt werden könnten.
• Verwenden Sie Ihr Gerät niemals zum Wärmen
oder Heizen von Räumen.
• Schalten Sie nach der Benutzung die Kochzone und
das Kochfeld wie in dieser Anleitung beschrieben
aus (d.h. über die Bedienelemente). Verlassen Sie
sich nicht auf die Topferkennung, um die Kochfelder
abzuschalten, wenn Sie Töpfe entfernen.
• Erlauben Sie Kindern nicht, mit dem Gerät zu
spielen, darauf zu sitzen, zu stehen oder auf das
Gerät zu klettern.
• Verstauen Sie keine Gegenstände, für die sich
Kinder interessieren könnten, in Schränken über
dem Gerät. Kinder, die auf das Kochfeld klettern,

DE-5
könnten schwer verletzt werden.
• Lassen Sie Kinder nicht allein oder unbeaufsichtigt
in Räumen, wo das Gerät in Betrieb ist.
• Kinder oder Personen mit einer Behinderung, die
ihre Fähigkeiten zur Bedienung des Geräts mindert,
sollten von einer verantwortlichen und kompetenten
Person in der Bedienung des Geräts unterwiesen
werden. Die unterweisende Person sollte sicher-
gehen, dass sie das Gerät ohne Gefahr für sich
selbst oder ihre Mitmenschen bedienen können.
• Versuchen Sie nicht, Teile des Geräts zu reparieren
oder zu ersetzen, wenn es in der Anweisung nicht
ausdrücklich empfohlen wird. Alle anderen
Wartungsarbeiten sollten von einem qualifizierten
Techniker durchgeführt werden.
• Verwenden Sie keinen Dampfreiniger für die
Reinigung des Kochfeldes.
• Stellen Sie keine Gegenstände auf dem Kochfeld ab
und lassen Sie nichts auf das Kochfeld fallen.
• Stellen Sie sich nicht auf Ihr Kochfeld.
• Verwenden Sie keine Töpfe mit rauen Kanten und
ziehen Sie Töpfe nicht über die Glasoberfläche des
Induktionskochfeldes, da Kratzer auf dem Glas
entstehen können.
• Verwenden Sie keine Scheuermittel oder andere
aggressive Reinigungsmittel für die Reinigung
Ihres Kochfeldes, da diese die Glasoberfläche des
Induktionskochfeldes verkratzen könnten.
• Wenn das Stromkabel beschädigt ist, muss es vom
Hersteller oder von seinem Service-Mitarbeiter, oder
einer gleichwertig qualifizierten Person ausgetauscht
werden, um jegliches Risiko zu vermeiden.
DE-6
• Dieses Gerät ist ausschließlich für den Haus-
gebrauch und vergleichbare Verwendungen
bestimmt. -Personalküchen in Geschäften, Büros
und anderen Arbeitsumgebungen; -Bauernhöfe;
-von Kunden in Hotels, Motels und ähnlichen
Unterkünften - Bed & Breakfasts (B&B) und
ähnlichen Unterkünften.
• WARNUNG: Das Gerät und die zugänglichen Teile
können während des Betriebs heiß werden.
Die Heizelemente nicht berühren.
Kinder unter 8 Jahre niemals unbeaufsichtigt in
der Nähe des Ofens lassen.
• Dieses Gerät kann von Kindern ab 8 Jahren und
Personen mit eingeschränkten körperlichen,
sensorischen oder geistigen Fähigkeiten oder
mangelnder Erfahrung und mangelndem Wissen
benutzt werden, wenn diese in die sichere
Bedienung des Geräts eingewiesen wurden oder
beaufsichtigt werden.
• Kinder dürfen nicht mit dem Gerät spielen.
Reinigung und Pflege darf nicht von Kindern ohne
Aufsicht erfolgen.
• WARNUNG: Unbeaufsichtigtes Kochen mit Fett
oder Öl auf dem Kochfeld kann gefährlich sein und
zu einem Brand führen. Löschen Sie ein Feuer
NIEMALS mit Wasser, sondern schalten Sie das
Gerät aus und decken Sie die Flammen dann ab,
z. B. mit einem Deckel oder einer Löschdecke.
• WARNUNG: Feuergefahr: Keine Gegenstände auf
Kochfeldern ablegen.
• Warnung: Ist die Oberfläche zersplittert oder
geborsten, schalten Sie das Gerät aus, um
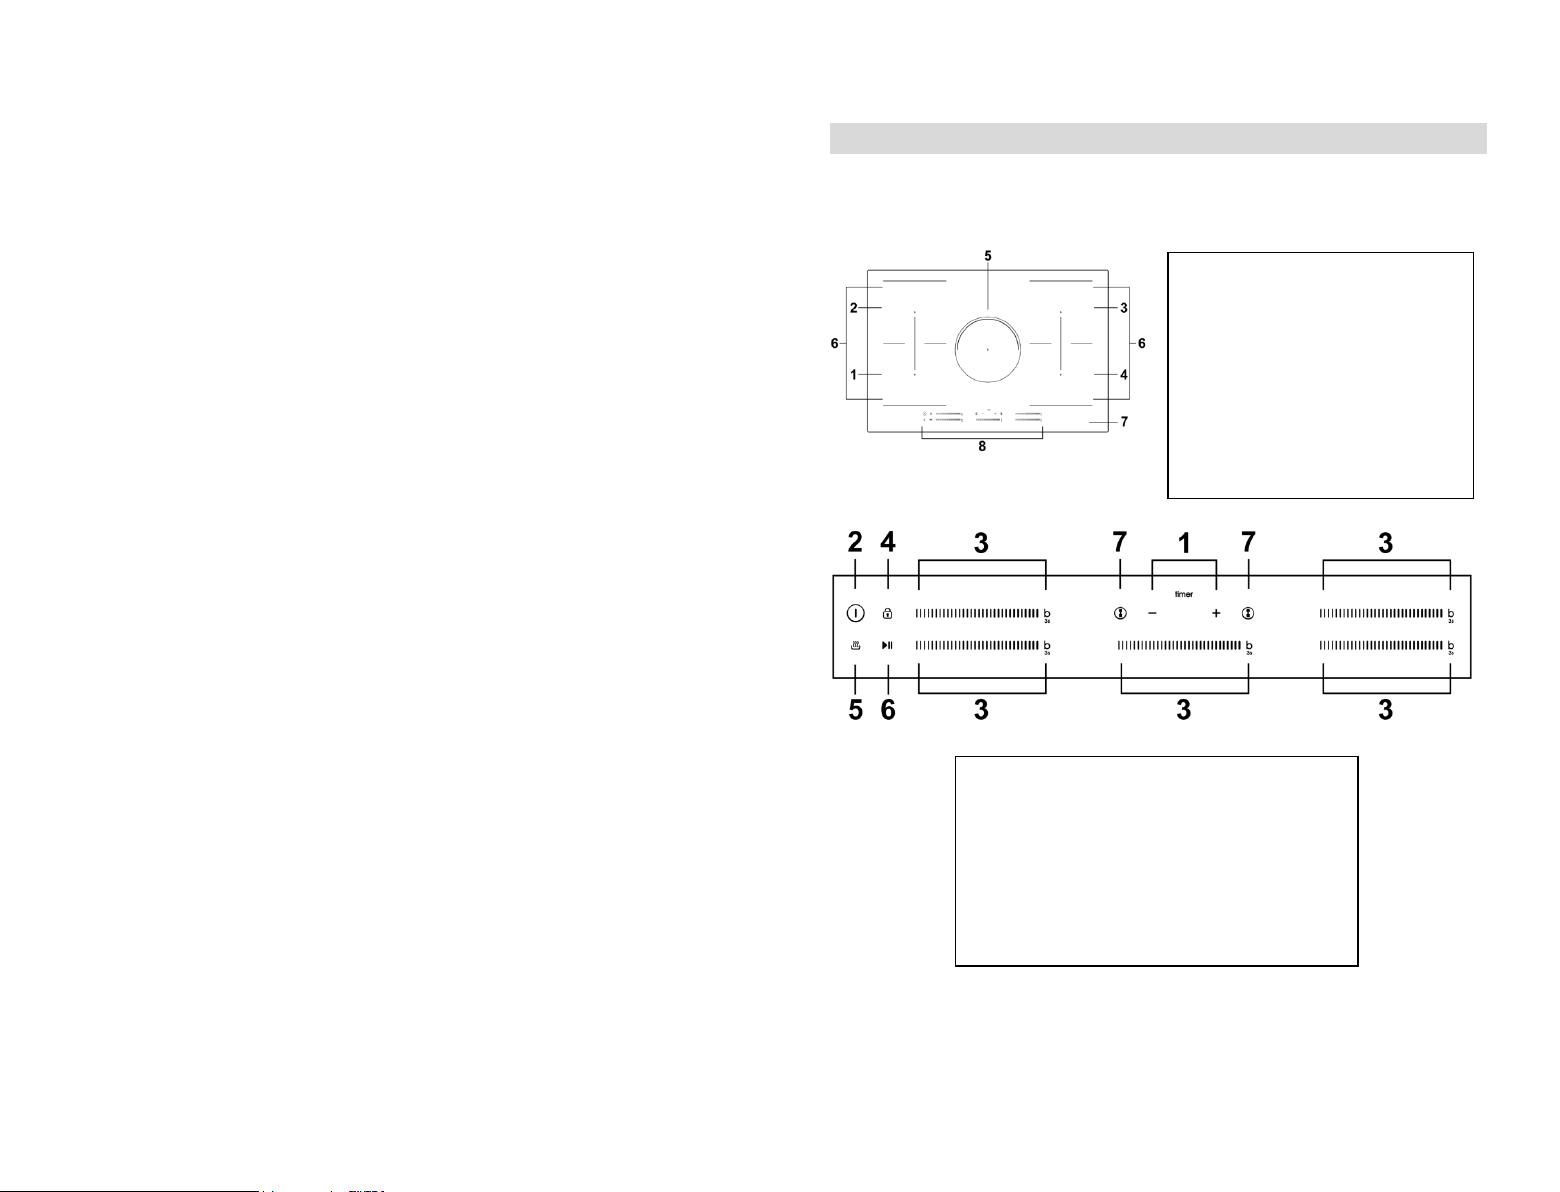
DE-7
Stromschlag zu vermeiden. Kochfeldoberflächen
aus Glaskeramik oder ähnlichem Material decken
spannungsführende Teile ab.
• Keinen Dampfreiniger verwenden.
• Das Gerät ist nicht dazu bestimmt, über einen
externen Timer oder eine gesonderte
Fernsteuerung betrieben zu werden.
VORSICHT: Der Garvorgang muss überwacht
werden. Eine kurzfristige Garung muss laufend
überwacht werden.
WARNUNG: Um das Kippen des Gerätes zu verhindern,
muss dieses Mittel zur Stabilisierung montiert
werden. Beachten Sie die Installationshinweise.
WARNUNG: Verwenden Sie nur Herdschutz-
vorrichtungen, die der Hersteller des Kochgeräts
oder die in der Bedienungsanleitung als geeignet
empfohlen wird, bzw. solche Schutzvorrichtungen
für die Kochmulde, die ein Bestandteil des Gerätes
sind. Die Verwendung ungeeigneter
Schutzeinrichtungen kann Unfälle verursachen.
Der Erdungsanschluss in diesem Gerät dient
ausschließlich zu Funktionszwecken.
Herzlichen Glückwunsch zum Kauf Ihres neuen Induktionskochfeldes.
Bitte nehmen Sie sich etwas Zeit, um diese Gebrauchs- und Installationsanleitung zu
lesen und sich mit der korrekten Installationsweise und Bedienung vertraut zu machen.
Für die Installation lesen Sie bitte den Abschnitt Installation.
Lesen Sie alle Sicherheitsanweisungen sorgfältig durch, bevor Sie das Gerät benutzen,
und bewahren Sie diese Gebrauchs- und Installationsanleitung zum späteren
Nachschlagen auf.
DE-8
1. Timer-Steuerung
2. EIN/AUS-Steuerung
3. Taste Leistungsstufen/ Booster-Funktion
4. Sperrfunktion
5. Keep warm function
6. Taste Pausieren und Fortsetzen
7. Flex-Zone
Produktübersicht
Ansicht von oben
Bedienfeld
1,2000 W-Zone, Boost auf 2600W
2,1500 W-Zone, Boost auf 2000W
3,2000 W-Zone, Boost auf 2600W
4,1500 W-Zone, Boost auf 200W
5,2000 W-Zone, Boost auf 2600W
6, Flex-Zone, 2800W Boost 3500W
7,Glasplatte
8,Bedienfeld
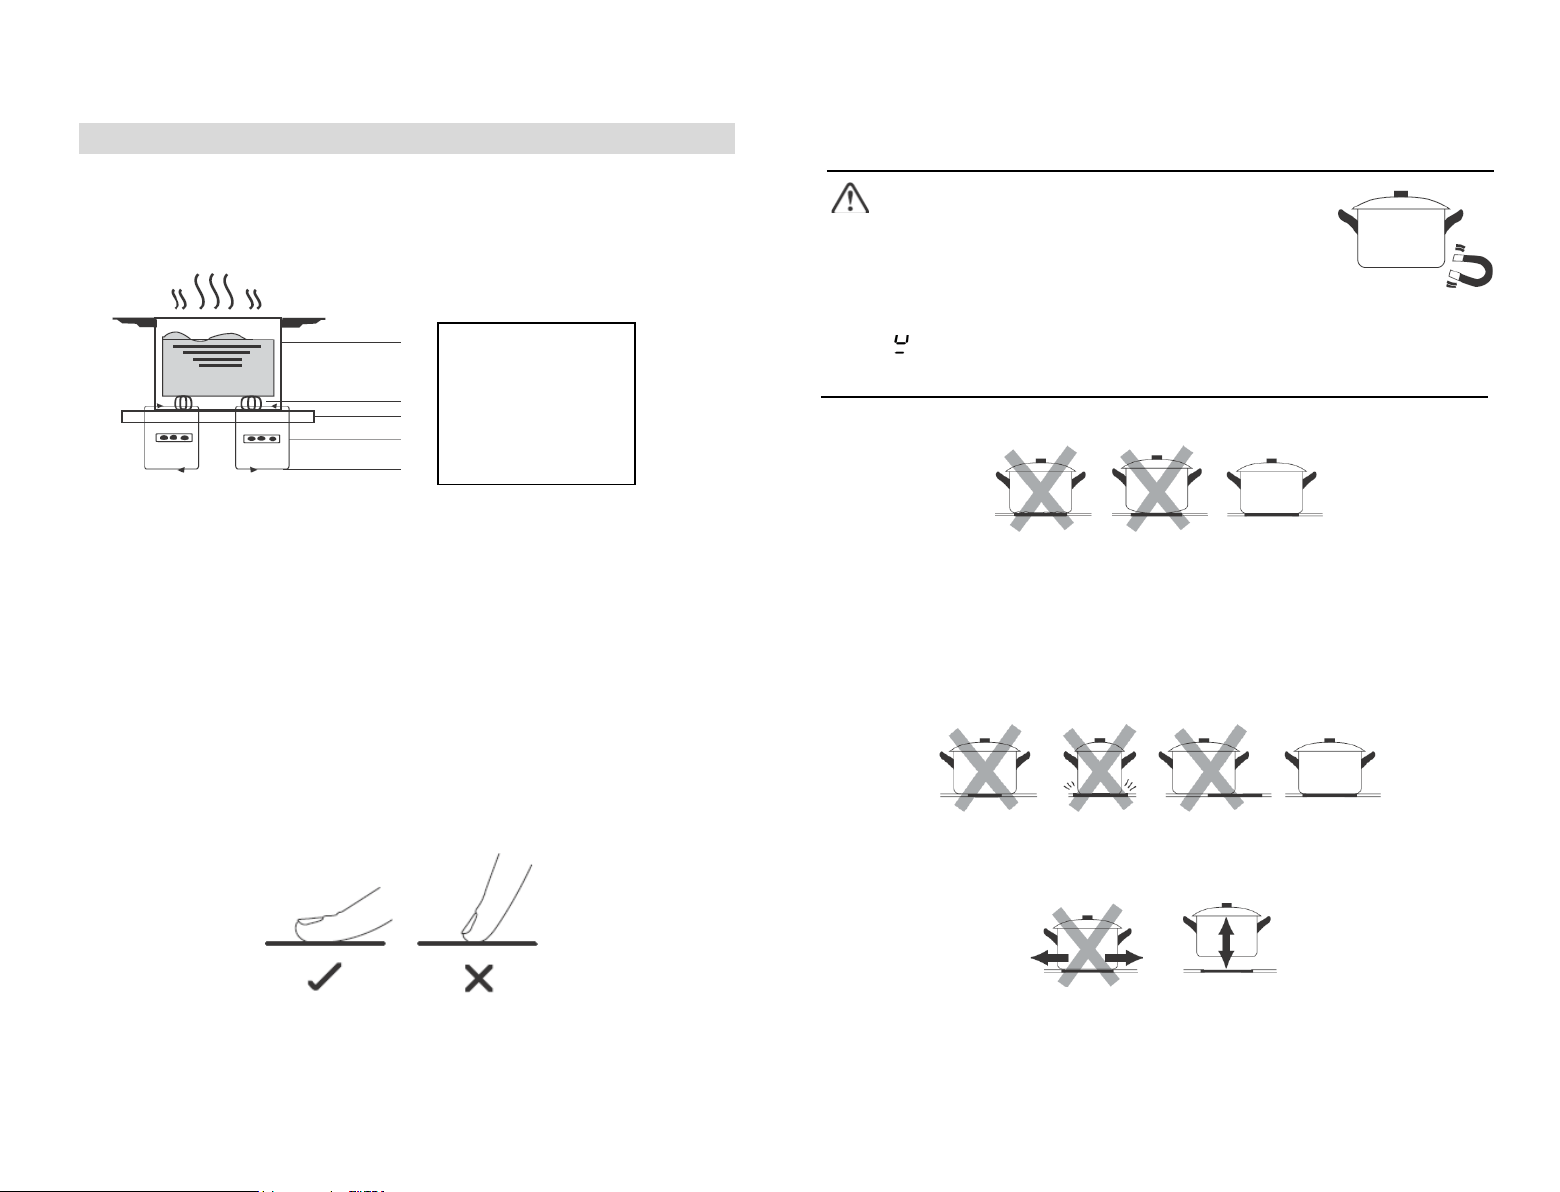
DE-9
Eisentopf
Magnetkreis
Keramikglasplatte
Induktionsspule
induzierte Ströme
Ein Wort zum Induktionskochen
Induktionskochen ist eine sichere, moderne, effiziente und kostengünstige
Kochtechnologie. Durch elektromagnetische Schwingungen wird die Wärme direkt
im Topf erzeugt und nicht indirekt über die Erhitzung der Glasfläche. Das Glas des
Kochfeldes wird nur deshalb heiß, weil es vom Topf oder der Pfanne erwärmt wird.
Bevor Sie Ihr neues Induktionskochfeld benutzen
• Lesen Sie diese Anleitung und achten Sie insbesondere auf den Abschnitt
„Sicherheitshinweise“.
• Entfernen Sie die Schutzfolie, die möglicherweise noch auf dem Induktionskochfeld
angebracht ist.
Verwenden der Touch-Bedienungen
• Die Bedienelemente sind berührungsempfindlich, d.h. Sie brauchen keinen
Druck anzuwenden.
• Benutzen Sie die Fingerballen, nicht die Fingerspitze.
• Bei jeder registrierten Berührung ertönt ein Signalton.
• Achten Sie darauf, dass die Bedienelemente immer sauber und trocken sind und
dass sie nicht durch Gegenstände (z.B. Kochgeschirr oder Abtrockentücher)
verdeckt werden. Selbst ein dünner Wasserfilm kann die Bedienung der
Touch-Elemente erschweren.
DE-10
Auswahl des richtigen Kochgeschirrs
• Verwenden Sie ausschließlich Kochgeschirr mit einem für das
Induktionskochen geeigneten Boden. Achten Sie auf das
Induktionssymbol auf der Verpackung oder am Boden des Topfes
oder der Pfanne.
• Ob ein Topf für das Kochen mit Induktion geeignet ist, können Sie auch
mit dem so genannten Magnettest herausfinden. Halten Sie einen Magneten
an den Topfboden. Wird der Magnet angezogen, ist der Topf oder die
Pfanne für die Induktion geeignet.
• Wenn Sie keinen Magneten haben:
1. Geben Sie etwas Wasser in den Topf oder die Pfanne, die Sie prüfen wollen.
2. Wenn nicht blinkt und das Wasser erwärmt wird, ist der Topf oder die Pfanne geeignet.
• Kochgeschirr aus folgenden Materialien ist nicht geeignet: reiner Edelstahl, Aluminium oder
Kupfer ohne Magnetboden, Glas, Holz, Porzellan, Keramik und Steingut.
Benutzen Sie kein Kochgeschirr mit scharfen Kanten oder gekrümmtem Boden.
Stellen Sie sicher, dass der Topf- oder Pfannenboden glatt ist, flach auf dem Glas
aufliegt und genau so groß wie die Kochzone ist. Verwenden Sie Töpfe mit einem
Durchmesser, der genau so groß ist, wie der Umriss auf der ausgewählten Kochzone.
Bei Verwendung eines etwas breiteren Topfes wird die Energie mit maximaler
Effizienz genutzt. Wenn Sie einen kleineren Topf verwenden, kann die Energieeffizienz
geringer als erwartet sein. Stellen Sie den Topf oder die Pfanne immer in die Mitte
der Kochzone.
Heben Sie die Töpfe immer vom Induktionskochfeld ab - ziehen Sie Töpfe nicht, da
Kratzer auf dem Glas entstehen können.
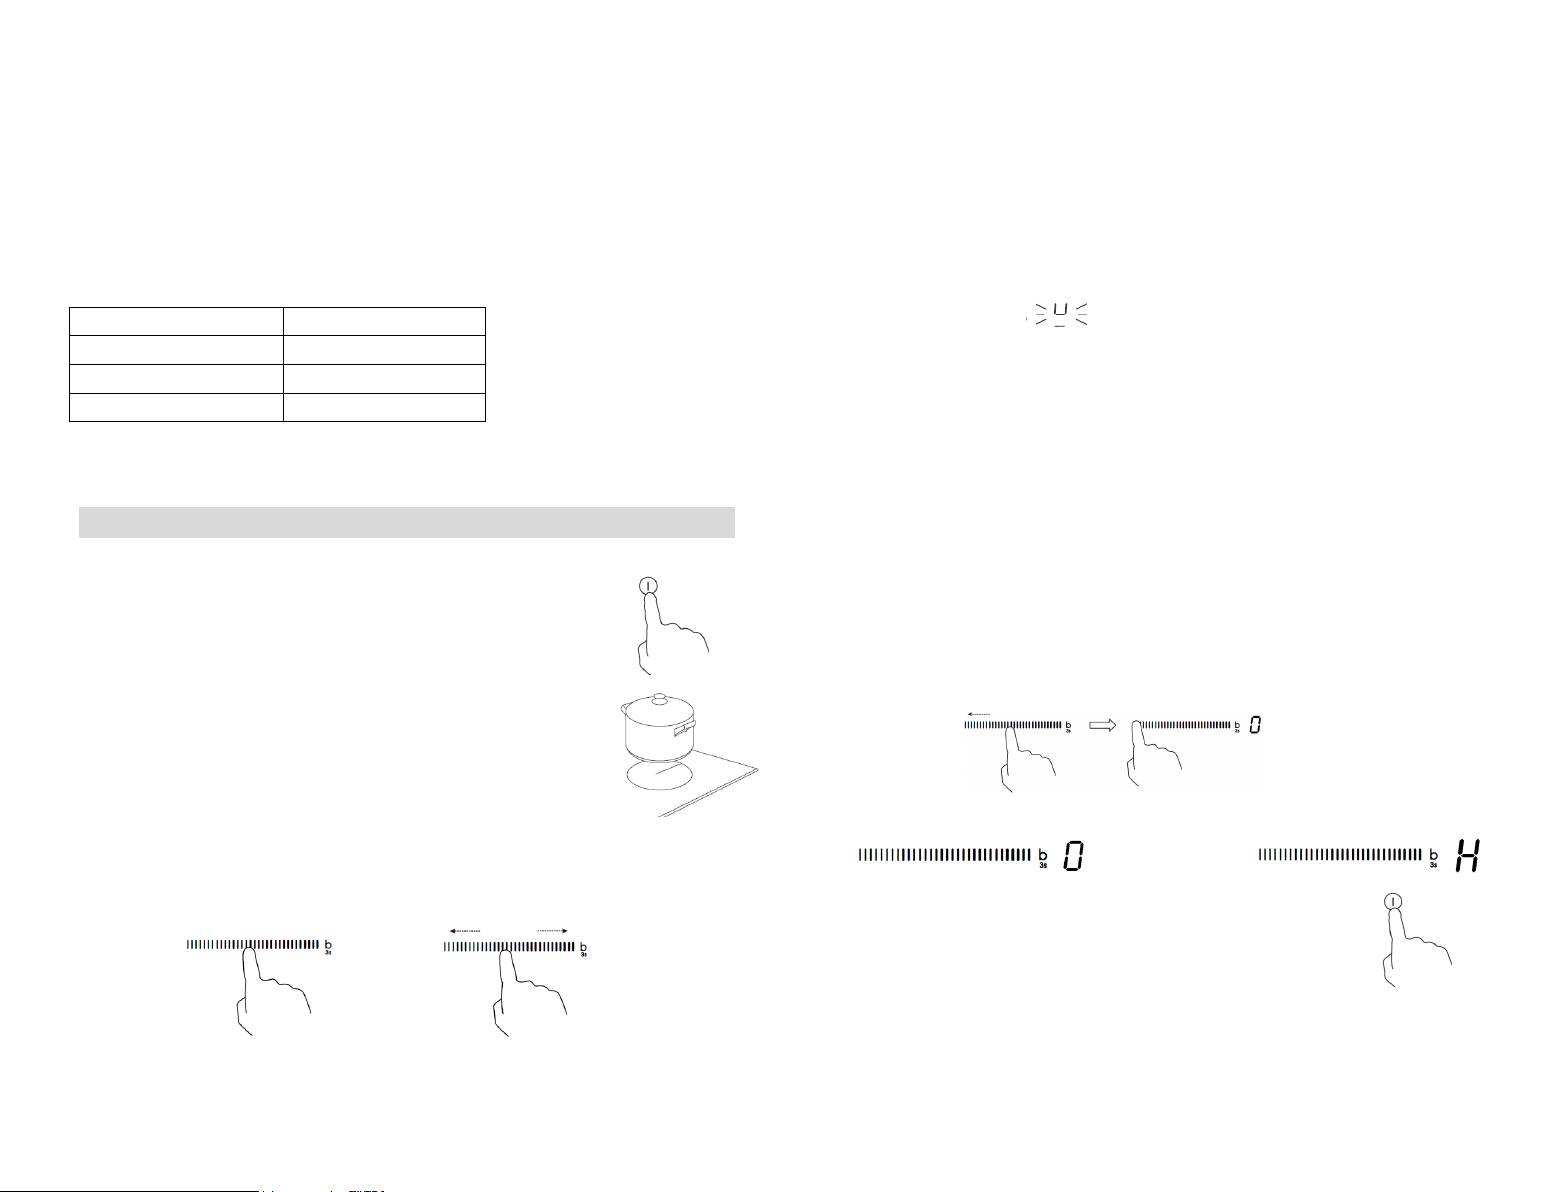
DE-11
Topfgröße
Die Kochzonen werden bis zu einer Obergrenze automatisch dem Topfdurchmesser
angepasst. Der Topfboden muss jedoch einen Mindestdurchmesser haben, der
dem der entsprechenden Kochzone entspricht. Um die maximale Effizienz des
Kochfeldes zu erzielen, platzieren Sie den Topf in die Mitte der Kochzone.
Der Bodendurchmesser von Induktionskochgeschirr
Kochzone
Minimum (mm)
1, 2, 3, 4(180 mm)
120
5 (210 mm)
140
Flex zone
240 oder 160*270
Angaben können nach verwendeter Pfanne variieren.
Kochen mit dem Induktionskochfeld
Mit dem Kochen starten
1. Berühren Sie die EIN/AUS-Steuerung.
Nach dem Einschalten des Geräts ertönt ein einmaliger Signalton
und die Kochzonen-Auswahlsteuerung zeigt „-“ oder „- -“ und weist
darauf hin, dass das Induktionskochfeld in den Standby-Modus
geschaltet wurde.
2. Stellen Sie einen geeigneten Topf oder Pfanne auf die
Kochzone, die Sie verwenden möchten.
• Stellen Sie sicher, dass der Topf- oder Pfannenboden und die
Oberfläche der Kochzone sauber und trocken sind.
3. Stellen Sie eine Leistungsstufe ein, indem Sie den Schieberegler berühren, den
Schieberegler entlang der Steuerleiste „—“ schieben oder einfach einen beliebigen
Punkt auf der Steuerleiste „—“ berühren.
Oder
DE-12
a. Wenn Sie innerhalb von 1 Minute keine Temperatureinstellung auswählen,
wird das Induktionskochfeld automatisch ausgeschaltet. Sie müssen wieder
mit Schritt 1 beginnen.
b. Sie können die Temperatureinstellung jederzeit während des Kochens
ändern.
c. Beim Entlangleiten auf der Steuerleiste „—“ variiert die Leistung von Stufe 1
bis Stufe 9.
Im Display blinkt abwechselnd mit der
Temperatureinstellung
Das bedeutet:
• Sie haben den Topf oder die Pfanne nicht richtig auf die Kochzone gestellt oder
• der verwendete Topf oder Pfanne ist nicht für das Induktionskochen geeignet
oder
• der Topf oder die Pfanne ist zu klein oder nicht richtig auf der Kochzone zentriert.
Es findet kein Aufheizen statt, bis ein geeigneter Topf oder Pfanne auf der
Kochzone erkannt wird.
Die Anzeige schaltet sich nach 1 Minuten automatisch aus, wenn kein geeigneter
Topf oder Pfanne aufgestellt wird.
Wenn Sie mit dem Kochen fertig sind
1. Schalten Sie die Kochzone aus, indem Sie auf der Steuerleiste „—“ nach links
gleiten und dann 1 Sekunde lang halten.
2. Stellen Sie sicher, dass das Leistungsdisplay „0“ und dann „H“ anzeigt.
und dann
3. Schalten Sie die ganze Kochfläche durch Berühren der
EIN/AUS-Steuerung aus.
4. Warnung vor heißer Oberfläche
„H“ weist darauf hin, welche Kochzone zu heiß zum Anfassen ist.
Das Symbol verschwindet, wenn die Oberfläche auf eine sichere Temperatur
abgekühlt ist. Es kann auch als Energiesparfunktion eingesetzt werden.
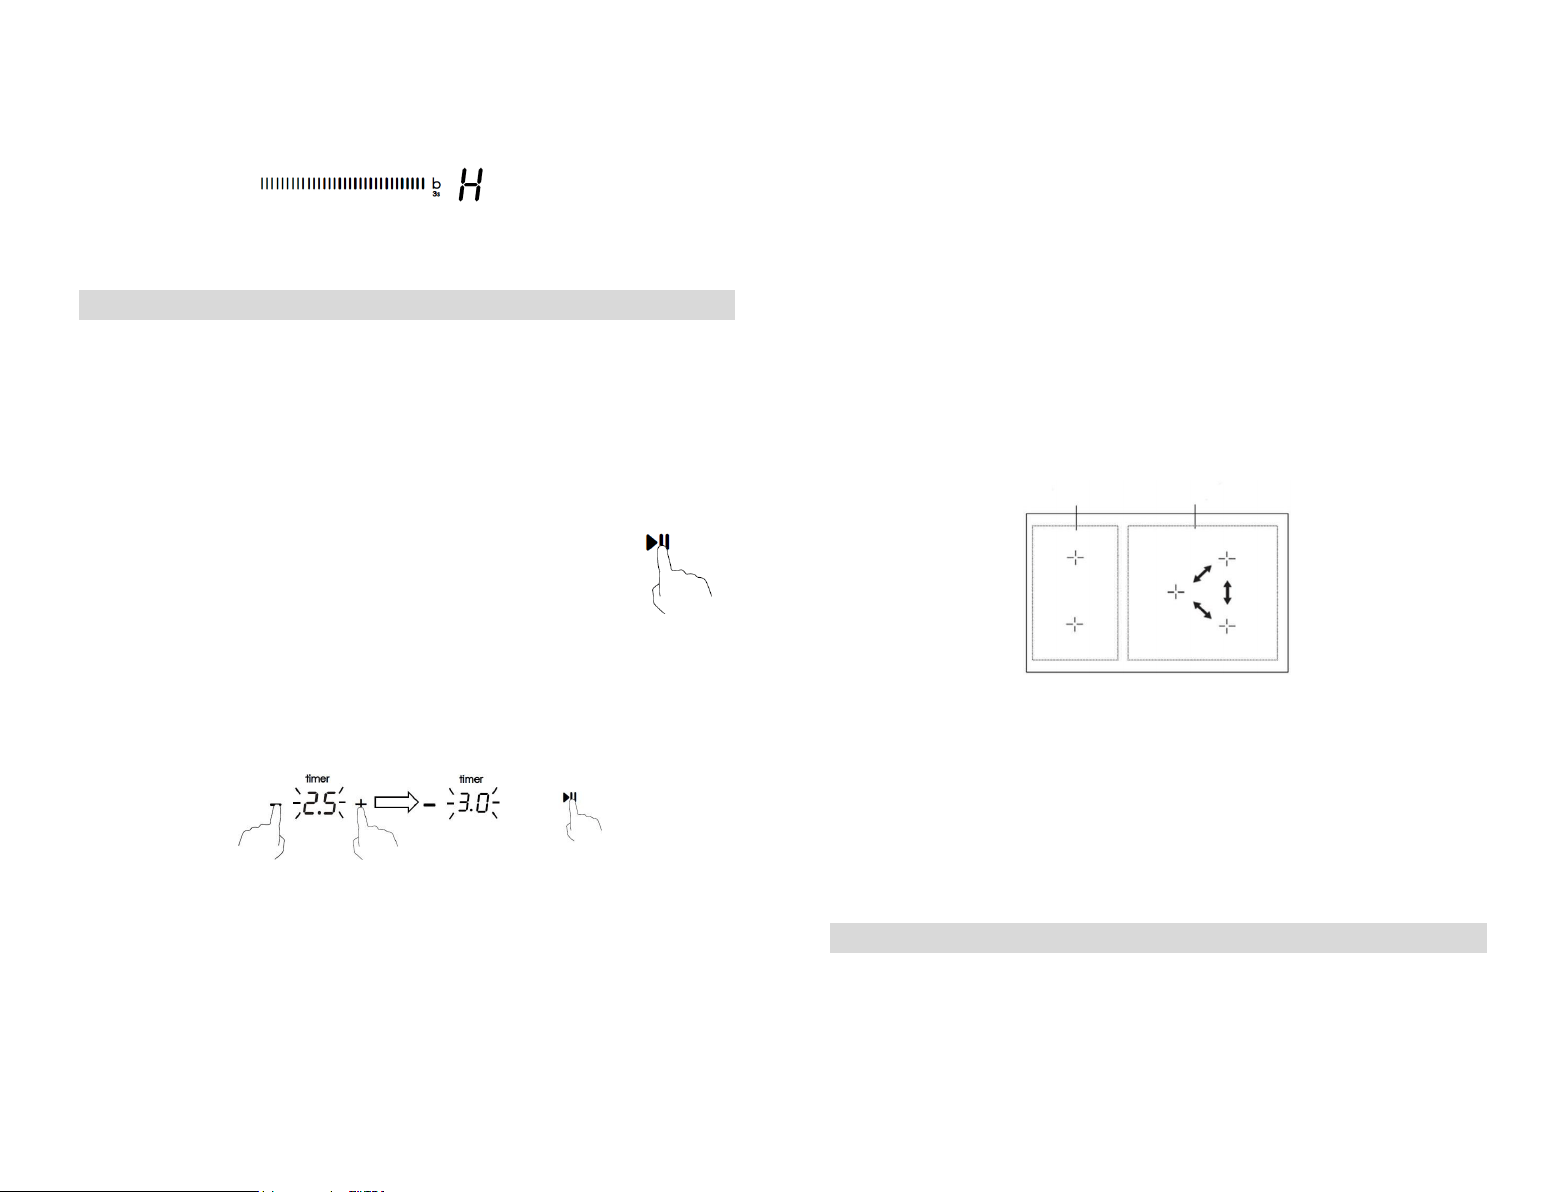
DE-13
Verwenden Sie die noch heiße Kochplatte, um zusätzliche Töpfe oder Pfannen
aufzuheizen.
Achten Sie bitte darauf auch im Falle einer Stromunterbrechung während das
Kochfeld “H” anzeigt das Kochfeld nicht zu berühren auch wenn das “H” nicht
länger angezeigt wird und der Strom wieder da ist.
Verwendung der Energieverwaltung
Über die Energieverwaltung können Sie die Gesamtleistung auf 2,5kW/ 3,0kW/
4,5kW/ 6,5kW und 7,4kW einstellen. Voreingestellt ist die maximale Leistungsstufe.
Gesamtleistung an Ihre Anforderungen anpassen
1. Stellen Sie sicher, dass die Kochfläche ausgeschaltet ist.
Hinweis: Sie können die Energieverwaltung nur einstellen, wenn das Kochfeld
ausgeschaltet ist.
2. Berühren Sie die Taste „Pausieren und Fortsetzen“ und halten Sie
sie 5 Sekunden gedrückt. Der Summer piept einmal.
3. Berühren Sie nach dem Piepton gleichzeitig die Tasten „+“ und „-“ und halten
Sie sie 3 Sekunden lang gedrückt. Die Timeranzeige blinkt die vorherige
Gesamtleistungsstufe, z.B. „2,5“. Berühren Sie die Tasten „+“ und „-“ und halten
Sie sie eine Sekunde lang gedrückt, um zu einer anderen Leistungsstufe wie
beispielsweise 3,0 umzuschalten. Wenn die gewünschte Leistung blinkt, berühren
Sie die Taste „Pausieren und Fortsetzen“ und halten Sie 5 Sekunden gedrückt. Der
Summer piept 10 Mal. Das bedeutet, dass Sie die Einstellung beendet haben.
Hinweis:
1. Nach Schritt 2 müssen Sie die Tasten „+“ und „-“ innerhalb von 3 Sekunden
nach dem Piepton berühren. Ansonsten müssen Sie wieder mit Schritt 2 beginnen.
2. Warten Sie nach dem Einstellen, bis der Summer 10 Mal gepiept hat. Berühren
Sie während dessen keine Taste. Andernfalls ist die Einstellung ungültig.
Regeln der Energieverwaltung
Wenn die Gesamtleistung die Grenze von 2,5kw, 3,0kw, 4,5kw,6,5kw oder
DE-14
Gruppe a Gruppe b
7,4kw übersteigt (je nach eingestellter Stufe), kann die Leistungsstufe
keiner Zone erhöht werden. Wenn Sie diese durch Berühren von
„+“ erhöhen, piept das
Kochfeld dreimal und die Anzeige blinkt „Pn“. Daher müssen Sie die Leistungsstufe
der anderen Zonen verringern, bevor Sie die Leistung der gewünschten Zone
erhöhen können.
Leistungsbegrenzung in mittleren und rechten Zonen
• Die Kochzonen sind in zwei Gruppen unterteilt. Jede Gruppe hat eine
maximale Strombelastung von 3600 W.
• Die Begrenzung verringert die Leistung der anderen Kochzonen.
• Die Wärmeeinstellungsanzeige der reduzierten Zonen wechselt
zwischenzwei Stufen.
Wenn beispielsweise alle Zonen eingeschaltet sind, sinkt die größte
Maximalleistung von drei Zonen auf Stufe 7, Stufe 7, Stufe 7.
In Gruppe a können beide Zonen gleichzeitig auf Stufe 9 arbeiten, da sie
insgesamt 3500 W beträgt.
Wenn 3 Zonen in Gruppe B eingeschaltet sind kann jede Zone nur die max.
Leistung Level 7 erreichen. Wenn die hintere Zone in Gruppe B ausgeschaltet ist,
können die anderen beiden Zonen eine max. Leistung von Level 8 erreichen.
Wenn Sie eine der Zonen in Gruppe B auf der höchsten Leistungsstufe betreiben
wollen, sollten nur 2 Zonen in Betrieb sein. Das Kochfeld reduziert automatisch
die Leistung der Zone, die zuerst eingeschaltet wurde.
Verwendung der Boost-Funktion
Mithilfe der Boost-Funktion können Sie die Leistung einer Zone innerhalb einer
Sekunde auf eine höhere Leistung steigern, die dann für 5 Minuten anhält. Damit
wird die Kochleistung schneller und stärker.
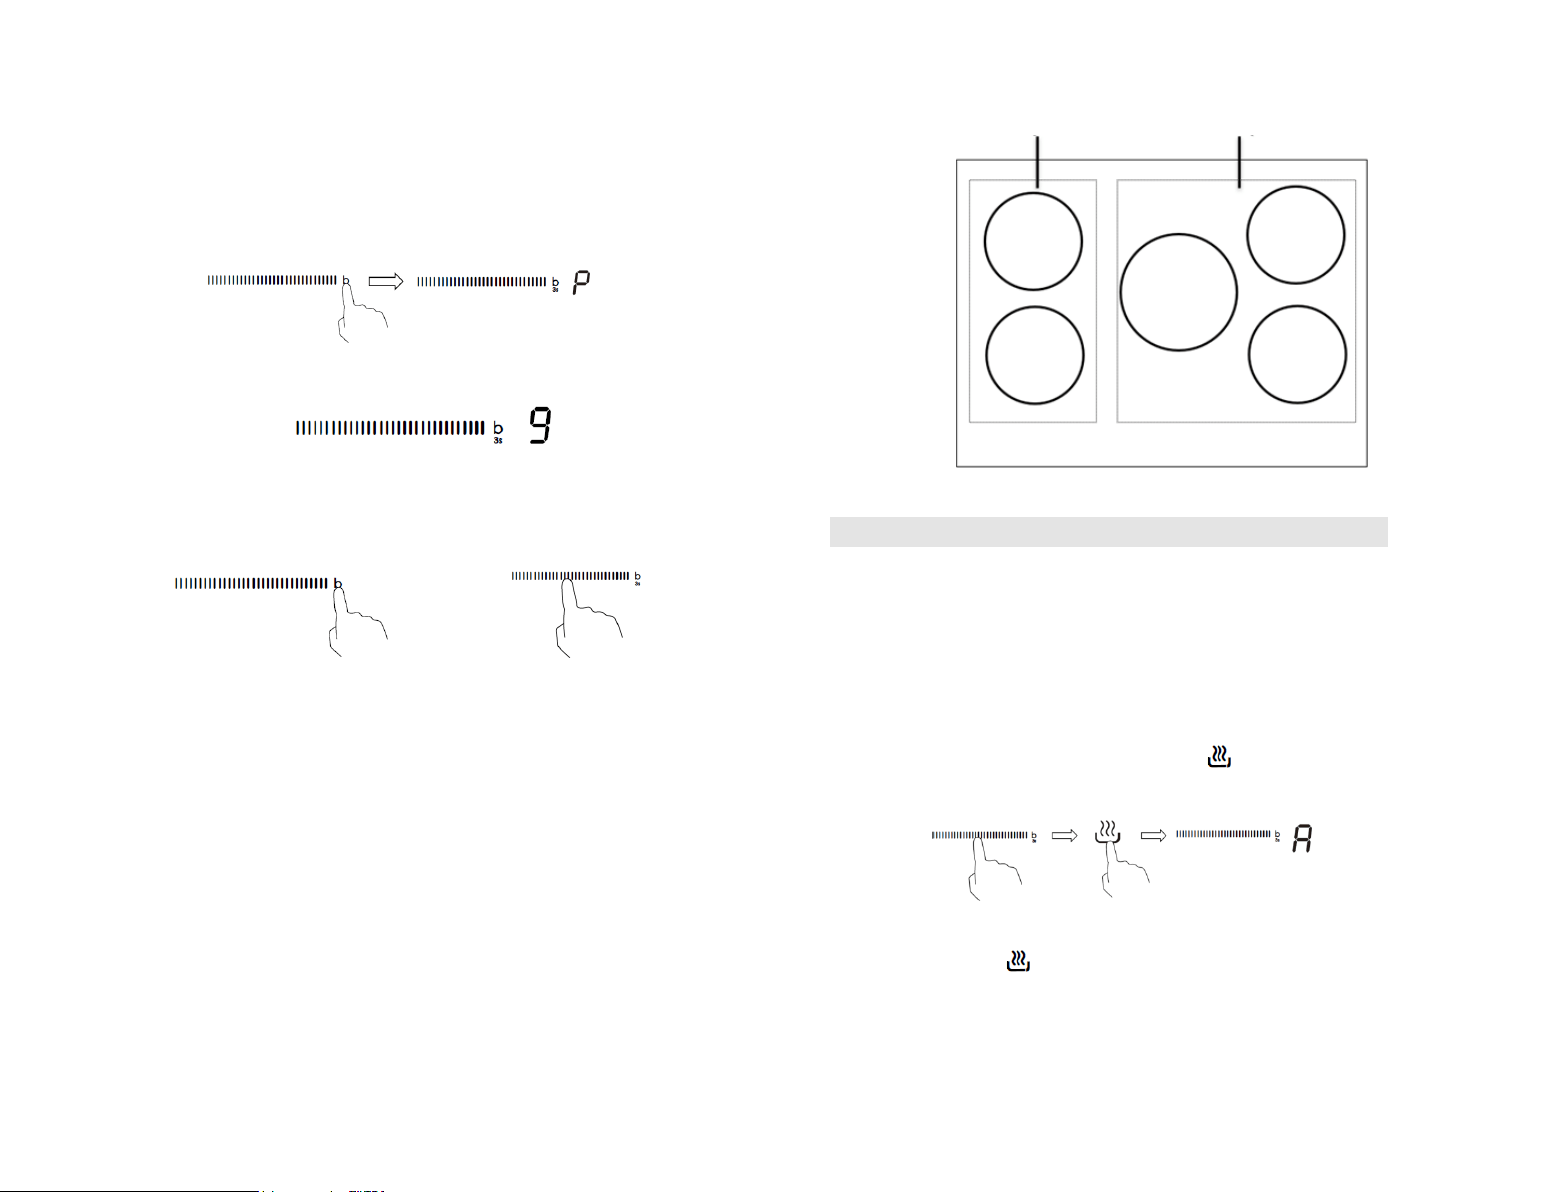
DE-15
Verwendung der Boost-Funktion für mehr Leistung
1. Berühren Sie die Bedienfeldtaste, die verstärkt werden soll, und halten Sie
dann das „b“ 3 Sekunden lang gedrückt. Die Leistungsanzeige zeigt „P“ als
Hinweis darauf an, dass die Leistung der Zone verstärkt wird.
2. Die Boost-Funktion hält 5 Minuten lang an, bevor die Kochzone zurück auf
Leistungsstufe 9 geschaltet wird.
3. Um die Boost-Funktion während dieser 5 Minuten zu beenden, berühren Sie die
Taste „b“ zweimal. Die Heizzone geht wieder zur Leistungsstufe „9“ zurück. Oder
gleiten Sie auf der Steuerleiste „—“ zum linken Punkt, damit die Heizzone wieder
zur gewünschten Leistungsstufe zurückgeht.
oder
Einschränkungen bei der Verwendung
Die fünf Zonen sind in zwei Gruppen unterteilt. Wenn Sie die Boost-Funktion in
einer Zone verwenden, müssen Sie in einer Gruppe zunächst sicherstellen, dass
die andere Zone maximal mit Leistungsstufe 5 arbeitet.
Wenn sich in Gruppe b eine Zone im Boost-Modus befindet, kann gleichzeitig nur
eine andere Zone in Betrieb sein.
DE-16
Gruppe a Gruppe b
Benutzung der Warmhaltefunktion
Die Warmhaltefunktion sorgt dafür, dass eine Zone mit geringerer Leistung
arbeitet, um die Temperatur konstant zu halten.
Konstante Temperatur mit Hilfe der
Warmhaltefunktion
1. Berühren Sie den Schieberegler der Heizzone, die Sie warmhalten wollen, und
berühren Sie dann die Taste „Warmhalten“ . Die Kochzonenanzeige zeigt
„A“ an.
2. Um die Warmhaltung zu beenden, berühren Sie den Schieberegler der Heizzone
und dann die Taste . Die Heizzone geht zurück auf Leistungsstufe „0“.
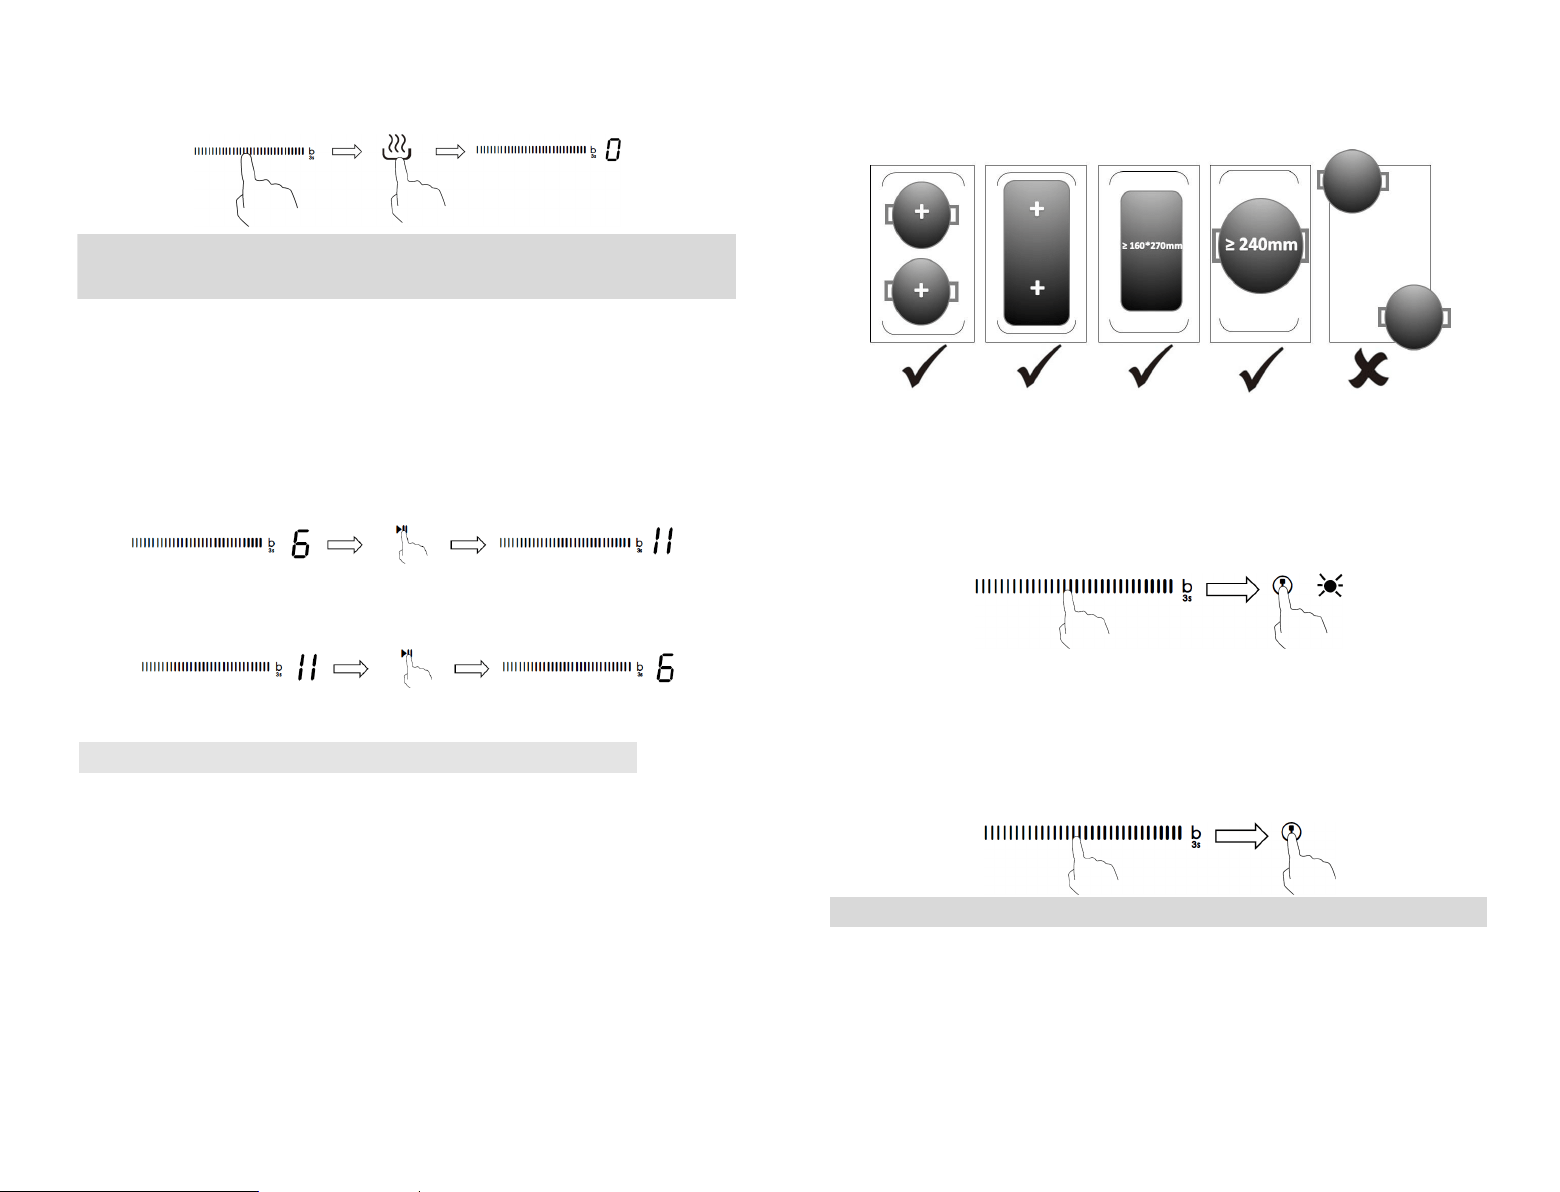
DE-17
Verwendung der Funktion zum Pausieren und
Fortsetzen
Die Pausenfunktion kann jederzeit während des Garvorgangs genutzt werden. Mit
ihr wird das Induktionskochfeld aus- und wieder angeschaltet.
1. Prüfen Sie, ob die Kochzone angeschaltet ist.
2. Berühren Sie die Taste Pausieren und Fortsetzen, und die Anzeige der Kochzone
zeigt „ll“ an.
Der Betrieb aller Kochzonen wird deaktiviert, mit Ausnahme der Tasten zum
Pausieren und Fortsetzen, zum Ein-/Ausschalten und zur Verriegelung.
3. Um den Pausenstatus abzubrechen, berühren Sie die Taste zum Pausieren und
Fortsetzen und die Kochzone kehrt auf die zuvor eingestellte Leistungsstufe zurück.
Flexzone
Dieser Bereich kann je nach Erfordernis als einzelne Zone oder als zwei
verschiedene Kochzonen benutzt werden.
Der flexible Bereich besteht aus zwei unabhängigen Kochzonen, die sich
separat regeln lassen.
Wichtig! Stellen Sie sicher, dass das Kochgeschirr auf der einzelnen
Kochzone zentriert ist. Achten Sie bei einem großen Topf oder ovalen,
rechteckigen und länglichen Pfannen darauf, dass sie mittig auf der
Kochzone platziert sind und beide Kreuze abdecken.
DE-18
Beispiele für gute und schlechte Topfplatzierungen:
Als große Zone
1. Berühren Sie den Schieberegler der Heizzone (linke Seite), die zur Flexzone
werden soll, und berühren Sie dann die Flexzonenauswahltaste, um den
flexiblen Bereich als einzelne große Zone zu aktivieren. Die Anzeige neben der
Flexzonentaste leuchtet auf.
2. Gleiten Sie entlang der Steuerleiste „—“ oder berühren Sie einfach einen
beliebigen Punkt auf der Steuerleiste „—“, um die Leistungsstufe einzustellen.
Als zwei unabhängige Zonen
1. Um die Flexzone zu beenden, berühren Sie erneut den Schieberegler der
Heizzone und dann die Flexzonenauswahltaste. Die Anzeige neben der
Flexzonentaste verschwindet.
Tastensperre
• Sie können die Bedienelemente sperren, um eine unbeabsichtigte Verwendung
zu verhindern (z.B. Kinder, die versehentlich die Kochzonen einschalten).
• Wenn die Bedienelemente gesperrt sind, sind alle Steuerungen mit Ausnahme
der EIN/AUS-Steuerung deaktiviert.

6.
Zeit abgelaufen ist.
“ angezeigt, wenn die eingestellte - -Anzeige wird „-Timer
der Der Summer ertönt für 30 Sekunden und auf
lang. blinkt 5 SekundenAnzeige -angezeigt und die Timer
Rückwärtszählung. Auf der Anzeige wird die Restzeit
die Sobald die Zeit eingestellt wurde, beginnt 5.
„0“. herunter auf
“ des Timers und gehen -Um die Zeiteinstellung abzubrechen, berühren Sie „ 4.
verlängern oder zu verkürzen. 10 Minuten zu
“ gedrückt, um die Zeit um -Taste „+“ oder „-Halten Sie die Timer
Minute zu verlängern oder zu verkürzen.
“ einmal, um die Zeit um eine -Hinweis: Berühren Sie die Taste „+“ oder „
ein “ oder „+“-„Tasten Stellen Sie die Zeit durch Berühren der 3.
ist. dass die Kochfläche eingeschaltetsicher, Stellen Sie 1.
Hinweis: Sie können den Minute-Minder auch benutzen, wenn Sie keine
Kochzone ausgewählt haben.
2. Berühren Sie „-“ oder „+“ der Timer-
Minder-Anzeige fängt an zu blinken und dasTimer-Display
zeigt „00“ an.
Steuerung, Die
Wenn Sie keine Kochzone auswählen
Minder-Verwendung des Timers als Minute
einstellen. Sie können den Timer auf bis zu 99 Minuten •
auszuschalten.
Zeit eingestellten der Ablauf nach Kochzone die um verwenden, ihn können Sie •
aus. nach Ablauf der eingestellten Zeit die jeweilige Kochzone
Timer der schaltet Fall diesem In verwenden. Minder-Minute als ihn können Sie •
Sie können den Timer auf zwei verschiedene Arten verwenden:
Funktion-Timer Verwendung der
fragen. Ratihren Arzt um
Geräts dieses Benutzung der vor sollten Herzschrittmachern mit Personen
20-DEDE-19
So werden die Bedienelemente gesperrt
Berühren Sie die Tastensperre. Auf der Timer-Anzeige wird der Schriftzug
„Lo“ angezeigt.
So wird die Tastensperre für die Bedienelemente aufgehoben
1. Stellen Sie sicher, dass das Induktionsfeld eingeschaltet ist.
2. Berühren Sie die Tastensperre und halten Sie sie eine Weile gedrückt
3. Sie können jetzt beginnen, Ihr Induktionskochfeld zu benutzen.
Wenn das Kochfeld im Sperrmodus ist, sind alle Bedienelemente mit Ausnahme der
ON/OFF-Steuerung gesperrt. Sie können das Induktionskochfeld mit der
ON/OFF-Steuerung jederzeit in den Not-Aus schalten. Sie sollten aber das Kochfeld
im nächsten Schritt zuerst entsperren.
Übertemperaturschutz
Ein integrierter Temperatursensor kann die Temperatur im Induktionskochfeld
überwachen. Wenn eine übermäßige Temperatur gemessen wird, stoppt das
Induktionskochfeld automatisch den Betrieb.
Schutz vor Überkochen
Der Schutz vor Überkochen ist eine Sicherheitsfunktion. Wenn Wasser auf das
Bedienfeld kommt, wird das Kochfeld innerhalb von 10 Sekunden automatisch
ausgeschaltet und es ertönt ein Piepton von einer Sekunde.
Erkennung von kleinen Gegenständen
Wenn eine ungeeignete Größe oder ein nicht magnetischer Topf (z.B. aus
Aluminium) oder andere kleine Gegenstände (z.B. Messer, Gabel, Schlüssel) auf
dem Kochfeld liegen gelassen wurden, schaltet das Kochfeld nach 1 Minute
automatisch in Standby. Der Lüfter kühlt die Temperatur des Induktions-
kochfeldes für eine weitere Minute ab.
Automatischer Übertemperaturschutz
Die automatische Abschaltung ist eine Sicherheitsfunktion für das Induktions-
kochfeld. Das Kochfeld schaltet sich automatisch ab, wenn Sie vergessen, die
Kochzone nach dem Kochen auszuschalten. Die Standard-Betriebszeiten für
verschiedene Leistungsstufen werden in der Tabelle unten dargestellt:
Leistungsstufe
1 2 3 4 5 6 7 8 9 A II
Standardbetrieb
Timer (Stunde)
8 8 8 4 4 4 2 2 2 2 2
Wenn der Topf entfernt wird, kann das Induktionskochfeld die Heizfunktion sofort
stoppen und das Kochfeld schaltet sich nach 2 Minuten automatisch ab.
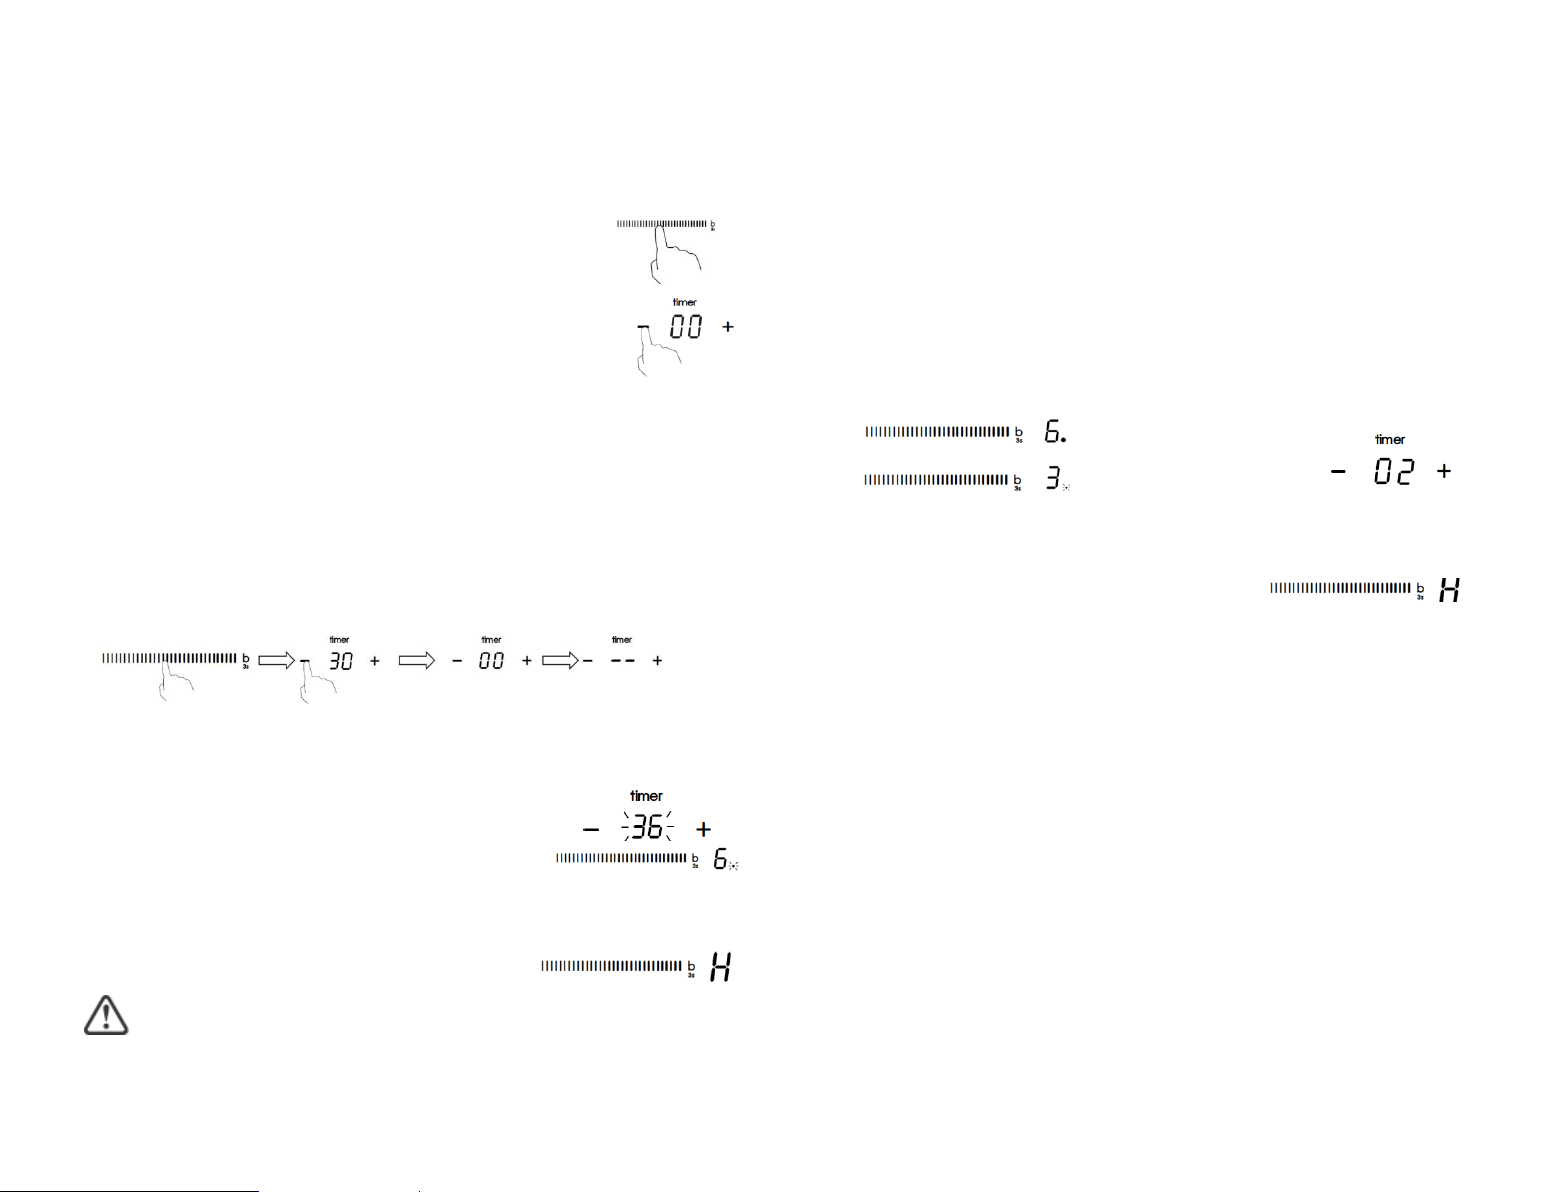
beginnen. mit Schritt 1 müssen Sie
möchten, ändern Timers des Einstellung der nach Zeit die Sie Wenn HINWEIS:
angezeigt.
wird automatisch ausgeschaltet und „H“
abgelaufen ist, wird die entsprechende Kochzone Timer -KochWenn der 2.
Minuten) (Einstellung auf 2
Minuten) ung auf 5(Einstell
an. Sie deren Auswahltaste. Der Timer zeigt dann die eingestellte Zeit
berühren möchten, prüfen Kochzone anderen einer Zeit eingestellte die Sie Wenn
die Timeranzeige die Zeit der Kochzone anzeigt.
Punkt neben der Leistungsstufe bedeutet, dass HINWEIS: Der blinkende rote
die Timeranzeige zeigt „2“.)
(z.B. Zone 1# Einstellzeit von 2 Minuten, Zone 2# Einstellzeit von 5 Minuten,
an. Anzeige die kürzeste Zeit-Timer
die Wenn Sie diese Funktion für mehr als eine Kochzone verwenden, zeigt 1.
Kochzone
r eine als mehr Ausschalten zum Timers des Einstellung
22-DEDE-21
Einstellung des Timers zum Ausschalten einer
Kochzone
Auf diese Funktion eingestellte Kochzonen:
1. Berühren Sie den Schieberegler der Heizzone, für die Sie den
Timer einstellen möchten.
3. Stellen Sie die Zeit durch Berühren der Tasten „-“ oder „+“
2. Berühren Sie „-“ oder „+“ der Timer-Steuerung. Die
Minder-Anzeige fängt an zu blinken und das Timer-Display zeigt
„00“ an.
ein.
Hinweis: Berühren Sie die Taste „+“ oder „-“ einmal, um die Zeit um eine
Minute zu verlängern oder zu verkürzen.
Berühren Sie die Taste „+“ oder „-“ und halten Sie sie gedrückt, um
die Zeit um 10 Minuten zu verlängern oder zu verkürzen.
Wenn die eingestellte Zeit 99 Minuten überschreitet, stellt sich der
Timer automatisch wieder auf 0 Minuten.
4. Um den Timer abzubrechen, berühren Sie den Schieberegler der
Auswahlsteuerung und dann „-“ oder „+“ bei „Timer“. Der Timer wird beendet,
und in der Minutenanzeige wird erst „00“ und dann „--“ angezeigt.
5. Sobald die Zeit eingestellt wurde, beginnt die Rückwärtszählung. Auf der
Anzeige wird die Restzeit angezeigt und die Timer-Anzeige blinkt 5 Sekunden lang
auf.
HINWEIS: Der rote Punkt neben der
Leistungsstufen-Anzeige leuchtet auf und
zeigt an, dass die Zone ausgewählt ist.
6. Wenn der Koch-Timer abgelaufen ist, wird die entsprechende Kochzone
automatisch ausgeschaltet und zeigt „H“ an.
Andere Kochzonen setzen den Betrieb fort, wenn sie nicht schon vorher
ausgeschaltet wurden.
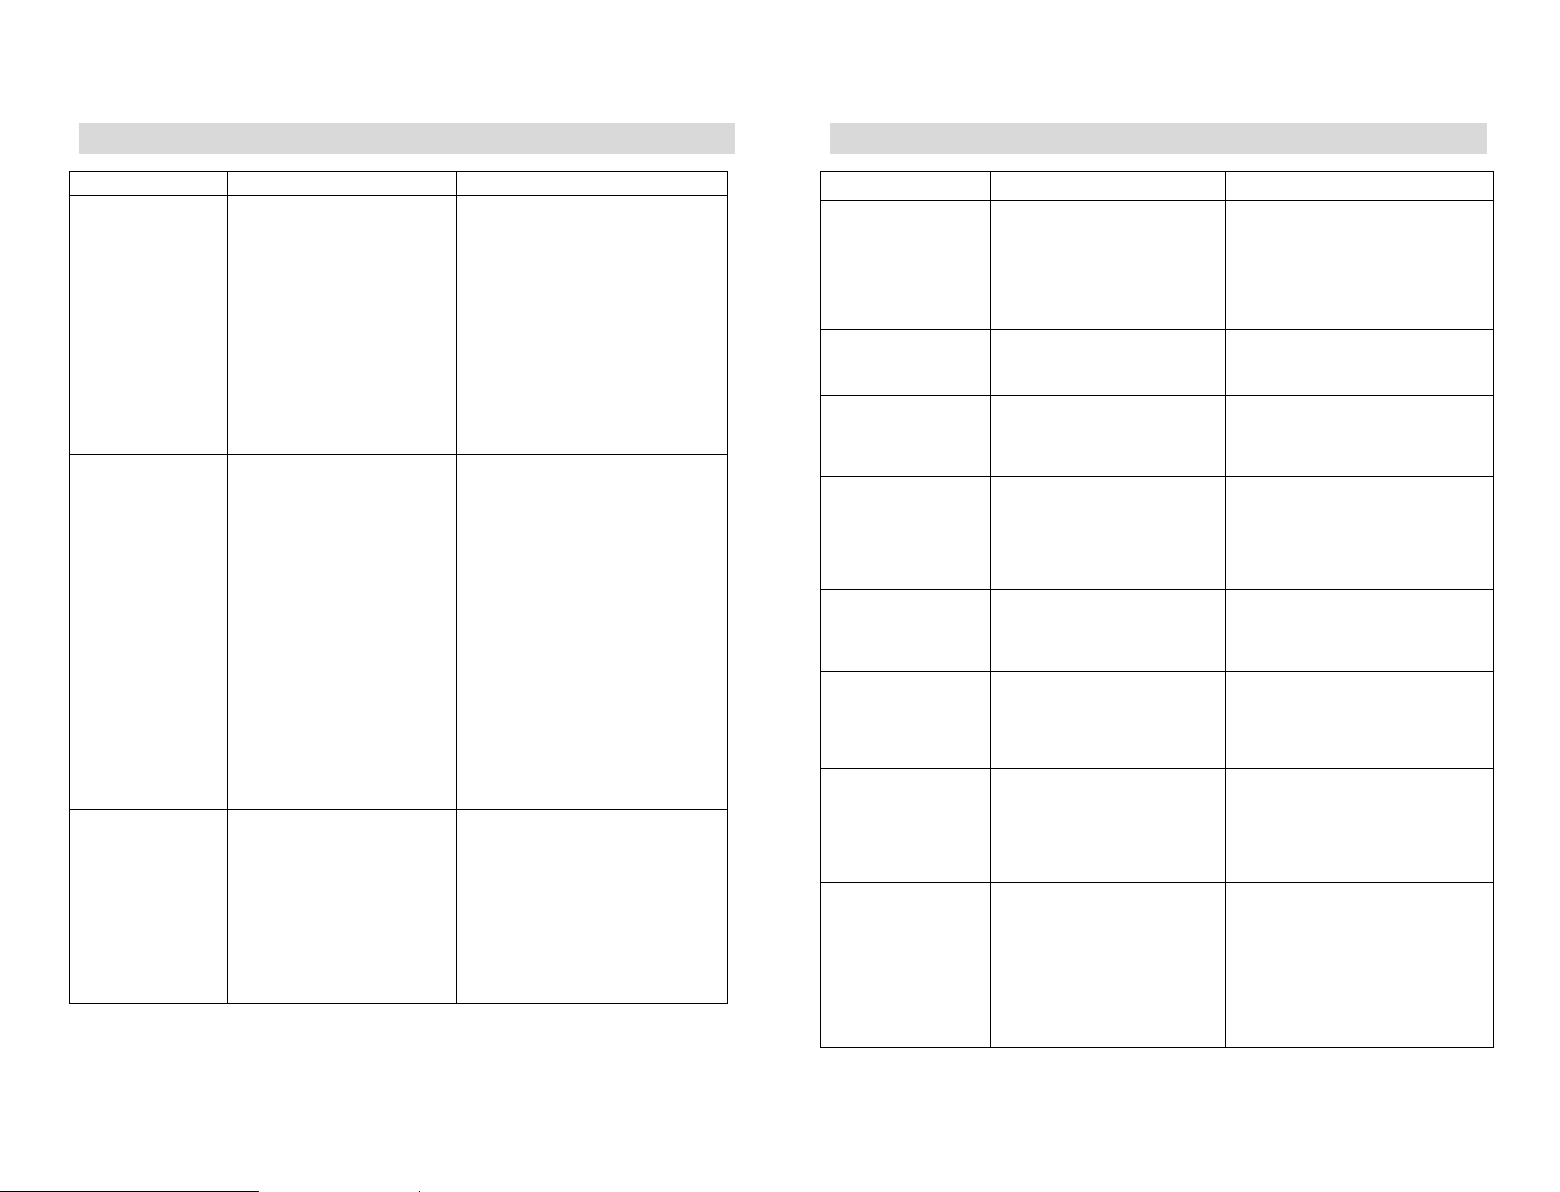
DE-23
Pflege und Reinigung
Was?
Wie das geht?
Wichtig!
Alltägliche
Verschmutzungen auf
dem Glas
(Fingerabdrücke,
Streifen, Flecken von
Lebensmitteln oder
übergekochte nicht
zuckerhaltige
Flüssigkeiten auf
dem Glas)
1. Den Netzschalter auf dem
Kochfeld ausschalten.
2. Einen Kochfeld-Reiniger
auftragen, wenn das Glas noch
warm ist (aber nicht heiß!)
3. Mit einem sauberen Lappen
oder Papiertuch abspülen und
trockenwischen.
4. Den Strom auf dem Kochfeld
wieder einschalten.
• Wenn die Stromversorgung auf dem
Kochfeld ausgeschaltet ist, gibt es
keine Anzeige für „heiße Oberfläche“,
aber die Kochzone kann trotzdem heiß
sein! Seien Sie besonders vorsichtig.
• Scharfe Scheuerschwämme,
Nylon-Scheuerschwämme und
raue/abrasive Reinigungsmittel
können das Glas zerkratzen. Lesen Sie
immer das Etikett, um zu prüfen, ob
der Reiniger oder Scheuerschwamm
für das Kochfeld geeignet ist.
• Lassen Sie niemals
Reinigungsrückstände auf dem
Kochfeld zurück: das Glas kann
dadurch Flecken bekommen.
Übergekochtes,
Geschmolzenes und
heiße, zuckerhaltige
Flüssigkeiten auf
dem Glas
mit einem Pfannenwender,
Spachtel oder einer Rasierklinge
für Induktionskochfelder aus Glas
sofort entfernen. Achten Sie
dabei immer auf heiße
Kochzonen-Oberflächen:
1. Den Netzschalter für die
Kochfläche an der Wand
ausschalten.
2. Die Klinge oder das Utensil in
einem 30°-Winkel festhalten
und die Verschmutzung
abkratzen und in einen kühlen
Bereich der Kochfläche
verschieben.
3. Die Verschmutzung mit einem
Geschirrtuch oder Papiertuch
reinigen.
4. Befolgen Sie die Schritte 2 bis
4 unter Punkt „Alltägliche
Verschmutzungen auf dem
Glas“.
• Entfernen Sie die Flecken, die durch
das Schmelzen oder die zuckerhaltigen
oder übergeschwappten Lebensmittel
entstehen, so schnell wie möglich.
Wenn sie auf dem Glas abkühlen, kann
es schwerer sein, sie zu entfernen
oder die Glasoberfläche kann
dauerhaft beschädigt werden.
• Gefahr durch Schneiden: wenn die
Schutzhülle entfernt wird, ist die
Klinge eines Glasschabers
messerscharf. Benutzen Sie ihn mit
äußerster Sorgfalt und bewahren Sie
ihn sicher und außerhalb der
Reichweite von Kindern auf.
Überschwappen
auf die
Touch-Bedienungen
1. Den Netzschalter auf dem
Kochfeld ausschalten.
2. Die übergeschwappte
Flüssigkeit aufnehmen
3. Das Touch-Bedienfeld mit
einem sauberen feuchten
Schwamm oder Tuch
abwischen.
4. Mit einem Papiertuch ganz
trockenwischen.
5. Den Strom auf dem Kochfeld
wieder einschalten.
• Das Kochfeld kann einen Piepton
erzeugen und sich selbst abschalten,
die Touch-Bedienungen können
funktionsuntüchtig sein, solange sich
Flüssigkeit darauf befindet. Stellen Sie
sicher, dass das Touch-Bedienfeld
trocken gewischt wurde, bevor Sie das
Kochfeld wieder einschalten.
DE-24
Hinweise und Tipps
Problem
Mögliche Ursachen
Was zu tun ist
Das Induktionskochfeld
kann nicht
eingeschaltet werden.
Kein Strom.
Stellen Sie sicher, dass das Induktions-
kochfeld an die Stromversorgung
angeschlossen und eingeschaltet ist.
Überprüfen Sie, ob ein Stromausfall in
Ihrem Haus oder Wohnbereich vorliegt.
Wenn Sie alles überprüft haben und das
Problem weiterhin besteht, wenden Sie
sich an einen qualifizierten Techniker.
Die Touch-Bedienungen
sprechen nicht an.
Die Bedienungen sind gesperrt.
Die Tastensperre der Bedienelemente
aufheben. Siehe Abschnitt „Verwendung
des Induktionskochfeldes“ für
Anweisungen.
Die Touch-Bedienungen
sind schwer zu
bedienen.
Es kann ein dünner Wasserfilm
über den Bedienelementen liegen,
oder Sie benutzen die
Fingerspitzen, um die
Bedienelemente zu berühren.
Stellen Sie sicher, dass das
Touch-Bedienfeld trocken ist und
verwenden Sie den Fingerballen, wenn
Sie die Bedienelemente berühren.
Das Glas wurde
zerkratzt.
Kochgeschirr mit rauen Kanten.
Ungeeigneter, abrasiver Scheuer-
schwamm oder Reinigungs-
produkte wurden verwendet.
Verwenden Sie Kochgeschirr mit flachen
und glatten Böden. Siehe „Auswahl des
richtigen Kochgeschirrs“.
Siehe „Pflege und Reinigung“.
Einige Töpfe knistern
oder knacken.
Dies kann durch die
Herstellungsweise Ihres
Kochgeschirrs bedingt sein (Lagen
aus unterschiedlichen Metallen,
die unterschiedlich vibrieren).
Das ist normal für Kochgeschirr und
deutet nicht auf einen Fehler hin.
Das Induktionskochfeld
macht ein leises,
brummendes Geräusch,
wenn es bei hohen
Temperaturen
verwendet wird.
Dies wird durch die
Induktionskochtechnologie
verursacht.
Das ist normal, aber das Geräusch sollte
leiser werden oder komplett aufhören,
wenn Sie die Temperatur senken.
Lüftergeräusche vom
Induktionskochfeld.
Ein Lüfter im Induktionskochfeld
wurde eingeschaltet, um die
Elektronik vor Überhitzung zu
schützen. Der Lüfter kann auch
dann weiter laufen, wenn das
Induktionskochfeld ausgeschaltet
wurde.
Das ist normal und erfordert keinen
Eingriff. Schalten Sie das
Induktionskochfeld nicht an der Wand
aus, solange der Lüfter noch läuft.
Töpfe werden nicht heiß
und auf der Anzeige
wird angezeigt.
Das Induktionskochfeld kann den
Topf oder Pfanne nicht erkennen,
weil er nicht für das
Induktionskochen geeignet ist.
Das Induktionskochfeld kann den
Topf oder Pfanne nicht erkennen,
weil er zu klein für das Kochfeld ist
oder nicht richtig darauf zentriert
wurde.
Verwenden Sie geeignetes Kochgeschirr
für das Induktionskochfeld. Siehe
Abschnitt „Auswahl des richtigen
Kochgeschirrs“.
Zentrieren Sie den Topf oder Pfanne und
stellen Sie sicher, dass der Boden mit
der Größe der Kochzone übereinstimmt.
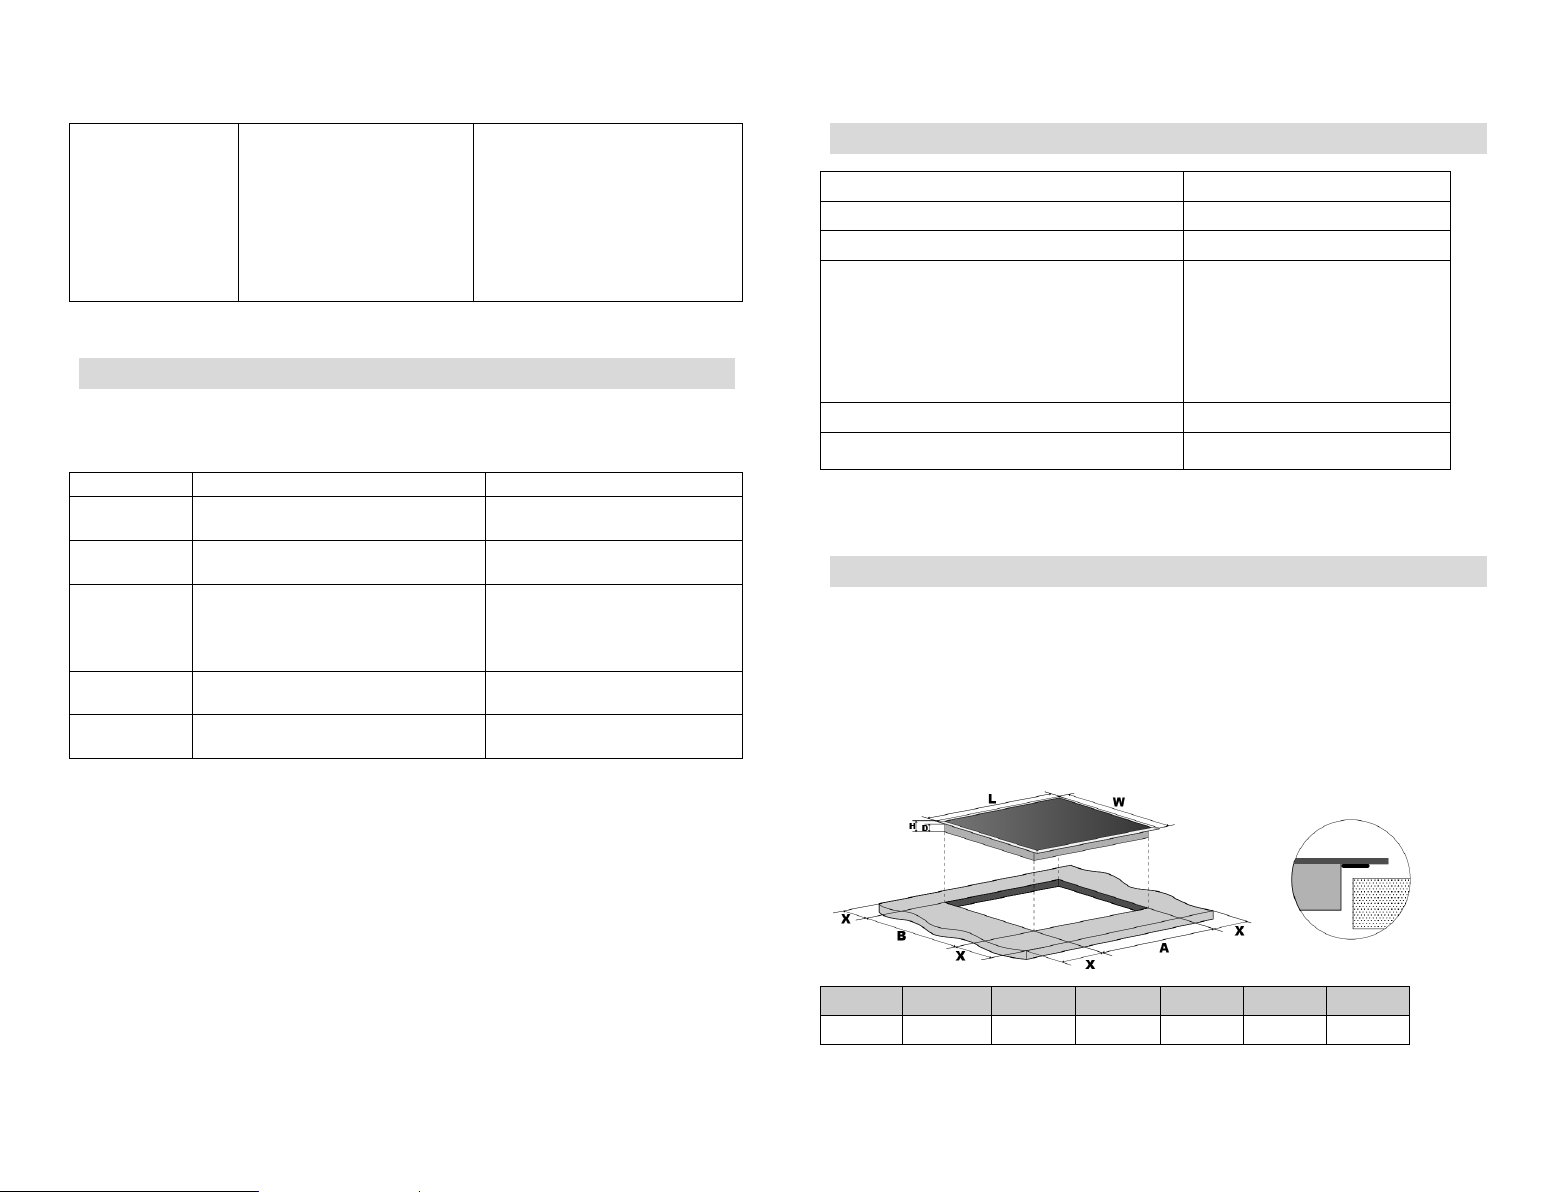
Mini50
+5
490
+5
740 56 60 520 770
X(mm) B(mm) A(mm) T(mm) H(mm) B(mm) L(mm)
unten dargestellt:
Verformungen durch Hitzestrahlung von den heißen Platten zu vermeiden. Wie
Bitte wählen Sie eine Arbeitsfläche aus hitzebeständigem Material, um größere
beträgt. 30mm Stellen Sie sicher, dass die Dicke der Arbeitsfläche mindestens
werden. 5 cm Platz gelassen
mindestens herum Loch das um sollten Anwendungszwecke und -Installations Für
aus. Maßen angegebenen Zeichnung der in den nach Arbeitsfläche die Sie Schneiden
Auswahl der Installationsausrüstung
Installation
vorherige Ankündigung geändert werden können.
unsere Produkte zu verbessern, sodass Spezifikationen und Gestaltung ohne
und Abmessungen sind ungefähre Angaben. Wir sind ständig bemüht, Gewicht
740X490
Einbaugröße A×B (mm)
770X520X60
Produktgröße L×B×H(mm)
7400W-7,4kw:6600
7150W oder-6,5kw:5850
4950W oder -4,5kw:4050
3300W oder -3,0 kw:2700
2750W oder -2,5kw:2250
Installierte elektrische Leistung
60Hz-240V~, 50-220
Versorgungsspannung
5 Kochzonen
Kochzonen
CIFS85MCTT/1
Kochfeld
Merkmale Technische
DICHTUNG
26-DEDE-25
Das Induktionskochfeld
oder die Kochzone hat
sich selbst unerwartet
ausgeschaltet, ein
Signalton ertönt und ein
Fehlercode wird
angezeigt
(in der Regel abwech-
selnd mit einer oder
zwei Ziffern auf der
Koch-Timer-Anzeige).
Technische Störung.
Bitte notieren Sie die Buchstaben und
Zahlen des Fehlers, schalten Sie das
Induktionskochfeld an der Wand aus
und kontaktieren Sie einen
qualifizierten Techniker.
Ausfallanzeige und Inspektion
Wenn eine Störung auftritt, schaltet das Induktionskochfeld automatisch in den
Schutz-Modus und zeigt die entsprechenden Schutzcodes an:
Problem Mögliche Ursachen Was zu tun ist
F3/F4 Temperatursensor der
Induktionsspule defekt.
Bitte kontaktieren Sie den
Hersteller.
F9/FA IGBT-Temperatursensor defekt. Bitte kontaktieren Sie den
Hersteller.
E1/E2 Anormale Versorgungsspannung Bitte überprüfen Sie, ob die
Stromversorgung normal ist.
Einschalten, wenn die
Stromversorgung normal ist.
E3 Hohe Temperatur des Induktions-
spulentemperatursensors
Bitte kontaktieren Sie den
Hersteller.
E5 Hohe Temperatur des
IGBT-Temperatursensors
Induktionskochfeld nach dem
Abkühlen neu starten.
Die beschriebenen Punkte sind die Beurteilung und Inspektion üblicher Fehler.
Bauen Sie das Gerät nicht selbst auseinander, um Gefahren und Schäden am
Induktionskochfeld zu vermeiden.

DE-27
Stellen Sie sicher, dass das Induktionskochfeld in jedem Fall gut belüftet wird und
dass der Lufteintritt und -austritt nicht behindert werden. Stellen Sie sicher, dass
das Induktionskochfeld in einem guten Betriebszustand ist. Wie unten dargestellt
Hinweis: Der Sicherheitsabstand zwischen der Kochplatte und dem
darüber liegenden Schrank sollte mindestens 760 mm betragen.
A(mm)
B(mm)
C(mm)
D
E
760
50 Mini
20 Mini
Lufteintritt
Luftaustritt 5mm
Bevor Sie das Kochfeld installieren, stellen Sie sicher,
dass
• die Arbeitsfläche rechtwinklig und eben ausgerichtet ist, und dass keine
strukturellen Bauteile den Platzbedarf einschränken.
• die Arbeitsfläche aus hitzebeständigem Material besteht.
• wenn das Kochfeld über einem Backofen installiert wird, der Backofen mit einem
eingebauten Lüfter ausgestattet ist
• die Installation mit allen Abstandsanforderungen und anwendbaren Normen und
Vorschriften übereinstimmt.
• ein geeigneter Trennschalter mit vollständiger Trennung vom Stromnetz in der
Festverdrahtung integriert ist, in Übereinstimmung mit den lokalen Regeln und
Vorschriften über die Montage und Positionierung der Verdrahtung.
Der Trennschalter muss von einem zugelassenen Typ sein und einen Luftspalt
von 3 mm als Kontaktabstand an allen Polen (oder an allen aktiven [Phasen]
Leitern, wenn die lokalen Verdrahtungsregeln hierfür eine Variante der
Anforderungen vorsehen) gewährleisten.
• Der Trennschalter ist für den Benutzer bei installiertem Kochfeld leicht zugänglich.
• Wenden Sie sich an die lokalen Baubehörden und konsultieren Sie die geltenden
Gesetzesvorschriften, wenn Sie Zweifel bezüglich der Installation haben.
• Verwenden Sie hitzebeständige und leicht zu reinigende Oberflächen (wie
Keramikfliesen) für die Wandoberflächen um das Kochfeld herum.
DE-28
Glas
Halteklammer
Schraube
ST3. 5*8
Gehäuse Unterseite
Arbeitsplatte/Küchenschrank
Nachdem Sie das Kochfeld installiert haben, stellen Sie
sicher, dass
• das Stromversorgungskabel nicht durch Schranktüren oder Schubladen
zugänglich ist.
• eine ausreichende Frischluftzufuhr von außerhalb der Schränke zur Unterseite
des Kochfeldes vorhanden ist.
• wenn das Kochfeld über einer Schublade oder einem Schrankraum installiert ist,
ein Hitzeschutz unterhalb des Kochfeldes installiert wurde.
• der Trennschalter für den Benutzer leicht zugänglich ist.
Bevor die Befestigungsbügel positioniert werden
Die Einheit sollte auf einer stabilen, glatten Oberfläche (verwenden Sie die
Verpackung) aufgestellt werden. Wenden Sie keine Kraft auf die Bedienelemente
des Kochfeldes an.
Ausrichtung der Position der Halterung
Fixieren Sie das Kochfeld nach dem Einbau in die Arbeitsfläche mit 4 angeschraubten
Halterungen (siehe Abbildung).
A
B
C
D
Schraube
Halterung
Schraubenloch
Gehäuse Unterseite
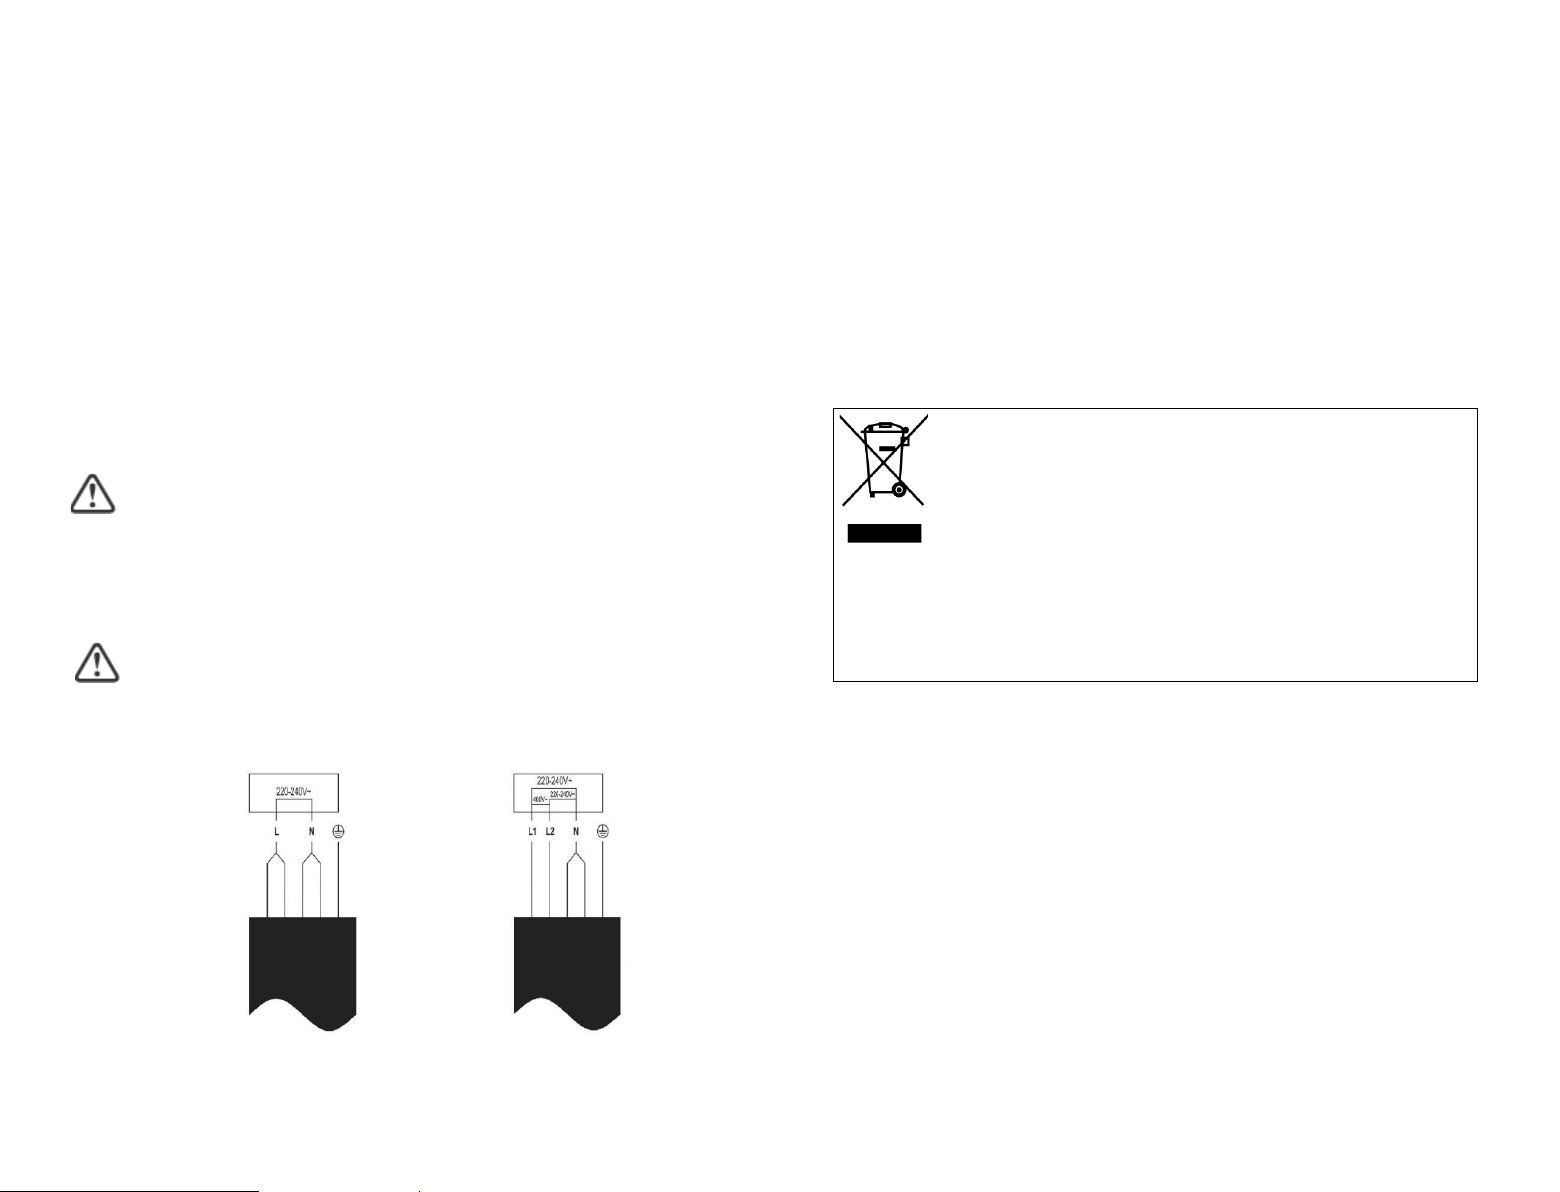
werden. Servicepersonal ausgetauscht
Netzkabel ist regelmäßig zu kontrollieren und darf nur von zugelassenem Das •
werden. Das Netzkabel darf nicht geknickt oder gequetscht •
entspricht. wurde und den Sicherheitsvorschriften
hergestellt korrekt Stromanschluss der dass sicherstellen, muss Installateur Der •
Kontakten. den
zwischen mm 3 von Mindestöffnung einer mit en,werd installiert Leistungsschalter
allpoliger ein muss wurde, angeschlossen Stromnetz das an direkt Gerät das Wenn •
vermeiden. durchgeführt werden, um mögliche Unfälle zu
Vertreter mit den entsprechenden Werkzeugen -von einem Kundendienst
Arbeiten die müssen muss, werden ersetzt oder ist beschädigt Kabel das Wenn •
Altgerät. die gleiche Funktion erfüllt wie das
und ist Typ ähnlichen einem von Gerät neue das sofern entsorgt, kostenfrei es der genommen,
-eines neuen Geräts wird das alte vom Händler zurückKauf Abholservice angeboten. Beim
Altgeräte ein -und Elektronik -In vielen Ländern wird für die Entsorgung großer Elektro
igen Stellen verwaltet werden. werden, die von der Stadtverwaltung oder anderen zuständ
Altgeräte müssen bei zugelassenen Sammelstellen abgegeben -und Elektronik -Elektro -
werden. entsorgt Hausmüll normalen dem mit nicht dürfen Altgeräte-Elektronik und -Elektro -
die folgenden Grundregeln: anbitte Sie sich daher werden. Halten Umweltproblem
Altgeräte nicht zu einem -und Elektronik -zu gewährleisten, dass Elektro
um leisten einen wichtigen Beitrag, Verbraucher zu recyceln. Teile wendbare
-alle schädlichen Substanzen zu entfernen und wiederverum zu entsorgen,
spezifisch Altgeräte -Elektronikund -Elektrowichtig, es ist Daher Grundelemente.
negative Auswirkung auf die Umwelt haben) sowie (wiederverwendbare)
eine ggf. Altgeräte enthalten umweltschädigende Substanzen (die -Elektronik
und -ektroAltgeräte (WEEE) gekennzeichnet. El-und Elektronik -über Elektro
Richtlinie 2012/19/EU -Dieses Elektrohaushaltsgerät ist in Einklang mit der EU
30-DEDE-29
Vorsicht
1. Die Induktionskochplatte muss von qualifiziertem Personal oder Technikern
installiert werden. Unsere Kundendienstmitarbeiter stehen Ihnen zu Diensten.
Bitte führen Sie den Vorgang nie selbst aus.
2. Das Kochfeld darf nicht direkt über einem Geschirrspüler, Kühlschrank,
Gefrierschrank, Waschmaschine oder Wäschetrockner installiert werden, da
die Feuchtigkeit die Elektronik des Kochfeldes beschädigen kann.
3. Die Induktionskochplatte sollte so installiert werden, dass eine bessere
Hitzestrahlung gewährleistet und die Zuverlässigkeit verbessert werden kann.
4. Die Wand und die induzierte Heizzone über der Tischoberfläche sollten
hitzebeständig sein.
5. Um Schäden zu vermeiden, müssen die Sandwich-Ebene und der Klebstoff
hitzebeständig sein.
Anschließen des Kochfeldes an das Stromnetz
Dieses Kochfeld darf nur von einer entsprechend qualifizierten Person an das Stromnetz
angeschlossen werden.
Bevor Sie das Kochfeld an das Stromnetz anschließen, überprüfen Sie dass:
1. das Hausstromnetz für die Leistungsaufnahme des Kochfeldes geeignet ist.
2. die Spannung mit dem Wert auf dem Typenschild übereinstimmt.
3. der Querschnitt des Stromkabels für die auf dem Typenschild angegebene Last geeignet ist.
Verwenden Sie keine Adapter, Reduzierstücke oder Verzweigungseinrichtungen, um das Kochfeld
an das Stromnetz anzuschließen, dies kann zu Überhitzung und Brand führen.
Das Stromkabel darf nicht mit heißen Teilen in Berührung kommen und muss so positioniert
werden, dass seine Temperatur an keiner Stelle auf über 75˚C ansteigen kann.
Überprüfen Sie mit einem Elektroinstallateur, ob das Hausstromnetz ohne Änderungen geeignet
ist. Änderungen dürfen nur von einem qualifizierten Elektroinstallateur vorgenommen werden.
Die Stromversorgung sollte in Übereinstimmung mit der einschlägigen Norm oder
mit einem 1-poligen Leistungsschalter angeschlossen werden. Die
Anschlussmethode wird unten dargestellt.
Einspeisung
Stromkabel
Schwarz
Braun
Grau
Blau
Gelb/Grün
Einspeisung
Schwarz
Braun
Grau
Blau
Stromkabel
Gelb/Grün
Stromkabel

ausgewählten Kochzone.
der wie der Umriss auf der genau so groß ist,Durchmesser, Verwenden Sie Töpfe mit einem •
wurde. Essen erwärmt
das wenn runter, Temperatur die Sie schalten und Temperatur hohen einer bei Kochen das Sie Starten •
verringern. zu Garzeiten die um Minimum, ein auf Fett oder Flüssigkeit an Menge die Sie Reduzieren •
gespart.
Energie Wärme der Bewahrung durch und reduziert Garzeit die wird Deckels eines Verwendung Durch •
Kochzone. der Mitte die in Topf den Sie platzieren erzielen, zu Kochfeldes des Effizienz maximale die Um •
Energiespartipps:
Messung der Leistung
Methoden zur -Teil 2: Kochfelder -2 Haushaltselektroherde -Angewendeter Standard: EN 60350
Wh/kg
8,681
hob ECelectric
berechnet pro kg
Energieverbrauch für das Kochfeld,
Wh/kg
5,618
cooking
ECelectric
Vorne rechts
Wh/kg
-
cooking
ECelectric
Vordere Mitte
Wh/kg
187,3
cooking
ECelectric
Vorne links
Wh/kg
-
cooking
ECelectric
Mitte rechts
Wh/kg
186,6
cooking
ECelectric
Zentral
Wh/kg
-
cooking
ECelectric
Mitte links
Wh/kg
3,187
cooking
ECelectric
Hinten rechts
Wh/kg
-
cooking
ECelectric
Mitte
Hinten in der
Wh/kg
186,5
cooking
ECelectric
Hinten links
Fläche, berechnet pro kg
Energieverbrauch pro Kochzone oder
cm
0,20
0,20
B
L
Vorne rechts
cm
-
B
L
Vordere Mitte
cm
0,20
0,20
B
L
Vorne links
cm
-
B
L
Mitte rechts
cm
-
B
L
Zentral
32-DEDE-31
Informationen zu Haushaltskochfeldern gemäß der Verordnung (EU) Nr. 66/2014
Stellung Symbol Wert Einheit
Modellkennung
Art des
CIFS85MCTT/1
Kochfeldes:
Elektrisches
Kochfeld
Anzahl der
Kochzonen und/ oder
Bereiche
Zonen
5
Bereiche
Heiztechnik
(Induktions- und
Kochzonen,
abstrahlende
Kochzonen,
Festplatten)
Induktionskochzonen
X
Induktionskochfelder
abstrahlende
Kochzonen
feste Platten
Für kreisförmige Kochzonen oder
-bereiche: Durchmesser der Nutzfläche pro
elektrisch beheizte Kochzone, auf die
nächsten 5 mm gerundet
Hinten links Ø - cm
Hinten in der
Mitte
Ø - cm
Hinten rechts Ø - cm
Mitte links Ø - cm
Zentral
Ø
21,0
cm
Mitte rechts Ø - cm
Vorne links Ø - cm
Vordere Mitte Ø - cm
Vorne rechts Ø - cm
Für nicht kreisförmige Kochzonen oder
-bereiche: Länge und Breite der Nutzfläche
pro elektrisch beheizte Kochplatte oder
-zone, auf die nächsten 5 mm gerundet
Hinten links
L
B
20,0
20,0
cm
Hinten in der
Mitte
L
B
-
cm
Hinten rechts
L
B
20,0
20,0
cm
Mitte links
L
B
-
cm

PL-1
Niebezpieczeństwo skaleczenia
• Należy zachować ostrożność – krawędzie panelu są
ostre.
• Brak zachowania ostrożności może spowodować
obrażenia lub skaleczenia.
Ważne instrukcje dotyczące bezpieczeństwa
• Przed zainstalowaniem lub użyciem tego urządzenia
należy przeczytać uważnie poniższe instrukcje.
Ostrzeżenia związane z bezpieczeństwem
Państwa bezpieczeństwo jest dla nas ważne. Przed
użyciem płyty kuchennej należy przeczytać poniższe
informacje.
Instalacja
Zagrożenie porażenia prądem
• Przed przystąpieniem do wykonywania
jakichkolwiek prac lub konserwacji urządzenia
należy odłączyć je od zasilania elektrycznego.
• Podłączenie do prawidłowo uziemionej instalacji
elektrycznej jest niezbędne i obowiązkowe.
• Zmiany w domowej instalacji elektrycznej mogą być
wykonywane wyłącznie przez wykwalifikowanego
elektryka.
• Nieprzestrzeganie tego zalecenia może
spowodować porażenie prądem lub śmierć.
PL-2
• Nigdy nie umieszczać na urządzeniu żadnych
łatwopalnych materiałów ani produktów.
• Proszę udostępnić niniejsze informacje osobie
odpowiedzialnej za instalację urządzenia, ponieważ
może to obniżyć koszty instalacji.
• Aby uniknąć zagrożenia bezpieczeństwa,
urządzenie należy zainstalować zgodnie z niniejszą
instrukcją instalacji.
• To urządzenie powinno zostać prawidłowo
zainstalowane i uziemione wyłącznie przez
odpowiednio wykwalifikowaną osobę.
• Urządzenie powinno być podłączone do obwodu,
który zawiera rozłącznik izolacyjny zapewniający
całkowite odłączenie urządzenia od zasilania.
• Nieprawidłowe zainstalowanie urządzenia może
spowodować utratę gwarancji lub prawa do
składania roszczeń z tytułu odpowiedzialności.
Obsługa i konserwacja
Zagrożenie porażenia prądem
• Nie gotować na pękniętej lub złamanej płycie
kuchennej. Jeśli powierzchnia płyty kuchennej jest
pęknięta lub złamana, należy natychmiast odłączyć
urządzenie od zasilania elektrycznego (wyłącznik
ścienny) i skontaktować się z wykwalifikowanym
technikiem.
• Przed czyszczeniem lub konserwacją odłączyć płytę
kuchenną od wyłącznika ściennego.
• Nieprzestrzeganie tego zalecenia może
spowodować porażenie prądem lub śmierć.

PL-3
Zagrożenie dla zdrowia
• To urządzenie spełnia wymagania norm
bezpieczeństwa elektromagnetycznego.
• Niemniej jednak osoby z rozrusznikami serca lub
innymi implantami elektrycznymi (takimi jak pompy
insulinowe) przed użyciem tego urządzenia muszą
skonsultować się z lekarzem lub producentem
implantu, aby upewnić się, że pole
elektromagnetyczne nie będzie miało szkodliwego
wpływu na ich implanty.
• Nieprzestrzeganie poniższego zalecenia może
spowodować śmierć.
Zagrożenie gorącą powierzchnią
• Podczas użytkowania dostępne części tego
urządzenia staną się wystarczająco gorące, aby
spowodować oparzenia.
• Nie dopuścić, aby ciało, ubranie lub jakikolwiek inny
przedmiot oprócz odpowiedniego naczynia do
gotowania zetknęło się ze szkłem indukcyjnym,
dopóki powierzchnia nie ochłodzi się.
• Zabrania się umieszczania na powierzchni płyty
metalowych przedmiotów, takich jak noże, widelce,
łyżki i pokrywki, ponieważ mogą one się nagrzewać.
• Dzieci powinny przebywać z dala od urządzenia.
• Uchwyty naczyń mogą być gorące podczas
dotknięcia. Sprawdzić, czy uchwyty naczyń nie
znajdują się nad innymi strefami grzewczymi, które
są włączone. Utrzymywać uchwyty poza zasięgiem
dzieci.
PL-4
• Nieprzestrzeganie tego zalecenia może
spowodować poparzenia i oparzenia.
Niebezpieczeństwo skaleczenia
• Ostre jak brzytwa ostrze skrobaka do płyty
kuchennej jest odsłonięte, gdy osłona
zabezpieczająca jest cofnięta. Używać z najwyższą
ostrożnością, zawsze przechowywać bezpiecznie i
w miejscu niedostępnym dla dzieci.
• Brak zachowania ostrożności może spowodować
obrażenia lub skaleczenia.
Ważne instrukcje dotyczące bezpieczeństwa
• Nigdy nie pozostawiać urządzenia bez nadzoru
podczas użytkowania. Przegrzanie spowoduje
dymienie oraz rozlanie tłuszczów, które mogą się
zapalić.
• Nigdy nie używać urządzenia jako powierzchni do
pracy lub przechowywania.
• Nigdy nie pozostawiać żadnych przedmiotów ani
naczyń na urządzeniu.
• Nie umieszczać ani nie pozostawiać w pobliżu
urządzenia żadnych przedmiotów, które mają
właściwości magnetyczne (np. kart kredytowych,
kart pamięci) lub urządzeń elektronicznych (np.
komputerów, odtwarzaczy MP3), ponieważ mogą
one być narażone na działanie pola
elektromagnetycznego.
• Nigdy nie używać urządzenia do ogrzewania lub
dogrzewania pomieszczenia.

PL-5
• Po użyciu zawsze wyłączać strefy grzewcze i płytę
kuchenną zgodnie z opisem w niniejszej instrukcji
(np. za pomocą przycisków dotykowych). Nie
polegać na funkcji wykrywania patelni w celu
wyłączenia strefy grzewczej podczas zdejmowania
patelni.
• Nie pozwalać dzieciom na zabawę z urządzeniem,
siadanie, stanie na nim lub wspinanie się na niego.
• Nie przechowywać przedmiotów interesujących
dzieci w szafkach nad urządzeniem. Dzieci
wspinające się na płytę kuchenną mogą ulec
poważnemu obrażeniu.
• Nie pozostawiać dzieci samych lub bez opieki w
strefie, gdzie urządzenie jest używane.
• Dzieci lub osoby niepełnosprawne, które mają
ograniczoną zdolność do korzystania z urządzenia,
powinny znajdować się pod opieką odpowiedzialnej
i kompetentnej osoby, która udzieli im instrukcji w
zakresie korzystania z urządzenia. Instruktor
powinien być przekonany, że może korzystać z
urządzenia bez powodowania zagrożenia dla siebie
lub swojego otoczenia.
• Nie naprawiać ani nie wymieniać żadnej części
urządzenia, chyba że wyraźnie to zalecono w
niniejszej instrukcji. Wszelkie inne czynności
serwisowe powinny być wykonywane przez
wykwalifikowanego technika.
• Nie używać myjki parowej do czyszczenia płyty
kuchennej.
PL-6
• Nie umieszczać ani nie upuszczać ciężkich
przedmiotów na płytę kuchenną.
• Nie stawać na płycie kuchennej.
• Nie używać patelni z wyszczerbionymi krawędziami
ani nie przesuwać takich patelni po powierzchni
szkła indukcyjnego, ponieważ może to porysować
szkło.
• Do czyszczenia płyty kuchennej nie używać
szczotek drucianych ani innych szorstkich środków
ściernych, ponieważ mogą one porysować szkło
indukcyjne.
• W razie uszkodzenia kabla zasilającego powinien
go wymienić producent, serwisant lub inna
wykwalifikowana osoba, aby uniknąć zagrożenia.
• To urządzenie jest przeznaczone do używania w
gospodarstwach domowych i podobnych
zastosowaniach, takich jak: – w pomieszczeniach
kuchennych personelu w sklepach, biurach i innych
miejscach pracy; – w gospodarstwach rolnych; –
przez klientów w hotelach, motelach i innych
środowiskach mieszkalnych; – środowiskach typu
„bed and breakfast”.
• OSTRZEŻENIE: Podczas użytkowania urządzenie i
dostępne części nagrzewają się do wysokiej
temperatury.
• Należy zachować ostrożność aby uniknąć dotykania
elementów grzejnych.
• Należy upewnić się, że dzieci do 8 roku życia nie
mają dostępu do urządzenia.

PL-7
• Urządzenie to może być obsługiwane przez dzieci
powyżej 8 roku życia oraz osoby o ograniczonej
zdolności fizycznej, czuciowej lub psychicznej bądź
nieposiadające doświadczenia i wiedzy, jeśli są one
pod nadzorem lub poinstruowano je w zakresie
bezpiecznej obsługi urządzenia i zrozumiały one
potencjalne zagrożenia.
• Nie zezwalać dzieciom na zabawę z urządzeniem.
Czyszczenie i konserwacja urządzenia nie powinny
być przeprowadzane przez dzieci bez nadzoru.
• OSTRZEŻENIE: gotowanie na płycie przy użyciu
tłuszczu lub oleju może stanowić zagrożenie i
spowodować pożar. NIGDY nie należy próbować
gasić pożaru wodą. Należy wyłączyć urządzenie, a
następnie zakryć płomień, na przykład pokrywką lub
kocem gaśniczym.
• OSTRZEŻENIE: Niebezpieczeństwo pożaru: nie
należy przechowywać przedmiotów na polach
grzejnych do gotowania.
• Ostrzeżenie: W przypadku płyt grzejnych z tworzyw
szklano-ceramicznych lub podobnych materiałów,
które osłaniają części przewodzące prąd, jeśli
powierzchnia jest popękana, należy wyłączyć
urządzenie, aby nie narazić się na możliwe
porażenie elektryczne.
• Nie należy używać myjki parowej.
• Urządzenie nie powinno być sterowane przez
zewnętrzny regulator czasowy lub osobny
• system sterowania zdalnego.
PL-8
PRZESTROGA: Proces gotowania powinien
przebiegać pod nadzorem. Krótki proces gotowania
powinien być stale nadzorowany.
OSTRZEŻENIE: Aby zapobiec przewróceniu się
urządzenia, należy zainstalować elementy
stabilizujące – patrz instrukcja instalacji.
OSTRZEŻENIE: Należy korzystać wyłącznie z osłon
płyty kuchennej zaprojektowanych przez producenta
urządzenia lub wskazanych przez niego w instrukcji
obsługi jako odpowiednie bądź z osłon płyty
kuchennej wbudowanych w urządzenie. Stosowanie
nieprawidłowych osłon może doprowadzić do
wypadków.
To urządzenie posiada uziemienie wyłącznie do celów
funkcjonalnych.
Gratulujemy zakupu nowej płyty indukcyjnej.
Zalecamy poświęcić trochę czasu na przeczytanie niniejszej Instrukcji obsługi/instalacji,
aby w pełni zrozumieć, jak prawidłowo zainstalować i obsługiwać urządzenie.
W celu dokonania instalacji należy zapoznać się z sekcją dotyczącą instalacji.
Przed użyciem należy przeczytać uważnie wszystkie instrukcje dotyczące bezpieczeństwa
i zachować niniejszą Instrukcję obsługi/instalacji do wykorzystania w przyszłości.
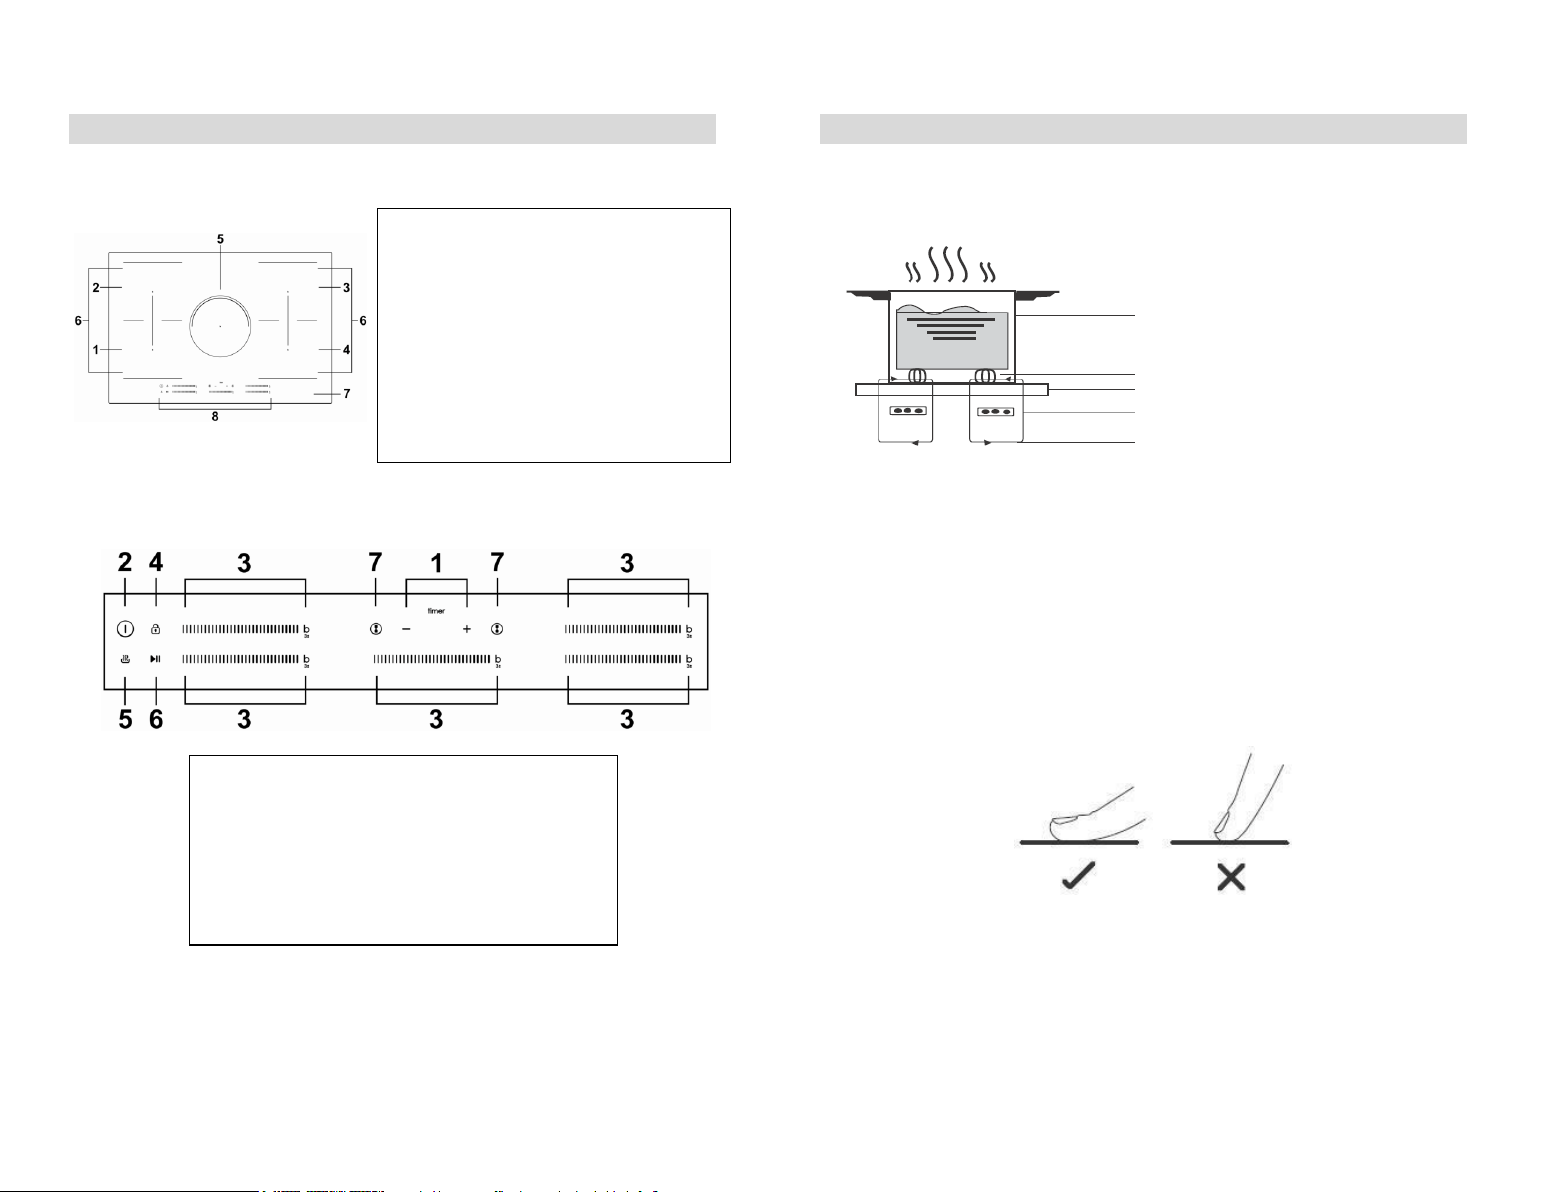
PL-9
1.
Strefa 2000 W, z funkcją Boost do 2600 W.
2.
Strefa 1500 W, z funkcją Boost do 2000 W.
3.
Strefa 2000 W, z funkcją Boost do 2600 W.
4.
Strefa 1500 W, z funkcją Boost do 1800 W.
5.
Strefa 2000 W, z funkcją Boost do 2600 W.
6.
Strefa Flex, 2800 W, tryb Boost 3500 W
7.
Płyta szklana.
8.
Panel sterowania.
1.
Przycisk regulatora czasowego.
2.
Przycisk włączania/wyłączania
3.
Przycisk regulacji mocy / Przycisk funkcji Boost
4.
Przycisk blokady
5.
Przycisk funkcji podtrzymania temperatury
6.
Przycisk zatrzymywania i uruchamiania funkcji
7.
Strefa Flex
Widok produktu
Widok z góry
Panel sterowania
PL-10
żelazny garnek
obwód magnetyczny
szklana płyta ceramiczna
cewka indukcyjna
indukowane prądy
A Opis gotowania indukcyjnego
Gotowanie indukcyjne to bezpieczna, zaawansowana, wydajna i ekonomiczna technologia
gotowania. Do działania urządzenia wykorzystywane są wibracje elektromagnetyczne
generujące ciepło bezpośrednio na patelni, a nie pośrednio poprzez nagrzewanie
powierzchni szklanej. Szkło staje się gorące tylko dlatego, że patelnia nagrzewa się.
Przed użyciem nowej płyty indukcyjnej
• Należy przeczytać niniejszą instrukcję, zwracając szczególną uwagę na sekcję
„Ostrzeżenia związane z bezpieczeństwem”.
• Zdjąć folię ochronną, która może nadal znajdować się na płycie indukcyjnej.
Obsługa przycisków dotykowych
• Przyciski reagują na dotyk, więc nie trzeba ich naciskać.
• Użyć opuszki palca, a nie jego czubka.
• Przy każdym odnotowaniu dotknięcia przez urządzenie generowany jest sygnał
dźwiękowy.
• Upewnić się, że przyciski są zawsze czyste, suche i że nie ma na nich żadnego
przedmiotu (np. naczynia lub szmatki). Nawet cienka warstwa wody może utrudniać ich
działanie.
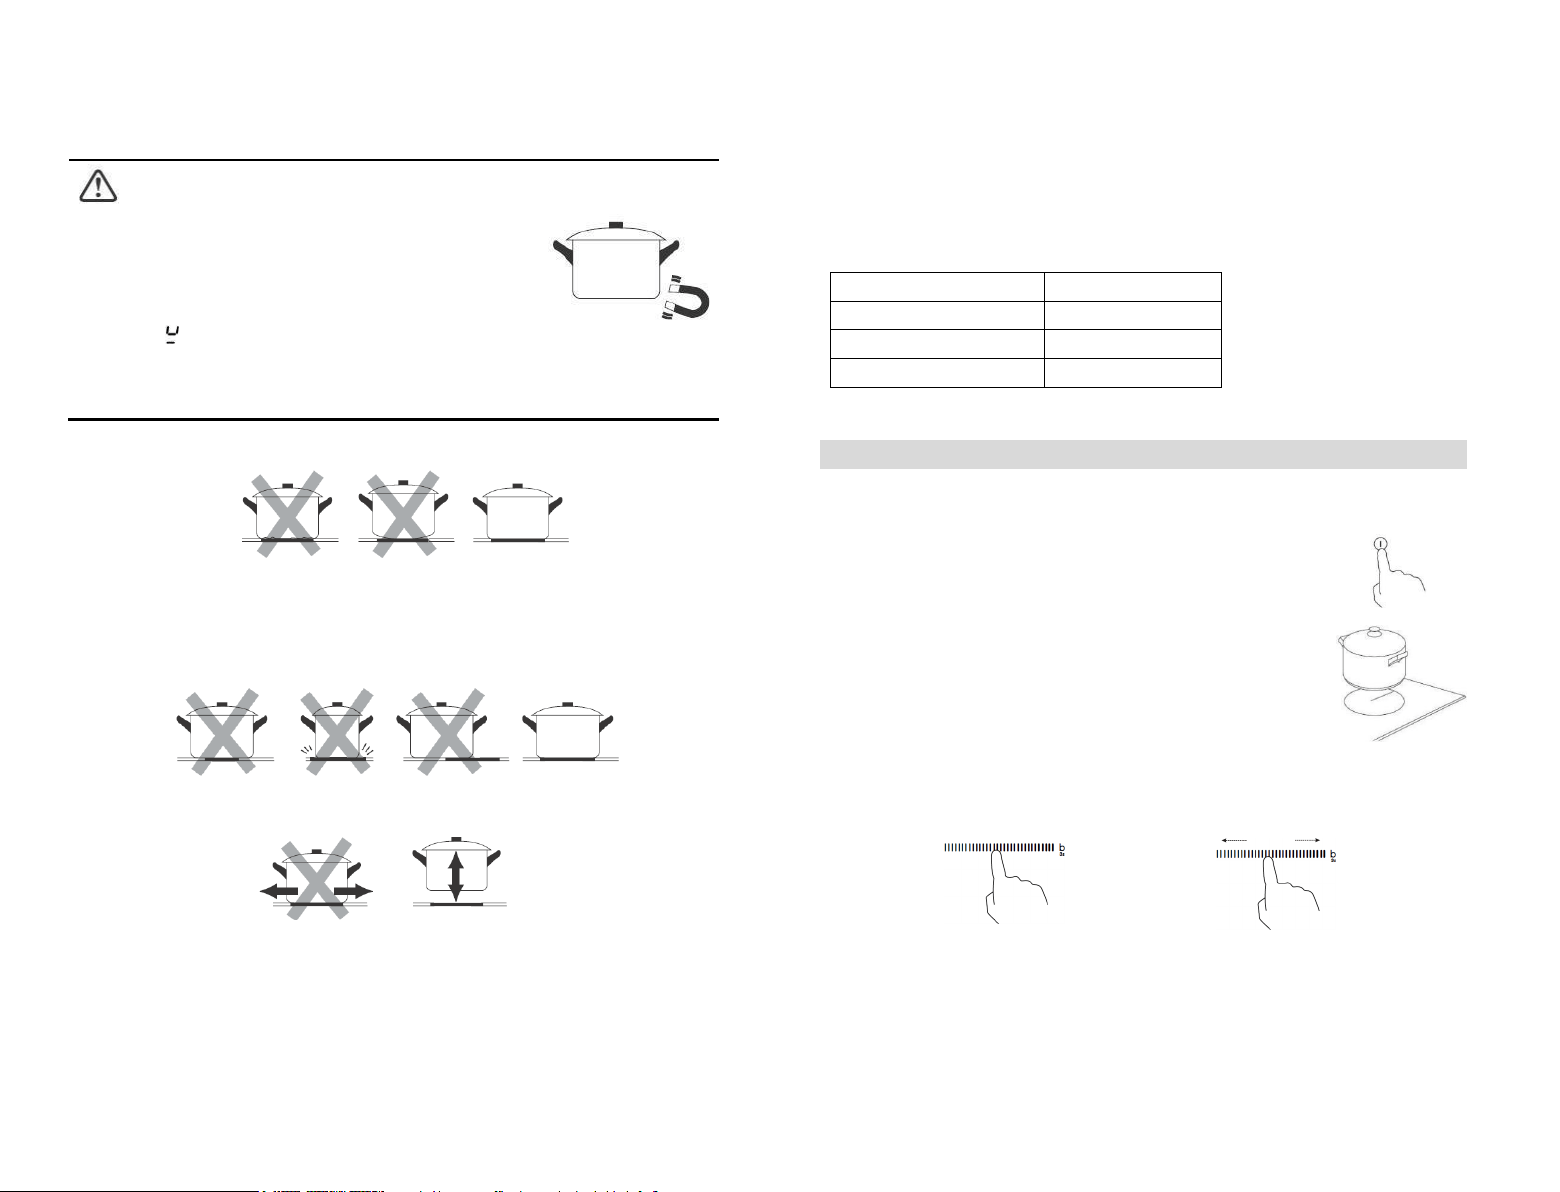
PL-11
Wybór odpowiedniego naczynia do gotowania
•
Używać tylko naczyń z podstawą odpowiednią do gotowania
indukcyjnego. Znaleźć symbol indukcji na opakowaniu lub na dnie patelni.
• Aby sprawdzić, czy posiadane naczynia są odpowiednie,
wystarczy przeprowadzić test magnetyczny. Przesunąć magnes w
kierunku podstawy patelni. Jeśli jest przyciągany, patelnia jest
odpowiednia do gotowania indykcyjnego.
• W przypadku braku magnesu można:
1.
wlać niewielką ilość wody na patelnię, którą zamierza się
sprawdzić.
2.
Jeśli wyświetlacz nie miga i woda się nagrzewa, naczynie jest
odpowiednie.
• Naczynia wykonane z następujących materiałów nie są odpowiednie: czysta stal nierdzewna,
aluminium lub miedź bez podstawy magnetycznej, szkła, drewna, porcelany, ceramiki i naczynia
gliniane.
Nie używać naczyń z wyszczerbionymi krawędziami lub krzywą podstawą.
Upewnić się, że podstawa patelni jest gładka, leży płasko na szkle i ma taki sam rozmiar
jak strefa grzewcza. Stosować patelnię o średnicy równej wielkości elementu graficznego
dla wybranego pola. Używając garnka, zużywamy nieco więcej energii przy jego
maksymalnej wydajności. W przypadku korzystania z mniejszych garnków wydajność
może być niższa od oczekiwanej. Zawsze wyśrodkować patelnię na strefie gotowania.
Zawsze podnosić patelnię z płyty indukcyjnej, a nie przesuwać jej, ponieważ może
porysować szkło.
PL-12
Wymiary patelni
Pola grzejne do pewnego stopnia automatycznie dopasowują się do średnicy patelni.
Jednakże dno tej patelni musi mieć minimalną średnicę dostosowaną do odpowiedniego
pola grzejnego. W celu uzyskania najlepszej wydajności płyty należy umieścić patelnię na
środku pola grzejnego.
Średnica podstawowa naczyń do gotowania indukcyjnego
Pole grzejne
Minimum (mm)
1,2, 3, 4 (180 mm)
120
5 (210 mm)
140
Strefa Flex
240 lub 160*270
Poniższe wartości mogą się różnić w zależności od jakości używanej patelni.
Obsługa płyty indukcyjnej
Aby rozpocząć gotowanie
1. Dotknąć przycisk ON/OFF.
Po włączeniu zasilania emitowany jest jeden sygnał akustyczny,
na wszystkich wyświetlaczach widnieją wskazania „–” lub „– –”
informujące, że płyta indukcyjna jest w trybie gotowości.
2.
Umieścić odpowiedni garnek na strefie grzewczej, z której
zamierza się skorzystać.
• Należy upewnić się, że spód garnka i powierzchnia strefy
grzewczej są czyste i suche.
3. Wybrać jedną strefę grzewczą i ustawić poziom mocy, dotykając suwak,
przesuwając palec wzdłuż przycisku „—” lub dotykając ten przycisk w dowolnym
miejscu.
lub
a. Jeśli w ciągu 1 minuty nie zostanie wybrane ustawienie mocy, płyta indukcyjna
wyłączy się automatycznie. Wówczas trzeba będzie ponowić czynności od punktu
1.
b. W trakcie gotowania można zmienić ustawienie mocy w dowolnym momencie.
c. Przy przesuwaniu palcem wzdłuż przycisku „—” można zmieniać moc w zakresie
od 1 do 9.
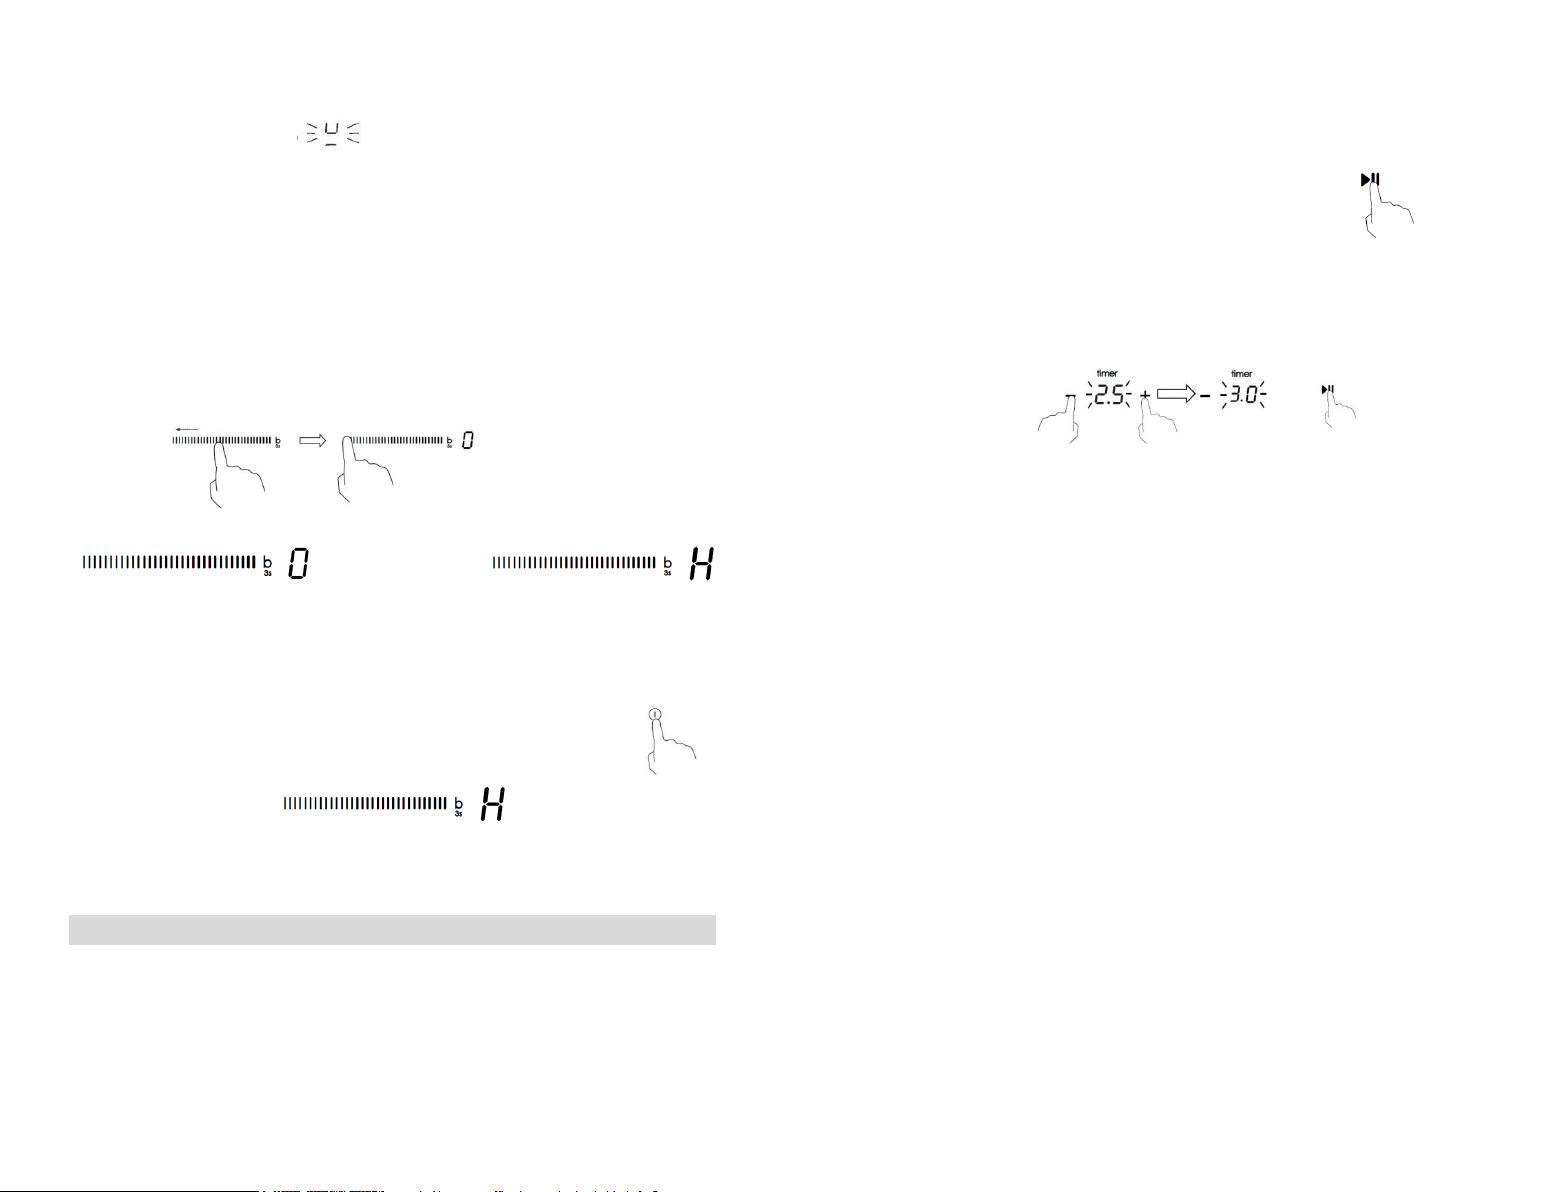
PL-13
Jeśli wyświetlacz miga naprzemiennie z ustawieniem mocy
Oznacza to że:
• nie postawiono garnka na właściwej strefie grzewczej lub
• używany garnek nie nadaje się do gotowania indukcyjnego lub
• garnek jest zbyt mały albo nie jest odpowiednio wyśrodkowany na strefie grzewczej.
Grzanie nie nastąpi, jeśli na strefie grzewczej nie znajduje się odpowiedni garnek.
Wyświetlacz wyłączy się automatycznie po 1 minutach, jeśli nie zostanie postawiony
odpowiedni garnek.
Po zakończeniu gotowania
1. Wyłączyć strefę grzewczą, przesuwając palec w lewo wzdłuż przycisku „—”
i przytrzymując przez 1 sekundę.
2. Sprawdzić, czy wskazanie mocy pokazuje „0”, a potem „H”.
a następnie
3. Wyłączyć całą płytę kuchenną, dotykając przycisk ON/OFF.
4. Uważać na gorące powierzchnie.
Na wyświetlaczu wciąż gorącej strefy grzewczej będzie widnieć litera H. Zniknie, gdy
powierzchnia ostygnie do bezpiecznej temperatury. Może również służyć jako
funkcja oszczędzania energii. Jeśli zamierza się podtrzymać temperaturę garnków,
należy użyć strefy grzewczej, która jest wciąż gorąca.
W przypadku przerwy w zasilaniu, gdy pojawiło się „H” , należy zwrócić uwagę, aby nie
dotykać powierzchni gotowania, nawet jeśli „H” nie jest już wyświetlany po przywróceniu
zasilania
Korzystanie z funkcji sterowania mocą
Przy użyciu funkcji sterowania mocą można ustawić całkowitą moc na
2,5 kW/3,0 kW/4,5 kW/6,5 kW i 7,4 kW w . Domyślnym ustawieniem mocy całkowitej jest
poziom maksymalny.
Ustawianie mocy całkowitej, odpowiadającej potrzebom
użytkownika
PL-14
1. Upewnić się, że płyta grzewcza jest wyłączona.
Uwaga: z funkcji zarządzania mocą można korzystać jedynie wówczas, gdy płyta grzewcza
jest wyłączona.
2. Dotknąć przycisk „Pauzy” i przytrzymać przez 5 sekund.
Zostanie wyemitowany jednokrotny dźwięk.
3. Po usłyszeniu dźwięku dotknąć jednocześnie przycisków „+” i „-” i przytrzymać przez
3 sekundy – na wskaźniku regulatora czasowego będzie migała wartość poprzedniego
poziomu mocy całkowitej, np. ‘2,5’. Dotknąć i ponownie przytrzymać przez 1 sekundę
przyciski „+” i „-” w celu przełączenia na inny poziom mocy, np. ‘3.0’. Gdy żądana
wartość mocy miga, dotknąć przycisk „Pauzy” i przytrzymać przez 5 sekund.
Zostanie wyemitowany 10-krotny dźwięk. Będzie to oznaczało zakończenie ustawień.
Uwaga:
1.
Po wykonaniu kroku 2, w czasie 3 sekund po usłyszeniu dźwięku należy dotknąć
przycisków „+” i „-”. W przeciwnym razie trzeba będzie ponowić czynności od punktu 2.
2.
Po zakończeniu ustawień odczekać do zakończenia emisji 10 dźwięków. W tym czasie
nie wolno dotykać żadnego przycisku. W przeciwnym razie ustawienia mogą być
nieprawidłowe.
Zasady sterowania mocą
Jeśli moc całkowita przekracza limit 2,5 kW, 3,0 kW, 4,5 kW,6,5kW lub 7,4 kW (w
zależności od ustawionego poziomu), nie można zwiększyć poziomu mocy żadnej ze stref.
Jeśli zostanie zwiększona za pomocą przycisku „+”, płyta grzewcza wyemituje 3-krotny
dźwięk, a na wskaźniku zostanie wyświetlony migający symbol ‘Pn’. Zatem należy
zmniejszyć poziom mocy innych stref przed zwiększeniem mocy żądanej strefy.
Ograniczenie mocy w środkowej i prawej strefie
• Strefy grzejne są podzielone na dwie grupy. Każda grupa ma maksymalne
obciążenie elektryczne wynoszące 3600 W.
• Ograniczenie zmniejsza moc innych pól grzejnych.
• Wyświetlacz ustawień temperatury stref z ograniczeniem przełącza się
pomiędzy dwoma poziomami.
np. jeśli wszystkie strefy są włączone, największy poziom mocy trzech stref
zmniejsza się do poziomu 7.

PL-15
W grupie a obie strefy mogą pracować jednocześnie na poziomie 9,
ponieważ w sumie obciążenie wynosi 3500 W.
W grupie b, jeśli pracują 3 strefy, maksymalny poziom mocy, jaki może
osiągnąć każda strefa, wynosi 7. Jeśli tylna strefa grupy b jest wyłączona,
pozostałe dwie strefy mogą osiągnąć maksymalny poziom mocy 8.
Jeśli chcesz, aby jedna ze stref z Grupy b działała z najwyższym poziomem
mocy, tylko 2 strefy powinny być włączone. Płyta automatycznie zmniejsza
moc pierwszej włączonej strefy
Korzystanie z funkcji Boost
Funkcja Boost służy do zwiększania mocy jednej strefy w ciągu jednej sekundy
i podtrzymywania jej przez 5 minut. Tym samym można uzyskać większą moc
i przyspieszyć gotowanie.
Korzystanie z funkcji Boost w celu zwiększenia mocy
1.
Dotknąć przycisk strefy, której moc ma zostać zwiększona i przytrzymać symbol „b”
przez 3 sekundy. Na wskaźniku mocy zostanie wyświetlony symbol „P”, wskazujący że
moc strefy jest zwiększana.
2.
Moc „Boost” będzie działać przez 5 minut, a następnie strefa powróci do poziomu
mocy „9”.
3.
Aby anulować funkcję Boost w czasie tych 5 minut, należy dwukrotnie dotknąć przycisk
„B”. Strefa grzewcza powróci do poziomu mocy „9”. Lub przesunąć wzdłuż przycisku
„—” w lewo – strefa grzewcza powróci do poziomu mocy w punkcie dotknięcia.
lub
PL-16
Ograniczenia podczas użytkowania
Pięć stref podzielono na dwie grupy. W jednej grupie, jeżeli używana jest
funkcja zwiększania mocy w jednej strefie, należy najpierw sprawdzić, czy inna
strefa pracuje co najwyżej na poziomie 5.
W grupie b, jeśli jedna strefa działa w trybie Boost, jednocześnie może działać
tylko jeszcze jedna inna strefa.
Korzystanie z funkcji podtrzymywania temperatury
Podtrzymywanie temperatury jest funkcją, w której jedna strefa utrzymuje niską moc, aby
dana potrawa nie ostygła.
Korzystanie z funkcji podtrzymywania temperatury w celu
utrzymania stabilnej temperatury
1. Dotknąć suwaka pola grzejnego, w którym ma być włączone podtrzymywanie
temperatury, a następnie dotknąć przycisku podtrzymywania temperatury , wówczas
wskaźnik strefy grzewczej będzie wyświetlał literę „A”.
2. Jeśli zamierza się anulować podtrzymywanie temperatury, należy dotknąć suwaka
strefy grzewczej, a następnie dotknąć przycisku , wówczas strefa grzewcza powróci
do poziomu „0”.
Korzystanie z funkcji wstrzymywania
Funkcja wstrzymywania może zostać użyta w każdym momencie gotowania. Umożliwia
ona wstrzymania grzania płyty indukcyjnej i powrócenie do grzania.
1. Sprawdzić, czy strefa grzewcza działa.
2. Dotknąć przycisku „Pauzy” – na wyświetlaczu strefy grzewczej pojawi się symbol „ll”.
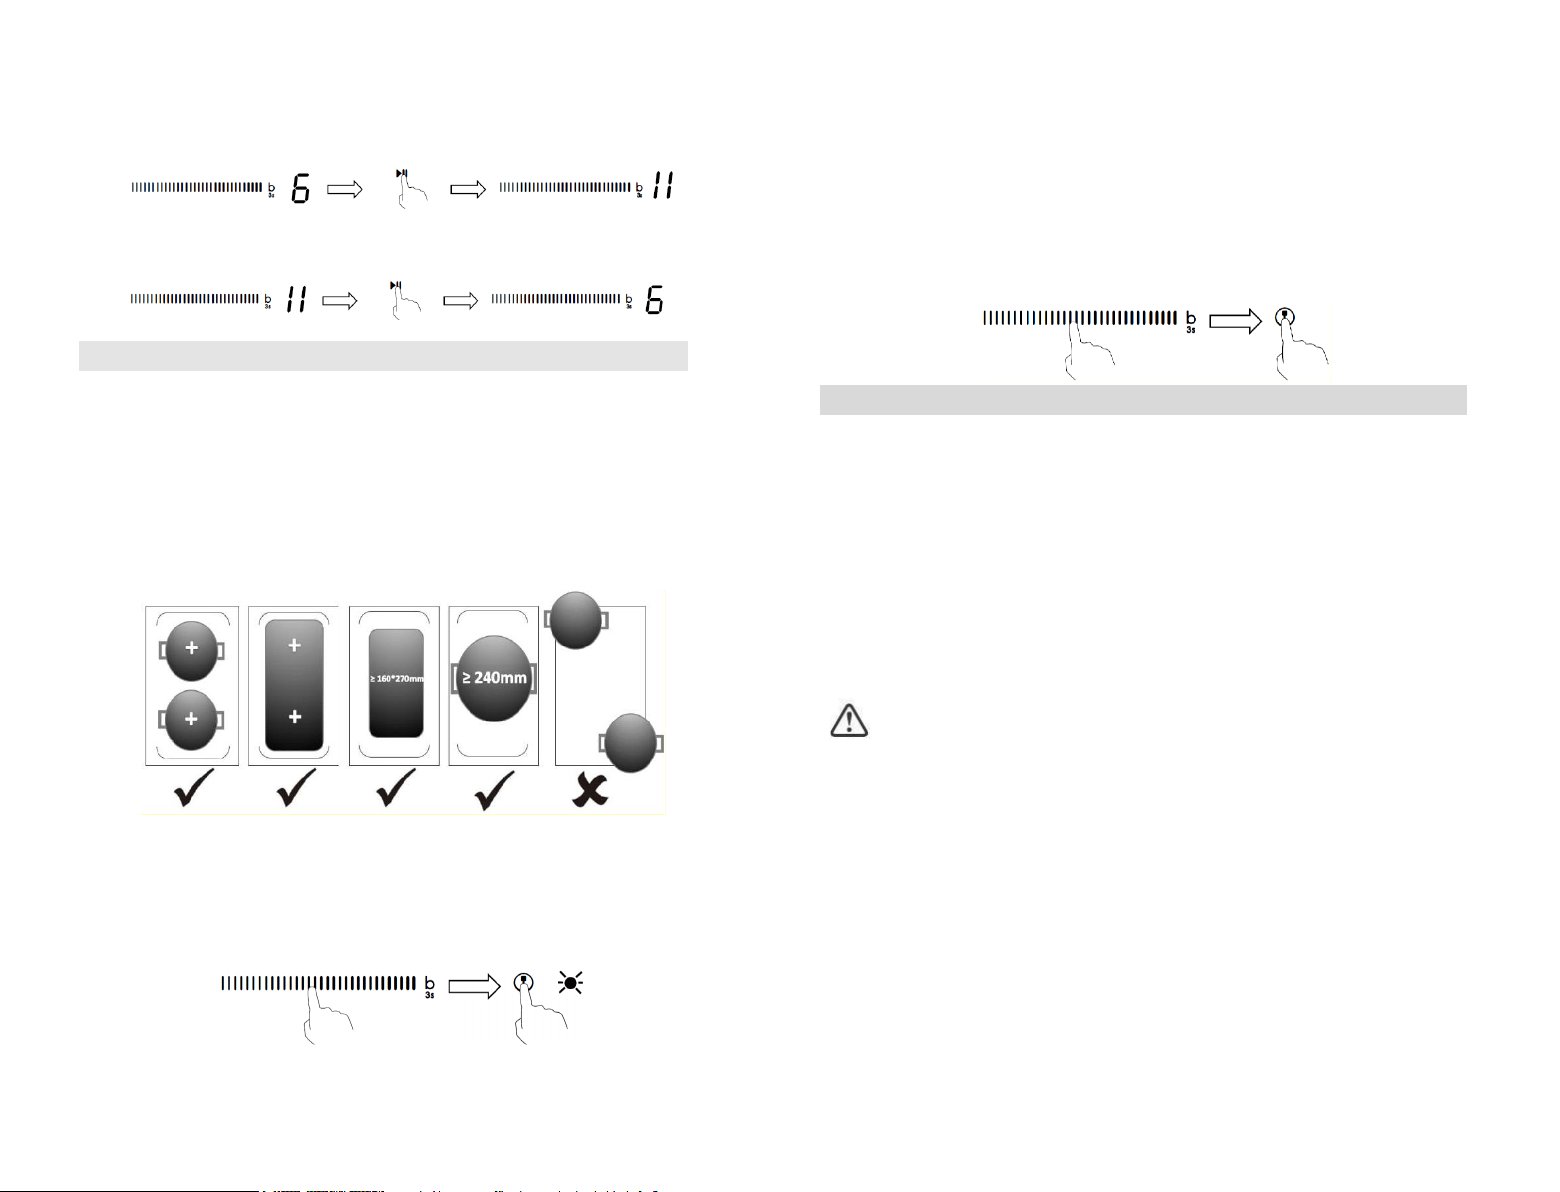
PL-17
Zostanie wstrzymane działanie płyty indukcyjnej we wszystkich strefach, oprócz funkcji
„Pauzy”, wł./wył. i przycisków blokady.
3. W celu wyjścia ze stanu wstrzymania należy dotknąć przycisku „Pauzy” – strefa
grzewcza powróci do poprzedniego poziomu mocy.
Strefa Flex
• Strefę tę można traktować jako pojedynczą strefę lub jako dwie różne strefy,
w zależności od wymogów związanych z gotowaniem.
• Strefa elastyczna składa się z dwóch niezależnych cewek, którymi można
sterować oddzielnie.
• Ważne: upewnić się, że naczynia są umieszczone na środku danej strefy
grzewczej. W przypadku dużych garnków, owalnych, prostokątnych i
wydłużonych patelni należy umieścić naczynie na środku strefy grzewczej,
pokrywając oba krzyżyki.
Przykłady prawidłowego i nieprawidłowego rozmieszczenia garnków:
Jako duża strefa
1. Dotknąć suwaka strefy grzewczej (strona lewa), która ma działać jako
strefa elastyczna, a następnie dotknąć przycisku wyboru strefy elastycznej,
aby uruchomić strefę elastyczną jako jedną dużą strefę. Wskaźnik obok
przycisku będzie zaświecony.
PL-18
2. Dotknąć suwaka wzdłuż kontrolki „—” lub dotknąć dowolnego punktu „—”,
aby ustawić poziom mocy.
Jako dwie niezależne strefy
1. Jeśli zamierza się anulować strefę elastyczną, należy dotknąć suwaka strefy
grzewczej ponownie, a następnie dotknąć przycisku wyboru strefy elastycznej.
Wskaźnik obok przycisku strefy elastycznej zgaśnie.
Blokowanie elementów sterowania
• Elementy sterowania można zablokować, aby zapobiec użyciu ich przez osoby
niepowołane (np. przez dzieci, które przypadkowo włączą strefy grzewcze).
• Po zablokowaniu elementów sterowania wszystkie elementy sterowania z wyjątkiem
przycisku ON/OFF są nieaktywne.
Jak zablokować elementy sterowania
Dotknąć przycisku blokady. Na wskaźniku regulatora czasowego będzie widnieć
wskazanie „Lo”.
Jak odblokować elementy sterowania
1. Upewnić się, że płyta indukcyjna jest włączona.
2. Dotknąć przycisku blokady i przytrzymać go przez chwilę.
3. Można w tym momencie zacząć korzystać z płyty indukcyjnej.
Gdy płyta kuchenna jest w trybie zablokowanym, wszystkie elementy sterowania są
wyłączone z wyjątkiem przycisku włączania/wyłączania. W sytuacji awaryjnej płytę
indukcyjną można zawsze wyłączyć za pomocą przycisku włączania/wyłączania, ale przy
kolejnym użyciu należy najpierw płytę odblokować.
Zabezpieczenie przed przegrzaniem
Czujnik temperatury, w który wyposażona jest płyta, może monitorować temperaturę
wewnątrz płyty indukcyjnej. Gdy monitorowana temperatura jest nadmierna, płyta
indukcyjna wyłącza się automatycznie.
Zabezpieczenie przed zalaniem
Funkcja zabezpieczenia przed zalaniem jest funkcją związaną z bezpieczeństwem. Płyta
indukcyjna zostanie wyłączona automatycznie w ciągu 10 sekund, jeśli na panel
sterowania wyleje się woda (przez 1 sekundę będzie emitowany dźwięk).
Wykrywanie małych przedmiotów
Gdy na płycie indukcyjnej pozostawiony zostanie przedmiot o małych wymiarach (np. nóż,
widelec, klucz) lub niemagnetyczna patelnia (np. aluminiowa), płyta automatycznie
przechodzi w stan gotowości w ciągu 1 minuty. Wentylator będzie ogrzewał płytę
indukcyjną jeszcze przez 1 minutę.
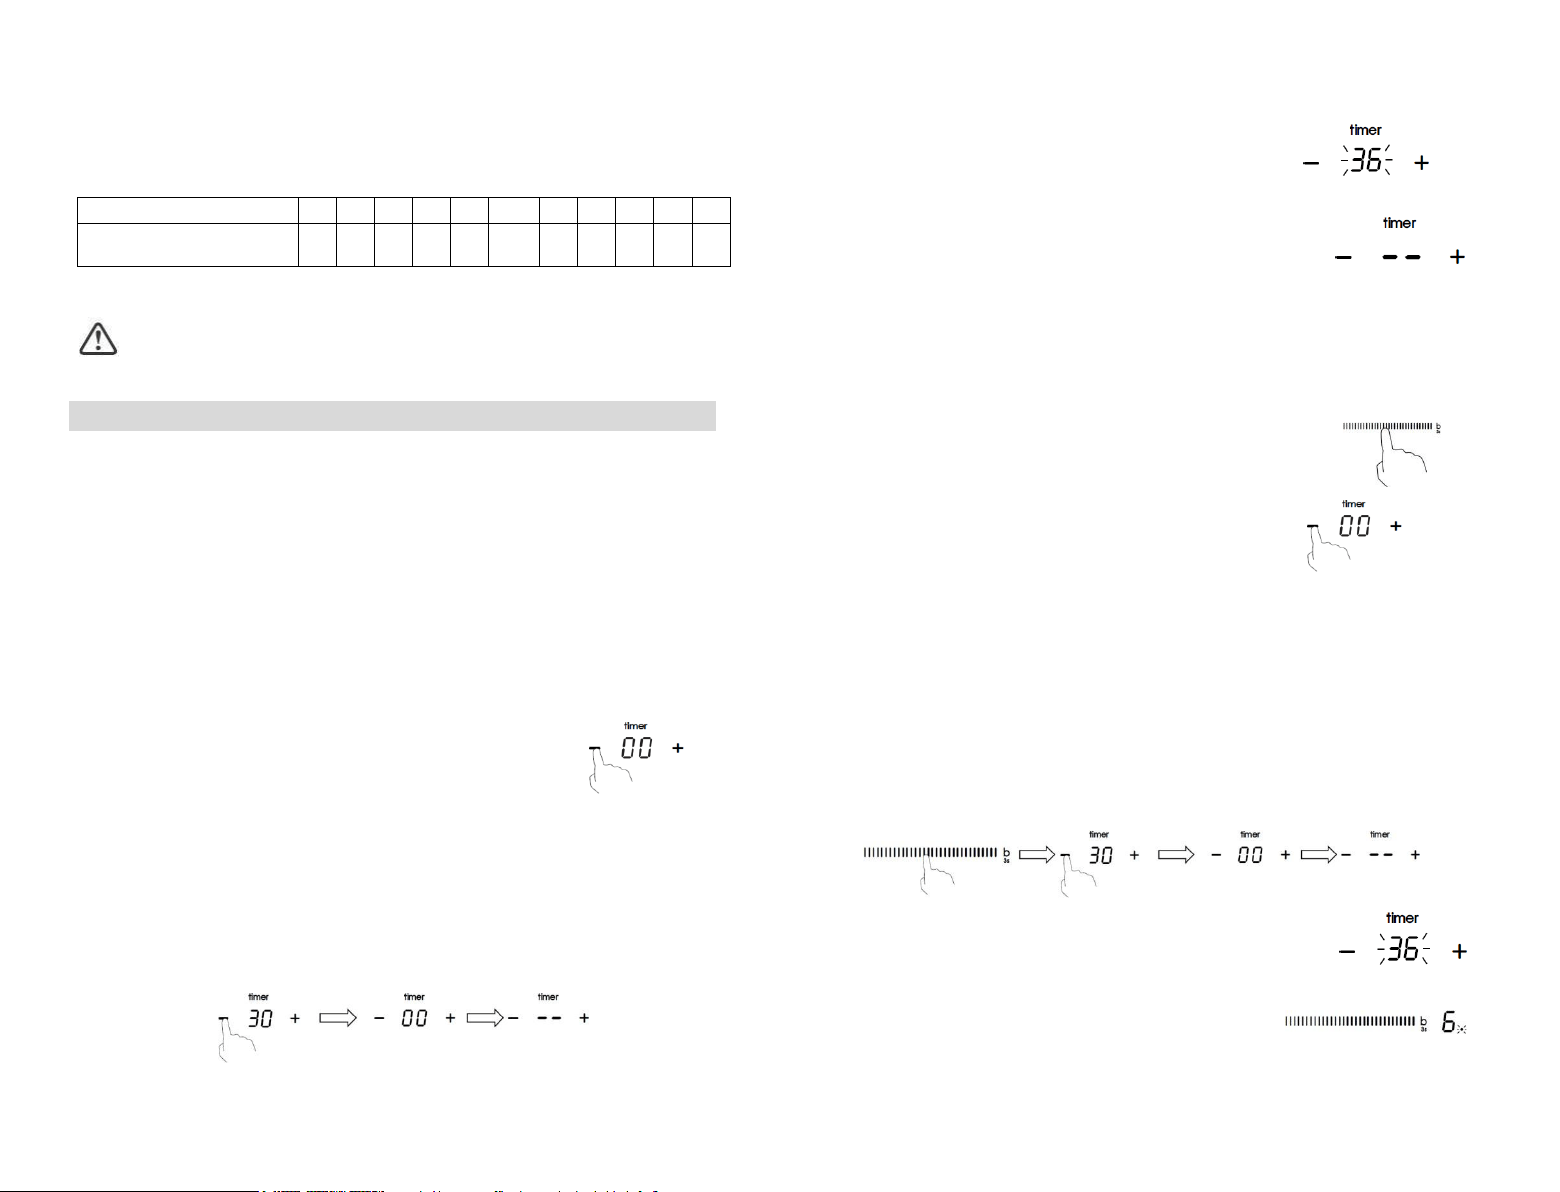
strefa.
ta mocy zaświeci się, wskazując, że wybrana jest
poziomu wskaźnika czerwona kropka obokUWAGA:
czasowego będzie migać przez 5 sekund.
Wyświetlacz pokaże pozostały czas, a wskaźnik regulatora
5. Po ustawieniu odliczanie czasu rozpocznie się natychmiast.
”.--symbol „00”, a następnie „
anie anulowana, a na wyświetlaczu minutnika pojawi się regulatora czasowego zost
funkcja –” lub „+” regulatora czasowego -wyboru, a następnie dotknąć przycisk „
4. W celu anulowania funkcji regulatora czasowego należy dotknąć suwak przycisku
automatycznie na wartość 0.
cza 99 minut, regulator czasowy powróci Jeśli ustawiony czas przekra
minut. zwiększy czas o 10
” lub „+” zmniejszy lub -minutę. Dotknięcie i przytrzymanie przycisku „
” lub „+” zmniejszy lub zwiększy czas o 1 -Wskazówka: Dotknięcie raz przycisku „
” lub „+”.-3. Ustawić czas, dotykając przycisku „
–” lub „+” regulatora czasowego -Dotknąć przycisku „
wskaźnik minutnika zacznie migać, a na wyświetlaczu
regulatora czasowego będzie widoczne wskazanie „00”.
2.
1#). zamierza się ustawić regulator czasowy (np. strefa
k wyboru strefy grzewczej, dla której Dotknąć przycis 1.
Ustawienie stref grzewczych przy użyciu tej funkcji:
strefy grzewczej
Ustawianie regulatora czasowego w celu wyłączenia jednej
ustawiony czas.
”, gdy zakończy się - -regulatora czasowego pokaże „
dźwiękowy trwający 30 sekund, a wskaźnik6. Nastąpi sygnał
czasowego będzie migać przez 5 sekund.
Wyświetlacz pokaże pozostały czas, a wskaźnik regulatora
5. Po ustawieniu odliczanie czasu rozpocznie się natychmiast.
20-PL
PL-19
Zabezpieczenie w postaci automatycznego wyłączania się
Automatyczne wyłączanie się to funkcja zabezpieczająca płytę indukcyjną. Płyta wyłącza
się automatycznie, jeśli użytkownik zapomni ją wyłączyć po gotowaniu. Domyślne czasy
pracy dla różnych poziomów mocy pokazane są w poniższej tabeli:
Poziom mocy
1
2
3
4
5
6
7
8
9
A
II
Domyślny regulator czasowy
działania (godzina)
8
8
8
4
4
4
2
2
2
2
2
Po zdjęciu garnka płyta indukcyjna może natychmiast zatrzymać ogrzewanie i wyłącza się
automatycznie po 2 minutach.
Osoby z rozrusznikiem serca powinny skonsultować się z lekarzem przed
użyciem tego urządzenia.
Używanie regulatora czasowego
Z regulatora czasowego można korzystać na dwa różne sposoby:
• Można używać go jako minutnika. W takiej sytuacji regulator czasowy nie wyłączy
żadnej strefy grzewczej przed upływem ustawionego czasu.
• Można go ustawić tak, aby wyłączyć jedną strefę grzewczą po upływie ustawionego
czasu.
• Regulator czasowy można ustawić do maksymalnie 99 minut.
Korzystanie z regulatora czasowego jako minutnika
Jeśli użytkownik nie wybierze żadnej strefy grzewczej
1. Upewnić się, że płyta grzewcza jest włączona.
Uwaga: można użyć minutnika, nawet jeśli nie zostanie wybrana żadna strefa grzewcza.
2.
3. Ustawić czas, dotykając przycisku „-” lub „+”.
Wskazówka: Dotknąć raz przycisku „-” lub „+”, aby zmniejszyć
Dotknąć przycisk regulatora czasowego – wskaźnik minutnika
zacznie migać, a na wyświetlaczu regulatora czasowego
będzie widoczne wskazanie „00”.
lub zwiększyć czas o 1
minutę. Przytrzymać przycisk „-” lub „+” regulatora czasowego, aby zmniejszyć lub
zwiększyć czas o 10 minut.
Jeśli ustawiony czas przekracza 99 minut, regulator czasowy powróci automatycznie na
wartość 0.
4. Anulować czas dotykając przycisku „-” regulatora czasowego i przesuwając na „0”.
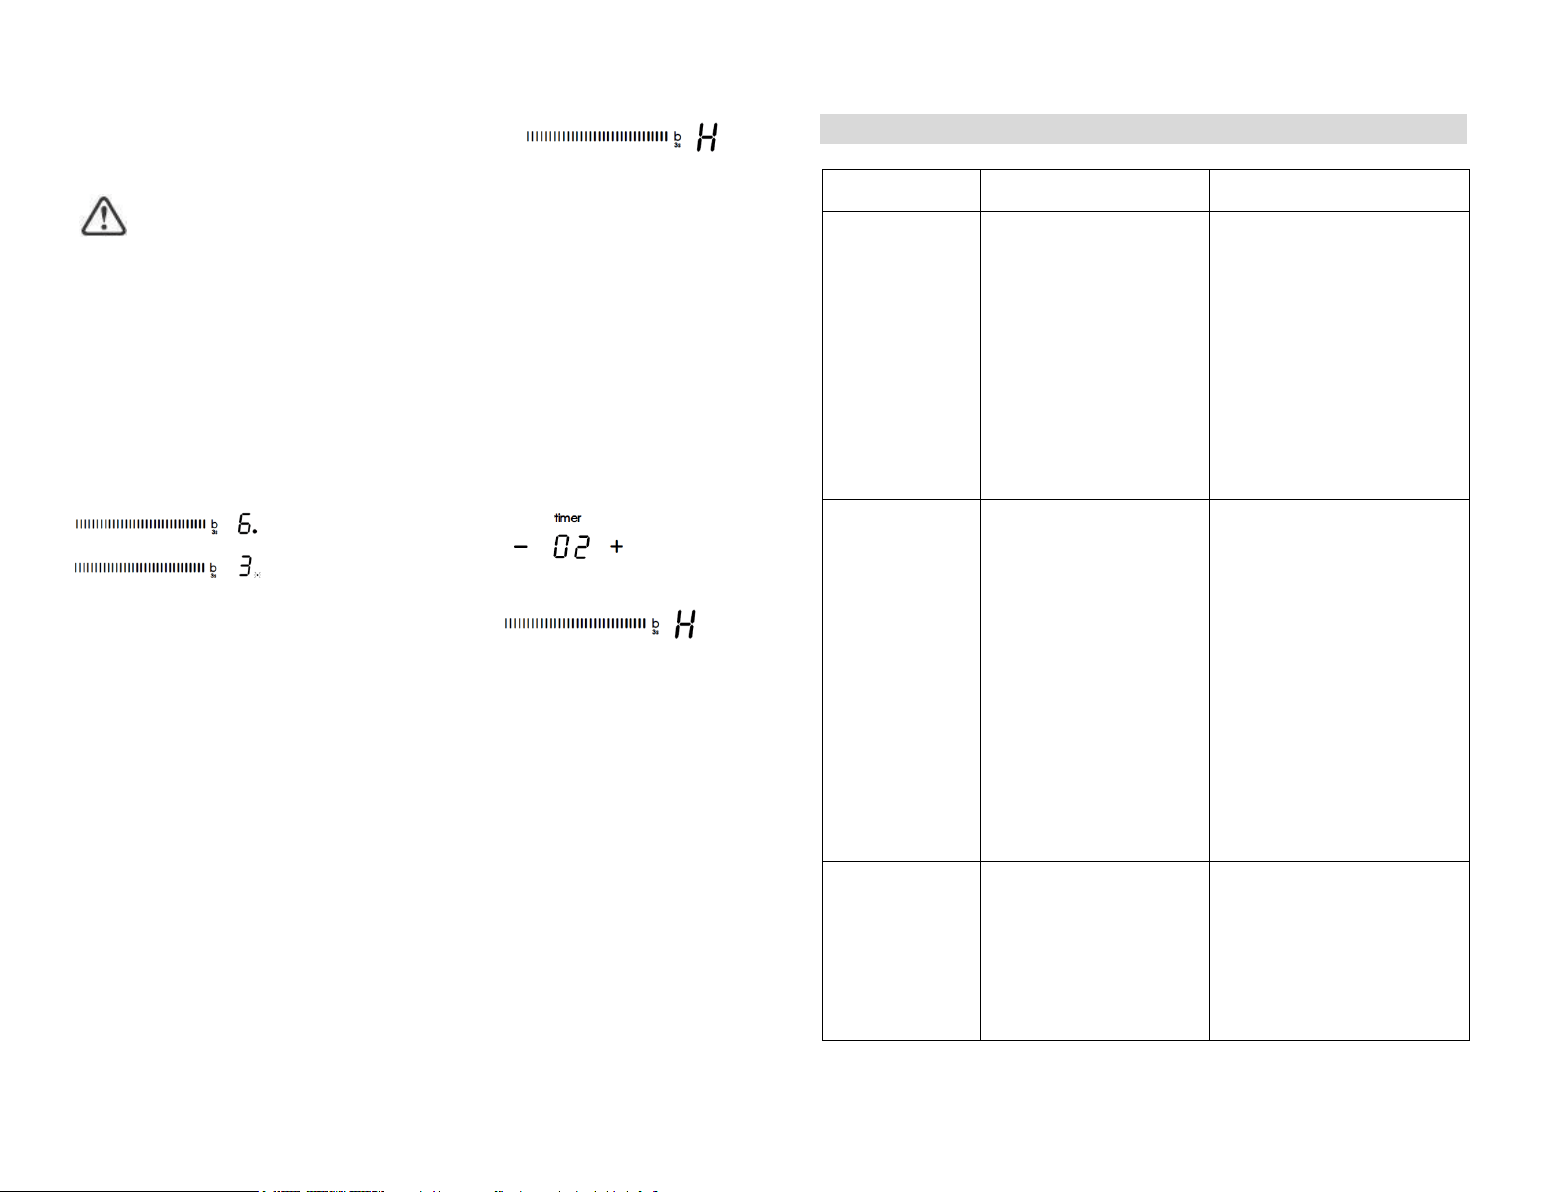
PL-21
6. Po upływie czasu grzania, odpowiednia strefa grzewcza
zostanie automatycznie wyłączona i wyświetlony
zostanie symbol „H”.
Pozostałe strefy grzewcze będą nadal działać, jeśli zostały wcześniej
włączone.
Ustawianie regulatora czasowego w celu wyłączenia więcej niż
jednej strefy grzewczej.
1. W przypadku użycia tej funkcji do więcej niż jednej strefy grzewczej, wskaźnik
regulatora czasowego wyświetli najkrótszy czas
(np. ustawiony czas strefy 1# – 2 min, ustawiony czas strefy 2# –5 min – na wskaźniku
regulatora czasowego zostanie wyświetlona cyfra „2”).
UWAGA: migająca czerwona kropka obok wskaźnika poziomu mocy oznacza, że
wskaźnik regulatora czasowego wskazuje czas strefy grzewczej.
Chcąc sprawdzić ustawiony czas innej strefy grzewczej, należy dotknąć przycisk
wyboru strefy grzewczej. Na regulatorze czasowym zostanie wyświetlony jej ustawiony
czas.
(ustawienie na 5 minut)
(ustawienie na 2 minut)
2. Po upływie czasu grzania ustawionego na
regulatorze, odpowiednia strefa grzewcza zostanie
automatycznie wyłączona i wyświetlony zostanie
symbol „H”.
UWAGA: chcąc zmienić czas po ustawieniu regulatora czasowego, należy rozpocząć od
kroku 1.
PL-22
Dbałość i czyszczenie
Co?
Jak?
Ważne!
Codzienne zabrudzenia
na szkle (odciski
palców, ślady, plamy
pozostawione przez
jedzenie lub niesłodkie
pozostałości na szkle)
1.
Wyłączyć zasilanie płyty
kuchennej.
2.
Zastosować środek do
czyszczenia płyty kuchennej,
gdy szkło jest jeszcze ciepłe
(ale nie gorące!)
3.
Wypłukać i wytrzeć do sucha
czystą ściereczką lub
ręcznikiem papierowym.
4.
Włączyć ponownie zasilanie płyty
kuchennej.
•
Gdy zasilanie płyty kuchennej
zostanie wyłączone, nie będzie na
niej wskazania „gorąca
powierzchnia”, ale pole grzejne
może nadal być gorące! Zachować
szczególną ostrożność.
•
Niektóre mocne środki czyszczące i
sztuczne środki czyszczące oraz
środki szorstkie/ścierne mogą
porysować szkło. Zawsze przeczytać
etykietę, aby sprawdzić, czy
posiadany środek czyszczący jest
odpowiedni.
•
Nigdy nie pozostawiać pozostałości
środków do czyszczenia na płycie
kuchennej: szkło może zostać
poplamione.
Ślady po kipieniu,
stopiona żywność
i
gorący cukier
pozostawiają wycieki
na szkle
Natychmiast usunąć je za pomocą
plastikowej łopatki, szpachelki lub
skrobaka, odpowiednich do
indukcyjnych płyt kuchennych, ale
uważać na gorące powierzchnie
stref grzewczych:
1. Wyłączyć zasilanie płyty
kuchennej od gniazdka
ściennego.
2. Trzymać ostrze lub narzędzie
pod kątem 30° i zeskrobać
zabrudzenie lub przesunąć
rozlane pozostałości na
chłodny obszar płyty
kuchennej.
3. Usunąć zabrudzenia lub
rozlane pozostałości
ściereczką do naczyń lub
ręcznikiem papierowym.
4. Wykonać czynności z punktów
od 2 do 4 sekcji „Codzienne
zabrudzenia na szkle” powyżej.
•
Jak najszybciej usunąć plamy
pozostawione przez słodką i
stopioną żywność. Pozostawione do
ostygnięcia na szybie mogą być
trudne do usunięcia lub nawet mogą
trwale uszkodzić powierzchnię szkła.
•
Zagrożenie skaleczeniem: kiedy
osłona bezpieczeństwa jest
wycofana, ostrze w skrobaku jest
ostre jak brzytwa. Używać z
najwyższą ostrożnością, zawsze
przechowywać bezpiecznie i w
miejscu niedostępnym dla dzieci.
Rozlane pozostałości
na przyciskach
dotykowych
1.
Wyłączyć zasilanie płyty
kuchennej.
2.
Usunąć rozlane pozostałości
3.
Przetrzeć obszar przycisków
sterowania dotykowego czystą,
wilgotną gąbką lub szmatką.
4.
Wytrzeć obszar do sucha
papierowym ręcznikiem.
5.
Włączyć ponownie zasilanie
płyty kuchennej.
•
Płyta kuchenna może emitować
sygnały dźwiękowe i wyłączać się, a
przyciski dotykowe mogą nie działać,
gdy znajduje się na nich płyn. Przed
włączeniem płyty kuchennej upewnić
się, że obszar przycisków
sterowania dotykowego został
wytarty.
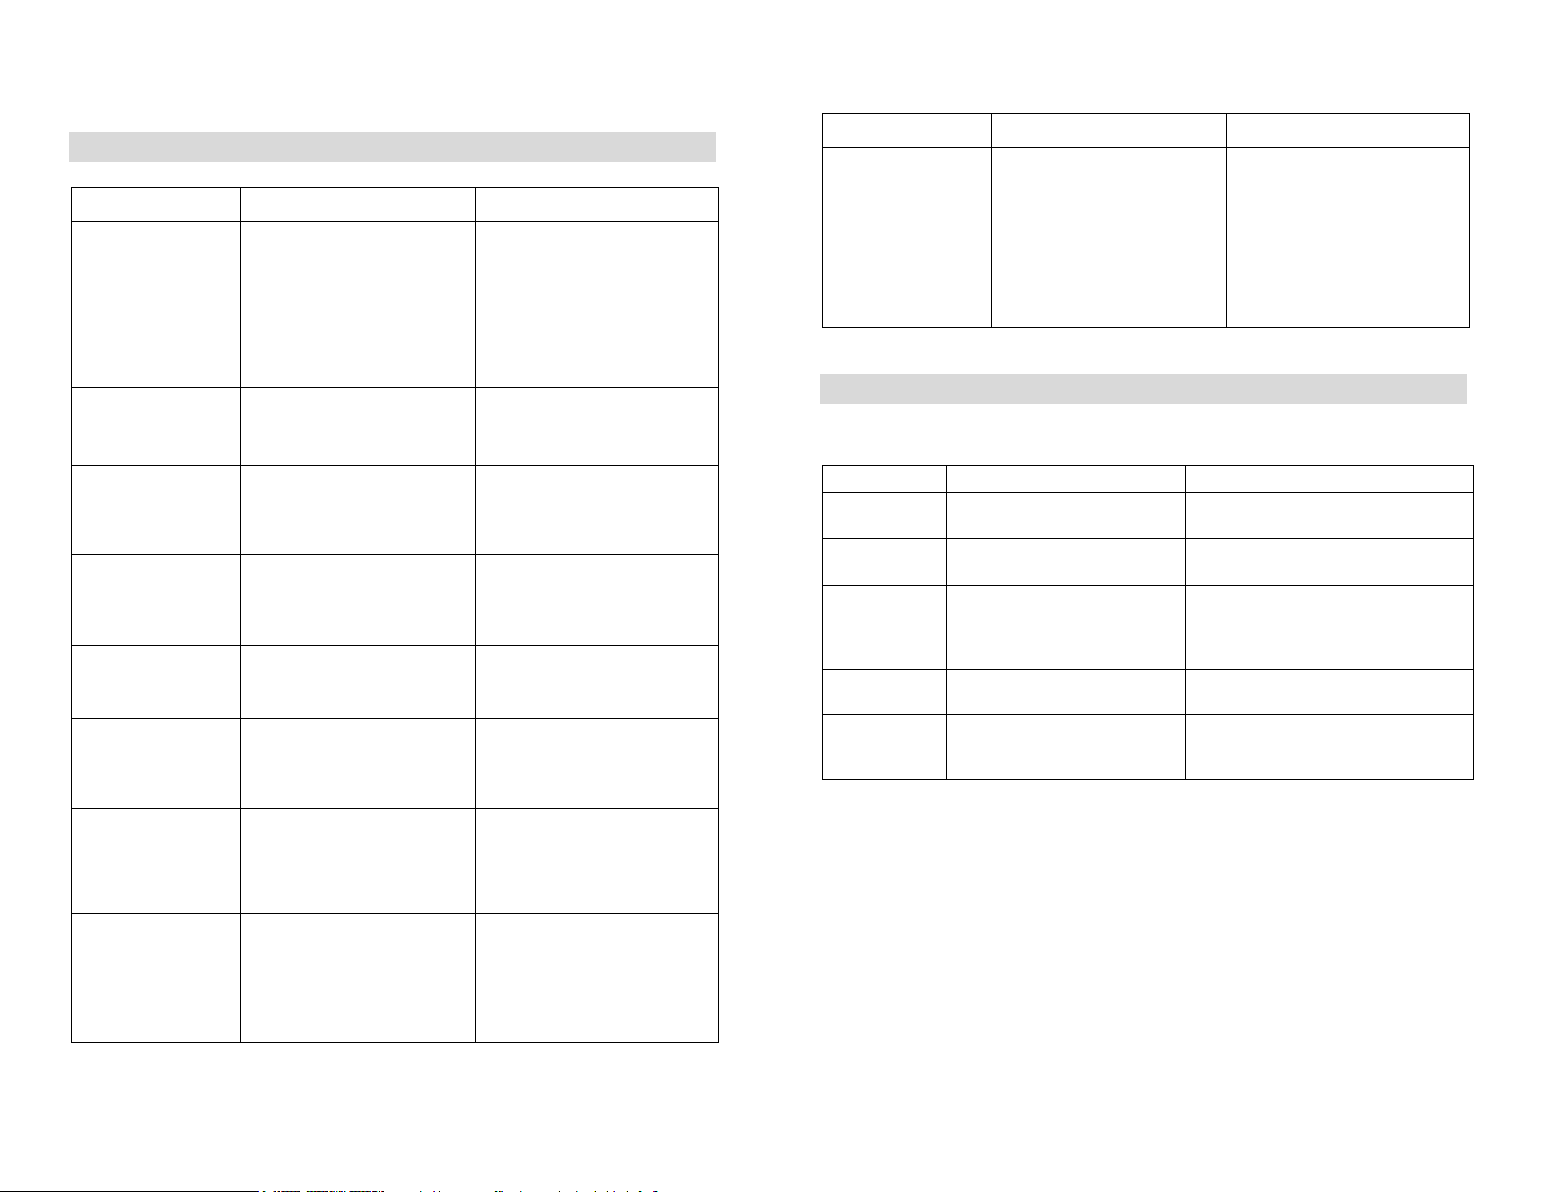
PL-23
Porady i wskazówki
Problem
Potencjalne przyczyny
Co należy zrobić?
Nie można włączyć płyty
indukcyjnej.
Brak zasilania.
Upewnić się, że płyta indukcyjna jest
podłączona do zasilania i jest
włączona.
Sprawdzić, czy w domu lub okolicy
nie wystąpiła przerwa w dostawie
energii elektrycznej. Jeśli wszystko
sprawdzono i problem nadal
występuje, należy skontaktować się z
wykwalifikowanym
technikiem.
Przyciski sterowania
dotykowego nie reagują.
Przyciski sterowania są
zablokowane.
Odblokować przyciski sterowania.
W celu uzyskania szczegółowych
informacji, patrz sekcja „Korzystanie
z płyty indukcyjnej”
Przyciski sterowania są
trudne w obsłudze.
Na przyciskach sterowania może
znajdować się niewielka warstwa
wody lub podczas dotykania
elementów sterujących używany jest
czubek palca.
Upewnić się, że obszar dotykania
elementów sterujących jest suchy i
użyć opuszka palca podczas
dotykania elementów sterujących.
Szkło jest porysowane.
Naczynia o szorstkich krawędziach.
Używane są nieodpowiednie,
ścierne środki czyszczące.
Używać naczyń z płaskimi i gładkimi
podstawami. Patrz „Wybór
odpowiedniego naczynia”.
Patrz „Dbałość i czyszczenie”.
Podczas używania
niektórych patelni słychać
trzaski lub stuki.
Może to być spowodowane
konstrukcją naczyń kuchennych
(warstw różnych metali o różnych
wibracjach).
Jest to normalne dla naczyń
kuchennych i nie jest to oznaka
usterki.
Płyta indukcyjna generuje
delikatny hałas podczas
działania
z wysokimi ustawieniami
temperatury.
Jest to spowodowane technologią
gotowania indukcyjnego.
Jest to normalne, ale hałas powinien
się zmniejszyć lub całkowicie ustać w
momencie wybrania niższego
ustawienia temperatury.
Hałas wentylatora
dochodzący z płyty
indukcyjnej.
Zainstalowano wentylator chłodzący
wbudowany w płytę indukcyjną, aby
zapobiec przegrzaniu elementów
elektronicznych. Może występować
nadal nawet po wyłączeniu płyty
indukcyjnej.
Jest to normalne i nie wymaga żadnej
interwencji. Nie wyłączać zasilania
płyty indukcyjnej, odłączając ją od
gniazdka ściennego, gdy wentylator
pracuje.
Patelnie nie nagrzewają
się i pojawia się na
wyświetlaczu.
Płyta indukcyjna nie może wykryć
patelni, ponieważ nie nadaje się do
ogrzewania indukcyjnego.
Używać naczyń odpowiednich do
gotowania indukcyjnego. Patrz sekcja
„Wybór odpowiedniego naczynia”.
Płyta indukcyjna nie może wykryć
patelni, ponieważ jest zbyt mała dla
strefy grzewczej lub nie jest
prawidłowo wyśrodkowana.
Wyśrodkować patelnię i upewnić się,
że jej podstawa odpowiada
rozmiarowi strefy grzewczej.
PL-24
Problem
Potencjalne przyczyny
Co należy zrobić?
Płyta indukcyjna lub pole
grzewcze
niespodziewanie się
wyłączyły, rozlega się
sygnał dźwiękowy i
wyświetlany jest kod
błędu (zwykle na
przemian z jedną lub
dwoma cyframi na
wyświetlaczu regulatora
czasowego).
Usterka techniczna.
Zanotować litery i cyfry błędu,
wyłączyć zasilanie płyty indukcyjnej
od gniazdka ściennego i
skontaktować się z wykwalifikowanym
technikiem.
Wyświetlanie błędów i ich sprawdzanie
Jeśli wystąpi usterka, płyta indukcyjna automatycznie przejdzie w stan zabezpieczenia i
wyświetli specjalne kody zabezpieczające:
Problem
Potencjalne przyczyny
Co należy zrobić?
F3/F4
Awaria czujnika temperatury
cewki indukcyjnej
Prosimy o kontakt z dostawcą.
F9/FA
Awaria czujnika temperatury
IGBT
Prosimy o kontakt z dostawcą.
E1/ E2
Nieprawidłowe napięcie
zasilania
Sprawdzić, czy zasilanie jest
prawidłowe.
Włączyć po sprawdzeniu, czy
zasilanie jest prawidłowe.
E3
Wysoka temperatura czujnika
temperatury cewki indukcyjnej
Prosimy o kontakt z dostawcą.
E5
Wysoka temperatura czujnika
temperatury IGBT
Po ostygnięciu płyty indukcyjnej
należy ponownie uruchomić
urządzenie.
Powyższe wskazania są jedynie przypuszczeniem, czynności takie wykonuje się przy
powszechnych usterkach.
Proszę nie demontować urządzenia samodzielnie, aby uniknąć zagrożeń i uszkodzeń płyty
indukcyjnej.
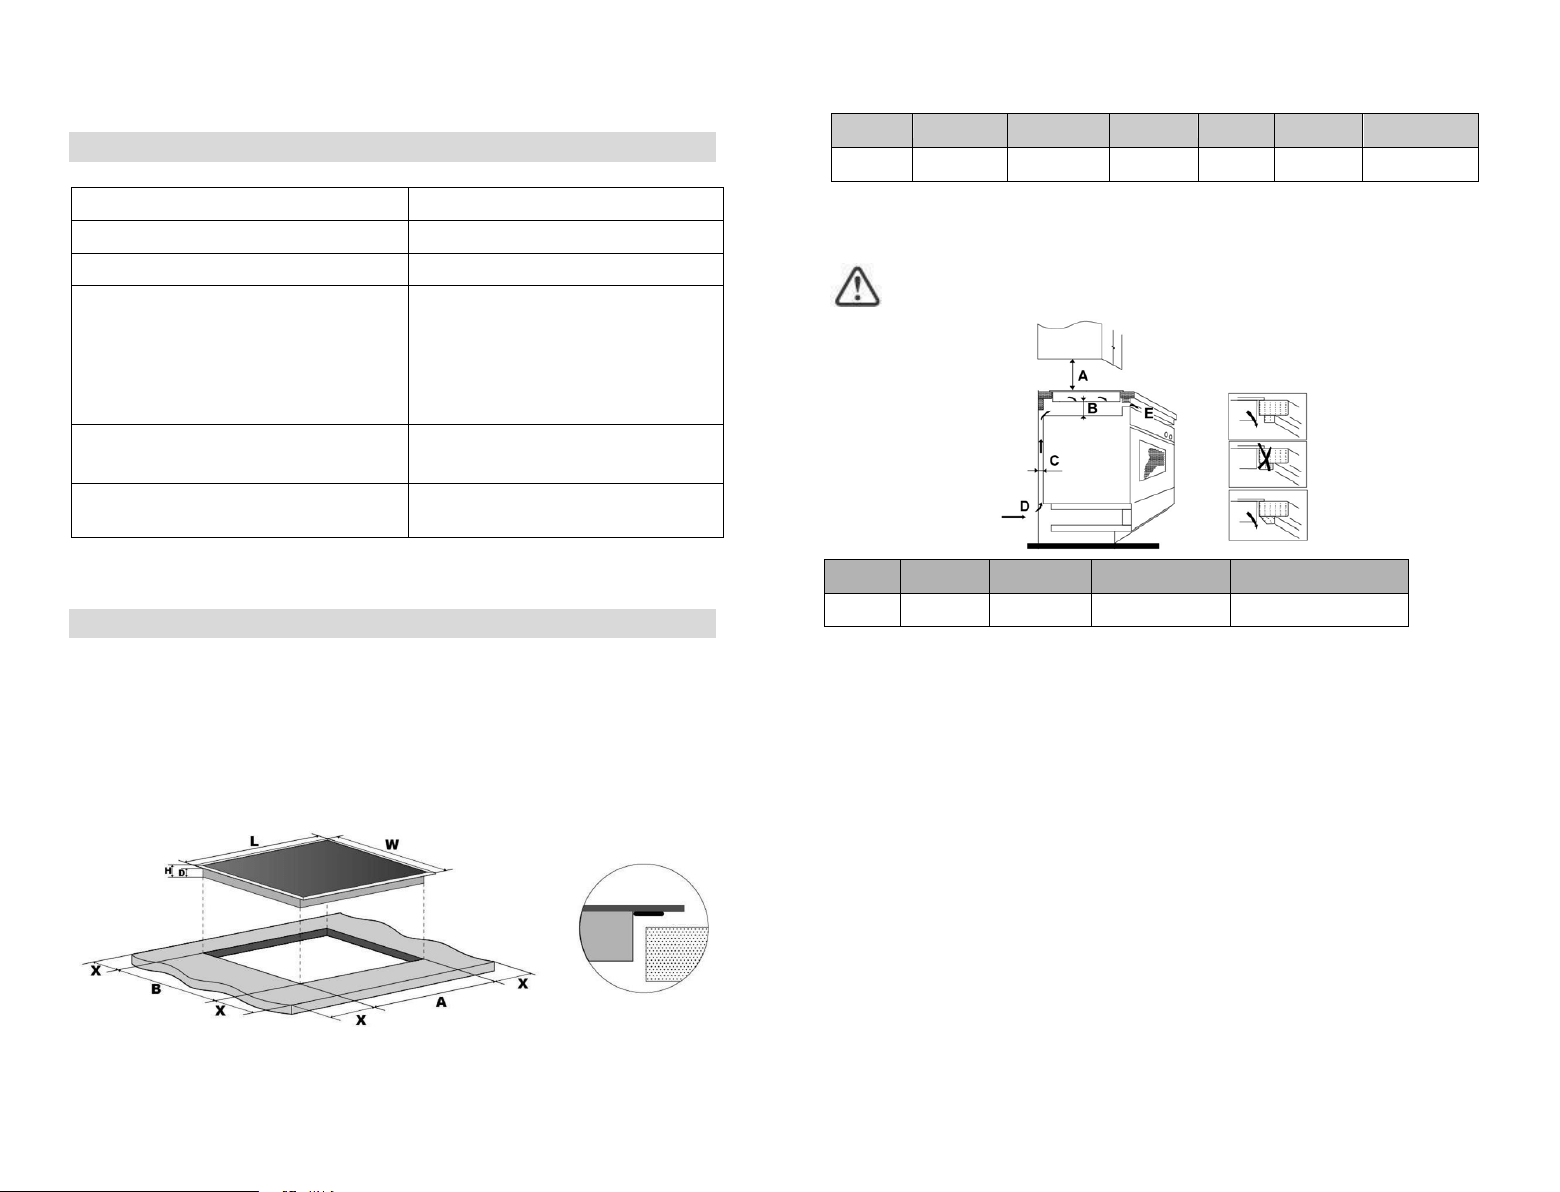
do na powierzchniach ścian otaczających płytę zastosowane są żaroodporne i łatwe •
przepisami; urzędem nadzoru budowlanego i zapoznać z
sultować z lokalnymi w razie wątpliwości dotyczących instalacji należy się skon •
zainstalowana;
rozłącznik izolacyjny będzie łatwo dostępny dla klienta, gdy płyta zostanie •
instalacji elektrycznej pozwalają na taką zmianę wymagań);
ch [fazowych], jeśli lokalne przepisy dotyczące wszystkich przewodach aktywny
stykami rozłącznika musi wynosić co najmniej 3 mm na wszystkich biegunach (lub na
Rozłącznik izolacyjny musi być rozłącznikiem zatwierdzonego typu, a odstęp między
instalacji.
alnymi zasadami i przepisami dotyczącymi tego typu umieszczony zgodnie z lok
elektrycznego jest wbudowany w stałą instalację elektryczną, zamontowany jest i
odpowiedni rozłącznik izolacyjny zapewniający całkowite odłączenie od zasilania •
przepisów; obowiązujących norm oraz
dotyczące bezpiecznej odległości i instalacja będzie spełniać wszystkie wymagania •
chłodzący;
jeśli płyta jest zainstalowana nad piekarnikiem, piekarnik ma wbudowany wentylator •
materiału; blat roboczy wykonany jest z żaroodpornego •
przestrzeni; nie zakłócają wymagań dotyczących
konstrukcyjne powierzchnia robocza jest równa i wypoziomowana, a żadne elementy •
Przed zainstalowaniem płyty należy upewnić się, że:
Wylot powietrza 5 mm Wlot powietrza 20 mini 50 mini 760
E
D
C (mm) B (mm) A (mm)
mm.760 yjną szafką powinna wynosić co najmniej indukc
Uwaga: bezpieczna odległość pomiędzy płytą a znajdującą się nad płytą
indukcyjna jest w dobrym stanie. Jak pokazano poniżej:
wentylowana oraz że wlot i wylot powietrza nie są zablokowane. Upewnić się, że płyta
indukcyjna płyta grzejna jest dobrze W każdym przypadku należy upewnić się, iż
50 mini
+5
490
+5
740 56 60 520 770
X (mm) B (mm) A (mm) gł. (mm) wys. (mm) szer. (mm) dł. (mm)
26-PL
PL-25
USZCZEL
Dane techniczne
Płyta indukcyjna
CIFS85MCTT/1
Strefy grzewcze 5 stref
Napięcie zasilania 220–240 V~, 50–60 Hz
Zainstalowana moc elektryczna
2,5 kW: 2250–2750 W lub
3,0 kW: 2700–3300 W lub
4,5 kW: 4050–4950 W lub
6,5 kW: 5850–7150 W lub
7,4 kW: 6600–7400 W
Wymiary produktu
dł. × szer. × wys. (mm)
770 X 520 X 60
Wymiary w przypadku zabudowy
A × B (mm)
Waga i wymiary są przybliżone. Ponieważ stale dążymy do ulepszania naszych produktów,
740 X 490
możemy zmienić specyfikacje i projekty bez wcześniejszego powiadomienia.
Instalacja
Wybór sprzętu instalacyjnego
Wyciąć powierzchnię roboczą zgodnie z wymiarami pokazanymi na rysunku.
Do celów instalacji i użytkowania wokół otworu należy zachować co najmniej 5 cm wolnej
przestrzeni.
Należy upewnić się, iż grubość powierzchni roboczej wynosi co najmniej 30 mm. Proszę
wybrać
żaroodporny materiał powierzchni roboczej, aby uniknąć dużych odkształceń
spowodowanych promieniowaniem cieplnym z płyty grzejnej. Jak pokazano poniżej:
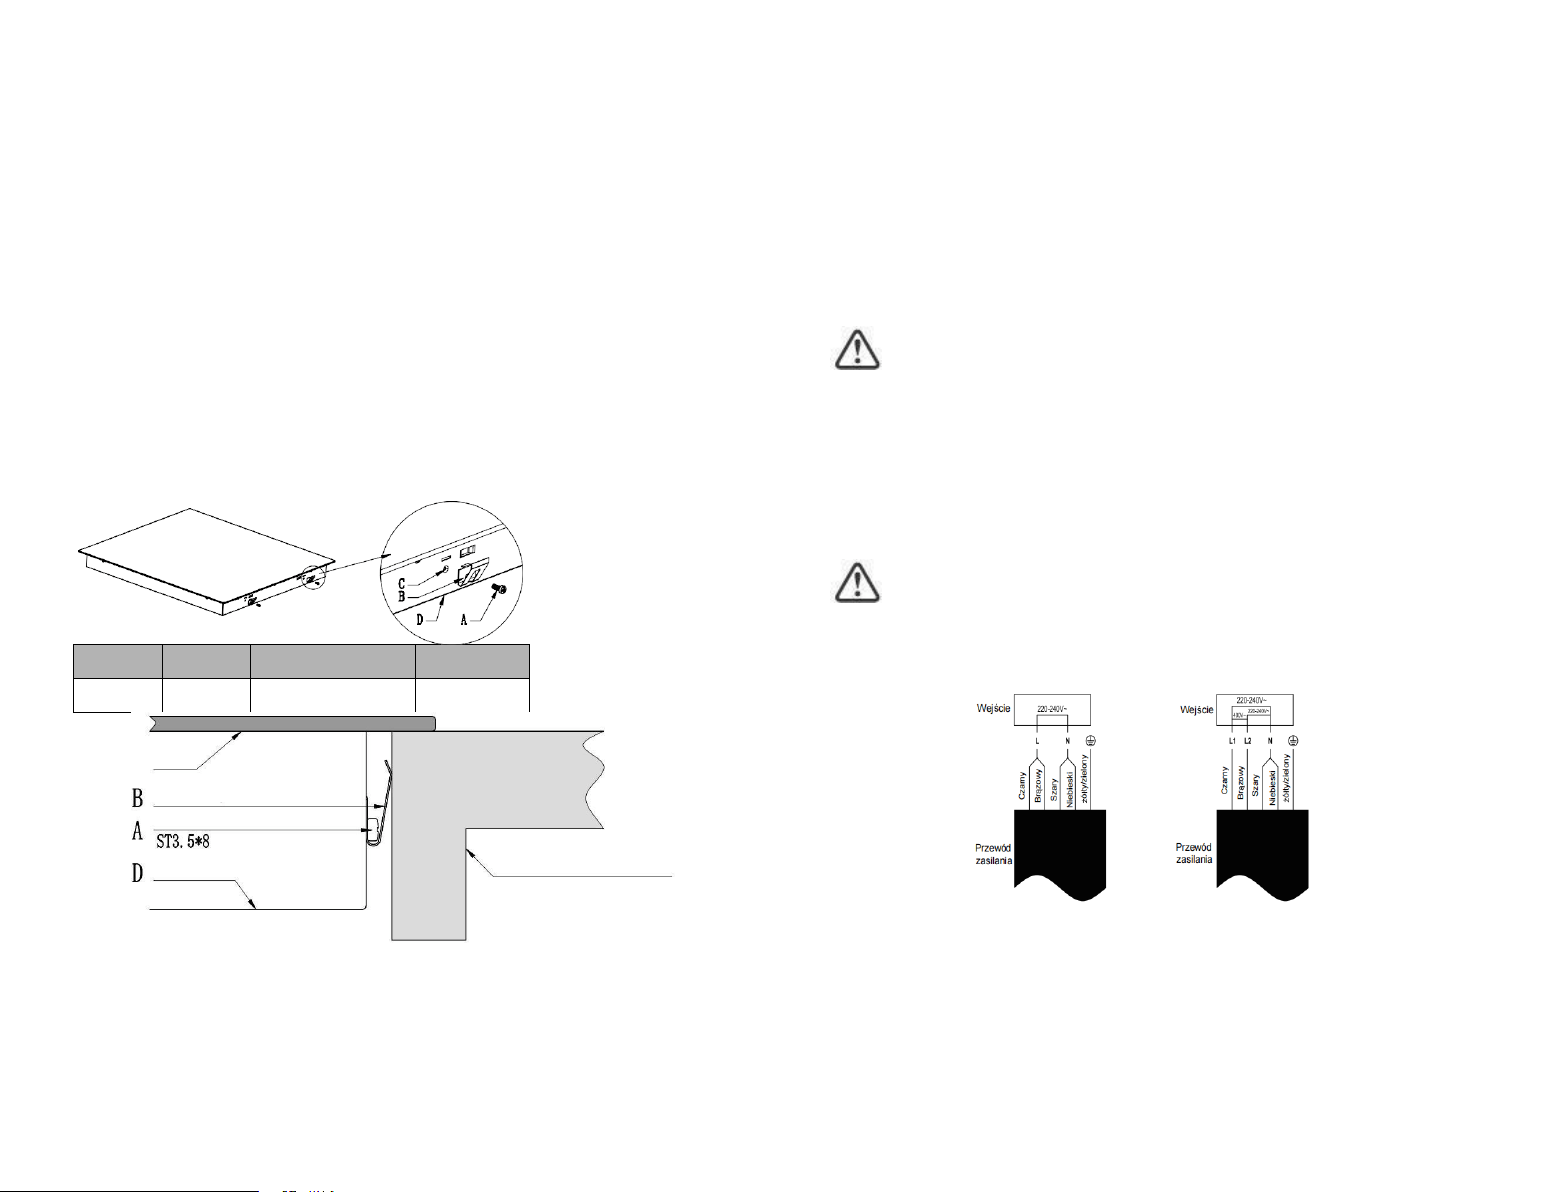
bezpieczeństwa. zgodne z przepisami
r musi zapewnić poprawne podłączenie elektryczne, oraz zapewnić że jest Instalato •
mm. stykami wynoszącej 3
zainstalować wielobiegunowy przerywacz obwodu o minimalnej przerwie między
Jeśli urządzenie jest podłączone bezpośrednio do zasilania sieciowego, należy •
wypadków. narzędzi, aby uniknąć
posprzedażnego za pomocą specjalnych przeprowadzona przez pracownika serwisu
Jeśli kabel jest uszkodzony lub wymaga wymiany, czynność ta musi zostać •
poniżej. jednobiegunowego przerywacza obwodu. Sposób połączenia pokazano
podłączone zgodnie z odpowiednią normą lub do Gniazdo powinno być 6.
wyłącznie wykwalifikowani elektrycy.
w domu jest odpowiedni do tego typu zmian. Zmian mogą dokonywać
wezwać elektryka, aby sprawdził, czy system okablowaniaNależy
punkcie.
ustawiony tak, aby jego temperatura nie przekroczyła 75° C w żadnym
być Kabel zasilający nie może dotykać żadnych gorących części i musi
pożar. ponieważ mogą one spowodować przegrzanie i
adapterów, reduktorów ani urządzeń rozgałęźnych, należy używać
na tabliczce znamionowej. Aby podłączyć płytę do zasilania, nie
określone przekroje kabla zasilającego mogą wytrzymać obciążenie
3.
znamionowej; napięcie odpowiada wartości podanej na tabliczce
2.
płyty; elektryczna jest odpowiednia dla mocydomowa instalacja
1.
zasilania sieciowego należy sprawdzić, czy:
odpowiednio wykwalifikowany specjalista. Przed podłączeniem płyty do
Płytę tę powinien podłączyć do zasilania sieciowego wyłącznie
Podłączanie płyty do zasilania sieciowego
iepło.c
Aby uniknąć uszkodzeń, panele warstwowe przekładek i klej muszą być odporne na 5.
ciepło.
Ściana i indukowana strefa grzewcza nad powierzchnią blatu powinny być odporne na 4.
niezawodności. lepsze odprowadzanie ciepła w celu zwiększenia jej
, aby zapewniać jak Indukcyjna płyta grzejna powinna być zainstalowana w taki sposób 3.
elektroniczne płyty.
zamrażarką, pralką lub suszarką, ponieważ wilgotność może uszkodzić elementy
28-PL
PL-27
czyszczenia elementy wykończeniowe (np. płytki ceramiczne).
Po zainstalowaniu należy upewnić się, że:
• kabel zasilający nie jest dostępny przez drzwi szafki lub szuflady;
• istnieje odpowiedni przepływ świeżego powietrza od zewnętrznej części zabudowy do
podstawy płyty;
• jeśli płyta jest zainstalowana nad szufladą lub szafką, pod podstawą płyty
zainstalowana jest odpowiednia bariera cieplna;
• rozłącznik izolacyjny jest łatwo dostępny dla klienta.
Przed umiejscowieniem wsporników mocujących
Urządzenie powinno być umieszczone na stabilnej, gładkiej powierzchni (użyć materiałów
opakowania). Nie wywierać nacisku na elementy sterowania wystające z płyty.
Regulacja pozycji wspornika
Zamocować płytę na powierzchni roboczej, przykręcając 4 wsporniki na ramie dolnej płyty
(patrz rysunek) po instalacji.
A
B
C
D
Śruba Wspornik otwór na śrubę Rama dolna
Przestrogi
1. Płyta indukcyjna powinna zostać zainstalowana przez wykwalifikowany personel lub
techników. Dysponujemy specjalistami wykonującymi tego typu usługi. Nigdy nie
przeprowadzać takich czynności samodzielnie.
2. Płyta kuchenna nie może zostać zainstalowana bezpośrednio nad zmywarką, lodówką,
szkło
śruba klamry zabezpieczającej
śruba
Rama dolna
Blat roboczy / szafka kuchenna
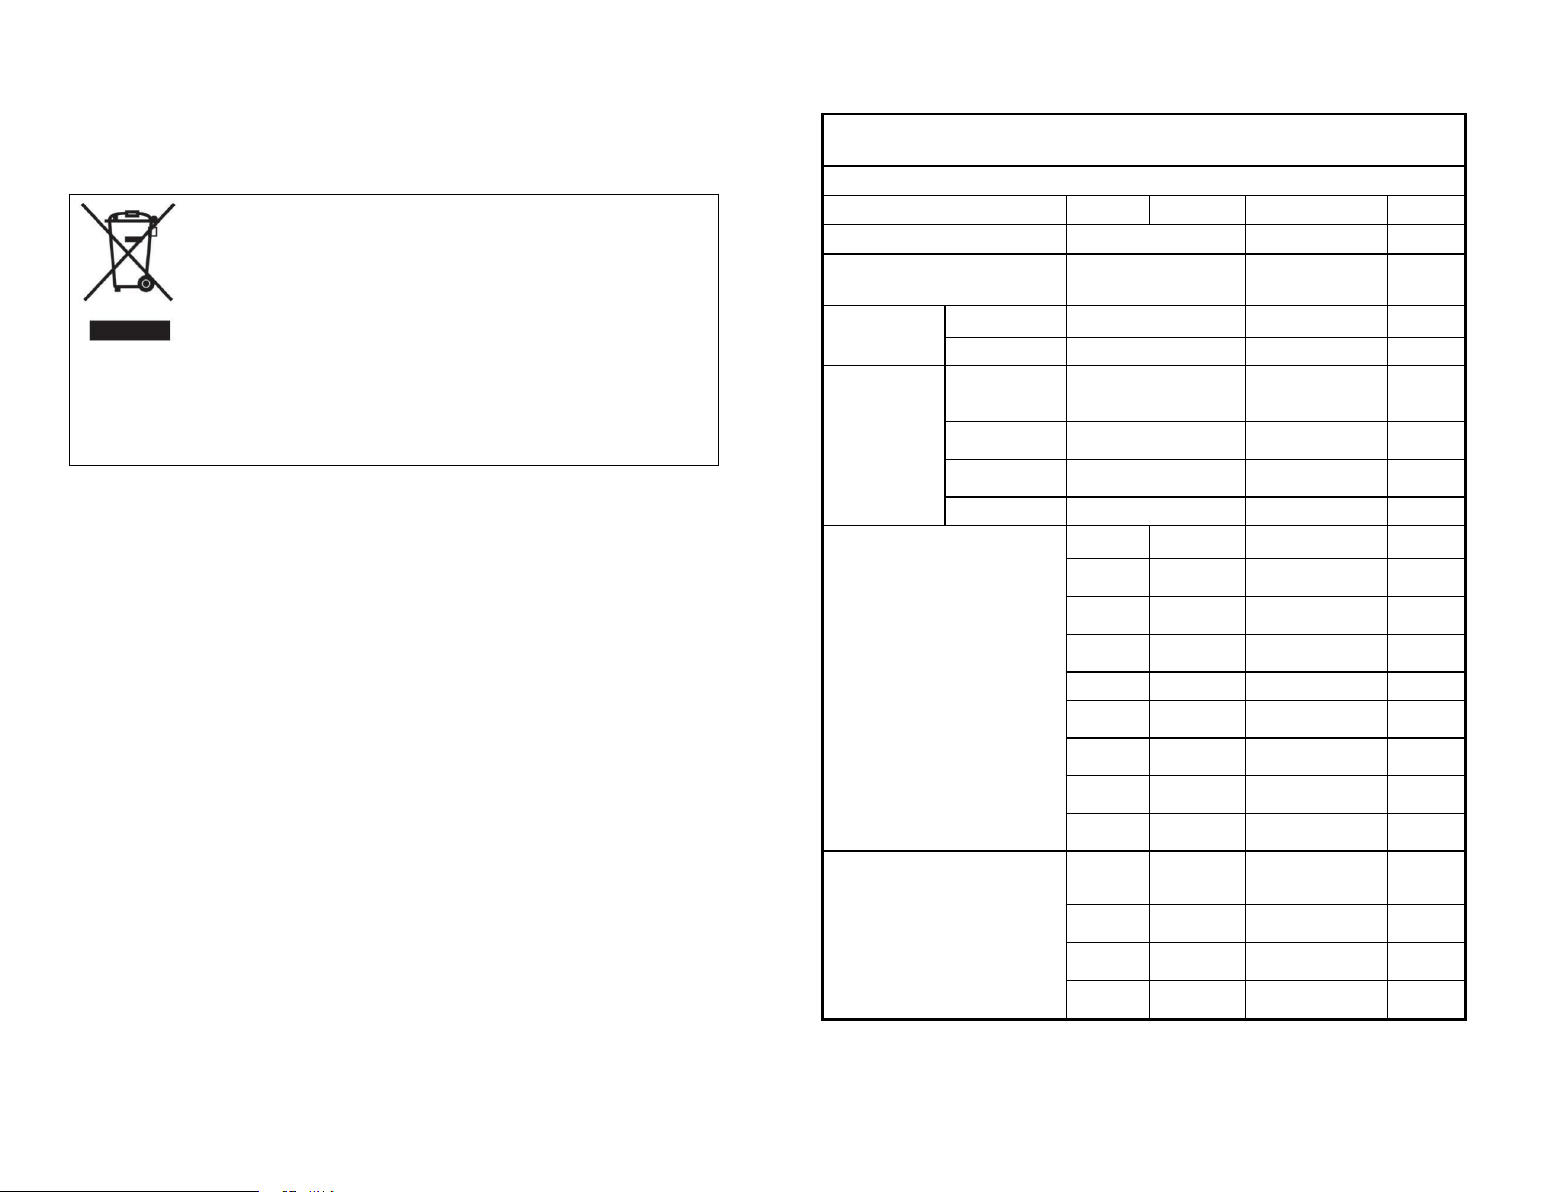
cm
-
W
L
lewa
Środkowa
cm
0,20
0,20
W
L
prawa
Tylna
cm
-
W
L
środkowa
Tylna
cm
0,20
0,20
W
L
Tylna lewa
grzejnego, w zaokrągleniu do 5 mm
elektrycznego pola lub obszaru
powierzchni użytkowej dla każdego
obszarów grzejnych: długość i szerokość
W przypadku nieowalnych pól lub
cm
-
Ø
prawa
Przednia
cm
-
Ø
środkowa
Przednia
cm
-
Ø
lewa
Przednia
cm
-
Ø
prawa
Środkowa
cm 21,0
Ø
Środkowa
cm
-
Ø
lewa
Środkowa
cm
-
Ø
prawa
Tylna
cm
-
Ø
środkowa
Tylna
cm
-
Ø
Tylna lewa
elektrycznego, w zaokrągleniu do 5 mm
dla każdego pola grzejnego użytecznej
grzejnych: średnica powierzchni
W przypadku owalnych pól lub obszarów
płyty lite
pola grzejne
promiennikowe
obszary grzejne
Indukcyjne
X
grzejne
Indukcyjne pola
lite)
pola grzejne, płyty
promiennikowe
obszary grzejne,
(indukcyjne pola i
grzejna
Technologia
obszary
5
pola
grzejnych
obszarów
Liczba pól i/lub
elektryczna
płyta grzejna
Typ płyty grzejnej:
CIFS85MCTT/1
Identyfikator modelu
Jednostka Wartość Oznaczenie Pozycja
Komisji (UE) nr 66/2014Informacja o produkcie (domowa płyta grzejna elektryczna) zgodnie z rozporządzeniem
30-PL
PL-29
• Kabel nie może być zgięty ani ściśnięty.
• Kabel musi podlegać regularnym sprawdzeniom i wymianie, dokonywanej wyłącznie
przez odpowiednio autoryzowanych techników.
Urządzenie jest oznakowane zgodnie z dyrektywą europejską 2012/19/WE w sprawie
zużytego sprzętu elektrycznego i elektronicznego (WEEE). Kategoria WEEE
obejmuje zarówno substancje zanieczyszczające (które mogą powodować negatywne
skutki dla środowiska), jak i podstawowe komponenty (które mogą zostać ponownie
użyte). Istotne odpowiednie obchodzenie się z WEEE, aby prawidłowo usuwać
substancje zanieczyszczające oraz odzyskiwać wszystkie materiały. Każdy z nas jest
odpowiedzialny za to, by WEEE nie stał się problemem środowiskowym; ważne jest
przestrzeganie pewnych podstawowych zasad:
– WEEE nie należy wyrzucać razem ze zwykłymi odpadami domowymi;
– WEEE należy oddać do odpowiednich punktów selektywnej zbiórki odpadów w regionie lub firm
zajmujących się ich utylizacją.
W wielu krajach w przypadku WEEE dużych rozmiarów może być odebrany przez odpowiedni podmiot z
domu użytkownika. Kiedy kupuje się nowe urządzenie, stare urządzenie można zwrócić sprzedawcy,
który odbierze je za darmo na zasadzie „urządzenie za urządzenie”, pod warunkiem, że urządzenie jest
odpowiedniego typu i posiada te same funkcje, co nowy dostarczony sprzęt.
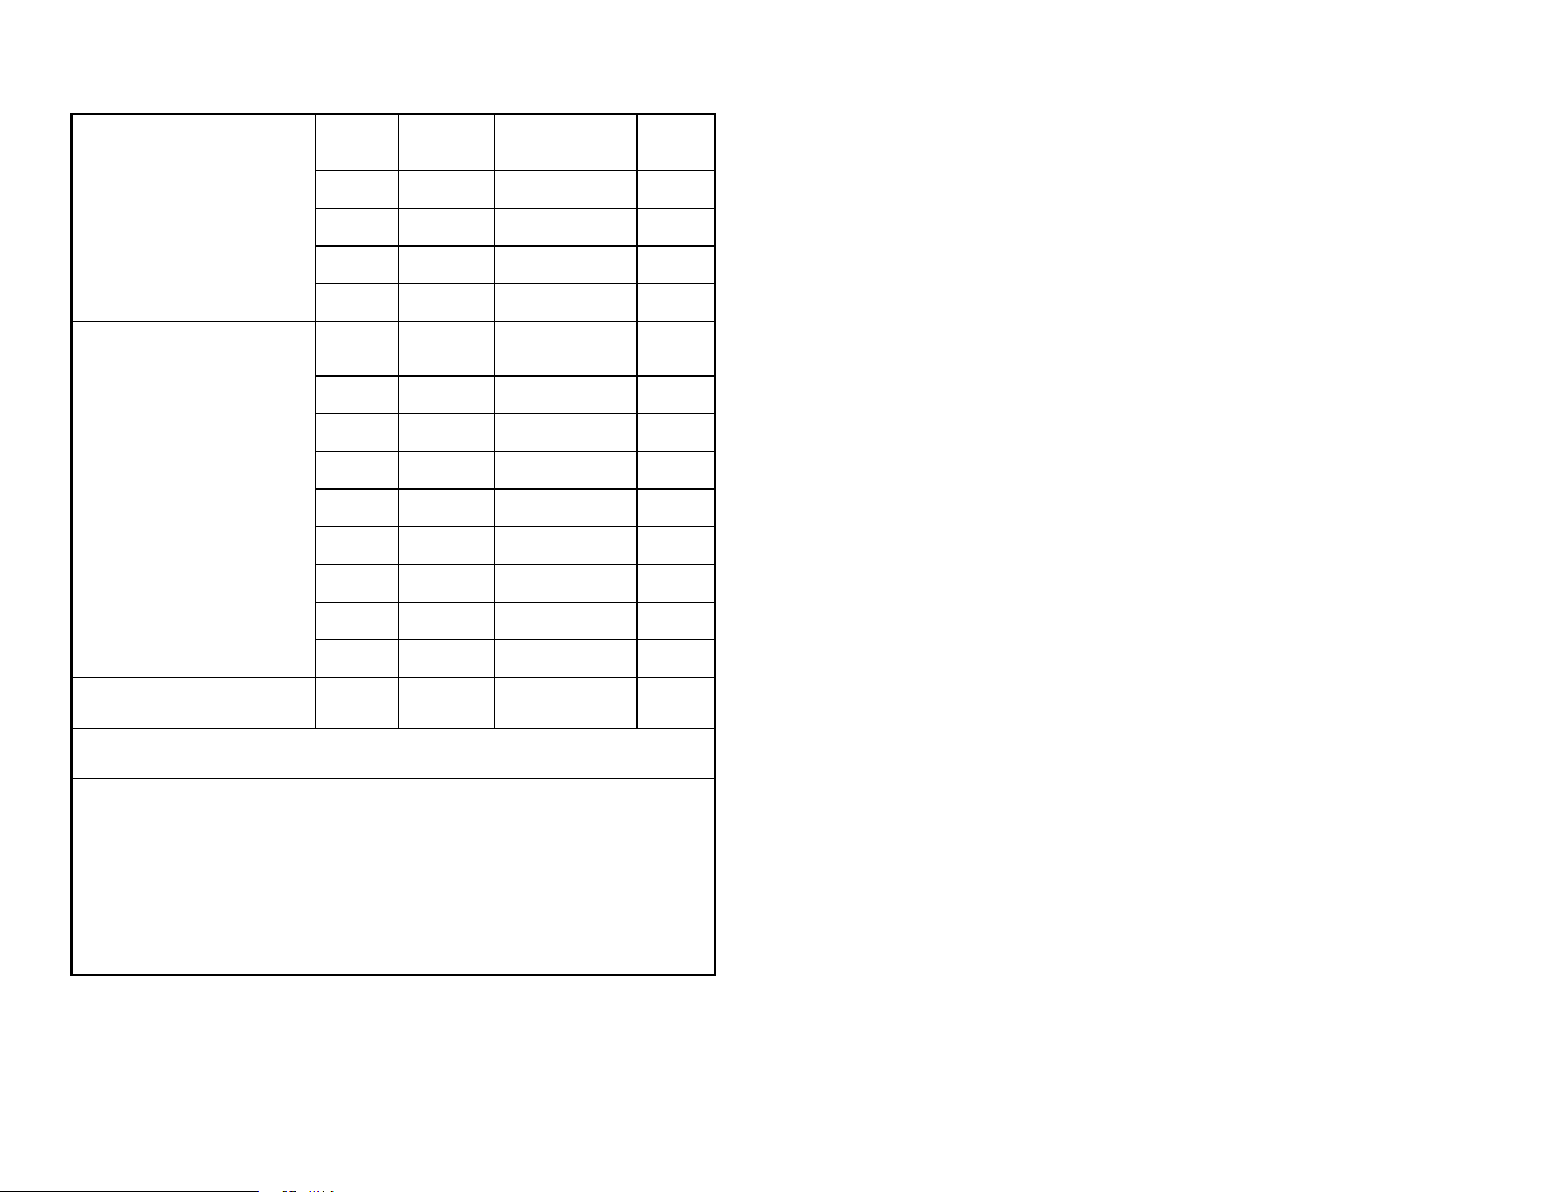
PL-31
Środkowa
L
W
-
cm
Środkowa
prawa
L
W
-
cm
Przednia
lewa
L
W
20,0
20,0
cm
Przednia
środkowa
L
W
-
cm
Przednia
prawa
L
W
20,0
20,0
cm
Zużycie energii dla każdego pola lub
każdego obszaru grzejnego w
przeliczeniu na kilogramy
Tylna lewa
ECelectric
cooking
186,5
Masa/kg
Tylna
środkowa
ECelectric
cooking
-
Masa/kg
Tylna
prawa
ECelectric
cooking
187,3
Masa/kg
Środkowa
lewa
ECelectric
cooking
-
Masa/kg
Środkowa
ECelectric
cooking
186,6
Masa/kg
Środkowa
prawa
ECelectric
cooking
-
Masa/kg
Przednia
lewa
ECelectric
cooking
187,3
Masa/kg
Przednia
środkowa
ECelectric
cooking
-
Masa/kg
Przednia
prawa
ECelectric
cooking
186,5
Masa/kg
Zużycie energii przez płytę grzejną w
przeliczeniu na kg
ECelectric
hob
186,8
Masa/kg
Przyjęta norma: EN 60350-2 Elektryczny sprzęt do gotowania do użytku domowego – Część 2: Płyty kuchenne –
Metody badań cech funkcjonalnych
Wskazówki dotyczące oszczędzania energii:
•
W celu uzyskania najlepszej wydajności płyty należy umieścić patelnię na środku pola grzejnego.
•
Korzystanie z pokrywki pozwoli na skrócenie czasów gotowania i zaoszczędzenie energii dzięki utrzymywaniu
ciepła.
•
Ograniczyć do minimum ilość płynu lub tłuszczu, aby skrócić czas gotowania.
•
Rozpocząć gotowanie na najwyższym ustawieniu i zmniejszyć ustawiony poziom, gdy cała potrawa będzie
podgrzana.
•
Stosować patelnię o średnicy równej wielkości elementu graficznego dla wybranego pola.