EN
2
Thank Y
OU
EN
Thank you for purchasing a Product.
Please read these instructions carefully before using this appliance. The instructions
contain important information which will help you get the best out of the appliance and
ensure safe and proper installation, use and maintenance.
Keep this manual in a convenient place so you can always refer to it for the safe and proper
use of the appliance.
If you sell the appliance, give it away, or leave it behind when you move house, make sure
you also
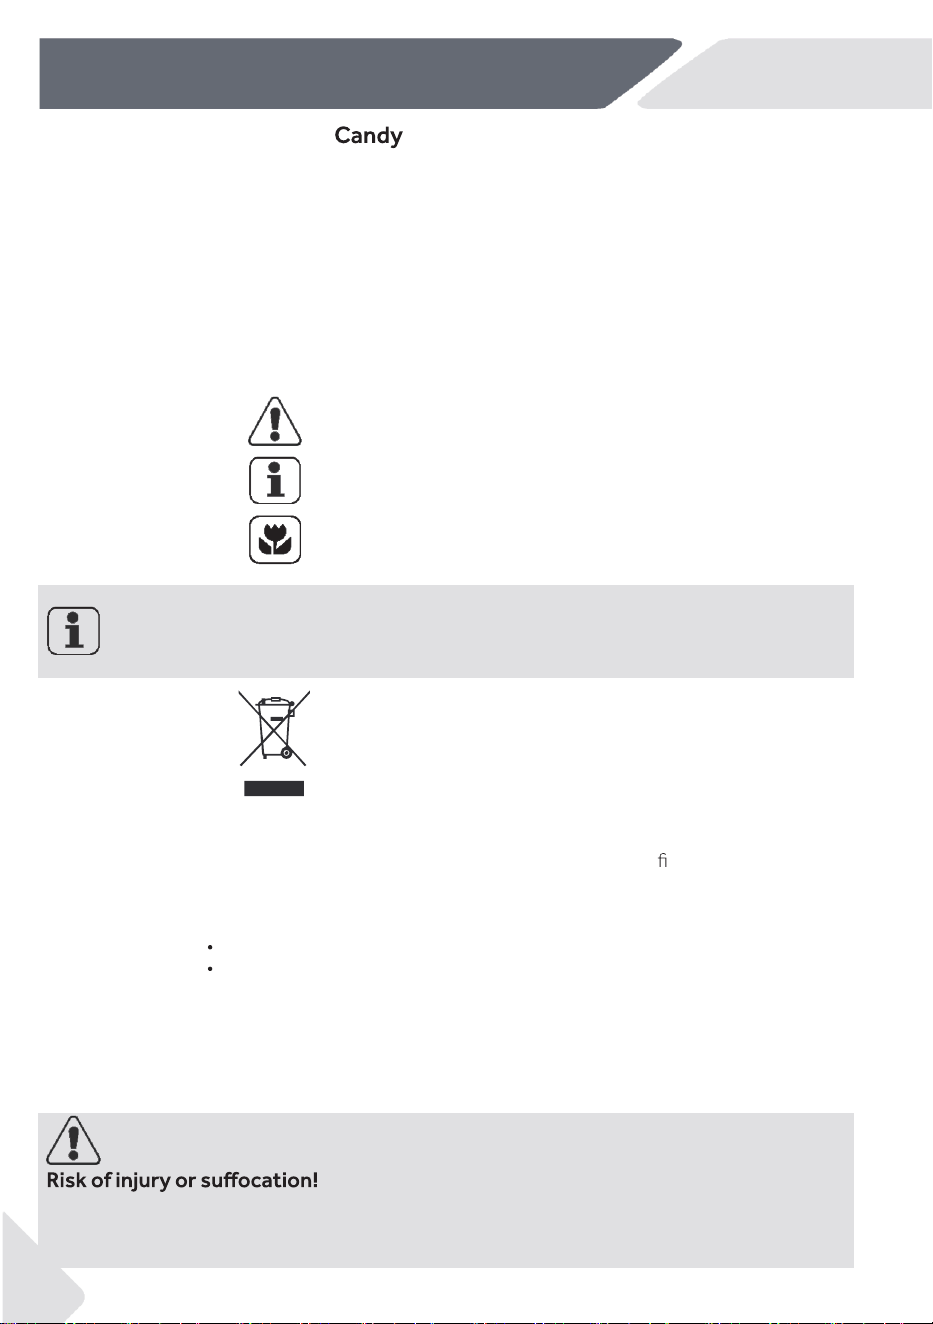
Legend
Warning - Important Safety information
General information and tips
Environmental information
YLNO .K.U ROF:ETON
On receipt of your appliance please check it carefully for damage. Any damage found
must be reported to the delivery driver immediately. Alternatively damage found must be
reported to the retailer within 2 days of receipt.
Environmental conditions
This appliance is marked according to the European directive
2012/19/EU on Waste Electrical and Electronic Equipment
(WEEE).
WEEE contains both polluting substances (which can cause negative
consequences for the environment) and basic components (which can be re-
used). It is important to have WEEE subjected to speci c treatments, in order
to remove and dispose properly all pollutants, and recover and recycle all
materials. Individuals can play an important role in ensuring that WEEE does
not become an environmental issue; it is essential to follow some basic rules:
WEEE should not be treated as household waste;
WEEE should be handed over to the relevant collection points managed by
the municipality or by registered companies. In many countries, for large
WEEE, home collection could be present.
In many countries, when you buy a new appliance, the old one may be returned
to the retailer who has to collect it free of charge on a one-to-one basis, as
long as the equipment is of equivalent type and has the same functions as the
supplied equipment.
WARNING!
pass on this manual so that the new owner can become familiar with the applian-
ce and safety warnings.
Disconnect the appliance from the mains supply. Cut off the mains cable and dispose
of
it. Remove the door catch to prevent children and pets to get closed in the appliance.
This manual is based on “EWY 485SW6-S,EWY 485SB8-S,EWY 485SG6-S”

3
Content
EN
1- Safety information ......................................................................................................................... 4
2- Installation ........................................................................................................................................ 7
3- Practical hints ...........................................................................................................
..................... 11
4- Product description ..................................................................................................................... 13
5- Control panel ................................................................................................................................. 14
6- Programmes ...........................................................................................................
...................... 17
7- Consumption .......................................................................................................... 20
8- ............................................................................................................... 21
Daily use
................................
....................
9- Care and cleaning ............
...............
.........................................................................................26
10-
Troubleshooting
................................
........................................................................................29
11-
Technical data
................................
............................................................................................32
12-
Customer service
.............................
......................................................................................33
4
1-Safety information
EN
1-Safety information
Before switching on the appliance for the st time read the following
safety hints!
WARNING!
Daily use
This appliance is intended to be used in household and similar applica-
tions such as:
-
ts;
- Farm houses;
- By clients in hotel motels and other residential type en ironments;
- Bed and brea st type en ironments.
A use of this appliance from household en ironment or from
typical house e fu as commercial use by expert or trained
users is excluded e en in the abo e applications. If the appliance is
used in a manner inconsistent this it may reduce the life of the
appliance and may id the manufacturer’s arranty. Any dama to
the appliance or other dama or loss thr use that is not
consistent h domestic or household use (e en if located in a
domestic or household en ironment) shall not be accepted by the
manufacturer to the fullest extent permitted by
This appliance can be used by children from 8 years and ab e
and persons h reduced physical sensory or mental capabilities or
of experience and ed e if they ha e been n supe sion
or instruction use of the appliance in a safe y and
understand the hazards ed.
Children should be sup sed to ensure that they do not play h the
appliance.
Children of less than 3 years should be pt ay unless continuously
supe sed.
If the supply cord is dama d it must be replaced by a special cord or
assembly a ailable from the manufacturer or its i ent.
5
1-Safety information
EN
Only use the hose-sets supplied with the appliance for the water supply
connection (do not reuse old hose-sets).
Water pressure must be between 0.03 MPa and 1 MPa.
Make sure carpets or rugs do not obstruct the base or any of the
ventilation openings.
After installation, the appliance must be positioned so that the plug is
accessible.
The maximum load capacity of dry clothes depends on the model used
(see control panel).
To consult the product technical speci cation please refer to the
manufacturer website.
Electrical connections and safety instructions
The technical details (supply voltage and power input) are indicated on
the product rating plate.
Make sure that the electrical system is earthed, complies with all
applicable law and that the (electricity) socket is compatible with the
stance.
The use of converters,multiple sockets or extension cords is strongly
advised against.
Before cleaning or maintaining the washing machine,unplug the appli-
Do not pull on the power cord or appliance to unplug the machine.
Make sure there is no water in the drum before opening the door.
WARNING!
Water may reach very high temperatures during the wash cycle.
Do not expose the washing machine to rain, direct sunlight or other
weather elements. Protect from possible freezing.
When moving,do not lift the washing maching by the knobs or deterg-
ent drawer;during transport,never rest the door on the trolley.
We recommend two people lift the washing machine.
In the event of fault and/or malfunction, turn the washing machine,
close the water tap and do not tamper with the appliance.
Immediately contact the customer service centre and only use original
spare parts.Failure to observe these instruction may jeopardise applia-
nce safety.

6
1-Safety information
EN
Intended use
This appliance is intended for washing machine-washable laundry only.
Anytime follow the instructions given on the label of each garment label. It
is designed exclusively for domestic use inside the house. It is not intended
for commercial or industrial use.
Changes or modi
cations to the device are not allowed. Unintended use
may cause hazards and loss of all warranty and liability claims.
7
2-Installation
EN
2-Installation
2.1 Preparation
Take the appliance out of the packaging.
Remove all packaging material including protecting
lm on cabinet, polystyrene
base, keep them out of children reach. While opening the package, water drops may
be seen on plastic bag and porthole. This normal phenomenon results from water
tests in the factory.
Note: Packaging disposal
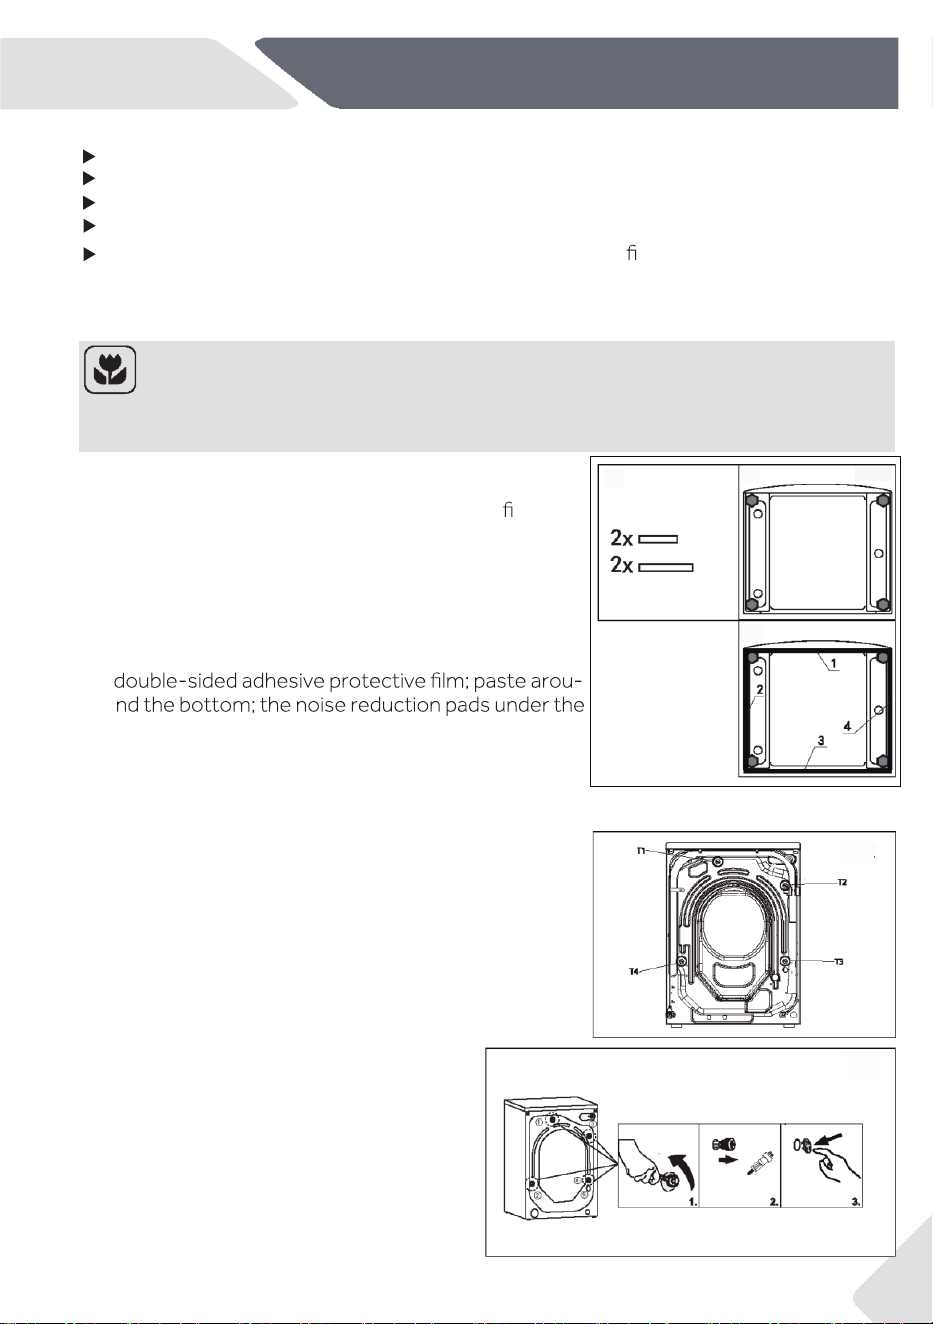
2.2 OPTIONAL: Install noise reduction pads
1. When opening the shrink package, you will nd four
noise reduction pads. These are used for reducing
noise (Fig. 2-1).
2. Lay the washing machine down to its side, porthole
pointing upwards, bottom side towards operator.
3. Take out the noise reduction pads and remove the
washing machine cabinet as shown in Figure 3 (two
longer pads in position 1 and 3, two shorter pads in
position 2 and 4). Finally set the machine upright
again.
2.3 Dismantle the transportation bolts
The transport protection on the rear side is designed
for clamping anti-vibration components inside the a-
ppliance during transportation to prevent inner dam-
age. All elements (T1,T2,T3 and T4, Fig 2-2) must be
removed before use.
1. Remove all 4 packing bolts (T1-T4)
(Fig.2-3).
2.
Fill the 5 holes with blanking plugs.
Packing bolts(1234) Hole wall(12345)
Remove the four Plug the five hole walls
packing bolts
l
Keep all packaging materials out of children’s reach and dispose them in an
environmentally friendly manner.
Make sure there is no transport damage.
Make sure all transport bolts are removed.
Handle the appliance always with at least two persons because it is heavy.
1 2
3
2-2
2-1
2-3
8
2-Installation
EN
Note: Keep in safe place
Keep all parts of the transport protection in a safe place for later use. Whenever the
appliance is to be moved at rst reinstall the protection parts.
2.4 Moving the appliance
If the machine is to be moved to a distant location, replace the transportation bolts
removed before installation to prevent damage: The assembly takes place in reverse
order.
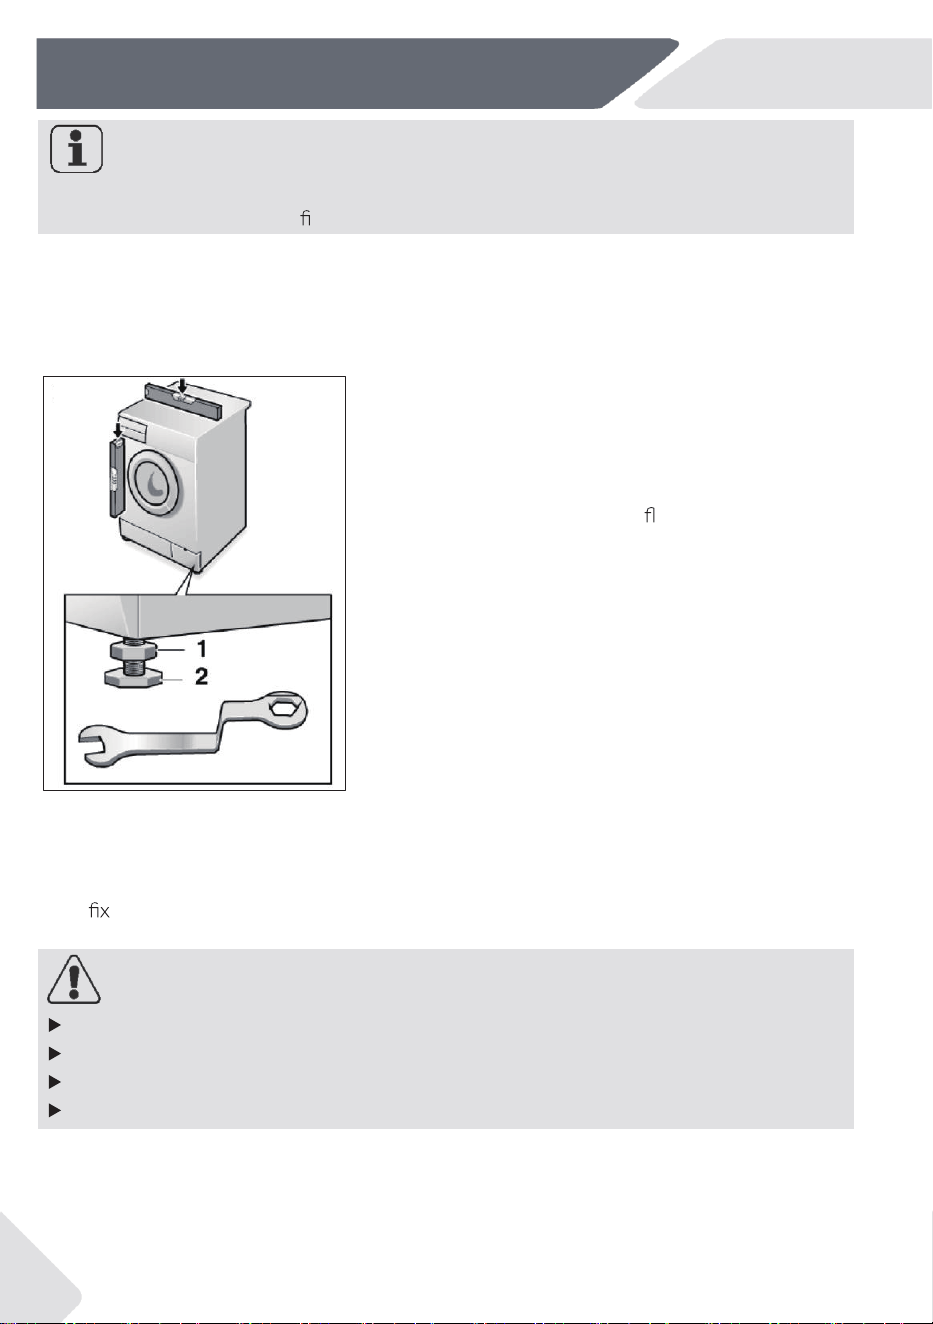
2.5 Aligning the appliance
Adjust all feet (Fig.2-4) to achieve a complete level
position. This will minimize vibrations and thus noise
during use. It will also reduce wear and tear. We
recommend to use a spirit level for adjustment.
Floor should be as stable and at as possible.
1. Loose the locknut (1) by using a wrench.
2. Adjust the height by turning the feets.(2).
3. Tighten locknut (1) against the housing.
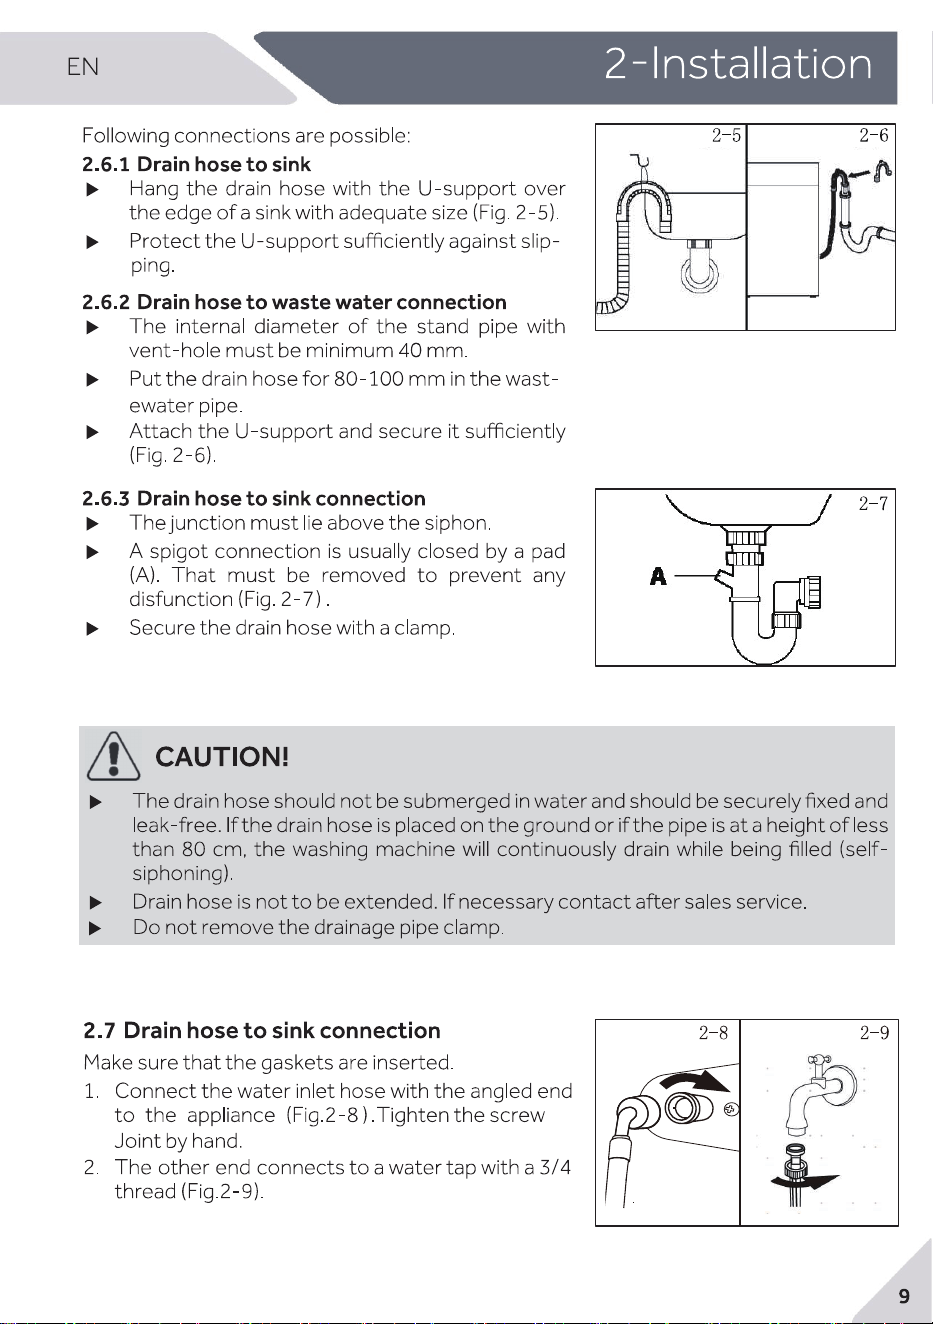
2.6 Aligning the appliance
Fix the water drain hose properly to the piping. The hose has to reach at one point a height
between 80 and 100 cm above the appliance bottom line! if possible keep always drain
hose
ed to the clip at the appliance back.
WARNING!
Use only the supplied hose set for the connection.
Never reuse old hose sets!
Only connect to cold water supply.
Before connection, check whether the water is clean and clear.
2-4
10
2-Installation
EN
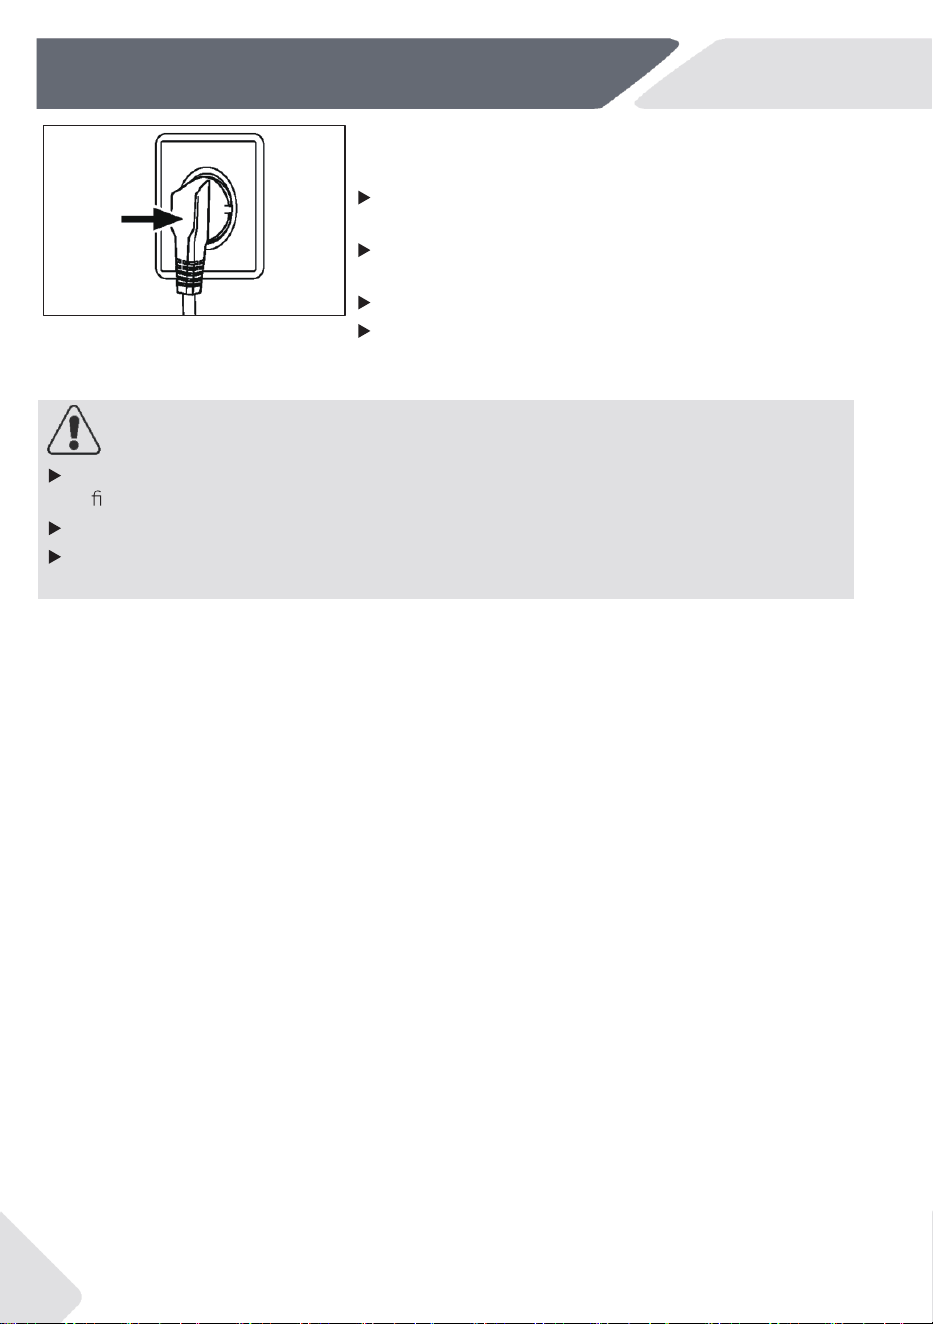
2.8 Electrical Connection
Before each connection check if:
power supply, socket and fusing are appropriate
to the rating plate.
the power socket is earthed and no multi-plug or
extension are used.
the power plug and socket are strictly according.
Only UK: The UK plug meets BS1363A standard.
Put the plug into the socket (Fig. 2-10).
WARNING!
Ensure always that all connections (power supply, drain and fresh water hose) are
lm, dry and leack free!
Take care these parts are never to be crushed, kinked, or twisted.
If the supply cord is damaged, it must be replaced by the service agent (see
warranty card) in order to avoid a hazard.
2-10
11
3-Practical hints
EN
3-Practical hints
3.1 Load tips
When sorting laundry, make sure:
- have eliminated metallic objects such as hair clips, pins, coins, from laundry;
- to have buttoned pillow cases, closed zips, tied loose belts and long robe ribbons;
- to have removed rollers, hooks or clips from curtains;
- to have carefully read clothing washing labels;
- to have removed any persistent stains using s
c detergents.
When washing rugs, bedcovers or other heavy clothing, we recommend you avoid the
spinning cycle.
To wash wool, make sure the item can be machine washed. Check the fabric label.
Leave the appliance’s door slightly open between washes, to prevent possible bad
smells developing inside the machine.
3.2 Useful advice for saving
Tips on how to save money and not damage the environment when using your appliance.
Load the machine with suggested capacity shown in the programme table for each
programme - this will allow you to save energy and water.
Noise and residual laundry moisture are a
ected by spin speed: a faster spin is
associated with greater noise and lower residual moisture in the laundry.
The most e
cient programmes in terms of combined use of water and energy are
usually the longer-lasting ones with lower temperature.
Scan QR code on energy label for energy consumption information. The actual energy
consumption ma
rom the declared one according to local conditions.
Maximise the load
size
Achieve the best use of energy,water,detergent and time by using the recommended
mximum load size.
Save up to 50% energy by washing a full load instead of 2 half loads.
Do you need to pre-wash?
For heavily soiled laundry only!
Save detergent, time, water and energy consumption by not selecting prewash for
slight to normally soiled laundry.
Is a hot wash required?
Pretreat stains with stain remover or soak dried in stains in water before washing to
3.3
Dosing the detergent
Below is a
short guide
with tips and advice on the use of detergent
Only use detergents suitable for washing machine.
Select
your detergent according to the type of fabric (cotton, delicates, synthetics,
wool, silk, etc.), the colour, the type and level of soiling and the programmed washing
temperature.
To use the right amount of detergent, softener or any other additives, carefully follow
reduce the necessity of a hot wash programme.Save energy by using a low temper-
ature wash programme.
12
3-Practical hints
EN
the
manufac
turer’s instructions every time: correctly using the appliance with the
When washing heavily soiled whites , we recommend using cotton programs
of 60°C or above and a normal washing powder (heavy duty) that contains
bleaching agents that at medium/high temperatures provide excellent results.
For washes between 40°C and 60°C the type of detergent used needs to be
appropriate for the type of fabric and level of soiling. Normal powders are
suitable for “white” or colour fast fabrics with high soiling, while liquid detergents
or “colour protecting” powders are suitable for coloured fabrics with light levels
of soiling.
For wash ing at temperat ures below 40°C, we recommend the use of liquid
detergents or detergents speci cally labeled as suitable for low temperature
washing.
For washing wool or silk, only use detergents ally formulated for these
fabrics.
Too much detergent leads to excessive foam, which prevents the cycle being carried
out correctly. It could also a
ect the quality of the washing and rinsing.
The use of ecological detergents without phosphates may cause the following e
ts:
- cloudier rinse drain water: This e
ect is tied to the suspended zeolites which do not
have negative e
ects on rinse e ncy.
- white powder (zeolites) on laundry at the end of the wash: this is normal, the
powder is not absorbed by fabric and does not change its colour.
To remove the zeolites, select a rinse programme. In the future consider using slightly
less detergent.
- foam in the water at last rinse: this does not necessary indicate poor rinsing.
Consider using less detergent in futur
e washes.
- abundant foam: This is often due to the anionic surfactants found in the detergents
which are hard to eliminate from laundry.
In this case, do not re-rinse to eliminate these e
ects. It is invalid.
We suggest conducting a maintenance wash using a proprietary cleaner.
If the problem persists or if you suspect a malfunction, immediately contact an
Authorised Customer Service Centre.
right dose allow you to avoid waste and to reduce the environmental impact.

13
4-Product description
EN
4-Product description
Note:
4.1
Picture of appliance
Front (Fig. 4-1): Rear side (Fig. 4-2):
1 Detergent / So tener
drawer
2 Work top
3 Programme tor
4
5 Washer door
6 Filter door
7 Adjustab
et
1 Transportatio (T1-T4)
2 Power cord
3 Drain hose
4 Water
4.2 Accessories
Check the accessories a iterature in accordance with t t (Fig 4-3):
4-1 4-2
5
Drainage hose clamp
5
5
Drain hose
bracket
Noise
reduction
pads
Warranty
card
4-3
Energy
10 year parts
guarantee
Simple operation
instruction sticker
1 2 4
6
7
5
3
14
5-Control panel
EN
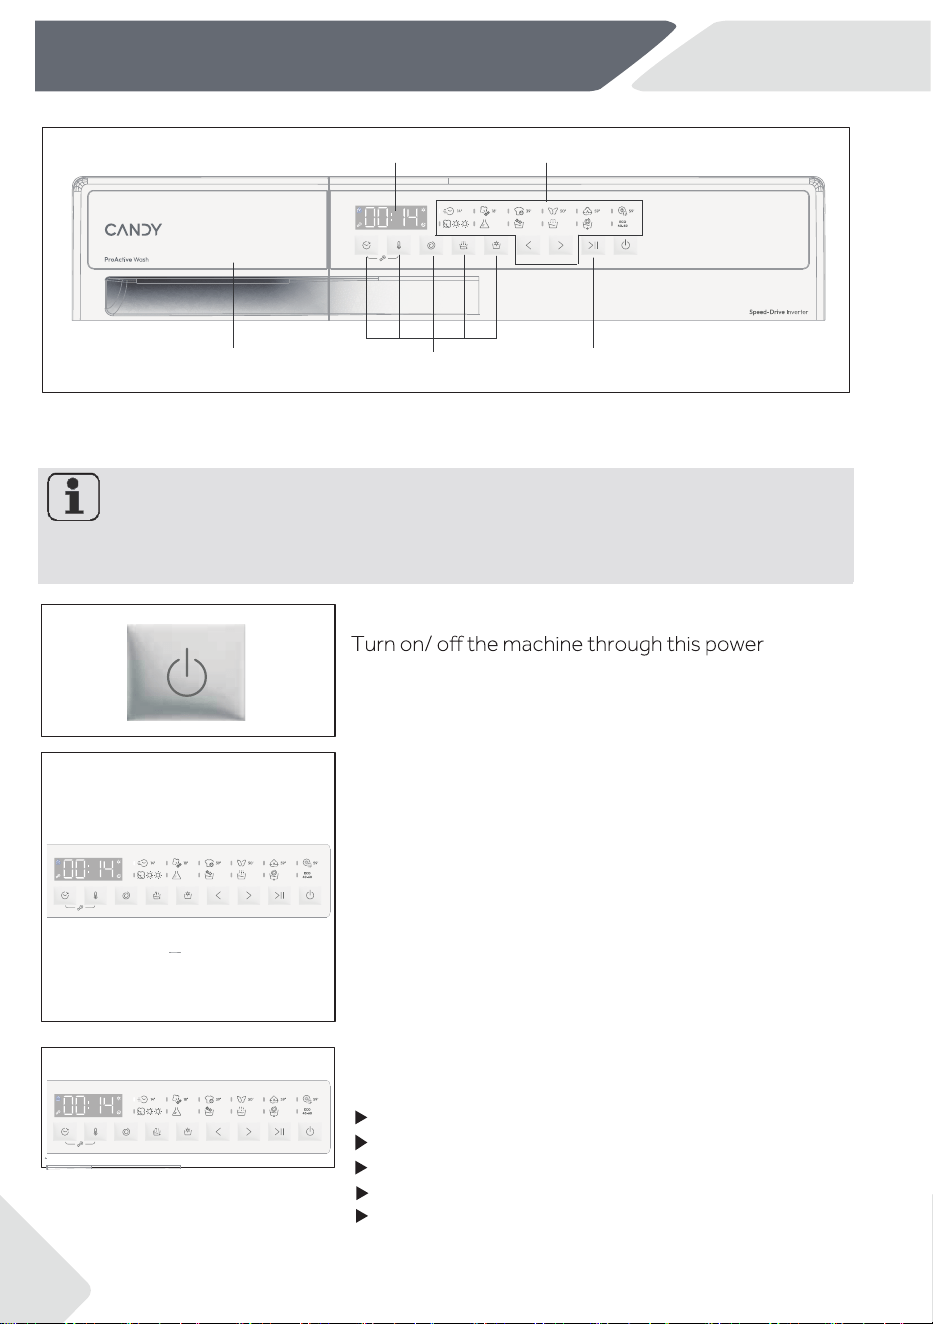
5-Control panel
1 Programme selector
2 Display
3 Detergent /Softener drawer
4 Function buttons
5 "Start/Pause" button
Note: Acoustic signal
The acoustic signal can be selected or canceled if necessary;see DAILY USE
(see P27 8.12).
5.1
button (Fig.5-2).
5.2
Programme selector
Display
The display (Fig.5-4) shows following information:
5-1
5-2
5-3
5-4
Power button
5.3
5-Control panel
3
5
1
4
By pressing the left and right buttons of the program
(Figure 5-3), you can select one of the 12 programs
and display its default Settings.
Remaining time
Reservation remaining time
Alarm information and prompt information
Pause end information
Delay time
2
15
5
-
Control panel
EN
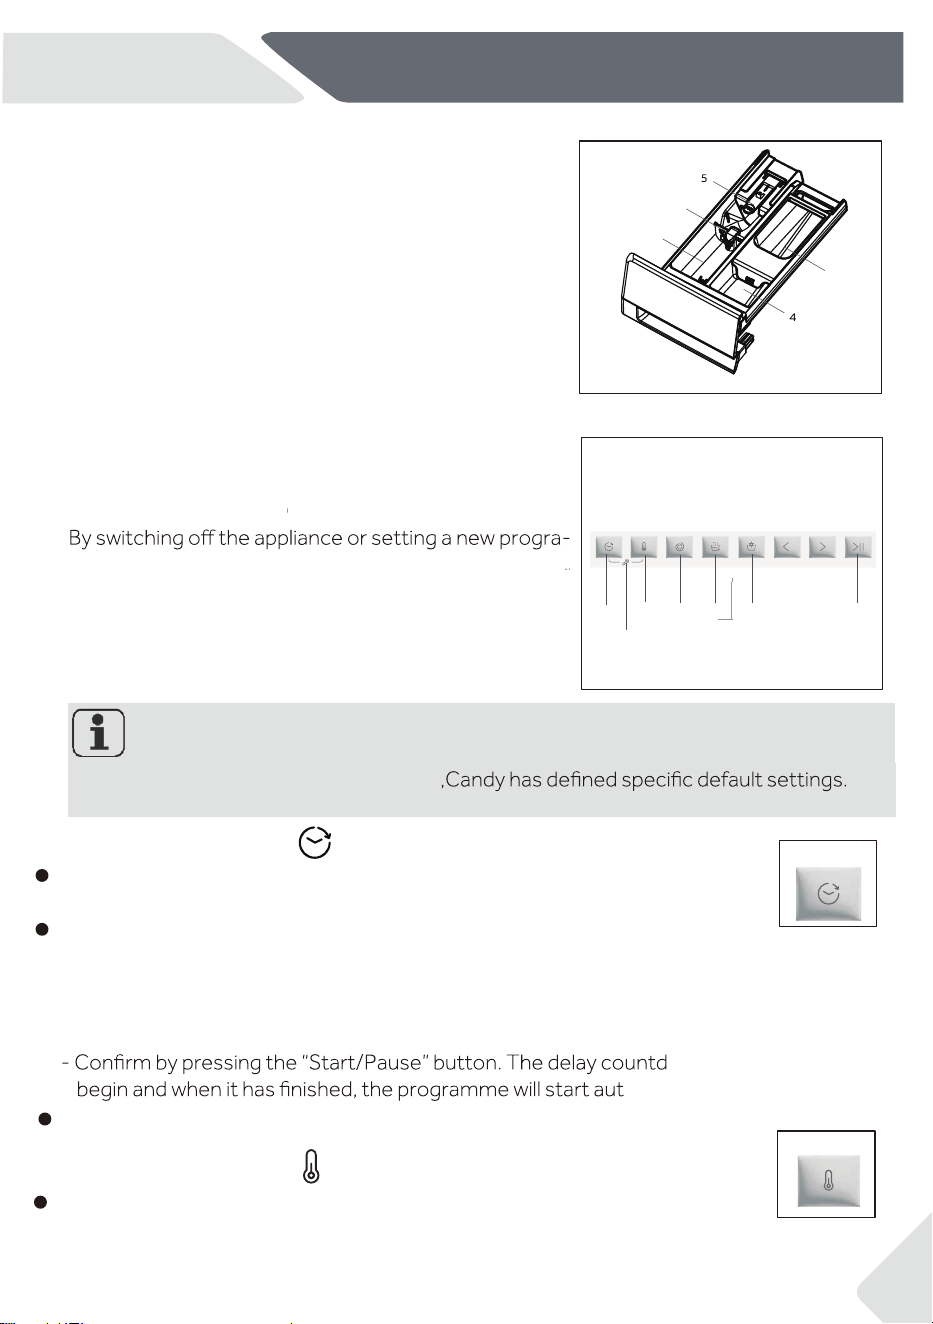
5.4 Detergent drawer
Open dispenser drawer, the following components can
be seen (Fig. 5-5):
1: .tnegreted diuqil ro redwop rof tnemtrapmoC
2:
3: Put a small amount of washing powder.
4: .renetfos rof tnemtrapmoC
5: Locktab,pressitdowntopulloutdispenserdrawer.
The recommendation on the type of detergents is
suitable for the various washing temperatures, please
referto the manual of detergent (seeP23).
5.5 Function buttons
The function buttons (Fig 5-6) enable additional options
in the selected programme before programme starts.
The related indicators are displayed.
mme,all options are displayed.
If a button has multiple options,the desired option can
be selected by pressing the button sequentially.
By touching the buttons, when it is in dull light, the
function is unselected; when it is in bright light, the
function is selected.
Note: Factory settings
To get best results in each programme
.dednemmocer era gnittes tluafed , tnemeriuqer laiceps on si ereht fI
5-6
5-5
5.5.1
5-7
5.5.2
5-8
Function button
"
It is possible to cancel the delay start by turning the programme selector.
Touch this temperature button(Fig.5-8) to display the corresponding temp-
erature.
If “--℃” is selected, the water will not be heated.
"
This delay button allows you to preprogramme the wash cycle to with a
maximum of 24 hours delay.(Fig.5-7)
Function button
To delay the start using the following procedures:
- Select the required programme.
- Press the button once to activated the delay start and then press it again
to set the desired delay.The delay increases in steps of 30 minutes,with a
maximum of 24 hours delay.
own
omatically.
¹
²
³
"
"
Lock tab, press it down to pull out dispenser drawe
5.5.3
5.5.4
5.5.6
5.5.1
5.5.2
5.5.7
5.5.5
5
-
Control panel
EN
16
5-10
end of washing cycle.(Some programmes do not have this function.) It is useful
for people with delicate and sensitive skin, for which a small amount of residue
may cause allergies. It is advisable to use this program for children clothes
and for the washing of heavily soiled items, which require a
large amount of detergent or for the washing of toweling items, have the
tendency to hold the detergent.
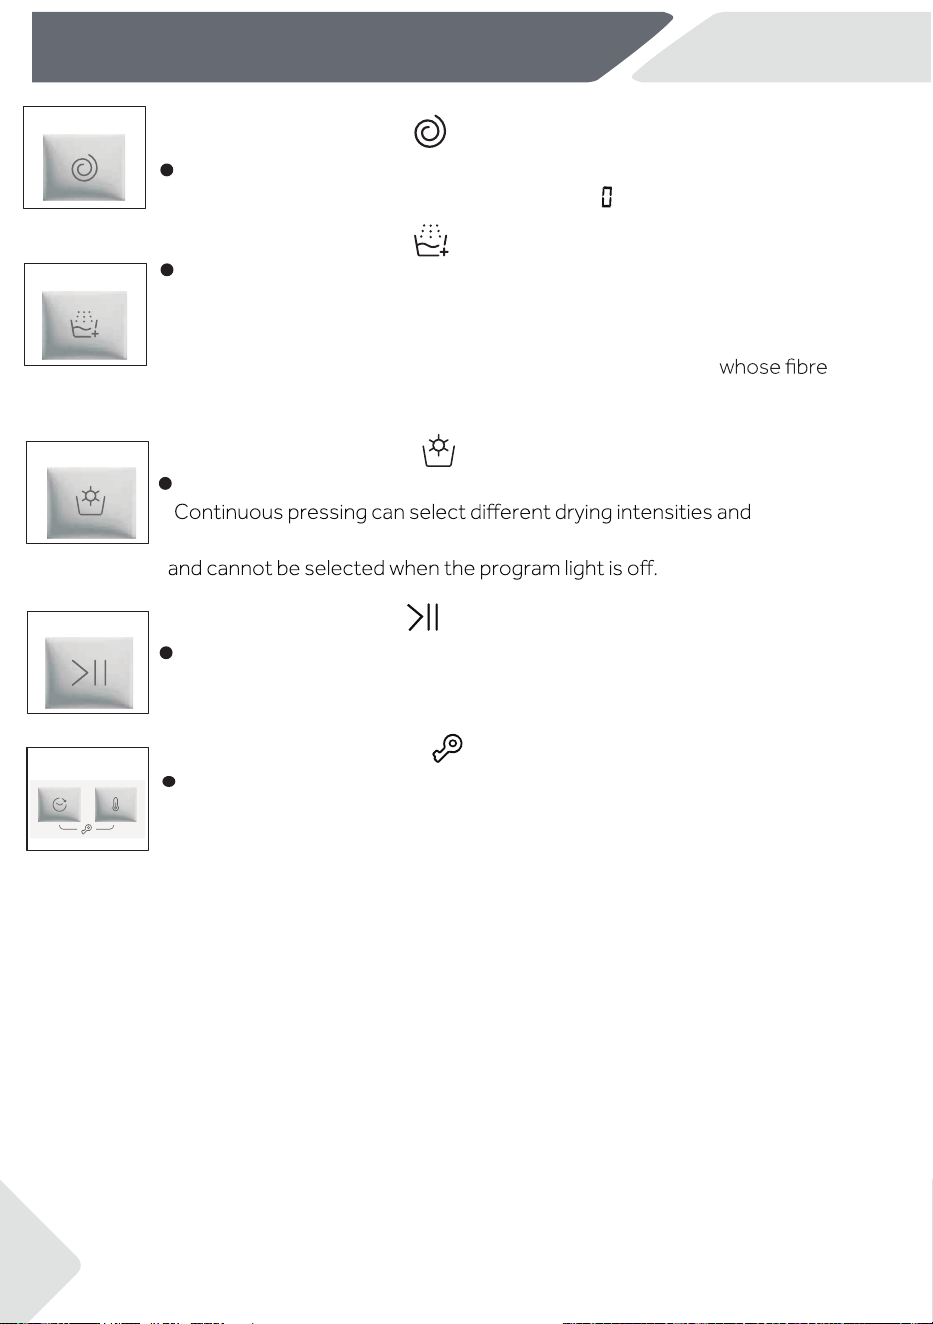
This button is extra rinse(Fig.5-10). It allows you to add at least one rinse at the
Function button
"
Touch this speed button (Fig.5-9 ) to change or deselect the spin speed of the
program. If no light is illuminated and display " ", the appliance will not spin.
5.5.3
5-9
"
Function button
"
5.5.4
"
5.5.6 Function button
5-12
Touch this button (Fig.5-12) gently to start or interrupt the currently
displayed programme.
5-13
5.5.7 Function button
Press the "Delay" and "Temperature" button (Fig.5-13) simultaneously to
activate the child lock mode.
" "
5.5.5 Function button
5-11
"
"
"
"
This button (Fig.5-12)
times.
This button can only be selected by some programs,
to select the drying function.
Eco 40-60 changed the program name to cotton after changing the parameters .
STD TEMP
MAX TEMP
PRESET SPIN
MAX SPIN
Yes
Optional
No
1
2 3
DRY
EXTRA RINSE
Detergent compartment for:
Detergent
Softener or care product
Prewash
—
√
×
DELAY
INFORMATION FOR THE TEST LABORATORIES
STANDARD PROGRAMME ACCORDING TO
(EU)No 2019/2023:ECO 40-60 PROGRAMME
MAX KG
8KG
Washing
Drying
40 90
1400 1400
ECO 40-60
√
√
√
√
√
30 30
RAPID
800
1400
√√
√
√
--
-
FRESH
VAPOR
-
- -
×
×
×
30 30
800
SPECIAL 39’
1400
√
√
DELICATE
30
40
400
400
×
×
√
- -
1000
1400
DRAIN&SPIN
×
×
30
COTTON
HIGH HEAT
90
1400
1400
√ √√
√
√
RINSE
-
-
1000
1000
×
×
40 60
1200
1200
SYNTHETICS
√ √
√
-
- - - -
DRUM CLEAN
90
90
-
× × ×
8
1
1
4 4
2
1.5
8
8
8
5.5
-
-
5
1
1
5
5
5
5
3.5
-
1)
1)
HYGIENE
PLUS 59’
60
90
1400
1400
×
× ×
√
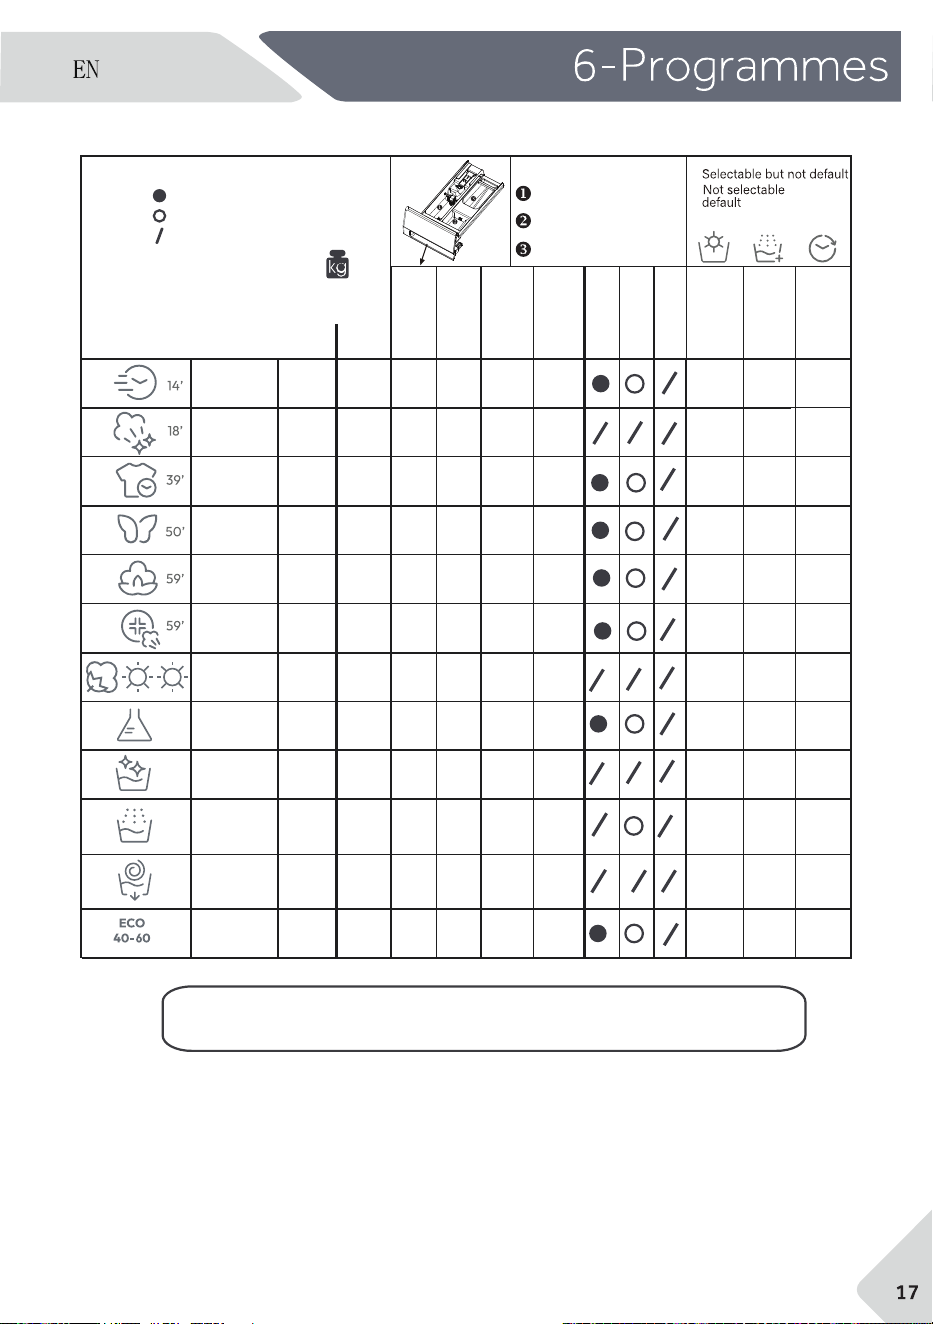
6-Programmes
Description of programmes
To clean di erent types of fabrics and various levels of dirt, the washing machine has
speci
c programs to meet every need of washing (see table of programmes).
Choose programme in accordance with the laundry instructions appearing on
labels, especially the maximum recommended temperature.
WARNING!
IMPORTANT WASH PERFORMANCE ADVICE.
New, coloured garments should be washed separately for at least 5 or 6 washes.
Certain large dark items such as jeans and towels should always be washed
separately.
Never mix NON COLOURFAST fabrics.
6-Programmes EN
18
Do not touch the observe window glass when the high temperature program is
operating.
ECO 40-60
SYNTHETICS
RINSE
The ECO 40-60 programme is able to clean normally dirty cotton laundry declared to be
washable at 40°C to 60°C, together in the same cycle. This programme is used to assess
the compliance with the EU Ecodesign legislation(environmentally friendly products design).
DRUM CLEAN
This program can carry out the self-cleaning of the washing machine. We recommend a
bucket self-cleaning after using the washing machine for 50 times. When using this program,
please do not use any clothes detergent or machine cleaner.
This program performs 2 rinses with an intermediate spin (which can be reduced or
excluded by using the appropriate button). It is used for rinsing any type of fabric, for
example after a wash carried out by hand.
rotation movement of the drum and the water levels are optimized, both during the washing
colours all together.The
rinsing phase. The accurate spin action ensures a reduced formation of creases in the fabrics.
RAPID
This new programme may be used to obtain excellent results while saving water, energy,
detergent and time. This option washes at a medium temperature suitable for lightly
dirty mixed laundry of cotton and synthetic. Recommended for small loads and lightly
dirty items.
SPECIAL 39’
DRAIN&SPIN
h as cuttons, synthetics
and mixed fabrics in only 39 minutes at 30°C (or less) temperature. This programme is
particularly suited to slightly dirty fabrics, up to half of nominal load.
The program completes the drain and a maximum spin. It is possible to delete or reduce
the spin through the spin selection button.
19
6-Programmes
EN
Note: The procedure to check the number of cycle that the
machine has run.
Procedure: under “COTTON”programme, press “TEMPERATURE” and “SPEED” simutaneously,
it will display the number of running cycle for 2 seconds, and then back to “COTTON” programme.
The cumulativer running cycles will add after the programme ending. The running cycle will be
displayed in hexademical. It is over 9999.
FRESH VAPOR
This programme uses a steam treatment to relax creases. It is designed for dry graments
and depending on the type of fabrics.
This programme is suitable for washing coloured cotton garments at 40°C or for ensuring
the highest degree of cleanliness for cotton resistant laundry
ct.
HYGIENE PLUS 59’
This washing programme is capable of reaching a temperature of 60°C for an extended
period of time, combining the steam action with a powerful rinsing action for thoroughly
clean and hygienic clothing. Recommended for cotton fabrics.
COTTON
DELICATE
Developed to take good care of delicate items, this programme washes at a low temper-
rature in short time. An extended, in - depth rinse nouris
HIGH HEAT
High temperature drying programme recommended for cottons and linen items
(always refer to the laundry care label).

Rated
Capacity
Programme
le) cyc/hWk(
Max
Temperature
(°C)
Max
Speed
(RPM)
Residual
Moisture(%)
) )MM:HH( )gk(
L/cycle
(
1 0:14Rapid’30
ECO 40-60
ECO 40-60
ECO 40-60
ECO 40-60+dry
ECO 40-60+dry
Cotton
60
°C
Synthetics40°C
8
kg
(1400r)
8
4
2
8
4
3:38
1:59
2:48
2:38
0.600
0.195
1.800
0.800
0.305
59.0
38.0
28.0
75.0
55.0
30
27
25
57
40
1330
1330
1330
1400
1200
53.0
52.0
56.0
5
7:30
3.150
74.0
25
1330
0
2.5
5:30
1.920
44.0
25
1330
0
55.0
20 Cold Wash
°C 8 1:23 0.320 75.0 20 1000 65.0
37.0
1000°C
1:45
0.350 38.0 30 65.0
7-Daily use
8.1 Power supply
Connect the washing machine to a power supply
(220V to 240V~/50Hz; Fig. 8-1). Please
also refer
to
section INSTALLATION (see P10).
8.2 Water connection
Before connecting check the cleanliness and cla-
rity of the water inlet.
Turn on the tap (Fig.8-2).
Note: Tightness
Before using, check for leakage in the joints between the tap and the inlet hose by
turning on the tap.
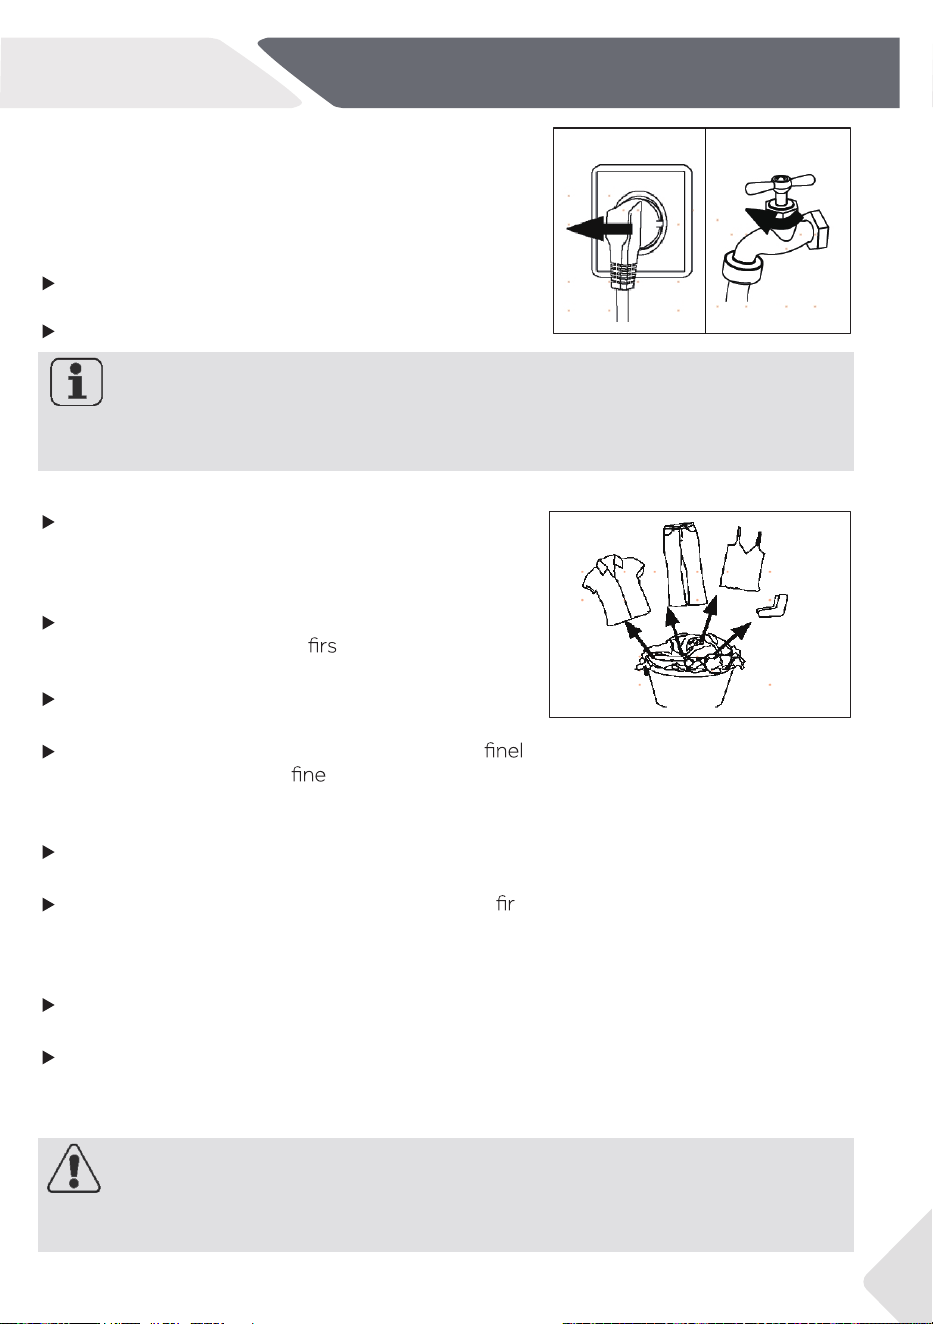
8.3 Preparing laundry
washing labels.
Separate white clothes from coloured ones.
Wash coloured textiles t by hand to check
if
they fade or run.
Empty pockets (keys, coins, etc.) and remove
harder decorative objects (e.g. brooches).
Garments without hems, delicates and
y
woven textile such as curtains are to be put
into a wash bag to care for this delicate laundry
(hand or dry cleaning would be better).
Close zippers, velco fastener and hooks, make
sure the buttons are sewn on tightly.
Place sensitive items like laundry without
m
hem, delicate underwear (Dessous) and small
items such as socks, belts, bras, etc. in a wash
bag.
Unfold large pieces of fabric such as bed sheets,
bedspreads etc.
Turn jeans and printed, decorated or color inten-
sive textiles inside out; wash separately as much
as possible.
CAUTION!
Non-textile, as well as small, loose or sharp-edged items may cause malfunctions and
damage of clothes and appliance.
8-1 8-2
EN
8-Daily use
21
8-3
Sort out clothes according to fabric (cotton,syn-
thetics, wool or silk etc.) and how dirty they are
(Fig.8-3). Pay attention to the care labelling of
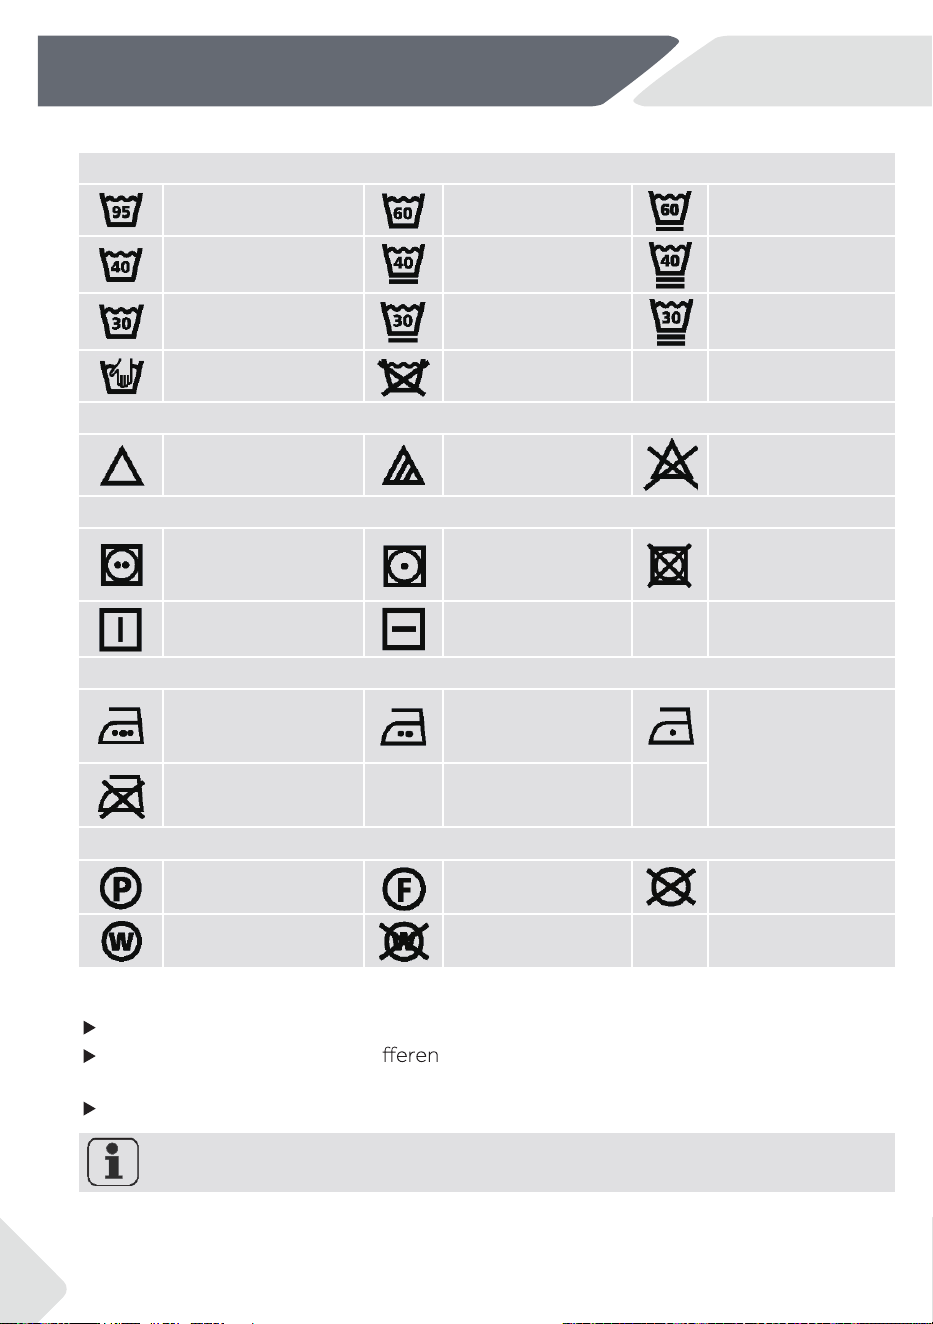
Care chart
Washing
Washable up to 95°C
normal process
Washable up to 60°C
normal process
Washable up to 60°C
mild process
Washable up to 40°C
normal process
Washable up to 40°C
mild process
Washable up to 40°C
very mild process
Washable up to 30°C
normal process
Washable up to 30°C
mild process
Washable up to 30°C
very mild process
Wash by hand max.
40°C
Do not wash
Bleaching
Any bleaching allowed
Only oxygen/ non-
chlorine
Do not bleach
Drying
Tumble drying possible
normal temperature
Tumble drying
possible lower
temperature
Do not tumble dry
Line drying
Flat drying
Ironing
Iron at a maximum
temperature up to 200
°C
Iron at a medial
temperature up to
150°C
Iron at a low
temperature up to
110 °C; without
steam (steam ironing
may cause
irreversible damage)
Do not iron
Professional Textile Care
Dry cleaning in tetra-
chloroethene
Dry cleaning in
hydrocarbons
Do not dry clean
Professional wet clean
Do not professional
wet clean
8.4 Loading the appliance
Put in the laundry piece by piece.
Don’t overload. Note the di
t maximum load according to programmes! Rule
of thumb for maximum load: Keep six inches between load and drum top.
Close the door carefully. Make sure that no pieces of laundry are pinched.
Note: Auto Weight
The display default time may vary depending on the load weight, involving the
“ ECO 40-60,
Whites, Smart wash,
Jeans, Synthetics, Hand wash, Hygiene Plus59’, Cotton and Delicate”.
EN
22
8-Daily use

8.5 Selecting detergent
Washing e
ciency and performance is determined by used detergent quality.
Use only machine wash approved detergent.
If needed use speci
c detergents, e.g for synthetic and woolen fabric.
Do not use dry cleaning agents such as trichloroethylene and similar products.
Choose the best detergent
EN
8-Daily use
23
Programme
Kind of detergent
Universal Colour Delicate Special Softener
RINSE
COTTON
ECO 40-60
HIGH HEAT
SYNTHETICS
DRAIN&SPIN
DRUM CLEAN
If using liquid detergent, it is not recommended to activate the time delay.
We recomment by using:
Laundry powder:
20°C to 90°C* (best use: 40-60°C)
Color detergent:
20°C to 60°C (best use: 30-60°C)
Wool/delicate detergent: 20°C to 30°C (best use: 20-30°C)
*
Choose 90 °C wash temperature only for special hygienic requirements.
*
If you choose the water temperature 60°C or above, we would like to advise you to
use
less detergent.
*
It is better to use less or free detergent powder.
- -
- -
--- - -
- - - -
- -
- -
- -
- -
*
Suggested detergent type on remote control depends on the program choosen on
APP.
RAPID
FRESH VAPOR
SPECIAL 39’
DELICATE
-
- - --
- -
HYGIENE PLUS 59’
----
O =Not Available -=Not Recommended=Suggest Using
- - - - -
8.6 Adding detergent
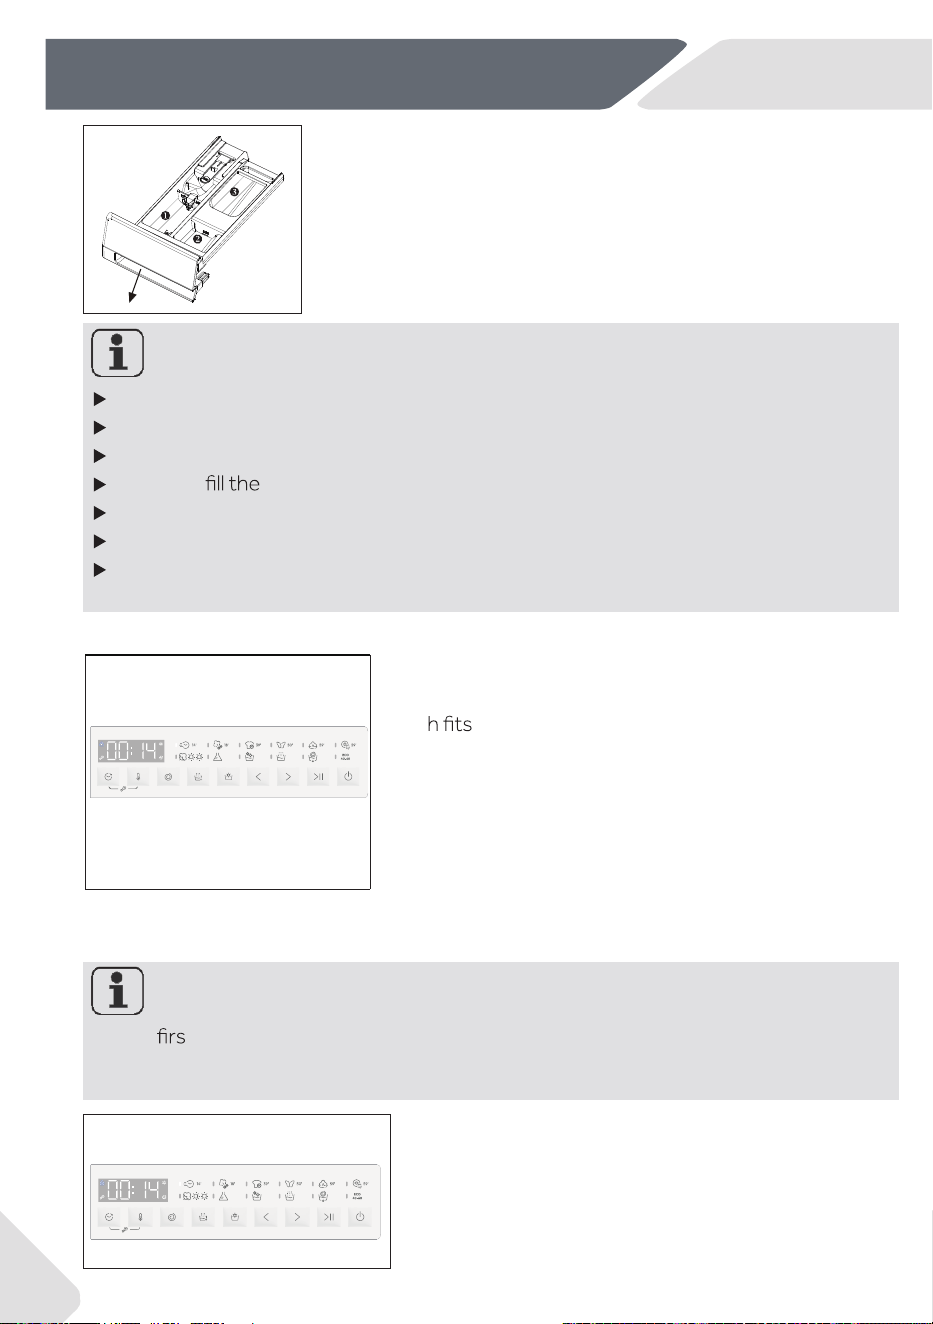
1. Slide out the detergent drawer.
2. gnidnopserroc otni slacimehc deriuqer eht tuP
compartments (Fig. 8-4).
3. Push back the drawer gently.
Note:
Remove detergent residues before next wash cycle from the detergent drawer.
Do not overuse detergent or softener.
Please follow the instruction on the detergent package.
Always
detergent just before the beginning of the wash cycle.
Concentrated liquid detergent should be diluted before adding.
Do not use liquid detergent if function "Delay" is selected.
Carefully choose the programme settings according to the care symbols on all
laundry labels and according to the programme table.
8.7 Select a programme
Note: Odour removal
Before naelC murD" emmargorp eht nur ot dnemmocer ew esu t "
possible corruptive residues.Please don't put any detergent or
cleaner in washing detergent compartment (2).
enihcam laiceps
8.8 Add individual selections
Select required options and settings (Fig. 8-6); refer to
Control Panel.
8-5
8-6
8-4
EN
24
8.
8-Daily use
to remove
T
o get the best washing results, select a programme
whic
the degree of dirty
and laundry type.
Press the left and right buttons (Figure 8-5)
to
select
the
right
programme
.
The display will show the selected
programme name.
8.10
Start wash programme
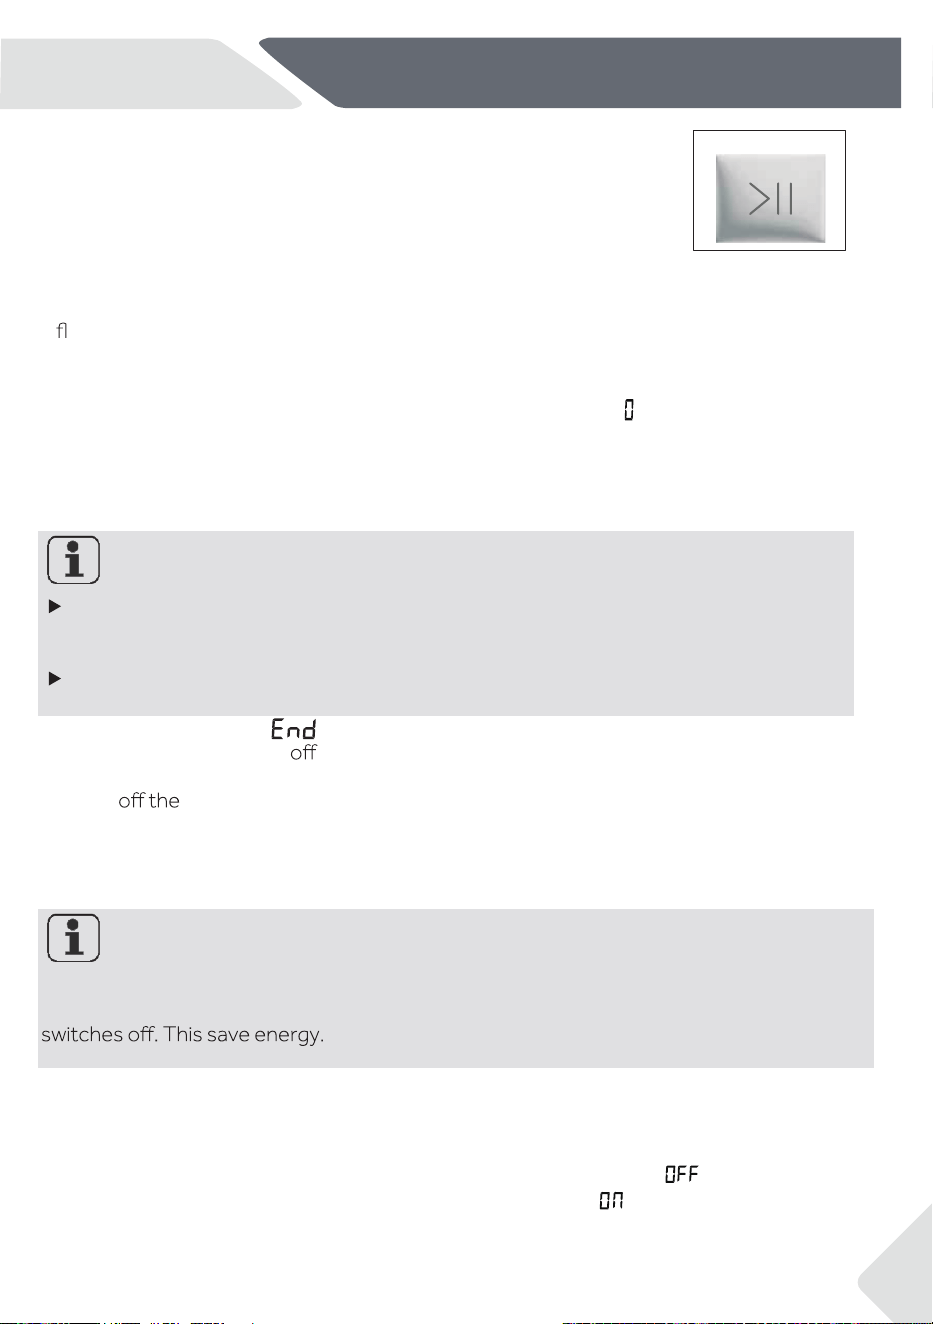
Touch "Start/Pause” button (Fig. 8-7) to start.
Appliance operates according to present settings.
8.11
Interrupt / cancel wash programme
To interrupt a running programme, press
"Start/Pause
"
, the
LED above the button
is
ashing. Press it again to resume operation.
3. After closing the programm to restart the appliance, select a new programme and
start it.
8.12
After washing
Note: Door lock
For safety reasons the door is locked partially during the washing cycle. It is only
possible to open the door at the end of the programme or after the programme was
cancelled correctly (see description above).
In case of high water level, high water temperature and during spinning. it is not
possible to open the door; Lock is displayed.
2. The appliance
1. At programme cycle” “ is displayed.
switches
automatically.
3.
to prevent more wrinkling.
4. Turn
water supply.
5. Unplug the power cord.
6. Open the door to prevent formation of moisture and odours. Let it open while not
used.
Note: Standby-mode / energy-saving mode
The switches on appliance will go into standby-mode if it will not be activated within 2
minutes before starting the programme or at the end of programme. The display
Activate or deactivate the buzzer
The acoustic signal can be deselected if necessary:
1.
8-7
Changes are only possible by cancelling the programme.
EN
25
8.9
To cancel arunningprogramme and all its individual settings:
1. Touch
"Start/Pause”
buttonto interrupttherunning programme.
2. Turn the knob to the programme DRAIN & SPIN and select" " to drain the water.
8-Daily use
In standby-mode, under any program, press the "Speed+ "Extra Rinse" buttons at the
same time for 5S, the buzzer will be activated, the screen shows “ ”. Press the
two button simutaneously again for 5S, the screen shows” ”.
Take it out carefully
26
gninaelc dna eraC-9
EN
9-Care and cleaning
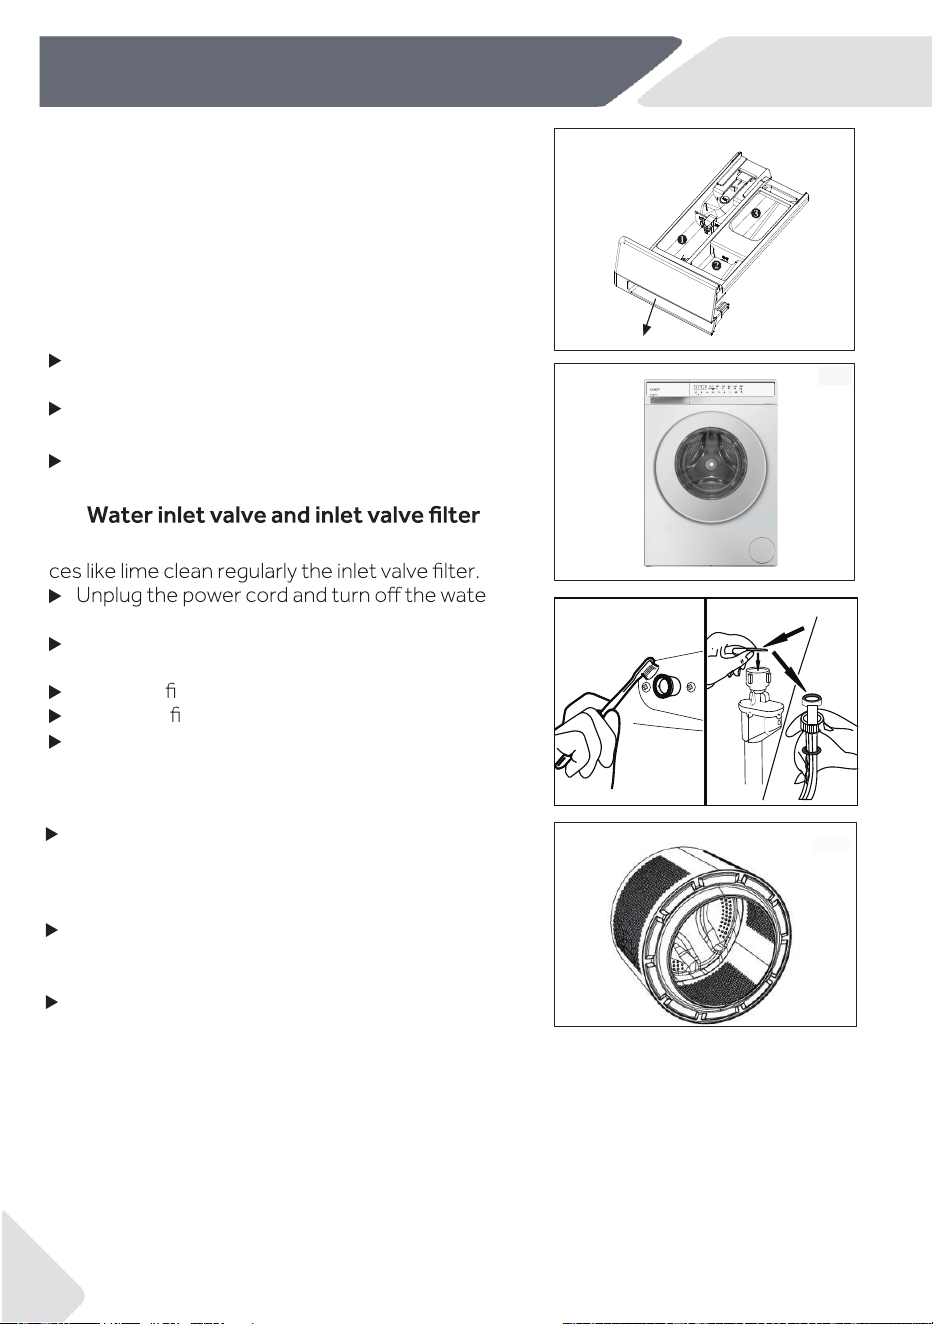
9.1 Cleaning the detergent drawer
Take .seudiser tnegreted on era ereht kcehc dna erac
Clean the drawer regularly (Fig. 9-1) :
1. Pull out the drawer until it stops.
2. Press the release button and remove the drawer.
3. Flush the drawer with water until it is clean and
insert the drawer back in the appliance.
9.2 Cleaning the machine
Unplug the machine during cleaning and
maintenance.
Use a soft cloth with soap liquid to clean the
machine case (Fig.9-2) and rubber components.
Do not use organic chemicals or corrosive
solvents.
9.3
-natsbus dilos yb ylppus retaw fo egakcolb tneverp oT
supply.
)3-9 .giF( kcab eht ta esoh telni retaw eht wercsnU
of the appliance as well as on the tap.
Flush the
lters with water and a brush (Fig. 9-4).
Insert the
lter and install the inlet hose.
9.4 Cleaning the drum
Remove accidental washed items, especially
metal parts such as pins, coins, etc. from the drum
(Fig. 9-5) because they cause rust stains and
damage.
Use a non-chloride cleaner for removing rust
gninaelc eht no sgninraw eht evresbO .sniats
agent manufacturer.
Do not use any hard objects or steel wool for
cleaning.
9-1
9-2
9-4
9-5
9-3
Turn on the tap to see if it leaks.

27
EN
9.5 Long periods of disuse
If the appliance is left idle for a longer period:
1. Pull out the electrical plug (Fig. 9-6).
2. Turn r supply (Fig. 9-7).
3. Open the door to prevent formation of moisture
and odours. L
9.6
Clean the lter once a month and check the pump
lter for instance if the appliance:
Doesn't
Doesn't spin.
Creates
unusual noise
hile running.
WARNING!
Scalding Risk! Water in the pump lter can be very
hot! Before any action please ensure has
cooled do n.
1.
Turn nd unplug the machine (Fig.9-8).
2.
9-6
9-7
9-8
9-9
9-10
9-11
4. Pull the drainhose out and hold its end above the
container(Fig.9-10).
5. Taking the sealing plug out of the drainhose.
(Fig.9-10).
6. After completing drainage, close the drainhose
and push it back to the machine(Fig.9-11).
8. Remove contaminants and dirt(Fig.9-13).
9-12
9-13
9 -Careandcleaning
28
9-Care and cleaning
EN
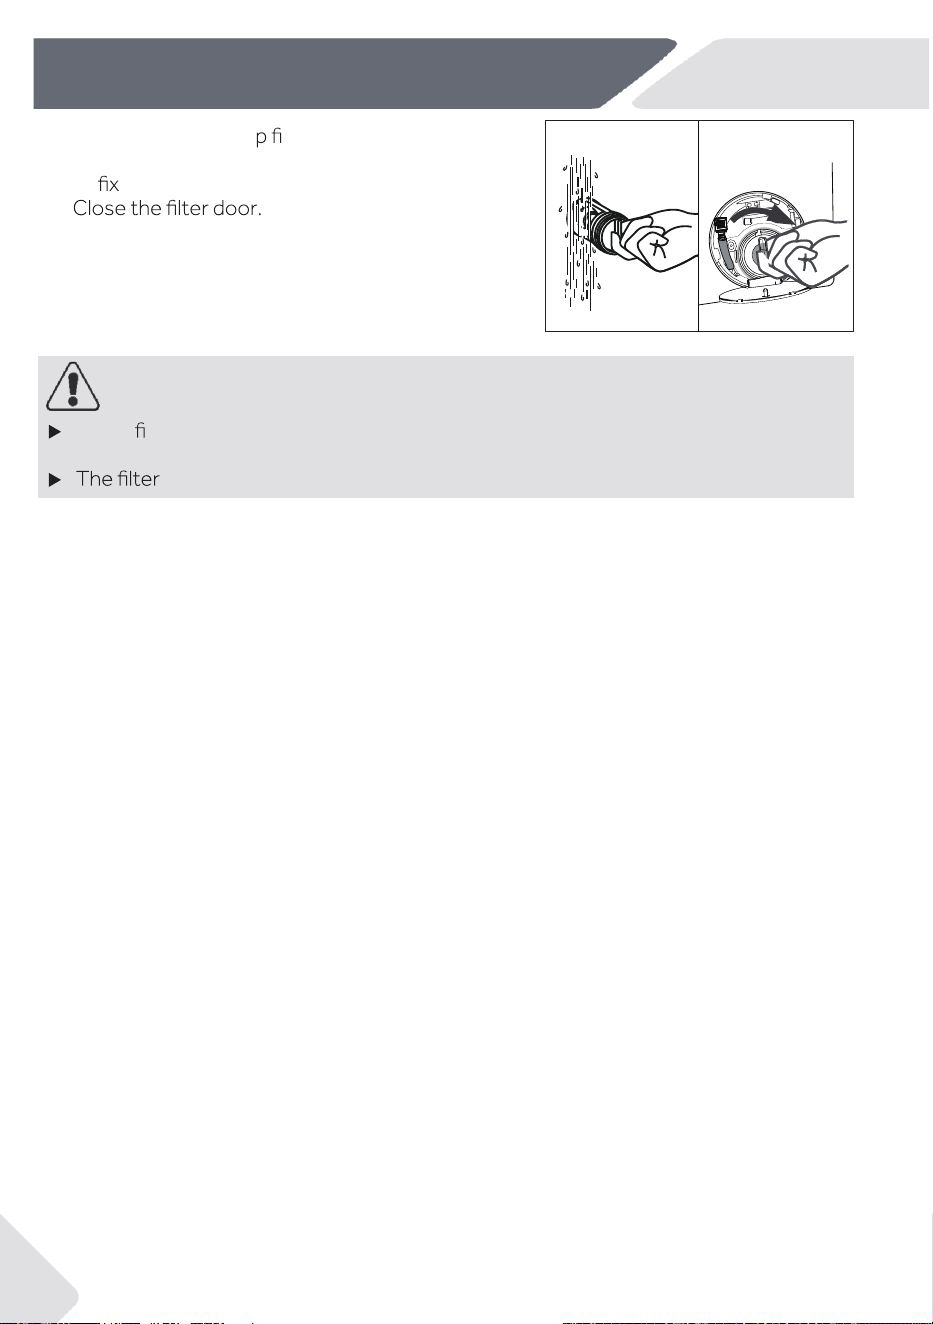
9. Clean carefully pum lter, e.g. using running water
(Fig. 9-14).
10. Re
it thoroughly (Fig. 9-15).
11.
CAUTION!
Pump
lter sealing has to be clean and undamaged. If the lid is not fully tightened,
water can escape.
must be in place, or it may lead to leakage.
9-14
9-15
29
10
-
Troubleshooting
EN
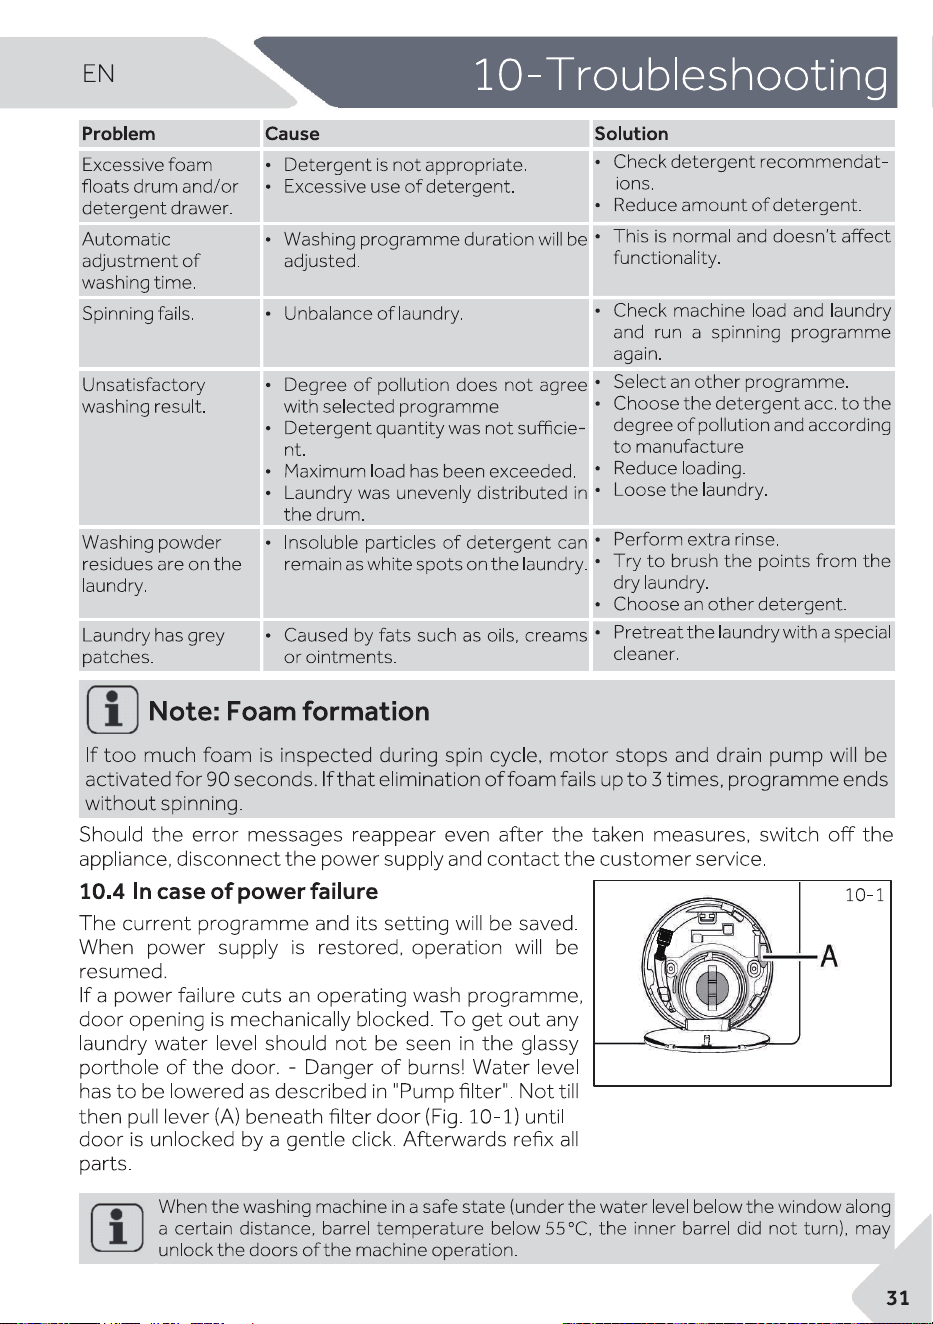
10-Troubleshooting
Many occuring problems could be solved by yourself without expertise. In case of
a problem please check all shown possibilities and follow below Instructions before you
contact an after sales service. See CUSTOMER SERVICE.
WARNING!
Before maintenance, deactivate the appliance and disconnect the mains plug from
the mains socket.
Electrical equipment should be serviced only by quali
al experts, because
improper repairs can cause considerable consequential damages.
A damaged power cable should only be replaced by the manufacturer, its service
agent or similarly quali persons in order to avoid a hazard.
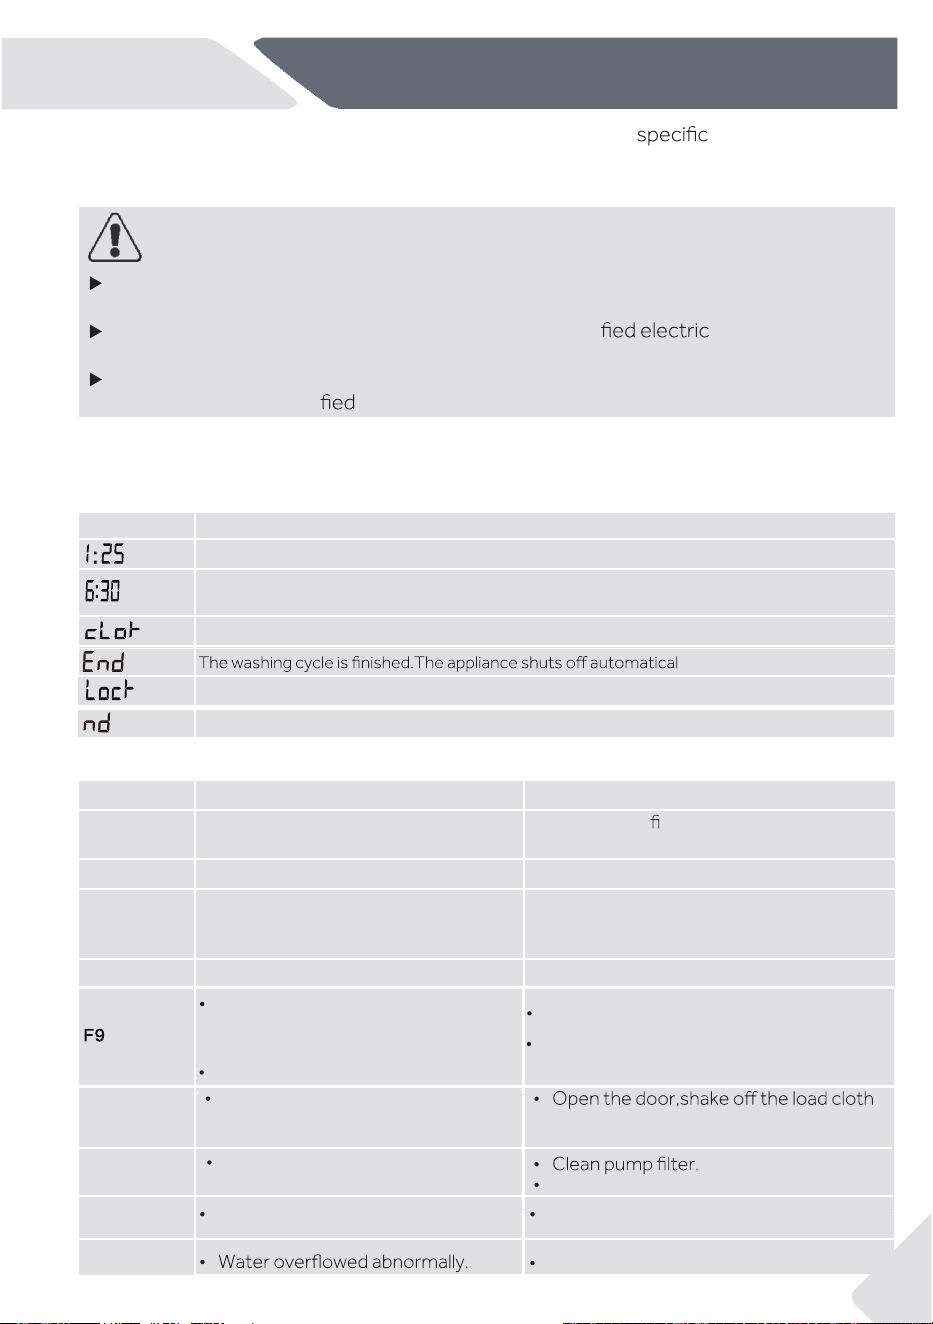
10.1 Information codes
Following codes are displayed only for information referring to the washing cycle. No
measures must be performed.
Code Message
The remaining wash cycle time will be 1 hour and 25 minutes.
The remaining delay time will be 6 hours and 30 minutes.
Function child lock is activated.
10.2 Troubleshooting with display code
Problem Cause Solution
CLR FLTR
• Drainage error, water is not fully
drained within 6 minutes.
• Clean pump lter
• Check drain hose installation.
E2
• Lock error.
• Shut the door properly.
E4
• niard ,dehcaer ton level retaW
hose is self-syphoning.
• Make sure that tap is fully opened and
water pressure is normal.
• .noitallatsni esoh telni eht kcehC
E8
• Water protective level error.
• Contact the After sales service.
Door is closed because of high water level,high water temperature or spinning cycle.
ly.
Model has not been selected.
Logic: The communication
between the drying tempera-
ture sensor is abnormal
Cause: Drying temp sensor
failure
Check whether the wire and terminal are well connected.
Check the resistance of dry temperature sensor.
E9
The load is attached to the cylinder
and put it back into the inner cylinder to
start the machine.
E5
wall.
Drainage error.Water is not fully
drained within 1 minutes.
Check drain hose installation.
Fd
Dry heating communication error.
Contact the after sales service.
Fb
Contact the after sales service.
30
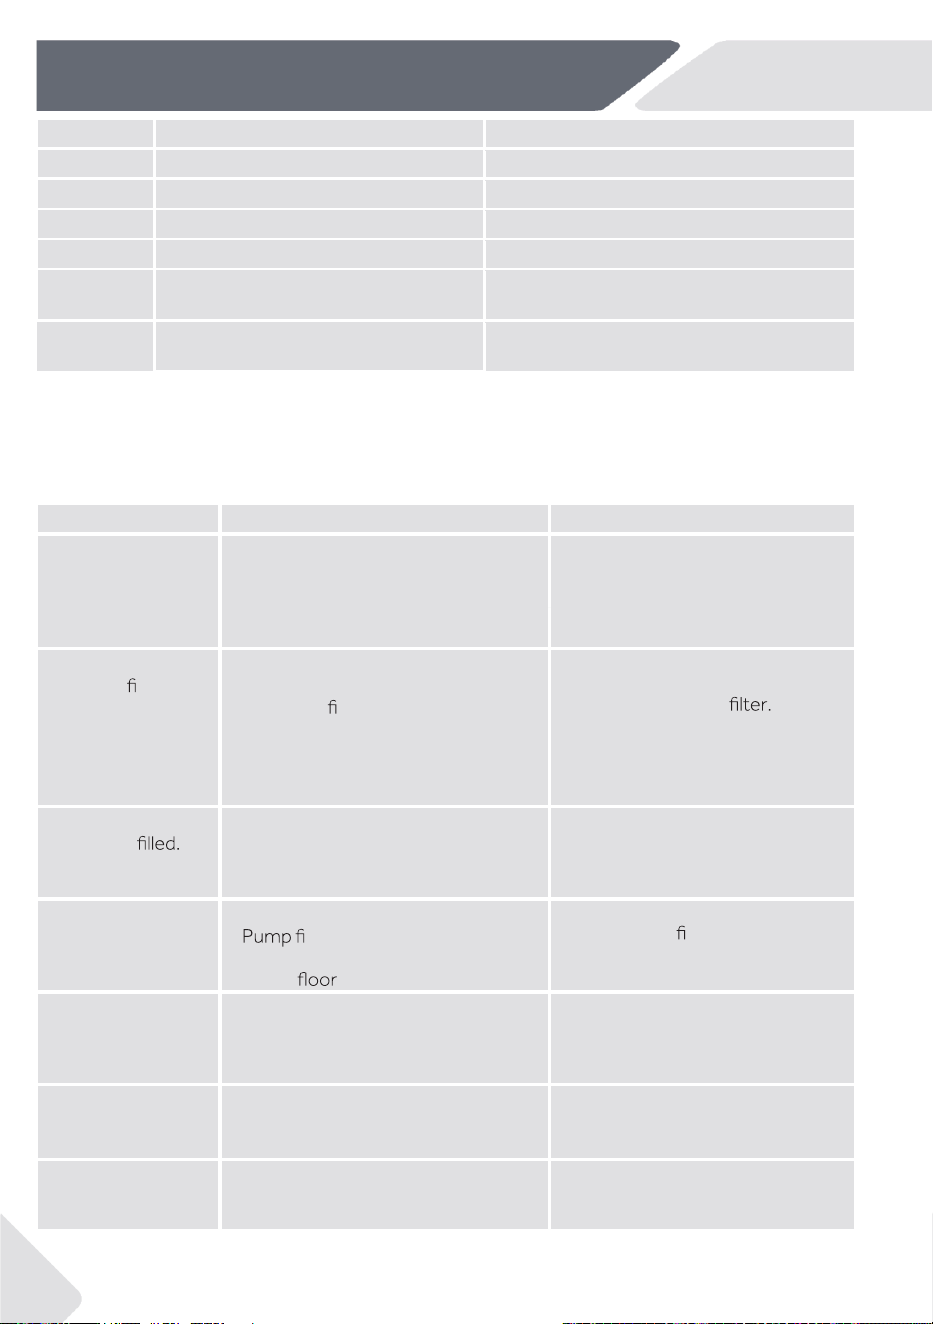
10-Troubleshooting
EN
Problem Cause Solution
F3
• Temperature sensor error.
• Contact the After sales service.
F4
• Heating error.
• Contact the After sales service.
F7
• Motor error.
• Contact the After sales service.
Contact the After sales service
FA
• Water level sensor error.
• Contact the After sales service.
• Abnormal communication error.
• Contact the After sales service.
10.3 Troubleshooting without display code
Problem Cause Solution
Washing machine
fails to operate.
• Programme is not yet started.
• Door is not properly closed.
• Machine has not been switched on.
• Power failure.
• Child lock is activated.
• Check programme and start it.
• Close the door properly.
• Switch the machine on.
• Check power supply.
• Deactivate child lock.
Washing machine
will not be lled with
water.
• No water.
• Inlet hose is kinked.
• Inlet hose lter is blocked.
• Water pressure is less than 0.03
MPa.
• Door is not properly closed.
• Water supply failure.
• Check water tap.
• Check inlet hose.
• Unblock inlet hose
• Check water pressure.
• Close the door properly.
• Ensure the water supply.
Machine is draining
while being
• Height of drain hose is below 80 cm.
• Drain hose end could reach into
water.
• Make sure that drain hose is
properly installed.
• Make sure the drain hose is not in
water.
Drainage failure.
• Drain hose is blocked.
• lter is blocked.
• Drain hose end is higher than 100 cm
above level.
• Unblock drain hose.
• Clean pump lter.
• Make sure that drain hose is
properly installed.
Strong vibration
while spinning.
• Not all transportation bolts have
been removed.
• Appliance has no solid position.
• Machine load is not correct.
• Remove all transportation bolts.
• Ensure solid ground and a levelled
position.
• Check load weight and balance.
Operation stops
before completing
wash cycle.
• Water or electric failure.
• Check power and water supply.
Operation stops for
a period of time.
• Appliance displays error code.
• Problem due to load pattern.
• Programme performs soaking cycle.
• Consider display codes.
• Reduce or adjust load.
• Cancel programme and restart.
FC0,FC1 or
FC2
Eb
Clothes jamming alarm.
•
•
Pause operating, open the door and place
garments again before restarting.
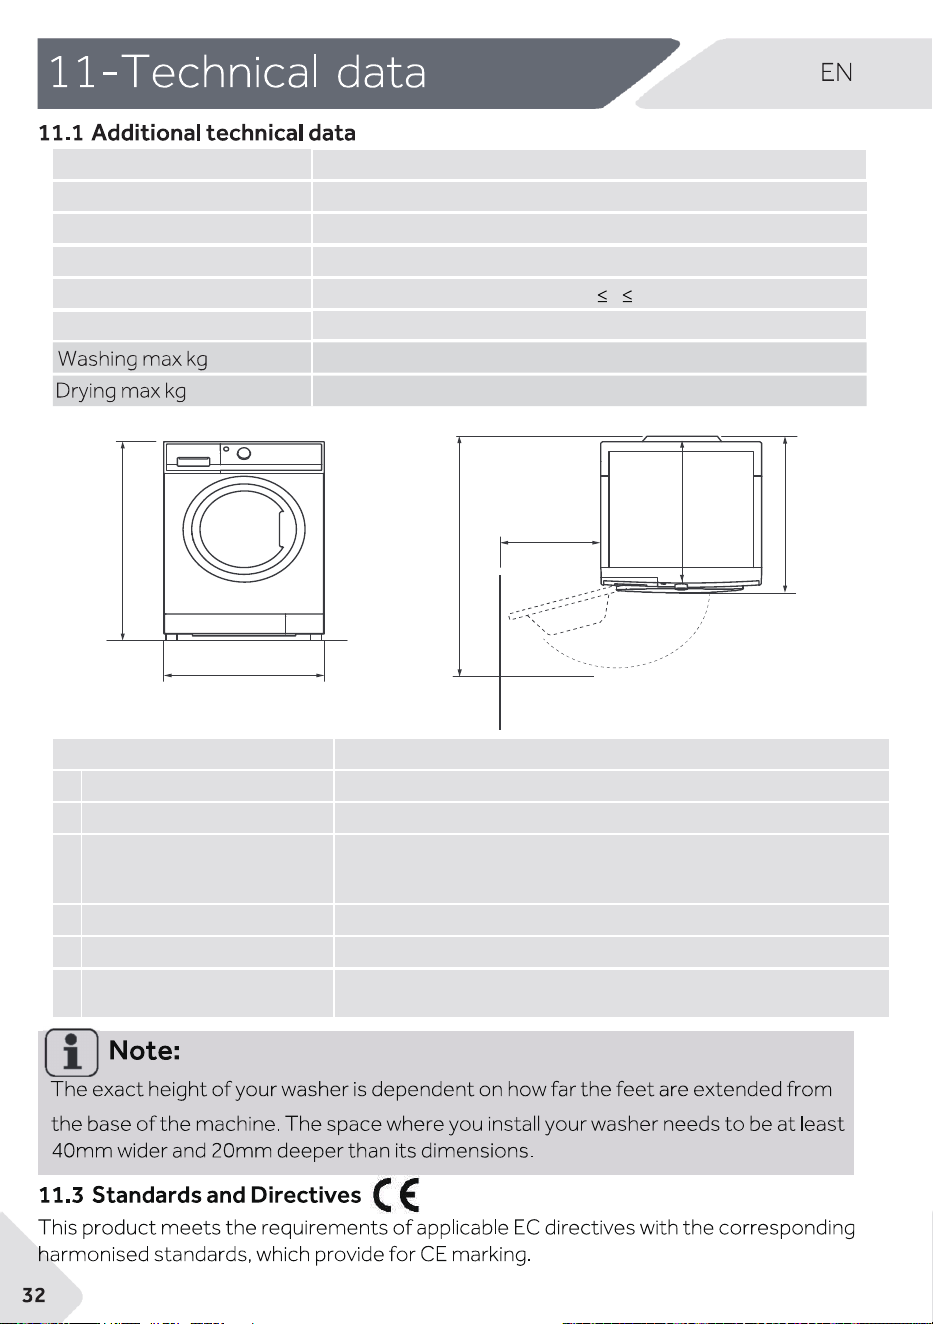
Voltage in V 220V-240 V~/50Hz
01Ani tnerruC
W ni rewop xaM
aPM ni erusserpretaW
Net weight in kg
11.2 Product dimensions
PRODUCT DIMENSIONS
H Overall heightof product mm
W
Overallwidthof product mm
Minimum door clearance to
adjac
overalldepth of productD5
(Tomain controlboardsize) mm
D1 Overall depth of product mm
D2 Depth of door open mm
D4
ent wallmm
WALL
TOP VIEW
FRONT VIEW
1950
0.03
P 1
61
8
5
H
W
D2
D4
D5
D1
EWY 485SW6-S / EWY 485SG6-S / EWY 485SB8-S
EWY 485SW6-S / EWY 485SG6-S / EWY 485SB8-S
850
595
495
533
1016
340

- EWY -