Loading ...
Loading ...
Loading ...
EN - 16 WWW.SENIXTOOLS.COM
ASSEMBLY
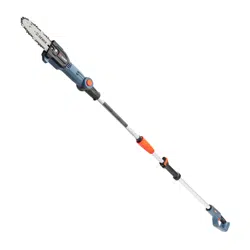
1. Unpack all parts and lay them on a at, stable surface:
2. Remove all packing materials and shipping devices, if
applicable.
3. The scope of delivery varies depending on the country
and purchased variant:
Model of CSPX2-M-0
• Pole saw x1
• Instruction manual x1
• Guide bar x1
• Guide bar cover x1
• Saw chain x1
• Wrench x1
• Harness x1
4. If you nd that parts are missing or show damage do
not use the product but contact your dealer. Using an
incomplete or damaged product represents a hazard to
people and property.
5. Ensure that you have all the accessories and tools
needed for assembly and operation. This also includes
suitable personal protective equipment.
NOTE:
CSPX2-M includes the charger and the battery pack.
CSPX2-M-0 does not include the charger and the battery
pack.
WARNING:
Wear protective gloves for this assembly work
and always lay the product on a flat and stable
surface while assembling.
Follow the assembly instructions step-by-step
and use the pictures provided as a visual guide
to easily assemble the product!
Do not insert the battery pack before the power
tool is completely assembled or adjusted!
CONNECTING THE FRONT AND
THE REAR POLE
1. Align arrows on the rear pole component and the front
pole, then Insert for connecting (Fig.2).
2. Rotate the connecting sleeve clockwise to reinforce the
connection (Fig.3).
3. Check looseness between two parts.
INSTALLING THE SAW CHAIN
AND GUIDE BAR
WARNING:
Switch off and remove the battery pack before
installing the saw chain and guide bar.
1. Loosen the sprocket cover nut and detach the chain
sprocket cover (Fig.4).
2. Wind the saw chain to the outside edge of the guide
bar. Make sure the chain teeth are stuck into the slots
(Fig.5).
NOTE:
Make sure the chain’s direction of rotation is correct. The
blades on each cutting link on the upper side of the cutting
bar must be facing towards the tip of the pole saw.
3. Attach the guide bar and the saw chain to the product.
Loop the saw chain around the sprocket and locate the
chain bar by the xing bolt on the saw (Fig.5). If the
guide bar and saw chain can not be mount over the
drive sprocket, slightly adjust the tensioning gear.
4. Pull the chain around the guide bar with your gloved
hand or using auxiliary tools to make sure it can run
smoothly.
5. Replace the sprocket cover and preliminarily screw the
sprocket cover nut to prevent the guide bar and saw
chain from dropping. Do not totally tighten it (Fig.4).
6. Turn the saw chain tensioning gear clockwise till the
saw chain can be lifted by 2-3 mm from the center of the
guide bar (Fig.5).
7. Fully tighten the sprocket cover nut to secure the the
sprocket cover.
INSTALLING THE HARNESS
The harness with quick release function can be hooked on
the front handle (Fig.6).
BAR AND CHAIN OIL FILLING
WARNING:
Never operate the pole saw without bar and
chain oil. The use of the pole saw without
enough bar and chain oil will damage the unit.
This pole saw is shipped without bar and chain oil in the
tank. Fill the oil tank for the initial use and check the oil level
before every start.
Loading ...
Loading ...
Loading ...