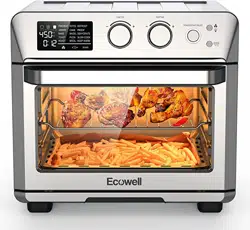
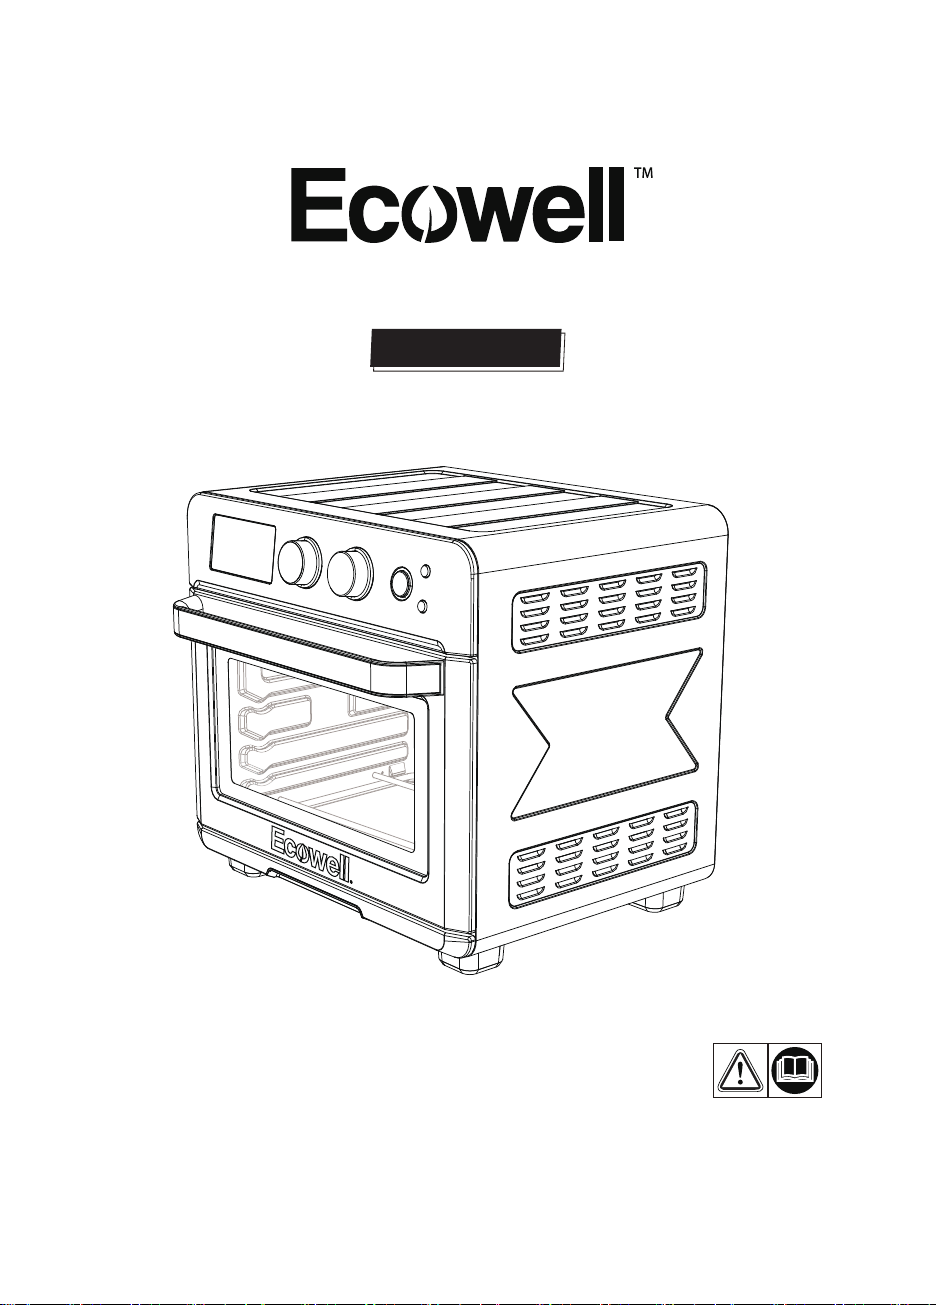
SMART AIR FRYER TOASTER OVEN
USER MANUAL
Read and understand this instruction manual thoroughly before using the product
It contains important information for your safety as well as operating and maintenance advice.
Model: ECOKX01

IMPORTANT SAFEGUARDS
BEFORE FIRST USE
FEATURES AND BENEFITS
GETTING TO KNOW YOUR CONTROL
PANEL
TIPS AND HINTS FOR USING PREHEAT
FUNCTION
TIPS AND HINTS FOR USING TOAST,
BAGEL FUNCITONS
TIPS AND HINTS FOR USING AIRFRY
Airfryer CHART
COOKING FUNCTIONS QUICK
REFERENCE CHART
CLEANING AND MAINTENANCE
TROUBLESHOOTING
WARRANTY
CONTENTS
01
03
03
04
05
05
06
07
08
10
11
13
IMPORTANT SAFEGUARDS
When using an electrical appliance, especially when children are present, basic safety
precautions should always be taken, including the following:
1. Read all instructions.
2. UNPLUG FROM OUTLET WHEN NOT IN USE AND BEFORE CLEANING.Allow to cool
3. Do not touch hot surfaces. Use handles or knobs.
4. To protect against electric shock, do not place any part of the Digital AirfryerToaster
Oven in water or other liquids. See instructions for cleaning.
5. This appliance should not be used by or near children or individuals with certain
disabilities.
6. Do not operate any appliance with a damaged cord or plug, or after the appliance
has malfunctioned or has been dropped or damaged in any way or has been dropped
in water. Return the Airfryer Toaster Oven to the store or retailer where purchased for
examination or repair or adjustment.
7. The use of accessory attachments not recommended may cause injury.
8. Do not use outdoors.
9. Do not let cord hang over the edge of the table or countertop where it could be pulled
on inadvertently by children or pets, or touch hot surfaces, which could damage the cord.
10. Do not place Airfryer Toaster Oven on or near a hot gas or electric burner or in a
heated oven.
11. Do not use this Airfryer Toaster Oven for anything other than its intended purpose.
12. Extreme caution should be exercised when using containers constructed of materials
other than metal or glass in the oven.
13. To avoid burns, use extreme caution when removing Airfryer Toaster Oven accessories
or disposing of hot grease.
14. When not in use,
always unplug the unit. Do not store any materials other than
manufacturer’s recommended ovenproof accessories in this Airfryer Toaster Oven.
15. Do not place any of the following materials in the Airfryer Toaster Oven:paper,
cardboard, plastic and similar products.
16. Do not cover Crumb Tray or any part of the oven with metal foil. This will cause
overheating of the oven.
17. Oversize foods, metal foil packages and utensils must not be inserted in the Airfryer
18. A fire may occur if the Airfryer Toaster Oven is covered or touching flammable
materials such as curtains, draperies or walls when in operation. Do not store any items
on top of the appliance when in operation. Do not operate under wall cabinets.
19. Do not clean with metal scouring pads. Pieces can break off the pad and touch
electrical parts, involving a risk of electric shock.
01
20. Do not attempt to dislodge food when the Airfryer Toaster Oven is plugged into
electrical outlet.
during use.
22. Use recommended temperature settings for all cooking/baking,roasting and AirFrying.
23. Do not rest cooking utensils or baking dishes on glass door.
24. Do not operate your appliance in an appliance garage or under a wall cabinet.When
storing in an appliance garage, always unplug the unit from the electrical outlet. Not
garage or the door touches the unit as it closes.
25. Extreme caution must be used when moving an appliance containing hot oil or other
hot liquids.
26. To disconnect, press Start/Stop to ensure cooking is stopped, then remove plug from
wall outlet.
27. To protect against electrical shock do not immerse cord, plugs in water or other liquid.
28. "Do not store any materials, other than manufacturers recommended accessories, in
this oven when not in use."
WARNING:
and/or a slight odor. This is normal and should quickly disappear. It will not recur after
appliance has been used a few times.
This appliance has a polarized plug (one blade is wider than the other). To reduce the
."
Please read and keep these instructions handy. These instructions will help you use your
Digital Airfryer Toaster Oven to its fullest, so that you will achieve consistent, professional
results.
A short power-supply cord is provided to reduce the risks resulting from becoming
entangled in or tripping over a longer cord. Extension cords are available and may be
used if care is exercised in their use.
If an extension cord is used, the marked electrical rating of the extension cord must be
at least as great as the electrical rating of the appliance, and the longer cord should be
arranged so that it will not drape over the countertop or tabletop, where it can be tripped
over unintentionally or pulled on by children.
SAVE THESE INSTRUCTIONS
SPECIAL CORD SET INSTRUCTIONS
FOR HOUSEHOLD USE ONLY
NOT INTENDED FOR COMMERCIAL USE
02
BEFORE FIRST USE
FEATURES AND BENEFITS
2. Move oven 2 to 4 inches away from the wall or from any objects on the countertop. Do
not use on heat-sensitive surfaces.
120V~60Hz 1700W
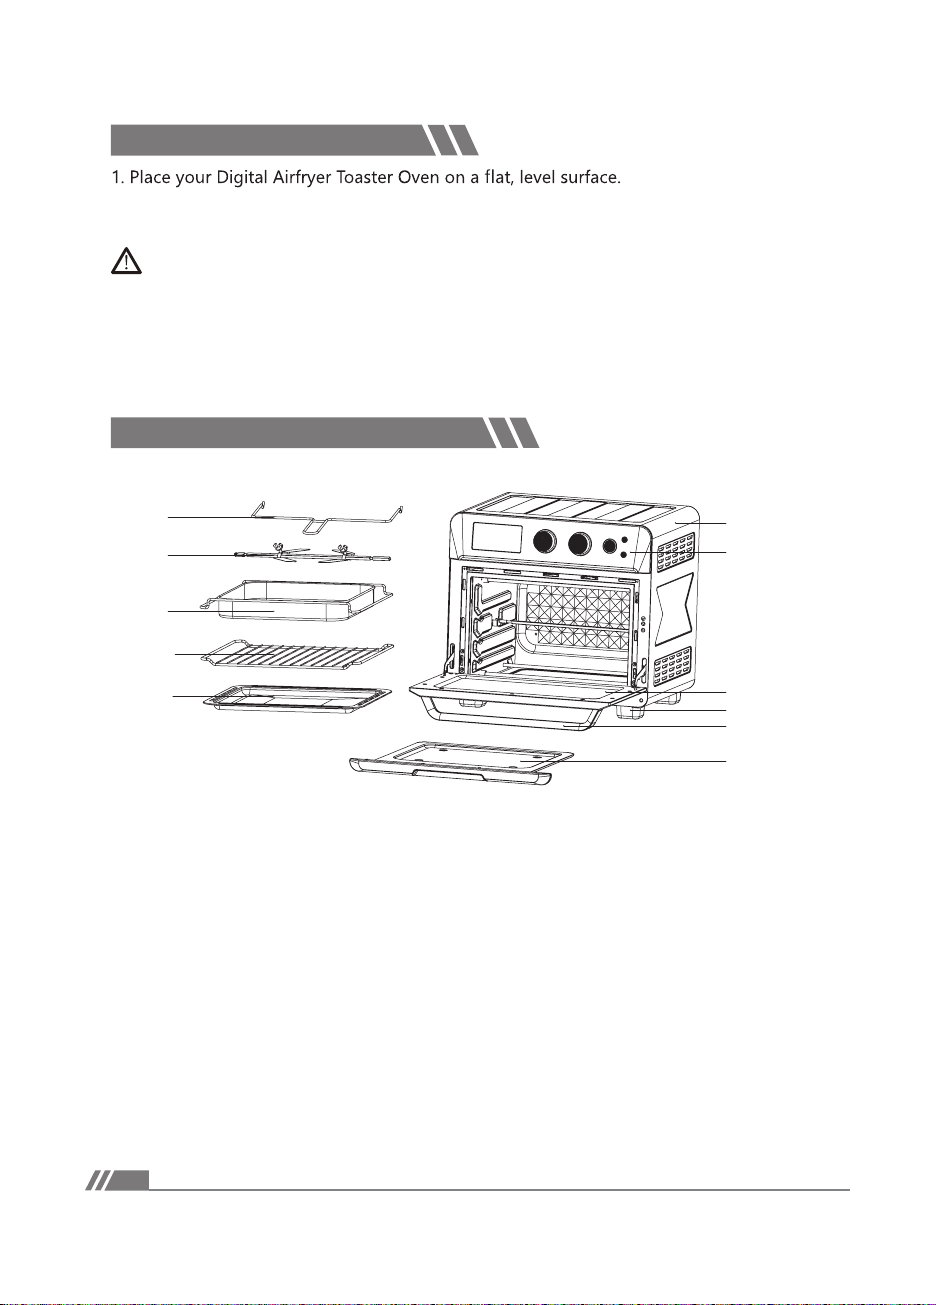
1. Oven housing
2. Control Panel
--Large LED, dial and intuitive buttons make the unit easy to use
3. Oven feet
4. Viewing Window
--Large viewing window to check progress.
5. Cool-Touch Handle
--Handle designed to stay cool during cooking.
6. Pull-Out Crumb Tray
eht morf tuo sedils yart ehT .nevo ruoy ni denoitisop ydaerla semoc yarT bmurC ehT--
lower front of the oven to clean.
7. Rotisserie handle
--Use this handle to take out the roast chicken when ready.
3. Check that the Crumb Tray is in place and that there is nothing in the oven.
4. Plug power cord into the wall outlet.
NOTE:
OBJECTS SHOULD NOT BE STORED ON THE TOP OF THE OVEN. IF THEY ARE,
REMOVE ALL OBJECTS BEFORE YOU TURN ON YOUR OVEN. THE EXTERIOR WALLS GET
VERY HOT WHEN IN USE. KEEP OUT OF REACH OF CHILDREN.
1
2
3
4
5
6
7
8
9
10
11
03
04
GETTING TO KNOW YOUR CONTROL PANEL
11. Baking/Drip Pan
--A Baking/Drip Pan is included for your convenience. Use alone when Baking
or Roasting. Use Baking/Drip Pan with Airfryer Basket when AirFrying, Broiling or
Dehydrating.
9. Airfryer Basket
--Use the basket when using the AirFry, Broil or Dehydrate functions to optimize your
cooking results. We recommend setting the Airfryer Basket in the Baking/Drip Pan.
10. Wire Rack
8.Rotisserie Sets
--Roast chicken with this accessories.
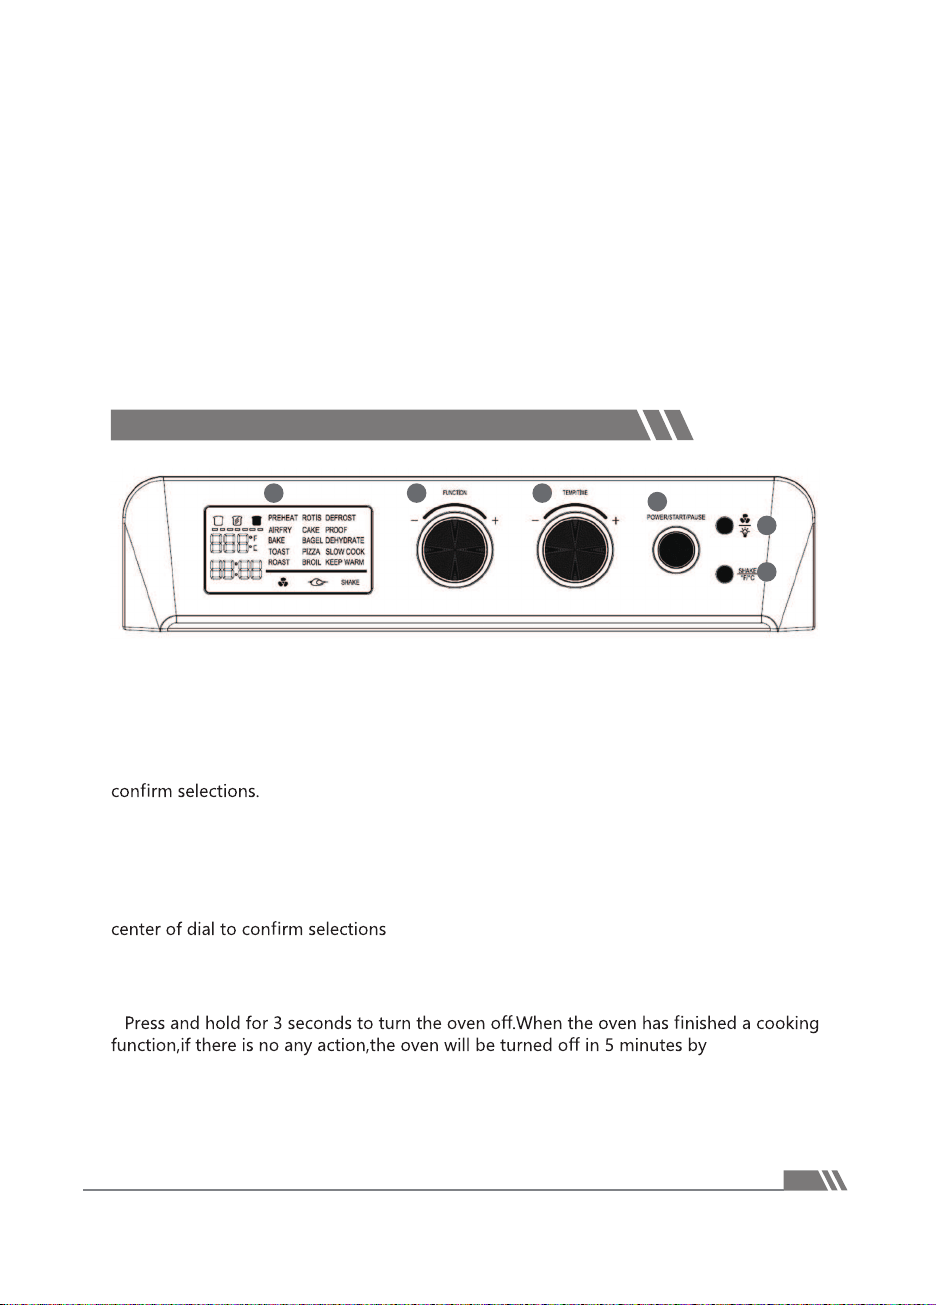
1.LED Screen
●
Displays cooking function,toast shade and slices,temperature,cooking countdown
timer,fan,rotisserie and shake reminder.
2.Function Dail
●
Rotate Function Dail to scroll through options on the LED screen.Press center of dial to
3.Temp/Time Dial
●
Increasing/decreasing operating time and temperature;setting browning level/slice
quantity.
●
Press once to adjust temperature.Press again to adjust time.Turn the control knob
clockwise to increase the setting and counterclockwise to decrease the setting.Press
4.Power/Start/Pause button
●
When plug in,press to trun the oven on,then set the function/temperature/time.
●
Press to start or pauses a cooking function.
●
default.
1
2 3
4
5
6
5.Fan and interior light button
●
dehydrate and airfry.
●
6.Shake and ℉ /℃ button
●
Press to add or remove a shake reminder.The shake reminder will appear halfway
through the remaining cooking time, the oven will beep,and “shake” will blink on the
display. This will repeat every 60 seconds until you open the oven door to shake food and
press the button to remove the shake reminder.
●
The shake reminder can not be added to the Toast,Preheat and Bagel functions.
●
Press and hold for 2 seconds to switch temperature units between Fahrenheit( ℉ ) and
Celsius(℃ ).
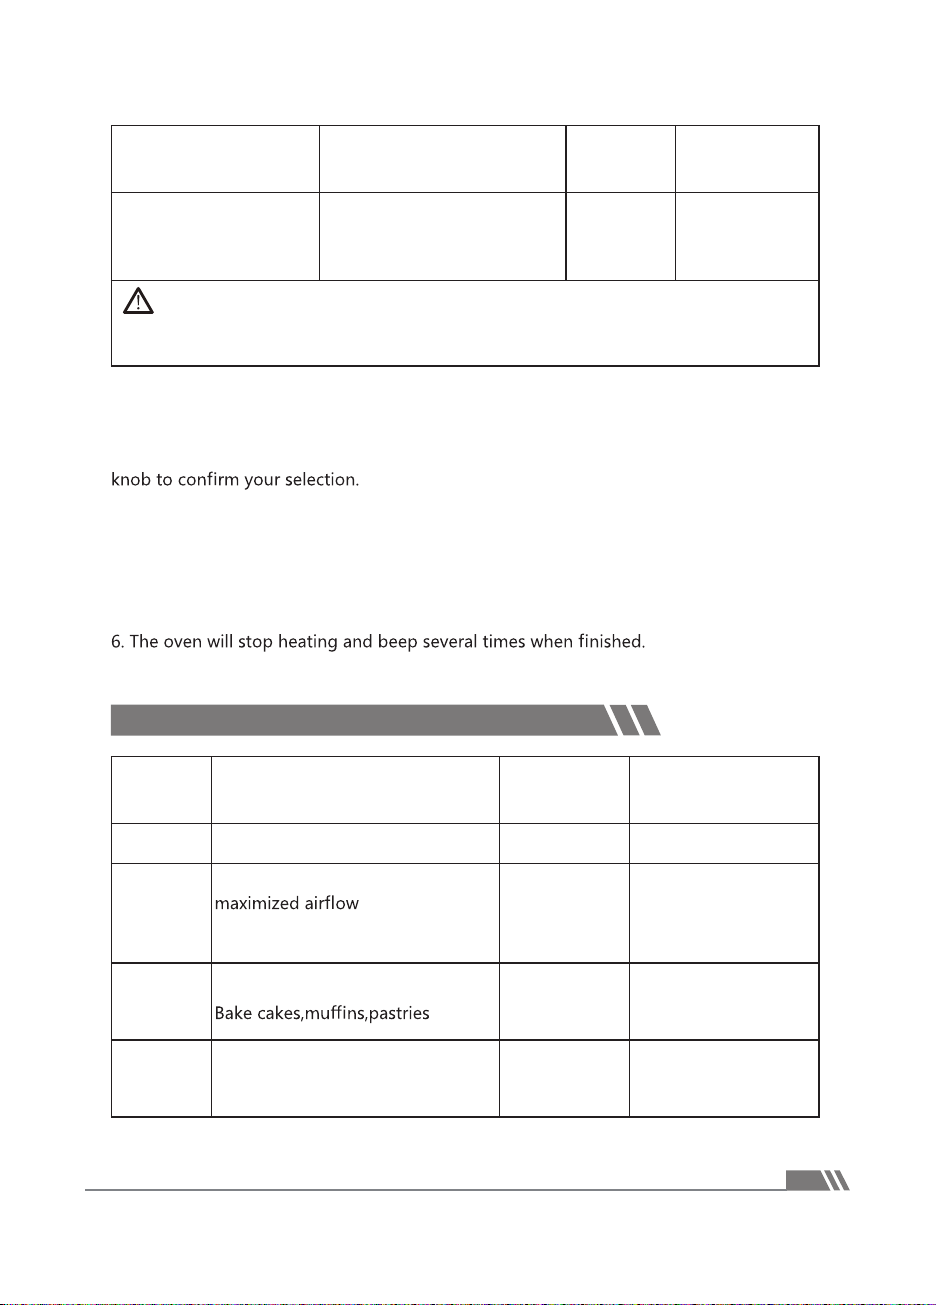
This function allows you to manually preheat your oven without selecting another
cooking function.
1.Turn the function knob to select “PREHEAT”.
2.Optionally, turn the Temp/Time knob to adjust the temperature between 150-450 ℉ .
The time will adjust automatically.
Preheat times
3.Press Power/Start/Pause button to begin preheating.The display will show”PREHEAT”.
be shown on the display
5.Select a cooking function and follow the instructions to begin cooking.
These functions brown the outside of your bread while keeping the inside soft.Also ideal
1. Place up to 4 slices of bread on the wire rack.Insert the wire rack at top position and
close the oven door.
2. Turn the function knob to “TOAST”(or “BAGEL”),which will blink on the display.Press the
TIPS AND HINTS FOR USING PREHEAT FUNCTION
TIPS AND HINTS FOR USING TOAST, BAGEL FUNCITONS
Setting Temperature Automatic Preheat Time
300 ℉ and below 3 min
305-395 ℉ 4 min
400℉-430 ℉ 5 min
435℉-450 ℉ 6 min
05
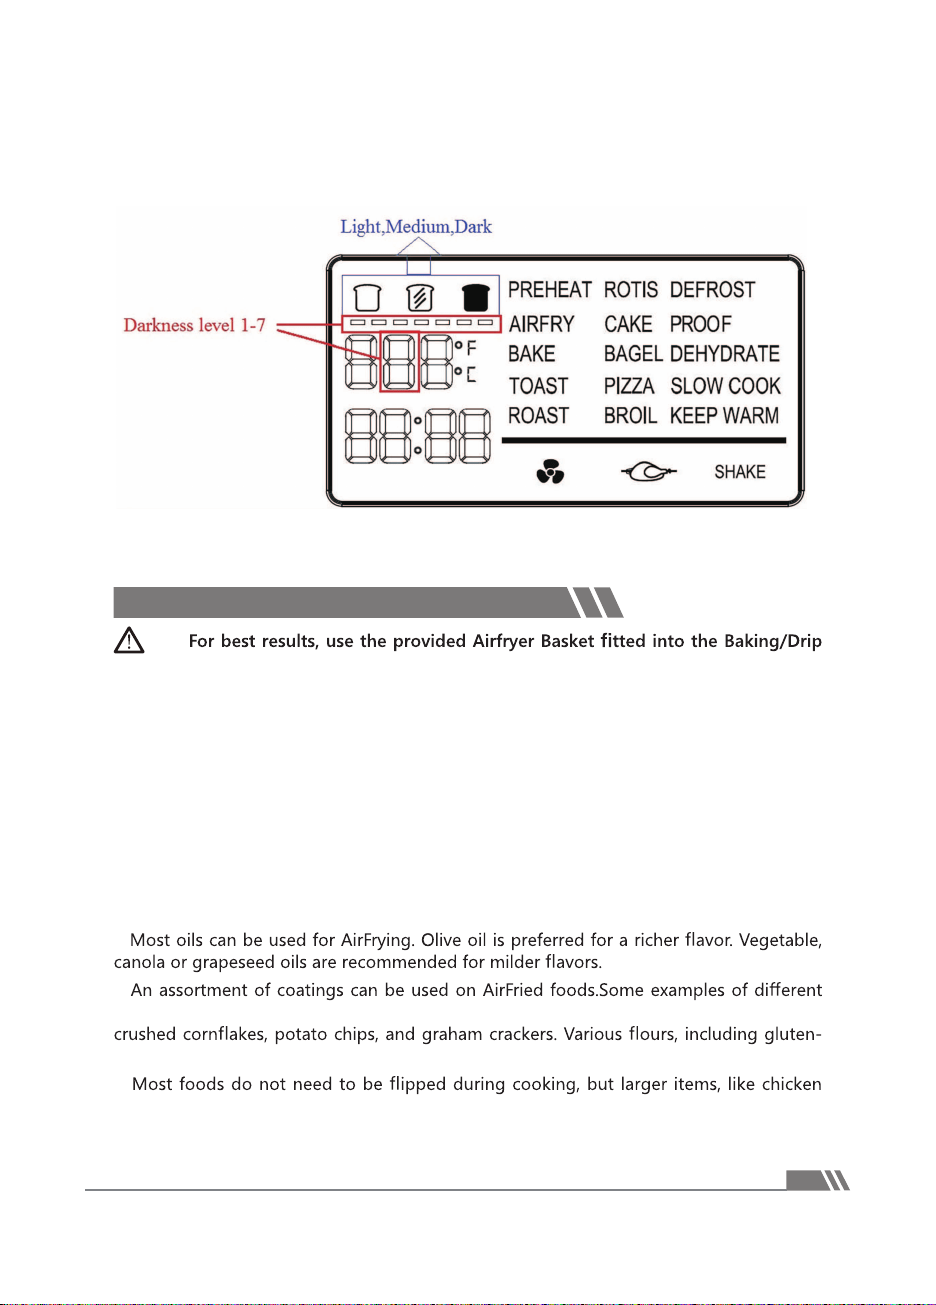
3. Optionally, customize the darkness level.You can only do this before cooking starts.
●
Press Temp/Time button, turn the knob to adjust the darkness level between 1-7.
Use 1-2 for light toast,3-5 for a medium toast,and 6-7 for a dark toast.
TIP:
Pan.
AirFry can be used at 150-450 ℉ for up to 1 hour. This function is used to AirFry meals as
a healthy alternative to deep frying in oil. A high fan speed and multiple heating elements
circulate hot air to prepare a variety of meals that can be both delicious and healthier
than traditional frying.
●
Default: 400 ℉ ; 25 minutes.
●
Many foods that can be fried can be AirFried without using excess amounts of oil.
AirFried foods will taste lighter and be less greasy than deep-fried foods.
●
AirFrying doesn’t require oil, but a light spray can enhance browning and crispiness. Use
an oil sprayer or a nonstick olive oil cooking spray to keep it extra light, a pastry brush to
evenly coat, or pour a little oil into a bowl, add food, and toss.
●
●
crumb mixtures include: breadcrumbs, seasoned breadcrumbs, panko breadcrumbs,
free, and other dry foods like cornmeal work as well.
●
cutlets, should be turned halfway through the cooking cycle to ensure evenly cooked and
browned results.
●
Press Power/Start/Pause button to begin.
TIPS AND HINTS FOR USING AIRFRY
06

●
cooking cycle to ensure evenly cooked results and color.
●
Use higher temperatures for foods that cook quickly, like bacon and chips, and lower
temperatures for foods that take longer to cook, like breaded chicken.
●
Foods will cook more evenly if they are cut into the same-size pieces.
●
Please note that many foods release water when they cook. When cooking large
quantities for an extended period of time, condensation may build up, which could leave
moisture on your countertop.
The chart below lists recommended amounts, cooking times and temperatures for
various types of food that can be AirFried in the Airfryer Oven. If portions exceed
recommendations, you can toss occasionally while cooking to ensure the crispiest, most
even results. Smaller amounts of food may require less time. For best AirFry results, use
the oven light to periodically check on food.
Airfryer CHART
Food Recommended Amount Temperature Time
Bacon
12 ounces, about 10 to 12
slices
400 ℉ 8 to 10 minutes
Chicken Wings
2 pounds, about 20 wings
(max 3 pounds)
450 ℉ 20 to 25 minutes
Frozen Appetizers (e
g , mozzarella sticks,
popcorn shrimp, etc )
11/2 pounds, about 20 frozen
mozzarella sticks
450 ℉ 5 to 7 minutes
Frozen Chicken Nuggets
1 pound, about 34 frozen
chicken nuggets
450 ℉ 10 minutes
Frozen Fish Sticks
12 ounces, about 20 frozen
450 ℉ 8 minutes
Frozen Fries 1 to 2 pounds 450 ℉ 15 to 25 minutes
Frozen Steak Fries 1 to 2 pounds 450 ℉ 15 to 25 minutes
Hand-Cut Fries
1 to 2 pounds, (2 to 4 medium
potatoes), cut into 1/4-inch
thick pieces, about 4 inches
450 ℉ 15 to 20 minutes
Hand-Cut Steak Fries
1 to 2 pounds (2 to 4
medium-large potatoes), cut
into eighths lengthwise
450 ℉ 15 to 20 minutes
Shrimp
1 pound, about 16 extra-large
shrimp
190 ℉ 8 to 10 minutes
07
COOKING FUNCTIONS QUICK REFERENCE CHART
Tortilla Chips
6, 5-inch tortillas cut into
fourths
450 ℉
5 to 6 minutes,
toss halfway
through
Vegetables 1 pound, about 4 cups 450 ℉
Thin slices:10
minutes; larger
cut: 15 to 20
minutes
NOTE:
AirFrying doesn’t require oil, but a light coating can enhance browning and
crispiness. Use an oil sprayer or a nonstick olive oil cooking spray to keep it extra light, a
pastry brush to evenly coat, or pour a little oil into a bowl, add food, and toss.
In addition to being able to program the temperature and time for AirFrying, the Airfryer
Oven has convenient, easy-to-use for your fried favorites-French fries, chicken wings,
chicken nuggets, snacks, and vegetables. To use Airfryer presets, follow these steps:
1. Turn the Function knob to “AIRFRY”,which will blink on the display. Press the Function
2. Optionally, customize the temperature and time.You can do this anytime during
cooking.
3. Place food in the fry basket.
4. Insert at top position.
5. Close the oven door and press Start button to begin cooking.
Name Use
Suggested
Accessory &
Position
Range
Preheat
●
Manually preheat oven None 150-450 ℉
Airfry
●
Cooks using intense heat and
●
Cook food such as french fries
and chicken wings
Fry basket at
top position
150-450 ℉
1 min-1 hour
Bake
●
Cook food evenly throughout
Food tray or
wire rack at mid
position
150-400 ℉
1 min-2 hour
Toast
●
Toast or brown bread
Wire rack at
top position
Darkness level 1-7
Time and temperature
are automatic
08
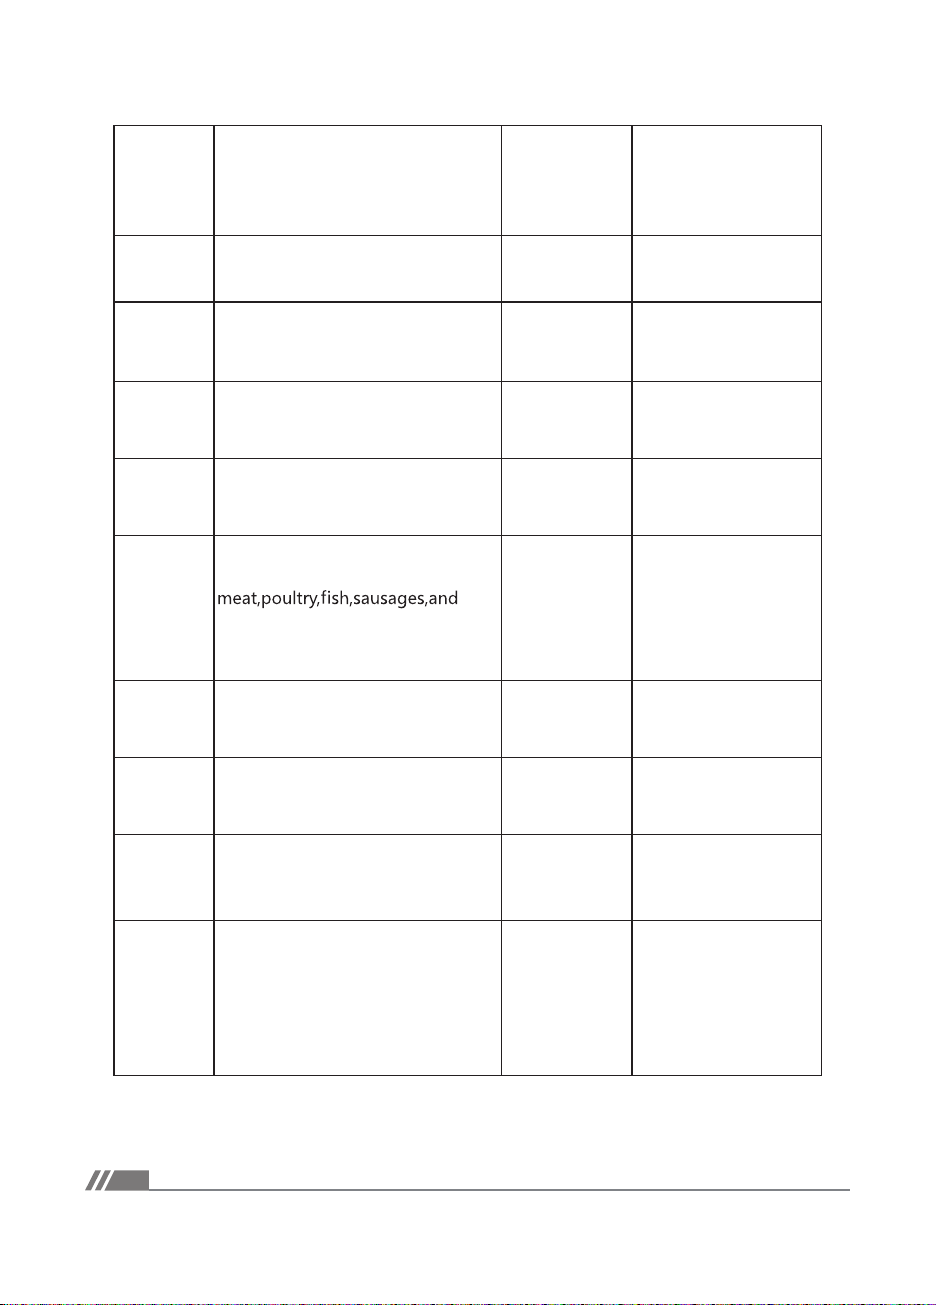
Roast
●
Cook a variety of meats and
poultry
●
Food will be tender and juicy on
the inside and well-roasted on the
outside
Food tray at
low position
150-450 ℉
1 min-1 hour
Rotis
●
Roast chicken Rotisserie sets
150-450 ℉
1 min-1 hour
Cake
●
To bake cakes
Food tray or
wire rack at mid
position
150-400 ℉
1 min-2 hour
Bagel
●
Toast both sides of bagel halves
Wire rack at
top position
Darkness level 1-7
Time and temperature
are automatic
Pizza
●
Melt and brown cheese and
toppings while crisping crust
Wire rack at
mid position
150-450 ℉
1 min-2 hour
Broil
●
Cook open-faced
sandwiches,thin cuts of
vegetables.
●
Brown the tops of
casseroles,gratins and desserts
Food tray at
top position
150-450 ℉
1 min-2 hour
Defrost
●
Thaw frozen food for cooking
Food tray at
mid position
150-400 ℉
1 min-1 hour
Proof
●
Precisely hold low temperatures
●
Proof bread,rolls,pizza and dough
●
Make yogurt
Food tray or
wire rack at low
position
80-120 ℉
30 min-12 hour
Dehydrate
●
Evenly dry out food without
cooking
●
Dry fruit or vegetable
Wire rack or fry
basket at top
position
100-180 ℉
30 min-24 hour
Slow cook
●
Simmer food for long periods of
time at low temperatures
●
Cook soup
Noted:
Usually requires placing
cookware on top of tray or rack.
Food tray or
wire rack at low
position
150-250 ℉
30 min-12 hour
09
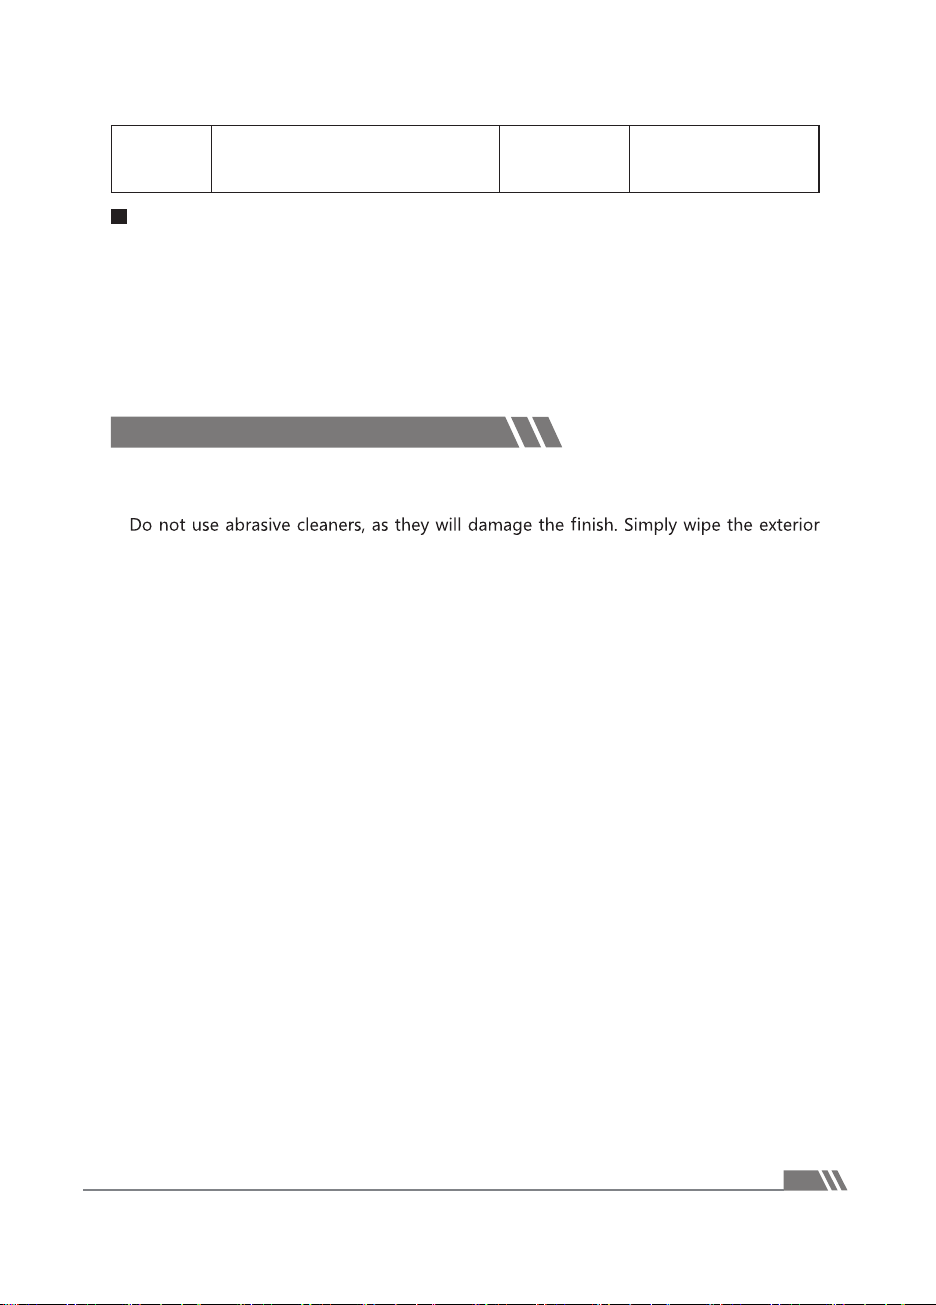
Keep warm
Keep food warm at the
recommended temperature to
prevent bacterial growth
Food tray or
wire rack at low
position
140-230 ℉
30 min-2 hour
Memory storage and reset function
●
Change the preset mode (It can be saved permanently if no change again): Use the
function knob, select the preset menu, change the temperature / time, press the center
of function dail for 5 seconds until the oven beeps.
●
Reset to default mode (factory settings): Use function knob, select any preset menu,
do not change temperature / time, press the center of function dail for 5 seconds until
the oven beeps, then all modes are reset to factory settings/default settings.
●
Always unplug the oven from the electrical outlet and allow it to cool completely
before cleaning.
●
with a clean, damp cloth and dry thoroughly. Apply the cleansing agent to a cloth, not
directly onto the toaster oven, before cleaning.
●
To clean interior walls, use a damp cloth and a mild liquid soap solution or a spray
solution on a sponge. Remove any residue from cleaners with a clean, damp rag. Never
use harsh abrasives or corrosive products. These could damage the oven surface. Never
use steel wool pads, etc., on interior of oven.
●
Cleaning the accessories:
– Oven Rack and Crumb Tray should be hand-washed in hot, sudsy water, or use a nylon
scouring pad or nylon brush, and thoroughly rinsed. These items are NOT dishwasher
safe.
– Baking/Drip Pan and Airfryer Basket are dishwasher safe or can be hand-washed in hot,
sudsy water, or use a nylon scouring pad or nylon brush,and thoroughly rinsed.
●
After cooking greasy foods and once your oven has cooled, always clean top of oven
interior. If this is done on a regular basis, your oven will perform like new.
Removing the grease will help to keep toasting consistent, cycle after cycle.
●
To remove crumbs, slide out the front Crumb Tray and discard crumbs. Wipe clean and
replace. To remove baked-on grease, soak the tray in hot, sudsy water or use nonabrasive
cleaners. Never operate the oven without the Crumb Tray in place.
●
Any other servicing should be performed by an authorized service Representative.
CLEANING AND MAINTENANCE
10
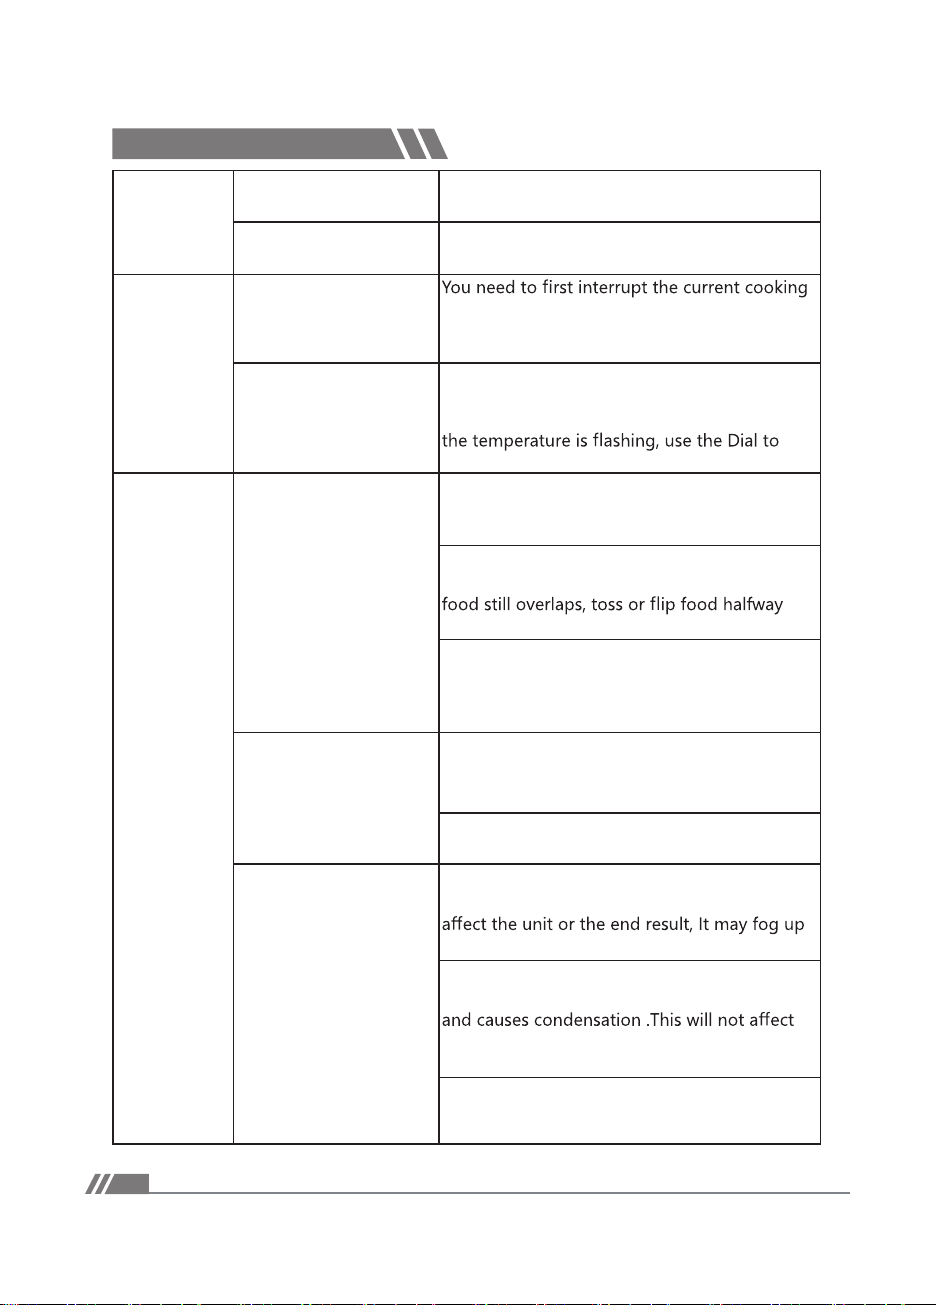
TROUBLESHOOTING
Operation
Why won’t my unit turn
on?
Make sure your unit is plugged into a
functional outlet.
Why does the fan remain
on after cooking?
The fan remains on for cooling purposes.
Programming
Can I change my cooking
function when the unit is
already cooking?
function by pressing Start/Pause. Then unit will
go back to selection menu and desired cooking
function can be chosen.
Can I change the time or
temperature when the
unit is already cooking?
Yes, Simply turn the Selector Dial during
cooking to add time, to change the
temperature, press the Selector Dial and, when
increase/decrease temperature.
Cooking
Why is my food not
crispy or fried evenly?
Some foods may require more oil than others.
If not crispy enough, spray, brush or add some
oil on the food.
Make sure food is spread evenly in one single
layer in the Airfryer Basket with no overlap. If
through cooking cycle.
Put the food in for additional cooking time.
Make sure to check periodically until food
reaches desired brownness. Do not leave oven
unattended.
Why is my food
undercooked?
If you put too much food in the basket, try
with smaller batches of food and single layers,
rather than stacking food on top of each other.
The temperature might be too low. Use the
Selector Dial to increase temperature.
Why does condensation
and steam come out of
my unit?
When preparing greasy foods, oil may leak into
the pan and it produces steam. This will not
the viewing window on the sides or corners .
When preparing foods with a high moisture
content, the water evaporates out of the food
the unit or the end result. It may fog up the
viewing window on the sides or corners.
The pan, basket, or bottom of oven may
contain grease residue from previous use Make
sure to clean the pan properly after each use.
11

Cleaning
Are the parts dishwasher
safe?
The Baking/Drip Pan and the Airfryer Basket
are dishwasher safe.
Do not put the Crumb Tray or the wire rack in
the dishwasher; instead, hand-wash with warm,
sudsy water.
How do I clean tough-
to-remove food residue
from my accessories?
To remove baked-on grease, soak the
accessories in hot, sudsy water or use a
nonabrasive cleanser.
NOTE:
E1: Problem: There is an open circuit in the temperature monitor.
Solution: Replace by new temp sensor
E2: Problem: There is a short circuit in the temperature monitor.
Solution: Replace by new temp sensor
12

WARRANTY
13