
Frigidaire.com USA 1-800-374-4432 Frigidaire.ca Canada 1-800-265-8352
Combination Oven
use & care
Introduction .......................................................2
Important Safety Information ....................3
Features ..............................................................5
Controls & Operation .....................................6
Care & Cleaning ............................................. 12
Troubleshooting ............................................. 13
Warranty ........................................................... 14
FRCOLIT0124 (April 2024)
2
Welcome to our
family
This manual is your resource for the use
and care of your product. Please read
it before using your appliance. Keep it
handy for quick reference. If something
doesn’t seem right, the troubleshooting
section will help you with common issues.
Visit Owner Support on
www.frigidaire.com
for access to FAQs,
how-to videos and articles, accessories
and cleaning products.
We are here for you! Visit our website,
chat with an agent, or call us if you need
help. If you do need service, we can get
that started for you.
For Peace of Mind Protection, register
you product. Locate your registration
card and/or label on your product with
the photo register icon.
Keep your product info here so it’s easy
to find.
Model Number:
Serial Number:
Purchase Date:
INTRODUCTION
Definitions
This is the safety alert symbol. It is
used to alert you to potential personal
injury hazards. Obey all safety messages
that follow this symbol to avoid possible
injury or death.
CAUTION
CAUTION indicates a potentially
hazardous situation which, if not
avoided, may result in minor or
moderate injury.
DANGER
DANGER indicates an imminently
hazardous situation which, if not avoided,
will result in death or serious injury.
IMPORTANT
IMPORTANT indicates installation, oper-
ation or maintenance information which
is important but not hazard-related.
WARNING
WARNING indicates a potentially
hazardous situation which, if not avoided,
could result in death or serious injury.
Product Information
Power: 120 V 60Hz 1700
A
TTENTION
Please read all instructions related to
your product and keep this manual for
your future reference. Follow all the
warnings and instructions described in
this manual to better use your product
and get better results.
ENVIRONMENT
Frigidaire is committed to offering
products that have less impact on the
environment, thus contributing to the
sustainable development. Electronic
equipment, cells and batteries must be
disposed of separately from ordinary
waste. If your equipment has cells or
batteries, when they are replaced or
discarded, they must be sent to an
Frigidaire Authorized Service so that
they have a suitable destination.
Environmentally sound preparation of
packaging and products at the end of life
is everyone’s responsibility.
Conforms to UL Std.1026
Certified to CSA Std. CSA C22.2
No.60335-1&60335-2-9:20

3
IMPORTANT SAFETY INFORMATION
SAFETY PRECAUTIONS
Read all instructions before using the
electric appliance. The following basic
precautions should always be followed.
• Children shall not play with the
appliance. Cleaning and user
maintenance shall not be performed
by children without supervision.
Close supervision is necessary when
the Combo Oven is being used by or
near children.
• Please keep the Combo Oven and
the power cord out of the reach of
children.
• After unpacking the product, keep
the packaging material out of reach
of children.
• This appliance is intended for
normal household use only. Not for
commercial use.
• Check that the supply voltage is the
same as the product label before
connecting it.
• Unplug the Combo Oven and allow it
to cool before cleaning.
• Do not use the appliance if the plug,
the main cord or the appliance itself
is damaged. Always make sure that
the plug is inserted properly into a
wall outlet.
• Regularly inspect the appliance
and power cord. If the power cord
is damaged or broken, it must be
replaced by a service agent or
similarly qualified persons to avoid
safety hazards.
• Always return the appliance to
an authorized service center for
examination or repair. Do not
attempt to repair the appliance
yourself.
• Keep the power cord away from hot
surfaces or sharp objects to avoid
damage. Do not use an extension
cord. Do not use an outlet under the
counter.
• Do not excessively pinch, bend, twist
or place heavy objects on the power
cord to prevent from exposing or
breaking its shielding. Do not use
the electrical cord to pull or drag the
product.
• Do not let cord hang over edge
of table or counter, or touch hot
surfaces.
• Always attach plug to appliance first,
then plug cord into the wall outlet.
To disconnect, turn the unit o, then
remove plug from wall outlet.
• The accessible surfaces may become
hot during use. Do not touch hot
surfaces. Use handles. Keep hair and
clothing away from heated parts of
the product.
• Do not cover the air inlet and the air
outlet openings while the appliance
is operating.
• Never unplug the product from the
outlet by pulling on the electrical
cable, use the plug.
• Do not place the appliance on or
near a hot gas or electric burner, or in
a heated oven. Do not use outdoors.
• Never put anything flammable,
explosive or corrosive in the
basket or trays. Never place paper,
cardboard, non-heat-resistant plastic
or similar combustible materials
into your Combo Oven. Never put
baking or parchment paper into the
Combo Oven without food on top.
Air circulation can cause paper to lift
and touch heating coils.
• Do not pour oil into the cooking
basket or trays.
• Be extremely cautious when moving
your Combo Oven (or removing the
basket) if it contains hot oil or other
hot liquids.
• Never start cooking without the
basket or trays in place.
• Do not fill the basket above the
MAX line in order to prevent food
contacting the heating element.
IMPORTANT SAFEGUARDS
4
IMPORTANT SAFETY INFORMATION
IMPORTANT SAFEGUARDS
FOR HOUSEHOLD USE ONLY
SAVE THESE INSTRUCTIONS FOR
FUTURE REFERENCE.
WARNING
CALIFORNIA RESIDENTS ONLY:
For cancer and reproductive harm
information visit:
www.P65Warnings.ca.gov
CAUTION
• Objects in the direct path of the hot
air vent may suer damage such as
deformation or staining.
• The appliance is not intended for use
as a barbecue. The use of coal inside
the over presents a high risk of fire.
WARNING
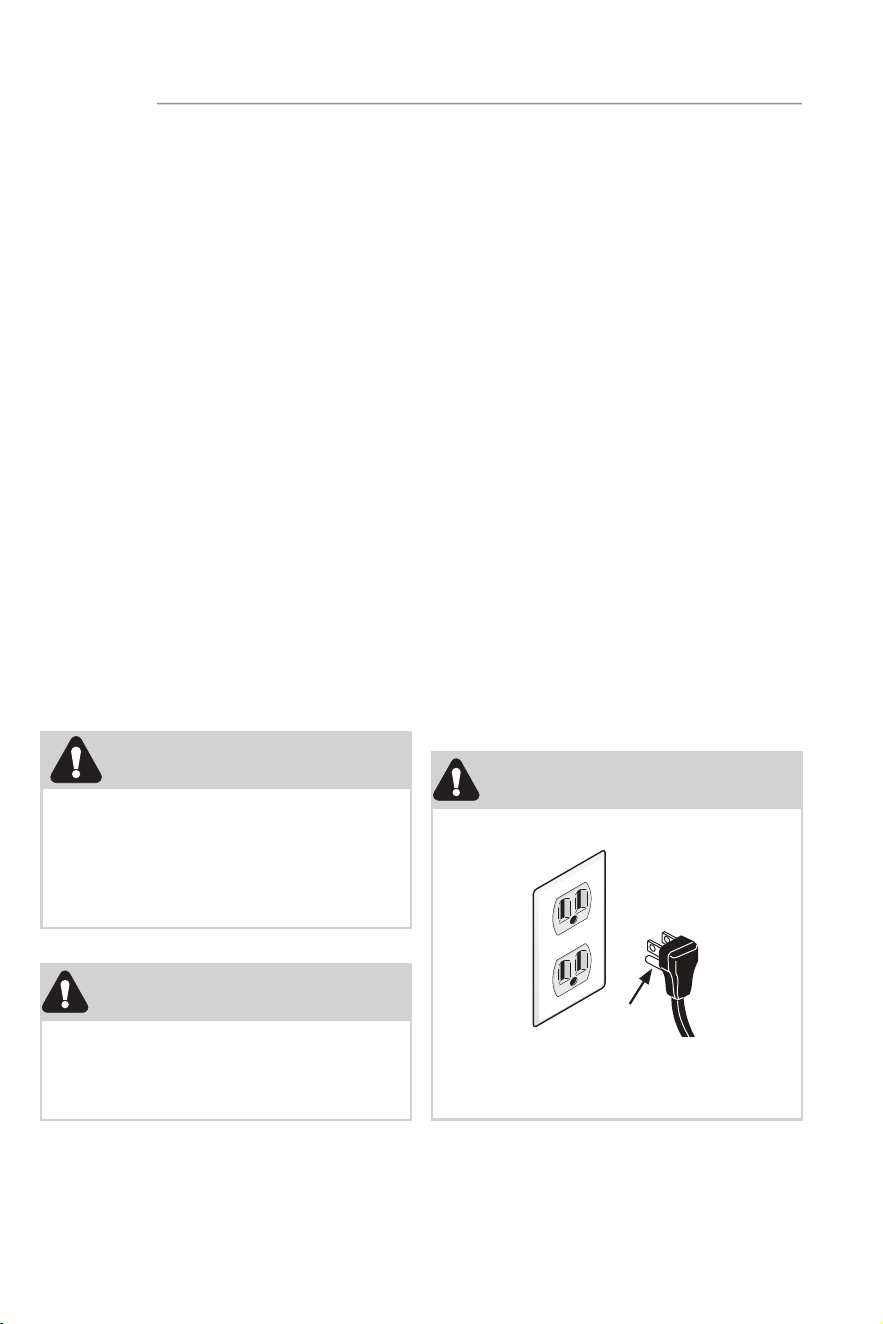
FIRE/ELECTRICAL SHOCK HAZARD
DO NOT, under any circumstances, cut,
remove, or bypass the grounding prong.
Grounding-type
wall receptacle
Power Cord
with 3-prong
grounded plug
• Do not touch the basket directly with
your hands during after use to avoid
burns. Always use the handle to
remove the basket and the handling
hook to remove the skewer.
• Do not insert pins, wires or other
objects into any of the openings
of the Combo Oven to avoid an
electrical shock or injury.
• To protect against electric shock, do
not immerse the Combo Oven cord,
plug, or housing in water or other
liquids.
• Do not move or shake the Combo
Oven during use.
• Do not insert any foreign objects into
the door safety switch. The safety
switch shuts the unit down when the
door is opened.
• Immediately unplug the unit if the
unit emits black smoke. Wait for
smoke to clear before removing the
cooking basket.
• Do not leave your Combo Oven
unattended while in use.
• Do not store items on top of the
Combo Oven when it is turned on.
• Do not use the Combo Oven for any
purpose other than its intended use.
• When cooking, DO NOT place the
appliance against a wall or against
other appliances. Leave at least
5"/13 cm of free space on the back,
sides, and above the appliance. DO
NOT operate the appliance on or
near combustible materials. DO NOT
block any ventilation openings as hot
steam is released through them. DO
NOT place anything on top of the
appliance.
• The use of accessory attachments
not recommended by the appliance
manufacturer may cause injuries.
• Respect the minimum distances
around the product: 5"/13 cm sides;
5"/13 cm rear.
5
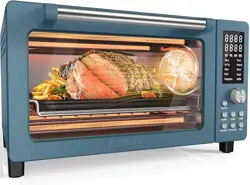
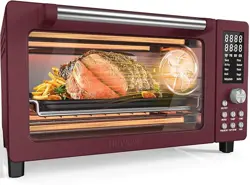
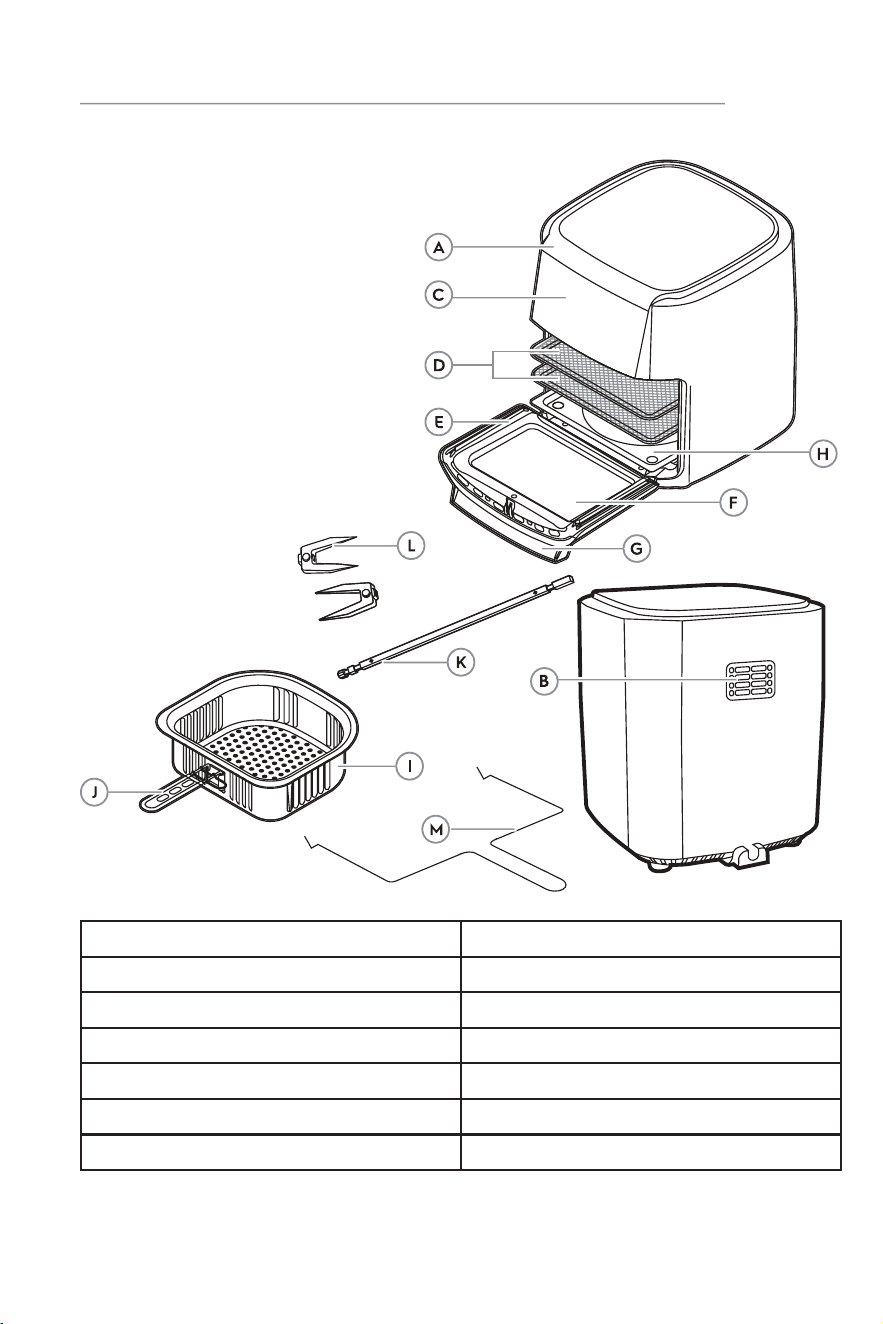
FEATURES
A. Main Unit H. Drip Tray
B. Rear Air Outlet I. Basket
C. Control Panel J. Basket Handle
D. Wire Racks K. Skewer
E. Removable Door L. Skewer Forks
F. Window Display M. Skewer Handling Hook
G. Door Handle
6
CONTROLS & OPERATION
1. Remove all packaging materials and
promotional labels from the inside
and outside of the appliance.
2. Place the appliance on a stable, level
and heat-resistant surface, leaving
enough space to open the door.
3. Clean the appliance and accessories
(see CARE & CLEANING).
4. Heat the appliance for 10 min using
the Air Fry function.
Before First Use
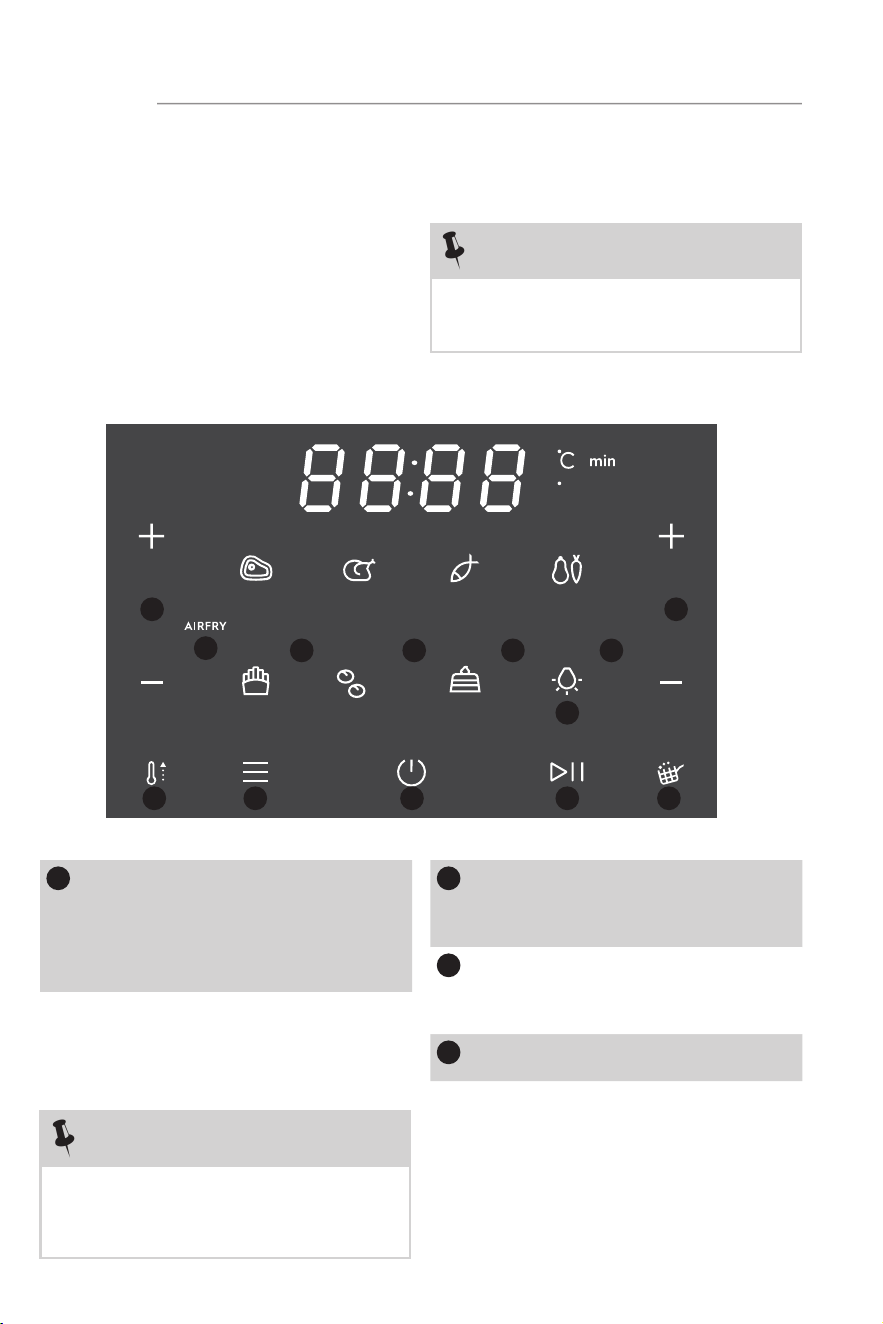
Control Panel
NOTE
The operating temperature varies
between 140 ºF and 400 °F (Dehydrate
function operates between 60 °F and
160°F)
NOTE
During the first heating operation you
may notice a small amount of smoke
and/or an odor of oil.
F
BAKE REHEAT DEHYDRATE
ROTISSERIE
1
Temperature Adjustment:
To change between Fahrenheit
and Celsius press the Plus (+)
Time (1) and Plus (+) Temperature
(7) buttons together for up to 5
seconds.
Press the + or - temperature buttons
to set the preparation temperature.
For a quick adjustment, Hold down
the button.
2
AIR FRY: With Air Fry mode
selected, you can choose one of the
7 preset recipes or manually adjust
the preparation.
3
BAKE: With bake mode selected,
cook your favorite foods such as
cookies, cakes, cinnamon rolls and
more.
4
REHEAT: Quickly warm up your
favorite foods.
1
2
3 4 5
6
7
8
9 10 11 12 13

7
CONTROLS & OPERATION
8
Light
Press the Light button to turn the
light on or o.
9
Preheat Indicator Light
The indicator light will turn on
informing you that the appliance is
preheating. The preheating lasts for
a maximum of 5 minutes.
NOTE
The operating time varies between 1
minute and 99 minutes (except for
the “dehydrate” function: which is
between
5 minutes and 300 minutes).
NOTE
If the Air Fryer is paused at any time
for more than 10 minutes, the appliance
will return to the home screen.
10
Preparation Mode Button
Press the Preparation Modes menu
to select one of the 5 preparation
modes.
11
On/O
This button has three functions:
Tap the button to activate the
control panel.
If the appliance is not in use, touch
the button for the panel to enter
rest mode. The panel will show a
countdown of 20 seconds for the
appliance to cool down.
12
Start/Pause
Tap the button to start preparing
your food or to pause the process
during cooking. When paused, it is
possible to adjust the temperature/
time of the cycle if necessary.
NOTE
The preset temperature and time in the
cooking modes can also be manually
adjusted according to your preference.
7
Time Adjustment
Tap the + or - time buttons to
set the cooking time. For a quick
adjustment, hold down the button.
5
DEHYDRATE: Dehydrate fruits and
vegetables at low temperatures for
healthy snacks.
6
ROTISSERIE: With the skewer
inserted into the appliance, use this
function to rotate your meats for
even cooking.
13
Turn Food Indicator Light
This indication will appear halfway
through the cooking time for some
of the preset recipes and for manual
adjustment.
8
CONTROLS & OPERATION
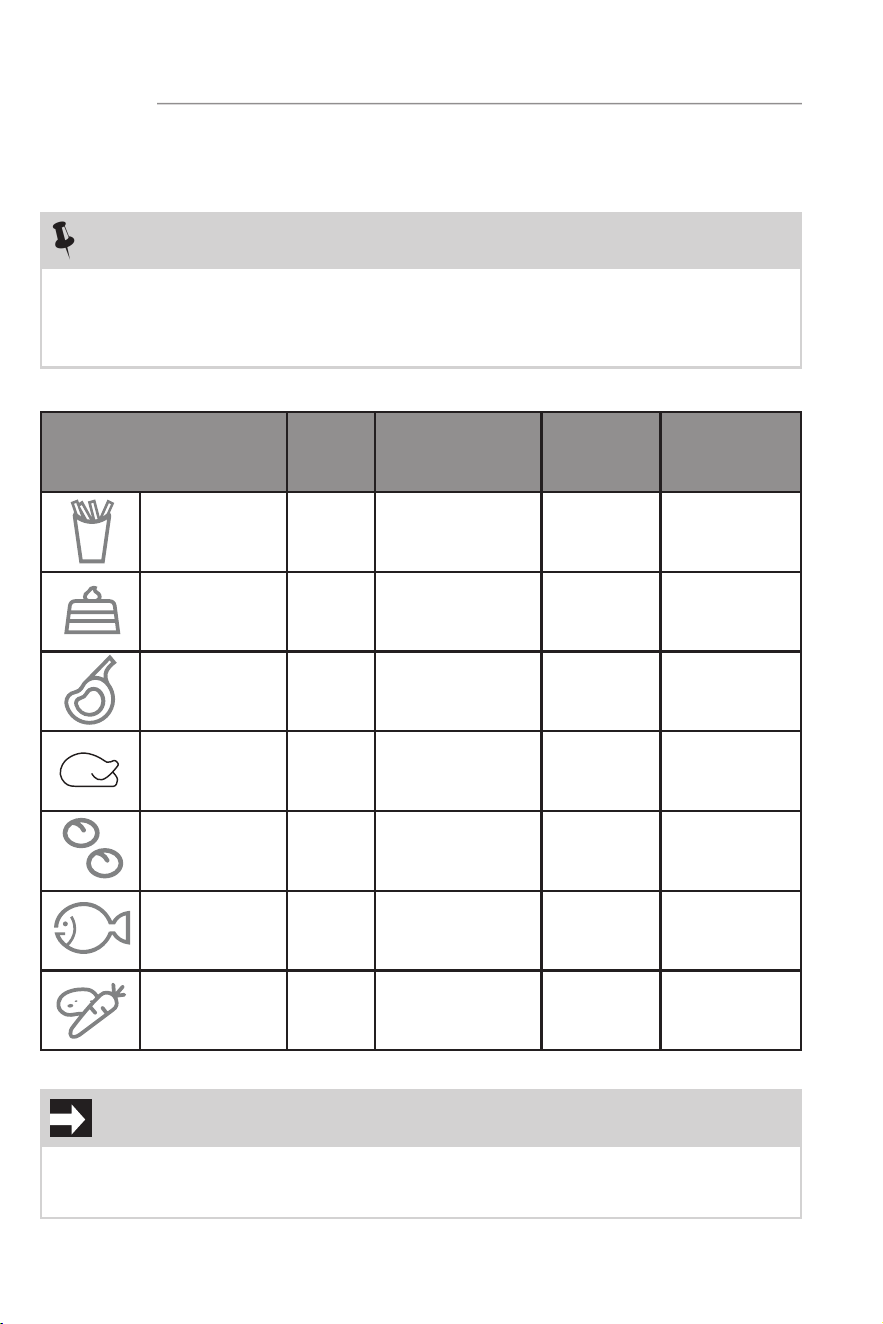
IMPORTANT
The temperature and preparation times listed in the table are guidelines and vary
depending on the recipes and the amount of ingredients, shape and texture of the
foods. You can adjust the cooking temperature and time as desired.
Preset Recipes
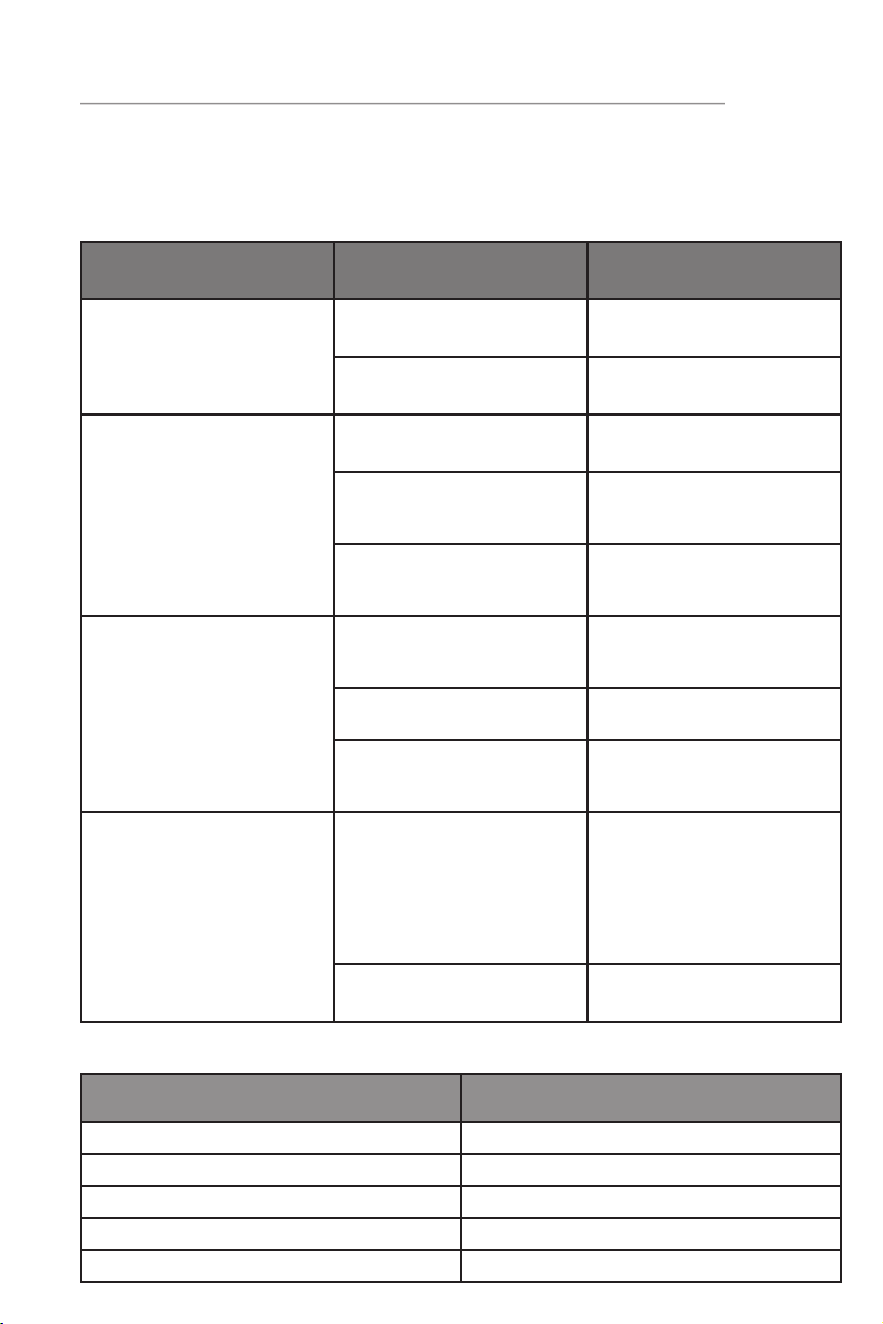
Select one of the 7 predefined preparation recipes:
Food
Temp.
(°F)
Prep.
Time
(minutes)
P
ortion (
g)
T
urn Food at
the halfway
point?
French Fries
400 20 600
Yes
Cake 340 45
550
6-8 inches
No
Meat 360 30
900
Yes
Chicken 400 40
1000
Yes
Rolls
360 10
50
8 pieces
No
Fish 360 15
200
No
Vegetables 360 30
800
Yes
NOTE
It is necessary to turn certain foods at halfway though the cooking time for uniform
texture. Use gloves or tongs to handle to ensure your safety and avoid accidents.
The cooking process pauses if the door is opened. Operation resumes once the
door is closed.
9
CONTROLS & OPERATION
WARNING
Keep your face, arms and hands away
from steam released when opening the
door.
Using your Air Fryer
1. Place the appliance on a stable, level
and heat-resistant surface leaving
enough room to open the door.
IMPORTANT
Do not obstruct the air outlets of the
product.
2. Plug in the appliance.
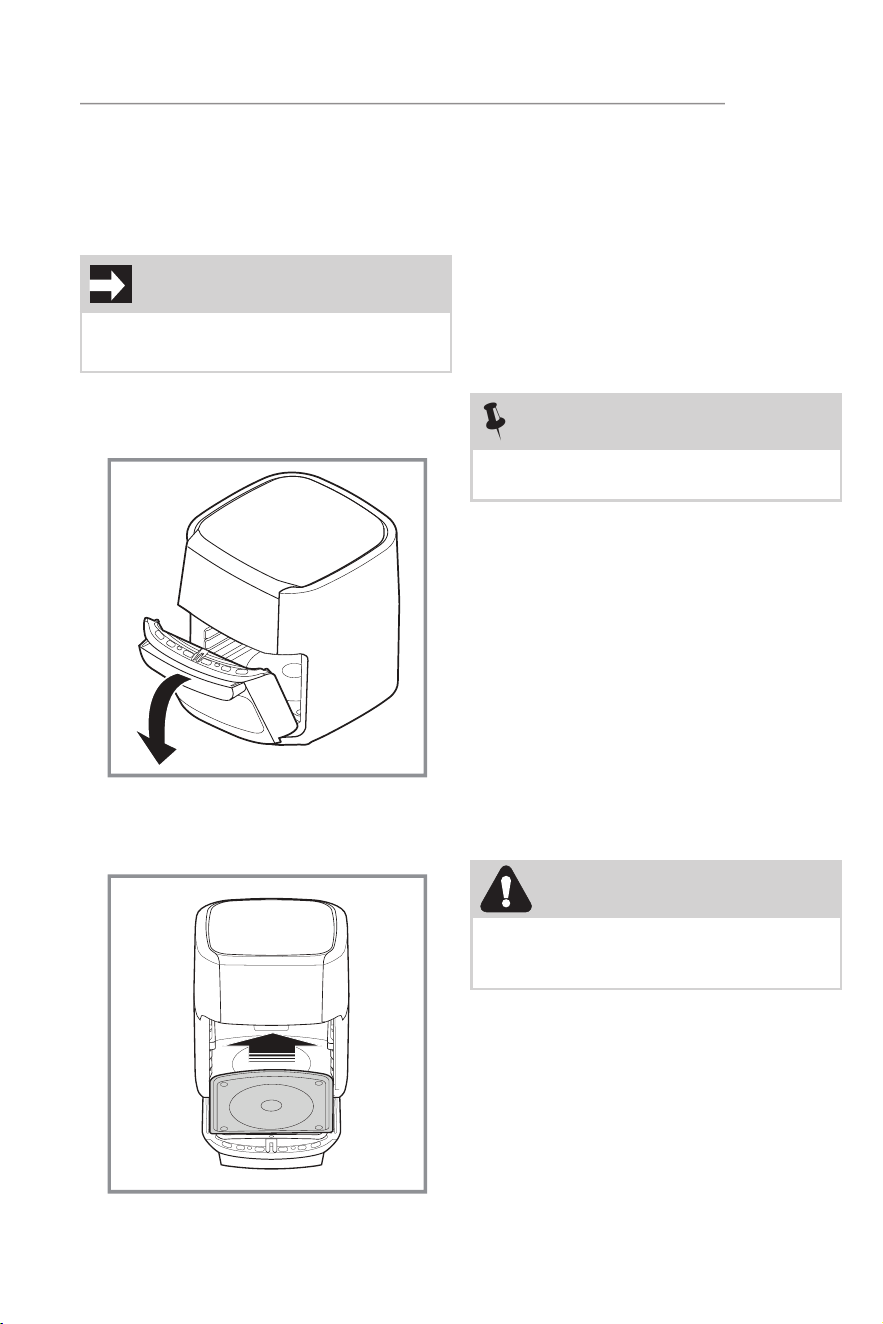
3. Pull on the handle to open Door.
4. Insert the Drip Tray into the bottom
of the appliance so that grease and
debris do not fall into the appliance.
6. Place food in the chosen accessory
and close the door of your
appliance.
7. Press the On/O button once to
turn on the appliance.
8. Select a preset recipe, staging
mode, or manually adjust the
temperature and time as desired.
9. Press the Start/Pause button to
begin food preparation.
NOTE
The control panel buttons beep to
confirm selection.
The appliance automatically preheats
when the start/pause button is pressed.
The preheat light stays on for up to 5min.
The time countdown begins once the
cooking temperature is reached.
10. At the end of the programmed time,
the panel will flash the time, and
start a countdown of 20s for the
device to cool down and at the same
time will emit an audible warning.
11. Pull the handle to open the door.
12. Use a heat resistant utensil to
remove food and deposit it in a
container.
13. Unplug the appliance when finished
or, return to step 8 if you wish to
prepare more food.
5. Your appliance has 3 accessories
for the preparation of various foods
(See FEATURES).
10
CONTROLS & OPERATION
NOTE
If both wire racks are used at the same
time it is recommended to switch the
rack positions halfway through the
cooking time for more even cooking.
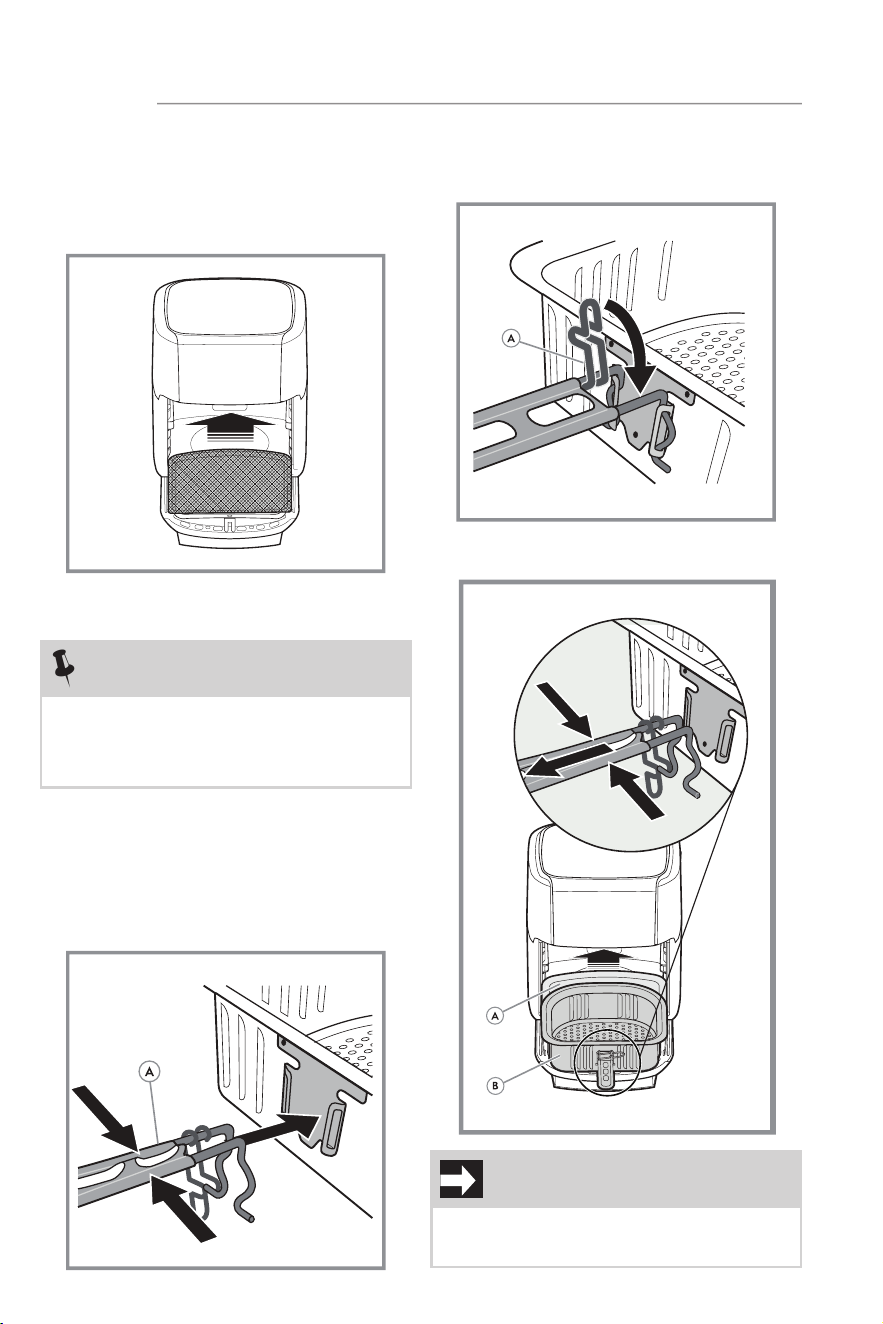
Wire Racks
1. Position the food on the Wire
Rack(s), then and slide them into the
rails on the sides of the appliance.
2. Use the wire racks when dehydrating
fruits/vegetables.
Basket
The basket handle must be attached
when inserting or removing food.
1. Press the sides of the handle (A) and
fit the handle into the slots on the
basket.
2. Release the handle then close the
clip to lock the handle in place.
3. Place the Basket on the desired shelf
and remove the basket handle.
IMPORTANT
Be sure handles are assembled and
fastened properly.
11
CONTROLS & OPERATION
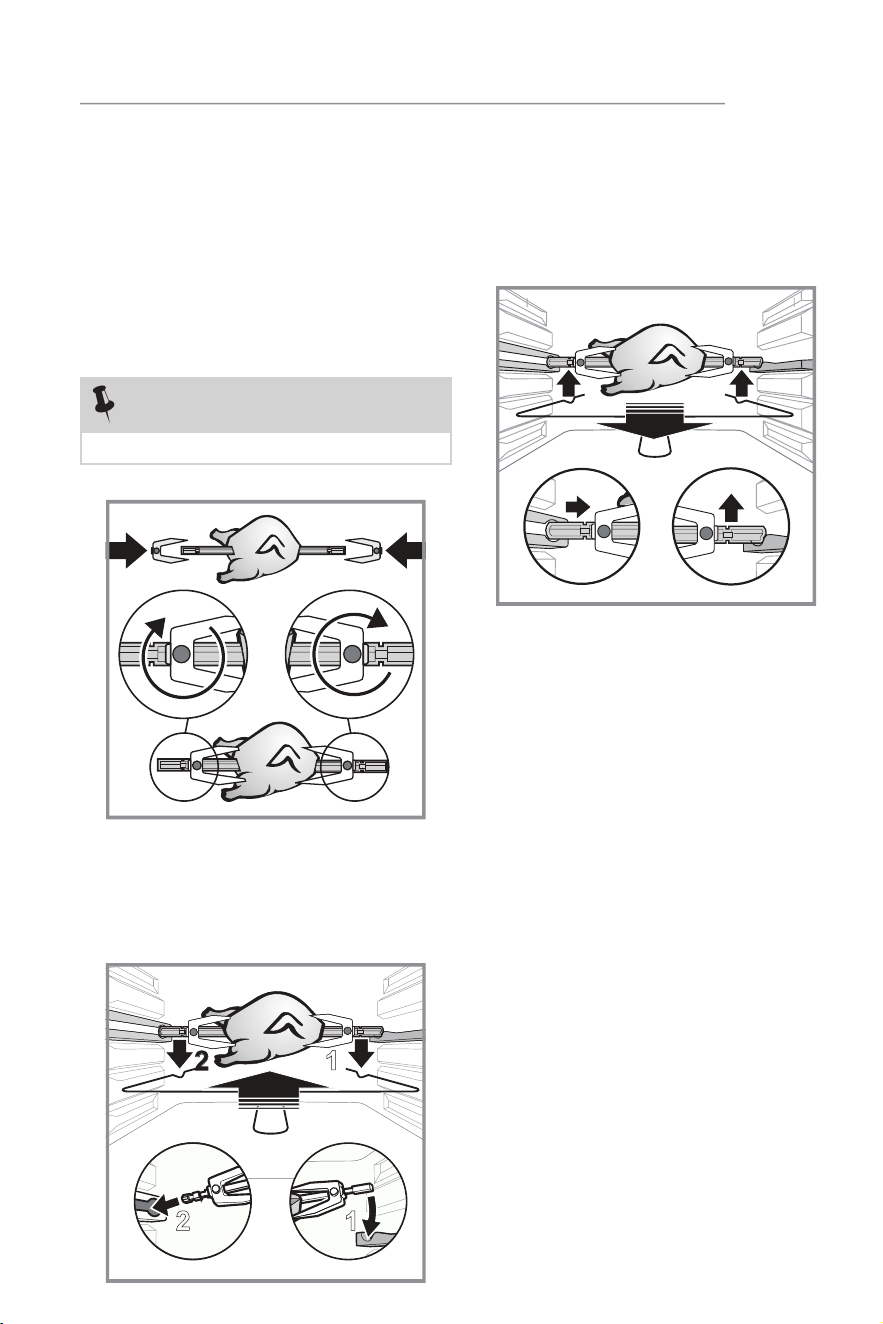
Spinning Skewer
Insert the Skewer into the meat of your
choice. Make sure the meat can freely
rotate within the cavity. If meats are too
large they may not cook correctly, and
they may hit the side of the cavity and
damage the appliance.
1. Position the forks and attach them
with the screws so that the food is
securely fastened.
3. To remove the Skewer, use the
Handling Hook by snapping into the
skewer and pushing it slightly to the
right to disengage it from the fixing
brackets. Then slide the Skewer
down the rails out of the appliance.
2. Use the Handling Hook to position
the Skewer on the rails and slide it
to the docking points. Make sure
the Skewer is properly seated in the
turning hole on the left side of the
appliance.
NOTE
Use the forks to help secure the food.
2
1
2
1
1
2
1
12
Cleaning
To avoid electric shock, remove the plug
from the outlet before performing any
cleaning or maintenance. Cleaning should
be done with a cold appliance.
Use only a damp cloth to clean the outside
of the appliance and its electrical cable.
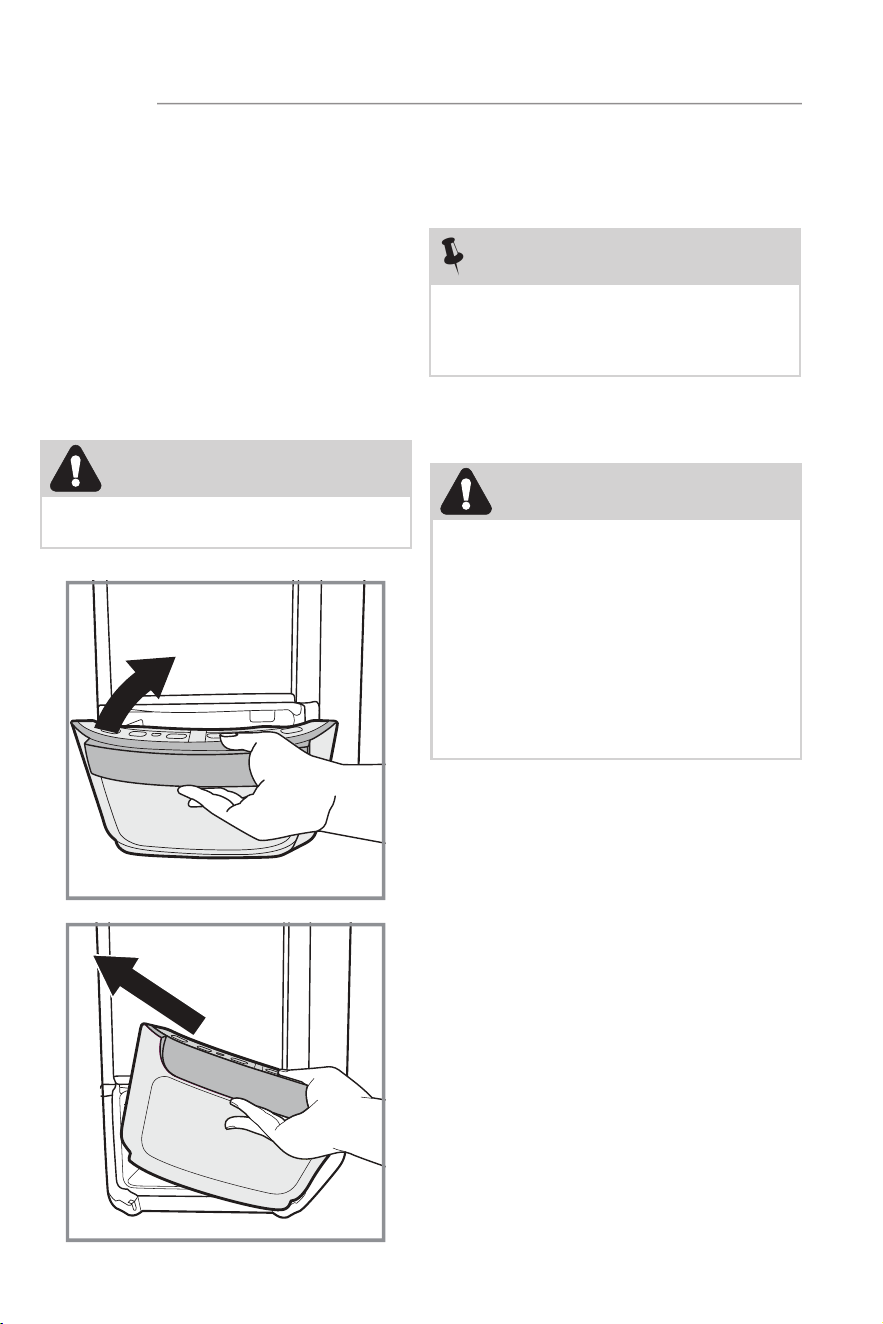
1. Open the door at 45° and remove
the Removable Door by first pulling
the left side up and then pull the
door to the left. Clean both sides
with warm water and mild detergent.
2. Use a soft sponge and mild
detergent and rinse thoroughly to
clean the accessories.
3. Use a dry, soft cloth to clean the
outside of the appliance.
CAUTION
Never immerse the appliance, plug or
power cord in water or any other liquid.
Never clean your appliance with
flammable fluids such as alcohol,
kerosene, gasoline, thinner, solvents,
removers or with chemicals such
as detergents with ammonia, acids,
vinegars, soda or abrasives such as
soaps.
Do not use steam equipment to clean
the appliance.
CAUTION
Do not place the removable door in the
dishwasher. Handwash only.
CARE & CLEANING
4. It is important to clean your
appliance after each use as the
buildup of oil, grease or food
can cause unpleasant odors,
malfunctions and decrease
performance.
Storage
1. Turn o the appliance and allow it to
cool completely.
2. Ensure that all components and
accessories are clean and dry.
3. Store your appliance in a flat, dry,
safe place away from children.
1
2
NOTE
The Drip Tray (H), Basket (I), Basket
Handle (J), Skewer (K), Skewer Forks
(L), and Skewer Handling Hooks (M) are
dishwasher safe. (See Features)
13
TROUBLESHOOTING
Use this guide to help with common issues that may interfere with the performance of
the product. If this does not help improve the issue, please contact Customer Service.
Problem Possible Cause Solution
Appliance does not turn
on or heat up
The appliance is not
plugged into the outlet
Place the power plug into
the socket
The door is not closed
properly
Check that the door is
closed
Food preparation takes
longer than expected
The basket is over filled
with food
Prepare a smaller amount
of ingredients
The set temperature is
too low
Increase the temperature
using the temperature
control keys
Food was not turned or
shaken
Turn or shake the food
after half the cooking time
has passed
The food is raw on the
inside and/or burned on
the outside.
The set temperature is too
high
Reduce the temperature
by using the temperature
control keys
The Wire Racks are not
set at a suitable height
Move the wire racks closer
to the heating element
Food was not turned or
shaken
Turn or shake the food
after half the cooking time
has passed
White smoke coming from
appliance.
Preparation of fatty foods The oil released when
cooking some foods may
splash on the heating
element and produce
white smoke. This is
normal and does not
aect the food
Residue from previous use Be sure to clean the
appliance after each use
Model FRCO100B
Voltage 120V
Frequency 60Hz
Power 1700W
Capacity 12.6 Qts
Color Black

1
L
IMITED WARRANTY
Your appliance is covered by a one year limited warranty. For one year from your
original date of delivery, Electrolux will pay all costs for repairing or replacing any
parts of this appliance that prove to be defective in materials or workmanship
when such appliance is installed, used and maintained in accordance with the
provided instructions.
Exclusions
This warranty does not cover the following:
1. Products with original serial numbers that have been removed, altered or cannot
be readily determined.
2. Product that has been transferred from its original owner to another party or
removed outside the USA or Canada.
3. Rust on the interior or exterior of the unit.
4. Products purchased “as-is” are not covered by this warranty.
5. Products used in a commercial setting.
6. Service calls which do not involve malfunction or defects in materials or
workmanship, or for appliances not in ordinary household use or used other than
in accordance with the provided instructions.
7. Service calls to correct the installation of your appliance or to instruct you how
to use your appliance.
8. Expenses for making the appliance accessible for servicing, such as removal of
trim, cupboards, shelves, etc., which are not a part of the appliance when it is
shipped from the factory.
9. Service calls to repair or replace appliance light bulbs, air filters, other
consumables, or knobs, handles, or other cosmetic parts.
10. Pickup and delivery costs; your appliance is designed to be repaired in the home.
11. Surcharges including, but not limited to, any after hour, weekend, or holiday
service calls, tolls, ferry trip charges, or mileage expense for service calls to
remote areas, including the state of Alaska.
12. Damages to the finish of appliance or home incurred during transportation or
installation, including but not limited to floors, cabinets, walls, etc.
13. Damages caused by: services performed by unauthorized service companies;
use of parts other than genuine Electrolux parts or parts obtained from persons
other than authorized service companies; or external causes such as abuse,
misuse, inadequate power supply, accidents, fires, or acts of God.
DISCLAIMER OF IMPLIED WARRANTIES; LIMITATION OF REMEDIES
CUSTOMER’S SOLE AND EXCLUSIVE REMEDY UNDER THIS LIMITED WARRANTY SHALL BE REPAIR
OR REPLACEMENT AS PROVIDED HEREIN. CLAIMS BASED ON IMPLIED WARRANTIES, INCLUDING
WARRANTIES OF MERCHANTABILITY OR FITNESS FOR A PARTICULAR PURPOSE, ARE LIMITED
TO ONE YEAR OR THE SHORTEST PERIOD ALLOWED BY LAW, BUT NOT LESS THAN ONE YEAR.
ELECTROLUX SHALL NOT BE LIABLE FOR CONSEQUENTIAL OR INCIDENTAL DAMAGES SUCH
AS PROPERTY DAMAGE AND INCIDENTAL EXPENSES RESULTING FROM ANY BREACH OF THIS
WRITTEN LIMITED WARRANTY OR ANY IMPLIED WARRANTY. SOME STATES AND PROVINCES DO
NOT ALLOW THE EXCLUSION OR LIMITATION OF INCIDENTAL OR CONSEQUENTIAL DAMAGES,
OR LIMITATIONS ON THE DURATION OF IMPLIED WARRANTIES, SO THESE LIMITATIONS OR
EXCLUSIONS MAY NOT APPLY TO YOU. THIS WRITTEN WARRANTY GIVES YOU SPECIFIC LEGAL
RIGHTS. YOU MAY ALSO HAVE OTHER RIGHTS THAT VARY FROM STATE TO STATE.
If You Need Service
Keep your receipt, delivery slip, or some other appropriate payment record to establish
the warranty period should service be required. If service is performed, it is in your best
interest to obtain and keep all receipts. Service under this warranty must be obtained by
contacting Electrolux at the addresses or phone numbers below.
This warranty only applies in the USA, Puerto Rico and Canada. In the USA and Puerto
Rico, your appliance is warranted by Electrolux Major Appliances North America, a
division of Electrolux Home Products, Inc. In Canada, your appliance is warranted by
Electrolux Canada Corp. Electrolux authorizes no person to change or add to any
obligations under this warranty. Obligations for service and parts under this warranty
must be performed by Electrolux or an authorized service company. Product features or
specifications as described or illustrated are subject to change without notice.
US
A & Puerto Rico
1-800 374 4432
Electrolux Home Products, Inc.
10200 David Taylor Drive
Charlotte, NC 28262
C
a
nada
1-800 265 8352
Electrolux Canada Corp.
5855 Terry Fox Way
Mississauga, Ontario,
Canada L5V 3E4
4

welcome home.
Frigidaire.com
1-800-374-4432
Frigidaire.ca
1-800-265-8352
owner support
accessories
service
Our home is your home. Visit us if you
need help with any of these things:
registration
(See your registration card
for more information.)