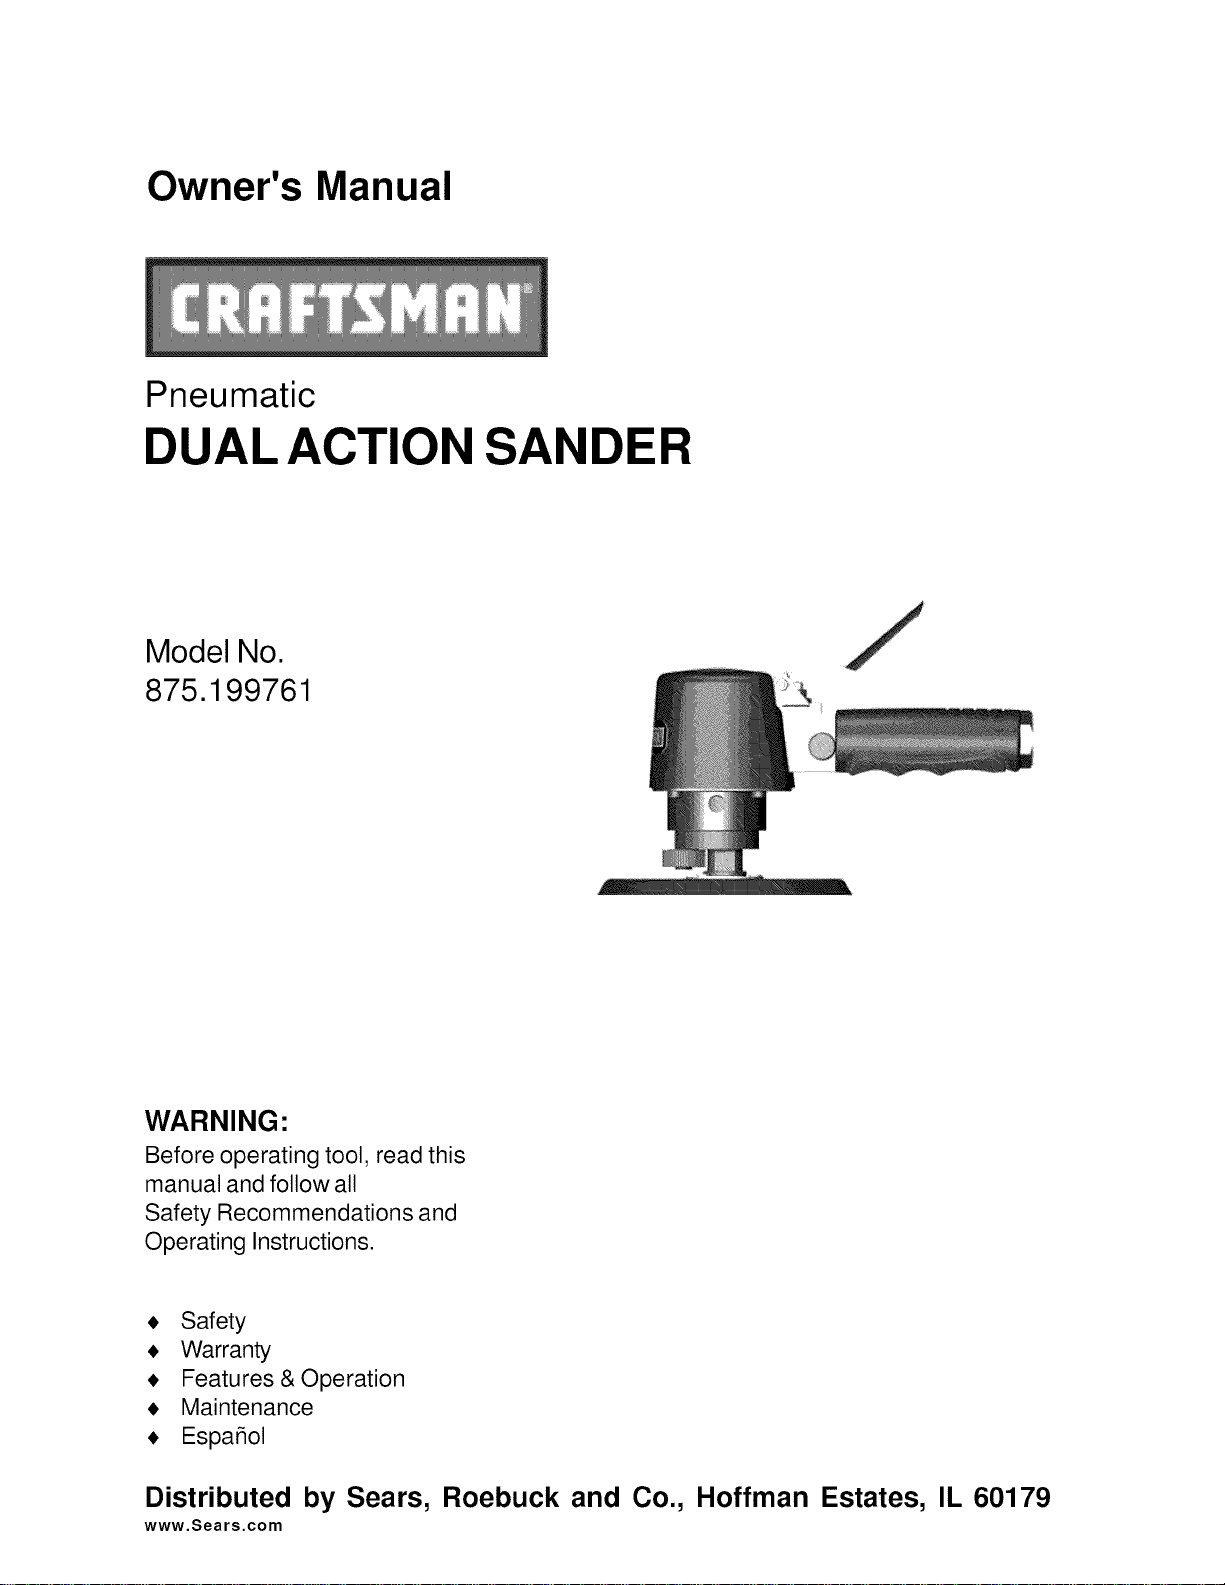
Owner's Manual
Pneumatic
DUAL ACTION SANDER
Model No.
875.199761
WARNING:
Before operating tool, read this
manual and follow all
Safety Recommendations and
Operating Instructions.
Safety
, Warranty
Features & Operation
Maintenance
EspaSol
Distributed by Sears,
www.Sears.com
Roebuck and Co.,
Hoffman
Estates,
IL 60179
Read Operating Instructions
Please become familiar with all the instructions and
warnings before operating any pneumatic tool.
Always Wear Approved Eye Protection
Impact resistant eye protection should meet or exceed
the standards set forth in ANSI Z87.1, Occupational and
Educational Eye and Face Protection. Look for marking
Z87.1 on your eye protection to ensure that it is an
approved style.
Hearing Protection is Recommended
Hearing protection should be used when the noise level
exposure equals or exceeds an 8 hour time-weighted
average sound level of 85dBA. Process noise, reflective
surfaces, other tools being operated nearby, all add to the
noise level in a given work area. If you are unable to
determine your noise level exposure, we recommend the
use of hearing protection.
Avoid Prolonged Exposure to Vibration
Pneumatic tools can vibrate during use. Prolonged
exposure to vibration or very repetitive hand and arm
movements can cause injury. Discontinue the use of any
tool if you experience tingling, numbness, discomfort or
pain in your hands or arms. You should consult your
physician before resuming use of tool.
90 PSI Maximum
This tool is designed to operate at an air pressure of 90
pounds per square inch gauge pressure (90 PSI)
maximum, at the tool. Use of higher air pressure can, and
may cause injury. Also, the use of higher air pressure
places the internal components under loads and
stresses they were not designed for, causing premature
toot failure.
NOTE: THEAIR SUPPLY SHOULD BE CLEAN, DRYAND
PREFERABLY LUBRICATED. FOR BEST RESULTS
DRAIN THE MOISTURE FROM YOUR COMPRESSOR
DAILY.
CAUTION: Safety goggles should be worn when
operating the sander to avoid dust and particles from
entering the eyes. Secure work with clamps or vise so
both hands are free to operate tool. Keep proper footing
and balance at all times.
[ WARNIN I
Some dust created by power sanding, sawing, grinding,
drilling and other construction activities contains chemi-
cals known to cause cancer, birth defects or other
reproductive harm. Some examples of these chemicals
are:
• Lead from lead based paint
• crystalline silica from bricks and cement
and other masonry products, and
• arsenic and chromium from chemically-
treated lumber.
Your risk from those exposures varies, depending on how
often you do this type of work. To reduce your exposure to
these chemicals: work in a well ventilated area, and work
with approved safety equipment, such as dust masks that
are specifically designed to filter out microscopic par-
ticles.
(2)
FULL ONE YEAR WARRANTY ON
CRAFTSMAN AIR-DRIVE TOOLS
If this Craftsman tool fails to give complete satisfaction
within one year from the date of purchase, RETURN IT
TO THE NEAREST SEARS STORE IN THE UNITED
STATES, and Sears will repair or replace it free of charge.
If this Craftsman tool is used for commercial or rental
purposes, this warranty applies for only 90 days from the
date of purchase. This warranty gives you specific legal
rights, and you may also have other rights which vary
from state to state.
Distributed by Sears, Roebuck and Co., Dept. 817WA,
Hoffman Estates, IL 60179.
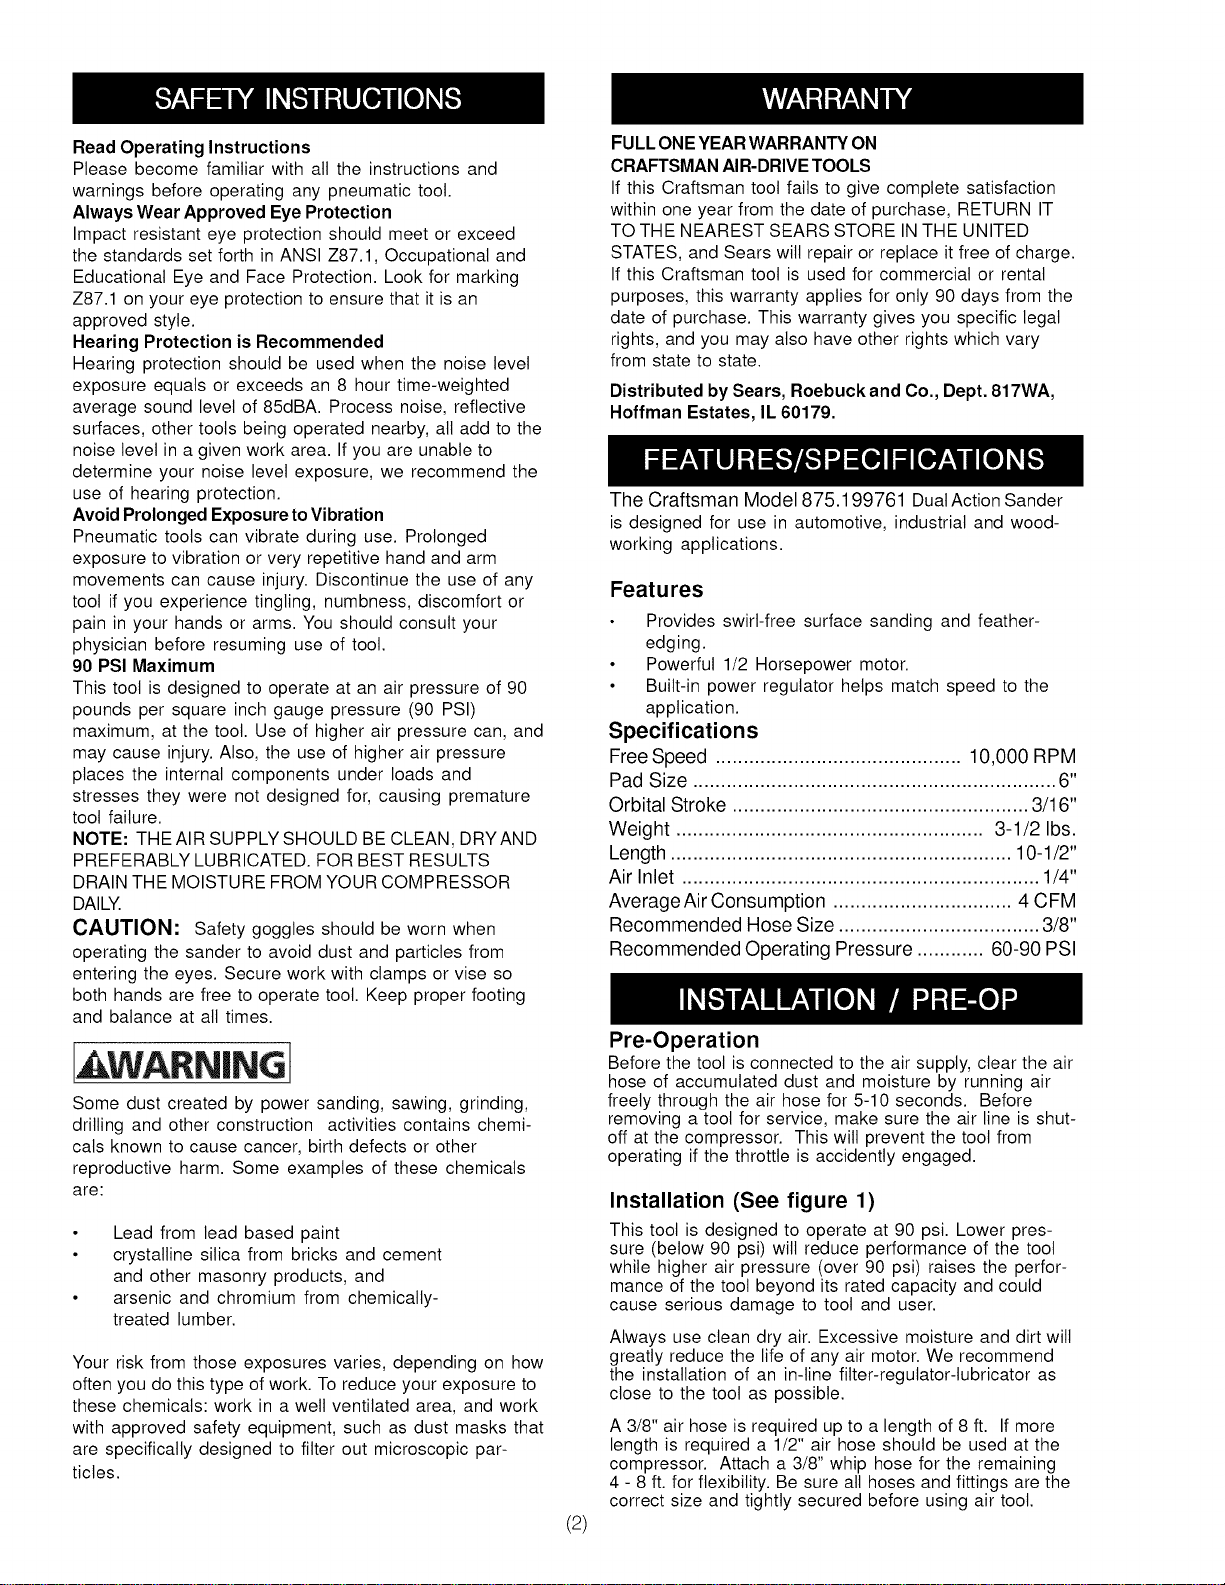
The Craftsman Model 875.199761 Dual Action Sander
is designed for use in automotive, industrial and wood-
working applications.
Features
Provides swirl-free surface sanding and feather-
edging.
• Powerful 1/2 Horsepower motor.
• Built-in power regulator helps match speed to the
application.
Specifications
Free Speed ............................................ 10,000 RPM
Pad Size ................................................................. 6"
Orbital Stroke ..................................................... 3/16"
Weight ....................................................... 3-1/2 Ibs.
Length............................................................. 10-1/2"
Air Inlet ................................................................ 1/4"
Average Air Consumption ................................ 4 CFM
Recommended Hose Size .................................... 3/8"
Recommended Operating Pressure ............ 60-90 PSI
Pre-Operation
Before the tool is connected to the air supply, clear the air
hose of accumulated dust and moisture by running air
freely through the air hose for 5-10 seconds. Before
removing a toot for service, make sure the air line is shut-
off at the compressor. This will prevent the tool from
operating if the throttle is accidentty engaged.
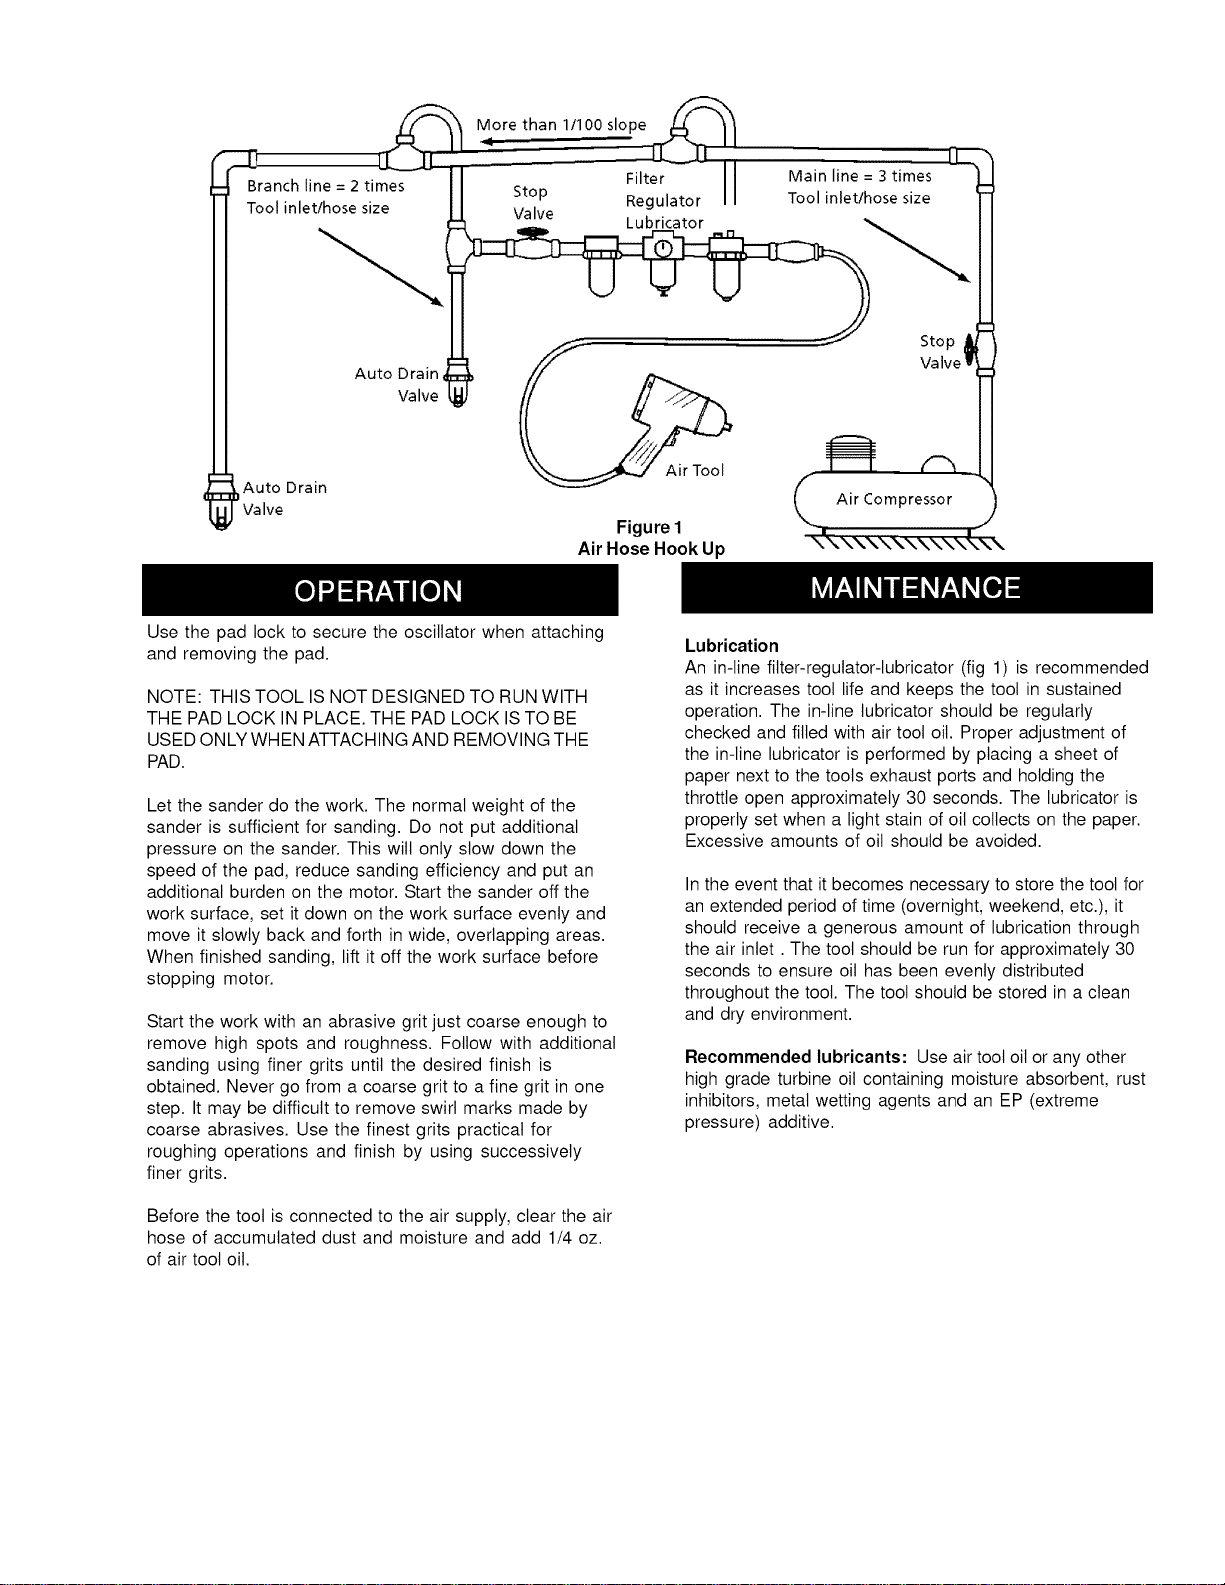
Installation (See figure 1)
This toot is designed to operate at 90 psi. Lower pres-
sure (below 90 psi) will reduce performance of the toot
while higher air pressure (over 90 psi) raises the perfor-
mance of the toot beyond its rated capacity and could
cause serious damage to tool and user.
Always use clean dry air. Excessive moisture and dirt wilt
greatly reduce the life of any air motor. We recommend
the installation of an in-line filter-regulator-lubricator as
close to the toot as possible.
A 3/8" air hose is required up to a length of 8 ft. If more
length is required a 1/2" air hose should be used at the
compressor. Attach a 3/8" whip hose for the remaining
4 - 8 ft. for flexibility. Be sure all hoses and fittings are the
correct size and tightly secured before using air tool.
::2]
Branch line = 2 times
Tool inlet/hose size
Auto Drain
Va Ive
_Auto Drain
Valve
More than 1/100 slope
4_
Stop
Valve
Filter
Regulator
Lubricator
Air Tool
Figure1
Air HoseHook Up
Use the pad lock to secure the oscillator when attaching
and removing the pad.
Main line = 3 times
Tool inlet/hose size
NOTE: THIS TOOL IS NOT DESIGNED TO RUN WITH
THE PAD LOCK IN PLACE. THE PAD LOCK IS TO BE
USED ONLY WHEN ATTACHING AND REMOVING THE
PAD.
Let the sander do the work. The normal weight of the
sander is sufficient for sanding. Do not put additional
pressure on the sander. This will only slow down the
speed of the pad, reduce sanding efficiency and put an
additional burden on the motor. Start the sander off the
work surface, set it down on the work surface evenly and
move it slowly back and forth in wide, overlapping areas.
When finished sanding, lift it off the work surface before
stopping motor.
Start the work with an abrasive grit just coarse enough to
remove high spots and roughness. Follow with additional
sanding using finer grits until the desired finish is
obtained. Never go from a coarse grit to a fine grit in one
step. It may be difficult to remove swirl marks made by
coarse abrasives. Use the finest grits practical for
roughing operations and finish by using successively
finer grits.
Before the toot is connected to the air supply, clear the air
hose of accumulated dust and moisture and add 1/4 oz.
of air tool oil.
Lubrication
An in-line filter-regulator-lubricator (fig 1) is recommended
as it increases toot life and keeps the toot in sustained
operation. The in-line lubricator should be regularly
checked and filled with air toot oil. Proper adjustment of
the in-line lubricator is performed by placing a sheet of
paper next to the tools exhaust ports and holding the
throttle open approximately 30 seconds. The lubricator is
properly set when a light stain of oil collects on the paper.
Excessive amounts of oil should be avoided.
In the event that it becomes necessary to store the tool for
an extended period of time (overnight, weekend, etc.), it
should receive a generous amount of lubrication through
the air inlet. The tool should be run for approximately 30
seconds to ensure oil has been evenly distributed
throughout the toot. The tool should be stored in a clean
and dry environment.
Recommended lubricants: Use air tool oil or any other
high grade turbine oil containing moisture absorbent, rust
inhibitors, metal wetting agents and an EP (extreme
pressure) additive.
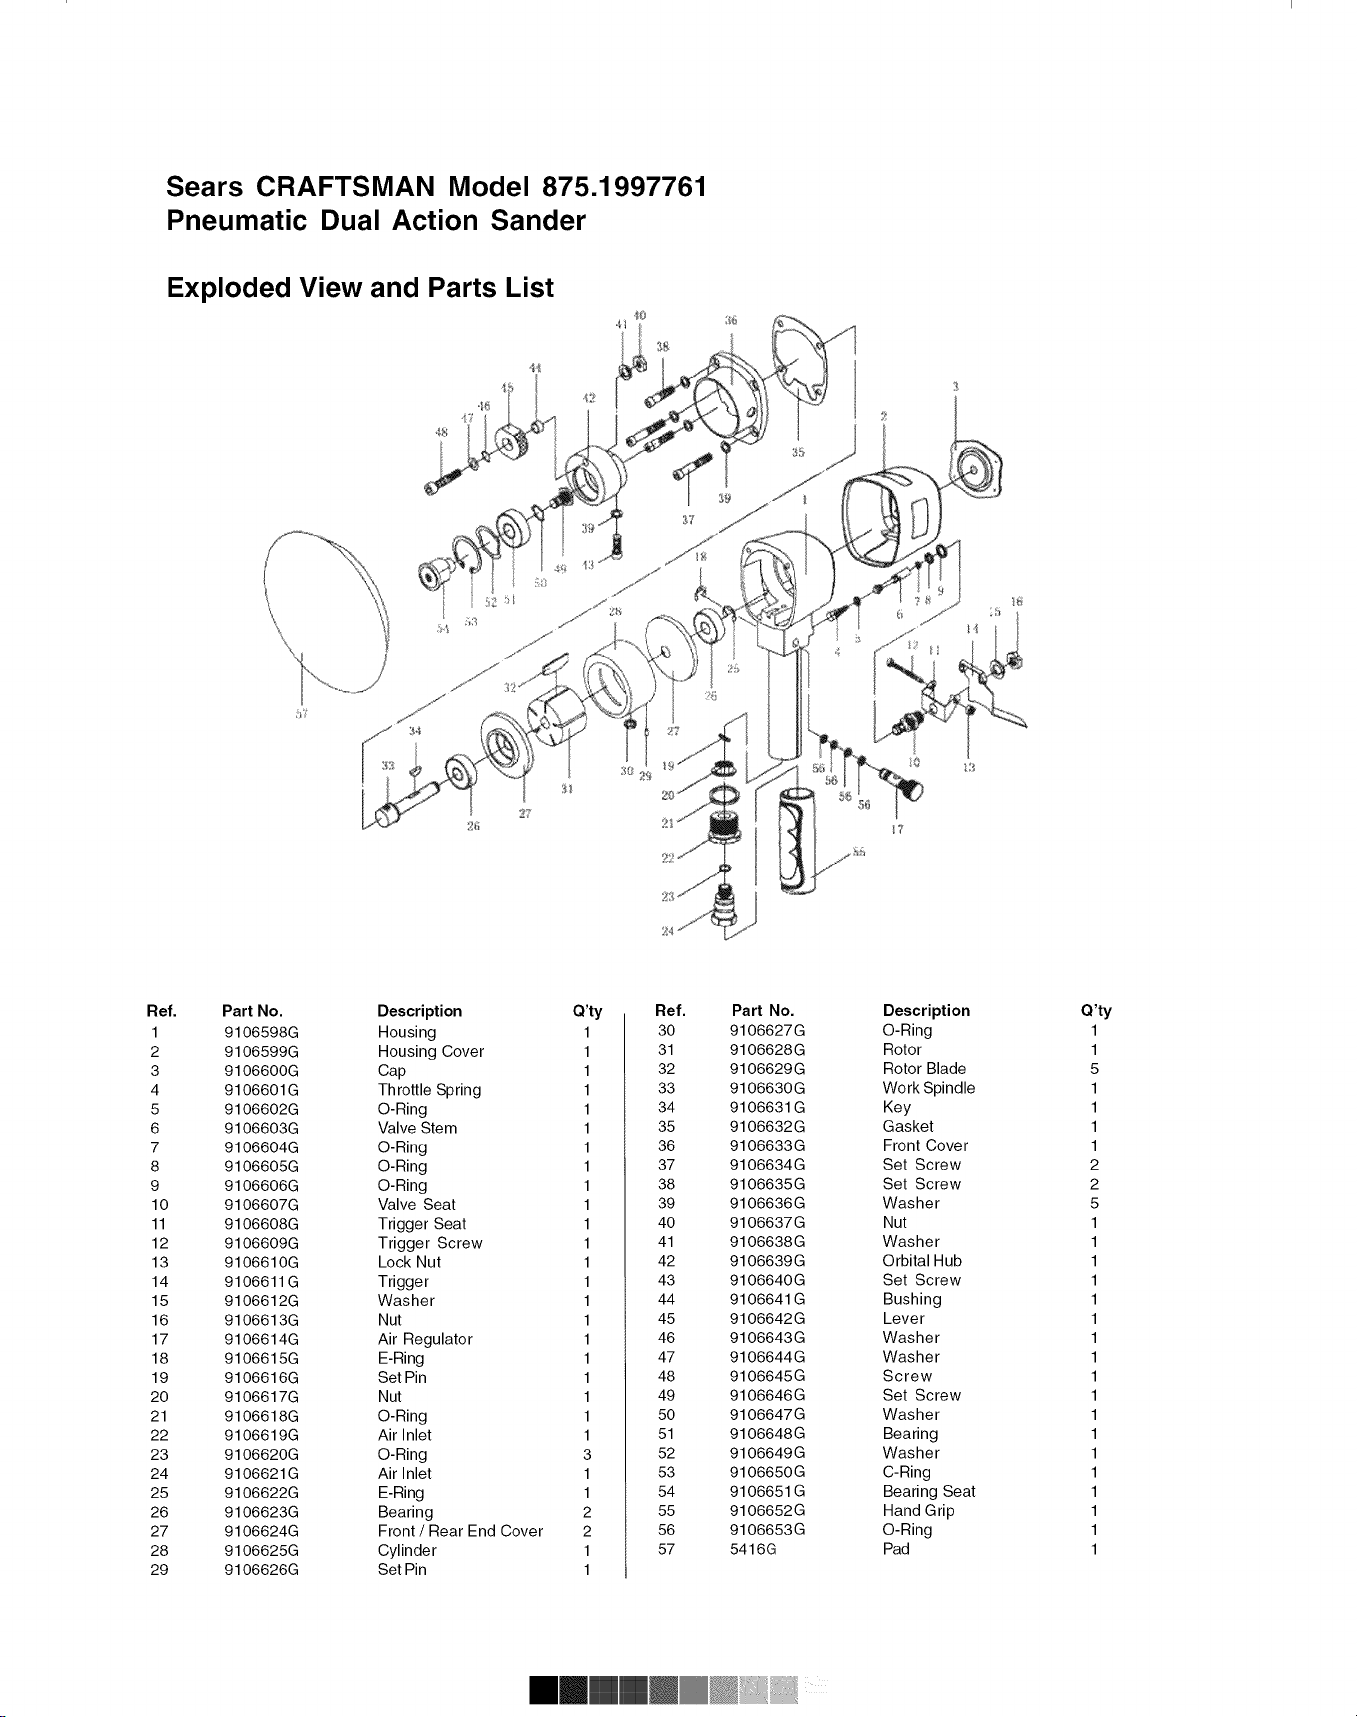
Sears CRAFTSMAN Model 875.1997761
Pneumatic Dual Action Sander
Exploded View and Parts List
,H
Ref.
1
2
3
4
5
6
7
8
9
10
11
12
13
14
15
16
17
18
19
2O
21
22
23
24
25
26
27
28
29
Part No.
9106598G
9106599G
9106600G
9106601G
9106602G
9106603G
9106604G
9106605G
9106606G
9106607G
9106608G
9106609G
9106610G
9106611G
9106612G
9106613G
9106614G
9106615G
9106616G
9106617G
9106618G
9106619G
9106620G
9106621G
9106622G
9106623G
9106624G
9106625G
9106626G
Description Q'ty
Housing 1
Housing Cover 1
Cap 1
Throttle Spring 1
O-Ring 1
Valve Stem 1
O-Ring 1
O-Ring 1
O-Ring 1
Valve Seat 1
Trigger Seat 1
Trigger Screw 1
Lock Nut 1
Trigger 1
Washer 1
Nut 1
Air Regulator 1
E-Ring 1
Set Pin 1
Nut 1
O-Ring 1
Air Inlet 1
O-Ring 3
Air Inlet 1
E-Ring 1
Bearing 2
Front / Rear End Cover 2
Cylinder 1
Set Pin 1
Ref. Part No.
30 9106627G
31 9106628G
32 9106629G
33 9106630G
34 9106631G
35 9106632G
36 9106633G
37 9106634G
38 9106635G
39 9106636G
40 9106637G
41 9106638G
42 9106639G
43 9106640G
44 9106641G
45 9106642G
46 9106643G
47 9106644G
48 9106645G
49 9106646G
50 9106647G
51 9106648G
52 9106649G
53 9106650G
54 9106651G
55 9106652G
56 9106653G
57 5416G
Description
O-Ring
Rotor
Rotor Blade
Work Spindle
Key
Gasket
Front Cover
Set Screw
Set Screw
Washer
Nut
Washer
Orbital Hub
Set Screw
Bushing
Lever
Washer
Washer
Screw
Set Screw
Washer
Bearing
Washer
C-Ring
Bearing Seat
Hand Grip
O-Ring
Pad
Q'ty
1
1
5
1
1
1
1
2
2
5
1
1
1
1
1
1
1
1
1
1
1
1
1
1
1
1
1
1
Troubleshooting
Tool runs slowly or wilt not operate 1. Grit or gum in tool
1. Flush the toot with air tool oil or gum
solvent.
2. No oil in tool
3. Low air pressure
4. Air hose leaks
5. Pressure drops
6. Worn rotor blade in motor
7. Worn ball bearing in motor
2. Lubricate the tool according to the lubrication
instructions in this manual
3. a. Adjust the regulator on the tool to the maxi-
mum setting
b. Adjust the compressor regulator to tool
maximum of 90 psi.
4.Tighten and seal hose fittings if leaks are found
use teflon tape.
5. a. Be sure the hose is the proper size. Long
hoses or tools using large volumes of air may
require a hose with an I.D. of 1/2" or larger
depending on the total length of the hose
b. Do not use a multiple number of hoses
connected together with quick connect fittings.
This causes additional pressure drops and
reduces the tool power. Directly connect the
hoses together
6. Replace rotor blade
7. Remove and inspect bearing for rust, dirt and
grit. Replace or clean and grease bearing with
bearing grease
Moisture blowing out of tool exahust 1. Water in tank
1.Drain tank. (See air compressor manual). Oil tool
and run until no water is evident. Oil tool again and
run 1-2 seconds
Impacts slowly or wilt not impact 1. Lack of lubrication
2. Tool regulator set in wrong
position
3. In-line regulator or
compressor regulator
set too low
1.Lubricate the air motor and the impact mechanism.
(See Lubrication section of this manual)
2. Adjust the regulator on the tool to the maximum
setting
3. Adjust regulators in the air system
Impacts rapidly but
1. Worn impact mechanism 1. Replace worn impact mechanism components
wilt not remove bolts
Does not impact 1. Broken impact mechanism 1. Replace broken impact mechanism components
(5)
Manual del Propietario
LIJADORA NEU M.&.TICA
DE ACCION DOBLE
Modelo No.
875.199761
ADVERTENCIA:
Antes de usar esta herramienta,
lea este manual y siga todas las
recomendaciones de seguridad
e instrucciones de operaci6n.
• Seguridad
• Garantia
• Caracteristicasyoperaci6n
• Mantenimiento
• Espafiol
Distribuido por Sears,
www.Sears.com
Roebuck and Co.,
Hoffman
Estates,
IL 60179
Lea las instrucciones de operaci6n
Por favor familiaricese con todas las instrucciones y
advertencias antes de operar cualquier herramienta neumatica.
Use siempre protecci6n adecuada para los ojos
La protecci6n de los ojos resistente al impacto debe cumplir o
exceder los estandares establecidos en ANSI Z87.1, Protecci6n
ocupacional y educativa de los ojos y el rostro. Busque la marca
Z87.1 en su protector de los ojos para asegurar que es un estilo
aprobado.
Se recomienda el uso de protecci6n auditiva
Debera usar protecci6n auditiva si la exposici6n al nivel de ruido
equivale al nivel acQstico promedio cronoponderado de 8 horas
de 85 dBA o Io supera. El ruido del proceso, superficies
reflectoras, otras herramientas operadas en la cercania, todos
agregan al nivel de ruido en un area determinada de trabajo.
Si no es posible determinar la exposici6n al nivel de ruido, se
recomienda usar protecci6n auditiva.
Evite una exposici6n prolongada a la vibraci6n
Las herramientas neumaticas pueden vibrar durante su uso.
La exposici6n prolongada a las vibraciones o los movimientos
muy repetidos de manos y brazos pueden causar lesiones.
Interrumpa el uso de cualquier herramienta si experimenta
cosquilleo, adormecimiento, malestar o dolor en las manos o
brazos. Antes de reanudar el uso de la herramienta, usted debe
consultar con su medico.
M&ximo de 90 PSI (libras manom_tricas por pulg,
cuadrada)
Esta herramienta esta diseSada para operar a una presi6n
neumatica maxima de indicador de 90 libras por pulgada
cuadrada (90 PSI) en la herramienta. El uso de una presi6n de
aire mayor puede y podra causar lesiones. Tambien, el uso de
una presi6n neumatica mayor somete a los componentes
internos a cargas y tensiones para las cuales no fueron
diseSados, causando una falla prematura de la herramienta.
NOTA: ELSUMINISTRO DEAIRE DEBERA SER LIMPIO YSECO,
PREFERENTEMENTE LUBRICADO. PARA OBTENER LOS
MEJORES RESULTADOS, PURGUEA DIARIO LAHUMEDAD DEL
COMPRESOR.
PRECAUClON: Cuando use una lijadora debe usar lentes de
protecci6n para evitar que el polvo y las particulas le caigan en
los ojos. Asegure la pieza con mordazas o un tornillo de banco,
de manera que ambas manos puedan operar la herramienta.
Mantengase parado firmemente yen equilibrio en todo momento.
[, ADVERTENCIA i
Algunos polvos creados por el lijado, aserrado, desgastado,
taladrado y otras actividades de construcci6n contienen
substancias quimicas conocidas como causantes de cancer,
defectos de nacimiento u otras lesiones en el sistema de
reproducci6n. Algunos ejemplos de esas sustancias quimicas
son:
Plomo de pinturas fabricadas a base de plomo
Silice cristalino de ladrillos, cemento y otros productos de
mamposteria, asi como
arsenico y cromo de maderas quimicamente tratadas.
Su riesgo a esas exposiciones varia, dependiendo de la
frecuencia a la que usted efectQe este tipo de trabajo. Para
reducir su exposici6n a estos materiales: trabaje en un area bien
ventilada y con los equipos de protecci6n aprobados, como
mascaras de polvo que esten especificamente dise_adas para
filtrar particulas microsc6picas.
(2)
GARANTIA POR UN ANO COMPLETO EN
LAS HERRAMIENTAS NEUMATICAS CRAFTSMAN
Siesta herramienta Craftsman no le satisface completamente
dentro de un a_o a partir de su fecha de compra, DEVU¢:LVALA
ALATIENDASEARS MAS CERCANAEN LOS ESTADOS UNIDOS,
y Sears la reparara o reemplazara gratis. Si esta herramienta
Craftsman se usa para fines comerciales o de alquiler, esta
garantia se aplica por 90 dias solamente a partir de la fecha de
compra. Esta garantia le proporciona derechos legales
especificos, y usted puede tener tambien otros derechos que
varian de estado a estado.
Distribuido por Sears, Roebuck and Co., Dept.
817WA, Hoffman Estates, IL 60179.
La lijadora de acci6n doble Craftsman, Modelo 875.199761, esta
diseSada para usar en aplicaciones industriales, en el trabajo
con madera y en aplicaciones de autom6viles.
Features
Proporciona un lijado superficial sin remolinos y eliminaci6n
de rebabas en los bordes.
Motor potente de 1!2 caballo de fuerza.
Un regulador de potencia integrado ayuda a fijar con
exactitud la velocidad para la aplicaci6n.
Especificaciones
Velocidad libre ............................................................ 10,000 pulg
TamaSo del disco .................................................................. 6 pulg
Carrera orbital ................................................................. 3/16 pulg
Peso ................................................................................ 3-1/2 Ibs
Longitud ....................................................................... 10-1/2 pulg
Admisi6n de aire ............................................................... 1/4 pulg
Consumo promedio de aire ................................................. 4CFM
TamaSo recomendado de la manguera ............................ 3/8 pulg
Presi6n operativa recomendada .................................... 60-90 PSI
Previo a la operaci6n
Antes de conectar la herramienta al suministro de aire, limpie la
manguera de aire para quitarle el polvo y la humedad
acumulados. Hagalo pasando aire libremente por la manguera por
un tiempo de 5 a 10 segundos. Antes de quitar la herramienta del
servicio, asegQrese de que la linea de aire este apagada en el
compresor. Con ello se prevendra que la herramienta funcione si
el acelerador se acciona accidentalmente.
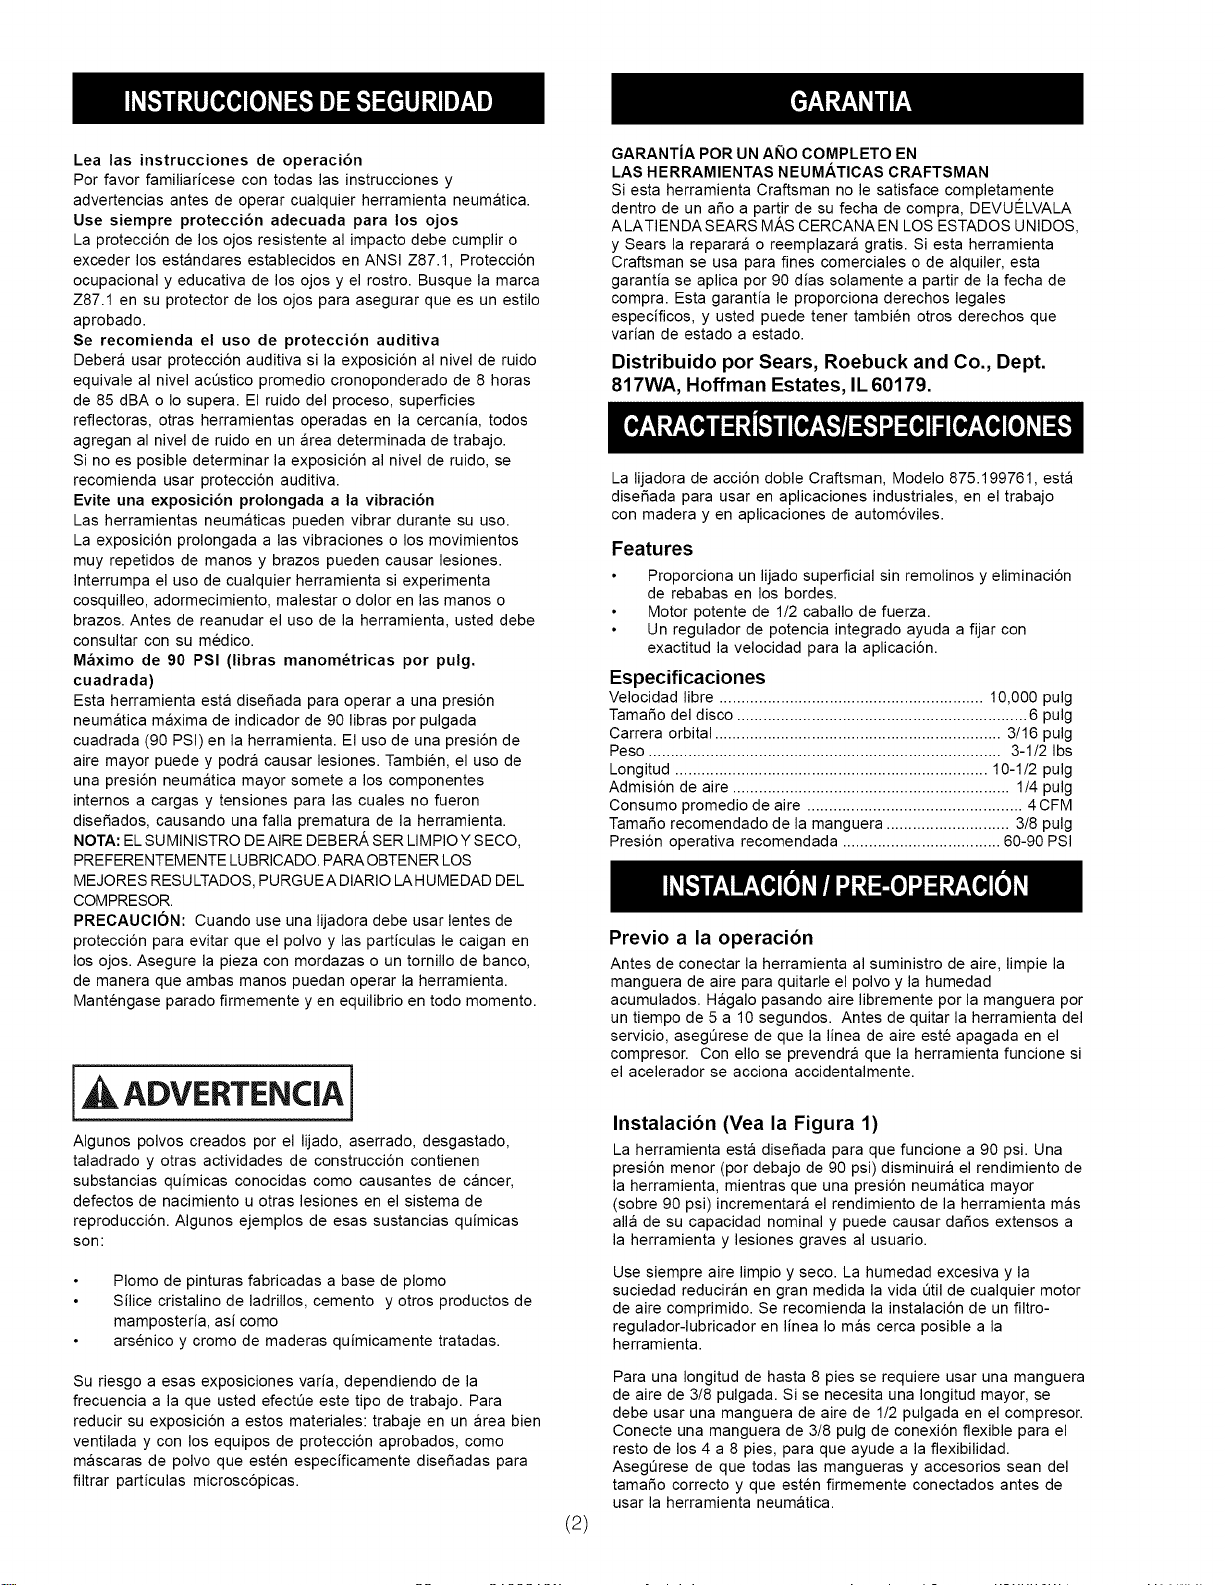
Instalaci6n (Yea la Figura 1)
La herramienta esta dise_ada para que funcione a 90 psi. Una
presi6n menor (por debajo de 90 psi) disminuira el rendimiento de
la herramienta, mientras que una presi6n neumatica mayor
(sobre 90 psi) incrementara el rendimiento de la herramienta mas
alia de su capacidad nominal y puede causar daSos extensos a
la herramienta y lesiones graves al usuario.
Use siempre aire limpio y seco. La humedad excesiva y la
suciedad reduciran en gran medida la vida Qtil de cualquier motor
de aire comprimido. Se recomienda la instalaci6n de un filtro-
regulador-lubricador en linea Io mas cerca posible a la
herramienta.
Para una Iongitud de hasta 8 pies se requiere usar una manguera
de aire de 3/8 pulgada. Si se necesita una Iongitud mayor, se
debe usar una manguera de aire de 1/2 pulgada en el compresor.
Conecte una manguera de 3/8 pulg de conexi6n flexible para el
resto de los 4 a 8 pies, para que ayude a la flexibilidad.
Asegerese de que todas las mangueras y accesorios sean del
tamaSo correcto y que esten firmemente conectados antes de
usar la herramienta neumatica.
P_dientemayorde1/100_"_
[C_bJ ", ,j_...jj:: n--",,
I Filtro-reaulador- II Linea principal = 3 veces _ ] I
Linea derivada = 2 veces Valvula lubricador el tama_o de la admisi6n/ I_
el tama_o de laadmisi6n/ ! . i _ manguera de herramienta I I
manguera d " / decterre t I
I _ _ ValvulaI_ I
.,//_ de cierre V___
Valvula de purga :z_ // _
aut°matica _ (/ _//_ I]
I
__'_._ H,eLra2Lenla de
t_Valvulade purga _ i sire comprimido f ............... "_
automatica k ..... _'........ )
Figura 1
Conexion de la manguera de aire " " "" "" " ",""'-"\'-
Use un cierre para asegurar el oscilador cuando conecte y
desconecte el disco.
NOTA: ESTA HERRAM IENTA NO EaT/_,DISENADA PARA OPERAR
CON EL CIERRE DEL DISCO EN SU LUGAR. EL CIERRE DEL
DISCO DEBER/k USARSE SOLO PARA PONER O QUITAR EL
DISCO.
Deje que la lijadora efect0e el trabajo. El peso normal de la
lijadora es suficiente para lijar. No aplique presi6n adicional sobre
la lijadora. Esto s61o disminuira la velocidad del disco, reducira la
eficiencia del lijado e impondra una carga adicional al motor.
Arranque la lijadora fuera de la superficie de trabajo, col6quela
sobre la superficie de trabajo uniformemente y avance y
retroceda lentamente en areas amplias y superpuestas. AI
finalizar el lijado, levante la lijadora de la superficie de trabajo
antes de detener el motor.
Comience el trabajo con una arenilla abrasiva Io suficientemente
gruesa para que retire los puntos altos y las asperezas. Luego
de un lijado adicional usando arenillas mas finas hasta que
obtenga el acabado deseado. Nunca pase de una arenilla
gruesa a una fina en un solo paso. Podria ser dificil quitar las
marcas de remolino que los abrasivos gruesos dejan. Use las
arenillas mas finas y practicas para las operaciones menos
delicadas y acabe usando arenillas mas finas sucesivamente.
Despeje la manguera neumatica de polvo y humedad
acumulados y agregue 1/4 oz. de aceite de herramienta
neumatica, antes que la manguera se conecte al suministro
neumatico.
Lubricaci6n
Se recomienda usar un filtro-regulador-lubricador en linea (Fig. 1)
ya que incrementa la duraci6n de la herramienta y mantiene la
herramienta en una operaci6n sostenida. Debera comprobar el
lubricador en linea con regularidad y Ilenarlo con aceite para
herramientas de aire comprimido. El ajuste correcto del lubricador
en linea se realiza colocando una hoja de papel pr6xima a los
orificios de escape de la herramienta y manteniendo abierto el
acelerador durante 30 segundos aproximadamente. Se ajusta
correctamente el lubricador cuando el papel queda manchado con
una ligera mancha de aceite. Deberan evitarse las cantidades
excesivas de aceite.
En caso de ser necesario almacenar la herramienta durante un
largo tiempo (de la noche a la maSana, un fin de semana, etc.),
debera lubricarla abundantemente a traves de la entrada de aire
Debera operar la herramienta durante 30 segundos
aproximadamente para asegurar la distribuci6n pareja del aceite
en toda la herramienta. Debera almacenarse la herramienta en un
medic limpio y seco.
Lubricantes recomendados:Use un aceite de herramienta
neumatica u cualquier otro aceite de grado elevado de turbina que
contenga absorbente de humedad, inhibidores de 6xido, agentes
humidificadores del metal y un aditivo EP (presi6n extrema).
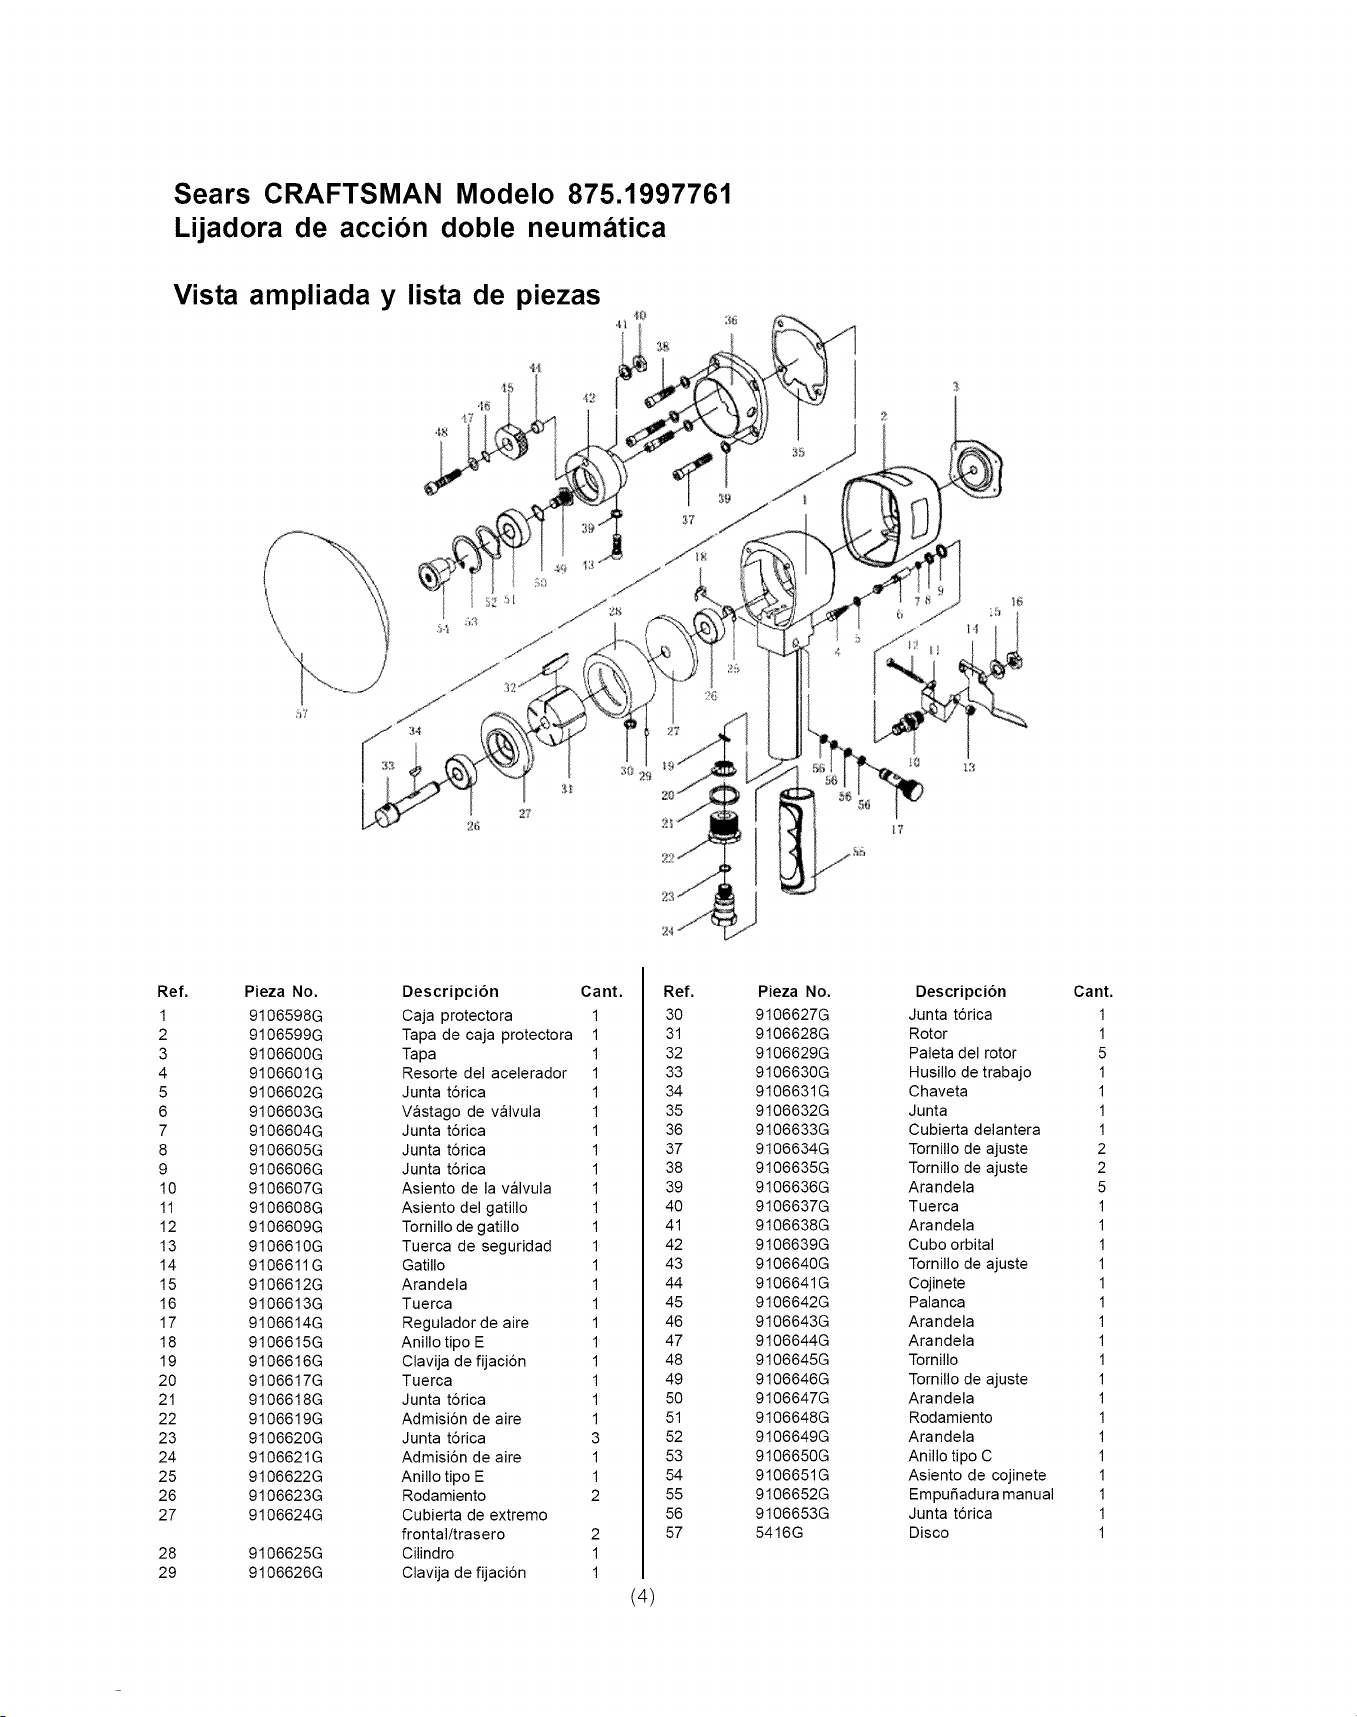
Sears CRAFTSMAN Modelo 875.1997761
Lijadora de accion doble neumatica
Vista ampliada y lista de piezas
%
Ref. Pieza No. Descripci6n Cant.
1 9106598G Caja protectora 1
2 9106599G Tapa de caja protectora 1
3 9106600G Tapa 1
4 9106601G Resorte del acelerador 1
5 9106602G Junta t6rica 1
6 9106603G Vastago de valvula 1
7 9106604G Junta t6rica 1
8 9106605G Junta t6rica 1
9 9106606G Junta t6rica 1
10 9106607G Asiento de la valvula 1
11 9106608G Asiento del gatillo 1
12 9106609G Tornillo de gatillo 1
13 9106610G Tuerca de seguridad 1
14 9106611 G Gatillo 1
15 9106612G Arandela 1
16 9106613G Tuerca 1
17 9106614G Regulador de aire 1
18 9106615G Anillo tipo E 1
19 9106616G Clavija de fijaci6n 1
20 9106617G Tuerca 1
21 9106618G Junta t6rica 1
22 9106619G Admisi6n de aire 1
23 9106620G Junta t6rica 3
24 9106621G Admisi6n de aire 1
25 9106622G Anillo tipo E 1
26 9106623G Rodamiento 2
27 9106624G Cubierta de extremo
frontal/trasero 2
28 9106625G Cilindro 1
29 9106626G Clavija de fijaci6n 1
Ref.
30
31
32
33
34
35
36
37
38
39
40
41
42
43
44
45
46
47
48
49
50
51
52
53
54
55
56
57
(4)
Pieza No.
9106627G
9106628G
9106629G
9106630G
9106631G
9106632G
9106633G
9106634G
9106635G
9106636G
9106637G
9106638G
9106639G
9106640G
9106641G
9106642G
9106643G
9106644G
9106645G
9106646G
9106647G
9106648G
9106649G
9106650G
9106651G
9106652G
9106653G
5416G
Descripci6n Cant.
Junta t6rica 1
Rotor 1
Paleta del rotor 5
Husillo de trabajo 1
Chaveta 1
Junta 1
Cubierta delantera 1
Tornillo de ajuste 2
Tornillo de ajuste 2
Arandela 5
Tuerca 1
Arandela 1
Cubo orbital 1
Tornillo de ajuste 1
Cojinete 1
Palanca 1
Arandela 1
Arandela 1
Tornillo 1
Tornillo de ajuste 1
Arandela 1
Rodamiento 1
Arandela 1
Anillo tipo C 1
Asiento de cojinete 1
EmpuSadura manual 1
Junta t6rica 1
Disco 1
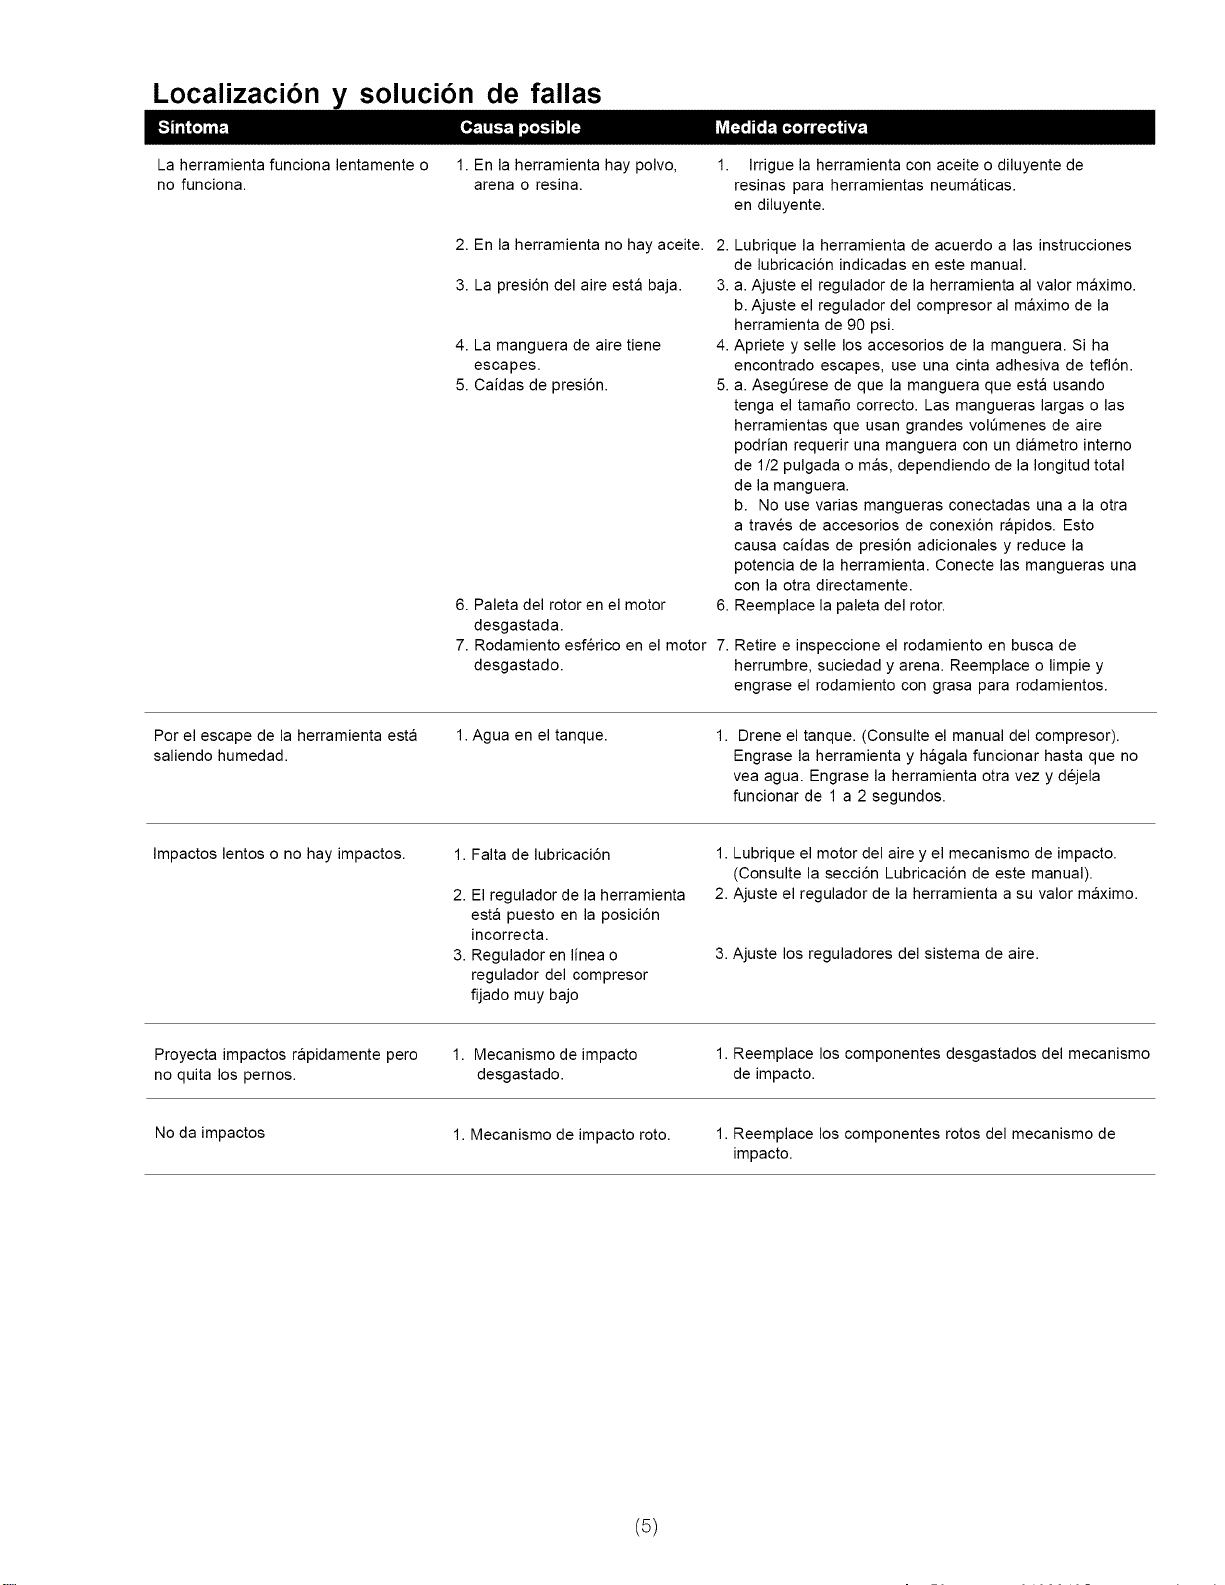
Localizacion y solucion de fallas
La herramienta funciona lentamente o
no funciona.
1. En la herramienta hay polvo, 1.
arena o resina.
2. En la herramienta no hay aceite. 2.
3. La presi6n del aire esta baja. 3.
4. La manguera de aire tiene 4.
escapes.
5. Caidas de presi6n. 5.
6. Paleta del rotor en el motor 6.
desgastada.
7. Rodamiento esferico en el motor 7.
desgastado.
Irrigue la herramienta con aceite o diluyente de
resinas para herramientas neumaticas.
en diluyente.
Lubrique la herramienta de acuerdo alas instrucciones
de lubricaci6n indicadas en este manual.
a. Ajuste el regulador de la herramienta al valor maximo.
b. Ajuste el regulador del compresor al maximo de la
herramienta de 90 psi.
Apriete y selle los accesorios de la manguera. Si ha
encontrado escapes, use una cinta adhesiva de tefl6n.
a. AsegQrese de que la manguera que esta usando
tenga el tamaSo correcto. Las mangueras largas o las
herramientas que usan grandes volQmenes de aire
podrian requerir una manguera con un diametro interno
de 1/2 pulgada o mas, dependiendo de la Iongitud total
de la manguera.
b. No use varias mangueras conectadas una a la otra
a traves de accesorios de conexi6n rapidos. Esto
causa caidas de presi6n adicionales y reduce la
potencia de la herramienta. Conecte las mangueras una
con la otra directamente.
Reemplace la paleta del rotor.
Retire e inspeccione el rodamiento en busca de
herrumbre, suciedad y arena. Reemplace o limpie y
engrase el rodamiento con grasa para rodamientos.
Por el escape de la herramienta esta
saliendo humedad.
1.Agua en el tanque.
1. Drene el tanque. (Consulte el manual del compresor).
Engrase la herramienta y hagala funcionar hasta que no
vea agua. Engrase la herramienta otra vez y dejela
funcionar de 1 a 2 segundos.
Impactos lentos o no hay impactos.
1.
2.
Falta de lubricaci6n
El regulador de la herramienta
esta puesto en la posici6n
incorrecta.
Regulador en linea o
regulador del compresor
fijado muy bajo
1. Lubrique el motor del aire y el mecanismo de impacto.
(Consulte la secci6n Lubricaci6n de este manual).
2. Ajuste el regulador de la herramienta a su valor maximo.
3. Ajuste los reguladores del sistema de aire.
Proyecta impactos rapidamente pero
no quita los pemos.
1. Mecanismo de impacto
desgastado.
1. Reemplace los componentes desgastados del mecanismo
de impacto.
No da impactos
1. Mecanismo de impacto roto. 1. Reemplace los componentes rotos del mecanismo de
impacto.
(5)
For the repair or replacement
parts you need delivered directly to your home
Call 7 am - 7 pm, 7 days a week
1-800-366-PART
(1-800-366-7278)
Para ordenar piezas con entrega
a domicilio - 1-800-659-7084
For the location of a
Sears Parts and Repair Center
in your area
Call 24 hours a day, 7 days a week
1-800-488-1222
For more information on
purchasing a Sears
Maintenance Agreement or to inquire
about an existing Agreement
Call 9 am - 5 pm, Monday-Saturday
1-800-827-6655
The model number of your air tool is located
on the serial plate attached to the tool.
When requesting service or ordering parts,
always give the following information:
• Product Type • Pneumatic Tool
• Model Number • Part Description
Distributed by Sears, Roebuck and Co., Hoffman Estates, IL 60179 USA