Loading ...
Loading ...
Loading ...

– 2
their safety or if they received precise
instructions on the use of this product.
Children should be supervised to pre-
vent them from playing with the product.
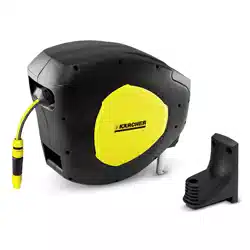
1 Tap connection with reduction fitting
2 Fastening material
3 Carrying handle
4 Stopper / retract
5 Hose coupling
6 Spray nozzle
7 Handle
8 Wall mount
9 Connection hose
10 Padlock (not included in the delivery)
Illustration
Mark the bores to mount the wall mount
and place dowels into the drilled bores.
Fasten the wall mount using the includ-
ed washers and screws.
몇 CAUTION
Risk of damage! Check the load-bearing
capacity of the wall prior to installation.
Illustration
Insert the metal bar of the hose box into
the wall bracket from the top.
Illustration
The product can be protected against
theft. For this purpose, attach a padlock
to the metal bar (drilled hole) under-
neath the wall bracket of the hose box
Illustration
Loosen both screws on the stopper.
Move the stopper to the desired posi-
tion and retighten it.
몇 CAUTION
Risk of crushing! Do not reach into the hose
outlet while the hose is being pulled out or
coiled up.
NOTICE
Make sure the hose has a free backflow. It
must not be too dirty prior to being coiled up
to ensure the proper function of the auto-
matic coiling.
Connect the connecting hose to the wa-
ter tap.
Open tap.
Pull the hose out to the desired length.
The hose can be locked in regular inter-
vals. The lock becomes noticeable due
to a click.
Attach the Kärcher garden accessories
to the hose coupling.
Trigger the automatic coiling function by
briefly and gently pulling the hose.
The garden hose is coiled up evenly.
Turn off tap.
The product is maintenance-free.
몇 CAUTION
Risk of injury! The hose box must not be
opened.
Repair work on the product may only be
performed by the authorized customer ser-
vice.
Proceed as follows to replace the connect-
ing hose:
Remove the side panel and loosen the
hose clamp using a screwdriver.
Pull out the hose.
Operation
Product description
Preparing the Appliance
Operation
Unroll the hose
Coil the hose
Finish operation
Maintenance
7EN
Loading ...
Loading ...
Loading ...