

Collet capacity:
Plunge range:
Compact Router
241-0973
Owner’s Manual

2
Product specifications ………….……………………………………………………. 1
Table of contents ……………………………………………………………………... 2
General safety warnings …………………………………………………………….. 3–4
Power tool safety ……………………………………………………………………... 5–6
Extension cord safety ………………………………………………………….…….. 7
Symbols ……………………………………………………………………………….. 8
Functional Description………………………………………………………………. 9
Assembly and operating …………………………………………………………….. 10–12
Maintenance…………………………………………………………………………………. 13
Accessories ………………………………………………………………………….. 13
Exploded view ………………………………………………………………………… 14
Parts list ……………………………………………………………………………….. 15
Warranty
……………………………………………………………………….……… 16
TABLE
TABLE
TABLE
TABLE OF
OF
OF
OF CONTENTS
CONTENTS
CONTENTS
CONTENTS
EYE,
EYE,
EYE,
EYE, EAR
EAR
EAR
EAR &
&
&
& LUNG
LUNG
LUNG
LUNG PROTECTION
PROTECTION
PROTECTION
PROTECTION
This
This
This
This instruction
instruction
instruction
instruction manual
manual
manual
manual includes
includes
includes
includes the
the
the
the following:
following:
following:
following:
General
General
General
General Safety
Safety
Safety
Safety Warnings
Specific
Specific
Specific
Specific Safety
Safety
Safety
Safety Rules
Rules
Rules
Rules and
and
and
and Symbols
Symbols
Symbols
Symbols
Functional
Functional
Functional
Functional Description
Description
Description
Description
Assembly
Assembly
Assembly
Assembly
Operation
Operation
Operation
Operation
Maintenance
Maintenance
Maintenance
Maintenance
Accessories
Accessories
Accessories
Accessories
WARNING:
WARNING:
WARNING:
WARNING: Use
Use
Use
Use hearing
hearing
hearing
hearing protection,
protection,
protection,
protection, particularly
particularly
particularly
particularly during
during
during
during extended
extended
extended
extended
periods
periods
periods
periods of
of
of
of operation
operation
operation
operation of
of
of
of the
the
the
the tool,
tool,
tool,
tool, or
or
or
or if
if
if
if the
the
the
the operation
operation
operation
operation is
is
is
is noisy.
noisy.
noisy.
noisy.
!
!
!
!
SAVE
SAVE
SAVE
SAVE THESE
THESE
THESE
THESE INSTRUCTIONS
INSTRUCTIONS
INSTRUCTIONS
INSTRUCTIONS FOR
FOR
FOR
FOR REFERENCE
REFERENCE
REFERENCE
REFERENCE
GENERAL
GENERAL
GENERAL
GENERAL SAFETY
SAFETY
SAFETY
SAFETY WARNINGS
WARNINGS
WARNINGS
WARNINGS
WARNING:
WARNING:
WARNING:
WARNING: Before
Before
Before
Before using
using
using
using this
this
this
this tool
tool
tool
tool or
or
or
or any
any
any
any of
of
of
of its
its
its
its accessories,
accessories,
accessories,
accessories, read
read
read
read this
this
this
this
manual
manual
manual
manual and
and
and
and follow
follow
follow
follow all
all
all
all Safety
Safety
Safety
Safety Rules
Rules
Rules
Rules and
and
and
and Operating
Operating
Operating
Operating Instructions.
Instructions.
Instructions.
Instructions. The
The
The
The important
important
important
important
precautions,
precautions,
pre
cautions,
precautions, safeguards
safeguards
safeguards
safeguards and
and
and
and instructions
instructions
instructions
instructions appearing
appearing
appearing
appearing in
in
in
in this
this
this
this manual
manual
manual
manual are
are
are
are not
not
not
not
meant
meant
meant
meant to
to
to
to cover
cover
cover
cover all
all
all
all possible
possible
possible
possible situations.
situations.
situations.
situations. It
It
It
It must
must
must
must be
be
be
be understood
understood
understood
understood that
that
that
that common
common
common
common
sen
se
sense
sense
sense and
and
and
and caution
caution
caution
caution are
are
are
are factors
factors
factors
factors which
which
which
which cannot
cannot
cannot
cannot be
be
be
be built
built
built
built into
into
into
into the
the
the
the product.
product.
product.
product.
!
!
!
!
!
!
!
!
ALWAYS
ALWAYS
ALWAYS
ALWAYS WEAR
WEAR
WEAR
WEAR EYE
EYE
EYE
EYE PROTECTION
PROTECTION
PROTECTION
PROTECTION THAT
THAT
THAT
THAT CONFORMS
CONFORMS
CONFORMS
CONFORMS WITH
WITH
WITH
WITH CSA
CSA
CSA
CSA
REQUIREMENTS
REQUIREMENTS
REQUIREMENTS
REQUIREMENTS or
or
or
or ANSI
ANSI
ANSI
ANSI SAFETY
SAFETY
SAFETY
SAFETY STANDARD
STANDARD
STANDARD
STANDARD Z87.1
Z87.1
Z87.1
Z87.1
FLYING DEBRIS can cause permanent eye damage. Prescription
eyeglasses ARE NOT a replacement for proper eye protection.
WARNING:
WARNING:
WARNING:
WARNING: Non-compliant
Non-compliant
Non-compliant
Non-compliant eyewear
eyewear
eyewear
eyewear can
can
can
can cause
cause
cause
cause serious
ser
ious
serious
serious injury
injury
injury
injury if
if
if
if
broken
broken
broken
broken during
during
during
during the
the
the
the operation
operation
operation
operation of
of
of
of a
a
a
a power
power
power
power tool.
tool.
tool.
tool.
3
Warnings
Warnings


5
WARNING:
WARNING:
WARNING:
WARNING: Read
Read
Read
Read all
all
all
all safety
safety
safety
safety warnings
warnings
warnings
warnings and
and
and
and
all
all
all
all instructions.
instructions.
instructions.
instructions. Failure to follow the warnings
and instructions may result in electric shock, fire
and/or serious injury.
Save
Save
Save
Save all
all
all
all warnings
warnings
warnings
warnings and
and
and
and instructions
instructions
instructions
instructions for
for
for
for future
future
future
future
reference.
reference.
reference.
reference.
Work
Work
Work
Work area
area
area
area safety
safety
safety
safety
Keep
Keep
Keep
Keep work
work
work
work area
area
area
area clean
clean
clean
clean and
and
and
and well
well
well
well lit.
lit
.
lit.
lit. Cluttered or
dark areas invite accidents.
Do
Do
Do
Do not
not
not
not operate
operate
operate
operate power
power
power
power tools
tools
tools
tools in
in
in
in explosive
explosive
explosive
explosive
atmospheres,
atmospheres,
atmospheres,
atmospheres, such
such
s
uch
such as
as
as
as in
in
in
in the
the
the
the presence
presence
presence
presence of
of
of
of
flammable
flammable
flammable
flammable liquids,
liquids,
liquids,
liquids, gases
gases
gases
gases or
or
or
or dust.
dust.
dust.
dust. Power tools
create sparks which may ignite the dust or
fumes.
Keep
Keep
Keep
Keep children
children
children
children and
and
and
and bystanders
bystanders
bystanders
bystanders away
away
away
away while
while
while
whil
e
operating
operating
operating
operating a
a
a
a power
power
power
powe
r tool.
tool.
tool.
tool. Distractions can cause
you to lose control.
Electrical
Electrical
Electrical
Electrical safety
safety
safety
safety
Power
Power
Power
Power tool
tool
tool
tool
plugs
plugs
plugs
plugs must
must
must
must match
match
match
match the
the
the
the outlet.
outlet.
outlet.
outlet.
Never
Never
Never
Never modify
modify
modify
modify the
the
the
the plug
plug
plug
plug in
in
in
in any
any
any
any way.
way.
way.
way. Do
Do
Do
Do not
not
not
not
use
use
use
use any
any
any
any adapter
adapter
adapter
adapter plugs
plugs
plugs
plugs with
with
with
with earthed
earthed
earthed
earthed
(grounded)
(grounded)
(grounded)
(grounded) power
power
power
power tools.
tools.
tools.
tools. Unmodified plugs and
matching outlets will reduce risk of electric
shock.
Avoid
Avoid
Avoid
Avoid body
body
body
body contact
contact
contact
contact with
with
with
with earthed
earthed
earthed
earthed or
or
or
or
grounded
grounded
grounded
grounded surfaces
surfaces
surfaces
surfaces such
such
such
such as
as
as
as pipes,
pipes,
pipes,
pipes, radiators,
radiators,
radiators,
radiators,
ranges
ranges
ranges
ranges and
and
and
and refrigerators.
refrigerators.
refrigerators.
refrigerators. There is an
increased risk of electric shock if your body is
earthed or grounded.
Do
Do
Do
Do not
not
not
not expose
expose
expose
expose power
power
power
power tools
tools
tools
tools to
to
to
to rain
rain
rain
rain or
or
or
or wet
wet
wet
wet
conditions.
conditions.
conditions.
conditions. Water entering a power tool will
increase the risk of elec
tric shock.
Do
Do
Do
Do not
not
not
not abuse
abuse
abuse
abuse the
the
the
the cord
.
cord.
cord.
cord. Never
Never
Never
Never use
use
use
use the
the
the
the cord
cord
cord
cord
for
for
for
for carrying,
carrying,
carrying,
carrying, pulling
pulling
pulling
pulling or
or
or
or
unplugging
unplugging
unplugging
unplugging the
the
the
the power
power
power
power
tool.
tool.
tool.
tool. Keep
Keep
Keep
Keep cord
cord
cord
cord away
away
away
away from
from
from
from heat,
heat,
heat,
heat, oil,
oil,
oil,
oil, sharp
sharp
sharp
sharp
edges
edges
edges
edges or
or
or
or moving
moving
moving
moving parts.
parts.
parts.
parts.
Damaged or
entangled cords increase the risk of electric
shock.
When
When
When
When operating
operating
operating
operating a
a
a
a power
power
power
power tool
tool
tool
tool outdoors,
outdoors,
outdoors,
outdoors, use
use
use
use
an
an
an
an extension
extension
extension
extension cord
cord
cord
cord suitable
suitable
suitable
suitable for
for
for
for outdoor
outdoor
outdoor
outdoor use.
use.
use.
use.
Use of a cord suitable for outdoor use reduces
the risk of electric shock.
If
If
If
If operating
operating
operating
operating a
a
a
a powe
r
power
power
power tool
tool
tool
tool in
in
in
in a
a
a
a damp
damp
damp
damp location
location
location
location
is
is
is
is unavoidable,
unavoidable,
unavoidable,
unavoidable, use
use
use
use a
a
a
a ground
ground
ground
ground fault
fault
fault
fault circuit
circuit
circuit
circuit
interrupter
interrupter
interrupter
interrupter (GFCI)
(GFCI)
(GFCI)
(G
FCI) protected
protected
protected
protected supply.
supply.
supply.
supply. Use of a
ground fault circuit interrupter (GFCI) reduces
the risk of electric shock.
Pers
onal
Personal
Personal
Personal safety
safety
safety
safety
Stay
Stay
Stay
Stay alert,
alert,
alert,
alert, watch
watch
watch
watch what
what
what
what you
you
you
you are
are
are
are doing
doing
doing
doing and
and
and
and use
use
use
use
common
comm
on
common
common sense
sense
sense
sense when
when
when
when operating
operating
operating
operating a
a
a
a power
power
power
power tool.
tool.
tool.
tool.
Do
Do
Do
Do not
not
not
not use
use
use
use a
a
a
a power
power
power
power tool
tool
tool
tool while
while
while
while you
you
yo
u
you are
are
are
are tired
tired
tired
tired
or
or
or
or under
under
under
unde
r the
the
the
the influence
influence
influence
influence of
of
of
of drugs,
drugs,
drugs,
drugs, alcohol
alcohol
alcohol
alcohol or
or
or
or
medication.
medication.
medication.
medication. A moment of inattention while
operating power tools may result in serious
personal injury.
Use
Use
Use
Use personal
personal
personal
personal protective
protective
protective
protective equipment.
equipment.
equipment.
equipment. Always
Always
Always
A
lways
wear
wear
wear
wear eye
eye
eye
eye protection.
protection.
protection.
protection. Protective equipment
such as dust mask, non-skid safety shoes, hard
hat, or hearing protection used for appropriate
conditions will reduce personal injuries.
Prevent
Prevent
P
revent
Prevent unintentional
unintentional
unintentional
unintentional starting.
starting.
starting.
starting. Ensure
Ensure
Ensure
Ensure the
the
the
the
switch
switch
switch
switch is
is
is
is in
in
in
in the
the
the
the off-position
off-position
off-position
off-pos
ition before
before
before
before
connecting
connecting
connecting
connecting to
to
to
to power
power
power
power source
source
source
source and/or
and/or
and/or
and/or battery
battery
battery
battery
pack,
pack,
pack,
pack, picking
picking
picking
picking up
up
up
up or
or
or
or carrying
carrying
carrying
carrying the
the
the
the tool.
tool.
tool.
tool.
Carrying power tools with your finger on the
switch or energizing power tools that have the
switch on invites accidents.
Remove
Remove
Remove
Remove any
any
an
y
any adjusting
adjusting
adjusting
a
djusting key
key
key
key or
or
or
or wrench
wrench
wrench
wrench before
before
before
before
turning
turning
turning
turning the
the
the
the power
power
power
power tool
tool
tool
tool on.
on.
on.
on. A wrench or a key
left attached to a rotating part of the power tool
may result in personal injury.
Do
Do
Do
Do not
not
not
not overreach.
overreach.
overreach.
overreach. Keep
Keep
Keep
Keep proper
proper
proper
proper footing
footing
footing
footing and
and
and
and
balance
balance
balance
balance at
at
at
at all
all
all
all times.
times.
times.
times. This enab
les better
control of the power tool in unexpected
situations.
POWER
POWER
POWER
POWER TOOL
TOOL
TOOL
TOOL SAFETY
SAFETY
SAFETY
SAFETY
SAVE
SAVE
SAVE
SAVE THESE
THESE
THESE
THESE INSTRUCTIONS
INSTRUCTIONS
INSTRUCTIONS
INSTRUCTIONS FOR
FOR
FOR
FOR REFERENCE
REFERENCE
REFERENCE
REFERENCE
!
!
!
!
6
PERSONAL SAFETY – cont
’
d
Dress
Dress
Dress
Dress properly.
properly.
properly.
properly. Do
Do
Do
Do not
not
not
not wear
wear
wear
wear loose
loose
loose
loose fitting
lothing
clothing
clothing
clothing
or jewelry.
or jewelry.
or jewelry.
Keep
Keep
Keep
Keep your
your
your
your hair,
hair,
hair,
hair, clothing
clothing
clothing
clothing
and
and
and
gloves
gloves
gloves
gloves away
away
away
away from
from
from
from moving
moving
moving
moving parts.
parts.
parts.
parts. Loose
clothes, jewelry or long hair can be caught in
moving parts.
If
If
If
If devices
devices
devices
dev
ices ar
e
are
are
are provided
provided
provided
provided for
for
for
for the
the
the
the connection
connection
connection
connection of
of
of
of
dust
dust
dust
dust extraction
extraction
extraction
extraction and
and
and
and collection
collection
collection
collection facilities,
facilities,
facilities,
facilities,
ensure
ensure
ensure
ensure these
these
these
these are
are
are
are connected
connected
connected
connected and
and
and
and properly
properly
properly
properly
used.
used.
used.
used. Use of dust collection can reduce dust-
related haza
rds.
Pow
er
Power
Power
Power tool
tool
tool
tool use
use
use
use and
and
and
and care
care
care
care
Do
Do
Do
Do not
not
not
not force
force
force
force the
the
the
the power
power
power
power tool.
tool.
tool.
tool. Use
Use
Use
Use the
the
the
the correct
correct
correct
correct
power
power
power
power tool
tool
tool
tool for
for
for
for your
your
your
your application.
application.
application.
application. The correct
power tool will do the job better and safer at the
rate for which it was designed.
Do
Do
Do
Do not
not
not
not use
use
use
use the
the
the
the power
power
power
power tool
tool
tool
tool if
if
if
if the
the
the
the switch
switch
switc
h
switch does
does
does
does
not
not
not
not turn
turn
turn
turn it
it
it
it on
on
on
on and
and
and
and off.
off.
off.
off. Any power tool that
cannot be controlled with the switch is
dangerous and must be repaired.
Disco
nnect
Disconnect
Disconnect
Disconnect the
the
the
the plug
plug
plug
plug from
from
from
from the
the
the
the power
power
power
power source
source
source
source
and/or
and/or
and/or
and/or the
the
the
the battery
battery
battery
battery pack
pack
pack
pack from
fro
m
from
from the
the
the
the tool
ol
ol
tool
before
before
before
before making
making
making
making any
any
any
a
n
y adjustments,
adjustments,
adjustments,
adjustments, changing
changing
changing
changing
accessories,
accessories,
accessories,
accessories, or
or
or
or storing
storing
storing
storing
.
.
. Such
preventative
safety measures reduce the risk of
starting
the power tool accidentally.
Store
Store
Store
Store idle
idle
idle
idle power
power
power
power tools
tools
tools
tools out
out
out
out of
of
of
of the
the
the
the reach
reach
reach
reach of
of
of
of
children
children
children
children and
and
and
and do
do
do
do not
not
not
not allow
allow
al
low
allow persons
persons
persons
persons unfamiliar
unfamiliar
unfamiliar
unfamiliar
with
with
with
with the
the
the
the power
power
power
power tool
tool
tool
tool or
or
or
or these
these
these
these instructions
instructions
instructions
instructions to
to
to
to
operate
operate
operate
operate the
the
the
the power
power
power
power tool.
tool.
tool.
tool.
Power tools are
dangerous in the hands of untrained users.
Maintain
Maintain
Maintain
Maintain power
power
power
power tools.
tools.
tools.
tools. Check
Check
Check
Check for
for
for
for
misalignment
misalignment
misalignment
misalign
ment or
or
or
or binding
binding
binding
binding of
of
of
of moving
moving
moving
moving parts,
parts,
parts,
parts,
breakage
breakage
breakage
breakage of
of
of
of parts
parts
parts
parts and
and
and
and any
any
any
any other
other
other
other condition
condition
condition
condition
that
that
that
that may
may
may
may affect
affect
affect
affect the
the
the
the power
power
power
power tool
tool
tool
tool’
’
’
’s
s
s
s operation.
operation.
operation.
operation. If
If
If
If
damaged,
damaged,
damaged,
damaged, have
have
have
have the
the
the
the power
power
power
power tool
tool
tool
tool repaired
repaired
repaired
rep
aired
before
before
before
before use.
use.
use.
use. Many accidents are caused by
poorly maintained power tools.
Keep
Keep
Keep
Keep cutting
cutting
cutting
cutting tools
tools
tools
tools sharp
sharp
sharp
sharp and
and
an
d
and clean.
clean.
clean.
clean. Properly
maintained cutting tools with sharp cutting
edges are less likely to bind and are easier to
control.
Use
Use
Use
Use the
the
the
the power
power
power
power tool,
tool,
tool,
tool, accessories
accessories
accessories
accessories and
and
and
and tool
tool
tool
tool bits
bits
bits
bits
etc.
etc.
et
c.
etc. in
in
in
in accordance
accordance
accordance
accordance with
with
with
with these
these
these
these instructions,
instructions,
instructions,
instructions,
taking
taking
taking
taking into
into
into
into
account
account
account
account the
the
the
the working
working
working
working conditions
conditions
conditions
conditions
and
and
and
and the
the
the
the work
work
work
work to
to
to
to be
be
be
be performed.
performed.
performed.
performed. Use of the
power tool for operations different from those
intended could result in a hazardous situation.
Service
Ser
vice
Service
Service
Have
Have
Have
Have your
your
your
your power
power
power
power tool
tool
tool
tool serviced
serviced
serviced
serviced by
by
by
by a
a
a
a qualified
qualified
qualified
qualified
repair
repair
repair
repair person
person
person
person using
using
using
using only
only
only
only identical
identical
identical
identical
replacement
replacement
replacement
replacement parts.
parts.
parts.
parts. This will ensure that the
safety of the power tool is maintained.
POWER
POWER
POWER
POWER TOOL
TOOL
TOOL
TOOL SAFETY
SAFETY
SAFETY
SAFETY
SAVE
SAVE
SAVE
SAVE THESE
THESE
THESE
THESE INSTRUCTIONS
INSTRUCTIONS
INSTRUCTIONS
INSTRUCTIONS FOR
FOR
FOR
FOR REFERENCE
REFERENCE
REFERENCE
REFERENCE
SPECIFIC
SPECIFIC
SPECIFIC
SPECIFIC SAFETY
SAFETY
SAFETY
SAFETY RULES
RULES
RULES
RULES
WARNING:
WARNING:
WARNING:
WARNING: Glasses,
Glasses,
Glasses,
Glasses, goggles
goggles
goggles
goggles or
or
or
or safety
safety
safety
safety
shields
shields
shields
shields not
not
not
not in
in
in
in compliance
compliance
compliance
compliance with
with
with
with ANSI
ANSI
ANSI
ANSI Z87.1
Z87.1
Z87.1
Z87.1
could
could
could
could cause
cause
cause
cause serious
serious
serious
serious injury
injury
injury
injury when
when
when
when they
they
they
they break.
break.
break.
b
reak.
WARNING:
WARNING:
WARNING:
WARNING:
Always
Always
Always
esu esu esu esusyawlA
use
use
hearing
hearing
hearing
hearing protection.
protection.
protection.
protection.
Always remove the plug from the power source
before adjusting or changing the router bit.
The warnings, precautions and instructions
discussed in this Owner’s Manual cannot cover
all possible conditions and situations that may
occur. It must be understood by t
he operator
that common sense and caution are factors
which cannot be built into this pr
oduct.
!
!
!
!
!
!
!
!
WARNING:
WARNING:
WARNING:
WARNING: Always keep your hands out of
the path of the router bit. Avoid awkward hand
positions where a sudden slip could cause your
hand to move into the path of the
router bit.
!
!
!
!
WARNING:
WARNING:
WARNING:
WARNING: Know
Know
Know
Know your
your
your
your .
.
.
. Do
Do
oDD
o
not
not
not
not plug
plug
plug
plug the
the
the
the
routerrouter
router
router
router
router
into
into
into
into the
the
the
the power
power
power
power
source
source
source
source
until
until
until
until you
you
you
you have
have
have
have read
read
read
read and
and
and
and understand
understand
understand
understand
this
this
this
this Instruction
Instruction
Instruction
Instruction
Manual.
Manual.
Manual.
Manual. Learn
Learn
Learn
Learn the
the
the
the tool
tool
tool
tool’
’
’
’s
s
s
s
applications
applications
application
s
applications and
and
and
and limitations,
limitations,
limitations,
limitations, as
as
as
as well
well
well
well as
as
as
as the
the
the
the
specific
specific
specific
specific potential
potential
potential
potential hazards
hazards
hazards
hazards related
related
related
related to
to
to
to this
this
this
this tool.
tool.
tool.
tool.
Following this rule will reduce the risk of elec
tric
shock, fire, or serious injury.
WARNING:
WARNING:
WARNING:
WARNING:
Always
Always
Always
Always wear
wear
wear
wear
e
ye
eye
eye
eye protection.
protection.
protection.
protection. Any power tool
can throw foreign objects into
your eyes and cause permanent
eye damage. ALWAYS wear a safety shield (not
glasses) that comply with ANSI safety standard
Z87.1. Everyday glasses have only impact
resistant lenses. They ARE NOT safety glasses.
!
!
!
!
!
!
!
!
fitting

7
WARNING:
WARNING:
WARNING:
WARNING:
Keep
Keep
Keep
Keep the
the
the
the extension
extension
extension
extension cord
cord
cord
cord
clear
clear
clear
clear of
of
of
of the
the
the
the working
working
working
working area.
area.
area.
area. Position the cord so
it will not get caught on the workpiece, tools or
any other obstructions while you are working
with the power tool.
Make sure any extension cord used with this
tool is in good condition. When using an
extension cord, be sure to use one of heavy
enough gauge to carry the current the tool w
ill
draw. An undersized cord will cause a drop in
line voltage resulting in loss of power and
overheating.
The table at right shows the correct size to us
e
according to cord length and nameplate ampere
rating. If in doubt, use the next heavier gauge.
The smaller the gauge number the heavier the
cord.
Be sure your extension cord is properly wired
and in good condition. Always replace a
damaged extension cord or have it repaired by a
qualified electrician before using it. Protect your
extension cord from sharp objects, excessive
heat and damp or wet areas.
Useaseparate elec
trical circuit for your power
tools. This circuit must not be less than 14
gauge wire and should be protected with either
a 15 A time delayed fuse or circuit breaker.
Before connecting the power tool to the power
source, make sure the switch is in the OFF
position and the powe
r source is the same as
indicated on the nameplate. Running at lower
voltage will damage the motor.
MINIMUM
MINIMUM
MINIMUM
MINIMUM GAUGE
GAUGE
GAUGE
GAUGE (AWG)
(AWG)
(AWG)
(AWG)
EXTENSION
EXTENSION
EXTENSION
EXTENSION CORDS
CORDS
CORDS
CORDS (120
(120
(120
(120 V
V
V
V use
use
use
use only)
only)
only)
only)
Amperage
rating Total length
More
than
Not
more
than
25'
(7.5 m)
50'
(15 m)
100'
(30 m)
150'
(45 m)
0 6 18 16 16 14
6 10 18 16 14 12
10 12 16 16 14 12
12 16 14 12 Not Applicable
EXTENSION
EXTENSION
EXTENSION
EXTENSION CORD
CORD
CORD
CORD SAFETY
SAFETY
SAFETY
SAFETY
!
!
!
!
SAVE
SAVE
SAVE
SAVE THESE
THESE
THESE
THESE INSTRUCTIONS
INSTRUCTIONS
INSTRUCTIONS
INSTRUCTIONS FOR
FOR
FOR
FOR REFERENCE
REFERENCE
REFERENCE
REFERENCE
8
V
Volts
A
Amperes
Hz
Hertz
W
Watts
kW
Kilowatts
Microfarads
L
Litres
kg
Kilograms
H
Hours
N/cm
2
Newtons per square
centimetre
Pa
Pascals
OPM
Oscillations per minute
Min
Minutes
S
Seconds
or a.c.
Alternating current
Three-phase alternating
current
Three-phase alternating
current with neutral
Read all safety warnings
and instructions
Direct current
No load speed
Alternating or direct
current
Class II construction
Splash-proof
construction
Watertight construction
Protective grounding at
grounding terminal,
Class I tools
Revolutions or
reciprocations per
minute
Diameter
Off position
Arrow
Warning symbol
Wear your safety
glasses
Wear hearing protection
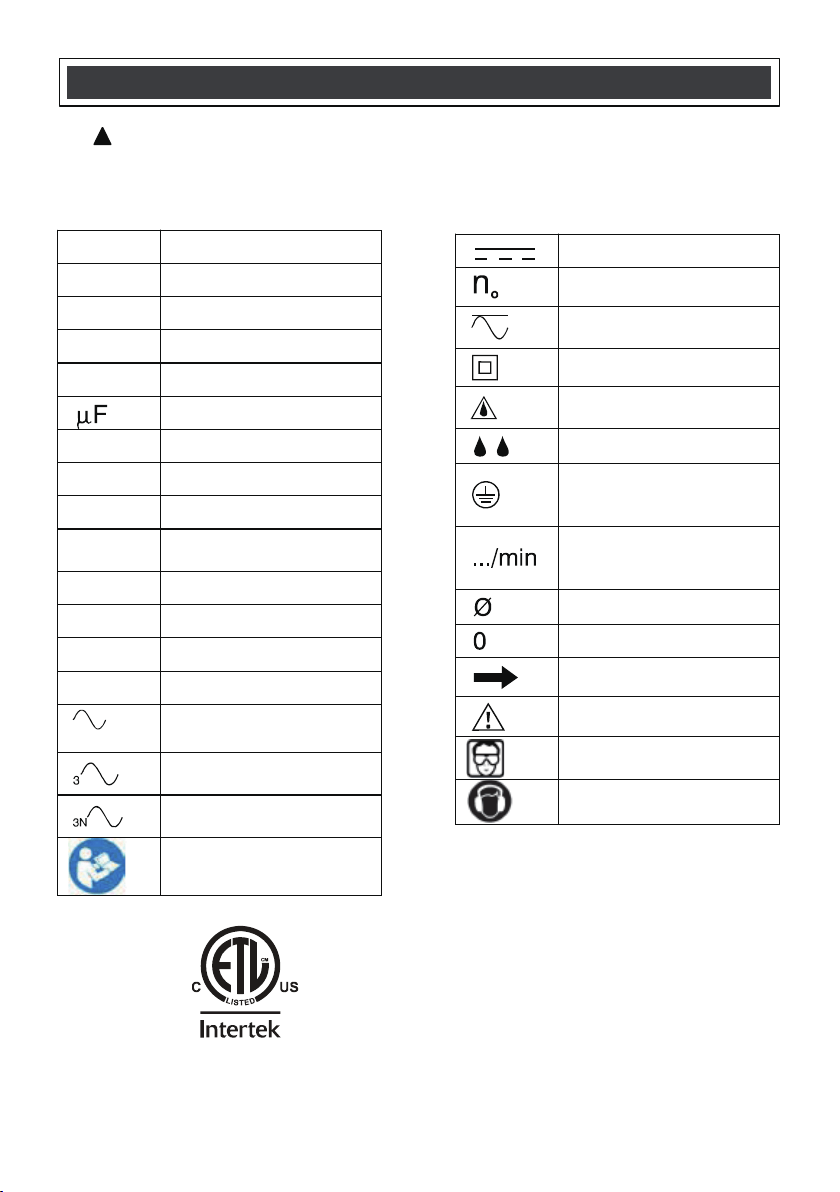
SYMBOLS
SYMBOLS
SYMBOLS
SYMBOLS
WARNING:
WARNING:
WARNING:
WARNING: Some
Some
Some
Some of
of
of
of the
the
the
the following
following
following
following symbols
symbols
symbols
symbols may
may
may
may appear
appear
appear
appear on
on
on
on the
the
the
the outer.router.router.router.router.
router.router.router.router.router.
outer.outer.outer.outer.outer.
Study
Study
Study
Study
these
these
these
these symbols
symbols
symbols
symbols and
and
and
and learn
learn
learn
learn their
their
their
their meaning.
meaning.
meaning.
m
eaning. Proper
Proper
Proper
Proper interpretation
interpretation
interpretation
interpretation of
of
of
of these
these
these
these symbols
symbols
symbols
symbols will
will
will
will
allow
allow
allow
allow for
for
for
for more
more
more
more efficient
efficient
efficient
efficient and
and
and
and safer
safer
safer
safer operation
operation
operation
operation of
of
of
of this
this
this
this tool.
tool.
tool.
tool.
!
!
!
!
This symbol designates that this tool is
listed with U.S. requirements by
Electrical Testing Laboratories.
Conforms to UL60745-1 and
UL60745-2-17.
4002080
ERM104
9
CAUTION:
CAUTION:
CAUTION:
CAUTION:
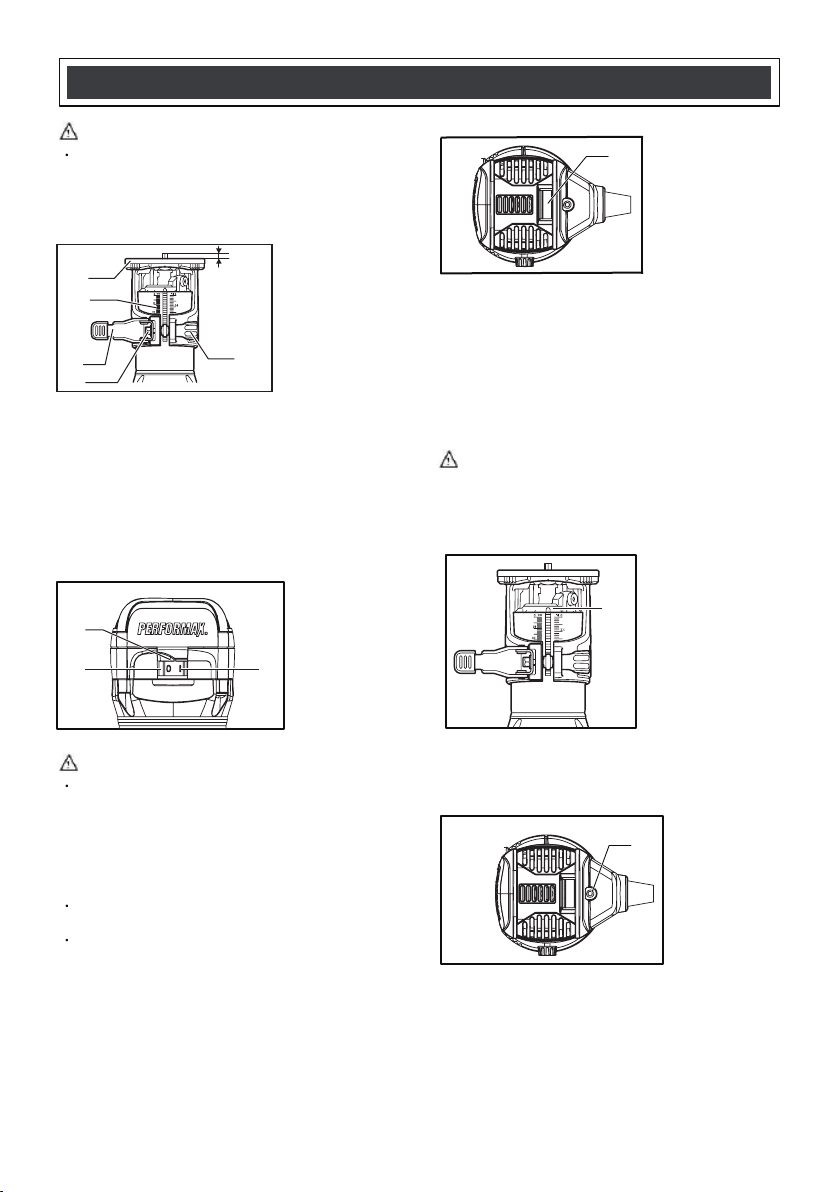
Adjusting
Adjusting
Adjusting
Adjusting cutting depthcutting depth
cutting depthcutting depth
1. Cutting depth
2. Tool base
3. Scale
4. Locking lever
5. Adjusting screw
6. Hex nut
You can set the depth of cut using the scale marked
on the side of the router.
To adjust the cutting depth, loosen the locking lever
and move the tool base up or down as desired by
turning the adjusting screw. After adjusting, tighten the
locking
lever firmly to secure the tool base.
Switch
Switch
Switch
2.
OFF (O) side
3. ON ( I ) side
1. Switch
CAUTION:
CAUTION:
CAUTION:
CAUTION:
This is a rocker ON/OFF switch.
To start the tool, press the "ON ( I )" side.
To stop the tool, press the "OFF (O)" side.
Electronic control function
Electronic control function
Electronic control function
Electronic Speed Control maintains constant
speed under heavy load.
Soft Start feature gradually increases speed
for a smoother start up process.
Variable speed dialVariable speed dialVariable speed dial
Variable speed dial
1. Variable speed
dial
CAUTION:
CAUTION:
CAUTION:
CAUTION:
LED
LED
LED
LED work
work
work
work light
light
light
lightsts
ts
ts
ts
1. LED work lights
The LED work light illuminates the work area and alerts
user of power to the tool.
Power
Power
Power
Power indicator
indicator
indicator
indicator
1.Power indicator
T
When light is on (1), there is power to the router.
When the light is off, there is no power to the router.
he power indicator helps to easily identify live tools.
FUNCTIONAL
FUNCTIONAL
FUNCTIONAL
FUNCTIONAL DESCRIPTION
DESCRIPTION
DESCRIPTION
DESCRIPTION
1
Always be sure that the tool is switched off and
unplugged before adjusting or checking the tool.
The tool speed can be changed by turning the
speed adjusting dial to any one of six speeds.
Speed at 1:10,000/min
Speed at 2:14,000/min
Speed at 3:18,000/min
Speed at 4:23,000/min
Speed at 5:27,000/min
Speed at 6:32,000/min
Please avoid prolonged low speed operation which
can cause over heating and possible motor damage.
1
2
3
4
5
6
1
1
1
2 3
10
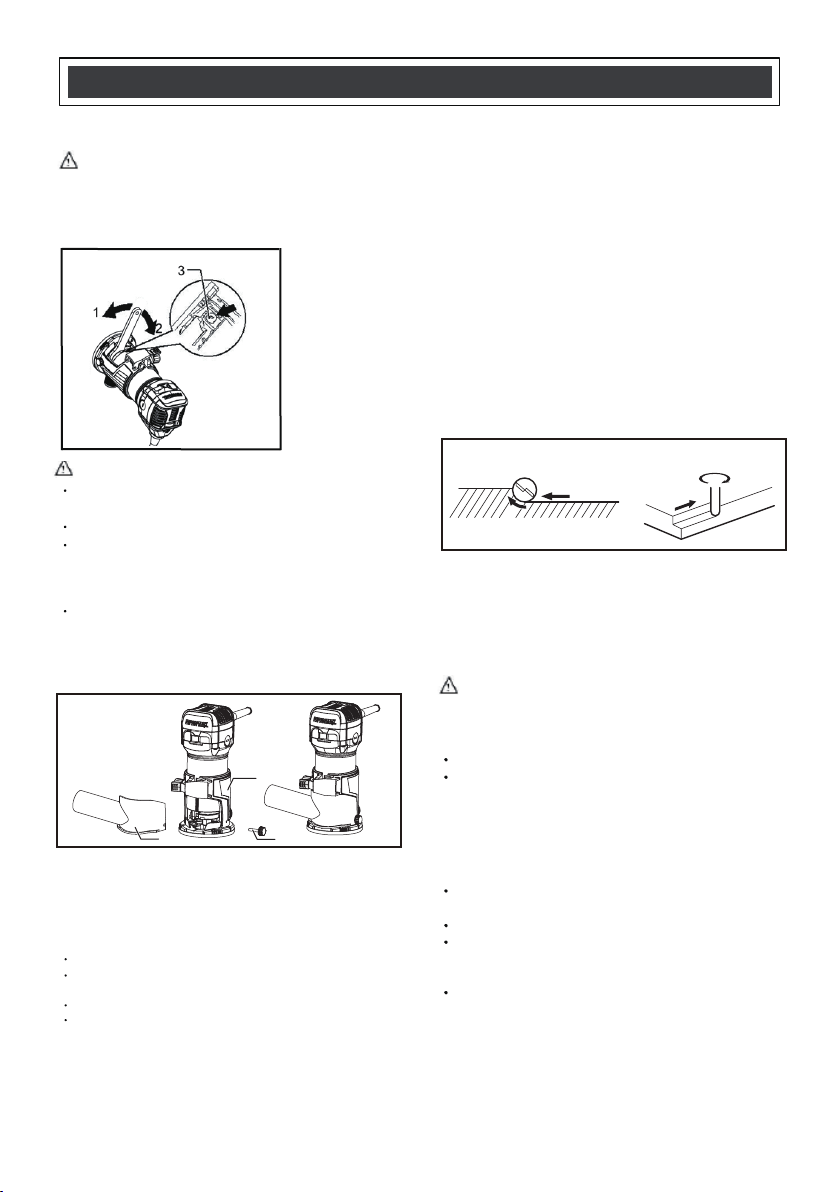
CAUTION:
CAUTION:
CAUTION:
CAUTION:
1.
Installing
Installing
Installing
Installing or
or
or
or removing
removing
removing
removing bit
bit
bit
bit
1.
Tighten
2. Loosen
3. Shaft lock
CAUTION:
CAUTION:
CAUTION:
CAUTION:
Do not tighten the collet nut without inserting a bit,
or the collet cone will break.
Use only the wrenches provided with the tool.
Insert the bit all the way into the collet cone and
tighten the collet nut securely with the two
wrenches or by pressing the shaft lock and using
the provided wrench.
To remove the bit, follow the installation procedure
in reverse.
ASSEMBLYASSEMBLY
ASSEMBLYASSEMBLY
ASSEMBLY
Dust Hood Installation
1. Dust hood
2. Thumb screw
3. Router base
Locate dust hood
As shown in above diagram, place hood to the bottom
right until the holes line up
Insert and tighten thumb screw
Check to ensure attachment is secure, then attach a 1 ¼”
vacuum hose (not included)
When doing edge cutting, the workpiece surface
should be on the left side of the bit in the feed direction.
1. Workpiece
2. Bit revolving direction
3. Feed direction
CAUTION:
CAUTION:
CAUTION:
CAUTION:
This section explains how to help keep your router
from over heating. Over heating can cause possible
motor damage.
The depth of cut should not exceed 1/8” per pass
If a deeper cut is required, increase the cut depth on
the router, but only 1/8” each time, repeat procedure
until desired depth is reached
NOTE:
NOTE:
NOTE:
NOTE:
Other things to look for:
Moving the tool too quickly may result in a poor cut,
or damage to the bit
Moving too slowly may burn or mar the cutting material
Keep in mind each cut will be different; depending on
type of wood used, thickness of wood; whether it is a
soft or hard wood, etc.
Before getting started, always make a practice cut on
wood scraps
ASSEMBLY
ASSEMBLY
ASSEMBLY
ASSEMBLY AND
AND
AND
AND OPERATING
OPERATING
OPERATING
OPERATING
Dust Hood Installation
Dust Hood Installation
Always be sure that the tool is switched off and
unplugged before making any adjustments.
OPERATION
OPERATION
OPERATION
OPERATION
General Operating Instructions
Run the tool for about 15 seconds, prior to beginning your
project, to ensure that all moving parts are running smoothly,
and there are no loose parts, rattles, or sparking that would
indicate damage. Be sure the bit is firmly and properly installed
before use. Improperly installed bits may eject suddenly at
high speed from the Router, resulting in personal injury.
Set the tool base on the workpiece without the bit making
any contact. Then, turn the tool on and move the tool
slowly forward over the workpiece surface. For best
results, be sure to keep the tool base flush and advance
smoothly until the cutting is complete.
(1) Using the fixed base(1) Using the fixed base(1) Using the fixed base
1 2
3
1
2
3
3
2
11
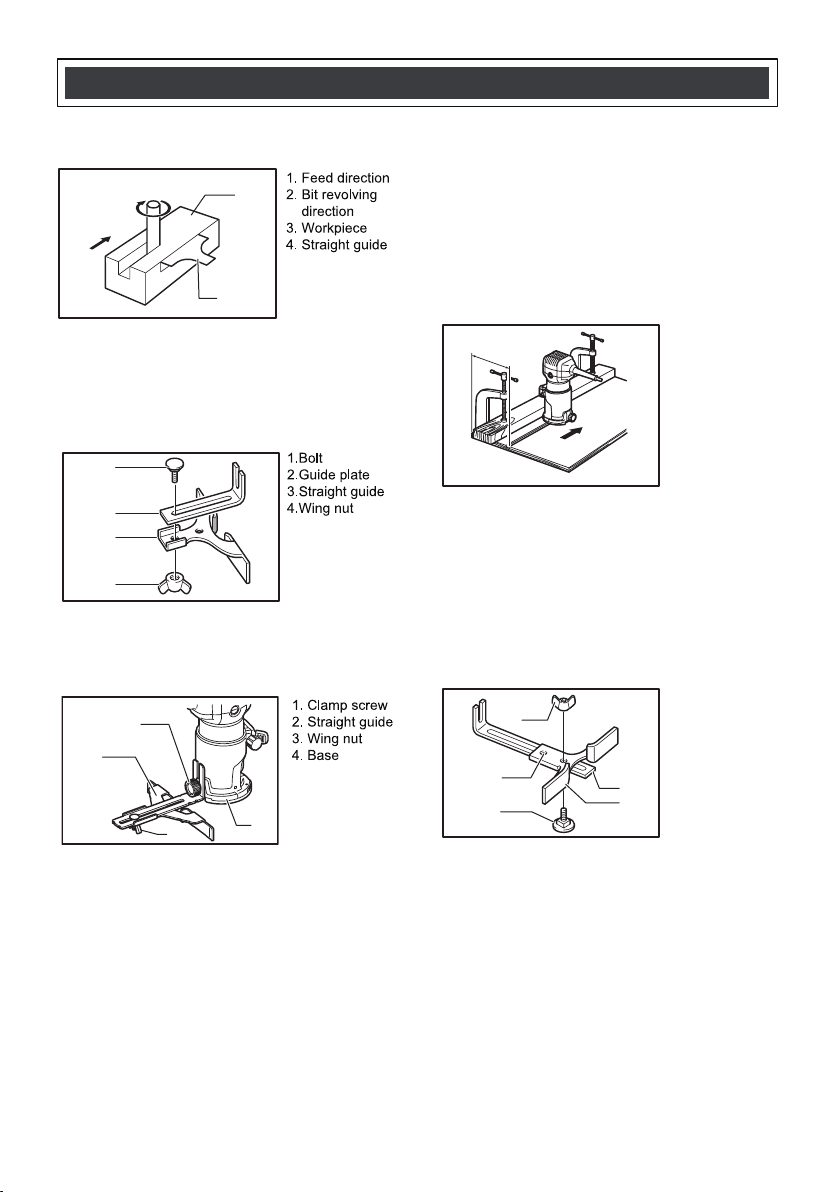
(2) Using the straight guide (2) Using the straight guide
(2) Using the straight guide
The straight guide is effectively used for straight cuts
when chamfering or grooving.
Attach the guide plate to the straight guide with the bolt
and the wing nut.
Attach the straight guide with the clamp screw (1).
Loosen the wing nut on the straight guide and adjust
the distance between the bit and the straight guide. At
the desired distance, tighten the wing nut securely.
When cutting, move the tool with the straight guide
flush with the side of the workpiece.
If the distance betwe
en the side of the workpiece
and the cutting position is too wide for the straight
guide, or if the side of the workpiece is not straight, the
straight guide cannot be used. In this case, firmly
clamp a straight edge to the workpiece and use it as a
guide against the router base. Feed the tool in the
direction of the arrow.
ASSEMBLY
ASSEMBLY
ASSEMBLY
ASSEMBLY AND
AND
AND
AND OPERATING
OPERATING
OPERATING
OPERATING
1. Feed direction
2. Bit revolving
direction
3. Workpiece
4. Straight guide
1.Bolt
2.Guide plate
4.Wing nut
1. Clamp screw
2. Straight guide
3. Wing nut
4. Base
Min.: 2-1/2"
Max.: 8-11/16"
For cutting circles between 2-1/2" and 4-5/8"
in radius.
1. Wing nut
2. Guide plate
3. Straight guide
4. Center hole
5. Bolt
(3) Circular work(3) Circular work(3) Circular work(3) Circular work
Circular work may be accomplished if you assemble
the straight guide and guide plate as shown below.
Min. and max. radius of circles to be cut
(distance
between the center of circle and the thethe center of
bit) are as follows:
1
2
3
4
1
2
3
4
1
2
3
4
5
1
2
3
4
For cutting circles between 4-5/8" and
8-11/16"
in radius.
12
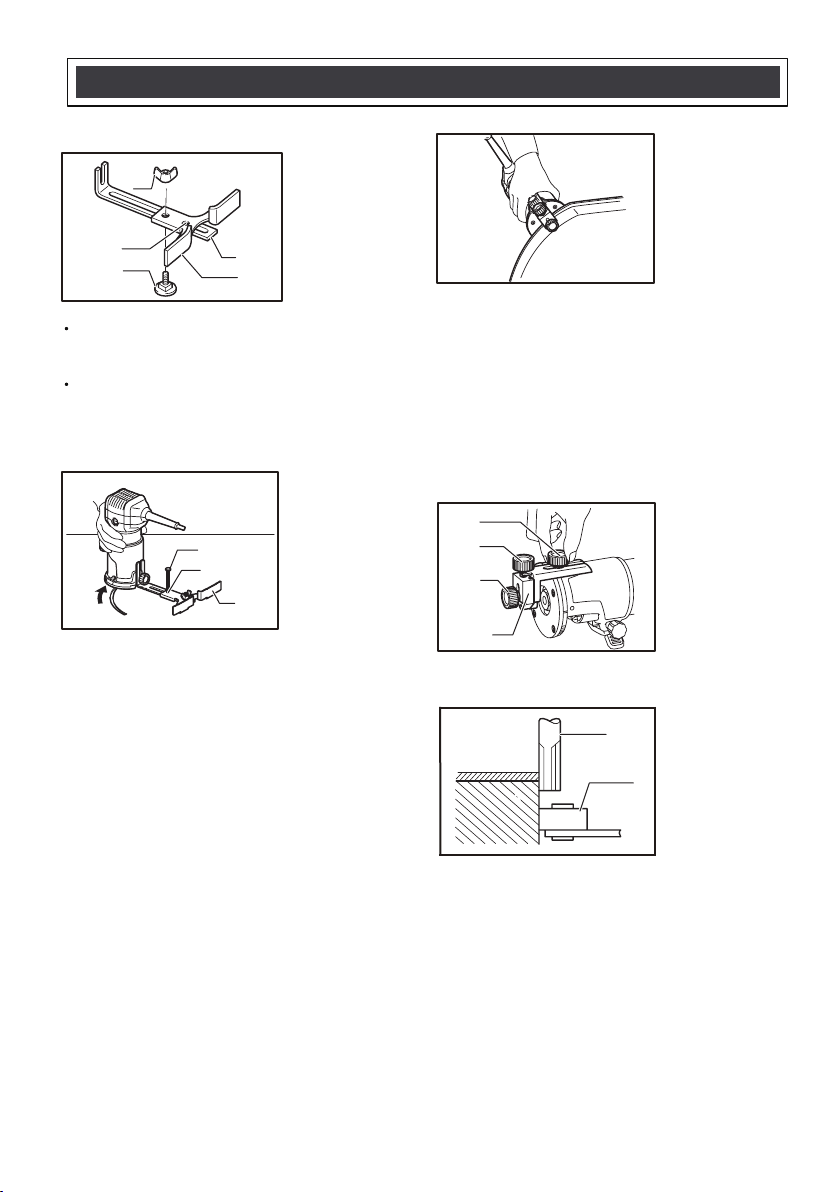
NOTE:
NOTE:
NOTE:
NOTE:
Circles between 6-3/4″ and 7-5/16" in radius cannot
be cut using this guide(Because Center hole(4)
is blocked).
Align the center hole in the straight guide with the
center of the circle to be cut. Drive a nail less than
1/4" in diameter into the center hole to
secure
the straight guide. Pivot the tool around the
nail in clockwise direction.
1. Nail
2. Center hole
3. Straight guide
(4) Using the roller guide(4) Using the roller guide(4) Using the roller guide(4) Using the roller guide
When edging curved cuts in veneers for furniture and the
like can be done easily with the roller guide. The
guide roller rides the curve and assures a fine cut.
Install the roller guide on the tool base with the
clamp screw (1). Loosen the c
lamp screw (2) and
adjust the distance between the bit and the roller
guide by turning the adjusting screw ( 3/64" per
turn). At the desired distance, tighten the clamp screw
(3) to secure the roller guide in place.
When cutting, move the tool with the guide roller riding
the side of the workpiece.
1. Workpiece
2. Bit
3. Guide roller
ASSEMBLY
ASSEMBLY
ASSEMBLY
ASSEMBLY AND
AND
AND
AND OPERATING
OPERATING
OPERATING
OPERATING
1. Clamp screw
2. Adjusting screw
3. Clamp screw
4. Roller guide
1. Wing nut
2. Guide plate
3. Straight guide
4. Center hole
5. Bolt
1
2
3
4
5
1
2
3
4
1
2
3
1
1
2
3
13
CAUTION:
CAUTION:
CAUTION:
CAUTION:
Always be sure that the tool is switched off and
unplugged before attempting to perform
inspection or maintenance.
Never use gasoline, benzene, thinner or alcohol to clean
the plastic housing of any tool as discoloration, deformation
or cracks may result.
All of the bearings in this tool are lubricated with a sufficient
amount of high-grade lubricant for the life of the unit under
normal conditions. Therefore, no further lubrication is
required.
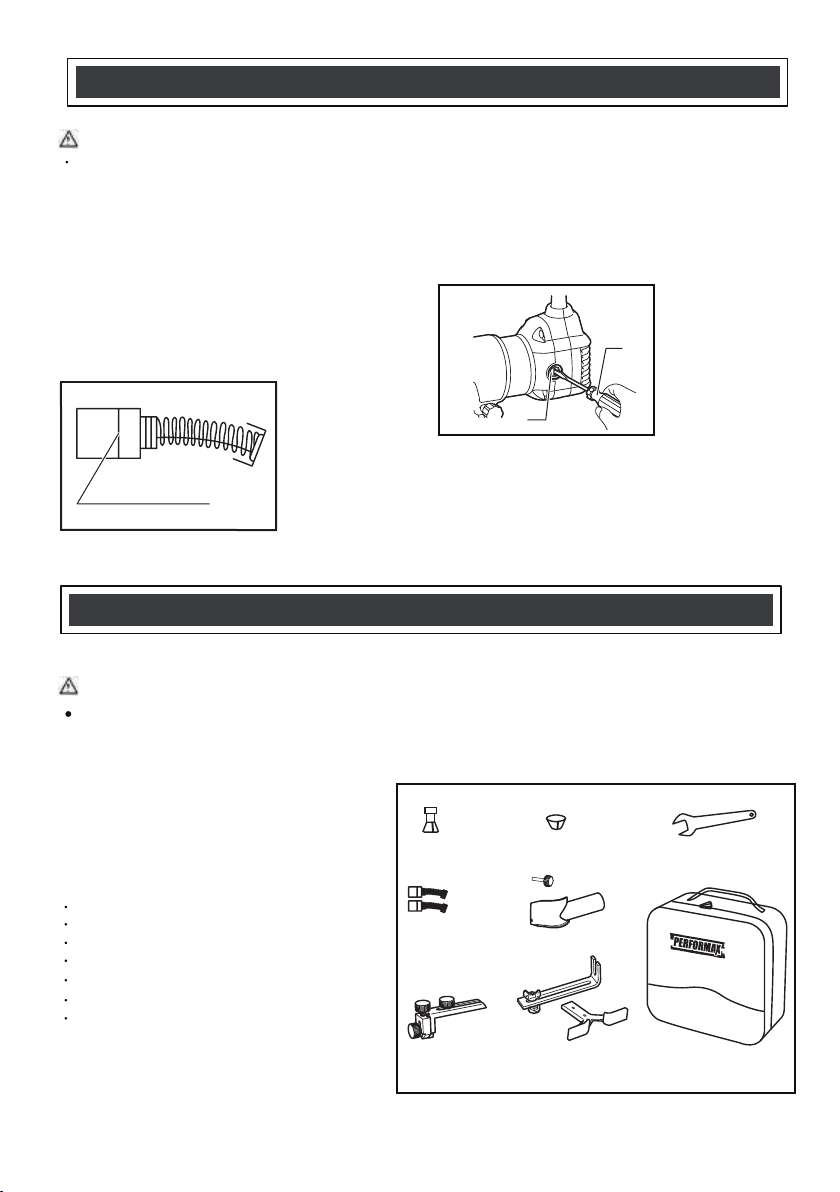
Replacing
Replacing
Replacing
Replacing carbon
carbon
carbon
carbon brushes
brush
es
brushes
brushes
1. Limit mark
CAUTION:
CAUTION:
CAUTION:
CAUTION:
If you need any assistance or more details regarding these
accessories, call the toll-free helpline at: 1-866-915-8626.
Dust hood
Roller guide assembly
Straight guide assembly
Collet 1/4"(installed with router)
Collet 3/8"
Collet wrench
Carbon bru
shes
Remove and check the carbon brushes regularly.
Replace when they wear down to the limit mark. Keep
the carbon brushes clean and free to slip in the
holders. Both carbon brushes should be replaced at
the same time. Use only identical carbon brushes.
Use a screwdriver to remove the brush holder caps.
Take out the worn carbon brushes, insert the new ones
and secure the brush holder caps.
1. Screwdriver
2. Brush
holder cap
To maintain product SAFETY and RELIABILITY,
always use
original replacement parts.
ACCESSORIES
ACCESSORIES
ACCESSORIES
ACCESSORIES
MAINTEN
MAINTEN
MAINTEN
MAINTENA
A
A
ANCE
NCE
NCE
NCE
These accessories/attachments are
recommended for use with your Performax tool
specified in this manual. The use of any other
accessories/attachments might present a risk
of injury to persons. Only use the accessories/
attachments for their stated purpose.
ACCESSORIES INCLUDED IN PACKAGE
1
2
1
Roller guide
assembly
Straight guide
assembly
Collet wrench
Carbon
brushes
Canvas bag
Dust hood
Collet 1/4″
Collet 3/8″
14
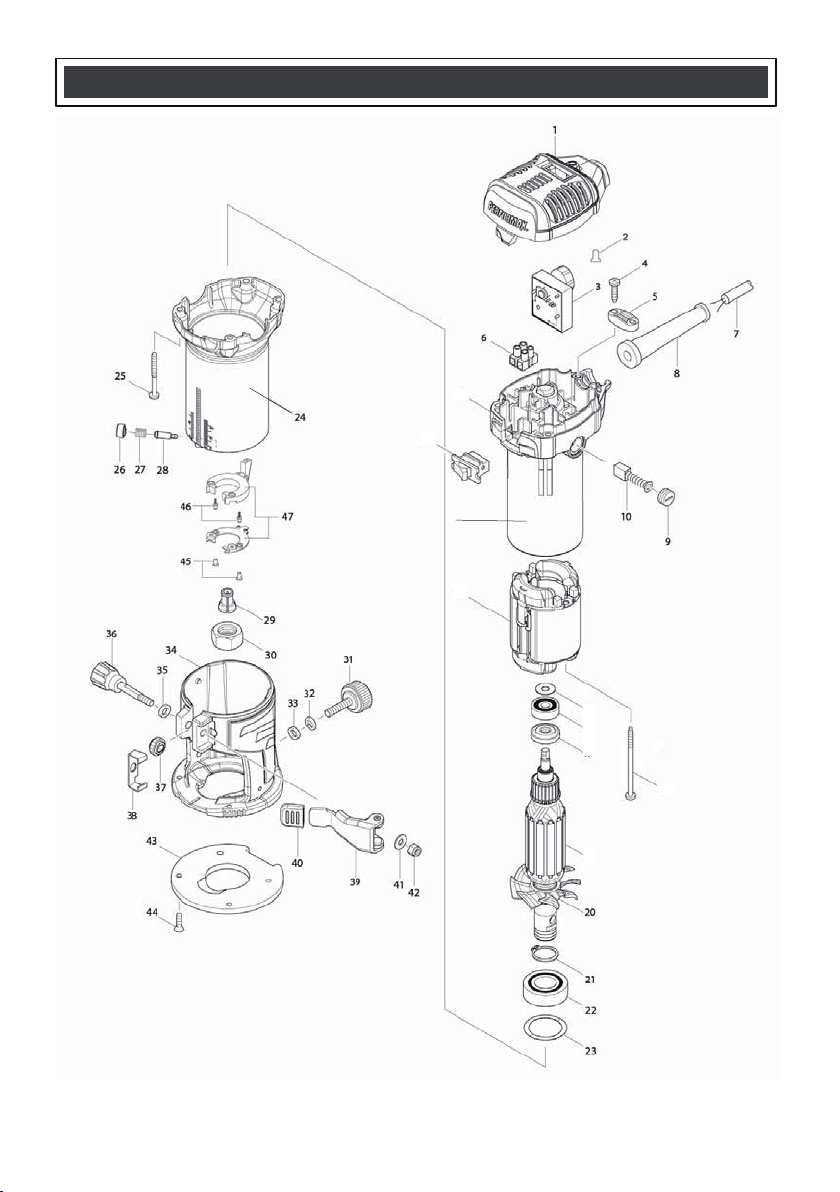
EXPLODED
EXPLODED
EXPLODED
EXPLODED VIEW
VIEW
VIEW
VIEW
12
13
11
14
16
17
18
19
15

15
WARNING:
WARNING:
WARNING:
WARNING:
When servicing, use only original equipment replacement parts. The use of any other
parts may create a safety hazard or cause damage to the trim router.
Any attempt to repair or replace electrical parts on this trim router may create a safety hazard unless
repairs are performed by a qualified technician. For more information, call the toll-free helpline, at
1-866-915-8626.
PARTS
PARTS
PARTS
PARTS LIST
LIST
LIST
LIST
!
!
!
!
Item
Description Qty Item Description Qty
1
TOP COVER COMPLETE 1 25 TAPPING SCREW 4X40 4
2
POWER INDICATOR 1 26 PUSH BUTTON 1
3
CONTROLLER 1 27 COMPRESSION SPRING 7 1
4
TAPPING SCREW 4X18 2 28 PIN 4 1
5
STRAIN RELIEF 1 29 COULLET CONE 1/4" 1
6
TERMINAL BLOCK 2P 1 30 COLLET NUT 1
7
POWER SUPPLY CORD 1 31 THUME SCREW M6X25 1
8
CORD GUARD 1 32 SPRING WASHER 6 1
9
BURSH HOLDER CAP 2 33 FLAT WASHER 6 1
10
CARBON BRUSH 1 34
TRIMMER
BASE
COMPLETE
1
11
BRACKET COMPLETE 1 35 FLAT WASHER 6 1
12
BRUSH HOLDER 6X9 2 36 THUME SCREW M5X35 1
13
SWITCH 1 37 SPUR GEAR 16 1
14
STATOR 1 38 CAM PLATE 1
15
TAPPING SCREW 4X18 2 39 LOCK LEVER COMPLETE 1
16
WAVE WASHER 1 40 RUBBER CAP 1
17
BALL BEARING 627DDW 1 41 FLAT WASHER 5 1
18
RESIN WASHER 1 42 HEX LOCK NUT M5-8 1
19
ARMATURE 1 43 BASE PROTECTOR 1
20
FAN 1 44 SCREW M4X10 4
21
RETAINING RING 1 45 SCREW M4X10 2
22
BALL BEARING 5003DDW 1 46 WORKING LIGHT 1
23
WAVE WASHER 20 1 47 WORKING LIGHT HOLDER 1
24
OUTER HOUSING COMPLET 1

16
PERFORMAX
PERFORMAX
PERFORMAX
PERFORMAX
®
®
®
®
COMPACT
ROUTER
ROUTER
ROUTER WARRANTY
WARRANTY
WARRANTY
WARRANTY
30-DAY
30-DAY
30-DAY
30-DAY MONEY
MONEY
MONEY
MONEY BACK
BACK
BACK
BACK GUARANTEE:
GUARANTEE:
GUARANTEE:
GUARANTEE:
This PERFORMAX
®
brand power tool carries our 30-Day Money Back
Guarantee. If you are not completely satisfied with your PERFORMAX
®
brand
power tool for any reason within thirty (30) days from the date of purchase, return
the tool with your original receipt to any MENARDS
®
retail store, and we will
provide you a refund – no questions asked.
2-YEAR
2-YEAR
2-YEAR
2-YEAR LIMITED
LIMITED
LIMITED
LIMITED WARRANTY:
WARR
ANTY:
WARRANTY:
WARRANTY:
This PERFORMAX
®
brand power tool carries a 2-Year Limited Warranty to the
original purchaser. If, during normal use, this PERFORMAX
®
power tool breaks
or fails due to a defect in material or workmanship within two (2) years from the
date of original purchase, simply bring this tool with the original sales receipt
back to your nearest MENARDS® retail store. At its discretion, PERFORMAX
®
agrees to have the tool or any defective part(s) repaired or replaced with the
same or similar PERFORMAX
®
product or part free of charge, within the stated
warranty period, when returned by the original purchaser with original sales
receipt. Not withstanding the foregoing, this limited warranty does not cover any
damage that has resulted from abuse or misuse of the Merchandise. This
warranty: (1) excludes expendable parts
including but not limited to blades,
brushes, belts, bits, light bulbs, and/or batteries; (2) shall be void if this tool is
used for commercial and/or rental purposes; and (3) does not cover any losses,
injuries to persons/property or costs. This warranty does give you specific legal
rights and you may have other rights, which vary from state to state. Be careful,
tools are dangerous if improperly used or maintained. Seller’s employees are
not qualified to advise you on the use of this Merchandise. Any oral
representation(s) made will not be binding
on seller or its employees. The rights
under this limited warranty are to the original purchaser of the Merchandise and
may not be transferred to any subsequent owner. This limited warranty is in lieu
of all warranties, expressed or implied inc
luding warranties or merchantability
and fitness for a particular purpose. Seller shall not be liable for any special,
incidental, or consequential damages. The sole exclusive remedy against the
seller will be for the replacement of any defects as provided herein, as long as
the seller is willing or able to replace this product or is willing to refund the
purchase price as provided above. For insurance purposes, seller is not allowed
to demonstrate any of these power tools for you.
For questions / comment
s, technical assistance or repair parts –
Please Call Toll Free at: 1-866-915-8626 (M-F 8am – 6pm)
SAVE
SAVE
SAVE
SAVE YOUR
YOUR
YOUR
YOUR RECEIPTS.
RECEIPTS.
RECEIPTS.
RECEIPTS. THIS
THIS
THIS
THIS WARRANTY
WARRANTY
WARRANTY
WARRANTY IS
IS
IS
IS VOID
VOID
VOID
VOID WITHOUT
WITHOUT
WITHOUT
WITHOUT THEM.
THEM.
THE
M.
THEM.
23/09/2013
Distributed by: Menard, Inc., Eau Claire, WI 54703
COMPACTCOMPACTCOMPACTCOMPACT
COMPACT