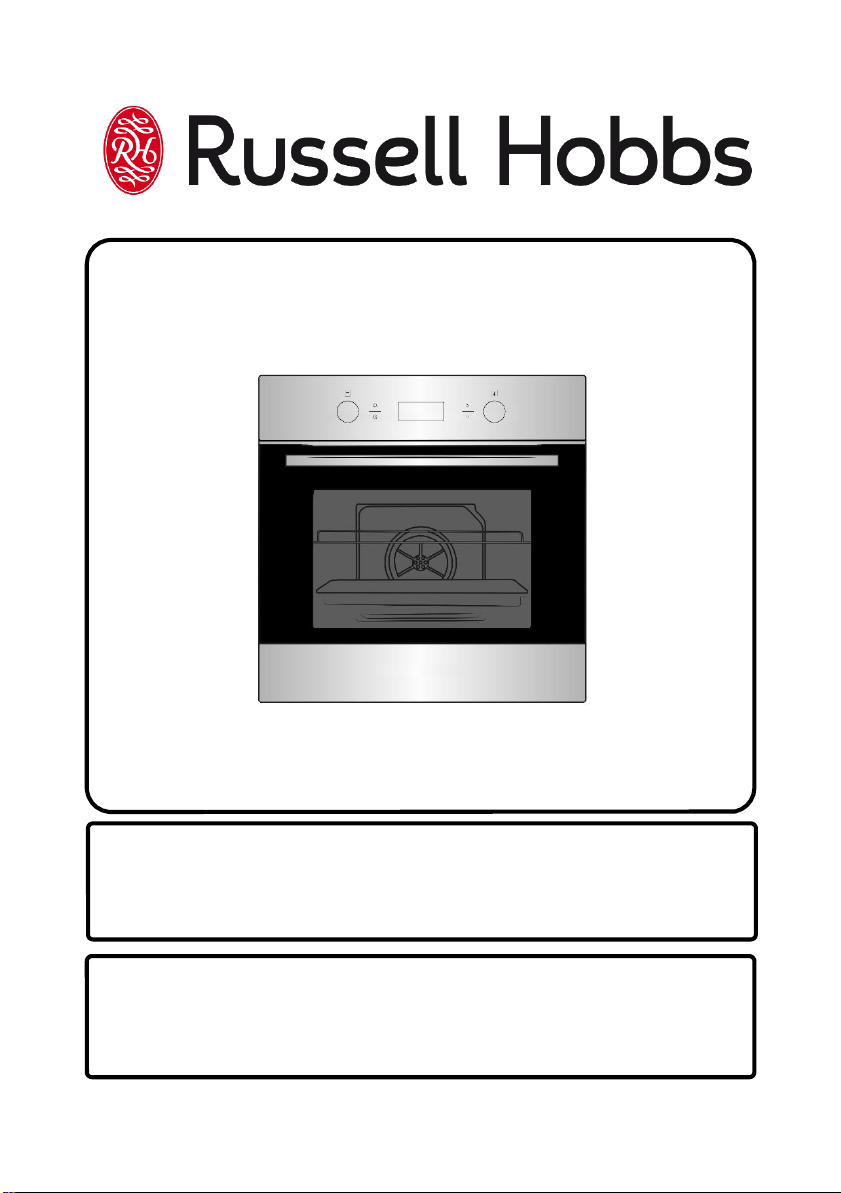
Model number(s):
RHPYRO6503B SS
Pyrolytic Oven
Instruction Manual
IMPORTANT:
RETAIN FOR FUTURE REFERENCE
For Customer Services & Spare Parts please call 0345 208 8750
Opening times: Monday - Friday 8am – 8pm & Saturday 9am – 1pm
or visit us at www.productcare.co.uk

For Customer Services & Spare Parts please call 0345 208 8750
Opening times: Monday - Friday 8am – 8pm & Saturday 9am – 1pm
or visit us at www.productcare.co.uk
Contents
Safety Instructions ………………………………………. 3-5
Product Overview ………………………………………. 6
Positioning ………………………………………. 7
Installation ………………………………………. 8-9
Usage ………………………………………. 10-25
Oven functions ………………………………………. 11-12
Dials & Button functions ………………………………………. 13
Oven cavity & before first use ………………………………………. 14
Setting the clock ………………………………………. 15
Function & temperature setting ………………………………………. 16
Minute minder ………………………………………. 17
Duration timer ………………………………………. 18
Reservation function ………………………………………. 19-20
Cancel function, checking time,
safety lock
………………………………………. 20-21
Cooking guidelines & warnings ………………………………………. 22-23
Accessories ………………………………………. 24-25
Cleaning & Maintenance ………………………………………. 26-30
Trouble shooting ………………………………………. 31
Guarantee ………………………………………. 32
Technical specification ………………………………………. 33
Notes ………………………………………. 34-35

For Customer Services & Spare Parts please call 0345 208 8750
Opening times: Monday - Friday 8am – 8pm & Saturday 9am – 1pm
or visit us at www.productcare.co.uk
3
Safety Instructions
Important note:
Please read this booklet before installing and switching on this appliance.
The manufacturer assumes no responsibility for incorrect installation and
usage as described in this booklet.
This appliance can be used by children aged from 8 years and above and
persons with reduced physical, sensory or mental capabilities or lack of
experience and knowledge if they have been given supervision or
instruction concerning use of the appliance in a safe way and understand
the hazards involved. Children shall not play with the appliance.
Electric ovens and hobs must be hard-wired to a suitably rated electrical
cooker power point – it is recommended that you consult a qualified
electrician. Failure to do so will invalidate your guarantee, liability claims
and could lead to criminal prosecution
• Children should be supervised to ensure that they do not play with the
appliance.
• If the supply lead is damaged it must be replaced by a qualified person
using the correct lead, available from 0345 208 8750.
• Packaging material is dangerous to children. Never allow children to play
with packaging material.
• Check the appliance for damage after unpacking it. Do not connect the
appliance if it has been damaged in transport.
• The appliance can only be used safely if it is correctly installed according
to the safety instructions. The installer is responsible for ensuring that
the appliance works correctly after installation.
• All operations relating to installation and regulation must be carried out
by an authorised installation engineer, respecting applicable regulations,
standards and the specifications of the local electricity providers.
For Customer Services & Spare Parts please call 0345 208 8750
Opening times: Monday - Friday 8am – 8pm & Saturday 9am – 1pm
or visit us at www.productcare.co.uk
4
Safety Instructions
• This appliance can only be installed in a well-ventilated place in accordance with
existing regulations and ventilation specifications.
• This appliance is intended for domestic use and the household environment
only. The appliance is not intended for use outside.
• Do not tamper with the appliance's interior. If necessary, call our customer
helpline
• Do not switch on the appliance if it is damaged in any way. Contact our
customer helpline
• This appliance is only intended for cooking purposes, not as a heating system.
• Do not leave the appliance unattended during operation. The manufacturer is
not liable for damage which is caused by improper use or incorrect operation.
• Combustible items stored in the cooking compartment may catch fire. Never
store combustible items in the cooking compartment. Never open the appliance
door if there is smoke inside. Switch off the appliance and switch off the circuit
breaker in the fuse box.
• A draught is created when the appliance door is opened. Greaseproof paper
may come into contact with the heating element and catch fire. Do not place
greaseproof paper loosely over accessories during preheating. Always weight
down the greaseproof paper with a dish or a baking tin. Only cover the surface
required with greaseproof paper. Greaseproof paper must not protrude over
the accessories.
• Always slide accessories into the cooking compartment
• The appliance becomes very hot. Never touch the interior surfaces of the
cooking compartment or the heating elements. Always allow the appliance to
cool down. Keep children at a safe distance.
• Accessories and ovenware become very hot. Always use oven gloves to remove
accessories or ovenware from the cooking compartment.
• Shelves and the universal tray only must be placed and used between the 5 side
supports.
• The universal tray or any other kind of baking tray should not be placed on the
bottom of the oven cavity.

For Customer Services & Spare Parts please call 0345 208 8750
Opening times: Monday - Friday 8am – 8pm & Saturday 9am – 1pm
or visit us at www.productcare.co.uk
5
Safety Instructions
• Alcoholic vapours may catch fire in the hot cooking compartment. Never
prepare food containing large quantities of drinks with a high alcohol content.
Only use small quantities of drinks with a high alcohol content. Open the
appliance door with care.
• The accessible parts become very hot when in operation. Never touch hot parts.
Keep children at a safe distance.
• When you open the appliance door, hot steam may escape. Open the appliance
door with care. Keep children at a safe distance.
• Water in a hot cooking compartment may create hot steam. Never pour water
into the hot cooking compartment.
• Scratched glass in the appliance door may develop into a crack. Do not use a
glass scraper, sharp or abrasive cleaning aids or detergents.
• The appliance gets hot. Do not keep combustible objects or aerosol cans in
drawers directly underneath the appliance.
• A defective appliance may cause electric shock. Never switch on a defective
appliance. Switch off the appliance and switch off the circuit breaker in the fuse
box. Contact the customer services.
• The cable insulation on electrical appliances may melt when touching hot parts
of the appliance. Never bring electrical appliance cables into contact with hot
parts of the appliance.
• Penetrating moisture may cause an electric shock. Do not use any high pressure
cleaners or steam cleaners.
• When replacing the cooking compartment bulb, the bulb socket contacts are
live. Before replacing the bulb, switch off the appliance and switch off the
circuit breaker in the fuse box.
• Incorrect repairs are dangerous. Repairs may only be carried out by a qualified
electrician.
• Never use strong and abrasive cleaning agents as they will cause surface
damage.
• In the event of a malfunction, turn off the appliance’s electricity supply. For
repairs, call customer services.
• Carrying the appliance: do not carry or hold the appliance by the door handle.
For Customer Services & Spare Parts please call 0345 208 8750
Opening times: Monday - Friday 8am – 8pm & Saturday 9am – 1pm
or visit us at www.productcare.co.uk
6
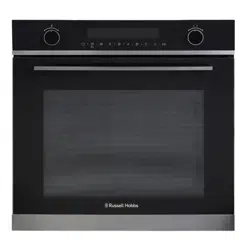
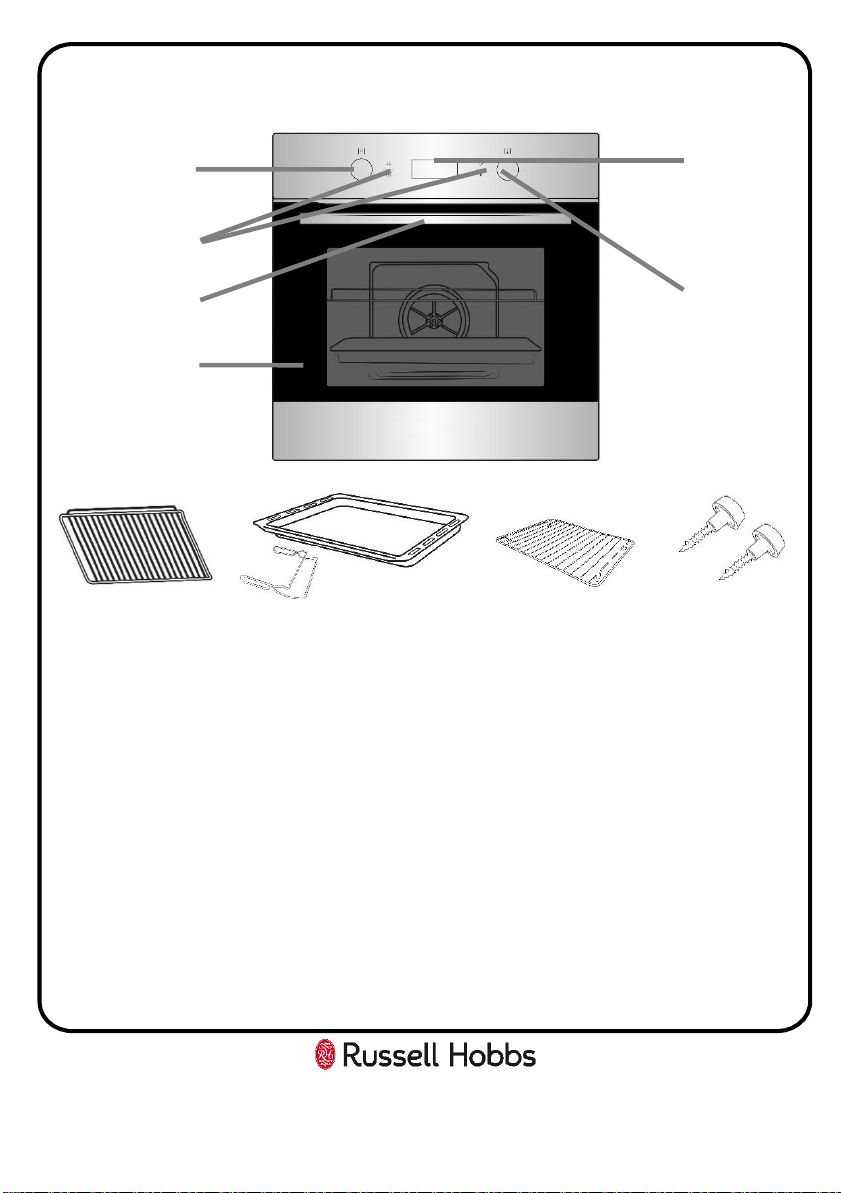
Product overview
1
7
8
1. Oven function dial
2. Function touch buttons
3. Handle
4. Glass window
5. LED Display
6. Temperature/adjustment
dial
7. 2 x Wire shelf
8. 1 x Universal tray & handle
9. 1 x Wire rack
10.2 x Distance holding screws
Unit & Spare Parts
If any of the above parts are missing please contact the customer service team on
0345 208 8750 or visit www.productcare.co.uk
2
4
3
5
6
9
10
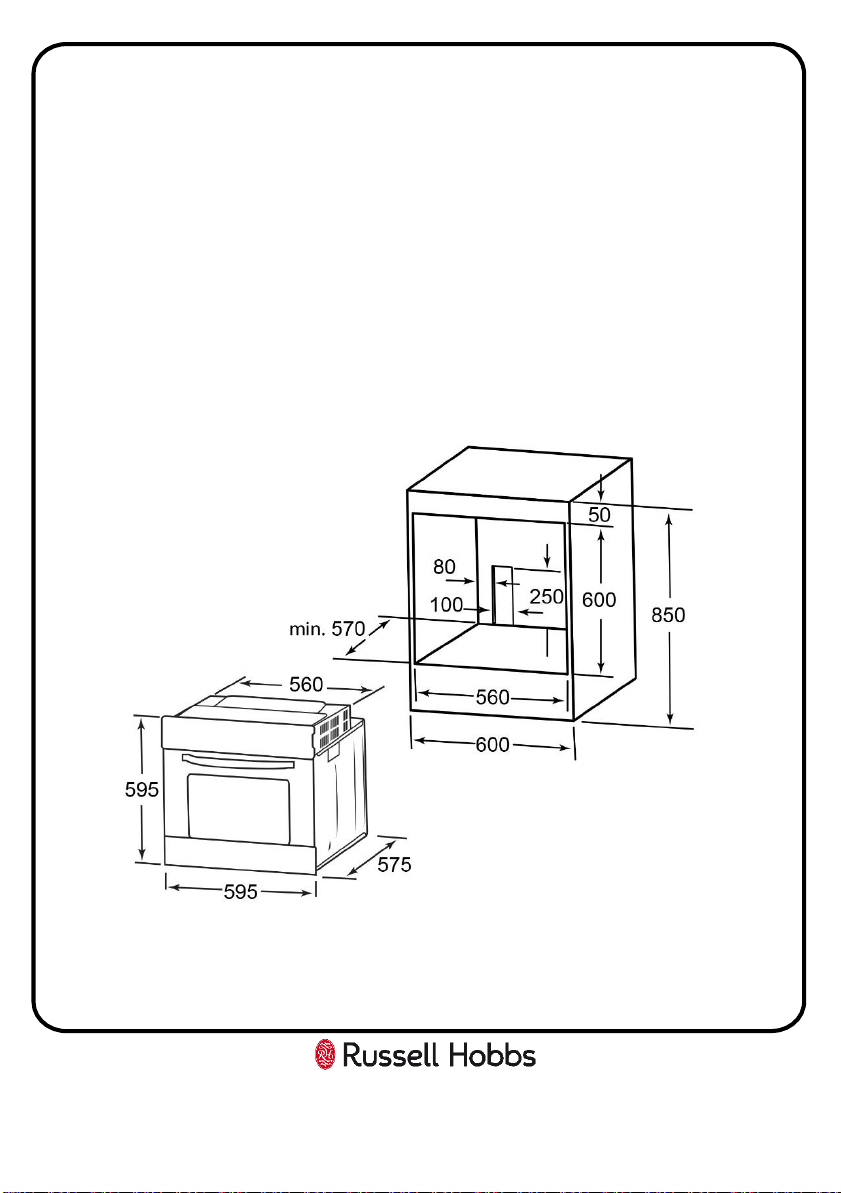
Positioning
• This appliance is to be installed under a counter top or in cabinets.
• Avoid damaging the product during installation.
• The appliance can only be used safely if it is correctly installed according to the
safety instructions. The installer is responsible for ensuring that the appliance
works correct when installed.
• Electric ovens and hobs must be hard-wired to a suitably rated electrical
cooker power point – it is recommended that you consult a qualified
electrician. Failure to do so will invalidate your guarantee, liability claims and
could lead to criminal prosecution.
• The aperture size has to be (H)600 x (W)560 x (D)570mm (please note that the
depth size is a minimum measure, the oven can be installed in an aperture that
has a bigger depth).
Note:
• Select heat-resistant work surface material to avoid larger deformation
caused by the heat radiation from the appliance.
• This oven has forced air ventilation.
For Customer Services & Spare Parts please call 0345 208 8750
Opening times: Monday - Friday 8am – 8pm & Saturday 9am – 1pm
or visit us at www.productcare.co.uk
7

Installation
Preparation & installation
Ensure that there are no electric wires, gas or water pipes in the area where holes
are to be made.
Components of the appliance may have sharp edges. Wear protective gloves.
1. Ensure that there is an electrical power point within adequate distance of the
oven after it has been installed.
2. Ensure the aperture measures (H)600 x (W)560 x (D)570mm, in accordance
with the positioning instructions detailed on the previous page.
3. Carefully and gently put the oven into the aperture recess, making sure that
power cable can still be accessed.
4. Connect the oven to the electrical power point before pushing the oven into
the aperture fully.
5. Once this is done open the oven door and secure the oven to the kitchen
cabinet with two distance holding screws which fit the holes in the oven frame.
For Customer Services & Spare Parts please call 0345 208 8750
Opening times: Monday - Friday 8am – 8pm & Saturday 9am – 1pm
or visit us at www.productcare.co.uk
8

Installation
Electrical connection
• WARNING- THIS APPLIANCE MUST BE EARTHED
• This appliance is designed to be connected to a 220-240V~50Hz AC electricity
supply.
• Before proceeding with the electrical connection, verify that the current
carrying capacity of the system and the isolator / main switch is adequate for
the maximum power rating of the oven.
• Electrical installation of the residence and of the appliance’s isolator must be
earthed and conform with the required safety regulations.
• If there is no suitable circuit and a fused switch, they must be installed
by a qualified electrician before the hob is connected.
• An isolator switch must be easily accessible once the oven has been installed.
• Do not use adaptors, multiple sockets and/or extension leads.
• A circuit breaker with a contact opening of at least 3 mm, rated 32A and
delayed functioning type must be installed inside the supply circuit.
• During installation, please ensure that insulated cables are used. An incorrect
connection might damage your appliance and will void the manufacturer’s
guarantee.
• All repairs must be carried out by an authorised service personal or a
qualified electrician.
• Switch off/isolate your appliance before each maintenance.
• The GREEN/YELLOW wire is the EARTH and must be connected to the
terminal which is marked with the letter E or by the earth symbol or
coloured GREEN or GREEN/YELLOW.
• The BLUE wire is the NEUTRAL and must be connected to the terminal
marked with the letter N or coloured BLACK.
• The BROWN wire is the LIVE wire and must be connected to the
terminal marked with the letter L or coloured RED.
For Customer Services & Spare Parts please call 0345 208 8750
Opening times: Monday - Friday 8am – 8pm & Saturday 9am – 1pm
or visit us at www.productcare.co.uk
9
Usage
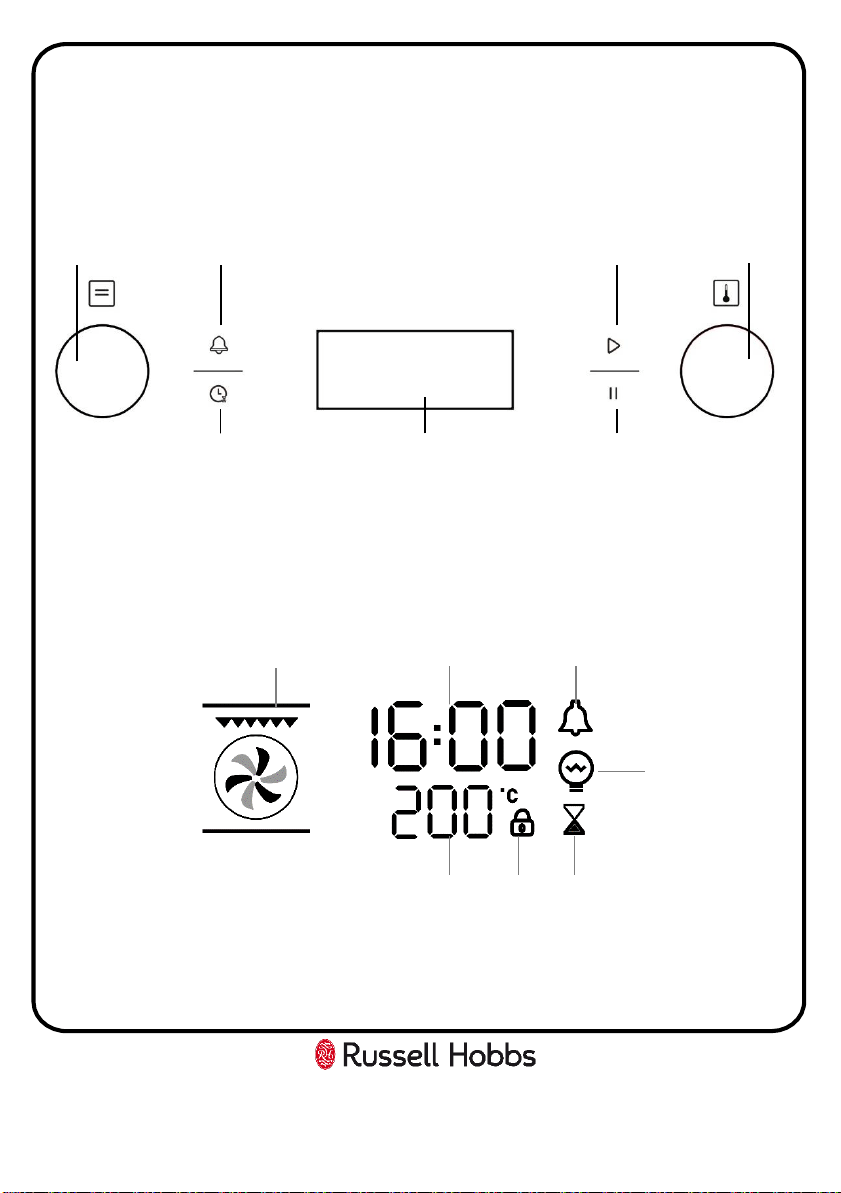
Control panel
The appliance has an oven function dial, temperature dial, a display and function
buttons, these are explained below:
LED display
For Customer Services & Spare Parts please call 0345 208 8750
Opening times: Monday - Friday 8am – 8pm & Saturday 9am – 1pm
or visit us at www.productcare.co.uk
10
1 2 5
7
3
4
6
1. Oven function dial
2. Minute minder touch button
3. Clock touch button
4. LED display
5. Start cooking touch button
6. Pause/stop cooking touch button
7. Temperature/adjustment dial
1. Oven function symbols
2. Time/minute minder
3. Oven temperature
4. Safety lock symbol
5. Alarm/Timer symbol
6. Oven light indicator
7. Reservation function
1 2
3
5
7
6
4
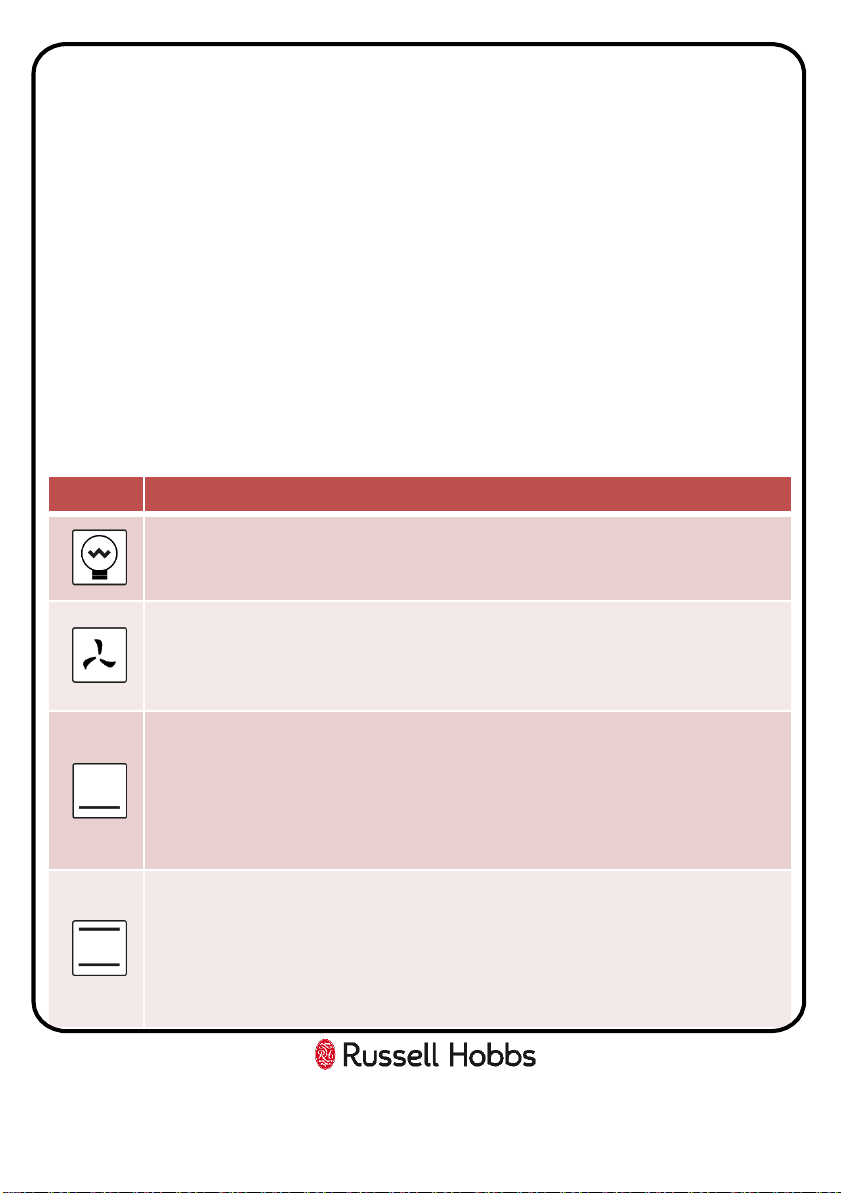
Symbol Function
Oven Lamp: Turns on the oven lamp.
Defrost: Circulates air in the oven at room temperature (without the use of
any heat) enabling quicker thawing of frozen food.
Use to defrost food only.
Bottom heating: The temperature is emitted from below which provides
heat to the base of food.
Use bottom heating for baking and browning dishes from below, ideal for
slow cooking dishes such as casseroles, stews, pastries and pizzas where a
crispy base is desired.
Top & bottom heating: Heat is emitted evenly from the top and bottom,
which provides convectional cooking. The top and bottom elements work
together to provide convectional cooking.
Best suited for single items that are centred in the oven: cakes and pizzas on
baking trays, and for lean joints of beef, etc.
Usage
Note: Always pre-heat the oven to the required temperature before cooking.
Oven function dial
The oven function dial allows you to set the oven function mode for the oven. The
dial has to be pressed in for it to pop out, before it can then be rotated clockwise
or anti-clockwise to set the required oven function.
When the required type of function is set, the oven light that is inside the oven
lights up. The temperature dial will also need to be adjusted when using any of the
oven functions except the oven lamp and defrost functions.
The appliance will utilise different elements within the oven cavity, depending on
the oven function that you select.
For Customer Services & Spare Parts please call 0345 208 8750
Opening times: Monday - Friday 8am – 8pm & Saturday 9am – 1pm
or visit us at www.productcare.co.uk
11
For Customer Services & Spare Parts please call 0345 208 8750
Opening times: Monday - Friday 8am – 8pm & Saturday 9am – 1pm
or visit us at www.productcare.co.uk
12
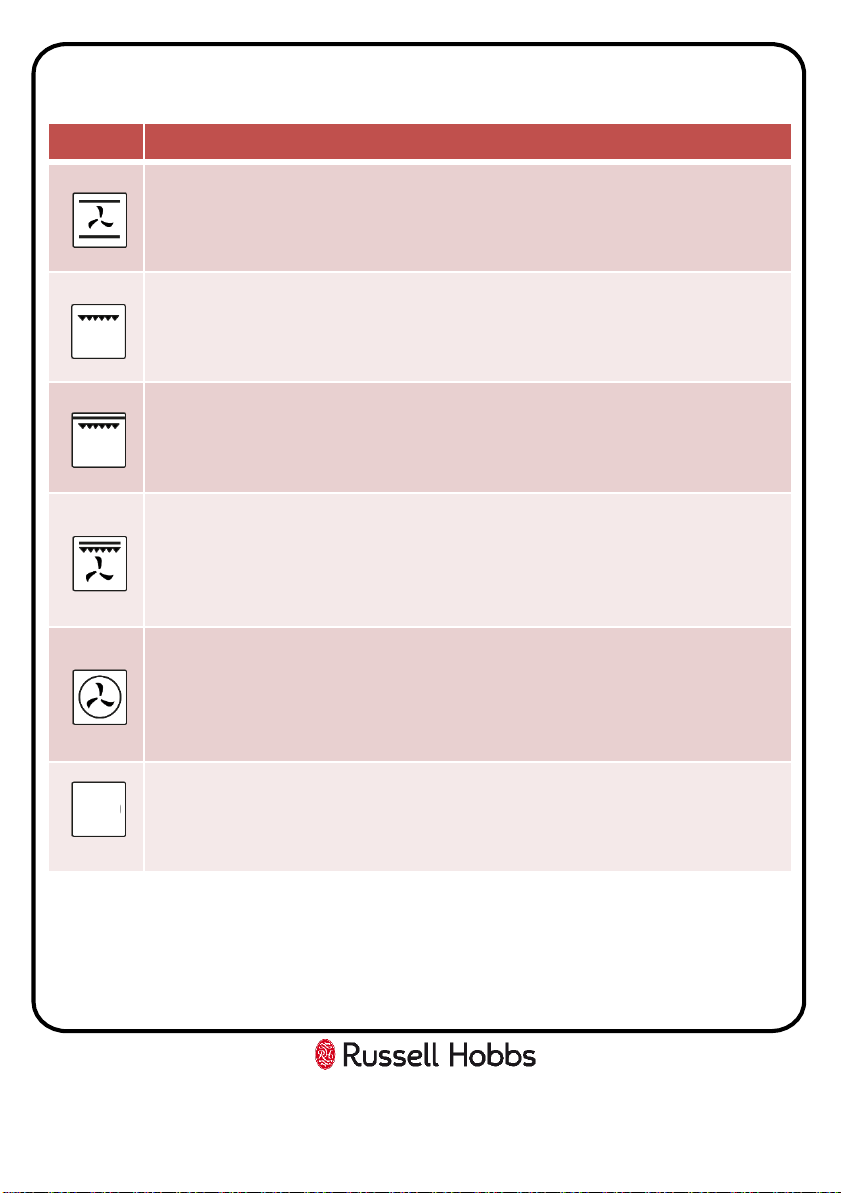
Symbol Function
Convection heating with fan: The fan distributes the heated air around the
food that is emitted by the top and bottom heating elements.
Best suited for baking, roasting all meat, vegetables and pre-cooked meals.
Single grill: Part of the area below the grill heating element becomes hot.
The inner grill element is on.
Can be used to grill a small number of burgers, sausages fish or bread.
Double grill: The whole area below the grill heating element becomes hot.
The inner and outer grill elements are on.
Can be used to grill a large number of burgers, sausages fish or bread.
Double grill with fan: The fan distributes the heated air around the food.
The grill element and fan switch on and off alternately.
Hot air grilling is particularly suitable for grilling fish, poultry and larger
pieces of meat.
Convection heating: A fan with a ring heating element on the back of the
oven ensures that the heated air is distributed evenly.
You can bake cakes, pizza, biscuits, small cakes and puff pastry on two
levels at the same time.
Pyrolytic cleaning: This function cleans the oven cavity by raising the inner
oven temperature to approximately 450°C (the oven will lock the oven door
during this function). The resultant ash deposits can be wiped away with a
soft damp cloth once the oven has cooled down
PYA
Usage

Usage
Temperature/adjustment dial
Use the Temperature/adjustment dial to set the required temperature for the
oven. The dial has to be pressed in for it to pop out, before it can then be rotated
clockwise to set the required temperature.
The temperature can be set between 50°C and 250°C (this is dependent on the
function that is selected) and the grill temperature can be set between 180°C and
240°C.
NOTE: The unit of adjustment for temperature will change 5°C at a time.
The oven function dial must be adjusted to select the required oven function;
turning the temperature dial alone will not make the oven heat up.
Minute minder touch button
Press the minute minder touch button to set the countdown timer. The timer is
independent from the oven functions, when the countdown time has finished, an
audible signal will sound. The minute minder must be set prior to selecting an
oven function.
Clock touch button
Press the clock touch button to set the clock.
Start cooking touch button
Press the start cooking touch button to start the cooking function after the oven
function and temperature have been selected. Also press this button to
continue/resume cooking after pausing the cooking function.
Pause/stop cooking touch button
Press the pause/stop cooking touch button to pause the cooking function (the
oven will stop heating). If you wish to cancel the cooking function, you should
press the pause/stop cooking touch button twice. The oven will stop heating and
return to stand-by mode.
For Customer Services & Spare Parts please call 0345 208 8750
Opening times: Monday - Friday 8am – 8pm & Saturday 9am – 1pm
or visit us at www.productcare.co.uk
13

Usage
The oven cavity
• The oven light is located in the cooking compartment. During oven operation,
the oven light is on.
• A cooling fan protects the oven from overheating.
• The cooling fan switches on and off as required. The hot air escapes above the
door.
• So that the cooking compartment cools down more quickly after operation, the
cooling fan continues to run for a certain period afterwards.
• There are supports either side of the compartment that accessories such as the
wire shelf baking tray, etc. can be inserted in to.
• The coating of the oven cavity is enamel.
• Before you use the accessories for the first time, clean them with hot soapy
water and a soft dish cloth.
• Clean all accessories by hand, do not clean in the dishwasher.
Before first use
Warnings:
• When it is first used, it is normal for the oven to give off odours; this does not
pose any risk and does not indicate a malfunction; they will disappear in
time.
• To remove any residue from the oven that may have been left from the
manufacturing process, you should select the convection & fan oven function
and set the thermostat to its maximum temperature setting.
• It is perfectly normal for a smell to be produced during this process.
• You should make sure that any windows in the room are left open during this
process.
• It is advisable for you not to remain in the room whilst the burning off
process is taking place.
• You should leave the oven on maximum setting for 30 – 40 minutes.
For Customer Services & Spare Parts please call 0345 208 8750
Opening times: Monday - Friday 8am – 8pm & Saturday 9am – 1pm
or visit us at www.productcare.co.uk
14

Usage
• After the oven cavity has cooled, it should then be cleaned with warm soapy
water, using either a sponge or soft cloth. No abrasive cleaners should be
used.
• Outer parts of the oven should be cleaned with warm soapy water, using
either a sponge or soft cloth. No abrasive cleaners should be used.
• We would recommend that an appropriate stainless steel cleaner and polish
is regularly used on the stainless steel surfaces of this appliance.
Setting the clock
When the oven is first connected to the electrical supply and powered on (or after
a power cut), the clock will need to be set. The display will automatically show the
time as “0:00“, there will be a single beep and the “:" will flash.
Note: ensure the correct time is set before using the oven.
Note: the clock is a 24 hour clock, for example 2PM will be shown as 14:00.
To set the correct time of day
1. Press the clock touch button and the hour digits will flash on the LED display.
2. Turn the temperature/adjustment dial to adjust the hour time. Your oven has
a 24 hour clock, so it is possible to adjust the hour digit between 0 and 23.
3. When the correct hour time appears on the LED display, press the clock button
again. The minute digits will flash on the LED display.
4. Turn the temperature/adjustment dial to adjust the minute time; it is possible
to adjust the minute digit between 0 and 59.
5. When the correct minute time appears on the LED display, press the clock
button for a third time to confirm the time of day.
6. The “:” symbol between the digits will flash and the time of day will light on
the LED display.
Note: You can adjust the time of day at any time by following the instructions
above, as long as the oven is not currently in use.
For Customer Services & Spare Parts please call 0345 208 8750
Opening times: Monday - Friday 8am – 8pm & Saturday 9am – 1pm
or visit us at www.productcare.co.uk
15

Usage
Note: Always pre-heat the oven to the required temperature before cooking.
Selecting an oven function and temperature
The oven function dial should be used to select the particular mode of cooking
that you require. The appliance will utilise different elements within the oven
cavity, depending on the oven function that you select.
To start cooking:
1. Turn the oven function dial to select the oven function that you require. The
oven function symbols will light on the display to show you which oven
function is currently being selected. (see page 11-13 for a list of oven
functions/symbols).
2. Turn the Temperature/adjustment dial to set the temperature; the
temperature can be set between 50°C and 250°C (this is dependent on the
function that is selected) and the grill temperature can be set between 180°C
and 240°C.
3. Press the start cooking touch button to confirm the oven function and
temperature that you have chosen and the oven will start cooking.
4. The oven will operate until it has been turned off.
During cooking, you can adjust the cooking temperature by turning the
temperature/adjustment dial. The oven temperature will appear on the LED
display as you turn the temperature/adjustment dial. When the correct
temperature appears on the LED display, press the start cooking touch button.
If the start button is not pressed within 3 seconds of an oven temperature being
selected then the oven will revert back to the previously set temperature
NOTE: The unit of adjustment for temperature will change 5°C at a time. The Grill
function will adjust in 5°C or 30°C units dependent on the grill function.
For Customer Services & Spare Parts please call 0345 208 8750
Opening times: Monday - Friday 8am – 8pm & Saturday 9am – 1pm
or visit us at www.productcare.co.uk
16

Usage
The minute minder
The minute minder is a countdown timer that is independent from the oven
functions. When the countdown time has finished, an audible signal will sound.
The minute minder must be set prior to selecting an oven function.
NOTE: The minute minder can be used without an oven cooking function
selected, and it will work as a separate kitchen timer.
To set the minute minder:
1. Press the minute minder touch button and the hour digits will flash on the LED
display.
2. Turn the temperature/adjustment dial to adjust the hour time; it is possible to
adjust the hour digit between 0 and 9.
3. When the correct hour time appears on the LED display, press the minute
minder touch button again. The minute digits will then flash.
4. Turn the temperature/adjustment dial to adjust the minute time; it is possible
to adjust the minute digits between 0 and 59.
5. When the correct minute time appears on the LED display, press the start
button to confirm the countdown time. The timer will be active immediately.
6. If required, you can now set an oven function, however the minute minder will
have no affect on the function when the time has elapsed.
7. The alarm will sound 10 times when the countdown has finished.
Note: You cannot amend the minute minder after a cooking function has been
started. To do this, you must cancel the current cooking operation and re-
program the minute minder and cooking function.
For Customer Services & Spare Parts please call 0345 208 8750
Opening times: Monday - Friday 8am – 8pm & Saturday 9am – 1pm
or visit us at www.productcare.co.uk
17

Usage
The duration timer
The duration timer is a countdown timer that is linked to your oven. When the
countdown has finished, an audible signal will sound and the oven will turn off.
To set the duration timer:
1. After you have selected an oven function and pressed start, the oven will start
to heat and will run until it is turned off unless the duration timer is set.
2. During cooking, adjust the cooking time (cooking duration) by turning the oven
function dial.
3. Press the start cooking touch button to confirm the oven cooking duration that
you have chosen and the oven timer will start.
4. At the end of the cooking time, an audible signal will sound and the oven will
turn off.
NOTE: When adjusting the timer, please be aware that the timer will scroll
through one minute at a time between 0:00 – 0:30 minutes. When scrolling
between 0:30 minutes to 9:00 hours, the timer will scroll in 5 minute units.
Pausing a cooking function
During cooking, if you wish to pause the cooking function, you should press the
pause/stop cooking touch button once. The oven will stop heating and the cooking
time will pause.
To continue cooking after pausing the cooking function, you should press the start
cooking touch button. The oven will resume cooking, using the same oven function
and temperature as previously set.
For Customer Services & Spare Parts please call 0345 208 8750
Opening times: Monday - Friday 8am – 8pm & Saturday 9am – 1pm
or visit us at www.productcare.co.uk
18

Usage
Reservation function
The reservation function allows you to set the time you want your oven to come
at, with the function you require and for the duration you require.
Note: The clock must be set for this function to work
To set the reservation function:
1. To set the time that you require the oven to start cooking at, press the clock
touch button and the hour digits will flash on the LED display.
2. Turn the temperature/adjustment dial to adjust the hour time. Your oven has
a 24 hour clock, so it is possible to adjust the hour digit between 0 and 23.
3. When the correct hour time appears on the LED display, press the clock button
again. The minute digits will flash on the LED display.
4. Turn the temperature/adjustment dial to adjust the minute time; it is possible
to adjust the minute digit between 0 and 59.
5. When the correct minute time appears on the LED display, turn the oven
function dial (do not press the clock button) to select the oven function that
you require. The oven function symbols will light on the display to show you
which oven function is currently being selected. (see page 11-13 for a list of
oven functions/symbols).
6. Turn the temperature/adjustment dial to set the temperature; the
temperature can be set between 50°C and 250°C (this is dependent on the
function that is selected) and the grill temperature can be set between 180°C
and 240°C.
7. Press the start cooking touch button to confirm the oven function and
temperature that you have chosen and the oven will start cooking.
8. Turn the oven function dial to set the cooking time you require, press the start
cooking touch button to confirm the cooking time.
9. The display will return to the clock but now the reservation icon will be lit on
the display
10. At the time of reservation, cooking will start automatically after a buzzing
sound and the reservation icon will stop being lit on the display.
For Customer Services & Spare Parts please call 0345 208 8750
Opening times: Monday - Friday 8am – 8pm & Saturday 9am – 1pm
or visit us at www.productcare.co.uk
19

Usage
Notes:
• The reservation time can be checked by pressing clock button, the reservation
time will be display for 3 seconds later before the display reverts back to the
current time again.
• When the reservation function has been set, press the cancel button once and
the oven function, temperature and cooking duration of the reservation
function will be shown on the display. Press the cancel button again to cancel
the reservation function completely, or press the start button to return to
reservation function.
• The minute minder function cannot be used when the reservation function has
been set
Cancelling a cooking function
During cooking, if you wish to cancel the cooking function, you should press the
pause/stop cooking touch button twice. The oven will stop heating and return to
stand-by mode.
Checking the time function
Whilst the appliance is cooking, to check the time of day, press the clock touch
button once. When a countdown time is set, to check the remaining cooking time,
press the clock touch button once.
Safety lock
Note: When the safety lock is switched on, it disables the control panel so that it
is not possible to alter any settings.
Press the pause/stop cooking touch button and start cooking touch buttons
simultaneously for 3 seconds. There will be a long audible signal and lock a symbol
will appear on the LED display, these confirm that the safety lock has been
activated.
For Customer Services & Spare Parts please call 0345 208 8750
Opening times: Monday - Friday 8am – 8pm & Saturday 9am – 1pm
or visit us at www.productcare.co.uk
20
Usage
To switch off the safety lock, press and hold the pause/stop cooking touch button
and start cooking touch button simultaneously for 3 seconds. There will be a long
audible signal and the lock symbol will go out, these confirm that the safety lock
has been switched off.
Note: when locked, you must unlock the control panel as outlined above if you
want to stop or change any oven function.
Internal light function
Note: The oven light will come on automatically when the oven is in use. If you
want to turn the oven light on without using an oven function please follow the
instructions below.
1. Using the Oven function dial, select the oven light function
2. Press the start button and the interior light will come on.
3. With the light function still selected, press the stop button to turn the light
back off.
For Customer Services & Spare Parts please call 0345 208 8750
Opening times: Monday - Friday 8am – 8pm & Saturday 9am – 1pm
or visit us at www.productcare.co.uk
21

Usage
Cooking guidelines
Please refer to the information given on food packaging for guidance on cooking
temperatures and times. Once familiar with the performance of your appliance,
temperatures and times can be varied to suit personal preference.
When using the fan oven function you should follow the information given on the
food packaging for this particular mode of cooking.
You should pre-heat the oven and not place food inside of it until the oven
operating light has gone off. You can choose not to preheat when using the fan
oven mode; however you should extend the cooking time given on the food
packaging by at least ten minutes.
IMPORTANT: You should ALWAYS pre-heat the oven if you are baking.
If there is no guidance given on the food packaging specifically for cooking in fan
oven mode, you can generally reduce the cooking time and temperature by 10%
from the information given for conventional oven cooking.
Make sure that frozen foods are thoroughly thawed before cooking, unless the
instructions on the food packaging advise that you can “cook from frozen”.
Before cooking, check that any accessories that are not required are removed
from the oven.
Place cooking trays in the centre of the oven and leave gaps between the trays to
allow air to circulate.
Try to open the door as little as possible to view the dishes.
The oven light will remain on during cooking.
For Customer Services & Spare Parts please call 0345 208 8750
Opening times: Monday - Friday 8am – 8pm & Saturday 9am – 1pm
or visit us at www.productcare.co.uk
22
Usage
Warnings
Keep the oven door closed when using any of the cooking functions, including all
grill functions.
Do not use aluminium foil to cover the enamelled baking tray or heat items
wrapped in aluminium foil under the grill. The high reflectivity of the foil could
potentially damage the grill element.
You should also never line the base of your oven with aluminium foil.
During cooking, never place pans or cookware directly onto the bottom of your
oven. They should always be placed on the shelves provided.
The grill heating element and other internal components of the oven become
extremely hot during operation, avoid touching them inadvertently when handling
the food which you are grilling.
The internal components of the oven become extremely hot during operation,
care should be taken avoid touching them inadvertently.
Important: Be careful when opening the door, to avoid contact with hot parts of
the oven and steam.
Warning: Accessible parts may become hot during use. Young children should be
kept well away from the oven when it is in use.
When removing the enamelled baking tray, you should ALWAYS use an oven
glove.
For Customer Services & Spare Parts please call 0345 208 8750
Opening times: Monday - Friday 8am – 8pm & Saturday 9am – 1pm
or visit us at www.productcare.co.uk
23
Usage
Accessories
Warning:
• All accessories must be removed before Pyrolytic cleaning is started.
• Correct placement of the shelves between the side supports is imperative.
This will ensure that food does not fall off or slide out when in the oven or
being carefully removed from the oven.
• Ensure that you always insert the accessories into the cooking compartment
the right way round.
• Shelves and the universal tray only must be placed and used between the 5
side supports.
• The universal tray or any other kind of baking tray should not be placed on
the bottom of the oven cavity.
The accessories can be inserted in the oven at 5 different levels. Always insert the
accessories as far as they can go to ensure that they do not touch the door glass.
Wire shelf - for ovenware, cake tins, roasts, grilling and frozen meals. Slide the
wire rack into the oven with the raised part at the back and at the top.
For Customer Services & Spare Parts please call 0345 208 8750
Opening times: Monday - Friday 8am – 8pm & Saturday 9am – 1pm
or visit us at www.productcare.co.uk
24
a
r
Usage
Universal tray - for cooking large quantities of food such as cakes, pastries, frozen
food, etc. Can also be used under the wire rack to catch fat when grilling. Slide the
baking tray into the oven with the sloping edge facing towards the oven door.
Wire rack - for grilling and roasting. Place the wire insert in the universal tray with
the legs facing downwards. This ensures that dripping fat and meat juices are
collected.
:
For Customer Services & Spare Parts please call 0345 208 8750
Opening times: Monday - Friday 8am – 8pm & Saturday 9am – 1pm
or visit us at www.productcare.co.uk
25
For Customer Services & Spare Parts please call 0345 208 8750
Opening times: Monday - Friday 8am – 8pm & Saturday 9am – 1pm
or visit us at www.productcare.co.uk
26
Cleaning and Maintenance:
Important notes:
• The appliance will become hot during operation, allow the appliance to cool
down before cleaning.
• Do not use any high-pressure cleaners or steam cleaners.
• Wash new sponge cloths thoroughly before use.
• Do not leave acidic substances (lemon juice, vinegar) on stainless steel parts.
• Follow all instructions and warnings included with the cleaning agents.
How to clean
Observe the information in the table below to ensure that the different surfaces
are not damaged by using the wrong type of cleaning agent. Do not use:
• Harsh or abrasive cleaning agents,
• Cleaning agents with a high concentration of alcohol,
• Hard scouring pads or sponges,
• High-pressure cleaners or steam cleaners.
• Clean all accessories by hand, do not clean in the dishwasher.
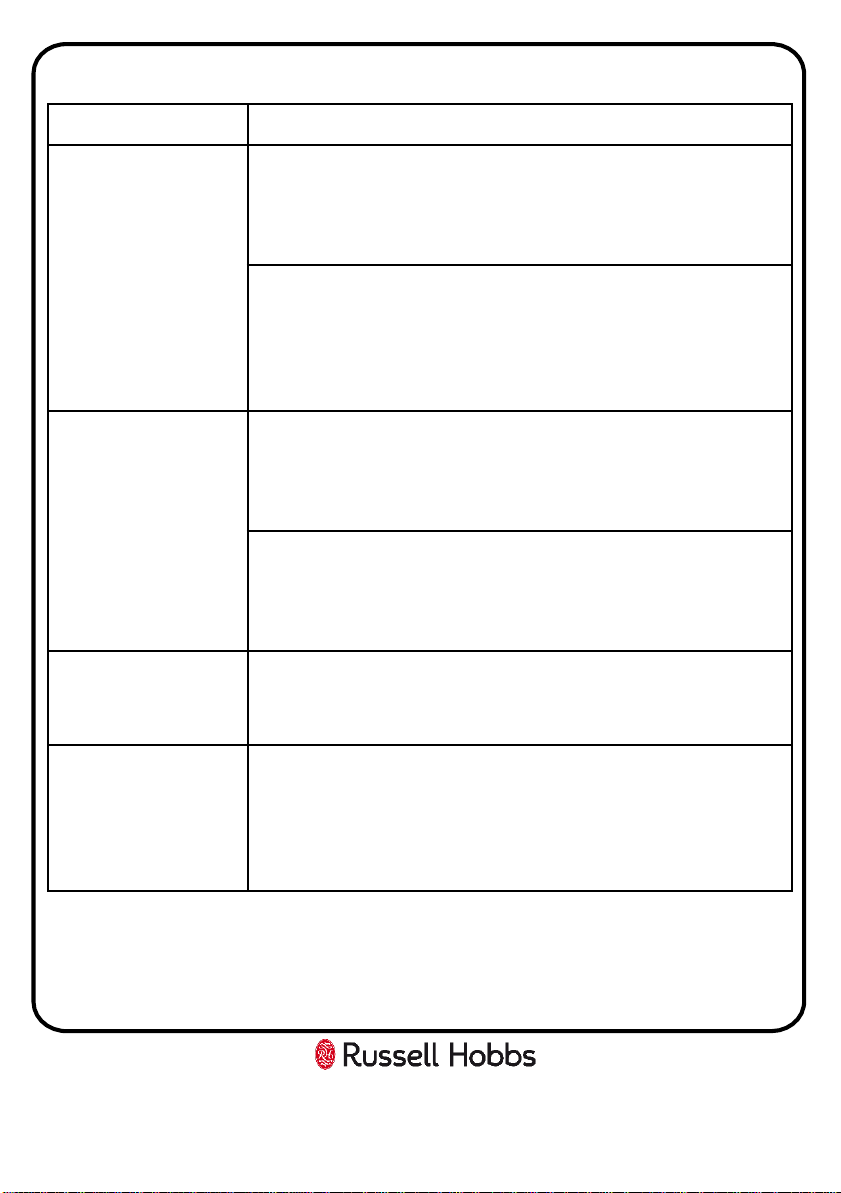
Surface type How to clean
Stainless Steel Hot soapy water: Clean with a dish cloth and dry with a soft cloth.
Clean stainless steel surfaces in the direction of the grain only.
Special stainless steel cleaning products are available from
specialist retailers. Apply a very thin layer of the cleaning product
with a soft cloth.
Painted surfaces Hot soapy water: Clean using a damp dish cloth and dry with a
soft cloth/towel. Do not use any stainless steel cleaners.
Aluminium and plastic Glass cleaner: Clean with a soft cloth.
Glass Glass cleaner: Clean with a soft cloth. Do not use a glass scraper.
Enamel Clean with some washing-up liquid and a damp cloth. Dry with a
soft cloth.

Cleaning and Maintenance:
How to clean:
• After each use, clean all surfaces once they have cooled down. If any residue is
left (baked-on food, drops of grease etc.), however little, will become stuck to
the surface and more difficult to remove later.
• Always clean off any liquid as soon as it is spilt: you will save yourself any
unnecessary effort.
• Where possible, do not allow salt to come into contact with the surfaces of the
appliance.
Causes of damage:
• Accessories, foil, greaseproof paper or ovenware on the cooking
compartment floor: Do not place accessories on the cooking compartment
floor. Do not cover the cooking compartment floor with any sort of foil or
greaseproof paper. Do not place ovenware on the cooking compartment floor if
a temperature of over 50ºC has been set. This will cause heat to accumulate.
The baking and roasting times will no longer be correct and the enamel will be
damaged.
• Water in a hot cooking compartment: Do not pour water into the cooking
compartment when it is hot. This will cause steam. The temperature change
can cause damage to the enamel.
• Moist food: Do not store moist food in the cooking compartment when it is
closed for prolonged periods. This will damage the enamel.
• Fruit juice: When baking particularly juicy fruit pies, do not pack the baking tray
too generously. Fruit juice dripping from the baking tray leaves stains that
cannot be removed. If possible, use the deeper universal pan.
• Cooling with the appliance door open: Only allow the cooking compartment to
cool when it is closed. Even if the appliance door is only open a little, front
panels of adjacent units could be damaged over time.
For Customer Services & Spare Parts please call 0345 208 8750
Opening times: Monday - Friday 8am – 8pm & Saturday 9am – 1pm
or visit us at www.productcare.co.uk
27

Cleaning and Maintenance:
• Very dirty door seal: If the door seal is very dirty, the appliance door will no
longer close properly when the appliance is in use. The fronts of adjacent units
could be damaged. Always keep the door seal clean.
• Never use the appliance door as a seat, shelf or worktop: Do not sit on the
appliance door, or place or hang anything on it. Do not place any cookware or
accessories on the appliance door.
• Inserting accessories: accessories can scratch the door panel when closing the
appliance door. Always insert the accessories into the cooking compartment as
far as they will go.
Pyrolytic cleaning
Note: All accessories must be removed from inside the oven before commencing
the pyrolytic cleaning function.
Note: The oven should not be left unattended when the pyrolytic cleaning cycle
is in progress.
Note: All major food residues must be removed from the oven before starting
this function.
To start the pyrolytic cleaning function:
1. Remove all accessories from inside the oven and remove all major food
residues.
2. Select the pyrolytic cleaning function by turning the oven function dial to the
cleaning symbol, “PYA” will appear on the LED display.
3. Press the start touch button to confirm. A cleaning period of 2 hours is
automatically set (2:00 will appear on the LED display).
4. NOTE: If the oven door is not properly closed the start button will be invalid
and “DOOR”, “PYA” will be shown on the LED display.
For Customer Services & Spare Parts please call 0345 208 8750
Opening times: Monday - Friday 8am – 8pm & Saturday 9am – 1pm
or visit us at www.productcare.co.uk
28

Cleaning and Maintenance:
5. The length of cycle can be decreased by 30 minutes to 1 hour and 30 minutes
(1:30) by turning the oven function dial, should your oven only be lightly
soiled.
6. The oven door will automatically lock when the temperature inside the oven
reaches 300°C. During pyrolytic cleaning, the oven light will not switch on.
7. The pyrolytic cleaning cycle will finish after the set time period has elapsed.
The oven door will remain locked until the oven temperature has fallen below
300°C. The LED display will display “0:00” when the Pyrolytic cycle has finished
and the oven will enter stand-by mode.
8. When the oven has reached a warm temperature, you should use a soft damp
cloth to wipe out the resultant ash deposits. For best cleaning results, you
should not allow the oven to get completely cold before wiping away the ash
deposits.
How to cancel the Pyrolytic operation
If the internal temperature is below 300°C, press the pause/stop touch button and
the oven will return to standby mode.
If the oven is above 300°C, press the start touch button to begin the cooling
process. The words “COOL” will be displayed and the door will remain locked until
the temperature has dropped below 300°C.
For Customer Services & Spare Parts please call 0345 208 8750
Opening times: Monday - Friday 8am – 8pm & Saturday 9am – 1pm
or visit us at www.productcare.co.uk
29
Cleaning and Maintenance:
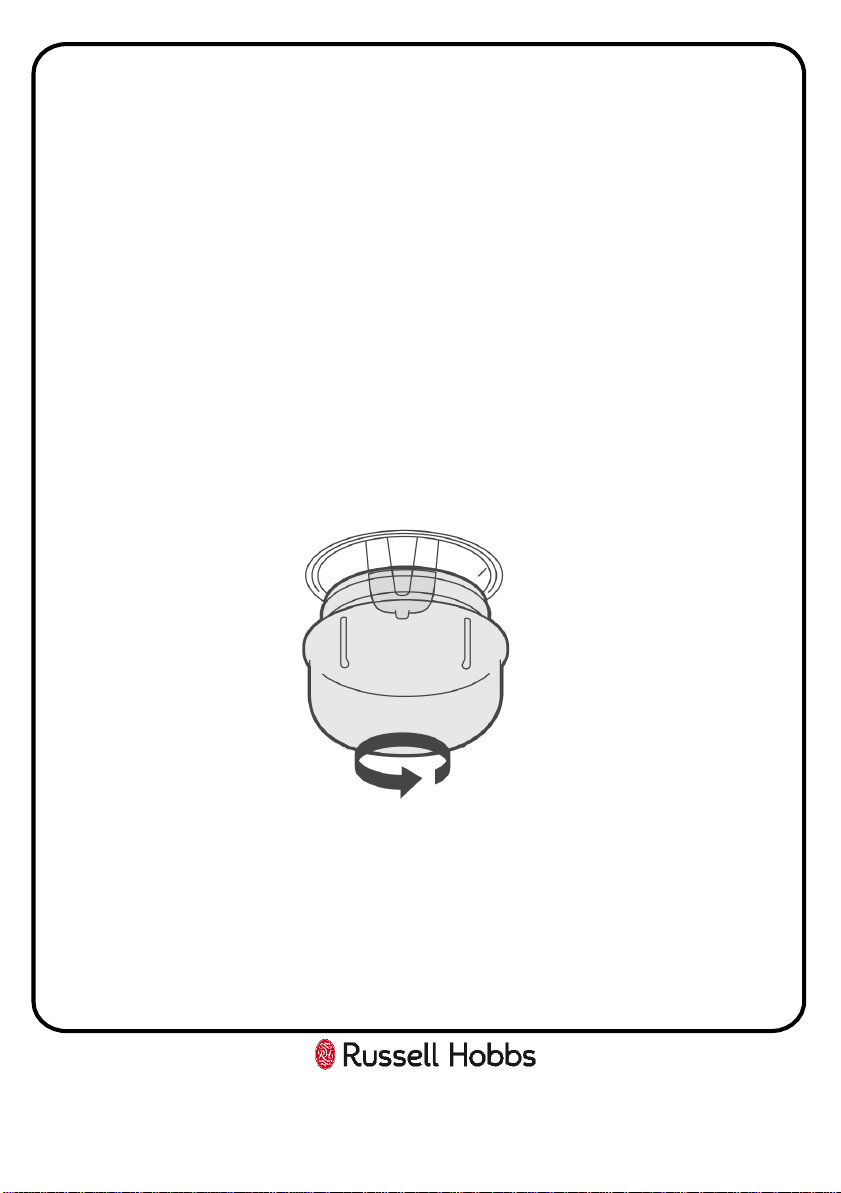
Changing the bulb
If the bulb in the oven light fails, it must be replaced with a heat resistant 25 watt
bulbs only. To replace the bulb follow the below steps:
Note: the oven lamp is located at the top right on the back of the oven.
1. Switch off the circuit breaker of the unit's mains outlet or fuse box.
2. Place a tea towel in the oven when it is cold to prevent damage.
3. Unscrew the glass cover by turning it anti-clockwise.
4. Replace the bulb with one of the same type.
5. Screw the glass cover back in.
6. Remove the tea towel and switch on the circuit breaker.
For Customer Services & Spare Parts please call 0345 208 8750
Opening times: Monday - Friday 8am – 8pm & Saturday 9am – 1pm
or visit us at www.productcare.co.uk
30
For Customer Services & Spare Parts please call 0345 208 8750
Opening times: Monday - Friday 8am – 8pm & Saturday 9am – 1pm
or visit us at www.productcare.co.uk
31
Trouble Shooting:
Problem Solution
No power
The circuit break is defective or turned off
check circuit breaker is in working order and that it is not
switched off
Power cut or faulty fuse
Check whether other kitchen appliances are working or
check in the fuse box to make sure that the fuse for the
appliance is working
Functions are
none responsive
when turning the
dials
The oven doesn’t heat up
Check the oven function and temperature dials have both
been set
The oven doesn’t heat up
Turn the control dials several times, as there may be dust
between the connections
The clock flashes
There has been a power cut
Reset the clock
Food is being
burnt
Location of the shelves are incorrect or the cooking
function that has been selected is incorrect
Adjust the shelf locations and/or the cooking function
that is being used

For Customer Services & Spare Parts please call 0345 208 8750
Opening times: Monday - Friday 8am – 8pm & Saturday 9am – 1pm
or visit us at www.productcare.co.uk
32
Guarantee
This product is guaranteed for 12 months from the date of the
original purchase. If any defect arises due to faulty materials or
workmanship you must contact Product Care with the original proof
of purchase so a replacement or refund can be arranged.
Refund or replacement is at the discretion of Product Care.
The following conditions apply:
• Product Care will require a valid proof of purchase at the point of
replacement or refund.
• The product must be installed and used in accordance with the
instructions contained in this instruction guide and any other
instructions for use which has been supplied.
• It must be used for domestic purposes only and for its intended
use.
• This guarantee does not cover wear and tear, damage, misuse or
consumable parts.
This does not affect your statutory rights.
Imported by
G2S LIMITED
WIGAN
WN2 4AY

For Customer Services & Spare Parts please call 0345 208 8750
Opening times: Monday - Friday 8am – 8pm & Saturday 9am – 1pm
or visit us at www.productcare.co.uk
33
Technical Specification
Model number RHPYRO6503B SS
Rated Voltage 220V – 240V ~ 50Hz
External Dimensions(HxWxD) 595mm x 595mm x 575mm

For Customer Services & Spare Parts please call 0345 208 8750
Opening times: Monday - Friday 8am – 8pm & Saturday 9am – 1pm
or visit us at www.productcare.co.uk
34
Notes

For Customer Services & Spare Parts please call 0345 208 8750
Opening times: Monday - Friday 8am – 8pm & Saturday 9am – 1pm
or visit us at www.productcare.co.uk
35
Notes
This symbol is known as the 'Crossed-out wheelie bin Symbol'. When this
symbol is marked on a product/batteries, it means that the product/batteries
should not be disposed of with your general household waste. Only discard
electrical/electronic/battery items in separate collection schemes, which cater
for the recovery and recycling of materials contained within. Your co-operation
is vital to make sure the success of these schemes and for the protection of the
environment. For your nearest disposal facility, visit www.recycle-more.co.uk
or ask in store for details.
We reserve the right due to possible changes to design to alter the
instruction manual without prior notice.
For Customer Services &
Spare Parts please call
0345 208 8750
Opening times:
Monday – Friday
8am – 8pm
&
Saturday
9am – 1pm
or visit us at
www.productcare.co.uk
Revision 2