User Manual
Feature-packed Audio Interface


Foreword
Main Features
Thanks for purchasing Comica feature-packed audio interface LinkFlex AD5
Notice
When working with other products which have high sensitivity, it is recommended to adjust the gain of AD5 to the minimum before turning
it on. Users can then adjust the gain step by step to avoid sound peak or audio feedback.
Before connecting/disconnecting the microphone/instrument, please turn o the 48V phantom power/Inst switch to avoid damaging the
devices.
Please read this user manual thoroughly before using the product, and keep it for future reference.
Please do not expose the product to rain or moisture, and avoid having water or other liquids spilled on it.
Please do not use or store the product near any heat sources such as radiators, stoves, or other heat-producing appliances.
This product is a high-precision product, please prevent it form dropping or colliding.
. 48kHz/24bit Audio Recording, Integrated Dual XLR/6.35mm Interfaces
Design
. Support Recording/Streaming Mode Switch and Direct Monitor
. Support 48V Phantom Power Mics and Hi-Z Instruments Input
. Dual USB-C Interfaces for Connecting Two Computers or Mobile Devices
. Multiple I/O Interfaces to Connect Phones, Tablets, and Computers
. Up to 65dB Gain Range for Wider Mic Compatibility
. Class-leading AD/DA Conversion to Deliver the Most Detailed Sound
. Individual Mic Preamps, Guitar Amps, Monitor Volume and Output Gain
Control
. Digital Signal Processing and Three EQ and Reverb Modes for
Unlimited Creativity
. Featured with Loopback for Sampling, Streaming and
Podcasting
. Support One-key Denoise and Mute, Easy to Use
. High-definition LCD Screen for Flexible and Intuitive Operation
. Built-in Rechargeable Lithium Battery, Operating Time Up to 6
Hours
1
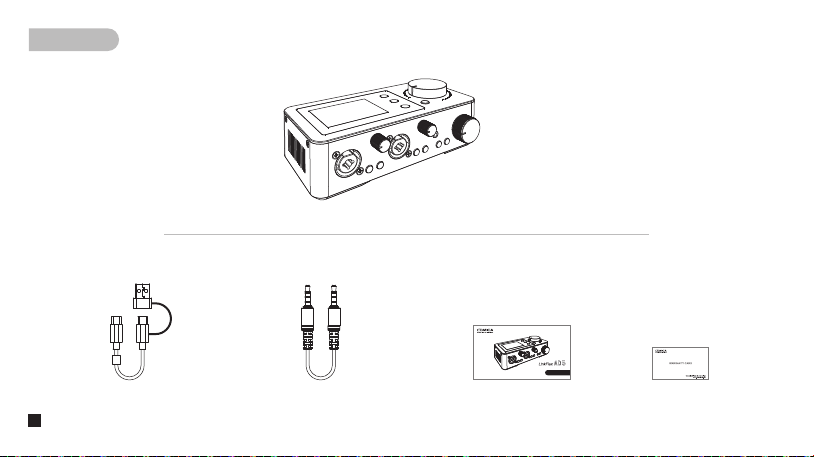
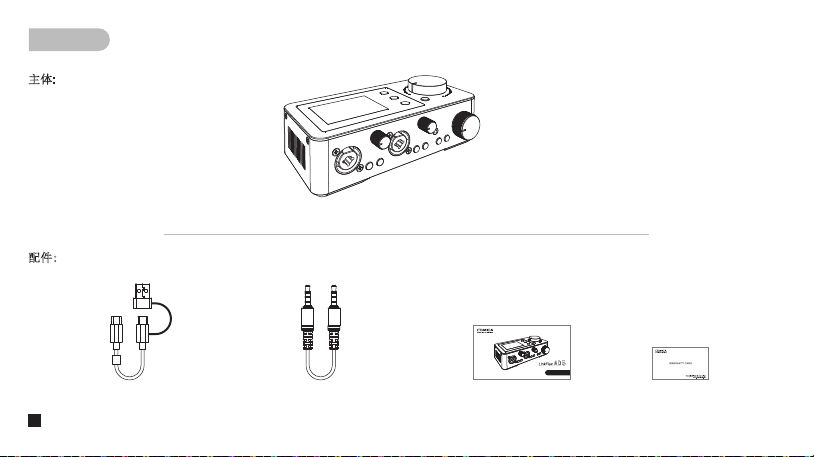
Packing List
Main Part:
Accessories:
2 in 1 Audio Cable
X2
User Manual Warranty Card3.5mm TRRS-TRRS Audio Cable
LinkFlex AD5
User Manual
Feature-packed Audio Interface
2
Components Introduction
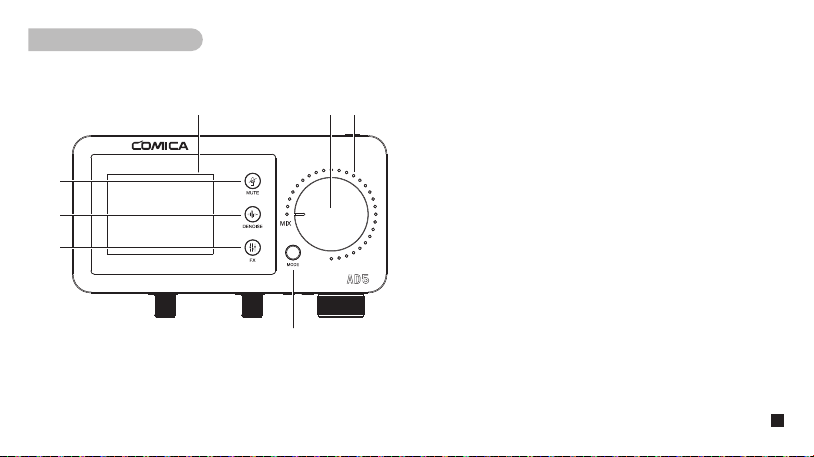
Top Panel:
1. LCD Screen
To show the device status intuitively. Please refer to the following “Screen
Display” for more information.
2. MIX Knob
To adjust the volume level of output audios; the volume indicators will
change according to the volume level.
3. Volume Indicator
Indicating the volume level of the output audios.
4. Recording/Streaming Mode Switch Button
Short press to switch between Recording mode and Streaming mode.
AD5 outputs stereo audio in recording mode, IN1 stands for the left
channel, and IN2 the right channel; AD5 outputs mono audio in streaming
mode.
5. Mute Touch Button
Touch to turn on/o Mute.
6. Denoise Touch Button
Touch to turn on/o Denoise.
7. REB/EQ Touch Button
Long press to switch to EQ or Reverb; short press to choose EQ/REB
modes.
①
②
④
⑤
⑥
⑦
③
3

Front Panel:
1. Input Port IN1/2
6.35 TRS instruments and XLR micrphones can be connected to AD5
through the input ports IN1/2. In Recording Mode, IN1 stands for the left
channel and IN2 the right channel.
2. Gain Control Knob 1/2
Adjust the preamp gain for input signals at IN1/2 respectively.
3. 48V Phantom Power Switch 1/2
Turn on/o 48V Phantom Power. When you turn this switch on, phantom
power will be supplied to the XLR jack connected to the IN1/2 ports. Please
turn it on when using a phantom powered microphone.
1. When connecting/disconnecting microphones to AD5, please set the
gain of AD5 to the minimum before turning on/o 48V Phantom power
to avoid damaging the devices.
2. When connecting devices not requiring 48V phantom power to IN1/2
port, please make sure to turn o 48V phantom power.
① ②
③ ④ ③ ④ ⑥⑤ ⑦ ⑧
① ②
4

4. Inst Switch 1/2
Turn on/o the input impedance. Please turn the inst switch on when connecting Hi-Z instruments such as an electric guitar/bass to achieve better input
eects.
1. It's recommended to set the gain of AD5 to the minimum before turning on/o Inst switch to avoid feedback problems and damage to the devices.
2. When connecting devices not requiring high inpedance to IN1/2 port, please make sure to turn o Inst switch.
3. To protect your speaker system, leave the monitor speakers turned o when turning the Inst switch on/o.
5. 3.5mm Monitoring Port 1
Plug in 3.5mm TRS/TRRS headphones to monitor.
6. Monitoring Mode Switch
Turn on/o Direct monitoring mode. In direct monitoring mode, AD5 will route the audio signals from IN1/2 directly to the monitor outputs and headphones with
zero latency. In input monitoring mode, audio signals from IN1/2 will be routed to the DAW software and then to the monitor outputs and headphones with
mixed audio, which will cause a delay in monitoring.
7. Loopback Switch
Loopback uses the 'virtual' inputs, which have no physical connectors on the audio interface itself but can directly route the digital signal streams back to
DAW software, it can capture all the audio signals from your computer(e.g., the audio signal output from a web browser) to input to the audio interface.
Short press to turn on/of Loopback. When Loopback is on, AD5 will output audio signals both from IN1/2 and USB-C ports; When Loopback is o, AD5 will
output audio signals from IN1/2 ports.
8. Monitoring Volume Control Knob
Adjust the volume level of the monitoring port1/2.
Loopback only aects the audio output of the USB-C port, not the 3.5mm port.
5
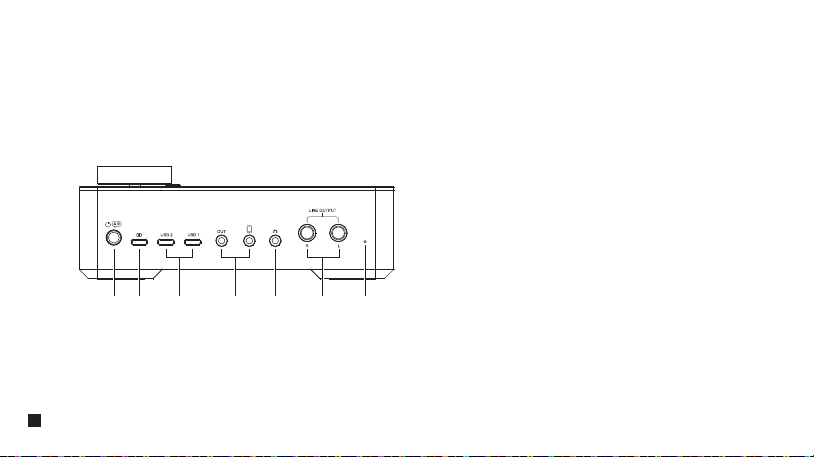
Back Panel:
1. Power/Language Switch Button
Long press to turn on/o; short press to switch the language of AD5
between Chinese and English.
2. USB-C Charging Port
Users can charge AD5 through the 2 in 1 cable.
3. USB Port 1/2
To connect phones/computers to input/output audio signals via the 2 in 1
audio cable. Phones/computers can route audio singals to AD5 and AD5
can achieve the digital output of audio signals from both phones/computers
and IN1/2.
4. 3.5mm Port 1/2
To connect phones to input/output audio signals via the 3.5mm
TRRS-TRRS audio cable. Phones can route audio signals to AD5 and AD5
can achieve analog output of the audio signals from phones and IN1/2.
5. 3.5mm Monitoring Port 2
Plug in 3.5mm TRS/TRRS headphones to monitor.
6. Line Output Port
Connect to the monitor speakers, L means the left channel and R the right
channel.
7. Reset Hole
If the device cannot be charged or is unable to function, insert the reset
pin into the reset hole to reset it.
① ② ③ ④ ⑤ ⑥ ⑦
6
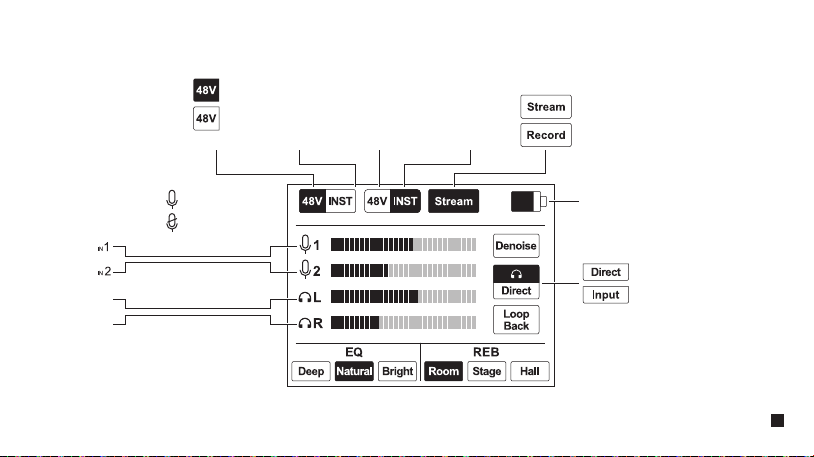
Screen Display:
Direct Monitor
Input Monitor
Left Channel
Right Channel
Monitoring Audio Dynamic Bar
Normal Working
Muting
Inst 148V Phantom Power 1 Inst 248V Phantom Power 2
(
Applicable to the status of other features
)
On
O
Input Audio Dynamic Bar
Power Status
7
Installation and Usage
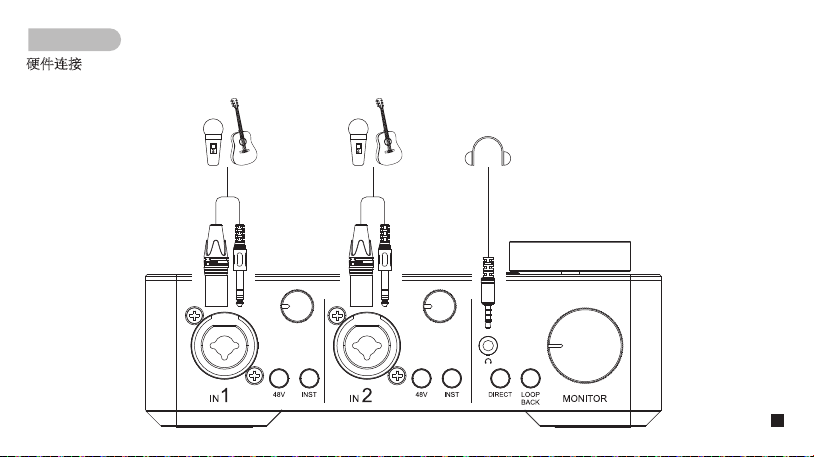
Devices Connection
Users can connect the corresponding devices to the audio interface referring to the following pictures
:
8
9

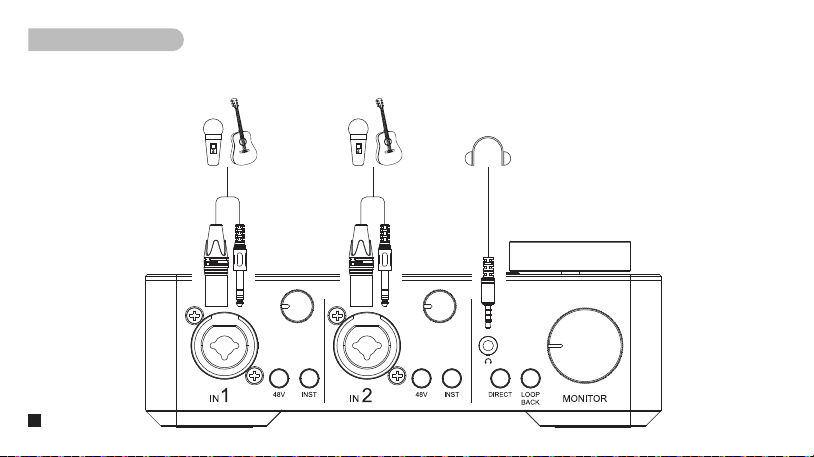
1. Connect microphones/ instruments
Connect 6.35mm TRS instrument/XLR microphone to AD5 via the input ports IN1/2. In Recording mode, IN1 stands for the left
channel, IN2 the right channel; when using a microphone powered by 48V phantom power, please turn on the 48V phantom
power; when connecting to a Hi-Z instrument like an electric guitar/bass, it's necessary to enable the Inst switch to achieve
better input eects; adjust the preamp gain for the input singals of IN1/2 via gain control knob.
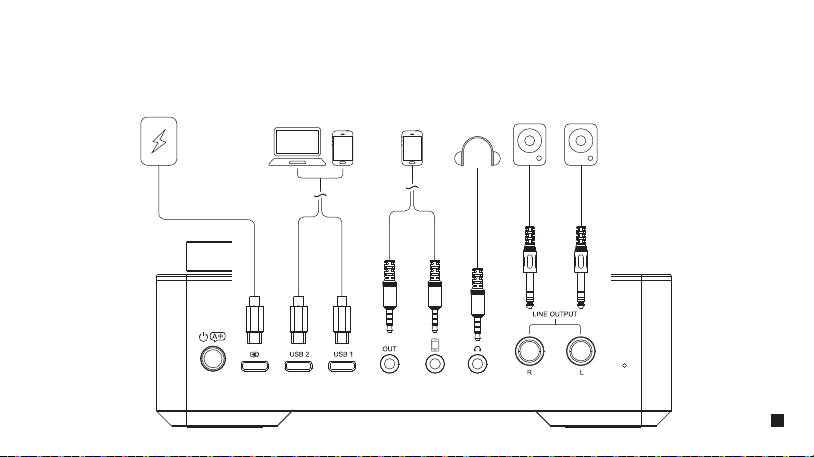
2. Connect mobile phones/computers
Users can connect mobile phones/computers to AD5 through the USB-C/3.5mm ports for audio signals input/output. Audio
signals such as music from the computers/phones can be routed to AD5, and AD5 outputs audio signals to phone/computer.
3. Connect monitoring headphones
Users can connect the headphones to the 3.5mm monitoring port1/2 of AD5, adjust the monitoring volume level through the
monitoring volume control knob, as well as monitor the audio dynamics through the LCD screen.
4. Connect the monitor speaker
Monitor speakers can be connected to AD5 via the two 6.35mm Line Output ports.
1. When connecting/disconnecting microphones to AD5, please set the gain of AD5 to the minimum before turning
on/o 48V Phantom power/inst switch to avoid damaging the devices.
2. When connecting devices not requiring 48V phantom power/high inpedance to IN1/2 port, please make sure to turn
o 48V phantom power/inst switch.
10

DAW Software Setting
1. Please download and install the driver ASIO4ALL in advance;
2. Connect AD5 to the computer, open Cubase, and create a new project;
3. Click ‘Devices - Device Setup’;
4. Select ‘VST Audio System - ASIO4ALL v2’;
5. Click ‘ASIO4ALL v2 - Control Panel’ to activate the ‘Comica_AD5-USB2’ input/output port (click to lighten the power and play icons);
6. Add a new audio track in the Cubase, click the ‘Record’ icon to start recording, and click the ‘Monitor’ icon to achieve input monitor.
1. Please download and install the driver ASIO4ALL in advance;
2. Connect AD5 to the computer, open ProTools, and create a new project;
3. Click ‘Setup- Playback Engine’, and choose ‘ASIO4ALL v2’;
4. Click ‘Setup - Hardware - ASIO4ALL v2 -Launch Setup App’ to activate the ‘Comica_AD5-USB2’ input/output port (click to lighten the power and play
icons);
5. Add a new audio track using key combo ‘Ctrl+Shift+N’;
6. Click the ‘Record’ icon to start recording, and click the ‘Monitor’ icon to achieve input monitor.
Users can start using the AD5 with the DAW software. (please refer to the following instructions in Cubase and ProTools).
If ‘Comica_AD5-USB2’ cannot be found on the software, please make sure that AD5 is connected to the computer and open the
sound settings in the computer to see if AD5 has been set as the default output device of the computer.
When direct monitoring mode is on, please turn o the "Monitor" of the DAW software, otherwise you will hear both the audio signal you're
monitoring and the echo eect the signal coming back from the DAW software; when input monitoring mode is on, please turn on the
"Monitor" of the DAW software, in which case users can hear the audios edited by the DAW software.
Cubase
ProTools
11

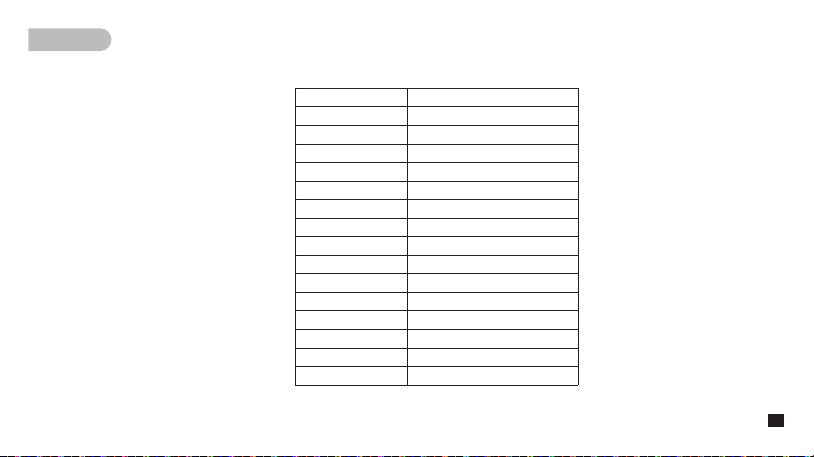
Specifications
Input Interface
Digital Interface
Analog Interface
Line Output Interface
Monitoring Interface
Preamp Gain
Dynamic Range
Sampling Rate
Bit Depth
Battery
Operating Time
Charging Port
Net Weight
Dimension
Working Temperature
Storage Temperature
2 x XLR/6.35mm
2 x USB-C
2 x 3.5mm
2 x 6.35mm
2 x 3.5mm
+65dB
+115dB
48kHz
24bit
Polymer Lithium Battery 3000mAh 3.7V
6 Hours
USB-C 5V2A
470g
170 x 85 x 61mm
0℃ ~ 50℃
-20℃ ~ 60℃
12

多功能直播播客录音一体声卡
产品使用说明书


前 言
产品主要功能
感谢您购买科唛多功能直播播客录音一体声卡LinkFlex AD5
注意事项
搭配部分灵敏度较高的产品使用时,需将本产品的增益调至合适位置以避免出现爆音和啸叫的情况(建议在开机时将增益调至最小状态,再
逐级进行调节)
连接/拔出麦克风/乐器之前建议关闭“48V”幻象电源和Inst 功能,以免对设备造成损坏
使用产品前请仔细阅读本手册,请妥善保存本手册以供将来参考
请将该产品放置在干燥环境中保存;请勿在雨中或潮湿的环境中使用该设备,以免发生短路
请勿将产品放置在散热器、烤箱、冰箱、空调等热源或干扰源附近使用
本产品属于高精密仪器类产品,请勿掉落、碰撞或撞击产品
. 48KHz/24bit
录音,广播级音质
.
直播
/
录音模式切换,支持硬件监听
.
双
XLR/6.35mm
接口一体化设计,支持
48V
幻象电源及乐器输入
.
双
USB-C
接口,可连接两台电脑或移动设备
.
多路音频输入及输出,广泛适配于手机、平板、电脑
.
高达
65dB
的增益调节,兼容多种麦克风
.
高精
AD/DA
及高动态范围,实现高品质录音及传输
.
支持独立调节前置放大增益、监听音量及输出增益
.
内置
DSP
声卡芯片,三种
EQ
及混响模式可调,适用多种场景
.
支持循环内录功能,用于简单采样、串流或播客
.
支持一键降噪,一键静音,方便易用
.
高清
LCD
显示屏,多功能灵活可视操控
.
内置可充电锂电池,续航长达
6
小时
1
包装清单
主体:
配件:
二合一音频连接线
X2
说明书 保修卡
3.5mm TRRS-TRRS
音频连接线
LinkFlex AD5
User Manual
Feature-packed Audio Interface
2
部件介绍及说明
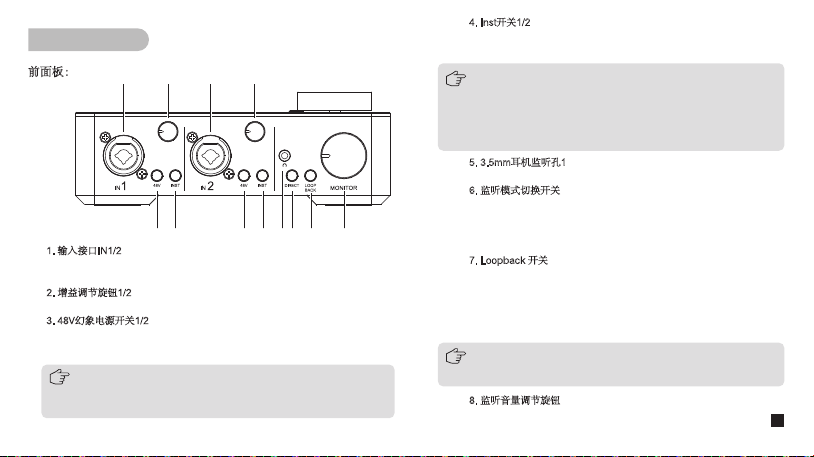
前面板:
Loopback
功能仅影响
USB-C
接口的音频输出,不影响
3.5mm
接口的
音频输出。
4. Inst
开关
1/2
打开
/
关闭阻抗。插入电吉他或电贝斯等高阻乐器至输入接口
1/ 2
插孔
时,需开启
inst
增加阻抗,获得更好的输入效果。
1.
连接
/
拔出乐器之前建议先将增益调至最小,然后再开启
/
关闭
Inst
,
以避免啸叫和设备损坏。
2.
当
IN1/2
所连接设备无需
Inst
功能时,确保关闭
Inst
。
3.
开启
/
关闭
Inst
时,请先关闭音箱系统或调低音箱输出音量以避免爆音
和损坏设备。
5. 3.5mm
耳机监听孔
1
插入
TRS/TRRS
耳机进行监听。
6.
监听模式切换开关
短按开启
/
关闭
Direct
监听模式。
Direct
为硬件监听模式,该模式下,
IN1/2
输入的音频信号直接传到监听口及耳机,实现实时监听。
Direct
监听模式关闭时,
IN1/2
输入的音频信号将经过
DAW
软件的处
理再返送到耳机,该监听模式下的监听将有一定的延迟。
7. Loopback
开关
Loopback
是指数字信号不经过声卡物理接口而直接返回软件内部,
可以捕捉电脑系统中所有声源(例如浏览器网页的音频输出信号)作
为输入音源传输到声卡。短按开启
/
关闭
Loopback
功能。开启
Loopback
功能时,
AD5
可输出
IN1/2
及
USB-C
接口的音频信号;关闭
Loopback
功能时,
AD5
输出
IN1/2
的音频信号。
8.
监听音量调节旋钮
可通过该旋钮调节监听音频的音量。
1.
输入接口
IN1/2
可连接
6.35mm TRS
乐器
/XLR
麦克风进行音频输入,录音模式下,
IN1
为左声
道,
IN2
为右声道。
2.
增益调节旋钮
1/2
分别调整输入接口
1
和
2
信号的前置放大器增益。
3. 48V
幻象电源开关
1/2
打开
/
关闭幻象电源。
48V
开启时,幻象电源会分别向连接在输入接口
1/2
的
XLR
插头供电。使用幻象供电的麦克风时,需开启
48V
幻象电源。
1.
连接
/
拔出麦克风之前建议先将增益调至最小之后再开启
/
关闭
48V
幻象
电源,以免对设备造成损坏。
2.
当所连接设备无需向
IN1/2
接口提供幻象电源时,确保关闭幻象电源。
① ②
③ ④ ③ ④ ⑥⑤ ⑦ ⑧
① ②
3
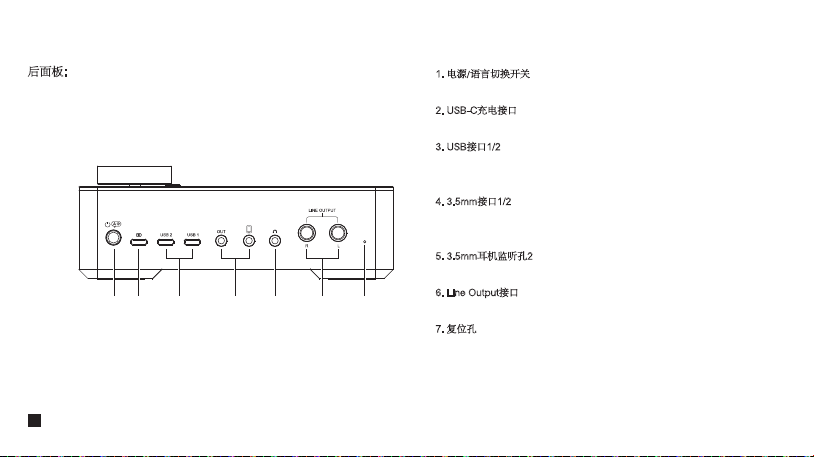
后面板
:
1.
电源/语言切换开关
长按开机
/
关机,短按切换系统语言。
2. USB-C
充电接口
可通过
USB-C
充电线连接声卡与电源进行充电。
3. USB
接口
1/2
连接电脑
/
手机输出
/
输入音频信号,实现双向信号传输。可通过此接口输入
电脑
/
手机播放的音乐伴奏,同时可输出
AD5
的音频信号。
4. 3.5mm
接口
1/2
连接手机输出
/
输入音频信号,实现双向信号传输。可通过此接口输入手机
播放的音乐伴奏,同时可输出
AD5
的音频信号。
5. 3.5mm
耳机监听孔
2
插入
TRS/TRRS
耳机进行监听。
6. Line Output
接口
用于连接
6.35mm
接口监听音响,
L
为左声道,
R
为右声道。
7.
复位孔
如出现死机或开不了机等异常现象,使用复位针插入复位孔即可复位。
① ② ③ ④ ⑤ ⑥ ⑦
4
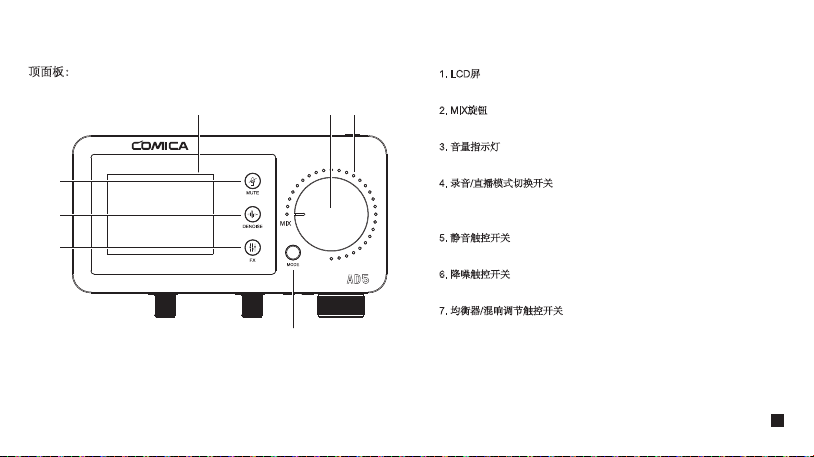
顶面板:
1. LCD
屏
显示设备状态,具体内容参考
“
屏显说明
”
。
2. MIX
旋钮
用于调节输出音频的音量,调节时,音量指示灯将随之变化。
3.
音量指示灯
指示输出音频的音量大小。
4.
录音
/
直播模式切换开关
短按切换输出音频的录音
/
直播模式。录音模式下为立体声,
IN1
为左声道,
IN2
为右声道;直播模式下为单声道。
5.
静音触控开关
轻触可开启
/
关闭静音功能。
6.
降噪触控开关
轻触可开启
/
关闭降噪功能。
7.
均衡器
/
混响调节触控开关
长按选择均衡器(
EQ
)或混响(
REB
),短按调节均衡器
/
混响模式。
① ②
④
⑤
⑥
⑦
③
5
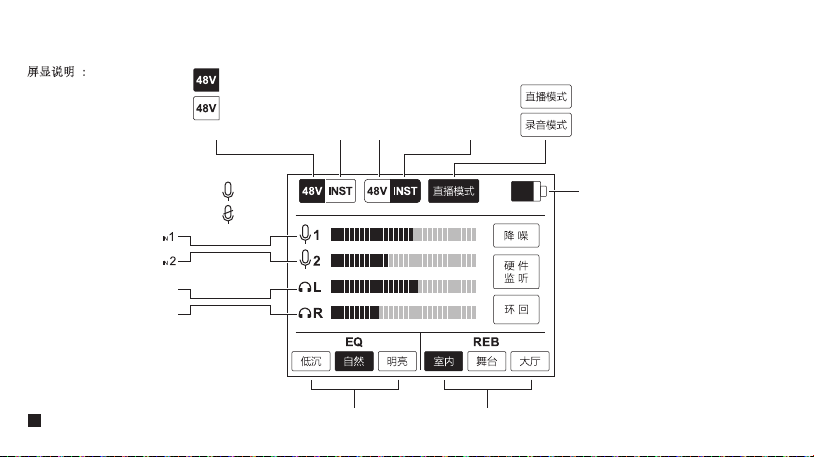
屏显说明 :
混响均衡器
左声道
右声道
监听音频动态条
正常
静音
Inst
乐器输入
148V
幻象电源
1 Inst
乐器输入
248V
幻象电源
2
(其他功能开启/关闭指示图标相同)
开启
关闭
输入音频动态条
电量
6
安装与使用
硬件连接
可参考下图连接相应设备到声卡:
7

8

1. 连接麦克风与乐器
可插入6.35mm TRS乐器/XLR麦克风到IN1/2接口,录音模式下,IN1为左声道,IN2为右声道;连接需要48V幻象电源供电的麦克风
时,需开启48V幻象电源;连接电吉他等乐器时,需开启inst开关增加阻抗,实现更好的输入效果;可通过增益调节旋钮控制麦克
风/乐器的输入增益。
2. 连接手机/电脑
用户可通过USB-C或3.5mm接口连接手机/电脑进行音频输入/输出。可通过手机/电脑输入音乐伴奏等音频信号,同时输出音频信号
至手机/电脑。
3. 连接监听耳机
AD5配备两个3.5mm耳机监听接口,用户可连接监听接口进行监听,通过监听音量调节旋钮调节监听音量,同时也可通过LCD屏监
看音频动态。
4. 连接监听音响
AD5配备两个6.35mm Line Output接口,可连接监听音响进行输出。
1.
连接
/
拔出麦克风
/
乐器前,请先关闭
48V
幻象电源
/Inst
功能,以免损坏设备。
2.
插入设备无需
48V
幻象电源或
Inst
功能时,请确保关闭
48V
幻象电源及
Inst
。
9

软件设置
1.连接声卡之前,需要下载并安装ASIO4ALL驱动;
2.连接声卡与电脑,打开Cubase,新建项目;
3.在顶部工具栏里点击‘设备—设备设置’,选择‘VST音频系统’,选择驱动‘ASIO4ALL v2’;
4.点击‘ASIO4ALL v2 — 控制面板’,激活‘Comica_AD5-USB2’输入/输出端口(鼠标点击,点亮设备前的电源和播放图标);
5.依次选择菜单栏‘工程—添加轨道—音频’新建轨道,点击‘录制’按钮开始录制,点击‘监听’按钮实现软件监听。
1.连接声卡之前,需要下载并安装ASIO4ALL 驱动;
2.连接声卡与电脑,打开Pro Tools,新建项目;
3.在顶部工具栏里点击‘设置-播放引擎’,选择‘ASIO4ALL v2’;
4.点击‘设置 — 硬件 — ASIO4ALL v2 — 打开设置程序’,激活‘Comica_AD5-USB2’输入/输出端口(鼠标点击,点亮设备前的电源和播放图标);
5.使用快捷键‘Ctrl+Shift+N’新建音频轨道;点击‘录制’按钮开始录制;点击‘监听’按钮实现软件监听。
连接电脑时,用户可参考下文在DAW软件内进行相应的设置(以Cubase和Pro Tools为例)。
如果在DAW软件设置里无法找到‘Comica_AD5-USB2’,请打开系统声音设置,确认声卡连接正常并已将声卡AD5设为默认的输
入输出设备。
选择Direct监听模式时,请关闭DAW软件‘监听’功能,否则将会听到两次录音,其中一个信号是延迟发声的回音;选择Input监
听模式时,请开启DAW软件内的‘监听’功能,即可听到经过DAW软件处理后的音频,该监听存在一定延迟。
Cubase
ProTools
10
参数规格
输入接口
数字接口
模拟接口
线路输出
耳机输出
前置增益
动态范围
采样率
位深
电池
续航时间
充电规格
净重
尺寸
工作温度
存储温度
2 x XLR/6.35mm
2 x USB-C
2 x 3.5mm
2 x 6.35mm
2 x 3.5mm
+65dB
+115dB
48kHz
24bit
锂聚合物 3000mAh 3.7V
6小时
USB-C 5V2A
470g
170 x 85 x 61mm
0℃ ~ 50℃
-20℃ ~ 60℃
11