
6
CONTENTS
1. INTRODUCTION ..........................................7
1.1 Letters in brackets .........................................7
1.2 Troubleshooting and repairs .......................... 7
1.3 Download the App! .......................................7
2. DESCRIPTION.............................................7
1.4 Description of the appliance (page 3 - A) ......7
2.1 Description of the homepage (main screen)
(page 2 - B) ...................................................7
2.2 Description of the accessories (page 2 - C ) ....7
2.3 Description of the milk container ..................7
2.4 Description of hot water/steam spout ...........8
3. SETTING UP THE APPLIANCE ...............8
4. TURNING THE MACHINE ON .................8
5. TURNING THE APPLIANCE OFF ....................8
6. MENU SETTINGS
................................. 9
6.1 Rinsin
g ................................................................ 9
6.2 Descaling ......................................................9
6.3 Clean milk container .....................................9
6.4 Adjust mill .....................................................9
6.5 Water lter ..................................................9
6.6 Water hardness ............................................9
6.7 General .........................................................9
6.8 A
uto
-o .......................................................10
6.9 Bluetooth ....................................................10
6.10 Selecting the language ...............................10
6.11 Emptying the circuit ..................................10
6.12 Edit prole...................................................10
6.13 Default values ............................................10
6.14 Statistics ......................................................11
7. MAKING COFFEE .............................. 11
7.1 M
akin
g coee using coee beans ................11
7.2 Your coee at a touch .................................. 11
7.3 Customising the beverages .........................11
7.4 Ma
king c
oee using pre-ground coee .......11
7.5 General indications for making coee-based
beverages ....................................................12
7.6 Tips for a hotter coee.................................12
8. CARAFE OF COFFEE
........................... 12
9. MAKING MILK-BASED BEVERAGES
......12
9.1 Filling and attaching the milk container ..... 12
9.2 Your milk-based beverage at a touch ..........13
9.3 Customising the beverages .........................13
9.4 Recommended quantity of froth .................13
9.5 Cleaning the milk container after use ........14
10. TEA FUNCTION ......................................... 14
11. DELIVERING HOT WATER .................. 14
11.1 Your beverage at a touch .............................14
11.2 Customising the beverages .........................15
12. STEAM DELIVERY ............................. 15
12.1 Tips for using steam to froth milk ................15
12.2 Cleaning the hot water/steam spout after use
15
13. GUIDED BEVERAGE CUSTOMISATION (MY)
....................................................... 15
14. SELECT YOUR PERSONAL PROFILE ...... 16
15. CLEANING ........................................ 16
15.1 Cleaning the machine .................................16
15.2 Cleaning the internal circuit ........................16
15.3 Cleaning the coee grounds container ........16
15.4 Cleaning the drip tray and drip tray grille .... 17
15.5 Cleaning the inside of the machine ............17
15.6 Cleaning the water tank ..............................17
15.7 Cleaning the coee spouts .........................17
15.8 Cleaning the pre-ground coee funnel .......18
15.9 Cleaning the infuser ....................................18
15.10 Cleaning the milk container ........................18
16. DESCALING
...................................... 19
17. SETTING WATER HARDNESS
.............. 20
17.1 Measuring water hardness ..........................20
17.2 Setting water hardness ...............................20
18. WATER SOFTENER FILTER
................. 21
18.1 Installing the lter ......................................21
18.2 Replacing the lter ......................................21
20. DISPLAYED MESSAGES ...................... 22
18.3 Removing the lter .....................................22
19. TECHNICAL DATA ...................................... 22
19.1 Tips for Energy Saving .................................22
21. TROUBLESHOOTING ......................... 28

7
1. INTRODUCTION
Thank you for choosing this bean to cup espresso and cappuc-
cino machine.
Take a few minutes to read this Instruction for Use. This will
avoid all risks and damage to the appliance.
1.1 Letters in brackets
The letters in brackets refer to the legend in the description of
the appliance on pages 2-3.
1.2 Troubleshooting and repairs
In the event of problems, rst try and resolve them by reading
the information given in sections “20. Displayed messages” and
“21. Troubleshooting”.
If this does not resolve the problem or you require further in-
formation, you should consult Customer Services by calling the
number given on the annexed "Customer Service" sheet.
If your country is not among those listed on the sheet, call the
number given in the guarantee. If repairs are required, contact
De’Longhi Customer Services only. The addresses are given in
the guarantee certicate provided with the machine.
1.3 Download the App!
A number of functions can be controlled remotely using the
De’Longhi Coee Link App.
In the App, you can also nd information, tips and curious facts
about the world of coee, together with information on your
machine at your ngertips.
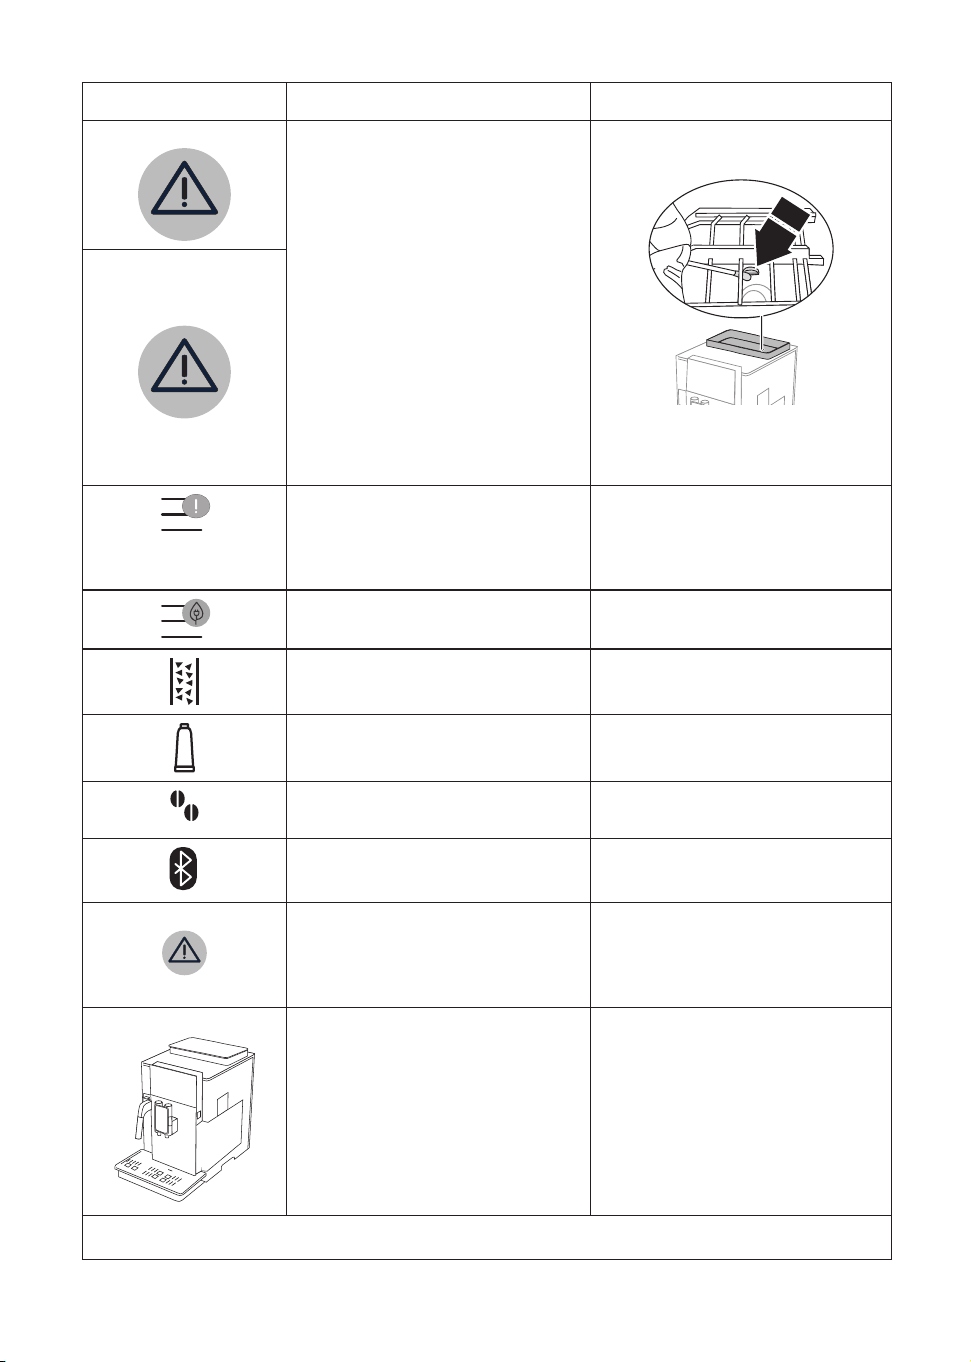
This symbol highlights the functions you can control or
consult using the App.
You can also create up to 6 new beverages and save them in your
appliance.
Please note!
Check compatible devices on "compatibledevices.delonghi.
com".
2. DESCRIPTION
1.4 Description of the appliance (page 3 - A)
A1. Pre-ground coee funnel lid
A2. Pre-ground coee measure compartment
A3. Pre-ground coee funnel (removable)
A4. Beans container
A5. Beans container lid
A6. button: to turn the appliance on and o (standby)
A7. Cup shelf
A8. Connection nozzles access door
A9. Connection nozzles
A10. Main switch (ON/OFF)
A11. Power cord connector socket
A12. Swivelling control panel
A13. Front door release button
A14. Front door
A15. Coee spouts (adjustable height)
A16. Coee grounds container
A17. Cup tray
A18. Drip tray water level indicator
A19. Drip tray grille
A20. Drip tray
A21. Water tank rell door
A22. Water tank lid
A23. Water tank
A24. Infuser door
A25. Removable infuser
2.1 Description of the homepage (main screen)
(page 2 - B)
B1. Display
B2. Customisable proles (see “14. SELECT YOUR PERSONAL
PROFILE ”)
B3. Scroll arrow
B4. To display and customise the beverage settings
B5. Directly selectable beverages
B6. Appliance settings menu
B7. Descaling required light
B8. Milk container cleaning required
B9. Filter exhausted light
B10. No coee beans light
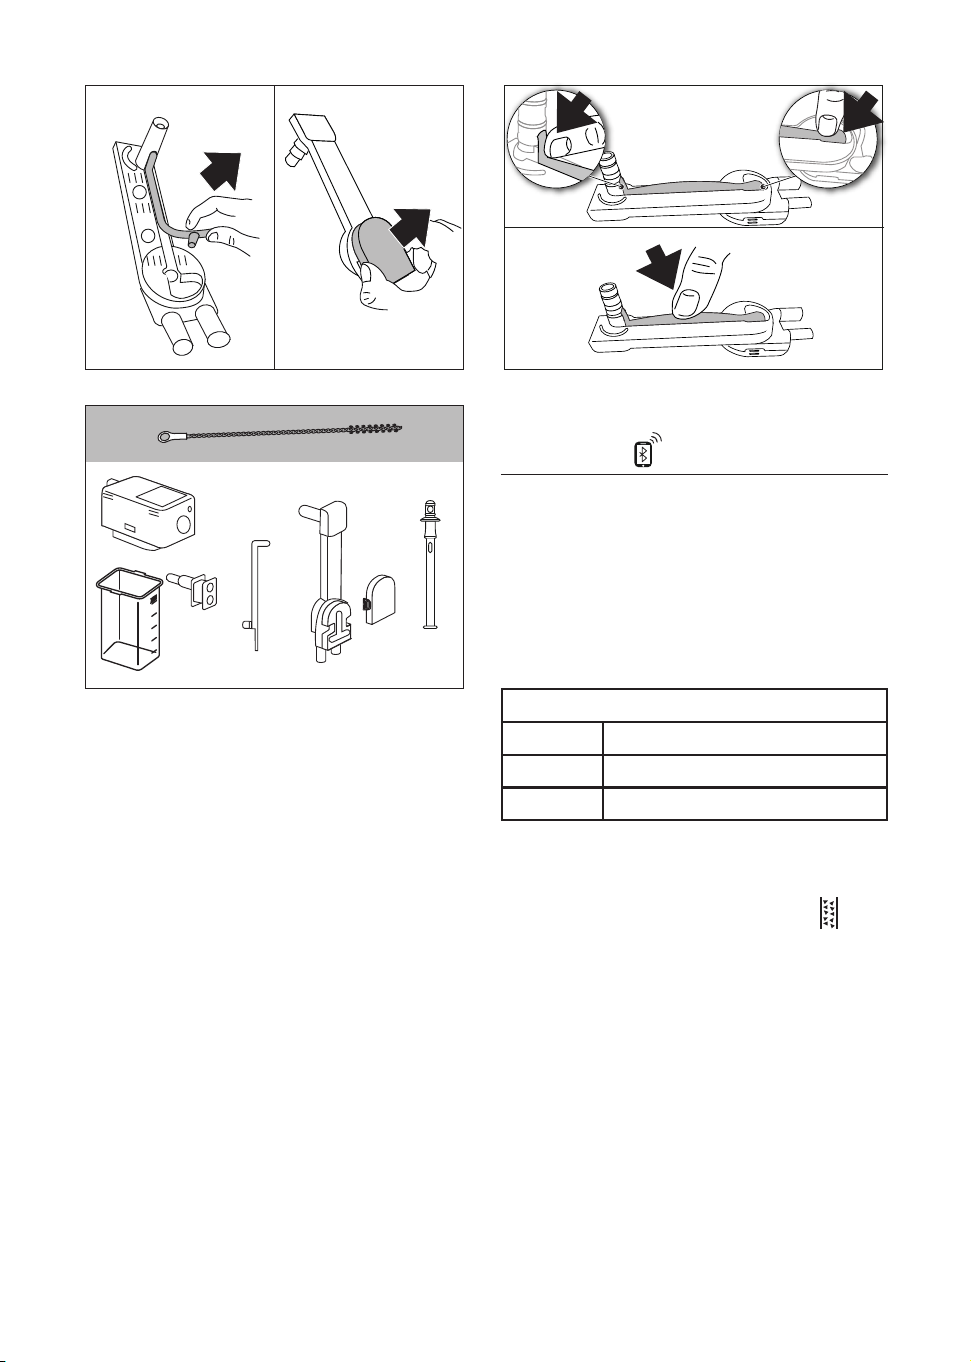
2.2 Description of the accessories (page 2 - C )
C1. “Total Hardness Test” indicator paper (attached to the
Quick Guide)
C2. Pre-ground coee measure (in the compartment (A2))
C3. Descaler
C4. Water softener lter
C5. Cleaning brush
C6. Power cord
C7. Tube brush
C8. Cloth
2.3 Description of the milk container
(page 2 - D )
D1. Milk container lid
D2. Milk container connector (removable for cleaning)
8
D3. Milk rell lid
D4. Milk container lid release button
D5. Milk intake tube
D6. Milk spout (adjustable height)
D7. Milk container
D8. Thermal casing
2.4 Description of hot water/steam spout
(page 2 - E )
E1. Spout body
E2. Spout connector (removable for cleaning)
E3. Spout release button
E4. Hot water/steam connection nozzle
E5. Cappuccino maker
3. SETTING UP THE APPLIANCE
Please note!
• Coee has been used to factory test the appliance and it
is therefore completely normal for there to be traces of
coee in the mill. The machine is, however, guaranteed to
be new.
• The rst time you use the appliance, rinse all removable
accessories which may come into contact with water or
milk with hot water.
• The rst time you use the machine, the water circuit is
empty and the appliance could be very noisy. The noise
becomes less as the circuit lls.
• You should customise water hardness as soon as possible
following the instructions in section “17. Setting water
hardness”.
• The control panel (B) can be swivelled to make sure the
homepage is always visible.
1. Plug the power cord connector (C6) into the socket (A11) at
the back of the appliance and connect the appliance to the
mains electricity supply (g. 1). Make sure the main switch
(A10) at the back of the appliance is pressed (g. 2);
2. Press the ag corresponding to the desired language.
Then follow the instructions which appear on the appliance
display (B1):
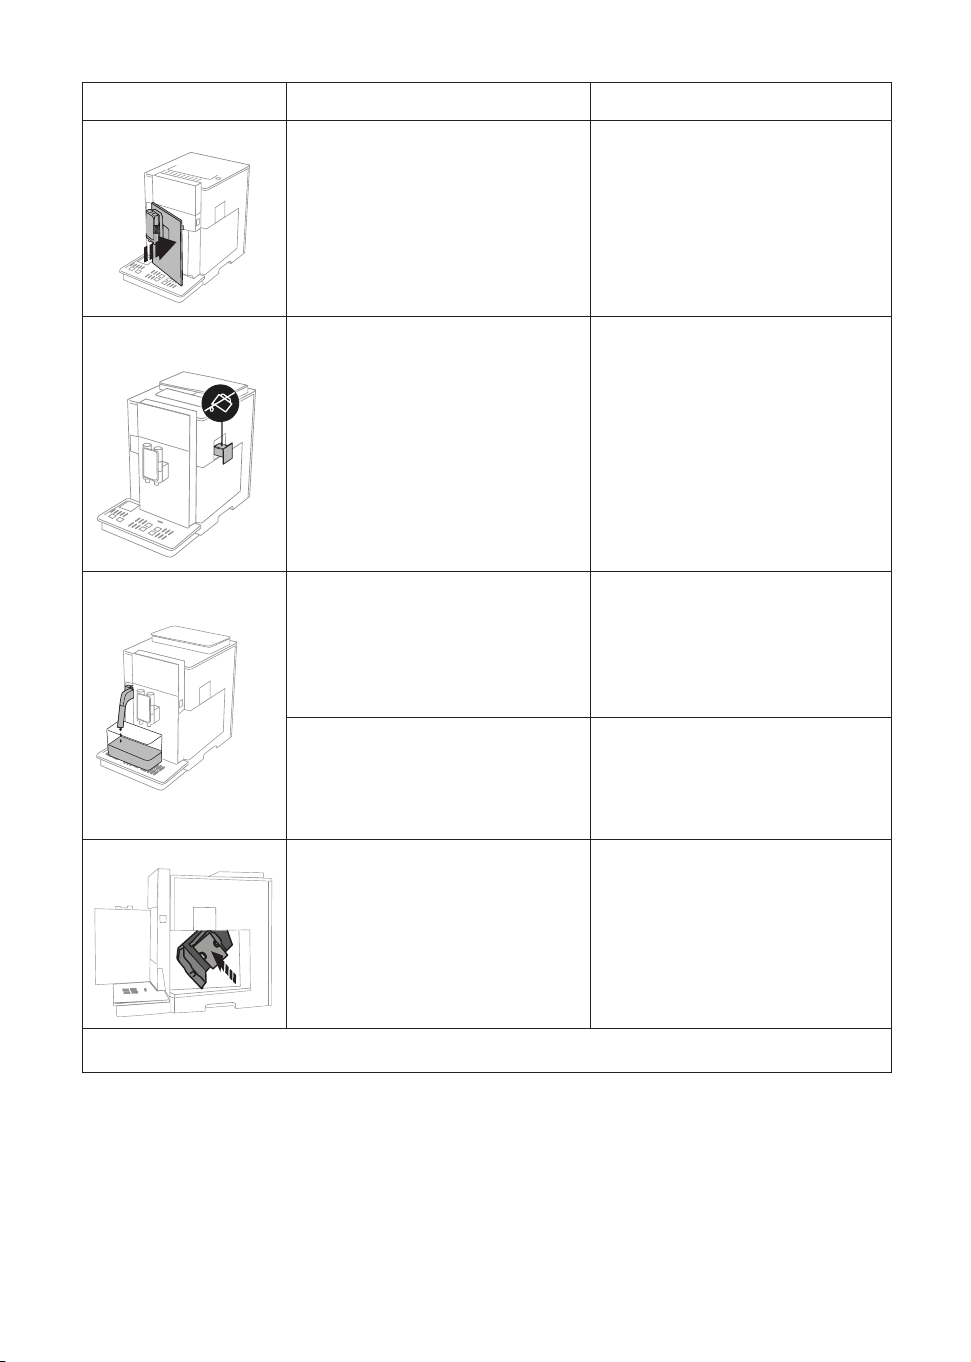
3. Press the button (A13) and open the door (A14) (g. 3);
4. Remove the water tank (A23) (g. 4) and ll to the MAX
line (marked on the inside of the tank) with fresh water
(g. 5);
5. Then put the tank back (g. 6) and close the door;
6. Check that the hot water/steam spout (E) is inserted on the
connection nozzles (A9) (g. 7) and place a container hold-
ing a minimum of 100 ml underneath (g. 8);
7. Press "Next".
8. Fill the beans container (A4) (g. 12), then conrm by
pressing “Next”.
9. Press “OK” to ll the water circuit: the appliance delivers
water from the spout (g. 9);
10. The appliance goes o.
The coee machine is now ready for normal use. Turn on follow-
ing the instructions in section “4. Turning the machine on ”.
Please note!
• The rst time you use the appliance, you need to make
4-5 cappuccinos before the results in the cup will be
satisfactory.
• The rst time you use the machine, the water circuit is
empty and the appliance could be very noisy. The noise
becomes less as the circuit lls.
• When making the rst 4-5 cappuccinos, it is normal to hear
the noise of boiling water. After this, the noise becomes
less.
4. TURNING THE MACHINE ON
Please note!
• Before turning the appliance on, make sure the main
switch (A10) is pressed (g. 2).
• Each time the appliance is turned on, it performs an auto-
matic preheat and rinse cycle which cannot be interrupted.
The appliance is ready for use only after completion of this
cycle.
1. To turn the appliance on, press the button (A6) (g.
10): the appliance comes on;
2. When at temperature, the appliance performs a rinse cycle
delivering hot water from the coee spouts(A15); as well
as heating the boiler, this also heats the internal circuits by
circulating hot water.
Please note! Using for the rst time:
3. Press "OK" to watch a short introductory video explaining
the homepage (B);
4. At the end of the video, press "OK" to go to the homepage
(main screen) (or press "Repeat" to watch the video again).
The appliance is at temperature when the homepage appears.
5. TURNING THE APPLIANCE OFF
Whenever the coee machine is turned o after being used to
make coee, it performs an automatic rinse cycle.
1. To turn the appliance o, press the button (A6) (g.
10).
2. I
f envisaged, the appliance performs a rinse cycle, deliver-
ing hot water from the coee spouts
(A15), then goes o
(stand-by).

9
Please note!
If you will not be using the appliance for some time, unplug
from the mains socket:
3. Release the main switch (A10) at the back of the appliance
(g. 2).
Important!
Never press the main switch while the appliance is on.
6. MENU SETTINGS
6.1 Rinsin
g
Use this function to deliver hot water from the coee spouts
(A15) and hot water/steam spout (E), if inserted, to clean and
heat the appliance’s internal circuit.
Place a container with a minimum capacity of 100ml under the
coee and hot water spouts (g. 8).
To enable the function, proceed as follows:
1. Press the settings menu (B7);
2. Select "Rinsing";
3. Press "OK" to start delivery: after a few seconds, hot water
is delivered rst from the coee spouts, then from the hot
water/steam spout (if inserted) to clean and heat the ap-
pliance’s internal circuit (g. 11);
4. To stop rinsing, press "Cancel" or wait for rinsing to stop
automatically.
Please note!
• If the appliance is not used for more than 3-4 days, when
you turn it on again, we strongly recommend performing
2-3 rinses before use;
• After cleaning, it is normal for the grounds container (A16)
to contain water.
6.2 Descaling
For instructions on descaling, see section “16. Descaling”.
6.3 Clean milk container
This function can be used to clean the milk container (D) before
putting it in the refrigerator. To clean, proceed as follows:
1. Attach the milk container to the connection nozzles (A9)
and push as far as it will go (g. 22). The machine emits a
beep (if the beep function is enabled);
2. Adjust the milk spout (D6) by turning it anticlockwise (g.
23);
3. Place a recipient under the milk spout (g. 25);
4. Press the settings menu (B7);
5. Select "Clean milk container";
6. Press "OK" to start cleaning (g. 26): hot water is delivered
from the milk spout and stops automatically when clean-
ing is complete.
7. Before extracting the milk container, place the milk spout
in the not-in-use position by turning clockwise.
Please note!
• Never extract the milk container by pulling the milk spout.
• To interrupt the cleaning cycle at any moment, press
"Stop";
• In some cases, to clean you must wait for the appliance to
heat up;
• The milk container can be kept in the refrigerator.
6.4 Adjust mill
The coee mill is set by default to prepare coee correctly and
should not require regulating initially.
However, if after making the rst few coees you nd that the
coee is either too weak and not creamy enough or delivery is
too slow (a drop at a time), they can be adjusted.
Proceed as follows:
1. Press the settings menu (B7);
2. Select "Adjust mill". A tutorial appears on the display (B1)
with suggestions on the grinding level; if you want to skip
this presentation, press "Skip" or "Next" to continue with
the tutorial;
3. Follow the previous instructions in the tutorial to select the
required grinding neness by pressing directly on one of
the selectable numbers in the highlighted interval;
4. Press "OK" to conrm the selection: "The result in the cup
will be perceived after about 5 deliveries";
5. Press "OK" to conrm and go back to the homepage (B)
with the new selection saved.
Please note!
• After carrying out the above procedure, we recommend
delivering at least 5 coees before adjusting again. If cof-
fee delivery is still not correct, repeat the procedure.
• You cannot adjust more than one grinding level at a time
unless at least two coee-based beverages have been
made.
• Press "Default" to reset the default values of the coee mill
(indicated by a star).
6.5 Water lter
For instructions on the lter (C6), see section “18. Water softener
lter .
6.6 Water hardness
For instructions on setting water hardness, see section “17. Set-
ting water hardness”.
6.7 General
1. Press the settings menu (B7);
2. Select "General";
Here you can enable or disable the following functions with a
simple touch:
- "Beep": when enabled, the appliance beeps whenever an
operation is performed.

10
- "Cup lighting": This function enables or disables the cup
lights under the coee spouts (A15).
- "Energy saving": use this function to enable or disable en-
ergy saving. When enabled, the function reduces energy
consumption in compliance with European regulations.
When enabled, the symbol appears on the icon in the
settings menu (B6).
6.8 A
uto
-o
Auto-o can be set so that the appliance goes o after 15 or 30
minutes, or 1, 2 or 3 hours.
To programme Auto-o, proceed as follows:
1. Press the settings menu (B7);
2. Select "Auto-O";
3. Select the desired time interval (15 or 30 minutes, or 1, 2
or 3 hours).
4. Press "←" to save the new selection and go back to the
homepage (B).
6.9 Bluetooth
This function enables or disables the protection PIN to connect
to the appliance from a mobile device. Proceed as follows:
1. Press the settings menu (B7);
2. Select "Bluetooth";
3. Enable or disable PIN protection by pressing the cursor cor-
responding to "PIN protection".
4. Press "←" to save the new selection and go back to the
homepage (B).
Please note!
• The serial number of the appliance, visible in the "Blue-
tooth" function, enables it to be identied unambiguously
when an association is created between the coee ma-
chine and the App.
• The preset PIN is "0000". You are recommended to custom-
ise the PIN directly from the App.
6.10 Selecting the language
To modify the language of the display (B1), proceed as follows:
1. Press the settings menu (B7);
2. Select "Select language";
3. Press the ag corresponding to the language you want
to set (press "Next" or "Back" to display all the languages
available). The display is immediately updated with the
selected language.
4. Press "←" to save the new selection and go back to the
homepage (B).
6.11 Emptying the circuit
To avoid the water in the circuit freezing if the appliance is to be
left idle for a long period of time, or before taking it to customer
services, we recommend emptying the water circuit.
Proceed as follows:
1. Press the settings menu (B7);
2. Select "Empty water circuit";
3. Press "OK" to start the guided procedure;
4. Empty the grounds container (A16) and drip tray (A20),
then press "Next";
5. Position a 0.5 L container under the coee spouts (A15).
Press "OK";
6. The appliance performs a rinse cycle with hot water from
the spouts;
7. When the rinse cycle has ended, press the button (A13),
open the door (A14) (g. 3), extract the water tank (A23)
(g. 4), empty it, then press "Next";
8. If present, remove the water softener lter (C6) from the
water tank and press "Next";
9. Put the water tank (empty) back in the appliance, close the
front door and press "OK";
10. Wait for the appliance to empty the circuit; (Important:
hot water from the spouts!). As the water circuit empties,
the appliance could become noisier. This is part of normal
operation.
11. When the circuits are empty, open the front door, extract
and empty the drip tray, put back in the appliance and
press "Next";
12. Press "OK". The appliance goes o (standby).
The next time the appliance is turned on, follow the instructions
in section “3. Setting up the appliance ”.
6.12 Edit prole
You can use this function to modify the image and colour of the
icon for each prole. To customise the icon, proceed as follows:
1. Press the settings menu (B7);
2. Select "Edit prole";
3. Select the prole and press "Next";
4. Customise as you wish, then press "OK" to continue.
5. Press "←" to save the new selection and go back to the
homepage (B).
6.13 Default values
This resets all menu settings and user customisation back to
the default values (with the exception of the language, which
remain as set, and the statistics).
Proceed as follows:
1. Press the settings menu (B7);
2. Select "Default values";
3. To reset the appliance to the default values, press "OK"; other-
wise to reset the individual prole, press the arrow to pass to the
next screen, select the prole to reset and press "OK";
4. Press "OK" again to conrm the reset to default values;
5. Press "OK" to exit the menu and go back to the homepage
(B).
11
Please note!
When the appliance (not the individual prole) has been reset
to the default values, the machine proposes the introductory
video again.
6.14 Statistics
This displays statistics relating to the machine. To view the sta-
tistics, proceed as follows:
1. Press the settings menu (B7);
2. Select "Statistics". To display the information and scroll be-
tween screens, press "Next" or "Back".
3. Press "←" to go back to the homepage (B).
7. MAKING COFFEE
7.1 M
akin
g coee using coee beans
Important!
Do not use green, caramelised or candied coee beans as they
could stick to the coee mill and make it unusable.
1. Fill the container (A4) with coee beans (g. 12);
2. Place 1 or 2 cups under the coee spouts (A15);
3. Lower the spouts as near as possible to the cup (g. 13).
This makes a creamier coee.
4. Select the coee you want to make as described in the fol-
lowing paragraphs.
7.2 Your coee at a touch
To deliver coee-based beverages, press the image on the
homepage (B) corresponding to the desired coee (e.g. espres-
so, g. 14). The appliance proceeds with preparation. The image
of the selected beverage appears on the display (B1), together
with a progress bar which gradually lls as the operation pro-
ceeds and a description of each individual phase (grinding,
brewing coee).
At the end of preparation, the message "Your beverage is
ready!" appears on the display (B1). The appliance is now ready
to be used again.
7.3 Customising the beverages
To make coee-based beverages with customised parameters,
proceed as follows:
1. Press (B5) at the bottom of the image corresponding
to the desired coee (e.g. Espresso, g. 15). The parameters
that can be customised according to your tastes appear on
the display (B1):
Length
Aroma
Coee type
Temperature
Please note!
If you set the "Coee type" to pre-ground and then select a bev-
erage not suitable for this mode, the message "PRE-GROUND
MODE IS NOT ALLOWED WITH THIS BEVERAGE" appears on the
display (B1).
2. After setting the parameters, press to make 1 cup,
or (if possible for the selected beverage) to
make 2 cups. The appliance starts making the coee and
the image of the selected beverage appears on the display,
together with a progress bar which gradually lls as the
operation proceeds and a description of each individual
phase (grinding, brewing coee);
3. When delivery has ended, press "Save" to save the new
settings, or "Cancel" to retain the previous parameters.
Please note!
If you save the new settings, they are memorised ONLY in the
selected prole.
4. Press "OK" to go back to the homepage (B).
The appliance is ready to be used again.
7.4
Ma
king c
oee using pre-ground coee
Important!
• Never add pre-ground coee when the machine is o or it
could spread through the inside of the machine and dirty
it. This could damage the machine.
• Never use more than 1 level measure (C2) as it could soil
the inside of the coee machine or block the funnel (A3).
• When using pre-ground coee, only one cup can be made
at a time.
• Making LONG coee: halfway through preparation, when
requested by the appliance, add one level measure of pre-
ground coee and press "OK".
• You cannot make a DOPPIO+ coee using pre-ground
coee.
1. Lift the pre-ground coee funnel lid (A1) (g. 16). Press
"Next" to proceed (or "Cancel" to stop and go back to the
homepage (B));
2. Make sure the funnel (A3) is not blocked, then add one
level measure (C2) of pre-ground coee (g. 13);
3. Press "OK" to proceed with preparation;
4. On the display (B1), the homepage appears with the mes-
sage "PRE-GROUND MODE": proceed as described in sec-
tion “7.2 Your coee at a touch” or “7.3 Customising the
beverages” above.
Please note!
To exit pre-ground mode, after point 3, open the lid of the pre-
ground coee funnel again and press "Cancel".
12
7.5 General indications for making coee-based
beverages
• While the machine is making coee, delivery can be inter-
rupted at any moment by pressing "Stop" or "Cancel".
• As soon as delivery has ended, to increase the quantity of
coee, just press "Extra". When the required quantity is
reached, press "Stop".
• Various alarm messages may appear on the display (B1)
while using the appliance ("FILL TANK WITH FRESH
WATER", "EMPTY GROUNDS CONTAINER", "EMPTY DRIP
TRAY" etc.). Their meaning is explained in section “20. Dis-
played messages ”.
• If the coee emerges drop-by-drop, too weak and not
creamy enough, or too cold, read the tips in sections “6.4
Adjust mill” and “21. Troubleshooting ”.
• If "Energy Saving" mode is active, you may have to wait a
few seconds before the rst coee is delivered
7.6 Tips for a hotter coee
For hotter coee, proceed as follows:
• perform a rinse cycle by selecting "Rinsing" in the settings
menu (B7) (section “6.1 Rinsing”);
• warm the cups with hot water using the hot water function
(see section “11. Delivering hot water ”);
• increase the coee temperature (section “7.3 Customising
the beverages”).
8. CARAFE OF COFFEE
Based on espresso coee, this beverage is light and balanced,
with a ne layer of froth, ideal to share in company.
Optional accessories:
Jug
(capacity 1 litre)
EAN: 8004399333642
To make the beverage, press the image on the homepage (B)
corresponding to the carafe of coee and proceed as follows:
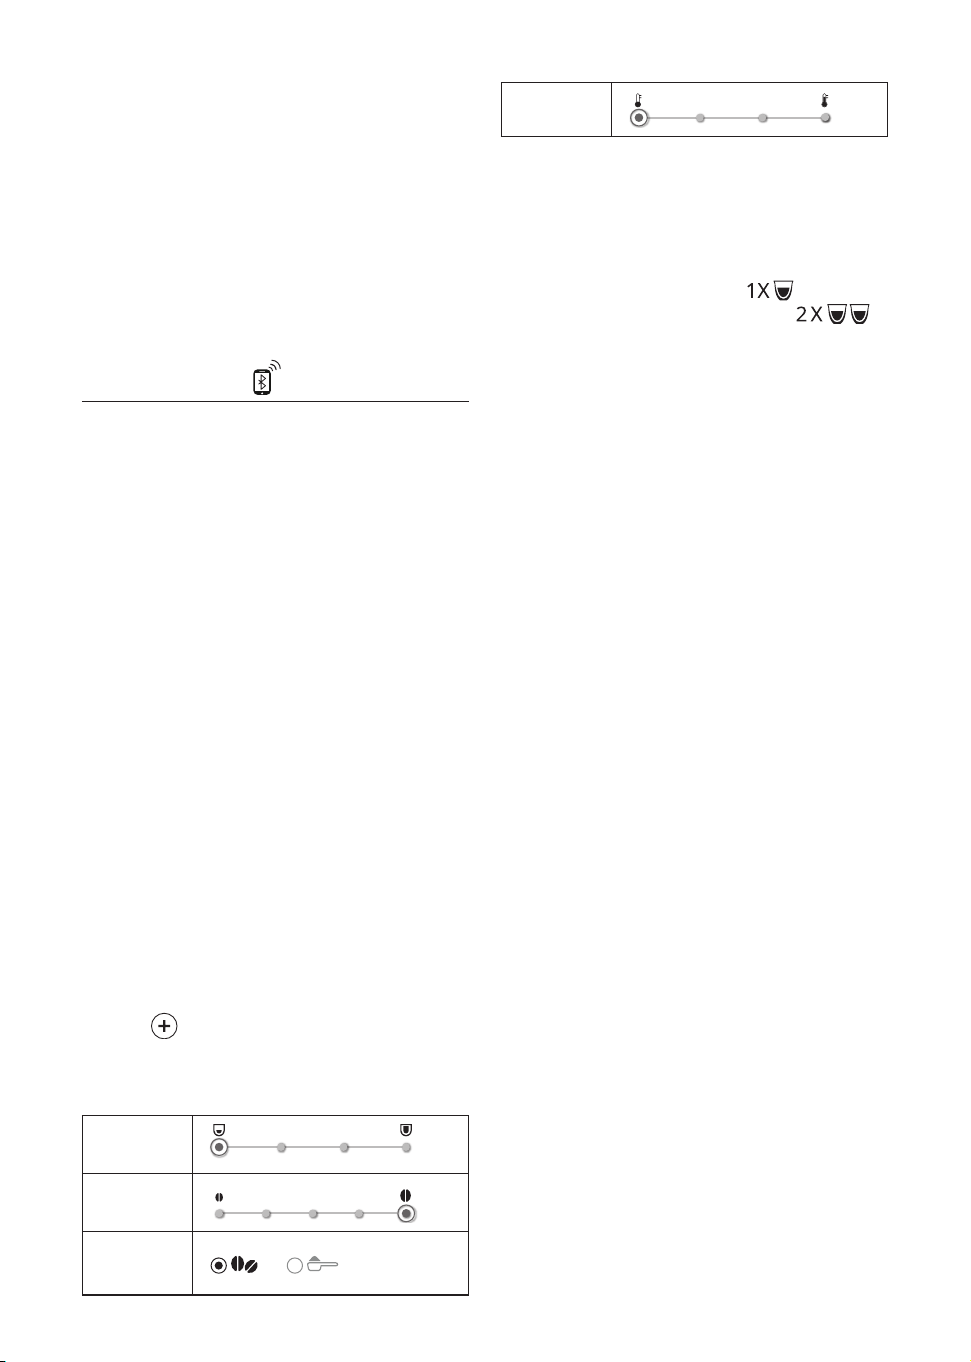
1. Adjust the parameters that can be customised according to
your tastes:
Cups
Aroma
Coee type
Temperature
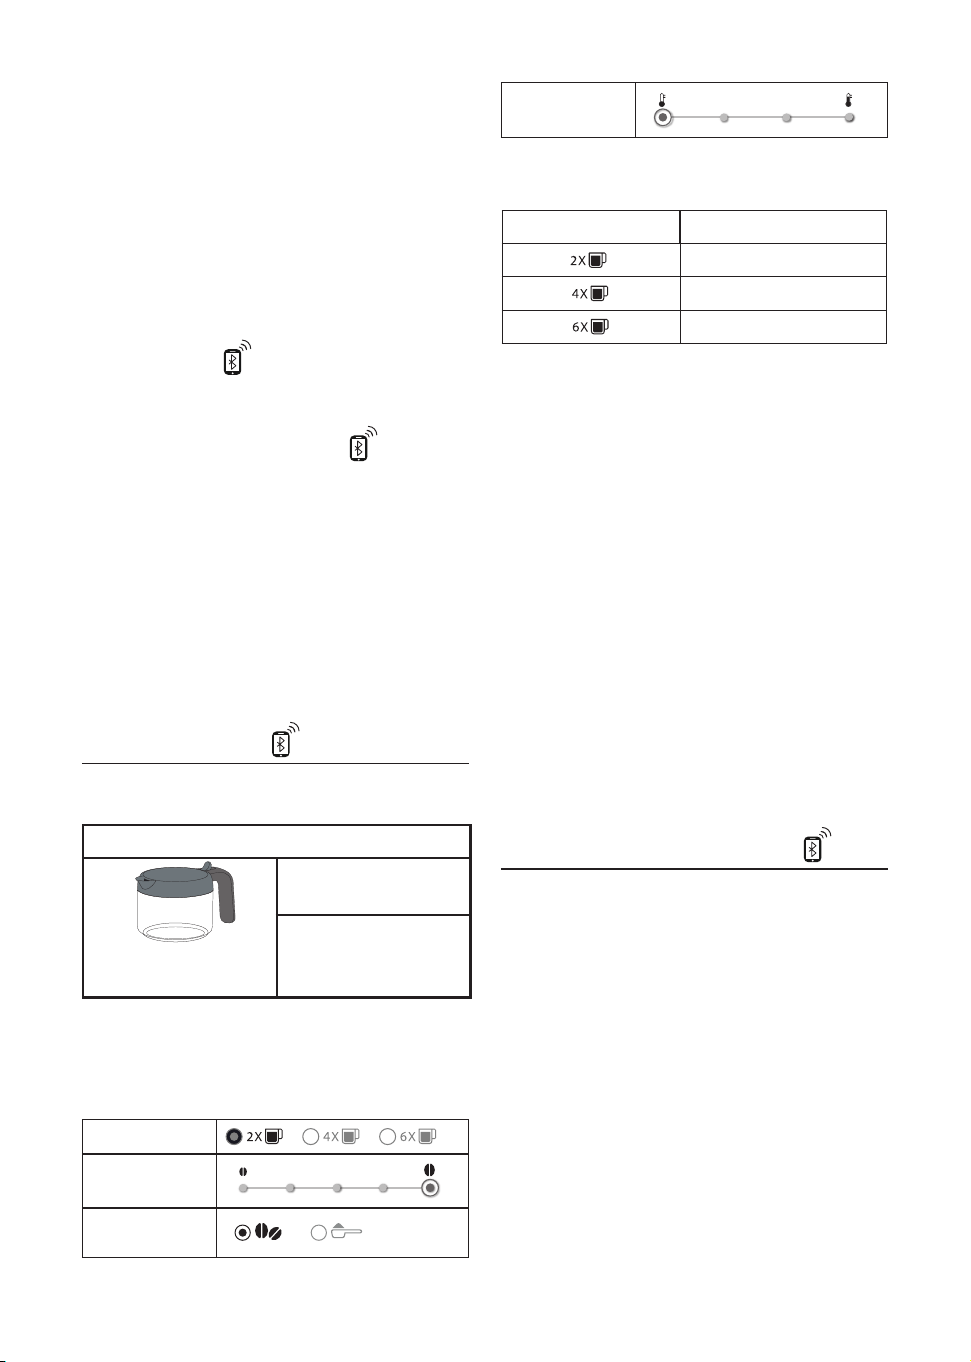
2. Position a carafe under the coee spouts (A15). When
choosing the carafe to use, bear in mind the quantity to
be delivered, namely:
Selected quantity Quantity (ml)
250
500
750
3. Press "Next" to move on to the next step;
4. If you select 4 or 6 cups, ll the water tank and beans
container, then when you have made sure the water and
coee is sucient, press "OK";
5. The appliance proceeds with preparation and the image of
the selected beverage appears on the display (B1), togeth-
er with a progress bar which gradually lls as the operation
proceeds and a description of each individual phase (grind-
ing, brewing coee).
Once the coee has been made, the appliance is ready to make
the next beverage.
Please note!
• "Cancel" or "Stop": press to stop preparation completely
and go back to the homepage.
SAFETY WARNING:
After making the carafe of coee, leave the
appliance to cool for 5 minutes before mak-
ing another beverage. Risk of overheating!
9. MAKING MILK-BASED BEVERAGES
Please note!
To avoid milk with poor froth or large bubbles, always clean
the milk container (D) as described in sections “9.5 Cleaning
the milk container after use” and “15.10 Cleaning the milk
container”.
9.1 Filling and attaching the milk container
1. Press the release buttons (D4) and lift the lid (D1) (g. 18);
2. Fill the milk container (D7) with a sucient quantity of
milk, not exceeding the MAX level marked on the container
(g. 19). Each mark on the container corresponds to about
100 ml of milk;
Please note!
• For a denser more even froth, you must use skimmed or
partially skimmed milk at refrigerator temperature (about
5°C).

13
• If "Energy Saving" mode is enabled (see section “6.7 Gen-
eral”), you may have to wait a few seconds before the bev-
erage is delivered.
• When using milk at the ideal temperature (about 5°C), the
thermal casing guarantees the eciency of the MilkCream
system for about 30 minutes outside the refrigerator.
• The quality of the froth will vary depending on:
• type of milk or vegetable beverage;
• brand used;
• ingredients and nutritional value.
3. Make sure the milk intake tube (D5) is correctly inserted on
the bottom of the milk container lid (g. 20);
4. Attach the lid back on the milk container;
Please note!
The milk container lid incorporates a rell lid (D3). If during
preparation you notice that the level of the milk is low, add
milk through the rell lid without extracting the container, then
complete preparation of the beverage.
5. If present, extract the hot water/steam spout (E1) by press-
ing the release button (E3) (g. 21);
6. Attach the milk container (D) to the connection nozzles
(A9) and push as far as it will go (g. 22). The machine
emits a beep (if the beep function is enabled);
7. Adjust the milk spout (D6) by turning it anticlockwise (g.
23);
8. Place a suciently large cup under the coee spouts and
milk spout (A15) (g. 24);
9. Select the desired beverage as described in the following
paragraphs.
9.2 Your milk-based beverage at a touch
To deliver milk-based beverages, on the homepage (B), press
the image corresponding to the desired beverage. The appliance
proceeds with preparation and the image of the selected bev-
erage appears on the display (B1), together with a progress bar
which gradually lls as the operation proceeds and a description
of each individual phase (grinding, brewing coee, milk deliv-
ery, etc.).
At the end of preparation, the message "Your beverage is
ready!" appears on the display. The appliance is now ready to
be used again.
Please note!
As soon as delivery has ended, to increase the quantity of coee,
just press "Extra". When the required quantity is reached, press
"Stop".
9.3 Customising the beverages
To deliver a customised milk-based beverage, proceed as
follows:
1. Press (B5)at the bottom of the image correspond-
ing to the desired beverage. The parameters that can be
customised according to your tastes appear on the display
(B1):
"Quantity"
"Froth"
NO MIN MED MAX
"Aroma"
"Coee type"
"Temperature"
2. After setting the parameters, press to make one or
(if possible for the selected beverage) to make
two cups;
3. The appliance proceeds with preparation and the image of
the selected beverage appears on the display, together with
a progress bar which gradually lls as the operation proceeds
and a description of each individual phase (grinding, milk
delivery, brewing coee, etc.).
4. When delivery has ended, press "Save" to save the set-
tings, or "Cancel" to retain the previous parameters.
Please note!
If you save the new settings, they are memorised ONLY in the
selected prole.
5. Press "OK" to go back to the homepage (B).
The appliance is ready to be used again.
9.4 Recommended quantity of froth
Each milk-based beverage corresponds to a default amount of
froth (see following table).
Description Recommended for…
"NO" FROTH CAFFELATTE
"MIN" FROTH FLAT WHITE
"MED" FROTH MACCHIATO / 2X MACCHIATO
"MAX" FROTH CAPPUCCINO/ 2X CAPPUCCINO /
CAPPUCCINO+ / ESPRESSO MACCHIATO /
CAPPUCCINO MIX / 2X CAPPUCCINO MIX /
HOT MILK (frothed)
A dierent amount of froth can be set according to your personal
tastes, following the instructions in section “9.3 Customising the
beverages”.
14
Please note!
The performance of the milk system and quality of the froth de-
pend on the type of milk or vegetable beverage used. If the froth
produced is not correct, reduce/modify the amount of froth from
the display of the selected recipe (see instructions in previous
section).
9.5 Cleaning the milk container after use
Each time you make a milk-based beverage, the message
"PRESS OK TO START CLEANING OR Cancel TO SELECT A NEW
BEVERAGE" appears on the display (B1). To start cleaning, pro-
ceed as follows:
1. Leave the milk container (D) in the machine (you do not
need to empty it);
2. Place a cup or other recipient under the frothed milk spout
(D6) (g. 25);
3. Press "OK" to start cleaning.;
4. Hot water is delivered from the milk spout (g. 26) and
stops automatically when cleaning is complete.
5. Before extracting the milk container, place the milk spout
in the not-in-use position by turning clockwise.
Please note!
• To prepare a number of cappuccinos and milk based cof-
fees, clean the milk container after you have prepared
the last beverage only. To proceed with making the next
beverages, when the "Clean milk container" message is
displayed, press "Cancel".
• If you do not clean the milk container, the symbol (B9)
appears on the display to remind you that cleaning is re-
quired. To clean, see the section “6.3 Clean milk container”.
• The milk container can be kept in the refrigerator.
• In some cases, to clean you must wait for the appliance to
heat up.
• You can interrupt cleaning of the milk container by press-
ing "Stop".
• Never extract the milk container by pulling the milk spout
(D6).
10. TEA FUNCTION
To make tea, proceed as follows:
1. Attach the hot water/steam spout (E) to the connection
nozzles (A9) (g. 7): the appliance beeps (if the beep func-
tion is enabled);
2. Put a tea bag in the cup, then place the cup under the spout
(as close as possible to avoid splashes) (g. 27);
3. To make the beverage, press
the image on the homepage
(B) corresponding to the tea function;
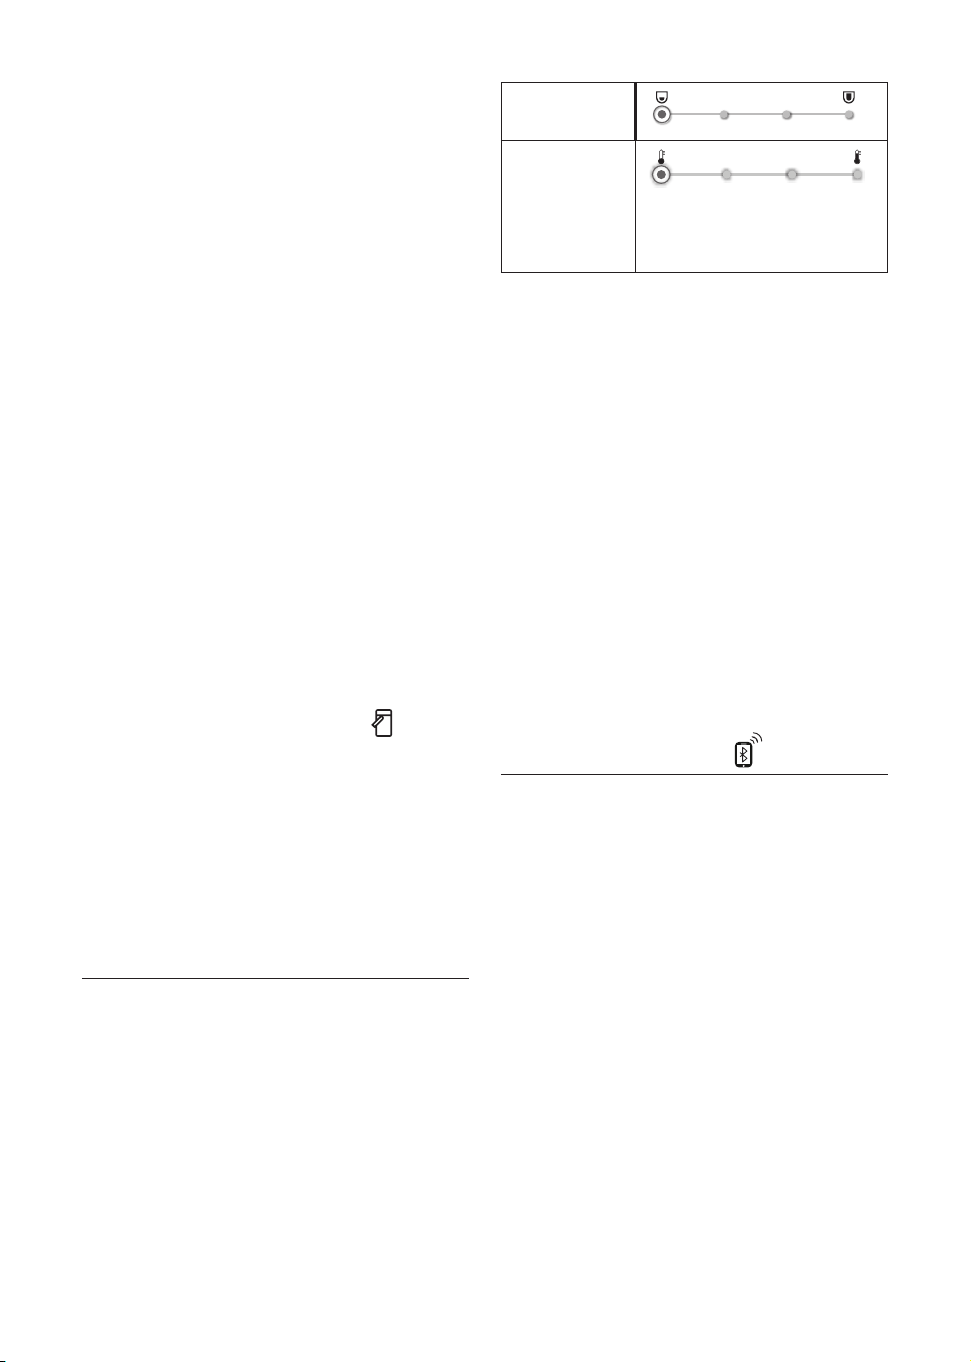
4. Adjust the parameters that can be customised according to
your tastes:
"Quantity"
"Temperature"
A dierent tea (white, green, oolong
or black) appears with each water
temperature
5. Press "OK" to start delivery: the appliance proceeds with
preparation and the image of the beverage appears on the
display (B1) together with a progress bar which gradual-
ly lls as the operation proceeds and a description of the
phase (water delivery);
6. At the end of preparation, the message "Your beverage is
ready! Save new settings?" appears on the control panel.
"Save new settings?": press "Save" to save the settings, or
"Cancel" to retain the previous parameters;
The appliance is now ready to be used again.
Please note!
• If "Energy Saving" mode is active, you may have to wait a
few seconds before the hot water is delivered.
• To stop delivery manually, press "Stop" or "Cancel".
• As soon as delivery has ended, to increase the quantity
of water in the cup, just press "Extra". When the required
quantity is reached, press "Stop".
• Each tea (white, green, oolong or black) is associated with
a specic water temperature.
11. DELIVERING HOT WATER
To deliver hot water, proceed as follows:
1. Attach the hot water/steam spout (E) to the connection
nozzles (A9) (g. 7): the appliance beeps (if the beep func-
tion is enabled);
2. Place a cup under the spout (as close as possible to avoid
splashes) (g. 28).
3. Select the function as described in the following
paragraphs.
11.1 Your beverage at a touch
Press the image on the homepage (B) corresponding to hot
water. The appliance proceeds with preparation and the image
of the beverage appears on the display (B1) together with a pro-
gress bar which gradually lls as the operation proceeds and a
description of the phase (water delivery).
At the end of preparation, the message "Your beverage is
ready!" appears on the display. The appliance is now ready to
be used again.
Please note!
As soon as delivery has ended, to increase the quantity of water
in the cup, just press "Extra". When the required quantity is
reached, press "Stop".
15
11.2 Customising the beverages
To deliver the desired quantity of hot water, proceed as follows:
1. Press (B5) at the bottom of the image corresponding
to hot water. The selectable quantities appear on the dis-
play (B1):
"Quantity"
2. After selecting the quantity, press : The appliance
proceeds with preparation and the image of the beverage
appears on the display together with a progress bar which
gradually lls as the operation proceeds and a description
of the phase (water delivery).
3. At the end of delivery, the message: "Your beverage is
ready! Save new settings?" is displayed;
4. Press "Save" to save the settings (or "Cancel" to retain the
previous parameters).
The appliance is now ready to be used again.
Please note!
• If "Energy Saving" mode is active, you may have to wait a few
seconds before the hot water is delivered.
• To interrupt delivery of hot water manually, press "Stop"
and "Cancel".
12. STEAM DELIVERY
To deliver steam, proceed as follows:
1. Attach the hot water/steam spout (F) to the connection
nozzles (A9) (g. 7): the appliance beeps (if the beep func-
tion is enabled);
2. Fill a container with the liquid to be heated or frothed and
immerse the hot water/steam spout in the liquid (g. 29);
3. Press the image on the homepage (B) corresponding to
steam. The appliance proceeds with preparation and the
image of the beverage appears on the display (B1) togeth-
er with a progress bar which gradually lls as the operation
proceeds and a description of the phase (steam delivery);
4. When the required temperature or level of froth is ob-
tained, interrupt steam delivery by pressing "Stop" or
"Cancel".
Important!
Always shut o the steam before the container with the heated
liquid is drawn clear of the spout, as splashes can cause scalding.
Please note!
If
"Energy saving" is active, you may have to wait a few seconds
before
steam is delivered.
12.1 Tips for using steam to froth milk
• When choosing the appropriate size of container, remem-
ber that the liquid will double or triple in volume.
• For a richer and denser froth, use skimmed or partially
skimmed milk from the refrigerator (about 5°C).
• For a creamier froth, swirl the container slowly, moving it
from the bottom upwards.
• To avoid producing milk with poor froth or large bubbles,
always clean the spout (E) as described in the following
section.
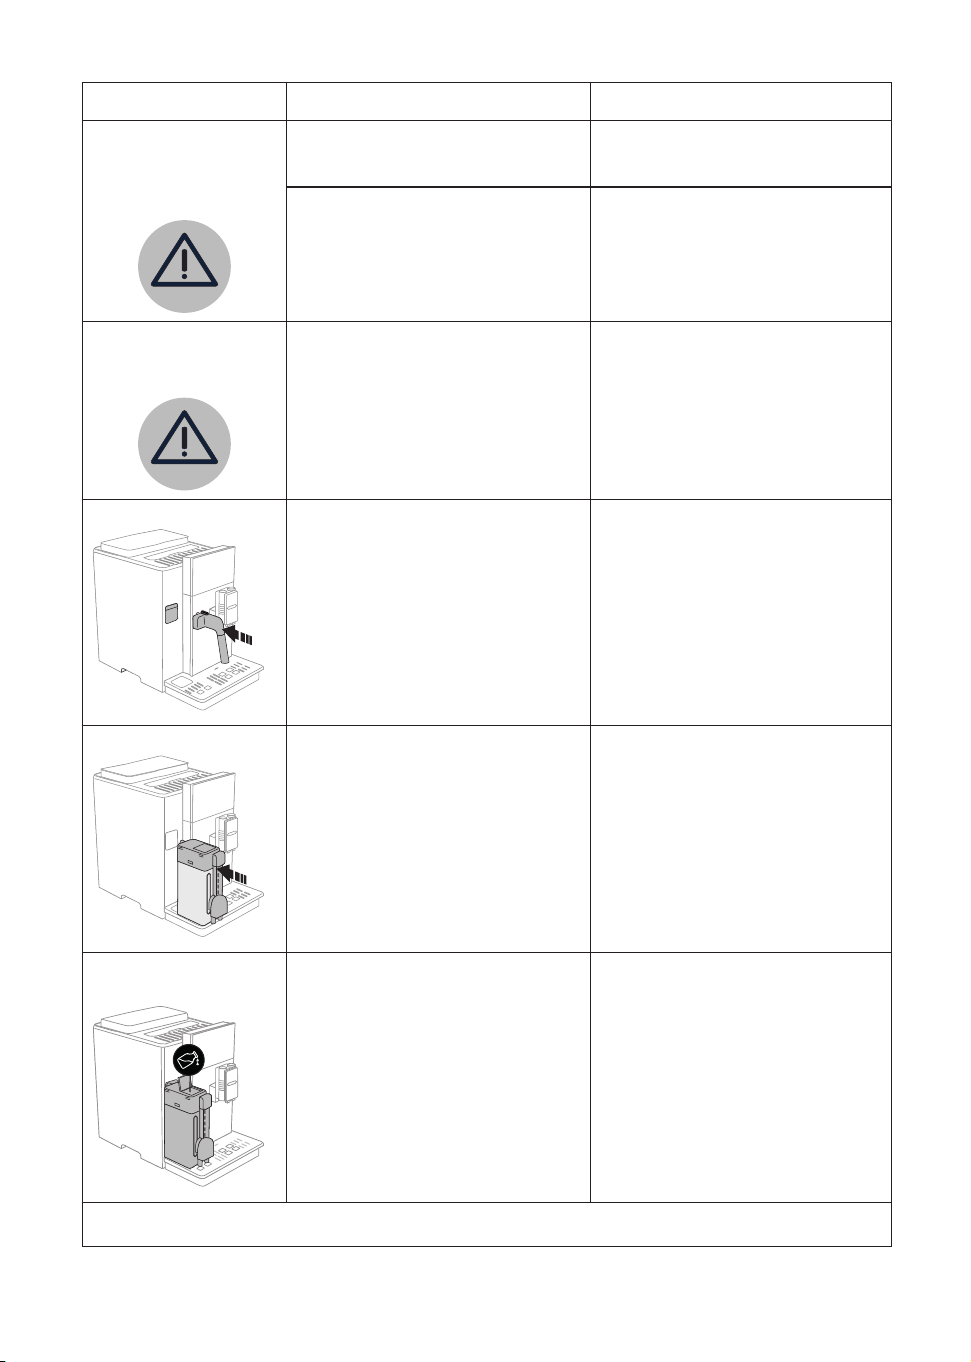
12.2 Cleaning the hot water/steam spout after
use
Always clean the hot water/steam spout (E) after use to avoid the
build-up of milk residues and prevent it from clogging.
1.
P
lace
a container under the hot water/steam spout
and de-
liver a little water (see section “11. Delivering hot water
”). Stop delivery of hot water by pressing "Stop";
2. Wait a few minutes for the hot water/steam spout to cool
down, then extract (g. 21) by pressing the release button
(E3);
3. Turn the connector (E2) clockwise and extract (g. 30);
4. Hold the spout (E1) with one hand and with the other, turn
the cappuccino maker (E5) and pull it downwards (g. 31).
Also remove the steam connection nozzle (E4) by pulling
it downwards;
5. Check the hole in the connection nozzle is not blocked. If
necessary, clean using a toothpick.
6. Wash all components of the spout thoroughly with a
sponge and warm water. Use the tube brush (C7) to scrape
o any milk residues.
7. Replace all the spout components correctly.
13. GUIDED BEVERAGE CUSTOMISATION (MY)
You can use this function to customise all beverages with the
MY symbol at the bottom of the image in beverage settings
(on the homepage (B), press at the bottom of the image
corresponding to the required beverage). To customise, proceed
as follows:
1. Make sure the prole (B2) for which you want to customise
the beverage is active;
2. Press (B5) at the bottom of the image corresponding
to the desired beverage;
3. Press at the bottom of the image corresponding to the
beverage;
4. Press "OK" to follow the guided procedure;
5. Select your preference and press "Next" to move on to the
next step (or "Back" to go back to the previous screen);
6. Press "OK" to begin delivery;
7. Preparation begins and the appliance displays the quanti-
ty customising screen in the form of a vertical bar (in the
case of beverages with milk and coee, customise both
ingredients).
16
8. When the quantity reaches the minimum amount you can
set, "Stop" appears on the display (B1).
9. When the required quantity has been delivered into the
cup, press "Stop".
10. If the result in the cup is as you want, press "Save", other-
wise press "Cancel".
11. Press "OK" to go back to the homepage .
The appliance goes back to the homepage.
Please note!
• When you customise a single beverage, the respective
double version is also customised and the appliance dis-
plays the message "Settings saved on both double and
single option";
• You can also customise the beverages by connecting with
the DeLonghi Coee Link App.
• Press "Cancel" to exit programming at any moment. The
values will not be saved.
• When a beverage has been customised, "Reset" (under the
image) and "my" (among the quantity selections) appear
in the settings. Press "Reset" to reset the default values for
the beverage.
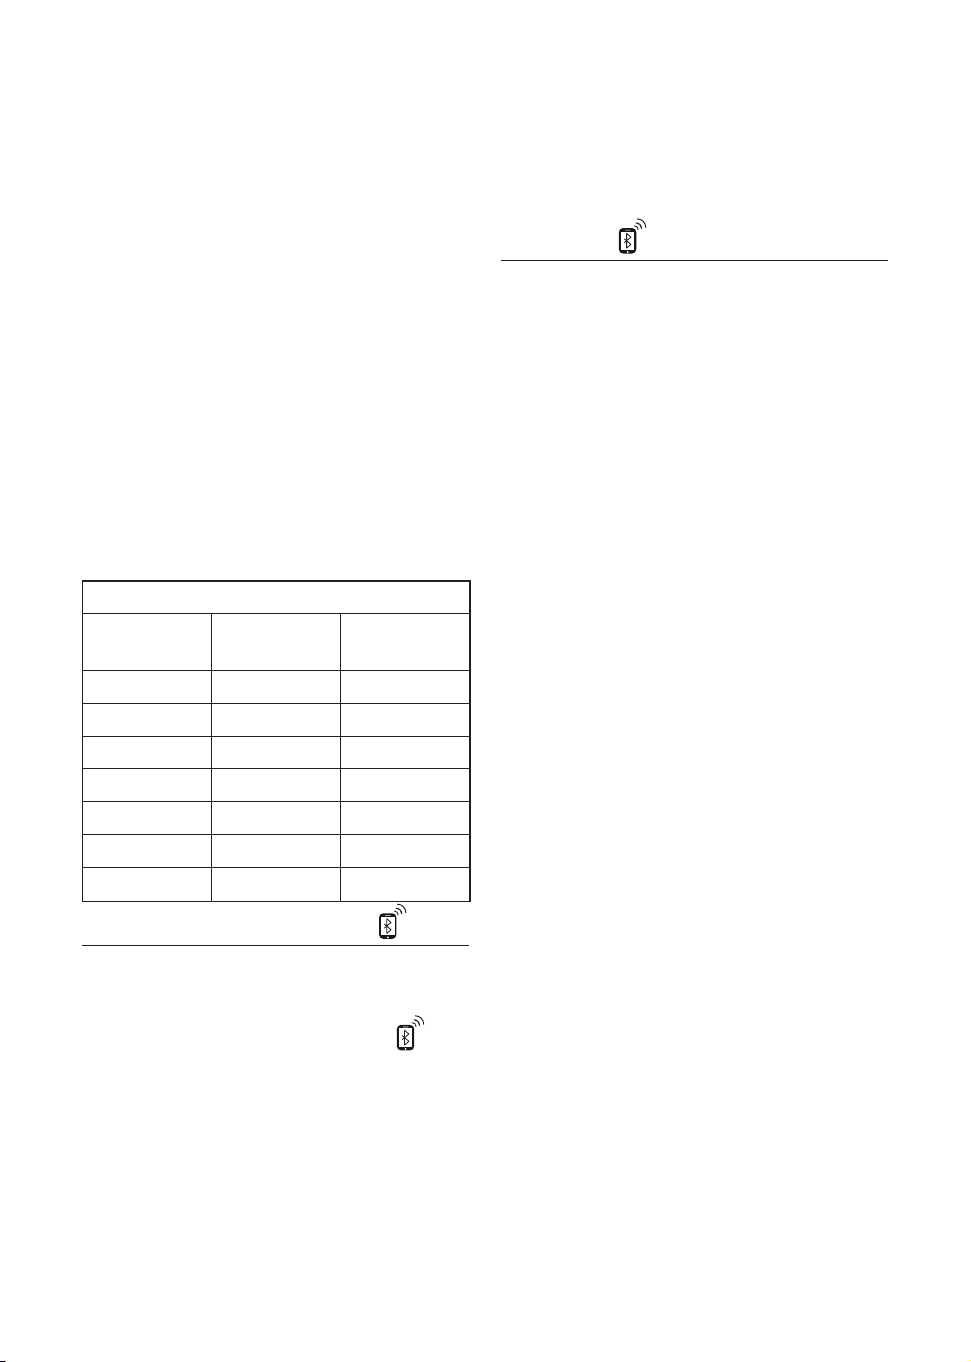
Beverage quantity table
Beverage Standard
quantity
Programmable
quantity
ESPRESSO 40 ml 20-180 ml
COFFEE 180 ml 100-240 ml
LONG 160 ml 115-250 ml
DOPPIO+ 120 ml 80-180 ml
AMERICANO 150 ml 70-480 ml
TEA 150 ml 20-420 ml
HOT WATER 250 ml 20-420 ml
14. SELECT YOUR PERSONAL PROFILE
The appliance allows you to memorise 6 dierent proles (B2),
each associated with a dierent icon (g. 32).
The customised beverage settings are saved in each prole (see
section “13. Guided beverage customisation (My) ”). The
order in which all the beverages are displayed is based on the
frequency of selection.
To select a prole, proceed as follows:
1. From the homepage (B), press the prole currently in use
(B2). A list of selectable proles appears;
2. Then select the required prole.
Please note!
• After making your selection, the beverage settings bars
will all appear in the same colour as the prole;
• You can rename your personal prole by connecting with
the DeLonghi Coee Link App;
• To customise the prole icon, see section “6.12 Edit prole”.
15. CLEANING
15.1 Cleaning the machine
The following parts of the machine must be cleaned regularly:
- the appliance’s internal circuit;
- coee grounds container (A16);
- drip tray (A20) and drip tray grille(A19);
- water tank (A23);
- coee spouts (A15);
- pre-ground coee funnel (A3);
- infuser (A25), accessible after opening the infuser door
(A24);
- milk container (D);
- hot water/steam spout (E) (see section “12.2 Cleaning the
hot water/steam spout after use”
- control panel(A12).
Important!
• Do not use solvents, abrasive detergents or alcohol to clean
the coee machine. With De’Longhi superautomatic coee
machines, no chemical products are required for cleaning
purposes.
• The components of the appliance can be washed in a dish-
washer, with the exception of the water tank (A23) and lid
(A22) and the thermal casing (D8) of the milk container
(D).
• Do not use metal objects to remove encrustations or coee
deposits as they could scratch metal or plastic surfaces.
15.2 Cleaning the internal circuit
If the appliance is not used for more than 3/4 days, before using
it again, we strongly recommend switching it on and perform-
ing 2/3 rinse cycles by selecting the "Rinse" function (section
“6.1 Rinsing”) with the hot water/steam spout (E) attached to
the appliance.
Please note!
After cleaning, it is normal for the grounds container (A16) to
contain water.
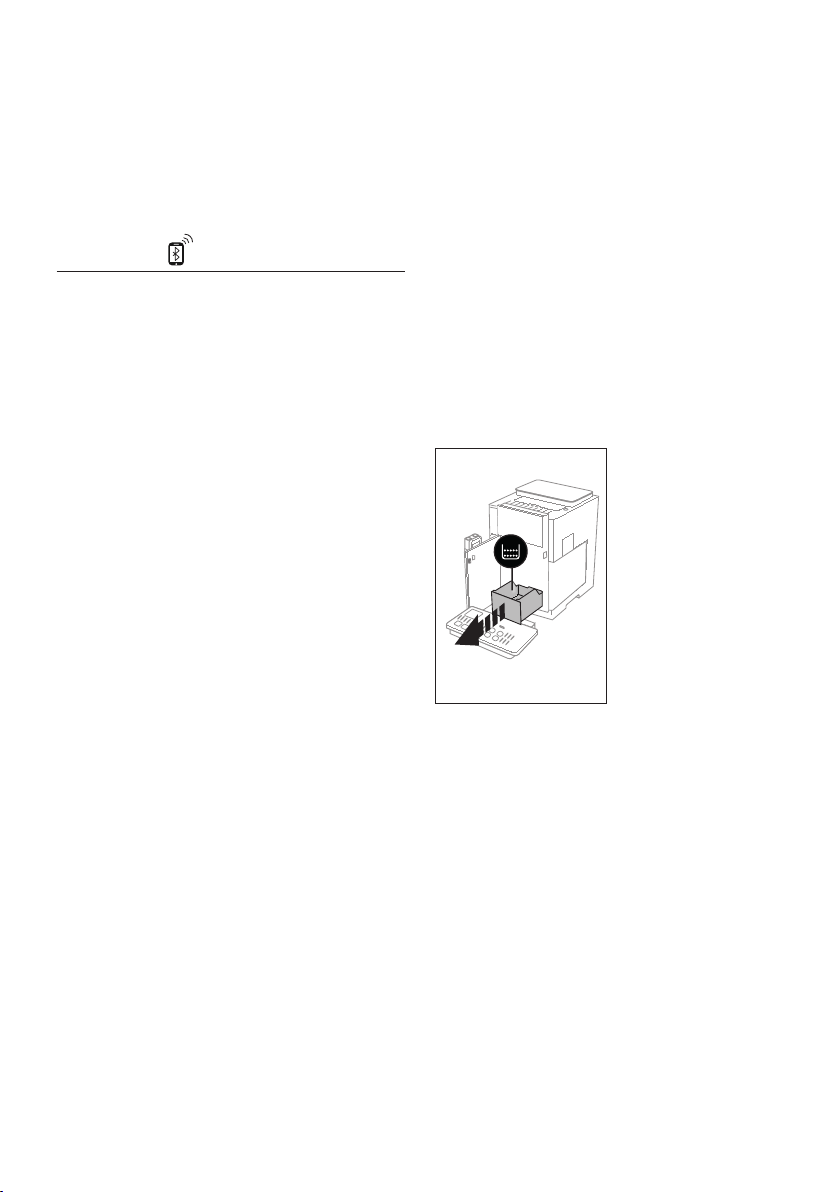
15.3 Cleaning the coee grounds container
When "EMPTY GROUNDS CONTAINER" appears on the display
(B1), the grounds container must be emptied and cleaned. The
appliance cannot be used to make coee until you have cleaned
the grounds container (A16). Even if not full, the empty grounds
container message is displayed 72 hours after the rst coee has
been prepared. For the 72 hours to be calculated correctly, the
machine must never be turned o with the main switch (A10).
17
Important! Danger of scalding
If you make a number of milk-based beverages one after the
other, the metal cup tray (A17) becomes hot. Wait for it to cool
down before touching it and handle it from the front only.
To clean (with the machine on):
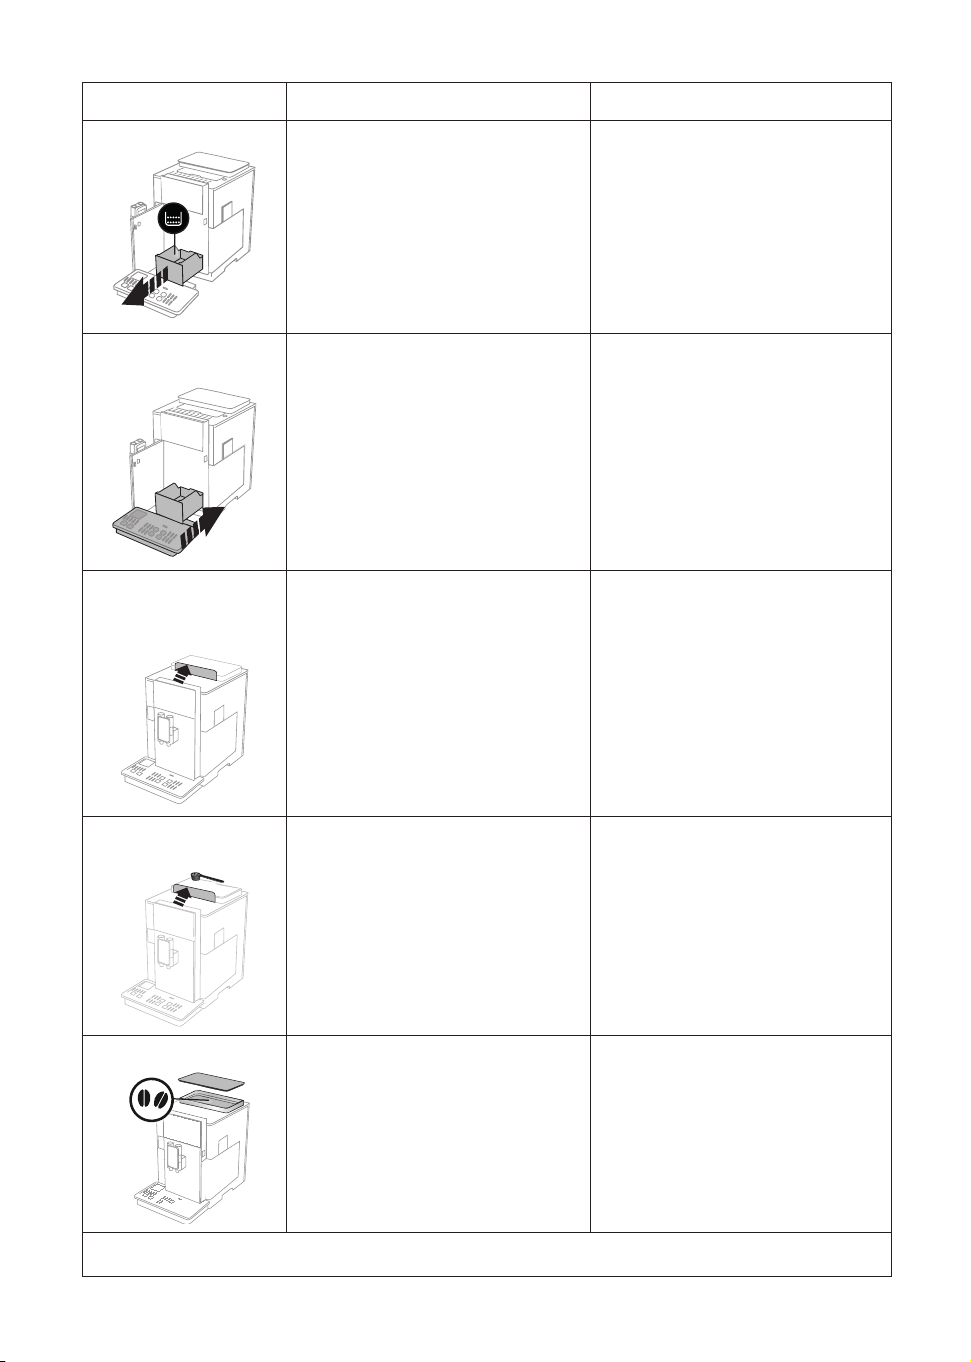
1. Press the button (A13) and open the front door (A14) (g.
3);
2. Remove the drip tray (A20) and grounds container (A16)
(g. 33);
3. Empty the grounds con-
tainer and clean thor-
oughly to remove all res-
idues left on the bottom.
This can be done using
the spatula on the brush
(C5) provided.
4. Put the drip tray complete
with grille and grounds
container back in the
appliance, then close the
front door.
Important!
When removing the drip tray, the grounds container must be
emptied, even if it contains few grounds. If this is not done,
when you make the next coees, the grounds container will ll
up more than expected and clog the machine.
15.4 Cleaning the drip tray and drip tray grille
Important!
The drip tray (A20) is tted with a level indicator (A18) (red)
showing the amount of water it contains (g. 34). Before the
indicator protrudes from the cup tray (A17), the drip tray must
be emptied and cleaned, otherwise the water may overow the
edge and damage the appliance, the surface it rests on or the
surrounding area. To remove the drip tray, proceed as follows:
1. Press the button (A13)
and open the front door
(A14) (g. 3);
2. Remove the drip tray and
coee grounds container
(A16) (g. 33);
3.
Remove the cup tray (A17)
and drip tray grille (A19),
then empty the drip tray and
grounds container and wash
all components.
4. Put the dr
ip
tray complete
with grille and grounds
container back in the
appliance, then close the
front door.
33
34
Important!
When removing the drip tray, the grounds container must be
emptied, even if it contains few grounds. If this is not done,
when you make the next coees, the grounds container will ll
up more than expected and clog the machine.
15.5 Cleaning the inside of the machine
Danger of electric shock!
Before cleaning internal parts,
the machine must be turned
o (see section “5. Turning the
appliance o”) and unplugged
from the mains power supply.
Never immerse the machine
in water.
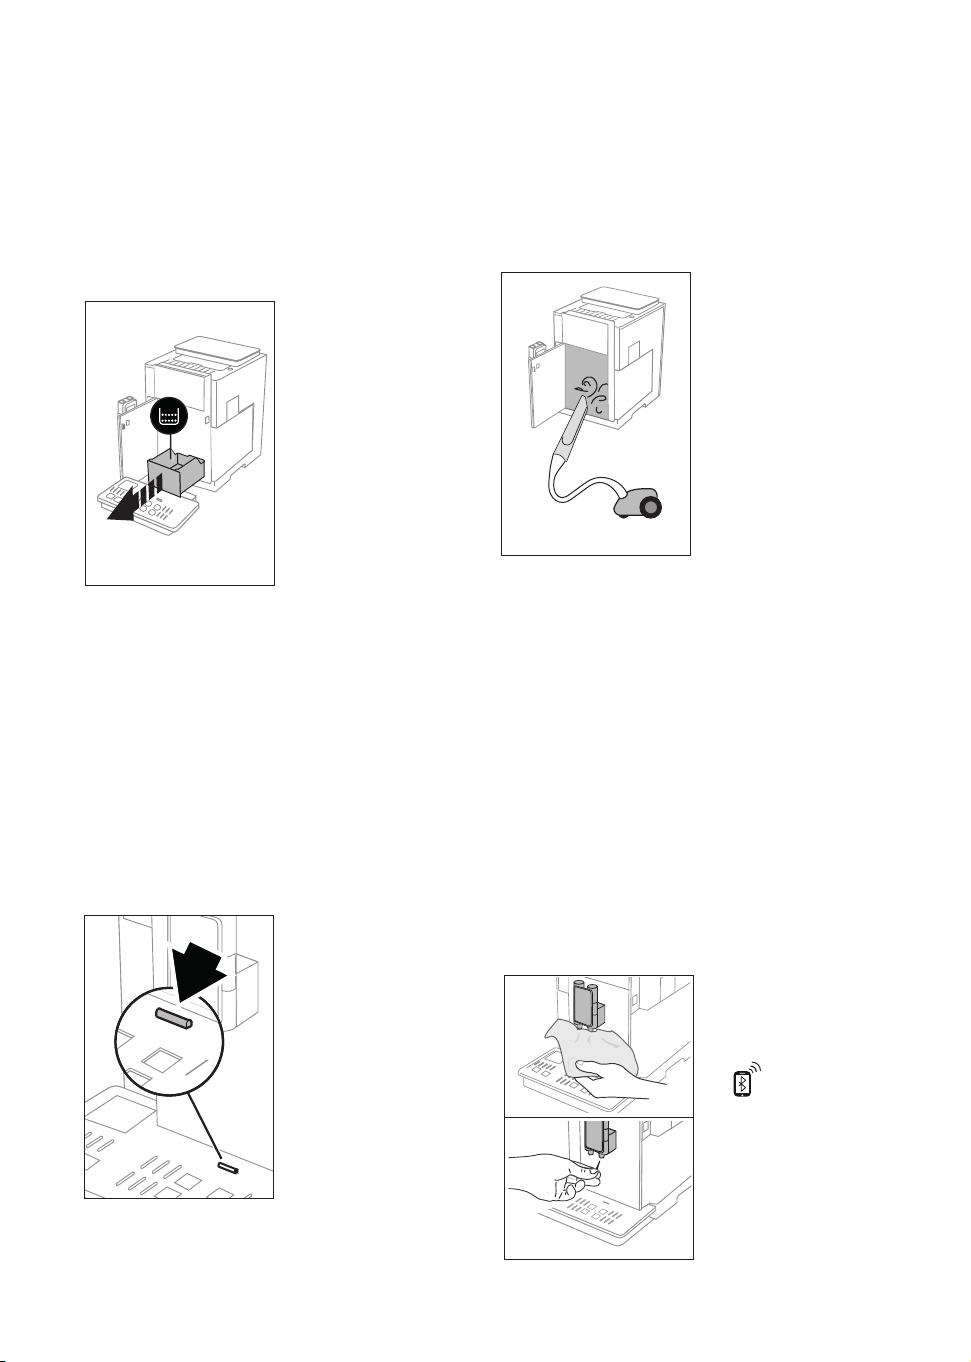
1. Regularly (about once
a month), check that
the inside of the appli-
ance (accessible after
pressing the button
(A13), opening the front
door (A14) (g. 3) and
removing the drip tray (A20)) is not dirty.
If necessary, remove coee deposits with the brush (C5)
supplied and a sponge.
2. Remove all residues with a vacuum cleaner (g. 35).
15.6 Cleaning the water tank
Clean the water tank (A23) regularly, about once a month and
whenever you replace the water softener lter (C6).
1. Press the button (A13) and open the door (A14) (g. 3);
2. Extract the water tank (g. 4), remove the water softener
lter (if present) and rinse it with running water;
3. Empty the water tank and clean with a damp cloth and a
little washing up liquid. Rinse thoroughly with water;
4. Put the lter back in the appliance (g. 53), ll the tank
with fresh water up to the MAX level (marked inside) (g.
5), put the tank back (g. 6) and close the door;
5. (models with a water sof-
tener lter only) Deliver
100ml of hot water (see
“11. Delivering hot water
”
) to reactivate the
lter
.
15.7 Cleaning the
coee spouts
1. Clean
the
coee spouts
(A15) regularly with a
sponge or the cloth (C8)
provided (g. 36A);
35
36B
36A
18
2. Check that the holes in the coee spout are not blocked.
If necessary, remove coee deposits with a toothpick (g.
36B).
15.8 Cleaning the pre-ground coee funnel
Cclean the pre-ground coee
funnel (A3) regularly (about
once a month) with a damp
cloth. Proceed as follows:
1. Open the lid (A1) (g. 16);
2. Extract the funnel (g. 37)
and clean with the brush
provided (C5);
3. If necessary, clean the
funnel with hot water and
washing up liquid or in a
dishwasher;
4. Put the funnel back in
the appliance;
5. Close the lid.
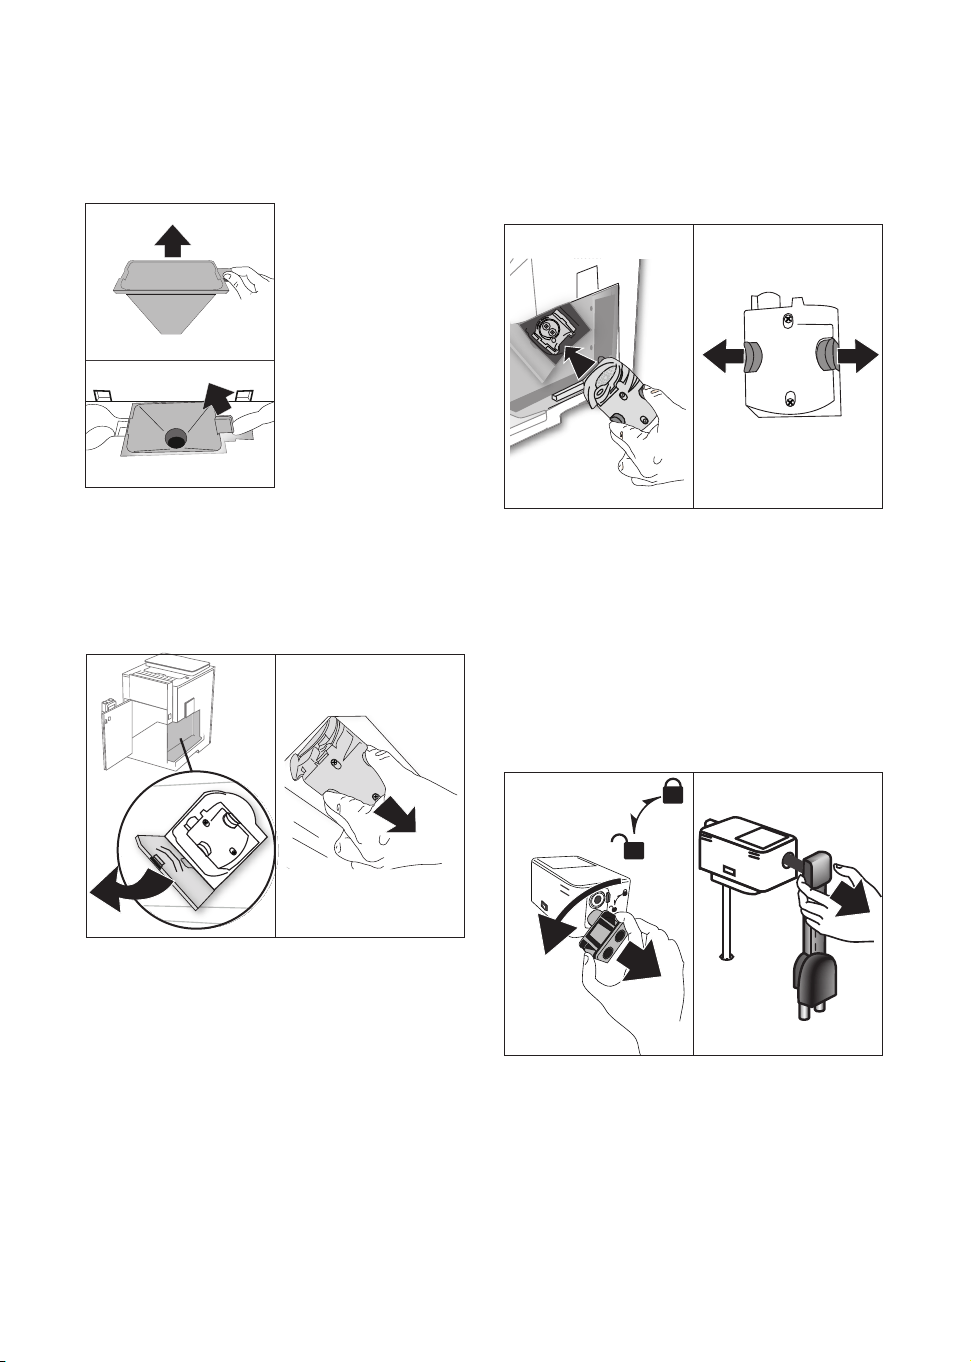
15.9 Cleaning the infuser
The infuser (A25) must be cleaned at least once a month.
Important!
The infuser cannot be extracted when the machine is on.
38 39
1.
Make sure the machine is correctly turned o (see section “5.
Turning the appliance o”);
2.
Press the button (A13), open the door (A14) and extract
the water tank (A23) (g. 4);
3. Open the infuser door (A24) (g. 38) on the right side of
the appliance;
4.
Press the two coloured release buttons inwards and at the
same time pull the infuser outwards (g. 39);
5. Soak the infuser in water for about 5 minutes, then rinse
under the tap;
Important!
RINSE WITH WATER ONLY
NO WASHING UP LIQUID - NO DISHWASHER
37
6. Clean the infuser without using washing up liquid as it
could be damaged.
7. Use the brush (C5) to remove any coee residues left in the
infuser housing, visible through the infuser door;
8. After cleaning, put the infuser back in the appliance, in-
serting it in the support (g. 40);
40 41
9. Once inserted, make sure the two coloured buttons have
snapped out (g. 41);
10. Close the infuser door;
11. Put the water tank back and close the front door.
15.10 Cleaning the milk container
To keep the frother ecient, clean the milk container (D) every
two days as described below:
1. Press the release buttons (D4) and extract the lid (D1) (g.
18);
2. Extract the milk intake tube (D5);
42 43
3. Turn the connector (D2) anticlockwise (g. 42) and extract;
4. Remove the milk spout (D6) by pulling (g. 43). When ex-
tracted, remove the transparent tube inside (g. 44) and the
lid located above the spouts (g. 45);
19
44 45
5. Extract the milk container (D7) from the thermal casing (D8);
46
6. Wash all the components thoroughly with hot water and
mild washing-up liquid. All components (except the
thermal casing) are dishwasher safe, placing them in the
top basket of the dishwasher. Make sure there are no milk
residues on the lid components. If necessary, use the tube
brush (C7) to scrape o any milk residues (g. 46);
7. Rinse the holes under running water;
8. Make sure the milk intake tube and milk spout are not
clogged with milk residues. Use the tube brush to clean
them thoroughly;
9. Place the milk container back in the thermal casing;
10. Insert the transparent tube into the milk spout, inserting
it rst in the hole nearest the connector, then in the hole
nearest the spouts (g. 47). After fully inserting the ends,
push for the full length of the tube, making sure it is insert-
ed correctly (g. 48);
47
48
11. Reassemble all the lid components;
12. Place the lid back on the milk container.
16. DESCALING
Important!
• Before use, read the instructions and the labelling on the
descaler pack.
• It is important to use De’Longhi descaler only. Using un-
suitable descaler and/or performing descaling incorrectly
may result in faults not covered by the manufacturer's
guarantee.
• Descaler could damage delicate surfaces. If the product is
accidentally spilt, dry immediately.
To descale
Descaler De’Longhi descaler
Container Recommended capacity: 2 l
Time ~45min
Descale the appliance when the corresponding message ap-
pears on the display (B1). To descale the appliance immediately,
press "OK" and follow the instructions from point (6).
To descale the appliance later, press "Cancel". The symbol
(B8) appears on the homepage (B) to remind you that the ap-
pliance needs descaling. (The message appears each time you
turn the appliance on).
To access the descaling menu:
1. On the display
, press the settings menu icon
(B7);
2. Select "Descale";
3. Press "OK" to enter the guided descaling procedure;
4. Press the button
(A13) and open the door (A14) (g. 3).
Remove and empty the drip tray (A20) and coee grounds
container (A16), then put both back in the appliance and
press "Next";
5. (If the lter is installed): extract the water tank (A23), lift
the lid(A22) and remove the lter(C6), then press "Next";
20
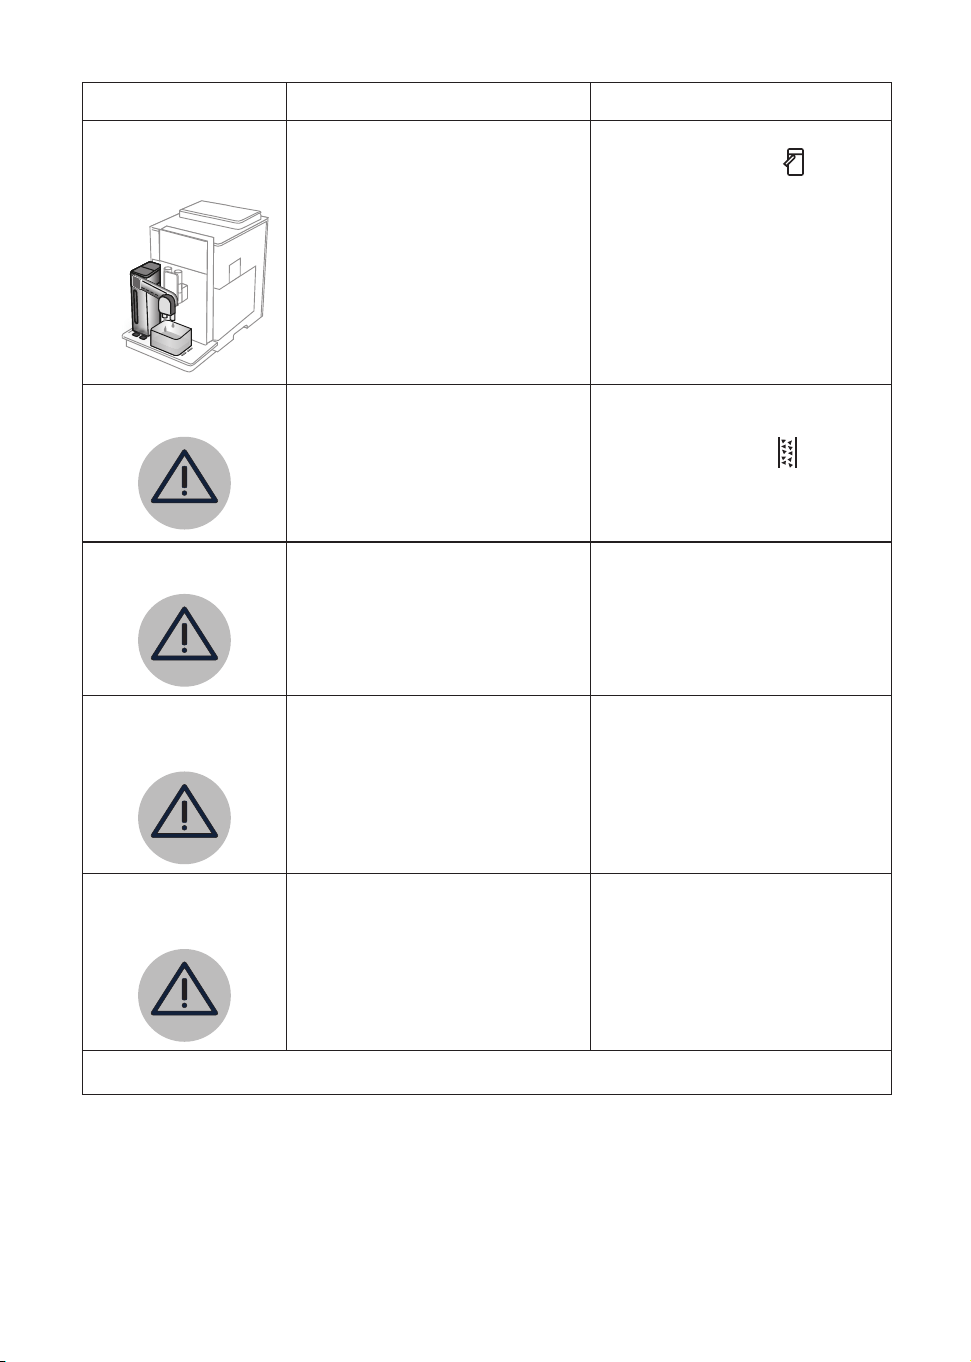
6.
Pour the descaler into
the tank up to the level
A marked inside the tank
(equal to one 100ml pack-
et), then add water (litre)
up to level B
(g. 49). Put
the water tank (with lid)
back in the appliance, close
the front door and press
"Next"
;
7. Place an empty container with a minimum capacity of
2 litres under the hot water/steam spout (E) and coee
spouts (A15) (g. 8). Press OK to start the process ("Back"
to go back to the previous screen or "Cancel" to exit the
procedure, remembering to remove the descaling solution
from the tank)
Important! Danger of scalding
Hot water containing acid ows from the hot water/steam and
coee spouts. Take care to avoid contact with splashes of this
solution.
8. IThe descale programme starts and the descaler liquid
comes out of the hot water and coee spouts (g. 11). A
series of rinses is performed automatically to remove all
the scale residues inside the coee machine;
After about 30 minutes, descaling stops;
9. The appliance is now ready for rinsing through with clean
water. Empty the container used to collect the descaler
solution; open the front door by pressing the button, ex-
tract the water tank, empty, rinse under running water, ll
with fresh water up to the MAX level and put back in the
appliance. Close the front door. Press "Next";
10. Place the container used to collect the descaler solution
empty under the coee spouts and hot water/steam spout
and press "OK" to start rinsing;
11. Hot water is delivered from the coee spouts and hot
water/steam spout;
12. When the water in the tank has run out, empty the con-
tainer used to collect the rinsing water;
13. (If the lter was installed): press the button and open the
front door; extract the water tank and, if removed previ-
ously, put the lter back. Press "Next" to continue;
14. Fill the tank with fresh water up to the MAX level, put
back in the appliance, close the door and press "Next" to
continue;
15. Place the container used to collect the descaler solution
empty under the hot water/steam spout
and press "OK"
to start rinsing;
16. Rinsing starts and water is delivered from the hot water/
steam spout;
17. When the water in the tank has run out, empty the con-
tainer used to collect the rinsing water, press the button
and open the front door, remove and empty the drip tray
(A12) and grounds container (A8), then put back in the
appliance;
18. Extract the water tank, top up to the max level, put back in
the appliance and close the front door, then press "Next"
19. The descaling process is now complete. Press "OK". The ap-
pliance performs a rapid preheat cycle and then goes back
to the homepage.
Please note!
• If the descaling cycle is not completed correctly (e.g. no
electricity) we recommend repeating the cycle;
• After descaling, it is normal for the grounds container
(A16) to contain water.
• If the water tank has not been lled to the MAX level, at
the end of descaling, the appliance requests a third rinse to
guarantee that the descaler solution has been complete-
ly eliminated from the machine's internal circuits. Before
starting rinsing, remember to empty the drip tray.
17. SETTING WATER HARDNESS
The descaling alarm is displayed after a period of time estab-
lished according to water hardness. The machine is set by de-
fault for a hardness value of "Level 4". The machine can also be
programmed according to the hardness of the mains water in
the various regions so that the machine needs to be descaled
less often.
17.1 Measuring water hardness
1. Remove the "Total hardness test" indicator paper (C1) from
its pack (attached to the Quick Guide).
2. Immerse the paper completely in a glass of water for one
second.
3. Remove the paper from the water and shake lightly. After
about a minute, 1, 2, 3, or 4 red squares form, depending
on the hardness of the water. Each square corresponds to
one level.
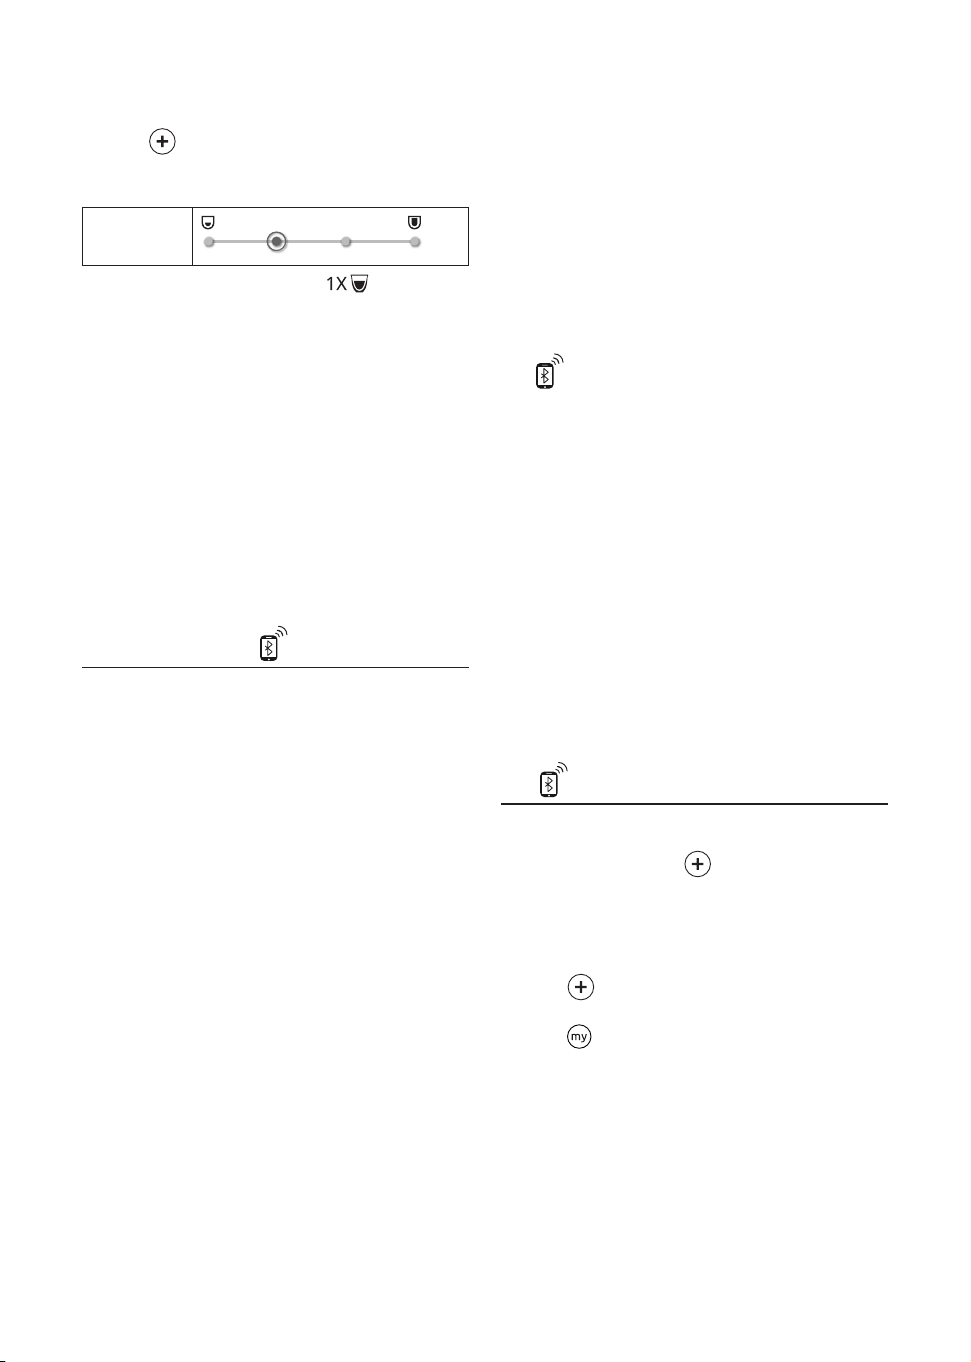
17.2 Setting water hardness
1. On the display (B1), press the settings menu icon (B7);
2. Select "Water hardness";
3. Carry out the procedure described in the previous section
and measure water hardness;
4. Press the dot corresponding to the water hardness meas-
ured previously as indicated in the following table:
49
A B
B
+
A
21
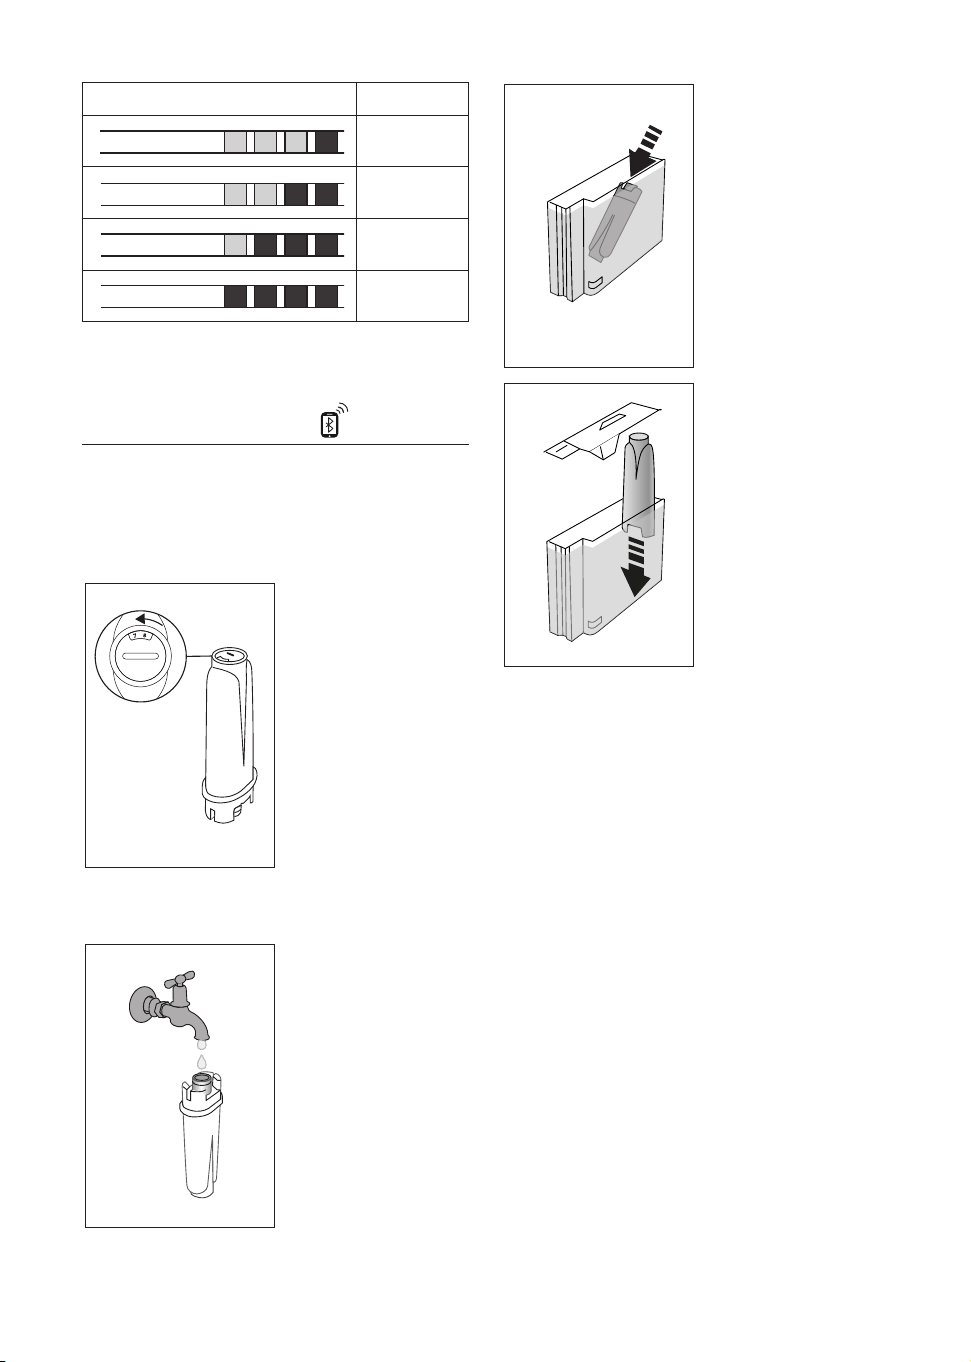
Total Hardness Test (C1) Water hardness
Level 1
Level 2
Level 3
Level 4
5. The machine is now reprogrammed with the new water
hardness setting.
6. Press “←” to go back to the homepage (B).
18. WATER SOFTENER FILTER
Certain models are tted with a water softener lter (C6). If this
is not the case with your model, you are recommended to pur-
chase one from De’Longhi Customer Services.
To use the lter correctly, follow the instructions below.
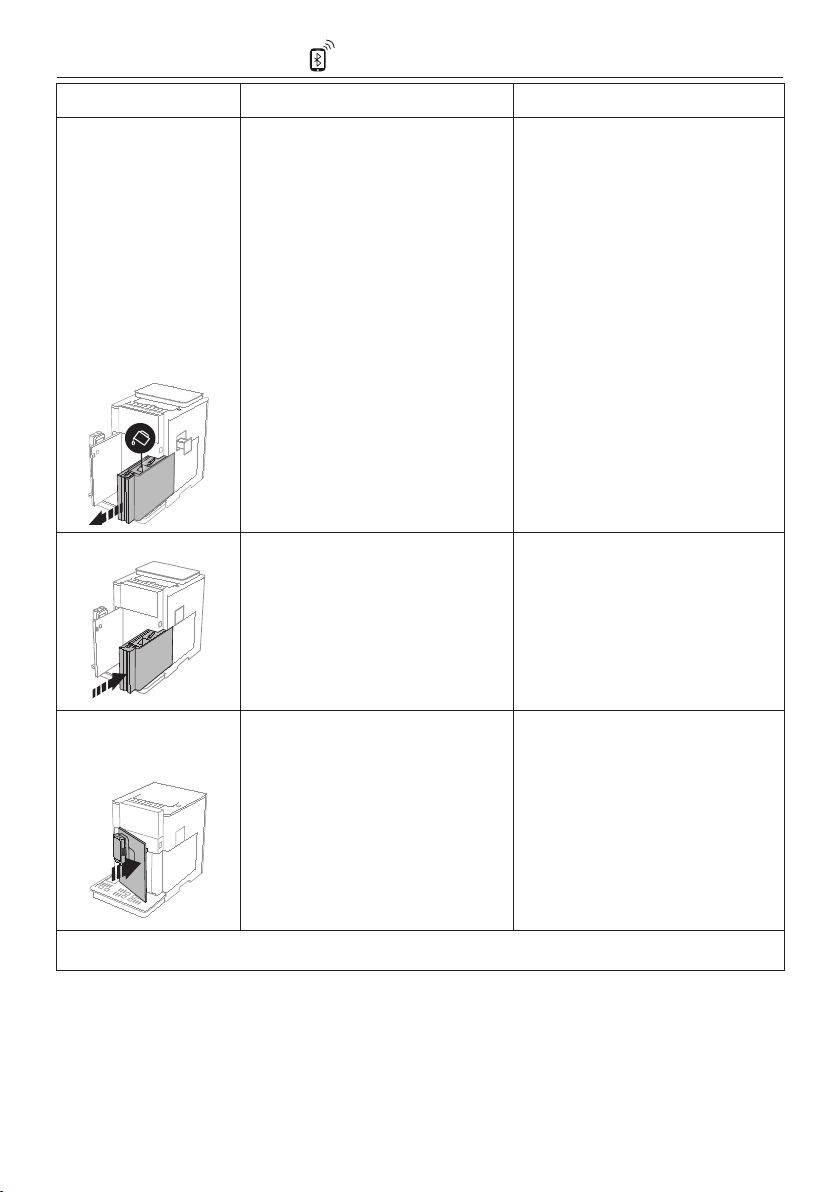
18.1 Installing the lter
1. Press the settings menu
(B7);
2. Select "Water lter";
3. Press "OK" to enter the
guided procedure
4. Remove the lter from
the packaging and turn
the date indicator to view
the next two months (g.
50);
Please note!
The lter lasts about two
months if the appliance is used
normally. If the coee machine is left unused with the lter in-
stalled, it will last a maximum of 3 weeks.
5. Press "Next" to continue
("Back" to go back to the
previous screen; "Cancel"
to cancel the operation);
6. To activate the lter, run
tap water through the
hole in the centre of the
lter (g. 51) until it
comes out of the open-
ings at the side for more
than a minute. Press
"Next";
7. Press the button
(A13),
open the front door
(A14)
50
51
(g. 3), extract the water
tank
(A23) (g. 4) and ll
with water; insert the l-
ter in the water tank and
immerse it completely
for about ten seconds,
sloping it and pressing it
lightly to enable the air
bubbles to escape (g.
52). Press "Next";
8. Insert the lter in the l-
ter housing (g. 53) and
press as far as it will go;
press "Next";
9. Close the tank with the
lid (A22), then put the
tank back in the machine
(g. 6) and close the front
door. Press "Next";
10. Place an empty container
with a minimum capacity
of 0.5 litres under the hot
water/steam spout (E)
(g. 8) and press "OK" to
activate the lter;
11. The appliance delivers hot water, then stops automatically.
Press "OK" to go back to the homepage (B);
12. The lter is now active and you can use the coee machine.
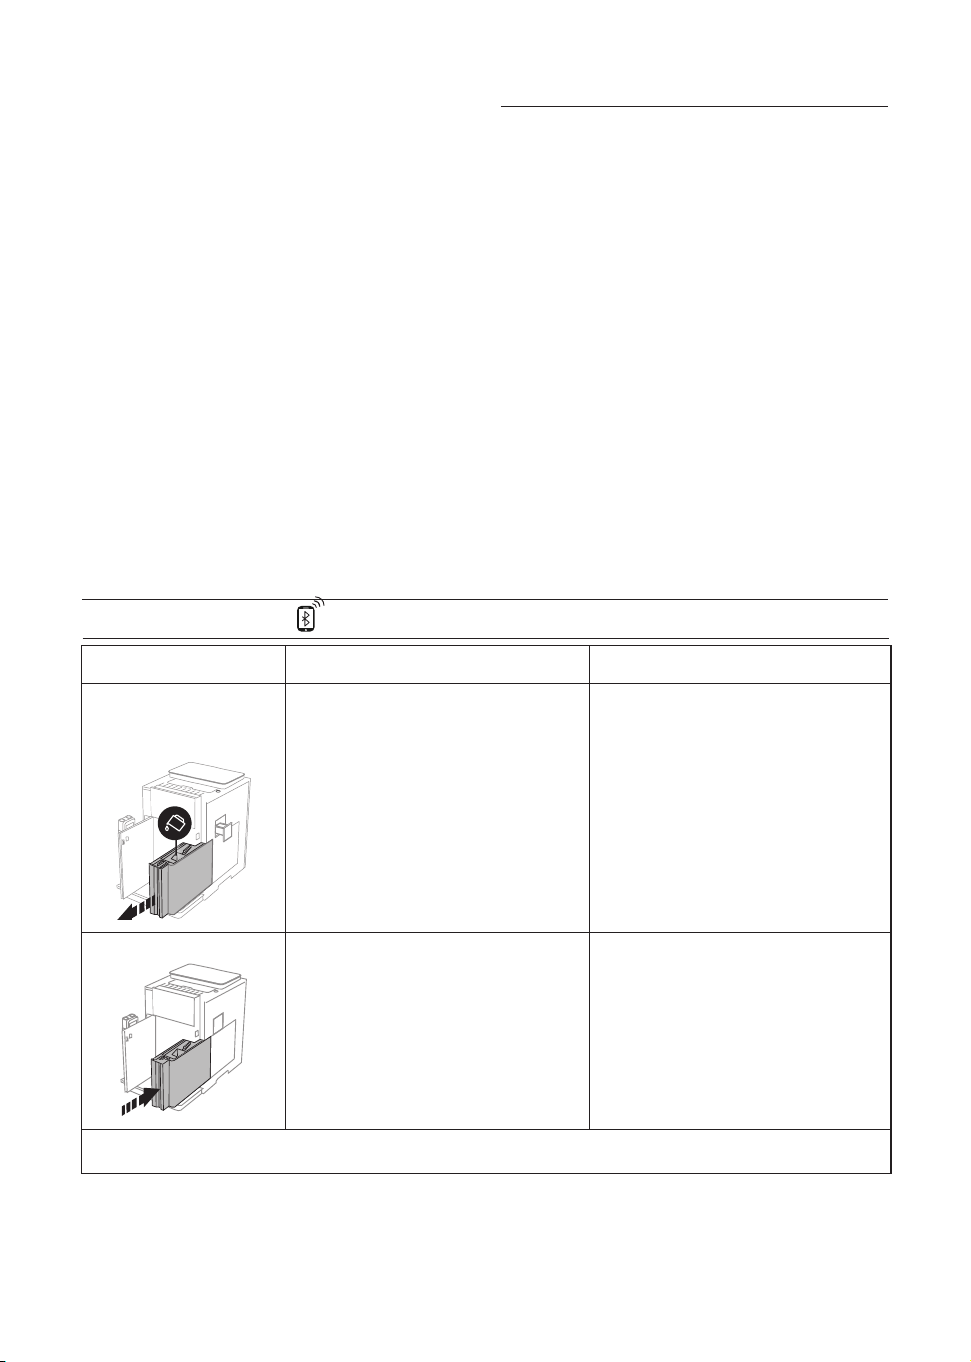
18.2 Replacing the lter
Replace the lter (C6) when the corresponding message ap-
pears on the display (B1). To replace the lter immediately,
press "OK" and follow the instructions from point 6. To replace
the lter later, press "Cancel". The symbol (B10) appears on the
display to remind you that the lter needs replacing.
To replace, proceed as follows:
1. Remove the new lter from the packaging;
2. Press the settings menu (B7);
3. Select "Replace water lter";
4. Press "OK" to enter the guided procedure;
5. Press the button (A13), open the front door (A14) (g.
3) and extract the water tank (A23) and exhausted lter.
Press "Next" to continue ("Back" to go back to the previous
screen; "Cancel" to cancel the operation);
6. Follow the operations described in the previous section
from point (4).
Please note!
After two months (see date indicator) or when the appliance has
not been used for 3 weeks, you should replace the lter even if
the message has not yet been displayed.
52
53
22
18.3 Removing the lter
If you want to use the appliance without the lter (C6), you
must remove it and notify the appliance of its removal. Proceed
as follows:
1. Press the settings menu (B7);
2. Select "Remove water lter";
3. Press the button
(A13), open the front door
(A14) (g. 3)
and extract the water tank
(A23) and exhausted lter. Re-
insert the tank (g. 6) and close the front door;
4. Press "OK" to conrm removal of the lter;
5. The change has been saved. Press "OK" to go back to the
homepage (B).
Please note!
After two months (see date indicator) or when the appliance has
not been used for 3 weeks, you should replace the lter even if
the message has not yet been displayed.
19. TECHNICAL DATA
Voltage: 220-240 V~ 50-60 Hz max. 10 A
Power: 1550 W
Pressure: 1.9 MPa (19 bars)
Water tank capacity: 2.1 l
Size LxDxH: 290x468x405mm
Cord length: 1750 mm
Weight: 15,9 kg
Beans container capacity: 460g
Frequency: 2400/2483.5 MHz
Maximum transmission power 10 mW
19.1 Tips for Energy Saving
• To reduce energy consumption, after delivering one
or more beverages, remove the milk container (D) or
accessories.
• Set auto-o to 15 minutes (see section “6.8 Auto-o”);
• Enable Energy Saving (see paragraph “6.7 General”);
• When requested by the machine, perform the descaling
cycle.
DISPLAYED MESSAGE POSSIBLE CAUSE REMEDY
FILL TANK WITH FRESH
WATER. USE REFILL FUNNEL
OR REMOVE WATER TANK
Insucient water in the tank
(A23)
. Press the button (A13), open the door (A14)
(g. 3), extract the tank and ll with fresh
water, then put back in the appliance and close
the door.
Alternatively, you can top up the tank by pour-
ing the water through the rell door (A21) and
checking the level through the transparent
window in the side of the tank. Important:
never pour water through the rell door
when the tank has been extracted.
INSERT WATER TANK
The tank
(A23)
is not correctly in place. Insert the tank correctly and press as far as it
will go.
→
20. DISPLAYED MESSAGES
23
DISPLAYED MESSAGE POSSIBLE CAUSE REMEDY
CLOSE FRONT DOOR
The front door (A14) is open or not closed
correctly.
Close the front door and press until it clicks into
place, the machine emits a beep (if the beep
function is enabled).
STOP FILLING, WATER TANK
FULL
The water tank (A23) is full. Stop lling immediately to avoid water over-
owing from the water tank. Press " OK" to
conrm and go back to the homepage (B).
WATER CIRCUIT EMPTY. PRESS
OK TO START FILLING
The water circuit is empty Place a container with a minimum capacity of
100 ml under the hot water/steam spout (E)
and press "OK" to deliver water. Delivery stops
automatically.
If the problem persists, make sure the water
tank (A23) is fully inserted.
A new water softener lter has been inserted
(C6)
Make sure you have followed the instructions
for inserting the new lter (section “18.1 In-
stalling the lter” and “18.2 Replacing the
lter”). If the problem continues, remove the
lter (section “18.3 Removing the lter”).
INSERT INFUSER ASSEMBLY
The infuser (A25) has not been replaced after
cleaning.
Insert the infuser as described in section “15.9
Cleaning the infuser”
→
24
DISPLAYED MESSAGE POSSIBLE CAUSE REMEDY
EMPTY GROUNDS CONTAINER
The grounds container (A16) is full. Clean as described in section “15.3 Cleaning
the coee grounds container”
INSERT GROUNDS CONTAINER
AND DRIP TRAY
After cleaning, the grounds container
(A16) has
not been put back in the appliance.
Press the button (A13), open the door (A14),
extract the drip tray (A20) and insert the
grounds container, then close the door.
PRE-GROUND LID OPEN.
DO YOU WANT TO USE PRE-
GROUND COFFEE?
When the lid (A1)is open, the appliance au-
tomatically asks whether you want to make
coee using pre-ground coee.
To make coee using pre-ground coee, press
"Next" and follow the instructions in section
“7.4 Making coee using pre-ground coee”,
otherwise close the lid or press "Cancel" to go
back to the homepage.
ADD PRE-GROUND COFFEE,
MAXIMUM ONE MEASURE
You have conrmed you want to make coee
using pre-ground coee.
Make sure the funnel (A3) is not blocked, then
add one level measure (C2) of pre-ground
coee, press "Next" on the display and follow
the instructions in section “7.4 Making coee
using pre-ground coee”.
FILL BEANS CONTAINERS The coee beans have run out. Fill beans container (A4).
→
25
DISPLAYED MESSAGE POSSIBLE CAUSE REMEDY
GROUND TOO FINE. ADJUST
MILL USING THE DEDICATED
FUNCTION IN MACHINE
SETTINGS
The grinding is too ne and the coee is deliv-
ered too slowly or not at all.
Adjust the coee mill (see “6.4 Adjust mill”).
If the water softener lter (C6) is present, an
air bubble
may have been released
inside the circuit, obstructing delivery.
Insert the hot water/steam spout (E) in the ap-
pliance and deliver a little water until the ow
becomes regular. If the problem continues, re-
move the lter (see section “18.3 Removing the
lter”)
SELECT A MILDER TASTE
OR REDUCE PRE-GROUND
COFFEE QUANTITY
Too much coee has been used. Select a milder "Aroma" (see “7.3 Customising
the beverages”) or reduce the quantity of pre-
ground coee (maximum 1 measure). Press
"OK to go back to the homepage or wait until
the message disappears.
INSERT WATER SPOUT The hot water spout (E) is not inserted or is
inserted incorrectly.
Insert the hot water spout and push as far as it
will go (g. 7): the appliance beeps (if the beep
function is enabled).
INSERT MILK CONTAINER
The milk container (D) is not inserted correctly. Insert the milk container and push as far as it
will go (g. 22): the machine emits a beep (if
the beep function is enabled).
IF NEEDED, FILL MILK CON-
TAINER USING THE REFILL LID
While preparing milk-based beverages, if the
milk in the container is not enough to make
the selected beverage, the appliance recom-
mends you top up the container (D) without
removing it.
Open the rell lid (D3) on the milk container lid
(D1) and pour in the milk without exceeding
the MAX level marked on the graduated scale
on the container (D6).
→
26
DISPLAYED MESSAGE POSSIBLE CAUSE REMEDY
PRESS OK TO START
CLEANING OR CANCEL TO
SELECT A NEW BEVERAGE
Each time you make a milk-based beverage
using the milk container (D), the appliance
requests a milk container cleaning cycle.
To proceed with cleaning, press "OK", otherwise
press "Cancel". In this case, the
symbol
(B9)
appears on the homepage (B) to remind you
that cleaning is needed (see section “6.3 Clean
milk container”).
DESCALING NEEDED. PRESS
OK TO START (~45MIN)
The machine must be descaled. To proceed with descaling, press "OK" and
follow the guided procedure, otherwise press
"Cancel". In this case, the symbol (B8)
appears on the homepage (B) to remind you
that descaling is needed (see section “16.
Descaling”).
REPLACE WATER FILTER.
PRESS OK TO START
The water softener lter (C6) is exhausted. Press "OK" to replace or remove the lter,
or "Cancel" to carry out the procedure later.
Follow the instructions in section “18. Water
softener lter”.
GENERAL ALARM: REFER TO
USER MANUAL OR COFFEE
LINK APP
The inside of the appliance is very dirty. Clean the inside of the appliance thoroughly,
as described in section “15. Cleaning”. If the
message is still displayed after cleaning, con-
tact De'Longhi Customer Services
PRE-GROUND MODE IS
NOT ALLOWED WITH THIS
BEVERAGE
The pre-ground coee function has been se-
lected for a beverage where use of pre-ground
coee is not possible/envisaged.
Press "OK" to go back to the previous screen.
→
27
DISPLAYED MESSAGE POSSIBLE CAUSE REMEDY
FILL BEANS CONTAINERS The beans present sensor is dirty and not work-
ing correctly
Remove the dust from the sensors using a cot-
ton bud.
If the problem persists, contact De'Longhi
Customer Services and/or an authorised
service centre.
NOT ENOUGH COFFEE.
CONSULT MANUAL OR
CUSTOMER SERVICES
The machine must be descaled
and/or the lter must be replaced (C6)
The descaling procedure described in section
“16. Descaling” needs to be performed
and/
or
the lter needs replacing or removing as de-
scribed in section “18. Water softener lter ”.
Energy saving is enabled. To disable energy saving, proceed as described
in section “6.7 General”.
The machine must be descaled. The descaling procedure described in section
“16. Descaling” needs to be performed.
The lter must be replaced (C6) Replace the lter or remove it as described in
section “18. Water softener lter”.
Indicates that the beans container (A4) is
empty
Fill the beans container
The appliance is connected to a device via
bluetooth.
NEW SETTINGS NOT SAVED
While customising the beverages (see section “13.
Guided beverage customisation (My)”), preparation
has been deliberately interrupted by pressing "Can-
cel" or an alarm has been triggered.
Press "OK" to go back to the homepage (B) to view
the alarm causing the interruption. Follow the in-
structions corresponding to the alarm displayed (see
section “20. Displayed messages ”)
CLEANING UNDERWAY The appliance has detected impurities in its
internal circuits.
Wait for the appliance to be ready again and
reselect the required beverage. Contact Cus-
tomer Services if the problem persists.
→
28
DISPLAYED MESSAGE POSSIBLE CAUSE REMEDY
MACHINE COOLING FAULT.
CONSULT MANUAL OR
CUSTOMER SERVICES
A malfunction is preventing correct cooling of
the machine.
Press "OK" to go back to the homepage (B) and
continue using the machine. If the problem
reoccurs, contact De'Longhi Customer Services.
You can continue using the machine, but we
recommend not making more than 10 coees
consecutively.
PROBLEM POSSIBLE CAUSE REMEDY
The coee is not hot. The cups were not preheated. Warm the cups by rinsing them with hot
water (Please note: you can use the hot water
function).
The internal circuits of the appliance
have cooled down because 2-3 min-
utes have elapsed since the last coee
was made.
Before making the coee, heat the internal
circuits by rinsing using the rinse function
(see
section “6.1 Rinsing”).
A low coee temperature is set.
Set a hotter coee temperature (see section “7.3
Customising the beverages”).
The machine must be descaled
Proceed as described in section “16. Descaling
”. Then check water hardness (“17.1 Meas-
uring water hardness”) and make sure the appli-
ance is set to the actual hardness (“17.2 Setting
water hardness”).
The coee is weak or not creamy
enough.
The coee is ground too coarsely. Enter the settings menu (B7) and adjust the
coee mill. The eect is only visible after deliv-
ering 5 coees (see section “6.4 Adjust mill”).
The coee is unsuitable. Use coee for espresso machines.
The coee is not fresh. The coee pack has been opened for too long
and has lost its taste.
The coee is delivered too slowly or a
drop at a time.
The coee is ground too nely. Enter the settings menu (B7) and adjust the
coee mill. The eect is only visible after deliv-
ering 5 coees (see section “6.4 Adjust mill”).
Coee does not come out of one or
both of the spouts.
The coee spouts (A15) are blocked. Clean the spouts with a toothpick (g. 36B).
The coee delivered is watery The pre-ground coee funnel (A3) is
clogged.
Open the door (A1), extract the funnel and
clean with the help of the brush (C5) as de-
scribed in section “15.8 Cleaning the pre-
ground coee funnel”.
→
21. TROUBLESHOOTING
Below is a list of some of the possible malfunctions.
If the problem cannot be resolved as described, contact Customer Services.

29
PROBLEM POSSIBLE CAUSE REMEDY
The appliance will not make coee The appliance has detected impurities
in its internal circuits. "Cleaning under-
way" is displayed.
Wait for the appliance to be ready again and
reselect the required beverage. Contact Cus-
tomer Services if the problem persists.
The appliance does not come on The power cord connector (C6) is not
inserted correctly.
Insert the connector as far as it will go in the
socket at the back of the appliance
(g. 1)
.
It is not plugged into the mains socket. Plug into the mains socket (g. 1).
The main switch (A10) is not turned on. Press the main switch (g. 2).
The infuser cannot be extracted The appliance has not been turned o
correctly
Turn the appliance o by pressing the but-
ton (A6)
(see section “5. Turning the appliance
o”).
At the end of descaling, the appliance
requests a third rinse
During the two rinse cycles, the water
tank (A23) has not been lled to the
MAX level
Follow the instructions displayed by the appli-
ance, but rst empty the drip tray
(A20)
to avoid
the water overowing.
No steam or hot water comes out of
the spout (E)
The spout is dirty or blocked Clean the spout as described in section “12.2
Cleaning the hot water/steam spout after use”
Milk does not ow from the milk
spout (D6)
The lid (D1) of the milk container (D)
is dirty
Clean the milk container lid as described in sec-
tion “15.10 Cleaning the milk container”.
The milk contains large bubbles and
squirts out of the milk spout (D6) or
there is little froth
The milk is not cold enough or is not
semi-skimmed or skimmed.
Use skimmed or semi-skimmed milk at refrig-
erator temperature (about 5° C). If the result is
not as expected, try a dierent brand of milk.
Change the froth settings Adjust the amount of froth as described in sec-
tion “9.3 Customising the beverages”
The milk container lid (D1)is dirty Clean the milk container as described in sec-
tion “15.10 Cleaning the milk container”
Vegetable beverages have been used. For best results, use beverages at refrigerator
temperature (about 5° C). Adjust the amount
of froth as described in section “9.3 Customis-
ing the beverages”
The cup shelf (A7) is hot. A number of beverages have been pre-
pared in rapid succession
The machine emits noises or small
pus of steam while not in use
The machine is ready for use, or has re-
cently been turned o, and condensate
is dripping into the hot vaporiser
This is part of normal operation. To limit the
phenomenon, empty the drip tray.
The appliance emits pus of steam
from the drip tray (A20) and/or there
is water on the surface the appliance
rests on.
The drip tray grille (A19)has not been
replaced after cleaning.
Put the drip tray grille back in the drip tray.
→

30
PROBLEM POSSIBLE CAUSE REMEDY
The inside of the machine is wet and
there is condensation
The machine's cooling circuit is not
working correctly. You are continuing
to use the machine even though the
"MACHINE COOLING FAULT" alarm is
displayed
Turn the machine o and leave it to cool down.
If the problem persists, contact De'Longhi Cus-
tomer Services
The app is not working App malfunction Close the app and run it again