
Safety • Assembly • Operation • Tips &Techniques • Maintenance • Troubleshooting • Parts Lists • Warranty
OF A O AL
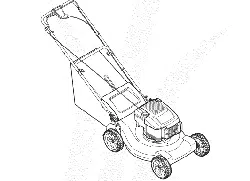
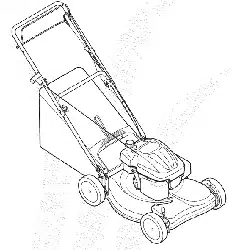
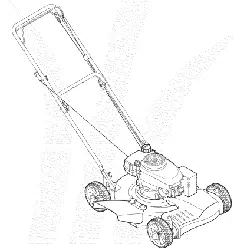
21" Rotary Mower- Model 566Q
iMPORTANT
READ SAFETY RULES AND iNSTRUCTiONS CAREFULLY BEFORE OPERATION
Warning: Thisunit is equippedwithaninternalcombustionengineandshouldnot beusedon or nearany unimprovedforest-covered,brush-
coveredor grass-coveredlandunlesstheengine'sexhaustsystemis equippedwitha sparkarrestermeetingapplicablelocalor statelaws(if any).
If a sparkarresteris used,it shouldbemaintainedineffectiveworkingorderby the operator.In theStateof Californiathe aboveis requiredbylaw
(Section4442of the CaliforniaPublicResourcesCode).Otherstatesmayhavesimilarlaws.Federallawsapplyonfederallands.A sparkarrester
for the muffleris availablethroughyour nearestengineauthorizedservicedealeror contactthe servicedepartment,RO.Box361131Cleveland,
Ohio44136-0019.
PRINTEDIN U.S.A.
MTD LLC, P.O. BOX 361131 CLEVELAND, OHIO 44136-0019
FORMNO.769-01770
3/24/2005

This Operator's Manual is an important part of your new lawn mower, it will help you assemble,
prepare and maintain the unit for best performance. Please read and understand what it says.
Table of Contents
Slope Gauge ....................................................... 3
Safe Operation Practices ................................... 4
Setup and Adjustment ....................................... 6
Operating Your Lawn Mower .............................. 8
Maintaining Your Lawn Mower ......................... 10
Trouble Shooting .............................................. 12
Off-Season Storage and Safety Labels .......... 13
Parts List ........................................................... 14
Finding and Recording Model Number
BEFOREYOU STARTASSEMBLING
YOUR NEW EQUIPMENT,
please locatethe model plate on the equipment and copy the
information to the sample model plate provided to the right.
Youcan locate the model plate by standing at the operating
position and lookingdown at the rear of the deck. This
information will be necessary to use the manufacturer'sweb
site and/or obtain assistancefrom the CustomerSupport
Department or an authorizedservice dealer.
Model Number
www.mtdproducts.com
Serial Number
MTD LLC
P.O= BOX 361131
CLEVELAND, OH 44136
330-220-4683
800-800-7310
Customer Support
Please do NOTreturn the unit to the retailer from which it was
purchased, without first contacting Customer Support.
Ifyou have difficulty assembling this product or have any
questions regarding the controls, operationor maintenanceof
this unit, you can seek help from the experts. Choose from the
options below:
1. Visit mtdproducts.com for many useful suggestions.
Click on Customer Support buttonand you will get the four
options reproducedin this sample to the right. Click on the
appropriate buttonand help is immediatelyavailable.
2. Phonea Customer Support Representative
at 1(800) 800-7310.
3. The engine manufacturer isresponsiblefor all engine-
relatedissueswith regardsto performance, power-rating,
specifications,warranty and service. Pleasereferto the
engine manufacturer'sOwner's/Operator's Manual,packed
separately with your unit, for more information.
Click here to search our knowledge base.
Search by product, keyword, or phrase.
Login to check the status of your questions, modify
your inquiries, or update your personal profile.
Need local assistance? Click here to find authorized
service centers in your area.
Need a manual and/or parts list? Download
literature from recent model years.
2
O
o
1=
o
>:.
(13
O3
(13
(13
O-
O
O
(--
O5
E
O
(13
(13
o3
(13
O-
O
o3
(13
E
(]3
(13
o
(13
C5
('5
O3
O5
(13
t"b
(13
O9
o5
(13
O-
O
O3
-5
O3
O
O
E
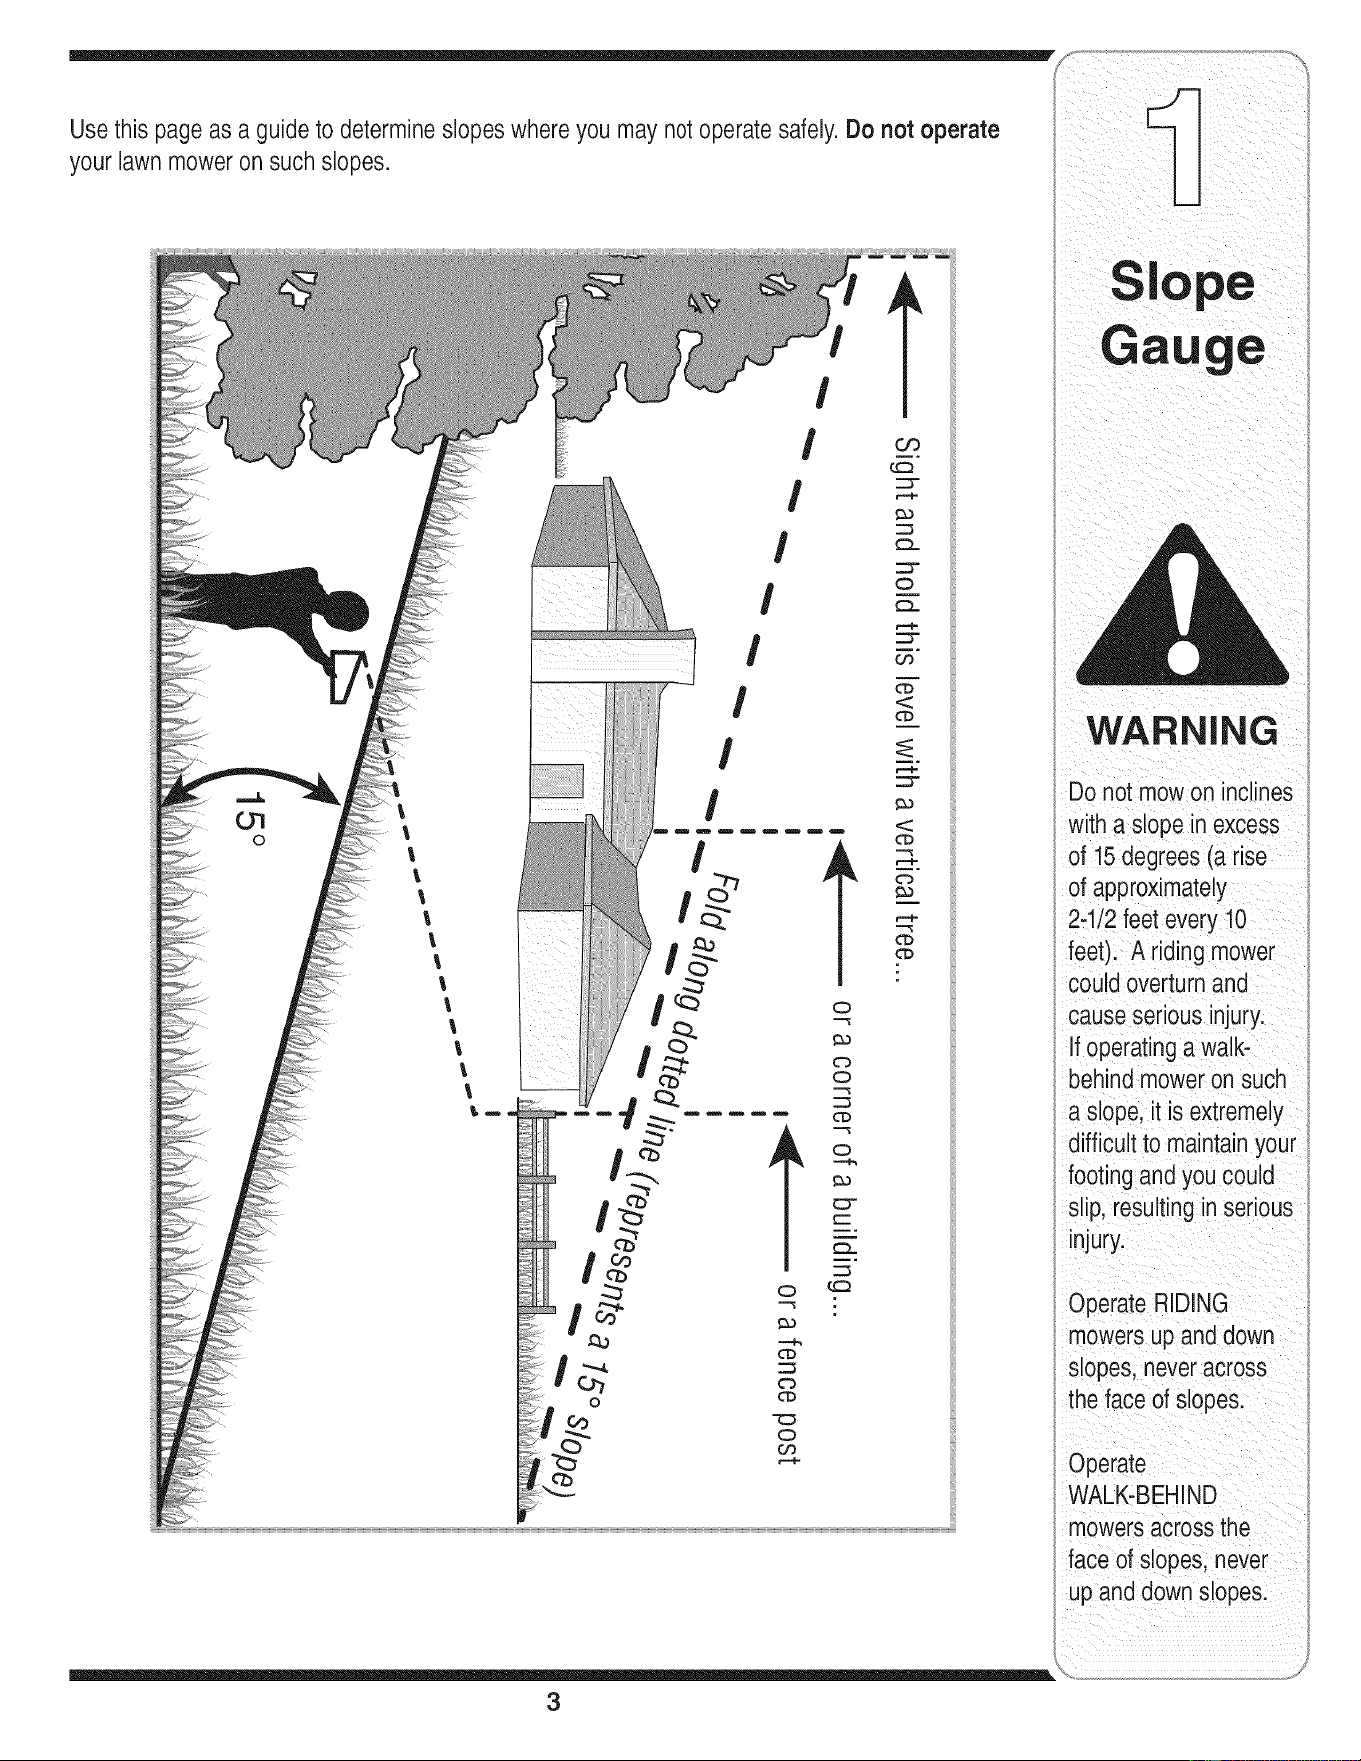
Sight and hold this levelwith a verticaltree...
also
I
15°
RNING
This symbol points
i out important safety
instructionswhich, if
notfollowed, could
endangerthe personal
i safetyand/or property
I of yourself and others.
Readand follow all
instructionsinthis man-
ual before attempting to
operatethis machine.
Failureto complywith
these instructionsmay
i resultin personal injury.
i When you see this
_symbol.
HEED ITS WARNING
Your
Responsibility
Restrictthe use
i ofthis power machine
i to personswho read,
understand
andfollow the warnings
and instructions
inthis manual
andon the machine.
WARNING: Engine Exhaust,some of its constituents, andcertain vehicle compo-
nents contain or emit chemicals knownto State of Californiato cause cancer and
birth defects or other reproductiveharm.
DANGER: This machinewas built to be operatedaccording to the rulesfor safe operation in this
manual.As with any type of power equipment, carelessness or error on the part of the operator can
result in serious injury.This machine is capable of amputatinghands andfeet andthrowing objects.
Failureto observethe followingsafety instructionscould result in serious injury or death.
Children
Tragicaccidentscanoccur ifoperatorisnotalert to presence
of children.Childrenare oftenattractedto mowerand mowing
activity.Theydonot understandthe dangers.Neverassume
thatchildrenwill remainwhereyoulastsawthem.
1. Keepchildrenoutof the mowingareaand underwatchful
careof a responsibleadultotherthanthe operator.
2. Bealert andturn moweroff if a childentersthearea.
3. Beforeand whilemovingbackwards,look behindanddown
forsmallchildren.
4. Useextremecare whenapproachingblindcorners,
doorways,shrubs,trees,or otherobjectsthat mayobscure
yourvisionof a child whomayrun intothe mower.
5. Keepchildrenawayfromhotor runningengines.Theycan
sufferburnsfroma hotmuffler.
6. Neverallowchildrenunder14yearsoldto operatea power
mower.Children14yearsoldand overshouldreadand
understandoperationinstructionsandsafetyrulesinthis
manualandshouldbetrainedandsupervisedbya parent.
General Operation
1. Readthis operator'smanual carefullyinits entiretybefore
attemptingto assemblethis machine.Read,understand,
andfollowall instructionsonthe machineandin the
manual(s) beforeoperation.Be completelyfamiliarwith
thecontrolsandthe properuseof this machinebefore
operatingit. Keepthis manualin a safeplaceforfuture
and regularreferenceand for orderingreplacementparts.
2. Thismachineis a precisionpieceof powerequipment,
nota plaything.Therefore,exerciseextremecautionat all
times.Yourunithas beendesignedto performonejob: to
mowgrass. Do notuseit for anyotherpurpose.
3. Neverallow childrenunder 14yearsold to operatethis
machine.Children14yearsold and overshould readand
understandthe instructionsinthis manualandshould
betrainedand supervisedby a parent.Onlyresponsible
individualswho arefamiliar withthese rulesof safe
operationshould be allowedto usethis machine.
4. Thoroughlyinspectthe areawherethe equipmentis to
beused. Removeall stones,sticks,wire, bones,toys and
otherforeignobjectswhichcouldbetripped overor picked
upandthrownby the blade.Thrownobjectscan cause
seriouspersonalinjury.Planyourmowingpatternto avoid
dischargeof materialtowardroads,sidewalks,bystanders
andthe like.Also, avoiddischargingmaterialagainsta
wall orobstructionwhich maycausedischargedmaterial
to ricochetbacktowardtheoperator.
5. Tohelpavoidbladecontact ora thrown objectinjury,
stay inoperatorzone behindhandlesand keepchildren,
bystanders,helpersand petsat least 75feetfrom mower
whileit is inoperation.Stop machineifanyoneenters
area.
6. Alwayswearsafetyglassesor safetygogglesduringopera-
tionandwhile performinganadjustmentor repairto protect
youreyes.Thrownobjectswhich ricochetcancauseserious
injuryto the eyes.
7. Wearsturdy,rough-soledworkshoesand close-fitting
slacksandshirts. Shirtsand pantsthatcoverthe armsand
legs andsteel-toedshoesare recommended.Neveroperate
this machinein barefeet,sandals, slipperyor lightweight
(e.g.canvas)shoes.
8. Do notputhands orfeet nearrotatingparts or undercutting
deck.Contactwithblade can amputatehandsandfeet.
9. A missingor damageddischargecovercancause blade
contactor thrownobject injuries.
10.Manyinjuriesoccuras a resultof the mowerbeing pulled
overthefoot duringa fall causedby slippingor tripping.
Do notholdonto the mowerifyou are falling;releasethe
handleimmediately.
11.Neverpullthe mowerbacktowardyou whileyou are
walking.If you must backthe mowerawayfroma wall or
obstructionfirstlook downand behindtoavoidtrippingand
thenfollowthese steps:
a. Stepbackfrommowerto fully extendyourarms.
b. Be sure youare well balancedwithsurefooting.
c. Pullthe mowerbackslowly,no morethan halfway
towardyou.
d. Repeatthesestepsas needed.
12.Do notoperatethe mowerwhileunderthe influenceof
alcoholordrugs.
13.Do notengage theself-propelledmechanismon unitsso
equippedwhilestartingengine.
14.The bladecontrolhandleis a safetydevice.Neverattempt
to bypassitsoperation.Doingso makesthe safetydevice
inoperativeandmayresult in personalinjurythrough
contactwiththe rotatingblade. The bladecontrolhandle
mustoperateeasily in bothdirectionsandautomatically
returnto the disengagedpositionwhenreleased.
15.Neveroperatethe mowerinwet grass.Alwaysbesure of
yourfooting. A slipand fall cancauseseriouspersonal
injury.If youfeel you are losingyourfooting,releasethe
bladecontrolhandle immediatelyand the bladewillstop
rotatingwithinthreeseconds.
16.Mowonlyin daylightor goodartificiallight. Walk,neverrun.
17.Stopthe bladewhencrossinggraveldrives, walksor roads.
18.If theequipmentshouldstartto vibrateabnormally,stopthe
engineand check immediatelyfor the cause.Vibrationis
generallya warningof trouble.
19.Shutthe engineoff andwait untilthe bladecomesto a
completestop beforeremovingthe grasscatcheror unclog-
gingthechute.
4
The cuttingbladecontinuesto rotatefor a fewseconds after
the engineis shutoff. Neverplaceany partof the bodyin
the bladearea untilyou are surethe blade hasstopped
rotating.
20. Neveroperatemowerwithoutpropertrail shield,discharge
cover,grass catcher,bladecontrolhandleor othersafety
protectivedevicesin placeand working.Neveroperate
mowerwithdamagedsafetydevices.Failureto do so,can
resultin personalinjury.
21. Mufflerandenginebecomehotandcan causea burn.Do
nottouch.
22.Only use parts and accessoriesmadefor this machineby
manufacturer.Failureto do so canresult inpersonalinjury.
23. If situationsoccurwhich are notcoveredin this manual,
usecareand goodjudgment.Contactyourdealerfor
assistance.Telephone1-800-800-7310for the nameof your
nearestdealer.
Slope Operation
Slopesare a majorfactorrelatedto slipandfallaccidentswhich
can resultinsevereinjury.Operationon slopesrequiresextra
caution.If youfeel uneasyon a slope,do notmowit.Foryour
safety,usetheslopegaugeincludedas part of this manualto
measureslopesbeforeoperatingthis unit on a slopedor hilly
area.If theslopeis greaterthan 15degrees,donot mowit.
Do:
1. Mowacrossthe faceof slopes; neverup anddown.
Exerciseextremecaution whenchangingdirectionon
slopes.
2. Watchfor holes,ruts,rocks, hiddenobjects,or bumpswhich
can causeyouto slipor trip. Tallgrass can hideobstacles.
3. Alwaysbesure of yourfooting.A slip andfall cancause
serious personalinjury.If youfeel youare losingyour
balance,releasethe bladecontrolhandleimmediately,and
the bladewill stoprotatingwithin 3 seconds.
Do Not:
1. Donot mowneardrop-offs, ditchesorembankments,you
could loseyour footingorbalance.
2. Donot mowslopesgreaterthan 15degrees asshownon
the slopegauge.
3. Donot mowon wetgrass.Unstablefootingcouldcause
slipping.
Service
Safe HandlingOf Gasoline:
1. To avoidpersonalinjury orpropertydamageuseextreme
care inhandlinggasoline.Gasolineis extremelyflammable
and thevaporsare explosive.Seriouspersonalinjurycan
occur whengasolineisspilled on yourself oryour clothes
which canignite.
2. Wash yourskin andchangeclothesimmediately.
3. Useonly an approvedgasolinecontainer.
4. Neverfill containers insidea vehicle oron a truckor trailer
bedwitha plasticliner.Alwaysplacecontainersonthe
groundawayfromyourvehicle beforefilling.
5. Removegas-poweredequipmentfromthe truck ortrailer
and refuelit onthe ground.If this is notpossible,then refuel
suchequipmentona trailerwitha portablecontainer,rather
than froma gasoline dispensernozzle.
6. Keepthe nozzlein contactwiththe rimof thefueltank or
containeropeningat alltimesuntil fuelingis complete.Do
notuse a nozzlelock-opendevice.
7. Extinguishallcigarettes,cigars, pipesand othersources
of ignition.
8. Neverfuel machineindoorsbecauseflammablevaporswill
accumulatein thearea.
9. Neverremovegascap oradd fuelwhileengineis hot or
running. Allowengineto cool at leasttwo minutesbefore
refueling.
10.Neveroverfill fueltank. Filltankto nomorethan Y2inch
belowbottomof filler neckto providefor fuelexpansion.
11.Replacegasolinecapandtightensecurely.
12.If gasolineis spilled,wipe itoff theengineand equipment.
Moveunitto anotherarea.Wait5 minutesbeforestarting
engine.
13.Neverstorethe machineorfuel containernearan open
flame,sparkor pilotlight as ona water heater,space
heater,furnace ,clothesdryeror othergas appliances.
14.Toreducefire hazard,keepmowerfree of grass, leaves,
orother debrisbuild-up.Cleanup oil orfuel spillageand
removeanyfuel soakeddebris.
15.Allowa mowerto cool at least5 minutesbeforestoring.
GeneralService:
1. Neverrun an engineindoorsorin a poorlyventilatedarea.
Engineexhaustcontainscarbonmonoxide,anodorlessand
deadlygas.
2. Beforecleaning,repairing,or inspecting,makecertainthe
bladeandall movingparts havestopped.Disconnectthe
sparkplugwire andgroundagainstthe engineto prevent
unintendedstarting.
3. Checkthe bladeandenginemountingboltsatfrequent
intervalsfor propertightness.Also,visuallyinspectbladefor
damage(e.g.,bent,cracked,worn)Replacebladewiththe
originalequipmentmanufacture's(O.E.M.)bladeonly,listed
inthis manual."Useof partswhichdo notmeetthe original
equipmentspecificationsmayleadto improperperformance
andcompromisesafety!"
4. Mowerbladesare sharpandcancut.Wrapthebladeor wear
gloves,anduse extracautionwhenservicingthem.
5. Keepallnuts,bolts,andscrewstightto besurethe equip-
mentis insafeworkingcondition.
6. Nevertamperwithsafetydevices.Checktheir properopera-
tionregularly.
7. Afterstrikinga foreignobject,stopthe engine,discon-
nectthesparkplugwire andgroundagainsttheengine.
Thoroughlyinspectthe mowerfor anydamage.Repairthe
damagebeforestartingandoperatingthe mower.
8. Neverattemptto makea wheel or cuttingheightadjustment
whiletheengineis running.
9. Grasscatchercomponents,dischargecover,andtrail
shieldaresubjectto wear anddamagewhichcould expose
movingparts or allowobjectsto bethrown.Forsafety
protection,frequentlycheckcomponentsandreplaceim-
mediatelywithoriginal equipmentmanufacturer's(O.E.M.)
parts only,listedinthis manual."Useof parts which do
notmeetthe originalequipmentspecificationsmayleadto
improperperformanceandcompromisesafety!"
10.Do notchangetheenginegovernorsettingor overspeedthe
engine.Thegovernorcontrolsthe maximumsafeoperating
speedof theengine.
11.Maintainor replacesafetylabels,as necessary.
12.Observeproperdisposallawsand regulations.Improper
disposalof fluidsand materialscanharmtheenvironment.
5
Practices
WARNING
This symbol points
out important safety
instructionswhich, if
not followed, could
endangerthe personal
safety and/or property
of yourselfand others.
Readand followall
instructions inthis man-
ual before attemptingto
operate this machine.
Failureto comply with
these instructionsmay
result in personal injury.
Whenyou see this
symbol.
HEED iTS WARNING
Your
Responsibility
Restrictthe use
of this power machine
to personswho read,
understand
and follow the warnings
and instructions
inthis manual
and on the machine.
NOTE:Standbehind
themowerasifyou
weregoingtooperate
it.Yourrighthandcor-
respondstotheright
sideofthemower;your
lefthandcorresponds
totheleftsideofthe
mower.
NOTE:Yourmower
i isshippedwiththe
handleinthehigher
I heightposition.
NOTE:Eachendof
thelowerhandlemust
beplacedinthesame
relativeposition.
iMPORTANT
DO NOTcrimp the
cableswhen lifting the
handle up. Make sure
to routethe cables
i insidethe lowerhandle.
iMPORTANT
This unit is shipped
} without gasoline or
oil inthe engine. Fih
up gasoline andoil
as instructed in the
accompanying engine
manual BEFORE
operatingyour mower.
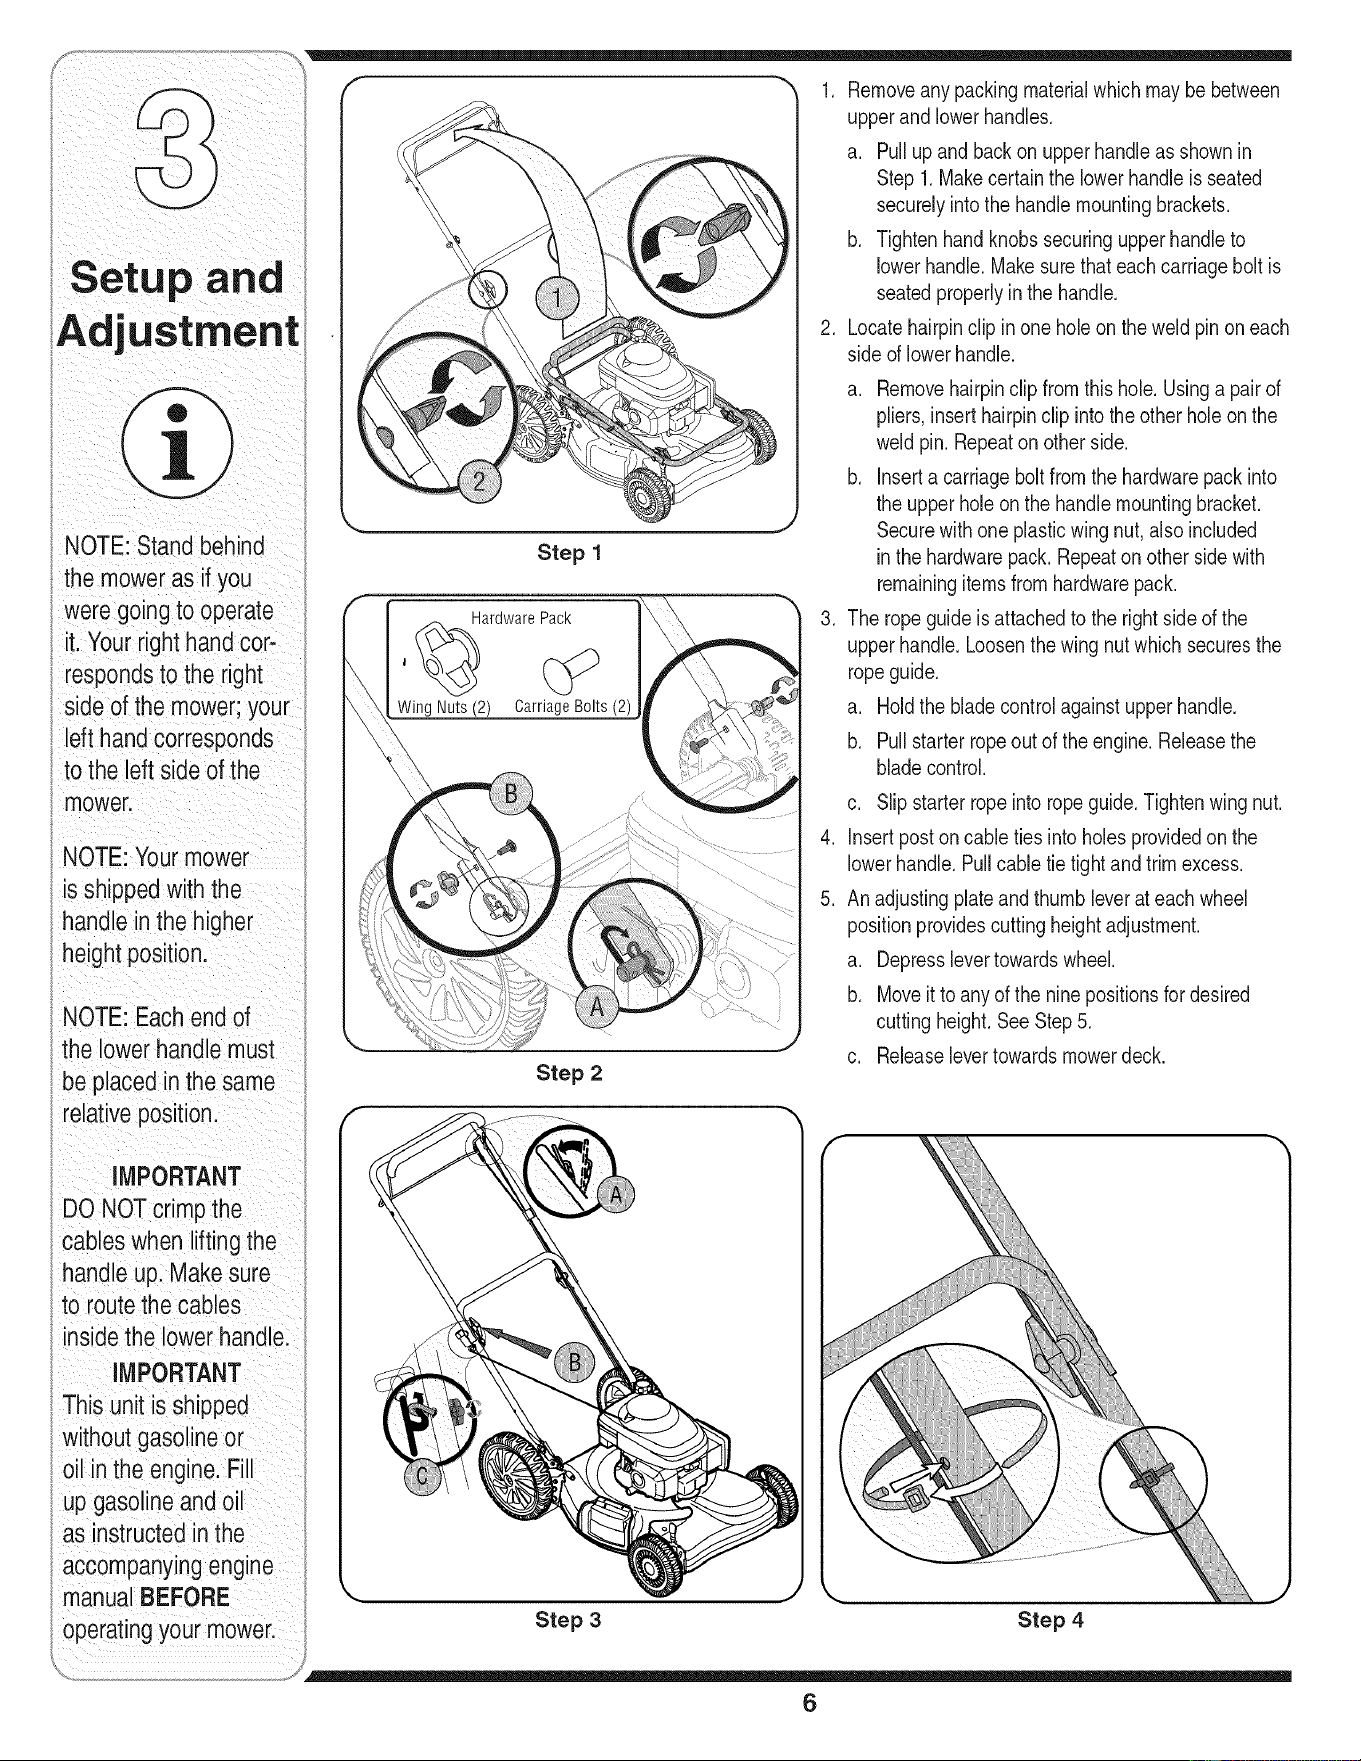
Step 1
HardwarePack
Wing Nuts (2) CarriageBolts (2)
Step 2
1. Removeanypackingmaterialwhichmaybebetween
upperandlowerhandles.
a. Pullupand backon upperhandleas shownin
Step 1.Makecertainthe lowerhandleis seated
securelyintothe handlemountingbrackets.
b. Tightenhandknobssecuringupperhandleto
lowerhandle.Makesurethateachcarriagebolt is
seatedproperlyin the handle.
2. Locatehairpinclip inone holeon the weldpinon each
sideof lowerhandle.
.
a. Removehairpinclipfromthis hole.Usinga pairof
pliers,inserthairpinclip intothe other holeon the
weldpin. Repeaton otherside.
b. Inserta carriagebolt fromthe hardwarepackinto
the upperholeonthe handlemountingbracket.
Securewithone plasticwing nut,also included
inthe hardwarepack.Repeatonother sidewith
remainingitemsfromhardwarepack.
The ropeguideis attachedto the right sideof the
upperhandle.Loosenthe wingnut whichsecuresthe
ropeguide.
a. Holdthe bladecontrolagainstupperhandle.
b. Pullstarterropeout of the engine.Releasethe
bladecontrol.
.
5.
c. Slipstarterropeinto ropeguide.Tightenwingnut.
Insertpostoncable tiesintoholes providedon the
lowerhandle.Pullcabletie tightandtrimexcess.
Anadjustingplateandthumbleverat eachwheel
positionprovidescuttingheightadjustment.
a. Depresslevertowardswheel.
b. Moveit to anyof the ninepositionsfor desired
cuttingheight.SeeStep5.
c. Releaselevertowardsmowerdeck.
Step 3 Step 4
6
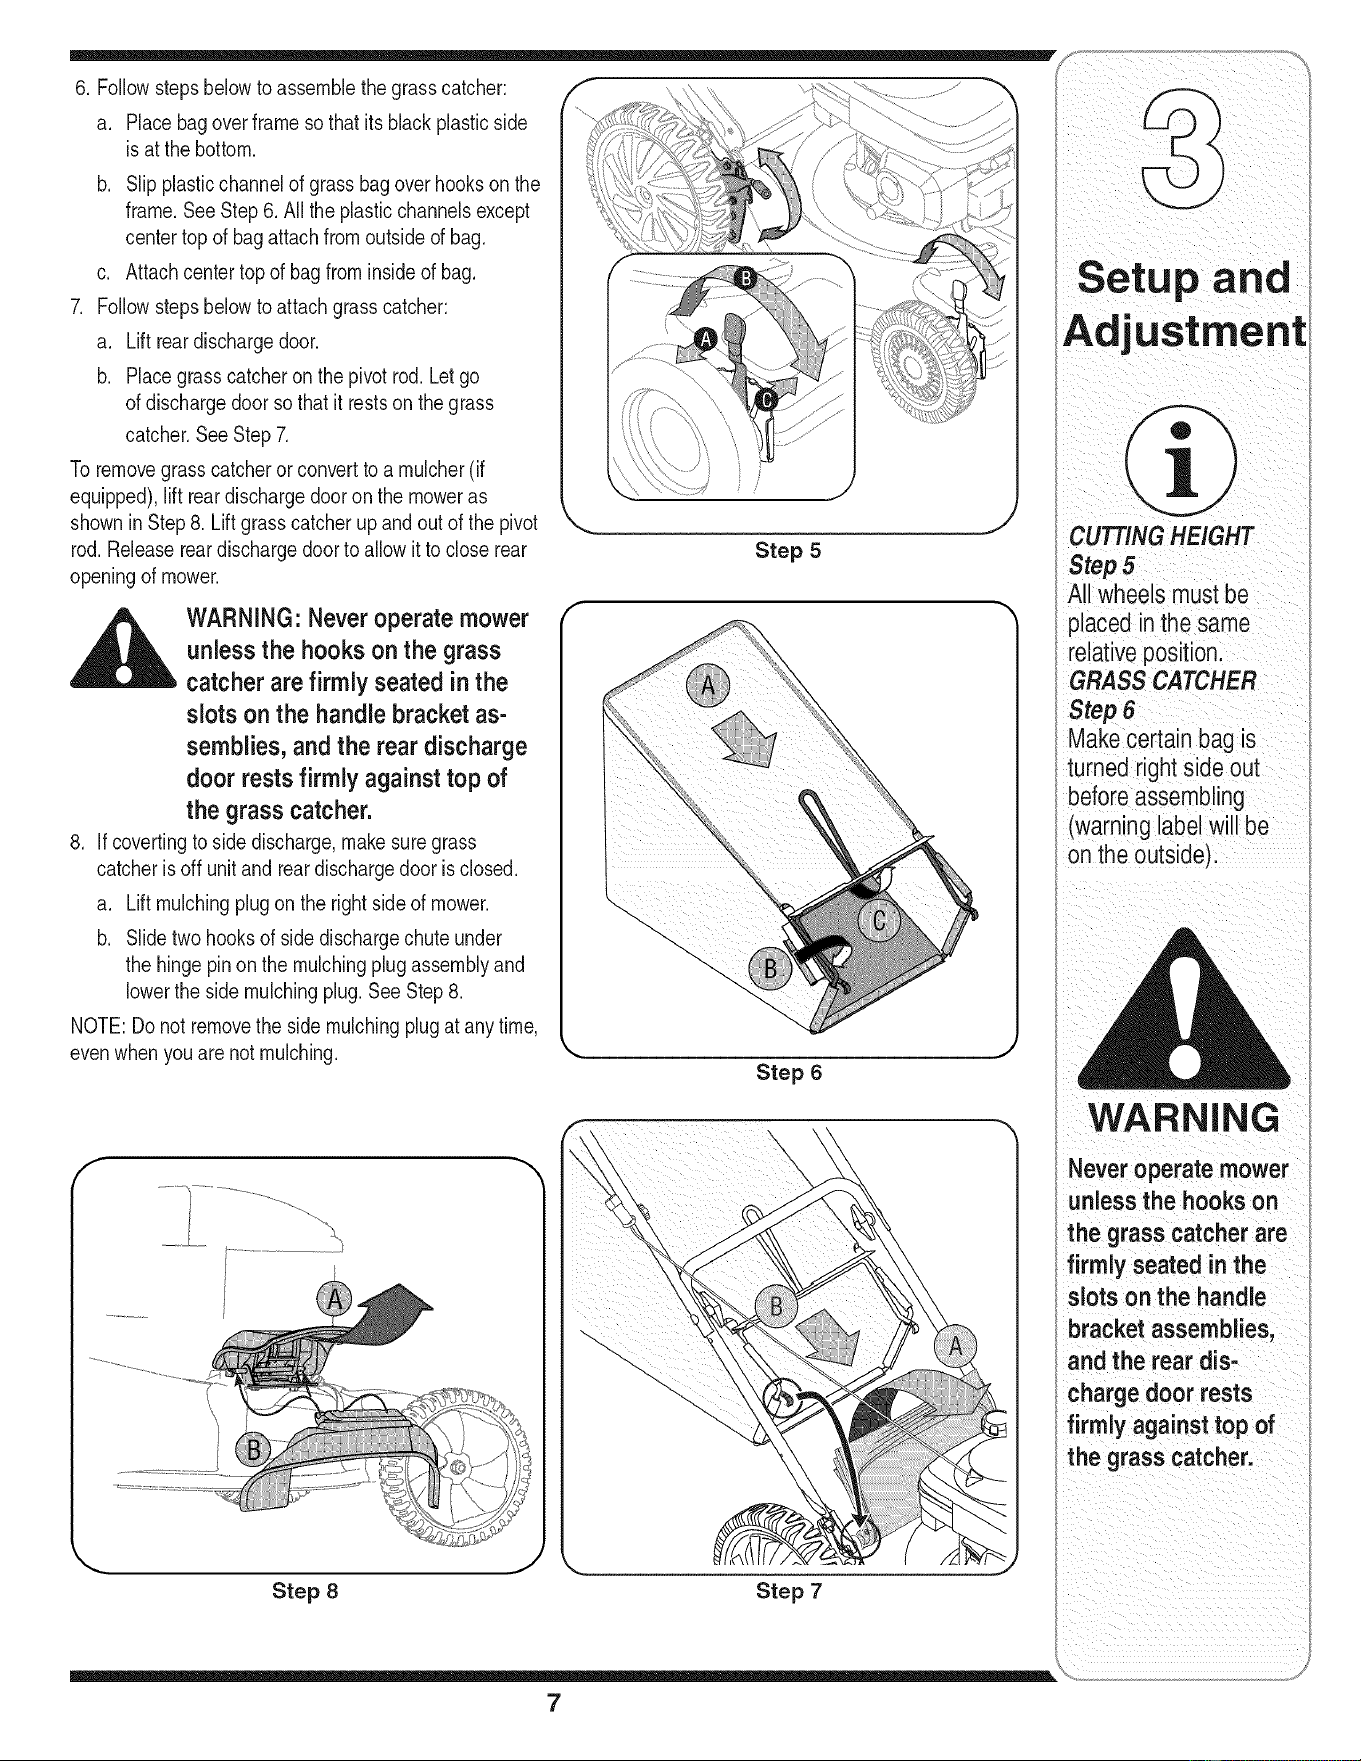
6. Followstepsbelowto assemblethe grasscatcher:
a. Placebagoverframesothat itsblackplasticside
is at the bottom.
b. Slip plasticchannelof grassbagoverhooksonthe
frame.SeeStep6. All the plasticchannelsexcept
centertop of bagattachfromoutsideof bag.
c. Attachcentertop of bagfrominsideof bag.
7. Followstepsbelowto attachgrasscatcher:
a. Liftreardischargedoor.
b. Placegrasscatcheron thepivotrod. Letgo
of dischargedoorsothat it restson thegrass
catcher.SeeStep7.
To removegrasscatcherorconvertto a mulcher(if
equipped),lift reardischargedooronthe moweras
showninStep8. Liftgrasscatcherupandout of the pivot
rod.Releasereardischargedoorto allow it to closerear
openingof mower.
_ ARNING: Never operate mower
unless the hooks on the grass
catcherare firmly seated in the
slotson the handle bracket as-
semblies, and the rear discharge
door rests firmly against top of
the grass catcher.
8. Ifcovertingto side discharge,makesuregrass
catcherisoff unitand reardischargedoorisclosed.
a. Liftmulchingplugon the rightsideof mower.
b. Slidetwohooksof sidedischargechuteunder
the hingepinonthe mulchingplugassemblyand
lowerthe side mulchingplug.SeeStep8.
NOTE:Do not removethe sidemulchingplugat anytime,
evenwhenyou arenot mulching.
Step 5
Step 6
J
f
Step 8 Step 7
7
uStment
CUTTING HEIGHT
Step5
All wheels mustbe
placedin the same
relative positionl
GRASS CATCHER
Stepe
Makecertain bag is
turned right side out
before assembling
(warning label Willbe
on the outside):
WARNING
Never operate mower
unlessthe hooks on
the grasscatcher are
firmly seated in the
slots on the handle
bracket assemblies,
and the rear dis-
charge door rests
firmly against top of
the grasscatcher.
WARNING
The blade control
mechanism is a
safety device. Never
attempt to bypass its
operations.
I Use extreme care
when handling
gasoline.Gasoline is
extremely flammable
and the vapors are
explosive. Never fuel
the machine indoors
or while the engine
is hot or running.
Extinguish cigarettes,
cigars, pipes and
other sources of
ignition.
Keep hands and feet
away from the chute
area on cutting deck.
Referto warning
label on the unit.
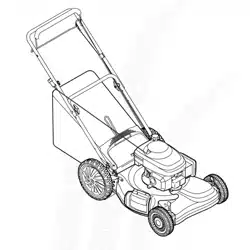
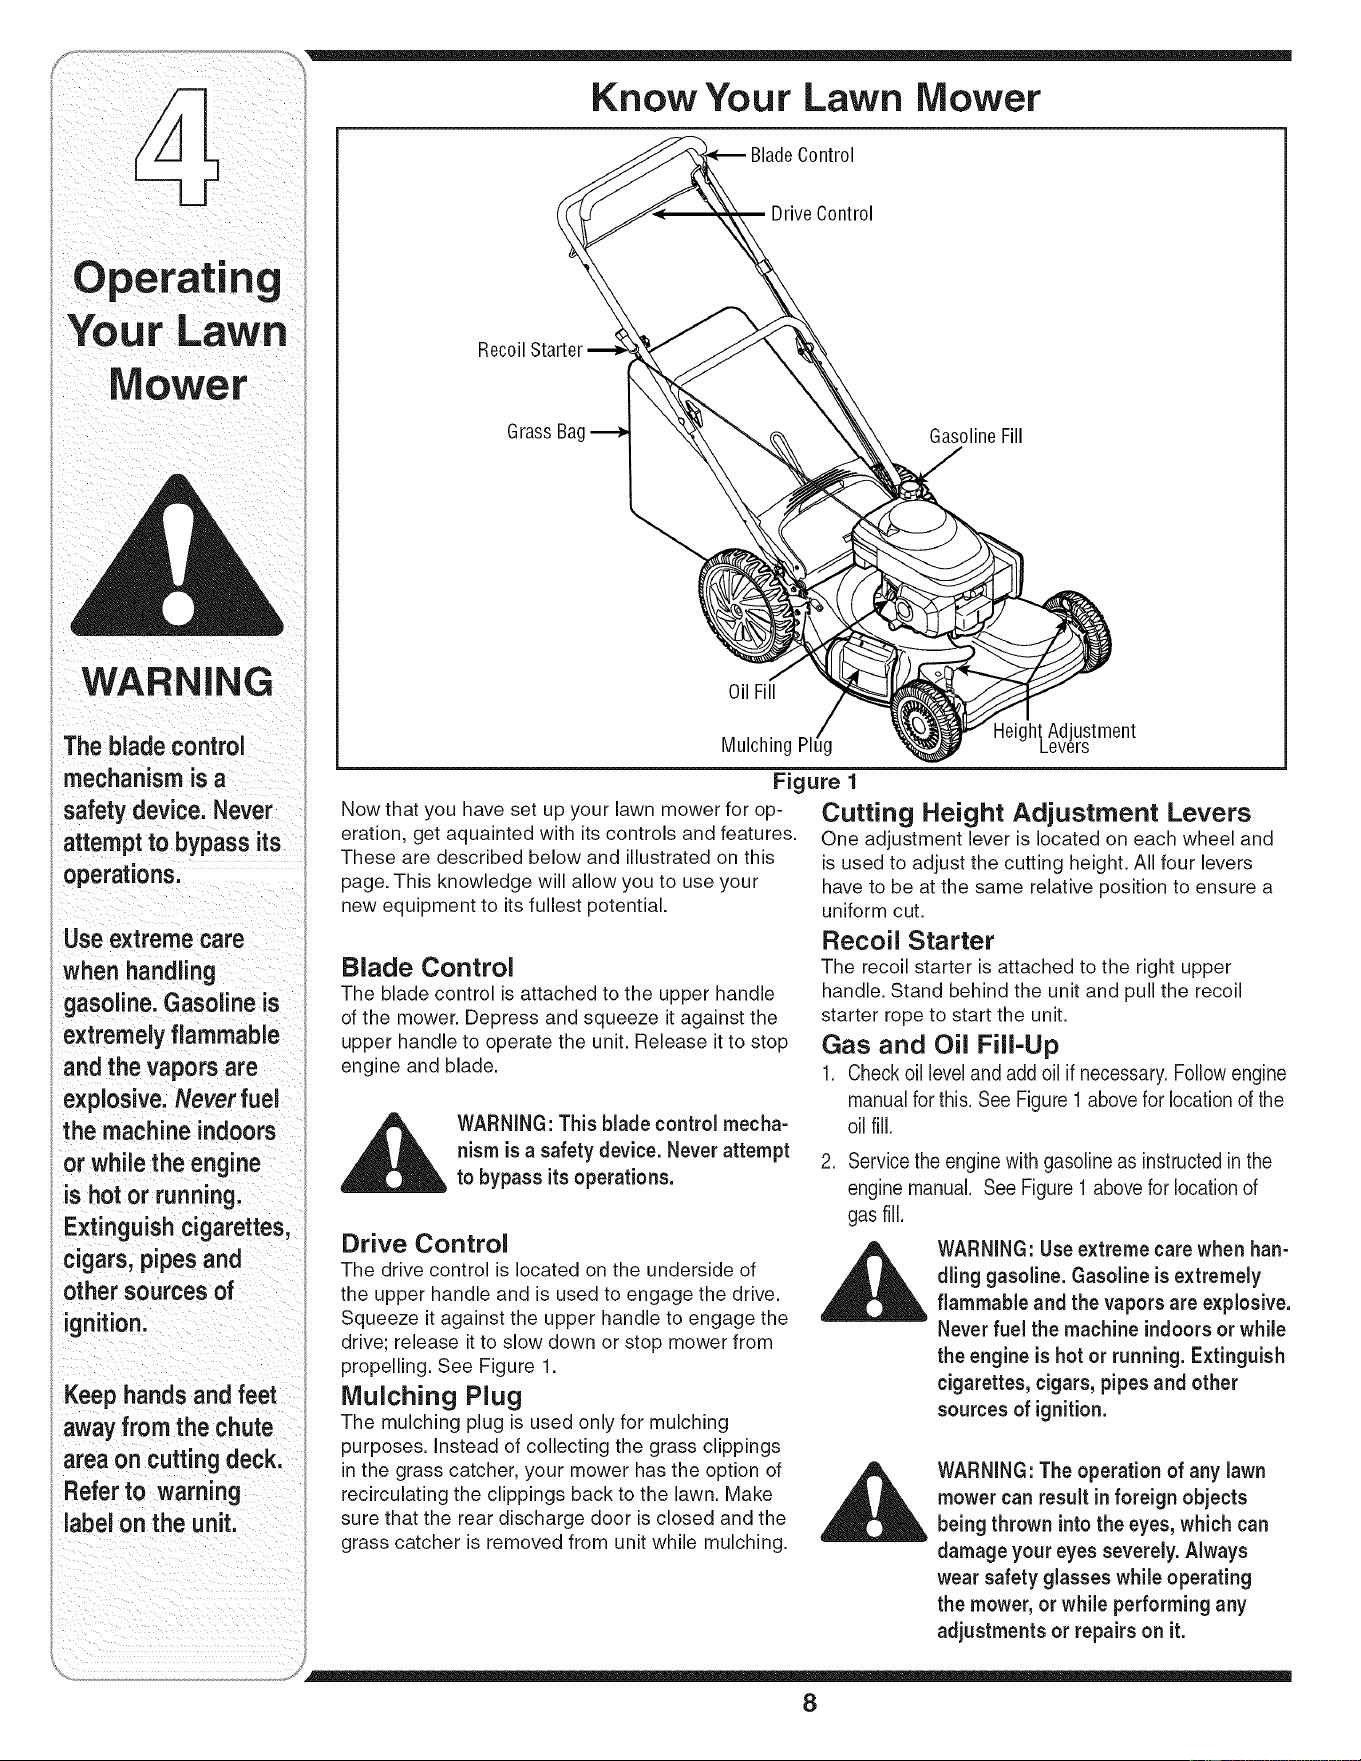
Know Your Lawn Mower
Blade Control
Control
Recoil
GrassBag
GasolineFill
Oil Fill
Mulching Plug
HeightAdjustment
Levers
Figure 1
Now that you have set up your lawn mower for op-
eration, get aquainted with its controls and features.
These are described below and illustrated on this
page. This knowledge will allow you to use your
new equipment to its fullest potential.
Blade Control
The blade control is attached to the upper handle
of the mower. Depress and squeeze it against the
upper handle to operate the unit. Release it to stop
engine and blade.
__k WARNING:Thisbladecontrolmecha-
nism is a safetydevice. Neverattempt
to bypass itsoperations.
Drive Control
The drive control is located on the underside of
the upper handle and is used to engage the drive.
Squeeze it against the upper handle to engage the
drive; release it to slow down or stop mower from
propelling. See Figure 1.
Mulching Plug
The mulching plug is used only for mulching
purposes. Instead of collecting the grass clippings
in the grass catcher, your mower has the option of
recirculating the clippings back to the lawn. Make
sure that the rear discharge door is closed and the
grass catcher is removed from unit while mulching.
Cutting Height Adjustment Levers
One adjustment lever is located on each wheel and
is used to adjust the cutting height. All four levers
have to be at the same relative position to ensure a
uniform cut.
Recoil Starter
The recoil starter is attached to the right upper
handle. Stand behind the unit and pull the recoil
starter rope to start the unit.
Gas and Oil Fill-Up
1. Check oil level and add oil if necessary. Follow engine
manual for this. See Figure 1 above for location of the
oil fill.
2. Servicethe enginewithgasolineas instructedinthe
enginemanual. SeeFigure1abovefor locationof
gasfill.
_ ARNING:Useextremecare when han-
dling gasoline.Gasoline is extremely
flammable and the vapors areexplosive.
Neverfuel the machine indoorsor while
the engine ishot or running. Extinguish
cigarettes, cigars, pipesand other
sources of ignition.
WARNING:Theoperation of any lawn
mower can result in foreign objects
being thrown into the eyes, which can
damage your eyesseverely. Always
wear safety glasses while operating
the mower, or while performing any
adjustments or repairs on it.
8
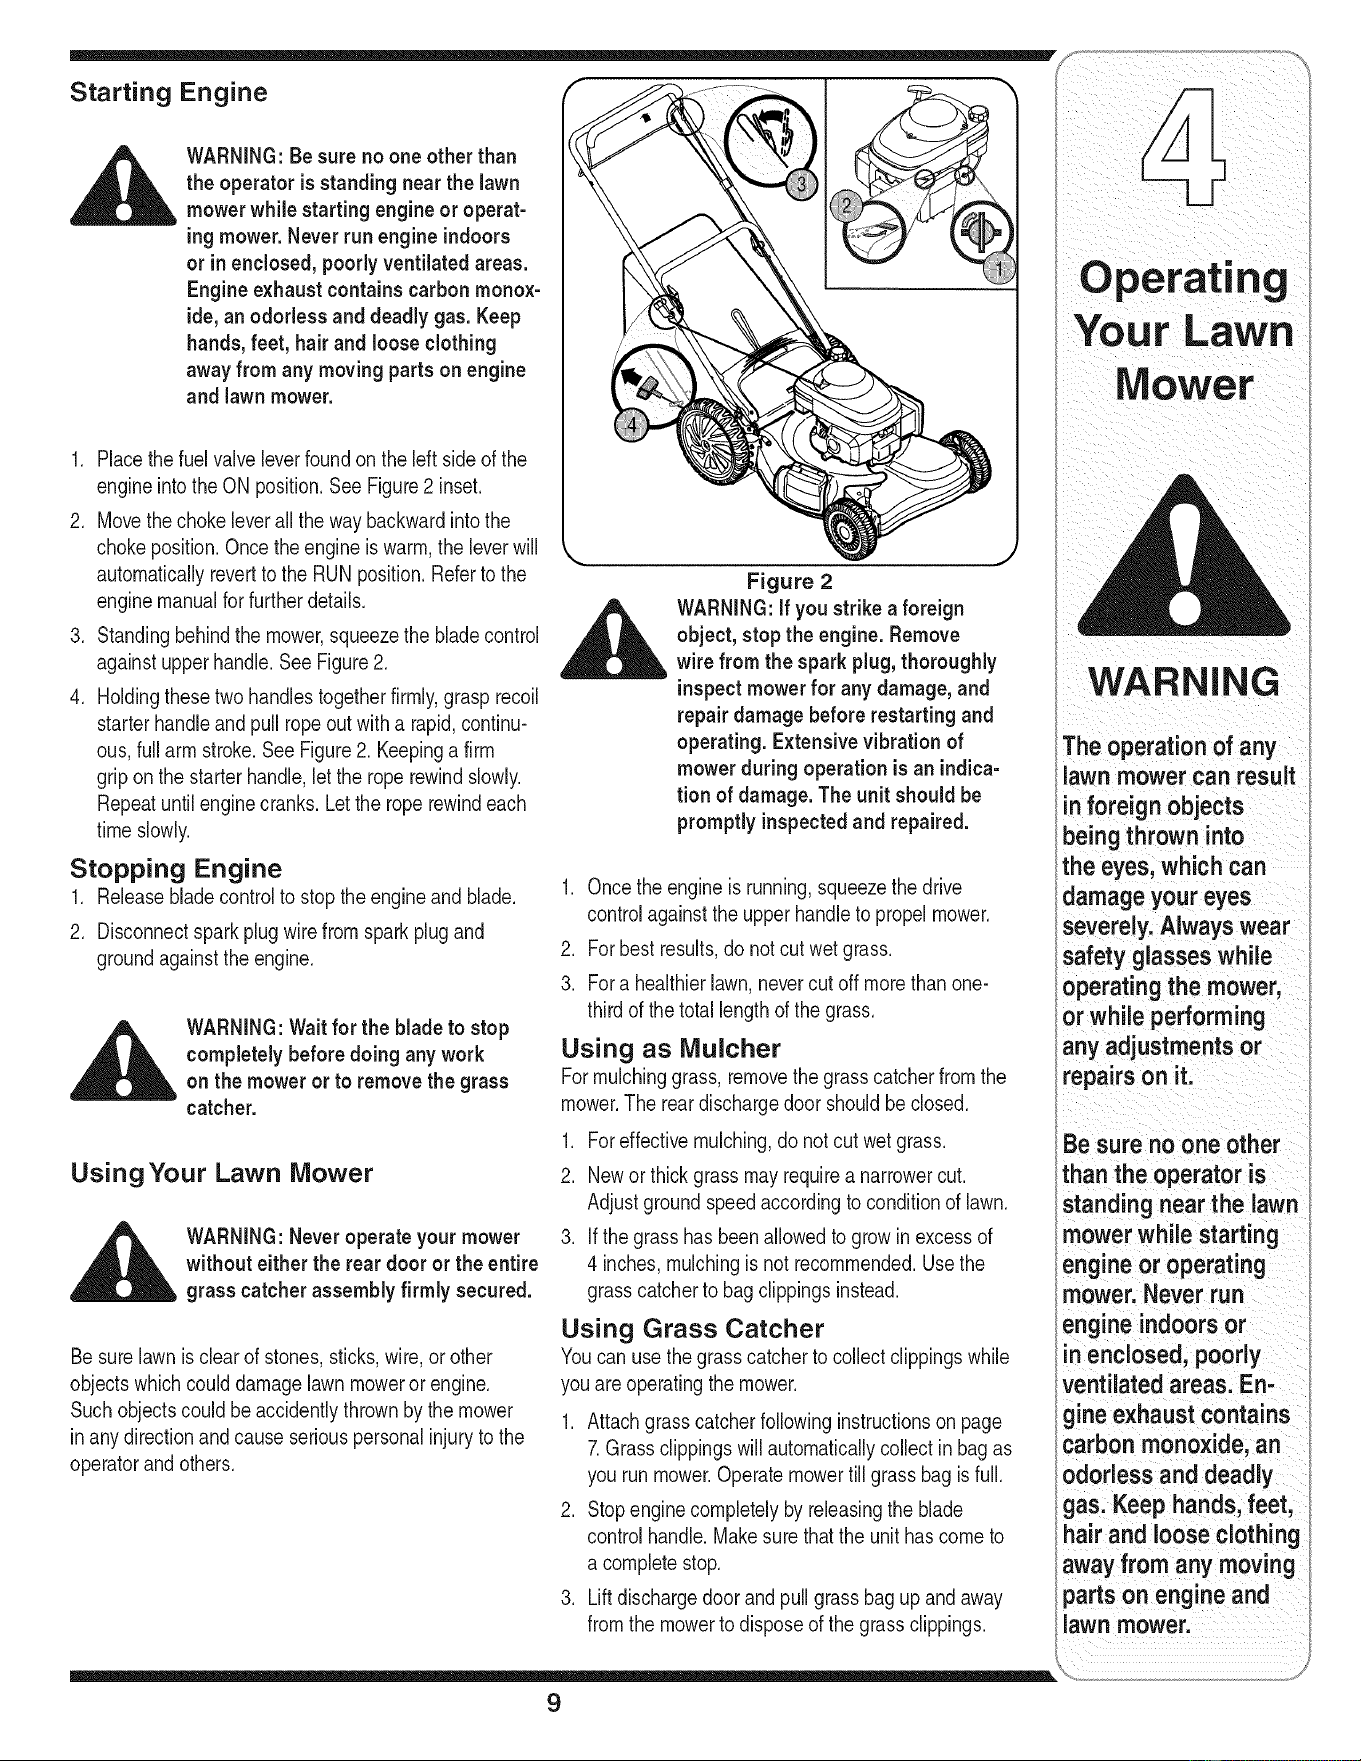
Starting Engine
WARNING:Besureno one otherthan
the operatoris standingnearthe lawn
mowerwhilestartingengineor operat-
ingmower. Neverrun engine indoors
or in enclosed, poorly ventilated areas.
Engine exhaust contains carbon monox-
ide,an odorless and deadly gas. Keep
hands,feet, hair and loose clothing
awayfrom any moving partson engine
and lawnmower.
1. Placethe fuel valveleverfoundonthe left sideof the
engineintothe ON position.SeeFigure2 inset.
2. Movethechokeleverall the waybackwardinto the
chokeposition.Oncethe engineis warm,the leverwill
automaticallyrevertto the RUNposition.Referto the
enginemanualfor furtherdetails.
3. Standingbehindthe mower,squeezethe bladecontrol
againstupperhandle.SeeFigure2.
4. Holdingthesetwo handlestogetherfirmly,grasp recoil
starterhandleand pullropeout witha rapid,continu-
ous,full arm stroke.SeeFigure2. Keepinga firm
grip onthe starterhandle,let the roperewindslowly.
Repeatuntil enginecranks.Letthe roperewindeach
timeslowly.
Stopping Engine
1. Releasebladecontrolto stoptheengineand blade.
2. Disconnectsparkplugwirefromsparkplugand
groundagainstthe engine.
_ ARNING:Waitfor the blade to stop
completelybefore doing any work
on the mower or to remove the grass
catcher.
UsingYour Lawn Mower
__IL ARNING:Neveroperate your mower
without either the rear door or the entire
grass catcher assembly firmly secured.
Besurelawnis clearof stones,sticks,wire,or other
objectswhichcoulddamagelawnmowerorengine.
Such objectscouldbe accidentlythrownby the mower
in anydirectionandcauseseriouspersonalinjuryto the
operatorandothers.
Figure 2
_ ARNING:if you strikeaforeign
object, stop the engine.Remove
wire from the spark plug,thoroughly
inspect mowerfor any damage,and
repair damage before restarting and
operating. Extensive vibration of
mower during operation is an indica-
tion of damage.The unit should be
promptlyinspectedand repaired.
1. Oncethe engineis running,squeezethedrive
controlagainstthe upperhandleto propelmower.
2. Forbest results,do notcut wetgrass.
3. Fora healthierlawn,nevercut offmorethan one-
thirdof the totallengthof the grass.
Using as Mulcher
Formulchinggrass,removethe grasscatcherfromthe
mower.The reardischargedoorshouldbeclosed.
1. Foreffectivemulching,do notcut wetgrass.
2. Newor thick grassmayrequirea narrowercut.
Adjustgroundspeedaccordingto conditionof lawn.
3. ifthegrasshas beenallowedto growinexcessof
4 inches,mulchingis not recommended.Usethe
grasscatcherto bagclippingsinstead.
Using Grass Catcher
Youcan usethe grasscatcherto collectclippingswhile
youareoperatingthe mower.
1. Attachgrasscatcherfollowinginstructionson page
7.Grassclippingswill automaticallycollectinbagas
you runmower.Operatemowertill grassbagis full.
2. Stopenginecompletelyby releasingthe blade
controlhandle.Makesurethatthe unit hascometo
a completestop.
3. Liftdischargedoorandpullgrassbagup andaway
fromthe mowerto disposeof the grassclippings.
Mower
WARNING
The operation of any
lawn mower can result
inforeign objects
being thrown into
the eyes, which can
damage your eyes
severely. Always wear
safety glasseswhile
operating the mower,
or while performing
any adjustments or
repairs on it.
Be sure no one other
than the operator is
standing near the lawn
mower while starting
engine or operating
mower. Never run
engine indoorsor
n enclosed, poorly
ventilated areas. En-
gineexhaust contains
carbon monoxide, an
odorless and deadly
gas. Keep hands, feet,
hair and loose clothing
away from any moving
partson engine and
lawn mower.
9
Maintaining
WARNING
A vaysstope,g ne;
disconnect spark
pluglandground
againstenginebefore
cleaning,lubricating
ordoinganyk ndof
maintenanceonV0ur
machine!
I
We do notrecommend
the used pressure
washers or garden
hoseto clean your
uniL These maycause
damage to electric
componentsspindles
pu eys;bear ngs, or
the engine. The use
of waterwill result in
shortened lifeand
i reduceserViceabilityl
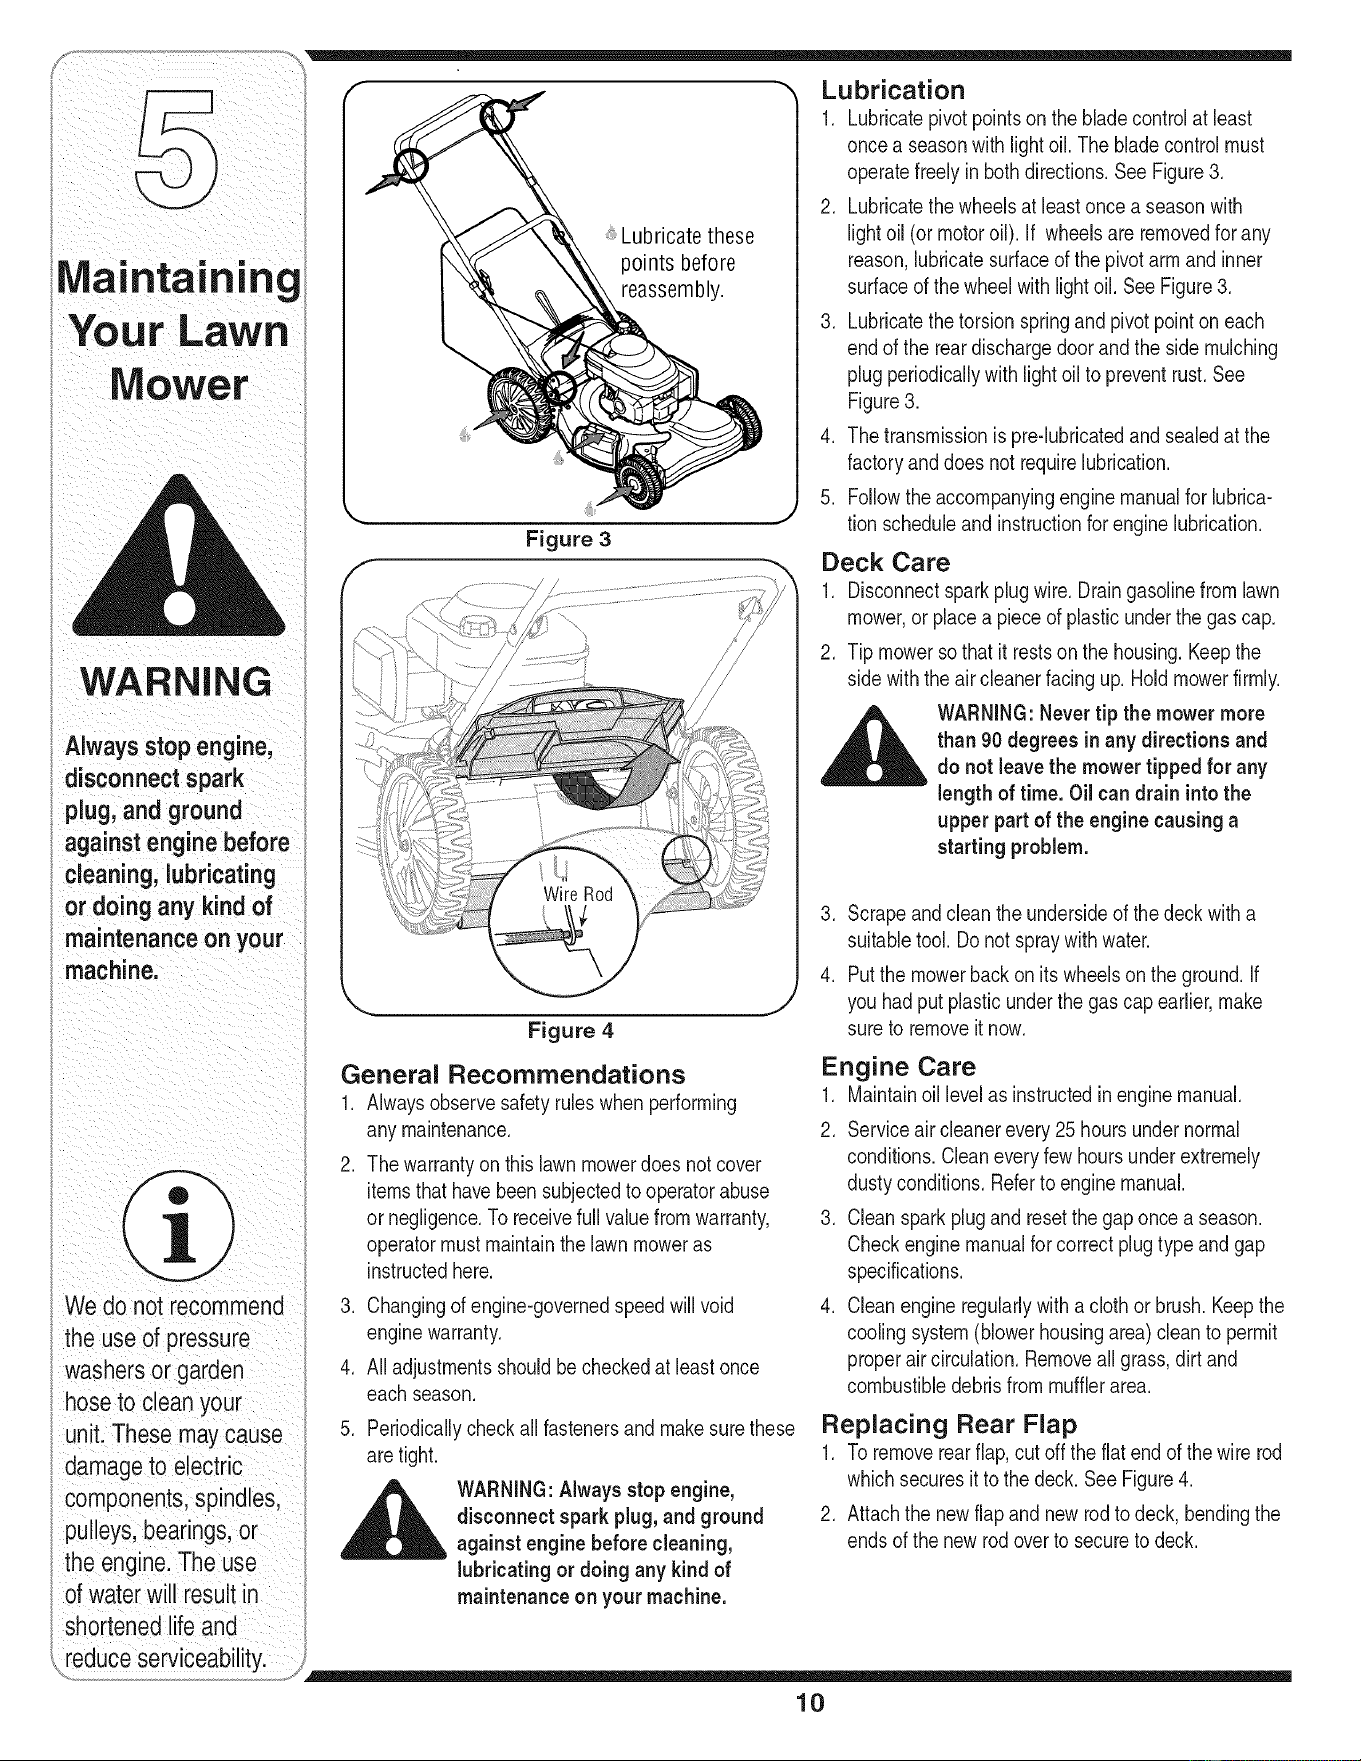
Lubricate these
points before
reassembly.
Figure 4
General Recommendations
1. Alwaysobservesafetyruleswhen performing
anymaintenance.
2. Thewarrantyon thislawnmowerdoesnot cover
itemsthathavebeensubjectedto operatorabuse
ornegligence.To receivefull valuefromwarranty,
operatormustmaintainthelawn moweras
instructedhere.
.
4.
5.
,A
Changingof engine-governedspeedwill void
enginewarranty.
Alladjustmentsshouldbecheckedat leastonce
eachseason.
Periodicallycheckallfastenersand makesurethese
aretight.
WARNING:Alwaysstop engine,
disconnect spark plug,and ground
against engine before cleaning,
lubricatingor doing any kind of
maintenance on your machine.
Lubrication
1. Lubricatepivotpointson thebladecontrolat least
oncea seasonwithlightoil. The bladecontrolmust
operatefreelyinboth directions.SeeFigure3.
2. Lubricatethe wheelsat leastoncea seasonwith
lightoil (ormotoroil). If wheelsareremovedfor any
reason,lubricatesurfaceof the pivotarm andinner
surfaceof thewheelwithlight oil. SeeFigure3.
3. Lubricatethe torsionspringandpivotpointoneach
endof the reardischargedoorandthe sidemulching
plugperiodicallywithlightoil to preventrust.See
Figure3.
4. Thetransmissionis pre-lubricatedandsealedat the
factoryanddoes not requirelubrication.
5. Followtheaccompanyingenginemanualfor lubrica-
tion scheduleandinstructionfor enginelubrication.
Deck Care
1. Disconnectsparkplugwire.Draingasolinefromlawn
mower,or placea pieceof plasticunderthe gas cap.
2. Tip mowersothat it restsonthe housing.Keepthe
sidewiththe aircleanerfacingup. Hold mowerfirmly.
_ ARNING:Nevertip the mowermore
than 90 degrees in any directions and
do not leavethe mower tipped for any
length of time. Oil can drain intothe
upper partof the engine causing a
starting problem.
3. Scrapeandclean the undersideof the deckwitha
suitabletool.Do notspraywithwater.
4. Putthe mowerbackonits wheelsonthe ground.If
youhadput plasticunderthe gas capearlier,make
sureto removeit now.
Engine Care
1. Maintainoil levelas instructedin enginemanual.
2. Serviceaircleanerevery25 hoursundernormal
conditions.Cleaneveryfewhoursunderextremely
dustyconditions.Referto enginemanual.
3. Cleansparkplugand resetthegaponce a season.
Checkenginemanualfor correctplugtype andgap
specifications.
4. Cleanengineregularlywitha clothorbrush.Keepthe
coolingsystem(blowerhousingarea)cleanto permit
properaircirculation.Removeall grass,dirt and
combustibledebrisfrommufflerarea.
Replacing Rear Flap
1. Toremoverearflap,cutoff the flatendof the wire rod
whichsecuresit to the deck.SeeFigure4.
2. Attachthe newflapand newrodto deck, bendingthe
endsof the new rodoverto secureto deck.
10
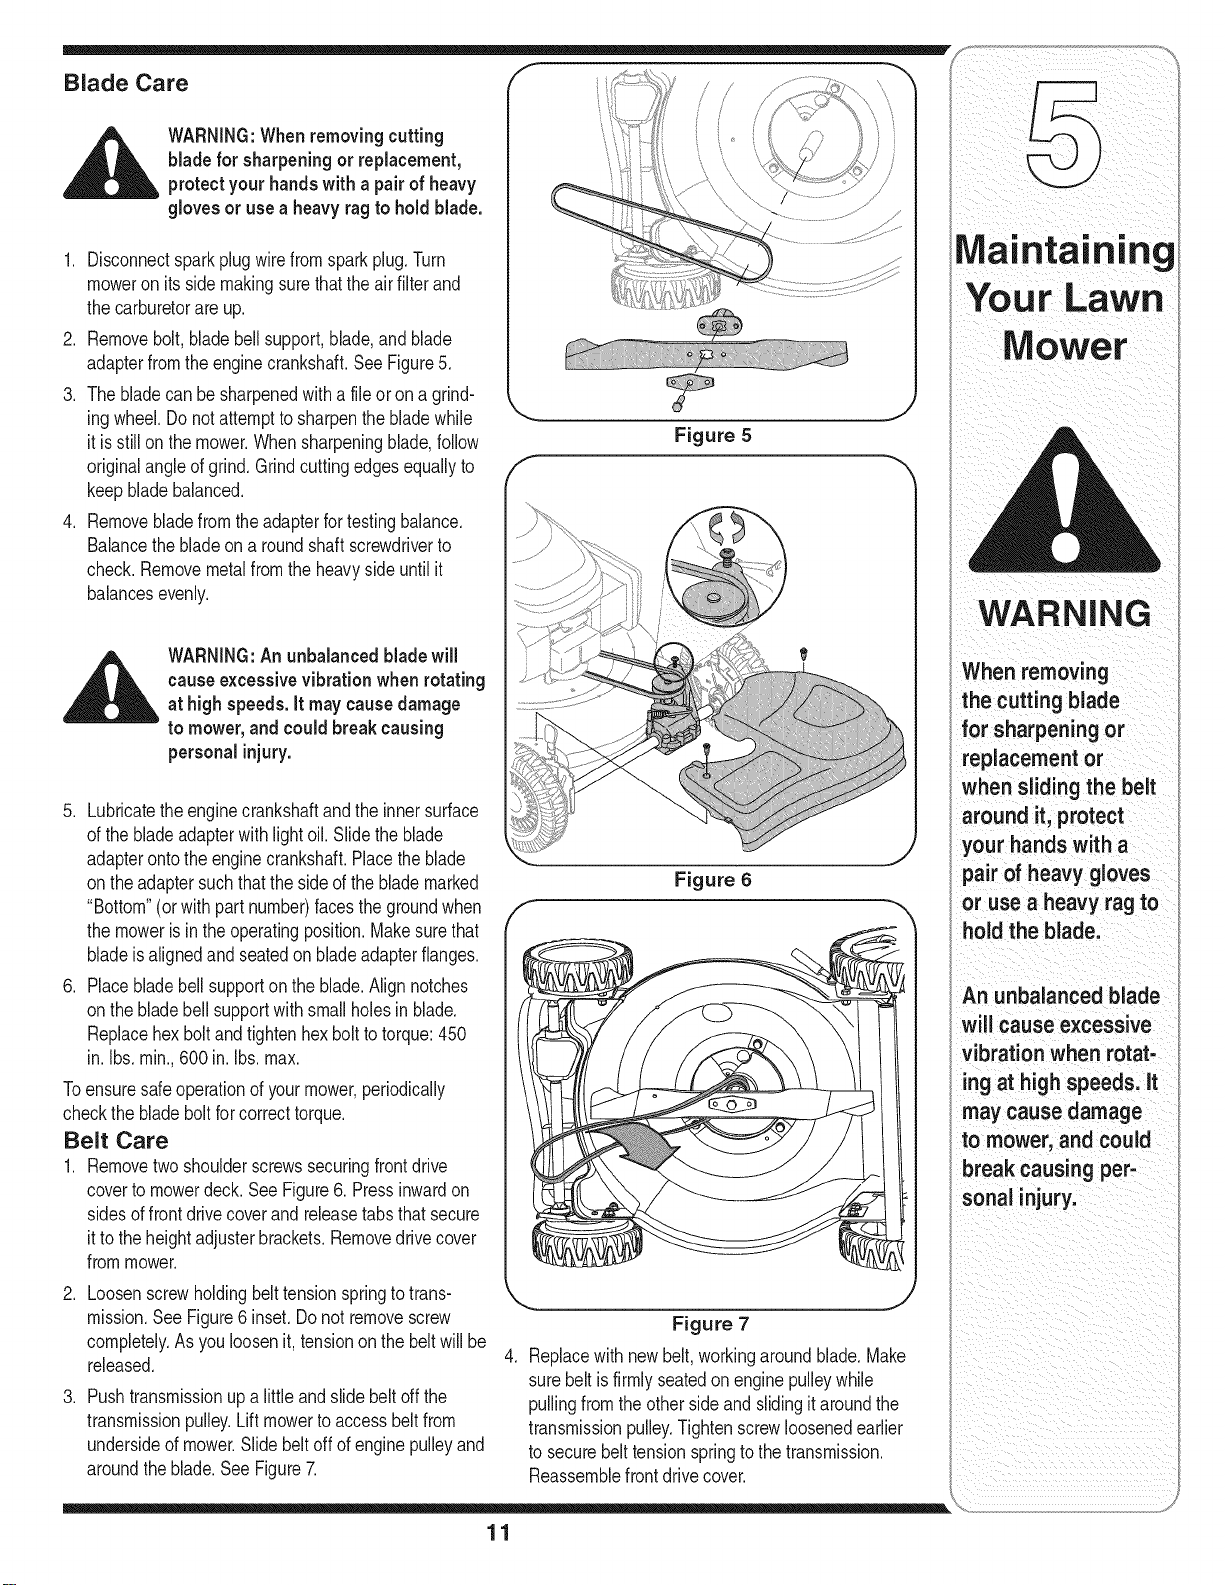
Blade Care
__i= ARNING:Whenremovingcutting
bladefor sharpeningor replacement,
protectyourhandswitha pairof heavy
gloves or use a heavy ragto hold blade.
1. Disconnectsparkplugwirefromsparkplug.Turn
moweron itsside makingsurethatthe airfilterand
the carburetorareup.
2. Removebolt,bladebellsupport,blade,andblade
adapterfromthe enginecrankshaft.SeeFigure5.
3. The bladecan be sharpenedwitha fileor on a grind-
ing wheel.Do notattemptto sharpenthe bladewhile
it is stillon the mower.Whensharpeningblade,follow
originalangleof grind.Grindcuttingedgesequallyto
keep bladebalanced.
4. Removebladefromthe adapterfor testingbalance.
Balancethe bladeona roundshaftscrewdriverto
check.Removemetalfromthe heavysideuntil it
balancesevenly.
_ WARNING:Anunbalanced bladewill
causeexcessive vibration when rotating
at high speeds, it may causedamage
to mower,and could break causing
personalinjury.
5. Lubricatetheenginecrankshaftandthe innersurface
of the bladeadapterwithlightoil. Slidethe blade
adapteronto the enginecrankshaft.Placethe blade
on theadaptersuchthatthe sideof the blademarked
"Bottom"(orwithpart number)facesthe groundwhen
the moweris in the operatingposition.Makesurethat
bladeis alignedandseatedon bladeadapterflanges.
6. Placebladebellsupportonthe blade.Alignnotches
on the bladebell supportwith smallholesin blade.
Replacehex boltandtightenhex boltto torque:450
in. Ibs. min.,600 in. Ibs.max.
Toensuresafeoperationof yourmower,periodically
checkthe bladeboltfor correcttorque.
Belt Care
1. Removetwoshoulderscrewssecuringfrontdrive
coverto mowerdeck.SeeFigure6. Pressinwardon
sidesof frontdrivecoverand releasetabsthat secure
it to the heightadjusterbrackets.Removedrivecover
frommower.
.
Loosenscrewholdingbelttensionspringto trans-
mission.SeeFigure6 inset.Donot removescrew
completely.As youloosenit, tensiononthe belt will be
released.
.
Pushtransmissionup a littleandslidebelt offthe
transmissionpulley.Lift mowerto accessbeltfrom
undersideof mower.Slidebeltoff of enginepulleyand
aroundthe blade.SeeFigure7.
Figure 5
Figure 6
Figure 7
4. Replacewith newbelt,workingaroundblade.Make
surebelt is firmlyseatedonenginepulleywhile
pullingfromthe othersideand slidingit aroundthe
transmissionpulley.Tightenscrewloosenedearlier
to securebelt tensionspringto the transmission.
Reassemblefrontdrivecover.
11
_ _ i i i iii _ _ ii _i ii ii
Maintaining
You r LaWn
MOwer
WARNING
When removing
the cutting blade
for sharpening or
replacement or
when sliding the belt
around it, protect
your hands with a
pair of heavy gloves
or use a heavy rag to
hold the blade.
An unbalanced blade
will cause excessive
vibration when rotat-
ing at high speeds. It
may cause damage
to mower, and could
break causing per-
sonal injury.
Shooting
For repairs beyond
the mbo
ments fisted here,
contact an authorized
service dealer.
i_i i_ii!_i_iii_i _iii_i_iii!iiii_!ii_i!_i_i!
i_i i i ii i i i
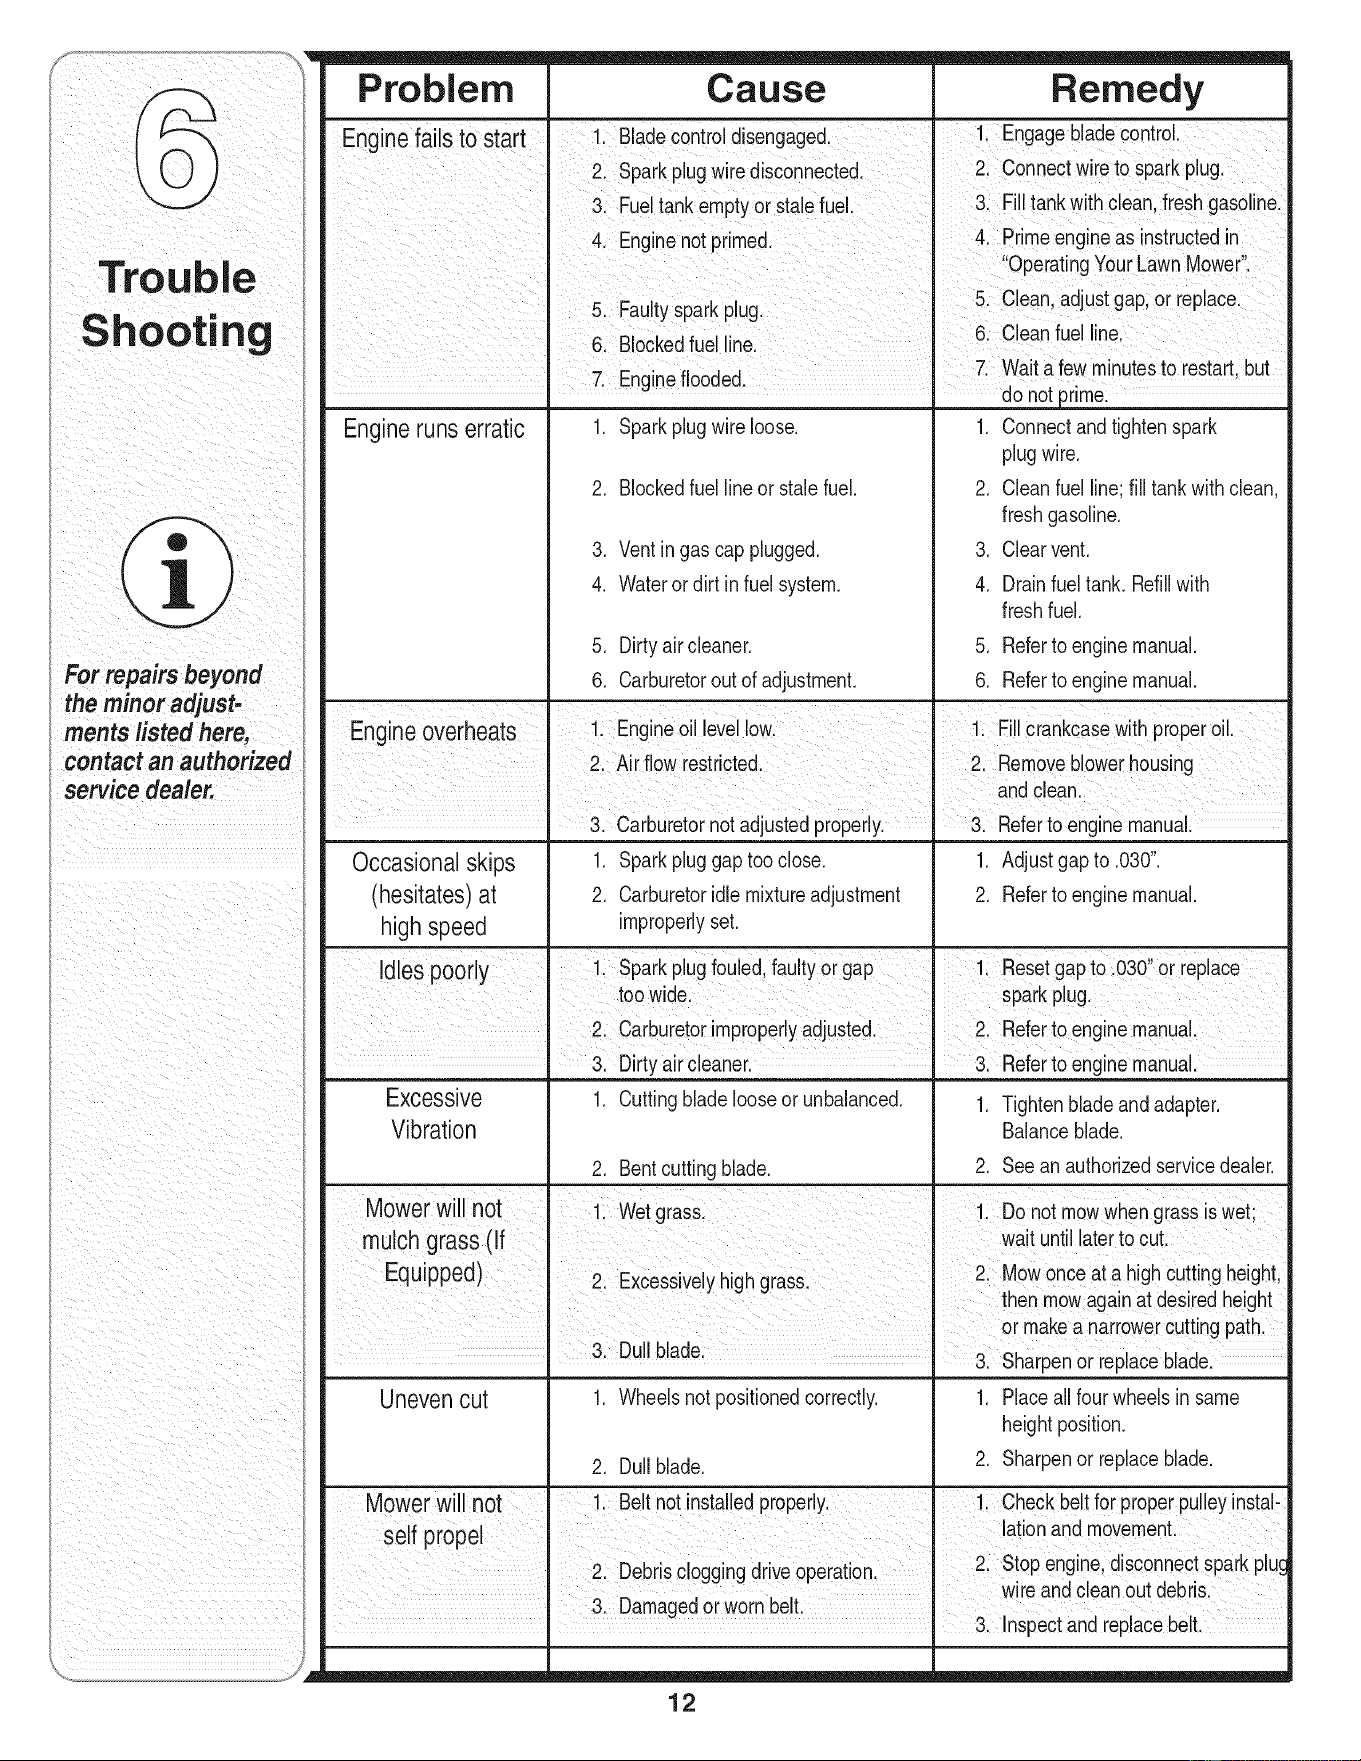
Problem Cause Remedy
Enginefails to start I 1. Bladecontroldisengaged• 1. Engagebladecontrol•
I 2. wire disconnected. 2. Connectwireto sparkplug.
Spark
plug
I 3, Fueltank orstalefue 3. Fil tankwithclean freshgasoline•
empty
I 4. Enginenot primed• 4. Primeengineas instructedin
I "OperatingYourLawnMower".
5 ault s ark lu 5. Cean adjustgap orrepace.
I .F yp pg.
H R
6. Cleanfuel inc.
I 6. BIockedfue line. I
I 7 En ne f coded I 7. Waitafew minutesto restart,but
J- g' " J do notprime_
Engineruns erratic 1. Sparkplugwireloose. 1. Connectandtightenspark
plugwire.
2. Blockedfuellineor stalefuel. 2. Cleanfuel line;fill tankwithclean,
freshgasoline.
3. Ventingas cap plugged. 3. Clearvent.
4. Waterordirt infuel system. 4. Drainfuel tank. Refillwith
freshfuel.
5. Dirty aircleaner. 5. Referto enginemanual.
6. Carburetorout of adjustment. 6. Referto enginemanual.
I I
Engine overheats 1. Engineoil levellow. 1. Fillcrankcasewth properoil.
2. Airf ow restricted. 2. Removeblowerhousing
I I andclean.
3. Carburetornotadjustedproperly, i 3. Referto enginemanual.
Occasional skips 1. Sparkpluggaptooclose. 1. Adjustgap to .030".
(hesitates)at 2. Carburetoridlemixtureadjustment 2. Referto enginemanual.
high speed improperlyset.
des poor y I 1. Sparkplugfouled faultyorgap 1. Resetgapto .030' or replace
I toowide. sparkplug.
H
I
2. Carburetorimproperlyadjusted. I 2. Referto enginemanual.
3. Dirty aircleaner. _l 3. Referto enginemanual.
Excessive 1. Cuttingbladelooseor unbalanced. 1. Tightenbladeandadapter.
Vibration Balanceblade.
2. Bentcuttingblade. 2. Seean authorizedservicedealer.
not I 1. Wetgrass. 1. Do not mowwhengrassis wet
m
Mower will
much grass (If I wet unt aterto cut.
Equpped) I 2 Excessivel hi h rass 2 Mowonceat a h ghcutt ngheght
• y gg . •
then mowagainat desiredheight
I I or makea narrowercuttingpath.
I 3 Du bade I
• " 3. Sharpenor replaceblade.
Unevencut 1. Wheelsnot positionedcorrectly. 1. Placeall fourwheelsin same
heightposition.
2. Dull blade. 2. Sharpenor replaceblade.
Mower w not I 1. Belt notinstalledproperly. 1 Checkbelt for properpulleyinstal-
f r aton and movement
se pope I I . . "
I 2 Stop engne,dsconnectsparkpuc
2. Debriscloggingdrive operation. I •
I w reandc eanout debrs
I 3. Damagedorworn belt, I
I 3. nspectandrepace bet.
12

Off-Season Storage
The followingstepsshouldbetakento prepareyour lawn
mowerfor storage.
1. Cleanandlubricatemowerthoroughlyas describedin
the lubricationinstructions.
2. We donot recommendthe useof a pressurewasher
or gardenhoseto cleanyour unit.
3. Referto enginemanualfor correctengine
storageinstructions.
4. Coatmower'scuttingbladewithchassisgreaseto
preventrusting.
5. Storemowerina dry,cleanarea. Donot storenext
to corrosivematerials,suchas fertilizer.
Whenstoringanytypeof powerequipmentin a poorly
ventilatedor metalstorageshed,careshouldbetaken
to rust-prooftheequipment.Usinga lightoil or silicone,
coattheequipment,especiallycablesandall moving
partsof yourlawnmowerbeforestorage.
Safety Labels Found On Your Lawn Mower
13
_i _i i _iii i__ i iii ii_
DO NOT remove safety
(or any) labelsfrom
mower for any reason.
',_ y_
@,
_3_
%.
_2_,
'k-y
'_m' (82
_.-,., _._
' _ y;
14

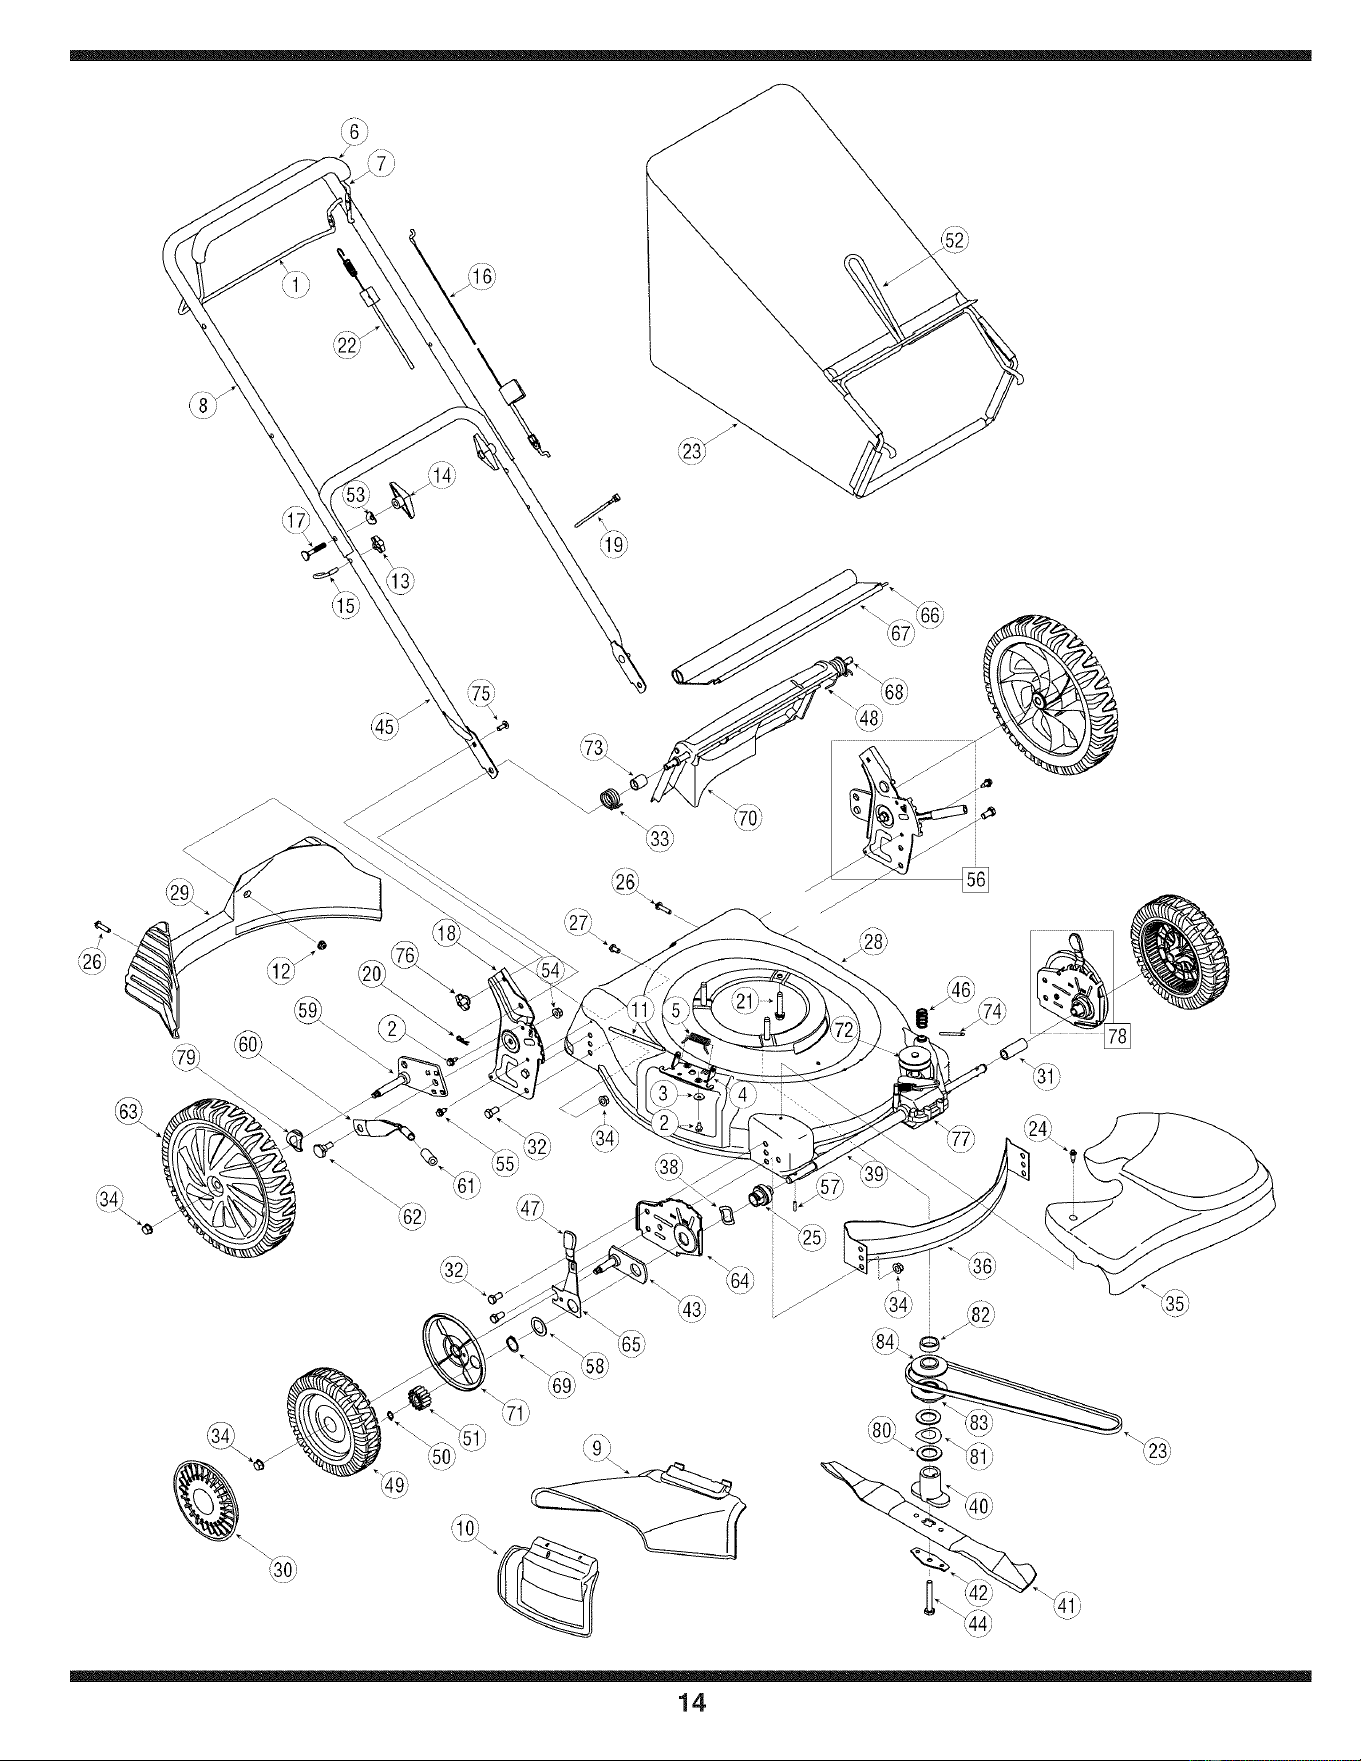
1 747-1214 DriveControl 46 732-1043 BeltTensionSpring
2 710-0599 TTScrew1/4-20x 0.5 47 720-0426 AdjustmentKnob
3 736-0270 BellWasher.265x0.75 48 732-04089A TorsionSpring- LH
4 17032A DeflectorChuteAdapter 49 734-2042 FrontWheel8 x 2.125
5 732-1014 TorsionSpring 50 716-0865 SnapRing
6 731-2626 DeluxeBailCover 51 717-1762 Gear14T RHFWD
7 747-1161A BladeControl 717-1761 Gear14T LHFWD
8 749-1092A UpperHandle 52 747-04080 GrassBagFrame
9 731-04177 ChuteDeflector 53 736-0451 SaddleWasher
10 687-02055 MulchPlugComplete 54 712-3005 HexFlangeLockNut3/8-16
11 747-0710 HingePin 55 710-1652 TT Scr.w/Washer1/4-20x.625
12 712-04064 FlangeLockNut,1/4-20 56 687-02057 HandleBracketAssembly- LH
13 720-0279 HandleKnob 687-02056 HandleBracketAssembly- RH
14 720-0284 HandleKnob 57 715-0221 DowelPin
15 710-1205 EyeBolt 58 736-0474 Washer
16 746-1113 ControlCable- 37.75" 59 687-02039 PivotArm Assembly-RH
17 710-1174 CarriageBolt5/16-18x 2.0 687-02040 PivotArm Assembly-LH
18 687-02033 HandleBracket- RH 60 732-0866 RearSpring Lever
687-02031 HandleBracket- LH 61 720-0312 FoamGrip
19 726-0240 CableTie 62 738-0507B ShoulderScr.500Dig.x.434
20 714-0104 CotterPin 63 734-04093 RearWheel, 12x2.125
21 710-0654A Self-TappingSeresScrew 64 782-0512B HeightAdjusterPlate- RH
22 746-04112A DriveCable-50.50" 782-0511A HeightAdjusterPlate- LH
23 664-04007 GrassbagAssembly 65 732-0706 FrontLever- RH
24 710-1650 ShoulderScrew# 12-24 732-0707 FrontLever- LH
25
26 710-04371 Screw,1/4-15x 1.25 67 731-04998 RearTrailingShield
27 710-0286 Screw,1/4-20x.500 68 747-0996 PivotRod
28 787-01278 21"Deck 69 716-0102 SnapRing
29 731-04150B RearBaffle 70 731-04134A RearDischargeDoor
30 731-0981A Hub Cap 71 782-7551A WheelDustCap
31 750-1166 Slev.Spacer2.1"Lg. 72 756-04017 input Pulley
32 710-0216 HexScrew,3/8-16x.75 73 750-04162 Spacer.375x.50x 1.02"Lg.
33 732-04090A TorsionSpring- RH 74 715-04011 Roll Pin
34 712-04065 FlangeLockNut,3/8-16 75 710-0703 CarriageBolt 1/4-20
35 731-05132A TransmissionCover 76 712-0397 WingNut
36 782-5002B FrontBaffle 77 618-0657 TransmissionAssembly
37 754-0637A V-Belt 78 682-0512A HeightAdjustmentAssembly- RH
38 736-0447 WaveWasher 682-0511A HeightAdjustmentAssembly- LH
39 750-04178 SleeveSpacer9.04"Lg. 79 736-0182 SpringWasher,.500x 1.00x .022
40 748-04082 BladeAdapterw/Star 80 736-0250 FiatWasher,1.00x 1.75x .107
41
42
43
44
&
682-0015 FrontBearingAssembly J . 66_732-0700 Wire
742-0741 21"MulchingBlade _ _81 . 736-04173 SprgWasher,1.005x 1.825x .048
736-0524B BladeBellSupport 82 750-04438A SleeveSpacer
687-02044 PivotPlateAssembly 83 756-04160 KeyHalfPulley
710-1257 HexScrew3/8-24x 2.50 84 756-04161 UpperHalfPulley
749-0928A LowerHandle
15
MPORTANT
For a oper Working
machine;use Factory
Approved Parts:
V..BELTS are Specially
designed to engage
and disengage safelyl
A substitute (nOnOEM)
VxBelt can be dangeri
ous by not disengaging
completely:
To order replacement
parts, contact 1-800-
800-7310 or visit www.
yardman.com.

MANUFACTURER'S LiMiTED WARRANTY FOR
The limitedwarrantysetforthbelowisgivenby MTDLLCwithrespectto
newmerchandisepurchasedandusedin the UnitedStates,itsposses-
sionsandterritories.
"MTD"warrantsthisproductagainstdefectsin materialandworkmanship
for a periodof two(2) yearscommencingonthe dateof originalpurchase
andwill,at its option,repairor replace,free of charge,anypart foundto
bedefectiveinmaterialsor workmanship.Thislimitedwarrantyshallonly
applyif this producthas beenoperatedandmaintainedinaccordance
withthe Operator'sManualfurnishedwiththe product,andhas not been
subjectto misuse,abuse,commercialuse,neglect,accident,improper
maintenance,alteration,vandalism,theft,fire,water,ordamagebecause
of otherperilor naturaldisaster.Damageresultingfromthe installationor
useof any part,accessoryorattachmentnotapprovedby MTDfor use
withthe product(s)coveredbythis manualwill voidyourwarrantyas to
any resultingdamage.
Normalwearpartsarewarrantedto befree fromdefectsinmaterialand
workmanshipfor a periodof thirty (30)daysfromthe dateof purchase.
Normalwearpartsinclude,butare notlimitedto itemssuchas: batteries,
belts,blades,bladeadapters,grassbags,riderdeckwheels,seats,snow
throwerskidshoes,shaveplates,augerspiralrubberandtires.
HOW TO OBTAIN SERVICE: Warranty service is available,WITH
PROOFOF PURCHASE, through your local authorized service
dealer. To locate the dealer in your area, check your Yellow Pages, or
contact MTD LLC at RO. Box 361131,Cleveland, Ohio 44136-0019,or
call 1-800-800-7310or 1-330-220-4683or log on to our Web site at
www.mtdproducts.com.
Thislimitedwarrantydoesnot providecoverageinthe followingcases:
a. Theengineor componentpartsthereof.Theseitemsmaycarrya
separatemanufacturer'swarranty.Referto applicablemanufacturer's
warrantyfor termsandconditions.
b. Logsplitterpumps,valves,andcylindershavea separateoneyear
warranty.
c. Routinemaintenanceitemssuchas lubricants,filters,blade
sharpening,tune-ups,brakeadjustments,clutchadjustments,deck
adjustments,andnormaldeteriorationof the exteriorfinishdueto use
orexposure.
d. Servicecompletedby someoneotherthananauthorizedservice
dealer.
e. MTDdoes notextendany warrantyfor productssoldor exported
outsideof the UnitedStates,itspossessionsandterritories,except
thosesoldthroughMTD'sauthorizedchannelsof exportdistribution.
f. Replacementpartsthatarenot genuineMTDparts.
g. Transportationchargesand servicecalls.
No impliedwarranty,includingany impliedwarranty of merchant-
ability of fitness for a particularpurpose,applies after the applicable
periodof express written warranty above as to the partsas identi-
fied. No other express warranty, whether written or oral, except as
mentionedabove,givenby any personor entity,includinga dealer
or retailer,with respect to any product,shallbind MTD.Duringthe
periodof the warranty, the exclusive remedyisrepairor replacement
of the productas set forth above.
The provisionsas set forth inthis warranty providethe sole and
exclusive remedyarising from the sale. MTDshall not be liable
for incidentalor consequential loss or damage including,without
limitation, expenses incurredfor substitute or replacementlawn care
services or for rentalexpenses to temporarily replacea warranted
product.
Somestatesdo not allowtheexclusionor limitationof incidentalor
consequentialdamages,or limitationson howlonganimpliedwarranty
lasts,so the aboveexclusionsor limitationsmaynotapplyto you.
In noeventshall recoveryof any kind begreaterthan theamountof the
purchasepriceof the productsold.Alterationof safetyfeatures of the
productshall void this warranty. Youassumethe riskandliabilityfor
loss, damage,or injuryto youandyour propertyand/orto othersandtheir
propertyarisingout of the misuseor inabilityto use theproduct.
Thislimitedwarrantyshall notextendto anyoneotherthanthe original
purchaseror to the personfor whomitwaspurchasedas a gift.
HOWSTATELAWRELATESTO THISWARRANTY: Thislimitedwar-
rantygivesyouspecificlegalrights,andyou mayalso haveother rights
whichvaryfromstateto state.
IMPORTANT: OwnermustpresentOriginalProofof Purchaseto obtain
warrantycoverage.
MTD LLC, P.O. BOX 361131 CLEVELAND, OHIO 44136-0019; Phone: 1-800-800-7310, 1-330-220-4683