
Safety • Assembly • Operation • Tips & Techniques • Maintenance • Troubleshooting • Parts Lists • Warranty
OF A'rO AL
_lllllll IIIIIIIIIIIIIIIIIIIIIIIIIIIIIIIIIIIIIIII• _,,_=_=L
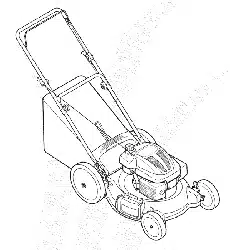
21" Rotary Mower- Model 829
iMPORTANT
READ SAFETY RULES AND iNSTRUCTiONS CAREFULLY BEFORE OPERATION
Warning: Thisunit is equippedwithaninternalcombustionengineandshouldnot beusedon or nearany unimprovedforest-covered,brush-
coveredor grass-coveredlandunlesstheengine'sexhaustsystemis equippedwitha sparkarrestermeetingapplicablelocalor statelaws(if any).
If a sparkarresteris used,it shouldbemaintainedineffectiveworkingorderby the operator.In theStateof Californiathe aboveis requiredbylaw
(Section4442of the CaliforniaPublicResourcesCode).Otherstatesmay havesimilarlaws.Federallawsapplyonfederallands.A sparkarrester
for the muffleris availablethroughyour nearestengineauthorizedservicedealeror contactthe servicedepartment,RO. Box361131Cleveland,
Ohio44136-0019.
PRINTEDIN U.S.A.
MTD LLC, P.O. BOX 361131 CLEVELAND, OHIO 44136-0019
FORMNO.769-01607
1/4/2005

This Operator's Manual is an important part of your new lawn mower, it will help you assemble,
prepare and maintain the unit for best performance. Please read and understand what it says.
Table of Contents
Slope Gauge ....................................................... 3
Safe Operation Practices ................................... 4
Setup and Adjustment ....................................... 6
Operating Your Lawn Mower .............................. 8
Maintaining Your Lawn Mower ......................... 10
Trouble Shooting .............................................. 14
Safety Labels .................................................... 15
Parts List ........................................................... 16
Finding and Recording Model Number
BEFOREYOU START ASSEMBLING
YOUR NEW EQUIPMENT,
please locatethe model plate on the equipment and copy the
information to the sample model plate provided to the right.
You can locate the model plate by standing at the operating
position and looking down at the rear of the deck. This
information will be necessary to use the manufacturer'sweb
site and/or obtain assistancefrom the Customer Support
Department or an authorized service dealer.
Model Number
Serial Number
P. O. BOX 361131
CLEVELAND,OH 44136
www.yardman.com 330-220-4683
800-800-7310
Customer Support
Please do NOTreturn the unit to the retailer from which it was
purchased, without first contacting Customer Support.
If you have difficulty assembling this product or have any
questions regarding the controls, operation or maintenanceof
this unit, you can seek help from the experts. Choose from the
options below:
1. Visit yardman.corn for many useful suggestions. Click
on Customer Support buttonand you will get the four
options reproduced in this sample to the right. Click on the
appropriate button and help is immediatelyavailable.
2. Phone a Customer Support Representative
at 1(800) 800-7310.
3. The engine manufacturer is responsiblefor all engine-
related issues with regards to performance, power-rating,
specifications, warranty and service. Please refer to the
engine manufacturer'sOwner's/Operator's Manual, packed
separately with your unit, for more information.
Click here to search our knowledge base.
Search by product, keyword, or phrase.
Login to check the status of your questions, modify
your inquiries, or update your personal profile.
Need local assistance? Click here to find authorized
service centers in your area.
Need a manual and/or parts list? Download
literature from recent model years.
2
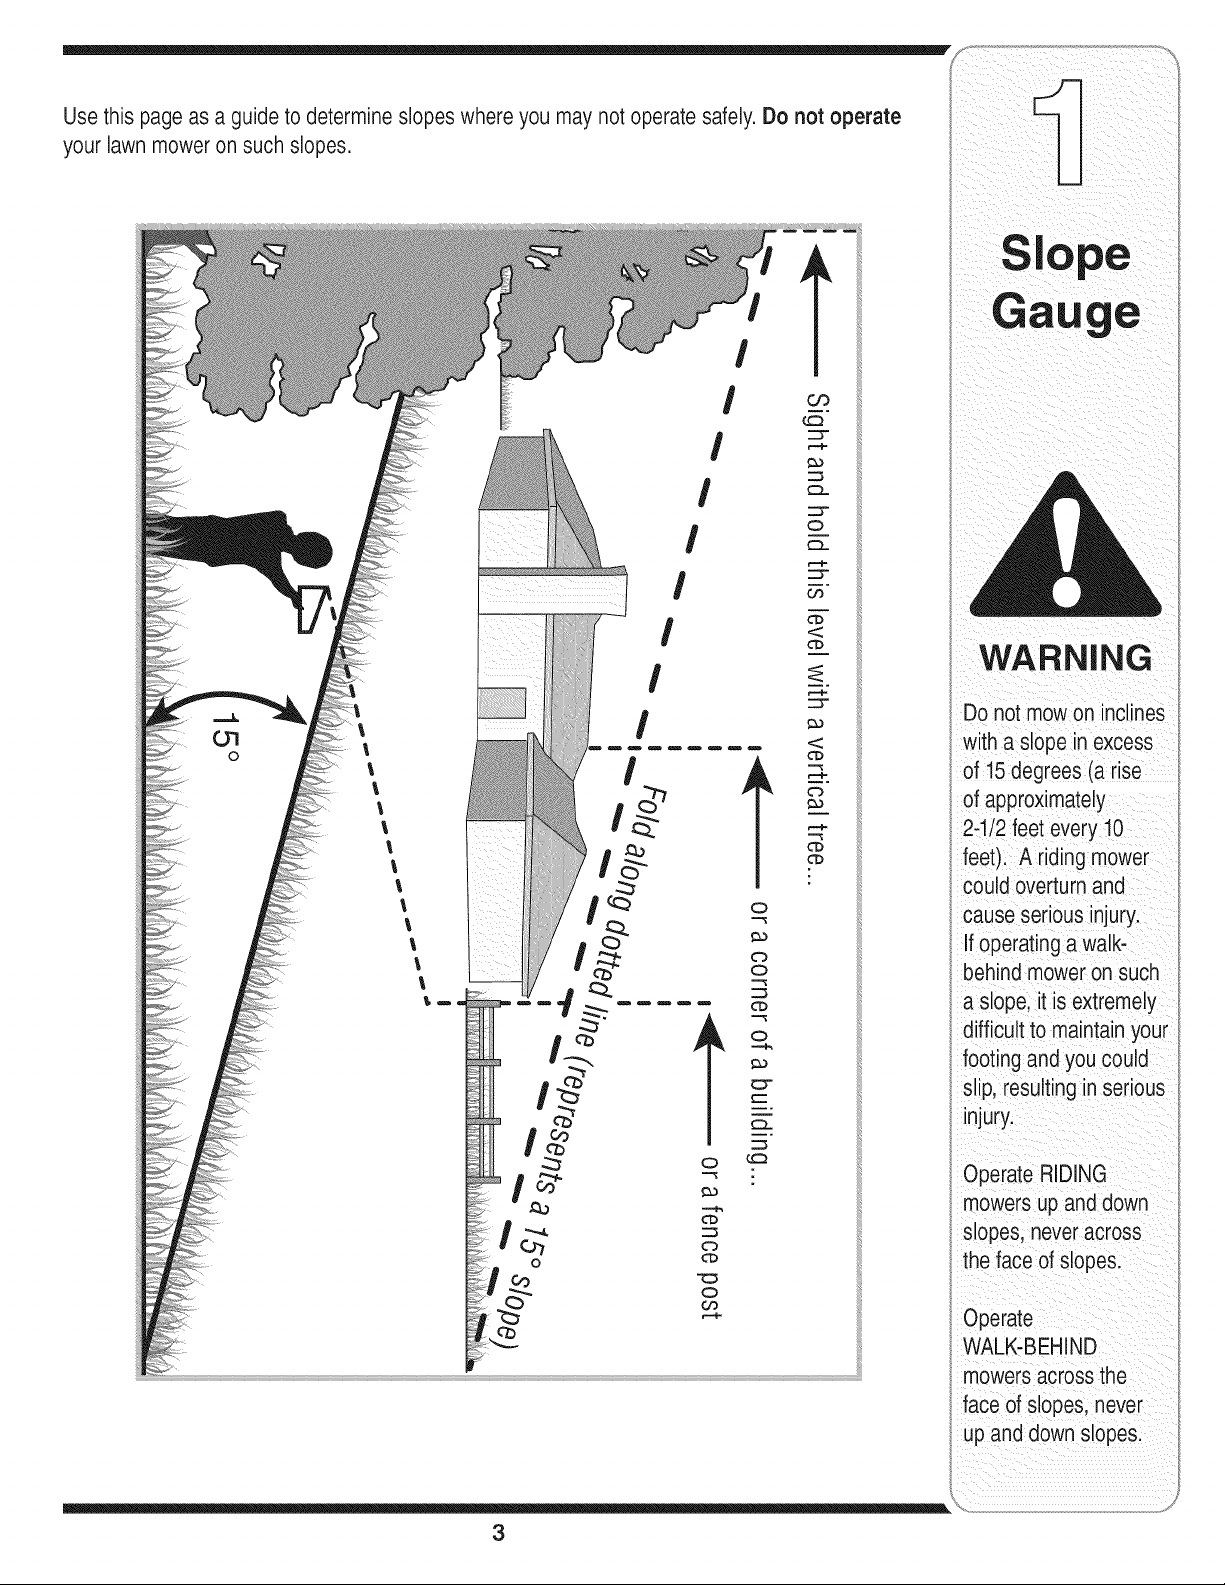
Use this page as a guide to determine slopes where you may not operatesafely. Do not operate
your lawn mower on such slopes.
!
I
!
3
i! i i iii_iii_ _ :iii
WARNING
Do not mow on inclines
with a slope in excess
of 15 degrees (a rise
of approximately
2-1/2 feet every 10
feet). A riding mower
could overturn and
cause serious injury.
If operating a walk-
behind mower on such
a slope, it is extremely
difficult to maintain your
footing and you could
slip, resulting in serious
injury.
Operate RIDING
mowers up and down
slopes, neveracross
the face d slopes.
Operate
WALK-BEHIND
mowers across the
face of slopes, never
up and down slopes.
RNING
This symbol points
i out important safety
instructionswhich, if
notfollowed, could
endangerthe personal
i safety and/or property
I of yourself and others.
Readand follow all
instructions in this man-
ual before attempting to
operatethis machine.
Failureto comply with
these instructions may
i result in personal injury.
i When you see this
_ symbol.
HEED ITS WARNING
Your
Responsibility
Restrictthe use
i of this power machine
i to personswho read,
understand
and follow the warnings
and instructions
in this manual
and on the machine.
WARNING: Engine Exhaust,some of its constituents, and certain vehicle compo-
nents contain or emit chemicals knownto State of Californiato cause cancer and
birth defects or other reproductiveharm.
DANGER: This machine was built to be operated according to the rules for safe operation in this
manual. As with any type of power equipment, carelessness or error on the part of the operator can
result in serious injury.This machine is capable of amputating hands and feet and throwing objects.
Failureto observe the followingsafety instructions could result in serious injury or death.
Children
Tragicaccidentscan occur if operatoris notalert to presence
of children.Childrenare oftenattractedto mowerand mowing
activity.Theydo not understandthe dangers.Neverassume
thatchildrenwill remainwhereyoulastsawthem.
1. Keepchildrenoutof the mowingareaand underwatchful
careof a responsibleadultotherthanthe operator.
2. Be alert andturn moweroff if a childentersthe area.
3. Beforeand whilemovingbackwards,look behindanddown
forsmallchildren.
4. Useextremecare when approachingblind corners,
doorways,shrubs,trees,or otherobjectsthat mayobscure
yourvisionof a child whomay run intothe mower.
5. Keepchildrenawayfromhot or runningengines.Theycan
sufferburnsfrom a hot muffler.
6. Neverallowchildrenunder14 yearsoldto operatea power
mower.Children14 yearsoldand overshouldreadand
understandoperationinstructionsandsafetyrulesinthis
manualandshouldbe trainedandsupervisedbya parent.
General Operation
1. Readthis operator'smanual carefully inits entiretybefore
attemptingto assemblethis machine.Read,understand,
andfollowall instructionson the machineandin the
manual(s) beforeoperation.Be completelyfamiliar with
thecontrols andthe properuseof this machinebefore
operatingit. Keepthis manualin a safe placeforfuture
and regularreferenceand for orderingreplacementparts.
2. This machineis a precision pieceof powerequipment,
nota plaything.Therefore,exerciseextremecautionat all
times.Yourunithas beendesignedto performonejob: to
mowgrass. Do notuse it for any otherpurpose.
3. Neverallow childrenunder 14yearsold to operatethis
machine.Children 14yearsold and overshould readand
understandthe instructionsinthis manualandshould
be trainedand supervisedby a parent.Onlyresponsible
individualswho arefamiliar withthese rulesof safe
operationshould be allowedto usethis machine.
4. Thoroughlyinspectthe areawherethe equipmentis to
be used. Removeall stones,sticks,wire, bones,toys and
otherforeignobjectswhichcould be tripped overor picked
up andthrown by the blade.Thrownobjectscan cause
seriouspersonalinjury.Plan yourmowingpatternto avoid
dischargeof materialtoward roads,sidewalks,bystanders
andthe like.Also, avoiddischargingmaterialagainsta
wall or obstructionwhich maycausedischargedmaterial
to ricochet backtoward the operator.
5. Tohelpavoid bladecontact ora thrownobjectinjury,
stay inoperatorzone behindhandlesand keepchildren,
bystanders,helpersand pets at least 75 feetfrom mower
whileit is inoperation.Stop machine if anyoneenters
area.
6. Alwayswearsafetyglasses or safetygogglesduringopera-
tion andwhile performingan adjustmentor repairto protect
youreyes.Thrownobjectswhich ricochetcancauseserious
injuryto the eyes.
7. Wearsturdy, rough-soledworkshoesand close-fitting
slacksandshirts. Shirtsand pantsthatcoverthe arms and
legs andsteel-toedshoesare recommended.Neveroperate
this machinein bare feet,sandals, slipperyor lightweight
(e.g. canvas)shoes.
8. Do notputhands or feet near rotatingparts or undercutting
deck.Contactwithblade can amputatehands andfeet.
9. A missingor damageddischargecovercan cause blade
contactor thrownobject injuries.
10.Manyinjuriesoccuras a resultof the mowerbeing pulled
overthefoot duringa fall causedby slippingor tripping.
Do nothold on to the mowerif you are falling; releasethe
handle immediately.
11.Neverpullthe mowerback towardyou whileyou are
walking.If you must backthe mowerawayfrom a wall or
obstructionfirst look downand behindto avoid trippingand
thenfollowthese steps:
a. Stepback from mowerto fully extendyourarms.
b. Be sure youare well balancedwith surefooting.
c. Pullthe mowerbackslowly,no morethan half way
toward you.
d. Repeatthesestepsas needed.
12.Do notoperatethe mowerwhileunderthe influenceof
alcoholor drugs.
13.Do notengage the self-propelledmechanismon units so
equippedwhilestartingengine.
14.The bladecontrol handle is a safetydevice.Neverattempt
to bypassits operation.Doingso makesthe safetydevice
inoperativeandmay result in personalinjurythrough
contactwith the rotatingblade. The bladecontrol handle
mustoperateeasily in bothdirectionsandautomatically
returnto the disengagedpositionwhen released.
15.Neveroperatethe mowerinwet grass. Alwaysbe sure of
yourfooting. A slip and fall cancauseseriouspersonal
injury.If youfeel you are losing yourfooting,releasethe
bladecontrol handleimmediatelyand the bladewillstop
rotatingwithinthreeseconds.
16.Mowonly in daylightor good artificiallight. Walk,never run.
17.Stopthe bladewhencrossinggraveldrives, walksor roads.
18.If the equipmentshouldstartto vibrateabnormally,stopthe
engineand check immediatelyfor the cause.Vibrationis
generallya warningof trouble.
19.Shutthe engineoff andwait untilthe bladecomesto a
completestop beforeremovingthe grasscatcheror unclog-
gingthe chute.
4
The cuttingbladecontinuesto rotatefor a fewseconds after
the engineis shut off. Neverplaceany part of the bodyin
the bladearea untilyou are surethe blade hasstopped
rotating.
20. Neveroperate mowerwithoutpropertrail shield, discharge
cover,grass catcher,bladecontrol handleor othersafety
protectivedevicesin placeand working.Neveroperate
mowerwithdamagedsafetydevices.Failureto do so,can
resultin personalinjury.
21. Mufflerandengine becomehot andcan causea burn. Do
nottouch.
22.Only use parts and accessoriesmadefor this machineby
manufacturer.Failureto do so can result inpersonalinjury.
23. If situationsoccurwhich are not coveredin this manual,
use careand goodjudgment.Contactyourdealerfor
assistance.Telephone1-800-800-7310for the nameof your
nearestdealer.
Slope Operation
Slopesare a majorfactor relatedto slip andfallaccidentswhich
can resultinsevereinjury.Operationon slopesrequiresextra
caution.If you feel uneasyon a slope,do notmow it. For your
safety,usethe slope gaugeincludedas part of this manualto
measureslopesbeforeoperatingthis unit on a slopedor hilly
area.If the slopeis greaterthan 15degrees,do not mowit.
Do:
1. Mowacrossthe faceof slopes; neverup anddown.
Exerciseextremecaution whenchangingdirectionon
slopes.
2. Watchfor holes,ruts,rocks, hiddenobjects,or bumpswhich
can causeyouto slip or trip. Tallgrass can hideobstacles.
3. Alwaysbe sure of yourfooting.A slip andfall cancause
serious personalinjury.If you feel you are losingyour
balance,releasethe bladecontrolhandle immediately,and
the bladewill stop rotatingwithin 3 seconds.
Do Not:
1. Donot mowneardrop-offs, ditchesor embankments,you
could loseyour footing or balance.
2. Donot mowslopesgreaterthan 15degrees asshownon
the slopegauge.
3. Donot mowon wetgrass. Unstablefooting could cause
slipping.
Service
Safe Handling Of Gasoline:
1. To avoidpersonalinjury orpropertydamage useextreme
care in handlinggasoline.Gasolineis extremelyflammable
and the vapors are explosive.Seriouspersonalinjurycan
occur when gasolineis spilled on yourself or your clothes
which can ignite.
2. Wash yourskin andchangeclothesimmediately.
3. Useonly an approvedgasolinecontainer.
4. Neverfill containers insidea vehicle oron a truckor trailer
bedwith a plasticliner.Alwaysplace containerson the
ground awayfrom yourvehicle beforefilling.
5. Removegas-poweredequipmentfromthe truck or trailer
and refuel it on the ground.If this is not possible,then refuel
such equipmenton a trailer with a portablecontainer,rather
than from a gasoline dispensernozzle.
6. Keepthe nozzlein contactwiththe rim of the fuel tank or
container openingat all times until fuelingis complete.Do
notuse a nozzlelock-opendevice.
7. Extinguishall cigarettes,cigars, pipesand othersources
of ignition.
8. Neverfuel machineindoorsbecauseflammablevaporswill
accumulatein thearea.
9. Neverremovegas cap oradd fuel whileengine is hot or
running. Allowengineto cool at least two minutesbefore
refueling.
10.Neveroverfill fuel tank. Filltank to no more than Y2inch
below bottomof filler neckto providefor fuel expansion.
11.Replacegasoline cap andtighten securely.
12.If gasolineis spilled,wipe it off theengine and equipment.
Moveunit to another area.Wait 5 minutesbeforestarting
engine.
13.Neverstorethe machineor fuel containernear an open
flame,sparkor pilot light as on a water heater,space
heater, furnace ,clothesdryeror othergas appliances.
14.Toreducefire hazard,keepmowerfree of grass, leaves,
orother debrisbuild-up.Clean up oil orfuel spillageand
removeany fuel soakeddebris.
15.Allow a mowerto cool at least5 minutesbeforestoring.
General Service:
1. Neverrun an engine indoorsorin a poorlyventilatedarea.
Engineexhaustcontainscarbonmonoxide,an odorless and
deadlygas.
2. Beforecleaning,repairing,or inspecting,makecertainthe
bladeandall movingparts havestopped.Disconnectthe
sparkplugwire andgroundagainstthe engineto prevent
unintendedstarting.
3. Checkthe bladeandengine mountingbolts atfrequent
intervalsfor propertightness.Also,visuallyinspectbladefor
damage(e.g.,bent,cracked,worn) Replacebladewiththe
originalequipmentmanufacture's(O.E.M.)bladeonly,listed
inthis manual."Use of partswhichdo notmeetthe original
equipmentspecificationsmay leadto improperperformance
andcompromisesafety!"
4. Mowerbladesare sharp andcan cut.Wrapthebladeor wear
gloves,anduse extracautionwhenservicingthem.
5. Keepallnuts,bolts, andscrewstight to be surethe equip-
mentis in safeworkingcondition.
6. Nevertamperwithsafetydevices.Checktheir properopera-
tion regularly.
7. Afterstrikinga foreignobject,stopthe engine,discon-
nectthe sparkplugwire andgroundagainstthe engine.
Thoroughlyinspectthe mowerfor any damage.Repairthe
damagebeforestartingandoperatingthe mower.
8. Neverattemptto makea wheel or cuttingheightadjustment
whiletheengine is running.
9. Grasscatchercomponents,dischargecover,andtrail
shield aresubjectto wear anddamagewhichcould expose
movingparts or allowobjectsto be thrown. For safety
protection,frequentlycheck componentsandreplaceim-
mediatelywithoriginal equipmentmanufacturer's(O.E.M.)
parts only,listed in this manual."Use of parts which do
notmeetthe original equipmentspecificationsmayleadto
improperperformanceandcompromisesafety!"
10.Do notchangetheenginegovernorsettingor overspeedthe
engine.The governorcontrolsthe maximumsafe operating
speedof theengine.
11.Maintainor replacesafetylabels,as necessary.
12.Observeproperdisposallawsand regulations.Improper
disposalof fluidsand materialscan harmthe environment.
5
Practices
WARNING
This symbol points
out important safety
instructions which, if
not followed, could
endangerthe personal
safety and/or property
of yourselfand others.
Readand follow all
instructions in this man-
ual before attempting to
operate this machine.
Failureto comply with
these instructionsmay
result in personal injury.
Whenyou see this
symbol.
HEED iTS WARNING
Your
Responsibility
Restrictthe use
of this power machine
to persons who read,
understand
and follow the warnings
and instructions
in this manual
and on the machine.
NOTEiStandbehind
the mowerasifyou
weregoingtooperate
L Yourrighthand€0r:
respondstotheright
sided themoWeryour
lefthandcorresp0nds
totheleftsideofthe
purposesyourmower
iSsetWiththewheels
in alowcutting
heightpostionlFor
best resultsraisethe
Cuttingpositionuntilit
isdeterminedwhich
heightiSbestforyour
lawnlsee Step7
detail&
IMPORTANT
DO NOTcr mp the
Cab es When ft ngthe
handle up.
I
This unit is shipped
without gasolineor
oil in the engine. Fil!
• ,
up gasolineand oil
as instructed in the
accompanying engine
manual BEFORE
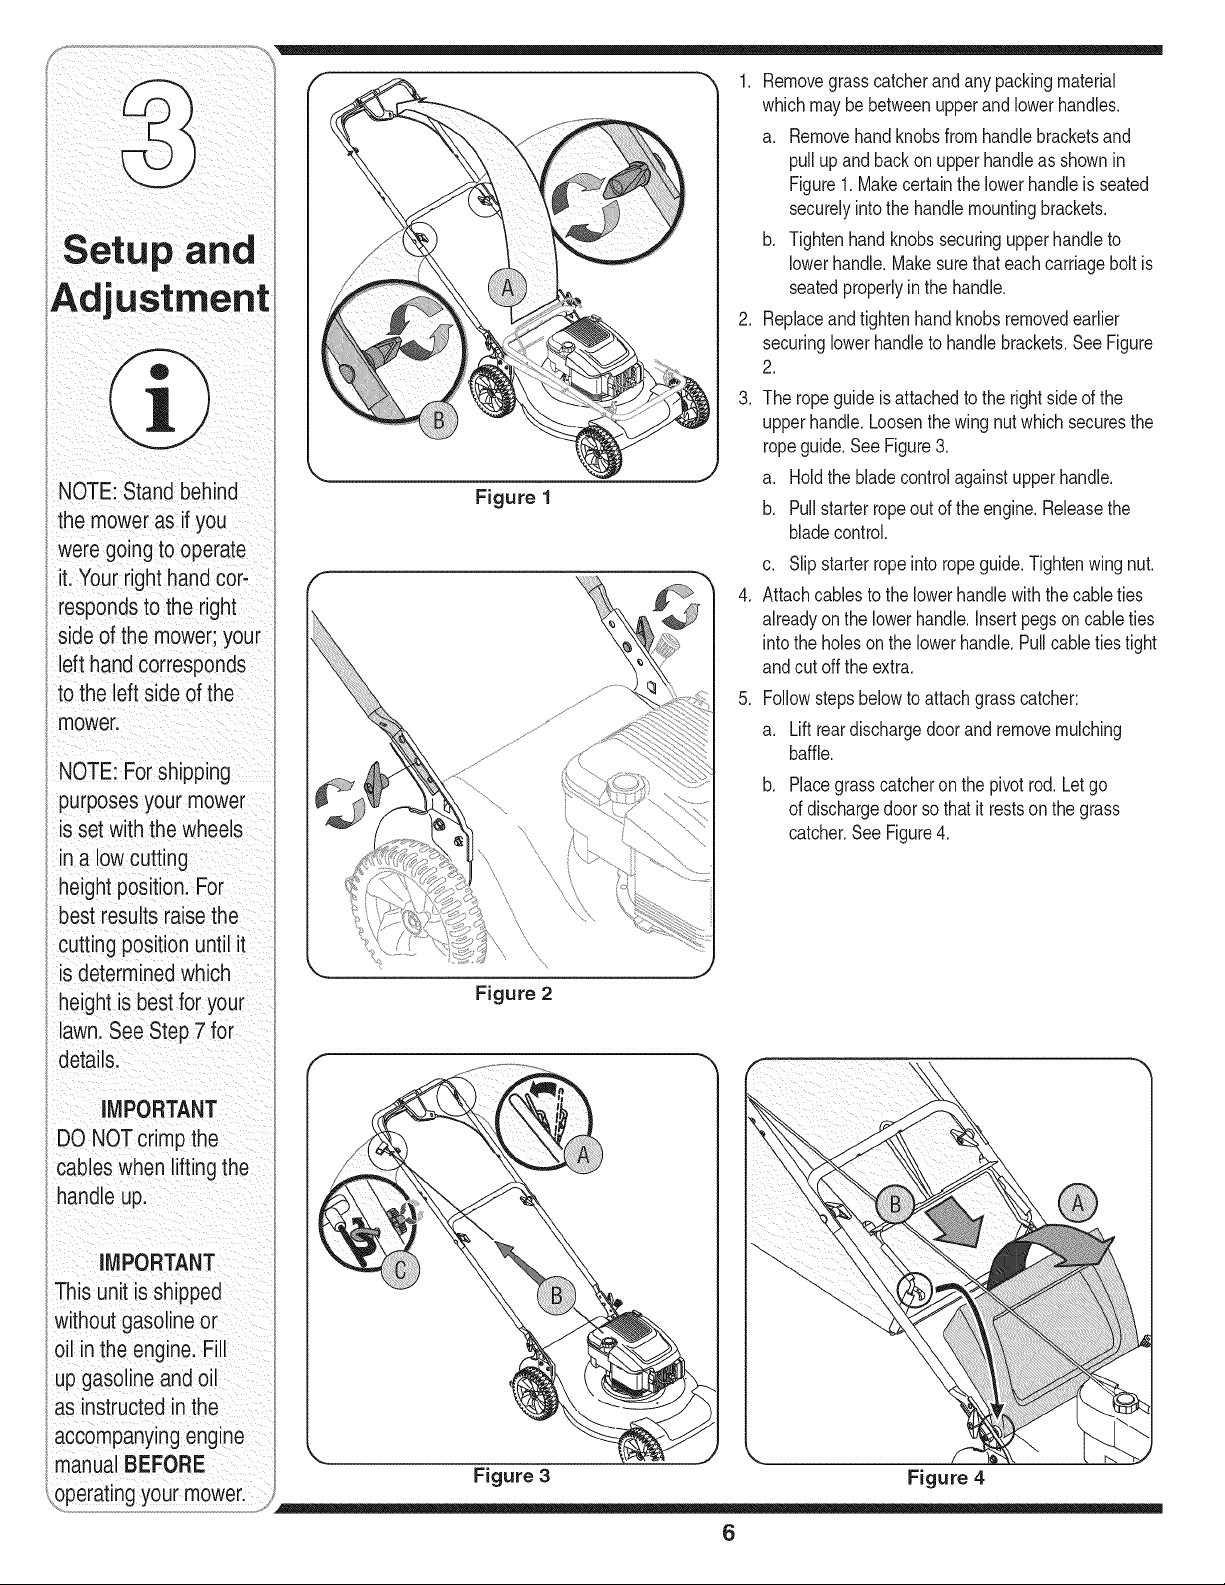
Figure 1
1. Removegrasscatcherandany packingmaterial
whichmaybe betweenupperand lowerhandles.
a. Removehandknobs from handlebracketsand
pullupand backon upperhandleas shown in
Figure1. Makecertainthe lowerhandleis seated
securelyintothe handle mountingbrackets.
b. Tightenhandknobssecuringupperhandleto
lowerhandle.Make surethat eachcarriagebolt is
seatedproperlyin the handle.
2. Replaceandtightenhandknobsremovedearlier
securinglowerhandleto handlebrackets.See Figure
2.
.
The ropeguide is attachedto the right sideof the
upperhandle.Loosenthe wingnut which securesthe
ropeguide.SeeFigure3.
a. Holdthe bladecontrolagainstupperhandle.
b. Pullstarterropeout of the engine.Releasethe
bladecontrol.
.
c. Slipstarterropeinto ropeguide.Tightenwingnut.
Attachcablesto the lowerhandlewiththe cableties
alreadyon the lowerhandle.Insertpegsoncable ties
intothe holeson the lowerhandle.Pull cabletiestight
andcutoff the extra.
5. Followstepsbelowto attachgrasscatcher:
a. Lift reardischargedoorand removemulching
baffle.
b. Placegrasscatcheron the pivot rod.Let go
of dischargedoor so that it restsonthe grass
catcher.See Figure4.
Figure 2
Figure 3 Figure 4
6
_ ARNING: Never operate mower
unless the hooks on the grass
catcher are firmly seated in the
slots on the handle bracket as-
semblies, and the rear discharge
door rests firmly against top of
the grass catcher.
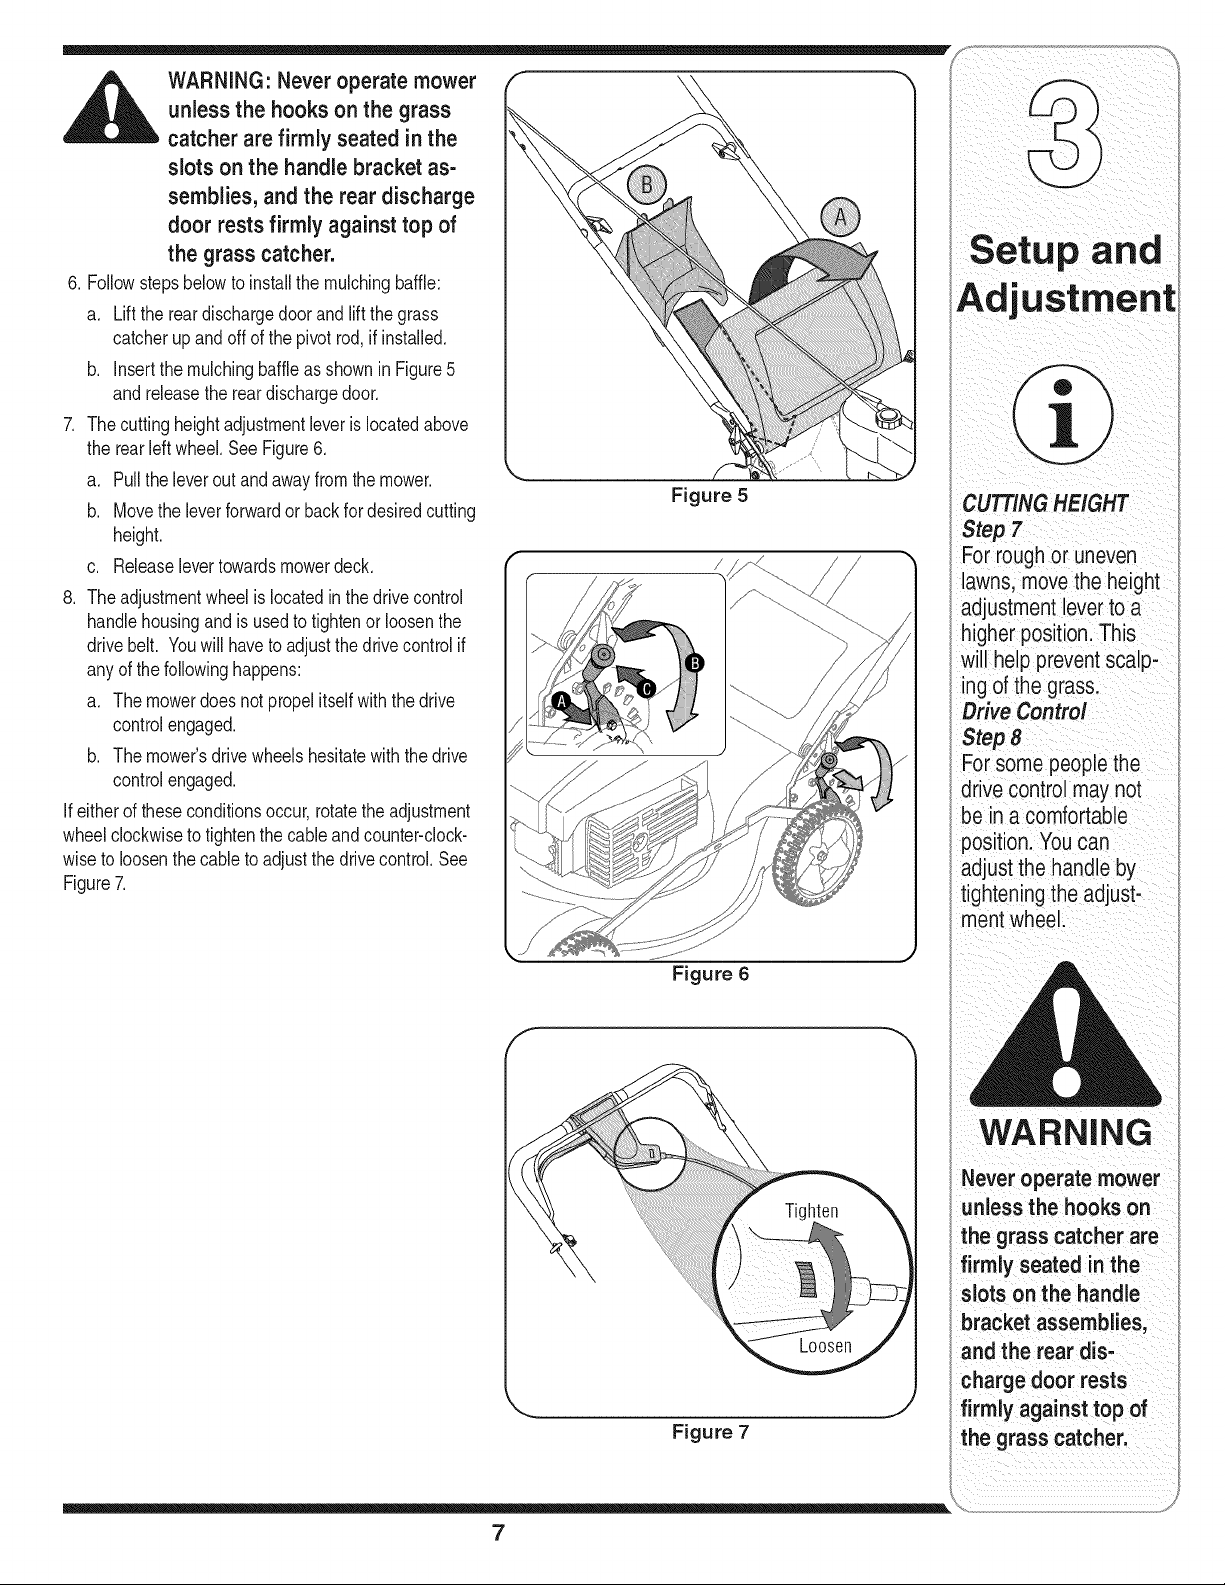
6. Followstepsbelowto installthe mulchingbaffle:
a. Liftthe rear dischargedoor and lift thegrass
catcherupandoff of the pivot rod,if installed.
b. Insertthe mulchingbaffleas shown in Figure5
and releasethe reardischargedoor.
7. The cuttingheightadjustmentleveris locatedabove
the rearleftwheel.SeeFigure6.
a. Pullthe leverout andawayfromthe mower.
b. Movethe leverforwardor backfor desiredcutting
height.
c. Releaselevertowardsmowerdeck.
8. The adjustmentwheelis locatedinthe drivecontrol
handlehousingand is usedto tightenor loosenthe
drive belt. Youwill haveto adjustthe drivecontrolif
any of the followinghappens:
a. The mowerdoesnot propelitselfwiththe drive
controlengaged.
b. The mower'sdrive wheelshesitatewith the drive
controlengaged.
Ifeitherof theseconditionsoccur,rotatethe adjustment
wheelclockwiseto tightenthe cableand counter-clock-
wiseto loosenthe cableto adjustthe drivecontrol.See
Figure7.
Figure 5
pand
i _i I
ustment
CU NG.E G"T
'rough oi uneven
lawns; move the heigh!
adjustment levertoa
higher position. This
will help preventscalp,
ingof the grass.
V
For some people the
drive contiol maynot
tightening
ment wheel.
Figure 6
Figure 7
WARNING
Never operatemower
unless the hooks on
the grass catcherare
firmly seated in the
on the handle
bracket assemblies,
and the rear dis:
e door rests
firmly against top of
the grass catcher,
7
WARNING
The blade control
mechanism is a
safety device. Never
attempt to bypass its
operations.
I Use extreme care
when handling
gasoline. Gasoline is
extremely flammable
and the vapors are
explosive. Never fuel
the machine indoors
or while the engine
is hot or running.
Extinguish cigarettes,
cigars, pipes and
other sources of
ignition.
Keep hands and feet
away from the chute
area on cutting deck.
Refer to warning
label on the unit.
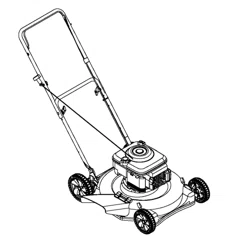
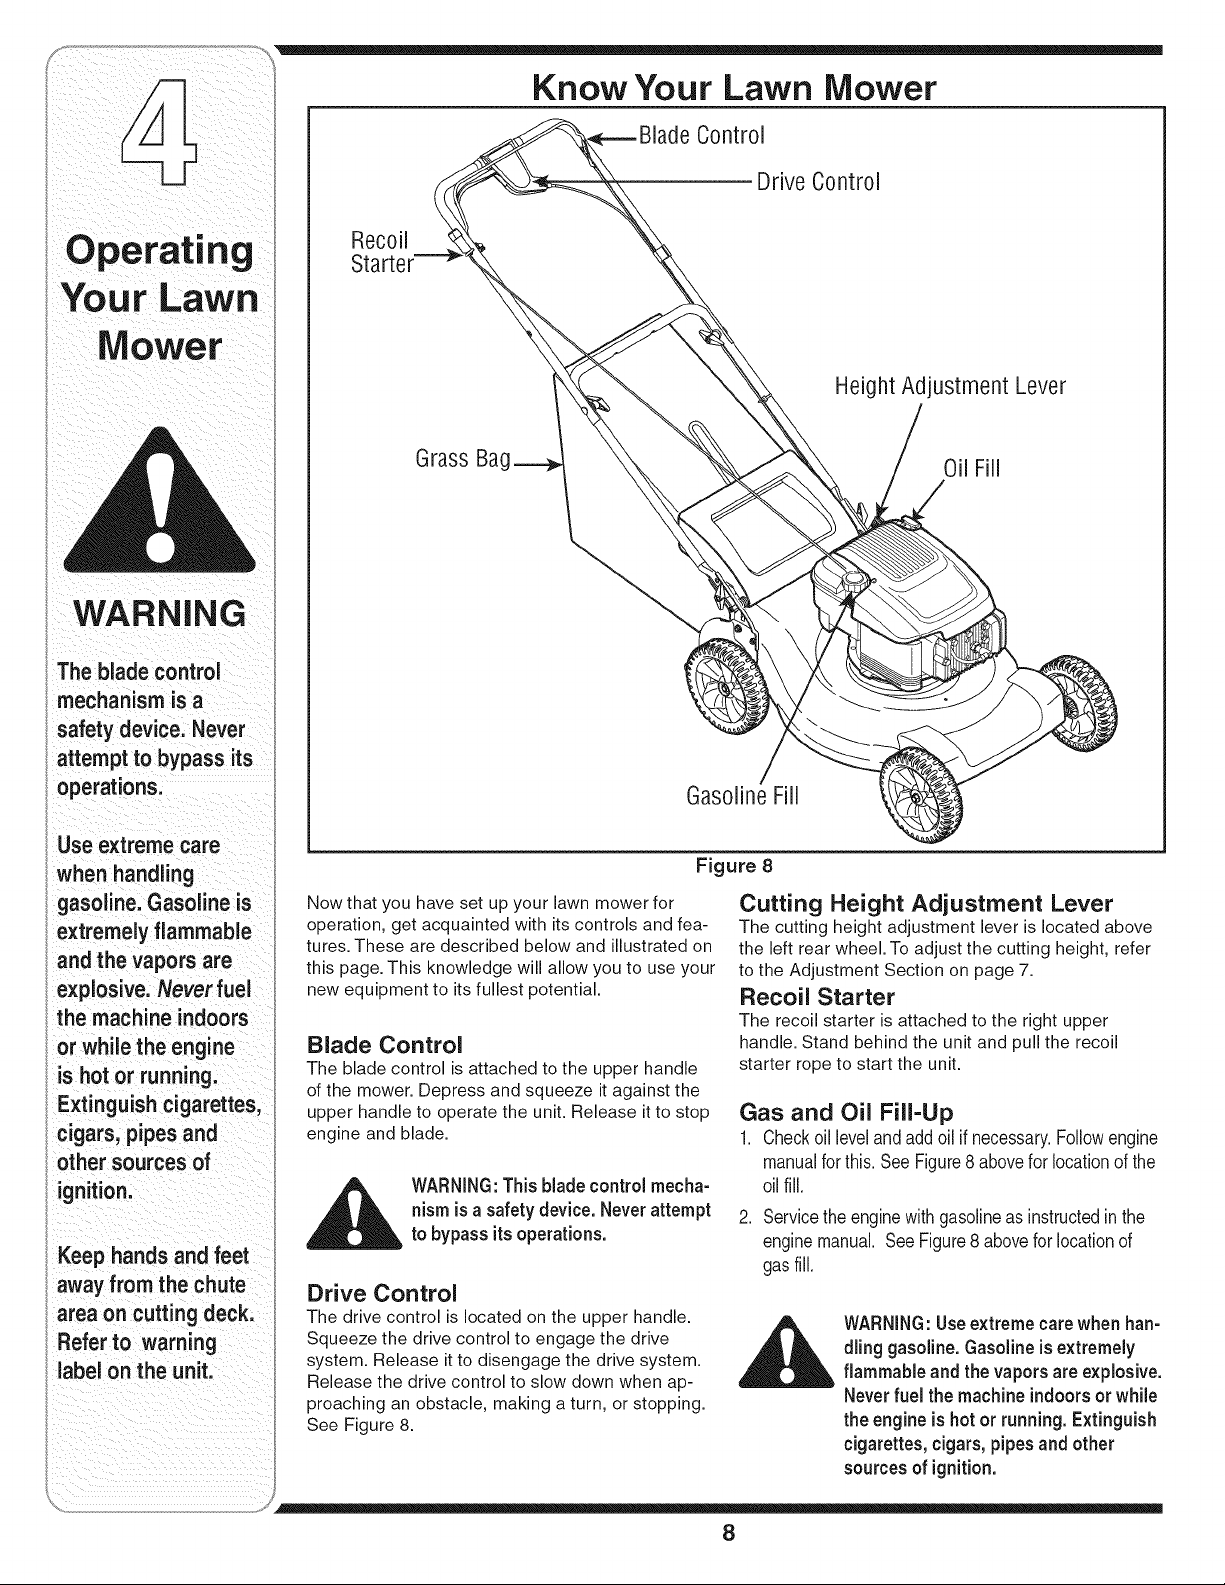
Know Your Lawn Mower
C0ntr01
Drive C0ntr01
Recoil
Height Adjustment Lever
Grass
GasolineFill
Figure 8
Now that you have set up your lawn mower for
operation, get acquainted with its controls and fea-
tures. These are described below and illustrated on
this page. This knowledge will allow you to use your
new equipment to its fullest potential.
Blade Control
The blade control is attached to the upper handle
of the mower. Depress and squeeze it against the
upper handle to operate the unit. Release it to stop
engine and blade.
_ WARNING:Thisbladecontrolmecha-
nism is a safetydevice. Never attempt
to bypass its operations.
Drive Control
The drive control is located on the upper handle.
Squeeze the drive control to engage the drive
system. Release it to disengage the drive system.
Release the drive control to slow down when ap-
proaching an obstacle, making a turn, or stopping.
See Figure 8.
Cutting Height Adjustment Lever
The cutting height adjustment lever is located above
the left rear wheel. To adjust the cutting height, refer
to the Adjustment Section on page 7.
Recoil Starter
The recoil starter is attached to the right upper
handle. Stand behind the unit and pull the recoil
starter rope to start the unit.
Gas and Oil Fill-Up
1. Check oil level and add oil if necessary. Follow engine
manual for this. See Figure 8 above for location of the
oil fill.
2. Servicethe enginewith gasolineas instructedinthe
enginemanual. SeeFigure8 abovefor locationof
gasfill.
_ ARNING:Useextremecarewhenhan-
dling gasoline.Gasoline is extremely
flammable and the vapors areexplosive.
Neverfuel the machine indoorsor while
the engine is hot or running. Extinguish
cigarettes, cigars, pipesand other
sources of ignition.
8
w
/_ WARNING:The operationof any lawn
being thrownintothe eyes,whichcan
mowercan result in foreign objects
damageyoureyesseverely.Always
wear safetyglasseswhile operating
the mower,or while performingany
adjustments or repairson it.
Starting Engine
,__ WARNING:Besure no one otherthan
the operatoris standing near the lawn
mowerwhilestarting engine or operat-
ingmower. Neverrun engine indoors
or in enclosed, poorly ventilated areas.
Engine exhaust contains carbon monox-
ide,an odorless and deadly gas. Keep
hands, feet, hair and loose clothing
awayfrom any moving partson engine
and lawn mower.
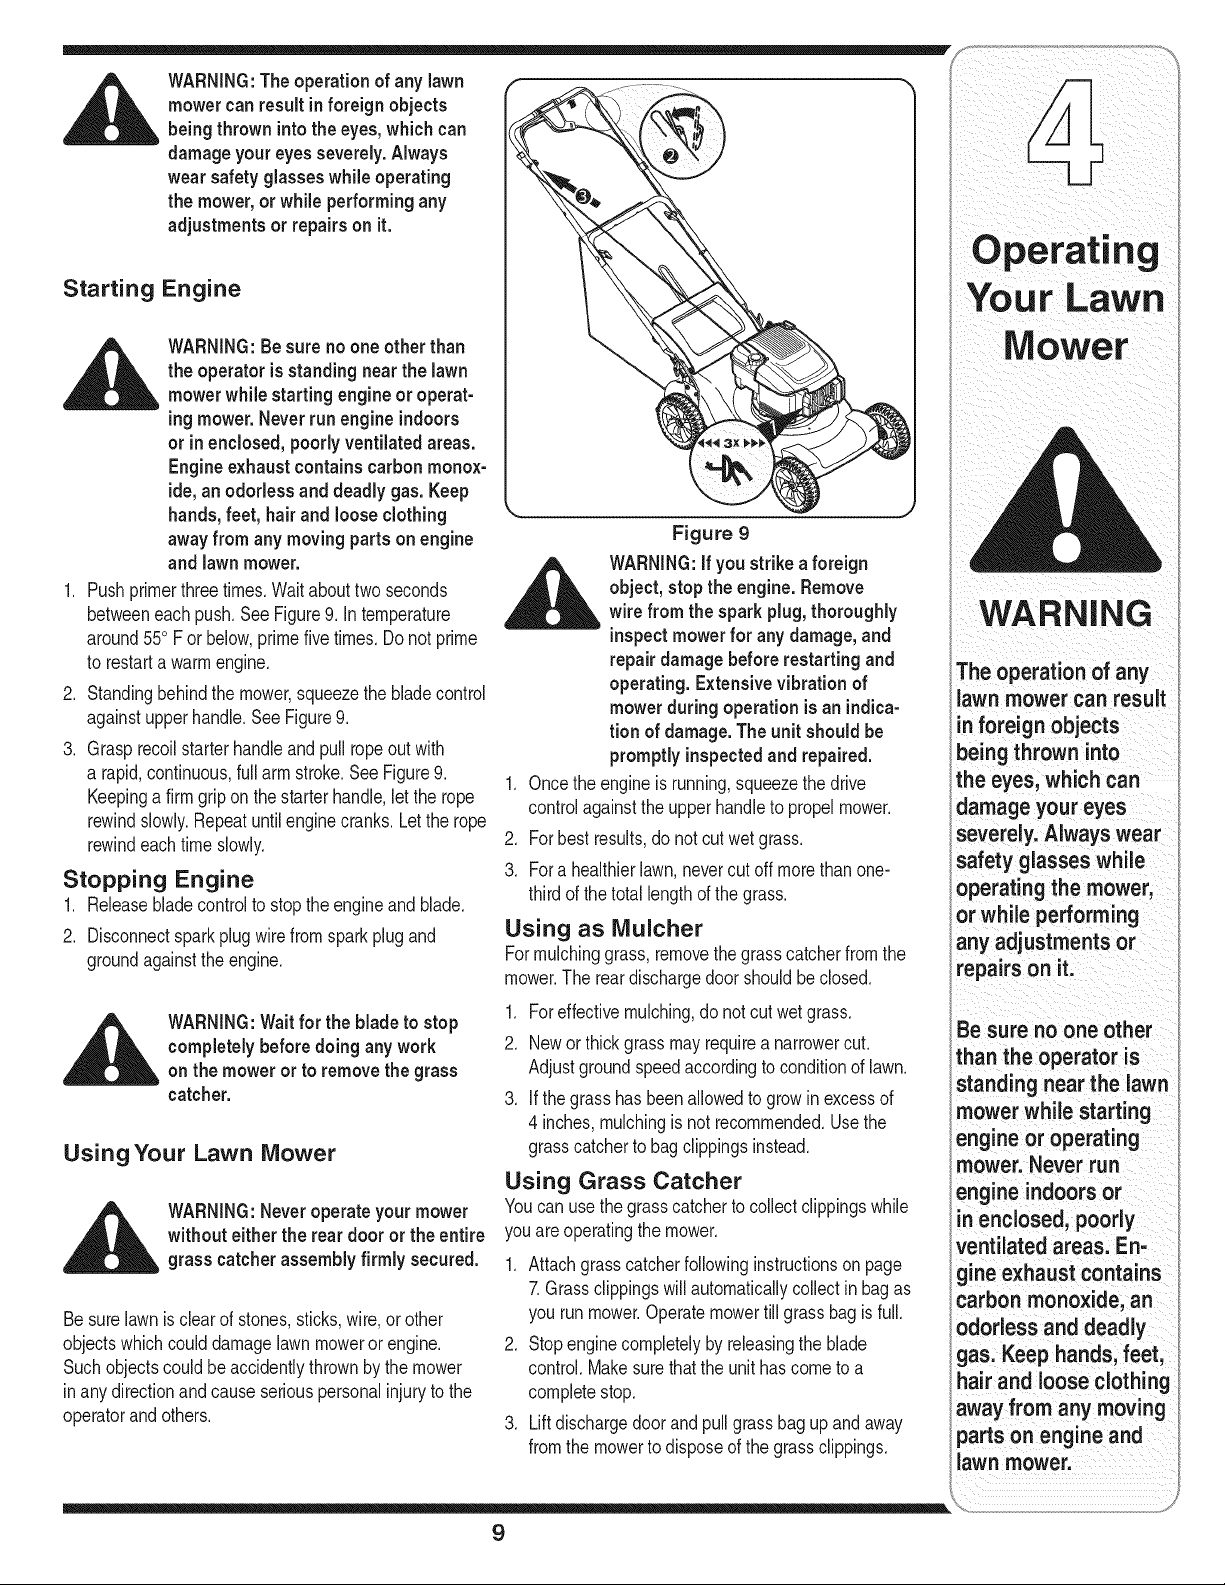
1. Pushprimerthreetimes.Wait abouttwoseconds
betweeneachpush.SeeFigure9. Intemperature
around550F or below,primefive times.Do not prime
to restarta warm engine.
2. Standingbehindthe mower,squeezethe bladecontrol
againstupperhandle.See Figure9.
3. Grasp recoilstarterhandleand pullropeout with
a rapid,continuous,full armstroke.SeeFigure9.
Keepinga firmgriponthe starterhandle,let the rope
rewindslowly.Repeatuntilenginecranks.Letthe rope
rewindeachtime slowly.
Stopping Engine
1. Releasebladecontrolto stop theengineand blade.
2. Disconnectsparkplugwirefromsparkplugand
groundagainstthe engine.
_ ARNING:Waitfor the blade to stop
completelybefore doing any work
on the mower or to removethe grass
catcher.
UsingYour Lawn Mower
_ ARNING:Neveroperate your mower
without either the rear door or the entire
grass catcher assembly firmly secured.
Besurelawnis clearof stones,sticks,wire,or other
objectswhichcoulddamagelawnmowerorengine.
Such objectscouldbe accidentlythrownby the mower
in anydirectionandcauseseriouspersonalinjuryto the
operatorand others.
Figure 9
_ ARNING:if you strike a foreign
object, stop the engine.Remove
.wirefrom the spark plug,thoroughly
respect mowerfor any damage,and
repairdamage before restarting and
operating. Extensive vibration of
mower during operation is an indica-
tion of damage.The unit should be
promptly inspectedand repaired.
1. Oncethe engineis running,squeezethedrive
controlagainstthe upperhandleto propelmower.
2. Forbest results,do notcut wetgrass.
3. Fora healthierlawn, nevercut offmorethan one-
thirdof the totallengthof the grass.
Using as Mulcher
Formulchinggrass,removethe grasscatcherfrom the
mower.The rear dischargedoor shouldbeclosed.
1. Foreffectivemulching,do notcut wetgrass.
2. Newor thick grassmay requirea narrowercut.
Adjustgroundspeedaccordingto conditionof lawn.
3. If thegrasshas beenallowedto growin excessof
4 inches,mulchingis not recommended.Usethe
grasscatcherto bagclippingsinstead.
Using Grass Catcher
Youcan usethe grasscatcherto collectclippingswhile
youareoperatingthe mower.
1. Attachgrasscatcherfollowinginstructionson page
7.Grassclippingswill automaticallycollectinbagas
you run mower.Operatemowertill grassbagis full.
2. Stopenginecompletelyby releasingthe blade
control.Makesurethatthe unithas cometo a
completestop.
3. Liftdischargedoorand pull grassbag up and away
fromthe mowerto disposeof the grass clippings.
Mower
WARNING
The operation of any
lawn mower can result
inforeign objects
being thrown into
the eyes, which can
damage your eyes
severely. Always wear
safety glasses while
operating the mower,
or while performing
any adjustments or
repairs on it.
Be sure no one other
than the operator is
standing near the lawn
mower while starting
engine or operating
mower. Never run
engine indoors or
n enclosed, poorly
ventilated areas. En-
gine exhaust contains
carbon monoxide, an
odorless and deadly
gas. Keep hands, feet,
hair and loose clothing
away from any moving
parts on engine and
lawn mower.
9
Maintaining
i
Your LaWn
i
_edo not recommend
ihe use of pressuie
bashers or garden hose
i0 clean your unitl These
_ay cause damage to
_lectriccomponents;
_pind es; pul eys, beai:
!ngs or the engine: The
bse0f WaterWillresultin
}hortened life and reduce
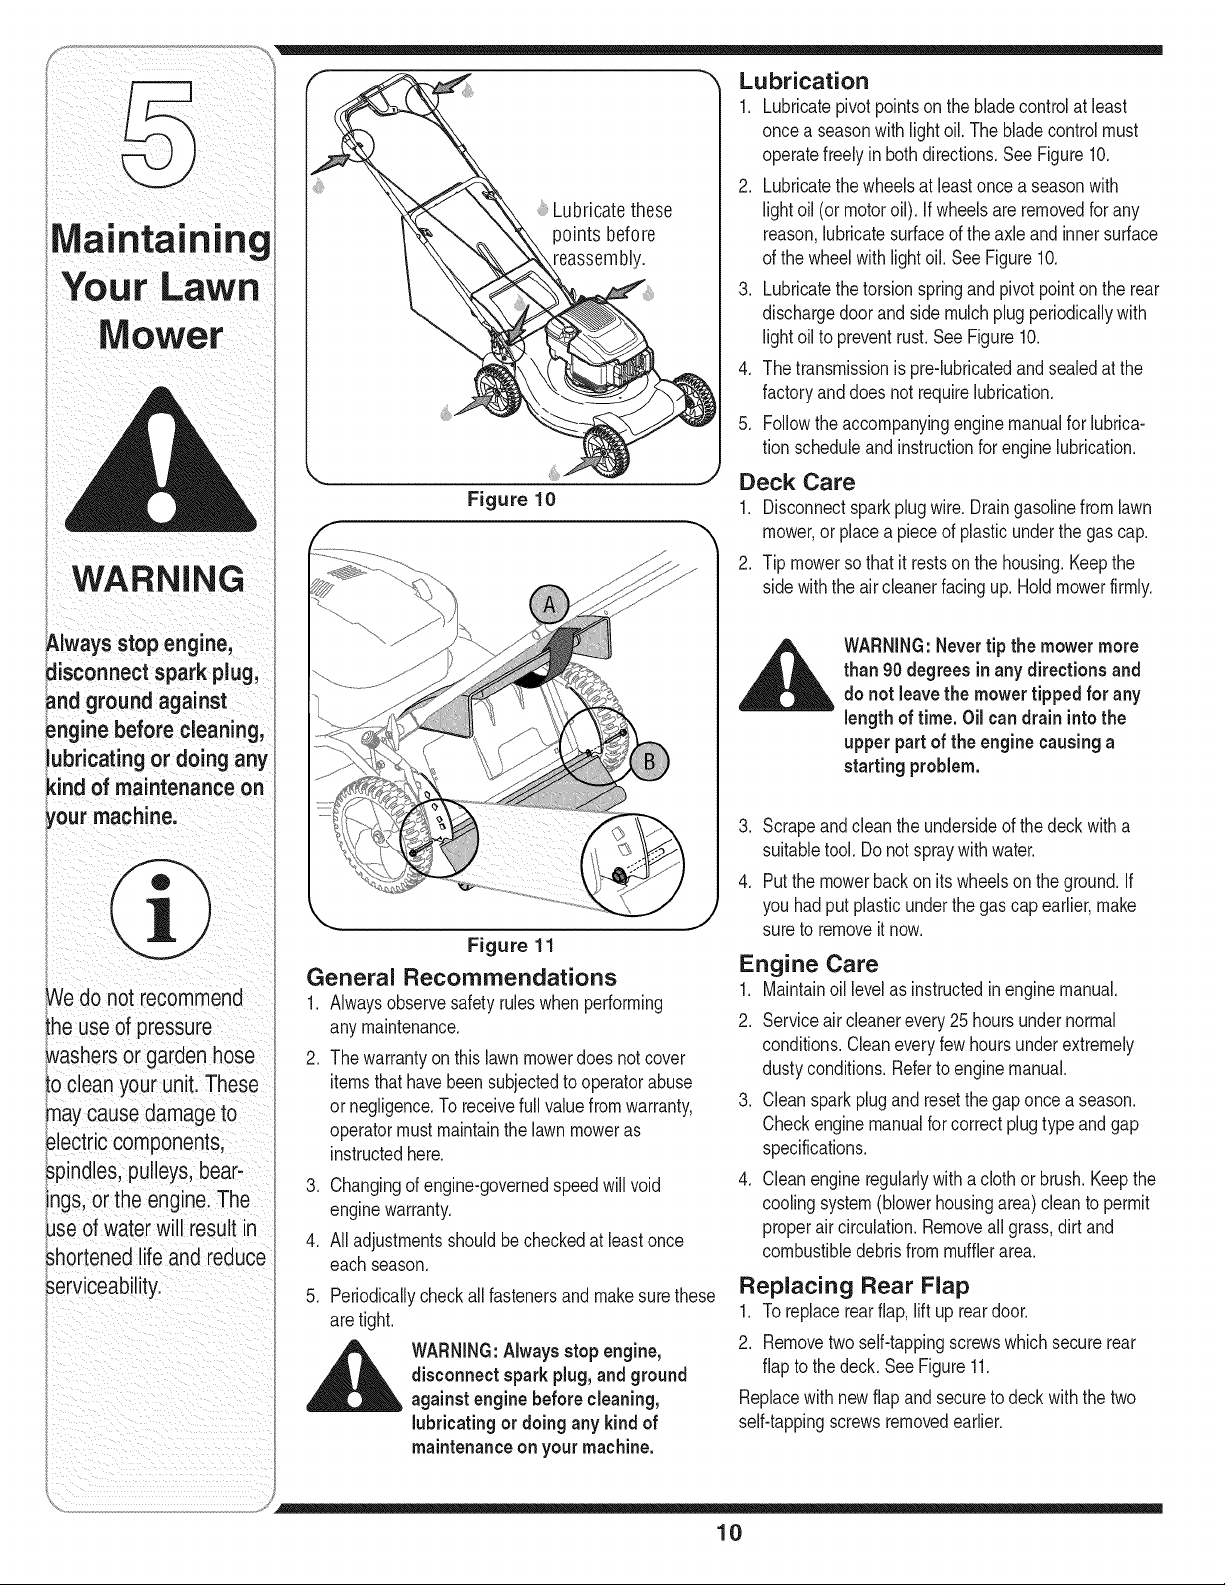
Lubricate these
points before
Figure 10
Lubrication
1. Lubricatepivotpointson thebladecontrolat least
oncea seasonwithlightoil. The bladecontrolmust
operatefreely inboth directions.See Figure10.
2. Lubricatethe wheelsat least oncea seasonwith
lightoil (ormotoroil). If wheelsareremovedfor any
reason,lubricatesurfaceof the axleand innersurface
of the wheelwith lightoil. See Figure10.
3. Lubricatethe torsionspringandpivotpointonthe rear
dischargedoorandside mulchplug periodicallywith
lightoil to preventrust.SeeFigure10.
4. Thetransmissionis pre-lubricatedandsealedat the
factoryanddoes not requirelubrication.
5. Followtheaccompanyingenginemanualfor lubrica-
tion scheduleand instructionfor engine lubrication.
Deck Care
1. Disconnectsparkplug wire. Draingasolinefrom lawn
mower,or placea pieceof plasticunderthe gas cap.
2. Tip mowersothat itrestson the housing.Keepthe
sidewiththe aircleanerfacingup. Hold mowerfirmly.
WARNING:Nevertip the mowermore
than 90 degrees in any directions and
do not leavethe mower tipped for any
length of time. Oil can drain intothe
upper part of the enginecausing a
starting problem.
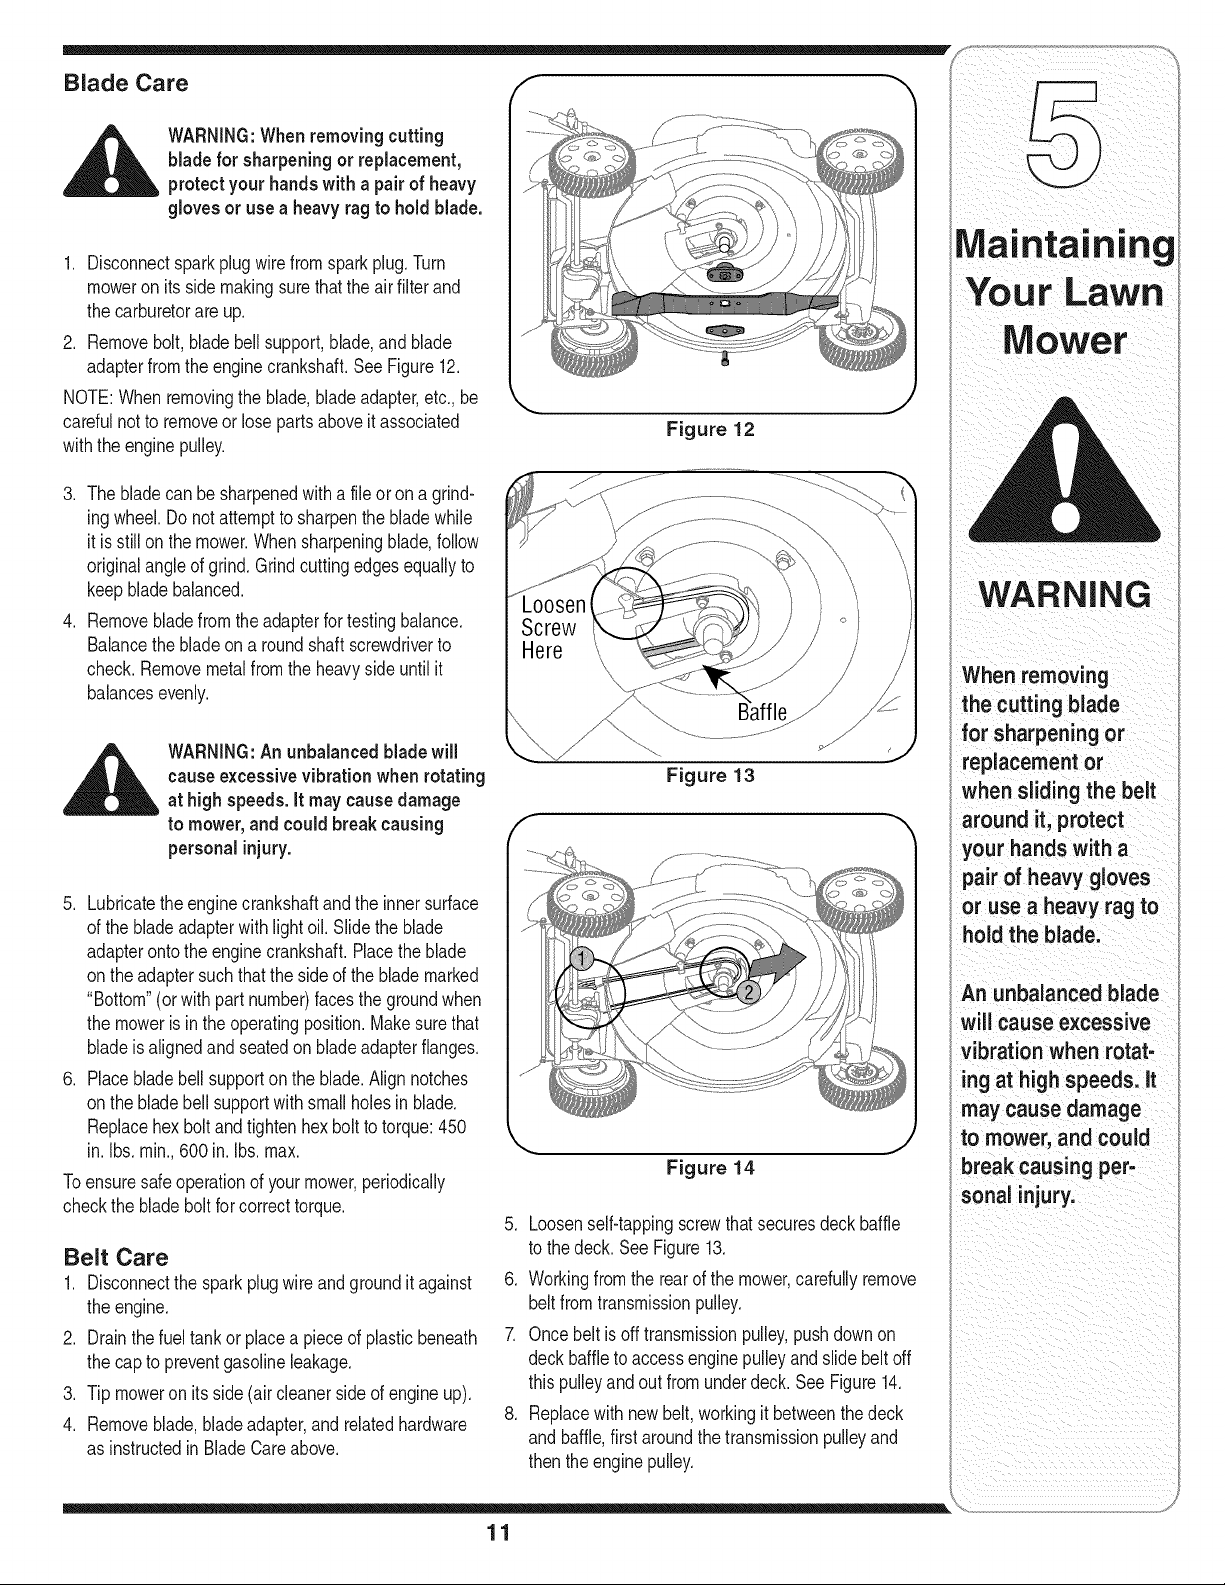
Figure 11
General Recommendations
1. Alwaysobservesafetyruleswhen performing
anymaintenance.
2. Thewarrantyon this lawnmowerdoesnot cover
itemsthathavebeensubjectedto operatorabuse
ornegligence.To receivefull valuefromwarranty,
operatormustmaintainthelawn moweras
instructedhere.
3. Changingof engine-governedspeedwill void
enginewarranty.
4. Alladjustmentsshouldbecheckedat leastonce
eachseason.
5. Periodicallycheckallfastenersand makesurethese
aretight.
,_hllL WARNING:Alwaysstopengine,
disconnect spark plug, and ground
against engine before cleaning,
lubricatingor doing any kind of
maintenance on your machine.
3. Scrapeand clean the undersideof the deckwitha
suitabletool.Do notspraywithwater.
4. Putthe mowerbackonitswheelsonthe ground.If
youhadput plasticunderthe gas capearlier,make
sureto removeit now.
Engine Care
1. Maintainoil levelas instructedin enginemanual.
2. Serviceaircleanerevery25 hoursundernormal
conditions.Cleaneveryfewhoursunderextremely
dustyconditions.Referto enginemanual.
3. Cleansparkplugand resetthegaponce a season.
Checkenginemanualfor correctplugtype and gap
specifications.
4. Cleanengineregularlywith a cloth or brush. Keepthe
coolingsystem(blowerhousingarea) cleanto permit
properaircirculation.Removeall grass,dirt and
combustibledebrisfrom mufflerarea.
Replacing Rear Flap
1. Toreplacerearflap,lift up reardoor.
2. Removetwo self-tappingscrewswhichsecure rear
flapto thedeck. SeeFigure11.
Replacewith newflapand secureto deckwiththe two
self-tappingscrewsremovedearlier.
10
Blade Care f
__k ARNING:Whenremovingcutting
bladefor sharpeningor replacement,
protectyourhandswitha pairof heavy
gloves or use a heavy rag to hold blade.
1. Disconnectsparkplugwirefromsparkplug.Turn
moweron itsside makingsurethatthe air filter and
the carburetorare up.
2. Removebolt,bladebellsupport,blade,and blade
adapterfrom the enginecrankshaft.See Figure12.
NOTE:Whenremovingthe blade,bladeadapter,etc.,be
carefulnotto removeorlose partsaboveit associated
withthe engine pulley.
3. The bladecan be sharpenedwith a fileor on a grind-
ing wheel.Do notattemptto sharpenthe bladewhile
it is stillon the mower.Whensharpeningblade,follow
originalangleof grind.Grindcuttingedgesequallyto
keep bladebalanced.
4. Removebladefromthe adapterfor testingbalance.
Balancethe bladeon a roundshaftscrewdriverto
check.Removemetalfrom the heavysideuntil it
balancesevenly.
Figure 12
_ WARNING:Anunbalanced bladewill
causeexcessivevibration when rotating
at high speeds. It may causedamage
to mower,and could break causing
personalinjury.
5. Lubricatetheenginecrankshaftand the inner surface
of the blade adapterwithlightoil. Slidethe blade
adapteronto the enginecrankshaft.Placethe blade
on theadaptersuchthatthe sideof the blademarked
"Bottom"(or with part number)facesthe groundwhen
the moweris in the operatingposition.Makesurethat
bladeis alignedand seatedon bladeadapterflanges.
6. Placeblade bell supporton the blade.Alignnotches
on the bladebell supportwith smallholesin blade.
Replacehex boltandtightenhex boltto torque:450
in. Ibs. min.,600 in. Ibs.max.
Toensuresafeoperationof yourmower,periodically
checkthe bladeboltfor correcttorque.
Belt Care
1. Disconnectthe sparkplug wireand ground itagainst
the engine.
2. Drainthe fuel tank or placea pieceof plasticbeneath
the cap to preventgasolineleakage.
3. Tip moweron its side (air cleanersideof engineup).
4. Removeblade,bladeadapter,and relatedhardware
as instructedin BladeCareabove.
Figure 13
Figure 14
5. Loosenself-tappingscrewthat securesdeckbaffle
to the deck.SeeFigure13.
6. Workingfromthe rear of the mower carefullyremove
beltfromtransmissionpulley.
7. Oncebelt is offtransmissionpulley,pushdownon
deckbaffleto accessengine pulleyand slidebelt off
thispulleyandout fromunderdeck.SeeFigure14.
8. Replacewith newbelt,workingit betweenthedeck
andbaffle,firstaroundthe transmissionpulleyand
thenthe enginepulley.
11
Your LaWn
ower
WARNING
When removing
the cutting blade
for sharpening or
replacement or
when sliding the belt
around it, protect
your hands with a
pair of heavy gloves
or use a heavy rag to
hold the blade.
An unbalanced blade
will cause excessive
vibration when rotat-
ing at high speeds, it
may cause damage
to mower, and could
break causing per-
sonal injury.

i F'-'--q NOTE: Makecertainthatbelt isseatedcorrectlyand Off-Season Storage
} ! _ thatit is ridingsmoothlyon the enginepulleyand is not Thefollowingstepsshouldbe takento prepareyourlawn
i L_ _ pinchedbetweenthe lowerand upperpulleyhalves, mowerfor storage.
_ ) 1. Cleanandlubricatemowerthoroughlyas describedin
9. Tightenself-tappingscrewsecuringdeckbaffle the lubricationinstructions.
Maintaining
Your Lawn
Mower
loosenedearlier.
10.Replaceblade,blade adapter,and associated
hardware.Followinstructionsin BladeCaresection
for properassembly.
11.Tip mowerbackonto its wheelsand removepieceof
plasticfromundergascap (if applicable).
2. Wedo not recommendthe use of a pressurewasher
orgardenhoseto cleanyourunit.
3. Referto enginemanualforcorrectengine
storageinstructions.
4. Coatmower'scuttingbladewithchassisgreaseto
preventrusting.
5. Storemowerina dry,cleanarea.Do not storenextto
corrosivematerials,suchas fertilizer.
Whenstoringanytypeof powerequipmentin a poorly
ventilatedor metalstorageshed,careshouldbetakento
rust-prooftheequipment.Usinga lightoil or silicone,coat
the equipment,especiallycablesandall movingpartsof
yourlawnmowerbeforestorage.
12

Notes
13
Maintaining
ii i ii i
ii i_ _i_ii_ii!ii_ _!_
i i i i i i ii
ii i _i I_ ii
Shooting
For repairs beyond
the mbor
ments fisted here,
contact an authorized
service dealer.
i_i/_ii!_iiii_i iii_i_iii!iiii !iii! i_i!
i_i i i ii i i i
_ - _ -]
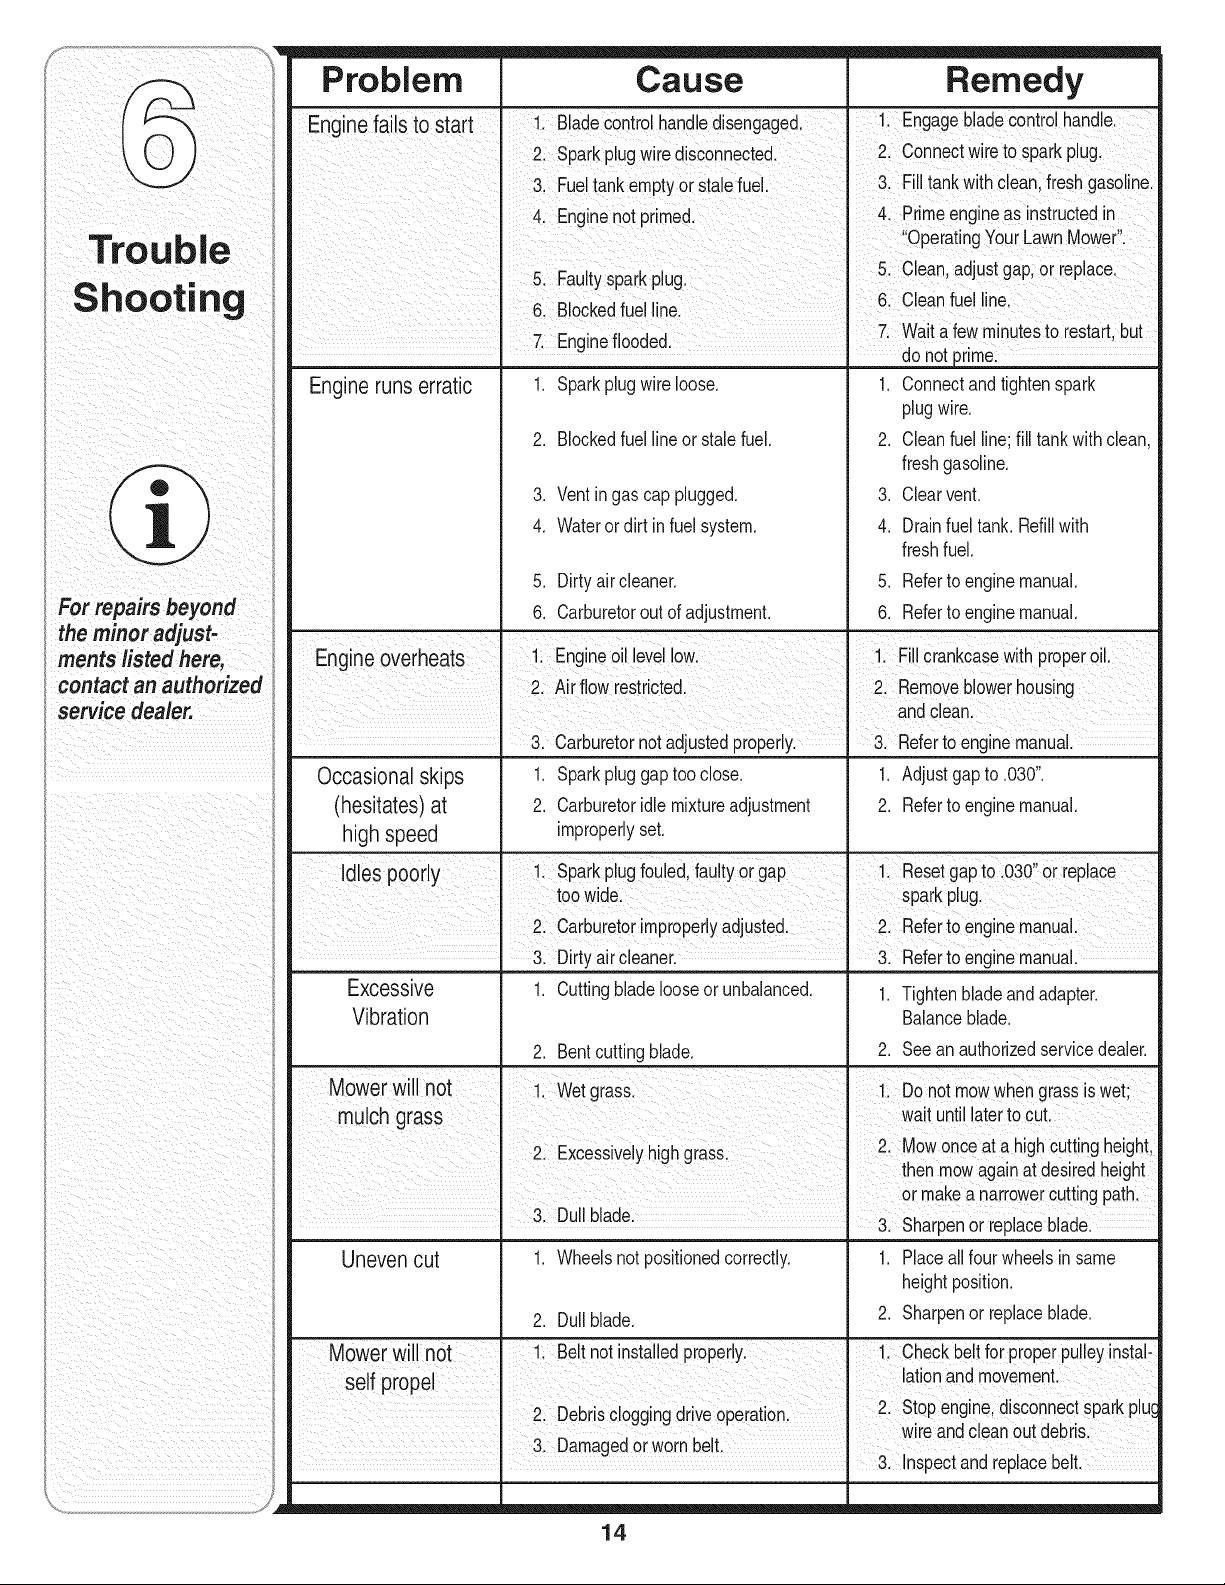
Problem Cause Remedy
Enginefails to start 1. Bladecontrolhandledisengaged• 1. Engagebladecontrolhandle•
2. Sparkplugwire disconnected, 2. Connectwireto spark plug•
3. Fueltankemptyorstalefuel• 3. Fil tankw th clean,fresh gasoline•
4. Engne not primed• 4. Primeengineas instructedin
"OperatngYourLawnMower"•
5. Faultysparkplug. 5. C ean adjustgap or repace.
6. Bockedfuel line, 6. Cleanfuel ine.
..... 7 Wat a few m nutesto restart but
/ t-ngne Tooaea. 1 do notprime.
Engineruns erratic 1. Sparkplug wireloose. 1. Connectandtightenspark
plugwire.
2. Blockedfuellineor stalefuel. 2. Cleanfuel line;fill tankwithclean,
freshgasoline.
3. Ventingas cap plugged. 3. Clearvent.
4. Waterordirt infuel system. 4. Drainfuel tank. Refillwith
freshfuel.
5. Dirty air cleaner. 5. Referto enginemanual.
6. Carburetorout of adjustment. 6. Referto enginemanual.
Engine overheats 1. Engineo level low 1. Fillcrankcasewth properoil.
2. Airflow restrcted. 2. Removeblowerhousing
I I andclean.
• 3. Carburetornotadjustedproperly. 3. Referto enginemanual.
Occasional skips 1. Sparkplug gap tooclose. 1. Adjustgap to .030".
(hesitates) at 2. Carburetoridlemixtureadjustment 2. Referto enginemanual.
high speed improperlyset.
Idles poorly 1 Sparkplugfouled,faultyorgap 1. Resetgap to 030"or replace
toowide. sparkplug.
2. Carburetorimproperlyadjusted 2. Referto enginemanual
'3 (Dr'ty:;c re_ne; -;3 _efer:o en_ n: m:nnua
Excessive 1. Cuttingbladelooseor unbalanced. 1. Tightenblade and adapter.
Vibration Balanceblade.
2. Bentcuttingblade. 2. Seean authorizedservicedealer.
Mower will not 1. Wetgrass. 1. Do not mowwhengrassis wet;
mulch grass wait untillaterto cut.
I 2 Excessivel h-h _rass 2. Mowonceat a highcuttingheight
• y u u then mowagain at desiredheight
or makea narrowercuttingpath.
I 3 Dull blade I
• " 3. Sharpenor replaceblade.
Unevencut 1. Wheelsnot positionedcorrectly. 1. Placeall fourwheelsin same
heightposition.
2. Dull blade. 2. Sharpenor replaceblade.
Mower wi not 1. Belt notinstalledpropery. 1 Checkbelt for properpulleyinstal-
f r aton and movement
se pope I I . . "
2 Stop engine disconnectspark pluc
2. Debriscloggingdrive operation. • . .
3. Damagedorworn belt. I w reanac ean ou, aeDrs
3. Inspectanarepace Det.
14
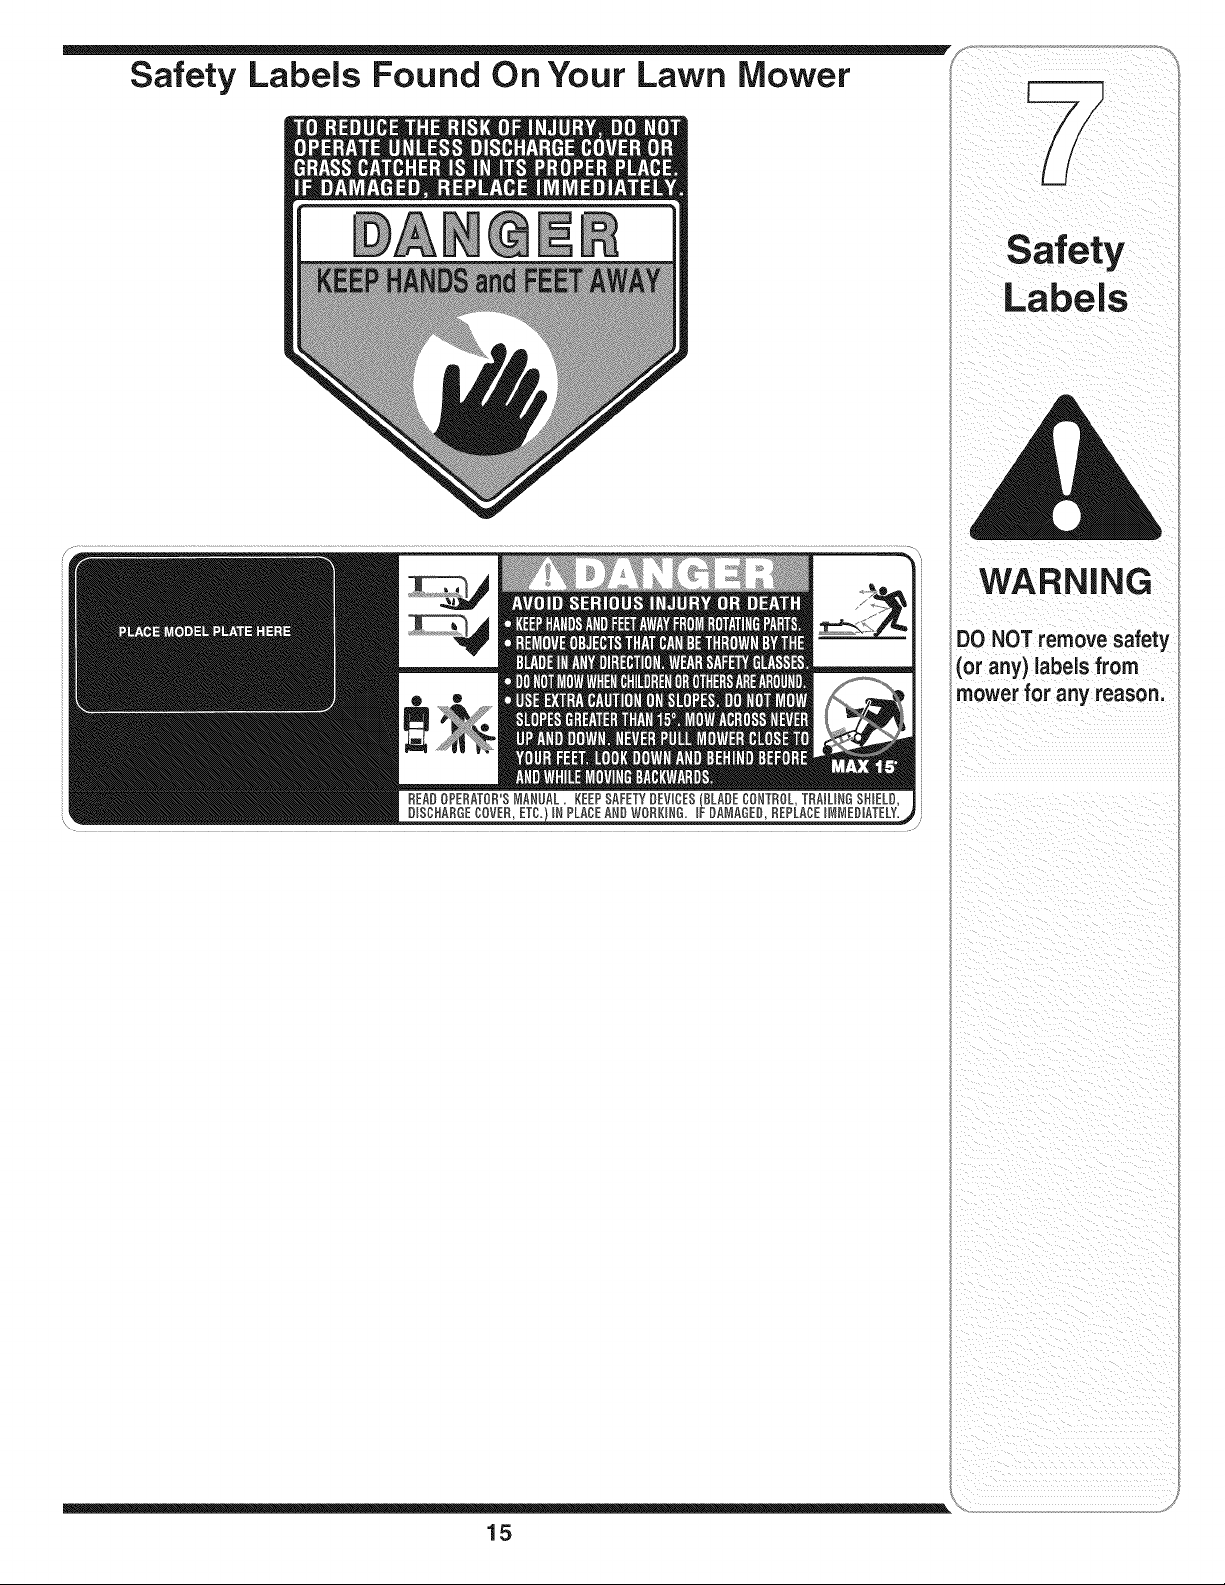
Safety Labels Found On Your Lawn Mower
15
Labels
WARNINC
DONOT remove safety
(or any)labels from
mower for any reason,
Shown For Reference
!
/
Shown For Reference
j j/
'\ •7)
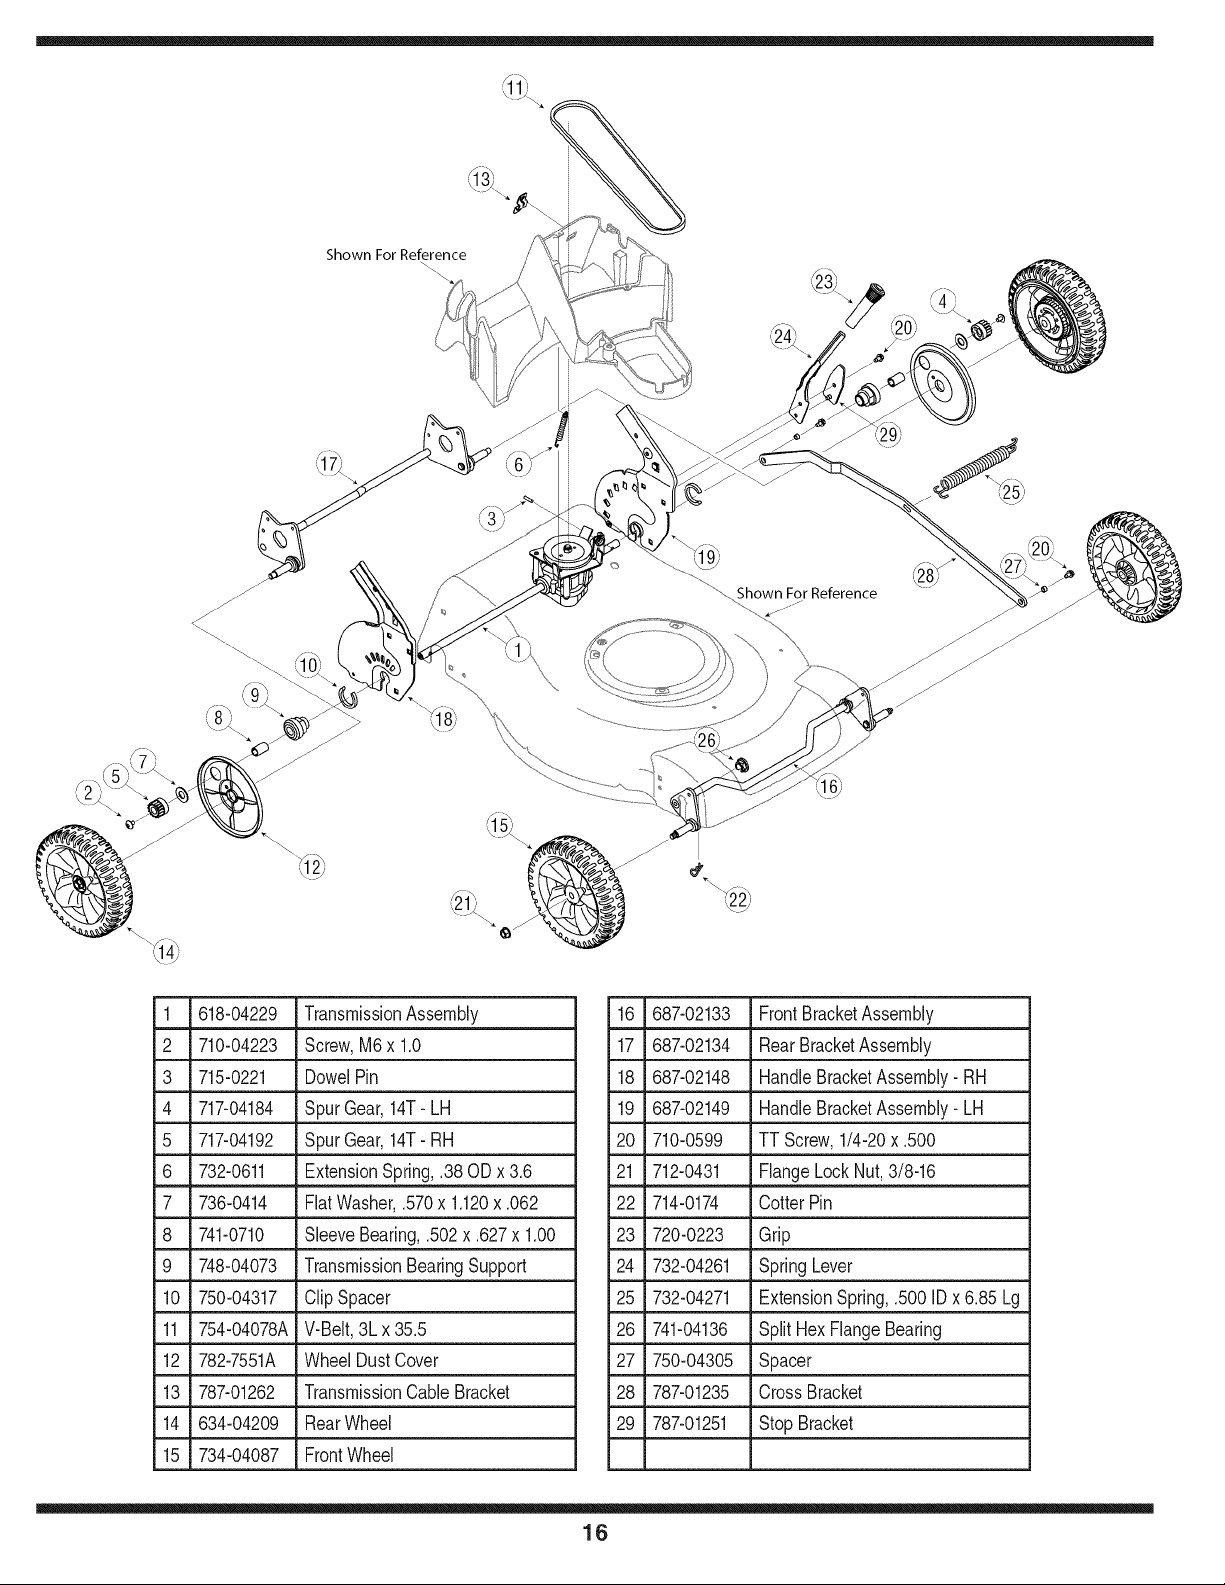
1 618-04229 TransmissionAssembly
2 710-04223 Screw,M6 x 1.0
3 715-0221 DowelPin
4 717-04184 SpurGear, 14T- LH
5 717-04192 SpurGear, 14T- RH
6 732-0611 ExtensionSpring,.38OD x 3.6
7 736-0414 FiatWasher,.570x 1.120x .062
8 741-0710 SleeveBearing,.502x .627x 1.00
9 748-04073 TransmissionBearingSupport
10 750-04317 ClipSpacer
11 754-04078A V-Belt,3Lx35.5
12 782-7551A WheelDustCover
13 787-01262 TransmissionCableBracket
14 634-04209 RearWheel
15 734-04087 FrontWheel
16 687-02133 FrontBracketAssembly
17 687-02134 RearBracketAssembly
18 687-02148 HandleBracketAssembly- RH
19 687-02149 HandleBracketAssembly- LH
20 710-0599 TT Screw,1/4-20x.500
21 712-0431 FlangeLockNut, 3/8-16
22 714-0174 CotterPin
23 720-0223 Grip
24 732-04261 SpringLever
25 732-04271 ExtensionSpring,.500ID x 6.85 Lg
26 741-04136 Split HexFlangeBearing
27 750-04305 Spacer
28 787-01235 CrossBracket
29 787-01251 Stop Bracket
16

1 721-04107 Oil Seal
2 741-04106 PlasticBushing
3 707-04409 ShiftFork
4 707-04540 TransmissionBracket
5 710-04329 Screw,.159OD x.610
6 710-04374 Hex Screw,.159OD x.43
7 711-04386 OutputShaft
8 711-04394 input Shaft
9 712-0411 HexLock Nut,5/16-24
10 715-0129 SpirolPin
11 715-04030 DowelPin
12 717-04194 PlasticGear,28T
13 756-04151 Pulley,3.36 OD
14 721-04110 O-Ring
15 726-04043 PushNut,3/8 ID x3/40D
16 731-04883 LowerHousing
17 731-05099 UpperHousing
18 731-05100 ClutchLever
19 732-04278 CompressionSpring,.525 IDx.588
20 736-0105 Beil Washer,.375x .870x .063
21 736-04170 FiatWasher,.508 ID x 1.00OD
22 736-04178 FeltSIottedWasher
23 736-0572 FiatWasher,.510x 1.00x .060
24 736-0864 ThrustWasher,.375x .812x .060
25 741-04116 BaliBearing
17
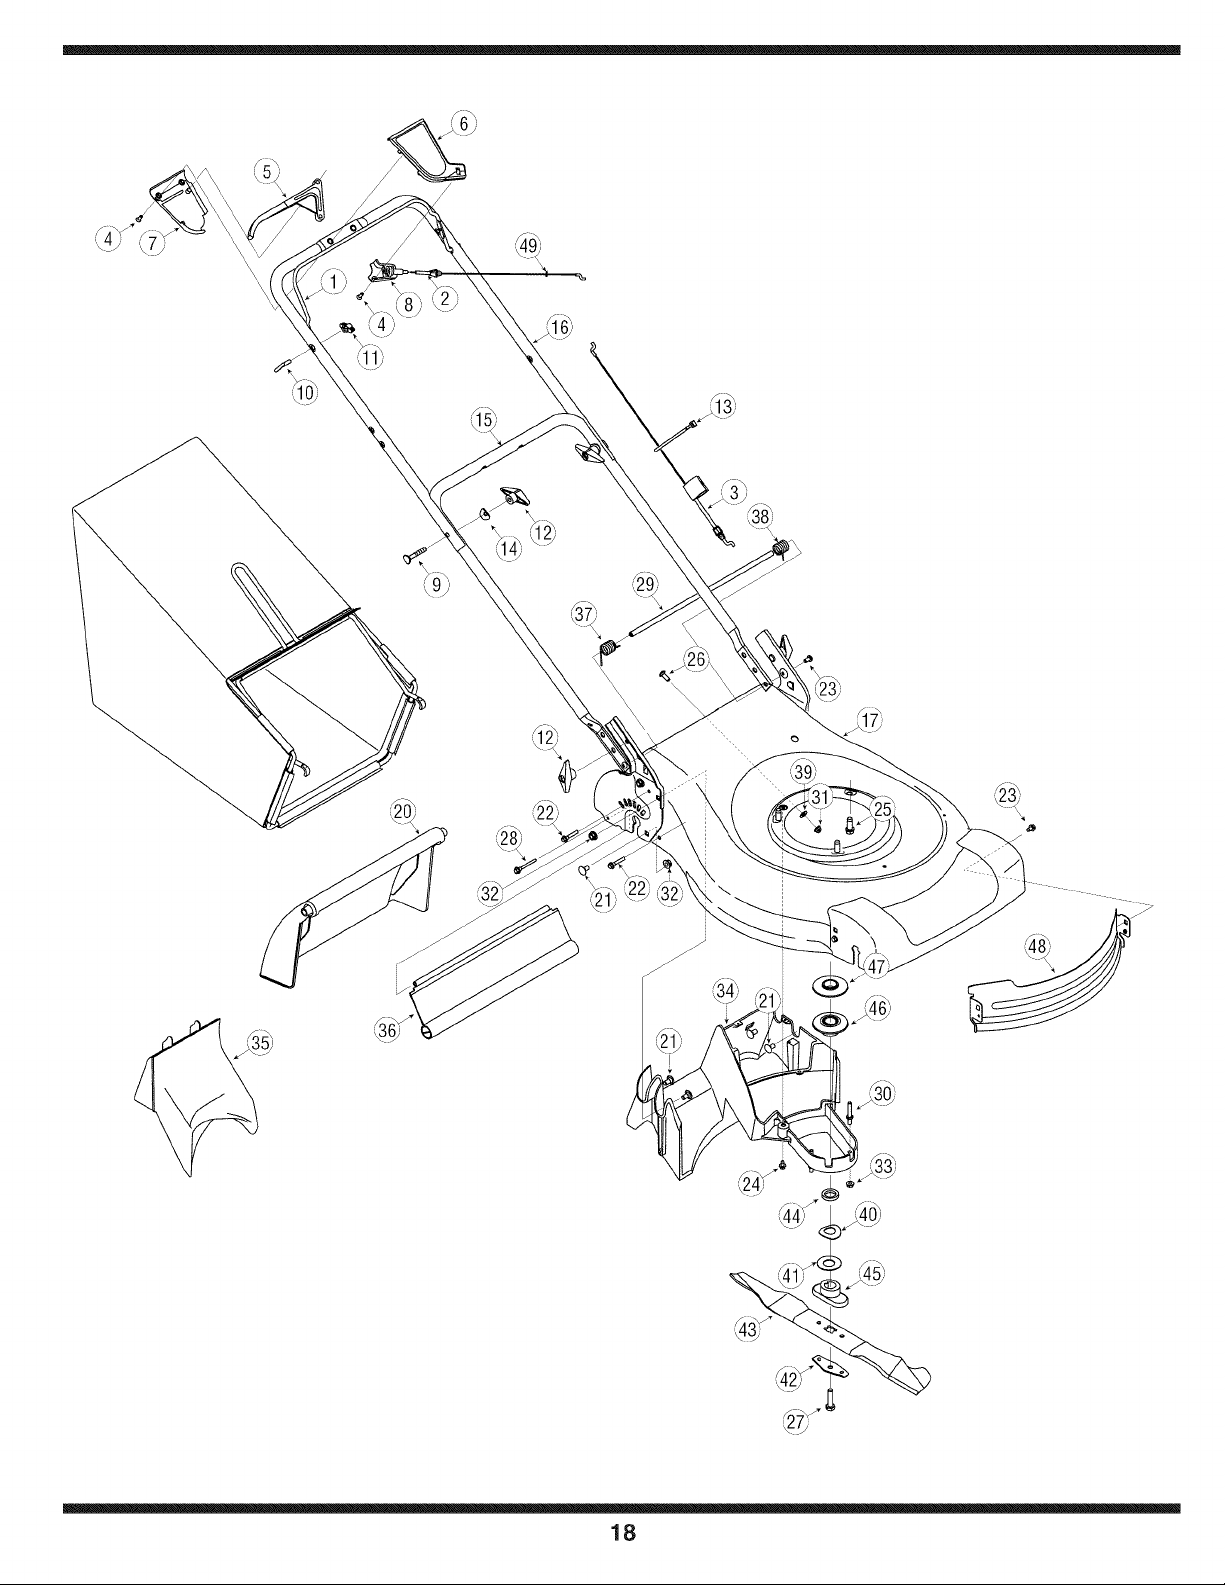
Parts List
To order replacement
parts, contact 1-800-
800-7310 or visit www.
mtdproducts.com.
\
18

1 747-1161A BladeControl
2 746-04195 DriveCable
3 746-04213 ControlCable
4 710-1667 Screw,#10-16x .625
5 731-0620 DriveControlLever
6 731-1057 UpperControlCover
7 731-1058 LowerControlCover
8 731-1059 MountingCap
9 710-1174 CarriageBolt, 5/16-18x 2.0
10 710-1205 EyeBolt
11 720-0279 WingNut
12 720-0284 HandleKnob
13 725-0157 CableTie
14 736-0451 SaddleWasher,.320x .93 x .060
15 749-04202 LowerHandle
16 749-04209 UpperHandle
17 787-01230 21"Deck
18 647-04048 GrassCatcherFrame
19 664-04038 GrassCatcher
20 731-05017 RearDoor
21 710-0260A CarriageBolt, 5/16-18x.62
22 710-1241 Screw,1/4-15x 1.00
23 710-0599 TTScrew, 1/4-20x.500
24 710-0653 TTScrew, 1/4-20x.375
25 710-0654A Screw,3/8-16x 1.00
26 710-0703 CarriageScrew,1/4-20x.75
27 710-1044 Screw,3/8-24x 1.50
28 710-1802 Screw,1/4-20x2.00
29 711-04374 Door PivotRod
30 711-0993 BeltGuard Pin
31 712-04064 FlangeLockNut,1/4-20
32 712-3004A FlangeLockNut,5/16-18
33 712-3027 FlangeLockNut,1/4-20
34 731-05154 Deck Baffle
35 731-05157 MulchPlug
36 731-05185 Trailshield
37 732-04264 DoorTorsionSpring- RH
38 732-04265 DoorTorsionSpring- LH
39 736-0463 FiatWasher,.25x .630x .0515
40 736-0513 SpringWasher,.890x 1.70x .048
41 736-0514 FiatWasher,.885x 1.850x .060
42 736-0524B BladeBellSupport
43 742-0741 21"MulchingBlade
44 748-0358 EngineSpacer
45 748-0376C BladeAdapter
46 756-04156 LowerEnginePulley
47 756-04157 UpperEnginePulley
48 787-01224 FrontDeckBaffle
49 735-0226 RubberGromet
Parts List
To order replacement
parts, contact 1-800-
800-7310 or visit www.
mtdproducts.com.
iMPORTANT
For a properworking
machine, use Factory
Approved Parts.
V-BELTSare specially
designedto engage
and disengage safely.
A substitute (non OEM)
V-Belt can be danger-
ous by not disengaging
completely.
19

MANUFACTURER'S LiMiTED WARRANTY FOR
The limitedwarrantyset forth belowisgivenby MTDLLCwithrespectto
newmerchandisepurchasedandusedin the UnitedStates,itsposses-
sionsandterritories.
"MTD"warrantsthisproductagainstdefectsin materialand workmanship
for a periodof two (2) yearscommencingon the dateof originalpurchase
andwill,at its option,repairor replace,free of charge,anypart foundto
bedefectiveinmaterialsor workmanship.Thislimitedwarrantyshallonly
applyif this producthas beenoperatedand maintainedin accordance
withthe Operator'sManualfurnishedwiththe product,and has not been
subjectto misuse,abuse,commercialuse, neglect,accident,improper
maintenance,alteration,vandalism,theft,fire,water,ordamagebecause
of otherperilor naturaldisaster.Damageresultingfrom the installationor
useof any part,accessoryor attachmentnotapprovedby MTDfor use
withthe product(s)coveredbythis manualwill voidyourwarrantyas to
any resultingdamage.
Normalwearpartsarewarrantedto be free fromdefectsinmaterialand
workmanshipfor a periodof thirty (30)daysfromthe dateof purchase.
Normalwearpartsinclude,butare notlimitedto itemssuch as: batteries,
belts,blades,bladeadapters,grass bags, riderdeck wheels,seats,snow
throwerskidshoes,shaveplates,augerspiralrubberand tires.
HOWTO OBTAINSERVICE:Warrantyserviceis available,WITH
PROOFOF PURCHASE,throughyour localauthorizedservicedealer.To
locatethe dealerin yourarea,checkyourYellowPages,or contact MTD
LLCat RO.Box 361131,Cleveland,Ohio44136-0019,or call 1-800-800-
7310or logon to our Website at www.mtdproducts.com.
Thislimitedwarrantydoesnot providecoveragein the followingcases:
a. Theengineor componentpartsthereof.These itemsmay
carrya separatemanufacturer'swarranty.Referto applicable
manufacturer'swarrantyfor termsand conditions.
b. Logsplitterpumps,valves,and cylindershavea separateone
yearwarranty.
c. Routinemaintenanceitemssuch as lubricants,filters, blade
sharpening,tune-ups,brakeadjustments,clutch adjustments,
deckadjustments,andnormaldeteriorationof the exteriorfinish
dueto use or exposure.
d. Servicecompletedby someoneotherthanan authorizedservice
dealer.
e.
f.
g.
MTDdoes notextendany warrantyfor productssoldor
exportedoutsideof the UnitedStates,its possessionsand
territories,exceptthosesoldthroughMTD'sauthorized
channelsof exportdistribution.
Replacementpartsthatarenot genuineMTDparts.
Transportationchargesand servicecalls.
No impliedwarranty, includingany impliedwarranty of merchant-
ability of fitness for a particularpurpose,applies after the applicable
periodof express written warranty above as to the partsas identi-
fied. No other express warranty, whether written or oral, except as
mentionedabove, given by any personor entity,includinga dealer
or retailer,with respect to any product,shallbind MTD. Duringthe
periodof the warranty, the exclusiveremedyis repairor replacement
of the productas set forth above.
The provisionsas set forth inthis warrantyprovidethe sole and
exclusiveremedy arising from the sale. MTDshallnot be liable
for incidentalor consequentialloss or damage including,without
limitation, expensesincurredfor substituteor replacement lawn care
servicesor for rentalexpenses to temporarily replacea warranted
product.
Somestatesdo not allowtheexclusionor limitationof incidentalor
consequentialdamages,or limitationson howlonganimpliedwarranty
lasts,so the aboveexclusionsor limitationsmaynotapplyto you.
In no eventshall recoveryof any kind be greaterthan theamountof the
purchasepriceof the productsold.Alterationof safety features of the
productshall void this warranty. Youassumethe riskandliabilityfor
loss, damage,or injuryto youand your propertyand/orto othersandtheir
propertyarisingout of the misuseor inabilityto use theproduct.
Thislimitedwarrantyshall notextendto anyoneotherthanthe original
purchaseror to the personfor whomitwas purchasedas a gift.
HOWSTATELAWRELATESTO THISWARRANTY: This limitedwar-
rantygivesyouspecificlegalrights,andyou mayalso haveother rights
whichvaryfromstateto state.
IMPORTANT: OwnermustpresentOriginalProofof Purchaseto obtain
warrantycoverage.
MTD LLC, P.O. BOX 361131 CLEVELAND, OHIO 44136=0019; Phone: 1=800=800=7310