Safety • Assembly • Operation • Tips & Techniques • Maintenance • Troubleshooting • Parts Lists • Warranty
OF A O AL
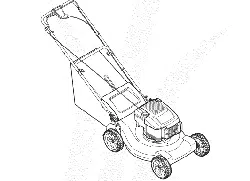
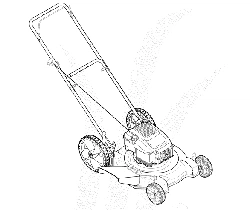
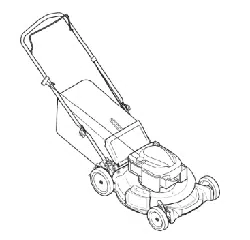
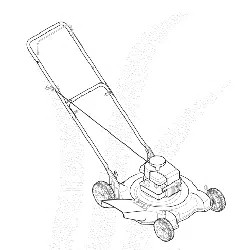
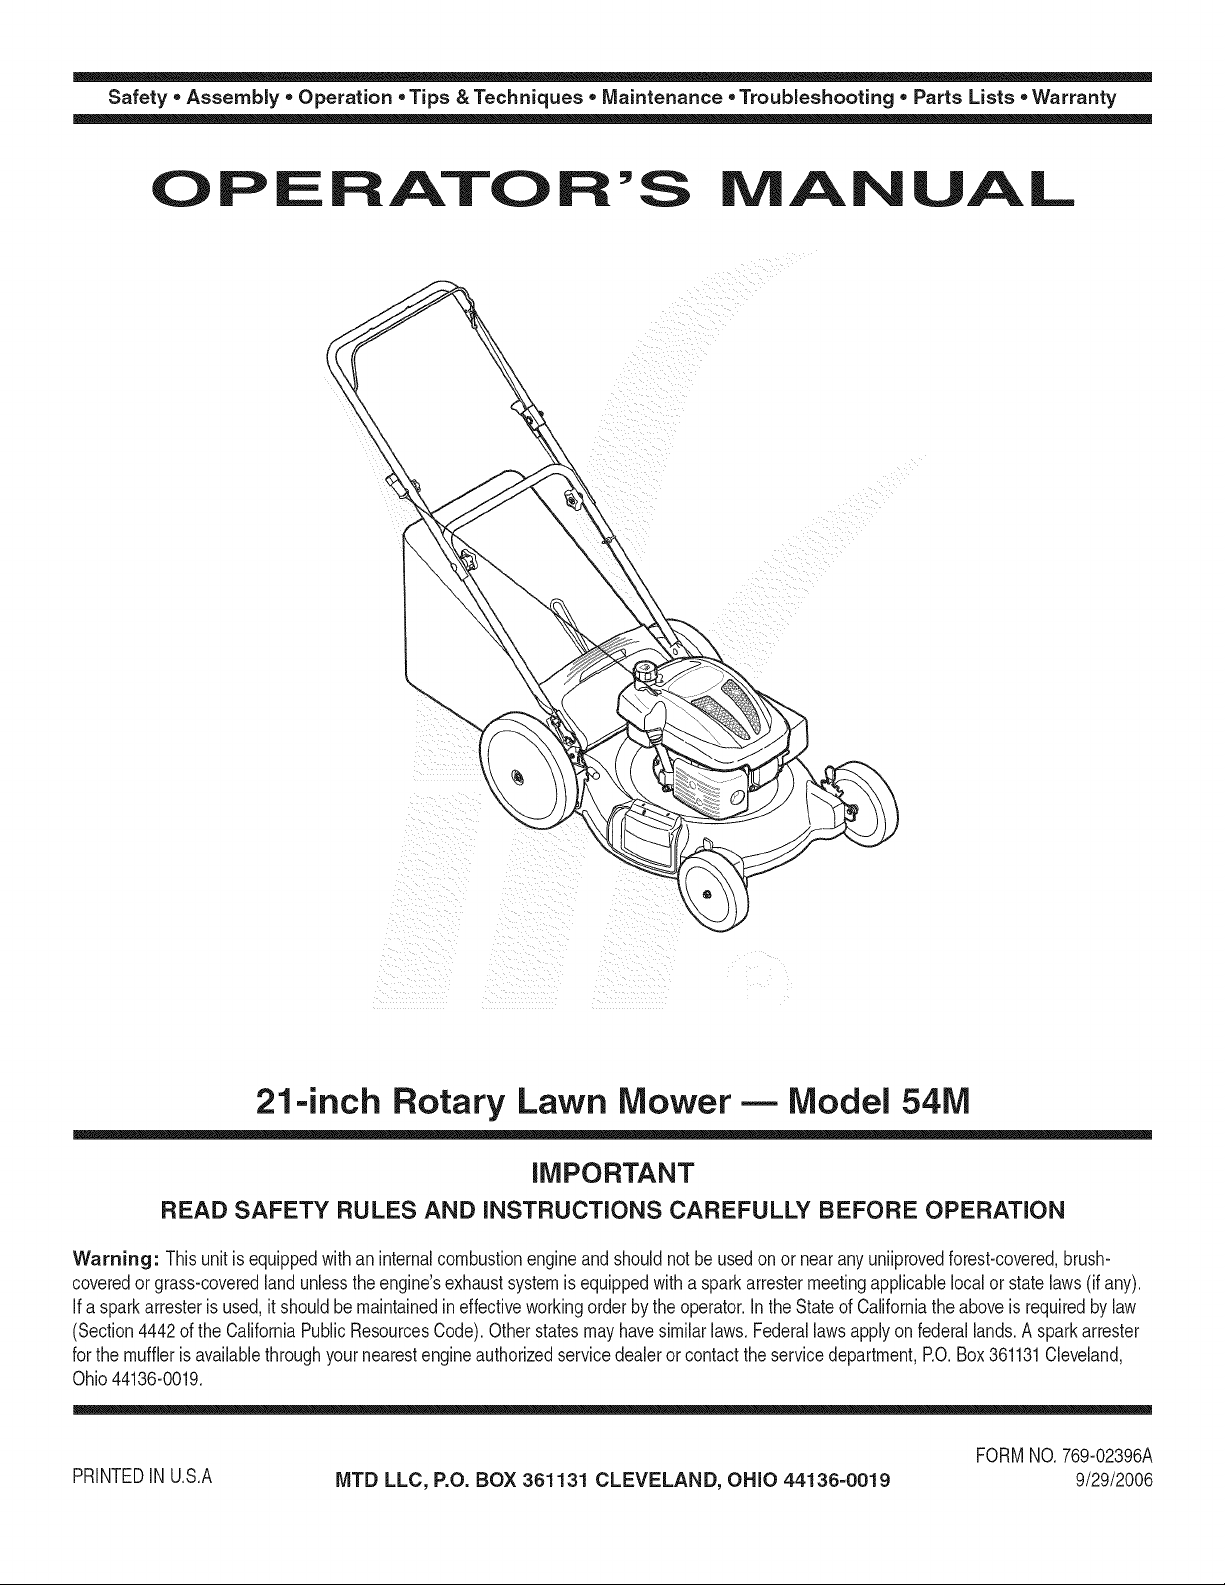
21 =inch Rotary Lawn Mower- Model 54M
iMPORTANT
READ SAFETY RULES AND iNSTRUCTiONS CAREFULLY BEFORE OPERATION
Warning: Thisunit is equippedwithan internalcombustionengineandshouldnot beusedon or nearany uniiprovedforest-covered,brush-
coveredor grass-coveredlandunlesstheengine'sexhaustsystemis equippedwitha sparkarrestermeetingapplicablelocalor statelaws(if any).
If a sparkarresteris used,it shouldbe maintainedineffectiveworkingorder by the operator.In theState of Californiathe aboveis requiredbylaw
(Section4442of the CaliforniaPublicResourcesCode).Otherstatesmayhavesimilarlaws.Federallawsapplyonfederallands.A sparkarrester
for the muffleris availablethroughyour nearestengineauthorizedservicedealeror contactthe servicedepartment,RO. Box361131Cleveland,
Ohio44136-0019.
PRINTEDIN U.S.A
MTD LLC, P.O. BOX 361131 CLEVELAND, OHIO 44136-0019
FORMNO.769-02396A
9/29/2006
This Operator's Manual is an important part of your new lawn mower, it will help you assemble,
prepare and maintain the unit for best performance. Please read and understand what it says.
Table of Contents
Slope Gauge ........................................................ 3
Safe Operation Practices ................................... 4
Setup and Adjustment ....................................... 6
Operating Your Lawn Mower .............................. 8
Maintaining Your Lawn Mower ......................... 10
Trouble Shooting .............................................. 12
Safety Labels .................................................... 13
Engine Appendix .............................................. 14
Engine Safe Operation Practices ................. 14
Operating Your Engine .................................. 16
Maintaining Your Engine ............................... 18
Parts List ........................................................... 22
Warranty ............................................. Back Cover
MTDLLCreservesthe rightto changeproductspecifications,designs,and equipmentwithoutnotice and withoutincurringobligation.
Finding and Recording Model Number
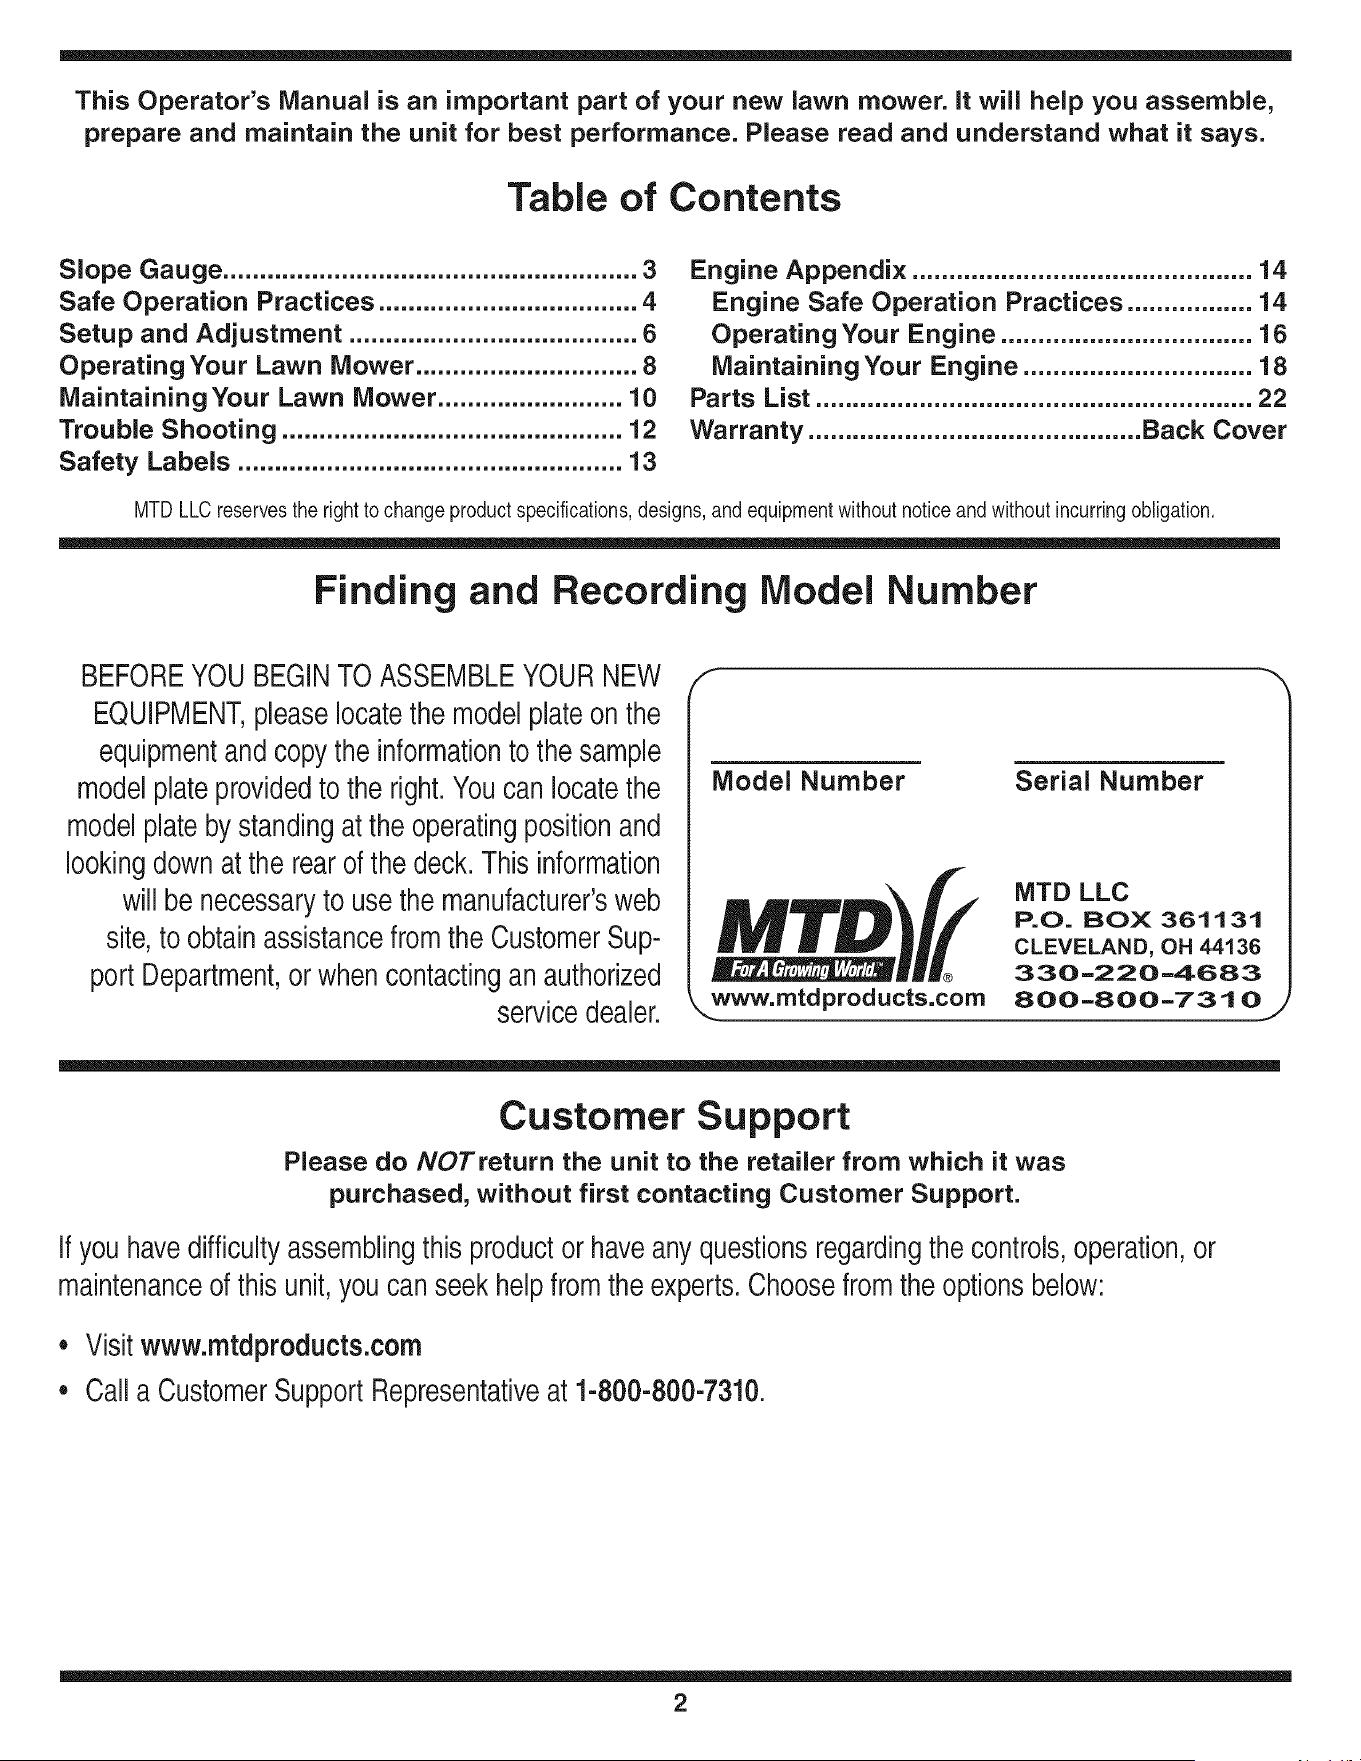
BEFOREYOU BEGINTO ASSEMBLEYOURNEW
EQUIPMENT,please locatethe model plateon the
equipmentand copy the informationto the sample
modelplate providedto the right.You can locatethe
model plateby standingat the operatingpositionand
lookingdownat the rear of the deck.This information
will be necessaryto use the manufacturer'sweb
site,to obtainassistancefrom the CustomerSup-
port Department,or when contactingan authorized
service dealer.
Model Number Serial Number
MTD LLC
P.O= BOX 361131
CLEVELAND, OH 44136
330-220-4683
www.mtdproducts.com 800-800-7310
Customer Support
Please do NOTreturn the unit to the retailer from which it was
purchased, without first contacting Customer Support.
If you havedifficulty assemblingthis productor haveany questions regardingthe controls,operation,or
maintenanceof this unit,you can seek helpfrom the experts. Choosefrom the optionsbelow:
= Visit www.mtdproducts.com
• Call a CustomerSupport Representativeat 1-800-800-7310.
2
z_
d_
o9
_D
_D
O
O
E
=5
O
d_
o6
d_ o3
o -5
O9 C5
d_ O3
C
_ o
_D
o_
E
O
_D
C5
c_ 0
o3
c_ _,_
c'_ _
!i!_i!il<
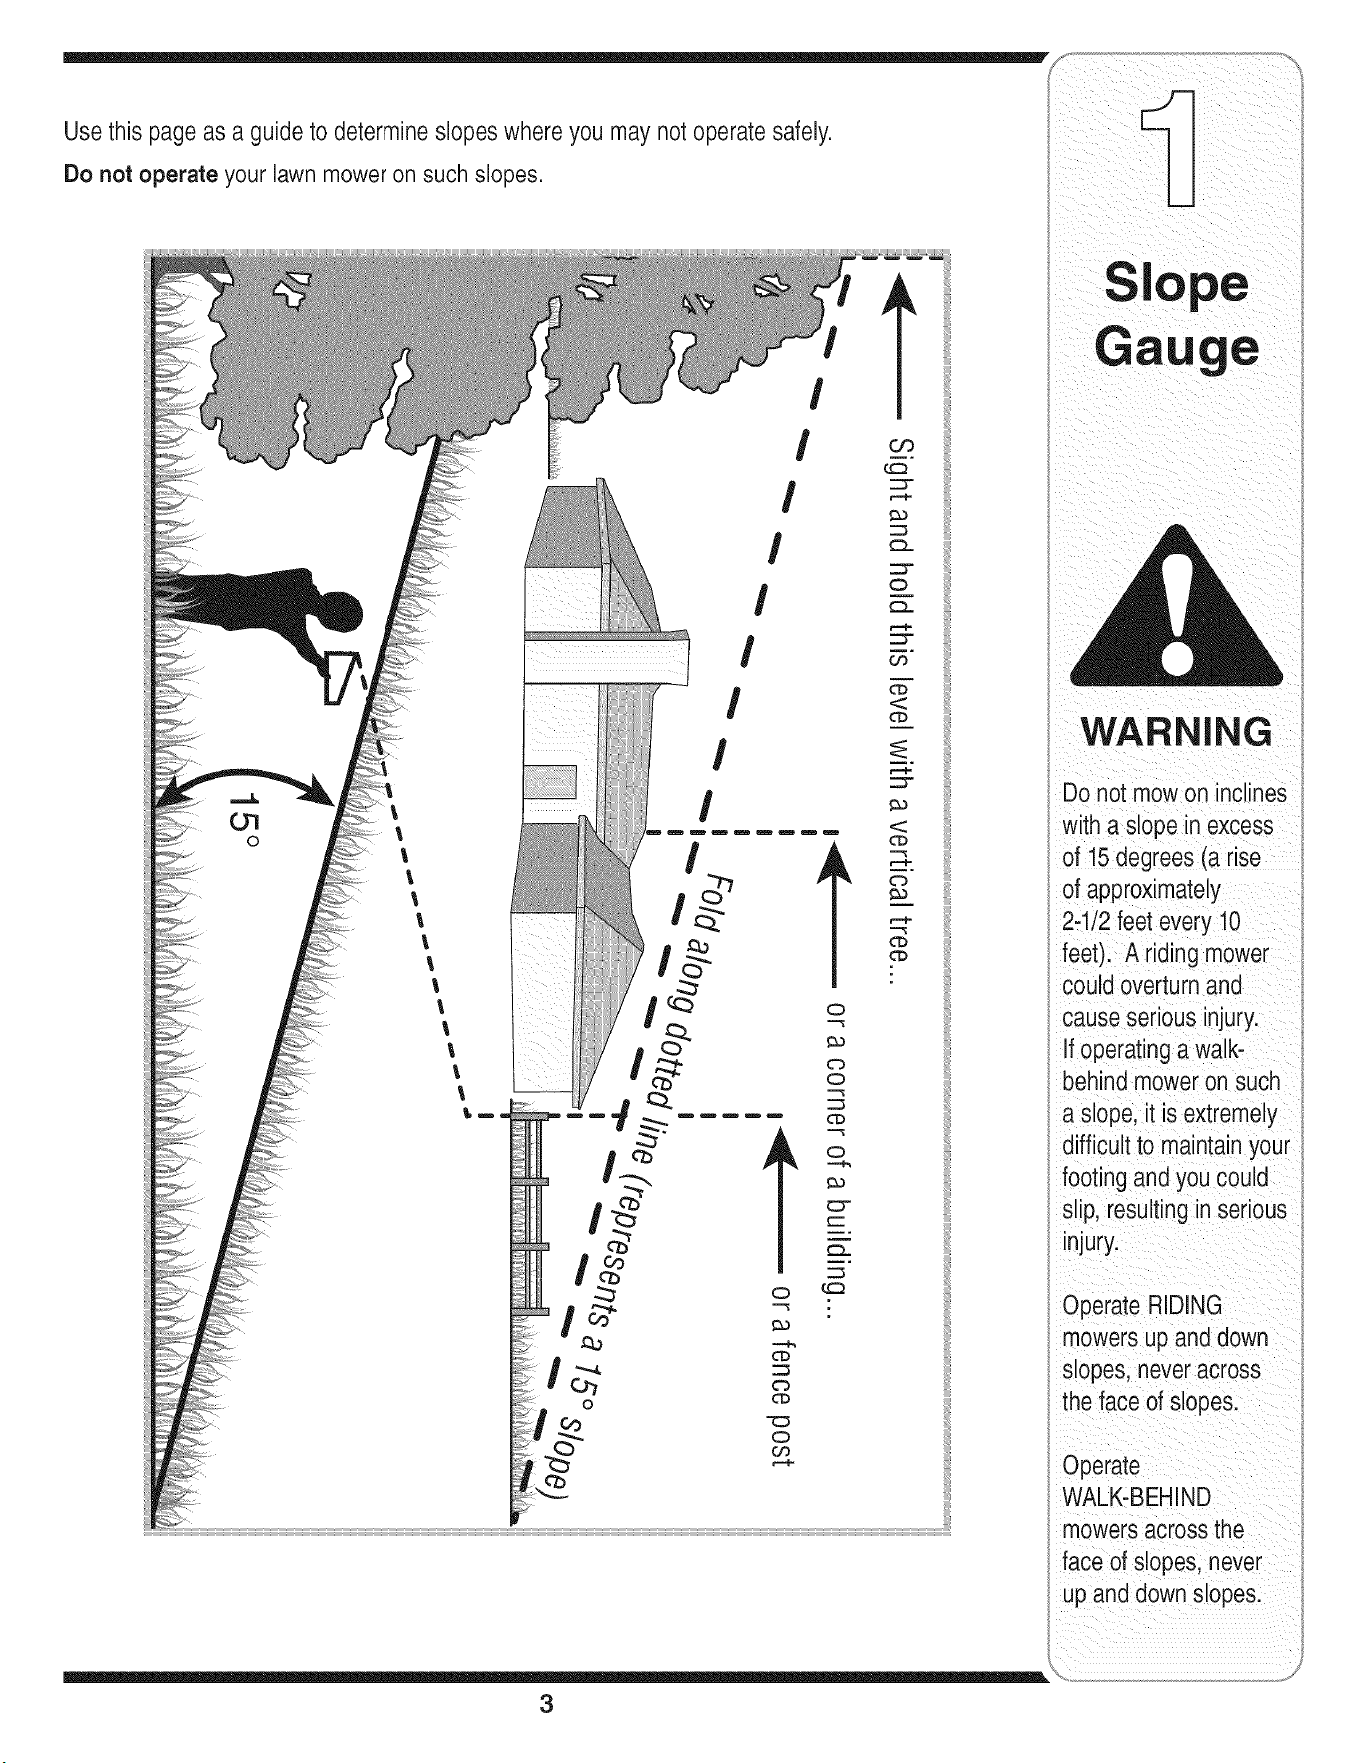
Sight and hold this levelwith a vertical tree...
_ or a corner of a building...
I
I
__ or a fence post
I
I I
-- fir_e (repros
_ _ er_ts a 15o
15°
_0
WARNING
This symbol points
out importantsafety
instructionswhich, if
notfollowed,could
endangerthe personal
i safety and/or property
I ofyourselfand others.
Readand follow all
instructionsinthis
manual beforeat-
temptingto operate
i this machine. Failure
I to complywith these
instructionsmay result
i in personalinjury.When
you see this symbol.
i HEED ITS WARNING!
i Your Responsibility
Restrictthe use
of this power machine
to personswho read.
i understand
and follow the warnings
and instructions
I.
=nthis manual
and on the machine.
WARNING: Engine Exhaust,some of its constituents, and certain vehicle compo-
nents contain or emit chemicals known to State of Californiato cause cancer and
birth defects or other reproductiveharm.
DANGER: This machine was built to be operated according to the rules for safe operation in this
manual. As with any type of powerequipment, carelessness or error on the part of the operator
can result in serious injury. This machine is capable of amputating hands and feet and throwing
objects. Failure to observe the following safety instructions could result in serious injury or death.
Children
Tragicaccidentscan occur if operatoris not alert to presence
of children.Childrenare oftenattractedto mowerand mowing
activity.Theydo not understandthe dangers.Neverassume
thatchildrenwill remainwhereyou lastsawthem.
1. Keepchildrenout of the mowingareaand underwatchful
careof a responsibleadultotherthanthe operator.
2. Be alert andturn moweroff if a childentersthe area.
3. Beforeand whilemovingbackwards,look behindanddown
forsmallchildren.
4. Useextremecare when approachingblind corners,
doorways,shrubs,trees,or otherobjectsthat mayobscure
yourvisionof a child whomay run intothe mower.
5. Keepchildrenawayfrom hot or runningengines.Theycan
sufferburnsfrom a hotmuffler.
6. Neverallow childrenunder14 yearsoldto operatea power
mower.Children14 yearsoldand overshouldreadand
understandoperationinstructionsandsafetyrulesinthis
manualandshouldbe trainedandsupervisedbya parent.
General Operation
1. Readthis operator'smanualcarefullyin its entiretybefore
attemptingto assemblethis machine.Read,understand,
andfollowall instructionson the machineandin the
manual(s)beforeoperation.Be completelyfamiliar with
thecontrols andthe properuseof this machinebefore
operatingit. Keepthis manualin a safe place forfuture
and regularreferenceand for orderingreplacementparts.
2. Thismachineis a precision pieceof powerequipment,
nota plaything.Therefore,exerciseextremecautionat all
times.Yourunithas beendesignedto performonejob: to
mowgrass. Do notuse it for any other purpose.
3. Neverallow childrenunder 14yearsold to operatethis
machine.Children 14yearsold and overshould readand
understandthe instructionsinthis manualandshould
be trainedand supervisedby a parent.Onlyresponsible
individualswho arefamiliar withthese rulesof safe
operationshould be allowedto usethis machine.
4. Thoroughlyinspectthe areawherethe equipmentis to
be used. Removeall stones,sticks,wire, bones,toys
andother foreignobjects, whichcouldbe trippedover or
pickedup andthrown bythe blade.Thrownobjects can
causeseriouspersonalinjury.Plan your mowingpattern
to avoiddischargeof materialtoward roads,sidewalks,
bystandersandthe like.Also,avoiddischargingmaterial
againsta wall or obstruction,whichmay causedischarged
materialto ricochetback towardthe operator.
5. Tohelpavoid bladecontact ora thrown objectinjury,
stay inoperatorzone behindhandlesand keepchildren,
bystanders,helpersand petsat least 75 feetfrom mower
whileit is inoperation.Stop machineif anyoneenters
area.
6. Alwayswearsafetyglasses or safetygogglesduringopera-
tion andwhile performingan adjustmentor repairto protect
youreyes.Thrownobjectswhich ricochetcancauseserious
injuryto the eyes.
7. Wearsturdy, rough-soledworkshoesand close-fitting
slacksandshirts. Shirtsand pantsthatcoverthe arms and
legs andsteel-toedshoesare recommended.Neveroperate
this machinein bare feet,sandals, slipperyor light-weight
(e.g. canvas)shoes.
8. Do not puthands or feet near rotatingparts or undercutting
deck.Contactwithblade can amputatehands andfeet.
9. A missingor damageddischargecovercan cause blade
contactor thrownobject injuries.
10.Manyinjuriesoccuras a resultof the mowerbeing pulled
overthefoot duringa fall causedby slippingor tripping.
Do nothold on to the mower if you are falling;releasethe
handle immediately.
11.Neverpullthe mowerbacktowardyou whileyou are
walking.If you must backthe mowerawayfrom a wall or
obstructionfirst look downand behindto avoid trippingand
thenfollowthese steps:
a. Stepback from mowerto fully extend yourarms.
b. Be sure youare well balancedwith surefooting.
c. Pullthe mowerbackslowly,no morethan half way
toward you.
d. Repeatthesestepsas needed.
12.Do notoperatethe mowerwhileunderthe influenceof
alcoholor drugs.
13.Do notengagetheself-propelledmechanismon unitsso
equippedwhilestartingengine.
14.The bladecontrol handle is a safetydevice.Neverattempt
to bypassits operation.Doingso makesthe safetydevice
inoperativeandmay result in personalinjurythrough
contactwith the rotatingblade. The bladecontrol handle
mustoperateeasily in bothdirectionsandautomatically
returnto the disengagedpositionwhen released.
15.Neveroperatethe mowerinwet grass. Alwaysbe sure of
yourfooting. A slipand fall can causeseriouspersonal
injury.If youfeel you are losing yourfooting,releasethe
bladecontrol handle immediatelyand the bladewill stop
rotatingwithinthreeseconds.
16.Mowonly in daylightor good artificial light. Walk,never run.
17.Stopthe bladewhencrossinggraveldrives, walksor roads.
18.If the equipmentshouldstartto vibrateabnormally,stopthe
engineand check immediatelyfor the cause.Vibrationis
generallya warningof trouble.
4
19.Shutthe engineoff and waituntil the bladecomesto a
completestop beforeremovingthe grasscatcheror unclog-
gingthe chute.
The cutting bladecontinuesto rotatefora few secondsafter
the engineis shut off. Neverplace any partof the body in
the bladeareauntil you are surethe bladehas stopped
rotating.
20.Neveroperate mowerwithoutpropertrail shield, discharge
cover,grasscatcher,bladecontrol handle or othersafety
protectivedevicesin placeand working.Neveroperate
mowerwith damagedsafetydevices.Failureto do so can
result in personalinjury.
21.Mufflerand enginebecomehotandcan causea burn.Do
nottouch.
22.Only use parts andaccessoriesmade forthis machineby
manufacturer.Failureto do so can resultin personalinjury.
23. Ifsituationsoccur whichare not coveredinthis manual,
use care and goodjudgment.Contactyour dealer for
assistance.
Slope Operation
Slopesare a majorfactor relatedto slip andfall accidents,which
can result insevereinjury.Operationon slopes requiresextra
caution.If youfeel uneasyon a slope,do notmowit. Foryour
safety,use theslope gaugeincludedas part of this manualto
measureslopesbeforeoperatingthis uniton a slopedorhilly
area.Ifthe slopeis greaterthan 15 degrees,do not mow it.
Do:
1. Mow acrossthe faceof slopes;neverupand down.Exercise
extremecautionwhenchangingdirectionon slopes.
2. Watchfor holes,ruts, rocks,hidden objects,or bumps
which can causeyouto slipor trip. Tallgrasscan hide
obstacles.
3. Alwaysbe sure of yourfooting.A slipand fallcan cause
serious personalinjury.If youfeel you are losingyour
balance,releasethe bladecontrol handle immediately,and
the bladewill stoprotatingwithin3 seconds.
Do Not:
1. Do notmow near drop-offs,ditchesor embankments,you
could loseyourfooting or balance.
2. Do not mow slopes greaterthan 15degreesas shown on
the slopegauge.
3. Do not mow on wet grass. Unstablefooting could cause
slipping.
Service
Safe Handling Of Gasoline:
1. Toavoidpersonalinjuryor propertydamageuse extreme
care in handlinggasoline.Gasolineis extremelyflammable
and the vapors are explosive.Serious personalinjury can
occur when gasolineis spilled on yourselfor your clothes,
which can ignite.Washyourskin andchangeclothes
immediately.
2. Use onlyan approvedgasolinecontainer.
3. Neverfill containersinside a vehicleor ona truck ortrailer
bed witha plasticliner.Alwaysplacecontainerson the
ground awayfrom yourvehicle beforefilling.
4. Removegas-poweredequipmentfrom the truckor trailer
and refuel it on theground. If this is not possible,then refuel
such equipmenton atrailer witha portable container,rather
than from a gasolinedispensernozzle.
5. Keepthe nozzlein contactwiththe rimof the fuel tank or
containeropeningat all timesuntilfueling is complete.Do
not use a nozzle lock-opendevice.
6. Extinguishallcigarettes,cigars, pipesand othersources
of ignition.
7. Neverfuel machineindoorbecauseflammablevapors will
accumulatein thearea.
8. Neverremovegas cap or add fuel while engine is hot or
running. Allowengineto cool at least two minutesbefore
refueling.
9. Neveroverfill fuel tank. Fill tankto no morethan Y2inch
below bottomof filler neckto providefor fuel expansion.
10.Replacegasoline cap andtighten securely.
11.If gasolineis spilled,wipe it off theengine and equipment.
Moveunit to another area.Wait 5 minutesbeforestarting
engine.
12.Neverstorethe machineorfuel containernear an open
flame,sparkor pilot light as on a water heater,space
heater,furnace, clothesdryeror othergas appliances.
13.Toreducefire hazard,keepmowerfree of grass, leaves,
orother debrisbuild-up.Clean up oil orfuel spillageand
removeany fuel soakeddebris.
14.Allow a mowerto cool at least5 minutesbeforestoring.
General Service:
1. Neverrun an engine indoorsorin a poorlyventilatedarea.
Engineexhaustcontainscarbonmonoxide,an odorless
anddeadlygas.
2. Beforecleaning,repairing,or inspecting,makecertainthe
bladeandall movingparts havestopped.Disconnectthe
sparkplugwire andgroundagainstthe engineto prevent
unintendedstarting.
3. Checkthe bladeandengine mountingbolts atfrequent
intervalsfor propertightness.Also,visually inspectblade
fordamage(e.g.,bent,cracked,worn) Replacebladewith
theoriginalequipmentmanufacture's(O.E.M.)bladeonly,
listedin this manual."Useof partswhichdo notmeetthe
originalequipmentspecificationsmayleadto improper
performanceand compromisesafety!"
4. Mowerbladesare sharp andcan cut.Wrapthebladeor
weargloves,anduse extracautionwhen servicingthem.
5. Keepall nuts,bolts, andscrewstightto be surethe equip-
mentis in safeworkingcondition.
6. Nevertamperwithsafetydevices.Checktheir proper
operationregularly.
7. Afterstrikinga foreignobject,stop the engine,discon-
nectthe sparkplugwire andgroundagainsttheengine.
Thoroughlyinspectthe mowerfor any damage.Repairthe
damagebeforestartingandoperatingthe mower.
8. Neverattemptto makea wheel or cuttingheightadjust-
mentwhile the engineis running.
9. Grasscatchercomponents,dischargecover,andtrail
shield aresubjectto wear anddamagewhichcould
exposemovingparts or allowobjectsto be thrown.For
safetyprotection,frequentlycheck componentsand re-
placeimmediatelywith original equipmentmanufacturer's
(O.E.M.)parts only, listedin this manual."Useof parts
whichdo notmeetthe originalequipmentspecifications
maylead to improperperformanceand compromise
safety!"
10.Do notchangetheenginegovernorsettingor over-revthe
engine.The governorcontrolsthe maximumsafe operating
speedof theengine.
11.Maintainor replacesafetylabels,as necessary.
12.Observeproperdisposallawsand regulations.Improper
disposalof fluidsand materialscanharmthe environment.
Practices
WARNING
This symbol points
out important safety
instructions, which if
not followed, could
endangerthe personal
safety and/or property
of yourselfand others.
Readand follow all
instructions in this man-
ual before attempting to
operate this machine.
Failureto comply with
these instructionsmay
result in personal injury.
When you see this
symbol.
HEED iT'S WARNING!
Your Responsibility
Restrictthe use
of this power machine
to persons who read.
understand
and follow the warnings
and instructions
in this manua
and on the machine.
5
NOTE:ThisOperator's
Manualcoversseveral
models.LawnMower
featuresvaryby
model.Notallfeatures
discussed(orengines
pictured)inthis manual
are applicableto all
Lawn Mower models.
NOTE: Stand behind
the mower as ifyou
were going to operate
it. Your right hand cor-
responds to the right
side of the mower; your
left hand corresponds
to the left side of the
i mower.
NOTE: Make sure to
route cable outside the
I lower handle. Do not
i crimp cable while lifting
i the handle up.
IMPORTANT
This unit is shipped
I without gasoline or
oil in the engine. Fill
Lp gasoline and oil
as instructed in the
accompanying engine
manual BEFORE
operating your mower.
i _ 1. Removeanypackingmaterial.Thefirst step in
,._ ..J
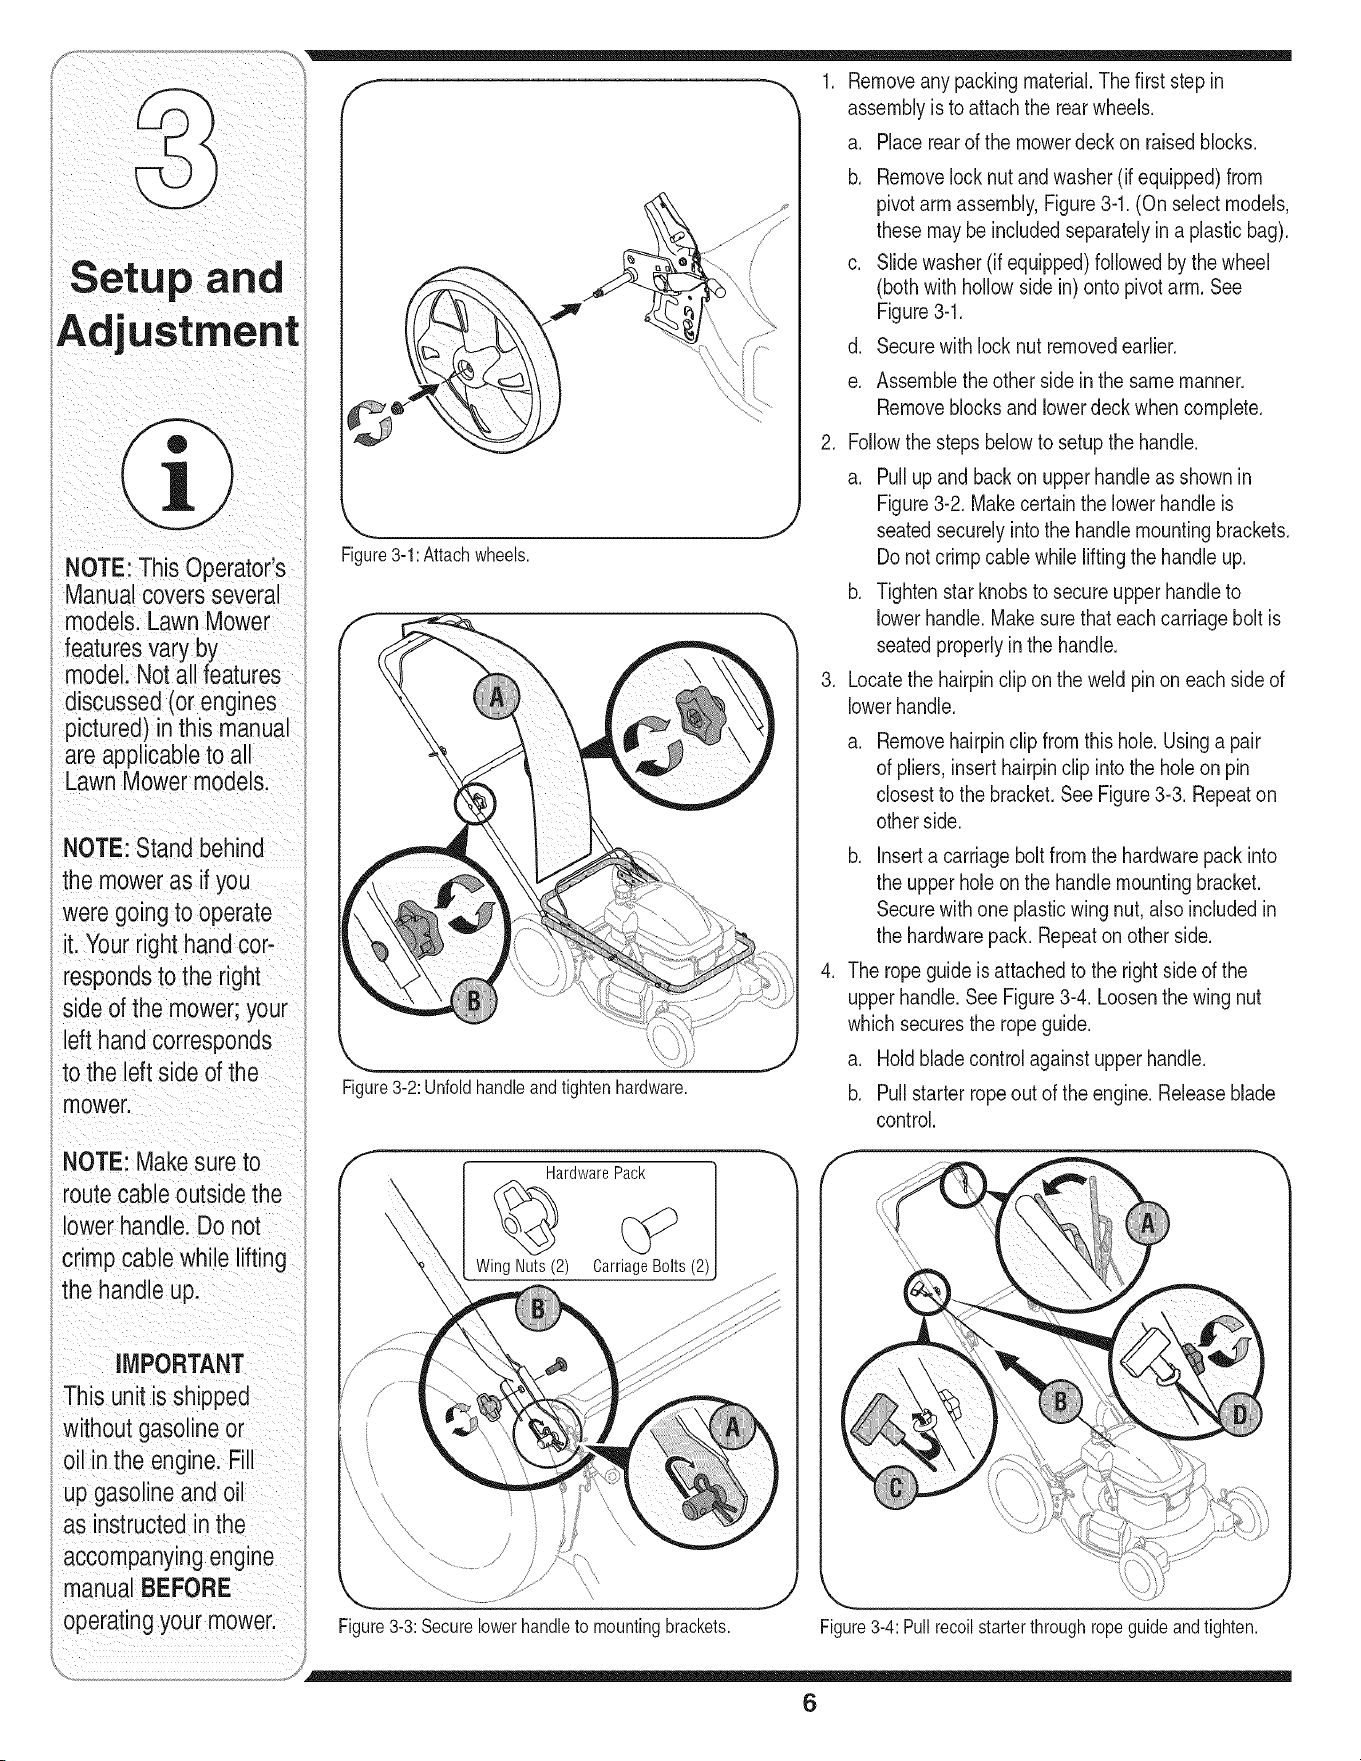
Figure3-1:Attachwheels.
Figure3-2: Unfoldhandleandtighten hardware.
assemblyis to attachthe rearwheels.
a. Placerearof the mowerdeckon raisedblocks.
b. Removelock nutandwasher(if equipped)from
pivotarm assembly,Figure3-1.(On selectmodels,
thesemaybe includedseparatelyin a plasticbag).
c. Slidewasher(if equipped)followedbythe wheel
(bothwithhollowside in)ontopivot arm. See
Figure3-1.
d. Securewith lock nut removedearlier.
e. Assemblethe other sidein the samemanner.
Removeblocksand lowerdeck whencomplete.
2. Followthe stepsbelowto setupthe handle.
a. Pullupand backon upperhandleas shownin
Figure3-2. Makecertainthe lowerhandleis
seatedsecurelyintothe handlemountingbrackets.
Do notcrimpcablewhilelifting the handleup.
b. Tightenstarknobsto secureupper handleto
lowerhandle.Makesurethateachcarriagebolt is
seatedproperlyin the handle.
3. Locatethe hairpinclipon the weldpinon eachsideof
lowerhandle.
HardwarePack
Wing Nuts(2)
a.
Figure3-3:Securelowerhandleto mountingbrackets.
Removehairpinclipfromthis hole.Usinga pair
of pliers,insert hairpinclip into the holeon pin
closestto the bracket.See Figure3-3. Repeaton
otherside.
b. Inserta carriagebolt fromthe hardwarepack into
the upperhole on the handle mountingbracket.
Securewith one plasticwing nut,also includedin
the hardwarepack. Repeaton otherside.
4. The ropeguide is attachedto the right sideof the
upperhandle.SeeFigure3-4. Loosenthe wing nut
whichsecuresthe ropeguide.
a. Holdbladecontrolagainstupperhandle.
b. Pullstarterropeout of the engine.Releaseblade
control.
J
Figure 3-4: Pull recoil starter through rope guide and tighten.
6
c. Slip starterropeinto ropeguide.
d. Tightenwing nut.
5. To securecablesto the handle,insert postson cable
ties intoholesprovidedon the lowerhandle.Pullcable
ties tightandtrimexcess.
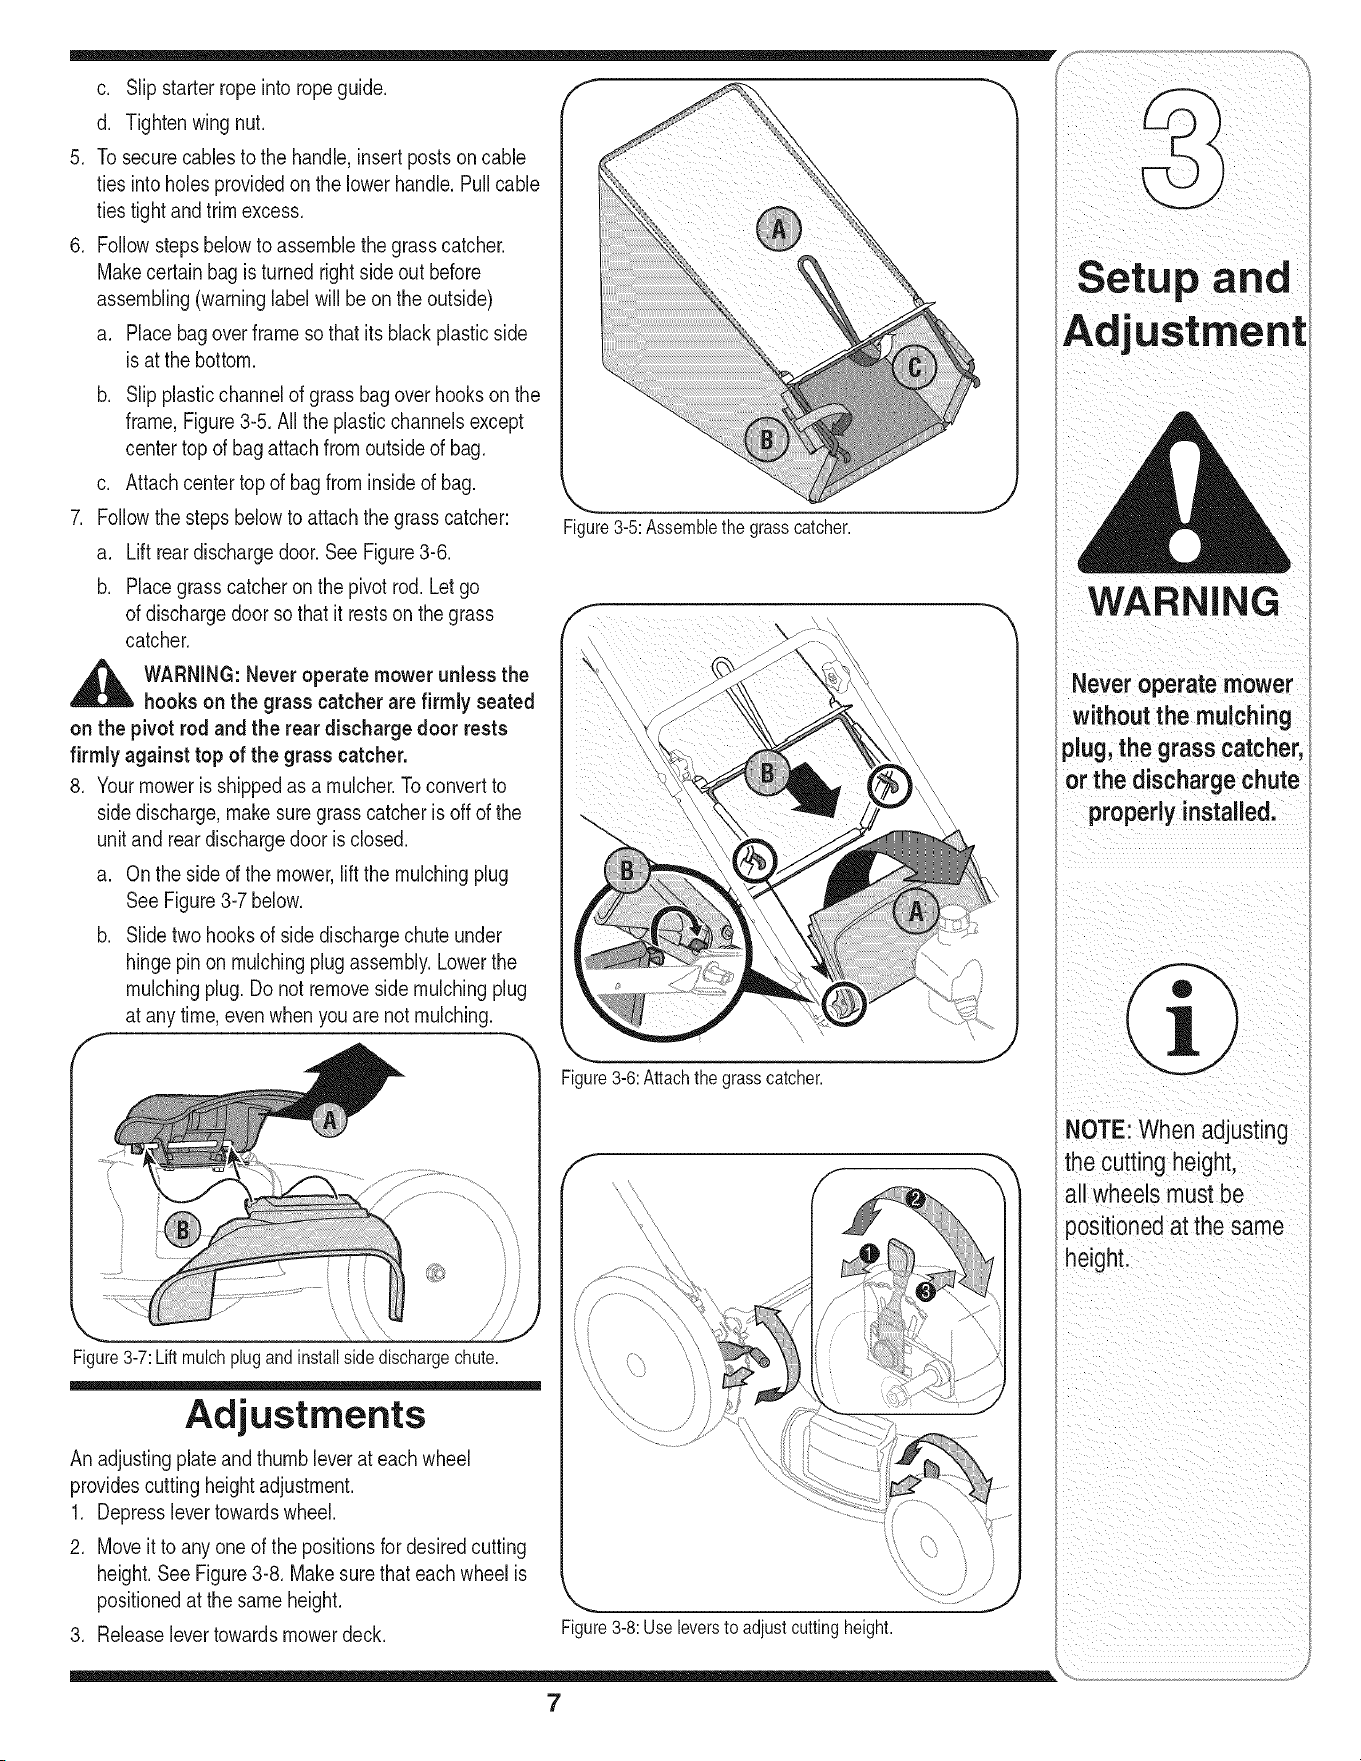
6. Followstepsbelowto assemblethe grasscatcher.
Makecertainbagis turned rightsideout before
assembling(warninglabelwill be on the outside)
a. Placebag overframesothat itsblackplasticside
is at the bottom.
b. Slip plasticchannelof grassbagoverhooksonthe
frame,Figure3-5.All the plasticchannelsexcept
centertop of bag attachfrom outsideof bag.
c. Attachcentertop of bagfrominsideof bag.
7. Followthe stepsbelowto attachthe grasscatcher:
a. Liftreardischargedoor.SeeFigure3-6.
b. Placegrass catcheron thepivotrod. Letgo
of dischargedoor sothat it restson thegrass
catcher.
_l_j_ll WARNING:Neveroperate mower unless the
hookson the grasscatcherare firmly seated
on the pivotrod and the rear discharge door rests
firmly against top of the grass catcher.
8. Yourmoweris shippedas a mulcher.Toconvertto
side discharge,makesuregrasscatcheris off of the
unit and rear dischargedoor isclosed.
a. On the sideof the mower lift the mulchingplug
See Figure3-7below.
b. Slidetwohooksof sidedischargechuteunder
hingepinon mulchingplugassembly.Lowerthe
mulchingplug.Do not removeside mulchingplug
at any time,evenwhenyouare notmulching.
f
Figure3-5:Assemblethe grasscatcher.
\
Figure3-6:Attachthegrasscatcher.
Figure3-7:Liftmulchplugandinstallsidedischargechute.
Adjustments
An adjustingplateandthumbleverat each wheel
providescuttingheightadjustment.
1. Depresslevertowardswheel.
2. Moveitto anyone of the positionsfordesiredcutting
height.SeeFigure3-8. Makesurethat each wheelis
positionedat the sameheight.
3. Releaselevertowardsmowerdeck.
Figure3-8:Useleversto adjustcuttingheight.
7
WARNING
Never operate mower
w thoutthemu ch ng
plug, the grass catcher,
or the discharge chute
properly installed,
NOTE: When adjusting
the cutting height,
al wheels must be
positioned at the same
height.
.g
You r LaWn
Mower
WARNING
This blade control
mechanism is a safety
device. Do not bypass
its operations,
Use extreme care
when handling
gasoline. Gasoline is
extremely flammable
and the vapors are
explosive. Never fuel
the machine indoors
or while the engine
is hot or running.
Extinguish cigarettes,
cigars, pipes, and
other sources of
ignition.
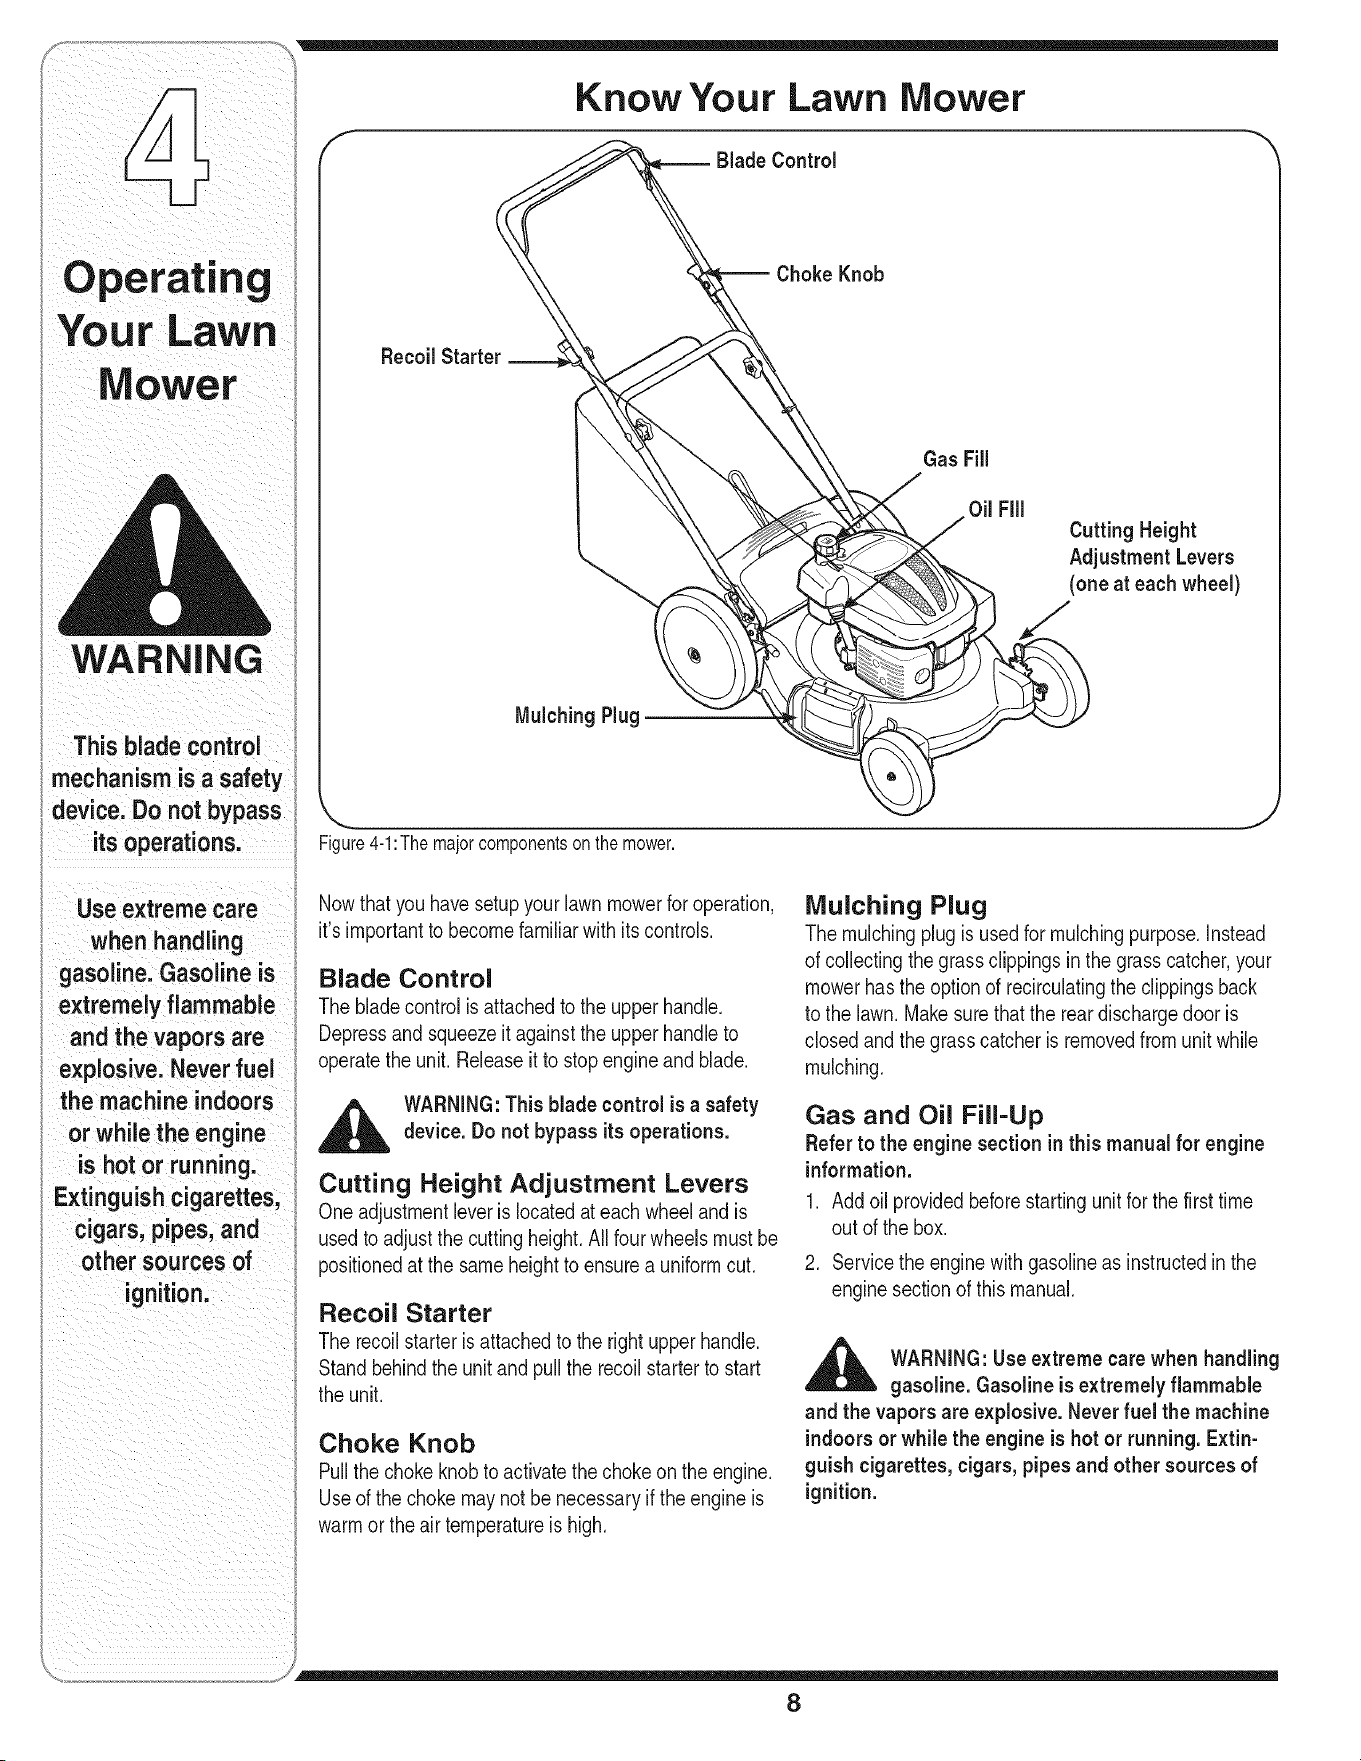
Know Your Lawn Mower
Y _ Blade Control
Choke Knob
Recoil Starter
\
MulchingPlug
Figure4-1:The majorcomponentson the mower.
Fill
Cutting Height
AdjustmentLevers
(one at eachwheel)
Nowthatyouhavesetupyour lawnmowerforoperation,
it's importantto becomefamiliarwithitscontrols.
Blade Control
The bladecontrolisattachedto the upperhandle.
Depressand squeezeit againstthe upperhandleto
operatethe unit. Releaseit to stop engineand blade.
_lL ARNING:Thisblade controlis a safety
device. Donot bypass its operations.
Cutting Height Adjustment Levers
Oneadjustmentleveris locatedat eachwheelandis
usedto adjustthe cuttingheight.All fourwheelsmust be
positionedat the sameheightto ensurea uniformcut.
Recoil Starter
The recoilstarteris attachedto the rightupperhandle.
Standbehindthe unitand pullthe recoilstarterto start
the unit.
Choke Knob
Pullthe chokeknobto activatethechoke on the engine.
Useof the chokemay notbe necessaryifthe engineis
warmor theair temperatureishigh.
Mulching Plug
Themulchingplugis usedfor mulchingpurpose.Instead
of collectingthe grassclippingsin the grasscatcher,your
mowerhasthe optionof recirculatingthe clippingsback
to the lawn. Makesurethatthe reardischargedoor is
closedandthe grasscatcheris removedfrom unit while
mulching.
Gas and Oil Fill-Up
Referto the enginesection inthis manual for engine
information.
1. Addoil providedbeforestartingunitfor the firsttime
out of the box.
2. Servicethe enginewith gasolineas instructedin the
enginesectionof thismanual.
,_ WARNING:Useextremecarewhen handling
gasoline. Gasoline is extremelyflammable
and the vapors are explosive.Never fuel the machine
indoorsor while the engine is hot or running. Extin-
guish cigarettes, cigars, pipesand other sources of
ignition.
8
_ WARNING:Theoperationof any lawn
mowercan result in foreign objectsbeing
thrownintothe eyes,whichcan damageyoureyes
severely.Nways wear safetyglasseswhileoperating
the mower,or whileperformingany adjustmentsor
repairson it.
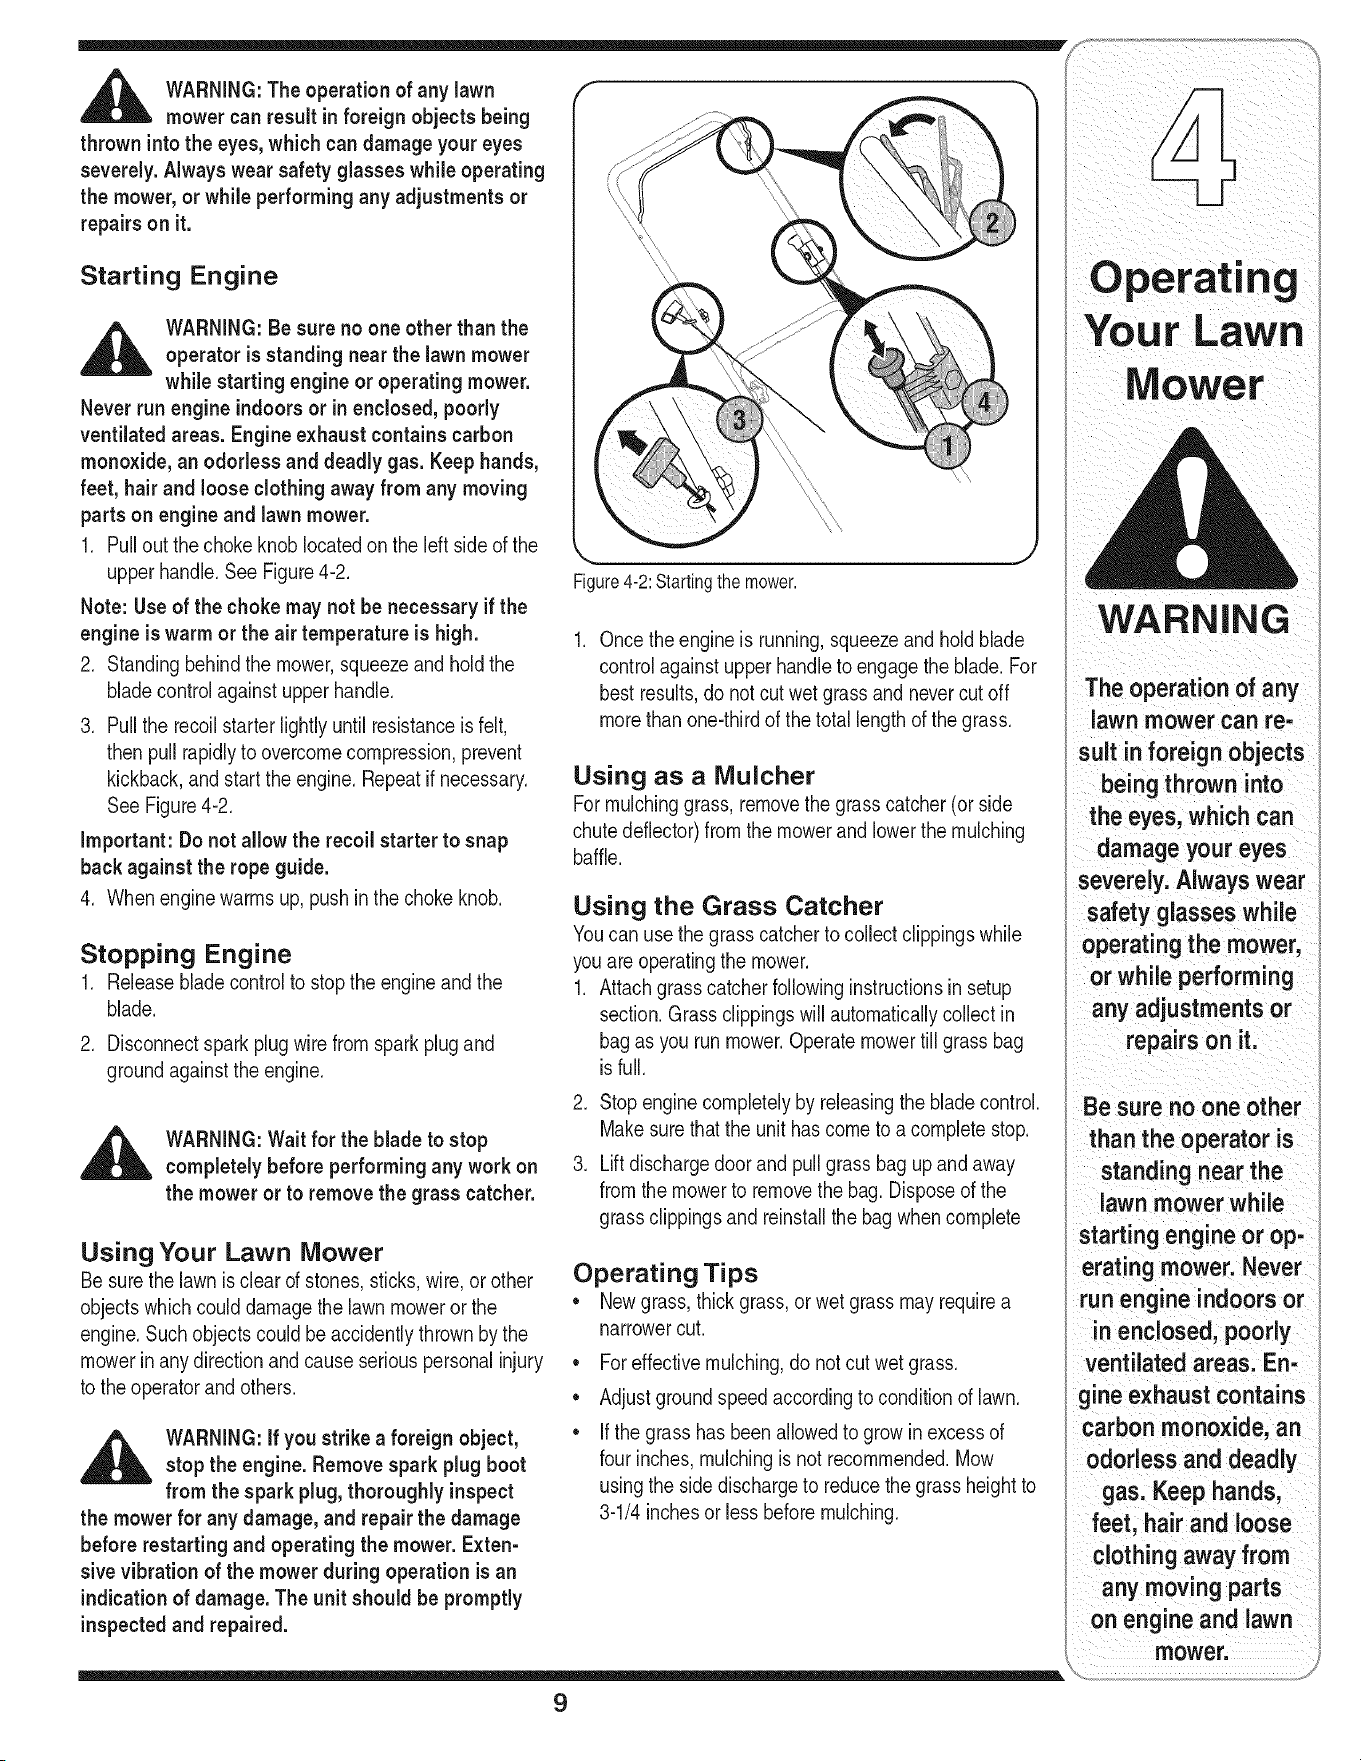
Starting Engine
,_ WARNING:Be sure no one otherthan theoperatoris standingnear the lawn mower
whilestartingengineor operatingmower.
Neverrun engine indoorsor inenclosed, poorly
ventilatedareas.Engineexhaustcontainscarbon
monoxide, an odorless and deadly gas. Keep hands,
feet, hairand looseclothing away from any moving
partson engineand lawnmower.
1. Pullout thechokeknoblocatedonthe left sideof the
upperhandle.See Figure4-2.
Note: Useof the choke may not be necessary if the
engine is warm orthe airtemperatureis high.
2. Standingbehindthe mower,squeezeand hold the
bladecontrolagainstupperhandle.
3. Pullthe recoilstarterlightlyuntil resistanceis felt,
thenpull rapidlyto overcomecompression,prevent
kickback,and startthe engine.Repeatif necessary.
SeeFigure4-2.
Important: Donot allow the recoil starter to snap
back against the ropeguide.
4. Whenenginewarmsup,pushin thechoke knob.
Stopping Engine
1. Releasebladecontrolto stop the engineand the
blade.
2. Disconnectsparkplug wirefrom spark plugand
groundagainstthe engine.
,_ WARNING:Waitfor the blade to stop
completelybefore performingany work on
the moweror to removethe grass catcher.
Using Your Lawn Mower
Besurethe lawn isclearof stones,sticks,wire,orother
objectswhichcoulddamagethe lawnmoweror the
engine.Suchobjectscouldbe accidentlythrownby the
mowerinany directionand causeseriouspersonalinjury
to the operatorand others.
_ WARNING:If youstrikea foreign object,stopthe engine.Removesparkplug boot
from the spark plug,thoroughly inspect
the mowerfor any damage,and repairthe damage
before restartingand operating the mower. Exten-
sivevibration of the mower during operation isan
indicationof damage.The unit shouldbe promptly
inspectedand repaired.
Figure4-2:Startingthe mower.
Oncethe engineis running,squeezeand hold blade
controlagainstupperhandleto engagethe blade.For
bestresults,do notcutwet grassand nevercut off
morethan one-thirdof thetotal lengthof thegrass.
Using as a Mulcher
Formulchinggrass,removethe grass catcher(or side
chutedeflector)fromthe mowerand lowerthe mulching
baffle.
Using the Grass Catcher
Youcan use thegrasscatcherto collectclippingswhile
you are operatingthe mower.
1. Attachgrasscatcherfollowinginstructionsinsetup
section.Grassclippingswill automaticallycollectin
bagas you run mower.Operatemowertill grassbag
isfull.
2. Stopengine completelyby releasingthe bladecontrol.
Makesurethatthe unithas cometo a completestop.
3. Liftdischargedoorandpull grass bag up and away
fromthe mowerto removethe bag. Disposeof the
grassclippingsand reinstallthe bagwhencomplete
Operating Tips
• Newgrass,thickgrass,orwet grassmayrequirea
narrowercut.
o
o
o
Foreffectivemulching,do not cut wet grass.
Adjustgroundspeedaccordingto conditionof lawn.
Ifthe grass hasbeenallowedto growin excessof
four inches,mulchingis not recommended.Mow
usingthe side dischargeto reducethegrassheightto
3-1/4inchesor less beforemulching.
WARNING
The operation of any
lawn mower can re-
sult in foreign objects
being thrown into
the eyes, which can
damage your eyes
severely.Always wear
safety glasseswhile
operating the mower,
or while performing
any adjustments or
repairs on it.
Be sure no one other
than the operator is
standing near the
lawn mower while
starting engine or op-
erating mower. Never
run engine indoors or
in enclosed, poorly
ventilated areas. En-
gine exhaust contains
carbon monoxide, an
ododess and deadly
gas. Keep hands,
feet, hair and loose
clothing away from
any moving parts
on engine and lawn
mower.
9
Your LaWn
MoWer
IMPORTANT: Do not
use a pressurewasher
or garden hose to
clean your uniL These
may cause damage to
electric components
spindleslpulleys; bear:
ings orthe engine The
Useof water Willresult
in Shortenedlife and
reduce SerViceabilityl
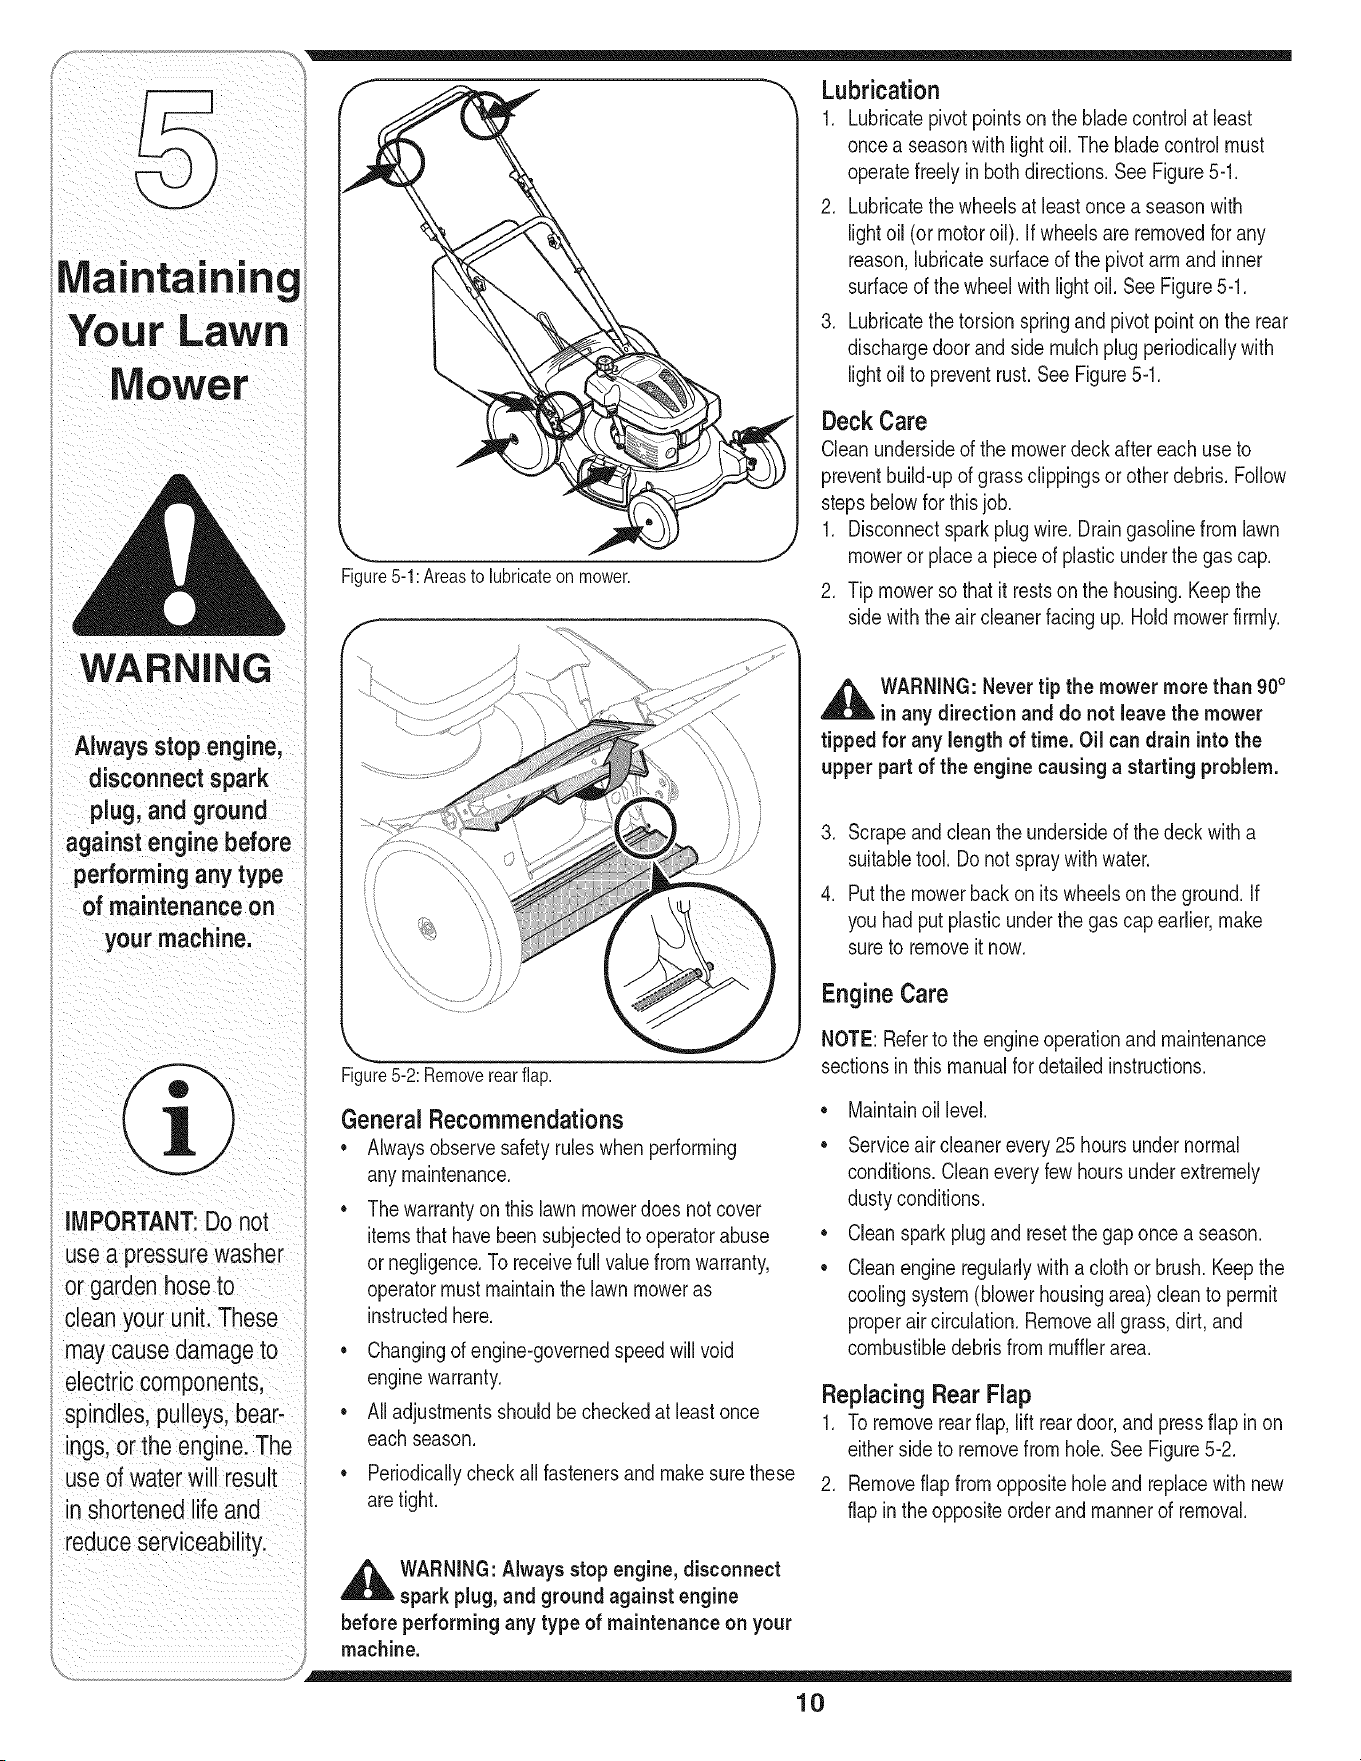
Lubrication
1. Lubricatepivotpointson theblade controlat least
oncea seasonwithlightoil. The bladecontrolmust
operatefreely in both directions.See Figure5-1.
2. Lubricatethe wheelsat least oncea seasonwith
lightoil (or motoroil). If wheelsare removedfor any
reason,lubricatesurfaceof the pivotarm and inner
surfaceof thewheelwithlight oil. SeeFigure5-1.
3. Lubricatethe torsionspringandpivot pointonthe rear
dischargedoorandside mulchplug periodicallywith
lightoil to preventrust.See Figure5-1.
Figure5-1:Areasto lubricateon mower.
Deck Care
Cleanundersideof the mowerdeck after eachuse to
preventbuild-upof grass clippingsor otherdebris.Follow
stepsbelowfor this job.
1. Disconnectsparkplug wire. Draingasolinefromlawn
mowerorplacea pieceof plasticunderthegas cap.
2. Tip mowersothat it restsonthe housing.Keepthe
sidewiththe air cleanerfacingup. Hold mowerfirmly.
Figure5-2: Removerearflap.
General Recommendations
• Alwaysobservesafetyruleswhen performing
anymaintenance.
• Thewarrantyon this lawnmowerdoesnot cover
itemsthathavebeensubjectedto operatorabuse
ornegligence.To receivefull valuefromwarranty,
operatormustmaintainthelawn moweras
instructedhere.
• Changingof engine-governedspeedwill void
enginewarranty.
• All adjustmentsshouldbe checkedat leastonce
eachseason.
Periodicallycheckallfastenersand makesurethese
aretight.
_ ARNING:Nevertip the mower more than go°
inany direction and do not leavethe mower
tipped for any length of time. Oil can drain intothe
upper partof the engine causing a starting problem.
3. Scrapeand cleanthe undersideof the deck with a
suitabletool.Do notspraywithwater.
4. Putthe mowerbackonits wheelsonthe ground.If
youhad putplasticunderthe gas capearlier,make
sureto removeit now.
Engine Care
NOTE:Referto the engineoperationand maintenance
sectionsinthis manualfor detailedinstructions.
e
e
e
e
Maintainoil level.
Serviceaircleanerevery25 hoursundernormal
conditions.Cleaneveryfewhoursunderextremely
dustyconditions.
Cleansparkplugand resetthegaponce a season.
Cleanengineregularlywitha clothorbrush.Keepthe
coolingsystem(blowerhousingarea) cleanto permit
properaircirculation.Removeall grass,dirt, and
combustibledebrisfrommufflerarea.
Replacing Rear Flap
1. Toremoverearflap,lift rear door,and pressflap in on
eithersideto removefromhole.See Figure5-2.
2. Removeflapfromoppositeholeand replacewith new
flap in the oppositeorderand mannerof removal.
,_ WARNING:Alwaysstop engine,disconnect
sparkplug, and groundagainst engine
before performing any type of maintenance on your
machine.
10

_, ARNING:Whenremovingthe cuttingblade
for sharpening or replacement, protectyour
hands with a pairof heavy gloves or use a heavyrag
to hold the blade.
Periodicallyinspectthe bladeadapterfor cracks,
especiallyif youstrikea foreignobject. Replacewhen
necessary.Followthe stepsbelowfor blade service.
1. Disconnectsparkplug wirefrom spark plug.Turn
moweron itsside makingsurethatthe air filter and
the carburetorare facing up.
2. Removethe boltand the bladebell supportwhich
holdthe bladeand the bladeadapterto the engine
crankshaft.See Figure5-3.
3. Removebladeand adapterfromthe crankshaft.See
Figure5-3.
4. Removebladefrom the adapterfor testingbalance.
Balancethe bladeon a roundshaftscrewdriverto
check.Removemetalfrom the heavysideuntil it
balancesevenly.
Whensharpeningthe blade,followthe originalangle
of grind. Grindeachcuttingedgeequallyto keepthe
bladebalanced.
_ ARNING:Anunbalanced blade will cause
excessive vibration when rotating at high
speeds. It may cause damageto mowerand could
break causing personalinjury.
5. Lubricatetheenginecrankshaftand the inner surface
of the blade adapterwith lightoil. Slide the blade
adapteronto the enginecrankshaft.Placethe blade
on theadaptersuch thatthe sideof the blademarked
"Bottom"(or with part number)facesthe groundwhen
the mowerisin the operatingposition.Makesurethat
the blade is alignedand seatedon the blade adapter
flanges.
6. Placeblade bell supporton the blade.Align notches
on the bladebell supportwith smallholesin blade.
7. Replacehex boltandtightenhex boltto torque:450
in.Ibs. rain.,600 in.Ibs.max.
Toensuresafeoperationof yourmower,periodically
checkthe bladeboltfor correcttorque.
Blade Bell Support / _,_,_, Bolt
Figure5-3:Removethebolt,support,andadaptertoaccess
theblade.
Off-Season Storage
Thefollowingstepsshouldbe takento prepareyour
lawnmowerfor storage.
• Cleanand lubricatemowerthoroughlyas described
inthe lubricationinstructions.
• Do not usea pressurewasheror garden hoseto
cleanyourunit.
Coatmower'scuttingblade with chassisgreaseto
preventrusting.
Storemowerina dry,cleanarea. Donot storenext
to corrosivematerials,suchas fertilizer.
Whenstoringanytypeof powerequipmentin a poorly
ventilatedor metal storageshed, careshouldbetaken
to rust-prooftheequipment.Usinga lightoil or silicone,
coattheequipment,especiallycablesand all moving
partsof yourlawnmowerbeforestorage.
11
Maintaining
WARNING
When removing
the cutting blade
for sharpening or
replacement, protect
your hands with a pair
of heavy glovesor use
a heavy rag to hold
the blade.
An unbalanced blade
will cause excessive
vibration when rotat-
ingat high speeds. It
may cause damage
to mower and could
break causing per-
sonal injury.
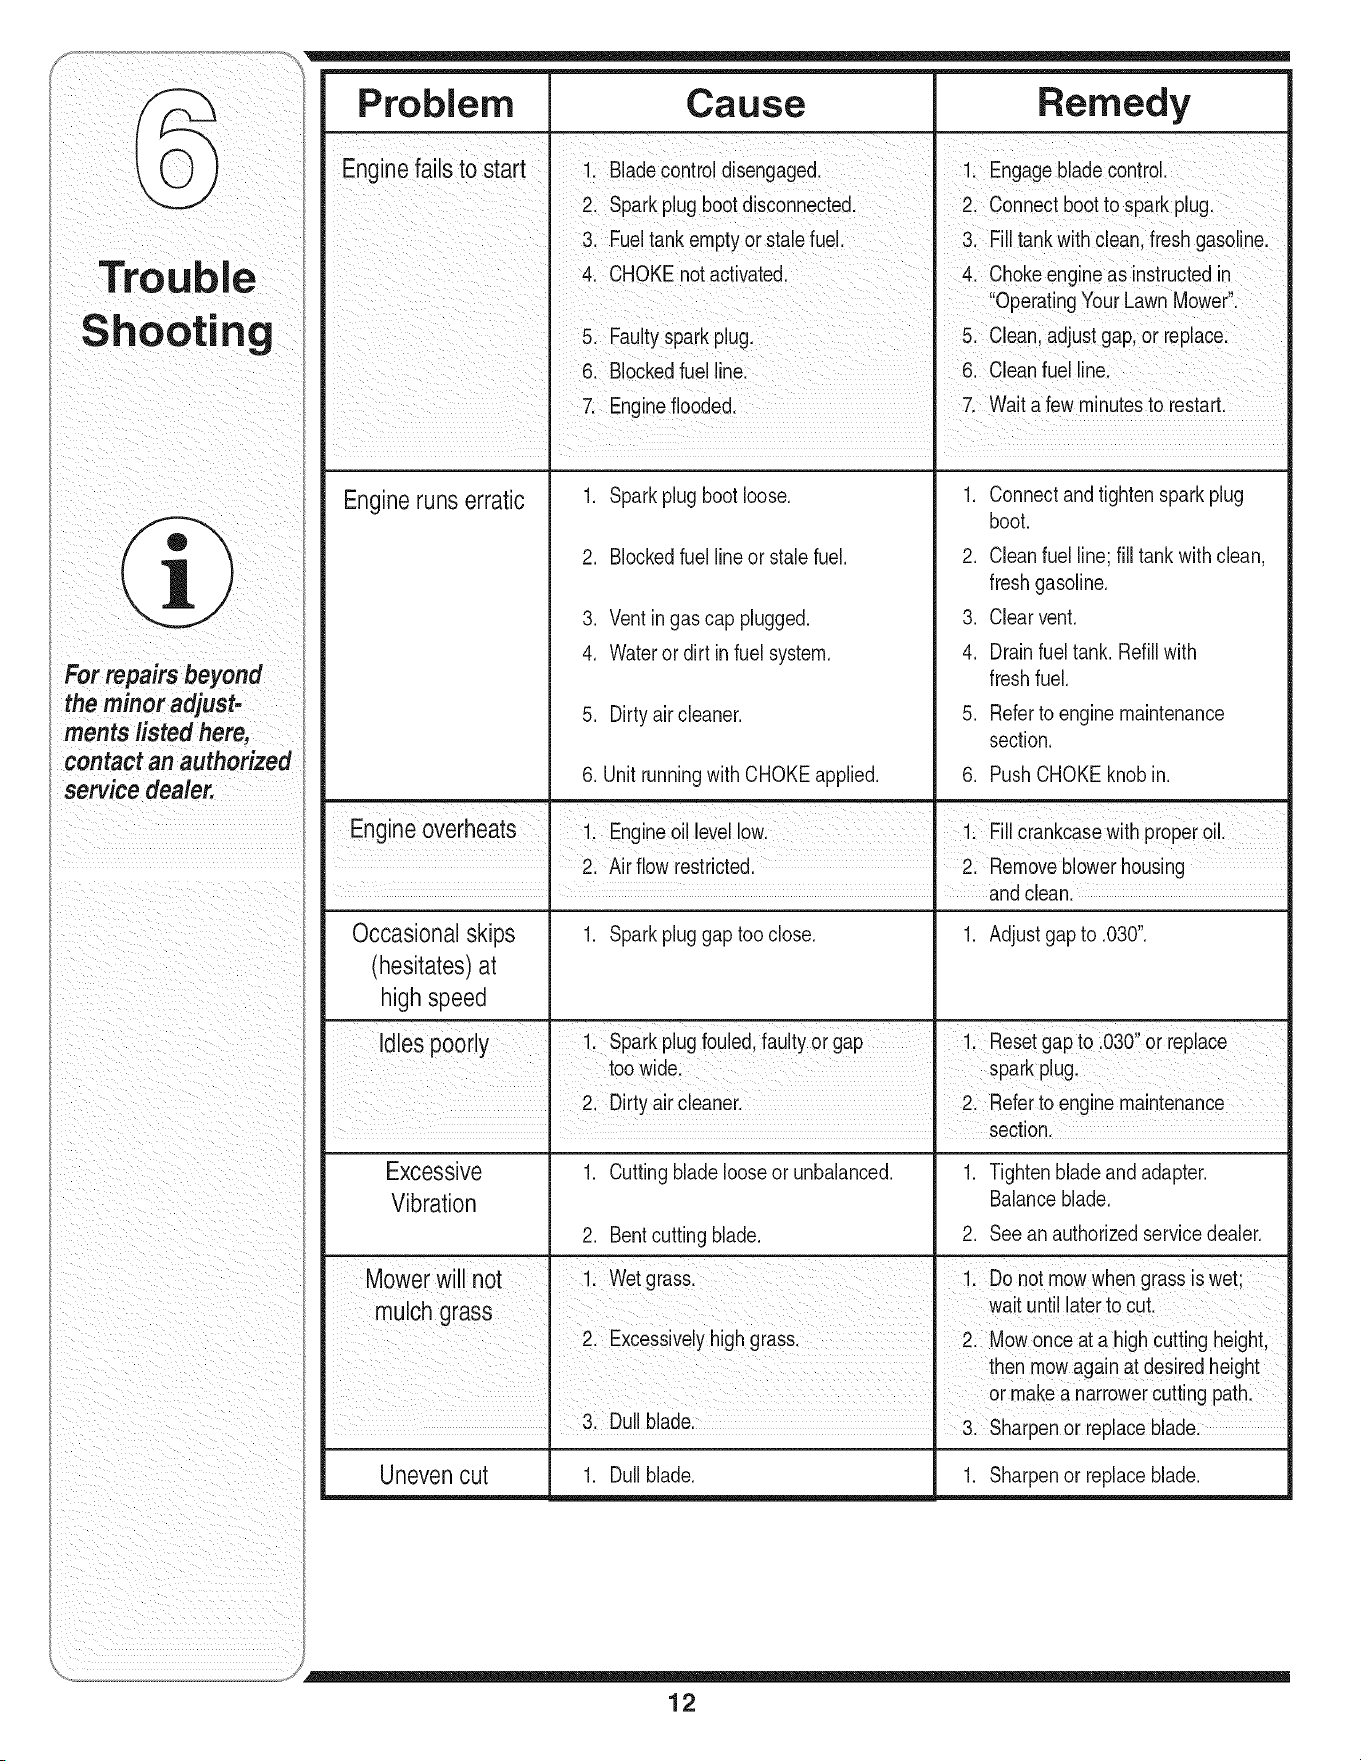
"Frouble
For repairs beyond
thembo
merits listed here,
contact an authorized
service dealer.
Problem Cause
Remedy
Engineruns erratic 1. Connectand tightenspark plug
boot.
2. Cleanfuel line; fill tank with clean,
freshgasoline.
3. Clearvent.
4. Drainfueltank. Refillwith
freshfuel.
5. Referto enginemaintenance
section.
6. Unit runningwith CHOKEapplied. 6. PushCHOKEknobin.
Eng ne overheats 1 Engneo eve Ow 1 F crankcasew th propero
I ....
- 2. Airflow restricted• 2. Removeblowerhousing
, and clean•
Occasional skips
(hesitates) at
high speed
1. Sparkplugbootloose.
2. Blockedfuel line or stalefuel.
3. Ventingas cap plugged.
4. Wateror dirt in fuel system.
5. Dirtyair cleaner.
1. Sparkpluggaptoo close. 1. Adjustgap to .030".
1. Tightenbladeand adapter.
Balanceblade.
2. Seeanauthorizedservicedealer.
1. Cuttingblade looseor unbalanced.
2. Bentcuttingblade.
Excessive
Vibration
Mower wi Inot I 1. Wetgrass 1. Do notmowwhen grassis wet;
mulhc grass wat unt aterto cut.
2. Excessivelyhighgrass. 2. Mowonce ata highcutting height
then mowagain at desiredheight
or makea narrowercuttingpath.
I 3 Du bade
• • 3. Sharpenor replaceblade.
Unevencut 1. Dullblade. 1. Sharpenor replaceblade.
12
13
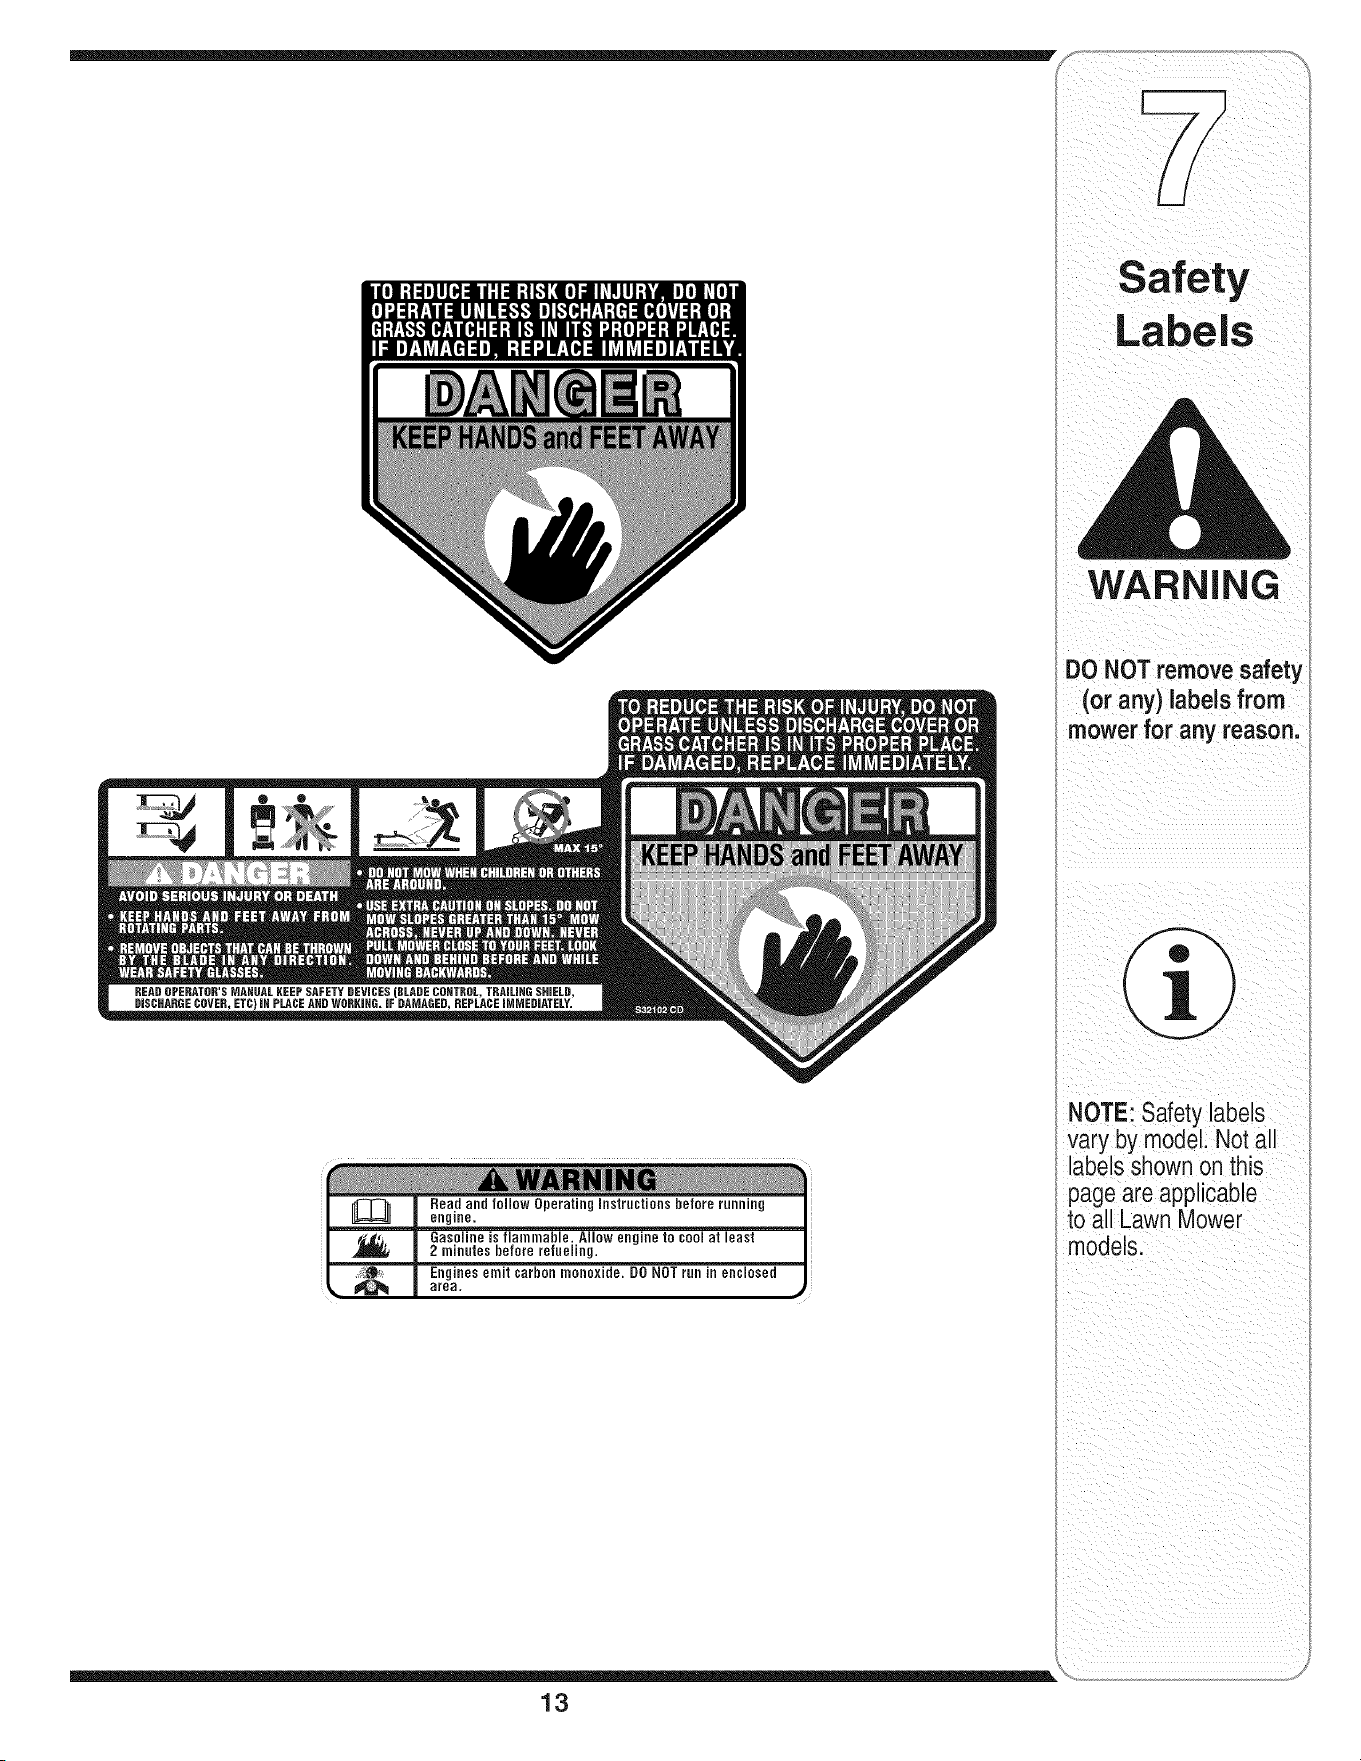
WARNIN
DO NOT remove safety
(or any)labels from
mower for any reason.
ii i _iI_ ii
NOTE: Safety labels
vary by model. Not all
labels shown on this
page are applicable
to all Lawn Mower
models.
WARNING
Gasolineand itsvapors
are extremelyflam-
mableand explosive.
Fireor explosioncan
cause severeburns
or death. If gasolineis
spilledon yourselfor
your clothes,wash your
I skin and changeclothes
i immediately.
i Starting enginecreates
sparking. Sparking can
ignite nearby flamma-
I
b e gases. Explosion
and fire could result.
Unintentionalsparking
can result in fire or
electric shock. Unin-
tentional start-up can
, result in entanglement,
traumatic amputation,
i or laceration.
WARNING: Gasoline and its vapors are extremely flammable and explosive. Fire or
explosion can cause severe burns or death. If gasoline is spilled on yourself or your
clothes, wash your skin and change clothes immediately.
Gasoline and its vapors are
extremely flammable and
explosive. Fire or explosion can
cause severe burns or death, if
gasoline is spilled on yourself
or your clothes, wash your skin
and change clothes immediately.
o
o
o
Whenaddingfuel,turnengineOFFandlet engine
coolat least2 minutesbeforeremovinggas cap.
Fill fueltankoutdoorsor inwellventilatedarea.
Useonlyanapprovedgasolinecontainer.
Neverfill containersinsideavehicleor ona truck or
trailerbedwitha plasticliner.Alwaysplacecontain-
ers on the groundawayfrom yourvehiclebefore
filling.
• If possible,removegas-poweredequipmentfrom the
truckor trailerand refuelit on theground.If this is
not possible,then refuelsuch equipmenton a trailer
witha portablecontainer,ratherthan froma gasoline
dispensernozzle.
• Keepthe nozzlein contactwith the rimof thefuel
tankorcontaineropeningat alltimesuntilfueling is
complete.Do notuse a nozzlelock-opendevice.
• Do notoverfillfuel tank. Filltank to approximately
2 cmbelowlowestportionof neckto allowfor fuel
expansion.
• Keepgasolineawayfrom sparks,open flames,pilot
lights,heat,andother ignitionsources.
• Neverfuelequipmentindoorsbecauseflammable
vaporswill accumulatein the area.
• Extinguishall cigarettes,cigars,pipes,and other
sourcesof ignition.
• Checkfuelline,tank, cap,andfittingsfrequentlyfor
cracksor leaks.Replaceif necessary.
• Whenstartingengine,makesurespark plug,muffler,
fuelcap andaircleanerarein place.
• Do notcrank enginewith spark plug removed.
• If fuelspills,wait untilit evaporatesbeforestarting
engine.
• Whenoperatingequipment,donot tip engineor
equipmentat anglewhich causesgasolineto spill.
• Do notchoke carburetorto stopengine.
• Whentransportingequipment,transportwithfuel tank
EMPTY.
Whenstoringgasolineorequipmentwithfuel in tank,
storeawayfromfurnaces,stoves,waterheatersor
otherappliancesthathavepilot lightorother ignition
sourcebecausetheycan ignitegasolinevapors.
,_ Starting engine creates spark-
ing. Sparking can ignite nearby
__ flammable gases. Explosion and
fire could result.
If thereisa naturalor LP gas leakagein area,do not
startengine.
• Do not usepressurizedstartingfluidsbecausevapors
areflammable.
_ ngines give off carbon mon-
oxide, an odorless, colorless,
poisonous gas. Breathing carbon
monoxide can cause nausea,
fainting, or death.
Startandrunengineoutdoors.
• Do not startor run enginein enclosedarea,evenif
doorsor windowsare open.
_ nintentional sparking can result
infire or electric shock. Unin-
tentional start-up can result in
entanglement, traumatic amputa-
tion, or laceration.
Beforepeformingadjustmentsor repairs,disconnect
sparkplugwireand keepitawayfrom spark plug.
• Whentestingfor spark,use approvedspark plug
tester.
Do notcheckfor sparkwithsparkplug removed.
14
Running engine produces heat.
Engine parts, especially muffler,
become extremely hot. Severe
thermal burns can occur on
contact. Combustibledebris,
such as leaves, grass, brush, etc.,
can catch fire.
* Allow muffler,enginecylinder,and fins to cool before
touching.
. Keepchildrenawayfrom hot or runningengines.They
can sufferburnsfroma hot muffler.
Removeaccumulatedcombustiblesfrommufflerand
cylinderarea.
_ Rotating engine parts can
contact or entangle hands, feet,
hair, clothing, or accessories.
Traumaticamputation or severe
laceration can result.
* Operateequipmentwithguardsin place.
* Keephandsand feet awayfrom rotatingparts.
SafetyAlert
• Tie up long hairand removejewelry.
• Do notwear loose-fittingclothing,danglingdraw-
stringsor itemsthatcouldbecomecaught.
,__ Rapid retraction of starter cord
(kickback) will pull hand and
arm toward engine faster than
you can let go. Broken bones,
fractures, bruises or sprains
could result.
• Whenstartingengine,pull cordslowlyuntil resis-
tanceisfelt,then pullrapidly.
• Removeall externalequipment/engineloadsbefore
startingengine.
• Directcoupledequipmentcomponentssuchas, but
not limitedto blades,impellers,pulleys,sprockets,
etc.,mustbesecurelyattached.
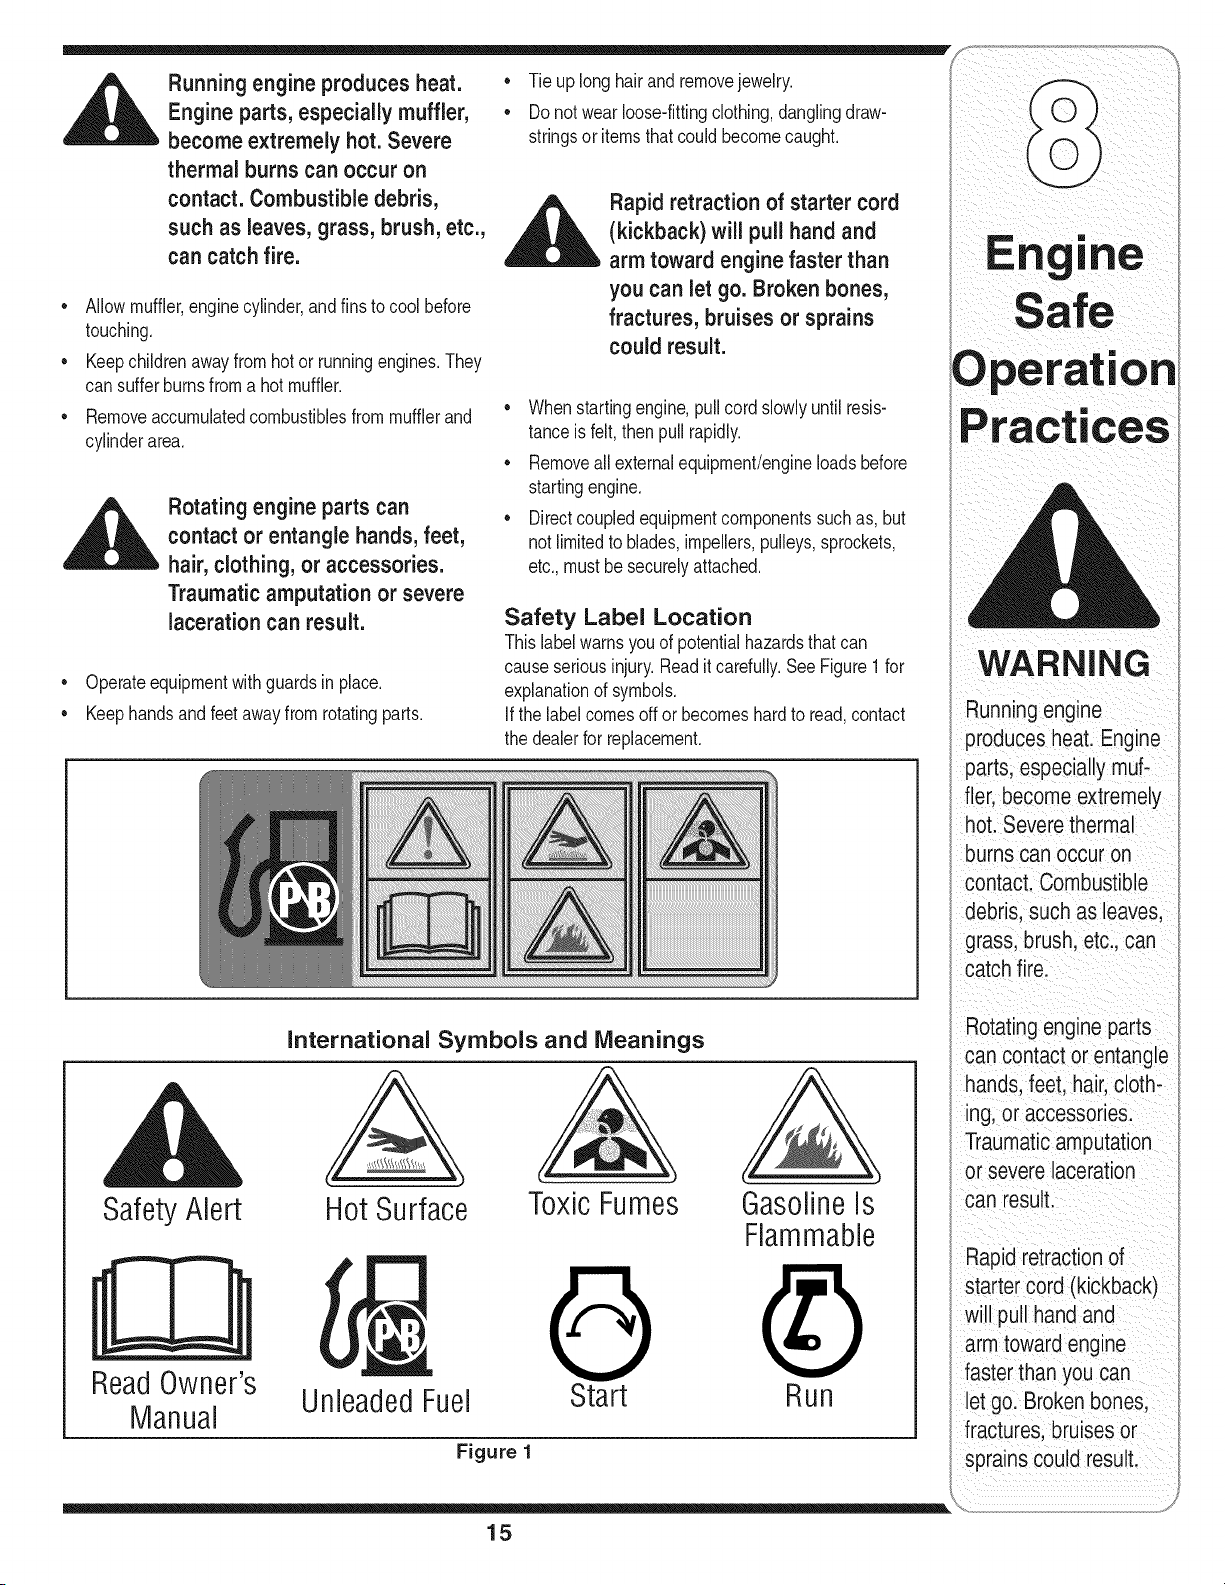
Safety Label Location
Thislabelwarnsyouof potentialhazardsthat can
causeseriousinjury.Readit carefully.See Figure1 for
explanationof symbols.
If the labelcomesoffor becomeshardto read,contact
the dealerfor replacement.
International Symbols and Meanings
A
Hot Surface
Toxic Fumes GasolineIs
Flammable
ReadOwner's
UnleadedFuel Start Run
Manual
Figure 1
WARNING
Running engine
produces heat. Engine
parts, especially muf-
fler, become extremely
hot. Severe thermal
burns can occur on
contact. Combustible
debris, such as leaves,
grass, brush, etc., can
catch fire.
Rotating engine parts
can contact or entangle
hands, feet. hair.cloth-
ing, or accessories.
Traumaticamputation
or severe laceration
can result.
Rapid retraction of
starter cord (kickback)
will pull hand and
arm toward engine
faster than you can
let go. Broken bones.
fractures, bruises or
sprains could result.
15
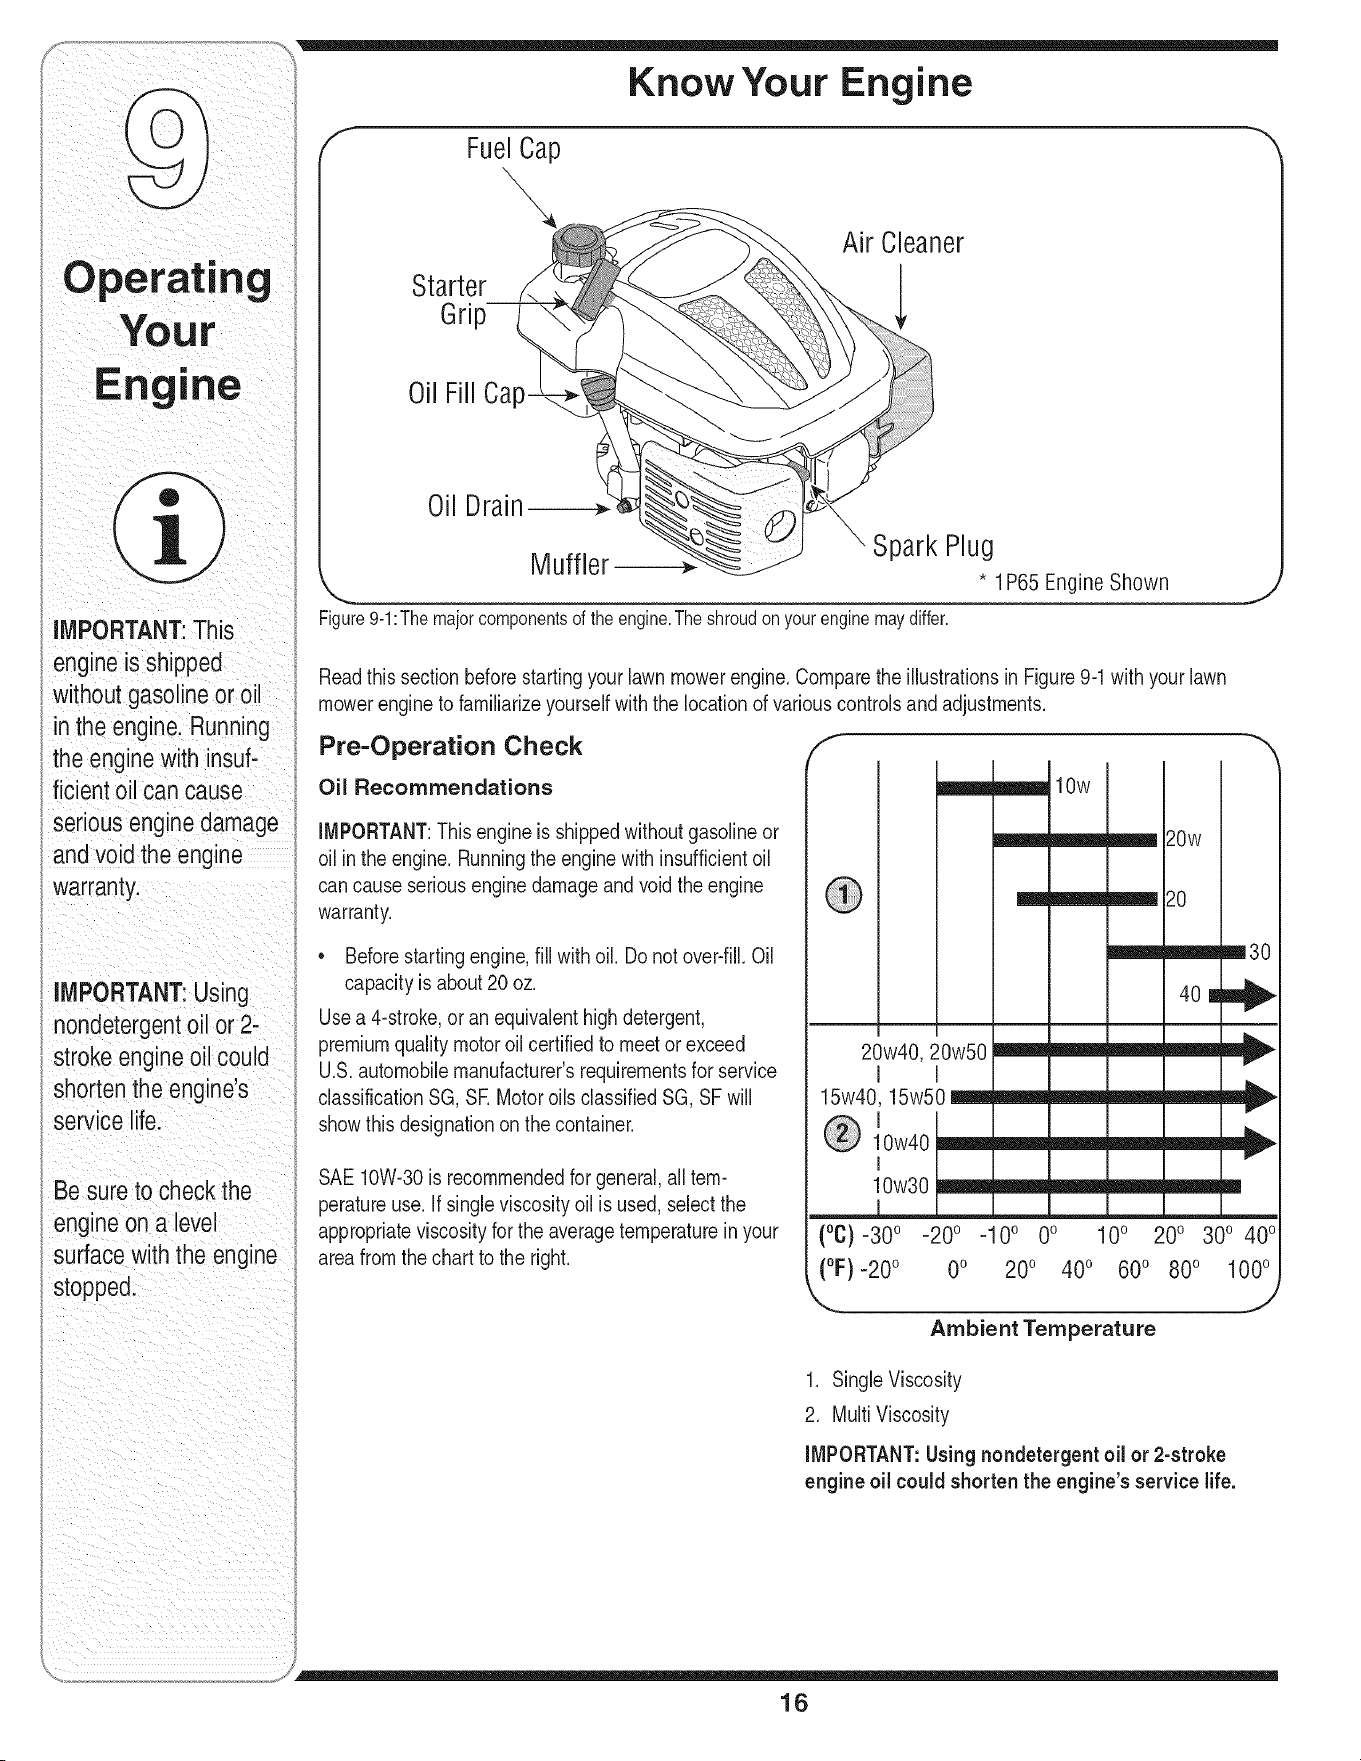
Know Your Engine
f"- Fuel Cap -'_
IMPORTANT:This
engine is shipped
without gasoline or oil
in the engine. Running
the engine with insuf-
ficient oil can cause
serious engine damage
andvoid the engine
warranty.
iMPORTANT: Using
nondetergentoil or 2-
stroke engine oil could
shorten the engine's
service life.
Be sure to check the
engine on a level
surface with the engine
stopped.
Starter
Gri
Air Cleaner
Oil Fiii Cap
Oil Drain-----_
Muffler Spark Plug
!%5Eng!neSh°wn t
Figure9-1:Themajorcomponentsoftheengine.Theshroudonyourenginemaydiffer.
Readthissectionbeforestartingyourlawnmowerengine.Comparethe illustrationsin Figure9-1with your lawn
mowerengineto familiarizeyourselfwith the locationof variouscontrolsandadjustments.
Pre-Operation Check
Oil Recommendations
IMPORTANT:This engineis shippedwithoutgasolineor
oil inthe engine.Runningthe enginewith insufficientoil
cancauseseriousenginedamageand voidthe engine
warranty.
• Beforestartingengine,fill with oil. Donot over-fill.Oil
capacityis about20oz.
Usea 4-stroke,oran equivalenthighdetergent,
premiumqualitymotoroilcertifiedto meetorexceed
U.S.automobilemanufacturer'srequirementsfor service
classificationSG, SE Motoroils classifiedSG,SF will
showthis designationon thecontainer.
SAE10W-30is recommendedfor general,alltem-
peratureuse. If singleviscosityoil is used,selectthe
appropriateviscosityfor theaveragetemperaturein your
areafromthe chart to the right.
20w40,
I
15w40,
__ 20w
m__ 20
mmlmml lil_l
m3o
!0w50 _____
v
0 _ mmmm mJlml _ _ _
v
I P"
10W30 _____1
(°C)-30 ° -20° -10° 0° 10° 200 300 400
("F)-20 ° 0° 200 400 600 800 1000
Ambient Temperature
1. SingleViscosity
2. MultiViscosity
iMPORTANT:Usingnondetergent oil or 2-stroke
engineoil could shortenthe engine'sservicelife.
16
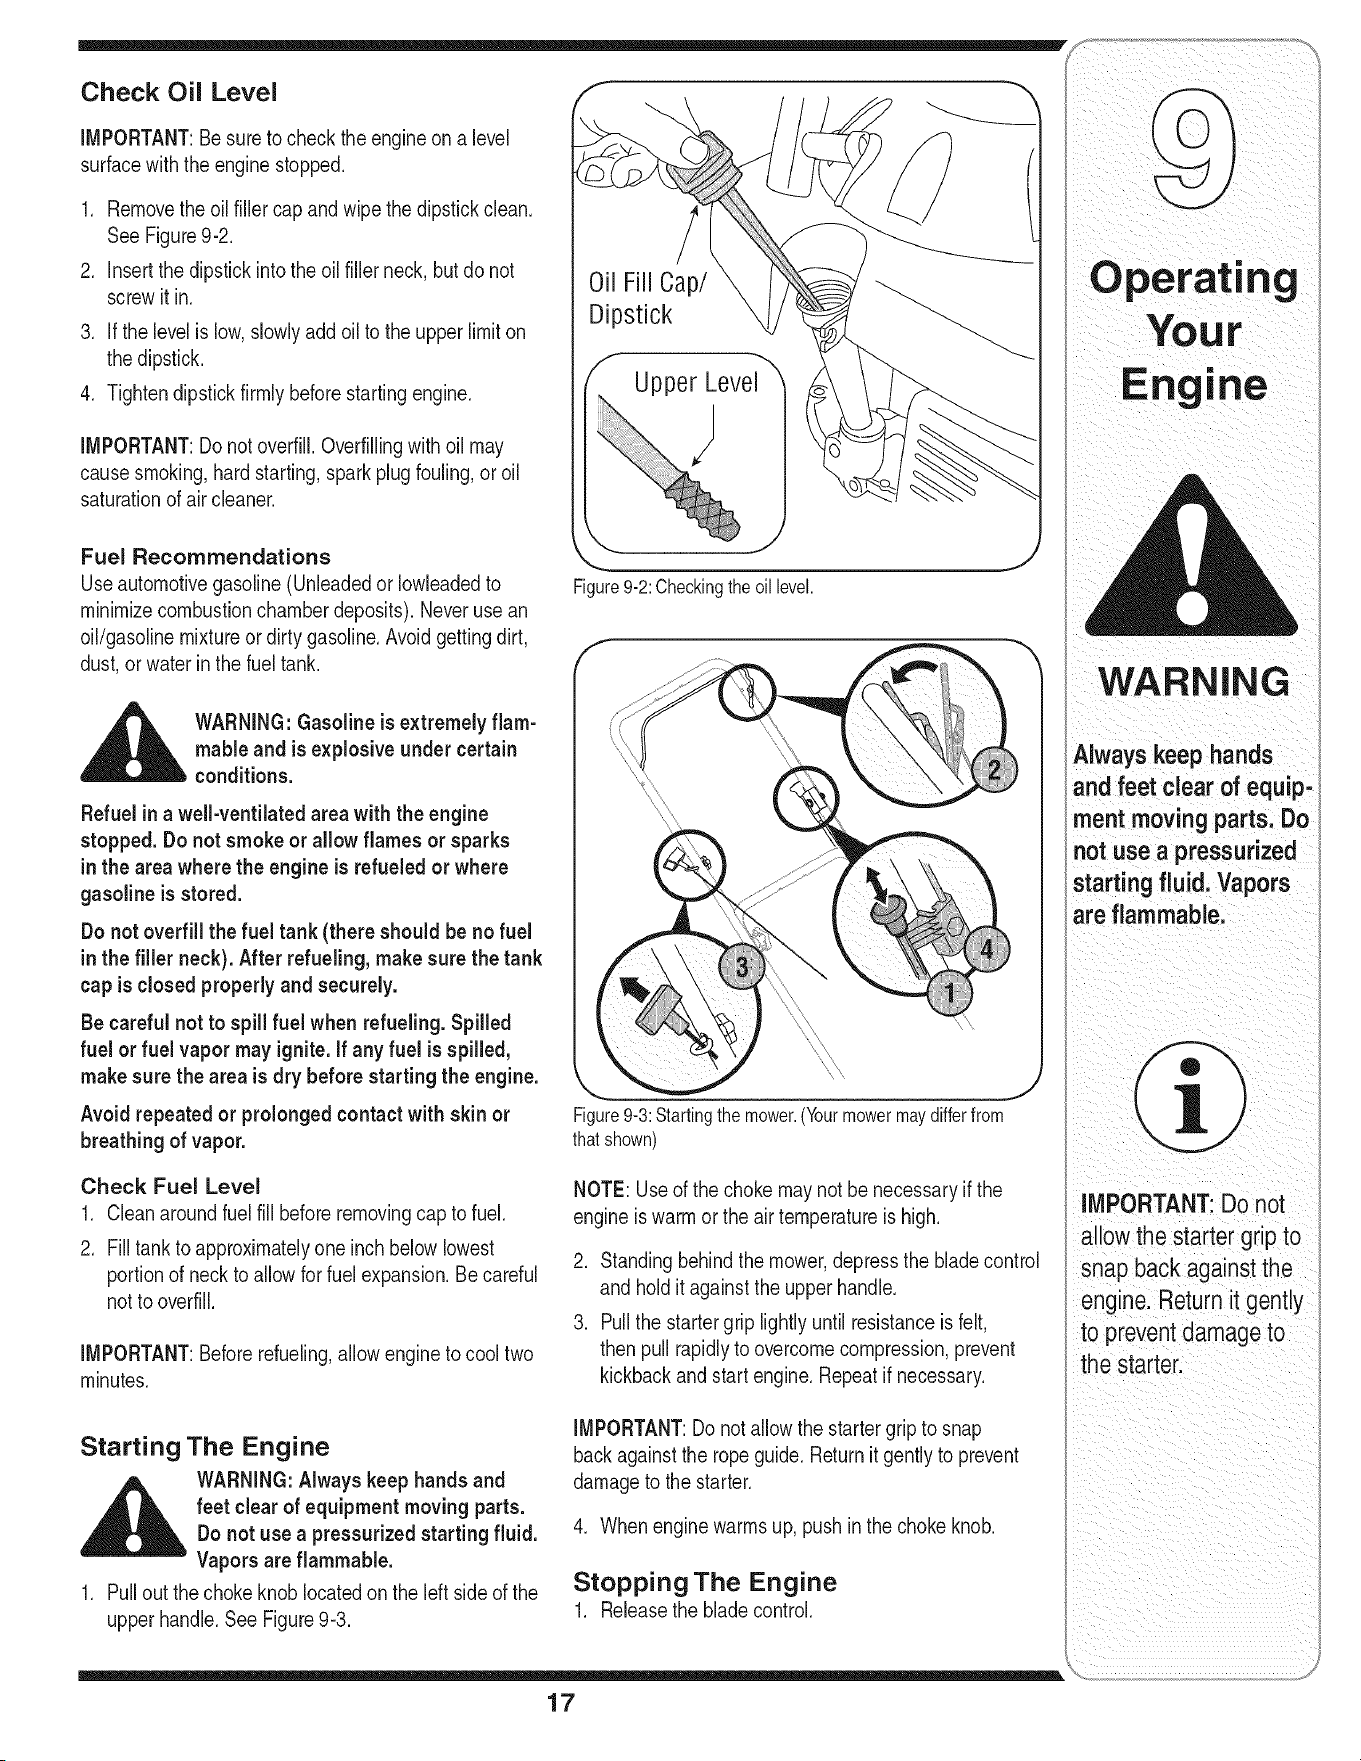
Check Oil Level
IMPORTANT:Be sureto checkthe engineon a level
surfacewith the engine stopped.
.
2.
3.
4.
Removethe oil fillercap and wipethe dipstickclean.
SeeFigure9-2.
Insertthe dipstickintothe oil fillerneck, butdo not
screwit in.
if the levelislow,slowlyaddoil to the upperlimiton
thedipstick.
Tightendipstickfirmlybeforestartingengine.
IMPORTANT:Donotoverfill.Overfillingwithoil may
causesmoking,hardstarting,sparkplug fouling,or oil
saturationof air cleaner.
Fuel Recommendations
Useautomotivegasoline(Unleadedor Iowleadedto
minimizecombustionchamberdeposits).Neverusean
oil/gasolinemixtureor dirtygasoline.Avoidgettingdirt,
dust,or waterinthe fuel tank.
_ ARNING:Gasolineis extremelyflam-
mable and is explosiveunder certain
conditions.
Refuel ina well-ventilatedarea with the engine
stopped.Do not smoke or allow flames or sparks
inthe areawhere the engineis refueledor where
gasoline is stored.
Donot overfill the fuel tank (there should be no fuel
inthe filler neck). After refueling, makesure the tank
cap isclosed properly and securely.
Be careful not to spillfuel when refueling. Spilled
fuel or fuel vapor mayignite,if any fuel is spilled,
makesurethe areais dry before startingthe engine.
Avoid repeatedor prolongedcontact with skinor
breathing of vapor.
Check Fuel Level
1. Cleanaroundfuelfill beforeremovingcap to fuel.
2. Filltankto approximatelyoneinchbelowlowest
portionof neckto allowfor fuelexpansion.Becareful
notto overfill.
IMPORTANT:Beforerefueling,allowengineto cool two
minutes.
Starting The Engine
_ ARNING:Alwayskeep hands and
feet clearof equipmentmovingparts.
Donot use a pressurizedstartingfluid.
Vaporsare flammable.
1. Pullout thechokeknoblocatedonthe left sideof the
upperhandle.See Figure9-3.
Figure9-2:Checkingthe oil level.
Figure9-3:Startingthe mower.(Yourmowermaydifferfrom
thatshown)
NOTE:Useof the chokemaynot be necessaryifthe
engineiswarmor the airtemperatureishigh.
2. Standingbehindthe mower,depressthe bladecontrol
andholditagainstthe upperhandle.
3. Pullthe startergrip lightlyuntil resistanceisfelt,
thenpull rapidlyto overcomecompression,prevent
kickbackand startengine.Repeatif necessary.
IMPORTANT:Do notallowthe startergripto snap
backagainstthe rope guide.Returnit gentlyto prevent
damageto the starter.
4. Whenenginewarmsup, pushinthe choke knob.
Stopping The Engine
1. Releasethe bladecontrol.
17
WARNING
Always keep hands
and feet clear of equip'
ment moving parts:Do
not use a pressurized
starting fluid, Vapors
IMPORTANT: Donot
allow the starter grip to
snap baCkagainstthe
enginel Returnit gently
to reventdamage to
the starter:
WARNING
Shut off the engine
beforeperforming
type of maintenance,
ro.roveo ,oo!doo o!
start-upidisconnect
t,e parkp boot:
Beforetipping engine
drain oil, drain fuel
from tank by running
engine until fuel tank
is empty;
iMPORTANT:Be sure
to check engineon a
level surfaceW th the
engine stopped Drain
i
the oil while the engine
is still warm to assure
rapid and complete
draining:
i
WARNING:Shut off the engine before
performingany maintenance. To
preventaccidental start-up, disconnect
the spark plugboot.
IMPORTANT:If enginemustbe tippedto transport
equipmentorto inspector removegrass,keepspark
plugsideof engineup.Transportingor tippingengine
sparkplugdownmaycausesmoking,hardstarting,
sparkplugfouling,or oil saturationof air cleaner.
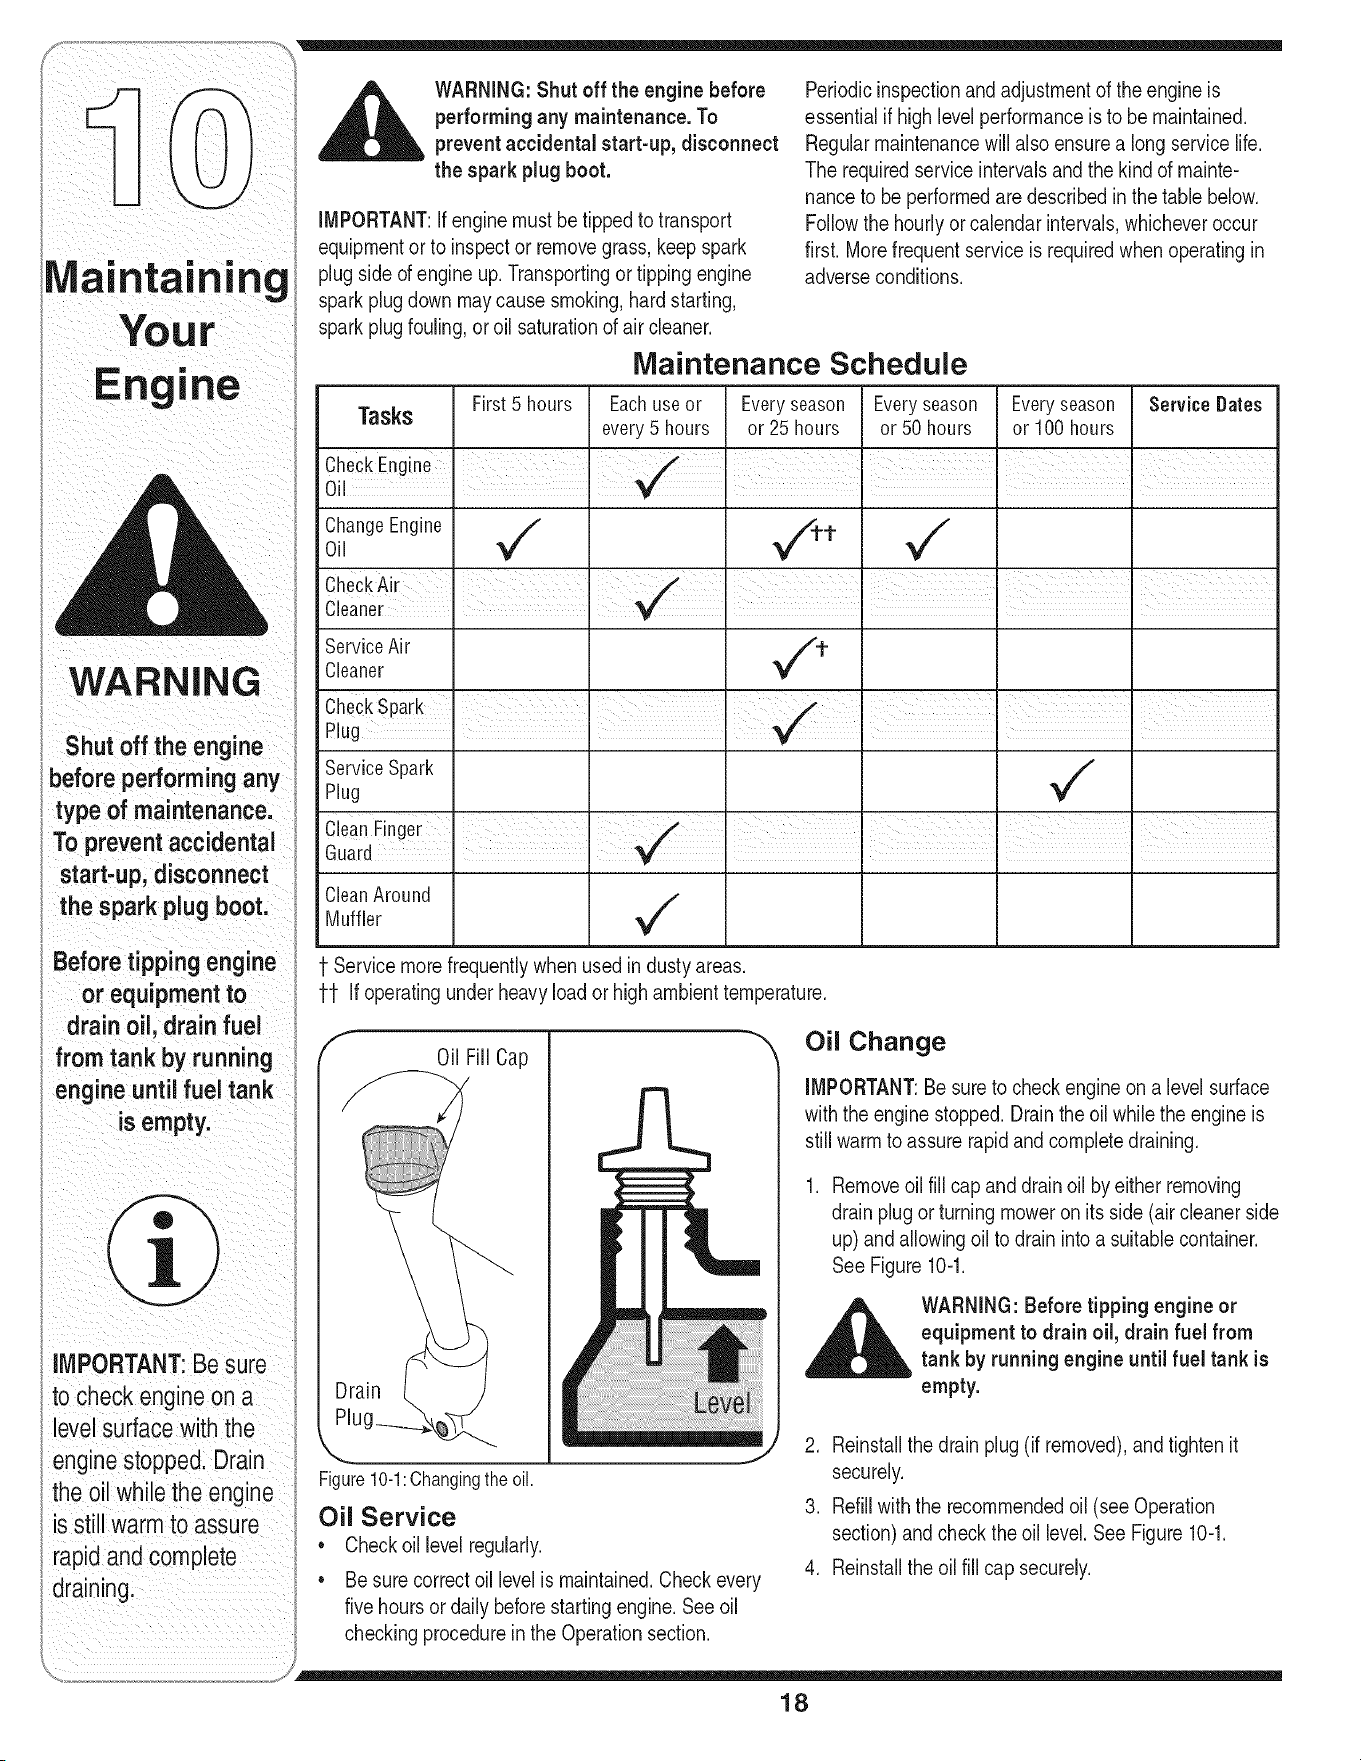
Maintenance Schedule
Periodicinspectionand adjustmentof theengine is
essentialif high levelperformanceis to be maintained.
Regularmaintenancewillalso ensurea long servicelife.
The requiredserviceintervalsandthe kindof mainte-
nanceto be performedare describedin thetable below.
Followthe hourlyor calendarintervals,whicheveroccur
first.Morefrequentserviceis requiredwhenoperatingin
adverseconditions.
Tasks
ChangeEngine
Oil
Service Air
Cleaner
First5 hours
v"
Service Spark
Plug
Clean Finger ........
Guard
Eachuseor
every5 hours
CleanAround
Muffler
Everyseason
or 25hours
Everyseason
or50 hours
v"
Everyseason
or 100hours
v"
Service Dates
1-Servicemorefrequentlywhenusedindustyareas.
ff Ifoperatingunder heavyload or highambienttemperature.
f
Oil Fill Cap
P
Drain
Figure10-1:Changingtheoil.
Oil Service
• Checkoil level regularly.
J
Besure correctoil levelis maintained.Checkevery
fivehoursordaily beforestartingengine.See oil
checkingprocedurein the Operationsection.
Oil Change
IMPORTANT:Be sureto checkengineona level surface
withthe enginestopped.Drainthe oil whilethe engine is
stillwarmto assurerapidandcompletedraining.
Removeoil fill cap and drain oil by eitherremoving
drainplugor turningmoweron its side (air cleanerside
up)andallowingoil to drainintoa suitablecontainer.
SeeFigure10-1.
WARNING:Before tipping engineor
equipmentto drain oil, drain fuel from
tank by runningengine until fuel tank is
empty.
2. Reinstallthe drain plug(if removed),and tightenit
securely.
3. Refillwiththe recommendedoil (see Operation
section)and checkthe oil level.See Figure10-1.
4. Reinstallthe oil fill cap securely.
18
IMPORTANT:Usedmotoroil may causeskin cancer
if repeatedlyleft incontactwiththe skin for prolonged
periods.Althoughthis is unlikelyunlessyou handleused
oilon a dailybasis,it is still advisableto thoroughlywash
yourhandswithsoapand wateras soon as possible
afterhandlingusedoil.
NOTE:Pleasedisposeof usedmotoroil in a mannerthat
is compatiblewith the environment.We suggestyoutake
it in a sealedcontainerto yourlocal servicestationfor
reclamation.Donot throwit inthe trashor pourit on the
ground.
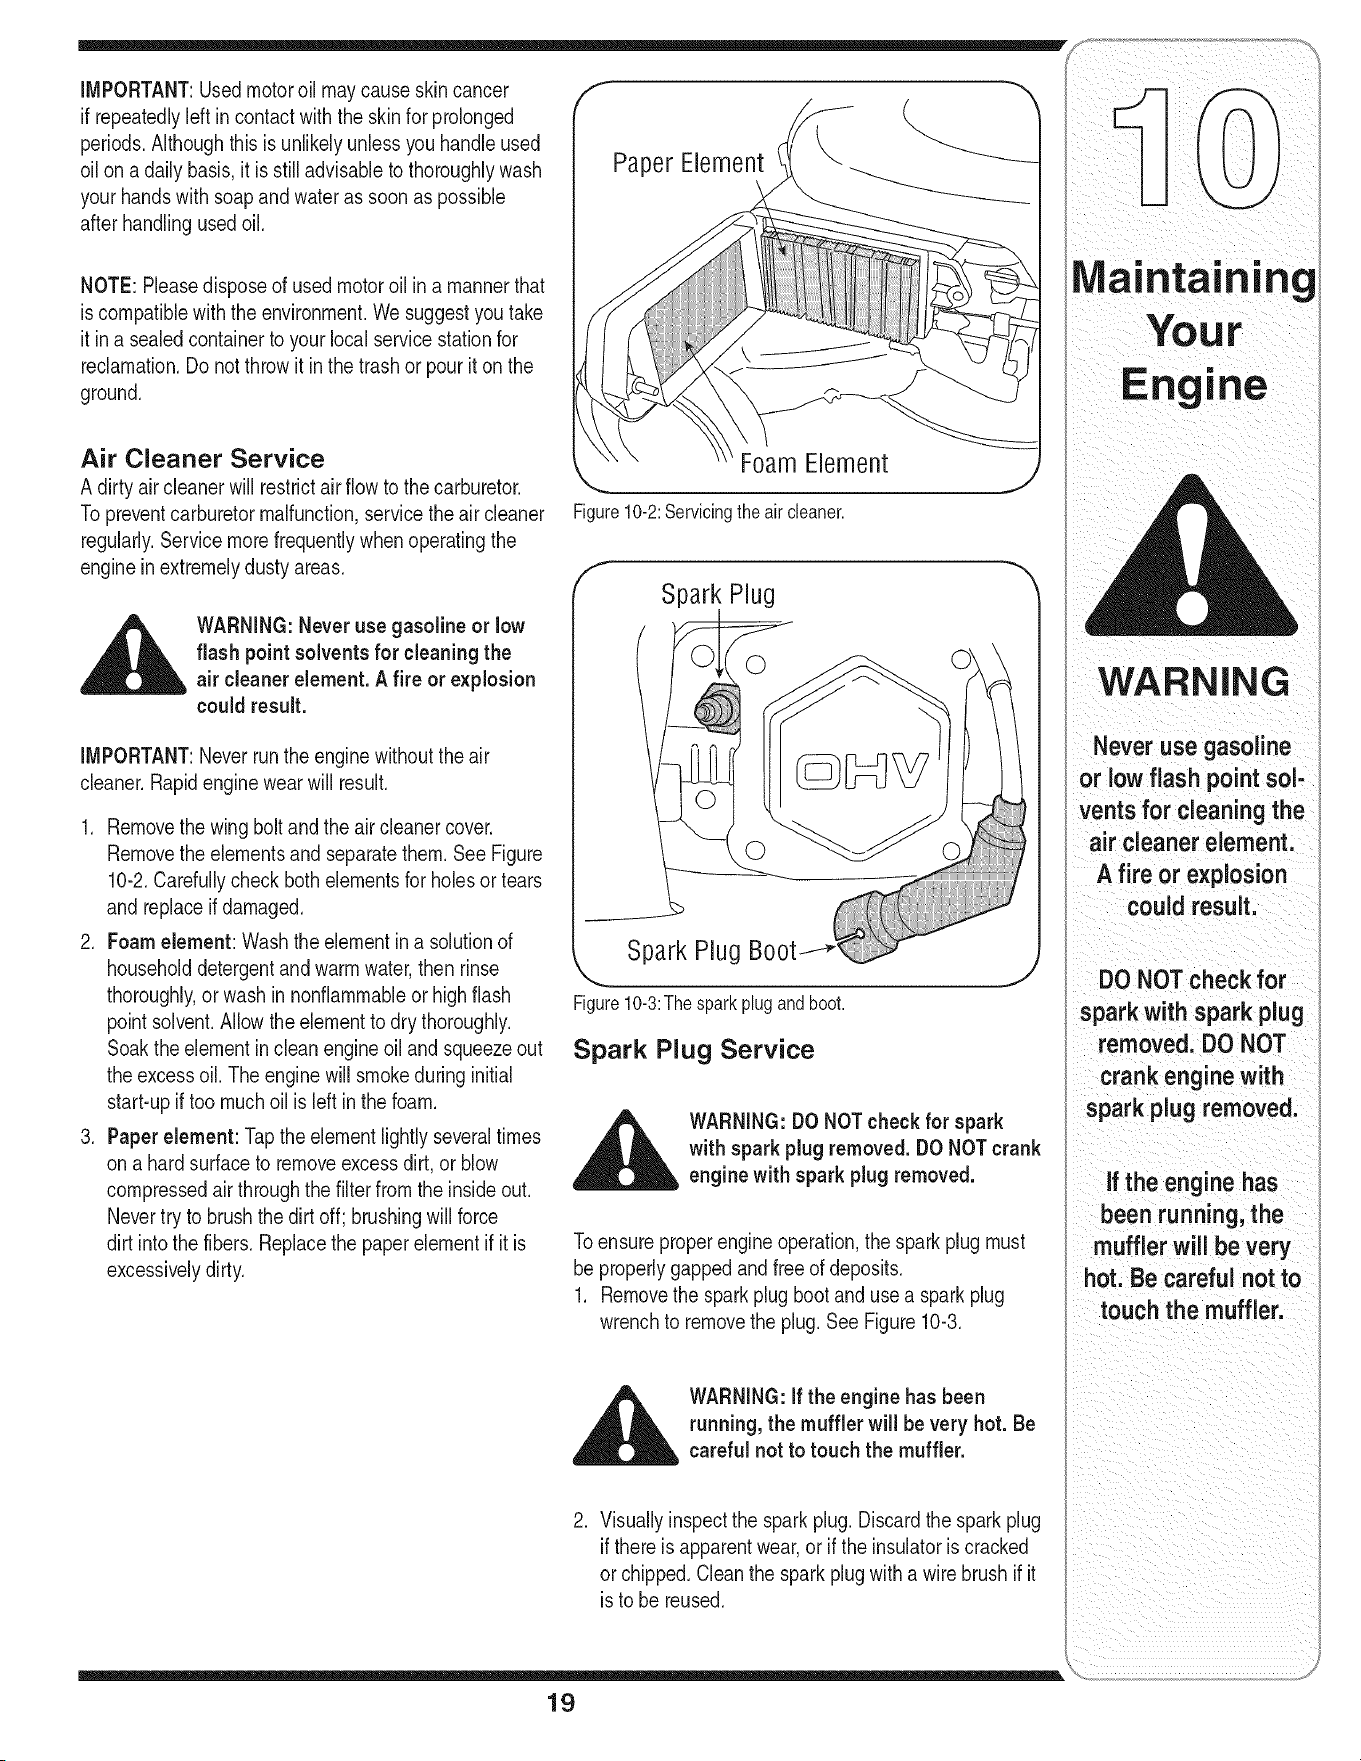
PaperElement
Air Cleaner Service
Adirty aircleanerwill restrictair flow to the carburetor.
Topreventcarburetormalfunction,servicethe air cleaner
regularly.Servicemorefrequentlywhenoperatingthe
enginein extremelydustyareas.
__k ARNING:Never use gasolineor low
flash pointsolventsfor cleaningthe
air cleaner element.A fire or explosion
couldresult.
IMPORTANT:Neverrunthe enginewithouttheair
cleaner.Rapidenginewearwill result.
1. Removethe wing boltand the air cleanercover.
Removethe elementsand separatethem. See Figure
10-2.Carefullycheck bothelementsfor holesor tears
andreplaceif damaged.
2. Foamelement: Wash theelementin a solutionof
householddetergentand warm water,then rinse
thoroughly,or wash in nonflammableor high flash
pointsolvent.Allowtheelementto dry thoroughly.
Soakthe elementin cleanengineoil and squeezeout
theexcessoil. The enginewill smokeduring initial
start-upif too muchoil is left inthe foam.
3. Paperelement: Taptheelementlightlyseveraltimes
ona hardsurfaceto removeexcessdirt,or blow
compressedair throughthe filterfrom the insideout.
Nevertry to brushthedirt off; brushingwillforce
dirt intothe fibers.Replacethe paperelementif it is
excessivelydirty.
Foam Element
Figure10-2:Servicingtheaircleaner.
Spark Plug
Spark Plug
Figure10-3:Thesparkplugandboot.
Spark Plug Service
__i= ARNING:DONOT check for spark
with spark plugremoved. DONOTcrank
enginewith spark plugremoved.
Toensureproperengineoperation,thesparkplug must
beproperlygappedand free of deposits.
1. Removethe spark plug bootand usea sparkplug
wrenchto removethe plug.See Figure10-3.
,_ WARNING:if the engine has been
running, the muffler will be very hot. Be
carefulnot to touch the muffler.
2. Visuallyinspectthe sparkplug.Discardthe sparkplug
if thereis apparentwear,or if the insulatoriscracked
orchipped.Cleanthe sparkplug with a wirebrushif it
is to be reused.
WARNING
Never use gasoline
or low flash point sol-
vents for cleaning the
air cleaner element.
A fire or explosion
could result.
DO NOT check for
spark with spark plug
removed. DO NOT
crank engine with
spark plug removed.
if the engine has
been running, the
muffler will be very
hot. Be careful not to
touch the muffler.
19
Maintaining
WARNING
Accumulation of
debris around muffler
cause afire:
Inspect and clean
b fo ooveryo
IMPORTANT:DOnot
spray engine Withwater
to clean because water
could contaminatefuel
Using a garden hose
or pressure Washing
equipment Cana so
force water into the
air cleaner ormuffler
opening:Water in the
air cleane! will soak
the paper e!emen
and water that Passes
through the element
or muffler canenter
the cylinder;causing:
damage:
i
f
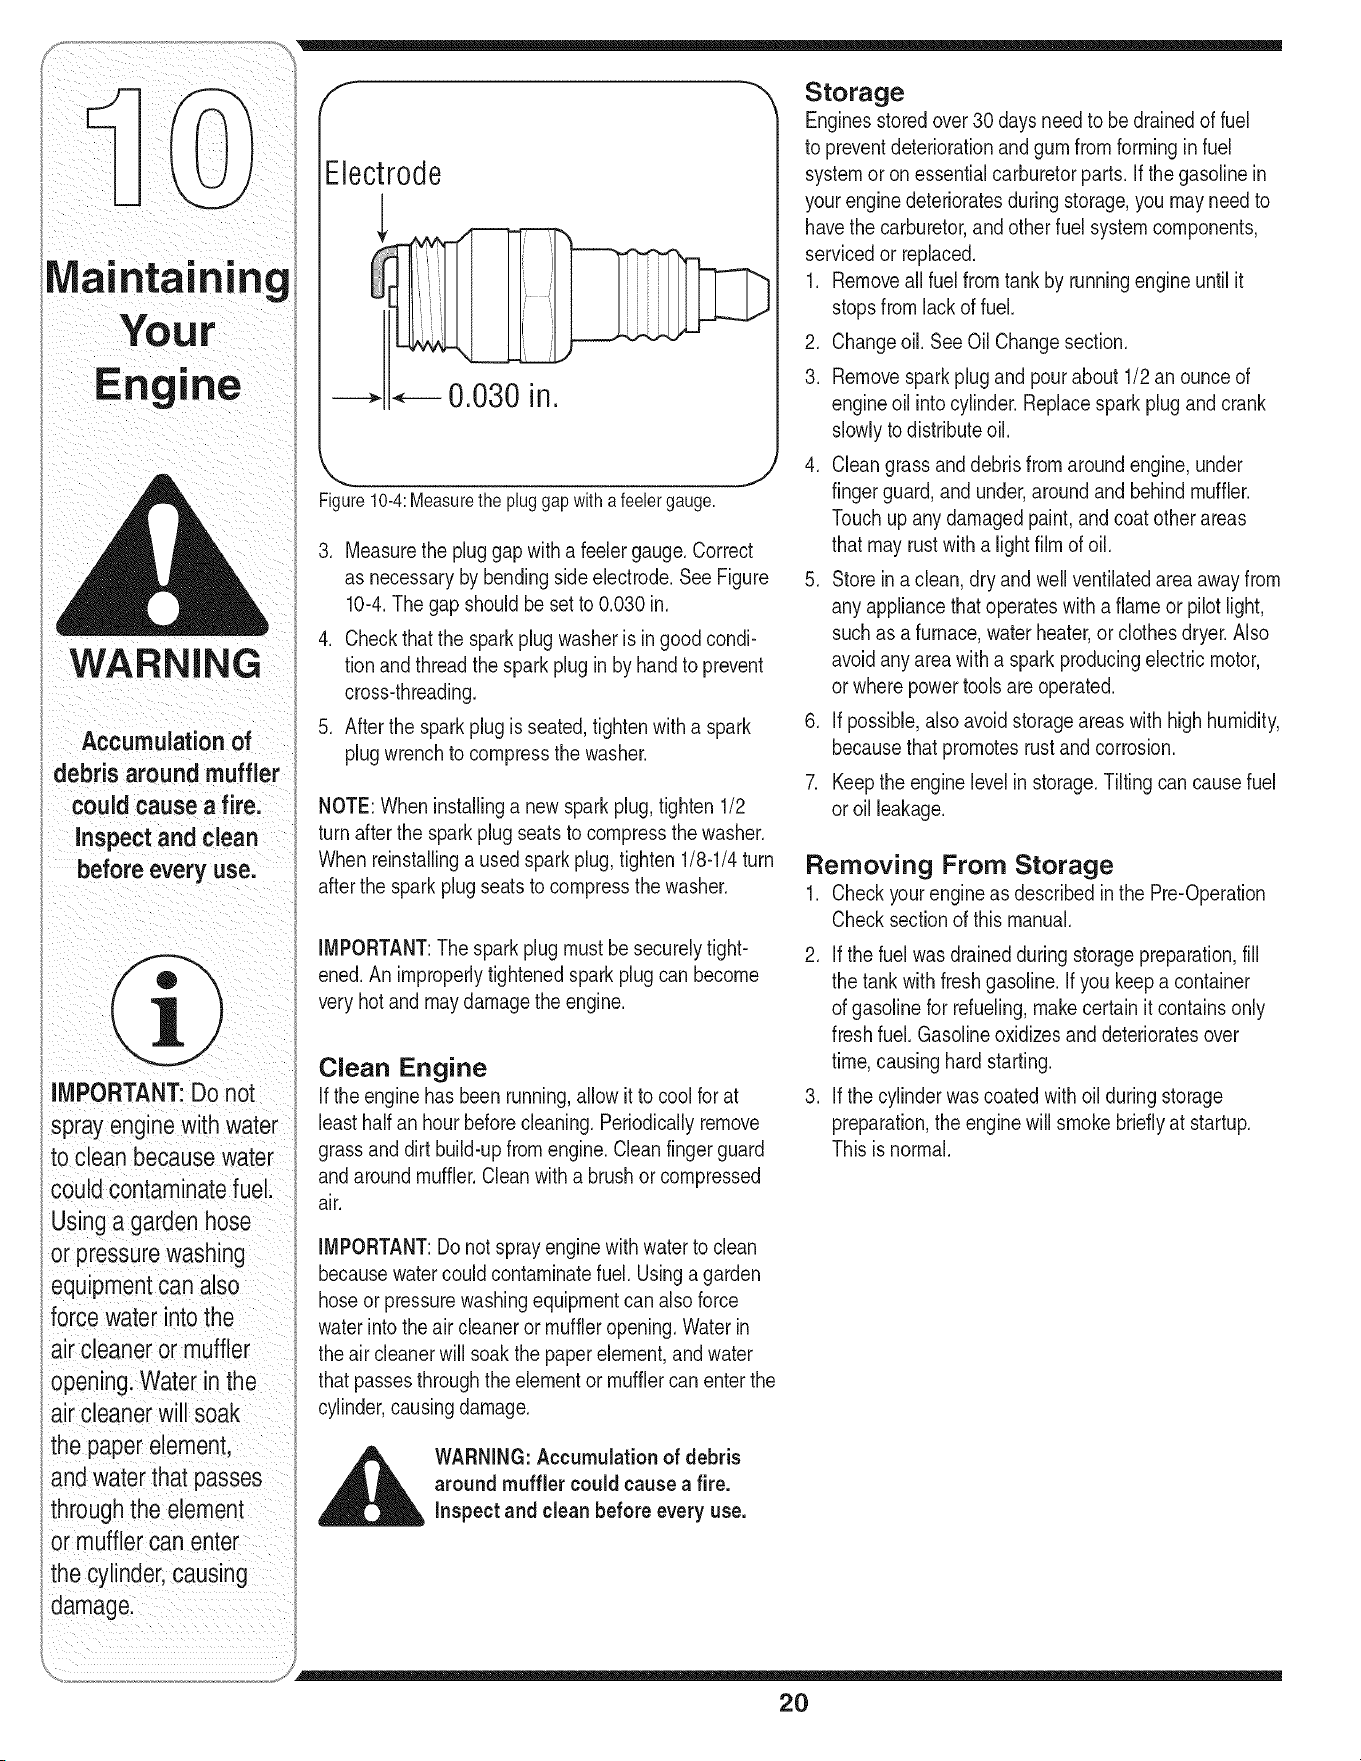
Electrode
--,,- *-- 0.030 in.
Figure10-4:Measurethepluggapwithafeelergauge.
3. Measurethe plug gap with a feelergauge.Correct
as necessaryby bendingsideelectrode.See Figure
10-4.Thegap shouldbe setto 0.030in.
4. Checkthat the sparkplug washeris in good condi-
tionandthreadthe sparkpluginby handto prevent
cross-threading.
5. Afterthe sparkplugis seated,tightenwith a spark
plugwrenchto compressthe washer.
NOTE:Wheninstallinga newspark plug,tighten 1/2
turnafterthe sparkplugseatsto compressthewasher.
Whenreinstallinga usedsparkplug,tighten 1/8-1/4turn
afterthe sparkplug seatsto compressthe washer.
IMPORTANT:The sparkplug mustbe securelytight-
ened.Animproperlytightenedsparkplugcan become
veryhotand maydamagethe engine.
Clean Engine
If theenginehasbeenrunning,allowit to coolfor at
leasthalfan hourbeforecleaning.Periodicallyremove
grassanddirt build-upfromengine.Cleanfingerguard
andaroundmuffler.Cleanwitha brushor compressed
air.
Storage
Enginesstoredover30 daysneedto be drainedof fuel
to preventdeteriorationand gumfromforminginfuel
systemor onessentialcarburetorparts. If the gasolinein
yourenginedeterioratesduringstorage,you mayneed to
havethe carburetor,and otherfuel systemcomponents,
servicedor replaced.
1. Removeall fuel fromtank by runningengineuntil it
stopsfromlackof fuel.
2. Changeoil. See Oil Changesection.
3. Removesparkplug and pour about1/2 an ounceof
engineoil intocylinder.Replacesparkplugandcrank
slowlyto distributeoil.
4. Cleangrassanddebrisfromaroundengine,under
fingerguard,and under,aroundand behindmuffler.
Touchupanydamagedpaint, and coatother areas
thatmayrustwitha lightfilmof oil.
5. Storeina clean,dry andwellventilatedareaawayfrom
anyappliancethatoperateswith a flame or pilotlight,
suchas a furnace,waterheater,or clothesdryer.Also
avoidanyareawitha sparkproducingelectricmotor,
orwherepowertoolsare operated.
6. If possible,alsoavoidstorageareaswithhighhumidity,
becausethat promotesrustandcorrosion.
7. Keepthe enginelevelin storage.Tiltingcan causefuel
oroil leakage.
Removing From Storage
1. Checkyourengineas describedin the Pre-Operation
Checksectionof this manual.
2. If the fuelwasdrainedduringstoragepreparation,fill
the tank with freshgasoline.If you keepa container
of gasolinefor refueling,makecertain it containsonly
freshfuel.Gasolineoxidizesand deterioratesover
time,causinghardstarting.
3. If the cylinderwascoatedwithoil duringstorage
preparation,the enginewill smokebrieflyat startup.
Thisis normal.
IMPORTANT: Do not spray engine with water to clean
because water could contaminate fuel. Using a garden
hose or pressure washing equipment can also force
water into the air cleaner or muffler opening. Water in
the air cleaner will soak the paper element, and water
that passes through the element or muffler can enter the
cylinder, causing damage.
__lk ARNING:Accumulationof debris
around muffler could causea fire.
Inspect and clean before every use.
2O

NOTES
21
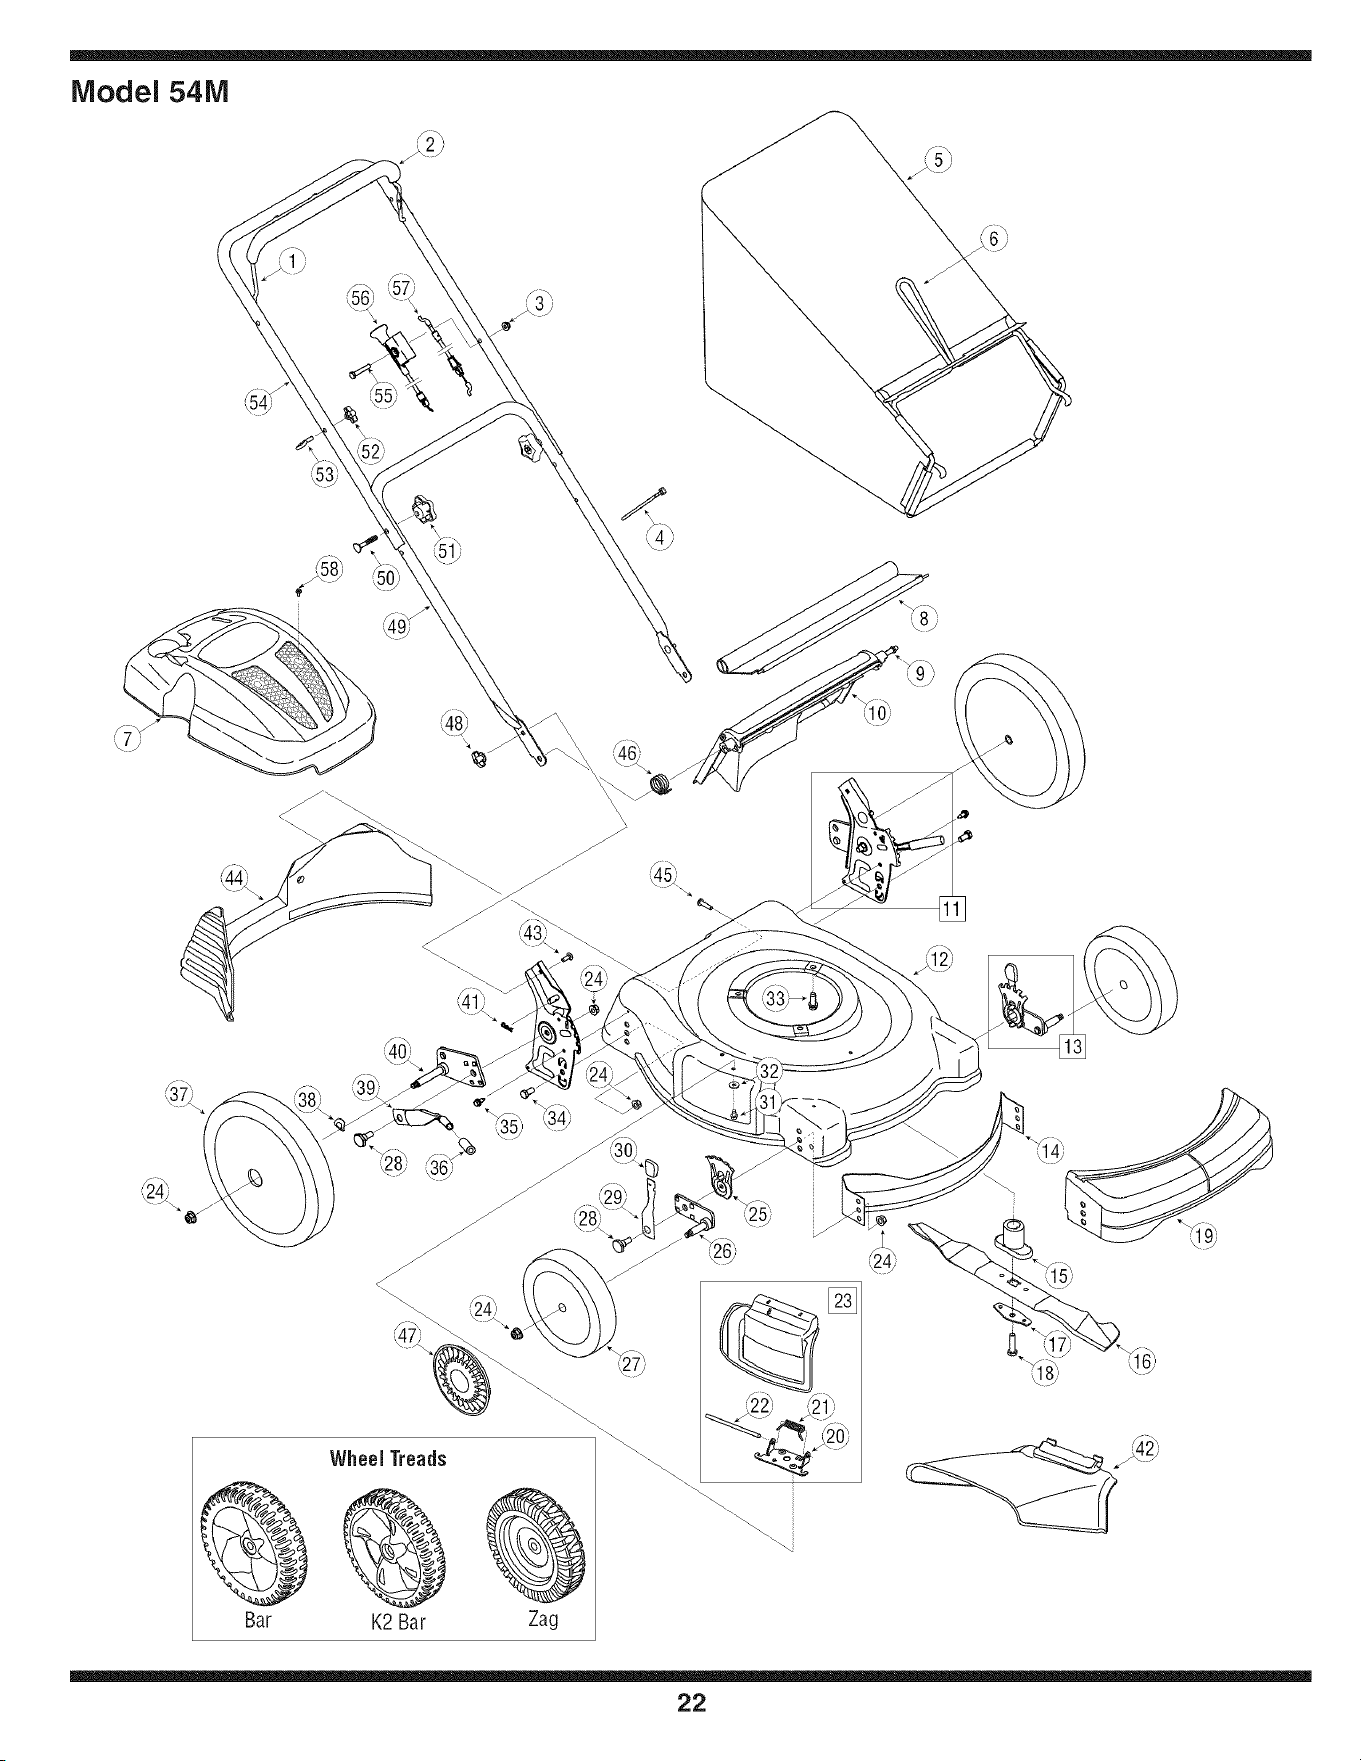
Model 54M
Wheel Treads
Bar K2Bar Zag
22
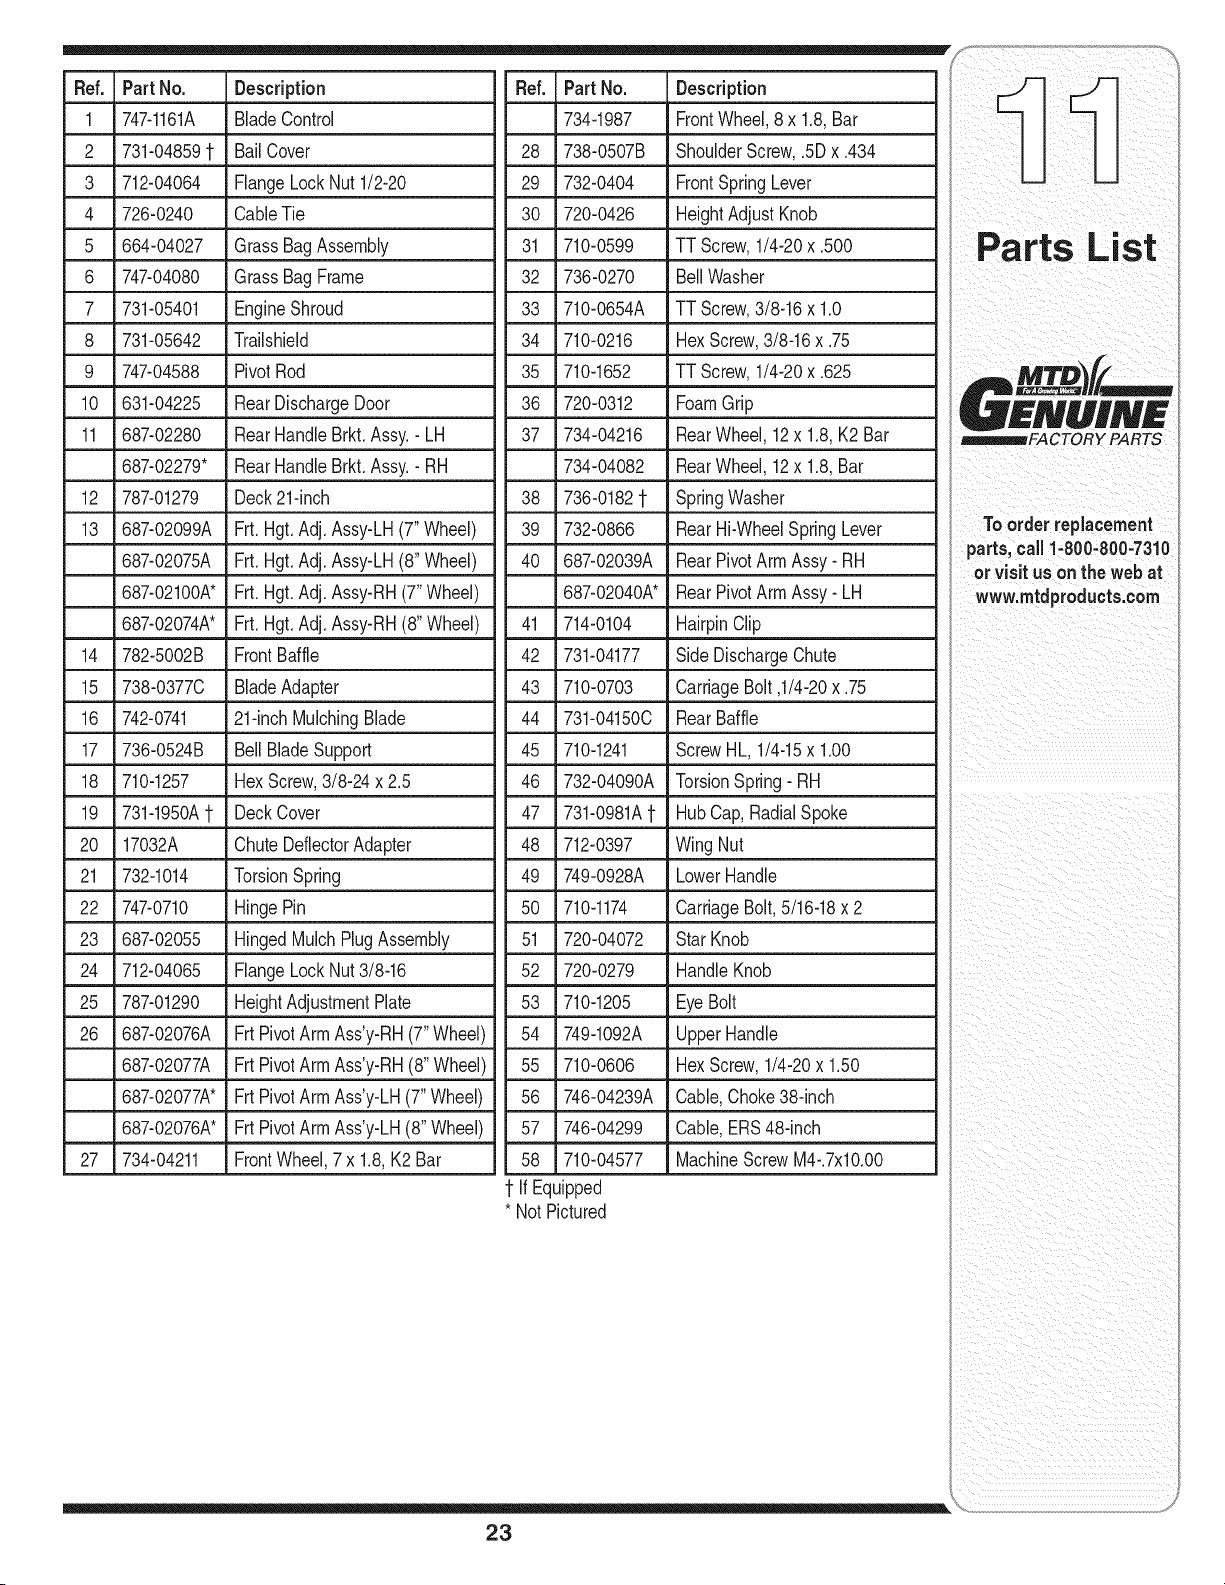
Re,.]po,tNo.ooso,iptioo Re,.lpo,tNo.[ooso,iptioo :
2 731-048591- BaiIOover 28 738-0507B ShoulderScrew,.5D x .434
3 712-04064 FlangeLockNut 1/2-20 29 732-0404 FrontSpringLever I m _
4 726-0240 CableTie 30 720-0426 HeightAdjust Knob
5 664-04027 GrassBagAssembly
6 747-04080 GrassBagFrame
7 731-05401 EngineShroud
8 731-05642 Trailshield
9 747-04588 PivotRod
31 710-0599 TT Screw,1/4-20x.500
32 736-0270 BellWasher
33 710-0654A TT Screw,3/8-16x 1.0
34 710-0216 HexScrew,3/8-16x.75
35 710-1652 TT Screw,1/4-20x.625
RearDischargeDoor
RearHandleBrkt.Assy.- LH
RearHandleBrkt.Assy.- RH
Deck21-inch
Frt. Hgt.Adj.Assy-LH(7"Wheel)
Frt. Hgt.Adj.Assy-LH(8" Wheel)
10 631-04225
11 687-02280
687-02279*
12 787-01279
13 687-02099A
687-02075A
687-02100A* Frt. Hgt.Adj.Assy-RH(7" Wheel)
687-02074A* Frt. Hgt.Adj.Assy-RH(8" Wheel)
14 782-5002B FrontBaffle
15 738-0377C BladeAdapter
16 742-0741 21-inchMulchingBlade
17 736-0524B Bell BladeSupport
18 710-1257 HexScrew,3/8-24x 2.5
19 731-1950A1 DeckCover
20 17032A ChuteDeflectorAdapter
21 _732-1014 LTorsionSpring
22 747-0710 HingePin
23 687-02055 HingedMulchPlugAssembly
24 712-04065 FlangeLockNut3/8-16
FoamGrip
RearWheel, 12x 1.8, K2 Bar
RearWheel, 12x 1.8, Bar
SpringWasher
RearHi-WheelSpringLever
RearPivotArmAssy- RH
RearPivotArmAssy- LH
HairpinClip
36 720-0312
37 734-04216
734-04082
38 736-01821-
39 732-0866
40 687-02039A
687-02040A*
41 714-0104
42 731-04177 Side DischargeChute
43 710-0703 CarriageBolt,I/4-20 x.75
44 731-04150C RearBaffle
45 710-1241 Screw HL, 1/4-15x 1.00
46 732-04090A TorsionSpring- RH
47 731-0981A1- HubCap,RadialSpoke
48 712-0397 Wing Nut
49 749-0928A LowerHandle
50 710-1174 CarriageBolt,5/16-18x 2
51 720-04072 Star Knob
52 720-0279 HandleKnob
25
26
787-01290
687-02076A
687-02077A
687-02077A*
687-02076A*
HeightAdjustmentPlate
FrtPivotArm Ass'y-RH(7"Wheel)
FrtPivotArm Ass'y-RH(8"Wheel)
FrtPivotArm Ass'y-LH(7" Wheel)
FrtPivotArm Ass'y-LH(8" Wheel)
53 710-1205
54 749-1092A
55 710-0606
56 746-04239A
57 746-04299
EyeBolt
UpperHandle
HexScrew,1/4-20x 1.50
Cable,Choke38-inch
Cable,ERS48-inch
27 734-04211 FrontWheel,7x 1.8,K2 Bar 58 710-04577 MachineScrewM4-.7x10.O0
1 If Equipped
* NotPictured
23
Parts List
Toorderrep!acement
parts;call1:8oo-8oo-731o
or visit us on the web at
Wwwlrntdproducts:com
ii i _iI_ ii
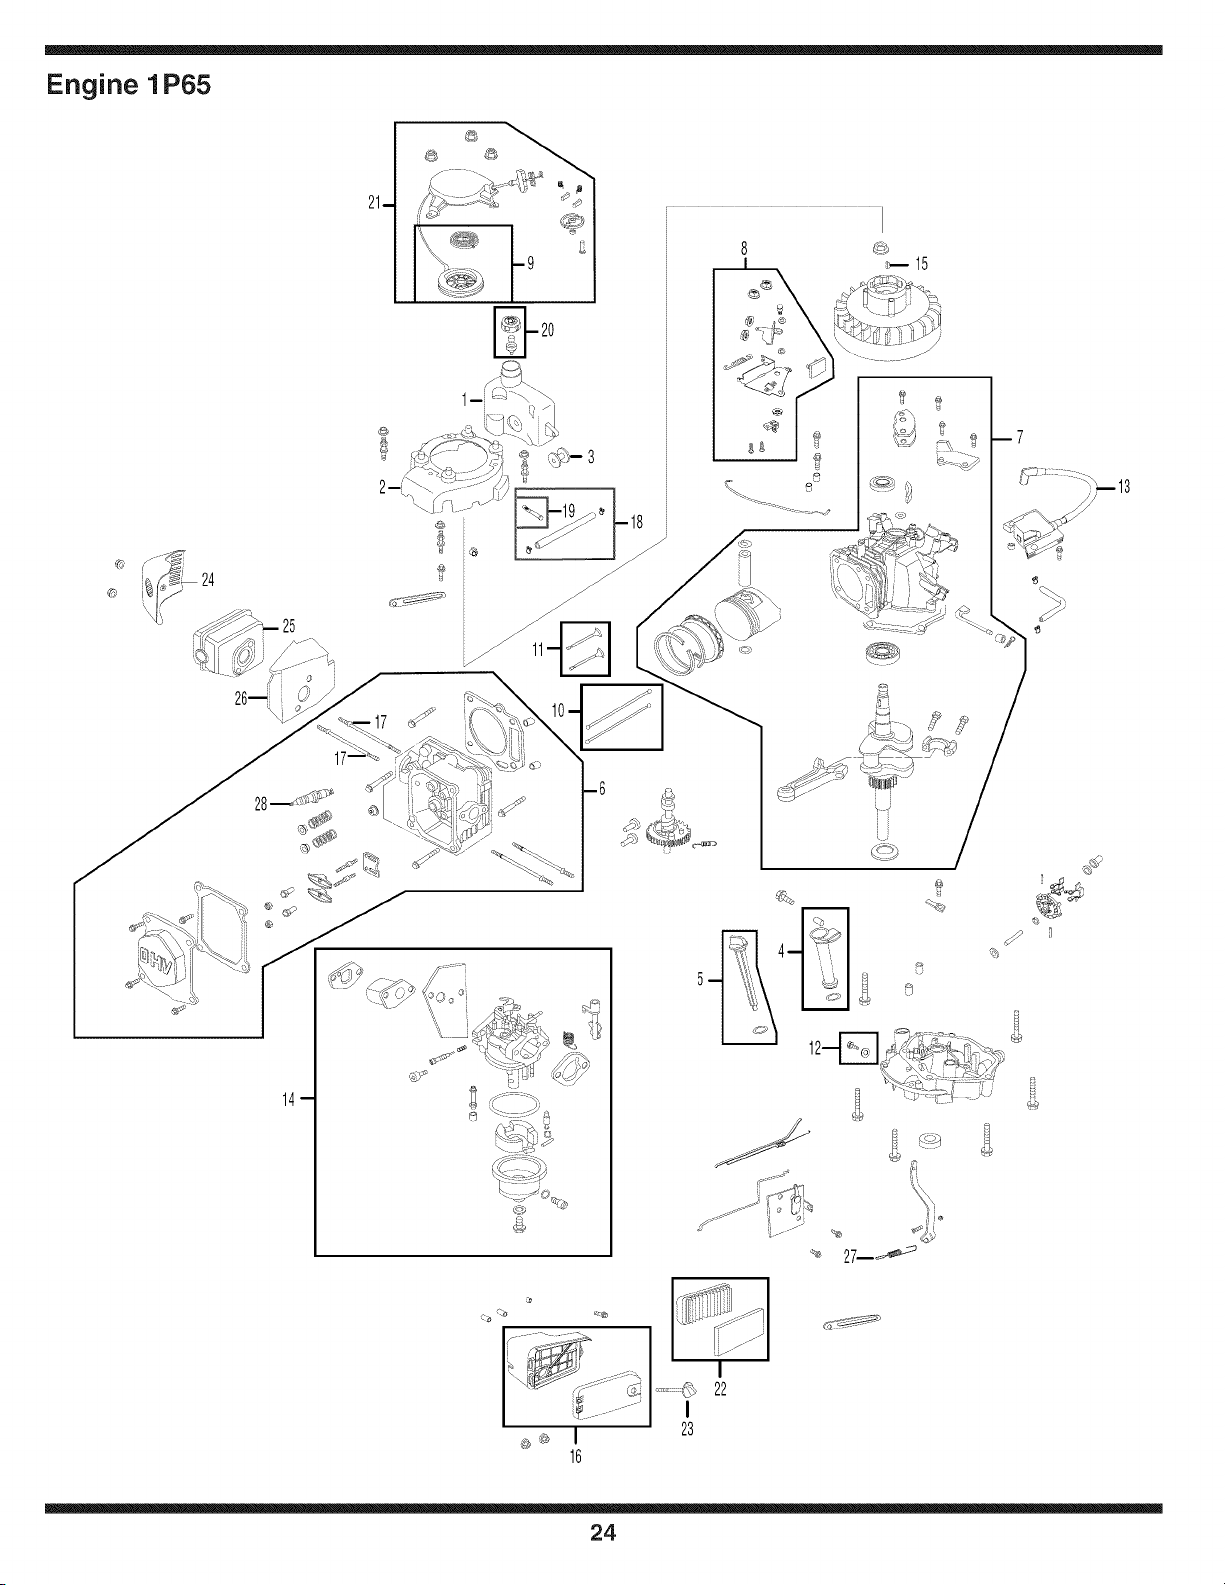
Engine 1P65
21-
--7
16
I
22
24
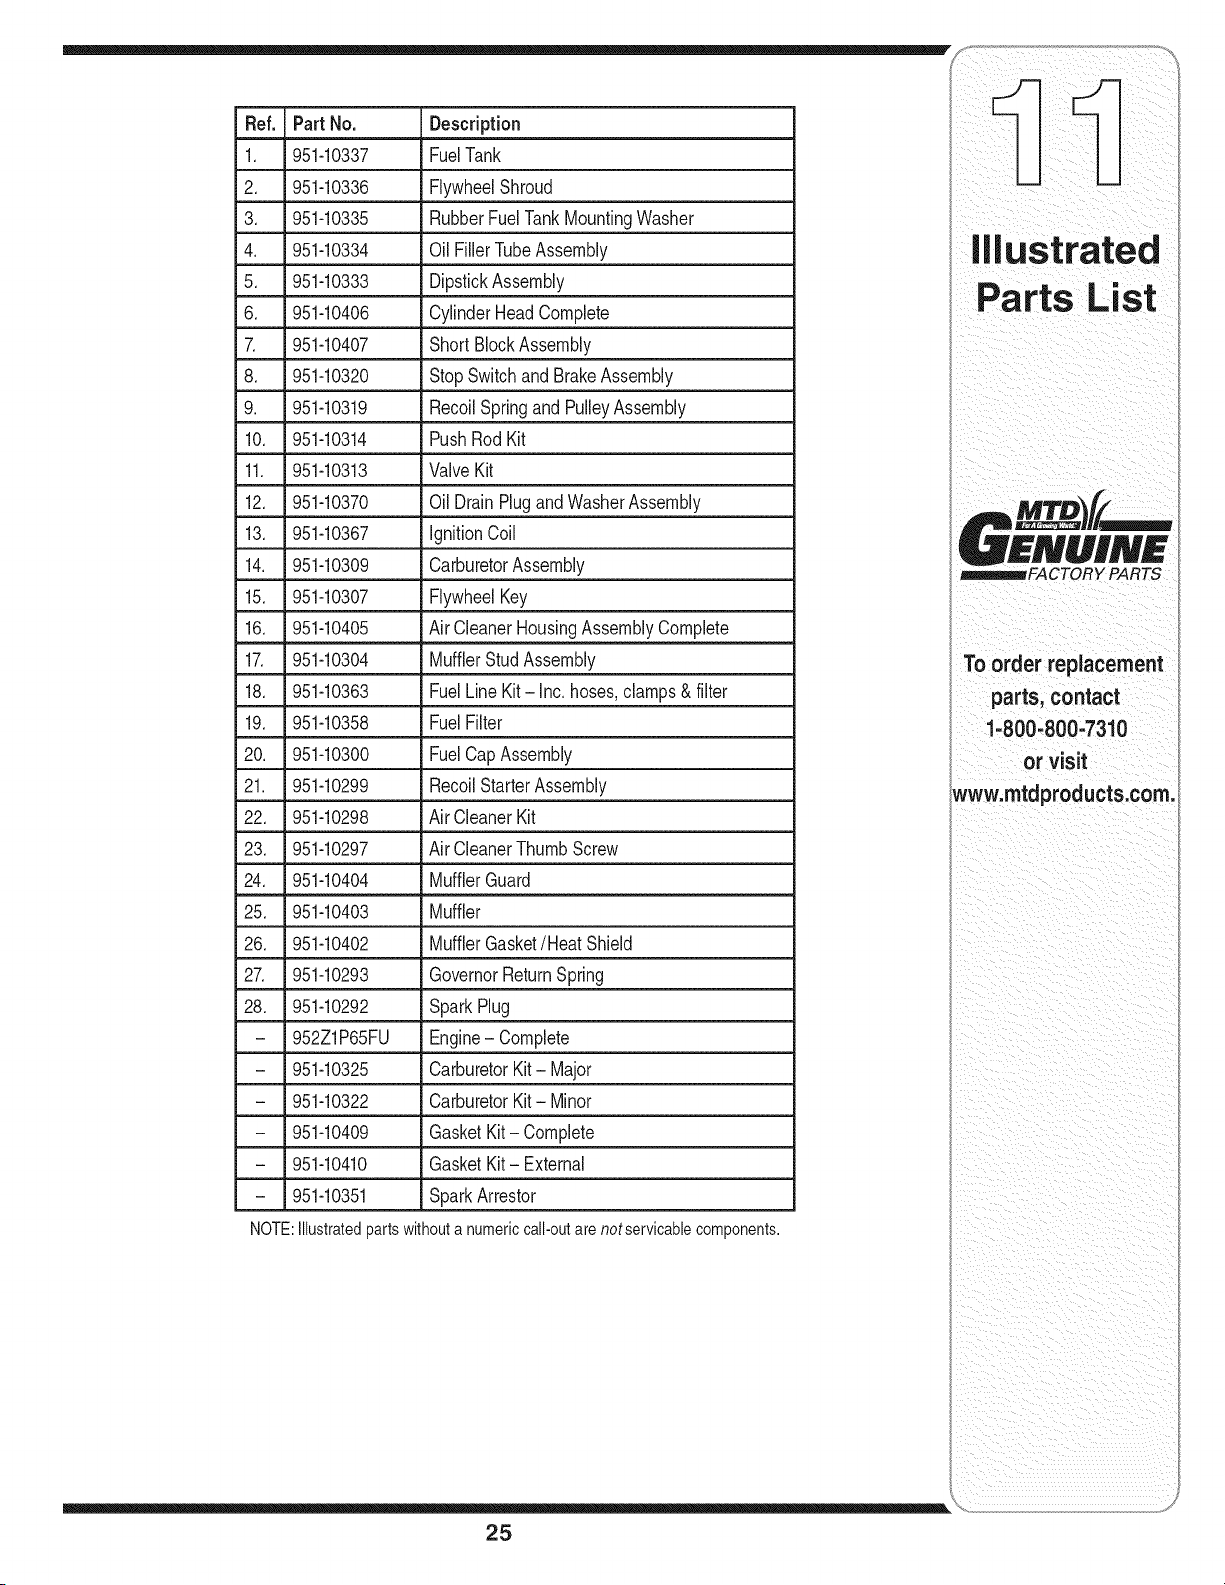
Ref. Part No. Description
1. 951-10337 FuelTank
2. 951-10336 FlywheelShroud
3. 951-10335 RubberFuelTankMountingWasher
4. 951-10334 Oil FillerTubeAssembly
5. 951-10333 DipstickAssembly
6. 951-10406 CylinderHeadComplete
7. 951-10407 Short BlockAssembly
8. 951-10320 Stop Switchand BrakeAssembly
9. 951-10319 RecoilSpringand PulleyAssembly
10. 951-10314 PushRod Kit
11. 951-10313 ValveKit
12. 951-10370 Oil DrainPlugandWasherAssembly
13. 951-10367 IgnitionCoil
14. 951-10309 CarburetorAssembly
15. 951-10307 FlywheelKey
16. 951-10405 Air CleanerHousingAssemblyComplete
17. 951-10304 MufflerStudAssembly
18. 951-10363 FuelLineKit-Inc. hoses,clamps& filter
19. 951-10358 FuelFilter
20. 951-10300 FuelCap Assembly
21. 951-10299 RecoilStarterAssembly
22. 951-10298 Air CleanerKit
23. 951-10297 Air CleanerThumbScrew
24. 951-10404 MufflerGuard
25. 951-10403 Muffler
26. 951-10402 MufflerGasket/Heat Shield
27. 951-10293 GovernorReturnSpring
28. 951-10292 Spark Plug
- 952Z1P65FU Engine- Complete
- 951-10325 CarburetorKit- Major
- 951-10322 CarburetorKit- Minor
- 951-10409 GasketKit- Complete
- 951-10410 GasketKit- External
- 951-10351 SparkArrestor
NOTE:Illustratedpartswithouta numericcall-outarenotservicablecomponents.
25
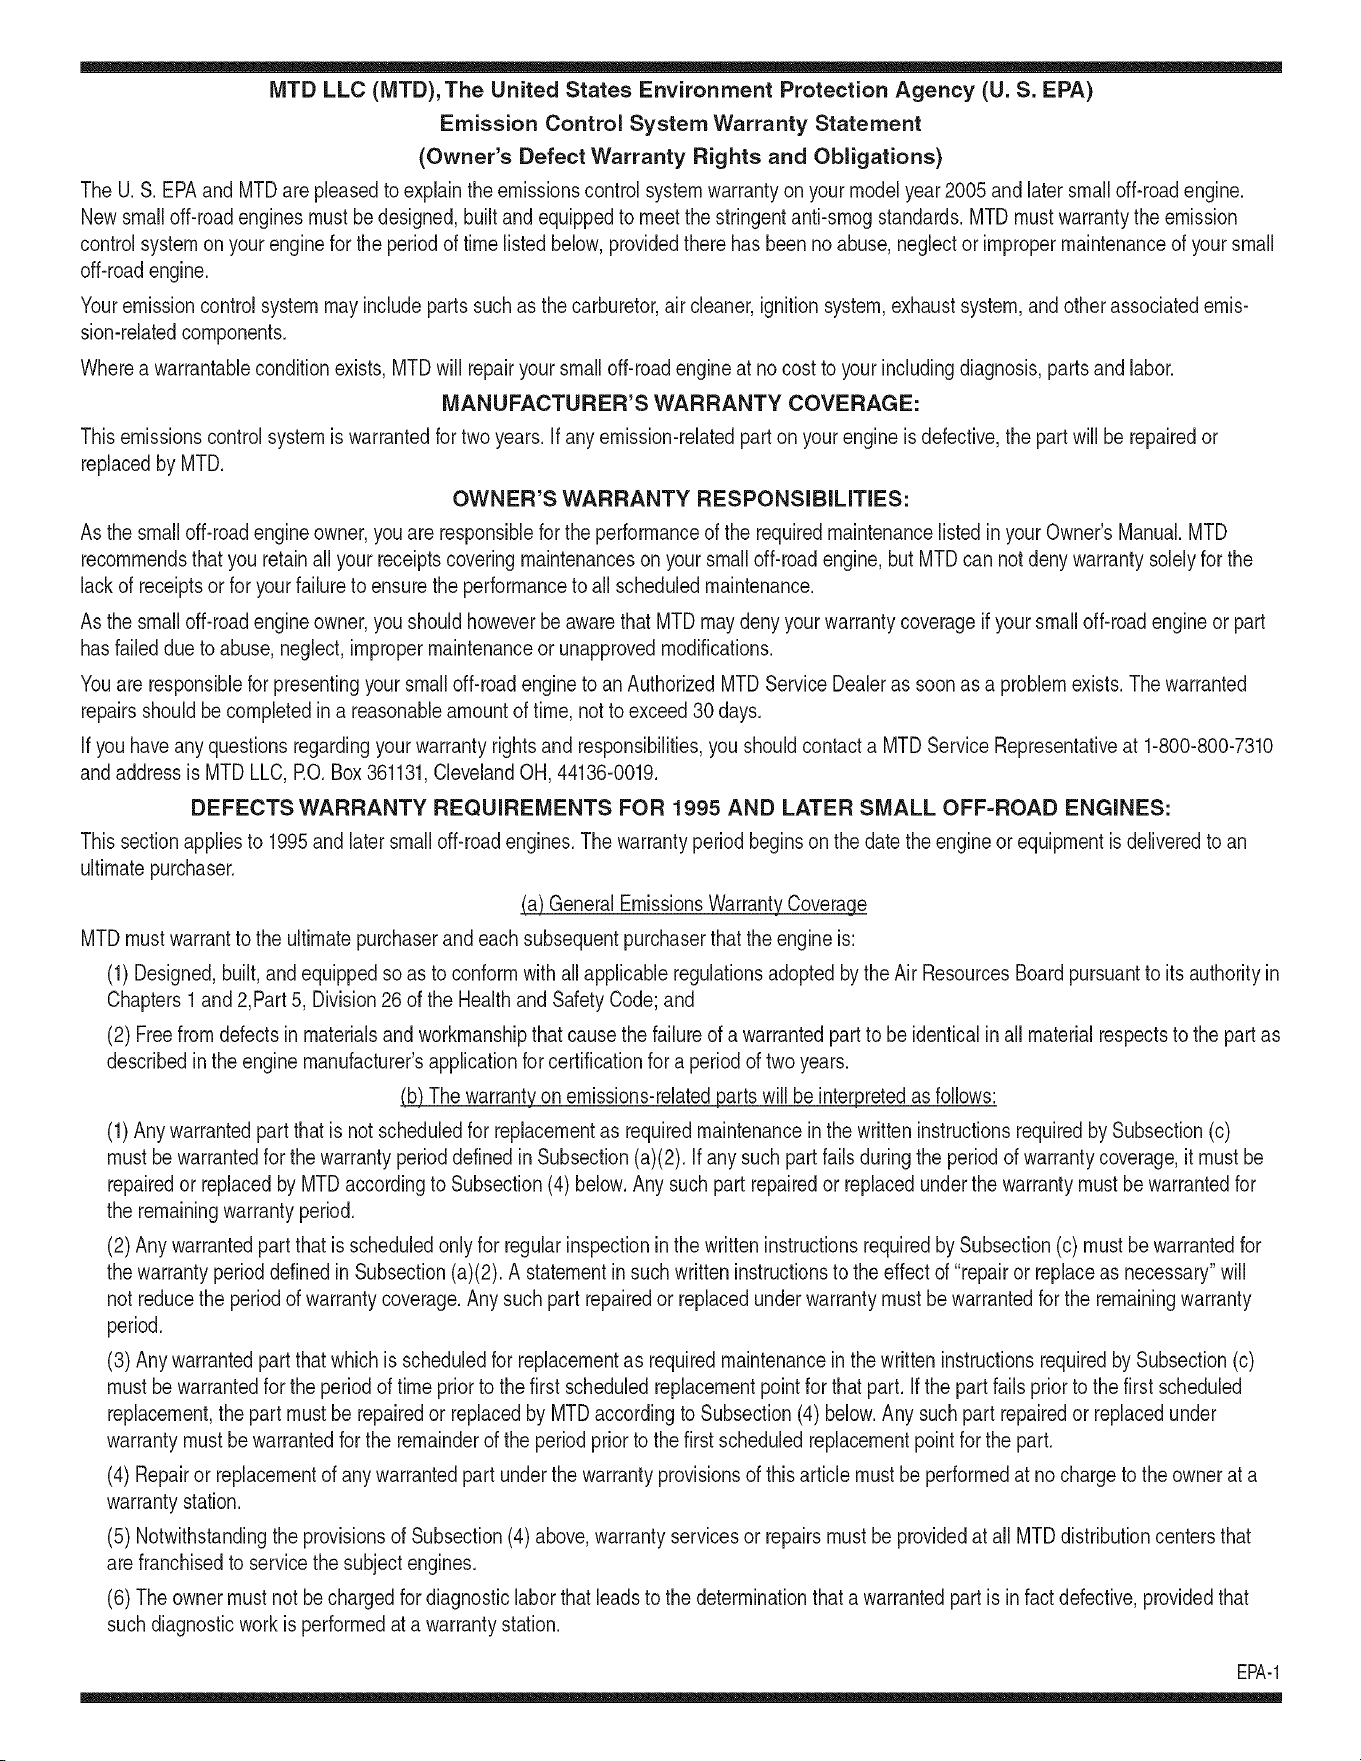
MTD LLC (MTD), The United States Environment Protection Agency (U. S. EPA)
Emission Control System Warranty Statement
(Owner's Defect Warranty Rights and Obligations)
The U. S. EPAand MTDarepleasedto explaintheemissionscontrolsystemwarrantyon your modelyear2005and latersmalloff-roadengine.
Newsmalloff-roadenginesmust be designed,built and equippedto meet the stringentanti-smogstandards.MTDmustwarrantytheemission
controlsystemon your enginefor the periodof time listed below,providedthere hasbeennoabuse,neglector impropermaintenanceof your small
off-roadengine.
Youremissioncontrolsystemmay includepartssuchas the carburetor,air cleaner,ignitionsystem,exhaustsystem,andotherassociatedemis-
sion-relatedcomponents.
Wherea warrantableconditionexists,MTDwill repairyour smalloff-roadengineat nocost to yourincludingdiagnosis,parts and labor.
MANUFACTURER'S WARRANTY COVERAGE:
Thisemissionscontrolsystemiswarrantedfor twoyears.If anyemission-relatedparton your engineisdefective,the partwill be repairedor
replacedby MTD.
OWNER'S WARRANTY RESPONSIBILITIES:
As the smalloff-roadengineowner,youare responsiblefor the performanceof the requiredmaintenancelistedin yourOwner'sManual.MTD
recommendsthatyou retainall your receiptscoveringmaintenancesonyoursmall off-roadengine,but MTDcan notdenywarrantysolely for the
lackof receiptsor for yourfailureto ensurethe performanceto all scheduledmaintenance.
As the smalloff-roadengineowner,youshouldhoweverbeawarethatMTDmaydenyyour warrantycoverageifyoursmall off-roadengineor part
hasfaileddue to abuse,neglect,impropermaintenanceor unapprovedmodifications.
Youare responsiblefor presentingyoursmalloff-roadengineto an AuthorizedMTDServiceDealeras soonas a problemexists.The warranted
repairsshouldbe completedin a reasonableamountof time,notto exceed30 days.
If youhaveanyquestionsregardingyour warrantyrightsand responsibilities,you shouldcontacta MTDServiceRepresentativeat 1-800-800-7310
andaddressisMTDLLC,EO. Box361131,ClevelandOH,44136-0019.
DEFECTS WARRANTY REQUIREMENTS FOR 1995 AND LATER SMALL OFF=ROAD ENGINES:
Thissectionappliesto 1995and latersmalloff-roadengines.Thewarrantyperiodbeginson the datetheengineorequipmentisdeliveredto an
ultimatepurchaser.
(a) GeneralEmissionsWarrantyCoveracj#_
MTDmustwarrantto the ultimatepurchaserandeachsubsequentpurchaserthat the engineis:
(1)Designed,built,and equippedso as to conformwith all applicableregulationsadoptedbythe Air ResourcesBoardpursuantto itsauthorityin
Chapters1 and 2,Part 5, Division26 of the Healthand SafetyCode;and
(2) Freefromdefectsinmaterialsand workmanshipthat causethe failureof a warrantedpartto be identicalinall materialrespectsto the part as
describedinthe enginemanufacturer'sapplicationfor certificationfor a periodof two years.
.(b)The warrantyon emissions-relatedpartswill be interpretedas follows:
(1)Anywarrantedpart thatisnot scheduledfor replacementas requiredmaintenanceinthe writteninstructionsrequiredby Subsection(c)
mustbewarrantedfor the warrantyperioddefinedinSubsection(a)(2). If anysuchpartfailsduringthe periodof warrantycoverage,it mustbe
repairedor replacedby MTDaccordingto Subsection(4) below.Any such partrepairedor replacedunderthewarrantymustbewarrantedfor
the remainingwarrantyperiod.
(2)Any warrantedpartthat isscheduledonlyfor regularinspectionin the writteninstructionsrequiredby Subsection(c) mustbe warrantedfor
thewarrantyperioddefinedinSubsection(a)(2).A statementinsuchwritteninstructionsto the effect of "repairor replaceas necessary"will
not reducethe periodof warrantycoverage.Anysuch part repairedor replacedunderwarrantymustbe warrantedforthe remainingwarranty
period.
(3) Anywarrantedpartthat whichis scheduledfor replacementas requiredmaintenancein the writteninstructionsrequiredby Subsection(c)
mustbewarrantedfor the periodof timepriorto the first scheduledreplacementpointfor that part. If the partfails prior to the first scheduled
replacement,the part mustbe repairedor replacedby MTDaccordingto Subsection(4) below.Any such part repairedor replacedunder
warrantymustbewarrantedfor the remainderof the period priorto thefirst scheduledreplacementpointfor the part.
(4) Repairor replacementof any warrantedpart underthe warrantyprovisionsof thisarticlemustbe performedat no chargeto the ownerat a
warrantystation.
(5) Notwithstandingthe provisionsof Subsection(4) above,warrantyservicesor repairsmustbe providedat all MTDdistributioncentersthat
arefranchisedto servicethe subjectengines.
(6) Theownermustnot be chargedfordiagnosticlabor that leadsto the determinationthata warrantedpart isinfact defective,providedthat
suchdiagnosticwork isperformedat a warrantystation.
EPA-1
(7)The enginemanufactureris liable fordamagesto otherenginecomponentsproximatelycausedbya failureunderwarrantyof anywarranted
part.
(8) Throughoutthe engine'swarrantyperioddefinedin Subsection(a)(2), MTDwill maintaina supplyof warrantedpartssufficientto meet the
expecteddemandfor such parts.
(9) Any replacementpart maybe usedin the performanceof any warrantymaintenanceor repairsandmustbe providedwithoutchargetothe
owner.Such usewill not reducethe warrantyobligationsof MTD.
(10)Add-onormodifiedpartsthat are not exemptedby theAir ResourcesBoardmay not be used.The useof anynon-exemptedadd-onor
modifiedpartsshall be groundsfor disallowinga warrantyclaimmade in accordancewith this article.The enginemanufacturershall notbe
liableunderthisarticle to warrantfailuresof warrantedpartscausedby the useof non-exemptedadd-on or modifiedpart.
(c) MTDwill includea copyof the followingemissionwarrantyparts list with each newengine,usingthose portionsof the list applicableto the
e__&gine.
(1)FuelMeteringSystem
• Coldstart enrichmentsystem(soft choke)
• Carburetorandinternalparts
• Fuel Pump
(2)Air InductionSystem
• Aircleaner
• Intakemanifold
(3) IgnitionSystem
• Sparkplug(s)
• MagnetoIgnitionSystem
(4)ExhaustSystem
(5) MiscellaneousItemsUsedinAboveSystem
• Vacuum,temperature,position,timesensitivevalvesandswitches
• Connectorsandassemblies
EPA-1

MANUFACTURER'S LiMiTED WARRANTY FOR
The limitedwarrantyset forth belowisgivenby MTDLLCwithrespectto
newmerchandisepurchasedand usedin the UnitedStates,itsposses-
sionsandterritories.
"MTD"warrantsthisproductagainstdefectsin materialandworkmanship
for a periodof two(2) yearscommencingonthe dateof originalpurchase
andwill,at its option,repairor replace,free of charge,anypart foundto
bedefectiveinmaterialsor workmanship.This limitedwarrantyshallonly
applyif this producthas beenoperatedand maintainedin accordance
withthe Operator'sManualfurnishedwith the product,and has not been
subjectto misuse,abuse,commercialuse, neglect,accident,improper
maintenance,alteration,vandalism,theft, fire,water,or damagebecause
of otherperilor naturaldisaster.Damageresultingfromthe installationor
useof any part,accessoryor attachmentnotapprovedby MTDfor use
withthe product(s)coveredbythis manualwill voidyourwarrantyas to
any resultingdamage.
Normalwearpartsarewarrantedto befree fromdefects in materialand
workmanshipfor a periodof thirty (30) days fromthe dateof purchase.
Normalwearpartsinclude,butare notlimitedto itemssuch as belts,
blades,bladeadapters,grass bags,wheels,engineoil, air filters,and
sparkplugs.
NOWTO OBTAINSERVICE:Warrantyserviceis available,WITH
PROOFOF PURCHASE,throughyour localauthorizedservicedealer.To
locatethe dealerin yourarea,checkyourYellowPages,or contact MTD
LLCat RO.Box 361131,Cleveland,Ohio44136-0019,or call 1-800-800-
7310or logon to ourWebsite at www.mtdproducts.com.
Thislimitedwarrantydoesnot providecoveragein the followingcases:
a. Logsplitterpumps,valves,andcylindershavea separateone
yearwarranty.
b. Routinemaintenanceitemssuch as lubricants,filters, blade
sharpening,tune-ups,brakeadjustments,clutch adjustments,
deckadjustments,andnormaldeteriorationof the exteriorfinish
dueto use or exposure.
c. Servicecompletedby someoneotherthanan authorizedservice
dealer.
d.
e.
f.
MTDdoes notextendany warrantyfor productssoldor
exportedoutsideof the UnitedStates,its possessionsand
territories,exceptthosesoldthroughMTD'sauthorized
channelsof exportdistribution.
Replacementpartsthatare not genuineMTDparts.
Transportationchargesand servicecalls.
No impliedwarranty, includingany impliedwarranty of merchant-
ability of fitness for a particularpurpose,applies after the applicable
periodof express written warranty above as to the partsas identi-
fied. No other express warranty, whether written or oral, except as
mentionedabove, given by any personor entity,includinga dealer
or retailer,with respect to any product,shallbind MTD. Duringthe
periodof the warranty, the exclusive remedyis repairor replacement
of the productas set forth above.
Theprovisionsas set forth inthis warrantyprovidethe soleand
exclusiveremedy arising from the sale. MTDshallnot be liable
for incidentalor consequentialloss or damage including,without
limitation, expensesincurredfor substituteor replacement lawncare
servicesor for rentalexpenses to temporarily replacea warranted
product.
Somestatesdo not allowtheexclusionor limitationof incidentalor
consequentialdamages,or limitationson howlong an impliedwarranty
lasts,so the aboveexclusionsor limitationsmay notapplyto you.
In no eventshall recoveryof any kind be greaterthan theamountof the
purchasepriceof the productsold.Alterationof safety features of the
productshall void this warranty. Youassumethe riskandliabilityfor
loss, damage,or injuryto youand your propertyand/orto others and their
propertyarisingout of the misuseor inabilityto use theproduct.
Thislimitedwarrantyshall notextendto anyoneotherthanthe original
purchaseror to the personfor whom itwaspurchasedas a gift.
HOWSTATELAWRELATESTO THiSWARRANTY: This limitedwar-
rantygivesyouspecificlegalrights,andyou mayalso haveother rights
whichvaryfromstateto state.
IMPORTANT: OwnermustpresentOriginalProofof Purchaseto obtain
warrantycoverage.
MTD LLC, P.O. BOX 361131 CLEVELAND, OHiO 44136=0019; Phone: 1=800=800=7310