
Loading ...
Loading ...
Loading ...
JET
7
Setup and Assembly
Any missing parts or damage should be reported
immediately to your JET
®
distributor. Do not use a
damaged tool. Read this instruction manual
thoroughly for operation, maintenance and safety
instructions.
Box contents:
1 Mini belt sander
2 Sanding belts (one is pre-installed)
1 Hex wrench 4mm
1 Operation and parts manual
1 Warranty card
Operation
The belt sander must be
properly lubricated before operation. See
“Lubrication” section.
Disconnect sander from air
hose before making any repair or adjustment.
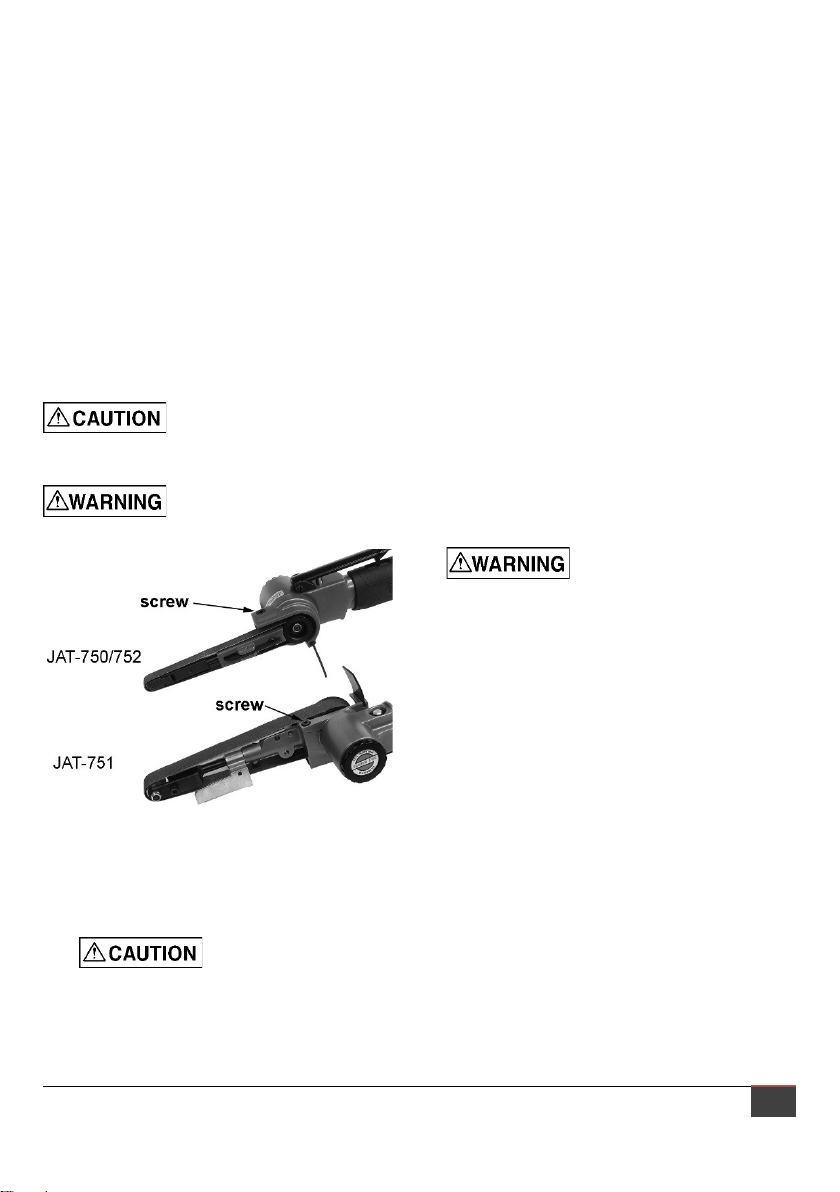
Figure 1
1. Adjust arm to desired angle and tighten hex
socket cap screw (Figure 1), with supplied
hex wrench. Make sure arm assembly is
fitted closely to housing shoulder.
Always tighten hex
socket cap screw firmly after adjustment,
or the head could rotate, causing loss of
control.
2. Remove protective cap from air inlet. If an in-
line oiler is not being used, add 4 or 5 drops
of air tool oil (not included) into the air inlet.
3. Blow out air line to remove any dirt or
moisture, then connect air supply hose to
tool. Set air pressure to 90 psi.
IMPORTANT: Connecting a quick-change
coupling directly to the tool is not
recommended, as vibration may cause the
connection to fail. Instead, add a leader hose
and install any quick-change couplings
farther down the line.
4. Grip sander securely and push safety lever
backward to release throttle lever. Gently
press throttle lever.
5. Place sanding belt on workpiece and move
tool back and forth with light pressure. Do not
apply excessive pressure, as it may damage
workpiece and hasten wear on sanding belt.
Adjustments
Tracking adjustment
Tracking adjustment requires
sander to be connected to the hose and
running. Use caution when hands and tools
are close to a running belt.
Belt is tracking properly on all models when
centered on the idle pulley.
JAT-750/752:
1. Disconnect sander from air source.
2. Loosen set screw with 1.5mm hex wrench
(not provided). See Figure 2.
3. With belt running, turn adjusting screw
clockwise or counterclockwise until belt is
centered on idle pulley.
4. Tighten set screw.
Loading ...
Loading ...
Loading ...