
Loading ...
Loading ...
Loading ...
10
JAT-750/751/752 Mini Belt Sanders
Tension bar replacement
JAT-750/752:
1. Disconnect sander from air source.
2. Remove belt.
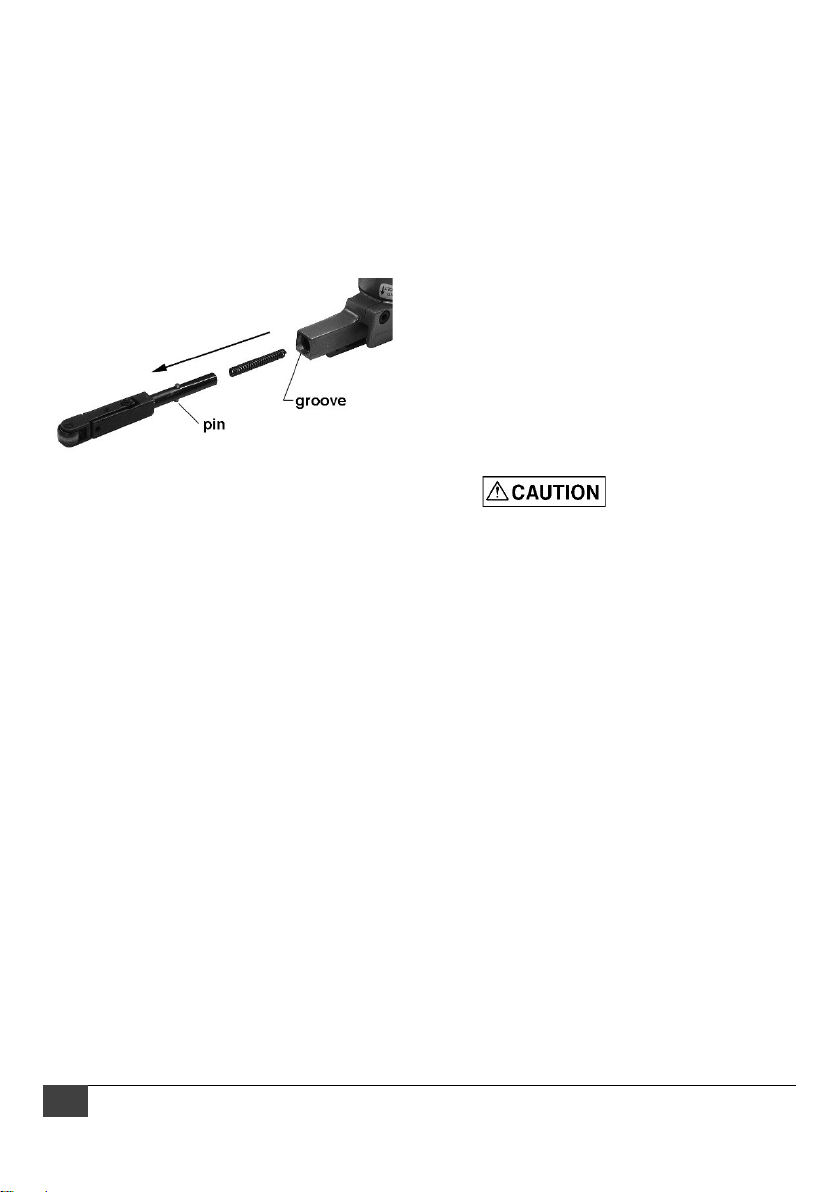
3. Pull out tension bar from housing, Figure 9.
Be careful not to lose spring.
4. Insert new tension bar by lining up pin with
pin groove. See Figure 9.
Figure 9
Speed adjustment
All models have a brass screw on the underside
of the handle, used for belt speed adjustment.
This has been set by the manufacturer; it is highly
recommended that the end user not attempt any
adjustment to the speed control.
Maintenance
Lubrication
The sander should be lubricated daily (or before
each use) with air tool oil through the air inlet.
During continual operation, it should be re-oiled
every 1 to 2 hours. This can be done with an in-
line oiler, or manually. If done manually, proceed
as follows:
1. Disconnect air hose from tool.
2. Place 4 or 5 drops of air tool oil into air inlet.
NOTE: Air tool oil not provided; it is available
at most major hardware and tool stores. SAE
#10 oil or sewing machine oil may be used
as a substitute. Do not use detergent oil.
3. Re-connect air. Run tool at low throttle
without load for a few seconds to distribute
the oil throughout tool.
4. When finished operating tool, disconnect air
hose. Wipe off housing with a dry cloth.
Place 4 or 5 drops of air tool oil into air inlet;
re-connect air and run tool for a few seconds
to distribute the oil. Disconnect air.
Storage
Avoid storing the sander in very humid locations
which promotes rusting of internal mechanisms.
Always oil the tool and disconnect air hose before
storage.
Air system requirements
1. Use proper air hose size (refer to tool
specifications). The hose should be just long
enough to serve the working area. Excessive
hose length will cause pressure drop.
2. Make sure air compressor supplies clean,
dry air at correct CFM for the tool.
3. Set air pressure to 90 psi.
Excess air pressure
and/or unclean air will shorten the tool’s
life and may create a hazardous situation.
4. Drain water from air compressor tank daily,
as well as any condensation from air lines.
Water in the air line may enter the tool and
cause damage.
5. Change filters on the air system on a regular
basis.
6. Air-line pressure may be increased
accordingly to compensate for extra-long air
hoses (usually over 25 feet). Inside diameter
of hose should be minimum 3/8-inch.
General Air Tool
Information
If the air tool is not performing according to
specifications, the following are among the most
common causes. (See also “Troubleshooting”
section.)
Contaminated air such as a dirty air system
or water in the system.
Using wrong size tool for the job.
Poor maintenance practices, such as using
excessive air pressure or air volume.
Improper or no lubrication.
Loading ...
Loading ...
Loading ...