Loading ...
Loading ...
Loading ...
TURNTABLE ON/OFF
For most cooking, the turntable should be on; however
the turntable can be turned off so that it does not rotate
when extra large dishes, such as the popular 13 x 9 x 2
glass utility casserole, are used. The casserole should
be placed on the turntable so that it is level.
• Suppose you want to cook lasagna in a 13 x 9 x 2
casserole for 45 minutes on 40% power.
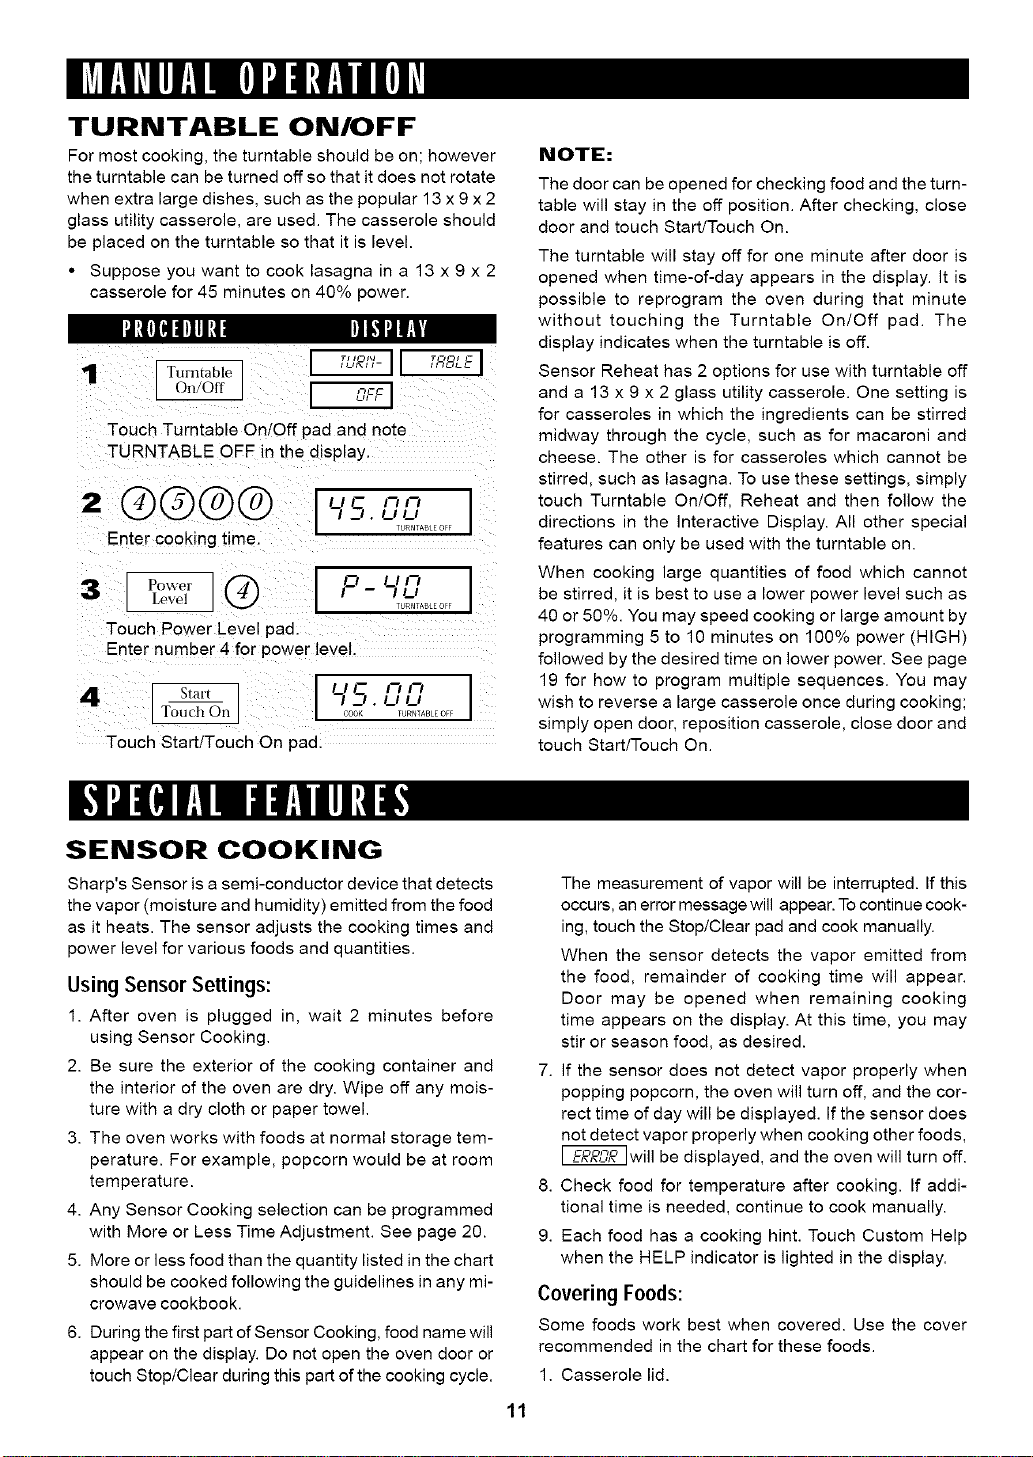
ll:[lI_|l]! I',|l 11|!,I1_li|'t
1 Turntable ]
On/Off
Touch Turntable On/Off pad and note
TURNTABLE OFF in the display.
=ee®@ 1,.-,o-,-,,-,]
I .._. U t,_#
TURNTASLE OFF
Enter cooking time.
3 [po,,,,o,® ,-,,-,,-,jLevel - IT%#,.......
Touch Power Level pad.
Enter nJmber 4 for power level.
1'-"-'-"-'1
4 , ,-,,-,
TURNTABLE OFf
Touch Start/Touch On pad.
NOTE:
The door can be opened for checking food and the turn-
table will stay in the off position. After checking, close
door and touch Start/Touch On.
The turntable will stay off for one minute after door is
opened when time-of-day appears in the display. It is
possible to reprogram the oven during that minute
without touching the Turntable On/Off pad. The
display indicates when the turntable is off.
Sensor Reheat has 2 options for use with turntable off
and a 13 x 9 x 2 glass utility casserole. One setting is
for casseroles in which the ingredients can be stirred
midway through the cycle, such as for macaroni and
cheese. The other is for casseroles which cannot be
stirred, such as lasagna. To use these settings, simply
touch Turntable On/Off, Reheat and then follow the
directions in the Interactive Display. All other special
features can only be used with the turntable on.
When cooking large quantities of food which cannot
be stirred, it is best to use a lower power level such as
40 or 50%. You may speed cooking or large amount by
programming 5 to 10 minutes on 100% power (HIGH)
followed by the desired time on lower power. See page
19 for how to program multiple sequences. You may
wish to reverse a large casserole once during cooking;
simply open door, reposition casserole, close door and
touch Start/Touch On.
SENSOR COOKING
Sharp's Sensor is a semi-conductor device that detects
the vapor (moisture and humidity) emitted from the food
as it heats. The sensor adjusts the cooking times and
power level for various foods and quantities.
Using Sensor Settings:
1. After oven is plugged in, wait 2 minutes before
using Sensor Cooking.
2. Be sure the exterior of the cooking container and
the interior of the oven are dry. Wipe off any mois-
ture with a dry cloth or paper towel.
3. The oven works with foods at normal storage tem-
perature. For example, popcorn would be at room
temperature.
4. Any Sensor Cooking selection can be programmed
with More or Less Time Adjustment. See page 20.
5. More or less food than the quantity listed in the chart
should be cooked following the guidelines in any mi-
crowave cookbook.
6. During the first part of Sensor Cooking, food name will
appear on the display. Do not open the oven door or
touch Stop/Clear during this part of the cooking cycle.
11
7.
8.
9.
The measurement of vapor will be interrupted. If this
occurs, an error message will appear. To continue cook-
ing, touch the Stop/Clear pad and cook manually.
When the sensor detects the vapor emitted from
the food, remainder of cooking time will appear.
Door may be opened when remaining cooking
time appears on the display. At this time, you may
stir or season food, as desired.
If the sensor does not detect vapor properly when
popping popcorn, the oven will turn off, and the cor-
rect time of day will be displayed. If the sensor does
not detect vapor properly when cooking other foods,
_wil] be displayed, and the oven will turn off.
Check food for temperature after cooking. If addi-
tional time is needed, continue to cook manually.
Each food has a cooking hint. Touch Custom Help
when the HELP indicator is lighted in the display.
Covering Foods:
Some foods work best when covered. Use the cover
recommended in the chart for these foods.
1. Casserole lid.
Loading ...
Loading ...
Loading ...