Loading ...
Loading ...
Loading ...
5
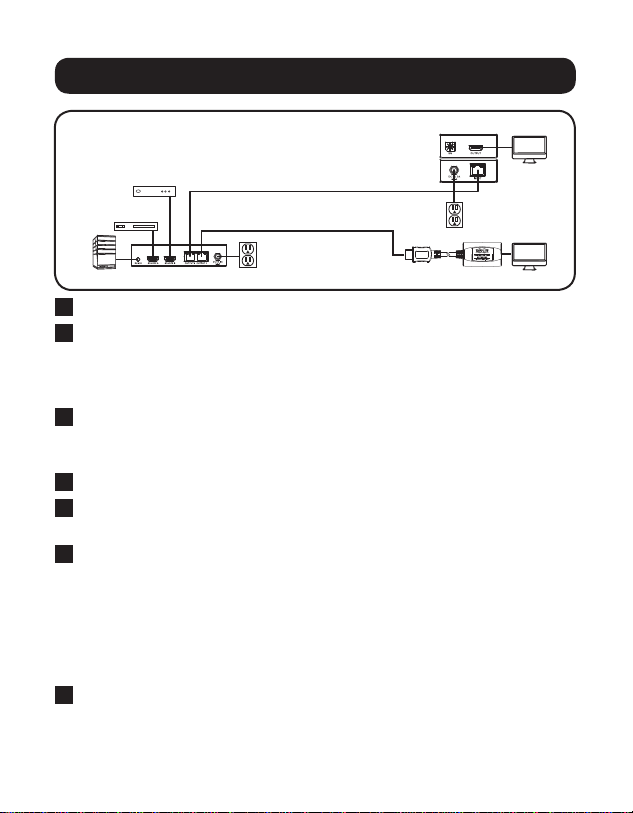
Standard Installation
B126-2x2
Computer
Blu-ray™
Cable Box
or DVR
B126-1P0
B126-1A0
Up to 125 ft. at 1080p @ 60 Hz
Up to 175 ft. at 1080i @ 60 Hz
Up to 50 ft. at 1080p @ 60 Hz
Up to 75 ft. at 1080i @ 60 Hz
1
Make sure all devices being connected are turned off.
2
Optional: Using the 3.5 mm to DB9 adapter cable, insert the
3.5 mm connector into the port labeled “RS-232” on the switch. Then
connect the DB9 connector to a serial port on the computer you will be
controlling the switch with.
3
Optional (B126-4X4 only): Connect the IR extension cable to the
3.5 mm jack on the rear of the unit. Position the cable’s infrared sensor
in an area that allows a direct line of sight between it and the remote.
4
Connect the first HDMI source to the port on the switch marked Source A.
5
Repeat step 3 to connect additional HDMI sources to the remaining
ports.
6
Connect the external power supply to the switch and plug it into a
Tripp Lite Surge Protector, Power Distribution Unit (PDU), or
Uninterruptible Power Supply (UPS). When receiving power, the following
LEDs will illuminate: The Green Power LED, The Orange Source LEDs (for
the Source ports that have devices connected to them), and the Green
RJ45 Output LEDs. A Green LED will also illuminate to indicate the
source that is being transmitted to each Output port.
7
Using Cat5e/6 cable, connect the RJ45 port marked Output 1 to a
B126-Series remote receiver unit.
17-06-500-9333F8-EN.indd 5 7/10/2017 1:20:49 PM
Loading ...
Loading ...
Loading ...