Loading ...
Loading ...
Loading ...
English
5
For optimal positioning, the diamond wheel should
ride above the brushes 1/8" (3.18mm). If diamond
wheel rides inside the shroud or stands taller than 1/4"
(6.35mm) the shroud will not workproperly.
NOTICE: If surface grinding shroud cannot be
tightened by the clamp adjusting screw, do not use
the tool and take the tool and surface grinding shroud
to a service center to repair or replace the surface
grindingshroud.
5. To remove the surface grinding shroud, loosen the
clamp adjusting screw, rotate the surface grinding
shroud to align the slots and tabs and pull up on the
surface grinding shroud.
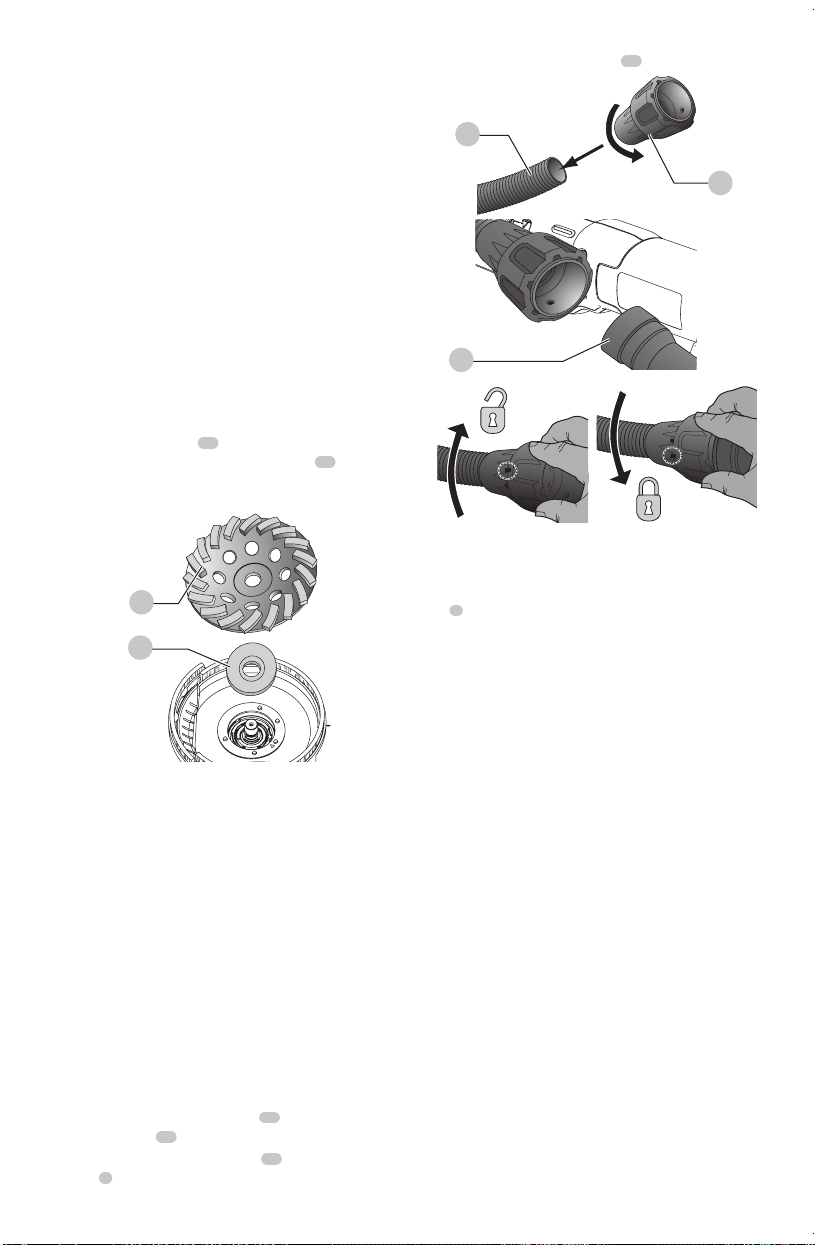
Mounting Dry Diamond Surface Cup
Wheels (Fig. C)
Follow the mounting and using cutting wheels instructions
in the tool manual and mount the grinding wheel. DO NOT
use Type 1 cutting wheels or bonded abrasivewheels.
Dry diamond surface cup
10
wheels are recommended for
use with this shroud. The inner flange washer
11
should be
installed behind the wheel allowing free tool removal and
properfit.
Fig. C
10
11
Dust Extraction (Fig. A, D)
WARNING: Use only power tools recommended by
D
e
WALT with thisattachment.
For more information about D
e
WALT power tools
compatible with this attachment, please contact your local
dealer, call 1–800–4-D
e
WALT (1–800–433–9258) or visit our
website www.
DeWALT
.com.
WARNING: This attachment must be used with a dust
extractor system. ALWAYS wear certified safety face
or dustmask.
nOTE: Ensure hose connection issecure.
nOTE: The amount of dust retained by the dust extractor
vacuum is dependent on its filter system. Refer to the dust
extractor vacuum instruction manual for moreinformation.
All D
e
WALT dust collection shrouds are designed to work
with the D
e
WALT universal DWV9000connector.
1. Attach the DWV9000 connector
12
to your dust
collector hose
13
.
2. Unlock the DWV9000 connector
12
and slide onto dust
port
1
.
3. Lock the DWV9000 connector
12
tosecure.
Fig. D
12
13
1
Traditional dust extractor vacuum
hoses
Attach recommended dust extractor vacuum hose to dust
port
1
.
OPERATION
WARNING: To reduce the risk of serious personal
injury, turn unit off and disconnect it from
power source before making any adjustments or
removing/installing attachments or accessories.
An accidental start-up can causeinjury. This applies
to both the grinder and the dust extractor
vacuum. Such preventative safety measures reduce
the risk of starting the tool accidentally.
WARNING: For your own safety, read the instruction
manual for both the grinding tool and the dust
extractor vacuum before using any accessory. Failure
to heed these warnings may result in personal
injury and serious damage to the tool and the
accessory. When servicing this tool, use only identical
replacementparts.
nOTE: The amount of dust retained by the dust extractor
vacuum is dependent on its filter system. Refer to the dust
extractor vacuum instruction manual for moreinformation.
1. Ensure all assembly instructions have beencompleted.
2. Turn the dust extractor vacuum on as instructed in the
dust extractor vacuum instructionmanual.
3. Turn the tool on as instructed in the tool instruction
manual and allow it to reach full speed before making
contact with worksurface.
4. Place the surface grinding shroud to flat work surface
such as a floor or wall and begingrinding.
Loading ...
Loading ...
Loading ...