
Loading ...
Loading ...
Loading ...
English
4
• lead from lead-based paints,
• crystalline silica from bricks and cement and other
masonry products, and
• arsenic and chromium from chemically-
treatedlumber.
Your risk from these exposures varies, depending on how
often you do this type of work. To reduce your exposure to
these chemicals: work in a well ventilated area, and work with
approved safety equipment, such as those dust masks that are
specially designed to filter out microscopicparticles.
• Avoid prolonged contact with dust from power
sanding, sawing, grinding, drilling, and other
construction activities. Wear protective clothing and
wash exposed areas with soap and water. Allowing
dust to get into your mouth, eyes, or lay on the skin may
promote absorption of harmfulchemicals.
WARNING: Use of this tool can generate and/
or disperse dust, which may cause serious and
permanent respiratory or other injury. Always use
NIOSH/OSHA approved respiratory protection
appropriate for the dust exposure. Direct particles
away from face andbody.
WARNING: Before beginning the work, check
to determine the hazard classification of the
dust produced. Use an industrial dust extractor
vacuum of the appropriate, officially approved
safety class that is in compliance with your local
dust hazard controlregulations.
WARNING: Always wear proper personal hearing
protection that conforms to ANSI S12.6 (S3.19)
during use. Under some conditions and duration
of use, noise from this product may contribute to
hearingloss.
• Air vents often cover moving parts and should be
avoided. Loose clothes, jewelry or long hair can be
caught in movingparts.
SAVE THESE INSTRUCTIONS FOR
FUTURE USE
COMPONENTS (FIG. A)
WARNING: Never modify the power tool or any part
of it. Damage or personal injury couldresult.
Refer to Figure A at the beginning of this manual for a
complete list ofcomponents.
Intended Use
Your concrete surface grinding shroud has been designed
for dust removal of the following: grinding, leveling and
polishing concrete surfaces. It can remove dust when
removing surface paint, epoxy and glue. Using the
appropriate grinder, diamond grinding wheel and dust
extractor vacuum it can be used to remove the vast majority
of static and airborne dust which without the use of the
surface grinding shroud could otherwise contaminate the
working environment or pose an increased health risk to the
operator and those in close proximity. This concrete surface
grinder should ALWAYS be used with a dust extractor
vacuum designed for concrete dustremoval.
DO nOT use under wet conditions or in presence of
flammable liquids orgases.
The surface grinding shroud is a professional tool. DO nOT
let children come into contact with the tool. Supervision is
required when inexperienced operators use thistool.
ASSEMBLY AND ADJUSTMENTS
WARNING: To reduce the risk of serious personal
injury, turn unit off and disconnect it from
power source before making any adjustments or
removing/installing attachments or accessories.
An accidental start-up can causeinjury. This applies
to both the grinder and the dust extractor
vacuum. Such preventative safety measures reduce
the risk of starting the tool accidentally.
Mounting and Removing Surface Grinding
Shroud
WARNING: When loosening the clamp screw, make
sure the screw remains attached to the shroud.
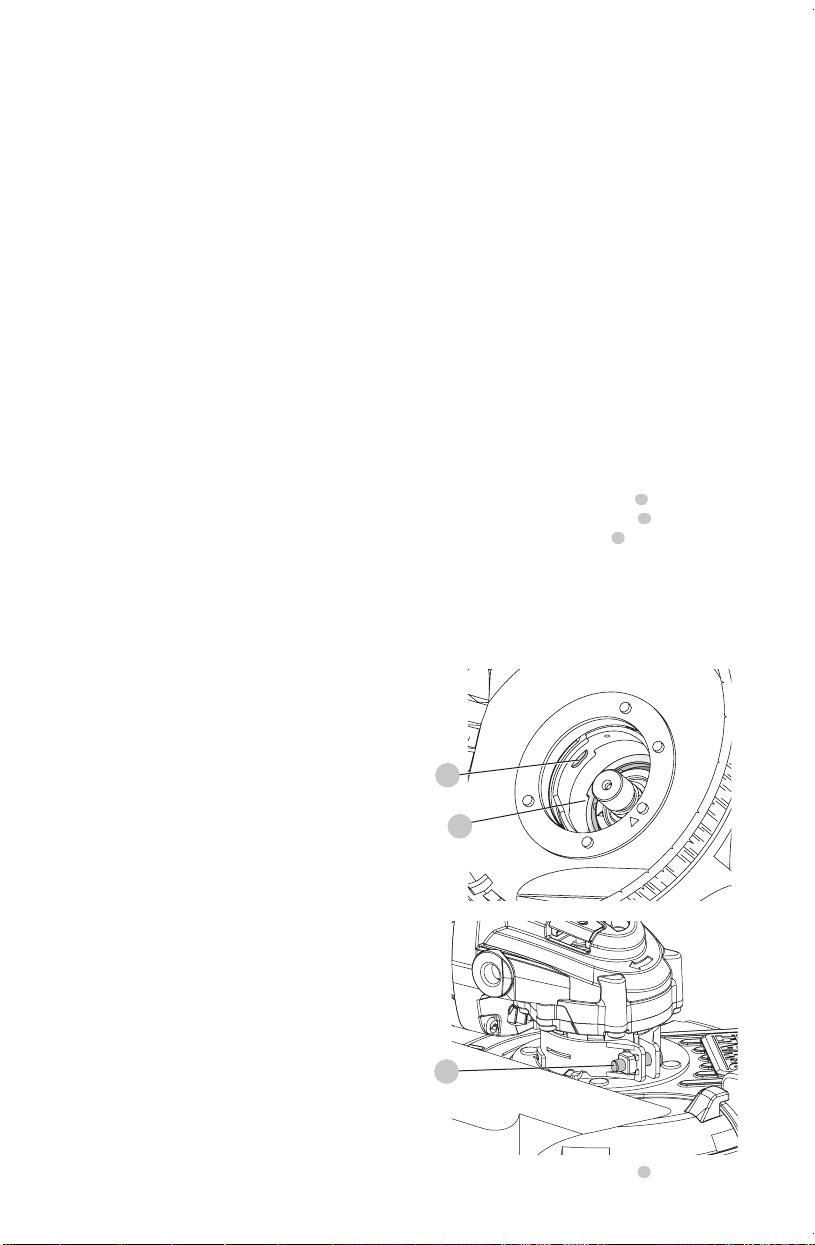
1. Follow the mounting and removing guard instructions
in tool manual to remove the guard fromgrinder.
2. Loosen the clamp adjusting screw
2
on the surface
grinding shroud and align the tabs
8
on the surface
grinding shroud with the slots
9
on the grinder
gearcase.
3. Rotate the shroud into the desired working position. The
surface grinding shroud should be positioned between
the spindle and the operator to provide operator
protection.
9
8
2
Fig. B
4. Tighten the clamp adjusting screw
2
to ensure shroud
is secured to gearcase.
Loading ...
Loading ...
Loading ...