
HP DesignJet 1600 Printer Series
User Guide

Edition 1
© Copyright 2019 HP Development Company,
L.P.
Legal notices
The information contained herein is subject to
change without notice.
The only warranties for HP products and
services are set forth in the express warranty
statements accompanying such products and
services. Nothing herein should be construed as
constituting an additional warranty. HP shall not
be liable for technical or editorial errors or
omissions contained herein.
IPv6-ready
Trademarks
Adobe®, Acrobat®, Adobe Photoshop® and
Adobe® PostScript® 3™ are trademarks of
Adobe Systems Incorporated.
ENERGY STAR and the ENERGY STAR mark are
registered U.S. trademarks.
Microsoft® and Windows® are U.S. registered
trademarks of Microsoft Corporation.
PANTONE® is Pantone, Inc.'s check-standard
trademark for color.

Table of contents
1 Introduction ............................................................................................................................................................................................... 1
Welcome to your printer ......................................................................................................................................................... 2
Printer models .......................................................................................................................................................................... 2
Safety precautions ................................................................................................................................................................... 3
Main components ..................................................................................................................................................................... 6
Turn the printer on and o ...................................................................................................................................................... 7
Front panel ................................................................................................................................................................................ 9
HP Utility .................................................................................................................................................................................. 12
HP Print Preview ..................................................................................................................................................................... 12
Embedded Web Server ......................................................................................................................................................... 13
Demo prints ............................................................................................................................................................................ 13
Congure your printer ........................................................................................................................................................... 14
Mobile printing ........................................................................................................................................................................ 29
Accessibility ............................................................................................................................................................................. 29
Other sources of information ............................................................................................................................................... 30
2 Paper handling ........................................................................................................................................................................................ 31
General advice ........................................................................................................................................................................ 32
Load a roll onto the spindle .................................................................................................................................................. 33
Load a roll into the printer .................................................................................................................................................... 35
Unload a roll ............................................................................................................................................................................ 38
Load a single sheet ................................................................................................................................................................ 39
The stacker .............................................................................................................................................................................. 42
The basket ............................................................................................................................................................................... 44
View information about the paper ...................................................................................................................................... 44
Paper presets .......................................................................................................................................................................... 44
Printing paper info ................................................................................................................................................................. 45
Move the paper ....................................................................................................................................................................... 46
Maintain paper ........................................................................................................................................................................ 46
Change the drying time ......................................................................................................................................................... 46
Turn the automatic cutter on and o .................................................................................................................................. 47
Clean cut .................................................................................................................................................................................. 47
ENWW iii

3 Working with two rolls (T1600dr only) ............................................................................................................................................... 48
Advantages of a multiroll printer ......................................................................................................................................... 49
How the printer allocates jobs to paper rolls ..................................................................................................................... 49
4 Networking .............................................................................................................................................................................................. 51
Introduction ............................................................................................................................................................................. 52
Control network protocols .................................................................................................................................................... 52
Front-panel menu items ....................................................................................................................................................... 52
Link conguration methods ................................................................................................................................................. 55
Troubleshooting ..................................................................................................................................................................... 56
5 Printing ..................................................................................................................................................................................................... 60
Introduction ............................................................................................................................................................................. 61
Print from a USB ash drive ................................................................................................................................................. 61
Print from the network folder .............................................................................................................................................. 62
Print from a computer using a printer driver ..................................................................................................................... 63
Advanced print settings ........................................................................................................................................................ 64
6 Mobile printing ........................................................................................................................................................................................ 75
Introduction ............................................................................................................................................................................. 76
Print from Android ................................................................................................................................................................. 76
Print from Chrome OS ........................................................................................................................................................... 76
Print and share from the HP Smart App ............................................................................................................................. 77
Print by email (HP ePrint) ...................................................................................................................................................... 77
Mobile specications .............................................................................................................................................................. 77
7 Job queue management ....................................................................................................................................................................... 78
Job queue in the front panel ................................................................................................................................................ 79
Job queue in the Embedded Web Server or HP DesignJet Utility .................................................................................. 83
8 Color management ................................................................................................................................................................................ 87
Introduction ............................................................................................................................................................................. 88
How colors are represented ................................................................................................................................................. 88
A summary of the color management process ................................................................................................................. 88
Color calibration ...................................................................................................................................................................... 88
Color management from printer drivers ............................................................................................................................ 90
Color management from the front panel ........................................................................................................................... 92
iv ENWW

9 Practical printing examples .................................................................................................................................................................. 93
Print a draft for revision with the correct scale ................................................................................................................. 94
Print a PDF multipage job from Adobe Acrobat Reader or Adobe Acrobat Pro ........................................................... 95
Print a document with the correct colors ........................................................................................................................... 97
Print a project ....................................................................................................................................................................... 104
Print a presentation ............................................................................................................................................................. 107
Print and scale from Microsoft Oce ............................................................................................................................... 111
10 Retrieving printer usage information ............................................................................................................................................. 115
Get printer accounting information .................................................................................................................................. 115
Check usage statistics ......................................................................................................................................................... 115
Check usage statistics for a job ......................................................................................................................................... 117
Check cost assignment ....................................................................................................................................................... 119
11 Handling ink cartridges and printhead ........................................................................................................................................... 120
About the ink cartridges ..................................................................................................................................................... 121
Check the ink cartridges status ......................................................................................................................................... 121
Remove an ink cartridge ..................................................................................................................................................... 121
Insert an ink cartridge ......................................................................................................................................................... 122
About the printhead ............................................................................................................................................................ 124
Check the printhead status ................................................................................................................................................ 124
Remove the printhead ........................................................................................................................................................ 125
Insert the printhead ............................................................................................................................................................. 128
Storage of anonymous usage information ..................................................................................................................... 131
Safe mode ............................................................................................................................................................................. 131
12 Maintaining the printer ..................................................................................................................................................................... 132
Check printer status ............................................................................................................................................................ 133
Clean the exterior of the printer ........................................................................................................................................ 133
Maintain the ink cartridges ................................................................................................................................................. 133
Move or store the printer .................................................................................................................................................... 133
Update the rmware ........................................................................................................................................................... 134
Update the software ........................................................................................................................................................... 135
Printer maintenance kits .................................................................................................................................................... 135
Secure File Erase .................................................................................................................................................................. 135
Disk Wipe ............................................................................................................................................................................... 136
13 Supplies and accessories ................................................................................................................................................................. 137
How to order supplies and accessories ........................................................................................................................... 138
Introduction to the accessories ......................................................................................................................................... 142
ENWW v

14 Troubleshooting paper issues ......................................................................................................................................................... 143
Paper cannot be loaded successfully ............................................................................................................................... 144
Paper type is not in the driver ............................................................................................................................................ 145
Printer printed on the wrong paper type ......................................................................................................................... 146
Automatic cut not available ............................................................................................................................................... 146
On hold for paper ................................................................................................................................................................. 146
The paper has jammed in the print platen ...................................................................................................................... 147
The paper has jammed in the stacker .............................................................................................................................. 152
The printer reports unexpectedly that the stacker is full ............................................................................................. 152
A strip stays on the output tray and generates jams .................................................................................................... 153
Printer displays out of paper when paper is available ................................................................................................... 153
Prints do not fall neatly into the basket ........................................................................................................................... 153
Sheet stays in the printer when the print has been completed ................................................................................... 153
Paper is cut when the print has been completed ........................................................................................................... 153
Cutter does not cut well ...................................................................................................................................................... 153
Roll is loose on the spindle ................................................................................................................................................. 153
Recalibrate the paper advance .......................................................................................................................................... 154
15 Troubleshooting print-quality issues ............................................................................................................................................. 156
General advice ...................................................................................................................................................................... 158
Horizontal lines across the image (banding) ................................................................................................................... 158
Whole image is blurry or grainy ......................................................................................................................................... 159
Paper is not at .................................................................................................................................................................... 160
Print is scued or scratched ............................................................................................................................................... 160
Ink marks on the paper ....................................................................................................................................................... 161
Black horizontal lines on yellow background .................................................................................................................. 161
Black ink comes o when you touch the print ................................................................................................................ 162
Edges of objects are stepped or not sharp ..................................................................................................................... 162
Edges of objects are darker than expected ..................................................................................................................... 162
Horizontal lines at the end of a cut sheet print .............................................................................................................. 162
Vertical lines of dierent colors ......................................................................................................................................... 163
White spots on the print ..................................................................................................................................................... 163
Colors are inaccurate ........................................................................................................................................................... 163
Colors are fading .................................................................................................................................................................. 164
Image is incomplete (clipped at the bottom) .................................................................................................................. 164
Image is clipped ................................................................................................................................................................... 164
Some objects are missing from the printed image ........................................................................................................ 165
Lines are too thick, too thin or missing ............................................................................................................................ 166
Lines appear stepped or jagged ........................................................................................................................................ 166
Lines print double or in the wrong colors ........................................................................................................................ 167
Lines are discontinuous ...................................................................................................................................................... 167
vi ENWW

Lines are blurred .................................................................................................................................................................. 168
Line lengths are inaccurate ................................................................................................................................................ 168
Image Diagnostics Print ...................................................................................................................................................... 169
If you still have a problem .................................................................................................................................................. 172
16 Troubleshooting ink cartridge and printhead issues ................................................................................................................... 173
Cannot insert an ink cartridge ........................................................................................................................................... 174
Ink cartridge status messages .......................................................................................................................................... 174
Cannot insert the printhead ............................................................................................................................................... 174
The front-panel display recommends reseating or replacing the printhead ............................................................. 174
Clean the printhead ............................................................................................................................................................. 175
Align the printhead .............................................................................................................................................................. 175
Printhead status messages ............................................................................................................................................... 176
17 Troubleshooting general printer issues ......................................................................................................................................... 177
Printer does not print .......................................................................................................................................................... 178
Front panel fails to initialize ............................................................................................................................................... 178
Printer seems slow .............................................................................................................................................................. 179
Communication failures between computer and printer .............................................................................................. 179
Cannot access the Embedded Web Server ...................................................................................................................... 179
Cannot access the network folder .................................................................................................................................... 180
Cannot connect to the Internet ......................................................................................................................................... 180
Web Services issues ............................................................................................................................................................ 180
Automatic le system check .............................................................................................................................................. 180
Alerts ...................................................................................................................................................................................... 181
18 Front-panel error messages ............................................................................................................................................................ 182
System error log .................................................................................................................................................................. 182
19 HP Customer Care ............................................................................................................................................................................. 183
Introduction .......................................................................................................................................................................... 184
HP Professional Services .................................................................................................................................................... 184
Customer Self Repair .......................................................................................................................................................... 185
Contact HP Support ............................................................................................................................................................. 185
20 Printer specications ......................................................................................................................................................................... 187
Functional specications .................................................................................................................................................... 188
Mobile printing specications ............................................................................................................................................ 190
Physical specications ........................................................................................................................................................ 190
Memory specications ........................................................................................................................................................ 190
ENWW vii

Power specications ............................................................................................................................................................ 191
Environmental specications ............................................................................................................................................. 191
Acoustic specications ........................................................................................................................................................ 191
Glossary ..................................................................................................................................................................................................... 192
Index ........................................................................................................................................................................................................... 195
viii ENWW


Welcome to your printer
Your printer is a color inkjet printer designed for printing high-quality images on paper up to 914 mm (36 in)
wide. Some major features of the printer are shown below:
● Print resolution of up to 2400 × 1200 optimized dpi, from a 1200 × 1200 dpi input, using the Best print-
quality option, the Maximum Detail option and photo paper.
● The printer can be controlled from its front panel or from a remote computer using the Embedded Web
Server, HP DesignJet Utility, or HP Click Printing Software (see http://www.hp.com/go/designjetclick).
● Touch-sensitive front panel in color, with an intuitive graphical user interface.
● Job previews in the front panel.
● Job previews on remote computers.
● Includes Web-connected features such as automatic rmware updates, HP ePrint, and Mobile Printing.
● Driverless printing: Files in common graphical formats can be printed directly without needing a printer
driver. Just insert a USB ash drive or use HP Click Printing Software.
● Paper exibility and automatic easy load, see Paper handling on page 31, with information and presets
accessible from the front panel and the HP DesignJet Utility.
● Handles cut-sheet and roll paper.
● Six-ink system.
● Accurate and consistent color reproduction with automatic color calibration.
● Economode for printing economically.
● Two rolls loaded at once (T1600dr only) provide fast and easy switching between dierent rolls, or long
runs of unattended printing.
● High productivity features such as job previewing and nesting using HP Click Printing Software.
● Ink and paper usage information available from the Embedded Web Server, see Embedded Web Server
on page 13.
● Access to the online HP Support Center (see HP Support Center on page 184).
Printer models
This guide covers the following printer models, normally referring to them by their short names for brevity.
Full name Short name
HP DesignJet T1600 T1600
HP DesignJet T1600 PostScript Printer T1600 PS
HP DesignJet T1600dr T1600dr
HP DesignJet T1600dr PostScript Printer T1600dr PS
2 Chapter 1 Introduction ENWW

Safety precautions
Read these safety precautions before using your printer. Also read your local Environmental, Health, and Safety
regulations.
This equipment is not suitable for use in locations where children are likely to be present.
For any maintenance or part replacement, follow the instructions provided in HP documentation to minimize
safety risks and to avoid damaging the printer.
General safety guidelines
There are no operator-serviceable parts inside the printer except those covered by HP’s Customer Self Repair
program (see http://www.hp.com/go/selfrepair). Refer servicing of other parts to qualied service personnel.
Turn o the printer and call your service representative in any of the following cases:
● The power cord or plug is damaged.
● The printer has been damaged by an impact.
● There is any mechanical or enclosure damage.
● Liquid has entered the printer.
● There is smoke or an unusual smell coming from the printer.
● The printer has been dropped.
● The printer is not operating normally.
Turn o the printer in either of the following cases:
● During a thunderstorm.
● During a power failure.
Take special care with zones marked with warning labels.
Ventilation measures for your location, whether oce, copy room, or printer room, should meet local
environmental health and safety (EHS) guidelines and regulations.
Electrical shock hazard
WARNING! The internal circuits of the built-in power supplies and power inlet operate at hazardous voltages
capable of causing death or serious personal injury.
Unplug the printer’s power cord before servicing the printer.
The printer requires a building installation circuit breaker, which must meet the requirements of the printer and
should be in accordance with the Electrical Code requirements of the local jurisdiction of the country in which the
equipment is installed.
To avoid the risk of electric shock:
● The printer should be connected to earthed mains outlets only.
● Avoid overloading the printer's electrical outlet with multiple devices.
ENWW Safety precautions 3

● Do not remove or open any closed system covers or plugs.
● Do not insert objects through slots in the printer.
● Take care not to trip over the cables when walking behind the printer.
● Insert the power cord securely and completely into the wall socket and printer inlet.
● Never handle the power cord with wet hands.
Fire hazard
To avoid the risk of re, take the following precautions:
● The customer is responsible for meeting the printer’s requirements and the Electrical Code requirements
according to the local jurisdiction of the country where the printer is installed. Use the power supply voltage
specied on the nameplate.
● Use only the power cord supplied by HP with the printer. Do not use a damaged power cord. Do not use the
power cord with other products.
● Do not insert objects through slots in the printer.
● Take care not to spill liquid on the printer. After cleaning, make sure all components are dry before using
the printer again.
● Do not use aerosol products that contain ammable gases inside or around the printer. Do not operate the
printer in an explosive atmosphere.
● Do not block or cover the openings of the printer.
Mechanical hazard
The printer has moving parts that could cause injury. To avoid personal injury, take the following precautions
when working close to the printer.
● Keep your clothing and all parts of your body away from moving parts.
● Avoid wearing necklaces, bracelets, and other hanging objects.
● If your hair is long, try to secure it so that it will not fall into the printer.
● Take care that sleeves or gloves do not get caught in moving parts.
● Do not operate the printer with covers bypassed.
● If you need to replace the cutter assembly, take care not to cut yourself on the sharp cutting edge.
● Internal fan blades are hazardous moving parts. Disconnect the printer before servicing.
● Never insert your hands into the printer while it is printing, due to the moving parts inside.
4 Chapter 1 Introduction ENWW
Heavy paper hazard
Special care must be taken to avoid personal injury when handling heavy papers.
● Handling heavy paper rolls may require more than one person. Care must be taken to avoid back strain
and/or injury.
● When handling heavy paper rolls, wear personal protective equipment, including boots and gloves.
● Follow your local Environmental Health and Safety regulations for handling heavy paper rolls.
Ink handling
HP recommends that you wear gloves when handling ink supplies.
Warnings and cautions
The following symbols are used in this manual to ensure the proper use of the printer and to prevent the printer
from being damaged. Follow the instructions marked with these symbols.
WARNING! Failure to follow the guidelines marked with this symbol could result in serious personal injury or
death.
CAUTION: Failure to follow the guidelines marked with this symbol could result in minor personal injury or
damage to the printer.
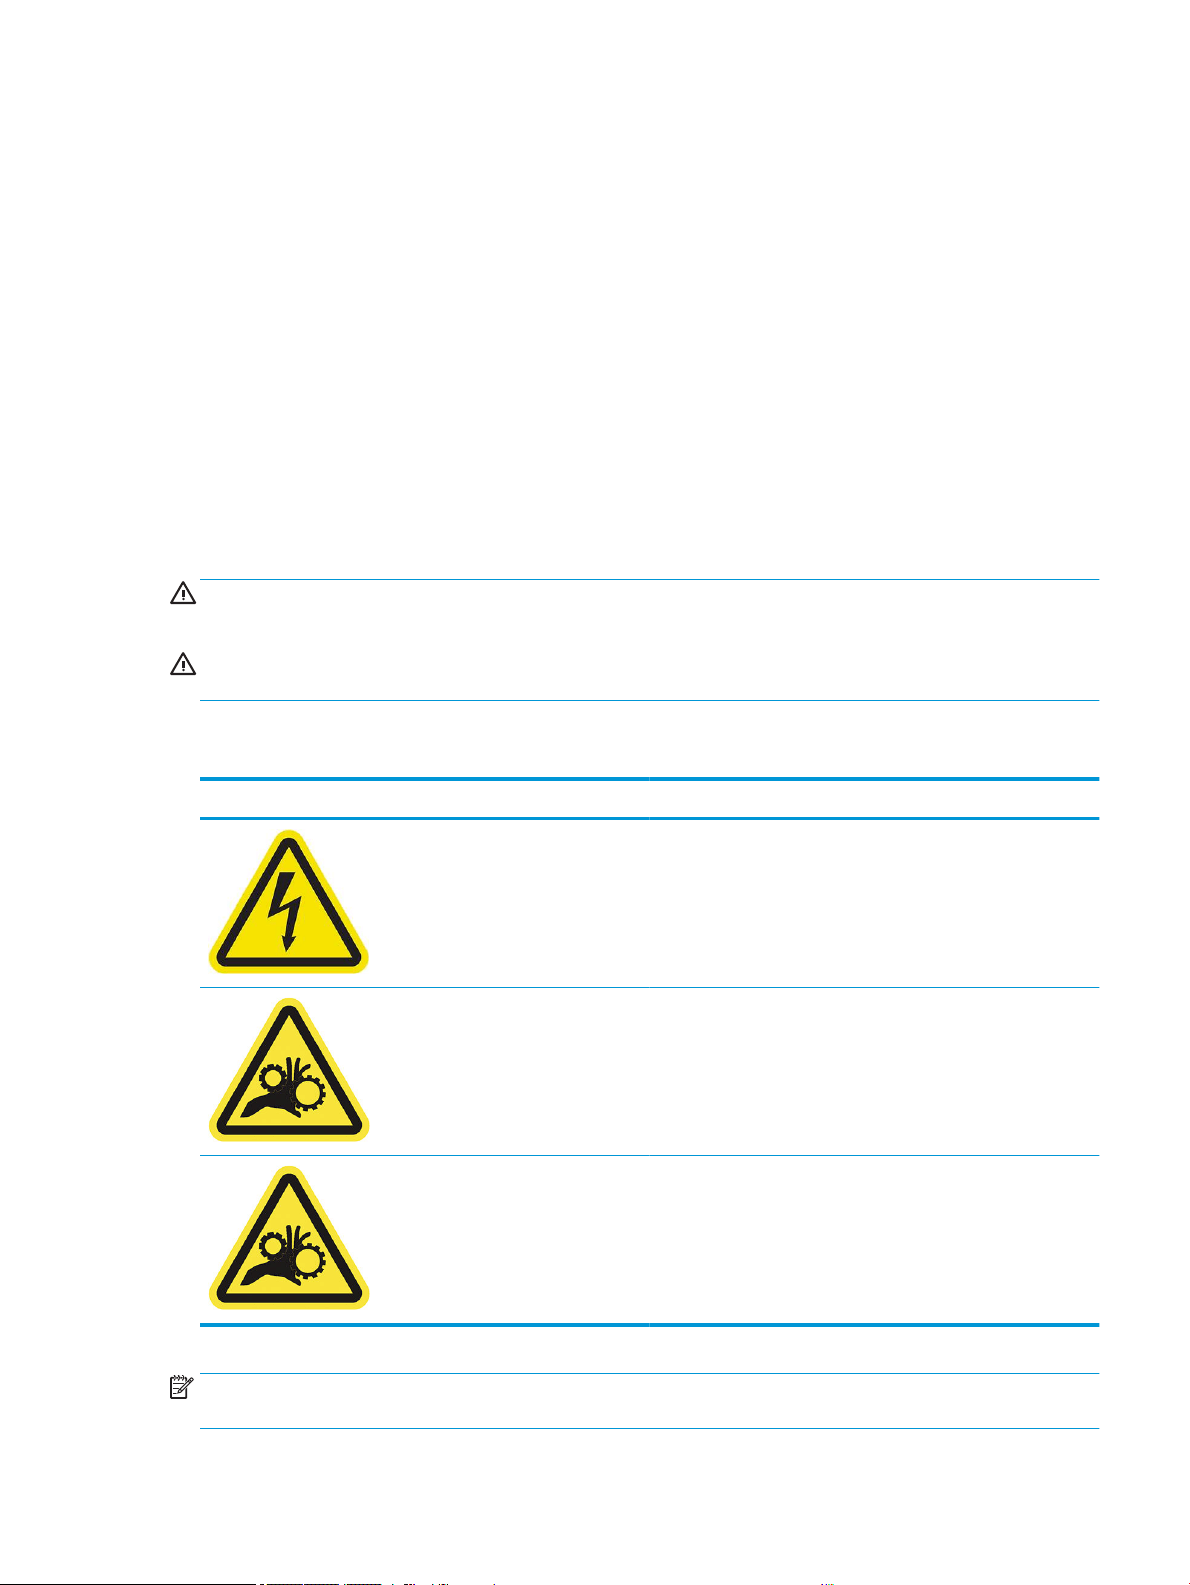
Warning labels
Label Explanation
Electric shock hazard. Power Supply inside that operates at
hazardous voltages. Disconnect all power sources before servicing.
Before starting, read and follow the operating and safety
instructions.
Moving part. Keep your ngers and hands away from the moving
paper system.
Moving parts. Rotating roll bar. Keep hands out.
NOTE: The nal label position and its size on the printer may vary slightly, but labels should always be visible
and close to the potential risk area.
ENWW Safety precautions 5
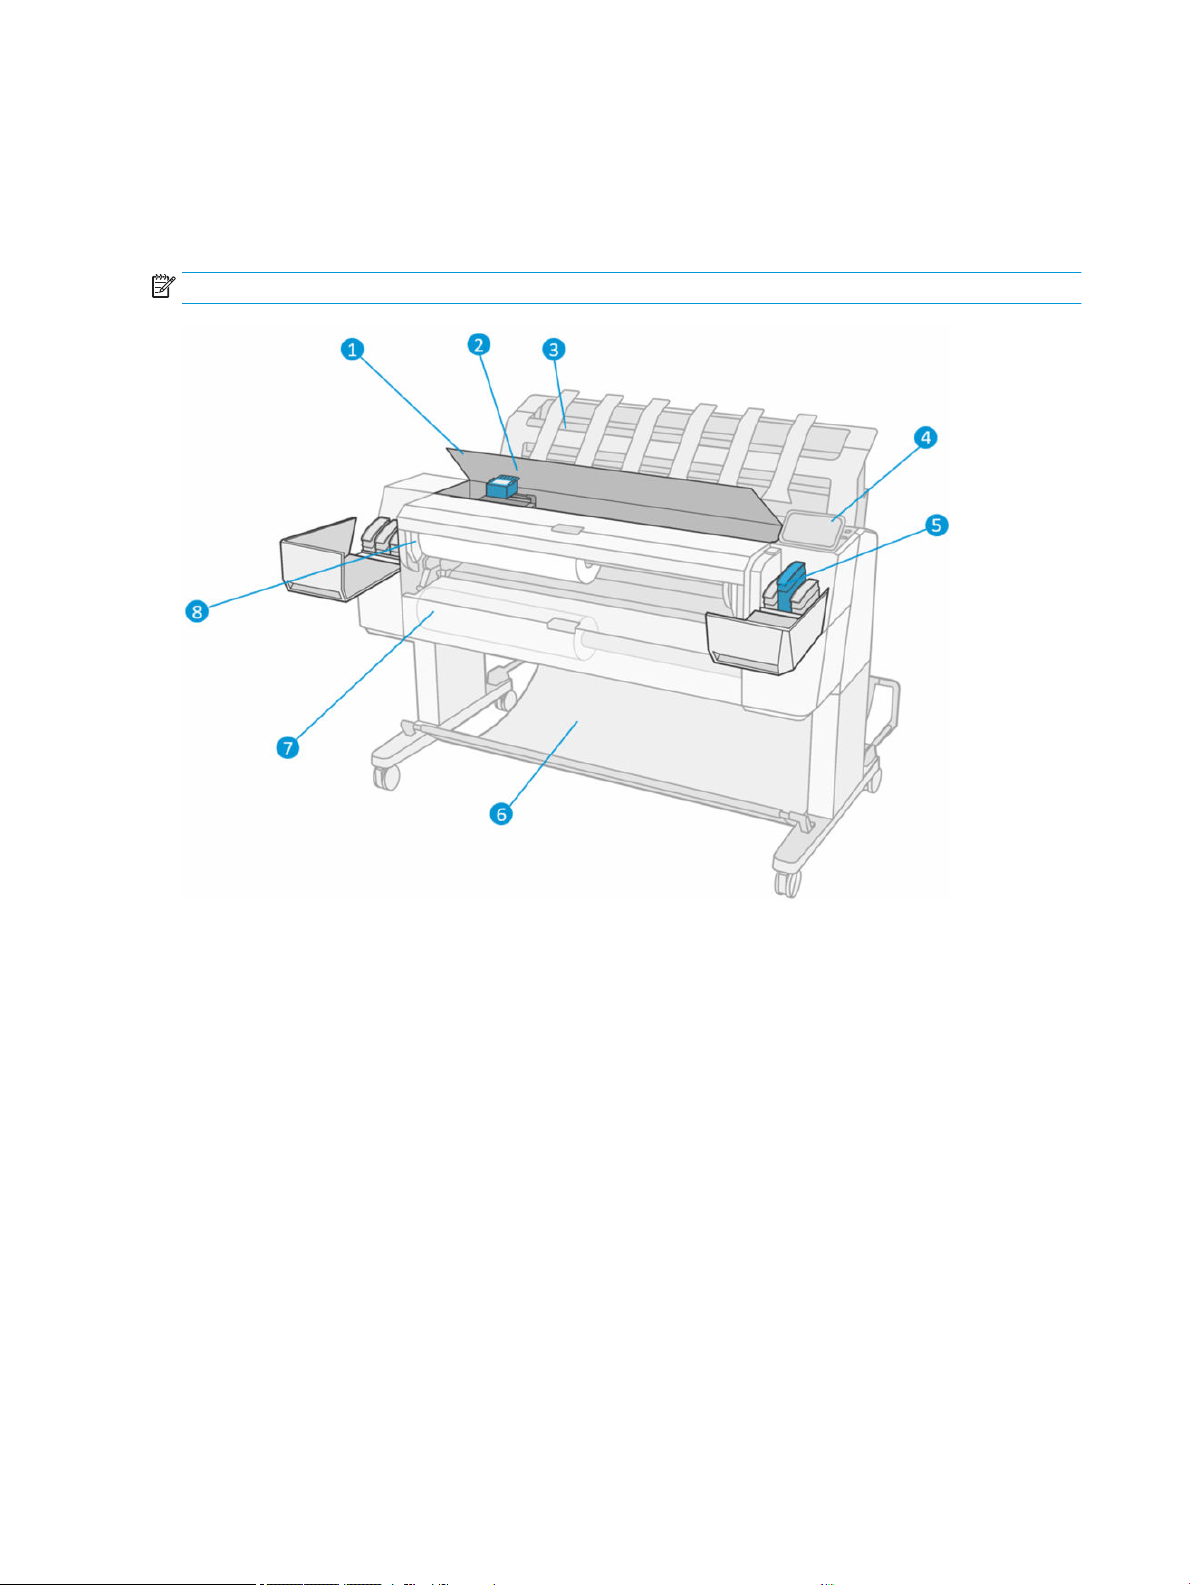
Main components
The following front and rear views of the printer illustrate the main components.
Front view
NOTE: This illustration shows the T1600dr.
1. Window
2. Printhead
3. Stacker
4. Front panel
5. Ink cartridge slot
6. Basket
7. Lower roll cover ( T1600dr only)
8. Upper roll cover
6 Chapter 1 Introduction ENWW
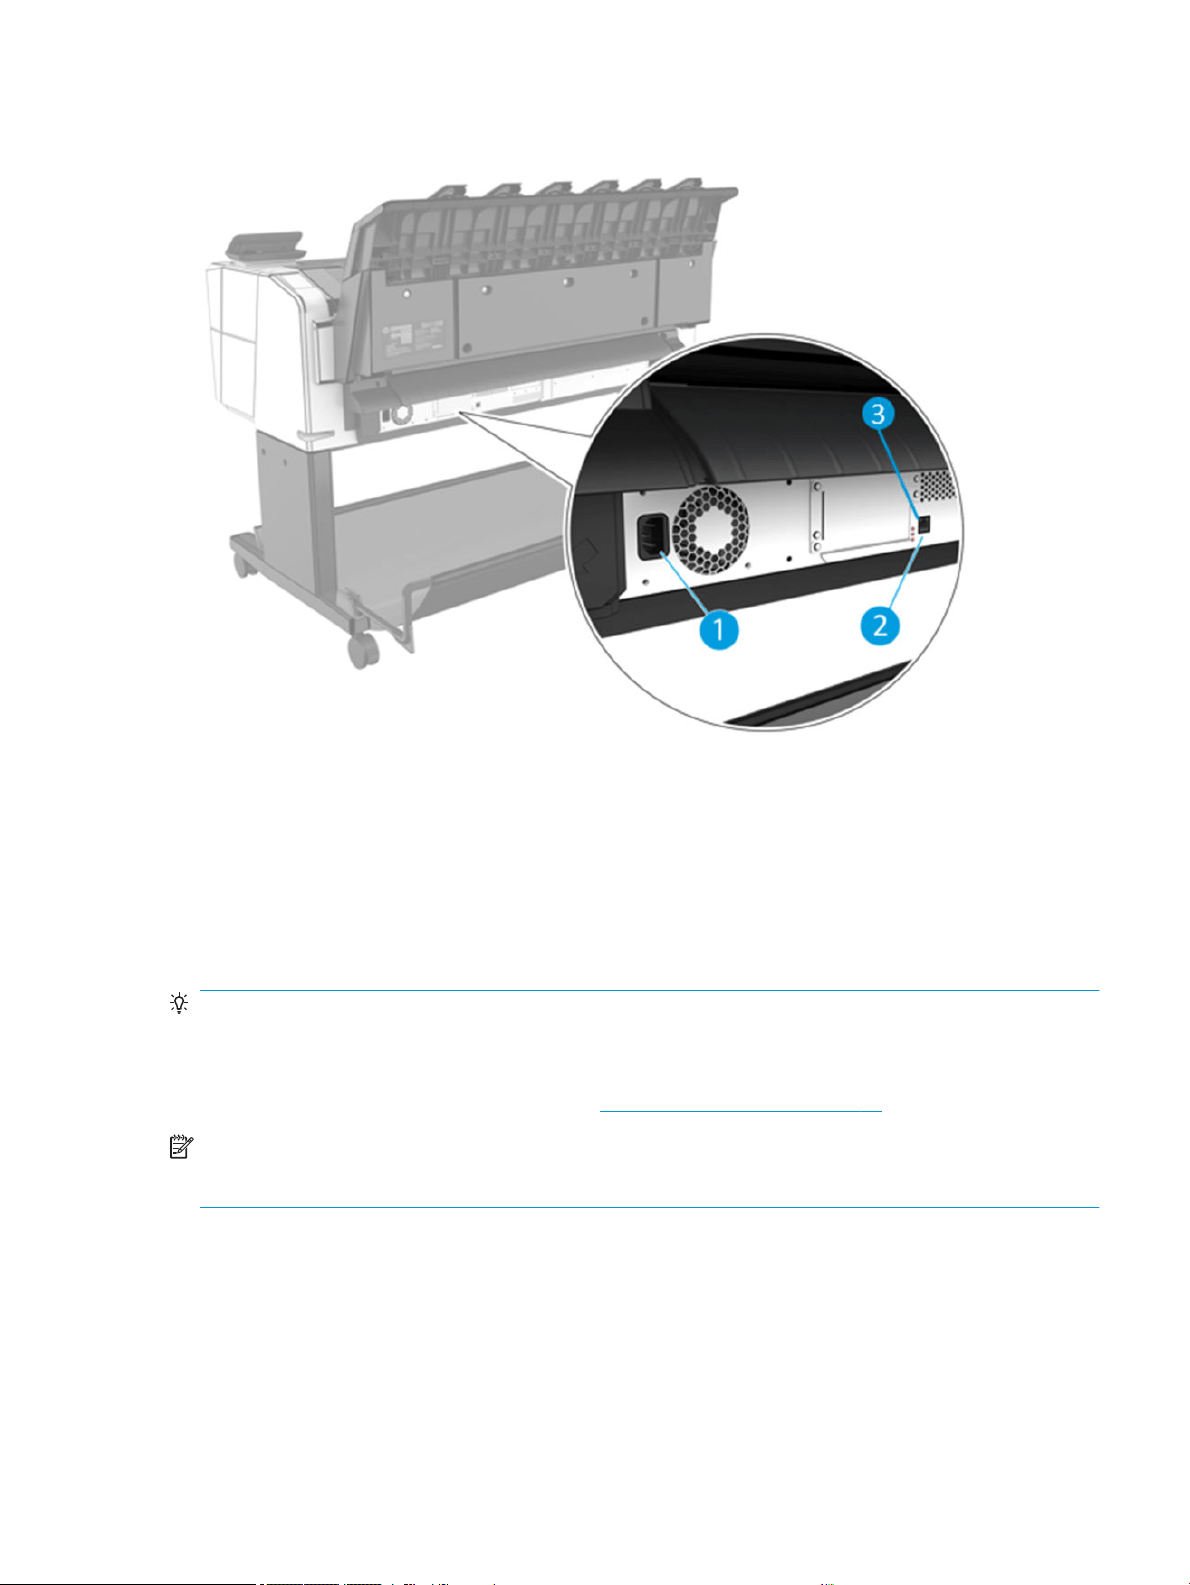
Rear view
1. Power socket
2. Gigabit Ethernet port, to connect to a network
3. Diagnostic LEDs, to be used by service engineers
The Hi-Speed USB host port is on the other side of the printer, beside the front panel.
Turn the printer on and o
TIP: The printer can be left powered on almost without wasting energy. Leaving it on improves response time
and overall system reliability. When the printer has not been used for a certain period of time (the default time is
determined by Energy Star), it saves power by going into sleep mode. However, any interaction with the printer's
front-panel display, or sending a new job to print, returns it to active mode, and it can resume printing
immediately. To change the sleep mode time, see Change system options on page 11.
NOTE: In sleep mode, the printer performs maintenance service to the printheads from time to time. This
avoids long preparation times after long idle periods. Therefore, it is strongly recommended to leave the printer
powered on or in sleep mode to avoid wasting ink and time.
If you want to turn the printer on or o or reset the printer, the normal and recommended method is to use the
power key beside the front panel.
ENWW Turn the printer on and o 7
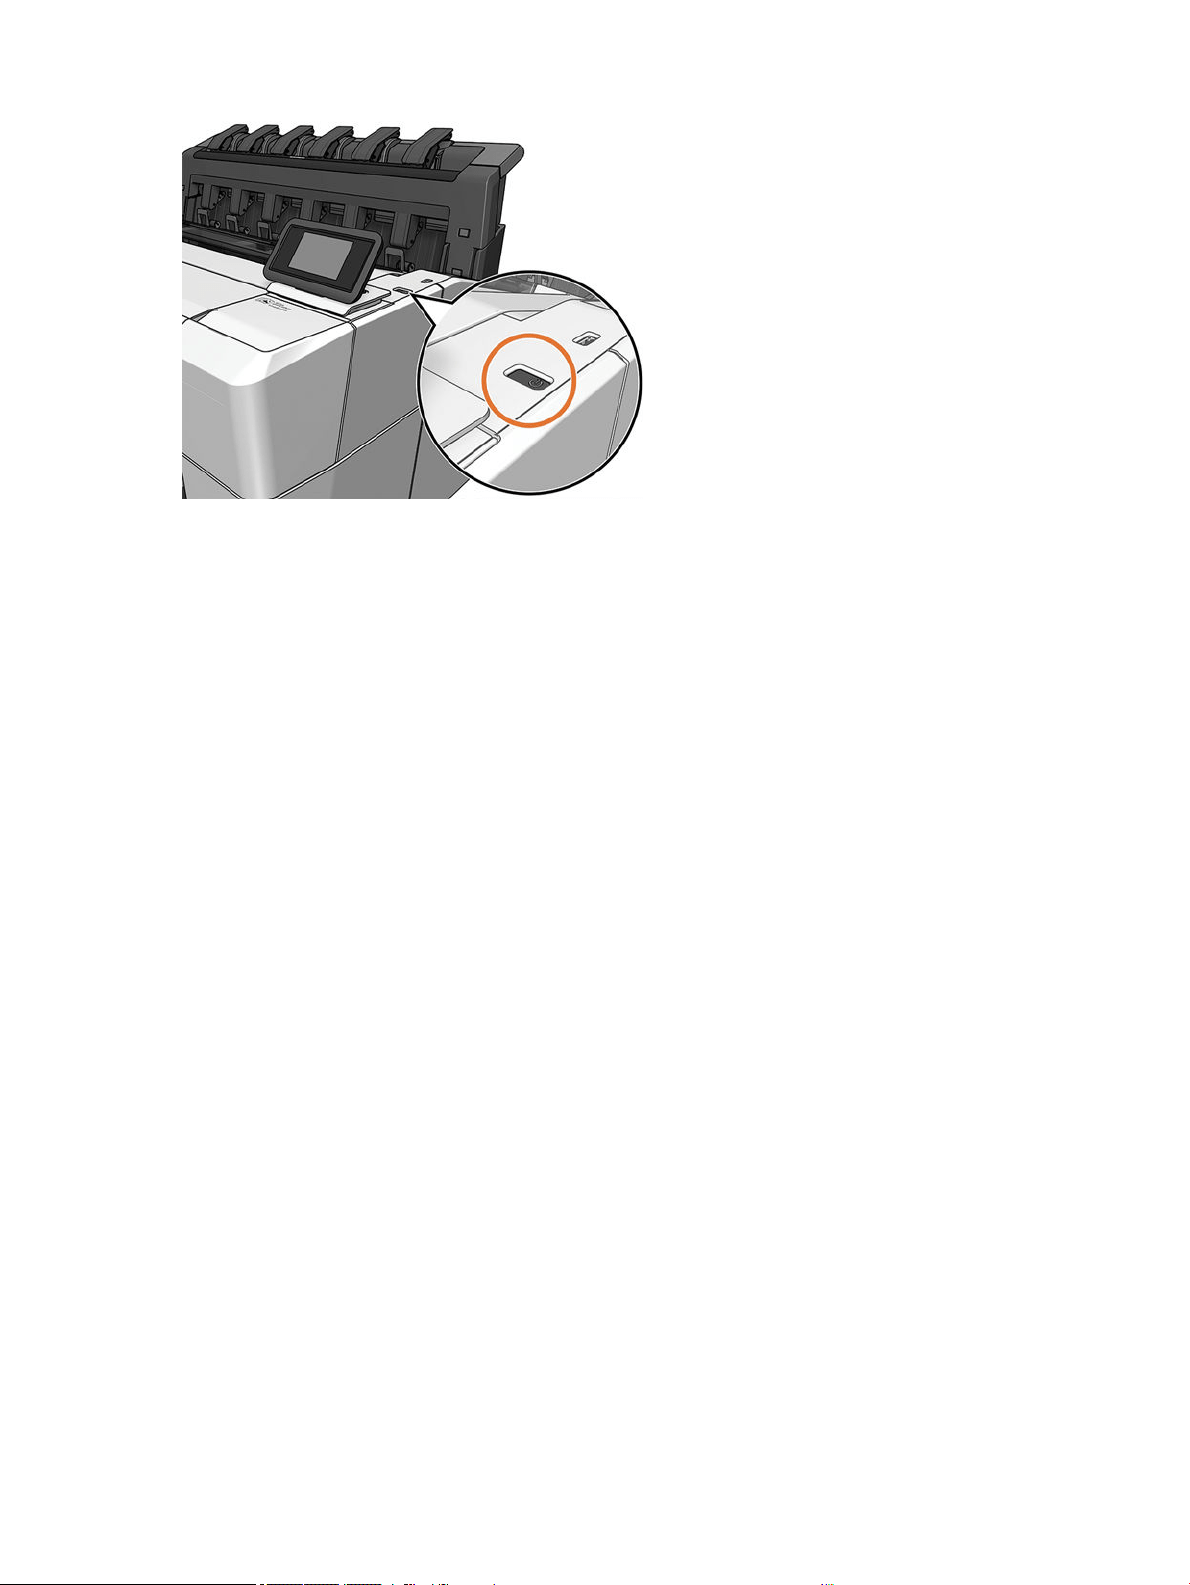
However, if you plan to store the printer for a long period or the power key does not seem to work, you are
recommended to unplug the power cord at the rear.
To turn it back on, plug in the power cord.
When the printer is powered back on, it takes about three minutes to initialize and check and prepare the
printheads. Preparing the printheads takes about 75 seconds. However, if the printer has been o for six weeks
or more, preparing the printheads could take up to 45 minutes.
8 Chapter 1 Introduction ENWW
Front panel
The front panel is a touch-sensitive screen with a graphical user interface, located on the front right of the
printer.
It gives you complete control of your printer: from the front panel, you can view information about the printer,
change printer settings, monitor printer status, and perform tasks such as supplies replacement and
calibrations. The front panel displays alerts (warning and error messages) when necessary.
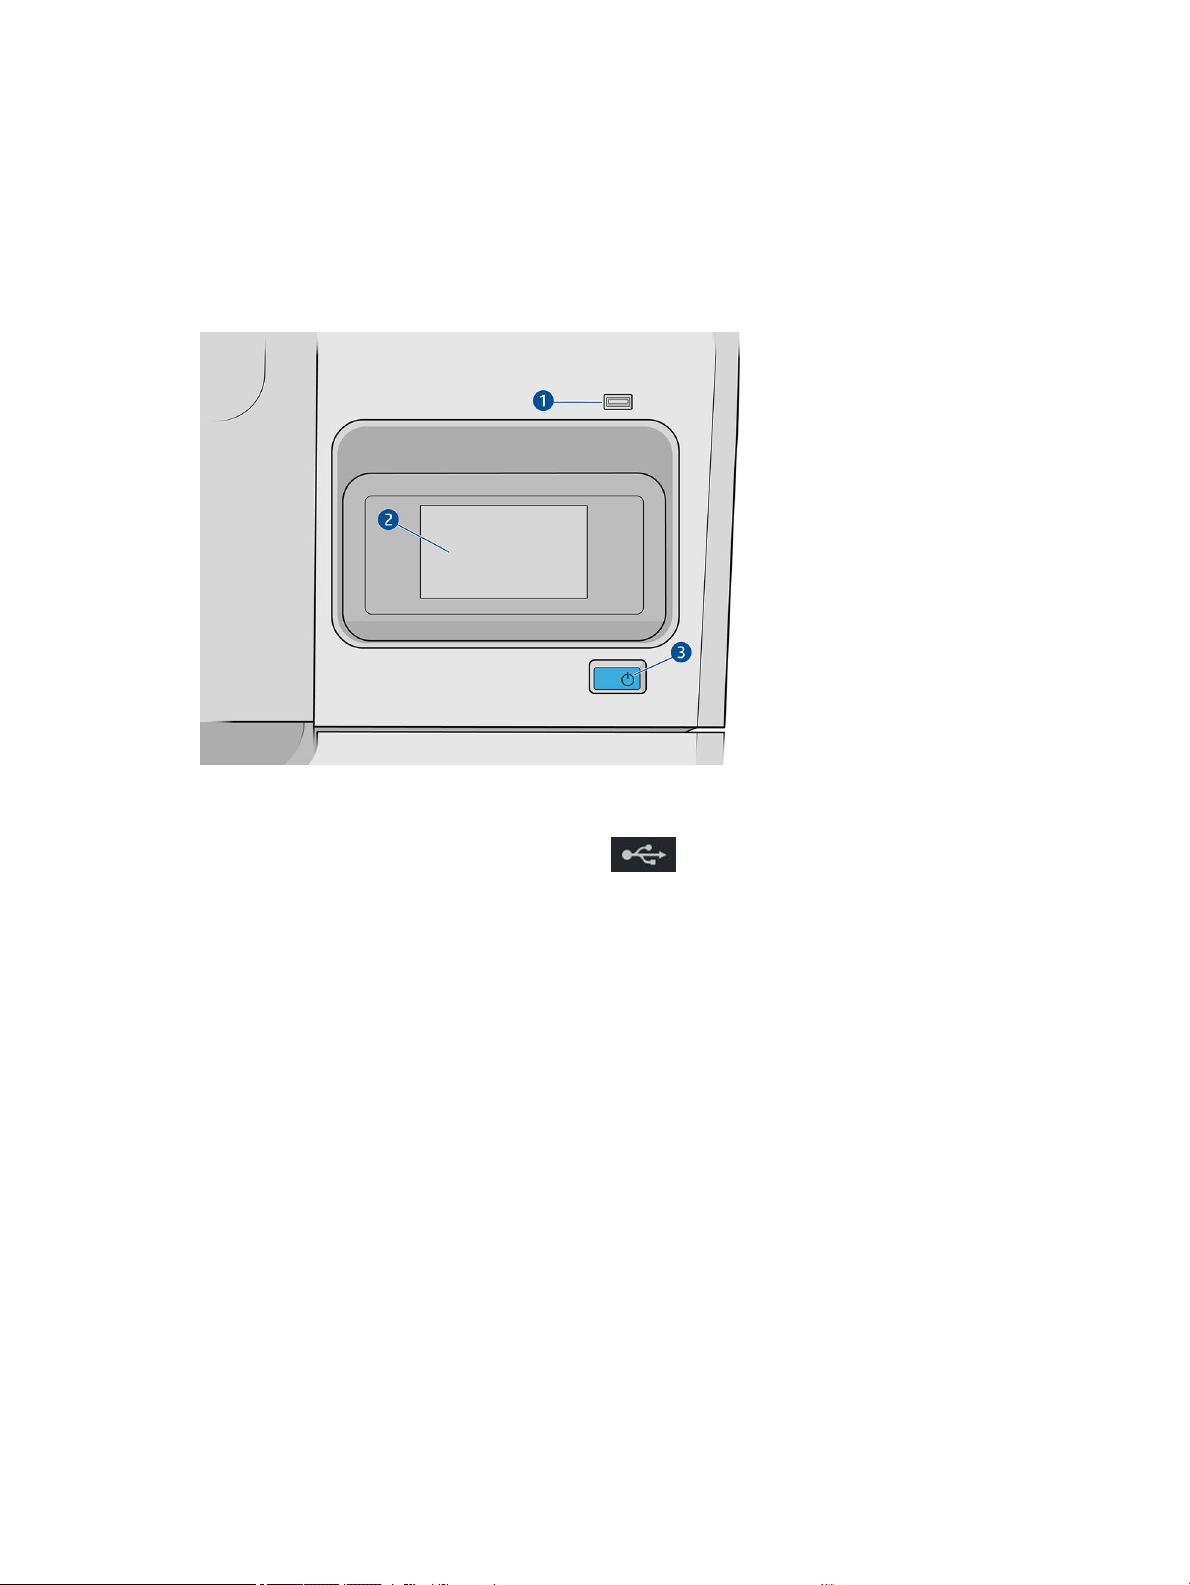
It includes the following components:
1. A Hi-Speed USB host port, intended for connecting a USB ash drive, which can provide les to be printed.
When a USB ash drive is inserted, a USB icon
is displayed on the front panel's all-apps page.
2. The front panel itself: a 4.3 inch, full-color, touch-sensitive screen with a graphical user interface.
3. The power key, with which you can turn the printer on or o, or wake up from sleep mode.
The front panel has a large central area to display dynamic information and icons.
ENWW Front panel 9
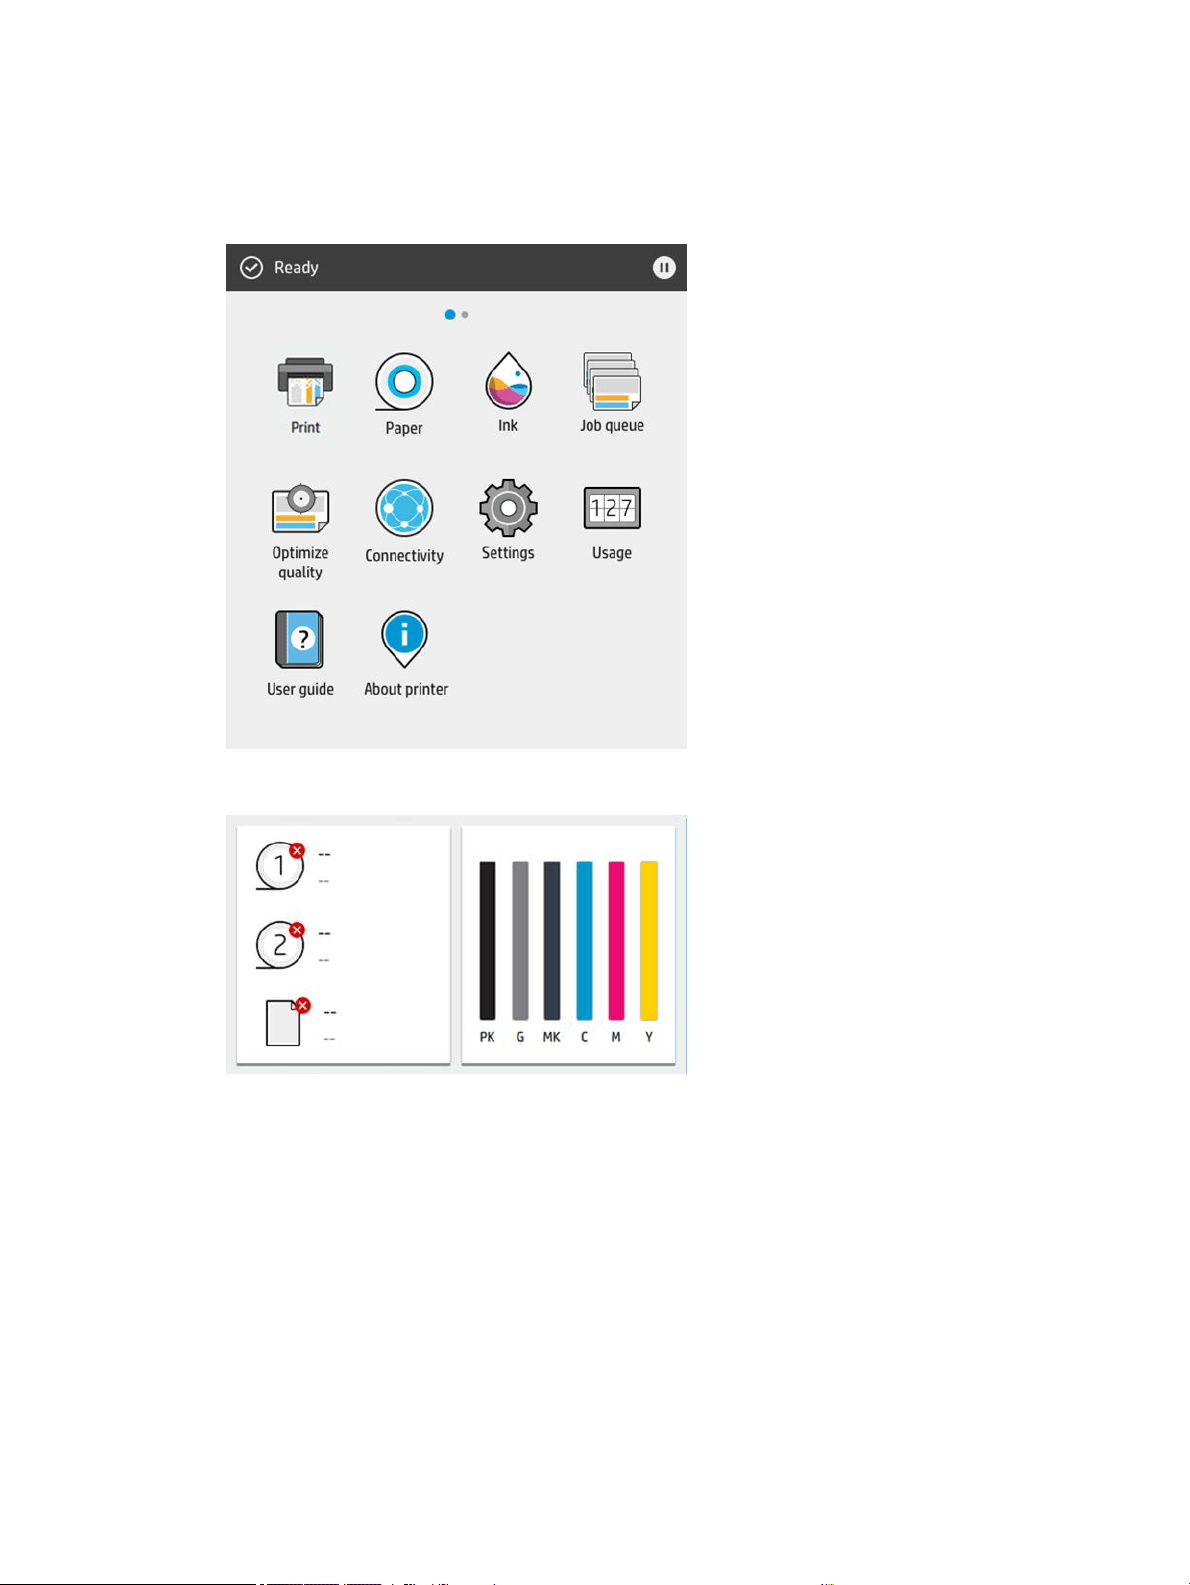
Home pages
There are two top-level pages that you can move between by sliding your nger across the screen:
● The all-apps page displays a list of all apps available in your printer, and the status of each of them.
● If you swipe left to the widget page, you can see at a glance the status of ink and paper supplies.
● At the top of the all-apps page there is a dashboard that displays alerts related to the main functions of the
printer. Swipe down the dashboard to access the Status Center.
Dim mode
After some time with no activity (5 minutes by default), the printer goes to dim mode, which reduces the
brightness of the front panel by 25%. Any activity, such as the use of the front panel or the arrival of a print job,
ends dim mode and restores normal brightness. After some time in dim mode (15 minutes by default), the
printer changes to sleep mode. The time periods can be changed from the front panel.
10 Chapter 1 Introduction ENWW

Sleep mode
Sleep mode puts the printer into a reduced power state after a period of inactivity, turning o some elements to
save energy. Printer features can be enabled from this mode, and the printer maintains network connectivity,
waking up only as necessary.
The printer can be woken from sleep mode any of the following ways:
● By pressing the power button
● By opening a door
● By sending a print job
The printer wakes up in several seconds, more quickly than if it is completely turned o. While in sleep mode, the
power button blinks.
To change the time that elapses before sleep mode, see
Change system options on page 11.
Printer Monitoring (with the Print Spooler) and Remote Printer Management with the HP Utility and Web
JetAdmin continue to be available during sleep mode. Some remote management tasks oer the option of
remotely waking up the printer if needed to perform the task.
Change the language of the front-panel display
If you can understand the current front-panel display language, tap , then System > Language.
The language selection menu should now appear on the front-panel display. Tap your preferred language.
The available languages are English, Portuguese, Spanish, Catalan, French, Dutch, Italian, German, Polish,
Russian, Simplied Chinese, Traditional Chinese, Korean, and Japanese.
Change system options
You can change various printer system options from the front panel. Tap , then System.
● Language.
● Display brightness to change the brightness of the front-panel display.
● Date and time options to view or set the printer's date and time.
● Unit selection to change the units of measurement in the front-panel display. Select English or Metric. By
default, units are set to Metric.
● Speaker volume to change the volume of the printer's loudspeaker. Select O, Low, or High.
● Power options > Printer sleep to change the length of time the printer waits before going into sleep mode
(see Sleep mode on page 11). You can set the time from 5 to 60 minutes. The default time is <15 minutes
(total time including 5 minutes in dim mode).
● Power options > Auto-o due to inactivity to turn o the printer automatically after 120 minutes of
inactivity.
● Restore factory settings to restore the printer settings to their original values as set in the factory. This
option restores all of the printer settings except the administrator password and the paper presets.
● Firmware update to congure the automatic rmware update.
ENWW Front panel 11
HP Utility
The HP Utility is a Windows only tool that enables you to manage your printer from a computer with a TCP/IP
connection.
You can install the HP Utility from http://www.hp.com/go/DesignJetT1600/drivers.
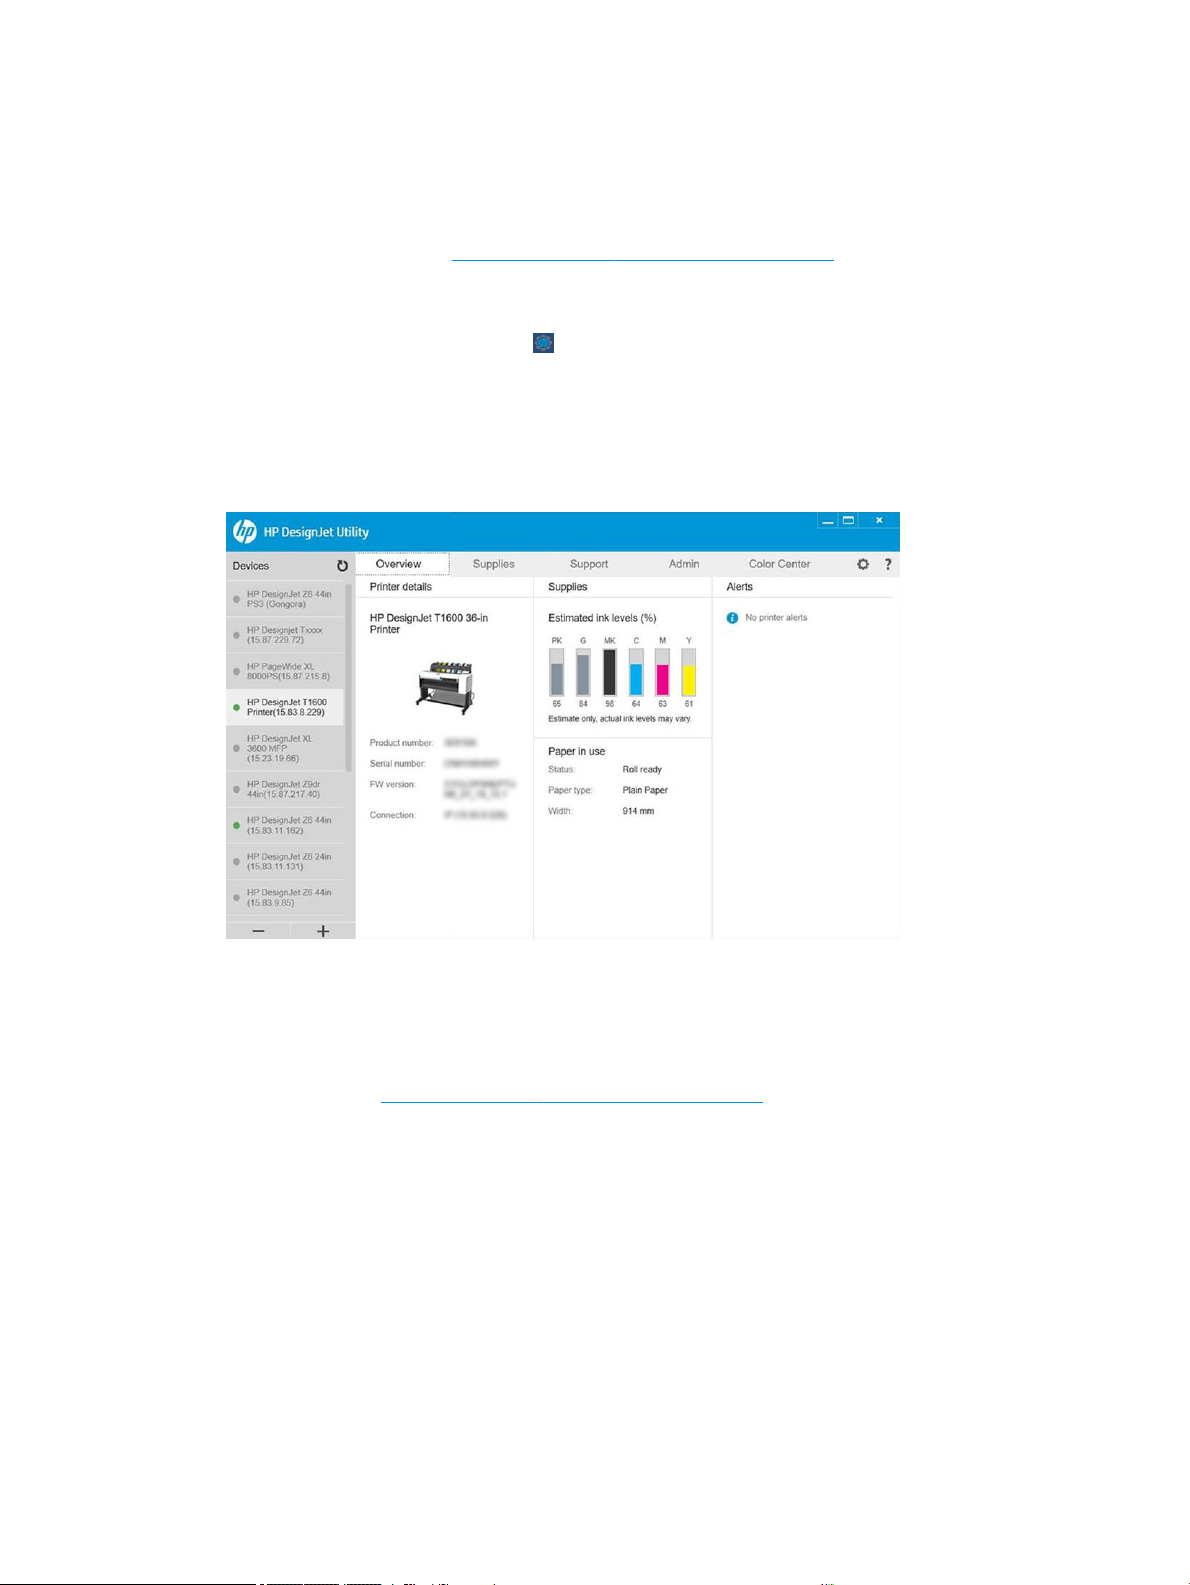
How to launch the HP Utility
Start the HP DesignJet Utility from the icon on your taskbar or from the Start menu > HP > HP DesignJet
Utility. This launches the HP DesignJet Utility, showing the printers installed on your computer. When you
open the HP DesignJet Utility for the rst time, it may oer you an automatic update with enhanced
functionality that we recommend you to accept.
When you select your printer in the left pane, everything that appears in the right pane is specic to that
printer.
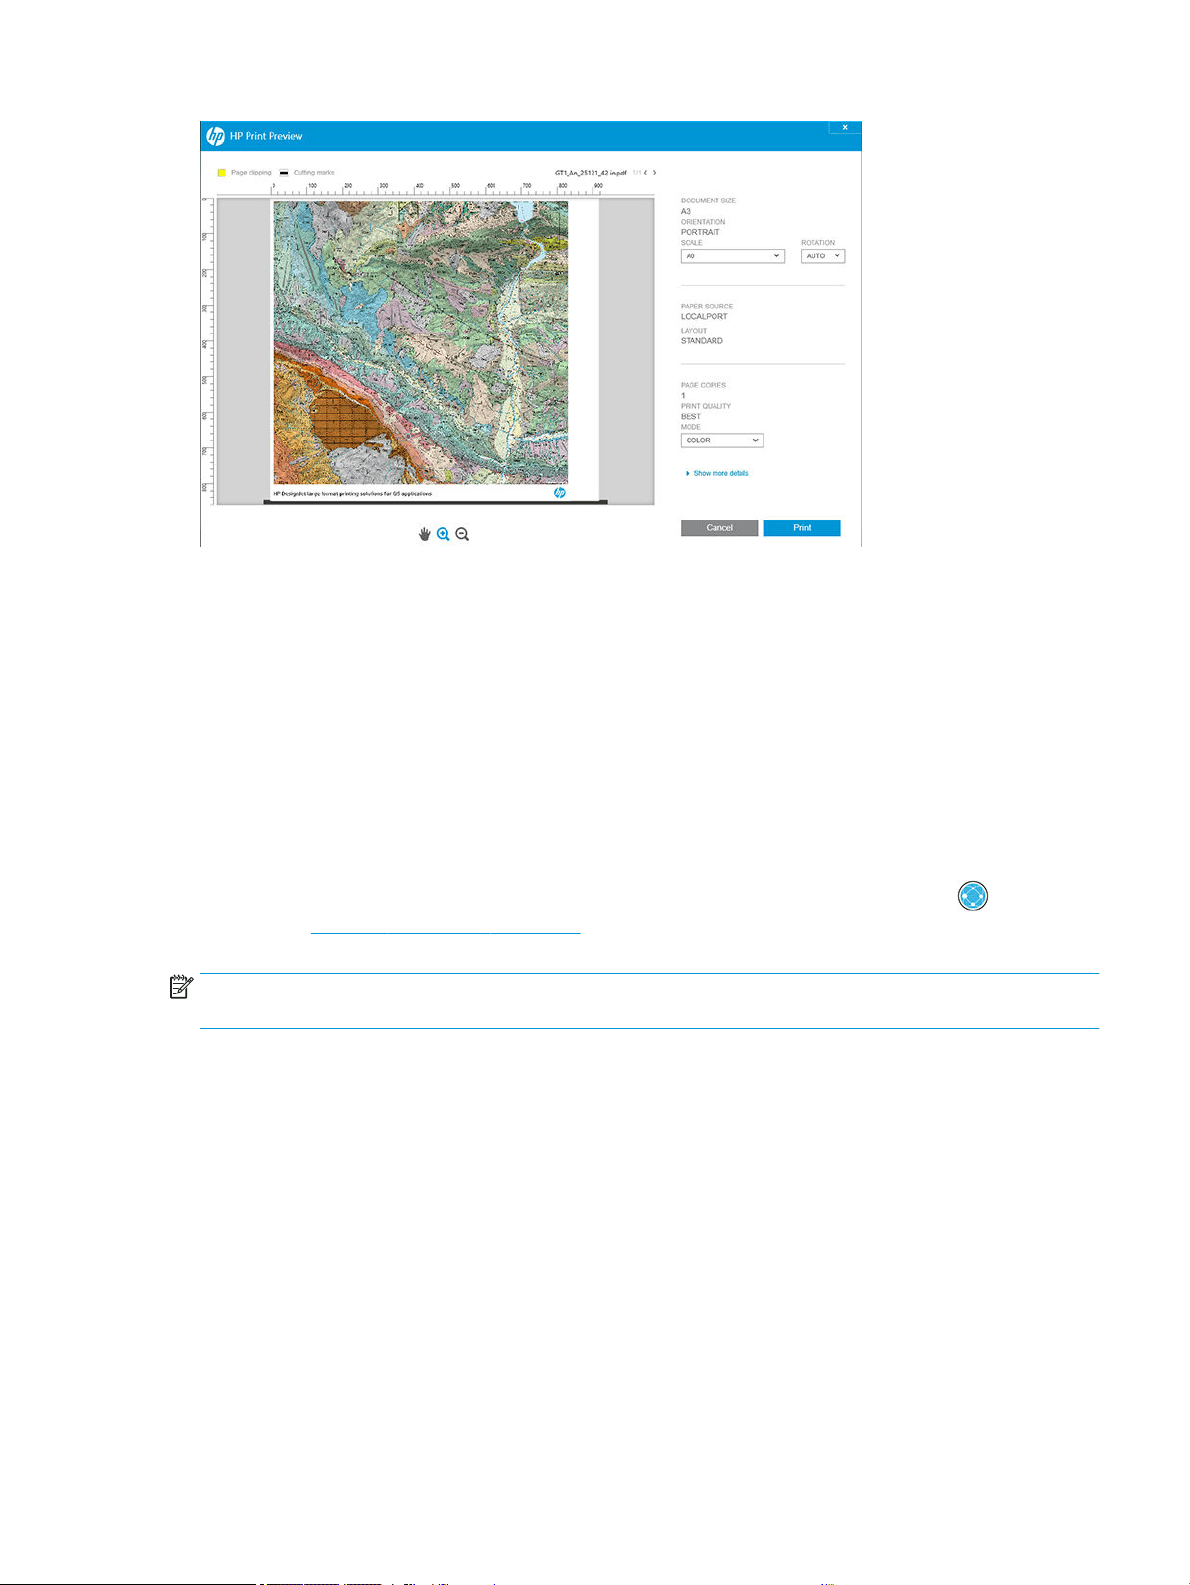
HP Print Preview
The HP Print Preview application enables you to see a basic preliminary preview of how your job will be printed.
This application is available only under Windows. You can install the HP Print Preview by downloading the
integrated installer from http://www.hp.com/go/DesignJetT1600/drivers.
If you use a V4 PDF driver, you can change the rotation, scaling, color mode and the paper source settings in the
application before you print.
12 Chapter 1 Introduction ENWW
Embedded Web Server
The following browsers are known to be compatible with the Embedded Web Server:
● Microsoft Internet Explorer 11 and later for Windows 7 and later
● Apple Safari 8 and later for OS X 10.10 and later
● Mozilla Firefox (latest version)
● Google Chrome (latest version)
To use the Embedded Web Server on any computer, open your Web browser and enter the printer's IP address in
the browser's address bar. You can nd your printer's IP address in the printer’s front panel: tap and then
Network. See Congure your printer on page 14.
NOTE: Your browser may display a security warning when you enter the IP address. If you have entered the
correct address, it is safe to ignore the warning and continue to access the Embedded Web Server.
The Embedded Web Server window displays a menu used to access all the supported functionality. It supports
the following languages: English, Portuguese, Spanish, Catalan, French, Dutch, Italian, German, Polish, Russian,
Simplied Chinese, Traditional Chinese, Korean, and Japanese. It uses the language that you specied in your
Web browser options. If you specify a language that it cannot support, it is displayed in the language selected in
the printer, or else in English.
To change the language, change your Web browser's language setting. To complete the change, close and
reopen your Web browser.
Demo prints
The demo prints give various kinds of information about your printer. They can be requested from the front
panel.
Before requesting a demo print, check that the printer and the paper are ready for printing.
ENWW Embedded Web Server 13
● The loaded paper should be at least A3 landscape—419 mm (16.53 in) wide—otherwise the print may be
clipped.
● The front panel should be displaying the Ready message.
To print a demo print, tap
, then scroll down and tap Internal prints, then Demo prints, and select a print. The
following prints are available:
● Cad Color
● GIS
● Render
● Architectural Presentation Panel
Congure your printer
Connect the printer to your network
The printer is able to congure itself automatically for most networks, in a similar way to any computer in the
same network. The rst time you connect it to a network, this process may take a few minutes.
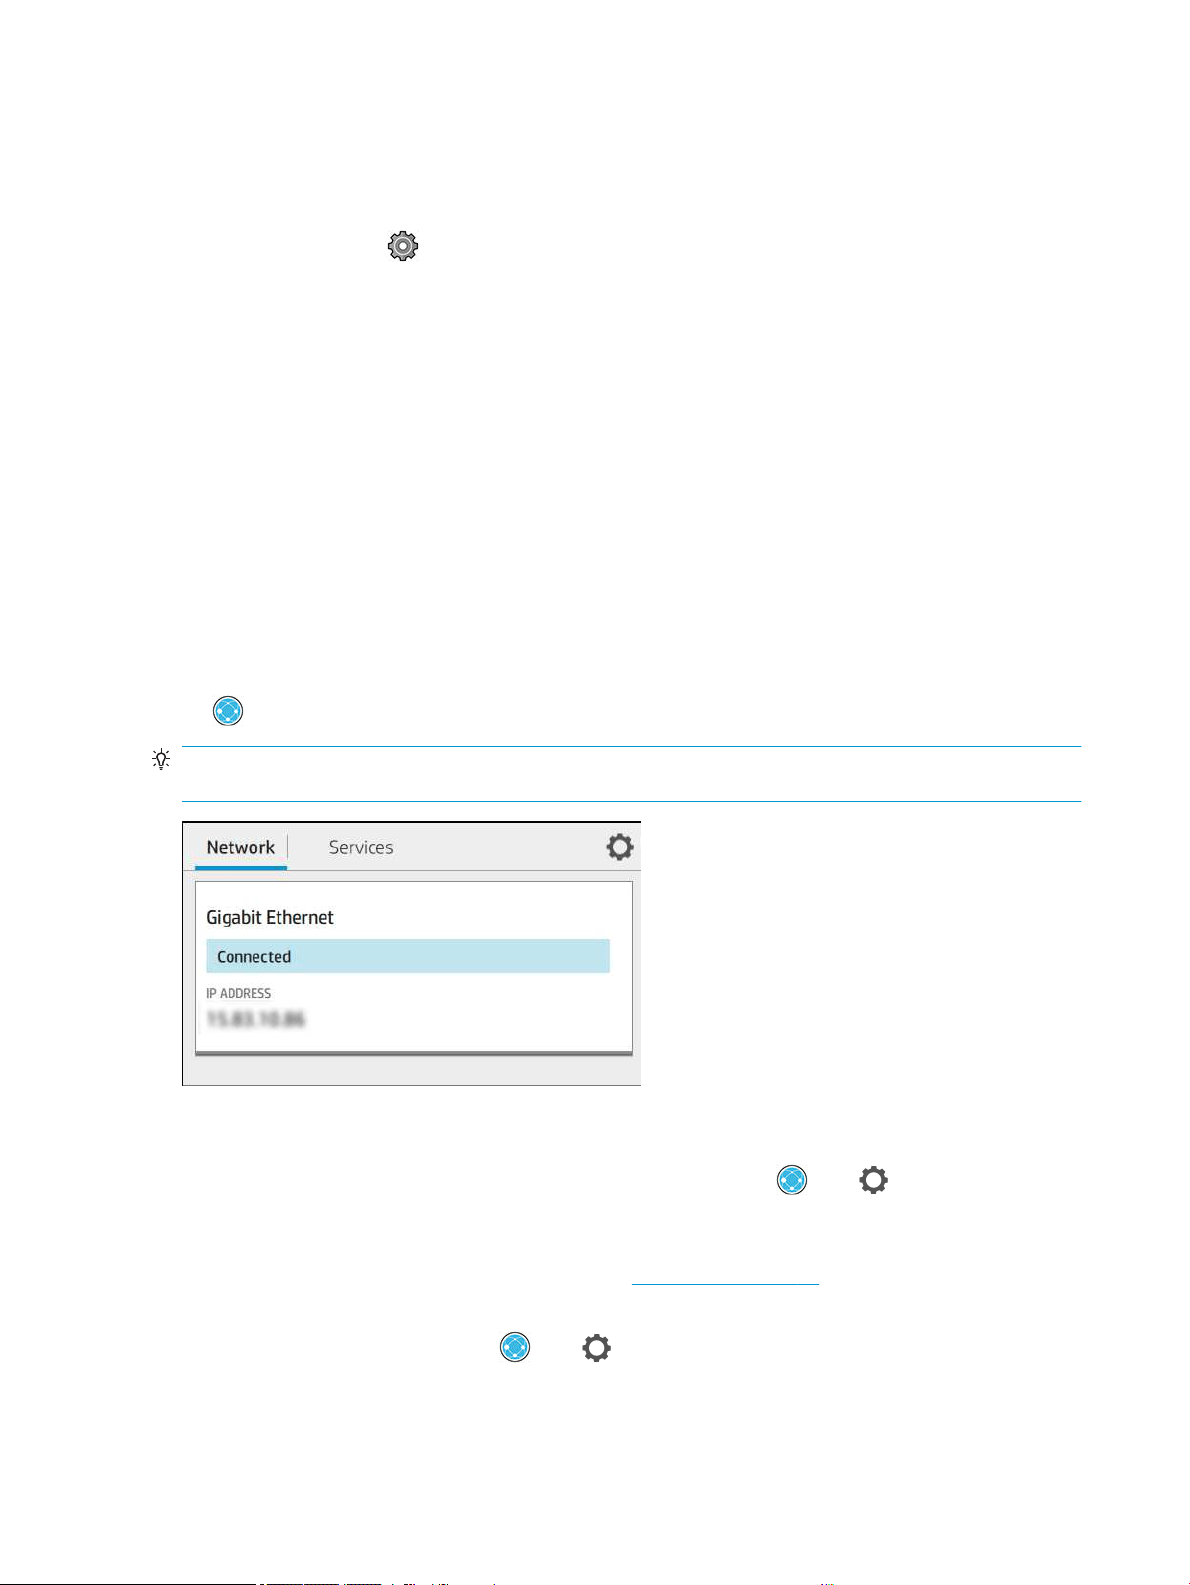
Once the printer has a working network conguration, you can check its network address from the front panel:
tap
.
TIP: Consider making a note of the printer’s IP address, because you may need it during the setup process of
connecting your Windows or Mac OS computer clients.
Modify network conguration
To modify the current network conguration, go to the front panel and tap , then , then Network > Gigabit
Ethernet. From here it is possible, though not normally necessary, to change the settings manually; this can also
be done remotely using the Embedded Web Server.
For full details of the available connectivity settings, see Networking on page 51.
If you accidentally miscongure the printer’s network settings, you can restore the network settings to their
factory values from the front panel: tap
, then , then Network > Restore factory settings. Then you must
restart the printer. This automatically provides a working network conguration for most networks. The printer’s
other settings remain unchanged.
14 Chapter 1 Introduction ENWW

Install your printer under Windows
The following instructions apply if you intend to print from software applications using a printer driver. See
Printing on page 60 for alternative ways of printing.
Before you begin, check your equipment:
● The printer should be set up and on.
● The Ethernet switch or router should be on and functioning correctly.
● The printer and the computer should be connected to the network (see Connect the printer to your network
on page 14).
Now you can proceed to install the printer software and connect to your printer.
Printer software installation
1. Make a note of the printer’s host name and IP address from the front panel (see Connect the printer to your
network on page 14).
2. Install the printer software from http://www.hp.com/go/DesignJetT1600/drivers, following the software
installation instructions. By default, the following driver is installed:
● Non-PostScript printers: The raster driver
● PostScript printers, with Windows 7 or Windows Server 2008R2: The PostScript driver
● PostScript printers, with Windows 8, Windows Server 2012, or later: The PDF driver
3. Once downloaded, open it, and follow on-screen steps.
If your computer fails to nd any printers on the network, the Printer Not Found window is displayed, which helps
you to try to nd your printer. If you have a rewall in operation; you may have to disable it temporarily in order
to nd the printer. You also have the options of searching for the printer by its hostname, IP address or MAC
address.
Uninstall the printer software under Windows
Use the Control Panel to uninstall the software, in the same way as you can uninstall any other software.
Connect a computer to the printer by network (Mac OS X)
HP Click is the recommended way to connect with your printer to a network. See http://www.hp.com/go/
clickDesignJet for installation instructions.
Set up printer services
You can set up the following services:
● Receive automatic rmware updates
● Enable email printing
● Enable additional printer services
A network connection is required, so the printer will test its own connectivity. Remember to connect the network
cable to the printer.
ENWW Congure your printer 15
Each printer service can be enabled or disabled individually as explained below.
During initial printer setup, you are asked whether you want to enable these services. That decision can be
changed later by tapping
, then at the top of the page, then Services > Data Collection & HP Privacy
Statement.
If you are part of the HP Partner Link Pay-per-use service, tap
, then Services > > Register new service in
order to register the printer service.
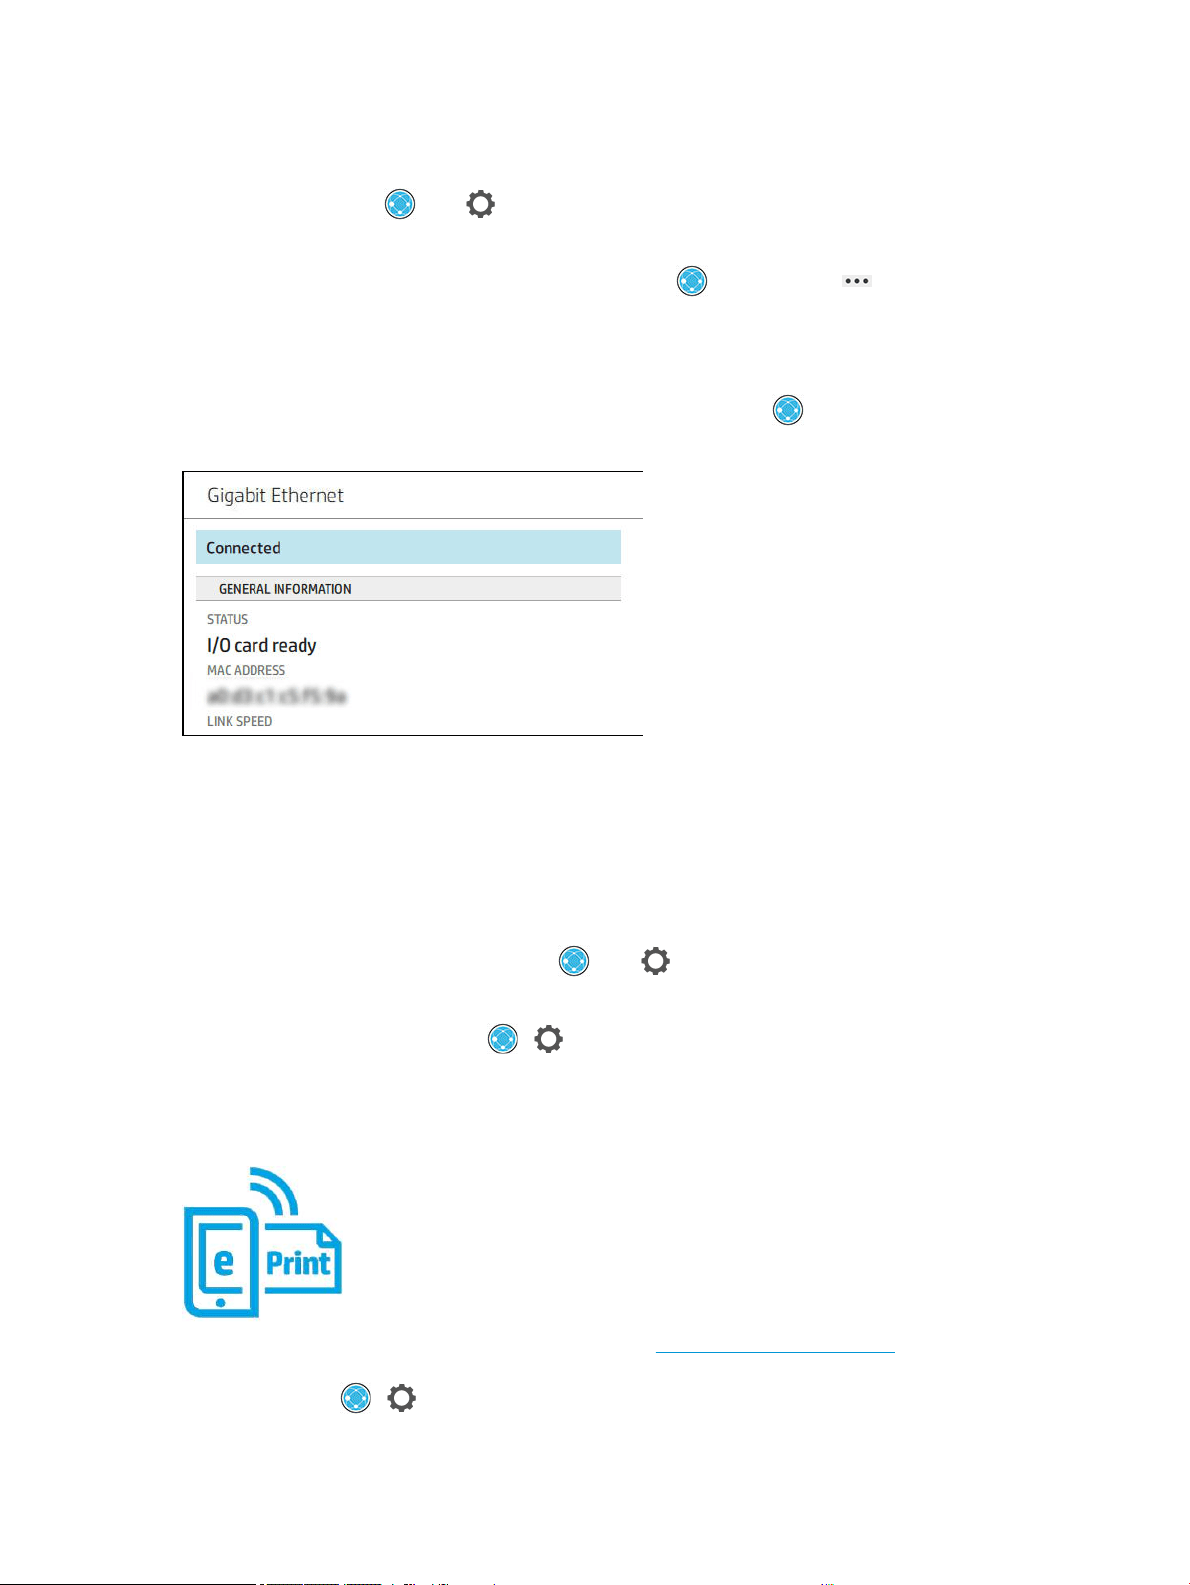
Verify printer connection to HP
You can check that the printer is able to connect to HP services by tapping and viewing the status there. You
can see detailed information by clicking the Network or Service card.
If there is any problem connecting to HP, you will be provided with a description of the problem and some
possible solutions.
Enable email printing with HP ePrint
The HP Connected service makes it easy to send jobs to your printer by attaching them to an email message.
You must accept the Data Collection & HP Privacy Statement in order to use HP Connected.
To enable email printing, in the front panel, tap
, then at the right top corner of the page, then Services. >
HP Connected > Setup Web Services. A printer email address and printer code are assigned to the printer.
To see your printer email address, tap
> in the right top corner of the page, then Services. > HP
Connected > Printer email address.
Alternatively, you can congure it from the Embedded Web Server, Go to the HP Web Services menu and click
Enable HP web Services to register and enable HP ePrint.
If you are the printer administrator, log in at HP Connected (http://www.hpconnected.com) to customize your
printer’s email address or manage printer security for remote printing. Refresh the printer’s email address from
the front panel, tap
> in the right top corner of the page, then Services. > HP Connected > Printer email
address.
16 Chapter 1 Introduction ENWW
Visit http://www.hpconnected.com to register yourself and your printer (using the printer code).
HP ePrint job policies
By default, the jobs sent by email are directly printed. To change the settings, tap , then at the right top
corner of the page, then
Services > HP Connected > HP ePrint jobs.
You can select the roll to be used for HP ePrint jobs, or let the printer decide (save paper).
Congure ePrint connectivity service
You can remove the connection to HP ePrint if required for security. At the front panel, tap , then at the
right top corner of the page, then
Services > HP Connected > Remove Web Services.
To use remote printing again, you will need to set it up again from scratch.
Congure rmware updates
You can choose from the Embedded Web Server or from the front panel whether and how to download rmware
updates.
NOTE: If an administrator password has been set, it will be required to change these settings.
● In the Embedded Web Server: Click About printer > Firmware update.
● Using the front panel: Tap , then System > Firmware update.
The following settings are available:
● Check for updates automatically: The printer will inform you when new rmware is available.
● Download new rmware automatically: The printer will automatically download new rmware whenever it
becomes available. Deactivate this option to download new rmware manually.
NOTE: Downloading the rmware does not mean that you have installed it in your printer. To install the
new rmware, you must conrm the installation manually.
● Firmware update history.
LDAP Congure the email address book
The printer uses Lightweight Directory Access Protocol (LDAP), which provides access to a network address book
for scan-to-email and authentication purposes.
The following instructions explain how to use LDAP to connect the printer to a network email address book, and
to authenticate users of the printer using their LDAP credentials.
Email lookup
When the printer uses LDAP it searches a database of email addresses. When you enter the email address and
click the Search button, LDAP searches a list of email addresses for matching characters. You can rene the
search results by typing additional characters and performing a new search.
Printers that support LDAP also support the use of a standard outgoing email prole, so they do not require a
connection to an LDAP server in order to send email.
ENWW Congure your printer 17

Information needed before starting
Ensure that you have the following information before starting the conguration:
● Server address (hostname or IP).
● Server authentication requirements.
● Path to start search (BaseDN, Search Root) (for example, o=mycompany.com).
● Attributes for matching the name entered (such as cnor samAccountName), retrieving the email
address (such as mail), and how the name will be displayed on the control panel (such as
displayName).
Address book setup
In the Embedded Web Server, click Settings >Address book. Here you can congure the printer to obtain email
addresses from an LDAP server, so that they are available when users perform a search.
1. Open the Embedded Web Server.
2. Click Settings >Address book.
3. Enable the LDAP server (mandatory to continue with the LDAP conguration).
Network Directory Server section:
4. In the Network Directory Server section, enter the name of the LDAP server address (for example,
ldap.mycompany.com) and Port.
Server Authentication requirements section:
5. In the Server authentication requirements section you can select the appropriate authentication type in the
server (Windows credentials, simple credential, use printer user’s credentials). It is mandatory to ll the
Domain name, Username, and password.
LDAP Database search settings section:
6. Fill in these elds:
● In the path to start a search (BaseDN, Search Root) box, enter the path to start searching the
database (for example, o=mycompany.com).
● In the recipients's display name box, enter the name of the attribute that contains the person's name
(for example, displayName).
● In the recipient's email address box, enter the name of the attribute that contains the person's email
address (for example, mail or rfc822Mailbox).
● Use the LDAP lter condition box to set up an optional lter to lter out e-mail addresses.
7. Click the Apply button to save the settings. Setup is complete.
8. To check that the LDAP retrieval is set up correctly, enter at least three characters of a network contact
name in the Test box, and then click the Test button. If the test is successful a message is displayed.
18 Chapter 1 Introduction ENWW
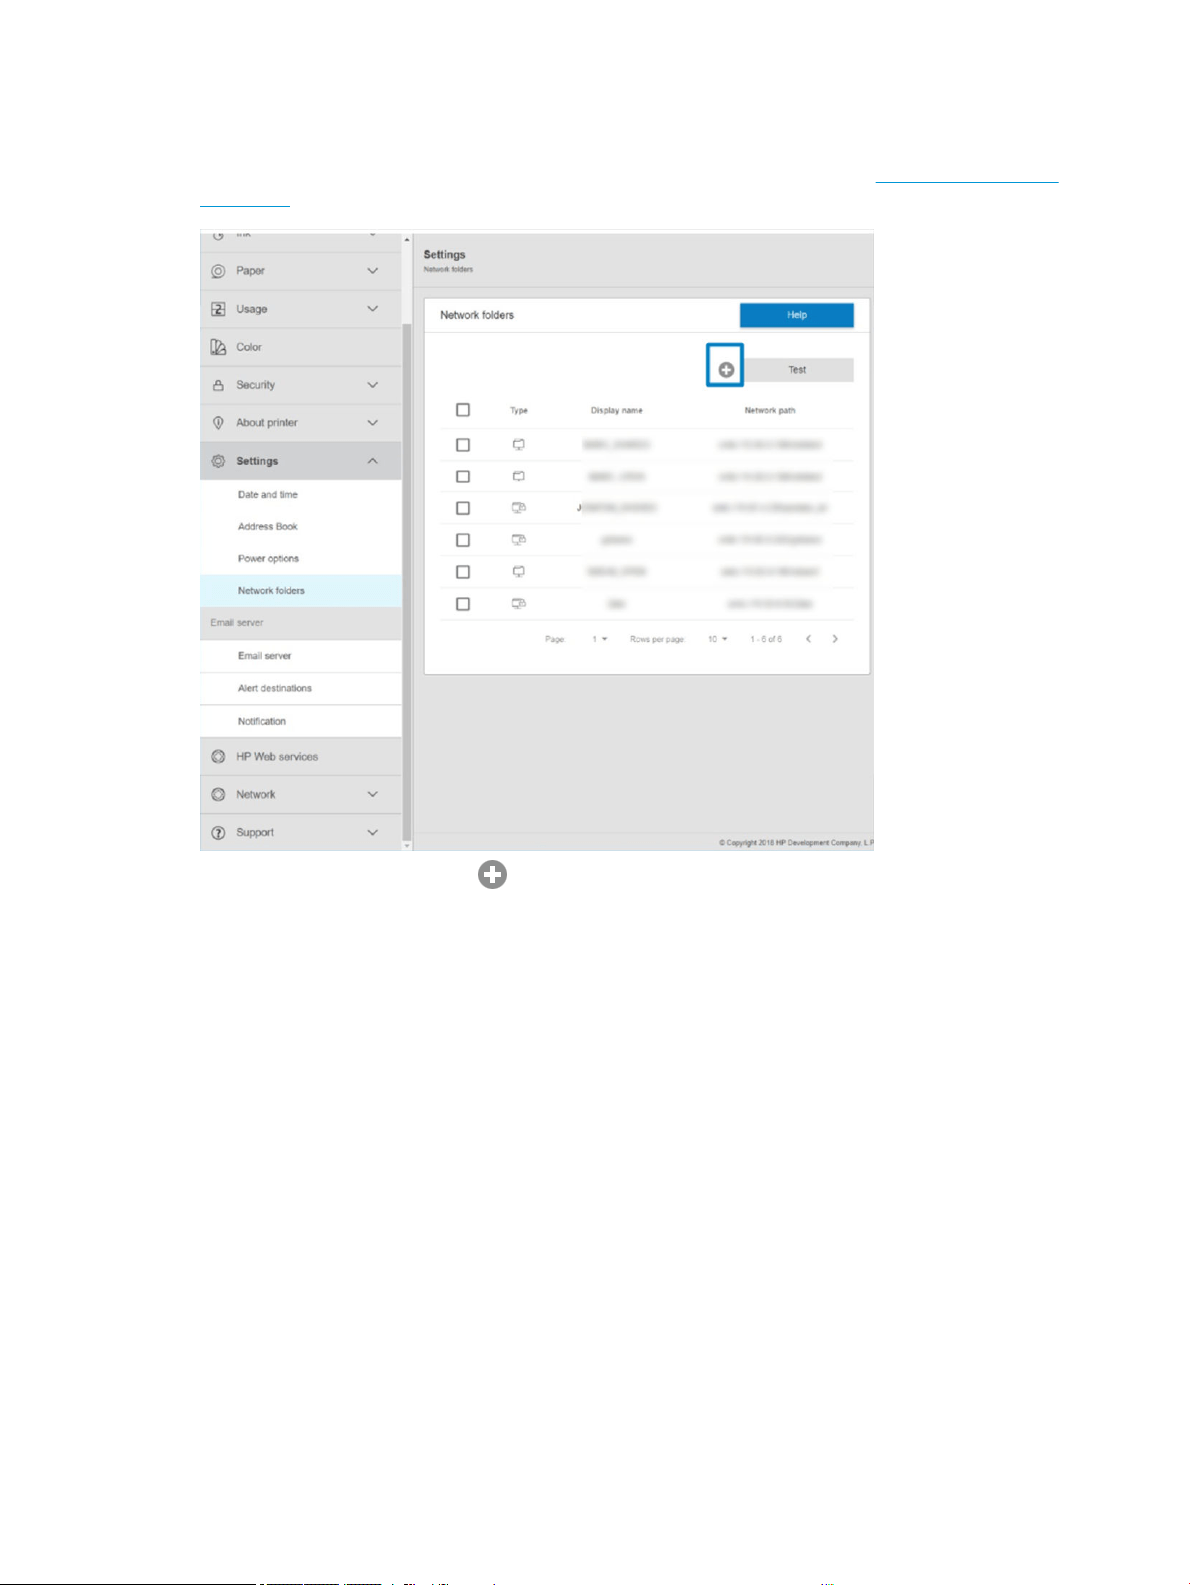
Congure a network folder
In the printer's Embedded Web Server, click the Settings tab and Network folder. See Embedded Web Server
on page 29.
On the Network folders page, click at the top of the page, and ll in the various elds:
● Display name: Name displayed in the front panel when you are choosing the le’s printing origin.
● Network path: Should contain the network name of the remote computer and must start with // followed
by the path.
● Protocol: SMB
● Functionality Use: Choose between Print only or None.
● Default Network destination: Enable this option to congure this folder as the default destination for les.
● Browse Network folder Structure: Enable to browse through the structure of folders.
● Authentication requirements: Enter the login username and password for the printer to access documents
and images in the network folder. The username and password are stored and encrypted in the printer's
memory. There are 3 options:
– None: Use this setting for an unprotected folder on the network (no credentials required).
–
Automatic login using following credentials: Enter username and password only once during
conguration and later use the folder in the front panel without entering credentials.
– Prompt for credentials when needed: Enter username and password in the front panel every time you
use it.
ENWW Congure your printer 19

NOTE: User password should contain the password of the user. Domain should contain the name of the
domain in which the user name exists. If the user does not belong to any domain, leave this eld empty.
● Security Pin Option: Create a 4-digit security PIN to prevent unauthorized people from accessing
documents and images in this network folder.
For a network folder, enter the remote computer’s name or IP address, the shared folder’s, and the username
and password of the user already created on the remote computer. Leave the user domain eld empty unless
the user is a member of a Windows domain. If the user is only a local user of the remote computer, leave the
eld empty. You can use the name (instead of the IP address) in the server name eld, only if the shared folder is
on a Windows computer in the same local network.
● Click Apply to save the conguration.
● The printer automatically checks that it can access the network folder. If not, see Cannot access the
network folder on page 180.
NOTE: If the product has already been congured for printing from networks and you now want to use a
dierent shared folder, click
.
You can check that the shared folder remains accessible by clicking Verify in the Embedded Web Server at any
time. A correctly congured shared folder can become inaccessible if the user’s password is changed, or if the
shared folder is moved or deleted.
Example: Create a network folder under Windows
1. Create a new user account on the remote computer. You can use an existing user account for this purpose,
but it is not recommended.
2. Create a new folder on the remote computer, unless you want to use an existing folder.
3. Right-click the folder and click Properties.
20 Chapter 1 Introduction ENWW
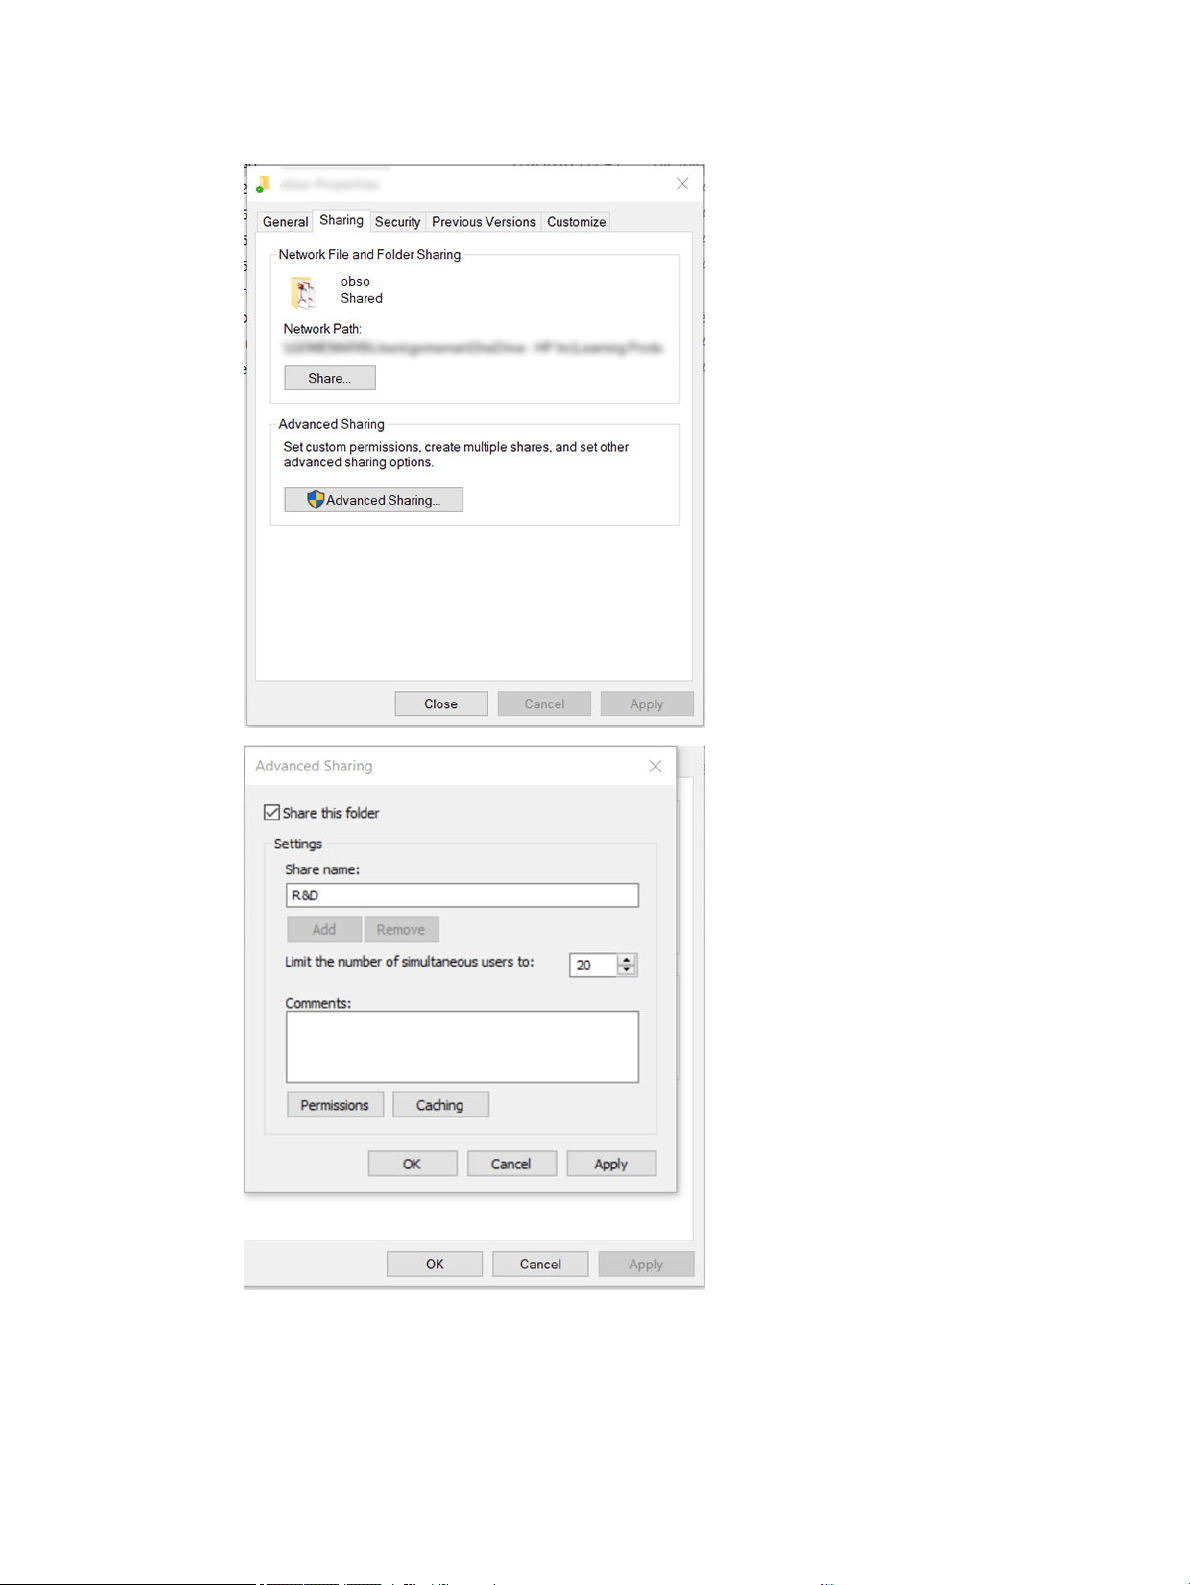
4. In the Sharing tab, click the Advanced Sharing button.
ENWW Congure your printer 21

5. Ensure that the user has the correct permission settings depending of the functionality use of the network
folder.
Example: Create a network folder under Mac OS
1. Create a new user account for the User on the remote computer. You can use an existing user account for
this purpose, but it is not recommended.
2. Create or choose a folder on the remote computer. By default, Mac OS users have a Public folder that can
easily be used for this purpose.
22 Chapter 1 Introduction ENWW
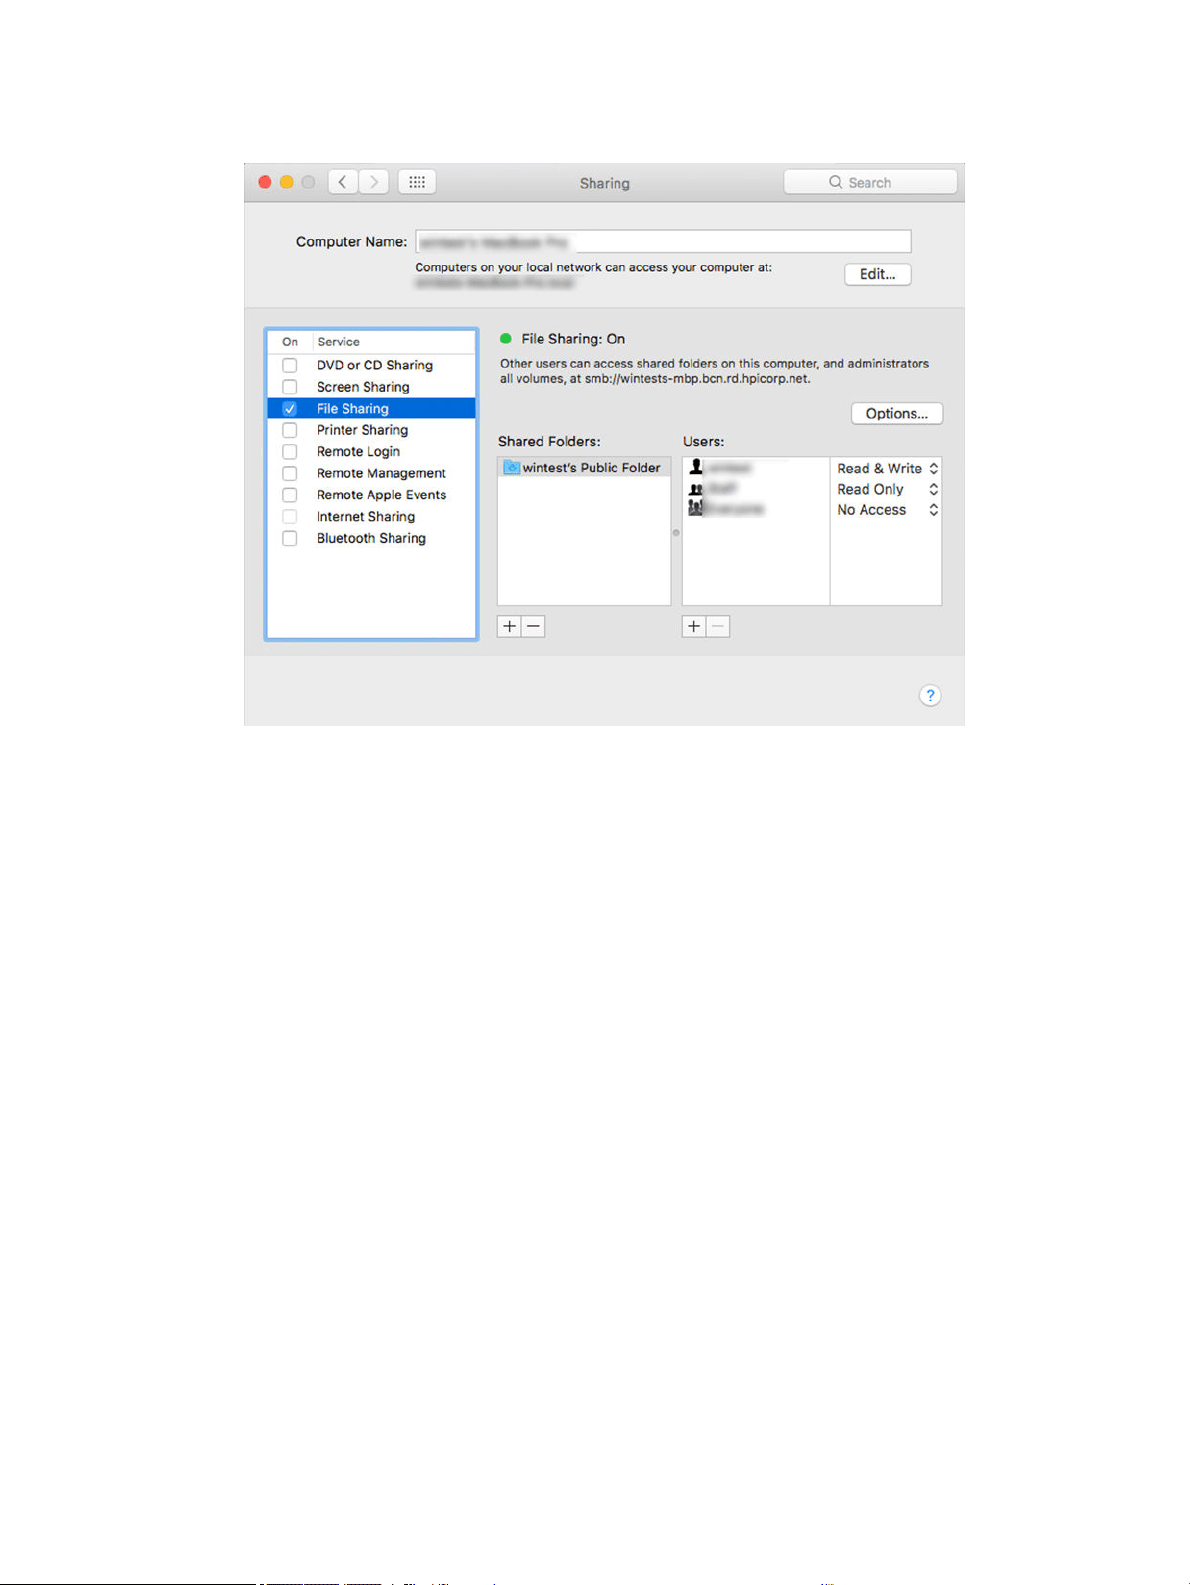
3. Open the System Preferences application and click the Sharing icon.
4. Depending of the functionality of the folder, make sure the user has the right permissions.
5. Click Options.
ENWW Congure your printer 23
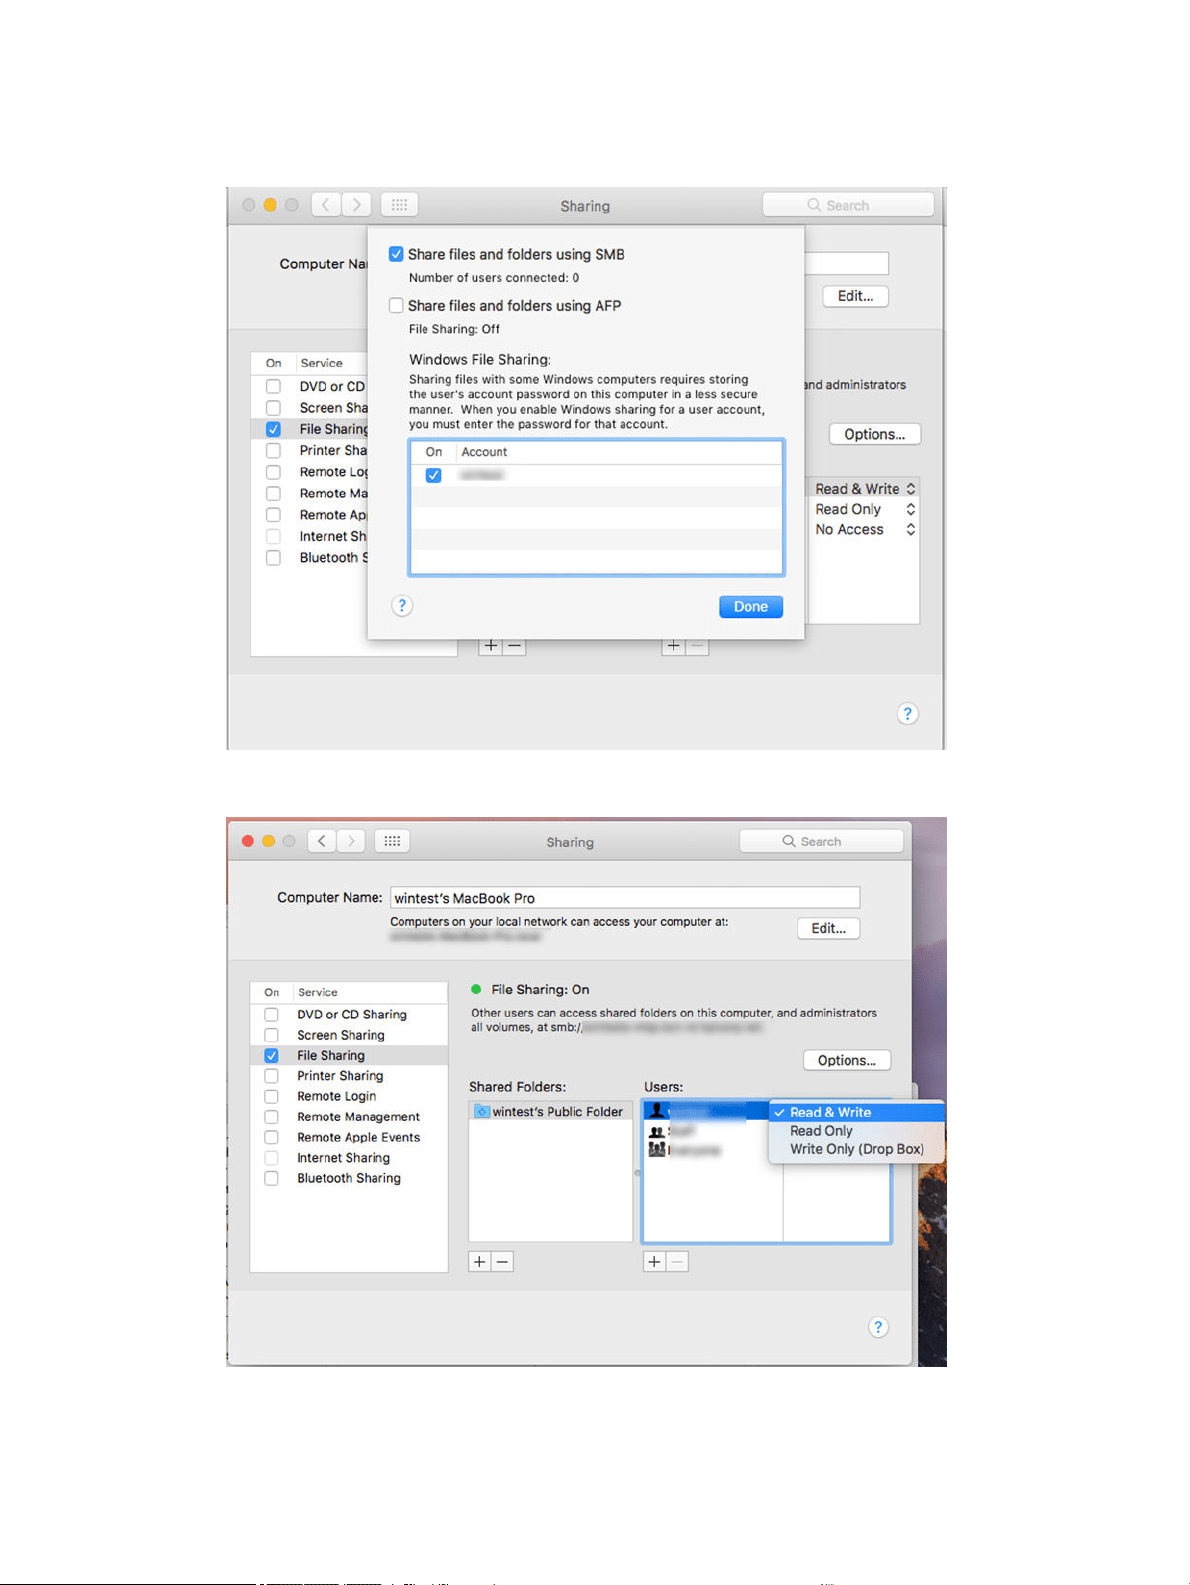
6. Check the Share les and folder using the SMB box, and make sure that the User is checked in the On
column.
7. Click Done. You can now see le sharing enabled and Windows sharing on.
24 Chapter 1 Introduction ENWW

Control access to the printer
Manage printer security with HP Connected
When you have set up Web Services, the printer is in unlock mode. In unlock mode, anyone who knows your
printer's email address can print to your printer just by sending a le to it. Although HP provides a spam ltering
service, you should be careful about giving out your printer's email address, as everything sent to that address
may be printed on your printer.
If you are the printer administrator, you can manage printer security or change your printer status to lock mode
by visiting HP Connected at http://www.hpconnected.com. You can also customize your printer's email address
and manage print jobs from there. At your rst visit, you will need to create an account at HP Connected using
the printer's code.
Embedded Web Server security settings
From the Embedded Web Server menu, you can click Security and then Administrator password to control access
to the printer by specifying an administrator account to control access to the Embedded Web Server and the
printer’s front panel.
The administrator can also dene other types of permissions in the control panel through the Access control
menu option. In this section, the administrator can create new printer user accounts and assign them specic
permissions depending on their role.
Other security settings are available under the Security settings menu option, which apply to all users.
LDAP – sign-in server
Information needed before starting
Ensure that you have the following information before starting the conguration:
● Server address (hostname or IP).
● Server authentication requirements.
● Path to start search (BaseDN, Search Root) (for example, o=mycompany.com).
● Attributes for matching the name entered (such as cnor samAccountName), retrieving the email
address (such as mail), and how the name will be displayed on the control panel (such as
displayName).
Setup
In the Embedded Web Server, click Settings >LDAP sign-in server.
1. Enable the LDAP server (mandatory to continue with the LDAP conguration).
Network Directory Server section:
2. In the Network Directory Server section, enter the name of the LDAP server address (for example,
ldap.mycompany.com) and Port.
● If you do not know the LDAP server, contact the server administrator.
● If you want to enable a secure (SSL) connection, enable the toggle
Use a secure connection (SSL).
Server Authentication requirements section:
ENWW Congure your printer 25

3. In the Server authentication requirements section you can select the appropriate authentication type in the
server (use printer user’s credentials, use LDAP administrator’s credentials). It is mandatory to ll the
Domain name, Username, and password.
LDAP Database search settings section:
4. Fill in these elds:
● In the Bind and search root enter the path to start searching the database (for example,
o=mycompany.com).
● In the
Retrieve the printer User’s Name using this attribute box enter the name of the attribute that
contains the person's name (for example, displayName).
● In the
Match the name entered with this attribute box enter the name of the attribute which its
content should be matched with the username type during sign-in.
● In the Retrieve the Users Email Address using this attribute box, enter the name of the attribute that
contains the person's email address (for example, mail or rfc822Mailbox).
● In the
Retrieve the printer user group using this attribute box enter the name of the attribute that
contains the groups the person belongs to.
5. Click the Apply button to save the settings. Setup is complete.
6. To check that the LDAP retrieval is set up correctly, enter at least three characters of a network contact
name in the Test box, and then click the Test button. If the test is successful a message is displayed.
Front-panel security settings
From the front panel, you can tap , then Security, to control some of the features of the printer:
● User sessions: Enable or disable automatic log-out after 1, 3, or 5 minutes.
● Embedded Web Server: Enable or disable the Embedded Web Server.
● Printing & management Web services: Enable or disable Web services that are used by printing and
management tools such as the HP Utility, HP Click, and SDK for RIPs.
If an administrator password has been set, it must be given in order to perform the following operations:
● Change the security settings (including the administrator password itself).
● Change the conguration of the Internet connection.
● Change the Automatic Firmware Update conguration.
● Enable or disable automatic downloading and/or installation of automatic rmware updates.
● Restore an earlier rmware version.
● Reset factory defaults.
NOTE: The administrator password can contain only characters that appear on the front panel's on-screen
keyboard. If you set a new password with the Embedded Web Server, it will reject characters that do not appear
in that limited character set.
26 Chapter 1 Introduction ENWW

Require account ID
If you want to keep records of printer usage by dierent users, you can set your printer to require an account ID
for each job. At the front panel, tap
, then Job management > Account ID required.
If this setting is turned on, the account ID eld will be mandatory and jobs with no account ID will be kept "on
hold for accounting".
The account ID can be set in the printer driver when sending the job. If the job is set "on hold for accounting" by
the printer, you can introduce the account ID in the driver or front panel, by going to the job queue and clicking
the job that is on hold. A window with a text box is displayed and you can enter the account ID into it.
Drivers
There are various dierent drivers for your printer; which is best for you depends on your circumstances:
● Your operating system
● The type of applications from which you print
● The number of printers you have
● The output accessories you have
You may wish to install one or several drivers according to your needs.
You can nd the latest driver software at
http://www.hp.com/go/DesignJetT1600/drivers/.
Specic Windows drivers
The following driver is recommended:
● Non-PostScript printers: The raster driver
● PostScript printers, with Windows 7 or Windows Server 2008R2: The PostScript driver
● PostScript printers, with Windows 8, Windows Server 2012, or later: The PDF driver
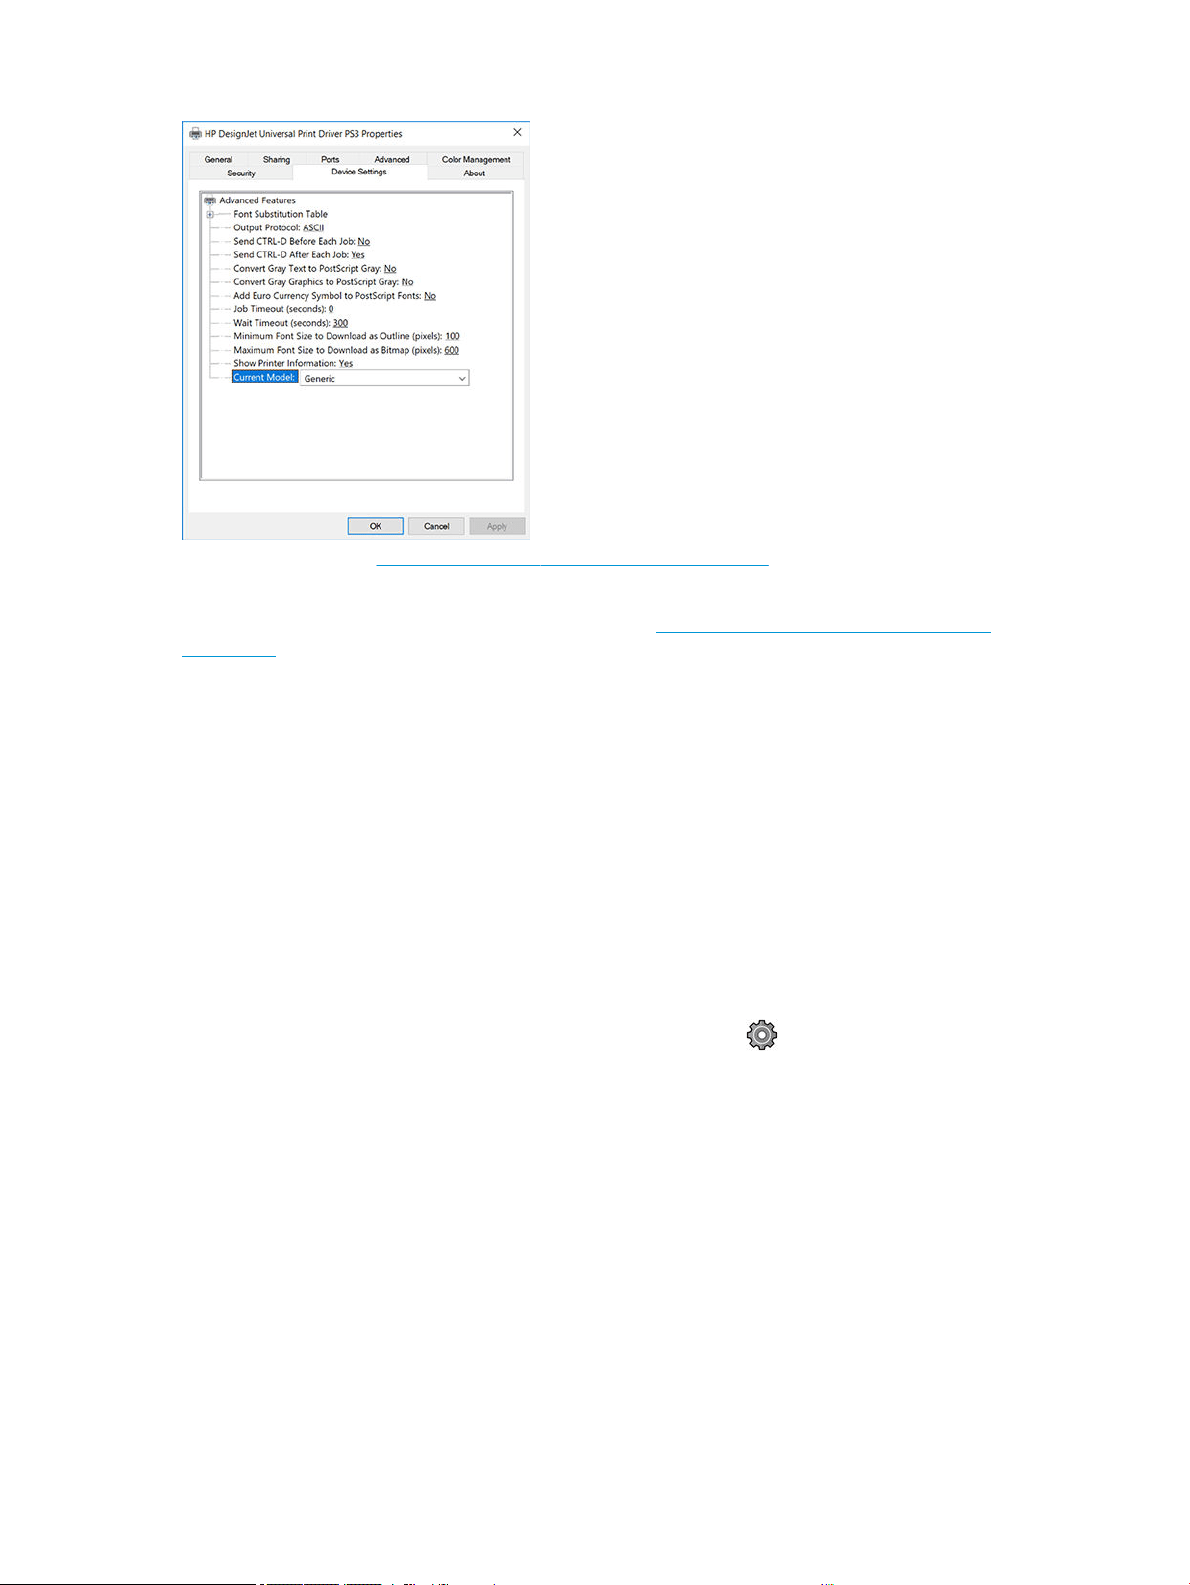
HP Universal Print Driver conguration tool
To install the HP Designjet Universal Print Driver, go to www.hp.com/go/DesignJetT1600/support and click
Software and drivers > Driver - Universal Print Driver > Download. We recommend to select the HP DesignJet
UPD PostScript Driver if you have a PostScript Printer.
At the end of installation, go to Printer > Device Settings > Properties, and conrm that Generic is displayed in
Current model.
ENWW Congure your printer 27
To install the tool, go to http://www.hp.com/go/DesignJetT1600/support and click Software and drivers >
Software – Utility > UPD conguration tool > Download.
For information about how to install and use the tool, go to https://support.hp.com/us-en/document/
c05658213.
Set Windows driver preferences
You can change some default settings in your printer driver according to your own preferences, for instance to
set color or paper-saving options. To do this, click the Start or Search button on your computer's screen, then
click Devices and Settings or Devices and Printers. In the next window, right-click your printer's icon, and click
Printing Preferences. Any settings you change in the Printing Preferences window will be saved as default values
for the current user.
To set the default values for all users of your system, right-click the printer’s icon, click Printer Properties, go to
the Advanced tab, and click Printing Defaults. Any settings you change in the printing defaults will be saved for
all users.
Change the graphic language setting
You can change the graphic language setting from the front panel. Tap , then Default printing conguration >
Graphics language.
Then select one of the following options:
● Select Automatic to let the printer determine which type of le it is receiving. This is the default setting; it
works for most software applications. You should not normally need to change it.
● Select PS (PostScript) only if you are sending a le of that type directly to the printer, without going through
a printer driver.
● Select PDF only if you are sending a le of that type directly to the printer, without going through a printer
driver.
● Select HP-GL/2 only if you are sending a le of that type directly to the printer, without going through a
printer driver.
28 Chapter 1 Introduction ENWW

● Select CALS/G4 only if you are sending a le of that type directly to the printer, without going through a
printer driver.
● Select TIFF only if you are sending a le of that type directly to the printer, without going through a printer
driver.
● Select JPEG only if you are sending a le of that type directly to the printer, without going through a printer
driver.
Mobile printing
With HP Mobile Printing Solutions you can print straight from your smartphone or tablet in just a few simple
steps wherever you are; using your mobile device OS or sending an email to your printer with PDF, TIFF, or JPEG
attachments.
● For Android printing, install the HP Print Service App from Google Play. If you have have already installed it,
check that it is up to date. You can obtain the latest version from https://play.google.com/store/apps/
details?id=com.hp.android.printservice.
● You can also download the HP Smart App to enhance your printing capabilities from a smartphone or
tablet.
– Latest iOS version from https://itunes.apple.com/app/id469284907
– Latest Android version from https://play.google.com/store/apps/details?id=com.hp.printercontrol
●
To enable email printing, ensure that the service is enabled, and retrieve the printer's email address from
the front panel.
For more detailed information, see http://www.hp.com/go/designjetmobility.
Accessibility
Front panel
If required, the front-panel display brightness and the loudspeaker volume can be changed (see Change system
options on page 11).
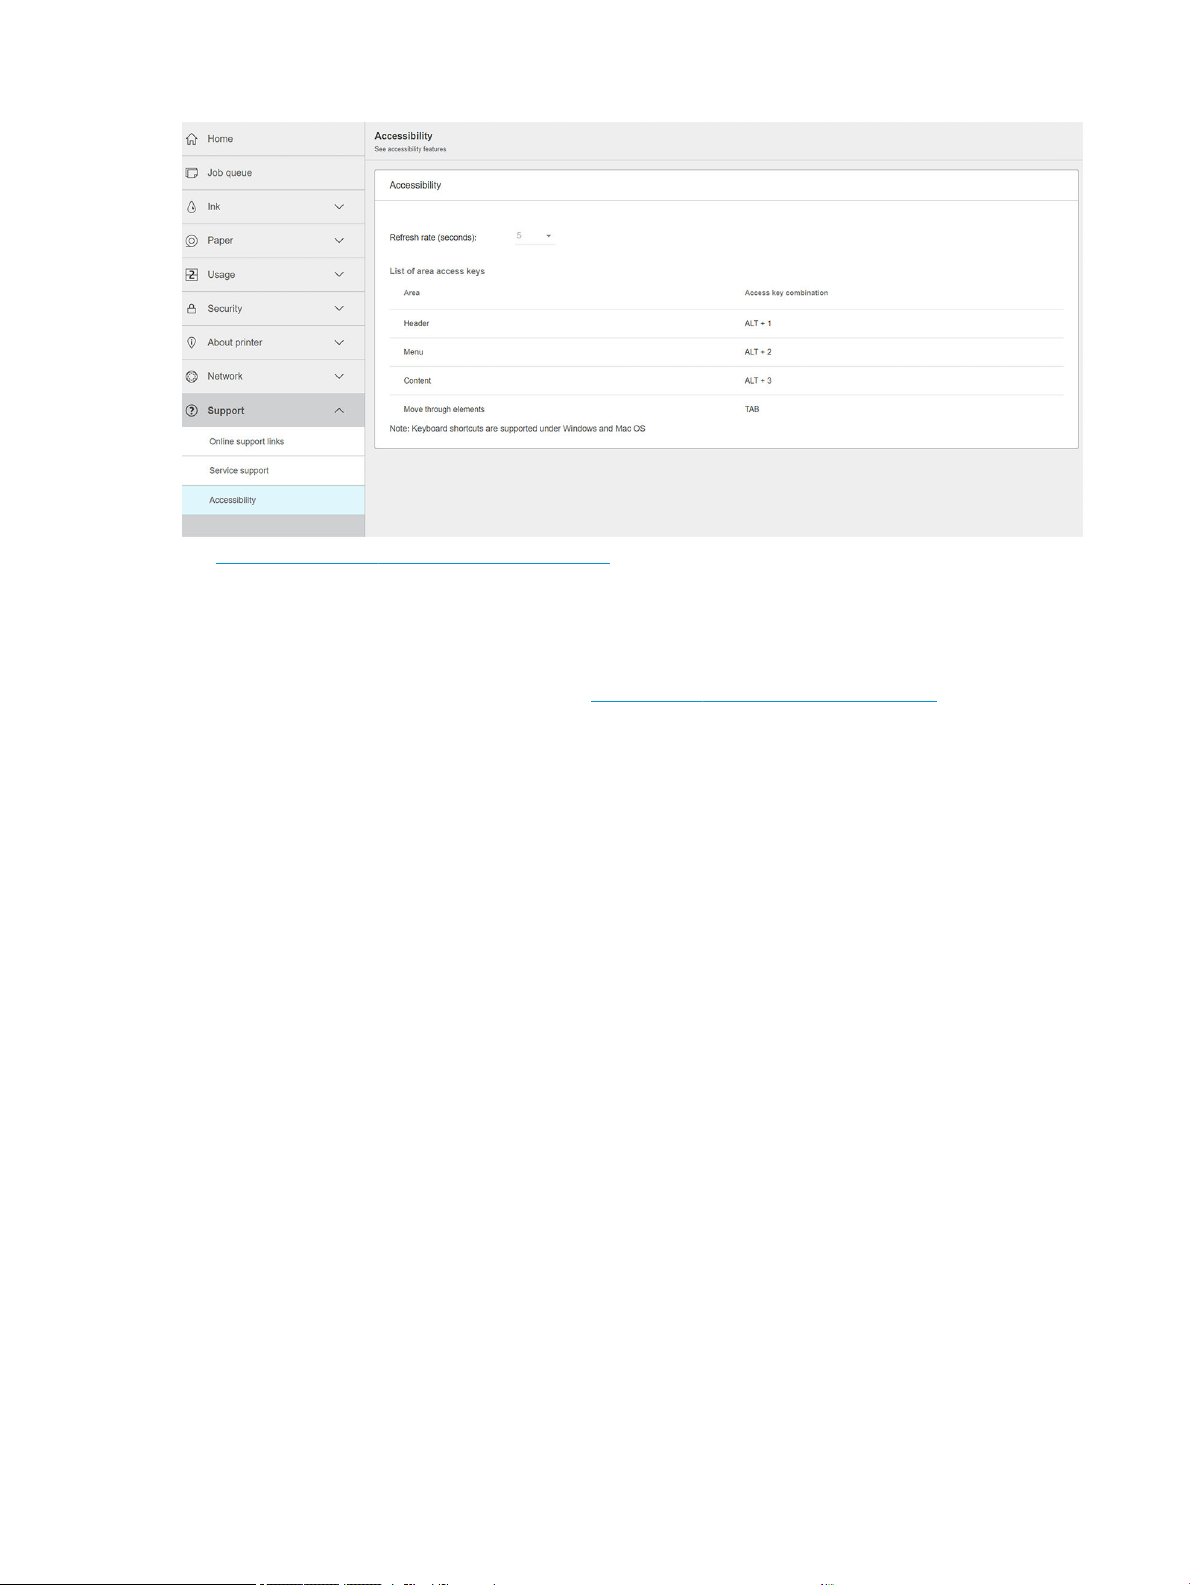
Embedded Web Server
From the Embedded Web Server, you can see the status of the printer, and perform other actions without using
the front panel.
For information about the accessibility features of the Embedded Web Server, click Support > Accessibility.
ENWW Mobile printing 29
See http://www.hp.com/hpinfo/abouthp/accessibility/ for information about the HP Accessibility Program, and
HP's commitment to making its products and services accessible to people with disabilities.
Other sources of information
The following documents can be downloaded from www.hp.com/go/DesignJetT1600/manuals:
● Introductory information
● User guide
● Legal information
● Limited warranty
30 Chapter 1 Introduction ENWW

2 Paper handling
●
General advice
●
Load a roll onto the spindle
●
Load a roll into the printer
●
Unload a roll
●
Load a single sheet
●
The stacker
●
The basket
●
View information about the paper
●
Paper presets
●
Printing paper info
●
Move the paper
●
Maintain paper
●
Change the drying time
●
Turn the automatic cutter on and o
●
Clean cut
ENWW 31
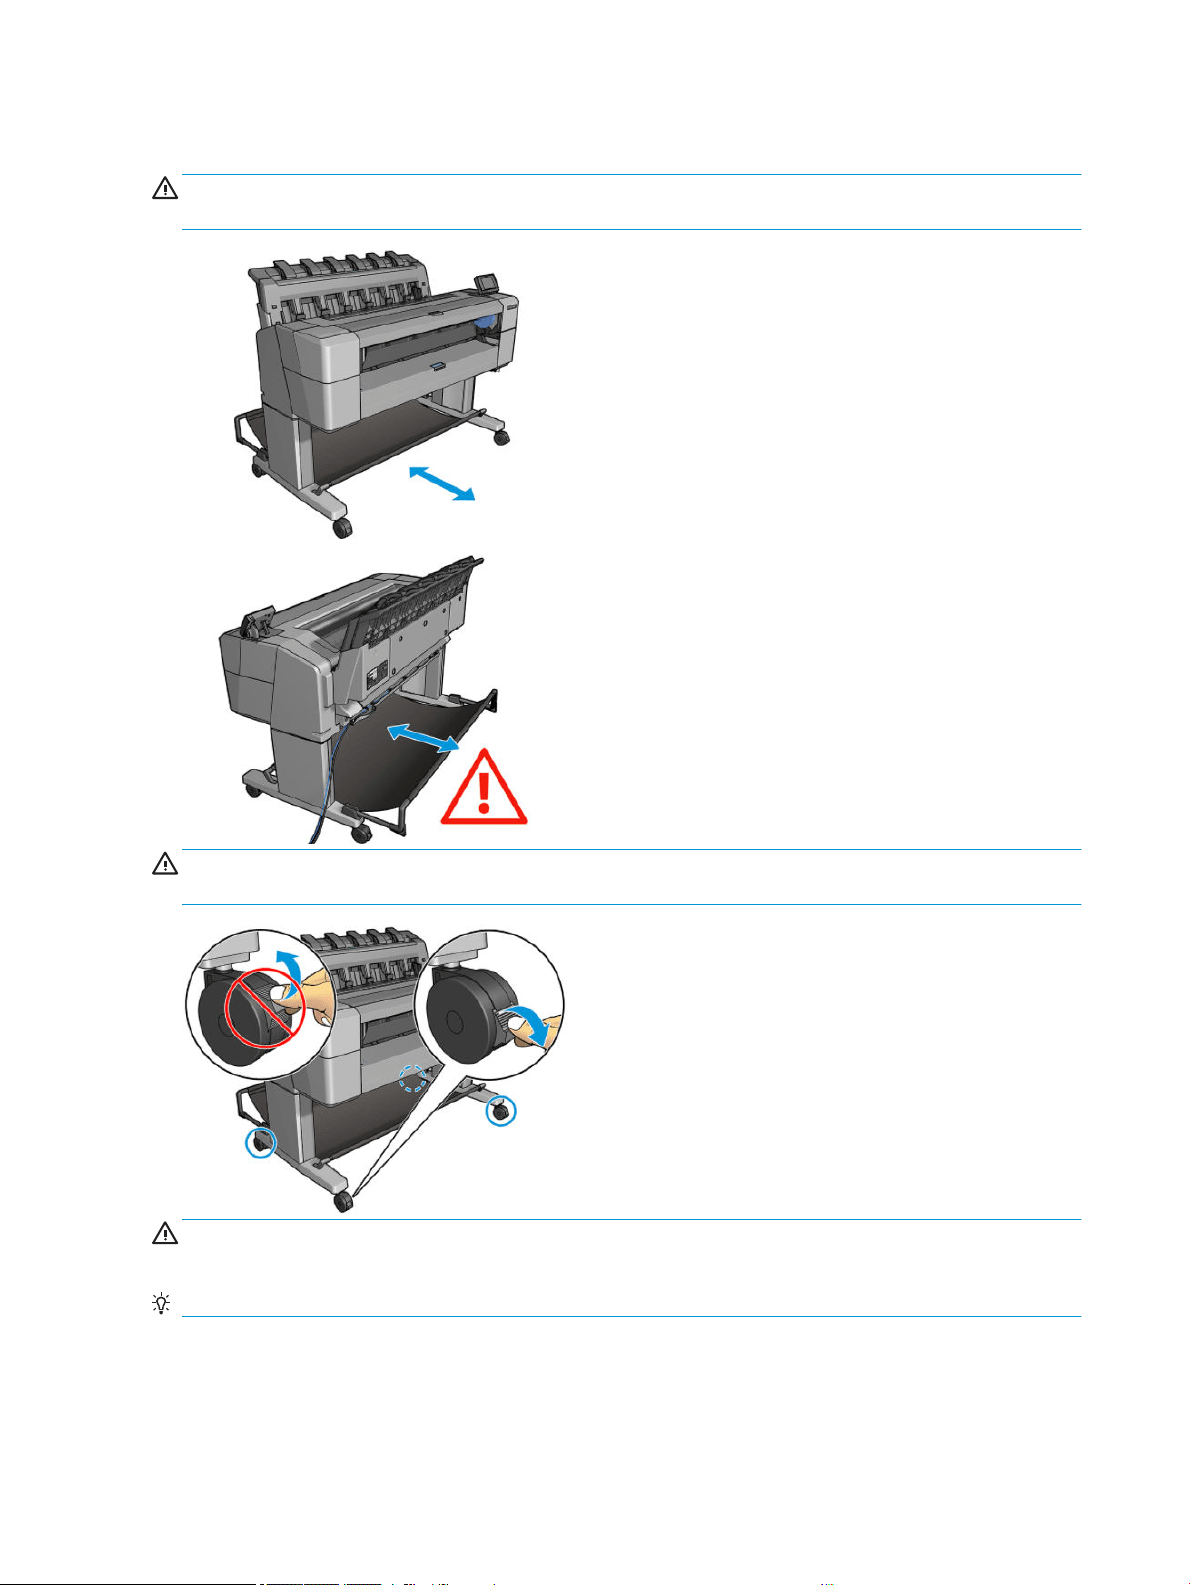
General advice
CAUTION: Before starting a paper loading process, ensure that you have enough room around the printer, both
in front and behind. You need at least enough space behind the printer to open the basket fully.
CAUTION: Ensure that the printer wheels are locked (the brake lever is pressed down) to prevent the printer
from moving.
CAUTION: All paper must be 279 mm (11 in) or longer. A4 and letter paper cannot be loaded in landscape
orientation.
TIP: For photo paper wear cotton gloves to avoid transferring oils onto the paper.
32 Chapter 2 Paper handling ENWW

Load a roll onto the spindle
1. Open the roll cover.
2. Remove the black end of the spindle from the printer, then the blue end.
CAUTION: Be sure to remove the black end rst. Removing the blue end rst could damage the black end.
WARNING! Do not insert your ngers into the spindle supports during the removal process.
ENWW Load a roll onto the spindle 33
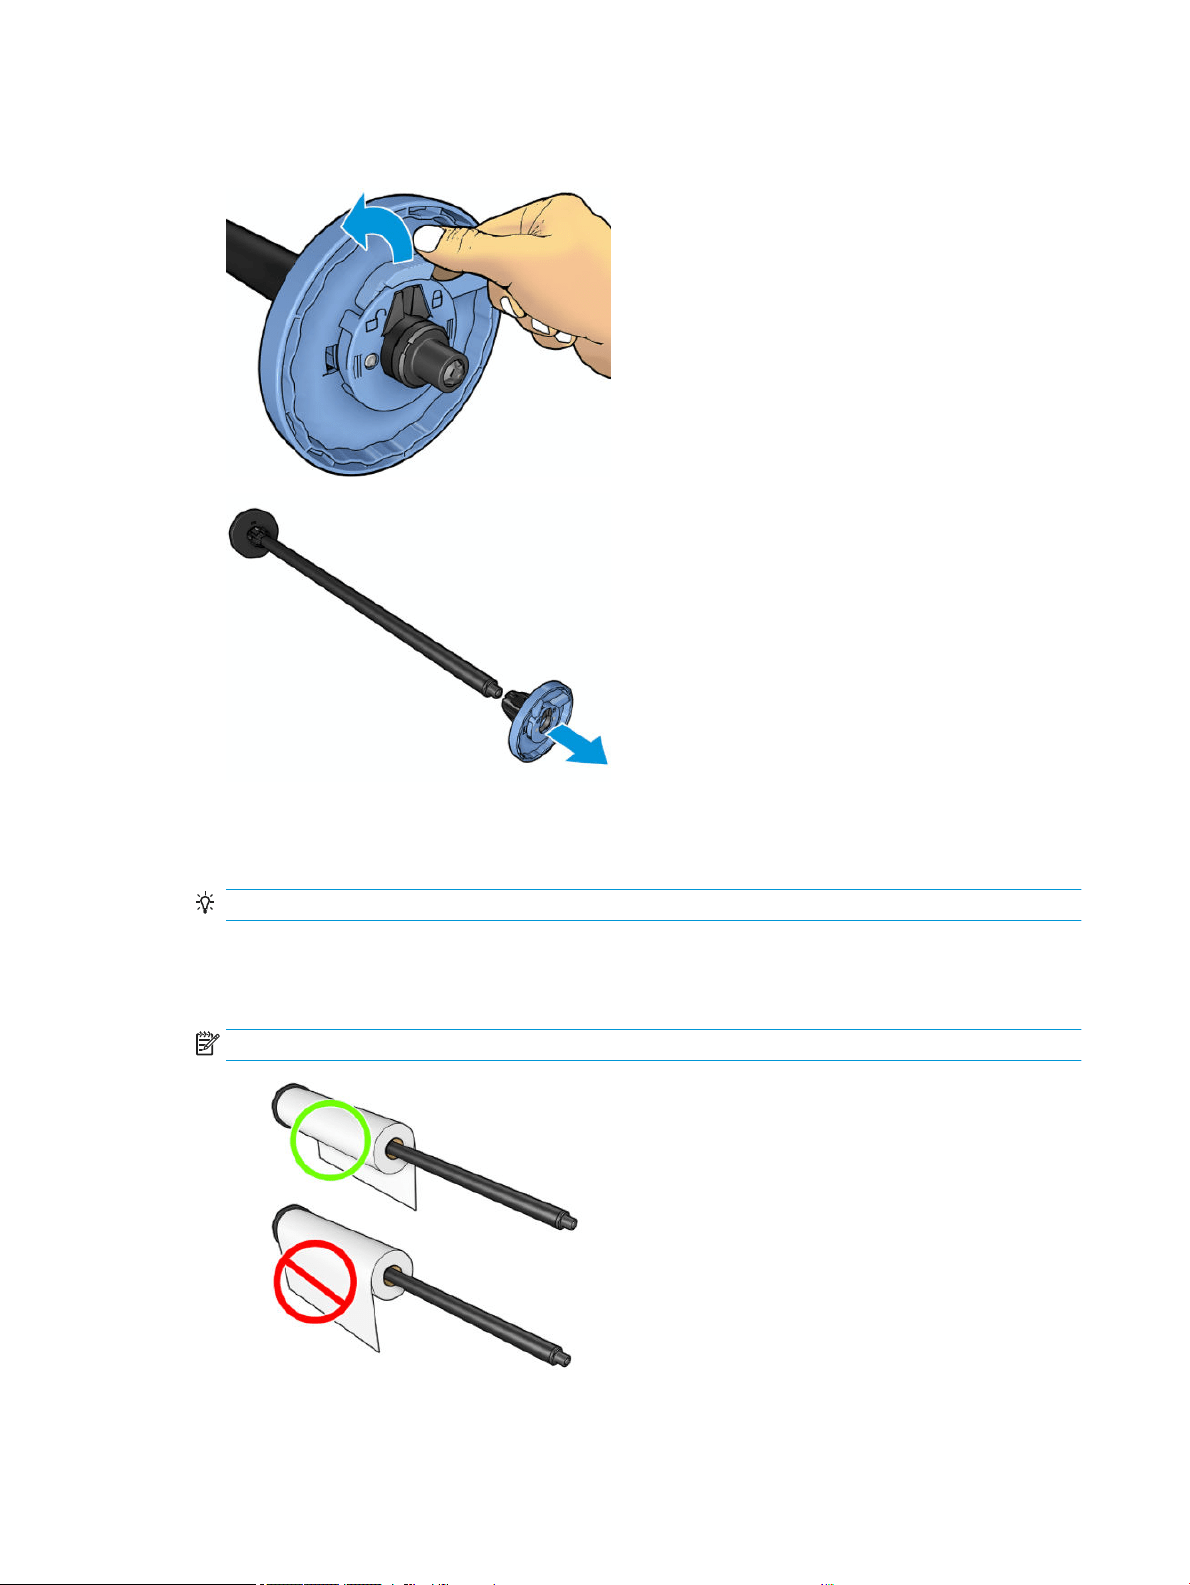
3. The spindle has a stop at each end. The blue stop can move along the spindle and has a latch to lock it in
place. Open the latch and remove the blue stop from the end of the spindle.
4. If there is already a roll or core on the spindle, remove it.
5. If the roll is long, rest it horizontally on a table and insert the spindle into it.
TIP: You may need two people to handle a large roll.
6. Slide the new roll onto the spindle. Make sure the paper type is oriented as shown. If it is not, remove the
roll, turn it 180 degrees and slide it back on to the spindle. There are labels on the spindle showing the
correct orientation.
NOTE: From the front of the printer, the blue stop should be inserted into the right-side holder.
34 Chapter 2 Paper handling ENWW

7. Put the blue stop onto the open end of the spindle, and push it towards the end of the roll.
8. Ensure that the blue stop is pushed in as far as it goes; until both ends are against the stops, then close the
latch.
If you are a regular user of dierent paper types, you can change rolls more quickly if you preload rolls of
dierent paper types on dierent spindles. Extra spindles are available for purchase, see Supplies and
accessories on page 137.
Load a roll into the printer
To start this procedure, you must have a roll loaded on the spindle. See Load a roll onto the spindle on page 33.
TIP: Do not try to open both roll covers at once; this may cause problems. Always close one cover before
opening the other.
NOTE: The rst two steps below are optional: you can start with step 3. However, in this case the printer will
not keep track of the length of the roll, and will print no barcode on the roll when it is next unloaded. So you are
recommended to follow all the steps, starting with step 1, unless you have turned o the Printing paper info
option. See Printing paper info on page 45.
ENWW Load a roll into the printer 35
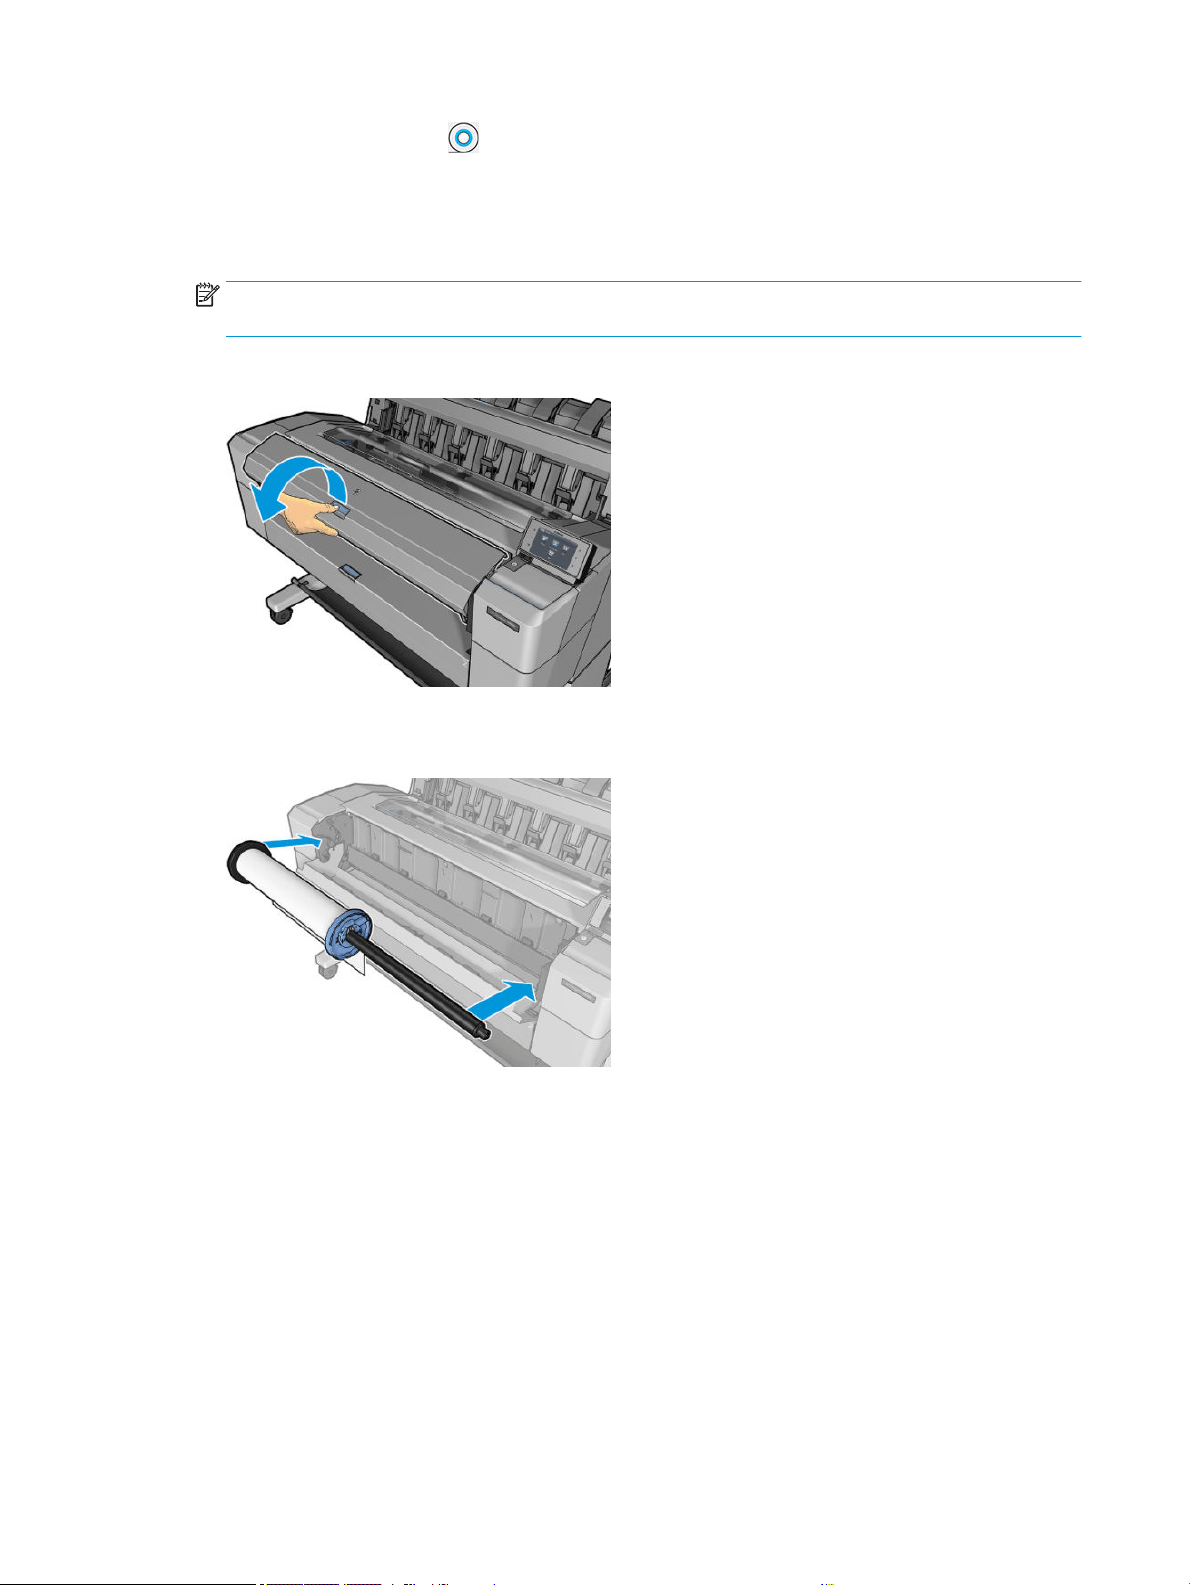
1. From the front panel, press , then the roll icon, then Load.
If the roll you have selected is already loaded, you have to wait while it is automatically unloaded.
2. If you start to load roll 1 while roll 2 is already loaded, roll 2 is withdrawn to the standby position, so that it
can be printed on again without reloading whenever required (and vice versa).
NOTE: If at any time you open a roll cover while that roll is loaded but not printing, the roll will be
automatically unloaded, and you will have to reload it the next time you want to print on it.
3. Open the roll cover.
4. Load the spindle into the printer, with the blue stop on the right. Hold the spindle by its ends and not in the
middle, to avoid touching the paper and perhaps leaving marks on it.
36 Chapter 2 Paper handling ENWW
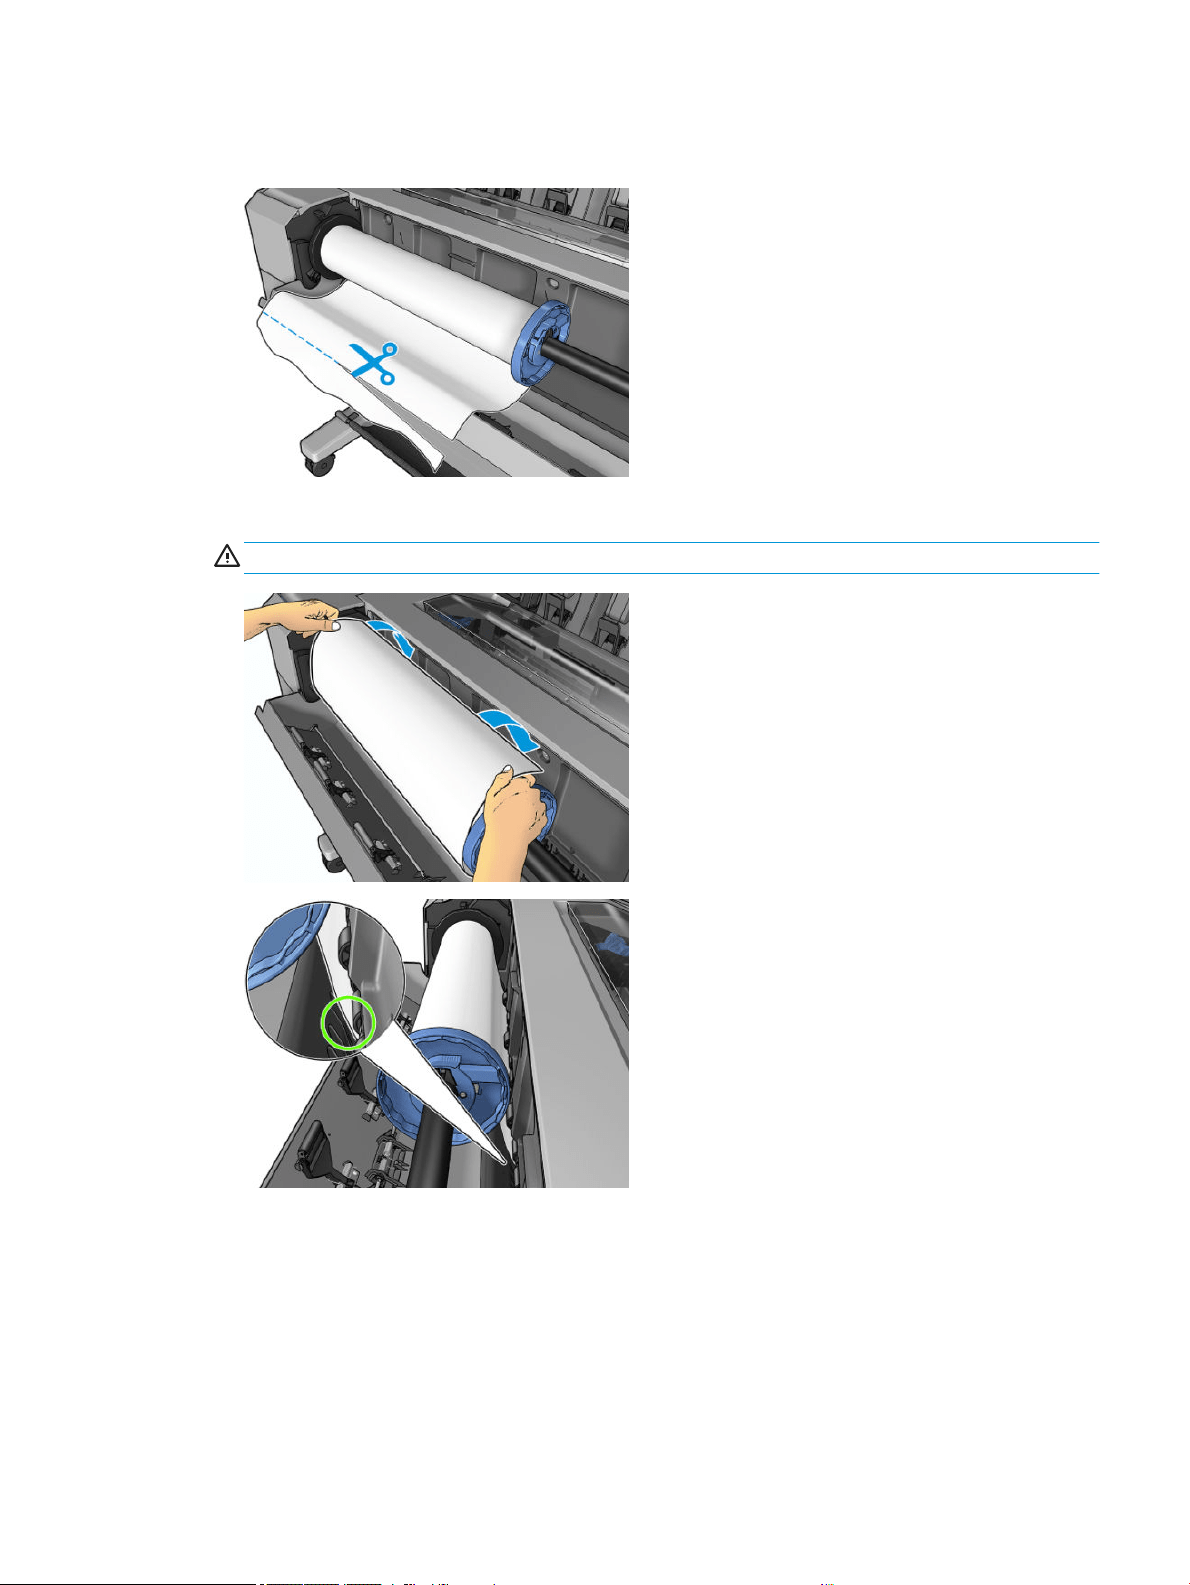
5. If the edge of the roll is not straight or torn (sometimes due to tape used to hold end of the roll), pull the
paper slightly and cut a straight edge.
6. Insert the edge of the paper into the printer.
WARNING! Do not push your ngers inside the printer's paper path.
ENWW Load a roll into the printer 37

7. Roll the paper into the printer until you feel resistance and the paper exes slightly. When the printer
detects the paper, it feeds it in automatically.
8. If the leading edge of the paper has a barcode, the printer reads and then cuts o the barcode, which falls
into the basket.
9. If the leading edge of the paper has no barcode, the front panel prompts you to select the paper category
and type.
TIP: If you have loaded a paper type whose name does not appear in the paper list, see Paper type is not
in the driver on page 145.
10. If the Printing paper info option is enabled, the front panel may ask you to specify the length of the roll. See
Printing paper info on page 45.
11. Close the roll cover when the front panel prompts you to do so.
NOTE: If you have an unexpected issue at any stage of the paper loading process, see Paper cannot be loaded
successfully on page 144.
Unload a roll
Before unloading a roll, check whether there is paper on the roll or if the roll is out of paper, and follow the
appropriate procedure as described below.
Quick procedure with paper on the roll
If there is paper on the roll, just open the roll cover, and the roll is unloaded automatically. The front panel
prompts you to load a new roll or sheet.
38 Chapter 2 Paper handling ENWW
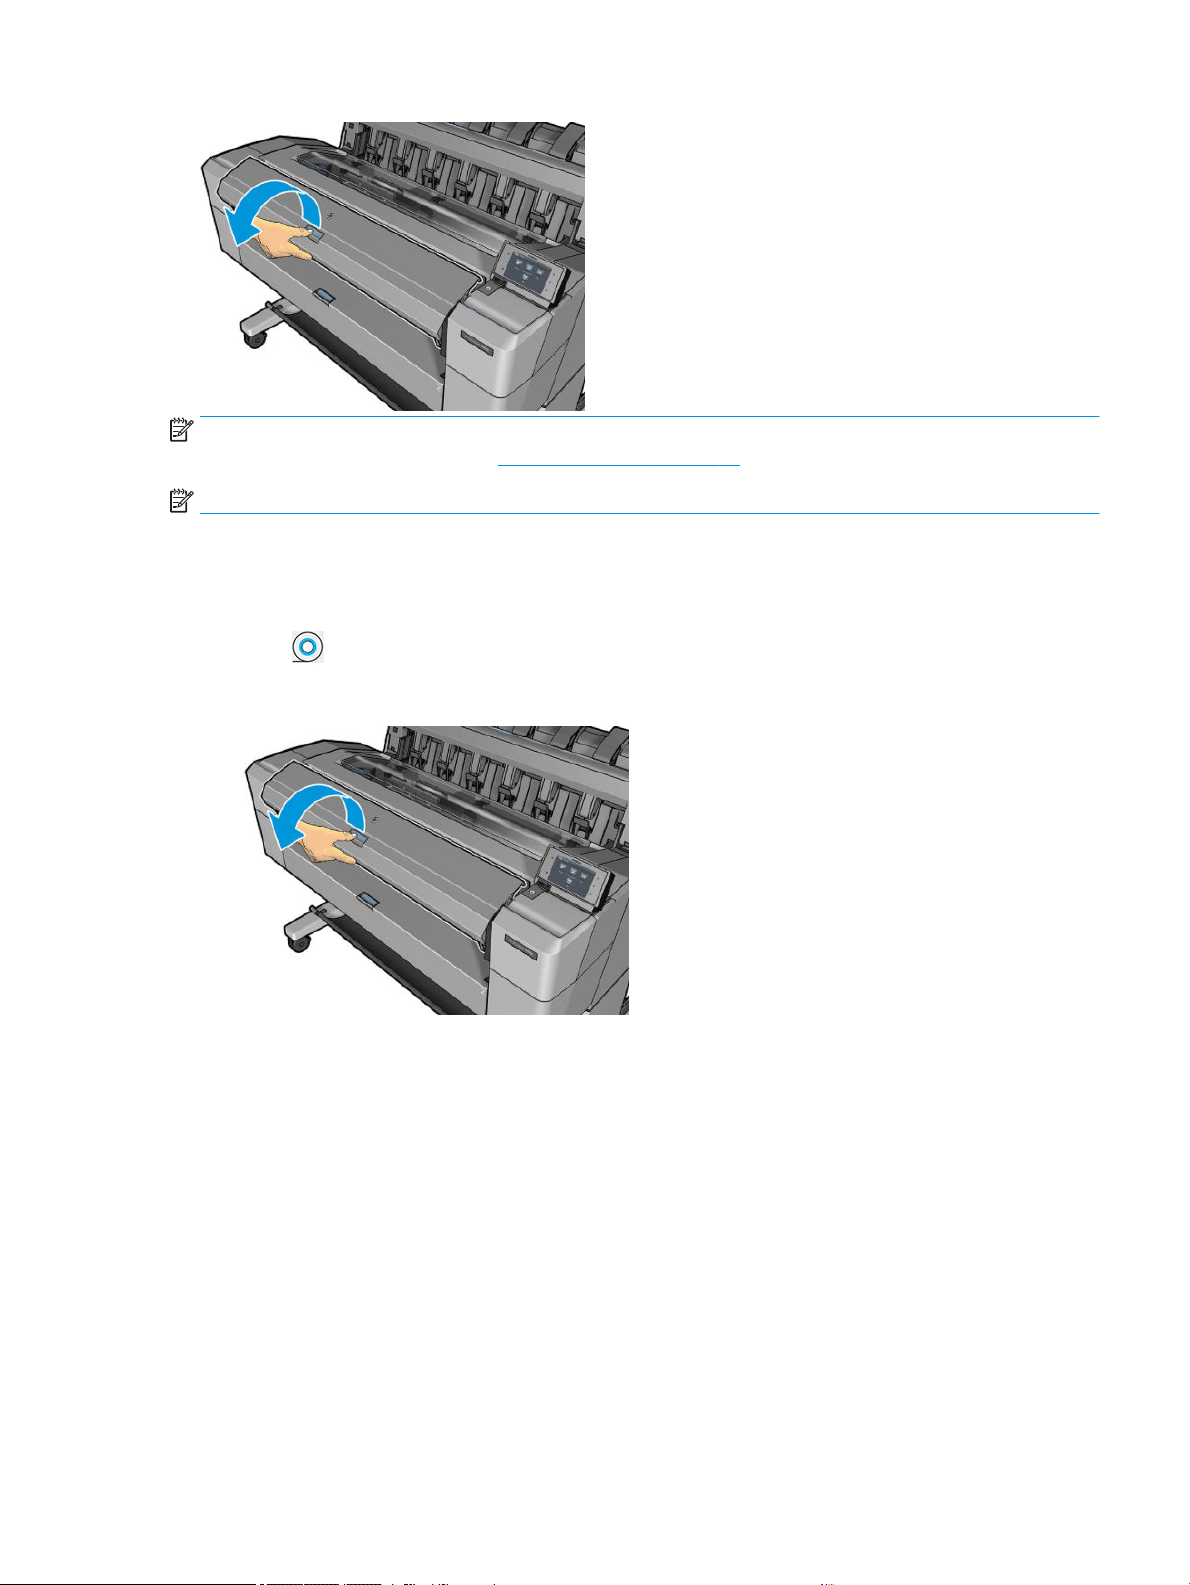
NOTE: When the roll is unloaded in this way, no barcode is printed on it, so the printer will not know the length
of the roll when it is next loaded. See Printing paper info on page 45.
NOTE: If you open the a roll cover while a sheet is loaded, the sheet is also unloaded.
Front panel procedure with paper on the roll
If there is paper on the roll, you can unload it from the front panel.
1. Press , then the roll icon, then Unload.
2. You may need to open the roll cover.
Load a single sheet
1. Measure sheet length before loading (if it is not standard size).
ENWW Load a single sheet 39
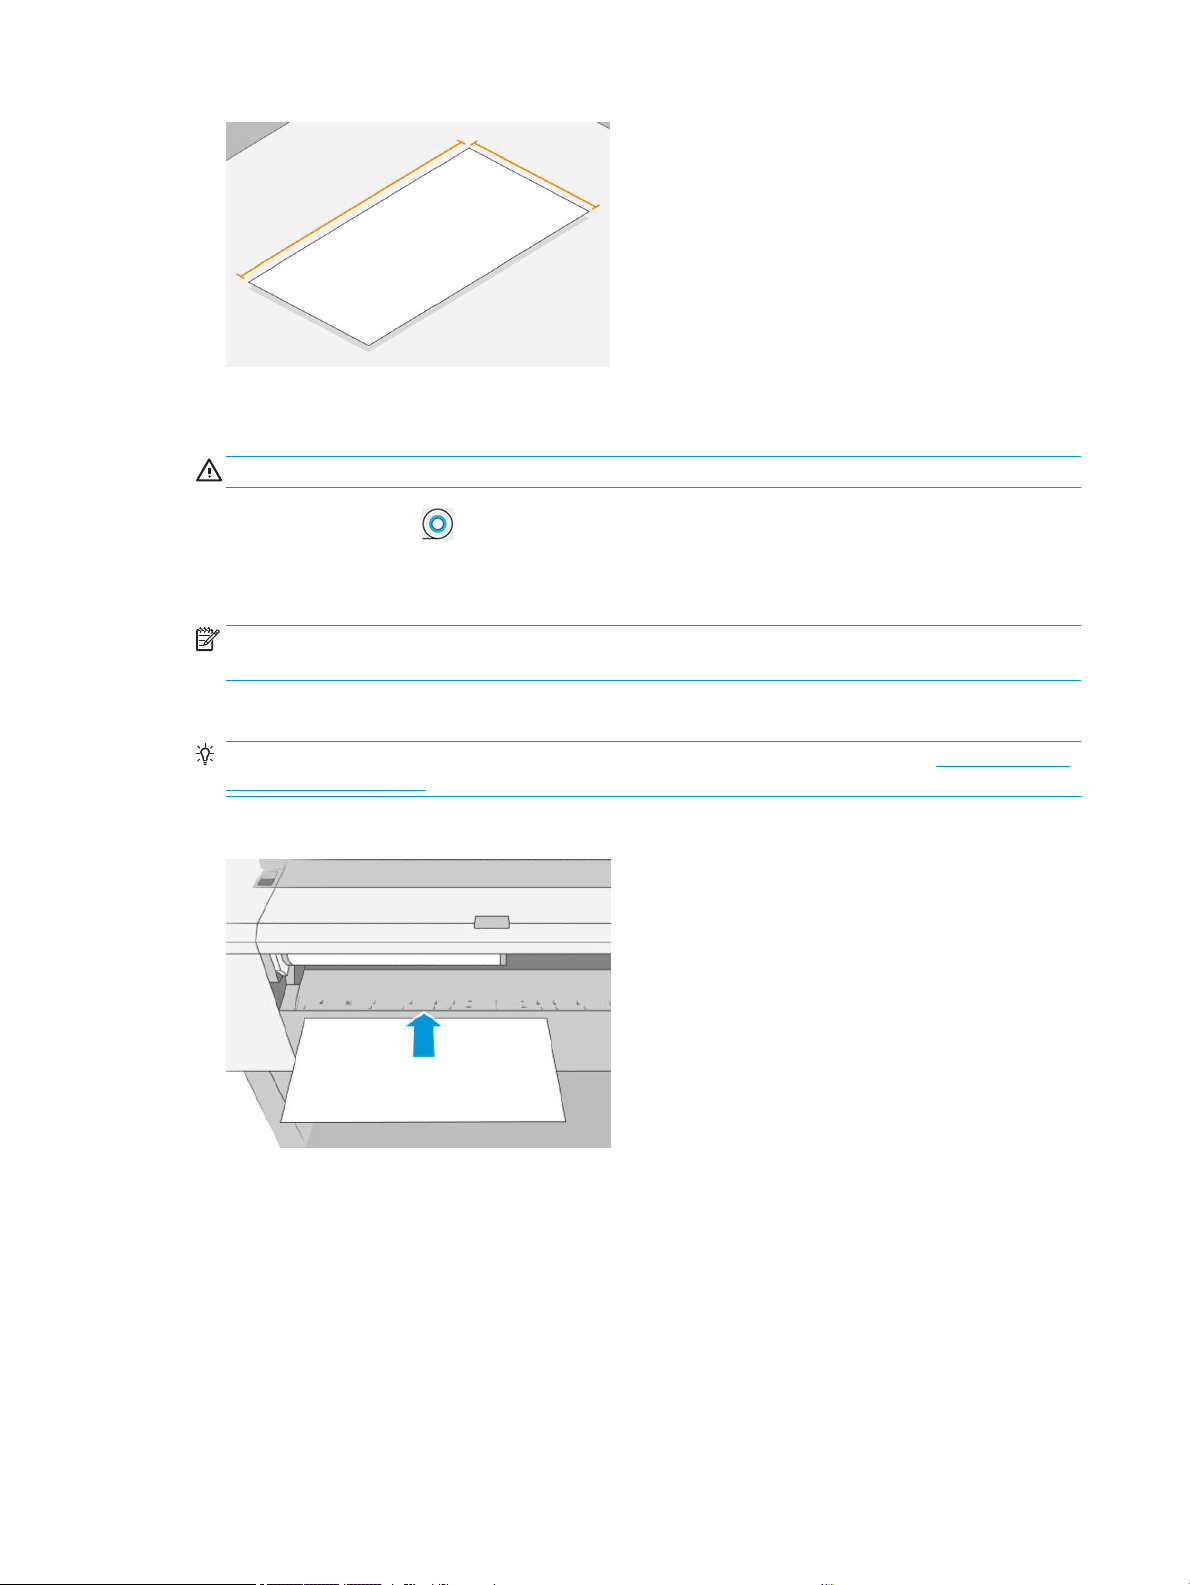
2. Ensure that both roll covers are closed. If a roll cover is opened while a sheet is loaded, the sheet is
immediately unloaded.
WARNING! Do not load the sheet before starting the loading process from the front panel.
3. At the front panel, press , then the sheet icon, then Load > Load sheet.
4. If a roll is already loaded, you have to wait while it is automatically withdrawn to the standby position, so
that it can be printed on again without reloading as soon as the sheet paper has been unloaded.
NOTE: If at any time you open a roll cover while that roll is loaded but not printing, the roll will be
automatically unloaded, and you will have to reload it the next time you want to print on it.
5. Select your paper category and type.
TIP: If you have loaded a paper type whose name does not appear in the paper list, see Paper type is not
in the driver on page 145.
6. When prompted by the front panel, insert the sheet into the front of the printer.
40 Chapter 2 Paper handling ENWW

7. Align the left-hand edge of the sheet with the blue line on the left-hand side of the printer.
8. Push the sheet into the printer until it will not go any further.
WARNING! Do not push your ngers inside the printer's paper path.
9. Guide the sheet into the printer until the printer beeps and starts pulling the paper.
10. The printer checks the alignment.
11. If the sheet is not correctly aligned, it is ejected, and you will have to try again.
NOTE: If you have an unexpected problem at any stage of the paper loading process, see Paper cannot be
loaded successfully on page 144.
ENWW Load a single sheet 41
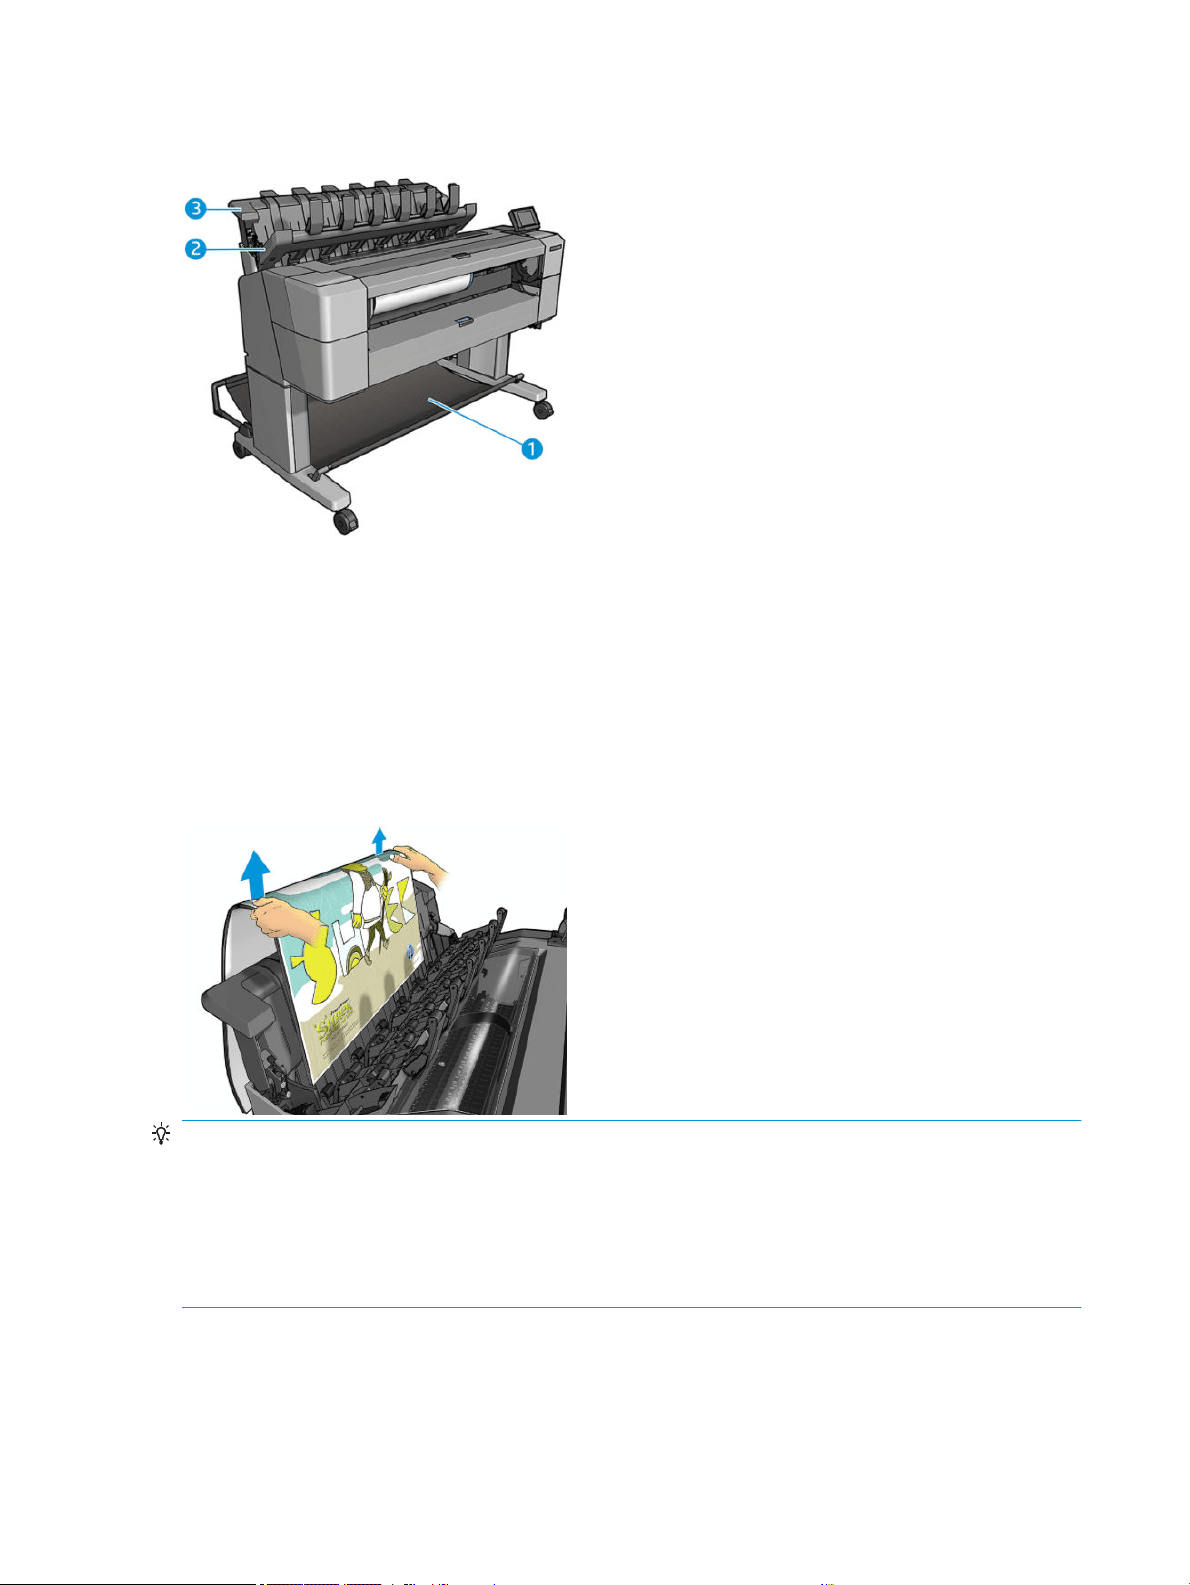
The stacker
1. Basket
2. Stacker pivoting cover
3. Stacker
By default, the printer cuts the paper after every print job. The resulting printed sheet of paper is neatly stacked
on top of the other printed sheets by the stacker.
To empty the stacker, stand in front of the printer and pull the stack of printed sheets out of the stacker. The
stacker cover may open during this process; make sure that it is closed after you have removed the sheets.
Normally the return spring will close it automatically.
TIP: Although you can remove sheets from the stacker while the printer is printing, you are recommended to
remove all the prints together while the printer is not printing.
TIP: You can lock the stacker cover in the open position to collect special jobs. Make sure that you close it
afterwards.
TIP: If you want to use a photo paper for printing in normal printing mode to the stacker, you are
recommended to use an HP Instant-Dry Photo Paper.
Manual printing with the stacker open
The stacker's manual printing mode is designed to be used when you want the highest-quality print possible on
photo paper, and you are willing to stand in front of the printer to ensure it.
42 Chapter 2 Paper handling ENWW
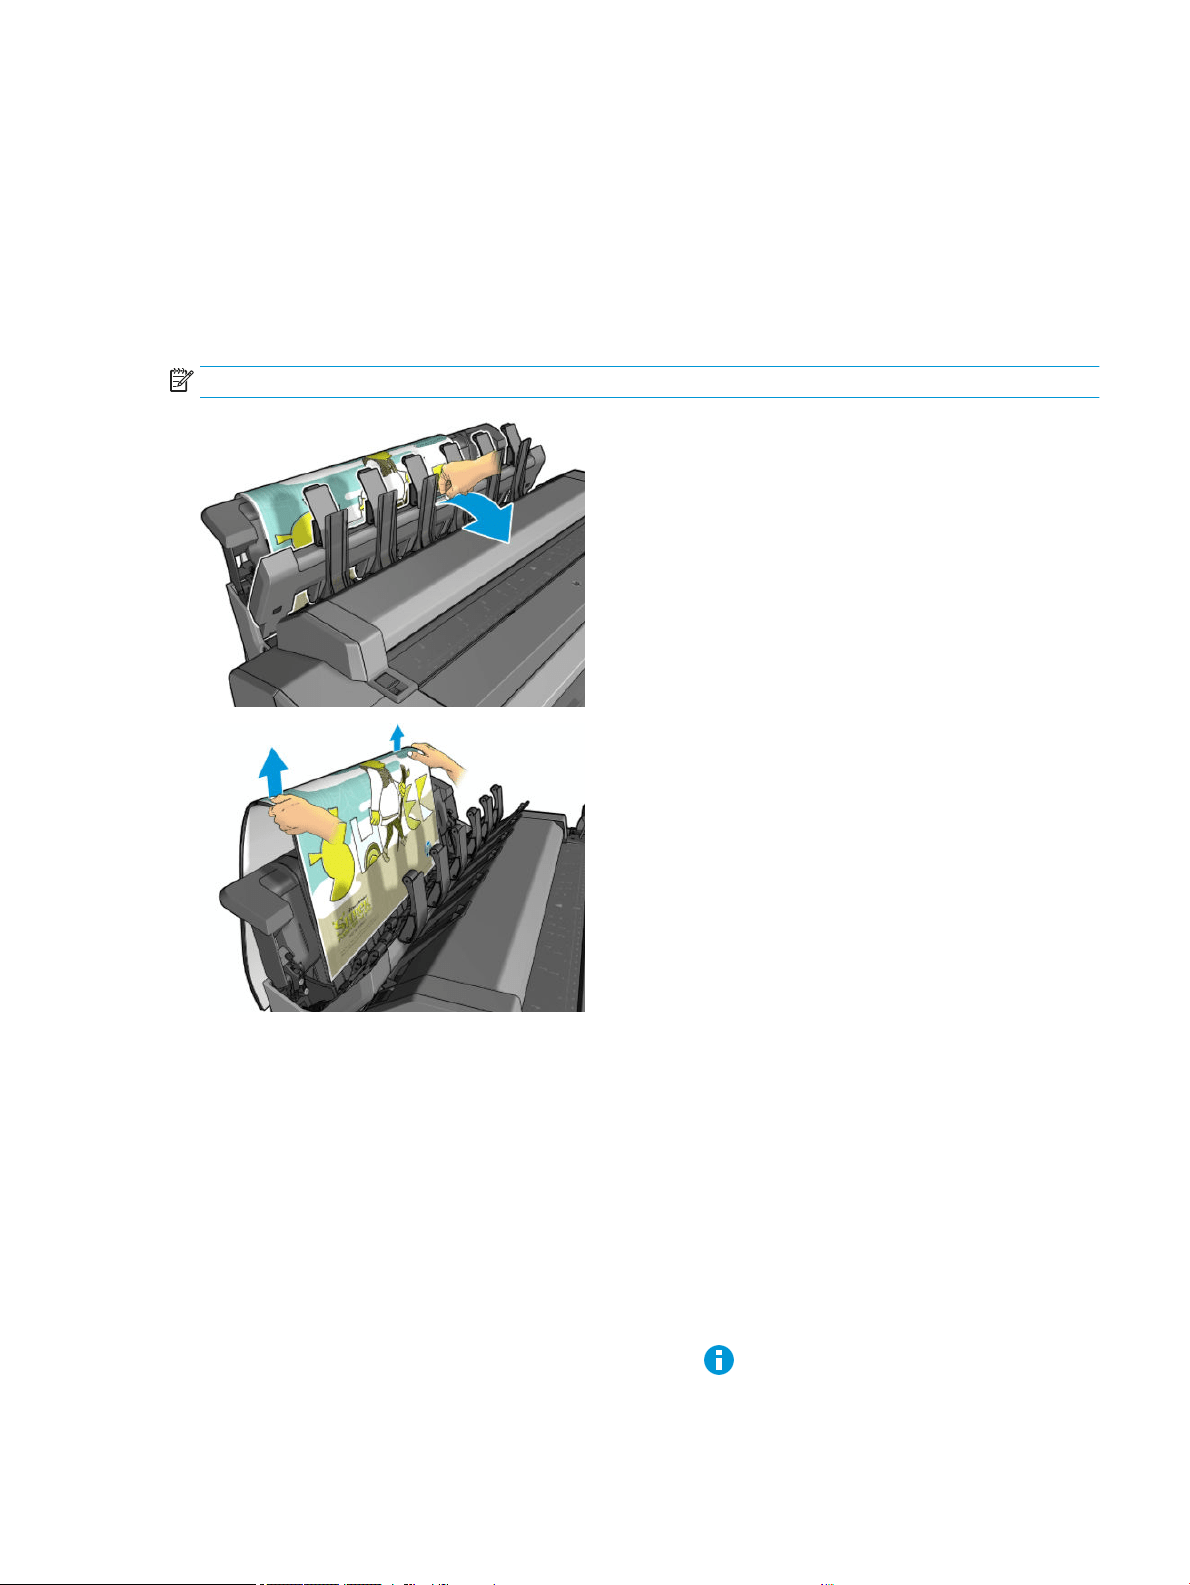
You can choose attended mode either for a particular job (for example, from the printer driver), or by putting the
printer into attended mode from the front panel.
● If you send a job with attended mode selected, the job is put on hold, and other jobs can continue printing,
until you select it for printing from the front panel (the front panel can guide you through this process) and
open the stacker cover.
● If you put the printer into attended mode from the front panel, all jobs in the queue are put on hold for
manual mode, and you can print them from the queue. When you exit manual mode, any jobs still in the
queue return to their previous status.
NOTE: When opening the stacker to enter manual mode, lock the stacker cover into the open position.
In manual mode:
● You can print only one page at a time. You must start each page manually from the front panel.
● You print with the stacker cover open, and stand in front of the printer to check the print as it emerges.
● With the stacker cover open, you have a better view of the print as it emerges, but the stacker cannot
guarantee that the print will follow the correct paper path, so you must watch over it to prevent possible
damage.
● If the printer is left idle and in manual mode for more than 15 minutes, manual mode is cancelled, and you
are advised to close the stacker.
● You can exit manual mode from the front panel or by closing the stacker.
Manual mode is indicated in various front-panel screens by the
icon.
ENWW The stacker 43
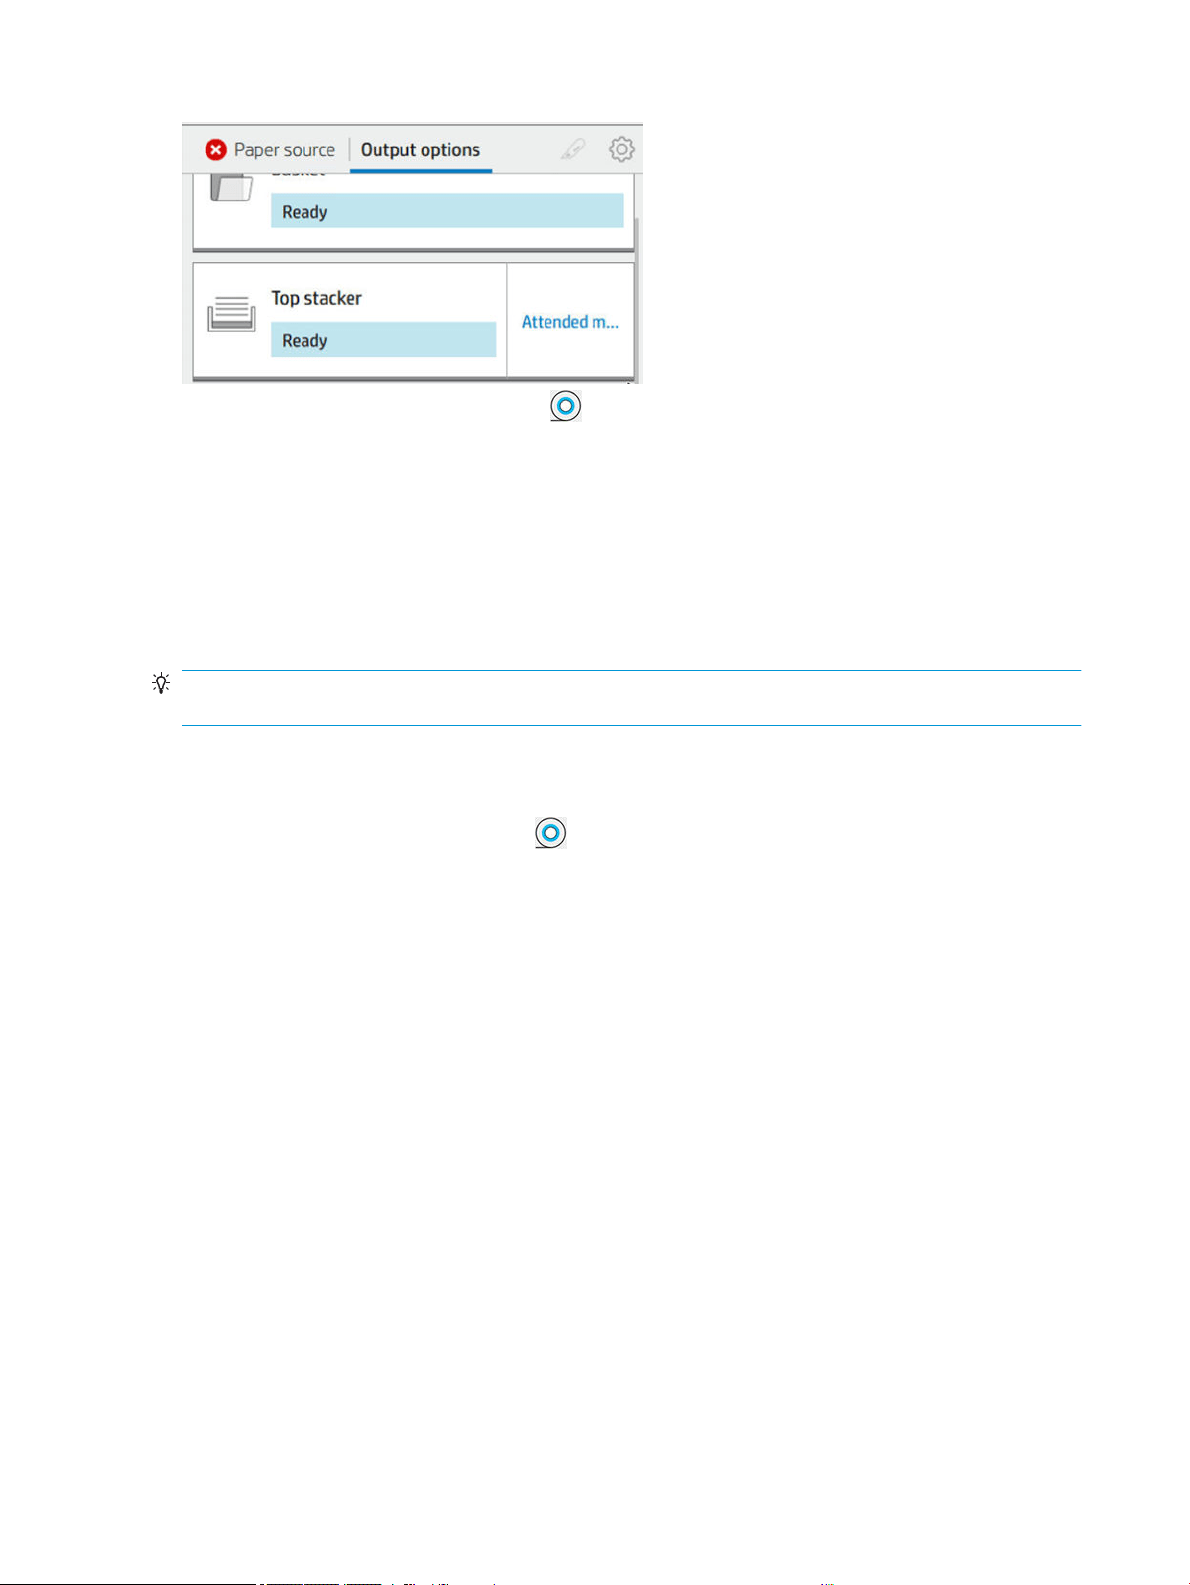
To enter manual mode, on the front panel tap , then output options > top stacker > attended mode.
The basket
The stacker is normally used to collect prints. If you decide not to use the stacker, you can send your prints to the
basket. You may decide to use the basket if you do not want to cut paper between print jobs, or if the stacker is
full.
The basket can accept up to 10 A1 or D-sized sheets of bond paper. Larger prints should be removed from the
basket immediately after printing.
TIP: Ensure that you have routed all cables correctly, so that they do not interfere with paper falling into the
basket. Otherwise you may experience paper jams.
View information about the paper
To view the loaded paper information, press , then the roll icon.
The following information is displayed on the front panel:
● The paper type you have selected
● Roll or sheet status
● Width of the paper in millimeters (estimated)
● Length of the paper in millimeters (estimated)
● Calibration status
The same information is displayed in the HP DesignJet Utility for Windows (
Overview tab > Supplies tab) and the
HP Utility for Mac OS X (Information group > Supplies Status).
Paper presets
Each supported paper type has its own characteristics. For optimum print quality, the printer changes the way it
prints on each dierent paper type. For example, some may need more ink and some may require a longer
drying time. So the printer must be given a description of the requirements of each paper type. This description
is called the paper preset. The paper preset contains the ICC prole, which describes the color characteristics of
the paper; it also contains information on other characteristics and requirements of the paper that are not
directly related to color. Existing paper presets for your printer are already installed in the printer's software.
44 Chapter 2 Paper handling ENWW

However, as it is inconvenient to scroll through a list of all paper types available, your printer only contains paper
presets for the most commonly used paper types. If you have a paper type for which your printer has no preset,
you cannot select that paper type.
There are two ways to assign a preset for a new paper type.
● Use one of the existing HP factory paper presets by selecting the closest category and type in the front
panel or the printer driver. See Paper type is not in the driver on page 145.
NOTE: Colors may not be accurate. This method is not recommended for high-quality prints.
● Download the correct paper preset from: http://hp.globalbmg.com/paperpresets.
NOTE: HP provides presets for HP paper types only. If you do not nd the paper preset you want on the
Web, you may nd that it has been added to the latest rmware for your printer. You can check the
rmware release notes for information, see Update the rmware on page 134.
To install a downloaded paper preset
1. After nding the right paper preset at http://www.globalbmg.com/hp/en/paperpresets, or the paper
manufacturer's website, click the Download Now button and save the paper preset (an .oms le) on your
computer.
NOTE: If you do not nd the paper preset you want on the Web, you may nd that it has been added to
the latest rmware for your printer. You can check the rmware release notes for information, see Update
the rmware on page 134.
2. Before starting to install the new preset, make sure that the printer is idle and the print queue is stopped.
Installing a new paper preset will interrupt any printing that is in progress.
3. Start the HP DesignJet Utility or the Embedded Web Server.
● In the HP DesignJet Utility for Windows, select the Color Center and then Import Paper Preset.
● In the Embedded Web Server, click the
Paper tab. In the Paper Management section, click the Import
Paper Preset tab.
4. On the Import page, select the paper preset le that you downloaded in step 1.
5. Click the Import button and wait for the update process to nish. It may take some time.
6. Check that the new paper type appears in the Additional paper or Custom paper category in your printer's
front panel.
Now that you have imported the paper preset, you can select the paper type from the front panel and from the
driver. The ICC prole for the new paper type is ready to use by your application.
Printing paper info
Enable the Printing paper info option to record the printer’s estimate of the remaining roll length, paper width
and type. The information is a combination of barcode and text that is printed on the leading edge of the roll
when the paper is unloaded from the printer.
ENWW Printing paper info 45

NOTE: The paper-length estimate is available only if the printer registered the amount of paper that was on
the roll when you loaded it. To provide this information to the printer, specify the roll length on the front panel
when loading the paper, or load a roll that has the paper-data barcode printed on it.
NOTE: The barcode and text are printed on the roll only when the loading and unloading processes are started
from the front panel's Paper menu.
NOTE: This option can be expected to work only with papers that are completely opaque. It may fail with
transparent or translucent papers.
To enable the Printing paper info option, go to the front panel and press , then Paper source > Printing paper
info > Enable.
NOTE: Enabling this option slightly changes the paper loading and unloading procedures.
Move the paper
If the printer is idle (ready to print), you can move the paper forwards or backwards from the front panel. You
may want to do this in order to have more or less white space between the last print and the next one when the
cutter is disabled; or to increase top margin of the next print.
To move the paper, press
, then Paper source > Move paper.
Maintain paper
To maintain paper quality, follow the recommendations below.
● Store rolls covered by another piece of paper or cloth
● Store cut sheets covered and clean or brush them before loading them in the printer
● Clean input and output platens
● Always keep the window of your printer closed
NOTE: Photo and coated paper requires careful handling, see Print is scued or scratched on page 160.
Change the drying time
You may wish to change the drying time setting to suit special printing conditions such as multiple prints where
time is of higher importance or when you need to be sure ink is dry before handling.
Press
, then Default printing conguration > Print retrieval > Drying time. You can select:
● Extended, to set a longer than recommended time to ensure ink is completely dry
● Optimal, to set the default and recommended time for your selected paper (this is the default setting)
● Reduced, to set a shorter than recommended time when quality is of lower importance
● None, to disable the drying time and remove your print as soon as it nishes printing
CAUTION: If the ink is not dry when the print is removed it could leave ink in the output tray and marks on the
print.
46 Chapter 2 Paper handling ENWW

NOTE: If you cancel the drying time during a print, the printer may not feed and cut the paper right away due to
the printhead maintenance, which runs in parallel. If the dry time is zero, the printer cuts the paper and then
performs the printhead maintenance. However, if the dry time is greater than zero, the printer does not cut the
paper until after the printhead maintenance has completed.
Turn the automatic cutter on and o
To turn the printer's paper cutter on or o:
● From the front panel, press , then Default printing conguration > Cutter > Horizontal cutter.
The default setting is
On.
If the cutter is turned o, it does not cut the paper between jobs, but continues to cut the paper on loading,
unloading, switching between rolls, and switching between the stacker and the basket.
TIP: To cut roll paper while the automatic cutter is disabled, see Clean cut on page 47.
Clean cut
If you go to the front panel and tap the cutter icon at the top of the page, the printer advances the paper and
makes a straight cut across the front edge. There are several possible reasons why you might want to do this.
● To trim the leading edge of the paper if it is damaged or not straight. The cut strip falls into the basket.
● To feed and cut the paper when the automatic cutter has been disabled.
● To cancel the waiting time and print the available pages immediately, if the printer is waiting to nest more
pages.
NOTE: The printhead is serviced after each print, and the paper cannot be cut until the process completes, so
you may notice a delay.
NOTE: Photo and coated paper requires careful handling, see Print is scued or scratched on page 160.
TIP: To move the paper without cutting it, see Move the paper on page 46.
ENWW Turn the automatic cutter on and o 47


Advantages of a multiroll printer
A multiroll printer can be useful in several dierent ways:
● The printer can automatically switch between dierent paper types according to your needs.
● The printer can automatically switch between dierent paper widths according to your needs. This enables
you to save paper by printing smaller images on narrower paper.
● If you load two identical rolls into the printer, you can leave it printing unattended for a long time, because
it can switch from one roll to the other automatically when the rst is exhausted. See Unattended printing/
overnight printing on page 73.
The current status of both rolls is shown on the front panel if you tap
.
NOTE: Bear in mind that a paper type is protected from use unless that paper type is specically requested.
See Protect a paper type (T1600dr only) on page 73.
NOTE: If you use a paper not supported by your printer, you may nd that automatic switching is disabled, in
which case jobs sent to the standby roll are put on hold until the roll is manually unloaded.
NOTE: When you print from a USB ash drive, multiroll printing is considerably simplied: either you specify
manually which roll you want to use, or you can select Save paper, in which case the printer chooses the
narrowest roll on which the print will t. You cannot specify the paper type.
How the printer allocates jobs to paper rolls
When you submit a print job from the printer driver, you can specify (using the Paper type or Type is option) that
you want it to be printed on a particular paper type; you can even specify (using the Paper source, Source is or
Paper Feed option) that you want it to be printed on a particular roll (1 or 2). The printer will try to satisfy these
requirements, and it will also look for a paper roll large enough to print the image without clipping.
● If both rolls are suitable for the job, the roll will be chosen according to the roll switching policy. See Roll
policies on page 81.
● If just one of the rolls is suitable for the job, it will be printed on that roll.
● If neither roll is suitable for the job, it will be put on hold for paper, or printed on an unsuitable roll,
depending on the paper mismatch action. See Solve paper mismatch on page 82.
The printer driver for Windows will tell you which paper types and widths are currently loaded in the printer, and
on which rolls.
Here are some settings that may be used in typical situations.
NOTE: The Paper settings are in the printer driver; the Roll switching policy is set in the front panel.
● With dierent paper types loaded:
– Paper types: select the paper type you require
–
Paper source: Use printer settings
–
Roll switching policy: doesn't matter
● With dierent paper widths loaded:
ENWW Advantages of a multiroll printer 49

– Paper type: Use printer settings
–
Paper source: Use printer settings
–
Roll switching policy: Minimize paper waste
TIP: You can also save paper in some cases by rotating or nesting your images. See Use paper
economically on page 70.
● With identical rolls loaded:
– Paper type: Use printer settings
–
Paper source: Use printer settings
–
Roll switching policy: Minimize roll changes
50 Chapter 3 Working with two rolls (T1600dr only) ENWW


Introduction
The printer provides a single RJ-45 connector port for a network connection. In order to meet Class B limits, the
use of shielded I/O cables is required.
The embedded Jetdirect print server supports connection to IEEE 802.3 10Base-T Ethernet, IEEE 802.3u
100Base-TX Fast Ethernet and 802.3ab 1000Base-T Gigabit Ethernet compliant networks. When connected and
powered on, the printer auto-negotiates with your network to operate with a link speed of 10, 100, or 1000
Mbps, and to communicate using full- or half-duplex mode. However, you can manually congure the link using
the printer's front panel, or through other conguration tools once network communication is established.
The printer can support multiple network protocols simultaneously, including TCP/IPv4 and TCP/IPv6. For
security, it includes features to control IP trac to and from the printer and supports conguration of IP Security
(IPsec) protocols.
Control network protocols
The printer can simultaneously support multiple network communication protocols. This allows network
computers that may be using dierent protocols to communicate with the same printer.
Each protocol may require some conguration before the printer can communicate on the network. For some
protocols, required parameters are automatically sensed and user-specied settings are not needed. However,
for other protocols, there may be many parameters to congure.
Enable or disable network protocols
If a network protocol is enabled, the printer may actively transmit on the network even when there are no
computers on the network that use the protocol. This may increase network trac. To eliminate unnecessary
trac, you can disable unused protocols. Disabling unused protocols lets you:
● Reduce network trac by eliminating broadcast messages from unused protocols
● Provide better control over who prints to the printer by eliminating users from other networks who might
route print jobs to this printer
● Display protocol-specic error conditions for enabled protocols only
To disable unused protocols through the device’s control panel menu, see
Front-panel menu items on page 52.
More detailed control of network protocols is available in the printer's Embedded Web Server, in the Networking
section web pages. For other tools, such as system command access to the embedded Telnet server, see the
HP Jetdirect Print Server Administrator’s Guide for your print server model.
Front-panel menu items
To access the printer network conguration settings, go to the front panel and tap , then , then Network
>
Gigabit Ethernet > Modify Conguration.
Menu item Sub-menu item Sub-menu item Values and description
Information Print Sec Report Yes: Prints a report.
No (default): Does not print a report.
52 Chapter 4 Networking ENWW

Menu item Sub-menu item Sub-menu item Values and description
TCP/IP Host Name An alphanumeric string, up to 32 characters, used to identify the device. This name is listed on
the HP Jetdirect conguration page. The default host name is NPIxxxxxx, where xxxxxx is the
last six digits of the LAN hardware (MAC) address.
IPV4 Settings Cong Method Species the method that TCP/IPv4 parameters will be congured on the HP Jetdirect print
server.
Bootp: Use BootP (Bootstrap Protocol) for automatic conguration from a BootP server.
DHCP (default): Use DHCP (Dynamic Host Conguration Protocol) for automatic conguration
from a DHCPv4 server. If selected and a DHCP lease exists, DHCP Release and DHCP Renew
menus are available to set DHCP lease options.
Auto IP: Use automatic link-local IPv4 addressing. An address in the form 169.254.x.x is
assigned automatically.
Manual: Use the Manual Settings menu to congure TCP/IPv4 parameters.
DHCP Release This menu appears if Cong Method was set to DHCP and a DHCP lease for the print server
exists.
No (default): The current DHCP lease is saved.
Yes: The current DHCP lease and the leased IP address are released.
DHCP Renew This menu appears if Cong Method was set to DHCP and a DHCP lease for the print server
exists.
No (default): The print server does not request to renew the DHCP lease.
Yes: The print server requests to renew the current DHCP lease.
Manual Settings (Available only if Cong Method is set to Manual) Congure parameters directly from the
printer control panel:
IP Address: The unique IP address of the printer (n.n.n.n).
Subnet Mask: The subnet mask for the printer (n.n.n.n).
Syslog Server: The IP address of the syslog server (n.n.n.n) used to receive and log syslog
messages.
Default Gateway: The IP address (n.n.n.n) of the gateway or router used for communications
with other networks.
Idle Timeout: The time period, in seconds, after which an idle TCP print data connection is
closed (default is 270 seconds, 0 disables the timeout).
Default IP Specify the IP address to default to when the print server is unable to obtain an IP address
from the network during a forced TCP/IP reconguration (for example, when manually
congured to use BootP or DHCP).
Auto IP: A link-local IP address 169.254.x.x is set.
Legacy: The address 192.0.0.192 is set, consistent with older HP Jetdirect devices.
Primary DNS Specify the IP address (n.n.n.n) of a Primary DNS Server.
NOTE: This item appears only if Manual conguration is a higher priority than DHCP in the
Cong. Precedence table, congured through the embedded Web server.
Secondary DNS Specify the IP address (n.n.n.n) of a Secondary Domain Name System (DNS) Server.
NOTE: This item will appear only if Manual conguration is a higher priority than DHCP in the
Cong. Precedence table, congured through the embedded Web server.
ENWW Front-panel menu items 53

Menu item Sub-menu item Sub-menu item Values and description
IPV6 Settings Enable Use this item to enable or disable IPv6 operation on the print server.
O: IPv6 is disabled.
On (default): IPv6 is enabled.
Address Use this item to manually congure an IPv6 address.
Manual Settings: Use the Manual Settings menu to enable and manually congure a TCP/ IPv6
address.
Enable: Select this item and choose On to enable manual conguration, or O to disable
manual conguration.
Address: Use this item to type a 32 hexadecimal digit IPv6 node address that uses the colon
hexadecimal syntax.
DHCPV6 Policy Router Specied: The stateful auto-conguration method to be used by the print server is
determined by a router. The router species whether the print server obtains its address, its
conguration information, or both from a DHCPv6 server.
Router Unavailable: If a router is not available, the print server should attempt to obtain its
stateful conguration from a DHCPv6 server.
Always: Whether or not a router is available, the print server always attempts to obtain its
stateful conguration from a DHCPv6 server.
Primary DNS Use this item to specify an IPv6 address for a primary DNS server that the print server should
use.
NOTE: This item will appear only if Manual conguration is a higher priority than DHCP in the
Cong Precedence table, congured through the embedded Web server.
Secondary DNS Use this item to specify an IPv6 address for a secondary DNS server that the print server
should use.
NOTE: This item will appear only if Manual conguration is a higher priority than DHCP in the
Cong Precedence table, congured through the embedded Web server.
Proxy Server Species the proxy server to be used by embedded applications in the device. A proxy server is
typically used by network clients for Internet access. It caches Web pages, and provides a
degree of Internet security, for those clients.
To specify a proxy server, enter its IPv4 address or fully-qualied domain name. The name can
be up to 255 octets.
For some networks, you may need to contact your Independent Service Provider (ISP) for the
proxy server address.
Proxy Port Type the port number used by the proxy server for client support. The port number identies
the port reserved for proxy activity on your network, and can be a value from 0 to 65535.
Security Print Sec Page Yes: Prints a page that contains the current IPsec security settings on the HP Jetdirect print
server.
No (default): A security settings page is not printed.
54 Chapter 4 Networking ENWW

Menu item Sub-menu item Sub-menu item Values and description
Secure Web For conguration management, specify whether the embedded Web server will accept
communications using HTTPS (Secure HTTP) only, or both HTTP and HTTPS.
HTTPS Required: For secure, encrypted communications, only HTTPS access is accepted. The
print server will appear as a secure site.
HTTP/HTTPS optional: Access using either HTTP or HTTPS is permitted.
NOTE: The factory default setting depends on the print server model.
IPSEC Specify the IPsec or Firewall status on the print server.
Keep: IPsec/Firewall status remains the same as currently congured.
Disable: IPsec/Firewall operation on the print server is disabled.
802.1x
Enable Wipe
Reset Security Specify whether the current security settings on the print server will be saved or reset to
factory defaults.
No (default): The current security settings are maintained.
Yes: Security settings are reset to factory defaults.
Link Speed The link speed and communication mode of the print server must match the network. The
available settings depend on the device and installed print server. Select one of the following
link conguration settings:
CAUTION: If you change the link setting, network communications with the print server and
network device might be lost.
Auto (default): The print server uses auto-negotiation to congure itself with the highest link
speed and communication mode allowed. If auto-negotiation fails, either 100TX HALF or 10TX
HALF is set depending on the detected link speed of the hub/switch port. (A 1000T half-duplex
selection is not supported.)
10T Half: 10 Mbps, half-duplex operation.
10T Full: 10 Mbps, Full-duplex operation.
100TX Half: 100 Mbps, half-duplex operation.
100TX Full: 100 Mbps, full-duplex operation.
100TX Auto: Limits auto-negotiation to a maximum link speed of 100 Mbps.
1000TX Full: 1000 Mbps, full-duplex operation.
Link conguration methods
The printer supports 10, 100, or 1000 Mbps network link speeds using full-duplex or half-duplex communication
modes (a 1000T half-duplex selection is not supported). By default, it will attempt to auto-negotiate its link
operation with the network.
When connecting to network hubs and switches that do not support auto-negotiation, the printer will congure
itself for 10 Mbps or 100 Mbps half-duplex operation. For example, when connected to a non-negotiating 10
Mbps hub, the print server will automatically set itself to operate at 10 Mbps half-duplex.
ENWW Link conguration methods 55

If the printer is not able to connect to the network through auto-negotiation, you can set the link setting by one
of the following methods:
● The front panel
● The Embedded Web Server
● The Telnet interface, through a system command prompt
● Network management tools such as HP Web Jetadmin
Troubleshooting
IO Conguration card
The IO Conguration card provides comprehensive print server status. The information provided is an important
diagnostic tool, especially if network communication is not available. For a description of messages that may
appear on the card, see the HP Jetdirect Print Servers Administrator’s Guide for your print server model.
For detailed connectivity information, go to the Connectivity menu and click Network card or Services card to see
all the information available.
The network card provides details about the network conguration and status. The services card provides
information about the state of connections to HP services, such as HP ePrint.
To verify correct operation:
1. On the network card, look for the status message I/O Card Ready.
2. If I/O Card Ready appears, the print server is operating properly. Proceed to the next section.
If a message other than I/O Card Ready appears, try the following:
a. Turn the printer o and then on again to re-initialize the print server.
b. Check that the status indicator lights (LEDs) are providing proper status.
See the HP Jetdirect Print Servers Administrator’s Guide for your print server model to interpret and troubleshoot
other messages.
Reset network parameters
If you accidentally miscongured the printer’s network settings, they can be reset to factory default values by
tapping
, then , then Network > Restore connectivity factory settings.
CAUTION: A factory-installed HP Jetdirect X.509 certicate will be saved during reset to factory default values.
However, a Certicate Authority (CA) certicate that has been installed by the user to validate a network
authentication server will not be saved.
56 Chapter 4 Networking ENWW

Link troubleshooting
The printer has status lights (LEDs) beside the network connector that indicate the link status and network
activity.
● When the green light is on, the printer has successfully linked to the network.
● When the yellow light is blinking, there is network transmission activity.
If the printer does not successfully connect to the network:
● Both LEDs will be o.
● The alert No network cable connected will appear on the front panel.
If a link failure is indicated, try the following:
1. Check the cable connections at both ends.
2. Consider replacing the cables by known good ones.
3. Consider switching to another network connector in the network switch, hub, or device to which the printer
is connected.
4. Manually congure the link setting to match the port conguration of the network hub or switch. For
manual conguration methods, see Link conguration methods on page 55. Turn the printer o, then on
again, to re-initialize the setting.
5. Print a Connectivity Conguration page and check link settings.
Item Description
Port Cong If the printer is properly linked, this item has one of the following values:
● 10BASE-T HALF: 10 Mbps, half-duplex
●
10BASE-T FULL: 10 Mbps, full-duplex
●
100TX-HALF: 100 Mbps, half-duplex
●
100TX-FULL: 100 Mbps, full-duplex
●
1000TX FULL
If the printer is not properly linked, one of the following messages will appear:
●
UNKNOWN: The printer is in an initialization state.
●
DISCONNECTED: A network connection has not been detected. Check network cables. Recongure the
link settings, or restart the printer.
Auto Negotiation Indicates whether auto-negotiation for link conguration is on or o.
● ON (default): The printer will attempt to automatically congure itself onto the network at the proper
speed and communication mode.
● OFF: You must manually congure the link speed and communication mode using the front panel. Your
settings must match those of the network for proper operation.
6
. In case of doubt or misconguration of link settings, reset the network parameters to their factory settings.
See
Reset network parameters on page 56.
ENWW Troubleshooting 57

Communication failures between computer and printer
Some symptoms are:
● The front-panel display does not show the Received jobs message when you have sent jobs to the printer.
● Your computer displays an error message when you are trying to print.
● Your computer or printer hangs (stays idle), while communication is taking place.
● Print jobs get stuck in your computer’s print spooler.
● Your printed output shows random or inexplicable errors (misplaced lines, partial graphics, and so on).
To solve a communication problem:
● Ensure that you have selected the correct printer when sending your job.
● Ensure that the printer works correctly when printing from other applications.
● If your printer is connected to your computer through any other intermediate devices, such as switch
boxes, buer boxes, cable adapters, or cable converters, try using it when connected directly to your
computer.
● Try another network cable.
● Remember that very large prints may take some time to receive, process and print.
● If your printer displays warning or error messages that require action, take the required action before
trying to print.
Cannot access the Embedded Web Server
1. If you have not done so already, read Embedded Web Server on page 13.
2. Make sure that Embdedded Web Server functionality is enabled in the printer: from the front panel, tap
, then Security > Connectivity > Embedded Web Server (EWS) > On.
3. Check the proxy conguration in your Web browser in case it is preventing communication with the printer.
4. Ensure that the printer works correctly when printing or accessed from other applications.
5. If the printer displays warning or error messages that require further action, take the action to resolve the
problems.
6. If all else fails, turn the printer o and on again with the power key on the front panel.
Cannot access the printer from the HP Utility
1. If you have not done so already, read HP Utility on page 12.
2. Make sure your printer is not in sleep mode.
3. Make sure your printer driver is available and working correctly for the HP Utility in Windows.
4. From the front panel, tap , then Security > Web services > Printing & management, and make sure that
it is enabled. If it is disabled, some parts of the HP Utility may not work properly.
58 Chapter 4 Networking ENWW

Print jobs take too much time to be received by the printer
If you send a very large print to the printer, there will normally be some delay before it starts printing. However,
if you think you are experiencing abnormally long delays, there are various things you could check:
● Make sure the network cable connected to the printer is rated at least Cat5e.
● Make sure that gigabit-speed networking equipment and cabling interconnects your computer client to the
printer.
● Make sure that there are no network link issues. See Link troubleshooting on page 57.
● Take into account that, in network deployments with IPSec security protocols enabled and congured in the
printer, network performance may be reduced due to the use of cryptographic algorithms to protect
network communications.
● Try resetting the network conguration to its factory settings in order to get default settings that are
suitable for most standard network environments. See Reset network parameters on page 56.
● You may also nd it helpful to test connecting the computer to the printer directly, using a normal Ethernet
(Cat5e or Cat6) cable point-to-point, without passing through an Ethernet switch or router. In this
conguration, the printer and the computer should both automatically change their IPv4 addresses to the
form 169.254.x.x . In this point-to-point conguration you can discard any issues caused by other network
equipment.
ENWW Troubleshooting 59

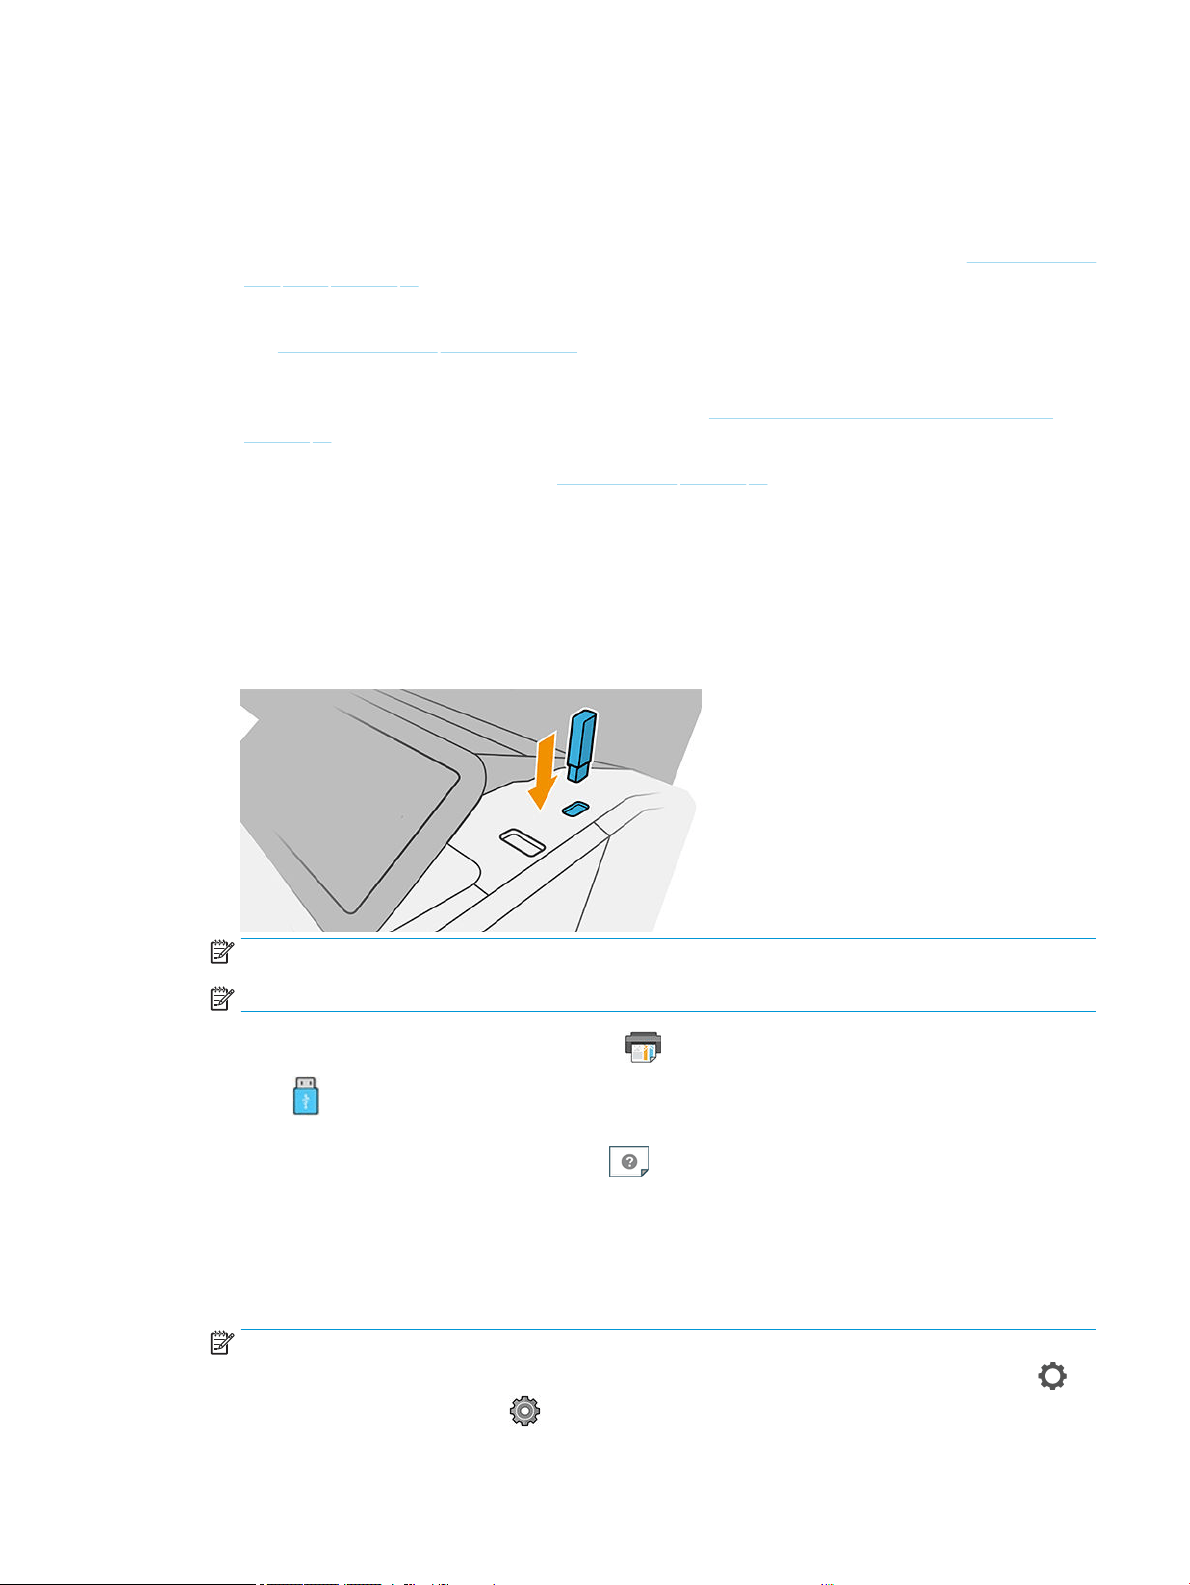
Introduction
There are various dierent ways in which you can choose to print, depending on your circumstances and
preferences:
● Print a TIFF, JPEG, HP-GL/2, RTL, PDF, or PostScript le directly from a USB ash drive. See Print from a USB
ash drive on page 61.
● Print a TIFF, JPEG, HP-GL/2, or PDF le directly from a computer connected to the printer, using HP Click.
See http://www.hp.com/go/DesignJetclick.
● Print any kind of le from a computer connected to the printer, using a software application that can open
the le, and a printer driver supplied with your printer. See Print from a computer using a printer driver
on page 63.
● Print from a smartphone or tablet. See Mobile printing on page 29.
● Print from a network folder. See Print from the network folder on page 62.
Print from a USB ash drive
1. Insert a USB ash drive containing one or more TIFF, JPEG, HP-GL/2, RTL, PDF, or PostScript les into the
printer's USB port.
NOTE: To print PDF or PostScript le, you must have a PostScript printer.
NOTE: The use of USB ash drives with your printer may be disabled by the administrator.
2. At the front panel, go to the home page and tap .
3.
Select . You can tap folders to browse their contents. Files are shown as document thumbnails, and you
can preview a ile by tapping the preview icon. When the preview is displayed, you can zoom in and out.
Files that cannot be printed are indicated with . For more details, press the information button.
4. Select a le to be printed. Multipage documents are supported only in PDF les; in this case, you can also
select a page to print.
5. The list of print-from-USB quicksets is displayed. You can choose and/or edit one of the quicksets for the
selected job.
NOTE: If you edit a quickset after selecting a job, the changed settings are applied only to the current job
and are not saved permanently. You can change any of your own quicksets permanently by tapping
on
the quicksets page, or by tapping
, then Quicksets.
ENWW Introduction 61

NOTE: The factory quicksets cannot be modied.
The following settings are available:
● Quickset name allows you to name the quickset you are working with.
●
Output scale allows you to resize the print in two dierent ways: to a percentage of its original size, or
to t a particular paper size. The default is 100% (its original size).
● Print quality allows you to set the print quality to Fast, Normal, or Best.
●
Color options allows you to choose color or grayscale.
●
Paper source allows you to specify printing on roll 1 or roll 2, or you can choose Save paper, which
automatically chooses the narrowest roll on which the print will t (if two rolls are loaded).
● Paper category allows you to choose the type of paper.
●
Page order allows you to choose rst page on top, or last page on top.
●
Collate allows you to turn collation on or o.
●
Rotation allows you to rotate the print by any multiple of 90°, or you can choose Automatic, which
rotates the print automatically if that will save paper.
● Alignment allows you to align the printer to the left, center, or right of the roll.
●
Printer margins allows you to change the default printer margins.
●
Storage mode oers two options, print and delete (the job is not retained in the job queue) and print
and store (the job is retained in the job queue).
6. When you are satised with the quickset settings, tap OK to continue.
7. A page with the following settings appears: Copies, Page order, and Collate. You can check and change
them in this step, regardless of the settings in the quickset. Tap Print to continue.
8. After printing, you can choose to print another le or go to the job queue. If you print another le
immediately without returning to the home page, the temporary settings used for the previous le are
used again.
Print from the network folder
1. Conrm the network folder is congured. See Congure a network folder on page 19.
2. At the front panel, go to the home page and tap
3. Select Network.
4. Select a le to be printed. Multipage documents are only supported in PDF; in this case, you can also select
a page to print.
5. The list of print-from-Network quicksets is displayed. You can choose and/or edit one of the quicksets for
the selected job.
62 Chapter 5 Printing ENWW

NOTE: If you edit a quickset after selecting a job, the changed settings are applied only to the current job
and are not saved permanently. You can change any of your own quicksets permanently by tapping
,
then manage quicksets, or by tapping , then Quicksets.
NOTE: The factory quicksets cannot be modied.
The following settings are available:
● Quickset name allows you to name the quickset you are working with.
●
Print quality allows you to set the print quality to Fast, Normal, or Best.
●
Output scale allows you to resize the print in two dierent ways: to a percentage of its original size, or
to t a particular paper size. The default is 100% (its original size).
● Color options allows you to choose color or grayscale.
●
Paper source allows you to specify printing on roll 1 or roll 2, or you can choose Save paper, which
automatically chooses the narrowest roll on which the print will t (if two rolls are loaded).
● Paper category allows you to choose the type of paper.
●
Page order allows you to choose rst page on top, or last page on top.
●
Collate allows you to turn collation on or o.
●
Rotation allows you to rotate the print by any multiple of 90°, or you can choose Automatic, which
rotates the print automatically if that will save paper.
● Print margins allows you to change the default printer margins.
●
Storage mode oers two options, print and delete (the job is not retained in the job queue) and print
and store (the job is retained in the job queue).
● Output destination.
6. When you are satised with the quickset settings, tap OK to continue. You can tap , then show quickset
details panel to show the most common quickset settings used.
7. Copies, Page order, and Collate can be selected in the right column of the screen. Tap Print to continue.
8. After printing, you can choose to print another le or go to the job queue. If you print another le
immediately without returning to the home page, the temporary settings used for the previous le are
used again.
Print from a computer using a printer driver
This is the traditional way of printing from a computer. The correct printer driver must be installed on the
computer (see Install your printer under Windows on page 15), and the computer must be connected to the
printer.
When the printer driver has been installed and the computer is connected to the printer, you can print from a
software application by using the application's own Print command and selecting the correct printer.
ENWW Print from a computer using a printer driver 63

Advanced print settings
The rest of this chapter explains the various print settings that you can use when printing with a printer driver or
the front panel. These methods oer a relatively large number of settings in order to satisfy all requirements.
TIP: In general you are recommended to use the default settings unless you know that they do not meet your
requirements.
TIP: If you intend to reuse a particular group of settings repeatedly, you can save those settings under a name
of your own choice and recall them later. A saved group of settings is known as a 'quick set' in the Windows
printer driver.
Select print quality
The printer has various print-quality options because best-quality printing requires some loss of speed, while
fast printing implies some reduction in print quality.
Therefore, the standard print-quality selector is a slider that allows you to choose between quality and speed.
With some paper types, you can choose a compromise position between the two.
Alternatively, you can select from the custom options: Best, Normal and Fast. If you select Fast, you can also
select Economode, which uses a lower rendering resolution and consumes less ink. It therefore increases
printing speed even further, but reduces print quality. Economode can be selected only from the custom options
(not from the slider).
There is also a supplementary custom option that may have an eect on print quality: Maximum detail. See
High-quality printing on page 70.
NOTE: In the Windows driver dialog, the rendering resolution for your job is displayed in the Custom Print
Quality Options dialog box (click Custom options > Settings).
64 Chapter 5 Printing ENWW
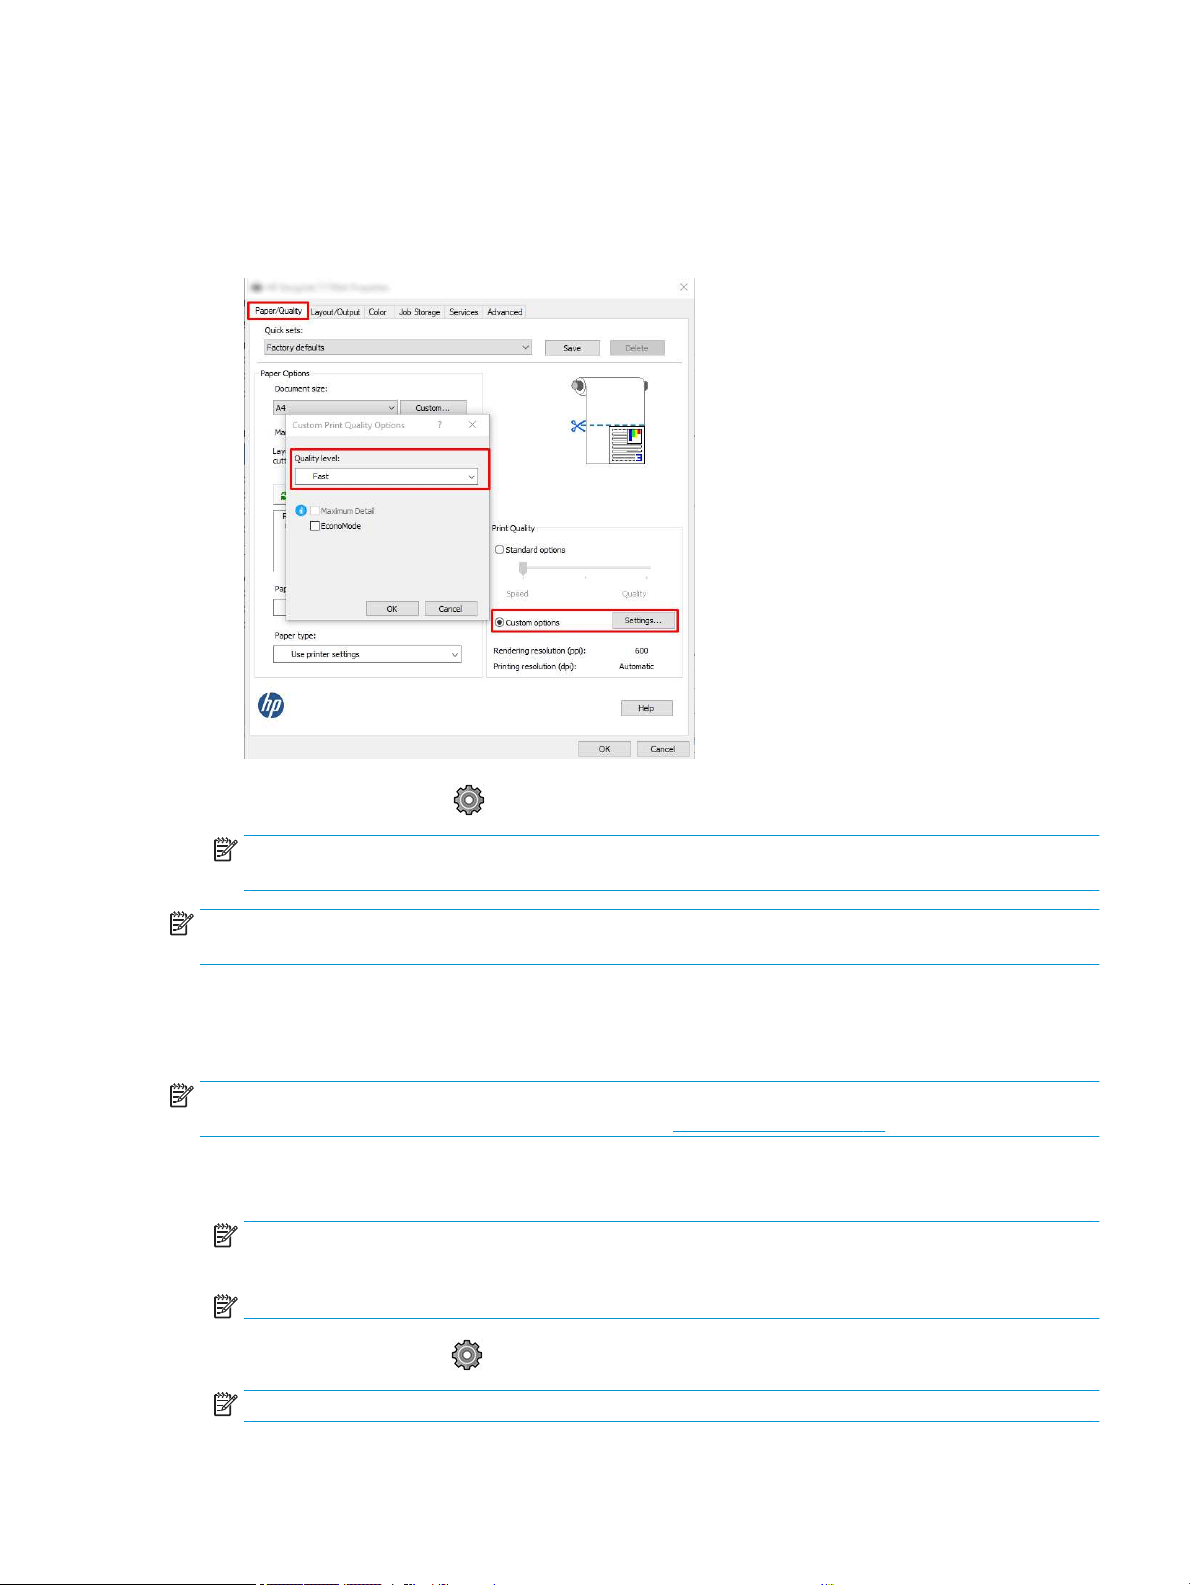
You can select print-quality options in the following ways:
● In the Windows driver dialog: Go to the Paper/Quality or Paper tab (depending on the driver version) and
look at the Print Quality section. If you use Standard Options, you will see a simple slider with which you
can select speed or quality. If you use Custom Options or Advanced(depending on the driver version), you
will see the more specic options described above.
● Using the front panel: Tap , then Default printing conguration > Print quality.
NOTE: If the print quality is set from your computer, it overrides the print-quality setting in the front
panel.
NOTE: You cannot change the print quality of pages that the printer is already receiving or has already received
(even if they have not started to print yet).
Select paper size
The paper size can be specied in the following ways.
NOTE: The paper size specied here should be the paper size in which the document was created. It is possible
to rescale the document to a dierent size for printing. See Rescale a print on page 68.
● In the Windows driver dialog: Select the Paper/Quality or Paper tab (depending on the driver version), then
select your paper size from the Document Size list.
NOTE: If you are printing with the V4 driver and from Adobe Acrobat, the page size and orientation are
determined by the application.
NOTE: If your application oers no Page Setup dialog, use the Print dialog.
● Using the front panel: tap , then Default printing conguration > Paper options > Paper size.
NOTE: If the paper size is set from your computer, it overrides the paper size setting in the front panel.
ENWW Advanced print settings 65

Custom paper sizes
If you want to choose a paper size that is not included in the list of standard paper sizes, there are various
dierent ways to specify it.
Use the Windows printer driver (version 3)
1. Click the Paper/Quality tab.
2. Click Custom.
3. Enter the name and dimensions of your new paper size.
4. Click OK. The new paper size is automatically selected.
Use the Windows printer driver (version 4)
1. Click the Paper tab.
2. Click Document size.
3. Enter the dimensions of your new paper size into the two elds in the custom area.
4. Click the arrow button.
A custom paper size created with the printer driver has the following characteristics:
● The paper size is permanent. It will not disappear if the driver is closed or the computer is turned o.
● The paper size is local to the printer queue. It will not be seen from other printer queues in the same
computer.
● In Domain server networks, the paper size is local to the computer. It will not be seen from other computers
sharing the printer queue.
● In Workgroup networks, the paper size will be shared among all the computers sharing the printer queue.
● If the printer queue is deleted, the paper size is deleted with it.
Use Windows forms
1. From the Start menu, or from the Control Panel, select Printers and Faxes.
2. From the File menu, select Server Properties.
3. In the Forms tab, check the Create a new form box.
4. Enter the name and dimensions of your new paper size. Leave the margins as 0.00.
5. Click the Save Form button.
6. Go to the printer driver, and select the Paper/Quality or Paper tab (depending on the driver version).
7. Select More… from the drop-down list of paper sizes.
8. Select your new paper size from the group of Custom sizes.
66 Chapter 5 Printing ENWW

A custom paper size created with Windows forms has the following characteristics:
● The paper size is permanent. It will not disappear if the driver is closed or the computer is turned o.
● Restricted users cannot create paper forms. The “manage documents” role in the Windows Active Directory
is the minimum required.
● The paper size is local to the computer. It will be seen in all the printer queues that have been created on
the computer and that support paper of that size.
● If a printer queue is shared, this paper size will appear in all the client computers.
● If a printer queue is shared from another computer, this paper size will not appear on the driver´s
document size list. A Windows form in a shared queue needs to be created in the server.
● If the printer queue is deleted, the paper size is not deleted.
Select margin options
By default, the printer leaves a 5 mm margin between the edges of your image and the edges of the paper
(increased to 22 mm at the foot of cut-sheet paper). However, you can change this behavior in several ways.
Choose between 3 and 5 mm margins
● In the Windows V3 driver dialog: Select the Advanced tab, then click Advanced features > Document
options > Printer features > Margin, and select the margin size.
● In the Windows V4 driver dialog: Select the Layout tab and select your margins from the With Margins list.
● Using the front panel: Tap , then Printing preferences > Margins.
Choose margin layout options
● In the Windows V3 driver dialog: Select the Paper/Quality tab, and click the Margins/Cutter Settings button.
The Layout and Margins window is displayed.
● In the Windows V4 driver dialog: Select the Layout tab and go to the Layout Mode area.
● Using the front panel: Tap , then Default printing conguration > Margins layout.
You will then see at least some of the following options.
● Use application settings (drivers)/Use standard (front panel). Your image will be printed on a page of the
size you have selected, with a narrow margin between the edges of the image and the edges of the paper.
The image should be small enough to t between the margins.
● Oversize. Your image will be printed on a page slightly larger than the size you have selected. If you cut o
the margins, you will be left with a page of the size you selected, with no margins remaining between your
image and the edges of the paper.
● Clip contents by margins. Your image will be printed on a page of the size you have selected, with a narrow
margin between the edges of the image and the edges of the paper. In this case, if the image is the same
size as the page, the printer assumes that the extreme edges of the image are either white or unimportant,
and do not need to be printed. This may be useful when your image already contains a border.
ENWW Advanced print settings 67

Print on loaded paper
To print a job on whichever paper is loaded in the printer, choose the following Paper Type option in your printer
driver:
● In the Windows driver dialog: Select the Paper/Quality or Paper tab (depending on the driver version), then
select Use Printer Settings in the Paper Type drop-down list.
NOTE: Use Printer Settings (Windows) or Any (Mac OS X) is the default Paper Type selection.
Rescale a print
You can send an image to the printer at a certain size but tell the printer to rescale it to a dierent size (normally
larger). This may be useful:
● If your software does not support large formats
● If your le is too large for the printer's memory—in this case, you can reduce the paper size in your
software and then scale it up again using the front-panel option
You can rescale an image in the following ways:
● In the Windows driver dialog: Go to the Layout Output or Layout tab (depending on the driver version) and
look at the Resizing Options section.
– The Actual size option leaves the size of the image unchanged.
– The
Fit to option adjusts the image size to the paper size you have selected. For example, if you have
selected ISO A2 as the paper size and you print an A3-sized image, it is enlarged to t the A2 paper. If
the ISO A4 paper size is selected, the printer reduces a larger image to t the A4 size.
– The % of actual size or Scale % option (depending on the driver version) enlarges the printable area of
the original paper size (the page minus the margins) by the percentage indicated, then adds the
margins to create the output paper size.
● Using the front panel: Tap , then Default printing conguration > Paper options > Resize.
If you are printing to a single sheet, you must ensure that the image can actually t onto the sheet, otherwise
the image will be clipped.
Change the treatment of overlapping lines
NOTE: This topic applies only when printing an HP-GL/2 job.
The merge option controls the overlapping lines in an image. There are two settings:
● O: Where the lines cross, only the color of the top line is printed. This is the default setting.
● On: Where the lines cross, the colors of the two lines merge.
To turn merge on, go to the front panel and tap
, then Default printing conguration > HP-GL/2 options >
Merge. You can set the merge option from your software in some applications. Settings in your software override
the front-panel settings.
68 Chapter 5 Printing ENWW

Preview a print
Previewing a print on the screen allows you to check the layout of the print before printing, which may help you
to avoid wasting paper and ink on a bad print.
● To preview a print under Windows, you have the following options:
– Use the HP Print Preview application:
Check the Show preview before printing box, which you can nd in the right bottom corner of the
driver dialog. Click Print, then wait a few seconds for the HP Print Preview application to be launched.
Check that the preview of the job is what you wanted. If so, click Print, otherwise click Cancel; you can
readjust the driver settings before trying again.
NOTE: The Show preview before printing box appears in the driver dialog only if HP Print Preview is
installed in your computer. See HP Print Preview on page 12.
– Use your application's print preview option.
● To preview a print under Mac OS X, you have the following options:
– Use your application's print preview option.
– There is no
Preview button at the bottom of the Print dialog box in the latest versions of Mac OS X. A
print preview is always shown at the upper left of the Print dialog box for most applications.
– Choose the HP Print Preview option from the PDF menu at the bottom of the Print dialog box. The
print preview is displayed by a separate HP Print Preview application.
Print a draft
You can specify fast draft-quality printing in the following ways:
● In the Windows driver dialog: Go to the Paper/Quality or Paper tab (depending on the driver version) and
look at the Print Quality section. Move the print-quality slider to the extreme left ('Speed').
● Using the front panel: Tap , then Default printing conguration > Print quality > Select quality level >
Fast.
You can specify even faster draft-quality printing by using Economode, as follows. This is intended mainly for
documents containing only text and line drawings.
● In the Windows driver dialog: Go to the Paper/Quality or Paper tab (depending on the driver version) and
look at the Print Quality section. Select Custom Options or Advanced (depending on the driver version),
then set the quality level to Fast and check the Economode box.
● Using the front panel: Tap , then Default printing conguration > Print quality > Enable economode.
NOTE: If the print quality is set from your computer, it overrides the print-quality setting in the front panel.
ENWW Advanced print settings 69

High-quality printing
You can specify high-quality printing in the following ways:
● In the Windows driver dialog: Go to the Paper/Quality or Paper tab (depending on the driver version) and
look at the Print Quality section. Move the print-quality slider to the extreme right ('Quality').
● Using the front panel: Tap , then Default printing conguration > Quality level > Best.
NOTE: If the print quality is set from your computer, it overrides the print-quality setting in the front panel.
If you have a high-resolution image
If your image has a resolution greater than the rendering resolution (which you can see in the Custom Print
Quality Options box under Windows), print sharpness may be improved by selecting the Maximum detail option.
This option is available only if you are printing on glossy paper and you have selected Best print quality.
● Using the front panel: Tap , then Default printing conguration > Print quality > Enable maximum detail.
NOTE: The Maximum detail option results in slower printing with photo papers, but it does not increase the
amount of ink used.
Print in gray shades
You can convert all colors in your image to shades of gray: see Printing in grayscale on page 91.
Print with crop lines
Crop lines indicate where the paper should be cut to reduce it to your selected page size. You can print crop lines
with individual jobs in the following ways:
● In the Windows V3 driver dialog: Select the Paper/Quality tab, then click the Margins/Cutter Settings button.
Check the Draw cutting lines box in the Layout and Margins window.
● In the Windows V4 driver dialog: Select the Output tab and check the Crop lines box.
Alternatively, you can choose to print crop lines with all jobs by default:
● Using the front panel: Tap , then Default printing conguration > Paper options > Enable crop lines > On.
To print crop lines with nested jobs (see
Nest jobs to save roll paper on page 71), you must select a dierent
option:
● Using the front panel: Tap , then Job management > Nest options > Enable crop lines > On.
Use paper economically
Here are some recommendations for making economical use of paper:
● If you are printing relatively small images or document pages, you can use nesting to print them side by
side instead of one after another. See Nest jobs to save roll paper on page 71.
● You may be able to save some roll paper by using the following options:
–
In the Windows driver dialog:
70 Chapter 5 Printing ENWW
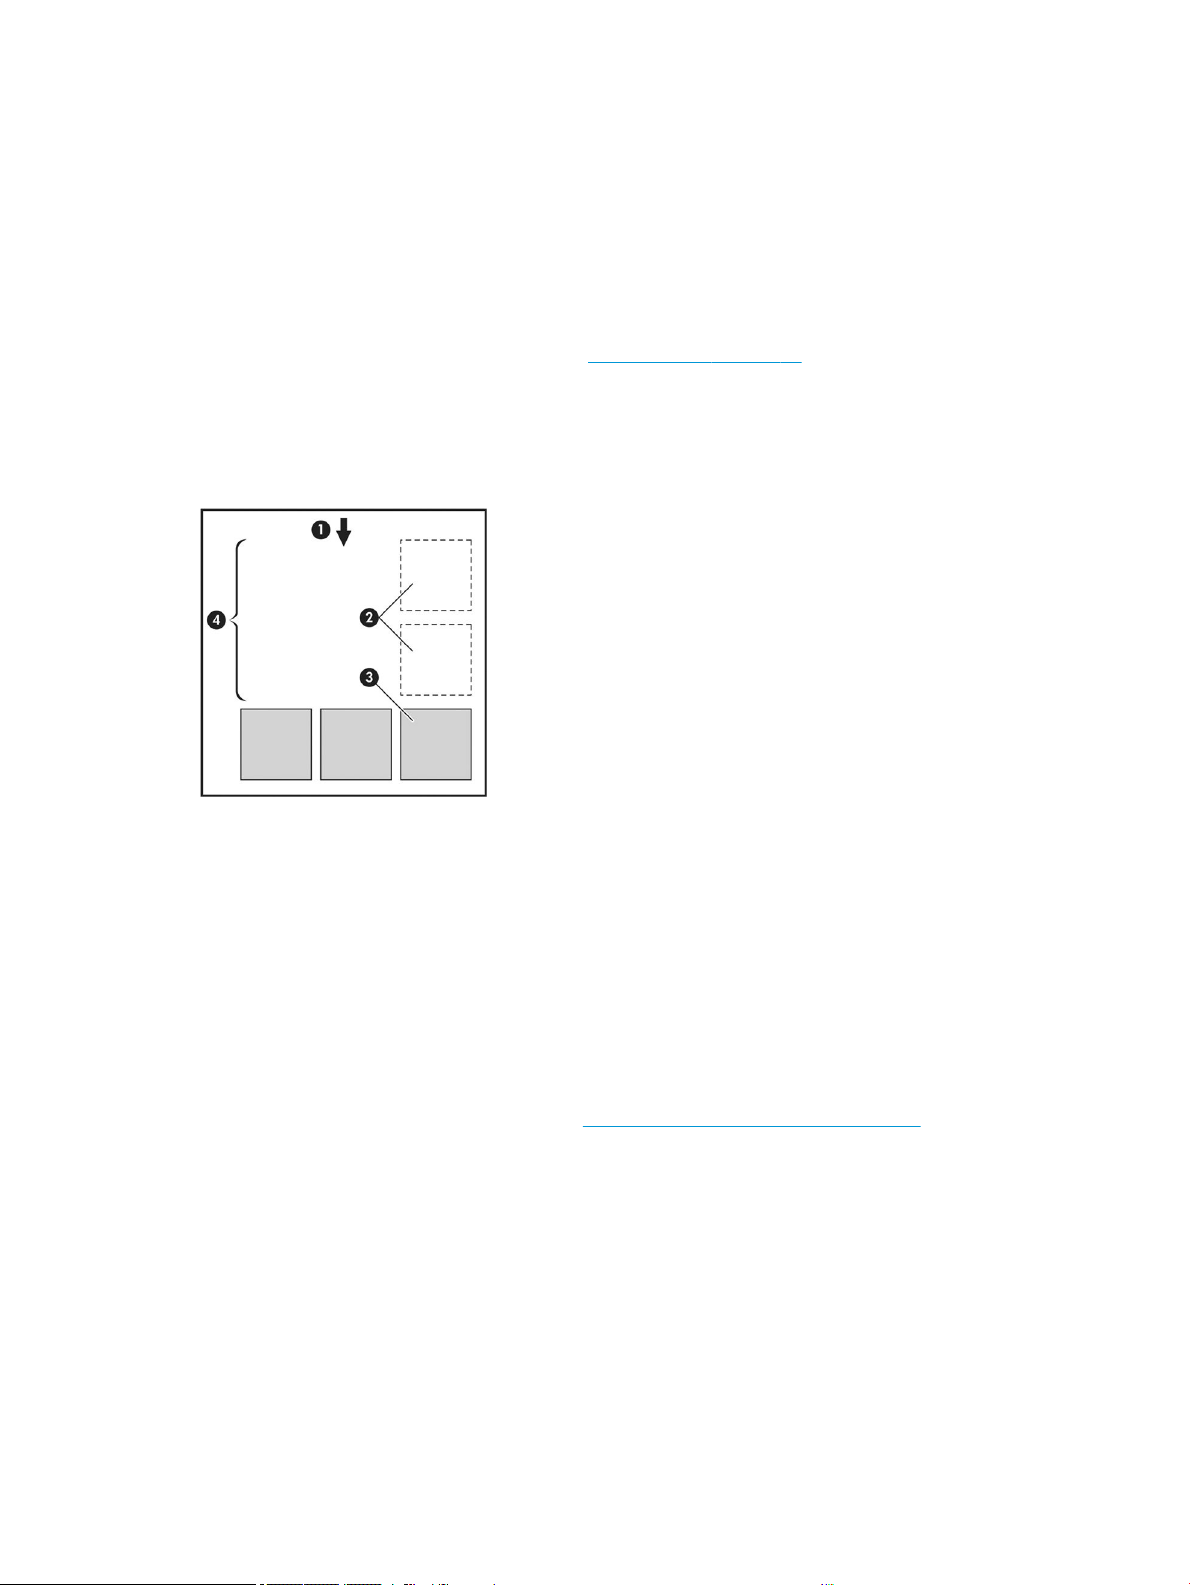
○ With a version 3 driver: Click the Paper/Quality tab, then the Margins/Cutter Settings button,
then check the box Remove blank areas.
○ With a version 4 driver: Click the Output tab, then Roll options, then check the box Remove blank
areas.
You can also select the Layout/Output or Layout tab (depending on the driver version) and then select
one of the Rotation options.
● If you check the print preview on your computer before printing, you can sometimes avoid wasting paper
on prints containing obvious mistakes. See Preview a print on page 69.
Nest jobs to save roll paper
Nesting means automatically printing images or document pages side by side on the paper, rather than one
after the other. This is done to avoid wasting paper.
1. Direction of paper ow
2. Nesting o
3. Nesting on
4. Paper saved by nesting
When does the printer try to nest pages?
When both of the following are true:
● The printer is loaded with roll paper, not sheet paper.
● The printer's Nest option is turned on. See How to turn nesting on and o on page 72.
What pages can be nested?
All pages can be nested, unless they are so large that two of them cannot t side by side on the roll, or unless
there are too many of them to t into the remaining length of the roll. A single group of nested pages cannot be
split between two rolls.
ENWW Advanced print settings 71

Which pages qualify for nesting?
In order to be in the same nest, the individual pages must be compatible in all of the following ways:
● All pages must have the same print quality setting (Economode, Fast, Normal or Best).
● The Maximum Detail setting must be the same on all pages.
● The Layout/Margins setting must be the same for all pages.
● The Mirror Image setting must be the same for all pages.
● The Rendering Intent must be the same for all pages.
● The Cutter setting must be the same for all pages.
● Pages must be all color, or all grayscale: not some in color and some in grayscale.
● All pages must be in one or other of the following two groups (the two groups cannot be mixed in the same
nest):
– PCL3, RTL, TIFF, JPEG
– PostScript, PDF
● JPEG and TIFF pages with resolutions greater than 300 dpi may not nest with other pages in some cases.
How to turn nesting on and o
To turn nesting on or o, you must rst make sure that the start of printing is set to After Processing (see Select
when to print a job on page 81).
Then go to the front panel and tap
, then Job management > Nest options > Nesting.
You will see the following options:
● In order: Pages are nested in the order in which they are sent to the printer (this is the default option). The
nested pages are printed as soon as one of three conditions is met:
– The next page will not t on the same row as the other pages already nested.
– No page has been sent to the printer during the specied wait time.
– The next page is incompatible with the pages already nested (see
Nest jobs to save roll paper
on page 71).
● Optimized order: Pages are not necessarily nested in the order in which they are sent to the printer. When it
receives an incompatible page, the printer holds it and waits for compatible pages to complete the nest.
The nested pages are printed as soon as one of three conditions is met:
– The next page will not t on the same row as the other pages already nested.
– No page has been sent to the printer during the specied wait time.
– The incompatible-page queue is full. The printer can queue up to six incompatible pages while
nesting compatible pages. If it receives a seventh incompatible page, the nest is printed as it is.
● O: nesting is disabled.
72 Chapter 5 Printing ENWW

TIP: Optimized order uses the minimum amount of paper; however, it may take longer to print because the
printer waits for compatible pages to arrive.
How long does the printer wait for another le?
So that the printer can make the best nest possible, it waits after a le has been received to check whether a
subsequent page will nest with it or with pages already in the queue. This waiting period is the nest wait time;
the factory default nest wait time is 2 minutes. This means that the printer waits for up to 2 minutes after the
last le is received before printing the nal nest. You can change this waiting time from the printer's front panel:
tap
, then Job management > Nest options, and select the wait time. The available range is 1 to 99 minutes.
While the printer is waiting for nesting to time out, it displays the remaining time on the front panel and in the
Embedded Web Server.
Use ink economically
Here are some recommendations for making economical use of ink:
● For draft prints, use plain paper and move the print-quality slider to the left end of the scale ('Speed'). For
further economy, select custom print quality options, then select Fast and Economode.
● Clean the printheads only when needed, and clean only those printheads that need cleaning. Cleaning the
printheads can be useful, but it uses a small amount of ink.
● Leave the printer permanently turned on so that it can maintain the printheads in good condition
automatically. This regular printhead maintenance uses a small amount of ink. However, if it is not done,
the printer may need to use much more ink later to restore the health of the printheads.
● Wide prints make more ecient use of ink than narrow prints, because printhead maintenance uses some
ink, and its frequency is related to the number of passes made by the printheads. Therefore, nesting jobs
can save ink as well as saving paper (see Nest jobs to save roll paper on page 71).
Protect a paper type (T1600dr only)
You can protect selected paper types to avoid printing on them unintentionally. A protected paper type will be
printed on only when the paper type is explicitly specied in the job.
To protect a paper type, tap
, then Job management > Roll policies > Protected paper types, then select the
category of paper you want to protect.
When a paper type is protected, the
icon appears before the paper name.
To print on a protected paper category, just select the paper type explicitly when submitting the job from a
printer driver or other job submission software.
NOTE: If a protected paper type is not explicitly selected, and no other paper types are available, an out-of-
paper message will appear.
Unattended printing/overnight printing
The printer is well suited to long, unattended print jobs, having multiple rolls plus robust and consistent image
quality.
Here are some recommendations to help you deal with a long queue of printing jobs.
ENWW Advanced print settings 73
● If feasible, use brand-new long rolls of paper.
● If you want to print on partly-used rolls, you can check the paper type and the remaining length in the
Embedded Web Server or in the front panel, to conrm that you have enough paper to print all your jobs.
NOTE: Information on the remaining length is available only if you told the printer the length of the roll
when you loaded it, or if the printer read the length of the roll from the barcode printed on it.
● If you have a T1600dr printer, load two rolls of paper suitable for your jobs. If the printer nishes one roll, it
will automatically switch to the other.
● HP recommends the use of papers approved for your printer. See Supplies and accessories on page 137.
● Check that you have paper wide enough to print all of your jobs. Any jobs that are too wide may be put on
hold for paper if the paper mismatch action is set to Put job on hold (see Solve paper mismatch
on page 82).
● Check the ink levels remaining in your ink cartridges.
● When you have submitted your print jobs, you can use the Embedded Web Server from a remote location
to monitor their status.
● Drying time should be set to Optimal.
● Tap , then Job management > Roll policies > Use most depleted roll > On.
We recommend the following settings, depending on the paper type and what kind of prints you are making.
Recommended settings for unattended printing
Print type Print mode Maximum detail Drying time Paper types
Lines Normal O Optimal Coated, Bond, Heavyweight
Coated, Glossy
Lines and lls Normal O Optimal Coated, Bond, Heavyweight
Coated, Glossy
Maps Best O Optimal Coated, Heavyweight Coated,
Glossy
Renderings, photographs Best O Optimal Coated, Heavyweight Coated,
Glossy
74 Chapter 5 Printing ENWW


Introduction
You can print to your printer from many mobile devices and from almost any location. There are two main
methods of Mobile Printing:
● Direct printing by connection to the same network
● Printing by e-mail
Your printer can be connected to the Web, providing various benets:
● Automatic rmware updates (see Update the rmware on page 134)
● Print on HP printers from almost anywhere
● Print on HP printers from almost any device, including smartphones, tablets, and laptops
See
http://www.hp.com/go/designjetmobility for more detailed information.
You can enable Web Services when setting up the printer: see Set up printer services on page 15 or the
Assembly Instructions for more information.
IMPORTANT: The printer must be connected to a network with Internet access: connect an Ethernet cable. See
Connect the printer to your network on page 14.
Print from Android
NOTE: Printing is only available from applications that oer printing or sharing.
For Android printing, install and enable the HP Print Service App from Google Play (https://play.google.com/
store/apps/details?id=com.hp.android.printservice&hl=en), if it is not already installed in your device. You must
have Android KitKat 4.4 or later.
1. Open the document or photo you want to print, and press the menu icon, and select Print.
2. Choose your printer from the list.
3. Check the print settings, then press Print.
Print from Chrome OS
Printing from Chromebook devices is as easy as installing the HP Print for Chrome extension from the Chrome
Web Store (https://chrome.google.com/webstore/detail/hp-print-for-chrome/
cjanmonomjogheabiocdamfpknlpdehm).
1. Choose your content. Open the document or photo you want to print, tap the menu icon and select Print.
2. Choose your printer. Select from the list of printers that appears.
3. Conrm that the correct printer and print setting are selected. Tap Print and collect your printed
documents.
NOTE: Printing is only available from applications that oer printing or sharing.
76 Chapter 6 Mobile printing ENWW

Print and share from the HP Smart App
Use the screen on your mobile device to control print functions. Print PDF, photos, email attachments, and more
from virtually anywhere.
You can download the HP Smart App from the following locations:
● Android: https://play.google.com/store/apps/details?id=com.hp.printercontrol
●
iOS: https://itunes.apple.com/app/id469284907
Make sure your device and printer are operating on the same network, and follow the steps below:
iOS and Android printing with the HP Smart App
1. Open the HP Smart App and select your printer.
2. Select whether you want to print documents or photos from your local device, or link your Google Drive,
Dropbox, or other accounts to access your content.
3. Use the edit options to adjust quality, color, and other settings if you wish to make such adjustments.
4. Tap Print and collect your printed documents.
Print by email (HP ePrint)
IMPORTANT: To enable email printing, see Enable email printing with HP ePrint on page 16.
If you can email it, you can print it. Simply attach a PDF or other print-ready le to an email message, and send it
to your printer’s dedicated address.
You can print from anywhere with an Internet connection, with no need for a printer driver, but there are a few
limitations to bear in mind:
● The attached les to be printed must be in PDF format.
● The maximum le size is 10 MB, but your email server may have a lower limit.
● Files are printed in the original document size (at 100% scale), in normal quality, in color, and normally in
portrait orientation (some printers may oer autorotation).
For more information, see https://www.hpconnected.com.
Mobile specications
●
Mobile devices must have an Internet connection and email capability.
● Print requires the mobile device and printer to be on the same network.
● Printing by email also requires the printer to be connected to the Internet.
● iOS 7.0 and above, or Android KitKat4.4 and above, is required.
ENWW Print and share from the HP Smart App 77

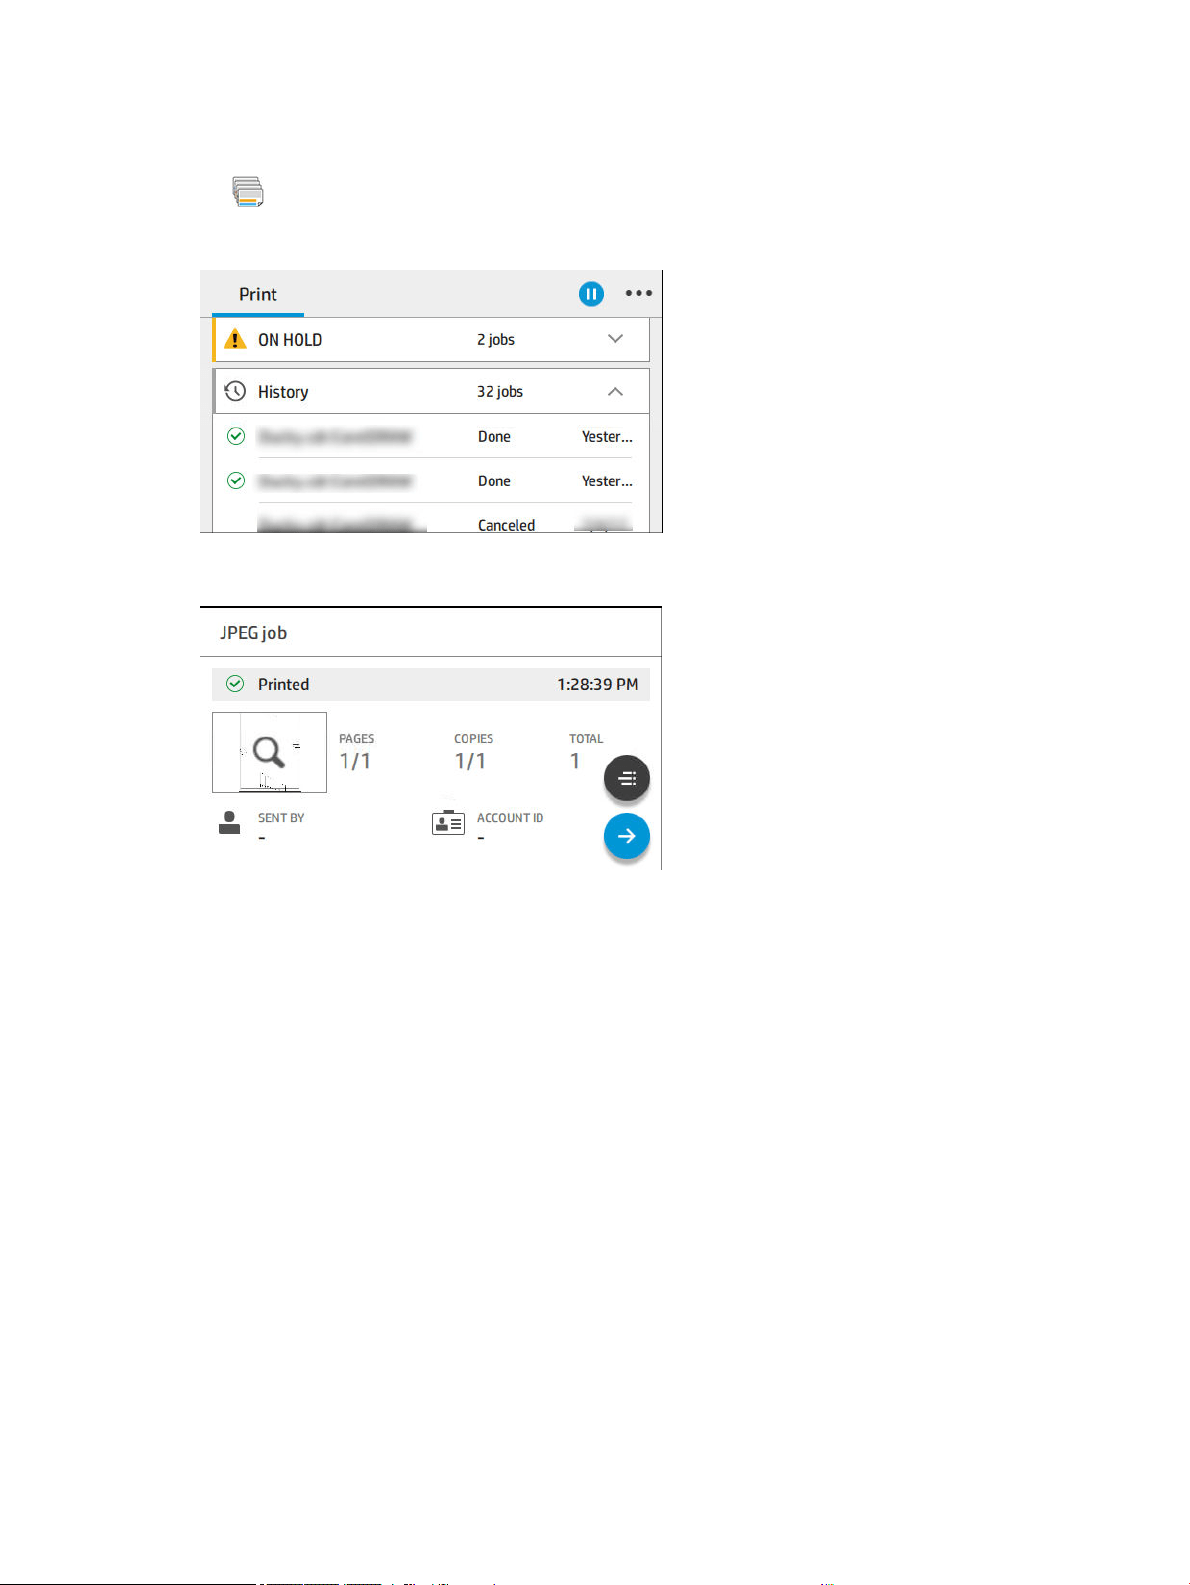
Job queue in the front panel
Tap on the home screen to view the job queue on the front panel.
The print queue includes jobs that are being received, parsed, rendered, printed, already printed, and so on.
Tap the name of the job to see all the job details, including information about status, pages, copies, total, and
preview.
In an active queue, the job you are printing appears in the middle of the queue, with printed jobs below and jobs
to be printed above. You can scroll up and down. Once scrolled, the queue remains static and does not move
automatically.
Jobs in the left pane are divided into four categories (Up next, Now printing, On hold, and History) in
chronological order starting from the top. On hold is shown only when there are one or more jobs on hold. Below
the job name, you can see its status:
Up next
● Waiting to process: The job has been received by the printer and is waiting to be rendered.
● Processing: The printer is parsing and rendering the job.
● Waiting to print or Paused: The job is processed and waiting for the print engine to be ready to proceed with
printing.
Now printing
The job is being printed.
● Paused: The job is paused.
ENWW Job queue in the front panel 79
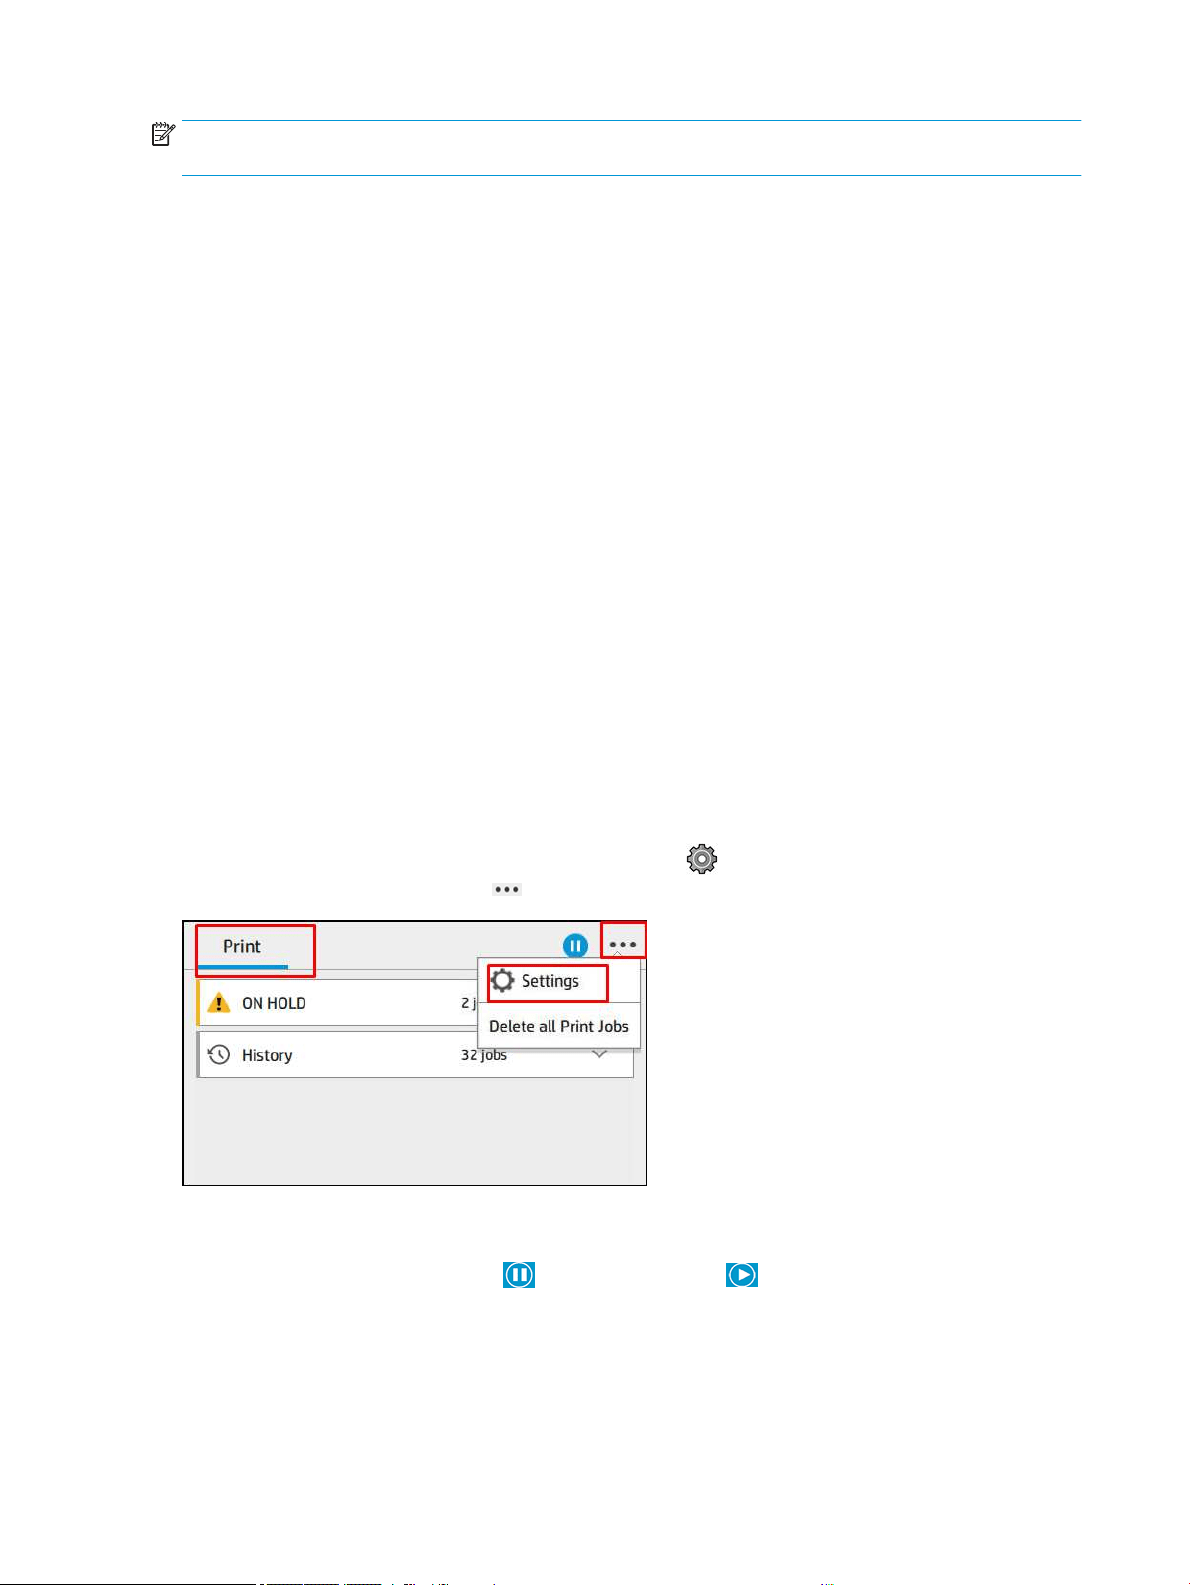
NOTE: Sometimes, while printing, you may see a Self-servicing status, which means that the printer is
performing some task such as paper type change or print mode change between pages of the same job.
On hold
The job will not be printed until you take some action. You should respond in one of the following ways:
● On hold: Private job: Enter the PIN required to print the job. The job will be deleted from the queue after
printing.
● Oh hold: Personal job: The job is not automatically printed: you must select it from the queue. No details
can be seen.
● On hold to preview: The job is not automatically printed: you must select it from the queue.
● On hold for paper mismatch: Load the paper required by the job.
● On hold for accounting: Enter an account ID to be used for the job.
● On hold: Recovered job: After a printer recovery, some jobs that were not printed are kept on hold.
History
● Printed: In chronological order, divided into today, yesterday, last week, and so on.
● Canceled: Canceled by the user.
● Failed: The job has failed for one or more reasons.
Job queue actions
Some of the actions in the job queue are determined by the settings selected. Some default settings may be
worth changing, depending on your environment. To do so, tap
in the home screen, then Job management.
Alternatively, in the job queue app, tap
at the top right, then Settings.
Pause the job queue
You can pause the job queue by tapping and resume by tapping . The pause takes eect at the end of
the page that is currently printing.
80 Chapter 7 Job queue management ENWW
Reprint
In the History section, tap the job you want to reprint. On the details screen, tap the Printer button, then ,
then
Reprint. On the next screen, you can select the number of copies, the source, and the destination.
Print next
If you want to change the position of a job in the queue to be printed immediately after the currently printing job,
select the desired job and tap the Print next button.
Select when to print a job
NOTE: The When To Start Printing options cannot be used with PostScript jobs.
You can select at what point you want to print a job in the queue. Tap , then Job management > When to start
printing.
There are three options you can select:
● When After Processing is selected, the printer waits until the whole page has been processed and then it
starts to print. This is the slowest setting but ensures the best print quality in large or complex prints.
● When Immediately is selected, the printer prints the page as it is processed. This is the quickest setting, but
the printer may stop halfway through a print to process data. This setting is not recommended for complex
images with dense color.
● When Optimized is selected (this is the default setting), the printer calculates the best time to begin
printing the page. It is usually the best compromise between the After Processing and Immediately
settings.
See job details
Tap the name of the job to show its details, including information about status, pages, copies, total, and preview.
Scroll down as necessary to see all of the information.
By tapping the thumbnail, you can navigate over all pages of the job. From there you can zoom in and out (pinch
and zoom) and see more information about each page: tap the i icon at the bottom of the page.
In an active queue, the job you are printing appears in the middle of the queue, with printed jobs below and jobs
to be printed above.
Roll policies
At the front panel, tap , then , then , then Roll policies.
Alternatively, tap , then Job management > Roll policies.
The following options are available:
● Increase productivity: To increase the productivity of the printer.
– Job autorotation: The printer can rotate a job automatically in order to save paper.
● Automatic roll selection:
ENWW Job queue in the front panel 81
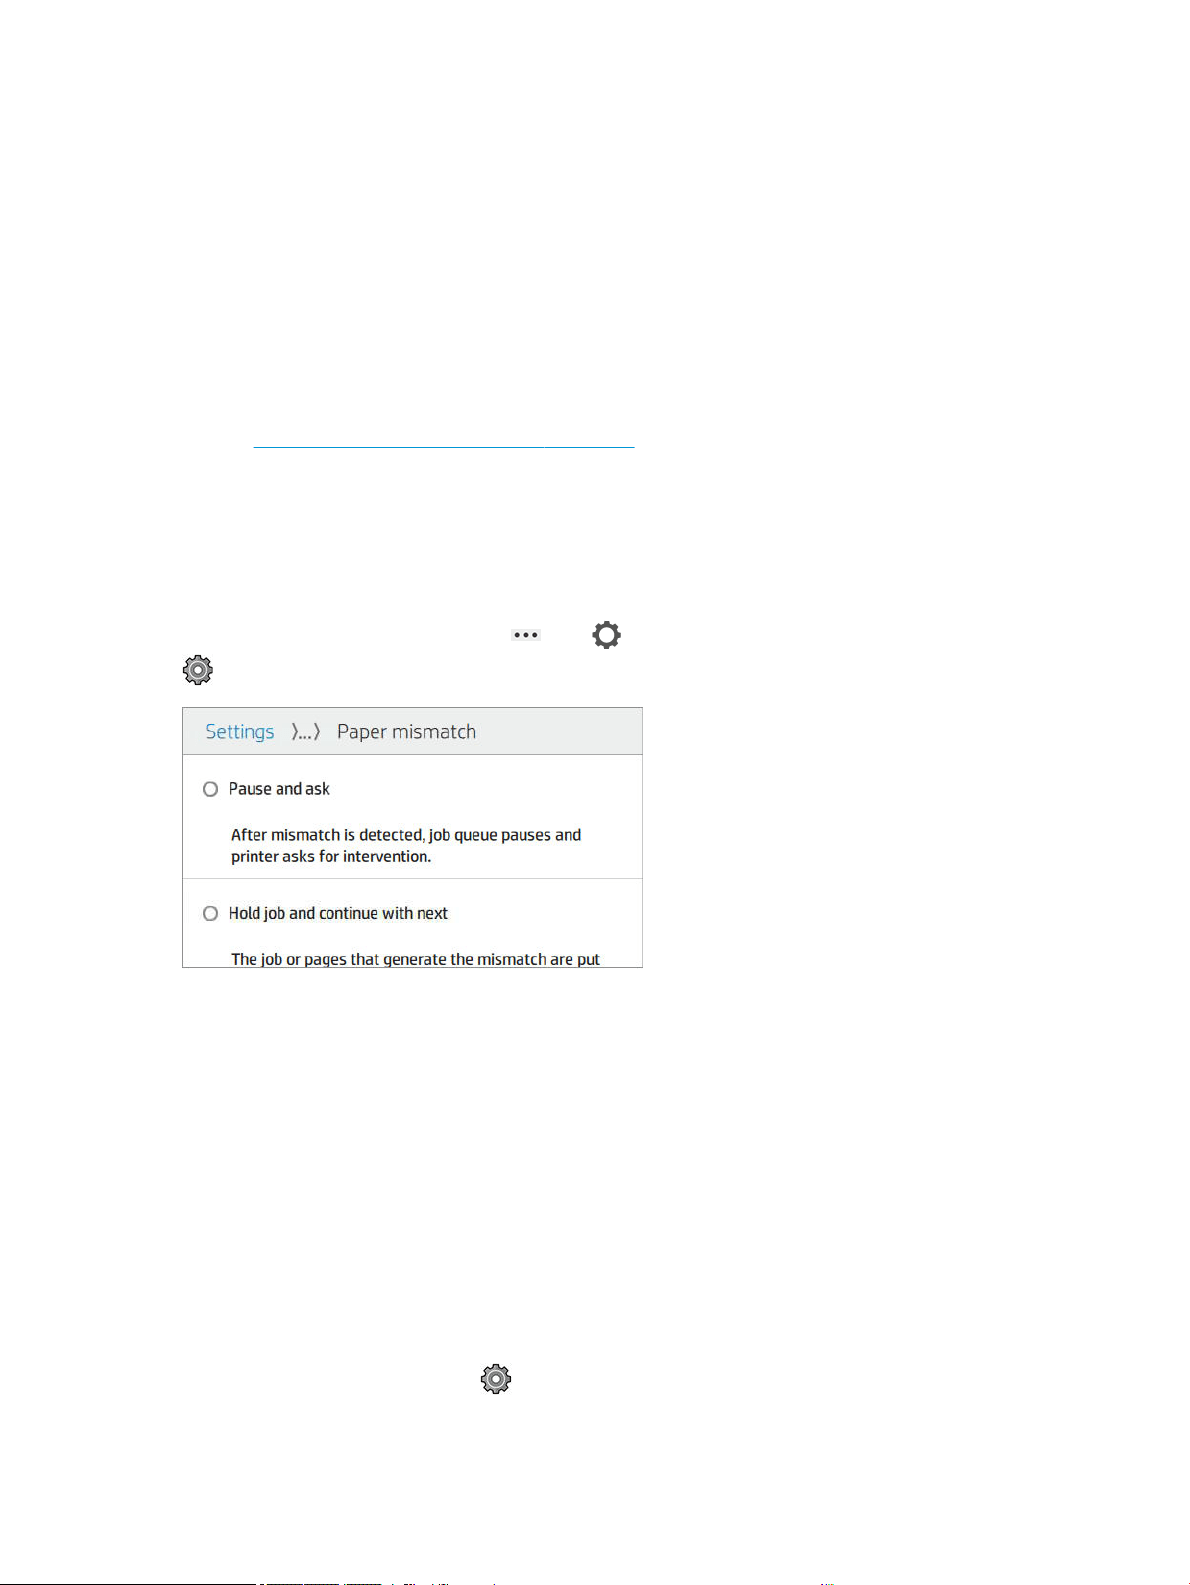
– Roll width selection: The printer can be more or less restrictive when selecting the roll width on which
to print. You can select:
○ Print on the same width only: Each page prints on a roll with the same page width.
○
Print on the same width or wider: Each page prints on a roll with the same width or wider.
–
Use most depleted roll (T1600dr only): When there are two or more rolls with the same paper type
and width, the roll selected is the roll with less paper.
● Paper type protection (T1600dr only): You can avoid printing accidentally on special paper types by
protecting them. Protected types are eligible for printing only when paper type or roll are specied in the
job.
See also Protect a paper type (T1600dr only) on page 73.
Solve paper mismatch
If the paper currently loaded in the printer is not suitable for a particular job or page, the printer can
automatically solve the conict or give a number of choices depending on the printer policies. Such a conict
may be caused by a job sent to the printer with no specic roll or paper type assigned to it, or by a roll coming to
its end during printing. The following options are available in the paper mismatch settings menu; you can reach
this menu from the job queue by tapping
, then , then Mismatch actions > Paper mismatch; or by tapping
, then Job management > Mismatch actions > Paper mismatch.
● Pause and ask (the most restrictive option): Printing stops until the correct paper is loaded. This option is
recommended when the printer is attended. A message appears, asking what you want to do: cancel the
job, print anyway, put on hold, or load paper. These options are also available in the job queue.
● Hold job and continue with next: Put mismatched jobs on hold until the correct paper is loaded, and
continue printing the rest of the job queue. The printer sends an alert whenever a job is put on hold. This
option is recommended when the printer is unattended, even though the integrity of a job may be
disrupted, to avoid stopping the queue. Once the paper required for the job is loaded, the job or pages are
automatically resumed.
● Print anyway (the least restrictive option): Print on whatever paper is loaded. The printer will choose the roll
to print according to the following criteria: rst where the page ts and then the same paper type. This
option will never select a paper type that has been protected.
Job queue options
To change the job queue options, tap , then Job management > Job queue.
82 Chapter 7 Job queue management ENWW

You can select the maximum number of printed jobs to have in the queue, when to delete printed jobs, and
whether to delete jobs on hold after a specied time.
Default printing preferences
At the front panel, tap , then Default Printing conguration to dene the default properties of jobs sent to
your printer from remote locations.
You can dene settings in the following areas: Print quality, Color, Paper, Margins, HP-GL/2, PostScript, Print
retrieval.
Job deletion
If the printer runs out of storage space for new jobs, the oldest printed jobs are automatically deleted from the
queue.
You can request that printed jobs should be automatically deleted from the queue when the total number of
printed jobs exceeds a specied limit (the maximum number in the history setting), or when the jobs were
printed more than a specied time ago (clear history settings).
To delete jobs on hold, the setting Delete jobs on hold allows you to dene the time after which these jobs will be
removed (2–48 h).
To delete a job manually, select the job and tap Delete in the menu. To delete all jobs, tap Delete all jobs in
the menu; the whole job queue will be deleted.
The Delete option deletes the job from the queue, while the Cancel option cancels the job but leaves it in the
queue, marked as Canceled by the user in the history category.
To cancel a job while printing, tap X. To cancel a job from the Up Next category, tap the job name on the list and
then tap Cancel job on the bottom right.
NOTE: If you tap X, you cancel the currently printing job only.
Job queue in the Embedded Web Server or HP DesignJet Utility
The HP DesignJet Utility provides a dierent way of accessing the Embedded Web Server's job management
facilities, but the facilities are exactly the same whether you use the Embedded Web Server or the HP DesignJet
Utility.
To see the queue in the Embedded Web Server, select Job queue in the Main menu.
Job queue page
By default, access to the job queue is open to all users. An administrator can set a password so that users are
required to enter a password to access the page.
The job queue page shows all jobs that are available in the print queue. The print queue includes jobs that are
being received, parsed, rendered, printed and already printed.
The Embedded Web Server displays the following information for each print job:
● File name: The name of the job.
● Status: The current status of the job.
ENWW Job queue in the Embedded Web Server or HP DesignJet Utility 83

● Pages: The number of pages in the job.
● Copies: The number of copies printed.
● Total: The total number of pages (including copies).
● Sent by: The username.
● Account ID: The account ID for the job.
● Date: The date and time attached to the job that was received by the printer, shown in the locale of the
Embedded Web Server.
● File source: The application from which the job was sent to print.
● Paper destination: The output option selected for the printed job.
Jobs in the queue can be sorted by any of the information items (except Preview) by clicking on the title of the
corresponding column. You can perform the following operations on one or all jobs in the queue:
● Cancel: Cancels the selected jobs. You are asked to conrm before the job is canceled. The job remains
stored in the printer, but will not be printed unless you click Reprint.
● Hold: Holds the select jobs until you click Continue to print.
● Resume: All selected jobs, which are on hold, continue printing.
● Reprint: Prints more copies of a job.
● Next print: Sends all selected jobs to the top of the job queue.
● Print anyway: The printer will try to print the job even if there is some problem with it.
● Delete: Deletes selected jobs from the job queue. You are asked to conrm before the job is deleted.
Prioritize a job in the queue
You can select any job in the queue and make it the next one to be printed. After selecting the job, click Move to
front.
If nesting is turned on, the prioritized job may still be nested with others. If you really want this job to be printed
next, and not nested with others, rst turn nesting o in the front panel and then move it to the front of the
queue.
In the following cases, the Next print button is not displayed:
● The job is already at the front of the queue.
● The job is on hold—in this case the Resume printing button is displayed instead.
● The job has nished—in this case the Reprint button is displayed instead.
● The job has some error condition.
Delete a job from the queue
Under normal circumstances, there is no need to delete a job from the queue after printing it, as it will just fall o
the end of the queue as more les are sent. However, if you have sent a le in error, and want to avoid printing it,
you can simply select the job and then click
Delete.
84 Chapter 7 Job queue management ENWW

In the same way, you can delete a job that has not been printed yet.
If the job is currently being printed (its status is printing), you can click Cancel and then Delete.
Reprint a job in the queue
To reprint an already-printed job, select the job from the queue, then click Reprint. When reprinting a print job,
you cannot change the print settings, because the job has already been rasterized.
Job status messages
These are the possible job status messages, approximately in the order in which they may be seen:
● Downloading: The printer is receiving the job from the computer.
● Processing: The printer is parsing and rendering the job.
● Waiting to print: The job is waiting for the print engine to become free to proceed with printing.
● Nested: The printer is set up with Nesting=On and is waiting for other jobs in order to complete the nest
and proceed with printing.
● Preparing to print: The printer is performing writing system checks before printing the job.
● On hold for preview: The job was sent with the on hold for preview option.
NOTE: If the printer hangs up while printing a job, and the queue facility is turned on, the partially printed
job will appear in the queue as on hold when the printer is next turned on. When you resume the job, it will
start printing at the page at which it was interrupted.
● On hold for paper: The job cannot be printed because the right paper is not loaded in the printer. Load the
required paper, see Paper handling on page 31, and click Continue to resume the job.
● On hold for accounting: The job cannot be printed because the printer requires all jobs to have an account
ID: enter the account ID and then click Continue to resume the job.
TIP: To set an account ID, see Require account ID on page 27.
● Printing
● Drying
● Cutting paper
● Ejecting page
● Canceling: The job is being canceled, but will remain in the printer job queue.
● Deleting: The job is being deleted from the printer.
● Printed
● Canceled: The job has been canceled by the printer.
● Canceled by user
● Empty job: The job does not contain anything to print.
ENWW Job queue in the Embedded Web Server or HP DesignJet Utility 85


Introduction
Color management is performed using a set of software tools that allow you to reproduce a color as accurately
as possible on any display or printing device.
In addition, your printer has been engineered with advanced hardware and software features to ensure
predictable and dependable results.
● Color calibration for consistent colors
● The Photo Black ink provides pure blacks when printing on photo papers
How colors are represented
Color is usually represented as an array of numbers: three numbers in the RGB color model or four in the CMYK
color model. These numbers are a measure of the base colors used in a mixture to create a given color. RGB
means that we are using a mixture of Red, Green, and Blue to create any specic color. In the case of CMYK, the
mixture is of Cyan, Magenta, Yellow, and Key (where Key means black, for historical reasons).
Most monitors use the RGB color model, while most printers use the CMYK color model.
An image can be converted from one color model to another, but in general the conversion is not perfect. Your
printer uses the RGB color model: the same color model that is used by your monitor.
This simplies but does not completely solve the problem of matching colors. Each device represents colors a
little dierently from another device, even if they use the same color model. However, color management
software can adjust the colors in an image according to the characteristics of the particular device, using a color
prole of the device, in order to achieve correct colors.
A summary of the color management process
To get the accurate and consistent colors that you want, you should follow these steps for each paper type that
you use.
1. Color-calibrate the paper type, for consistent colors. Calibration should be repeated every now and then
(see Color calibration on page 88). In addition, you may wish to calibrate immediately before a particularly
important print job for which color consistency is vital.
2. When printing, select the correct paper preset for the paper type you are using. The paper preset contains
the color prole* as well as various other characteristics of the paper. See Paper presets on page 44.
*A color prole is a description of a printer, ink, and paper combination, that contains all the information required
for these color conversions.
Color calibration
Color calibration enables your printer to produce consistent colors with the particular printheads, inks and paper
type that you are using, and under your particular environmental conditions. After color calibration, you can
expect to get similar prints from any two dierent printers situated in dierent geographical locations.
Some paper types cannot be calibrated. For all other paper types, calibration should be done in any of the
following circumstances:
88 Chapter 8 Color management ENWW
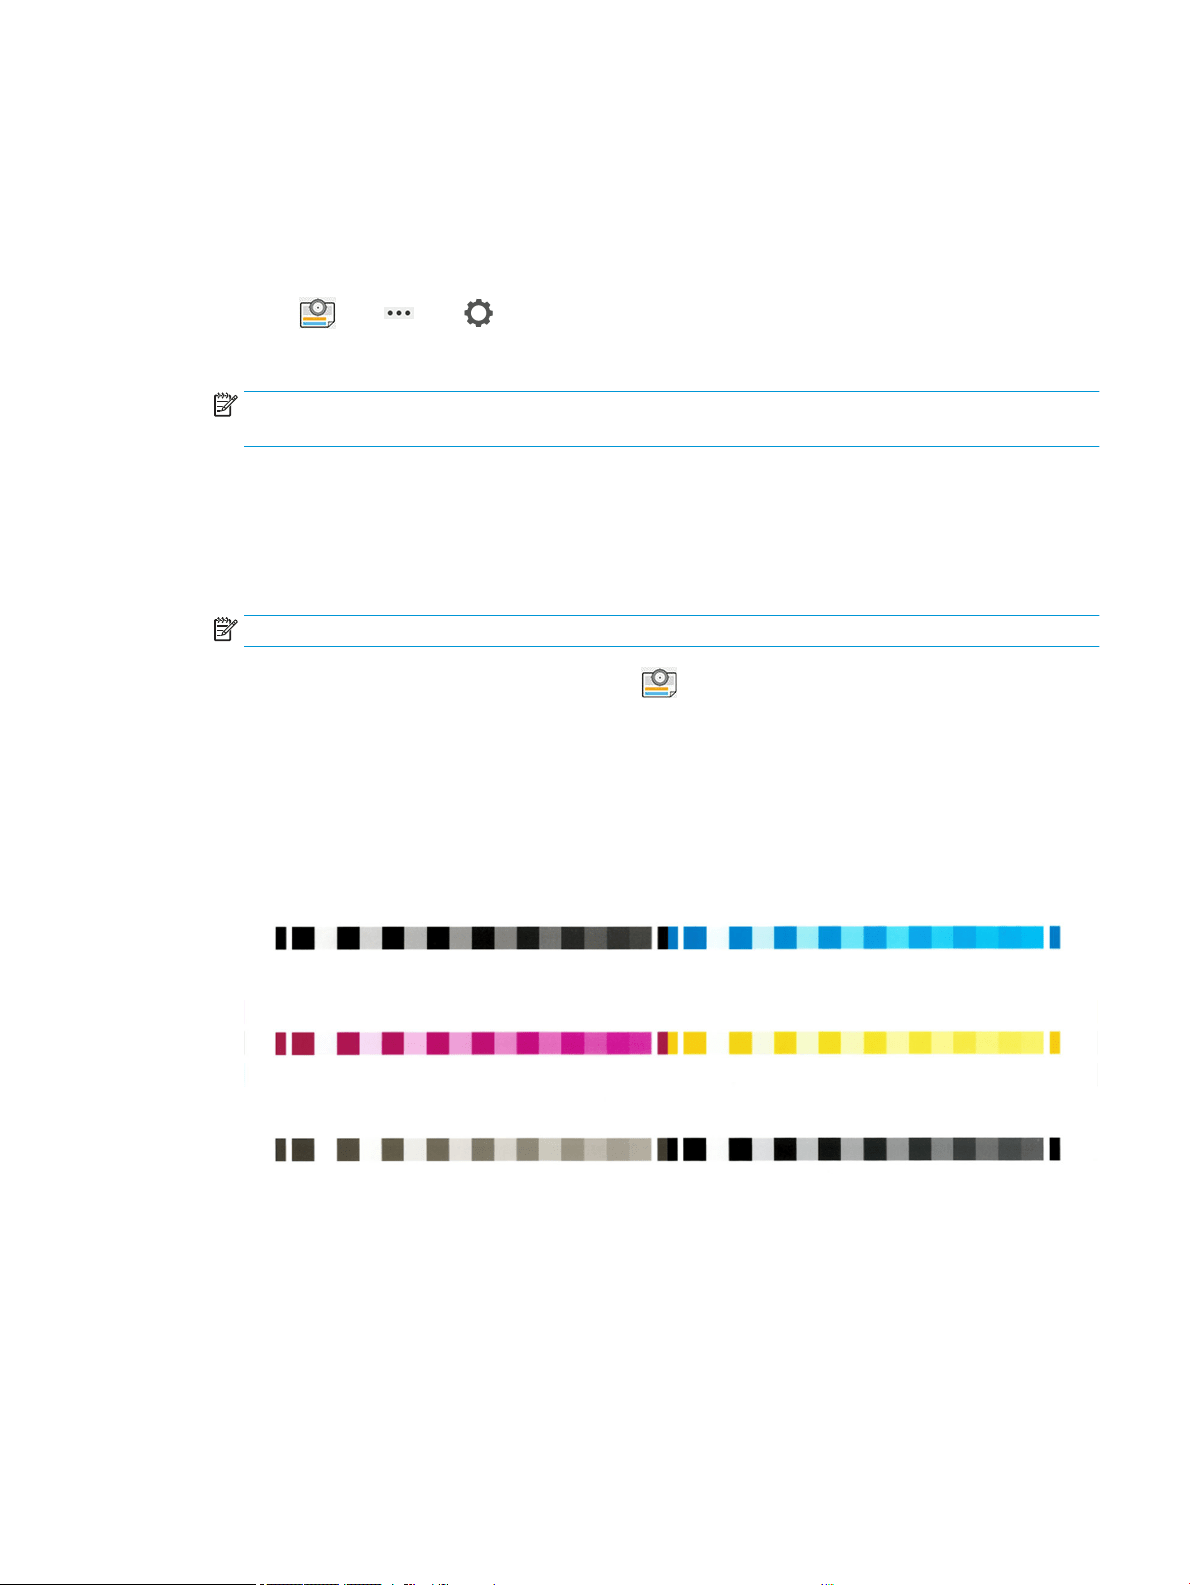
● Whenever a printhead is replaced
● Whenever a new paper type is introduced that has not yet been calibrated with the current set of
printheads
● Whenever the environmental conditions (temperature and humidity) change signicantly
You can check the color calibration status of the currently loaded paper at any time by going to the front panel
and tapping
, then , then , then Color calibration status. The status may be one of the following:
● Recommended: The paper has not been calibrated.
NOTE: Whenever you update the printer's rmware, the color calibration status of all papers is reset to
Recommended.
● Obsolete: The paper has been calibrated, but the calibration is now out of date because a printhead has
been replaced, and should be repeated.
● Done: The paper has been calibrated, and the calibration is up to date.
● Disabled: This paper cannot be calibrated.
NOTE: Color calibration cannot be performed on plain paper, nor on any kind of transparent material.
You can start color calibration from the front panel: tap , then Color calibration., and press Continue. Choose
the paper and press
OK.
The calibration process is fully automatic and can be performed unattended after you have loaded paper of the
type you wish to calibrate—which should be wider than 355 mm (14 in). If you have more than one roll loaded,
the printer will ask which roll you want to use for the calibration.
The process takes about 3–5 minutes and consists of the following steps:
1. A calibration chart is printed, which contains patches of each ink used in your printer.
2. The chart is allowed to dry for a period of time that depends on the paper type, so that the colors have time
to stabilize.
3. The chart is scanned and measured.
4. From the measurements, the printer calculates the necessary correction factors to apply for consistent
color printing on that paper type. It also calculates the maximum amount of each ink that can be applied to
the paper.
ENWW Color calibration 89

Color management from printer drivers
Color management options
The aim of color management is to reproduce colors as accurately as possible on all devices: so that, when you
print an image, you see very similar colors as when you view the same image on your monitor.
There are two basic approaches to color management for your printer:
● Printer-Managed Colors: In this case your application program sends your image to the printer without any
color conversion, and the printer converts the colors to its own color space. The details of this process
depend on the graphics language that you are using. HP recommends this setting for the best experience
and results.
– PostScript: The PostScript and PDF interpreter modules perform the color conversion using the
proles stored in the printer and any additional ICC color proles sent with the PostScript job. This
kind of color management is done when you are using the PostScript or PDF driver.
– Non-PostScript (PCL3, CALS/G4): The color management is done using a set of stored color tables. ICC
proles are not used. This method is somewhat less versatile than the alternatives, but is a little
simpler and faster, and can produce good results with standard HP paper types.
NOTE: In non-PostScript printing, the printer can convert to sRGB if you are using Windows, or to
Adobe RGB if you are using Mac OS X.
● Application-Managed Colors: In this case your application program must convert the colors of your image
to the color space of your printer and paper type, using the ICC prole embedded in the image and the ICC
prole of your printer and paper type.
IMPORTANT: Make sure to select matching settings in the driver and in the application.
You are recommended to consult the HP Support Center (see HP Support Center on page 184) to see how to use
the color management options of your particular application. See also Print a document with the correct colors
on page 97.
To choose between Application-Managed Colors and Printer-Managed Colors:
● In the Windows driver dialog: Select the Color tab.
● In some applications: You can make this choice in the application.
Color options
Printing in color
The printer prints in color by default.
You can select color printing explicitly in the following ways:
● In your application program: Many programs provide this option.
● In the Windows driver dialog: Go to the Color tab and look at the Output Color or Color Options section
(whichever is available in your driver). Select Print in color.
90 Chapter 8 Color management ENWW

Printing in grayscale
You can convert all colors in your image to shades of gray in the following ways:
● In your application program: Many programs provide this option.
● In the Windows driver dialog: Go to the Color tab and look at the Output Color or Color Options section
(whichever is available in your driver). Select Print in grayscale.
Printing in pure black and white
You can convert all colors in your image to pure black and pure white in the following way:
● In the Windows driver dialog: Go to the Color tab and look at the Output Color or Color Options section
(whichever is available in your driver). Select Print in pure black and white.
HP Professional PANTONE Emulation
When you use a named PANTONE color in an image, your application will normally send to the printer a CMYK or
RGB approximation to that color. But the application does not take the printer or the paper type into account, it
merely produces a generic approximation of the PANTONE color, which will look dierent on dierent printers
and on dierent papers.
HP Professional PANTONE Emulation can do a much better job by taking into account the characteristics of the
printer and the paper type. The results look as similar to the original PANTONE colors as is possible on a given
printer using a given paper type. This technology is designed to produce emulations similar to those set up
manually by prepress professionals.
To use HP Professional PANTONE Emulation, all you have to do is to turn it on. In fact, it is normally on by default.
● In the Windows PostScript/PDF driver dialog: Go to the Color tab and select HP Professional PANTONE
Emulation.
● From the front panel: Tap , then Default printing conguration > Color options > HP Pantone Emulation.
● In the Embedded Web Server: From the main menu, select the Color tab.
HP Professional PANTONE Emulation not only provides the closest match that can be achieved on your printer; it
also gives clear information on how close the emulation is to the original spot color.
Default color spaces
When a document or image does not specify the working color space in which the content is originally described,
the user can choose among dierent standards. That is, the user can determine how data should be interpreted
by the color management system during the rendering process.
You can set source proles in the following ways:
● In the Windows PostScript/PDF driver dialog: Select the Color tab, and Printer Managed Colors.
The standard way of encapsulating such information is in ICC proles. As part of the solution, we provide the
most common standards for the dierent devices.
The options are as follows.
ENWW Color management from printer drivers 91

Default RGB source proles
Your printer is provided with the following color proles:
● None (Native): No imitation, for use when the color conversion is done by the application or operating
system, and therefore the data arrive at the printer already color-managed. Available for PostScript and
PDF drivers only.
● sRGB IEC61966-2.1 imitates the characteristics of the average PC monitor. This standard space is endorsed
by many hardware and software manufacturers, and is becoming the default color space for many
scanners, printers and software applications.
● Adobe RGB (1998) provides a fairly large gamut of RGB colors. Use this space if you need to do print
production work with a broad range of colors.
● ColorMatch RGB imitates the native color space of Radius Pressview monitors. This space provides a
smaller gamut alternative to Adobe RGB (1998) for print production work. Available for PostScript and PDF
drivers only.
● Apple RGB imitates the characteristics of the average Apple monitor, and is used by a variety of desktop
publishing applications. Use this space for les that you plan to display on Apple monitors, or for working
with old desktop publishing les. Available for PostScript and PDF drivers only.
Default CMYK source proles
You can choose from a selection of CMYK source proles recognized by the printer. The default CMYK prole is
Coated FOGRA39 (ISO 12647 - 2:2004), available for PostScript drivers only.
Color management from the front panel
You can color-calibrate the loaded paper type from the front panel by tapping , then Color calibration, then
Continue and choose paper. See Color calibration on page 88.
The other color options in the front panel can all be found by tapping
, then Default printing conguration >
Color options (they can also be found under Advanced printing preferences).
Color/Grayscale
● Print in color
● Print in grayscale
● Print in pure black and white
RGB source prole
You can choose from a selection of RGB source proles recognized by the printer. Default: sRGB IEC 1966-2.1.
● Select CMYK source prole: You can choose from a selection of CMYK source proles recognized by the
printer. Default: Coated FOFRA39 (ISO12647-2:2004).
● Select rendering intent: You can select the rendering intent. Default: Perceptual.
● Black point compensation: You can turn black point compensation on or o. Default: On.
● HP Professional PANTONE Emulation: You can turn HP Professional PANTONE Emulation on or o. Default:
On (PostScript and PDF jobs only).
92 Chapter 8 Color management ENWW

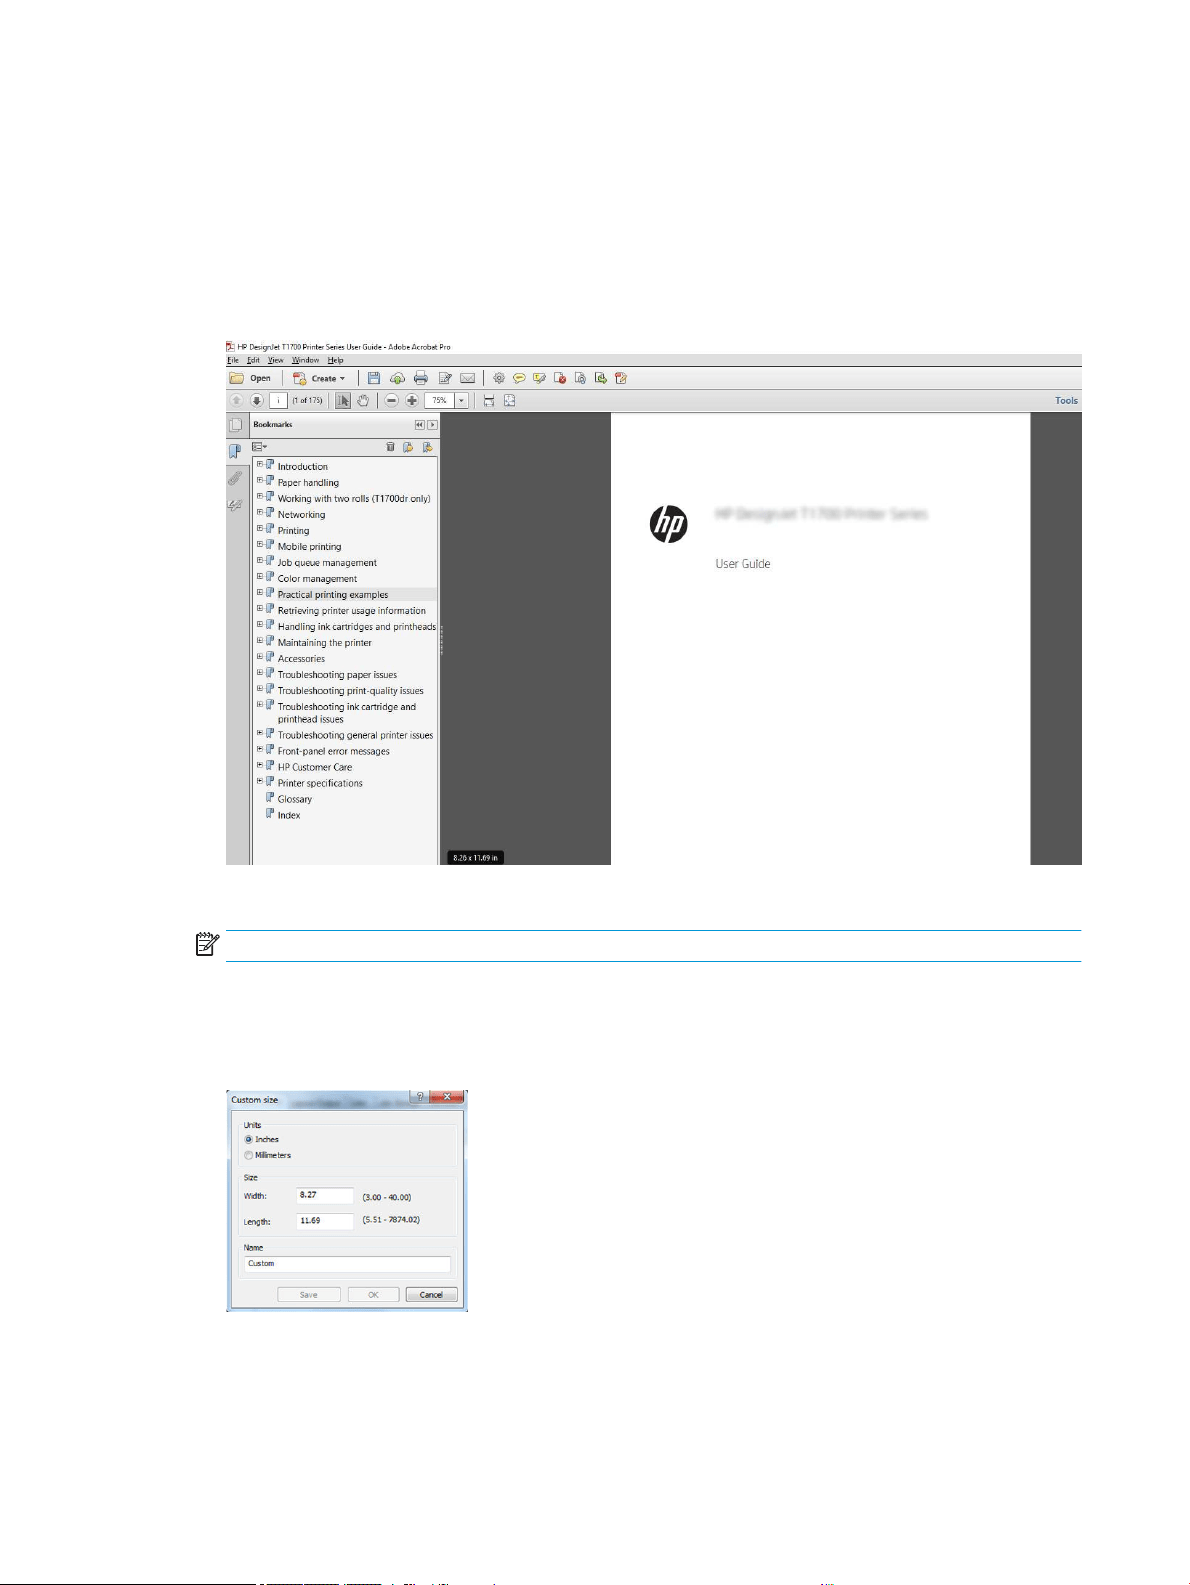
Print a draft for revision with the correct scale
This section demonstrates how to print a draft for revision with the correct scale from Adobe Acrobat.
Using Adobe Acrobat
1. In the Acrobat window, bring the mouse cursor to the bottom left corner of the document pane to check
the page size.
2. Select File > Print and ensure that Page Sizing & Handling is set to Actual size.
NOTE: The page size will not be automatically selected according to the drawing size.
3. Click the Properties button and then select the Paper/Quality tab.
4. Choose whatever Document Size and Print Quality you want to use. If you want to dene a new custom
paper size, click the Custom button.
5. Select the Features tab, and then Autorotate.
6. Click OK, and check that the print preview in the Print dialog box seems correct.
94 Chapter 9 Practical printing examples ENWW
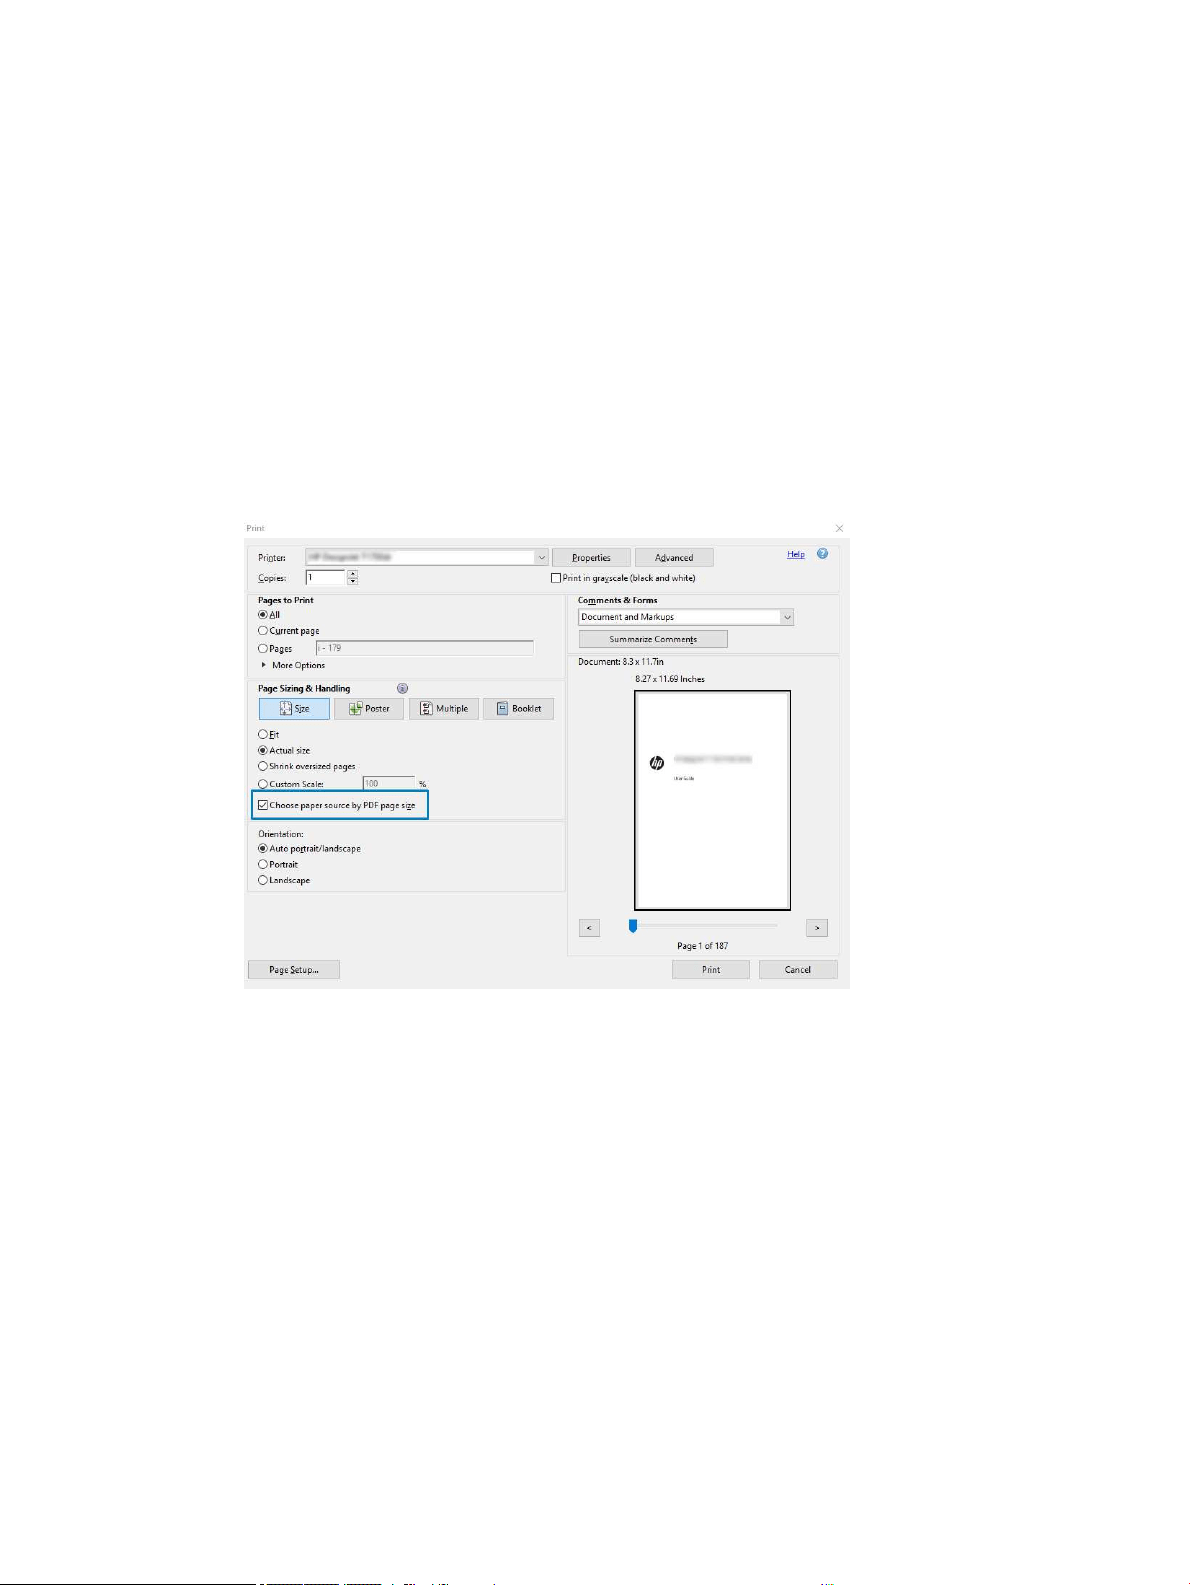
Print a PDF multipage job from Adobe Acrobat Reader or Adobe
Acrobat Pro
Using a raster driver
1. Open a multipage job in Adobe Acrobat Reader or Adobe Acrobat Pro (HP recommends always using the
latest version).
2. Click File > Print.
3. Select the printer and driver.
4. Check the Choose paper source by PDF page size box.
5. Adjust other properties in the driver properties window, as required.
6. Click the Print button.
The pages will be printed on the standard page size closest to the page size in the original document.
Using a PostScript driver
1. Open a multipage job in Adobe Acrobat Reader or Adobe Acrobat Pro (HP recommends always using the
latest version).
2. Click File > Print.
3. Select the printer and driver.
ENWW Print a PDF multipage job from Adobe Acrobat Reader or Adobe Acrobat Pro 95

4. Check the Choose paper source by PDF page size and Use custom paper size when needed boxes.
5. Adjust other properties in the driver properties window, as required.
6. Click the Print button.
If you checked the Use custom paper size when needed box, the pages will be printed on paper sizes
corresponding to the page sizes in the original document.
Using a PDF driver
With the latest versions of Adobe Acrobat Pro or Adobe Acrobat Reader, this is managed by the application, and
the pages will be printed on paper sizes corresponding to the page sizes in the original document.
96 Chapter 9 Practical printing examples ENWW
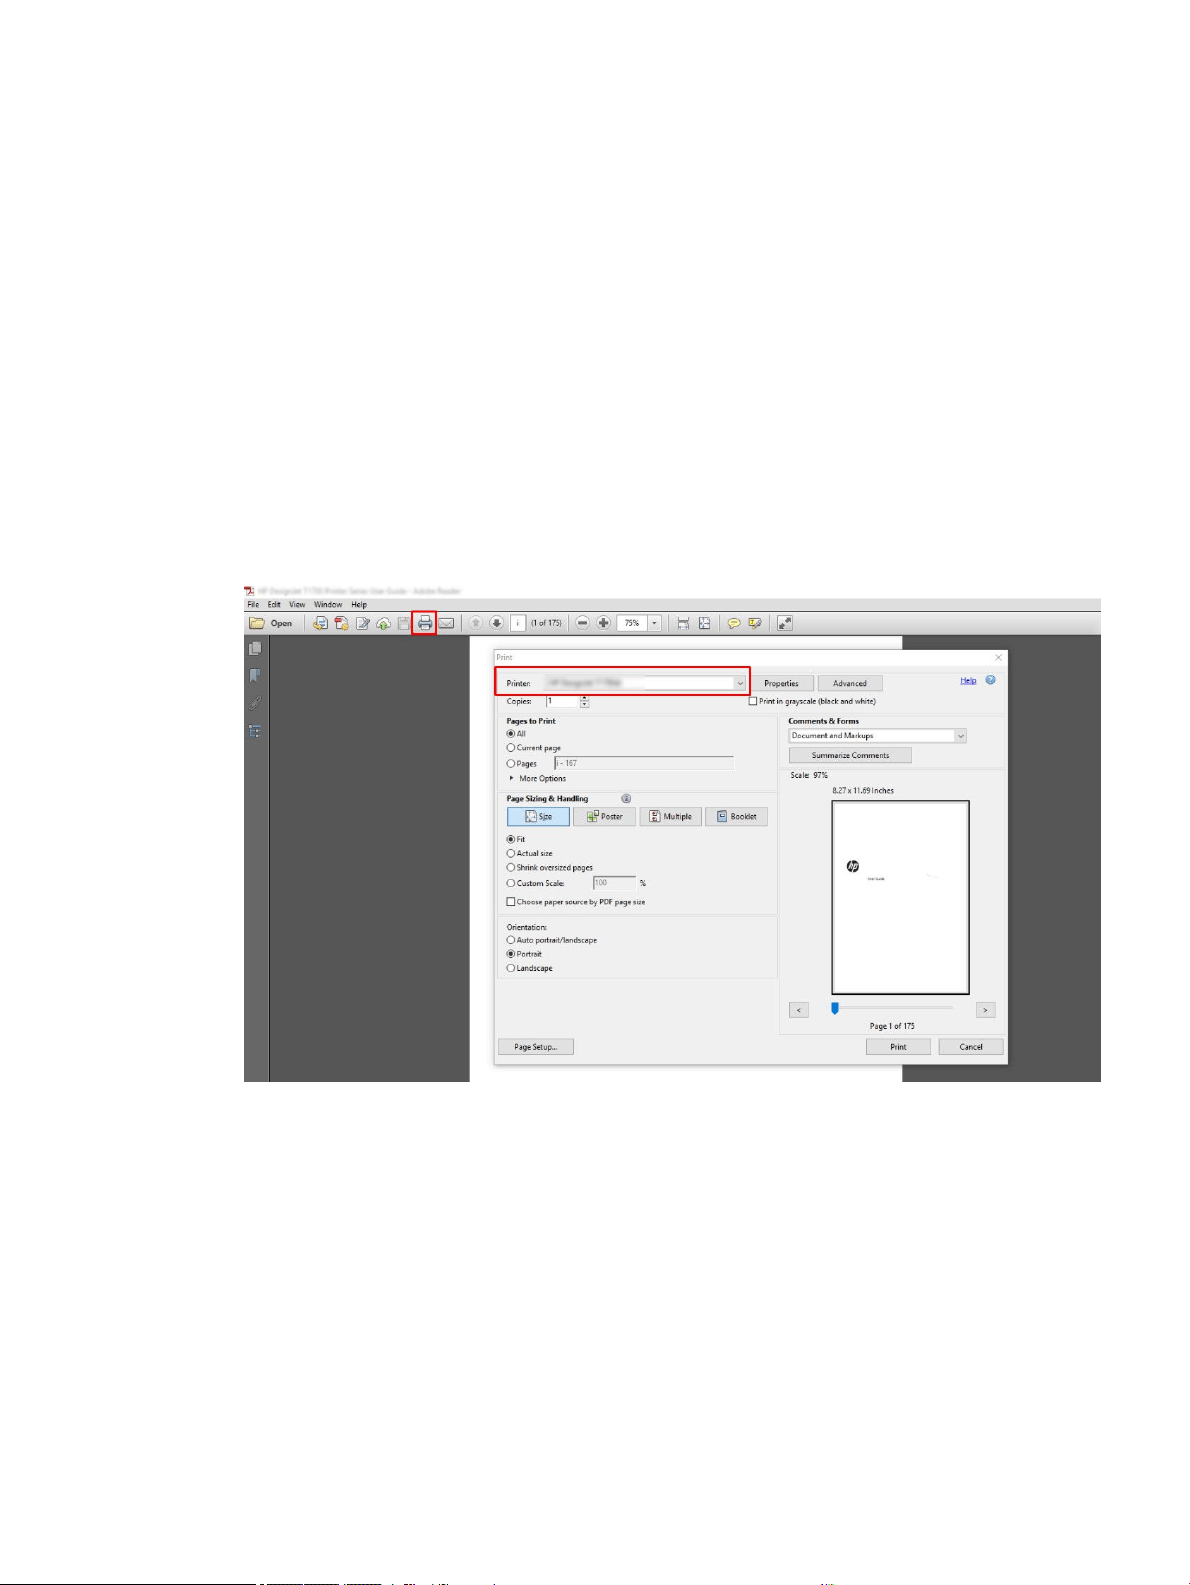
Print a document with the correct colors
This section demonstrates how to print a document from Adobe Acrobat and Adobe Photoshop, with the
emphasis on color management.
Using Adobe Acrobat Reader
Acrobat Reader is the most basic application for PDF les; several color management tools common in more
sophisticated applications are not explicitly present, and work by default with presets that cannot be changed.
For example, there is no way to select a working color space; a default color space, most likely sRGB, is applied.
This color space is used for screen display, for example. Also, as an alternative color prole when no other is
specied by a le, as will be explained later.
The printing process is very simple.
1. Click File > Print.
2. Select the printer and driver from the Printer drop-down menu in the Print dialog box. Driver settings can
be adjusted by clicking the Properties button.
ENWW Print a document with the correct colors 97
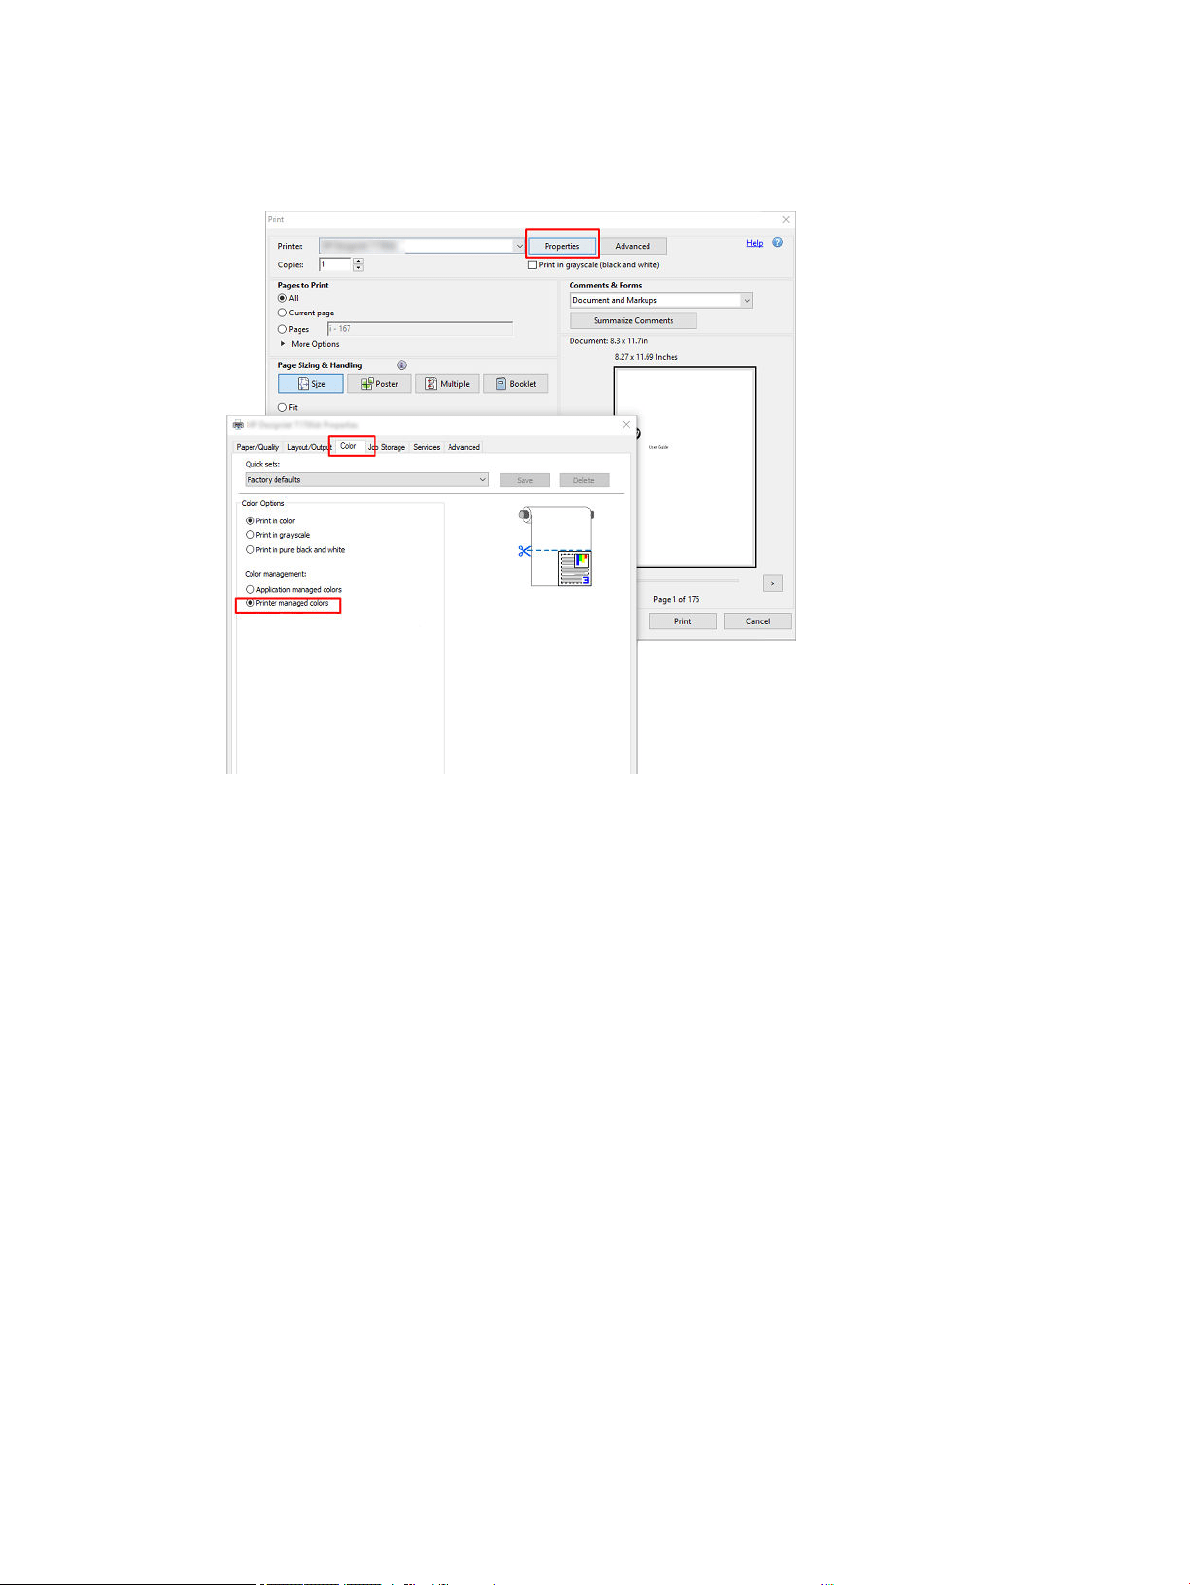
3. Adjust the color settings in the driver properties window. Click the Properties button in the Print dialog and
set the Color option in the Color tab. Check the box Printer Managed Colors and, if you have a V4 driver,
select the most convenient source prole. Click OK.
98 Chapter 9 Practical printing examples ENWW
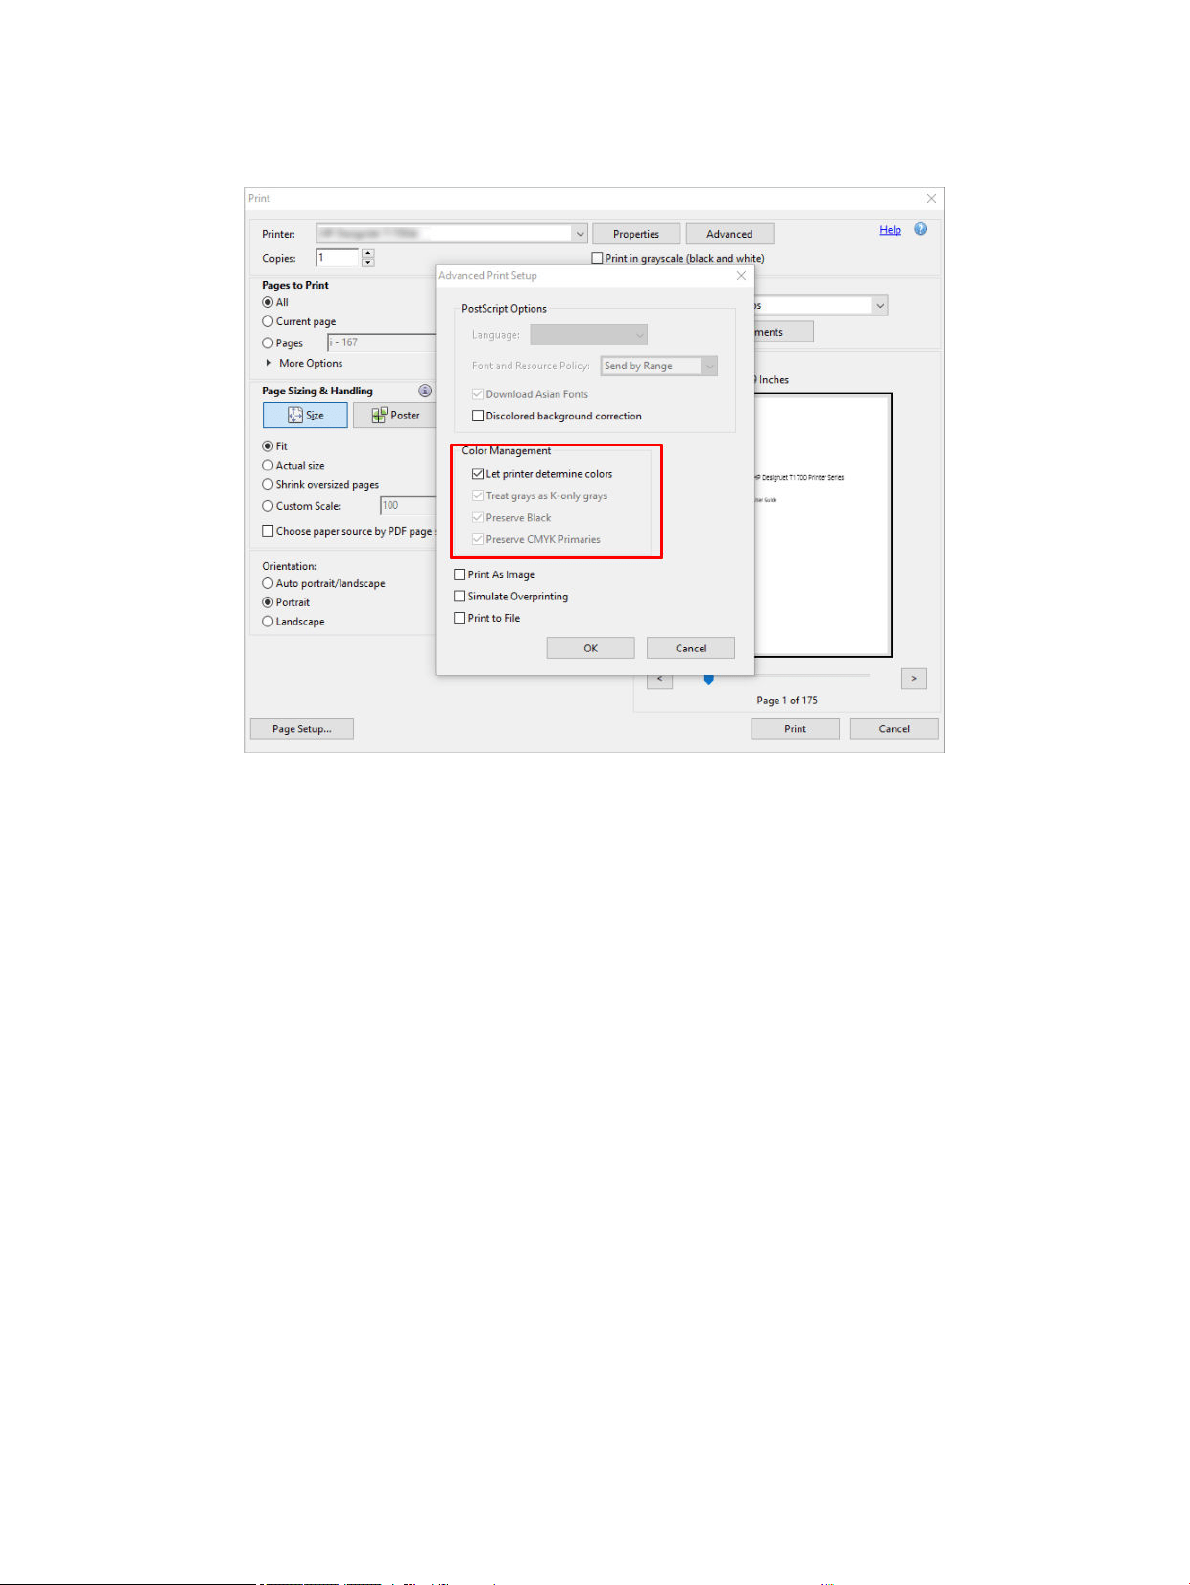
4. If you have a V3 driver, click the Advanced button in the Print dialog box to set color management options.
Check the box Let printer determine colors.
5. If the document contains several color proles and you are not sure what the result will be, you can atten
the document rst and print it as seen on the screen. To do this, check the box Print As Image in the
Advanced Print Setup dialog box. In this case, the rasterization is performed by Acrobat Reader before
calling the driver; whereas, if you do not check this box, the rasterization is performed by the driver. So
checking the box may have a visible eect on the look of the printed document.
Using Adobe Acrobat Pro
Acrobat Pro is a professional application that allows full color management. This section briey describes the
options to select a working color space, convert images to a desired color space, and print.
1. PDF les may not contain a color prole. In the absence of a color prole, Acrobat uses a working color
space by default. To choose a working color space, rst click Edit > Preferences.
ENWW Print a document with the correct colors 99
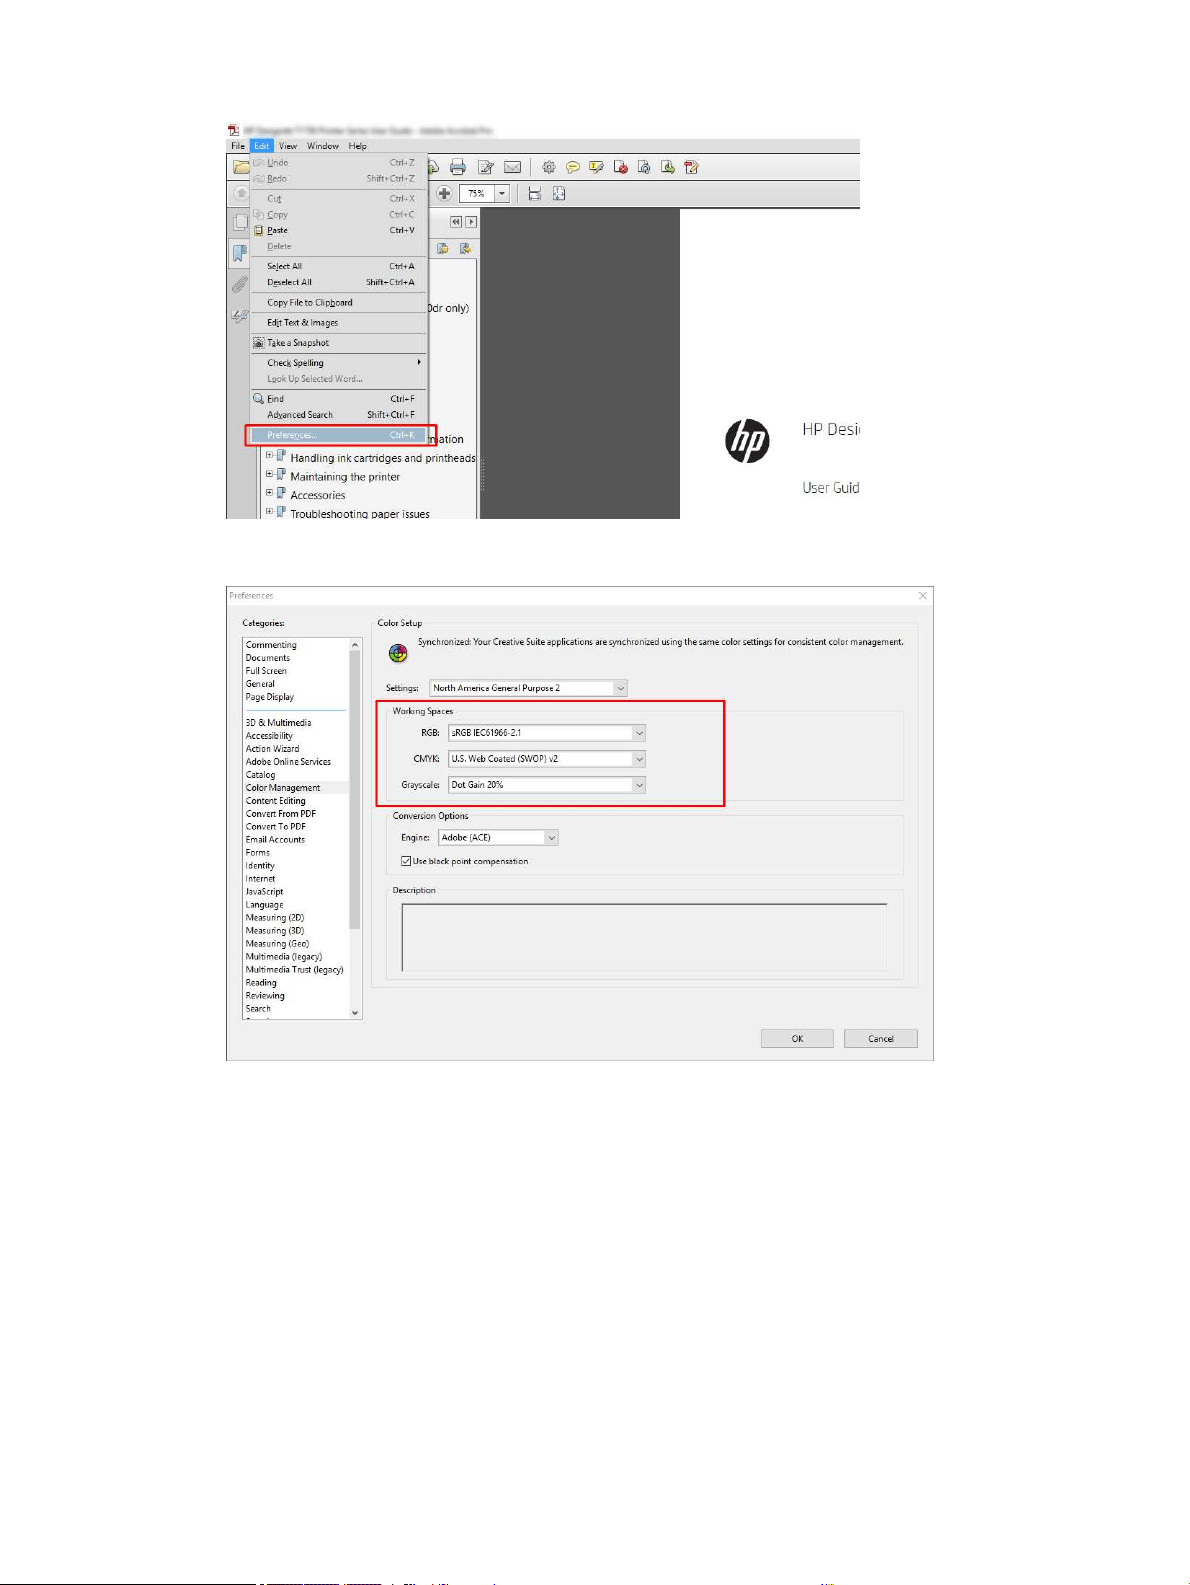
2. In the Preferences dialog box, you can choose RGB, CMYK, and grayscale working color spaces.
100 Chapter 9 Practical printing examples ENWW
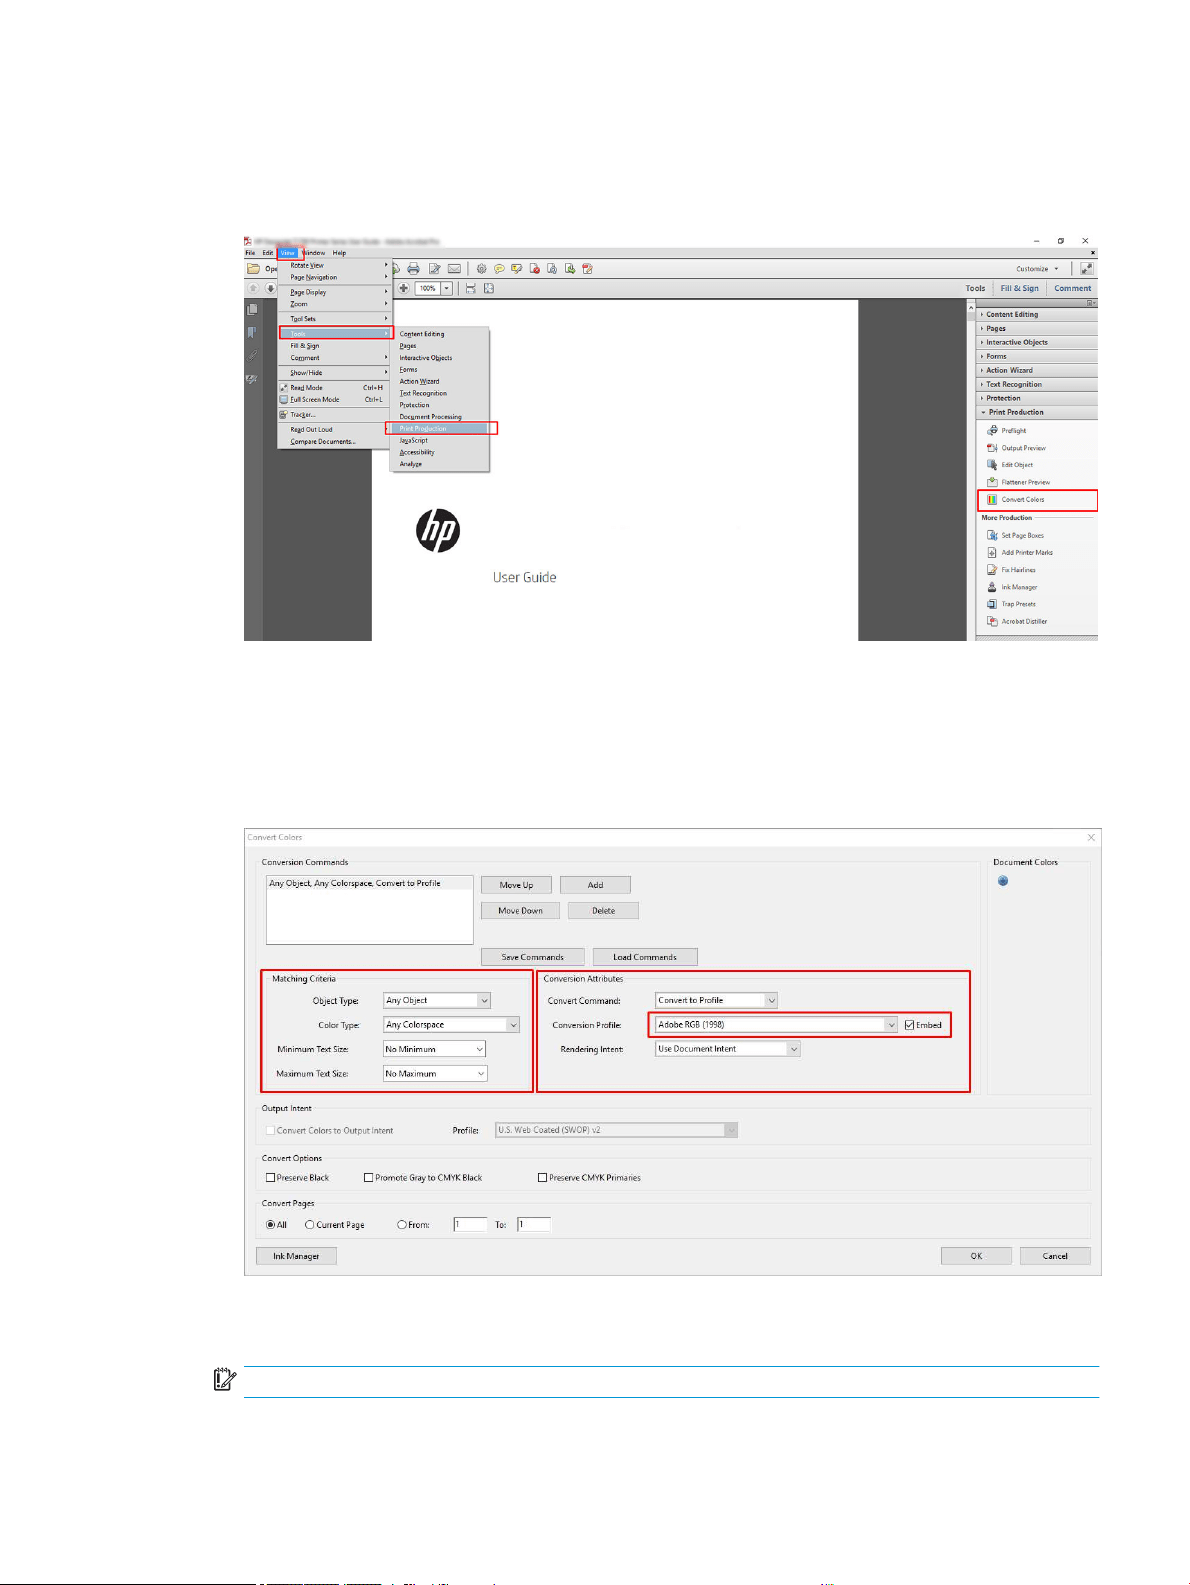
3. PDF les can contain elements with dierent color proles. Some may have color proles, some may not.
The working color space will aect only those without a color prole. If you want to attach a specic color
prole to the document, you must convert the contents of the document as follows. First, select Convert
Colors from View > Tools > Print Production or by clicking the icon in the status bar.
4. Select the elements you want to convert by specifying matching criteria (object type and/or color type) and
then the conversion attributes. If you want to change the embedded color prole, you can select Any Object
and Any Colorspace in the Matching Criteria section. In the Conversion Attributes section you can choose,
for example, to embed an Adobe RGB (1998) prole by selecting it as the Conversion Prole, checking the
Embed box, clicking the OK button, and saving the le to keep the changes. The saved le will have an
embedded Adobe RGB color prole.
5. To print the document, choose a printer from the Print dialog box, click the Properties button, and set the
color options in the Color tab.
IMPORTANT: Select Print in color and Printer managed colors.
ENWW Print a document with the correct colors 101

If you use the V4 driver, you can also select a default color prole, which will be used for any elements that
lack a color prole. HP suggests:
● sRGB or Adobe RGB (sRGB is the standard for most les)
● CMYK: Choose Coated FOGRA39 or US Web Coated (SWOP) v2.
102 Chapter 9 Practical printing examples ENWW
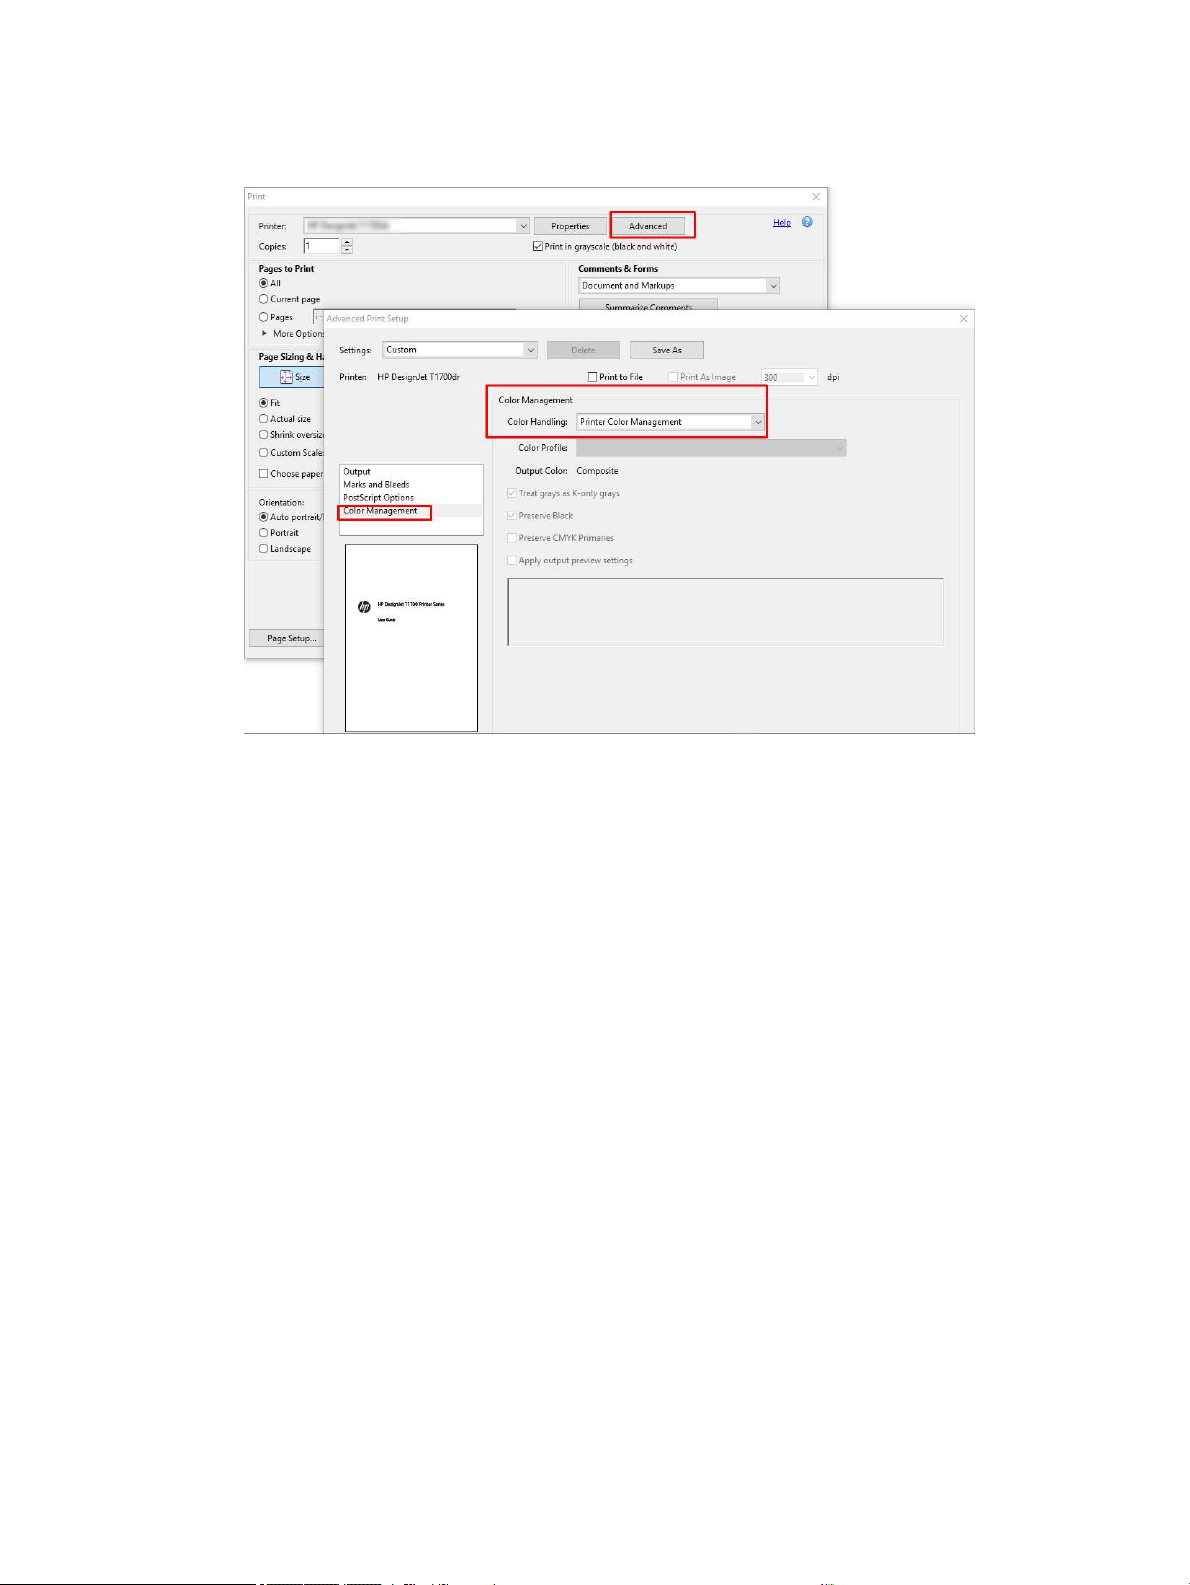
6. If you have a V3 driver, click the Advanced button in the Print dialog box, set Color Handling to Printer Color
Management, and click OK.
7. In the Print dialog box, click the Print button to print the document.
Using Adobe Photoshop
1. In Photoshop, click File > Print, then select your printer.
ENWW Print a document with the correct colors 103
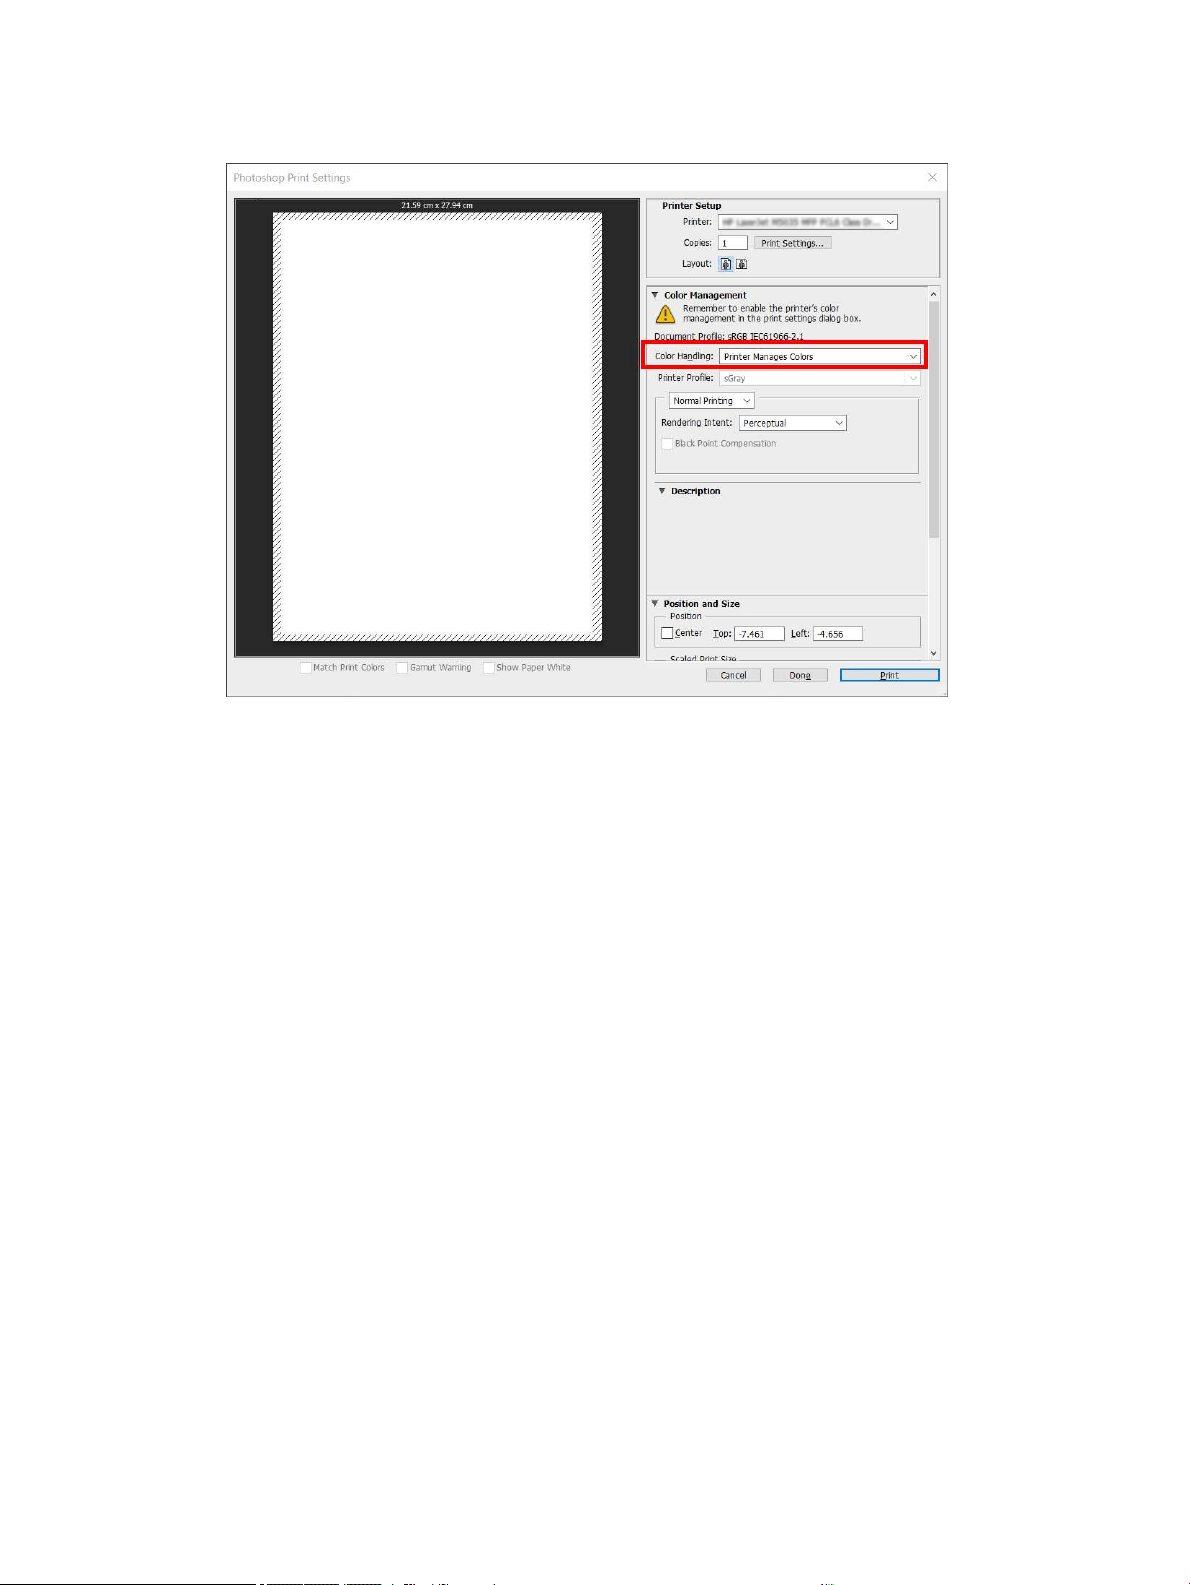
2. In the Color Management section, set the Color Handling option to Printer Manages Colors.
3. In the driver’s Color tab, ensure that the color management option is Printer managed colors. This is the
correct option because you have already selected Printer Manages Colors in Photoshop.
Print a project
This section demonstrates how to print a project from AutoCAD.
Using Autodesk AutoCAD
1. The AutoCAD window can show a model or layout. Normally a layout is printed rather than the model.
104 Chapter 9 Practical printing examples ENWW

2. Click the Plot icon at the top of the window.
3. The Plot window opens.
ENWW Print a project 105
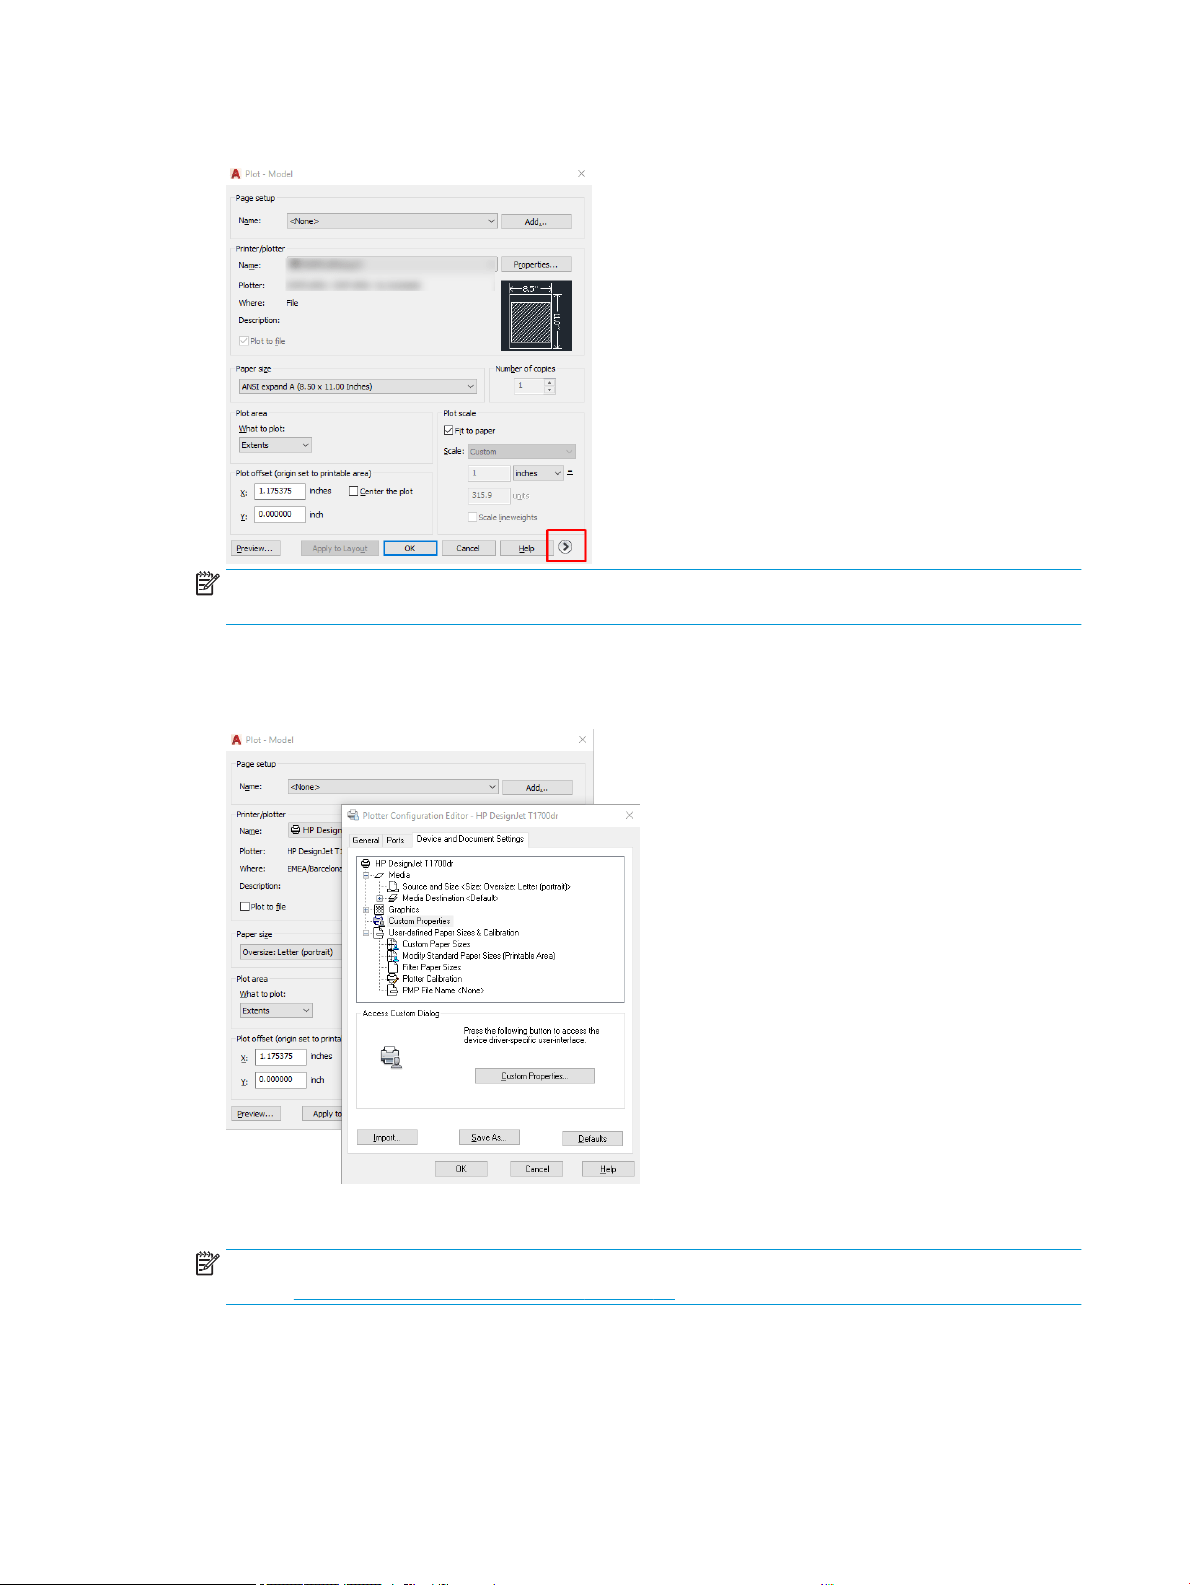
4. You can see further options by clicking the circular button in the lower right corner of the window.
NOTE: The Quality option here does not refer to the nal print quality but to the quality of AutoCAD
viewport objects that are sent for printing.
5. Select your printer and click the Properties button.
6. Select the Device and Document Settings tab, and click the Custom Properties button.
7. In the Paper/Quality or Paper tab, select the paper type that you intend to use.
NOTE: If you select neither the paper source nor the paper type, the printer will not print on any protected
roll (see Protect a paper type (T1600dr only) on page 73).
8. Select the print quality (your own choice between speed and quality of printing).
9. If you intend to print on roll paper, you must decide where the printer should cut the paper.
106 Chapter 9 Practical printing examples ENWW
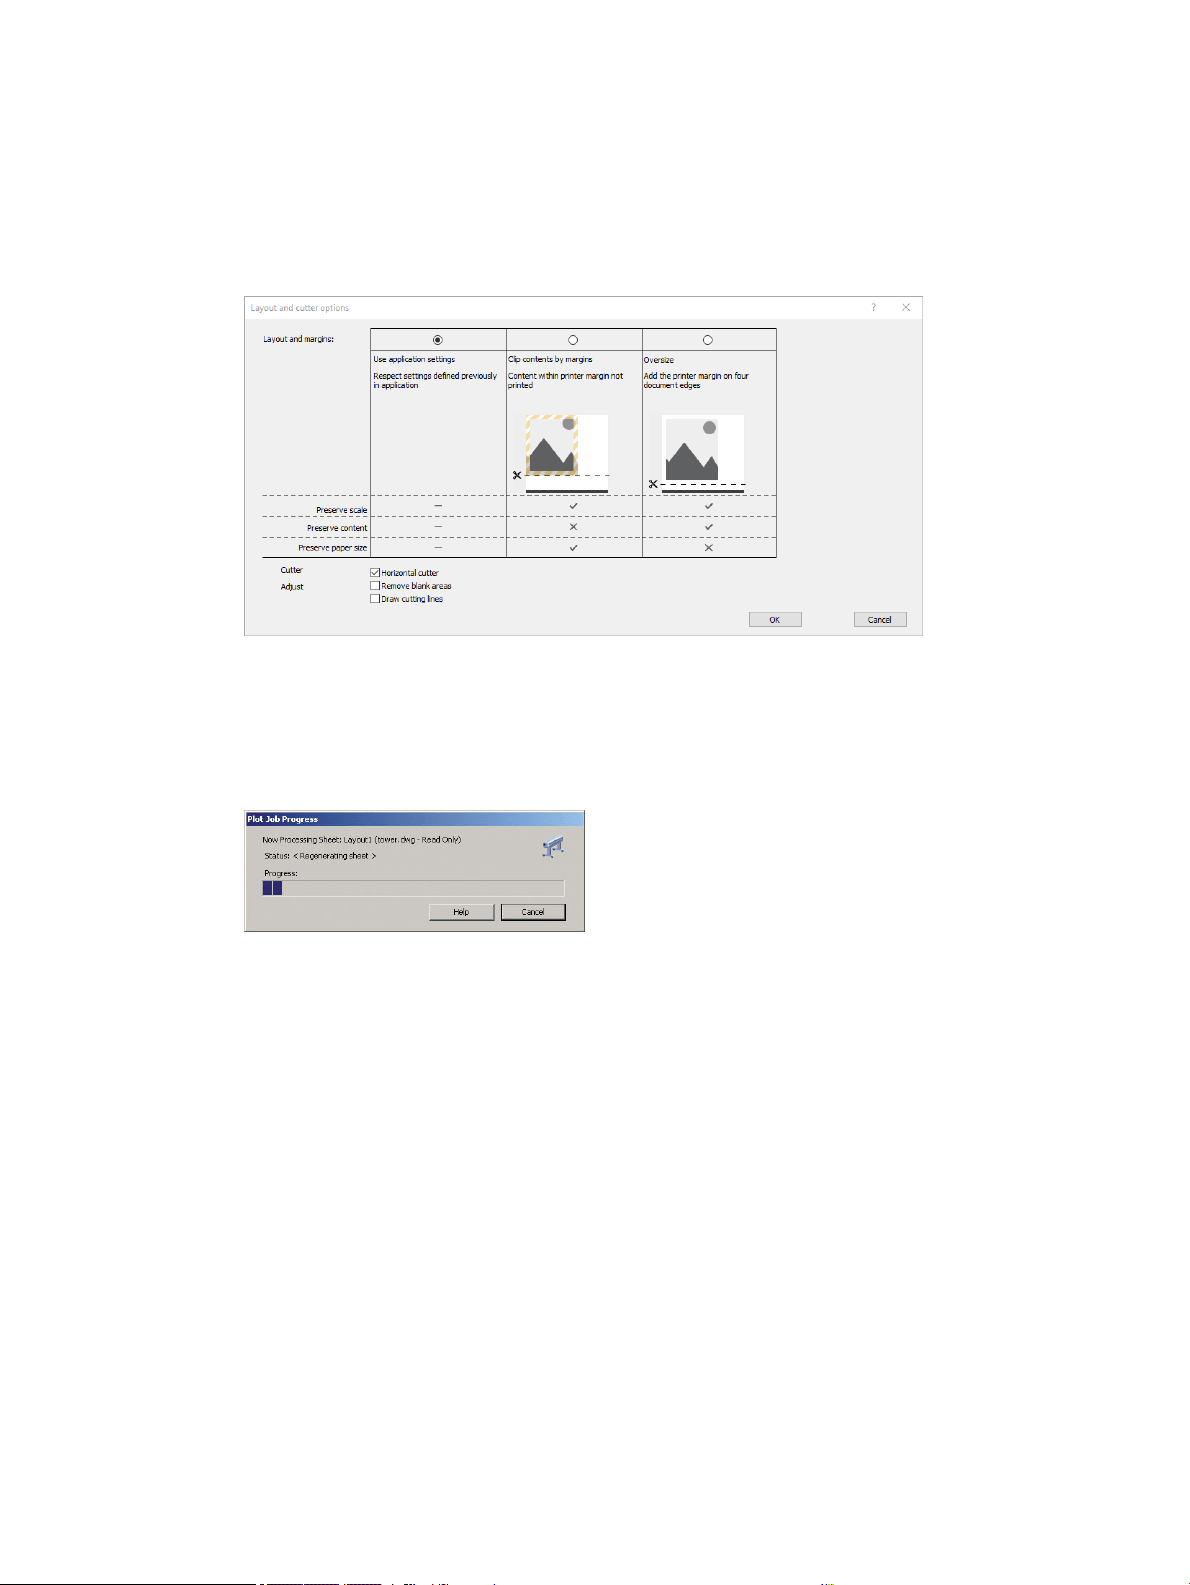
● With a Windows V3 driver: Click the Paper/Quality tab, then the Margins/Cutter Settings button, and
select Clip content by margins.
● With a Windows V4 driver: Click the Layout tab; then, in the Layout Mode area, select With margins >
Clip content by margins.
You can also adjust the crop lines, which indicated where to cut the paper after printing.
10. Select the Layout/Output tab, then select the Autorotate option. Autorotation can help to avoid wasting
paper.
11. Click the OK button and save your conguration changes to a PC3 le.
12. When you have clicked the OK button in the Plot window, the printer will construct a print preview.
Using clip contents by margins
You can select this margins option from Advanced settings > Paper > Layout/Margins > Print with margins >
Layout > Clip contents by margins.
Use this option when the contents to be printed have white borders and a size equal to that of the paper you
have selected. The printer will use the white border for its margins and you will get a page of size equal to that
which is selected in the driver.
Print a presentation
This section demonstrates how to print a presentation from AutoCAD and from Photoshop.
Using Autodesk AutoCAD
1. Open the AutoCAD le and select a layout.
ENWW Print a presentation 107
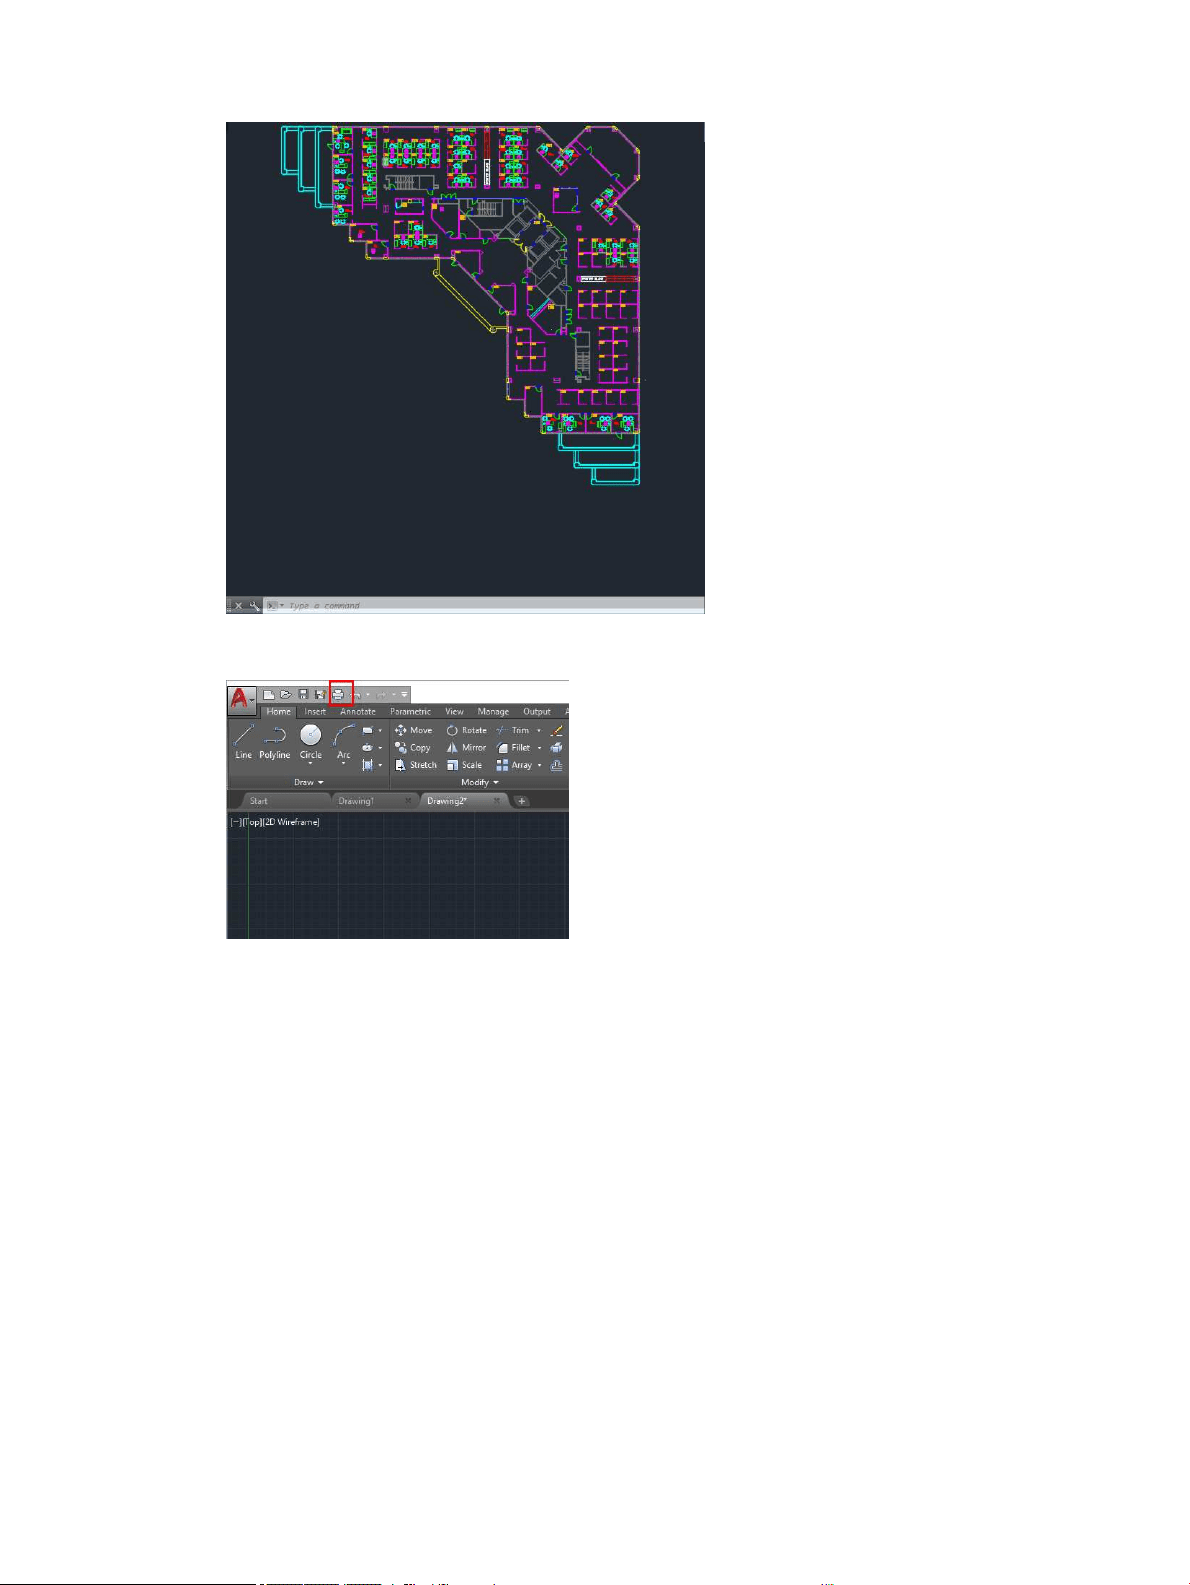
2. Click the Plot icon at the top of the window.
3. Ensure that the correct printer is selected, then click the Properties button.
108 Chapter 9 Practical printing examples ENWW
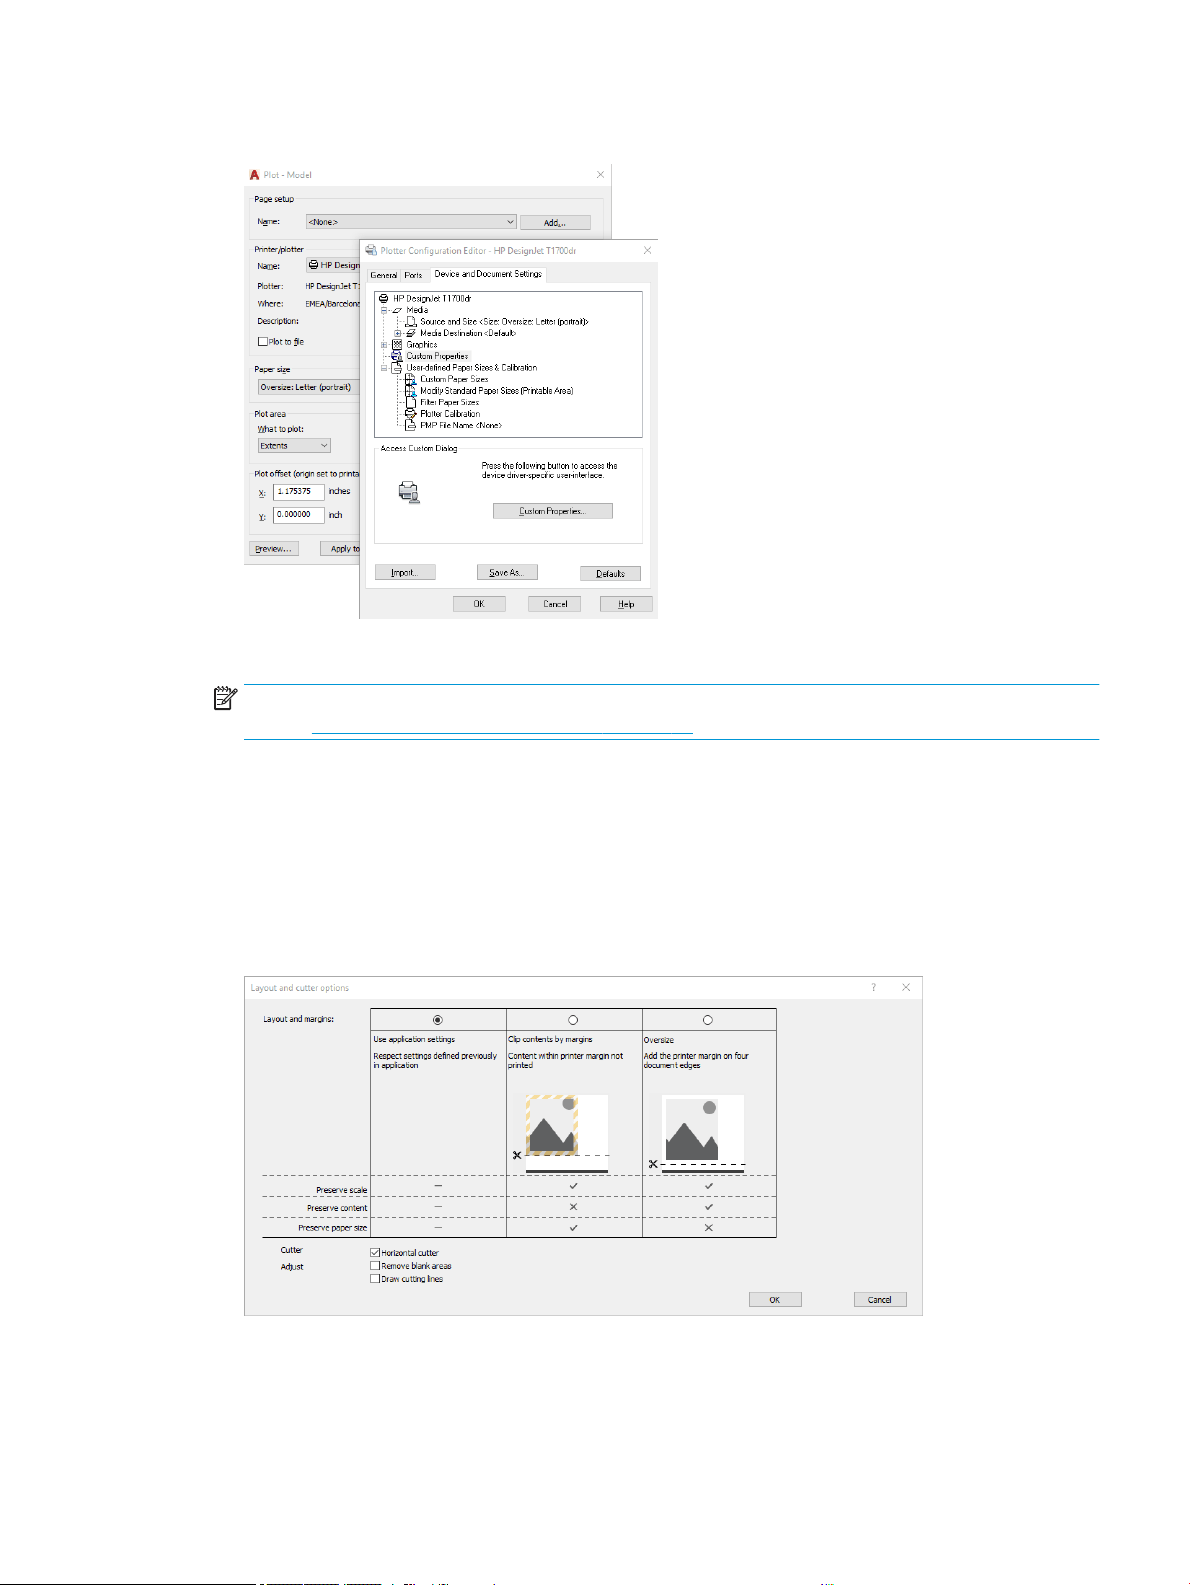
4. Select the Device and Document Settings tab, and click the Custom Properties button.
5. In the Paper/Quality tab, select the paper type that you intend to use.
NOTE: If you select neither the paper source nor the paper type, the printer will not print on any protected
roll (see Protect a paper type (T1600dr only) on page 73).
6. Select the print quality (your own choice between speed and quality of printing).
7. If you intend to print on roll paper, you must decide where the printer should cut the paper.
● With a Windows V3 driver: Click the Paper/Quality tab, then the Margins/Cutter Settings button, and
select Clip content by margins.
● With a Windows V4 driver: Click the Layout tab; then, in the Layout Mode area, select With margins >
Clip content by margins.
8. Select the Layout/Output tab, then select the Autorotate option. Autorotation can help to avoid wasting
paper.
9. Click the OK button and save your conguration changes to a PC3 le.
ENWW Print a presentation 109
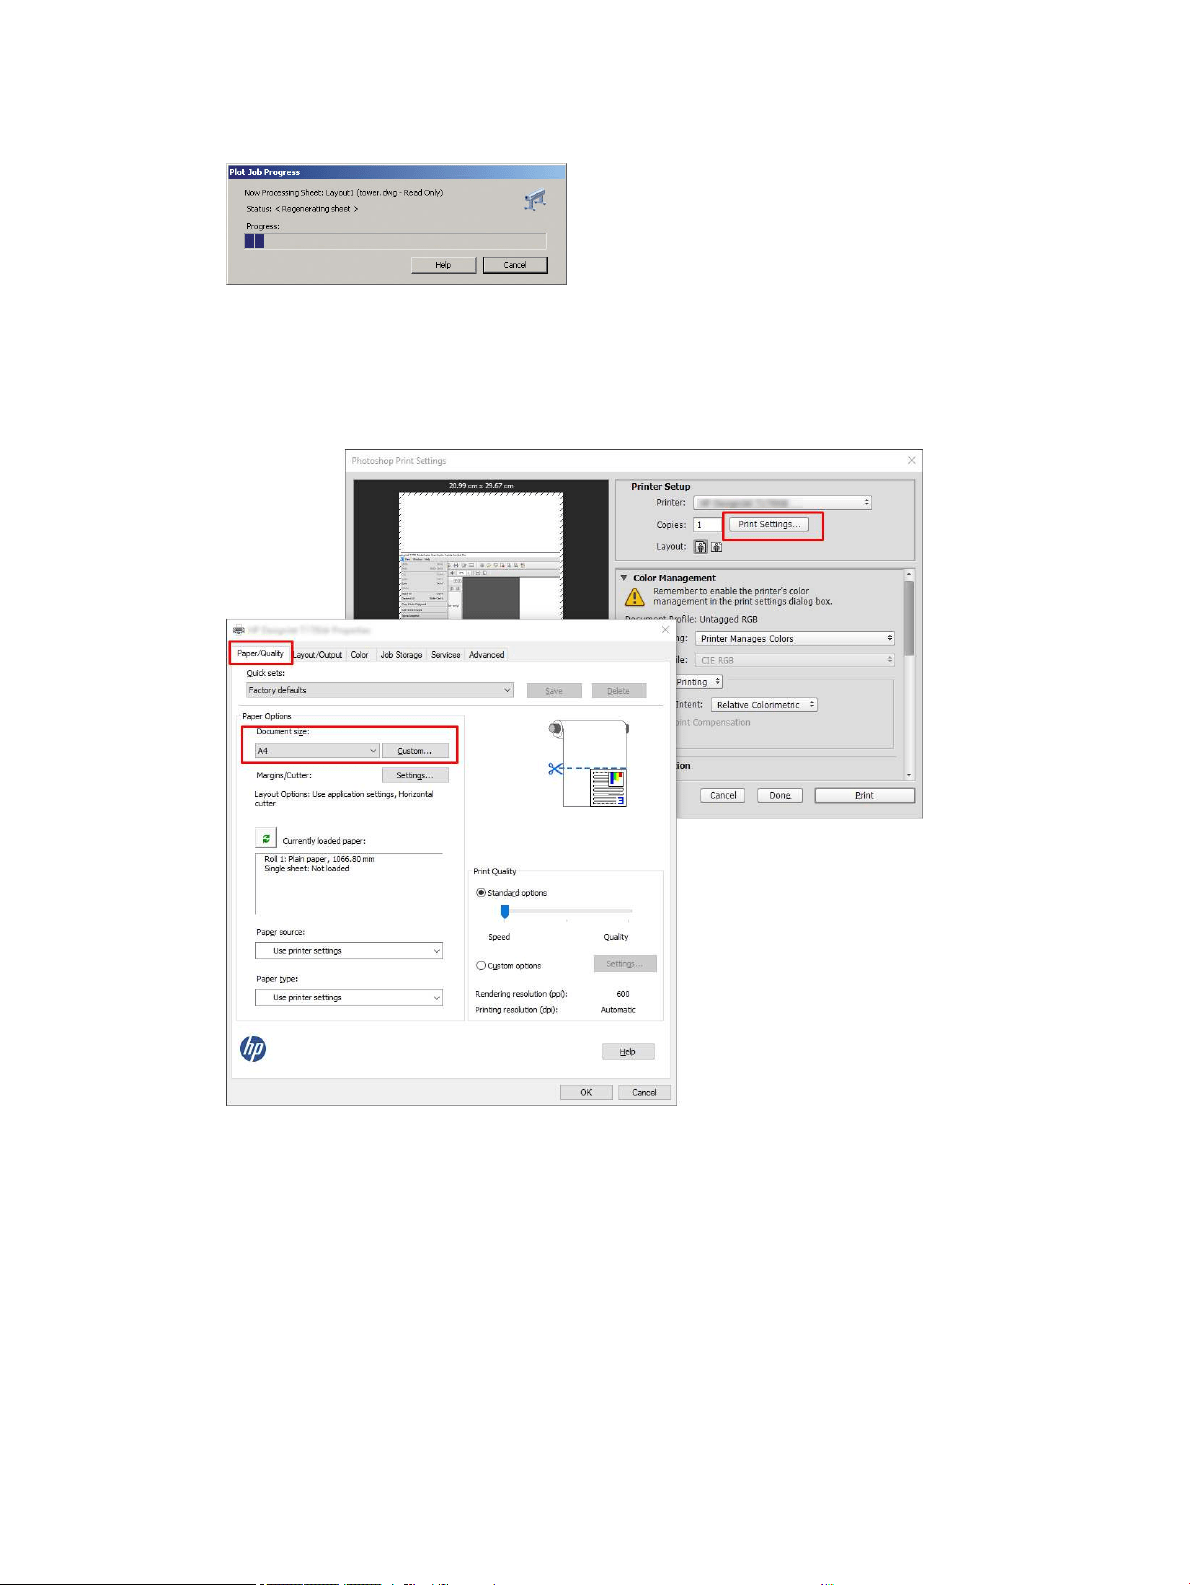
10. When you have clicked the OK button in the Plot window, the printer will construct a print preview.
Using Adobe Photoshop
1. In Photoshop, click File > Print and then select your printer.
2. Click Print settings, then select the Paper/quality tab.
110 Chapter 9 Practical printing examples ENWW
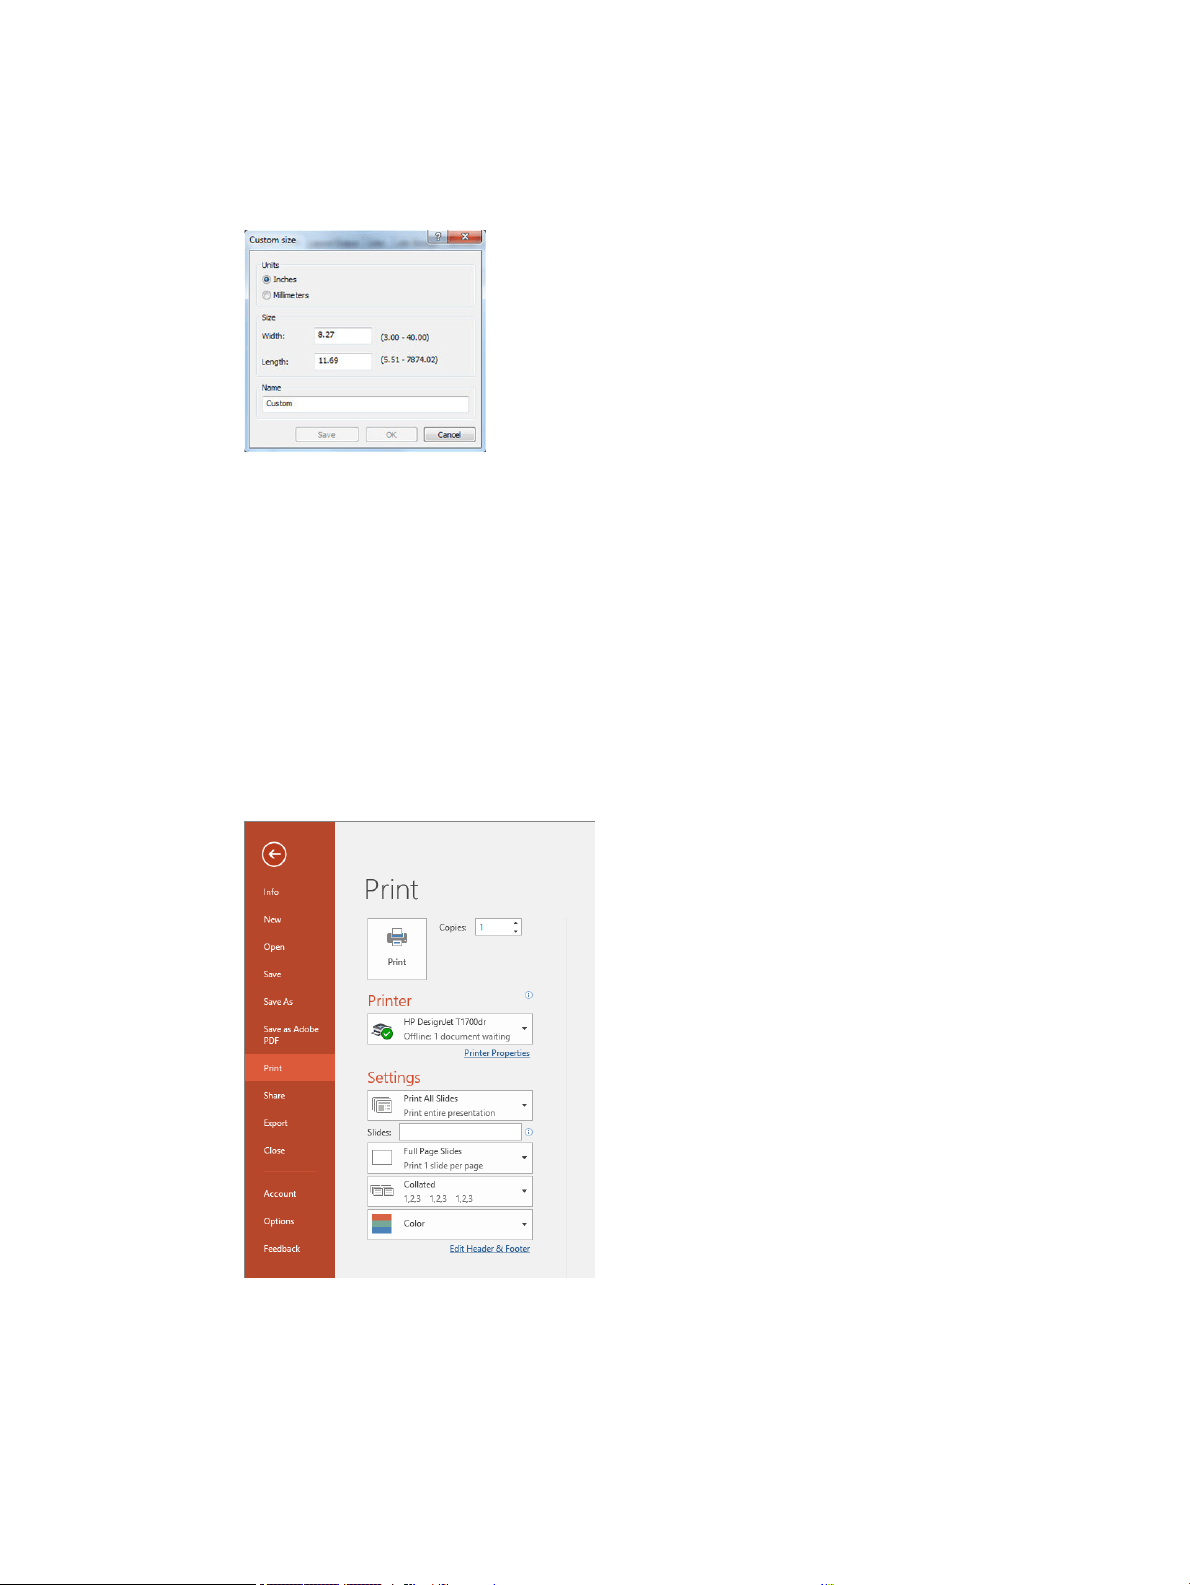
3. Choose from the available paper sizes.
If you do not nd the paper size that you intend to use, click the Custom button. Enter the width, the length
and the name of your custom paper size. Click the Save and OK buttons.
4. Select Show preview before printing. You may also wish to change the default paper source, paper type
and print quality.
5. In the Color tab, the default color management option is Printer managed colors, and this is the correct
option because you have already selected Printer Manages Colors in Photoshop.
Print and scale from Microsoft Oce
This section demonstrates how to print and scale from Microsoft Oce 2013.
Using Microsoft PowerPoint
1. Click File > Print, and select the name of your printer.
2. Click Printer properties > Layout/Output > Resizing options to scale the document to a particular size.
3. Select the Paper/Quality tab, then select Paper Source and Paper Type.
4. To clip contents by margins:
ENWW Print and scale from Microsoft Oce 111
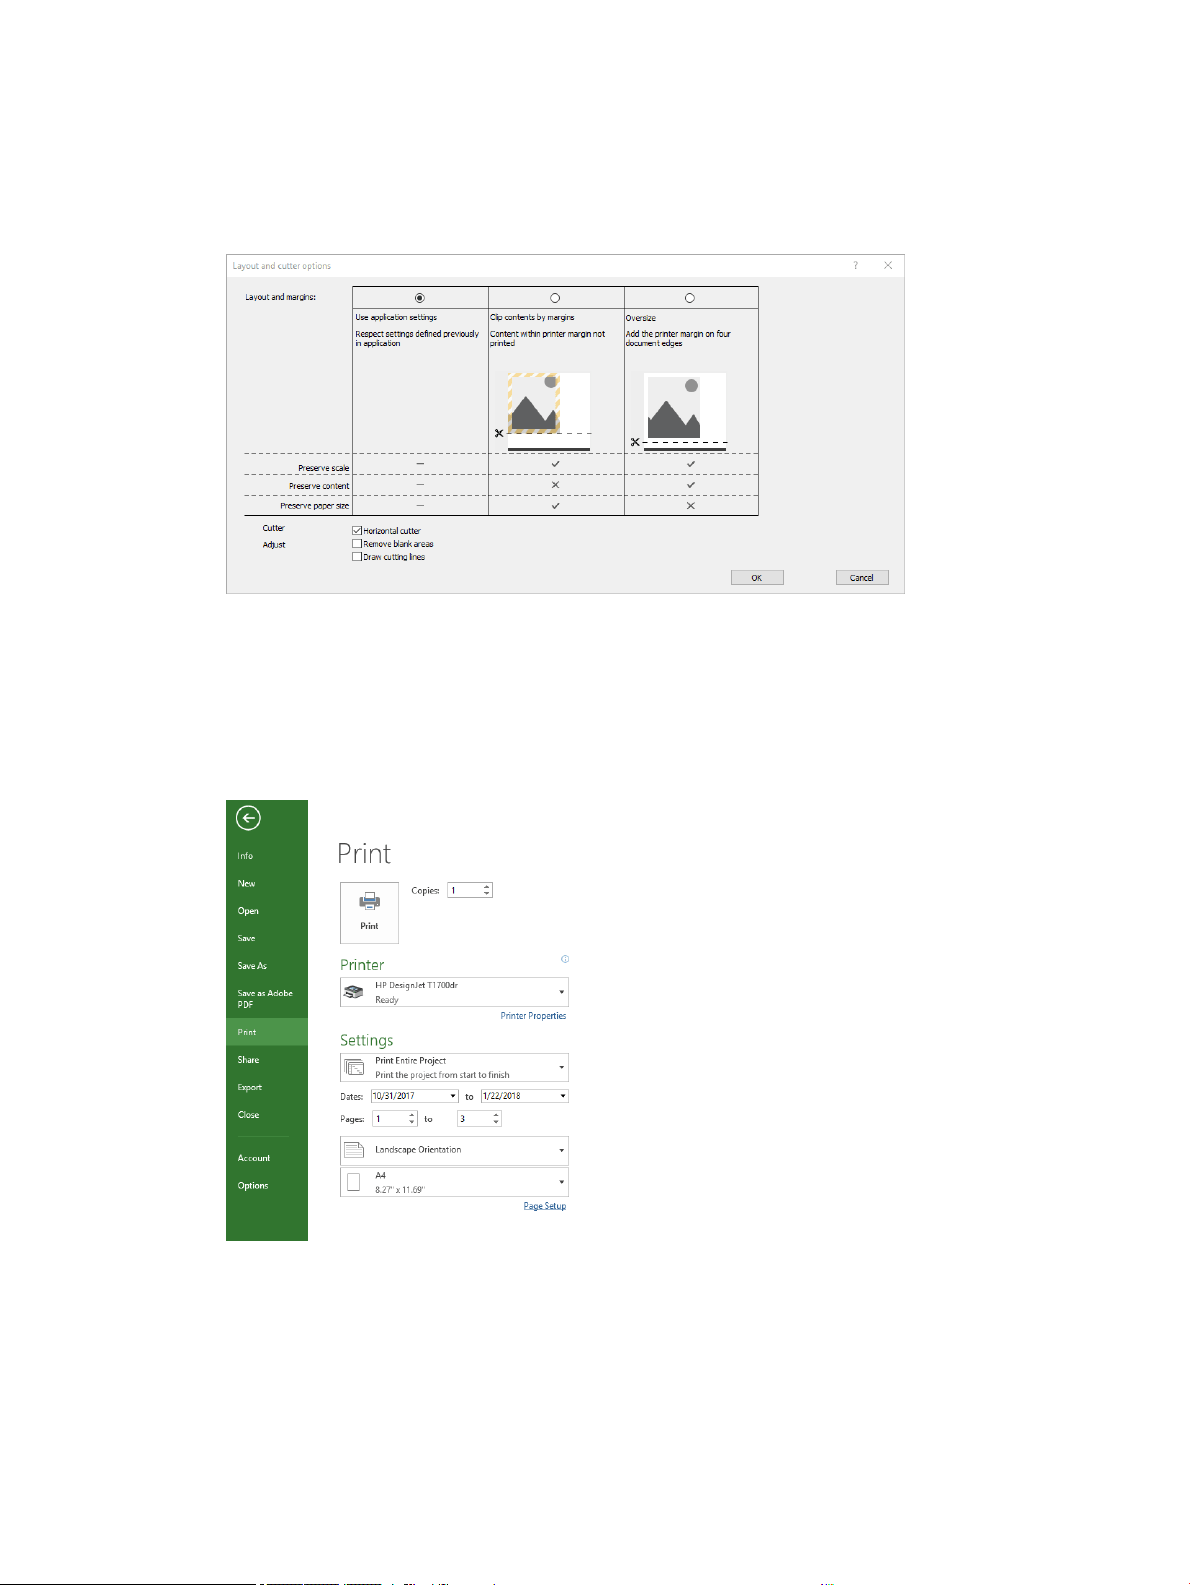
● With a Windows V3 driver: Click the Paper/Quality tab, then the Margins/Cutter Settings button, and
select Clip content by margins.
● With a Windows V4 driver: Click the Layout tab; then, in the Layout Mode area, select With margins >
Clip content by margins.
Using Microsoft Project
1. Click File > Print.
2. Select your printer's name.
3. In the Settings section, you can choose the pages to print, the orientation, and the paper size.
112 Chapter 9 Practical printing examples ENWW
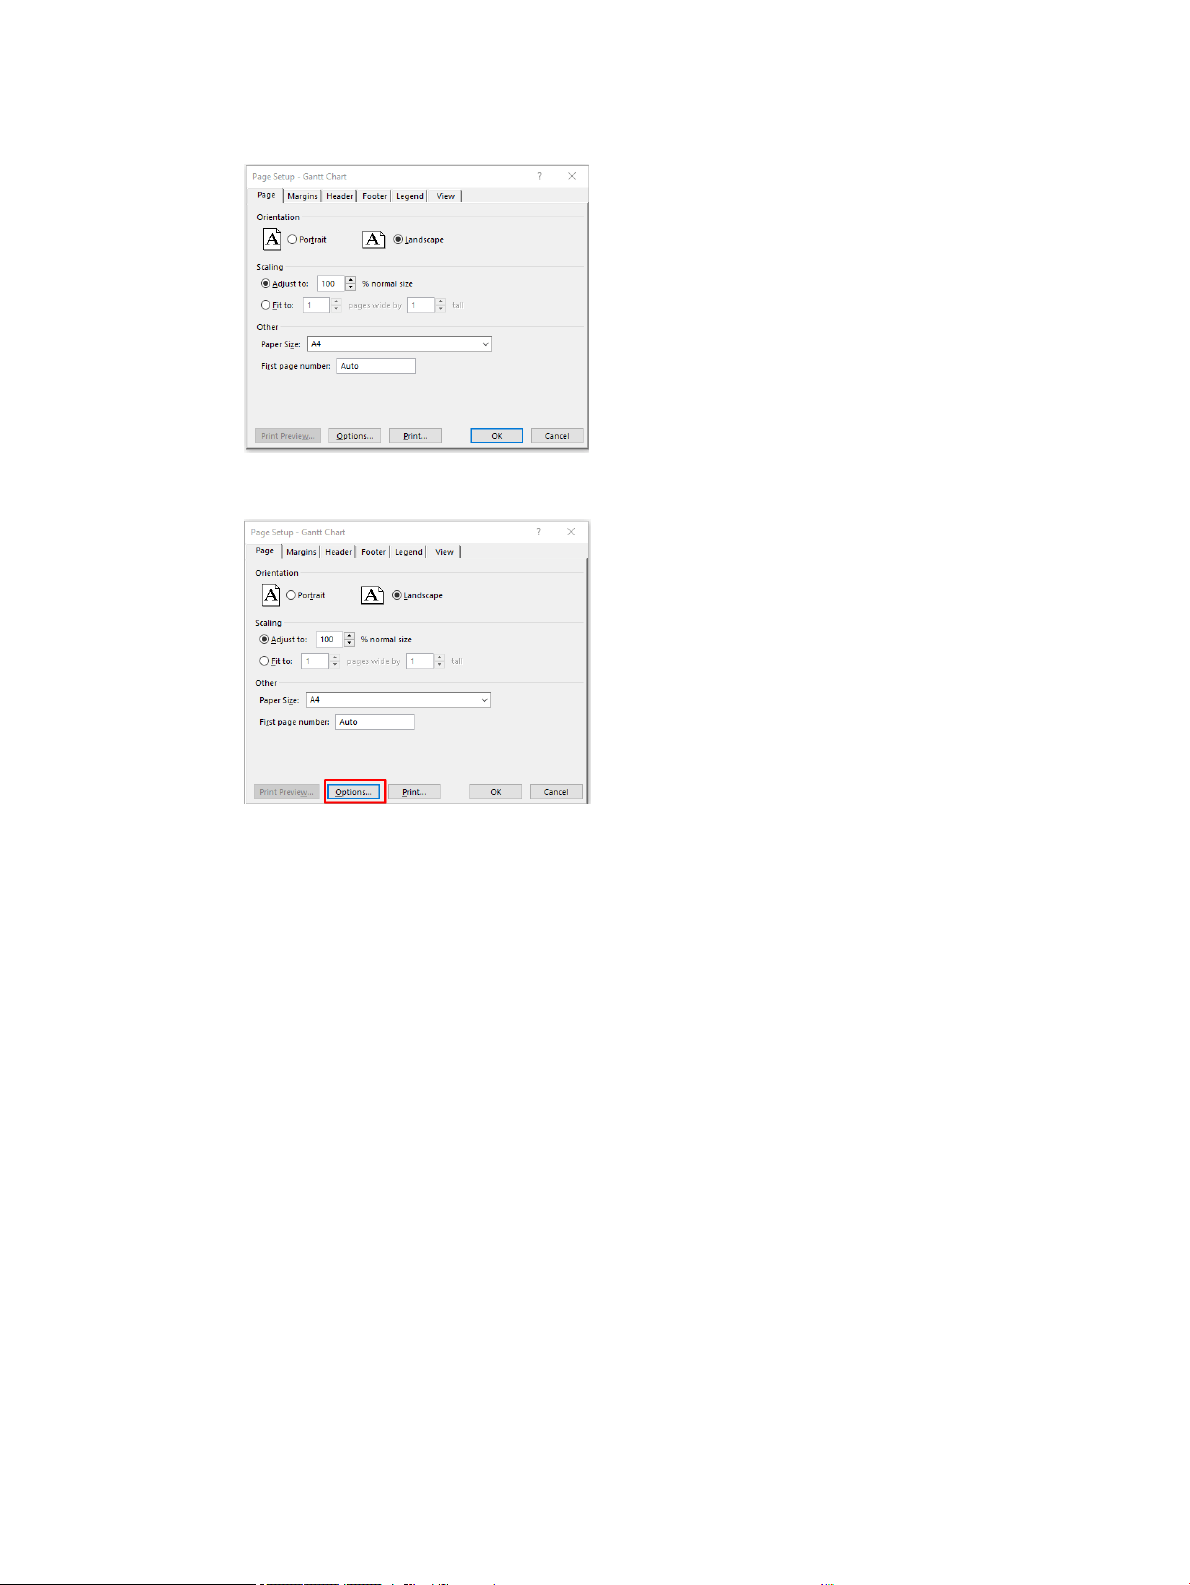
4. Click Page Setup to choose the Paper Size you want.
5. Select Options to go to the printer driver.
The default options in the Paper/Quality tab are probably suitable: Paper source: Use printer settings and
Paper Type: Use Printer Settings.
6. Click Layout/Output > Resizing options to scale the document to a particular size. Alternatively, you can
scale the document in Project.
ENWW Print and scale from Microsoft Oce 113
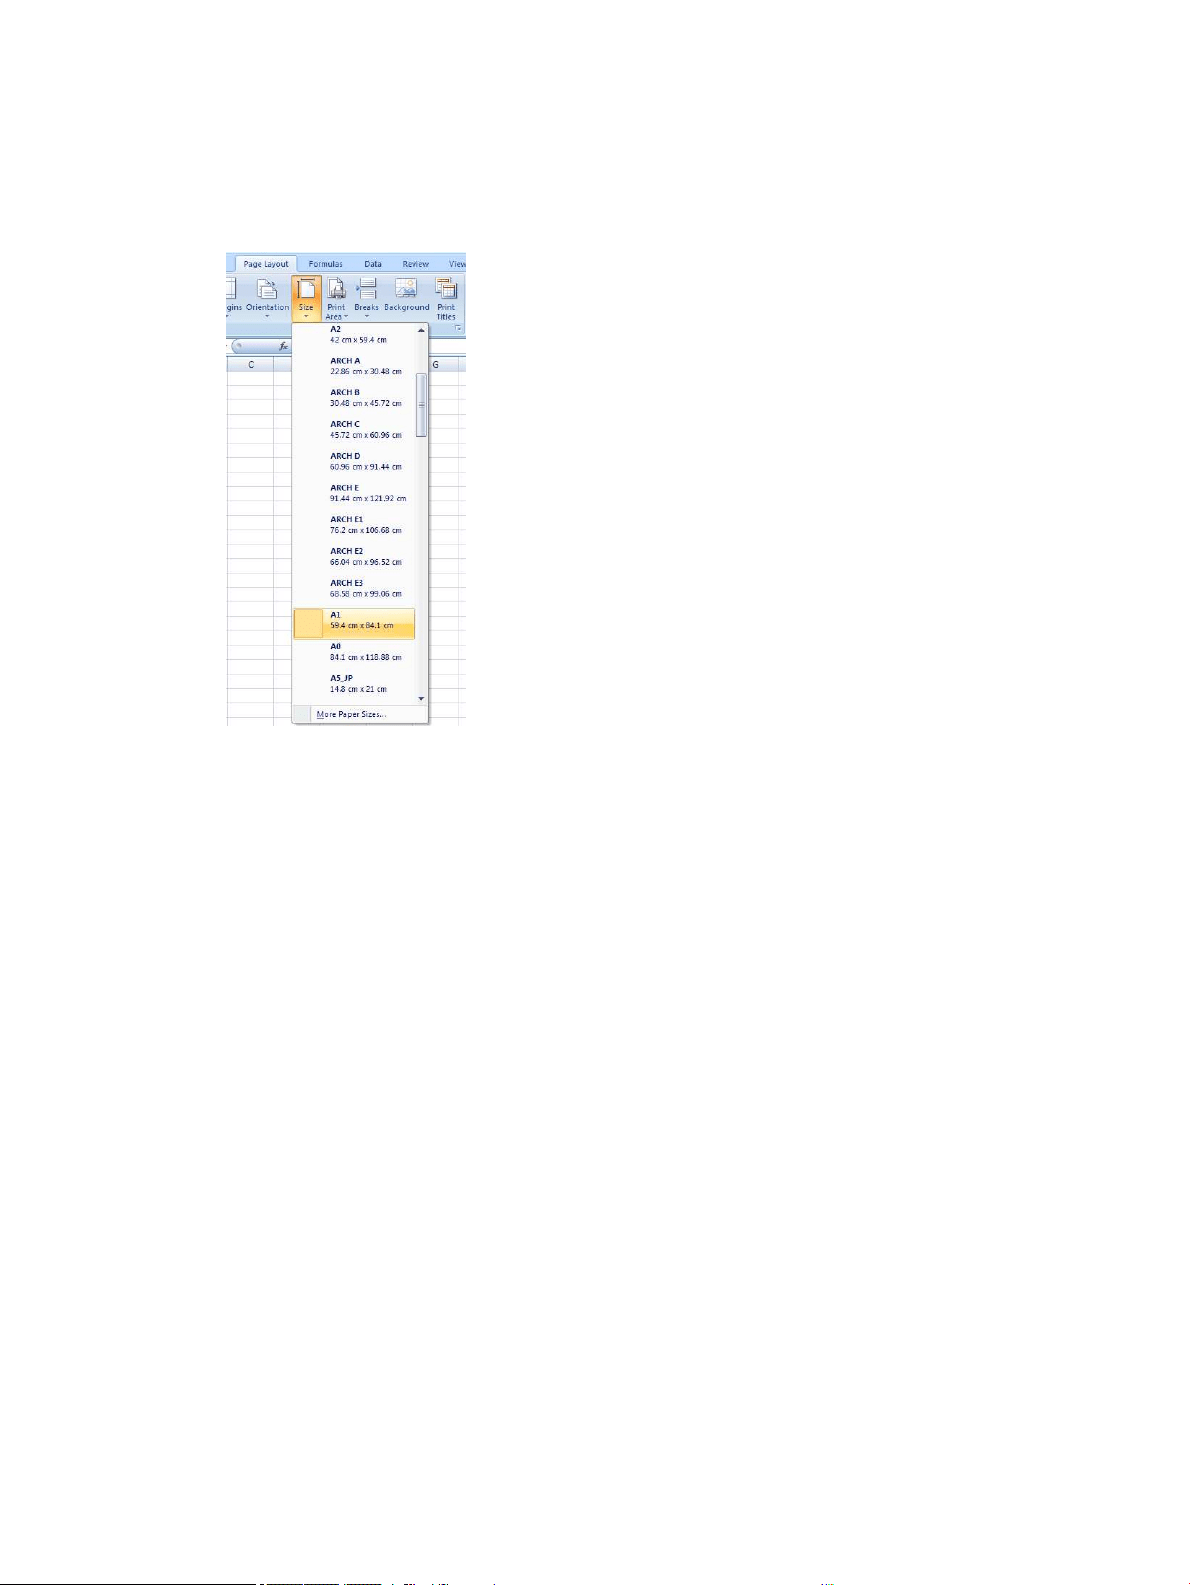
Using Microsoft Excel
1. Click File > Print. Select your printer's name, then click the back arrow to leave the File menu.
2. Select the Page Layout tab, then Size, and choose the paper size you want.
3. Click File > Print > Printer properties to go to the printer driver. In the Paper/Quality tab, select Paper
source, Paper Type and Print Quality.
4. Click Layout/Output > Resizing options to scale the document to a particular size. Alternatively, you can
scale the document in Excel.
114 Chapter 9 Practical printing examples ENWW
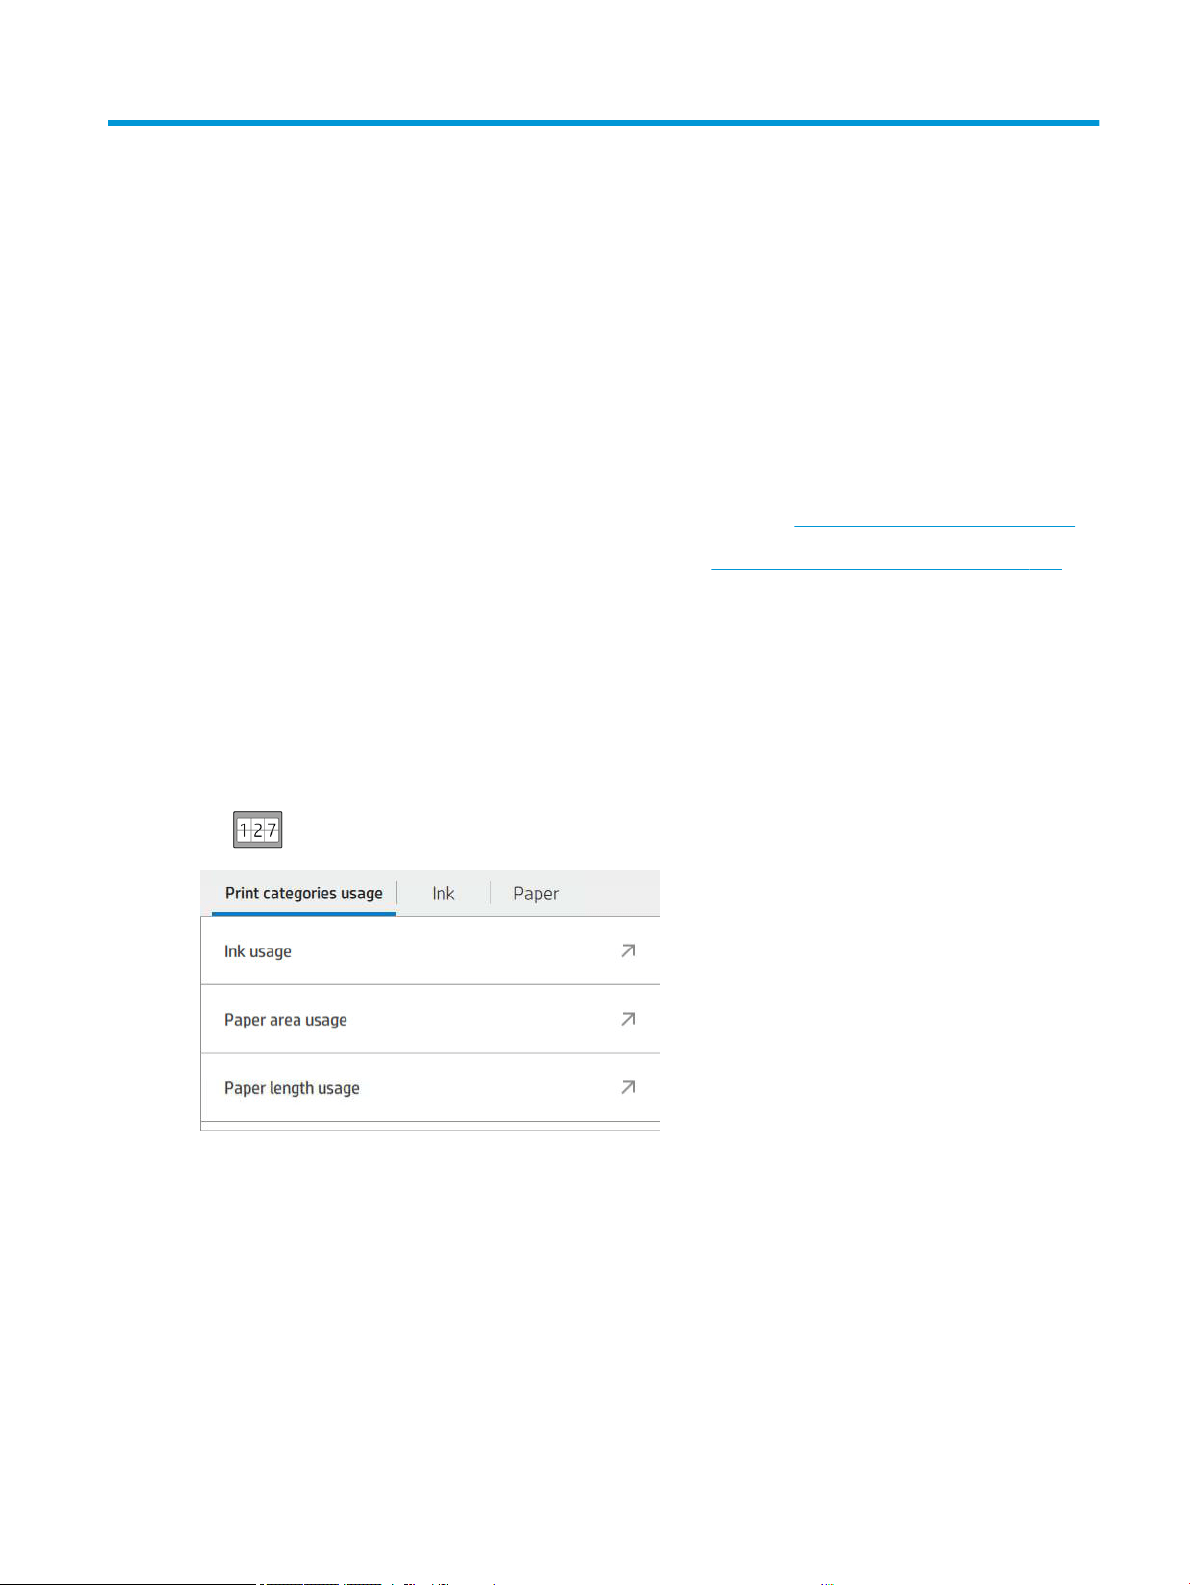
10 Retrieving printer usage information
Get printer accounting information
There are dierent ways of getting accounting information from your printer.
● View printer usage statistics for the whole lifetime of the printer, see Check usage statistics on page 115.
● View ink and paper usage for each of your recent jobs, see Check usage statistics for a job on page 117.
● Use a third-party application to request printer status, printer usage or job accounting data from the printer
through the Internet. The printer provides data in XML to the application whenever requested. HP provides
a Software Development Kit to facilitate the development of such applications.
Check usage statistics
Check usage from the front panel
Tap on the front panel to display the usage information.
The following information can be retrieved:
● In the tab Print categories usage, you can see the ink, paper area, and paper length usage divided into
categories:
– Mono lines: Between 0% and 10% of non-white pixel coverage, printed on standard paper, with less
than 1% of color pixel coverage
– Color lines: Between 0% and 10% of non-white pixel coverage, printed on standard paper, with more
than 1% of color pixel coverage
– Low density image: Between 10% and 50% of non-white pixel coverage printed on standard paper
ENWW Get printer accounting information 115
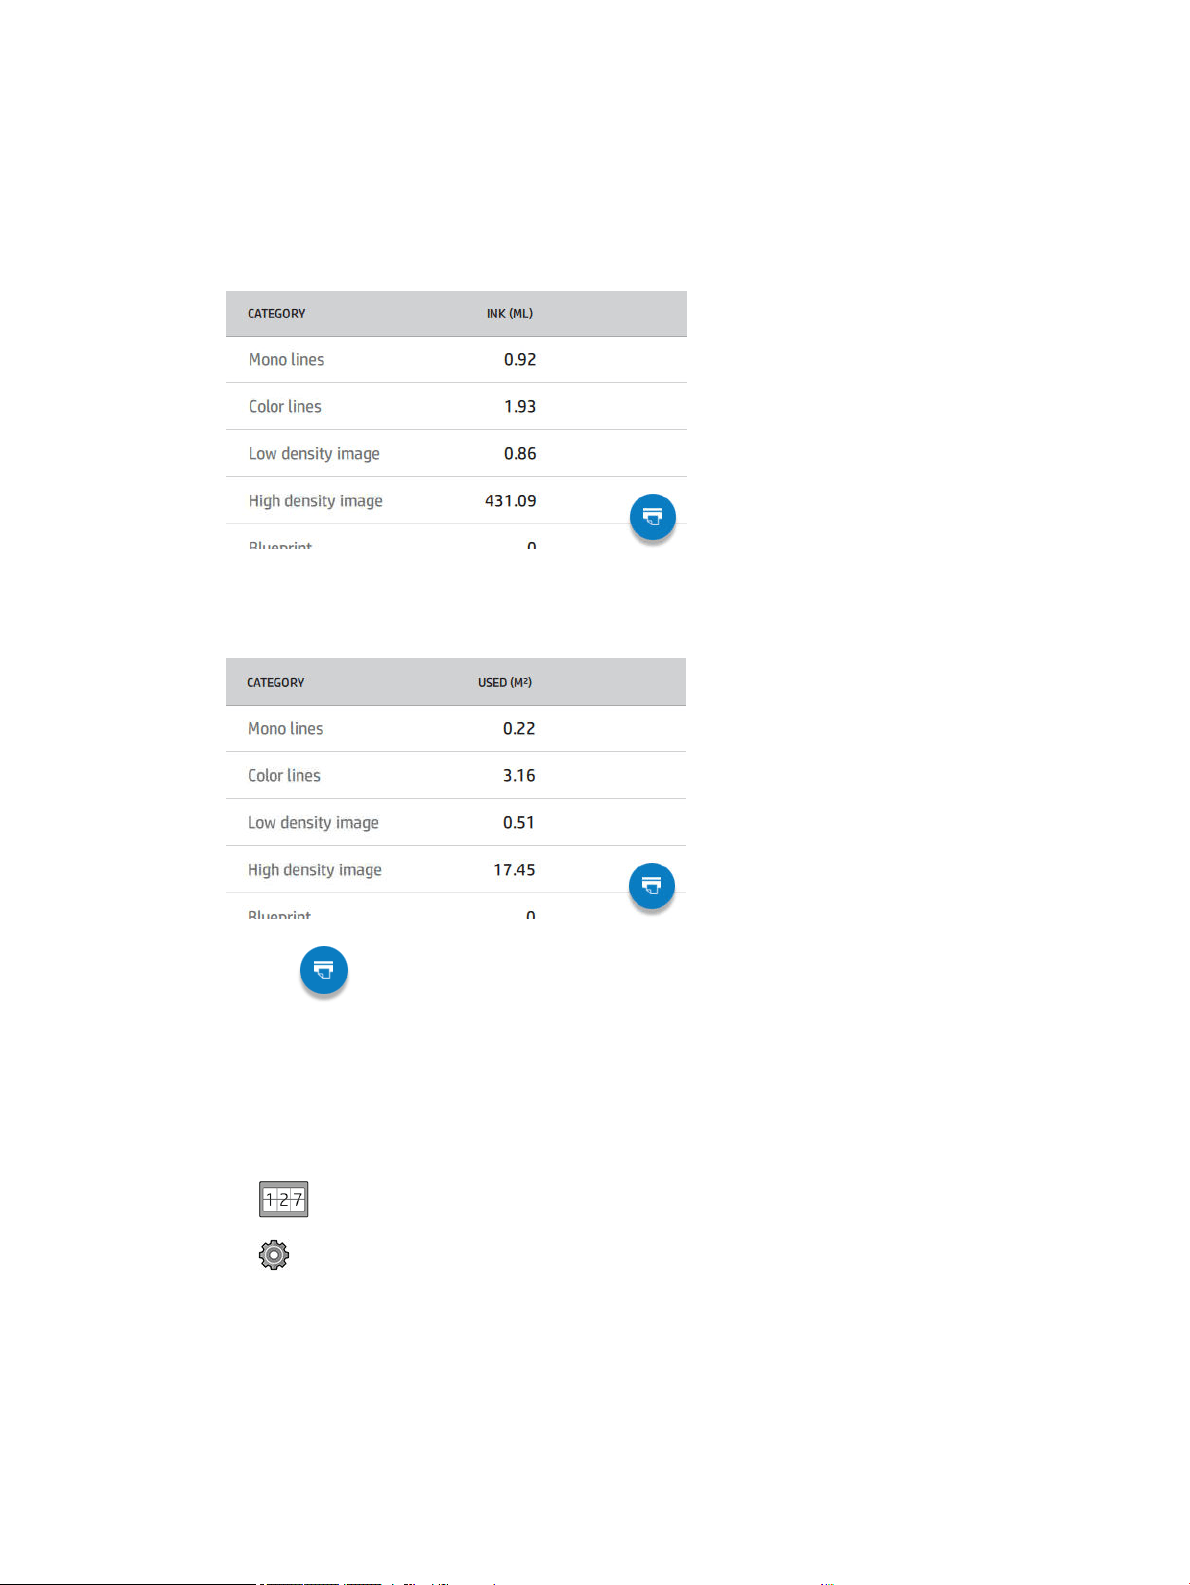
– High density image: Over 50% of non-white pixel coverage printed on standard paper
– Premium quality image: Any content type printed on premium paper
– Blueprint: Any content type printed on blueprint paper
● Ink usage: The ink consumed by each cartridge in ml, and the total amount of ink consumed.
● Paper usage: Amount of paper used and the total at the top, divided into paper categories or families.
Usage can be seen at each level.
When you tap , a message is displayed: The usage report was sent to the job queue and will be printed
soon.
All the values can be displayed in English or metric units.
Print the usage information
There are two dierent ways to print the usage information from the front panel’s home screen:
● Tap to launch the usage information screen, then tap the Print usage report button.
● Tap , then Internal prints > User information prints > Print usage report.
116 Chapter 10 Retrieving printer usage information ENWW

Check usage from the Embedded Web Server
The same information can be retrieved from the Embedded Web Server as from the front panel.
1. Access the Embedded Web Server, see Embedded Web Server on page 13.
2. In the menu at the side, click Usage.
The usage page shows all the printer usage information separated into various tables:
● Summary: The total ink usage and the total paper usage (in units of area and length).
● Print categories usage: The ink and paper usage and the number or pages printed for the dierent print
categories (content type, such as mono lines, color lines, premium quality image, blueprint paper). This
table information is shown only if the Show application categories printer setting is enabled. There are
further conditions depending on the following settings:
– The paper printed usage is shown if the Paper area used and paper area printed setting is enabled.
– The blueprint category is shown if the
Enable the blueprint category setting is enabled.
– The premium quality image category is only shown if the
Enable the premium quality image category
setting is enabled.
– If the printed-paper column information is shown, the paper area used eld changes the string to
"Paper area (m² used)". Otherwise, the string shown is "Paper area (m²)".
● Ink usage: The ink usage for the whole life of the printer (with approximate values). The ink consumption
table lists the ink consumed in each color, ignoring the product number of the cartridge.
● Paper usage: All the papers that have been used throughout the life of the printer.
Check usage statistics for a job
NOTE: The accuracy of the usage statistics is not guaranteed.
1. Access the Embedded Web Server, see Embedded Web Server on page 13.
2. In the menu at the side, click Usage > Accounting.
The accounting page shows a table of the latest printed jobs, with the following information per job (not per
page):
● Name: The name of the job
The job name is shown only if the Show user name and job name in job accounting setting is enabled for
users under Security > Security settings.
ENWW Check usage statistics for a job 117
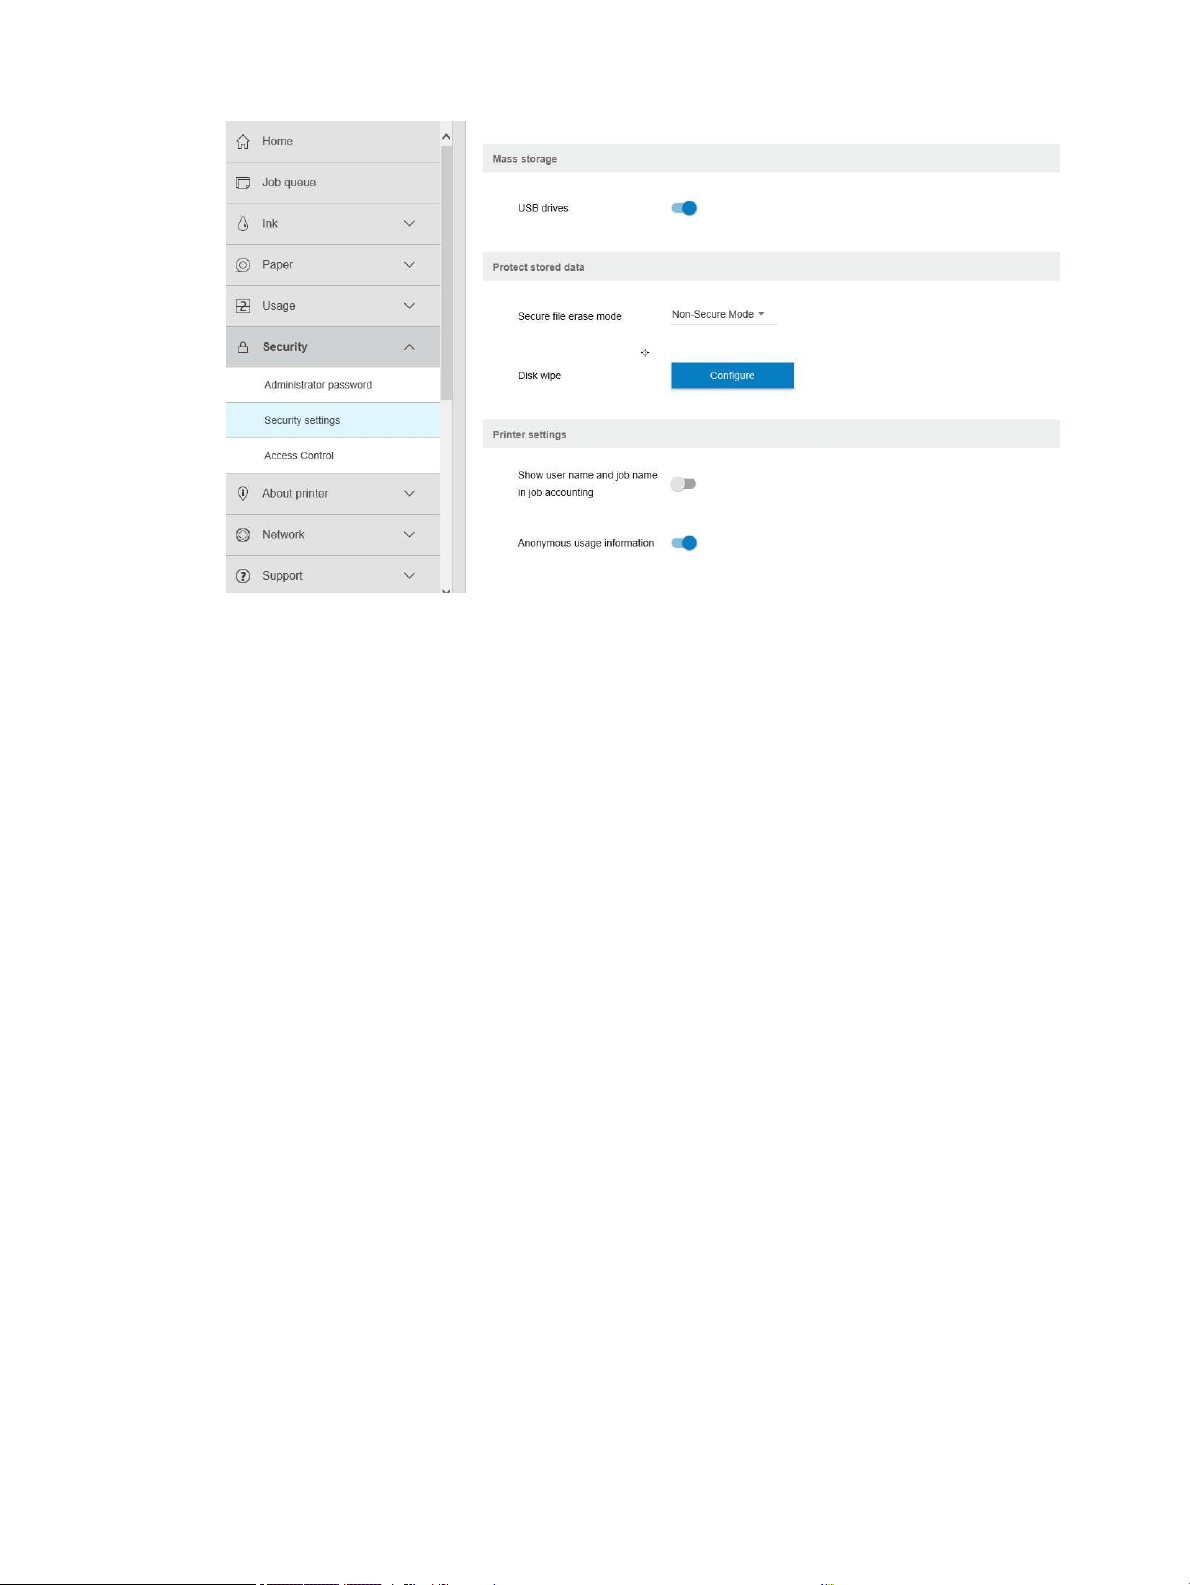
● Number: The number of the job
● Time: The date and time when the job was completed
● User: The name entered by the person who submitted the job (this item is present only if the
corresponding security setting is enabled)
The user name is shown only if the Show user name and job name in job accounting setting is enabled for
users under Security > Security settings.
● Type: The type of job (print)
● Source: The source of the job: USB, network, and so on
● Print quality: The print quality used to print the job
● Copies: The number of copies requested (cumulative after reprints)
● Pages: The number of pages completed
● Status: The status of the job: printed, canceled by user, and so on
● Total cost: The total cost of the job (visible if cost assignment is enabled)
● Paper type: The paper type used for the job
● Paper area: The used paper area of the job
● Paper length: The used paper length of the job
● Ink used: The volume of ink consumed by the job
A job is considered completed when all its pages have been printed, or canceled by the user, or canceled by the
printer itself. An ongoing job (waiting for printing, being printed, being canceled, on hold for preview, and so on)
will not appear on this list.
You can lter the jobs shown on the accounting page by using a drop-down control available on the same page.
This control just changes the view, the job accounting information is not deleted in the printer. Essentially, this
118 Chapter 10 Retrieving printer usage information ENWW

page will report the last N jobs (or fewer if there are not enough completed jobs), where N is the value of this
conguration parameter. By default, N is 10.
Two buttons appear in the accounting table:
● Help: This button opens a window displaying help information.
● Export to CSV: This button opens a window with a progress bar, and generates and downloads a CSV le.
The downloaded le contains similar information to the accounting page, in CSV format. If the cost
assignment is enabled, the CSV displays more detailed information about the cost of the job.
Check cost assignment
NOTE: The accuracy of the usage statistics is not guaranteed.
1. Access the Embedded Web Server, see Embedded Web Server on page 13.
2. Go to the Main tab.
3. Click Usage > Cost assignment conguration.
The cost assignment page allows you to enable or disable the cost assignment setting, using the checkbox next
to Enable accounting assignment conguration at the top of the page. If the setting is enabled, you can insert or
modify the cost of the following sections.
NOTE: At least one of these sections must be enabled in order to save the conguration.
● Units
– Currency: Enter any three-letter currency code.
–
Paper usage: Select the units, English or metric.
● Print categories cost: Can be enabled or disabled. When enabled, you can assign a cost to each category,
and select the units of the cost (per millimeter, or the option selected in the previous Units section). The
cost is a number with two decimal digits of precision. Disabled categories are displayed grayed out.
● Ink usage cost: Can be enabled or disabled. Allows you to apply a cost to ink usage, and displays the
available inks with a eld to indicate the cost.
● Paper usage cost: Can be enabled or disabled. Allows you to apply a cost to the papers displayed. You can
add papers from the list of supported papers. The costs can be removed or edited; they cannot be empty,
but may be 0 (zero). The units selection is the same as for print categories.
● Fixed cost: Can be enabled or disabled. Allows you to add a xed cost to all print, scan, and copy jobs.
Enabling the cost assignment setting causes the total cost column to appear in the accounting information, and
detailed information is added to the exported CSV.
ENWW Check cost assignment 119

11 Handling ink cartridges and printhead
●
About the ink cartridges
●
Check the ink cartridges status
●
Remove an ink cartridge
●
Insert an ink cartridge
●
About the printhead
●
Check the printhead status
●
Remove the printhead
●
Insert the printhead
●
Storage of anonymous usage information
●
Safe mode
120 Chapter 11 Handling ink cartridges and printhead ENWW
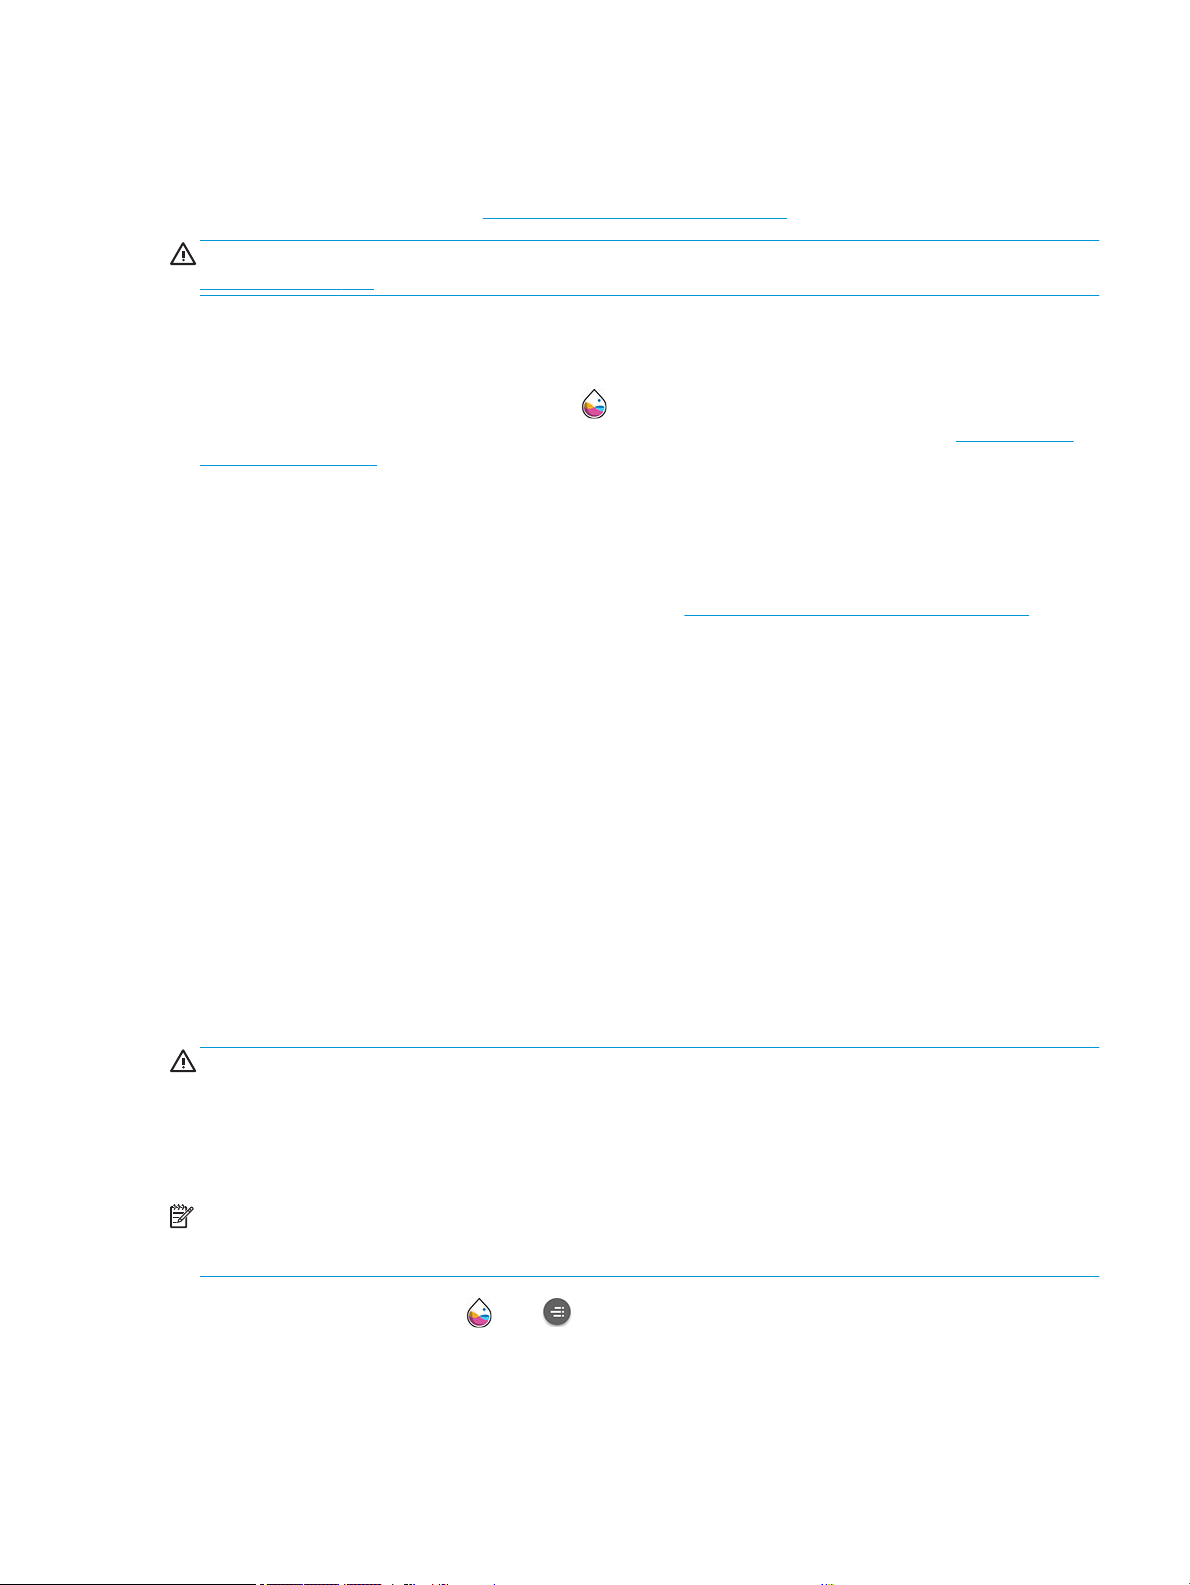
About the ink cartridges
Ink cartridges store the ink and are connected to the printhead, which distributes the ink on the paper. To
purchase additional cartridges, see Supplies and accessories on page 137.
CAUTION: Observe precautions when handling ink cartridges because they are ESD-sensitive devices (see the
Glossary on page 192). Avoid touching pins, leads and circuitry.
Check the ink cartridges status
To view the ink levels of your ink cartridges, tap , then tap the cartridge that you want information on. There is
a
Replace ink cartridges option on the ink information page in case you want to do so (see also Remove an ink
cartridge on page 121).
To get more information on your ink cartridges, you can press the color of the cartridge on which you want
information.
You can also get this information from the HP Utility.
For an explanation of the ink cartridge status messages, see Ink cartridge status messages on page 174.
HP Utility procedures
● In the HP DesignJet Utility for Windows, go to the Overview tab, each cartridge's status is under Supplies
Status > Cartridges.
Remove an ink cartridge
There are three occasions when you need to remove an ink cartridge.
● The ink cartridge is very low and you want to replace it with a full cartridge for unattended printing (you can
use up the remaining ink in the rst cartridge at a more convenient time).
● The ink cartridge is empty or faulty, and you must replace it to continue printing.
● You want to replace the printhead, and there is not enough ink left in the ink cartridge to complete the
printhead replacement process. In this case, if the cartridge is not empty you can use it again later.
CAUTION: Do not try to remove an ink cartridge while printing.
CAUTION: Remove an ink cartridge only if you are ready to insert another one.
CAUTION: Make sure the printer wheels are locked (the brake lever is pressed down) to prevent the printer
from moving.
NOTE: When a cartridge runs out of ink, the current job is not automatically cancelled: unless you cancel it
manually, it will resume printing when the empty cartridge has been replaced. If there is a delay in replacing the
cartridge, you may see some banding on the print.
1. From the front panel, press , then , then Replace.
ENWW About the ink cartridges 121
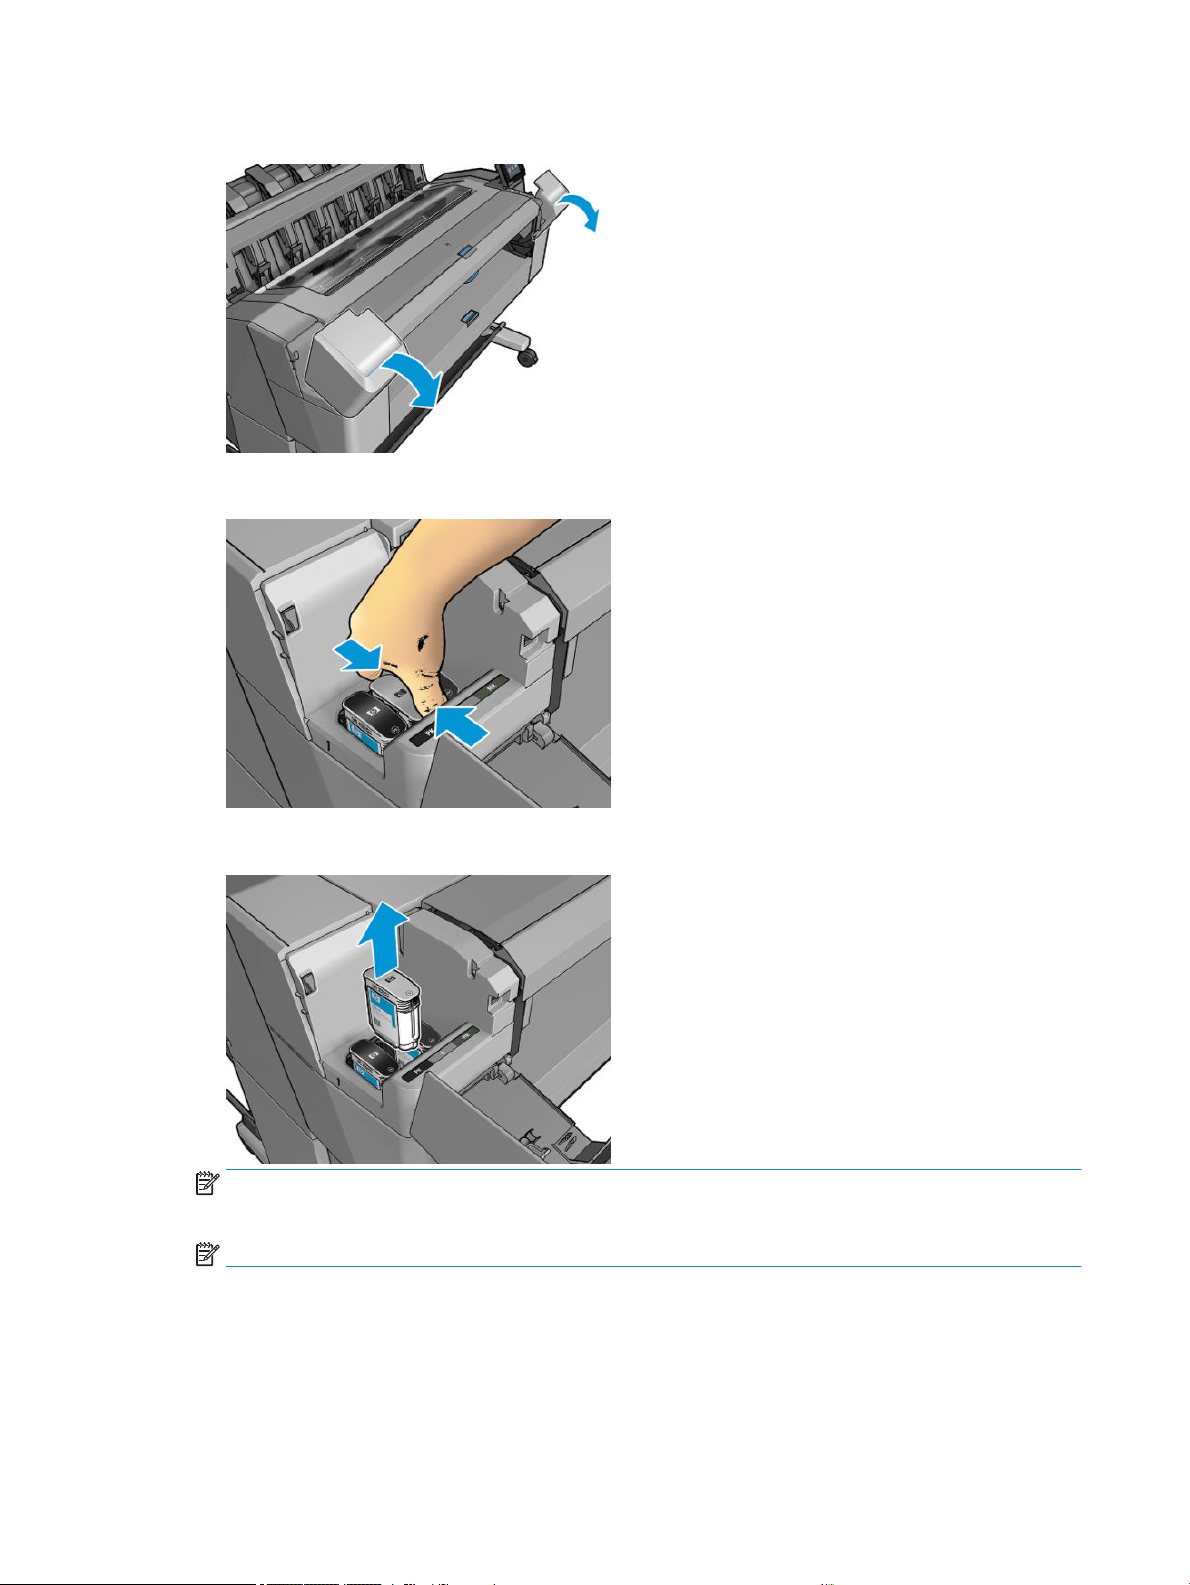
2. Open the ink cartridge cover on the left- or right-hand side of the printer.
3. Grip the cartridge you wish to remove.
4. Pull the cartridge straight up.
NOTE: Avoid touching the end of the cartridge that is inserted into the printer, as there may be ink on the
connection.
NOTE: Avoid storing partially used ink cartridges.
5. The front-panel display identies the missing ink cartridge.
Insert an ink cartridge
1. Before removing the cartridge from its wrapping, shake it vigorously.
122 Chapter 11 Handling ink cartridges and printhead ENWW
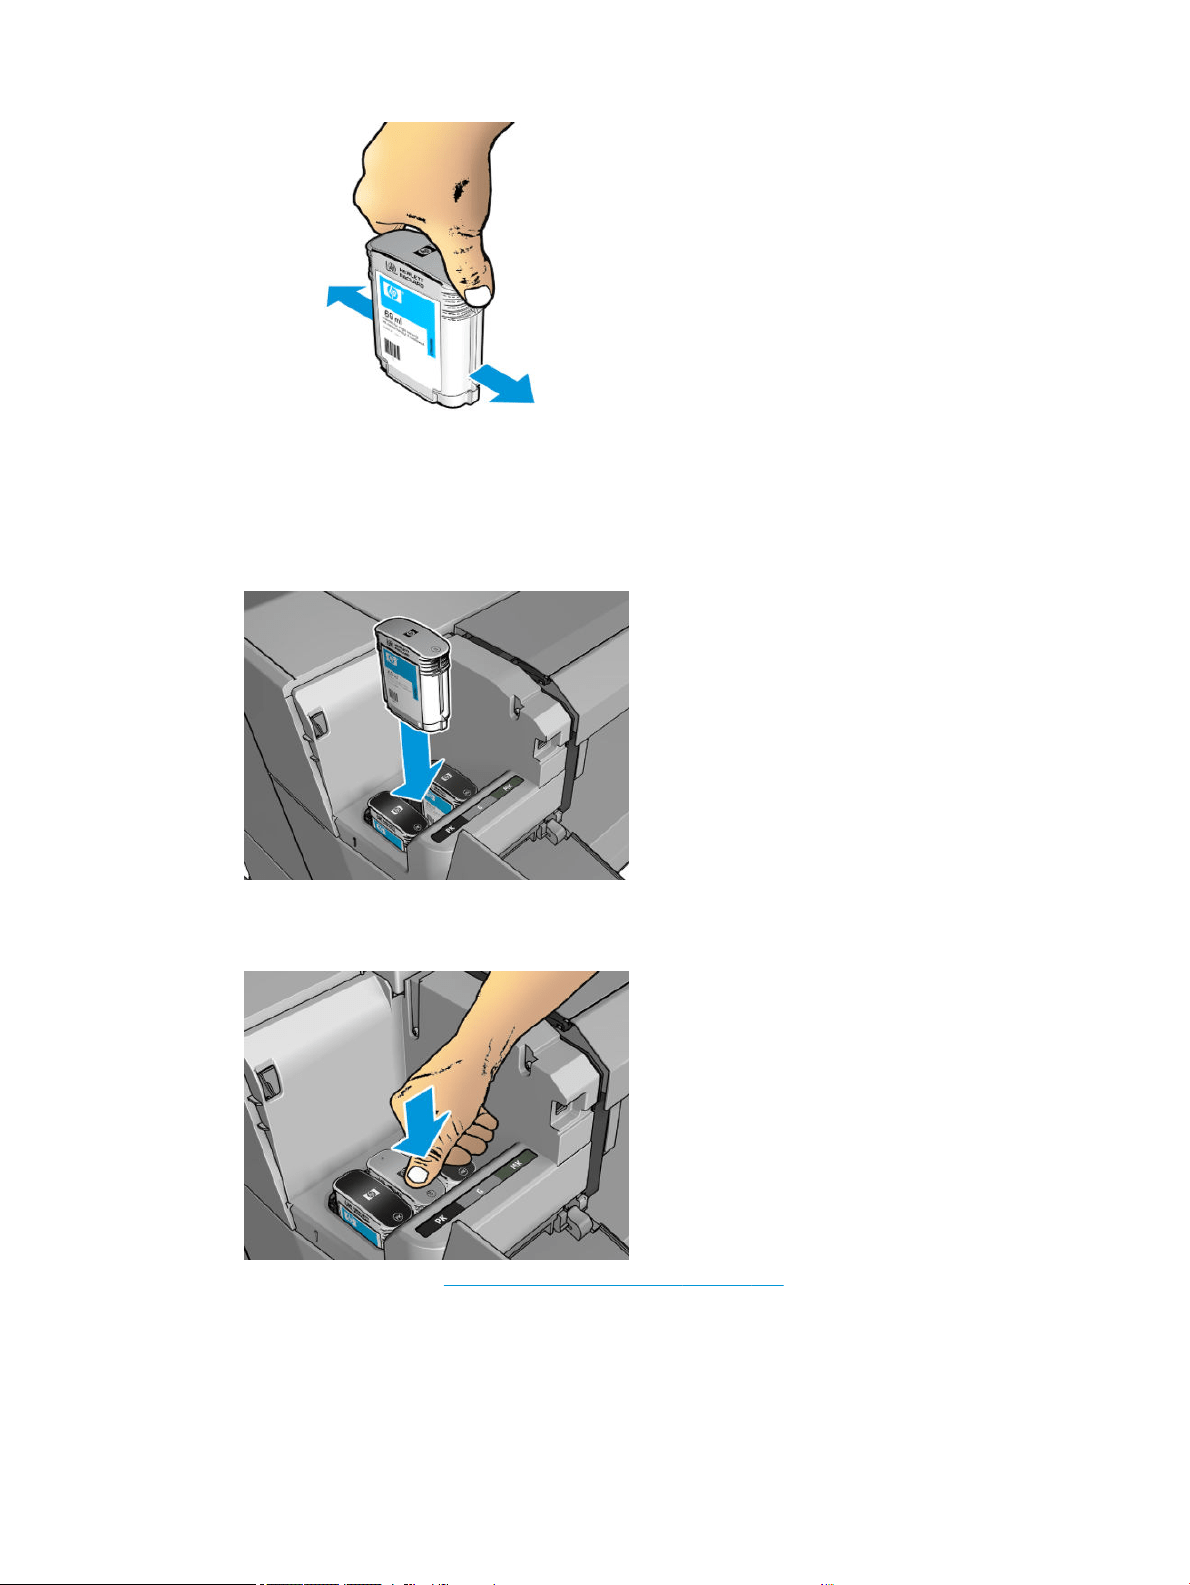
2. Unwrap the new ink cartridge, nd the label identifying the ink color. Check that the letter or letters (in
these illustrations, M for magenta) marking the empty slot, matches the letter or letters on the cartridge
label.
3. Insert the ink cartridge into its slot: photo black, gray, and matte black on the left; cyan, magenta, and
yellow on the right.
4. Push the cartridge into the slot until it snaps into position. You should hear a beep and see conrmation
that the cartridge has been inserted.
If you have diculty, see Cannot insert an ink cartridge on page 174.
ENWW Insert an ink cartridge 123
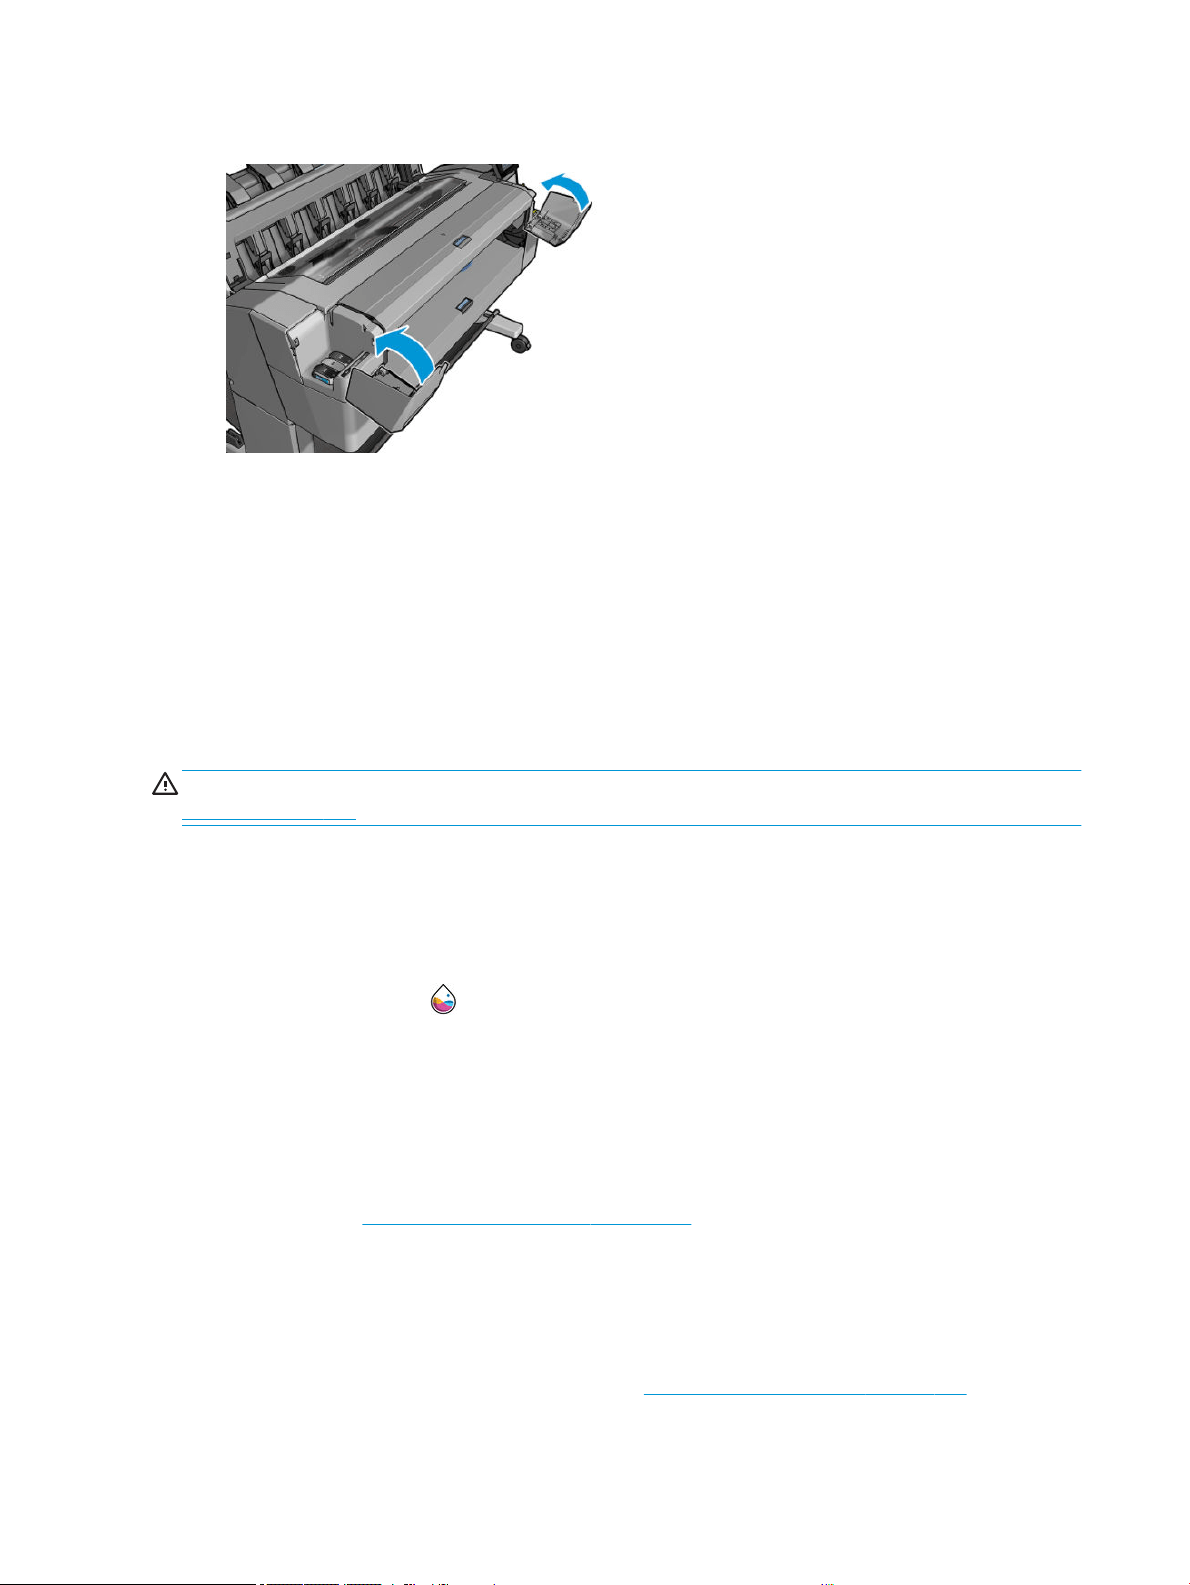
5. When all cartridges have been inserted, close the cover.
6. The front-panel display conrms that all cartridges have been correctly inserted.
Although it is possible to use non-HP ink cartridges, this choice has several serious disadvantages. It may not be
possible to determine with enough accuracy the ink level or status of used, relled, or counterfeit ink cartridges.
Any service or repair required as a result is not covered under the warranty. System ink ushing, color
calibration, and printhead alignment are recommended. If you experience print-quality problems,
HP recommends changing to Original HP inks.
About the printhead
The printhead is connected to the ink cartridges and jets ink onto the paper.
CAUTION: Observe precautions when handling the printhead because it is an ESD-sensitive device (see the
Glossary on page 192). Avoid touching pins, leads, and circuitry.
Check the printhead status
The printer automatically checks and services the printhead after each print. Follow the steps below to get more
information on your printhead.
1. From the front panel, tap , then select the Printhead tab at the top of the window.
2. The front panel displays:
● Product name
● Product number
● Serial number
● Status, see
Front-panel error messages on page 182
● Volume of ink it has used
● Warranty status
You can also get some of this information from the HP Utility.
For an explanation of the printhead status messages, see
Printhead status messages on page 176.
124 Chapter 11 Handling ink cartridges and printhead ENWW
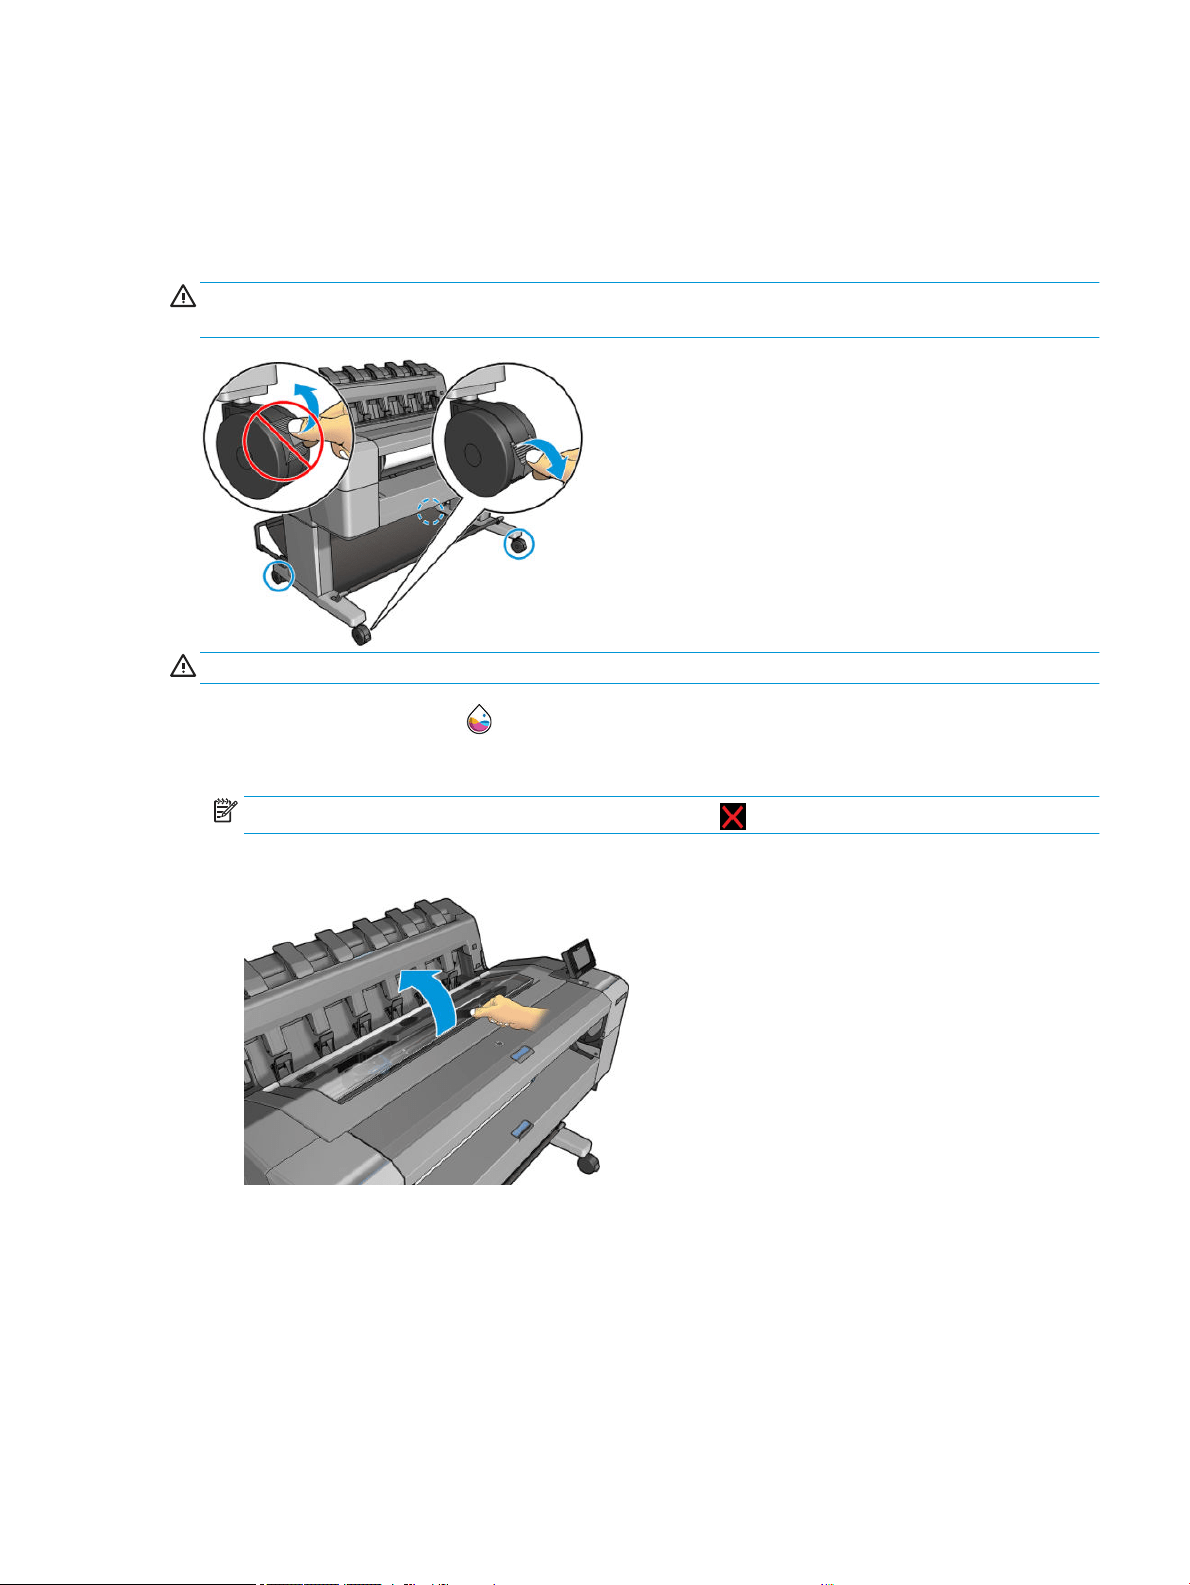
If the warranty status is See warranty note, this indicates that expired ink is being used. If the warranty status is
Out of warranty, this indicates that non-HP ink is being used. See the limited warranty document provided with
your printer for details of the warranty implications.
Remove the printhead
CAUTION: Make sure the printer wheels are locked (the brake lever is pressed down) to prevent the printer
from moving.
CAUTION: Printhead replacement must be performed with the printer powered on.
1. From the front panel, press , then select the Printhead tab, then Replace.
The front panel may ask whether the replacement printhead is new or used.
NOTE: You can cancel the process at any time by pressing .
2. The front panel asks you to open the window.
ENWW Remove the printhead 125
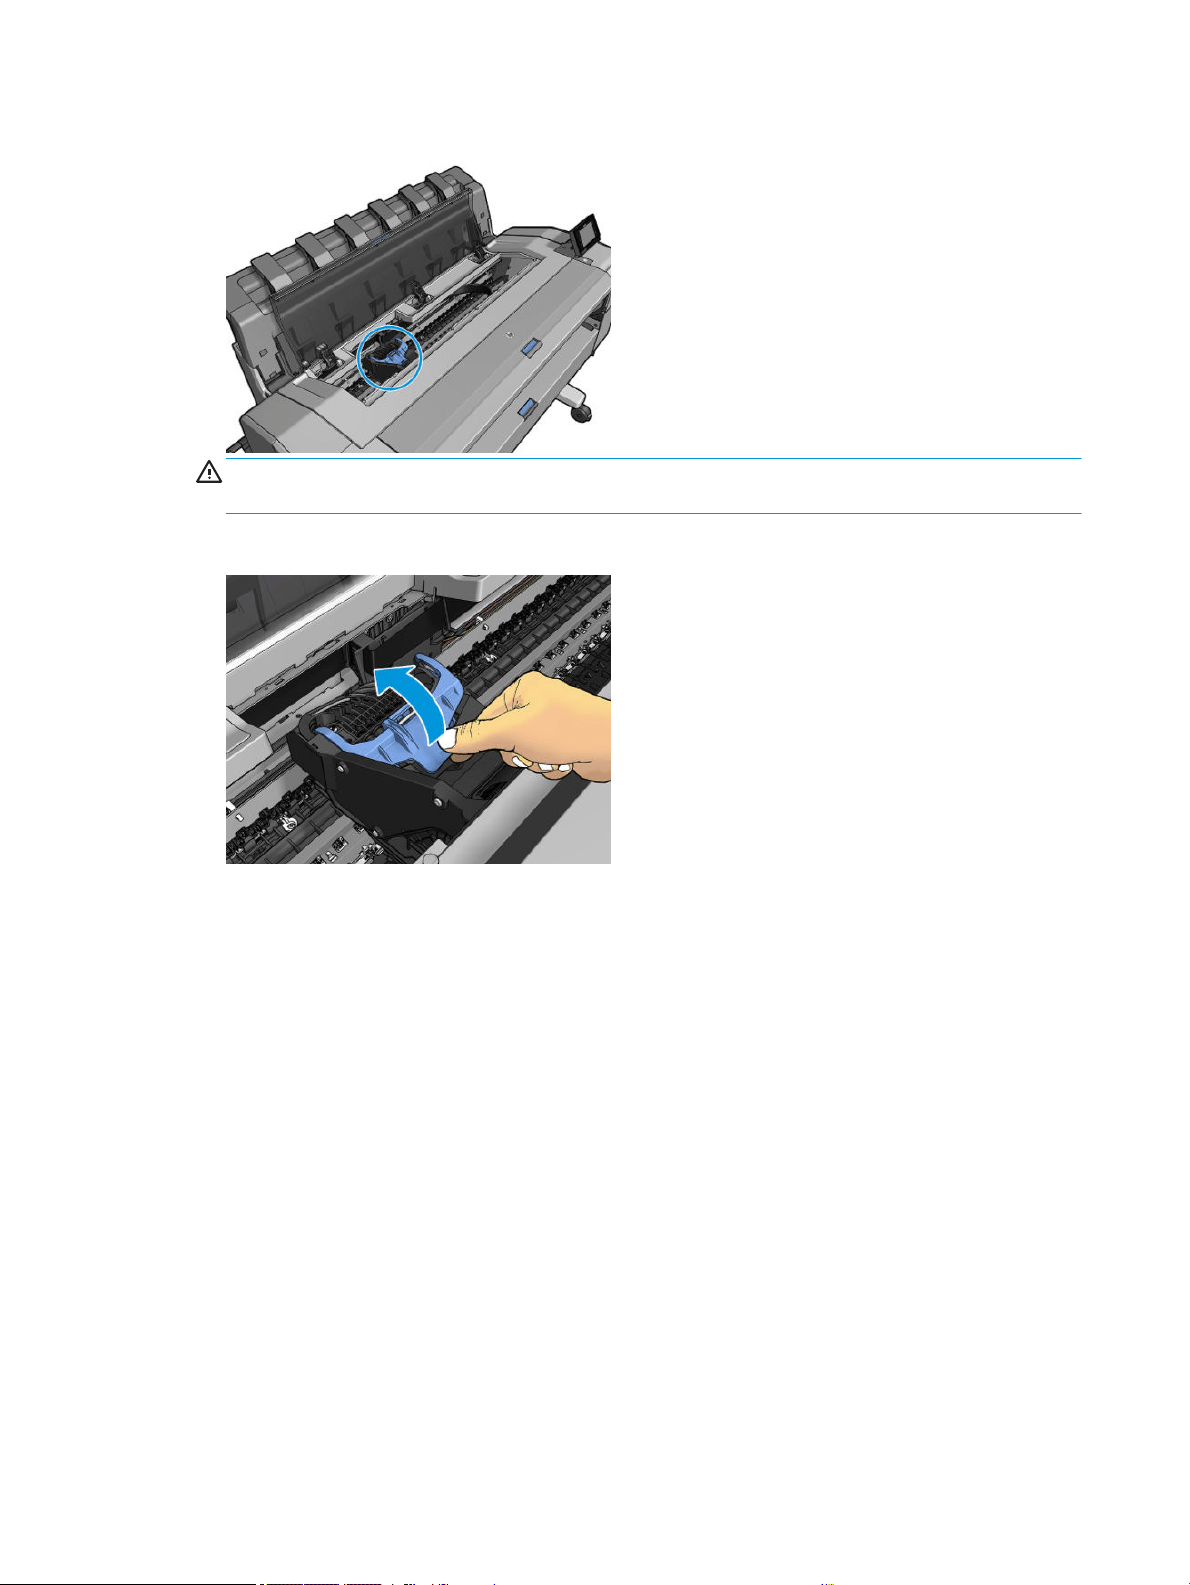
3. The carriage moves automatically to the left side of the printer.
CAUTION: If the carriage is left in the removal position for more than three minutes without inserting or
removing the printhead, it tries to move back to its normal position in the right-hand end.
4. Raise the blue printhead cover.
126 Chapter 11 Handling ink cartridges and printhead ENWW
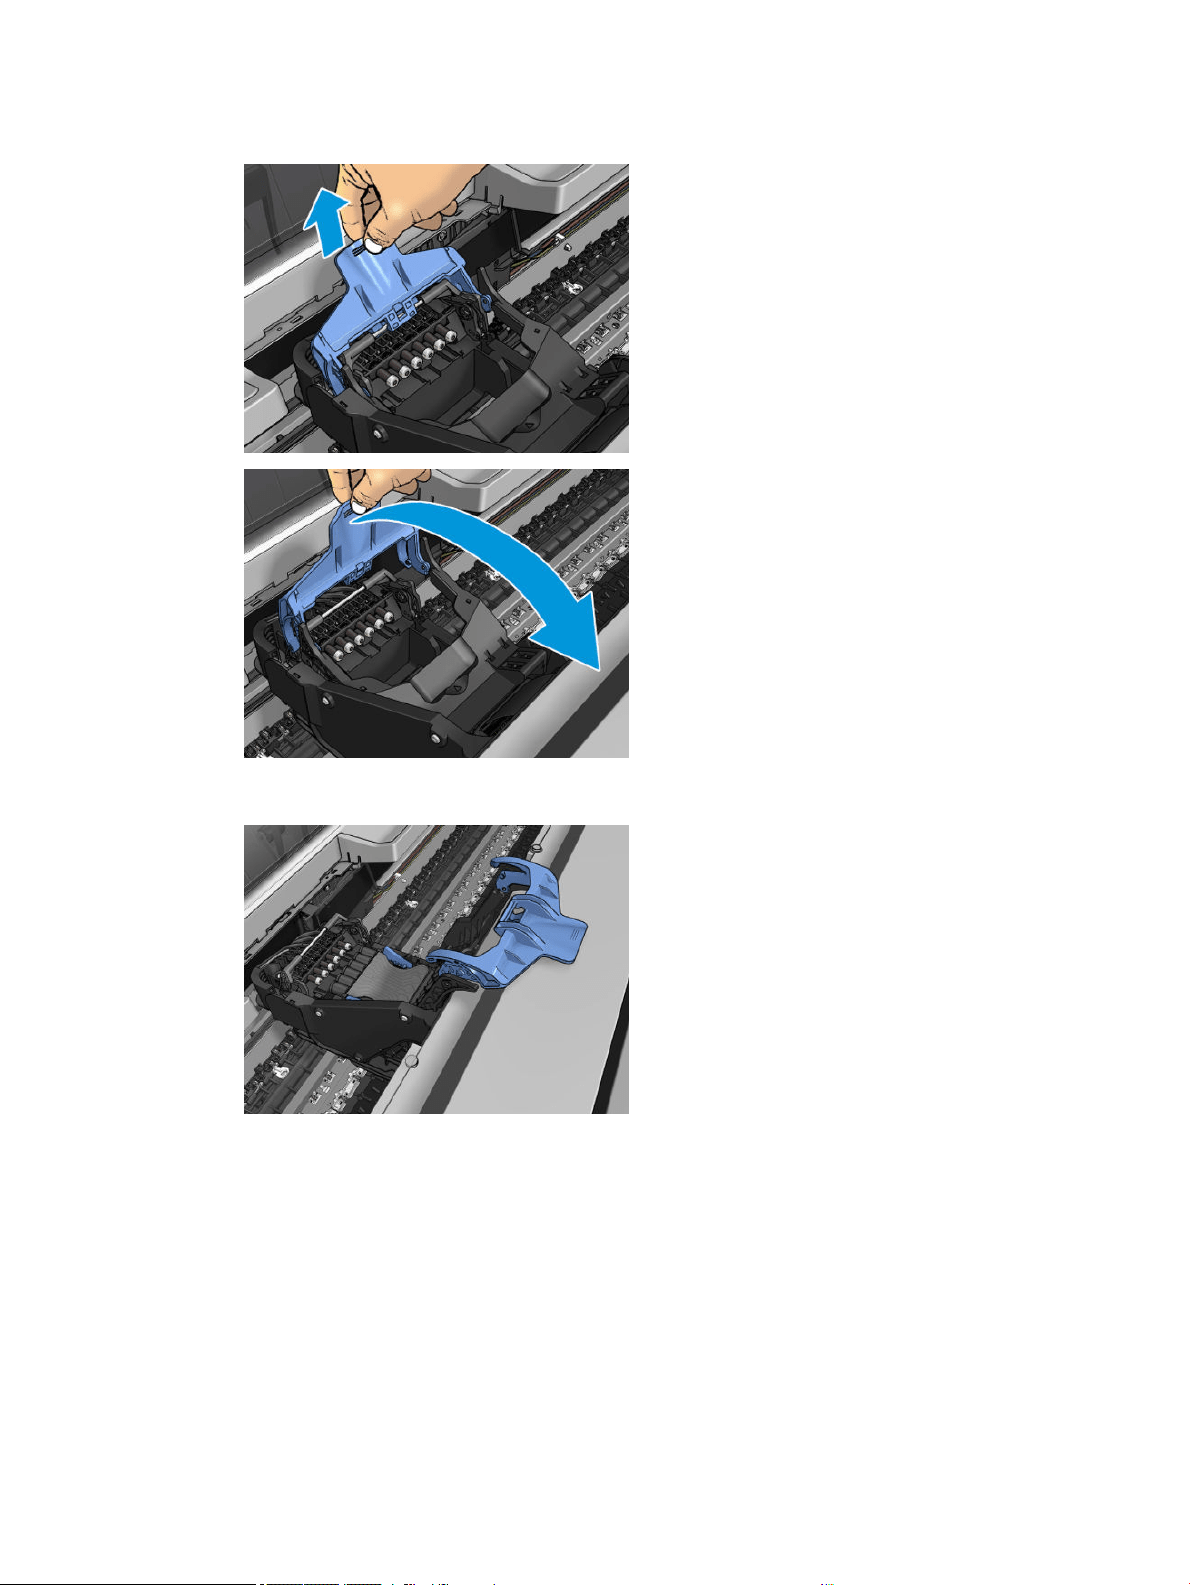
5. Pull the blue cover back towards you, raising the black piece to which it is attached.
6. Leave the black piece approximately vertical.
ENWW Remove the printhead 127
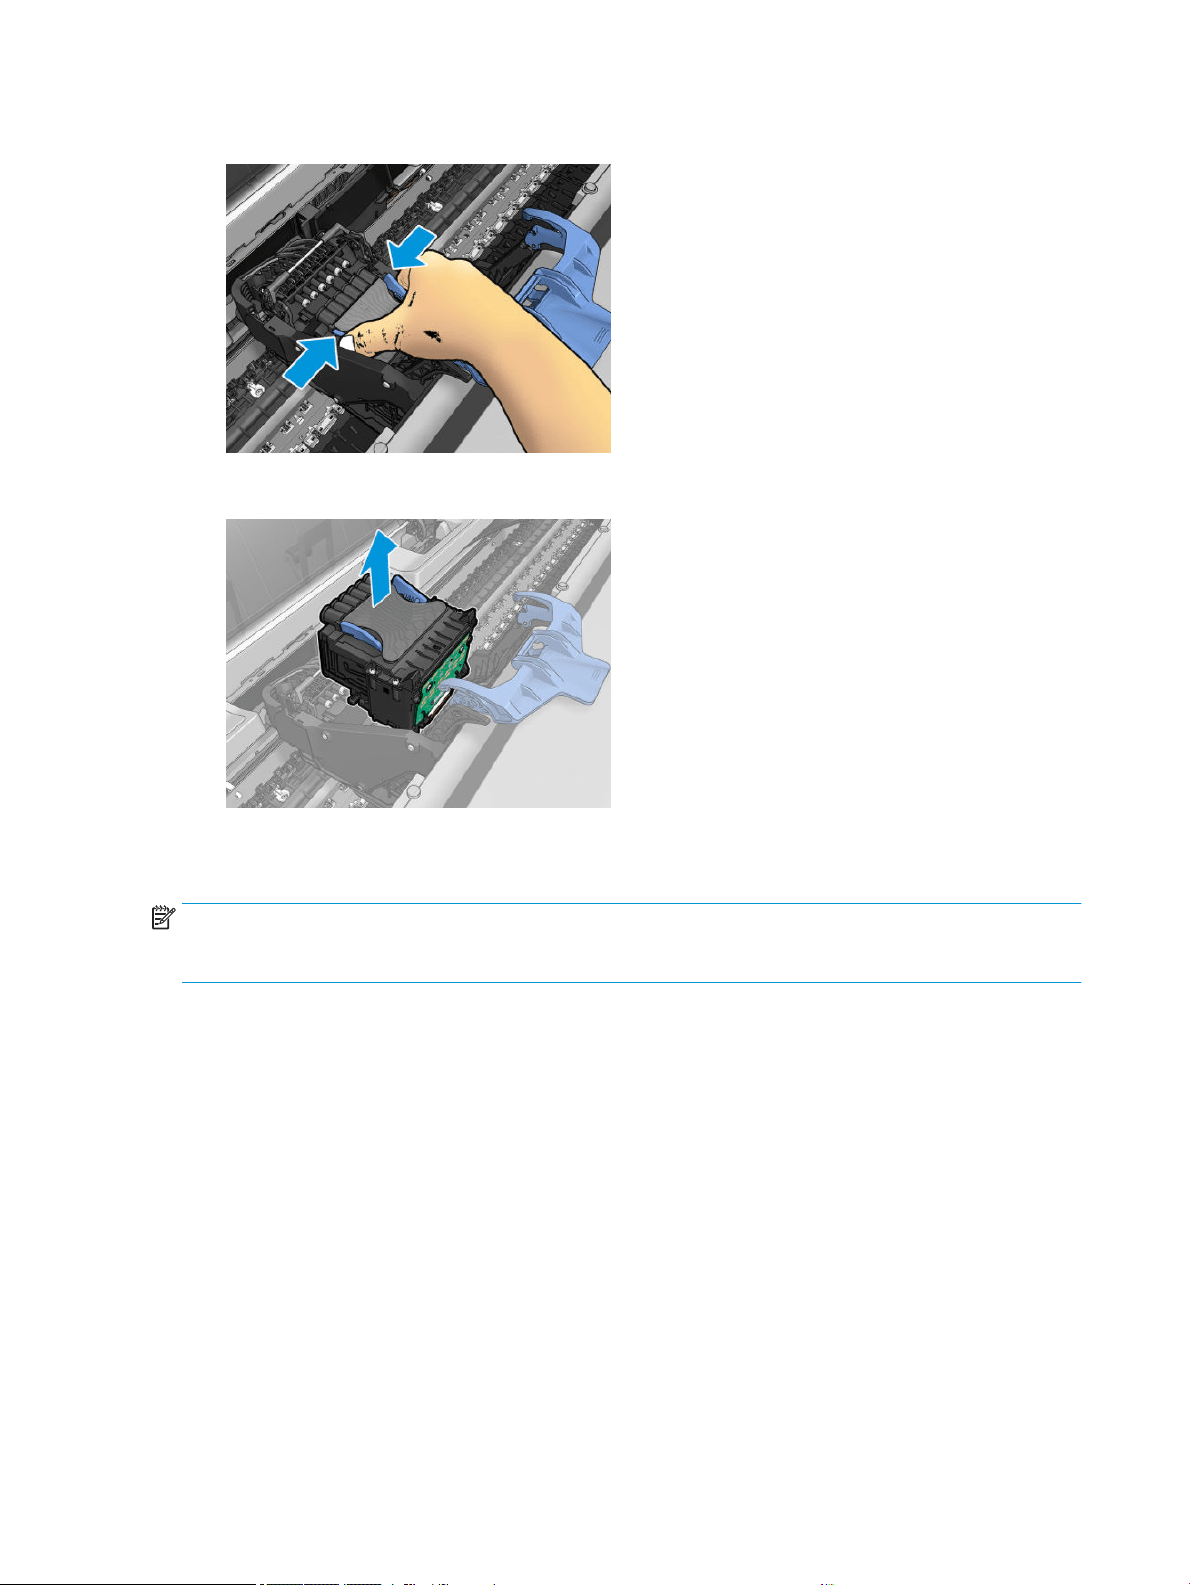
7. Grasp the printhead by the blue pieces on each side.
8. Lift the printhead out of the carriage.
Insert the printhead
NOTE: You cannot insert a new printhead successfully if a connected ink cartridge has not enough ink to
complete the printhead replacement process. In this case, you should replace the ink cartridge before inserting
the new printhead. You can use the old cartridge later if it still contains some ink.
1. Remove the orange protective caps by pulling them down.
128 Chapter 11 Handling ink cartridges and printhead ENWW
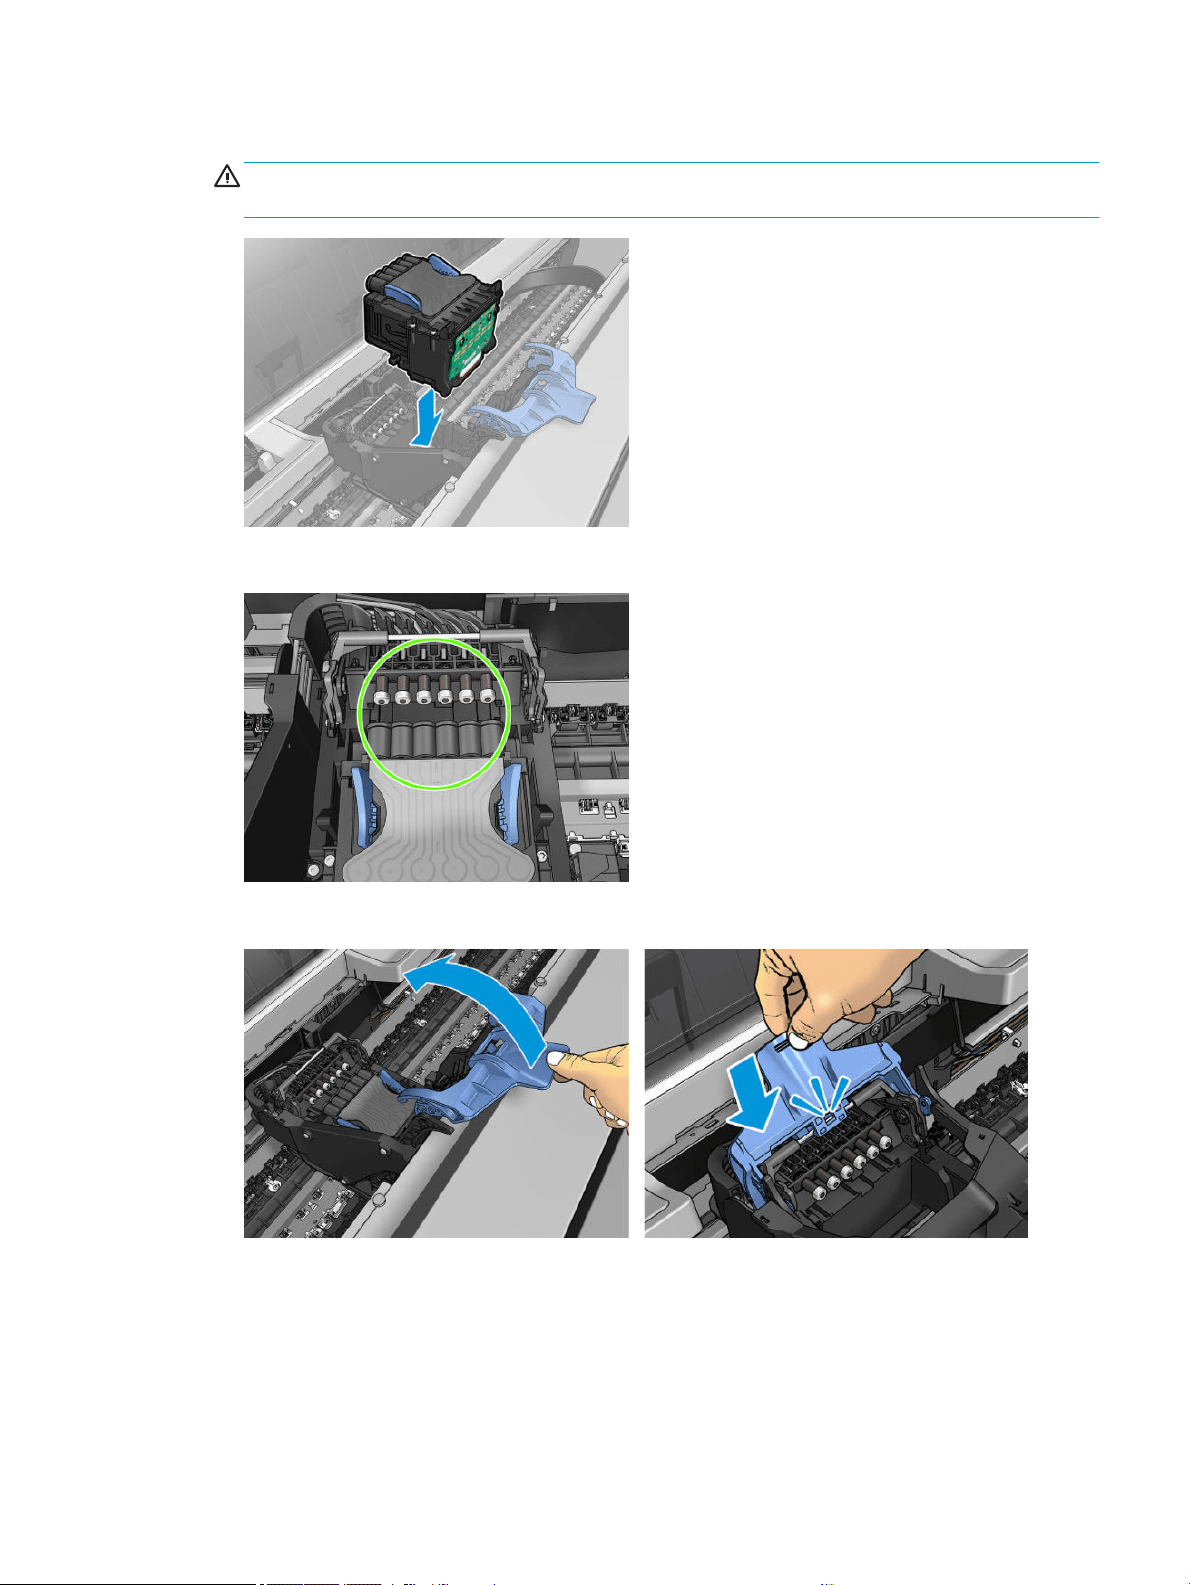
2. Insert the new printhead.
CAUTION: Insert the printhead slowly and vertically, straight down. It may be damaged if you insert it too
fast, or at an angle, or if you rotate it as you insert it.
3. Check that the printhead is correctly aligned with its ink connectors.
4. Lower the black piece over the printhead.
ENWW Insert the printhead 129

5. Close the blue cover and make sure that it is properly closed.
When the printhead has been inserted correctly and is accepted by the printer, the printer beeps.
NOTE: If the printer does not beep when you insert the printhead and the Replace message appears on
the front-panel display, the printhead may need to be reinserted.
6. Close the window.
7. The front-panel display conrms that the printhead is correctly inserted. The printer starts checking and
preparing the printhead. The default routine process takes 10 minutes. If the printer nds problems in
preparing the printhead, it takes longer, up to 45 minutes. After the printhead is checked and prepared, the
printhead realignment procedure runs automatically if paper is loaded, see Align the printhead
on page 175.
8. You are recommended to perform a color calibration after inserting a new printhead. See Color calibration
on page 88.
130 Chapter 11 Handling ink cartridges and printhead ENWW

Storage of anonymous usage information
Each ink cartridge contains a memory chip that assists in the operation of the printer. In addition, this memory
chip stores a limited set of anonymous information about the usage of the printer, which can include the
following: the date when the cartridge was rst installed, the date when the cartridge was last used, the number
of prints printed using the cartridge, the print coverage, the frequency of printing, the printing modes used, any
printing errors that may have occurred, and the product model. This information helps HP to design future
products to meet our customers' printing needs.
The information collected by the memory chip does not include information that could be used to identify a
customer or user of the cartridge or printer.
HP collects a sample of the memory chips from ink cartridges returned to HP's free return and recycling program
(HP Planet Partners: http://www.hp.com/recycle). The sampled memory chips are read and studied in order to
improve future HP products.
HP partners who assist in recycling ink cartridges may also have access to the information. Any third party
possessing the cartridge may be able to access the anonymous information on the memory chip.
If you are concerned about providing this anonymous information, you can tell the printer not to store the
information in the memory chip. To do so, access the Embedded Web Server, and select Security > Security
Settings, then in the Printer Settings section toggle to Anonymous usage information. This does not prevent the
cartridge from working normally in other respects. However, if you change your mind later, you can restore the
factory defaults to resume collecting printer usage information.
Safe mode
Under certain conditions, including printer operation outside of environmental specications, and when a used,
relled, or counterfeit ink cartridge has been detected, the printer will operate in safe mode. HP is unable to
warrant the performance of the printing system when operated outside of environmental specications or when
a used, relled, or counterfeit ink cartridge is installed. Safe mode is designed to protect the printer and the
printheads from damage due to unexpected conditions, and is in operation when the icon is displayed on the
printer’s front panel and by the Embedded Web Server and HP Utility.
For optimal performance, use original HP ink cartridges. HP DesignJet printing systems, including original HP inks
and printheads, are designed and engineered together to provide uncompromising print quality, consistency,
performance, durability, and value—with every print.
NOTE: This printer is not designed to use continuous ink systems. To resume printing, remove the continuous
ink system and install genuine HP (or compatible) cartridges.
NOTE: This printer is designed for ink cartridges to be used until they are empty. Relling cartridges prior to
depletion might cause your printer to fail. If this happens, insert a new cartridge (either genuine HP or
compatible) to continue printing.
NOTE: Dynamic security enabled printer. Only intended to be used with cartridges using an HP original chip.
Cartridges using a non-HP chip may not work, and those that work today may not work in the future. More at:
http://www.hp.com/go/learnaboutsupplies.
ENWW Storage of anonymous usage information 131


Check printer status
You can check the current status of the printer in various ways:
● If you start the HP Utility and select your printer, you see a page of information describing the status of the
printer and its paper and ink supplies.
● If you access the Embedded Web Server, you see information about the general status of the printer. The
Supplies page in the Main tab describes the status of the paper and ink supplies.
● The front panel has 2 top-level screens that you can move between by sliding your nger across. The main
screen provides direct access to the main printer functions. Swipe left to the widget page and see the
status of ink and paper supplies.
If there are any current alerts, the upper row of the home screen shows the top-priority alert. Swipe down
the dashboard to access the Status Center and take action.
Clean the exterior of the printer
Clean the outside of the printer and all other parts of the printer that you regularly touch as part of normal
operation with a damp sponge or a soft cloth and a mild household cleaner such as non-abrasive liquid soap.
WARNING! To avoid an electric shock, make sure that the printer is turned o and unplugged before you clean
it. Do not let water get inside the printer.
CAUTION: Do not use abrasive cleaners on the printer.
Maintain the ink cartridges
During the normal lifetime of a cartridge, no specic maintenance is required. However, in order to maintain the
best print quality, replace a cartridge when it reaches its expiration date. The printer's front panel noties you
when any cartridge reaches its expiration date.
You can also check a cartridge's expiration date at any time: see Check printer status on page 133.
See also Handling ink cartridges and printhead on page 120.
Move or store the printer
If you need to move or store the printer, prepare it correctly to avoid possible damage to it. To prepare the
printer, follow the instructions below.
1. Do not remove the ink cartridges or printhead.
2. Make sure that no paper is loaded.
3. Make sure that the printer is idle.
4. Disconnect any cables connecting the printer to a network or a computer.
5. If the stacker seems likely to impede the movement of the printer through doorways, you can fold it out of
the way by removing two screws.
If you need to leave the printer turned o for a long time, follow the additional steps below.
ENWW Check printer status 133

1. Turn o the power using the Power key on the front panel.
2. Disconnect the printer's power cable.
CAUTION: If you turn the printer upside down, ink could escape into the printer and cause serious damage.
When reconnecting the power cable, remember to route the cable tidily along the back gutter.
When the printer is turned back on, it takes about three minutes to initialize itself and to check and prepare the
printhead. Preparing the printhead normally takes just over a minute. However, if the printer has been o for a
six weeks or more, preparing the printhead could take up to 45 minutes.
CAUTION: If the printer remains o for a long period of time, the printhead may become unusable. In this case,
you need to replace the printhead.
TIP: Because preparing and purging the printhead uses both time and ink, you are strongly recommended to
leave the printer always on or in sleep mode, whenever possible, to maintain the health of the printhead. In both
cases, the printer wakes up from time to time to maintain the printhead. Thus, you can avoid going through
lengthy preparation processes before using your printer.
Update the rmware
The printer's various functions are controlled by rmware that resides in the printer.
From time to time rmware updates will be available from HP. These updates increase the printer's functionality,
enhance its features, and may correct minor problems.
IMPORTANT: You are strongly recommended to update the rmware periodically in order to take advantage of
the latest developments.
There are various ways of downloading and installing rmware updates; you can choose whichever you nd
most convenient. They can be divided into two categories: automatic and manual updates.
Automatic rmware updates
Automatic rmware updates are a convenience that is possible with Web-connected printers. Your printer can
automatically download the latest rmware release and install it for you.
Important notes
● Your printer must be connected to the Internet; see Set up printer services on page 15.
● To congure automatic rmware updates, you can use the front panel or the Embedded Web Server; see
Set up printer services on page 15.
● If an administrator password has been set, it will be required to change these settings.
● A rmware update package can be large; you may want to consider whether there are any implications for
your network or Internet connection.
● A rmware update is downloaded in the background: the printer can be printing at the same time. However,
it cannot be installed in the background: printing must stop.
Manual rmware updates
Manual rmware updates can be performed in the following ways:
134 Chapter 12 Maintaining the printer ENWW
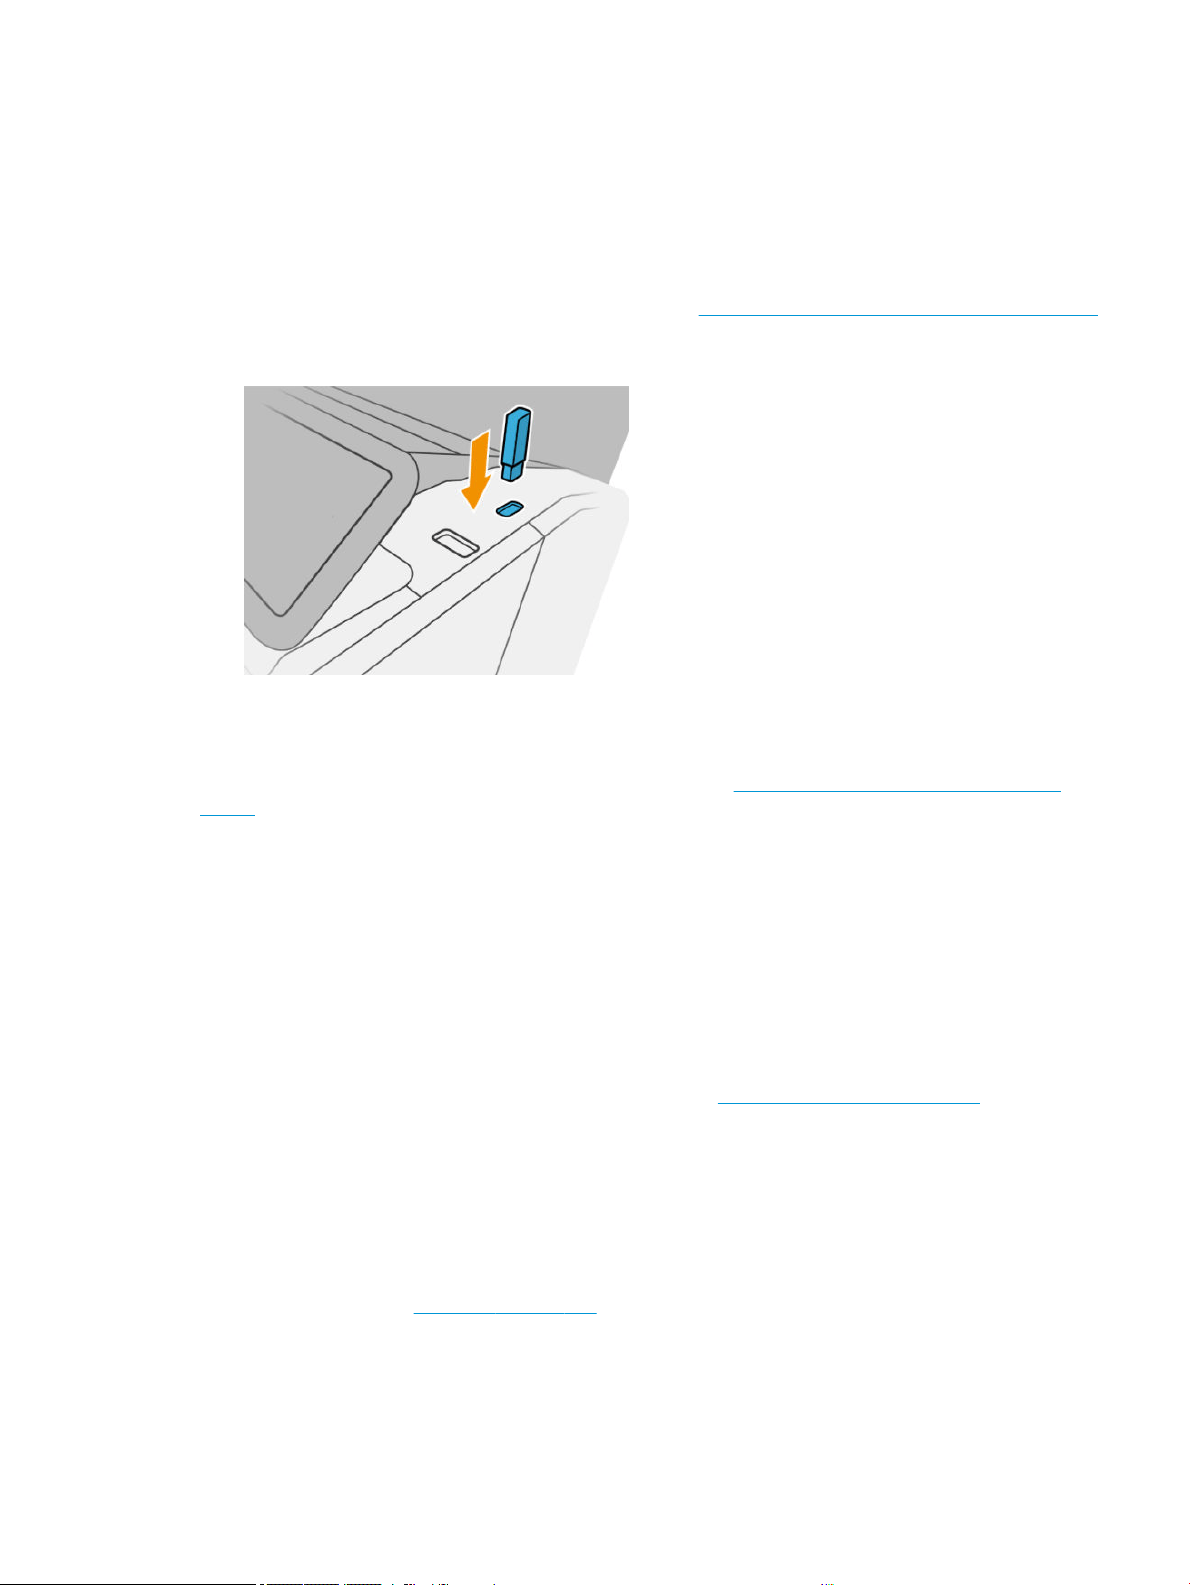
● Using the Embedded Web Server, select the About Printer tab and then Manual Firmware Update. If new
rmware is available, some information about the new rmware is displayed, and you are given the
opportunity to download and install it.
● Using the HP DesignJet Utility under Windows, select the Admin tab and then Launch Firmware Update.
● Using HP Web Jetadmin, with which you can make manual rmware updates or request automatic updates.
● Using a USB ash drive. Download the rmware le from http://www.hp.com/go/DesignJetT1600/rmware
into the USB ash drive and insert it into the Hi-Speed USB host port in the front panel. A rmware update
assistant will appear on the front panel to guide you through the update process.
Update the software
To update printer drivers and other software for your printer, go to http://www.hp.com/go/DesignJetT1600/
drivers.
● Under Windows, HP Software Update regularly oers to update your software automatically, and the
HP DesignJet Utility may oer you automatic updates when restarted.
● Under Mac OS X, Apple SW Update oers you software updates when available.
Printer maintenance kits
Three maintenance kits are available for your printer, containing components that may need to be replaced after
long use. When one of them is needed, a message is displayed on the front panel and by the HP Utility.
When you see the message, you should contact HP Support (see Contact HP Support on page 185) and request
the maintenance kit. The kits are installed by service engineers only.
Secure File Erase
The printer's hard disk is used as a temporary storage area for print jobs. Secure File Erase can erase your
temporary les from the hard disk to protect them from unauthorized access. It begins to do so as soon as you
turn it on, but old temporary les that were already on the hard disk are not erased retroactively. If you want to
erase the old les too, see Disk Wipe on page 136.
Secure File Erase provides three dierent levels of security:
● Non-Secure: all pointers to the information are erased. The information itself remains on the hard disk until
the disk space it occupies is needed for other purposes, and it is then overwritten. While it remains on the
ENWW Update the software 135

disk, it is dicult for most people to access, but may be accessed using software designed for the purpose.
This is the normal method in which les are erased on most computer systems; it is the fastest method but
the least secure.
● Secure Fast Erase (1 pass): all pointers to the information are erased, and the information itself is also
overwritten with a xed character pattern. This method is slower than Non-Secure, but more secure. It may
still be possible to access fragments of the erased information by using special tools to detect residual
magnetic traces.
● Secure Sanitizing Erase (5 passes): all pointers to the information are erased, and the information itself is
repetitively overwritten using an algorithm designed to eliminate any residual traces. This is the slowest
method, but the most secure. Secure Sanitizing Erase meets the US Department of Defense 5220-22.m
requirements for clearing and sanitization of disk media. This is the default security level when using
Secure File Erase.
While les are being erased, the printer's performance may be aected.
Secure File Erase is one of the facilities provided by Web JetAdmin, which is HP's free Web-based print
management software: see http://www.hp.com/go/webjetadmin.
If you have diculty in using Secure File Erase from Web JetAdmin, please contact HP Support: see Contact
HP Support on page 185.
The Secure File Erase conguration can be changed from Web JetAdmin or the Embedded Web Server (Setup >
Security settings).
Disk Wipe
Disk Wipe is the same as Secure File Erase (see Secure File Erase on page 135), except that it erases all
temporary les, including old ones.
The Disk Wipe conguration can be changed from Web JetAdmin or the Embedded Web Server (Setup > Security
settings).
NOTE: If you choose to erase the whole hard disk, you may be asked to restart the printer several times during
the process, which will take about 6 hours with Secure Fast Erase or 24 hours with Secure Sanitizing Erase.
136 Chapter 12 Maintaining the printer ENWW


How to order supplies and accessories
There are two alternative ways to order supplies or accessories:
● Visit http://www.hp.com, select your printer and click on the accessories button.
● Contact HP Support (see Contact HP Support on page 185), and check that what you want is available in
your area.
The rest of this chapter lists the available supplies and accessories, and their part numbers, at the time of
writing.
Order ink supplies
The following ink supplies can be ordered for your printer.
Ink cartridges
Cartridge Part number
HP 730 130-ml Cyan DesignJet Ink Cartridge P2V62A
HP 730 130-ml Magenta DesignJet Ink Cartridge P2V63A
HP 730 130-ml Yellow DesignJet Ink Cartridge P2V64A
HP 730 130-ml Matte Black DesignJet Ink Cartridge P2V65A
HP 730 130-ml Gray DesignJet Ink Cartridge P2V66A
HP 730 130-ml Photo Black DesignJet Ink Cartridge P2V67A
HP 730 300-ml Cyan DesignJet Ink Cartridge P2V68A
HP 730 300-ml Magenta DesignJet Ink Cartridge P2V69A
HP 730 300-ml Yellow DesignJet Ink Cartridge P2V70A
HP 730 300-ml Matte Black DesignJet Ink Cartridge P2V71A
HP 730 300-ml Gray DesignJet Ink Cartridge P2V72A
HP 730 300-ml Photo Black DesignJet Ink Cartridge P2V73A
Printhead
Printhead Part number
HP 732 Printhead B3P06A
Order paper
The following paper types are currently provided for use with your printer.
NOTE: This list is likely to change over the course of time. For the latest information, see
http://www.hplfmedia.com.
NOTE: Paper types that HP does not support may nevertheless be compatible with your printer.
138 Chapter 13 Supplies and accessories ENWW

Key to availability:
● (A) indicates papers available in Asia (excluding Japan)
● (C) indicates papers available in China
● (E) indicates papers available in Europe, the Middle East and Africa
● (J) indicates papers available in Japan
● (L) indicates papers available in Latin America
● (N) indicates papers available in North America
If the part number is not followed by parentheses, the paper is available in all regions.
Roll paper
Paper type g/m² Length Width Product number
HP Bond and Coated Paper
HP Super Heavyweight Plus Matte
Paper
210 30.4 m (100 ft) 610 mm (24 in) Q6626B (ELN)
914 mm (36 in) Q6627B (AELN)
HP Universal Bond Paper 80 45.7 m (150 ft) 594 mm (23.39 in) (A1) Q8003A (AJ)
610 mm (24 in) Q1396A
SA025A (2 Pack) (J)
914 mm (36 in) Q1397A
91.4 m (300 ft) 594 mm (23.39 in) (A1) Q8004A (EAJ)
840 mm (33.11 in) (A0) Q8005A (EAJ)
914 mm (36 in) C6810A
HP Bright White Inkjet Paper 90 45.7 m (150 ft) 419 mm (16.5 in) Q1446A (EJ)
594 mm (23.4 in) (A1) Q1445A (EJ)
610 mm (24 in) C1860A (LN)
610 mm (24 in) C6035A (EAJ)
840 mm (33.11 in) (A0) Q1444A (EAJ)
914 mm (36 in) C6036A (EAJ)
914 mm (36 in) C1861A (LN)
91.4 m (300 ft) 914 mm (36 in) C6810A
HP Heavyweight Coated Paper 130 30.4 m (100 ft) 610 mm (24 in) C6029C
914 mm (36 in) C6030C
HP Coated Paper 90 45.7 m (150 ft) 594 mm (23.4 in) (A1) Q1442A (AEJ)
610 mm (24 in) C6019B
840 mm (33.11 in) (A0) Q1441A (EJ)
914 mm (36 in) C6020B
ENWW How to order supplies and accessories 139

Roll paper (continued)
Paper type g/m² Length Width Product number
91.4 m (300 ft) 914 mm (36 in) C6980A
HP Universal Coated Paper 90 45.7 m (150 ft) 610 mm (24 in) Q1404B
914 mm (36 in) Q1405B
HP Universal Heavyweight Coated
Paper
131 30.4 m (100 ft) 610 mm (24 in) Q1412B
914 mm (36 in) Q1413B
HP Technical Paper
HP Translucent Bond Paper 63 45.7 m (150 ft) 610 mm (24 in) C3860A (LN)
914 mm (36 in) C3859A (AJLN)
HP Natural Tracing Paper 90 45.7 m (150 ft) 594 mm (23.4 in) (A1) Q1439A (J)
610 mm (24 in) C3869A
914 mm (36 in) C3868A
HP Film (Technical and Graphic)
HP Clear Film 174 22.8 m (75 ft) 610 mm (24 in) C3876A
914 mm (36 in) C3875A
HP Matte Film 160 38.1 m (125 ft) 610 mm (24 in) 51642A
914 mm (36 in) 51642B
HP Special Inkjet Paper 131 45.7 m (150 ft) 610 mm (24 in) 51631D (ELN)
914 mm (36 in) 51631E
HP Photographic Paper
HP Universal Gloss Photo Paper 200 30.4 m (100 ft) 610 mm (24 in) Q1426B
914 mm (36 in) Q1247B
HP Universal Satin Photo Paper 200 30.4 m (100 ft) 610 mm (24 in) Q1420B
914 mm (36 in) Q1421B
HP Universal Instant-dry Gloss Photo
Paper
200 30.4 m (100 ft) 610 mm (24 in) Q6574A
914 mm (36 in) Q6575A
HP Premium Instant-dry Gloss Photo
Paper
235 30.5 m (100 ft) 610 mm (24 in) Q7991A (AELN)
914 mm (36 in) Q7993A (AELN)
HP Universal Instant-dry Satin Photo
Paper
200 30.4 m (100 ft) 610 mm (24 in) Q6579A
914 mm (36 in) Q6580A
60.9 m (200 ft) 1066 mm (42 in) Q8755A (AELN)
HP Premium Instant-dry Satin Photo
Paper
235 30.5 m (100 ft) 610 mm (24 in) Q7992A (AELN)
914 mm (36 in) Q7994A (AELN)
HP Premium Matte Photo Paper 210 30.4 m (100 ft) 610 mm (24 in) CG459B
140 Chapter 13 Supplies and accessories ENWW

Roll paper (continued)
Paper type g/m² Length Width Product number
914 mm (36 in) CG460B
HP Self-Adhesive Material
HP Everyday Adhesive Matte
Polypropylene
120
168 with
liner
22.8 m (75 ft) 610 mm (24 in) C0F18A (AELN)
914 mm (36 in) C0F19A (AELN)
HP Everyday Adhesive Matte
Polypropylene , 3-in Core
120 30.5 m (100 ft) 914 mm (36 in) D9R24A (ELN)
HP Everyday Adhesive Gloss
Polypropylene
140
190 with
liner
22.8 m (75 ft) 914 mm (36 in) C0F28A (AELN)
HP Universal Adhesive Vinyl 160
300 with
liner
20 m (66 ft) 914 mm (36 in) C2T51B (2 Pack) (ELN)
HP Banner and Sign Material
HP Everyday Matte Polypropylene 120 30.4 m (100 ft) 610 mm (24 in) CH022A
914 mm (36 in) CH023A (AELN)
60.9 m (200 ft) 914 mm (36 in) CH024A
Media name: HP Everyday Matte
Polypropylene , 3-in Core
120 61 m (200 ft) 914 mm (36 in) D9R28A (ELN)
HP Premium Matte Polypropylene 140 22.9 m (75 ft) 914 mm (36 in) C2T53A (ELN)
HP Durable Synthetic Banner 133 22.9 m (75 ft) 914 mm (36 in) C0F12A (LN)
HP Durable Synthetic Banner, 3-in Core 133 30.5 m (100 ft) 914 mm (36 in) 1AF09A (LN)
HP Opaque Scrim 495 30.5 m (100 ft) 610 mm (24 in) Q8675C (LN)
914 mm (36 in) Q1898C (AELN)
HP Everyday Blockout Display Film 220 30.5 m (100 ft) 914 mm (36 in) Y3Z17A (ELN)
Order accessories
The following accessories can be ordered for your printer.
Name Product number
HP USB 3.0 to Gigabit LAN Adapter N7P47AA
HP DesignJet PostScript®/Pdf Upgrade Kit C0C66C
HP DesignJet 3-in Spindle Adaptor Kit CN538A
HP DesignJet 36-in Spindle L4R66A
HP HD Pro 42-in scanner G6H51B
HP SD Pro 44-in scanner G6H50B
ENWW How to order supplies and accessories 141

Introduction to the accessories
PostScript Upgrade
The PostScript Upgrade enables a T1600 to print the same le types that a T1600 PS can print, including PDF
and PostScript les. The PostScript upgrade can be plugged into the printer's USB host. It is not necessary to
leave it permanently connected: just plug it in once, and the printer is upgraded forever.
Spindle
With extra spindles, you can change rapidly from one paper type to another.
3-in Spindle Adaptor Kit
With this adaptor you can use paper rolls with 3-inch cores, provided that the diameter of the roll is within printer
specications.
142 Chapter 13 Supplies and accessories ENWW

14 Troubleshooting paper issues
●
Paper cannot be loaded successfully
●
Paper type is not in the driver
●
Printer printed on the wrong paper type
●
Automatic cut not available
●
On hold for paper
●
The paper has jammed in the print platen
●
The paper has jammed in the stacker
●
The printer reports unexpectedly that the stacker is full
●
A strip stays on the output tray and generates jams
●
Printer displays out of paper when paper is available
●
Prints do not fall neatly into the basket
●
Sheet stays in the printer when the print has been completed
●
Paper is cut when the print has been completed
●
Cutter does not cut well
●
Roll is loose on the spindle
●
Recalibrate the paper advance
ENWW 143

Paper cannot be loaded successfully
●
Ensure that no paper is already loaded.
● Ensure that the paper is far enough inside the printer: you should feel the printer grab the paper.
● Do not attempt to straighten the paper during the aligning process, unless instructed to do so by the front-
panel display. The printer automatically attempts to straighten the paper.
● The paper may be crumpled, or warped, or may have irregular edges.
● It can be dicult to insert a particularly sti paper from the upper roll. Try moving it to the lower roll.
Unsuccessful roll load issues
● If the paper does not load, the leading edge of the paper may not be straight or clean and needs to be
trimmed. Remove the initial 2 cm (1 in) from the roll and try again. This may be necessary even with a new
roll of paper.
● Ensure the roll ends are tight against the spindle ends.
● Check that the spindle is correctly inserted.
● Check that the paper is correctly loaded on the spindle. See Load a roll onto the spindle on page 33.
● Check that all roll end plugs have been removed.
● Check that the paper is wound tightly on the roll.
● Do not touch the roll or paper at during the alignment process.
● When loading a roll, the roll cover must remain open until the front panel prompts you to close it.
If the paper has not been inserted straight, the printer attempts to straighten the roll.
If you would like to start the load process again, cancel the process on the front panel and rewind the roll from
the end of the spindle until the edge is removed from the printer.
NOTE: If the roll has become loose around the core, the printer cannot load the paper.
Unsuccessful sheet load
● Guide the sheet, especially thick papers, when the printer initially feeds the sheet.
● Ensure that the sheet is aligned with the reference line on the roll cover.
● Do not attempt to straighten the sheet during the loading process, unless instructed to by the front-panel
display.
● Do not use hand-cut sheets, which may be of irregular shapes. Use only purchased sheets.
● Ensure the single sheet is not skewed.
In case of any problem, follow the instructions given on the front-panel display.
If you would like to start the load process again, cancel the process on the front panel; the printer ejects the
sheet.
144 Chapter 14 Troubleshooting paper issues ENWW
Paper loading error messages
Here is a list of front-panel messages related to paper loading, with the suggested corrective action.
Front-panel message Suggested action
Paper incorrectly loaded The paper has not been loaded correctly. Remove the paper.
Paper loaded with too much skew During the paper load process the printer detected that the paper had too much skew.
Follow the instructions on the front-panel display.
Paper loose around core The end of the roll has become loose around the core. Tighten the paper to the core or
insert a new roll.
Paper not detected During the paper load process the printer did not detect any paper. Ensure the paper is
inserted fully and is not transparent.
Roll cover closed during paper load process Do not close the roll cover until you are prompted to do so by the front panel.
Sheet too big During the load process the printer has detected that the sheet of paper is either too wide
or too long to be loaded correctly. Follow the instructions on the front-panel display.
Sheet too small During the load process the printer detected that the sheet of paper is too narrow or too
short to be loaded in the printer. Follow the instructions on the front-panel display.
Upper roll load and paper is inserted through
the single sheet path
Avoid inserting roll paper into the cut sheet slot.
Paper type is not in the driver
To work with a paper not in the driver, you can use your paper as one of the presets already in the driver,
however, you must identify whether your paper is transparent or translucent, glossy or matte.
NOTE: For glossy paper, it is important to use a glossy paper type, as matte black ink does not print well on
glossy paper.
Glossy paper
If your paper is a photo paper, use the Photo Paper category.
Matte paper
If your paper is a matte paper, use any of the papers in the Bond and Coated Paper category. If your paper is
classied as photo matte, its category depends on whether it can hold matte black ink. In this case, try both with
Heavyweight Coated Paper and with Photo Semi Gloss/Satin Paper, and choose the best result.
General-purpose paper
●
For natural tracing papers, select paper type Natural Tracing Paper < 65 g/m2 or Natural Tracing Paper >
65 g/m2, depending on the weight of the paper.
● For thin papers (< 90 g/m
2
) uncoated papers (for example plain paper or bright white paper) select paper
type Bond and Coated Paper > Plain Paper.
● For light coated papers (< 110 g/m
2
), select paper type Bond and Coated Paper > HP Coated Paper.
ENWW Paper type is not in the driver 145

● For heavyweight coated papers (< 200 g/m
2
), select paper type Bond and Coated Paper > Heavyweight
Coated Paper.
● For cockle-free very thick coated papers (> 200 g/m
2
), select paper type Bond and Coated Paper > Super
Heavyweight Coated Paper.
Black ink is easily removed when touched
This happens when your paper is incompatible with matte black ink. To use non-matte black ink, select any of
the papers in the Photo Paper category.
After printing, the paper has wrinkles or there is too much ink
This happens when too much ink is used. To use less ink, select a thinner category. Matte paper categories from
thinnest to thickest are:
● Plain Paper
● Coated Paper
● Heavyweight Coated Paper
● Super Heavyweight Coated Paper
For other image quality problems, see
Troubleshooting print-quality issues on page 156.
Printer printed on the wrong paper type
If the printer prints your job before you were able to load your desired paper, you may have Use Printer Settings
selected for the Paper Type in the printer driver. When either of these is selected, the printer will print
immediately on whichever paper is loaded. Load your desired paper, see Paper handling on page 31, and select
your paper type specically in the driver.
● In the Windows driver dialog: select the Paper/Quality or Paper tab (depending on the driver version), then
select your paper type from the Paper Type list.
NOTE: Use Printer Settings (Windows) is the driver default.
Automatic cut not available
Some paper types cannot be cut by the automatic cutter. When such a paper type is loaded and active, the
printer cannot switch automatically to the other roll: the active roll must rst be unloaded manually.
On hold for paper
Based on a set of conditions that you can set when sending a job (see Solve paper mismatch on page 82), the
printer will decide which of the loaded rolls of paper is more suitable to print the job. If there is no roll of paper
available that meets all the conditions, the printer will put the job on hold for paper. You can manually resume
the job, forcing it to print on a paper other than the one originally specied, otherwise it will stay on hold.
NOTE: When an uncuttable roll is active, every job sent to any other paper source is put on hold until you
manually unload the uncuttable roll.
146 Chapter 14 Troubleshooting paper issues ENWW

Which criteria are used to decide on which roll a job will be printed?
When a user sends a job, the desired paper type can be set in the driver. The printer will print the job on a roll of
paper of the chosen paper type that is large enough to print the drawing without clipping. If there is more than
one roll on which the job could be printed meeting all the criteria, the roll will be chosen according to your
preferences. These can be set from the front panel: see Roll policies on page 81.
When is a job put on hold for paper?
If the paper mismatch action is set to Pause and ask (see Solve paper mismatch on page 82), a job is put on hold
for paper in the following cases:
● The paper type that has been selected by the user is not currently loaded on the specied roll—or on
either of the rolls, if no roll has been specied.
● The paper type that has been selected by the user is loaded on the specied roll, but the drawing is too
large to t on the roll—or on either of the rolls, if no roll has been specied.
If I load a new roll of paper, will jobs that were on hold for paper be automatically
printed?
Yes. Every time a new roll of paper is loaded, the printer will check if there are any jobs on hold for paper that
could be printed on the loaded roll.
I don’t like jobs being put on hold for paper. Can I prevent it?
Yes, this can be done from the front panel: see Solve paper mismatch on page 82.
My job is exactly as wide as the roll of paper that is loaded on the printer, but is put on
hold for paper
Margins are managed in dierent ways depending on the le type:
● For HP-GL/2 and HP RTL les, by default, margins are included inside the drawing, so a 914 mm (36 in) HP-
GL/2 and HP RTL le can be printed on a 914 mm (36 in) roll of paper and will not be put on hold for paper.
● For other le formats, such as PostScript, PDF, TIFF, or JPEG, the printer assumes that margins need to be
added outside the drawing (as, in many cases, these formats are used for photographs and other images
that do not include margins). This means that, to print a 914 mm (36 in) TIFF, the printer needs to add
margins, and the drawing needs 925 mm (36.4 in) of paper to be printed; this would cause the job to be put
on hold if the paper that is loaded on the printer is only 914 mm (36 in) wide.
If you wish to print these le formats without adding extra margins outside of the drawing, the Clip
contents by margins option can be used. This option will force the margins to be set inside of the drawing,
so a 914 mm (36 in) TIFF can be printed on a 914 mm (36 in) roll of paper without being put on hold.
However, if there is no white space already included in the drawing’s borders, some contents could be
clipped because of the margins.
The paper has jammed in the print platen
When a paper jam occurs, you normally see the Possible paper jam message in the front-panel display. The front
panel starts the paper jam wizard which displays where the jam has occurred and how to x it. Clear the paper
jam as instructed on each wizard screen.
1. Lift the window.
ENWW The paper has jammed in the print platen 147
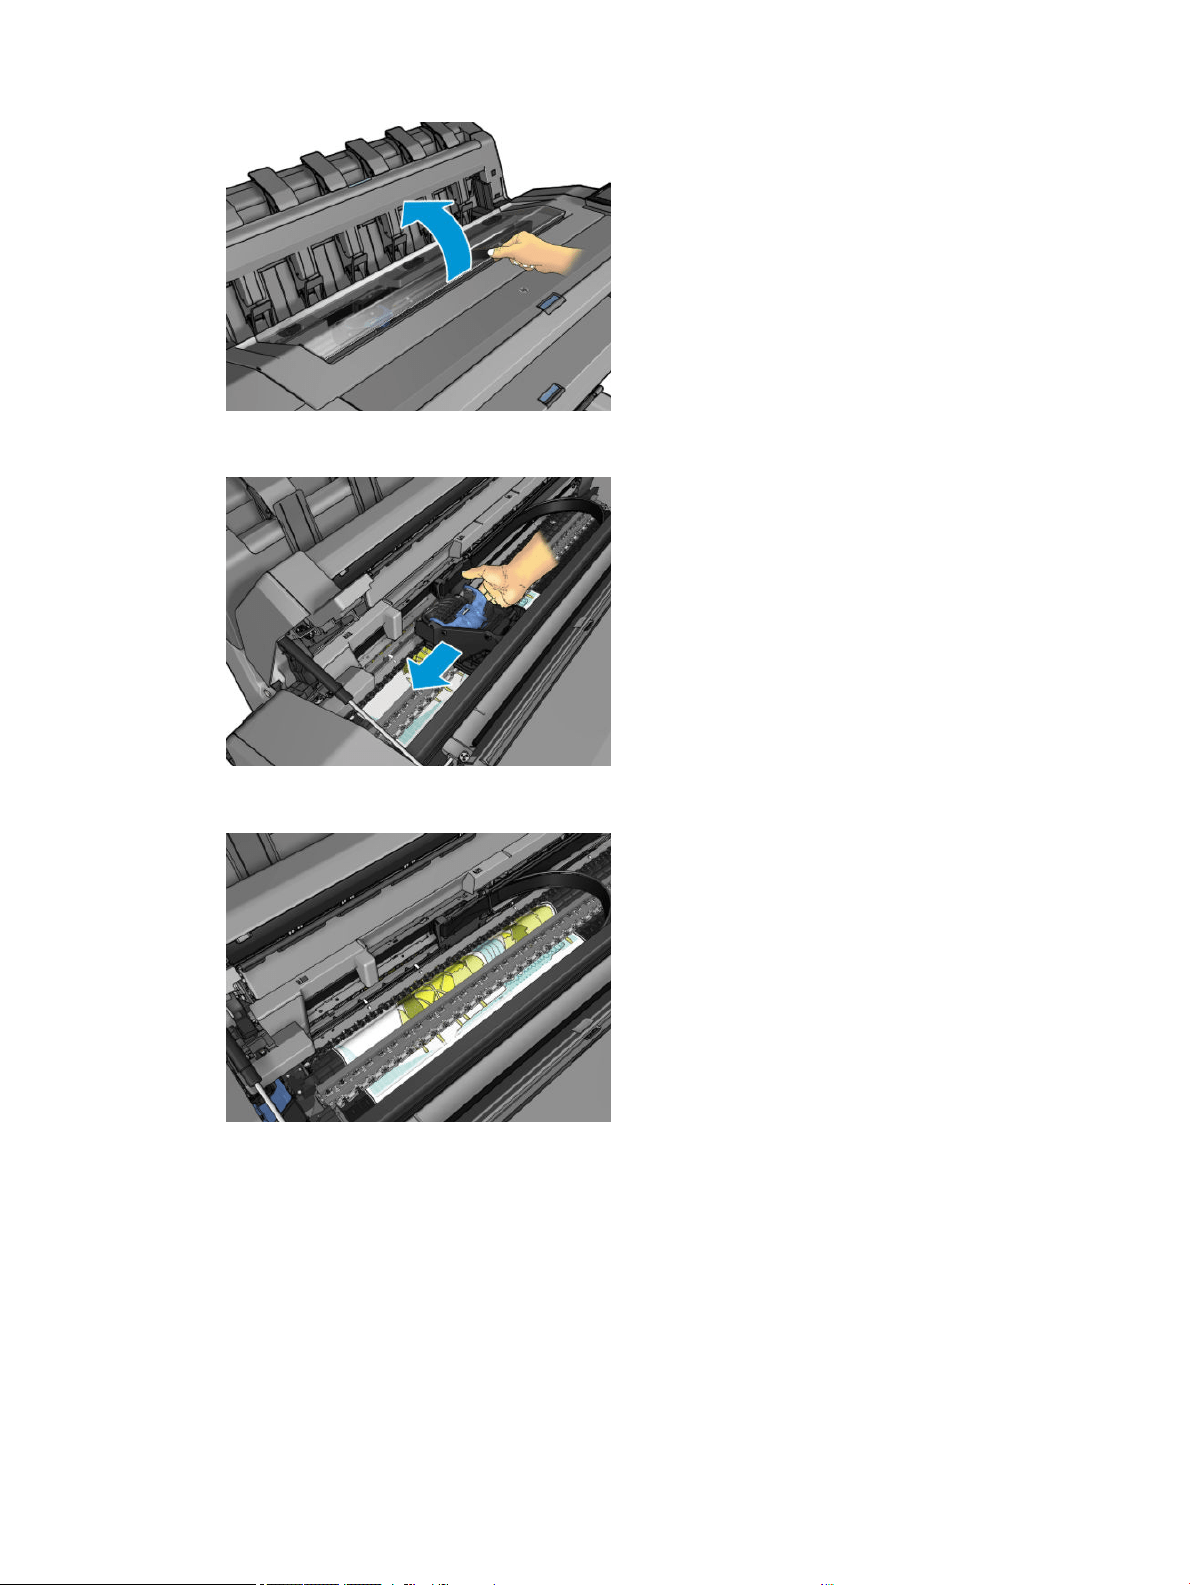
2. Move the carriage manually to the left side of the printer, if feasible.
3. Go to the paper path.
148 Chapter 14 Troubleshooting paper issues ENWW
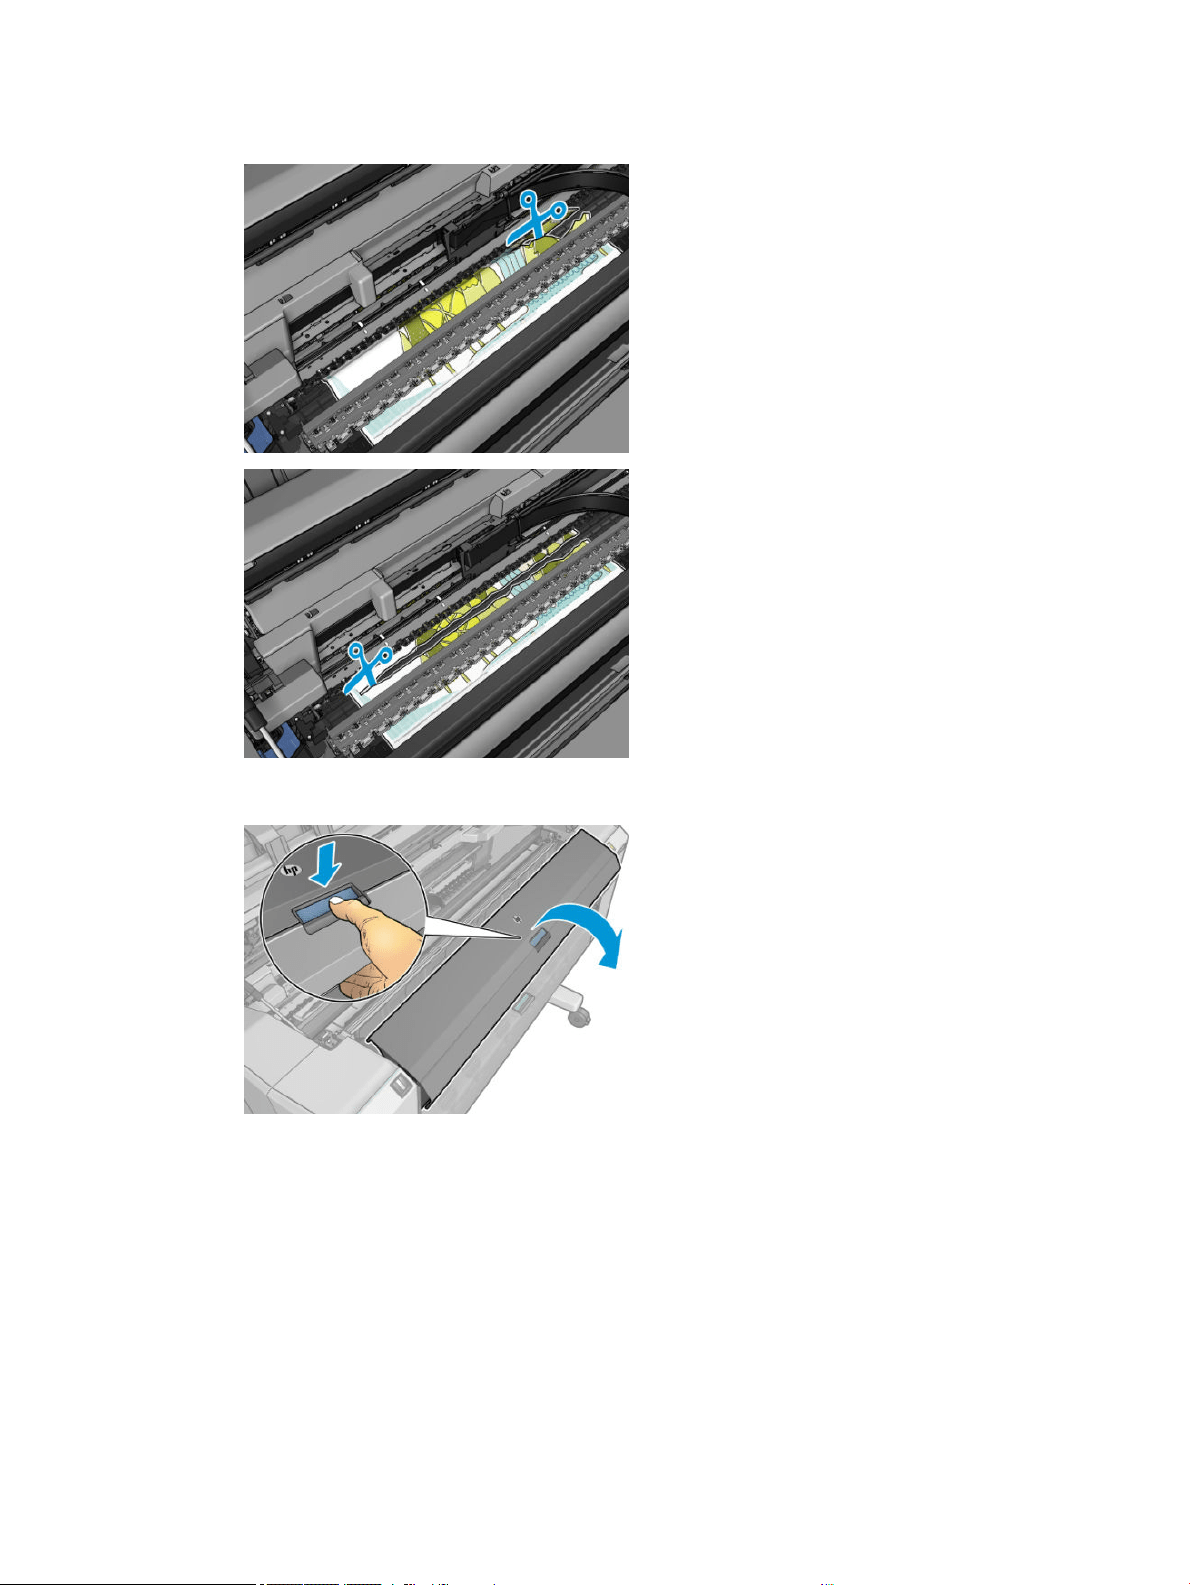
4. Cut the paper with a pair of scissors.
5. Open the roll cover.
ENWW The paper has jammed in the print platen 149
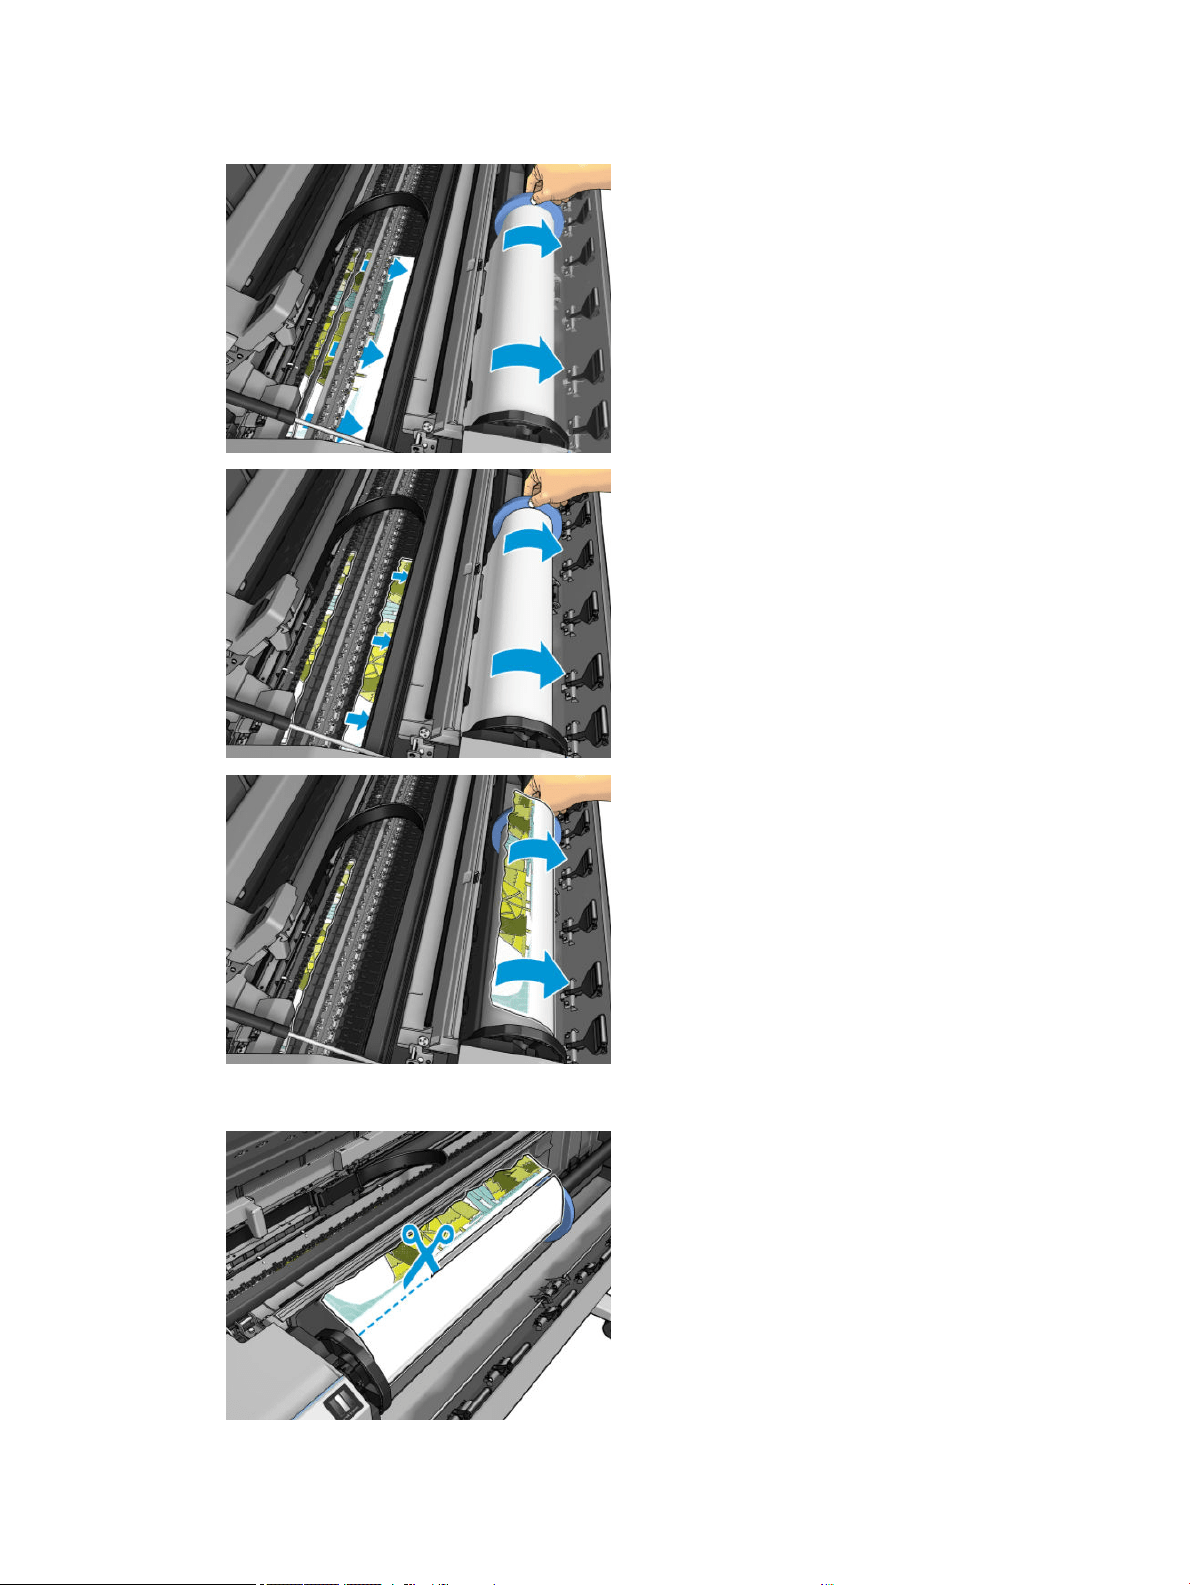
6. Manually rewind paper onto the roll.
7. If the leading edge of the paper is ragged, trim it carefully with scissors.
150 Chapter 14 Troubleshooting paper issues ENWW
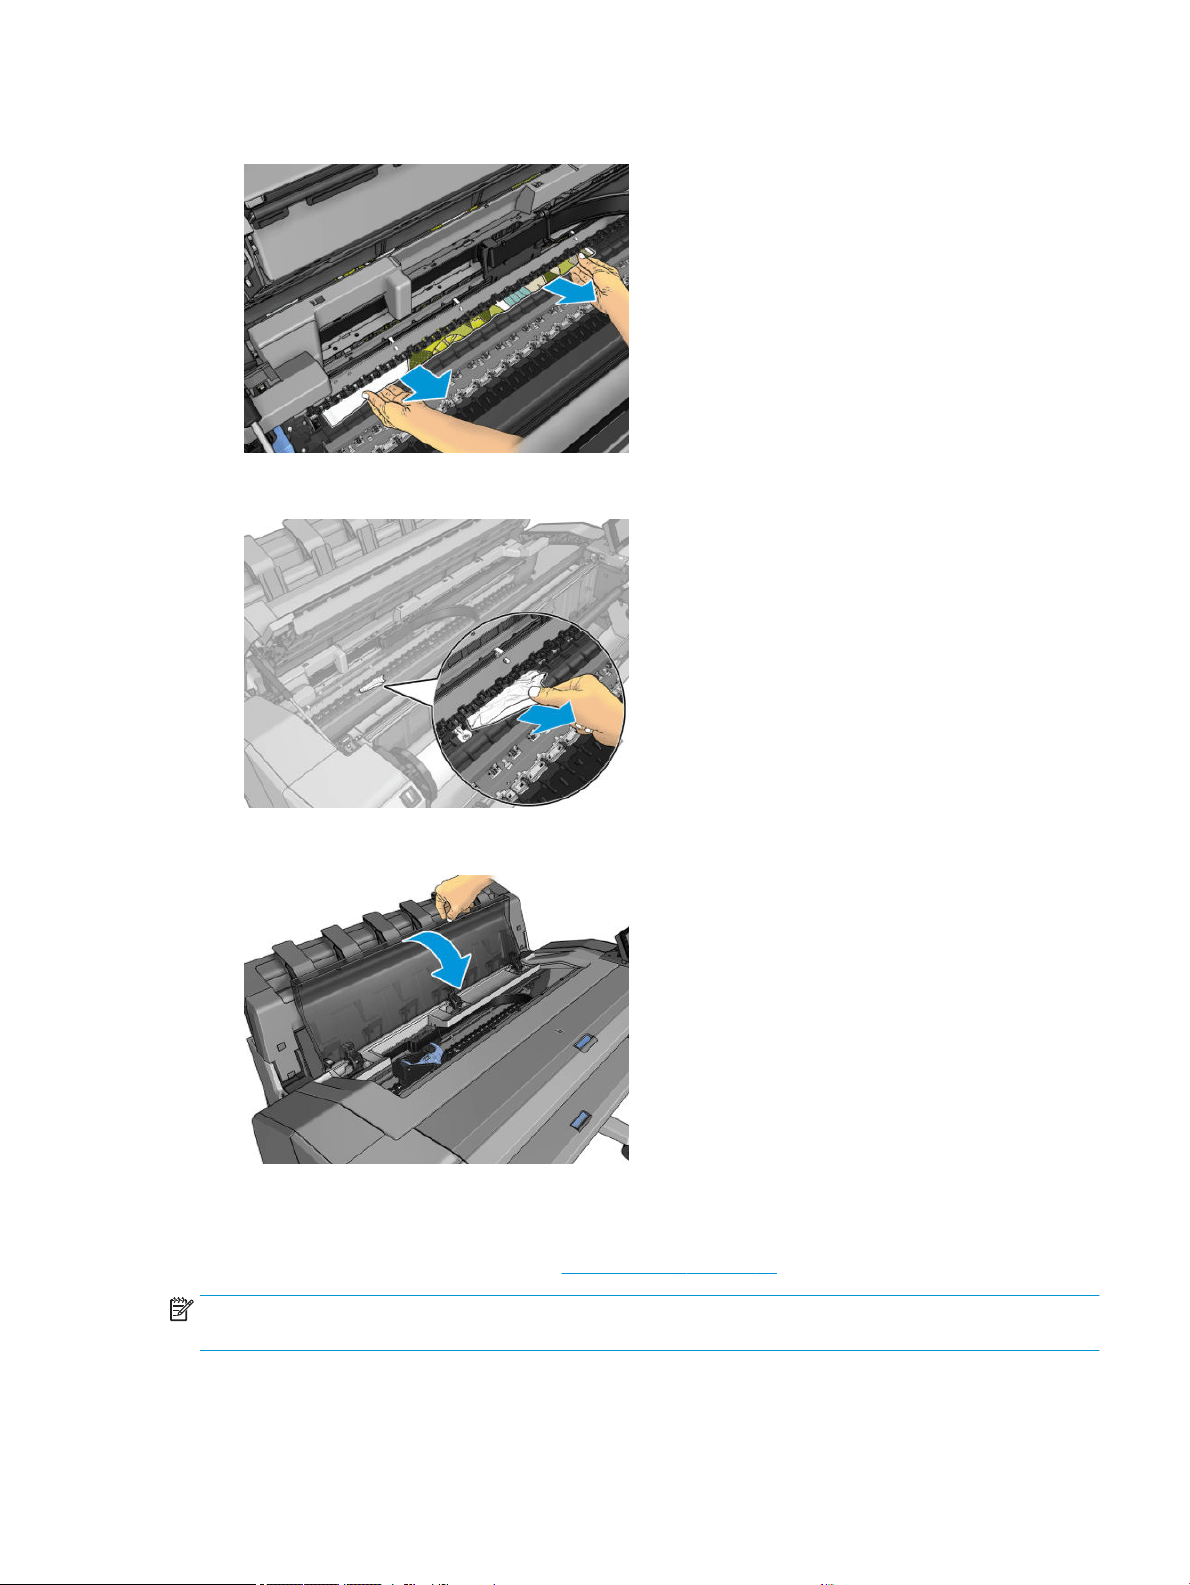
8. Remove the paper left in the printer.
9. Make sure you have removed every fragment of paper.
10. Lower the window and close the roll cover.
11. Restart the printer by holding down the power button for a few seconds, or by turning the power switch at
the rear o and then on.
12. Reload the roll, or load a new sheet see Paper handling on page 31.
NOTE: If you nd that there is still some paper causing an obstruction within the printer, restart the procedure
and carefully remove all pieces of paper.
ENWW The paper has jammed in the print platen 151

The paper has jammed in the stacker
When a paper jam is detected in the stacker, printing is paused, and the front panel asks you to open the stacker
cover and clear the jam by pulling out the paper.
When the stacker cover is closed and the printer detects no jammed paper, the front panel requests
conrmation to continue printing.
The printer reports unexpectedly that the stacker is full
The printer may report that the stacker is full in the following circumstances:
● When there is a paper jam in the stacker
● When you are using very thin or very sti paper, such as heavyweight coated paper
● When you are sending small paper sizes to the stacker, such as A3 portrait or A2 landscape
152 Chapter 14 Troubleshooting paper issues ENWW

A strip stays on the output tray and generates jams
If a small piece of paper (200 mm or smaller) has been cut, such as before (if new roll) and after a full-bleed print
or after the front-panel option Move and cut has been used, the cut strip remains in the output tray. Only when
the printer is not printing, reach into the tray and remove the strip.
Printer displays out of paper when paper is available
If the roll has become loose from its core, it will not feed correctly and the printer will not load the paper. If
possible, tighten the paper to its core or load a new roll.
Prints do not fall neatly into the basket
●
Ensure that the basket is correctly installed.
● Ensure that the basket is open.
● Ensure that the basket is not full.
● Paper often tends to curl near the end of a roll, which can cause output problems. Load a new roll, or
remove prints manually as they are completed.
Sheet stays in the printer when the print has been completed
The printer holds the paper to allow the print to dry after printing, see Change the drying time on page 46. If the
paper is only partially ejected after the drying time, gently pull the sheet out of the printer. If the automatic
cutter is disabled, use the Move and cut option in the front panel, see Clean cut on page 47.
Paper is cut when the print has been completed
By default the printer cuts the paper after the drying time has been completed, see Change the drying time
on page 46. You can disable the cutter, see Turn the automatic cutter on and o on page 47.
Cutter does not cut well
By default, the printer is set to cut the paper automatically after the drying time has been completed. If the
cutter is turned on but not cutting correctly, check that the cutter rail is clean and clear of any obstacles.
If the cutter is turned o, Move and cut only advances the paper. Use it to move the print far enough out of the
front of the printer, until it is convenient to cut manually with a straight edge or scissors.
Roll is loose on the spindle
The roll may need to be replaced or reloaded.
Ensure that you are using the right core, and use the HP DesignJet 3-in Core Adapter when needed.
ENWW A strip stays on the output tray and generates jams 153
Recalibrate the paper advance
Accurate paper advance is important to print quality because it is part of controlling the proper placement of
dots on the paper. If the paper is not advanced the proper distance between printhead passes, light or dark
bands appear in the print and image grain may increase.
The printer is calibrated to advance correctly with all the papers appearing in the front panel. When you select
the type of loaded paper, the printer adjusts the rate at which to advance the paper while printing. However, if
you are not satised with the default calibration of your paper, you may need to recalibrate the rate at which the
paper advances. See Troubleshooting print-quality issues on page 156 for steps to determine if paper advance
calibration will solve your issue.
You can check the paper advance calibration status of the currently loaded paper from the front panel at any
time by tapping
, then , then , then Calibration status. The status may be one of the following:
● DEFAULT: This status appears when loading any paper that has not been calibrated. HP papers in the Front
Panel have been optimized by default and unless you experience image quality problems in your printed
image such as banding or graininess it is not recommended to recalibrate the paper advance.
● OK: This status indicates that the loaded paper has been calibrated before. However you may need to
repeat the calibration if you experience print-quality problems such as banding or graininess in your printed
image.
NOTE: Whenever you update the printer’s rmware, the paper advance calibration values are reset to
factory default, see Update the rmware on page 134.
Recalibrating the paper advance procedure
CAUTION: If you are using a transparent paper or lm, go directly to step 3 of this procedure.
1. From the front panel, tap , then Paper advance calibration > Continue. The printer automatically
recalibrates the paper advance and prints a paper advance calibration image.
2. Wait until the front panel displays the status page, and reprint your print.
NOTE: The recalibration procedure takes approximately three minutes. Do not worry about the paper
advance calibration image. The front-panel display shows any errors in the process.
If you are satised with your print continue using this calibration for your paper type. If you see
improvement in your print, continue with step three. If you are dissatised with the recalibration, return to
the default calibration, see Return to default calibration on page 155.
3. If you would like to ne-tune the calibration or are using a transparent paper, tap , then Paper advance
calibration > Adjust paper advance.
154 Chapter 14 Troubleshooting paper issues ENWW
4. Select the percentage of change from –100% to +100%. To correct light banding, decrease the percentage.
To correct dark banding, increase the percentage.
5. Tap on the front panel to return to the all-apps page.
Return to default calibration
Returning to the default calibration sets all the corrections made by the paper advance calibration to zero. To
return to the default paper advance calibration value, you must reset the calibration.
1. From the front panel, tap , then , then , then Reset calibration.
2. Wait until the front panel displays the operation has completed successfully.
ENWW Recalibrate the paper advance 155

15 Troubleshooting print-quality issues
●
General advice
●
Horizontal lines across the image (banding)
●
Whole image is blurry or grainy
●
Paper is not at
●
Print is scued or scratched
●
Ink marks on the paper
●
Black horizontal lines on yellow background
●
Black ink comes o when you touch the print
●
Edges of objects are stepped or not sharp
●
Edges of objects are darker than expected
●
Horizontal lines at the end of a cut sheet print
●
Vertical lines of dierent colors
●
White spots on the print
●
Colors are inaccurate
●
Colors are fading
●
Image is incomplete (clipped at the bottom)
●
Image is clipped
●
Some objects are missing from the printed image
●
Lines are too thick, too thin or missing
●
Lines appear stepped or jagged
●
Lines print double or in the wrong colors
●
Lines are discontinuous
●
Lines are blurred
●
Line lengths are inaccurate
156 Chapter 15 Troubleshooting print-quality issues ENWW


General advice
When you have any print-quality problem:
● To achieve the best performance from your printer, use only genuine manufacturer's supplies and
accessories, whose reliability and performance have been thoroughly tested to give trouble-free
performance and best-quality prints. For details of recommended papers, see Order paper on page 138.
● Make sure that the paper type selected in the front panel is the same as the paper type loaded into the
printer (see View information about the paper on page 44). At the same time, check that the paper type has
been calibrated. Also make sure that the paper type selected in your software is the same as the paper
type loaded into the printer.
CAUTION: If you have the wrong paper type selected, you could experience poor print quality and
incorrect colors, and perhaps even damage to the printheads.
● Check that you are using the most appropriate print-quality settings for your purposes (see Printing
on page 60). You are likely to see lower print quality if you have moved the print-quality slider to the
'Speed' end of the scale, or set the custom quality level to Fast.
● Check that your environmental conditions (temperature, humidity) are in the recommended range. See
Environmental specications on page 191.
● Check that your ink cartridges and printheads have not passed their expiration dates: see Maintain the ink
cartridges on page 133.
Horizontal lines across the image (banding)
If your printed image suers from added horizontal lines as shown (the color may vary):
1. Check that the paper type you have loaded corresponds to the paper type selected in the front panel and in
your software. See View information about the paper on page 44.
2. Check that you are using appropriate print-quality settings for your purposes (see Printing on page 60). In
some cases, you can overcome a print-quality problem merely by selecting a higher print-quality level. For
instance, if you have set the Print Quality slider to Speed, try setting it to Quality. If you change the print-
quality settings, you may wish to reprint your job at this point in case the problem has been solved.
158 Chapter 15 Troubleshooting print-quality issues ENWW

3. Print the Image Diagnostics Print and follow the instructions in Image Diagnostics Print on page 169,
including printhead cleaning if recommended.
4. If the printheads are working correctly, go to the front panel and tap , then Paper advance calibration.
Choose the paper source and then
Paper advance calibration. See Recalibrate the paper advance
on page 154.
If the problem persists despite all the above actions, contact your customer service representative for further
support.
Whole image is blurry or grainy
1. Check that the paper type you have loaded corresponds to the paper type selected in the front panel and in
your software. See View information about the paper on page 44.
2. Check that you are printing on the correct side of the paper.
3. Check that you are using appropriate print-quality settings (see Printing on page 60). In some cases, you
can overcome a print-quality problem merely by selecting a higher print-quality level. For instance, if you
have set the Print Quality slider to Speed, try setting it to Quality. If you change the print-quality settings,
you may wish to reprint your job at this point in case the problem has been solved.
4. Realign the printheads. See Align the printhead on page 175. After alignment, you may wish to reprint your
job in case the problem has been solved.
5. Clean the printhead drop detector.
6. Go to the front panel and tap , then Paper advance calibration. Choose the paper source. See
Recalibrate the paper advance on page 154.
If the problem persists despite all the above actions, contact your customer service representative for further
support.
ENWW Whole image is blurry or grainy 159

Paper is not at
If the paper does not lie at when it comes out of the printer, but has shallow waves in it, you are likely to see
defects in the printed image, such as vertical stripes. This can happen when you use thin paper that becomes
saturated with ink.
1. Check that the paper type you have loaded corresponds to the paper type selected in the front panel and in
your software. See View information about the paper on page 44.
2. Try changing to a thicker paper type, such as HP Heavyweight Coated Paper or HP Super Heavyweight Plus
Matte Paper.
3. Select a paper type that is slightly thinner than the paper you have loaded; this will cause the printer to use
less ink. Here are some example paper types in ascending order of thickness: Plain Paper, Coated Paper,
Heavyweight Coated Paper, Super Heavyweight Plus Matte Paper.
Print is scued or scratched
The black ink pigment can be scued or scratched when touched by a nger, a pen or some other object. This is
particularly noticeable on coated paper.
Glossy paper may be extremely sensitive to the basket or to anything else that it contacts soon after printing,
depending on the amount of ink used and the environmental conditions at the time of printing.
To reduce the risk of scus and scratches:
● Handle prints carefully.
● Avoid stacking prints on top of each other.
● Catch your prints as they are cut from the roll and do not let them fall into the basket. Alternatively, leave a
sheet of paper in the basket so that freshly printed sheets do not make direct contact with the basket.
● Try loading the paper in sensitive-paper mode.
160 Chapter 15 Troubleshooting print-quality issues ENWW

Ink marks on the paper
This problem can occur for several dierent reasons.
Horizontal smears on the front of coated paper
If a lot of ink is used on plain or coated paper, the paper absorbs the ink quickly and expands. As the printheads
move over the paper, the printheads may come into contact with the paper and smear the printed image. This
problem is normally seen only on cut sheets of paper (not on roll paper).
Whenever you notice this problem, cancel the printing job immediately. Tap and also cancel the job from your
computer application. Soaked paper can damage the printheads.
Try the following suggestions to avoid this problem:
1. Check that the paper type you have loaded corresponds to the paper type selected in the front panel and in
your software. See View information about the paper on page 44.
2. Use a recommended paper type (see Order paper on page 138) and the correct print settings.
3. If using sheet paper, try rotating the sheet 90 degrees. The orientation of the paper bers may aect
performance.
4. Try changing to a thicker paper type, such as HP Heavyweight Coated Paper and HP Super Heavyweight
Plus Matte Paper.
5. Select a paper type that is slightly thinner than the paper you have loaded; this will cause the printer to use
less ink. Here are some example paper types in ascending order of thickness: Plain Paper, Coated Paper,
Heavyweight Coated Paper, Super Heavyweight Plus Matte Paper.
6. Try to increase the margins by relocating the image to the center of the page using your software
application.
Ink marks on the back of the paper
Clean the platen with a soft cloth. Clean each rib separately without touching the foam between the ribs.
Black horizontal lines on yellow background
This problem may be caused by storing the printer in a cold environment.
Go to the front panel and tap
, then Clean printheads.
ENWW Ink marks on the paper 161

Black ink comes o when you touch the print
This problem may be caused by printing with matte black ink on glossy paper. The printer will not use matte
black ink if it knows that the paper will not retain it. To be sure of avoiding matte black ink, you can select any
paper type from the Photo Paper category.
Edges of objects are stepped or not sharp
1. If edges of objects or lines appear to be poorly dened or lighter in density, and you have already set the
print-quality slider to Quality in the print dialog box, select the custom print-quality options, and try setting
the quality level to Normal. See Printing on page 60.
2. The issue may be related to orientation. Try rotating the image: you may nd that the result looks better.
Edges of objects are darker than expected
1. If edges of objects seem darker than expected, and you have already set the print-quality slider to Quality
in the driver dialog, select the custom print-quality options, and try setting the quality level to Normal. See
Printing on page 60.
2. The issue may be related to orientation. Try rotating the image: you may nd that the result looks better.
Horizontal lines at the end of a cut sheet print
This type of defect aects only the end of a print, within approximately 30 mm of the trailing edge of the paper.
You may see some very thin horizontal lines across the print.
To avoid this problem:
162 Chapter 15 Troubleshooting print-quality issues ENWW
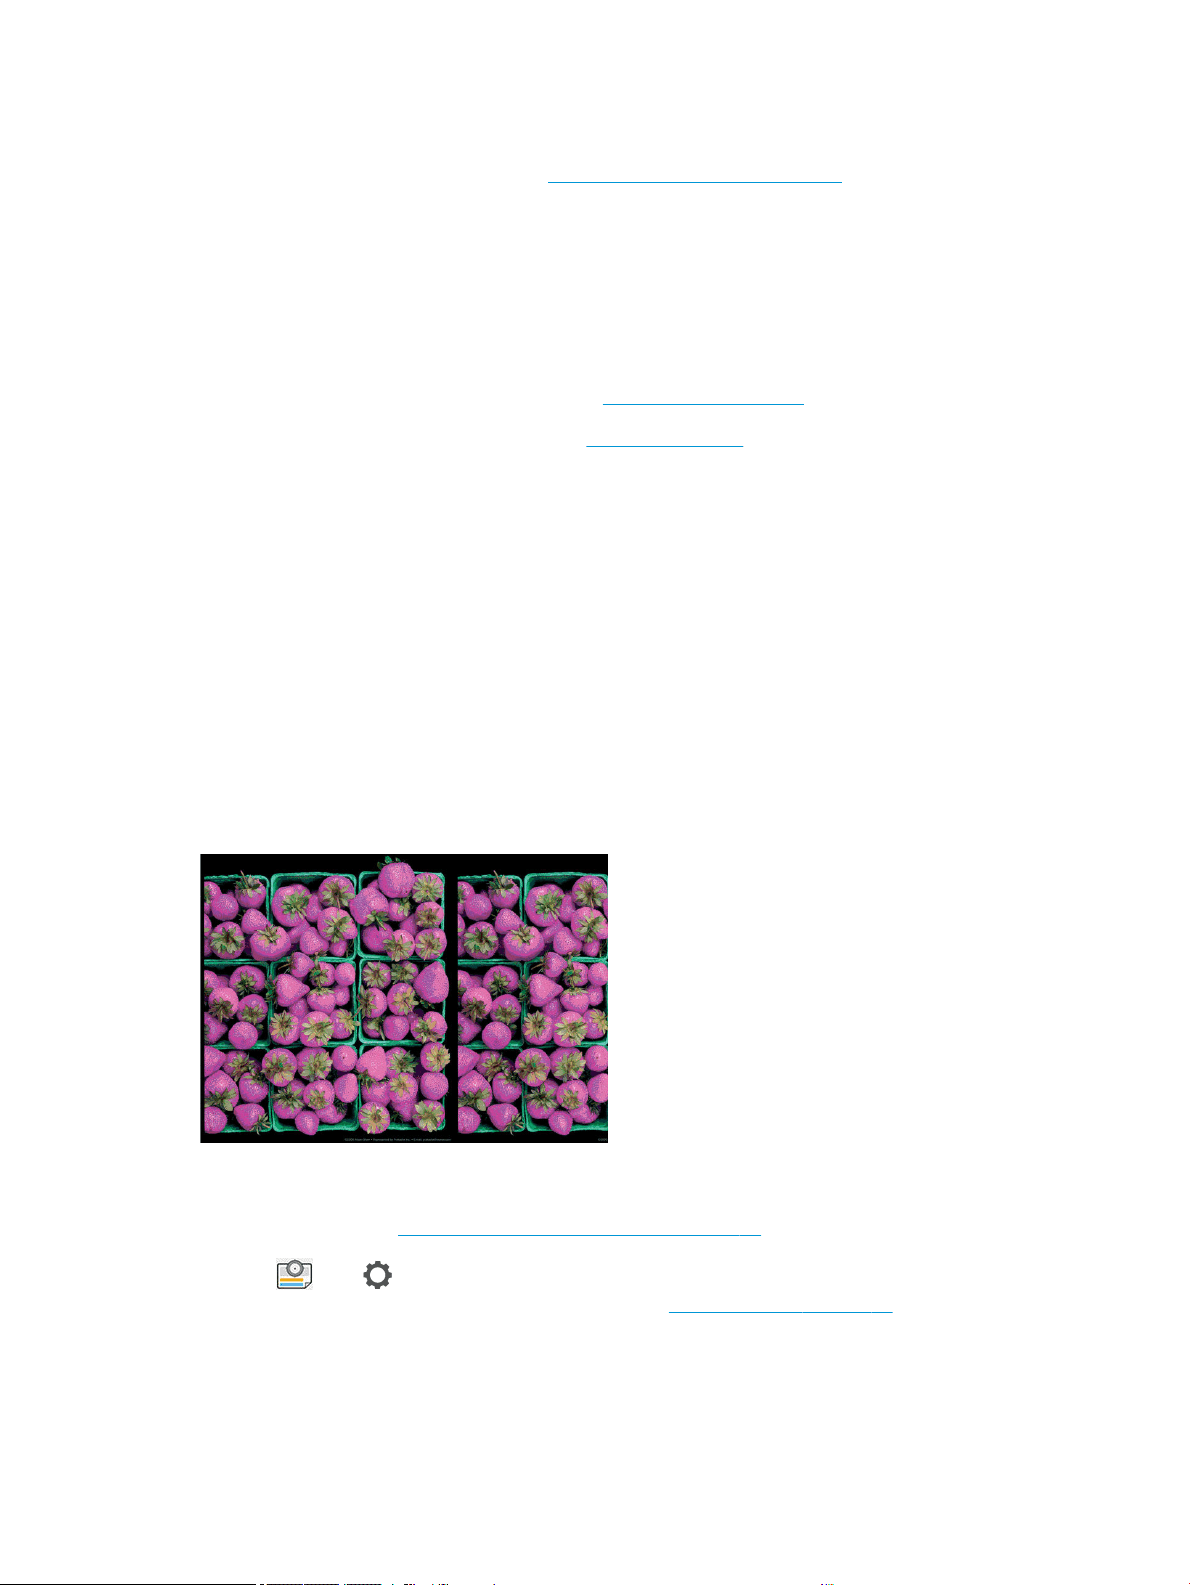
1. Consider using larger margins around your image.
2. Print the Image Diagnostics Print. See Image Diagnostics Print on page 169.
3. Consider printing with roll paper.
Vertical lines of dierent colors
If your print has vertical bands of dierent colors along it:
1. Try using thicker paper, choosing from the recommended paper types such as HP Heavyweight Coated
Paper and HP Super Heavyweight Paper. See Order paper on page 138.
2. Try using higher print-quality settings (see Printing on page 60). For instance, if you have set the Print
Quality slider to Speed, try setting it to Quality.
White spots on the print
You may notice white spots on the print. This is probably due to paper bers, dust, or loose coating material. To
avoid this problem:
1. Try cleaning the paper manually with a brush before printing, to remove any loose bers or particles.
2. Always keep the cover of your printer closed, and avoid actions that may introduce dust into the printer,
such as handling or cutting paper on the printer cover.
3. Protect your paper rolls and sheets by storing them in bags or boxes.
Colors are inaccurate
If the colors of your print do not match your expectations, try the following:
1. Check that the paper type you have loaded corresponds to the paper type selected in the front panel and in
your software. See View information about the paper on page 44.
2. Tap , then , then Calibration Status to check the color calibration status. If the status is PENDING or
OBSOLETE, you should perform color calibration: see
Color calibration on page 88. If you have made any
changes, you may wish to reprint your job in case the problem has been solved.
3. Check that you are printing on the correct side of the paper.
ENWW Vertical lines of dierent colors 163

4. Check that you are using appropriate print-quality settings (see Printing on page 60). If you have selected
the Speed or Fast options, you may not get the most accurate colors. If you change the print-quality
settings, you may wish to reprint your job at this point in case the problem has been solved.
5. If you are using Application Color Management, check that the color prole you are using corresponds to
the selected paper type and print-quality settings. If you have doubts about which color settings to use,
see Color management on page 87.
6. If a grayscale image shows a color cast in some of the gray shadows, click Color > Grayscale in the driver.
7. If the problem consists of color dierences between your print and your monitor, try calibrating your
monitor. At this point, you may wish to reprint your job in case the problem has been solved.
8. Print the Image Diagnostics Print. See Image Diagnostics Print on page 169.
If the problem persists despite all the above actions, contact your customer service representative for further
support.
Colors are fading
If you print on instant-dry photo paper, your prints will fade rapidly. If you plan to display the prints for more than
two weeks, you should laminate them to achieve longer life.
Alternatively, prints on swellable coated papers such as HP Universal Gloss Photo Paper or HP Universal Satin
Photo Paper will fade much less rapidly.
Lamination can increase the life of prints on all paper types, depending on the type of lamination. For more
information, consult your laminate provider.
Image is incomplete (clipped at the bottom)
● Did you tap before all the data were received by the printer? If so, you have ended the data
transmission and will have to print the page again.
● The I/O timeout setting may be too short. This setting determines how long the printer waits for the
computer to send more data, before deciding that the job is nished. From the front panel, increase the I/O
timeout setting to a longer period and then send the print again. Tap , then Connectivity > Network > I/O
timeout.
● There may be a communications problem between your computer and the printer. Check your USB or
network cable.
● Check to make sure that your software settings are correct for your current page size (for example, long-
axis prints).
● If you are using network software, make sure it has not timed out.
Image is clipped
Clipping normally indicates a discrepancy between the actual printable area on the loaded paper and the
printable area as understood by your software. You can often identify this kind of problem before printing by
previewing your print (see Preview a print on page 69).
● Check the actual printable area for the paper size you have loaded.
164 Chapter 15 Troubleshooting print-quality issues ENWW

printable area = paper size – margins
● Check what your software understands to be the printable area (which it may call "printing area" or
"imageable area"). For example, some software applications assume standard printable areas that are
larger than those used in this printer.
● If you have dened a custom page size with very narrow margins, the printer may impose its own minimal
margins, clipping your image slightly. You may want to consider using a larger paper size.
● If your image contains its own margins, you may be able to print it successfully by using the Clip Contents
by Margins option (see Select margin options on page 67).
● If you are trying to print a very long image on a roll, check that your software is capable of printing an
image of that size.
● If you try to print an image larger than your software can handle, the bottom of the image may be clipped.
To print the whole image, try these suggestions:
– Save the le in another format, such as TIFF or EPS, and open it with another application.
– Use a RIP to print the le.
● You may have asked to rotate the page from portrait to landscape on a paper size that is not wide enough.
● If necessary, reduce the size of the image or document in your software application, so it ts between the
margins.
Some objects are missing from the printed image
Large quantities of data may be necessary to print a high-quality large-format print job, and in some specic
workows there may be issues that can lead to some objects missing from the output. Here are some
suggestions to help you to avoid this problem:
● Select a smaller page size and scale to the desired nal page size in the driver or in the front panel.
● Save the le in another format, such as TIFF or EPS, and open it with another application.
● Use HP Click software to print the le.
● Use a RIP to print the le.
● Try printing from a USB ash drive.
● Reduce the resolution of bitmap images in your application software.
● Select a lower print quality in order to reduce the resolution of the printed image.
NOTE: If you are working under Mac OS X, not all of these options are available.
These options are suggested for troubleshooting purposes and may adversely aect the nal output quality or
the time necessary to generate the print job. Therefore, they should be canceled if they do not help to solve the
problem.
ENWW Some objects are missing from the printed image 165
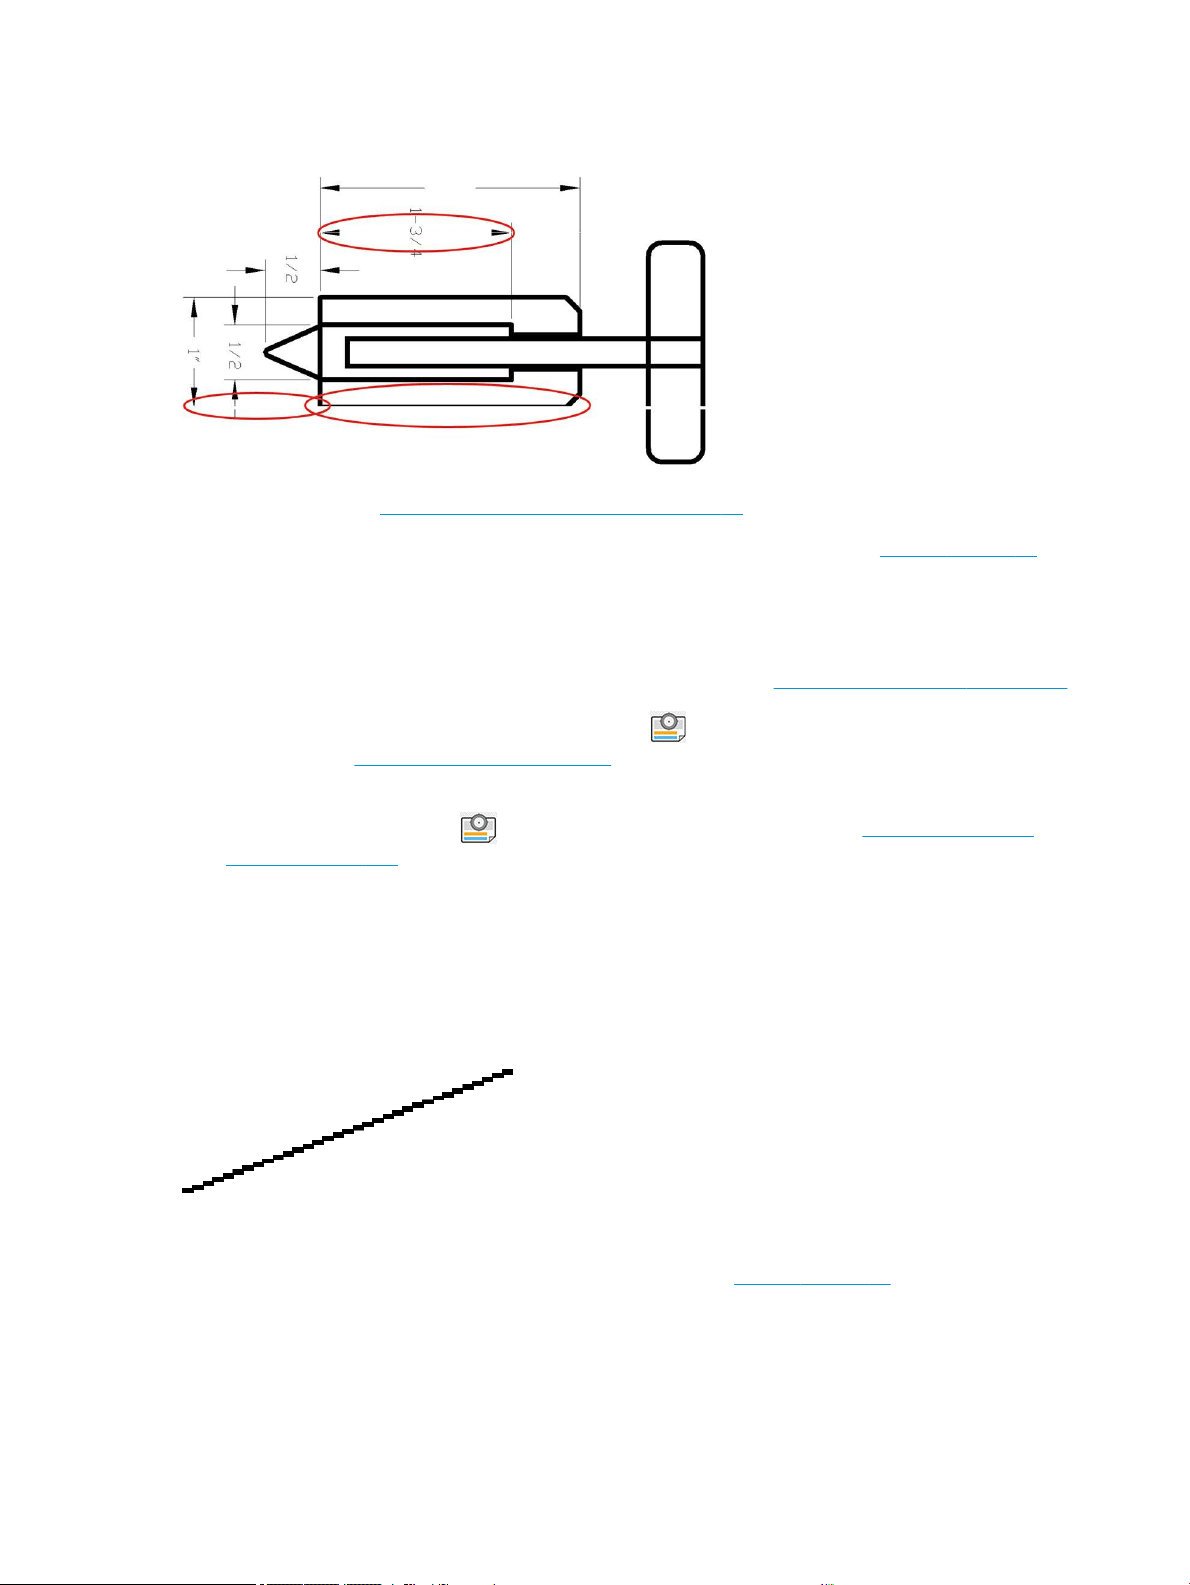
Lines are too thick, too thin or missing
1. Check that the paper type you have loaded corresponds to the paper type selected in the front panel and in
your software. See View information about the paper on page 44.
2. Check that you are using appropriate print-quality settings for your purposes (see Printing on page 60).
Select the custom print-quality options in the driver dialog, and try turning on the Maximum detail option (if
available). You may wish to reprint your job at this point in case the problem has been solved.
3. If the resolution of your image is greater than the printing resolution, you may notice a loss of line quality.
4. If lines are too thin or missing, print the Image Diagnostics Print. See Image Diagnostics Print on page 169.
5. If the problem remains, go to the front panel and tap , then Printhead alignment to align the
printheads. See
Align the printhead on page 175. After alignment, you may wish to reprint your job in case
the problem has been solved.
6. Go to the front panel and tap , then perform paper advance calibration: see Recalibrate the paper
advance on page 154.
If the problem persists despite all the above actions, contact your customer service representative for further
support.
Lines appear stepped or jagged
If lines in your image appear stepped or jagged when printed:
1. The problem may be inherent in the image. Try to improve the image with the application you are using to
edit it.
2. Check that you are using appropriate print-quality settings. See Printing on page 60.
3. Select the custom print-quality options in the driver dialog, and turn on the Maximum detail option (if
available).
166 Chapter 15 Troubleshooting print-quality issues ENWW

Lines print double or in the wrong colors
This problem can have various visible symptoms:
● Colored lines are printed double, in dierent colors.
● The borders of colored blocks are wrongly colored.
To correct this kind of problem:
1. Reseat the printheads by removing them and then reinserting them. See Remove the printhead
on page 125 and Insert the printhead on page 128.
2. Align the printheads. See Align the printhead on page 175.
Lines are discontinuous
If your lines are broken in the following way:
1. Check that you are using appropriate print-quality settings. See Printing on page 60.
2. Reseat the printheads by removing them and then reinserting them. See Remove the printhead
on page 125 and Insert the printhead on page 128.
3. Align the printheads on the paper that you have the issue with. See Align the printhead on page 175.
ENWW Lines print double or in the wrong colors 167

Lines are blurred
Humidity can cause ink to soak into the paper, making the lines blurred and fuzzy. Try the following:
1. Check that your environmental conditions (temperature, humidity) are suitable for high-quality printing.
See Environmental specications on page 191.
2. Check that the paper type selected in the front panel is the same as the paper type you are using. See View
information about the paper on page 44.
3. Select the custom print-quality options, then select Best and Maximum detail (if available). See High-
quality printing on page 70.
4. Try changing to a heavier paper type, such as HP Heavyweight Coated Paper or HP Super Heavyweight Plus
Matte Paper.
5. Select a paper type that is slightly thinner than the paper you have loaded; this will cause the printer to use
less ink. Here are some example paper types in ascending order of thickness: Plain Paper, Coated Paper,
Heavyweight Coated Paper, Super Heavyweight Plus Matte Paper.
6. If you are using glossy paper, try changing to a dierent type of glossy paper.
7. Align the printheads. See Align the printhead on page 175.
Line lengths are inaccurate
If you have measured your printed lines and nd that the lengths are not suciently accurate for your purposes,
you can try to improve line length accuracy in the following ways:
1. Print on HP Matte Film, for which your printer's line length accuracy is specied. See Functional
specications on page 188.
Polyester lm is about ten times more dimensionally stable than paper. However, using lm that is thinner
or thicker than HP Matte Film will reduce line length accuracy.
2. Set the Print Quality slider to Quality.
3. Maintain the room at a steady temperature between 10 and 30°C (50 and 86°F).
4. Load the roll of lm and let it rest for ve minutes before printing.
5. If you are still not satised, try recalibrating the paper advance. See Recalibrate the paper advance
on page 154.
168 Chapter 15 Troubleshooting print-quality issues ENWW

Image Diagnostics Print
The Image Diagnostics Print consists of patterns designed to highlight printhead reliability problems. It helps you
to check the performance of the printheads that are currently installed in your printer, and whether any
printhead suers from clogging or other problems.
To print the Image Diagnostics Print:
1. Use the same paper type that you were using when you detected a problem.
2. Check that the selected paper type is the same as the paper type loaded into the printer. See View
information about the paper on page 44.
3. At the printer's front panel, tap , then , then , then Print diagnostic image.
It takes about two minutes to print the Image Diagnostics Print.
The print is divided into two parts, both of which test printhead performance:
● Part 1 (top) consists of rectangles of pure colors, one for each printhead. This part represents the print
quality that you will get from each color.
● Part 2 (bottom) consists of small dashes, one for each nozzle on each printhead. This part complements
the rst, and aims more specically to detect how many faulty nozzles each printhead has.
Look carefully at the print. The names of the colors are shown above the rectangles and in the center of the
patterns of dashes.
ENWW Image Diagnostics Print 169
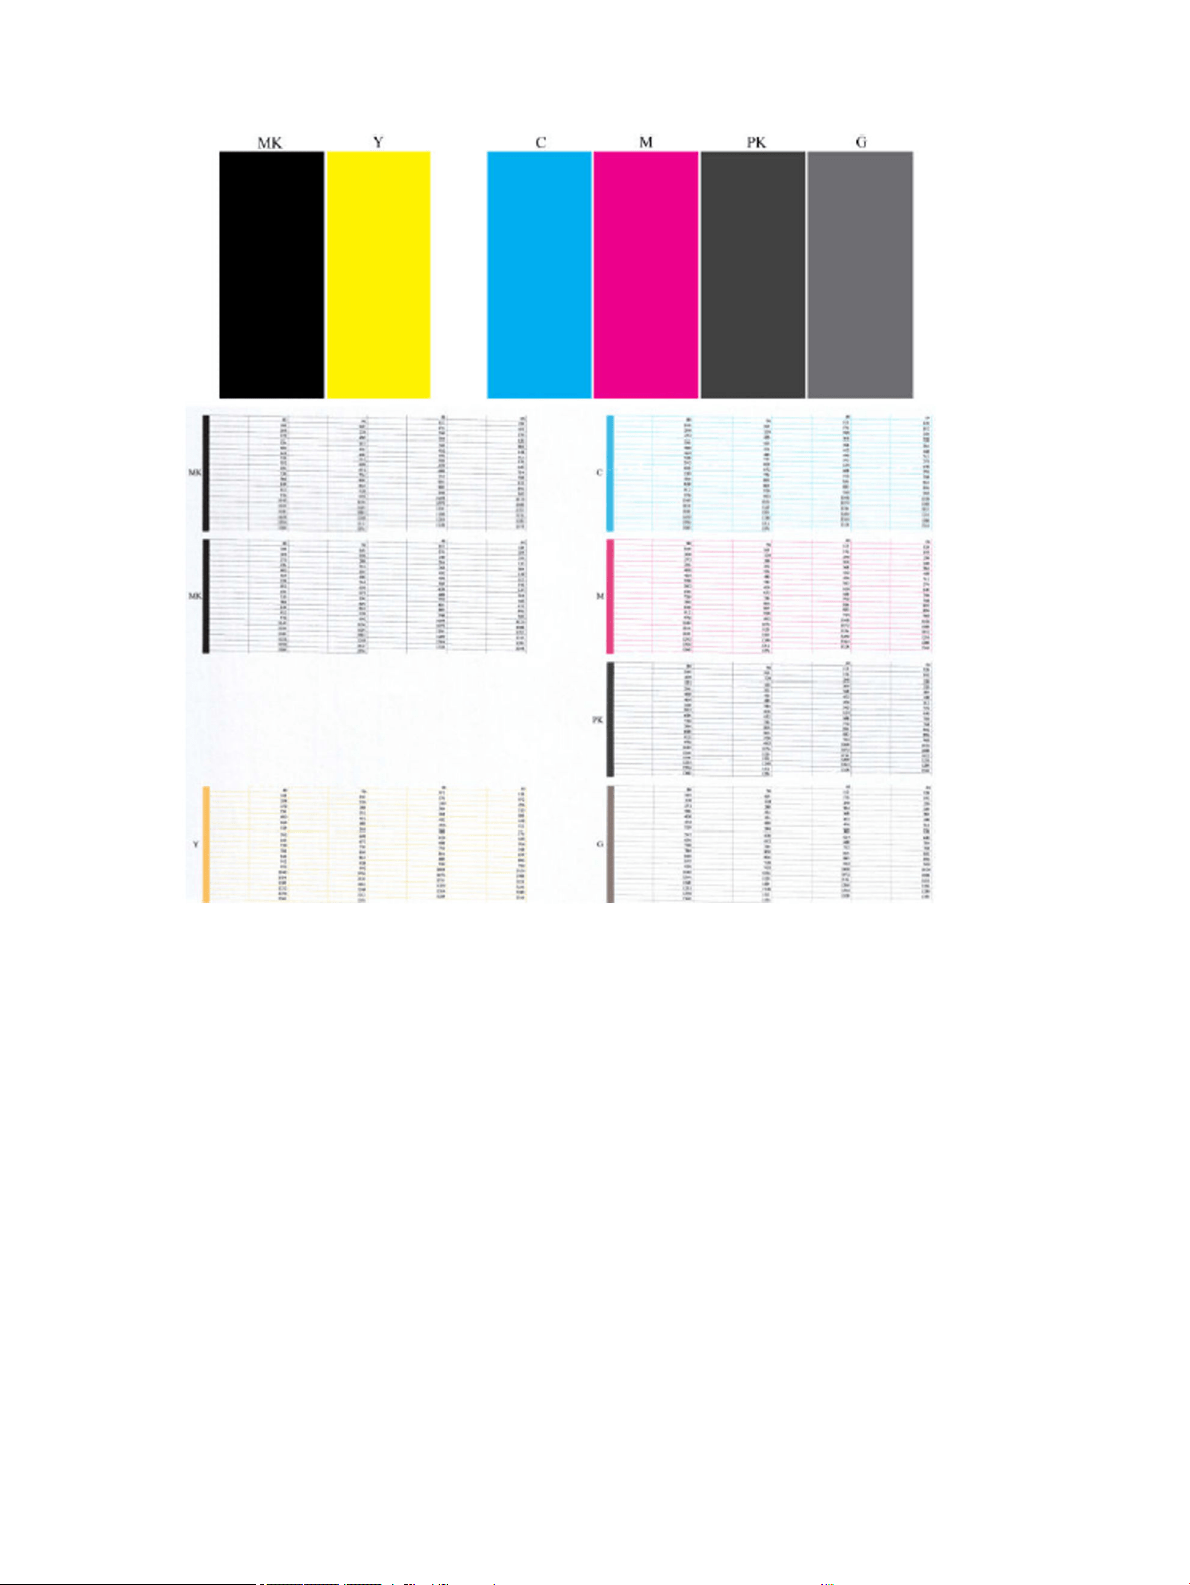
First look at the upper part of the print (part 1). Each colored rectangle should be a uniform color without any
horizontal lines across it.
Then look at the bottom part of the print (part 2). For each individual colored pattern, check that most of the
dashes are present.
If you see horizontal lines in part 1 and also missing dashes in part 2 for the same color, the printhead
responsible needs cleaning. However, if the rectangles look solid, do not worry about just a few missing dashes
in part 2; these are acceptable because the printer can compensate for a few clogged nozzles.
Here is an example of a gray printhead in a good state:
170 Chapter 15 Troubleshooting print-quality issues ENWW

And here is an example of the same printhead in a bad state:
Corrective action
1. Clean any faulty printheads (see Clean the printhead on page 175). Then reprint the Image Diagnostics
Print to see whether the problem has been solved.
2. If the problem remains, clean the printheads again, and reprint the Image Diagnostics Print to see whether
the problem has been solved.
3. If the problem remains, consider cleaning your printheads manually (see Clean the printhead on page 175).
You could also try reprinting your current print job, in case it now prints satisfactorily.
4. If the problem remains, try cleaning the printhead drop detector. The printer normally noties you when
this is necessary, but it may be worth trying even if the printer has not suggested it.
5. If the problem still remains, replace any persistently faulty printheads (see Handling ink cartridges and
printhead on page 120), or contact HP Support (see Contact HP Support on page 185).
ENWW Image Diagnostics Print 171

If you still have a problem
If you still experience print-quality problems after applying the advice in this chapter, here are some further
things that you can do:
● Try using a higher print-quality option. See Printing on page 60.
● Check the driver you are using to print with. If it is a non-HP driver, consult the driver vendor about the
problem. You could also try using the correct HP driver, if feasible. The latest HP drivers can be downloaded
from http://www.hp.com/go/DesignJetT1600/drivers.
● If you are using a non-HP RIP, its settings may be incorrect. See the documentation that came with the RIP.
● Check that your printer's rmware is up to date. See Update the rmware on page 134.
● Check that you have the right settings in your software application.
172 Chapter 15 Troubleshooting print-quality issues ENWW


Cannot insert an ink cartridge
1. Check that you have the correct type of cartridge (model number).
2. Check that the colored label on the cartridge is the same color as the label on the slot.
3. Check that the cartridge is correctly oriented, with the letter or letters marking the cartridge label right-side
up and readable.
CAUTION: Never clean inside the ink cartridge slots.
Ink cartridge status messages
These are the possible ink cartridge status messages:
● OK: The cartridge is working normally, with no known problems.
● Missing: There is no cartridge present, or it is not correctly connected to the printer.
● Low: The ink level is low.
● Very low: The ink level is very low.
● Empty: The cartridge is empty.
● Reseat: You are recommended to remove the cartridge and then reinsert it.
● Replace: You are recommended to replace the cartridge with a new cartridge.
● Expired: It is past the cartridge's expiration date.
● Incorrect: The cartridge is not compatible with this printer. The message includes a list of compatible
cartridges.
● Non-HP: The cartridge is used, relled, or counterfeit.
Cannot insert the printhead
1. Check that you have the correct type of printhead (model number).
2. Check that you have removed the seven orange protective caps from the printhead.
3. Check that the printhead is correctly oriented.
4. Check that you have correctly closed and latched the printhead cover, see Insert the printhead
on page 128.
The front-panel display recommends reseating or replacing the
printhead
1. Remove the printhead, see Remove the printhead on page 125.
174 Chapter 16 Troubleshooting ink cartridge and printhead issues ENWW
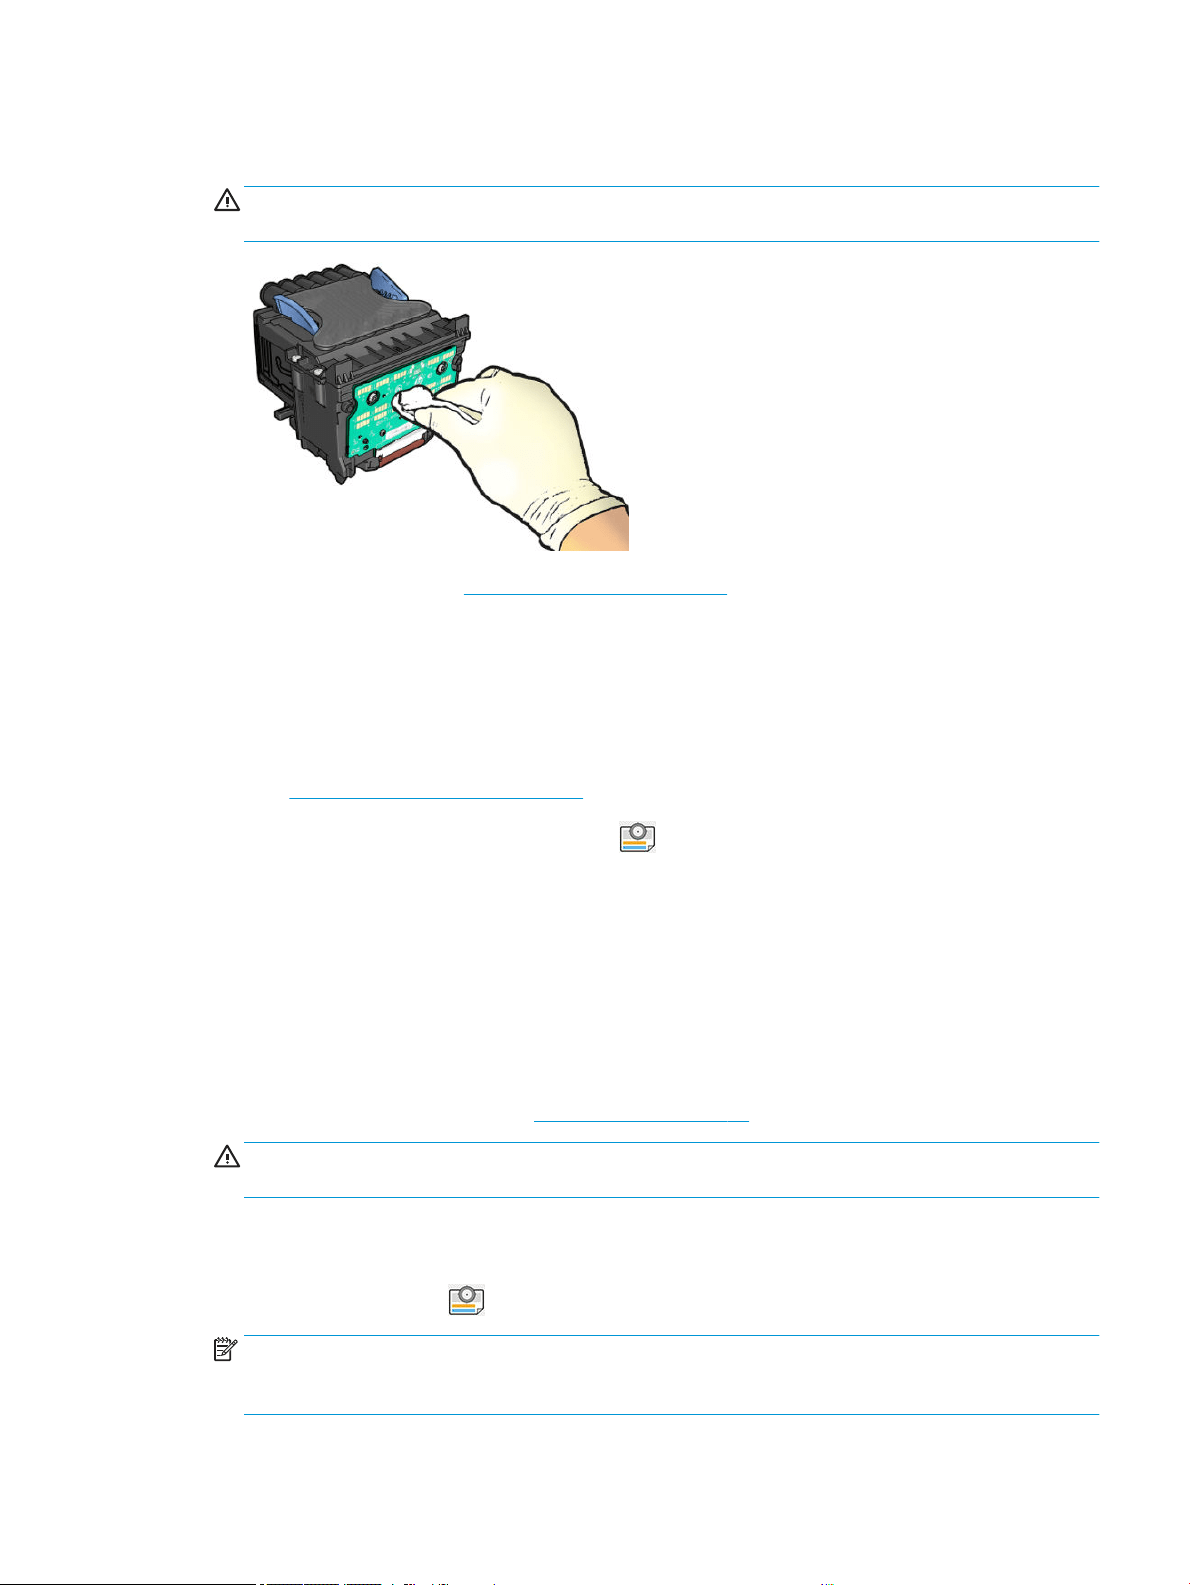
2. Clean the electrical connections on the backside of the printhead with a lint-free cloth. You can carefully use
a mild rubbing alcohol if moisture is needed to remove residue. Do not use water.
CAUTION: This is a delicate process and may damage the printhead. Do not touch the nozzles on the
bottom side of the printhead, especially not with any alcohol.
3. Reinsert the printhead, see Insert the printhead on page 128.
4. Check the front-panel display message. If the problem remains, try a new printhead.
Clean the printhead
As long as the printer is kept turned on, automatic cleaning is performed periodically. This ensures there is fresh
ink in the nozzles and prevents nozzle clogs, thus preserving print quality. If you have print quality problems,
please see Image Diagnostics Print on page 169 before proceeding.
To clean the printhead, go to the front panel and tap
, then Printheads, and select the color group including
the color that needs cleaning (
Clean all, Clean MK-Y, Clean C-M-PK-G).
Align the printhead
Precise printhead alignment is essential for accurate colors, smooth color transitions, and sharp edges in
graphical elements. Your printer has an automatic printhead alignment process which runs whenever the
printhead has been accessed or replaced.
You may need to align the printhead after a paper jam or if you are experiencing print-quality problems.
1. Load the paper you wish to use, see Paper handling on page 31. You can use a roll or a cut sheet.
CAUTION: Do not use transparent or semi-transparent paper to align the printhead. HP recommends
plain or bond paper.
2. Ensure that the window is closed, as a strong light source near the printer during printhead realignment
can aect alignment.
3. From the front panel, tap , then Align printheads.
NOTE: Printhead alignment can also be started from the Embedded Web Server (Support > Print Quality
Troubleshooting), or from the HP Utility (Windows: Support > Print Quality Troubleshooting; Mac OS X:
Information and Print Quality > Align).
ENWW Clean the printhead 175

4. If the loaded paper is satisfactory, the printer runs the realignment and prints a realignment pattern.
5. The process takes about ve minutes. Wait until the front-panel display shows the process complete
before using the printer.
If the printer cannot complete the printhead alignment successfully, you may be asked to clean the printhead
and try again.
Printhead status messages
These are the possible printhead status messages:
● OK: The printhead is working normally, with no known problems
● Missing: There is no printhead present, or it is not correctly installed in the printer.
● Reseat: You are recommended to remove the printhead and then reinsert it. If that fails, clean the electrical
connections, see The front-panel display recommends reseating or replacing the printhead on page 174. If
that fails, replace the printhead with a new printhead, see Remove the printhead on page 125 and Insert
the printhead on page 128.
● Replace: The printhead is failing. Replace the printhead with a working printhead, see Remove the
printhead on page 125 and Insert the printhead on page 128.
● Replacement incomplete: The printhead replacement process has not completed successfully; re-launch
the replacement process and let it nish completely.
● Remove: The printhead is not a suitable type for use in printing.
● Non-HP ink: Ink from a used, relled, or counterfeit ink cartridge has passed through the printhead. See the
limited warranty document provided with your printer for details of the warranty implications.
176 Chapter 16 Troubleshooting ink cartridge and printhead issues ENWW

17 Troubleshooting general printer issues
●
Printer does not print
●
Front panel fails to initialize
●
Printer seems slow
●
Communication failures between computer and printer
●
Cannot access the Embedded Web Server
●
Cannot access the network folder
●
Cannot connect to the Internet
●
Web Services issues
●
Automatic le system check
●
Alerts
ENWW 177

Printer does not print
If all is in order (paper loaded, all ink components installed and no le errors), there are still reasons why a le
you have sent from your computer may not start printing when expected:
● You may have an electrical power problem. If there is no activity at all from the printer, and the front panel
does not respond, check that the power cable is connected correctly and that there is power available at
the socket. Press the power key for 5 seconds to reset the printer.
● You may be experiencing unusual electromagnetic phenomena, such as strong electromagnetic elds or
severe electrical disturbances, which can cause the printer to behave strangely or even stop working. In this
case, turn o the printer using the power key on the front panel and unplug the power cord, wait until the
electromagnetic environment has returned to normal, then turn it on again. If you still experience
problems, contact your support representative.
● Nesting may be on, and the printer is waiting for the specied nest wait time before calculating the
appropriate nests. In this case, the front panel shows the remaining time needed for nesting.
● You may have the wrong graphic language setting, see Change the graphic language setting on page 28.
● You may not have installed in your computer the correct driver for your printer, see the Assembly
instructions.
● If you are printing on a sheet, you must specify Single sheet as the paper source in your printer driver.
● The printer may be holding the job for suitable paper (see On hold for paper on page 146) or accounting ID
information (see Require account ID on page 27).
● You may have requested a print preview from your printer driver. This is a function you can use to check
that the image is the one you want. In this case, the preview is displayed on your screen, and you must click
the Print button to start printing.
Front panel fails to initialize
If the printer will not start (the front panel is blank or the diagnostic LEDs are all o), you are recommended to
replace the rmware, in the following way:
1. Go to the HP Support Center (see HP Support Center on page 184) and download the rmware.
2. Save the rmware on a USB ash drive. Ideally, the USB ash drive should be empty and formatted with
the FAT lesystem.
3. Ensure that the printer is turned o. Connect the USB ash drive to the Hi-Speed USB host port beside the
front panel, then turn the printer on.
4. The printer takes about a minute to read the rmware le, then asks you to remove the USB ash drive.
5. The printer automatically installs the new rmware and restarts.
178 Chapter 17 Troubleshooting general printer issues ENWW

Printer seems slow
Here are some possible explanations:
● Did you set the print quality to Best or Maximum detail? Best-quality and maximum detail prints take
longer.
● Did you specify the correct paper type when loading the paper? Some paper types require more time for
printing; for example, photo and coated papers require more drying time between passes. To nd out the
printer's current paper type setting, see View information about the paper on page 44.
● If your printer is connected by network, check that all components used in the network interface (wired or
wireless), such as hubs, routers, switches, and cables, are capable of high-speed operation. Is there a lot of
trac from other devices on the network?
● Did you specify Extended drying time in the front panel? Try changing the drying time to Optimal.
Communication failures between computer and printer
Some symptoms are:
● The front-panel display does not show the Receiving message when you have sent an image to the printer.
● Your computer displays an error message when you are trying to print.
● Your computer or printer hangs (stays idle), while communication is taking place.
● Your printed output shows random or inexplicable errors (misplaced lines, partial graphics etc.)
To solve a communication problem:
● Ensure that you have selected the correct printer in your application, see Printing on page 60.
● Ensure that the printer works correctly when printing from other applications.
● Remember that very large prints may take some time to receive, process and print.
● If your printer is connected to your computer through any other intermediate devices, such as switch
boxes, buer boxes, cable adapters, cable converters, and so on, try using it when connected directly to
your computer.
● Try another interface cable.
● Try wired a connection if you're using wireless.
● Ensure that the graphic language setting is correct, see Change the graphic language setting on page 28.
● If the printer is connected by network, check that your printer has a static IP address. If it is using DHCP, the
IP address may change every time it is turned on, in which case the driver may not be able to nd it.
Cannot access the Embedded Web Server
If you have not done so already, read Embedded Web Server on page 13.
From the front panel, tap
, then Security > Embedded Web Server.
ENWW Printer seems slow 179

If you are using a proxy server, try bypassing the server and accessing the Web server directly:
● In Internet Explorer 6 for Windows, go to Tools > Internet Options > Connections > LAN Settings, and check
the Bypass proxy server for local addresses box. Alternatively, for more precise control, click the Advanced
button and add the printer's IP address to the list of exceptions, for which the proxy server is not used.
● In Safari for Mac OS X, go to Safari > Preferences > Advanced and click the Proxies: Change Settings button.
Add the printer's IP address or its domain name to the list of exceptions, for which the proxy server is not
used, in the Bypass proxy settings for these Hosts & Domains eld.
If you still cannot connect, turn the printer o and back on with the power key on the front panel.
Cannot access the network folder
If you have set up a network folder, but the printer cannot access it, try the following suggestions:
● Check that you have lled in each eld correctly. See Congure a network folder on page 19.
● Check that the printer is connected to the network.
● Check that the remote computer is switched on, working normally and connected to the network.
● Check that the folder is shared and that you have the correct permissions and functionality use of it.
● Check that you can put/read les (depending of the functionality use), to the same folder from a dierent
computer on the network, using the printer's logon credentials.
● Check that the printer and the remote computer are in the same network subnet; if they are not, check that
the network routers are congured to forward the CIFS protocol trac (also known as Samba).
Cannot connect to the Internet
If your printer has diculty in connecting to the Internet, it may start the Connectivity Wizard automatically.
The Connectivity Wizard performs a series of tests automatically.
If any test fails, the printer describes the problem and recommends how to solve it. You can modify settings and
rerun the test, unless the settings are protected.
Web Services issues
For any issues with HP ePrint, see HP Connected: http://www.hpconnected.com.
Automatic le system check
When you turn on the printer, you will occasionally see a front panel message: File system check.
A le system check is taking place; it can take up to 40 minutes. Please wait until it nishes.
CAUTION: If you turn the printer o before the le system check has nished, the le system could be seriously
damaged, making the printer's hard disk unusable. In any case, the le system check will restart from the
beginning whenever you turn the printer on again.
180 Chapter 17 Troubleshooting general printer issues ENWW

A le system check is scheduled every 90 days, in order to maintain the hard disk's le system integrity.
NOTE: When the printer is powered back on, it takes about three minutes to initialize and check and prepare
the printheads. However, it can take up to 40 under some conditions, for example, when the printer has not
been used for a long period of time and requires more time to prepare the printheads.
Alerts
Your printer can communicate two types of alerts:
● Errors: Mainly alerting you to the fact that the printer is unable to work normally. However, in the printer
driver, errors can also alert you to conditions that could ruin the print, such as clipping, even if the printer is
able to print.
● Warnings: Alert you when the printer needs attention either for an adjustment, such as a calibration or for a
possible unprintable situation, such as a preventive maintenance or low ink.
There are four dierent alerts communicators within your printer's system:
● Front-panel display: The front panel shows only the most relevant alert at a time. In the case of a warning,
it disappears after a timeout. There are permanent alerts, such as "ink cartridge low on ink", that reappear
when the printer becomes idle and there is not another more severe alert.
TIP: From the front panel display you can congure paper mismatch alerts, see Solve paper mismatch
on page 82.
● Embedded Web Server: The upper-right corner of the Embedded Web Server window shows the printer
status. If there is an alert in the printer, the status shows the alert text.
● Driver: The driver warns about job conguration settings that may produce a problem in the nal output. If
the printer is not ready to print, it displays a warning.
● HP DesignJet Utility: To see alerts, go to the Overview tab and review the Items needing attention list on
the right-hand side.
By default, alerts are displayed only when you are printing. If alerts are enabled and there is a problem that
prevents a job from completing, you see a pop-up window, which explains the reason for the problem.
Follow the instructions to achieve your required result.
ENWW Alerts 181

18 Front-panel error messages
The printer may occasionally display a system error, consisting of a numerical code of 12 digits followed by the
recommended action that you should take.
In most cases you will be asked to restart the printer, because when the printer starts it can diagnose the issue
better and may be able to x it automatically. If the problem persists after restarting, you should contact your
support representative and be ready to give the numerical code from the error message.
If the error message contains some other recommended action, follow the printer’s instructions.
System error log
The printer saves a log of system errors that you can access in the following way.
Using a USB ash drive
1. Take a standard USB ash drive, formatted as FAT32.
2. Create an empty le in the USB ash drive (right-click, New > Text Document), and name it
pdipu_enable.log.
3. When an error message is displayed on the front panel, insert the USB ash drive into the Hi-Speed USB
host port at the front of the printer. The log is automatically copied into the drive. You can remove the USB
ash drive when prompted by the front panel.
4. Contact your support representative (see Contact HP Support on page 185) to share the le created in the
USB ash drive.
Using the Embedded Web Server
1. In your Web browser, go to https://printer IP address/hp/device/support/serviceSupport.
2. Click the Download button to get the Diagnostic package.
3. Save the package in your computer and contact your support representative (see Contact HP Support
on page 185).
182 Chapter 18 Front-panel error messages ENWW


Introduction
HP Customer Care oers award-winning support to ensure you get the most from your HP DesignJet, providing
comprehensive, proven support expertise and new technologies to give you unique end-to-end support.
Services include setup and installation, troubleshooting tools, warranty upgrades, repair and exchange services,
phone and Web support, software updates and self-maintenance services. To nd out more about HP Customer
Care, see Contact HP Support on page 185.
To register your warranty, visit http://register.hp.com/.
HP Professional Services
HP Support Center
Enjoy a world of dedicated services and resources to ensure you always get the best performance from your
HP DesignJet printers and solutions.
Join the HP community at the HP Support Center, your large-format printing community, for 24×7 access to:
● Multimedia tutorials
● Step-by-step how-to guides
● Downloads: the latest printer rmware, drivers, software, paper presets, etc.
● Technical support: online troubleshooting, customer care contacts and more
● Workows and detailed advice for completing various printing tasks from particular software applications
● Forums for direct contact with the experts, both HP and your colleagues
● Warranty tracking online, for your peace of mind
● Latest product information: printers, supplies, accessories, software, etc.
● Supplies Center for all you need to know about ink and paper
The HP Support Center can be found at
www.hp.com/go/DesignJetT1600/support.
By customizing your registration for the products you have purchased and your type of business, and by setting
your communication preferences, you decide the information you need.
Download printer software
Install the printer software from http://www.hp.com/go/DesignJetT1600/drivers. Be sure to follow the software
installation instructions.
HP Care Packs and Warranty Extensions
HP Care Packs and Warranty Extensions allow you to extend your printer's warranty beyond the standard period.
They include remote support. On-site service is also provided if necessary, with two alternative response-time
options:
● Next business day
● Same business day, within four hours (may not be available in all countries)
184 Chapter 19 HP Customer Care ENWW

There is an HP Installation service that unpacks, sets up, and connects the printer for you.
For more information on HP Care Packs, see http://cpc.ext.hp.com/portal/site/cpc.
Customer Self Repair
HP's Customer Self Repair program oers our customers the fastest service under either warranty or contract. It
enables HP to ship replacement parts directly to you (the end user) so that you can replace them. Using this
program, you can replace parts at your own convenience.
Convenient, easy to use
● An HP Support Specialist will diagnose and assess whether a replacement part is required to address a
defective hardware component.
● Replacement parts are express-shipped; most in-stock parts are shipped the very same day you contact
HP.
● Available for most HP products currently under warranty or contract.
● Available in most countries.
For more information about Customer Self Repair, see
http://www.hp.com/go/selfrepair.
Contact HP Support
HP Support is available to you by telephone. What to do before you call:
● Review the troubleshooting suggestions in this document.
● Review the relevant driver documentation.
● If you have installed third-party software drivers and RIPs, see their documentation.
● If you call your support representative, please have the following information available to help us answer
your questions more quickly:
– The product you are using (the product number and the serial number, found on the label at the back
of the product).
– If there is an error code on the front panel, note it down; see Front-panel error messages
on page 182.
– The computer you are using.
– Any special equipment or software you are using (for example, spoolers, networks, switch-boxes,
modems or special software drivers).
– The type of interface used on your product (USB or network).
– The software and driver name and version number that you are currently using.
– The Printer Service information, which you can get from the Embedded Web Server. In a Web browser,
enter the IP address of your printer to access the Embedded Web Server. Then click
Support > Service
support > Service information > Display. If you need to send the information by email, you can
download it as a le from your browser, and later send the le.
ENWW Customer Self Repair 185

NOTE: After you click Display, your browser may prevent the pop-up window from opening. In this
case, you have to nd the browser option that allows the window to open.
Alternatively, from your browser you can send the page directly: click File > Send > Page by email.
Telephone number
Your HP Support telephone number is available on the Web: see http://welcome.hp.com/country/us/en/
wwcontact_us.html.
186 Chapter 19 HP Customer Care ENWW


Functional specications
HP ink supplies
Printhead One printhead, with doubled nozzles for matte black
Ink cartridges Cartridges containing 130 ml of ink: gray, photo black, matte black, yellow, magenta, and
cyan
Cartridges containing 300 ml of ink: gray, photo black, matte black, yellow, magenta, and
cyan
Paper sizes
Minimum Maximum
Roll width 279 mm (11 in) 914 mm (36 in)
Roll length 91 m (300 ft)
Roll diameter 140 mm (5.51 in)**
Roll weight 11.9 kg (26.3 lb)
Sheet width 210 mm (8.26 in) 914 mm (36 in)
Sheet length 279 mm (11 in) 1676 mm (66 in)
Roll paper thickness 0.5 mm (19.7 mil)*
Sheet paper thickness 0.5 mm (19.7 mil)*
Paper weight 60 g/m² 328 g/m²
* up to 0.6 mm (23.6 mil) printed to the output stacking tray with manual mode.
** Roll core diameter of 51 mm (2 in). Paper with roll core diameter of 76 mm (3 in) can be used with the HP
DesignJet 3-in Spindle Adaptor Kit (see 3-in Spindle Adaptor Kit on page 142).
Printing resolutions
Print quality Maximum detail Graphic language
Rendering resolution
(ppi)
Printing resolution
(dpi)
Best (photo paper*) On HP PLC3GUI
PostScript/PDF
600 × 600 2400 × 1200
O any 600 × 600 1200 × 1200
Best (other papers) O any 600 × 600 1200 × 1200
Normal O HP PCL3GUI,
PostScript/PDF
600 x 600** 1200 × 1200
Fast (heavyweight coated, photo) O HP PCL3GUI,
PostScript/PDF
600 x 600** 1200 × 1200
188 Chapter 20 Printer specications ENWW

Printing resolutions (continued)
Print quality Maximum detail Graphic language
Rendering resolution
(ppi)
Printing resolution
(dpi)
Fast (plain, coated, natural tracing paper) O HP PCL3GUI,
PostScript/PDF
600 x 600** 600 × 1200
Economode O any 300 × 300 600 × 1200
* For a list of supported papers, see Order paper on page 138.
** Except Backlit papers ( 300 x 300 ppi).
Margins
Top, right and left margins 5 mm (0.2 in) (default) / 3 mm (0.1 in) (optional)
Bottom margin (trailing edge) 5 mm (0.2 in) (roll) (default) / 3 mm (0.1 in) (optional)
22 mm (0.87 in) (sheet)
Mechanical accuracy
±0.1% of the specied vector length or ±0.2 mm (whichever is greater) at 23°C (73°F), 50-60% relative humidity, on E/A0 printing material
in Best or Normal mode with HP Matte Film roll feed.
Graphic languages supported
HP DesignJet Languages
T1600 HP PCL3GUI, HP-GL/2 and HP RTL, CALS G4, TIFF, JPEG, URF
T1600 PS HP PCL3GUI, HP-GL/2 and HP RTL, CALS G4, TIFF, JPEG, URF, Adobe PDF 1.7, Adobe PostScript 3
ENWW Functional specications 189

Mobile printing specications
Mobile printing
Mobile printing Yes, directly from Android with HP Print Service Plugin
Mobile devices supported by
HP Mobile printing
Smartphones and tablets
Supported operating systems iOS, Android, Windows
OS Versions iOS from 7.0 and Android from 4.4, Windows any
Connectivity requirements Printer and mobile device must use the same network
Supported le formats PDF, JPEG
Email printing
Mobile devices supported Smartphones, tablets, PC
Supported operating systems Any, as long as it has email
Connectivity requirements Cloud connection
Cloud features Remote printing through email
Supported le formats PDF, JPEG, TIFF
Max le size 10 MB
Physical specications
Printer physical specications
HP DesignJet T1600 HP DesignJet T1600 dr
Weight 81 kg (179 lb) 85 kg (187 lb)
Width 1390 mm (54.7 in) 1390 mm (54.7 in)
Depth 920 mm (36.2 in) (stacker and basket open)
760 mm (29.9 in) (stacker and basket closed)
920 mm (36.2 in) (stacker and basket open)
760 mm (29.9 in) (stacker and basket closed)
Height 1080 mm (42.5 in) (stacker and front panel deployed)
950 mm (37.4 in) (stacker and front panel folded)
1080 mm (42.5 in) (stacker and front panel deployed)
950 mm (37.4 in) (stacker and front panel folded)
Memory specications
Memory specications
HP DesignJet Physical DRAM
Dedicated le-processing
memory Hard disk
T1600 Printer Series 4 GB 128 GB 500 GB encrypted
190 Chapter 20 Printer specications ENWW

Power specications
Printer power specications
Input voltage 100–240 V ac ±10%, auto-ranging
Frequency 50/60 Hz
Maximum current < 2 A
Power < 100 W
Environmental specications
Printer environmental specications
Operating temperature 5 to 35°C (41 to 95°F)
Recommended operating temperature 15 to 35°C (59 to 95°F), depending on paper type
Storage temperature –25 to 55°C (–13 to 131°F)
Recommended operating humidity 20 to 80% RH, depending on paper type
Storage humidity 0 to 95% RH
Acoustic specications
Declared noise emission levels for the HP DesignJet T1600 Printer Series. Sound pressure levels at bystander
positions and sound power levels measured per ISO 7779.
Printer acoustic specications
Operating sound pressure 42 dB(A) (plain paper, line drawing, normal mode)
Operating sound power ≤5.9 B(A) (plain paper, line drawing, normal mode)
Idle sound pressure 32 dB(A)
<17 dB(A) (sleep)
Idle sound power ≤4.9 B(A)
<3.5 B(A) (sleep)
ENWW Power specications 191

Glossary
AppleTalk
A suite of protocols that Apple Computer developed in 1984 for computer networking. Apple now recommends TCP/IP and
Bonjour networking instead. HP DesignJet products no longer support AppleTalk.
Bonjour
Apple Computer's trade name for its implementation of the IETF Zeroconf specication framework, a computer network
technology used in Apple's Mac OS X from version 10.2 onwards. It is used to discover services available on a local area
network. It was originally known as Rendezvous.
Color accuracy
The ability to print colors that match the original image as closely as possible, bearing in mind that all devices have a limited
color gamut and may not be physically capable of matching certain colors precisely.
Color consistency
The ability to print the same colors from a particular print job from print to print and from printer to printer.
Color model
A system of representing colors by numbers, such as RGB or CMYK.
Color space
A color model in which each color is represented by a specic set of numbers. Many dierent color spaces can use the same
color model: for instance, monitors generally use the RGB color model, but they have dierent color spaces, because a
particular set of RGB numbers results in dierent colors on dierent monitors.
Cutter
A printer component that slides back and forth across the platen to cut the paper.
ESD
ElectroStatic Discharge. Static electricity is common in daily life. It is the spark when touching the car door, or the cling of
clothing. Although controlled static electricity has some useful applications, uncontrolled electrostatic discharges are one of
the main hazards to electronic products. Therefore, to prevent damage some precautions are needed when setting up the
printer, or handling ESD sensitive devices. This type of damage may reduce the life expectancy of the device. One way to
minimize uncontrolled ESDs, and therefore reduce this type of damage is by touching any exposed grounded part of the
printer (mainly metal parts) before handling ESD sensitive devices (such as the printheads or ink cartridges). Additionally, to
reduce the generation of electrostatic charge in your body try to avoid working in a carpeted area, and keep your body
movements to a minimum when handling ESD sensitive devices. Also, avoid working in low humidity environments.
Ethernet
A popular computer networking technology for local area networks.
Firmware
Software that controls your printer's functionality and is stored semi-permanently in the printer (it can be updated).
Gamut
The range of colors and density values reproducible on an output device, such as a printer or monitor.
192 Glossary ENWW

Gigabit Ethernet
An Ethernet network capable of transferring data at up to 1,000,000,000 bits/second. Gigabit Ethernet interfaces are
capable of negotiating slower speeds when required for compatibility with older Ethernet devices.
HP-GL/2
HP Graphics Language 2: a language dened by HP to describe vector graphics.
HP RTL
HP Raster Transfer Language: a language dened by HP to describe raster (bitmap) graphics.
I/O
Input/Output: this term describes the passing of data between one device and another.
ICC
The International Color Consortium, a group of companies that have agreed on a common standard for color proles.
Ink cartridge
A removable printer component that stores ink of a particular color and provides it to the printhead.
IP address
May mean an IPv4 address (most likely) or an IPv6 address.
IPSec
A sophisticated mechanism for providing network security by authenticating and encrypting IP packets sent between nodes
on a network. Each network node (computer or device) has an IPSec conguration. Applications are usually unaware
whether IPSec is being used or not.
IPv4 address
A unique identier that identies a particular node on an IPv4 network. An IPv4 address consists of four integers separated
by full stops. Most networks in the world use IPv4 addresses.
IPv6 address
A unique identier that identies a particular node on an IPv6 network. An IPv6 address consists of up to 8 groups of
hexadecimal digits separated by colons. Each groups contains up to 4 hexadecimal digits. Only a few new networks in the
world use IPv6 addresses.
Jetdirect
HP's brand name for its series of print servers that allow a printer to be connected directly to a local area network.
LED
Light-Emitting Diode: a semiconductor device that emits light when electrically stimulated.
MAC address
Media Access Control address: a unique identier used to identify a particular device on a network. It is a lower-level
identier than the IP address. Thus, a device may have both a MAC address and an IP address.
Network
A network is a set of connections that pass data between computers and devices. Every device is able to communicate with
every other device in the same network. This allows data to be moved between computers and devices, and allows devices
such as printers to be shared between many computers.
Nozzle
One of many tiny holes in a printhead through which ink is deposited onto the paper.
Paper
A thin, at material made to be written or printed on; most commonly made from bers of some kind which are pulped,
dried and pressed.
ENWW Glossary 193

Platen
The at surface within the printer over which the paper passes while it is being printed on.
Printer driver
Software that converts a print job in a generalized format into data suitable for a particular printer.
Printhead
A removable printer component that takes ink of one or more colors from the corresponding ink cartridge(s) and deposits it
on the paper, through a cluster of nozzles. In your printer, each printhead prints two dierent colors.
Spindle
A rod that supports a roll of paper while it is being used for printing.
TCP/IP
Transmission Control Protocol/Internet Protocol: the communications protocols on which the Internet is based.
USB
Universal Serial Bus: a standard serial bus designed to connect devices to computers.
USB host port
A rectangular USB socket such as those on found on computers. A printer can control USB devices that are connected to
such a port. Your printer has two USB host ports, which it uses to control accessories and USB ash drives.
194 Glossary ENWW

Index
A
access control 25
accessories
order 141
account ID
requiring 27
accounting 115
acoustic specications 191
Acrobat Pro, print 99
Acrobat Reader, print 97
Acrobat, print 94
Acrobat, print multipage 95
alerts
errors 181
warnings 181
AutoCAD, print presentation 107
AutoCAD, print project 104
B
banding problems 154
basket 44
output problems 153
black and white 91
blurred lines 168
C
calibration
color 88
cannot load paper 144
caution 5
clean the platen 161
clean the printer 133
clipped at bottom 164
clipped image 164
color
advantages 88
calibration 88
CMYK 88
inaccurate 163
prole 88
RGB 88
spaces 91
color management
from front panel 92
from printer drivers 90
options 90
process 88
components of printer 6
computer communication
printer/computer communications
issues 58, 179
congure
HP ePrint connectivity 17
connect the printer
general 14
cost assignment 119
crop lines 70
Customer Care 184
Customer Self Repair 185
cutter
on/o 47
D
delayed printing 59
demo prints 13
DHCP settings 53
dim mode 10
disk wipe 136
DNS settings 53
draft printing 69
driver preferences 28
drivers 27
drying time
change 46
E
economize
on ink 73
on paper 70
Email printing 190
email printing
enable hp eprint 16
HP ePrint job policies 17
Embedded Web Server 13
accessibilty 29
cannot access 58, 179
cost assignment 119
job queue 83
usage per job 117
usage statistics 115
environmental specications 191
erase les securely 135
error messages
front panel 182
log 182
F
le erase, secure 135
le system check 180
rewall status 55
rmware update 134
manual setup 17
front panel 9
accessibility 29
job queue 79
language 11
front panel option
align printheads 175
auto-o due to inactivity 11
clean printhead 175
display brightness 11
drying time 46
Embedded Web Server 58
enable 46
ENWW Index 195

form feed and cut 47
horizontal cutter 47
language 11
move paper 46
printer sleep 11
printhead information 124
printing & management 58
replace 121, 125
speaker volume 11
unit selection 11
unload paper 39
front panel will not start 178
front view 6
front-panel option
account ID required 27
adjust paper advance 154
black point compensation 92
calibrate paper advance 154
CMYK source prole 92
color calibration 89
Embedded Web Server 179
enable crop lines 70
enable economode 69
enable maximum detail 70
I/O timeout 164
margins layout 67
merge 68
nest options 73
PANTONE emulation 92
paper size 65
print diagnostic image 169
print in color 92
print in grayscale 92
print quality 65
protected paper types 73
pure black and white 92
rendering intent 92
reset calibration 155
resize 68
RGB source prole 92
select graphics language 28
select paper type 145, 146
front-panel options
date and time options 11
rmware update 11
language 11
restore factory settings 11
functional specications 188
G
graininess 159
graphic languages 189
gray shades 91
H
hard disk specication 190
HP Care Packs 184
HP Customer Care 184
HP DesignJet Utility
access 12
hp eprint
enable 16
HP ePrint connectivity
congure 17
HP ePrint policies
printing 17
HP Print Preview 12
HP Support 185
HP Support Center 184
HP Utility
access 12
cannot access 58
I
image diagnostics print 169
image problems
clipped at bottom 164
clipped image 164
missing objects 165
import paper preset 45
ink
economical use of 73
usage 117
ink cartridge
about 121
cannot insert 174
insert 122
maintenance 133
order 138
remove 121
specication 188
status 121
status messages 174
Internet connection
troubleshooting 180
IP address 53
IPSEC status 55
IPV6 settings 54
J
job deletion 83
job details 81
job queue
Embedded Web Server 83
front panel 79
job queue actions 80
job queue options 82
job, when to print 81
L
labels, warning 5
language 11
line length accuracy 168
line thickness 166
link speed 55
load paper
cannot load 144
general advice 32
paper not in driver 145
roll cannot load 144
roll into printer 35
roll onto spindle 33
sheet 39
sheet cannot load 144
loading paper problems 144
M
maintenance kits 135
margins 67
specication 189
mechanical accuracy 189
memory specications 190
Microsoft Oce, print 111
misaligned colors 167
Mobile printing 190
print 75
mobile printing specications 190
Mobile specications 77
move the printer 133
multiroll printer 48
N
nesting 71
turn on and o 72
network
connect mac 15
network folder
cannot access 180
network troubleshooting 56
networking 51
196 Index ENWW

networks
link speed 55
protocols 53
security settings 54
O
on hold for paper 146
enable/disable 147
order
accessories 141
ink cartridges 138
paper 138
printhead 138
overlapping lines 68
overnight printing 73
P
page size 65
PANTONE emulation 91
paper
advance 47
calibrate the paper advance 154
cannot load 144
clean cut 47
cut after printing 153
displaying information 45
download presets 44, 45
economical use of 70
incorrect out of paper 153
jam due to cut strip 153
jam in platen 147
jam in stacker 152
loading error messages 145
maintenance 46
movement 46
not cut well 153
not at 160
output problems in basket 153
paper not in driver 145
presets 44
print on loaded paper 68, 146
printed on wrong paper 146
retained by printer 153
roll loose on spindle 153
select type 68
size 65
sizes (max and min) 188
stacker unexpectedly full 152
usage 117
view information 44
paper mismatch 82
paper not in driver 145
paper types 138
pause the queue 80
Photoshop, print 103
Photoshop, print presentation 110
physical specications 190
platen cleaning 161
PostScript upgrade 142
power
on/o 7
power specications 191
preferences, Windows driver 28
preview a print 69
print from
printer driver 63
USB ash drive 61
print from mobile 75
print job
nesting 71
print next 81
print preview 69
print quality
select 64
print-quality problems
banding 158
black ink comes o 162
black lines on yellow 161
blurred lines 168
bottom of print 162
discontinuous lines 167
edges darker than expected 162
edges stepped or not sharp 162
general 158
graininess 159
horizontal lines 158
inaccurate line lengths 168
ink marks 161
line thickness 166
misaligned colors 167
paper not at 160
scratching 160
scung 160
stepped lines 166
vertical lines of dierent colors
163
white spots 163
printer
can't access network folder 180
printer characteristics 2
printer does not print 178
printer models 2
printer services
congure 15
printer software
Windows installation 15
Windows uninstallation 15
printer software, download 184
printer status 133
printer will not start 178
printer's main components 6
printhead
about 124
align 175
cannot insert 174
clean; purge 175
insert 128
order 138
remove 125
replace, reseat 174
specication 188
status 124
status messages 176
printhead cleaner
specication 188
printing 60
printing preferences
default 83
printing resolutions 188
protect a paper type T1600dr only
73
protocols, network 53
Proxy Server settings 54
Q
quality, high 70
R
rear view 7
reprint job 81
rescale a print 68
roll paper
load 35
spindle load 33
unload 38
roll policies 81
S
safe mode 131
safety labels 5
safety precautions 3
ENWW Index 197

scale a print 68
scratched prints 160
scued prints 160
secure le erase 135
security 25
network settings 54
sheet paper
load 39
sleep mode 11
slow printing 179
software update 135
software, download 184
specications
acoustic 191
email printing 190
environmental 191
functional 188
graphic languages 189
hard disk 190
ink supplies 188
margins 189
mechanical accuracy 189
memory 190
mobile 190
mobile printing 190
paper size 188
physical 190
power 191
printing resolutions 188
spindle 142
roll load 33
spindle adaptor kit 142
stacker 42
statistics
cost assignment 119
ink cartridge 121
usage 115
usage per job 117
stepped lines 166
store the printer 133
support services
HP Care Packs 184
HP Customer Care 184
HP Support 185
HP Support Center 184
printer software 184
warranty extensions 184
T
TCP/IP settings 53
telephone number 186
two rolls 48
U
unattended printing 73
unload paper
roll 38
W
warning 5
warning labels 5
warranty extensions 184
Web Services
troubleshooting 180
198 Index ENWW
