PB
1
blackanddeckerappliances
2-in-1 Iron & Steamer
Plancha y Vaporizador 2 en 1
use and care manual
manual de uso y cuidado
HGS500
2
3

2
3
IMPORTANT SAFETY INSTRUCTIONS
When using your iron/steamer, basic safety precautions should always be followed, including the following:
• READ ALL INSTRUCTIONS BEFORE USING.
• Use iron/steamer only for intended use.
• To reduce the risk of contact with hot water emitting from steam
vents, check appliance before each use by holding it away from body
and operating steam button.
• To protect against risk of electric shock, do not immerse the iron/
steamer in water or other liquids.
• Always turn the iron/steamer OFF before plugging or unplugging the
iron from the electrical outlet.
• Never yank cord to disconnect from the outlet; instead grasp plug and
pull to disconnect.
• Keep the cord away from the heated surfaces. Do not wrap the cord
around the appliance. Let the iron/steamer cool completely before
putting the iron/steamer away.
• Always disconnect iron/steamer from electric outlet before filling with
water, cleaning, or emptying and when not in use.
• Do not operate the iron/steamer if it has been dropped, if there
are visible signs of damage to the iron/steamer or its cord, or if it’s
leaking. To avoid the risk of electric shock, do not dissemble the iron/
steamer; take it to a qualified service person for examination and
repair, or call the appropriate toll-free number on the cover of this
manual. Incorrect reassembly can cause risk of electric shock when
the iron/steamer is used.
• Close supervision is necessary for any appliance being used by or near
children. Do not leave iron/steamer unattended when plugged in or on
an ironing board.
• Burns can occur from touching hot metal parts, hot water, or steam.
Use caution when you turn a steam iron/steamer upside down—there
might be hot water in the reservoir. Avoid rapid movement of iron/
steamer to minimize hot water spillage.
• This appliance is not intended for use by persons (including children)
with reduced physical, sensory, or mental capabilities, or lack of
experience and knowledge, unless they have been given supervision
or instruction concerning use of the appliances by a person
responsible for their safety.
• Children should be supervised to ensure that they do not play with the
appliance.
• The iron/steamer must be used and rested on a stable surface.
• When standing the iron/steamer on its heel, ensure that the surface on
which the iron/steamer is placed is stable.
SPECIAL INSTRUCTIONS
• To avoid circuit overload, do not operate another high wattage
appliance on the same circuit.
• If an extension cord is absolutely necessary, a 15-ampere cord should
be used. Cords rated for less amperage can result in a risk of fire or
electrical shock due to overheating. Care should be taken to arrange
the cord so that it cannot be pulled or tripped over.
SAVE THESE INSTRUCTIONS.
This product is for household use only.

4
5
POLARIZED PLUG
This appliance has a polarized plug (one blade is wider than the
other). To reduce the risk of electric shock, this plug is intended to fit
into a polarized outlet only one way. If the plug does not fit fully into
the outlet, reverse the plug. If it still does not fit, contact a qualified
electrician. Do not attempt to modify the plug in any way.
TAMPER-RESISTANT SCREW
Warning: This appliance is equipped with a tamper-resistant screw
to prevent removal of the outer cover. To reduce the risk of fire or
electrical shock, do not attempt to remove the outer cover. There are no
user-serviceable parts inside. Repair should be done only by authorized
service personnel.
Note: If the supply cord is damaged, it must be replaced by the
manufacturer, its service agent or similarly qualified persons in order to
avoid a hazard. Please contact the Customer Care line listed below.
Customer Care Line: 1-800-465-6070
For online customer service:
www.prodprotect.com/blackanddecker
4
5
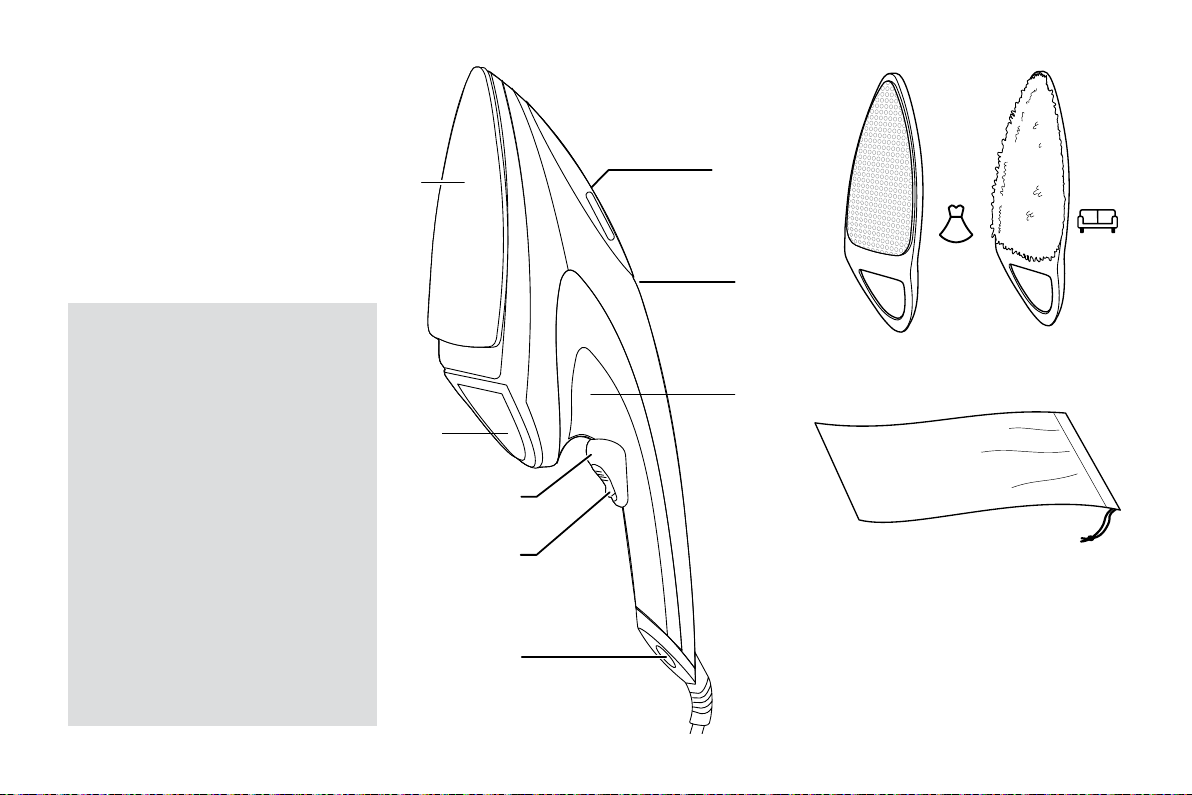
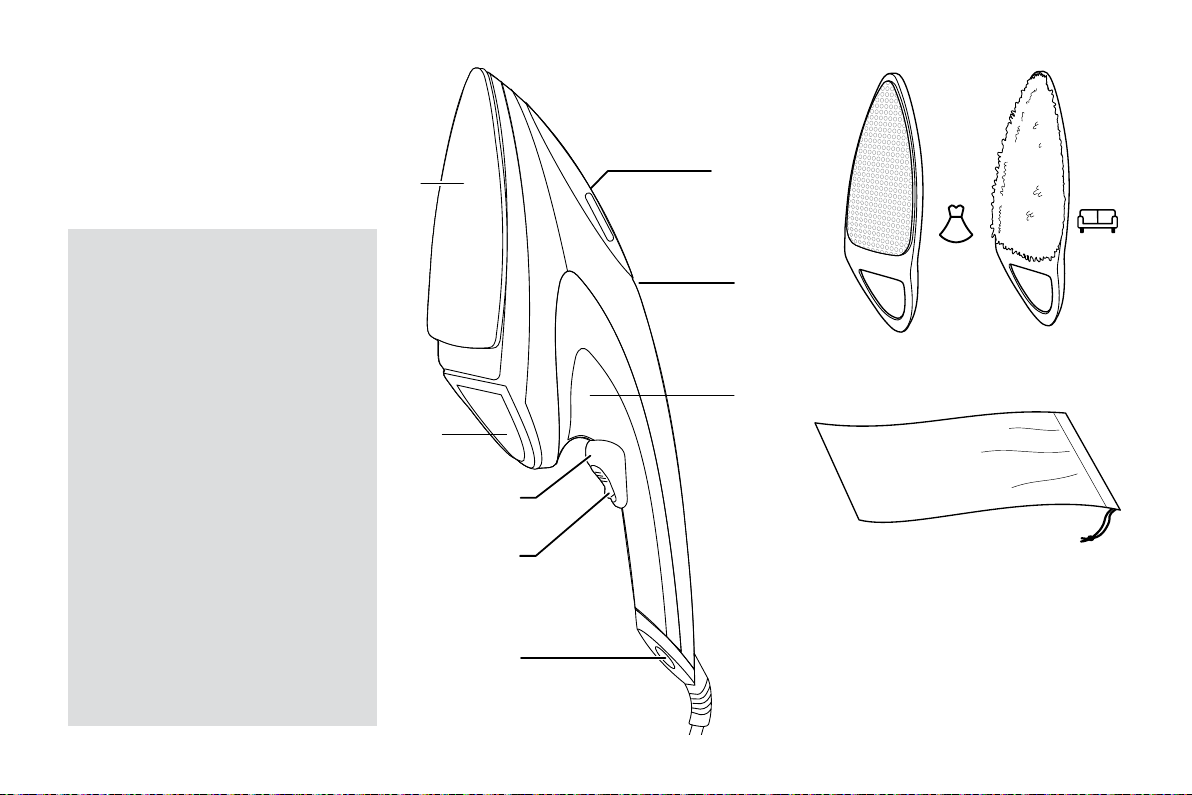
Product may vary slightly from what is illustrated.
1. Ceramic soleplate
2. Steam trigger lock
3. Steam trigger
4. Water inlet
5. Water tank
6. Power light
7. Power button
8. Heel rest
† 9. Delicate fabric attachment
† 10. Upholstery attachment
† 11. Heat resistant bag
Note: † indicates consumer
replaceable/removable parts.
11
9
10
GETTING TO KNOW YOUR
2-IN-1 IRON & STEAMER
1
4
5
6
3
2
7
8
6
7
HOW TO USE
This product is for household use only.
GETTING STARTED
• Remove all labels, tags and stickers attached to the
body, cord, or soleplate of the iron/steamer and the
plastic band around the power plug.
• Remove and save literature.
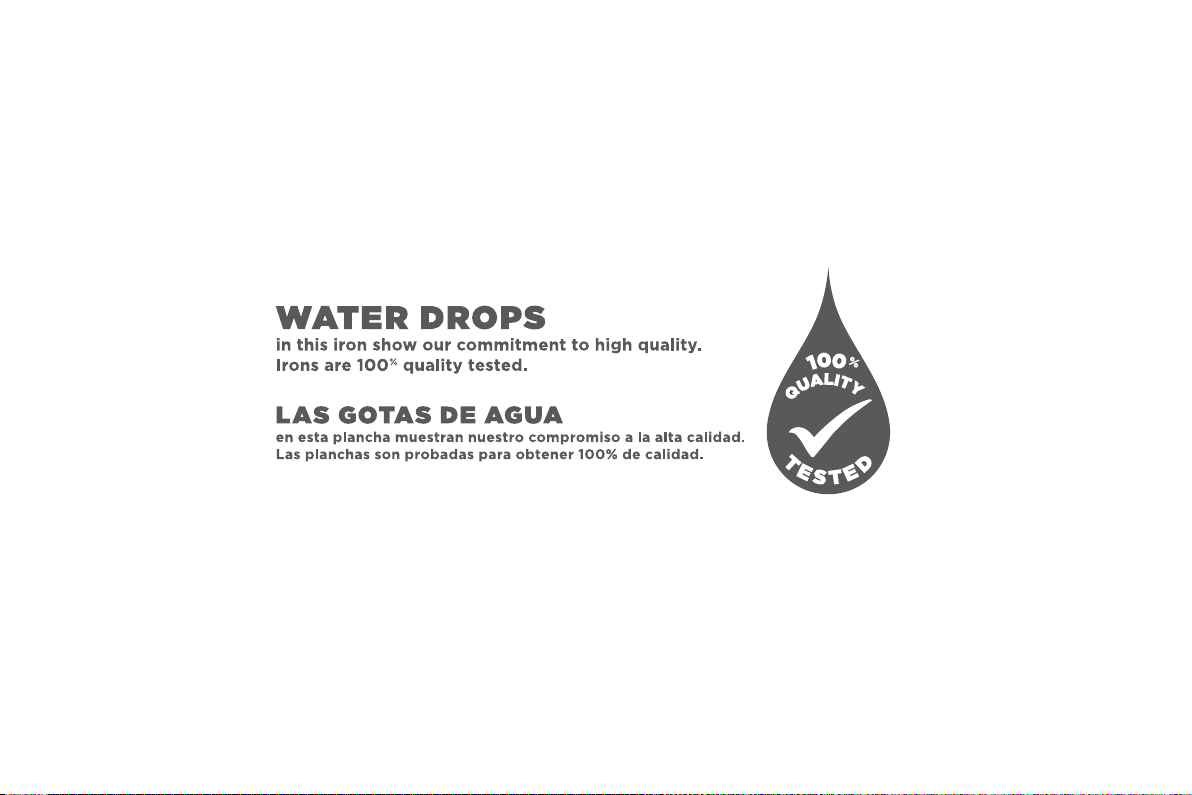
• Please note that water droplets may still be visible
in the tank at the time of purchase. This is from the
individual quality tests done to ensure that every
iron/steamer meets our high standards for product
performance.
IMPORTANT INFORMATION
• For best performance, we recommend using distilled,
purified or filtered water in your steamer. Tap water
contains minerals that can build up inside your iron/
steamer over time and reduce its efficiency or even
cause damage.
• Never use perfumes, oils or other additives.
• Always check the garment’s care label before
steaming, and always test fabrics for colorfastness
in an inconspicuous area. Steamers are not
recommended for use on leather, suede, vinyl, plastic,
or other materials that are sensitive to steam.
• During use the iron/steamer and accessories will
become HOT. Never try to fit or remove attachments
while still hot.
• After preheating, prime the water pump by holding
the steam trigger until steam forms.
• It is normal to feel or hear the water pump inside the
device. It may become louder when the water level
in the tank is low. Check and refill the tank when
required.
• Small amounts of dripping might occur during use. If
excessive, your iron/steamer needs time to get back
up to full temperature. Just allow the iron/steamer a
minute to reheat.
• Wearing clothes immediately after ironing or steaming
can actually create wrinkles. Always allow the clothing
to cool for about 5 minutes before wearing.
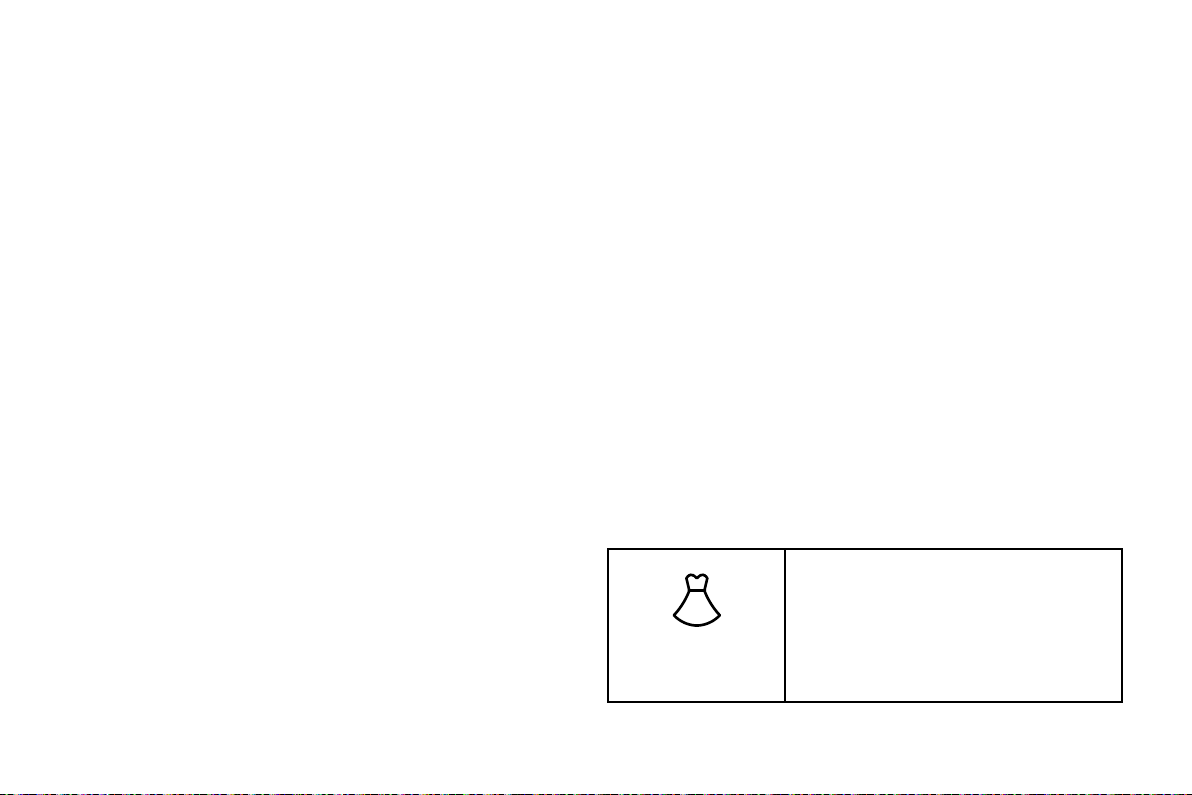
ATTACHMENTS
Your iron/steamer has two attachments. Each attachment
is marked with an icon.
Delicate fabric
attachment
Reduces the possibility of damage to
fabrics such as silk and lace.
Tip: For items with printing/
embellishment, turn the garment
inside out to avoid damage to
sensitive areas.
6
7
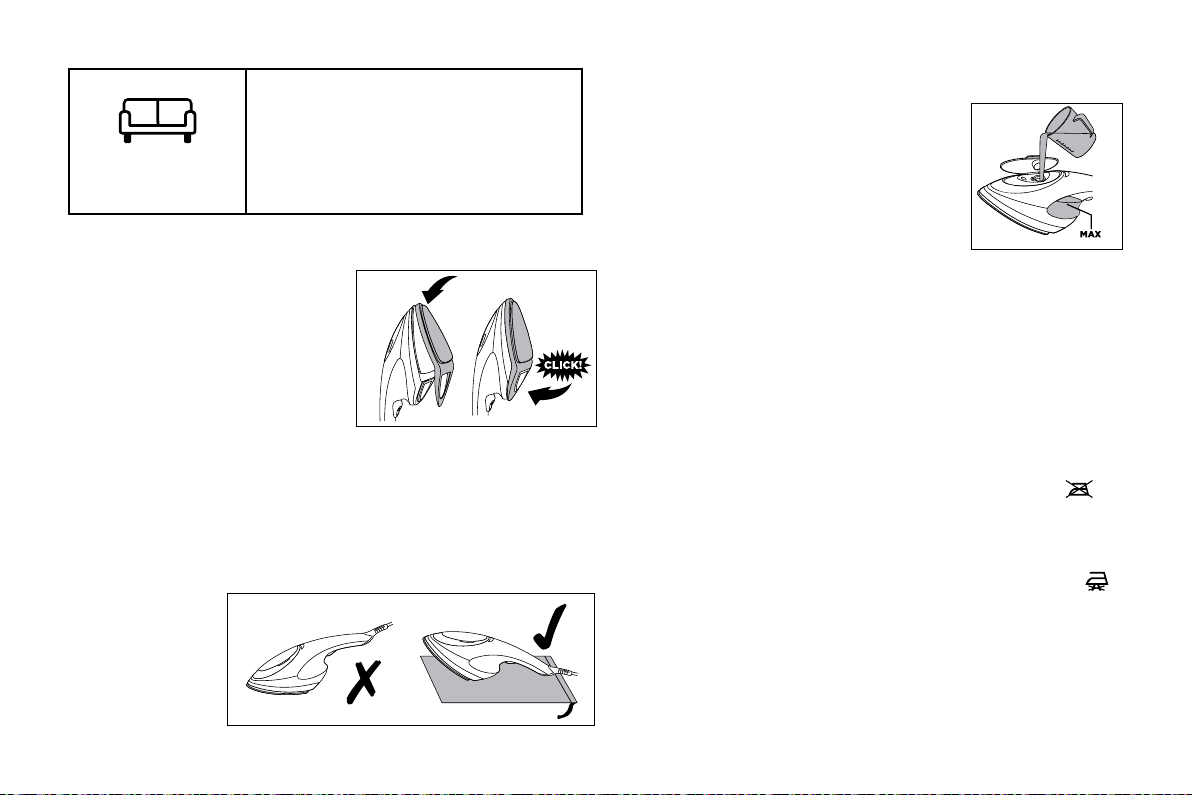
Upholstery
attachment
Refresh and clean larger materials
such as bedding, mattresses,
curtains, soft toys, sofas and much
more.
Always test for colorfastness and heat
sensitivity on an inconspicuous area.
ATTACHING/REMOVING (FIG. A)
1. Make sure that the iron/
steamer and attachment
are cool.
2. Hook the top of the
attachment over the top
edge of the steamer.
3. Click the bottom edge into
place.
4. Remove attachments by lifting them away from your
iron/steamer starting at the heel. When removing the
attachment, watch out for condensation that may
have built up during use.
FILLING
1. Place the
iron/steamer
as shown
(Fig. B). You
can also
place your
iron/steamer on the heat resistant storage bag.
2. Open the water inlet cover (Fig. C).
3. Pour slowly, to let the air in the
reservoir escape, otherwise you’ll
cause an air lock and the water will
overflow.
4. Don’t fill past the max marking or
water will escape in use.
5. To refill at any time during use, turn the iron/steamer
off by pressing the power button until the blue
indicator light goes out, unplug from outlet, and
follow the above procedure.
6. After refilling, allow to reheat for 45 seconds and then
prime the pump by holding the steam trigger until
steam forms.
USING
1. If the label says “do not iron” or shows this icon ,
install the delicate attachment and make sure to test
on an inconspicuous area prior to steaming the entire
garment.
2. If the label says “do not steam” or shows this icon
,
do not steam the garment.
3. Hang the garment in an area that will not be
affected or damaged by the heat and steam, such
as on a shower curtain rail, or in an open doorway.
Alternatively, place the garment on a bed or towel.
A
C
B
8
9
You can use the heat resistant bag between the towel/
bed and garment if required.
4. Install any attachment you wish to use. (optional)
5. Plug the iron/steamer in then press the power button.
The blue power light will turn on.
6. After 45 seconds, the iron/steamer is ready for use and
the power light will go off. Please note that the light will
come on repeatedly during use when the appliance is
heating.
7. Prime the water pump by holding steam trigger until
steam forms.
8. To generate steam, press the steam trigger. As long as
the trigger is held, steam will emit from the steamer.
When the trigger is released, the steam will stop.
9. To generate a constant flow of steam without holding the
trigger, press the steam trigger and then slide the steam
trigger lock downwards. You
can then release pressure on
the steam trigger. To turn the
steam off, press the trigger, slide
the steam trigger lock upwards,
then release the trigger.
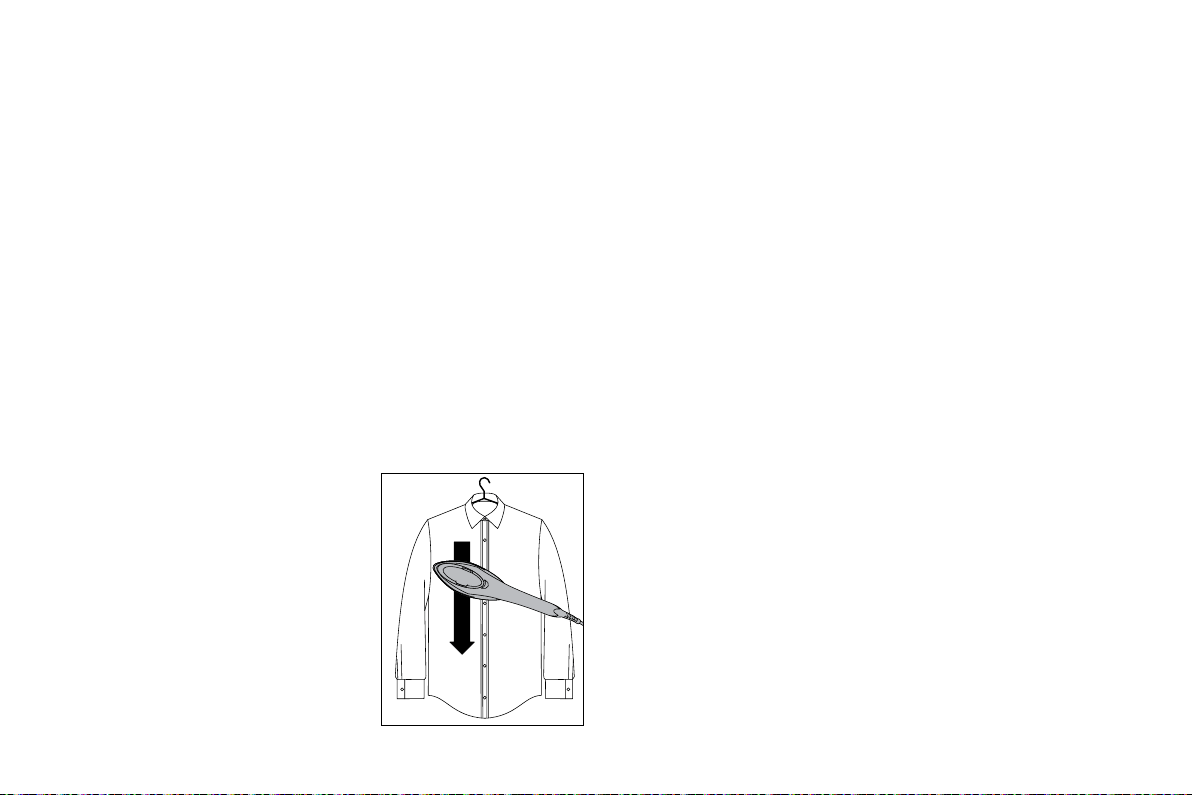
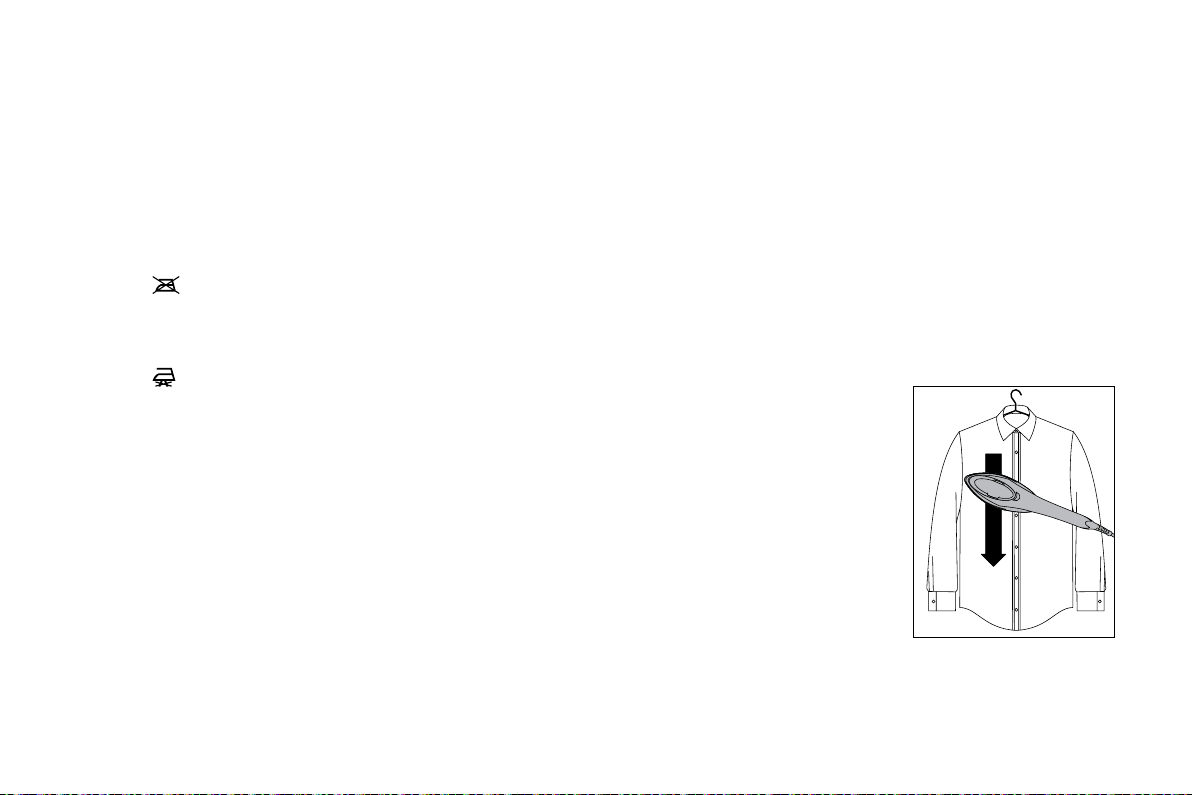
10. With your free hand keep the
fabric taut. Steam the garment
with slow, downward strokes,
keeping the head of the iron/
steamer in contact with the
fabric (Fig. D).
11. When you have finished, press and hold the power
button until the blue light goes out (about 3 seconds)
and unplug.
12. After ironing or between garments, set your iron/
steamer down with the handle resting on a flat, stable
surface. You can use the heat resistant bag to rest
your iron/steamer on (Fig. B).
FABRIC SOFTENING INFUSED SOLEPLATE
Your iron/steamer features a ceramic heated plate that
helps smooth out wrinkles and creases on the areas of
garments that are more difficult to reach with steam
alone. The fabric softening infused ceramic sole plate
helps condition fabrics to defend against wrinkles and
reduce static. The temperature of the plate is safe for all
ironable fabrics.
To press garments (collars, cuffs, etc.) place it on a flat,
heat resistant surface. Keep the plate in contact with the
garment. Use steam as required. You can use the heat-
resistant bag to iron on (Fig E).
Important: Always make sure that the surface you use to
iron on will not be affected or damaged by heat or steam!
D

8
9
CARE AND MAINTENANCE
This product contains no user serviceable parts. Refer to
service qualified service personnel.
1. Make sure iron/steamer is off, unplugged and
completely cool.
2. Wipe all surfaces with a clean damp cloth.
3. After the iron/steamer has been thoroughly dried,
turn it back on and lightly steam over an old cloth.
This will help remove any residue left in the steam
holes.
4. To avoid mineral buildup, empty the tank after each
use.
CLEANING ATTACHMENTS
• Delicate fabric attachment: Wash with cold water and
small amounts of a gentle cleanser if needed. The
fabric cannot be removed.
• Upholstery attachment: The fabric can be removed
and hand washed with cold water and a gentle
cleanser.
STORAGE
Unplug the iron/steamer whenever it is not in use. Allow
it to cool, then store it out of reach of children in a safe,
dry location. Never wrap the cord around the appliance.
This will cause the cord to wear prematurely and break,
thus voiding the warranty. Handle the cord carefully and
avoid jerking, twisting, or straining it, especially at plug
connections.

10
11
TROUBLESHOOTING
PROBLEM POSSIBLE CAUSE SOLUTION
Not enough steam or no
steam is coming out of the
steamer.
The iron/steamer is not heated to full
temperature.
Always allow iron/steamer to preheat at
least 45 seconds, or until the power button
light stops flashing.
There is not enough water in the water tank. Fill the water tank.
The water pump hasn’t been primed. If unit
still will not steam, move the unit around or
shake to assist with priming.
After preheating, always prime the water
pump by holding the steam trigger until
steam forms.
Discolored water is
coming through the holes
and staining the fabric.
Residue has built up in the water tank. Empty the water tank after each use. Only
use distilled, filtered, or purified water.
Perfumed or scented additives were used. Never use perfumed or scented additives.
Iron/steamer is leaking or
spitting.
Iron/steamer is not hot enough. Allow the iron/steamer to heat for about 45
seconds.
Water tank is running low. Fill the water tank.

10
11
INSTRUCCIONES IMPORTANTES DE SEGURIDAD
Cuando utilice su plancha/vaporizador, siempre debe seguir precauciones básicas de seguridad, incluyendo las siguientes:
• LEA TODAS LAS INSTRUCCIONES ANTES DE UTILIZAR EL PRODUCTO.
• Use la plancha/vaporizador solamente con el fin para el que ha sido
diseñado.
• Para reducir el riesgo de contacto con el agua caliente emitida por las
rejillas de vapor, revise el aparato antes de cada uso manteniéndolo
alejado del cuerpo y accionando el botón de vapor.
• Para protegerse contra una descarga eléctrica, no sumerja la plancha/
vaporizador en agua ni en ningún otro líquido.
• Siempre apague la plancha / vaporizador antes de enchufar o
desenchufar la plancha del tomacorriente.
• Nunca le dé un tirón al cable para desconectarlo del tomacorriente;
en cambio, sujete firmemente el enchufe y tire del mismo para
desconectarlo.
• Mantenga el cable alejado de las superficies calientes. No enrolle el
cable alrededor del aparato. Espere a que la plancha/vaporizador se
enfríe completamente antes de guardarlo.
• Siempre desconecte la plancha/vaporizador del tomacorriente antes
de llenar con agua, limpiar o vaciar y cuando no esté en uso.
• No opere la plancha/vaporizador si se ha dejado caer o se ha
dañado el cable, si hay señales visibles de daños ocasionados a la
plancha/vaporizador o su cable, o si está goteando. Para evitar una
descarga eléctrica, no desarme la plancha; llévela a una persona de
servicio calificada para su revisión y reparación o llame al número
gratis que aparece en la primera página de este manual. El armar
incorrectamente podría ocasionar una descarga eléctrica cuando se
use la plancha/vaporizador.
• Se requiere supervisión para cualquier aparato utilizado por o cerca de
los niños. No deje la plancha/vaporizador desatendido cuando esté
enchufado o sobre una tabla de planchar.
• Pueden ocurrir quemaduras al tocar las partes metálicas calientes,
el agua caliente o el vapor. Use precaución cuando voltee una
plancha/vaporizador—puede haber agua caliente en el tanque. Evite
el movimiento rápido de la plancha/vaporizador para reducir los
derrames de agua caliente.
• Este aparato no está diseñado para ser usado por personas (incluído
niños) con capacidad limitada física, mental o sensoriales disminuidas
y falta de experiencia o conocimiento que les impida utilizar el aparato
con toda seguridad sin supervisión o instrucción.
• Se debe asegurar la supervisión de los niños para evitar que usen el
aparato como juguete.
• La plancha/vaporizador debe usarse y descansar sobre una superficie
estable.
• Cuando coloque la plancha/vaporizador sobre su talón de descanso,
asegúrese de que la superficie sobre la cual está colocado sea estable.
INSTRUCCIONES ESPECIALES
• Para evitar sobrecargas, no opere ningún otro aparato de alto
consumo de orriente en el mismo circuito.
• Para evitar sobrecargas, no opere ningún otro aparato de alto
consumo de corriente en el mismo circuito. Si el uso de un cable de
extensión es absolutamente necesario, se deberá utilizar uno de 15
amperios. Los cables de menor amperaje se pueden sobrecalentar. Se
debe tener cuidado de acomodar el cable de manera que nadie lo hale
ni se tropiece.
CONSERVE ESTAS INSTRUCCIONES.
Este aparato eléctrico es para uso doméstico solamente.

12
13
ENCHUFE POLARIZADO
Este aparato cuenta con un enchufe polarizado (un contacto es más
ancho que el otro). A fin de reducir el riesgo de un choque eléctrico,
este enchufe encaja en una toma de corriente polarizada en un solo
sentido. Si el enchufe no entra en la toma de corriente, inviértalo y si aun
así no encaja, consulte con un electricista. Por favor no trate de alterar
esta medida de seguridad.
TORNILLO DE SEGURIDAD
Advertencia: Este aparato cuenta con un tornillo de seguridad para
evitar la remoción de la cubierta exterior del mismo. A fin de reducir el
riesgo de incendio o de choque eléctrico, por favor no trate de remover
la cubierta exterior. Este producto no contiene piezas reparables por
el consumidor. Toda reparación se debe llevar a cabo únicamente por
personal de servicio autorizado.
Nota: Si el cable de alimentación está dañado, debe ser reemplazado
por el fabricante, su agente de servicio o personas calificadas de
manera similar para evitar un peligro. Comuníquese con la línea de
atención al cliente que se indica a continuación.
Línea de Atención del Cliente: 1-800-465-6070
Para servicio al cliente en línea:
www.prodprotect.com/blackanddecker
12
13
El producto puede variar ligeramente del que
aparece ilustrado.
CONOZCA SU
PLANCHA Y
VAPORIZADOR 2 EN 1
1. Suela de cerámica
2. Seguro para gatillo de
vapor
3. Gatillo de vapor
4. Orificio de agua
5. Tanque de agua
6. Luz indicadora de
encendido
7. Botón de encendido
8. Descanso del talón
† 9. Accesorio para tejidos
delicados
† 10. Accesorio para tapicería
† 11. Bolsa resistente al calor
Nota: † indica piezas
reemplazables / removibles
por el consumidor.
11
9
10
1
4
5
6
3
2
7
8

14
15
COMO USAR
Este product es solamente para uso doméstico.
PRIMEROS PASOS
• Quite todas las etiquetas, rótulos y adhesivos
adheridos al cuerpo, el cable o la suela de la
plancha / vaporizador y la banda de plástico
alrededor del enchufe de alimentación.
• Retire y conserve la literatura.
• Tenga en cuenta que todavía pueden estar visibles
gota de agua en el taque cuando compra aparato.
Este se debe a las pruebas de calidad realizadas para
asegurar que la plancha/vaporizador cumpla con
nuestros altos estándares para el desempeño del
producto.
INFORMACIÓN IMPORTANTE
• Para óptimo rendimiento, se recomienda utilizar
agua destilada, purificada o filtrada en su plancha/
vaporizador. El agua de llave contiene minerales
que se pueden acumular dentro de su plancha/
vaporizador con el transcurso del tiempo y reducir su
eficiencia o hasta causar daño.
• Nunca use perfumes, aceites ni otros aditivos.
• Siempre revise las instrucciones indicadas en la
etiqueta del fabricante para el cuidado de la prenda
antes de aplicar vapor y siempre haga una prueba
de los tejidos para el nivel de desteñido un área no
visible. No es recomendado utilizar los vaporizadores
en piel, gamuza, vinil, plástico ni ningún otro tejido
que pueda ser sensible al vapor.
• El vaporizador y sus accesorios SE CALENTARÁN
durante su uso. Evite instalar o retirar los accesorios
mientras estén calientes.
• Después del precalentamiento, prepare la bomba de
agua sosteniendo el gatillo de vapor hasta que se
forme el vapor.
• Es normal sentir o escuchar la bomba de agua dentro
del mango. Esta podría tornarse más ruidosa cuando
el nivel de agua en el tanque está bajo. Revise el
tanque y llénelo según sea necesario.
• Pequeñas cantidades de goteo podrían ocurrir
durante el uso. Si es excesivo, su plancha/vaporizador
necesita tiempo para alcanzar de nuevo el nivel de
temperatura completo. Solo permítale un minuto a la
plancha/vaporizador para se vuelva a calentar.
• Vestirse inmediatamente después de planchar o
aplicar vapor, puede crear arrugas. Siempre permita
que la ropa se enfríe por aproximadamente 5 minutos
antes de usarla

14
15
ACCESORIOS
Su plancha/vaporizador cuenta con dos accesorios. Cada
accesorio está marcado con un icono.
Accesorio para
tejidos delicados
Reduce la posibilidad de ocasionar
daño a tejidos tales como la seda y el
encaje.
Consejo: Para artículos de prendas
con estampados/adornos, coloque
la prenda con el tejido al revés para
evitar daños en áreas sensibles.
Accesorio para
tapicería
Refresca y limpia artículos más
grandes tales como ropa de cama,
colchones, cortinas, juguetes de felpa,
sofás y mucho más.
Siempre haga una prueba de
desteñido .
CÓMO INSTALAR/RETIRAR
LOS ACCESORIOS (IL. A)
1. Asegúrese de que la
plancha/vaporizador y el
accesorio estén fríos.
2. Enganche la parte superior
del accesorio sobre
el borde superior del
vaporizador.
3. Encaje le borde inferior en su lugar.
4. Retire los accesorios levantándolos fuera de su
plancha/vaporizador, comenzando en el talón.
Cuando retire los accesorios, tenga cuidado con la
condensación que pueda haberse acumulado durante
el uso
LLENADO DEL TANQUE
1. Coloque la plancha/vaporizador como se muestra (il.
B). También puede colocar su plancha/vaporizador en
la bolsa de almacenamiento resistente al calor.
2. Abra la
tapa del
orificio de
agua (il. C).
3. Vierta
lentamente
para dejar
que el aire entre en el escape del
tanque, de lo contrario, causará
una bolsa de aire y el agua se
desbordará.
4. No llene pasado de la marca max o
el agua se escapará durante el uso
5. Para volver a llenar el tanque
en cualquier momento durante el uso, apague la
plancha/vaporizador presionando el botón de
encendido hasta que la luz indicadora azul se apague,
C
B
A
16
17
desenchufe del tomacorriente y siga el procedimiento
anterior.
6. Después de volver a llenar el tanque, deje que se
recaliente por 45 segundos y luego prepare la bomba
de agua sosteniendo el gatillo de vapor hasta que se
forme vapor
USO
1. Si la etiqueta dice “no planche” o muestra este
icono
, instale el accesorio de tejidos delicados y
asegúrese de hacer una prueba en un área no visible
antes de aplicar vapor a toda la prendat.
2. Si la etiqueta dice “no aplique vapor” o muestra este
icono
, no aplique vapor a la prenda.
3. Cuelgue la prenda en un área que no se vaya a afectar
o dañar por el calor y el vapor, tal como en una
barra para la ducha o en una puerta abierta. Como
alternativa, coloque la prenda sobre una cama o
toalla. Puede usar la bolsa resistente al calor entre la
toalla/cama y la prenda, si es necesario.
4. Instale el accesorio que desea usar. (opcional)
5. Enchufe la plancha/vaporizador y después presione
el botón de encendido. La luz de encendido azul se
iluminará.
6. Después de 45 segundos, la plancha/vaporizador está
listo para utilizar y la luz de encendido se apagará.
Tenga en cuenta que la luz se encenderá repeditamente
durante el uso cuando el aparato esta calentando.
7. Prepare la bomba de agua sosteniendo el gatillo de
vapor hasta que se forme vapor.
8. Para crear vapor, presione el gatillo de vapor. Mientras
que el gatillo se mantenga presionado, el vapor se
emitirá del vaporizador.
9. Cuando el gatillo se suelta, la emisión de vapor
terminará.
10. Para crear un flujo continuo de vapor sin sostener el
gatillo, presione el gatillo de vapor y luego deslice
hacia abajo el seguro del gatillo de vapor. Después
puede soltar la presión en el gatillo de vapor. Para
apagar, presione el gatillo, deslice hacia arriba el
seguro del gatillo de vapor y luego suelte el gatillo.
11. Con su mano libre, mantenga
el tejido estirado. Aplique
vapor a la prenda con
movimientos hacia abajo
y lentos, manteniendo
la cabeza de la plancha/
vaporizador en contacto con
el tejido (il. D).
12. Cuando haya terminado,
presione y sostenga el botón
de encendido hasta la luz
azul se apague (unos 3
segundos) y desenchufe del
tomacorriente.
13. Después de planchar o entre cada prenda. coloque
su plancha/vaporizador con el mango descansando
D

16
17
sobre una superficie plana y estable. Puede usar la
bolsa resistente al calor para descansar su plancha
sobre la misma (il. B).
SUELA INFUNDIDA CON SUAVIZANTE DE TEJIDOS
Su plancha/vaporizador está equipado con una placa
calentada de cerámica que ayuda a eliminar las arrugas
y las líneas de pliegues en áreas de las prendas que son
más difíciles de alcanzar con solamente vapor. La suela
de cerámica infundida con suavizante de tejidos ayuda
a acondicionar los tejidos para defenderlos contra las
arrugas y reducir la estática. La temperatura de la placa
es segura para todos los tejidos aptos a planchar.
Para planchar las prendas (cuellos, puños, etc.), coloque
la prenda sobre una superficie plana, resistente al calor.
Mantenga la placa en contacto con la prenda. Use vapor
según sea requerido. Puede usar la bolsa resistente al
calor para planchar sobre la misma (il. E).
Importante: Siempre asegúrese de que la superficie en la
que vaya a planchar ¡no se afectará o dañará por el calor
o vapor!
LIMPIEZA Y CUIDADO
Este producto no contiene piezas que se deban ser
reparadas por el usuario. Consulte a personal de servicio
calificado.
1. Asegúrese de que su plancha/vaporizador esté
apagado, desenchufado y enfriado completamente.
2. Limpie todas las superficies con un paño suave,
húmedo.
3. Después de secar bien la plancha/vaporizador,
enciéndalo de nuevo y aplique vapor ligeramente
sobre un paño viejo. Esto ayudará a eliminar cualquier
residuo en los orificios de vapor.
4. Para evitar la acumulación de minerales, vacíe el
tanque después de cada uso.
LIMPIEZA DE LOS ACCESORIOS
• Accesorio para tejidos delicados: Lave con agua fría
y pequeñas cantidades de detergente suave, si es
necesario. La tela del accesorio no puede ser retirada.
• Accesorio para tapicería: La tela del accesorio puede
ser retirada y lavada a mano con agua fría y un
detergente suave.
ALMACENAMIENTO DE SU PLANCHA/VAPORIZADOR
Desenchufe la plancha/vaporizador cuando no esté en
uso. Permita que se enfríe, luego almacénelo fuera del
alcance de los niños en un lugar seguro y seco. Nunca
enrolle el cable alrededor del aparato. Esto puede causar
que el cable se gaste prematuramente y se rompa,
anulando la garantía. Maneje el cable cuidadosamente y
evite sacudirlo, torcerlo o esforzarlo, especialmente en las
conexiones del enchufe.

18
19
RESOLUCIÓN DE PROBLEMAS
PROBLEMA CAUSA POSIBLE SOLUCIÓN
No hay suficiente vapor
o no sale vapor de la
plancha/vaporizador.
La plancha/vaporizador no está calentado a
la temperatura completa.
Siempre permita que el vaporizador se
precaliente por lo menos 45 segundos o
hasta que la luz del botón de encendido
esté constante en azul.
No hay suficiente agua en el tanque de
agua.
Llene el tanque de agua.
No se preparó la bomba de agua. Si la
unidad aún no produce vapor, muévala o
agítela para ayudar con el cebado.
Después del precalentamiento, siempre
prepare la bomba de agua, sosteniendo el
gatillo de vapor hasta que se forme vapor.
Sale agua descolorida a
través de los orificios y
está manchando el tejido.
Se han acumulados residuos en el tanque de
agua.
Vacíe el tanque de agua después de cada
uso. Solamente utilice agua destilada,
filtrada o purificada.
Se utilizaron aditivos perfumados o
aromáticos.
Nunca utilice aditivos
perfumados o aromáticos.
La plancha/vaporizador
está goteando o
disparando agua.
La plancha/vaporizador no está lo
suficientemente caliente.
Permita que el vaporizador se
caliente por unos 45 segundos.
El tanque de agua
está funcionando con poca agua.
Llene el tanque de agua.

18
19
At the end of this product’s life,
you can mail it to Spectrum Brands at
507 Stokely Drive, Deforest, WI 53532
marked “Product Takeback: Please Recycle!”
Al final de la vida útil de este producto,
puede enviarlo por correo a Spectrum Brands,
507 Stokely Drive, Deforest, WI 53532
marcado “Product Takeback: Please Recycle!”

20
PB
www.BlackAndDeckerAppliances.com
29017 E/S
T22-9002486-D
© 2022 Spectrum Brands, Inc. All rights reserved.
Spectrum Brands Inc., Middleton, WI 53562
Made in China.
Fabricado en China.
1700 W 120 V ~ 60 Hz
BLACK+DECKER® and the BLACK+DECKER® logos are trademarks of The Black & Decker
Corporation, used under license by Spectrum Brands, Inc. for its manufacturing and sale of
this product. All rights reserved.
BLACK+DECKER® y los logotipos BLACK+DECKER® son marcas registradas de Black
& Decker Corporation, utilizados por Spectrum Brands, Inc. bajo su licencia para su
manufactura y venta de este producto. Todos los derechos reservados.