
POWERFLOW PRO ADJUSTABLE DUMBBELL STAND
READY,
SET, PRO
USER MANUAL
HELLO THERE.
Joel and I are athletes who suffered from
severe ACL injuries a few months apart.
We purchased multiple pieces of exercise
equipment for our in-home rehab but were
left disappointed and frustrated by all that
fitness gear that made big promises but gave
no support, no well-thought-out plan to follow,
and no results. And that’s how Lifepro came
about, and why the Strength Training collection
was created—we’ve set out to change all of
that. It’s why every piece of equipment bearing
our name not only undergoes rigorous scrutiny
to make sure it delivers on power and efficacy,
but comes with built-in support from our
‘guiding angels’ and a built-in lifetime warranty
so that you’re never left hanging.
Welcome to Lifepro.
We’re in this together now.
A & Joel

Strength Training Collection 5
FIRST STEPS
UNPACKING THE DUMBBELL STAND COMPONENTS
1. Remove the hardware and components from the shipping box and
inspect all items for shipping damage.
2. Compare the parts and hardware to the items listed in WHAT’S IN THE
BOX on the next page.
3. Read carefully through this user manual and all safety instructions
before assembling and using the PowerFlow Pro stand.
4. Follow the steps in the 7-MINUTE ASSEMBLY GUIDE on page 7 to
begin assembling your dumbbell stand.
5. Go to powerflowstand.lifeprofitness.com and register your product
within 14 days of purchase to activate your lifetime warranty.
CUSTOMER SUPPORT
If you have any questions about using your PowerFlow Pro adjustable
dumbbell stand, we’re here to help. Call or email us and an experienced
customer support representative will be happy to assist you:
(800) 563-6604 or support@lifeprofitness.com.
4 PowerFlow Pro Stand User Manual Lifepro
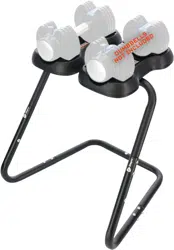
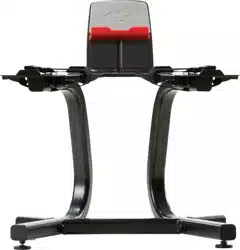
The PowerFlowPro Adjustable Dumbbell Stand was designed exclusively
to hold the Lifepro PowerFlowPro Series adjustable dumbbells.
G
H
K
D
E
A B
J
I
F
C
×2
×2
×2
×4
×4
×2
×2
×6
L
×12
×2
M N
×32
O
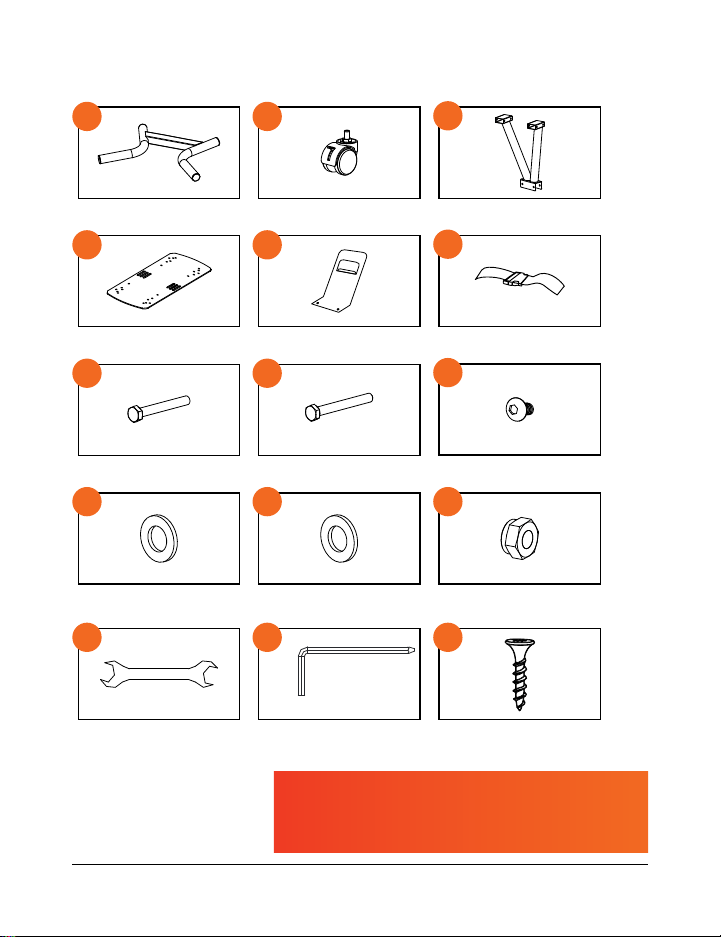
Base
Baseplates
M8×70mm Bolts
M8×1mm Washers
Wrenches Screwdriver Rack Screws* (4 Sets)
Wheels
Mobile Device Holder
M8×80mm Bolts
M8×2mm Washers
Center Support
Safety Straps
M8×10mm Bolts
M8 Nuts
WHAT’S IN THE BOX
POWERFLOW PRO
ADJUSTABLE DUMBBELL STAND
STRENGTH TRAINING
* Rack Screws:
• M4×20mm (8 ea)
• M5×25mm (8 ea)
• M6×20mm (8 ea)
• M5×20mm (8 ea)
Strength Training Collection 5
FIRST STEPS
UNPACKING THE DUMBBELL STAND COMPONENTS
1. Remove the hardware and components from the shipping box and
inspect all items for shipping damage.
2. Compare the parts and hardware to the items listed in WHAT’S IN THE
BOX on the next page.
3. Read carefully through this user manual and all safety instructions
before assembling and using the PowerFlow Pro stand.
4. Follow the steps in the 7-MINUTE ASSEMBLY GUIDE on page 7 to
begin assembling your dumbbell stand.
5. Go to powerflowstand.lifeprofitness.com and register your product
within 14 days of purchase to activate your lifetime warranty.
CUSTOMER SUPPORT
If you have any questions about using your PowerFlow Pro adjustable
dumbbell stand, we’re here to help. Call or email us and an experienced
customer support representative will be happy to assist you:
(800) 563-6604 or support@lifeprofitness.com.
4 PowerFlow Pro Stand User Manual Lifepro
The PowerFlowPro Adjustable Dumbbell Stand was designed exclusively
to hold the Lifepro PowerFlowPro Series adjustable dumbbells.
G
H
K
D
E
A B
J
I
F
C
×2
×2
×2
×4
×4
×2
×2
×6
L
×12
×2
M N
×32
O
Base
Baseplates
M8×70mm Bolts
M8×1mm Washers
Wrenches Screwdriver Rack Screws* (4 Sets)
Wheels
Mobile Device Holder
M8×80mm Bolts
M8×2mm Washers
Center Support
Safety Straps
M8×10mm Bolts
M8 Nuts
WHAT’S IN THE BOX
POWERFLOW PRO
ADJUSTABLE DUMBBELL STAND
STRENGTH TRAINING
* Rack Screws:
• M4×20mm (8 ea)
• M5×25mm (8 ea)
• M6×20mm (8 ea)
• M5×20mm (8 ea)
Strength Training Collection 7 6 PowerFlow Pro Stand User Manual Lifepro
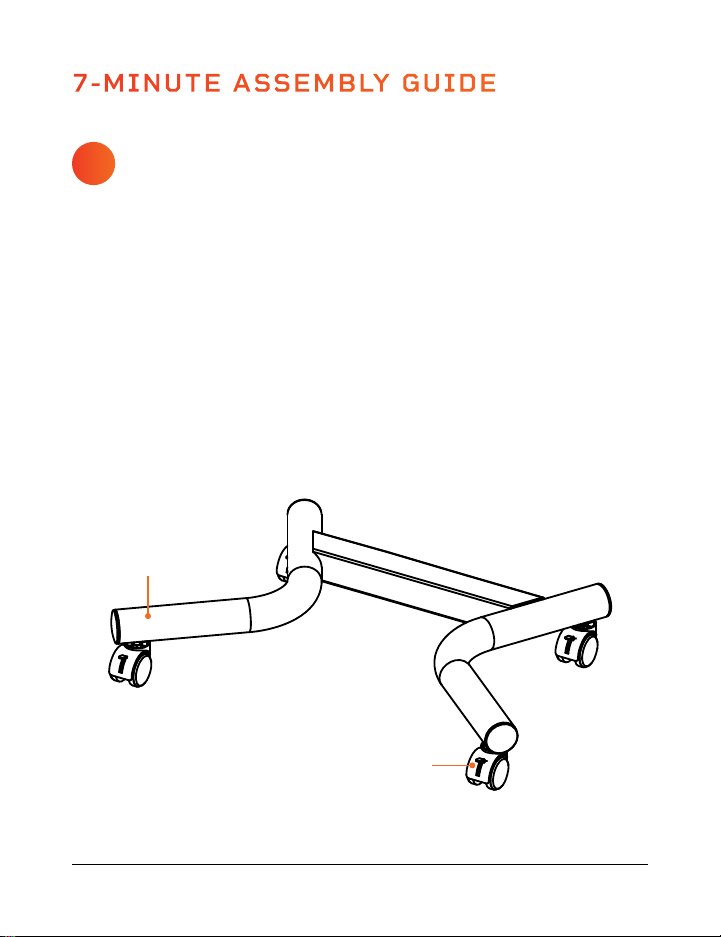
7-MINUTE ASSEMBLY GUIDE
INSTALL THE WHEELS
TO THE BASE
1. Gather the base (A), four wheels (B), and wrench (M).
2. Place the base on the floor with the four screw holes facing UP.
3. Screw the four wheels into the screw holes.
4. Use the wrench to fully tighten all four wheels.
5. Flip the base right-side up. See Figure 1.
Figure 1
A
B
G
J
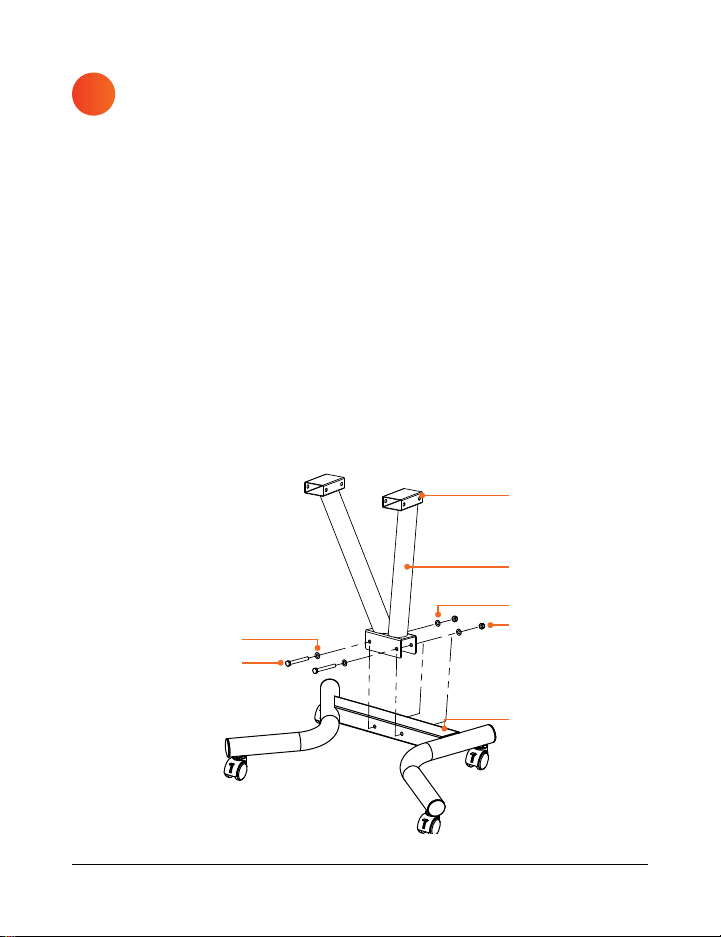
ATTACH THE V-SHAPED
CENTER SUPPORT
1. Gather the center support (C), two M8×70mm bolts (G), four M8×1mm
washers (J), four nuts (L), and wrench (M).
2. Slide the bracket at the base of the center support onto the crossbar in
the wheeled base. See Figure 2.
a. Make sure the screw holes in the center support and base line up.
b. The crossbar is at the BACK.
c. The arms of the center support angle to the FRONT.
3. Place a washer onto each bolt.
4. Insert a bolt/washer combination through each screw hole.
5. Place a washer and nut onto the end of each bolt.
6. Tighten the nuts with your fingers.
7. Use the wrench to fully tighten each nut.
2
Figure 2
Crossbar at
the BACK
Arms angle to
the FRONT
C
L
J
FRONT
1
Strength Training Collection 7 6 PowerFlow Pro Stand User Manual Lifepro
7-MINUTE ASSEMBLY GUIDE
INSTALL THE WHEELS
TO THE BASE
1. Gather the base (A), four wheels (B), and wrench (M).
2. Place the base on the floor with the four screw holes facing UP.
3. Screw the four wheels into the screw holes.
4. Use the wrench to fully tighten all four wheels.
5. Flip the base right-side up. See Figure 1.
Figure 1
A
B
G
J
ATTACH THE V-SHAPED
CENTER SUPPORT
1. Gather the center support (C), two M8×70mm bolts (G), four M8×1mm
washers (J), four nuts (L), and wrench (M).
2. Slide the bracket at the base of the center support onto the crossbar in
the wheeled base. See Figure 2.
a. Make sure the screw holes in the center support and base line up.
b. The crossbar is at the BACK.
c. The arms of the center support angle to the FRONT.
3. Place a washer onto each bolt.
4. Insert a bolt/washer combination through each screw hole.
5. Place a washer and nut onto the end of each bolt.
6. Tighten the nuts with your fingers.
7. Use the wrench to fully tighten each nut.
2
Figure 2
Crossbar at
the BACK
Arms angle to
the FRONT
C
L
J
FRONT
1
Strength Training Collection 9 8 PowerFlow Pro Stand User Manual Lifepro
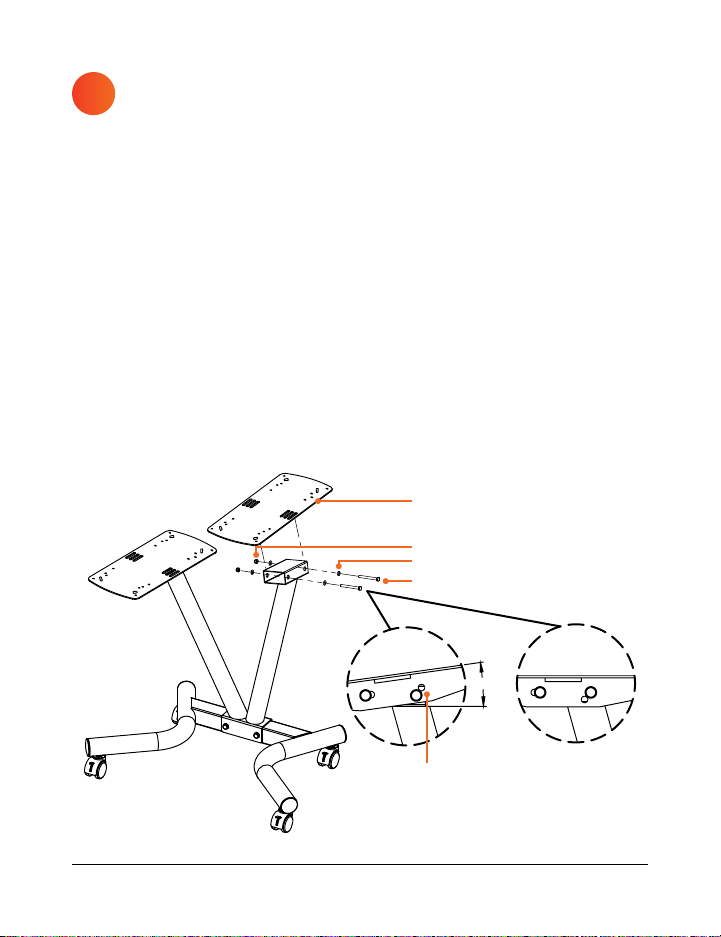
ATTACH THE
BASEPLATES
1. Gather the two baseplates (D), four M8×80mm bolts (H), eight
M8×1mm washers (J), four nuts (L), and wrench (M).
2. Place a baseplate at the top of one arm of the center support. See
Figure 3.
3. Align the two screw holes on the underside of the baseplate with the
screw holes at the top of the arm.
4. Place a washer onto two bolts.
5. Insert a bolt/washer combination through each screw hole.
a. The baseplates can be tilted to two angles. See Figure 3 insets.
6. Place a washer and nut onto the end of each bolt.
7. Tighten the nut with your fingers.
8. Repeat steps 2–7 to attach the second plate.
9. Use the wrench to fully tighten all four nuts.
3
8°
or
Figure 3
H
Two holes to
the BACK
L
D
J
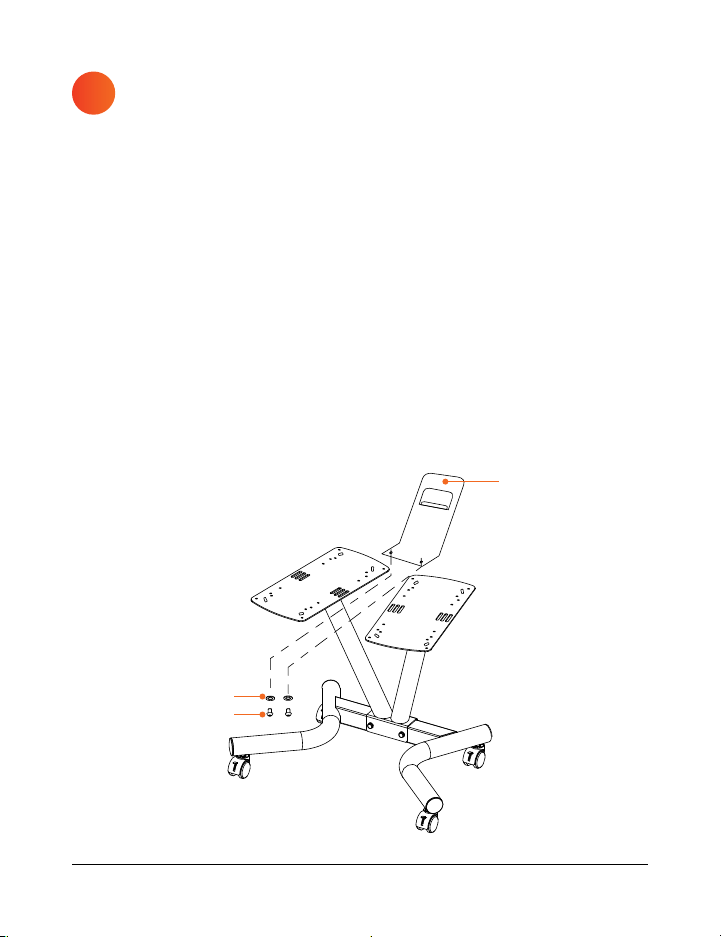
ATTACH THE PHONE
HOLDER
1. Gather the phone holder (E), two M8×10mm bolts (I), two M8×2mm
washers (K), and the screwdriver (N).
2. Align the two screw holes in the base of the phone holder with the
screw holes in the inner corners of the baseplates. See Figure 4.
a. The phone holder attaches to the UNDERSIDE of the baseplates.
3. Place a washer onto each bolt.
4. Insert a bolt/washer combination through the two largest (M8) screw
holes on the inner corners of the baseplates from the BOTTOM.
5
. Use the hex key end of the screwdriver to fully tighten each bolt.
4
Figure 4
E
K
I
Strength Training Collection 9 8 PowerFlow Pro Stand User Manual Lifepro
ATTACH THE
BASEPLATES
1. Gather the two baseplates (D), four M8×80mm bolts (H), eight
M8×1mm washers (J), four nuts (L), and wrench (M).
2. Place a baseplate at the top of one arm of the center support. See
Figure 3.
3. Align the two screw holes on the underside of the baseplate with the
screw holes at the top of the arm.
4. Place a washer onto two bolts.
5. Insert a bolt/washer combination through each screw hole.
a. The baseplates can be tilted to two angles. See Figure 3 insets.
6. Place a washer and nut onto the end of each bolt.
7. Tighten the nut with your fingers.
8. Repeat steps 2–7 to attach the second plate.
9. Use the wrench to fully tighten all four nuts.
3
8°
or
Figure 3
H
Two holes to
the BACK
L
D
J
ATTACH THE PHONE
HOLDER
1. Gather the phone holder (E), two M8×10mm bolts (I), two M8×2mm
washers (K), and the screwdriver (N).
2. Align the two screw holes in the base of the phone holder with the
screw holes in the inner corners of the baseplates. See Figure 4.
a. The phone holder attaches to the UNDERSIDE of the baseplates.
3. Place a washer onto each bolt.
4. Insert a bolt/washer combination through the two largest (M8) screw
holes on the inner corners of the baseplates from the BOTTOM.
5
. Use the hex key end of the screwdriver to fully tighten each bolt.
4
Figure 4
E
K
I
Strength Training Collection 11 10 PowerFlow Pro Stand User Manual Lifepro
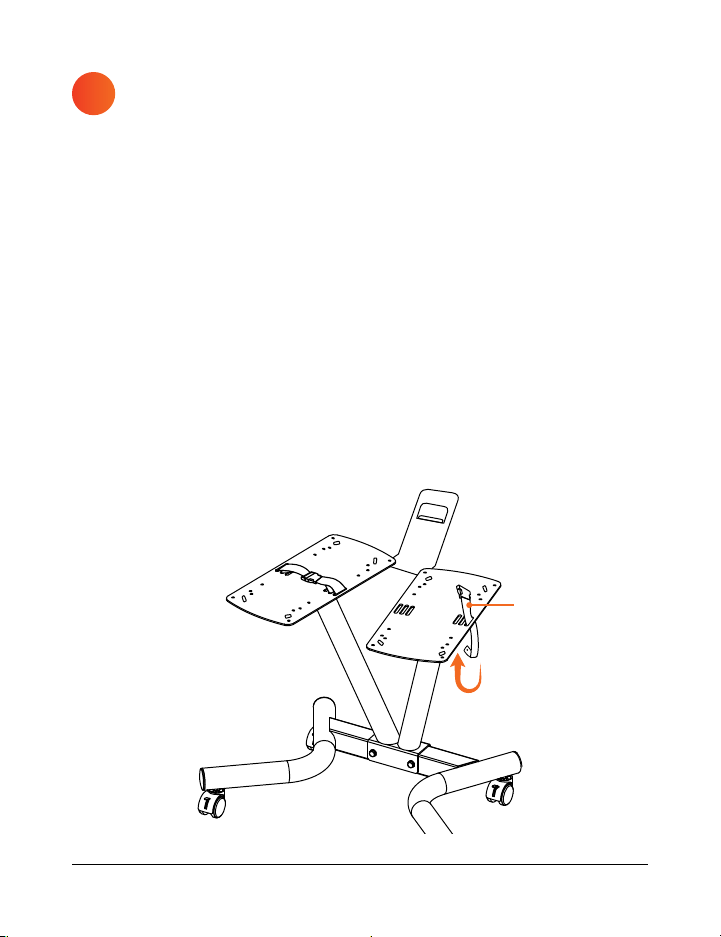
ATTACH THE SAFETY
STRAPS
1. Gather the two safety straps (F).
2. Notice the three slots on the OUTER edge of each baseplate. See
Figure 5.
3. Press the sides of the plastic buckle on a safety strap to release it,
separating the two halves of the strap.
4. Unfasten the metal snaps on both halves of the safety strap.
5. Insert the free end of one half of the strap DOWN through the
OUTER-MOST slot in a baseplate, and UP through the MIDDLE slot.
See Figure 5.
6. Fasten the snap to secure the first half of the strap to the baseplate.
7. Repeat steps 4–6 to attach the second half of the strap to the other
side of the baseplate.
8. Repeat steps 2–7 to attach the second safety strap to the other
baseplate.
5
Figure 5 Figure 6
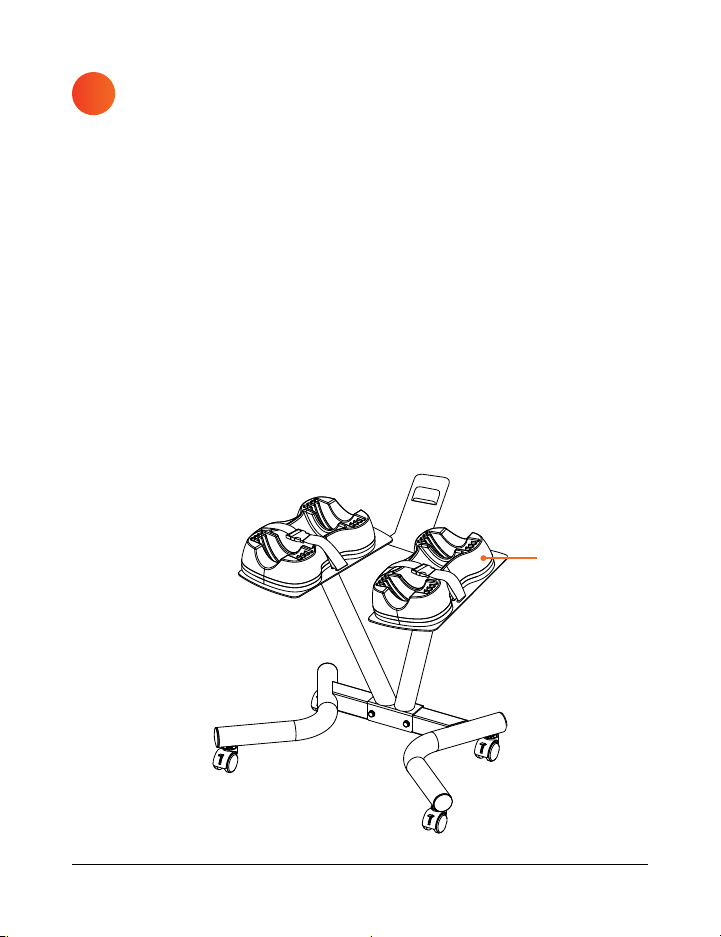
ATTACH THE PLASTIC
DUMBBELL RACKS
1. Gather the screwdriver (N) and four sets of dumbbell rack screws (O).
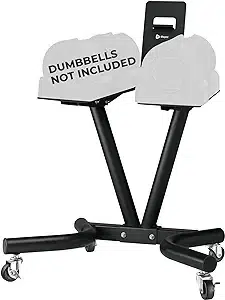
2. Locate the two plastic racks that came with your adjustable dumbbell
set (dumbbell set not included; prior purchase required).
3. Attach the plastic racks to the assembled dumbbell rack following the
instructions for your particular adjustable dumbbell set, as listed on the
following pages (see Figure 6):
a. Lifepro PowerFlow Pro (4–55 lbs) on page 12.
b. Lifepro PowerFlow Max (5–80 lbs) on page 13.
c. BowFlex SelectTech 552 (5–52.5 lbs) on page 14.
d. PowerFlow Plus (5–25 lbs) on page 15.
e. NordicTrack Select-a-Weight (10–55 lbs) on page 16.
f. ProForm Rapid Strike (10–50 lbs) on page 17.
6
Plastic Rack
F
Strength Training Collection 11 10 PowerFlow Pro Stand User Manual Lifepro
ATTACH THE SAFETY
STRAPS
1. Gather the two safety straps (F).
2. Notice the three slots on the OUTER edge of each baseplate. See
Figure 5.
3. Press the sides of the plastic buckle on a safety strap to release it,
separating the two halves of the strap.
4. Unfasten the metal snaps on both halves of the safety strap.
5. Insert the free end of one half of the strap DOWN through the
OUTER-MOST slot in a baseplate, and UP through the MIDDLE slot.
See Figure 5.
6. Fasten the snap to secure the first half of the strap to the baseplate.
7. Repeat steps 4–6 to attach the second half of the strap to the other
side of the baseplate.
8. Repeat steps 2–7 to attach the second safety strap to the other
baseplate.
5
Figure 5 Figure 6
ATTACH THE PLASTIC
DUMBBELL RACKS
1. Gather the screwdriver (N) and four sets of dumbbell rack screws (O).
2. Locate the two plastic racks that came with your adjustable dumbbell
set (dumbbell set not included; prior purchase required).
3. Attach the plastic racks to the assembled dumbbell rack following the
instructions for your particular adjustable dumbbell set, as listed on the
following pages (see Figure 6):
a. Lifepro PowerFlow Pro (4–55 lbs) on page 12.
b. Lifepro PowerFlow Max (5–80 lbs) on page 13.
c. BowFlex SelectTech 552 (5–52.5 lbs) on page 14.
d. PowerFlow Plus (5–25 lbs) on page 15.
e. NordicTrack Select-a-Weight (10–55 lbs) on page 16.
f. ProForm Rapid Strike (10–50 lbs) on page 17.
6
Plastic Rack
F

LIFEPRO POWERFLOW PRO
ADJUSTABLE DUMBBELLS
1. Remove the dumbbells from the plastic racks and set them aside.
2. Turn the plastic racks upside down.
3. Use the included screwdriver (N) to remove the four screws from the
corners of each rack.
4. Locate the eight included M5×25mm (medium diameter) rack screws.
a. The new screws are the same diameter/thickness but slightly
longer than the original screws.
5. Place one of the empty plastic dumbbell racks on one of the baseplates
at the top of the assembled stand. See Figure 6.
6. Align the four screw holes in the plastic rack with the corresponding
holes in the baseplate.
7. Insert four of the new M5×25mm screws through the BOTTOM of the
baseplate and into the plastic rack.
8. Tighten the screws with the screwdriver.
9. Repeat steps 5–8 to attach the second plastic dumbbell rack.
Strength Training Collection 13 12 PowerFlow Pro Stand User Manual Lifepro
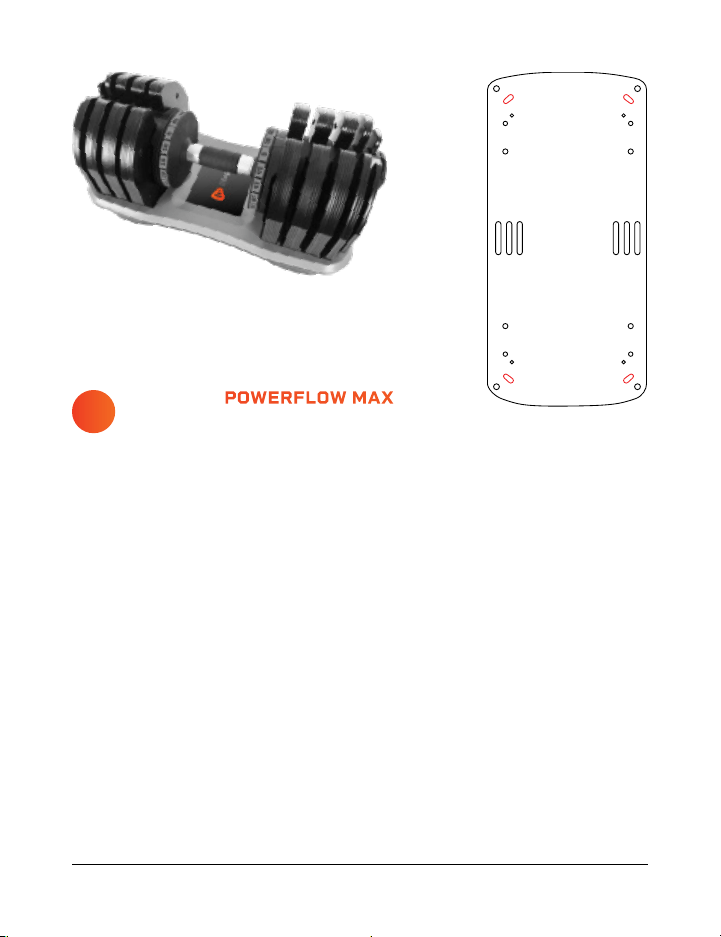
LIFEPRO POWERFLOW MAX
ADJUSTABLE DUMBBELLS
1. Remove the dumbbells from the plastic racks and set them aside.
2. Turn the plastic racks upside down.
3. Use the included screwdriver (N) to remove the four screws from the
corners of each rack.
4. Locate the eight included M5×25mm (medium diameter) rack screws.
a. The new screws are the same diameter/thickness but slightly
longer than the original screws.
5. Place one of the empty plastic dumbbell racks on one of the baseplates
at the top of the assembled stand. See Figure 6.
6. Align the four screw holes in the plastic rack with the corresponding
holes in the baseplate.
7. Insert four of the new M5×25mm screws through the BOTTOM of the
baseplate and into the plastic rack.
8. Tighten the screws with the screwdriver.
9. Repeat steps 5–8 to attach the second plastic dumbbell rack.
b
a
LIFEPRO POWERFLOW PRO
ADJUSTABLE DUMBBELLS
1. Remove the dumbbells from the plastic racks and set them aside.
2. Turn the plastic racks upside down.
3. Use the included screwdriver (N) to remove the four screws from the
corners of each rack.
4. Locate the eight included M5×25mm (medium diameter) rack screws.
a. The new screws are the same diameter/thickness but slightly
longer than the original screws.
5. Place one of the empty plastic dumbbell racks on one of the baseplates
at the top of the assembled stand. See Figure 6.
6. Align the four screw holes in the plastic rack with the corresponding
holes in the baseplate.
7. Insert four of the new M5×25mm screws through the BOTTOM of the
baseplate and into the plastic rack.
8. Tighten the screws with the screwdriver.
9. Repeat steps 5–8 to attach the second plastic dumbbell rack.
Strength Training Collection 13 12 PowerFlow Pro Stand User Manual Lifepro
LIFEPRO POWERFLOW MAX
ADJUSTABLE DUMBBELLS
1. Remove the dumbbells from the plastic racks and set them aside.
2. Turn the plastic racks upside down.
3. Use the included screwdriver (N) to remove the four screws from the
corners of each rack.
4. Locate the eight included M5×25mm (medium diameter) rack screws.
a. The new screws are the same diameter/thickness but slightly
longer than the original screws.
5. Place one of the empty plastic dumbbell racks on one of the baseplates
at the top of the assembled stand. See Figure 6.
6. Align the four screw holes in the plastic rack with the corresponding
holes in the baseplate.
7. Insert four of the new M5×25mm screws through the BOTTOM of the
baseplate and into the plastic rack.
8. Tighten the screws with the screwdriver.
9. Repeat steps 5–8 to attach the second plastic dumbbell rack.
b
a
Strength Training Collection 15 14 PowerFlow Pro Stand User Manual Lifepro
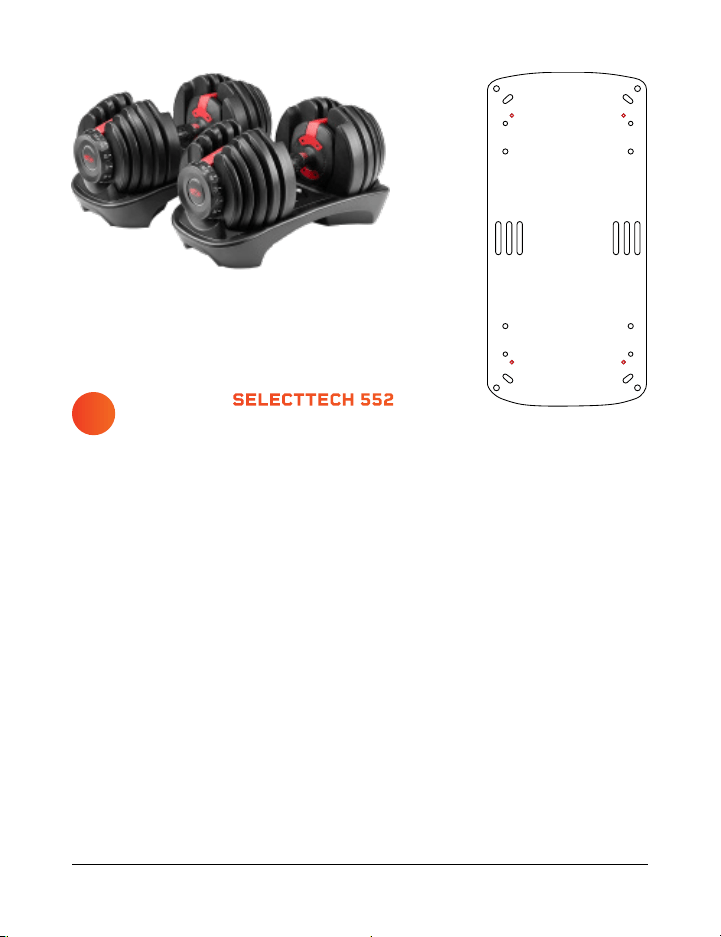
BOWFLEX SELECTTECH 552
ADJUSTABLE DUMBBELLS
1. Remove the dumbbells from the plastic racks and set them aside.
2. Turn the plastic racks upside down.
3. Use the included screwdriver (N) to remove the four screws from the
corners of each rack.
4. Locate the eight included M4×20mm (smallest diameter) rack screws.
a. The new screws are the same diameter/thickness but slightly
longer than the original screws.
5. Place one of the empty plastic dumbbell racks on one of the baseplates
at the top of the assembled stand. See Figure 6.
6. Align the four screw holes in the plastic rack with the corresponding
holes in the baseplate.
7. Insert four of the new M4×20mm screws through the BOTTOM of the
baseplate and into the plastic rack.
8. Tighten the screws with the screwdriver.
9. Repeat steps 5–8 to attach the second plastic dumbbell rack.
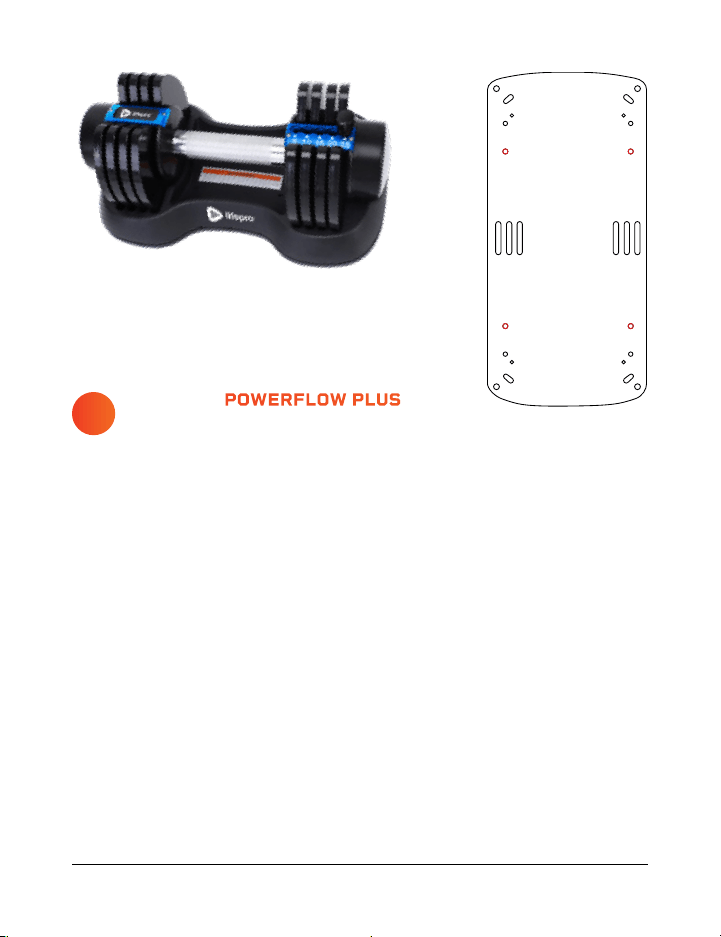
LIFEPRO POWERFLOW PLUS
ADJUSTABLE DUMBBELLS
1. Remove the dumbbells from the plastic racks and set them aside.
2. Locate the eight included M6×20mm (medium diameter) rack screws (O)
and the screwdriver (N).
3. Place one of the empty plastic dumbbell racks on one of the baseplates
at the top of the assembled stand. See Figure 6.
4. Align the four screw holes in the plastic rack with the corresponding
holes in the baseplate.
5. Insert four of the included M6×20mm screws through the BOTTOM of
the baseplate and into the plastic rack.
6. Tighten the screws with the screwdriver.
7. Repeat steps 3–6 to attach the second plastic dumbbell rack.
d
c
Strength Training Collection 15 14 PowerFlow Pro Stand User Manual Lifepro
BOWFLEX SELECTTECH 552
ADJUSTABLE DUMBBELLS
1. Remove the dumbbells from the plastic racks and set them aside.
2. Turn the plastic racks upside down.
3. Use the included screwdriver (N) to remove the four screws from the
corners of each rack.
4. Locate the eight included M4×20mm (smallest diameter) rack screws.
a. The new screws are the same diameter/thickness but slightly
longer than the original screws.
5. Place one of the empty plastic dumbbell racks on one of the baseplates
at the top of the assembled stand. See Figure 6.
6. Align the four screw holes in the plastic rack with the corresponding
holes in the baseplate.
7. Insert four of the new M4×20mm screws through the BOTTOM of the
baseplate and into the plastic rack.
8. Tighten the screws with the screwdriver.
9. Repeat steps 5–8 to attach the second plastic dumbbell rack.
LIFEPRO POWERFLOW PLUS
ADJUSTABLE DUMBBELLS
1. Remove the dumbbells from the plastic racks and set them aside.
2. Locate the eight included M6×20mm (medium diameter) rack screws (O)
and the screwdriver (N).
3. Place one of the empty plastic dumbbell racks on one of the baseplates
at the top of the assembled stand. See Figure 6.
4. Align the four screw holes in the plastic rack with the corresponding
holes in the baseplate.
5. Insert four of the included M6×20mm screws through the BOTTOM of
the baseplate and into the plastic rack.
6. Tighten the screws with the screwdriver.
7. Repeat steps 3–6 to attach the second plastic dumbbell rack.
d
c
Strength Training Collection 17 16 PowerFlow Pro Stand User Manual Lifepro
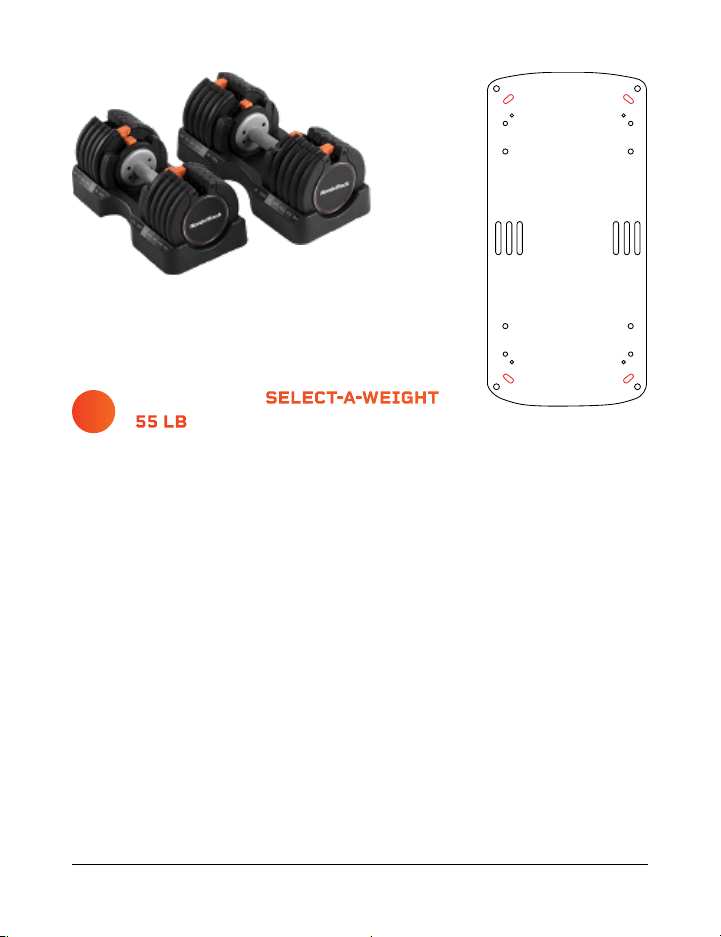
NORDITRACK SELECT-A-WEIGHT
55 LB ADJUSTABLE DUMBBELLS
1. Locate the eight included M6×20mm (largest diameter) rack screws (O)
and the screwdriver (N).
2. Remove the dumbbells from the plastic racks and set them aside.
3. Place one of the empty plastic dumbbell racks on one of the baseplates
at the top of the assembled stand. See Figure 6.
4. Align the four screw holes in the plastic rack with the corresponding
holes in the baseplate.
5. Insert four of the included M6×20mm screws through the BOTTOM of
the baseplate and into the plastic rack.
6. Tighten the screws with the screwdriver.
7. Repeat steps 3–6 to attach the second plastic dumbbell rack.
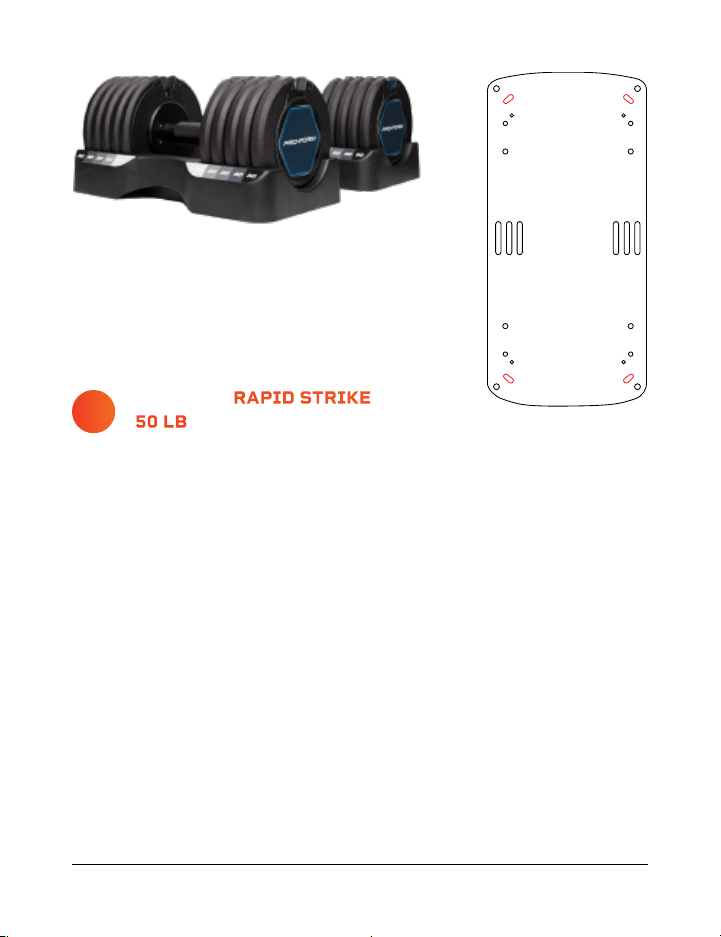
PROFORM RAPID STRIKE
50 LB ADJUSTABLE DUMBBELLS
1. Locate the eight included M5×20mm (largest diameter) rack screws (O)
and the screwdriver (N).
2. Remove the dumbbells from the plastic racks and set them aside.
3. Place one of the empty plastic dumbbell racks on one of the baseplates
at the top of the assembled stand. See Figure 6.
4. Align the four screw holes in the plastic rack with the corresponding
holes in the baseplate.
5. Insert four of the included M5×20mm screws through the BOTTOM of
the baseplate and into the plastic rack.
6. Tighten the screws with the screwdriver.
7. Repeat steps 3–6 to attach the second plastic dumbbell rack.
f
e
Strength Training Collection 17 16 PowerFlow Pro Stand User Manual Lifepro
NORDITRACK SELECT-A-WEIGHT
55 LB ADJUSTABLE DUMBBELLS
1. Locate the eight included M6×20mm (largest diameter) rack screws (O)
and the screwdriver (N).
2. Remove the dumbbells from the plastic racks and set them aside.
3. Place one of the empty plastic dumbbell racks on one of the baseplates
at the top of the assembled stand. See Figure 6.
4. Align the four screw holes in the plastic rack with the corresponding
holes in the baseplate.
5. Insert four of the included M6×20mm screws through the BOTTOM of
the baseplate and into the plastic rack.
6. Tighten the screws with the screwdriver.
7. Repeat steps 3–6 to attach the second plastic dumbbell rack.
PROFORM RAPID STRIKE
50 LB ADJUSTABLE DUMBBELLS
1. Locate the eight included M5×20mm (largest diameter) rack screws (O)
and the screwdriver (N).
2. Remove the dumbbells from the plastic racks and set them aside.
3. Place one of the empty plastic dumbbell racks on one of the baseplates
at the top of the assembled stand. See Figure 6.
4. Align the four screw holes in the plastic rack with the corresponding
holes in the baseplate.
5. Insert four of the included M5×20mm screws through the BOTTOM of
the baseplate and into the plastic rack.
6. Tighten the screws with the screwdriver.
7. Repeat steps 3–6 to attach the second plastic dumbbell rack.
f
e

18 PowerFlow Pro Stand User Manual Lifepro Strength Training Collection 19
LIFETIME WARRANTY
Lifepro creates quality, durable exercise
products and we stand by that quality
with a lifetime warranty on all of our
products. If your dumbbell stand ever
breaks (and we doubt it will), we’ll send
you replacement parts and show you
how to repair it. If your stand cannot
be repaired, we’ll replace it—free of
charge. Register your dumbbell stand at
powerflowstand.lifeprofitness.com to
activate your warranty within 14 days
of purchase.
SAFETY, CARE, AND MAINTENANCE
WARNING: To reduce injury to persons, or damage to equipment, read the
following warnings carefully.
DISCLAIMER
• The health benefits suggested or implied in this manual, other product literature,
and website are not certified or endorsed by any regulatory authority or medical
institute.
• The use of this equipment is entirely at the user’s discretion. Please read all
instructions and safety information carefully before using this product. We assume
no responsibility for personal injury or property damage sustained by or through
using this product.
SAFETY INSTRUCTIONS
• Use the PowerFlow Pro Stand dumbbell only as instructed in this manual.
• Check bolts/nuts before each use to ensure they are properly tightened; tighten
any loose bolts/nuts before use.
• Always inspect the dumbbell stand for damaged, worn, or loose parts before each
use. Do not use if damaged, worn, rusty, malfunctioning, or missing bolts. Do not
use stand again until the problem has been fixed.
• Always make sure the plastic dumbbell rack is securely fastened to the stand.
• Keep away from children and pets. The dumbbell stand is not a toy.
• This equipment is not intended for use by people with reduced physical, sensory or
mental capabilities, unless supervised by a responsible adult.
• It is the responsibility of the owner to ensure that all users of the dumbbell stand
are adequately informed of all warnings and precautions.
• Always place the dumbbell stand on a flat, sturdy floor.
• Place the dumbbell stand in a location away from traffic where it will not create a
tripping hazard.
• Always keep the wheels locked to prevent the stand from rolling.
• Never drop a dumbbell onto the rack or dumbbell stand.
• Always make sure to place the dumbbell securely in the rack.
• Keep hair, fingers, and clothing away from the dumbbell and stand to avoid
pinching.
MAINTENANCE AND CLEANING
• Use a slightly damp cloth to wipe any dirt or moisture from the dumbbell stand
after each use. Do not use solvents or chemical or abrasive cleaners.
• Do not remove screws or attempt to disassemble the dumbbell stand.

Strength Training Collection 21
The Agility vibrating massage ball is designed to target small muscle
groups. The Agility Ball is small enough to fit in the palm of your hand and
gives you a wide range of massage motions: circular, up-and-down, and
side-to-side.
The Agility Ball’s silicone exterior is durable and easy-to-grip, but soft
enough to use on sensitive areas like your neck, hands, and feet.
AGILITY
VIBRATING MASSAGE BALL
AGILITY BALL BENEFITS
• Increase circulation
• Improve muscle flexibility and
performance
• Relax tight muscles and fascia
• Reduce muscle pain and inflammation
• Boost blood flow
20 PowerFlow Pro Stand User Manual Lifepro
PRODUCT
SPECIFICATIONS
MADE IN CHINA
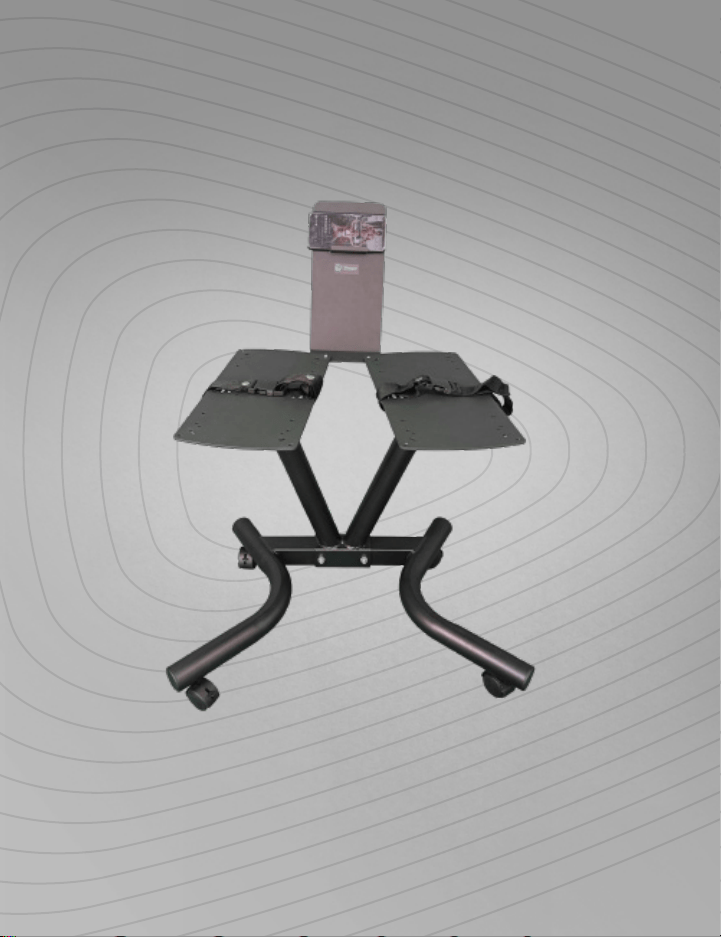
UNIT SPECS
Dimensions: 18.5” L × 26.8” W × 21.7” H
Height with Phone Holder: 32.3” H
Net Weight: 26.6 lbs.
Maximum Weight Load: 220 lbs.
Frame: Ø50mm × 1.5mm powder-coated steel
POWERFLOW PRO
ADJUSTABLE DUMBBELL STAND
STRENGTH TRAINING
FROM OUR SPORTS RECOVERY COLLECTION

Strength Training Collection 21
The Agility vibrating massage ball is designed to target small muscle
groups. The Agility Ball is small enough to fit in the palm of your hand and
gives you a wide range of massage motions: circular, up-and-down, and
side-to-side.
The Agility Ball’s silicone exterior is durable and easy-to-grip, but soft
enough to use on sensitive areas like your neck, hands, and feet.
AGILITY
VIBRATING MASSAGE BALL
AGILITY BALL BENEFITS
• Increase circulation
• Improve muscle flexibility and
performance
• Relax tight muscles and fascia
• Reduce muscle pain and inflammation
• Boost blood flow
20 PowerFlow Pro Stand User Manual Lifepro
PRODUCT
SPECIFICATIONS
MADE IN CHINA
UNIT SPECS
Dimensions: 18.5” L × 26.8” W × 21.7” H
Height with Phone Holder: 32.3” H
Net Weight: 26.6 lbs.
Maximum Weight Load: 220 lbs.
Frame: Ø50mm × 1.5mm powder-coated steel
POWERFLOW PRO
ADJUSTABLE DUMBBELL STAND
STRENGTH TRAINING
FROM OUR SPORTS RECOVERY COLLECTION

The Rhythm Vibration Platform works
by creating rapid vibrations throughout
the body, especially on the muscles
specifically targeted. These vibrations
cause the muscles to stretch, flex, and
relax at a rapid rate. This results in
increased muscle and bone growth,
improved flexibility, and boosted
metabolism—all of which increase
the number of calories you burn.
The Rhythm can be used by people
from every fitness level. If you
have suffered an injury or you
experience joint or back pain,
find relief and help prevent
future injuries by adding the
Rhythm to your rehab routine.
RHYTHM
VIBRATION PLATFORM
RHYTHM BENEFITS
• Improve mobility
• Prevent injury
• Increase strength
• Boost metabolism
• Improve sleep
• Develop stronger bones
• Increase circulation
Strength Training Collection 23 22 PowerFlow Pro Stand User Manual Lifepro
FROM OUR SPORTS RECOVERY COLLECTION FROM OUR VIBRATION THERAPY COLLECTION
Enjoy all of the benefits of foam
rolling and vibration technology
together with the Surger Vibrating
Foam Roller. Use the Surger before
or after your workout as part of
your warm-up or recovery routine
to gain more flexibility and to help
prevent soreness and injuries.
Deep compression of muscle
fibers and tissues (self-myofascial
release) combined with the
Surger’s vibration technology
breaks up muscle knots and relaxes
tight muscles and fascia. Choose
from 4 vibration speed levels
to apply the perfect amount of
intensity every time.
SURGER
VIBRATING FOAM ROLLER
SURGER BENEFITS
• Increase workout
effectiveness
• Reduce soreness
• Speed up recovery
• Prevent injury
• Boost circulation
• Improve muscle flexibility
and performance
• Decrease pain and
inflammation
• Loosen knots, trigger
points, and tightness in your
muscles and fascia.

Access Lifepro TV, our library of free
personal training videos on the web at
powerflowstand.lifeprofitness.com to learn
how to get the most out of your Lifepro®
PowerFlow Pro Stand and achieve the
results you want.
GROW
SOME
WINGS
Lifeprousa Lifeprousa support@lifeprofitness.com