60cm Canopy Rangehood
RAHT60XN
www.linarie.com.au
NARBONNENARBONNE
TABLE OF CONTENTS
2
CONGRATULATIONS
Congratulations and thank you for choosing Linärie to
introduce a new comfort of cooking in your home. We are
sure you will find your new appliance a pleasure to use and
a great asset to your kitchen.
This appliance complies with all relevant safety
requirements in Australia. Inappropriate use can, however,
lead to personal injury and damage to property.
In order to operate the unit correctly and safely, please read
this instruction manual carefully before installation and
usage. This user manual which provides you with all
required instructions related to safety, installation, use and
maintenance of the appliance.
For future reference, please store this booklet in a safe place
and ensure that all users are familiar with the contents. Pass
them on to any future owner of the
appliance.
Record Model & Serial Number
Model:.............................................................................................................................
Serial Number .........................................................................................................
Register your product www.linarie.com.au
Adherence to the directions for use in this manual is extremely
important for health and safety. Failure to strictly adhere to the
requirements in this manual may result in personal injury, property
damage and affect your ability to make a claim under Linärie’s
manufacturer’s warranty provided with your product. Products must
be used, installed and operated in accordance with this manual. You
may not be able to claim on Linärie’s manufacturer’s warranty in the
event that your product fault is due to failure to adhere this manual.
Correct Conditions of Use
The appliance is intended for use in the home and similar
environments only. It is not intended for commercial use.
The appliance is not suitable for outdoor use, non-stationary
installation (e.g. on ships, vehicles), or heating rooms.
It must only be used to extract vapors and remove odors
from cooking. Any other usage is at the owner's risk.
Where a recirculation rangehood is fitted above a gas
cooktop, please ensure that there is an adequate supply of
fresh air into the room in which it is installed. Please seek the
advice of a qualified gas fitter if necessary.
Linärie does not assume any liability for damage
arising from non-adherence to these documents
and from improper assembly. The electricity connection
must be made by a qualified specialist. Installation must
comply with the valid standards, regulations and laws. All
safety and warning information and the operating and
installation instructions must be complied with.
Additional information on products, accessories,
warranty, replacement parts and services can be
found at www.linarie.com.au
1. General Information .............................. 03
1.1 Appliance information
2. General Safety Instructions .................... 03
.................... 03
................. 03
................. 04
2.1 General safety information
2.2 Safety instruction - Installation
2.3 Exhaust air Operation ..............................04
2.4 Correction use & Operation
2.5 Disassembling and Disposal
of the Appliance ......................................0
......................................06
......................................06
5
2.6 Accessories and Spare parts
3. Description of the Functions ...................0
...................05
5
...................05
...................05
...................05
3.1 Air extraction mode
3.2 Recirculation mode
3.3 Guide to the appliance
4. Installation ..............................................06
4.1 Pre-installation
4.2 Safety distance
4.3 Installation tips .........................06
4.5 Installation {Air
extraction} ......................08
4.4 Installation {External Ventilation .........06
5. Operation .................................................0
...............08
............10
8
5.1 Control panel and function keys
5.2 Energy saving tips .....................................09
.....................................09
6. Troubleshooting
7. Cleaning and maintenance ......................10
......................10
......................10
......................10
......................10
7.1 Stainless steel
7.2 Control panel
7.3 Cleaning agents
7.4 Aluminum grease filter
7.5 Removing the aluminum glass filter
7.6 Activated carbon filter ................................11
................................11
7.7 Replacing lamps
8. Environmental tips ....................................12
.............12
9. Warranty and After sales service
Cleaning & Maintenance
1. GENERAL INFORMATION
2. GENERAL SAFETY
A damaged appliance can be dangerous. If you find the
appliance is damaged or marked, you must report it within
7 days if you wish to claim for damage/marks under the
manufacturer’s warranty. This does not affect your statutory
rights. Do not use a damaged appliance.
The manufacturer's warranty will be invalidated if the
appliance is not repaired by a Linärie approved service
technician.
Faulty components must only be replaced by genuine Linärie
spare parts. The manufacturer can only guarantee the safety
of the appliance when Linärie replacement parts are used.
If the power cord is damaged, it must only be replaced by a
Linärie authorized service technician or suitably qualified
electrician in order to avoid a hazard.
Linärie cannot be held liable for noncompliance with these
instructions, resulting from incorrect or improper use or
operation.
1.1 Appliance Information
Unauthorized Modifications
Unauthorised modifications can cause the appliance to
pose risks. Do not conduct any modifications to the
appliance.
The device must be cleaned regularly. Dirt can lead to
damage or the buildup of odors. (See “Cleaning and
maintenance” section).
Always clean the appliance exactly as indicated in
the operating instructions.
Always ensure the appliance is switched off before
cleaning or replacing parts.
Clean the appliance immediately after any food
spillage and the filter regularly to keep the appliance
working efficiently.
There is a risk of fire if cleaning is not carried out as
described in these operating instructions.
Make sure no water penetrates inside the device when
cleaning. Do not use a steam cleaning appliance to
clean this appliance. The steam could reach electrical
components and
cause a short circuit.
In areas which may be subject to infestation by
cockroaches or other vermin, pay particular attention to
keeping the machine and its surroundings in a clean
condition at all times. Any damage which may be
caused by cockroaches or other vermin will not be
covered by the machine warranty.
2.1 General Safety Instructions
Children and People with Special Needs
2.2 Safety Instructions - Installation
This appliance is not intended for use by persons (including
children) with reduced physical, sensory or mental capabilities, or
lack of experience and knowledge, unless they have been given
supervision or instruction concerning use of the appliance by a
person responsible for their safety.
The appliance must only be installed and assembled by trained
specialists who are familiar with and comply with the standard
national regulations and supplementary regulations of ventilation
systems.
The appliance is NOT suitable for use by children
without supervision.
Young children should be supervised near the appliance
to ensure they do not play with this appliance.
Children may be able to wrap themselves in packing
material or pull it over their heads with the risk of
suffocation. Keep children away from any packing
material.
In order to avoid any potential hazard, the installation
instructions must be followed.
Observe all regional regulations for the installation of
ventilation systems.
During installation, maintenance and repair work, the
appliance must be disconnected from the mains
electricity supply. It is only completely isolated from the
electricity supply when:
– the mains circuit breaker is switched off, or
– it is switched off at the wall socket and the plug is
withdrawn from the socket.
Do not pull the mains connection cable but the mains
plug to disconnect your appliance from the mains
electricity supply.
If the rangehood is used with cookers that burn gas or
other fuels, there must be adequate ventilation in the
room.
Insufficient distance between the cook
top and the
rangehood can result in damage to the rangehood.
When installing the appliance, make sure that the following
distances between the top of rangehood or hob and the
lowest part of thecooker hood must be observed:
Gas hobs: 750mm. Electric hobs: 650mm.
The appliance complies with the stipulated safety
requirements in Australia. The user is responsible for
appliance cleaning and maintenance as well as its safe
use. Improper use can lead to personal injury and
damage to property.
3
INSTRUCTIONS
Ensure that all specified vents, openings and airspaces
are not blocked.
All ducting, pipework and fittings must be of
non-flammable material.
The appliance must not be connected to a chimney or
vent flue which is in current use for exhausting fumes
from appliances burning gas or other fuels. Neither
should it be connected to ducting which ventilates rooms
with fireplaces.
Do not connect the appliance to the mains electricity
supply by a multi-socket unit or an extension lead.
Extension leads are a fire hazard and do not guarantee
the required safety of the appliance.
Tampering with electrical connections or components
and mechanical parts is highly dangerous to the user
and can cause operational faults. Only open the
housing as described in the instructions given in
“Installation” and in the “Cleaning & Maintenance”
sections of this booklet. Under no circumstances should
any other parts of the housing be opened.
THIS APPLIANCE MUST BE PROPERLY EARTHED. It is
most important that this basic safety requirement is
present and tested regularly and, where there is any
doubt, the household wiring system should be inspected
by a qualified electrician.
Linärie cannot be held liable for noncompliance with
these instructions, resulting from incorrect or improper
use or operation.
2.3 Exhaust Air Operation
2.4 Correction Use & Operation
WARNING
Danger of poisoning from recirculated exhaust gases! Do not
operate the appliance in extract air mode if it is operated together
with a room air-dependent fireplace and sufficient air circulation is
not guaranteed.
CAUTION
The rangehood can get very hot during cooking due to heat rising
from the cooktop. Do not touch the housing or the grease filters
until the rangehood has cooled down.
For safety reasons, this appliance may only be used after
it has been built in.
Reliable and safe operation of this rangehood can only
be assured if it has been connected to the mains
electricity supply.
Before using the appliance, ensure that all packaging
materials are removed from the appliance and make
sure that the connection data on the data plate [voltage
(V) and frequency (Hz)] indicated on the rangehood
correspond to the voltage and frequency of the power
supply in your household. Consult a qualified electrician
if in doubt.
DO NOT use the rangehood without the filters in place.
This way you will avoid the risk of grease and dirt getting
into the appliance and hindering its smooth operation.
Never use an open flame beneath the rangehood. To
avoid the danger of fire, do not flambé or grill over an
open flame. When switched on, the rangehood could
draw flames into the filter. Fat deposits could ignite,
presenting a fire hazard.
DO NOT store or spray flammable materials in the
appliance or near this appliance while it is in operation
(e.g. aerosols).
The rangehood can become damaged when exposed
to excessive heat.
– Select a pan which is suitable for the size of the
burner.
– Regulate the flame so that it does not burn up the
sides of the pan.
– Avoid overheating the pan (e.g. when cooking with a
wok).
Always switch the rangehood on when a cooking zone
is in use, otherwise condensation may collect in the
rangehood, which could cause corrosion.
When cooking with oil or fat, chip pans and deep fat
fryers etc., do not leave the pans unattended. Never
leave an open grill unattended when grilling.
Overheated oil and fat can ignite and could set the
rangehood on fire.
Safe operation is only possible if the negative pressure at
the location of the fireplace doe
s not exceed 4 Pa (0.04
mbar). This can be achieved if the air required for
combustion can flow in through non-closable openings
in doors and windows in conjunction with a supply air /
exhaust air wall box. In any case, have a master chimney
sweep advise you and assess the entire ventilation
system of the house. If necessary, they can tell you the
necessary measure for ventilation.
If the rangehood is used exclusively in recirculation
mode, where the air is directed back into the room in
which it is located, operating a heating appliance
which depends on the room air at the same time is not
hazardous.
Room air-dependent fireplaces such as gas, oil, wood or
coal heaters, boilers or instantaneous water heaters draw
the air from the room and lead it outdoors through an
exhaust pipe or chimney. In extract air mode, air is
extracted from the kitchen and neighbouring rooms.
Without sufficient supply air, negative pressure is created.
The heating appliance will be starved of oxygen, impairing
combustion. Toxic gases from the chimney or exhaust pipe
can be sucked back into the living rooms.
Make sure that sufficient fresh air supply is guaranteed
and that the air can circulate.
A supply air/exhaust air wall box is not sufficient to
ensure compliance with the limit value.
4
3. DESCRIPTION OF THE FUNCTIONS
2.5 Disassembling and Disposal of the
Appliance
3.1 Air extraction mode
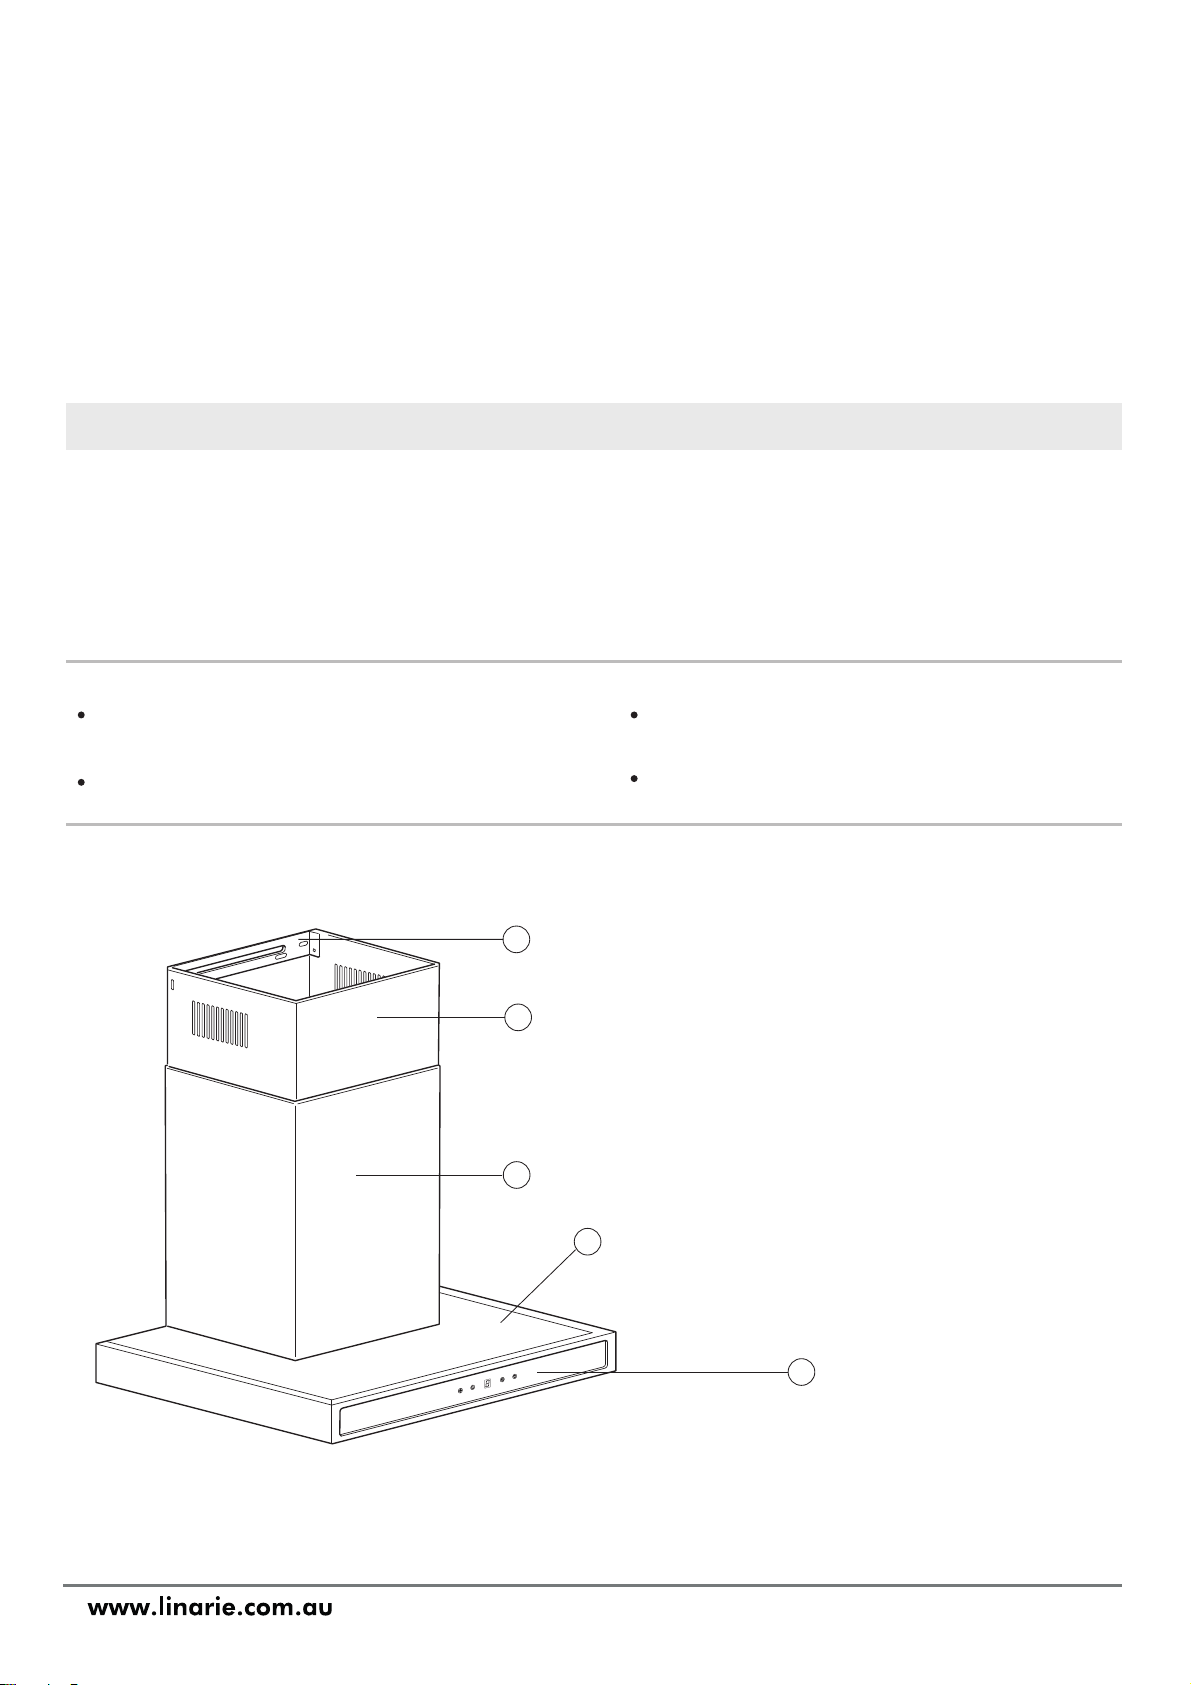
3.3 Guide to the appliance
Non-return flap
2.6 Accessories and Spare parts
Depending on the model of the rangehood, the following
options are available:
The air is drawn in and cleaned by the grease filter and
directed outside.
The air is drawn in and cleaned first by the grease filter
and then by a charcoal filter. The cleaned air is then
recirculated back into the kitchen.
When using recirculation mode, ensure a sufficient
supply of fresh air, e.g. by opening a window.
(see the “Environmental Tips” section for best practices on
disposing of this appliance).
The device must only be disassembled by trained
specialists who are familiar with and comply with the
standard national regulations and supplementary
regulations of the local utility companies.
Work on electrical components must only be conducted by
trained electrical personnel.
The non-return flap is designed to prevent the exchange of
room and outside air taking place. The flap is closed
when the rangehood is switched off. When the rangehood
is switched on, the non-return flap opens for the cooking
vapors to be blown directly outside. If the on-site
ventilation system does not have a non-return flap, the
nonreturn flap supplied must be fitted.
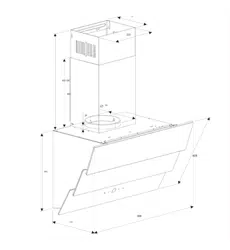
En
1. Inside chimney bracket
2. Inside chimney
3. Outside chimney
4. Hood
5. Control panel
sure a normal and comfortable room climate (humidity
of 45–60%), e.g. by opening natural ventilation openings
or using domestic ventilation systems.
After every use in recirculation mode, switch the
rangehood to a low level for about 15 minutes.
Incorrect components can lead to personal injury or
damage to the appliance. Only use original Linärie spare
parts for repairs.
Modifications, additions or alterations to the appliance
can lead to safety risks. If spare parts or accessories from
other manufacturers are used, the warranty will be
invalidated, and Linärie cannot accept liability.
Please check www.linarie.com.au for more information.
3.2 Recirculation mode
5
5
2
1
3
4
4.1 Pre-Installation
4.2 Safety Distance
WARNING
WARNING
Before installation, it is important to read the information given on
the following pages as well as the "General Safety Instructions" at
the beginning of this booklet. Failure to install the appliance
correctly could invalidate any warranty or liability claims and lead
to prosecution.
WARNING
If you are fitting a front panel made of wood or plastic to the
rangehood, observe the safety distances given by the cooktop
manufacturer regarding the use of easily flammable materials.
Before installing the rangehood, peel off any protective
plastic covering and remove polystyrene from inside
behind the fan motor.
4. INSTALLATION
6
65cm
to
75cm
Before installation, turn the unit off and unplug it from the outlet.
For safety reason, please use only the same size of fixing or mounting
screws which are recommended in this instruction manual.
Failure to install the screws or fixing device in accordance with these
instructions may result in electrical hazards.
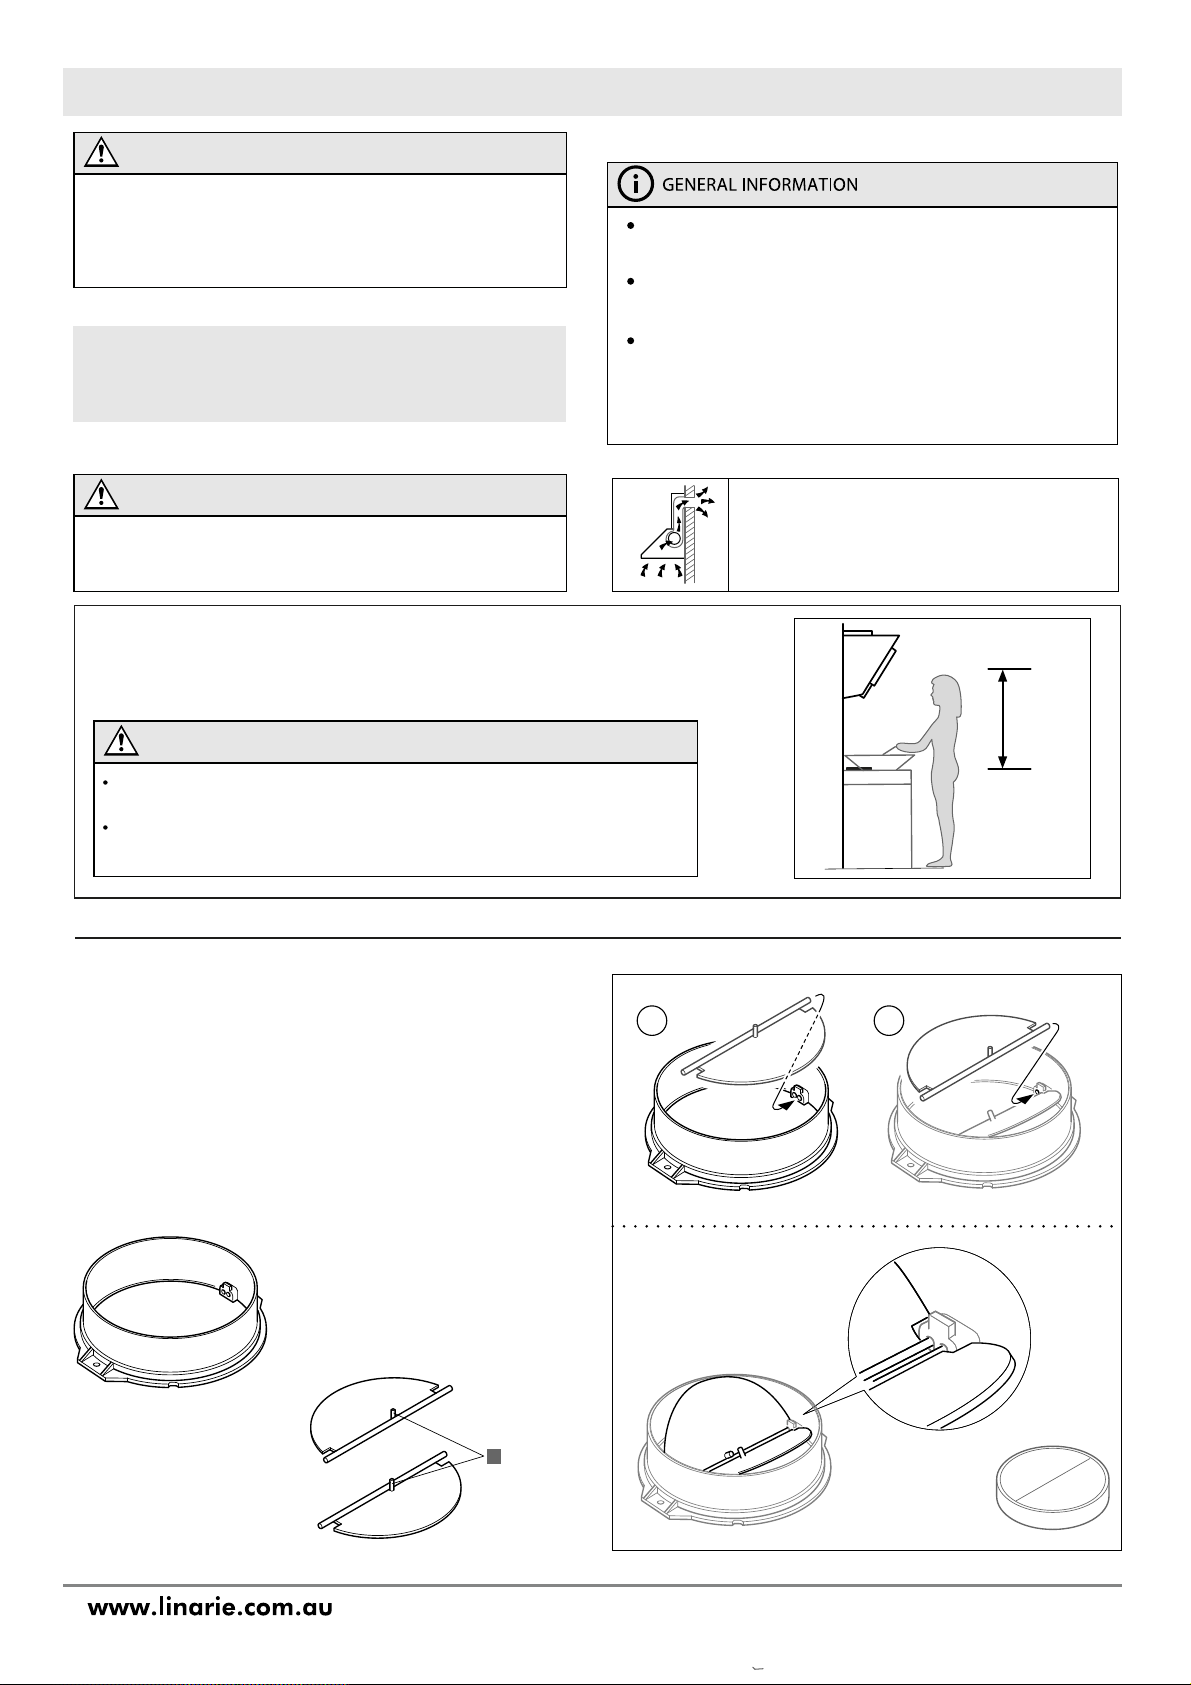
The rangehood should be placed at a distance of 65~75cm
above the cooking surface for best effect.
4.4 Installation [External Ventilation]
Mounting of V-flap
To achieve optimum vapor extraction, the rangehood must
cover the cooktop. It should be positioned centrally over the
cooktop, not to the side.
The cooktop should be no wider than the rangehood and, if
possible, it should be narrower, especially for safety distances
greater than 750 mm.
The installation area must be easily accessible. The rangehood
should be easily accessible and easy to dismantle in the event
that service is required. This should be taken into consideration
when planning the position of cupboards, shelves, ceilings or
features in the vicinity of the rangehood.
If the rangehood does not have a pre-assembled V-flap, install
the parts as follows:
1. Install the first half into the housing
2. The pin should be facing upwards.
3. The axle is inserted into the holes on the housing.
4. Repeat all the steps for the second half of the flap.
4.3. Installation Tips
Note direction
when attaching
1 2
Flaps
Housing
If you have an air outlet to the outside, the
rangehood can be connected via an extraction
duct (enamel, aluminium, flexible pipe or
non-combustible material with an internal
diameter of 150 mm) as shown on the left.
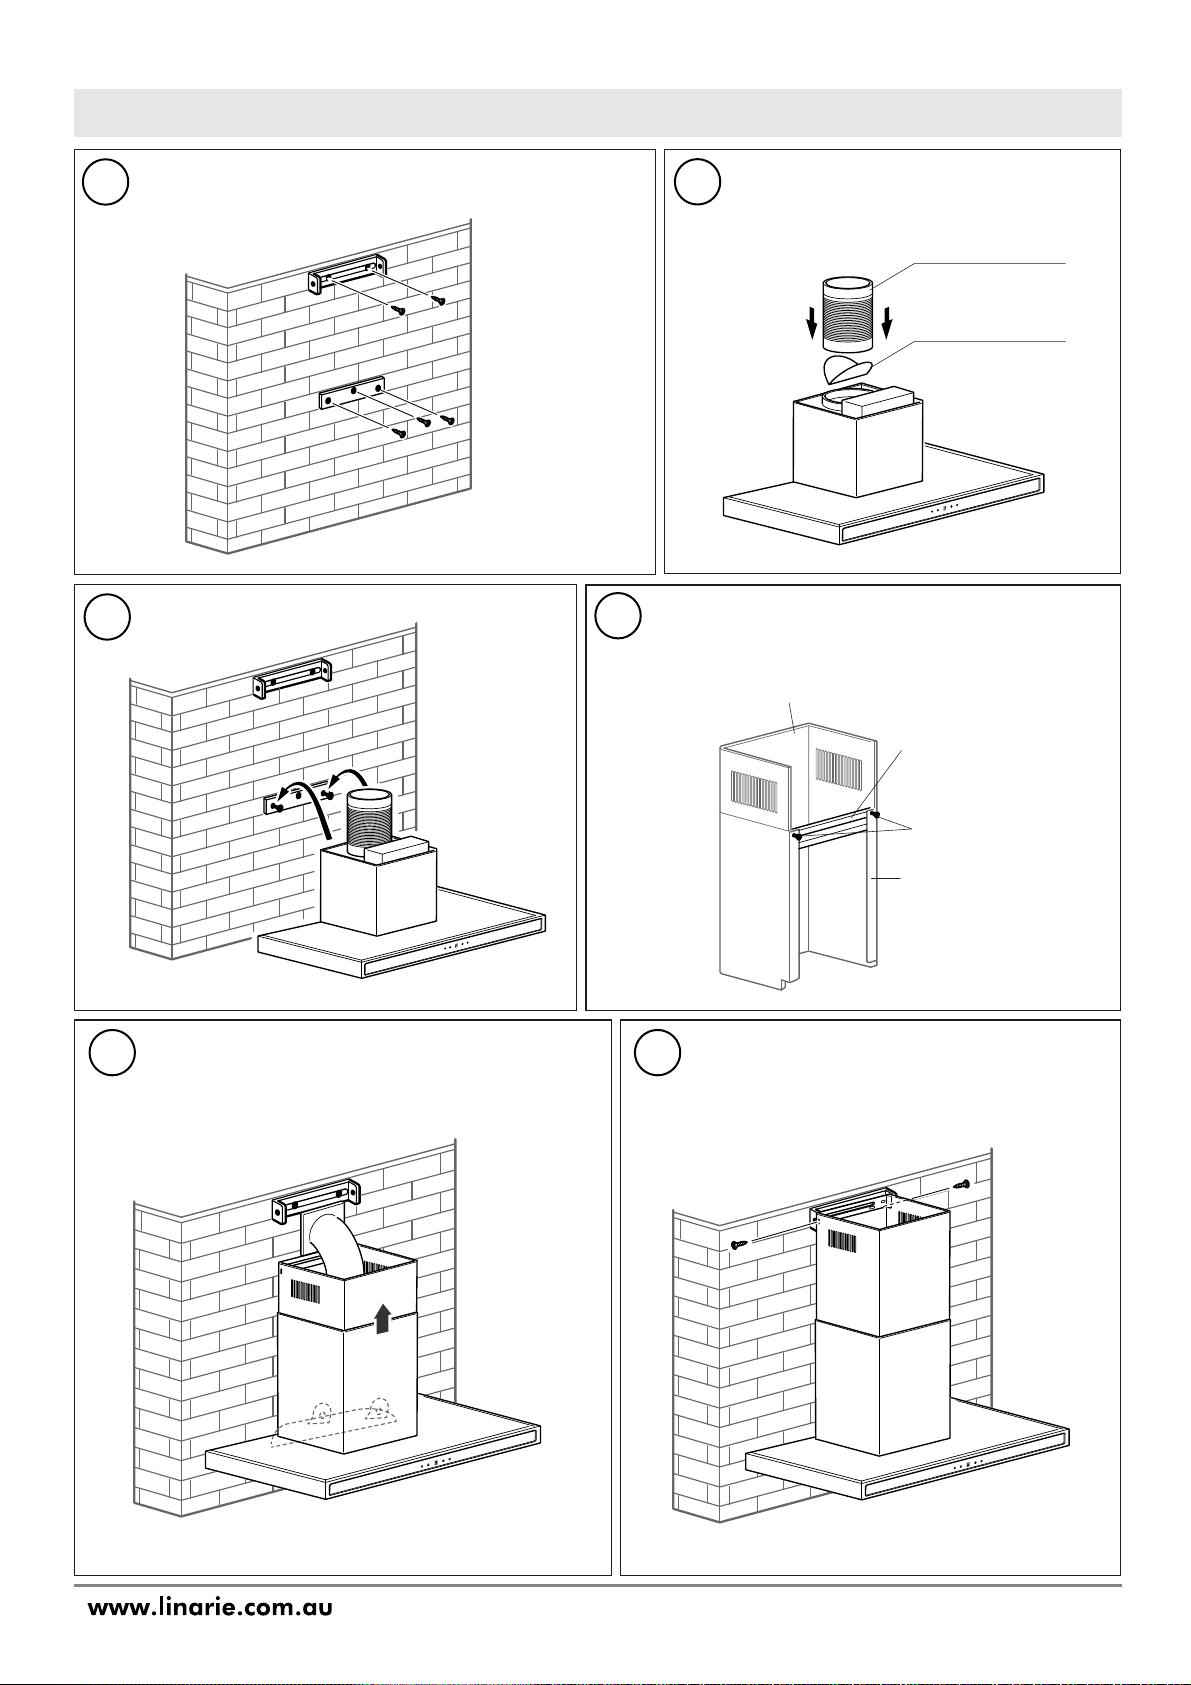
Install the outside chimney bracket into the outside
chimney with 2 ST 4x8mm screws.
Ensure that the inside chimney can move freely.
Inside chimney
outside chimney
bracket
outside chimney
4
Slide the upper part of the chimney inside the part lower
part, then pull the upper part up to the height
desired. Attach 2 x Security Screws (4mm x 30mm)
to the back of the 6mm thick diameter.
5
Mount the chimney on the hood then fix them
together with 2 screws.
6
cont. installation
7
ST 4x8
Drill 5 x 8mm holes in the wall where you want to mount the
wall bracket. Secure it using the screws and dowels provided.
1
Connect the exhaust duct and the
V-shaped flap to the hood.
2
Lift the hood and hang it on the wall bracket.
3
Expansion pipe
v-flap
5. OPERATION
8
4.5 Installation [Air Extraction]
The following rules must be strictly observed to
achieve optimum air extraction.
Ma
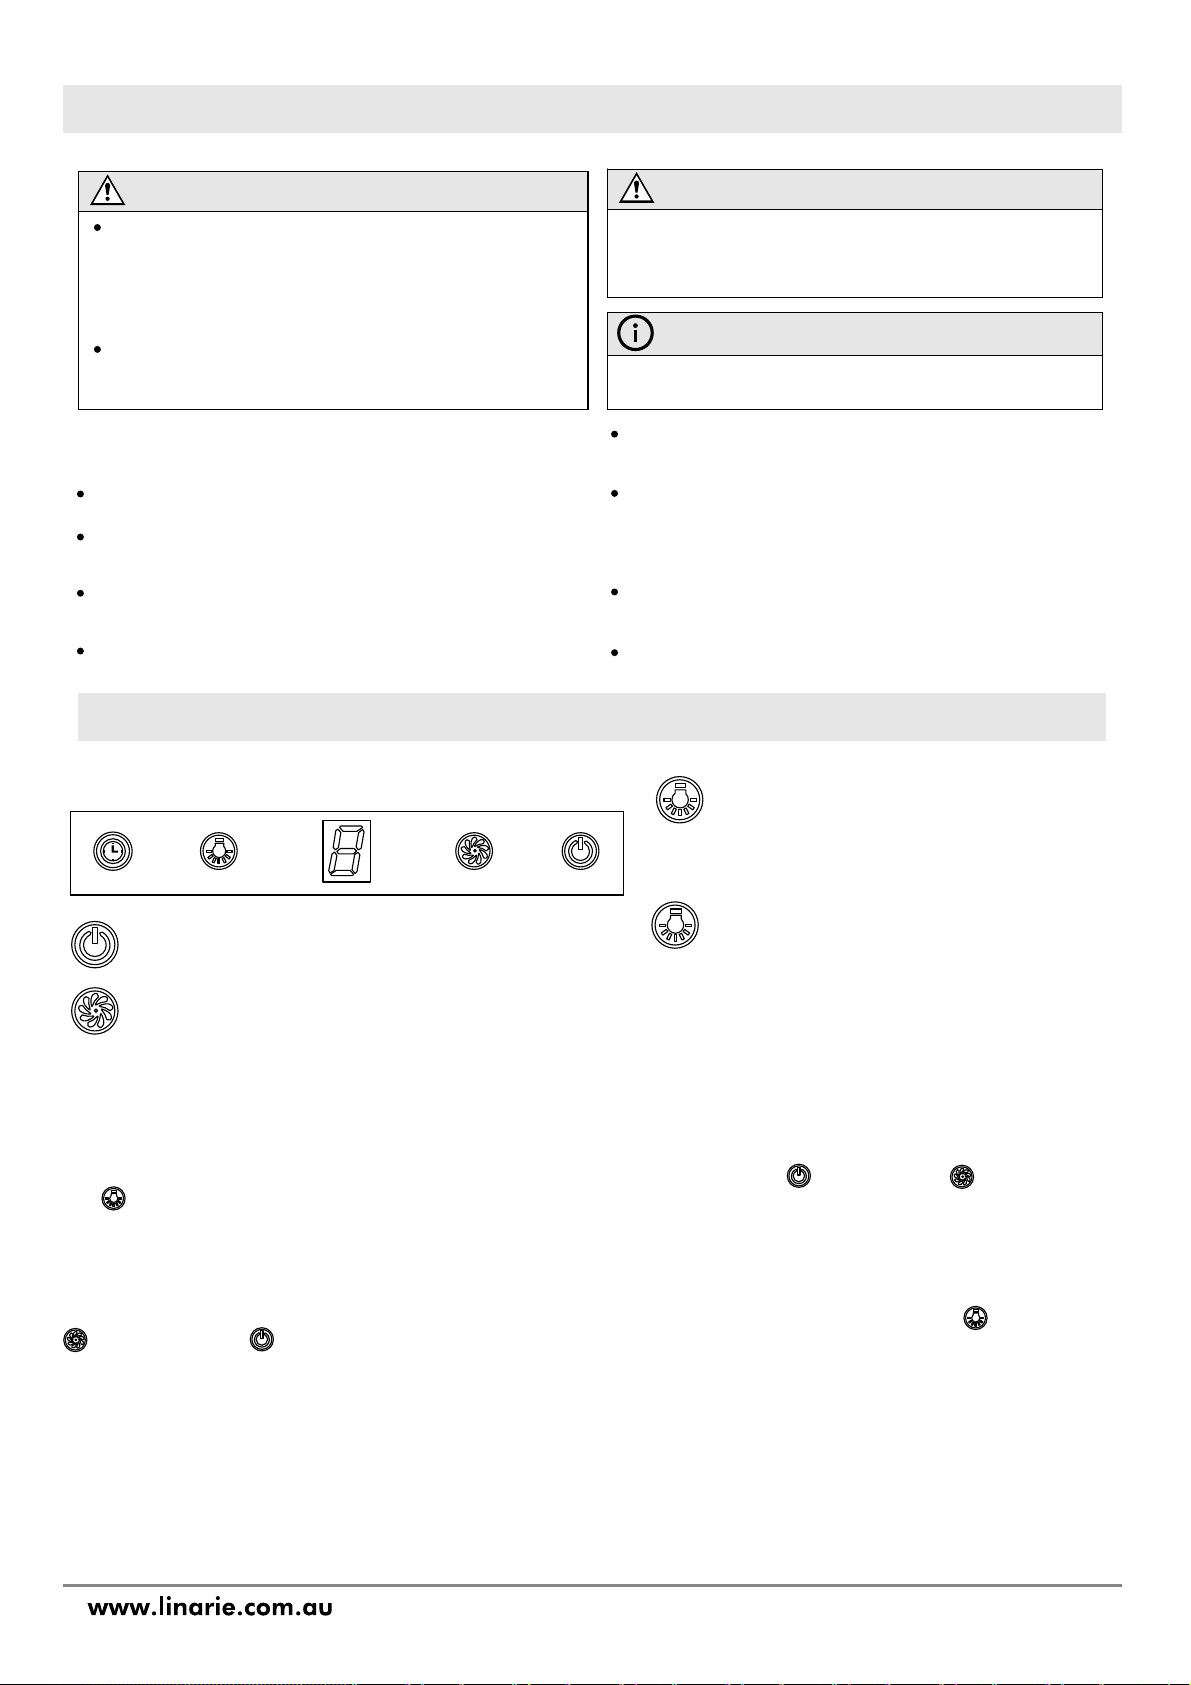
The button control the “on” & “off ” of the hood.
1. Power button
By pressing the “Speed” button, the motor runs
the low / mid / high / low / mid motion.
The speed runs in circulation mode; and the LED
display will also indicate in 1-2-3-1-2 motion.
2. Speed button
ke sure that the exhaust pipe extends as short and
straight as possible.
Do not reduce the size or restrict the exhaust pipe. When
using exhaust air pipes, always install the pipe tightly to
minimise pressure loss.
Non-compliance with these basic instructions will reduce
the performance and increase the noise level of the
rangehood.
All installation work must be carried out by an
electrician or a qualified person.
Do not connect the exhaust pipe of the rangehood to an
existing ventilation system used for another appliance,
e.g. a flue, gas pipes or hot air pipes.
In case the exhaust air pipe is bent, the angle of the
exhaust air pipe should not be less than 120°. Never
point the exhaust air pipe downwards, but always
horizontally or guide the pipe from the starting point
upwards to the air outlet on the outside wall.
After installation, please make sure that the rangehood is
positioned horizontally to prevent grease from
accumulating.
Make sure that the exhaust pipe selected for installation
complies with the relevant standards and is fire-retardant.
CAUTION
Before installation, it is important to read the information given
on the
"Warning and Safety instructions" section at the
beginning of this booklet. This is particularly crucial when usin
g
the rangehood at the same time as a heating appliance that
relies on oxygen from the same room, which could result in the
build-up of toxic fumes.
The rangehood should be installed according to local and
national building regulations. Seek approval from the building
inspector where necessary
.
CAUTION
Risk of injury! For safety reasons, only use the size of fastening or
mounting screw recommended in these operating instructions.
Non-compliance with these instructions can lead to injuries and
electric shocks.
Remember that any constriction of the airflow will reduce extraction
performance and increase operating noise.
NOTE
cont. installation
5.1 Control panel and function keys
By press “Lamp” button, the light illuminates.
Press this button again, and the light will turn off.
Please note that the Lamp is not under control of
the On/Off button.
5.1 Wave your hand from left to right once within 8cm from the front of the sensor, the rangehood will start to work at low
speed and the LED display will show “1”.The light will lit on. The indicator lights of the (Power) button, (Speed) button
and (Lamp) button will be on. Wave your hand from left to right again, the rangehood works at medium speed and the
LED display will show “2”. Wave your hand in the same direction as above for another time, the rangehood works at high
speed and the LED display will show “3”. Wave your hand in the same way again when the hood works at the highest speed,
the hood will work at the same speed.
5.2When wave your hand from right to left once, the cooker hood will shift to a lower speed. Wave your hand from right to left
when the hood works at high speed, the cooker hood will switch to medium speed. The indicator light of the (Lamp) button,
(Speed) button and (Power) button will be on. Wave your hand from right to left when the hood works at medium speed,
the cooker hood will switch to low speed. The LED display will show current speed level. If continuously reducing to no speed,
the indicator lights will be off and all the function operation of the hood will not be available. The hood will then enter standby
mode. The above steps can be operated repeatedly.
5.3 If without any operation for functional buttons, the gesture sensor will enter sleeping mode after 10 minutes. Re-awake
gesture function requires manual operation of any function buttons. The gesture function can be operated only when it has
been activated.
In addition, in order to improve the quality of air treatment, we advise you to turn on your hood a few minutes
before cooking, this will create a furrow and bring the unfiltered air back to the hood the first time.
Please do not open any window or door when using, it will lose the furrow and efficiency of the hood.
3. Lamp button
Timer Lamp Speed Power
When the hood is working, by pressing the
“Timer” button, the hood will go into the status
of acquiescent working (acquiescent time is 9mins),
and then, the LED display will be shown 9.8.7.6.
decreasing by 1. When time is up, the hood will be
off automatically and the lamp will switch off.
By pressing “Timer” button, the hood will be in IN
or Out “Timer” function.
4. Timer button
5.Gesture sensor mode:
9
cont. operation
5.2 Energy Saving tips
This rangehood operates very efficiently and economically.
The following will help you to save even more energy when
using it:
Ensure that there is sufficient ventilation in the kitchen
when cooking. In extraction mode, if there is insufficient
air flow the rangehood cannot operate efficiently and this
causes increased operating noise levels.
Always cook with the lowest possible setting. This
produces fewer cooking vapors, so you can use a lower
rangehood power level and therefore benefit from
reduced energy consumption.
Check the power level selected on the rangehood. A
lower power level is generally sufficient for the majority of
cooking.
When a large volume of cooking vapors is being
produced, switch to a high-power level in good time.
This is more efficient than operating the rangehood
for longer to try to capture cooking vapors which have
already been distributed throughout the kitchen.
Make sure that you switch the rangehood off after use.
Clean or change the filters at regular intervals. Heavily
soiled filters reduce performance, increase the risk of
fire and are unhygienic.
Lights on, but motor
does not work.
Light does not work,
motor does not work.
Oil leakage.
Lights not working.
Fan switch has turned off.
Fan switch has failed.
Motor has failed.
Select a fan switch position.
Contact service center.
Contact service center.
Problem Possible Cause Possible Solution
6. TROUBLESHOOTING
Observe all safety and warning information during operation. ( see the General Safety Instructions” section)
Mains power cable is loose
or disconnected.
One way valve and the outlet
are not tightly sealed.
Leakage from the connection
of chimney and cover.
Broken or faulty bulbs.
House fuses has blown.
Select a fan switch position.
Remove and reattach mains power cable to power outlet.
Switch power outlet on.
Take chimney down and seal.
Replace bulbs following this instruction manual.
Insufficient suction.
The rangehood
inclines.
The distance between the
rangehood and the gas top
is too far.
The fixing screw is not tight
enough.
Realign and refit the rangehood to the correct distance.
Tighten the hanging screw and make it horizontal.
Take down the one way valve and seal with sealant.
WAR NIN G
Any electrical repairs to this appliance must conform to your local, state and federal laws. Please contact the service center if in any
doubt before undertaking any of the above. Always disconnect the unit from the power source when opening the unit.
WAR NIN G
The stainless steel must be cleaned regularly (weekly)
to ensure a long service life. Stainless steel surfaces
can be cleaned with a proprietary nonabrasive
cleaning agent designed specifically for use on
stainless steel.
Observe all safety and warning information during operation
(see the “General Safety Instructions” section).
Before maintenance or cleaning, the rangehood should always
be disconnected from the power supply. Make sure that the
rangehood is switched off and the plug has been removed.
Exterior surfaces are prone to scratches and dents. Therefore,
please follow the cleaning instructions to achieve the best
possible result without damage.
WAR NIN G
Do not use stainless steel cleaning agents on the controls.
Use neutral cleaning agents and avoid using harsh cleaning
chemicals, strong household cleaners or products containing
abrasive cleaners as this will affect the appearance of the
appliance and may remove the printed symbols on the control
panel.
WAR NIN G
An oversaturated filter is a fire hazard. The aluminum grease filter
in the appliance removes solid particles from the kitchen vapors,
grease, dust, etc., therefore, preventing soiling of the rangehood.
7. CLEANING & MAINTENANCE
7.1 Stainless steel
The control panel can be cleaned with warm soapy
water. Make sure the cloth is clean and thoroughly
wrung out before cleaning the control panel.
Use a dry, soft cloth to remove excess moisture after
cleaning.
The reusable aluminum filter can be cleaned by hand.
Soak them in water together with a grease-dissolving
detergent for about 3 minutes and then brush them
gently with a soft brush. Do not apply too much
pressure to avoid damaging the filter. Allow the filter
to air dry afterwards, but do not place it directly in the
sun. Filters should always be washed separately from
crockery and kitchen utensils!
The grease filter should be cleaned regularly (at least
every 3-4 weeks) to avoid a build-up of grease
Removing the filters as the instruction in Pic. 10.
You can clean the filter as below measure:
Soak them for about 3 minute in hot water
(40-50 degrees) with a grease-loosening detergent
then brush it gently with a soft brush.
Please do not apply too much pressure, avoid damaging it.
Please do not use abrasive detergent for it will damage the hood.
Make sure that the hood is shut off before cleaning.
7.2 Control panel
7.4 Aluminum grease filter
Grease filter cleaning intervals
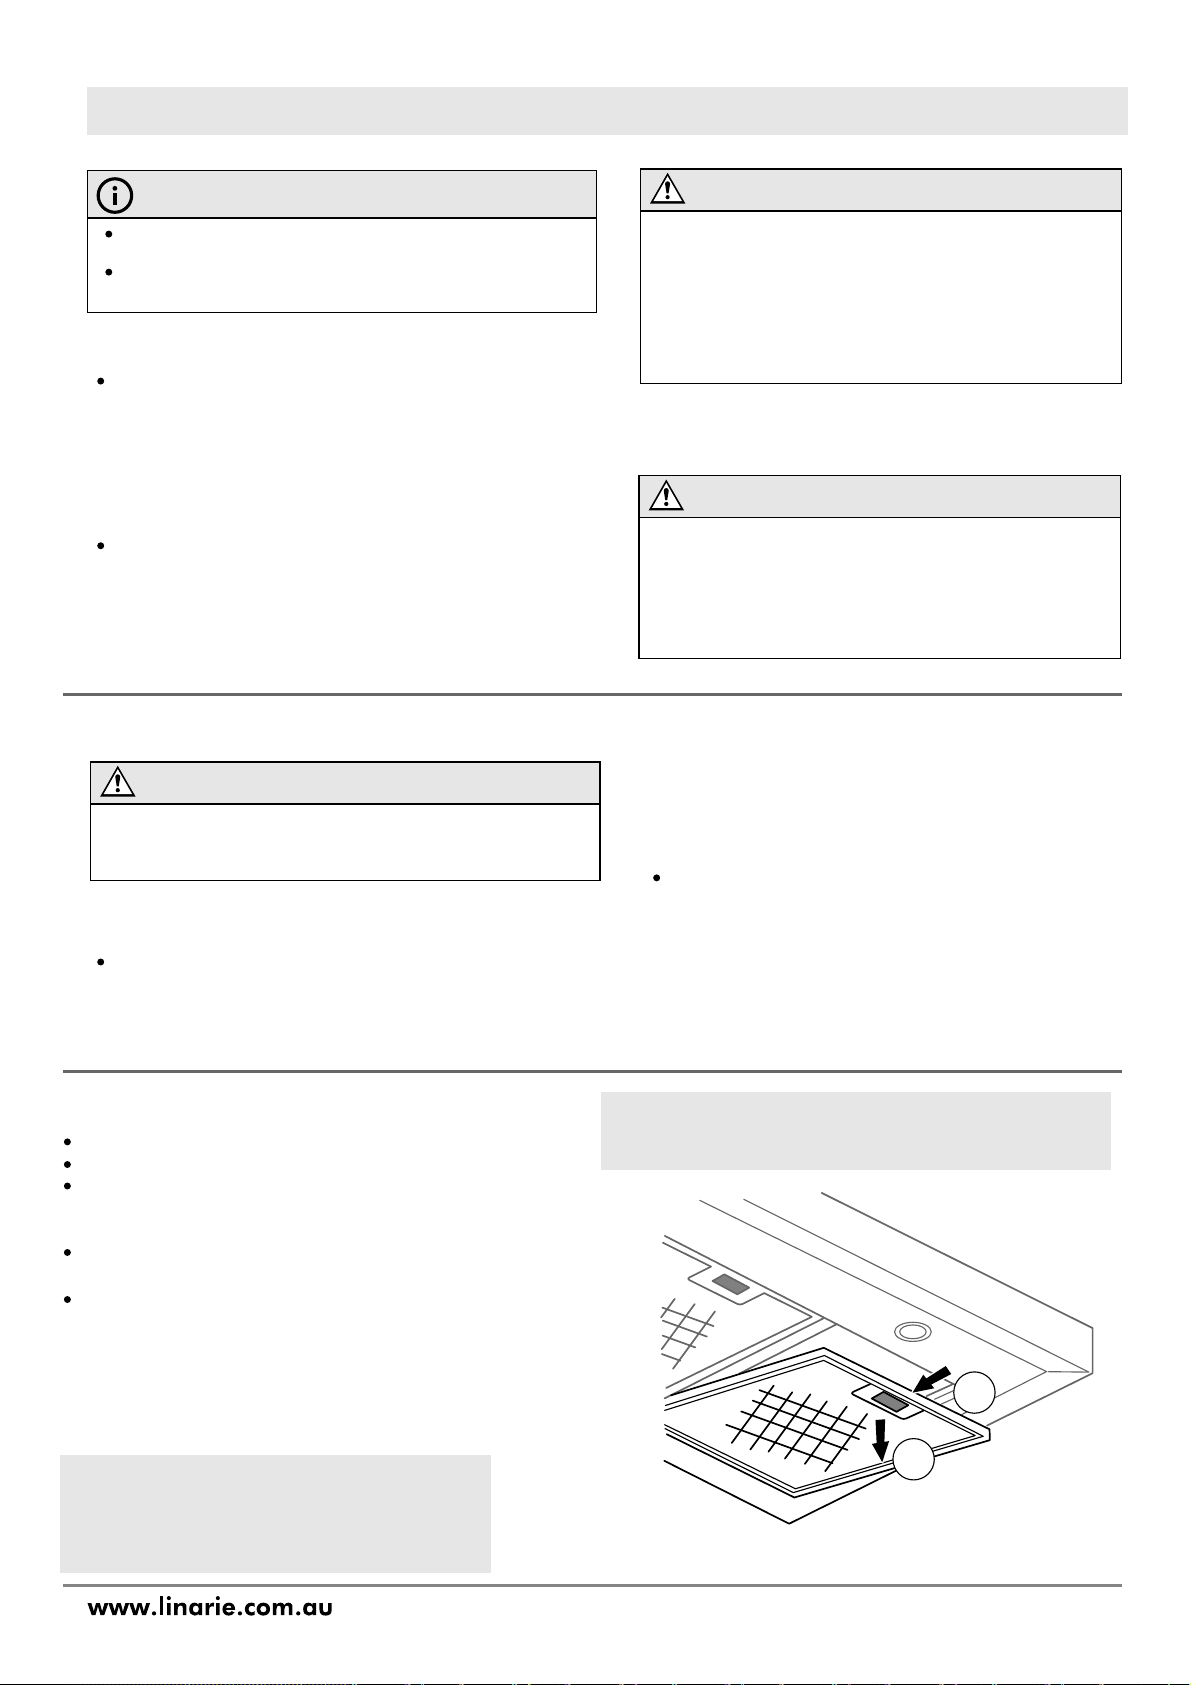
7.5 Removing the aluminum grease filter
Cleaning the grease filter by hand
Remove the filter as shown in the image
below and reinsert the filter in reverse order.
7.3 Cleaning agents
GENER AL IN F ORMA T IO N
Allow the appliance to cool down completely before cleaning and
maintenance.
The surfaces and controls are susceptible to scratches and
abrasion. Please observe the following cleaning instructions.
When handling a grease filter, be careful not to
drop it. This can result in damage to the filter
and the cooktop below. Make sure you hold the
filter securely at all times when handling it.
10
2
1
cont. cleaning and maintenance
WAR NIN G
Make sure that the filter is tightly closed. It can otherwise detach
and become dangerous. If an activated carbon filter is connected,
the suction power is reduced.
WAR NIN G
The lamps become hot when in use. Allow the lamps to cool
down completely before changing them.
The lamp must be replaced by the manufacturer, its after-sales
service or similarly qualified persons.
Always switch off the power supply before carrying out any work
on the appliance.
Always hold the lamp with a cloth or gloves when inserting or
removing it to ensure that sweat does not come into contact with
the lamp, as this can reduce its life.
If the rangehood is connected for recirculation, a charcoal
filter must be inserted in addition to the grease filter. This
is designed to absorb cooking odors.
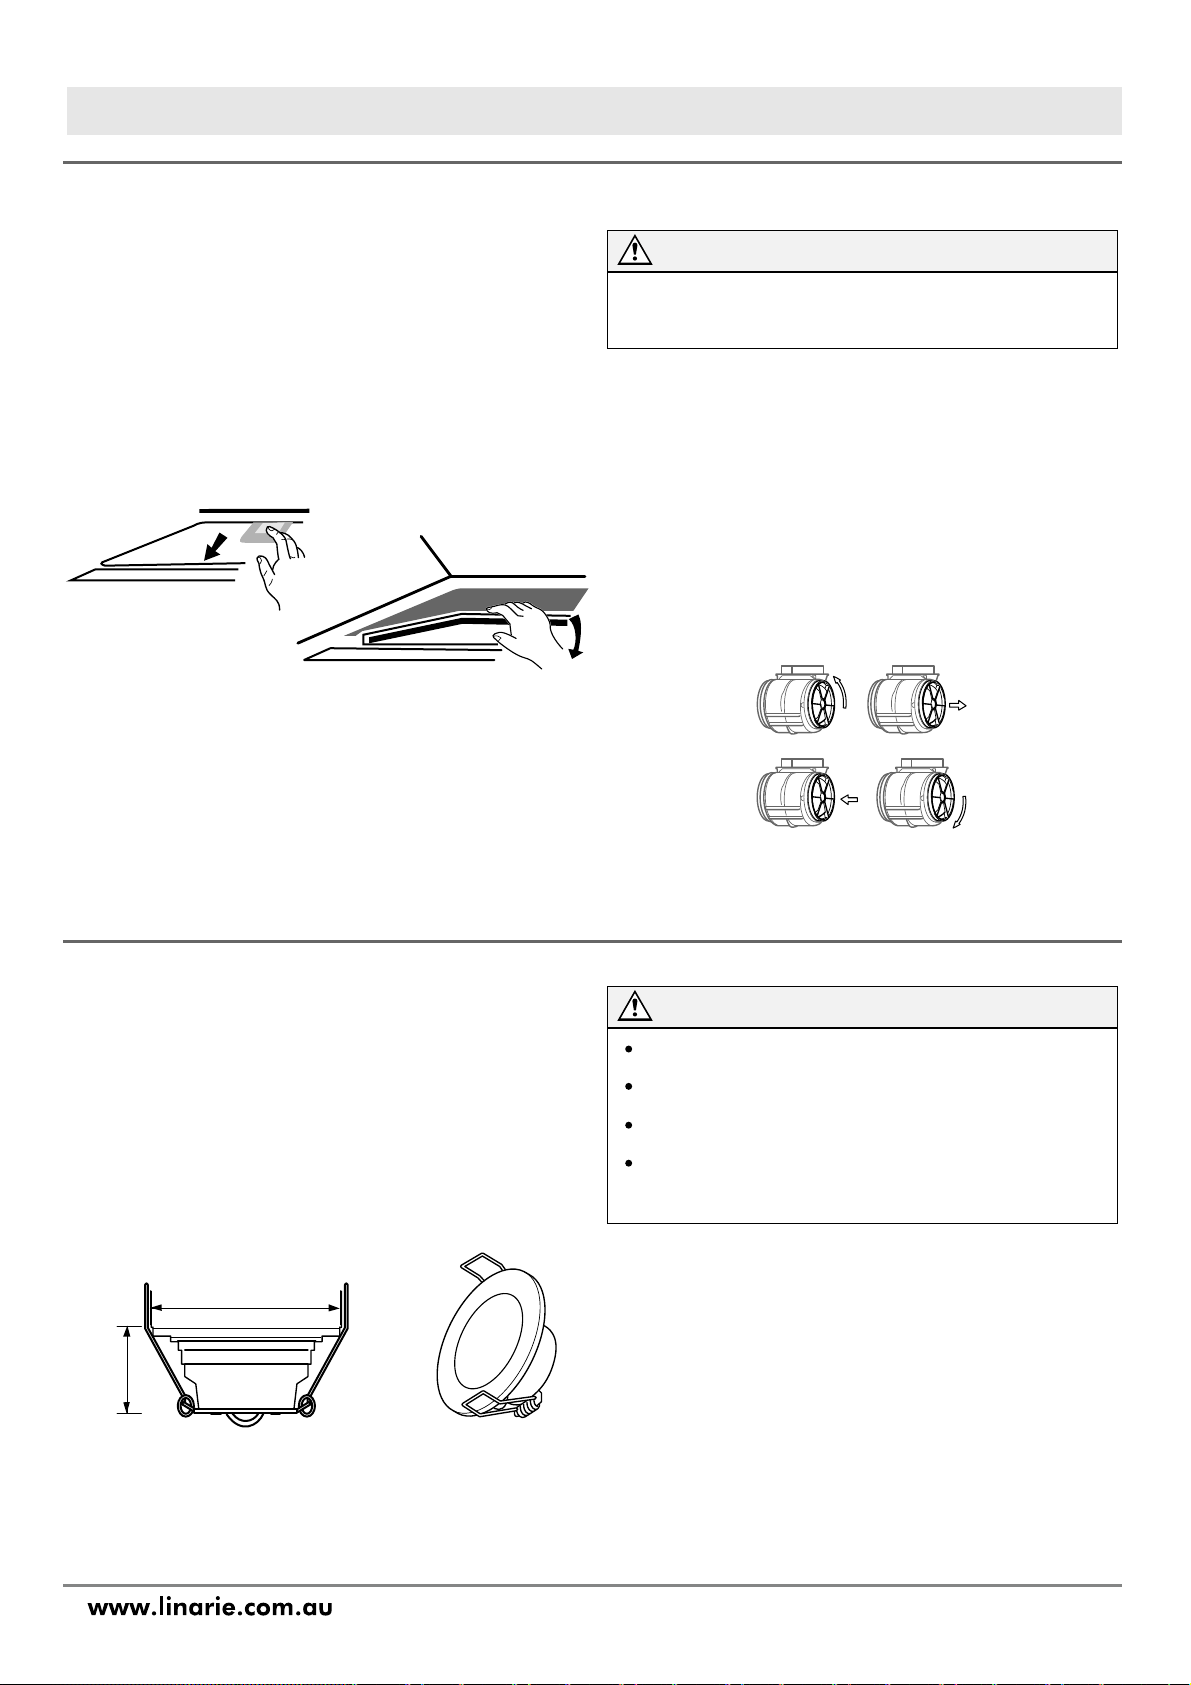
The installation of the activated carbon filter is done as
follows:
1. Remove the filters.
2. The charcoal filters (right image) are located at both end of the
motor. Turn the charcoal filters until they are unscrewed.
3. Apply reverse procedure to uninstall the charcoal filter.
Warning: the charcoal filer cannot be washed or recycled.
It should be replaced after approximately 120 hours of use.
First, remove the grease filter by pulling it down after
having unblocked.
Mount the charcoal filter on the hood by turning it clockwise.
Do the same for the second filter.
The activated charcoal filter should be changed after 3 to
6 months, depending on your cooking habits. Allow the
appliance to cool down completely before maintenance.
Replacement charcoal filters can be obtained from
www.linarie.com.au
The used activated charcoal filter can be disposed with the
normal househ
Charcoal filter
old waste.
Observe all safety and warning information during
operation (see the “General Safety Instructions”
section).
The lamps should be replaced with the following:
ILCOS D code: DSR-1.5-65-S-64
LED
Max wattage: 1.5W
Volateg range: DC 12v
Type: Self-ballasted - round lamp
Dimensions: 64mm
7.6 Activated carbon filter
7.7 Replacing the lamps
Installing and replacing the activated charcoal filter
When to change the activated charcoal filter?
Disposing of the activated charcoal filter
11
20.5
64
Open
Replace filter on both sides
Close
8.2 Disposing of your old appliance
8. ENVIRONMENTAL TIPS
9. WARRANTY & AFTER SALES SERVICE
The transport and protective packaging has been selected
from materials which are environmentally friendly for
disposal, and can normally be recycled.
Recycling the packaging reduces the use of raw materials
in the manufacturing process and also reduces the
amount of waste in landfill sites. Ensure that any plastic
wrappings, bags etc. are disposed of safely and kept out
of the reach of babies and young children. Danger of
suffocation.
Observe all safety and warning information during
operation (see the “General Safety Instructions” section).
Observe all safety and warning information during
operation (see the “General Safety Instructions” section).
Incorrect components can lead to personal injury or
damage to the appliance. Use only genuine original
Linärie spare parts.
Modifications, additions or alterations to the appliance
can lead to safety risks. If spare parts or accessories from
other manufacturers are used, the warranty will be
invalidated, and Linärie cannot accept liability.
Please check www.linarie.com.au for more information.
Model:…………………………………………………………
Serial Number:.………………………………………………
Register your product www.linarie.com.au
In the event of a fault which you cannot remedy yourself,
please contact Linärie.
The manufacturer’s warranty for this appliance is 2 years.
The contact details for Linärie are given at the beginning
and of these instructions.
When contacting Linärie, please quote the mo
del and
serial number of your appliance. These can be found on
the data plate, after removing the grease filter.
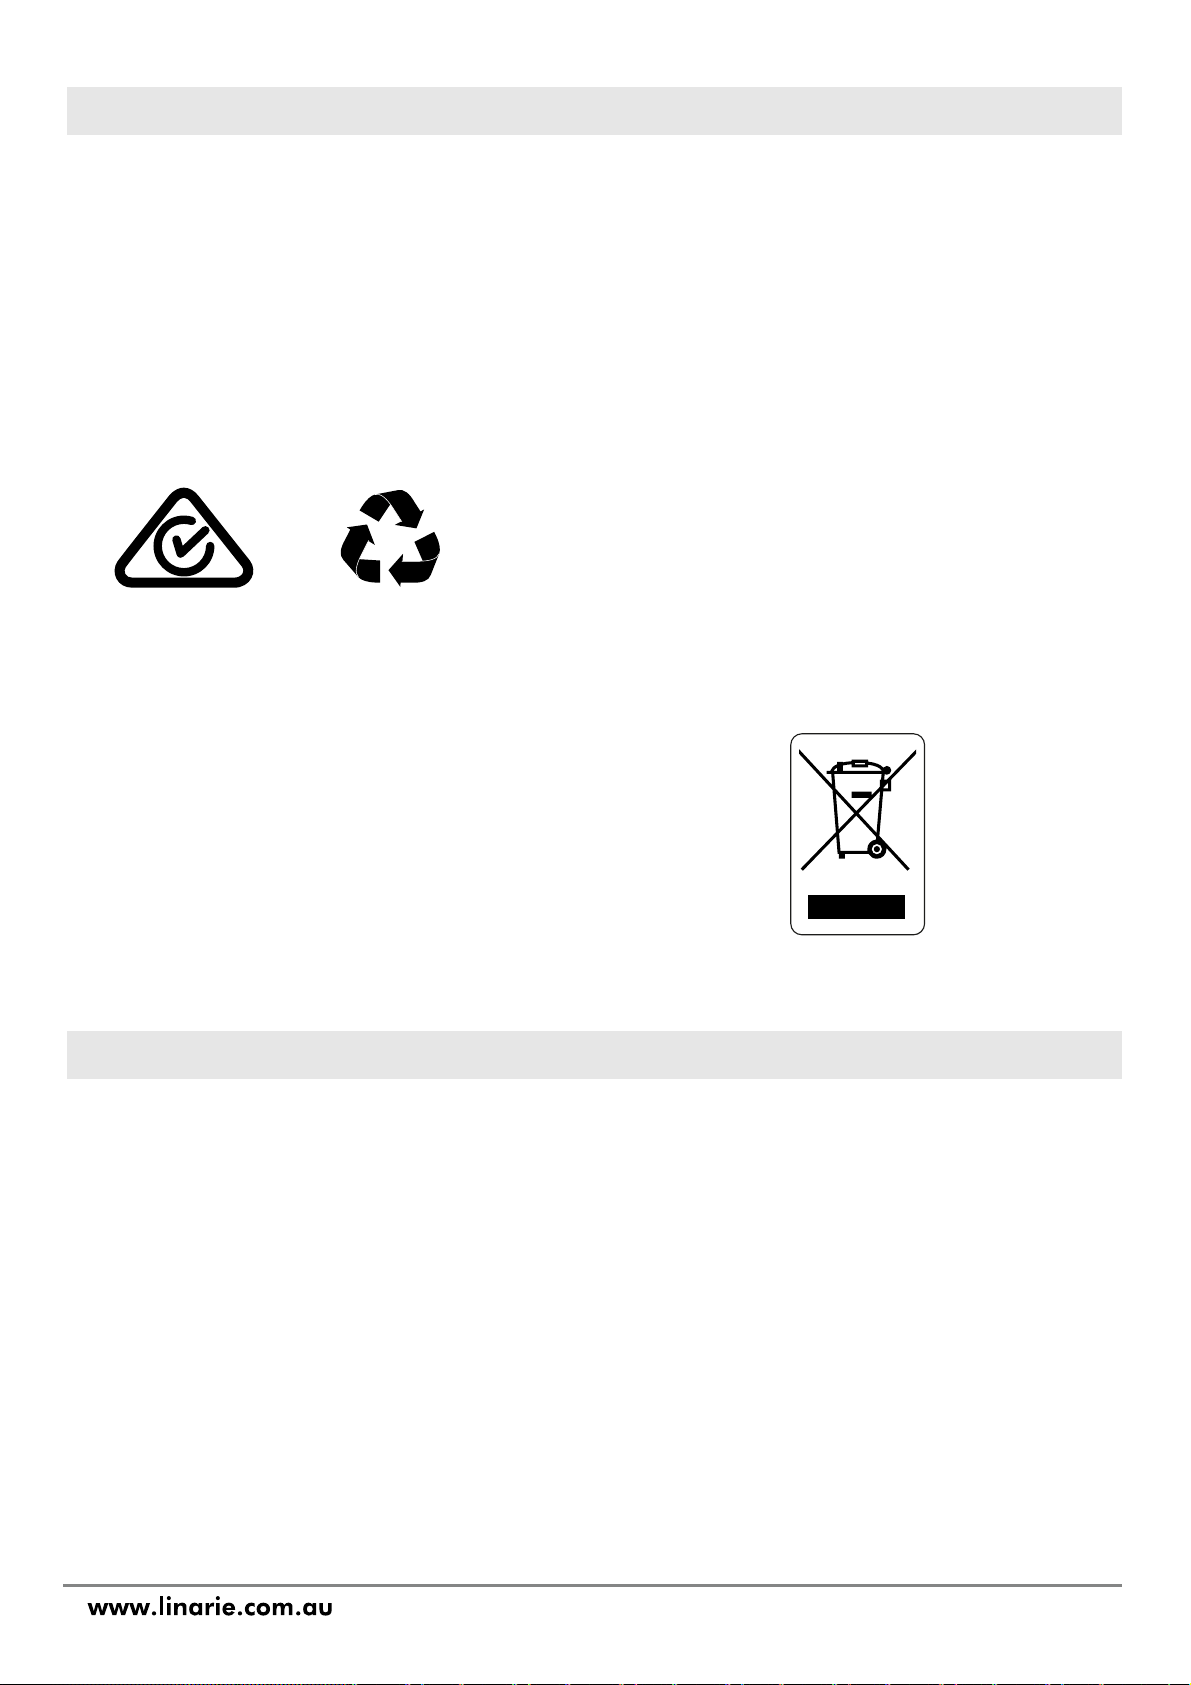
Electrical devices marked with this label may not be
disposed of in domestic waste at the end of their service
life.
Electrical and electronic appliances often contain valuable
materials. They also contain specific materials, compounds
and components, which were essential for their correct
function and safety. These could be hazardous to human
health and to the environment if disposed of with your
domestic waste or if handled incorrectly. Please do not,
therefore, dispose of your old appliance with your
household waste.
Please dispose of those materials by contacting your local
authorities and ask for the correct method of disposal.
Please ensure that your old appliance poses no risk to
children while being stored prior to disposal.
By disposing of this product in accordance with the
regulations, you protect the environment and the health of
those around you from negative consequences.
8.1 Disposal considerations
9.1 Warranty 9.3 Replacement of spare parts
9.2 After sales service
Record model & serial number
12

LIKE TO
KNOW MORE?
© Linärie
For further information on all Linärie appliances,
or to obtain detailed dimension and installation
information, phone or email our Customer Care
team or visit our website:
Australia
www.linarie.com.au
Follow Us
@Linarie.Appliances
www.linarie.com.au

Operating and installation instructions: Original √ Translation
Linärie Contact
www.linarie.com.au
The distribution and duplication of this document, as well as the use and disclosure of its contents
are prohibited unless expressly authorised.
These operating and installation instructions have been drawn up with the greatest of care. But it
cannot be ruled out that subsequent technical modifications have not yet been incorporated or
the relevant content has not yet been adapted. Please accept our apologies in this eventuality. An
updated version can be requested from our team. Subject to printing errors and mistakes.
© Linärie
All rights reserved.
www. linarie .com.a u
Mart Online Services Pty Ltd.
ACN 657 824 050