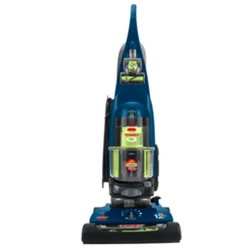
Biss_ll °
ZING °
USER'S GUIDE
6489 SERIES
Thank You
Safety Instructions
Product View
Assembly
Operations
Maintenance and Care
Troubleshooting
Replacement Parts
Accessories
Warranty
Product Registration
Consumer Care
lanks for buying a BISSELL Vacuum
We're glad you purchased a BISSELLvacuum. Everything we know about
floor care went into the design and construction of this complete, high-tech
home cleaning system.
Your BISSELLZing canister vacuum is well made, and we back it with a
limited one year warranty. We also stand behind it with a knowledgeable,
dedicated Consumer Care department, so, should you ever have a
problem, you'll receive fast, considerate assistance.
My great-grandfather invented the floor sweeper in ] 876. Today, BISSELL
is a global leader in the design, manufacture, and service of high quality
homecare products like your BISSELLZing canister vacuum.
Thanks again, from all of us at BISSELL.
Mark J. Bissell
Chairman & CEO
2
www. b is sell .com y_>_, 800.237.7691
SAFETY INSTRUCTIONS
When using an electrical appliance,
basic precautions should be observed,
including the following:
READ ALL
INSTRUCTIONS
BEFORE USING
YOUR CANISTER
VACUUM.
Always connect to a polarized outlet
(left slot is wider than right). Unplug
from outlet when not in use and before
conducting maintenance.
/k WARNING: To
reduce the risk of fire,
electric shock, or injury:
• Unplug from outlet when not in use
and before servicing.
• Do not use with damaged cord or plug.
• To unplug, grasp plug, not cord.
• Do not pull or carry by cord, use cord as
a handle, close door on cord, pull cord
around sharp corners, run cleaner over
cord, or expose cord to heated surfaces.
• Hold plug when rewinding the cord
onto the reel. Do not allow the plug
to whip when rewinding.
• Do not use cleaner if it has been
dropped, damaged, left outdoors or
dropped into water. Have it repaired
at an Authorized Service Center.
• Do not allow children to use as a toy.
• Do not use outdoors or on wet surfaces.
• Do not handle cleaner or plug with
wet hands.
• Do not put any object into openings, use
with blocked opening, or restrict air flow.
• Do not use without dust bag and/or
filters in place.
• Do not allow hair, loose clothing, fingers
or body parts to get near openings or
floor brush in the appliance.
• Do not pick up hot coals, cigarette
butts, matches or any hot, smoking,
or burning objects.
• Do not pick up hard or sharp objects
such as glass, nails, screws, coins, etc.
www. b is sell. co m _
• Do not pick up flammable or combus-
tible materials (lighter fluid, gasoline,
kerosene, etc.) or use in the presence
of explosive liquids or vapor.
• Do not unplug by pulling on cord
• Do not pick up toxic material (chlorine
bleach, ammonia, drain cleaner, etc.).
• Do not use in an enclosed space filled
with vapors given off by oil base paint,
paint thinner, some moth proofing
substances, flammable dust, or other
explosive or toxic vapors.
• Do not use for any purpose other
than described in this User's Guide.
• Always turn off this appliance before con-
necting or disconnecting vacuum hose.
• Use only manufacturer's
recommended attachments.
• Use only on dry, indoor surfaces.
• Keep openings free of dust, lint, hair, etc.
• Keep appliance on a level surface.
• Turn off all controls before plugging
in or unplugging cleaner.
• Be extra careful when cleaning stairs.
• Close attention is necessary when
used by or near children.
SAVE THESE
INSTRUCTIONS
FOR FUTURE
USE
THIS APPLIANCE
HAS A POLARIZED
PLUG.
To reduce the risk of electric shock, this
appliance has a polarized plug (one blade
is wider than the other). This plug will fit
in a polarized outlet only one way. If the
plug does not fit fully in the outlet, reverse
the plug. If it still does not fit, contact a
qualified electrician to install a proper out-
let. Do not change the plug in any way.
This model is for household use only.
3
800.237.7691
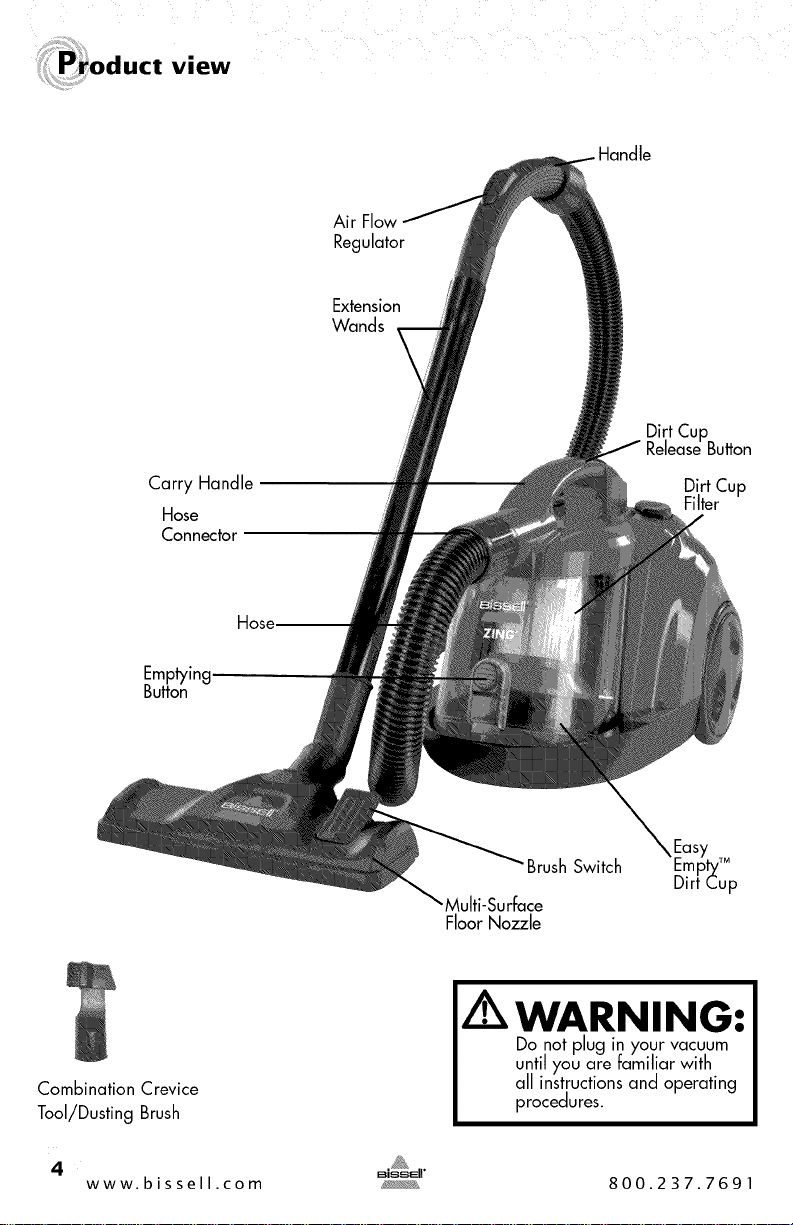
view
Carry Handle
Hose
Connector
Emptying
Button
Air
Regulator
Extension
Wands
DirtCup
ReleaseButton
Dirt Cup
Filter
CombinationCrevice
Tool/DustingBrush
4
www.bissell.com
BrushSwitch
Multi-Surface
FloorNo771e
WARNING:
Donot plug inyour vacuum
untilyou are familiar with
all instructionsand operating
procedures.
800.237.7691
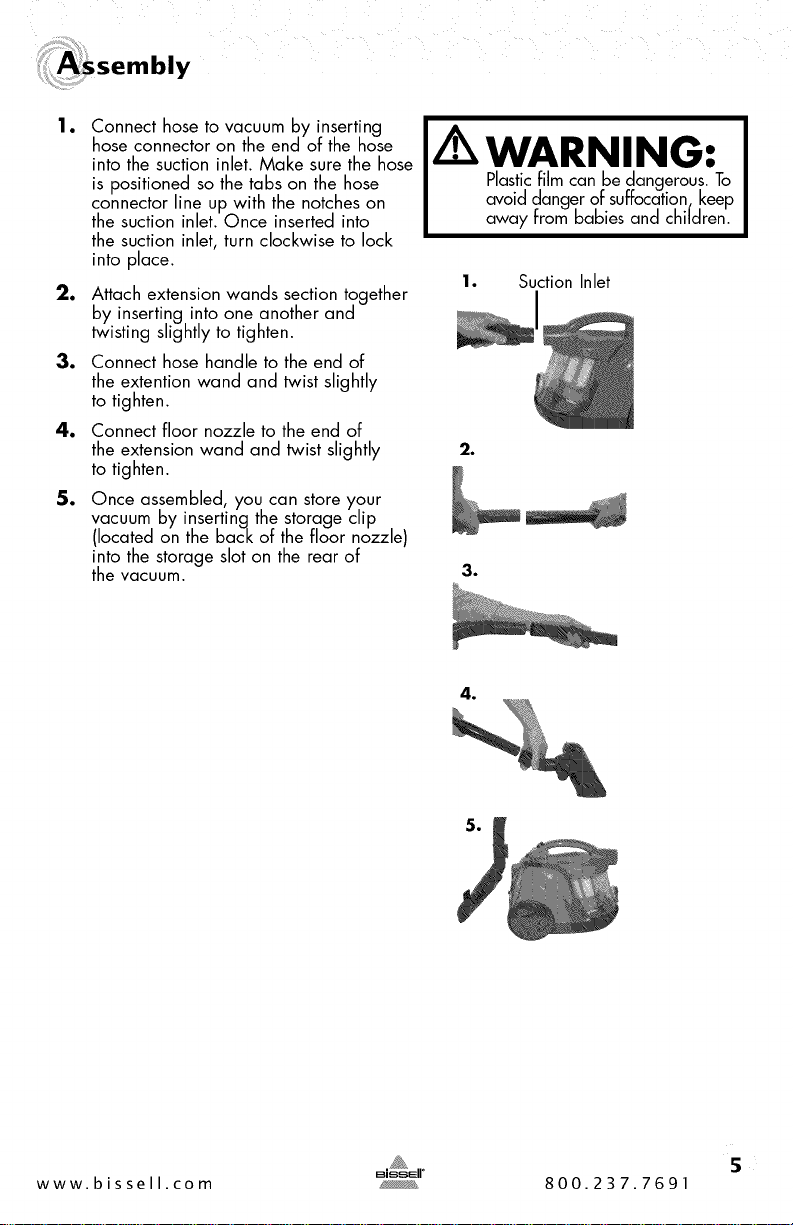
;sembly
le
Connect hose to vacuum by inserting
hose connector on the end of the hose
into the suction inlet. Make sure the hose
is positioned so the tabs on the hose
connector line up with the notches on
the suction inlet. Once inserted into
the suction inlet, turn clockwise to lock
into place.
2. Attach extension wands section together
by inserting into one another and
twisting slightly to tighten.
3. Connect hose handle to the end of
the extention wand and twist slightly
to tighten.
4. Connect floor nozzle to the end of
the extension wand and twist slightly
to tighten.
5. Once assembled, you can store your
vacuum by insertingthe storage clip
(located on the back of the floor nozzle)
into the storage slot on the rear of
the vacuum.
WARNING:
Plasticfilm can be dangerous. To
avoid danger of suffocation, keep
away from babies and chiJdren.
1. Suction Inlet
2.
3.
4,
5
www. bi s se II. co m _, 800.237.7691
Power cord
The power cord is located at the rear of the
vacuum. Gently pull out the power cord,
watching for the yellow line. Stop pulling the
power cord once the yellow line is visible.
There is also a red line, which indicates the
end of the usable cord. Do not pull the power
cord out beyond the red line.
Automatic cord rewind
Your vacuum is equipped with an automatic
cord rewind. When cleaningis finished, press
the power button OFF andgrasp the plug to
disconnect from the electrical outlet. Hold
the plug and press the automatic cord rewind
button to rewind the cord automatically.
Power button
TurnthepowerON or OFFby pressinglightly
downward on the powerbutton(©).
Automatic Cord
Rewind Button
/K CAUTION:
Becareful toavoid injury ascord
retractsvery quickly.
Power
Button
Before usinc!your vacuum, make
sure that the dirt cup and all filters
are in place. Do not operate
your vacuum without the dirt
cup and filters.
NOTICE:
While vacuuming, certain types of
carpets and low'humidity conditions
may generate small static discharges.
The _scharges are entirely harmless
and are not associated in any way
with the main power supply.
6
www. bis sell .com y_, 800.237.7691
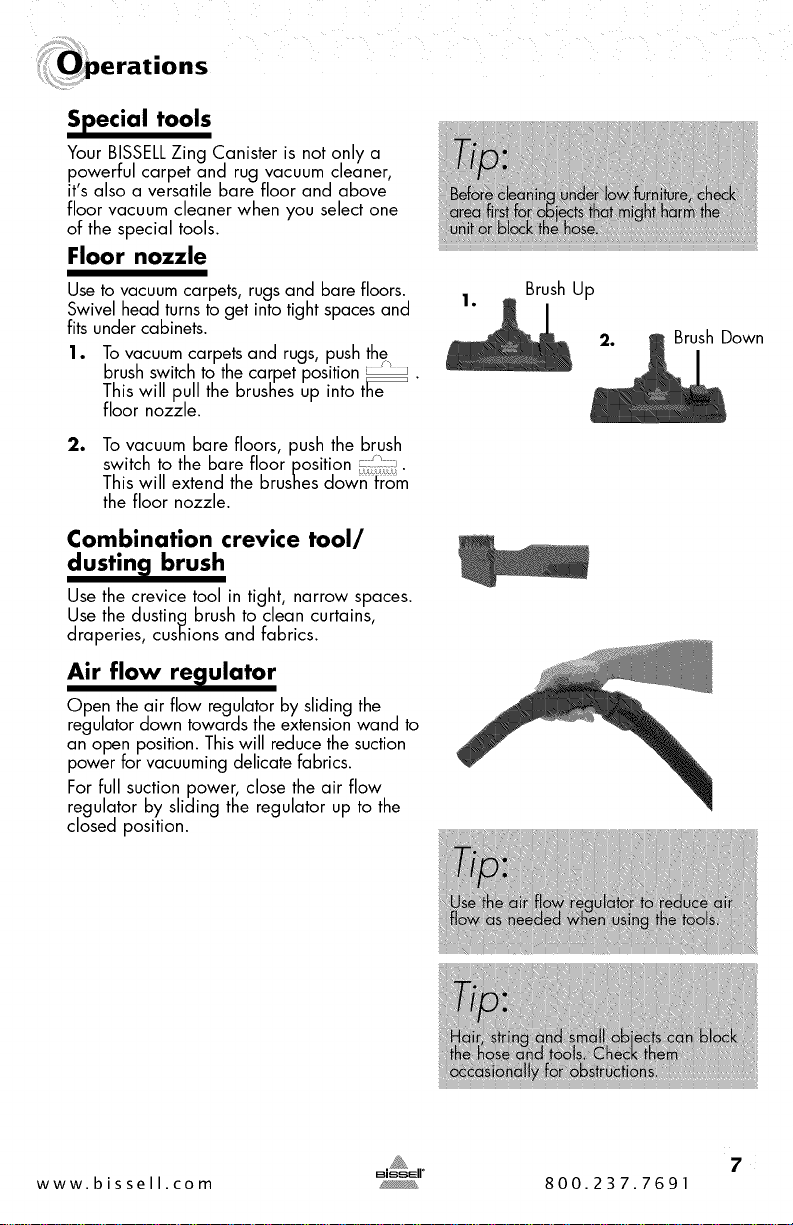
Special tools
Your BISSELLZing Canister is not only a
p,owerful carpet and rug vacuum cleaner,
it s also a versatile bare floor and above
floor vacuum cleaner when you select one
of the special tools•
Floor nozzle
Use to vacuum carpets, rugs and bare floors•
Swivel head turns to get into tight spaces and
fits under cabinets•
1. To vacuum carpets and rugs, push the
.... f_
brush sw_tchto the carpet pos_hon_.
This will pull the brushes up into the
floor nozzle•
2. Tovacuum bare floors, push the brush
switch to the bare floor position _i:,_ •
This will extend the brushes down kom
the floor nozzle•
Combination crevice tool/
dustin_l brush
Use the crevice tool in tight, narrow spaces•
Use the dusting brush to clean curtains,
draperies, cushions and fabrics•
Air flow re_lulator
Open the air flow regulator by sliding the
regulator down towards the extension wand to
an open position• This will reduce the suction
power for vacuuming delicate fabrics•
For full suction power, close the air flow
regulator by sliding the regulator up to the
closed position•
BrushUp
2.
BrushDown
7
www. bi s se II. co m _,_®_ 800.237.7691
ntenance and care
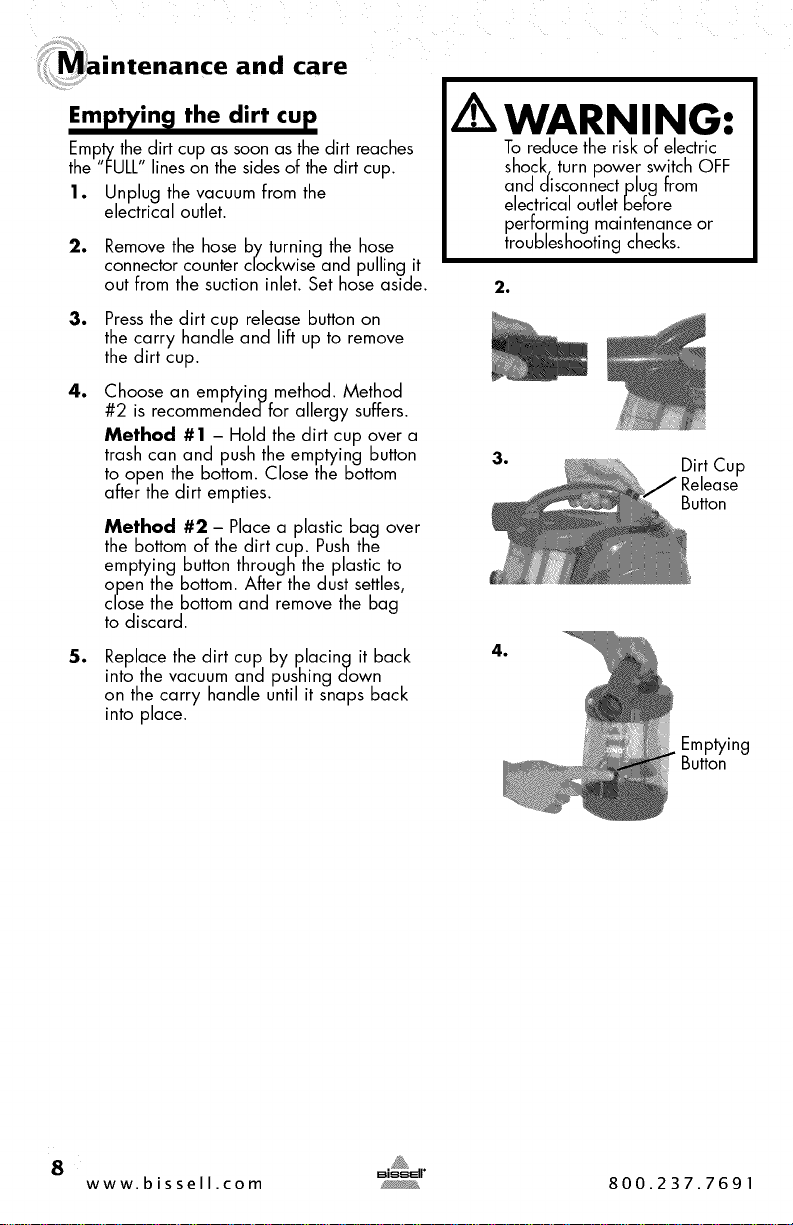
Emptyin_l the dirt
cup
Empty the dirt cup as soon as the dirt reaches
the "FULL" lines on the sides of the dirt cup.
1. Unplug the vacuum from the
electrical outlet.
2. Remove the hose by turning the hose
connector counter clockwise and pulling it
out from the suction inlet. Set hose aside.
o
°
Pressthe dirt cup release button on
the carry handle and lift up to remove
the dirt cup.
Choose an emptying method. Method
#2 is recommendedfor allergy suffers.
Method #1 - Hold the dirt cup over a
trash can and push the emptying button
to open the bottom. Close the bottom
after the dirt empties.
Method #2 - Place a plastic bag over
the bottom of the dirt cup. Pushthe
emptying button through the plastic to
open the bottom. After the dust settles,
close the bottom and remove the bag
to discard.
o
Replace the dirt cup by placing it back
into the vacuum and pushing down
on the carry handle until it snaps back
into place.
Toreducetheriskof electric
shock,turn power switchOFF
and disconnectplug from
electricaloutletbefore
performing maintenanceor
troubleshootingchecks.
2,
Dirt Cup
Release
Button
Emptying
Button
8
www.bissell.com 800.237.7691
ntenance and care
Cleaning_ the dirt cup filters
Use only BISSELLreplacement filters in your
Zing Canister.
1. Unplug the vacuum from the
electrical outlet.
2. The dirt cup filters can be reached
by removing the dirt cup from the
vacuum, _grasping the handle on the
bottom otthe dirt cup filter assembly
and turning counter clockwise to
unlock. Pull straight down to remove.
3. Remove the dirt cup filter screen
by grasping the bottom of the filter
frame base and pulling straight up.
4.. Remove the dirt cup filter by
grasping the bottom of the filter
frame base and turning the dirt cup
filter counter clockwise and pulling
straight up.
5. The dirt cup filter screen and dirt
cup filter can be hand washed in
cold water with a mild detergent.
Rinsewell and air dry completely
before placing back onto the filter
frame base.
Toreducethe riskof electric
shock,turn power switchOFF
and disconnectplug from
electricaloutletbefore
performing maintenanceor
troubleshootingchecks.
2,
3,
4,
9
www. bi s se II. co m _, 800.237.7691
ntenance and care
¢leanin_l the dirt cup filters (cont)
6. Attach the dirt cup filter back onto
the filter frame base by lining up
the tabs on the filter base with
the notches on the dirt cup filter
and turning clockwise to lock back
into place.
.
Attach the dirt cup filter screen back
on to the dirt cup filter by slidin_it
down over the dirt cup filter, making
sure that the tabs on the bottom of
the dirt cup filter screen line up with
the notches on the dirt cup filter.
.
Insert the dirt cup filter assembly
back into the dirt cuR by lining up
the tabs on the top of the dirt cup
filter assembly with the notches
inside the top of the dirt cup and
turning the handle on the bottom of
the dirt cup filter assembly clockwise
to lock into place.
10
www. bis sell .com y_, 800.237.7691
ntenance and care
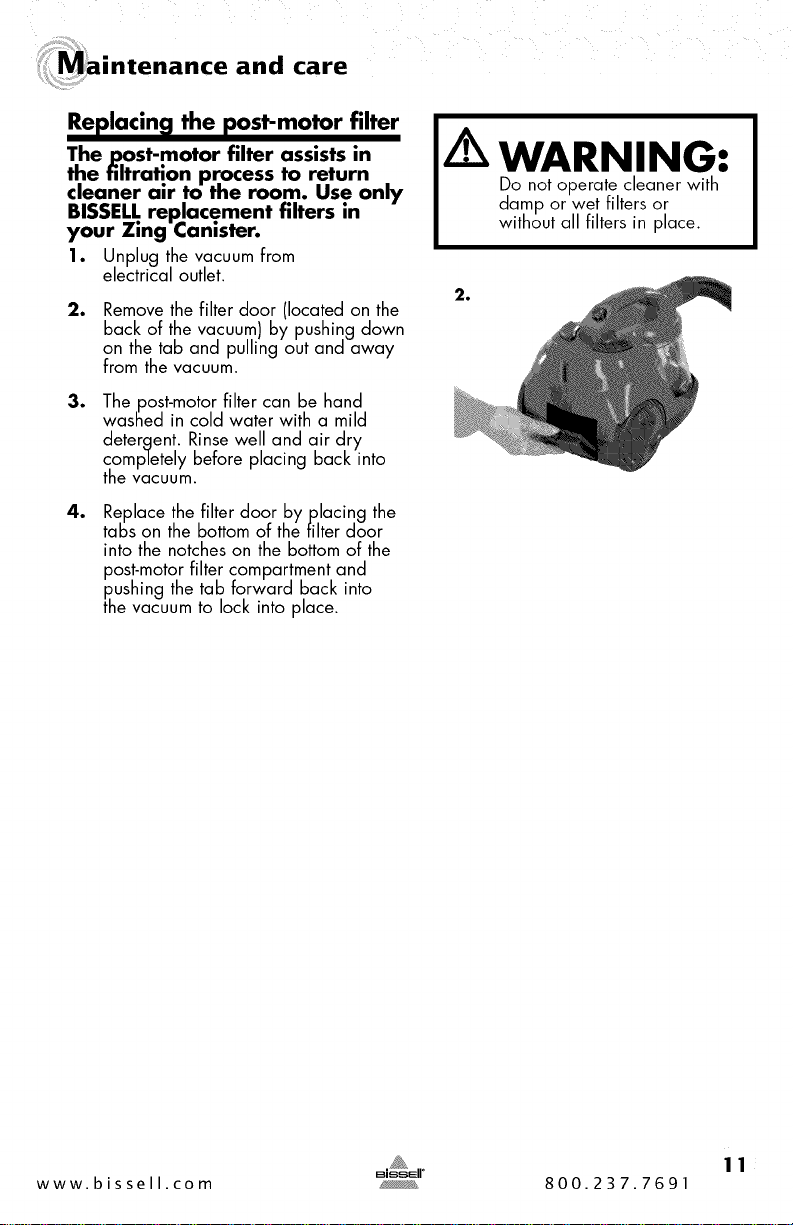
Replacin_l the post-motor filter
The post-motor filter assists in
the filtration process to return
cleaner air to the room. Use only
BISSELLreplacement filters in
your Zing Canister.
1. Unplug the vacuum from
electrical outlet.
2. Remove the filter door (located on the
back of the vacuum) by pushing down
on the tab and pulling out and away
from the vacuum.
.
The post-motor filter can be hand
washed in cold water with a mild
detergent. Rinse well and air dry
completely before placing back into
the vacuum.
.
Replace the filter door by placing the
tabs on the bottom of the filter door
into the notches on the bottom of the
post-motor filter compartment and
pushing the tab forward back into
the vacuum to lock into place.
WARNING:
Do not operate cleaner with
damp or wet filters or
without all filters in place.
11
www. bi s se II. co m ;_, 800.237.7691
ntenance and care
¢learin_l €lovisfrom the dirt cup
1. Unplug the vacuum from electrical outlet.
2. Remove the dirt cup from the vacuum,
following steps 1-3 of the "Emptying
the dirt cup" instructions on page 8.
3. Remove the dirt cup filter assembly
from the dirt cup, following step
2 of the "Clean the dirt cup filter"
instructions on page 9.
4. Tap the dirt cup filter assembly over a
garbage container to remove any dirt
or debris from the dirt cup filter screen
that surrounds the dirt cup filter.
5. Reach up into the dirt cup to clear
any dirt or debris from the dirt cup.
6. Check to see if there are any clogs
in the suction inlet.
7. After clearing any dirt or debris from
the dirt cup, replace the dirt cup filter
assembly back in the dirt cuR following
step 8 of the "Cleaning the dirt cup
filter" instructions on page 9.
12
www. bis sell .com y_, 800.237.7691
I
g
Vacuum cleaner won't run
Possible causes
WARNING:
Toreduce the risk of electric shock,
turn power OFF and disconnect plug
from electrical outlet before performing
maintenance or troubleshooting.
Remedies
1. Vacuumcleanerisnotpluggedin
2. Powerbuttonisnotpresseddown
Vacuum cleaner won't pick up or low
Possible causes
1. Checkelectricalplug
2. Presspowerbuttondown
suction
Remedies
1. Tools,hoseand/orextensionwandsareblocked
2. Filtersaredirty
3. Dirtcupisfull
4. Hoseconnectornotsecurelyattachedtosuctioninlet
5. Crackorholeinhose
6. Airflowregulatorissettoopenor
minimumsetting
7. Cloginthedirtcup
Visible dust escaping from vacuum
Possible causes
1. Removeeachpartandcheckforblockages
2. Checkandcleanorreplaceallfilters
3. Emptydirtcup
4. Makesurehoseconnectorislockedinto
suclioninlet
5. Checkhoseandreplaceifneeded
6. Changetoclosedormaximumsetting
Cleardogfromdirtcupfollowing
instructionsonpage12
Remedies
1. Dirtcupisfull 1. Emptydirtcup
2. Filtersmissingorinstalledincorre_y 2. Checkallfiltersforcorrectinstallation
3. Filtersaredirty 3. Checkandcleanorreplaceallfilters
4. Hoseisblocked 4. Removehoseandcheckforblockages
5. Hoseconnectornotsecurelyattachedtosuctioninlet 5. Makesurehoseconnectorislockedinto
suclioninlet
6. Crackorholeinhose 6. Checkhoseandreplaceifneeded
7. Dirtcupisopen 7. FollowEmptyingthedirtcupinstruclionsstep(s)(1-5)
onpage8
Other maintenance or service not included in the manual should be
performed by an authorized service representative.
Thank you for selecting a BISSELLproduct.
Please do nat return this product to the stare. I
For any questions or concerns, BISSELLis happy to be of
service. Contact us directly at 1-800-2,37-7691.
13
www. b i s se II. co m _, 800.237.7691

_lacement parts - BISSELL vacuum
Item Part No. Part Name
1 203-1771 DirtCupFilterScreen
2 203-1772 DirtCupFilterAssembly
3 203-1786 Post-MotorFilter
4 203-1792 Hosewith Handle
5 203-1783 DustTankBlue280U
6 203-1780 BottomLidDustTankBlue280U
2 3
:cessories
Item
1
2
3
Part No.
203-1773
203-1538
203-1539
Part Name
FloorNozzle
ExtensionWands(2)
CombinationCreviceTool/DustingBrush
1 2 3
14
www. bis sell .com y_>>_, 800.237.7691
- BISSELL Zing ®Canister Vacuum
This warranty givesyou specific leqal rights, and you may also haveother rightswhich may vary
from state to state. Ifyou need additional instruction regarding this warranty or have questions
regarding what it may cover, please contact BISSELLConsumer Care by E-mail,telephone, or
regular mail as described below.
Limited One Year Warranty
Subjectto the *EXCEPTIONSAND EXCLUSIONSidentified below, upon receipt of the product,
BISSELLwill repair or replace (with new or remanufactured components or products), at BISSELLs
option, free of charge from the date of purchase by the original purchaser, for one year any
defective or malfunctioning part.
See information below on "If your BISSELLproduct should require service".
Thiswarranty applies to product used for personal, and not commercial or rental service.This
warranty does not apply to fans or routine maintenancecomponentssuchas filters, belts, or
brushes.Damageor malfunctioncaused by negligence, abuse, neglect, unauthorized repair, or any
other use not in accordance with the User's Guide is not covered.
If your BISSELLproduct should require service:
Contact BISSELLConsumer Care to locate a BISSELLAuthorized Service Center in your area.
Ifyou need information about repairs or replacement parts, or if you have questions about
your warranty, contact BISSELLConsumer Care.
Website or E-maih
www.bissell.com
Use the "Customer Care" tab.
Or Call:
BISSELLConsumer Care
1-800-237-7691
Monday- Friday 8 am - 10 pm ET
Saturday 9 am - 8 pm ET
Sunday 10 am -7 pm ET
Or Write:
BISSELLHomecare, Inc.
PC)Box 3606
Grand Rapids, MI 49501
AI-IN: Consumer Care
BISSELLISNOT LIABLEFORINCIDENTALOR CONSEQUENTIALDAMAGES OF ANY NATURE
ASSOCIATEDWITH THEUSEOF THISPRODUCT.BISSELL'SLIABILITYWILLNOT EXCEEDTHE
PURCHASEPRICEOF THEPRODUCT.
Some states do not allow the exclusion or limitation of incidental or consequential
damages, so the above limitation or exclusion may not apply to you.
*EXCEPTIONS AND EXCLUSIONS FROM THE TERMS OF THE LIMITED WARRANTY
THIS WARRANTY IS EXCLUSIVEAND IN LIEUOF ANY OTHER WARRANTIES EITHERORAL OR
WRITTEN. ANY IMPLIEDWARRANTIES WHICH MAY ARISE BY OPERATION OF LAW, INCLUDING
THE IMPLIEDWARRANTIES OF MERCHANTABILITY AND FITNESSFOR A PARTICULARPURPOSE,ARE
LIMITEDTO THE ONE YEAR DURATION FROM THE DATEOF PURCHASE AS DESCRIBEDABOVE.
Some states do not allow limitations on how long an implied warranty last so the
above limitation may not apply to you.
15
www. bi s se II. co m _, 800.237.7691

k
i_L_SSELL Consumer Care
Forinformationabout repairsor replacementparts,or questionsaboutyour warranty, call:
BISSELL Consumer Care
1-800-237-7691
Monday- Friday 8 am - 10 pm ET
Saturday 9 am - 8 pm ET
Sunday 10 am - 7 pm ET
Or write:
BISSELLHomecare, Inc.
PO Box 3606
Grand Rapids MI 49501
ATTN: Consumer Care
Or visit the BISSELLwebsite - _.bissell.com
When contacting BISSELL,have model number of cleaner available.
Please record your Model Number:
Please record your Purchase Date:
NOTE: Please keep your original sales receipt. It
provides proof of purchase date in the event of a
warranty claim. See Warranty on page 15 for details.
16
www.bissell.com
f_
©2012 BISSELLHomecare, Inc
Grand Rapids, Michigan
All rights reserved. Printed in China
Part Number 1104559
Rev 7/12
Visit our website at:
www.bisselhcom
800.237.7691
Biss_ll °
ZING °
GUIA DEL USUARIO
SERIE6489
Gracias
Instrucciones de seguridad
Vista del producto
Ensamblaje
Funcionamiento
Mantenimiento y cuidado
Solucion de problemas
Piezas de repuesto
Accesorios
Garantia
Registro del producto
Atencion al Consumidor
por comprar una aspiradora BISSELL
Nos complace que haya comprado una aspiradora BISSELL.Utilizamos
todos nuestros conocimientos sobre el cuidado de pisos para disefiar y
fabricar este sistema completo de limpieza para el hogar de alta tecnolog_a.
La aspiradora con dep6sito BISSELLZing est_ bien fabricada y la avalamos
con una garantia limitada de un afio. Adem_s, la respaldamos con un
Departamento de Atenci6n al Consumidor especializado y dedicado, de
manera que si alguna vez tiene alg0n problema, recibir_ una atenci6n
r_pida y considerada.
En 1876, mi bisabuelo invent6 la barredora para pisos. Actualmente,
BISSELLes lider mundial en el disefio, la fabricaci6n y el servicio t_cnico de
productos de alta calidad para el cuidado del hogar, como la aspiradora con
dep6sito BISSELLZing.
Gracias nuevamente, de parte de todos los que integramos BISSELL.
Mark J. Bissell
Presidente de laJunta Directiva y Director Ejecutivo
2
www. b is sell .com y_>_, 800.237.7691

PORTANTES
SEGURIDAD
Si utiliza electrodom_sticos, debe respetar las
medidas de precaucion basicas, incluidas las
siguientes:
LEA TODAS LAS
INSTRUCCIONES ANTES DE
USAR LA ASPIRADORA CON
DEPOSlTO.
Con_ctela siempre a un tomacorriente
polarizado (la ranura izquierda es mas ancha
que la derecha). DesenchOfela del tomacorriente
cuando no la est_ usando y antes de realizar el
mantenimiento.
ADVERTENCIA:
Para reducir el riesgo de incendio,
descargas electricas o lesiones:
• Desench_fela del tomacorriente cuando
no la est_ usando y antes de realizar el
mantenimiento.
• No la utilice si el enchufe o el cable estan
daffados.
• Paradesenchufarla, sujete el enchufe, no el
cable.
• Nojale ni transporte la aspiradora del cable,
no use el cable como manija, no Io apriete al
cerrar puertas ni Io pase por esquinas filosas;
no pise el cable con la aspiradora ni Io exponga
a superficies calientes.
• Sostenga el enchufe mientras rebobina el cable
en el carrete. No deje que el enchufe se mueva
violentamente durante el rebobinado.
• No utilice laaspiradora si se cayo, est_ daffada,
se dej6 al aire libre o se sumergi6 en agua.
Ll_vela a un centro de servicio autorizado si
necesita reparacion.
• No permita que los niffos la usen como juguete.
• No la utilice en exteriores ni en superficies
ht_medas.
• No manipule la aspiradora o el enchufe con las
manos mojadas.
• No coloque ning_n objeto en las aberturas, y
no la use si las aberturas estan bloqueadas o el
flujo de aire se encuentra restringido.
• No la utilice si la bolsa para polvo o los filtros
no estan en su lugar.
• Mantenga el cabello, las ropas holgadas, los
dedos y todas las partes del cuerpo alejados
de las aberturas y del cepillo para pisos del
electrodom_stico.
• No aspire cenizas calientes, colillas de
cigarrillos, fosforos, ni ning_n objeto caliente,
humeante o encendido.
INSTRUCCIONES
• No aspire objetos duros o filosos tales como
vidrio, clavos, tornillos, monedas, etc.
• No emplee el electrodom_stico para aspirar
materiales inflamables o combustibles (liquido
para encendedores, gasolina, queroseno,
etc.) ni en presencia de liquidos o vapores
explosivos.
• Nojale del cable para desenchufarla.
• No aspire materiales toxicos (blanqueador con
cloro, amoniaco, limpiador para desagiJes, etc.).
• No utilice el electrodom_stico en un ambiente
cerrado lleno de vapores despedidos por
pinturas a base de aceite, disolventes de
pintura, algunas sustancias repelentes de
polillas, polvo inflamable u otros vapores
explosivos o toxicos.
• No use este electrodom_stico para otro fin que
no sea el especificado en esta Guia del usuario.
• Apague siempre este electrodom_stico antes
de conectar o desconectar la manguera de la
aspiradora.
• Use solo los accesorios recomendados por el
fabricante.
• Utilicela unicamente en superficies secas e
interiores.
• Mantenga las aberturas sin polvo, pelusas,
cabellos, etc.
• Mantenga el electrodom_stico sobre una
superficie nivelada.
• Apague todos los controles antes de enchufar o
desenchufar la aspiradora.
• Seaextremadamente cuidadoso al limpiar
escaleras.
• Senecesita una estricta supervision si hay
niffos cerca del electrodom_stico o si ellos Io
utilizan.
GUARDE ESTAS
INSTRUCCIONES PARA USO
FUTURO.
ESTE ELECTRODOMI_STICO
TIENE UN ENCHUFE
POLARIZADO.
Parareducir el riesgo de descargas el_ctricas,
este electrodom_stico posee un enchufe
polarizado (una clavija es mas ancha que laotra).
Dicho enchufe se inserta en un tomacorriente
polarizado de una sola manera. Si el enchufe
no encaja por completo en el tomacorriente,
invi_rtalo. Si ann no encaja, pongase en contacto
con un electricista calificado para instalar el
tomacorriente apropiado. No cambie el enchufe
de ninguna manera.
Este modelo es solo para uso dom_stico.
3
www.bissell.com _ 800.237.7691
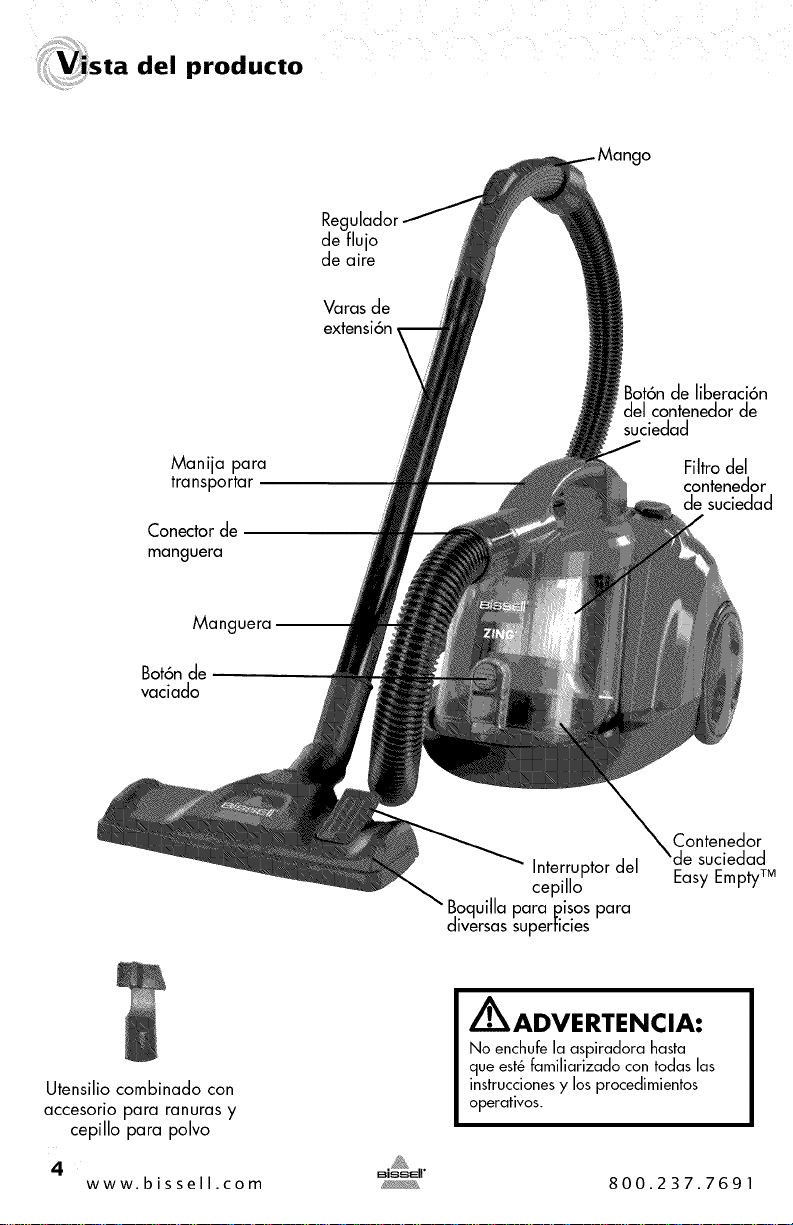
ii_sta del producto
Manija para
transportar
Conectorde
manguera
Mang
Bot6n de
vaciado
Reg
de flujo
de aire
Varasde
extensi6n
]ot6n de liberaci6n
del contenedorde
suciedad
Filtrodel
contenedor
de suciedad
Interruptordel
cepillo
Boquillapara pisospara
diversassuperncles
Contenedor
'de suciedad
EasyEmptyTM
Utensilio combinado con
accesorio para ranuras y
cepillo para polvo
/_ADVERTENCIA:
No enchufela aspiradora hasta
queest_familiarizado contodas las
instruccionesy losprocedimientos
operativos.
4
www. bis sell .com y_, 800.237.7691
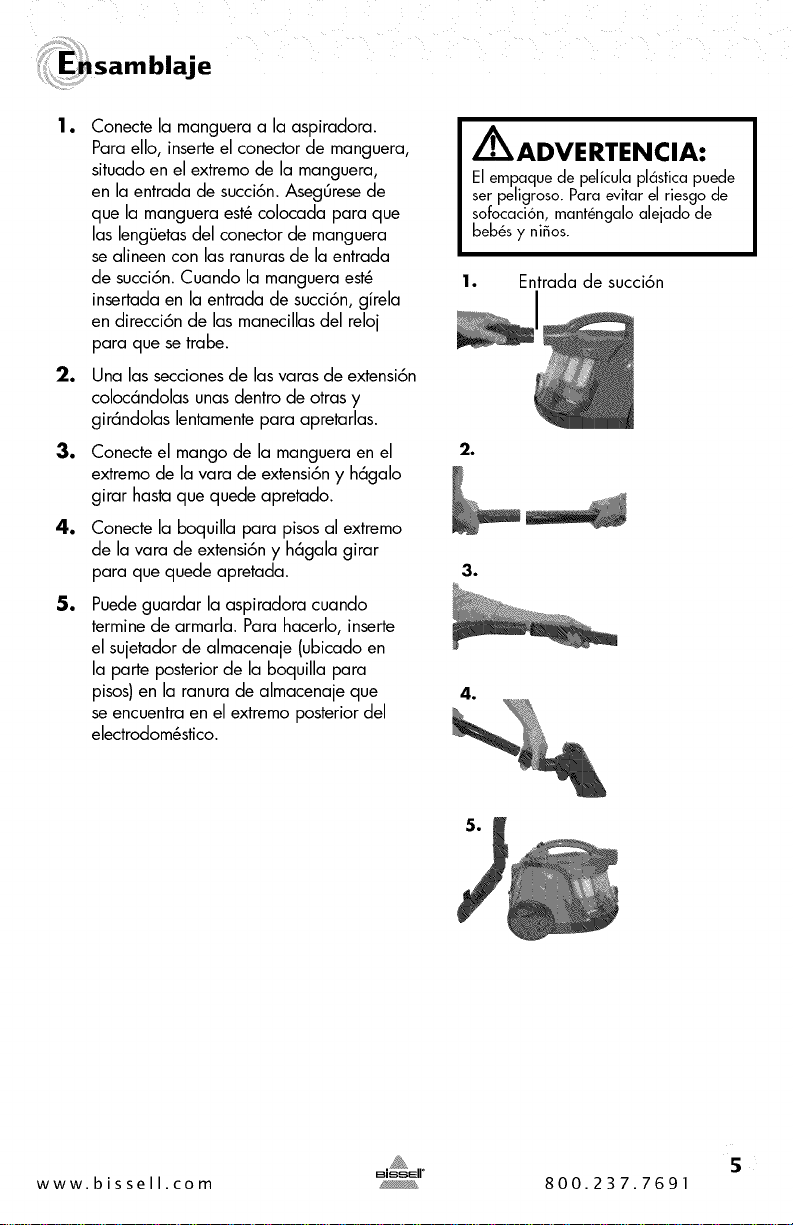
,samblaje
lo
o
o
o
o
Conecte la manguera a la aspiradora.
Para ello, inserteel conector de manguera,
situado en el extremo de la manguera,
en laentrada de succi6n. AsegOresede
que la manguera est_colocada para que
las lengiJetasdel conector de manguera
se alineen con las ranuras de la entrada
de succi6n. Cuando la manguera est_
insertada en la entrada de succi6n, girela
en direcci6n de las manecillas del reloj
para que se trabe.
Una lassecciones de las varas de extensi6n
coloc6ndolas unas dentro de otras y
gir6ndolas lentamente para apretarlas.
Conecte el mango de la manguera en el
extremo de la vara de extensi6n y h6galo
girar hasta que quede apretado.
Conecte la boquilla para pisos al extremo
de la vara de extensi6n y h6gala girar
para que quede apretada.
Puede guardar la aspiradora cuando
termine de armarla. Para hacerlo, inserte
el sujetador de almacenaje (ubicado en
la parte posterior de la boquilla para
pisos)en la ranura de almacenaje que
se encuentra en el extremo posterior del
electrodom_stico.
/ ADVERTENCIA:
Elempaquede pelicula pl6sticapuede
serpeligroso.Paraevitarel riesgode
sofocaci6n,mant_ngaloalejado de
beb_sy ni_os.
1. Entrada de succi6n
2,
3,
4,
5
www. bi s se II. co m _, 800.237.7691
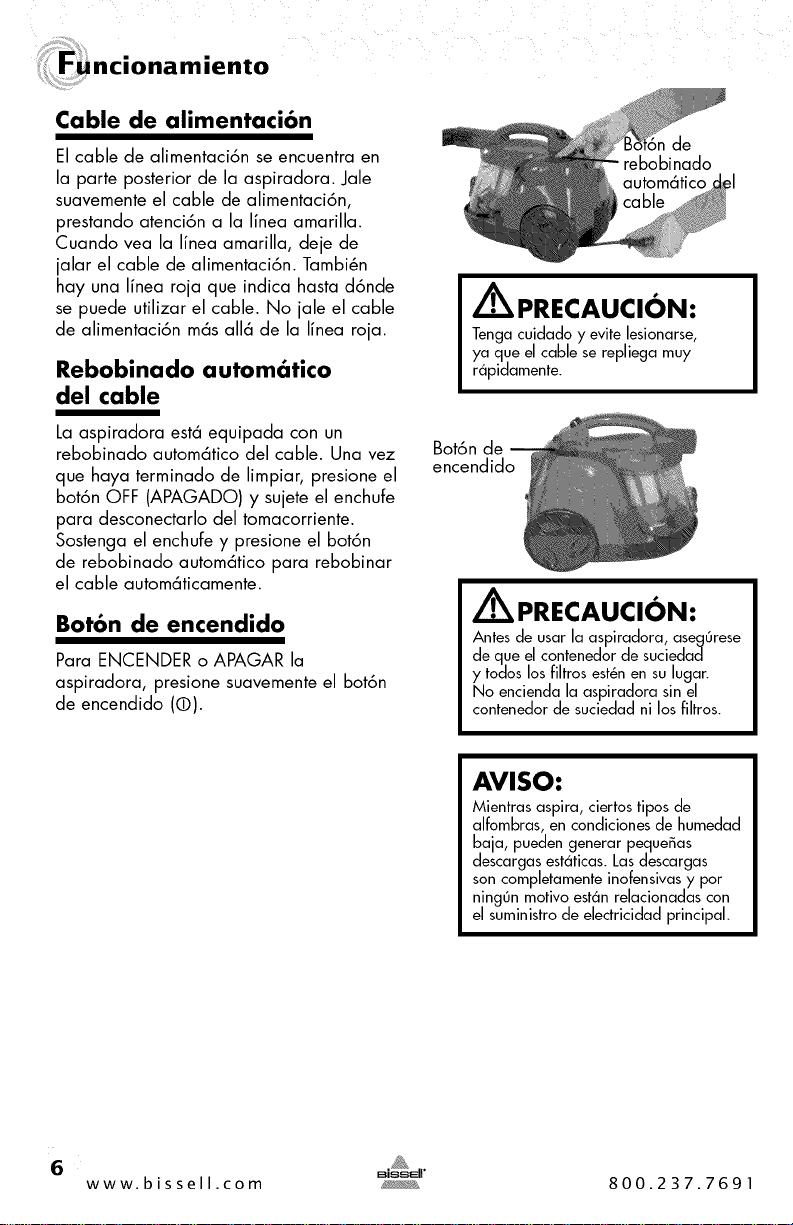
incionamiento
Cable de alimentaci6n
El cable de alimentaci6n se encuentra en
la parte posterior de la aspiradora. Jale
suavemente el cable de alimentaci6n,
prestando atenci6n a la linea amarilla.
Cuando vea la linea amarilla, deje de
jalar el cable de alimentaci6n. TambiSn
hay una linea roja que indica hasta d6nde
se puede utilizar el cable. No jab el cable
de alimentaci6n m6s all6 de la linea roja.
Rebobinado autom_tico
del cable
La aspiradora est6 equipada con un
rebobinado autom6tico del cable. Una vez
que haya terminado de limpiar, presione el
bot6n OFF (APAGAD©) y sujete el enchufe
para desconectarlo del tomacorriente.
Sostenga el enchufe y presione el bot6n
de rebobinado autom6tico para rebobinar
el cable autom6ticamente.
Bot6n de encendido
Para ENCENDER o APAGAR la
aspiradora, presione suavemente el bot6n
de encendido (©)
n de
rebobinado
.,I
/_ PRECAUCION:
Tengacuidado y evitelesionarse,
ya que elcable serepliegamuy
r6pidamente.
Bot6n de
encendido
/_ PRECAUCI(_N:
Antes de usar la aspiradora, asegOrese
de que el contenedor de suciedad
y todos los fihros est_n en su lugar.
No encienda la aspiradora sin el
contenedor de suciedad ni los fihros.
AVISO:
Mientras aspira, ciertos tipos de
alfombras, en condiciones de humedad
baja, pueden generar peque_as
descargas est6ticas. Las descargas
son completamente inofensivas y por
ningOn motivo est6n relacionadas con
el suministro de electricidad principal.
6
www.bisse .com 800.237.7691

_ncionamiento
Accesorios especiales
La aspiradora con dep6sito BISSELLZing no
es solo una potente aspiradora de alfombras
y tapetes, sino que tambi_n es una
aspiradora vers6til para pisos sin alfombrar
y superficies sobre el nivel del piso cuando
usted selecciona uno de los accesorios
especiales.
Bocluilla para pisos
Se usa para aspirar alfombras, tapetes y
pisos sin alfombrar. El cabezal giratorio es
capaz de Ilegar a lugares estrechos y cabe
debajo de gabinetes.
1. Para aspirar alfombras y tapetes, Ileve
el interruptor del cepillo a la posici6n
para alfombras _ . De esta forma,
los cepillos se retraer6n hacia el interior
de la boquilla para pisos.
o
Para aspirar pisos sin alfombrar, Ileve
el interruptor del cepillo a la posici6n
para pisos sin alfombrar . Asi, los
cepillos se extender6n desde la boquilla
para pisos.
Utensilio combinado con
accesorio para ranuras y
cepillo para polvo
Use el accesorio para ranuras en espacios
limitados y estrechos. Use el cepillo para
polvo para limpiar cortinas, cojines y telas.
Re_lulador de flujo de aire
Para abrir el regulador de flujo de aire,
deslicelo hacia la vara de extensi6n hasta
la posici6n abierta. De esta manera, se
reducir6 la potencia de succi6n para aspirar
telas delicadas.
Para Iograr una potencia de succi6n
m6xima, cierre el regulador de flujo de aire
desliz6ndolo hasta la posici6n cerrada.
Cepillo retraido
2.
_0
Cepillo
extendido
7
www. bi s se II. co m _, 800.237.7691
imiento y cuidado
Vaciado del contenedor de
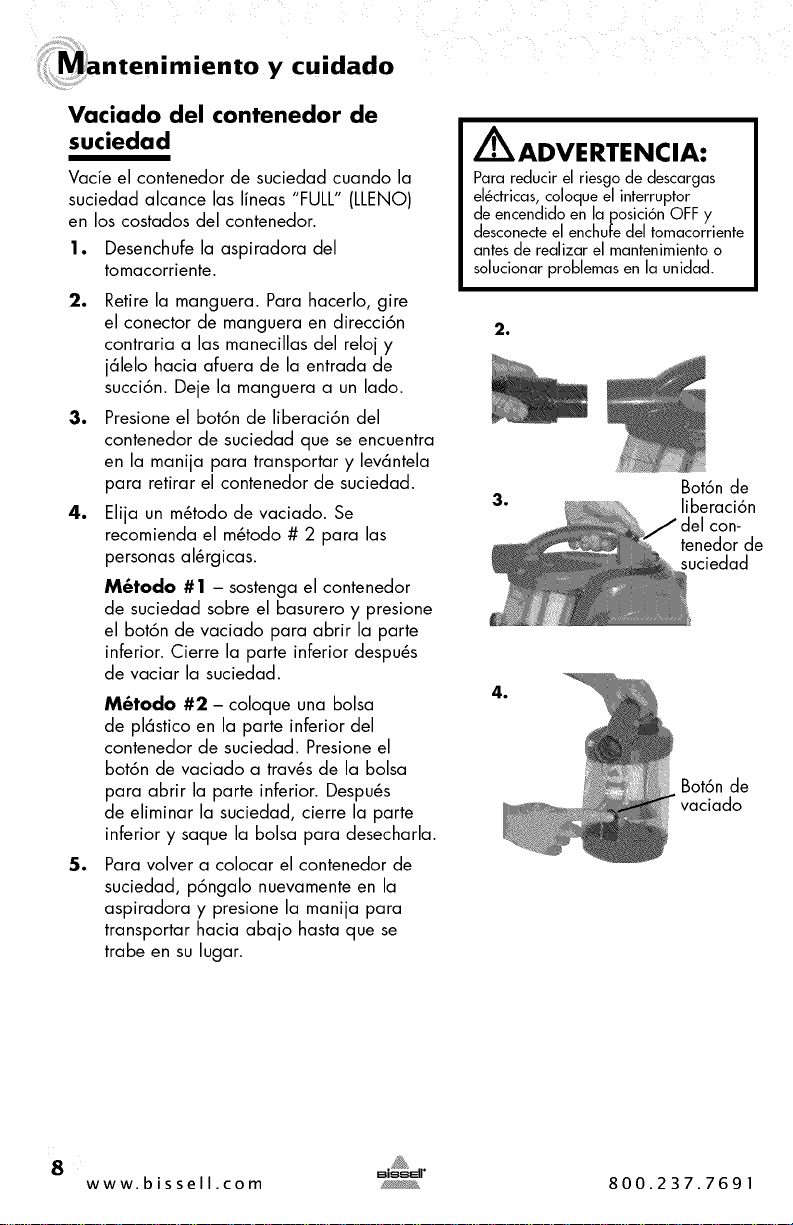
suciedad
Vacie el contenedor de suciedad cuando la
suciedad alcance las lineas "FULL" (LLEN©)
en los costados del contenedor.
1. Desenchufe la aspiradora del
tomacorriente.
°
Retire la manguera. Para hacerlo, gire
el conector de manguera en direcci6n
contraria alas manecillas del reloj y
j61elo hacia afuera de la entrada de
succi6n. Deje la manguera a un lado.
3. Presione el bot6n de liberaci6n del
contenedor de suciedad que se encuentra
en la manija para transportar y lev6ntela
para retirar el contenedor de suciedad.
4. Elija un m_todo de vaciado. Se
recomienda el m_todo # 2 para las
personas al_rgicas.
M_todo # 1 - sostenga el contenedor
de suciedad sobre el basurero y presione
el bot6n de vaciado para abrir la parte
inferior. Cierre la parte inferior despu_s
de vaciar la suciedad.
°
M6todo #2 - coloque una bolsa
de pl6stico en la parte inferior del
contenedor de suciedad. Presione el
bot6n de vaciado a trav_s de la bolsa
para abrir la parte inferior. Despu_s
de eliminar la suciedad, cierre la parte
inferior y saque la bolsa para desecharla.
Para volver a colocar el contenedor de
suciedad, p6ngalo nuevamente en la
aspiradora y presione la manija para
transportar hacia abajo hasta que se
trabe en su lugar.
/ ADVERTENCIA:
Para reducir el riesgo de descargas
el_ctricas, coloque el interruptor
de encendido en la posici6n OFF y
desconecte el enchufe del tomacorriente
antes de realizar el mantenimiento o
solucionar problemas en la unidad.
2,
Bot6n de
liberaci6n
del con-
tenedor de
suciedad
Bot6n de
vaciado
8
www.bissell.com 800.237.7691
imiento y cuidado
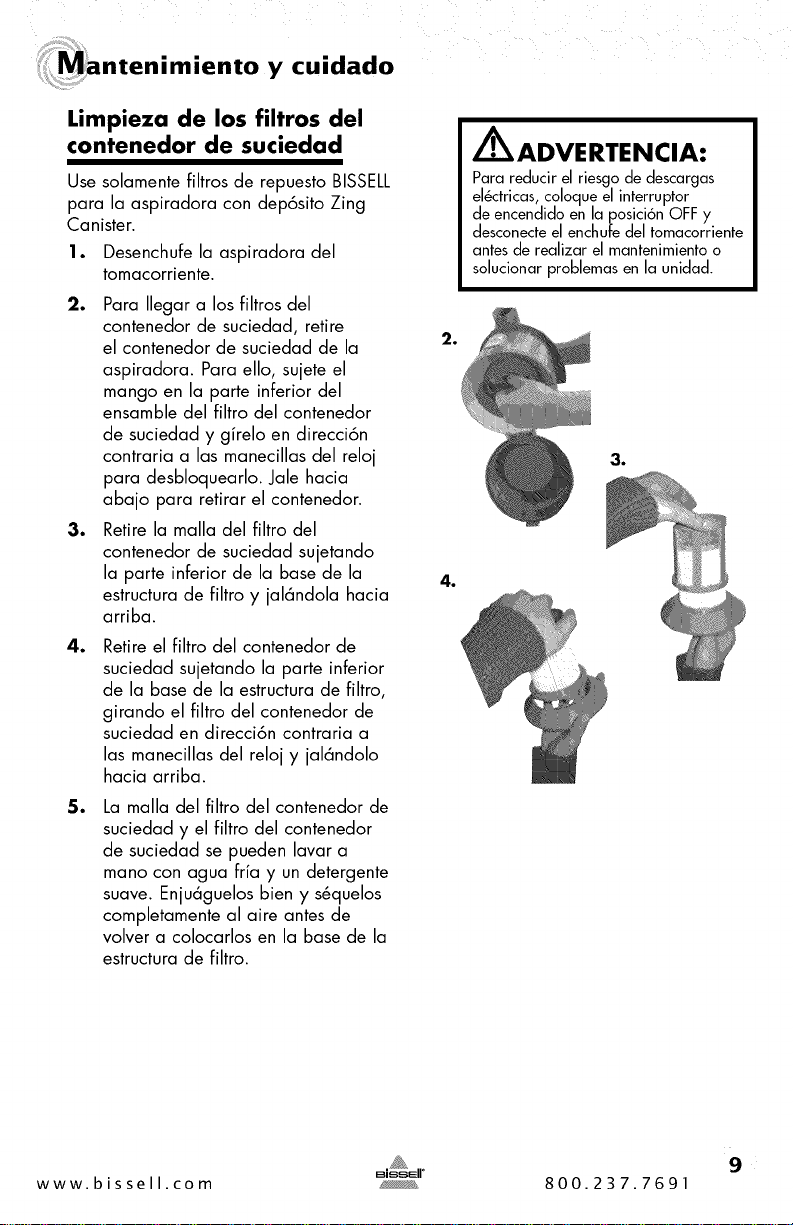
Limpieza de los filtros del
€ontenedor de suciedad
Use solamente filtros de repuesto BISSELL
para la aspiradora con dep6sito Zing
Canister.
1. Desenchufe la aspiradora del
tomacorriente.
°
°
°
°
Para Ilegar a los filtros del
contenedor de suciedad, retire
el contenedor de suciedad de la
aspiradora. Para ello, sujete el
mango en la parte inferior del
ensamble del filtro del contenedor
de suciedad y girelo en direcci6n
contraria alas manecillas del reloj
para desbloquearlo. Jale hacia
abajo para retirar el contenedor.
Retire la malla del filtro del
contenedor de suciedad sujetando
la parte inferior de la base de la
estructura de filtro y jal6ndola hacia
arriba.
Retire el filtro del contenedor de
suciedad sujetando la parte inferior
de la base de la estructura de filtro,
girando el filtro del contenedor de
suciedad en direcci6n contraria a
las manecillas del reloj y jal6ndolo
hacia arriba.
La malla del filtro del contenedor de
suciedad y el filtro del contenedor
de suciedad se pueden lavar a
mano con agua fria y un detergente
suave. Enju6guelos bien y s_quelos
completamente al aire antes de
volver a colocarlos en la base de la
estructura de fihro.
2,
4,
/ ADVERTENCIA:
Para reducir el riesgo de descargas
el6ctricas, coloque el interruptor
de encendido en la posici6n OFF y
desconecte el enchufe del tomacorriente
antes de realizar el mantenimiento o
solucionar problemas en la unidad.
3,
9
www. bi s se II. co m _,_®_ 800.237.7691
imiento y cuidado
Limpieza de los filtros del
€ontenedor de suciedad
(continuaci6n)
6. Para volver a colocar el filtro del
contenedor de suciedad en la base
de la estructura de filtro, alinee las
lengOetas de la base del filtro con las
ranuras del filtro y girelo en direcci6n
de las manecillas del reloj para
bloquearlo en su lugar.
. Para volver a colocar la malla del
filtro del contenedor de suciedad en
el filtro del contenedor de suciedad,
deslicela hacia abajo sobre el filtro,
cercior6ndose de que las lengOetas en
la parte inferior de la malla queden
alineadas con las ranuras del filtro.
. Vuelva a colocar el ensamble del filtro
del contenedor de suciedad dentro
del contenedor de suciedad. Para
ello, alinee las lengOetas en la parte
superior del ensamble del filtro con las
ranuras que se encuentran en el interior
de la parte superior del contenedor
de suciedad y gire el mango en la
parte inferior del ensamble del filtro en
direcci6n de las manecillas del reloj
para fijarlo en el lugar.
10
www. bis sell .com y_>_, 800.237.7691
imiento y cuidado
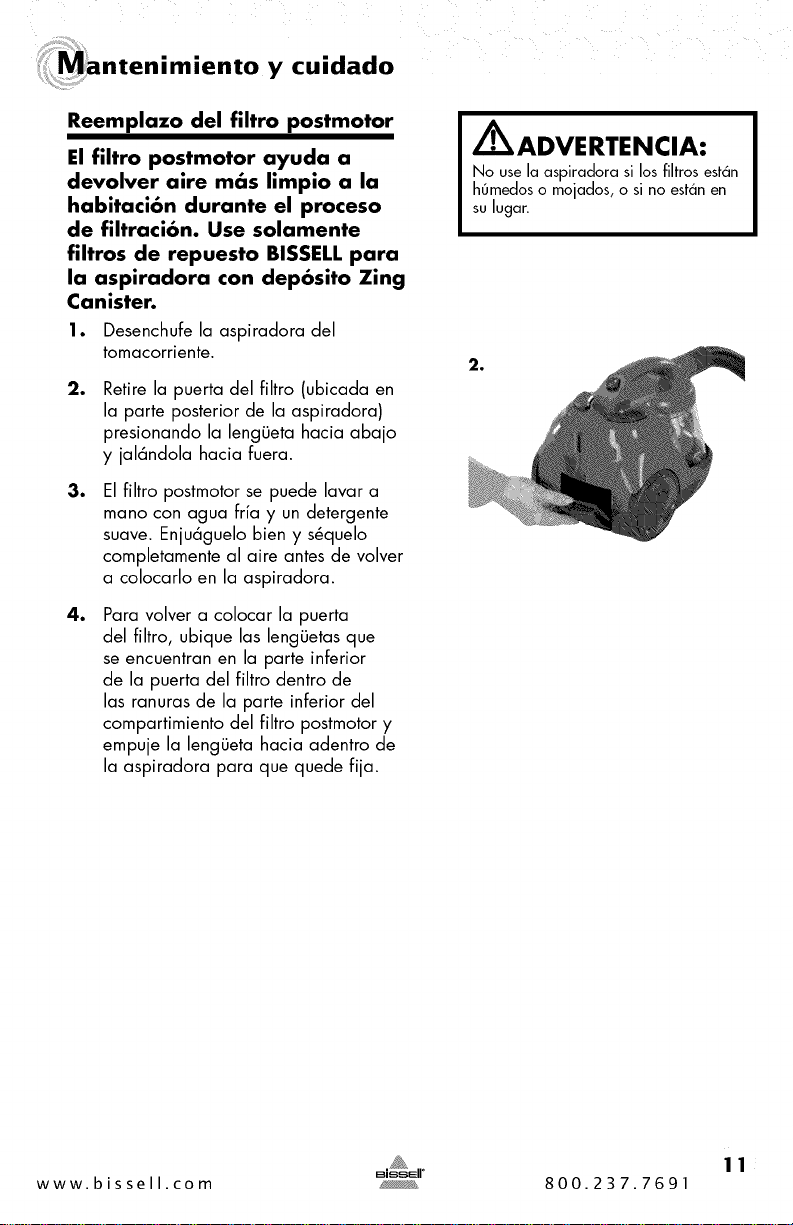
Reemplazo del filtro postmotor
El filtro postmotor ayuda a
devolver aire m_s limpio a la
habitaci6n durante el proceso
de filtraci6n. Use solamente
filtros de repuesto BISSELL para
la aspiradora con dep6sito Zing
Canister.
1. Desenchufe la aspiradora del
tomacorriente.
.
.
.
Retire la puerta del filtro (ubicada en
la parte posterior de la aspiradora)
presionando la lengOeta hacia abajo
y jal6ndola hacia fuera.
El filtro postmotor se puede lavar a
mano con agua fria y un detergente
suave. Enju6guelo bien y s_quelo
completamente al aire antes de volver
a colocarlo en la aspiradora.
Para volver a colocar la puerta
del filtro, ubique las lenggetas que
se encuentran en la parte inferior
de la puerta del filtro dentro de
las ranuras de la parte inferior del
compartimiento del filtro postmotor y
empuje la lenggeta hacia adentro de
la aspiradora para que quede fija.
\ADVERTENCIA:
No usela aspiradora si losfihrosest6n
hOmedoso mojados,o si no est6nen
sulugar.
11
www. bi s se II. co m _, 800.237.7691
imiento y cuidado
Eliminaci6n de las obstrucciones
del €ontenedor de suciedad
1. Desenchufe la aspiradora del
tomacorriente.
2.
.
.
.
.
7.
Retire el contenedor de suciedad de la
aspiradora siguiendo los pasos 1 al 3 de
las instrucciones incluidas en "Vaciado del
contenedor de suciedad" en la p6gina 8.
Retire el ensamble del filtro del contenedor
de suciedad del contenedor de suciedad
como se indica en el paso 2 de las
instrucciones detalladas en "Limpieza del
filtro del contenedor de suciedad" en la
p6gina 9.
Golpee suavemente el ensamble del filtro
del contenedor de suciedad sobre un
contenedor de basura para eliminar la
suciedad o los residuos de la malla del
filtro que rodea al filtro del contenedor de
suciedad.
Sujete el contenedor de suciedad para
eliminar la suciedad o los residuos que
contenga.
Verifique la entrada de succi6n para ver si
hay obstrucciones.
Despu_s de limpiar el contenedor de
suciedad, vuelva a colocar el ensamble
del filtro del contenedor de suciedad en el
contenedor de suciedad como se indica
en el paso 8 de las instrucciones sobre
"Limpieza del filtro del contenedor de
suciedad" en la p6gina 9.
12
www. bis sell .com y_. 800.237.7691

,luci6n de problemas
Z_ADVERTENCIA:
Para reducir el riesgo de descargas el_ctricas, coloque el interruptor de
encendido en la posici6n OFF (0) y desconecte el enchufe del tomacorriente
antes de realizar el mantenimiento de la unidad o solucionar problemas.
La aspiradora no funciona.
Causas posibles
1.Losaccesorios,lamangueraolasvaras
deextensi6nestc_nbloqueados.
2.Losfiltrosest_nsucios.
3.Elcontenedordesuciedadest_Ileno.
4.Elconectordemangueranoest_sujetadofirmemente
alasalidadesucci6n.
5.Lamangueratieneunagrietaounorificio.
6.Elreguladordeflujodeaireestc_configuradoparaabrirse
oest_enlaconfiguraci6nminima.
7.Elcontenedordesuciedadest_obstruido.
Se observa polvo que sale de la
Causas posibles
1.Elcontenedordesuciedadest_Ileno.
2.Faltanfiltrosoest_nmalinstalados.
3.Losfiltrosest_nsucios.
4.Lamangueraest_obstruida.
5.Elconectordemangueranoest_sujetadofirmemente
alasalidadesucci6n
6.Lamangueratieneunagrietaounorificio.
7.Elcontenedordesuciedadest_abierto.
Soluciones
1.Retiretodaslaspiezasyreviselasparabuscarbloqueos.
2.Reviseylimpietodoslosfiltrosoreempl_celos.
3.Vacieelcontenedordesuciedad.
4.Cerci6resedequeelconectordemangueraest_aseguradoenla
salidadesucci6n.
5.Reviselamanguerayreempl_celasiesnecesario.
6.Cambieala configuraci6ncerradaom_xima.
7.EliminelasobstruccionesdelcontenedordesuciedadsegOnlas
instruccionesdelap_gina12.
aspiradora.
Soluciones
1.Vacieelcontenedordesuciedad.
2.Verifiquetodoslosfiltrosparacerciorarsedequeest_ninstalados
correctamente.
3.Reviseylimpietodoslosfiltrosoreempkkelos.
4.Retirelamanguerayreviselaenbuscadeobstrucciones.
5.Cerci6resedequeelconectordemangueraest6aseguradoenla
salidadesucci6n.
6.Reviselamanguerayreemplckelasiesnecesario.
7.Sigalospasos(1 al5)delasinstruccionesdetalladasen"Vaciado
delcontenedordesuciedad"queseincluyenenlap_gina8.
Cualquier otro mantenimiento o servicio no incluido en el manual debe
ser realizado por un representante de servicio autorizado.
Gracias por elegir un producto BISSELL.
I No devuelva este producto a la tienda. I
Si tiene alguna pregunta o duda, BISSELL se complace en
ayudarlo. P6ngase en contacto con nosotros Ilamando
directamente al 1-800-237-7691.
13
www. b i s se II. co m _, 800.237.7691
de repuesto: aspiradora BISSELL
Articulo
1
2
3
4
5
6
No. de pieza
203-1771
203-1772
203-1786
203-1792
203-1783
203-1780
Nombre de pieza
Malladelfiltro delcontenedordesuciedad
Ensambledelfiltrodelcontenedordesuciedad
Filtropostmotor
Mangueraconmango
Dep6sitodepolvoazul280U
Tapainferiordeldep6sitodepolvoazul280U
2
3
:cesorios
Articulo
1
2
3
No. de pieza
203-1773
203-1538
203-1539
2 3
Nombre de pieza
Boquillaparapisos
Varasdeextensi6n(2)
Utensiliocombinadoconaccesoriopararanuras
y cepilloparapolvo
14
www. bis sell .com y_>>_, 800.237.7691
irantia: aspiradora con deposito BISSELL Zing ®
Estagarantia le otorga derechoslegales especificos pero tambi_n puede tener otrosderechos
quevarian seg6nelestado. Si necesitainstruccionesadicionales con respectoa esta garantia o
tienepreguntas sobre Ioque puede cubrir, p6ngase en contactocon Atenci6n al Consumidor de
BISSELLpor correo electr6nico, tel_fono o correo postalcomo sedescribe a continuaci6n.
Garantia limitada de un a_o
Sujetaalas *EXCEPCIONESY EXCLUSIONESdetalladas a continuaci6n, presentandoel
comprobante de compra del producto BISSELLreparar6 o reemplazar6 (concomponenteso
productos nuevoso vueltosa fabricar), a discreci6n de BISSELL,sin costo para el comprador
original a partir de la fecha de compra y durante un a_o cualquier pieza defectuosao que
tenga un ma funcionamiento.
Consultela informaci6n siguienteen "Si su producto BISSELLnecesitamantenimiento'.
Estaqarantia seaplica al producto utilizado para el servicio personal y no comercial o de
alquirer. Estagarantia no seaplica a losventiladores o a los componentesde mantenimiento
de rutina como filtros, correas o cepillos. Losda_os o el mal funcionamientocausados por
negligencia, uso inacJecuado,descuido, reparaci6n no autorizada o cualquier otro uso que no
est_de acuerdo con la Guia del usuario no est6ncubiertos.
Si su producto BISSELL necesita mantenimiento:
P6ngase en contacto con Atenci6n al Consumidor de BISSELLpara ubicar un centro de
servicio autorizado de BISSELLen su6rea.
Si necesita informaci6n sobre reparaciones o piezas de repuesto, o si tiene preguntas sobre
la garantia, p6ngase en contacto con Atenci6n al Consumidor de BISSELL.
Sitio web o correo electr6nico:
wwv.bissell.com
Utilice la pesta_a "Servicio al Cliente'.
O Ilame a:
Atenci6n al Consumidor de BISSELL
1-800-237-7691
Lunesa viernes de 8 a.m. a 10 p.m., hora del Este
S6bados de 9 a.m. a 8 p.m., hora del Este
Domingos de 10 a.m. a 7 p.m., hora del Este.
O escriba a:
BISSELLHomecare, Inc.
P© Box 3606
Grand Rapids, MI 49501
ATTN: Atenci6n al Consumidor
BISSELLNO SEHACERESPONSABLEDENINGON DAI'T,IO ACCIDENTAL0 RESULTANTEDE
NINGUNA NATURALEZARELACIONADOCON ELUSODEESTEPRODUCTO.LARESPONSABILIDAD
DEBISSELLNO SUPERAR,a,ELPRECIODECOMPRADELPRODUCTO.
Algunos estados no permiten la exclusi6n o limitaci6n de los da6os accidentales o
resultantes, de modo que la exclusi6n o limitaci6n anterior pueden no aplicarse en su
caso.
*EXCEPCIONESY EXCLUSIONESDE LOS TERMINOS DE LAGARANTJA LIMITADA
ESTAGARANTIAESEXCLUSIVAYREEMPLAZAA CUALQUIEROTRAGARANTIAORAL0 ESCRITA.
CUALQUIERGARANTIAIMPLICITAQUEPUEDASURGIREN FUNCIONDELALEY,INCLUIDASLAS
GARANTIASIMPLICITASDECOMERCIABILIDADEIDONEIDADPARAUN FINEN PARTICULAR,EST,a,
LIMITADAA UNANO DEDURACIONA PARTIRDELAFECHADECOMPRACOMO SEDETALLO
ANTERIORMENTE.
Algunosestadosnopermitenlimitacionessobreel tiempode duraci6nde la garantia implicita, de
modoquela limitaci6nanteriortalvez noseapliqueen sucaso.
15
www. bi s se II. co m _, 800.237.7691
_i_enclon al Consumidor de BISSELL
Para obtener informaci6n sobre reparaciones o piezas de repuesto,o si tiene preguntas
sobre la garantia, Ilame a:
Atenci6n al Consumidor de BISSELL
1-800-237-7691
Lunes a viernes de 8 a.m. a 10 p.m., hora del Este
S6bados de 9 a.m. a 8 p.m., hora del Este
Domingos de 10 a.m. a 7 p.m., hora del Este.
O escriba a:
BISSELLHomecare, Inc.
PO Box 3606
Grand Rapids MI 49501
ATTN:Atenci6nal Consumidor
O visite el sitio Web de BISSELL:_Nw.bissell.com
Cuando seponga en contacto con BISSELL,tenga a mano
el n0mero de modelo de la aspiradora.
Registreel n0mero de modelo:
Registrela fecha de compra:
NOTA: conserve el recibo de venta original.
Esel comprobante de la fecha de compra en
caso de una reclamaci6n de garantia. Para
obtener m_s detalles, consulte la Garantia en
la p_gina 15.
16
www.bissell.com
©2012 BISSELLHomecare, Inc
Grand Rapids, Michigan
Todos los derechos reservados.
Impreso en China
Ngmero de pieza: 110-4559
Rev.7/12
Visite nuestro sitio web en:
www.bisselhcom
800.237.7691