POWERLIFTER
™
BAGGED
Vacuum
___________
USER GUIDE
2019 SERIES
More of a video
person? Look for this
icon and go online
for an instructional
how-to video at
www.BISSELL.com/
videos
www.BISSELL.com
2
IMPORTANT SAFETY INSTRUCTIONS
WARNING
TO REDUCE THE RISK OF FIRE,
ELECTRIC SHOCK, OR INJURY:
» Do not leave vacuum cleaner
when it is plugged in. Unplug
from outlet when not in use
and before servicing.
» Do not use outdoors or on
wet surfaces.
» Do not allow to be used as a toy.
Close attention is necessary when
used by or near children.
» Do not use for any purpose other
than described in this User’s
Guide. Use only manufacturer’s
recommended attachments.
» Do not use with damaged cord or
plug. If appliance is not working
as it should, has been dropped,
damaged, left outdoors, or
dropped into water, have it repaired
at an authorized service center.
» Do not pull or carry by cord, use
cord as a handle, close a door on
cord, or pull cord around sharp
edges or corners. Do not run
appliance over cord. Keep cord
away from heated surfaces.
» Do not unplug by pulling on
cord. To unplug, grasp the plug,
not the cord.
» Do not handle plug or vacuum
cleaner with wet hands.
» Do not put any object into
openings. Do not use with any
opening blocked; keep openings
free of dust, lint, hair, and anything
that may reduce air flow.
» Keep hair, loose clothing, fingers,
and all parts of body away from
openings and moving parts.
» Turn off all controls before
plugging or unplugging
vacuum cleaner.
» Use extra care when cleaning
on stairs.
» Do not use to pick up flammable
or combustible materials (lighter
fluid, gasoline, kerosene, etc.)
or use in areas where they may
be present.
» Do not use vacuum cleaner in an
enclosed space filled with vapors
given off by oil base paint, paint
thinner, some moth proofing
substances, flammable dust, or
other explosive or toxic vapors.
» Do not use to pick up toxic
material (chlorine bleach,
ammonia, drain cleaner, etc.).
» Do not pick up anything that is
burning or smoking, such as
cigarettes, matches, or hot ashes.
» Do not use without filters in place.
» Do not pick up hard or sharp
objects such as glass, nails, screws,
coins, etc.
» Use only on dry, indoor surfaces.
» Keep appliance on a level surface.
» Do not carry the vacuum cleaner
while it is running.
» Unplug before connecting or
disconnecting the TurboEraser®
Tool
READ ALL INSTRUCTIONS BEFORE USING YOUR UPRIGHT VACUUM.
Always connect to a polarized outlet (one slot is wider than the other). Unplug from outlet when not in
use and before conducting maintenance. When using an electrical appliance, basic precautions should be
observed, including the following:
This model is for household use only.
SAVE THESE INSTRUCTIONS
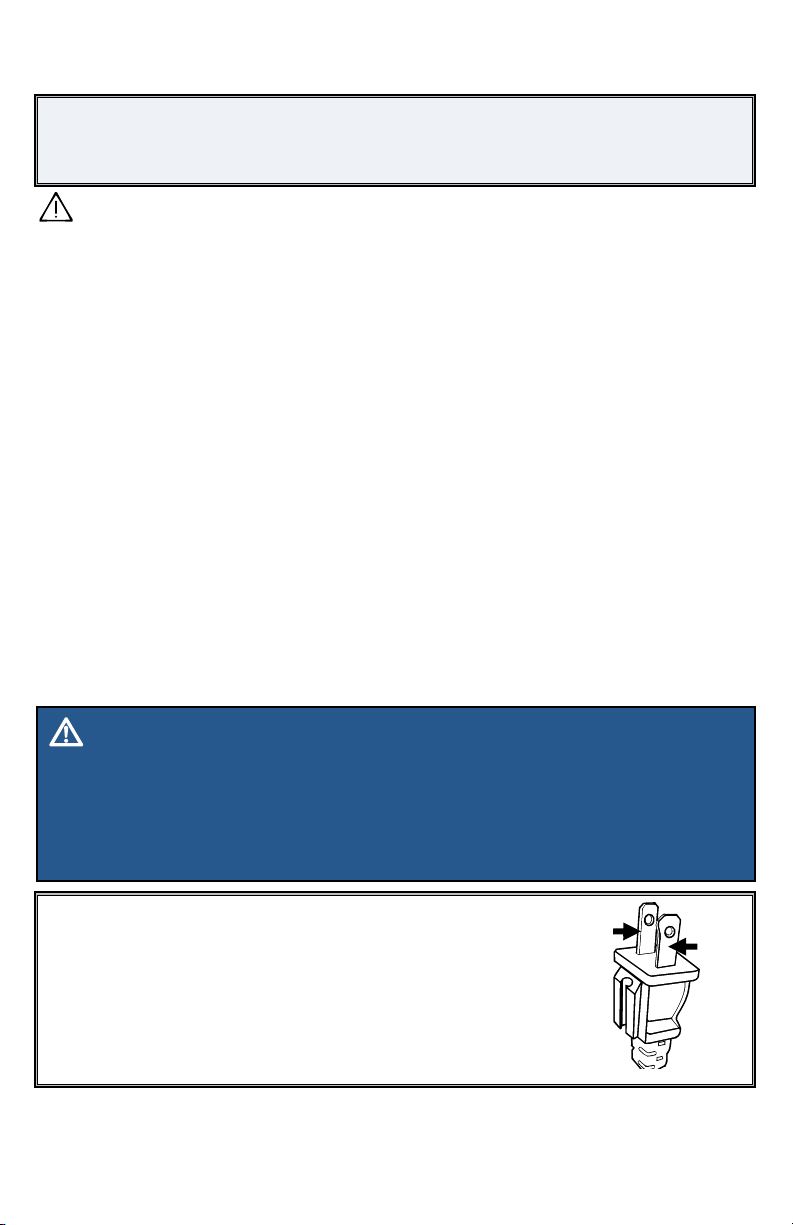
THIS APPLIANCE HAS
A POLARIZED PLUG
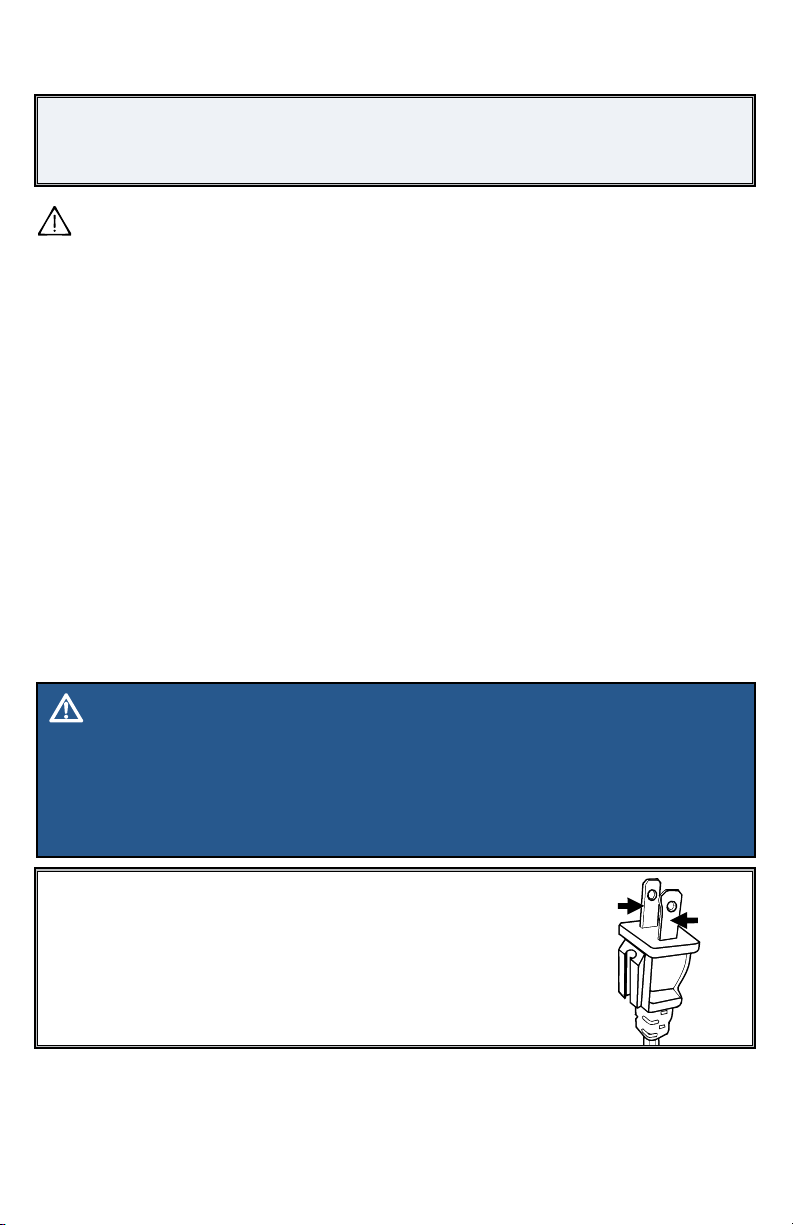
To reduce the risk of electric shock, this appliance has a polarized plug (one blade
is wider than the other). This plug will fit in a polarized outlet only one way. If the
plug does not fit fully in the outlet, reverse the plug. If it still does not fit, contact a
qualified electrician to install a proper outlet. Do not change the plug in any way.
Hot
Neutral
WARNING
›› Plastic film can be dangerous. To avoid danger of suocation, keep away from children.
›› Do not plug in your vacuum cleaner UNTIL you are familiar with all instructions and
operating procedures.
›› To reduce the risk of electrical shock, turn power switch o and disconnect polarized
plug from electrical outlet BEFORE performing maintenance or troubleshooting checks.

www.BISSELL.com
3
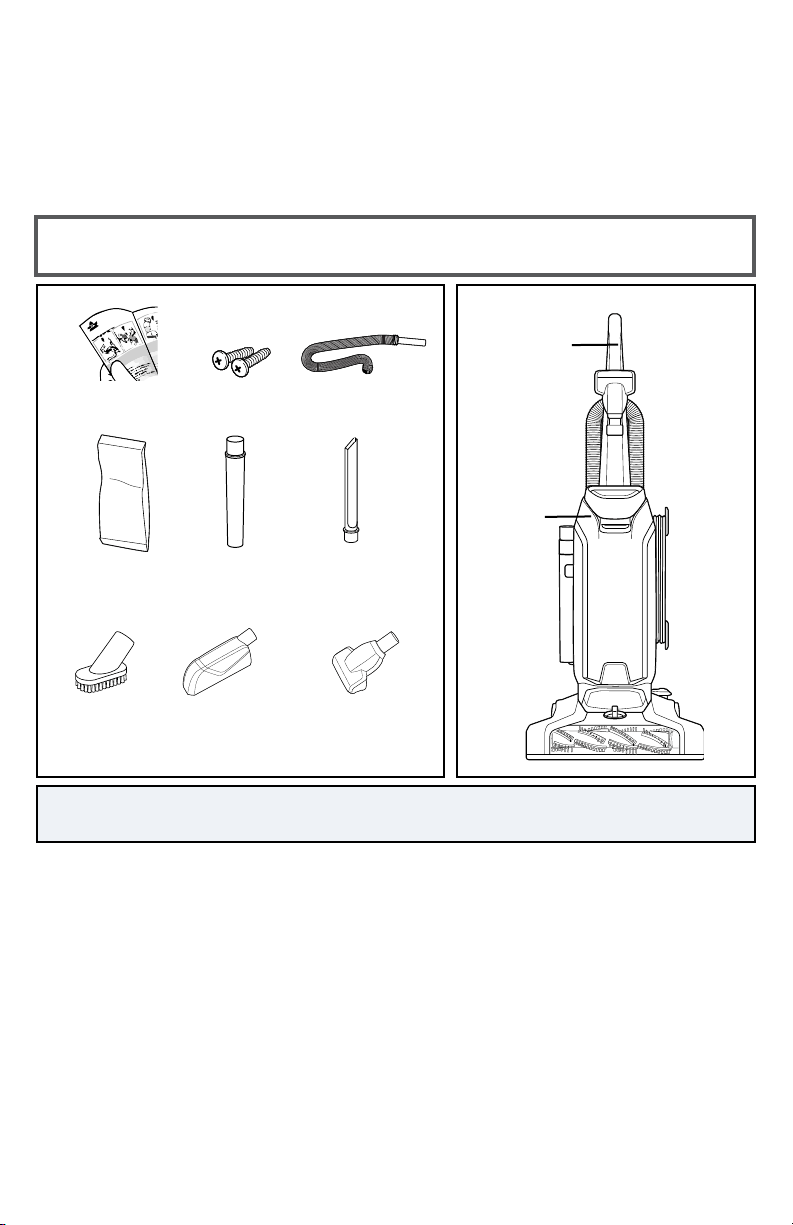
Crevice
Tool
User
Guide
Hose
Dusting
Brush
What’s in the Box?
Base
Unit
Upper
Handle
Extension
Wand
2 Screws
Thanks for buying a BISSELL vacuum!
We love to clean and we’re excited to share one of our innovative products
with you. We want to make sure your vacuum works as well in one year as
it does today, so this guide has tips on using (page 6-7), maintaining (pages
7-9), and if there is a problem, troubleshooting (page 10).
Safety Instructions...........2
Product View................4
Assembly ...................5
Operations ................6-7
Maintenance & Care .......7-9
Troubleshooting ............10
Warranty ....................11
Service ......................11
Product Registration........12
Parts & Supplies ............12
NOTE: Standard accessories may vary by model.To identify what should be included with
your purchase, please refer to the “Carton Contents” list located on the carton top flap.
Febreze®
Style 7 Bag
(2 included)
Pet Hair Eraser®
Tool
Pet TurboEraser®
Tool
www.BISSELL.com
4
3
4
12
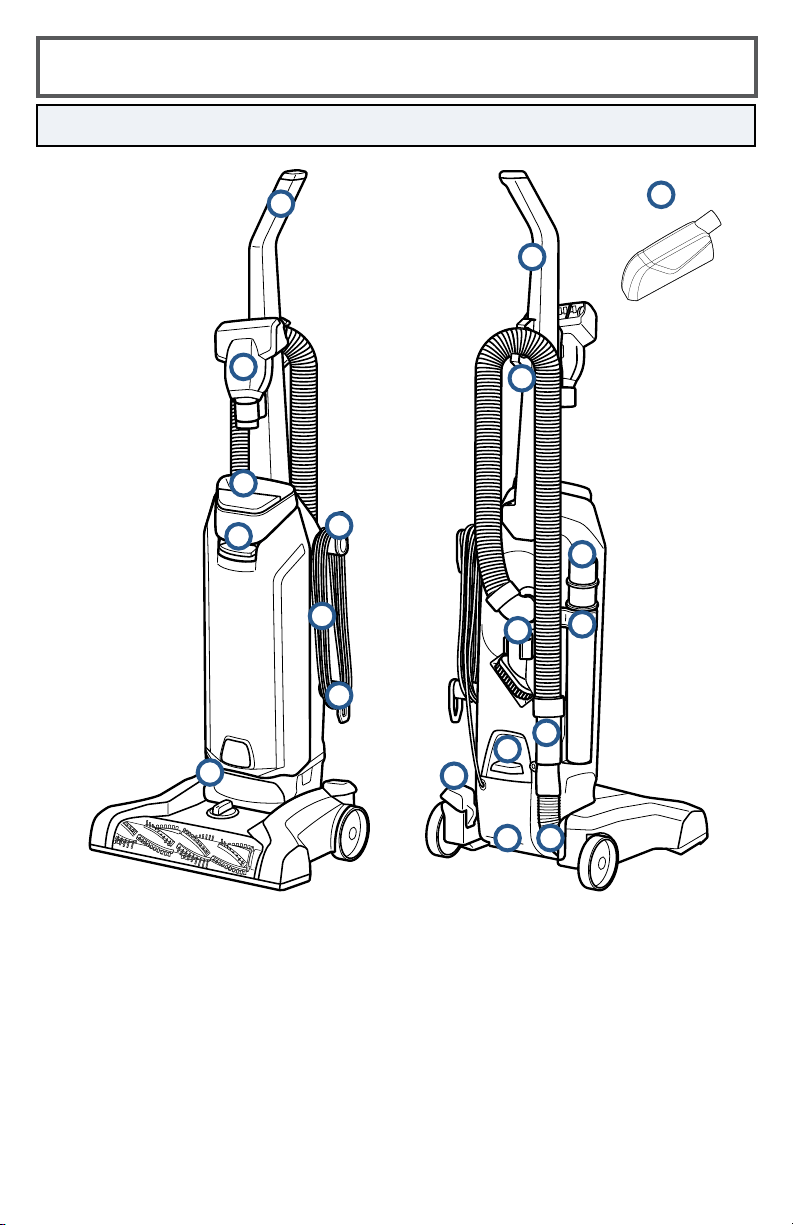
Product View
1
5
13
14
15
8
16
17
18
11
7
6
9
10
1 Upper Handle
2 Pet TurboEraser® Tool
3 Carry Handle
4 Bag Door Release Button
5 Washable Pre-Motor Filter
6 Upper Quick Wrap Release™ Cord Wrap
7 Lower Cord Wrap
8 Power Cord
9 Cord Clip
10 Hose Clip
11 Crevice Tool (stored in Extension Wand)
12 Extension Wand
13 Dusting Brush
14 Hose Wand
15 Power Switch Pedal
16 Handle Recline Pedal
17 Foot Hose
18 Product Rating Label &
Serial Number
19 Pet Hair Eraser® Tool
2
19
NOTICE: Two Febreze® Pet Odor Eliminator bags are included with your vacuum.
Febreze and related trademarks are owned by The Procter & Gamble
Company, Cincinnati, Ohio, used under license by BISSELL Homecare, Inc.
www.BISSELL.com
5
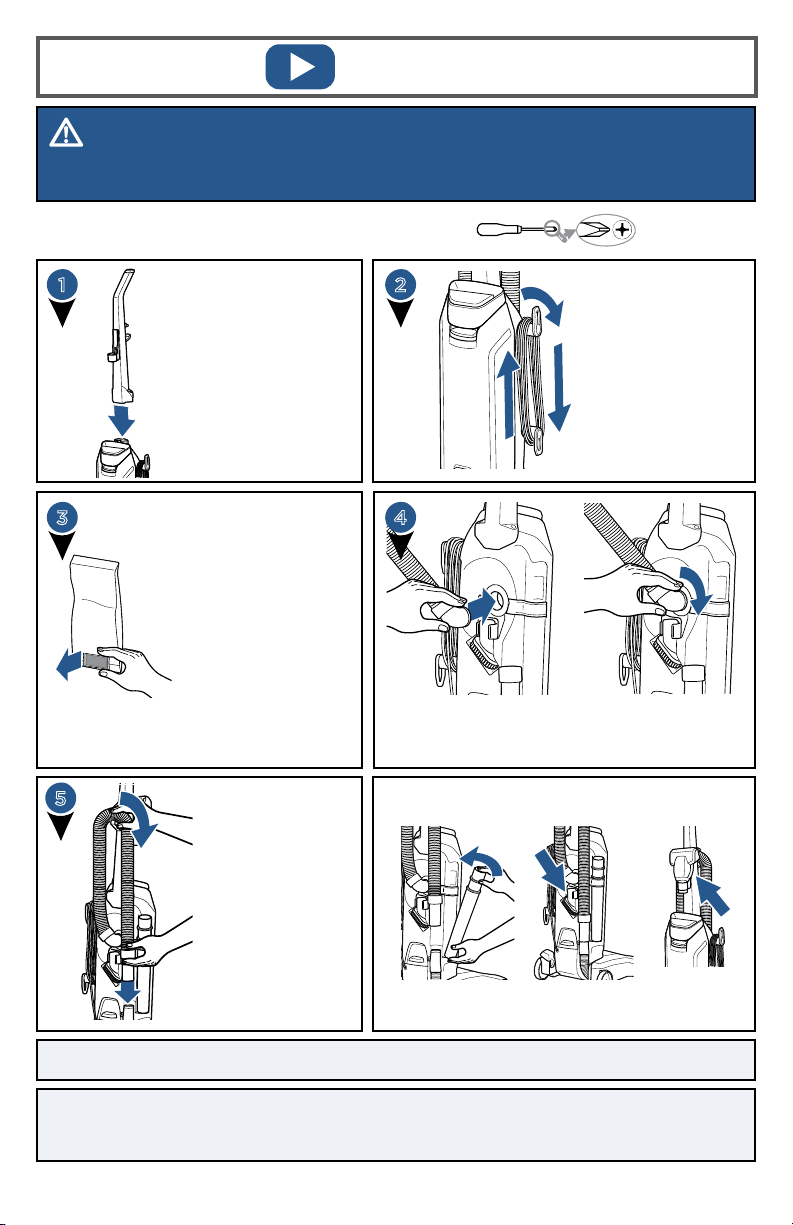
1
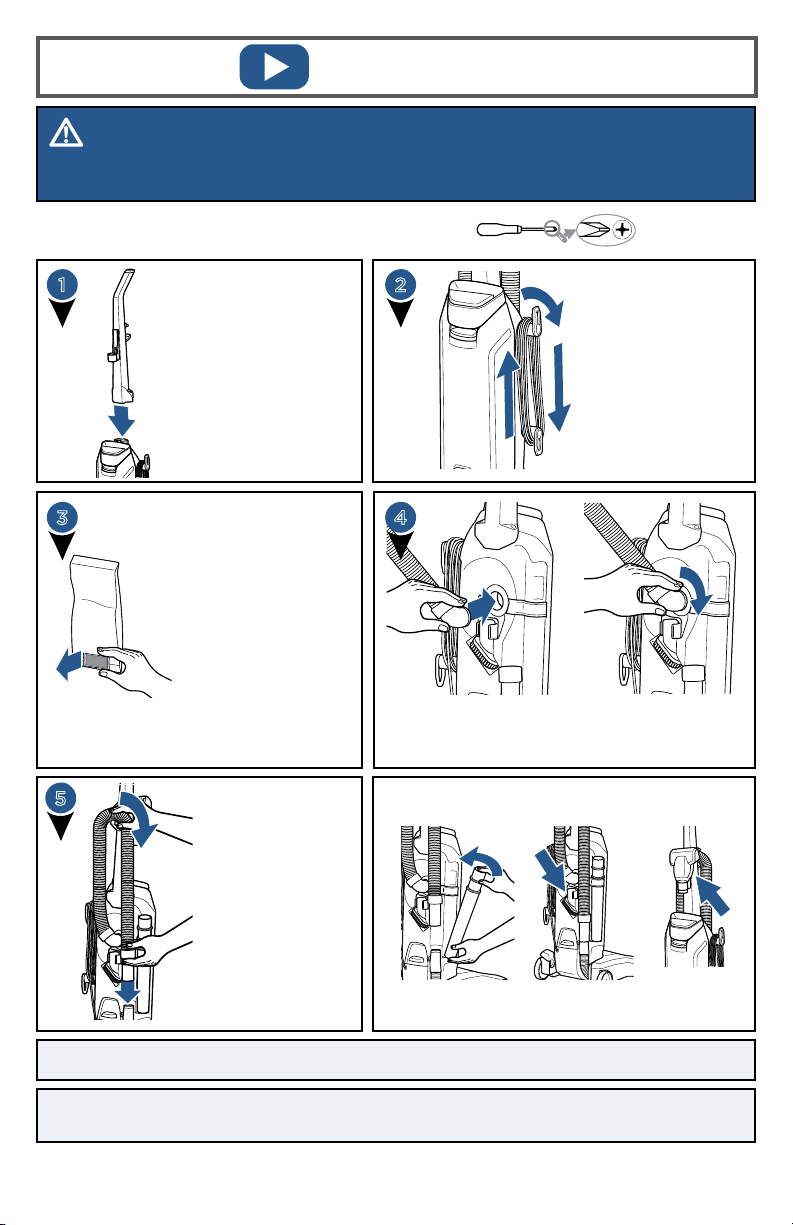
Assembly
WARNING
Do not plug in your vacuum until you are familiar with all instructions and operating
procedures.
Place the upper
handle onto the base
and push it down.
Then attach the
handle with the 2
screws that are taped
to the handle in a
plastic bag.
Wrap the power
cord around the
cord wrap clips
and clip the end
of the plug to
the power cord.
Now wrap
the hose
through the
hose clip and
connect the
hose wand to
the foot hose
down at the
bottom of the
vacuum.
Next, insert the end of the hose into the back
of the vacuum and twist to lock it into place.
Put your accessory tools on the
vacuum and you’re ready to go!
NOTE: The crevice tool can be found inside the extension wand. You can remove
it to use it and put it back to store it neatly out of your way when you’re finished.
Dusting
Brush
Extension
Wand
4
5
3
2
To experience
freshness as you
vacuum, locate the
Febreze® scent tag
at the bottom of
the vacuum bag.
Carefully pull the tab
along the perforated
lines in the center of
the scent tag.
The only tool you will need to assemble
your vacuum is a Phillips screwdriver.
NOTE: The Pet Hair Eraser® Tool does not store on-board.
NOTE: Only a portion of the
overwrap should be removed.
Pet
TurboEraser®
Tool

www.BISSELL.com
6
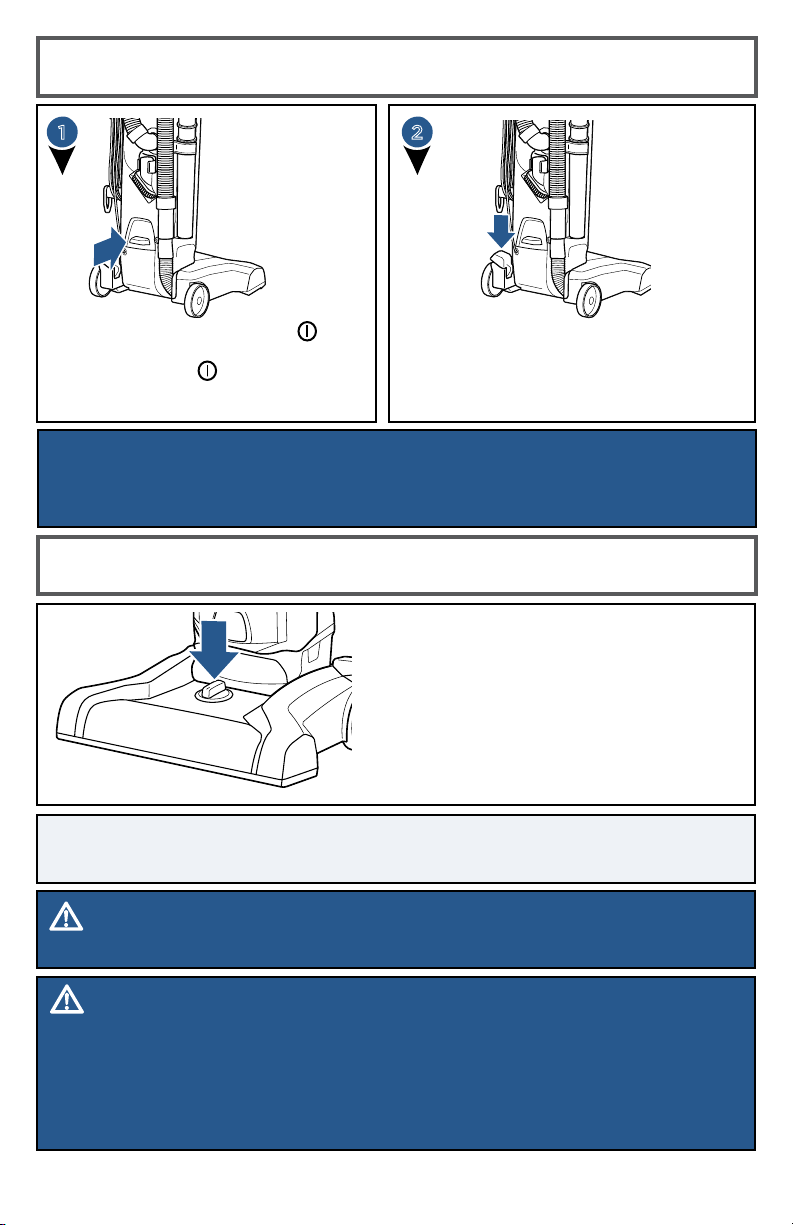
Power Switch
Height Adjustment
Press the recline pedal to lean your vacuum
back for cleaning. To get even lower, press
the recline pedal a second time. When
you’re finished, lean it all the way back up to
lock it into the upright position.
You can easily raise or lower your vacuum
to adjust to different flooring types. Simply
turn the knob towards the desired flooring
type. If your vacuum becomes too difficult
to push, just move to a higher setting.
Press the red power switch with
your foot to turn on the unit.
Press it again to turn your vacuum
off when you’ve finished cleaning.
NOTE: Some frieze and berber carpets have long delicate fibers or threads that
may be damaged by rotating brush. Repeated strokes in the same area may
enhance this condition.
WARNING
Before using you vacuum, make sure the bag and filter are in
place and the bag door is secure. DO NOT operate your vacuum without the bag and filter.
WARNING
The rotating floor brush continues to rotate while tools are in use. To reduce the risk of
injury from moving parts, always move the cleaner with the carry handle at the front of the
unit. Always place the cleaner on the floor with the handle in the upright position when
using tools. Never place your fingers under the cleaner when it is running. Never place the
powerfoot on furniture or uneven surfaces. Do not place vacuum cleaner close enough to
objects to pull them into rotating brush.
1
2
NOTICE
The floor brush will continue to rotate while you use your vacuum for above floor cleaning.
To prevent carpet damage, do not lean on the vacuum or let the powerfoot tilt forward.
www.BISSELL.com
7
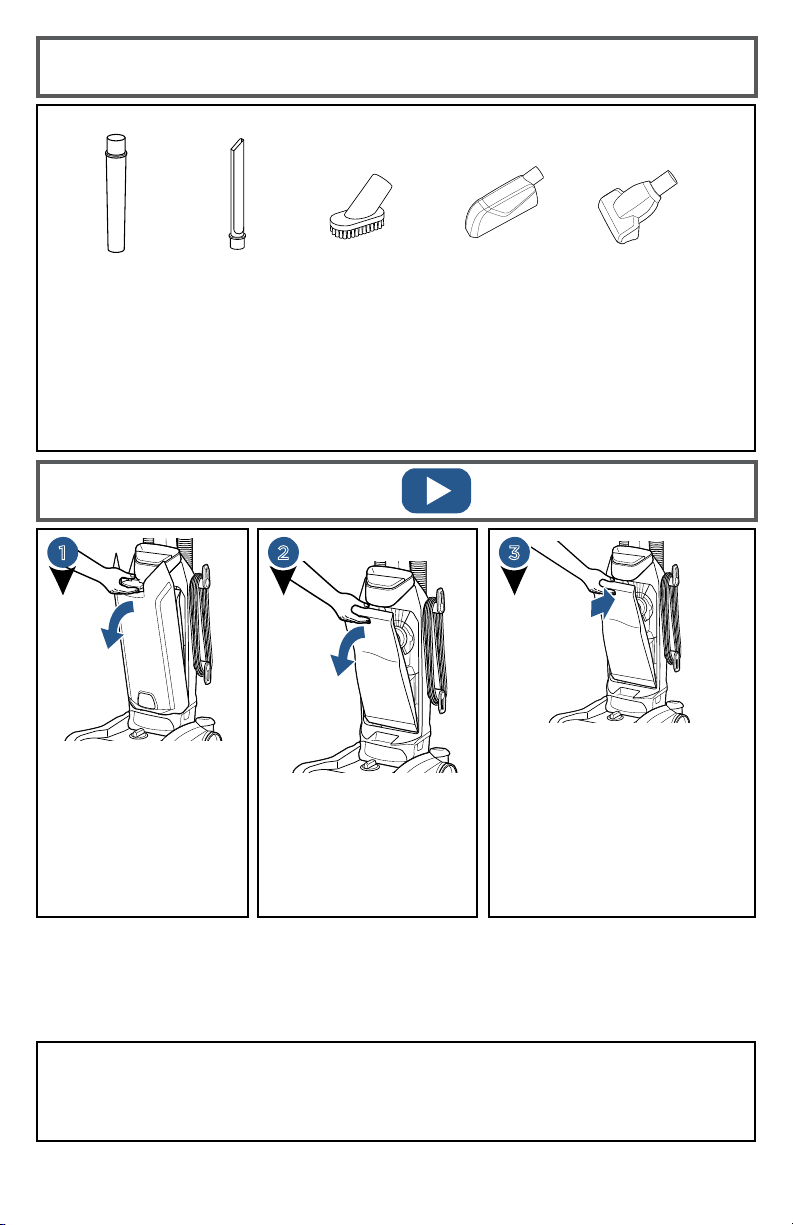
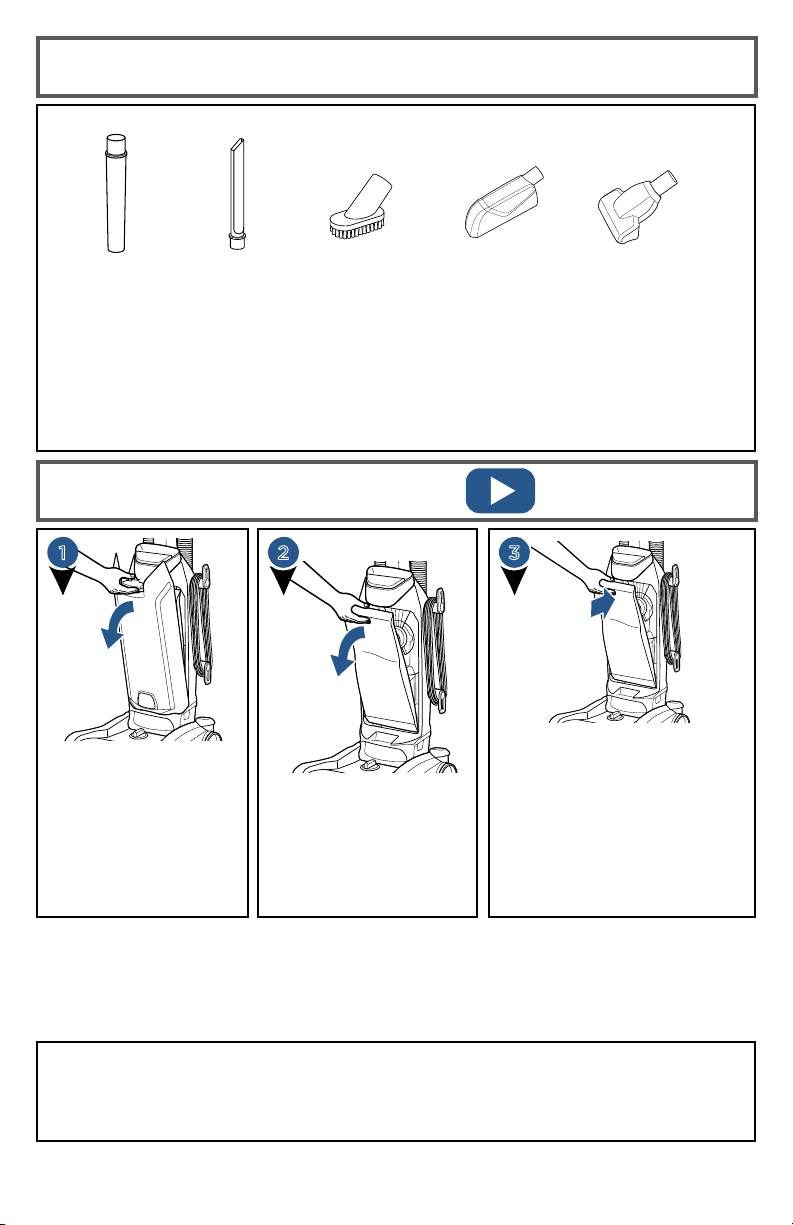
Tools
Changing the Bag
Parts & Supplies
For Parts and Supplies, go to www.BISSELL.com and enter
your model number in the search field.
Remove the old bag by
grabbing the dust bag
collar and pull towards
you to remove it from the
vacuum. Then carefully
throw it away.
As you use your
PowerLifter™ Pet
vacuum, eventually your
bag will get full and
need to be replaced. To
check it, open the bag
door and inspect the
bag. If the bag is full, it
is time to replace it.
Grab a new bag, grasp the
collar and press it onto the
connector tube. Tuck the bag
into the bag compartment. If
it’s a Febreze® bag, open the
wrapper on the scent tag by
pulling along the perforated
line to release the Febreze®
freshness. Put the bag door
back on and you’re finished.
Your new PowerLifter™ Pet vacuum not only does a great job on your floors, it also
comes with a complete set of accessory tools to make your above floor cleaning
jobs easier. Just put your vacuum in the upright position, pick the accessory tool
that best fits your needs and attach it to the end of your hose. You’re ready to
clean base boards, curtains, upholstery and much more.
1
32
Febreze® and related trademarks are owned by The Procter & Gamble Company, Cincinnati, Ohio
and used under license by BISSELL Homecare, Inc.
Crevice Tool
(store inside
extension wand)
Dusting
Brush
Extension
Wand
Pet Hair Eraser®
Tool
(does not store on unit)
Pet TurboEraser®
Tool

www.BISSELL.com
8
WARNING
To reduce the risk of electrical shock, turn power switch o and disconnect polarized plug
from electrical outlet before performing maintenance or troubleshooting checks.
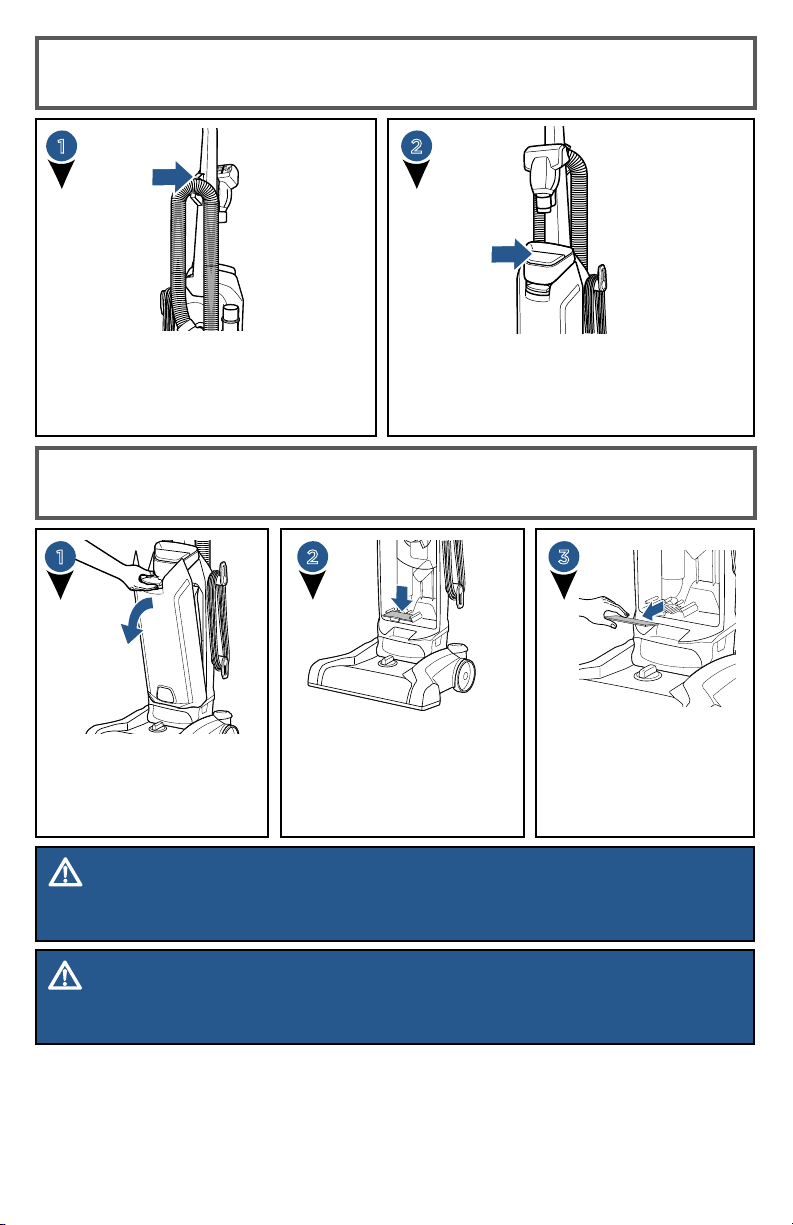
Cleaning the Pre-Motor Filter
Remove the bag door
cover by pressing the
latch down and pulling
the door off.
Remove the pre-motor
filter. Clean it with warm
water. Once it’s clean and
dry, put it back into the
unit.
WARNING
Do not operate the vacuum with damp or wet filters, without the bag in place, or with the
bag door missing. Allow components to dry before reassembling the unit.
Locate the filter on the left
side at the bottom of the
bag compartment. You may
need to lift the bag out of
the way to find it.
1
32
Helpful Tips
Easily carry the vacuum up and down stairs
or from room to room using the vacuum
carry handle. The vacuum carry handle is
located on the front of the vacuum above
the vacuum bag latch.
While vacuum is in use, fasten the
power cord to the cord clip located on
the back of the handle above the hose
clip. This will help to keep the cord out
of your way as you vacuum.
1
2
www.BISSELL.com
9
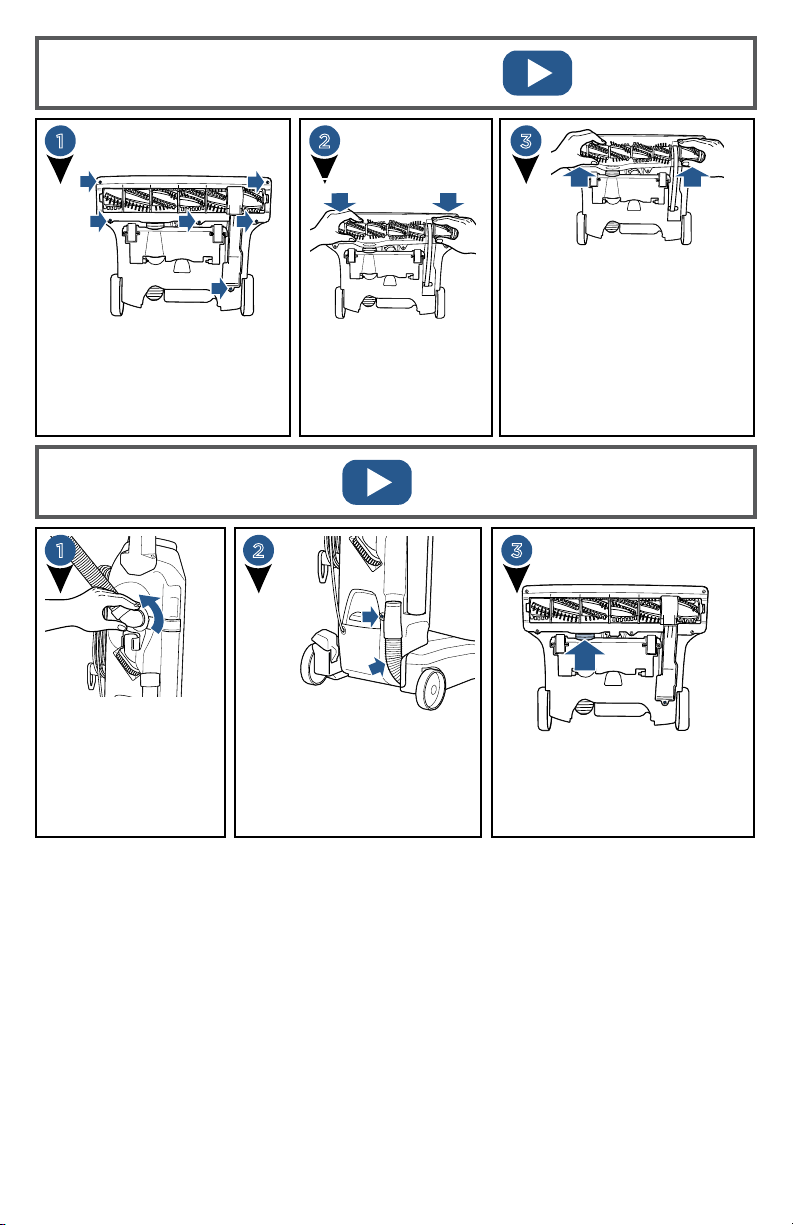
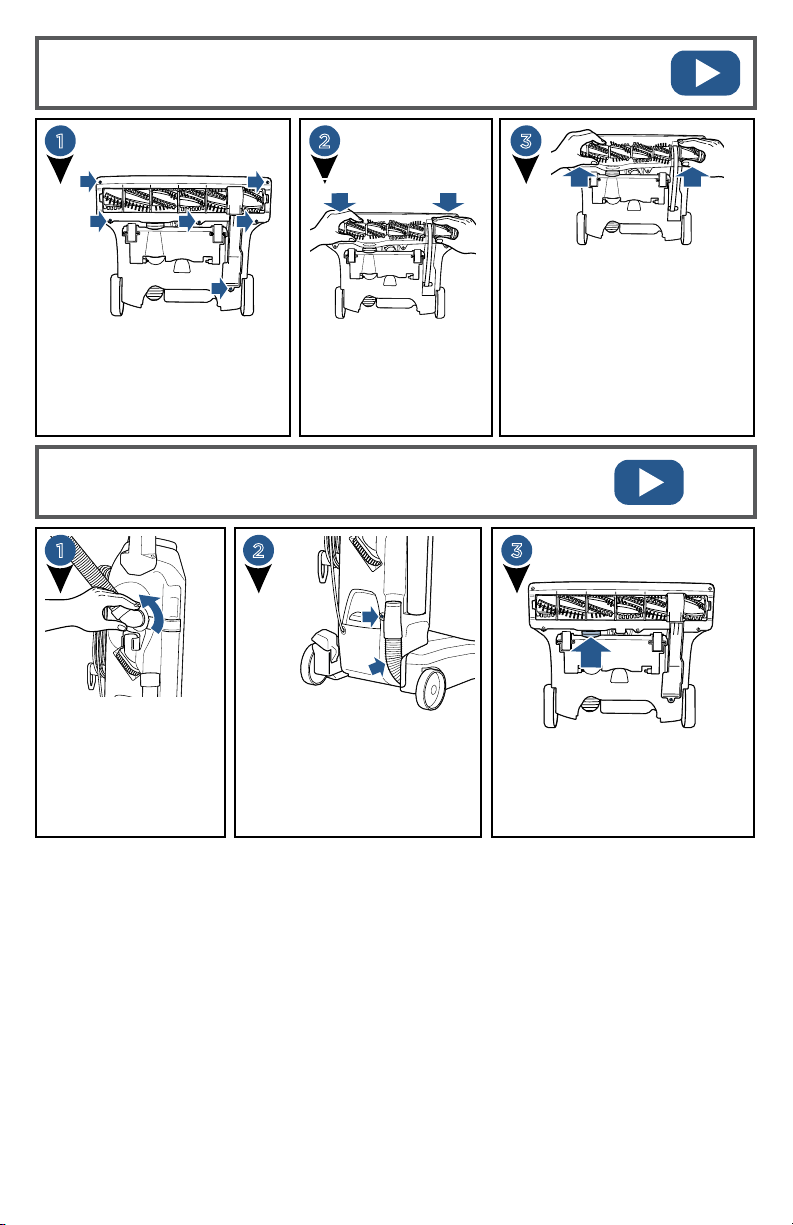
Replace the Brush & Belt
Clearing a Clog
Unplug vacuum, turn over and
unscrew Philips head screws
to remove bottom cover. This
model has 6 screws.
Lift roller straight
out. If the belt is not
broken, remove roller
from inside of the
looped belt.
Replace the brush roll and
belt by looping the belt
over the motor shaft and
the brush roll. Line up the
end caps and pull the brush
forward into place. This will
stretch the belt. Once the
brush roll is installed, place
the bottom cover back on
and replace the screws.
Remove the hose
from the back of the
vacuum by twisting
it to the left. Remove
any debris that may
have gotten clogged.
Check the foot hose
on the back of your
vacuum down towards
the bottom. Remove the
screw from the foot hose
and check for clogs.
Check the air passageway on
the bottom of your vacuum.
Remove the bottom cover and
the brush. Remove any debris.
1
1
3
3
2
2

www.BISSELL.com
10
Problem Possible causes Remedies
Vacuum
cleaner
won’t run
Power cord not plugged in Check electrical plug
Blown fuse/tripped breaker Check/replace fuse or reset breaker
Vacuum
cleaner won’t
pick up dirt
Dirt bag is full Replace bag
Filter dirty Check, remove debris or clean
Hose not secure Check to ensure the hose is secured
into place at both ends
Bag door is not in place Make sure the bag isn’t caught
between the door and the body of
the unit and snap the door into place
Vacuum path clogged Visually check air passageway, hose
inlet, and hose for anything that
might be obstructing the vacuum
path. Carefully remove blockage
Rotating power brush drive belt
broken
Replace drive belt
Drive belt stretched Check drive belt area and remove
obstructions. Replace drive belt if
necessary
Floor brush bristles worn Replace floor brush
Floor brush jammed Remove floor brush and clean debris
from brush and ends, then check
drive belt for any damage
Troubleshooting
WARNING
To reduce the risk of electric shock, turn power switch o and disconnect plug from
electrical outlet before performing maintenance or troubleshooting checks.

www.BISSELL.com
11
If your BISSELL product should require service:
Contact BISSELL Consumer Care to locate a BISSELL Authorized Service Center in your area.
If you need information about repairs or replacement parts, or if you have questions about
your warranty, contact BISSELL Consumer Care.
This warranty gives you specific legal rights,
and you may also have other rights which
may vary from state to state. If you need
additional instruction regarding this warran-
ty or have questions regarding what it may
cover, please contact BISSELL Consumer
Care by E-mail, telephone, or regular mail
as described below.
Limited Five-Year Warranty
Subject to the *EXCEPTIONS AND
EXCLUSIONS identified below, upon receipt
of the product BISSELL will repair or replace
(with new or remanufactured components
or products), at BISSELL’s option, free of
charge from the date of purchase by the
original purchaser, for five years any
defective or malfunctioning part.
See information below on "If your BISSELL
product should require service".
This warranty applies to product used for
personal, and not commercial or rental
service. This warranty does not apply to
fans or routine maintenance components
such as filters, belts, or brushes. Damage or
malfunction caused by negligence, abuse,
neglect, unauthorized repair, or any other
use not in accordance with the User's Guide
is not covered.
BISSELL IS NOT LIABLE FOR INCIDENTAL
OR CONSEQUENTIAL DAMAGES OF ANY
NATURE ASSOCIATED WITH THE USE OF
THIS PRODUCT. BISSELL’S LIABILITY WILL
NOT EXCEED THE PURCHASE PRICE OF
THE PRODUCT.
Some states do not allow the exclusion or
limitation of incidental or consequential
damages, so the above limitation or
exclusion may not apply to you.
*EXCEPTIONS AND EXCLUSIONS FROM
THE TERMS OF THE LIMITED WARRANTY
THIS WARRANTY IS EXCLUSIVE AND
IN LIEU OF ANY OTHER WARRANTIES
EITHER ORAL OR WRITTEN. ANY IMPLIED
WARRANTIES WHICH MAY ARISE
BY OPERATION OF LAW, INCLUDING
THE IMPLIED WARRANTIES OF
MERCHANTABILITY AND FITNESS FOR
A PARTICULAR PURPOSE, ARE LIMITED
TO THE FIVE YEAR DURATION FROM
THE DATE OF PURCHASE AS DESCRIBED
ABOVE.
Some states do not allow limitations on
how long an implied warranty lasts so the
above limitation may not apply to you.
Website:
www.BISSELL.com
E-mail:
www.BISSELL.com/email-us
Call:
BISSELL Consumer Care
1-800-237-7691
Monday – Friday 8am - 10pm ET
Saturday 9am - 8pm ET
Sunday 10am - 7pm ET
Warranty
Service
Please do not return this product to the store.
Other maintenance or service not included in the manual should be
performed by an authorized service representative.
For any questions or concerns, BISSELL is happy to be of service.
Contact us directly at 1-800-237-7691.
NOTE: Please keep your original sales receipt. It provides proof of date of
purchase in the event of a warranty claim.
12
©2017 BISSELL Homecare, Inc
Grand Rapids, Michigan
All rights reserved. Printed in China
Part Number 161-1175 5/17
Visit our website at: www.BISSELL.com
Registering is quick, easy and offers you benefits over the lifetime of your product.
You’ll receive:
Visit www.BISSELL.com/registration!
Visit the BISSELL website: www.BISSELL.com
When contacting BISSELL, have model number of cleaner available.
Please record your Model Number: ___________________
Please record your Purchase Date: ___________________
NOTE: Please keep your original sales receipt. It provides proof of purchase
date in the event of a warranty claim. See Warranty on page 11 for details.
BISSELL Rewards Points
Automatically earn points for
discounts and free shipping on
future purchases.
Faster Service
Supplying your information now
saves you time should you need to
contact us with questions regarding
your product.
Product Support Reminders
and Alerts
We’ll contact you with any
important product maintenance
reminders and alerts.
Special Promotions
Optional: Register your email
to receive notice of offers,
contests, cleaning tips and more!
We c’t wait to ar from y!
Rate this product and let us (and millions
of your closest friends) know what you think!
www.BISSELL.com
Parts & Supplies
For Parts and Supplies, go to www.BISSELL.com and enter
your model number in the search field.
Register your product today!
POWERLIFTER
™
ASPIRADORA
CON BOLSA
___________
GUÍA DEL USUARIO
SERIE 2019
¿Es una persona que
prefiere vídeos? Utilice
este icono y vaya en
línea a ver un vídeo
instructivo en
www.BISSELL.com/
videos
www.BISSELL.com
14
Este modelo es solamente para uso doméstico.
GUARDE ESTAS INSTRUCCIONE
INSTRUCCIONES IMPORTANTES DE SEGURIDAD
» No deje la aspiradora
desatendida mientras esté
enchufada. Desenchufe del
tomacorriente cuando no se use y
antes de efectuar tareas de servicio.
» No la use al aire libre ni sobre
superficies mojadas.
» No permita que se use como un
juguete. Se debe estar muy atento
cuando la usan los niños o cuando
se usa cerca de ellos.
» No la utilice para ningún otro
propósito que no sean los que se
describen en esta Guía del Usuario.
Use únicamente los accesorios que
recomienda el fabricante.
» No la use si el cordón o el enchufe
están dañados. Si el electrodomésti-
co no funciona como debiera, si se
lo ha dejado caer, dañado, dejado al
aire libre, o si se ha caído en el agua,
haga que lo reparen en un centro de
servicio autorizado.
» No arrastre ni cargue por el cordón
eléctrico ni utilice el cordón como si
fuera una manija. No cierre la puerta
sobre el cordón ni tire del mismo
sobre bordes ni esquinas filosas. No
pase el electrodoméstico por arriba
del cordón. Mantenga el cordón
alejado de superficies calientes.
» No desenchufe tirando del cordón.
Al desenchufar, agarre el enchufe, no
el cordón.
» No toque la aspiradora ni el enchufe
con las manos mojadas.
» No coloque ningún objeto en las
aberturas. No la use con aberturas
bloqueadas; mantenga las aberturas
libres de polvo, pelusas, pelos y
cualquier cosa que pueda reducir
el flujo de aire.
» Mantenga el pelo, la ropa holgada,
los dedos y cualquier parte del
cuerpo lejos de las aberturas y
piezas móviles.
» Apague todos los controles antes
de enchufar o desenchufar la
aspiradora.
» Tenga mucho cuidado al limpiar en
escaleras.
» No la use para recoger materiales
inflamables ni combustibles (fluido
para encendedores, gasolina,
queroseno, etc.) ni la use donde
pueda haberlos.
» No utilice la aspiradora en un
espacio cerrado lleno de vapores de
pintura al aceite, disolventes de
pintura, ciertas sustancias antipolillas,
polvos inflamables u otros vapores
explosivos o tóxicos.
» No la use para recoger materiales
tóxicos (blanqueador con cloro,
amoníaco, limpiador de drenajes,
etc.).
» No aspire nada que se esté
quemando o humeando, como
cigarrillos, fósforos o cenizas
calientes.
» No la use sin los filtros instalados.
» No aspire objetos duros o filosos
como vidrio, clavos, tornillos,
monedas, etc.
» Use solo sobre superficies secas en
ambientes interiores.
» Mantenga el electrodoméstico sobre
una superficie nivelada.
» No transporte la aspiradora mientras
está funcionando.
» Desenchúfela antes de conectar
o desconectar la herramienta
TurboEraser®.
LEA TODAS LAS INSTRUCCIONES ANTES DE USAR SU ASPIRADORA
VERTICAL.
Conecte siempre a un tomacorriente polarizado (una ranura es más ancha que la otra).
Desenchufe del tomacorriente cuando no se use y antes de efectuar tareas de mantenimiento. Cuando
se utiliza un electrodoméstico, es necesario tomar precauciones básicas, que incluyen las siguientes:
ESTE ELECTRODOMÉSTICO TIENE
UN ENCHUFE POLARIZADO
Para disminuir el riesgo de choque eléctrico, este electrodoméstico tiene un enchufe
polarizado (una de las clavijas es más ancha que la otra). Este enchufe entra en un
tomacorriente polarizado en una sola posición. Si el enchufe no entra bien en el
tomacorriente, inviértalo. Si aun así no entra, comuníquese con un electricista calificado
para que instale un tomacorriente apropiado. No modifique el enchufe de manera alguna.
Vivo
Neutro
ADVERTENCIA
›› La película de plástico puede ser peligrosa. Para evitar el peligro de asfixia, mantenga fuera del alcance de niños.
›› No enchufe la aspiradora hasta que esté familiarizado con todas las instrucciones y los procedimientos de operación.
›› Para reducir el riesgo de choque eléctrico, coloque el interruptor de encendido en la posición de apagado y
desconecte el enchufe polarizado del tomacorriente antes de efectuar tareas de mantenimiento o identificación de
fallas.
ADVERTENCIA
PARA REDUCIR EL RIESGO DE INCENDIOS, DESCARGA ELÉCTRICA O LESIONES:
www.BISSELL.com
15
Herramienta para
espacios pequeños
Guía del
Usuario
Manguera
Cepillo para
polvo
¿Qué hay en la caja?
Unidad
base
Mango
superior
Tubo de
extensión
2 tornillos
¡Muchas gracias por comprar una aspiradora BISSELL!
Nos gusta mucho limpiar y nos entusiasma compartir uno de nuestros productos innova-
dores con usted. Queremos asegurarnos de que su aspiradora funcione tan bien dentro de
un año como funciona hoy, por eso, esta guía incluye consejos sobre el uso (páginas 18-19),
mantenimiento (páginas 19-21) y si hay un problema, identificación de fallas (página 22).
Instrucciones de seguridad....14
Vista del producto ............16
Ensamblaje...................17
Operaciones...............18-19
Mantenimiento y cuidad ...19-21
Solución de problemas.......22
Garantía.....................23
Servicio .....................23
Registro del producto........24
Piezas y suministros .........24
NOTA:
Los accesorios estándar varían de un modelo a otro. Para identificar lo que se debiera haber
incluido con su compra, consulte la lista “Contenido de la caja” situada en la pestaña superior de la caja.
Bolsa Febreze®
estilo 7
(se incluyen 2)
Herramienta Pet Hair
Eraser®
Herramienta Pet
TurboEraser®

www.BISSELL.com
16
3
4
12
Diagrama del producto
1
5
13
14
15
8
16
17
18
11
7
6
9
10
1 Mango superior
2 Herramienta Pet TurboEraser®
3 Mango de transporte
4 Botón de liberación de puerta de la
bolsa
5 Filtro lavable antes del motor
6 Soporte superior para envolver el
cordón Quick Release™
7 Soporte inferior para envolver el cordón
8 Cordón eléctrico
9 Clip del cordón
10 Clip de manguera
11 Herramienta para espacios pequeños
(almacenada en el tubo de extensión)
12 Tubo de extensión
13 Cepillo para polvo
14 Tubo para manguera
15 Pedal de encendido
16 Pedal para reclinar la manija
17 Manguera del cabezal
18 Rótulo de calificación del producto y
número de serie
19 Herramienta Pet Hair Eraser®
2
19
AVISO: Se incluyeron dos bolsas para eliminar olores de mascotas Febreze® Pet
Odor Eliminator junto con su aspiradora.
Febreze y las marcas registradas relacionadas son propiedad de The Procter & Gamble Company, Cincinnati, Ohio y BISSELL
Homecare, Inc. la usa bajo licencia.
www.BISSELL.com
17
1
Ensamblaje
ADVERTENCIA
No enchufe su aspiradora antes de que se haya familiarizado con todas las instrucciones y
los procedimientos de operación.
Coloque el mango superior
sobre la base y empuje
hacia abajo. Luego instale el
mango con los 2 tornillos que
están adheridos con cinta
al mango en una bolsa de
plástico.
Envuelva el cordón
eléctrico alrededor
de los clips del
soporte para envolver
el cordón y fije el
extremo del enchufe
en el cordón eléctrico.
Ahora envuelva
la manguera a
través del clip
para manguera y
conecte el tubo
para la manguera
a la manguera
del cabezal en la
parte inferior de la
aspiradora.
A continuación, inserte el extremo de la manguera dentro de
la parte posterior de la aspiradora y gire para bloquear en su
sitio.
¡Coloque sus herramientas accesorias en la
aspiradora y está listo para comenzar!
NOTA: La herramienta para espacios angostos se encuentra dentro del tubo de extensión. Usted puede
quitarla para usarla y volver a colocarla para almacenar prolijamente fuera de su camino cuando haya
terminado.
Cepillo para
polvo
Tubo de
extensión
4
5
3
2
Para experimentar la
frescura mientras aspira,
busque una etiqueta de
aroma Febreze® en la parte
inferior de la bolsa de la
aspiradora. Con cuidado
tire de la lengüeta a lo largo
de las líneas perforadas
en el centro de la etiqueta
perfumada.
La única herramienta que necesitará para el
ensamblaje de su aspiradora es un destornillador Phillips.
NOTA: La herramienta Pet Hair Eraser® no se almacena en la aspiradora.
NOTA: Solamente se debe eliminar una
parte de la superposición.
Herramienta Pet
TurboEraser®
www.BISSELL.com
18
Interruptor de encendido
Ajuste de la altura
Presione el pedal para reclinar su aspiradora hacia atrás
para limpiarla. Para bajar aún más, presione el pedal de
reclinar una segunda vez. Cuando haya terminado, inclínela
totalmente hacia arriba nuevamente para bloquearla en la
posición vertical.
Puede elevar o bajar fácilmente su aspiradora para
ajustarse a distintos tipos de pisos. Simplemente gire la
perilla hacia el tipo de piso deseado. Si su aspiradora se
vuelve muy difícil de empujar, simplemente mueva a un
ajuste superior.
Presione el interruptor rojo de encendido con su
pie para encender la unidad.
Presiónelo nuevamente para apagar su aspiradora
cuando haya terminado de limpiar.
NOTA: Algunas alfombras friso y berber tienen fibras largas delicadas o hebras que se pueden dañar con los
cepillos giratorios. Las pasar repetidas en la misma área puede aumentar esta condición.
ADVERTENCIA
Antes de usar su aspiradora, asegúrese de que la bolsa y el filtro
estén en su sitio y que la puerta de la bolsa esté segura. NO haga funcionar la aspiradora sin la bolsa y el filtro.
ADVERTENCIA
El cepillo para piso sigue girando mientras se usan las herramientas. Para reducir el riesgo de lesiones
causadas por las piezas móviles, siempre mueva la aspiradora usando la manija de transporte en la parte
delantera de la aspiradora. Siempre coloque la limpiadora sobre el piso con la manija en la posición vertical al
usar herramientas. Nunca coloque los dedos abajo de la aspiradora cuando está funcionando. Nunca coloque
el cabezal motorizado sobre muebles ni superficies irregulares. No coloque la aspiradora suficientemente
cerca de objetos como para tirar de ellos adentro del cepillo giratorio.
1
2
AVISO
El cepillo para el piso seguirá girando mientras usa la aspiradora para limpiar arriba del piso.
Para evitar daños a la alfombra, no se apoye en la aspiradora ni deje que el cabezal motorizado se incline hacia adelante.
www.BISSELL.com
19
Herramientas
Cómo cambiar la bolsa
Piezas y suministros
Por piezas y suministros vaya a BISSELL.com e ingrese el número de su
modelo en el campo de búsqueda.
Extraiga la bolsa vieja tomado el
collar de la bolsa de polvo y tiran-
do hacia usted para quitarla de la
aspiradora. Luego, con cuidado
deshágase de ella
Mientras usa su aspiradora
para mascotas PowerLifter™,
eventualmente se llenará la
bolsa y habrá que cambiarla.
Para comprobarla, abra la
puerta de la bolsa e inspeccione
la bolsa. Si la bolsa está
llena, llegó el momento de
reemplazarla.
Tome una bolsa nueva, tome el collar
y presiónelo dentro del tubo conector.
Meta la bosa dentro del compartimiento
para la bolsa. Si es una bolsa Febreze®,
abra la envoltura del aroma en la bolsa
perfumada tirando a lo largo de la línea
perforada para liberar la frescura de
Febreze®. Coloque de nuevo la puerta
de la bolsa y estará listo.
Su nueva aspiradora para mascotas PowerLifter™ no solo hace un gran trabajo sobre sus pisos,
también viene con un juego completo de herramientas accesorias para hacer su limpieza de
superficies del piso más fácil. Simplemente coloque la aspiradora en posición vertical, escoja la
herramienta accesoria que mejor se ajusta a sus necesidades y conéctela en el extremo de su
manguera. Ahora está listo para limpiar zócalos, cortinas, tapizado, y mucho más.
1
32
Febreze® y las marcas registradas relacionadas son propiedad de The Procter & Gamble Company, Cincinnati, Ohio y BISSELL
Homecare, Inc. la usa bajo licencia.
Herramienta para
espacios pequeños
(almacenada en el tubo de
extensión)
Cepillo para
polvo
Tubo de
extensión
Herramienta Pet Hair
Eraser®
(no se almacena en la unidad)
Herramienta Pet
TurboEraser®
www.BISSELL.com
20
ADVERTENCIA
Para reducir el riesgo de choque eléctrico, coloque el interruptor de encendido en la posición de apagado y desconecte el
enchufe polarizado del tomacorriente antes de efectuar tareas de mantenimiento o identificación de fallas.
ADVERTENCIA
No opere la aspiradora con filtros húmedos o mojados, sin tener la bolsa en su sitio, o sin la puerta de la bolsa. Permita que
se sequen los componentes antes de volver a armar la unidad.
Limpieza del filtro antes del motor
Extraiga la cubierta de la puerta
de la bolsa presionando el cierre
hacia abajo y tirando para quitar
la puerta.
Extraiga el filtro adelante del
motor. Límpielo con agua tibia.
Una vez limpio y seco, colóquelo
de nuevo en la unidad.
Busque el filtro en el lado izquierdo en
la parte inferior del compartimiento de
la puerta. Es posible que necesite alzar
la bolsa para sacarla del camino para
encontrarlo.
1
32
Helpful Tips
Easily carry the vacuum up and down stairs
or from room to room using the vacuum
carry handle. The vacuum carry handle is
located on the front of the vacuum above
the vacuum bag latch.
While vacuum is in use, fasten the
power cord to the cord clip located on
the back of the handle above the hose
clip. This will help to keep the cord out
of your way as you vacuum.
1
2
www.BISSELL.com
21
Vuelva a instalar el cepillo y la correa
Eliminación de una obstrucción
Desenchufe la aspiradora, invierta y
destornillo los tornillos con cabeza
Phillips para quitar la cubierta inferior.
Este modelo tiene 6 tornillos.
Levante el rodillo derecho
hacia arriba. Si la correa no
está rota, extraiga el rodillo
desde adentro de la correa
enlazada.
Vuelva a instalar el cepillo giratorio y
la correa pasándola arriba del eje del
motor y el cepillo giratorio. Alinee las
tapas de extremo y tire del cepillo
hacia adelante colocándolo en su sitio.
Esto estirará la correa. Una vez que el
cepillo giratorio está instalado, coloque
nuevamente la cubierta inferior en su
sitio y reemplace los tornillos.
Extraiga la manguera de la
parte posterior de la aspi-
radora girándola hacia la
izquierda. Extraiga cualquier
suciedad que se haya blo-
queado.
Compruebe la manguera del
cabezal de la base en la parte
posterior de la aspiradora hacia la
parte inferior. Extraiga el tornillo
de la manguera del cabezal
de la base y compruebe si hay
obstrucciones.
Compruebe el pasaje de aire en la parte
inferior de la aspiradora. Extraiga la
cubierta inferior y el cepillo. Extraiga la
suciedad.
1
1
3
3
2
2

www.BISSELL.com
22
Problema Causas posibles Acciones correctivas
La aspiradora
no funciona
El cordón de alimentación no está
enchufado
Compruebe el enchufe eléctrico
Fusible quemado o disyuntor dis
-
parado
Compruebe/reemplace el fusible o
restablezca el disyuntor
La aspiradora
no recoge la
suciedad
La bolsa de suciedad está llena Reemplace la bolsa
Filtro sucio Compruebe, elimine la suciedad o limpie
La manguera no está segura Compruebe para asegurarse de que la
manguera esté asegurada en su sitio en
ambos extremos
La puerta no está en su sitio Asegúrese de que la bolsa no esté atra
-
pada entre la puerta y el cuerpo de la
unidad y calce la puerta en su sitio
La aspiradora está obstruida Compruebe visualmente el pasaje de
aire, la entrada de la manguera y la
manguera por cualquier cosa que pueda
estar obstruyendo el pasaje del vacío.
Extraiga cuidadosamente el bloqueo
Se rompió la correa de la
transmisión del cepillo giratorio
motorizado
Reemplace la correa de accionamiento
Se estiró la correa de
accionamiento
Compruebe el área de la correa de
accionamiento y extraiga obstrucciones.
Reemplace la correa de accionamiento si
es necesario
Las cerdas del cepillo giratorio para
piso están gastadas
Reemplace el cepillo para piso
Cepillo giratorio para el piso atasca
-
do
Extraiga el cepillo para piso y limpie la
suciedad del cepillo y los extremos, luego
compruebe la correa de accionamiento
para ver si hay daños.
Identificación de fallas
ADVERTENCIA
Para reducir el riesgo de choque eléctrico, apague el interruptor de encendido y desconecte el enchufe del
tomacorriente antes de efectuar tareas de mantenimiento o hacer una comprobación para identificar fallas.

www.BISSELL.com
23
Si su producto BISSELL requiere servicio:
Comuníquese con Atención al Consumidor de BISSELL para ubicar un centro de servicio autorizado de BISSELL en su área.
Si necesita información sobre reparaciones o repuestos o si tiene preguntas sobre su garantía, comuníquese con el
departamento de atención al consumidor de BISSELL.
Esta garantía le concede derechos legales
específicos, y es posible que tenga otros
derechos que pueden variar de un estado a otro.
Si necesita instrucciones adicionales con respecto a
esta garantía o si tiene preguntas con respecto a lo
que puede cubrir, comuníquese con el departamento
de atención al cliente de BISSELL por correo
electrónico, teléfono o correo postal como se
describe a continuación.
Garantía limitada de cinco años
Sujeta a las *EXCEPCIONES Y EXCLUSIONES
identificadas a continuación, una vez que BISSELL
reciba el producto, y a su única discreción, BISSELL
reparará o reemplazará gratuitamente (con com
-
ponentes o productos nuevos o remanufacturados)
durante cinco años a partir de la fecha de compra
del comprador original, cualquier pieza que esté
defectuosa o que no funcione correctamente.
Consulte la información a continuación sobre “Si su
producto BISSELL necesita servicio”.
Esta garantía se aplica a productos usados para
fines personales y no para servicios comerciales o de
alquiler. Esta garantía no se aplica a los ventiladores
ni a los componentes de mantenimiento periódico
como filtros, correas o cepillos. No cubre los daños
o desperfectos causados por negligencia, abuso o
descuido, reparación no autorizada o cualquier otro
uso no contemplado en la guía del usuario.
BISSELL NO ES RESPONSABLE DE DAÑOS
IMPREVISTOS O CONSECUENTES O DE
CUALQUIER TIPO RELACIONADOS CON EL USO
DE ESTE PRODUCTO. LA RESPONSABILIDAD DE
BISSELL NO SERÁ MAYOR QUE EL PRECIO DE
COMPRA DEL PRODUCTO.
Algunos estados no permiten la exclusión ni la
limitación de daños consecuentes o incidentales,
de modo que la limitación o exclusión antes
mencionada puede que no se aplique en su caso.
*EXCEPCIONES Y EXCLUSIONES DE LOS TÉRMI
-
NOS DE LA GARANTÍA LIMITADA
ESTA GARANTÍA ES EXCLUSIVA Y REEMPLAZA
CUALQUIER OTRA GARANTÍA ORAL O ESCRITA.
CUALQUIER GARANTÍA IMPLÍCITA QUE PUEDA
SURGIR CONFORME A DERECHO, INCLUIDAS LAS
GARANTÍAS IMPLÍCITAS DE APTITUD E IDONEIDAD
PARA UN PROPÓSITO EN PARTICULAR, SE
LIMITAN A LA DURACIÓN DE CINCO AÑOS DESDE
LA FECHA DE COMPRA COMO SE DESCRIBE MÁS
ARRIBA.
Algunos estados no permiten limitaciones de la
duración de una garantía implícita, de modo que la
limitación o exclusión antes mencionada puede que
no se aplique en su caso.
Sitio web:
www.BISSELL.com
Correo Electrónico:
www.BISSELL.com/email-us
Llame al:
Atención al Consumidor de BISSELL
1-800-237-7691
Lunes a viernes 8 am - 10 pm hora del este
Sábados 9 am - 8 pm hora del este
Domingos 10 am - 7 pm hora del este
Garantía
Servicio
Por favor no devuelva este producto al establecimiento donde lo compró.
Todo trabajo de mantenimiento o servicio no incluido en el manual deberá ser realizado por un representante de
servicio autorizado.
Si tiene alguna pregunta o inquietud, BISSELL lo atenderá con mucho gusto.
Comuníquese directamente con nosotros llamando al 1-800-237-7691.
NOTA:
Guarde el recibo original de compra. Servirá como comprobante de la fecha de
compra en caso de que necesite hacer un reclamo en garantía.
24
©2017 BISSELL Homecare, Inc
Grand Rapids, Michigan
Todos los derechos reservados. Impreso en China
Pieza número 161-1175 5/17
Visite nuestro sitio web en: www.BISSELL.com
El registro es rápido, fácil y le ofrece beneficios durante la vida útil de su producto.
Usted recibirá:
Visite www.BISSELL.com/registration
Puntos de recompensa BISSELL
Obtenga puntos de manera automática
para descuentos y entregas a domicilio
gratis en compras futuras.
Servicio más rápido
Si envía la información ahora, ahorrará
tiempo por si necesita ponerse en
contacto con nosotros con preguntas
relacionadas con el producto.
Recordatorios y alertas del
centro de servicio de productos
Nos pondremos en contacto con usted
ante cualquier recordatorio y alerta
importante relacionada con el
mantenimiento del producto.
Promociones especiales
Opcional: Registre su correo electrónico
para recibir notificaciones de ofertas,
concursos, consejos de limpieza y más.
¡Registre su producto hoy mismo!
Visite el sitio Web de BISSELL: www.BISSELL.com
Cuando se ponga en contacto con BISSELL, tenga a mano el número de modelo de la
aspiradora.
Registre su número de modelo: ___________________
Registre su fecha de compra: ___________________
NOTA: Guarde el recibo original de compra. Servirá como comprobante de
la fecha de compra en caso de que necesite hacer un reclamo de la garantía.
Consulte la Garantía en la página 23 para ver los detalles.
Nos enctaría saber de usd.
Califique este producto y háganos saber (a nosotros
y a millones de sus amigos cercanos) lo que piensa.
www.BISSELL.com
Piezas y suministros
Para consultar sobre piezas y suministros, visite el sitio www.BISSELL.com e
ingrese el número de modelo en el campo de búsqueda.