Unmanned Aircraft Flight Manual
2022.12
v1.2
AGRAS T40
(Type: DJI-3WWDZ-40A)
AGRAS T20 P
(Type: DJI-3WWDZ-20A)

Searching for Keywords
Search for keywords such as “battery” and “install” to nd a topic. If you are using Adobe Acrobat
Reader to read this document, press Ctrl+F on Windows or Command+F on Mac to begin a search.
Navigating to a Topic
View a complete list of topics in the table of contents. Click on a topic to navigate to that section.
Printing this Document
This document supports high resolution printing.
Record of Manual Revisions
Version Date Revisions
v1.0 2022.08 Initial release
v1.2 2022.12 Added FAR Remote ID Compliance Information.
This document is copyrighted by DJI with all rights reserved. Unless otherwise
authorized by DJI, you are not eligible to use or allow others to use the document
or any part of the document by reproducing, transferring or selling the document.
Users should only refer to this document and the content thereof as instructions
to operate DJI UAV. The document should not be used for other purposes.
The T40 aircraft and T20P aircraft have similar functions and operations. Unless otherwise
specied, descriptions in this document use the T40 aircraft as an example and apply to both
aircraft models.
©
2022 DJI All Rights Reserved.
1
Information
The aircraft may not come with a flight battery in certain regions. Only purchase official DJI
TM
flight
batteries. Read the corresponding Intelligent Flight Battery user guide and take necessary precautions
when handling the batteries to ensure your own safety. DJI assumes no liability for damage or injury
incurred directly or indirectly from misusing batteries.
Using This Manual
Legend
Important Hints and tips Reference
Before Flight
The following documents have been produced to help you safely operate and make full use of your
aircraft:
1. In the Box
2. Disclaimer and Safety Guidelines
3. Quick Start Guide
4. User Manual (Unmanned Aircraft Flight Manual)
Refer to the corresponding in the box to check the listed parts and read the disclaimer and safety
guidelines before flight. Refer to the quick start guide for more information on assembly and basic
operation. Refer to the user manual for more comprehensive information.
Downloading DJI Assistant 2 for MG
Download DJI ASSISTANT
TM
2 for MG from:
https://www.dji.com/t40/downloads or https://www.dji.com/t20p/downloads
The operating temperature of this product is 0° to 45° C (32° to 113° F). It does not meet
the standard operating temperature for military grade application (-55° to 125° C (-67° to
257° F)), which is required to endure greater environmental variability. Operate the product
appropriately and only for applications that it meets the operating temperature range
requirements of that grade.

2
©
2022 DJI All Rights Reserved.
Table of Contents
General Information and System Description
4
Introduction 4
Aircraft 5
Control Station 12
Command and Control Link 26
Ground Operational Area Setup 26
Performance and Limitations
27
Performance 27
Prohibited Maneuvers 28
Center of Gravity Limitations 28
Applicable Environmental Limitations 31
Normal Procedures
32
Airspace Environment 32
Radio Frequency Environment 35
Use of Launch and Recovery Equipment 35
Distance to Control Station 35
System Assembly 36
Pre-Flight Checklist 38
System Starting
39
Calibrating the Flow Meter
39
Calibrating the Compass 40
Takeoff/Landing 40
Cruise / Maneuvering Flight 42
System Shutdown 51
Post-Flight Inspection 51
Emergency Procedures
52
General Information 52
Engine Failure 52
Fire 52
Loss of C2 Link 52
Loss of Navigation Systems 54
Control Station Failures 54
Flyaway 54
Reporting Requirements 54

©
2022 DJI All Rights Reserved.
3
AGRAS T40/T20 P
Unmanned Aircraft Flight Manual
Weight and Balance and Equipment List
55
Handling, Servicing and Instructions for Maintenance and Continued
Airworthiness
55
Ground Handling 55
Disassembly, Storage, and Reassembly 55
Charging / Conditioning / Replacing Batteries 59
Maintenance Program 60
Supplements
62
Specifications
62
Operation Resumption 70
System Data Protection 72
Empty Tank Warning 72
Return to Home (RTH) 73
Low Battery and Low Voltage Warnings 74
RTK Functions 74
Aircraft LEDs 75
Updating the Firmware 75
DJI Assistant 2 for MG 76
Intelligent Flight Battery 77
Payload - Spraying System 83
Optional Payload - T40/T20P Spreading System 83
T40/T20P Drone Recommended Maintenance Cycle 86
FAR Remote ID Compliance Information 89

4
©
2022 DJI All Rights Reserved.
General Information and System Description
Introduction
The Agras T40 and Agras T20P have a truss-style design with arms that can be folded to reduce
the body size, making the aircraft easier to transport. The all-new integrated spraying system can
quickly be swapped with a spreading system. The spreading payload of the T40 has increased to
50 kg for more efcient spreading.
The spatial intelligent sensing system includes active phased array radars and binocular vision
to ensure ight safety. Boasting a 12MP UHD FPV camera with a tiltable gimbal, the aircraft can
automatically collect HD field images for local offline reconstruction to assist in precise field
planning. Using the P4 Multispectral and DJI Agras Intelligent Cloud, prescription maps can be
generated in order to perform variable rate fertilization.
The spraying system is equipped with the brand new magnetic drive impeller pumps, dual atomized
sprinklers, and anti-drip centrifugal valves. When used with the weight sensors, the spraying
system provides real-time liquid level detection and improves spraying efciency while saving liquid
pesticide.
Core modules adopt potting technology and the aircraft has a protection rating of IPX6K (ISO
20653:2013) so that the aircraft body can be washed directly with water.
The next generation DJI RC Plus remote controller features DJI O3 Agras, the latest version of the
signature OCUSYNC
TM
image transmission technology, and has a max transmission distance of
up to 7 km (at an altitude of 2.5 m).
[1]
The remote controller has a high-performance 8-core CPU
and a built-in 7-in high brightness touchscreen powered by the Android operating system. Users
can connect to the internet via Wi- Fi or the DJI Cellular Dongle. Operations are more convenient
and accurate than ever before thanks to the revamped DJI Agras app design and a wide range of
buttons on the remote controller. With Mapping mode added to the app, users can complete ofine
reconstructions and perform precise eld planning without the need of extra devices. The remote
controller has a maximum operating time of 3 hours and 18 min with the high-capacity internal
battery. Users can also purchase an external battery separately to be used to supply power to the
remote controller and fully meet the requirements for long and high-intensity operations.
[1] The remote controller is able to reach its maximum transmission distance (FCC/NCC: 7 km (4.35 mi);
SRRC: 5 km (3.11 mi); CE/KCC/MIC: 4 km (2.49 mi)) in an open area with no electromagnetic interference, and
at an altitude of approximately 2.5 m (8.2f t).

©
2022 DJI All Rights Reserved.
5
AGRAS T40/T20 P
Unmanned Aircraft Flight Manual
Aircraft
Feature Highlights
The aircraft has a truss-style body with arms that can be quickly folded, making it easy for
transportation. Folding detection sensors built into the frame arms enable the aircraft to perform
a folding mechanism self-check, ensuring the arms are properly unfolded. The aircraft supports
centimeter-level positioning
[1]
when used with the onboard D-RTK
TM
.
Thanks to the spatial intelligent sensing system with the binocular vision system, active phased
array omnidirectional radar, and active phased array backward and downward radar, the aircraft
can achieve comprehensive obstacle sensing and terrain following to ensure ight safety as well as
improve operation efciency.
In the new Mapping operation mode, images in the task area can be captured using the UHD FPV
camera, and local maps can be generated using the remote controller without internet connection
to assist in precise planning.
In the new Fruit Tree operation mode, operations imported in multiple methods can be displayed
together for users to start operations more efciently.
The dual atomized spraying system is equipped with the brand new magnetic drive impeller
pump, making the system more corrosion-resistant and durable. The dual atomized sprinkler
and proprietary centrifugal valve prevent leakage and reduce pesticide use while protecting the
environment.
The T40 aircraft is equipped with a coaxial twin-rotor structure to produce strong winds so that
pesticides can penetrate thick canopies for thorough spraying.
Aircraft and operation control is more convenient than ever, thanks to a wide range of buttons and
dials on the DJI RC Plus remote controller. With the built-in revamped DJI Agras app, the payload
for each ight is maximized through intelligent route planning for greater efciency.
[1] Must be used with a DJI D-RTK 2 High Precision GNSS Mobile Station (sold separately) or a DJI-approved
Network RTK service.
6
©
2022 DJI All Rights Reserved.
AGRAS T40/T20 P
Unmanned Aircraft Flight Manual
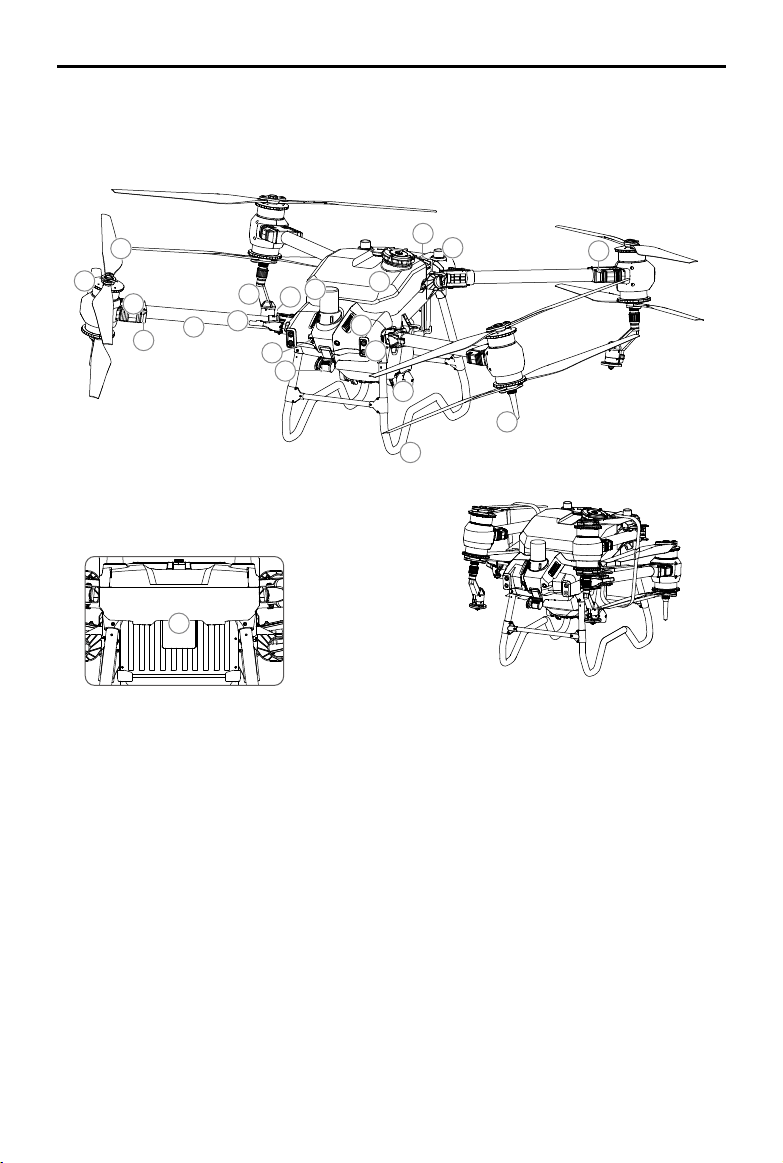
16
Aircraft Overview
T40
Rear View
4
2
3
5
6
7
9
1
18
15
21
14
13
10
19
11
12
17
8
20
Folded
1. Propellers
2. Motors
3. ESCs
4. Aircraft Front Indicators
(on two front arms)
5. Frame Arms
6. Folding Detection Sensors
(built-in)
7. Spray Lance
8. Sprinklers
9. Spray Tank
10. Delivery Pumps
11. FPV Camera
12. Binocular Vision System
13. Spotlights
14. Heat Sinks
15. Active Phased Array
Omnidirectional Radar
16. Active Phased Array
Backward and
Downward Radar
17. Intelligent Flight Battery
18. Landing Gear
19. OcuSync Image
Transmission Antennas
20. Onboard D-RTK
Antennas
21. Aircraft Rear Indicators
(on two rear arms)
©
2022 DJI All Rights Reserved.
7
AGRAS T40/T20 P
Unmanned Aircraft Flight Manual
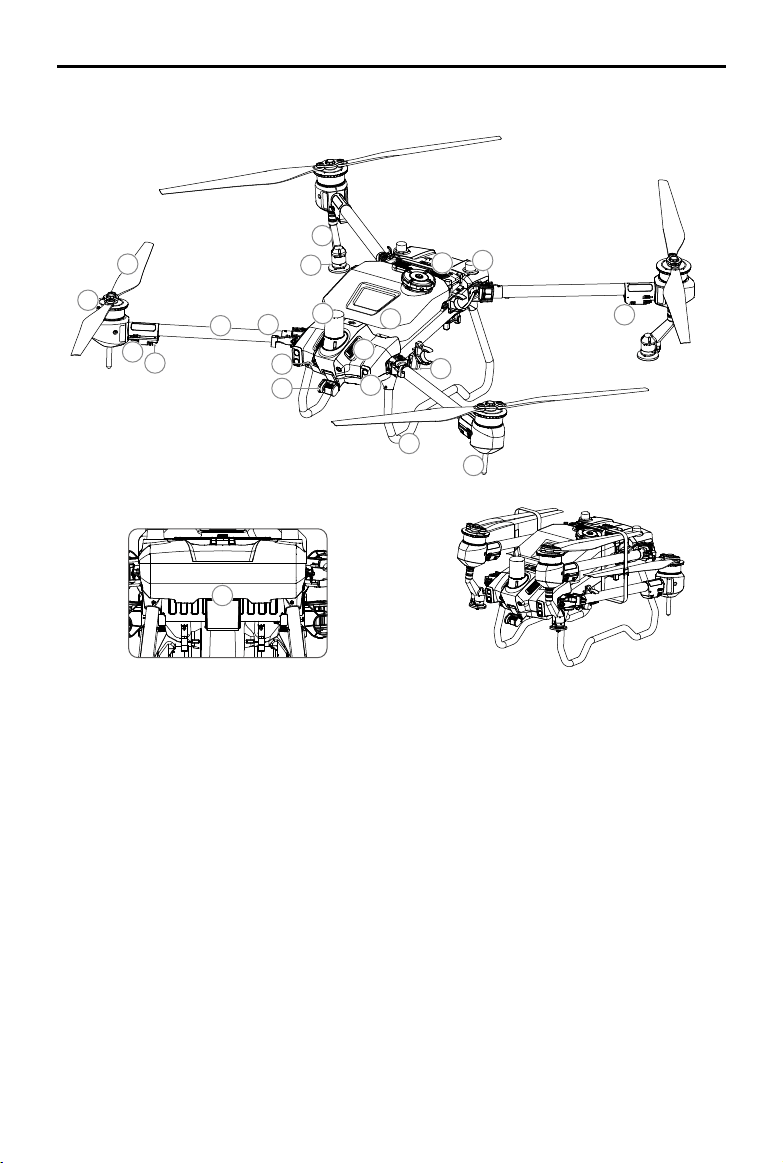
16
T20P
4
6
2
3
5
1
10
18
21
20
15
14
13
19
11
12
9
7
17
8
1. Propellers
2. Motors
3. ESCs
4. Aircraft Front Indicators
(on two front arms)
5. Frame Arms
6. Folding Detection
Sensors (built-in)
7. Spray Lance
8. Sprinklers
9. Spray Tank
10. Delivery Pumps
11. FPV Camera
12. Binocular Vision System
13. Spotlights
14. Heat Sinks
15. Active Phased Array
Omnidirectional Radar
16. Active Phased Array
Backward and Downward
Radar
17. Intelligent Flight Battery
18. Landing Gear
19. OcuSync Image
Transmission Antennas
20. Onboard D-RTK
Antennas
21. Aircraft Rear Indicators
(on two rear arms)
Rear View
Folded
8
©
2022 DJI All Rights Reserved.
AGRAS T40/T20 P
Unmanned Aircraft Flight Manual
Flight Control Surfaces
Not applicable for multicopters.
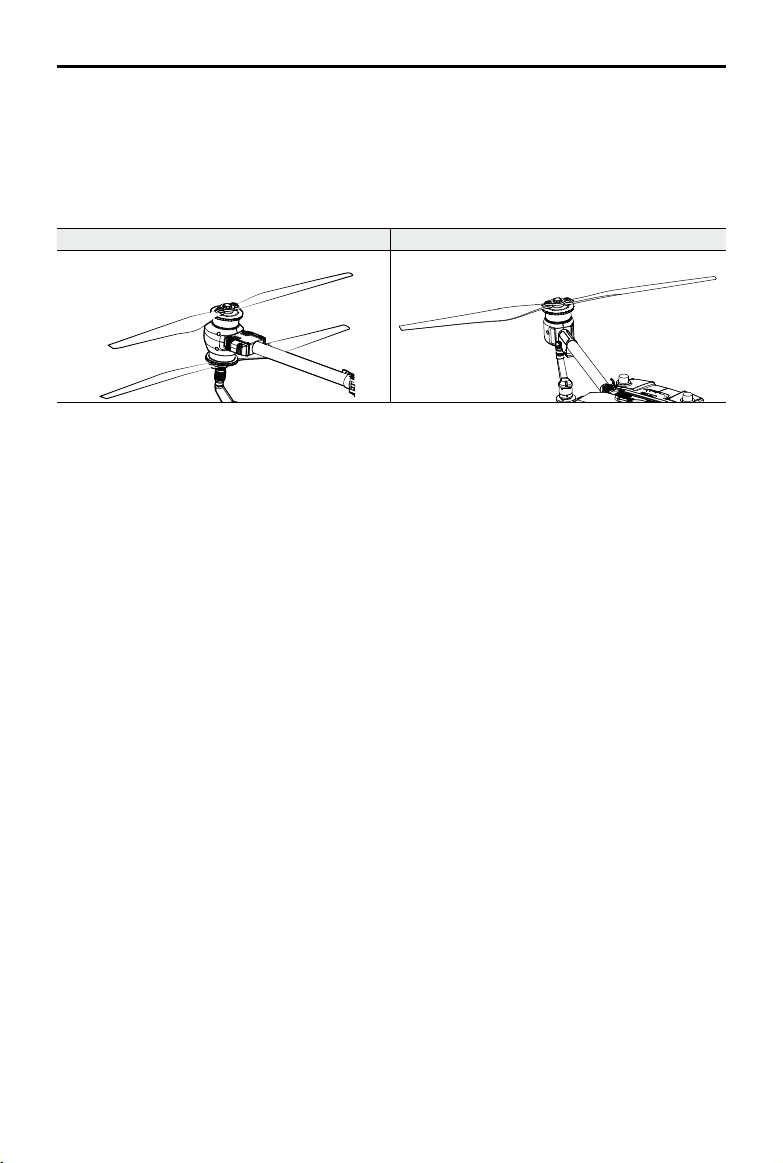
Propulsion System
The propulsion system consists of motors, ESCs, and folding propellers, to provide stable and
powerful thrust.
T40 T20P
Avionics
The avionics includes an aerial-electronics system, image transmission system, binocular vision and
radar system, spraying control board, and FPV module.
Flight Control and Navigation System
The ight control and navigation system built into the aircraft is integrated with modules such as the ight
controller, IMU, barometer, GNSS receiver, RTK module, and compass, providing stable and reliable
navigation and control. The dedicated industrial flight controller provides multiple flight modes and
operation modes for various applications. The GNSS+RTK dual-redundancy system is compatible with
GPS, GLONASS, BeiDou, and Galileo. The aircraft also supports centimeter-level positioning when used
with the built-in onboard D-RTK antennas. Dual-antenna technology provides strong resistance against
magnetic interference.
Communications Equipment
The aircraft boasts two OcuSync image transmission antennas and DJI O3 Agras image transmission
system, offering a maximum transmission range of 7 km for communication with the remote controller.
FPV Module
Equipped with the UHD FPV camera with a tiltable gimbal, the aircraft can automatically collect
HD field images for local offline reconstruction to assist in precise field planning. Furthermore, the
bright spotlights double the night vision capabilities of the aircraft, creating more nighttime operation
possibilities.
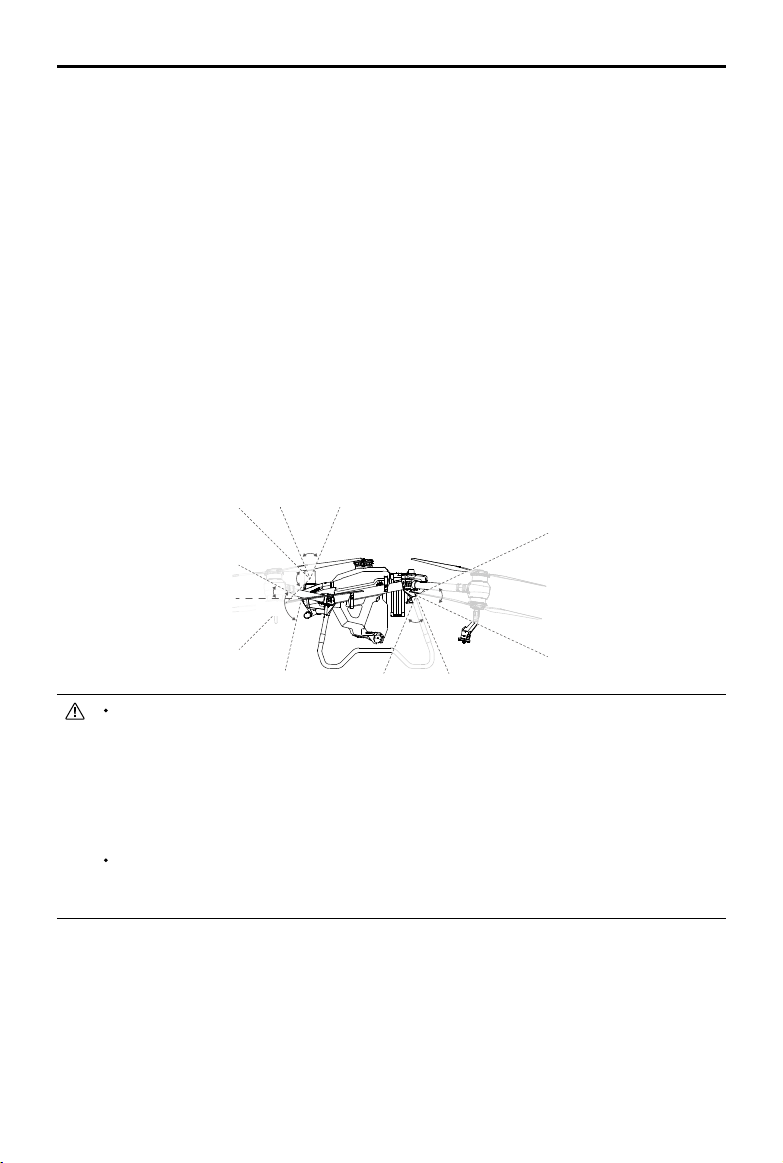
Binocular Vision and Phased Array Radar (Detection and Obstacle Avoidance System)
Prole
The aircraft spatial intelligent sensing system consists of the binocular vision system, active phased array
omnidirectional radar, and active phased array backward and downward radar. In an optimal operating
environment, the radar module can predict the distance between the aircraft and the vegetation or other
surfaces in forward, backward, and downward directions to y at a constant distance and ensure even
spraying and terrain following. The system can detect obstacles in all horizontal directions as well as
upward and backward to ensure ight safety. In addition, the ight control system limits the descent
speed of the aircraft according to the distance between the aircraft and ground detected by the radar
modules to achieve a smooth landing.
©
2022 DJI All Rights Reserved.
9
AGRAS T40/T20 P
Unmanned Aircraft Flight Manual
The binocular vision system is enabled automatically when the aircraft is in use. Terrain follow and
bypassing functions need to be enabled in the app before use. In Route and A-B Route operation
modes, users can enable the terrain follow and bypassing functions for different terrain types. The
aircraft will y above the vegetation at a constant spraying distance and bypass detected obstacles.
When task terrain is set to Mapping/Field on Flatland, bypassing can be enabled or disabled
independently. In Manual Plus and Mapping operation modes, select Mapping/Field on Flatland as the
task terrain and enable Auto Terrain Follow. The aircraft will achieve terrain follow. In Manual and Fruit
Tree operation modes, the radar can measure the spraying distance above the vegetation or other
surfaces, but the aircraft will not use the data for altitude stabilization. Obstacle avoidance can be used
in any mode.
Detection Range
Binocular vision system: 90° (horizontal), 106° (vertical), 0.4-25 m.
Active phased array omnidirectional radar: 360° (horizontal), ±45° (vertical), 1.5-50 m.
Active phased array backward and downward radar: ±60° (horizontal), ±25° (vertical), 1.5-30 m
(backward), 1-45 m (downward).
Note that the aircraft cannot sense obstacles that are not within its detection range. Fly with caution.
Detection Range of Binocular Vision System and Radars (Vertical)
45°
28°
25°
±
45°
±
45°
106°
The effective detection range varies depending on the size and material of the obstacle. When
sensing objects such as buildings that have a radar cross section (RCS) of more than -5
dBsm, the effective detection range is 50 m. When sensing objects such as power lines that
have a RCS of -10 dBsm, the effective detection range is approximately 30 m. When sensing
objects such as dry tree branches that have a RCS of -15 dBsm, the effective detection range
is approximately 20 m. Obstacle sensing may be affected or unavailable in areas outside of
the effective detection distance.
Fly with caution when the aircraft is near an obstacle that is at a similar altitude with the bottom
of the aircraft. The aircraft cannot detect the obstacle as most or even the whole obstacle is
out of the detection range.
Horizontal Obstacle Avoidance Usage
Make sure horizontal and backward obstacle avoidance are enabled in the app. Obstacle avoidance is
used in the following two scenarios:
1. The aircraft begins to decelerate when it detects an obstacle 15 m in front of the aircraft (when the
aircraft is ying forward) or 15 m behind the aircraft (when the aircraft is ying backward), then brakes
and hovers. While braking, the aircraft cannot accelerate toward the obstacle but can y away from it.

10
©
2022 DJI All Rights Reserved.
AGRAS T40/T20 P
Unmanned Aircraft Flight Manual
2. The aircraft immediately brakes and hovers if it detects an obstacle nearby. Users cannot control the
aircraft while it is braking.
Users can y in a direction away from the obstacle to regain full control of the aircraft.
Backward obstacle avoidance will be disabled when the aircraft ies backward at a speed of
more than 7 m/s. Fly with caution.
Obstacle avoidance is disabled during auto landing. Make sure to operate the aircraft with
caution when controlling the aircraft manually during auto landing.
If backward obstacle avoidance is disabled in the app, the aircraft cannot detect obstacles
behind the aircraft while ying backward.
Upward Radar Usage
Make sure the upward obstacle avoidance function of the radar module is enabled in the app. Obstacle
avoidance is used in the following two scenarios:
1. The aircraft begins to decelerate when it detects an obstacle is 3 m away and brakes and hovers in
place.
2. The aircraft immediately brakes if it detects an obstacle nearby.
Users cannot accelerate in the direction of the obstacle, but can y in a direction away from the obstacle
when the aircraft is braking or hovering.
Terrain Follow and Bypassing Functions Usage
In Sensor Settings in the app, select the task terrain according to the environment and enable Auto
Terrain Follow and Obstacle Bypassing. Each type of task terrain is suitable for the corresponding
operation modes. Refer to the descriptions below.
Bypassing is disabled during night or in dark environments. Fly with caution.
In some scenarios such as with power lines, the bypassing function may not be able to
bypass the obstacle successfully. Users can bypass the obstacle by manually controlling the
aircraft.
Terrain follow will be affected when the aircraft is ying over water. Fly with caution.
The max ight speed of the aircraft will be limited to 7 m/s and the height above the vegetation
will be limited from 2.5 to 8 m when obstacle bypassing is enabled.
Mapping/Field on Flatland
This task terrain is suitable for Mapping operations or Route, A-B Route, and Manual operations in areas
without obvious surface elevation changes.
1. Select Mapping/Field on Flatland as the task terrain.
2. Enable Auto Terrain Follow only. Enter the desired operation mode and set the height above the
vegetation. After the operation is started, the aircraft will y above the vegetation at the pre-set height.
3. Enable both Auto Terrain Follow and Obstacle Bypassing (supporting Route and A-B Route
operations only). After a Route or A-B Route operation is started, the aircraft will bypass detected
obstacles automatically. Moving the control stick can pause auto bypassing. The aircraft will hover in
place if bypassing fails. Users can bypass the obstacle by manually controlling the aircraft.
©
2022 DJI All Rights Reserved.
11
AGRAS T40/T20 P
Unmanned Aircraft Flight Manual
Fruit Orchard on Flatland and Mountain Land
Both Fruit Orchard on Flatland and Mountain Land are suitable for Route and A-B Route operations. Fruit
Orchard on Flatland is suitable for terrain without obvious surface elevation changes. Mountain Land
is suitable for undulating terrain covered with mountain crops and fruit trees. Flying vertically to bypass
obstacles takes priority in Mountain Land mode. Both modes have the same operation instructions.
1. Select the corresponding task terrain.
2. Enable Terrain Follow and Obstacle Bypassing. After a Route or A-B Route operation is started,
the aircraft will fly above the vegetation at the pre-set height and bypass detected obstacles
automatically. Moving the control stick can pause auto bypassing. The aircraft will hover in place if
bypassing fails. Users can bypass the obstacle by manually controlling the aircraft.
Radar Usage Notice
DO NOT touch or let your hands or body come in contact with the metal parts of the radar
module when powering on or immediately after ight as they may be hot.
Maintain full control of the aircraft at all times and do not rely completely on the radar module
and DJI Agras app. Keep the aircraft within VLOS at all times. Use your discretion to operate
the aircraft manually to avoid obstacles.
In Manual operation mode, users have complete control of the aircraft. Pay attention to the
ying speed and direction when operating. Be aware of the surrounding environment and
avoid the blind spots of the radar module.
The obstacle avoidance functions are disabled in Attitude mode.
When sensing objects such as an inclined line, inclined utility pole, or power line at an inclined
angle against the ying direction of the aircraft, the radar detection performance will be
affected since most of the radar electromagnetic waves are reected to other directions. Fly
with caution.
The radar module enables the aircraft to maintain a xed distance from vegetation only within
its working range. Observe the aircraft’s distance from vegetation at all times.
Operate with extra caution when ying over inclined surfaces. The recommended maximum
inclination at different aircraft speeds are 10° at 1 m/s, 6° at 3 m/s, and 3° at 5 m/s.
Comply with local radio transmission laws and regulations.
The sensitivity of the radar module may be reduced when operating several aircraft within a
short distance. Operate with caution.
The radar module is a precision instrument. DO NOT squeeze, tap, or hit the radar module.
Before use, make sure that the radar module is clean and the outer protective cover is not
cracked, chipped, sunken, or misshapen.
Keep the protective cover of the radar module clean. Clean the surface with a soft damp cloth
and air dry before using again.

12
©
2022 DJI All Rights Reserved.
AGRAS T40/T20 P
Unmanned Aircraft Flight Manual
Binocular Vision System Usage Notice
The performance of the binocular vision system is affected by light intensity and the patterns
or texture of the surface being flown over. Operate the aircraft with great caution in the
following situations:
a. Flying over monochrome surfaces (e.g., pure black, pure white, pure green).
b. Flying over highly reective surfaces.
c. Flying over water or transparent surfaces.
d. Flying in an area where the lighting changes frequently or drastically.
e. Flying over extremely dark (< 10 lux) or bright (> 10,000 lux) surfaces.
f. Flying over surfaces with repeating identical patterns or textures or with particularly sparse
patterns or textures.
Keep the cameras of the binocular vision system clean at all times.
Make sure that there are clear patterns and adequate lighting in the surroundings since
the binocular vision system relies on images of the surrounding environment to obtain
displacement data.
The obstacle sensing function of the binocular vision system may not work properly when the
aircraft is operated in a dim environment or over water or surfaces without a clear pattern.
Keep the cameras of the binocular vision system clean. Make sure that the aircraft is powered
off. First remove any larger pieces of grit or sand then wipe the lens with a clean, soft cloth to
remove dust or other dirt.
Control Station
Prole
The DJI RC Plus remote controller is used as a control station. The remote controller features DJI O3
Agras, the latest version of the signature OcuSync image transmission technology, with a maximum
transmission distance of 7 km (at an altitude of 2.5 m).
[1]
The remote controller has a built-in 7.02-in
high brightness touchscreen powered by the Android operating system. Users can connect to the
internet via Wi-Fi or the DJI Cellular Dongle. Operations are more convenient and accurate than ever
before thanks to the revamped DJI Agras app design and a wide range of buttons on the remote
controller. The remote controller has a maximum operating time of 3 hours 18 minutes with the internal
battery and 6 hours when mounted with an external WB37 Intelligent Battery, to cater for long and
high-intensity operations.
[1] The remote controller is able to reach its maximum transmission distance (FCC/NCC: 7 km (4.35 mi);
SRRC: 5 km (3.11 mi); CE/MIC: 4 km (2.49 mi)) in an open area with no electromagnetic interference and at an
altitude of approximately 2.5 m (8.2 ft).
©
2022 DJI All Rights Reserved.
13
AGRAS T40/T20 P
Unmanned Aircraft Flight Manual
Remote Controller Overview
8
13
5 5
7
7
1
4
4
3
15
2
10
11
9
9
12
6
14
1. External RC Antennas
Relays the aircraft control and image
transmission signal.
2. Touchscreen
Displays system and app views and supports
up to 10 touch points. Android-based device
for running the DJI Agras app.
3. Indicator Button (reserved)
4. Control Sticks
Controls aircraft movement. Control mode can
be set in DJI Agras.
5. Internal Wi-Fi Antennas
Do not block the internal Wi-Fi antennas during
use, otherwise the signals may be affected.
6. Back Button
Press once to return to the previous screen.
Press twice to return to the home screen.
Hold the back button and press another
button to activate button combinations. Refer
to the Button Combinations section for more
information.
7. L1/L2/L3/R1/R2/R3 Buttons
When buttons are displayed in the app near
these physical buttons or the prompts in the
app include L1/L2/L3/R1/R2/R3, press the
corresponding button on the remote controller
to operate instead of tapping the touchscreen.
8. Return to Home (RTH) Button
Press and hold to initiate RTH. Press again to
cancel RTH.
9. Microphones
10. Status LEDs
Indicates the status of the remote controller.
Refer to Guide on the home screen for more
information.
11. Battery Level LEDs
Displays the current battery level of the
internal battery.
12. Internal GNSS Antennas
Do not block the internal GNSS antennas
during use. Otherwise the positioning
accuracy may be affected.
13. Power Button
Press once to check the current battery level.
Press, and then press and hold to power the
remote controller on or off. When the remote
controller is powered on, press once to turn
the touchscreen on or off.
14. 5D Button
15. Flight Pause Button (reserved)
16. Button C3
Press to enable or disable horizontal obstacle
avoidance after DJI Agras is launched.
17. Left Dial
Turn to adjust the spray rate in Manual
operation mode.
16
17
18
19
25
26
27
28
3
0
29
21
22
23
24
31 31
2
0
2
0
34
32
36
35
33
37
38 39
31
4
0
4
1

14
©
2022 DJI All Rights Reserved.
AGRAS T40/T20 P
Unmanned Aircraft Flight Manual
18. Spray/Spread Button
Press to start or stop spraying/spreading in
Manual operation mode.
19. Flight Mode Switch
The three positions of the switch correspond
to: N-mode (Normal), S-mode (Attitude), and
F-mode (Normal).
20. Internal RC Antennas
Relays aircraft control and image
transmission signals. Do not block the
internal RC antennas during use. Otherwise
the signals may be affected.
21. microSD Card Slot
Slot to insert a microSD card.
22. USB-A Port
For connecting devices such as the RTK
Dongle. When it is connected to the intelligent
charger or multifunctional inverter generator,
users can view the device status information
in DJI Agras.
23. HDMI Port
The output of the HDMI signal to an external
monitor.
24. USB-C Port
For charging the remote controller or connect
to a computer to update rmware and export
logs via the DJI Assistant 2 software.
25. FPV/Map Switch Button
In Operation View in DJI Agras, press to
switch between FPV and Map View.
26. Right Dial
Turn to adjust the tilt of the FPV camera.
27. Scroll Wheel (reserved)
28. Handle
29. Speaker
30. Air Vent
For heat dissipation. Do not block the air vent
during use.
31. Reserved Mounting Holes
32. Button C1
In A-B Route operation mode, press to add
Point A.
33. Button C2
In A-B Route operation mode, press to add
Point B.
34. Rear Cover
35. Battery Release Button
36. Battery Compartment
For installing the WB37 Intelligent Battery.
37. Rear Cover Release Button
38. Alarm
39. Air Intake
For heat dissipation. Do not block the air
intake during use.
40. Dongle Compartment
The USB-C connector in the compartment is
used to connect the DJI Cellular Dongle.
41. Strap Bracket
©
2022 DJI All Rights Reserved.
15
AGRAS T40/T20 P
Unmanned Aircraft Flight Manual
Using the Remote Controller
Powering the Remote Controller On and Off
Both the internal battery and external battery can be used to supply power to the remote controller. The
battery level is indicated via the battery level LEDs on the remote controller or on the external battery.
Follow the steps below to power on the remote controller:
1. When the remote controller is powered off, press the power button once to check the current battery
level of the internal battery. Press the battery level button on the external battery to check the current
battery level of the external battery. If the battery level is too low, recharge before use.
2. Press the power button once, then press and hold to power on the remote controller.
3. The remote controller beeps when powered on. The status LED glows solid green when linking is
complete.
4. Repeat Step 2 to power off the remote controller.
Charging the Batteries
1. Use the DJI 65W Portable Charger to charge both the internal and external batteries simultaneously.
Power Outlet
(100-240 V, 50/60 Hz)
Use the provided charger to charge the remote controller. Otherwise, use a locally certied
USB-C charger with a maximum rated power and voltage of 65 W and 20 V.
Fully charge and discharge the internal and external batteries of the remote controller at least
once every three months. The battery will deplete when it is stored for an extended period.
2. Use the WB37 Battery Charging Hub (USB-C) and 65W Portable Charger to charge the external
battery. Refer to the WB37 Battery Charging Hub (USB-C) User Guide for more information.
Power Outlet
(100-240 V, 50/60 Hz)
16
©
2022 DJI All Rights Reserved.
AGRAS T40/T20 P
Unmanned Aircraft Flight Manual
Operating the Aircraft
This section explains how to control the orientation of the aircraft through the remote controller. Control
can be set to Mode 1, Mode 2, or Mode 3.
Right StickLeft Stick
Turn RightTurn Left
UP
Down
RightLeft
UP
Down
Turn RightTurn Left
RightLeft
Forward
Backward
Left Stick Right Stick
Forward
Backward
Right Stick
UP
Down
Forward
Backward
Left Stick
Turn RightTurn Left
RightLeft
Mode 1
Mode 2
Mode 3
©
2022 DJI All Rights Reserved.
17
AGRAS T40/T20 P
Unmanned Aircraft Flight Manual
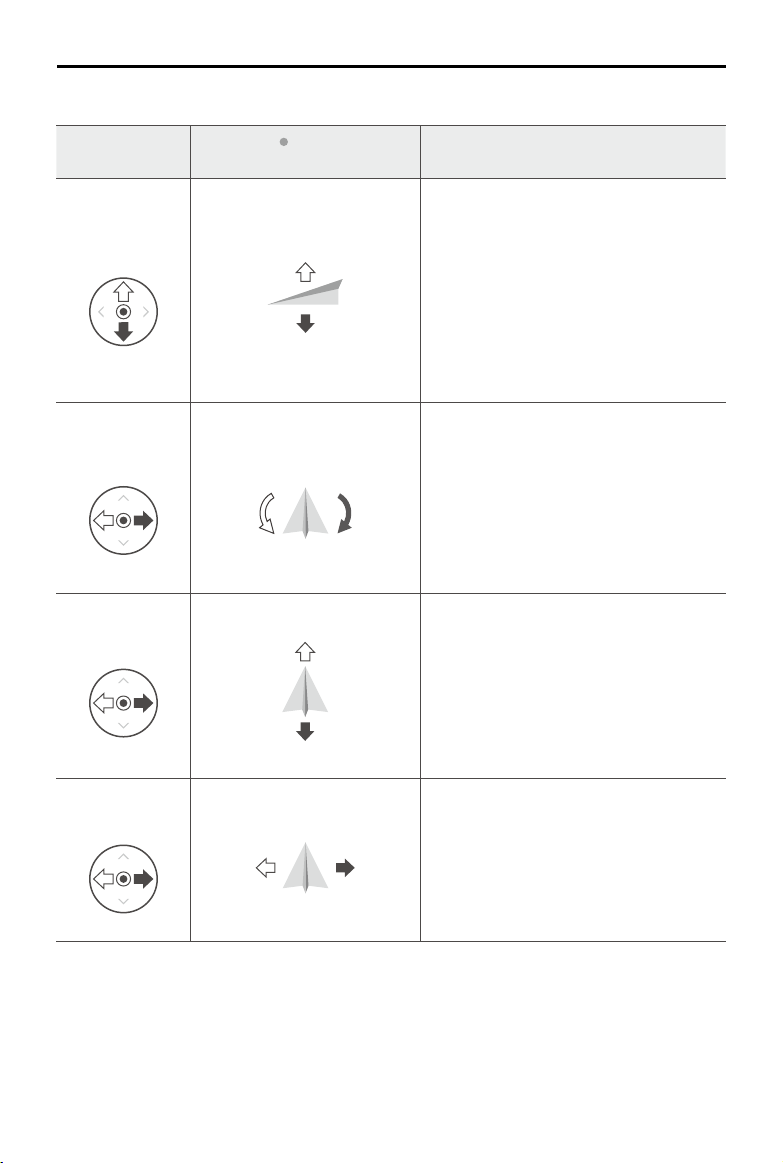
For example, the following description uses Mode 2:
Remote Controller
(Mode 2)
Aircraft ( Indicates nose
direction)
Remarks
Left Stick
Throttle Stick:
Move the left stick vertically to
control the elevation of the aircraft.
Push up to ascend and push down to
descend. Use the left stick to take off when
the motors are spinning at an idle speed.
The aircraft hovers in place if the stick is in
the center position. The further the stick is
pushed away from the center position, the
faster the aircraft changes elevation.
Left Stick
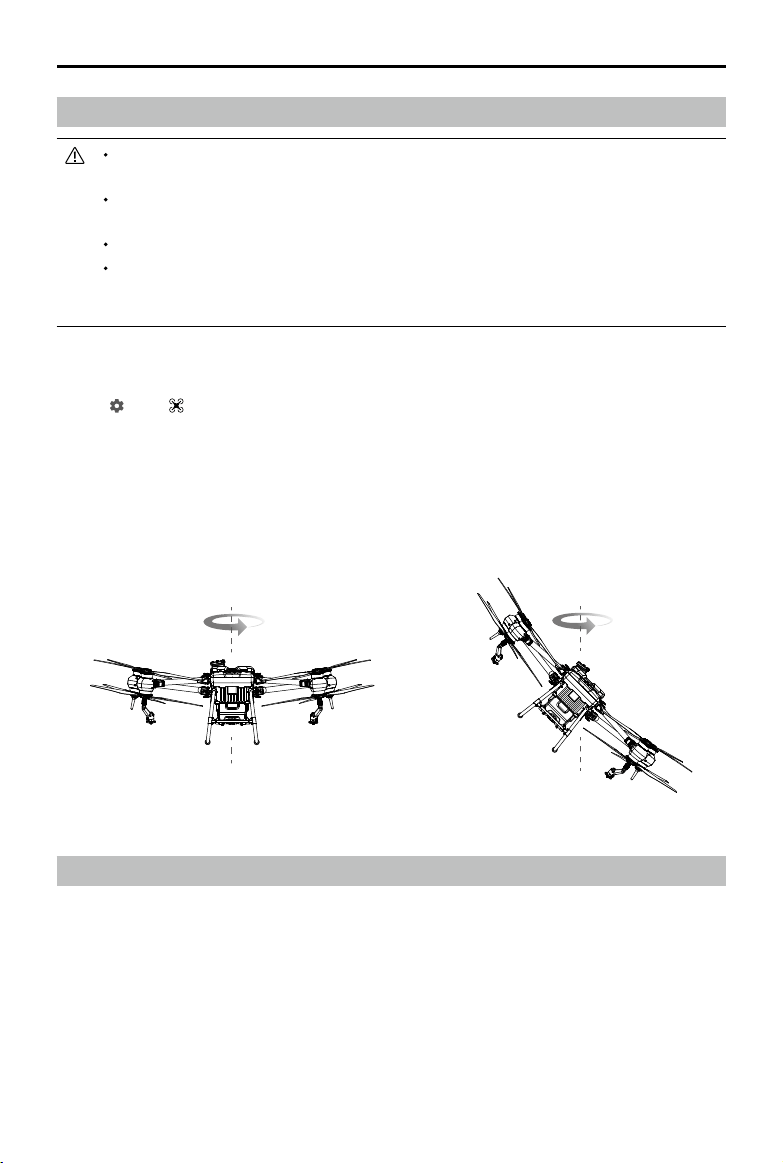
Yaw Stick:
Move the left stick horizontally to
control the heading of the aircraft.
Push left to rotate the aircraft counterclockwise
and push right to rotate clockwise. The aircraft
hovers in place if the stick is in the center
position. The further the stick is pushed away
from the center position, the faster the aircraft
rotates.
Right Stick
Pitch Stick:
Move the right stick vertically to
control the pitch of the aircraft.
Push up to y forwards and press down to y
backwards. The aircraft hovers in place if the
stick is in the center position. Push the stick
further for a larger pitch angle and faster
ight.
Right Stick
Roll Stick:
Move the right control stick
horizontally to control the roll of the aircraft.
Push the stick left to fly left and right to fly
right. The aircraft hovers in place if the stick
is in the central position. Push the stick
further for a larger roll angle and faster ight.

18
©
2022 DJI All Rights Reserved.
AGRAS T40/T20 P
Unmanned Aircraft Flight Manual
Controlling the Spraying System
2
6
3
5
1
4
7
1. Left Dial
In Manual operation mode, turn left to reduce and right to increase the spray rate.* The app indicates
the current spray rate.
* Spray rate may vary according to the sprinkler model and viscosity of the liquid.
2. Spray/Spread Button
In Manual operation mode, press to start or stop spraying.
3. FPV/Map Switch Button
In Operation View in DJI Agras, press to switch between FPV and Map View.
4. Right Dial
When the aircraft is not performing a Mapping operation, turn the dial to adjust the tilt of the FPV
camera. The tilt cannot be adjusted during Mapping operations.
5. Button C1
Records Point A of the route in an A-B Route operation.
6. Button C2
Records Point B of the route in an A-B Route operation.
7. Button C3
Press to enable or disable horizontal obstacle avoidance after DJI Agras is launched.
Flight Mode Switch
Toggle the switch to switch between ight modes.
Position Flight Mode
N
N-mode (Normal)
S
S-mode (mapped to A-mode, Attitude)
F
F-mode (Normal)
N
S
F
Regardless of the position the switch is in on the remote controller, the aircraft begins in N-mode by
default. To switch ight modes, rst go to Operation View in DJI Agras, tap , then , and enable
“Enable Attitude Mode” in Advanced Settings. After enabling Attitude mode, toggle the switch to N or F
and then to S to switch the ight mode to Attitude mode.
©
2022 DJI All Rights Reserved.
19
AGRAS T40/T20 P
Unmanned Aircraft Flight Manual
The aircraft still begins in N-mode by default after powering on, even though A-mode was enabled in
the app beforehand. When A-mode is required, toggle the Flight Mode switch as mentioned above after
powering on the remote controller and aircraft.
RTH Button
Press and hold the RTH button to bring the aircraft back to the last recorded home point. The LED
around the RTH Button blinks white during RTH. Users can control aircraft altitude while it ies to the
home point. Press this button again to cancel RTH and regain control of the aircraft.
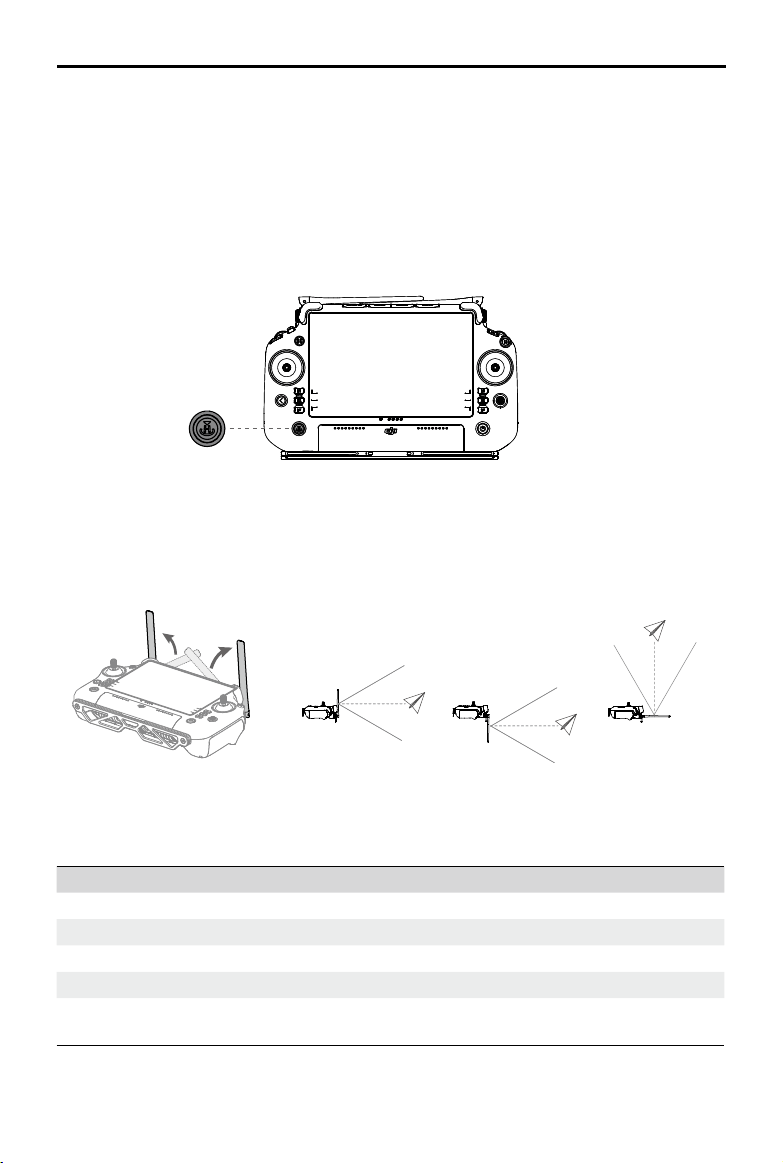
Optimal Transmission Zone
Lift and adjust the antennas. The strength of the remote controller signal is affected by the position of the
antennas. Adjust the direction of the external RC antennas of the remote controller so that the controller
and aircraft are within the optimal transmission zone.
Button Combinations
Some frequently-used features can be activated by using button combinations. Use the back button and
the other button at the same time to execute a specic function.
Button Combinations Description
Back Button + Left Dial Adjust the screen brightness
Back Button + Right Dial Adjust the system volume
Back Button + Spray Button Record the screen
Back Button + FPV/Map Switch Button Screenshot the screen
Back Button + 5D Button
Toggle up - Home; toggle down - Quick Settings;
toggle left - Recently opened apps

20
©
2022 DJI All Rights Reserved.
AGRAS T40/T20 P
Unmanned Aircraft Flight Manual
Remote Controller LEDs
Status LED
Battery Level Indicators
The battery level indicators display the battery level of the controller. The status LED displays the linking
status and warnings for control stick, low battery level, and high temperature.
Blinking Patterns Descriptions
Solid red Disconnected with aircraft
Blinking red Low aircraft battery level
Solid green Connected with aircraft
Blinking blue The remote controller is linking to an aircraft
Solid yellow Firmware update failed
Blinking yellow Low remote controller battery level
Blinking cyan Control sticks not centered
Battery Level Indicators Battery Level
75%~100%
50%~75%
25%~50%
0%~25%
Remote Controller Alert
The remote controller vibrates or beeps to issue an error alert or warning. For detailed information, see
the real-time prompts on the touchscreen or in the DJI Agras app. To disable some alerts, slide down
from the top and select Do Not Disturb in Quick Settings.
Any voice prompts and alerts will be disabled in Silent mode, including alerts during RTH and low
battery alerts for the remote controller or aircraft. Fly with caution.
Linking the Remote Controller
The remote controller is linked to the aircraft by default. Linking is only required when using a new
remote controller for the rst time. When using the Multi-Aircraft Control function, it is required to link all
aircraft to the same remote controller.
1. Power on the remote controller and open DJI Agras. Power on the aircraft.
2. Tap Execute Operation to enter Operation View and tap
, then . Tap Single Linking and then
Starting Linking. The status LED blinks blue and the remote controller beeps twice repeatedly,
indicating that the remote controller is ready for linking.
©
2022 DJI All Rights Reserved.
21
AGRAS T40/T20 P
Unmanned Aircraft Flight Manual
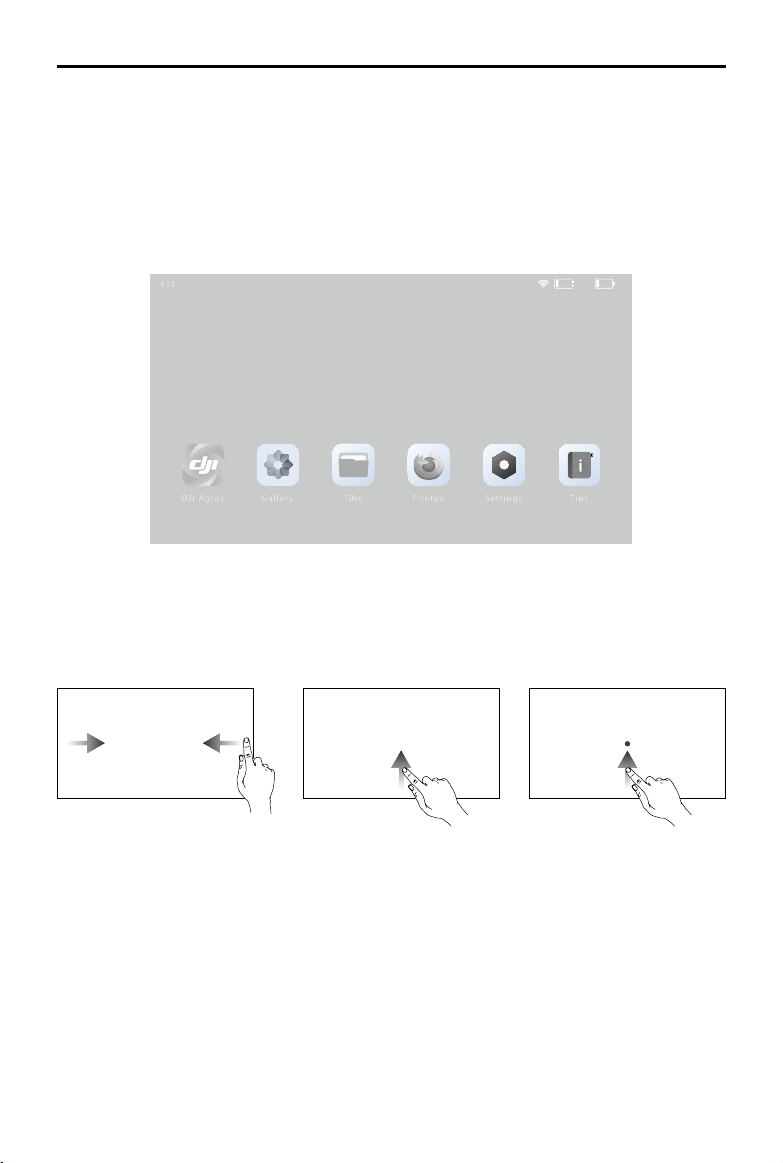
Firefox
4:53
Tips
Settings
Gallery
DJI Agras
Files
25%25%
3. Press and hold the power button on the Intelligent Flight Battery for ve seconds. The Intelligent Flight
Battery LEDs blink in sequence, indicating that the linking is in progress.
4. The Status LED on the remote controller glows solid green if linking is successful. If linking fails, enter
linking status again and retry.
Operating the Touchscreen
Home Screen
The top bar displays the time, network status, as well as battery levels of the internal and external
batteries of the remote controller.
Operations
Slide up from the bottom
of the screen and hold to
access recently opened
apps.
Slide from the left or right
to the center of the screen
to return to the previous
screen.
Slide up from the bottom of
the screen to return to the
home screen.

22
©
2022 DJI All Rights Reserved.
AGRAS T40/T20 P
Unmanned Aircraft Flight Manual
Quick Settings
Slide down from the top to enter Quick Settings.
2
Wi-Fi
Bluetooth
Do Not Dis
Record Screen
Screenshot
Notifications
3:05
PM
Mondy
Apr 18, 2022
Mobile dat Airplane mo
3 4
5
7
6
1
1. Notifications
Tap to view system or app notications.
2. Recent
Tap
to view and switch to recently opened apps.
3. Home
Tap
to return to the home screen.
4. System Settings
Tap
to access system settings.
5. Shortcuts
: Tap to enable or disable Wi-Fi. Hold to enter settings and connect to or add a Wi-Fi network.
: Tap to enable or disable Bluetooth. Tap and hold to open settings and connect with nearby
Bluetooth devices.
: Tap to enable DO NOT Disturb mode. In this mode, system prompts will be disabled.
: Tap to start screen recording.
: Tap to screenshot the screen.
: Mobile data. Tap to turn mobile data on or off; long press to set mobile data and diagnose
network connection status.
: Tap to enable Airplane mode. Wi-Fi, Bluetooth, and mobile data will be disabled.
6. Adjust Brightness
Slide the bar to adjust the brightness. Tap the icon
to auto-brightness mode. Tap the icon or
slide the bar to switch to manual brightness mode.
7. Adjust Volume
Slide the bar to adjust the volume and tap to mute. Note that after muting, all sounds of the remote
controller will be completely disabled, including related alarm sounds. Please turn on the mute with
caution.
©
2022 DJI All Rights Reserved.
23
AGRAS T40/T20 P
Unmanned Aircraft Flight Manual
Advanced Features
Calibrating the Compass
After the remote controller is used in places with electro-magnetic interference, the compass may need
to be calibrated. A warning prompt will appear if the remote controller’s compass requires calibration.
Tap the warning prompt to start calibrating. In other cases, follow the steps below to calibrate your
remote controller.
1. Power on the remote controller and go to the home screen.
2. Tap Settings, scroll down and tap Compass.
3. Follow the diagram on the screen to calibrate your remote controller.
4. The user will receive a prompt when the calibration is successful.
HDMI Settings
The touchscreen can be shared to a display after connecting the HDMI port of the remote controller. The
resolution can be set by entering Settings, Display, and then Advanced HDMI.
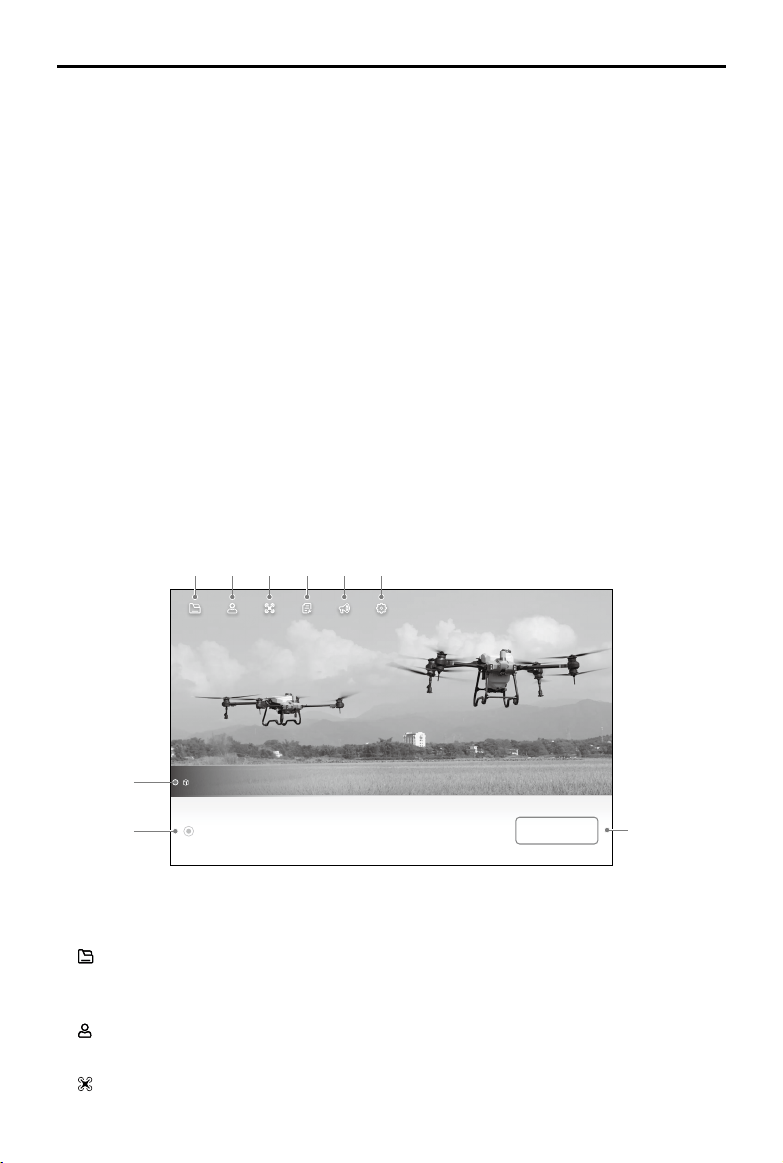
DJI Agras App (Information Display and User Interface)
DJI Agras is designed for agricultural applications. The app has a clear and concise interface and
displays the status of the aircraft, spraying system, and other devices connected to the remote
controller, and enables users to configure various settings. After planning a field via the intelligent
operation planning system of the app, the aircraft can automatically follow the pre-planned ight route.
BeginAircraft connected
New firmware
9
2 3 4 5 6
7
8
1
Home Screen
1. Document Management
: view planned fields, operation progress, and resources such as prescription maps and
reconstruction ouput. You can synchronize the local data with the data on the DJI AG platform.
2. User Info
: view account information.
3. Aircraft Info
: view the information of the connected aircraft such as the rmware version.
24
©
2022 DJI All Rights Reserved.
AGRAS T40/T20 P
Unmanned Aircraft Flight Manual
4. Troubleshooting
: view solutions for errors of each module and upload error logs.
5. Notification Center
: check notications about any changes to the aircraft, users, or operations.
6. General Settings
: tap for settings such as units of measurement, network diagnosis, and Android system settings.
7. Firmware Notifications
: shows the rmware update notications. Tap to enter the rmware page.
8. Aircraft Connection Status
: shows if the aircraft is connected to the remote controller.
9. Begin
Tap to enter Operation View.
Operation View
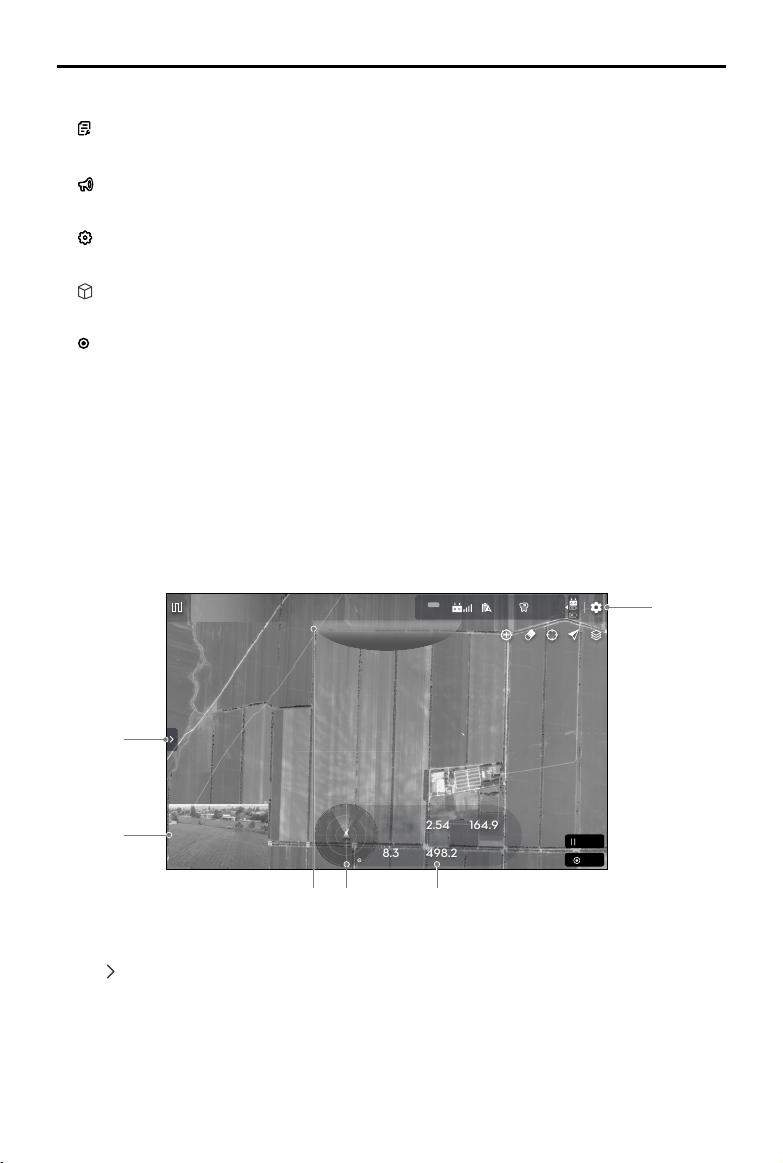
View the aircraft status, set parameters, switch between operation modes, plan a eld, and perform
operations in Operation View.
Slide from the left or right to the center of the screen to return to the home screen. Tap and hold the
icons or buttons in Operation View to check function descriptions. The following section describes the
other displayed information and the setting menu in Operation View.
41.8
N
8.3
498.2
24.28
2.54
164.9
FIX
RTK
4.7
99%
Route (RTK)
Pause
End
5.6!
5.6m
L
Flow(L/Min)
Distance(m)
Speed(m/s)
Completed Area(Ha)
Altitude(m)
1
2
6
3 4 5
1. Field List/Task Settings
Tap
to expand the list.
When the aircraft is not performing any operations, the eld list will be displayed, users can view the
planned elds and the operations being executed.
When an operation has been applied or started, the task settings will be displayed where users can
set operation parameters. The adjustable parameters vary between different operation modes.
©
2022 DJI All Rights Reserved.
25
AGRAS T40/T20 P
Unmanned Aircraft Flight Manual
2. FPV Camera View
Displays the live view from the FPV camera. Tap to switch between the Map View and Camera View.
3. Upward Obstacle Indicator
If upward obstacle avoidance is enabled, a red zone will appear on the top of the screen when an
obstacle is detected including the distance from the obstacle.
4. Radar Indicator
Displays information such as the orientation of the aircraft and the Home Point. Shows information
on the detected obstacles when the horizontal obstacle avoidance function is enabled. Red, yellow,
and green zones indicate the relative distance of the obstacles ranging from near to far. The value
indicates the distance in meters or feet depending on the settings. Tap the radar indicator to enable
or disable horizontal obstacle avoidance and set the side obstacle detection distance in the pop-
up menu. There will be a red circle around the radar indicator when horizontal obstacle avoidance is
disabled.
5. Flight Telemetry and Operation Status
Altitude: when the terrain follow function is enabled, it shows the height between the aircraft and the
nearest object or ground underneath the aircraft. If the terrain follow function is disabled, it displays
the altitude between the aircraft and the takeoff point.
Distance: displays the horizontal distance from the aircraft to the Home Point.
Speed: displays the ight speed of the aircraft.
Flow: displays the liquid ow rate.
Area: displays the area values related to the task area.
6. Settings
Tap
to enter the extended menu to view and adjust the parameters of all other settings.
Aircraft Settings: include setting the connection routing and RTH speed and altitude, maximum
altitude, maximum flight distance, whether to display the empty tank point, the action to perform
when the tank is empty and when an operation is completed, the action to perform and whether to
abort operation when the remote controller signals are lost, home point position, spotlight switch, and
advanced settings.
Spraying System Settings: include setting the spraying system switch, spraying system real-time
data switch, empty tank warning, spray droplet size, ow meter calibration, restoring the ow meter
to factory settings, and setting the weight sensors.
RC Settings: includes linking and calibrating remote controllers, setting the control stick mode and
customizable buttons, and checking information of linked aircraft.
Sensor Settings: include setting, horizontal obstacle avoidance, backward obstacle avoidance,
obstacle avoidance audio alert, upward obstacle avoidance, radar sensitivity, side obstacle detection
distance, warning distance, obstacle distance display, task terrain, terrain follow and bypassing, and
advanced settings.
RTK Settings: includes RTK signal source and the corresponding settings.
Image Transfer Settings: includes channel mode and sweep frequency chart selection.
Aircraft Battery: includes low battery warning threshold, low battery action, and battery information.
General Settings: includes map settings, ight route display, and FPV settings.
26
©
2022 DJI All Rights Reserved.
AGRAS T40/T20 P
Unmanned Aircraft Flight Manual
Command and Control Link
The command and control (C2) link between the aircraft and remote controller is established using DJI
O3 Agras transmission technology with the two OcuSync antennas on the aircraft and DJI O3 Agras
image transmission system, offering a maximum transmission range of 7 km. Its performance is listed
below.
Operating Frequency* 2.4000-2.4835 GHz, 5.725-5.850 GHz
Transmitter Power (EIRP)
2.4 GHz: <33 dBm (FCC), <20 dBm (CE/SRRC/MIC)
5.8 GHz: <33 dBm (FCC), <14 dBm (CE), <23 dBm (SRRC)
* 5.8 GHz frequency is prohibited in some countries.
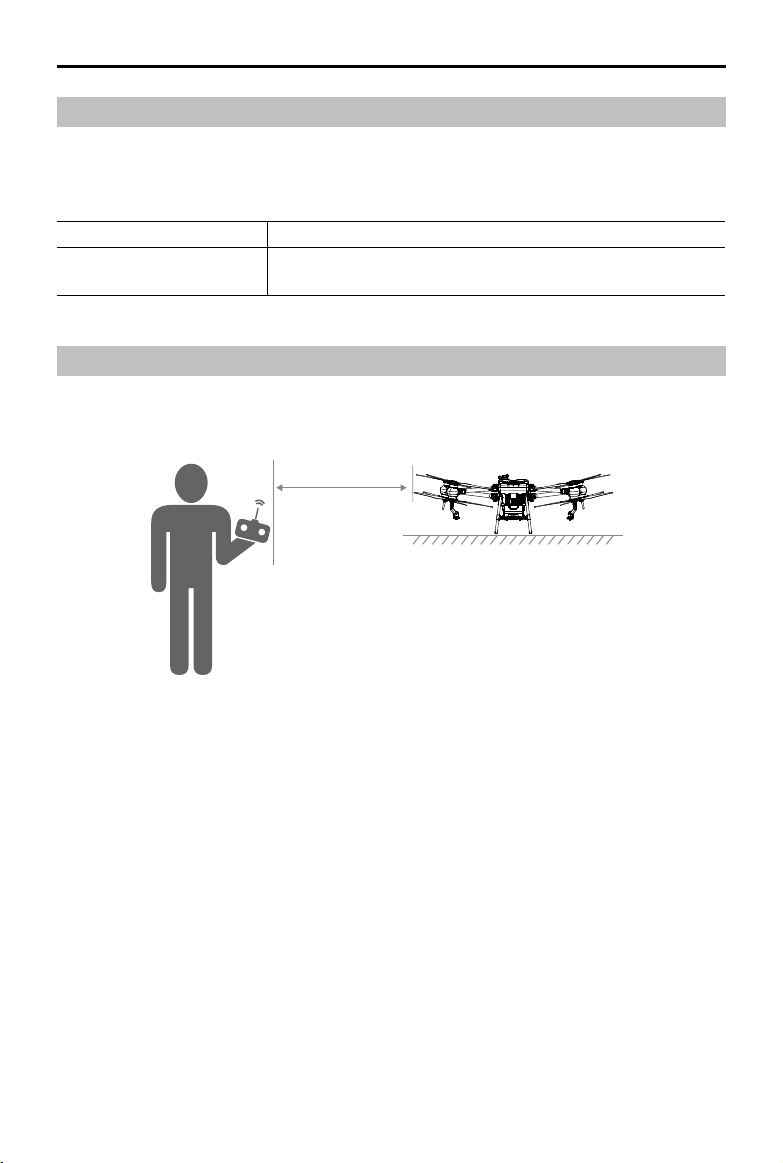
Ground Operational Area Setup
It is recommended to take off the aircraft in an open area. When taking off, the operator should be more
than 10 m away from the aircraft.
>10 m

©
2022 DJI All Rights Reserved.
27
Performance and Limitations
Performance
T40
Basic Empty Weight 50 kg
Max Takeoff Weight
Max takeoff weight for spraying: 90 kg (at sea level)
Max takeoff weight for spreading: 101 kg (at sea level)
Top Speed/Never Exceed Speed 10 m/s (at sea level)
Endurance*
18 min (takeoff weight of 50 kg with a 30Ah battery)
7 min (takeoff weight of 90 kg with a 30Ah battery)
6 min (takeoff weight of 101 kg with a 30Ah battery)
Flight Battery
Type: Li-ion
Capacity: 30 Ah
Energy: 1567 Wh
Max Wind Resistance
6 m/s
Max Service Ceiling Above Sea Level
4500 m
Max Flight Range
2000 m
* The endurance is tested in laboratory environment and is for reference only. The endurance under actual operating
conditions will be reduced.
T20P
Basic Empty Weight 32 kg
Max Takeoff Weight
Max takeoff weight for spraying: 52 kg (at sea level)
Max takeoff weight for spreading: 58 kg (at sea level)
Top Speed/Never Exceed Speed 10 m/s (at sea level)
Endurance*
14.5 min (takeoff weight of 32 kg with a 13Ah battery)
7 min (takeoff weight of 52 kg with a 13Ah battery)
6 min (takeoff weight of 58 kg with a 13Ah battery)
Flight Battery
Type: Li-ion
Capacity: 13 Ah
Energy: 679 Wh
Max Wind Resistance 6 m/s
Max Service Ceiling Above Sea Level 4500 m
Max Flight Range 2000 m
* The endurance is tested in laboratory environment and is for reference only. The endurance under actual operating
conditions will be reduced.

28
©
2022 DJI All Rights Reserved.
AGRAS T40/T20 P
Unmanned Aircraft Flight Manual
Prohibited Maneuvers
The following actions are prohibited.
1. Be under the inuence of alcohol, drugs, or anesthesia, or suffering from dizziness, fatigue, nausea,
or any other conditions, whether physical or mental, that could impair your ability to operate the
aircraft safely.
2. Stop the motors mid-ight. NOTE: this is not prohibited in an emergency situation where doing so will
reduce the risk of damage or injury.
3. Upon landing, power off the remote controller before powering off the aircraft.
4. Drop, launch, re, or otherwise project any dangerous payloads on or at any buildings, persons, or
animals, or which could cause personal injury or property damage.
5. Fly the aircraft recklessly without any plan.
6. Use this product for any illegal or inappropriate purpose such as spying, military operations, or
unauthorized investigations.
7. Use this product to defame, abuse, harass, stalk, threaten, or otherwise violate the legal rights of
others, such as the right of privacy and publicity.
8. Trespass onto private property of others.
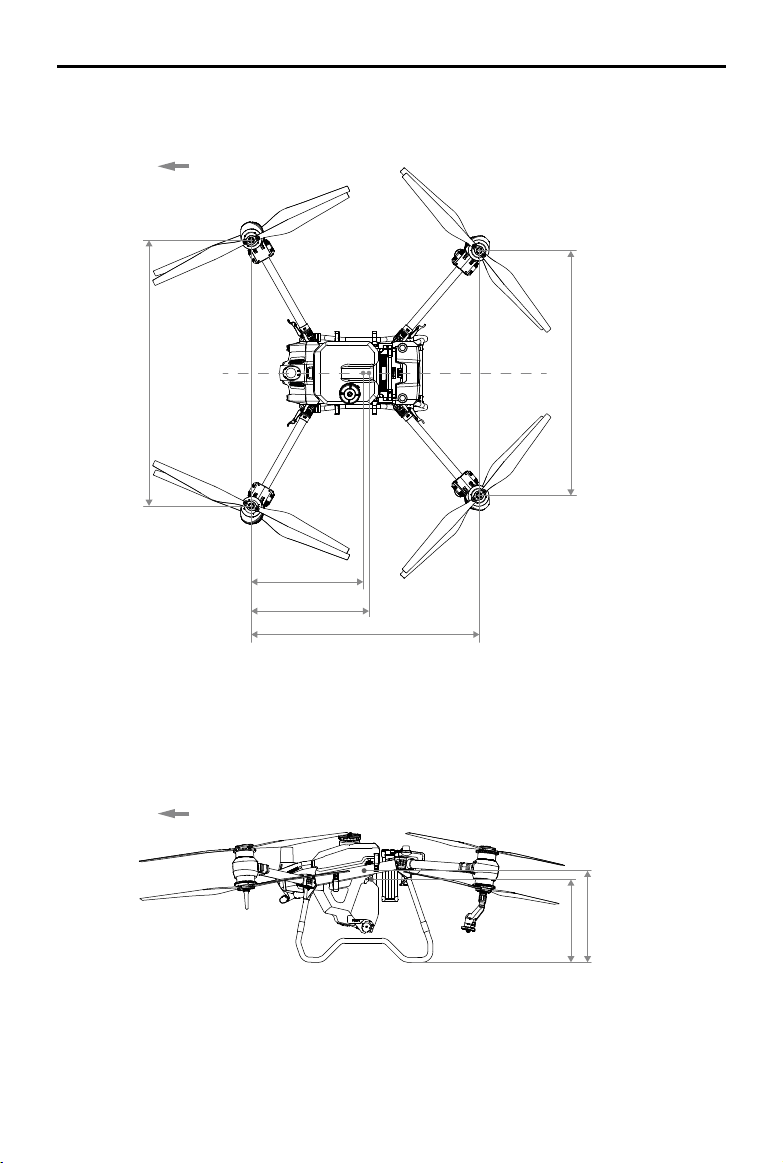
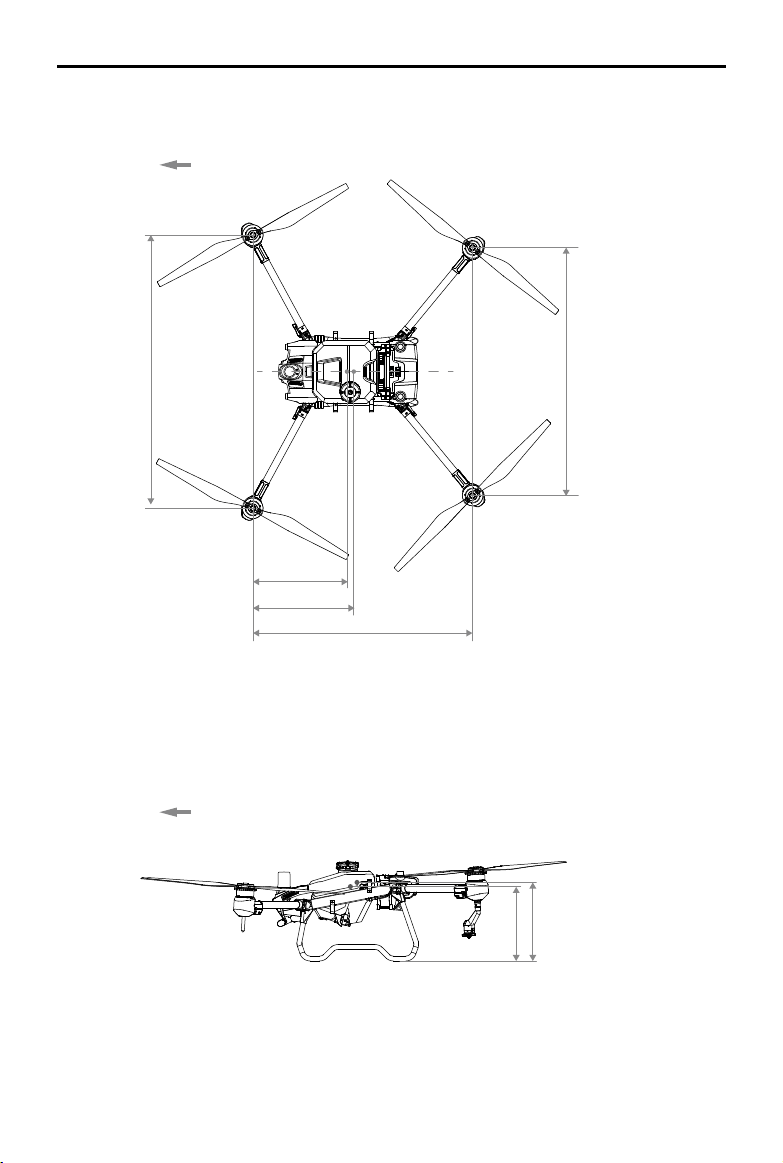
Center of Gravity Limitations
1. Using the M1 motor shaft as a reference, the center of gravity of the aircraft in the front-to-back
direction ranges from 768.1 to 828.6 mm (for T40) and 755.8 to 806 mm (for T20P), as shown in the
diagram below.
2. Using the lowest point of the aircraft as a reference, the center of gravity in the vertical direction of
the aircraft ranges from 529.0 to 536.1 mm (for T40) and 401.5 to 416.4 mm (for T20P), as shown in
the diagram below.
3. The center of gravity of the aircraft in the left-to-right direction should be the symmetrical center of the
aircraft.
©
2022 DJI All Rights Reserved.
29
AGRAS T40/T20 P
Unmanned Aircraft Flight Manual
T40
Front Center of Gravity
768.1 mm
Rear Center of Gravity
828.6 mm
Wheelbase L1 1453 mm
Wheelbase L2 1563 mm
Wheelbase L2 1700 mm
M2
M1
M3
M4
Aircraft Front
529.0 mm
536.1 mm
Center of Gravity
Without Load
Aircraft Front
30
©
2022 DJI All Rights Reserved.
AGRAS T40/T20 P
Unmanned Aircraft Flight Manual
T20P
Front Center of
Gravity 755.8 mm
Rear Center of
Gravity 806 mm
Wheelbase L1 1425 mm
Wheelbase L2 1583 mm
Wheelbase L2 1750 mm
M2
M1
M3
M4
Aircraft Front
401.5 mm
416.4 mm
Center of Gravity
Without Load
Aircraft Front

©
2022 DJI All Rights Reserved.
31
AGRAS T40/T20 P
Unmanned Aircraft Flight Manual
Applicable Environmental Limitations
1. DO NOT use the aircraft in adverse weather conditions such as winds exceeding 6 m/s, rain, snow,
or fog.
2. Aircraft and battery performance is subject to environmental factors such as air density and
temperature. Be careful when ying 2 km (6,560 ft) or more above sea level as battery and aircraft
performance may be reduced.
3. DO NOT use the aircraft near accidents, re, explosions, oods, tsunamis, avalanches, landslides,
earthquakes, dust, or sandstorms.
4. In low temperature environments (between 0° and 10° C (32° and 50° F)), make sure that the ight
battery is fully charged and be sure to reduce the payload of the aircraft. Otherwise, it will affect the
ight safety or a takeoff limit will occur.

32
©
2022 DJI All Rights Reserved.
Normal Procedures
Airspace Environment
The DJI Agras T40/T20P is a multi-copter crop protection RPAS mainly operated in farming, forestry,
animal husbandry and shery scenarios. Once pre-ight preparation is complete, it is recommended to
hone your ight skills and practice ying safely. Make sure that all ights are carried out in an open area.
Operation Environment
1. To avoid injury and damage and make sure spraying is effective, spray in winds lower than 6 m/s. It
is recommended to spray in winds lower than 3 m/s for herbicides, fungicides, and insecticides that
may drift and cause phytotoxicity and can be poisoning.
2. DO NOT use the aircraft in adverse weather conditions such as winds exceeding 6 m/s, rain, snow,
or fog.
3. Only y in open areas. Tall buildings and steel structures may affect the accuracy of the compass
and the GNSS signal.
4. Pay attention to utility poles, power lines, and other obstacles. DO NOT fly near or above water,
people, or animals.
5. Maintain VLOS of the aircraft at all times, and avoid flying near obstacles, crowds, animals, and
bodies of water.
6. Avoid ying in areas with high levels of electromagnetism, including mobile phone base stations and
radio transmission towers.
7. DO NOT y more than 4500 m above sea level.
8. The DJI Agras app will intelligently recommend the payload weight limit for the tank according to the
current status and surroundings of the aircraft. Do not exceed the recommended payload weight
limit when adding material to the tank. Otherwise, the ight safety may be affected.
9. Make sure that there is a strong GNSS signal and the D-RTK antennas are unobstructed during
operation.
10. DO NOT operate the aircraft indoors.
GEO (Geospatial Environment Online) System
GEO Zones
DJI’s GEO System designates safe flight locations, provides risk levels and safety concerns for
individual ights, and offers restricted airspace information. The locations designated by GEO are
called GEO Zones. GEO Zones are specic ight areas that are categorized by ight regulations and
restrictions. GEO Zones that prohibit ight are implemented around locations such as airports, power
plants, and prisons. They can also be temporarily implemented around major stadium events, forest
res, or other emergency situations. Certain GEO Zones do not prohibit ight but do trigger warnings
informing users of potential risks. All restricted ight areas are referred to as GEO Zones, and are
further divided into Warning Zones, Enhanced Warning Zones, Authorization Zones, Altitude Zones,
and Restricted Zones. By default, GEO limits ights into or taking off within zones that may result in
safety or security concerns. There is a GEO Zone Map, which contains comprehensive global GEO
Zone information on the ofcial DJI website: https://www.dji.com/ysafe.
The GEO System is for advisory purposes only. Individual users are responsible for checking ofcial
sources and determining which laws or regulations may apply to their ight. In some instances, DJI
has selected widely-recommended general parameters (such as a 1.5-mile radius at airports) without
making any determination as to whether these guidelines match regulations that apply to specic users.
©
2022 DJI All Rights Reserved.
33
AGRAS T40/T20 P
Unmanned Aircraft Flight Manual
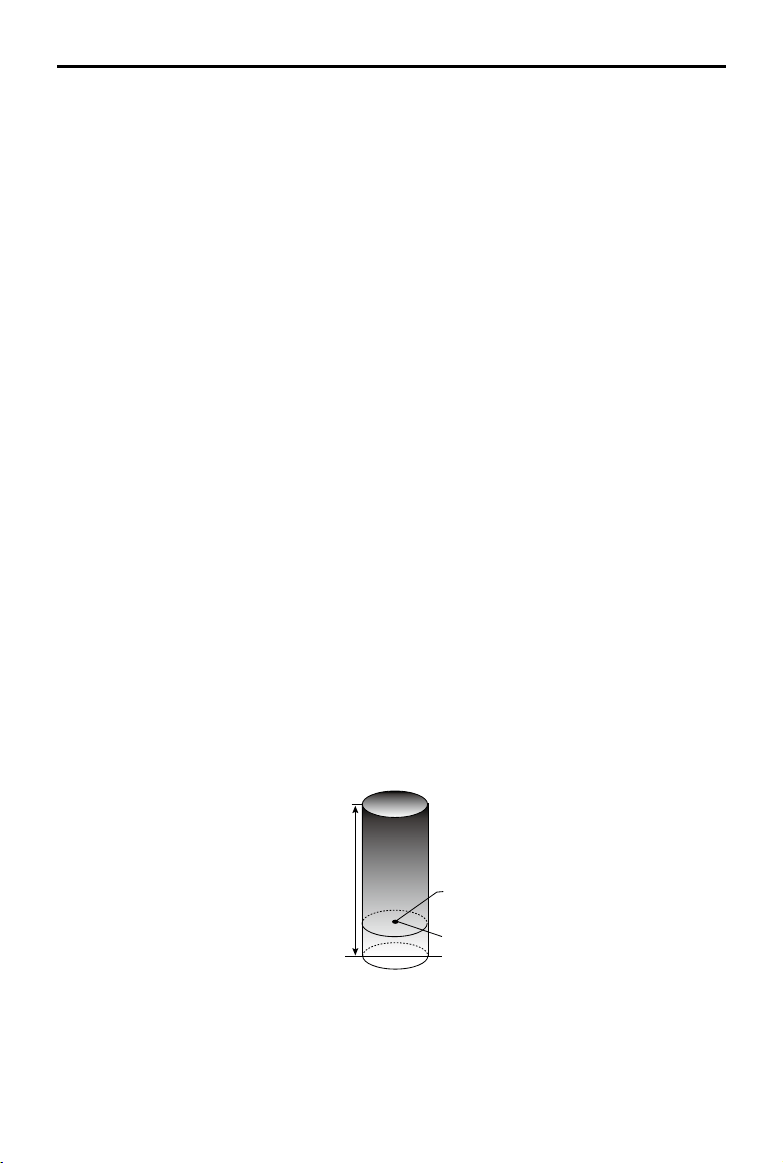
Max Flight Altitude
Max Radius
Home Point
Altitude of aircraft when powered on or the
distance of the aircraft to the surface
GEO Zone Definitions
Warning Zones:
Users receive a warning message with information relevant to their ight.
Enhanced Warning Zones:
Users receive a prompt from the GEO System at the time of ight. They are
required to conrm their ight path.
Authorization Zones:
Users receive a warning message and the flight is prohibited by default.
Authorization Zones can be unlocked by authorized users with a DJI-veried account. Self-Unlocking
privileges must be applied for online. https://www.dji.com/ysafe
Altitude Zones:
Flights are limited to a specic altitude.
Restricted Zones:
Flights are completely prohibited. UAVs cannot y in these zones. If you have obtained
permission to y in a Restricted Zone, please go to https://www.dji.com/ysafe or contact ysafe@dji.
com to unlock the zone.
DJI GEO Zones aim to ensure the user’s flight safety, but it cannot be guaranteed to be in full
compliance with local laws and regulations. Users should check local laws, regulations, and regulatory
requirements before each ight and are responsible for the ight safety.
All intelligent flight features will be affected when DJI aircraft fly nearby or into GEO Zones. Such
interference includes, but is not limited to, decreased speed, takeoff failure, and ight termination.
Flight Limits
Unmanned aerial vehicle (UAV) operators should abide by the regulations from self-regulatory
organizations such as the International Civil Aviation Organization, the Federal Aviation Administration,
and their local aviation authorities. For safety reasons, ight limits are enabled by default to help users
operate this aircraft safely and legally. Users can set ight limits on height and distance.
When operating with a strong GNSS signal, the height and distance limits and GEO zones work
together to monitor ight. With a weak GNSS signal, only the rmware height limit prevents the aircraft
from going above 100 meters.
Maximum Height and Radius Limits
Users can change the maximum height and radius limits in the app. Once completed, the aircraft ight
is restricted to a cylindrical area that is determined by these settings. The tables below show the details
of these limits.
34
©
2022 DJI All Rights Reserved.
AGRAS T40/T20 P
Unmanned Aircraft Flight Manual
With a strong GNSS signal
Flight Limits
Max Height Flight altitude must be below the preset height.
Max Radius Flight distance must be within the max radius.
With a weak GNSS signal
Flight Limits
Max Height Flight altitude must be below the preset height.
Max Radius No limit.
If the aircraft ies into a Restricted Zone, it can still be controlled, but the aircraft can only y in
a backward direction.
If the aircraft loses GNSS signal and ies out of the max radius but regains GNSS signal later,
it will y back within range automatically.
DO NOT y near airports, highways, railway stations, railway lines, city centers, or other busy
areas. Make sure the aircraft is visible at all times.
GEO Zone Flight Restrictions
GEO Zone Description
Restricted Zone
Takeoff: The aircraft’s motors cannot be started.
In-ight: When GNSS signal changes from weak to strong, the app starts
a 100-second countdown. Once the countdown is over, the aircraft
immediately lands in semi-automatic descent mode and turns off its
motors after landing.
In-flight: When the aircraft approaches the boundary of the Restricted
Zone, it automatically decelerates and hovers.
Authorization Zone
Takeoff: The aircraft’s motors cannot be started.
In-ight: When GNSS signal changes from weak to strong, the app starts
a 100-second countdown. Once the countdown is over, the aircraft
immediately lands in semi-automatic descent mode and turns off its
motors after landing.
Enhanced Warning Zone The aircraft ies normally but the user is required to conrm the ight path.
Warning Zone The aircraft ies normally but the user receives warning messages.
Altitude Zone
When GNSS signal is strong, the aircraft cannot exceed the specified
altitude.
In-ight: When GNSS signal changes from weak to strong, the aircraft will
descend and hover below the altitude limit.

©
2022 DJI All Rights Reserved.
35
AGRAS T40/T20 P
Unmanned Aircraft Flight Manual
Altitude Zone
When the GNSS signal is strong, the aircraft approaches the boundary
of the Altitude Zone. If it is higher than the altitude limit, the aircraft
decelerates and hovers in place.
When the GNSS signal changes from weak to strong, the app starts a
100-second countdown. Once the countdown is over, the aircraft will
descend and hover below the altitude limit.
Free Zone The aircraft ies normally with no restrictions.
Semi-Automatic Descent: All stick commands except the throttle stick command and the RTH
button are available during descent and landing. The aircraft motors will turn off automatically
after landing. It is recommended to y the aircraft to a safe location before the semi-automatic
descent.
Radio Frequency Environment
1. Avoid using wireless devices that use the same frequency bands as the remote controller.
2. When using with multiple aircraft, including T40, T20P, and other aircraft, make sure that the distance
between each aircraft is more than 10 m to avoid interference.
3. The sensitivity of the radar module may be reduced when operating several aircraft within a short
distance. Operate with caution.
4. Be alert when flying near areas with magnetic or radio interference. These include, but are not
limited to, high voltage lines, large scale power transmission stations or mobile base stations, and
broadcasting towers. Failing to do so may compromise the transmission quality of this product or
cause transmission errors which may affect ight orientation and location accuracy. The aircraft may
behave abnormally or go out of control in areas with too much interference.
5. If the RTK dongle is used for eld planning, the module should be disconnected from the remote
controller after planning is completed. Otherwise, it will affect the communication performance of the
remote controller.
Use of Launch and Recovery Equipment
Not applicable.
Distance to Control Station
When taking off or landing, the aircraft should be more than 10 m away from the remote controller and
operator to ensure safety. Maintain visual line of sight with the aircraft at all times.

36
©
2022 DJI All Rights Reserved.
AGRAS T40/T20 P
Unmanned Aircraft Flight Manual
M4
M3
M1
M2
1. Unfold the M3 and M4 arms, and fasten the two arm locks. Avoid pinching ngers.
2. Unfold the M1 and M2 arms, and fasten the two arm locks. Avoid pinching ngers.
3. Unfold the propeller blades.
4. Insert the Intelligent Flight Battery into the aircraft until you hear a click.
The T40 uses the T40 Intelligent Flight Battery (model: BAX601-30000mAh-52.22V), while the T20P
uses the T20P Intelligent Flight Battery (model: BAX601-13000mAh-52.22V). Check and charge the
battery based on the requirements in the respective battery manual.
Make sure that the battery is rmly inserted into the aircraft. Only insert or remove the battery
when the aircraft is powered off.
To remove the battery, press and hold the clamp and lift the battery up.
When folding the arms, make sure to fold the M1 and M2 arms followed by the M3 and M4
arms and make sure that the arms are inserted into the storage clamps on both sides of the
aircraft. Otherwise, the arms may be damaged.
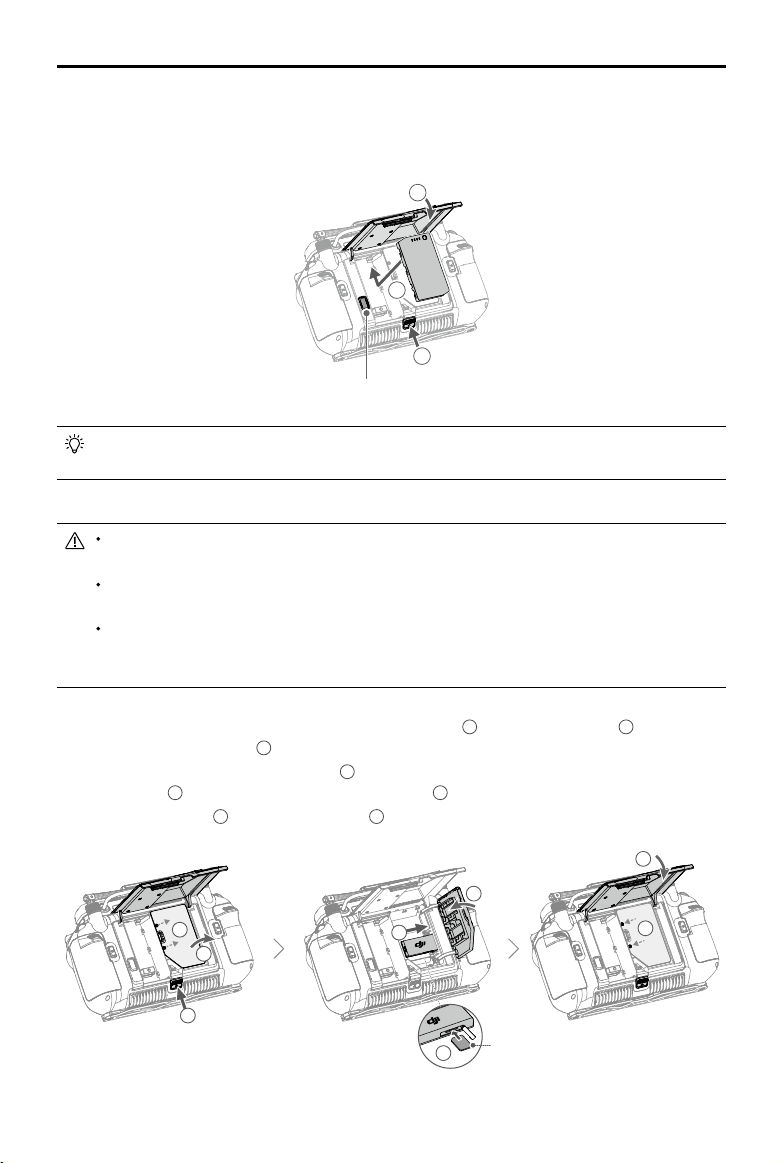
Preparing the Remote Controller
Mounting the WB37 Intelligent Battery
Follow the instructions below to mount the battery if using the WB37 Intelligent Battery for the remote
controller power supply.
System Assembly
Preparing the Aircraft
©
2022 DJI All Rights Reserved.
37
AGRAS T40/T20 P
Unmanned Aircraft Flight Manual
1
2
3
Battery Release Button
To remove the WB37 battery, press and hold the battery release button and push the battery
downward.
Mounting the Dongle and SIM Card
Dongle related functions are not supported in some countries or regions. Comply with the local
laws and regulations.
Only use a DJI-approved dongle (name: DJI Cellular Dongle (LTE USB Modem), model: IG830/
IG830E).
The dongle and nano-SIM card enable the remote controller to access specic networks and
platforms such as DJI Agras Intelligent Cloud. Make sure to insert them correctly. Otherwise,
network access will not be available.
1. Press the rear cover release button to open the rear cover
1
. Remove the screws
2
and open the
dongle compartment cover
3
.
2. Insert the nano-SIM card into the dongle
4
. Insert the dongle into the USB-C connector in the dongle
compartment
5
. Close the dongle compartment cover
6
.
3. Remount the screws
7
. Close the rear cover
8
.
1. Push the rear cover release button to the end to open the rear cover.
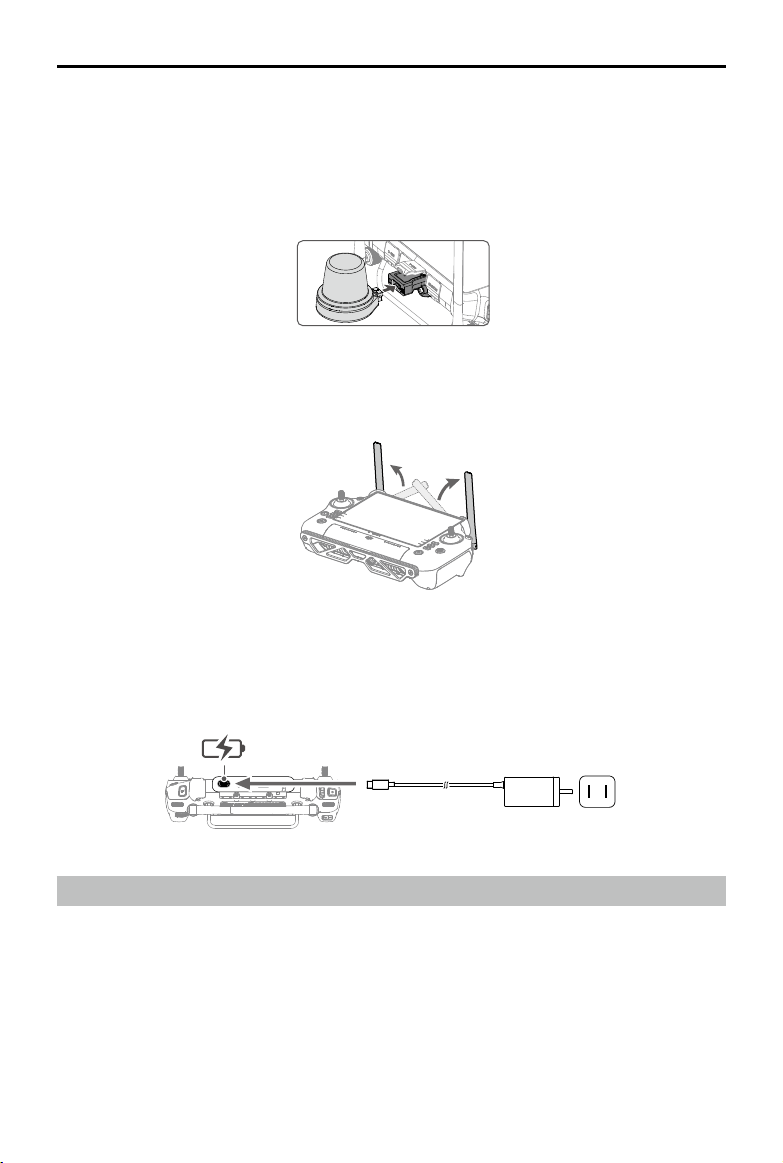
2. Insert the WB37 battery into the battery compartment and push it to the top. There will be a clicking
sound to indicate the battery is installed rmly.
3. Close the rear cover.
2
1
3
7
8
5
6
4
Nano-SIM
38
©
2022 DJI All Rights Reserved.
AGRAS T40/T20 P
Unmanned Aircraft Flight Manual
Adjusting the Antennas
Lift and adjust the antennas. The signal strength of the remote controller is affected by the position of the
antennas.
Mounting the RTK Dongle
When adding points with the remote controller to plan the operation area, attach the RTK dongle
connector (for DJI RC Plus) and RTK dongle to the remote controller for more precise positioning.
1. Mount the RTK dongle connector to the USB-A port on remote controller and tighten the two screws.
2. Mount the RTK dongle to the RTK dongle connector.
Activating the Internal Battery
The internal battery must be charged before using for the rst time. Connect the 65W portable charger
to the USB-C port on the remote controller and connect the charger to a power outlet. The battery level
LEDs will start to ash to indicate that the internal battery is activated.
Pre-Flight Checklist
1. Make sure the remote controller and aircraft battery are fully charged. The pesticides required are
adequate.
2. Make sure the spray tank and Intelligent Flight Battery are rmly in place.
3. Make sure all parts are mounted securely.
4. Make sure all cables are connected properly and rmly.
©
2022 DJI All Rights Reserved.
39
AGRAS T40/T20 P
Unmanned Aircraft Flight Manual
5. Make sure propellers are securely mounted, that there are no foreign objects in or on the motors and
propellers, that the propeller blades and arms are unfolded, and the arm locks are rmly tightened.
6. The FPV camera and binocular vision system are clean and in good condition.
7. Make sure the spraying system is not blocked in any way.
8. Make sure the sprinkler hoses are clear from bubbles. Discharge any bubbles as they may affect the
performance of the sprinkler.
System Starting
1. Press the power button on the remote controller and then press and hold to power on the remote
controller. Make sure that DJI Agras is open.
2. Press the power button on the Intelligent Flight Battery and then press and hold to power on the
aircraft.
3. Check the home screen in DJI Agras to make sure that the aircraft is connected to the remote
controller.
4. If using RTK for positioning, make sure that the RTK signal source is correctly set (D-RTK 2 Mobile
Station or Network RTK service). Go to Operation View in the app, tap
and select RTK to view and
set.
Set the RTK signal source to None if RTK positioning is not in use. Otherwise, the aircraft is not able
to take off when there is no differential data.
5. Wait for satellites to be searched, make sure that there is a strong GNSS signal, and make sure the
aircraft heading measurement using the dual antennas is ready. (If the dual antennas are not ready
after waiting for an extended period, move the aircraft to an open area with a strong GNSS signal.)
Calibrating the Flow Meter
Make sure to calibrate the flow meter before using for the first time. Otherwise, the spraying performance
may be adversely affected.
1. Fill the spray tank with approximately 2 L of water.
2. In the app, go to Operation View, tap
, then , and tap Calibration on the right side of the ow
meter calibration section.
3. Tap Start Calibration and calibration will start automatically. The result of the calibration will be
displayed in the app when completed.
After calibrating successfully, users can proceed with the operation.
If calibration fails, tap “?” to view and resolve the problem. Recalibrate once the problem is
resolved.
During calibration, tap , then to cancel. If the calibration is cancelled, the accuracy of the
ow meter is based on the data before the calibration was started.
When to Recalibrate
1. Using a liquid of a different viscosity.
2. The error between the actual value and the theoretical value of the completed area is more than 15%.
40
©
2022 DJI All Rights Reserved.
AGRAS T40/T20 P
Unmanned Aircraft Flight Manual
Calibrating the Compass
It is important to calibrate the compass. The calibration result affects the ight safety. The
aircraft may malfunction if the compass is not calibrated.
DO NOT calibrate the compass where there is a chance of strong magnetic interference. This
includes areas where there are utility poles or walls with steel reinforcements.
DO NOT carry ferromagnetic materials with you during calibration such as keys or mobile phones.
After calibrating successfully, the compass may be abnormal when you place the aircraft on
the ground. This may be because of underground magnetic interference underground. Move
the aircraft to another location and try again.
Calibrate the compass when prompted by the app. It is recommended to calibrate the compass with an
empty tank.
1. Tap
, then , move the slider to the bottom, and select Advanced Settings, then IMU and
Compass Calibration. Tap Calibration in the compass calibration section.
2. Hold the aircraft horizontally and rotate it 360° around a vertical axis with the aircraft approximately 1.2
m above the ground. Calibration is completed when the app displays that calibration was successful.
3. If the app displays a tilted aircraft, it indicates that the horizontal calibration failed. Users should tilt
the aircraft and rotate it horizontally. Calibration is completed when the app displays that calibration
was successful. To reduce the number of rotations required, the aircraft should be tilted at least 45°.
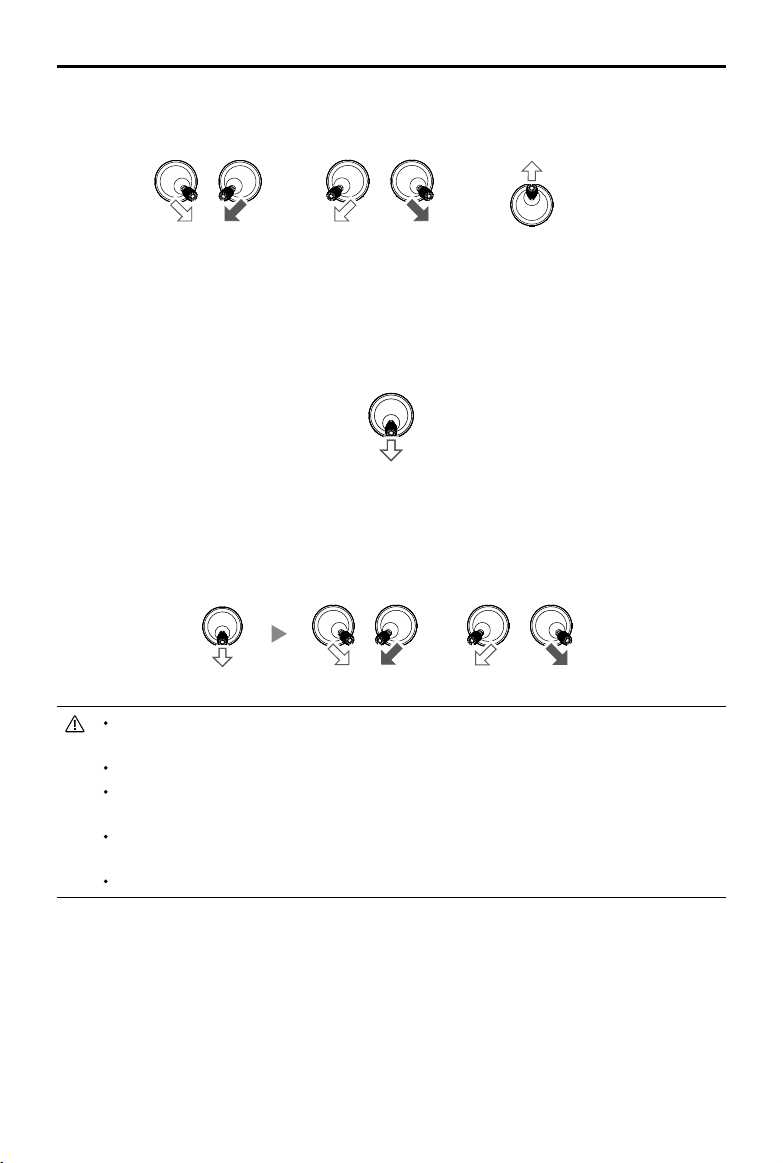
Takeoff/Landing
The Combination Stick Command (CSC) listed below is used to start and stop the motors. Make sure
you perform the CSC in one continuous motion. The motors begin to accelerate at an idle speed.
Release both sticks simultaneously. Take off immediately once the motors are spinning, or else the
aircraft may lose balance, drift, or even takeoff by itself and risk causing damage or injury.
©
2022 DJI All Rights Reserved.
41
AGRAS T40/T20 P
Unmanned Aircraft Flight Manual
Takeo
Perform a Combination Stick Command (CSC) and push the throttle stick up to take off.
OR
Throttle Stick
(left stick in Mode 2)
Landing
To land, pull down on the throttle stick to descend until the aircraft touches the ground. There are two
methods to stop the motors.
Method 1: when the aircraft has landed, push and hold the throttle stick down. The motors will stop after
three seconds.
Throttle Stick
(left stick in Mode 2)
Method 2: when the aircraft has landed, push the throttle stick down, and perform the same CSC that
was used to start the motors. Release both sticks once the motors have stopped.
OR
Spinning propellers can be dangerous. Stay away from spinning propellers and motors. DO
NOT start the motors in conned spaces or where there are people nearby.
Maintain control of the remote controller as long as the motors are running.
DO NOT stop the motors mid-flight unless in an emergency situation where doing so will
reduce the risk of damage or injury.
It is recommended to use Method 1 to stop the motors. When using Method 2 to stop the
motors, the aircraft may roll over if it is not completely grounded. Use Method 2 with caution.
After landing, power off the aircraft before turning off the remote controller.
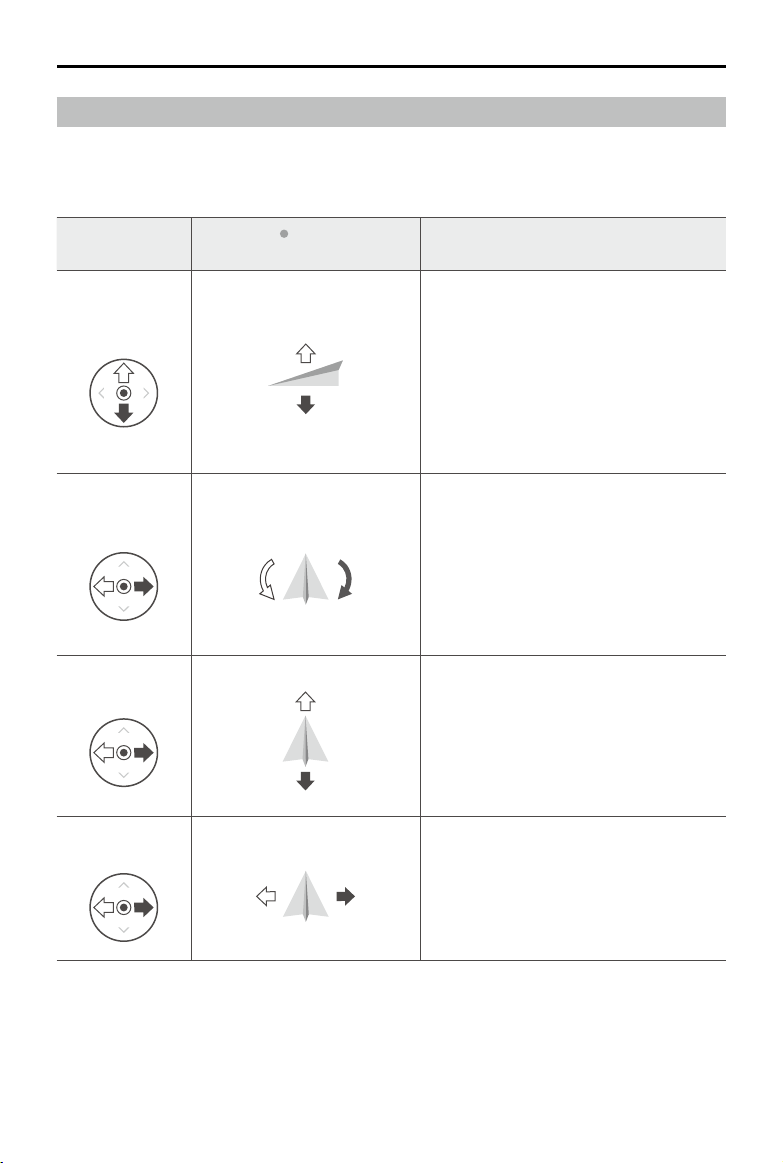
42
©
2022 DJI All Rights Reserved.
AGRAS T40/T20 P
Unmanned Aircraft Flight Manual
Remote Controller
(Mode 2)
Aircraft ( Indicates nose
direction)
Remarks
Left Stick
Throttle Stick:
Move the left stick vertically to
control the elevation of the aircraft.
Push up to ascend and push down to
descend. Use the left stick to take off when
the motors are spinning at an idle speed.
The aircraft hovers in place if the stick is in
the center position. The further the stick is
pushed away from the center position, the
faster the aircraft changes elevation.
Left Stick
Yaw Stick:
Move the left stick horizontally to
control the heading of the aircraft.
Push left to rotate the aircraft counterclockwise
and push right to rotate clockwise. The aircraft
hovers in place if the stick is in the center
position. The further the stick is pushed away
from the center position, the faster the aircraft
rotates.
Right Stick
Pitch Stick:
Move the right stick vertically to
control the pitch of the aircraft.
Push up to y forwards and press down to
y backwards. The aircraft hovers in place
if the stick is in the center position. Push
the stick further for a larger pitch angle and
faster ight.
Right Stick
Roll Stick:
Move the right control stick
horizontally to control the roll of the aircraft.
Push the stick left to fly left and right to fly
right. The aircraft hovers in place if the stick
is in the central position. Push the stick
further for a larger roll angle and faster ight.
Cruise / Maneuvering Flight
Operating the Aircraft
This section explains how to control the orientation of the aircraft through the remote controller. Control
can be set to Mode 1, Mode 2, or Mode 3. For example, the following description uses Mode 2:

©
2022 DJI All Rights Reserved.
43
AGRAS T40/T20 P
Unmanned Aircraft Flight Manual
Flight Modes
The aircraft will y in N-mode (Normal) by default. Users can switch between ight modes by toggling
the Flight Mode switch on the remote controller when A-mode is enabled in the app.
N-mode/F-mode (Normal):
The aircraft utilizes GNSS or the RTK module for positioning. When the
GNSS signal is strong, the aircraft uses GNSS for positioning. When the RTK module is enabled and the
differential data transmission is strong, it provides centimeter-level positioning. It will revert to A-mode
when the GNSS signal is weak or when the compass experiences interference.
S-mode (mapped to A-mode, Attitude):
GNSS is not used for positioning and the aircraft can only
maintain altitude using the barometer. The ight speed in A-mode depends on its surroundings such as
the wind speed.
Attitude Mode Warning
In A-mode, the aircraft cannot position itself and is easily affected by its surroundings, which may result
in horizontal shifting. Use the remote controller to position the aircraft.
Maneuvering the aircraft in A-mode can be difcult. Avoid ying in conned spaces or in areas where
the GNSS signal is weak. Otherwise, the aircraft will enter A-mode, leading to potential ight risks. Land
the aircraft in a safe place as soon as possible.
Mapping Operation Modes
After the boundary points of the task area have been added, the app will automatically produce a task
route. The aircraft will perform the mapping operation along the route and take photos for the mapping
task area. The app will reconstruct an HD map using the photos after the ight so that users can plan a
eld on the HD map.
Operation Procedure
1. Go to Operation View in the app, tap the mode switch button on the upper left, and select Route
Mapping on the Mapping panel.
2. Tap
at the bottom right of the screen and select Area Route or Boundary Route. In Area Route,
mapping and reconstruction will be performed for the whole task area to help users check the
current status of the area. In Boundary Route, mapping and reconstruction will be performed for the
boundary of the task area only, which takes a shorter time.
3. Tap
in middle of the right screen to select the mode for adding points. Crosshair is set by default.
4. Drag the map and tap Add to add a point at the crosshairs.
If Add Point with RC or Add Point with Aircraft is selected, walk with the remote controller to the
desired position or y the aircraft to the desired position and tap Add.
5. Edit boundary points: Tap the added boundary point to select it and then drag to move the point. Tap
twice to delete.
6. Adjust the route direction:
a. Drag the
icon near the route to adjust the ight direction of the planned route. Tap the icon to
show the Fine Tuning menu and adjust.
b. Tap one of the boundaries to select it and then tap it twice to align the route direction with the
selected boundary.
7. Tap
to save.

44
©
2022 DJI All Rights Reserved.
AGRAS T40/T20 P
Unmanned Aircraft Flight Manual
8. Tap and move the slider to launch the aircraft. The aircraft will y automatically along the route to
perform the mapping task. Check the progress on the upper right of the screen in the app.
9. The aircraft completes the ight and lands. Wait for the reconstruction to complete. The reconstructed
map will be displayed on the original map.
If the mapping operation is paused or stopped during flight and a new mapping field is
added, users can only view the paused or stopped operation in the operation list, and the
operation cannot be resumed.
If the user exits a mapping operation during reconstruction, select the operation in the
operation list and tap to restart reconstruction.
Reconstruction Result Application
Field Planning
After reconstruction, tap Plan Field to plan a eld on the HD map. The steps are the same as planning
a eld in Route operation mode. Users can also tap
to cancel the current selection and start a new
mapping operation.
Field Identifying
1. After reconstruction is completed, tap Identify Field. The app will identify and mark the boundary of
elds as well as obstacles.
2. When adjustment for the boundary of a eld is required, tap to select the eld and tap Boundary
Tuning to edit the boundary points, such as adjusting point position and adding points. The
operations are the same as editing a eld in Route operation mode. Tap Conrm after edit.
3. Adjust boundary for other elds if necessary.
4. If the identication results meet the corresponding operation scenarios, select one or multiple elds
and tap Save to save the elds to the eld list in Route operations. Users can easily use the elds in
the Route operation mode.
Spraying Operation Modes
Spraying operation modes include Route, A-B Route, Manual, Manual Plus, and Fruit Tree operation
modes. Use the mode switch button in the app to switch between modes. Select the desired mode for
spray according to the operation scenarios.
Route Operation Mode
In Route operation mode, after planning a field, adding obstacles, and setting parameters, the app
will intelligently produce a task route based on the input of the user. Apply and start an operation
and the aircraft will fly along the task route automatically. Once prescription maps are added after
an operation is applied, the aircraft will perform variable rate fertilization according to the information
included in the maps. The aircraft supports connection routing and operation resumption, as well as
the altitude stabilization and obstacle avoidance functions of the binocular vision system and active
phase array radars. Use the app to adjust the spray amount and ight speed. Route operation mode is
recommended for large spray areas.
Field Planning
1. Go to Operation View in the app, tap the mode switch button on the upper left, and select Route in
the Agriculture panel.

©
2022 DJI All Rights Reserved.
45
AGRAS T40/T20 P
Unmanned Aircraft Flight Manual
2. Tap on the bottom right and tap in the middle of the right screen to select the mode for adding
points and the type of point. The following description uses Crosshair as an example.
3. Add boundary points: Select Boundary Point as the type of point, drag the map, and tap Add to add
a point at the crosshairs.
A more accurate map is required to add points using the crosshairs. It is recommended to
use the HD map reconstructed in a Mapping operation or select a map source in HD Second-
layer Map in under to improve the accuracy of the added points.
If Add Point with RC is selected, walk with the remote controller to the desired position and tap
Add. If the RTK dongle is mounted to the remote controller for adding points, make sure that
RTK positioning is enabled. Go to , tap RTK to select the RTK signal source, and complete
conguration. Wait until the system status bar on the upper left of the screen turns green,
indicating that RTK positioning is in use.
If Add Point with Aircraft is selected, y the aircraft to the desired position and tap Add.
4. Mark any obstacles:
Use one of the two methods below to mark any obstacles in or outside a target eld. Obstacles that
are marked outside of the task area during eld planning will be avoided when planning a connection
route for Connection Routing. Refer to Connection Routing for more information.
1
Select Obstacle as the type of point, drag the map, and tap Add to add a point at the crosshairs.
2
Select Round as the type of point. A red circle will appear on the map. Tap the center of the circle
to select the obstacle and drag to adjust the position. Select the red point on the circumference of
the obstacle and drag to adjust the radius.
5. Tap
, name the eld, choose the crop, and save. The newly added eld will be displayed in the
eld list.
Field Editing
Select a eld in the eld list and tap to enter Edit mode.
1. Edit boundary points
Move: Tap and drag to move the point.
Delete: Tap twice to delete a point.
2. Edit Obstacles
Tap the obstacle to select and edit it.
For polygonal obstacles, follow the Edit Boundary Points instructions to edit the added points around
the obstacle. For circular obstacles, tap the center of the circle to select the obstacle and drag to
adjust the position. Select the red point on the circumference of the obstacle and drag to adjust the
radius.
3. Users can add more boundary points or obstacles. The steps are the same as for eld planning.
4. Tap
to save.
Performing an Operation
1. Place the aircraft on open, at ground with the rear of the aircraft facing you. Power on the remote
controller and then the aircraft.

46
©
2022 DJI All Rights Reserved.
AGRAS T40/T20 P
Unmanned Aircraft Flight Manual
2. Tap Start on the home screen of the app to enter Operation View. Tap the mode switch button on the
upper left and select Route in the Agriculture panel.
3. Tap
on the left and select a eld in the eld list.
4. Tap
to edit the eld again.
5. Tap
to apply the eld.
6. Operation Settings
Set parameters in the Task tab in the menu on the left of the screen. Users can select a spraying
template or set the spray amount, ight speed, line spacing (the distance between two neighboring
lines), and height above the vegetation accordingly.
If Auto Route Spacing Adjustment is enabled in Advanced Settings under Aircraft Settings, fine
tuning will be applied automatically after the user has adjusted the value of the line spacing. This will
adapt the route to be more aligned with the task area. The spacing value displayed may vary slightly
from the user input.
7. Route Settings
The app produces a task route automatically after the eld is applied. The green point on the route
indicates the start point while the yellow point indicates the end point. The route settings are as
follows.
Route Direction:
a. Drag the
icon near the route to adjust the ight direction of the planned route. Tap the icon to
show the Fine Tuning menu and adjust.
b. Tap one of the boundaries to select it and then tap it twice to align the route direction with the
selected boundary.
Start Point: Tap Start Point on the right, select a boundary point and conrm. The start point of the
route will change to a location close to the selected boundary point.
Connection Point: Drag the map and tap Connection Point on the right to add a connection
point at the crosshairs. Connection points and Connection Routing can be used to adjust the
connection route to circumvent obstacles that were not marked during eld planning. Refer to the
descriptions below for more information on Connection Routing.
Rectify Offset: Tap Rectify Offset and adjust the route position using the Fine Tuning buttons.
8. Add Prescription Maps
Tap
on the eld and select a prescription map from the list for a preview. Each area of the eld
on the map will be displayed in a color corresponding to the quantity of material to be sprayed or
spread. Tap OK to apply the selected prescription map to the eld.
9. Tap
, check the aircraft status and task settings, set an appropriate Connection Routing/
RTH Altitude, and move the slider to launch the aircraft. The aircraft will perform the operation
automatically.
The Connection Routing and RTH altitude and speed can be adjusted under Pre-Task Auto
Check and Aircraft Settings. If it is adjusted in one location, it will automatically be updated in
the other location too.
Users can enable or disable Connection Route Altitude in Pre-Task Auto Check or Aircraft
Settings. When enabled, the aircraft will fly to the first waypoint at the pre-set Connection
Route altitude and return to the ight route with this altitude after the operation is paused and
resumed. When disabled, the aircraft will arrive at the rst waypoint with the pre-set height
above the vegetation.
©
2022 DJI All Rights Reserved.
47
AGRAS T40/T20 P
Unmanned Aircraft Flight Manual
Only take off in open areas and set an appropriate auto-takeoff height according to the
operating environment.
The operation is automatically cancelled if the motors are started before beginning the
operation. You will need to recall the operation in the task list.
Once started, the aircraft ies to the starting point of the route and locks its heading in the
direction of the rst turning point for the duration of the ight route. During operation, users
cannot control the aircraft heading via the control stick.
The aircraft does not spray while ying along route spacing, but automatically sprays while
ying along the rest of the route. Users can adjust the spray amount, ying speed, and the
height above vegetation in the app.
An operation can be paused by moving the control stick slightly. The aircraft will hover and
record the breakpoint, and then the aircraft can be controlled manually. To continue the
operation, select it again from the Executing tag in the eld list, and the aircraft will return to
the breakpoint automatically and resume the operation. Pay attention to aircraft safety when
returning to a breakpoint.
Users can set the action the aircraft will perform after the operation is completed in the app.
Connection Routing
Connection Routing:
refers to the procedure where the aircraft ies from the current position to
the task route. Only available in Route and Fruit Tree operation modes.
Connection Routing returns the aircraft from its current position to the task route and automatically
avoids any obstacles that were marked outside of the task area during field planning. Users can
add connection points, which the aircraft must y through on the connection route to circumvent the
obstacles that were not marked during eld planning.
1. It is recommended to mark all obstacles inside or outside of the task area during eld planning. After
entering or resuming an operation, the connection route calculated by Connection Routing will be
displayed on the map automatically.
2. Drag the map to align the crosshair to the desired position and tap Connection Point to add a
connection point in the crosshair position.
3. Perform an operation, and the aircraft flies along the connection route including through any
connection points that have been marked along the way.
A-B Route Operation Mode
In A-B Route operation mode, the aircraft travels along a pre-planned route. Operation resumption and
data protection are available, as well as the altitude stabilization and obstacle avoidance functions of the
binocular vision system and active phase array radars. Use the app to adjust the ying speed and spray
amount. A-B Route operation mode is recommended for large, triangular, or rectangular spray areas.
Operation Route
The aircraft travels along a planned square zig-zag route after recording turning points A and B. Under
optimal working conditions, obstacle avoidance is available and the aircraft maintains the same distance
from the vegetation. The length of the dotted lines, called route spacing, can be adjusted in the app.
If users adjust the heading for points A and B after the points are recorded, the turning angles for the
turning points of the operation route will change according to the preset heading for points A and B. The
shape of the operation route will also change, for example, as Route L’ and Route R’ in the gure below.
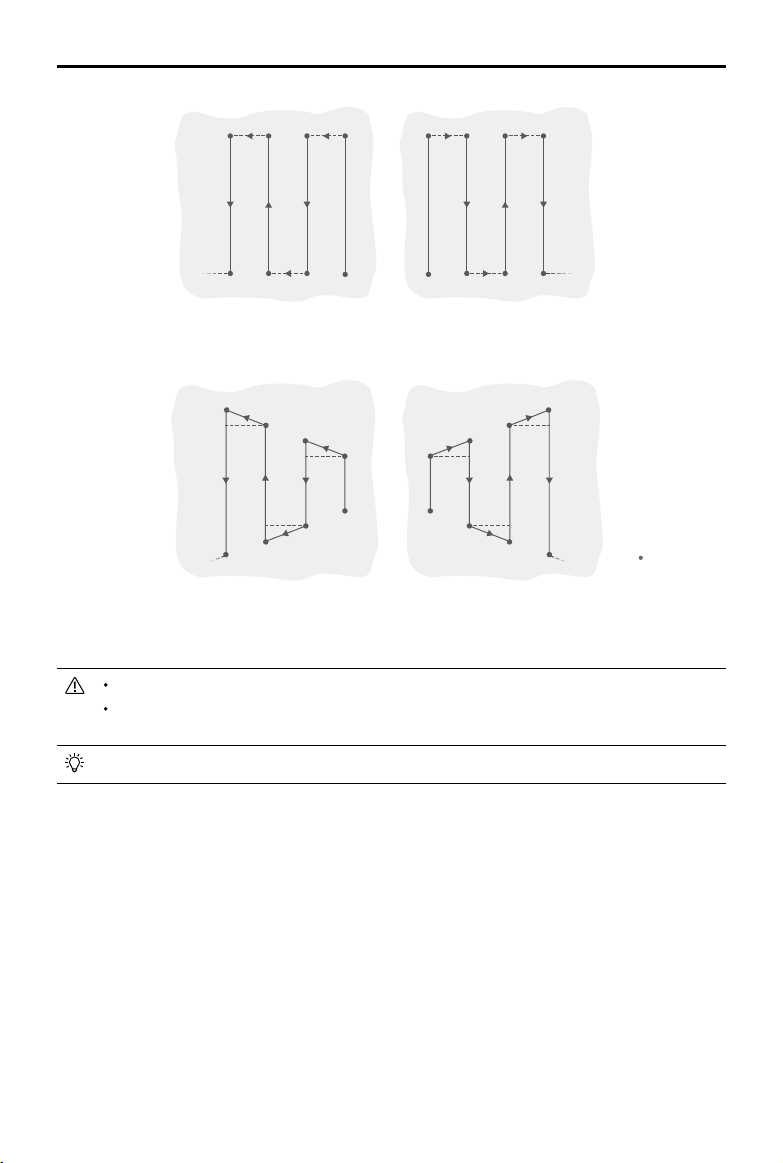
48
©
2022 DJI All Rights Reserved.
AGRAS T40/T20 P
Unmanned Aircraft Flight Manual
A
B
A
B R1
R2
L1
L2 R3
R4
L3
L4 R5
……
……
R6
L5
L6
Route L
Route R
A
B
A
B
R1’
R2’
L1’
L2’
R3’
R4’
L3’
L4’
R5’
……
……
R6’
L5’
L6’
Route L
’
Route R
’
Legend
- - - -
Route Spacing
Turning Point
Operation Procedure
Maintain VLOS of the aircraft at all times.
Make sure that the GNSS signal is strong. Otherwise, A-B Route operation mode may be
unreliable.
Make sure to inspect operating environments before ying.
Make sure that the GNSS signals are strong and the screen shows Ready to GO (GNSS) or Ready to
GO (RTK).
1. Enter A-B Route Operation Mode
Go to Operation View in the app, tap the mode switch button on the upper left, and select A-B Route.
2. Set the Operation Parameters
In the parameter settings on the left of the screen, users can select a spraying template or set the
spray amount, ight speed, line spacing, and height above the vegetation accordingly.
3. Record Points A and B in Order
Fly the aircraft to the starting point, depicted as Point A or B, hover, and tap Point A or B onscreen or
press the preset customizable button on the remote controller. Point A or B will appear on the map
after it is recorded. If the heading for Point A or B is required to be adjusted, the heading for Point
A should be adjusted after Point A is recorded and then users can record Point B and adjust the
heading for Point B.
©
2022 DJI All Rights Reserved.
49
AGRAS T40/T20 P
Unmanned Aircraft Flight Manual
The aircraft sprays automatically when ying from Point A to Point B.
Points A and B cannot be recorded if the spray tank is empty or the ying speed of the aircraft
is higher than 0.4 m/s.
Make sure to record Point A before Point B, and that the distance between Point A and B is
more than 1 m.
Users cannot adjust the position of Point A or B after they have been recorded. Start a new A-B
Route operation if adjustment of Point A or B is required.
For optimal performance, it is recommended to keep the direction of Point A to B parallel to
one side of the polygonal spray area.
4. Adjust angle for Point A and B
After Point A or B is recorded, tap Adjust A or B Heading onscreen, and move the yaw stick on the
remote controller. The heading of the aircraft corresponds to the heading for Point A or B that is
indicated by a dotted line on the screen. Tap Adjust A or B Heading again to set the current heading
for Point A or B. There are angle limits for adjusting the heading for Point A or B. Take note of any
prompts in the app when operating.
The heading for Point A or B cannot be set when the rotating speed of the aircraft’s heading is
higher than 15°/s.
5. Select the Route
After Point A and B are recorded, the app produces Route R or Route R’ by default. Tap
to switch
to Route L or Route L’.
6. Performing an Operation
Tap
and move the slider to start the operation.
Users can adjust the spray amount, flight speed and height above the vegetation during
operation while the line spacing cannot be adjusted.
Users cannot control the aircraft heading via the control stick during the operation.
When using the control sticks to control the aircraft in A-B Route operation mode, the aircraft
automatically switches to Manual operation mode, completes the corresponding flight
behavior, and then hovers. To resume the operation, tap Resume onscreen. The aircraft
resumes ying along the operation route. Refer to Operation Resumption for more information.
Even though the heading of the aircraft cannot be adjusted, use the control sticks to avoid
obstacles if the obstacle avoidance function of the radar module is disabled. Refer to Manual
Obstacle Avoidance for more information.
During the operation, the aircraft does not spray liquid while ying along the route parallel to
the line from A to B, but automatically sprays liquid while ying along the other parts of the
route.
Manual Operation Mode
Tap the mode switch button on the upper left in the app and select M to enter Manual operation mode.
In this mode, you can control all the movements of the aircraft, spray liquid via the spray button of the
remote controller, and adjust the spray rate via the dial. Refer to Controlling the Spraying System for
more information. Manual operation mode is ideal when the operating area is small.
50
©
2022 DJI All Rights Reserved.
AGRAS T40/T20 P
Unmanned Aircraft Flight Manual
Manual Plus Operation Mode
Tap the mode switch button on the upper left and select M+ to enter Manual Plus operation mode. In this
mode, the heading is locked and all other movements can be manually controlled. Users can disable
the M+ heading lock in the parameter settings. Use the buttons in the app to steer the aircraft left or
right. Under optimal working conditions, the radar module maintains the spraying distance between
the aircraft and vegetation if altitude stabilization function is enabled. Manual Plus operation is ideal for
irregularly-shaped operating areas.
1. In the parameter settings on the left, users can select a spraying template, set the spray amount,
ight speed, line spacing and height above the vegetation, and lock the heading.
2. Tap
and move the slider to launch the aircraft.
3. Tap the corresponding buttons in the app and the aircraft will fly to the left or right at the preset
distance for line spacing. The aircraft automatically sprays when accelerating forward, backward or
diagonally, but does not spray when ying sideward.
During an operation, users can adjust the spray amount, ight speed, and height above the
vegetation but not the line spacing.
Fruit Tree Operation Mode
Users can obtain information on Fruit Tree operations by either downloading it from DJI Agras Intelligent
Cloud or importing it from a microSD card and use the operation in Fruit Tree operation mode.
Download/Import Fruit Tree Operations Information
1. Download from DJI Agras Intelligent Cloud: Go to the home screen in the DJI Agras app and tap
to enter the task management screen. Tap
and select desired Fruit Tree operations in the pop-up
window and download.
2. Import from the microSD card: Insert the microSD card with the planning data from DJI Terra into the
microSD card slot on the remote controller. Next, go to the home screen of DJI Agras. Select the data
in the pop-up window and import it. To view the data, go to
task management on the home screen.
3. The downloaded or imported operations will be displayed in the operation list in Fruit Tree operation
mode.
Performing an Operation
1. Place the aircraft on open, at ground with the rear of the aircraft facing you. Power on the remote
controller and then the aircraft.
2. Tap Start in the home screen of the app to enter Operation View. Tap the mode switch button on the
upper left of the screen and select Fruit Tree in the Agriculture panel.
3. Tap
on the left and select the operation in the operation list.
4. Tap
to apply the operation.
5. Operation Settings
In the parameter settings on the left, set the spray amount or ow rate, ight speed, and height above
the vegetation.
Rotary Spraying can be enabled or disabled for operations involving tree crown center points. Once
enabled, the aircraft will rotate automatically and spray the pesticide when arriving at a tree crown
center.
For operations with no tree crown center points, users can select the method for calculating the task
area.
©
2022 DJI All Rights Reserved.
51
AGRAS T40/T20 P
Unmanned Aircraft Flight Manual
6. Connection Point: Drag the map and tap Connection Point on the right to add a connection point
at the crosshairs. Connection points and Connection Routing can be used to adjust the connection
route to circumvent obstacles that were not marked during eld planning. Connection Routing works
the same as in Route operation mode.
7. Rectify Offset: Tap Rectify Offset and adjust the route position using the Fine Tuning buttons. If
calibration points are included in the route, place the aircraft at one of the calibration points and tap
Rectify Aircraft Position.
8. Tap
, check the aircraft status and task settings, set an appropriate Connection Routing/
RTH Altitude, and move the slider to launch the aircraft. The aircraft will perform the operation
automatically.
The Connection Routing and RTH altitude and speed can be adjusted under Pre-Task Auto
Check and Aircraft Settings. If it is adjusted in one location, it will automatically be updated in
the other location too.
Only take off in open areas and set an appropriate auto-takeoff height according to the
operating environment.
The operation is automatically cancelled if the motors are started before beginning the
operation. You will need to recall the operation in the task list.
Once started, the aircraft ies to the starting point of the route and locks its heading in the
direction of the rst turning point for the duration of the ight route. During operation, users
cannot control the aircraft heading via the control stick.
The aircraft does not spray while ying along route spacing, but automatically sprays while
ying along the rest of the route. Users can adjust the spray amount, ying speed, and the
height above vegetation in the app.
An operation can be paused by moving the control stick slightly. The aircraft will hover and
record the breakpoint, and then the aircraft can be controlled manually. To continue the
operation, select it again from the Executing tag in the eld list, and the aircraft will return to
the breakpoint automatically and resume the operation. Pay attention to aircraft safety when
returning to a breakpoint.
Users can set the action the aircraft will perform after the operation is completed in the app.
System Shutdown
After landing, push the throttle stick down and hold to stop the motors. Press the power button and then
press and hold to power off the aircraft and remote controller.
Post-Flight Inspection
1. Make sure that the aircraft is powered off. Remove the battery from the aircraft and store it properly.
2. Check the aircraft structure, clean the dirt and dust, and replace any loose or damaged parts.
3. Make sure that there is no residue in the spray/spread tank and the whole spraying/spreading
system.
4. Make sure that the aircraft is folded correctly for transportation.
5. Make sure that the battery connector on the aircraft is clean and dry.

52
©
2022 DJI All Rights Reserved.
Emergency Procedures
General Information
This chapter introduces how to handle the aircraft or remote controller if one of the following
emergencies occurs.
Engine Failure
If one or more motors fail during ight, the aircraft will calculate the remaining propulsion according to
factors such as the status of the propulsion system, aircraft weight, and ight environment. Two possible
scenarios may occur:
1. Remaining propulsion is sufcient: the aircraft will continue to y in a stable condition with remaining
propulsion.
2. Remaining propulsion is insufcient: the aircraft will spin and perform a controlled descent.
Afterward, it is recommended that users land the aircraft manually and check and repair the aircraft
immediately.
Fire
A prompt will appear in the app and the flight controller will reduce the power of the aircraft when
the flight battery temperature is too high. The battery will be locked for future use if it exceeds the
temperature threshold during ight and cannot be used again after landing.
Follow the instructions below if the ight battery catches re.
1. If the battery catches re when the battery is being charged using a battery station or generator,
make sure personal safety is guaranteed, power off the battery station or generator immediately,
and disconnect the battery from the charging device. If the battery catches re when the battery is
in the aircraft, make sure personal safety is guaranteed and disconnect the battery from the aircraft
immediately.
2. Transfer the ammable materials surrounding the battery to a safe distance of more than 5 m away.
3. If the re is small, use materials such as large amount of sand to cover the location of the re and
pour cold water to cool the battery until there is no longer any smoke being produced. With the
help of re-resistant gloves or other protective tools that allow users to avoid direct contact with the
battery, move the battery to a container with enough water to fully immerse the battery and add an
appropriate amount of salt to help fully discharge the battery. Leave the container in a cool place for
more than 72 hours and take out the battery and discard it.
4. If the re is large, double check that there are no ammable materials surrounding the re, extend
the safety distance to more than 10 m, and evacuate any people in the surrounding environment.
Wait until the battery burns out and the re is extinguished in order to avoid any further accidents.
Loss of C2 Link
The aircraft supports Failsafe RTH function.
Home Point:
The default home point is the first location where your aircraft received strong
GNSS signals
. Note that the white GNSS icon requires at least four bars before the signal is
strong.
RTH:
RTH brings the aircraft back to the last recorded home point.
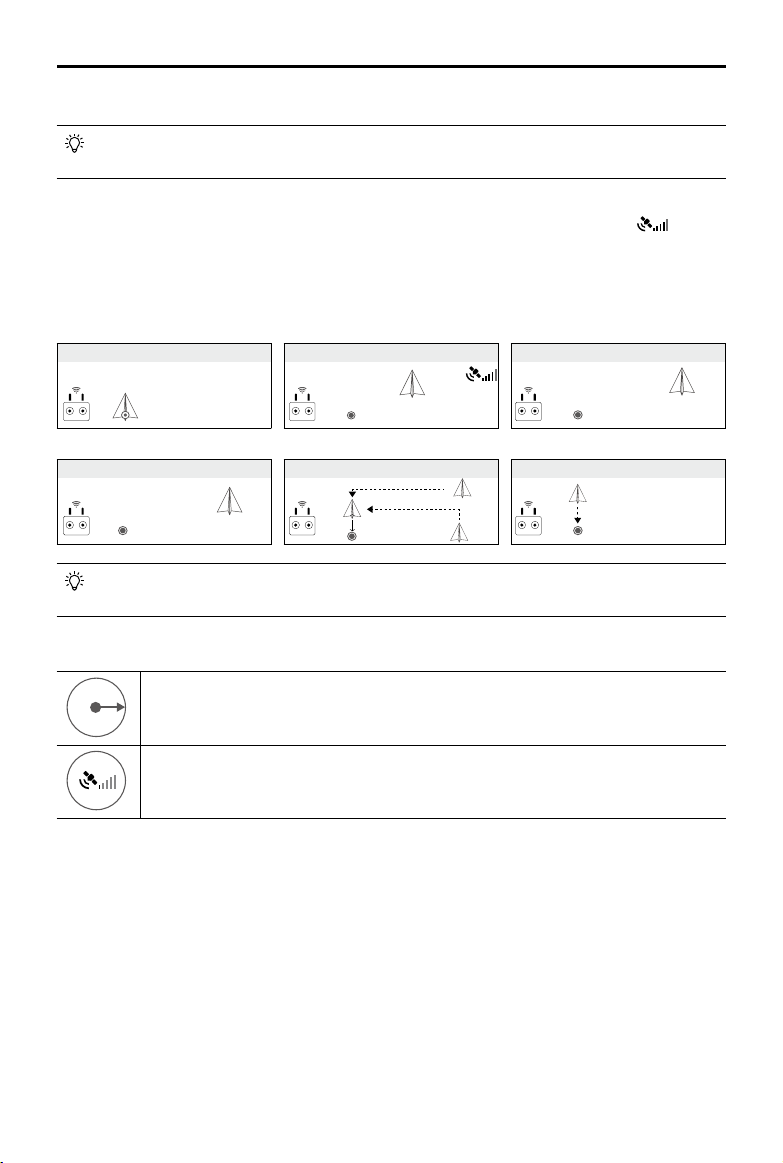
©
2022 DJI All Rights Reserved.
53
AGRAS T40/T20 P
Unmanned Aircraft Flight Manual
Failsafe RTH
The aircraft will RTH or hover if the remote controller signal is lost. The action can be set in the
app. Failsafe RTH will only be available if RTH is set.
Failsafe RTH is automatically activated if the remote controller signal is lost for more than three seconds,
provided that the home point has been successfully recorded, the GNSS signal is strong
, and the
RTK module is able to measure the heading of the aircraft. The RTH continues if the remote controller
signal is recovered, and users can control the aircraft using the remote controller. Press the RTH button
once to cancel RTH and regain control of the aircraft.
RTH Illustration
If RTH is triggered during Route operations, the aircraft can plan a flight path for RTH to
circumvent the obstacles added when planning a eld.
RTH Safety Notices
3 m
H
The aircraft will not enter RTH if RTH is triggered when the aircraft is within a 3m radius of
the Home Point, but the remote controller will still sound an alert. Exit RTH to cancel the
alert.
The aircraft cannot return to the home point when the GNSS signal is weak (the GNSS
icon displays red) or is unavailable.
Obstacle Avoidance During RTH
In an optimal operating environment, obstacle avoidance during RTH is available. If there is an obstacle
within 20 m of the aircraft, the aircraft decelerates and then stops and hovers. The aircraft will exit the
RTH procedure and wait for further commands.
Landing Protection Function
Landing Protection activates during auto landing. The procedure is as follows:
1. After arriving at the home point, the aircraft descends to a position 3 m above the ground and hovers.
2. Control the pitch and roll sticks to adjust the aircraft position and make sure the ground is suitable for
landing.
1. Record Home Point (HP)
4. RTH initiated if signal lost > 3 s
5. RTH initiated (height 15 m (customizable))
3. Remote controller signal lost 2. Conrm Home Point
6. Lands after hovering for 5 s
Height over HP > 15 m
Elevate to 15 m
Height over HP ≤ 15 m
15 m

54
©
2022 DJI All Rights Reserved.
AGRAS T40/T20 P
Unmanned Aircraft Flight Manual
3. Pull down the throttle stick or follow the onscreen instructions in the app to land the aircraft.
When using fixed RTK positioning, the aircraft will land directly instead of entering Landing
Protection. Landing Protection is still available if the aircraft is performing a fruit tree route
operation planned using DJI Terra.
Loss of Navigation Systems
When using xed RTK positioning, the aircraft will switch to GNSS if RTK is unavailable during ight.
If GNSS is also unavailable, the aircraft will switch to Attitude (ATTI) mode automatically to stabilize its
attitude and a prompt will appear in the app to remind users to y with caution and land as soon as
possible.
Control Station Failures
Control station failures include the following scenarios.
1. Control signal is lost: the aircraft will enter Failsafe RTH if Failsafe RTH is enabled in the app. Refer
to Loss of C2 Link for more information about Failsafe RTH. The aircraft action can also be set to
hovering in place until the aircraft lands with critically low battery level or landing directly.
2. The app crashes during automatic operations while the control signal is normal: in this case, the C2
link between the aircraft and the remote controller is in good condition, so the aircraft will continue
performing the current operation until landing is triggered by critically low battery level. Users can
exit from Route operations by moving the control stick slightly and control the aircraft manually.
Flyaway
The ight telemetry of the aircraft will be displayed on the screen of the remote controller during ight.
If the aircraft ies away during operation, users can search for the aircraft according to the location of
the aircraft and remote controller displayed on the map in the app. If the GNSS signal of the aircraft is
lost after the aircraft ies away then the aircraft will not be displayed on the map in the app. Users can
estimate the location of the aircraft to its last location, ight speed, and heading before the loss of the
GNSS signal.
Reporting Requirements
Users are responsible to inform DJI of any event of an uncontrolled crash or yaway within 2 business
days through DJI Support, a DJI authorized dealer, or other means and shall upload the flight data
related to the event. See the instructions of ight data upload from
https://youtu.be/X8sVce69z5g
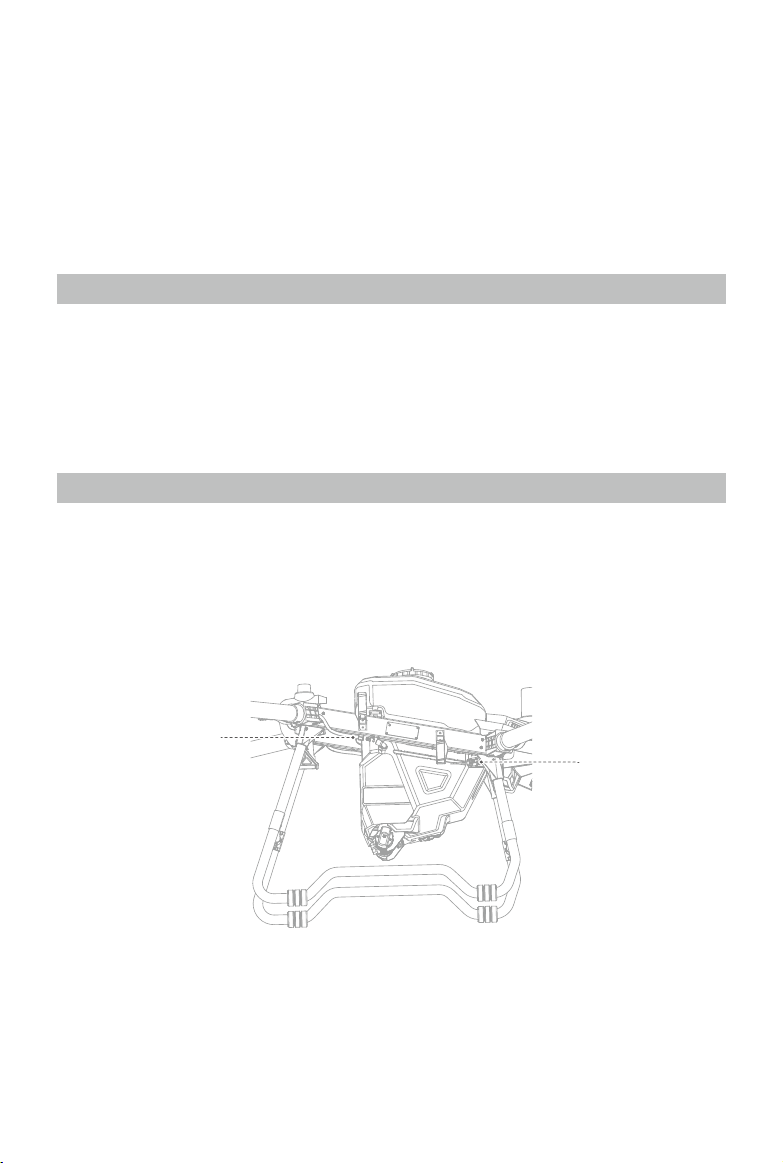
©
2022 DJI All Rights Reserved.
55
Weight and Balance and Equipment List
Users can remove the spray tank and install the spreading system for spreading operations. The center
of gravity is within the ranges listed in the Center of Gravity Limitations section whether a spray tank or
spreading system is used.
Handling, Servicing and Instructions for Maintenance
and Continued Airworthiness
Ground Handling
1. Make sure that the aircraft is powered off. Remove the battery from the aircraft and store it properly.
2. Check the aircraft structure, clean the dirt and dust, and replace any loose or damaged parts.
3. Clean the residue in the spray/spread tank and the spraying/spreading system and keep the system
dry.
4. Make sure that the aircraft is folded correctly for transportation or storage.
5. Make sure that the battery connector on the aircraft is clean and dry.
Disassembly, Storage, and Reassembly
The tank, propellers, and sprinklers on the aircraft can be disassembled. Follow the instructions below
to disassemble, reassemble, and store them. Make sure to remove the Intelligent Flight Battery from the
aircraft before disassembly and reassembly.
Tank
Disassembly
A
B
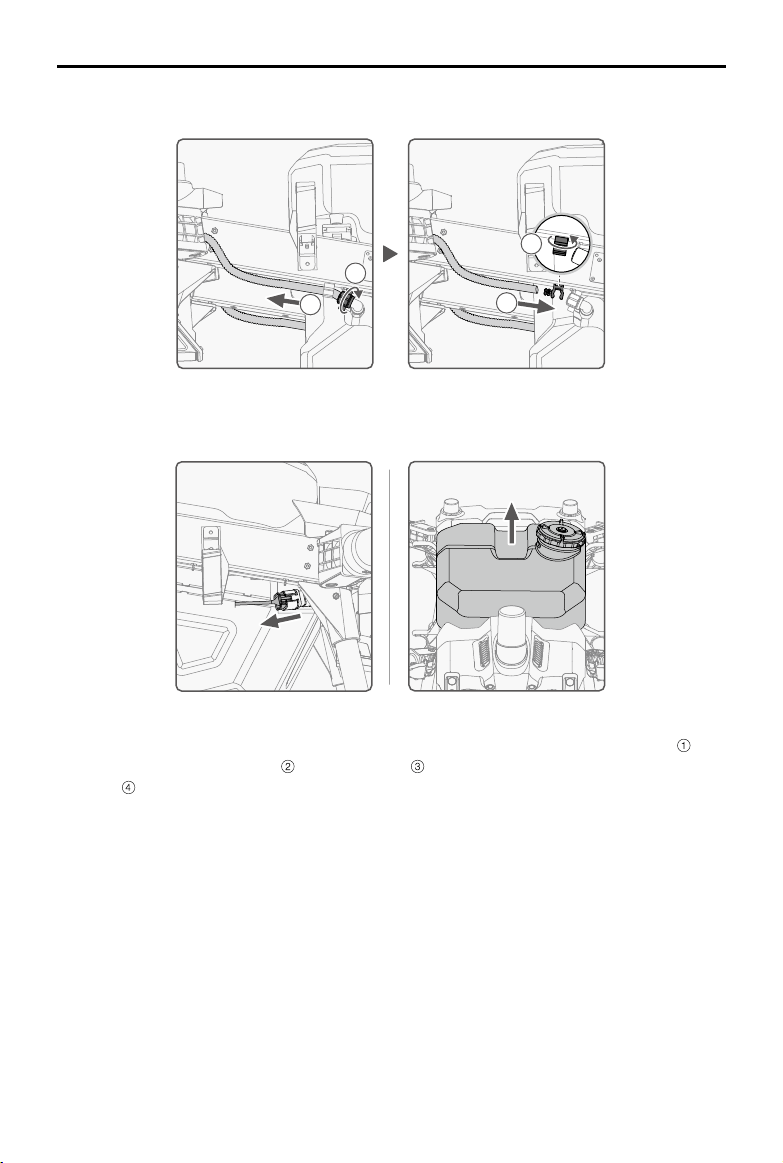
56
©
2022 DJI All Rights Reserved.
AGRAS T40/T20 P
Unmanned Aircraft Flight Manual
1
2
3
4
A.
B. C.
1. On the aircraft, locate the hoses on either side of the spray tank. Loosen the nut on the hose , take
the hose out of the hose clamp , rotate the clamp , and connect the hose to the protrusion on the
clamp . (Figure A)
Note: After the hose is removed, make sure to tighten the hose nut on the spray tank hose connector
to avoid losing the nut.
2. Locate the spraying system cable in front of the right landing gear on the aircraft. Unplug the cable
from the connector. Operate with caution to avoid damaging the cable. (Figure B)
3. Lift and remove the spray tank on the aircraft. (Figure C)
Reassembly
Follow the steps of disassembly in reverse order for reassembly.
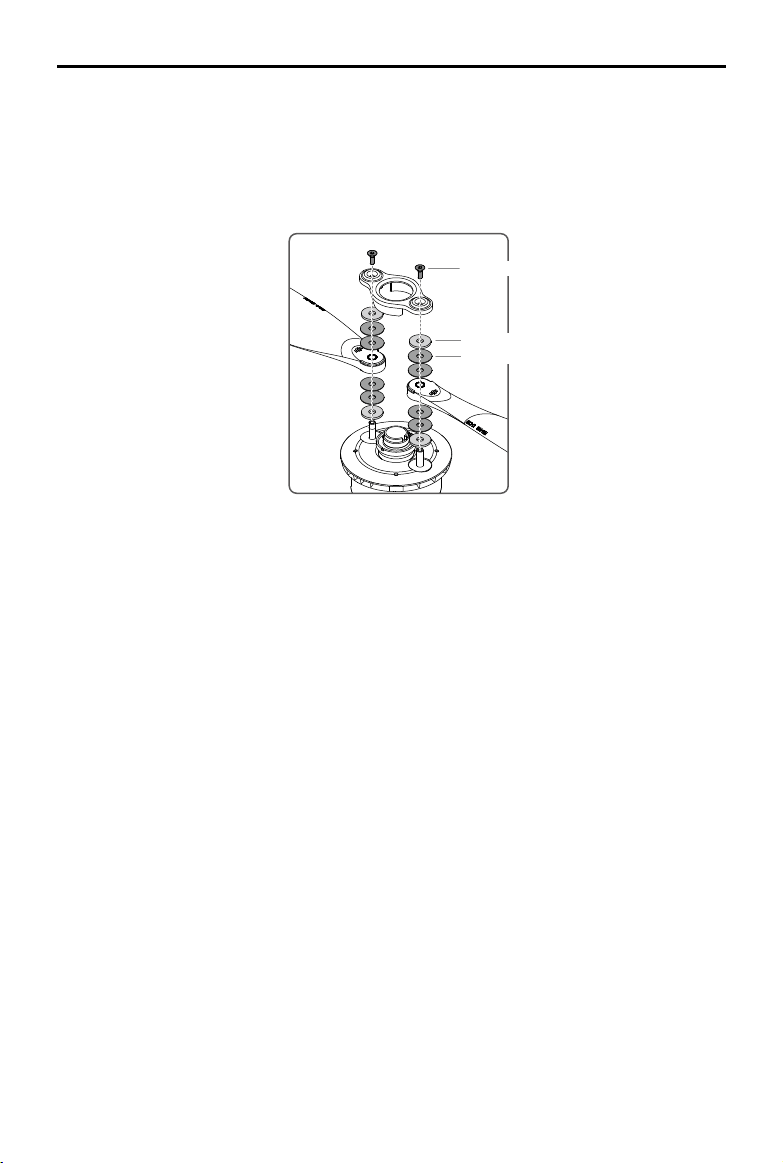
©
2022 DJI All Rights Reserved.
57
AGRAS T40/T20 P
Unmanned Aircraft Flight Manual
Propellers
Disassembly
1. Remove the two M5×15 propeller blade screws using a proper hex key.
2. Remove the propeller adapter, the four Teon gaskets, and two rubber washers above and under
each propeller blade.
Reassembly
Identify the CW or CCW marks on the propeller blades and motors. Make sure to assemble the parts
with the same mark. T40 users can identify the upper (U) and lower (L) propeller blades with the
corresponding letter at the end of the model number on each propeller.
1. Place the one rubber washer and then two Teflon gaskets onto one of the mounting hole on the
motor. Place the propeller blade and then two Teon gaskets and one rubber washer.
2. Follow the same steps for the other mounting hole on the motor.
3. Place the propeller adapter on the top.
4. Insert the two M5×15 screws to the mounting holes and tighten to secure the propeller blades.
Sprinklers
Disassembly
1. Rotate and remove the screw and cover at the bottom of the sprinkler. Remove the centrifugal disk
module.
2. Separate the upper and lower disks.
3. Remove the washer on the lower disk.
Reassembly
Follow the steps of disassembly in reverse order for reassembly.
M5×15 Screws
Rubber Washers
Teflon Gaskets

58
©
2022 DJI All Rights Reserved.
AGRAS T40/T20 P
Unmanned Aircraft Flight Manual
Storage
Aircraft Storage
1. Keep the aircraft and parts clean and dry and store them in a cool dry place. Recommended storage
temperature (when the tank, ow meter, pumps, and hoses are empty): between -20° and 40° C (-4°
and 104° F).
2. Make sure to keep the small parts properly to avoid loss. Small parts, such as cables and straps, are
dangerous if swallowed. Keep all parts out of reach of children and animals.
3. Remove or empty the tank when not in use to avoid damaging the landing gear.
4. Remove the battery from the aircraft when stored.
Battery Storage
Disconnect the battery from the aircraft and check if there is any buildup in the battery port.
Power off and disconnect the battery from the aircraft or other devices during transportation.
Keep batteries out of the reach of children and animals. Seek professional medical support
immediately if children swallow parts of the battery.
If the battery level is critically low, charge the battery to a power level of 40% to 60%. DO NOT
store a battery with a low power level for an extended period. Otherwise, the performance will
be negatively affected.
DO NOT leave the battery near heat sources such as a furnace or heater. DO NOT leave the
battery inside a vehicle on hot days.
The battery must be stored in a dry environment.
DO NOT place the battery near explosive or hazardous material or near metal objects such as
eyeglasses, watches, jewelry, and hairpins.
DO NOT attempt to transport a battery that is damaged or has more than 30% power.
Discharge the battery to 30% or lower before transportation.
Make sure the battery is placed on a at surface to avoid damage to the battery from sharp
objects.
If storing the battery for more than three months, it is recommended to store the battery in a
battery safety bag in an environment at a temperature range from -20° to 40° C (-4° to 104° F).
DO NOT store the battery for an extended period after fully discharging. Doing so may over-
discharge the battery and cause irreparable damage to the battery cell.
If a battery with a low power level has been stored for an extended period, the battery will be in
deep hibernation mode. Charge to wake the battery.
Disconnect the battery from the aircraft if you intend to store the battery for an extended period.
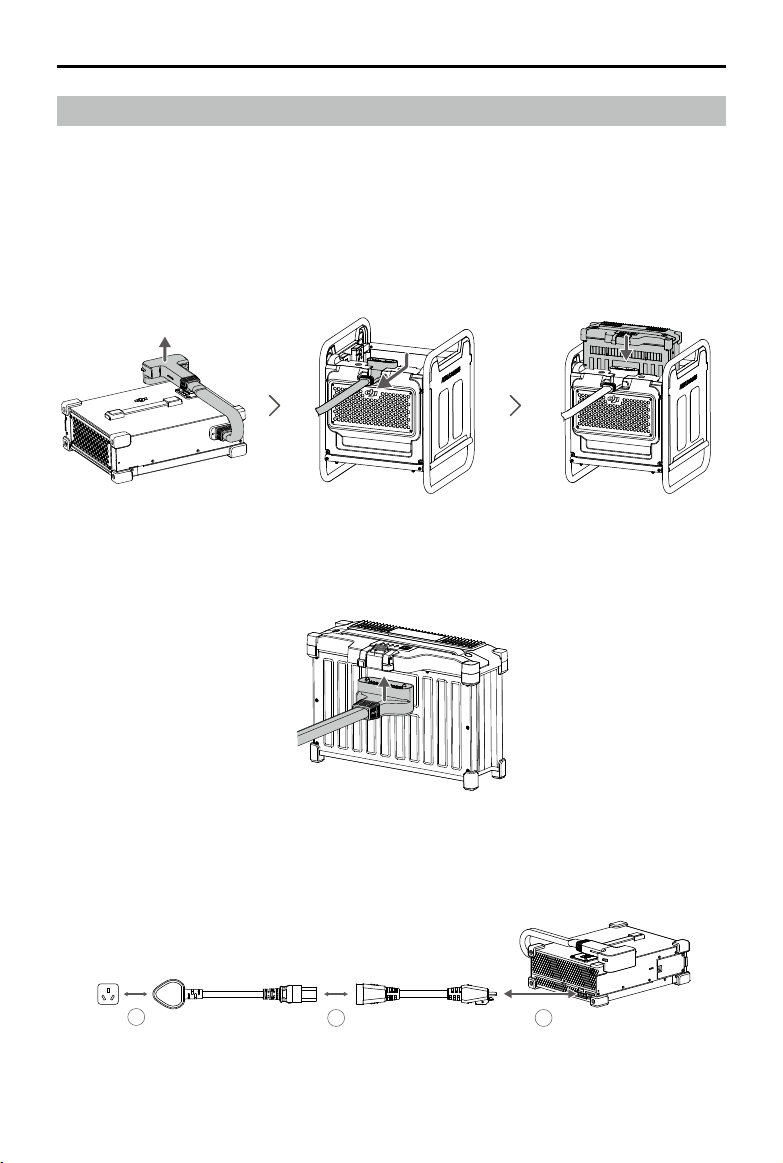
©
2022 DJI All Rights Reserved.
59
AGRAS T40/T20 P
Unmanned Aircraft Flight Manual
Charging / Conditioning / Replacing Batteries
Charging Batteries
Use the T40/T20P Intelligent Charger to charge the batteries.
1. Connect the battery to the charger.
• If using Agras T40, connect the charging cable to the air-cooled heat sink before putting the
battery into the heat sink. The charger starts to charge the battery. The four LEDs of the battery
blink in sequence while charging. Remove the battery when the four LEDs turn solid or off and put
another battery inside the heat sink to charge.
• If using Agras T20P, connect the charging cable to the battery directly. The charger starts to
charge the battery. The four LEDs of the battery blink in sequence while charging. Remove the
battery when the four LEDs turn solid or off and connect another battery to charge.
2. Connect the two single-phase AC power cables. Connect the single-phase AC power cable (charger)
to the charger and then connect the single-phase AC power cable (power supply) to a power outlet.
13 2
≥16 A

60
©
2022 DJI All Rights Reserved.
AGRAS T40/T20 P
Unmanned Aircraft Flight Manual
3. Once charging is complete, the charging channel status LED on the charger will be solid green.
Disconnect the battery from the charger.
Users can also use the D12000i Multifunctional Inverter Generator or D6000i Multifunctional
Inverter Generator to charge the ight battery. Refer to the corresponding user guide for more
information.
Conditioning Batteries
If the battery is not used for an extended period, the battery life may be reduced.
Fully charge and discharge the battery at least once every three months to ensure the
performance of the battery.
If a battery has not been charged or discharged for ve months or more, the battery will no
longer be covered by the warranty.
Replacing Batteries
The battery should not be used again if any accident occurs. Users should replace the battery
immediately. See details below.
1. DO NOT use swollen, leaking, or damaged batteries.
2. DO NOT use a battery that has been dropped.
3. If the battery falls into water while inserted in an aircraft during ight, take it out immediately, and put
it in a safe and open area. DO NOT use the battery again.
4. If the battery cannot be discharged completely, replace the battery and contact a professional
battery recycle company for assistance on disposal.
Maintenance Program
Operator Performing List
1. Clean all parts of the aircraft at the end of each day of spraying after the aircraft returns to a normal
temperature. DO NOT clean the aircraft immediately after operations are completed.
a. Fill the spray tank with clean water or soapy water and spray the water through the sprinklers until
the tank is empty. Repeat the step two more times.
b. Remove the spray tank strainer and sprinklers to clean them and clear any blockage. Afterwards,
immerse them in clean water for 12 hours.
c. Make sure that the aircraft structure is completely connected so that it can be washed directly
with water. It is recommended to use a spray washer lled with water to clean the aircraft body
and wipe with a soft brush or wet cloth before removing water residue with a dry cloth.
d. If there is dust or pesticide liquid on the motors, propellers, or heat sinks, wipe them with a wet
cloth before cleaning the remaining water residue with a dry cloth.
e. Store the cleaned aircraft in a dry environment.
2. Wipe the surface and screen of the remote controller with a clean wet cloth that has been wrung out
with water daily after operations.

©
2022 DJI All Rights Reserved.
61
AGRAS T40/T20 P
Unmanned Aircraft Flight Manual
3. Inspect the aircraft every 100 ights or after ying for over 20 hours:
a. Check for and replace worn propellers.
b. Check for loose propellers. Replace propellers and propeller washers if needed.
c. Check for aging plastic or rubber parts.
d. Check for poor atomization of the sprinklers. Clean the centrifugal disks of the sprinklers
thoroughly. Replace the centrifugal disks in the case of severely poor atomization.
e. Replace the spray tank strainer.
4. Keep the protective cover of the radar module clean. Clean the surface with a soft damp cloth and
air dry before using again.
5. Regularly wipe off dirt on the gimbal of the FPV camera. Keep the FPV camera and the cameras of
the binocular vision system clean. Make sure that the aircraft is powered off. First remove any larger
pieces of grit or sand then wipe the lens with a clean, soft cloth to remove dust or other dirt.
Notice
1. In the event of a crash or collision, make sure to thoroughly inspect every part of the aircraft and
make any necessary repairs and replacements before your next ight. If you have any problems or
questions, contact DJI Support or a DJI authorized dealer.
2. DO NOT attempt to repair the aircraft if any parts are damaged. Contact DJI Support or a DJI
authorized dealer for professional maintenance services. The T40/T20P Drone Recommended
Maintenance Cycle table in the Supplements section lists the recommended maintenance cycle and
item maintenance performed by DJI authorized dealers only.
3. When a replacement part is required, make sure to purchase the new part from a DJI authorized
dealer only.
Find the dealer information from https://www.dji.com/where-to-buy/agriculture-dealers

62
©
2022 DJI All Rights Reserved.
Supplements
This chapter introduces the specications of the whole system, additional functions of the aircraft, the
operation of optional equipment, and other relevant information.
Specifications
T40
Aircraft
Model 3WWDZ-40A
Weight
38 kg (excl. battery)
50 kg (inc. battery)
Max Takeoff Weight
[1]
Max takeoff weight for spraying: 90 kg (at sea level)
Max takeoff weight for spreading: 101 kg (at sea level)
Max Diagonal Wheelbase 2,184 mm
Dimensions
2,800×3,150×780 mm (arms and propellers unfolded)
1,590×1,930×780 mm (arms unfolded and propellers folded)
1,125×750×850 mm (arms and propellers folded)
Hovering Accuracy Range
(with strong GNSS signal)
D-RTK enabled: Horizontal: ±10 cm, Vertical: ±10 cm
D-RTK disabled:
Horizontal: ±60 cm, Vertical: ±30 cm (radar module enabled: ±10 cm)
Operating Frequency
[2]
2.4000-2.4835 GHz, 5.725-5.850 GHz
Transmitter Power (EIRP)
2.4 GHz: <20 dBm (SRRC/CE/MIC), <33 dBm (FCC)
5.8 GHz: <33 dBm (SRRC/FCC), <14 dBm (CE)
RTK/GNSS Operating
Frequency
GPS L1/L2, GLONASS F1/F2, BeiDou B1/B2, Galileo E1/E5
GNSS: GPS L1, GLONASS F1, Galileo E1, BeiDou B1
Hovering Time
[3]
No payload: 18 min (takeoff weight of 50 kg with a 30Ah battery)
Fully loaded for spraying: 7 min (takeoff weight of 90 kg with a 30Ah battery)
Fully loaded for spreading: 6 min (takeoff weight of 101 kg with a 30Ah battery)
Max Congurable Flight
Radius
2,000 m
Max Wind Resistance 6 m/s
Operating Temperature 0° to 45° C (32° to 113° F)
Propulsion System
Motors
Stator Size 100×33 mm
KV 48 rpm/V
Power 4000 W/rotor
Propellers
Diameter 54 in (1371.6 mm)
Rotors Quantity 8

©
2022 DJI All Rights Reserved.
63
AGRAS T40/T20 P
Unmanned Aircraft Flight Manual
Dual Atomized Spraying System
Spray Tank
Volume Full: 40 L
Operating Payload
[1]
Full: 40 kg
Sprinklers
Model LX8060SZ
Quantity 2
Droplet Size 50-300 μm
Max Effective Spray Width
[4]
11 m (at a height of 2.5 m above the crops with a ight speed of 7 m/s)
Delivery Pumps
Type Magnetic drive impeller pump
Max Flow Rate 6 L/min × 2
Active Phased Array Omnidirectional Radar
Model RD2484R
Terrain Follow Max slope in Mountain mode: 30°
Obstacle Avoidance
[5]
Obstacle sensing range (horizontal): 1.5-50 m
FOV: Horizontal 360°, Vertical ±45°
Working conditions: ying higher than 1.5 m over the obstacle at a speed no
more than 7 m/s
Safety limit distance: 2.5 m (distance between the front of propellers and the
obstacle after braking)
Obstacle avoidance direction: omnidirectional obstacle avoidance in the
horizontal direction.
Obstacle sensing range (upward): 1.5-30 m
FOV: 45°
Working conditions: available during takeoff, landing, and ascent when an
obstacle is more than 1.5 m above the aircraft.
Safety limit distance: 3 m (distance between the top of aircraft and the
obstacle after braking)
Obstacle avoidance direction: upward
Operating Frequency 24.05-24.25 GHz (NCC/FCC/MIC/KCC/CE)
Power Consumption 15 W
Transmitter Power (EIRP) <20 dBm (NCC/FCC/MIC/KCC/CE)
Operating Voltage DC 15V
Operating Temperature 0° to 45° C (32° to 113° F)
Active Phased Array Backward and Downward Radar
Model RD2484B
Altitude Detection
[5]
Altitude detection range: 1-45 m
Stabilization working range: 1.5-30 m

64
©
2022 DJI All Rights Reserved.
AGRAS T40/T20 P
Unmanned Aircraft Flight Manual
Obstacle Avoidance
[5]
Obstacle sensing range (backward): 1.5-30 m
FOV: Horizontal ±60°, Vertical ±25°
Working conditions: available during takeoff, landing, and ascent when the
distance between the rear of aircraft and the obstacle is more than 1.5 m and
the aircraft speed is no more than 7 m/s.
Safety limit distance: 2.5 m (distance between the front of propellers and the
obstacle after braking)
Obstacle avoidance direction: backward
Operating Frequency 24.05-24.25 GHz (NCC/FCC/MIC/KCC/CE)
Power Consumption 15 W
Transmitter Power (EIRP) <20 dBm (NCC/FCC/MIC/KCC/CE)
Operating Voltage DC 15V
Operating Temperature 0° to 45° C (32° to 113° F)
Binocular Vision System
Measurement Range 0.4-25 m
Effective Sensing Speed ≤10 m/s
FOV Horizontal: 90°, Vertical: 106°
Operating Environment Adequate light and discernible surroundings
Remote Controller
Model RM700B
GNSS GPS + Galileo + BeiDou
Screen
7.02-in LCD touchscreen, with a resolution of 1920×1200 pixels, and high
brightness of 1200 cd/m
2
Operating Temperature -20° to 50° C (-4° to 122° F)
Storage Temperature Range
Less than one month: -30° to 45° C (-22° to 113° F)
One to three months: -30° to 35° C (-22° to 95° F)
Three months to one year: -30° to 30° C (-22° to 86° F)
Charging Temperature 5° to 40° C (41° to 104° F)
Internal Battery Chemical
System
LiNiCoAIO2
Internal Battery Runtime 3 hours 18 minutes
External Battery Runtime 2 hours 42 minutes
Charging Type
It is recommended to use a locally certied USB-C charger at a maximum
rated power of 65 W and maximum voltage of 20 V such as the DJI 65W
Portable Charger.
Charging Time
2 hours for internal battery or internal and external battery (when remote
controller is powered off and using a standard DJI charger)
O3 Agras
Operating Frequency
[2]
2.4000-2.4835 GHz, 5.725-5.850 GHz
Transmitter Power (EIRP)
2.4 GHz: <33 dBm (FCC), <20 dBm (CE/SRRC/MIC)
5.8 GHz: <33 dBm (FCC), <14 dBm (CE), <23 dBm (SRRC)

©
2022 DJI All Rights Reserved.
65
AGRAS T40/T20 P
Unmanned Aircraft Flight Manual
Max Transmission Distance
7 km (FCC), 5 km (SRRC), 4 km (MIC/CE)
(unobstructed, free of interference, and at an altitude of 2.5 m)
Wi-Fi
Protocol WiFi 6
Operating Frequency
[2]
2.4000-2.4835 GHz, 5.150-5.250 GHz, 5.725-5.850 GHz
Transmitter Power (EIRP)
2.4 GHz: <26 dBm (FCC), <20 dBm (CE/SRRC/MIC)
5.1 GHz: <26 dBm (FCC), <23 dBm (CE/SRRC/MIC)
5.8 GHz: <26 dBm (FCC/SRRC), <14 dBm (CE)
Bluetooth
Protocol Bluetooth 5.1
Operating Frequency 2.4000-2.4835 GHz
Transmitter Power (EIRP) <10 dBm
[1] The DJI Agras app will intelligently recommend the payload weight limit for the spread tank according to the current
status and surroundings of the aircraft. Do not exceed the recommended payload weight limit when adding material to
the spread tank. Otherwise, the ight safety may be affected.
[2] 5.8 and 5.1 GHz frequencies are prohibited in some countries. In some countries, the 5.1 GHz frequency is only allowed
for use indoors.
[3] Hovering time acquired at sea level with wind speed lower than 3 m/s and a temperature of 25° C (77° F). For reference
only. The data may vary depending on the environment. Actual results shall be as tested.
[4] The spray width depends on the actual operation scenarios.
[5] The effective sensing range varies depending on the material, position, shape, and other properties of the obstacle.

66
©
2022 DJI All Rights Reserved.
AGRAS T40/T20 P
Unmanned Aircraft Flight Manual
T20P
Aircraft
Model 3WWDZ-20A
Weight
26 kg (excl. battery)
32 kg (inc. battery)
Max Takeo Weight
[1]
Max takeo weight for spraying: 52 kg (at sea level)
Max takeo weight for spreading: 58 kg (at sea level)
Max Diagonal Wheelbase 2,190 mm
Dimensions
2,800×3,125×640 mm (arms and propellers unfolded)
1,565×1,915×640 mm (arms unfolded and propellers folded)
1,077×620×670 mm (arms and propellers folded)
Hovering Accuracy Range
(with strong GNSS signal)
D-RTK enabled: Horizontal: ±10 cm, Vertical: ±10 cm
D-RTK disabled:
Horizontal: ±60 cm, Vertical: ±30 cm (radar module enabled: ±10 cm)
Operating Frequency
[2]
2.4000-2.4835 GHz, 5.725-5.850 GHz
Transmitter Power (EIRP)
2.4 GHz: <20 dBm (SRRC/CE/MIC), <33 dBm (FCC)
5.8 GHz: <33 dBm (SRRC/FCC), <14 dBm (CE)
RTK/GNSS Operating
Frequency
GPS L1/L2, GLONASS F1/F2, BeiDou B1/B2, Galileo E1/E5
GNSS: GPS L1, GLONASS F1, Galileo E1, BeiDou B1
Hovering Time
[3]
No payload: 14.5 min (takeo weight of 32 kg with a 13Ah battery)
Fully loaded for spraying: 7 min (takeo weight of 52 kg with a 13Ah battery)
Fully loaded for spreading: 6 min (takeo weight of 58 kg with a 13Ah battery)
Max Congurable Flight
Radius
2,000 m
Max Wind Resistance 6 m/s
Operating Temperature 0° to 45° C (32° to 113° F)
Propulsion System
Motors
Stator Size 100×33 mm
KV 48 rpm/V
Power 4000 W/rotor
Propellers
Diameter 54 in (1371.6 mm)
Rotors Quantity 4
Dual Atomized Spraying System
Spray Tank
Volume Full: 20 L
Operating Payload
[1]
Full: 20 kg

©
2022 DJI All Rights Reserved.
67
AGRAS T40/T20 P
Unmanned Aircraft Flight Manual
Sprinklers
Model LX8060SZ
Quantity 2
Droplet Size 50-300 μm
Max Eective Spray Width
[4]
7 m (at a height of 2.5 m above the crops with a ight speed of 7 m/s)
Delivery Pumps
Type Magnetic drive impeller pump
Max Flow Rate 6 L/min × 2
Active Phased Array Omnidirectional Radar
Model RD2484R
Terrain Follow Max slope in Mountain mode: 30°
Obstacle Avoidance
[5]
Obstacle sensing range (horizontal): 1.5-50 m
FOV: Horizontal 360°, Vertical ±45°
Working conditions: ying higher than 1.5 m over the obstacle at a speed no more
than 7 m/s
Safety limit distance: 2.5 m (distance between the front of propellers and the
obstacle after braking)
Obstacle avoidance direction: omnidirectional obstacle avoidance in the horizontal
direction.
Obstacle sensing range (upward): 1.5-30 m
FOV: 45°
Working conditions: available during takeo, landing, and ascent when an
obstacle is more than 1.5 m above the aircraft.
Safety limit distance: 3 m (distance between the top of aircraft and the obstacle
after braking)
Obstacle avoidance direction: upward
Operating Frequency 24.05-24.25 GHz (NCC/FCC/MIC/KCC/CE)
Power Consumption 15 W
Transmitter Power (EIRP) <20 dBm (NCC/FCC/MIC/KCC/CE)
Operating Voltage DC 15V
Operating Temperature 0° to 45° C (32° to 113° F)
Active Phased Array Backward and Downward Radar
Model RD2484B
Altitude Detection
[5]
Altitude detection range: 1-45 m
Stabilization working range: 1.5-30 m
Obstacle Avoidance
[5]
Obstacle sensing range (backward): 1.5-30 m
FOV: Horizontal ±60°, Vertical ±25°
Working conditions: available during takeo, landing, and ascent when the
distance between the rear of aircraft and the obstacle is more than 1.5 m and the
aircraft speed is no more than 7 m/s.
Safety limit distance: 2.5 m (distance between the front of propellers and the
obstacle after braking)
Obstacle avoidance direction: backward

68
©
2022 DJI All Rights Reserved.
AGRAS T40/T20 P
Unmanned Aircraft Flight Manual
Operating Frequency 24.05-24.25 GHz (NCC/FCC/MIC/KCC/CE)
Power Consumption 15 W
Transmitter Power (EIRP) <20 dBm (NCC/FCC/MIC/KCC/CE)
Operating Voltage DC 15V
Operating Temperature 0° to 45° C (32° to 113° F)
Binocular Vision System
Measurement Range 0.4-25 m
Eective Sensing Speed ≤10 m/s
FOV Horizontal: 90°, Vertical: 106°
Operating Environment Adequate light and discernible surroundings
Remote Controller
Model RM700B
GNSS GPS + Galileo + BeiDou
Screen
7.02-in LCD touchscreen, with a resolution of 1920×1200 pixels, and high
brightness of 1200 cd/m
2
Operating Temperature -20° to 50° C (-4° to 122° F)
Storage Temperature Range
Less than one month: -30° to 45° C (-22° to 113° F)
One to three months: -30° to 35° C (-22° to 95° F)
Three months to one year: -30° to 30° C (-22° to 86° F)
Charging Temperature 5° to 40° C (41° to 104° F)
Internal Battery Chemical
System
LiNiCoAIO2
Internal Battery Runtime 3 hours 18 minutes
External Battery Runtime 2 hours 42 minutes
Charging Type
It is recommended to use a locally certied USB-C charger at a maximum rated
power of 65 W and maximum voltage of 20 V such as the DJI 65W Portable
Charger.
Charging Time
2 hours for internal battery or internal and external battery (when remote controller
is powered o and using a standard DJI charger)
O3 Agras
Operating Frequency
[2]
2.4000-2.4835 GHz, 5.725-5.850 GHz
Transmitter Power (EIRP)
2.4 GHz: <33 dBm (FCC), <20 dBm (CE/SRRC/MIC)
5.8 GHz: <33 dBm (FCC), <14 dBm (CE), <23 dBm (SRRC)
Max Transmission Distance
7 km (FCC), 5 km (SRRC), 4 km (MIC/CE)
(unobstructed, free of interference, and at an altitude of 2.5 m)
Wi-Fi
Protocol WiFi 6
Operating Frequency
[2]
2.4000-2.4835 GHz, 5.150-5.250 GHz, 5.725-5.850 GHz
Transmitter Power (EIRP)
2.4 GHz: <26 dBm (FCC), <20 dBm (CE/SRRC/MIC)
5.1 GHz: <26 dBm (FCC), <23 dBm (CE/SRRC/MIC)
5.8 GHz: <26 dBm (FCC/SRRC), <14 dBm (CE)

©
2022 DJI All Rights Reserved.
69
AGRAS T40/T20 P
Unmanned Aircraft Flight Manual
Bluetooth
Protocol Bluetooth 5.1
Operating Frequency 2.4000-2.4835 GHz
Transmitter Power (EIRP) <10 dBm
[1] The DJI Agras app will intelligently recommend the payload weight limit for the spread tank according to the current
status and surroundings of the aircraft. Do not exceed the recommended payload weight limit when adding material to
the spread tank. Otherwise, the ight safety may be affected.
[2] 5.8 and 5.1 GHz frequencies are prohibited in some countries. In some countries, the 5.1 GHz frequency is only allowed
for use indoors.
[3] Hovering time acquired at sea level with wind speed lower than 3 m/s and a temperature of 25° C (77° F). For reference
only. The data may vary depending on the environment. Actual results shall be as tested.
[4] The spray width depends on the actual operation scenarios.
[5] The effective sensing range varies depending on the material, position, shape, and other properties of the obstacle.
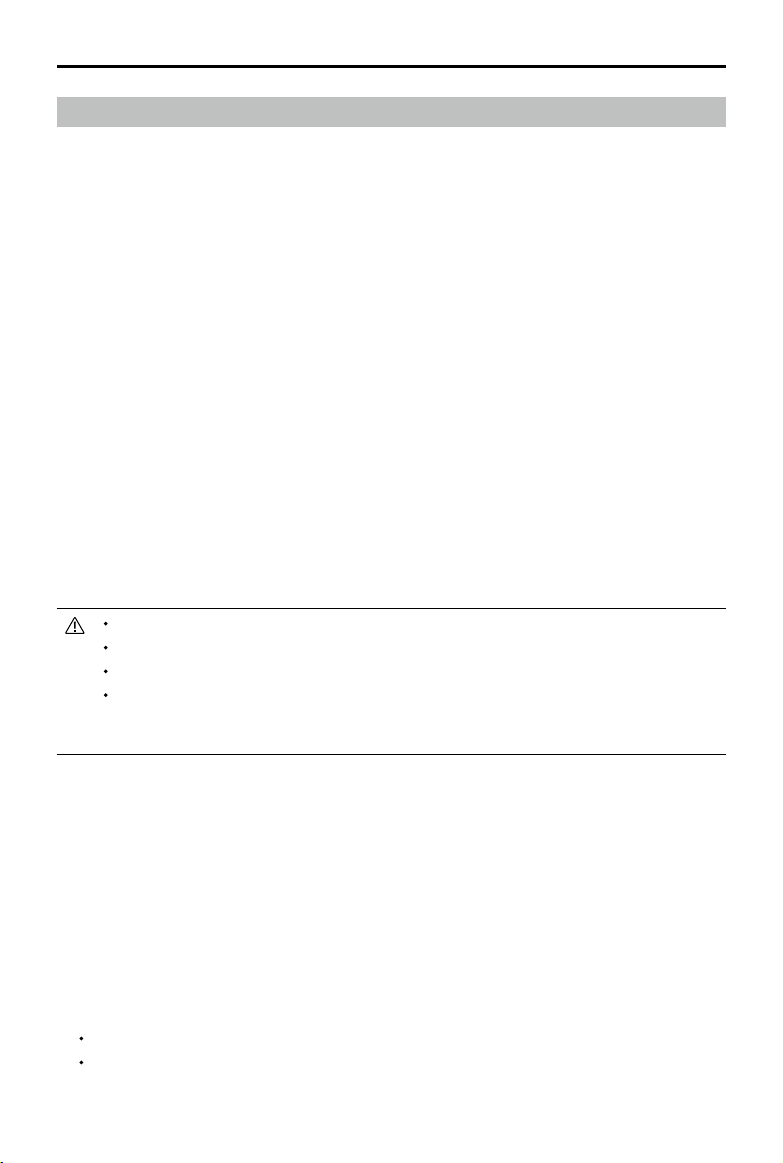
70
©
2022 DJI All Rights Reserved.
AGRAS T40/T20 P
Unmanned Aircraft Flight Manual
Operation Resumption
When exiting a Route, A-B Route, or Fruit Tree operation, the aircraft will record a breakpoint. The
Operation Resumption function allows the user to pause an operation temporarily to rell the spray tank,
change the battery, or avoid obstacles manually. Afterwards, resume operation from the breakpoint.
Recording a Breakpoint
If GNSS signals are strong, a breakpoint will be recorded in the following scenarios during an operation.
If GNSS signals are weak, the aircraft will enter Attitude mode and exit the current operation. The last
position where GNSS signals were strong will be recorded as a breakpoint.
1. Tap the Pause or End button on the lower right corner of the screen. Note: tapping the End button
during an A-B Route operation does not cause the aircraft to record a breakpoint. The operation
ends immediately and cannot be resumed.
2. Initialize RTH.
3. Push the pitch or roll stick in any direction on the remote controller.
4. Obstacle detected. The aircraft brakes and enters obstacle avoidance mode.
5. Radar module error detected when its obstacle avoidance function is enabled.
6. The aircraft reaches its distance or altitude limit, or the aircraft is close to a GEO zone.
7. Empty tank.
8. The aircraft enters low-battery landing mode.
9. If the option “Continue operation if remote control signal is lost” is disabled in Aircraft Settings,
and the aircraft disconnects from the remote controller, the aircraft will record a breakpoint after it
performs the action preset for when signals are lost.
Make sure that the GNSS signal is strong when using the Operation Resumption function.
Otherwise, the aircraft cannot record and return to the breakpoint.
The breakpoint is updated as long as it meets one of the above conditions.
If RTK positioning is not in use and the operation is paused for longer than 25 minutes during
an A-B Route operation, the system will automatically switch to Manual operation mode and
erase the breakpoint.
Resuming Operation
1. Exit an operation through one of the above methods. The aircraft will record the current location as
the breakpoint.
2. Fly the aircraft to a safe location after operating the aircraft or removing the conditions for recording a
breakpoint.
3. Return Route
For Route operations, Flight-Efcient Operation Resumption becomes available if any of the following
conditions are met. The app will calculate the optimal return point according to the breakpoint and
the aircraft location to reduce the ying distance when carrying more payload. Make sure that Flight-
Efcient Operation Resumption is enabled in Advanced Settings under Aircraft Settings before using
the function.
The aircraft will land on the ground after the operation is paused.
Exit an operation by tapping the end button and then start this operation again in the Executing tag
in the operation list.
©
2022 DJI All Rights Reserved.
71
AGRAS T40/T20 P
Unmanned Aircraft Flight Manual
For Route operations that do not meet the conditions mentioned above, as well as operations in other
modes, the return route is as follows.
The default return route is to y back to the breakpoint. Users can also select a return point from
the list of return points and breakpoint on the screen, which means the aircraft will return to the task
route following a perpendicular line. After exiting an operation by tapping the end button, resume the
operation by selecting the Executing tag in the operation list to apply the operation again and select
the return route.
4. Tap Resume in the lower right corner of the screen and the aircraft will fly to the task route by
following the selected return route and continue spraying. For Route and Fruit Tree operations,
Connection Routing is supported for return ights.
5. If obstacle avoidance is required when returning to the route, users can control the aircraft forward,
backward, and sideward. Refer to the Manual Obstacle Avoidance section for more information.
Typical Applications
In Route, A-B Route, or Fruit Tree operation mode, users can control the aircraft forward, backward, and
sideward, avoiding obstacles along the operation route, or in an emergency such as when the aircraft is
experiencing abnormal behavior. The following instructions describe how to avoid obstacles manually:
Manual Obstacle Avoidance
C
D
E1
E2
E3
Obstacle
Turning Point
Operation Route
Manual Fly Route
Auto Return Route
Legend
1. Exiting a Route, A-B Route, or Fruit Tree operation
In these modes, when using the control sticks to control the aircraft forward, backward, or sideward,
the aircraft automatically switches the current mode to Manual operation mode, pauses the operation,
records the current position as a breakpoint (Point C), completes the corresponding ight behavior,
and hovers.
When pushing the control sticks to exit the operation, the aircraft requires a braking distance.
Make sure that there is a safe distance between the aircraft and any obstacles.
2. Avoiding an Obstacle
After switching to Manual operation mode, users can control the aircraft to avoid the obstacle from
Point C to D.
3. Resuming Operation
Select one of the three return points marked as E1, E2, or E3. Tap resume and the aircraft ies from
the point marked D to the selected return point following a perpendicular line.
72
©
2022 DJI All Rights Reserved.
AGRAS T40/T20 P
Unmanned Aircraft Flight Manual
The amount of selectable return points is related to the position of the aircraft. Select
according to the app display.
Make sure that the aircraft has completely avoided the obstacle before resuming operation.
In the event of an emergency, make sure that the aircraft is operating normally and y the
aircraft manually to a safe area to resume operation.
Repeat the instructions above to exit and resume operation in the event of an emergency when
returning to the route, such as whenever obstacle avoidance is required.
System Data Protection
In Route, A-B Route, or Fruit Tree operation mode, the System Data Protection feature enables the
aircraft to retain vital system data such as operation progress and breakpoints after the aircraft is
powered off to replace a battery or rell the spray tank. Follow the instructions in Operation Resumption
to resume the operation after restarting the aircraft.
During Route operations, in situations such as when the app crashes or the remote controller
disconnects from the aircraft, the breakpoint will be recorded by the flight controller and recovered
automatically in the app once the aircraft is reconnected. If recovery is not performed automatically,
users can perform the operation manually. Go to Advanced Settings under Aircraft Settings in the app
and tap Continue Unnished Task. Recall the operation in the Executing tag in the operation list.
Empty Tank Warning
Prole
The aircraft calculates the empty tank and rell points according to the preset remaining liquid level
threshold, current remaining liquid level, aircraft status, and operation parameters and displays the
empty tank point on the map. In Route, A-B Route, and Fruit Tree operations, users can set the action
the aircraft will perform for empty tank point.
The empty tank point will not be displayed on the map if the tank is not calculated to run out
before the end of the task route.
For Route operations, when adding liquid to the spray tank or adjusting the operation
parameters, the empty tank point will update dynamically on the operating route according to
the amount of added liquid and the adjusted settings.
Usage
1. In Aircraft settings, enable the display of empty tank point and set the empty tank action.
2. When an empty tank warning appears in the app, the sprinklers automatically turn off and the aircraft
performs the preset empty tank action.
3. Land the aircraft and stop the motors. Rell the spray tank and tightly secure the cover.
4. Select an operation mode and continue the operation.

©
2022 DJI All Rights Reserved.
73
AGRAS T40/T20 P
Unmanned Aircraft Flight Manual
Return to Home (RTH)
Home Point:
The default home point is the first location where your aircraft received strong
GNSS signals
. Note that the white GNSS icon requires at least four bars before the signal is
strong.
RTH:
RTH brings the aircraft back to the last recorded home point.
There are three types of RTH: Smart RTH, Low Battery RTH, and Failsafe RTH.
Smart RTH
Press and hold the RTH button on the remote controller when GNSS is available to enable Smart RTH.
Both Smart and Failsafe RTH use the same procedure. With Smart RTH, you may control the altitude of
the aircraft to avoid collisions when returning to the home point. Press the RTH button once or push the
pitch stick to exit Smart RTH and regain control of the aircraft.
Low Battery RTH
Low Battery RTH is only available in Route and A-B Route operations. If the Low Battery Action is set
to RTH in the Aircraft Battery settings in the app, the aircraft will pause the operation and enter RTH
automatically when the aircraft battery level reaches the low battery threshold. During RTH, users can
control the altitude of the aircraft to avoid collisions when returning to the home point. Press the RTH
button once or push the pitch stick to exit RTH and regain control of the aircraft.
The aircraft will not enter RTH if the Low Battery Action is set to Warning in the Aircraft Battery settings in
the app.
Failsafe RTH
Refer to Emergency Procedures for more information about Failsafe RTH.
Updating the Home Point
You can update the home point in DJI Agras during ight. There are two ways to set a home point:
1. Set the current coordinates of the aircraft as the home point.
2. Set the current coordinates of the remote controller as the home point.
Make sure the space above the remote controller’s GNSS module (located inside the place above
the ight switch mode) is not obstructed and that there are no tall buildings around when updating
the home point.
Follow the instructions below to update the home point:
1. Go to DJI Agras and enter Operation View.
2. Tap
, then , and select in Home Point Location settings to set the current coordinates of the
aircraft as the home point.
3. Tap
, then , and select in Home Point Location settings to set the current coordinates of the
remote controller as the home point.
4. The aircraft status indicators blink green to indicate that the new home point has been set
successfully.

74
©
2022 DJI All Rights Reserved.
AGRAS T40/T20 P
Unmanned Aircraft Flight Manual
Low Battery and Low Voltage Warnings
The aircraft features a low battery warning, critical low battery warning, and critical low voltage warning.
1. When the low battery warning prompt appears in the app, y the aircraft to a safe area and land as
soon as possible. Stop the motors and replace the battery. The aircraft will enter RTH automatically
after the low battery warning prompt appears in the app if the Low Battery Action is set to RTH in the
Aircraft Battery settings.
2. The aircraft will automatically descend and land when the critical low battery warning or critical
voltage warning (battery voltage lower than 47.6 V) prompt appears in the app. Landing cannot be
cancelled.
Users can set the threshold of low battery warnings in the app.
RTK Functions
The aircraft has an onboard D-RTK. The heading reference of the aircraft from the dual antennas of
the onboard D-RTK is more accurate than a standard compass sensor and can withstand magnetic
interference from metal structures and high-voltage power lines. When there is a strong GNSS signal,
the dual antennas activate automatically to measure the heading of the aircraft.
The aircraft supports centimeter-level positioning to improve agricultural operation when used with the
DJI D-RTK 2 Mobile Station. Follow the instructions below to use the RTK functions.
Enable/Disable RTK
Before each use, make sure that the RTK signal source is correctly set to either D-RTK 2 Mobile
Station or Network RTK. Otherwise, RTK cannot be used for positioning. Go to Operation View in the
app, tap , and select RTK to view and set.
Set the RTK signal source to None if RTK positioning is not in use. Otherwise, the aircraft is not able to
take off when there is no differential data.
Using with the DJI D-RTK 2 Mobile Station
1. Refer to the D-RTK 2 Mobile Station User Guide for more information about completing the linking
between the aircraft and the mobile station and setting up the mobile station.
2. Power on the mobile station and wait for the system to start searching for satellites. The RTK status
icon on top of the Operation View in the app shows
RTK
FIX
to indicate that the aircraft has obtained and
used the differential data from the mobile station.
Using with the Network RTK Service
The Network RTK service uses the remote controller instead of the base station to connect to an
approved Network RTK server for differential data. Keep the remote controller on and connected to the
internet when using this function.
1. Make sure that the remote controller is connected to the aircraft and has access to the internet.
2. Go to Operation View in the app, tap
, and then RTK. Set the RTK signal source to Custom Network
RTK, and input the network information.
3. Wait for the remote controller to be connected with the Network RTK server. The RTK status icon on
top of the Operation View in the app shows
RTK
FIX
to indicate that the aircraft has obtained and used the
RTK data from the server.
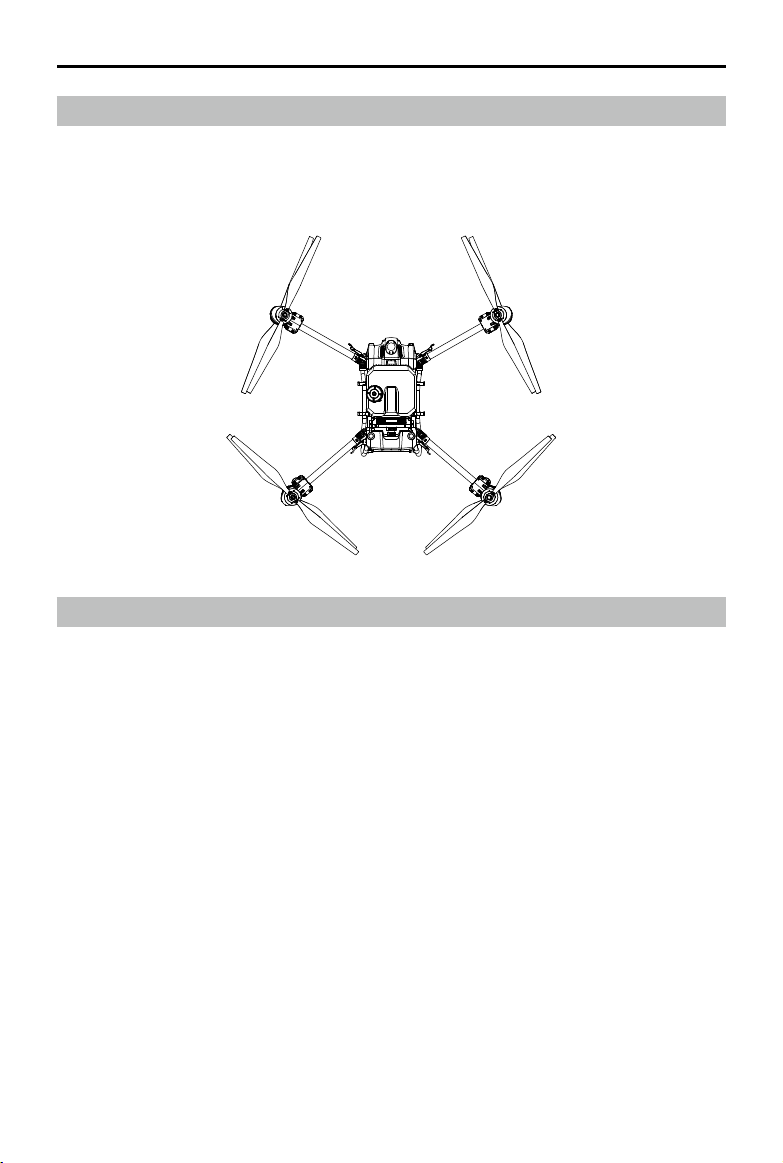
©
2022 DJI All Rights Reserved.
75
AGRAS T40/T20 P
Unmanned Aircraft Flight Manual
Updating the Firmware
The rmware of the remote controller, aircraft, and other devices such as the intelligent charger and
multifunctional inverter generator can be updated together in the DJI Agras app. Follow the steps below.
1. Power on the remote controller and the aircraft. Make sure that the remote controller has access to
the internet via Wi-Fi or the cellular dongle. The rmware le may be large. It is recommended to use
Wi-Fi.
2. A prompt appears at the bottom of the home screen in DJI Agras when a new rmware update is
available. Tap the prompt to enter the rmware screen.
3. Connect the device to the USB-A port on the remote controller to update the firmware of the
intelligent charger or multifunctional inverter generator. Tap the dropdown menu for each device and
select the rmware. There will be a check mark on the device displayed in the app when a rmware
is selected for the corresponding device. Uncheck the mark to cancel the update.
4. Tap Update All to redirect to the update screen. The app will download the rmware for all selected
devices and update automatically.
5. Make sure all the devices are connected to the remote controller and wait for the update to complete.
The aircraft front LEDs will blink yellow during an update.
6. The aircraft front indicators will glow solid green after an update is completed. Restart the remote
controller and the aircraft manually. If the indicators glow solid red indicating that a rmware update
has failed, try running the update again.
Aircraft LEDs
There are LEDs on the frame arms marked M1 to M4. The LEDs on frame arms M1 and M2 are front
LEDs that blink slowly in red to indicate the front of the aircraft. The LEDs on frame arms M3 and M4 are
rear LEDs that blink slowly in green to indicate the rear of the aircraft. All the LEDs are turned off when
the aircraft is grounded.
M1M2
M3
M4
76
©
2022 DJI All Rights Reserved.
AGRAS T40/T20 P
Unmanned Aircraft Flight Manual
DJI Assistant 2 for MG
Configure settings of the basic parameters, copy flight records, and update aircraft and remote
controller rmware in DJI Assistant 2 for MG.
Installation and Launching
1. Download the DJI Assistant 2 for MG installation le from the T40 or T20P download page:
https://www.dji.com/t40/downloads or https://www.dji.com/t20p/downloads
2. Install the software.
3. Launch DJI Assistant 2 for MG.
Using DJI Assistant 2 for MG
Connecting the Aircraft
Connect the USB-C port under the bottom cover on the front of the aircraft to a computer with a USB-C
cable, and then power on the aircraft.
Make sure to remove the propellers before using DJI Assistant 2 for MG.
Remove the waterproof cover on the USB-C port before use. Attach the waterproof cover to the
port after use. Otherwise, water may enter the port, causing it to short circuit.
Firmware Update
A DJI account is required for rmware updates. Login or register an account.
Exporting Log
View all the logs of the aircraft and select logs to export.
Simulator
Click Open to enter the flight simulation view. Input location and environment parameters and click
Congure to save. Click Start Simulation to enter ight simulation practice.
Basic Settings
Congure the idle speed of and test the motor.
Connecting the Remote Controller
Connect the USB-C port of the remote controller to a computer with a USB-C cable and power on the
remote controller.
Firmware Update
A DJI account is required for rmware updates. Login or register an account.
Exporting Log
View all the logs of the remote controller and select the logs to export.
DO NOT power off the remote controller during the update.
DO NOT perform the rmware update while the aircraft is in the air. Only carry out the rmware
update when the aircraft is on the ground.
The remote controller may become unlinked from the aircraft after the rmware update. Relink
the remote controller and aircraft if necessary.
©
2022 DJI All Rights Reserved.
77
AGRAS T40/T20 P
Unmanned Aircraft Flight Manual
Intelligent Flight Battery
Battery Functions
1. Battery Level Display: the status LEDs indicate the current battery level. Press the power button to
check.
2. Communication: battery parameters including the voltage and power level are transmitted to the
aircraft to enable the aircraft to take appropriate action when battery parameters change.
3. Battery Error Self-Diagnosis: the battery can detect errors such as abnormal voltage, current, and
temperature, and issue an alert. The error information will be recorded in the battery.
4. Short Circuit Detection: after the battery is inserted into the aircraft and powered on, the battery will
rst detect if a short circuit exists on the aircraft. If detected, the battery will cut off the power supply
to the aircraft to avoid re.
5. Charging Error Detection: errors that occur during charging are indicated by the status LEDs. When
an error occurs, wait for the battery to x the error automatically. For more information, refer to the
LED Patterns section.
6. Auto Balancing: in certain situations, the battery automatically balances the voltages of the cells.
7. Auto Discharging: if fully charged for more than one day, the battery automatically discharges to
97%. After 7 days, it automatically discharges to 60%.
8. Auto Current Adjustment: the battery intelligently adjusts the charging current based on the
temperature of the battery cells. The battery also supports self-protection based on the environment
temperature.
9. Temperature Control: the battery ensures the temperature difference between the battery cells are
the same and stay within the allowable temperature range.
Refer to the safety requirements listed on the label of the battery before using for the rst time.
Users accept full responsibility for any violations of the safety requirements stated on the label.
The product warranty is void if any battery errors occur due to misuse of the battery.
Using the Battery
Press and then press and hold the power button to power on the battery after it is connected to
the aircraft. When the aircraft lands and the motors stop, press and then press and hold the power
button to power off the battery, and then disconnect the battery from the aircraft.
DO NOT use the battery near heat sources such as a furnace or heater. DO NOT leave the
battery inside a vehicle on hot days.
DO NOT allow the battery to come into contact with any liquid. DO NOT leave the battery near a
source of moisture and DO NOT use the battery in humid environments. Otherwise, the battery
may corrode, potentially resulting in the battery catching re or exploding.
DO NOT use swollen, leaking, or damaged batteries. If your battery is abnormal, contact an
authorized DJI dealer for further assistance.
Make sure the battery is powered off before connecting to or disconnecting from the aircraft.
DO NOT connect or disconnect the battery while it is powered on. Otherwise, the power ports
may be damaged.
78
©
2022 DJI All Rights Reserved.
AGRAS T40/T20 P
Unmanned Aircraft Flight Manual
The battery should be used in the temperature range of -5° to 45° C (23° to 113° F). Use of
batteries in environments above 50° C (122° F) can lead to fire or an explosion. Use of the
battery in temperatures below -5° C (23° F) can negatively affect the performance of the battery.
The battery can be used again when it returns to a normal temperature.
DO NOT use the battery in strong electrostatic or electromagnetic environments or near high-
voltage transmission lines. Otherwise, the battery circuit board may malfunction, which could
cause a serious ight hazard.
DO NOT disassemble or pierce a battery in any way or it may leak, catch re, or explode.
The electrolytes in the battery are highly corrosive. If any electrolytes make contact with your
skin or eyes, immediately wash the affected area with water and see a doctor immediately.
DO NOT use a battery that has been dropped. Dispose of the battery as described in the
Battery Disposal section.
If the battery falls into water while inserted in an aircraft during ight, take it out immediately,
and put it in a safe and open area. DO NOT use the battery again and dispose of it properly as
described in the Battery Disposal section.
DO NOT put the battery in a microwave oven or a pressurized container.
DO NOT place the battery on or near wires or other metal objects such as eyeglasses, watches,
jewelry, and hairpins. Otherwise, the battery ports may be short-circuited.
DO NOT drop or strike batteries. DO NOT place heavy objects on the batteries or station. Avoid
dropping batteries.
Always use a clean, dry cloth when cleaning the battery terminals.
DO NOT y when the battery power level is below 15% to avoid damage to the battery and
ight risks.
Make sure the battery is correctly connected. Otherwise, the battery may overheat or even
explode due to abnormal charging. Only use approved batteries from authorized dealers. DJI
assumes no responsibility for any damaged caused by using batteries that are unapproved.
Make sure to lift the battery by the handle.
Make sure the battery is placed on a at surface to avoid damage to the battery from sharp
objects.
DO NOT place anything on a battery. Otherwise, the battery may be damaged, which may lead
to re hazards.
The battery is heavy. Be careful when moving the battery to avoid dropping it. If the battery
is dropped and damaged, immediately leave the battery in an open area away from people.
Wait 30 minutes and soak the battery in water for 24 hours. After making sure the power has
completely run out, dispose of the battery in accordance with local laws.
Make sure the battery is fully charged before each ight.
Immediately land the aircraft if a critical battery level warning appears and replace with a fully
charged battery.
Before operating in a low-temperature environment, make sure the battery is at least above
5° C (41° F). Ideally, above 20° C (68° F).
©
2022 DJI All Rights Reserved.
79
AGRAS T40/T20 P
Unmanned Aircraft Flight Manual
LED Patterns
The Battery Level Indicators will show the current battery level and status during charging
and discharging. The indicators are dened below:
LED is on LED is blinking
LED is off
Checking Battery Level
If the battery is in power saving mode, press the power button once to check the current battery level.
LED1 LED2 LED3 LED4 Battery Level
88-100%
75-87%
63-74%
50-62%
38-49%
25-37%
13-24%
0-12%
LED Patterns During Charging
During charging, the LEDs blink in sequence to indicate the current battery level. All the LEDs will be
off after a full charge.
Disconnect the battery when charging is complete, and always use the officially
recommended charging device to charge the battery.
LED1 LED2 LED3 LED4 Battery Level
0-49%
50-74%
75-89%
90-99%
100%
80
©
2022 DJI All Rights Reserved.
AGRAS T40/T20 P
Unmanned Aircraft Flight Manual
Battery Error LED Patterns
The table below shows battery protection mechanisms and corresponding LED patterns.
LED1 LED2 LED3 LED4 Blinking Pattern Battery Exception Item
LED2 and LED4 blink
three times per second
Aircraft short circuit
LED2 blinks twice per
second
Overcurrent detected
LED2 blinks three times
per second
The battery system is abnormal
LED3 blinks twice per
second
Overcharged detected
LED3 blinks three times
per second
Charging device over-voltage
LED4 blinks twice per
second
Charging temperature is too low
LED4 blinks three times
per second
Charging temperature is too high
All 4 LEDs blink fast
The battery is abnormal and
unavailable
If a short circuit occurs, unplug the battery, resolve the issue on the aircraft, and plug in the
battery.
If the charging temperature is abnormal, wait for the charging temperature to return to normal.
The battery will then automatically resume charging without the need to unplug and plug the
charging device again.
For other situations, after resolving the issue (overcurrent, excess battery voltage due to
overcharging, or excess charging device voltage), press the power button to cancel the LED
indicator protection alert and unplug and plug in the charging device again to resume charging.
DJI does not take any responsibility for damage caused by third-party charging devices.
DO NOT charge the battery near flammable materials or on flammable surfaces such as
carpet or wood. DO NOT leave the battery unattended during charging. There should be a
distance of at least 30 cm between the battery station and any charging batteries. Otherwise,
the battery station or charging batteries may be damaged by excessive heating and may
even lead to a re hazard.
The battery temperature will be high after a ight. Place the battery into the DJI Air-Cooled
Heat Sink or a third-party air-cooled heat dissipation device to charge it. Otherwise, charging
may be disabled. Refer to the DJI Air-Cooled Heat Sink manual document for its usage
instructions. Charge the battery at a temperature range of 0° to 60° C (32° to 140° F). The
ideal charging temperature range is 22° to 28° C (72° to 82° F). Charging within the ideal
temperature range can prolong battery life.
DO NOT immerse the battery in water to cool it down or when it is charging. Otherwise,
the battery cells will corrode causing serious damage to the battery. The user accepts full
responsibility for any damage to the battery caused by immersing the battery in water.
©
2022 DJI All Rights Reserved.
81
AGRAS T40/T20 P
Unmanned Aircraft Flight Manual
DO NOT charge the battery near heat sources such as a furnace or heater.
Regularly check the terminals and battery ports. DO NOT clean the battery using alcohol or
other inammable liquid. DO NOT use a damaged charging device.
Keep the battery dry at all times.
The battery stops charging when charging is complete. It is recommended to disconnect the
battery once charging is complete.
Make sure the battery is powered off before charging. Otherwise, the battery ports may be
damaged.
Battery Storage and Transportation
Disconnect the battery from the aircraft and check if there is any buildup in the battery port.
Power off and disconnect the battery from the aircraft or other devices during transportation.
Keep batteries out of the reach of children and animals. Seek professional medical support
immediately if children swallow parts of the battery.
If the battery level is critically low, charge the battery to a power level of 40% to 60%. DO NOT
store a battery with a low power level for an extended period. Otherwise, the performance will
be negatively affected.
DO NOT leave the battery near heat sources such as a furnace or heater. DO NOT leave the
battery inside a vehicle on hot days.
The battery must be stored in a dry environment.
DO NOT place the battery near explosive or hazardous material or near metal objects such as
eyeglasses, watches, jewelry, and hairpins.
DO NOT attempt to transport a battery that is damaged or has more than 30% power.
Discharge the battery to 30% or lower before transportation.
Make sure the battery is placed on a at surface to avoid damage to the battery from sharp
objects.
If storing the battery for more than three months, it is recommended to store the battery in a
battery safety bag in an environment at a temperature range from -20° to 40° C (-4° to 104° F).
DO NOT store the battery for an extended period after fully discharging. Doing so may over-
discharge the battery and cause irreparable damage to the battery cell.
If a battery with a low power level has been stored for an extended period, the battery will be
in deep hibernation mode. Charge to wake the battery.
Disconnect the battery from the aircraft if you intend to store the battery for an extended
period.
Battery Disposal
Before disposing, make sure to soak the battery in water for 24 hours to completely discharge
the battery. Dispose of the battery in specific recycling boxes. DO NOT place the battery
in regular waste containers. Strictly follow your local regulations regarding the disposal and
recycling of batteries.
If the battery cannot be discharged completely, DO NOT dispose of the battery in a battery
recycling box directly. Contact a professional battery recycle company for assistance.

82
©
2022 DJI All Rights Reserved.
AGRAS T40/T20 P
Unmanned Aircraft Flight Manual
Battery Maintenance
DO NOT splash the battery with water. An excessive amount of water will damage the battery.
DO NOT store the battery when the temperature is outside the range of -20° to 45° C (-4° to
113° F).
Battery performance will be negatively affected if the battery is not used for an extended period.
Fully charge and discharge the battery at least once every three months to ensure the
performance of the battery.
If a battery has not been charged or discharged for ve months or more, the battery will no
longer be covered by the warranty.
Specications
Specifications
T40 Intelligent Flight Battery
(BAX601-30000mAh-52.22V)
T20P Intelligent Flight Battery
(BAX601-13000mAh-52.22V)
Nominal Voltage 52.22 V
Battery Type Li-ion
Battery Chemical System LiNiMnCoO2
Discharge Rate 11.5C
Operating Temperature -5° to 45° C (23° to 113° F)
Charging Temperature 0° to 60° C (32° to 140° F)
Warranty Details 1,500 cycles or 12 months (whichever occurs rst)
IP Rating IP54 + Board-level potting protection
Compatible Aircraft DJI Agras T40, T20P, T30 DJI Agras T20P
Capacity 30 Ah 13 Ah
Energy 1567 Wh 679 Wh
Max Charging Power 9500 W 4200 W
Compatible Charging
Device
[1]
D12000iE Multifunctional Inverter
Generator, T40 Intelligent Charger,
T30 Intelligent Battery Station
[2]
D6000i Multifunctional Inverter
Generator, T20P Intelligent
Charger, T30 Intelligent Battery
Station
[2]
Charging Time for Each
Battery
[3]
Using the D12000iE
Multifunctional Inverter Generator:
9-12 min
Using the D6000i Multifunctional
Inverter Generator: 9-12 min
Weight Approx. 12 kg Approx. 6 kg
[1] Charging devices available for purchase vary by country or region. Consult your local dealers for details.
[2] Firmware update is required to charge the T40/T20P Intelligent Flight Battery.
[3] Charging time was tested in a lab environment at a temperature of 25° C (77° F). For reference only.
©
2022 DJI All Rights Reserved.
83
AGRAS T40/T20 P
Unmanned Aircraft Flight Manual
Payload - Spraying System
Equipped with the 2-channel electromagnetic ow meter and continuous liquid level gauge, the spraying
system provides users with accurate control of the magnetic drive impeller pumps and dual atomized
sprinklers.
Optional Payload - T40/T20P Spreading System
Introduction
The T40/T20P Spreading System is compatible with the Agras T40/T20P aircraft with a large spread tank
of 70 L and 35 L, respectively, and offers efcient and reliable spreading.
The spreading system has a built-in stirring device to prevent material blockages and improve operating
accuracy and reliability. The control module on the spreading system and the weight sensors on
the aircraft monitor the weight of the remaining material in the spread tank in real-time to improve
the accuracy of the spread rate control and empty tank warnings. The included fenders can block
spreading material that ies upward and prevent it from damaging the propellers. The quick-release
hopper gate allows for easy maintenance.
Users can congure spreading settings in the DJI Agras app and create specic templates for different
materials in order to meet different requirements. The app also provides warning prompts for an empty
tank as well as for abnormalities in rotational speed, temperature, and hopper outlet size.
Installation
Make sure to remove the Intelligent Flight Battery from the aircraft before installation.
Operate with caution to avoid injury caused by sharp or moving mechanical parts.
Check the parts on the aircraft and spreading system after installation to make sure that the
spinner disk will not damage the cables or any other part during operations.
The T40 Spreading System and T20P Spreading System are similar in appearance, but the spread tanks
are different sizes. Unless otherwise specied, the illustrations in this document use the T40 Spreading
System as an example.
1. On the aircraft, locate the hoses on either side of the spray tank. Loosen the nut on the hose
, take
the hose out of the hose clamp , rotate the clamp , and connect the hose to the protrusion on the
clamp . (Figure A)
Note: After the hose is removed, make sure to tighten the hose nut on the spray tank hose connector
to avoid losing the nut.
2. Locate the spraying system cable in front of the right landing gear on the aircraft. Unplug the cable
from the connector. Operate with caution to avoid damaging the cable. (Figure B)
3. Lift and remove the spray tank on the aircraft. (Figure C)
4. Insert the spreading system into the aircraft. (Figure D)
5. Connect the spreading system cable to the connector in step 2 and ensure a firm and accurate
connection. (Figure E)
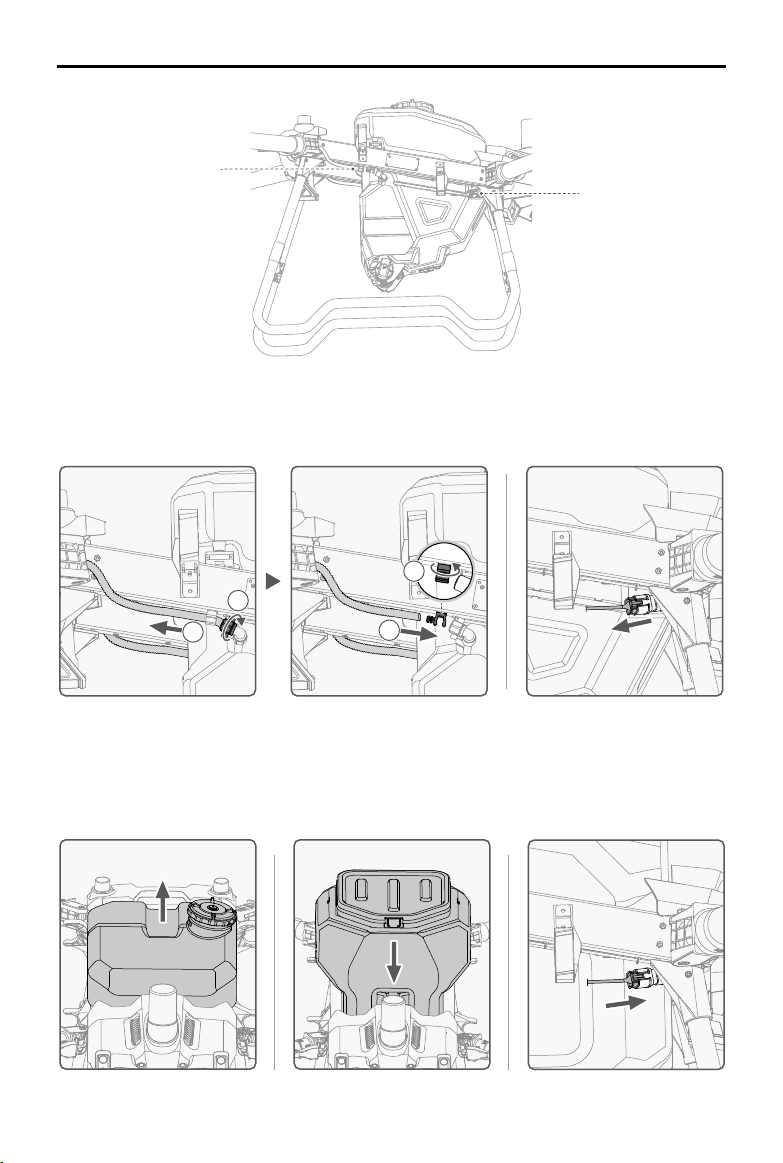
84
©
2022 DJI All Rights Reserved.
AGRAS T40/T20 P
Unmanned Aircraft Flight Manual
A
B
C. D. E.
1
2
3
4
A. B.

©
2022 DJI All Rights Reserved.
85
AGRAS T40/T20 P
Unmanned Aircraft Flight Manual
Specications
Items T40 Spreading System T20P Spreading System
Compatible Aircraft
[1]
Agras T40 Agras T20P
Spreading System Weight
(inc. spread tank and fender)
4.41 kg 3.57 kg
Spread Tank Volume 70 L 35 L
Spread Tank Internal Load
[2]
50 kg 25 kg
Compatible Material Diameter 0.5-5 mm
Spreading Range
Varies according to material diameter, spinner disk rotating speed, hopper outlet
size, and ying altitude. For best operating performance, it is recommended to
adjust the corresponding variables to achieve a spreading range of 5-7 meters.
[1] The aircraft rmware must support the spreading system. Check the release notes of the corresponding aircraft on the
o
ffi
cial DJI website.
[2] The DJI Agras app will intelligently recommend the payload weight limit for the spread tank according to the current
status and surroundings of the aircraft. Do not exceed the recommended payload weight limit when adding material to
the spread tank. Otherwise, the ight safety may be a
ected.

86
©
2022 DJI All Rights Reserved.
AGRAS T40/T20 P
Unmanned Aircraft Flight Manual
T40/T20P Drone Recommended Maintenance Cycle
Part for service Module Recommended service time
Recommended replacement
cycle
Propulsion system
- motor
Motor
1. Carry out the rst inspection for a new
drone after 100 ights.
2. Carry out an inspection every 100h after
the rst inspection.
3. If an ESC is stalling, and temperature of
the motor/ESC is abnormal, carry out this
inspection.
4. If the motor is damaged due to external
force, carry out this inspection.
Replacement after 1,000h of
usage is recommended.
Propulsion system
- motor internal
resistance
Motor
1. Carry out the rst inspection for a new
drone after 100 ights.
2. Carry out an inspection every 100h or 1
month after the rst inspection.
3. If an ESC is stalling, and temperature of
the motor/ESC is abnormal, carry out this
inspection.
Replacement after 1,000h of
usage is recommended.
Propulsion system
- ESC
ESC Every 6 months
Replacement after 36
months of usage is
recommended.
Propulsion system
- motor base
Motor Base
1. Carry out the rst inspection for a new
drone after 100 ights.
2. Carry out an inspection every 100h or 1
month after the rst inspection.
3. If the motor base is damaged due to
external force, carry out this inspection.
Replacement after 500 hours
of usage is recommended.
Propulsion system
- propellers
Propellers
1. Carry out the rst inspection for a new
drone after 100 ights.
2. Carry out an inspection every 100h or 1
month after the rst inspection.
3. If an ESC is stalling, and temperature of
the motor/ESC is abnormal, carry out this
inspection.
Replacement after 700 hours
of usage is recommended.
Propulsion system
- propeller adapter
Propeller
Adapter
Before daily operation preparation
Replacement after 1,000h of
usage is recommended.
Propulsion system
- screw bolts of
frame arm
Screw Bolts of
Frame Arm
Every 1 month
Replacement after 1,000h of
usage is recommended.
Aircraft
components
- frame arm
connector
Frame Arm
Connector
Every 1 month
Replacement after 1,000h of
usage is recommended.
Aircraft
components -
screws
Securing
screws of frame
arm buckle
Every 1 month
Replacement after 1,000h of
usage is recommended.

©
2022 DJI All Rights Reserved.
87
AGRAS T40/T20 P
Unmanned Aircraft Flight Manual
Aircraft
components -
connector
Aircraft
Connector
Every 1 month
Replacement after 1,000h of
usage is recommended.
Middle frame xing
piece - screws
Screw securing
the middle
frame
Every 1 month
Replacement after 1,000h of
usage is recommended.
Landing gear
components -
screws
Screw Bolts
Securing the
Landing Gear
Every 1 month
Replacement after 1,000h of
usage is recommended.
Landing gear
components -
xing bracket
Radar Fixing
Bracket
Every 1 month
Replacement after 1,000h of
usage is recommended.
Spraying system -
delivery pump
Delivery Pump Every 100h or 1 month
Pump replacement
after 500h of usage is
recommended.
Motor replacement
after 1,000h of usage is
recommended.
Spraying system -
sprinkler
Sprinkler Every 100h or 1 month
Replacement after 1,000h of
usage is recommended.
Spraying system -
hose connector
Hose
Connector
Before daily operation preparation
Replacement after 1,000h of
usage is recommended.
Spraying system -
hose
Hose Before daily operation preparation
Replacement after 1,000h of
usage is recommended.
Spraying system -
weight sensor
Weight Sensor Every 100h or 1 month
Replacement after 1,000h of
usage is recommended.
Spraying system
- lter and liquid
level gauge
Liquid Level
Gauge
Before daily operation preparation
Replacement after 1,000h of
usage is recommended.
Spraying system -
spray tank
Spraying
System
Every 6 months
Replacement after 1,000h of
usage is recommended.
RF module RF Module Every 6 months
Replacement after 36
months of usage is
recommended.
Aerial-electronics
system module
Aerial-
Electronics
System Module
Every 6 months
Replacement after 36
months of usage is
recommended.
Cable distribution
board module
Cable
Distribution
Board Module
Every 6 months
Replacement after 36
months of usage is
recommended.
Spraying module
Spraying
Module
Every 6 months
Replacement after 36
months of usage is
recommended.
Radar system -
omnidirectional
digital radar
Omnidirectional
Digital Radar
Every 6 months
Replacement after 36
months of usage is
recommended.

88
©
2022 DJI All Rights Reserved.
AGRAS T40/T20 P
Unmanned Aircraft Flight Manual
Radar system -
backward and
downward radar
Backward and
Downward
Radar
Every 6 months
Replacement after 36
months of usage is
recommended.
Power distribution
module
Power
Distribution
Module
Every 6 months
Replacement after 36
months of usage is
recommended.
Aircraft
components - front
frame
Front Frame Every 6 months
Replacement after 1,000h of
usage is recommended.
Aircraft
components - rear
frame
Rear Frame Every 6 months
Replacement after 1,000h of
usage is recommended.
Aircraft
components -
middle frame
Middle Frame Every 6 months
Replacement after 1,000h of
usage is recommended.
Positioning system
- SDR antenna
SDR Antenna Every 6 months
Replacement after 36
months of usage is
recommended.
Positioning system
- RTK module
RTK Module Every 6 months
Replacement after 36
months of usage is
recommended.
Aircraft cables Aircraft Cable Every 1 month
Replacement after 36
months of usage is
recommended.
Spraying system -
ow meter
Flow Meter Every 1 month
Replacement after 36
months or 3,000h of usage
is recommended.
Aircraft
components -
battery slider
Battery Slider
Replacement after 2,000 times of plugging
and unplugging is required or 1 month
Replacement after 1,000h of
usage is recommended.
Remote controller
Remote
controller
Every 1 month
Replacement after 36
months of usage is
recommended.
Battery
Aircraft
Standard
Battery
After 100 cycles of charging or 1 month
Replacement after 1,000h of
usage is recommended.
Intelligent Charger
Intelligent
Charger
After 200 cycles of charging or 1 month
Replacement after 1,000h of
usage is recommended.

©
2022 DJI All Rights Reserved.
89
AGRAS T40/T20 P
Unmanned Aircraft Flight Manual
FAR Remote ID Compliance Information
The aircraft complies with the requirements of 14 CFR Part 89:
• The aircraft automatically initiates a pre-ight self-test (PFST) of the Remote ID system before takeoff
and cannot take off if it does not pass the PFST
[1]
. The results of the PFST of the Remote ID system
can be viewed in a DJI ight control app such as DJI Agras.
• The aircraft monitors the Remote ID system functionality from pre-ight to shut down. If the Remote
ID system malfunctions or has a failure, an alarm will be displayed in a DJI ight control app such as
DJI Agras.
• The user shall keep the DJI ight app running in the foreground and always allow it to obtain the
location information of the remote controller.
Footnotes
[1] The pass criterion for PFST is that the hardware and software of the Remote ID required-data source
and transmitter radio in the Remote ID system are functioning properly.

DJI Support
http://www.dji.com/support
and AGRAS are trademarks of DJI.
Copyright © 2022 DJI All Rights Reserved.
This content is subject to change without prior notice.