
BOSCH
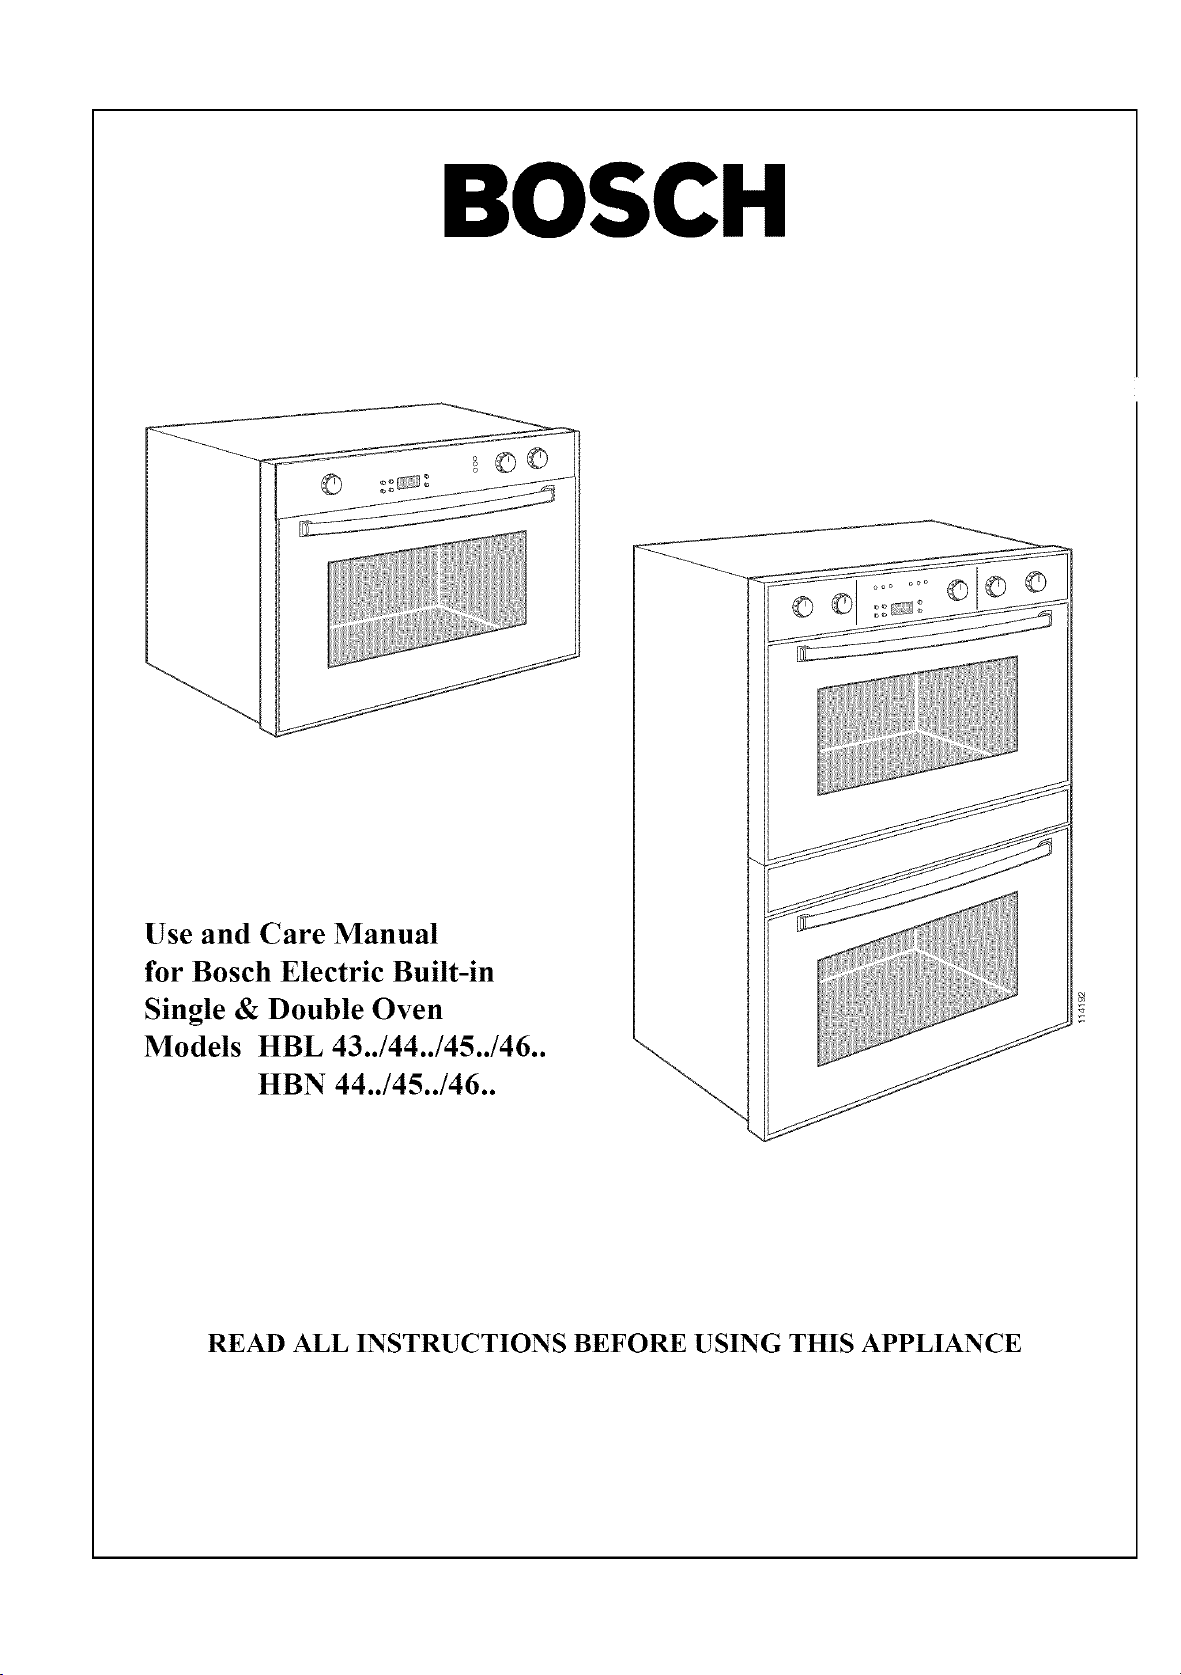
Use and Care Manual
for Bosch Electric Built-in
Single & Double Oven
Models HBL 43../44../45../46..
HBN 44../45../46..
Manuel d'utilisation et d'entretien
Four _lectrique Bosch encastr_, simple et double
Modeles HBL 43../44../45../46..
HBN 44../45../46..
Ed. 01-02
Dear Bosch Oven Owner:
Thank you and congratulations on your choice and purchase of a Bosch oven.
Whether you are an expert chef or a beginning cook we believe that you will find your
Bosch oven meets and exceeds your expectations. Bosch engineers have spent years de-
veloping these units to be the most versatile and energy efficient so that you may take
great pride in the quality of construction of these fine ovens.
We also ask that you read this manual thoroughly before using your new oven.
Please pay particular attention to the Safety Instructions printed at the front of the book
and the numerous safety hints and cautions placed throughout this manual. Also, be sure
to familiarize yourself with the proper operation of the oven and its cleaning and main-
tenance procedures. Adherence to these instructions and procedures will assure that you
realize the full potential of your new Bosch oven as well as protect it from damage and
yourself from injury.
BSH Home Appliances
Chef client,
ChOre cliente,
Tous nos remerciements et f_licitations pour avoir choisi d'acquOrir un four Bosch.
Que vous soyez un fin gastronome ou un d_butant clans la matiOre, vous dOcouvrirez que
votre four Bosch r@ond _ routes les exigences qu 'on pourrait avoir _ l'_gard d'un four.
Les ingOnieurs de Bosch ont pass_ des annOes _ mettre au point ces appareils qui sont
parmi les plus polyvalents et les plus _conomiques, sans parler de leur haute qualit_ de
construction.
Nous vous demanderons de bien vouloir lire ce manuel avant d'utiliser votre nou-
veau four, surtout sic 'est la premiOre fois que vous poss_dez un four Bosch. Lisez atten-
tivement les conseils de s_curit_ et les nombreuses raises en garde mentionnOs dans ce
manuel. Prenez soin _galement de vous familiariser avec le fonctionnement de votre ap-
pared et ses procedures d'entretien et de nettoyage. C'est en respectant ces instructions
et procedures que vous tirerez le plus de profit et le plus de plaisir de votre nouveau
four.
BSH Home Appliances
BOSCH
Use and Care Manual
for Bosch Electric Built-in
Single & Double Oven
Models HBL 43../44../45../46..
HBN 44../45../46..
READ ALL INSTRUCTIONS BEFORE USING THIS APPLIANCE
Table of Contents
hnportant Safety Instructions .........................................................................................................
Product Features ...............................................................................................................................
About Your Oven .........................................................................................................................
Cooling Fan ..........................................................................................................................
Racks and Rack Positions ....................................................................................................
Baking Elements ...................................................................................................................
Broiling Elements .................................................................................................................
Convection Element .............................................................................................................
About Convection Ovens .....................................................................................................
Oven Operation ..................................................................................................................................
Oven Models ................................................................................................................................
Using Your Oven .........................................................................................................................
Cooking Function Settings, Table 3 ...........................................................................................
Oven Programmer ........................................................................................................................
Setting the Electronic Clock ................................................................................................
Timer .....................................................................................................................................
Using the Oven Controls ..................................................................................................................
Manual Operation of Oven ..........................................................................................................
Electronic Control of Oven .........................................................................................................
hnmediate Start/Automatic Shut-Off ..................................................................................
Delayed Start/Automatic Shut-Off ......................................................................................
Care and Cleaning ...........................................................................................................................
Using Self Clean Function ..........................................................................................................
Replacing an Oven Light .............................................................................................................
Oven Door Removal ....................................................................................................................
Service and Repair ............................................................................................................................
Problem Solving, Table 4............................................................................................................
If You Need Assistance ...............................................................................................................
Model Information .......................................................................................................................
Model Warranty ................................................................................................................................
3
4
4
4
4
5
5
5
5
6
6
6
8
9
9
9
11
11
12
12
12
15
15
16
17
18
19
20
2O
21
IMPORTANT SAFETY INSTRUCTIONS
WARNING - When using this appliance, basic safety precautions should always be followed to reduce
the risk of fire, electric shock, and/or injury to persons, including the following.
1. Read All Instruction Before Using the Oven.
2. Proper Installation - Be sure your appliance is properly installed and grounded by a qualified
technician. Have the installer show you where the fuse or breaker box is located and how to turn
off the power to the oven.
3. Do Not Operate the Oven if it is Damaged or Not Working Properly.
4. Never Use Your Appliance for Warming or Heating the Room.
5. Do Not Leave Children Alone - Children should not be left alone or unattended in area where the
appliance is in use. They should never be allowed to sit or stand on any part of the appliance.
6. Do Not Touch Heating Elements or Interior Surfaces of Oven - Heating elements may be hot
even though they are dark in color. Interior surfaces of the oven, including racks become hot
enough to cause serious burns. Do not touch or let clothing or other flammable material come into
contact with the heating elements or interior surt:aces or racks of the oven during or immediately
after use. Allow the oven to cool.
7. Wear Proper Apparel - Loose-fitting or hanging garments should never be worn while using the
appliance. Fabric may ignite and result in personal injury.
8. Use Only Dry Potholders - Moist or damp potholders on hot surt:aces may result in burns from
steam. Do not let potholder touch hot heating elements. Do not use a towel or other bulky cloth.
9. User Servicing - Do not repair or replace any part of the appliance unless specifically recom-
mended in the manual. All other service should be referred to a qualified technician.
10. Storage in or on Appliance - Flammable materials should not be stored in an oven or near sur-
face units.
11. Do Not Use Water on Grease Fires - Smother fire or flame or use dry chemical or tk3am type ex-
tinguisher.
12. Use Care When Opening Door - Let hot air or steam escape before removing or replacing food.
13. Do Not Heat Unopened Food Containers - Build-up of pressure may cause container to burst
and result in injury.
14. Keep Oven Vent Ducts Unobstructed
15. Placement of Oven Racks - Always place oven racks in desired location while oven is cool. If
rack must be moved while oven is hot, do not let potholder contact hot heating element in oven.
16. Do Not Clean Door Gasket - The door gasket is essential for a good seal. Care should be taken
not to rub, damage, or move gasket.
17. Do Not Use Oven Cleaners - No commercial oven cleaner or oven liner protective coating of any
kind should be used in or around any part of the oven.
18. Clean Only Parts Listed in Manual
19. Before Self-Cleaning the Oven - Remove oven racks and other utensils.
20. Check for Off When Done - Always check the position of the oven control knobs when you have
finished cooking to make sure they are all in the off positions.
21. "CAUTION" - Do not store items of interest to children in cabinets above the oven - children
climbing on the oven to reach items could be burned or otherwise seriously injured.
22. Ahvays Disconnect the Electrical Supply Before Servicing the Oven.
Product Features
Halogen lights
Control pane[
[eve[ no. 4
[eve[ no. 3
[eve[ no. 2
[eve[ no. 1
Broil and top elements
Convection element (not visible)
and fan located on back of oven
cavity (Convection Models Only)
Mode! and serial
number plate
/
Bake elements
(under oven floor)
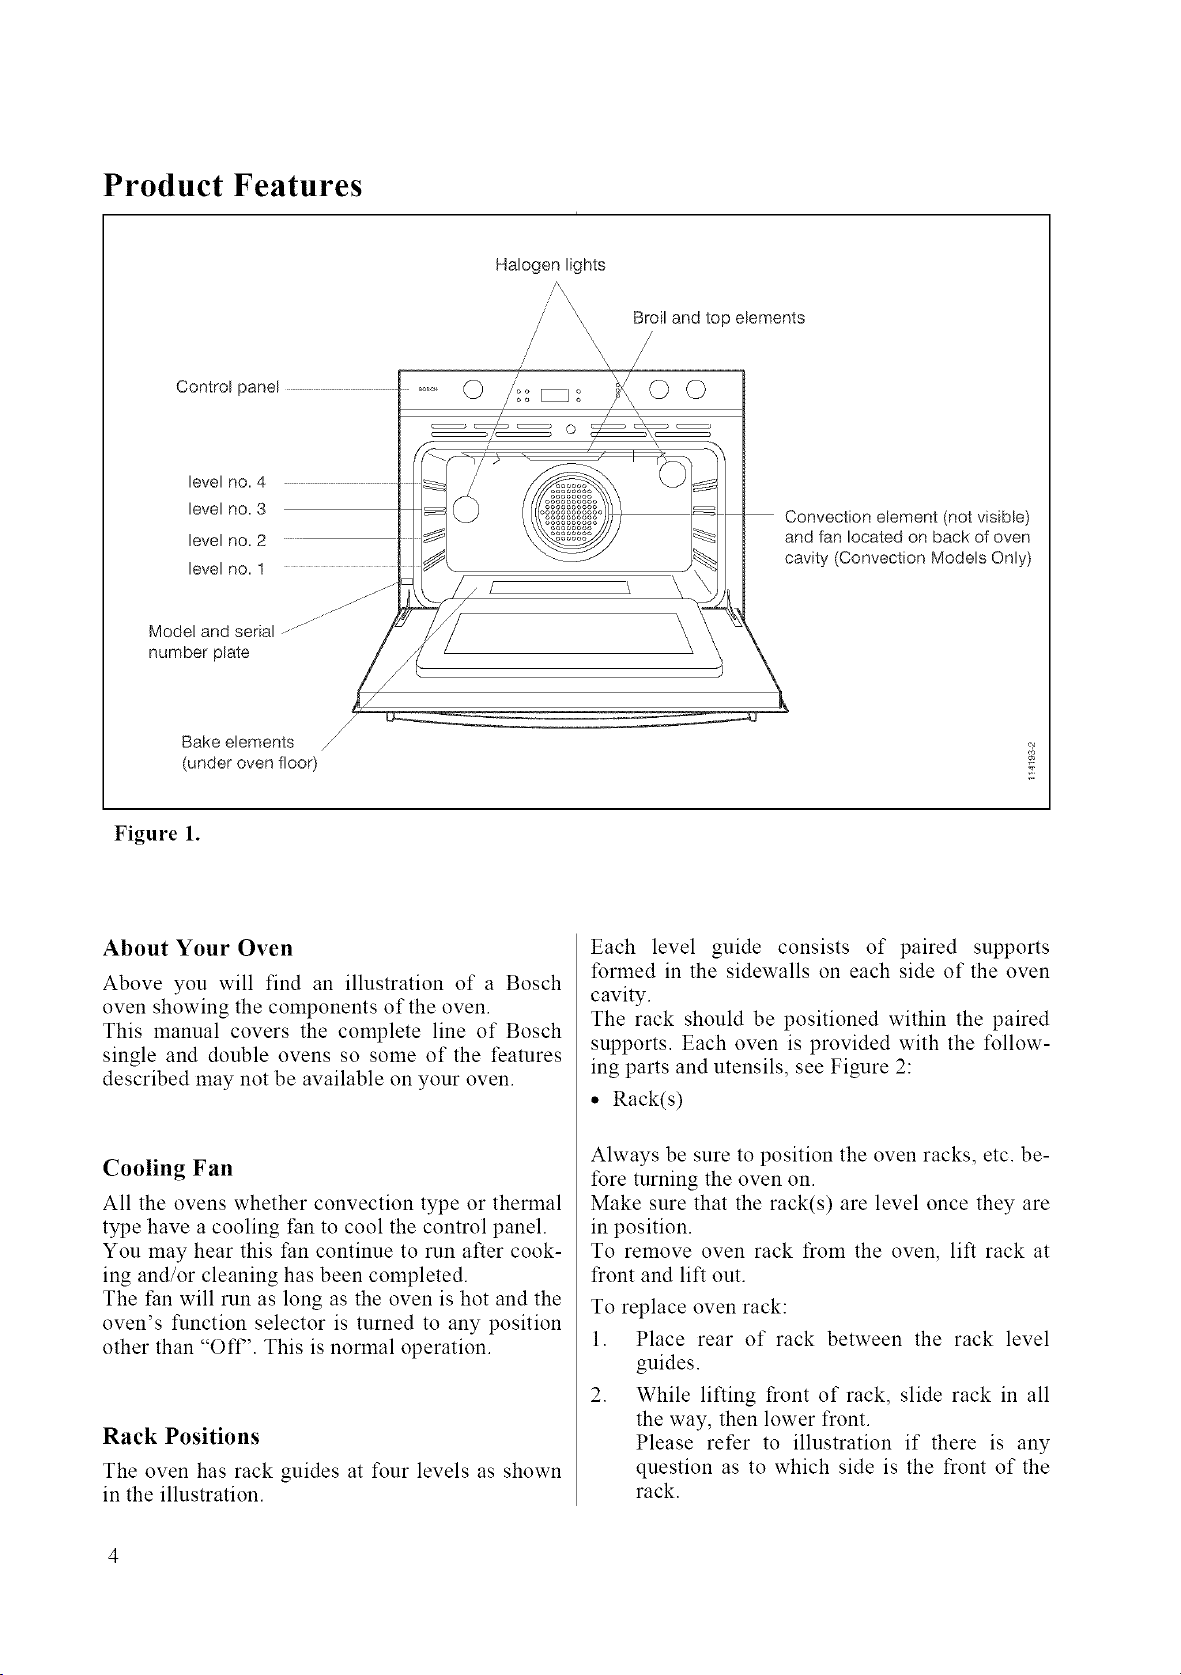
Figure 1.
About Your Oven
Above you will find an illustration of a Bosch
oven showing the components of the oven.
This manual covers the complete line of Bosch
single and double ovens so some of the features
described may not be available on your oven.
Cooling Fan
All the ovens whether convection type or thermal
type have a cooling fan to cool the control panel.
You may hear this fan continue to run after cook-
ing and/or cleaning has been completed.
The fan will run as long as the oven is hot and the
oven's function selector is turned to any position
other than "OFF'. This is normal operation.
Rack Positions
The oven has rack guides at four levels as shown
in the illustration.
Each level guide consists of paired supports
formed in the sidewalls on each side of the oven
cavity.
The rack should be positioned within the paired
supports. Each oven is provided with the follow-
ing parts and utensils, see Figure 2:
• Rack(s)
Always be sure to position the oven racks, etc. be-
fore turning the oven on.
Make sure that the rack(s) are level once they are
in position.
To remove oven rack from the oven, lift rack at
front and lift out.
To replace oven rack:
1. Place rear of rack between the rack level
guides.
2. While lifting front of rack, slide rack in all
the way, then lower front.
Please refer to illustration if there is any
question as to which side is the front of the
rack.
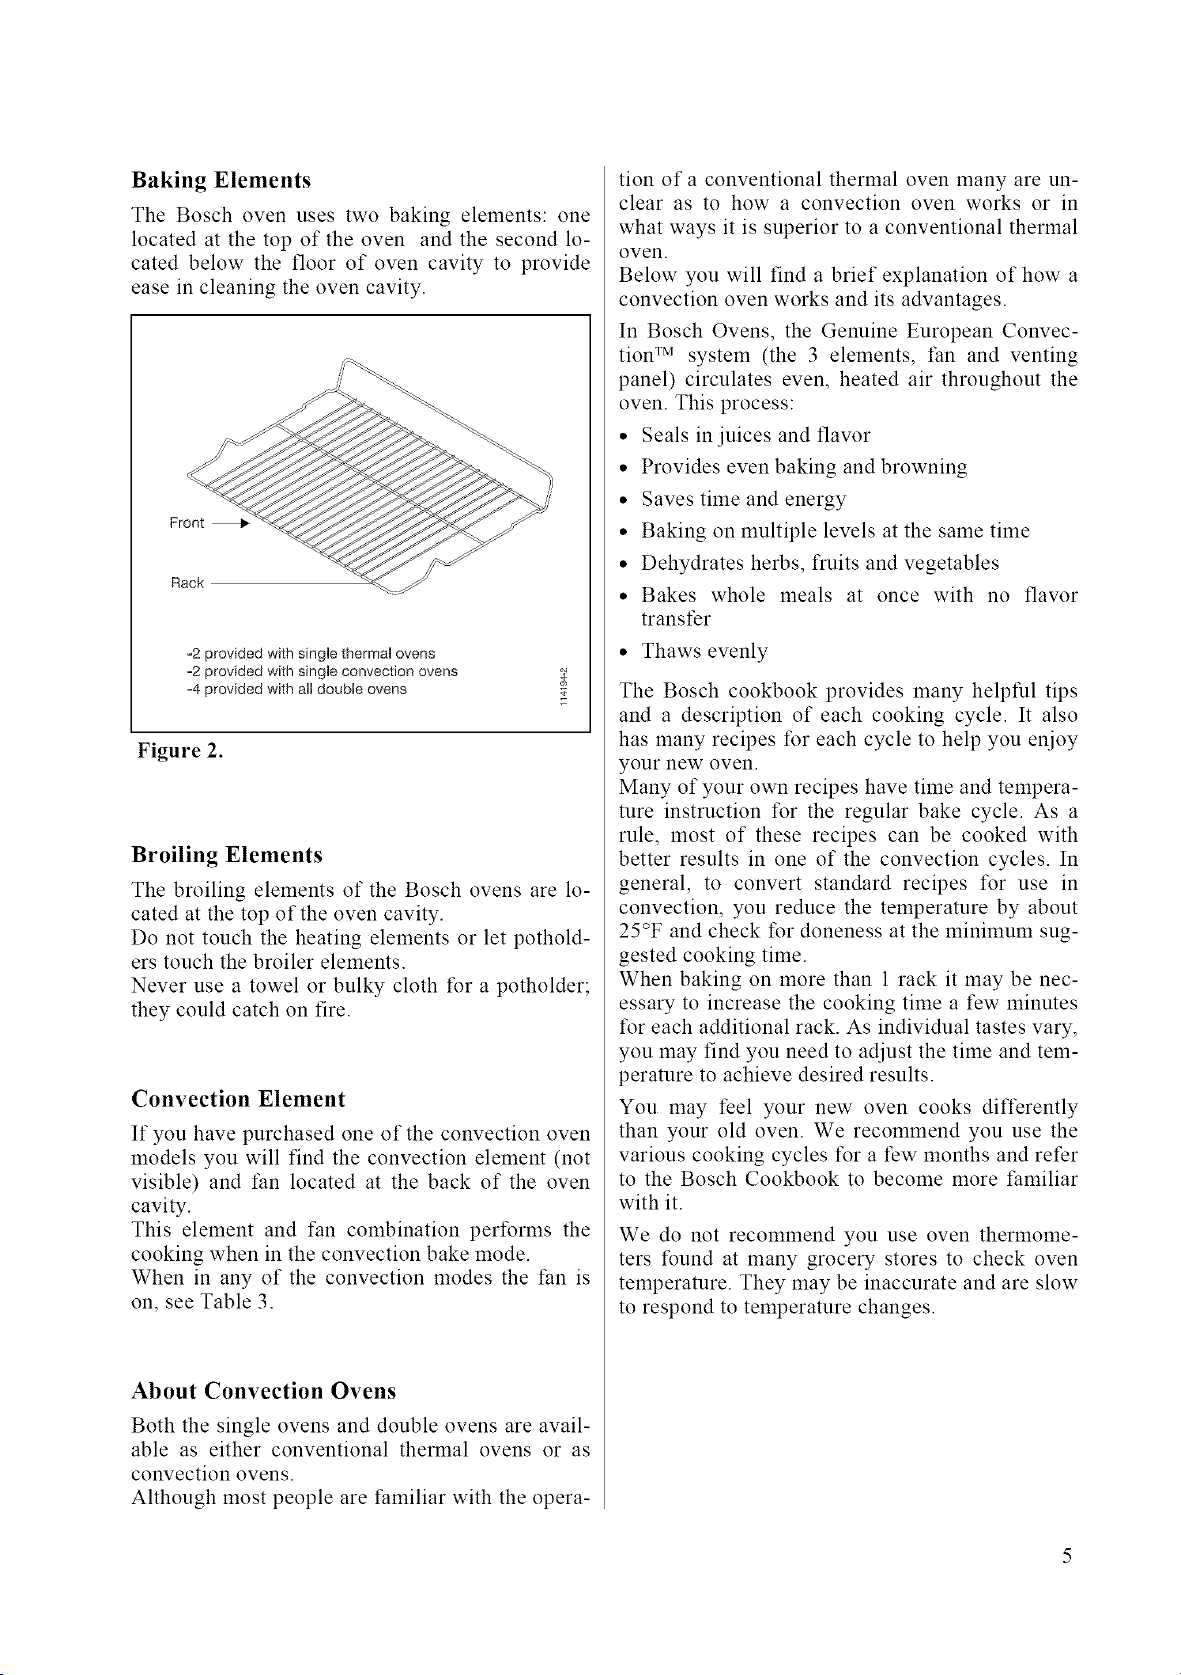
Baking Elements
The Bosch oven uses two baking elements: one
located at the top of the oven and the second lo-
cated below the floor of oven cavity to provide
ease in cleaning the oven cavity.
Front
Rack
-2 provided with single thermal ovens
=2 provided with single convection ovens
o4 provided with all double ovens
Figure 2.
Broiling Elements
The broiling elements of the Bosch ovens are lo-
cated at the top of the oven cavity.
Do not touch the heating elements or let pothold-
ers touch the broiler elements.
Never use a towel or bulky cloth for a potholder;
they could catch on fire.
Convection Element
If you have purchased one of the convection oven
models you will find the convection element (not
visible) and fan located at the back of the oven
cavity.
This element and tan combination performs the
cooking when in the convection bake mode.
When in any of the convection modes the fan is
on, see Table 3.
About Convection Ovens
Both the single ovens and double ovens are avail-
able as either conventional thermal ovens or as
convection ovens.
Although most people are familiar with the opera-
tion of a conventional thermal oven many are un-
clear as to how a convection oven works or in
what ways it is superior to a conventional thermal
oven.
Below you will find a brief explanation of how a
convection oven works and its advantages.
In Bosch Ovens, the Genuine European Convec-
tion TM system (the 3 elements, tan and venting
panel) circulates even, heated air throughout the
oven. This process:
• Seals in juices and flavor
• Provides even baking and browning
• Saves time and energy
• Baking on multiple levels at the same time
• Dehydrates herbs, fruits and vegetables
• Bakes whole meals at once with no flavor
transfer
• Thaws evenly
The Bosch cookbook provides many helpful tips
and a description of each cooking cycle. It also
has many recipes for each cycle to help you enioy
your new oven.
Many of your own recipes have time and tempera-
ture instruction for the regular bake cycle. As a
rule, most of these recipes can be cooked with
better results in one of the convection cycles. In
general, to convert standard recipes for use in
convection, you reduce the temperature by about
25°F and check for doneness at the minimum sug-
gested cooking time.
When baking on more than 1 rack it may be nec-
essary to increase the cooking time a few minutes
for each additional rack. As individual tastes vary,
you may find you need to adjust the time and tem-
perature to achieve desired results.
You may feel your new oven cooks differently
than your old oven. We recommend you use the
various cooking cycles tk_ra few months and refer
to the Bosch Cookbook to become more familiar
with it.
We do not recommend you use oven thermome-
ters found at many grocery stores to check oven
temperature. They may be inaccurate and are slow
to respond to temperature changes.
Oven Operation
Oven Models
There are 21 different models of Bosch ovens, see
Tables 1 & 2, below. Bosch ovens are available in
27" or 30", in white, black or stainless steel, in
single or double oven configurations as well as
being provided as either standard, thermal-type
ovens or convection type, with the double ovens
being available with either a single convection
oven or with two convection ovens.
Single Oven
Models
HBL 432A UC
HBL 435A UC
HBL 436A UC
HBL 442A UC
HBN 442A UC
HBL 445A UC
HBN 445A UC
HBL 446A UC
HBN 446A UC
Convection
No
No
No
Yes
Wht
X
Colors
SS
X
Yes X
Yes
Blk
X
Table 1.
Double Oven
Models
HBL 452A UC
HBN 452A UC
HBL 455A UC
HBN 455A UC
HBL 456A UC
HBN 456A UC
HBL 462A UC
HBN 462A UC
HBL 465A UC
HBN 465A UC
HBL 466A UC
HBN 466A UC
Convection
(top/bottom)
Yes/No
Yes/No
Yes/No
Yes/Yes
Yes/Yes
Yes/Yes
Wht
X
SS Blk
x
x
x
x
x
Table 2.
Due to the number of models offered not all the
features described below may apply to your oven.
Using Your Oven
It is very important to learn how to properly use
your oven to obtain the best cooking results.
Following you will find important information for
the sate and efficient use of your oven.
Before Using for the First Time
Before using your Bosch oven for the first time
remove all packing and foreign materials from the
oven(s). Any material of this sort left in the
oven(s) may melt and/or burn when the oven(s)
are used.
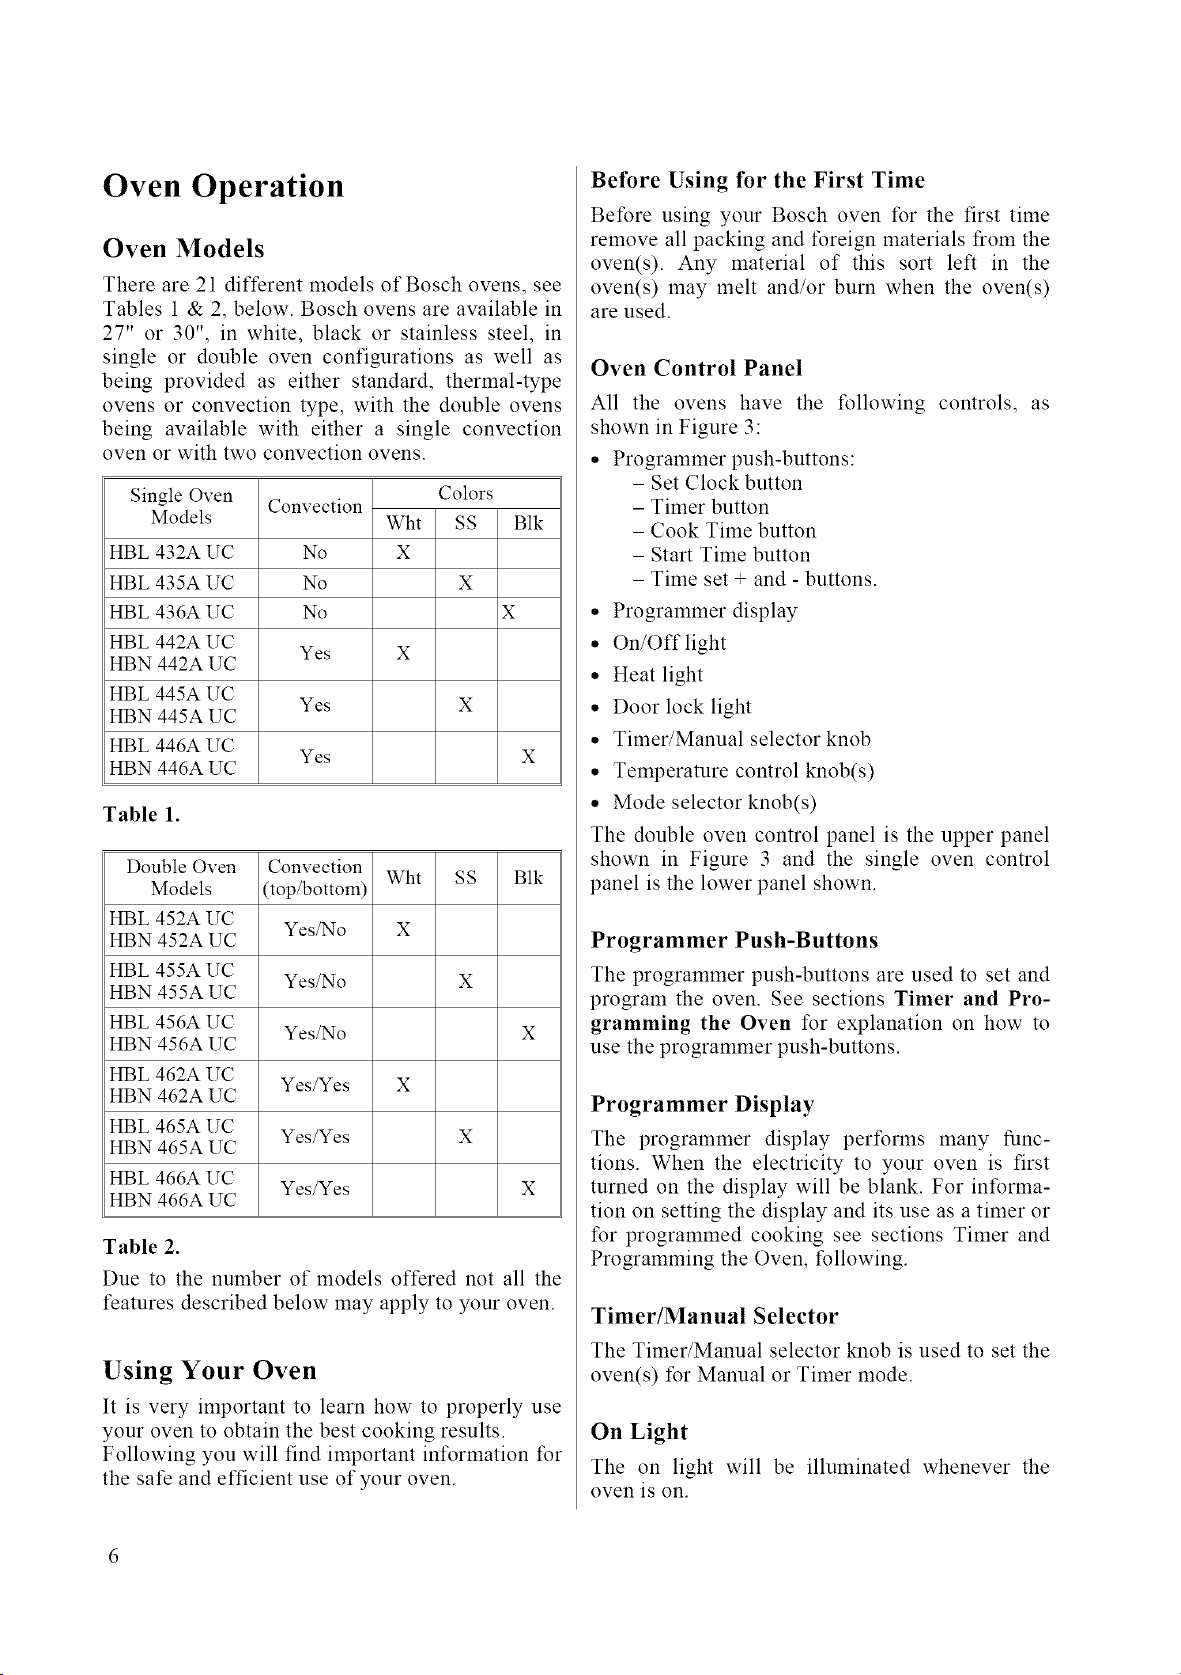
Oven Control Panel
All the ovens have the following controls, as
shown in Figure 3:
• Programmer push-buttons:
- Set Clock button
- Timer button
- Cook Time button
- Start Time button
- Time set + and - buttons.
• Programmer display
• On/Off light
• Heat light
• Door lock light
• Timer/Manual selector knob
• Temperature control knob(s)
• Mode selector knob(s)
The double oven control panel is the upper panel
shown in Figure 3 and the single oven control
panel is the lower panel shown.
Programmer Push-Buttons
The programmer push-buttons are used to set and
program the oven. See sections Timer and Pro-
gramming the Oven for explanation on how to
use the programmer push-buttons.
Programmer Display
The programmer display per%rms many func-
tions. When the electricity to your oven is first
turned on the display will be blank. For informa-
tion on setting the display and its use as a timer or
for programmed cooking see sections Timer and
Programming the Oven, following.
Timer/Manual Selector
The Timer/Manual selector knob is used to set the
oven(s) for Manual or Timer mode.
On Light
The on light will be illuminated whenever the
oven is on.
Double Oven lower oven lights upper oven lights
Control Panel _J'------_
temperature control mode _ = o
selector _ .c_ _°_
Temperature F I
Lower Oven
_,, _ o,f 0 0 0 0 0 0
o0 mmer!
display
lower oven controls programmer
push-buttons
programmer controls
selector temperature control
I I
Upper Oven Temperature F'
timer/manual
selector
J
upper oven controls
Single Oven Control Panel
BOSCH
Figure 3.
timer/manual
selector
s_ @ 0Coo_
pr°gr/mmer I
display
prog rammer
push-buttons
on 0
_t 0
_ 0
mode
selector
Temperature F"
temperature control
o_
Heat Light
The heat light will be lit when you turn on your
oven. When the oven reaches the set temperature
the light will turn off to let you know the oven is
preheated. (Preheat time should take approxi-
mately 12-15 minute when using 240 volts. If
electrical supply is less than 240 volts preheat
times will be longer). The light is connected to
the cooking elements and will turn off and on as
the oven cycles to maintain the set temperature.
Door Lock Light
The door lock light will be illuminated whenever
the oven is in the self-clean mode and the door is
locked.
Temperature Control Knob
The temperature control knob is marked in de-
grees Fahrenheit (°F). This control knob is used to
adjust the oven temperature.
Mode Selector
The mode selector knob is used to set the oven to
Oft, or for Self Clean, or to select the cooking
function desired. A number of modes are avail-
able depending on the model oven you have pur-
chased.
Please see Table 3, Cooking Function Settings,
for intbrmation on selecting a cooking mode.
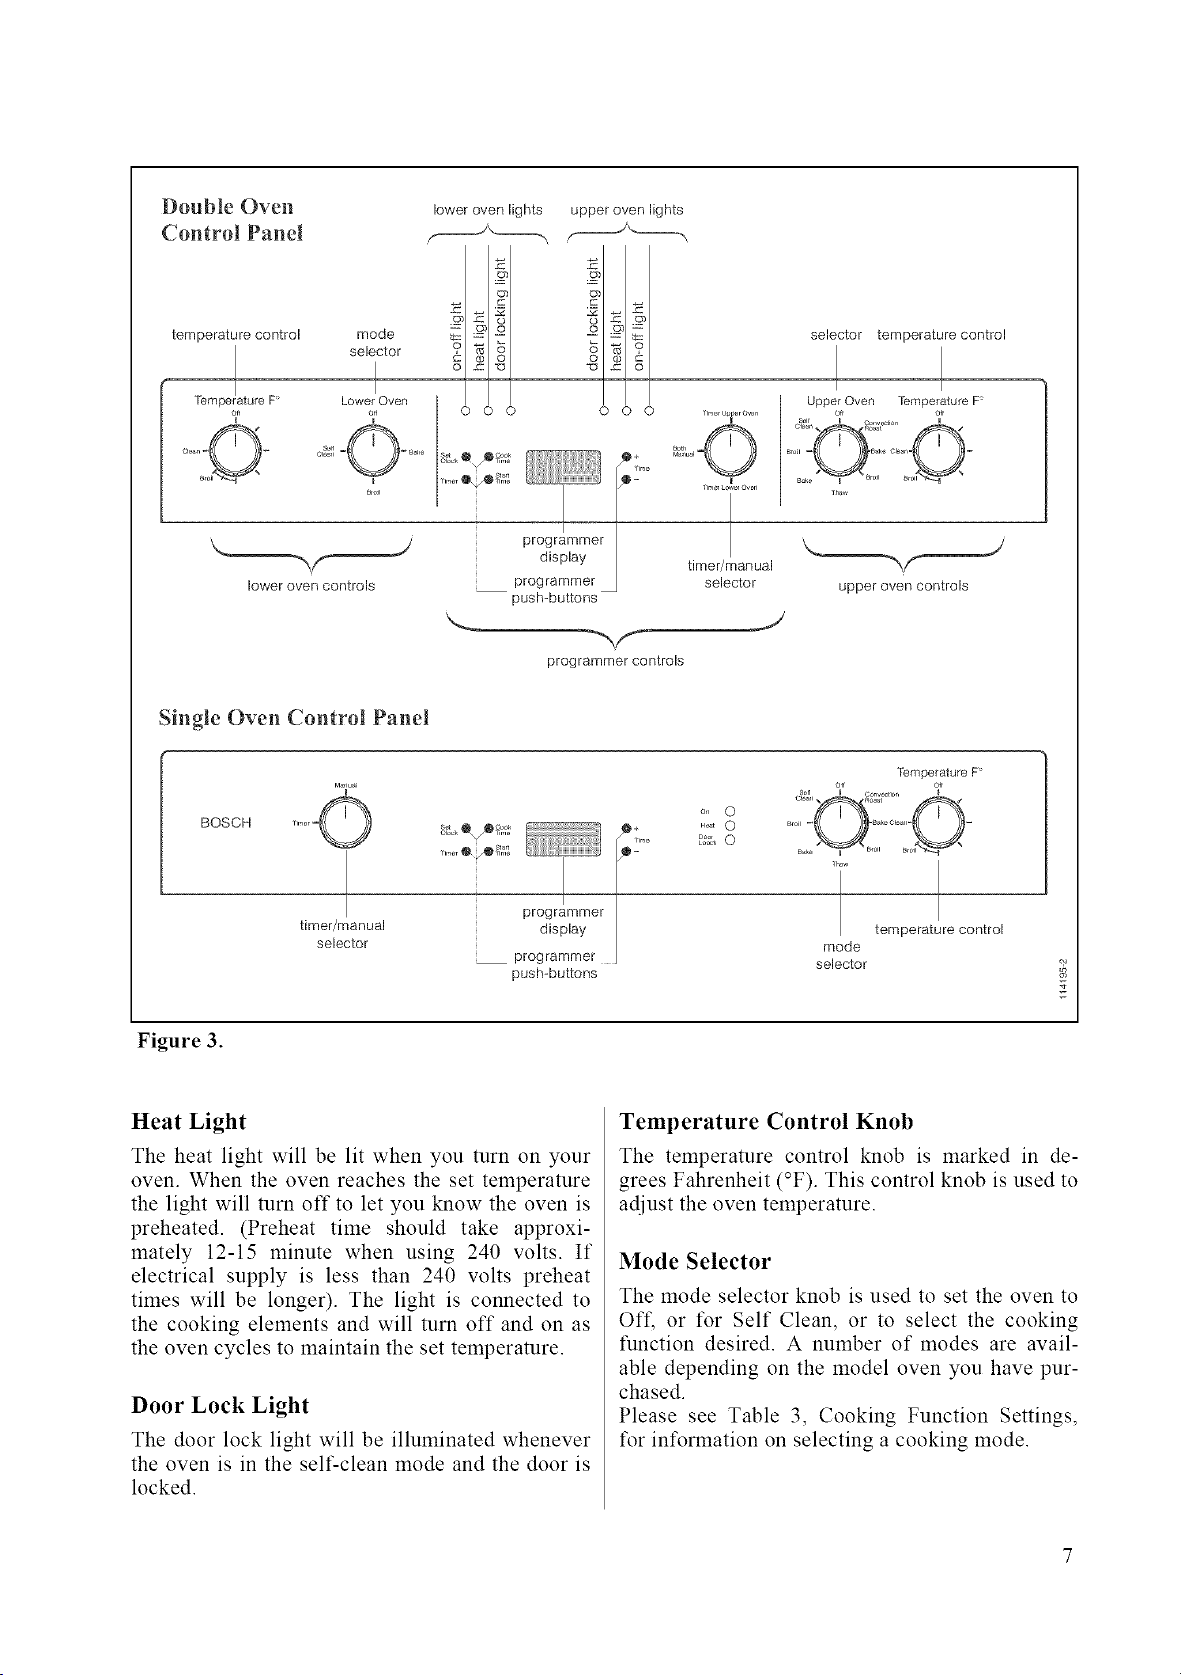
Cooking Function Settings
Thermal Oven Function Information
Broil - Used for broiling.
When set on Broil the top
elements operate whenever
heating.
May be used with door open or
closed.
Note: Lower element shown t\_r
clarity only. Lower ele-
ment actually is located
below floor of cavity
....... i ............
L
Bake (Roast) - This mode is used
for baking, roasting and heating of
casseroles, etc. When set on Bake
the top element and the bottom
element operate whenever heating.
Convection Ovens have following additional cooking functions
Convection Bake - The most
versatile mode for baking and
heating a variety of dishes.
Also recommended l\_rpreparing
large quantities of i\_od on several
racks.
When set on Convection the rear
circular bake element operates
whenever heating. Fan operates.
Note: Lower element shown l\_r
clarity only. Lower ele-
ment actually is located
below floor of cavity
Convection Roast - Use l\_r
roasting.
When set on Convection Roast the
top element and the bottom
element operate whenever heating.
Fan operates.
Convection Broil - Use of fish
and broiling thick cuts of meat.
The door must be closed when
Convection Broiling. When set on
Convection Broil top elements
operate whenever heating. Fan
operates.
Thaw - Use i\_r defrosting.
When set on Thaw no elements
operate, only the fan is on.
Table 3. Cooking Function Settings
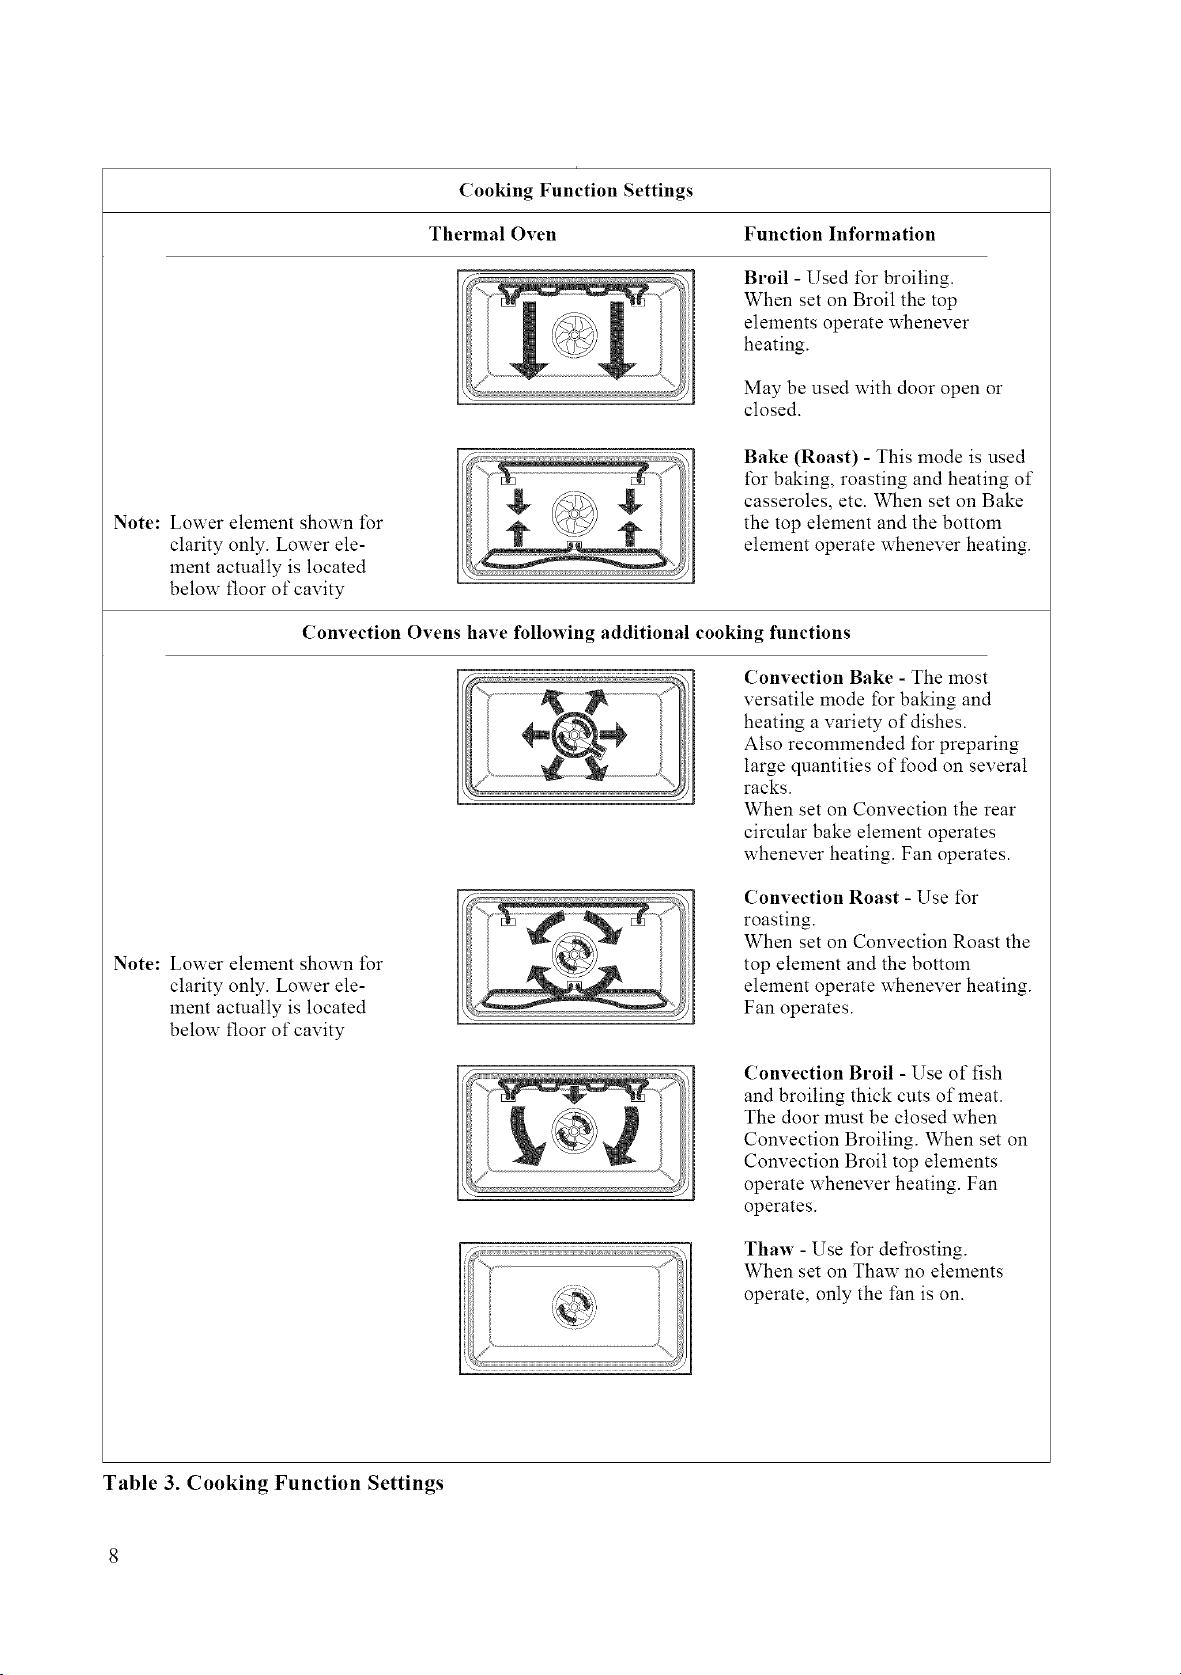
Oven Programmer
The oven programmer can be used to electroni-
cally control the cooking in your oven. Figure 4
shows all the call-outs that are available on the
display and their locations. The buttons directly
adjacent to the display are the programming but-
tons. These are used to program the oven, includ-
ing setting the clock.
SET (_)
DELAY _ _ _ $TART _ Time
, T,M_!) O-
Figure 4.
Setting the Electronic Clock
When you first turn on the power to your oven, or
if the power to the oven has been off for a while
the display will come on showing all the call-outs,
as shown in Figure 4, and then will become blank,
with dashes in the display area and the set clock
symbol in the upper right of the programmer dis-
play, as shown in Figure 5.
@
@
\. J
Figure 5.
To set time of day
Press in Set Clock button. A "beep" will be
heard. Then press either the plus (+) or minus (-)
button, to the right of the display, to set the cor-
rect time. If the plus (+) or minus (-) button is
pressed it will advance or decrease the time in 1
minute increments, if the plus (+) or minus (-)
button is held in the minutes will increase or de-
crease in 10 minute increments. Once the time is
properly set depress the Set Clock button again to
enter the time. A "beep" will sound and the Set
Clock symbol, in the upper right, will disappear.
To change the time of day simply repeat the steps
described above. To check the time of day when
the timer is in use depress the Set Clock button.
The time of day will be displayed briefly and then
will return to the timer function.
Timer
The timer acts as a kitchen timer, counting down
from the set time.
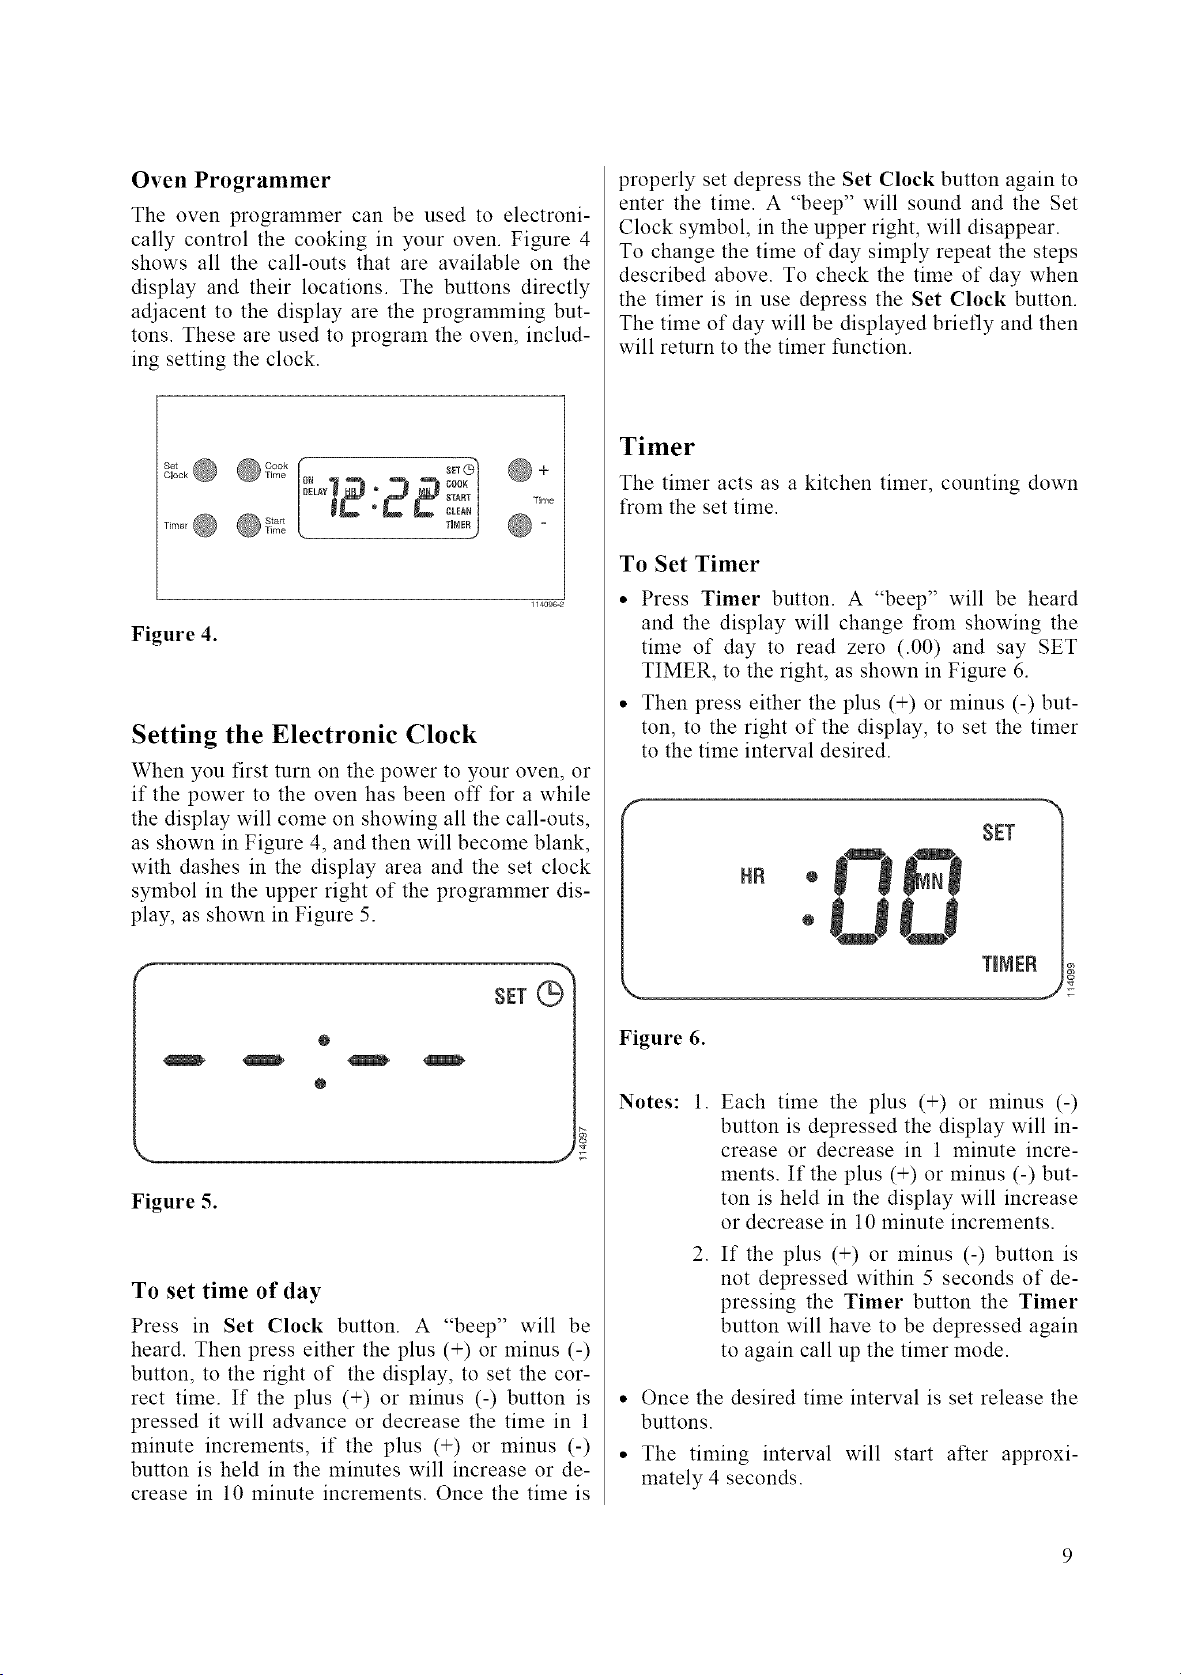
To Set Timer
• Press Timer button. A "beep" will be heard
and the display will change from showing the
time of day to read zero (.00) and say SET
TIMER, to the right, as shown in Figure 6.
• Then press either the plus (+) or minus (-) but-
ton, to the right of the display, to set the timer
to the time interval desired.
HR
SET
TINEB
Figure 6.
Notes:
1. Each time the plus (+) or minus (-)
button is depressed the display will in-
crease or decrease in 1 minute incre-
ments. If the plus (+) or minus (-) but-
ton is held in the display will increase
or decrease in 10 minute increments.
2. If the plus (+) or minus (-) button is
not depressed within 5 seconds of de-
pressing the Timer button the Timer
button will have to be depressed again
to again call up the timer mode.
• Once the desired time interval is set release the
buttons.
• The timing interval will start after approxi-
mately 4 seconds.
• The indicator word TIMER will remain in the
display during timer countdown.
• The timer will countdown in minutes until the
last minute when it will switch over and count-
down in seconds.
• At the end of the timing interval the indicator
word TIMER will blink on and off and three
"beeps" will be heard.
• The display will return to time of day or any
active programmed function and "beeping" will
continue every 10 seconds until any button is
touched.
• Once any button is touched the flashing word
TIMER disappears from the display.
To Cancel Timer
With the indicator word TIMER in the display all
that is necessary to cancel the timer is to depress
the Timer button once.
If some other timed function has been pro-
grammed after setting the timer, the TIMER indi-
cator word can be recalled to the display by de-
pressing the Timer button.
Then with the indicator word TIMER in the dis-
play you can, as above, cancel the timer by de-
pressing the Timer button a second time.
Then after 5 seconds the display will return to
time of day or any active programmed function.
To Check Timer During Timed Function
If some other timed function has been pro-
grammed after setting the timer, TIMER may be
recalled to the display by depressing the Timer
button.
The amount of time remaining on the timer can
then be viewed.
10
Using the Oven Controls
Temperature P
Lower Oven Lower Oven Upper Oven
7 o o ok _j 2,o
_"o,, ++'+++@ ®++_ @-
Upper Oven Ternperatuie F'
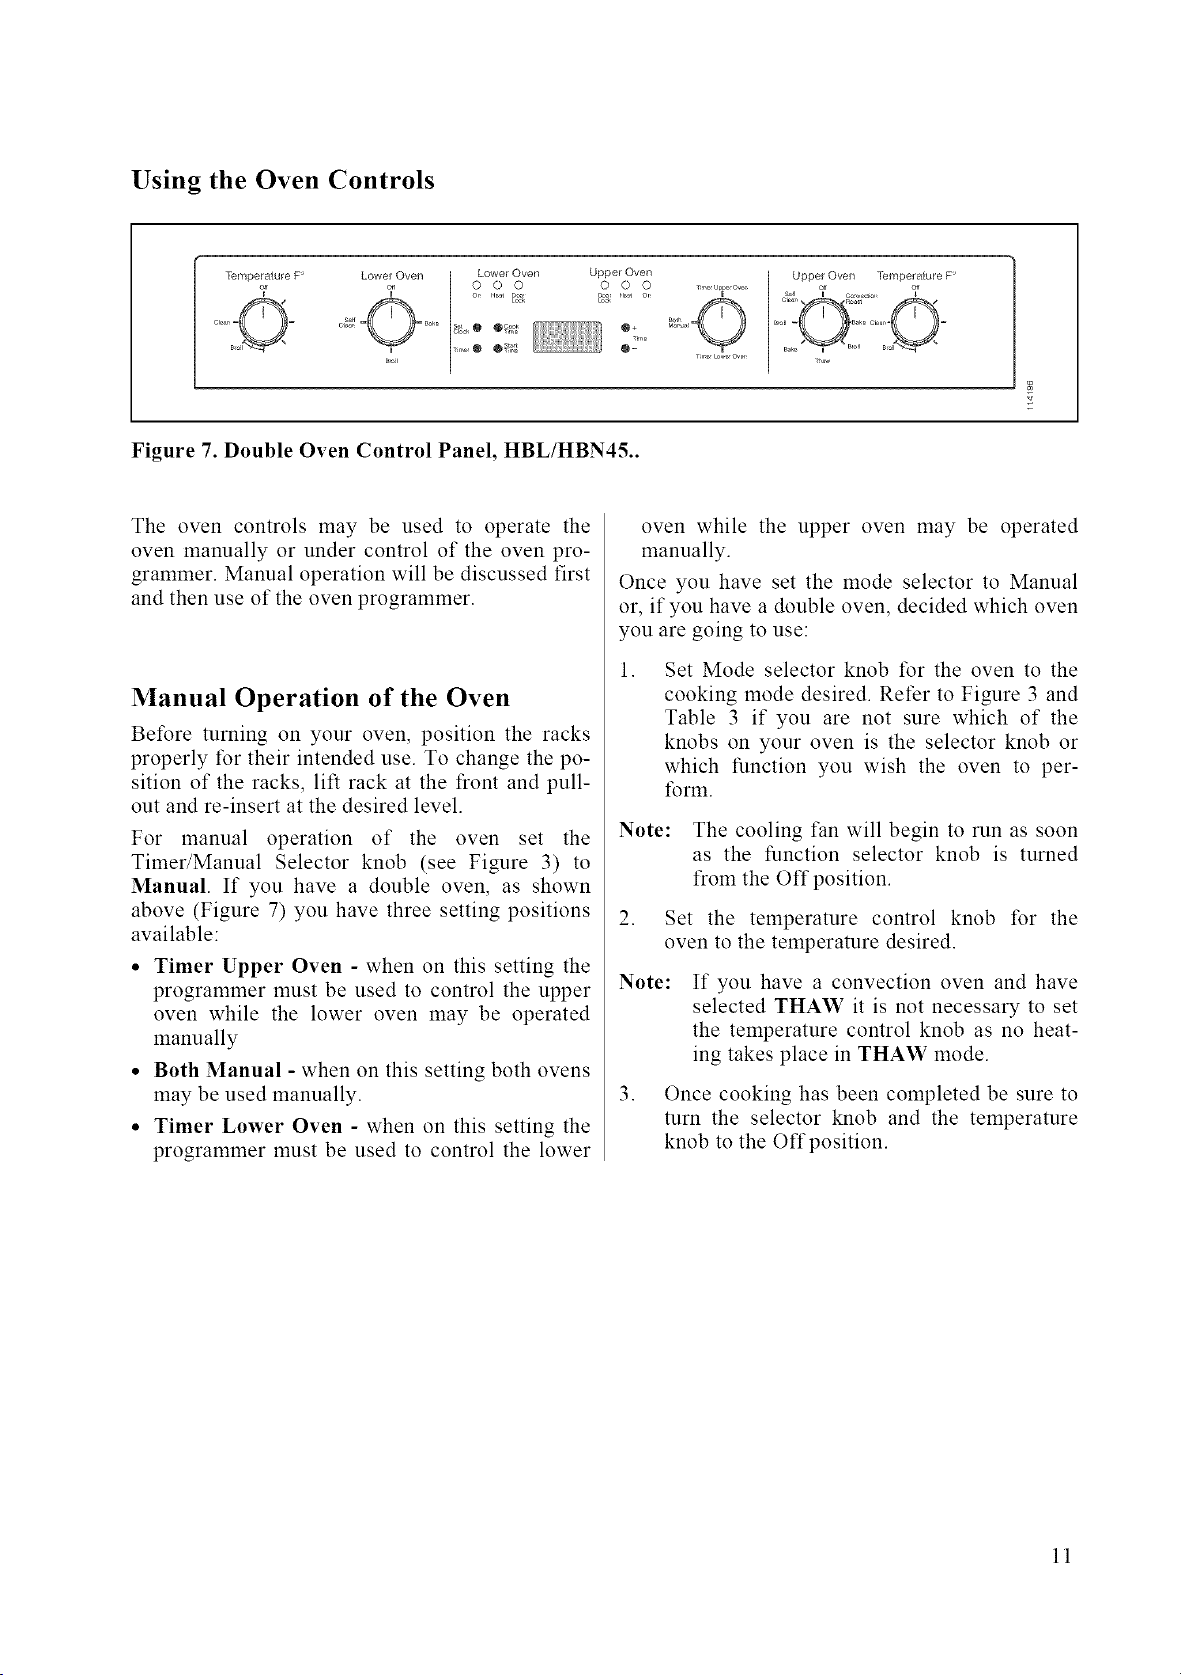
Figure 7. Double Oven Control Panel, HBL/HBN45..
The oven controls may be used to operate the
oven manually or under control of the oven pro-
grammer. Manual operation will be discussed first
and then use of the oven programmer.
Manual Operation of the Oven
Before turning on your oven, position the racks
properly for their intended use. To change the po-
sition of the racks, lift rack at the front and pull-
out and re-insert at the desired level.
For manual operation of the oven set the
Timer/Manual Selector knob (see Figure 3) to
Manual. If you have a double oven, as shown
above (Figure 7) you have three setting positions
available:
• Timer Upper Oven - when on this setting the
programmer must be used to control the upper
oven while the lower oven may be operated
manually
• Both Manual - when on this setting both ovens
may be used manually.
• Timer Lower Oven - when on this setting the
programmer must be used to control the lower
oven while the upper oven may be operated
manually.
Once you have set the mode selector to Manual
or, if you have a double oven, decided which oven
you are going to use:
, Set Mode selector knob for the oven to the
cooking mode desired. Refer to Figure 3 and
Table 3 if you are not sure which of the
knobs on your oven is the selector knob or
which function you wish the oven to per-
li_rm.
Note: The cooling fan will begin to run as soon
as the function selector knob is turned
from the Off position.
2. Set the temperature control knob for the
oven to the temperature desired.
Note:
If you have a convection oven and have
selected THAW it is not necessary to set
the temperature control knob as no heat-
ing takes place in THAW mode.
3. Once cooking has been completed be sure to
turn the selector knob and the temperature
knob to the Offposition.
11
Electronic Control of Oven
Immediate Start/Automatic Shut-Off
To use the electronic control so that your cooking
starts immediately and then shuts-off automatically:
1. Set the oven rack(s) as desired and place
food in the oven.
2. Make sure that the oven clock is set to the
correct time.
3. Set the Timer/Manual Selector (Figure 3) to
Timer for the single oven or to Timer Upper
Oven or Timer Lower Oven for double
oven, so that oven programmer is enabled for
the oven you wish to use in programmed op-
eration.
SET
I__i COOK
®
TmNE
J
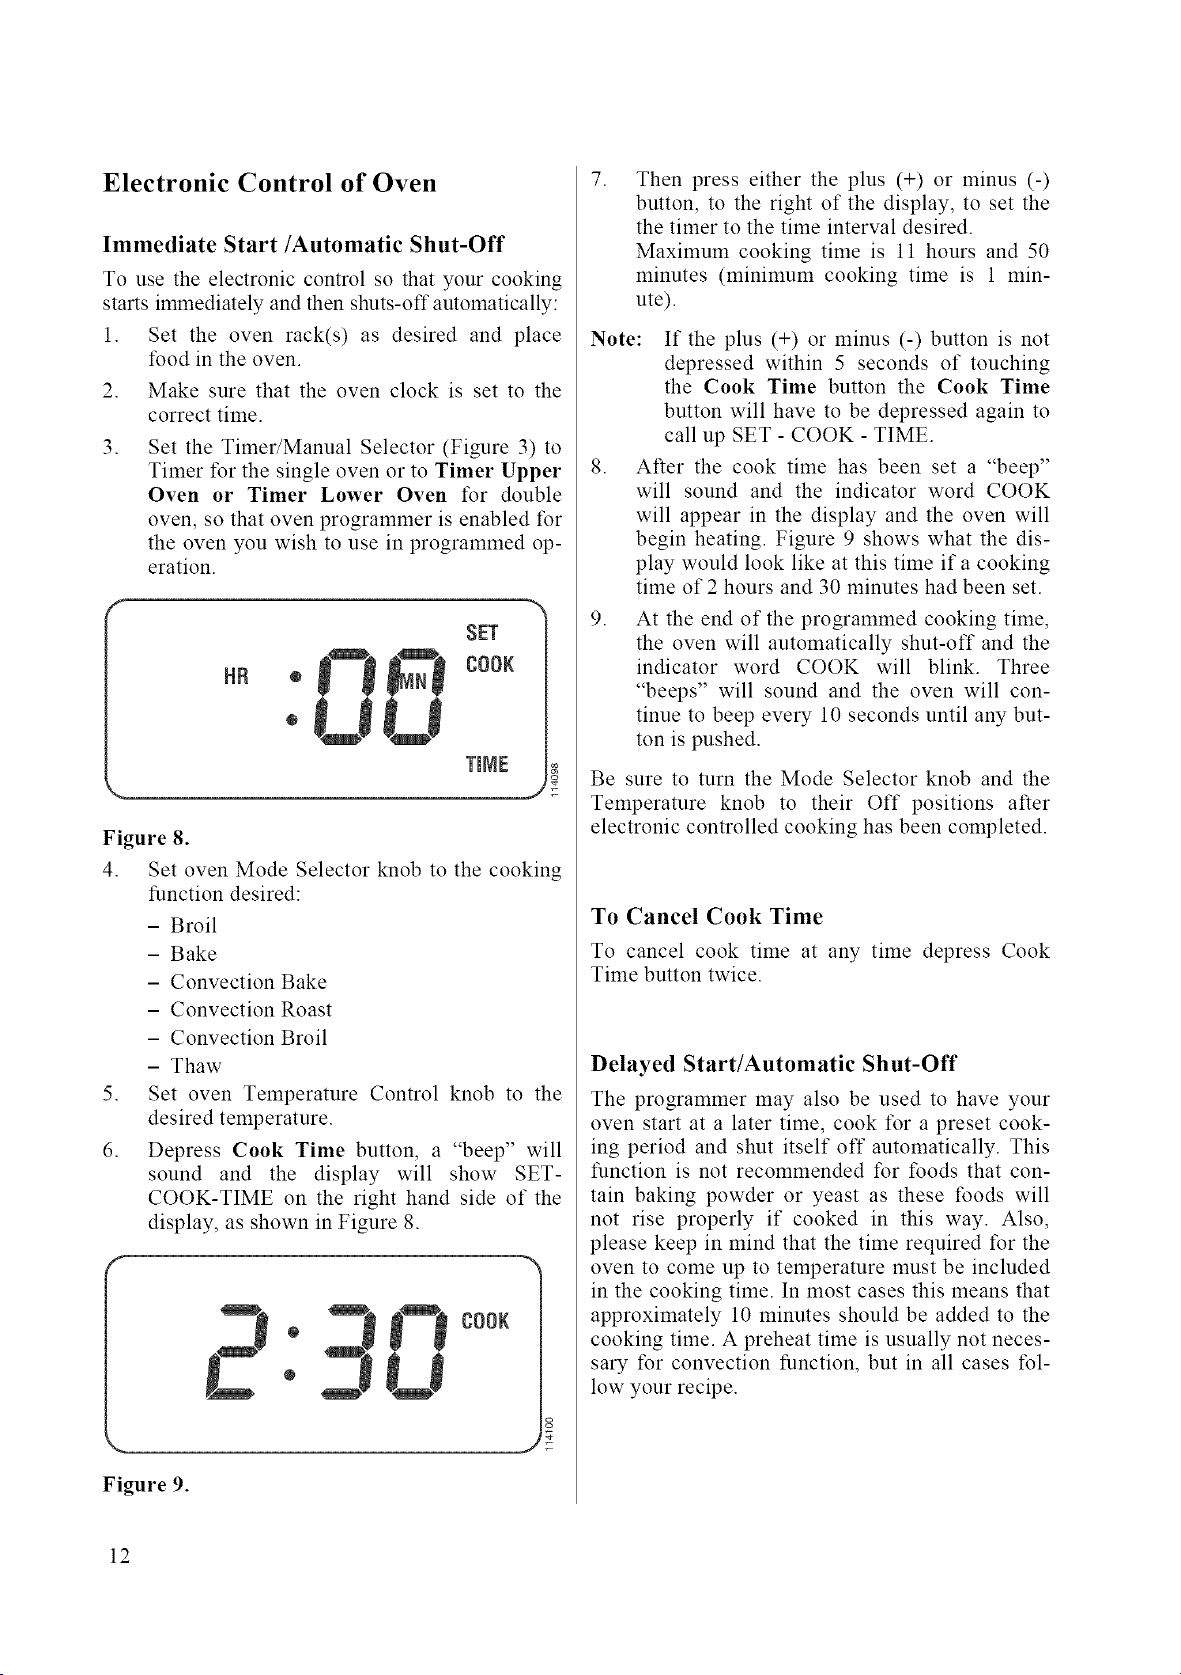
Figure 8.
4. Set oven Mode Selector knob to the cooking
function desired:
- Broil
- Bake
- Convection Bake
- Convection Roast
- Convection Broil
- Thaw
5. Set oven Temperature Control knob to the
desired temperature.
6. Depress Cook Time button, a "beep" will
sound and the display will show SET-
COOK-TIME on the right hand side of the
display, as shown in Figure 8.
®
®
O00K
J
Figure 9.
.
Then press either the plus (+) or minus (-)
button, to the right of the display, to set the
the timer to the time interval desired.
Maximum cooking time is 11 hours and 50
minutes (minimum cooking time is 1 min-
ute).
Note:
.
.
If the plus (+) or minus (-) button is not
depressed within 5 seconds of touching
the Cook Time button the Cook Time
button will have to be depressed again to
call up SET - COOK - TIME.
After the cook time has been set a "beep"
will sound and the indicator word COOK
will appear in the display and the oven will
begin heating. Figure 9 shows what the dis-
play would look like at this time if a cooking
time of 2 hours and 30 minutes had been set.
At the end of the programmed cooking time,
the oven will automatically shut-off and the
indicator word COOK will blink. Three
"beeps" will sound and the oven will con-
tinue to beep every 10 seconds until any but-
ton is pushed.
Be sure to turn the Mode Selector knob and the
Temperature knob to their Off positions after
electronic controlled cooking has been completed.
To Cancel Cook Time
To cancel cook time at any time depress Cook
Time button twice.
Delayed Start/Automatic Shut-Off
The programmer may also be used to have your
oven start at a later time, cook for a preset cook-
ing period and shut itself off automatically. This
function is not recommended for foods that con-
tain baking powder or yeast as these foods will
not rise properly if cooked in this way. Also,
please keep in mind that the time required for the
oven to come up to temperature must be included
in the cooking time. In most cases this means that
approximately 10 minutes should be added to the
cooking time. A preheat time is usually not neces-
sary for convection function, but in all cases fol-
low your recipe.
12
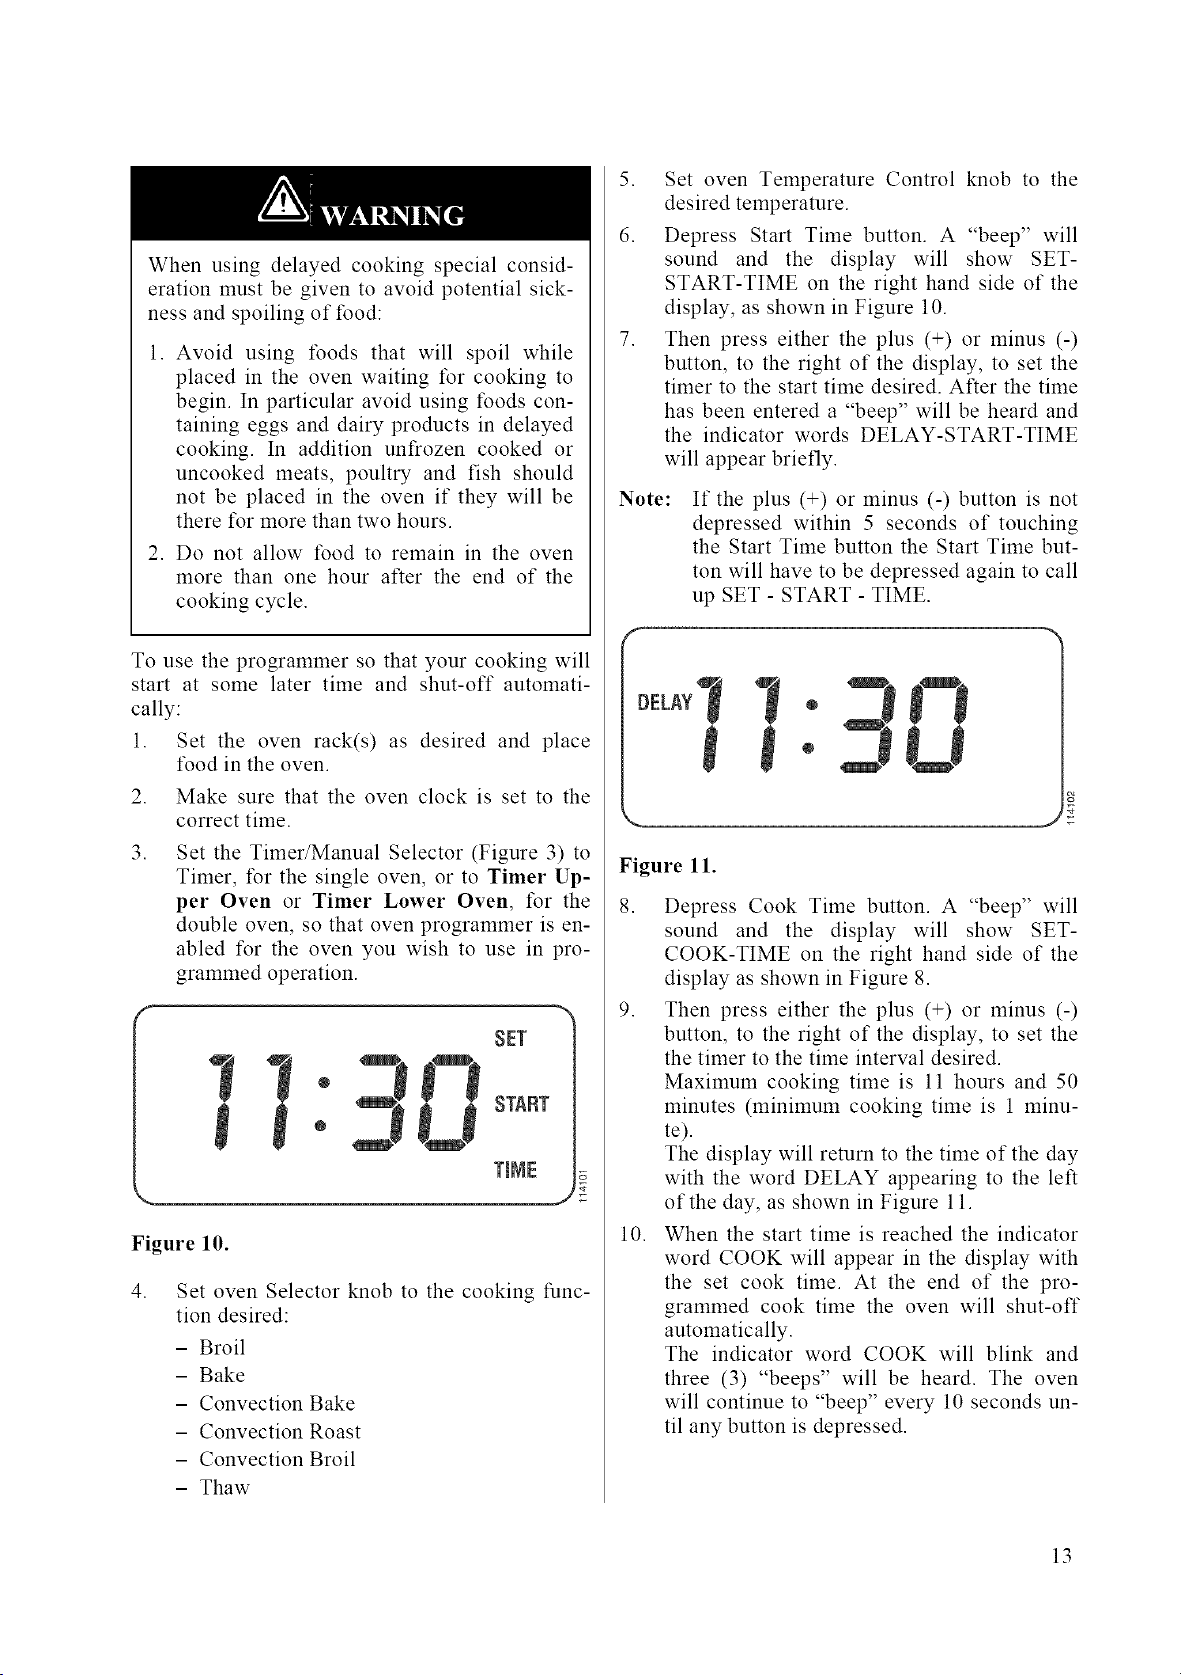
When using delayed cooking special consid-
eration must be given to avoid potential sick-
ness and spoiling of food:
1. Avoid using foods that will spoil while
placed in the oven waiting for cooking to
begin. In particular avoid using foods con-
taining eggs and dairy products in delayed
cooking. In addition unfrozen cooked or
uncooked meats, poultry and fish should
not be placed in the oven if they will be
there tbr more than two hours.
2. Do not allow food to remain in the oven
more than one hour after the end of the
cooking cycle.
To use the programmer so that your cooking will
start at some later time and shut-off automati-
cally:
1. Set the oven rack(s) as desired and place
food in the oven.
2. Make sure that the oven clock is set to the
correct time.
3. Set the Timer/Manual Selector (Figure 3) to
Timer, for the single oven, or to Timer Up-
per Oven or Timer Lower Oven, for the
double oven, so that oven programmer is en-
abled for the oven you wish to use in pro-
grammed operation.
SET
START
TmIV]E
Figure 10.
,
Set oven Selector knob to the cooking func-
tion desired:
- Broil
- Bake
- Convection Bake
- Convection Roast
- Convection Broil
- Thaw
5. Set oven Temperature Control knob to the
desired temperature.
6. Depress Start Time button. A "beep" will
sound and the display will show SET-
START-TIME on the right hand side of the
display, as shown in Figure 10.
7. Then press either the plus (+) or minus (-)
button, to the right of the display, to set the
timer to the start time desired. After the time
has been entered a "beep" will be heard and
the indicator words DELAY-START-TIME
will appear briefly.
Note:
If the plus (+) or minus (-) button is not
depressed within 5 seconds of touching
the Start Time button the Start Time but-
ton will have to be depressed again to call
up SET - START - TIME.
Figure ll.
8. Depress Cook Time button. A "beep" will
sound and the display will show SET-
COOK-TIME on the right hand side of the
display as shown in Figure 8.
9. Then press either the plus (+) or minus (-)
button, to the right of the display, to set the
the timer to the time interval desired.
Maximum cooking time is 11 hours and 50
minutes (minimum cooking time is 1 minu-
te).
The display will return to the time of the day
with the word DELAY appearing to the left
of the day, as shown in Figure 11.
10. When the start time is reached the indicator
word COOK will appear in the display with
the set cook time. At the end of the pro-
grammed cook time the oven will shut-off
automatically.
The indicator word COOK will blink and
three (3) "beeps" will be heard. The oven
will continue to "beep" every 10 seconds un-
til any button is depressed.
13
Be sure to turn the Mode Selector knob and the
Temperature knob to their Off positions after the
programmed cooking has been completed.
To Check Start Time/before cooking
begins
Depress Start Time button. The start time will be
displayed briefly and then the display will return
to time of day.
To Change Start Time/before Cooking
begins
Depress Start Time button. A "beep" will sound
and the display will show SET - START - TIME
on the right hand side of the display. Then press
either the plus (+) or minus (-) button to the right
of the display, to set the timer to the start time de-
sired.
After the time has been entered a "beep" will be
heard and the indicator words DELAY-START-
TIME will appear briefly and then the display will
return to time of day with the word DELAY ap-
pearing to the left of the time of day, as shown
Figure 11.
To Check Cook Time
Depress Cook Time button. The cook time will be
displayed briefly, then the display will return to
on-going program.
To Change Cook Time
Depress Cook Time button. A "beep" will sound
and the display will show SET - COOK - TIME
on the right hand side of the display, see Figure 8.
Then press either the plus (+) or minus (-) button,
to the right of the display, to set the timer to the
time interval desired. Maximum cooking time is
11 hours and 50 minutes (minimum cooking time
is 1minute).
To Cancel Delay Start
Depress Start Time button twice.
To Cancel Cook Time
Depress Cook Time button twice.
14

Care & Cleaning
The Bosch line of ovens feature a pyrolytic self-
cleaning function that eliminates the difficult and
time consuming manual scrubbing of the oven in-
terior. During self-cleaning the oven uses very
high temperature (approx. 850°F) to burn away
soil and grease. The fumes produced during this
function of the oven are then filtered and ex-
pelled. You will note however that a powder ash
residue will be left on the bottom of the oven after
completion of self cleaning. Once the oven has
cooled sufficiently the residue may be removed
using a damp cloth or sponge. See the following
instruction on use of the self clean function.
Make sure all controls are Off and the oven is
cool betk_re cleaning. Failure to do so can re-
sult in burns or electrical shock.
For parts of the oven other than the oven cavity
the following cleaning methods are recom-
mended:
* Control Panel
Use warm soapy water or spray glass cleaner to
clean the control panel. With a soft cloth or
sponge wash, rinse and dry the control panel
thoroughly. DO NOT use abrasive cleaners or
steel wool pads. These will damage the surface.
• Stainless Steel
To clean, use a standard cleaner designed for
stainless steel such as: Cameo(R_', Bar Keepers
Friend(R) or Bon-Ami,_R). Follow manufacture in-
structions. When clean, a polish such as Twin-
kle(R_'or Stainless Steel Magic(R_' can be applied.
DO NOT USE ABRASIVE MATERIALS
SUCH AS STEEL WOOL OR ROUGH
SPONGES. IT WILL SCRATCH THE SUR-
FACE.
• Front of Oven Door(s) and Handle(s)
Use warm soapy water or spray glass cleaner to
clean the glass door surface. With a soft cloth
or sponge wash, rinse and dry the door front(s)
and handle(s) thoroughly. DO NOT use abra-
sive cleaners or steel wool pads. These will
damage the surface.
• Broiler Pan and Rack(s)
Use warm soapy water. With a steel wool pad
wash, rinse and thoroughly dry the pan and/or
rack(s). DO NOT clean the broiler pans or
racks by leaving them in the oven when run-
ning the Self Clean function.
Frame Outside Door Gasket Area
Make sure oven is cool, then use warm soapy
water. With a non-abrasive, plastic scrubbing
pad clean the frame surface outside the door
gasket area. This area must be cleaned by hand
because the area outside the gasket does not get
hot enough to burn offthe soil (see Figure 12).
DO NOT
Hand clean gasket
Hand clean frame
area outside gasket
-" 0 ::_: _ 0 0
o
Figure 12.
• Door Outside gasket Area
Make sure oven is cool, then use warm soapy
water. With a non-abrasive, plastic scrubbing
pad clean the area outside the door gasket area.
This area must be cleaned by hand because the
area outside the gasket does not get hot enough
to burn offthe soil (see Figure 12).
Using the Self Clean Function
The Self Clean function is a timed function and
theretk_re is used just as if using the oven in Im-
mediate Start/Automatic Shut-Off or Delayed
Start/Automatic Shut-Off. There are a few
preparations that must be made however as well
as some post function clean-up that you will find
described below:
1. Before using Self Clean be sure to remove
the racks. Also, if you have placed any alu-
minum foil in the oven this should also be re-
moved.
Note: If items are left in the oven during self
cleaning they may become damaged and
racks will become discolored. Also, the
racks will become difficult to slide in and
out.
2. Clean soil from the frame around the door,
outside the door gasket (see Figure 12). Do
not clean the door gasket by hand as this
15
,
could move or damage the gasket. The areas
outside the gasket area must be cleaned by
hand because these areas do not become hot
enough during Self Clean to burn away the
soiled spots.
Also wipe up excess grease and other food
spills with a damp cloth. This will minimize
the amount of smoke created during self
cleaning.
SET
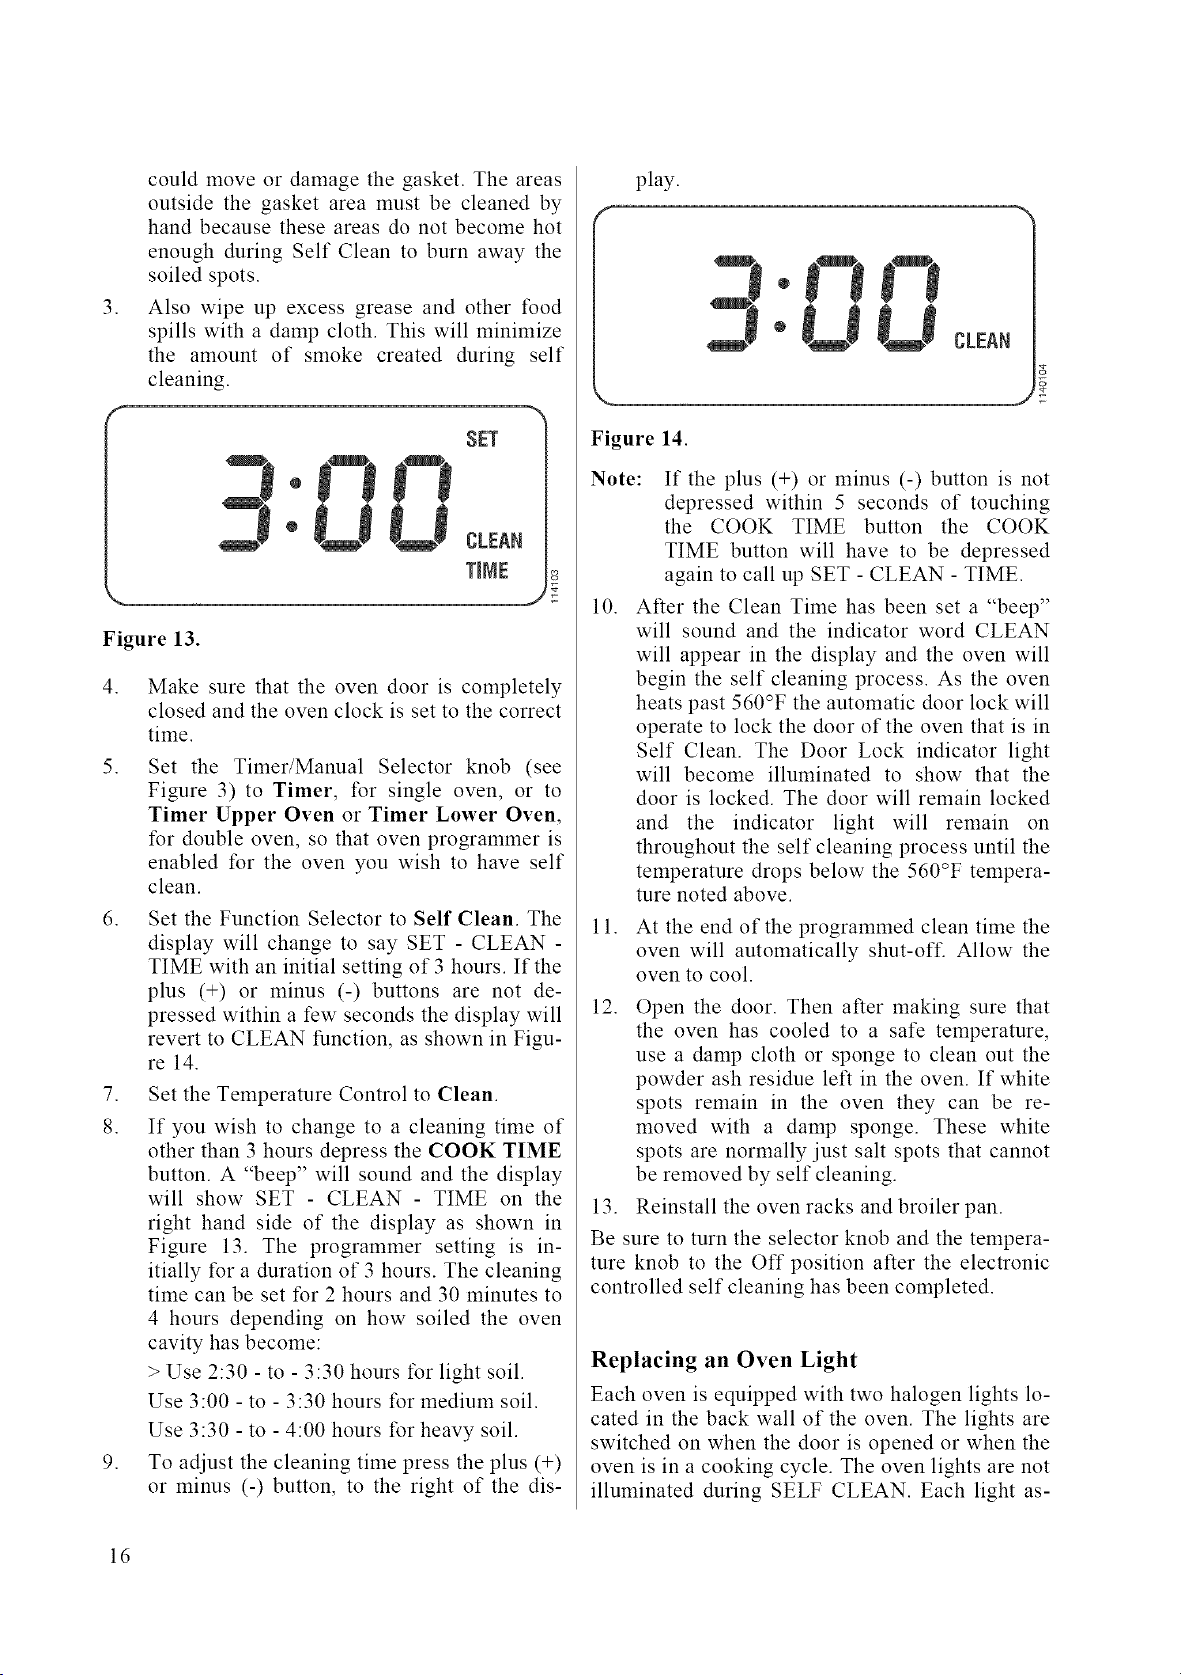
Figure 13.
4. Make sure that the oven door is completely
closed and the oven clock is set to the correct
time.
5. Set the Timer/Manual Selector knob (see
Figure 3) to Timer, for single oven, or to
Timer Upper Oven or Timer Lower Oven,
for double oven, so that oven programmer is
enabled for the oven you wish to have self
clean.
6. Set the Function Selector to Self Clean. The
display will change to say SET - CLEAN -
TIME with an initial setting of 3 hours. If the
plus (+) or minus (-) buttons are not de-
pressed within a few seconds the display will
revert to CLEAN function, as shown in Figu-
re 14.
7. Set the Temperature Control to Clean.
8. If you wish to change to a cleaning time of
other than 3 hours depress the COOK TIME
button. A "beep" will sound and the display
will show SET - CLEAN - TIME on the
right hand side of the display as shown in
Figure 13. The programmer setting is in-
itially for a duration of 3 hours. The cleaning
time can be set for 2 hours and 30 minutes to
4 hours depending on how soiled the oven
cavity has become:
> Use 2:30 - to - 3:30 hours for light soil.
Use 3:00 - to - 3:30 hours for medium soil.
Use 3:30 - to - 4:00 hours for heavy soil.
9. To adjust the cleaning time press the plus (+)
or minus (-) button, to the right of the dis-
play.
CLEAN
Figure 14.
Note: If the plus (+) or minus (-) button is not
depressed within 5 seconds of touching
the COOK TIME button the COOK
TIME button will have to be depressed
again to call up SET - CLEAN - TIME.
10. After the Clean Time has been set a "beep"
will sound and the indicator word CLEAN
will appear in the display and the oven will
begin the self cleaning process. As the oven
heats past 560°F the automatic door lock will
operate to lock the door of the oven that is in
Self Clean. The Door Lock indicator light
will become illuminated to show that the
door is locked. The door will remain locked
and the indicator light will remain on
throughout the self cleaning process until the
temperature drops below the 560°F tempera-
ture noted above.
11. At the end of the programmed clean time the
oven will automatically shut-off. Allow the
oven to cool.
12. Open the door. Then after making sure that
the oven has cooled to a sate temperature,
use a damp cloth or sponge to clean out the
powder ash residue left in the oven. If white
spots remain in the oven they can be re-
moved with a damp sponge. These white
spots are normally just salt spots that cannot
be removed by self cleaning.
13. Reinstall the oven racks and broiler pan.
Be sure to turn the selector knob and the tempera-
ture knob to the Off position after the electronic
controlled self cleaning has been completed.
Replacing an Oven Light
Each oven is equipped with two halogen lights lo-
cated in the back wall of the oven. The lights are
switched on when the door is opened or when the
oven is in a cooking cycle. The oven lights are not
illmninated during SELF CLEAN. Each light as-
16
sembly consists of a removable lens, a light bulb
as well as a light socket housing that is fixed in
place, see Figure 15. Light bulb replacement is
considered to be a routine maintenance item.
To replace a light bulb:
1. Read WARNING on this page.
2. Turn off power at the main power supply
(your fuse or breaker box).
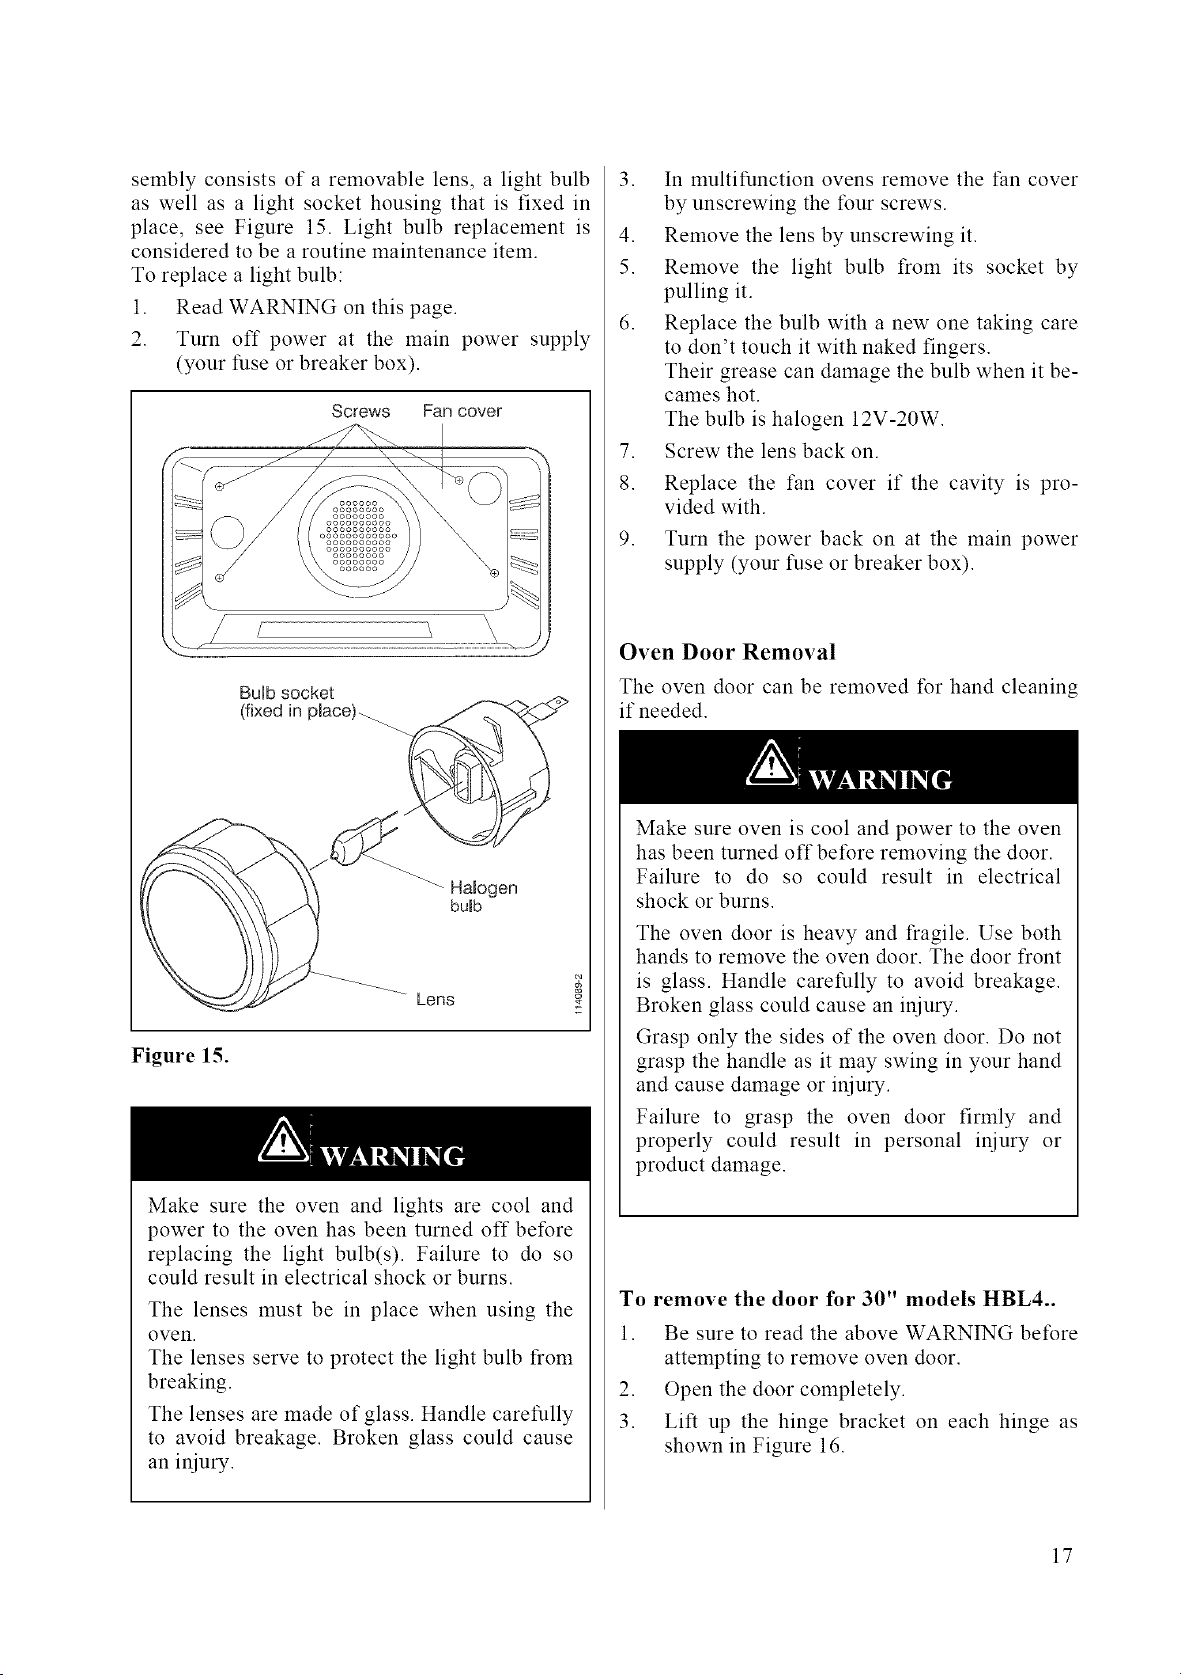
Screws Fan cover
BuHbsocket
(fixed in pmace)-_
Halogen
bumb
Lens
Figure 15.
Make sure the oven and lights are cool and
power to the oven has been turned off before
replacing the light bulb(s). Failure to do so
could result in electrical shock or burns.
The lenses must be in place when using the
oven.
The lenses serve to protect the light bulb from
breaking.
The lenses are made of glass. Handle carefully
to avoid breakage. Broken glass could cause
an injury.
3. In multifunction ovens remove the t:an cover
by unscrewing the four screws.
4. Remove the lens by unscrewing it.
5. Remove the light bulb from its socket by
pulling it.
6. Replace the bulb with a new one taking care
to don't touch it with naked fingers.
Their grease can damage the bulb when it be-
cames hot.
The bulb is halogen 12V-20W.
7. Screw the lens back on.
8. Replace the fan cover if the cavity is pro-
vided with.
9. Turn the power back on at the main power
supply (your fuse or breaker box).
Oven Door Removal
The oven door can be removed for hand cleaning
if needed.
Make sure oven is cool and power to the oven
has been turned off before removing the door.
Failure to do so could result in electrical
shock or burns.
The oven door is heavy and fragile. Use both
hands to remove the oven door. The door front
is glass. Handle carefully to avoid breakage.
Broken glass could cause an injury.
Grasp only the sides of the oven door. Do not
grasp the handle as it may swing in your hand
and cause damage or injury.
Failure to grasp the oven door firmly and
properly could result in personal injury or
product damage.
To remove the door for 30" models HBL4..
1. Be sure to read the above WARNING before
attempting to remove oven door.
2. Open the door completely.
3. Lift up the hinge bracket on each hinge as
shown in Figure 16.
17
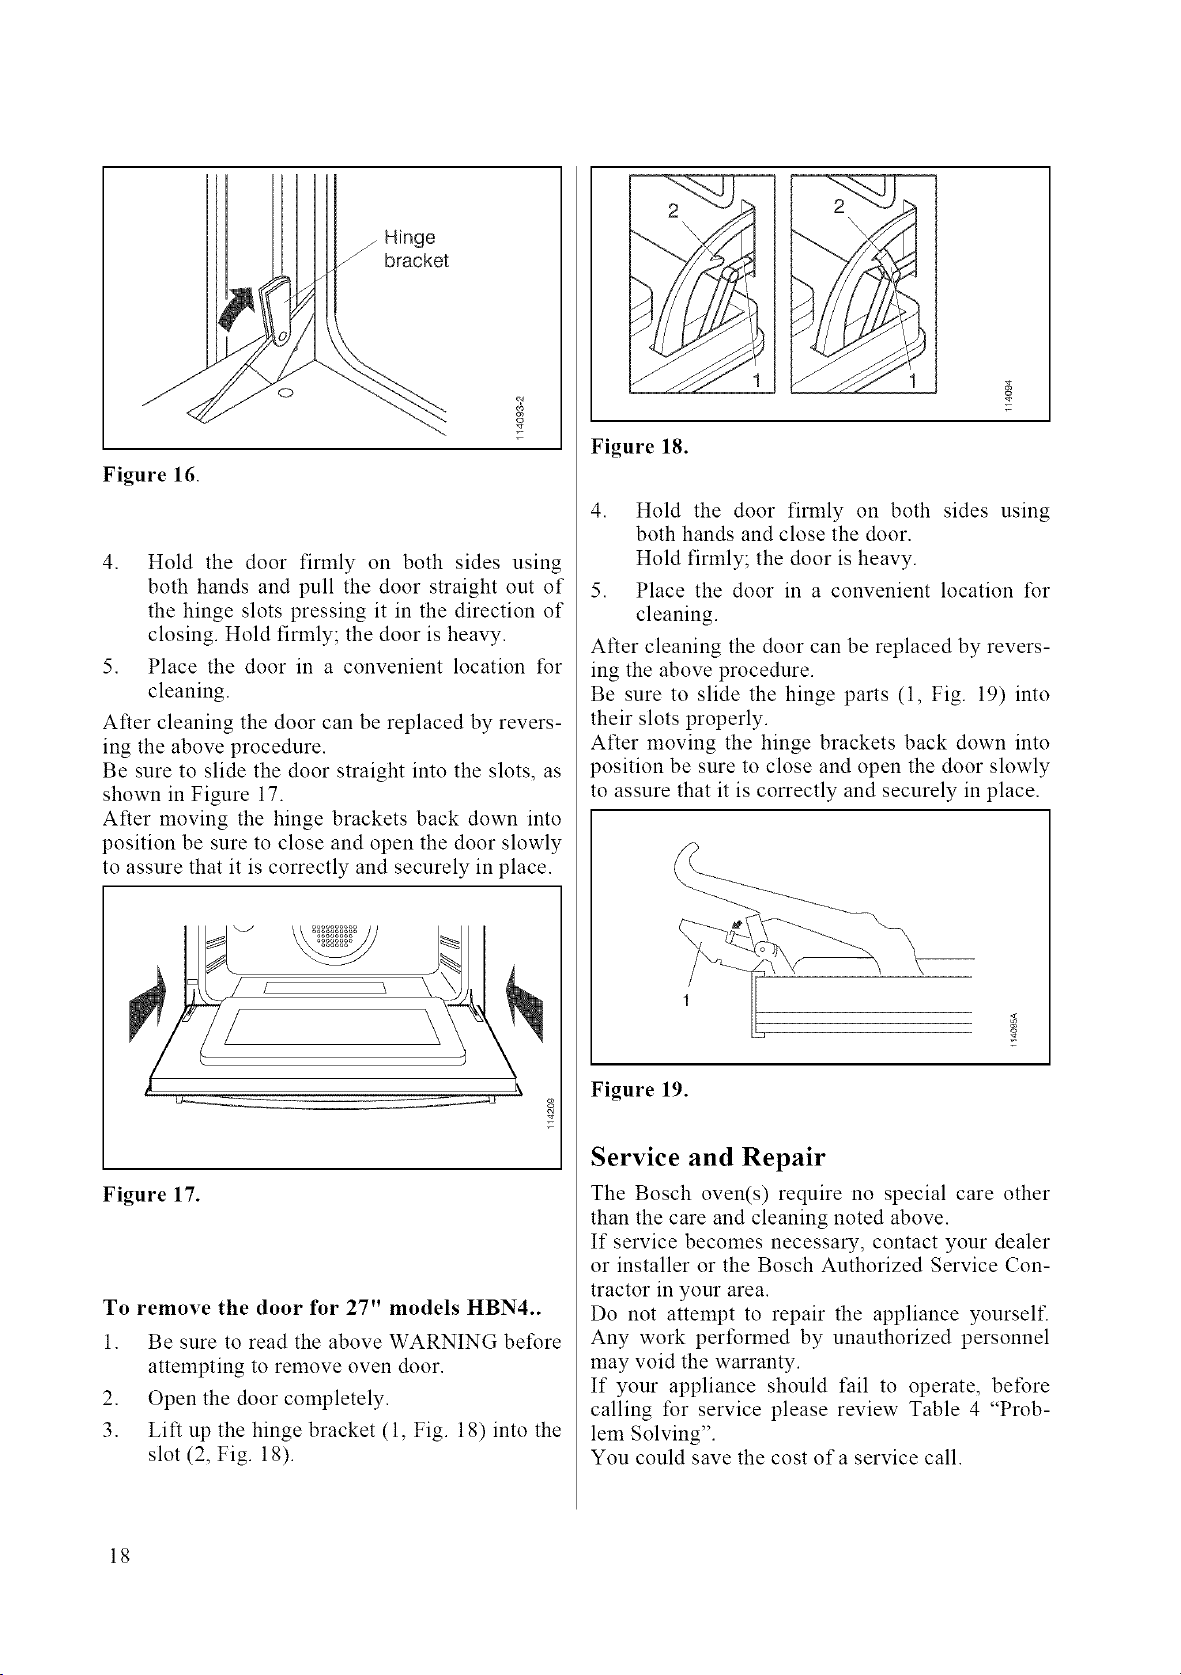
/Hinge
bracket
o
Figure 16.
c_
4. Hold the door firmly on both sides using
both hands and pull the door straight out of
the hinge slots pressing it in the direction of
closing. Hold firmly; the door is heavy.
5. Place the door in a convenient location for
cleaning.
After cleaning the door can be replaced by revers-
ing the above procedure.
Be sure to slide the door straight into the slots, as
shown in Figure 17.
After moving the hinge brackets back down into
position be sure to close and open the door slowly
to assure that it is correctly and securely in place.
Figure 17.
To remove the door for 27" models HBN4..
1. Be sure to read the above WARNING before
attempting to remove oven door.
2. Open the door completely.
3. Lift up the hinge bracket (1, Fig. 18) into the
slot (2, Fig. 18).
1
Figure 18.
4. Hold the door firmly on both sides using
both hands and close the door.
Hold firmly; the door is heavy.
5. Place the door in a convenient location for
cleaning.
After cleaning the door can be replaced by revers-
ing the above procedure.
Be sure to slide the hinge parts (1, Fig. 19) into
their slots properly.
After moving the hinge brackets back down into
position be sure to close and open the door slowly
to assure that it is correctly and securely in place.
Figure 19.
Service and Repair
The Bosch oven(s) require no special care other
than the care and cleaning noted above.
If service becomes necessary, contact your dealer
or installer or the Bosch Authorized Service Con-
tractor in your area.
Do not attempt to repair the appliance yourself.
Any work performed by unauthorized personnel
may void the warranty.
If your appliance should fail to operate, before
calling for service please review Table 4 "Prob-
lem Solving".
You could save the cost of a service call.
18
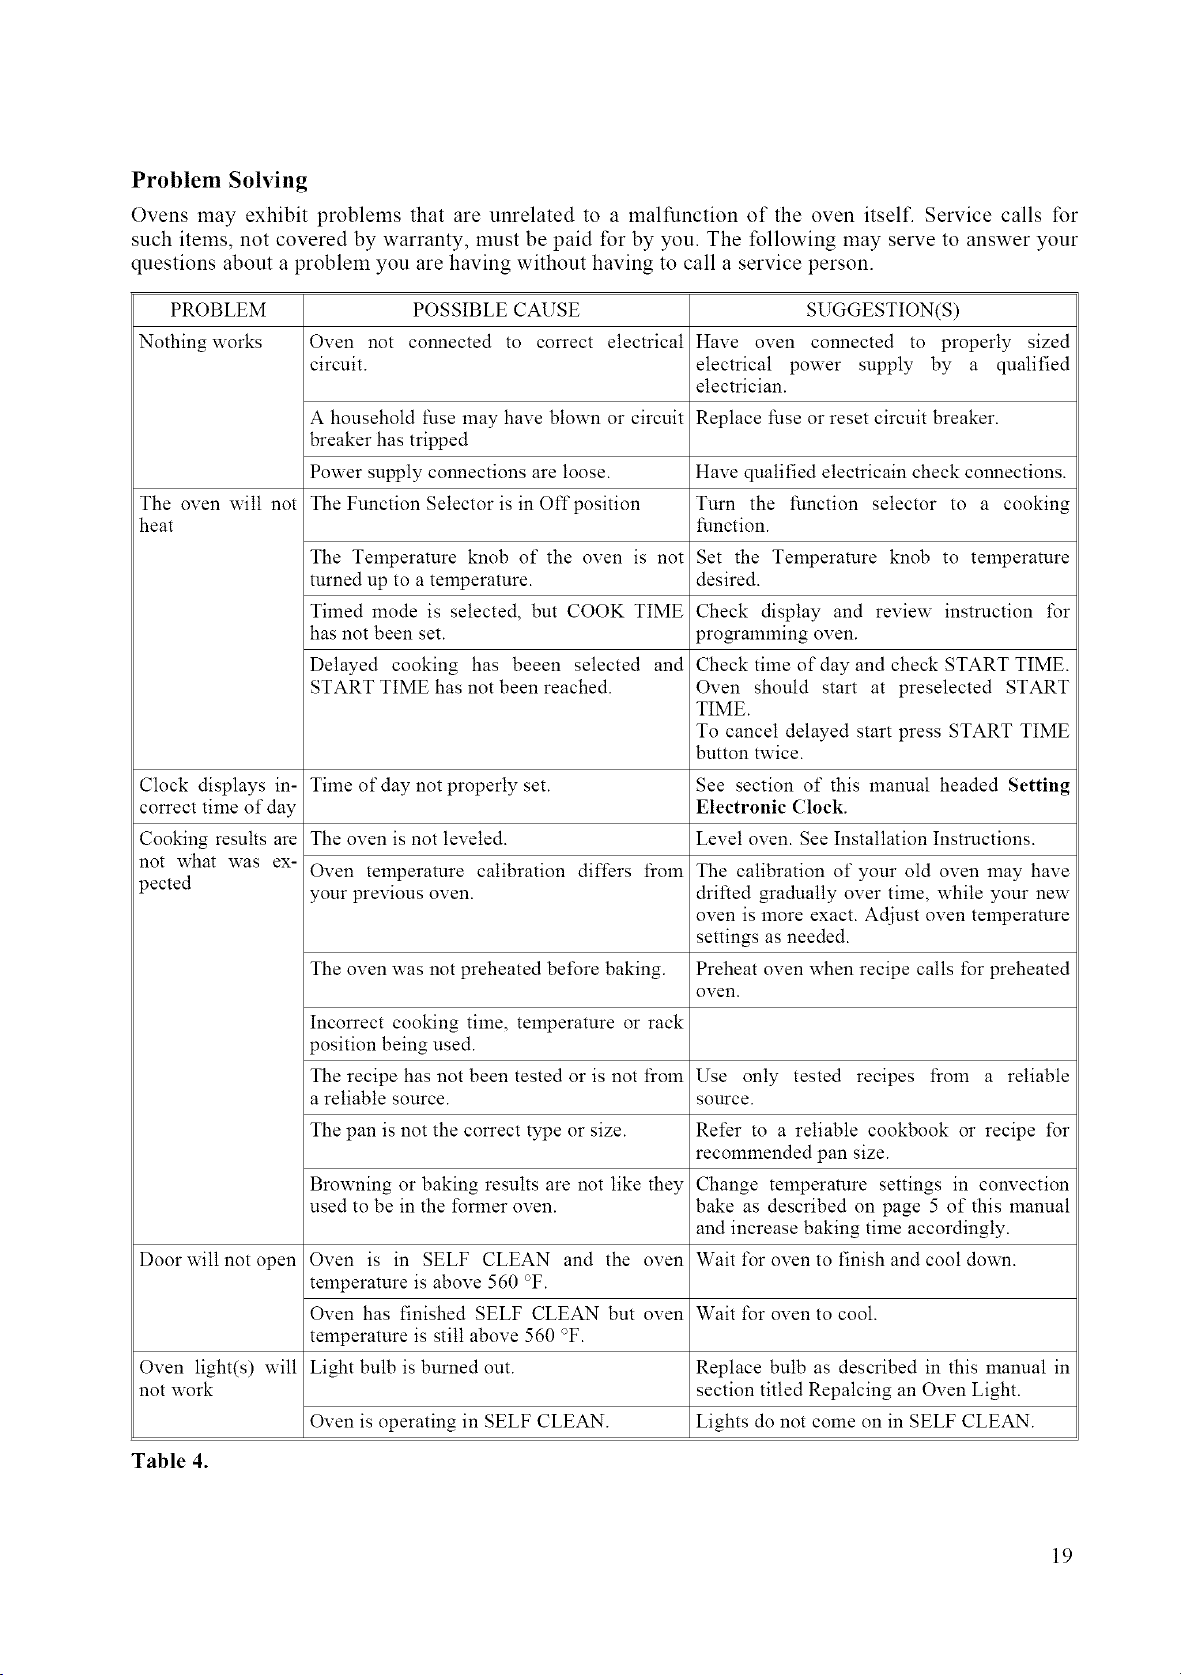
Problem Solving
Ovens may exhibit problems that are unrelated to a malfunction of the oven itself. Service calls for
such items, not covered by warranty, must be paid for by you. The following may serve to answer your
questions about a problem you are having without having to call a service person.
PROBLEM POSSIBLE CAUSE SUGGESTION(S)
Nothing works Oven not connected to correct electrical Have oven connected to properly sized
circuit, electrical power supply by a qualified
electrician.
A household fuse may have blown or circuit Replace fuse or reset circuit breaker.
breaker has tripped
Power supply connections are loose. Have qualified electricain check connections.
The oven will not The Function Selector is in Off position Turn the function selector to a cooking
heat function.
The Temperature knob of the oven is not Set the Temperature knob to temperature
turned up to a temperature, desired.
Timed mode is selected, but COOK TIME Check display and review instruction t\_r
has not been set. pro_amming oven.
Delayed cooking has beeen selected and Check time of day and check START TIME.
START TIME has not been reached. Oven should start at preselected START
TIME.
To cancel delayed start press START TIME
button twice.
Clock displays in- Time ofdaynot properly set. See section of this manual headed Setting
correct time of day Electronic (;lock.
Cooking results are The oven is not leveled. Level oven. See Installation Instructions.
not what was ex- Oven temperature calibration differs from The calibration of your old oven may have
pected your previous oven. drifted gradually over time, while your new
oven is more exact. Adjust oven temperature
settings as needed.
The oven was not preheated before baking. Preheat oven when recipe calls t\_rpreheated
oven.
Incorrect cooking time, temperature or rack
position being used.
The recipe has not been tested or is not from Use only tested recipes from a reliable
a reliable source, source.
The pan is not the correct type or size. Refer to a reliable cookbook or recipe t\_r
recommended pan size.
Browning or baking results are not like they Change temperature settings in convection
used to be in the forlner oven. bake as described on page 5 of this manual
and increase baking time accordingly.
Door will not open Oven is in SELF CLEAN and the oven Wait t\_r oven to finish and cool down.
temperature is above 560 °F.
Oven has finished SELF CLEAN but oven Wait for oven to cool.
temperature is still above 560 °F.
Oven light(s) will Light bulb is burned out. Replace bulb as described in this manual in
not work section titled Repalcing an Oven Light.
Oven is operating in SELF CLEAN. Lights do not come on in SELF CLEAN.
Table 4.
19
If You Need Assistance or Service
If after reviewing Table 4 you decide that you do
require service for your oven contact your dealer
or installer or the Bosch Authorized Service Con-
tractor in your area. Do not attempt to repair the
appliance yourself. Any work performed by un-
authorized personnel may void the warranty.
If you are having a problem with your Bosch oven
and are not pleased with the service you received:
• First, please contact your installer or the Bosch
Authorized Service Contractor in your area and
explain to them why you are not satisfied. This
will usually correct the problem.
• If after working with your installer or service
person the problem still has not been resolved
to your satisfaction, please let us know by
either writing to us at,
BSH Home Appliances
5551 McFadden Avenue,
Huntington Beach, CA 92649
or, calling us at, 800/735-4328
Please be sure to include, if writing, or have avail-
able, if calling the following information:
• Model Number
• Serial Number
• Date of Original Purchase
• Date Problem Originated
• Explanation of Problem
Also, if writing, please be sure to include a day-
time phone number.
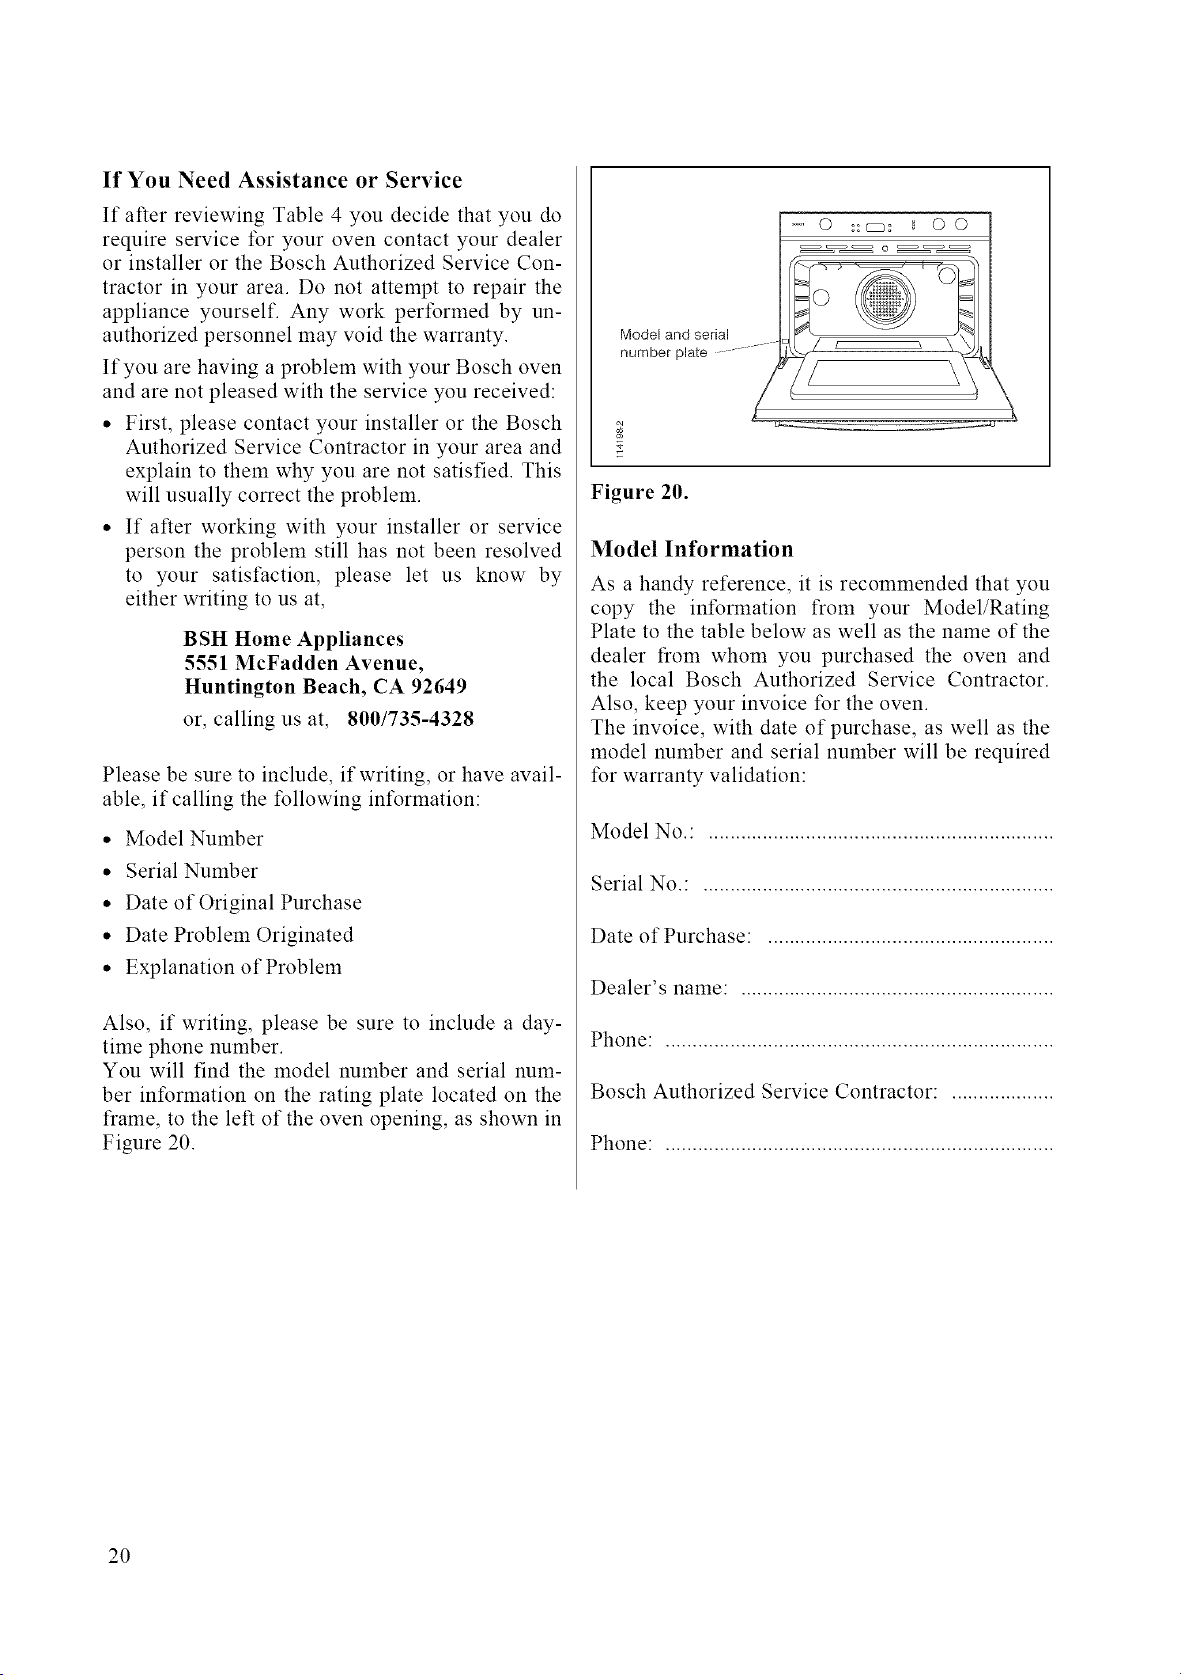
You will find the model number and serial num-
ber information on the rating plate located on the
frame, to the left of the oven opening, as shown in
Figure 20.
Model and serial
number plate ..................
" 0 ::cB: _ 0 0
o
// L _ \
Figure 20.
Model Information
As a handy reference, it is recommended that you
copy the information from your Model/Rating
Plate to the table below as well as the name of the
dealer from whom you purchased the oven and
the local Bosch Authorized Service Contractor.
Also, keep your invoice for the oven.
The invoice, with date of purchase, as well as the
model number and serial number will be required
for warranty validation:
Model No.: ................................................................
Serial No.: .................................................................
Date of Purchase: .....................................................
Dealer's name: ..........................................................
Phone: ........................................................................
Bosch Authorized Service Contractor: ...................
Phone: ........................................................................
2O
Model Warranty
Statement of Limited Warranty
The warranties provided by BSH Home Appliances ("Bosch") in this Statement of Limited Warranty apply only to the Bosch
Electric Buih-ln Ovens ("Built-In Oven") sold to you, the first using purchaser, provided that the Built-In Oven was pur-
chased (1) for your use and not for resale and (2) in the United States or Canada and is located in the country of purchase.
As used in this Statement of Limited Warranty, the term "Date of Installation" shall refer to the earlier of the date the Built-In
Oven is installed or ten (10) business days after the date the Built-In Oven is sold to the first using purchaser.
The warranties stated herein apply only to the first using purchaser and are not transferable.
Standard Limited Warranty
Bosch warrants that its Built-In Oven is free from defects in materials and workmanship for a period of twelve (12) months
fi'om the Date of Installation. During the warranty period, Bosch or its authorized service center will repair or replace, at its
sole option, any Built-In Oven that proves to have been defective under conditions of normal use without charge.
All removed parts and components shall become the property of Bosch, at Bosch's option. All replaced and/or repaired parts
shall assume the identity of the original part for purposes of this warranty and this warranty shall not be extended with re-
spect to such parts.
Other Conditions of the Limited Warranties
The warranties provided in this Statement of Limited Warranty exclude defects or damage resulting from (1) use of the Built-
In Oven in other than its normal and customary manner (commercial use of the Built-In Oven shall not be deemed normal or
customary), (2) misuse, abuse, accidents or neglect, (3) improper operation, maintenance, installation or unauthorized serv-
ice, (4) adjustment or alteration or modification of any kind, (5) a failure to comply with applicable state, local, city, and
county electrical and/or building codes, (6) spills of food or liquid, and (7) external forces such as floods, fires, acts of God
or other circumstances beyond Boseh's control.
Also excluded from this warranty are scratches and damages on external surfaces and exposed parts or Built-In Ovens on
which the serial numbers have been altered, defaced or removed.
To the extent allowed by law, this warranty sets out your exclusive remedies with respect to products covered by it, whether
the claim arises in contract or tort (including strict liability, and negligence) or otherwise.
Bosch will not be liable for consequential or incidental damages, losses, or expenses.
THIS WARRANTY IS IN LIEU OF ALL OTHER EXPRESS WARRANTIES. ANY WARRANTY IMPLIED BY LAW,
WHETHER FOR MERCHANTABILITY OR FITNESS FOR A PARTICULAR PURPOSE OR OTHERWISE_ SHALL BE
EFFECTIVE ONLY FOR THE PERIOD THAT THIS EXPRESS WARRANTY IS EFFECTIVE.
No attempt to alter, modify or amend this warranty shall be effective unless authorized in writing by an officer of BSH.
How to Obtain Warranty Service
To obtain warranty service for the Buih-ln Oven, you should contact the nearest Bosch authorized service center.
BSH Home Appliances - 5551 McFadden Avenue, Huntington Beach, CA 92649 800/735-4328.
See Page 20.
21

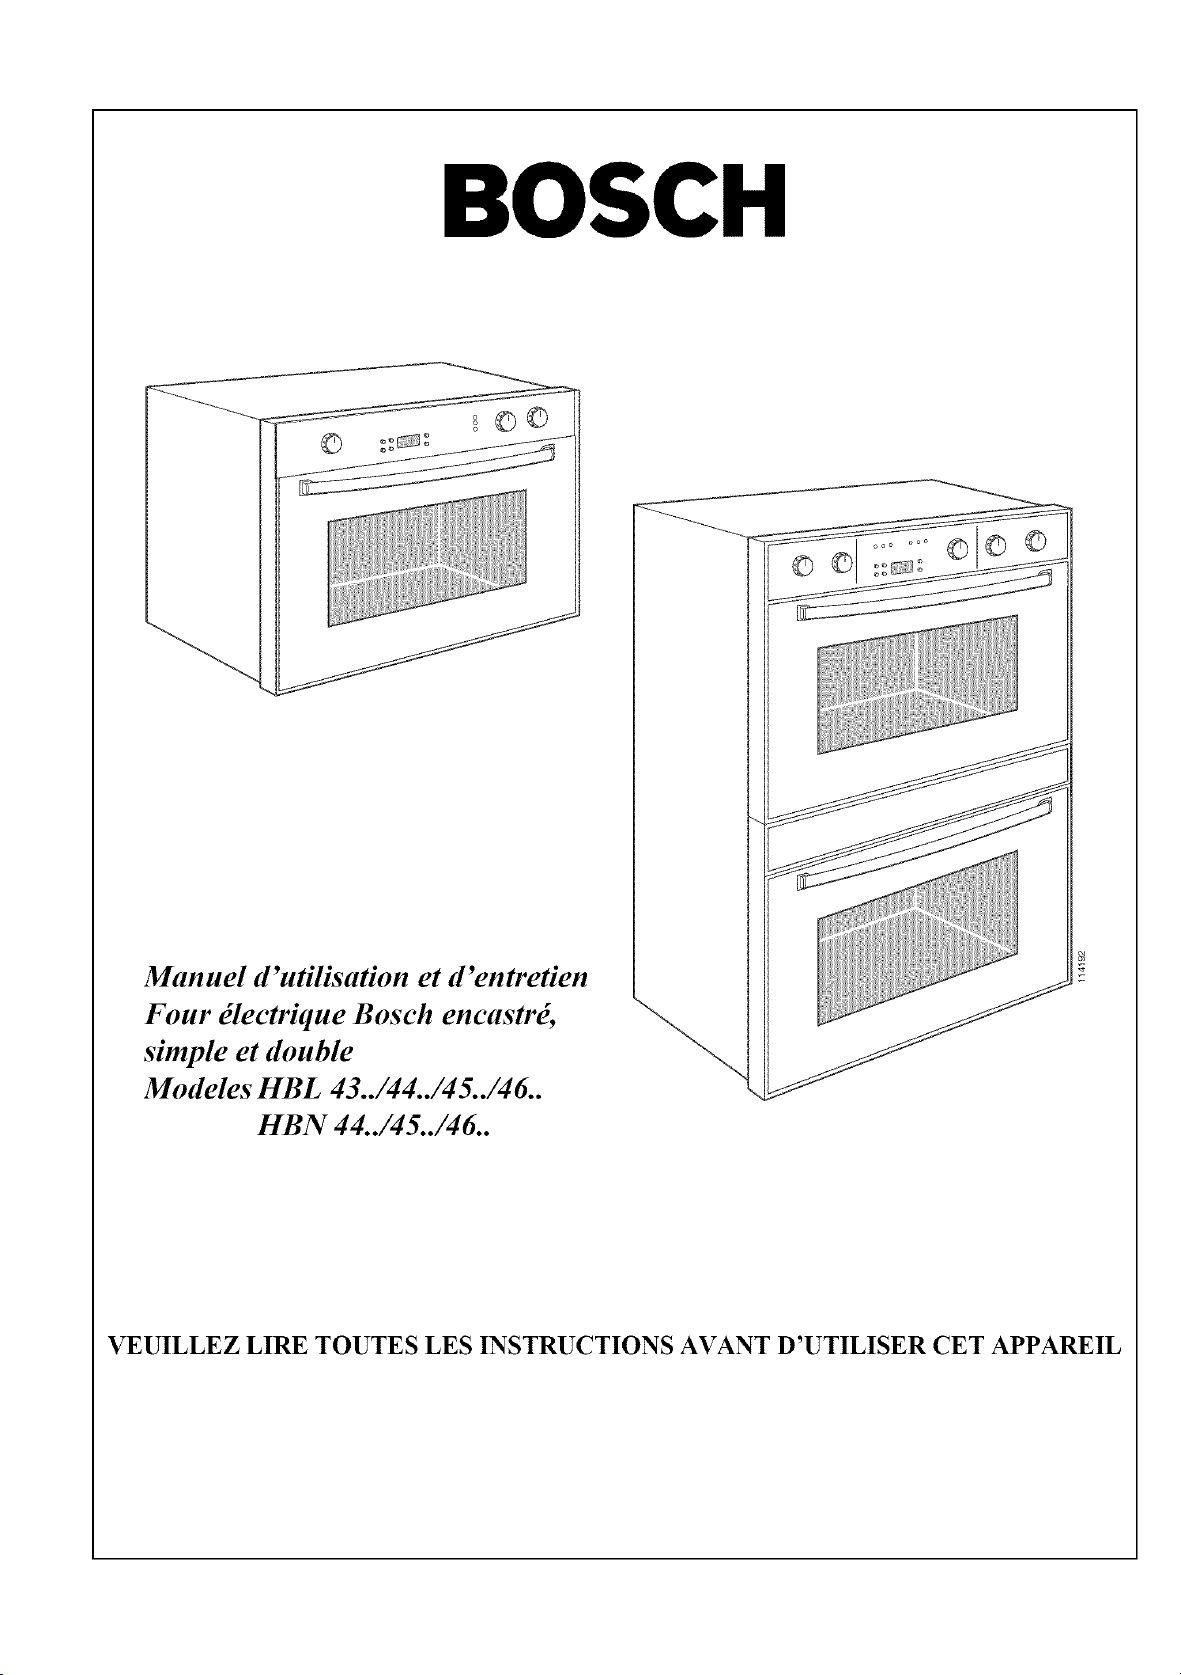
BOSCH
Manuel d'utilisation et d'entretien
Four _lectrique Bosch encastr_,
simple et double
Modeles HBL 43../44../45../46..
HBN 44../45../46..
VEUILLEZ LIRE TOUTES LES INSTRUCTIONS AVANT D'UTILISER CET APPAREIL
Table des mati6res
Conseils de s6curit6 importants ............................................................................................................ 25-26
Caract6ristiques du produit .................................................................................................................. 27
D4tails sur votre tour ....................................................................................................................... 27
Ventilateur de refroidissement ................................................................................................ 27
Position des grilles ................................................................................................................... 27
t_l_ments de cuisson ................................................................................................................. 28
t_l_ments du grilloir ................................................................................................................. 28
t_l_ment chauffant de la convection ........................................................................................ 28
Caract_ristiques des fours _ convection .................................................................................. 28
Fonctionnement du four ........................................................................................................................ 29
ModUles de tour ............................................................................................................................... 29
Utilisation de votre four ................................................................................................................... 29
R_glage des fonctions de cuisson, Tableau 3.................................................................................. 31
Programmeur de tour ....................................................................................................................... 32
R_glage de l'horloge 41ectronique ........................................................................................... 32
Minuteur ................................................................................................................................... 32
Usage des commandes du four ............................................................................................................. 34
Fonctionnement manuel du four ...................................................................................................... 34
Contr61e 41ectronique du tbur .......................................................................................................... 35
Allumage imm4diat/Fermeture automatique .......................................................................... 35
Allumage retard4/Fenneture automatique .............................................................................. 35
Nettoyage et entretien ............................................................................................................................ 38
Utilisation de la fonction auto-nettwage ........................................................................................ 38
Remplacement de la lampe du four ................................................................................................. 39
Enl_vement de la porte du four ........................................................................................................ 40
Service et r6paration .............................................................................................................................. 41
Solutions des probl_mes, Tableau 4 ................................................................................................ 42
Besoin d'aide .................................................................................................................................... 43
Information sur le modale ................................................................................................................ 43
D_claration de garantie limit6e ............................................................................................................ 44
24
CONSEILS DE SI CU TI IMPORTANTS
MISE EN GARDE - Lors de l'utilisation de cet appareil, il est impdratif de toujours suivre des consignes de
sdcuritd de base afin de rdduire tout risque de feu, de choc dlectrique et/ou de blessures.
,
2.
,
4.
5.
,
,
,
,
10.
11.
12.
13.
14.
15.
Lisez toutes les instructions avant d'utiliser le four.
Installation correcte - Assurez-vous que votre appareil est correctement installd et mis _ la terre
par un technicien qualifid. Demandez _ l'installateur de vous montrer off se trouvent les fusibles
ou la boite du disjoncteur et comment couper le courant de votre four.
Ne faites pas fonctionner le four s'il est endommag_ ou ne fonctionne pas correctement.
N'utilisez jamais votre appareil pour chauffer la piece.
Ne laissez pas les enfants seuls ou sans surveillance dans une piece off l'appareil est en marche.
Ne leur permettez jamais de s'asseoir ou de grimper sur n'importe quelle partie de l'appareil.
Ne touchez pas les 616ments chauffants ou les surfaces int6rieures du four - Mdme si les
dldlnents chaufflants ne sont pas de couleur rouge, ils peuvent dtre tr_s chauds. Les surfaces
intdrieures et les grilles peuvent aussi _tre assez chaudes pour causer des brfilures. Durant et
apr_s l'utilisation de votre appareil, ne touchez pas les dldlnents chauffiants et ne laissez aucun
lnatdriau inflammable en contact avec ceux-ci. Laissez le four se refroidir.
Portez des v_tements ad_quats - t_vitez de porter des v_tements amples ou qui pendent lorsque
vous cuisinez. Les tissus peuvent s'enflammer et causer des brfilures graves.
Utilisez seulement des mitaines s_ches - Le contact des mitaines humides ou mouilldes avec
une surPace chaude, peut causer des brfilures dues _ la vapeur. Ne touchez pas les dldlnents
chauffiants avec des mitaines. N'utilisez pas de serviette ou de linge dpais pour manipuler les
ustensiles.
Service - Ne rdparez nine remplacez aucune pi6ce de l'appareil _ moins que ce ne soit
spdcifiquement recommandd dans ce manuel. Toute autre rdparation doit etre rdfdrde il un
technicien qualifid.
Rangement d'articles dans ou sur l'appareil - Ne rangez aucun article inflammable dans le
four.
Ne jetez jamais d'eau sur de la graisse en feu - l_touffez les flammes _ l'aide d'un couvercle ou
utilisez un extincteur chimique sec ou _ mousse.
Faites attention en ouvrant la porte - Laissez l'air chaud ou la vapeur s'dchapper avant de
sortir ou de remuer les aliments.
Ne faites pas chauffer d'aliments en bolte sans avoir au pr_alable ouvert la bolte - La
pression dans une boite fermde peut causer une explosion et des blessures.
Gardez toujours les ouvertures de ventilation libres de toute obstruction.
Installation des grilles de four - Placez toujours les grilles de four il l'endroit ddsird quand le
four est froid. Si vous devez ddplacer la grille alors que le four est chaud, prenez soin de ne pas
toucher les dldments chauffiants avec vos mitaines.
25
CONSEILS DE SI CU TI IMPORTANTS
16. Ne nettoyez pas le joint de la porte - Le joint de la porte est essentiel/_ la bonne fermemre du four.
Prenez soin de ne pas le frotter, l'endommager ou le d@lacer.
17. N'utilisez pas de nettoyant pour four - N'utilisez aucun nettoyant ni rev_tement protecteur pour four
sur n'importe quelle piece du four.
18. Ne nettoyez que les pi_ces list_es dans le manuel.
19. Avant d'auto-nettoyer le four - Enlevez les grilles du four et autres ustensiles.
20. V_rifiez que l'appareil est _teint lorsque vous avez fini - A_ la fin de la cuisson, assurez-vous que tous
les boutons de colrnnande du four sont/_ la position OFF.
21. MISE EN GARDE - Ne rangez pas d'articles qui peuvent int6resser les enfants dans les armoires
au-dessus du four. Si un enfant grimpe sur l'appareil pour aller chercher ces articles, il pourrait se blesser
sdrieusement.
22. D_branchez toujours le four de ralimentation _lectrique avant de le faire r_parer.
26
Caract6ristiques du produit
Panneau de
commande
Niveau no 4
Niveau no 3
Niveau no 2
Niveau no 1
Plaque du modele et
du num@o de s@ie
Lampes halogene
Grilloir et 6[6ments du haut
\
cz]_
O
O©
f \
convection (non visible)
et ventilateur situes a Farriere de [a ca-
vite du four (Modeles a convection
seulement)
Elements de cuisson J
(sous [e fond du four)
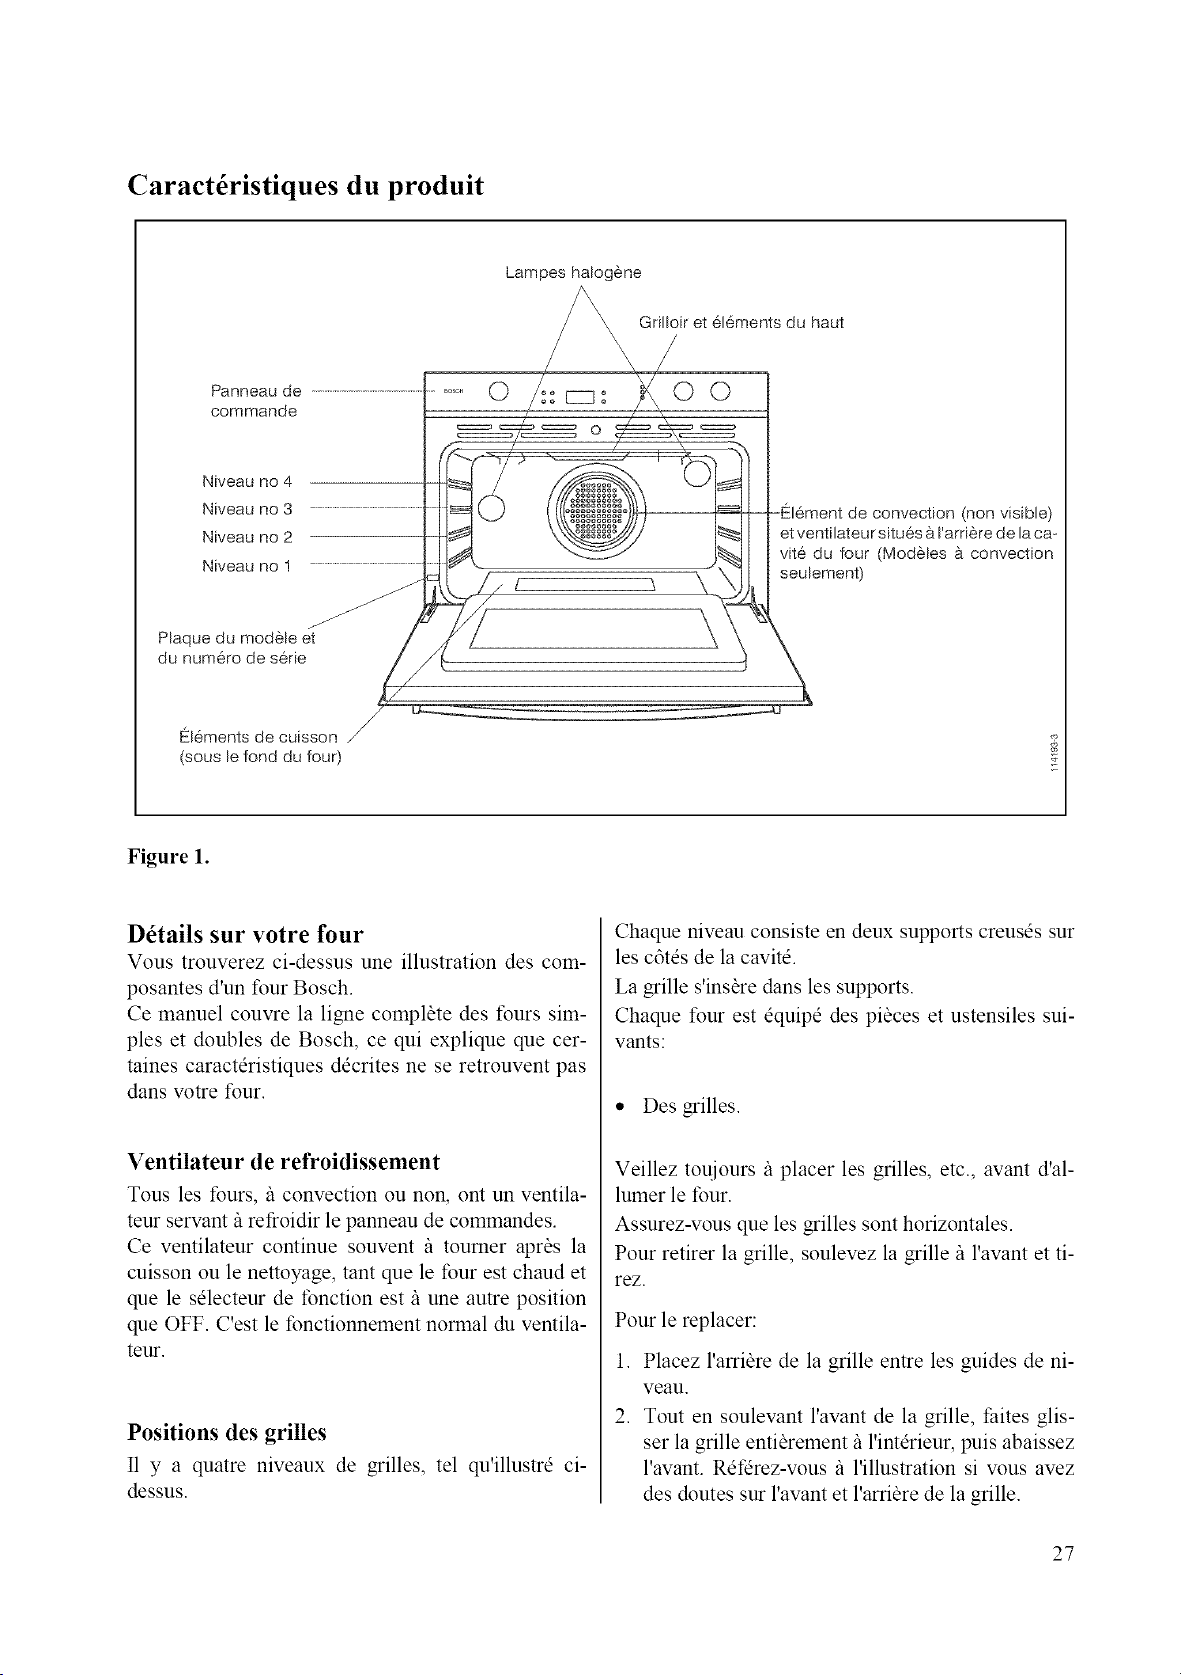
Figure 1.
D6tails sur votre four
Vous trouverez ci-dessus une illustration des com-
posantes d'un four Bosch.
Ce manuel couvre la ligne complete des tours sim-
ples et doubles de Bosch, ce qui explique que cer-
taines caractdristiques ddcrites ne se retrouvent pas
dans w_tre four.
Ventilateur de refroidissement
Tousles tours, /_ convection ou non, ont un ventila-
teur servant/_ refroidir le panneau de commandes.
Ce ventilateur continue souvent /_ toumer apras la
cuisson ou le nettoyage, tant que le lbur est chaud et
que le sdlecteur de fonction est/_ une autre position
que OFF. C'est le fonctionnement normal du ventila-
teur.
Positions des grilles
I1 y a quatre niveaux de grilles, tel qu'illustrd ci-
dessus.
Chaque niveau consiste en deux supports creusds sur
les c6tds de la cavitd.
La grille s'insare dans les supports.
Chaque four est dquipd des pi_ces et ustensiles sui-
vants:
,, Des grilles.
Veillez touiours/_ placer les grilles, etc., avant d'al-
lumer le four.
Assurez-vous que les grilles sont horizontales.
Pour retirer la grille, soulevez la grille/_ l'avant et ti-
rez.
Pour le replacer:
1. Placez l'arribre de la grille entre les guides de ni-
veau.
2. Tout en soulevant l'avant de la grille, faites glis-
ser la grille entibrement fil'intdrieur, puis abaissez
l'avant. Rdfdrez-vous fi l'illustration si wins avez
des doutes sur l'avant et l'arribre de la grille.
27

Les _l_ments de cuisson
Les fours Bosch sont munis de deux elements de
cuisson: un situd en haut du tour et un autre situe
sous le fond de la cavite du four pour faciliter le
nettoyage de la cavite du timr.
Avant
-2 fournies avec le four thermique singulier
-2 fournies avec le four a convection singulier
-4 fournies avec le four douNe
Figure 2.
l_lements du grilloir
Les elements du grilloir des fours Bosch sont situes
en haut de la cavite du tbur. Ne touchez pas ces ele-
ments chauffants et evitez tout contact avec vos mi-
taines. N'utilisez pas de serviette ou de gros chit'fons
pour retirer un ustensile, ils pourraient prendre feu.
l_16ment chauffant de la convection
Si vous avez un four/_ convection, vous trouverez
l'element/_ convection (non visible) et le ventilateur
il l'arri_re de la cavite du four. La cotnbinaison de cet
element et du ventilateur effectue la cuisson dans le
mode "convection bake". Le ventilateur est touiours
en marche lorsque le four est en mode convection,
refdrez-vous au Tableau 3.
Caract6ristiques des fours h convection
Les fours simples et doubles sont offerts en module
conventionnel thermique ou en modules it convec-
tion. Nombreux sont ceux qui se posent des ques-
tions sur le syst_me it convection et sur les raisons
pour lesquelles il est supdrieur au syst_me thermi-
que. Vous trouverez ci-dessous une br_ve explica-
tion du fonctionnement d'un four it convection et de
ses avantages.
Dans les Fours/_ Convection Bosch, (Genuine Eu-
ropean Convection System TM) les 3 elements, le
ventilateur et le panneau de ventilation, l'air chaud
circule/_ travers le tour dans une facon uguale. I1en
resulte plusieurs avantages:
• La conservation des jus et de la saveur
• La cuisson et il permet de rissoler les aliments
• L'@argne du temps et d'energie
• La cuisson /_ de diffdrents niveaux et simulta-
nement
• La deshydratation des herbes, des fruits et des
legumes
• La cuisson de repas complates sans perdre la
saveur des aliments
• La decongelation des aliments
Le livre de cuisine de Bosch fournit quelques
conseils utiles et une description de chaque cycle
de cuisson. I1 fournit en outre des recettes pour
chaque cycle pour vous aider /_ employer votre
nouveau four. Beaucoup de nos recettes ont les ins-
tructions et les temperatures pour le temps de cuis-
son du cycle normal. En ragle generale, la plupart
des recettes peuvent atre cuisinaes avec les meil-
leurs resultats dans un des cycles de convention,
vous reduisez la temperature de 25°F et vous veri-
fiez /_ ce point le minimum de cuisson sugger&
Quand vous t:aites de cuisson sur plus de 1 grille on
doit augmenter le temps de cuisson, quelques minu-
tes en plus pour chaque grille additionnelle.
Comme chaque gofit varie, vous devrez essayer de
mettre le temps de cuisson exact ainsi que la juste
temperature pour obtenir de bons resultats.
Vous devrez cuisiner avec votre nouveau four
d'une facon diffdrente de votre vieux four.
Nous vous conseillons d'employer les diffdrents
cycles de cuisine pour quelques mois et vous de-
vrez vous refdrer au livre de cuisine Bosch pour
vous t:amiliariser avec votre four.
I1 est deconseille d'employer des thermom_tres /_
four que vous pourrez trouver dans de grands ma-
gasins pour verifier la temperature du four. Ils
pourraient atre inexacts et ils ne pourraient pas re-
pondre aux changements de temperature.
28

Fonctionnement du four
ModUles de fours
I1y a 21 modbles diffdrents de tours Bosch (voir Ta-
bleaux 1 et 2 ci-dessous). Les fours Bosch sont of-
ferts en 27" ou 30" en blanc, noir ou acier inoxyda-
ble, en configuration simple ou double et en modble
standard, de type thermique ou de type il convection.
Les tours doubles sont offerts avec un seul four/_
convection ou les deux il convection.
Modbles it four
simple
HBL 432A UC
HBL 435A UC
HBL 436A UC
HBL 442A UC
HBN 442A UC
HBL 445A UC
HBN 445A UC
HBL 446A UC
HBN 446A UC
Tableau 1.
Convection Couleurs
Blanc Acier Noir
inox.
NON X
NON X
NON
OUI
OUI X
X
OUI X
Modhles it four
duoble
HBL 452A UC
HBN 452A UC
HBL 455A UC X
HBN 455A UC
HBL 456A UC X
HBN 456A UC
HBL 462A UC X
HBN 462A UC
HBL 465A UC X
HBN 465A UC
HBL 466A UC X
HBN 466A UC
Tableau 2.
Convection Couleurs
(Haut/Bas) Blanc Acier Noir
inox.
OUI/NON X
OUI/NON
OUI/NON
OUI/OUI
OUI/OU[
OUI/OU[
En raison des nombreux modales offerts, toutes les
caractdristiques ddcrites ci-dessous peuvent ne pas
s'appliquer/_ votre four.
Utilisation de votre four
I1 est tr_s important d'apprendre/_ bien se servir de
son four pour obtenir les meilleurs rdsultats. Vous
truuverez ci-apr_s des infonnations importantes
pour l'utilisation efficace et sdcuritaire de votre four.
Avant d'utiliser le four pour la premiere fois
Assurez-vous d'enlever tousles produits d'emballage
et autre matdriel du four. Tout matdriel de cette sorte
laissd/_ l'intdrieur du tour risque de fondre ou de brfi-
ler quand le four sera mis en marche.
Panneau de commandes
Tousles fours comportent les commandes suivantes,
tel qu'illustrd dans la figure 3:
• Boutons-poussoirs du programmeur:
- Bouton de l'horloge
- Bouton du minuteur
- Bouton du temps de cuisson (Cook Time)
- Bouton de l'heure de ddbut de cuisson
- Rdglage de l'heure, boutons + et -
• Affichage du programmeur
• Lumi_re allumde/dteinte
• Lumi_re de la chaleur
• Lumi_re de fermemre de la porte
• Bouton sdlecteur manuel/Minuteur
• Boutons de contr61e de tempdramre
• Boutons sdlecteur de mode
La Figure 3 montre en haut le panneau de commande
du four double; en basle panneau de commande du
four simple.
Boutons-poussoirs du programmeur
Ces boutons servent g rdgler et programmer le tour.
Voir les sections Minuteur et Programmation du
four pour plus d'explications sur l'usage de ces bou-
tons.
Afficheur du programmeur
L'afficheur du programaneur effecme plusieurs tbnc-
tions. Lorsque le four est branchd pour la premibre
fois/_ l'dlectricitd, l'afficheur est vide.
Voir les sections Minuteur et Programmation du
four pour plus d'explications sur le rdglage de l'af-
ficheur et la cuisson programmde.
Sdlecteur du mode Minuteur/Manuel
Ce bouton sert _ rdgler le tour sur le mode Minuteur
(Timer) ou sur le mode Manuel.
29
Panneau de c6ntrole
du tbur double
Commande de
temp@ature
Tempe!ature F
_ff
Voyants lumineux
du four inf@ieur
(0
S61ecteur _. _1
os I
de mode
I
Lower Oven
_f 0 0 0
i r _t
_rol
Commandos du
four inf6rieur
Voyants lumineux
du four sup6rieur
O
_2z
B -_
0 0 0
f !i,,/_
A ,eh'urduI
programmeur I
Boutons du
programmeur
_,_r u_rOwn
°°O
Selecteur
Minuteur/Manuel
J
Commandes du programmeur
Selecteur Commande de
de mode temperature
I I
Upper Oven Temperature F
aff aff
Ba_/_Broil Br
Commandos du
four sup6rieur
Panneau de contr61e du _ur single
BOSCH
Selecteur
Minuteur/Manuel
A ,eh'urduI
programmeur
oo 0
_ 0
Temperature F
Commande de
S61ecteur temperature
de mode
Figure 3.
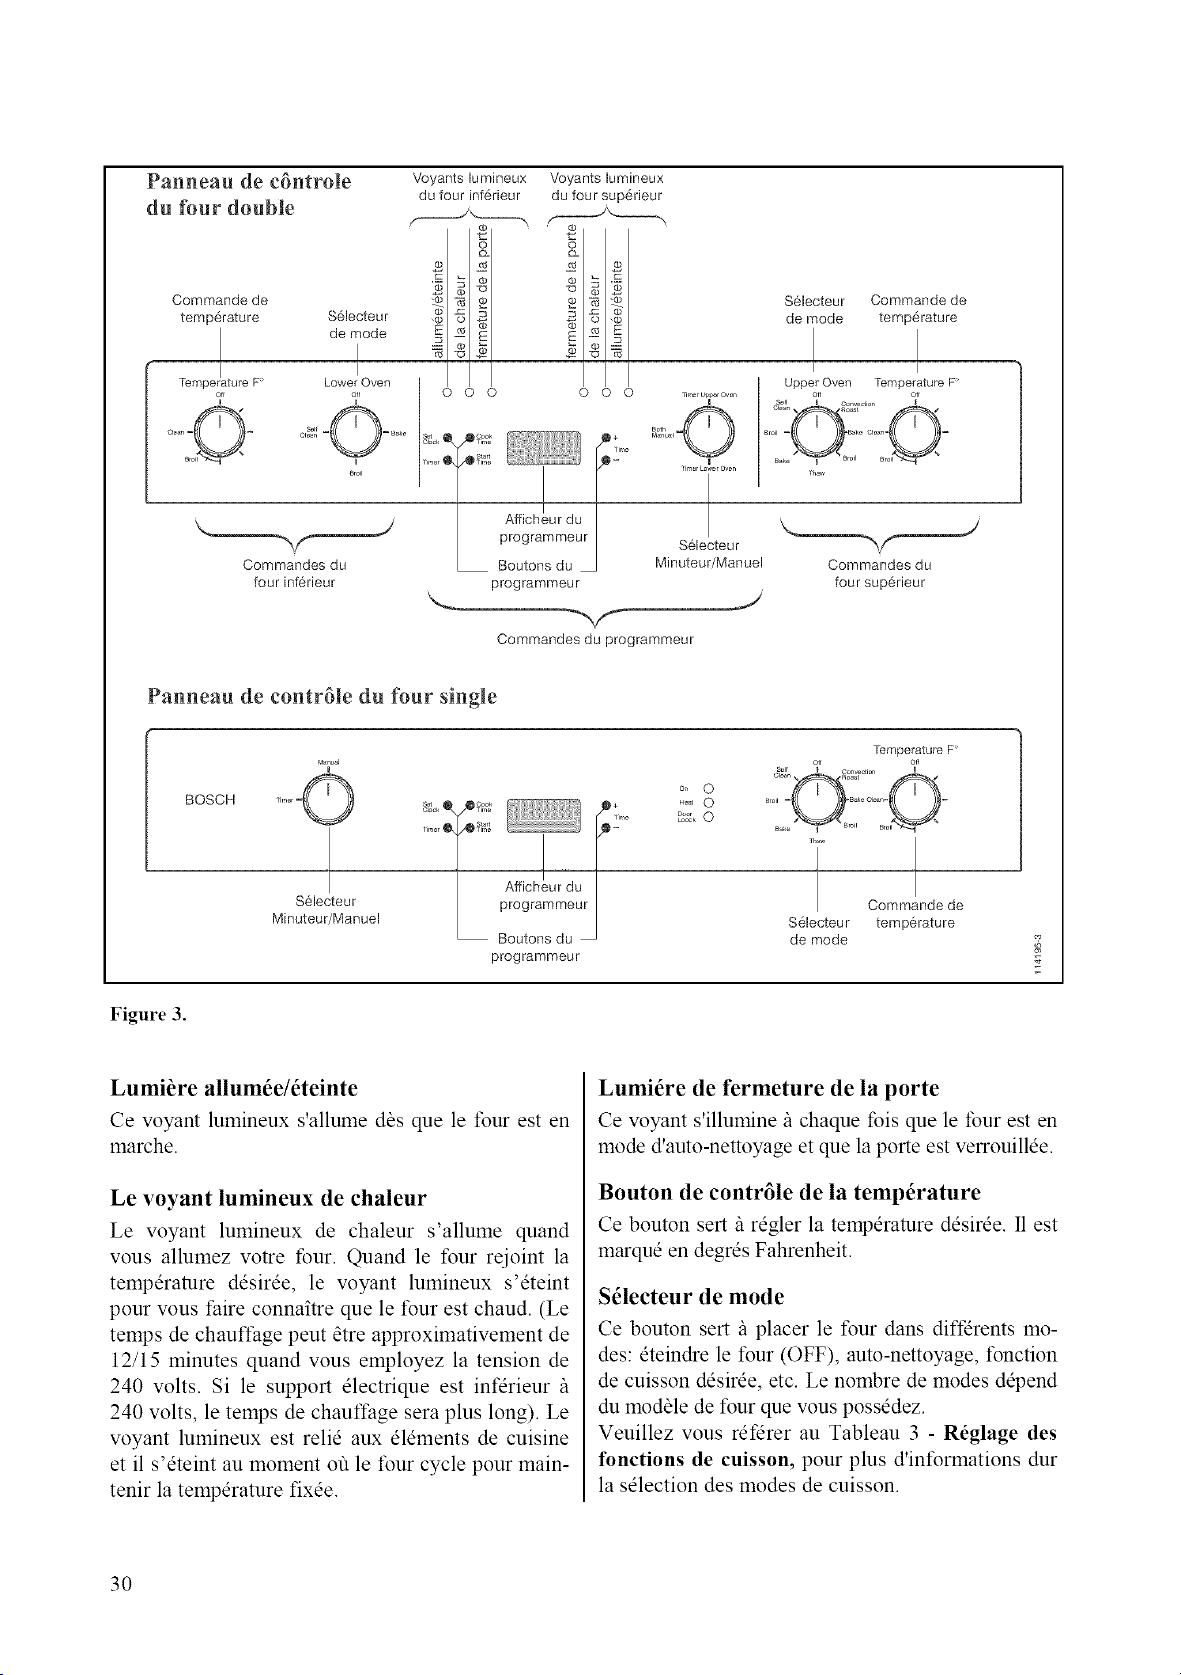
Lumi_re allum6e/6teinte
Ce voyant lumineux s'allume das que le four est en
marche.
Le voyant lumineux de chaleur
Le voyant lumineux de chaleur s'allume quand
vous allumez votre four. Quand le four rejoint la
temperature desir@, le voyant lumineux s'eteint
pour vous faire connaitre que le four est chaud. (Le
temps de chauffage peut atre approximativement de
12/15 minutes quand vous employez la tension de
240 volts. Si le support electrique est infdrieur /_
240 volts, le temps de chauffage sera plus long). Le
voyant lumineux est relie aux elements de cuisine
et il s'eteint au moment ou le four cycle pour main-
tenir la temperature fix@.
Lumit}re de fermeture de la porte
Ce voyant s'illumine/_ chaque fois que le tour est en
mode d'auto-nettoyage et que la porte est verrouill@.
Bouton de contr61e de la temperature
Ce bouton sert/_ regler la temperature desir@. I1 est
marque en degres Fahrenheit.
S61ecteur de mode
Ce bouton sert/_ placer le four dans diffdrents mo-
des: eteindre le tour (OFF), auto-nettoyage, fonction
de cuisson desk@, etc. Le nombre de modes depend
du modale de four que vous possedez.
Veuillez vous ret'drer au Tableau 3 - R6glage des
functions de cuisson, pour plus d'informations dur
la selection des modes de cuisson.
3O

R6glage des fonctions de cuisson
Four thermique
Information sur les fonctions
BROIL (Grilloir) - sert it griller les ali-
ments. Lorsque le four est rdgtd sur
"BROIL", les dldments du haut fonction-
nent et chaufl}nt. Peut s'utiliser avec la
porte ouverte ou fennde.
Note:
Note:
Les dldlnents du bas
sont iltustrds itdes fins
de clartd seulement.
Ils sont en thit simds
sous le plancher de la
cavitd du tbur.
BAKE (R6tissoire) - ce mode est utilisd
pour cuire, r6tir et rdchauffer des 1nets
cuisinds, etc. Lorsque le four est rdgtd sur
"BAKE", l'dtdlnent du haut et celui du bas
fonctionnent et chaufl_nt.
Les fours 'a convection ont les fonctions de cuisson additionnelles suivantes
Convection Bake (Cuisson 'a convec-
tion) - c'est le mode le plus polywatent de
cuisson ou de r&hauffement d'une _ande
varidtd de plats. Iddal pour la pr@aration
d'une grande quantitd de mets sur plu-
sieurs miltes en 11"1_11"1etemps.
Lorsque le four est rdgld sur "Convec-
tion Bake", les dldments pour le cuisson
circulair de l'arri_re t\mctionnent et le
ventilatem se met en marche.
Les dldlnents du bas
sont iltustrds ildes tins
de clartd seulement.
Ils sont en thit simds
sous le plancher de la
cavitd du tbur.
Convection Roast (R6tissage) - sert
lake r6tir les aliments.
Lorsque le *bur est rdgtd sur "Convection
Roast", l'dldment du haut et l'dldlnent du
has fonctionnent. Le ventilateur se met en
marche.
Convection Broil (Grilloir) - sert _ lake
gritler le poisson et les lnorceaux @ais de
viande. La porte dolt _tre fennde durant la
griltade _ convection.
Lorsque le tbur est rdgtd sur "Convection
Broil", les dldments du haut fonctionnent.
Le ventilateur se met en marche
Thaw (D_cong_lation) - sert _ ddconge-
let tes aliments.
Lorsque le four est rdgtd sur "Thaw", au-
cun dldlnent ne fonctionne. Seul le venti-
lateur se met en marche
Tableau 3. R6glages des fonctions de cuisson
31
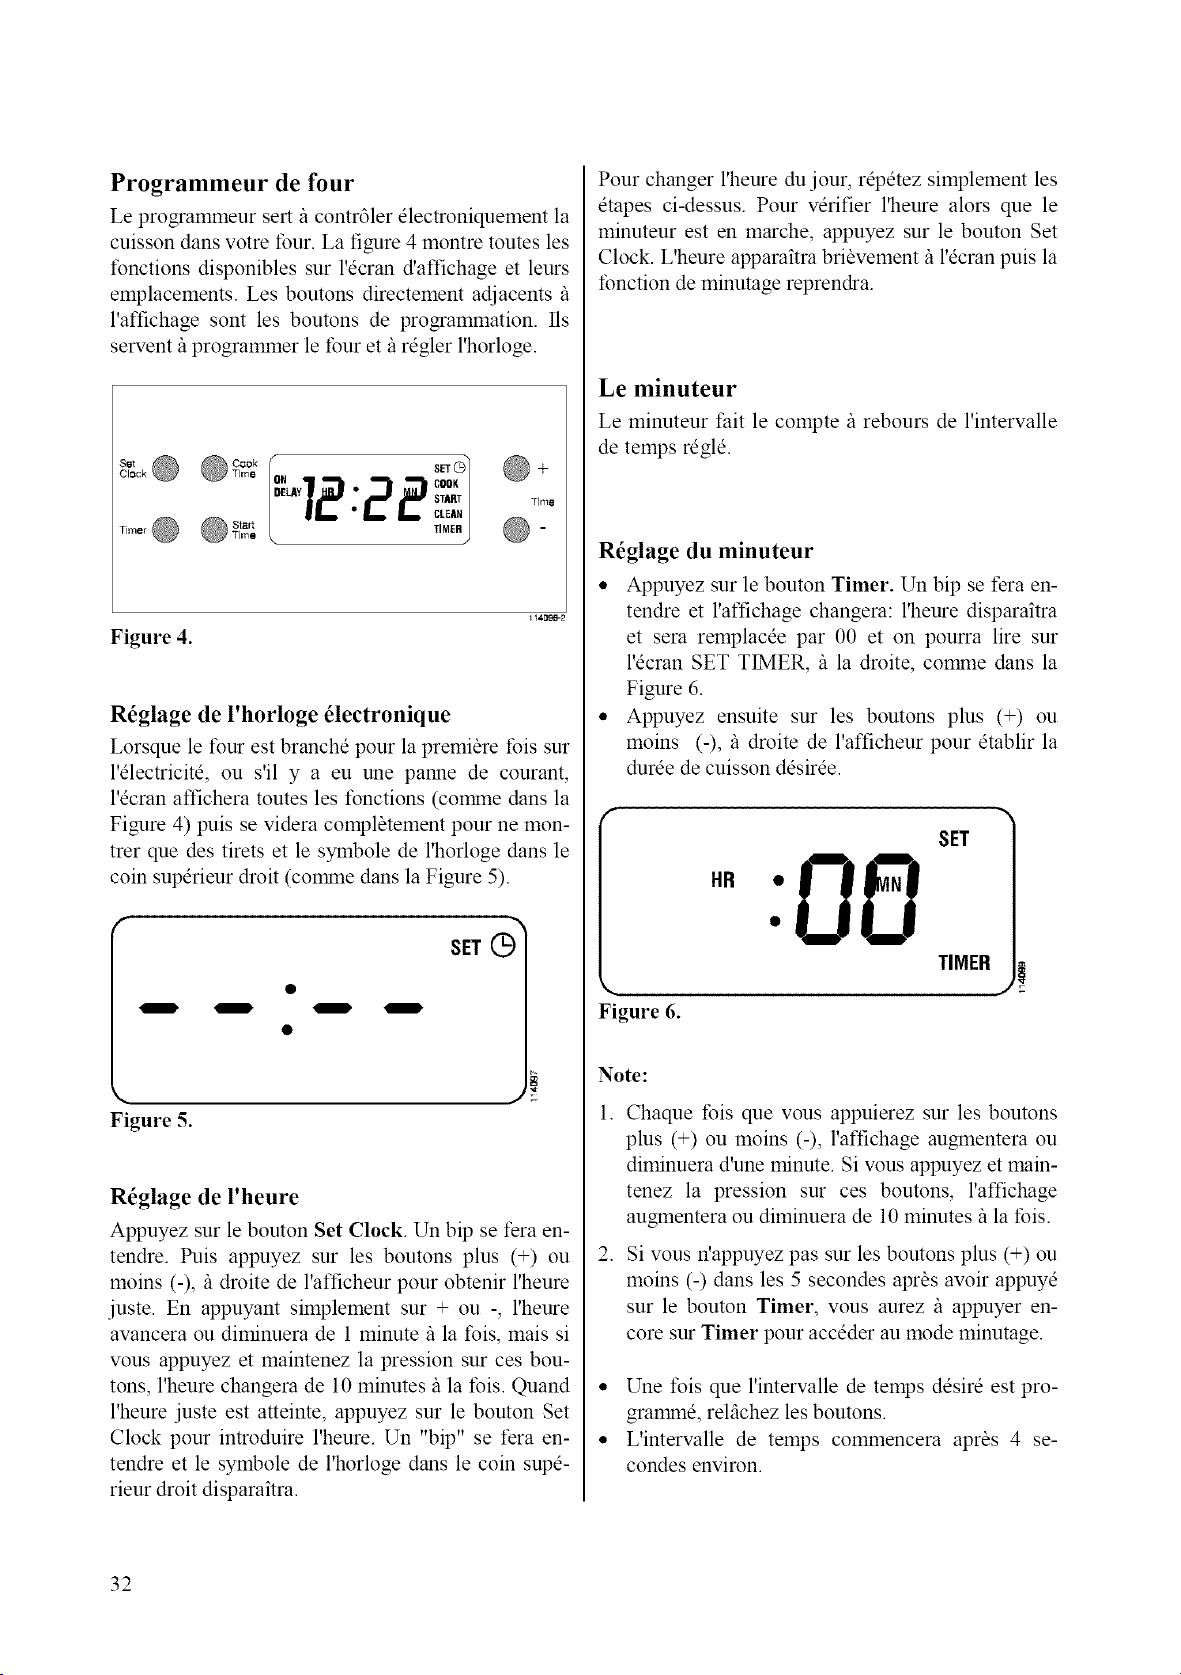
Programmeur de four
Le programmeur sert/_ contr61er electroniquement la
cuisson dans votre four. La figure 4 montre toutes les
fonctions disponibles sur l'ecran d'affichage et leurs
emplacements. Les boutons directement adjacents/_
l'affichage sont les boutons de programmation. Ils
servent il programmer le four et il regler l'horloge.
8_, O
Clock
Timer @
"TO1@+
12:22 °°'
CLEAN
TIMER @ -
Figure 4.
R_glage de l'horloge _lectronique
Lorsque le four est branche pour la premiere Ibis sur
l'electricite, ou s'il y a eu une panne de courant,
l'ecran affichera toutes les tbnctions (corpane clans la
Figure 4) puis se videra compl_tement pour ne mon-
trer que des tirets et le symbole de l'horloge dans le
coin superieur droit (comane dans la Figure 5).
Figure 5.
R_glage de l'heure
Appuyez sur le bouton Set Clock. Un bip se fera en-
tendre. Puis appuyez sur les boutons plus (+) ou
moins (-), il droite de l'afficheur pour obtenir l'heure
juste. En appuyant simplement sur + ou -, l'heure
avancera ou diminuera de 1 minute il la fois, mais si
vous appuyez et maintenez la pression sur ces bou-
tons, l'heure changera de 10 minutes il la fois. Quand
l'heure juste est atteinte, appuyez sur le bouton Set
Clock pour introduire l'heure. Un "bip" se fera en-
tendre et le symbole de l'horloge dans le coin supe-
rieur droit disparaitra.
Pour changer l'heure du jour, repetez simplement les
etapes ci-dessus. Pour verifier l'heure alors que le
minuteur est en marche, appuyez sur le bouton Set
Clock. L'heure apparaitra bribvement/_ l'ecran puis la
fonction de minutage reprendra.
Le minuteur
Le minuteur fait le compte/_ rebours de l'intervalle
de temps regle.
R_glage du minuteur
• Appuyez sur le bouton Timer. Un bip se fera en-
tendre et l'affichage changera: l'heure disparaitra
et sera remplacee par 00 et on pourra lire sur
l'ecran SET TIMER, il la droite, comme dans la
Figure 6.
• Appuyez ensuite sur les boutons plus (+) ou
moins (-), il droite de l'afficheur pour etablir la
duree de cuisson desiree.
Figure 6.
SET
TIMER
Note:
1. Chaque fois que vous appuierez sur les boutons
plus (+) ou moins (-), l'affichage augmentera ou
diminuera d'une minute. Si vous appuyez et main-
tenez la pression sur ces boutons, l'affichage
augmentera ou diminuera de 10 minutes/_ la fois.
2. Si vous n'appuyez pas sur les boutons plus (+) ou
moins (-) dans les 5 secondes aprbs avoir appuye
sur le bouton Timer, vous aurez il appuyer en-
core sur Timer pour acceder au mode minutage.
• Une fois que l'intervalle de temps desire est pro-
gramane, relfichez les boutons.
• L'intervalle de temps commencera aprbs 4 se-
condes environ.
32
• Le mot indicateur Timer restera affichd durant
tout le compte/_ rebours.
• Le minuteur fera le compte/_ rebours en minutes,
jusqu% la dernibre minute, puis il passera aux se-
condes.
• A la fin de l'intervalle de temps programmd, le
mot Timer clignotera et trois bips se feront en-
tendre.
• L'afficheur retournera alors/_ l'heure courante ou
/_ tout autre fonction programande active, et les
bips continueront toutes les 10 secondes jusqu'il
ce que n'importe quel bouton soit touche.
• Dbs qu'un bouton est touche, le mot clignotant
Timer disparait de l'dcran.
Annulation du minuteur
Le mot Timer _tant present il l'_cran, il suffit d'ap-
puyer une seule this sur le bouton Timer pour annu-
ler la fonction de minutage.
Si vous aviez programme d'autres fonctions minutdes
apr_s avoir rdgld le minuteur, vous pouvez rappeler
le mot indicateur Timer/_ l'dcran en appuyant sur le
bouton Timer.
Ensuite, comme pr_cddemment, annulez la fonction
en appuyant une seconde fois sur le bouton Timer.
Apr_s 5 secondes, l'afficheur retournera/_ l'heure du
jour ou/_ tout autre fonction programmde active.
V6rification du minuteur durant une fonc-
tion minut6e
Si vous avez programm_ une autre fonction minut_e
apr_s avoir rdgld le minuteur, vous pouvez rappeler
la tbnction Timer/_ l'dcran en appuyant sur le bou-
ton Timer.
Vous pourrez alors voir combien de temps il reste au
minuteur.
33
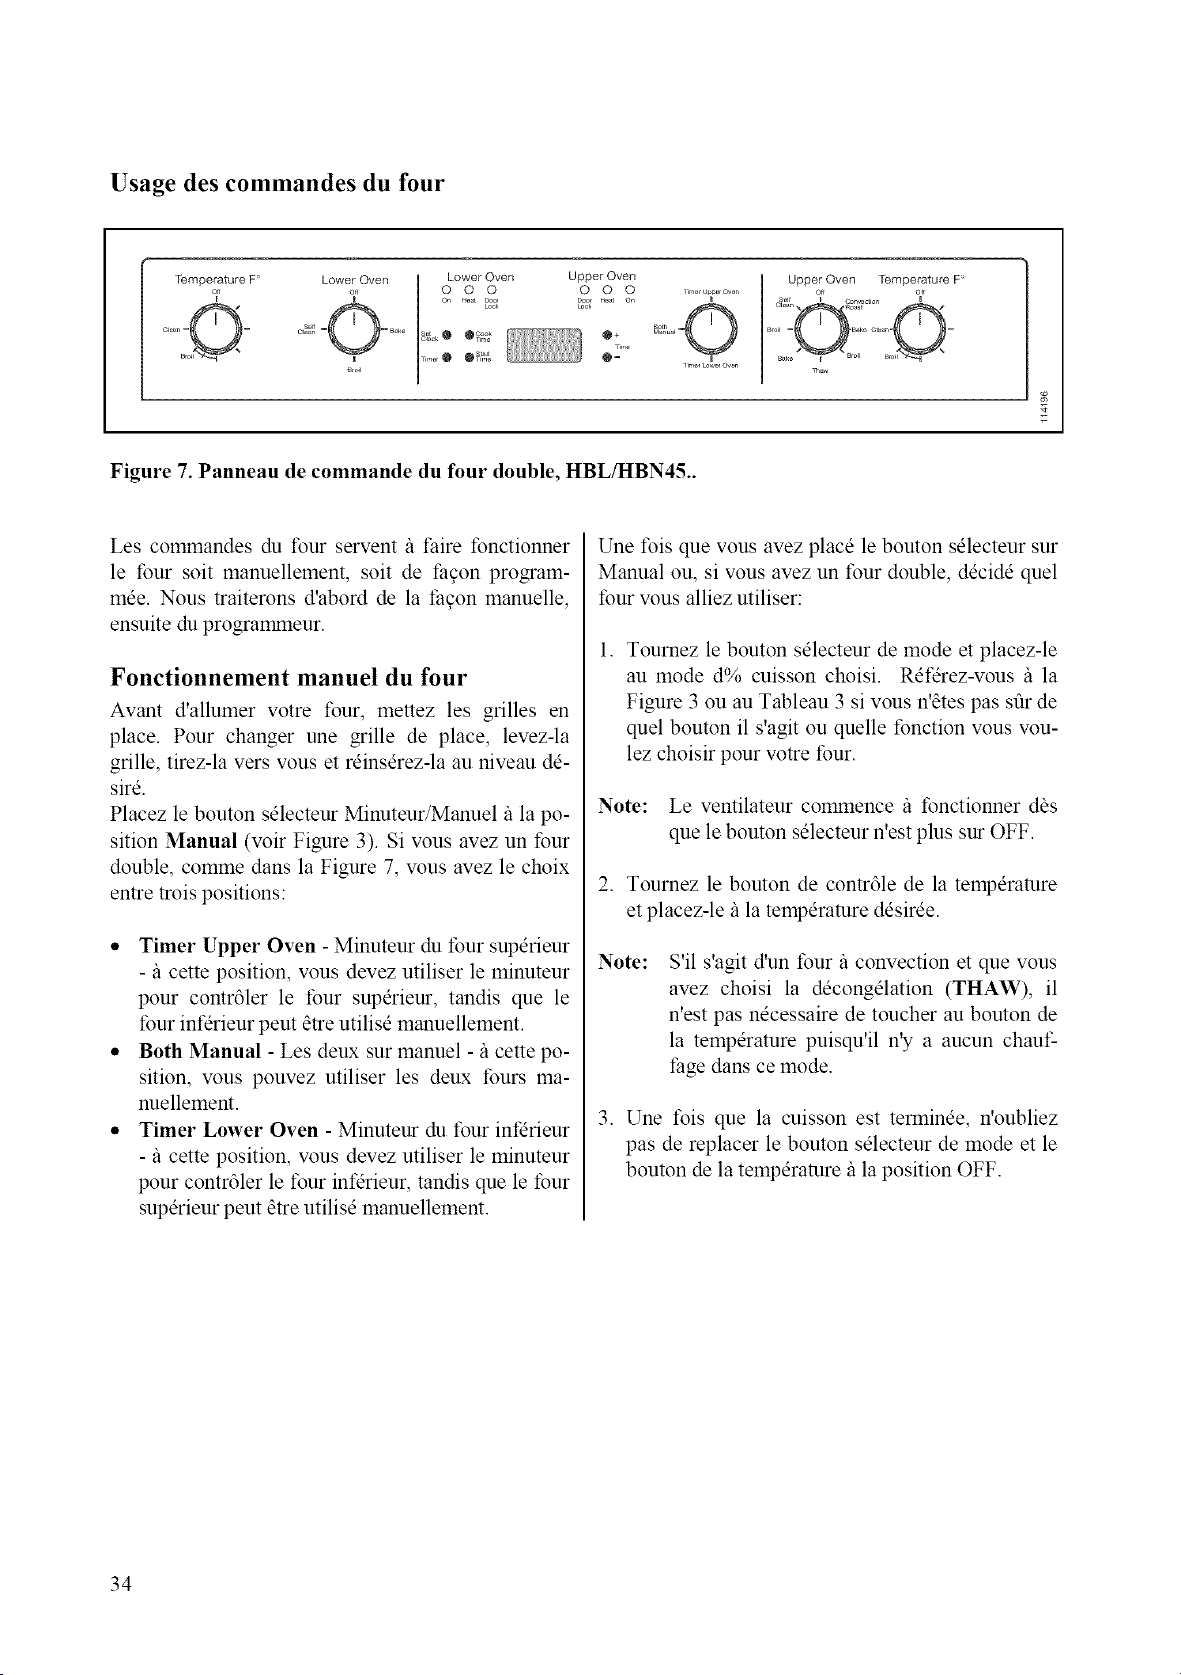
Usage des commandes du four
Temperature F'
Lower Oven Upper Oven
_,,,o,• O_:g @2' m
Upper Oven Temperature F
Figure 7. Panneau de commande du four double, HBL/HBN45..
Les commandes du tour servent/_ t:aire tbnctionner
le tour soit manuellement, soit de facon program-
rode. Nous traiterons d'abord de la facon manuelle,
ensuite du programmeur.
Fonctionnement manuel du four
Avant d'allumer votre four, mettez les grilles en
place. Pour changer une grille de place, levez-la
grille, tirez-la vers vous et reinserez-la au niveau de-
sire.
Placez le bouton selecteur Minuteur/Manuel/_ la po-
sition Manual (voir Figure 3). Si vous avez un four
double, comme dans la Figure 7, wins avez le choix
entre trois positions:
• Timer Upper Oven - Minuteur du tour superieur
-/_ cette position, vous devez utiliser le minuteur
pour contr61er le four superieur, tandis que le
four infdrieur peut etre utilisd manuellement.
• Both Manual - Les deux sur manuel -/_ cette po-
sition, vous pouvez utiliser les deux fours ma-
nuellement.
• Timer Lower Oven - Minuteur du tour infdrieur
- il cette position, wins devez utiliser le minuteur
pour contr61er le tour infdrieur, tandis que le four
superieur peut atre utilisd manuellement.
Une fois que vous avez place le bouton sdlecteur sur
Manual ou, si vous avez un four double, decide quel
four vous alliez utiliser:
l. Tournez le bouton sdlecteur de mode et placez-le
au mode d% cuisson choisi. Rdferez-wms /_ la
Figure 3 ou au Tableau 3 si vous n'_tes pas stir de
quel bouton il s'agit ou quelle fonction vous vou-
lez choisir pour votre four.
Note: Le ventilateur commence il fonctionner dbs
que le bouton selecteur n'est plus sur OFF.
2. Tournez le bouton de contr61e de la temperature
et placez-le/_ la temperature ddsirde.
Note:
S'il s'agit d'un four il convection et que vous
avez choisi la ddcongdlation (THAW), il
n'est pas ndcessaire de toucher au bouton de
la temperature puisqu'il n'y a aucun chauf-
fage dans ce mode.
3. Une fois que la cuisson est tenninee, n'oubliez
pas de replacer le bouton sdlecteur de mode et le
bouton de la temperature/_ la position OFF.
34
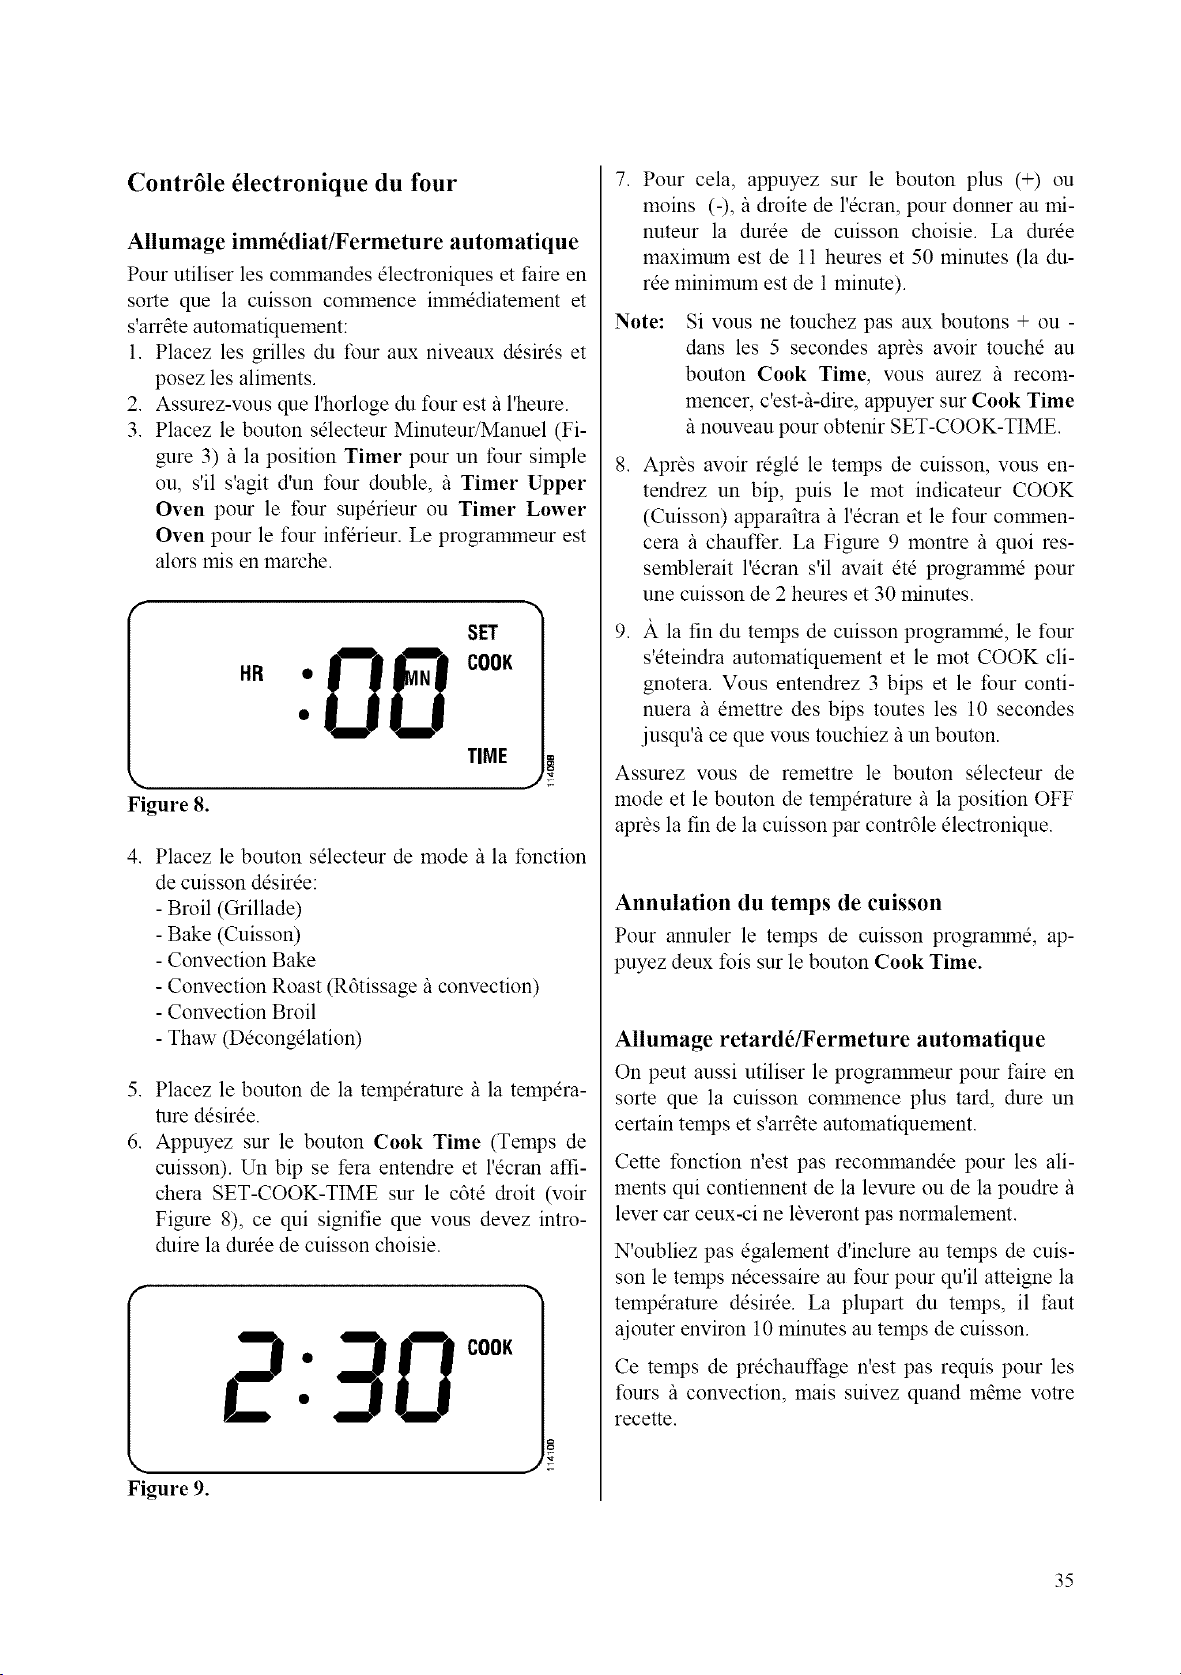
Contr61e 61ectronique du four
Allumage imm6diat_ermeture automatique
Pour utiliser les commandes electroniques et faire en
sorte que la cuisson commence immediatement et
s'arr_te automatiquement:
1. Placez les grilles du four aux niveaux desires et
posez les aliments.
2. Assurez-vous que l'horloge du tour est/_ l'heure.
3. Placez le bouton selecteur Minuteur/Manuel (Fi-
gure 3)/_ la position Timer pour un tour simple
ou, s'il s'agit d'un four double, /_ Timer Upper
Oven pour le four superieur ou Timer Lower
Oven pour le tour infdrieur. Le programmeur est
alors mis en marche.
Figure 8.
SET
TIME
4. Placez le bouton selecteur de mode/_ la fonction
de cuisson desiree:
- Broil (Grillade)
- Bake (Cuisson)
- Convection Bake
- Convection Roast (R6tissage il convection)
- Convection Broil
- Thaw (Decongelation)
5. Placez le bouton de la temperature/_ la tempera-
ture desiree.
6. Appuyez sur le bouton Cook Time (Temps de
cuisson). Un bip se fera entendre et l'ecran affi-
chera SET-COOK-TIME sur le c6te droit (w_ir
Figure 8), ce qui signifie que vous devez intro-
duire la duree de cuisson choisie.
2:30 c°"
Figure 9.
7. Pour cela, appuyez sur le bouton plus (+) ou
moins (-), il droite de l'ecran, pour donner au mi-
nuteur la duree de cuisson choisie. La duree
maximum est de 11 heures et 50 minutes (la du-
ree minimum est de 1 minute).
Note:
Si vous ne touchez pas aux boutons + ou -
dans les 5 secondes apr_s aw_ir touche au
bouton Cook Time, vous aurez il recom-
mencer, c'est&-dire, appuyer sur Cook Time
/_nouveau pour obtenir SET-COOK-TIME.
,
Apras avoir regle le temps de cuisson, vous en-
tendrez un bip, puis le mot indicateur COOK
(Cuisson) apparaitra il l'ecran et le tour comanen-
cera il chauffer. La Figure 9 montre il quoi res-
semblerait l'ecran s'il avait ete programme pour
une cuisson de 2 heures et 30 minutes.
,
)t la fin du temps de cuisson programme, le four
s'eteindra automatiquement et le mot COOK cli-
gnotera. Vous entendrez 3 bips et le tour conti-
nuera il emettre des bips toutes les 10 secondes
jusqu% ce que wins touchiez il un bouton.
Assurez vous de remettre le bouton selecteur de
mode et le bouton de temperature/_ la position OFF
apr_s la fin de la cuisson par contr61e electronique.
Annulation du temps de cuisson
Pour annuler le temps de cuisson programane, ap-
puyez deux fois sur le bouton Cook Time.
Allumage retard_/Fermeture automatique
On peut aussi utiliser le programmeur pour t:aire en
sorte que la cuisson commence plus tard, dure un
certain temps et s'arr_te automatiquement.
Cette fonction n'est pas recommandee pour les ali-
ments qui contiennent de la levure ou de la poudre/_
lever car ceux-ci ne laveront pas normalement.
N'oubliez pas egalement d'inclure au temps de cuis-
son le temps necessaire au four pour qu'il atteigne la
temperature desiree. La plupart du temps, il taut
ajouter environ 10 minutes au temps de cuisson.
Ce temps de prechauffage n'est pas requis pour les
fours il convection, mais suivez quand marne votre
recette.
35
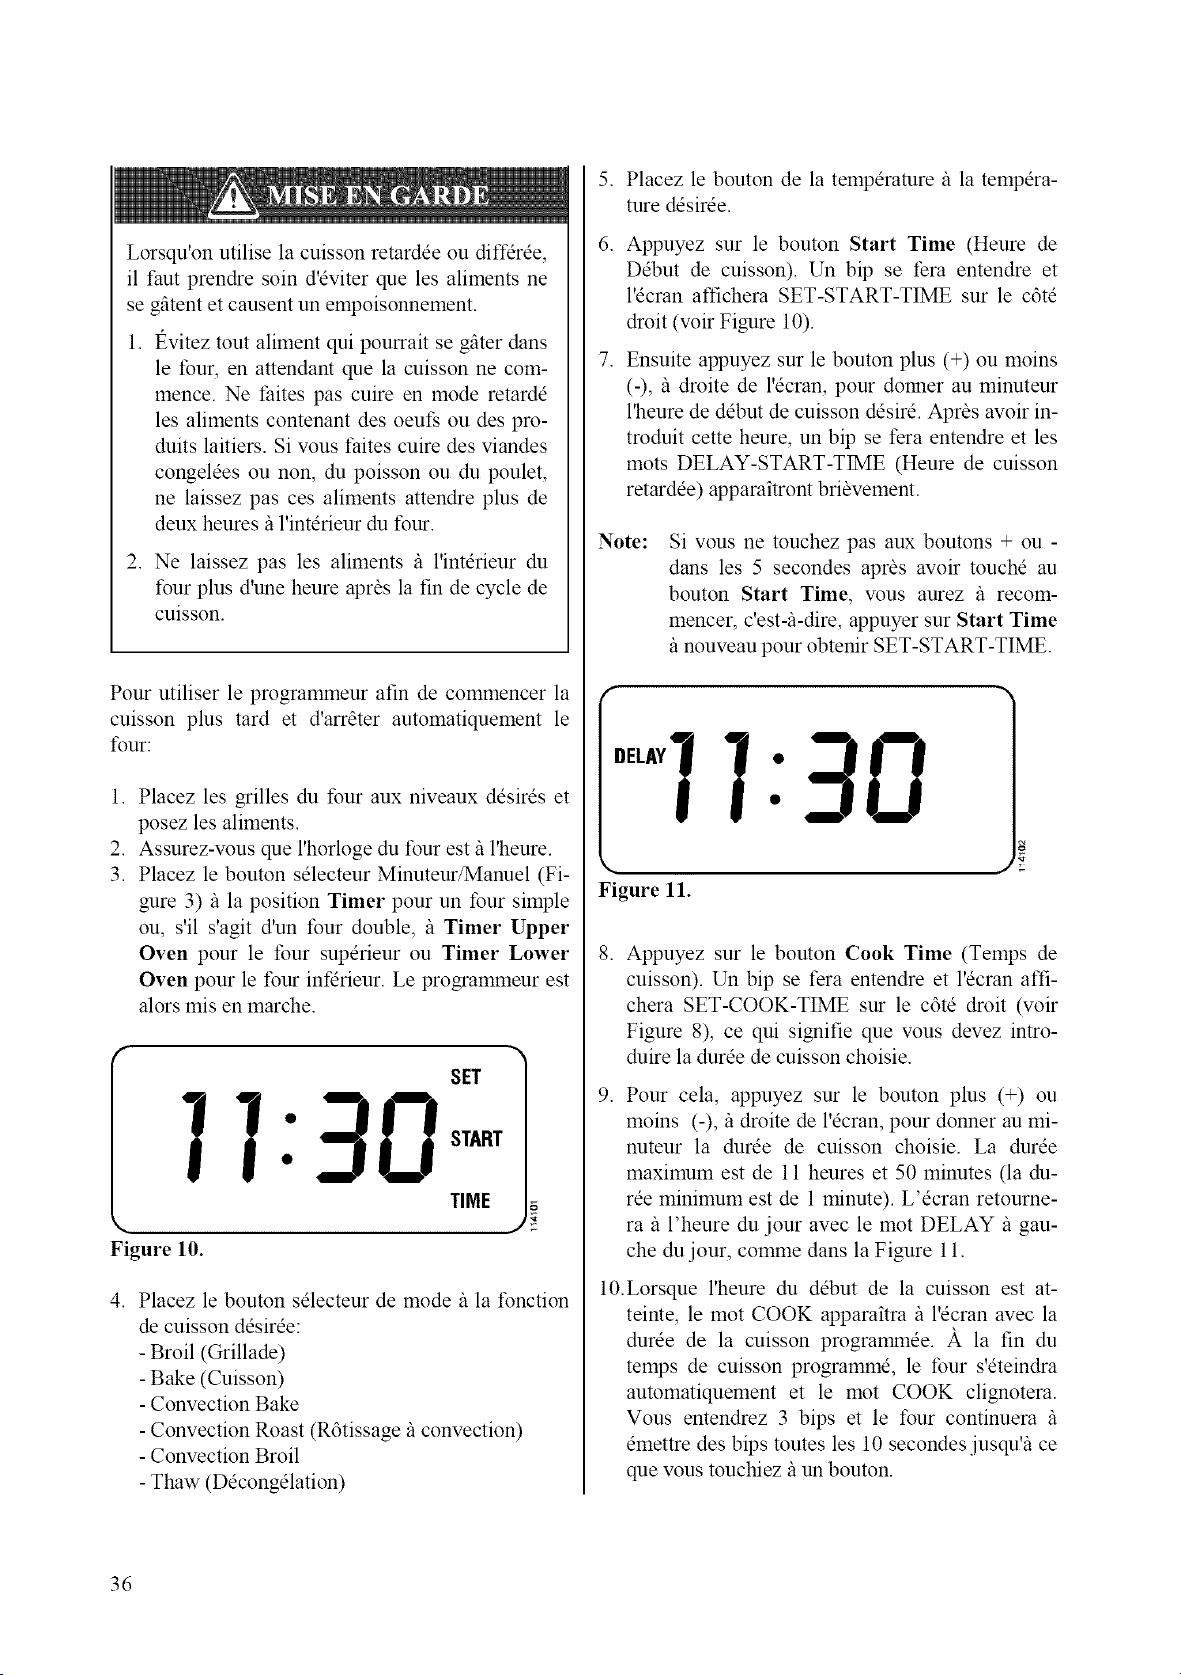
Lorsqu'on utilise la cuisson retardee ou diffdree,
il faut prendre soin d'eviter que les aliments ne
se gfitent et causent un empoisonnement.
1. t_vitez tout aliment qui pourrait se gfiter dans
le tour, en attendant que la cuisson ne com-
mence. Ne faites pas cuire en mode retarde
les aliments contenant des oeut; ou des pro-
duits laitiers. Si vous t:aites cuire des viandes
congelees ou non, du poisson ou du poulet,
ne laissez pas ces aliments attendre plus de
deux heures/_ l'interieur du four.
2. Ne laissez pas les aliments /_ l'interieur du
four plus d'une heure apras la fin de cycle de
cuisson.
Pour utiliser le programmeur afin de commencer la
cuisson plus tard et d'arrater automatiquement le
four:
,
2.
3.
Placez les grilles du four aux niveaux desires et
posez les aliments.
Assurez-wms que l'horloge du tour est il l'heure.
Placez le bouton selecteur Minuteur/Manuel (Fi-
gure 3)/_ la position Timer pour un tour simple
ou, s'il s'agit d'un four double, il Timer Upper
Oven pour le four superieur ou Timer Lower
Oven pour le four infdrieur. Le programmeur est
alors mis en marche.
SET
TIME
Figure lO.
, Placez le bouton selecteur de mode/_ la fonction
de cuisson desiree:
- Broil (Grillade)
- Bake (Cuisson)
- Convection Bake
- Convection Roast (R6tissage/_ convection)
- Convection Broil
- Thaw (Decongelation)
,
6.
,
Placez le bouton de la temperature il la tempera-
ture desiree.
Appuyez sur le bouton Start Time (Heure de
Debut de cuisson). Un bip se fera entendre et
l'ecran affichera SET-START-TIME sur le c6te
droit (voir Figure 10).
Ensuite appuyez sur le bouton plus (+) ou moins
(-), il droite de l'ecran, pour donner au minuteur
l'heure de debut de cuisson desire. Apr_s avoir in-
troduit cette heure, un bip se fera entendre et les
mots DELAY-START-TIME (Heure de cuisson
retardee) apparaitront briavement.
Note:
Si wins ne touchez pas aux boutons + ou -
dans les 5 secondes apr_s avoir touche au
bouton Start Time, wins aurez il recom-
mencer, c'est&-dire, appuyer sur Start Time
/_nouveau pour obtenir SET-START-TIME.
°'I7:_-!8
Figure 11.
,
Appuyez sur le bouton Cook Time (Temps de
cuisson). Un bip se fera entendre et l'ecran affi-
chera SET-COOK-TIME sur le c6te droit (voir
Figure 8), ce qui signifie que vous devez intro-
duire la duree de cuisson choisie.
,
Pour cela, appuyez sur le bouton plus (+) ou
moins (-), il droite de l'ecran, pour donner au mi-
nuteur la duree de cuisson choisie. La duree
maximum est de 11 heures et 50 minutes (la du-
ree minimum est de 1 minute). L'ecran retourne-
ra/_ l'heure du jour avec le mot DELAY/_ gau-
che du jour, comme dans la Figure 11.
10.Lorsque l'heure du debut de la cuisson est at-
teinte, le mot COOK apparaitra/_ l'ecran avec la
duree de la cuisson programmee. )t la fin du
temps de cuisson programme, le tbur s'eteindra
automatiquement et le mot COOK clignotera.
Vous entendrez 3 bips et le four continuera il
emettre des bips toutes les 10 secondes jusqu'i_ ce
que vous touchiez/_ un bouton.
36
Assurez vous de remettre le bouton sdecteur de
mode et le bouton de tempdrature fi la position OFF
aprbs la fin de la cuisson.
V6rification de l'heure de d6but de cuisson avant
que la cuisson ne colnlnence:
Appuyez sur le bouton Start Time. L'heure de ddbut
de cuisson apparaitra bribvement fi l'dcran, puis dis-
paraitra pour retourner _ l'heure du jour.
Changement de l'heure de d6but de cuisson avant
que la cuisson ne commence:
Appuyez sur le bouton Start Time. Un bip se fera
entendre et l'dcran affichera SET-START-TIME sur
le c6td droit. Ensuite appuyez sur le bouton plus (+)
ou moins (-), il droite de l'dcran, pour donner au mi-
nuteur l'heure de ddbut de cuisson ddsird. Aprbs
avoir introduit cette heure, un bip se fera entendre et
les roots DELAY-START-TIME (Heure de cuisson
retardde) apparaitront bribvement il l'dcran puis
l'dcran retoumera/_ l'heure du jour avec le mot DE-
LAY/_ gauche de l'heure, comane dans la Figure 11.
V6rification de la dur6e de cuisson:
Appuyez sur le bouton Cook Time. La durde de
cuisson apparaitra bribvement _ l'dcran, puis dispa-
raitra pour retourner au programme courant.
Changement de la dur_e de cuisson:
Appuyez sur le bouton Cook Time. Un bip se fera
entendre et l'dcran affichera SET-COOK-TIME sur
le c6td droit (volt Figure 8). Ensuite appuyez sur le
bouton plus (+) ou moins (-), il droite de l'dcran, pour
donner au minuteur la durde de cuisson ddsirde. La
durde de cuisson maximum est de 11 heures et 50
minutes (la durde minimum est de 1 minute).
Annulation de la cuisson retard6e
Appuyez deux fois sur le bouton Start Time.
Annulation du temps de cuisson
Appuyez deux fois sur le bouton Cook Time.
37
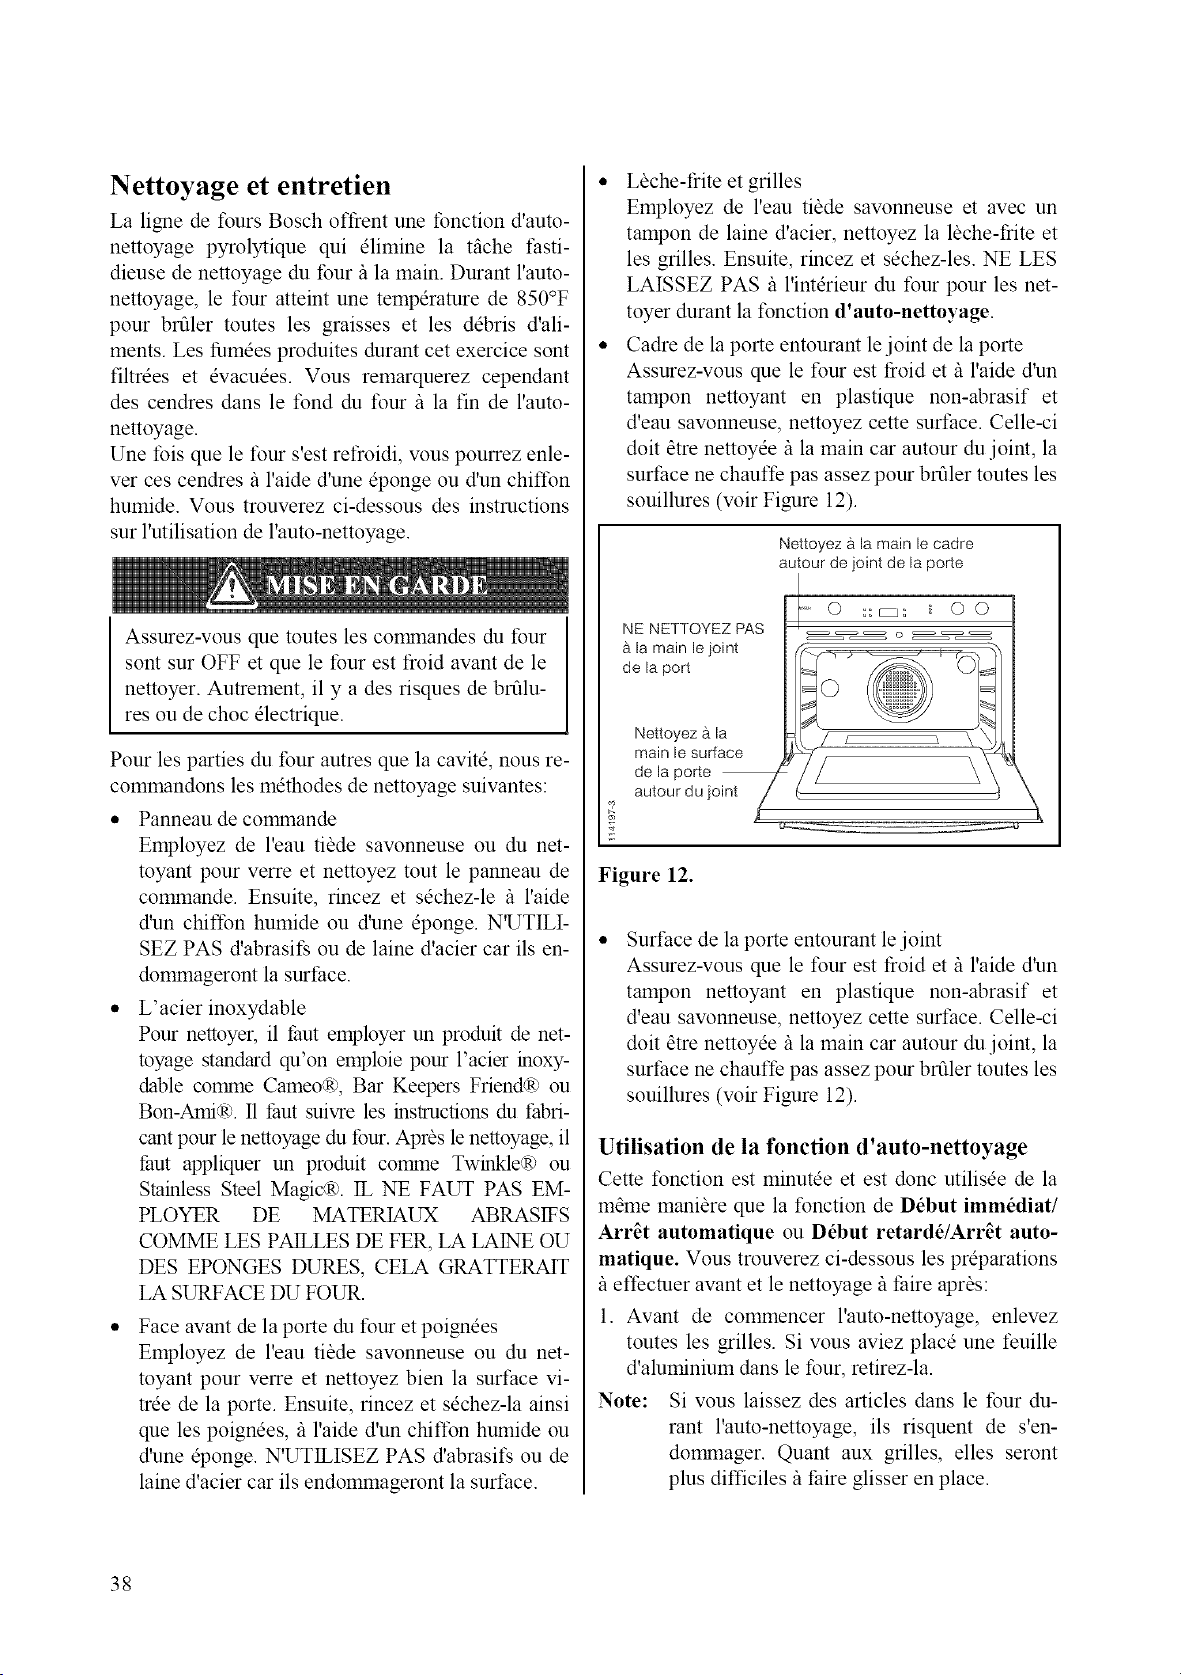
Nettoyage et entretien
La ligne de fours Bosch offrent une fonction d'auto-
nettoyage pyrolytique qui elimine la tfiche t:asti-
dieuse de nettoyage du tour/_ la main. Durant l'auto-
nettoyage, le four atteint une temperature de 850°F
pour brfiler toutes les graisses et les debris d'ali-
ments. Les fumees produites durant cet exercice sont
filtrees et evacuees. Vous remarquerez cependant
des cendres dans le fond du four/_ la fin de l'auto-
nettoyage.
Une Ibis que le four s'est refroidi, wins pourrez enle-
ver ces cendres il l'aide d'une eponge ou d'un chiffon
humide. Vous trouverez ci-dessous des instructions
sur l'utilisation de l'auto-nettoyage.
Assurez-wms que toutes les cormnandes du tour
sont sur OFF et que le four est froid avant de le
nettoyer. Autrement, il y a des risques de brfilu-
res ou de choc electrique.
Pour les parties du tour autres que la cavite, nous re-
commandons les methodes de nettoyage suivantes:
* Panneau de commande
Employez de l'eau tilde savonneuse ou du net-
toyant pour verre et nettoyez tout le panneau de
commande. Ensuite, rincez et sechez-le /_ l'aide
d'un chiffon humide ou d'une eponge. N'UTILI-
SEZ PAS d'abrasifs ou de laine d'acier car ils en-
dommageront la surface.
• L'acier inoxydable
Pour nettoyer, il thut employer un produit de net-
toyage standard qu'on emploie pour l'acier inoxy-
dable comme Cameo(R), Bar Keepers Friend(R) ou
Bon-Ami,:R). II thut suivre les instructions du fabri-
cant pour le nettoyage du tbur. Apras le nettoyage, il
taut appliquer un produit comme TwinkleR) ou
Stainless Steel Magic(R). IL NE FAUT PAS EM-
PLOYER DE MATERIAUX ABRASIFS
COMME LES PAILLES DE FER, LA LAINE OU
DES EPONGES DURES, CELA GRATTERAIT
LA SURFACE DU FOUR.
Face avant de la porte du four et poignees
Employez de l'eau tibde sawmneuse ou du net-
toyant pour verre et nettoyez bien la surface vi-
tree de la porte. Ensuite, rincez et sechez-la ainsi
que les poignees, il l'aide d'un chiffon humide ou
d'une @onge. N'UTILISEZ PAS d'abrasit; ou de
laine d'acier car ils endommageront la surface.
• Lbche-frite et grilles
Employez de l'eau tibde sawmneuse et avec un
tampon de laine d'acier, nettoyez la lbche-frite et
les grilles. Ensuite, rincez et sechez-les. NE LES
LAISSEZ PAS il l'interieur du four pour les net-
toyer durant la fonction d'auto-nettoyage.
• Cadre de la porte entourant lejoint de la porte
Assurez-vous que le tour est t_oid et/_ l'aide d'un
tampon nettoyant en plastique non-abrasif et
d'eau savonneuse, nettoyez cette surt:ace. Celle-ci
doit atre nettoyee/_ la main car autour du joint, la
surface ne chauffe pas assez pour brfiler toutes les
souillures (voir Figure 12).
NE NETTOYEZ PAS
b la main le joint
de la port
Nettoyez a.la
main le surface
de la porte
autour du joint
Nettoyez a la main le cadre
autour de joint de la porte
o
Figure 12.
Surt:ace de la porte entourant le joint
Assurez-vous que le tour est froid et/_ l'aide d'un
tampon nettoyant en plastique non-abrasif et
d'eau savonneuse, nettoyez cette surt:ace. Celle-ci
doit atre nettoyee/_ la main car autour du joint, la
surface ne chauffe pas assez pour brfiler toutes les
souillures (voir Figure 12).
Utilisation de la fonction d'auto-nettoyage
Cette fonction est minutee et est donc utilisee de la
mame maniare que la fonction de D_but imm_diat/
Arr_t automatique ou D_but retard_/Arr_t auto-
matique. Vous trouverez ci-dessous les preparations
/_effectuer avant et le nettoyage/_ thire apr_s:
1. Avant de commencer l'auto-nettoyage, enlevez
toutes les grilles. Si wins aviez place une feuille
d'aluminium dans le four, retirez-la.
Note: Si vous laissez des articles dans le tour du-
rant l'auto-nettoyage, ils risquent de s'en-
dormnager. Quant aux grilles, elles seront
plus difficiles/_ faire glisser en place.
38
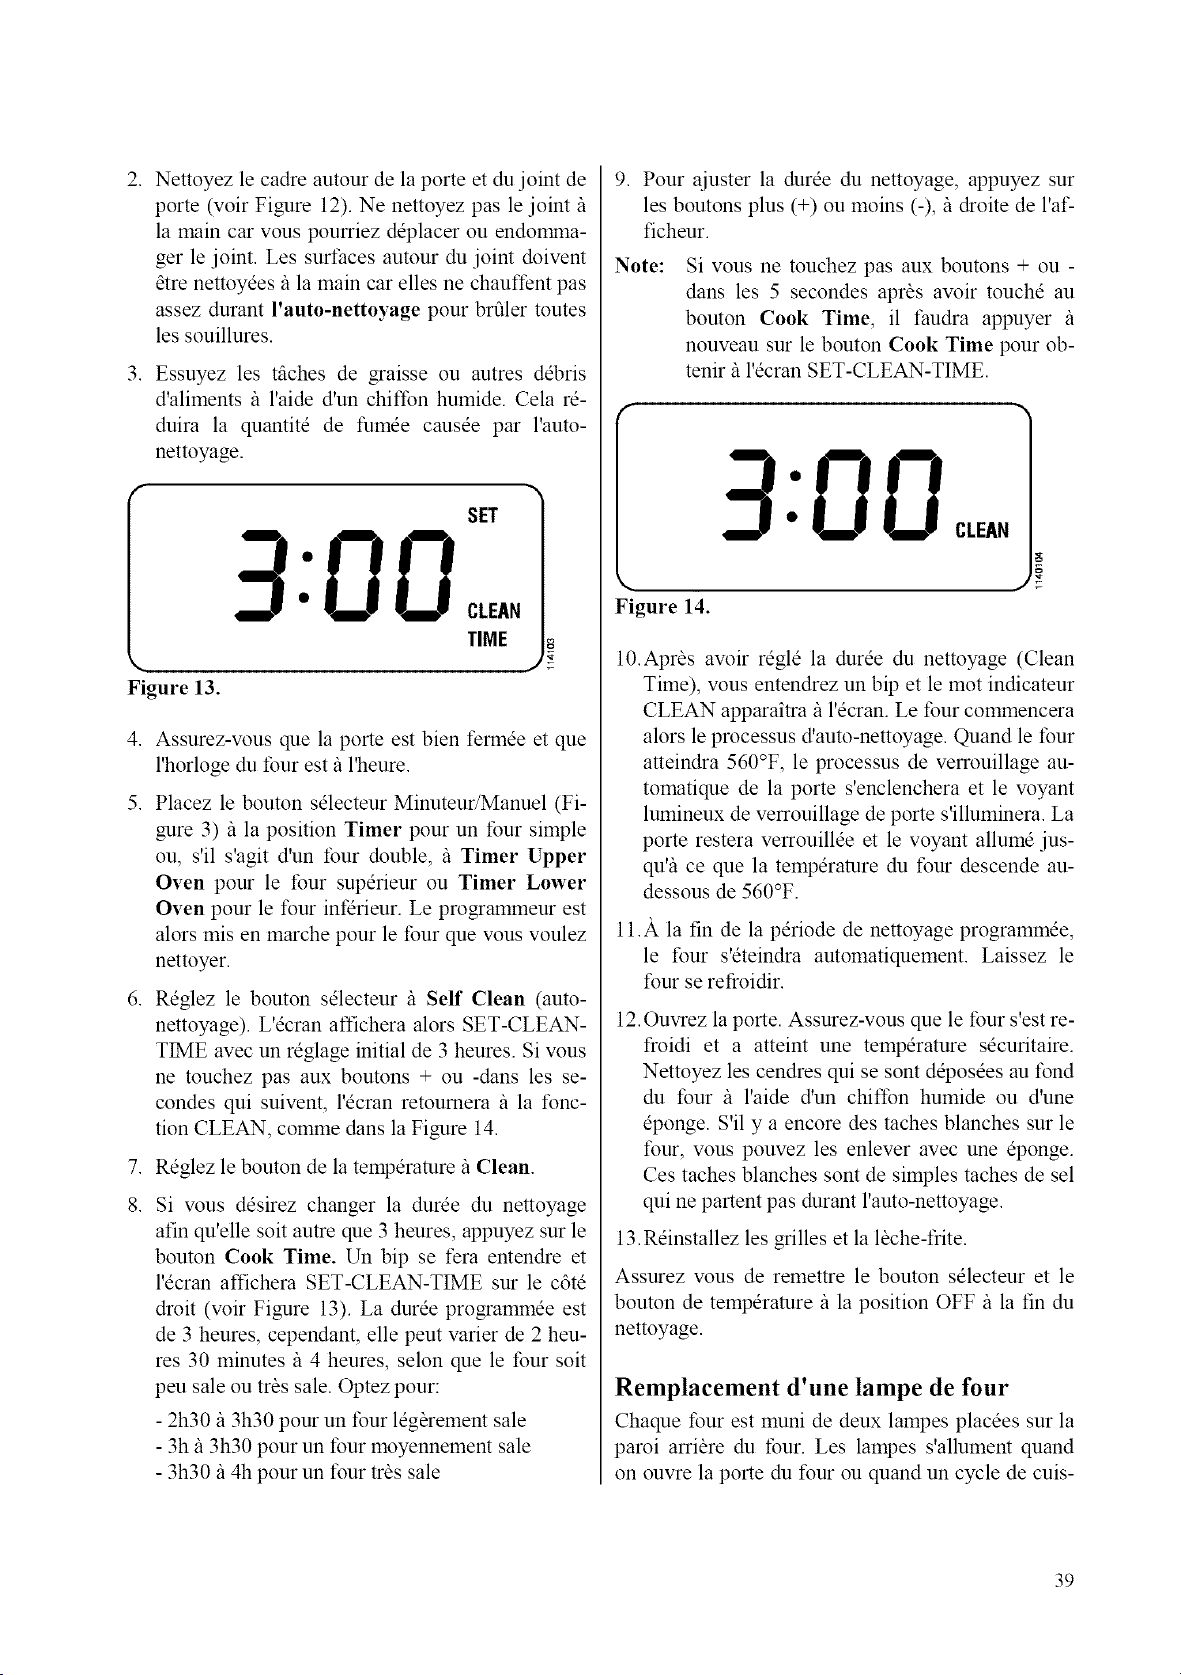
2. Nettoyez le cadre autour de la porte et du joint de
porte (voir Figure 12). Ne nettoyez pas le joint/_
la main car wins pourriez deplacer ou endomma-
ger le joint. Les surfaces autour du joint doivent
_tre nettoyees/_ la main car elles ne chauffent pas
assez durant l'auto-nettoyage pour brfiler toutes
les souillures.
3. Essuyez les tfiches de graisse ou autres debris
d'aliments /_ l'aide d'un chiffon humide. Cela re-
duira la quantite de fumee causee par l'auto-
nettoyage.
Figure 13.
SET
3:00c..,
TIME
4. Assurez-vous que la porte est bien fennee et que
l'horloge du four est fi l'heure.
5. Placez le bouton selecteur Minuteur/Manuel (Fi-
gure 3)/_ la position Timer pour un four simple
ou, s'il s'agit d'un four double, /_ Timer Upper
Oven pour le four superieur ou Timer Lower
Oven pour le four infdrieur. Le programmeur est
alors mis en marche pour le four que vous voulez
nettoyer.
6. Reglez le bouton selecteur _ Self Clean (auto-
nettoyage). L'ecran affichera alors SET-CLEAN-
TIME avec un reglage initial de 3 heures. Si vous
ne touchez pas aux boutons + ou -dans les se-
condes qui suivent, l'ecran retoumera _ la fonc-
tion CLEAN, comme dans la Figure 14.
7. Reglez le bouton de la temperature/_ Clean.
,
Si vous desirez changer la duree du nettoyage
afin qu'elle soit autre que 3 heures, appuyez sur le
bouton Cook Time. Un bip se fera entendre et
l'ecran affichera SET-CLEAN-TIME sur le c6te
droit (wfir Figure 13). La duree programmee est
de 3 heures, cependant, elle peut varier de 2 heu-
res 30 minutes/_ 4 heures, selon que le four soit
peu sale ou tr_s sale. Optez pour:
- 2h30/_ 3h30 pour un four leg_rement sale
- 3h/_ 3h30 pour un tour moyennement sale
- 3h30 il 4h pour un four trbs sale
9. Pour ajuster la duree du nettoyage, appuyez sur
les boutons plus (+) ou moins (-), il droite de l'af-
ficheur.
Note:
Si vous ne touchez pas aux boutons + ou -
dans les 5 secondes aprbs avoir touche au
bouton Cook Time, il faudra appuyer /_
nouveau sur le bouton Cook Time pour ob-
tenir/_ l'ecran SET-CLEAN-TIME.
Figure 14.
10.Aprbs awfir regle la duree du nettoyage (Clean
Time), vous entendrez un bip et le mot indicateur
CLEAN apparaitra/_ l'ecran. Le four commencera
alors le processus d'auto-nettoyage. Quand le four
atteindra 560°F, le processus de verrouillage au-
tomatique de la porte s'enclenchera et le voyant
lumineux de verrouillage de porte s'illuminera. La
porte restera verrouillee et le voyant allume jus-
qu% ce que la temperature du four descende au-
dessous de 560°F.
11.)t la fin de la periode de nettoyage programmee,
le four s'eteindra automatiquement. Laissez le
four se refroidir.
12.Ouvrez la porte. Assurez-vous que le four s'est re-
froidi eta atteint une temperature securitaire.
Nettoyez les cendres qui se sont deposees au fond
du four /_ l'aide d'un chiffon humide ou d'une
eponge. S'il y a encore des taches blanches sur le
four, vous pouvez les enlever avec une eponge.
Ces taches blanches sont de simples taches de sel
qui ne partent pas durant l'auto-nettoyage.
13. Reinstallez les grilles et la lbche-frite.
Assurez vous de retnettre le bouton selecteur et le
bouton de temperature/_ la position OFF/_ la fin du
nettoyage.
Remplacement d'une lampe de four
Chaque four est muni de deux lampes placees sur la
paroi arri&e du four. Les lampes s'allument quand
on ouvre la porte du four ou quand un cycle de cuis-
39
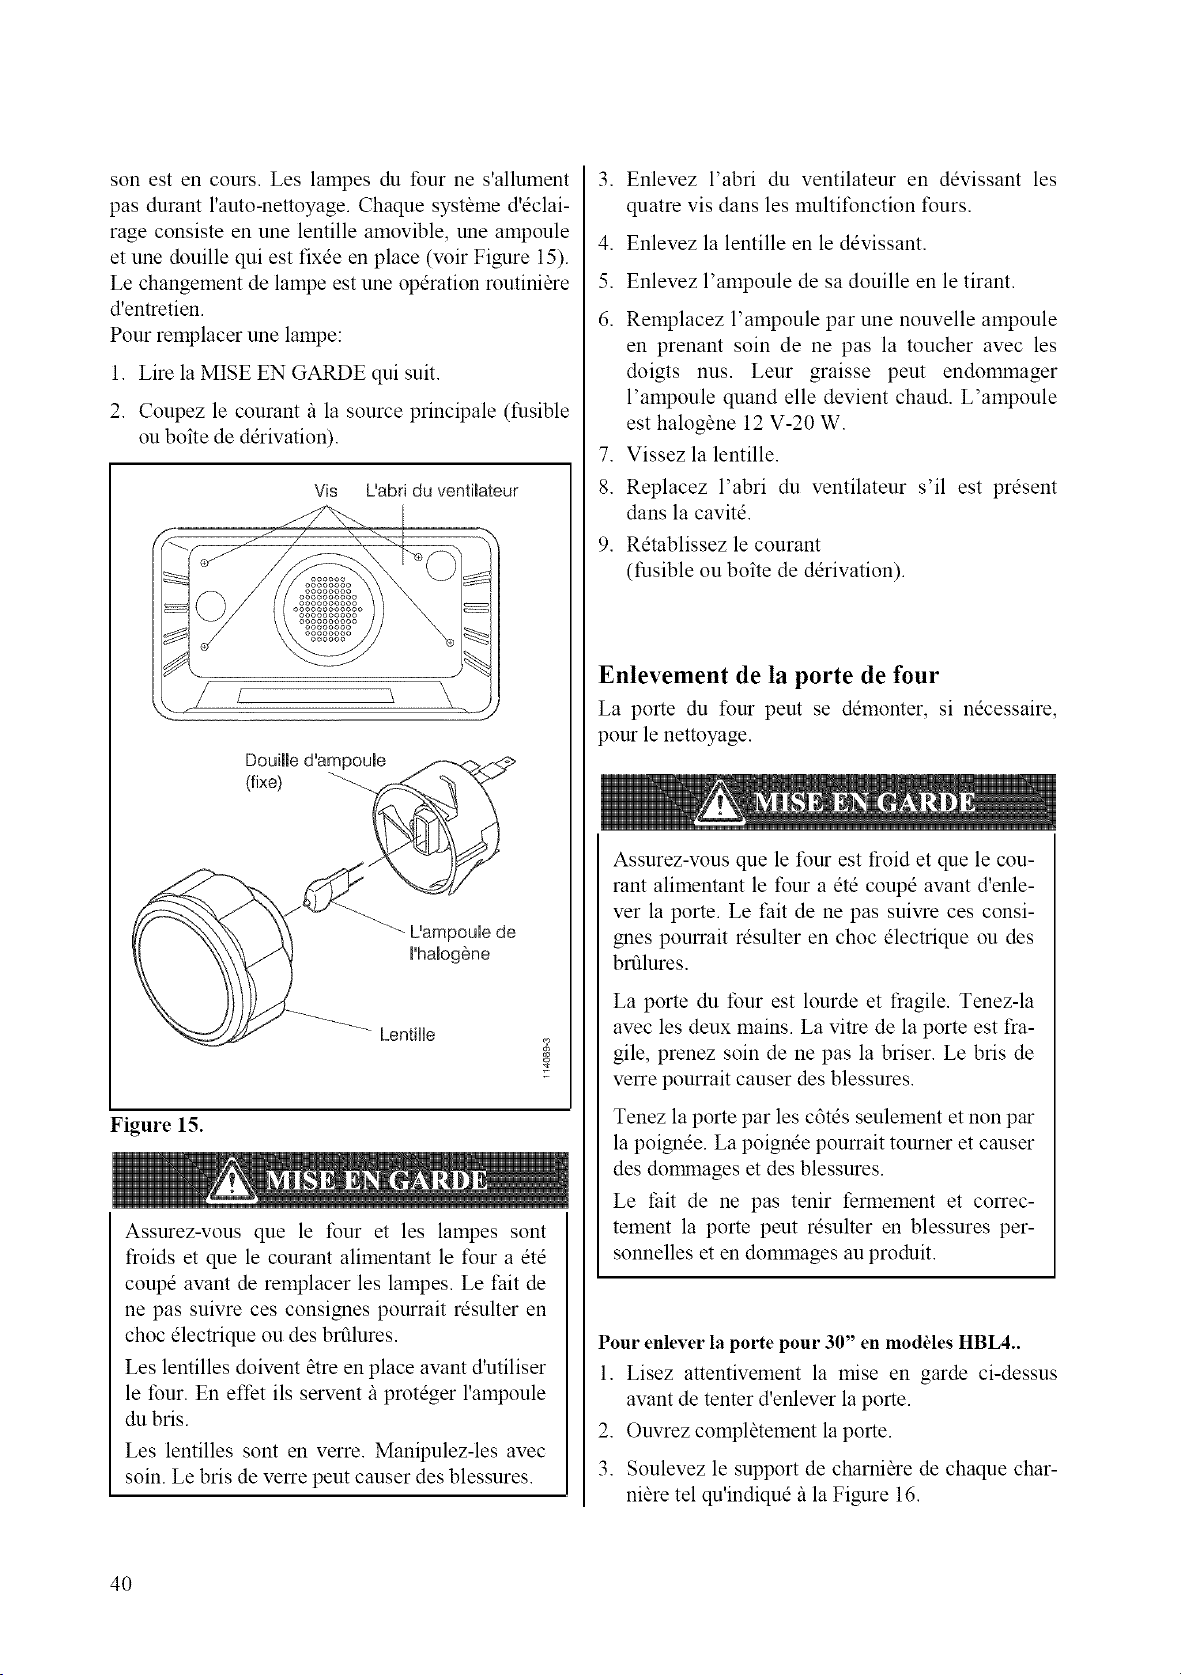
son est en cours. Les lampes du four ne s'allument
pas durant l'auto-nettoyage. Chaque syst_me d'dclai-
rage consiste en une lentille amovible, une ampoule
et une douille qui est fix@ en place (voir Figure 15).
Le changement de lampe est une operation routini_re
d'entretien.
Pour remplacer une lampe:
1. Life la MISE EN GARDE qui suit.
2. Coupez le courant/_ la source principale (fusible
ou boite de derivation).
Vis L'abd du ventimateur
DouiHe d'ampoule
(fix@
L'ampoub de
I'halogOne
Lentille
Figure 15.
Assurez-vous que le four et les lampes sont
froids et que le courant alimentant le four a etd
coupe avant de remplacer les lampes. Le t:ait de
ne pas suivre ces consignes pourrait resulter en
choc electrique ou des brfilures.
Les lentilles doivent _tre en place avant d'utiliser
le four. En effet ils servent il proteger l'ampoule
du bris.
Les lentilles sont en verre. Manipulez-les avec
soin. Le bris de verre peut causer des blessures.
.
.
5.
6.
.
8.
.
Enlevez l'abri du ventilateur en devissant les
quatre vis dans les multifonction fours.
Enlevez la lentille en le devissant.
Enlevez l'ampoule de sa douille en le tirant.
Remplacez l'ampoule par une nouvelle ampoule
en prenant soin de ne pas la toucher avec les
doigts nus. Leur graisse peut endommager
l'ampoule quand elle devient chaud. L'ampoule
est halog6ne 12 V-20 W.
Vissez la lentille.
Replacez l'abri du ventilateur s'il est present
dans la cavite.
Retablissez le courant
(fusible ou boite de derivation).
Enlevement de la porte de four
La porte du four peut se demonter, si necessaire,
pour le nettoyage.
Assurez-vous que le four est froid et que le cou-
rant alimentant le four a ete coupe avant d'enle-
ver la porte. Le fait de ne pas suivre ces consi-
gnes pourrait resulter en choc electrique ou des
brfilures.
La porte du four est lourde et fragile. Tenez-la
avec les deux mains. La vitre de la porte est fra-
gile, prenez soin de ne pas la briser. Le bris de
verre pourrait causer des blessures.
Tenez la porte par les c6tes seulement et non par
la poign@. La poignee pourrait tourner et causer
des domanages et des blessures.
Le thit de ne pas tenir fermement et correc-
tement la porte peut resulter en blessures per-
sonnelles et en dommages au produit.
Pour enlever la porte pour 30" en moddes HBL4..
1. Lisez attentivement la raise en garde ci-dessus
avant de tenter d'enlever la porte.
2. Ouvrez compl_tement la porte.
3. Soulevez le support de charni_re de chaque char-
nitre tel qu'indique fila Figure 16.
4O
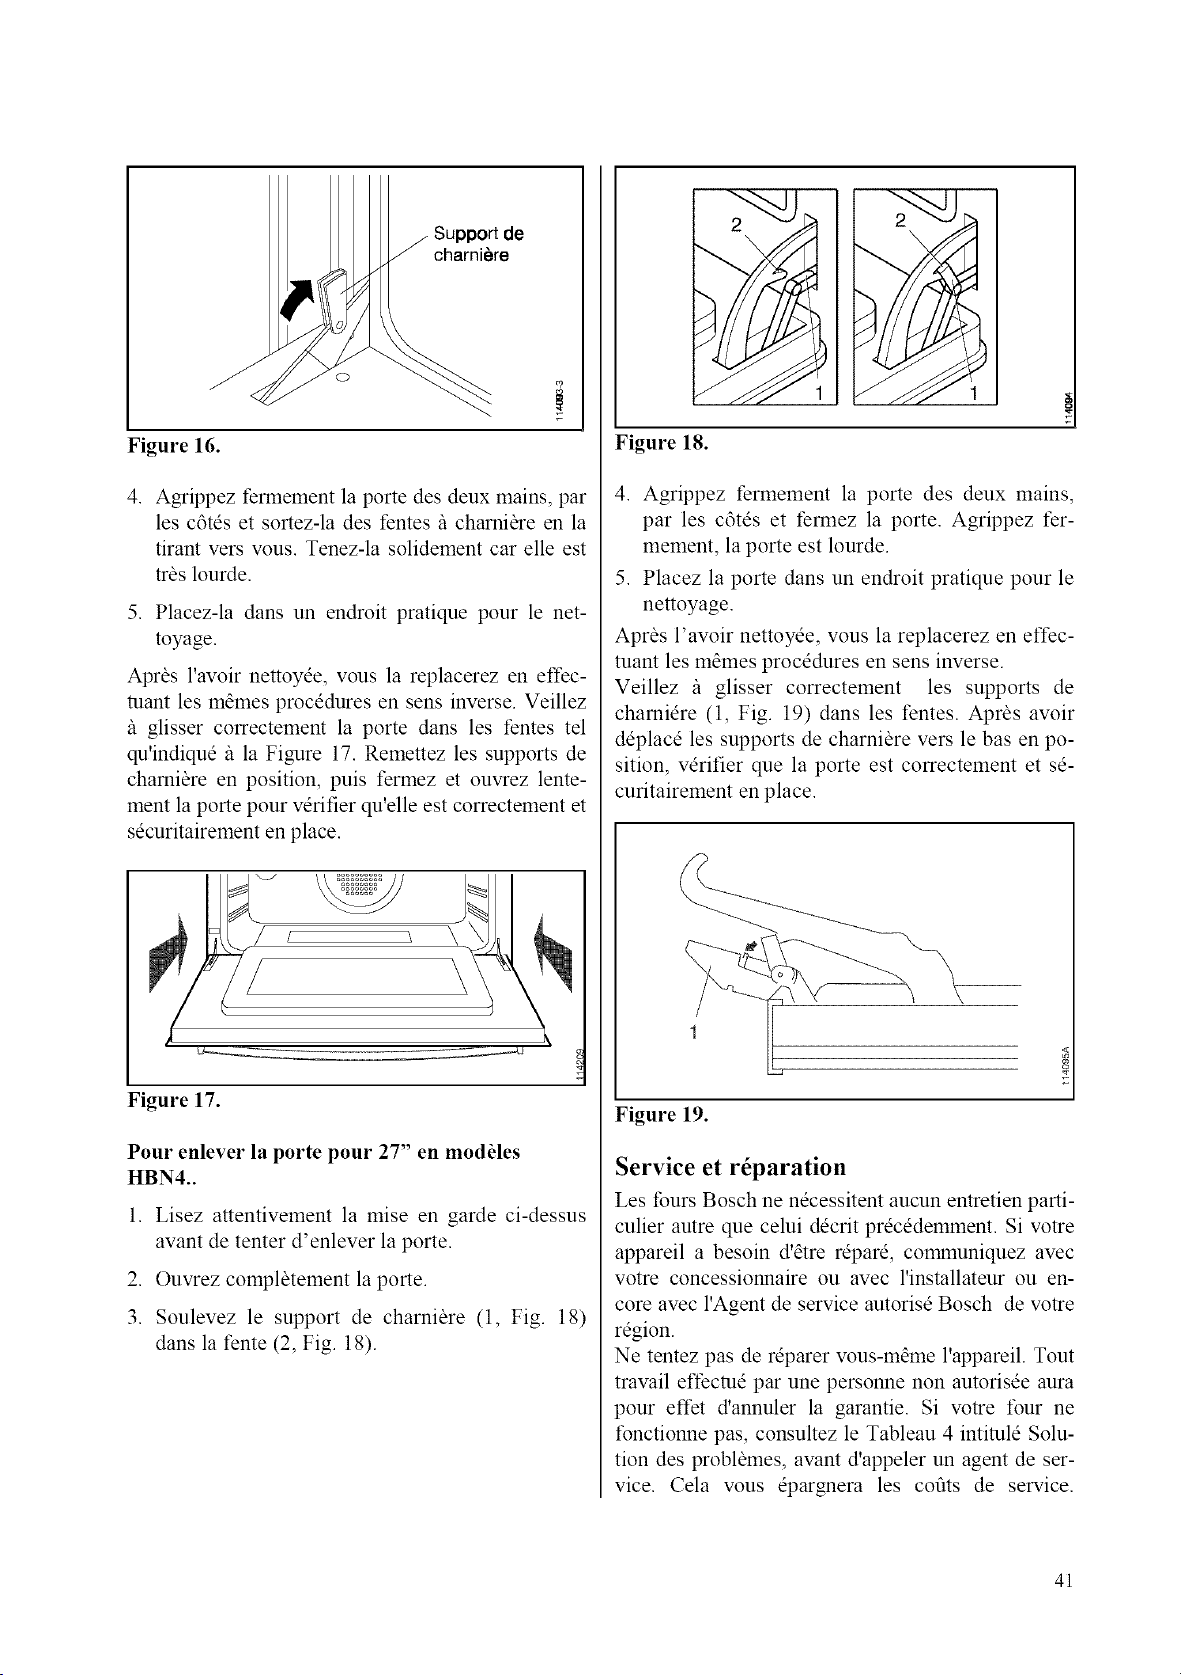
Support de
charni_re
Figure 16.
4. Agrippez fennement la porte des deux mains, par
les c6tes et sortez-la des fentes/_ charni_re en la
tirant vers vous. Tenez-la solidement car elle est
tr_s lourde.
5. Placez-la dans un endroit pratique pour le net-
toyage.
Apr_s l'avoir nettoyee, vous la replacerez en effec-
tuant les mames procedures en sens inverse. Veillez
/_ glisser correctement la porte dans les fentes tel
qu'indique/_ la Figure 17. Remettez les supports de
chamiare en position, puis fermez et ouvrez lente-
ment la porte pour verifier qu'elle est correctement et
securitairement en place.
Figure 17.
Pour enlever la porte pour 27" en modules
HBN4..
1. Lisez attentivement la mise en garde ci-dessus
avant de tenter d'enlever la porte.
2. Ouvrez compl_tement la porte.
3. Soulevez le support de charniare (1, Fig. 18)
dans la fente (2, Fig. 18).
Figure 18.
4. Agrippez fermement la porte des deux mains,
par les c6tes et fennez la porte. Agrippez fer-
mement, la porte est lourde.
5. Placez la porte dans un endroit pratique pour le
nettoyage.
Apras l'avoir nettoyee, vous la replacerez en effec-
tuant les mames procedures en sens inverse.
Veillez /_ glisser correctement les supports de
chamiere (1, Fig. 19) dans les fentes. Apr_s avoir
deplace les supports de charniare vers le bas en po-
sition, verifier que la porte est correctement et se-
curitairement en place.
Figure 19.
Service et r_paration
Les tours Bosch ne necessitent aucun entretien parti-
culier autre que celui decrit precedemment. Si votre
appareil a besoin d'atre repare, communiquez avec
votre concessionnaire ou avec l'installateur ou en-
core avec l'Agent de service autorise Bosch de votre
region.
Ne tentez pas de reparer vous-mame l'appareil. Tout
travail effecme par une personne non autorisee aura
pour effet d'annuler la garantie. Si votre four ne
fonctionne pas, consultez le Tableau 4 intimle Solu-
tion des probl_mes, avant d'appeler un agent de ser-
vice. Cela vous epargnera les coots de service.
41
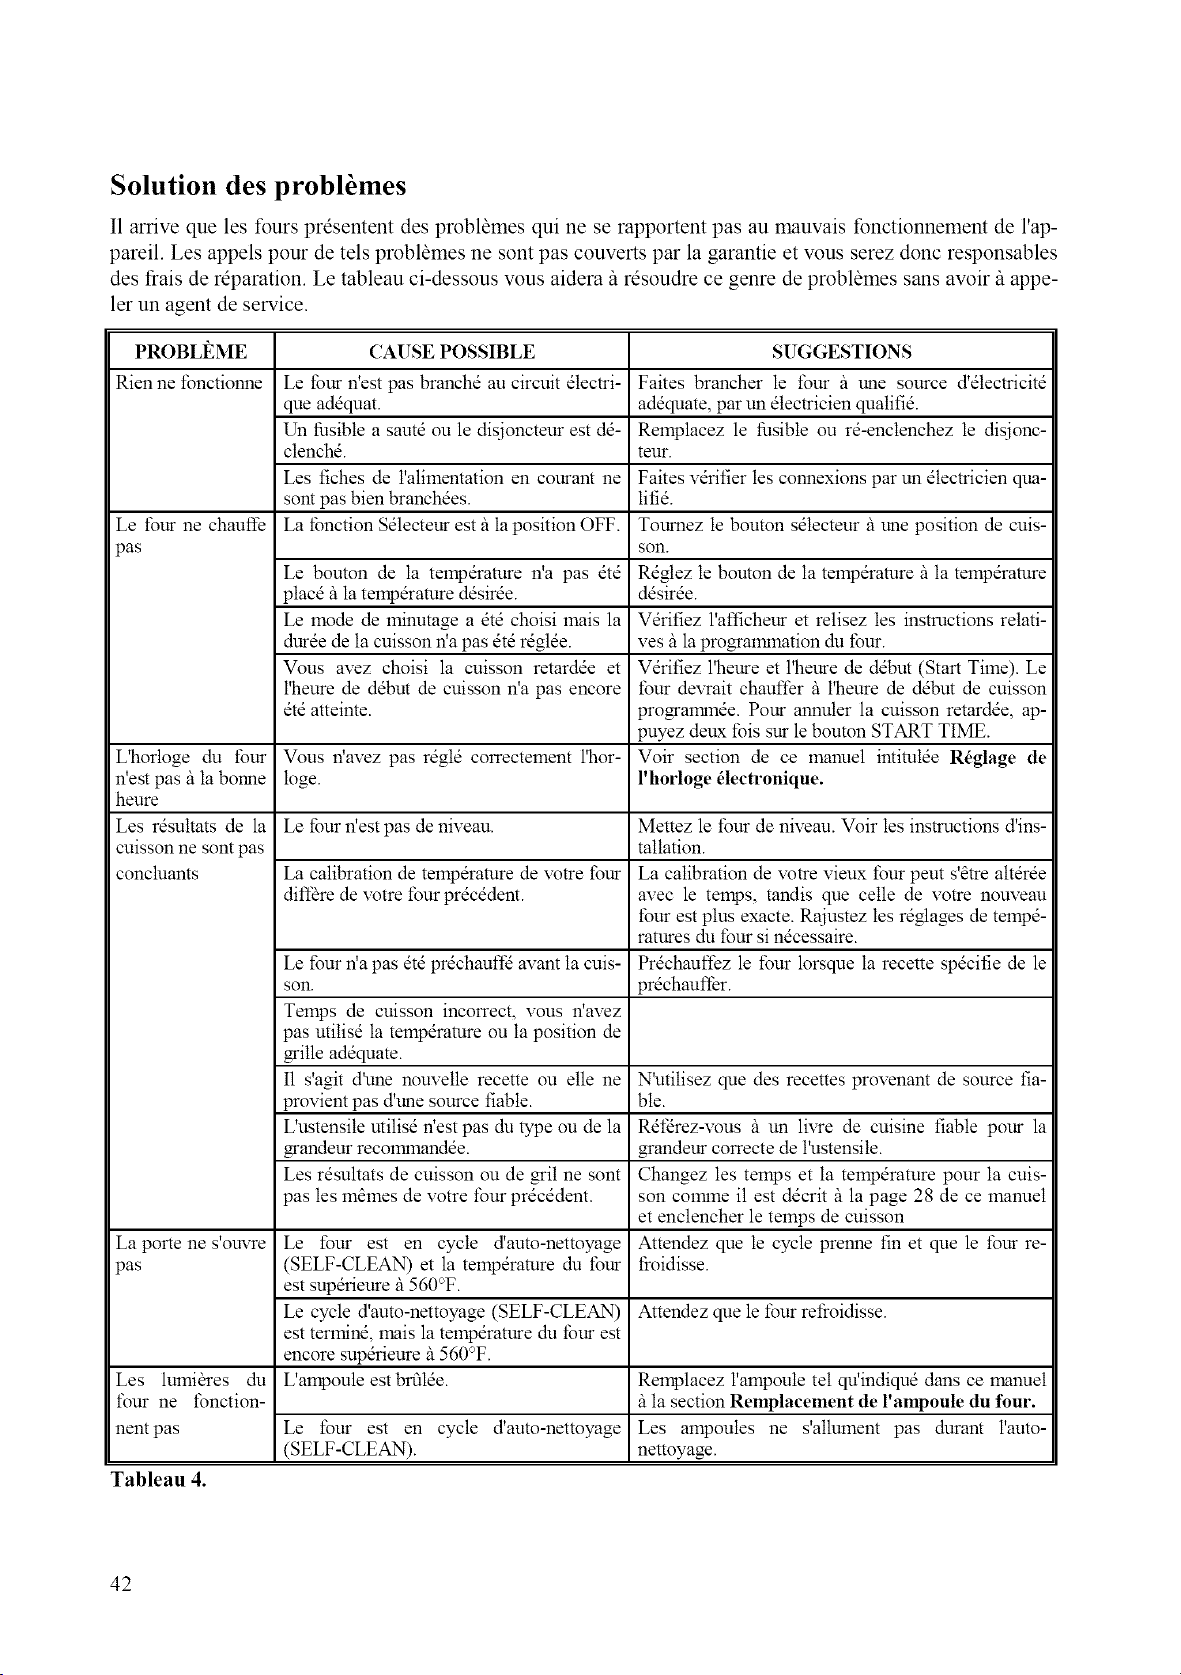
Solution des probl6mes
I1arrive que les fours prdsentent des probl_mes qui ne se rapportent pas au mauvais fonctionnement de l'ap-
pareil. Les appels pour de tels problames ne sont pas couverts par la garantie et vous serez donc responsables
des frais de reparation. Le tableau ci-dessous vous aidera il rdsoudre ce genre de problames sans avoir il appe-
ler un agent de service.
PROBLI_ME CAUSE POSSIBLE SUGGESTIONS
Rien ne fonctionne Le four n'est pas branchd au circuit dlectri- Faites brancher le tour it une source d'dtectricitd
que addquat, addquate, par un dtectricien quatifid.
Un fusible a sautd ou le disjoncteur est dd- Remplacez le fusible ou r&enclenchez le disjonc-
clenchd, teur.
Les fiches de l'alimentation en courant ne Faites vdrifier les connexions par un dlectricien qua-
sont pas bien branchdes, lifid.
Le four ne chauffe La tbnction Sdlecteur est it la position OFF. Toumez le bouton sdlecteur il une position de cuis-
pas son.
Le bouton de la temp&ature n'a pas did Rdglez te bouton de la tempdramre it la telnpdramre
placd it la telnpdramre ddsirde, ddsirde.
Le mode de lninutage a did choisi mais la Vdrifiez l'afficheur et relisez les instructions relati-
durde de la cuisson ffa pas dtdrdglde, ves illa programlnation du four.
Vous avez choisi la cuisson retardde et V&ifiez l'heure et l'heure de ddbut (Start Time). Le
l'heure de ddbut de cuisson n'a pas encore tour devrait chauffer it l'heure de ddbut de cuisson
did atteinte, programmde. Pour annuter la cuisson retardde, ap-
puyez deux fois sur le bouton START TIME.
L'horloge du four Vous ffavez pas rdgld correctement l'hor- Voir section de ce manuel intimlde R6glage de
n'est pas itla bonne loge. l'horloge _lectronique.
heure
Les r&ultats de la Le four ffest pas de niveau. Mettez le four de niveau. Voir les instructions d'ins-
cuisson ne sont pas tallation.
concluants La calibration de tempdrature de votre four La calibration de votre vieux four peut s'_tre air&de
diff_re de votre four prdcddent, avec le temps, tandis que celle de votre nouveau
four est plus exacte. Rajustez les rdglages de tempd-
ratures du four si n&essaire.
Le four ffa pas dtd pr&hauffd avant la cuis- Prdchauffez le four lorsque la recette spdcifie de le
son. prdchauf/br.
Temps de cuisson incorrect, vous ffavez
pas utilisd la tempdrature ou la position de
grille addquate.
I1 s'agit d'une nouvelle recette ou elle ne N'utitisez que des recettes provenant de source fia-
provient pas d'une source fiable, ble.
L'ustensite utilisd ffest pas du type ou de la Rdfdrez-vous it un livre de cuisine fiable pour la
grandeur recommandde, grandeur correcte de l'ustensile.
Les rdsultats de cuisson ou de grit ne sont Changez les temps et la temp&ature pour la cuis-
pas les m_lnes de votre four prdcddent, son comlne il est ddcrit it la page 28 de ce manuel
et enclencher le temps de cuisson
La porte ne s'ouvre Le four est en cycle d'auto-nettoyage Attendez que le cycle prenne fin et que le four re-
pas (SELF-CLEAN) et la telnpdramre du four tioidisse.
est supdrieure i1560°F.
Le cycle d'auto-nettoyage (SELF-CLEAN) AtteMez que le four refioidisse.
est terlnind, mais la temp&ature du timr est
encore supdrieure it 560°F.
Les lulnibres du L'ampoule est brfilde. Remplacez l'ampoute tel qu!indiqud dans ce manuel
four ne fonction- il la section Remplacement de l'ampoule du four.
nentpas Le four est en cycle d'auto-nettoyage Les ampoules ne s'allument pas durant I'auto-
(SELF-CLEAN). nettoyage.
Tableau 4.
42
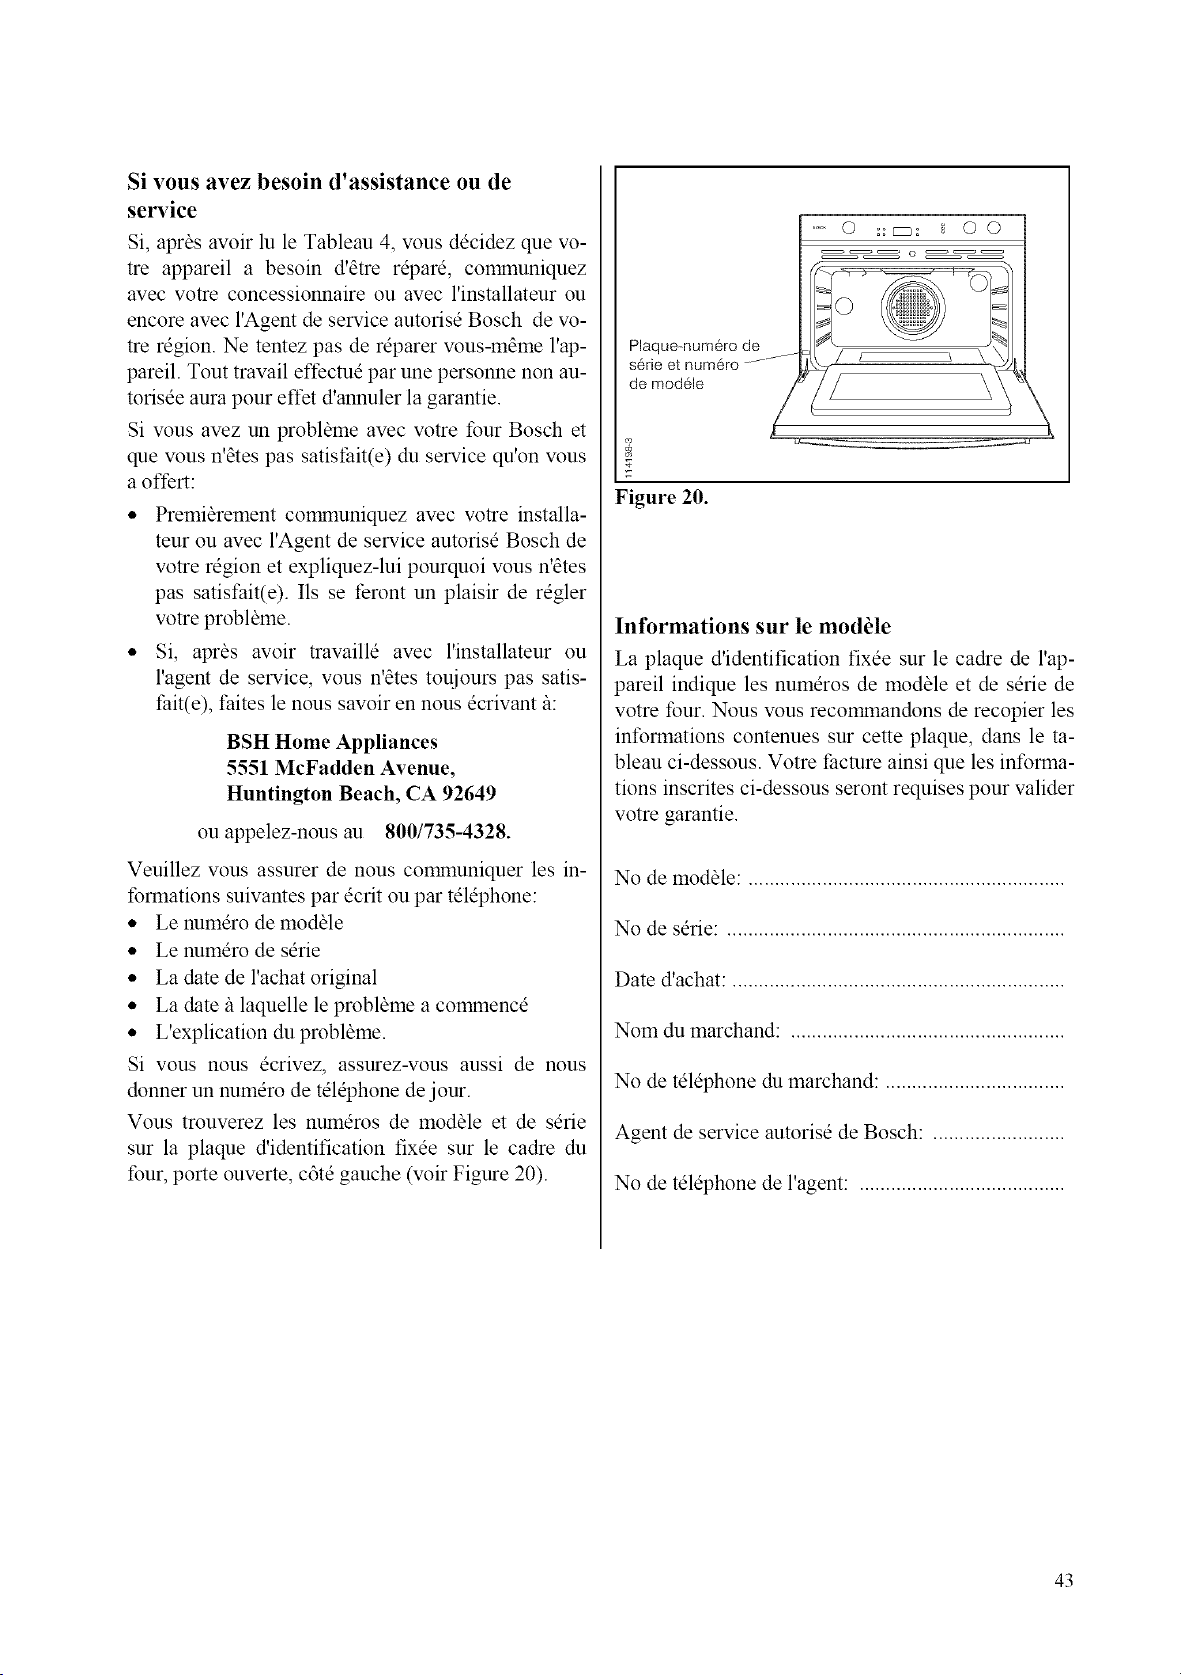
Si vous avez besoin d'assistance ou de
service
Si, apr_s avoir lu le Tableau 4, vous decidez que vo-
tre appareil a besoin d'etre repare, communiquez
avec votre concessionnaire ou avec l'installateur ou
encore avec l'Agent de service autorisd Bosch de vo-
tre region. Ne tentez pas de reparer vous-m_me l'ap-
pareil. Tout travail effectue par une personne non au-
torisee aura pour effet d'annuler la garantie.
Si vous avez un problbme avec votre four Bosch et
que vous n'_tes pas satisthit(e) du service qu'on wins
a offert:
• Premibrement communiquez avec votre installa-
teur ou avec l'Agent de service autorisd Bosch de
votre region et expliquez-lui pourquoi wins n'_tes
pas satist:ait(e). Ils se feront un plaisir de regler
votre probl_me.
• Si, apr4s avoir travaille avec l'installateur ou
l'agent de service, vous n'4tes toujours pas satis-
fait(e), faites le nous savoir en nous ecrivant/_:
BSH Home Appliances
5551 McFadden Avenue,
Huntington Beach, CA 92649
ou appelez-nous au 800/735-4328.
Veuillez vous assurer de nous comanuniquer les in-
formations suivantes par ecrit ou par tel@hone:
• Le numero de module
• Le numero de serie
• La date de l'achat original
• La date/_ laquelle le probl_me a comanence
• L'explication du probl_me.
Si vous nous ecrivez, assurez-vous aussi de nous
donner un numero de telephone de jour.
Vous trouverez les numeros de module et de sdrie
sur la plaque d'identification fixee sur le cadre du
four, porte ouverte, c6te gauche (voir Figure 20).
Plaque-num6ro de
serle et numero/-
de modOle
0 :a_: _ O0
_7
g
g
Figure 20.
Informations sur le module
La plaque d'identification fixee sur le cadre de l'ap-
pareil indique les numeros de module et de serie de
votre tour. Nous wins recomanandons de recopier les
infonnations contenues sur cette plaque, dans le ta-
bleau ci-dessous. Votre facture ainsi que les informa-
tions inscrites ci-dessous seront requises pour valider
votre garantie.
No de modale: ............................................................
No de serie: ................................................................
Date d'achat: ...............................................................
Nom du marchand: ....................................................
No de telephone du marchand: ..................................
Agent de service autorise de Bosch: .........................
No de telephone de l'agent: .......................................
43
D6claration de garantie limit6e
Les garanties foumies par BSH Home Appliances ("Bosch") dans cette ddclaration de garantie limitde s'appliquent seulement aux Iburs
dlectriques encastrds Bosch ("Fours encastrds") achetds par vous, le premier acheteur, fi condition clue le Four encastrd ait dtd achetd (1)
pour votre usage personnel et non pour la revente (2), aux t_tats-Unis ou au Canada, et clue le four se trouve dans le pays off il a dtd
achetd. Le temle <<Date d'installatiom> utilisd dans cette ddclaration se rdf_re fi la date fi laquelle le Four encastrd a dtd installd ou fi dix
(10) jonrs ouvrables aprSs la date fi laquelle le Four encastrd a dtd vendu an premier acheteur.utilisateur. Les garanties mentionndes ci-
dessous s'appliquent seulement au premier acheteur utilisateur et ne sont pas transfdrables.
Garantie limitde standard
Bosch garantit que ses Iburs encastrds sont libres de toute ddlEcmositd de matdriau ou de fabrication pour une pdriode de douze (12)
mois fi partir de la date d'installation. Durant cette pdriode de garantie, Bosch ou son centre de service autorisd r@arera ou remplacera,
sa seule discrdtion et sans frais, tont Four encastrd qui s'av_rera ddfecmeux, dans des conditions d'nsage normal. Toutes les pisces et
composantes retirdes du four deviendront la propridtd de Bosch, fi la seule discrdtion de Bosch. Toutes les pisces remplacdes etou r&
pardes assumeront l'identitd de la piSce originale aux fins de cette garantie et cette garantie ne s'applkluera pas fi de telles pisces.
Autres conditions de la garantie limitde
Les garanties Iburnies dans cette Ddclaration de garantie limitde excluent les ddfecmositds et les dommages rdsultant de (1) l'usage du
Four encastrd antre qu'un usage nomml et habituel (l'usage commercial du Four encastrd n'est pas considdrd conmle nomml ou habi-
reel), (2) le mauvais usage, l'abus, les accidents ou la ndgligence, (3) le fbnctionnement incorrect, l'entretien, l'installation ou le service
non antorisds, (4) les rajustements, changements ou modifications de toutes sortes, (5) le Ihit de ne passe conibrmer aux rSglements et
codes dlectriques et.ou de construction locaux, municipaux, provinciaux et nationaux en vigueur, (6) les renversements d'aliments et
ou de liquides, et (7) les lbrces extdrieures telles clue inondations, incendies, actes naturels et autres circonstances hors du contr61e de
Bosch. Sont exclues dgalement de cette garantie les draflures et donmmges aux surihces extdrieures et aux parties exposdes du Four en-
castrd sur lequel les numdros de sdrie ont dtd effacds, changds ou enlevds.
Dans la mesure autorisde par la loi, cette garantie dtablit vos recours exclusifs relativement aux produits couverts par la garantie, clue la
rdclamation provienne du contrat ou d'un tort (incluant la stricte responsabilitd et la ndgligence) ou autre. Bosch ne sera pas responsa-
ble des dommages-mtdr_ts indirects ou accessoires, des pertes ou des ddpenses. CETTE GARANTIE REMPLACE TOUTE AUTRE
GARANTIE EXPRESSE OU ACCESSOIRE. TOUTE GARANTIE SUGGt_Rt_E PAR LA LOI, QUE CE SOIT POUR LA QUALI-
Tt_ MARCHANDE OU L'USAGE A DES FIN'S PARTICULIERES OU AUTRE, NE SERA APPLICABLE QUE DURANT LA
Pt_RIODE OU CETTE GARANTIE EXPRESSE EST EN VIGUEUR. Aucune tentative de modifier, changer ou amender cette garan-
tie ne sera en vigueur fi moins qtCelle ne soit autorisde par dcrit par un cadre de BSH.
Comment obtenir un service de _arantie
Pour obtenir un service sons garantie pour Four eneastrd, connnuniquez avec le centre de service Bosch le plus proche ou avec
BSH Home Appliances 5551 McFadden Avenue, Hnntington Beach, CA 92649.
Voir page 43.
44


Code 09BH0320 TPS Gallarate - (02-003)