USER INSTRUCTIONS
OVENS
NOTICE D'EMPLOI ET D'INSTALLATION
DESFOURSENCASTRABLES
MANUALE D’ISTRUZIONI
FORNO
INSTRUCCIONES DE USO
HORNOS EMPOTRABLES
BEDIENUNGSANLEITUNG
BACKOFEN
KULLANIM KILAVUZU
FIRINLAR
POKYNY PRO UŽIVATELE
TROUBY
GB
FR
02
14
IT
ES
27
39
DE
51
TR
CZ
63
76
• HOAZ 3373
• HOAZ 7150
• HOAT 3150
• HOAZ7801
• HOAT3150IN
• HOC3151B
CANDY HOOVER GROUP S.R.L. • Via Comolli 16 • 20861 Brugherio (MB) - Italy
GB, FR, IT, ES, DE, TR, CZ
Rev_G Değişen sayfalar; 6 - 19 - 32 - 33 - 44 - 55 - 68 - 80 - 88

Safety Indications
• Cleaning and maintenance should not be carried out by unsupervised
children.
• WARNING: the accessible parts can become hot when the oven is in
use. Children must be kept at a safe distance.
• Only use the meat probe recommended for this oven.
- Remove large or coarse food residues from the inside of the oven using
a damp sponge. Do not use detergents;
• The oven must be switched off before removing the removable parts
and, after cleaning, reassemble them according the instructions.
• During cooking, moisture may condense inside the oven cavity or on
the glass of the door. This is a normal condition. To reduce this effect,
wait 10-15 minutes after turning on the power before putting food
inside the oven. In any case, the condensation disappears when the
oven reaches the cooking temperature.
• WARNING: ensure that the appliance is switched off before replacing
the bulb, to avoid the possibility of electric shocks.
• In ovens with meat probe it is necessary, before making the cleaning
cycle, close the hole with the nut provided. Always close the hole with
the nut when the meat probe is not used.
• Children under 8 must be kept at a safe distance from the appliance if
not continuously supervised.
• Avoid leaving food inside the oven after cooking for more than 15/20
minutes.
• Cook the vegetables in a container with a lid instead of an open tray.
- Clean the oven door;
• WARNING: the appliance and accessible parts become hot during use.
Be careful not to touch any hot parts.
- Remove all accessories and the sliding rack kit (where present);
• Do not use rough or abrasive materials or sharp metal scrapers to
clean the oven door glasses, as they can scratch the surface and cause
the glass to shatter.
• Children must not play with the appliance. The appliance can be used
by those aged 8 or over and by those with limited physical, sensorial or
mental capacities, without experience or knowledge of the product,
only if supervised or provided with instruction as to the operation of the
appliance, in a safe way with awareness of the possible risks.
- Do not place tea towels
• WARNING: before initiating the automatic cleaning cycle:
GB 02
GB, FR, IT, ES, DE, TR, CZ
Rev_G Değişen sayfalar; 6 - 19 - 32 - 33 - 44 - 55 - 68 - 80 - 88

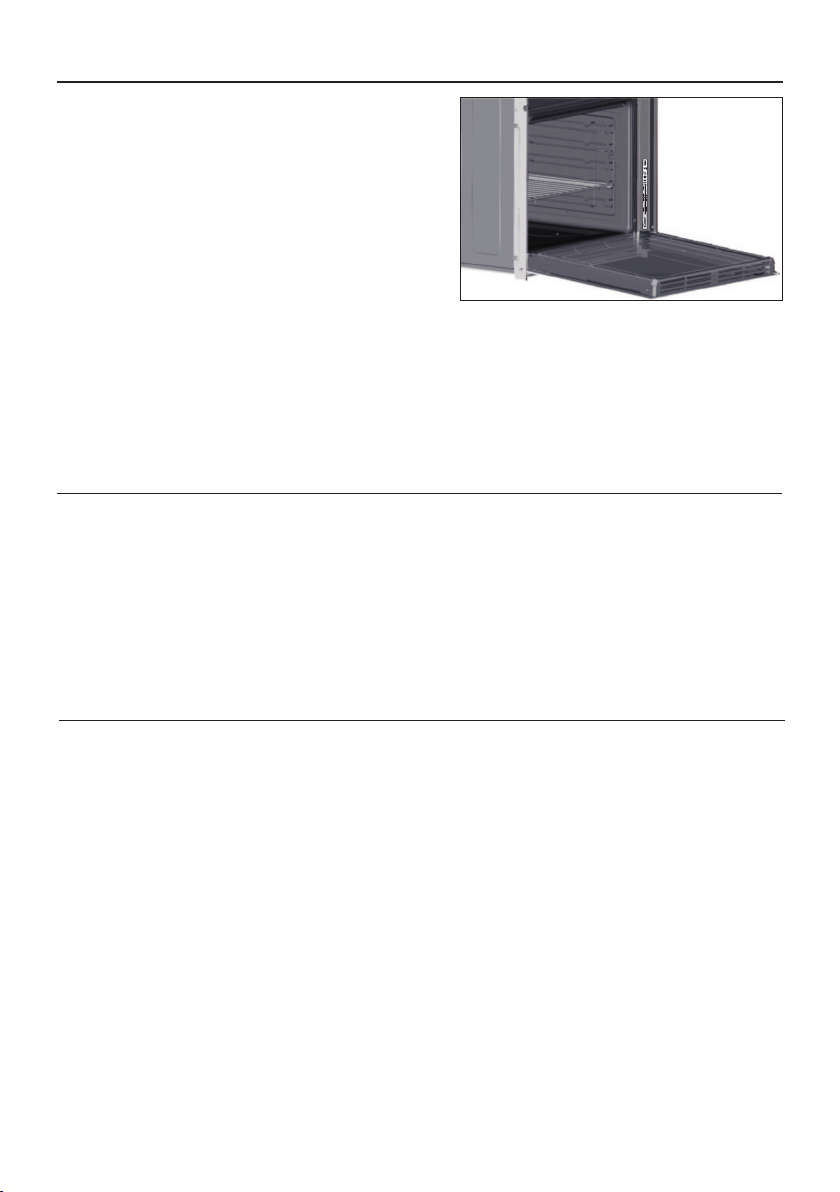
The shelf must be inserted completely into the cavity
• The type of power cable must be H05V2V2-F.
• Connect a plug to the supply cable that is able to bear the voltage,
current and load indicated on the tag and having the earth contact. The
socket must be suitable for the load indicated on the tag and must be
having the earth contact connected and in operation. The earth
conductor is yellow-green in colour. This operation should be carried out
by a suitably qualified professional. In case of incompatibility between
the socket and the appliance plug, ask a qualified electrician to
substitute the socket with another suitable type. The plug and the
socket must be conformed to the current norms of the installation
country. Connection to the power source can also be made by placing an
omnipolar breaker between the appliance and the power source that
can bear the maximum connected load and that is in line with current
legislation. The yellow-green earth cable should not be interrupted by
the breaker. The socket or omnipolar breaker used for the connection
should be easily accessible when the appliance is installed.
• If the power cable is damaged, it must be substituted with a cable or
special bundle available from the manufacturer or by contacting the
customer service department.
• Failure to comply with the above can compromise the safety of the
appliance and invalidate the guarantee.
• Any excess of spilled material should be removed before cleaning.
• The appliance must not be installed behind a decorative door in order
to avoid overheating.
• During the pyrolytic cleaning process, surfaces can heat up more than
usual, children must therefore be kept at a safe distance.
• The disconnection may be achieved by having the plug accessible or
by incorporating a switch in the fixed wiring in accordance with the
wiring rules.
• When you place the shelf inside, make sure that the stop is directed
upwards and in the back of the cavity.
•Do not use a steam cleaner for cleaning operations.
• WARNING: Never remove the oven door seal.
• No additional operation/setting is required in order to operate the
appliance at the rated frequencies.
• WARNING: Do not line the oven walls with aluminum foil or single-use
protection available from stores. Aluminum foil or any other protection,
in direct contact with the hot enamel, risk melting and deteriorating the
enamel of the insides.
GB 03
GB, FR, IT, ES, DE, TR, CZ
Rev_G Değişen sayfalar; 6 - 19 - 32 - 33 - 44 - 55 - 68 - 80 - 88

Summary
GB 04
General Instructions
5
1.1 Safety indications
1.2 Electrical safety
1.3 Recommendations
1.4 Installation
1.5 Waste management
1.6 Conformity declaration
2.1 Overview
2.2 Accessories
2.3 First use
Product Description
7
3.1 Display description
3.2 Cooking modes
Use of the Oven
8
4.1 General notes on cleaning
4.2 Maintenance
• Removal and cleaning of the side racks
• Removal of the oven window
• Removal and cleaning of the glass
door
Oven Cleaning and Maintenance
11
5.1 F.A.Q.
Troubleshooting
13
GB, FR, IT, ES, DE, TR, CZ
Rev_G Değişen sayfalar; 6 - 19 - 32 - 33 - 44 - 55 - 68 - 80 - 88
1. General Instructions
We thank you for choosing one of our products. For the
best results with your oven, you should read this
manual carefully and retain it for future reference.
Before installing the oven, take note of the serial
number so that you can give it to customer service staff
if any repairs are required. Having removed the oven
from its packaging, check that it has not been damaged
during transportation. If you have doubts, do not use
the oven and refer to a qualified technician for advice.
Keep all of the packaging material (plastic bags,
polystyrene, nails) out of the reach of children. When
the oven is switched on for the first time, strong
smelling smoke can develop, which is caused by the glue on the insulation panels surrounding the oven
heating for the first time. This is absolutely normal and, if it occurs, you should wait for the smoke to
dissipate before putting food in the oven. The manufacturer accepts no responsibility in cases where
the instructions contained in this document are not observed.
NOTE: the oven functions, properties and accessories cited in this manual will vary, depending on the
model you have purchased.
1.1 Safety Indications
- Do not pull on the power cable to disconnect the plug from the socket;
- Do not touch the appliance with wet or damp hands or feet;
Only use the oven for its intended purpose, that is only for the cooking of foods; any other use, for
example as a heat source, is considered improper and therefore dangerous. The manufacturer cannot
be held responsible for any damage resulting from improper, incorrect or unreasonable usage.
The use of any electrical appliance implies the observance of some fundamental rules:
- In general the use of adaptors, multiple sockets and extension cables is not recommended;
- In case of malfunction and/or poor operation, switch off the appliance and do not tamper with it.
1.2 Electrical Safety
ENSURE THAT AN ELECTRICIAN OR QUALIFIED TECHNICIAN MAKES THE ELECTRICAL CONNECTIONS.
The power supply to which the oven is connected must conform with the laws in force in the country of
installation. The manufacturer accepts no responsibility for any damage caused by the failure to observe
these instructions. The oven must be connected to an electrical supply with an earthed wall outlet or a
disconnector with multiple poles, depending on the laws in force in the country of installation. The
electrical supply should be protected with suitable fuses and the cables used must have a transverse
section that can ensure correct supply to the oven.
CONNECTION
The oven is supplied with a power cable that should only be connected to an electrical supply with 220-
240 Vac 50 Hz power between the phases or between the phase and neutral. Before the oven is
connected to the electrical supply, it is important to check:
- power voltage indicated on the gauge;
- the setting of the disconnector.
The grounding wire connected to the oven's earth terminal must be connected to the earth terminal of
the power supply.
WARNING
Before connecting the oven to the power supply, ask a qualified electrician to check the continuity of the
power supply's earth terminal. The manufacturer accepts no responsibility for any accidents or other
problems caused by failure to connect the oven to the earth terminal or by an earth connection that has
defective continuity.
GB 05
GB, FR, IT, ES, DE, TR, CZ
Rev_G Değişen sayfalar; 6 - 19 - 32 - 33 - 44 - 55 - 68 - 80 - 88
1.3 Recommendations
After each use of the oven, a minimum of cleaning will help keep the oven perfectly clean.
Do not line the oven walls with aluminium foil or single-use protection available from stores. Aluminium
foil or any other protection, in direct contact with the hot enamel, risks melting and deteriorating the
enamel of the insides. In order to prevent excessive dirtying of your oven and the resulting strong
smokey smells, we recommend not using the oven at very high temperature. It is better to extend the
cooking time and lower the temperature a little. In addition to the accessories supplied with the oven,
we advise you only use dishes and baking moulds resistant to very high temperatures.
1.4 Installation
The manufacturers have no obligation to carry this out. If the assistance of the manufacturer is required
to rectify faults arising from incorrect installation, this assistance is not covered by the guarantee. The
installation instructions for professionally qualified personnel must be followed. Incorrect installation
may cause harm or injury to people, animals or belongings. The manufacturer cannot be held
responsible for such harm or injury.
The oven can be located high in a column or under a worktop. Before fixing, you must ensure good
ventilation in the oven space to allow proper circulation of the fresh air required for cooling and
protecting the internal parts. Make the openings specified on last page according to the type of fitting.
NOTE: as the oven could require maintenance work, it is advisable to keep another wall socket available
so that the oven can be connected to this if it is removed from the space in which it is installed. The
power cable must only be substituted by technical service staff or by technicians with equivalent
qualifications.
1.5 Waste management and environmental protection
- The WEEE should not be treated as domestic waste;
Where possible, avoid pre-heating the oven and always try to fill it. Open the oven door as infrequently
as possible, because heat from the cavity disperses every time it is opened. For a significant energy
saving, switch off the oven between 5 and 10 minutes before the planned end of the cooking time, and
use the residual heat that the oven continues to generate. Keep the seals clean and in order, to avoid any
heat dispersal outside of the cavity. If you have an electric contract with an hourly tariff, the "delayed
cooking" programme makes energy saving more simple, moving the cooking process to start at the
reduced tariff time slot.
- The WEEE should be taken to dedicated collection areas managed by the town council or a registered
company.
In many countries, domestic collections may be available for large WEEEs. When you buy a new
appliance, the old one can be returned to the vendor who must accept it free of charge as a one-off, as
long as the appliance is of an equivalent type and has the same functions as the purchased appliance.
This appliance is labelled in accordance with European Directive 2012/19/EU regarding
electric and electronic appliances (WEEE). The WEEE contain both polluting substances
(that can have a negative effect on the environment) and base elements (that can be
reused). It is important that the WEEE undergo specific treatments to correctly remove and
dispose of the pollutants and recover all the materials. Individuals can play an important
role in ensuring that the WEEE do not become an environmental problem; it is essential to
follow a few basic rules:
SAVING AND RESPECTING THE ENVIRONMENT
1.6 Declaration of compliance
By placing the mark on this product, we are confirming compliance to all relevant European safety,
health and environmental requirements which are applicable in legislation for this product.
GB 06
GB, FR, IT, ES, DE, TR, CZ
Rev_G Değişen sayfalar; 6 - 19 - 32 - 33 - 44 - 55 - 68 - 80 - 88
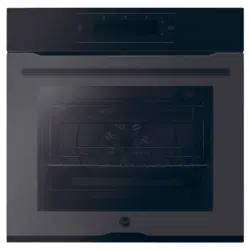
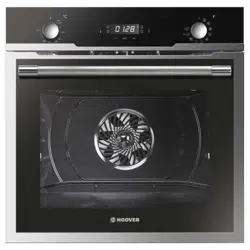
2. Product Description
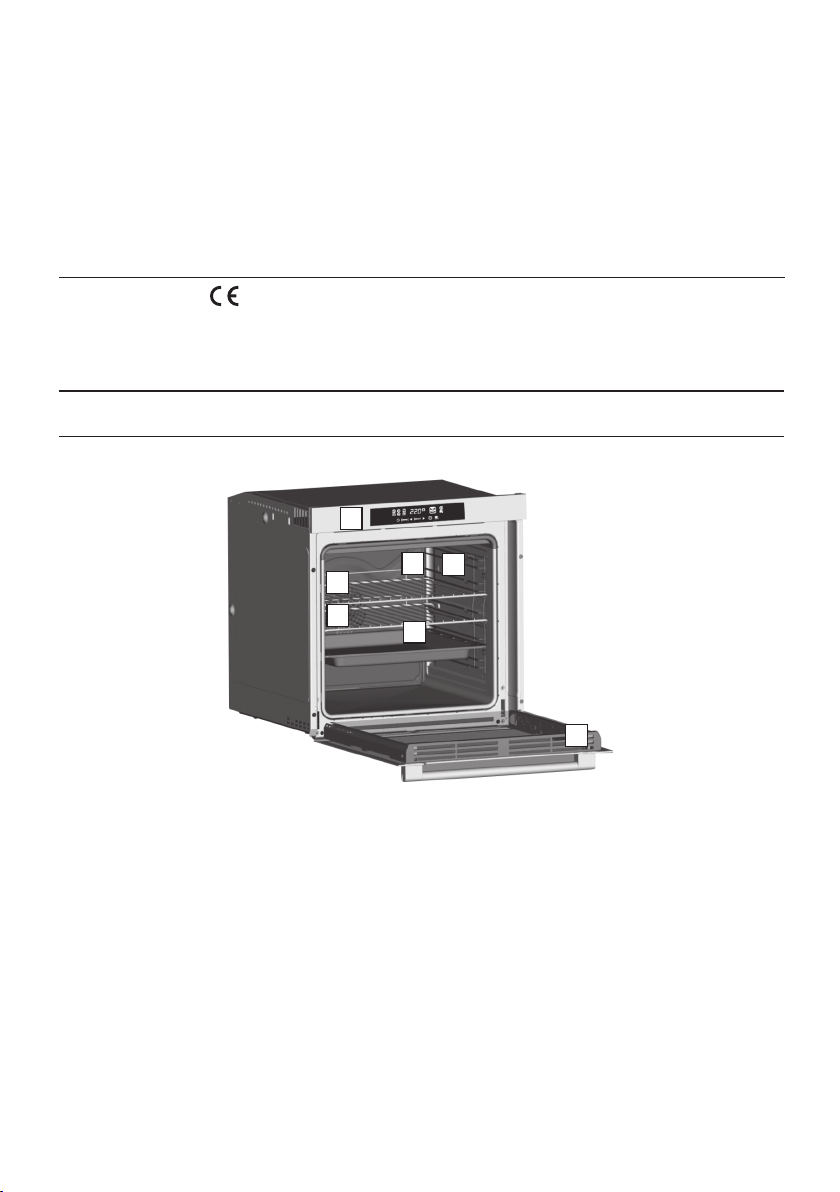
2.1 Overview
2.2 Accessories (According to model)
Metal grill
1
Drip pan
2
Holds baking trays and plates.
Collects the residues that drip during the cooking
of foods on the grills.
GB 07
1. Control panel
2. Shelf positions
(lateral wire grid if included)
3. Metal grill
4. Drip pan
5. Fan (behind the steel plate)
6. Meat probe
7. Oven door
Led vision
3
Advantages :
This system, besides providing excellent illumination
inside the oven, lasts longer than the traditional
light bulb its easier and to maintain and most of all
saves energy.
Is an illumination system which replaces the
traditional « light bulb ». 14 LED (for non-pyrolitic
versions) or 10 High Power LED (for pyrolitic
versions) lights are integrated within the door.
These produce white high quality illumination
which enables to view the inside of the oven with
clarity without any shadows on all the shelves.
- Optimum view
- Long life illumination
- Very low energy consumption,- 95% in comparison
with the traditional illumination High.
1
3
5
4
6
2
7
GB, FR, IT, ES, DE, TR, CZ
Rev_G Değişen sayfalar; 6 - 19 - 32 - 33 - 44 - 55 - 68 - 80 - 88
GB 08
2.3 First Use
PRELIMINARY CLEANING
Clean the oven before using for the first time. Wipe over external surfaces with a damp soft cloth. Wash
all accessories and wipe inside the oven with a solution of hot water and washing up liquid. Set the
empty oven to the maximum temperature and leave on for about 1 hour, this will remove any lingering
smells of newness.
3. Use of the Oven
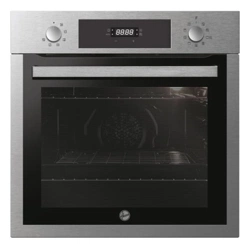
3.1 Display description
2. Clock setting
4. End of cooking
6. LCD display adjustment controls
3. Cooking time
5. Temperature or clock display
7. Thermostat selector knob
8. Function selector knob
1. Minute minder
8
WARNING : the first operation to carry out after the
oven has been installed or following the
interruption of power supply (this is recognizable
the display pulsating and showing 12:00 ) is setting
the correct time. This is achieved as follows.
•Release all buttons.
•Set time with "-" "+" buttons.
•Push the central button.
ATTENTION: The oven will only operate providing the
clock is set.
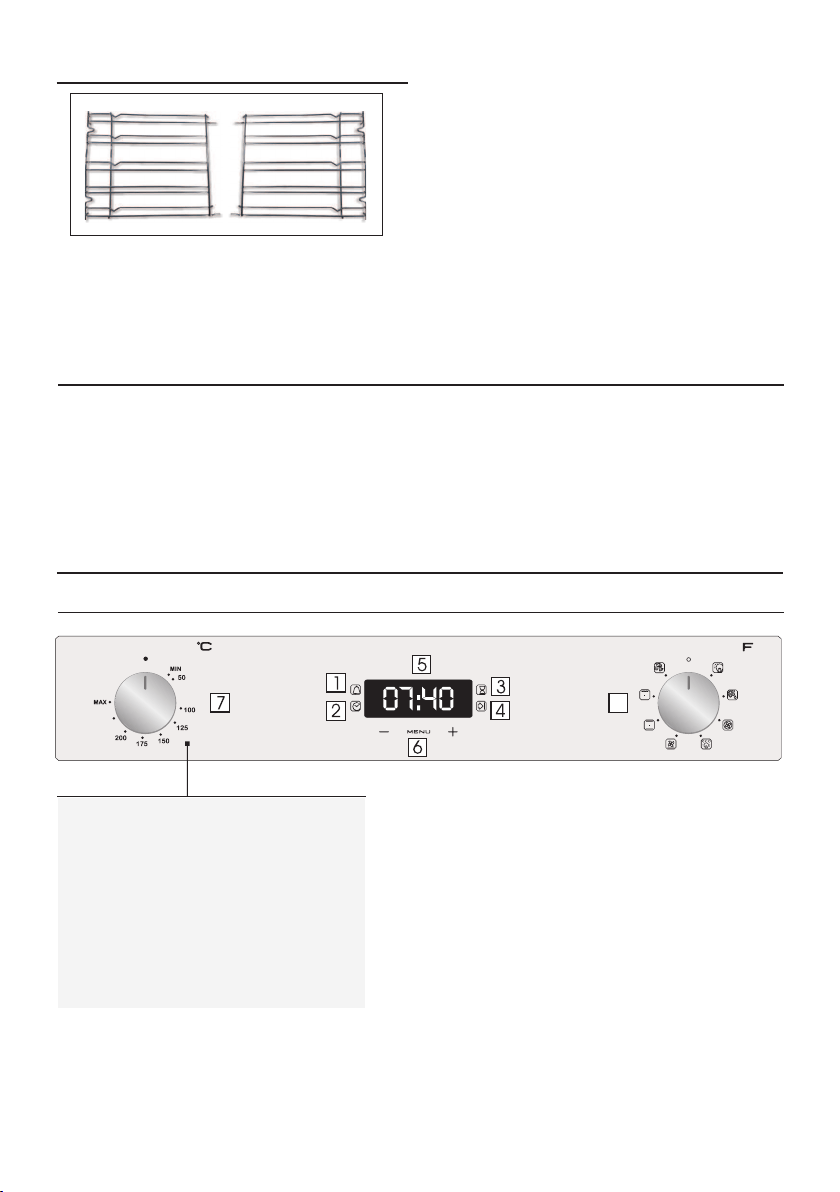
Lateral wire grids
4
Lateral wire grid if included.
GB, FR, IT, ES, DE, TR, CZ
Rev_G Değişen sayfalar; 6 - 19 - 32 - 33 - 44 - 55 - 68 - 80 - 88
GB 09
FUNCTIONHOW TO DEACTIVATEWHAT IT DOESWHY IT IS NEEDED HOW TO USE
KEY LOCK
MINUTE
MINDER
COOKING
TIME
END OF
COOKING
•Child Lock function is
activated by touching Set
(+) for a minimum of 5
seconds. From this
moment on all other
function are locked and
the display will flash
STOP and preset time
intermittently.
•Child Lock function is
deactivated by touching
touchpad Set (+) again
for a minimum of 5
seconds. From this
moment on all functions
are selectable again.
•Push the central button
1 times
•Press the buttons "-"
"+"
to set the required time
•Release all the buttons
•When the set time as
elapsed an audible alarm
is activated (this alarm
will stop on its own,
however it can be
stopped immediately by
pressing the button)
SELECT.
•Sounds an alarm at the
end of the set time.
•
During the process, the
display shows the
remaining time.
•Allows to use the oven as
alarm clock (could be
activated either with
operating the oven or with
out operating the oven)
• Push the central button
2 times
• Release all buttons
• Set th e co okin g
function with the oven
function selector
• Press the buttons "-" or
"+"to set the lenght of
cooking required
• It allows to preset the
cooking time required for
the recipe chosen.
• To check how long is left
to run press the SELECT
button 2 Times.
• To alter/change the
preset time press SELECT
and "-" "+" buttons.
•
Push any button to
stop the signal. Push the
central button to return
to the clock
function.
•When the time is elapsed
the oven will switch off
automatically.
Should you wish to stop
cooking earlier either turn
the function selector to 0, or
set time to 0:00
(SELECT and "-" "+" buttons)
•At the time set, the
oven will switch off. To
switch off manually,
turn the oven function
selector to position O.
•To modify the preset
time press buttons
SELECT + "-" "+"
•Enables you to set the
end of cooking time
•To check the preset
time p
ush the central
button 3 times
•Release the buttons
•
Push the central button
3 times
•Press the
buttons "-" "+" to set the
time at which you wish
the oven to switch off
• Se t t h e co o ki n g
function with the oven
function selector.
•This function is typically
used with “cooking time”
function.
For example if the dish has
to be cooked for 45 minutes
and needs to be ready by
12:30, simply select the
required function, set the
cooking time to 45 minutes
and the end of cooking time
to 12:30.
• Co o k in g w il l s ta r t
automatically at 11:45
(12:30 minus 45 mins) and
will continue until the pre-
set end-of-cooking-time,
when the oven will switch
itself off automatically.
WARNING.
•At the end of the cooking
set time, the oven will
switch off automatically and
an audible alarm will ring.
If the END of cooking is
selected without setting the
length of cooking time, the
oven will start cooking
immediately and it will stop
at the END of cooking time
set.
GB, FR, IT, ES, DE, TR, CZ
Rev_G Değişen sayfalar; 6 - 19 - 32 - 33 - 44 - 55 - 68 - 80 - 88
GB 10
T °C
default
180
220
210
210
40
T °C
range
40 ÷ 40
50 ÷ 240
50 ÷ 280
50 ÷ 230
50 ÷ 240
Function
Dial
Function (Depends on the oven model)
LAMP: Turns on the oven light.
FAN COOKING: We recommend you use this method for poultry, pastries, fish
and vegetables. Heat penetrates into the food better and both the cooking and
preheating times are reduced. You can cook different foods at the same time
with or without the same preparation in one or more positions. This cooking
method gives even heat distribution and the smells are not mixed.
Allow about ten minutes extra when cooking foods at the same time.
CONVENTIONAL COOKING: Both top and bottom heating elements are used.
Preheat the oven for about ten minutes. This method is ideal for all traditional
roasting and baking. For seizing red meats, roast beef, leg of lamb, game, bread,
foil wrapped food (papillotes), flaky pastry. Place the food and its dish on a shelf
in mid position.
DEFROST: When the dial is set to this position. The fan circulates air at room
temperature around the frozen food so that it defrosts in a few minutes
without the protein content of the food being changed or altered.
*Tested in accordance with the CENELEC EN 60350-1 used for definition of energy class.
3.2 Cooking Modes
FAN + LOWER ELEMENT: The bottom heating element is used with the fan
circulating the air inside the oven. This method is ideal for juicy fruit flans, tarts,
quiches and pâté.
It prevents food from drying and encourages rising in cakes, bread dough and
other bottom-cooked food.
Place the shelf in the bottom position.
L3
L1 ÷ L5
GRILL: Use the grill with the door closed.
The top heating element is used alone and you can adjust the temperature.
Five minutes preheating is required to get the elements red-hot. Success is
guaranteed for grills, kebabs and gratin dishes. White meats should be put at a
distance from the grill; the cooking time is longer, but the meat will be tastier.
You can put red meats and fish fillets on the shelf with the drip tray
underneath. The oven has two grill positions:
Grill: 2140 W Barbecue: 3340 W
200150 ÷ 220
The top heating element is used with the fan circulating the air inside the oven.
Preheating is necessary for red meats but not for white meats. Ideal for
cooking thick food items, whole pieces such as roast pork, poultry, etc. Place
the food to be grilled directly on the shelf centrally, at the middle level. Slide
the drip tray under the shelf to collect the juices. Make sure that the food is not
too close to the grill. Turn the food over halfway through cooking.
FAN ASSISTED GRILL : Use the turbo-grill with the door closed.
*
*
PIZZA: With this function hot air circulated in the oven to ensure perfect result
for dishes such as pizza or cake.
22050 ÷ 230
GB, FR, IT, ES, DE, TR, CZ
Rev_G Değişen sayfalar; 6 - 19 - 32 - 33 - 44 - 55 - 68 - 80 - 88

GB 11
4. Oven cleaning and maintenance
4.1 General notes on cleaning
OVEN WINDOW SEAL
DRIP PAN
If greasy residues remain, immerse the pan in water and detergent. Alternatively, you can wash the pan
in the dishwasher or use a commercial oven detergent. Never put a dirty pan back into the oven.
GLASS PARTS
The lifecycle of the appliance can be extended through regular cleaning. Wait for the oven to cool before
carrying out manual cleaning operations. Never use abrasive detergents, steel wool or sharp objects for
cleaning, so as to not irreparably damage the enamelled parts. Use only water, soap or bleach-based
detergents (ammonia).
It is advisable to clean the glass window with absorbent kitchen towel after every use of the oven. To
remove more obstinate stains, you can use a detergent-soaked sponge, well wrung out, and then rinse
with water.
If dirty, the seal can be cleaned with a slightly damp sponge.
ACCESSORIES
Clean accessories with a wet, soapy sponge before rinsing and drying them: avoid using abrasive
detergents.
After using the grill, remove the pan from the oven. Pour the hot fat into a container and wash the pan in
hot water, using a sponge and washing-up liquid.
4.2 Maintenance
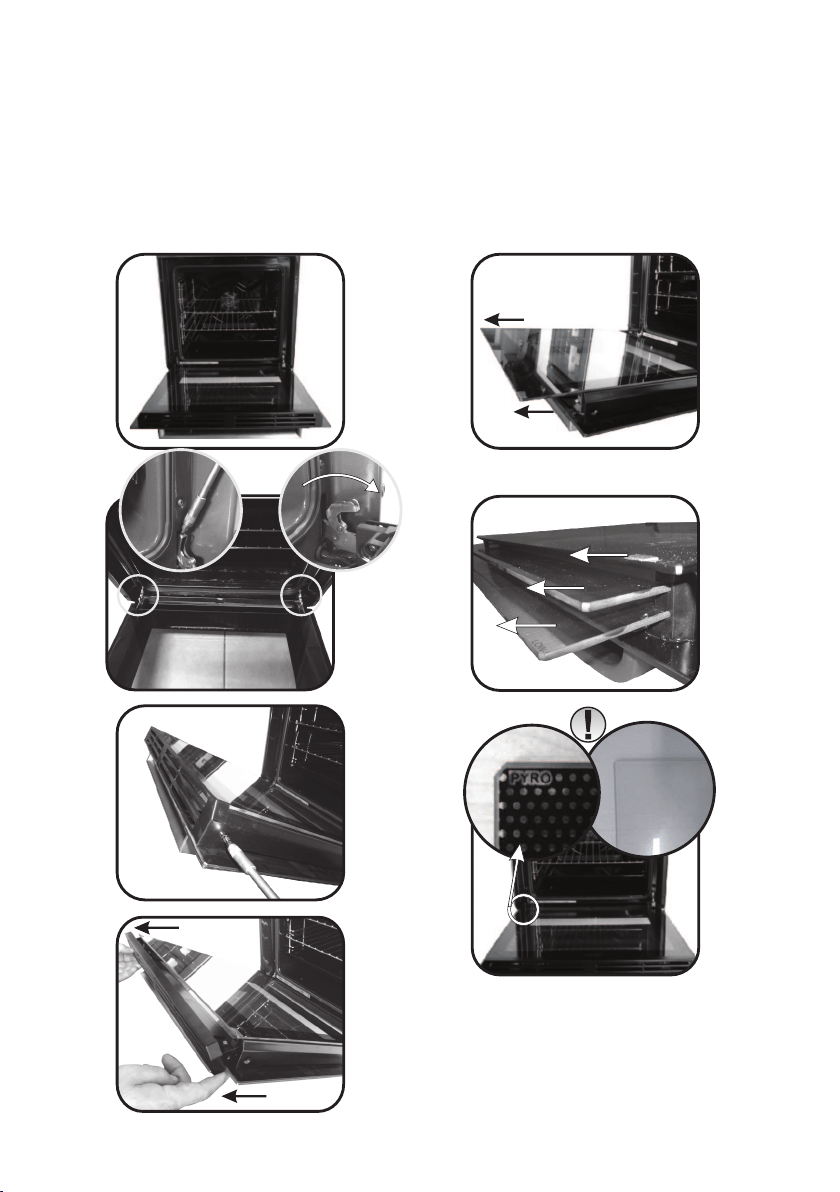
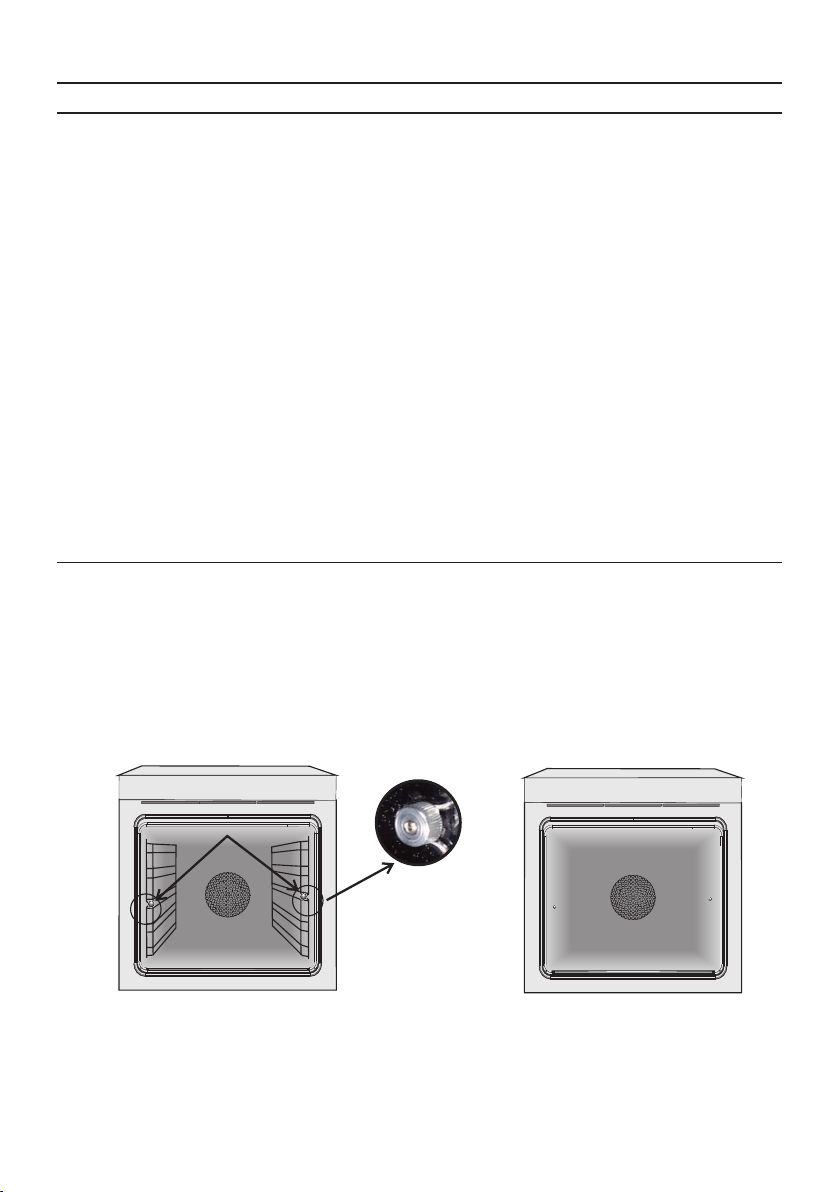
REMOVAL AND CLEANING OF THE SIDE RACKS
3. Clean the side racks in a dishwasher or with a wet sponge and then dry them immediately.
1. Unscrew the bolt in an anti-clockwise direction.
2. Remove the side racks by pulling them towards you.
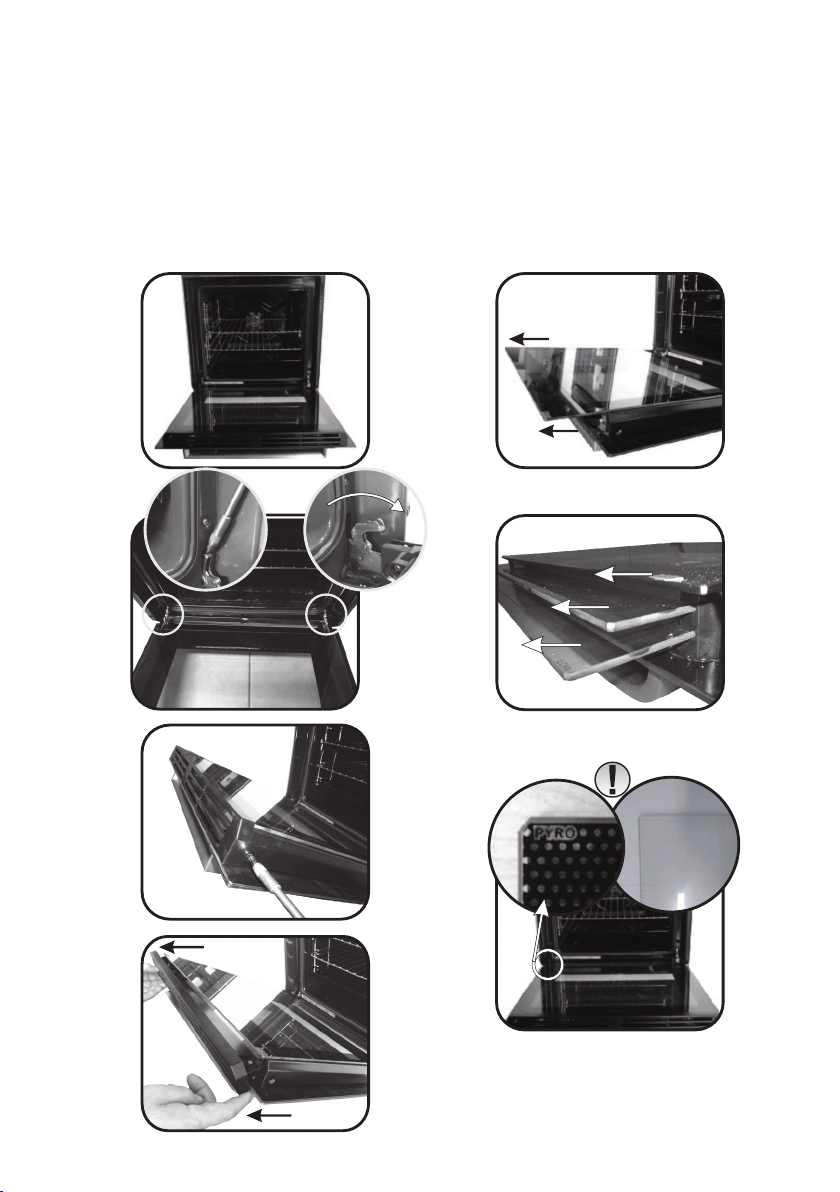
2. Open the clamps of the hinge housing on the right and left side of the front window by pushing them
downwards.
4. Having cleaned the side racks, put them back in and reinsert the bolts, ensuring that they are fully
tightened.
1. Open the front window.
3. Replace the window by carrying out the procedure in reverse.
REMOVAL OF THE OVEN WINDOW
A
GB, FR, IT, ES, DE, TR, CZ
Rev_G Değişen sayfalar; 6 - 19 - 32 - 33 - 44 - 55 - 68 - 80 - 88
LOW-E
1
2
3
1.
2.
3.
4.
5.
6.
7.
.REMOVAL AND CLEANING OF THE GLASS DOOR
1. Open the oven door.
2.3.4. Lock the hinges, remove the screws and remove the upper metal cover by pulling it upwards.
5.6. Remove the glass, carefully extracting it from the oven door (NB: in pyrolytic ovens, also remove the
second and third glass (if present)).
7. At the end of cleaning or substitution, reassemble the parts in reverse order.
On all glass, the indication "Pyro" must be legible and positioned on the left side of the door, close to the
left-hand lateral hinge. In this way, the printed label of the first glass will be inside the door.
GB 12
GB, FR, IT, ES, DE, TR, CZ
Rev_G Değişen sayfalar; 6 - 19 - 32 - 33 - 44 - 55 - 68 - 80 - 88
5. Troubleshooting
5.1 FAQ
PROBLEMPOSSIBLE CAUSE SOLUTION
The oven does not heat up
The clock is not setSet the clock
The child lock is on
A cooking function and
temperature has not been set
Deactivate the child lock
Ensure that the necessary
settings are correct
The oven does not heat up
The oven does not heat up
GB 13
Steam and condensation on
the user interface panel
Clean with a microfiber
cloth the user interface
panel to remove the
condensation layer
No reaction of the touch
user interface
GB, FR, IT, ES, DE, TR, CZ
Rev_G Değişen sayfalar; 6 - 19 - 32 - 33 - 44 - 55 - 68 - 80 - 88

• Les enfants ne doivent jouer avec l'appareil.
• Ne pas utiliser de nettoyants abrasifs ou de racloirs métalliques
tranchants pour nettoyer la vitre de la porte du four car ils peuvent rayer
la surface, entrainant des risques d'explosion.
• Une fois que la cuisson est terminée, nous vous conseillons de ne pas
laisser les aliments à l’intérior de la cavité pour plus de 15/20 minutes.
• Le nettoyage et l'entretien par l'utilisateur ne doit pas être fait par des
enfants sans surveillance.
• AVERTISSEMENT: L'appareil et les parties accessibles deviennent
chauds pendant l'utilisation. Des précautions doivent être prises pour
éviter de toucher les éléments chauffants.
• En cours d'utilisation l'appareil devient chaud. Des précautions doivent
être prises pour éviter de toucher les éléments chauds à l'intérieur du four.
• Le four doit être éteint avant d'enlever la protection et après le
nettoyage, la protection doit être replacé en respectant les instructions.
• Cet appareil n'est pas destiné à être utilisé par des personnes (y compris
les enfants) dont les capacités physiques, sensorielles ou mentales sont
réduites, ou ayant un manque d'expérience et de connaissances, à moins
qu'elles n'aient été formées à l'utilisation de l'appareil, par une personne
responsable de leur sécurité.
• Pendant la cuisson de l’humidité peut se créer dans la cavité ou sur la
surface de la porte. Le cas décrit est normal. Si on veut reduire cet effet, il
faut laisser réchauffer le four 10-15 minutes avant d’introduire les
aliments. L’humidité va disparaître grâce à la juste température de cuisson.
• Nous vous conseillons de faire la cuisson des légumes dans un
récipient avec couvercle pas sur un plateau.
• ATTENTION: les parties accessibles peuvent devenir très chaudes
quand le four est en marche. Les enfants doivent être tenus à une
distance de sécurité.
AVERTISSEMENT: Les parties accessibles peuvent devenir chaudes
pendant l'utilisation. Les jeunes enfants doivent être tenus à l'écart.
• Utiliser seulement la sonde de température recommandée pour ce four.
• Brancher le câble d’alimentation sur une prise de courant qui supporte
le voltage ; le courant et la charge sont indiqués sur l’étiquette ; vérifier la
présence d’une mise à la terre. La prise d’alimentation doit supporter la
charge indiquée sur l’étiquette et être dotée d’une mise à la terre en état
de fonctionnement. Le conducteur de mise à la terre est jaune et vert.
• Ne pas utiliser de nettoyants vapeur pour le nettoyage.
FR 14
Conseils De Securite
GB, FR, IT, ES, DE, TR, CZ
Rev_G Değişen sayfalar; 6 - 19 - 32 - 33 - 44 - 55 - 68 - 80 - 88

• AVERTISSEMENT : Ne retirez jamais le joint de la porte du four.
• En introduisant le plateau dans le four, s’assurer que le stop est dirigé
vers le haut et au fond de la cavité.
Cette opération doit être exécutée par du personnel qualifié. En cas
d’incompatibilité entre la prise d’alimentation et la fiche du câble de
l’appareil, demander à un électricien professionnel de remplacer la prise
d’alimentation par un dispositif compatible. La fiche du câble
d’alimentation et la prise d’alimentation doivent être conformes aux
normes en vigueur dans le pays d’installation. Il est possible de brancher
l’appareil à la prise d’alimentation en installant un disjoncteur multipolaire
qui supporte la charge électrique maximale, conformément aux lois en
vigueur, entre l’appareil et la prise d’alimentation. Le conducteur jaune et
vert de mise à la terre ne doit pas être bloqué par le disjoncteur. La prise
d’alimentation ou le disjoncteur multipolaire utilisé pour le branchement
doit rester à tout moment accessible lors de l’installation de l’appareil.
• Le débranchement doit se faire en accédant à la prise d’alimentation
ou en prévoyant un interrupteur sur le circuit électrique fixe, conforme
aux normes électriques.
• Le câble d’alimentation requis est le H05V2V2-F.
• Le non-respect des consignes ci-dessus peut compromettre la sécurité
de l’appareil et annuler la garantie.
• Tout produit déversé en quantité doit être éliminé avant le nettoyage.
• Si le câble d’alimentation est endommagé, il doit être remplacé par un
câble ou un faisceau de câbles spécial disponible auprès du fabriquant
ou en contactant le service après-vente.
• Pendant le nettoyage à pyrolyse, les surfaces peuvent devenir beaucoup
plus chaude que d’habitude, les enfants doivent donc être tenus à une
distance de sécurité.
• Ne pas installer l’appareil derrière une porte décorative, pour éviter la
surchauffe.
Le plateau doit complètement être inséré dans la cavité
• AVERTISSEMENT : Ne tapissez pas les parois du four avec du papier
aluminium ou un autre matériau de protection jetable en vente dans le
commerce. Tout papier aluminium ou autre matériau de protection qui
entrerait au contact direct de l'émail chaud risquerait de fondre et de
détériorer l'émail intérieur du four.
• Aucun réglage/opération supplémentaire n’est requis pour faire
fonctionner l’appareil aux fréquences nominales.
FR 15
GB, FR, IT, ES, DE, TR, CZ
Rev_G Değişen sayfalar; 6 - 19 - 32 - 33 - 44 - 55 - 68 - 80 - 88

SOMMAIRE
FR 16
Instructions Générales
17
1.1 Indications de sécurité
1.2 Sécurité électrique
1.3 Recommandations
1.4 Installation
1.5 La gestion des déchets et la
protection de l'environnement
1.6 Déclaration de conformité
2.1 Vue d'ensemble
2.2 Accessoires
2.3 Première utilisation
Description du produit
19
3.1 Description de l'affichage
3.2 Mode de cuisson
Utilisation du Four
21
4.1 Remarques générales concernant
le nettoyage
4.2 Entretien
• Retrait et nettoyage des gradins fils
• Retrait de la porte du four
• Retrait et nettoyage des vitres
Nettoyage du four et
maintenance
24
5.1 F.A.Q.
Dépannage
26
GB, FR, IT, ES, DE, TR, CZ
Rev_G Değişen sayfalar; 6 - 19 - 32 - 33 - 44 - 55 - 68 - 80 - 88

1. Instructions générales
REMARQUE: les fonctions du four, les propriétés et les accessoires cités dans ce manuel peuvent varier
selon les modèles.
Nous vous remercions d'avoir choisi un de nos produits.
Pour obtenir les meilleurs résultats avec votre four, vous
devez lire attentivement ce manuel et le conserver pour
toute consultation ultérieure. Avant d'installer le four,
notez le numéro de série, il vous sera demandé par le
support technique si des réparations sont nécessaires.
Après avoir enlevé le four de son emballage, vérifiez
qu'il n'a pas été endommagé pendant le transport. Si
vous avez des doutes, ne pas utiliser le four et se référer
à un technicien qualifié pour obtenir des conseils.
Conservez tous les matériaux d'emballage (sacs en
plastique, polystyrène, clous) hors de la portée des
enfants.Lors de la première utilisation du four, il peut se produire un dégagement de fumée âcre
provoqué par le premier échauffement de la colle des panneaux d’isolation enveloppant le four. Ce
phénomène est normal. Attendez que la fumée cesse avant de cuire des aliments. Le fabricant décline
toute responsabilité dans les cas où les instructions contenues dans le présent document ne sont pas
respectées.
1.1 Indications de sécurité
- Ne pas toucher l'appareil avec les mains ou les pieds mouillés ou humides;
- En général l'utilisation d'adaptateurs, de prises multiples et de rallonges est déconseillé;
Utilisez uniquement le four à sa destination, qui est seulement pour la cuisson des aliments; toute autre
utilisation, par exemple comme une source de chaleur, est considérée comme inapproprié et donc
dangereuse. Le fabricant ne peut être tenu responsable de tout dommage lié à une mauvaise utilisation
ou a des modifications techniques du produit.
- En cas de dysfonctionnement et / ou de mauvais fonctionnement, éteindre l'appareil et ne pas y
toucher.
L'utilisation de tout appareil électrique implique le respect de certaines règles fondamentales:
- Ne pas tirer sur le fil électrique pour débrancher la prise.
1.2 Sécurité électrique
LE BRANCHEMENT ELECTRIQUE DOIT ÊTRE REALISE PAR UN INSTALLATEUR AGREE OU UN
TECHNICIEN DE E.QUALIFICATION SIMILAIR
L'alimentation électrique à laquelle le four est connecté doit être conforme aux lois en vigueur dans le
pays d'installation. Le fabricant décline toute responsabilité pour tout dommage causé par le non
respect de ces instructions. Le four doit être raccordé à l'alimentation électrique avec une prise murale
reliée à la terre ou par l'intermédiaire d'un dispositif à coupure omnipolaire, selon les lois en vigueur
dans le pays d'installation. L'alimentation électrique doit être protégée par des fusibles appropriés et les
câbles utilisés doivent avoir une section transversale qui peut assurer une alimentation normale du four.
CONNEXION
Le four est livré avec un câble d’alimentation permettant le raccordement sous une tension électrique
de 230 V entre les phases ou entre phase et neutre. Le raccordement devra être effectué après avoir
vérifié:
- Le réglage du disjoncteur.
Le fil de protection du cordon (vert/jaune) relié à la Borne Terre de l’appareil doit être relié à la Borne
Terre de l’installation.
- La tension d'alimentation indiquée sur le compteur;
FR 17
GB, FR, IT, ES, DE, TR, CZ
Rev_G Değişen sayfalar; 6 - 19 - 32 - 33 - 44 - 55 - 68 - 80 - 88
1.3 Recommandations
Après chaque utilisation du four, réaliser un petit entretien qui favorisera le nettoyage parfait du four.
Ne pas tapisser les parois du four avec des feuilles en aluminium ou des protections jetables du
commerce. La feuille d'aluminium ou toute autre protection, en contact direct avec l'émail chauffé,
risque de fondre et de détériorer l'émail du moufle. Avant installation de l'appareil, il faut relever le
numéro de série et le noter ci-dessous en cas d'éventuelle demande d'intervention.
Afin d'éviter les salissures excessives de votre four ainsi que les fortes odeurs de fumée pouvant en
résulter, nous recommandons de ne pas utiliser le four à trop forte température. Il est préférable de
rallonger le temps de cuisson et de baisser la température. Nous vous conseillons de n'utiliser que des
plats, des moules à pâtisserie résistants à de très hautes températures.
1.4 Installation
La mise en service de l’appareil est à la charge de l’acheteur, le constructeur est dégagé de ce service.
Les pannes liées à une mauvaise installation ne seront pas couvertes par la garantie. Une mauvaise
installation peut provoquer des dommages aux personnes, aux animaux domestiques; dans ce cas la
responsabilité du constructeur ne peut être engagée. L'installation du four doit être réalisée par un
installateur agréé ou un technicien de qualification similaire. Le four peut être placé en hauteur dans
une colonne ou enchâssé sous un plan de travail. Avant sa fixation: il est indispensable d'assurer une
bonne aération dans la niche d'encastrement afin de permettre la bonne circulation de l'air frais
nécessaire au refroidissement et à la protection des organes intérieurs. Pour cela, réaliser les
ouvertures spécifiées selon le type d'encastrement (dernière page).
ATTENTION
Faire vérifier la continuité de la terre de l’installation avant de procéder au raccordement. Le fabricant
décline toute responsabilité en cas d'accidents ou d'autres problèmes qui pourraient survenir à l'usage
d'un appareil non relié à la terre, ou relié à une terre dont la continuité serait défectueuse.
REMARQUE: Le four peut nécessiter une opération de S.A.V. Aussi, placez la prise de courant de façon à
pouvoir brancher le four une fois sorti de sa niche. Câble d'alimentation: si le changement du câble
d'alimentation s'avère nécessaire, nous vous demandons de faire réaliser cette opération par le service
après-vente ou une personne de qualification similaire.
1.5 La gestion des déchets et la protection de l'environnement
Le présent appareil est marqué conformément à la directive 2012/19/UE relative aux
déchets d'équipements électriques et électroniques
Chacun peut jouer un rôle important quant à la protection de l'environnement contre les DEEE. Pour
atteindre cet objectif, il est impératif de suivre quelques règles élémentaires :
• Lorsque vous achetez un nouvel appareil, vous devez retourner l'ancien au vendeur qui le récupère
gratuitement, au cas par cas, à condition que l'équipement soit de type équivalent et possède les
mêmes fonctions que celui fourni.
(DEEE). Les DEEE contiennent à la fois des substances polluantes (qui peuvent avoir des
conséquences négatives sur l'environnement) et des éléments de base (réutilisables). Il est
important de soumettre les DEEE à des traitements spécifiques, en vue d'extraire et
d'éliminer de façon appropriée toutes les substances polluantes, puis de récupérer et
recycler tous les matériaux.
• Les DEEE ne doivent pas être traités comme des déchets ménagers.
• Ils doivent être remis aux points de collecte appropriés gérés par la municipalité ou par des sociétés
immatriculées. Dans plusieurs pays, il est possible de collecter à domicile les DEEE volumineux.
FR 18
GB, FR, IT, ES, DE, TR, CZ
Rev_G Değişen sayfalar; 6 - 19 - 32 - 33 - 44 - 55 - 68 - 80 - 88
1.6 Declaration De Conformité
En utilisant le symbol sur ce produit, nous déclarons sur notre propre responsabilité que ce produit
est conforme à toutes les normes Européennes relatives à la sécurité, la santé et à l’environnement.
2. Description du produit
2.1. Vue d'ensemble
1. Panneau de commande
2. Positions des gradins
(gradins fils si inclus)
3. Grille métalique
4. Léchefrite
5. Ventilateur
(derrière la plaque d'acier)
6. Sonde à viande
7. Porte du four
ÉCONOMIE ET R ESPECT DE L'ENVIRONNEMENT
FR 19
Lorsque cela est possible, éviter le préchauffage du four et éviter de le faire tourner à vide. N'ouvrez la
porte du four que lorsque cela est nécessaire, car il y a des déperditions de chaleur à chaque fois qu'il est
ouvert. Pour une économie d'énergie significative, éteindre le four entre 5 et 10 minutes avant la fin de
cuisson prévue, et utiliser la chaleur que le four continue de générer. Gardez les joints propres et en bon
état, pour éviter toute déperdition d'énergie. Si vous avez un contrat électrique avec un tarif heure
creuse, le programme "cuisson différée" peut vous faire réaliser des économies d'énergie en déplaçant
le début du programme à un intervalle de temps à tarif réduit.
1
3
5
4
6
2
7
GB, FR, IT, ES, DE, TR, CZ
Rev_G Değişen sayfalar; 6 - 19 - 32 - 33 - 44 - 55 - 68 - 80 - 88
FR 20
2.2. Accessories (Par modele)
Grille métalique
1
La grille métalique sert de support aux plats.
Léchefrite
2
Alimentaire recueille les gouttes pendant la
cuisson sur le gril.
Led vision
3
Ce système d'éclairage remplace les « ampoules »
traditionnelles. 14 LED (pour les versions non-
pyrolyse) ou 10 LED haute puissance (pour les
versions pyrolyse) sont intégrées dans la contre
porte du four. Celles-ci illuminent la cavité avec
une lumière diffuse permettant une vision de la
cuisson sans ombres, sur plusieurs niveaux.
- Visibilité optimales des plats
- Durée de vie prolongée
Les avantages :
- Consommation énergétique extrêmement basse
'' -95'' par rapport au système traditionnel
d'éclairage du four « les appareils dotés de LED
blanches de classe 1M selon la norme IEC 60825
1:1993 + A1:1997 + A2: 2001 (équivalent a la
norme EN 60825-1:1994 + A1:2002+A2:2001) la
puissance maximale lumineuse émise est 459nm
< 150uW. Donnée non observée directement avec
des instruments optiques ».
Grilles de fil latéral
4
Grille fil latéral si inclus.
GB, FR, IT, ES, DE, TR, CZ
Rev_G Değişen sayfalar; 6 - 19 - 32 - 33 - 44 - 55 - 68 - 80 - 88
2.3 Première Utilisation
UN PREMIER NETTOYAGE doit être réalisé avant la première utilisation passer un chiffon doux et
humide sur les surfaces extérieures de l'appareil. Nettoyer avec une éponge additionnée de produit
lessiviel, les accessoires et l'intérieur du four. Rincer et sécher. Faire chauffer le four à vide une bonne
heure à la température maximale pour faire disparaître l'odeur du neuf. Pendant cette opération, bien
aérer la pièce.
FR 21
3. Utilisation du Four
3.1 Description de l'affichage
2- Reglage de l'heure
5- Display température ou horloge
3- Durèe de cuisson
7- Manette de température
1- Minuteur
4- Fin de cuisson
6- Boutons de réglage
8- Manette des fonctions
8
ATTENTION: la première opération à exécuter
après l'installation ou après une coupure de
courant (de telles situations se reconnaissent parce
que le atticheur est sur 12:00 et clignote)est réglage
de l'heure, comme décrit ci-dessus.
•Appuyer 1 foi sur la touche centrale.
•Relâcher les touches.
•Régler l'heure à l'aide des boutons ."-" "+"
ATTENTION: Le four fonctionne uniquement si
l'horloge est réglée.
GB, FR, IT, ES, DE, TR, CZ
Rev_G Değişen sayfalar; 6 - 19 - 32 - 33 - 44 - 55 - 68 - 80 - 88
FR 22
MINUTEUR
• Vous activez la
sécurité enfants en
pressant la touche
pendant au moins 5
secondes, l'écran
affiche lternativement :
STOP et le temps
programmé A partir de
cet instant, toutes les
f onctions sont
bloquées.
• Vous désactivez la
sécurité enfants en
pressant la touche
pendant au moins 5
secondes. A partir de
cet instant, toutes les
fo nct io ns s ont à
nouveau utilisables.
•Relâcher les touches.
•Appuyer 1 foi sur la
touche centrale.
•Appuyer sur les
touches "-"ou "+" pour
régler la dureé
•A la fin de la durée
sé le cti on né e, l e
minuteur se coupe et
un sig nal sonore
retentit (il s'arrête
automatique-ment,
mais pour le stopper de
suite, appuyer sur la
touche SELECT
•Emission d'un signal
sonore à la fin d'un
temps sélectionné
•Durant l'utilisation,
l'écran affiche le temps
restant.
•II permet d'utiliser le
program- mateur du four
comme un rêveilmémoire
(il peut être utilisé avec le
four allumé ou éteint).
•Relâcher les touches
•Choisir la fonction de
cuisson avec le bouton
de sélection.
•Appuyer 2 fois sur la
touche centrale.
•Appuyer sur les
touches oupour "-" "+"
régler la durée.
•Pour modifier le temps
restantappuyer la
touche +ou SELECT "-"
“+"
•Sélectionner la durée
de lacuissondes
alimentes dans lefour .
•Pour visualiser le
temps restantappuyer
la touche. SELECT
•Pour arrêter le signal,
appuyer sur l'une des
touches au choix.
Appuyer sur la touche
centrale pour
retourner à la fonction
horloge.
• A la fin du temps de
cuisson,lefoursera
automatiquementmis
horsfonction. Si vous
souhaitezarreter la
cuisson avant, vous
pouvez soit positionner le
bouton de selection sur o,
soitrégler le temps de
cuisson à0:00.(touches
SELECT"""")+- et +
•A l'heure sélectionnée
le four s'éteint tout
seul; pour l'arrêter en
avant il est nécessaire
de porter le bouton de
sélection en position O.
•Mémoriser l'heure de
fin de cuisson
•Pour visualiser l'heure
3 fois
•Pour modifier l'heure
sélectionnée appuyer
sur les touche SELECT
+"" ou ""-+
•Appuyer sur les
touches ou pour "-" "+"
régler la durée
•Relâcher les touches
•Choisir la fonction de
cuisson avec le bouton
de sélection
•3 fois•Cette fonction est
utilisée pour des cuissons
que l'on peut programmer
à l'avance. Par exemple,
votre plat doit cuire 45 mn
et être prêt à 12:30; réglez
alors simplement la durée
sur 45 mn et l'heure de fin
de cuisson sur 12:30.
•Quand le temps de
cuisson est écoulé, la
cuisson s'arrête automati
quemen et l'alarme sonne
quelques secondes. La
cuisson commencera
auto- matiquement à
11:45 (12:30 moins 45
mn) et continuera jusqu'à
ce que l'heure de fin de
cuisson soit atteinte. A ce
moment, le tour s'arrêtera
automatiq uement.
FONCTION
COMMENT L’UTILISERCOMMENT L’ARRETER
BUT
Á QUOI SERT-IL ?
SECURITE
ENFANT
TEMPS
DE CUISSON
HEURE DE
FIN DE
CUISSON
GB, FR, IT, ES, DE, TR, CZ
Rev_G Değişen sayfalar; 6 - 19 - 32 - 33 - 44 - 55 - 68 - 80 - 88
FR 23
* Programme testé selon le CENELEC, norme européenne EN 60350-1 qui définit la classe énergétique.
3.2 Mode de cuisson
Bouton de
sélection
T °C
par défaut
Fonction (selon modèle)
L'ampoule: Allumage de l’éclairage du four
Gril: l'utilisation du grilloir se fait porte fermée. Un préchauffage de 5 mins est
nécessaire pour le rougissement de la résistance. Succès assuré pour les
grillades, les brochettes et les gratins. Les viandes blanches doivent être écartées
du grilloir ; le temps de cuisson sera alors plus long, mais la viande sera plus
savoureuse. Les viandes rouges et filets de poissons peuvent être placés sur
la grille avec le plat récolte sauce glissé dessous.
Le four a deux positions de gril :
Gril: 2140 W Barbecue: 3340 W
Turbo-Gril: l'utilisation de la position turbo-gril se fait porte fermée. Un
préchauffage est nécessaire pour les viandes rouges et inutile pour les viandes
blanches. Idéal pour les cuissons de volume épais, des pièces entières telles
que rôti de porc, volailles etc... Placer le mets à cuire directement sur la grille au
centre du four, à un niveau moyen. Glisser le récolte-sauce sous la grille de
façon à récupérer les graisses. S'assurer que le mets ne soit pas trop près du
grilloir. Retourner la pièce à cuire à mi-cuisson.
Prévoir une dizaine de minutes de plus, pour la cuisson combinée.
Chaleur brassée: fonction recommandée pour les volailles, les pâtisseries, les
poissons, les légumes... La chaleur pénètre mieux à l'intérieur du mets à cuire
et réduit le temps de cuisson, ainsi que le temps de préchauffage. Vous pouvez
réaliser des cuissons combinées avec préparations identiques ou non sur un ou
deux gradins. Ce mode de cuisson assure en effet une répartition homogène de
la chaleur et ne mélange pas les odeurs.
Décongélation: fonctionnement de la turbine de cuisson qui brasse l'air dans
l'enceinte du four. Idéale pour réaliser une décongélation avant une cuisson.
Sole brassée: idéale pour les tartes à fruits juteux, les tourtes, les quiches, les
pâtés. Elle évite le dessèchement des aliments et favorise la levée pour les
cuissons de cakes, pâte à pain et autres cuissons par le dessous. Placer la grille
sur le gradin inférieur. Avec ce mode de cuisson, un préchauffage est
nécessaire en Chaleur Brassée pendant une dizaine de minutes.
T °C
range
180
210
200
210
40
L3
40 ÷ 40
50 ÷ 240
50 ÷ 230
150 ÷ 220
50 ÷ 240
L1 ÷ L5
Convection naturelle: utilisation simultanée de la résistance de sole et de
voûte.
Préchauffer le four une dizaine de minutes. Idéale pour toutes les cuissons à
l'ancienne, pour saisir les viandes rouges, les rosbifs, gigots, gibiers, le pain, les
papillotes, les feuilletages. Placer le mets à cuire à un niveau de gradin moyen.
22050 ÷ 280
*
*
Pizza: La forte chaleur produite par la fonction Pizza est très proche de celle d’un
feu de bois dans un four traditionnel
22050 ÷ 230
GB, FR, IT, ES, DE, TR, CZ
Rev_G Değişen sayfalar; 6 - 19 - 32 - 33 - 44 - 55 - 68 - 80 - 88
FR 24
4. Nettoyage du four et maintenance
4.1 Remarques générales sur le nettoyage
Il est conseillé de nettoyer la vitre avec du papier absorbant après chaque utilisation du four. Pour
enlever les taches plus tenaces, vous pouvez utiliser une éponge imbibée de détergent, puis rincer à
l'eau.
PARTIE VITREE
Le cycle de vie de l'appareil peut être étendu grâce à un nettoyage régulier. Attendez le refroidissement
du four avant de procéder à des opérations de nettoyage manuel. Ne jamais utiliser de détergents
abrasifs, de laine d'acier ou d'objets pointus pour le nettoyage, l'émail serait irrémédiablement abîmé.
Utilisez uniquement de l'eau, du savon ou des détergents à base d'eau de Javel (ammoniac).
LECHEFRITE
JOINT DE LA PORTE
Après l'utilisation de la grille, retirez le du four. Prendre soin de reverser les graisses (tièdes) lêchefrite
dans l’évier. Laver et rincer le plat récolte-sauce dans de l’eau chaude, avec une éponge imbibée de
produit lessiviel. Si les résidus restent collés, le faire tremper dans de l’eau et un produit détergent. Il
peut aussi être nettoyé dans un lave-vaisselle ou avec un produit du commerce.
Nettoyer les accessoires avec une éponge et de l'eau savonneuse puis rincer. Eviter d'utiliser des
détergents abrasifs.
ACCESSOIRES
Si il est sale, le joint peut être nettoyé avec une éponge légèrement humide.
Ne jamais replacer le plat récolte-sauce encrassé dans un four.
4.2 Entretien
A
RETRAIT ET NETTOYAGE DES GRADINS FILS
1. Dévissez les écrous moletés dans le sens inverse des aiguilles d'une montre.
RETRAIT DE LA PORTE DU FOUR
2. Retirez les en les tirant vers vous.gradins fils
2. Ouvrez les pinces du boîtier de charnière sur le côté droit et gauche de la fenêtre avant en les
poussant vers le bas.
3. Replacez la porte en procédant en sens inverse.
3. Nettoyez les dans le lave-vaisselle ou avec une éponge humide, puis séchez-les gradins fils
immédiatement.
1. Ouvrez la porte.
4. Après avoir nettoyé les , les remettre dans le four et revisser les écrous moletés.gradins fils
GB, FR, IT, ES, DE, TR, CZ
Rev_G Değişen sayfalar; 6 - 19 - 32 - 33 - 44 - 55 - 68 - 80 - 88
1
2
3
1.
2.
3.
4.
5.
6.
FR 25
7.
LOW-E
7. A la fin du nettoyage Remonter les pièces dans l'ordre inverse.
RETRAIT ET NETTOYAGE DES VITRES
1. Ouvrez la porte du four.
2.3.4. Bloquer les charnières, enlever les vis et retirez le couvercle métallique supérieur en le tirant vers
le haut.
5.6. Retirez le verre, soigneusement de la porte du four (NB: dans les fours de pyrolyse, retirez l'extraire
également les deuxième et troisième verre (le cas échéant)).
Sur toutes les vitres, l'indication "Pyro" doit être lisible et positionné sur le côté gauche de la porte, à
proximité de la charnière latérale gauche. De cette manière, l'étiquette imprimée du premier verre sera
à l'intérieur de la porte.
GB, FR, IT, ES, DE, TR, CZ
Rev_G Değişen sayfalar; 6 - 19 - 32 - 33 - 44 - 55 - 68 - 80 - 88
5. Dépannage
5.1 FAQ
FR 26
PROBLEMESCAUSE POSSIBLESOLUTION
Le four ne chauffe pas
L'horloge n'est pas réglée
Réglez l'horloge
La sécurité enfant est
activée
Les réglages nécessaires
ne sont pas imposés
Désactivez la sécurité enfant
Assurez-vous que les
paramètres nécessaires
sont corrects
Le four ne chauffe pas
Le four ne chauffe pas
Vapeur et de la
condensation sur l' écran
tactile
Nettoyez avec un chiffon en
microfibres l'écran tactile
pour enlever la couche de
condensation
Aucune réaction de l'écran
tactile
GB, FR, IT, ES, DE, TR, CZ
Rev_G Değişen sayfalar; 6 - 19 - 32 - 33 - 44 - 55 - 68 - 80 - 88

• Durante la cottura l'umidità può condensarsi all'interno della cavità o
sul vetro della porta. È normale. Per ridurre questo effetto, attendere
10-15 minuti dopo l'accensione prima di mettere il cibo all'interno del
forno. In ogni caso, la condensa scompare quando il forno raggiunge la
temperatura di cottura.
• Usare solo la sonda termica raccomandata per questo forno.
• Spegnere il forno prima di rimuovere lo schermo di protezione e, dopo
la pulizia, rimontarlo secondo le istruzioni.
• Cuocere le verdure in un contenitore con un coperchio invece di un
vassoio aperto.
• Non usare per la pulizia materiali ruvidi abrasivi o raschietti metallici
affilati per pulire le porte di vetro del forno dato che possono graffiare la
superficie e causare la frantumazione del vetro.
• ATTENZIONE: le parti accessibili possono diventare molto calde quando
si utilizza il forno. I bambini devono essere tenuti a distanza di sicurezza.
• Non utilizzare un pulitore a vapore.
• Durante l’uso l’apparecchio diventa molto caldo. Si dovrebbe fare
attenzione a non toccare gli elementi riscaldanti all’interno del forno.
• L'apparecchio può essere usato da bambini dagli 8 anni in su e
persone con ridotte capacità fisiche, sensoriali o mentali o senza
esperienza e conoscenza del prodotto se supervisionate o dando loro
istruzioni riguardo al funzionamento dell'apparecchio in maniera sicura
e coscente del rischio possibile.
• ATTENZIONE: l'apparecchio e le parti accessibili diventano calde
durante l'uso. Prestare attenzione a non toccare le parti calde.
• I bambini non dovrebbero giocare con l'apparecchio.
• Evitare di lasciare il cibo all'interno del forno dopo la cottura per un
periodo superiore a 15/20 minuti.
• La pulizia e la manutenzione non dovrebbero essere fatte da bambini
senza supervisione
• ATTENZIONE: Le parti accessibili possono diventare molto calde
durante l’uso. I bambini dovrebbero essere tenuti a distanza.
• Collegare al cavo di alimentazione una spina dimensionata per la
tensione, la corrente e la potenza indicate nella targhetta e dotata del
contatto di terra. La presa deve essere dimensionata per la potenza
indicata sulla targhetta e deve avere il contatto di terra collegato e
funzionante. Il conduttore di terra è giallo-verde. Questa operazione
deve essere eseguita solo da un tecnico adeguatamente addestrato. In
Indicazioni di Sicurezza
IT 27
GB, FR, IT, ES, DE, TR, CZ
Rev_G Değişen sayfalar; 6 - 19 - 32 - 33 - 44 - 55 - 68 - 80 - 88

IT 28
• Se il cavo di alimentazione si danneggia, deve essere sostituito con un
cavo o uno speciale fascio di cavi disponibile presso il produttore o
contattando il reparto assistenza al cliente.
• L’elettrodomestico non deve essere installato dietro a una porta a
scopo ornamentale per evitarne il surriscaldamento.
• Il cavo di alimentazione deve essere di tipo H05V2V2-F.
• Il mancato rispetto di quanto indicato sopra può compromettere la
sicurezza dell'elettrodomestico e rendere nulla la garanzia.
• La disconnessione può essere eseguita con la spina accessibile o
aggiungendo un interruttore sul cablaggio fisso, nel rispetto delle
normative relative ai cablaggi.
• Durante il processo di pulizia pirolitico, le superfici possono
surriscaldarsi più del normale: mantenere sempre i bambini a distanza
di sicurezza;
• AVVERTENZA: Non togliere mai la guarnizione della porta del forno.
• Il funzionamento dell'elettrodomestico alle frequenze nominali non
richiede alcuna operazione o impostazione.
• Quando si posiziona uno scaffale all’interno, accertarsi che il blocco
sia rivolto verso l’alto e nella parte posteriore della guida.
Lo scaffale deve essere inserito completamente nella guida
• AVVERTENZA: Non coprire le pareti del forno con fogli di alluminio o
protezioni monouso disponibili in commercio. I fogli di alluminio o le
altre protezioni, se a diretto contatto con lo smalto caldo, rischiano di
fondersi e di danneggiare lo smalto interno stesso.
caso di incompatibilità tra presa e spina dell'elettrodomestico,
richiedere ad un tecnico specializzato di sostituire la presa con un'altra
di tipo compatibile. La spina e la presa devono essere conformi alle
normative attuali del paese di installazione. Il collegamento alla rete di
alimentazione può essere effettuato anche collocando un interruttore
automatico onnipolare tra l'elettrodomestico e la rete di alimentazione,
in grado di supportare il carico massimo collegato, in linea con la
legislazione corrente. Il cavo di terra giallo-verde non deve essere
interrotto dall'interruttore automatico. La presa o l'interruttore
automatico onnipolare utilizzati per il collegamento devono essere
facilmente accessibili al momento del montaggio dell'elettrodomestico.
• Qualsiasi materiale fuoriuscito in eccesso deve essere tolto prima
della pulizia.
GB, FR, IT, ES, DE, TR, CZ
Rev_G Değişen sayfalar; 6 - 19 - 32 - 33 - 44 - 55 - 68 - 80 - 88

IT 29
Sommario
Avvertenze Generali
30
1.1 Suggerimenti sulla sicurezza
1.2 Sicurezza elettrica
1.3 Raccomandazioni
1.4 Installazione
1.5 Gestione dei rifiuti
1.6 Dichiarazione di conformità
2.1 Panoramica
2.2 Accessori
2.3 Primo utilizzo
Descrizione del Prodotto
32
3.1 Descrizione del display
3.2 Modalità di cottura
Utilizzo del Forno
33
4.1.Note generiche di pulizia
4.2 Manutenzione
• Rimozione e pulizia delle griglıie
• Rimozione dello sportello del forno
• Rimozione e pulizia della porta in
vetro
Pulizia e Manutenzione del Forno
36
5.1 F.A.Q.
Risoluzione dei problemi
38
Garanzie
38
GB, FR, IT, ES, DE, TR, CZ
Rev_G Değişen sayfalar; 6 - 19 - 32 - 33 - 44 - 55 - 68 - 80 - 88
1. Avvertenze Generali
Vi ringraziamo per aver scelto uno dei nostri prodotti.
Per utilizzare il forno in modo ottimale è consigliabile
leggere con attenzione questo manuale e conservarlo
con cura per ogni ulteriore consultazione. Prima di
installare il forno, prendere nota del numero di serie in
modo da poterlo comunicare al personale del servizio di
assistenza in caso di richiesta di intervento. Dopo aver
rimosso il forno dall’imballaggio, verificare che non
abbia subito danni durante il trasporto. In caso di
dubbi, non utilizzare il forno e richiedere l’assistenza di
un tecnico qualificato. Tenere tutto il materiale da
imballaggio (sacchetti di plastica, polistirolo, chiodi)
fuori dalla portata dei bambini. Alla prima accensione del forno può svilupparsi fumo di odore acre,
causato dal primo riscaldamento del collante dei pannelli d’isolamento avvolgenti il forno: si tratta di un
fenomeno assolutamente normale e, in caso si verificasse, occorre attendere la cessazione del fumo
prima di introdurre le vivande. Il produttore declina ogni responsabilità in caso di mancata osservanza
delle istruzioni contenute in questo documento.
NOTA: le funzioni, le proprietà e gli accessori dei forni citati in questo manuale possono variare a
seconda dei modelli.
1.1 Suggerimenti sulla Sicurezza
- Non tirare il cavo di alimentazione per staccare la spina della presa di corrente;
- Non toccare l’apparecchio con mani o piedi bagnati o umidi;
- In caso di guasto e/o cattivo funzionamento dell’apparecchio, spegnerlo e non manometterlo.
L’uso di un qualsiasi apparecchio elettrico comporta l’osservanza di alcune regole fondamentali:
- In generale è sconsigliabile l’uso di adattatori, prese multiple e prolunghe;
Utilizzare il forno solo per lo scopo per cui è stato progettato, ossia solo per la cottura di alimenti;
qualsiasi altro utilizzo, ad esempio come fonte di riscaldamento, è considerato improprio e quindi
pericoloso. Il costruttore non può essere considerato responsabile per eventuali danni derivanti da usi
impropri, erronei ed irragionevoli.
1.2 Sicurezza Elettrica
Il filo di messa a terra collegato al morsetto di terra del forno deve essere collegato al morsetto di terra
della rete elettrica.
FARE EFFETTUARE I COLLEGAMENTI ELETTRICI AD UN’ELETTRICISTA O TECNICO QUALIFICATO.
Il forno viene fornito con un cavo di alimentazione che deve essere collegato solo a una rete elettrica con
una tensione di 230 VCA tra le fasi o tra la fase e il neutro. Prima di collegare il forno alla rete elettrica, è
indispensabile controllare:
COLLEGAMENTO
- la tensione di alimentazione indicata sul misuratore;
La rete di alimentazione a cui viene collegato il forno deve essere conforme con le normative in vigore
nel paese di installazione. Il produttore declina ogni responsabilità per eventuali danni derivanti dalla
mancata osservanza di tali disposizioni. Il forno deve essere collegato alla rete elettrica tramite una
presa a muro con messa a terra o tramite un sezionatore con più poli, a seconda delle disposizioni in
vigore nel paese di installazione. La rete elettrica deve essere protetta mediante fusibili idonei e devono
essere utilizzati cavi con una sezione trasversale idonea a garantire una corretta alimentazione del
forno.
- l’impostazione del sezionatore.
Prima di collegare il forno alla rete elettrica, far controllare la continuità della messa a terra della rete
elettrica ad un elettricista qualificato. Il produttore declina ogni responsabilità per eventuali incidenti o
altri problemi derivanti dal mancato collegamento a terra del forno o dal suo collegamento ad una
ATTENZIONE
IT 30
GB, FR, IT, ES, DE, TR, CZ
Rev_G Değişen sayfalar; 6 - 19 - 32 - 33 - 44 - 55 - 68 - 80 - 88
NOTA: poiché il forno potrebbe richiedere interventi di assistenza, è consigliabile prevedere la
disponibilità di un’ulteriore presa a muro a cui collegare il forno dopo che è stato rimosso dallo spazio in
cui è stato installato. Il cavo di alimentazione deve essere sostituito solo dal personale dell’assistenza
tecnica o da tecnici con qualifiche analoghe.
messa a terra con una continuità difettosa.
1.3 Raccomandazioni
Dopo l’uso sono sufficienti alcune semplici operazioni di pulizia per mantenere il forno perfettamente
pulito. Non rivestire le pareti del forno con fogli d’alluminio da cucina o fogli monouso commerciali,
perché potrebbero fondersi a contatto con le superfici in smalto caldo e danneggiare le superfici in
smalto all’interno del forno. Per evitare di sporcare eccessivamente il forno e prevenire la diffusione di
fumo maleodorante, è consigliabile non utilizzare il forno a temperature molto alte. E’ generalmente
preferibile imposta- re un tempo di cottura più lungo e utilizzare una temperatura più bassa. Oltre agli
accessori forniti con il forno, è consigliabile utilizzare piatti e teglie resistenti alle alte temperature.
1.4 Installazione
Il produttore non è obbligato ad occuparsi dell’installazione. Gli eventuali interventi di assistenza,
necessari per correggere problemi dovuti ad un’errata installazione, non sono coperti da garanzia.
L’installazione deve essere effettuata da un tecnico qualificato e in conformità con queste istruzio- ni.
Un’installazione impropria potrebbe causare infortuni alle persone, agli animali domestici o danni alle
attrezzature. Il produttore declina ogni responsabilità per eventuali lesioni o danni dovuti ad un’errata
installazione.
Il forno può essere installato sopra una colonna o sotto a un piano di lavoro. Prima di fissare in posizione
il forno, verificare che lo spazio attorno allo stesso sia sufficiente a garantire la circolazione del flusso di
aria fresco necessario a garantire il raffreddamento del forno e la sicurezza dei componenti interni.
Realizzare le aperture indicate nell’ultima pagina del manuale, a seconda del tipo di installazione.
1.5 Gestione dei rifiuti e rispetto dell’ambiente
Questo apparecchio è contrassegnato in conformità alla Direttiva europea 2012/19/EU
sulle apparecchiature elettriche ed elettroniche (WEEE). I WEEE contengono sia sostanze
inquinanti (che possono provocare conseguenze negative sull’ambiente) che componenti
di base (che possono essere riutilizzati). E’ importante che i WEEE siano soggetti a
trattamenti specifici per rimuovere e smaltire correttamente tutti gli inquinanti e
recuperare tutti i materiali. I singoli possono giocare un ruolo importante nell’assicurare
che i WEEE non diventino un problema ambientale; è essenziale seguire alcune regole di
base:
In molti paesi, per i WEEE di grandi dimensioni, potrebbe essere presente la raccolta domestica.
Quando si acquista un nuovo apparecchio, quello vecchio potrebbe essere restituito al rivenditore che
deve acquisirlo gratuitamente su base singola, sempre che l’apparecchio sia del tipo equivalente e
abbia le stesse funzioni di quello acquistato.
- i WEEE non devono essere trattati come rifiuti domestici;
- i WEEE devono essere portati ai punti di raccolta appositi gestiti dal comune o da società registrate.
Ove possibile, evitare di pre-riscaldare il forno e cercare sempre di riempirlo. Aprire la porta del forno
quanto necessario, perché vi sono dispersioni di calore ogni volta che viene aperta. Per risparmiare
molta energia sarà sufficiente spegnere il forno dai 5 ai 10 minuti prima della fine del tempo di cottura
pianificato, e servirsi del calore che il forno continua a generare. Tenere le guarnizioni pulite e in ordine,
per evitare eventuali dispersioni di energia. Se si dispone di un contratto di energia elettrica a tariffa
oraria, il programma “cottura ritardata” renderà più semplice il risparmio spostando l’avvio del
programma negli orari a tariffa ridotta.
RISPARMIARE E RISPETTARE L’AMBIENTE
IT 31
GB, FR, IT, ES, DE, TR, CZ
Rev_G Değişen sayfalar; 6 - 19 - 32 - 33 - 44 - 55 - 68 - 80 - 88
1
3
5
4
6
2
7
IT 32
1.6 Dichiarazione di conformità
Apponendo la marcatura su questo prodotto, dichiariamo, sotto la nostra responsabilità, di
ottemperare a tutti i requisiti relativi alla tutela di sicurezza, salute e ambiente previsti dalla
legislazione europea in essere per questo prodotto.
2. Descrizione del Prodotto
2.1 Panoramica
1. Pannello di controllo
2. Posizioni ripiani (castelletto se previsto)
3. Griglia metallica
4. Leccarda
5. Ventola (dietro alla piastra di acciaio)
6.Sonda para carnes
7. Porta forno
2.2 Accessori (Secondo modello)
Leccarda
2
Raccoglie i residui di cibo che gocciolano durante
la cottura.
Griglia metallica
1
Sostiene teglie e piatti.
3
Led vision
Vantaggi:
- Illuminazione di lunga durata
- Ottima visibilità
Questo sistema di illuminazione sostituisce le
“lampadine” tradizionali. I 14 LED (sui modelli non
pirolitici) o i 10 LED ad alta potenza (sui modelli
pirolitici) sono integrati direttamente nello
sportello. Questi LED producono una luce bianca
di alta qualità che consente di vedere bene tutti i
ripiani all'interno del forno senza ombre.
Oltre a garantire una buona visibilità all'interno del
forno, questo sistema è più resistente rispetto alla
lampadine tradizionali, richiede una minore
manutenzione e consuma meno dei sistemi tradizionali.
- Consumi ultra-ridotti, Consuma il 95% in meno rispetto
ai sistemi tradizionali.
GB, FR, IT, ES, DE, TR, CZ
Rev_G Değişen sayfalar; 6 - 19 - 32 - 33 - 44 - 55 - 68 - 80 - 88
IT 33
2.3 Primo utilizzo
PULIZIA PRELIMINARE
Lavare tutti gli accessori e pulire l’interno del forno con del detergente per piatti ed acqua calda.
Verificare che il forno sia vuoto, impostare la temperatura massima e lasciarlo acceso per almeno 1 ora,
così da rimuovere tutti gli odori normalmente presenti nei forni nuovi.
Pulire sempre il forno prima di utilizzarlo per la prima volta. Pulire le superfici esterne con un panno
morbido leggermente inumidito.
3. Utilizzo del Forno
3.1 Descrizione del display
2- Regolazione dell'ora
4- Display temperatura e tempo
6- Manopola del termostato
3- Tempo di cotturaFine cottura
5- Comandi di regolazione del display LCD
7- Manopola del selettore di funzione
1- Timer contaminuti
8
ATTENZIONE: la prima operazione da eseguire dopo
l’installazione o dopo una interruzione di corrente
(tali situazioni si riconoscono perchè sul dispay
lampeggia l’ora 12:00 ) è la regolazione dell’ora,
come di seguito descritto.
•Premere il tasto centrale 4 volte.
•Imposta l'ora con i tasti "- " "+".
•Lasciare i tasti.
ATTENZIONE: Il forno funziona solo se impostato in
modalità manuale o cottura programmata.
Griglie a filo laterale
4
Griglia laterale se inclusa.
NOTA: Per un corretto utilizzo del forno, si consiglia di non porre gli alimenti a diretto contatto con
griglie e vassoi, ma di utilizzare carte forno e/o appositi contenitori.
GB, FR, IT, ES, DE, TR, CZ
Rev_G Değişen sayfalar; 6 - 19 - 32 - 33 - 44 - 55 - 68 - 80 - 88

IT 34
•Tenere premuto per 5
secondi il tasto (+), Da
questo momento lo
schermo visualizza
al ter nativamen te
“STOP” e il tempo
preimpostato.
•Tenere premuto per 5
secondi il tasto (+). Da
questo momento tutle
l e f u nz io n i s o no
riabilitate.
•Premere il tasto
centra le 1 v olta .
•Premere i tasti "- " "+"
per regolare la durata
•Lasciare i tasti
•Al termine della durata
impostata la funzione si
spegne da sola ed avvisa
con un segnale sonoro
(il segnale sonoro si
ferma da solo; per
f e r m a rl o su b it o
pre mere il tasto)
SELECT.
•Da un segnale sonoro al
termine di un tempo
stabilito
•Durante il
funzionamento il display
visualizza il tempo
rimanente.
•Permette di utilizzare il
programmatore del forno
come una sveglia (può
essere usato con forno
funzionante o spento.
•Premere i tasti "- "
"+"per regolare la
durata
•Lasciare i tasti
• Se l ez i on a re l a
funzione di cottura
con la manopola
commutatore.
•Premere il tasto
centrale 2 volte
•Permette di impostare
la durata della cottura
del cibo inserito nel
forno
•Per visualizzare il
te mp o ri ma n en te
premere il tasto SELECT.
•Per modificare il tempo
rimanente premere il
tasto SELECT +"- " "+"
•Al termine della
durata impostata il
forno si spegne da solo;
se deve essere fermato
prima si deve portare la
manopola
c o m m u ta t o re i n
posizione O oppure
portare a 0:00 la durata
della cottura (tasti
SELECT e "- " "+")
•Per interrompere il
segnale premere un tasto
qualsiasi. Premere il tasto
centrale per tornare alla
funzione orologio.
•All’ora impostata il
forno si spegne da solo;
se deve essere fermato
prima è necessario
portare la manopola
commutatore
in posizione O.
•Permette di
memorizzare l’ora di
fine cottura
•Per visualizzare l’ora
programmata premere
il tasto centrale 3 volte
•Per modificare l’ora
programmata premere i
tasti SELECT + "- " "+"
•Selezionare la unzione
di co tt ura co n l a
manopola
commutatore
•Premere il tasto
c e nt ra l e 3 v o l te
•Premere i tasti "- " "+"
per regolare l’ora di fine
cottura
•Lasciare i tasti
•Tipicamente si utilizza
questa funzione con la
funzione DURA TA
COTTURA–ad esempio il
cibo esiderato deve cuocere
per 45 minuti e desidero che
sia pronto per le ore 12:30;
in tal caso:
•Al termine della durata
impostata il forno si spegne
automaticamente ed avvisa
con un segnale sonoro.
Selezionare la funzione di
c o t tu r a d e s i d e r a ta
Impostare la durata cottura
a 45 minuti ( "- " "+")
Impostare la fine cottura alle
ore 12:30 ( "- " "+" ) La
c o t t u r a a v r à a u t o -
maticamente inizio alle
11:45 (12:30 meno 45
minuti), all’ora impostata
come fine cottura il forno si
spegne automaticamente.
ATTENZIONE: impostando
solo la fine cottura e non la
durata della cottura, il forno
si accenderà subito e si
spegnerà all’ora di fine
cottura impostata.
FUNZIONECOME SI ATTIVACOME SI SPEGNECOSA FAA COSA SERVE
BLOCCO
BAMBINO
CONTA-
MINUTI
DURATA
COTTURA
FINE
COTTURA
GB, FR, IT, ES, DE, TR, CZ
Rev_G Değişen sayfalar; 6 - 19 - 32 - 33 - 44 - 55 - 68 - 80 - 88
40
40 ÷ 40
180
210
50 ÷ 240
50 ÷ 240
IT 35
Manopola
commuta-
tore
Funzione (a seconda del modello)
LAMPADA: Accende la luce interna.
200150 ÷ 220
GRILL + VENTOLA: l'utilizzo del turbo-grill richiede la porta chiusa. Utilizzando
la ventilazione e la resistenza grill contemporaneamente, si cuociono
perfettamente grandi porzioni di cibo, come arrosti, pollame, ecc.
Mettere la griglia a metà del forno e posizionare la leccarda sotto di essa per
raccogliere i grassi. Assicuratevi che il cibo non sia troppo vicino al grill. Girare la
carne a metà cottura.
FORNO VENTILATO: l’aria calda viene ripartita sui diversi ripiani. E’ ideale per
cuocere contemporaneamente diversi tipi di cibo (carne, pesce), senza
miscelare sapori e odori. Cottura delicata - indicata per pan di spagna, torte
Margherita, pasta sfoglia, ecc...
SCONGELAMENTO: Questa posizione permette di far circolare l’aria a
temperatura ambiente intorno al cibo surgelato facendolo così scongelare in
pochi minuti senza modificare od alterare il contenuto proteico.
* Programma di prova secondo CENELEC EN 60350-1 utilizzato per la definizione della classe energetica.
3.2 Modalità di cottura
21050 ÷ 230
SUOLA VENTİLATA: Adatta per cotture delicate (torte-soufflè).
22050 ÷ 280
*
CONVEZIONE NATURALE: Sono in funzione le resistenze superiore e inferiore.
È la cottura tradizionale, ottima per arrostire cosciotti, selvaggina, ideale per
biscotti, mele al forno e per rendere i cibi molto croccanti.
T° preim-
postata
Intervallo
di T°
L3
L1 ÷ L5
GRILL: Grigliatura tradizionale a porta chiusa: con questa funzione viene
inserita la resistenza del grill. Ottima nella cottura di carni di medio e piccolo
spessore (salsicce, costine, bacon).
*
PIZZA: Il calore avvolgente in questa funzione ricrea un ambiente simile a
quello dei forni a legna di pizzeria.
22050 ÷ 230
GB, FR, IT, ES, DE, TR, CZ
Rev_G Değişen sayfalar; 6 - 19 - 32 - 33 - 44 - 55 - 68 - 80 - 88
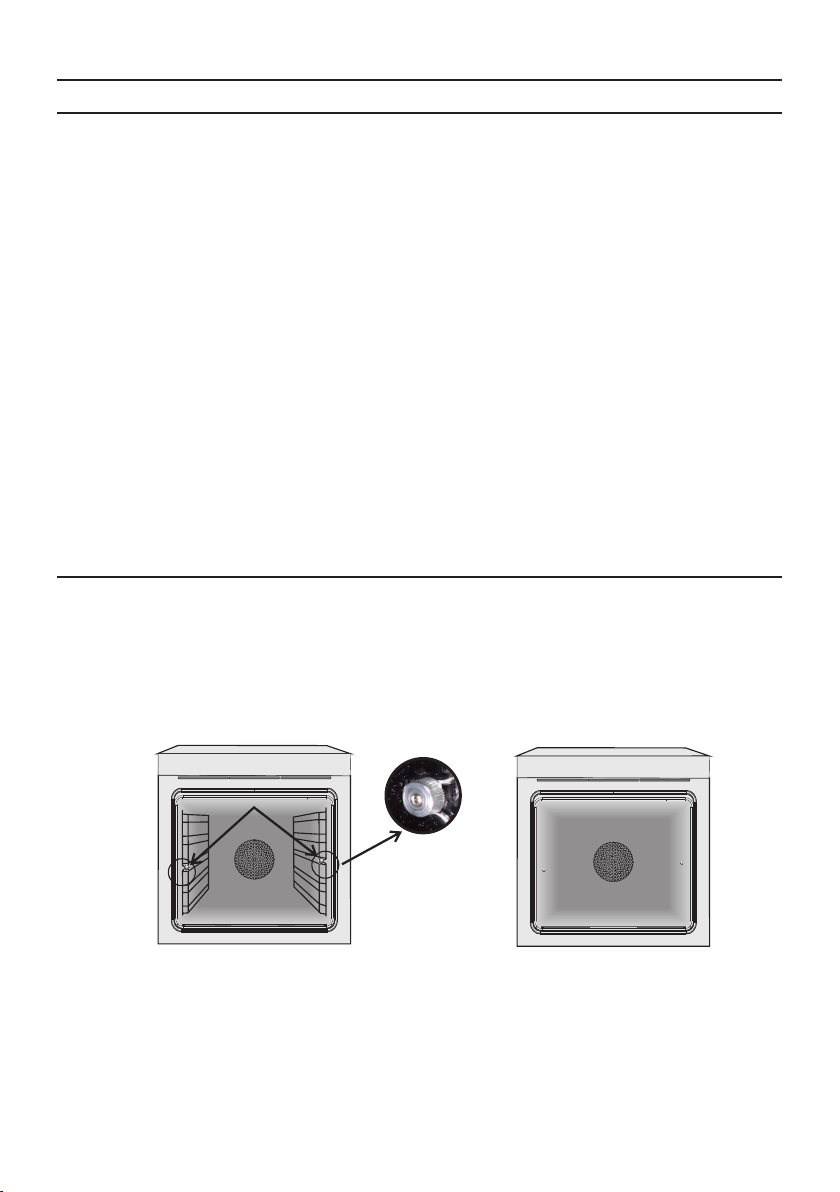
4. Pulizia e manutenzione del forno
4.1 Note generiche di pulizia
PARTI IN VETRO
GUARNIZIONE DELLO SPORTELLO DEL FORNO
Se sporca, la guarnizione può essere pulita con una spugna leggermente inumidita.
Pulire gli accessori con una spugna imbevuta con acqua e sapone, sciacquarli e asciugarli : evitare di
usare detergenti abrasivi.
VASCHETTA DI GOCCIOLAMENTO
ACCESSORI
Dopo l’uso del grill, rimuovere la vaschetta dal forno. Versare il grasso caldo in un contenitore e lavare la
vaschetta in acqua calda, utilizzando una spugna e del detergente per piatti.
Se rimangono dei residui di grasso, immergere la vaschetta in acqua e detergente. In alternativa, è
possibile anche lavare la vaschetta nella lavastoviglie oppure utilizzare un detergente per forni di tipo
commerciale. Non reinserire mai una vaschetta sporca nel forno.
La vita di servizio dell’apparecchio si allunga se questo viene pulito ad intervalli regolari. Attendere che il
forno si raffreddi prima di effettuare le operazioni di pulizia manuali. Non utilizzare mai detergenti
abrasivi, pagliette di ferro o oggetti appuntiti per lapulizia, per non danneggiare in modo irreparabile le
parti smaltate.Utilizzare solo acqua, sapone o detergenti a base di candeggina (ammoniaca).
E’ consigliabile pulire lo sportello in vetro con carta assorbente da cucina dopo ogni utilizzo del forno.
Per rimuovere le macchie più ostinate, è possibile anche utilizzare una spugna imbevuta di detergente
ben strizzata e sciacquare con acqua.
IT 36
4.2 Manutenzione
3. Pulire le griglie lavandole in lavastoviglie o con una spugna bagnata e asciugandole subito dopo.
2. Rimuovere le griglie tirandole verso se stessi.
RIMOZIONE E PULIZIA DELLE GRIGLIE
1. Svitare in senso antiorario i dadi zigrinati.
4. Dopo aver pulito le griglie, installarle nuovamente, fissando i dadi zigrinati.
A
1. Aprire lo sportello anteriore.
2. Aprire i morsetti dell’alloggiamento della cerniera sul lato destro e sinistro dello sportello anteriore,
premendoli verso il basso.
3. Installare nuovamente lo sportello eseguendo la procedura all’inverso.
RIMOZIONE DELLO SPORTELLO DEL FORNO
GB, FR, IT, ES, DE, TR, CZ
Rev_G Değişen sayfalar; 6 - 19 - 32 - 33 - 44 - 55 - 68 - 80 - 88
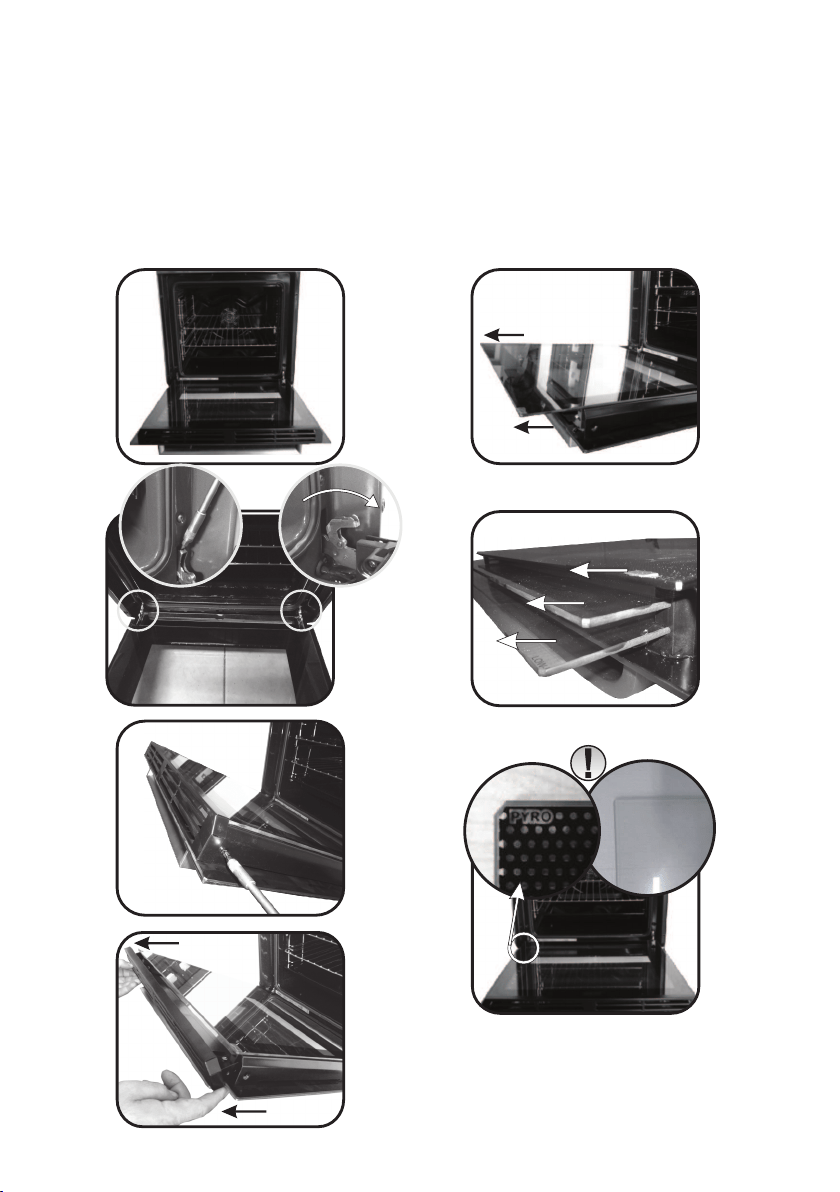
1
2
3
1.
2.
3.
4.
5.
6.
7.
Su tutti i vetri, l’indicazione ”Low-E” deve essere correttamente leggibile e posizionata sul lato sinistro
della porta, vicino alla cerniera laterale sinistra. In questo modo, l’etichetta stampata del primo vetro
rimarrà interna alla porta.
5.6. Rimuovere il vetro, estraendolo con molta cura, dalla controporta del forno (NB: nei forni pirolitici,
rimuovere anche il secondo e terzo vetro (se presente)).
1. Aprile la porta del forno.
7. Al termine della pulizia o sostituzione riassemblare le parti nell’ordine opposto alla rimozione.
2.3.4. Bloccare le cerniere, rimuovere le viti e rimuovere la copertura metallica superiore tirandola
verso l’alto.
RIMOZIONE E PULIZIA DELLA PORTA IN VETRO
IT 37
LOW-E
GB, FR, IT, ES, DE, TR, CZ
Rev_G Değişen sayfalar; 6 - 19 - 32 - 33 - 44 - 55 - 68 - 80 - 88
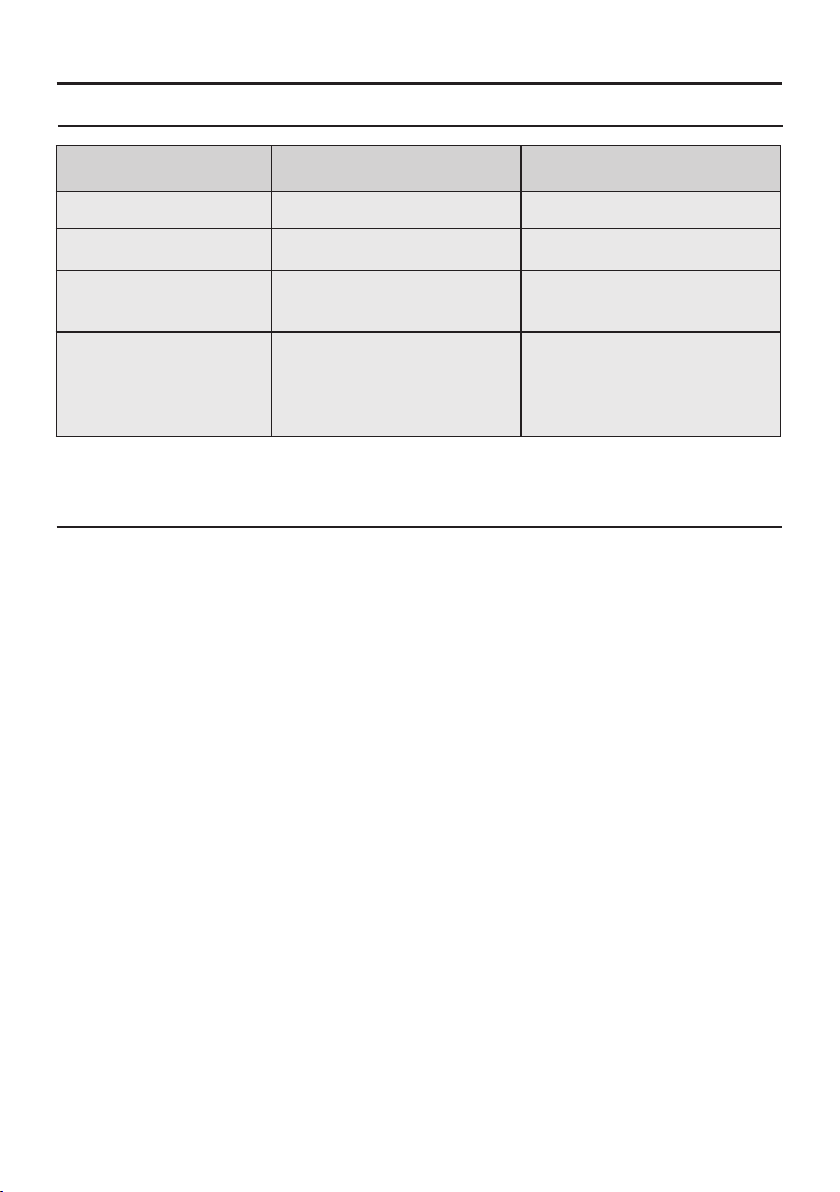
5. Risoluzione dei Problemi
5.1 FAQ
IT 38
Vapore e condensa sul
pannello interfaccia utente
Pulire con un panno in
microfibra il pannello
interfaccia utente per togliere
lo strato di condensa
Nessuna reazione
quando si usa l'interfaccia
utente di tipo touch
PROBLEMAPOSSIBILE CAUSA SOLUZIONE
Il forno non si scalda
L’orologio non è impostato
Impostare l’orologio
Il blocco bambini è attivo
Le regolazioni necessarie
non sono impostate
Disattivare il blocco bambini
Assicurarsi che le impostazioni
necessarie siano corrette
Il forno non si scalda
Il forno non si scalda
6. Garanzie
Il prodotto è garantito, oltre che ai sensi di legge, alle condizioni e nei termini riportati sul certificato di
garanzia convenzionale inserito nel prodotto. Il certificato dovrà essere conservato e mostrato al nostro
Centro di Assistenza Tecnica Autorizzato, in caso di necessità, insieme allo scontrino comprovante
l'acquisto dell'elettrodomestico. Puoi consultare le condizioni di garanzia anche sul nostro sito internet.
Per ottenere assistenza compila l'apposito form on-line oppure contattaci al numero che trovi indicato
nella pagina di assistenza del nostro sito internet.
GB, FR, IT, ES, DE, TR, CZ
Rev_G Değişen sayfalar; 6 - 19 - 32 - 33 - 44 - 55 - 68 - 80 - 88

Indicaciones de seguridad
• Evite dejar los alimentos en el horno más de 15/20 minutos después
de cocinarlos.
• ADVERTENCIA: Las partes accesibles pueden estar muy calientes cuando
se utiliza el horno. Los niños deben mantenerse a una distancia segura.
• Los niños no deben jugar con el aparato.
• Durante la cocción, podría condensarse humedad dentro de la cavidad
del horno o en el cristal de la puerta. Esto es normal. Para reducir este
efecto, espere de 10 a 15 minutos antes de introducir alimentos en el
horno una vez que lo encienda. De todos modos, la condensación
desaparece cuando el horno alcanza la temperatura de cocción.
• Para cocinar verduras, póngalas en un recipiente con una tapa en
lugar de utilizar una bandeja sin cubrir.
• ADVERTENCIA: El aparato y sus componentes accesibles se calientan
durante el uso. Se debe tener cuidado de no tocar los elementos
calefactores.
• Este aparato puede ser usado por niños mayores de 8 años y personas
con capacidades físicas, sensoriales o mentales reducidas o falta de
experiencia y conocimiento siempre y cuando hayan sido supervisadas
o instruidas sobre el uso del aparato de forma segura y del
conocimiento de los riesgos que comporta.
interior del horno.
• Se debe apagar el horno antes de retirar la pantalla, después de la
limpieza, se debe colocar según las instrucciones.
• Use solamente el sensor de temperatura recomendado para este horno.
• No utilice limpiadores de vapor para la limpieza del aparato.
• Conecte un enchufe en el cable que transporta la tensión, la corriente
y la carga indicadas en la etiqueta y que tiene el contacto de masa. La
toma de corriente debe adecuarse a la carga indicada en la etiqueta y
disponer de un contacto de masa conectado y operativo. El conductor
• Durante el uso, se calienta el aparato. Se debe tener cuidado de no
tocar los elementos calefactores del
ADVERTENCIA: Las partes accesibles pueden calentarse durante el uso.
Los niños deben permanecer alejados.
• No utilizar limpiadores abrasivos o rascadores metálicos afilados para
limpiar el cristal de la puerta del horno ya que pueden rayar la
superficie, pudiendo comportar la rotura del cristal.
• La limpieza y el mantenimiento que debe realizar el usuario no será
realizada por niños sin supervisión.
ES 39
GB, FR, IT, ES, DE, TR, CZ
Rev_G Değişen sayfalar; 6 - 19 - 32 - 33 - 44 - 55 - 68 - 80 - 88

ES 40
de tierra es de color amarillo verdoso. Esta operación debe realizarla un
profesional debidamente cualificado. Si la toma de corriente es
incompatible con el enchufe del electrodoméstico, pida a un electricista
profesional que sustituya la toma por otra adecuada. El enchufe y la
toma deben cumplir las normas actuales del país donde se instala el
electrodoméstico. En la conexión con la fuente de alimentación
también puede utilizarse un contactor omnipolar entre la fuente y el
electrodoméstico. Este debe soportar la carga conectada máxima y
cumplir la legislación vigente. El contactor no debe interrumpir el cable
de tierra de color amarillo verdoso. La toma de corriente o el contactor
omnipolar empleados deben estar fácilmente accesibles cuando se
instala el electrodoméstico.
• La desconexión puede realizarse mediante el enchufe accesible o
mediante la incorporación de un interruptor en el cableado fijo con
arreglo a las normativas de cableado.
• El cable de alimentación debe ser de tipo H05V2V2-F.
• El incumplimiento de lo anterior puede poner en peligro la seguridad
del electrodoméstico y anular la garantía.
• Cualquier vertido de material excesivo debe eliminarse ante de la
limpieza.
• Durante la limpieza pirolítica, las superficies pueden calentarse más
de lo habitual, por lo que los niños deben mantenerse a una distancia de
seguridad.
• Cuando coloque la bandeja interior, asegúrese de dirigir el tope hacia
arriba en la parte trasera de la cavidad.
La bandeja debe introducirse por completo en la cavidad.
• ADVERTENCIA: No forre las paredes del horno con papel de aluminio
ni utilice las protecciones desechables que se encuentran disponibles
en los comercios. El papel de aluminio o cualquier otra protección que
entre en contacto directo con el esmalte caliente puede derretirse y
dañar el esmalte del interior.
• El electrodoméstico no debe instalarse detrás de una puerta decorativa
para evitar que se caliente en exceso.
• ADVERTENCIA: Nunca quite la junta de estanqueidad de la puerta del
horno.
• Si el cable de alimentación está dañado, debe sustituirse por un cable
o un haz de cables especial comercializado por el fabricante; también
puede ponerse en contacto con el departamento de atención al cliente.
• No se requiere ninguna operación/ajuste adicional para hacer funcionar
el aparato a las frecuencias nominales.
GB, FR, IT, ES, DE, TR, CZ
Rev_G Değişen sayfalar; 6 - 19 - 32 - 33 - 44 - 55 - 68 - 80 - 88

Resumen
ES 41
Advertencias generales
42
1.1 Recomendaciones de seguridad
1.2 Seguridad eléctrica
1.3 Recomendaciones
1.4 Instalación
1.5 Gestión de residuos
1.6 Declaración de conformidad
2.1 Descripción general
2.2 Accesorios
2.3 Primer uso
Descripción del producto
44
3.1 Descripción de la pantalla
3.2 Modalidades de cocción
Utilización del horno
45
4.1 Notas genéricas de limpieza
4.2 Mantenimiento
• Extracción y limpieza de las rejillas
• Extracción de la puerta del horno
• Extracción y limpieza de la puerta
de vidrio
Limpieza y mantenimiento
del horno
48
5.1 Preguntas más frecuentes
Solución de problemas
50
GB, FR, IT, ES, DE, TR, CZ
Rev_G Değişen sayfalar; 6 - 19 - 32 - 33 - 44 - 55 - 68 - 80 - 88

1. Advertencias Generales
Le agradecemos que haya elegido uno de nuestros
productos. Para utilizar el horno de forma óptima es
aconsejable leer con atención este manual y
conservarlo para poder consultarlo en el futuro. Antes
de instalar el horno, anote el número de serie para
poder facilitárselo al personal del servicio de asistencia
técnica en caso de solicitar su intervención. Después de
extraer el horno del embalaje, compruebe que no haya
sufrido daño alguno durante el transporte. En caso de
duda, no utilice el horno y solicite la asistencia de un
técnico cualificado. Conserve todo el material de
embalaje (bolsitas de plástico, poliestireno, clavos)
fuera del alcance de los niños. La primera vez que se enciende el horno puede producirse un humo de
olor acre, causado por el primer calentamiento del adhesivo de los paneles de aislamiento que recubren
el horno: se trata de un fenómeno absolutamente normal y, en caso de que se produzca, será preciso
esperar a que cese el humo antes de introducir los alimentos. El fabricante declina toda responsabilidad
en caso de no observar las instrucciones contenidas en este documento.
NOTA: las funciones, las propiedades y los accesorios de los hornos citados en este manual pueden
variar según los modelos.
1.1 Recomendaciones de seguridad
- En caso de avería o mal funcionamiento del aparato, apáguelo y no lo manipule.
El uso de cualquier aparato eléctrico comporta la observación de una serie de reglas fundamentales:
- No tirar del cable de alimentación para desenchufar el conector de la toma de corriente;
Utilice el horno solo con el fin para el que se ha diseñado, es decir: únicamente para cocer alimentos;
cualquier otro uso, por ejemplo como fuente de calefacción, se considera impropio y por lo tanto
peligroso. El fabricante no puede ser considerado responsable de eventuales daños derivados de usos
impropios, erróneos o irracionales.
- No tocar el aparato con las manos ni los pies mojados o húmedos;
- En general no es aconsejable usar adaptadores, regletas ni alargadores;
1.2 Seguridad eléctrica
La red de alimentación a la que se conecte el horno debe cumplir la normativa vigente en el país de
instalación. El fabricante declina toda responsabilidad por eventuales daños derivados de no observar
dicha normativa. El horno debe conectarse a la red eléctrica mediante un enchufe de pared con toma de
tierra o mediante un seccionador con varios polos, según la normativa vigente en el país de instalación.
La red eléctrica debe estar protegida mediante fusibles adecuados y deben utilizarse cables con una
sección transversal idónea que garantice una correcta alimentación del horno.
CONEXIÓN
El horno se suministra con un cable de alimentación que debe conectarse únicamente a una red
eléctrica con una tensión de 230 V de CA entre fases o entre la fase y el neutro. Antes de conectar el
horno a la red eléctrica es imprescindible comprobar:
- La tensión de alimentación indicada por el medidor;
ATENCIÓN
Antes de conectar el horno a la red eléctrica, confíe la comprobación de la continuidad de la toma de
tierra de la red eléctrica a un electricista cualificado. El fabricante no se hace responsable de eventuales
accidentes u otros problemas derivados de no conectar el horno a tierra o de conectarlo a una toma de
tierra con una continuidad defectuosa.
El hilo de toma de tierra conectado al terminal de tierra del horno debe estar conectado al terminal de
tierra de la red eléctrica.
CONFÍE LA CONEXIÓN ELÉCTRICA A UN ELECTRICISTA O A UN TÉCNICO CUALIFICADO.
- La configuración del seccionador.
ES 42
GB, FR, IT, ES, DE, TR, CZ
Rev_G Değişen sayfalar; 6 - 19 - 32 - 33 - 44 - 55 - 68 - 80 - 88
1.3 Recomendaciones
Una limpieza mínima después de utilizar el horno ayudará a mantenerlo limpio durante más tiempo. No
forrar las paredes del horno con aluminio u otras protecciones disponibles en tiendas. El aluminio o los
protectores, en contacto directo con el esmalte caliente puede derretirse y deteriorar el esmalte del
interior. Para evitar un exceso de suciedad en el horno y que pueden derivar en olores y humo en exceso,
recomendamos no utilizar el horno a temperaturas muy elevadas. Es mejor ampliar el tiempo de
cocción y bajar un poco la temperatura.
1.4 Instalación
Han de seguirse a rajatabla las instrucciones de instalación para personal cualificado. Una instalación
incorrecta puede provocar daños personales, materiales o en animales. El fabricante no se hace
responsable de esos posibles daños.
No es obligación del fabricante instalar el horno. Si se requiere la ayuda del fabricante para subsanar
fallos derivados de una instalación incorrecta, dicha asistencia no la cubrirá la garantía.
El horno se puede colocar encima, en una columna, o debajo de una encimera. Antes de fijar el horno
hay que asegurar una buena ventilación en el hueco donde se vaya a colocar y que el aire necesario para
enfriar y proteger las piezas internas circula sin problema. Realizar las aperturas especificadas en la
última página según el tipo de altura.
1.5 Gestión de residuos y respeto por el medio ambiente
Este aparato está certificado conforme a la directiva europea 2012/19/EU sobre aparatos
eléctricos y electrónicos (WEEE). Los dispositivos WEEE contienen sustancias
contaminantes (que pueden provocar consecuencias negativas en el medio ambiente) o
componentes básicos (que pueden reutilizarse). Es importante que dichos dispositivos
estén sujetos a tratamientos específicos para eliminar y desechar correctamente todos los
contaminantes y recuperar todos los materiales. Cada individuo puede desempeñar un
papel importante a la hora de asegurar que los dispositivos WEEE no se conviertan en un
problema medioambiental; es esencial seguir algunas reglas básicas:
AHORRAR Y RESPETAR EL MEDIO AMBIENTE
En muchos países, para los WEEE de grandes dimensiones, puede haber disponible un servicio de
recogida a domicilio. Cuando se compra un nuevo aparato, el viejo puede entregarse al vendedor, que
debe adquirirlo gratuitamente siempre que el aparato sea de tipo equivalente y tenga las mismas
funciones que el que se ha adquirido.
- Los dispositivos WEEE deben llevarse a los puntos de recogida específicos gestionados por el municipio
o por una sociedad registrada.
Siempre que sea posible, evite precalentar el horno e intente utilizarlo siempre lleno. Abra la puerta del
horno lo menos posible, ya que se producen dispersiones de calor cada vez que se lleva a cabo esta
operación. Para ahorrar mucha energía basta apagar el horno de 5 a 10 minutos antes del fin del tiempo
de cocción planificado y servirse del calor que el horno continúa generando. Mantener las juntas
limpias y en buen estado para evitar posibles dispersiones de energía. Si se dispone de un contrato de
energía eléctrica por tarifa horaria, el programa de cocción retardada permitirá ahorrar más fácilmente
retrasando el encendido del horno hasta el horario de tarifa reducida.
- Los dispositivos WEEE no deben tratarse como residuos domésticos;
ES 43
NOTA: puesto que el horno podría requerir la intervención del servicio de asistencia, es aconsejable
prever la disponibilidad de otro enchufe de pared al que conectar el horno después de extraerlo del
espacio donde se ha instalado. El cable de alimentación debe sustituirse únicamente por personal de
asistencia técnica o por técnicos con una cualificación análoga.
GB, FR, IT, ES, DE, TR, CZ
Rev_G Değişen sayfalar; 6 - 19 - 32 - 33 - 44 - 55 - 68 - 80 - 88
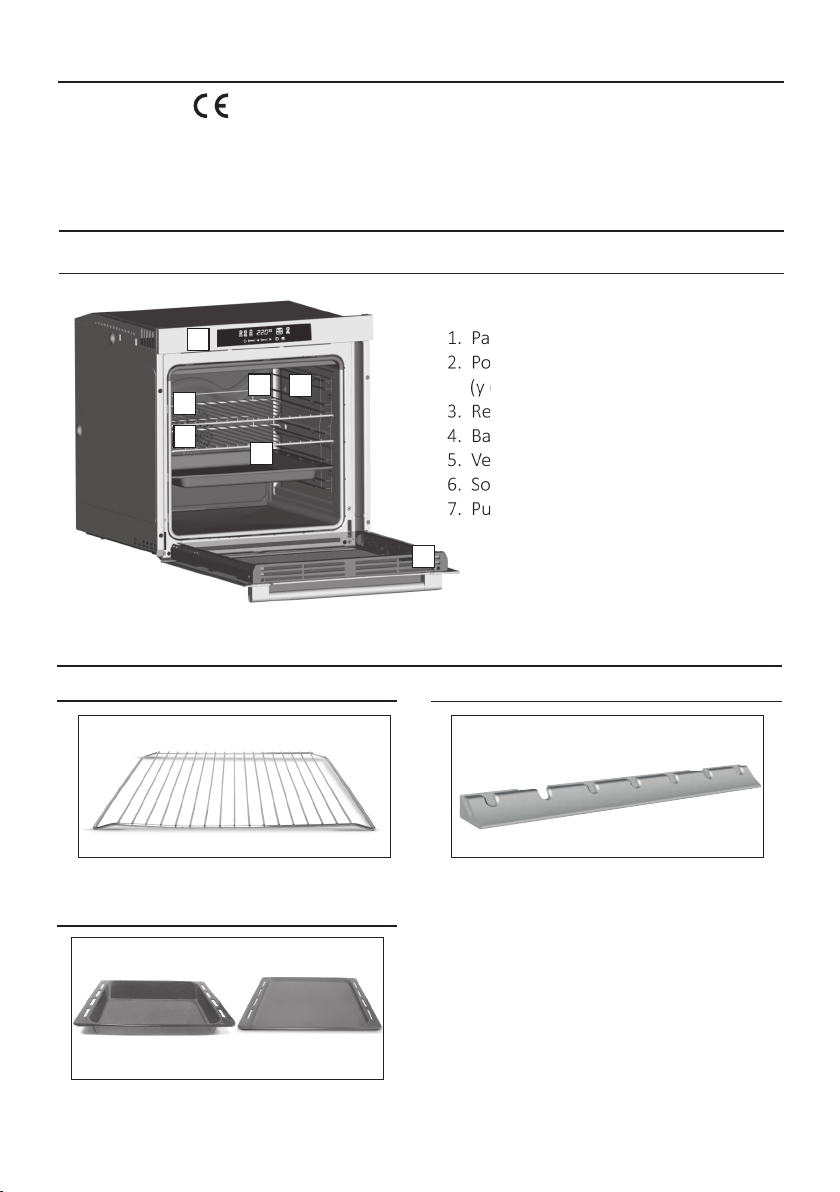
1.6 Consejos De Cumplimiento
Al mostrar el logo marcado en este producto, declaramos, bajo nuestra propia responsabilidad,
el cumplimiento de todos los requisitos europeos en términos de seguridad, salud y medio ambiente,
establecidos en la legislación de este producto.
2. Descripción del producto
2.1 Descripción general
1. Panel de control
2. Posiciones de las bandejas
(y del soporte elevado si corresponde)
3. Rejilla metálica
4. Bandeja
5. Ventilador (detrás de la placa de acero)
6.Sonda para carnes
7. Puerta del horno
2.2 Accesorios
1 Rejilla metálica
Sostiene fuentes y platos.
Recoge los residuos que gotean durante la
cocción de alimentos con las resistencias.
2 Bandeja
ES 44
Los LEDS permanecen apagados durante la apertura
de la puerta (sólo para hornos piroliticos).
Es un sistema de iluminacion que sustituye el
tradicional sistema “de bombilla”. En la puerta del
horno se integran 14 luces LED (en versiones no
piroliticas) o 10 luces LED de Potencia Superior (en
modelos piroliticos). Las luces LED crean una
iluminacin blanca de calidad que permite ver dentro ó
del horno con claridad todas las bandejas sin
sombras.
3
Visin Ledó
1
3
5
4
6
2
7
GB, FR, IT, ES, DE, TR, CZ
Rev_G Değişen sayfalar; 6 - 19 - 32 - 33 - 44 - 55 - 68 - 80 - 88
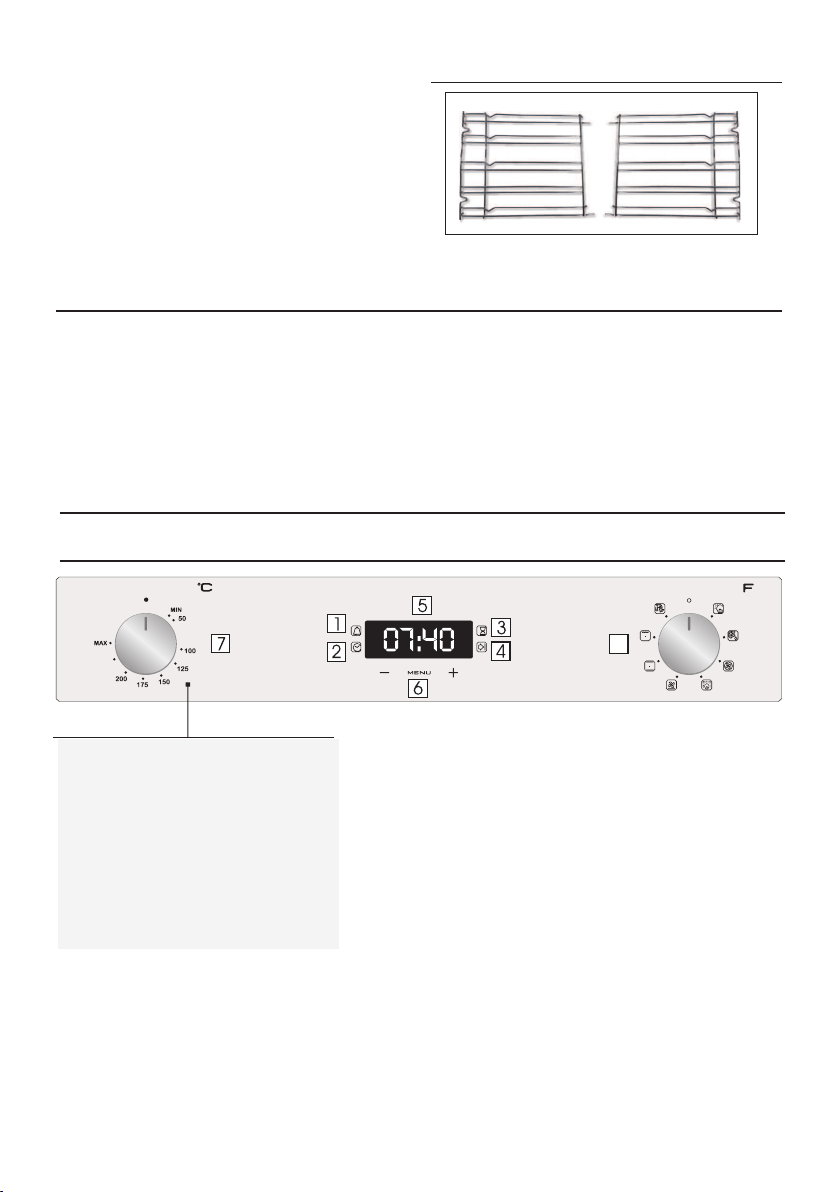
2.3 Primer uso
LIMPIEZA PRELIMINAR
Lave todos los accesorios y limpie el interior del horno con detergente lavavajillas y agua caliente.
Compruebe que el horno esté vacío, seleccione la temperatura máxima y déjelo encendido durante un
mínimo de una hora para eliminar todos los olores que suele haber presentes en los hornos nuevos.
Limpie el horno antes de utilizarlo por primera vez. Limpie las superficies externas con un paño suave
levemente humedecido.
ES 45
-Visin ptimaóó
Este sistema, ademas de proporcionar una
iluminacion excelente dentro del horno, dura mas
que la bombilla tradicional, tiene un mantenimiento
mas sencillo y, sobre todo, ahorra energia.
Ventajas:
-Iluminacin duraderaó
consumo energetico muy bajo, reduccion del 95%
en comparacion con la iluminacin tradicional.ó
3. Uso del horno
3.1 Descripción de la pantalla
2- Configuración del reloj
1- Temporizador
5- Display para temperatura o tiempo
8- Selección de función
3- Tiempo de cocción
4- Fin de la cocción
6- Teclas para pulsar
7- Selección de temperatura
8
ATENCIÓN: la primera operación que hay que
efectuar después de la instalación o después de una
interrupción de la corriente (este tipo de
situaciones se reconocen al observar que en la
pantalla de visualización parpadea la hora 12:00 ) es
el ajuste de la hora, como se indica a continuación:
•Pulse el botón central 4 vez.
•Ajustar la hora con los botones "-" "+".
•Suelte las teclas.
ATENCIÓN: El horno funciona sólo si la hora está
programada.
Laterales de alambres
4
Rejilla del alambre lateral si está incluido.
GB, FR, IT, ES, DE, TR, CZ
Rev_G Değişen sayfalar; 6 - 19 - 32 - 33 - 44 - 55 - 68 - 80 - 88
ES 46
•Pulse el botón central
1 vez
•Pulse las teclas"-" "+"
para ajustar la duración
•Suelte las teclas
• Cuando transcurre el
tiempo seleccionado, el
funcionamiento se para
solo y avisa con una señal
ac ústi ca (l a señ al
acústica se para sola;
interrumpirlo
inmediatamente pulse la
tecla SELECT
•Durante el
funcionamiento, la
pantalla muestra el
tiempo restante.
•Emite una señal acústica
finalizado el tiempo
establecido
•Durante el
funcionamiento, la pantalla
muestra el tiempo restante.
•Emite una señal acústica
finalizado el tiempo
establecido
•Pulse el botón central 2
veces
•Suel te l as teclas
•Seleccione la función
de cocción con el mando
selector de función.
•Pulse las teclas "-" "+"
para el ajuste de la
duración
•Permite seleccionar el
tiempo de cocción del
alimento introducido en
el horno.
•Para visualizar el tiempo
restante pulse la tecla
SELECT.
•Para modificar el tiempo
restante, pulse la tecla
SELECT+ "-" “+"
•Cuando transcurre el
tiempo seleccionado, el
horno se desconecta
solo; párelo antes de
s itu er el mando
selector de función en la
posición O ó ajuste a
0:00 el tiempo de la
cocción (teclas SELECT
"-" "+".
•Para detener la señal,
pulse cualquier tecla.
Pulse el botón central
para volver a la función
de reloj.
•A la hora seleccionada
el horno se
desconectará solo; si
desea interrumpirlo,
situer antes el mando
selector de función en la
posición O.
•Permite memorizar la
hora de fin de la cocción.
•Para visualizar la hora
rogramada, Pulse el
botón central 3 veces
•Para modificar la hora
programada, pulse las
teclas END +"-" "+"
fin de cocción.
•Pulse las teclas "-" "+"
para ajustar la hora del
•Suel te l as teclas
•Seleccione la función
de cocción con el mando
selector de función.
•Pulse el botón central 3
veces
Normalmente se utiliza esta
función con la finalidad de
DURACIÓN DE LA COCCIÓN
A modo de ejemplo: el
alimento debe cocinarse
durante 45 minutos y deseo
que esté listo para las 12:30;
en tal caso. Seleccione la
función de cocción deseada.
Ajuste el tiempo de la
cocción en 45 minutos ( "-"
"+") Ajuste el fin de la cocción
a las 12:20 h. ("-" "+" ).
•Cuando termina el tiempo
seleccionado, el horno se
desconecta automática-
mente y avisa emitiendo una
señal acústica.
La cocción comenzará auto-
máticamente a las11:45 h
(12:30, menos 45minutos), y
a la hora seleccionada como
fin de la cocción el horno se
desconectará automática-
mente.
ATENCIÓN: Si selecciona
únicamente el fin de
cocción sin el tiempo de
cocción, el horno se
conectará inmediatamente
y se desconectará a la hora
de fin de la cocción
seleccionada.
MODO DE
ACTIVACIÓN
MODO DE
DESCONEXIÓN
FUNCIONAMIENTOFINALIDAD
BLOQUEO
PARA
NIÑOS
Para desactivar la
función del “Bloqueo
para niños”, se debe
pulsar nuevamente “Set
(+)” durante un mínimo
de 5 segundos. A partir
de este momento, todas
las funciones están
disponibles.
Para activar la función del
“Bloqueo para niños”, se
debe pulsar “Set (+)”
durante un mínimo de 5
segundos, A partir de
este momento, todas las
demás funciones están
loqueadas El display
m ues tra ST OP y
s e le c c io n ar h o ra
alternativamente.
MINUTERO
DURACIÓN
DE LA
COCCIÓN
FIN DE LA
COCCIÓN
FUNCIÓN
GB, FR, IT, ES, DE, TR, CZ
Rev_G Değişen sayfalar; 6 - 19 - 32 - 33 - 44 - 55 - 68 - 80 - 88
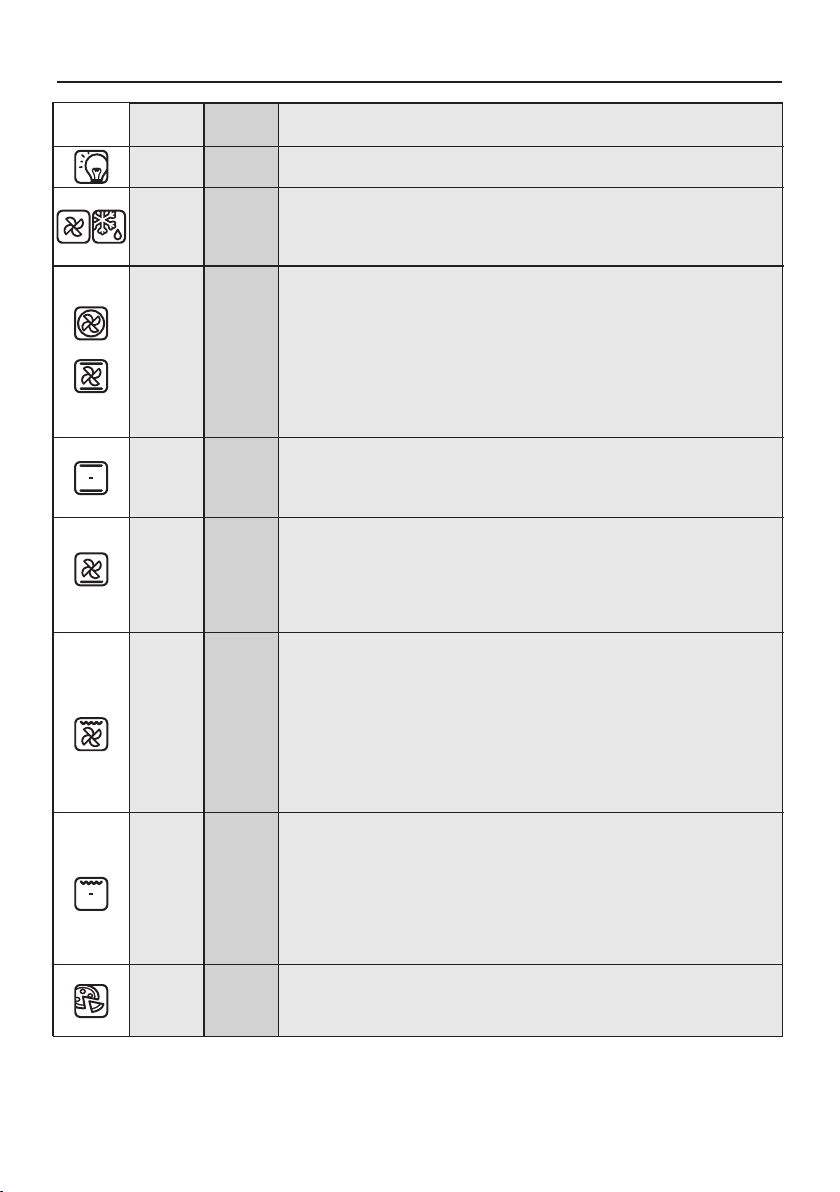
180
210
200
210
40
L3
40 ÷ 40
50 ÷ 240
50 ÷ 230
150 ÷ 220
50 ÷ 240
L1 ÷ L5
22050 ÷ 280
*
3.2 Modalidades de cocción
Mando
selector
FUNCIÓN ()dependiendo del modelo
T°C
establecida
Rango
de T°C
LAMPARA: Conecta la luz interior
DESCONGELACIÓN: Funcionamiento de la turbina de cocción que hace
circular el aire dentro del espacio del horno. Ideal para realizar una
descongelación previa a una cocción.
CALOR CIRCULANTE: Utilización simultánea de la resistencia inferior, superior
y de la turbina que hace circular el aire dentro del espacio del horno. Función
recomendada para las aves, la repostería, los pescados, las verduras... El calor
penetra mejor dentro del alimento a cocer reduciendo el tiempo de cocción,
así como el tiempo de precalentamiento. Se pueden realizar cocciones
combinadas con preparaciones idénticas o distintas en uno o dos niveles. Este
modo de cocción garantiza una distribución homogénea del calor y no mezcla
los olores. Para una cocción combinada se deben prever unos diez minutos
más.
CONVECCİÓN NATURAL: Funcionan la resistencia inferior y la resistencia
superior del horno. Es la cocción tradicional, ideal para cocinar asados, caza,
galletas, manzanas al horno y para conseguir alimentos crujientes.
RESISTENCIA INFERIOR CIRCULANTE: Utilización de la resistencia inferior más
la turbina que hace circular el aire dentro del espacio del horno. Ideal para
hacer tartas de frutas jugosas, tortadas, quiches, pasteles. Evita que se sequen
los alimentos y favorece la subida de bizcochos, masa de pan y otras cocciones
realizadas por debajo. Coloque la rejilla en la ranura inferior.
TURBOGRILL : La función turbogrill debe utilizarse con la puerta cerrada.
Utilización de la resistencia superior más la turbina que hace circular el aire
dentro del espacio del horno. Se requiere un precalentamiento para las carnes
rojas pero no para las carnes blancas. Ideal para las cocciones de volumen
grueso, piezas enteras como cerdo asado, las aves, etc. Coloque el plato que
quiera cocer directamente en la rejilla en el centro del horno, a un nivel medio.
Coloque la grasera debajo de la rejilla para que las grasas caigan dentro.
Asegúrese de que la comida no quede demasiado cerca del grill. En la mitad de
la cocción, gire la pieza que esté cociendo.
GRILL: El grill debe utilizarse con la puerta cerrada. Utilización de la resistencia
superior con posibilidad de ajustar la temperatura. Es necesario un
precalentamiento de 5 minutos para que la resistencia se ponga al rojo. Éxito
seguro con las parrilladas, las brochetas y los gratinados. Las carnes blancas
deben alejarse del grill, porque aunque así se alargará el tiempo de cocción, la
carne quedará más sabrosa. Las carnes rojas y los filetes de pescado se pueden
colocar encima de la rejilla colocando debajo la grasera.
* Programa de prueba según CENELEC EN 60350-1 utilizado para la definición de la clase energética.
ES 47
*
PIZZA: El calor envolvente en esta modalidad genera un ambiente similar al de
los hornos de leña de las pizzerías.
22050 ÷ 230
GB, FR, IT, ES, DE, TR, CZ
Rev_G Değişen sayfalar; 6 - 19 - 32 - 33 - 44 - 55 - 68 - 80 - 88
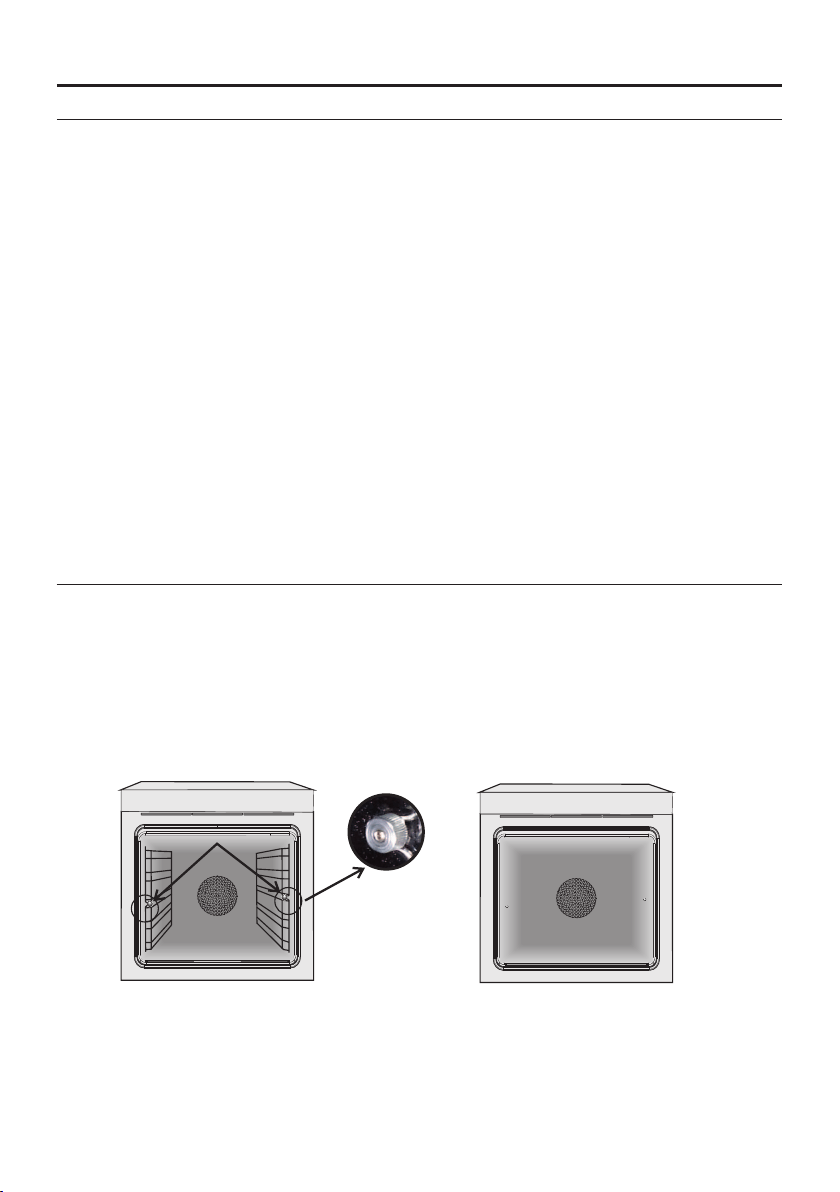
ES 48
4. Limpieza y mantenimiento del horno
4.1 Notas genéricas de limpieza
estropajos metálicos ni objetos puntiagudos para la limpieza con el fin de no dañar de forma irreparable
las piezas esmaltadas. Utilice únicamente agua, jabón o detergentes a base de amoniaco.
PIEZAS DE VIDRIO
horno. Para eliminar las manchas más persistentes, se puede utilizar también una esponja empapada
JUNTA DE LA PUERTA DEL HORNO
Es aconsejable limpiar la puerta de vidrio con papel absorbente de cocina después de cada uso del
ACCESORIOS
La vida útil del aparato se prolonga si se limpia a intervalos regulares. Espere a que el horno se enfríe
Limpie los accesorios con una esponja empapada en agua y jabón, escúrralos y séquelos: no utilice
Si quedan residuos grasos, sumerja la fuente en agua y detergente. También se puede lavar la fuente en
el lavavajillas o bien utilizar un el horno.detergente comercial para hornos. Nunca vuelva a introducir la
fuente sucia en
detergentes abrasivos.
lave la fuente con agua caliente utilizando una esponja y detergente lavavajillas.
en detergente bien escurrida y aclarar con agua.
FUENTE DE GOTEO
Si se ensucia, la junta se puede limpiar con una esponja ligeramente húmeda.
antes de llevar a cabo las operaciones de limpieza manuales. No utilice nunca detergentes abrasivos,
Después de usar las resistencias, extraiga la fuente del horno. Vierta la grasa caliente en un recipiente y
4.2 Mantenimiento
A
3. Vuelva a instalar la puerta llevando a cabo el procedimiento a la inversa.
2. Abra las pestañas de alojamiento de la bisagra por el lado derecho e izquierdo de la puerta anterior
presionándolas hacia abajo.
EXTRACCIÓN Y LIMPIEZA DE LAS REJILLAS
1. Desenrosque en sentido antihorario las tuercas estriadas.
2. Extraiga las rejillas tirando de ellas hacia fuera.
3. Límpielas lavándolas en el lavavajillas o con una esponja húmeda y séquelas inmediatamente
después.
1. Abra la puerta anterior.
4. Una vez limpias, vuelva a instalar las rejillas fijando las tuercas estriadas.
EXTRACCIÓN DE LA PUERTA DEL HORNO
GB, FR, IT, ES, DE, TR, CZ
Rev_G Değişen sayfalar; 6 - 19 - 32 - 33 - 44 - 55 - 68 - 80 - 88
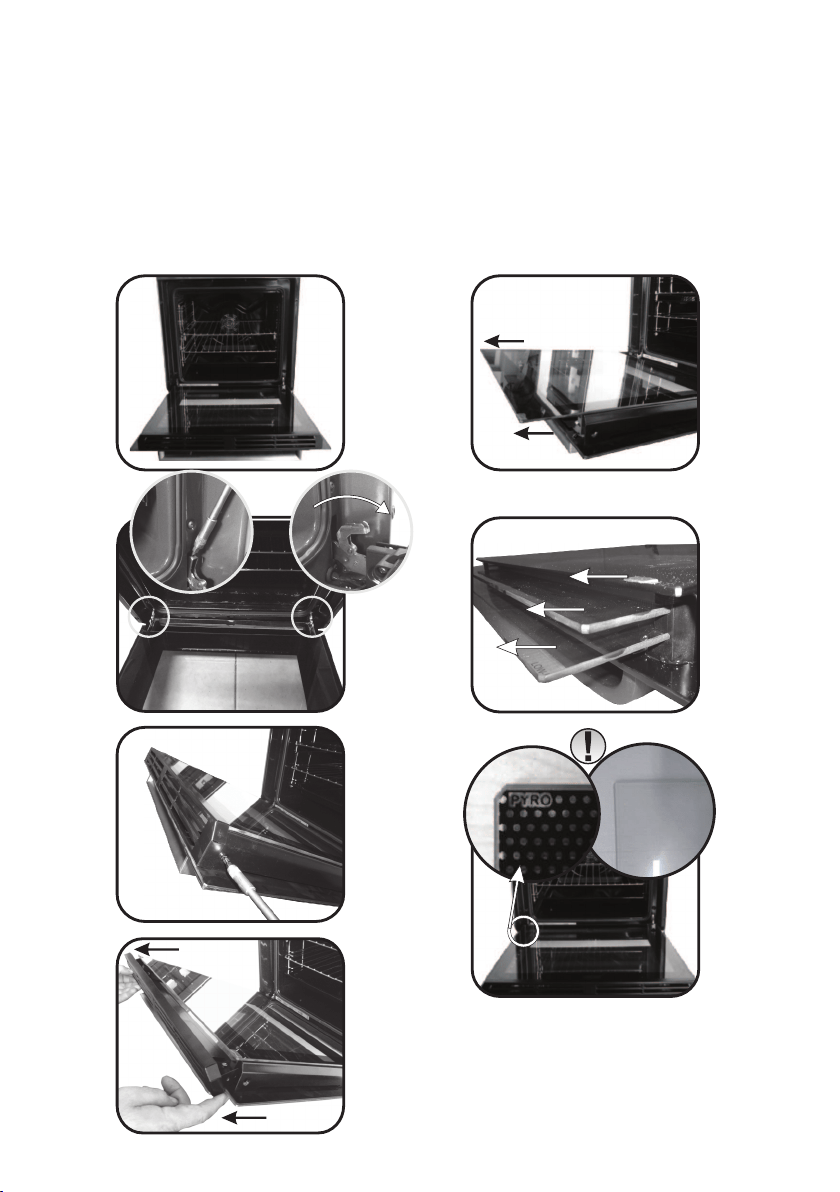
ES 49
LOW-E
1
2
3
1.
2.
3.
4.
5.
6.
7.
EXTRACCIÓN Y LIMPIEZA DE LA PUERTA DE VIDRIO
1. Abra la puerta del horno.
2.3.4. Bloquee las bisagras, desenrosque los tornillos y extraiga la cubierta metálica superior tirando hacia
arriba.
5.6. Extraiga el vidrio con mucho cuidado de la contrapuerta del horno (N. B.: si se trata de un horno
pirolítico, extraiga también el segundo y el tercer vidrio si los hubiera).
7. Al término de la limpieza o sustitución, vuelva a ensamblar las piezas en el orden opuesto a la extracción.
En todos los vidrios, la indicación ”Low-E” debe ser correctamente legible y estar ubicada a la izquierda de
la puerta, cerca de la bisagra lateral izquierda. De este modo, la etiqueta estampada en el primer vidrio
quedará por el interior de la puerta.
GB, FR, IT, ES, DE, TR, CZ
Rev_G Değişen sayfalar; 6 - 19 - 32 - 33 - 44 - 55 - 68 - 80 - 88
ES 50
Vapor y condensa en la
pantalla
Limpiar con un paño de
microfibra la pantalla para
quitar la capa condensación
No hay reacción cuando
se toca la pantalla
5. Solución de problemas
5.1 Preguntas más frecuentes
PROBLEMACAUSA POSIBLE SOLUCIÓN
El horno no se calienta
El reloj no está en horaConfigure el reloj
El bloqueo infantil está
activado
Los ajustes necesarios no
están configurados
Desactive el bloqueo infantil
Asegúrese de que los ajustes
necesarios sean correctos
El horno no se calienta
El horno no se calienta
GB, FR, IT, ES, DE, TR, CZ
Rev_G Değişen sayfalar; 6 - 19 - 32 - 33 - 44 - 55 - 68 - 80 - 88

Scherhetshnwese
• Kinder dürfen nicht mit dem Gerät spielen.
• Während des Garvorgangs kann Feuchtigkeit im Ofenraum oder auf dem
Glas der Tür kondensieren. Dies ist ein normaler Zustand. Um diesen Effekt
zu verringern, warten Sie 10-15 Minuten nach dem Einschalten des Geräts,
bevor Sie die Speisen in den Ofen stellen. In jedem Fall verschwindet das
Kondensat, wenn der Ofen die Gartemperatur erreicht hat.
• Das Gemüse in einem Behälter mit Deckel anstelle einer offenen Schale
kochen.
• ACHTUNG: Zugängliche Teile können heiß werden, wenn der Ofen in
Betrieb ist. Kinder fernhalten.
• WARNUNG: Das Gerät und die zugänglichen Teile des Gerätes werden
während des Betriebs heiß. Das Berühren der heißen Geräteteile sollte
vermieden werden.
• Dieses Gerät ist nicht bestimmt zum Gebrauch durch Personen
(einschließlich Kindern) mit beeinträchtigten körperlichen, sensorischen
oder geistigen Fähigkeiten oder durch Personen, die keine entsprechenden
Erfahrungen oder Kenntnisse besitzen, es sei denn, sie werden
beaufsichtigt oder angewiesen durch eine Person, die für ihre Sicherheit
verantwortlich ist.
• Vermeiden Sie es, Speisen nach dem Garvorgang länger als 15/20 Minuten
im Ofen zu lassen.
• Die Reinigung und Wartung des Gerätes darf nicht durch Kinder ohne
Aufsicht durchgeführt werden.
• Nutzen Sie kein Dampfreinigungsgerät zur Reinigung des Ofens.
• An die Zuleitung ist ein Stecker anzuschließen, der für die auf dem
Typenschild aufgeführte Spannung, Stromstärke und Last ausgelegt ist und
über einen Schutzkontakt verfügt. Die Steckdose muss für die auf dem
Typenschild aufgeführte Last ausgelegt und der Schutzkontakt
WARNUNG: zugängliche Geräteteile werden während des Betriebs heiß.
Kinder sollten fern gehalten werden.
• Nutzen Sie nur die empfohlene Temperatureinstellung für den Ofen.
• Nutzen Sie keine scharfen oder scheuernden Reiniger oder scharfe
Metallreiniger um den Herd und das Glass zu reinigen, da dadurch Kratzer
auf der Oberfläche entstehen können.
• Während des Betriebs wird das Gerät heiß. Bitte vermeiden Sie die
Berührung der heißen Geräteteile.
• Der Ofen muss ausgeschaltet werden, bevor der Deckel zur Reinigung
entfernt wird. Anschließend den Deckel gemäß der Anweisungen wieder
montieren.
DE 51
GB, FR, IT, ES, DE, TR, CZ
Rev_G Değişen sayfalar; 6 - 19 - 32 - 33 - 44 - 55 - 68 - 80 - 88

DE 52
angeschlossen und in Betrieb sein. Der Schutzleiter ist gelb-grün gefärbt.
Dieser Vorgang darf nur von entsprechend qualifiziertem Fachpersonal
durchgeführt werden. Im Falle einer Inkompatibilität zwischen Steckdose
und Gerätestecker müssen Sie einen qualifizierten Elektriker bitten, die
Steckdose durch eine geeigneten Typ zu ersetzen. Stecker und Buchse
müssen zu den im Installationsland geltenden aktuellen Normen konform
sein. Zwischen Gerät und Stromquelle lässt sich auch ein allpoliger
Schutzschalter zwischenschalten, der für die maximale Anschlussleistung
ausgelegt ist und aktuelle gesetzliche Bestimmungen einhält. Der gelb-grüne
Schutzleiter darf durch den Schutzschalter nicht unterbrochen werden. Bei
der Geräteinstallation ist darauf zu achten, dass die für den Anschluss
verwendete Buchse bzw. der allpolige Schutzschalter leicht zugänglich sind.
• Die Trennung von der Stromversorgung darf durch Herausziehen des
Steckers aus der Steckdose oder Auslösen eines gemäß gängiger
Verkabelungsnormen in die Festverdrahtung zwischengeschalteten
Schutzschalters erfolgen.
• Wenn das Netzkabel beschädigt ist, muss es durch ein Kabel bzw.
Spezialbündel ersetzt werden, das beim Hersteller erhältlich ist. Wenden
Sie sich dazu an den Kundendienst.
• Eine Nichteinhaltung der oben genannten Anweisungen kann die
Schutzfunktion des Geräts gefährden und zum Erlöschen der Garantie
führen.
• Überschüssiges verschüttetes Material ist vor dem Reinigen zu entfernen.
• Während des pyrolytischen Reinigungsvorgangs können sich Flächen
mehr als üblich erwärmen. Deswegen sind Kinder in einem sicheren
Abstand fernzuhalten.
• Zum Vermeiden von Überhitzung darf das Gerät nicht hinter einer
Verkleidungstür installiert werden.
• Beim Einschieben des Ofenrostes ist darauf zu achten, dass der Anschlag
nach oben und hinten Richtung Ofenraum zeigt.
Das Rost muss vollständig in den Ofenraum eingeschoben werden.
• Der Netzkabeltyp muss H05V2V2-F sein.
• WARNHINWEIS: Die Seitenwände des Ofens nicht mit Aluminium oder
Einweg-Schutz, wie er in Geschäften erhältlich ist, auskleiden.
Aluminiumfolie oder jeglicher andere Schutz, der in direkten Kontakt mit
der heißen Emaille kommt, kann Schmelzen und Verschleiß der Emaille an
den Innenseiten verursachen.
• WARNHINWEIS: Entfernen Sie niemals die Dichtung der Ofentür.
• Es ist kein zusätzlicher Vorgang oder eine andere Einrichtung erforderlich,
um das Gerät mit der angegebenen Spannung zu betreiben.
GB, FR, IT, ES, DE, TR, CZ
Rev_G Değişen sayfalar; 6 - 19 - 32 - 33 - 44 - 55 - 68 - 80 - 88

Zusammenfassung
DE 53
Allgemeine Anweisungen
54
Produktbeschreibung
56
1.1 Sicherheitshinweise
1.2 Elektrische Sicherheit
1.3 Empfehlungen
1.4 Installation
1.5 Abfallentsorgung
1.6 Konformitätserklärung
2.1 Übersicht
2.2 Zubehör
2.3 Inbetriebnahme
Betrieb des Backofens
57
Reinigung und Wartung des
Backofens
60
3.1 Beschreibung der Anzeige
3.2 Funktionen zum Garen
4.1 Allgemeine Reinigungshinweise
4.2 Wartung
•
Entfernen und Reinigen der
Führungsschienen
•
Entfernen und Reinigen der Glastür
Fehlerbehebung
62
5.1 Häufig gestellte Fragen
GB, FR, IT, ES, DE, TR, CZ
Rev_G Değişen sayfalar; 6 - 19 - 32 - 33 - 44 - 55 - 68 - 80 - 88

1. Allgemeine Anweisungen
Vielen Dank, dass Sie sich für eins unserer Produkte
entschieden haben. Damit Sie lange Freude mit Ihrem
Backofen haben, sollten Sie diese Bedienungsanleitung
sorgfältig durchlesen und zum Nachschlagen in der
Zukunft aufbewahren. Notieren Sie sich vor dem
Anschließen des Backofens die Seriennummer, sodass Sie
diese im Reparaturfall an den Kundendienst weitergeben
können. Den Backofen nach dem Auspacken auf mögliche
Transportschäden überprüfen. Im Zweifelsfall den Ofen
nicht in Betrieb nehmen und einen qualifizierten
Servicetechniker konsultieren. Verpackungsmaterial
(Plastiktüten, Styropor, Nägel usw.) außerhalb der
Reichweite von Kindern aufbewahren. Beim ersten
Einschalten des Backofens kann ein streng riechender Rauch entstehen.
HINWEIS: Die in diesem Handbuch erwähnten Funktionen, Eigenschaften und Zubehörteile können je
nach gekauftem Modell variieren.
Dieser kann beim ersten Erhitzen durch den Kleber auf den Dämmplatten hervorgerufen werden. Dies ist
bei der ersten Inbetriebnahme ein normaler Vorgang; es sollte jedoch abgewartet werden, bis der Rauch
sich verzogen hat, bis Lebensmittel in den Ofen geschoben werden. Der Hersteller übernimmt keine
Verantwortung in Fällen, wo die in diesem Dokument enthaltenen Anweisungen nicht beachtet werden.
1.1 Sicherheitshinweise
- Das Gerät nicht am Stromkabel aus der Steckdose ziehen.
- Bei einer Fehlfunktion beziehungsweise bei unzulänglichem Betrieb Gerät ausschalten und nicht öffnen.
- Die Verwendung von Adaptern, Mehrfachsteckern und Verlängerungskabeln wird nicht empfohlen.
Den Backofen nur zum vorbestimmten Zweck, das heißt, für das Garen von Lebensmitteln einsetzen. Alle
anderen Verwendungsmöglichkeiten wie beispielsweise als Heizungsquelle gelten als unsachgemäß und
sind daher gefährlich. Der Hersteller übernimmt keine Haftung für Schäden, die aus einer falschen,
unsachgemäßen oder unverständlichen Verwendung hervorgehen.
Der Betrieb elektrischer Geräte erfordert die Einhaltung einiger Grundregeln:
- Gerät nicht mit nassen oder feuchten Händen oder Füßen berühren.
1.2 Elektrische Sicherheit
Vor dem Anschließen des Backofens an die Stromquelle einen qualifizierten Elektriker darum bitten, die
Kontinuität der Erdungsklemme an der Stromquelle zu überprüfen. Der Hersteller übernimmt keine
Verantwortung für Unfälle oder sonstige Probleme, die aus einem nicht sachgemäßen Anschluss des
Backofens an die Erdungsklemme oder an einen geerdeten Anschluss mit defekter Kontinuität entstehen
können.
Landes entsprechen. Der Hersteller übernimmt keine Haftung für Schäden, die aus der Nichtbefolgung
dieser Anweisungen entstehen. Der Backofen muss entsprechend der geltenden Gesetzgebung des Landes
an eine geerdete Wandsteckdose oder an einen allpoligen Trennschalter angeschlossen werden. Die
Stromquelle sollte durch entsprechende Sicherungen geschützt sein und die verwendeten Kabel müssen
einen Querschnitt aufweisen, der eine ordnungsgemäße Stromversorgung des Backofens gewährleistet.
WARNUNG
- Beschaffenheit und Umfeld des Trennschalters.
Der Backofen wird mit einem Stromkabel geliefert, das an eine Stromquelle mit 220- 240 Vac 50 Hz
angeschlossen werden kann. Bevor der Backofen an die Stromquelle angeschlossen wird, muss Folgendes
überprüft werden:
Die Stromquelle, an die der Backofen angeschlossen wird, muss den gesetzlichen Voraussetzungen des
Die mit der Erdungsklemme des Backofens verbundene Schutzleitung muss mit der Erdungsklemme der
Stromquelle verbunden werden.
- Spannung des Stromnetzes mit dem Messgerät;
DER ANSCHLUSS AN DIE STROMQUELLE DARF NUR DURCH EINEN ELEKTRIKER ODER QUALIFIZIERTEN
TECHNIKER ERFOLGEN.
ANSCHLUSS
DE 54
GB, FR, IT, ES, DE, TR, CZ
Rev_G Değişen sayfalar; 6 - 19 - 32 - 33 - 44 - 55 - 68 - 80 - 88
1.3 Empfehlungen
1.4 Einbau und Installation
1.5 Entsorgung und Umweltschutz
1.6 Konformitätserklärung
DE 55
Die Ofenwände nicht mit Aluminiumfolie oder sonstiger im Handel erhältlicher Einmalschutzfolie
auskleiden.
Gerät die Aluminiumfolie oder sonstige Schutzfolie mit der heißen Emaille in Berührung, so kann sie
schmelzen und die Qualität der Backofenbeschichtung beeinträchtigen. Es wird empfohlen, den Backofen
nicht bei sehr hohen Temperaturen zu betreiben, um eine übermäßige Verschmutzung und unangenehme
Rauch- und Geruchsentwicklung zu vermeiden. Es ist besser, bei niedrigerer Temperatur die Garzeit zu
erhöhen. Zusätzlich zum mitgelieferten Zubehör sollten nur temperatur- und hitzebeständige Backformen
und ofenfestes Geschirr verwendet werden.
Es empfiehlt sich, den Backofen nach jeder Verwendung grob zu reinigen.
Der Hersteller ist nicht zur Installation verpflichtet. Wird das Eingreifen des Hersteller erforderlich, um
Fehler zu beheben, die aus einer falschen Installation hervorgehen, so erfolgt dieses nicht im Rahmen der
Gewährleistungsgarantie. Die Installationsanweisungen für qualifiziertes Fachpersonal müssen befolgt
werden. Eine falsche Installation kann Personen- oder Sachschäden hervorrufen. Für derartige Schäden
oder Verletzungen übernimmt der Hersteller keine Haftung.
Der Backofen kann oben in einem Einbauschrank oder unter der Arbeitsfläche eingebaut werden. Vor dem
Fixieren muss gewährleistet sein, dass im Backofenraum genügend Fischluft zirkulieren kann, um die
Kühlung und den Schutz der innenliegenden Teile zu gewährleisten. Je nach Einbauart die auf der letzten
Seite angegebenen Öffnungen vornehmen.
aus dem Inneren verloren geht. Falls Sie einen Stromversorgungsvertrag mit wechselndem Stundentarif
haben, erleichtert das Programm der „verzögerten Startzeit“ das Stromsparen, indem der Anfang des
Garvorgangs in die Zeit verschoben wird, wo der günstigere Stromtarif gilt.
- Elektro- und Elektronik-Altgeräte dürfen nicht mit dem normalen Hausmüll entsorgt werden.
- Elektro- und Elektronik-Altgeräte müssen bei zugelassenen Sammelstellen abgegeben werden, die von
der Stadtverwaltung oder anderen zuständigen Stellen verwaltet werden.
MASSNAHMEN ZUM STROMSPAREN UND UMWELTSCHUTZ
Dieses Elektrohaushaltsgerät ist in Einklang mit der EU-Richtlinie 2012/19/EU über Elektro-
und Elektronik-Altgeräte (WEEE) gekennzeichnet. Elektro- und Elektronik-Altgeräte enthalten
umweltschädigende Substanzen, aber auch Grundkomponenten, die wiederverwendet
werden können. Daher ist es wichtig, Elektro- und Elektronik-Altgeräte spezifisch zu entsorgen,
um alle schädlichen Substanzen zu entfernen und wiederverwendbare Teile zu recyceln.
Verbraucher leisten einen wichtigen Beitrag zur Gewährleistung, dass Elektro- und Elektronik-
Altgeräte nicht zu einem Umweltproblem werden. Halten Sie sich daher bitte an die folgenden
Grundregeln:
Sofern möglich, das Vorheizen des Backofens vermeiden und seine Kapazität voll ausnutzen. Die
Backofentür so selten wie möglich öffnen, weil die Hitze aus dem Innenraum bei jedem Öffnen verloren
geht.
In vielen Ländern wird für die Entsorgung großer Elektro- und Elektronik-Altgeräte ein Abholservice
angeboten. Beim Kauf eines neuen Geräts wird das alte möglicherweise vom Händler zurückgenommen,
der es kostenfrei entsorgt, sofern das neue Gerät von einem ähnlichen Typ ist und die gleiche Funktion
erfüllt wie das Altgerät.
Für eine deutliche Energieersparnis den Backofen 5-10 Minuten vor dem Ende der Garzeit ausschalten und
mit der Restwärme zu Ende garen. Die Dichtungen sollten sauber und unversehrt bleiben, damit keine Hitze
Durch das Zeichen auf diesem Produkt wird seine Einhaltung aller geltenden Sicherheits-,
Gesundheits- und Umweltanforderungen bestätigt, die gesetzlich für dieses Produkt vorgeschrieben sind.
darf nur von qualifizierten Kundendiensttechnikern oder Elektrikern ausgetauscht werden.
HINWEIS: Für eine eventuelle Wartung des Ofens ist die Zugänglichkeit einer zweiten Wandsteckdose von
Vorteil, sodass er an diese angeschlossen werden kann, wenn er ausgebaut werden muss. Das Stromkabel
GB, FR, IT, ES, DE, TR, CZ
Rev_G Değişen sayfalar; 6 - 19 - 32 - 33 - 44 - 55 - 68 - 80 - 88
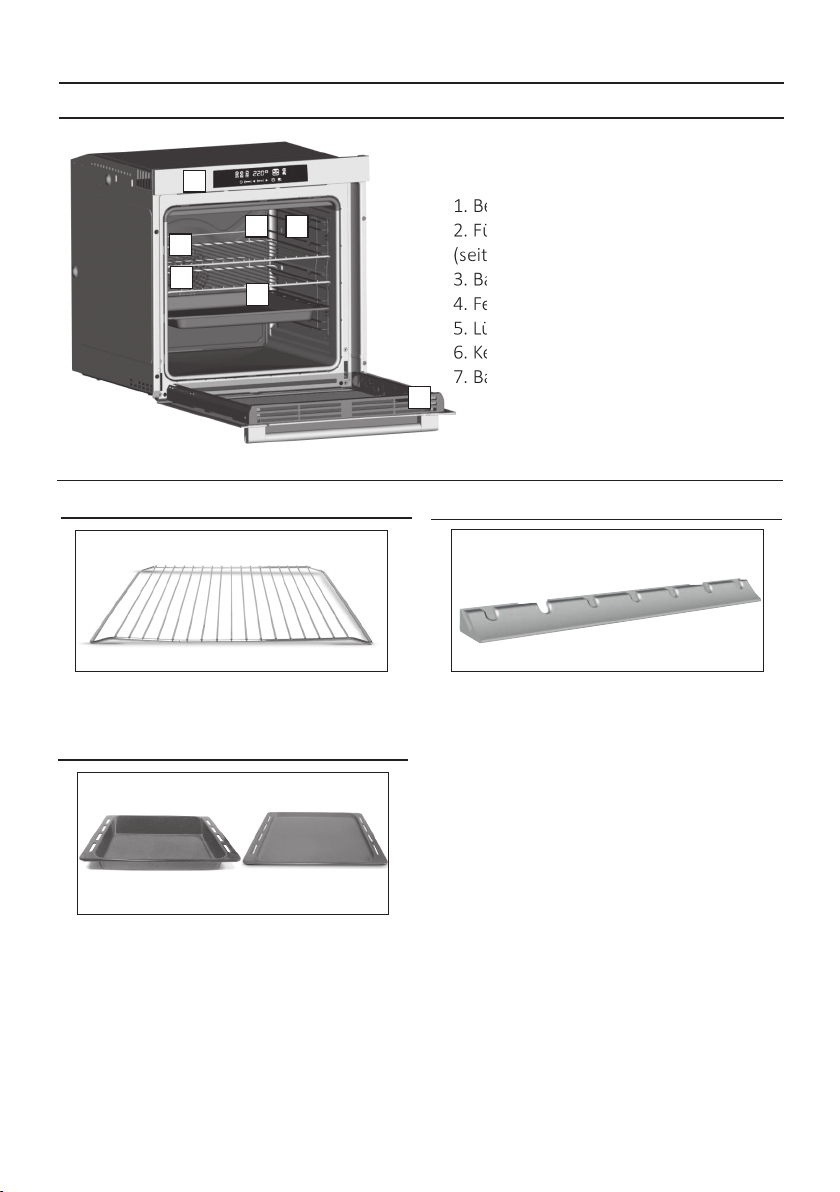
2. Produktbeschreibung
2.1 Übersicht
1. Bedienfeld
2. Führungsschienen
(seitlicher Metallrost, falls enthalten)
3. Backrost
4. Fettpfanne/Backblech
5. Lüfter (hinter der Stahlabdeckung)
6. Kerntemperaturfühler
7. Backofentür
2.2 Zubehör
Fettpfanne/Backblech
2
Fängt die beim Backen aus den Lebensmitteln
austretende Flüssigkeit auf.
Backrost
1
Hält Auflauf- und Backformen.
DE 56
LED schaltet sich wahrend der Turoffnung aus (nur
fur Pyrolyseofen).
Das ist ein Beleuchtungssystem, dass die
traditionelle Gluhbirne ersetzt. 14 LED-Leuchten
sind in der Backofentur integriert. Das erzeugte Licht
ist sehr hell und ermoglicht eine fast schattenfreie
Sicht auf allen Ebenen im Backofeninneren.
3
Led vision
Die Vorteile:
- Optimale Ubersicht auf allen Backofenebenen
Neben der herausragenden Qualitat und Intensitat
der Beleuchtung, bietet das System U-See auch
eine langere Lebensdauer im Vergleich zu
herkommlichen Backofenlampen, ist auserdem
leicht zu reinigen und vor allem sehr sparsam im
Enerigeverbrauch.
- Zuverlassige Funktion und lange Lebensdauer
- Hohe Helligkeit bei sehr niedrigen Energieverbrauch, bis
zu 95%weniger als herkommliche Backofenbeleuchtung
- Leicht zu reinigen.
1
3
5
4
6
2
7
GB, FR, IT, ES, DE, TR, CZ
Rev_G Değişen sayfalar; 6 - 19 - 32 - 33 - 44 - 55 - 68 - 80 - 88
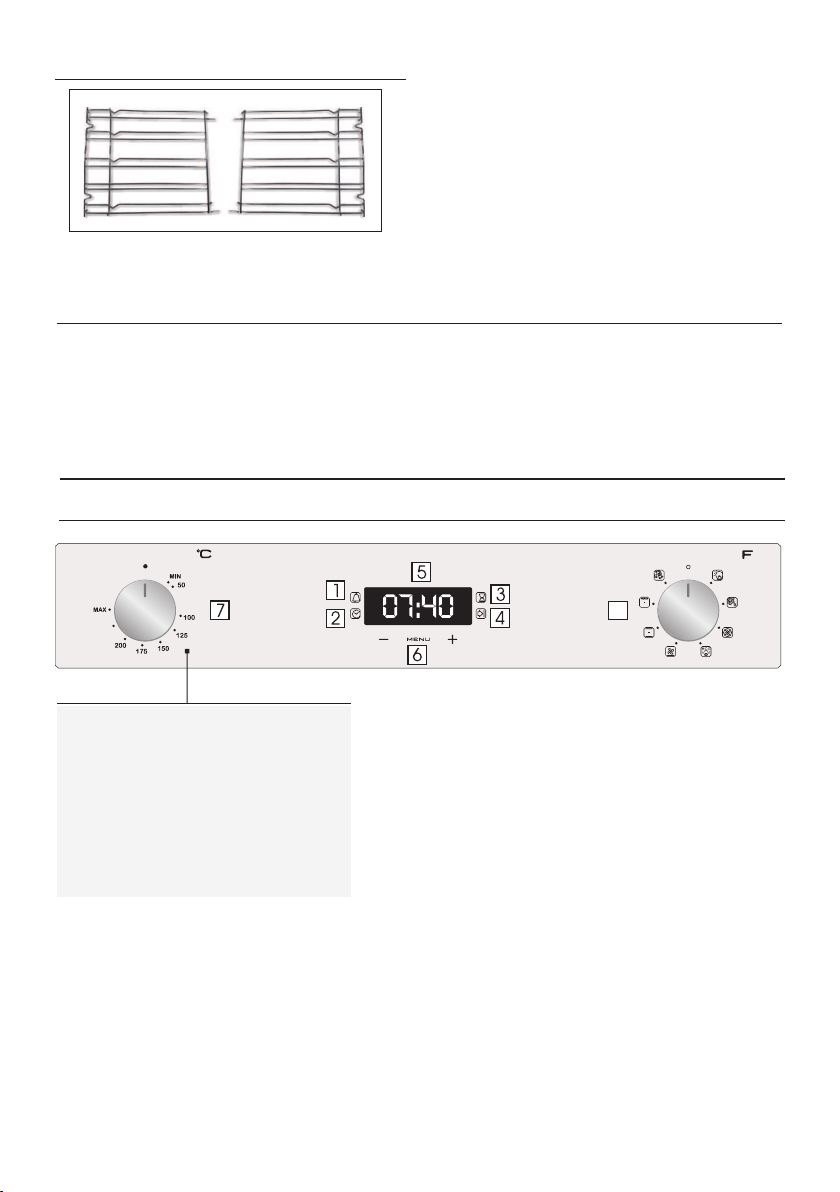
2.3 Erste Inbetriebnahme
Den Backofen vor der ersten Inbetriebnahme reinigen. Die Außenflächen mit einem feuchten, weichen
Tuch abwischen. Alle Zubehörteile spülen und den Backofen innen mit warmem Spülwasser
auswischen. Den leeren Backofen auf die Höchsttemperatur einstellen und etwa eine Stunde lang
anlassen, damit der neue Geruch verfliegt.
ERSTE REINIGUNG
DE 57
3. Betrieb des Backofens
3.1 Beschreibung der Anzeige
5- Anzeige für Temperatur bzw. Uhrzeit
4- Ende der garzeit
8- Wahlschalter für Betriebsarten
3- Garzeit
6- Einstelltasten
7- Wahlschalter für Temperatur
2- Uhr einstellen
1- Timer
8
HINWEIS: Das erste, was nach der Installation des
Ofens oder nach der Unterbrechung der
Stromversorgung (die am blinkenden Display mir
der Anzeige 12:00 zu erkennen ist) gemacht werden
muss, ist die Einstellung der korrekten Uhrzeit.
HINWEIS: Backofen funktioniert nur, wenn die Uhr
eingestellt ist
•Drücken Sie den mittleren Knopf.
•Einstellen Sie die Zeit mit den Tasten "-" "+" ein.
•Alle Knöpfe loslassen.
Seitliche Draht Gitter
4
Seitliche Drahtnetz wenn inbegriffen.
GB, FR, IT, ES, DE, TR, CZ
Rev_G Değişen sayfalar; 6 - 19 - 32 - 33 - 44 - 55 - 68 - 80 - 88
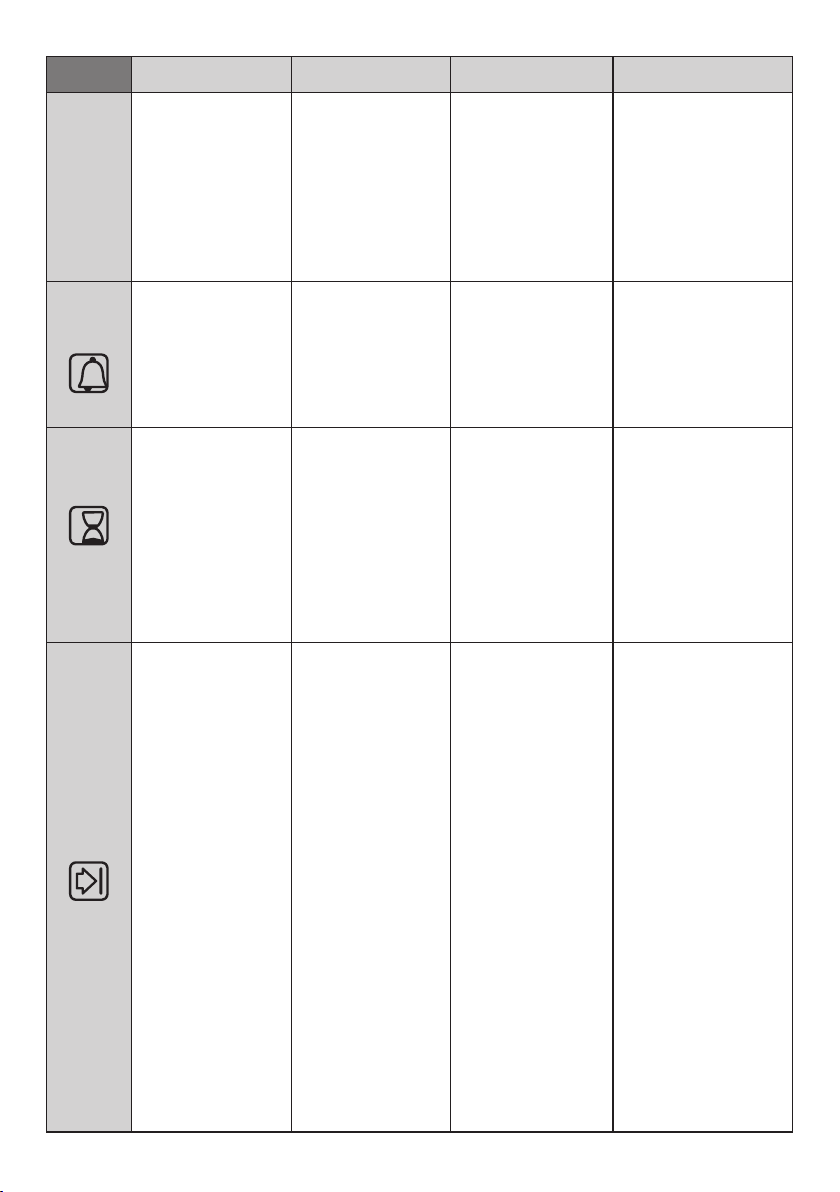
DE 58
•Alle Knöpfe loslassen.
• Dr ü cke n S i e d e n
mittleren Knopf einmal
•Die Knöpfe "-" "+"
d rück en, um die
erforderliche Backzeit
einzustellen.
•Wenn die eingestellte
Backzeit abgelaufen ist,
wird ein akustisches
Signal aktiviert (dieser
Alarm hört von alleine auf,
nach er kann jedoch sofort
Bausgeschaltet werden,
wenn man auf SELECT
drückt).
•Während dessen zeigt
das Display die
verbleibende Zeit an.
•Aktiviert einen Alarm am
Ende der eingestellten
Backzeit.
•Es ermöglicht Ihnen, das
Signal als
Erinnerungsfunktion zu
benutzen (auch wenn den
Ofen nicht zum Backen
verwendet wird)
• Dr üc ke n S ie d e n
mittleren Knopf zweimal
•Die Knöpfe "-" "+"
drück en, um die
erforderliche Backzeit
einzustellen.
•Alle Knöpfe loslassen.
•Stellen Sie die
Backfunktion mit dem
e ntspre chend en
Kontrollknebelfür die
Backfunktion.
•Es ermöglicht Ihnen,die
für das gewählte Rezept
erforderl iche Backzeit
vorzu- programmieren.
•Um die Restzei t zu
erfahren drücken Sie den
Knopf SELECT ZWEIMAL.
•Um die eingestellte Zeit zu
ändern, drücken Sie den
Kn opf TIMER und
nehmen Sie die neue
E i ns te l l u n g d u rc h
Betätigung der Knöpfe "-"
"+" vor.
• Drücken Sie einen Knopf,
um das Signal zu beenden.
Drücken Sie den mittleren
Knopf, um zur Uhr-
unktion zu gelangen.
•Wenn die eingestellte Zeit
abgelaufen ist, schaltet sich
der Ofen automatisch
ab. Wenn Sie den
Backvorgang vorzeitig ab-
bzw.unterbrechen möchten,
drehen Sie den Knebel zum
Auswählen der Ofenfunktion
bis zur Position O oder stellen
Sie die programmierte Zeit
auf 0.00 (Knöpfe SELECT und
"-" "+"
•Zum eingestellten
Zeitpunkt wird der
Ofen sich automatisch
abschalten.
•Wenn Sie den Ofen
manuell ausschalten
möchten, drehen Sie
den Knebel zur
E i ns t el lu ng d e r
Ofenfunktion auf
Position O.
•Es ermöglicht die
Einstellung d er
Backendzeit.
•Um die voreingestellte
Zeit zu überprüfen,
D r ü c k e n S i e d e n
mittleren Knopf dreimal
•Um die voreingestellte
Zeit zu ändern, drücken
Sie den Knopf SELECT
und die Knöpfe "-" "+"
gleichzeitig.
•D rücken Si e den
mittleren Knopf dreimal
•Die Knöpfe "-" "+"
d r ü ck e n , um de n
Zeitpunkt zu wählen,
wenn Sie möchten, dass
der Ofen sich abschaltet.
•Knöpfe loslassen.
• W ä h l en Si e d i e
Backfunktion mit dem
e n t s p r e c h e n d e n
Kontrollknebel für die
Backofenfunktion
•Diese Funktion wird
z u s a m m e n m i t d e r
Backdauer benutzt. Z.B. Soll
Ihre Speise 45 Minuten
backen und um 12:30 fertig
sein. Wählen Sie zuerst die
Backfunkt io n, dann
Backzeitdauer 45 Minuten
einstellen, dann
Ba ckzeit end e 12:30
eingeben.
• Be i Er re ic h en d er
eingestellten Backzeit
schaltet sich der Ofen
automatisch ab und ein
akustisches Signal ertönt.
Der Backofen startet
automatisch um 11:45
(12:30 minus 45 Min.) und
schaltet sich dann zu der
eingestellten Zeit ab.
ACHTUNG: Wenn nur die
Backendzeit, nicht jedoch
die Dauer der Backzeit
eingestellt worden ist, setzt
sich der Ofen sofort in
Betrieb und schaltet sich bei
Erreichen der eingestellten
Backendzeit ab.
EINSCHALTENAUSSCHALTENFUNKTION
NÜTZLICH FÜR
KINDER-
SICHERUNG
Die Kindersicherung wird
aktiviert wenn Sie
mindestens 5 Sekunden
lang die Taste Set (+) der
Kindersicherung auf dem
Display erscheint. Von
diesem Moment an ist
die Bedienung aller
anderen Funktionen
gesperrt Display zeigt
STOP und die alternativ
voreingestellte Zeit.
Die Kindersicherung wird
deaktiviert wenn Sie
mindestens 5 Sekunden
lang die Taste Set (+)
gedrückt halten und bis
das auf dem Display
erlischt. Von diesem
Moment an ist die
Bedienung aller anderen
Funktionen aktiv.
MANUELLER
BETRIEB
BACKDAUER
BACKZEI-
TENDE
FUNKTION
GB, FR, IT, ES, DE, TR, CZ
Rev_G Değişen sayfalar; 6 - 19 - 32 - 33 - 44 - 55 - 68 - 80 - 88
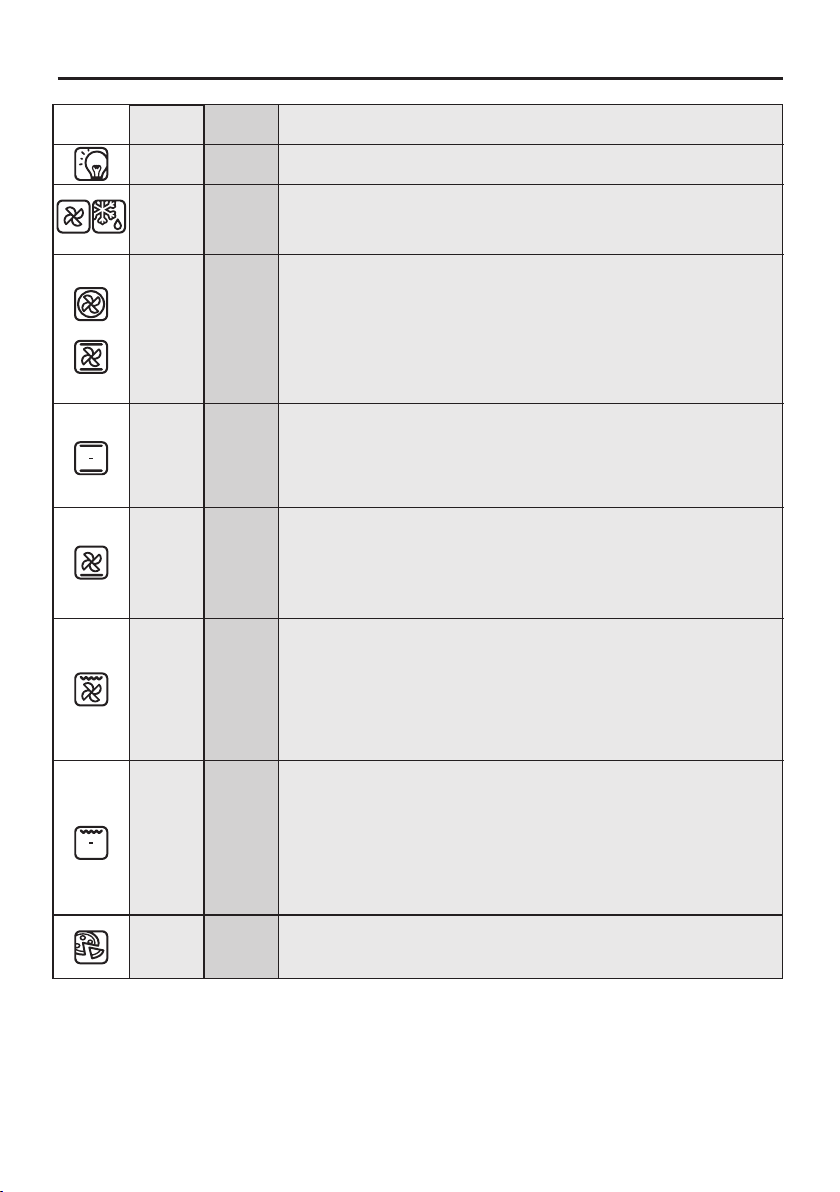
T °C
standard
180
210
200
210
40
L3
T °C
Bereich
40 ÷ 40
50 ÷ 240
50 ÷ 230
150 ÷ 220
50 ÷ 240
L1 ÷ L5
Funktion
Funktion (je nach Backofenmodell)
LAMPE: Schaltet das Licht im Backofen an.
GRILL: Grill mit geschlossener Tür verwenden. Es wird nur das obere Heizelement
verwendet und die Temperatur kann eingestellt werden. Damit die Heizelemente
rot glühen ist eine Vorheizdauer von fünf Minuten erforderlich. Grillgerichte,
Kebab und Gratin gelingen garantiert. Weißes Fleisch sollte mit Abstand zum Grill
gegart werden; die Garzeit ist dann zwar länger, aber das Fleisch bleibt schön
saftig. Rotes Fleisch und Fischfilet kann auf dem Rost mit der Fettpfanne darunter
gegart werden. Der Backofen verfügt über zwei Grillstufen:
Grill: 2140 W Barbecue: 3340 W
UMLUFT + GRILL: Turbogrill mit geschlossener Tür verwenden.
Das obere Heizelement wird zusammen mit dem Ventilator gebraucht, der die
Luft im Ofen umwälzt. Für rotes Fleisch ist Vorheizen erforderlich, für weißes
Fleisch nicht. Ideal zum Garen dicker Leben smittel am Stück wie Schweinebraten,
Geflügel usw. Grillgut in der Mitte des Ofens auf mittlerer Schiene garen.
Bratensaft mit der Fettpfanne auffangen. Darauf achten, dass sich der Braten
nicht zu nahe am Grill befindet. Nach der Hälfte der Garzeit wenden.
UMLUFT: Diese Garmethode ist für die Zubereitung von Geflügel, Backwaren, Fisch
und Gemüse zu empfehlen. Die Hitze gelangt besser in das Lebensmittel und die
Dauer zum Garen und Vorheizen wird reduziert. Es lassen sich unterschiedliche
Lebensmittel und Rezepte gleichzeitig und auf mehreren Garebenen zubereiten.
Diese Garmethode sorgt für eine gleichmäßige Hitzeverteilung und Gerüche
werden nicht vermischt.
Wenn mehrere Gerichte gleichzeitig zubereitet werden, ist eine zusätzliche
Gardauer von 10 Minuten erforderlich.
AUFTAUEN: Wenn die Auswahl auf diese Funktion eingestellt wird. Der Ventilator
wälzt die Luft bei Raumtemperatur um, sodass das Tiefkühlprodukt innerhalb
weniger Minuten aufgetaut wird, ohne dass sein Eiweißgehalt sich ändert.
*Nach CENELEC EN 60350-1 zur Definition der Energieklasse geprüft.
3.2 Funktionen zum Garen
UMLUFT + UNTERHITZE: Das untere Heizelement wird zusammen mit dem
Ventilator gebraucht, der die Luft im Ofen umwälzt. Diese Garmethode ist ideal
für saftige Obstkuchen, Quiche und Pasteten.
Das Essen trocknet nicht aus, Kuchen, Brotteige und sonstige Rezepte mit
Unterhitze gehen gut auf. Auf unterster Schiene backen.
DE 59
22050 ÷ 280
OBER-/UNTERHITZE: Es kommt das obere und untere Heizelement zum Einsatz.
Den Backofen etwa zehn Minuten lang vorheizen. Diese Methode eignet sich für
alle herkömmlichen Brat- und Backrezepte. Für rotes Fleisch, Roastbeef,
Lammkeulen, Wild, Folienrezepte, Blätterteig. Lebensmittel in feuerfestem
Geschirr auf mittlerer Schiene garen.
*
*
PIZZA: Die umfassende Hitze dieser Funktion reproduziert im Backofen
ahnliche Bedingungen wie im Holzofen einer Pizzeria.
22050 ÷ 230
GB, FR, IT, ES, DE, TR, CZ
Rev_G Değişen sayfalar; 6 - 19 - 32 - 33 - 44 - 55 - 68 - 80 - 88
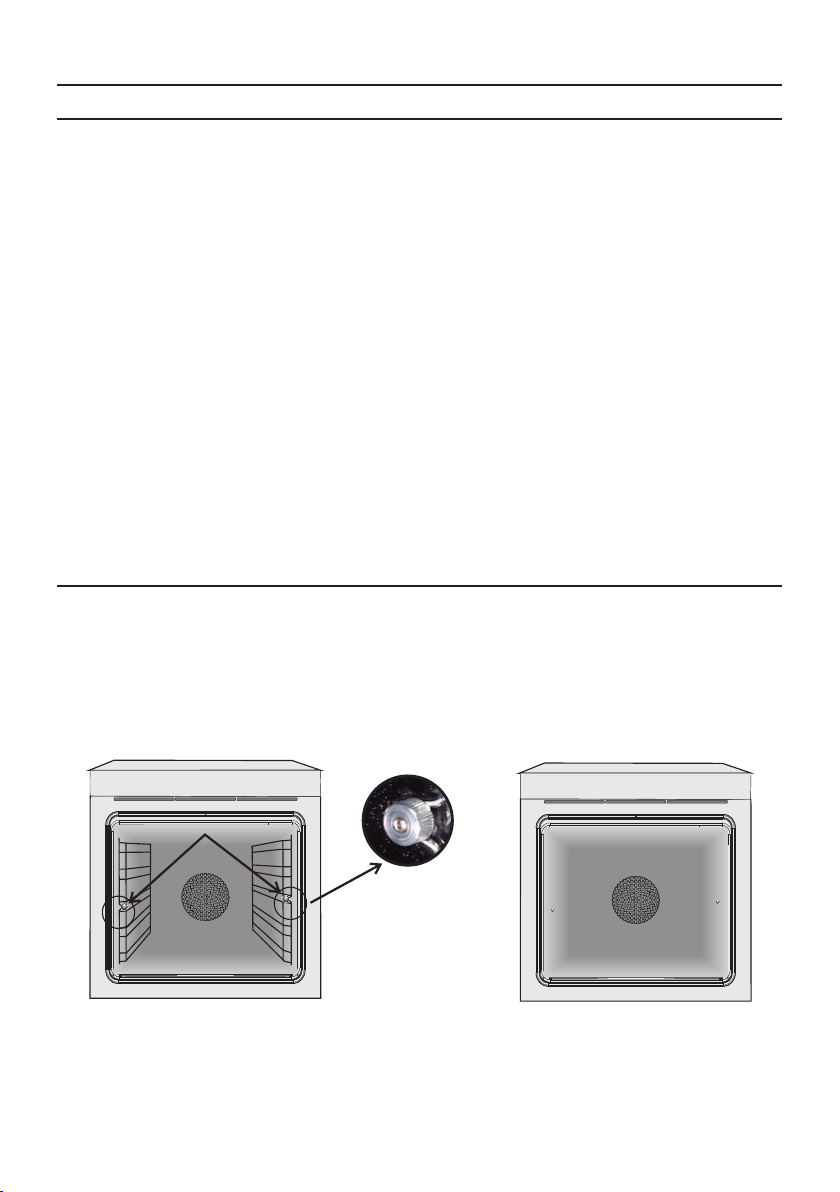
DE 60
4. Reinigung und Wartung des Backofens
4.1 Allgemeine Reinigungshinweise
Zubehörteile mit einem feuchten Reinigungsschwamm säubern, abwaschen und abtrocknen. Keine
Scheuermittel verwenden.
ZUBEHÖR
BESTANDTEILE AUS GLAS
FETTPFANNE
Die Lebensdauer des Geräts lässt sich durch eine regelmäßige Reinigung verlängern. Den Ofen vor der
Reinigung abkühlen lassen. Keine Scheuermittel, Stahlwolle oder scharfkantige Gegenstände für die
Reinigung verwenden, um die Emaillebeschichtung nicht zu beschädigen. Nur Wasser, Spülmittel oder
Reinigungsmittel mit Bleiche (Ammoniak) verwenden.
Hartnäckige Flecken können mit einem in Reinigungsmittel getränkten Schwamm gesäubert und mit
klarem Wasser abgewaschen werden.
DICHTUNG OFENTÜR
Schmutzige Dichtungen mit einem leicht angefeuchteten Schwamm reinigen.
Es empfiehlt sich, die Glastür nach jeder Verwendung des Backofens mit einem saugfähigen
Küchentuch zu reinigen.
Fettpfanne nach der Verwendung des Grills aus dem Ofen nehmen. Das heiße Fett abschütten (nicht in
den Abfluss) und Fettpfanne mit heißem Wasser und Spülmittel reinigen.
Hartnäckige Fettreste durch Einweichen in Spülwasser reinigen. Alternativ lässt sich die Fettpfanne
auch in der Spülmaschine oder mit einem herkömmlichen Backofenreiniger säubern. Schmutzige
Fettpfanne nicht wieder zurück in den Backofen schieben.
4.2 Wartung
2. Die seitlichen Führungsschienen herausziehen und aus dem Ofen nehmen.
ENTFERNEN UND REINIGEN DER SEITLICHEN FÜHRUNGSSCHIENEN
1. Schraube entgegen dem Uhrzeigersinn abschrauben.
3. In der Spülmaschine oder mit einem feuchten Schwamm säubern und sofort abtrocknen.
4. Die gereinigten Führungsschienen wieder einsetzen und mit den Schrauben sichern.
1. Die Backofentür öffnen.
2. Die Klemmen am Scharniergehäuse rechts und links an der Scheibe nach unten drücken und öffnen.
ENTFERNEN DES BACKOFENFENSTERS
3. Glasscheibe austauschen, indem die Schritte in umgekehrter Reihenfolge ausgeführt werden.
A
GB, FR, IT, ES, DE, TR, CZ
Rev_G Değişen sayfalar; 6 - 19 - 32 - 33 - 44 - 55 - 68 - 80 - 88
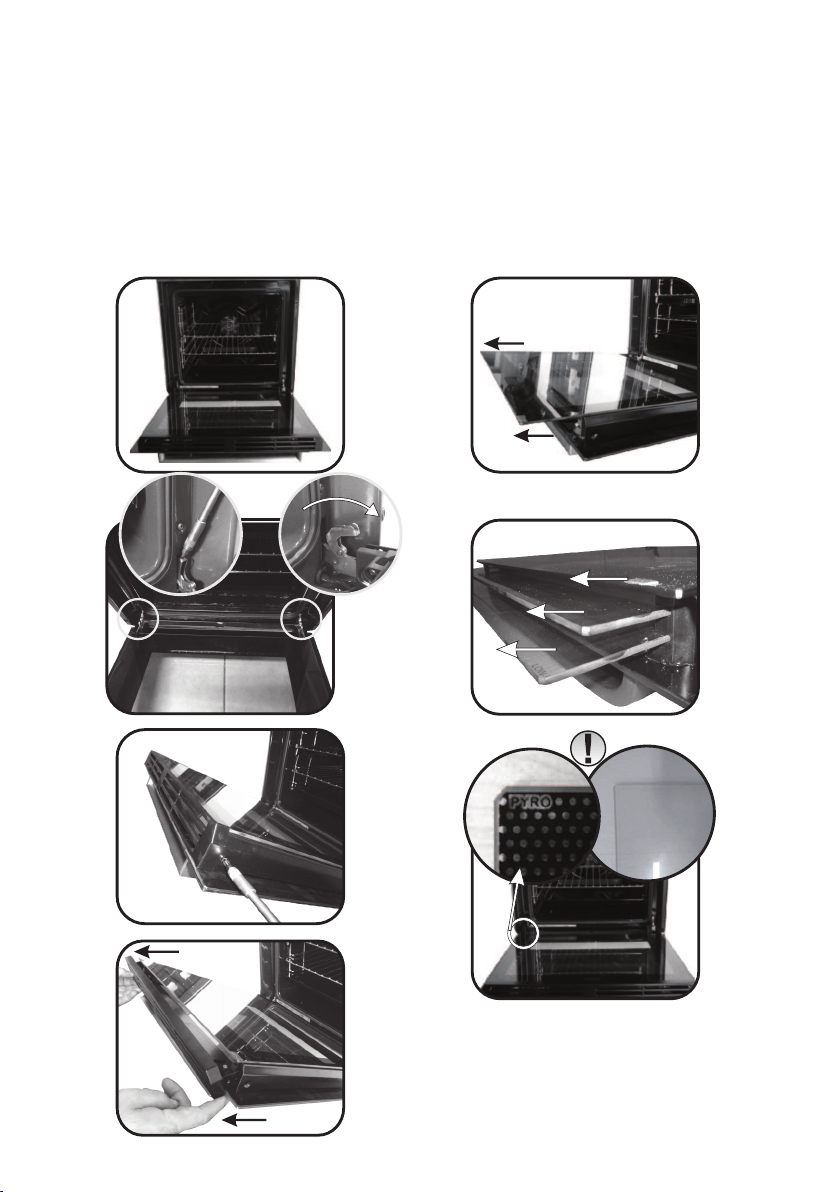
DE 61
1
2
3
1.
2.
3.
4.
5.
6.
LOW-E
7.
1. Die Backofentür öffnen.
ENTFERNEN UND REINIGEN DER GLASTÜR
2.3.4. Scharniere sperren, Schrauben entfernen und die obere Metallkappe nach oben abziehen.
5.6. Die Glasscheibe vorsichtig aus der Ofentür ziehen (Hinweis: Bei Backöfen mit Pyrolyse-
Reinigungsfunktion auch die zweite (falls vorhanden) und dritte Scheibe herausnehmen).
7. Nach der Reinigung oder dem Austausch der Scheibe, Einzelteile in umgekehrter Reihenfolge wieder
einbauen.
Bei allen Glasscheiben muss die Aufschrift „PYRO“ in der oberen linken Ecke, in der Nähe des linken
Scharniers, gut lesbar sein. Auf diese Weise wird sichergestellt, dass sich die Aufschrift auf der
Innenseite der ersten Scheibe befindet.
GB, FR, IT, ES, DE, TR, CZ
Rev_G Değişen sayfalar; 6 - 19 - 32 - 33 - 44 - 55 - 68 - 80 - 88
5. Fehlerbehebung
5.1 HÄUFIG GESTELLTE FRAGEN
STÖRUNGMÖGLICHE URSACHELÖSUNG
Der Backofen wird nicht heiß.
Die Uhr ist nicht eingestellt.
Uhr einstellen.
Die Kindersicherung ist
eingeschaltet.
Garfunktion und Temperatur
wurden nicht eingestellt.
Kindersicherung deaktivieren.
Prüfen, ob die nötigen
Einstellungen richtig sind.
Der Backofen wird nicht heiß.
Der Backofen wird nicht heiß.
DE 62
Dampf und Kondenstropfen
auf dem Touch-Display.
Touch-Display mit einem
Mikrofasertuch abtrocknen.
Das Touch-Display reagiert
nicht.
GB, FR, IT, ES, DE, TR, CZ
Rev_G Değişen sayfalar; 6 - 19 - 32 - 33 - 44 - 55 - 68 - 80 - 88

Güvenlik uyarıları
• Bu cihaz, 8 yaş ve üzeri çocuklar ve fiziksel, duyusal veya zihinsel
yetenekleri veya bilgi ve tecrübe açısından yetersiz kişiler tarafından
ancak yetişkin bir bireyin denetiminde ve cihazın nasıl kullanılacağına
dair verilen talimatların uygulanması durumunda ve oluşabilecek
tehlikleri kavradıkları takdirde güvenle kullanılabilir.
• Sebzeleri açık bir tepsi yerine kapaklı bir kapta pişiriniz.
• Cihazın temizlik ve bakımı gözetmen olmaksızın çocuklar tarafından
yapılmamalıdır.
• Kullanım sırasında cihaz ısınabilir. Fırının içindeki ısıtma elemanlarının
dokunurken dikkatli olunmalıdır.
• Pişirme tamamlandıktan sonra, 15-20 dakikadan daha uzun bir süre
fırında yiyecek bırakmaktan kaçının.
• Çocuklar cihazla oynamamalıdırlar.
• Besleme kablosuna etikette belirtilen gerilimi, akımı ve yükü
kaldırabilecek, toprak bağlantısı olan bir fiş takın. Prizin etikette belirtilen
yüke uygun, toprak bağlantısı yapılmış ve çalışır durumda olması gerekir.
Topraklama iletkeni sarı-yeşil renklidir. Bu işlem yalnızca uygun yetkinliğe
sahip personel tarafından gerçekleştirilmelidir. Prizle cihazın fişi arasında
uyumsuzluk olması durumunda, yetkin bir elektrik ustasından prizi uygun
• UYARI: Cihaz ve aparatları kullanım sırasında ısınır. Isınmış parçalara
dokunmaktan kaçınınız.
• UYARI: Fırın kullanımdayken erişilebilir parçalar çok sıcak olabilir.
Çocuklar güvenli bir mesafede tutulmalıdır.
• Fırın kapak camını temizlerken kuvvetli aşındırıcı temizleyiciler veya
keskin metal kazıyıcılar kullanmayın çünkü bu camın kırılmasına veya
yüzeyin çizilmesine neden olabilir.
• Sadece bu fırın için önerilen sıcaklık probu kullanın.
• Pişirme sırasında nem, fırın içinde veya kapı camının içinde
yoğunlaşabilir. Bu normal. Bu etkiyi azaltmak için, fırını 10-15 dakika
çalıştırınız sonra yiyeceklerinizi fırının içine koyunuz. Fırın pişirme
sıcaklığına ulaştığında yoğunlaşma ortadan kalkar.
• Koruma çıkarılmadan önce fırın kapatılmalıdır ve temizlikten sonra
koruma parçası talimatlara uygun olarak yerine koyulmalıdır.
UYARI: Erişilebilir parçalar kullanım sırasında ısınabilir. Küçük çocuklar
uzak tutulmalıdır.
• Fırını temizlerken buharlı temizleyiciler kullanmayınız.
TR 63
GB, FR, IT, ES, DE, TR, CZ
Rev_G Değişen sayfalar; 6 - 19 - 32 - 33 - 44 - 55 - 68 - 80 - 88

TR 64
• Güç kablosu hasarlıysa üreticiden temin edilen bir kablo veya özel bir
demet ile ya da müşteri hizmetleri departmanıyla iletişim kurularak
değiştirilmelidir.
• UYARI: Fırın duvarlarını alüminyum folyoyla kaplamayın veya mağazalardan
alınan tek kullanımlık koruma malzemelerini kullanmayın. Alüminyum folyo
veya diğer tüm koruma malzemeleri, sıcak emayeyle doğrudan temas
ettiğinde iç yüzeylerdeki emayenin erimesine ve bozulmasına neden olma
riski taşımaktadır.
• Yukarıdaki yönergelere uyulmaması cihazın güvenliğini tehlikeye atabilir
ve garantiyi geçersiz kılabilir.
tipte bir prizle değiştirmesini isteyin. Fiş ve priz kurulumun yapıldığı
ülkede geçerli olan normlara uygun olmalıdır. Güç kaynağı bağlantısı,
cihazla güç kaynağı arasına maksimum bağlı yükü kaldırabilecek ve
geçerli mevzuata uygun olan omnipolar bir devre kesici yerleştirilerek de
yapılabilir. Sarı-yeşil topraklama kablosu devre kesici tarafından kesintiye
uğratılmamalıdır. Priz veya bağlantı için kullanılan omnipolar devre kesici,
cihazın kurulumu yapıldığında kolayca erişilebilir durumda olmalıdır.
• Pirolitik temizleme işlemi sırasında yüzeyler normalden daha fazla
ısınabilir; bu nedenle çocuklar güvenli bir mesafede tutulmalıdır.
• Temizlemeden önce dökülen malzemeler temizlenmelidir.
Raf, bölmeye tamamen girerek yerleştirilmelidir.
• UYARI: Fırın kapağı contasını kesinlikle çıkarmayın.
• Rafı fırının içine yerleştirirken stopun yukarıya baktığından ve
bölmenin arka tarafında olduğundan emin olun.
• Güç kablosu H05V2V2-F tipi olmalıdır.
• Cihazı anma frekanslarından çalıştırmak için ek işlem/ayarlama gerekli
değildir.
• Bağlantı, fişin erişilebilir durumda tutulması veya kablolama kurallarına
uygun şekilde sabit kablo tesisatına bir anahtarın eklenmesi yoluyla
kesilebilir.
• Cihaz, aşırı ısınmayı önlemek için dekoratif bir kapının arkasına monte
edilmemelidir.
GB, FR, IT, ES, DE, TR, CZ
Rev_G Değişen sayfalar; 6 - 19 - 32 - 33 - 44 - 55 - 68 - 80 - 88

Özet
TR 65
Genel Açıklamalar
66
1.1 Güvenlik ipuçları
1.2 Elektriksel güvenlik
1.3 Tavsiyeler
1.4 Kurulum
1.5 Atık yönetimi
1.6 Uygunluk beyanı
2.1 Genel bakış
2.2 Aksesuarlar
2.3 İlk kullanım
Ürün Açıklaması
68
3.1 Gösterge açıklamaları
3.2 Pişirme modları
Fırının Temizlenmesi ve Bakımı
69
4.1 Temizleme hakkında genel notlar
4.2 Bakım
• Yan rafların çıkarılması ve temizlenmesi
• Fırın kapağının sökülmesi
• Camın sökülmesi ve temizlenmesi
Fırının Temizlenmesi ve Bakımı
72
Sorun Giderme
74
5.1 Sorun giderme
• Garanti belgesi
GB, FR, IT, ES, DE, TR, CZ
Rev_G Değişen sayfalar; 6 - 19 - 32 - 33 - 44 - 55 - 68 - 80 - 88

1. Genel Açıklamalar
Tüm ambalaj malzemelerini (plastik torbalar, polistiren,
vidalar) çocukların erişemeyeceği yerlerde tutun. Fırın
ilk kez çalıştırıldığında güçlü bir duman kokusu oluşabilir,
bunun nedeni fırın ilk kez ısındığında yalıtım panelleri üzerinde bulunan yapışkan maddenin yanmasıdır.
Bu kesinlikle normal bir durumdur ve oluştuğu zaman dumanın yayılması beklendikten sonra
yiyeceklerin fırının içine konulması gereklidir. Bu dokümanda verilen açıklamalara uyulmaması halinde
ortaya çıkabilecek durumlar için imalatçı herhangi bir sorumluluk kabul etmez.
Ürünlerimizden birini tercih ettiğiniz için teşekkür ederiz.
Fırınınızdan en iyi sonuçları almak için bu kılavuzu dikkatle
okuyun ve daha sonra başvurmak için saklayın. Fırının
montajından önce, herhangi bir onarım gerekmesi
halinde müşteri hizmetleri personeline vermek üzere seri
numarasını not edin. Fırını ambalajından çıkardıktan
sonra nakliye sırasında hasar almamış olduğunu kontrol
edin. Eğer tereddüdünüz varsa fırını kullanmayın ve
tavsiye almak için kalifiye bir teknisyene başvurun.
NOT: Bu kılavuzda belirtilen fırın işlevleri, özellikleri ve aksesuarları satın almış olduğunuz modele bağlı
olarak farklılık gösterecektir.
1.1 Güvenlik İpuçları
Fırın sadece kullanım amacına uygun biçimde kullanılmalıdır, kullanım amacı yiyeceklerin pişirilmesidir;
başka bir amaç için, örneğin bir ısı kaynağı olarak kullanılması uygunsuz ve bu nedenle tehlikeli kullanım
olarak değerlendirilir. Uygunsuz, hatalı veya makul olmayan kullanım sonucunda ortaya çıkabilecek her
türlü zarardan imalatçı sorumlu tutulamaz.
Herhangi bir elektrikli cihazın kullanımı sırasında bazı asli kurallara uyulması gereklidir:
- Elektrik fişini prizden çıkarmak için asla kablodan tutarak çekmeyin;
- Genellikle adaptörlerin, çoklu prizlerin ve uzatma kablolarının kullanılması tavsiye edilmez;
- Elleriniz ya da ayaklarınız ıslak veya nemli iken cihaza dokunmayın;
- Arızalanması ve/veya düzgün çalışmaması durumunda cihazı kapatın ve kurcalamayın.
1.2 Elektriksel Güvenlik
ELEKTRİK BAĞLANTILARINI BİR ELEKTRİKÇİNİN YA DA KALİFİYE BİR TEKNİSYENİN YAPMASINI
SAĞLAYIN
BAĞLANTI
Fırını elektrik beslemesine bağlamadan önce, elektrik beslemesinin topraklama klemensinin
sürekliliğini kontrol etmesi için kalifiye bir elektrikçiye başvurun. Fırının topraklama klemensine
bağlanmaması veya topraklama bağlantısının sürekliliğinde bir sorun olması sonucunda ortaya
Fırın, faz arası veya faz nötr arası 220-240 VAC 50 Hz olan bir elektrik beslemesine bağlanması gereken
bir elektrik kablosu ile sağlanmıştır. Fırın elektrik beslemesine bağlanmadan önce aşağıdakilerin kontrol
edilmesi gereklidir:
- Etikette belirtilen gerilim değeri;
- Devre kesicinin ayarı.
Fırının topraklama klemensine bağlanmış olan topraklama kablosunun elektrik beslemesinin
topraklama klemensine bağlanması gereklidir.
UYARI
Fırının bağlanmış olduğu elektrik beslemesinin montajın yapıldığı ülkede yürürlükte bulunan yasalara
uygun olması gereklidir. Bu açıklamalara uyulmaması durumunda ortaya çıkabilecek zararlar için
imalatçı herhangi bir sorumluluk kabul etmemektedir. Montajın yapıldığı ülkede yürürlükte bulunan
yasalara bağlı olarak fırının topraklı bir priz ya da bütün kutupları ayıran bir devre kesici kullanılarak
elektrik beslemesine bağlanması gereklidir. Elektrik beslemesinin uygun sigortalarla korunması ve
kullanılan kabloların fırının doğru bir şekilde beslenebilmesine yeterli kapasitede olması gereklidir.
TR 66
GB, FR, IT, ES, DE, TR, CZ
Rev_G Değişen sayfalar; 6 - 19 - 32 - 33 - 44 - 55 - 68 - 80 - 88
1.3 Tavsiyeler
Fırını her kullandıktan sonra yapılacak kısa süreli temizlik işlemi fırının her zaman mükemmel temizlikte
kalmasını sağlayacaktır. Fırının yan duvarlarını alüminyum folyo veya mağazalardan satın alınabilecek
tek kullanımlık koruma malzemeleri ile kaplamayın. Sıcak emaye ile temas eden alüminyum folyo veya
başka herhangi bir koruma malzemesi erime riskine sahiptir ve emaye iç yüzeylerin bozulmasına neden
olabilir. Fırınınızın aşırı kirlenmesini ve bunun sonucunda duman kokusu oluşmaması için fırını çok
yüksek sıcaklıklarda kullanmamanızı tavsiye ederiz. Pişirme süresini uzun tutmak ve sıcaklığı biraz
düşürmek daha iyidir. Fırın ile birlikte verilen aksesuarlara ek olarak, sadece çok yüksek sıcaklıklara
dayanıklı tabaklar ve pişirme kapları kullanmanızı tavsiye ederiz.
1.4 Kurulum
Ürünün kurulumu firmanın yetkilendirilmiş servis/yetkilendirilmiş kişi tarafından yapılmalıdır. Yetkisiz
kişi ve kuruluşlar tarafından yapılan kurulumlardan doğan tüm ürün, kişi, mahal hasarları firmanın
sorumluluğunda değildir. Kurulum yapılacak mahalin ürünün çalışma ve teknik koşullara kullanma
kılavuzunda belirlenen kurallara uygun şekilde olması/sağlanması tüketicinin sorumluluğundadır. Eğer
tüketici tarafından yapılan kurulum nedeniyle ortaya çıkan hataların düzeltilmesi için imalatçının desteği
gerekirse, bu destek garanti kapsamında sağlanmaz. Kurulum açıklamaları profesyonel kalifiye personel
içindir ve kurulum sırasında uyulması gereklidir. Hatalı kurulum insanların ve evcil hayvanların
yaralanmasına ve eşyaların zarar görmesine neden olabilir. Böylesi bir yaralanma veya zarar için imalatçı
sorumlu tutulamaz.
Fırın yüksek bir mutfak dolabına ya da tezgah altına yerleştirilebilir. Sabitlemeden önce, iç parçaların
soğutulması ve korunması için gerekli temiz havanın uygun biçimde dolaşımının sağlanması amacıyla
fırının etrafında iyi bir havalandırma sağlandığından emin olun. Sabitleme şekline göre son sayfada
belirtilen hava alma açıklıklarını açın. Bu cihaz ev standartlarında kullanımına uygun olarak tasarlanmış
ve üretilmiş olup ticari ve profesyonel amaçla kullanımlara uygun değildir. Ticari kullanımlarda (ev harici)
ürün teslim tarihinden itibaren 1 (bir) ay sure ile üretim hatalarına karşı garanti kapsamındadır. Ticari
kullanımlarda cihazın ömrü kısalabilir ve kullanım beklentilerini karşılamayabilir. Ev ve benzeri kullanım
amacıyla örtüşmeyen (ev veya ev tipi bir mekanda bile olsa) kullanım dolayısıyla cihazda meydana
gelebilecek herhangi bir arıza ve/veya hasar üretici /satıcı tarafından kabul edilmeyecektir. Ticari amaç
ile kullanılan ürünlerde, malın ayıplı olduğu teslim sırasında açıkça belli ise alıcı 2 (iki) gün içinde durumu
satıcıya ihbar etmelidir. Açıkça belli değilse alıcı malı teslim aldıktan sonra 8 (sekiz) gün içinde incelemek
veya incelettirmekle ve bu inceleme sonucunda malın ayıplı olduğu ortaya çıkarsa, haklarını korumak
için durumu bu süre içinde satıcıya ihbarla yükümlüdür.
çıkabilecek her türlü kaza veya zararda imalatçı herhangi bir sorumluluk kabul etmemektedir.
NOT: fırında bazı bakım işlemleri yapılması gerektiğinden, montajın yapılmış olduğu alandan çıkarılması
halinde fırının bağlanabileceği başka bir prizin yakınlarda bulunması tavsiye edilir. Elektrik kablosunun
sadece teknik servis personeli ya da eşdeğer niteliklere sahip teknisyenler tarafından değiştirilmesi
gereklidir.
1.5 Atık yönetimi ve çevrenin korunması
- WEEE evsel atık olarak işlem görmemelidir;
Bu cihaz, 2012/19/EU Atık Elektrikli ve Elektronik Cihazlar (WEEE) hakkında Avrupa
Yönergesine göre etiketlenmiştir. WEEE hem kirletici maddeleri (çevreye olumsuz bir etkisi
olabilecek), hem de baz elemanları (yeniden kullanılabilir olan) içermektedir. Kirletici
maddelerin bertaraf edilmesi ve tüm malzemelerin geri dönüştürülebilmesi için WEEE'lerin
doğru bir şekilde tasnif edilmesi önemlidir. WEEE'lerin çevre açısından bir sorun
oluşturmaması için bireyler önemli bir rol oynayabilir; birkaç temel kurala uyulması son
derece önemlidir:
- WEEE belediyeler veya tescilli bir firma tarafından yönetilen belirlenmiş toplama alanlarına
götürülmelidir.
TR 67
Bu cihaz ev standartlarında kullanılmak üzere üretilmiştir. Profesyonel kullanım veya
ticare kullanım için kurulmuş olması durumunda, ilgili ticari hususta uygulanan
standartlar dikkate alınmalıdır.
GB, FR, IT, ES, DE, TR, CZ
Rev_G Değişen sayfalar; 6 - 19 - 32 - 33 - 44 - 55 - 68 - 80 - 88
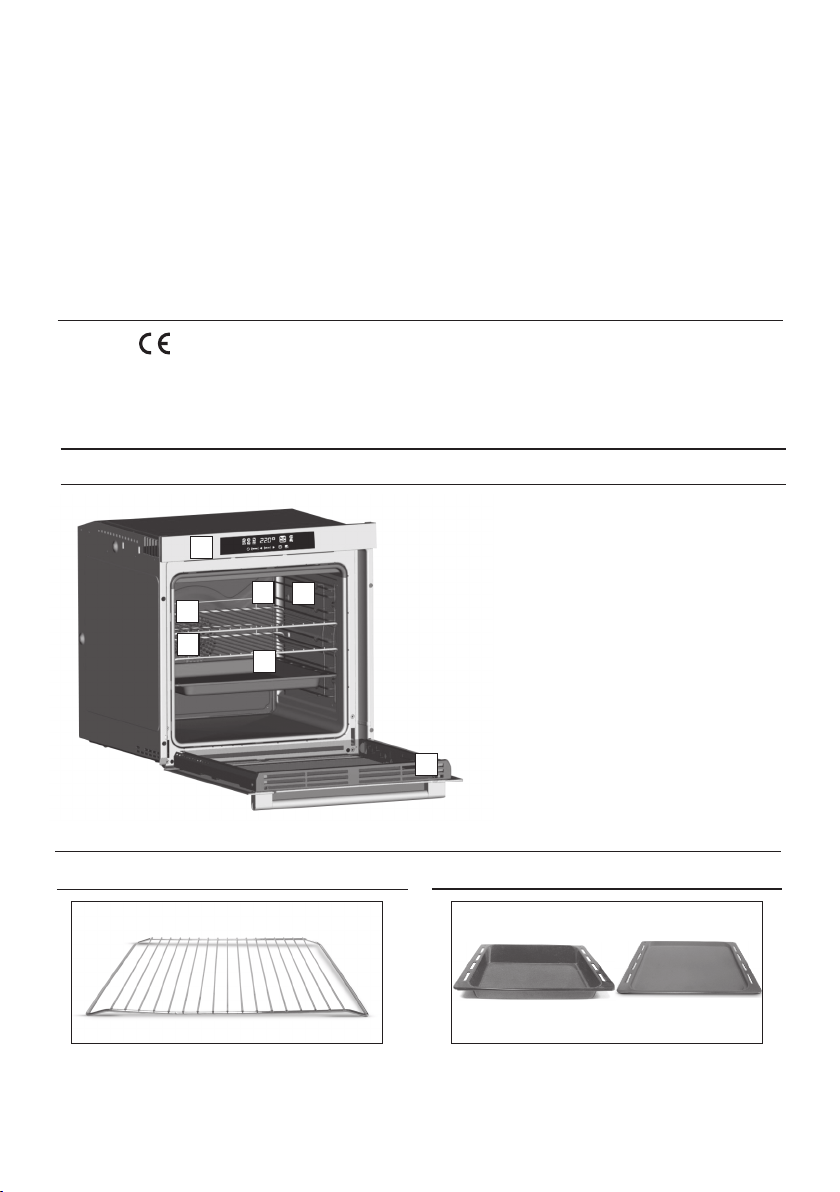
TR 68
Birçok ülkede, büyük WEEE'ler için şehir içinde toplama noktaları bulunmaktadır. Yeni bir cihaz satın
aldığınızda, eski cihazın satın alınan cihazla aynı tipte olması ve aynı işlevlere sahip olması
durumunda eski cihazı ücretsiz olarak bire bir kabul etmesi gereken satıcıya iade edebilirsiniz.
ENERJİ TASARRUFU VE ÇEVREYE SAYGI
Mümkün olduğunda, fırını önceden ısıtmaktan kaçının ve her zaman doldurmaya çalışın. Fırın
kapağını olabildiğince az açın çünkü her açılışında ısı kaybı oluşur. Önemli oranda enerji tasarrufu
için, fırını planlanan pişirme süresinden 5 ile 10 dakika daha önce kapatın ve fırının üretmeye devam
edeceği artakalan ısıyı kullanın. Isının hazne dışına kaçmaması için contaları temiz ve düzgün tutun.
Eğer saatlik bir tarife ile ücretlendirilen bir elektrik sözleşmeniz varsa, pişirmeye başlama saatini
indirimli fiyat tarifesinin saatine taşıyan "gecikmeli pişirme" programı ile daha basit bir şekilde enerji
tasarrufu yapılabilir.
1.6 Uygunluk beyanı
Bu ürüne işaretinin yerleştirilmesi ile cihazın bu ürün için yürürlükte olan tüm ilgili Avrupa
güvenlik, sağlık ve çevre standartlarına uygun olduğunu doğruluyoruz.
2. Ürün Açıklaması
2.1 Genel bakış
1. Kontrol paneli
2. Raf konumları
(eğer varsa yan tel raflar)
3. Metal ızgara
4. Tepsi
5. Fan (çelik plakanın arkasında)
6. Sıcaklık probu
7. Fırın kapağı
2.2 Aksesuarlar
Yiyeceklerin ızgara üzerinde pişirilmesi sırasında
damlayan sularını toplar.
2
Tepsi
Metal ızgara
1
Pişirme tepsilerini ve tabaklarını tutar.
1
3
5
4
6
2
7
GB, FR, IT, ES, DE, TR, CZ
Rev_G Değişen sayfalar; 6 - 19 - 32 - 33 - 44 - 55 - 68 - 80 - 88
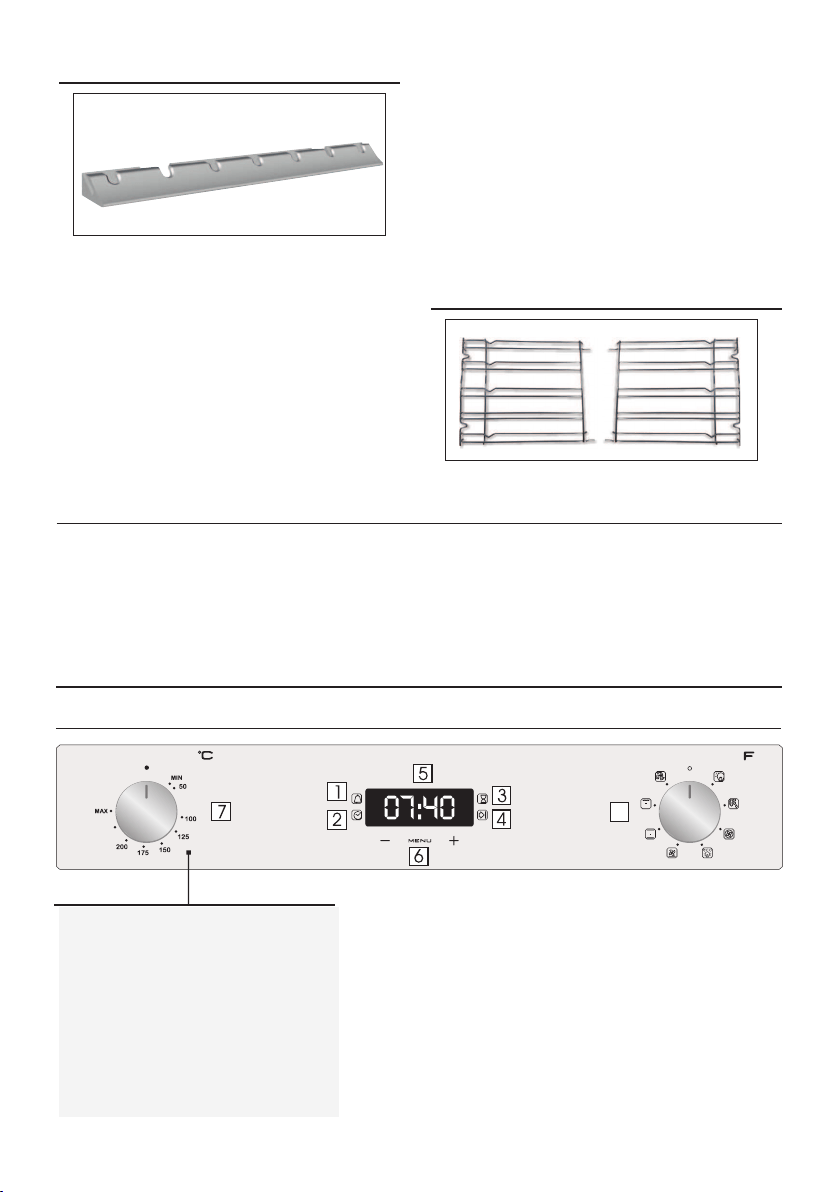
TR 69
Klasik “elektrik ampulünün” yerine geçen bir
aydınlatma sistemidir. 14 adet LED (pirolitik
olmayan modeller için) veya 10 adet Yüksek Güçlü
LED (pirolitik modeller için) lamba, kapıya
entegredir. Bu lambalar, fırının içini, hiçbir raf
üzerine gölge düşmeden, net bir şekilde görmenizi
sağlayan yüksek kalitede beyaz ışık vermektedir.
3
Led vision
2.3 İlk Kullanım
İLK TEMİZLEME
İlk kez kullanmadan önce fırını temizleyin. Dış yüzeyleri yumuşak bir ıslak bezle silin. Tüm aksesuarları
yıkayın ve fırının içini sabunlu su ve sıvı bulaşık deterjanı karışımına batırılmış bir bezle silin. Boş fırını
maksimum sıcaklık değerine ayarlayın ve yaklaşık 1 saat çalıştırın, bu şekilde fırının yeni olmasından
kaynaklı tüm kokular giderilecektir.
-Optimum görüş
Bu sistem, fırın icinde mükemmel aydınlatma
sağlamanın yanı sıra, klasik ampullerden daha
uzun süre dayanır, kullanımı ve bakımı daha
kolaydır ve her şeyden önemlisi, enerji tasarrufu
sağlar.
-Çok düşük enerji tüketimi; klasik yüksek aydınlatma
sistemlerine kıyasla %95 daha düşük.
-Uzun ömürlü aydınlatma
Avantajları:
3. Fırının Kullanımı
3.1 Gösterge açıklamaları
1- Dakika hatırlatıcı
3- Pişirme süresi
4- Pişirme sonu
5- Sıcaklık veya saat ekranı
6- LCD ekran ayar kontrolleri
2- Saat ayarı
7- Sıcaklık seçici düğme
8- Fonksiyon seçici düğme
8
UYARI: Fırın yerine monte edilip elektrik bağlantısı
yapıldığında veya elektrik beslemesi kesilip tekrar geri
geldiğinde, gösterge yanıp sönmeye başlar. Bu
aşamada saatin ( 12:00 ) ayarlanması gerekir. Saat
aşağıdaki gibi ayarlanır:
•Orta düğmeye 1 kez basınız.
• "-" "+" Butonlarıyla zamanı ayarlayınız.
•Bütün düğmelere basmaya son verin.
UYARI: Fırın ancak saat ayarlandıysa çalışmaya başlar.
Yanal tel ızgaralar
4
Eğer dahil yanal tel ızgara.
GB, FR, IT, ES, DE, TR, CZ
Rev_G Değişen sayfalar; 6 - 19 - 32 - 33 - 44 - 55 - 68 - 80 - 88
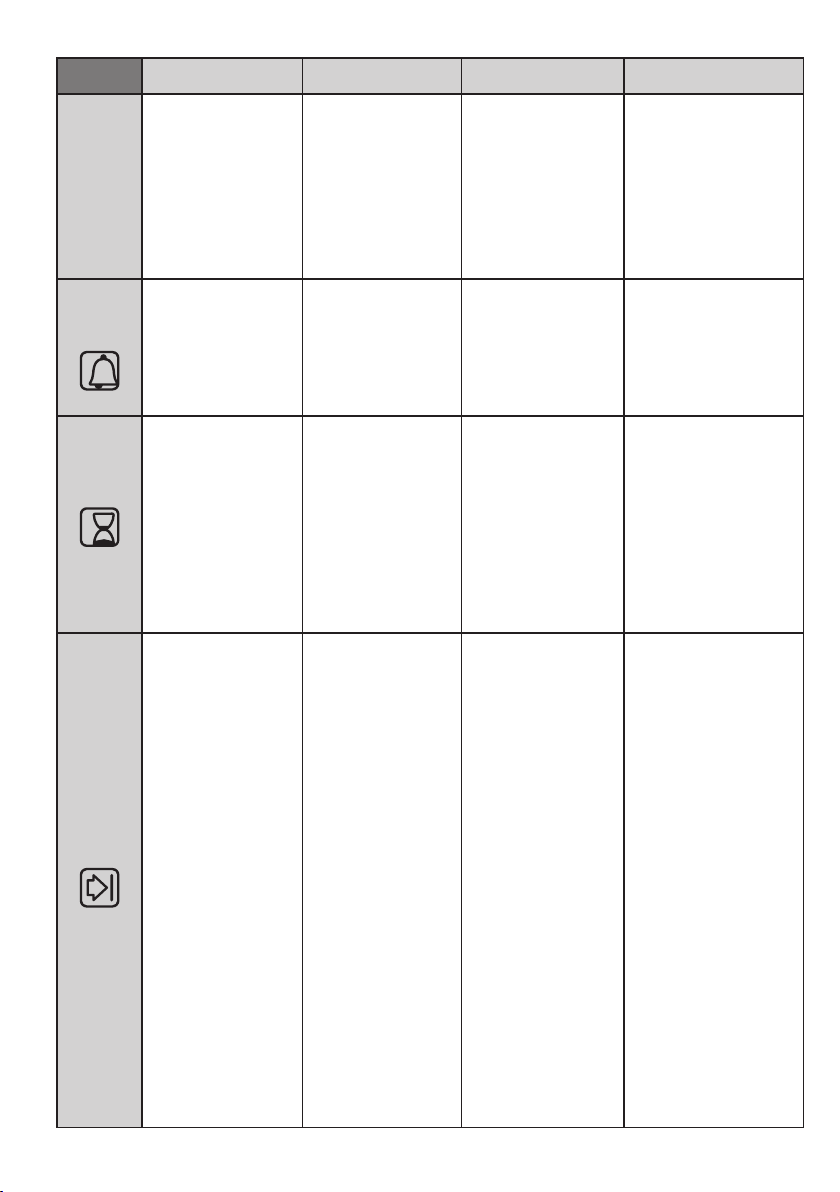
TR 70
PİŞİRME
SÜRESİ
PROGRAMI
•Orta düğmeye 1 kez
basınız
•Arzu ettiğiniz süreyi
ayarlamak için "-" "+"
düğmelerine basın.
•Bütün düğmelere
basmaya son verin.
•Ayarlanmış olan süre
sona erdiğinde, sesli bir
alarm verilir (bu alarm
kendiliğinden durur)
ancak, düğmesine
basılarak istendiği
takdirde daha önce
de durdurulabilir.
• Aya rl an mı ş o l an
sürenin sonunda alarmı
çaldırır.
•İşlem sırasında kalan
süreyi gösterir.
•Fırını bir alarmlı saat
olarak kullanabilmenize
olanak sağlar (fı rın
çalışırken de çalışmıyorken
de kullanılabilir)
•Orta düğmeye 2 kez
basınız
•Arzu ettiğiniz pişirme
süresini ayarlamak için
"-" "+" düğmelerine
basın.
•Bütün düğmelere
basmaya son verin.
• Fı r ın f on ks i yo n
düğmesi ile pişirme
fonksiyonunu seçin.
•Seçilmiş olan tarif için
gerekli olan pişirme
süresini
ayarl aya bilmen ize
olanak sağlar.
•Ne kadar çalışma süresi
kaldığını görmek için
SELECT düğmesine
basın.
•Programlanmış olan
süreyi değiştirmek için
SELECT ve "-" "+"
düğmelerine basın.
•Ayarlanmış olan süre
sona erdiğinde, fırın
o t om a ti k o l a ra k
ka pa n ır. P iş i rm e
işlemini daha önce
durdurmak istemeniz
durumunda, işlev
seçicisini 0 konumuna
getirin veya süreyi 0:00
olarak ayarlayın SELECT
ve "-" "+" düğmeleri.
•Sinyali durdurmak için
herhangi bir düğmeye
basın. Saat fonksiyonuna
geri dönmek için orta
düğmeye basın.
•Ayarlanmış olan süre
sona erdiğinde, fırın
o to m at ik o la ra k
ka pa nır. P iş ir me
işlemini kendiniz
müdahale ederek
durdurmak için fırın
fonksiyon düğmesini O
konumuna getirin.
•Pişirme sonu saatini
ayarlayabilmenize
olanak sağlar.
•Ayarlanmış olan saati
kontrol etmek için orta
düğmeye 3 kez basınız
•Programlanmış olan
saati değiştirmek için
SELECT ve "-" "+"
düğmelerine basın.
•Bütün düğmelere
basmaya son verin.
•Orta düğmeye 3 kez
basınız.
•Arzu ettiğiniz
pişirmenin sona erme
saatini ayarlamak için "-
" "+" düğmelerine
basın.
• Fı r ın f on ks i yo n
düğmesi ile pişirme
fonksiyonunu seçin.
•Pişirme saat 11:45'de
(12:30 eksi 45 dakika)
otomatik olarak başlar ve
programlanmış olan
pişirme süresi (45 dakika)
kadar sürdükten sonra fırın
otomatik olarak kapanır.
UYARI:Pişirme sonu(END)
programı pişirme süresi
seçilmeden ayarlanmış
olması durumunda, fırın
hemen çalışmaya başlar ve
programlanmış olan
pişirme sonu saatine kadar
çalışıp otomatik olarak
durur.
•Programlanmış olan
pişirme süresinin sonunda
fırın otomatik olarak
kapanır ve bir sesli alarm
verilir.
•Bu işlev genellikle
“pişirme süresi” işlevi ile
birlikte kullanılır. Örneğin
yiyeceğin pişme süresi 45
dakikaysa ve saat 12:30'da
hazır olması gerekiyorsa,
sadece pişirme süresini 45
dakikaya ve pişirme sonu
s a at i n i d e 1 2 :3 0 'a
ayarlamanız yeterlidir.
PİŞİRME
SONU
PROGRAMI
ÇOCUK
KİLİDİ
Ekran ya “Stop” ya da
zaman ayarlayıcıyı
gösterir. İkisini de aynı
anda göstermez.
• Çocuk kilidi fonksiyonu
dokunmatik ekrandaki
(+) sembolüne en az 5
saniye dokunarak aktif
hale getirilir. Bu andan
itibaren diğer tüm
fonksiyonlar kilitlenir.
• Çocuk kilidi
fonksiyonu tekrar
dokunmatik ekrandaki
(+) sembolüne en az 5
saniye dokunarak iptal
edilir. Bu andan itibaren
tüm fonksiyonlar tekrar
seçilebilir hale gelir.
ZAMAN
SAYACI
PROGRAMDEVREYE SOKULMASI
DEVREDEN
ÇIKARILMASI
İŞLEVİ
NE İÇİN KULLANILDIĞI
GB, FR, IT, ES, DE, TR, CZ
Rev_G Değişen sayfalar; 6 - 19 - 32 - 33 - 44 - 55 - 68 - 80 - 88
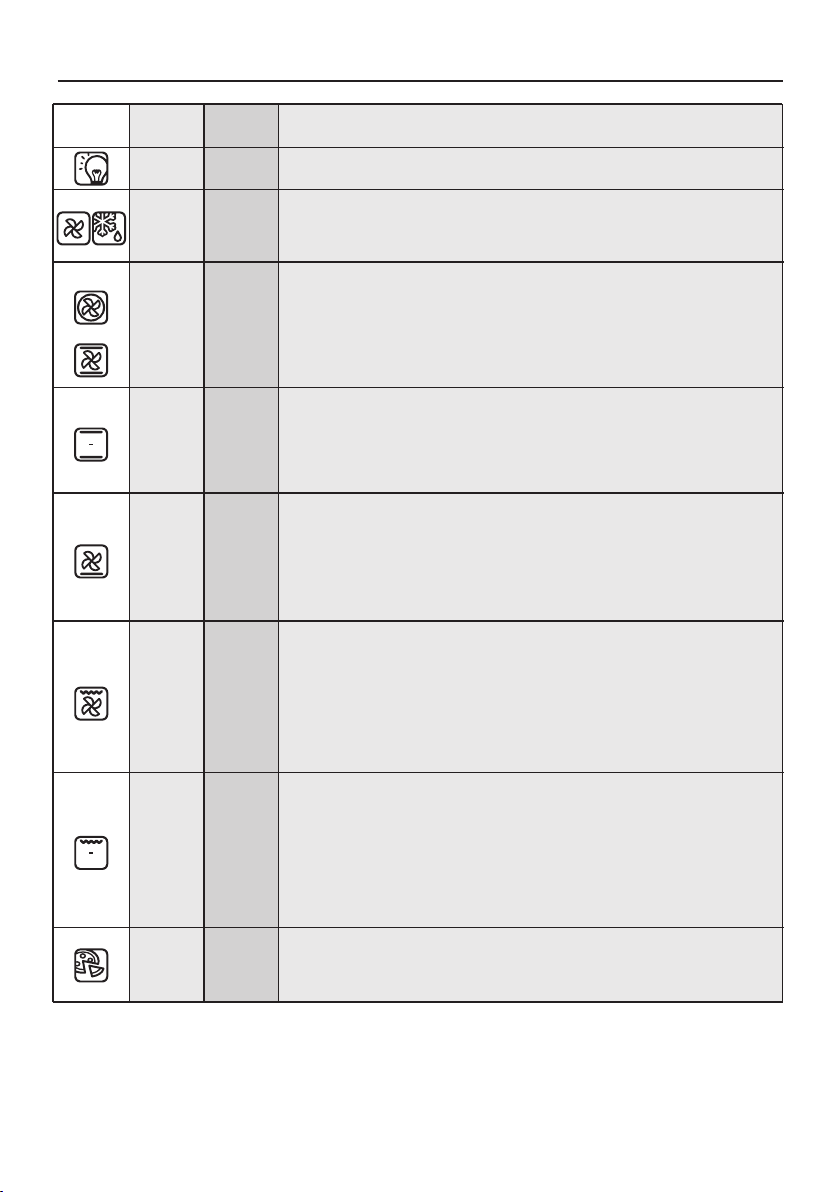
Varsayılan
sıcaklık °C
180
210
200
210
40
L3
Sıcaklık
aralığı °C
40 ÷ 40
50 ÷ 240
50 ÷ 230
150 ÷ 220
50 ÷ 240
L1 ÷ L5
Fonksiyon
ikonu
Fonksiyon (Fırın modeline bağlıdır)
LAMBA: Fırın lambasını yakar.
IZGARA: Fırın kapağı kapalı iken bu fonksiyonu kullanın.
Üst ısıtıcı eleman tek başına kullanılır ve sıcaklık ayarı yapılabilir. Elemanların
ısınması için beş dakikalık ön ısıtma gereklidir. Izgaralar, kebaplar ve üstü
örtülen yemeklerin pişirilmesinde başarı garanti edilir. Beyaz etlerin ızgaradan
biraz açıkta tutulması gereklidir; pişirme süresi daha uzundur, ancak et daha
lezzetli olacaktır. Kırmızı etleri ve balık filetolarını altında damlama tepsisi ile
rafın üzerine yerleştirin. Fırın iki ızgara konumuna sahiptir:
Izgara: 2140W Barbekü: 3340 W
FAN DESTEKLİ IZGARA: fırın kapağı kapalı iken bu fonksiyonu kullanın. Üst ısıtıcı
eleman kullanılır, fan fırının içindeki havanın sirkülasyonunu sağlar. Kırmızı etler
için ön ısıtma gereklidir, ancak beyaz etler için gerekmez. Kızarmış domuz,
kümes hayvanları, vb gibi kalın parçalar ile bütün parçaların pişirilmesi için
idealdir. Pişirilecek gıdayı doğrudan orta konumda bulunan rafın ortasına
yerleştirin. Suları toplamak için rafın altına damlama tepsisini koyun. Gıdanın
ızgaraya çok yakın olmadığından emin olun. Pişirme süresinin yarısında gıdayı
çevirin.
FANLI PİŞİRME: Bu yöntemi kümes hayvanları, çörekler, balık ve sebzeler için
kullanmanızı tavsiye ederiz. Isı gıdanın içine daha iyi işler ve hem pişirme, hem
de ısıtma süreleri azalır. Değişik gıdaları aynı veya farklı soslarla bir veya daha
fazla konumda pişirebilirsiniz. Bu pişirme yöntemi ısı yayılımının eşit olmasını
sağlar ve kokular birbirine karışmaz. Aynı anda farklı gıdalar pişirdiğiniz zaman
fazladan yaklaşık on dakika daha bekleyin.
BUZ ÇÖZME: Düğme bu konuma alındığı zaman fan oda sıcaklığında havayı
donmuş gıdanın etrafında dolaştırır, böylece gıdanın protein içeriği
değişmeden birkaç dakika içinde buzu çözülür.
*CENELEC EN 60350-1 uyumlu olarak test edilmiştir. Enerji sınıfının tanımlanması için kullanılmıştır.
3.2 Pişirme Modları
Rafı alt konuma yerleştirin.
FAN + ALT ISITICI: Alt ısıtıcı eleman kullanılır, fan fırının içindeki havanın
sirkülasyonunu sağlar. Bu yöntem sulu meyveler, meyveli pastalar, turtalar,
kişler ve etli börekler için idealdir.
Gıdaların kurumasını önler ve keklerin, ekmeklerin ve alttan pişirilen diğer
gıdaların kabarmasını fazlalaştırır.
TR 71
*
22050 ÷ 280
STATİK/GELENEKSEL PİŞİRME: Hem üst, hem de alt ısıtıcı elemanlar kullanılır.
Fırını yaklaşık on dakika önceden ısıtın. Bu yöntem her türlü geleneksel
kızartma ve fırında pişirme için idealdir. Kırmızı etler, rosto, kuzu butu, ekmek,
folyoya sarılmış yiyecekler (papillote), katmer içindir. Gıdayı bir tabağın içinde
orta rafın üzerine yerleştirin.
*
PİZZA: Bu seçenekte sıcak hava sirkülasyonuyla pizza ve kek gibi yiyecekler
mükemmel bir şekilde pişirilir.
22050 ÷ 230
GB, FR, IT, ES, DE, TR, CZ
Rev_G Değişen sayfalar; 6 - 19 - 32 - 33 - 44 - 55 - 68 - 80 - 88
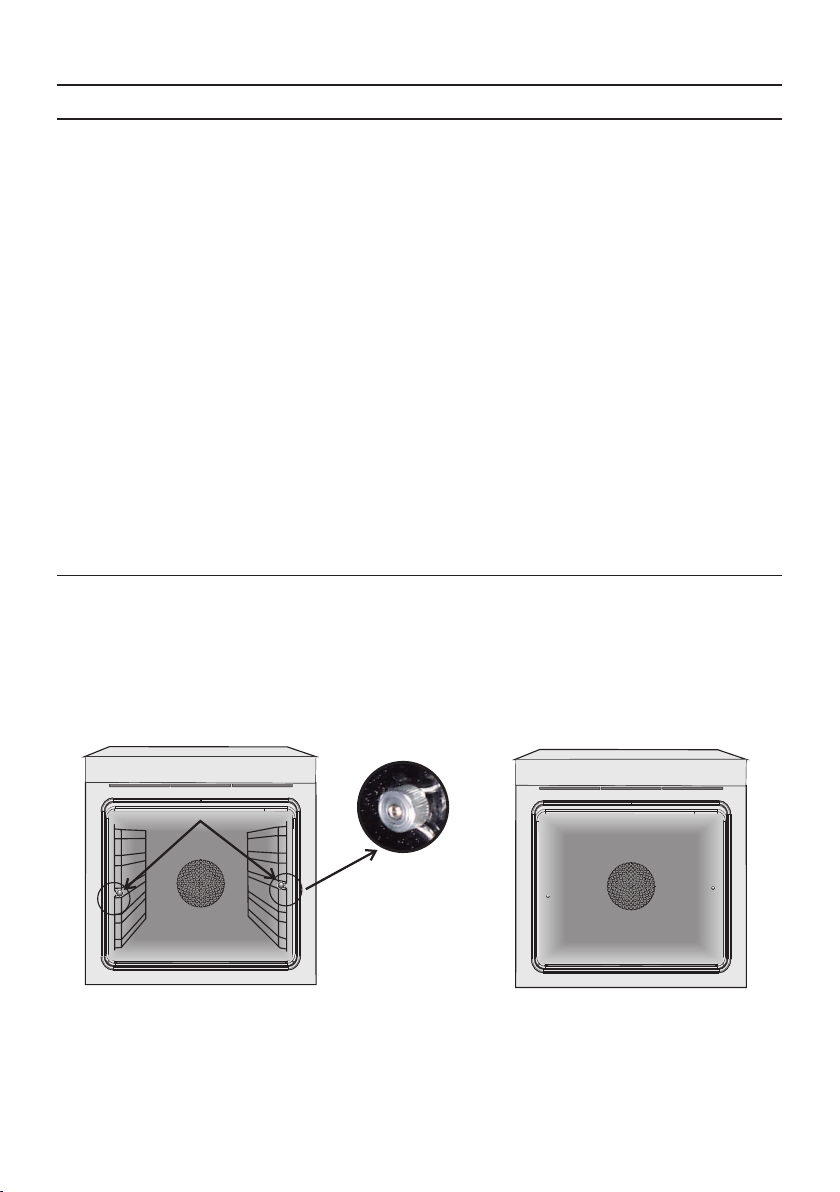
TR 72
4. Fırının Temizlenmesi ve Bakımı
4.1 Temizleme hakkında genel notlar
FIRIN KAPAK CONTASI
CAM PARÇALAR
Eğer yap artıkları kalırsa, tepsiyi deterjanlı suya batırın. Alternatif olarak, tepsiyi bulaşık makinesinde
yıkayabilir veya piyasada bulunan fırın deterjanlarını kullanabilirsiniz. Kirli tepsiyi asla fırına geri
koymayın.
DAMLAMA TEPSİSİ
Fırın her kullanıldıktan sonda pencerenin camının emici bir mutfak bezi ile temizlenmesi tavsiye edilir.
İnatçı lekeleri temizlemek için deterjana batırılmış ve iyice sıkılmış bir sünger kullanın ve sonra su ile
durulayın.
Izgarayı kullandıktan sonra tepsiyi fırından çıkarın. Sıcak yağı bir kaba dökün ve bir sünger ve sıvı bulaşık
deterjanı kullanarak tepsiyi sıcak su ile yıkayın.
Düzenli temizlik ile cihazın kullanım ömrü uzatılabilir. Elle temizlik işlemlerini yapmadan önce fırının
soğumasını bekleyin. Temizlik için asla aşındırıcı deterjanlar, çelik tel veya keskin nesneler kullanmayın,
aksi takdirde emaye parçalarda onarılamaz hasarlar oluşabilir. Sadece su, sabun veya ağartıcı bazlı
deterjanlar (amonyak) kullanın.
AKSESUARLAR
Aksesuarları sabunlu su ile ıslatılmış bir süngerle temizleyin, ardından durulayın ve kurutun: aşındırıcı
deterjanlar kullanmaktan kaçının.
Kirlendiği zaman hafifçe ıslatılmış bir süngerle temizlenebilir.
4.2 Bakım
1. Saat yönünün tersine çevirerek vidayı sökün.
3. Yan rafları bir bulaşık makinesinde veya ıslak bir sünger kullanarak temizleyin ve hemen kurutun.
4. Yan rafları temizledikten sonra yerlerine takın ve vidalarını sonuna kadar sıkın.
YAN RAFLARIN ÇIKARILMASI VE TEMİZLENMESİ
2. Kendinize doğru çekerek yan rafları çıkarın.
3. Bu işlemin tersini uygulayarak kapağı yerine takın.
1. Kapağı açın.
2. Aşağı doğru iterek fırın kapağının sağ ve sol tarafında bulunan menteşe yuvalarının kıskaçlarını açın.
FIRIN KAPAĞININ SÖKÜLMESİ
A
GB, FR, IT, ES, DE, TR, CZ
Rev_G Değişen sayfalar; 6 - 19 - 32 - 33 - 44 - 55 - 68 - 80 - 88
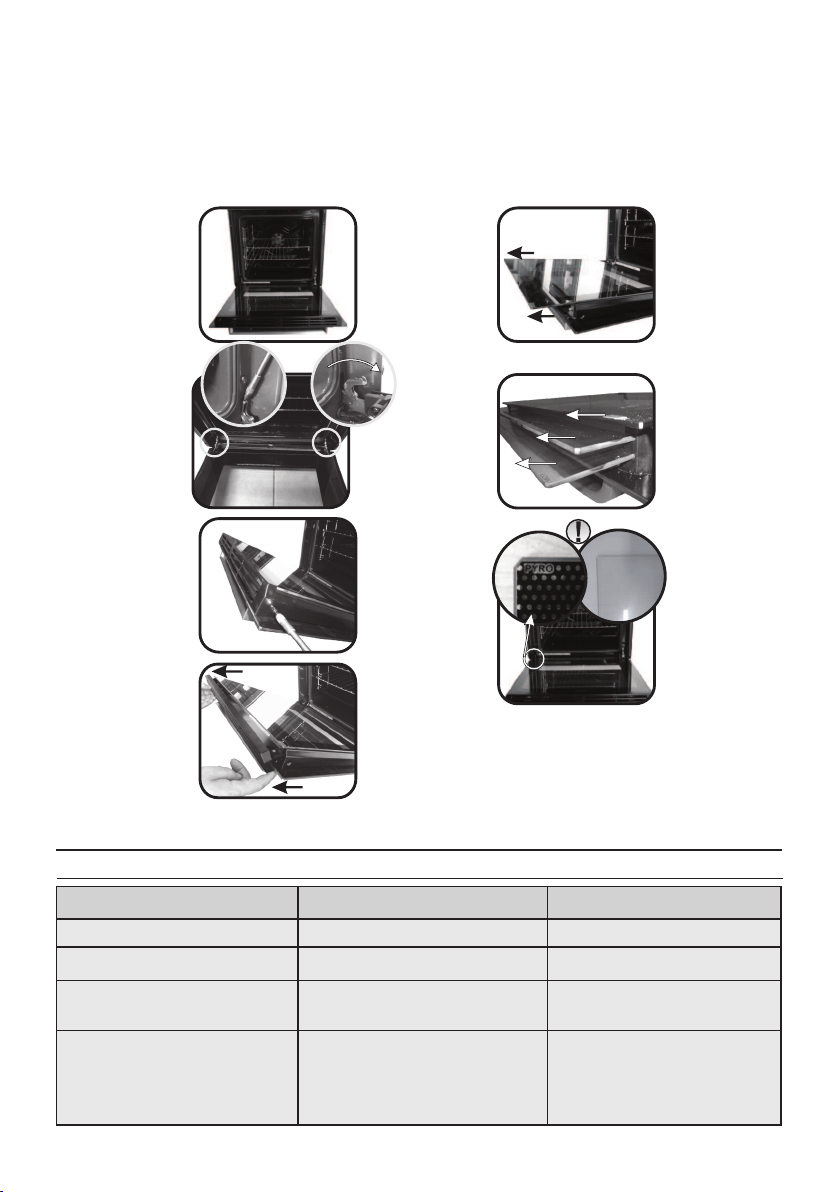
LOW-E
1
2
3
1.
2.
3.
4.
5.
6.
7.
Tüm camların üzerinde "PYRO" kelimesinin okunabilmesi ve kapağın sol tarafında bulunması gereklidir, soldaki yatay
menteşeyi kapatın. Bu şekilde birinci camın baskılı yüzeyi kapağın içinde kalacaktır.
CAMIN SÖKÜLMESİ VE TEMİZLENMESİ
1. Fırının kapağını açın.
2.3.4. Menteşeleri kilitleyin, vidaları çıkarın ve yukarı doğru çekerek üst metal kapağı çıkarın.
5.6. Camı dikkatli bir şekilde fırın kapağından çekerek çıkarın (Not: pirolitik fırınlarda ikinci ve üçüncü camı (eğer
varsa) da çıkarın).
7. Temizleme veye değişim işleminin sonunda parçaları sökme işleminin ters sıralaması ile toplayın.
5. Sorun Giderme
5.1 Sorun giderme
SORUN
OLASI NEDENİ
ÇÖZÜMÜ
Fırın ısınmıyor
Saat ayarlanmamış
Saati ayarlayın
Çocuk kilidi devrede
Bir pişirme işlevi ya da sıcaklık
ayarlanmamış
Çocuk kilidini devre dışı bırakın
Gerekli ayarların doğru
olduğunu kontrol edin
Fırın ısınmıyor
Fırın ısınmıyor
Kullanıcı panelinde buhar
veya yoğuşma var
Yoğuşma tabakasını
temizlemek için kullanıcı
panelini mikrofiber bir
bezle silin
Dokunmatik kullanıcı paneli
tepki vermiyor
TR 73
GB, FR, IT, ES, DE, TR, CZ
Rev_G Değişen sayfalar; 6 - 19 - 32 - 33 - 44 - 55 - 68 - 80 - 88

TR 74
Yetkili servislerimizden hizmet talebiniz olduğunda veya ürünlerimizle ilgili genel öneri ve talepleriniz için
aşağıdaki numaradan ulaşabilirsiniz.
TÜKETİCİ HATTI: 444 03 98
Sabit telefonlardan veya cep telefonlarından alan kodu çevirmeden arayınız.
Ürününüzü kullanmadan önce montaj ve kullanma kılavuzunu mutlaka okuyunuz. Ürünün montaj ve
kullanım kılavuzunda yer alan hususlara aykırı kullanılması, kullanım hataları ve cihazın standart kullanım
şartları / amaçları haricinde kullanılması halinde ürün garanti kapsamı dışında kalacaktır.
Ürünün standart ve sorunsuz çalışma koşullarının sağlanması için gerekli / zorunlu olan montaj ve
kullanım kılavuzunda belirtilen teknik özelliklerinin (su basıncı, voltaj değeri, gaz besleme basıncı, sigorta
değeri, topraklama, yakıt cinsi, yakıt kalitesi vb.) uygun olmaması, sabit olmaması ve/veya değişken
olması halinde, cihazda meydana gelebilecek arızalar ve sorunlar garanti kapsamı dışında kalacaktır.
Candy Hoover Euroasia tarafından sağlanan garanti şartları aşağıdaki koşullarda geçersiz olacaktır.
• Ürüne, yetkili servis dışındaki kişiler tarafından müdahale edilmesi, elektrik-su kesintisi ve üründen
kaynaklanmayan kaçaklar garanti kapsamı dışındadır.
• Kullanım hatalarından dolayı oluşan arıza ve hasarlar, elektrik-gaz -su tesisatı ve / veya tesisat
ekipmanları nedeniyle meydana gelebilecek arızalar garanti kapsamı dışındadır.
• Hatalı elektrik tesisatı, ürünün üzerinde belirtilen voltajdan farklı voltajda kullanılması veya şebeke
voltajındaki dalgalanmalar sonucu oluşan arıza ve hasarlar, doğal afetler, üründen kaynaklanmayan
harici/fiziki dış etkenler, mevsimsel hava şartları ve çevresel etkenler (deprem, yangın, sel, su basması,
şiddetli rüzgar, yıldırım düşmesi, kireç, nem, rutubet, toz, nakliye, taşıma, ürünün dona maruz kalması,
susuz çalışma vb.) nedeniyle oluşan arızalar garanti kapması dışında kalacaktır.
•Ürünün, müşteriye ulaştırılması sonrası yapılan taşıma işlemine bağlı arıza ve hasarlar, tüketici
tarafından yapılan yanlış depolama ve ortam koşulları nedeniyle cihazda meydana gelen hasarlar ve
arızalar garanti kapsamı dışındadır.
Üretim yeri Türkiye 'dir.
• Kullanım kılavuzunda belirtilen hususlara aykırı kullanılmasından kaynaklanan arızalar ve hasarlar.
Yukarıda belirtilen arızaların giderilmesi ücret karşılığı yapılır.
Ürünün kullanım ömrü 10 (on) yıldır. Bu ürünün tanımlandığı şekilde çalışabilmesi için gerekli yedek
parçaları bulundurma süresidir.
ÜRETİCİ FİRMA:
CANDY HOOVER GROUP
Via Privata E. Fumagalli 20861 Brugherio (MB) - ITALY
Tel: 039.2086.1 • Fax: 039.2086.403
www.candy-group.com
İTHALATCI FİRMA:
CANDY HOOVER EUROASIA EV GEREÇLERİ SAN. VE TİC. A.Ş.
İçerenköy Mh. Hal Yolu Cd. Çayır Yolu Sk. No: 11
Sayar İş Merkezi Kat: 7 34752 Ataşehir / İSTANBUL/ TÜRKİYE
Tel: 0216 466 42 42 • Fax: 0216 466 15 45
www.hoover.com.tr • servis@hoover.com.tr
TÜKETİCİ HİZMETLERİ
GB, FR, IT, ES, DE, TR, CZ
Rev_G Değişen sayfalar; 6 - 19 - 32 - 33 - 44 - 55 - 68 - 80 - 88
GARANTİ BELGESİ
Malın bütün parçaları dahil olmak üzere tamamı garanti kapsamındadır.
ç) İmkan varsa, satılanın ayıpsız bir misli ile değiştirilmesini isteme, seçimlik haklarından birini kullanabilir.
Garanti belgesinin tekemmül ettirilerek tüketiciye verilmesi ve bu yükümlülüğün yerine getirildiğinin ispatı
satıcıya aittir.
• Garanti süresi içinde tekrar arızalanması,
Satıcı tarafından bu Garanti Belgesinin verilmemesi durumunda, tüketici Gümrük ve Ticaret Bakanlığı Tüketicinin
Korunması ve Piyasa Gözetimi Genel Müdürlüğüne başvurabilir.
b) Satılanı alıkoyup ayıp oranında satış bedelinde indirim isteme,
Malın ayıplı olduğunun anlaşılması durumunda tüketici, 6502 sayılı Tüketicinin Korunması Hakkında Kanunun 11
inci maddesinde yer alan;
• Tamiri için gereken azami sürenin aşılması,
• Tamirinin mümkün olmadığının, yetkili servis istasyonu, satıcı, üretici veya ithalatçı tarafından bir raporla
belirlenmesi durumlarında;
Malın tamir süresi 20 iş gününü geçemez. Bu süre, garanti süresi içerisinde mala ilişkin arızanın yetkili servis
istasyonuna veya satıcıya bildirimi tarihinde, garanti süresi dışında ise malın yetkili servis istasyonuna teslim
tarihinden itibaren başlar. Malın arızasının 10 iş günü içerisinde giderilememesi halinde, üretici veya ithalatçı; malın
tüketicinin kullanımına tahsis etmek zorundadır. Malın garanti süresi içerisinde arızalanması durumunda, tamirde
geçen süre garanti süresine eklenir.
Ankastre fırın kullanma kılavuzunda gösterildiği şekilde kullanılması ve yetkili kıldığımız servis elemanları dışındaki
şahıslar tarafından bakımı, onarımı veya başka bir nedenle müdahale edilmemiş olması şartıyla bütün parçaları dahil
olmak üzere tamamı malzeme, işçilik ve üretim hatalarına karşı ürünün teslim tarihinden itibaren 3 ( ÜÇ ) YIL SÜRE
İLE CANDY HOOVER EUROASIA A.Ş. TARAFINDAN GARANTİ EDİLMİŞTİR.
Malın kullanma kılavuzunda yer alan hususlara uykırı kullanılmasından kaynaklanın arızalar garanti kapsamı
dışındadır.
Satılan mala ilişkin olarak düzenlenen faturalar garanti belgesi yerine geçmez.
Tüketicinin, Kanunun 11. maddesinde yer alan seçimlik haklarından ücretsiz onarım hakkını seçmesi durumunda
satıcı; işçilik masrafı, değiştirilen parça bedeli ya da başka herhangi bir ad altında hiçbir ücret talep etmeksizin malın
onırımını yapmak veya yaptırmakla yükümlüdür. Tüketici ücretsiz onarım hakkını üretici veya ithalatçıya karşı da
kullanılabilir. Satıcı, üretici ve ithalatçı tüketicinin bu hakkını kullanmasından müteselsilen sorumludur.
c) Aşırı bir masraf gerektirmediği takdirde, bütün masrafları satıcıya ait olmak üzere satılanın ücretsiz onarılmasını
istem,
a) Satılanı geri vermeye hazır olduğunu bildirerek sözleşmeden dönme,
Tüketicinin, ücretsiz onarım hakkını kullanması halinde malın;
Garanti uygulaması sırasında değiştirilen malın garanti süresi, satın alınan malın kalan garanti süresi ile
sınırlıdır.
tüketici malın bedel iadesini alıp, ayıp oranında beden indirimini veya imkan varsa malın ayıpsız misli ile
değiştirilmesini satıcıdan talep edebilir. Satıcı, tüketicinin talebini reddetmez. Bu talebin yerine getirilmemesi
durumunda satıcı, üretici ve ithalatçı müteselsilen sorumludur.
Tüketici, garantiden doğan haklarının kullanılması ile ilgili olarak çıkabilecek uyuşmazlıklarda yerleşim yerinin
bulunduğu veya tüketici işleminin yapıldığı yerdeki Tüketici Hakem Heyetine veya Tüketici Mahkemesine
başvurabilir.
ANKASTRE FIRIN
Bu bölümü, ürünü aldığınız Yetkili Satıcı imzalayacak ve kaşeleyecektir.
Bu garanti belgesi ile kesilen fatura garanti süresi boyunca garanti belgesi ile muhafaza edilmesi önerilir.
CANDY-HOOVER-EUROASIA EV GEREÇLERİ SAN VE TİC. A.Ş.
Model:..............................
Bandrol ve Seri No:...........
Teslim Tarihi Yeri: ..............
Fatura Tarihi No: .................
Satıcı Firma Ünvanı: ............
Genel Müdür:
Adres:
Tel - Fax:
Satıcı Firma (Kaşe ve İmza):
TR 75
GB, FR, IT, ES, DE, TR, CZ
Rev_G Değişen sayfalar; 6 - 19 - 32 - 33 - 44 - 55 - 68 - 80 - 88

Bezpečnostní pokyny
• Používejte pouze tepelní sondu doporučenou pro tuto troubu.
• Připojte zástrčku k napájecímu kabelu, který je schopen vydržet
napětí, proud a zátěž uvedené na štítku a který je opatřen uzemňovacím
kontaktem. Zásuvka musí být vhodná pro zatížení uvedené na štítku a
musí mít zapojený a funkční uzemňovací kontakt. Uzemňovací vodič má
žlutozelenou barvu. Tuto operaci by měl provádět odborník s vhodnou
• Vařte zeleninu v nádobě s víkem namísto otevřeného zásobníku.
• Nenechávejte jídlo uvnitř trouby po uvaření po dobu delší než 15-20
minut.
• Během vaření může ve vnitřním prostoru trouby nebo na skle dveří
docházet ke kondenzaci vlhkosti. Jedná se o normální stav. Chcete-li
tento efekt omezit, počkejte po zapnutí napájení 10-15 minut, než
vložíte jídlo do trouby. Kondenzace v každém případě zmizí, jakmile
trouba dosáhne teploty vaření.
• UPOZORNĚNÍ: Spotřebič a jeho přístupné části se během použití
zahřívají. Nedotýkejte se topných prvků.
• Tento spotřebič smí používat děti starší 8 let a osoby se sníženými
fyzickými, senzorickými nebo mentálními schopnostmi nebo bez
dostatečných zkušeností, pokud jsou pod dohledem a byly poučeny o
použití spotřebiče a možném riziku.
• Nedovolte dětem hrát si se spotřebičem.
• Čištění a údržbu nesmí provádět děti bez dohledu.
• Během použití se spotřebič zahřívá. Nedotýkejte se ohřevných prvků
uvnitř trouby.
UPOZORNĚNÍ: Přístupné části mohou být během provozu horké.
Udržujte děti mimo dosah spotřebiče.
• Nepoužívejte drsné čističe ani ostré kovové předměty k čištění skla
dvířek trouby, neboť můžete poškrábat povrch.
• Vypněte troubu před sejmutím ochrany a po očištění nasaďte ochranu
v souladu s pokyny.
• UPOZORNĚNÍ: přístupné části se mohou při používání trouby zahřát.
Děti musejí být udržovány v bezpečné vzdálenosti.
• K čištění nepoužívejte vysokotlaké parní čističe.
CZ 76
GB, FR, IT, ES, DE, TR, CZ
Rev_G Değişen sayfalar; 6 - 19 - 32 - 33 - 44 - 55 - 68 - 80 - 88

CZ 77
kvalifikací. V případě neslučitelnosti mezi zásuvkou a zástrčkou
spotřebičů požádejte kvalifikovaného elektrikáře, aby zásuvku nahradil
jiným vhodným typem. Zástrčka i zásuvka musejí odpovídat platným
normám země instalace. Připojení k napájecímu zdroji lze provést také
tak, že mezi spotřebičem a zdrojem energie, který zvládne maximální
připojenou zátěž a který je v souladu se stávajícími právními předpisy, je
umístěn omnipolární vypínač. Žlutozelený uzemňovací kabel by neměl
být přerušen vypínačem. Zásuvka nebo omnipolární vypínač používaný
pro připojení by měl být při instalaci spotřebiče snadno přístupný.
• Pokud je napájecí kabel poškozen, musí být nahrazen kabelem nebo
speciálním svazkem, který je k dispozici u výrobce. Případně se obraťte
na zákaznický servis.
• Odpojení lze zajistit přístupnou zástrčkou nebo začleněním spínače v
pevném zapojení v souladu s pravidly elektroinstalace.
• Typ napájecího kabelu musí být H05V2V2-F.
• Před čištěním by měl být odstraněn veškerý přebytek rozlitého materiálu.
• Během procesu pyrolytického čištění se mohou povrchy zahřát více,
než je obvyklé, proto je nutné děti udržovat v bezpečné vzdálenosti.
• Spotřebič nesmí být instalován za ozdobnými dvířky, aby nedošlo k
přehřátí.
• Když umístíte polici uvnitř, ujistěte se, že zarážka směřuje nahoru a
dozadu do komory.
• Nedodržení výše uvedených pokynů může ohrozit bezpečnost spotřebiče
a zneplatnit záruku.
Police musí být zasunuta zcela do komory.
• VAROVÁNÍ: Nepotahujte stěny trouby alobalem ani jednorázovými
ochrannými produkty, které jsou k dostání v obchodech. Hliníková fólie
nebo jakákoli jiná ochrana způsobuje v přímém kontaktu se
smaltovaným povrchem riziko roztavení nebo poškození smaltovaného
povrchu uvnitř trouby.
• VAROVÁNÍ: V žádném případě neodstraňujte těsnění dveří trouby.
• K provozování spotřebiče při jmenovitých frekvencích nejsou nutné
žádné další úkony ani nastavování.
GB, FR, IT, ES, DE, TR, CZ
Rev_G Değişen sayfalar; 6 - 19 - 32 - 33 - 44 - 55 - 68 - 80 - 88

Shrnutí
CZ 78
Obecné pokyny
79
1.1 Bezpečnostní pokyny
1.2 Elektrická bezpečnost
1.3 Doporučení
1.4 Instalace
1.5 Odpadové hospodářství
1.6 Prohlášení o shodě
2.1 Přehled
2.2 Příslušenství
2.3 První použití
Popis výrobku
81
3.1 Popis displeje
3.2 Režimy vaření
Použití trouby
82
4.1 Obecné poznámky k čištění
4.2 Údržba
• Demontáž a čištění bočnic
• Demontáž okna trouby
• Demontáž a čištění skleněných dvířek
Čištění a údržba trouby
85
5.1 Často kladené otázky
Řešení potíží
86
GB, FR, IT, ES, DE, TR, CZ
Rev_G Değişen sayfalar; 6 - 19 - 32 - 33 - 44 - 55 - 68 - 80 - 88
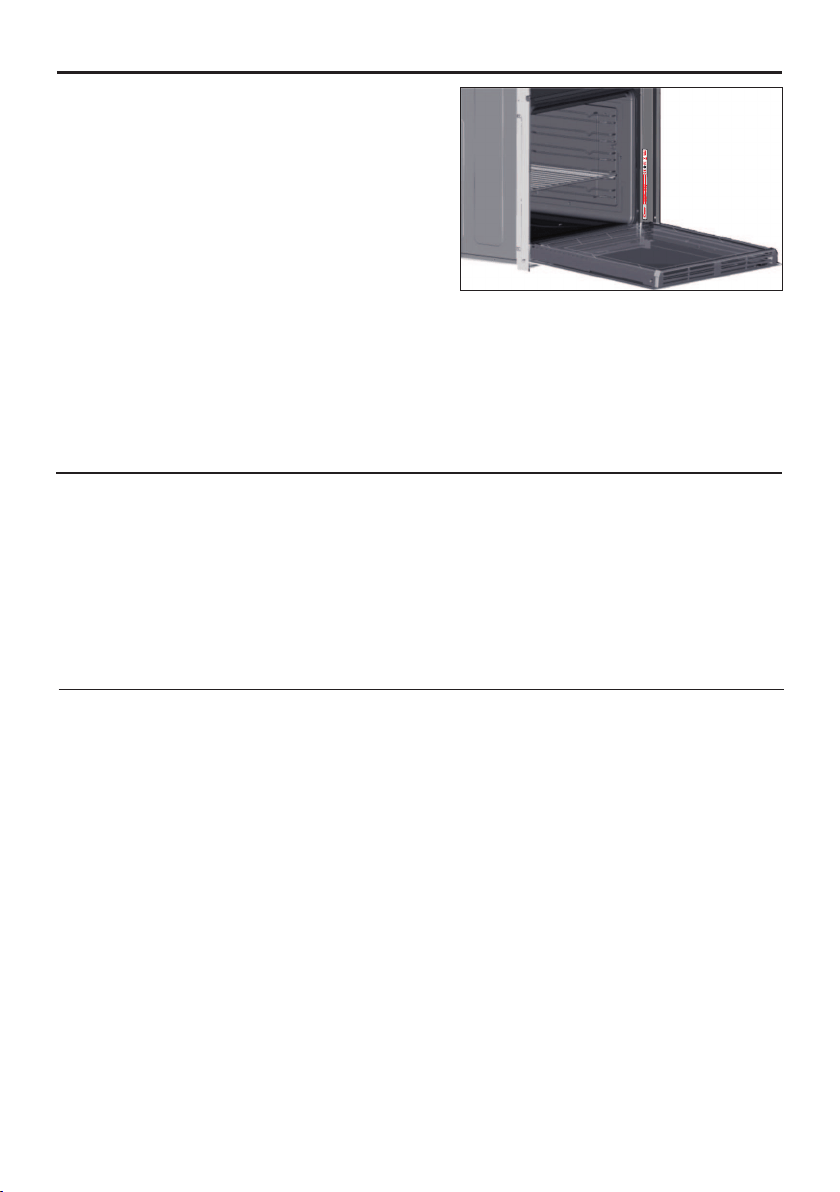
1. Obecné pokyny
Děkujeme Vám, že jste si zvolili jeden z našich výrobků.
Pro dosažení nejlepších výsledků s troubou byste si měli
pečlivě přečíst tento návod a uschovat jej pro budoucí
použití. Před instalací trouby si poznamenejte výrobní
číslo, abyste jej mohli poskytnout pracovníkům
zákaznických služeb v případě nutnosti opravy. Po
vyjmutí trouby z obalu zkontrolujte, zda nedošlo během
přepravy k jejímu poškození. Máte-li pochybnosti,
troubu nepoužívejte a požádejte kvalifikovaného
technika o radu. Uchovávejte všechen obalový materiál
(plastové sáčky, polystyrén, hřebíky) mimo dosah dětí.
Při prvním zapnutí trouby se může linout silný
páchnoucí kouř, který je způsoben prvním ohřevem lepidla na izolačních deskách v troubě. To je
naprosto normální, a pokud k tomu dojde, je třeba počkat, než se kouř rozptýlí, a teprve poté vložit do
trouby pokrmy. Výrobce neponese žádnou odpovědnost v případech, kdy nebudou dodrženy pokyny
obsažené v tomto dokumentu.
POZNÁMKA: funkce, vlastnosti a doplňky trouby uváděné v tomto návodu se budou lišit v závislosti na
modelu, který jste zakoupili.
1.1 Bezpečnostní pokyny
- Neodpojujte napájecí kabel ze zásuvky taháním;
Používejte troubu pouze ke stanovenému účelu, kterým je pečení potravin; jakékoliv jiné použití,
například jako zdroj tepla, je považováno za nevhodné a proto nebezpečné. Výrobce nemůže nést
odpovědnost za případné škody vzniklé nesprávným či nevhodným používáním.
Použití jakéhokoliv elektrického spotřebiče předpokládá dodržování některých základních pravidel:
- Nedotýkejte se spotřebiče mokrýma nebo vlhkýma rukama či nohama;
- V případě selhání nebo a/nebo špatné funkce vypněte spotřebič a nemanipulujte s ním.
- Použití adaptérů, rozdvojek a prodlužovacích kabelů není zásadně doporučeno;
1.2 Elektrická bezpečnost
Trouba je dodávána s napájecím kabelem, který by měl být připojen pouze k elektrickému zdroji s
220–240 V AC 50 Hz mezi fázemi nebo mezi fází a nulovým vodičem. Pře připojením trouby k elektrické
síti je důležité zkontrolovat:
- Nastavení odpojovače.
Před připojením trouby k elektrické síti požádejte kvalifikovaného elektrikáře o kontrolu spojitosti
zemnicí svorky elektrického napájení. Výrobce nenese žádnou odpovědnost za nehody nebo jiné
problémy způsobené nepřipojením trouby k zemnící svorce nebo uzemněním, které má vadnou
spojitost.
Výrobce nenese žádnou zodpovědnost za případné škody způsobené nedodržením těchto pokynů.
Trouba musí být připojena k elektrické síti prostřednictvím uzemněné zásuvky nebo odpojovače s více
póly, v závislosti na právních
- Napájecí napětí uvedené na voltmetru;
Uzemňovací vodič připojený k zemnicí svorce trouby musí být připojen k zemnící svorce napájecího
zdroje.
VAROVÁNÍ
ZAJISTĚTE, ABY ELEKTRICKÁ ZAPOJENÍ PROVÁDĚL ELEKTRIKÁŘ NEBO KVALIFIKOVANÝ TECHNIK.
ZAPOJENÍ
Napájecí zdroj, ke kterému je trouba připojena, musí být v souladu s právními předpisy platnými v zemi
instalace.
předpisech platných v zemi instalace. Elektrické napájení je třeba chránit vhodnými pojistkami a použité
kabely musístit správné napájení trouby.
CZ 79
GB, FR, IT, ES, DE, TR, CZ
Rev_G Değişen sayfalar; 6 - 19 - 32 - 33 - 44 - 55 - 68 - 80 - 88
1.3 Doporučení
Po každém použití trouby napomůže minimální vyčištění udržet troubu v dokonalé čistotě.
Nevykládejte stěny trouby hliníkovou fólií nebo jednorázovou ochranou dostupnou ve specializovaných
prodejnách.
U hliníkové fólie nebo jakékoliv jiné ochrany hrozí při přímém kontaktu s horkým smaltem riziko tavení a
poškození vnitřního smaltu. Aby se zabránilo nadměrnému znečištění trouby a výsledným silným
kouřovým zápachům, doporučujeme nepoužívat troubu při velmi vysokých teplotách. Je lepší
prodloužit dobu pečení a mírně snížit teplotu.
Vedle příslušenství dodávaného s troubou dop oručujeme používat pouze nádobí a pečicí formy odolné
proti velmi vysokým teplotám.
1.4 Instalace
Výrobci nemají žádnou povinnost provádět instalaci. Pokud je požadována pomoc výrobce k nápravě
škod způsobených nesprávnou instalací, na takovou pomoc se nevztahuje záruka. Je nutno dodržet
pokyny pro instalaci určené pro odborně vyškolené pracovníky. Nesprávná instalace může způsobit
újmu nebo zranění na osobách, zvířatech nebo věcech. Výrobce nemůže být za takové škody nebo
zranění zodpovědný.
Trouba může být umístěna ve výšce ve sloupci nebo pod pracovní deskou. Před upevněním je nutné
zajistit dobré větrání v prostoru pro troubu, které umožní řádnou cirkulaci čerstvého vzduchu
potřebného pro chlazení a ochranu vnitřních částí. Na základě typu upevnění vytvořte otvory popsané
na poslední straně.
POZNÁMKA: protože trouba může vyžadovat údržbu, je vhodné mít k dispozici další elektrickou
zásuvku, ke které lze troubu připojit po vyjmutí z prostoru, ve kterém je nainstalována. Napájecí kabel
smí být nahrazen pouze servisním technikem nebo technikem s rovnocennou kvalifikací.
1.5 Odpadové hospodářství a ochrana životního prostředí
Tento spotřebič je označen v souladu s evropskou směrnicí 2012/19/EU o odpadních
elektrických a elektronických zařízeních (OEEZ). OEEZ obsahují jak znečišťující látky (které
mohou mít negativní vliv na životní prostředí), tak i základní prvky (které mohou být znovu
použity). Je důležité, aby OEEZ podstoupily zvláštní zacházení pro správné odstranění a
likvidaci znečišťujících látek a obnovení všech materiálů. Jednotlivci mohou hrát
významnou roli při ochranně životního prostředí před OEEZ; je nutné dodržovat některá
základní pravidla:
- S odpadními elektrickými a elektronickými zařízeními se nesmí zacházet jako s domovním odpadem;
- OEEZ by měly být odvezeny do speciálních sběrných dvorů spravovaných místním úřadem nebo
registrovanou společností.
Šetrnost a ohleduplnost k životnímu prostředí Kdykoli je to možné, vyhněte se předehřátí trouby a vždy
se ji snažte naplnit. Otevírejte dvířka trouby co možná nejméně často, protože při každém otevření uniká
teplo z dutiny. Pro významnou úsporu energie vypněte troubu 5 až 10 minut před plánovaným koncem
doby pečení a využijte zbytkové teplo, které trouba nadále generuje. Udržujte těsnění v čistotě a v
pořádku, aby nedocházelo k unikání tepla z trouby. Máte-li hodinový tarif, program „zpožděné pečení“
usnadňuje úspory energie přesunutím doby vaření na dobu s nižší sazbou.
V mnoha zemích může být k dispozici vyzvednutí velkých OEEZ u zákazníka. Když koupíte nový spotřebič,
můžete starý odevzdat obchodníkovi, který musí bezplatně přijmout jeden starý spotřebič za jeden
nový prodaný spotřebič, pokud se jedná o ekvivalentní typ se stejnými funkcemi, jaké má nový
zakoupený spotřebič.
1.6 Prohlášení o shodě
Umístěním značky na tento produkt potvrzujeme shodu se všemi příslušnými evropskými
směrnicemi týkajícími se bezpečnosti, ochrany zdraví a ochrany životního prostředí, které lze použít pro
tento produkt.
CZ 80
GB, FR, IT, ES, DE, TR, CZ
Rev_G Değişen sayfalar; 6 - 19 - 32 - 33 - 44 - 55 - 68 - 80 - 88
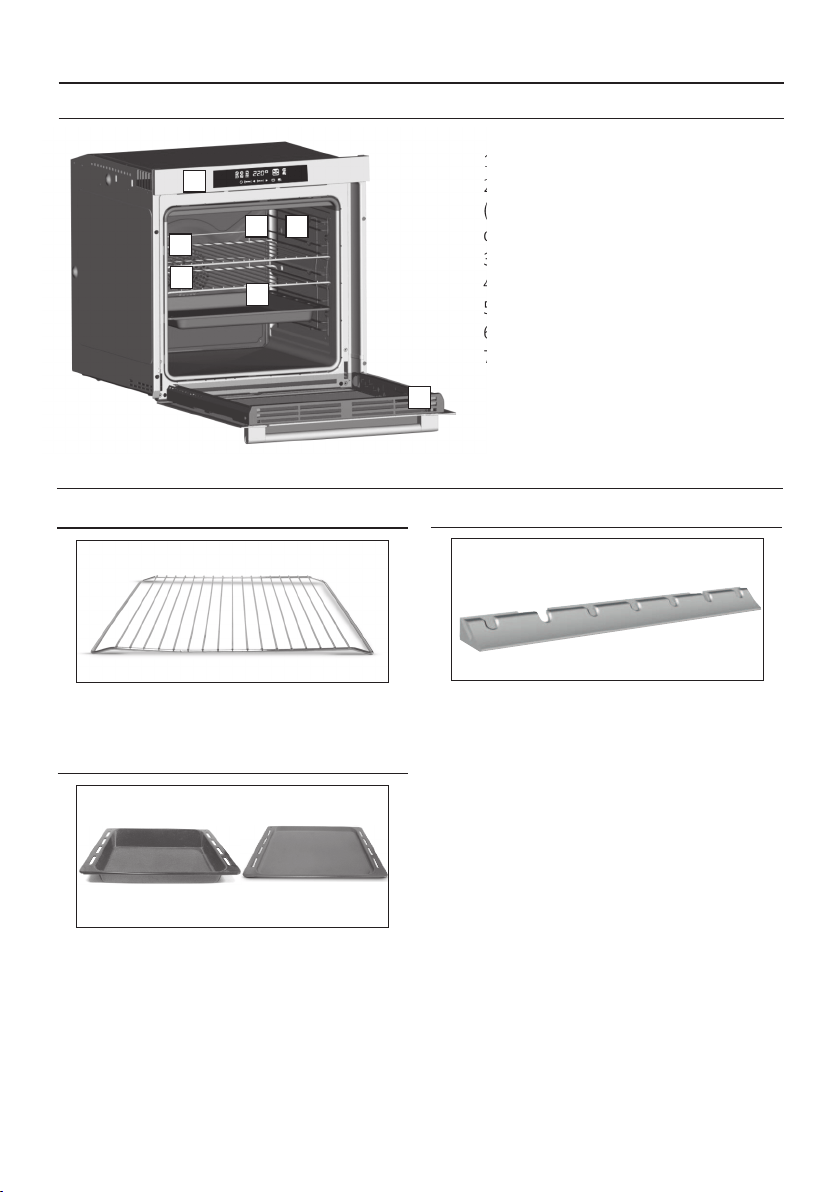
2. Popis výrobku
2.1 Přehled
1. Ovládací panel
2. Polohy polic
(podélný drátěný rošt, je-li součástí
dodávky)
3. Kovový rošt
4. Odkapávací plech
5. Ventilátor (za ocelovou deskou)
6. Sonda na maso
7. Dvířka trouby
2.2 Příslušenství
Kovový rošt
1
Drží pečicí plechy a talíře.
Odkapávací plech
2
Shromažďuje zbytky, které odkapávají během
pečení potravin na roštech.
CZ 81
3
Led vision
Je to system osvětleni, ktery nahrazuje klasicke
(žarovky ). 14 LED (u nepyrolytickych modelů)
nebo 10 vysokovykonnych LED (u pyrolytickych
modelů) je integrovanych ve dviřkach trouby. Tyto
nabizeji kvalitni osvětleni, umožňujici jasne
zobrazeni vnitřku trouby bez stinů na všech
urovnich.
- Optimalni pohled
Vyhody:
- Dlouha životnost
- Velmi nizka spotřeba energie, -95% ve srovnani s
klasickymi žarovkami.
Tento system nabizi vyjimečne osvětleni vnitřku
trouby, ma delši životnost než klasicke žarovky,
snadnějši udržbu a zejmena šetři energii.
1
3
5
4
6
2
7
GB, FR, IT, ES, DE, TR, CZ
Rev_G Değişen sayfalar; 6 - 19 - 32 - 33 - 44 - 55 - 68 - 80 - 88

2.3 První použtí
PŘEDBĚŽNÉ ČIŠTĚNÍ
Před prvním použitím troubu vyčistěte. Otřete vnější povrchy vlhkým měkkým hadříkem. Umyjte
všechna příslušenství a vytřete vnitřek trouby roztokem horké vody a promývací kapaliny. Nastavte
prázdnou troubu na maximální teplotu a ponechte ji zapnutou zhruba po dobu 1 hodiny. To odstraní
veškeré zápachy novosti.
CZ 82
3. Použití trouby
3.1 Popis displeje
1- Doba pečení
3- Časovač
6- Tlačítka nastavení
5- Zobrazení teploty nebo času
7- Volič funkcí
8- Volič teploty
4- Konec pečení
2- Nastavení hodin
8
VAROVÁNÍ: první operace lze provádět když trouba
byla nainstalována nebo po přerušení napájení
(když je displej pulzující – bliká a ukazuje 12:00) je
nastavení funkce správného času. Toho je dosaženo
takto.
• Stiskněte centrální tlačítko 4 krát
• Nastavte čas "-" "tlačítek +".
• Uvolněte všechna tlačítka.
UPOZORNĚNÍ: Le four ne peut fonctionner qu'après
réglage de l'heure.
Boční drátěné mřížky
4
Boční drátěné mřížky Pokud zahrnuty.
GB, FR, IT, ES, DE, TR, CZ
Rev_G Değişen sayfalar; 6 - 19 - 32 - 33 - 44 - 55 - 68 - 80 - 88
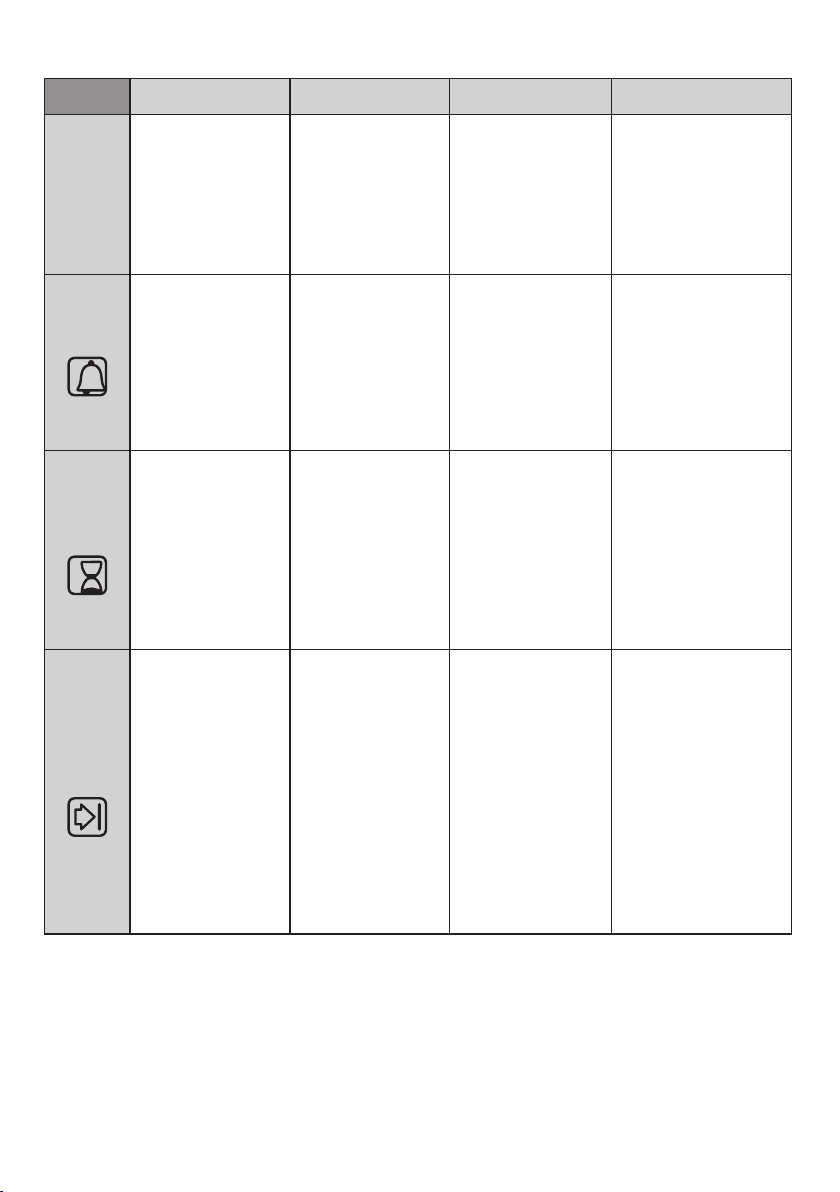
CZ 83
• Uvolněte všechna
tlačítka.
• Stiskněte centrální
tlačítko 1 krát.
• Stisknutím tlačítka "-"
"+" nastavte
požadovaný čas.
• Stiskněte středové
tlačítko Když nastavený
čas jako uplynulý
zvukový alarm je
aktivován (tento alarm
bude zastavit na jeho
vlastní, nicméně to
může být okamžitě
zastaveno stisknutím
tlačítka) SELECT.
• Zvuky alarmu na
konec nastaveného
času. Během procesu,
displeji se zobrazí
zbývající čas.
• Umožňuje použít troubu
jako budík (může být
aktivní buď při provozu
trouby nebo samostatně
(při provozu trouby)
• Nastavte funkci
pečení s funkce trouby
voličem.
• Stisknutím tlačítka "-"
Nebo "+" nastavit délka
vaření požadované.
• Stiskněte centrální
tlačítko 2 krát.
• Uvolněte všechna
tlačítka
• Umožňuje nastavení
vaření čas potřebný pro
vybrané receptury.
• Chcete-li zkontrolovat,
jak dlouho zůstane
spustit stisknutím
SELECT Tlačítko 2 krát.
• Chcete-li změnit /
změnit přednastavený
čas stiskněte tlačítko
SELECT a "-" "+" tlačítka.
• Je-li uplynutí doby
tro uba se v yp ne
automaticky. Pokud
byste chcete zastavit
vaření dříve buď
vypněte funkci voliče 0,
nebo nastavený čas
0:00 (SELECT a "-" "+"
Tlačítka).
• Stiskněte jakékoli
tlačítko
pro zastavení signálu.
Stiskněte centrální Tlačítko
pro návrat do hodiny
funkce.
• v době stanovené,
trouba vypne. Chcete-
li přepnout off ručně,
troubu voličem funkcí
na Pozici O.
• Umožňuje nastavení -
konec pečení
• Chcete-li změnit
nastavení Tlačítka
času stiskněte SELECT +
"-" „+".
• Chcete-li
zkontrolovat nastavený
čas stiskněte centrální
tlačítko 3 krát
• Uvolněte tlačítka
• Nastavte funkci
pečení s funkce trouby
volič.
• Stisknutím tlačítka "-"
"+" nastavit čas, kdy
Chcete troubu na
vypnout.
• Stiskněte centrální
tlačítko 3 krát.
Tato funkce se obvykle
používá s "čas vaření"
funkce. Například pokud
jídlo musí být vařené po
dobu 45 minut a musí být
připravena do 12:30,
vyberte požadovanou
funkci, nastavte dobu
vaření na 45 minut a do
konce doby vaření až
12:30. Na konci doby
vaření nastavené, bude
trouba automaticky vypne
a zvukový alarm bude
zvonit.
FUNKCE
JAK AKTIVOVATJAK VYPNOUT
CO TO DĚLÁVÝHODY
DĚTSKÁ
POJISTKA
• Dětský zámek Funkce
se aktivuje dotykem Set
(+) po dobu minimálně
5 sekund. Od tohoto
okamžiku se u všech
ostatních funkcích
uzamknou a na displeji
bude blikat STOP a
nastavení času .
• Dětský zámek Funkce
je d eakti vována
dotykem tlačítka Set
(+) opět na minimálně
5 sekund. Od této
chvíle jsou možnosti
všech funkcí volitelné
znovu.
MINUTKA
DOBA
PEČENÍ
KONEC
PEČENÍ
GB, FR, IT, ES, DE, TR, CZ
Rev_G Değişen sayfalar; 6 - 19 - 32 - 33 - 44 - 55 - 68 - 80 - 88
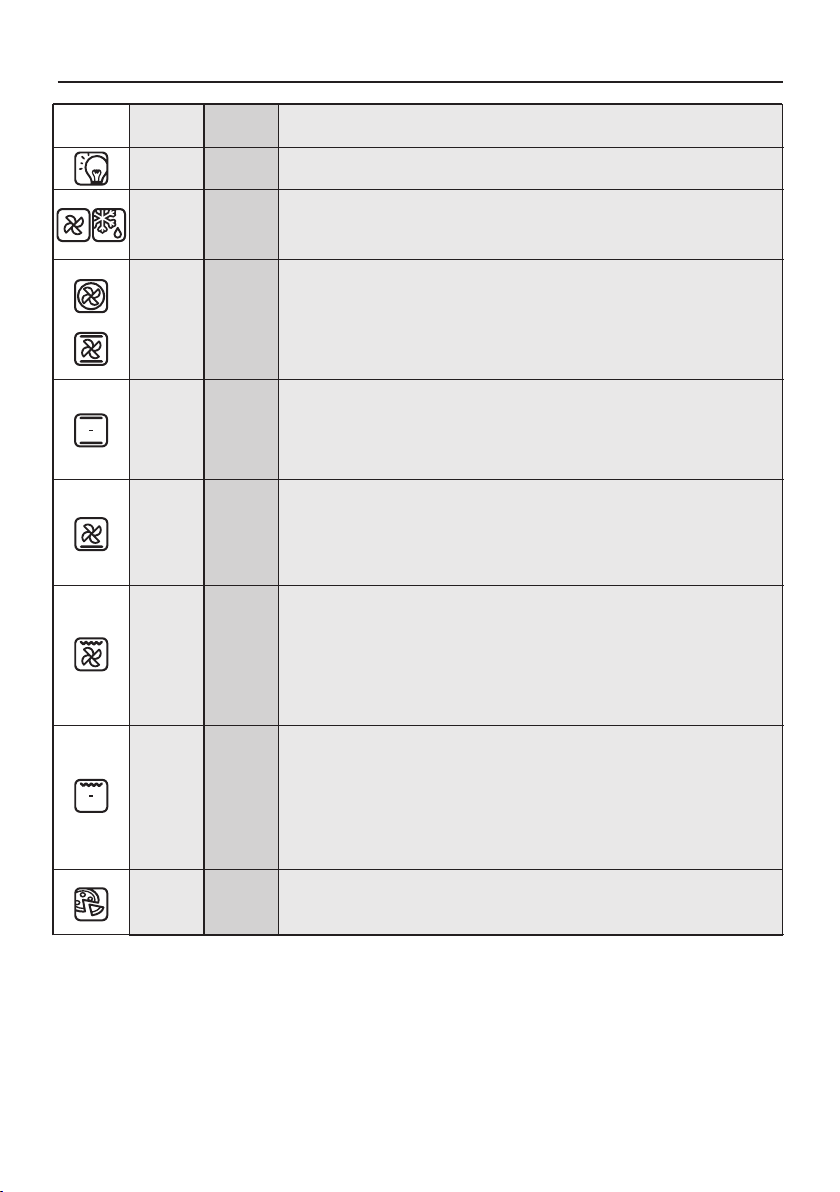
T °C
výchozí
180
210
200
210
40
L3
T °C
ozmezí
40 ÷ 40
50 ÷ 240
50 ÷ 230
150 ÷ 220
50 ÷ 240
L1 ÷ L5
Volič
funkc
Funkce (Závisí na modelu trouby)
SVĚTLO: Zapne světlo v troubě.
Rozžhavení těles do ruda vyžaduje pět minut předehřívání. Úspěch je zaručen
pro grily, kebaby a pokrmy s kůrkou. Bílá masa se umísťují dále od grilu; doba
pečení je delší, ale maso bude chutnější. Tmavá masa a rybí filety můžete
pokládat na rošt nad odkapávací plech. Trouba má dvě polohy grilu:
GRIL: používejte gril se zavřenými dvířky. Horní topné těleso se používá
samostatně a můžete upravovat teplotu.
Gril: 2140 W Barbecue: 3340 W
GRIL S PODPOROU VENTILÁTORU: používejte turbo-gril se zavřenými dvířky.
Horní topné těleso se používá spolu s ventilátorem dmýchajícím vzduch uvnitř
trouby. Předehřev je nezbytný u tmavých mas, ale nikoli u bílých mas. Ideální
pro pečení pokrmů o velké tloušťce, celých kusů jako je pečené vepřové,
drůbež atd. Umístěte pokrm určený ke grilování přímo do středu roštu ve
střední poloze. Zasuňte pod rošt odkapávací plech pro zachycení šťáv. Zajistěte,
aby nebyl pokrm příliš blízko u grilu. V polovině pečení pokrm obraťte.
Při současném pečení více pokrmů nastavte o deset minut delší dobu.
PEČENÍ S VENTILÁTOREM: Doporučujeme používat tuto metodu pro drůbež,
těstoviny, ryby a zeleninu. Teplo proniká do pokrmu lépe a zkrátí se také doba
pečení a předehřevu. Můžete péct různé pokrmy zároveň se stejnou přípravou
nebo bez přípravy v jedné nebo více pozicích. Tato metoda pečení zajišťuje
rovnoměrnou distribuci tepla a zabraňuje smísení vůní.
ROZMRAZOVÁNÍ: Je-li volič nastaven do této polohy. Ventilátor dmýchá
vzduch o pokojové teplotě kolem zmrzlého pokrmu a tak jej za několik minut
rozmrazí bez toho, aby se jakkoli změnil obsah proteinů v pokrmu.
* Testováno v souladu s normou CENELEC EN 60350-1, používanou k definování energetické třídy.
3.2 Režimy vaření
VENTILÁTOR + SPODNÍ OHŘEV: Spodní topné těleso se používá spolu s
ventilátorem dmýchajícím vzduch uvnitř trouby. Tato metoda je ideální pro
šťavnaté ovocné koláče, dortíky, quiche a paštiky.
Zabraňuje vysoušení pokrmu a podporuje kvašení v dortech, chlebovém těstu
a jiných pokrmech pečených zespodu. Umístěte rošt do dolní polohy.
CZ 84
KONVENČNÍ PEČENÍ: Používají se současně horní i dolní topná tělesa.
Předehřívejte troubu po dobu zhruba deseti minut. Tato metoda je ideální pro
jakékoli tradiční pečení. Pro přípravu červeného masa, hovězí pečeně, jehněčí
kýty, zvěřiny, chleba, pokrmů ve fólii (papillotes), listového těsta. Umístěte
pokrm a jeho nádobu na roštu do střední polohy.
22050 ÷ 280
*
*
PIZZU: Tato funkce s horkým vzduchem cirkulujícím uvnitř trouby zajišťuje
perfektní výsledky pokrmů jako je pizza nebo focaccia.
22050 ÷ 230
GB, FR, IT, ES, DE, TR, CZ
Rev_G Değişen sayfalar; 6 - 19 - 32 - 33 - 44 - 55 - 68 - 80 - 88

DEMONTÁŽ A ČIŠTĚNÍ BOČNIC
3. Vyčistěte bočnice v myčce na nádobí nebo mokrou houbičkou a poté je ihned vysušte.
2. Vyjměte bočnice vytažením směrem k sobě.
4. Po vyčištění dejte bočnice zpět, nasaďte zpět šrouby a pevně je utáhněte.
1. Odšroubujte šroub proti směru hodin.
3. Vraťte okno zpět provedením předchozího postupu v opačném pořadí kroků.
DEMONTÁŽ OKNA TROUBY
2. Otevřete svorky krytu závěsu na pravé a levé straně čelního okna stlačením směrem dolů.
1. Otevřete čelní okno.
4. Čištění a údržba trouby
4.1 Obecné poznámky k čištění
Doporučuje se čistit skleněné okno savou kuchyňskou utěrkou po každém použití trouby. Chcete-li
odstranit odolnější skvrny, můžete použít dobře vyždímanou houbu napuštěnou mycím prostředkem a
potom opláchnout vodou.
TĚSNĚNÍ OKNA TROUBY
ODKAPÁVACÍ PLECH
PŘÍSLUŠENSTVÍ
Pokud stále ulpívají mastné skvrny, ponořte plech do vody a mycího prostředku. Alternativně můžete
plech umýt v myčce na nádobí nebo použít komerční saponát na trouby. Nikdy nedávejte znečištěný
plech zpět do trouby.
Životnost spotřebiče můžete prodloužit prostřednictvím pravidelného čištění. Před prováděním
ručního čištění počkejte, až trouba vychladne. Nikdy nepoužívejte při čištění brusné mycí prostředky,
drátěnku nebo ostré předměty. Předejdete tak neopravitelnému poškození smaltovaných dílů.
Používejte pouze mycí prostředky na bázi vody, mýdla nebo bělidla (čpavek).
SKLENĚNÉ DÍLY
Je-li těsnění znečištěné, můžete jej vyčistit mírně navlhčenou houbičkou.
Příslušenství vyčistěte před oplachováním a sušením mokrou mýdlovou houbičkou: vyvarujte se použití
abrazivních mycích prostředků.
Po použití grilu vyjměte plech z trouby. Nalijte na plech horký tuk a umyjte jej v horké vodě pomocí
houbičky a prostředku na mytí nádobí.
CZ 85
4.2 Údržba
A
GB, FR, IT, ES, DE, TR, CZ
Rev_G Değişen sayfalar; 6 - 19 - 32 - 33 - 44 - 55 - 68 - 80 - 88
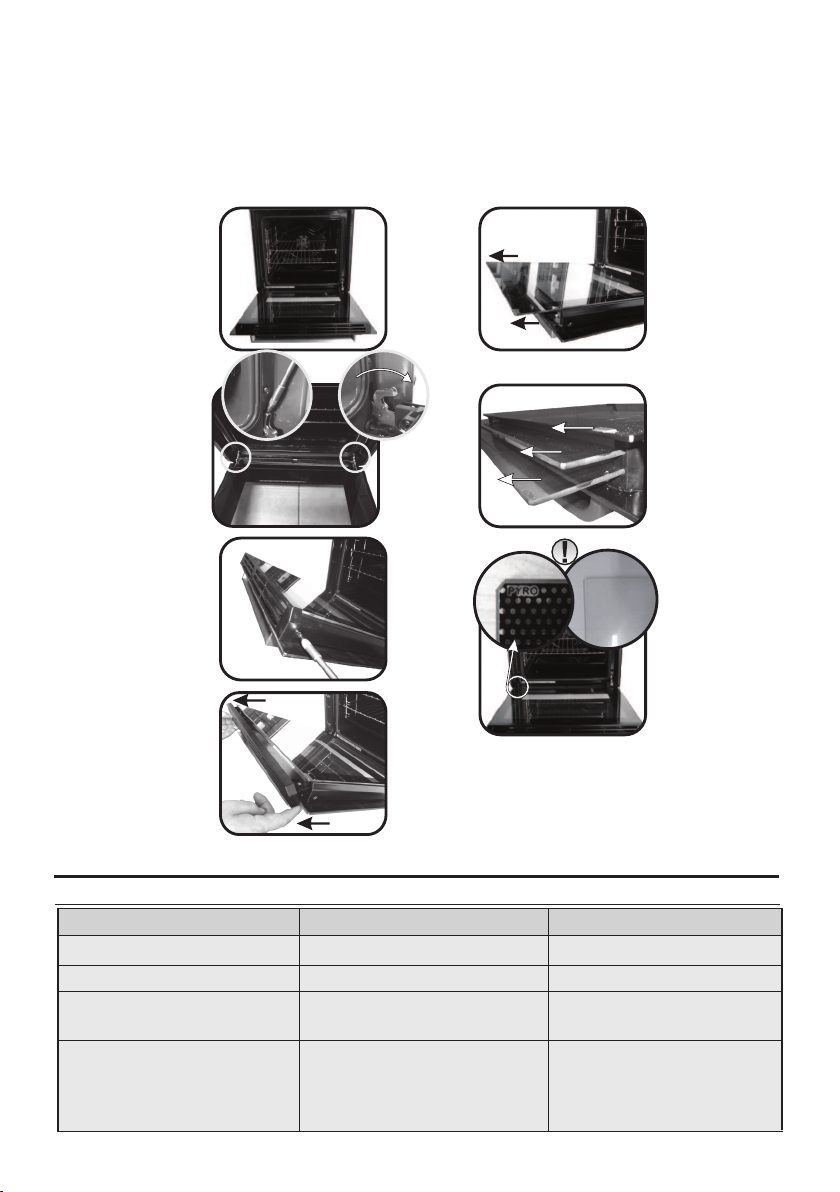
CZ 86
1
2
3
1.
2.
3.
4.
5.
6.
LOW-E
7.
5.6. Vyjměte opatrně sklo ze dvířek trouby (Pozn: u pyrolytických trub vyjměte také druhé a třetí sklo (jsou-li
osazena)).
2.3.4. Zajistěte závěsy, vyšroubujte šrouby a demontujte horní kovový kryt vytažením směrem nahoru.
7. Na konci čištění nebo výměny díly znovu sestavte provedením kroků v opačném pořadí. U všech skel musí být
čitelný znak „Pyro“ umístěný na levé straně dvířek poblíž levého bočního závěsu. Tak bude natištěný štítek prvního
skla uvnitř dvířek.
DEMONTÁŽ A ČIŠTĚNÍ SKLENĚNÝCH DVÍŘEK
1. Otevřete dvířka trouby.
5. Řešení potíží
5.1 Často Kladené Otázky
PROBLÉMMOŽNÁ PŘÍČINAŘEŠENÍ
Trouba se nezahřívá
Hodiny nejsou nastaveny
Nastavte hodiny
Dětský zámek je aktivní
Funkce pečení a teplota
nebyly nastaveny
Deaktivujte dětský zámek
Přesvědčte se, že potřebná
nastavení jsou správná
Trouba se nezahřívá
Trouba se nezahřívá
Pára nebo kondenzace na
panelu uživatelského rozhraní
Vyčistěte panel uživatelského
roz hra ní h ad ří ke m z
mikrovláken a odstraňte
kondenzát
Žádná reakce dotykového
uživatelského rozhraní
GB, FR, IT, ES, DE, TR, CZ
Rev_G Değişen sayfalar; 6 - 19 - 32 - 33 - 44 - 55 - 68 - 80 - 88
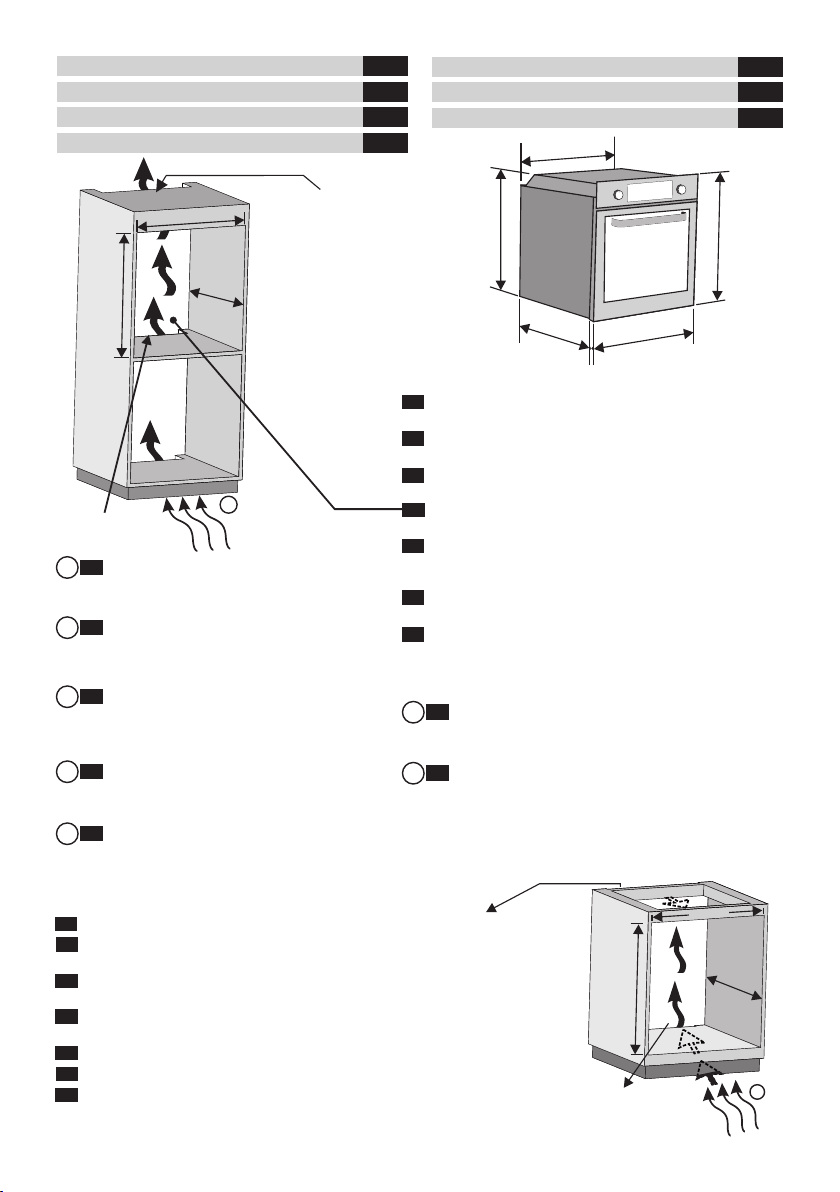
If the furniture is coverage with a bottom at the back part,
provide an opening for the power supply cable.
INSTALLATION
ES
INSTALACIÓN
GB
FR
IT
INSTALLATION
DE
TR
CZ
INSTALACE
KURULUM
INSTALLAZIONE
INSTALLATION DU FOUR
Opening/Ouverture/Apertura/
Açıklık/OtvorÖffnung/
560 mm x 45 mm
Opening/erture/OuvApertura/
Öffnung/Açıklık/Otvor
460 mm x 15 mm
Schaffen Sie eine Öffnung, wenn der Ofen über keinen Lüfter verfügt 460 mm x 15 mm
IT
ES
CZ
If the oven does not have a cooling fan, create an opening 460 mm x 15 mm
Se il forno non dispone di una ventola di raffreddamento, lasciare uno spazio
460 mm x 15 mm
Si el horno no tiene ventilador de refrigeración, practique una abertura.
460 mm x 15 mm
Pokud nemá trouba chladicí ventilátor, vytvořte otvor. 460 mm x 15 mm
DE
Fırında soğutma fanı yoksa bir açıklık oluşturun 460 mm x 15 mm
TR
GB
Si le four n’a pas de ventilateur de refroidissement, créer une ouverture
460 mm x 15 mm
FR
595 mm
595 mm
546 mm
22 mm
580 mm
560 mm
A
600 mm
560
mm
560
mm
560 mm
560 mm x 45 mm
A
560 mm
590 mm
Si le fond du meuble est doté d’un panneau de fermeture,
prévoyez un orifice pour le passage du câble d’alimentation.
GB
ES
Si el mueble tiene panel posterior, haga un orificio para el cable
de alimentación.
FR
Je-li nábytek v zadní části vybaven krytem, vytvořte otvor pro
napájecí kabel.
CZ
Wenn das Gerät mit einer Abdeckung auf der Rückseite
ausgestattet ist, sorgen Sie für eine Öffnung für das
Stromversorgungskabel.
DE
Se il mobile ha un fondo posteriore, praticare un foro per il
passaggio del cavo di alimentazione.
IT
Mobilyanın arka tarafında bir kaplama bulunuyorsa güç kaynağı
kablosu için bir delik açın.
TR
If the mounting of the plinth does not allow air
circulation, to obtain the maximum performance of
the oven it is necessary to create an opening of
500x10mm or the same surface in 5.000 mm²
GB
A
Se l'installazione in colonna non permette la
circolazione dell'aria, per ottenere la massima
prestazione del forno, è necessario creare un
apertura di 50 x100mm o garantire la stessa per una
superficie di 5000mm²
IT
A
Si le montage du socle ne permet pas la circulation
d'air, pour obtenir la performance maximale du four, il
est nécessaire de créer une ouverture de 500x10mm ou
2
la même surface dans 5.000 mm
FR
A
Si el montaje del zócalo no permite la circulación
de aire, para obtener el máximo rendimiento del
horno es necesario crear una abertura de 500x10 mm
o la misma superficie en 5.000 mm².
ES
A
Wenn die Montage des Sockels keine
Luftzirkulation zulässt, ist es notwendig, um eine
maximale Leistung des Ofens zu erreichen, eine
Öffnung von 500x10 mm oder die gleiche Oberfläche
in 5.000 mm² zu schaffen.
DE
A
Eğer taban montajı, hava dolaşımına olanak
tanımıyorsa, ocaktan en yüksek performansı elde
etmek için 500x10 mm'lik bir açıklık veya 5,000
mm²'de aynı yüzeyin oluşturulması gerekir.
TR
A
Pokud montáž podstavce neumožňuje cirkulaci
vzduchu, k dosažení maximálního výkonu sporáku je
třeba vytvořit otvor 500 x 10 mm nebo stejnou plochu
velikosti 5 000 mm²
CZ
A
GB, FR, IT, ES, DE, TR, CZ
Rev_G Değişen sayfalar; 6 - 19 - 32 - 33 - 44 - 55 - 68 - 80 - 88
42821405 • 70gr A5 • 01.2020 • REV.G
The manufacturer will not be responsible for any inaccuracy resulting from printing or transcript errors contained in this brochure. We
reserve the right to carry out modifications to products as required, including the interests of consumption, without prejudice to the
characteristics relating to safety or function.
Le constructeur décline toute responsabilité concernant d'éventuelles Inexacltudes Imputables à des erreurs d'impression ou de
transcription contenue dans cette notice. Le constructeur se réserve le droit de modifier les produits en cas de nécessité, même dans
l'intérêt de l'utilisation, sans causer de préjudices aux caractéristiques de fonctionnement de sécurité des appareils.
FR
IT
Il produttore declina ogni responsabilità per inesattezze contenute nel documento stampato o per errori di trascrizione contenuti in
questa brochure. Inoltre, si riserva il diritto di apportare modifiche al prodotto, nell'interesse dei consumatori, senza alcun
pregiudizio per la sua sicurezza o funzionalità.
TR
Üretici bu kullanma kılavuzunda bulunan basım veya kopyalama hatalarından kaynaklanan herhangi bir yanlışlıktan sorumlu
olmayacaktır. Güvenlik veya işlevle ilgili özelliklere zarar vermeden tüketim istekleri dahil olmak üzere ürünlerde gerektiğinde
değişiklik yapma hakkımız mahfuzdur.
GB
ES
El fabricante no se responsabiliza de las inexactitudes debidas a fallos de impresión o transcripción contenidos en este folleto. Nos
reservamos el derecho a modificar los productos como sea necesario, incluidos los intereses de consumo, sin perjuicio de las
características relacionadas con la seguridad o su funcionamiento.
DE
Der Hersteller übernimmt keine Haftung für eventuelle Druck- oder Übersetzungsfehler dieser Bedienungsanleitung. Der Hersteller
behält sich vor technische Änderungen zurVerbesserung der Produktqualität im Interesse des Endverbrauchers vorzunehmen.
CZ
Výrobce neodpovídá za tiskové chyby v návodu. Vyhrazujeme si právo na změny spotřebiče podle potřeby, včetně údajů spotřeby, bez
vlivu na bezpečnost nebo funkci.
GB, FR, IT, ES, DE, TR, CZ
Rev_G Değişen sayfalar; 6 - 19 - 32 - 33 - 44 - 55 - 68 - 80 - 88