Loading ...
Loading ...
Loading ...
PISTON PUMP REPAIR KIT ( # 0610407-K)
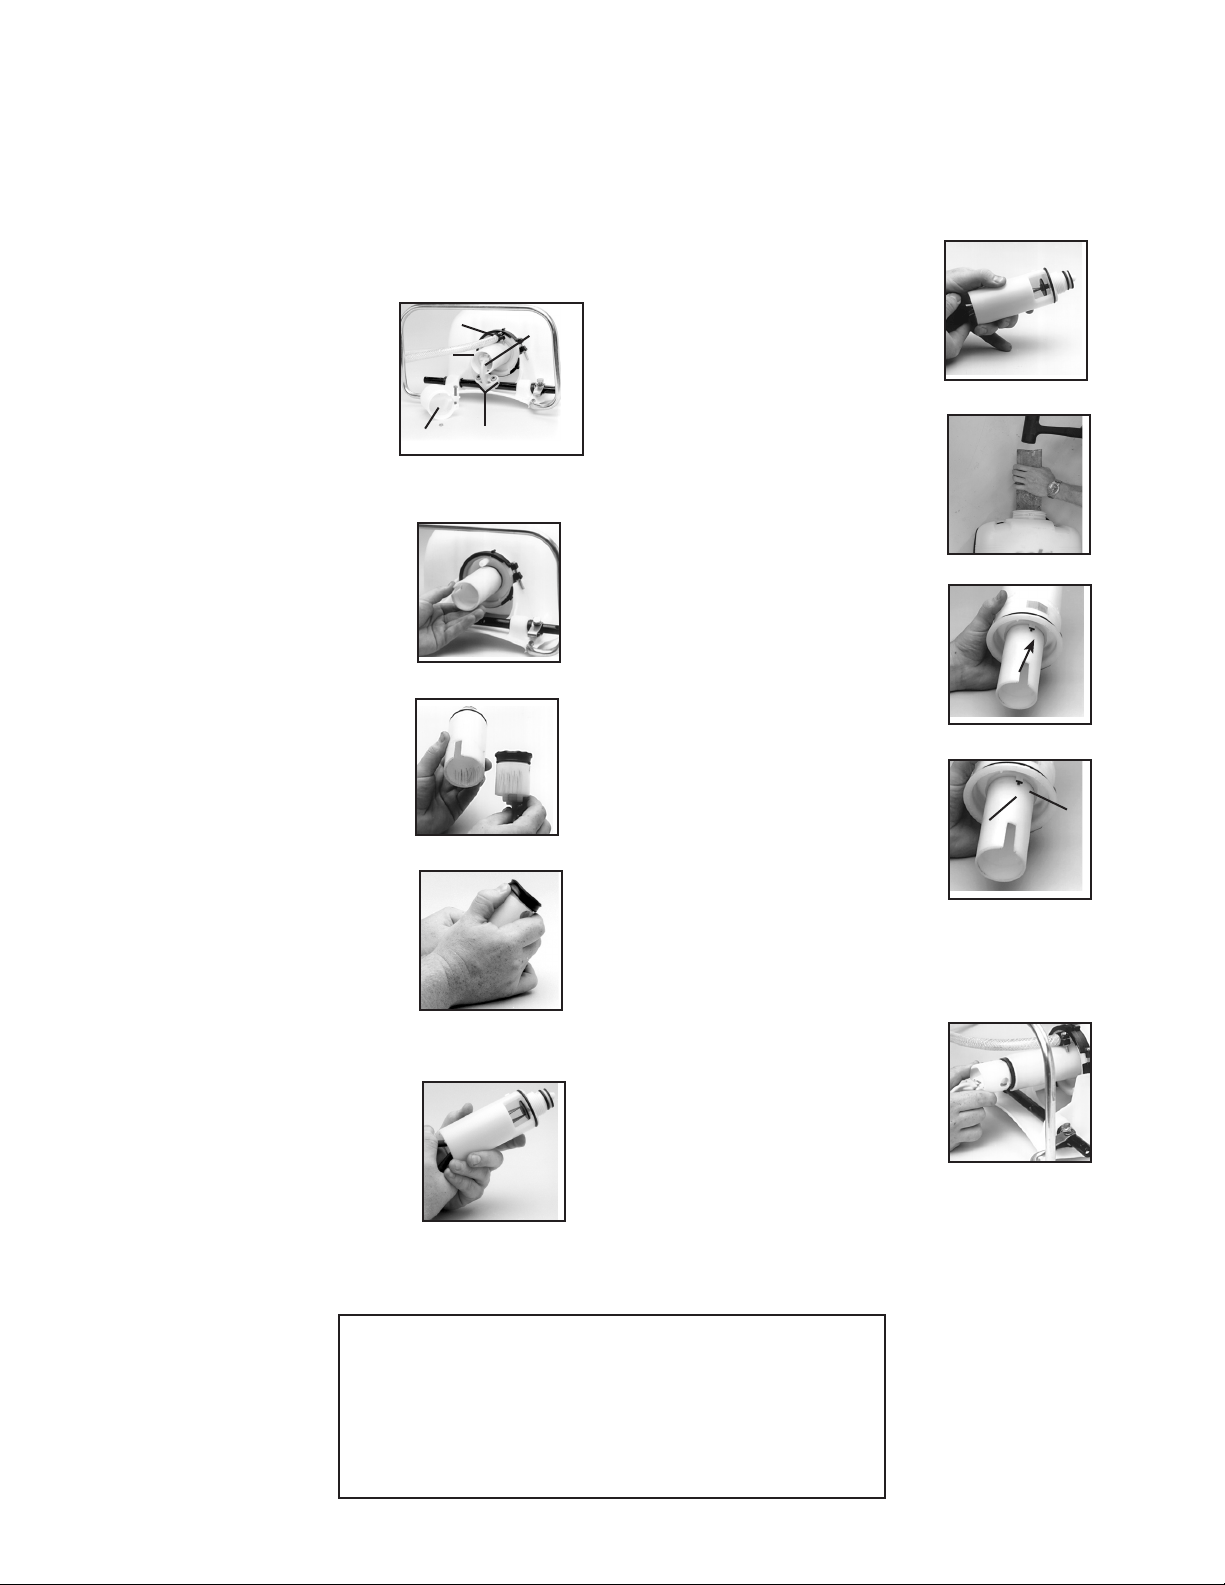
1. Using a 13mm socket wrench
remove the handle bolts, and set
aside. Lay unit on its back with
pump assembly facing you. See
figure 1. Loosen hose clamp (E).
Pull off sprayer hose. Caution:
There may be liquid inside the
hose and pressure cylinder even
when the tank is empty. Wear
protective gloves. Next, remove
the nut and bolt from protective
cap, and remove cap (C). Rotate
the pump shaft to access the two
lever bolts in the center (B). Using
a 6mm allen head wrench, remove
them. Pull the piston (F) out of the
piston cylinder (D).
2. To remove the piston cylinder
assembly, turn the cylinder counter
clockwise when viewing from the
bottom. Figure 2. Caution: The
piston cylinder has sharp edges.
3. Check the outside of the piston
and inside ot the cylinder for
scratches. If the piston or cylinder
are scratched, replace with part#
0610409-K (piston) or part#
4073190 (cylinder). Figure 3.
4. To replace the Viton
®
collar,
push it off the top of the piston with
your thumb. Figure 4. Install the
new collar on the piston onto the
form fitted sides.
5. Remove the valve plate and
O-rings from the outside of the
piston cylinder. Install the new
valve plate and the two O-rings
making sure the O-rings seat in the
grooves. Finally, inside the piston
cylinder you will find a second
valve plate. Using needle nose
pliers, pull out the red or orange
pin and remove the valve plate.
Figure 5.
E
G
H
C
D
B
F
Figure 1.
Figure 6.
Figure 8.
Figure 7.
Figure 9.
Figure 10.
Figure 2.
Figure 3.
Figure 5.
Figure 4.
6. Install a new valve plate and
firmly reseat the retaining pin using
needle nose pliers. Figure 6.
7. If the sprayer was leaking at
the pressure cylinder, it may
be necessary to remove the
pressure cylinder. First, unscrew
the pressure regulator control,
if equipped. Remove the large
clamp at the bottom of the cylinder.
Using a block of wood and a large
hammer, forcefully hit the top of
the pressure cylinder, driving the
assembly through the bottom of
the tank. Figure 7. Replace and
lubricate the O-ring at the bottom
of the pressure cylinder, then
reinstall the pressure cylinder using
the block of wood and hammer.
Reattach clamp.
8. Next, assemble the piston
cylinder. First, lubricate the O-rings
on the piston cylinder, being careful
not to get any on the valve plate.
Screw the piston cylinder clockwise
into the pressure cylinder until it
is tight and the bottom O-ring is
no longer seen. Figure 8. When
properly seated the notch on the
piston cylinder (G) will line up with
the indent on the pressure cylinder
(H). Figure 9.
9. Apply a light coat of grease to
the inside of the piston cylinder wall
and on the Viton
®
collar, and then
re-install the piston into the piston
cylinder. Figure 10. To insert the
piston, tilt at a slight angle with
the leading edge of the Viton
®
collar placed over the slot. When
seated, install the 6mm Allen Head
bolts through lever base into shaft.
Replace the protective cap and
tighten the nut and bolt. Reinstall
the handle. Replace the hose and
black hose clamp making sure it is
firmly secured.
Tools needed for kit installation: 6mm Allen Head Wrench, Flat Screwdriver, 11mm Wrench or Cresent Wrench, Long Nose Pli-
ers, Hammer, 13mm Socket or Wrench, T-25 Torx Screwdriver, Grease or Petroleum Jelly, 2X4 Piece of wood 18” long
INSTALLATION INSTRUCTIONS
8
Note: Always wear rubber gloves, safety goggles and appropriate
protective clothing when repairing a sprayer. Work in a well-
ventilated area. Prior to repair, flush unit with water by filling,
then spraying the water into an appropriate container or area.
Ensure that all pressure is released by locking the shut-off valve
in the open position. Once a repair is completed, fill the unit with
clean water, pressurize, and check for leaks. If the sprayer leaks,
DO NOT USE. Repair leaks and recheck.
Loading ...
Loading ...
Loading ...