Loading ...
Loading ...
Loading ...
Problem Possible cause Solution
Water flows on the floor. The melting water outlet is not con‐
nected to the evaporative tray above
the compressor.
Attach the melting water outlet to
the evaporative tray.
Temperature cannot be set. The Frostmatic function is switched
on.
Switch off Frostmatic function man‐
ually, or wait until the function deac‐
tivates automatically to set the tem‐
perature. Refer to "Frostmatic func‐
tion" section.
The temperature in the appliance is
too low/too high.
The temperature is not set correctly. Set a higher/lower temperature.
The door is not closed correctly. Refer to "Closing the door" section.
The food products' temperature is
too high.
Let the food products temperature
decrease to room temperature be‐
fore storage.
Many food products are stored at
the same time.
Store less food products at the
same time.
The door has been opened often. Open the door only if necessary.
The Frostmatic function is switched
on.
Refer to "Frostmatic function" sec‐
tion.
There is no cold air circulation in the
appliance.
Make sure that there is cold air cir‐
culation in the appliance. Refer to
"Hints and tips" chapter.
Some specific surfaces inside the
fridge compartment are warmer at
some times.
This is a normal state.
Temperature setting LEDs flash at
the same time.
An error has occurred in measuring
the temperature.
Contact the nearest Authorised
Service Centre. The cooling system
will continue to keep food products
cold, but temperature adjustment
will not be possible.
If the advice does not lead to the desired
result, call the nearest Authorized
Service Centre.
8.2 Replacing the lamp
The appliance is equipped with a longlife LED
interior light.
Only service is allowed to replace the lighting
device. Contact your Authorised Service
Centre.
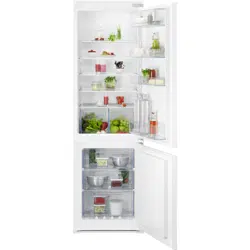
8.3 Closing the door
1. Clean the door gaskets.
2. If necessary, adjust the door. Refer to
installation instructions.
3. If necessary, replace the defective door
gaskets. Contact the Authorised Service
Centre.
ENGLISH 17
Loading ...
Loading ...
Loading ...