BRIO 300
Setup Guide
设置指南

CONTENTS
English . . . . . . . . . . . . . . . . . 3
简体中文 . . . . . . . . . . . . . . . . 8
繁體中文 . . . . . . . . . . . . . . . . 13
한국어 . . . . . . . . . . . . . . . . . 18
Indonesia . . . . . . . . . . . . . . .23

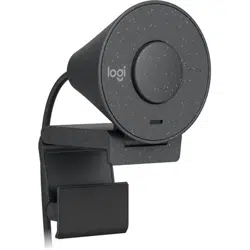
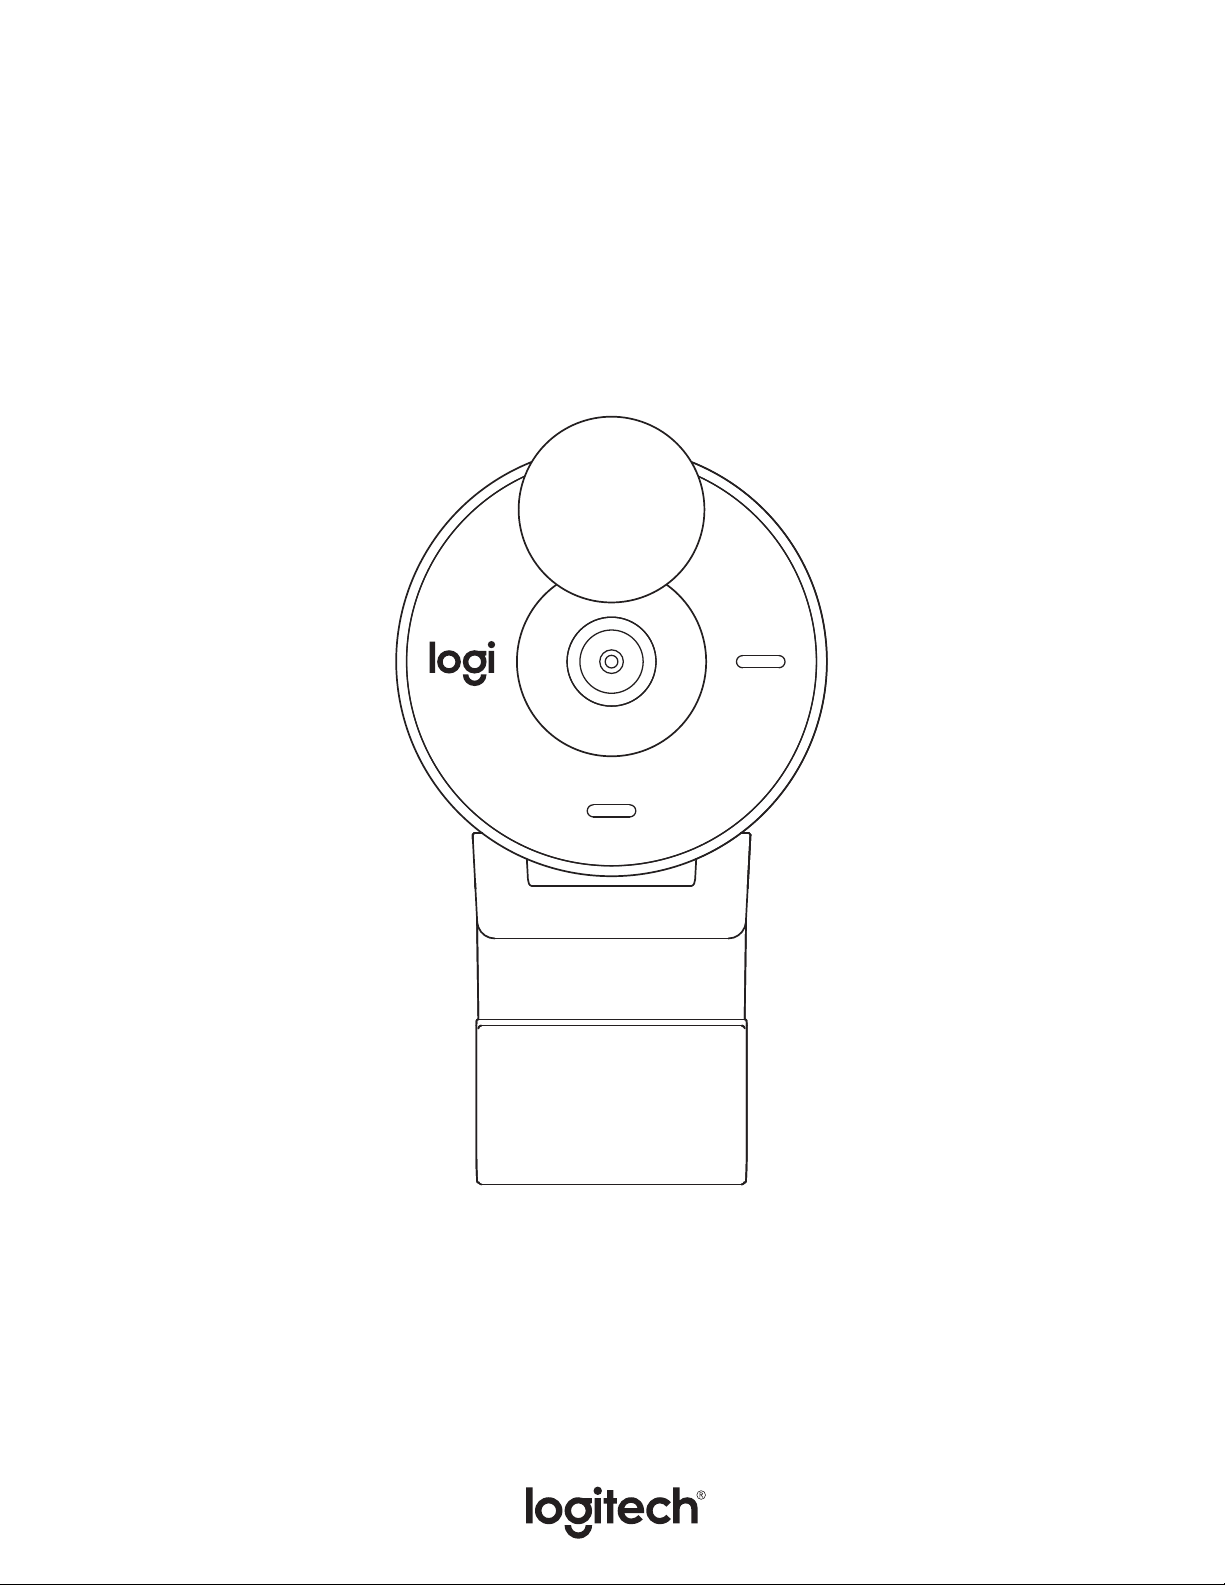
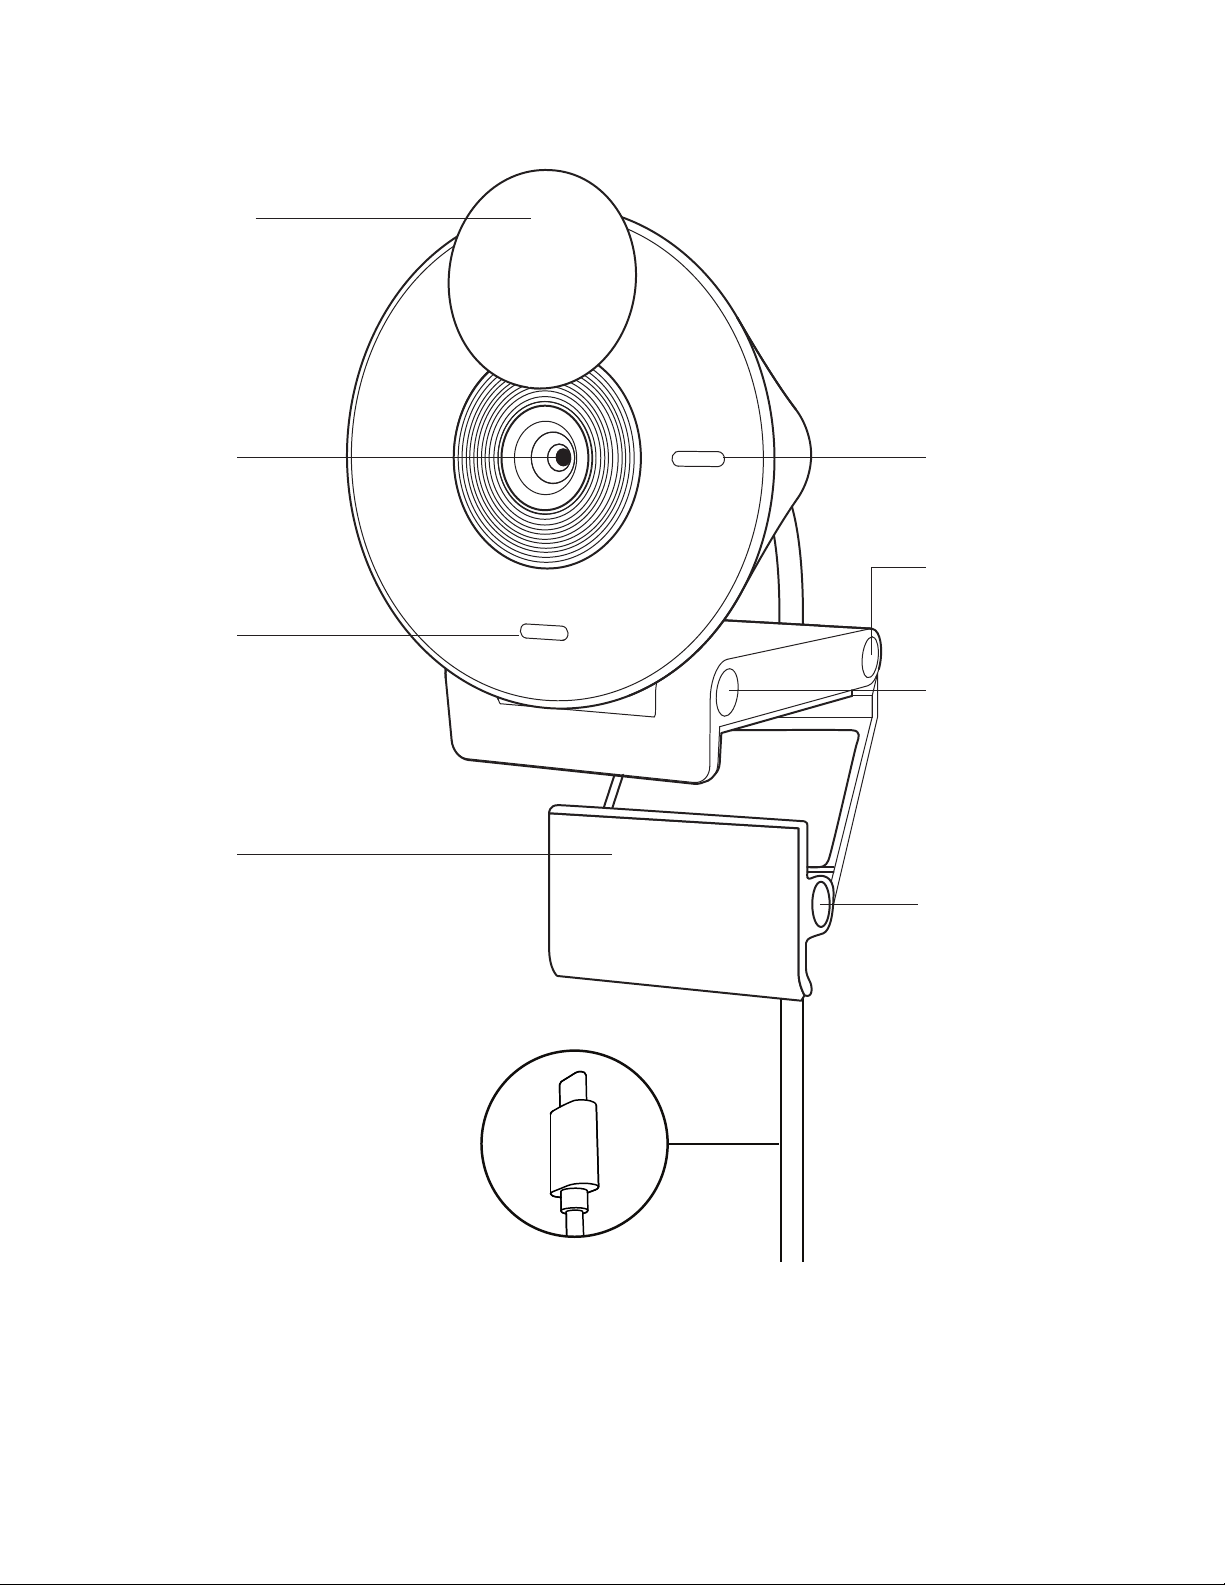
KNOW YOUR PRODUCT
Led indicator light
Front hinge
(tiltadjustment)
Foot hinge (monitor
angle adjustment)
Rear hinge (primary
mounting hinge)
Privacy shutter
Camera lens
Noise-
reducing mic
Padded foot
USB-C connector
3English
USB-C
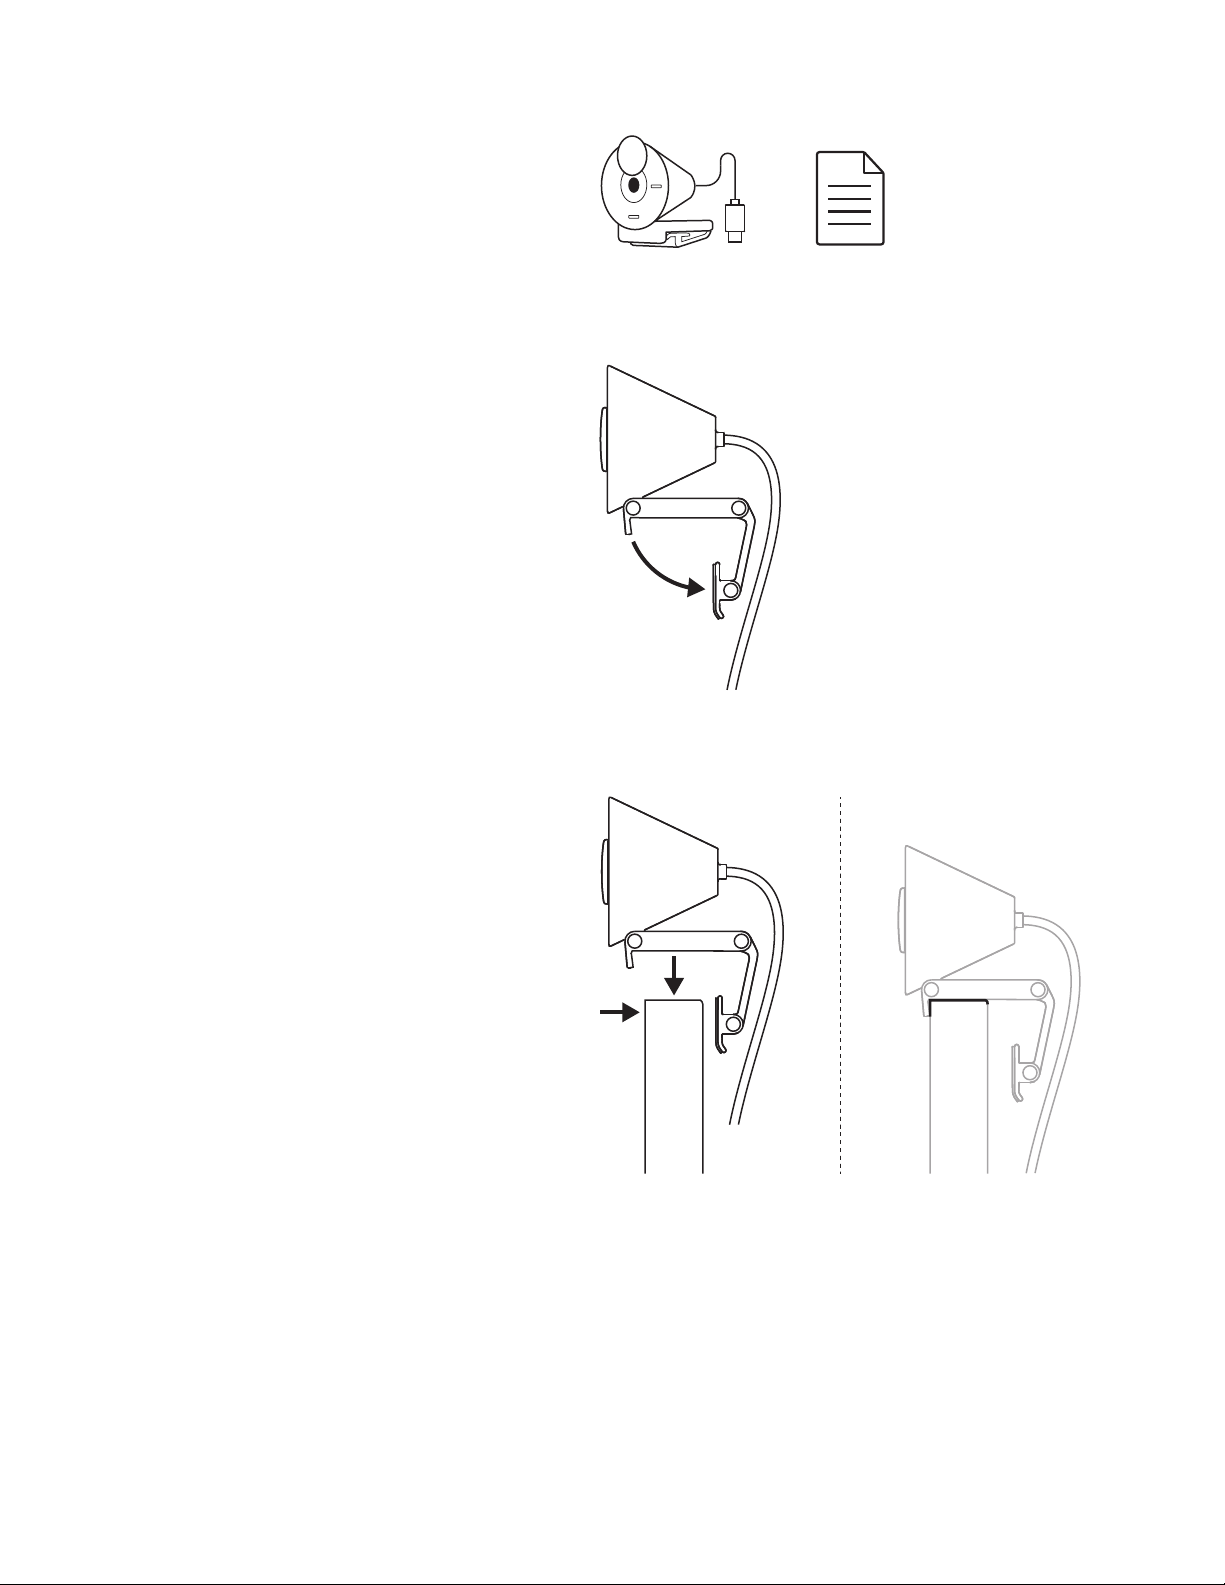
WHAT’S IN THE BOX
1. Brio 300 with attached USB-C cable
2. User documentation
OPEN THE MOUNT
Open the mounting arm.
PLACE ON MONITOR
Place the Brio 300 on top of your monitor
andensure that the front tab of the mount
issnug against the front of your screen.
4English
COMPRESS TO FIT MONITOR
Move the mounting arm towards the back
of your screen so that it ts the width of
themonitor. Please note that you may need
toadjust the angle of the “foot hinge” to t
your monitor's shape.
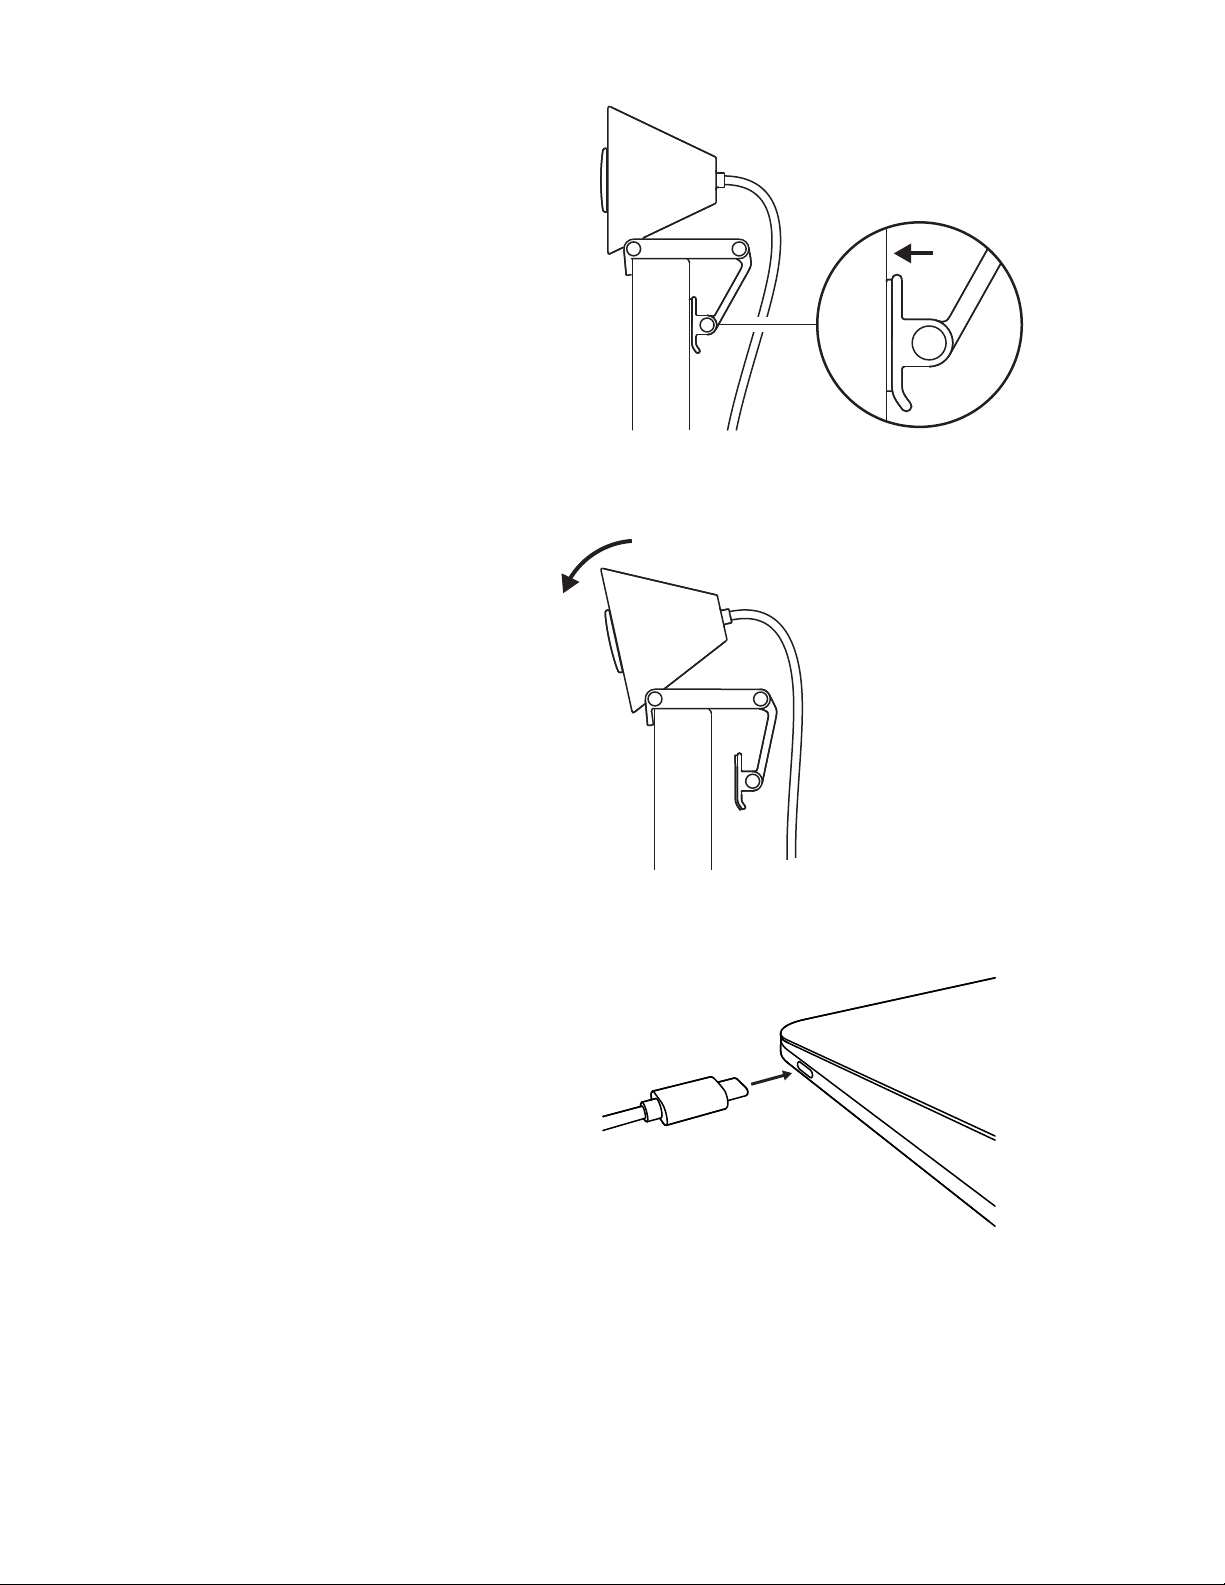
ADJUST THE ANGLE
Adjust the angle of the Brio 300 by tilting
itforwards or backwards.
PLUG DIRECTLY INTO COMPUTER
Plug the attached USB-C connector into
the corresponding port on your computer.
Ifpossible, we recommend plugging
theBrio300 directly into your computer
andnot through a USB hub.
5English

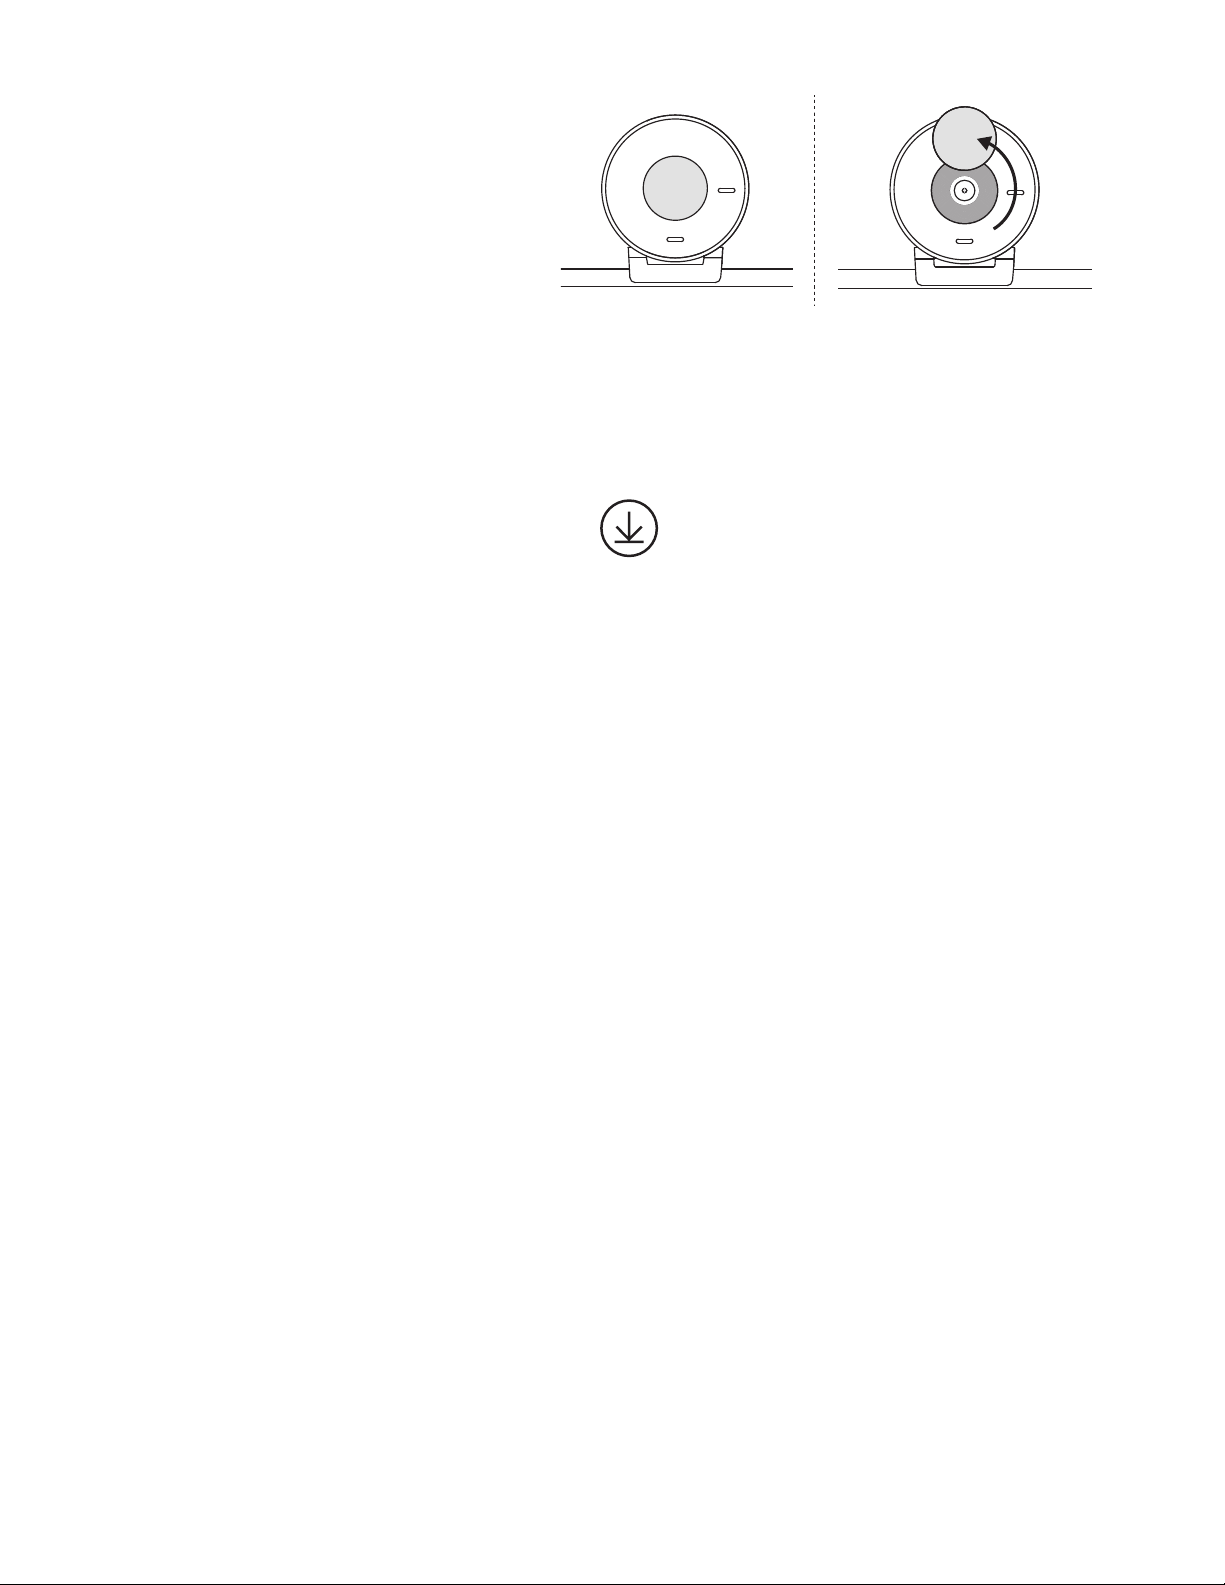
OPEN THE PRIVACY SHUTTER
Open the privacy shutter by gently pushing
itfrom the le or right direction of the device;
the cover will snap into its “o” position above
the camera.
INSTALL TUNE
Logi Tune helps boost your webcam
performance with periodic soware and
rmware updates.
It is recommended to update your webcam
andtake advantage of the great features
ofBrio 300.
To do so, download Logi Tune from
www.logitech.com/tune
Logi Tune
Webcam:
Height x Width x Depth: 2.58 in (65.63 mm) x 2.09 in (53.1 mm) x 1.78 in (45 mm),
incl. mount clip
Product weight:
2.63 oz (74.6 g), incl. mount clip & cable
Attached Cable length:
1.5 m (5 )
DIMENSIONS
6English

© 2023 Logitech. Logitech, Logi and the Logitech logo are trademarks or registered trademarks
of Logitech Europe S.A. and/or its aliates in the U.S. and other countries. USB-C and all other
trademarks are the property of their respective owners. Logitech assumes no responsibility for
anyerrors that may appear in this manual. Information contained herein is subject to change
without notice.
www.logitech.com/support/Brio300

了解您的产品
LED 指示灯
前铰链(倾斜调节)
支脚铰链
(显示器角度调节)
后铰链(主安装铰链)
隐私镜头盖
摄像头镜头
降噪麦克风
衬垫脚
USB C接头
8 简体中文

USB-C
包装内容
1. 带 USB-C 线缆的 Brio 300
2. 用户文档
打开支架
打开支臂。
放在显示器上
将 Brio 300 放在显示器上方,然后 确保安装配
件的正面卡舌 紧贴屏幕正面。
9 简体中文

收紧以适配显示器
将安装臂移向屏幕背面,使其适合显示器屏幕
厚度。 请注意,您可能需要 调整“支脚铰链”的角
度以匹配显示器的形状。
调整角度
通过向前或向后倾斜调整 Brio 300 的角度。
直接插入电脑
将随附的 USB-C 接头插入电脑的相应端口。
如果 可以,我们建议将 Brio 300 直接插入
电脑, 不通过 USB 集线器连接。
10 简体中文
打开隐私镜头盖
轻轻推动隐私镜头盖,将其 从设备的左侧或右侧
打开;镜头盖将卡入摄像头上方的“关闭”位置。
安装 TUNE
Logi Tune 通过定期的软件和固件更新帮助改善
网络摄像头性能。
建议您更新网络摄像头并 充分发挥 Brio 300
的功能。
为此,请下载 Logi
Tune:www.logitech.com/tune
Logi Tune
网络摄像头:
高 x 宽 x 深:约 65.63 毫米 x 约 53.1 毫米 x 约 45 毫米(含安装夹)
产品重量:
约 74.6 克(含安装夹和线缆)
随附线缆长度:
约 1.5 米
规格
11 简体中文

版权所有 © 2023 罗技。罗技、Logi、Logitech 和罗技标志为罗技欧洲公司和/或其美国及其他国家/
地区附属公司的商标,并或已注册。USB-C 和所有其它商标均是其各自所有者的财产。罗技对于本手
册中可能出现的任何错误不承担任何责任。本手册中包含的信息如有更改,恕不事先通知。
www.logitech.com/support/Brio300
瞭解您的產品
Led 指示燈
前鉸鏈 (傾斜調整)
底部鉸鏈
(顯示器角度調整)
後鉸鏈
(主要安裝鉸鏈)
隱私遮罩
攝影機鏡頭
隔噪麥克風
軟墊支架
USB C 接頭
13 繁體中文

USB-C
包裝內容
1. 含 USB-C 連接線的 Brio 300
2. 使用者文件
打開安裝套件
打開安裝懸臂。
放置到顯示器上
將 Brio 300 放到顯示器上端, 確認安裝套件的
前卡口 貼緊螢幕前端。
14 繁體中文

按壓使其穩固安裝於顯示器上
將安裝懸臂移向螢幕背面,使其配合顯示器的
寬度 。請注意,您可能需要調整「底部鉸鏈」
的角度, 以配合顯示器的形狀。
調整角度
前後傾斜 Brio 300, 以調整其角度。
直接插入到電腦
將連接的 USB-C 接頭插入到電腦上對應的連
接埠。 如有可能,建議將 Brio 300 直接插入到
電腦, 不要透過 USB 集線器。
15 繁體中文

開啟隱私遮罩
將隱私遮罩從裝置的左方或右方向輕輕地推開;
蓋板會卡入攝影機上方的「關閉」位置。
安裝 TUNE
Logi Tune 可透過定期的軟體與韌體更新,協助
加強網路攝影機性能。
建議更新您的網路攝影機 ,以利用 Brio 300
的強大公能。
若要如此做,請到下列網址下載
LogiTune:www.logitech.com/tune
Logi Tune
網路攝影機:
高 x 寬 x 深:65.63 公釐 (2.58 英吋) x 53.1 公釐 (2.09 英吋) x 45 公釐 (1.78 英吋),
包括安裝夾具
產品重量:
74.6 公克 (2.63 盎司),含安裝夾具和連接線
隨附的連接線長度:
1.5 公尺(5 英呎)
尺寸
16 繁體中文

版權所有 © 2023 羅技。羅技、Logi 和羅技標誌為 Logitech Europe S.A. 及/或其附屬公司在美國和其
他國家的商標或註冊商標。USB-C 與所有其他商標均是其各自所有人的財產。羅技對於本手冊中可能
出現的任何錯誤不承擔任何責任。本手冊中包含的資訊如有更改,恕不事前通知。
www.logitech.com/support/Brio300

제품 설명
LED 표시등
전면 힌지(틸트 조절)
풋 힌지
(모니터 각도 조절)
후면 힌지
(기본 장착 힌지)
프라이버시 셔터
카메라 렌즈
소음 감소
마이크
패딩 풋
USB C 커넥터
18 한국어

USB-C
내용물
1. USB-C 케이블이 부착된 Brio 300
2. 사용 설명서
마운트 열기
장착 암을 엽니다.
모니터 위에 놓기
Brio 300을 모니터 상단에 놓고 마운트의 전면
탭이 화면 전면에 꼭 맞게 합니다.
19 한국어

모니터에 맞게 압축
장착 암을 화면 뒤쪽으로 이동하여 모니터
너비에 맞춥니다. 모니터 모양에 맞게 "다리
힌지"의 각도를 조절해야 할 수도 있습니다.
각도 조절
Brio 300을 기울여 앞으로 또는 뒤로 각도를
조절합니다.
컴퓨터에 직접 연결
내장형 USB-C 커넥터를 컴퓨터의 해당 포트에
연결합니다. 가능한 경우, Brio 300을 USB
허브가 아닌 컴퓨터에 직접 연결하는 것을
권장합니다.
20 한국어

프라이버시 셔터 열기
프라이버시 셔터를 장치의 왼쪽 또는 오른쪽
방향에서 가볍게 눌러 엽니다. 커버가 카메라
위의 ‘o’ 위치에 맞춰집니다.
TUNE 설치
Logi Tune은 정기 소프트웨어 및 펌웨어
업데이트로 웹캠 성능 향상을 지원합니다.
웹캠을 업데이트하여 Brio 300의 뛰어난 기능을
활용하세요.
업데이트하려면 www.logitech.com/tune에서
Logi Tune을 다운로드합니다.
Logi Tune
웹캠:
높이 x 너비 x 깊이: 65.63mm(2.58인치) x 53.1mm(2.09인치) x 45mm(1.78인치),
마운트 클립 포함
제품 무게:
마운트 클립 및 케이블 포함 74.6g(2.63oz)
내장 케이블 길이:
1.5m(5)
규격
21 한국어

© 2023 Logitech. Logitech, Logi 및 Logitech 로고는 미국과 기타 국가에서 Logitech Europe S.A.
및/또는 그 계열사의 상표 또는 등록 상표입니다. USB-C 및 그 밖의 모든 상표는 해당 소유자의
자산입니다. Logitech은 이 설명서에 명시된 어떤 오류에 대해서도 책임지지 않습니다. 이 설명서에
있는 정보는 예고 없이 변경될 수 있습니다.
www.logitech.com/support/Brio300

MENGENAL PRODUK
Lampu indikator Led
Engsel depan
(penyesuaian
kemiringan)
Engsel kaki
(penyesuaian
sudutmonitor)
Engsel belakang
(engsel mounting
utama)
Shutter privasi
Lensa kamera
Mikrofon
noise-reducing
Kaki yang
empuk
Konektor USB C
23 Indonesia

USB-C
ISI KEMASAN
1. Brio 300 dengan kabel USB-C terpasang
2. Dokumentasi pengguna
BUKA MOUNT
Buka lengan mounting.
LETAKKAN DI MONITOR
Letakkan Brio 300 di atas monitor Anda
kemudian pastikan tab depan mount
menempel di bagian depan layar Anda.
24 Indonesia

TEKAN AGAR MENEMPEL KE MONITOR
Gerakkan lengan mounting ke arah belakang
layar agar sesuai dengan lebar monitor.
Harapdiperhatikan bahwa Anda mungkin perlu
menyesuaikan sudut “engsel kaki” agar sesuai
dengan bentuk monitor Anda.
MENYESUAIKAN SUDUT
Sesuaikan sudut Brio 300 dengan
memiringkannya ke depan atau ke belakang.
COLOKKAN LANGSUNG KE KOMPUTER
Colokkan konektor USB-C yang terpasang
ke port yang sesuai di komputer Anda.
Jika memungkinkan, kami sarankan untuk
mencolokkan Brio 300 langsung ke komputer
Anda dan jangan melalui hub USB.
25 Indonesia

BUKA SHUTER PRIVASI
Buka shutter privasi dengan mendorongnya
perlahan dari arah kiri atau kanan perangkat;
cover akan masuk ke posisi “o” di atas kamera.
INSTAL TUNE
Logi Tune membantu meningkatkan kinerja
webcam Anda dengan pembaruan soware
dan rmware secara berkala.
Kami menyarankan agar Anda memperbarui
webcam dan memanfaatkan tur-tur hebat
dari Brio 300.
Untuk melakukan hal ini, download Logi Tune
dari www.logitech.com/tune
Logi Tune
Webcam:
Tinggi x Lebar x Tebal: 2,58 inci (65,63 mm) x 2,09 inci (53,1 mm) x 1,78 inci (45 mm),
termasuk mount clip
Berat produk:
2,63 oz (74,6 g), termasuk mount clip & kabel
Panjang Kabel yang Terpasang:
1,5 m (5 kaki)
DIMENSI
26 Indonesia

© 2023 Logitech. Logitech, Logi, dan logo Logitech adalah merek dagang atau merek dagang
terdaar Logitech Europe S.A. dan/atau aliasinya di AS dan negara lainnya. USB-C dan
semua merek dagang lainnya adalah properti dari setiap pemilik merek terkait. Logitech tidak
bertanggung jawab atas setiap kesalahan yang terjadi akibat manual ini. Informasi di dalam
manual ini dapat berubah sewaktu-waktu tanpa pemberitahuan.
WEB-621-002257 002
www.logitech.com/support/Brio300