
HOBS
USER INSTRUCTIONS
GB
HH74DBXP
PIANI COTTURA
ISTRUZIONI D’USO E DI INSTALLAZIONE
IT
TABLE DE CUISSON
NOTICE D’EMPLOI ET D’INSTALLATION
FR
VARNÉ DESKY
NAVOD POUŽITĺ
CZ
KOCHMULDE
GEBRAUCHS - UND INSTALLATIONSANWEISUNGEN
DE
ANKASTRE OCAK
KULLANIM KILAVUZU
TR
CANDY HOOVER GROUP S.R.L. • Via Comolli 16 • 20861 Brugherio (MB) - Italy
INDICE
IT
ISTRUZIONI DI SICUREZZA
1. Avvertenze generali
2. Salvaguardia dell'ambiente
3.Installazione
4. Collegamento elettrico
5. Consigli sui recipienti di cottura per il piano
6. Uso
7. Pulizia e manutenzione
8. Risoluzione del problema
9. Manutenzione aggiuntiva
10. Garanze
.....................................11....
..................................................12
.......................................12
.......................................12.........................
..............................................13
..............14
............................................................................15
...........................................17
..........................................18
...........................................18
........................18...........................................
SOMMAIRE
FR
CONSIGNES DE SÉCURITÉ
1. Avertissements généraux
2. Protection de l'environnement
3.Installation
4. Raccordement électrique
5. Conseils concernant les ustensiles de
cuisine pour la table de cuisson
6. Utilisation
7. Nettoyage et entretien
8. Résolution de problèmes
9. Contrôle d'entretien préliminaire
........................................19
..........................................20
...................................20
..................................................................20
.......................................21
....................................22
..................................................................23
.......................................25
........................................26
.........................................26
OBSAH
CZ
BEZPEČNOSTNÍ OPATŘENÍ
1. Všeobecná upozornění
2. Ochrana životního prostředí
3.Instalace
4. Elektrické připojení
5. uDoporučení ohledně nádobí pro varnou desk
6. Použití
7. Čištění a údržba
8. Řešení problémů
9. Následná péče
........................................27
.............................................28
......................................28
.....................................................................28
....................................................29
..........30
........................................................................31
........................................................33
.......................................................33
..........................................................34
CONTENTGB
SAFETY INSTRUCTIONS
1. General warnings
2. Protecton of the envronment
3. Installaton
4. Electrical connection
5. Hob cookware advice
6. Use
7. Cleaning and maintenance
8. Problem solving
9. Aftercare
.............................................03
.......................................................04
....................................04
..................................................................04
..................................................05
................................................06
............................................................................07
........................................09
.........................................................09
....................................................................10
INHALT
DE
SICHERHEITSHINWEISE
1. Allgemene Warnhnwese
2. Umweltschutz
3. Installaton
4. Elektrscher Anschluss
5. Tpps zum Kochgeschrr
6. Benutzung
7. Rengung und Wartung
8. Problembehebung
9. Kundendenst
..........................................35
........................................36
..........................................................36
................................................................36
............................................37
..........................................38
................................................................39
............................................41
....................................................42
...........................................................42
İÇİNDEKİLERTR
GÜVENLİK TALİMATLARI
1. Genel uyarılar
2. Çevrenn korunması
3. Kurulum
4. Elektrk bağlantısı
5. Ocak çn pşrme gerec tavsyes
6. Kullanım
7. Temzlk ve bakım
8. Sorun gderme
9. Satış sonrası bakım
Garant Belges
.............................................43
............................................................44
...................................................44
.....................................................................44
......................................................45
..............................46
....................................................................47
......................................................49
...........................................................49
...................................................50
..............................................................51
02

CAUTION: the cooking process must be
supervised. A short term cooking process has to
be supervised continuously.
We recommend you keep the instructions for
installation and use for later reference, and before
installing the hob, note its serial number in case
you need to get help from the after sales service.
WARNING: use only hob guards designed by the
Manufacturer of the cooking appliance or
indicated by the Manufacturer of the appliance in
the instructions for use as suitable or hob guards
incorporated in the appliance. The use of
inappropriate guards can cause accidents.
WARNING: the appliance and its accessible parts
become hot during use. Care should be taken to
avoid touching heating elements. Children under
8 years of age must be kept away from the
appliance unless they are continuously
supervised.
WARNING: unattended cooking on a hob with fat
or oil can be dangerous and may result in fire.
NEVER try to extinguish a fire with water, but
switch off the appliance and then cover flame e.g.
with a lid or a fire blanket.
WARNING: danger of fire: do not store items on
the cooking surfaces.
WARNING: if the surface is cracked, do not touch
the glass and switch off the appliance to avoid the
possibility of electric shock.
This appliance can be used by children aged from
8 years and above and people with reduced
physical, sensory or mental capabilities or lack of
experience and knowledge if they have been
given supervision or instruction concerning use of
the appliance in a safe way and understand the
hazards involved. Children should be supervised
to ensure that they do not play with the appliance.
Cleaning and user maintenance shall not be
made by children without supervision.
It is strongly recommended to keep children away
from the cooking zones while they are in operation
or when they are switched off, so long as the
residual heat indicator is on, in order to prevent
the risks of serious burns.
This appliance is not intended to be operated by
means of an external timer or separate remote
control system.
If present do not to stare into halogen lamp hob
elements.
Connect a plug to the supply cable that is able to
bear the voltage, current and load indicated on the
tag and having the earth contact. The socket must
be suitable for the load indicated on the tag and
must be having the earth contact connected and
in operation. The earth conductor is yellow-green
in color. This operation should be carried out by a
SAFETY INSTRUCTIONS
Do not put metallic objects such as knives, forks,
spoons or lids on the hob. They could heat up.
If the supply cord is damaged, it must be replaced
by Manufacturer, its service agent or similarly
qualified people in order to avoid a hazard. The
earth conductor (yellow-green) must be longer
than 10 mm on the terminal block side. The
internal conductors section should be appropriate
to the power absorbed by the hob (indicated on
the tag). The type of power cable must be
HO5V2V2-F.
After every use, some cleaning of the hob is
necessary to prevent the build-up of dirt and
grease. If left, this is recooked when the hob is
used and burns giving off smoke and unpleasant
smells, not to mention the risks of fire
propagation.
The yellow-green earth cable should not be
interrupted by the breaker. The socket or
omnipolar breaker used for the connection should
be easily accessible when the appliance is
installed.
Always use the appropriate cookware.Always
place the pan in the center of the unit that you are
cooking on.
Do not use the hob as a working surface.
Do not use the surface as a cutting board.
The disconnection may be achieved by having the
plug accessible or by incorporating a switch in the
fixed wiring in accordance with the wiring rules.
Do not store heavy items above the hob. If they
drop onto the hob, they may cause damage.
Do not use the hob for storage of any items.
Do not slide cookware across the hob.
Do not place anything on control panel.
Never use a steam or high pressure spray to clean
the appliance.
Aluminum foil and plastic pans must not be placed
on heating zones.
suitably qualified professional. In case of
incompatibility between the socket and the
appliance plug, ask a qualified electrician to
substitute the socket with another suitable type.
The plug and the socket must be conformed to the
current norms of the installation country.
Connection to the power source can also be made
by placing an omnipolar breaker between the
appliance and the power source that can bear the
maximum connected load and that is in line with
current legislation.
Never cook food directly on the glass ceramic
hob.
Do not touch the heat zones during operation or
for a while after use.
03 GB

Leave a distance of at least 55
mm between the hob and the
back wall and of at least 150
mm between the hob and the
vertical furniture or walls in the
lateral side. If a furniture is
installed above the hob, the
minimum distance required is
700 mm.
When installing a hood above
the hob, please consult the
installation requirements
specified for the hood but, in
any case, the distance between
the hob and the hood must not
be lower than 700 mm.
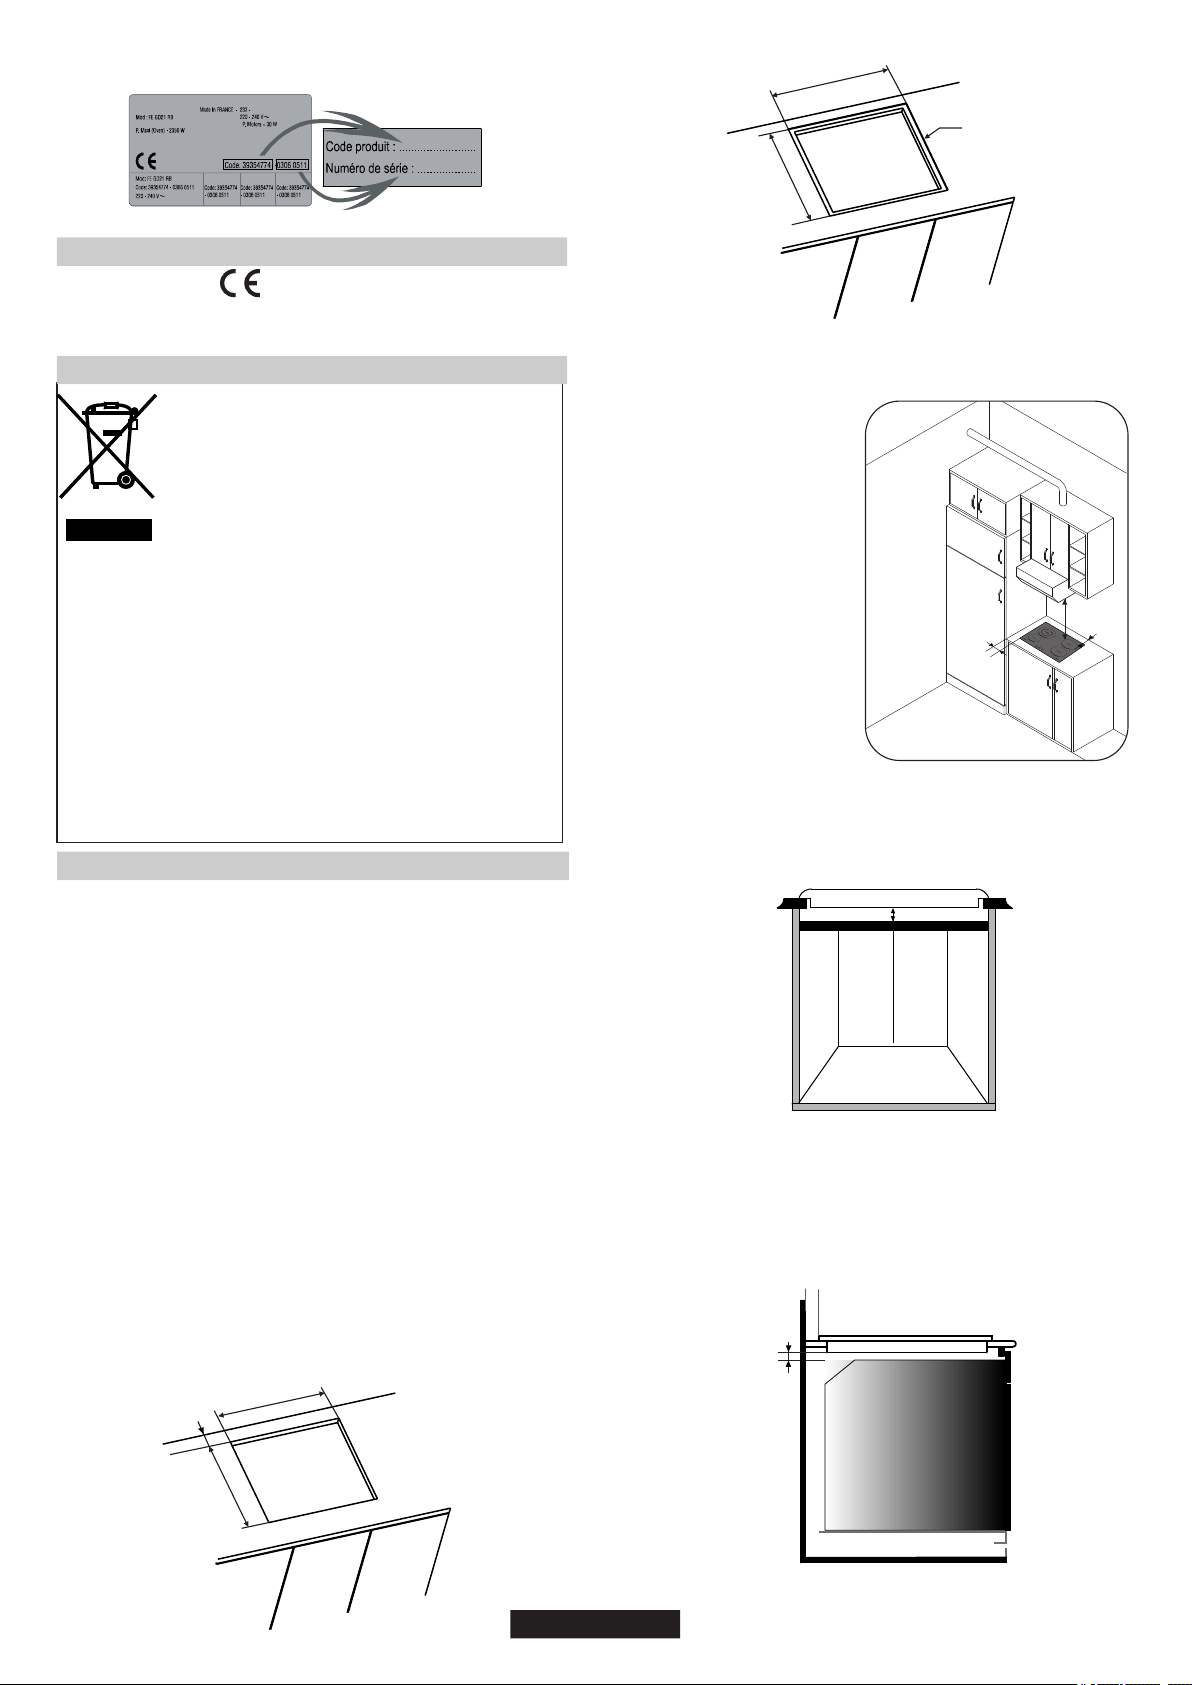
PRODUCT CODE T
Identification Plate (located under the hob's bottom casing)
1. GENERAL WARNINGS
By placing the mark on this appliance we are assuring
compliance to all European Safety, Health and Environment
requirements which are applicable for this product category.
2. PROTECTION OF THE ENVIRONMENT
Individuals can play an important role in ensuring that the WEEE
does not become an environmental issue; it is essential to follow
some basic rules:
• WEEE shall be handled over to the relevant collection points
managed by the municipality or by registered companies. In many
Countries, for large WEEE, home collection could be present.
This appliance is marked according to European
Directive 2012/19/EU on Waste Electrical and
Electronic Equipment (WEEE).
• WEEE shall not be threatened as household waste.
WEEE contains both polluting substances (which
can cause negative consequences for the
environment) and basic components which can be
reused.It is important to have WEEE subjected to
specific treatments, in order to remove and dispose
properly all pollutants and recover and recycle all
materials.
• In many Countries, when you buy a new appliance, the old one
may be returned to the retailer who has to collect it free of charge on
a one-to-one basis, as long as the appliance is of equivalent
typology and has the same functions as the supplied one.
3. INSTALLATION
Installing a domestic appliance it is a complicated operation which, if
not carried out correctly, can seriously have impact on safety of goods,
properties or people. For this reason, it should be carried out by a
professionally qualified person in accordance with technical
regulations.
In the event that this advice it is ignored and installation is carried out
by an unqualified person, the Manufacturer declines all responsibility
for any technical failure of the appliance whether or not it results in
damage of goods or properties or in injury of people or animals.
After having removed the packaging please be sure that the appliance
it is not damaged, otherwise contact the Retailer or Manufacturer After
Sales Service.
Make sure that the furniture in which the appliance will be fitted and all
other furniture in the nearby are made with materi
ls which can withstand high temperatures (min 100 °C).
In addition, all decorative laminates should be fixed with high-resistance
glue.
Appliance can be installed in a Built-in furniture in “Standard” or “Flush”
mode.
700 mm
55 mm
150 mm
490 mm
+ 2
- 0
560 mm
+ 2
- 0
Min. 70 mm
Standard installation
perimeter
Note: Inner perimeter dimensions are same with standard installation
703 mm (70 cm hob)
+ 2
- 0
523 mm
+ 2
- 0
593 mm (60 cm hob)
+ 2
- 0
Slot depth: 5 mm
Flush installation
perimeter
Worktop thickness should be between 25 and 45 mm.
If the bottom part of the hob is adjacent to an area normally accessible
for handling or cleaning operations, a separator it must be put 20 mm
below the bottom part of the hob.
min 20 mm
When installing an oven under the hob, separator must not be put and
the minimum distance between the bottom part of the hob and the
oven must not be lower than 10 mm. Do not install not cooled oven
under this hob and install the oven following its own installation
requirements.
10
mm
min
04 GB
Do not use the hob until the
silicone layer it is completely dry.
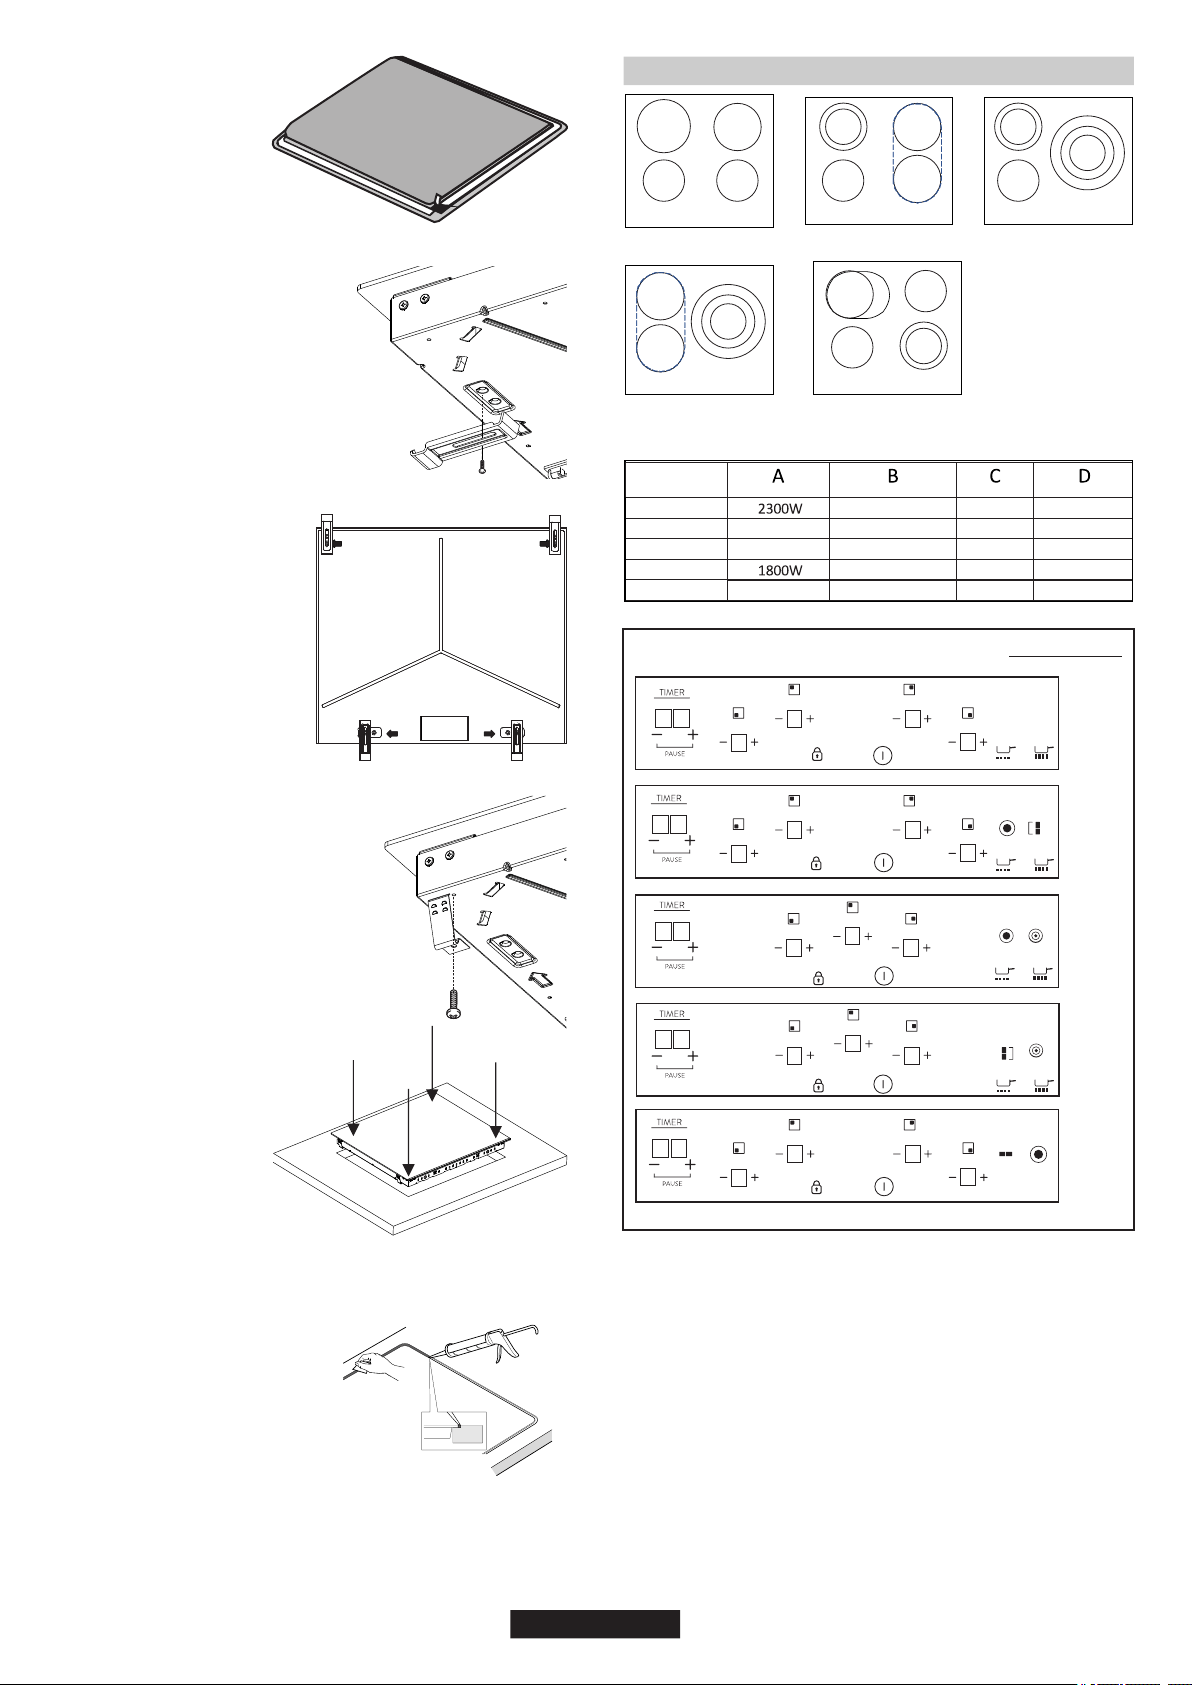
FLUSH INSTALLATION
After checking that the position of
the hob is correct fill the gap
between the worktop and the hob
with silicone adhesive. Flatten the
silicone layer with a scraper or
with wet finger damped with water
and soap before it forms.
A watertight seal gasket is
supplied with the hob. Fit
the seal gasket around the
bottom hob as described
and make sure that it is
properly fitted to avoid any
leakage into the supporting
furniture.
Bottom
Normal Fixing:
- Get the fixing clips from accessory bag
and screw them into the position shown
on bottom box. (Do not tighten the
screws to block clips, they should move
freely)
- Insert the hob in center
position of cut out.
- Turn the clips and tighten
them fully.
Get four springs form accesory bag and
screw them onto bottom box as shown
in figure.
Quick Fixing: (Depending on model)
Center and insert the hob.
Press the sides of hob until it
is supported around its
entire perimeter.
05 GB
1
2
3
4
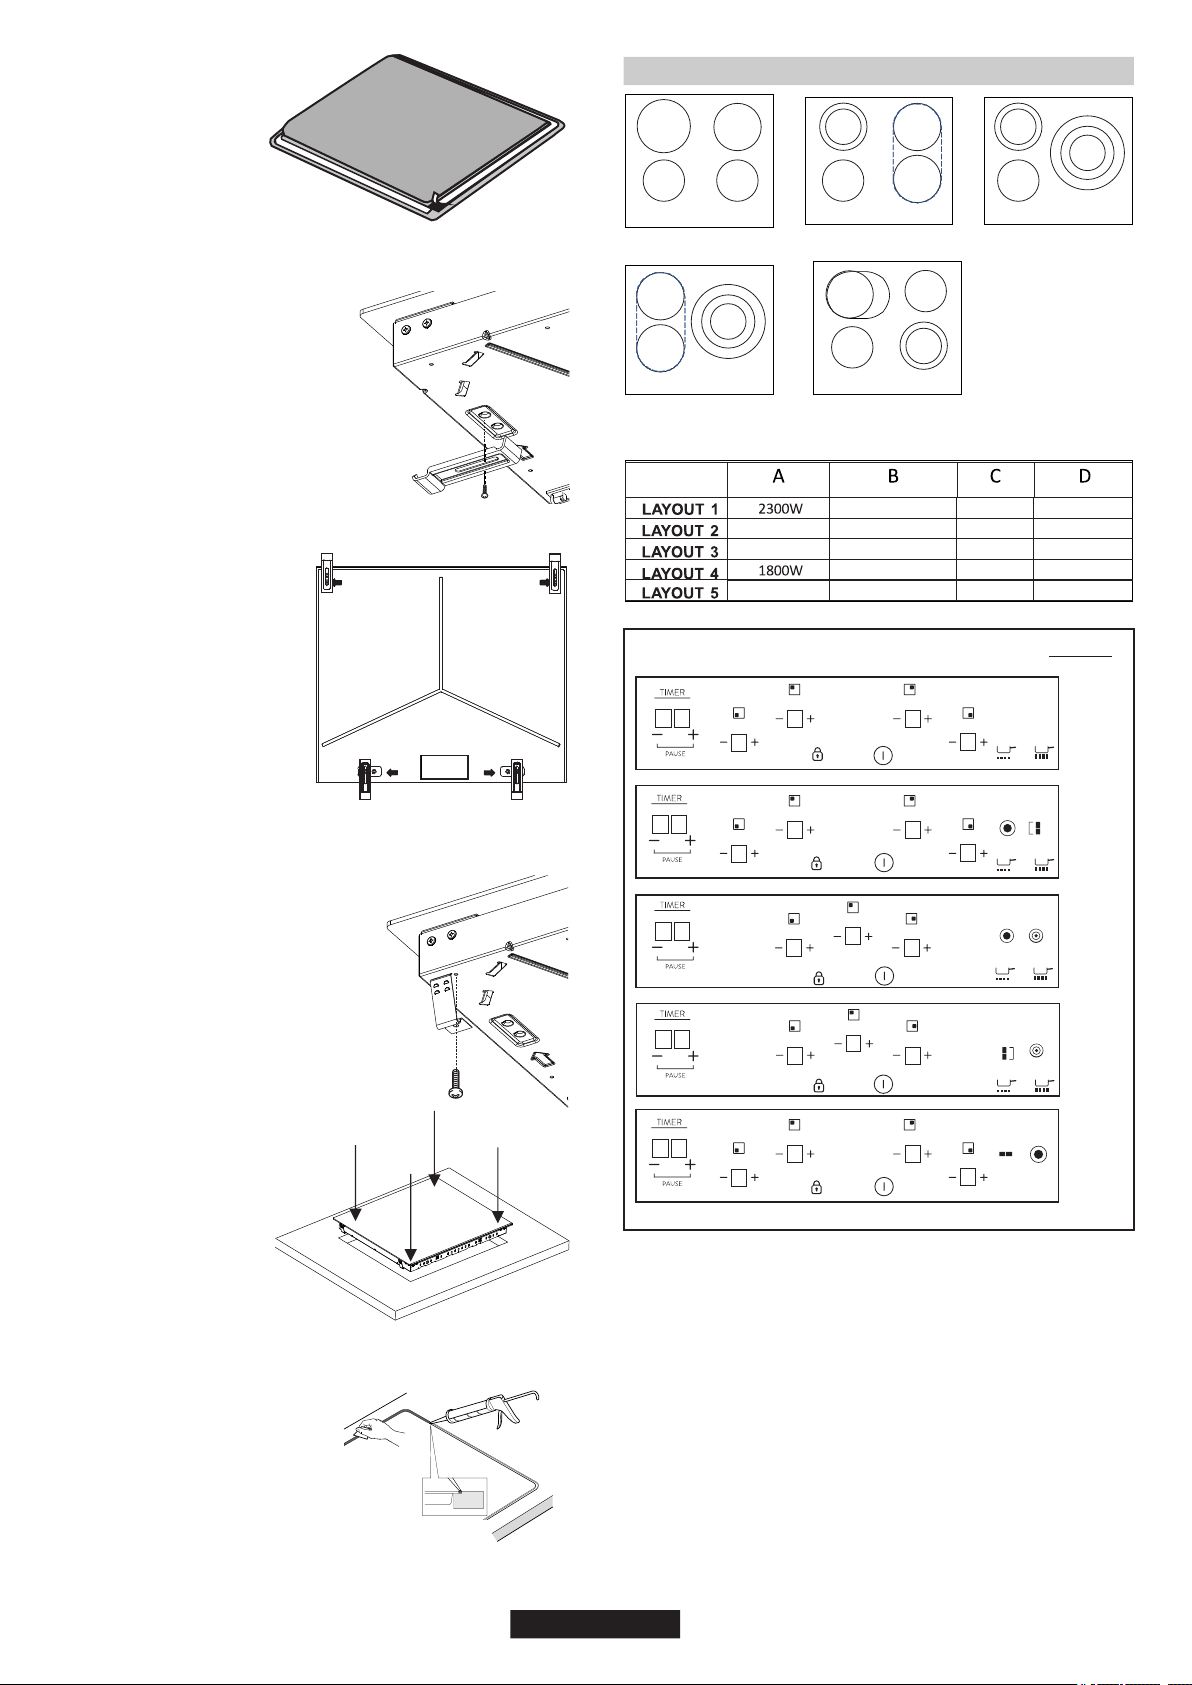
LAYOUT
9. Melting
According to model
6. Cooking zone programming indicator
1. ON/OFF
5. Additional cooking zone led
2. " + "
3. " - "
4. TIMER
7. Bridge
8. Child lock
10. Boiling
4. ELECTRICAL CONNECTION
8
88
8
2
22
23
33
3
6
1
8
9
10
8 8
4
8
88
8
5
7
23
23
23
23
1
8
6
8 8
4
9
10
8
8
8
57
23
23
23
1
8
6
8 8
4
9
10
8
8
8
55
23
23
23
1
8
6
8 8
4
9
10
B
CD
BA
C
B
C
D
A
C
B
B
D
A
LAY OUT 1LAY OUT 2LAY OUT 3
LAY OUT 4LAY OUT 5
AA
C
1000+700 W
1000+700 W
1500+900 W1200 W
1050+900+750 W
1050+900+750 W
1200 W
1200 W
1200 W
1800 W
1200 W
1200 W
1800 W
1000+700 W
-
-
1800 W
1800 W
5
8
88
8
5
5
23
23
23
23
1
8
6
8 8
4
"Installation must conform to the standards & directives."
Manufacturer declines all responsibility for any damage that might
be caused by unsuitable or unreasonable use.
WARNING: Manufacturer cannot be held responsible for any incident or
its consequences that may arise during the use of an appliance not linked
to the earth, or linked to an earth whose continuity is defective. Before any
electrical operation, please check the supply tension shown on the
electricity meter, the adjustment of the circuit- breaker, the continuity of the
connection to earth to the installation and that the fuse is suitable.
The electrical connection to the installation should be made according to
the rated power of the Appliance; this should be made via an Omni pole
cut-out switch.
To proceed to the new connection, please follow below instructions:
For any questions regarding power supply cord refer to After Sales
Service or a qualified technician.
It is however possible to connect the hob to:
If the hob is fitted with power supply cord, this shall be connected only to a
power supply of 220-240 V between phase and neutral.
Before making the connection, make sure that the installation is protected
by a suitable fuse, and that it is fitted with wires of a large enough section to
supply the appliance normally.
If the appliance has a socket outlet, it must be installed so that the socket
outlet is accessible.
Turn over the hob, glass side against the working top, taking care to protect
the glass.
The yellow/green wire of the power supply cable must be connected to the
earth of both power supply and appliance terminals.
Three Phase 380-415 V2N
Open the cover in the following sequence:
Three Phase 220-240 V3
231
- unscrew the cable clamp "1";
- Strip the end of each conductor of the supply cord on a 10 mm length, by
taking in account the requested length of the cord for the connection to the
terminal block;
Operations to be carried out to make a new
connection:
- Choose the power supply cable in accordance
with the recommendations in the table;
- Strip the end of each conductor of the supply cord
on a 10 mm length, by taking in account the
requested length of the cord for the connection to
the terminal block;
- Choose the power supply cable in accordance with the recommendations in
the table;
- put the blade of a flat screw-driver in front of each tab "2" e
"3", push in and press;
- find the two tabs located on the sides;
- Pass the power supply cable into the clamp;
To release the power supply cord:
- remove the cover.
- Pass the power supply cable into the clamp;
- Screw the cable clamp.
- According to the installation and with the help of shunt bars which you should
have recovered in the first operation, fix the conductor as shown on the chart;
- Screw the cable clamp.
- Remove the screws retaining the terminal block which contains
the shunt bars and the conductors of the supply cord;
- Pull out the supply cord.
Note: make sure the terminal board screws are tight.
Operations to be carried out to make a new connection:
- Fix the cover;
- According to the installation and with the help of
shunt bars which you should have recovered in the
first operation, fix the conductor as shown on the
chart;
- Fix the cover;
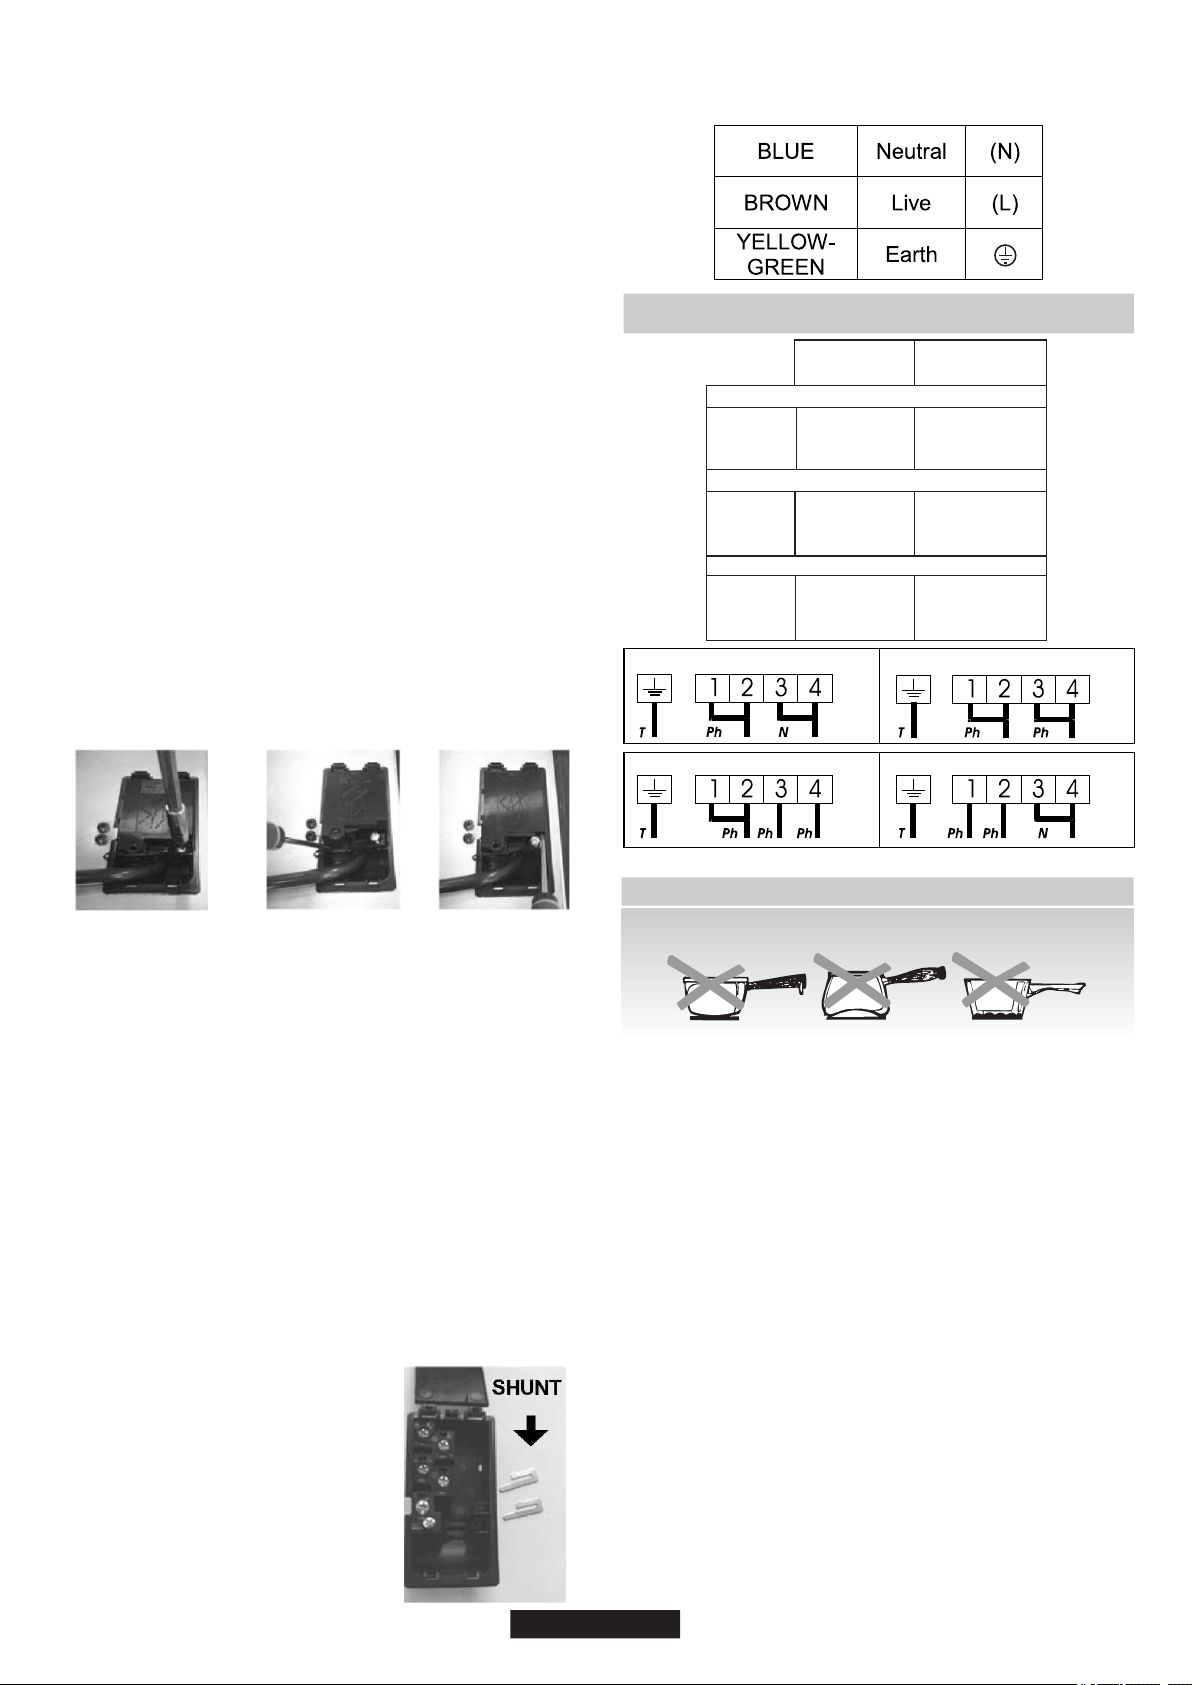
N
=
NeutralT
=
Earth
Monophase
220-240
V~
Two
phases
220-240
V2~
Three
phases
220-240
V3~Three
phases
380-415
V2N~
Ph = Phase
Connection to the terminals on the terminal block
If it should be necessary to replace the power supply cord, connect the
wire in accordance with following colors/codes:
ATTENTION:
LAY OUT
"1-3"
LAY OUT
"2-4"
MONOPHASE or TWO PHASES 220-240 V~
Cable
HO5V2V2F
Cable
HO5V2V2F
Cable
HO5V2V2F
2
3x2,5 mm
2
3x4 mm
2
4x1,5 mm
2
4x1,5 mm
2
4x1,5 mm
2
4x1,5 mm
THREE PHASES 220-240 V3~
THREE PHASES 380-415 V2N~
06 GB
( )
5. HOB COOKWARE ADVICE
Using good quality cookware is critical for setting
the best performance from your hob.
• Ensure that the base of the pot or pan is dry : when filling pans with
liquid or using one that has been stored in the refrigerator, ensure
that the base of the pan is completely dry before placing it on the hob. This
will help to avoid staining the hob.
Aluminium : heavy weight recommended. Good conductivity.
Aluminium residues sometimes appear as scratches on the hob, but can
be removed if cleaned immediately.
Cast Iron : usable, but not recommended. Poor performance. May
scratch the surface.
• Always use good quality cookware with perfectly flat and thick
bases : using this type of cookware will prevent hot spots that cause food
to stick. Thick metal pots and pans will provide an even distribution of heat.
• Use pans whose diameter is wide enough to completely cover the
surface unit : the size of the pan should be no smaller than the
heating area. If it is slightly wider the energy will be used at its maximum
efficiency.
THE CHOICE OF COOKWARE - The following information will help you to
choose cookware which will give good performance.
Stainless Steel : highly recommended. Especially good with a sandwich
clad base. The sandwich base combines the benefits of stainless steel
(appearance, durability and stability) with the advantages of aluminium or
copper (heat conduction, even heat
distribution).
Because of its low melting point, thin aluminium should not be used.
dry. Overheated metal can bond to glass hobs. An overheated copper pot
will leave a residue that will permanently stain the hob.
Copper Bottom / stoneware: heavy weight recommended. Good
performance, but copper may leave residues which can appear as
scratches. The residues can be removed, as long as the hob is cleaned
immediately. However, do not let these pots boil
6. USE
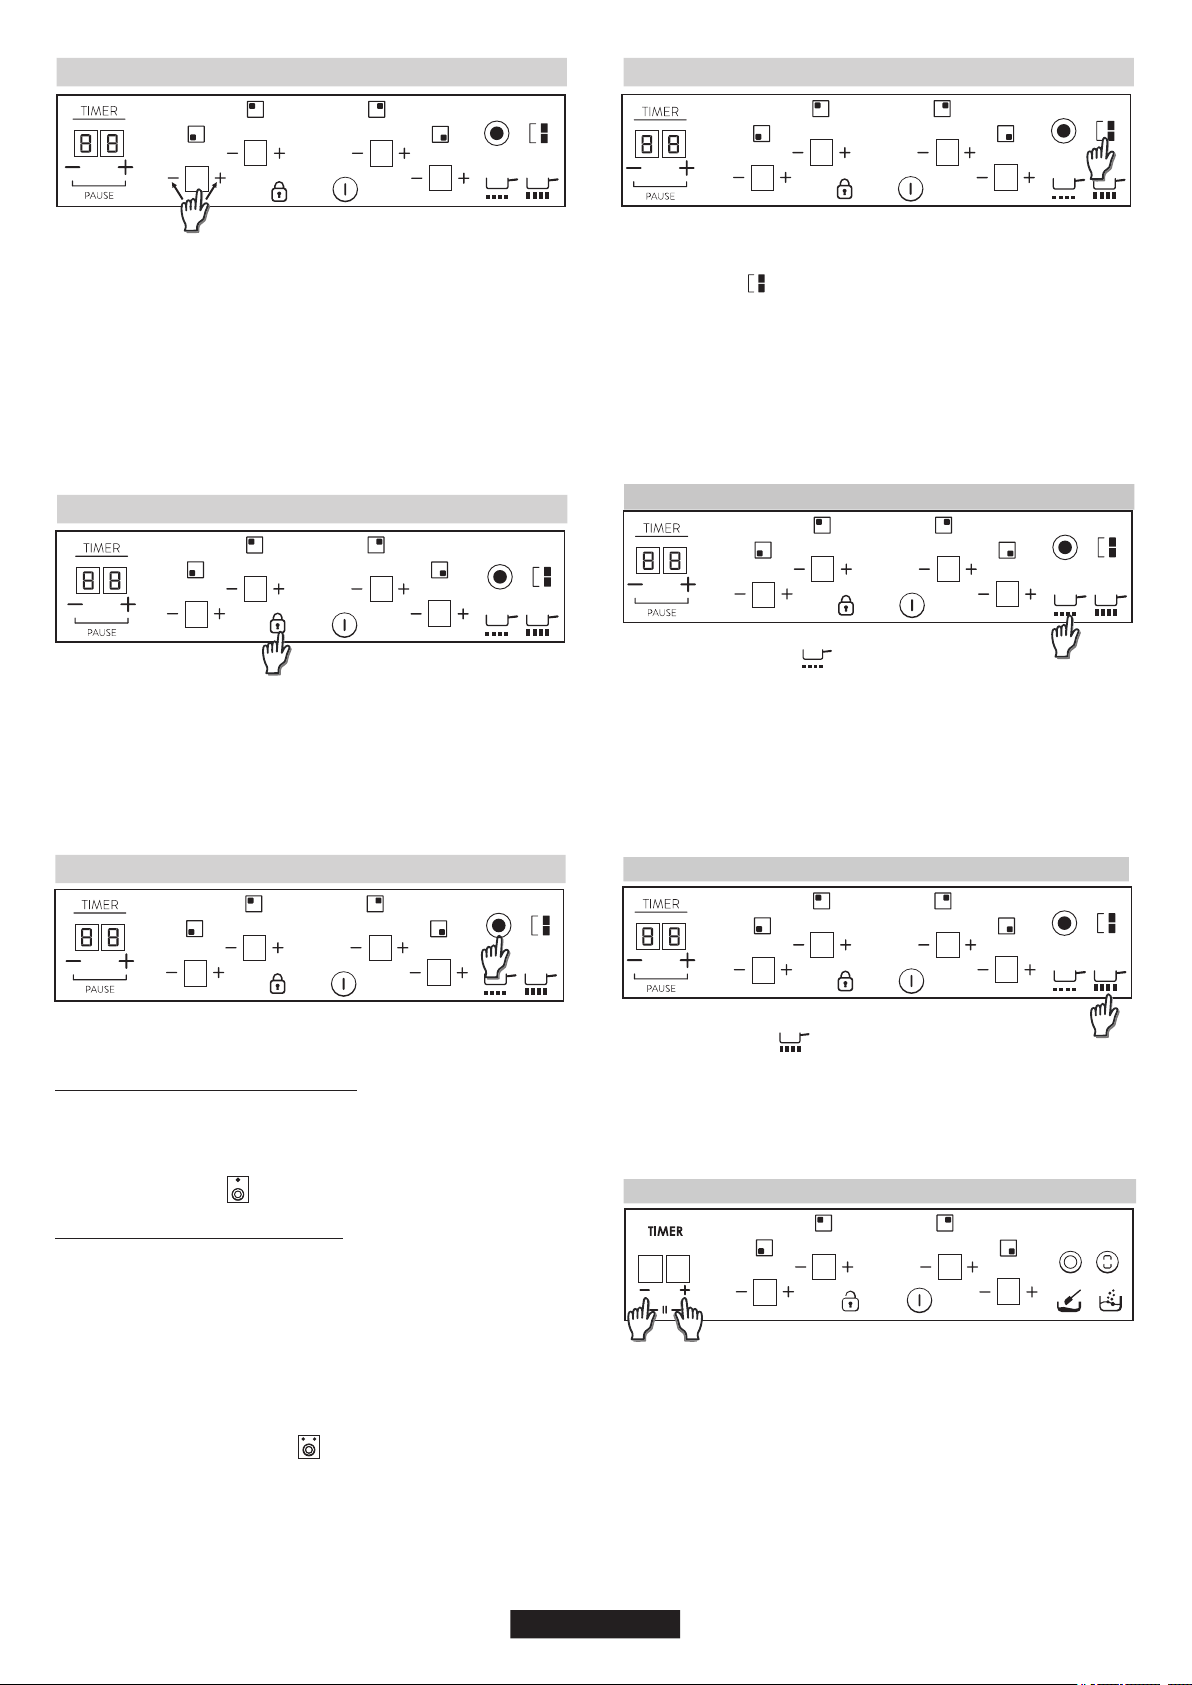
Switch ON/OFF a heater zone
2) If there is residual heat indication in the display which is OFF, "H"
will be displayed.
To switch ON a heater Touch power key during 400 msec. Long beep
will be heard and "0" value will appear in target zone digit, indicating
power level.
3) If lock function is active you cannot switch ON a zone.
1) If any cooking stage is in position 0, this display will switch OFF
automatically after 10 seconds and the zone OFF sequence will
sound.
2) If there is residual heat indication in the display which is ON but in 0
power, "0" will appear changing over.
To switch OFF a heater Touch power key during 1,2 sec. 3 Short
beeps will be heard and nothing or "H" value will appear in target zone
digit if residual heat exists. Zone will be OFF.
1) If any cooking stage is in position 0, this display will switch OFF
automatically after 10 seconds and the zone OFF sequence will
sound.
3) Even lock function is active you can switch OFF a zone.
4) If only one heater is active and this one is switched off, 4 Short beep
will be heard indicating all cook top is Off.
Increase / Decrease power level
3. With a zone ON at 0 power level, if the zone is hot, 0 will blink
alternatively. After 10 seconds, 0 will disappear an ‘H’ letter will appear
fixed on display.
With a short press on ‘+’ or ‘-‘ keys, Increase or decrease power in the
selected zones digit: 0-1-2-3...9-P
1. For Long Presses in + or - keys, power level increases /decreases
continuously. With a fast increase, power stops at level 9, and for a
higher power another short press is needed on the + key. No beep
sound is heard with fast increase / decrease.
2. Once arrived to P power level, pressing + key again does not
change power level to 0.Once arrived to 0 power level, pressing - key
again does not change power level to P.
4. When a heater is selected and ‘+’ & ‘-‘keys are touched at the same
time, power level will go to ‘0’ but heater will maintain selected during
10 seconds. If heater was temporized, timer will go to Off. This action
can only be developed in several cases depending touch control
configuration.The following examples are for information only.
Personal experience should then let you adapt these settings to your
taste and habits.
07 GB
8
8
8
8
8
8
8
8
Porcelain/enamel : Good perfomance only with a thiny smooth, flat base.
Glass-ceramic : not recommended. Poor performance. May scratch
the surface.
Through the "Power management" function, the user can set the
maximum power that can be reached by the hob. Power management
function is only available during first 30 seconds after switch on the
hob. There is even the possibility to repeat this setting switching off
and on the power plug. By setting the desired maximum power, the
hob automatically adjusts the distribution in the various cooking zones
so that this limit is never exceeded; with the added advantage of being
able to simultaneously manage all the zones without overload
problems. The customer can set the maximum power of hob between
2.5 kW and the maximum related power of the hob (this can change
according to the model). For example if the maximum power of the hob
2.- Let touch control fnsh ts ntalzaton process.
1.- Swtch on hob.
is 7 kW, the maximum power level for setting is between 2.5kW and
7 kW. After connecting the appliance to the electrical power, within 30
seconds you can set the power level based on the points shown
below:
3.- Unlock the control.
How to choose power management level
P
8
8
8
8
4.- Before pass 30 seconds after switch on the hob; touch for 5 seconds
“-” key of timer.
8
8
8
8
88
6.- Using '+' and '-' of Timer keys, Power Management value can be
adjusted. When requred value s selected, touch at the same tme “+”
and “–” keys durng 5 seconds.
4
0
0
5
P
8
8
8
8
88
7.- When ths process s fnshed, a long beep s heard and a reset s
produced. Start-up process wll be generated agan.
8.- After start-up process, n tmer dsplay power management wll be
showed.
5.- After ths moment, ths message wll appear on dsplay, Po on tmer
dsplay. Power level dvded by 100 n heater dsplays.
6
0
0
5
P
P
After that, touch control won´t allow any combnaton whch
can exceed ths lmt.
4
0
0
5
b) If ths power management selecton s ON, f more than 90 seconds
after swtch on the hob ths process wll be fnsh wthout
c) If ths power management selecton s ON, f any key s touched
except the combnaton of tmer “+” and “–”, process
d) If ths power management selecton s ON, f any key s touched the
combnaton of tmer “+” and “–”, process wll be
Notes:
a) Ths power management s only avalable durng frst 30 seconds
after swtch on the hob.
any new power value were recorded.
fnsh wth a new power value were recorded , reset and touch
control wll start workng as usual.
wll be fnsh wthout any new power value were recorded and touch
control wll start workng as usual, wthout reset.
Child Lock
The action will be done when lock key is touched
Then, any time when a key will be touched, displays will show "L"
during 2sec. heating remains at the same state.
To deactivate Child Lock, follow the same process explained before.
Then Short beep will be heard and displays will show "n" letter. Hob will
remain unlocked.
Note: An automatic child lock will produce in 15 minutes after total
Switch OFF of the hob.
2nd Short Press on extension key Switches OFF extension ring.
1st Short Press on extension key Switches ON 1st extension ring. 1
LED over extension key turns ON if 1st extension ring is ON (left LED
in case of triple zone, middle and only LED in case of double zone) 2nd
Short Press on extension key Switches ON 2nd extension ring. 2
LEDs over extension key turn ON if 1st and 2nd extension rings are
ON
To switch ON double extension ring, associated main zone must be
already ON and Indicating power level must be higher than 0.
Short beep each press on extension key.
1st Short Press on extension key Switches ON extension ring. LED
over extension key turns ON if Extension ring is ON.
3rd Short Press on extension key. Switches OFF 1st and 2nd
extension rings.
8.2- Triple zone ON
Short beep each press on extension key.
8.1- Double zone ON
Double / Triple zones
8
8
8
8
8
8
8
8
Bridge function
The bridge can be enabled only when both heaters are off. One heater
of the bridge has been selected, to activate bridge function touch
bridge key.
A beep sounds and the zone LED is switched on if the zone is enabled.
Once the heaters selected, if the power level is not the desired power
level, by the + - keys.
Both bridge heater displays will show same power level.
The function will finish:
- If the bridge key is touched in setting mode
Both bridge heaters will be selected at the same time.
- If user selects power level “0”
Meltng functon
- If it is selected to other power level.
- If switched off
- Select melting key
The heater will work at power level “2”
A tone sounds and heater display shows “U”
Being the heater selected, Melting function will finish
After a heater has been selected, to activate melting function:
8
8
8
8
8
8
8
8
Overflow security
Something (an object or a liquid) is pressing any key during more than
5s. 2 Short Beep + 1 Long beep every 30s while the key is pressed.
Cook-top will turn Off. This symbol will maintain blinking while the
matter persist.
Timer
6) When the time is elapsed and the hob is beeping, press any key and
the alarm and digit sequence will end.
Select the zone to be timed. Power level of the zone greater than 0.
Static is displayed in the zone being timed . "0 0" in the digits
reserved for the timer.
3) If timer "+" or "-" keys is maintained pressed during TBD time, there
is quick setting.
To activate timer, heater must be selected and its power level must
be greater than “0”;
2) Pressing simultaneously timer "+/-" keys the timer is cancelled
(goes to 00).
4) When setting timer time, it is possible to go from "00" to "99" with "-"
key, and from "99" to "00" with "+" key.
1) With "+" or "-" keys, timer time can be chosen. No Beeps at time
change.
5) Maximum time 99 minutes.
Boiling Function:
- Select Boiling key
After a heater has been selected, to activate Boiling function:
A tone sounds and heater display shows “P”
After these 10 minutes a tone sounds heater will return to level “9”
The heater will work at maximum power level for 10 minutes.
8
8
8
8
Pause function
To select ths functo , the user should touch “tmer +/- keys” together.
All the tmers runnng count downs are paused,
All keys are locked except “tmer +/- keys” and “on/off key” (Tmer keys
can only be actve f they are used together to deactvate pause
functon),
Tmer dsplays nothng, and all the heaters dsplays are gettng on and
putng out “0”, swtchng on segment by segment n left drecton, and
after that swtchng off segment by segment n rght drecton,
contnously.
The stop functon wll fnsh:
f the “tmer +/- keys” (together) are touched for more than ½ second a
beep sounds and the heaters actual power settng and tmer
countdowns are restored, or f the cooktop s stopped for more than 10
mnutes the cooktop s swtched off automatcally.
The Pause functon allows temporary pausng of the cookng process,
allowng the users to answer the door or the telephone wthout
worryng that the water s bolng over. Ths functon s also useful to
clean the user nterface surface wthout changng the cookng set up.
If the “tmer +/- keys” are touched for ½ seconds :
A beep sounds and the cooktop s stopped,
The heaters actual power settng s stored and all the actve heaters
power s set to power level 0,
The heaters auto-swch off tme s paused,
8 8
8
8
8
8
08 GB
Residual Heat Indicator (In radiant heaters-> calculated)
While a temperature on the cook top glass surface is above
o
65 Cb(theory value), this condition will be shown in the associated
display, by means of an “H”.
o
To generate a temperature above 65 C a heating element has to be in
operation for certain time, this time depends on the power level. Once
this time has expired, the residual heat warning will be shown when
the heating element is switched off.
The same indicators can be used for “residual heat” indication as well.
A time table must be defined on this purpose: Rest Heat time=f (power
level, working time).
Automatic Safety Off
The maximum time a heater can stay on, depends on the selected
cooking level.
If the power level is not changed during a preset time, the
corresponding heater turns off automatically.
Power level
Max. time on (hours)
1
2
3
4
5
6
7
8
9
10
5
5
4
3
2
2
2
2
NOTE: while an overheating situation should occur during the
operation of the highest power levels, the Hob control will
automatically adjust the power level in order to protect the hob from
overheating.
7. CLEANING AND MAINTENANCE
. It is advisable to keep away from the hob all substances which are
liable to melt, such as plastic items, sugar, or sugar-based products.
- Wipe with a soft cloth or dry kitchen paper until the surface is clean.
- Rub any stubborn stains with a soft cloth or with slightly damp
kitchen paper.
. Only products, (creams and scrapers) specifically designed for
aglass ceramic surfaces should be used. They are obtainable from
hardware stores.
- Place a few drops of the specialised cleaning product on the hob
surface.
If there are still some stubborn stains:
- Place a few more drops of specialised cleaning fluid on the surface.
- Wipe with a soft cloth or dry kitchen paper until the surface is clean.
. Avoid spillages, as anything which falls on to the hob surface will
quickly burn and will make cleaning more difficult.
- Repeat the operation if necessary.
. Before carrying out any maintenance work on the hob, allow it to
cool down.
.MAINTENANCE:
- Scrape with a scraper, holding it at an angle of 30° to the hob, until
the stains disappear.
09 GB
To activate timer, heater must be selected and its power level must
be greater than “0”;
Select the zone to be timed. Power level of the zone greater than 0.
Static is displayed in the zone being timed . "0 0" in the digits
reserved for the timer.
1) With "+" or "-" keys, timer time can be chosen. No Beeps at time
change.
9) Last minute will be displayed by seconds (For Variants only visible if
we enter the timer programming while the last minute of the
countdown)
12) Alternatively Power (5s) and (0,5s) is displayed in the zone being
timed.
3) If timer "+" or "-" keys is maintained pressed during TBD time, there
is quick setting.
8) Power of timed zone can be modified without consequences on the
timer programming.
10) Pressing the Timer key without any selected zone and when no
zone is being timed, does nothing.
7) It is possible to adjust the timer time while the timer is previously
running.
Remaining time is displayed in the digits reserved for the timer. If
multiple zones are timed, the smallest remaining time is displayed,
and the decimal point is displayed in the corresponding zone.
5) Maximum time 99 minutes.
2) Pressing simultaneously timer "+/-" keys the timer is cancelled
(goes to 00).
11) Pressing the Timer key without any selected zone and when many
zones are being timed, the time shown in time digits changes in a
rotatory way, and shows the time whose power display has the
decimal point ON.
6) When the time is elapsed and the hob is beeping, press any key and
the alarm and digit sequence will end.
4) When setting timer time, it is possible to go from "00" to "99" with "-"
key, and from "99" to "00" with "+" key.
30°
Maxi
Any change in the colour of the glass-ceramic surface does
not affect its operation or the stability of the surface. Such
discolorations are mostly a result of burnt food residues or
use of cookware made of materials such as aluminium or
copper; these stains are difficult to remove.
8. PROBLEM SOLVING
The pan bottom should fully cover the diameter of the selected zone.
The cooking is too slow
Unsuitable pans are being used. Only use flatbottomed utensils, that
are heavy and have a diameter at least the same
as the cooking zone.
The cooking zones do not simmer or only fry gently
Small scratches or abrasions on the hob's glass surface
Only use flat-bottomed pans. If light is visible between the pan and the
hob, the zone is not transmitting heat correctly.
Incorrect cleaning or rough-bottomed pans are used; particles like
grains of sand or salt get between the hob and the bottom of the pan.
Refer to the "CLEANING" section; make sure that pan bottoms are
clean before use and only use smooth bottomed pans. Scratches can
be lessened only the cleaning is done correctly.
NB:
. The metal surround : to safely clean the metal surround wash with
soap and water, rinse, then dry with a soft cloth.
Never use a knife or a screwdriver.
A scraper with a razor blade will not damage the surface, as long
as it is kept at an angle of 30°.
The glass ceramic surface will withstand scraping from flat-bottomed
cooking vessels, however, it is always better to lift them when moving
them from one zone to another.
A FEW HINTS:
Frequent cleaning leaves a protective layer which is essential to
prevent scratches and wear. Make sure that the surface is clean
before using the hob again. To remove marks left by water, use a few
drops of white vinegar or lemon juice. Then wipe with absorbent paper
and a few drops of specialised cleaning fluid.
Do not use a sponge which is too wet.
Never leave a scraper with a razor blade within the reach of
children.
Never use abrasive products or scouring powders.

Heater dsplay Fault Acton
F0
Fc
Ft
FE
Fb
FU / FJ
FA
FC / Fd
Fr
If error has occurred disconnected and connect again the cooktop to the power supply. If error persist,
call after-sales service. If error appears suddenly in a normal operation, call after-sales service.
Touch control software error.
Wait until temperature goes down, Cook-top will be recoverd when temperature reaches a normal
value. When the message disappears, the hob may be used again.
Touch control zone is too hot
and has turned off all the
heaters.
Wait until temperature goes down. If message persist when temperature reaches an environment
value, call after-sales service.
Touch control temperature
sensor can be damaged.
Wait until temperature goes down. If message persist when temperature reaches an environment
value, call after-sales service.
Touch control temperature
sensor can be damaged.
See if cook-top is mounted correctly. Be sure that keys touch correctly the glass surface.
on any key.
Excessive sensitivity
This error is a keyboard auto-check. It disappears when autocheck return to secure value. If error
persist, call after-sale service.
Security keyboard error
This error is a software auto-check. It disappears when auto-check return to secure value. If error
persist, call after-sale service.
Security software error
This error is a software auto-check. It disappears when auto-check return to secure value. If error
persist, call after-sale service.
Security software error
Any relay driver can have any problemn. Remove cook-top from the power supply, wait a minute
and switch on again. If error persist, call after-sale service.
Relays security error
9. AFTERCARE
Before calling out a Service Engineer please check the following:
If the fault cannot be identified switch off the appliance — do not
tamper with it — call the Aftercare Service Centre. The appliance is
supplied with a guarantee certificate that ensures that it will be
repaired free of charge at the Service Centre.
— that the plug is correctly inserted and fused;
The cooking zones do not simmer or only fry gently
Only use flat-bottomed pans. If light is visible between the pan and the
hob, the zone is not transmitting heat correctly.
Use a razor blade and follow the "CLEANING" section.
Marks from an aluminium or copper pan, but also mineral, water or
food deposits; they can be removed using the cream cleaner.
The pan bottom should fully cover the diameter of the selected zone.
Metal marks
The cooking is too slow
Small scratches or abrasions on the hob's glass surface
Light surfaces on the hob
Caramelisation or melted plastic on the hob.
Use a razor blade and follow the "CLEANING" section.
Dark stains
Incorrect cleaning or rough-bottomed pans are used; particles like
grains of sand or salt get between the hob and the bottom of the pan.
Refer to the "CLEANING" section; make sure that pan bottoms are
clean before use and only use smooth bottomed pans. Scratches can
be lessened only the cleaning is done correctly.
Do not slide aluminium pans on the hob. Refer to the cleaning
recommendations.
Unsuitable pans are being used. Only use flatbottomed utensils, that
are heavy and have a diameter at least the same
The hob does not operate or certain zones don't work
You use the correct materials, but the stains persist.
Have a check made that the connection is done he control panel is
locked. Unlock the hob.
Refer to the "CLEANING" section.
as the cooking zone.
The shunts are not positioned correctly on the terminal board.
10 GB
Frequency of on/off operations for cooking zones
The hob does not cut off.
The control panel is locked. Unlock the hob.
The on-off cycles vary according to the required heat level:
- low level: short operating time,
The cooktop is not working.
Check the condition of the fuses / circuit breakers at your
location.Check to see if you are experiencing a power failure.
The cooktop has turned itself off.
The main switch (ON/OFF key) was accidentally touched or there is
any object above any key. Turn the unit on again without any object
about the keyboard. Enter your settings again.
Display F and numbers
If F and numbers appears in the display, your unit has detected a fault.
The following table list actions you can take to correct the problem.
- high level: long operating time.

11 IT
AVVERTENZA: l'elettrodomestico e le sue parti
accessibili diventano calde durante l'uso.
Prestare attenzione ad evitare qualsiasi contatto
con le resistenze di riscaldamento. Mantenere
lontani dall'elettrodomestico i bambini di età
inferiore agli 8 anni, a meno che non siano
continuamente supervisionati.
Si consiglia di conservare le istruzioni di uso e
montaggio per riferimento successivo e, prima di
montare il piano di cottura, annotare il suo
numero di serie per richiedere assistenza al
Servizio post-vendita.
AVVERTENZA: se la superficie è crepata, non
toccare la vetroceramica e spegnere
l'elettrodomestico per evitare la possibilità di
elettrocuzioni.
L'elettrodomestico può essere utilizzato da bambini
di età superiore a 8 anni e da persone con ridotte
capacità fisiche, sensoriali o mentali, oppure prive
di esperienza e conoscenza, se supervisionate o
istruite riguardo all'uso dell'elettrodomestico in
sicurezza, e se comprendono i rischi che derivano
dall'uso dello stesso. I bambini dovrebbero essere
supervisionati per assicurarsi che non giochino con
l'elettrodomestico. La pulizia e la manutenzione da
parte dell'utente non possono essere effettuate da
bambini senza supervisione.
ATTENZIONE: il processo di cottura deve essere
supervisionato. Un processo di cottura di breve
termine deve essere supervisionato in continuo.
AVVERTENZA: la cottura senza sorveglianza su
un piano di cottura in presenza di grasso o olio
nella pentola può essere pericolosa, con rischio di
incendi. NON cercare MAI di spegnere un incendio
con acqua, bensì spegnere l'elettrodomestico e
coprire la fiamma con un coperchio o una coperta
antifiamma.
AVVERTENZA: utilizzare unicamente protezioni per
piani di cottura progettate dal produttore della cucina
o indicate dal produttore dell'elettrodomestico nelle
istruzioni d'uso come adatte, o ancora protezioni
incorporate nell'elettrodomestico. L'utilizzo di
protezioni non adatte può provocare incidenti.
AVVERTENZA: pericolo di incendio: non
appoggiare nulla sulle superfici di cottura.
Questo elettrodomestico non è concepito per
funzionare con temporizzatori esterni o con
sistemi di comando a distanza separati.
Si consiglia vivamente di tenere i bambini a
distanza dalle zone di cottura quando queste
sono in funzione o quando sono spente, per tutto
il tempo durante il quale l'indicatore di calore
residuo rimane attivo, per evitare il rischio di
ustioni gravi.
Collegare al cavo di alimentazione una spina
dimensionata per la tensione, la corrente e la
potenza indicate nella targhetta e dotata del
contatto di terra. La presa deve essere
dimensionata per la potenza indicata sulla
targhetta e deve avere il contatto di terra
collegato e funzionante. Il conduttore di terra è
giallo-verde. Questa operazione deve essere
eseguita solo da un tecnico adeguatamente
addestrato. In caso di incompatibilità tra presa e
Se è presente, non guardare direttamente gli
elementi riscaldati della lampada alogena.
ISTRUZIONI DI SICUREZZA
Non cuocere mai gli alimenti direttamente sul
piano di cottura in vetroceramica.
Se il cavo di alimentazione dell'elettrodomestico
dovesse essere danneggiato, farlo sostituire dal
produttore, dal suo servizio tecnico o da tecnici
qualificati, per evitare rischi. Il conduttore di terra
(giallo-verde) deve essere più lungo di 10 mm sul
lato della morsettiera. La sezione dei conduttori
interni deve essere adatta alla potenza assorbita
dal piano di cottura (come indicato sulla
targhetta). Il cavo di
alimentazione deve essere di
tipo HO5V2V2-F.
Non appoggiare sulle zone riscaldanti pellicole di
alluminio e padelle in plastica.
Mettere sempre la pentola al centro del gruppo
sul quale si sta effettuando la cottura. Non
appoggiare nulla sul pannello di comando.
La disconnessione può essere eseguita con la
spina accessibile o aggiungendo un interruttore
sul cablaggio fisso, nel rispetto delle normative
relative ai cablaggi.
Mai utilizzare il piano di cottura come tagliere.
Non utilizzare il piano di cottura per riporvi
oggetti.
Il collegamento alla rete di alimentazione può
essere effettuato anche collocando un interruttore
automatico onnipolare tra l'elettrodomestico e la
rete di alimentazione, in grado di supportare il
carico massimo collegato, in linea con la
legislazione corrente.
Mai utilizzare il piano di cottura come superficie di
lavoro.
Non toccare le zone riscaldanti durante il
funzionamento o per un breve periodo dopo l'uso.
Dopo ogni utilizzo è necessario pulire il piano di
cottura per evitare l'accumulo di sporcizia e
grasso. Se ci sono accumuli di questo tipo
vengono cotti nuovamente quando il piano di
cottura viene acceso, creando fumo e odori
sgradevoli per non parlare del rischio di
propagazione di incendi.
Non fare scivolare i recipienti sul piano di cottura.
Il cavo di terra giallo-verde non deve essere
interrotto dall'interruttore automatico. La presa o
l'interruttore automatico onnipolare utilizzati per il
collegamento devono essere facilmente accessibili
al momento del montaggio dell'elettrodomestico.
Utilizzare sempre i recipienti di cottura adatti.
Non appoggiare sul piano di cottura oggetti
metallici come coltelli, forchette, cucchiai o
coperchi. Potrebbero scaldarsi eccessivamente.
Non utilizzare mai un getto di vapore o ad alta
pressione per la pulizia dell'elettrodomestico.
spina dell'elettrodomestico, richiedere ad un
tecnico specializzato di sostituire la presa con
un'altra di tipo compatibile. La spina e la presa
devono essere conformi alle normative attuali del
paese di installazione.
Non appoggiare oggetti pesanti al di sopra del
piano di cottura. Se cadono sul piano possono
danneggiarlo.
Quando si installa una cappa
al di sopra del piano di
cottura, consultare i requisiti di
montaggio specifici per la
cappa, ma, in ogni caso, la
distanza tra cappa e piano di
cottura non deve essere
inferiore a 700 mm.
Lasciare una distanza pari a
almeno 55 mm tra il piano di
cottura e il muro posteriore e di
almeno 150 mm tra il piano di
cottura e il mobile verticale o le
pareti sul lato. Qualora venga
installato un pensile sopra il
piano cottura, la distanza
minima richiesta è pari a 700
mm.
CODICE PRODOTTO T
Targhetta di identificazione (posta sotto il carter inferiore del piano di
cottura)
1. AVVERTENZE GENERALI
Apponendo il marchio su questo elettrodomestico confermiamo
la conformità a tutti i requisiti di legge europei di sicurezza, salute e
tutela ambientale applicabili a questa categoria di prodotti.
2. SALVAGUARDIA DELL'AMBIENTE
Questo elettrodomestico dispone di contrassegno ai
sensi della direttiva europea 2012/19/UE in materia di
rifiuti di apparecchiature elettriche ed elettroniche
(RAEE).
I RAEE contengono sostanze inquinanti (che
possono causare conseguenze negative per
l'ambiente) e i componenti principali che possono
essere riutilizzati. È importante che i RAEE siano
sottoposti a trattamenti specifici in modo da togliere e smaltire in
modo corretto gli inquinanti nonché recuperare e riciclare tutti i
materiali.
• i RAEE non devono essere trattati come rifiuti domestici.
• i RAEE devono essere affidati agli speciali centri di raccolta
gestiti dai comuni o da società autorizzate. In molti stati è
disponibile anche un servizio di raccolta porta a porta per i RAEE.
In molti stati, nel caso di acquisto di nuovi elettrodomestici, quelli
vecchi possono essere affidati al venditore che li deve ritirare
gratuitamente in numero corrispondente agli elettrodomestici
acquistati, a condizione che i singoli elettrodomestici siano di tipo
simile e con le stesse funzioni di quelli acquistati.
Spetta ai singoli individui garantire che i RAEE non diventino un
problema a livello ambientale. Esistono alcune regole specifiche da
rispettare:
Dopo avere tolto l'imballaggio, accertarsi che l'elettrodomestico non
sia danneggiato; in caso contrario contattare il rivenditore o il servizio
di assistenza post vendita del produttore.
Accertarsi che il mobile nel quale verrà inserito l'elettrodomestico e
tutti gli altri arredi nelle vicinanze siano di un materiale in grado di
resistere a temperature elevate (minimo 100°C).
L'elettrodomestico può essere installato in un mobile ad incasso in
modalità "standard" o "a filo".
Nel caso in cui questa precauzione non venga rispettata e il
montaggio sia effettuato da un tecnico non qualificato, il produttore
declina tutte le responsabilità per guasti tecnici dell'elettrodomestico
che possano causare o meno danni alle cose o ai beni o lesioni alle
persone o agli animali.
Inoltre, tutti i laminati decorativi devono essere fissati con colla ad alta
resistenza.
Il montaggio di un elettrodomestico può essere un'operazione
complicata che, se non viene effettuata correttamente, può
minacciare gravemente la sicurezza di prodotti, proprietà o persone.
Per questa ragione tale attività deve essere intrapresa da un tecnico
professionalmente qualificato che la effettuerà in accordo con le
normative tecniche in vigore.
700 mm
55 mm
150 mm
490 mm
+ 2
- 0
560 mm
+ 2
- 0
Mn. 70 mm
Perimetro per
installazione a filo
Nota: Le dimensioni del perimetro interno sono le stesse
dell'installazione standard
703 mm (70 cm hob)
+ 2
- 0
523 mm
+ 2
- 0
593 mm (60 cm hob)
+ 2
- 0
Profondità incavo 5 mm
Perimetro per
installazione a filo
Lo spessore del piano di lavoro deve essere compreso tra 25 e 45 mm.
Se la parte inferiore del piano di cottura è adiacente ad un'area
normalmente accessibile durante la cottura o la pulizia, inserire un
separatore 20 mm sotto alla base del piano di cottura.
mn 20 mm
3- INSTALLAZIONE
Quando si installa un forno al di sotto del piano di cottura, non è
necessario inserire un separatore e la distanza minima tra la parte
inferiore del piano di cottura ed il forno non deve essere inferiore a
10 mm. Non montare un forno non raffreddato al di sotto di questo
piano di cottura e installare il forno seguendo i relativi requisiti di
montaggio.
10
mm
min
12 IT
1
2
3
4
DISPOSIZIONE
8
88
8
2
22
23
33
3
6
1
8
9
10
8 8
4
8
88
8
5
7
23
23
23
23
1
8
6
8 8
4
9
10
8
8
8
57
23
23
23
1
8
6
8 8
4
9
10
8
8
8
55
23
23
23
1
8
6
8 8
4
9
10
5
B
CD
BA
C
B
C
D
A
C
B
B
D
A
DISPOSIZIONE 1DISPOSIZIONE 2DISPOSIZIONE 3
DISPOSIZIONE 4DISPOSIZIONE 5
AA
C
13 IT
INSTALLAZIONE A FILO
Dopo avere verificato che la
posizione del piano di cottura è
corretta, riempire lo spazio fra
piano di lavoro e piano di cottura
con adesivo siliconico. Appiattire
lo strato di silicone con un
raschiatore o bagnando le dita in
acqua e sapone prima che
indurisca.Non utilizzare il piano di
cottura fino a quando lo strato di
silicone non è perfettamente
asciutto.
- Utilizzare le fascette di
fissaggio presenti nel sacchetto
degli accessori ed avvitarle nella
posizione indicata sulla scatola
inferiore. (Non serrare le viti per
bloccare completamente le
fascette, dovrebbero muoversi
liberamente)
Fissaggio normale:
- Inserire il piano di cottura
nella posizione centrale
dell'intaglio.
- Ruotare le fascette e
serrarle a fondo.
Centrare ed inserire il
piano di cottura.
Fissaggio rapido: (A seconda del
modello)
Prelevare quattro molle dal sacchetto
accessori ed avvitarle sulla scatola
inferiore come illustrato in figura.
Premere i lati del piano di
cottura fino a quando non
risulta supportato sull'intero
perimetro.
4. COLLEGAMENTO ELETTRICO
Il piano di cottura viene
fornito con una guarnizione
di tenuta. Montare la
guarnizione di tenuta
intorno alla parte inferiore
del piano di cottura ed
assicurarsi che sia inserita
correttamente per evitare
perdite sui mobili di
supporto sottostanti.
Parte inferiore
2. "+"
7. Bridge
3. "-"
5. LED zona di cottura aggiuntiva
9. Fusione
A seconda del modello
4. TIMER
8. Sicurezza bambini
1. ACCESO/SPENTO
10. Bollitura
6. Indicatore programmi zona di cottura
DISPOSIZIONE 1
DISPOSIZIONE 2
DISPOSIZIONE 3
DISPOSIZIONE 4
DISPOSIZIONE 5
1000+700 W
1000+700 W
1500+900 W1200 W
1050+900+750 W
1050+900+750 W
1200 W
1200 W
1200 W
1800 W
1200 W
1200 W
1800 W
1000+700 W
-
-
1800 W
1800 W
8
88
8
5
5
23
23
23
23
1
8
6
8 8
4

Prima di effettuare il collegamento accertarsi che l'impianto sia protetto da
un fusibile appropriato e che sia dotato di cavi aventi una sezione
sufficientemente grande per alimentare normalmente l'elettrodomestico.
Per qualsiasi domanda relativa al cavo di alimentazione elettrica rivolgersi
al Servizio di Assistenza post-vendita o a un tecnico qualificato.
Per procedere al nuovo collegamento, rispettare le istruzioni che seguono:
Se il piano di cottura è dotato di un cavo di alimentazione, collegarlo
solo ad un'alimentazione con tensione di 220-240 V tra la fase e il
neutro.
Capovolgere il piano di cottura, con la vetroceramica rivolta verso il piano
di lavoro, prestando attenzione a proteggere la vetroceramica.
"Il montaggio deve essere conforme alle direttive e agli standard." Il
produttore declina qualsiasi responsabilità per danni che potrebbero
essere causati da utilizzo inappropriato o irragionevole.
AVVERTENZA: Il Produttore non può essere ritenuto responsabile di
qualsiasi incidente o delle relative conseguenze che potessero insorgere
durante l'utilizzo di un elettrodomestico privo di messa a terra, oppure
collegato ad una terra avente una continuità difettosa.
Trifase 220-240 V3
Se l'elettrodomestico ha un'uscita a presa, deve essere installato in modo
che tale uscita sia accessibile.
È comunque sempre possibile collegare il piano di cottura a:
Trifase 380-415 V2N
Il cavo giallo/verde del cavo di alimentazione elettrica deve essere
collegato alla terra dell'alimentazione elettrica ed ai morsetti
dell'elettrodomestico.
Il collegamento elettrico all'impianto deve essere effettuato rispettando la
potenza nominale dell'elettrodomestico; ciò deve essere effettuato tramite
un sezionatore multipolare.
Prima di qualsiasi funzionamento elettrico, controllare sempre la tensione
di alimentazione riportata sul contatore, la regolazione del sezionatore, la
continuità del collegamento a terra rispetto all'impianto; verificare anche
che il fusibile sia appropriato.
231
- Tirare verso l'esterno il cavo di alimentazione.
Operazioni da effettuare per un nuovo collegamento:
- Scegliere il cavo di alimentazione in accordo con le indicazioni della
tabella;
- togliere il coperchio.
- mettere la punta di un cacciavite piatto davanti alle linguette "2" e "3",
spingere all'interno e premere;
- Passare il cavo di alimentazione elettrica nella fascetta;
- Secondo il tipo di montaggio, utilizzare le deviazioni recuperate nella
prima operazione, fissare il conduttore come indicato sulla tabella;
- Bloccare il coperchio;
Per staccare il cavo di alimentazione elettrica:
- Togliere le viti che fissano la morsettiera che contiene le derivazioni e i
conduttori del cavo di alimentazione;
- Spelare l'estremità di ogni conduttore del cavo di alimentazione per circa
10 mm, tenendo in considerazione la lunghezza richiesta del cavo per il
collegamento alla morsettiera;
Nota: accertarsi che le viti della morsettiera siano completamente
avvitate.
- svitare la fascetta per cavi "1";
- Avvitare la fascetta per cavi.
Operazioni da effettuare per un nuovo
collegamento:
- individuare le due linguette sui lati;
- Passare il cavo di alimentazione elettrica nella
fascetta;
- Bloccare il coperchio;
- Avvitare la fascetta per cavi.
- Spelare l'estremità di ogni conduttore del cavo
di alimentazione per circa 10 mm, tenendo in
considerazione la lunghezza richiesta del cavo
per il collegamento alla morsettiera;
- Scegliere il cavo di alimentazione in accordo
con le indicazioni della tabella;
- A seconda del tipo di montaggio, utilizzare le
deviazioni recuperate nella prima operazione,
fissare il conduttore come indicato sulla tabella;
Aprire il coperchio nella seguente sequenza:
DERIVAZIONE
N
=
NeutroT
=
Terra
Ph = Fase
nel caso in cui fosse necessario sostituire il cavo di alimentazione,
collegare i fili in accordo con i seguenti colori/codici:
ATTENZIONE:
DISPOSIZIONE
"1-3"
DISPOSIZIONE
"2-4"
MONOFASE O BIFASES 220-240 V~
Cavo
HO5V2V2F
Cavo
HO5V2V2F
Cavo
HO5V2V2F
2
3x2,5 mm
2
3x4 mm
2
4x1,5 mm
2
4x1,5 mm
2
4x1,5 mm
2
4x1,5 mm
TRIFASE 220-240 V3~
TRIFASE 380-415 V2N~
BLU
MARRONE
GIALLO VERDE
Neutro
Fase
Terra
( )
Collegamento ai morsetti della morsettiera
Monofase 220-240 V~Bifase 220-240 V2~
Trifase 220-240 V3~Trifase 380-415 V2N~
14 IT
5. CONSIGLI SUI RECIPIENTI DI COTTURA
PER IL PIANO
L'utilizzo di recipienti di cottura appropriati è di fondamentale
importanza per ottenere le migliori prestazioni dal piano di cottura.
• Utilizzare sempre recipienti di cottura di buona qualità con
basi perfettamente piane e spesse: l'utilizzo di questo tipo di
recipienti di cottura evita la formazione di punti più caldi nei quali si
attacca il cibo. Padelle e pentole spesse in metallo garantiscono una
distribuzione regolare del calore.
• Accertarsi che la base della pentola o della padella sia
asciutta: quando si introduce liquido nelle padelle o se ne utilizza una
che era stata riposta in frigorifero, accertarsi che la base della padella
sia completamente asciutta prima di appoggiarla sul piano di cottura.
In questo modo si evita di macchiare il piano di cottura.
SCELTA DEI RECIPIENTI DI COTTURA - Le informazioni riportate qui
di seguito facilitano la scelta dei recipienti di cottura adatti per fornire
prestazioni ottimali.
Acciaio inossidabile: vivamente consigliato. Particolarmente
efficace se dotato di una base con strato doppio placcato. La base
doppia abbina i vantaggi dell'acciaio inossidabile (aspetto, durata e
stabilità) con i vantaggi di alluminio e rame (conduzione di calore,
distribuzione uniforme del calore).
Alluminio: si consiglia di tipo pesante. Buona conduttività. A volte i
residui di alluminio si presentano come graffi sul piano di cottura, ma si
eliminano se si pulisce immediatamente il piano.
• Utilizzare pentole di diametro sufficientemente largo per
coprire completamente la superficie: le dimensioni della pentola
non devono essere inferiori alla zona di riscaldamento. Con una
pentola leggermente più grande l'energia viene utilizzata alla massima
efficienza.
15 IT
6. USO
Ghisa: utilizzabile, ma non consigliata. Scarse prestazioni. Può
graffiare la superficie.
Si sconsiglia l'utilizzo di alluminio sottile a causa del suo basso punto di
fusione.
Porcellana/smalto: Buone prestazioni solo con una base piana,
sottile e liscia.
Vetroceramica: sconsigliata. Scarse prestazioni. Può graffiare la
superficie.
Terracotta / fondo in rame: si consiglia di tipo pesante. Buone
prestazioni, ma il rame può lasciare residui che si possono presentare
come graffi. I residui si possono eliminare se il piano di cottura viene
pulito immediatamente. È però importante non dimenticare i recipienti
vuoti sul fornello acceso. Il metallo surriscaldato può legarsi al piano di
cottura in vetroceramica. Un recipiente di cottura in rame surriscaldato
lascia residui che macchiano permanentemente il piano di cottura.
La funzone d gestone della potenza consente all'utente d mpostare
la potenza massma che può raggungere l pano cottura.
La funzone gestone della potenza è dsponble solo entro 30 second
dall'accensone del pano cottura. È possble, comunque, rpetere
questa mpostazone scollegando e rcollegando l cavo d
almentazone. Impostando la massma potenza desderata, l pano
cottura regola automatcamente la dstrbuzone delle vare zone d
cottura n modo da non superare ma tale lmte, con l'ulterore
vantaggo d poter gestre contemporaneamente tutte le zone senza
problem d sovraccarco. Per l pano cottura l clente può mpostare
una potenza massma compresa tra 2,5 kW e la massma potenza del
pano cottura. Ad esempo, se la potenza massma del pano cottura è
d 7 kW, la potenza massma d regolazone è compresa tra 2,5 kW e 7
kW. Al momento dell'acqusto, l pano cottura è mpostato sulla
massma potenza. Dopo l collegamento dell'elettrodomestco alla
rete elettrca, entro 30 second è possble mpostare l lvello d
potenza n base a punt sopra ndcat:
3.- Sbloccare comand.
1.- Accendere l pano cottura.
2.- Attendere che l controllo tattle termn l processo d nzalzzazone.
P
8
8
8
8
Scelta del lvello d gestone della potenza
8 8
8
8
8
8
5.- Dopo questo ntervallo, questo messaggo apparrà sul dsplay, Po
sul dsplay del tmer. Lvello d potenza dvso per 100 ne dsplay del
rscaldatore.
6.- Utlzzando tast '+' e '-' del tmer, è possble regolare l valore d
gestone della potenza. Quando è selezonato l valore desderato,
toccare contemporaneamente tast "+" e "-" per 5 second.
4.- Entro 30 second dopo l'accensone del pano cottura, toccare per
5 second l tasto "-" del tmer.
P
6
0
0
5
P
4
0
0
5
8 8
8
8
8
8
7.- Al termne d questa procedura, vene emesso un lungo segnale
acustco, l sstema s azzera e la procedura rcomnca.
Come rsultato, l controllo tattle non consentrà alcuna
combnazone che super questo lmte.
a) Questa gestone della potenza è dsponble solo per prm 30
second dopo l'accensone del pano d cottura.
c) Se questa selezone d gestone della potenza è ON, se vene
premuto un tasto qualsas tranne la combnazone d "+" e "-" del
tmer, l processo sarà termnato senza regstrare nuov valor d
potenza e l comando a sforamento nzerà a funzonare come solto,
senza reset.
b) Se questa selezone d gestone della potenza è ON, se trascorrono
pù d 90 second dall'accensone del pano cottura questo processo
sarà termnato senza che sa stato regstrato un nuovo valore d
potenza.
Note:
d) Se questa selezone d gestone della potenza è ON, se vene
premuta la combnazone d "+" e "-" del tmer, l processo sarà
termnato con la regstrazone d un nuovo valore d potenza; reset
e l comando a sforamento nzeranno a funzonare come al solto.
8.- Dopo l processo d avvamento, sul dsplay del tmer verrà vsualzzata
la gestone della potenza.
P
4
0
0
5
Come accendere/spegnere una zona di riscaldamento
Per accendere una zona di riscaldamento toccare il pulsante di accensione
per 400 msec. Si sentirà un bip prolungato ed il valore "0" verrà visualizzato
nella cifra della zona di destinazione, indicando il livello di potenza.
1) Se una qualsiasi fase di cottura è in posizione 0, il display si spegne
automaticamente dopo 10 secondi e la sequenza di spegnimento zona
emette un segnale acustico.
2) Se c'è un'indicazione di calore residuo sul display acceso ma con
potenza pari a 0, lo "0" viene acceso in commutazione.
3) Se la funzione di blocco è attiva non è possibile accendere una zona.
Per spegnere una zona di riscaldamento toccare una qualsiasi zona di
riscaldamento per un periodo di 1,2 sec. Si avvertiranno tre brevi bip nella
cifra della zona di destinazione e non verrà visualizzato nulla oppure "H" se
è presente calore residuo. La zona sarà spenta.
1) Se una qualsiasi fase di cottura è in posizione 0, il display si spegne
automaticamente dopo 10 secondi e la sequenza di spegnimento zona
emette un segnale acustico.
2) Se c'è un'indicazione di calore residuo sul display spento, verrà
visualizzato "H".
4) Se è attiva solo una zona di riscaldamento e anche questa viene spenta,
si avvertono 4 brevi bip per indicare che il piano di cottura è spento.
3) Se la funzione di blocco è attiva è possibile spegnere una zona.
8
8
8
8
La seconda breve pressione sul pulsante dell'estensione spegne
l'anello di estensione.
Si avverte un breve bip ogni volta che si
preme il pulsante di estensione.
Per accendere l'anello di estensione doppio, la zona associata deve
essere già accesa e l'indicazione di livello di potenza deve essere
superiore a 0.
8.1- Zona a doppio riscaldamento accesa
La prima breve pressione sul pulsante dell'estensione accende
l'anello di estensione. Il LED sul pulsante di estensione si accende se
l'anello di estensione è acceso.
La prima breve pressione sul pulsante dell'estensione accende il
primo anello di estensione. 1 LED sul pulsante di estensione si
accende quando il primo anello di estensione è acceso (il LED a
sinistra nel caso di triplo riscaldamento, quello centrale e l'unico LED
nel caso di zona doppia)
La seconda breve pressione sul pulsante dell'estensione accende il
secondo anello di estensione. 2 LED sull'anello di estensione si
accendono se il primo e il secondo anello di estensione sono accesi
8.2- Zona a triplo riscaldamento accesa
La terza breve pressione sul pulsante dell'estensione spegne il primo
e il secondo anello di estensione Si avverte un breve bip ogni volta
che si preme il pulsante di estensione.
Zone a doppio / triplo riscaldamento
8
8
8
8
Funzione bridge
- Se in modalità impostazione viene sfiorato il pulsante bridge
Entrambi i display della zona di cottura con funzione bridge mostrano
lo stesso livello di potenza. La funzione finisce:
Si avverte un bip e il LED della zona si accende se la zona è abilitata.
La funzione bridge può essere abilitata unicamente quando entrambe
le zone di riscaldamento sono spente. Una zona di riscaldamento del
bridge è stata selezionata; per attivare la funzione bridge sfiorare il
pulsante bridge.
Entrambe le zone di riscaldamento della funzione bridge sono
selezionate contemporaneamente.
Quando le zone di riscaldamento sono selezionate, se il livello di
potenza non è quello desiderato, utilizzare i pulsanti "+" e "-".
- Se l'utente seleziona il livello di potenza "0"
Funzione fusione
- Selezionare il pulsante fusione
- Se è spenta
- Se è selezionata ad un altro livello di potenza.
La zona di cottura funziona a livello di potenza "2"
Si attiva un segnale acustico e il display della zona di riscaldamento
visualizza "U"
Quando una zona di cottura è stata selezionata, per attiva
re la funzione di fusione:
Essendo selezionata la zona di riscaldamento, la funzione fusione ha
termine
8
8
8
8
8
8
8
8
1. Premendo a lungo i pulsanti "+" o "-" il livello di potenza aumenta /
diminuisce in continuo. Con un aumento rapido, la potenza si
interrompe al livello 9 e per potenza superiore è necessario premere
ulteriormente il tasto "+". Non si attiva alcun bip con aumento /
diminuzione rapidi.
2. Una volta raggiunto il livello di potenza P, premendo nuovamente
"+" il livello di potenza non cambia a 0. Una volta arrivato al livello di
potenza 0, premendo nuovamente "-" il livello di potenza non passa a P.
Premendo brevemente i pulsanti '+' o '-' si aumenta o diminuisce la
potenza nella cifra delle zone selezionate: 0-1-2-3...9-P
3. Con una zona accesa a livello di potenza 0, se la zona è calda, lo 0
lampeggerà alternativamente. Dopo 10 secondi, lo 0 scompare e sul
display viene visualizzata la lettera "H" in continuo.
Aumento/diminuzione del livello di potenza
Nota: Una sicurezza bambini automatica si attiva per 15 minuti dopo lo
spegnimento completo del piano di cottura.
Questa azione si svolge quando viene premuto il pulsante di
blocco
Quindi, ogni volta che viene premuto un pulsante, il display visualizza
"L" per due secondi. Il riscaldamento rimane nelle stesse condizioni.
Per disattivare la sicurezza bambini, seguire lo stesso processo sopra
indicato. Quindi viene emesso un breve bip e il display visualizza "n". Il
piano di cottura si sblocca.
Opzione Sicurezza Bambini
8
8
8
8
8
8
8
8
Funzione bollitura
Quando una zona di cottura è stata selezionata, per attivare la
funzione di bollitura:
- Selezionare il pulsante Bollitura
La zona di riscaldamento si attiva al livello di potenza massimo per 10
minuti. Dopo questi 10 minuti si avverte un segnale acustico e la zona
di riscaldamento ritorna al livello "9"
Si attiva un segnale acustico e la zona di riscaldamento visualizza "P"
8
8
8
8
Funzione pausa
La funzione di Pausa viene indicata dal simbolo II. Per selezionare
questa funzione, l'utente può toccare contemporaneamente i pulsanti
+ e – sotto al timer.
La funzione Pausa consente di interrompere temporaneamente il
processo di cottura, consentendo agli utenti di rispondere alla porta o
al telefono, senza il rischio che l'acqua nella pentola vada in
ebollizione e trabocchi. Questa funzione è anche utile per pulire la
superficie dell'interfaccia utente, senza modificare le impostazioni di
cottura.
Nota: Non è possibile mettere in pausa una sola zona. Attivando la
funzione di Pausa si disattiva l'intero piano di cottura.
8 8
8
8
8
8
16 IT
Sicurezza contro le fuoriuscite
Qualcosa (un oggetto o un liquido) sta mantenendo premuto un
qualsiasi pulsante per più di 5 secondi. 2 bip veloci + 1 bip lungo
ogni 30 secondi mentre viene premuto il pulsante. Il piano di
cottura si spegne. Questo simbolo continua a lampeggiare per
tutto il tempo in cui questa situazione persiste.
Tmer
3) Se i pulsanti timer "+" o "-" sono mantenuti premuti durante un
tempo da determinare, si ha un'impostazione rapida.
La funzione timer può essere attivata tramite il relativo pulsante o
sfiorando allo stesso tempo i pulsanti "+" e "-".
In entrambi i casi, la zona di riscaldamento deve essere selezionata
ed il relativo livello di potenza deve essere superiore a 0.
Selezionare la zona da temporizzare. Il livello di potenza della zona è
superiore a 0. viene visualizzato fisso nella zona da temporizzare.
"0 0" nelle cifre riservate al timer.
1) Con i pulsanti "+" o "-" è possibile selezionare il tempo del timer.
Ogni volta che il tempo varia non si avverte alcun bip.
4) Durante l'impostazione del tempo del timer, è possibile passare
da "00" a "99" con il pulsante "-" e da "99" a "00" con il pulsante "+".
5) Il tempo massimo corrisponde a 99 minuti.
7) È possibile regolare il tempo del timer quando il timer era già in
funzione.
8) La potenza delle zone temporizzate può essere modificata senza
conseguenza sulla programmazione del timer.
9) L'ultimo minuto verrà visualizzato in secondi (per alcune varianti
visibile solo accedendo alla programmazione del timer durante il
conto alla rovescia dell'ultimo minuto)
2) Premendo contemporaneamente i pulsanti il timer si azzera
(visualizzazione 00).
10) Premendo il pulsante timer senza avere selezionato alcuna
zona e quando non ci sono zone temporizzate, non accade nulla.
11) Premendo il pulsante timer senza avere selezionato alcuna
zona e quando molte sono soggette a temporizzazione, il tempo
visualizzato nella cifra del tempo varia in modo rotatorio, indicando il
tempo il cui display di potenza ha la virgola decimale accesa.
6) Quando il tempo è trascorso e il piano di cottura emette dei bip,
premere un qualsiasi pulsante per terminare la sequenza di
inserimento e l'allarme.
12) Nella zona soggetta a temporizzazione viene visualizzato in
alternanza potenza (5 s) e (0,5 s).
Il tempo rimanente è visualizzato nelle cifre riservate al timer. Se
molte zone sono temporizzate, il tempo più basso rimanente e la
virgola decimale è visualizzata nella zona corrispondente.
Indicatore del calore residuo
(in zone di riscaldamento radianti -> calcolato)
Per ottenere una temperatura superiore a 65°C una zona di
riscaldamento deve essere in funzione per un certo periodo di tempo,
che dipende dal livello di potenza. Una volta trascorso questo tempo,
la segnalazione di calore residuo viene visualizzata quando la zona di
riscaldamento viene spenta.
Gli stessi indicatori possono essere utilizzati anche per l'indicazione
del "calore residuo". È necessario stabilire una tabella oraria a tale
proposito: Tempo di calore rimanente = F (livello di potenza, tempo di
lavoro).
Quando la temperatura sulla superficie in vetroresina del piano di
cottura è superiore a 65°C (valore teorico), questa condizione viene
visualizzata sul relativo display, tramite la lettera "H".
Spegnimento automatico di sicurezza
Il tempo massimo durante il quale una zona di riscaldamento può
restare accesa dipende dal livello di cottura selezionato.
Se il livello di potenza non è variato per un tempo preimpostato, la
corrispondente zona di riscaldamento si spegne in automatico.
Livello
di potenza
Tempo massimo
di attivazione (ore)
1
2
3
4
5
6
7
8
9
10
5
5
4
3
2
2
2
2
NOTA: se si verifica una situazione di surriscaldamento durante il
funzionamento dei massimi livelli di potenza, il comando del piano di
cottura regola automaticamente il livello di potenza per proteggere il
piano di cottura dai surriscaldamenti.
7. PULIZIA E MANUTENZIONE
Prima di effettuare qualsiasi attività di manutenzione sul piano di
cottura, lasciarlo raffreddare.
• Utilizzare unicamente prodotti (paste detergenti e raschietti)
progettati specificatamente per superfici in vetroceramica. Sono
reperibili normalmente in commercio.
• Evitare sgocciolamenti, in quanto qualsiasi sostanza che cade sulla
superficie del piano di cottura brucia rapidamente e ne rende più
difficile la pulizia.
• Si consiglia di tenere lontano dal piano di cottura tutte le sostanze
che possono sciogliersi, quali oggetti in plastica, zucchero o prodotti a
base di zucchero.
- Sfregare le eventuali macchie più persistenti con un panno morbido
o carta da cucina leggermente inumidita.
- Asciugare con un panno morbido o carta da cucina asciutta fino alla
completa pulizia della superficie.
- Versare alcune gocce del detergente specifico sulla superficie del
piano di cottura.
MANUTENZIONE:
17 IT
- La funzione Pausa è attiva e il piano di cottura è spento
Nota: Nessun LED indica che la funzione Pausa è attiva. Premendo
nuovamente la combinazione + e – si disattiva la funzione Pausa.
Disattivazione della funzione Pausa:
Nota: se il piano di cottura resta inattivo per più di 10 minuti esso si
spegnerà automaticamente.
Per disattivare la “funzione Pausa” mantenere premuta per ½
secondo la combinazione di pulsanti + e – del timer. La funzione
Pausa si disattiva, il piano di cottura si riattiva (si sente un segnale
acustico) e vengono ripristinate le impostazioni precedenti delle zone
di riscaldamento.
- Il timer non visualizza niente, tutti i display delle zone di
riscaldamento si attivano e visualizzano “0”, accendendo i singoli
segmenti verso sinistra, quindi spegnendo i singoli segmenti verso
destra, in modo continuo.
Come opera la funzione Pausa?
La funzione Pausa si attiva mantenendo premuti per ½ secondo i
pulsanti + e – sotto al timer
- Vengono memorizzati i valori delle impostazioni delle zone di
riscaldamento attive, poi esse vengono portate a 0
- Si interrompe il tempo di spegnimento automatico delle zone di
riscaldamento.
- Si interrompono tutti i conteggi dei timer.
- Tutti i pulsanti sono bloccati ad eccezione della funzione Pausa
(combinazione + e – sotto al timer) e di Accensione/Spegnimento
- Versare altre gocce di detergente specifico sulla superficie del piano
di cottura.
- Asciugare con un panno morbido o carta da cucina asciutta fino alla
completa pulizia della superficie.
- Raschiare utilizzando un raschietto, mantenendolo ad un angolo di
30° rispetto al piano di cottura, fino a quando la macchia non
scompare.
- Ripetere l'operazione se necessario.
Se ci sono ancora macchie persistenti:
30°
Maxi
Qualsiasi variazione di colore della superficie in vetroceramica
non influenza il relativo funzionamento o la stabilità della
superficie. Tali scolorimenti sono principalmente dovuti a
residui di alimenti combusti o dall'utilizzo di recipienti di
cottura in materiali quali alluminio o rame; questi tipi di
macchie sono difficili da eliminare.
La superficie in vetroceramica resiste ai graffi causati da recipienti di
cottura a fondo piatto, tuttavia si consiglia sempre di sollevarli quando
si spostano da una zona all'altra.
Non utilizzare mai un coltello o un cacciavite.
ALCUNI SUGGERIMENTI:
Cornice metallica: per pulire in modo sicuro la cornice metallica,
lavare con acqua e sapone, risciacquare e quindi asciugare con un
panno morbido.
Un raschietto con lametta non danneggia la superficie, a patto
che venga mantenuto ad un angolo di 30°.
Non utilizzare mai prodotti abrasivi o detergenti in polvere.
N.B.:
Una pulizia frequente lascia uno strato protettivo che è fondamentale
per evitare graffi e usura. Prima di utilizzare nuovamente il piano di
cottura accertarsi che la superficie sia pulita. Per togliere segni lasciati
dall'acqua, utilizzare alcune gocce di aceto di vino bianco o di succo di
limone. Quindi asciugare con carta assorbente e alcune gocce di
detergente specifico.
Non utilizzare mai una spugna troppo bagnata.
Non lasciare mai un raschietto con lametta alla portata dei
bambini.
8. RISOLUZIONE DEL PROBLEMA
Le zone di cottura non cuociono a fuoco lento oppure friggono
solo a bassa temperatura
Utilizzare solo recipienti di cottura a fondo piatto. Se tra il recipiente di
cottura ed il piano di cottura si intravede dello spazio, la zona non sta
trasmettendo correttamente il calore.
Il fondo del recipiente di cottura deve coprire completamente il
diametro della zona selezionata.
La cottura è troppo lenta
Pulizia non corretta o utilizzo di recipienti di cottura a fondo ruvido;
particelle simili a granelli di sabbia o sale tra il piano di cottura e il
fondo del recipiente. Fare riferimento alla sezione "PULIZIA";
accertarsi che i recipienti siano puliti prima de ll'uso e utilizzare solo
recipienti di cottura a fondo liscio. I graffi si possono ridurre solo se la
pulizia
Si stanno utilizzando recipienti di cottura inadatti. Utilizzare solo
recipienti a fondo piatto, pesanti ed aventi un diametro che
corrisponda almeno alla zona di cottura.
Piccoli graffi o abrasioni sulla superficie in vetroceramica del
piano di cottura
Graffi metallici
Si utilizzano i materiali appositi, ma le macchie sono ancora presenti.
Utilizzare una lametta e seguire quanto indicato nella sezione
"PULIZIA".
Segni lasciati da recipienti in alluminio o rame, ma anche depositi di
minerali, acqua o alimenti; possono essere ripuliti utilizzando la pasta
detergente.
Macchie scure
Il piano di cottura non si blocca.
Utilizzare una lametta e seguire quanto indicato nella sezione
"PULIZIA".
Non fare scivolare i recipienti di cottura sul piano di cottura. Fare
riferimento ai suggerimenti per la pulizia.
Superfici chiare sul piano di cottura
Formazione di caramello o plastica fusa sul piano di cottura.
Fare riferimento alla sezione "PULIZIA".
Il piano di cottura non funziona o alcune zone non funzionano
Le deviazioni non sono posizionate correttamente sulla morsettiera.
Verificare se il collegamento è corretto e se il pannello di comando è
bloccato. Sbloccare il piano di cottura.
Il pannello comandi è bloccato. Sbloccare il piano di cottura.
Frequenza delle operazioni di accensione/spegnimento delle
zone di cottura
Il cicli di accensione/spegnimento variano a seconda del livello di
calore richiesto:
- livello basso: tempo di funzionamento breve,
Controllare le condizioni dei fusibili / interruttori automatici
dell'abitazione. Verificare se si tratta di una mancata alimentazione.
Il piano di cottura si è spento.
L'interruttore principale (pulsante accensione/spegnimento) è stato
sfiorato involontariamente o ci sono oggetti su un qualsiasi pulsante.
Riaccendere l'elettrodomestico senza appoggiare nulla sui pulsanti.
Inserire nuovamente le impostazioni.
- livello alto: tempo di funzionamento lungo.
Display con F e numeri
Se la lettera F e dei numeri compaiono sul display, l'elettrodomestico
ha rilevato un'anomalia. La seguente tabella elenca i provvedimenti
correttivi che si possono adottare per correggere il problema. viene
effettuata correttamente.
Il piano di cottura non funziona.
9. MANUTENZIONE AGGIUNTIVA
Prima di rivolgersi ad un tecnico dell'Assistenza controllare
quanto segue:
— che la spina sia inserita correttamente e dotata di fusibili;
Se non è possibile identificare il guasto spegnere l'elettrodomestico
— non manometterlo — e chiamare il Centro di Assistenza Tecnica
post-vendita. L'elettrodomestico è fornito con un certificato di
garanzia che garantisce la riparazione gratuita presso il Centro di
Assistenza.
18 IT
F0
Fc
Ft
FE
Fb
FU / FJ
FA
FC / Fd
Fr
Se si è verificato un errore, scollegare e ricollegare il piano di cottura all'alimentazione elettrica. Se
l'errore persiste, contattare l'assistenza post-vendita. Se un errore si verifica improvvisamente durante il
normale funzionamento, contattare l'assistenza post-vendita.
Errore software comando
sfioramento.
Attendere che la temperatura dmnusca fno al raggungmento d un valore normale. Quando l
messaggo scompare, è possble rutlzzarlo.
La zona comandi a sfioramento
è troppo calda ed ha spento
tutte le zone di riscaldamento.
Attendere che la temperatura scenda. Se il messaggio persiste quando la temperatura raggiunge quella
ambientale, contattare l'assistenza post-vendita.
Attendere che la temperatura scenda. Se il messaggio persiste quando la temperatura raggiunge quella
ambientale, contattare l'assistenza post-vendita.
Il sensore temperatura di
comando a sfioramento può
essere danneggiato.
Verificare che il piano di cottura sia montato correttamente. Accertarsi che i pulsanti tocchino
correttamente la superficie in vetroresina.
Pulsante eccessivamente
sensibile.
Questo errore è un controllo automatico della tastiera. Scompare quando il controllo automatico ritorna ad
un valore di sicurezza. Se l'errore persiste, contattare l'assistenza post-vendita.
Errore sicurezza tastiera
Questo errore è un controllo automatico del software. Scompare quando il controllo automatico ritorna ad
un valore di sicurezza. Se l'errore persiste, contattare l'assistenza post-vendita.
Errore sicurezza tastiera
Questo errore è un controllo automatico del software. Scompare quando il controllo automatico ritorna ad
un valore di sicurezza. Se l'errore persiste, contattare l'assistenza post-vendita.
Errore sicurezza tastiera
Qualsiasi driver dei relè può presentare dei problemi. Togliere il piano di cottura dall'alimentazione,
attendere un minuto e riaccendere. Se l'errore persiste, contattare l'assistenza post-vendita.
Errore di sicurezza relè
AnomaliaAzione
Display della zona
di riscaldamento
Il sensore temperatura di
comando a sfiorame+nto può
essere danneggiato.
Il prodotto è garantito, oltre che ai sensi di legge, alle condizioni e nei
termini riportati sul certificato di garanzia convenzionale inserito nel
prodotto. Il certificato dovrà essere conservato e mostrato al nostro
Centro di Assistenza Tecnica Autorizzato, in caso di necessità,
insieme allo scontrino comprovante l'acquisto dell'elettrodomestico.
Puoi consultare le condizioni di garanzia anche sul nostro sito
internet. Per ottenere assistenza compila l'apposito form on-line
oppure contattaci al numero che trovi indicato nella pagina di
assistenza del nostro sito internet.
10. GARANZIE

AVERTISSEMENT : l'utilisation de la table de
cuisson sans surveillance avec manipulation de
graisse ou d'huile peut être dangereux et
provoquer un incendie. N'essayez JAMAIS
d'éteindre un feu avec de l'eau, mais éteignez
l'appareil, puis couvrez la flamme avec un
couvercle ou une couverture anti-feu, par
exemple.
AVERTISSEMENT : n'utilisez qu'un dispositif de
protection de votre table de cuisson conçu par le
fabricant de votre appareil ou indiqué, dans le
manuel d'utilisation, comme étant compatible, ou
bien le dispositif de protection fourni avec
l'appareil. L'utilisation d'un dispositif de protection
non approprié peut causer des accidents.
Nous vous recommandons de conserver les
instructions d'installation et d'utilisation pour
pouvoir les consulter ultérieurement. Avant
d'installer la table de cuisson, notez son numéro
de série, au cas où vous auriez besoin de l'aide du
service après-vente.
AVERTISSEMENT : l'appareil et ses parties
accessibles chauffent pendant l'utilisation. Évitez
de toucher les éléments chauffants. Les enfants
de moins de 8 ans doivent être tenus hors de
portée de l'appareil, sauf s'ils sont surveillés en
permanence.
AVERTISSEMENT, risque d'incendie : ne stockez
pas d'éléments sur les surfaces de cuisson.
AVERTISSEMENT : si la surface est fissurée, ne
touchez pas le verre de la table et éteignez
l'appareil pour éviter tout risque d'électrocution.
ATTENTION : la cuisson demande d'être
surveillée. Les cuissons de courte durée doivent
être surveillées en permanence.
Il est chaudement recommandé d'éloigner les
enfants de la zone de cuisson lorsqu'elle
fonctionne ou même quand elle est éteinte, mais
que l'indicateur de chaleur résiduelle est encore
visible, afin d'éviter tout risque de brûlures
graves.
Si votre table de cuisson est dotée d'éléments
halogènes, n'en fixez pas la lumière.
Brancher le câble d'alimentation sur une prise de
courant qui supporte le voltage (le courant et la
charge sont indiqués sur l'étiquette) et vérifier la
présence d'une mise à la terre. La prise
d'alimentation doit supporter la charge indiquée
sur l'étiquette et être dotée d'une mise à la terre en
état de fonctionnement. Le câble conducteur de
mise à la terre est jaune et vert. Cette opération
doit être exécutée par du personnel qualifié. En
cas d'incompatibilité entre la prise d'alimentation
et la fiche du câble de l'appareil, demander à un
Cet appareil n'est pas conçu pour être actionné
par un temporisateur externe ou un système
séparé de commande à distance.
Cet appareil peut être utilisé par des enfants âgés
de 8 ans et plus, par des personnes dont les
capacités physiques, sensorielles ou mentales
sont réduites ou par des personnes dénuées
d'expérience et de connaissances, mais qui ont
été informées sur la manière d'utiliser l'appareil
en toute sécurité, si elles comprennent les risques
impliqués. Surveillez les enfants afin qu'ils ne
jouent pas avec l'appareil. L'entretien et le
nettoyage ne doivent pas être effectués par des
enfants sans surveillance.
CONSIGNES DE SÉCURITÉ
19 FR
Ne faites jamais cuire d'aliments directement sur
la table de cuisson vitrocéramique.
Il est possible de brancher l'appareil à la prise
d'alimentation en installant un disjoncteur
multipolaire qui supporte la charge électrique
maximale, conformément aux lois en vigueur,
entre l'appareil et la prise d'alimentation.
électricien professionnel de remplacer la prise
d'alimentation par un dispositif compatible. La
fiche du câble d'alimentation et la prise
d'alimentation doivent être conformes aux
normes en vigueur dans le pays d'installation.
Ne déposez jamais d'objets en métal, tels que des
couteaux, fourchettes, cuillers ou couvercles sur
la table de cuisson. Ils pourraient devenir
brûlants.
Après chaque utilisation, il convient de nettoyer la
table de cuisson, afin d'éviter l'accumulation de
saleté et de graisse. Dans le cas contraire, les
résidus risquent de brûler lors de la prochaine
utilisation de la table de cuisson, causant fumées
et odeurs déplaisantes, pour ne pas mentionner
les risques d'incendie.
Le conducteur jaune et vert de mise à la terre ne
doit pas être bloqué par le disjoncteur. La prise
d'alimentation ou le disjoncteur multipolaire utilisé
pour le branchement doit rester à tout moment
accessible lors de l'installation de l'appareil.
Si le câble d'alimentation est endommagé, il doit
être remplacé par le fabricant, son agent
d'entretien ou des personnes dotées du même
type de qualification, afin d'éviter tout risque. Le
conducteur de mise à la terre (jaune et vert) doit
être plus long de 10 mm du côté de la plaque à
bornes. Le diamètre interne du câble conducteur
doit être proportionné à la puissance absorbée
par la table de cuisson (indiquée sur l'étiquette).
Le câble d'alimentation requis est le suivant :
H05V2V2-F.
Ne touchez pas les zones chauffantes pendant
qu'elles fonctionnent, ni pendant un certain temps
après leur utilisation.
Ne posez jamais de papier aluminium ou de
récipients en plastique sur les zones chauffantes.
N'utilisez jamais de vaporisateur, ni de jet à haute
pression pour nettoyer l'appareil.
Le débranchement doit se faire en accédant à la
prise d'alimentation ou en prévoyant un
interrupteur sur le circuit électrique fixe, conforme
aux normes électriques.
Utilisez toujours des ustensiles de cuisson
adéquats.
Ne rangez pas d'objets lourds sur votre table de
cuisson. S'ils tombaient sur la table de cuisson, ils
risqueraient de l'endommager.
N'utilisez pas la table de cuisson pour ranger des
objets.
N'utilisez jamais votre table de cuisson comme
plan de travail.
N'utilisez pas la surface de la table de cuisson
comme planche à découper.
Ne faites pas glisser d'ustensiles de cuisine sur la
table de cuisson.
Placez toujours votre casserole au centre du
foyer que vous utilisez. Ne déposez jamais aucun
objet sur le panneau de commande.
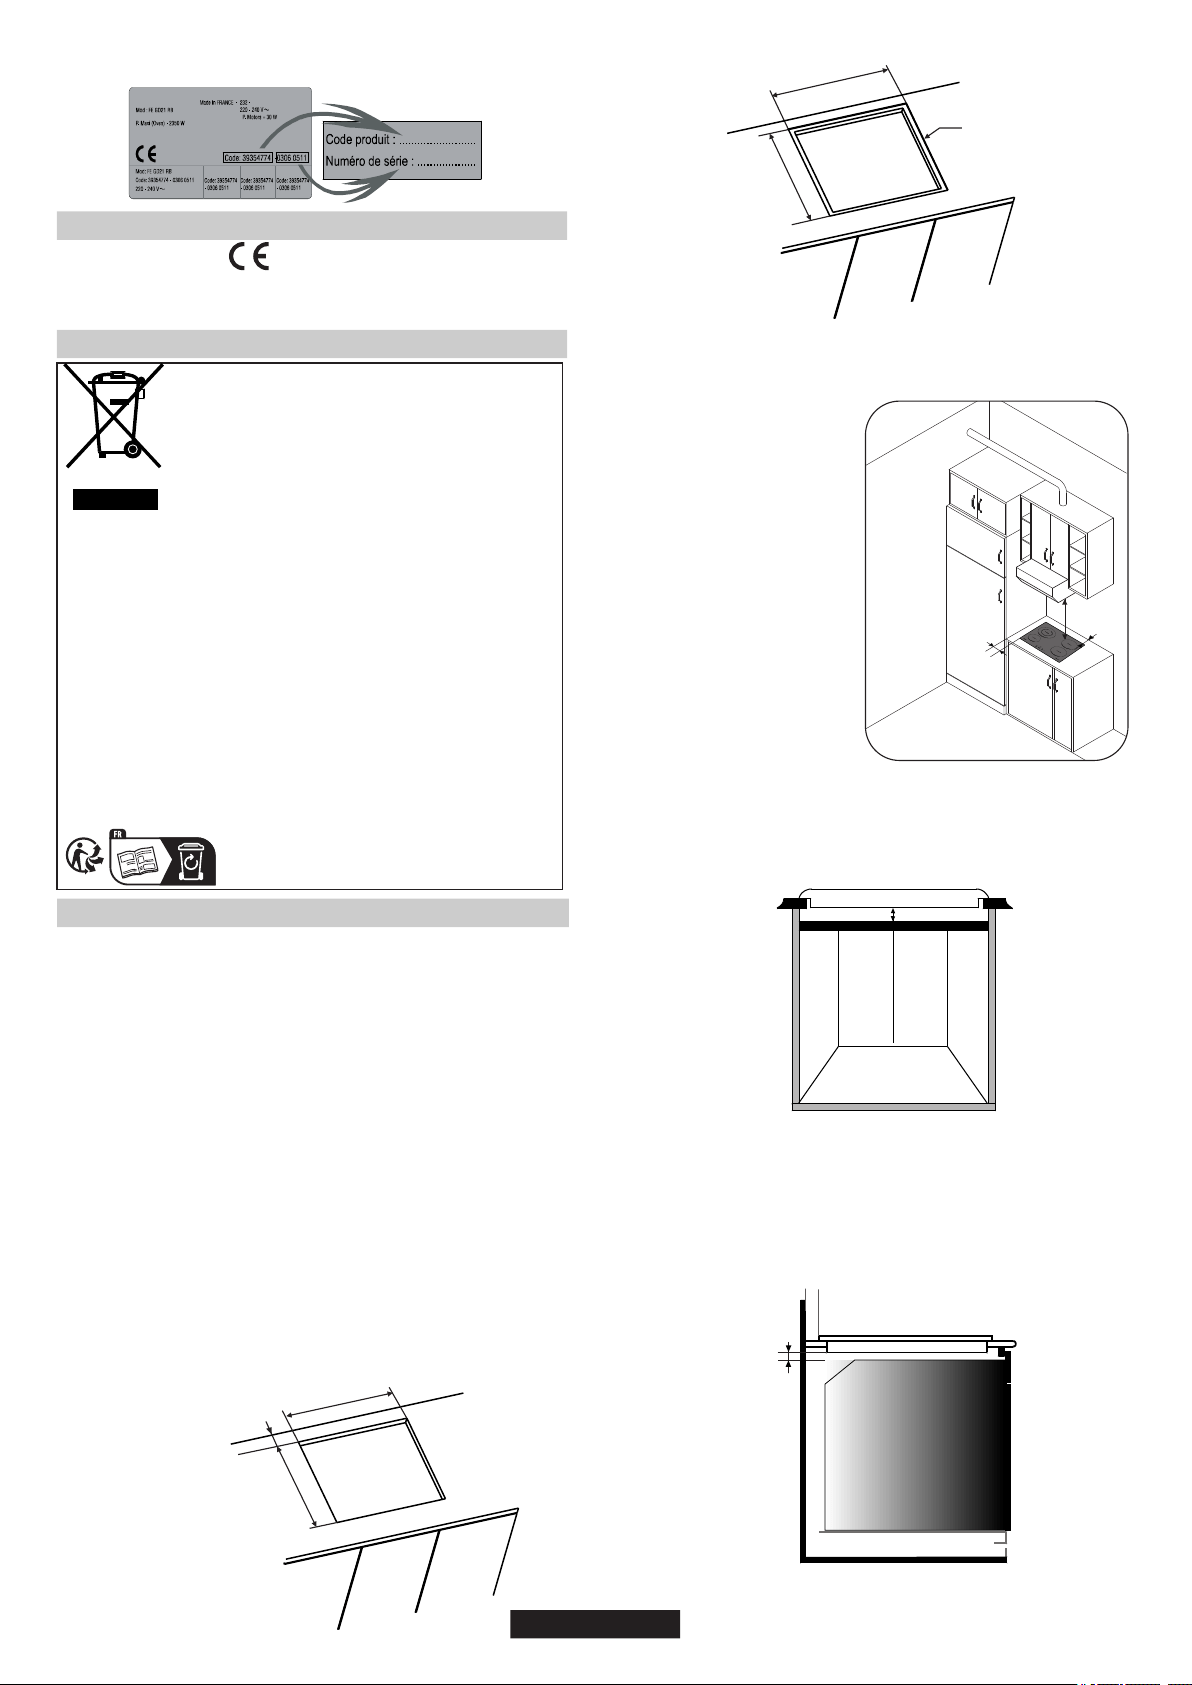
Laissez une distance minimum
de 55 mm entre la table de
cuisson et le mur du fond et de
150 mm entre la table de
cuisson et le meuble vertical ou
mur présent sur le côté. Pour
l'installation d'un meuble au-
dessus de la table de cuisson,
la distance minimum requise
est de 700 mm.
Si vous souhaitez installer une
hotte au-dessus de la table de
cuisson, veuillez consulter les
consignes d'installation de la
hotte, tout en sachant que la
distance minimum requise
entre table de cuisson et hotte
ne peut pas être inférieure à
700 mm.
CODE PRODUIT
Plaque d'identification (située sous le caisson de la table de cuisson)
1.AVERTISSEMENTS GÉNÉRAUX
En plaçant la marque sur cet appareil, nous confirmons sa
conformité à toutes les normes européennes de protection de
l'environnement, de la santé et de sécurité applicables à sa catégorie
de produits.
2. PROTECTION DE L'ENVIRONNEMENT
La catégorie DEEE recouvre à la fois les substances
polluantes (pouvant avoir des retombées négatives
sur l'environnement) et les composants de base
pouvant être réutilisés. Il est important de soumettre
les produits DEEE à des traitements spécifiques, afin
d'en retirer et éliminer tous les polluants, de manière adéquate, et
d'en récupérer et recycler tous les matériaux possibles.
•Les produits DEEE doivent être remis aux points de collecte
compétents gérés par la municipalité ou des sociétés autorisées.
Dans de nombreux pays, les produits DEEE encombrants peuvent
faire l'objet d'une collecte à domicile.
Chaque individu peut jouer un rôle important en veillant à ce que les
produits DEEE ne deviennent pas un problème pour
l'environnement. Pour cela, il est essentiel de suivre quelques
règles de base :
•Les produits DEEE ne doivent pas être traités comme des
ordures ménagères.
Cet appareil est marqué du symbole correspondant
à la directive européenne 2012/19/EU sur les
déchets d'équipements électriques et électroniques
(DEEE).
Dans de nombreux pays, lorsque vous achetez un nouvel
appareil, l'ancien peut être retourné au détaillant qui est en devoir
de le retirer sans frais sur la base du nouvel achat, lorsqu'il s'agit
d'un équipement du même type et ayant les mêmes fonctions.
En outre, tous les stratifiés décoratifs doivent être fixés avec une colle
résistant à la chaleur.
L'installation d'un appareil ménager est une opération compliquée qui,
si elle n'est pas correctement effectuée, peut avoir des conséquences
négatives sur la sécurité des biens, des propriétés et des personnes.
C'est pourquoi cette tâche doit être effectuée par un professionnel
qualifié et conformément à la réglementation technique en vigueur.
Si cette recommandation n'est pas respectée et que l'installation est
effectuée par une personne non qualifiée, le fabricant décline toute
responsabilité pour des pannes techniques du produit entraînant ou
non des dommages aux biens et propriétés ou des blessures aux
personnes et animaux.
Vérifiez que le meuble dans lequel l'appareil sera installé et tous les
autres meubles à proximité de celui-ci soient construits avec des
matériaux qui supportent les hautes températures (min. 100 °C).
Après avoir retirer l'emballage de votre appareil, vérifiez que celui-ci
n'est pas endommagé. Dans le cas contraire, contactez votre
détaillant ou notre service après-vente.
Il est possible d'installer l'appareil dans un meuble encastré de façon
standard ou « au ras ».
700 mm
55 mm
150 mm
490 mm
+ 2
- 0
560 mm
+ 2
- 0
Mn. 70 mm
Largeur du périmètre
d'installation par encastrement
Remarque : les dimensions du périmètre interne sont les mêmes que
pour une installation standard.
703 mm (70 cm hob)
+ 2
- 0
523 mm
+ 2
- 0
593 mm (60 cm hob)
+ 2
- 0
Profondeur de la rainure 5 mm
Largeur du périmètre
de l'installation par
encastrement
L'épaisseur du plan de travail doit être comprise entre 25 et 45 mm.
Si la partie inférieure de la table de cuisson confine avec un
espace accessible pour des opérations de manutention ou de
nettoyage, un panneau de séparation doit être installé 20 mm au-
dessous de la table de cuisson
mn 20 mm
3- INSTALLATION
L'installation d'un four au-dessous de la table de cuisson ne requiert
pas de panneau de séparation, mais la distance minimum entre la
partie inférieure de la table de cuisson et le four doit être de 10 mm.
Seul un four avec système de refroidissement peut être installé sous
la table de cuisson, selon ses propres consignes d'installation.
10
mm
min
20 FR

1
2
3
4
SCHÉMA
8
88
8
2
22
23
33
3
6
1
8
9
10
8 8
4
8
88
8
5
7
23
23
23
23
1
8
6
8 8
4
9
10
8
8
8
57
23
23
23
1
8
6
8 8
4
9
10
8
8
8
55
23
23
23
1
8
6
8 8
4
9
10
5
B
CD
BA
C
B
C
D
A
C
B
B
D
A
SCHÉMA 1SCHÉMA 2SCHÉMA 3
SCHÉMA 4SCHÉMA 5
AA
C
SCHÉMA 1
SCHÉMA 2
SCHÉMA 3
SCHÉMA 4
SCHÉMA 5
1000+700 W
1000+700 W
1500+900 W1200 W
1050+900+750 W
1050+900+750 W
1200 W
1200 W
1200 W
1800 W
1200 W
1200 W
1800 W
1000+700 W
-
-
1800 W
1800 W
INSTALLATION PAR ENCASTREMENT
Vérifiez que la table de cuisson
est correctement installée, puis
étalez de la colle au silicone au
niveau de l'interstice entre le
plan de travail et la table de
cuisson. Aplatissez la couche de
silicone avec un racloir ou un
doigt mouillé à l'eau
savonneuse, avant qu'elle ne
sèche.
N'utilisez pas la table de cuisson
avant que la couche de silicone ne soit complètement sèche
Fixation ordinaire :
- Saisissez les pattes de fixation
contenues dans le sachet de
visserie et vissez-les dans la
position indiquée sur le boîtier
inférieur. (ne serrez pas les vis à
fond pour ne pas bloquer les
pattes : elles doivent rester
mobiles).
- Insérez la table de cuisson
au centre du plan de découpe.
- Tournez les pattes de fixation
et serrez-les à fond.
Saisissez quatre ressorts
contenus dans le sachet de
visserie et vissez-les sur le boîtier
inférieur, comme illustré.
Exercez une pression sur
les côtés de la table de
cuisson pour qu'elle adhère
à son support sur tout son
périmètre.
Centrez la table de
cuisson et insérez-la.
Fixation rapide : (selon le modèle)
Un joint d'étanchéité à l'eau
est fourni avec la table de
cuisson. Posez le joint
d ' ét a n ch é i té b i e n
soigneusement tout autour
de la partie inférieure de la
table de cuisson, comme
illustré, afin d'empêcher
toute fuite dans le meuble
d'encastrement.
21 FR
Selon le modèle
3. « - »
6. Indicateur de programmation de la zone de cuisson
4. Mnutere
8. Verrouillage enfant
9. Faire fondre
1. ON/OFF
10. Faire bouillir
2. « + »
5. LED supplémentaire zone de cuisson
7. Pont
4. RACCORDEMENT ÉLECTRIQUE
Dessous
8
88
8
5
5
23
23
23
23
1
8
6
8 8
4

Toute question concernant le cordon d'alimentation électrique doit être
adressée au service après-vente ou à un technicien qualifié.
Il est toutefois possible de brancher la table de cuisson à :
Le câble jaune et vert du cordon d'alimentation doit être mis à la terre des
bornes d'alimentation et des bornes de l'appareil.
Si la table de cuisson est équipée d'un cordon d'alimentation, celui-ci doit
obligatoirement être raccordé au secteur 220-240 V entre la phase et le
neutre.
AVERTISSEMENT : Le fabricant décline toute responsabilité pour tout
incident ou ses conséquences pouvant être dues à l'usage d'un appareil
non mis à la terre ou dont la continuité de mise à la terre est défectueuse.
Avant tout branchement électrique, vérifiez toujours la tension
d'alimentation indiquée sur le compteur électrique, l'installation du coupe-
circuit, la continuité de la mise à la terre de l'installation et la compatibilité
du fusible.
Le branchement électrique de l'installation doit correspondre à la
puissance nominale de l'appareil : brancher l'appareil à l'aide d'un
interrupteur bipolaire.
Si l'appareil est équipé d'une prise de courant, il convient de veiller lors de
l'installation à ce que la prise reste accessible.
« L'installation doit être conforme aux normes et directives. » Le
fabricant décline toute responsabilité en cas de dommage dû à une
utilisation non conforme ou non raisonnable.
Triphasés 220-240 V3
Triphasés 380-415 V2N
Pour procéder au nouveau branchement, suivez les instructions ci-
dessous :
Avant de réaliser le branchement, assurez-vous que l'installation est
protégée par un fusible adéquat et qu'elle est équipée de câbles de section
suffisante pour alimenter normalement l'appareil.
Retournez la table de cuisson, côté verre, sur le plan de travail, en prenant
soin de protéger le verre.
231
- Retirez le cordon d'alimentation.
Opérations nécessaires pour réaliser un nouveau branchement :
- Découvrez l'extrémité de chaque fil du cordon d'alimentation sur 10
mm, en tenant compte de la longueur de cordon nécessaire pour le
branchement à la plaque à bornes ;
- Retirez les vis fixant la plaque à bornes contenant les barres shunt et
les conducteurs du cordon d'alimentation ;
Opérations nécessaires pour réaliser un nouveau branchement :
- Choisissez le cordon d'alimentation en fonction
des recommandations du tableau ;
Remarque : vérifiez que les vis du bornier sont bien serrées.
- Selon l'installation et avec l'aide des barres
shunt que vous avez récupérées à la première
étape, fixez le conducteur comme indiqué sur le
graphique ;
- localisez les deux pattes situées sur les côtés ;
- Faites passer le cordon dans le serre-câble ;
- Découvrez l'extrémité de chaque fil du cordon
d'alimentation sur 10 mm, en tenant compte de la
longueur de cordon nécessaire pour le
branchement à la plaque à bornes ;
- déposez le couvercle.
- Vissez le serre-câble.
- Fixez le couvercle ;
- introduisez un tournevis plat devant les pattes « 2 » et « 3 », enfoncez
et appuyez ;
Pour retirer le cordon d'alimentation :
- choisissez le cordon d'alimentation en fonction des recommandations
du tableau ;
- Faites passer le cordon dans le serre-câble ;
- Selon l'installation et avec l'aide des barres shunt que vous avez
récupérées à la première étape, fixez le conducteur comme indiqué sur
le graphique ;
- Fixez le couvercle ;
- dévissez le serre-câble « 1 » ;
- Vissez le serre-câble.
Ouvrez le couvercle selon les étapes suivantes :
SHUNT
N
=
Neutre
T
=
Terre
Ph = Phase
ATTENTION :
Si le cordon d'alimentation doit être remplacé, connectez le nouveau
cordon conformément aux couleurs/codes suivants :
DISPOSITION
"1-3"
DISPOSITION
"2-4"
MONOPHASÉS ou BIPHASÉS 220-240 V~
Câble
HO5V2V2F
Câble
HO5V2V2F
Câble
HO5V2V2F
2
3x2,5 mm
2
3x4 mm
2
4x1,5 mm
2
4x1,5 mm
2
4x1,5 mm
2
4x1,5 mm
TRIPHASÉS
220-240 V3~
TRIPHASÉS 380-415 V2N~
BLEU
MARRON
JAUNE VERT
Neutre
Sous tension
Terre
( )
Branchement aux bornes de la plaque à bornes
Monophasés 220-240 V~Biphasés 220-240 V2~
Triphasés 220-240 V3~Triphasés 380-415 V2N~
22 FR
5. CONSEILS CONCERNANT LES USTENSILES
DE CUISINE POUR LA TABLE DE CUISSON
Il est important d'utiliser des ustensiles de cuisson de bonne qualité afin
d'obtenir les meilleurs résultats avec votre table de cuisson
• Assurez-vous que le dessous de la casserole ou de la poêle est
sec : lorsque vous remplissez votre casserole de liquide ou lorsque vous
en utilisez une précédemment rangée au réfrigérateur, assurez-vous
que le dessous est bien sec avant de le poser sur la table de cuisson.
Cela évitera de tâcher la table de cuisson.
CHOIX DES USTENSILES DE CUISSON - Les informations suivantes
vous aideront à choisir des ustensiles de cuisson performants.
Acier inoxydable : nous le recommandons vivement. Notamment les
modèles avec fond plat en sandwich. Le fond en sandwich allie les
avantages de l'acier inoxydable (esthétique, durabilité et résistance) et
de l'aluminium ou du cuivre (conduction thermique, distribution
homogène de la chaleur).
• Utilisez toujours des ustensiles de cuisson de qualité, aux fonds
parfaitement plats et épais : l'utilisation de ce type d'ustensiles évitera
les points chauds causant l'adhérence des aliments. Les casseroles et
poêles épaisses assurent une distribution homogène de la chaleur.
Fonte : elle peut être utilisée, mais nous ne la recommandons pas. Les
performances laissent à désirer. Elle risque de rayer la surface.
• Utilisez des casseroles dont le diamètre est assez large pour
recouvrir toute la surface du foyer : la taille de la casserole ne doit pas
être inférieure à celle du foyer. Si elle est un peu plus grande, l'énergie
sera exploitée au maximum.
Fond en cuivre / faïence : nous recommandons les modèles extra-
lourds. Bonnes performances, mais le cuivre risque de laisser des
Aluminium : nous recommandons les modèles extra-lourds. Bonne
conductivité. Les résidus d'aluminium laissent parfois des rayures sur la
table de cuisson, mais elles s'éliminent si elles sont nettoyées
immédiatement.
En raison de son point de fusion bas, l'aluminium fin ne doit pas être
utilisé.
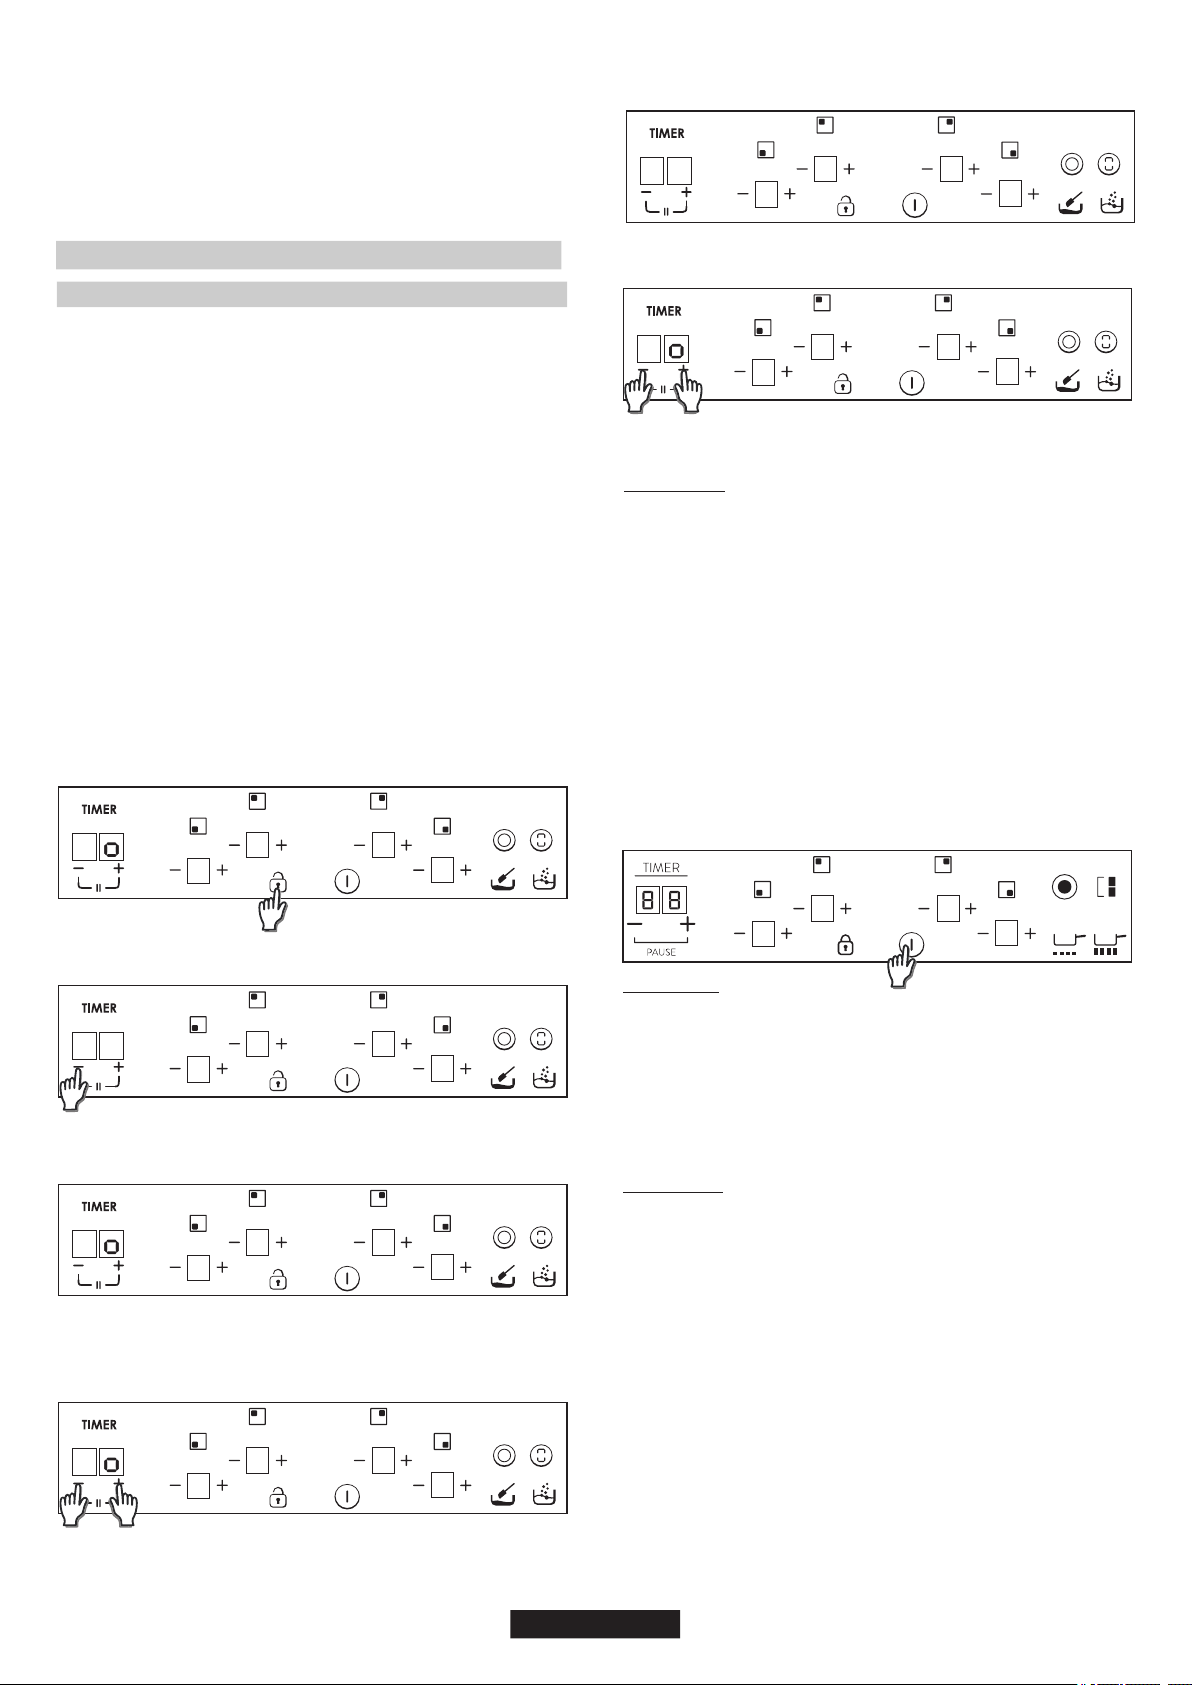
6. UTILISATION
23 FR
Porcelaine / émail : bonnes performances uniquement avec un petit
fond lisse et plat.
résidus ressemblant à des rayures. Les résidus peuvent être éliminés si
la table de cuisson est immédiatement nettoyée. Quoiqu'il en soit, ne
laissez pas ces casseroles chauffer à vide. Le métal surchauffé risque
d'adhérer aux plaques vitrocéramiques. Une casserole en cuivre
surchauffée laissera une trace indélébile sur la table de cuisson.
Vitrocéramique : non recommandée. Les performances laissent à
désirer. Elle risque de rayer la surface.
1.- Actvez la plaque de cusson
2.- Lassez la commande tactle fnr son processus d'ntalsaton
Au moment de l’achat, la plaque de cusson est défne sur la
pussance maxmale. Après avor branché l'apparel sur l'almentaton
électrque, vous avez 30 secondes pour régler le nveau de pussance
en vous basant sur les ponts ndqués c-dessous :
3.- Déverroullez la touche de commande.
Grâce à la foncton « Geston de la pussance », l’utlsateur peut
défnr la pussance maxmale qu peut être attente par la plaque de
cusson. La foncton de geston de la pussance est dsponble
unquement durant les 30 premères secondes suvant l'actvaton de
la plaque de cusson. Il exste également la possblté de répéter ce
réglage en débranchant et rebranchant la prse électrque. En réglant
la pussance maxmale souhatée, la plaque de cusson ajuste
automatquement la dstrbuton de la pussance dans les dfférentes
zones de cusson afn de ne jamas dépasser la lmte ; cela permet
également de gérer smultanément toutes les zones de cusson sans
problème de surcharge. Le clent peut défnr la pussance maxmale
de la plaque de cusson entre 2,5 kW et la pussance maxmale
relatve de la plaque de cusson (peut varer en foncton du modèle).
Par exemple, s la pussance maxmale de la table de cusson est de 7
kW, la pussance maxmale à régler se stue entre 2,5 kW et 7 kW.
P
8
8
8
8
Comment chosr le nveau de geston de la pussance
8 8
8
8
8
8
5.- Après ce moment, ce message apparaîtra sur l'affchage, Po sur
l'affchage de la mnutere. Nveau de pussance dvsé par 100 dans
les affchages de chauffage.
6.- A l'ade des touches '« + » et « - » de la mnutere, la valeur de
geston de la pussance peut être ajustée. Lorsque la valeur désrée
est sélectonnée, appuyer en même temps sur les touches « + » et « - »
pendant 5 secondes.
4.- Avant de passer 30 secondes après la mse en marche de la table de
cusson, appuyer pendant 5 secondes sur la touche « - » de la mnutere.
P
6
0
0
5
P
4
0
0
5
8 8
8
8
8
8
7.- Au terme de ce processus un long bp retentt et une remse à zéro
est fate. Le processus de démarrage sera généré à nouveau.
Par la sute, la commande tactle ne permettra aucune
combnason dépassant cette lmte.
Remarques :
a) Cette geston de la pussance n'est dsponble que pendant les 30
premères secondes après la mse en marche de la table de cusson.
b) S cette sélecton de geston de la pussance est sur ON, s plus de
90 secondes passent après l'allumage de la table de cusson, ce
processus sera termné sans qu'aucune nouvelle valeur de pussance
ne sot enregstrée.
c) S cette sélecton de geston de la pussance est sur ON, s l'on
appue sur une touche sauf la combnason des touches « + » et « - »
de la mnutere, le processus sera termné sans aucune nouvelle
valeur de pussance étant enregstrée et la commande tactle
commencera à fonctonner comme d'habtude, sans réntalsaton.
d) S cette sélecton de geston de l'almentaton est sur ON, s la
combnason des touches "+" et "-" de la mnutere est appuyée, le
processus sera termné avec un nouvelle valeur de pussance étant
enregstrée ; la remse à zéro et le contrôle tactle commenceront à
fonctonner comme d'habtude.
8.- Après le processus de démarrage, la geston de la pussance
s'affche sur l'écran de la mnutere.
P
4
0
0
5
Allumer/Éteindre un foyer de cuisson
Pour allumer un foyer de cuisson, touchez la zone de
commande correspondante
bip retentit et le chiffre « 0 » s'affiche pour cette zone, indiquant le
niveau de chauffe.
1) Si le niveau de cuisson est sur « 0 », cet affichage s'interrompt
automatiquement au bout de 10 secondes et le signal de coupure de
cette zone retentit.
2) S'il y a présence de chaleur résiduelle avec niveau de chauffe égal
à « 0 », ce « 0 » clignote.
3) Si la fonction de verrouillage est activée, vous ne pouvez activer
de zone de cuisson.
Pour éteindre un foyer, touchez sa zone de commande pendant 1,2 s.
Trois bips sonores retentissent et, s'il y a chaleur résiduelle, la lettre «
H » s'affiche. La zone de commande du foyer est alors éteinte.
1) Si le niveau de cuisson est sur « 0 », cet affichage s'interrompt
automatiquement au bout de 10 secondes et le signal de coupure de
la zone de commande retentit.
4) Si un seul foyer de cuisson est activé et que celui-ci est ensuite
éteint, 4 bips sonores retentissent pour indiquer que tout le plan de
cuisson est éteint.
2) S'il y a chaleur résiduelle, mais que la zone de commande est
éteinte, le lettre « H » s'affiche.
3) Même si la fonction de verrouillage est activée, vous pouvez
éteindre une zone de commande.
8
8
8
8
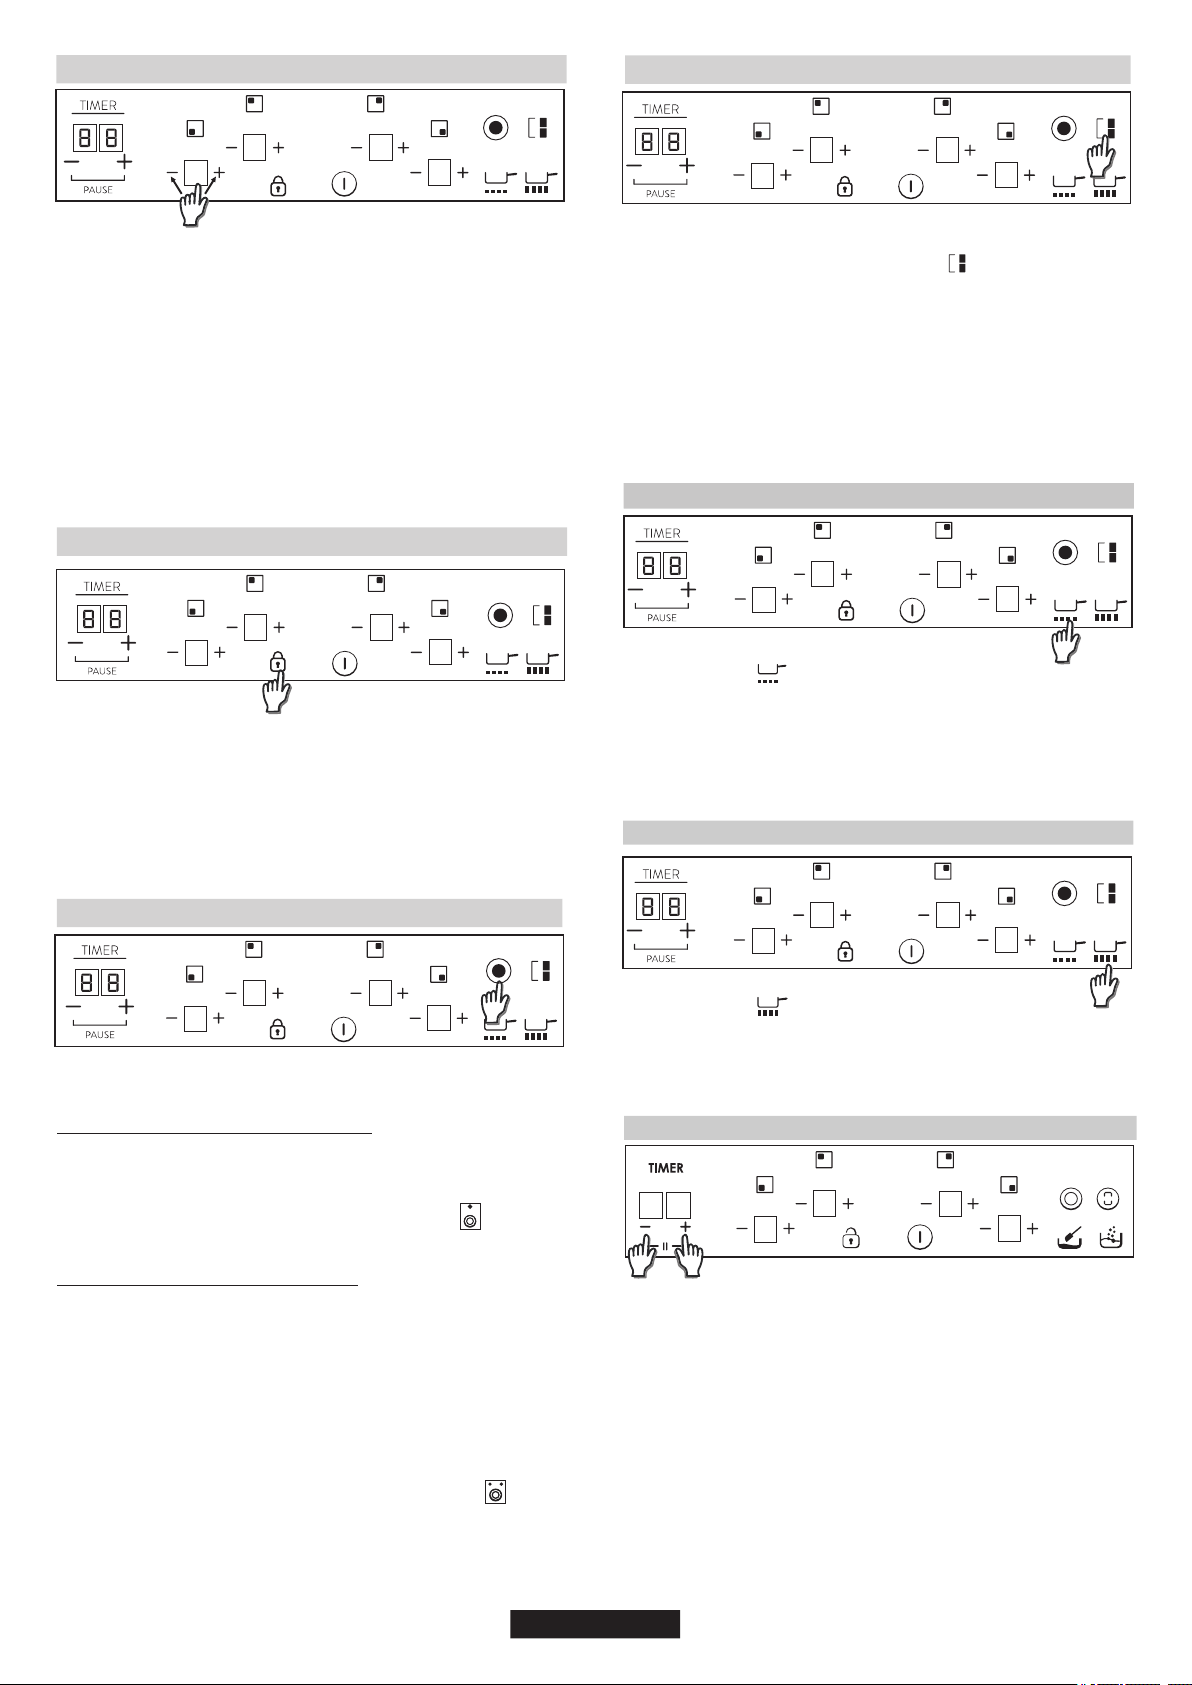
Pour activer l'élargissement double de la zone de cuisson, la zone
principale associée doit déjà être allumée à un niveau de chauffe
supérieur à « 0 ».
8.2- Allumage de la zone triple de cuisson
Appuyez brièvement sur la touche d'élargissement qui allumera le 1er
élargissement du foyer de cuisson. L'un des LED de la touche
d'élargissement affiche ON si le 1er élargissement du foyer de
cuisson est activé (LED côté gauche pour un foyer triple de cuisson,
LED du milieu, le seul existant, pour un foyer double de cuisson).
8.1- Allumage de la zone double de cuisson
Appuyez brièvement sur la touche d'élargissement qui activera
l'élargissement du foyer de cuisson. Le LED de la touche
d'élargissement affiche ON si l'élargissement du foyer de cuisson est
activé.
Appuyez une deuxième fois brièvement sur la touche d'élargissement
qui active le deuxième élargissement du foyer de cuisson. Deux LED
de la touche d'élargissement du foyer s'allument si le 1er et le 2è
élargissement du foyer de cuisson sont allumés.
Appuyez une troisième fois brièvement sur la touche d'élargissement
qui éteint le 1er et le 2è élargissement du foyer de cuisson.
Un bip retentit chaque fois que vous appuyez sur la touche
d'élargissement.
Appuyez une deuxième fois brièvement sur la la touche
d'élargissement qui éteint l'élargissement du foyer de cuisson. Un bip
retentit chaque fois que vous appuyez sur la touche d'élargissement.
Doubler/Tripler la zone de cuisson
8
8
8
8
Fonction de pont
La fonction de pont ne peut être activée que lorsque les deux foyers
sont éteints. L'un des foyers du pont a été sélectionné ; pour activer la
fonction de pont appuyez sur la touche pont.
Les deux foyers du pont affiche le même niveau de chauffe. Arrêt de la
fonction :
Les deux foyers du pont sont activés en même temps.
- Si l'utilisateur règle le niveau de chauffe sur « 0 ».
Une fois que les deux foyers sont activés, vous pouvez régler le
niveau de chauffe en appuyant sur les touches « + » et « - ».
Un bip retentit et le LED de la zone s'allume si la zone de commande
est activée.
- en appuyant sur la touche fonction de pont en mode de
paramétrage.
Fonction « faire fondre »
Activation de la fonction Faire fondre, après sélection d' un
foyer de cuisson :
un signal sonore retentit et l'affichage du foyer indique « U » ;
- appuyez sur la touche Faire fondre ,
le foyer fonctionnera au niveau de chauffe « 2 ».
Le foyer étant sélectionné, la fonction Faire fondre se terminera :
- si elle est désactivée,
- si un autre niveau de chauffe est sélectionné.
8
8
8
8
8
8
8
8
En appuyant brièvement sur « + » ou « - », vous augmentez ou
diminuez le niveau de chauffe de la zone sélectionnée : 0 - 1 - 2 - 3 -... -
9 - P
1. En appuyant plus longuement sur « + » ou « - », le niveau de
chauffe augmente ou diminue de manière continue. L'augmentation
rapide du niveau de chauffe atteint le niveau 9 et pour un niveau
encore plus élevé, appuyez brièvement sur la touche « + ». Aucun bip
ne retentit avec l'augmentation ou la diminution rapide du niveau de
chauffe.
3. Si une zone de commande est activée avec réglage sur « 0 » et
qu'il y a chaleur résiduelle, le « 0 » clignote. 10 secondes après, le « 0 »
disparaît et la lettre « H » fixe s'affiche.
2. Une fois sur « P », si vous appuyez une nouvelle fois sur la touche
« + », cela ne ramène pas le niveau de réglage à « 0 ». De même, une
fois sur « 0 », si vous appuyez une nouvelle fois sur la touche « - », cela
ne ramène pas le niveau de réglage sur « P ».
Cette action est activée en appuyant sur la touche de
verrouillage.
Pour désactiver le verrouillage enfant, suivre la même procédure que
celle indiquée plus haut. Ensuite, un bip retentit et l'écran affiche la
lettre « n ». La table de cuisson n'est plus verrouillée.
Ensuite, chaque fois qu'on appuie sur une touche, la lettre « L »
s'affiche pendant 2 secondes et le niveau de chauffe reste le même.
Remarque : Le verrouillage enfant est automatiquement activé 15
minutes après l'arrêt total de la table de cuisson.
Augmenter/Diminuer le niveau de chauffe.
Option verrouillage enfant
8
8
8
8
8
8
8
8
Fonction « faire bouillir »
un signal sonore retentit et l'affichage du foyer indique « P »
- appuyez sur la touche Faire bouillir ,
Le foyer fonctionnera au niveau maximum de chauffe pendant 10
minutes. À la fin de ces 10 minutes, un signal sonore retentit et le
niveau de chauffe descend au niveau « 9 ».
Activation de la fonction Faire bouillir, après sélection d'un f
oyer de cuisson :
8
8
8
8
FONCTION PAUSE
La fonction pause est indiquée par le symbole « II ». Pour sélectionner
cette fonction, l'utilisateur appuie en même temps sur les touches « +
» et « - » qui sont sous la touche du temporisateur.
Comment la fonction pause fonctionne-t-elle ?
La fonction pause permet de mettre la cuisson en pause pendant un
moment, pour permettre à l'utilisateur
d'aller ouvrir la porte ou de répondre au téléphone, sans craindre que
le contenu de sa casserole ne déborde. Cette fonction est également
très utile pour nettoyer la surface de l'interface utilisateur, sans
modifier le réglage de cuisson.
Remarque : il n'est pas possible de mettre en pause une seule zone
de cuisson. En utilisant la fonction pause, vous mettez toute la plaque
de cuisson en pause.
Pour activer la fonction pause, appuyez simultanément sur la touche «
8 8
8
8
8
8
24 FR
Sécurité débordement
Un objet ou un liquide fait pression sur une ou plusieurs touches
pendant plus de 5 s. 2 bips retentissent suivis d'un long bip toutes les
30 s, aussi longtemps que la ou les touches subissent telle pression.
La table de cuisson s'éteint. Ce symbole clignote tant que ce
problème persiste.
Mnutere
Pour mettre le temporisateur en marche, il faut qu'un foyer ait été
sélectionné à un niveau de chauffe supérieur à « 0 ».
Choisissez la zone que vous voulez temporiser. Le niveau de chauffe
doit être supérieur à « 0 ». Le symbole statique s'affiche en
correspondance de la zone choisie pour la temporisation. Les chiffres
« 0 0 » s'affichent en correspondance de la fonction de temporisation.
2) En appuyant simultanément sur les touches « + » et « - », la
temporisation est annulée (elle affiche 00).
4) Pour régler la mnutere, la touche « - » permet d'aller de « 00 » à «
99 » et la touche « + » de « 99 » à « 00 ».
3) En appuyant sur les touches « + » et « - » du temporisateur
pendant un certain temps, vous effectuez un réglage rapide.
1) Appuyez sur les touches « + » ou « - » pour choisir la durée de
temporisation. Aucun bip ne retentit lorsque vous changez cette durée.
5) Durée maximum 99 minutes.
8) Le niveau de chauffe des zones temporisées peut être modifié
sans conséquences pour le réglage la mnutere.
10) Si vous appuyez sur la touche de temporisation sans avoir
sélectionné de zone et quand aucune zone n'est temporisée, cela n'a
pas de suite.
6) Une fois ce temps écoulé, la table de cuisson commence à sonner
: appuyez sur n'importe quelle touche pour faire cesser l'alarme.
7) Il est possible de modifier la valeur la mnutere alors même qu'il
est déjà en fonction.
9) La dernière minute s'affichera en secondes (sur certaines
versions visible uniquement si vous entrez dans la programmation la
mnutere pendant la dernière minute du compte à rebours).
11) Si vous appuyez sur la touche de temporisation sans avoir
sélectionné de zone et quand plusieurs zones sont temporisées, la
durée indiquée change dans le sens des aiguilles d'une montre et
indique la durée de l'affichage dont le point des décimales est activé.
12) Snon l'affchage du nveau de pussance du foyer temporsé
alterne entre nveau de pussance (5s) et le symbole (0,5s).
Le compte à rebours s'affiche dans les espaces d'affichage de la
temporisation. Si plusieurs zones sont temporisées, c'est la valeur la
plus petite du compte à rebours qui s'affiche et les décimales
s'affichent en correspondance de la zone concernée.
Indicateur de chaleur résiduelle
(pour les foyers à rayonnement -> calculé)
Quand la température sur le plan de cuisson vitrocéramique est égale
à environ 65 °C (valeur théorique), cette condition est indiquée par un
« H » s'affichant en correspondance du foyer concerné.
De même, on peut utiliser les mêmes indicateurs pour montrer la «
chaleur résiduelle ». Un tableau des durées est défini dans ce but :
Durée de chaleur résiduelle = f (niveau de chauffe, durée de
fonctionnement).
Pour générer une température supérieure à 65 °C, tel foyer doit
fonctionner depuis un certain temps et cette durée dépend du niveau
de chauffe. Une fois ce temps écoulé, l'avertissement de chaleur
résiduelle s'affiche au moment où le foyer est éteint.
Arrêt automatique
Si le niveau de chauffe ne change pas pendant un certain temps
prédéterminé, il y a arrêt automatique du foyer correspondant.
La durée maximale de fonctionnement d'un foyer dépend du niveau
de chauffe réglé.
Niveau de
chauffe
Durée max.
(heures)
1
2
3
4
5
6
7
8
9
10
5
5
4
3
2
2
2
2
REMARQUE : s'il y a risque de surchauffe dû à l'activation du
niveau de chauffe maximum, la table de cuisson règle
automatiquement son niveau de chauffe pour se protéger.
7. NETTOYAGE ET ENTRETIEN
. Avant toute opération d'entretien, laissez refroidir la table de cuisson.
Si des taches subsistent :
- Versez quelques gouttes supplémentaires de détergent spécifique
sur la table de cuisson.
. Évitez les débordements, car toute substance se renversant sur la
table de cuisson brûle rapidement et rendra le nettoyage plus difficile.
- Versez quelques gouttes d'un détergent spécifique sur la table de
cuisson.
. Nous recommandons d'éviter d'utiliser des substances risquant de
fondre (plastique, sucre, produits à base de sucre) à proximité de la
table de cuisson.
- Frottez les taches tenaces à l'aide d'un chiffon doux ou de papier
absorbant légèrement humide.
. Utilisez uniquement des produits (crèmes et racleurs)
spécifiquement conçus pour les surfaces vitrocéramiques. Ils
s'achètent dans le commerce.
- Essuyez avec un chiffon doux ou du papier absorbant sec jusqu'à
ce que la surface soit propre.
ENTRETIEN :
25 FR
- La touche de temporisation (Timer) n'affiche rien et tous les brûleurs
s'allument et affichent « 0 », segment par segment vers la gauche,
puis vers la droite, sans arrêt.
+ » et la touche « - », sous le temporisateur, pendant une demi-
seconde.
- La fonction pause est activée et la plaque de cuisson cesse de
chauffer
- La coupure automatique des brûleurs est suspendue
- Tous les décomptes de durée de chauffe sont suspendus
- Toutes les touches sont verrouillées, sauf la fonction pause
(combinaison de la touche « + » et de la touche « - ») et la touche
ON/OFF
- Le réglage de la puissance de chauffe des brûleurs, pour les
cuissons en cours, est mémorisé et la puissance de chauffe des
brûleurs est sur « 0 »
Remarque : aucun témoin à LED n'indique que la fonction pause est
en cours. En appuyant une nouvelle fois en même temps sur les
touches « + » et « - », la fonction pause est désactivée.
Désactiver la fonction pause :
Pour mettre fin à la « Fonction pause », appuyez une nouvelle fois sur
la combinaison de touches « + » et « - » du temporisateur (Timer)
pendant une demi-seconde. La fonction pause est désactivée, la
plaque de cuisson reprend à chauffer (un signal sonore retentit) et le
réglage de cuisson de chaque brûleur est rétabli.
Remarque : si la plaque de cuisson est mise en pause pendant plus de
10 minutes, la plaque de cuisson s'éteint automatiquement.
- Essuyez avec un chiffon doux ou du papier absorbant sec jusqu'à
ce que la surface soit propre.
QUELQUES CONSEILS :
Le nettoyage fréquent crée une couche protectrice essentielle pour
éviter les rayures et l'usure de la table de cuisson. Assurez-vous que
la surface de la table de cuisson est propre avant de la réutiliser. Pour
éliminer les traces d'eau, utilisez quelques gouttes de vinaigre blanc
ou de jus de citron. Puis essuyez avec du papier absorbant et
quelques gouttes de détergent spécifique.
- Recommencez si nécessaire.
La surface vitrocéramique résiste aux rayures des ustensiles de
cuisson à fond plat. Toutefois, il est préférable de les soulever pour les
déplacer d'une zone de cuisson à l'autre.
- Grattez à l'aide d'un racleur en le tenant à un angle de 30° par
rapport à la table de cuisson, jusqu'à disparition de la tache.
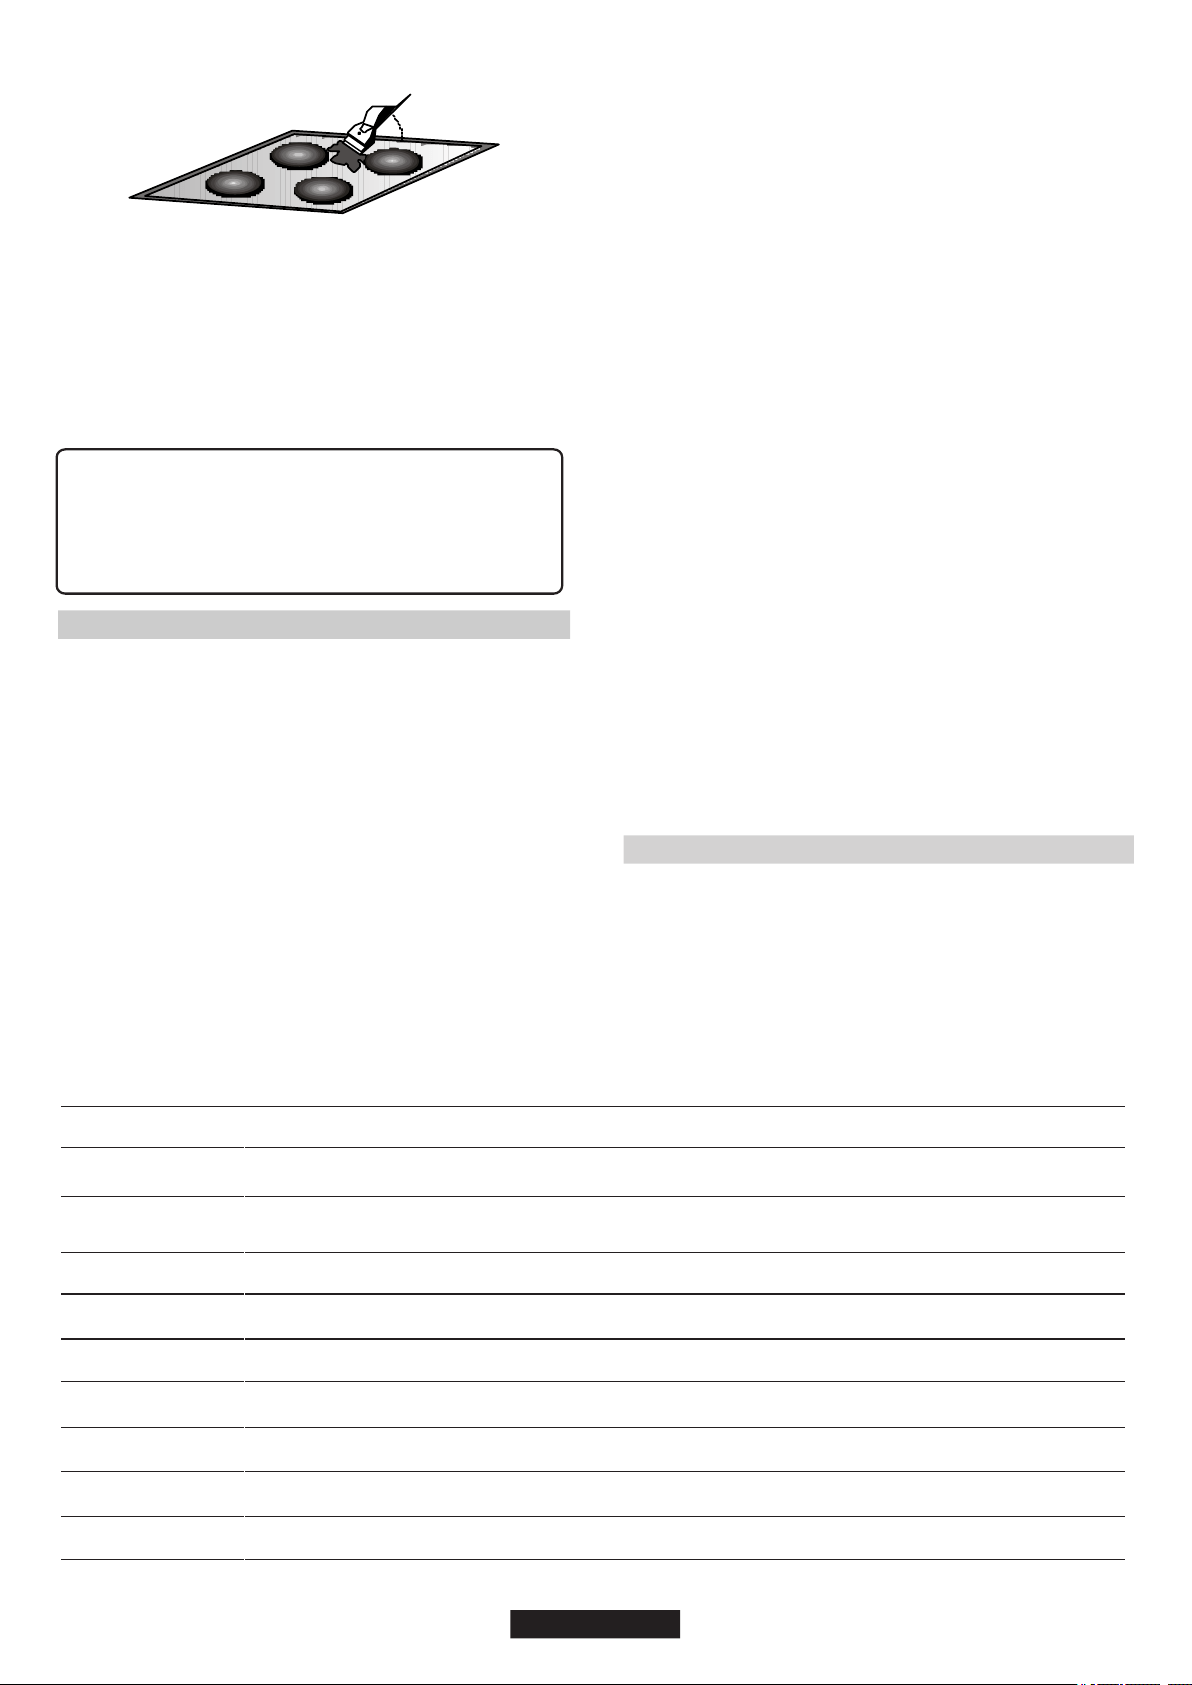
Toute variation de la couleur du verre vitrocéramique n'a
pas d'influence sur son fonctionnement, ni sur la solidité
de sa surface. Les variations de couleur sont pour la
plupart dues à des résidus alimentaires brûlés ou à des
ustensiles de cuisine en aluminium ou en cuivre (ces
dernières sont difficiles à éliminer).
8. RÉSOLUTION DE PROBLÈMES
Utilisez uniquement des casseroles à fond plat. Si de la lumière passe
entre la casserole et la table de cuisson, la zone de cuisson ne peut
pas correctement transmettre la chaleur.
Le fond de casserole doit couvrir entièrement le diamètre de la zone
sélectionnée.
Les casseroles utilisées ne sont pas adaptées. Utilisez uniquement
des ustensiles de cuisson à fond plat, lourd et dont le diamètre est au
moins égal à celui de la zone de cuisson.
La cuisson est trop lente
Les zones de cuisson ne permettent pas de faire mijoter ou ne
font frire qu'à petit feu
Petites rayures ou traces d'abrasion sur la surface vitrocéramique
Nettoyage inadapté ou utilisation de casseroles à fond non lisse ;
particules, telles que des grains de sable ou du sel, entre la plaque de
cuisson et le fond de la casserole. Consultez le chapitre «
NETTOYAGE ». Assurez-vous que le fond des casseroles est propre
avant de vous en servir et utilisez uniquement des casseroles à fond
lisse. Vous pouvez réduire le nombre de rayures par un nettoyage
soigné.
Ne faites pas glisser les casseroles en aluminium sur la surface
vitrocéramique. Reportez-vous aux recommandations de nettoyage.
Taches foncées
Zones claires sur la table de cuisson
Il s'agit peut-être de traces de casseroles en aluminium ou en cuivre,
ou encore de dépôts minéraux, d'eau ou d'aliments : vous pouvez les
éliminer à l'aide d'un détergent en crème.
Utilisez une lame de rasoir et suivez les consignes du chapitre «
NETTOYAGE ».
Caramélisation ou plastique fondu sur la table de cuisson
Consultez le chapitre « NETTOYAGE ».
La table de cuisson ou certaines zones de cuisson ne
fonctionnent pas.
Traces de métal
Vous utilisez le bon matériel, mais les taches persistent. Utilisez une
lame de rasoir et suivez les consignes du chapitre « NETTOYAGE ».
- niveau élevé: temps d'activité long.
Le panneau de commande est verrouillé. Déverrouillez la table de
cuisson.
Le plan de cuisson s'est éteint.
Faites vérifier que la connexion est conforme et contrôlez que le
panneau de commande est verrouillé. Déverrouillez la table de
cuisson.
Si un « F » et des chiffres s'affichent, votre appareil a détecté une
défaillance. Le tableau suivant vous indique les actions possibles de
résolution du problème.
Le commutateur principal (touche ON/OFF) a été actionné
accidentellement ou un objet quelconque est présent sur une ou
plusieurs touches. Éliminez le ou les objets présents sur le panneau
de commande. Saisissez à nouveau vos paramètres de réglage.
Fréquence des cycles de marche-arrêt des zones de cuisson
Les shunts ne sont pas bien positionnés sur le bornier.
La table de cuisson ne s'arrête pas.
- niveau faible : temps d'activité court,
Les cycles de marche-arrêt varient en fonction du niveau de chaleur
requis :
Le plan de cuisson ne fonctionne pas.
La lettre « F » et des chiffres sont affichés
Contrôlez l'état des fusibles et du disjoncteur de votre circuit
électrique. Vérifiez s'il y a une panne de courant.
9. CONTRÔLE D'ENTRETIEN PRÉLIMINAIRE
- la prise est correctement branchée et le fusible est en bon état ;
Avant de faire appel à un technicien d'entretien, veuillez vérifier
les points suivants :
Si vous ne parvenez pas à identifier l'erreur, éteignez l'appareil. Ne le
modifiez pas. Appelez le centre SAV. L'appareil est fourni avec
certificat de garantie, qui vous assure une réparation gratuite au
centre SAV.
F0
Fc
Ft
FE
Fb
FU / FJ
FA
FC / Fd
Fr
Si une erreur s'est produite, débranchez puis rebranchez le câble d'alimentation. Si l'erreur persiste,
appelez le service après-vente. Si l'erreur apparait à l'improviste au cours du fonctionnement ordinaire,
appelez le service après-vente
Erreur du logiciel de commande
tactile
Attendez jusqu'à ce que la température at bassé, la plaque de cusson sera rétable quand la
température attendra une valeur normale. Quand le message dsparaît, vous pouvez utlser à nouveau la
table de cusson.
La zone de commande tactile est
trop chaude, ce qui a désactivé
tous les foyers de cuisson.
Attendez que la température ait chuté. Si ce message persiste quand la température atteint telle valeur
ambiante, appelez le service après-vente.
Attendez que la température ait chuté. Si ce message persiste quand la température atteint telle valeur
ambiante, appelez le service après-vente.
Le capteur de température à
commande tactile est peut-
être endommagé.
Vérifiez que le plan de cuisson est correctement monté. Contrôlez que les touches sont bien au contact
de la plaque en verre vitrocéramique.
Sensibilité excessive de
toutes les touches.
Cette erreur résulte d'un contrôle automatique du clavier. Elle disparaît quand le contrôle automatique
détecte une valeur acceptable. Si l'erreur persiste, appelez le service après-vente.
Erreur sécurité du clavier
Cette erreur résulte d'un contrôle automatique du logiciel. Elle disparaît quand le contrôle automatique
détecte une valeur acceptable. Si l'erreur persiste, appelez le service après-vente.
Erreur sécurité du clavier
Cette erreur résulte d'un contrôle automatique du logiciel. Elle disparaît quand le contrôle automatique
détecte une valeur acceptable. Si l'erreur persiste, appelez le service après-vente
Erreur sécurité du clavier
Les pilotes de relais sont susceptibles d'une multitude de problèmes. Coupez l'alimentation du plan de
cuisson pendant une minute, puis rebranchez. Si l'erreur persiste, appelez le service après-vente.
Erreur sécurité des relais
Problème
Solution
Affichage foyer
de cuisson
Le capteur de température à
commande tactile est peut-être
endommagé.
26 FR
30°
Maxi
N.B.:
Un racleur équipé d'une lame de rasoir n'endommage pas la
surface, tant qu'il est maintenu à un angle de 30°.
Ne pas laisser le racleur avec lame de rasoir à la portée des
enfants.
Ne jamais utiliser de produits abrasifs ou de poudre à récurer.
Bordure métallique : Pour nettoyer la bordure métallique en toute
sécurité, lavez à l'eau et au savon, rincez, puis séchez avec un
chiffon doux.
Ne pas utiliser d'éponge trop humide.
Ne jamais utiliser de couteau ou de tournevis.

UPOZORNĚNÍ: Spotřebič a jeho přístupné části
se během používání zahřívají na vysokou teplotu.
Dávejte pozor, abyste se nedotkli topných článků.
Děti do 8 let věku musejí být mimo dosah
spotřebiče, pokud nejsou pod neustálým
dohledem.
Je-li jimi varná deska vybavena, nedívejte se po
delší dobu na prvky varné desky s halogenovými
žárovkami
Důrazně doporučujeme, aby se děti nepřibližovaly
k varným zónám v době, kdy jsou v provozu nebo
jsou vypnuté, ale indikátor zbytkového tepla svítí,
aby se zabránilo riziku vážných popálenin.
UPOZORNĚNÍ: Používejte pouze ochrannou
zábranu varné desky navrženou výrobcem
varného spotřebiče nebo zábranu, kterou
výrobce spotřebiče označí v návodu k použití za
vhodnou, nebo zábranu zabudovanou do
spotřebiče. Použití nevhodných ochranných
zábran může způsobit nehody.
Tento spotřebič není určen k používání pomocí
externího časovače nebo samostatného dálkového
ovládání.
UPOZORNĚNÍ: Vaření bez dozoru na varné
desce s tukem nebo olejem může být
nebezpečné a způsobit požár. Nikdy se
nepokoušejte uhasit požár vodou; vypněte
spotřebič, a potom zakryjte plamen např.
pokličkou nebo protipožární dekou.
Doporučujeme vám, abyste si uchovali pokyny
pro instalaci a použití pro pozdější potřebu, a před
instalací varné desky si poznamenejte její sériové
číslo pro případ, že byste potřebovali pomoc
poprodejního servisu.
POZOR: Vaření musí probíhat pod dohledem. Na
krátký proces vaření je nutné dohlížet neustále.
Připojte zástrčku k napájecímu kabelu, který je
schopen vydržet napětí, proud a zátěž uvedené
na štítku a který je opatřen uzemňovacím
kontaktem. Zásuvka musí být vhodná pro zatížení
uvedené na štítku a musí mít zapojený a funkční
uzemňovací kontakt. Uzemňovací vodič má
žlutozelenou barvu. Tuto operaci by měl provádět
UPOZORNĚNÍ: Nebezpečí požáru: na varném
povrchu nic neskladujte.
Tento spotřebič smějí používat děti starší 8 let a
osoby se sníženými fyzickými, smyslovými nebo
duševními schopnostmi nebo bez patřičných
zkušeností a znalostí, pokud jsou pod dohledem
osoby odpovědné za jejich bezpečnost, případně
byly poučené o bezpečném používání spotřebiče
a rozumějí možným nebezpečím. Děti by měly být
dohledem, aby se zajistilo, že si se spotřebičem
nebudou hrát. Děti nesmějí bez dozoru dospělých
spotřebič čistit, ani provádět činnosti údržby.
UPOZORNĚNÍ:Pokud je povrch prasklý,
nedotýkejte se skla a spotřebič vypněte, aby
nedošlo k úrazu elektrickým proudem.
BEZPEČNOSTNÍ OPATŘENÍ
27 CZ
Na zóny ohřevu se nesmějí umisťovat hliníkové
fólie ani plastové nádoby.
Na varnou desku nepokládejte žádné kovové
předměty jako nože, vidličky, lžíce nebo pokličky.
Mohly by se zahřát na velmi vysokou teplotu.
Žlutozelený uzemňovací kabel by neměl být
přerušen vypínačem. Zásuvka nebo omnipolární
vypínač používaný pro připojení by měl být při
instalaci spotřebiče snadno přístupný.
Připojení k napájecímu zdroji lze provést také tak,
že mezi spotřebičem a zdrojem energie, který
zvládne maximální připojenou zátěž a který je v
souladu se stávajícími právními předpisy, je
umístěn omnipolární vypínač.
odborník s vhodnou kvalifikací. V případě
neslučitelnosti mezi zásuvkou a zástrčkou
spotřebičů požádejte kvalifikovaného elektrikáře,
aby zásuvku nahradil jiným vhodným typem.
Zástrčka i zásuvka musejí odpovídat platným
normám země instalace.
K čištění spotřebiče nikdy nepoužívejte páru ani
vysokotlaký postřik.
Vždy používejte odpovídající nádobí.
Nádobu vždy umístěte do středu jednotky, na
které vaříte. Nic nepokládejte na ovládací panel.
Povrch desky nepoužívejte jako krájecí prkénko.
Jídlo nepřipravujte nikdy přímo na
sklokeramické varné desce.
Nedotýkejte se tepelných zón během provozu a
po nějakou dobu po použití
Na varnou desku neodkládejte žádné předměty.
Je-li napájecí kabel poškozen, musí jej vyměnit
výrobce, jeho autorizovaný servis nebo podobně
kvalifikované osoby, aby nedošlo ke vzniku
nebezpečných situací. Zemnící vodič (žlutozelený)
musí být na straně svorkovnice delší než 10 mm.
Vnitřní část vodičů by měla odpovídat výkonu
absorbovanému varnou deskou (uvedeno na
štítku). Typ napájecího kabelu musí být HO5V2V2-
F.
Odpojení lze zajistit přístupnou zástrčkou nebo
začleněním spínače v pevném zapojení v
souladu s pravidly elektroinstalace.
Varnou desku nepoužívejte jako pracovní
plochu.
Nad varnou deskou neukládejte těžké předměty.
Pokud by na desky spadly, mohly by způsobit
její poškození.
Nádobí po varné desce neposunujte.
Po každém použití je nutné varnou desku vyčistit,
aby se zabránilo hromadění nečistot a mastnoty.
Pokud se tyto nečistoty a mastnota na varné
desce ponechají, jsou při jejím používání znovu
zahřívány a spalovány za vzniku kouře a
nepříjemných zápachů, nemluvě o riziku šíření
požáru.
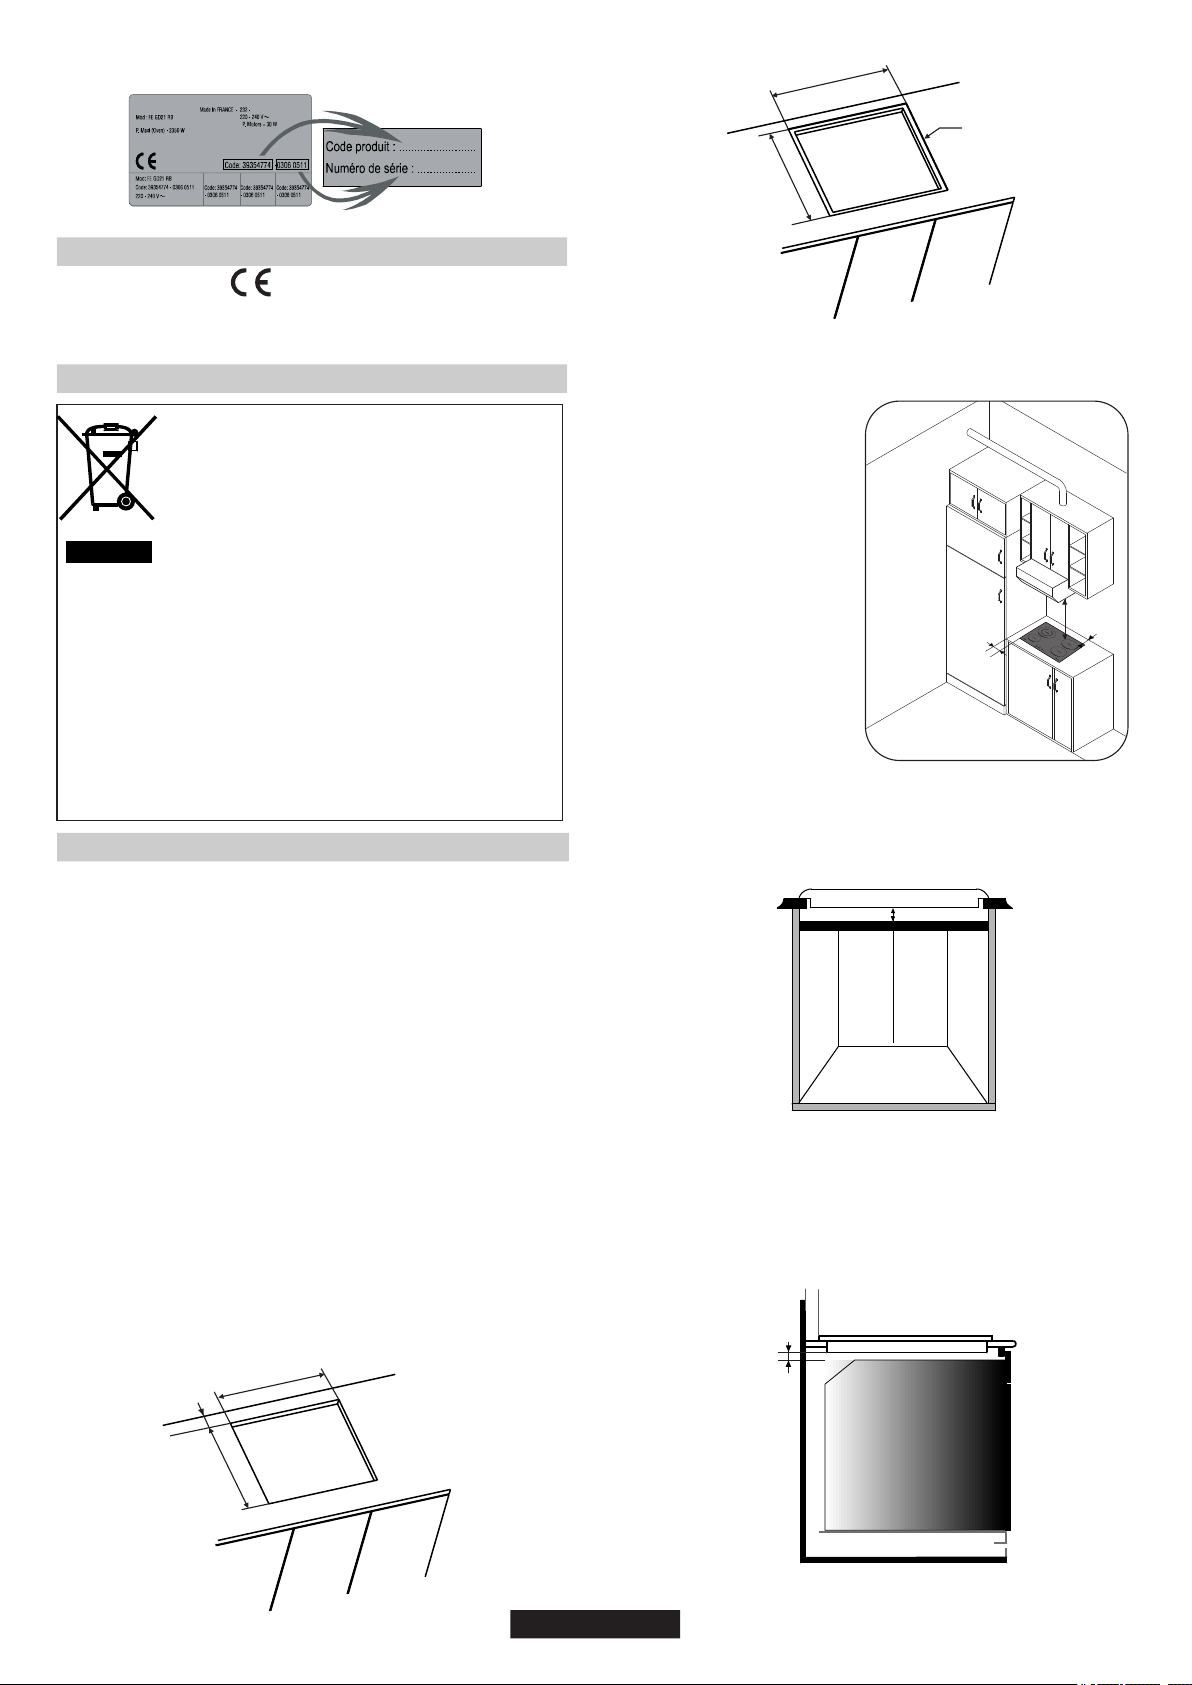
Nechte mezi varnou deskou a
zadní stěnou mezeru nejméně
55 mm a mezi varnou deskou a
vertikálním nábytkem nebo
stěnami na boční straně
nejméně 150 mm. Pokud je nad
varnou deskou instalován
nábytek, požadova ná
minimální vzdálenost je 700
mm.
Při instalaci odsavače par nad
varnou desku se řiďte
požadavky na instalaci
odsavače par, ale v žádném
případě nesmí být vzdálenost
mezi varnou deskou a
odsavačem par kratší než 700
mm.
KÓD PRODUKTU T
Identifikační štítek (umístěný pod spodním krytem varné desky)
Umístěním značky CE na tento spotřebič jsme potvrdili shodu
se všemi příslušnými evropskými požadavky na bezpečnost,
ochranu zdraví a životního prostředí, které se vztahují na tuto
kategorii výrobků.
2. OCHRANA ŽIVOTNÍHO PROSTŘEDÍ
• WEEE se nesmí likvidovat jako domovní odpad.
• WEEE se musí předat na příslušné sběrné místo pod správou
obce nebo autorizovaných společností. V mnoha zemích je
zaveden odběr WEEE v domácnostech.
V mnoha zemích lze při zakoupení nového spotřebiče vrátit starý
spotřebič prodejci, který je povinen jej odebrat bezplatně kus za
kus, pokud je spotřebič obdobného typu a má stejnou funkci jako
dodaný spotřebič.
Tento spotřebič je označen v souladu s evropskou
směrnicí 2012/19/EU o likvidaci elektrického a
elektronického zařízení (WEEE).
WEEE obsahuje znečišťující látky (které mohou mít
negativní dopad na životní prostředí) a základní
součástky, které lze znovu použít. Je nutné provést
speciální zpracování WEEE, aby se odstranily a
správně zlikvidovaly všechny znečišťující látky a
získaly a zrecyklovaly všechny materiály.
Jednotlivci mohou hrát důležitou roli při zajišťování toho, aby se
WEEE nestala přítěží pro životní prostředí. Je nezbytné dodržovat
několik základních pravidel:
V případě, že by se tato doporučení ignorovala a instalaci provedla
nekvalifikovaná osoba, výrobce odmítá veškerou odpovědnost za
případné technické selhání spotřebiče, bez ohledu na to, zda má nebo
nemá za následek poškození zboží či majetku nebo zranění osob či
zvířat.
Instalace domácího spotřebiče může být komplikovaná operace,
která, pokud není provedena správně, může vážně ovlivnit
bezpečnost zboží, majetku či osob. Z tohoto důvodu ji musí provádět
odborně kvalifikovaná osoba v souladu s technickými předpisy.
Ujistěte se, že nábytek, do kterého se spotřebič instaluje, a veškerý
přilehlý nábytek je vyroben z materiálů, které odolávají vysokým
teplotám (min. 100 °C).
Kromě toho by měly být všechny dekorativní lamináty upevněny
pomocí tepelně odolného lepidla.
Po odstranění obalu se ujistěte, že spotřebič není poškozen. V
opačném případě se obraťte na oddělení poprodejních služeb
prodejce nebo výrobce.
Spotřebič lze nainstalovat do vestavěného nábytku v režimu
„Standard“ nebo „Flush“.
700 mm
55 mm
150 mm
490 mm
+ 2
- 0
560 mm
+ 2
- 0
Mn. 70 mm
Instalační obvod v
případě instalace „Flush“
Poznámka: Vnitřní obvodové rozměry jsou shodné se standardní
instalací
703 mm (70 cm hob)
+ 2
- 0
523 mm
+ 2
- 0
593 mm (60 cm hob)
+ 2
- 0
Hloubka otvoru 5 mm
Instalační obvod v
případě instalace „Flush“
Pracovní deska musí mít tloušťku 25-45 mm.
Sousedí-li spodní část varné desky s oblastí, která je běžně přístupná
pro manipulaci nebo čištění, je nutné umístit pod spodní část varné
desky oddělovač o tloušťce 20 mm.
mn 20 mm
3- INSTALACE
Při instalaci trouby pod varnou desku nelze oddělovač použít a
minimální vzdálenost mezi spodní částí varné desky a troubou
nesmí být kratší než 10 mm. Neinstalujte pod tuto varnou desku
troubu bez chlazení. Troubu nainstalujte podle jejích vlastních
požadavků na instalaci.
10
mm
min
1.VŠEOBECNÁ UPOZORNĚNÍ
28 CZ
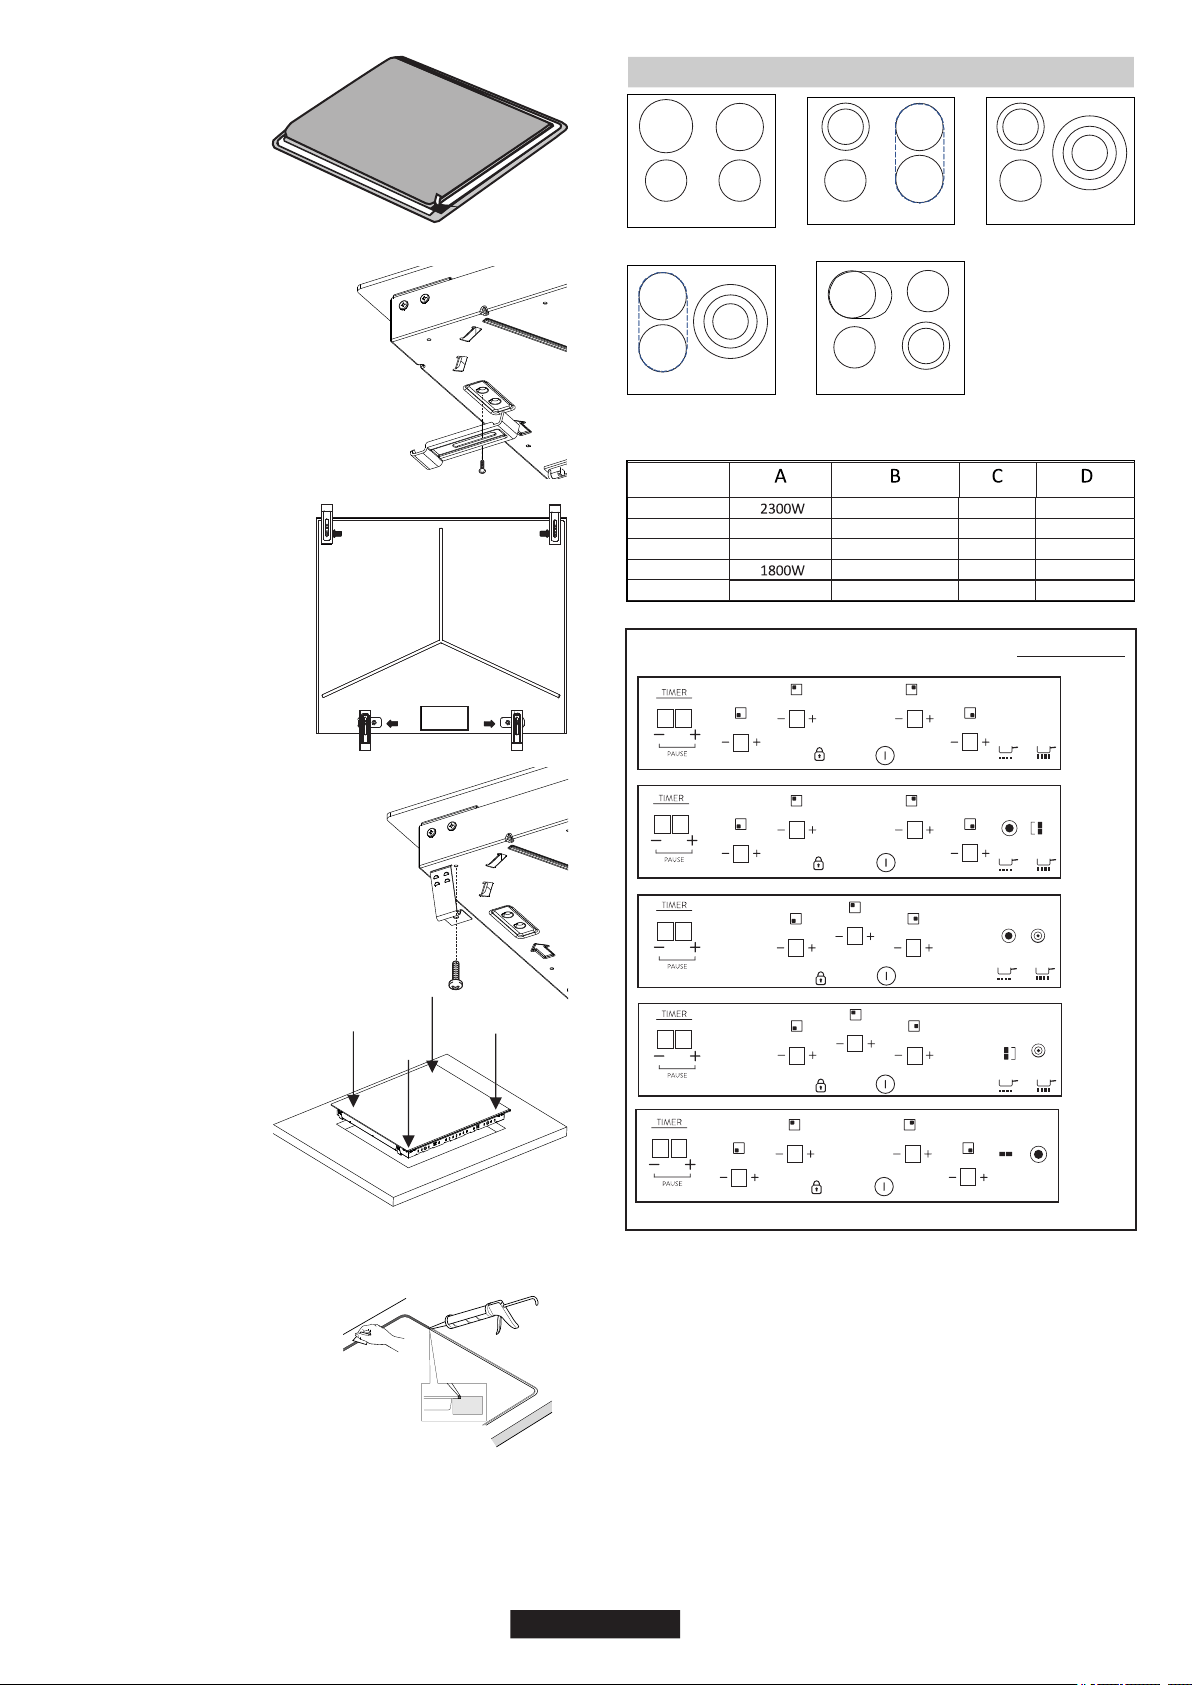
1
2
3
4
USPOŘÁDÁNÍ
8
88
8
2
22
23
33
3
6
1
8
9
10
8 8
4
8
88
8
5
7
23
23
23
23
1
8
6
8 8
4
9
10
8
8
8
57
23
23
23
1
8
6
8 8
4
9
10
8
8
8
55
23
23
23
1
8
6
8 8
4
9
10
5
B
CD
BA
C
B
C
D
A
C
B
B
D
A
USPOŘÁDÁNÍ 1USPOŘÁDÁNÍ 2USPOŘÁDÁNÍ 3
USPOŘÁDÁNÍ 4USPOŘÁDÁNÍ 5
AA
C
USPOŘÁDÁNÍ 1
USPOŘÁDÁNÍ 2
USPOŘÁDÁNÍ 3
USPOŘÁDÁNÍ 4
USPOŘÁDÁNÍ 5
1000+700 W
1000+700 W
1500+900 W1200 W
1050+900+750 W
1050+900+750 W
1200 W
1200 W
1200 W
1800 W
1200 W
1200 W
1800 W
1000+700 W
-
-
1800 W
1800 W
INSTALACE FLUSH
Po zkontrolování správné polohy
varné desky vyplňte mezery mezi
pracovní deskou a varnou deskou
silikonovým lepidlem. Silikonovou
vrstvu zarovnejte škrabkou nebo
mokrým prstem namočeným do
vody s mýdlem, než zatvrdne.
Varnou desku nepoužívejte,
dokud nebude silikonová vrstva
zcela suchá.
Normální upevnění:
- Vyjměte upevňovací svorky ze
sáčku s příslušenstvím a
zašroubujte je do polohy
zobrazené ve spodní straně.
(Neutahujte šrouby ve
svorkách, měly by se volně
pohybovat)
- Otáčejte svorkami a zcela je
utáhněte.
- Umístěte varnou desku do
středu výřezu.
Stlačujte strany varné
desky, dokud nebude
deska po celém obvodu
podložena.
Vyjměte čtyři pružiny ze sáčku s
příslušenstvím a zašroubujte je
do spodní strany, jak je zobrazeno
na obrázku.
Rychlé upevnění: (V závislosti na
modelu)
Zarovnejte a vložte
varnou desku.
4. ELEKTRICKÉ PŘIPOJENÍ
Voděodolné těsnění je
dodáváno s varnou
deskou. Namontujte
těsnění na spodní stranu
dle popisu a ujistěte si, že
je správně upevněno,
abyste se vyhnuli úniku do
nosného nábytku.
Spodní strana
29 CZ
V závislosti na modelu
2. „+“
5. Kontrolka přídavné varné zóny
3. „-“
4. ČASOVAČ
6. Kontrolka programování varné zóny
1. ZAP/VYP
7. Můstek
8. Dětská pojistka
9. Rozmrazení
10. Var
8
88
8
5
5
23
23
23
23
1
8
6
8 8
4
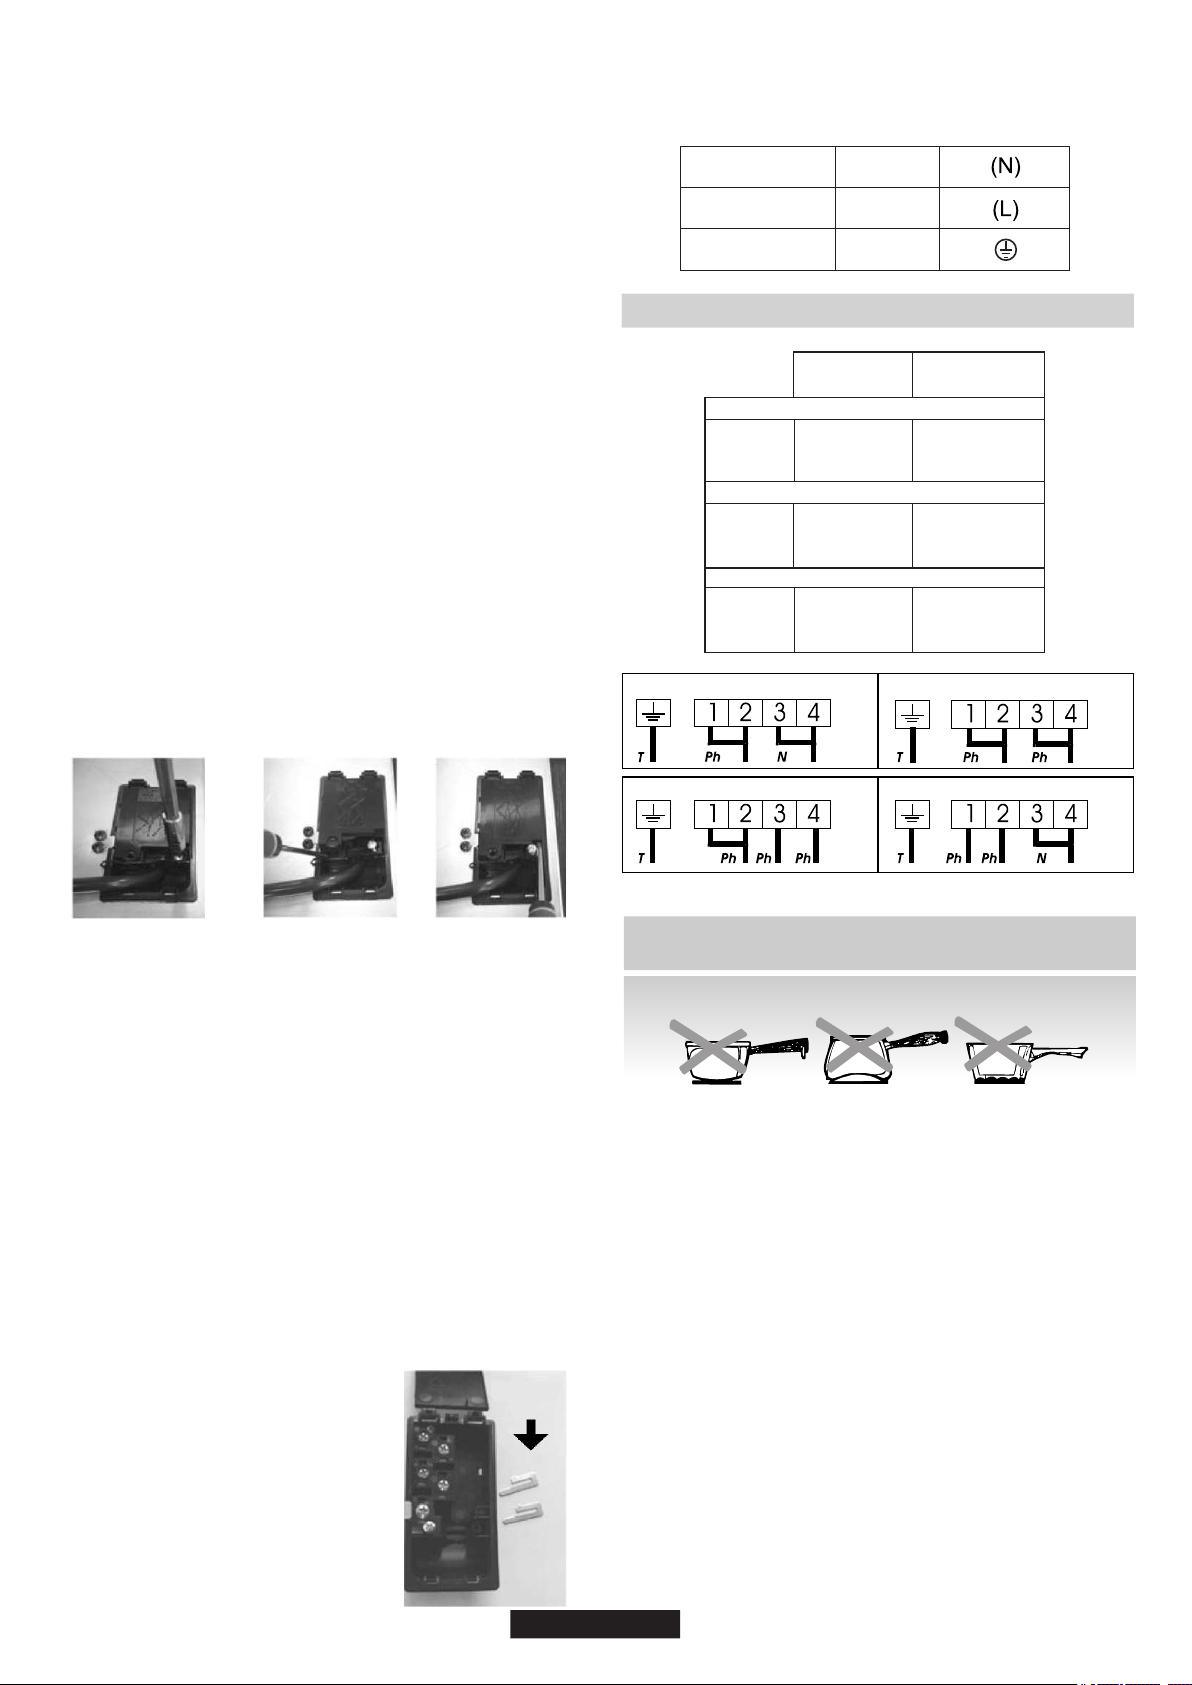
Elektrické připojení k zařízení je nutné provést podle jmenovitého
výkonu spotřebiče. To se provede přes vypínač s otvory.
„Instalace musí odpovídat normám a směrnicím.“ Výrobce
neodpovídá za žádné škody, které byly způsobené nevhodným
nebo nepřiměřeným použitím.
Varnou desku je však možné připojit k:
Před každou elektrickou operací zkontrolujte napájecí napětí, které je
uvedené na elektroměru, nastavení jističe, kontinuitu uzemnění zařízení
a vhodnost pojistky.
Jakékoli dotazy týkající se napájecího kabelu směřujte na poprodejní
servis nebo kvalifikovaného technika.
Žlutý/zelený vodič napájecího kabelu musí být připojen k uzemnění
napájecího zdroje a pólů zařízení.
Tři fáze 220-240 V3
Tři fáze 380-415 V2N
VAROVÁNÍ: Výrobce nezodpovídá za žádné nehody způsobené při
používání spotřebiče, který není uzemněn nebo není uzemněn správně,
ani za následky takových nehod.
Pokud je spotřebič vybaven zásuvkou, musí být nainstalován tak, aby
byla zásuvka přístupná.
Pokud je varná deska napájena napájecím kabelem, může být připojen
pouze k napájecímu napětí 220-240 V mezi fází a středem.
Před připojením se ujistěte, že je zařízení chráněno vhodnou pojistkou a
že je opatřeno vodiči dostatečně velkého průřezu pro normální napájení
spotřebiče.
Chcete-li přejít k nového připojení, postupujte podle následujících
pokynů:
Otočte varnou desku skleněnou stranou proti pracovní ploše a dbejte na
ochranu skla.
231
Poznámka: Ujistěte se, že jsou šrouby
svorkovnice těsně utažené.
- Napájecí kabel přetáhněte do svorky.
- Zašroubujte kabelovou svorku.
- Vyjměte šrouby, které drží svorkovnici, která obsahuje zkratovací
tyče a vodiče napájecího kabelu;
- najděte dva jazýčky umístěné po stranách;
Operace nezbytné k vytvoření nového připojení:
Uvolnění napájecího kabelu:
- Vytáhněte napájecí kabel.
- položte čepel plochého šroubováku před každý jazýček „2“ a „3“,
zatlačte a stiskněte;
- Zvolte napájecí kabel v souladu s doporučeními uvedenými v
tabulce.
- odejměte kryt.
- Sloupněte konec každého vodiče napájecího kabelu na délce 10
mm, přičemž přihlédnete k požadované délce kabelu pro připojení ke
svorkovnici.
- V závislosti na zařízení upevněte pomocí zkratovacích tyčí, které
byste měli mít z prvního kroku, vodič podle obrázku.
- Upevněte kryt.
- odšroubujte kabelovou svorku „1“;
- Zvolte napájecí kabel v souladu s
doporučeními uvedenými v tabulce.
- Napájecí kabel přetáhněte do svorky.
- Sloupněte konec každého vodiče
napájecího kabelu na délce 10 mm, přičemž
přihlédnete k požadované délce kabelu pro
připojení ke svorkovnici.
Operace nezbytné k vytvoření nového
připojení:
- Zašroubujte kabelovou svorku.
- Upevněte kryt.
- V závislosti na zařízení upevněte pomocí
zkratovacích tyčí, které byste měli mít z
prvního kroku, vodič podle obrázku.
Otevřete kryt v následujícím pořadí:
ZKRACOVACÍ
PROPOJKA
N
=
StředT
=
Zemnění
Ph = Fáze
UPOZORNĚNÍ:
Bude-li nutné vyměnit napájecí kabel, zapojte dráty podle
následujících barev/ kódů:
USPOŘÁDÁNÍ
"1-3"
USPOŘÁDÁNÍ
"2-4"
JEDNA FÁZE nebo DVĚ FÁZE 220-240 V~
Kabel
HO5V2V2F
Kabel
HO5V2V2F
Kabel
HO5V2V2F
2
3x2,5 mm
2
3x4 mm
2
4x1,5 mm
2
4x1,5 mm
2
4x1,5 mm
2
4x1,5 mm
TŘI FÁZE 220-240 V3~
TŘI FÁZE 380-415 V2N~
MODRÁ
HNĚDÁ
ŽLUTO-ZELENÝ
Střední
Fázový
Zemnicí
( )
Připojení ke svorkám na svorkovnici
Jedna fáze 220-240 V~Dvě fáze 220-240 V2~
Tři fáze 220-240 V3~Tři fáze 380-415 V2N~
30 CZ
5. DOPORUČENÍ OHLEDNĚ NÁDOBÍ
PRO VARNOU DESKU
Použití kvalitního nádobí je rozhodující pro získání nejlepšího
výkonu z varné desky
• Zajistěte, aby dno hrnce nebo pánve bylo suché: pokud plníte
nádoby tekutinou nebo používáte tekutinu, která byla uložena v
ledničce, tak se před umístěním nádoby na varnou desku ujistěte, že
dno nádoby je zcela suché. To pomůže zamezit znečištění varné
desky.
• Vždy používejte kvalitní nádobí s dokonale plochým a silným
dnem: používání tohoto typu nádobí zabrání vytváření horkých míst,
které způsobují přilnutí potravin. Silné kovové hrnce a pánve zajistí
rovnoměrné rozložení tepla.
VOLBA NÁDOBÍ - Následující informace vám pomohou vybrat
nádobí, které zajistí dobrý výkon.
Vzhledem k nízkému bodu tavení by se neměl používat tenký hliník.
Měděné dno / kamenina: doporučuje se vyšší hmotnost. Dobrý
výkon, ale měď může zanechat zbytky, které mohou vypadat jako
Nerezová ocel: výrazně doporučeno. Obzvláště dobré se
sendvičovým dnem. Sendvičové dno spojuje výhody nerezové oceli
(vzhled, odolnost a stabilita) s výhodami hliníku nebo mědi (vedení
tepla, rovnoměrné rozložení tepla).
Hliník: doporučuje se vyšší hmotnost. Dobrá vodivost. Hliníkové
zbytky někdy vypadají jako škrábance na varné desce, ale lze je
odstranit okamžitým vyčištěním.
Litina: použitelná, ale nedoporučuje se. Nízký výkon. Může povrch
poškrábat.
• Používejte nádoby, jehož průměr je dostatečně široký na to,
aby zcela zakrylo povrchovou jednotku: velikost pánve by neměla
být menší než plocha ohřevu. Pokud je o něco širší, je to zárukou
využití energie s maximální účinností.
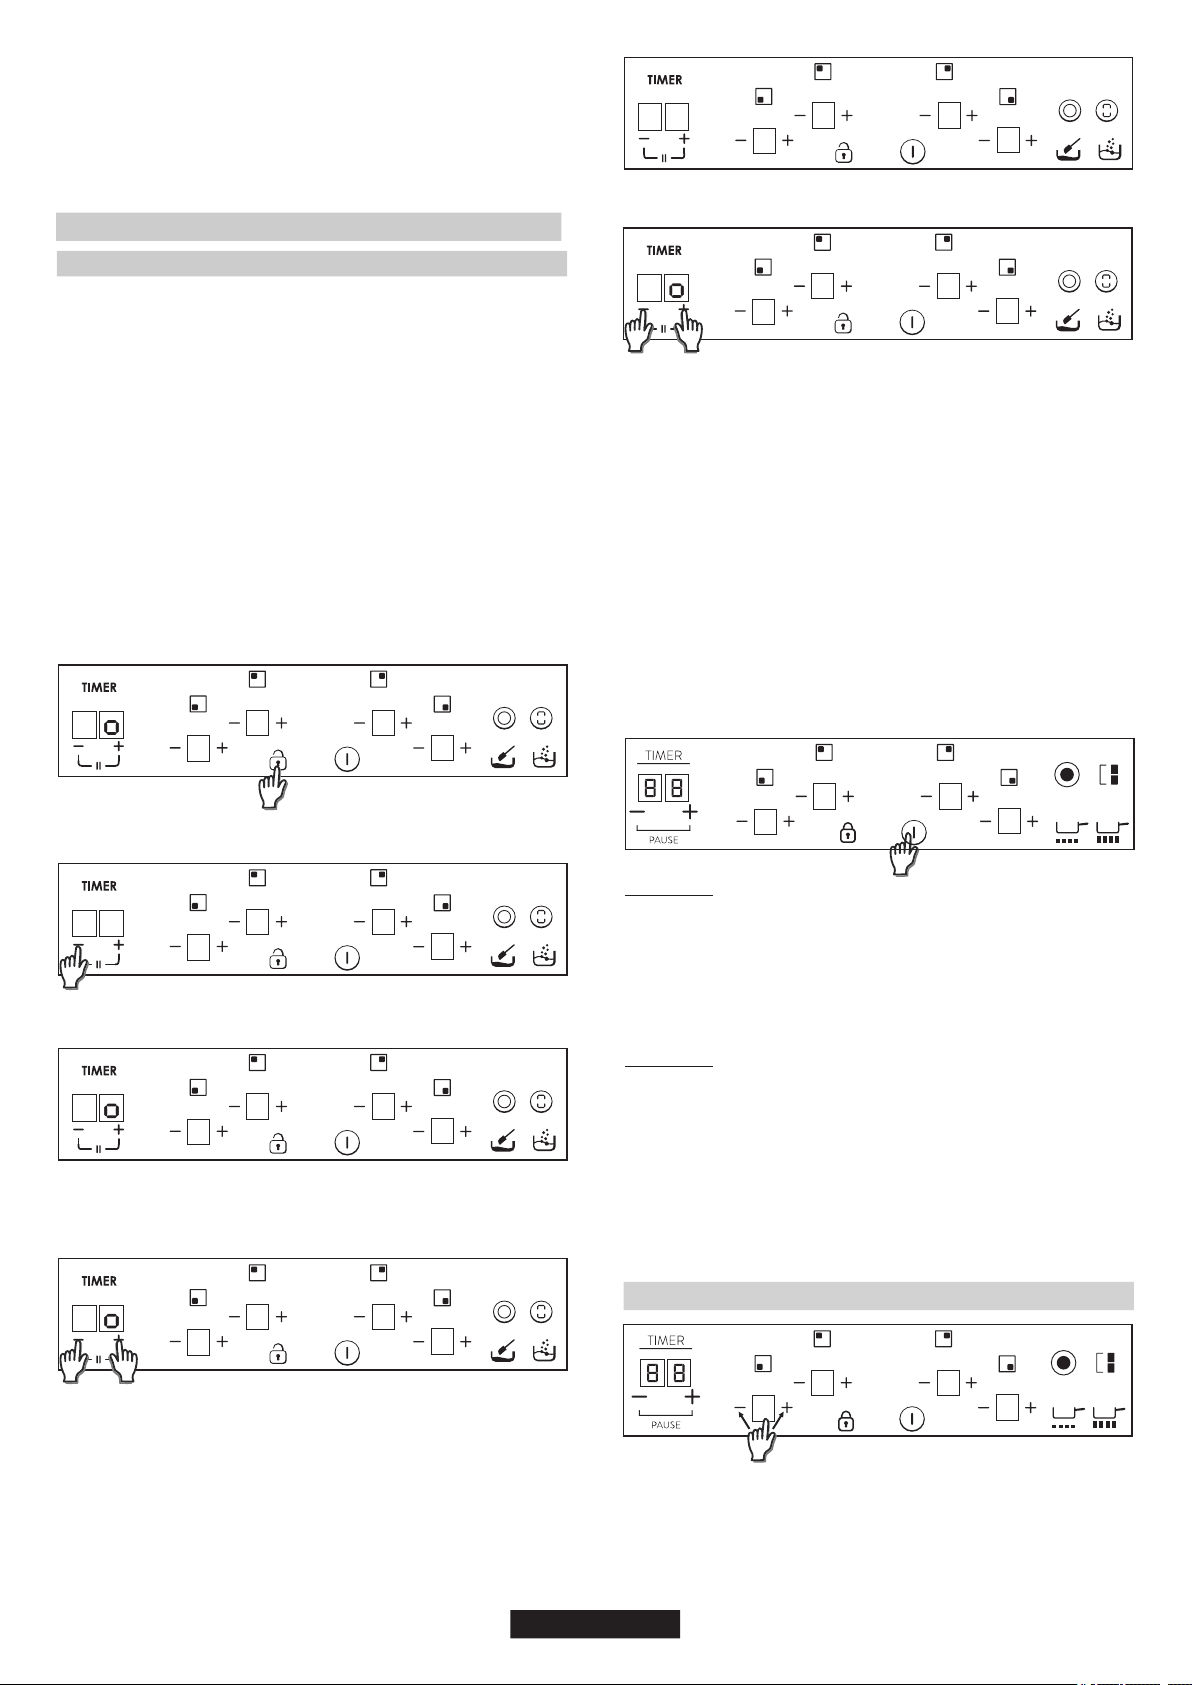
6. POUŽITÍ
31 CZ
škrábance. Tyto zbytky lze odstranit, pokud varnou desku okamžitě
vyčistíte. Nenechávejte však tyto hrnce vařit nasucho. Přehřátý kov
se může ke skleněným varným deskám přilepit. Přehřátý měděný
hrnec zanechá zbytky, které varnou desku trvale poskvrní.
Porcelán / smalt: Dobrý výkon pouze s tenkým, hladkým a plochým
dnem.
Sklo-keramika: nedoporučuje se. Nízký výkon. Může povrch
poškrábat.
3.- Odblokujte ovládání.
Prostřednctvím funkce „Řízení výkonu“ může užvatel nastavt
maxmální výkon, kterého může varná deska dosáhnout. Funkce
řízení výkonu je k dspozc pouze během prvních 30 sekund po
zapnutí varné desky. Toto nastavení lze dokonce opakovat tak, že se
vypne a zapne přívod napájení. Př nastavení požadovaného
maxmálního výkonu varná deska automatcky upravuje rozvod do
různých varných zón tak, aby tento lmt nkdy nebyl překročen; další
výhodou je schopnost současně řídt všechny zóny, anž by docházelo
k problémům s přetížením. Zákazník může nastavt maxmální výkon
varné desky mez 2,5 kW a příslušným maxmálním výkonem varné
desky (ten se může lšt podle modelu) Například, pokud je maxmální
výkon varné desky 7 kW, maxmální výkon pro nastavení je mez 2,5
kW a 7 kW. Po zakoupení je varná deska nastavena na maxmální
výkon. Po přpojení spotřebče k elektrckému napájení můžete do 30
sekund nastavt stupeň výkonu podle níže uvedených bodů:
1.- Zapněte varnou desku.
2.- Počkejte, než se dokončí ncalzace dotykového ovládání.
P
8
8
8
8
Jak zvolt stupeň řízení výkonu
8 8
8
8
8
8
5.- Potom se na dsplej časovače objeví tato zpráva - Po. Na dsplej
ohřívače se objeví úroveň výkonu dělená 100.
6.- Pomocí tlačítek časovače "+" a "-" lze nastavt hodnotu Řízení
výkonu. Po zvolení požadované hodnoty do 5 vteřn současně
stskněte tlačítka "+" a "-".
4.- Do 30 vteřn po zapnutí varné desky se na 5 vteřn dotkněte tlačítka
"-" časovače.
P
6
0
0
5
P
4
0
0
5
8 8
8
8
8
8
7.- Po dokončení tohoto postupu se ozve dlouhé pípnutí a provede se
reset. Znovu se aktvuje spouštěcí postup.
Potom dotykové ovládání nedovolí žádnou kombnac, která
by překročla tento lmt.
Poznámky:
a) Tato funkce Řízení výkonu je k dspozc pouze během prvních 30
vteřn po zapnutí varné desky.
c) Je-l tato volba Řízení výkonu ZAPNUTÁ, a dotknete se jakéhokol
tlačítka s výjmkou kombnace časovače "+" a "-", proces bude
ukončen bez uložení nové hodnoty výkonu a dotykové ovládání
začne fungovat jako obvykle, bez resetu.
b) Je-l tato volba Řízení výkonu ZAPNUTÁ, po uplynutí více než 90
vteřn od zapnutí varné desky bude proces ukončen bez uložení nové
hodnoty výkonu.
c) Je-l tato volba Řízení výkonu ZAPNUTÁ, a dotknete se kombnace
časovače "+" a "-", proces bude ukončen s uložením nové hodnoty
výkonu a reset a dotykové ovládání začne fungovat jako obvykle.
8.- Po procesu spuštění se na dsplej časovače zobrazí řízení výkonu.
P
4
0
0
5
Zapnutí/vypnutí zóny ohřevu
4) Je-li aktivní pouze jedna plotýnka a tu vypnete, zazní čtyři krátká
pípnutí, která značí, že je celá varná deska vypnutá.
2) Pokud na displeji, který je zapnutý, avšak v poloze 0, svítí indikátor
zbytkového tepla, bude blikat „0“.
Pro zapnutí plotýnky podržte stisknuté tlačítko spuštění plotýnky po
dobu 400 ms. Zazní dlouhé pípnutí a v zóně se objeví hodnota „0“.
Tato číslice označuje úroveň výkonu.
3) Zónu lze vypnout, i pokud je aktivní funkce zámku.
3) Je-li aktivní funkce zámku, nelze zónu zapnout.
Pro vypnutí plotýnky podržte stisknutou zónu kterékoli plotýnky po
dobu 1,2 s. Zazní tři krátká pípnutí a na místě číslice cílové zóny se
neobjeví nic nebo se objeví hodnota „H“, pokud je na plotýnce
zbytkové teplo. Zóna bude vypnutá.
1) Je-li nějaký stupeň vaření v poloze 0, displej se po 10 sekundách
automaticky vypne a zazní tón vypnutí zóny.
2) Pokud na displeji, který je vypnutý, svítí indikátor zbytkového
tepla, zobrazí se „H“.
1) Je-li nějaký stupeň vaření v poloze 0, displej se po 10 sekundách
automaticky vypne a zazní tón vypnutí zóny.
8
8
8
8
1. V případě dlouhého stisknutí tlačítek + nebo - se výkon zvyšuje
nebo snižuje rychle. V případě rychlého zvyšování se výkon zastaví na 9
a vyšší výkon vyžaduje další krátké stisknutí tlačítka +. Během rychlého
zvyšování nebo snižování výkonu nezazní žádný zvukový signál.
Krátkým stisknutím tlačítek „+“ a „-“ zvýšíte nebo snížíte výkon
prostřednictvím číslice zvolených zón: 0-1-2-3...9-P
Zvýšení / snížení úrovně výkonu
8
8
8
8
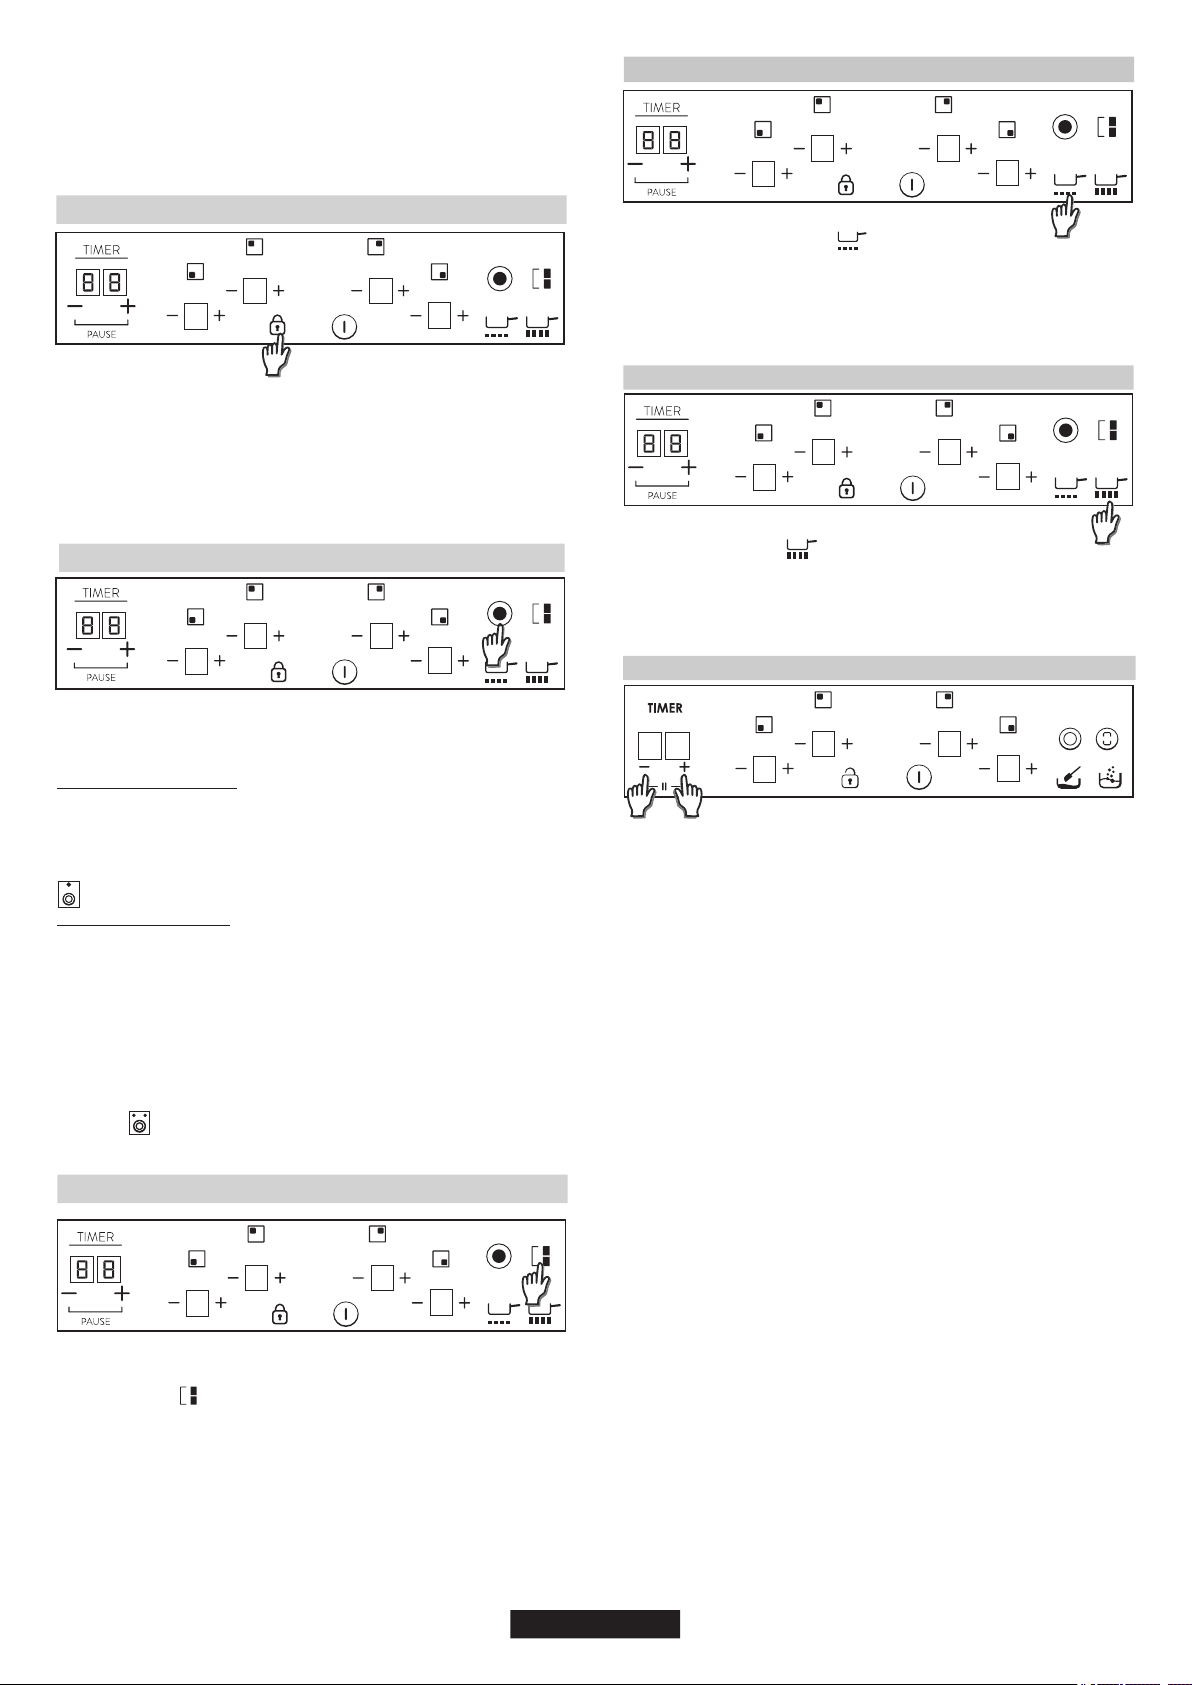
První krátké stisknutí tlačítka rozšíření zapne rozšiřovací plotýnku.
Pokud je rozšiřovací plotýnka zapnutá, rozsvítí se kontrolka nad
tlačítkem rozšíření.
Přejete-li si zapnout dvojitou rozšiřovací plotýnku, musí již být
přidružená hlavní zóna zapnutá a uvedená úroveň výkonu musí být
vyšší než 0.
Druhé krátké stisknutí tlačítka rozšíření vypne rozšiřovací plotýnku.
Krátké pípnutí při každém stisknutí tlačítka rozšíření.
8.2- Zapnutí trojité zóny
První krátké stisknutí tlačítka rozšíření zapne první rozšiřovací
plotýnku. Pokud je zapnutá první rozšiřovací plotýnka, rozsvítí se
jedna kontrolka nad tlačítkem rozšíření (levá kontrolka v případě
trojité zóny, prostřední a jediná kontrolka v případě dvojité zóny).
Třetí krátké stisknutí tlačítka rozšíření vypne první i druhou rozšiřovací
plotýnku.
8.1- Zapnutí dvojité zóny
Krátké pípnutí při každém stisknutí tlačítka rozšíření.
Druhé krátké stisknutí tlačítka rozšíření zapne druhou rozšiřovací
plotýnku. Pokud je zapnutá první i druhá rozšiřovací plotýnka, rozsvítí
se dvě kontrolky nad tlačítkem rozšíření.
Dvojité / trojité zóny
8
8
8
8
Funkce můstku
Obě plotýnky můstku budou zvoleny současně.
Po zvolení plotýnek lze úroveň výkonu upravit dle potřeby pomocí
tlačítek + a -.
Oba displeje propojených plotýnek budou ukazovat stejnou úroveň
výkonu. Ukončení funkce:
- Zvolí-li uživatel úroveň výkonu „0“
Bude-li zóna aktivována, zazní pípnutí a zapne se kontrolka zóny.
Můstek lze aktivovat pouze v případě, že jsou obě plotýnky vypnuté.
Po zvolení jedné plotýnky z můstku aktivujte funkci můstku dotykem
tlačítka můstku.
- Dotknete-li se tlačítka můstku v režimu nastavení
Funkce rozmrazení
Po zvolení plotýnky se funkce rozmrazení ukončí
Po zvolení plotýnky aktivujte funkci rozmrazení takto:
- v případě vypnutí
- Zvolte tlačítko rozmrazení
- přepnutím na jinou úroveň výkonu.
Zazní zvukový signál a na displeji se zobrazí „U“. Plotýnka bude
spuštěna na úrovni výkonu „2“
8
8
8
8
8
8
8
8
Po zvolení plotýnky aktivujte funkci varu takto:
- Zvolte tlačítko varu
Zazní zvukový signál a na displeji se zobrazí „P“.
Plotýnka bude spuštěna na nejvyšší úroveň výkonu po dobu 10 minut.
Po těchto 10 minutách zazní zvukový signál a plotýnka se přepne na
úroveň „9“
Funkce varu
8
8
8
8
Tento krok provedete stisknutím tlačítka zámku
Přejete-li si dětskou pojistku deaktivovat, opakujte výše popsaný
postup. Poté zazní krátké pípnutí a na displeji se zobrazí písmeno „n“.
Varná deska zůstane odemknutá.
Poté, kdykoli se dotknete tlačítka, na displejích se zobrazí „L“
po dobu 2 sekund. Ohřev zůstane beze změny.
Poznámka: Automatická dětská pojistka se zapne 15 minut po
celkovém vypnutí varné desky.
Dětská pojistka
8
8
8
8
2. Jakmile dosáhnete úrovně výkonu P, opětovné stisknutí tlačítka +
nezmění úroveň výkonu na 0. Jakmile dosáhnete úrovně výkonu 0,
opětovné stisknutí tlačítka - nezmění úroveň výkonu na P.
3. Pokud je zóna vypnutá s úrovní výkonu 0, pak v případě, že je
horká, bude blikat 0. Po 10 vteřinách 0 zmizí a na displeji se již bez
blikání objeví písmeno „H“.
Funkce pauza
Jak funkce Pauza funguje?
- Funkce pauzy je aktivována a varná deska se vypne.
- Automatický časový vypínač ohřívačů je vypnutý.
Chcete-li ukončit funkci Pauza, stiskněte znovu kombinaci tlačítek + a
- časovače na ½ vteřiny. Funkce pauzy se vypne, varná deska se
znovu aktivuje (uslyšíte pípnutí) a obnoví se předchozí nastavení
výkonu ohřívačů.
- Všechny odpočítávající časovače jsou vypnuté.
- Všechna tlačítka jsou zablokována s výjimkou funkce Pauza
(kombinace + a - pod časovačem) a vypínače ZAP/VYP.
Aktivujte funkci pauzy současným stisknutím tlačítka + a - pod
časovačem na ½ vteřiny.
Poznámka: Není možné pozastavit pouze jednu zónu. Jestliže
aktivujete funkci pauzy, nastavíte pauzu pro celou varnou desku.
Vypnutí funkce Pauza:
- Na displeji časovače se nic nezobrazuje, všechny displeje ohřívačů
zobrazují "0"; zapíná se segment po segmentu směrem doleva, a pak
se vypíná segment po segmentu směrem doprava, plynule.
Poznámka: Pokud se varná deska pozastaví na dobu delší než 10
minut, varná deska se automaticky vypne.
Funkce Pauza umožňuje dočasné pozastavení procesu vaření, takže
máte možnost jít otevřít dveře, nebo si vyřídit telefon bez obav, že
voda přeteče. Tato funkce je rovněž užitečná při čištění povrchu
uživatelského rozhraní bez změny nastavení vaření.
Funkce Pauza je označena symbolem II. Tuto funkci lze zvolit tak, že
se dotknete současně tlačítka + a – pod časovačem.
Poznámka: Funkci Pauza nesignalizuje žádná kontrolka LED. Funkce
pauzy skončí, jakmile se podruhé dotknete kombinace + a -.
- Aktuální nastavení výkonu ohřívačů se uloží a výkon všech aktivních
ohřívačů je nastaven na úroveň výkonu 0.
8 8
8
8
8
8
32 CZ
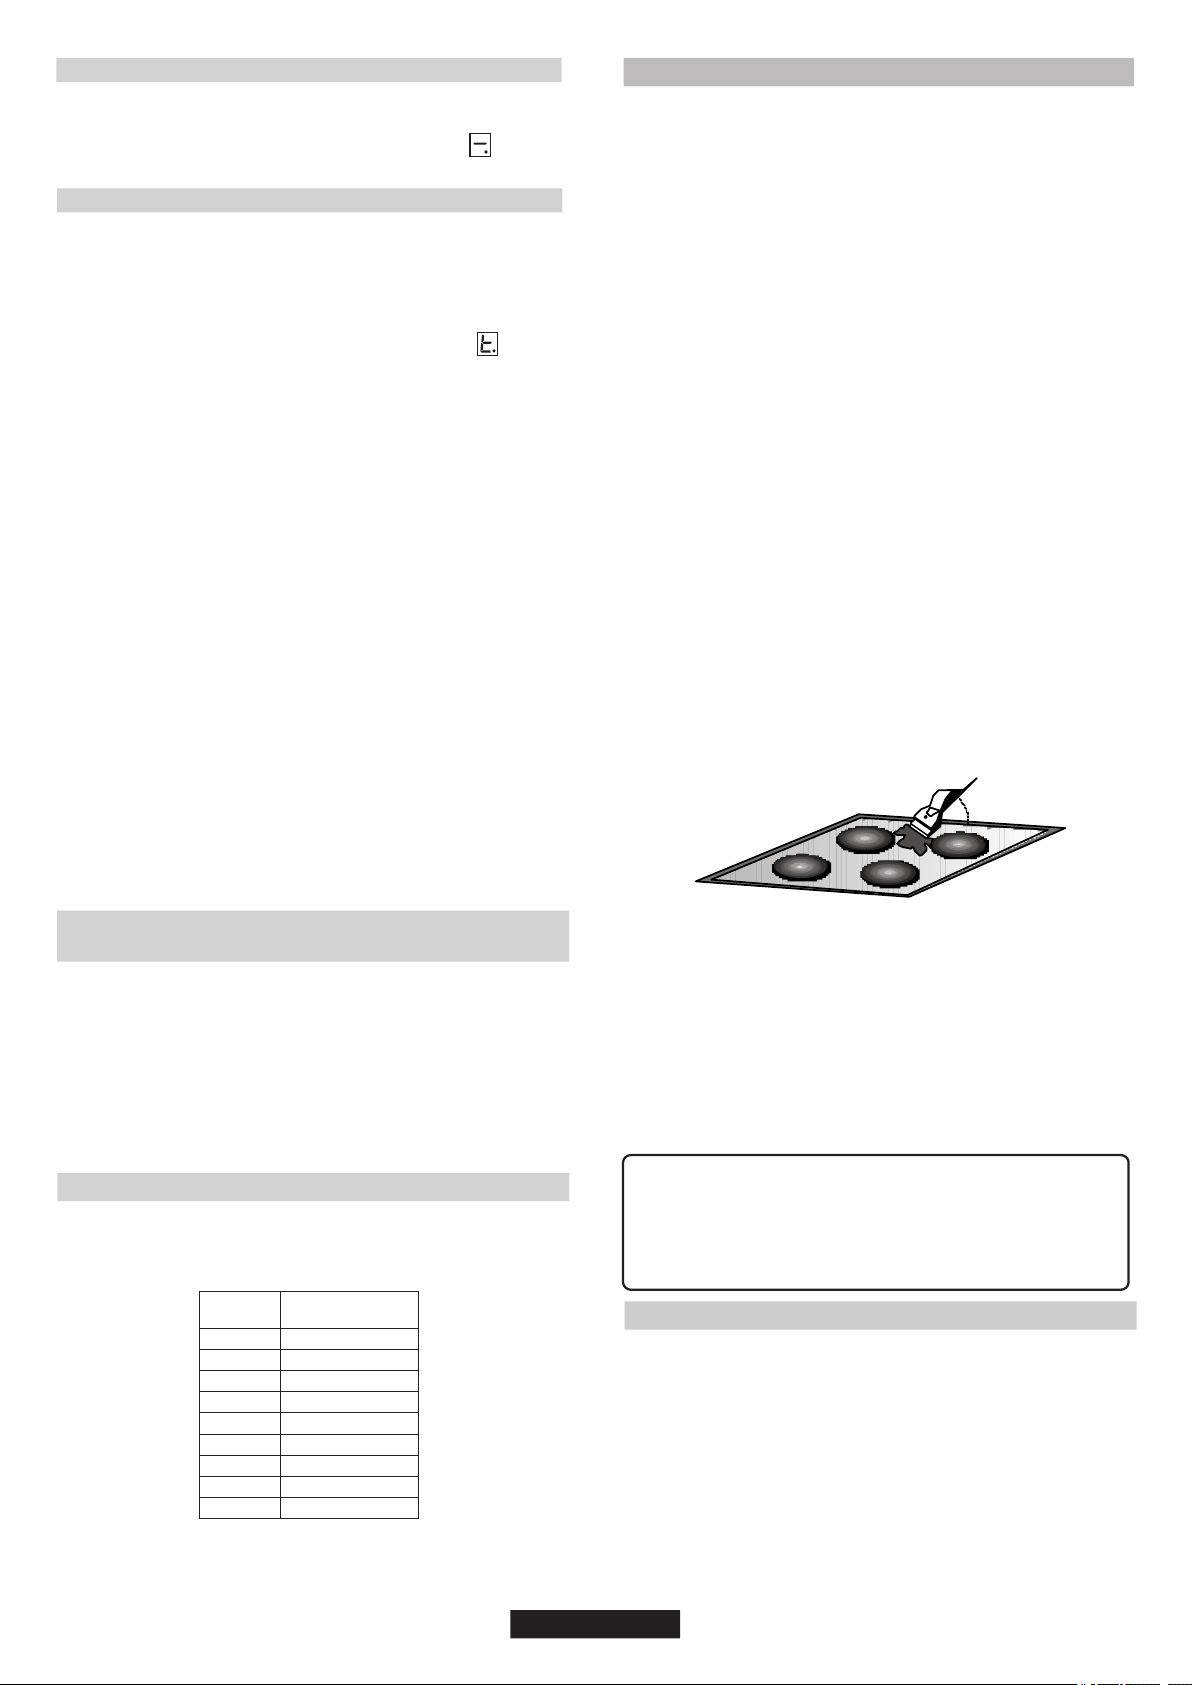
Zabezpečení proti přetečení
Něco (předmět nebo tekutina) tlačí na jakékoli tlačítko po dobu delší
než 5s. 2 krátká pípnutí + 1 dlouhé pípnutí každých 30 s při
současném stisknutí tlačítka. Varná deska se vypne. Po dobu
tohoto problému bude tento symbol neustále blikat.
Časovač
9) Poslední minuta se odpočítává po sekundách (u některých
možností je to viditelné pouze v případě, že zadáme programování
časovače během poslední minuty odpočtu).
8) Výkon časované zóny lze změnit bez vlivu na programování
časovače.
1) Čas časovače lze nastavit pomocí tlačítek „+“ a „-“. Při změně
času nezazní zvukový signál.
2) Současným stisknutím tlačítek časovače se časovač zruší
(přejde na 00).
3) Pokud tlačítka časovače „+“ nebo „-“ zůstanou stisknuta po
určitou dobu, dojde k rychlému nastavení.
4) Při nastavování časovače lze přejít z „00“ na „99“ pomocí tlačítka
„-“ a „99“ na „00“ pomocí tlačítka „+“.
5) Maximální doba je 99 minut.
6) Když čas vyprší a varná deska bude pípat, stiskněte jakékoli
tlačítko, alarm a odpočítávání se vypnou.
7) Čas časovače lze změnit i během odpočítávání.
Pro aktivaci časovače je nutné zvolit plotýnku a její úroveň výkonu
musí být vyšší než 0.
Zvolte zónu, u níž si přejete nastavit časovač. Úroveň výkonu zónu
musí být vyšší než 0. V časované zóně se objeví statické
V obou případech je nutné zvolit plotýnku a její úroveň výkonu musí
být vyšší než 0.
. A na místě číslic vyhrazených pro časovač se objeví „0 0“.
12) Případně se v časované zóně zobrazí výkon (5s) a (0,5s).
Zbývající čas se zobrazí na místě číslic vyhrazených pro časovač. Je-
li časováno několik zón, zobrazí se nejkratší zbývající čas a v
příslušné zóně se zobrazí tečka.
10) Stisknutí tlačítka časovače bez zvolení konkrétní zóny, pokud
není časovaná žádná zóna, nebude mít žádný účinek.
11) Stisknutí tlačítka časovače bez zvolení konkrétní zóny, pokud je
odpočítáváno několik zón, způsobí, že se pomocí číslic zobrazí časy
jeden po druhém s tím, že se zobrazuje čas plotýnky, na jejímž displeji
je tečka.
Kontrolka zbytkového tepla
(u sálavých ohřívačů -> vypočteno)
Aby se vygenerovala teplota vyšší než 65 °C, musí být topný článek v
provozu po určitou dobu, přičemž tato doba závisí na úrovni výkonu.
Jakmile tato doba uplyne, po vypnutí topného článku se zobrazí
upozornění na zbytkové teplo.
Stejné kontrolky lze také použít pro oznamování „zbytkového tepla“.
Pro tento účel je nutné definovat harmonogram: Doba zbytkového
tepla=f (úroveň výkonu, doba spuštění).
Když je teplota na skleněném povrchu varné desky vyšší než 65 °C
(teoretická hodnota), bude to zobrazeno na příslušném displeji
pomocí hodnoty „H“.
Funkce automatického bezpečnostního vypnutí
Pokud po předem nastavenou dobu nedojde ke změně úrovně
výkonu, příslušná plotýnka se automaticky vypne.
Maximální doba, po kterou může plotýnka zůstat zapnutá, závisí na
zvolené úrovni vaření.
Stupeň
výkonu
Max. doba
spuštění (hodiny)
1
2
3
4
5
6
7
8
9
10
5
5
4
3
2
2
2
2
POZNÁMKA: Pokud dojde při provozu s nejvyššími úrovněmi
výkonu k přehřátí, ovládání varné desky automaticky změní úroveň
výkonu, aby tak chránilo varnou desku před přehřátím.
7. ČIŠTĚNÍ A ÚDRŽBA
Před prováděním jakékoliv údržby na varné desce ji nechte nejprve
vychladnout.
. Používejte pouze výrobky (krémy a škrabky), které jsou speciálně
určené pro sklokeramické povrchy. Jsou k dostání v příslušných
obchodech.
. Vyhněte se rozlití, protože vše, co spadne na plochu varné desky, se
rychle spálí a čištění pak bude obtížnější.
- Nečistoty odstraňujte pomocí měkkého hadříku nebo mírně
navlhčeného kuchyňského papíru.
- Utírejte měkkým hadříkem nebo suchým kuchyňským papírem
dokud povrch nebude čistý.
- Utírejte měkkým hadříkem nebo suchým kuchyňským papírem
dokud povrch nebude čistý.
ÚDRŽBA:
- V případě potřeby postup opakujte.
. Doporučuje se udržovat v dostatečné vzdálenosti od varné desky
všechny látky, které se mohou roztavit, jako jsou například plastové
předměty, cukr nebo výrobky na bázi cukru.
V případě, že se stále vyskytují odolné skvrny:
- Umístěte na povrch varné desky několik kapek speciálního
čisticího prostředku.
- Umístěte na povrch několik kapek speciální čisticí kapaliny.
- Oškrábejte je škrabkou, kterou držte k varné desce pod úhlem 30°
dokud skvrny nezmizí.
33 CZ
30°
Maxi
Případná změna barvy sklokeramického povrchu nemá
vliv na jeho provoz ani na stabilitu povrchu. Takové
zbarvení je většinou výsledkem zbytků spálených potravin
nebo používání nádoby z materiálů, jako je hliník nebo
měď. Tyto skvrny se těžko odstraňují.
NĚKOLIK POZNÁMEK:
Nikdy nenechávejte škrabku s žiletkou v dosahu dětí.
Škrabka s žiletkou nepoškodí povrch, pokud se používá pod
úhlem 30.
Kovové okraje: kovové okraje bezpečně vyčistíte, pokud je
umyjete mýdlem a vodou, opláchnete a poté osušíte měkkým
hadříkem.
Nikdy nepoužívejte abrazivní přípravky ani prací prášky.
Sklokeramický povrch je odolný vůči poškrábání od nádob s
plochým dnem, nicméně je vždy vhodné je při přesunu z jedné zóny
do druhé zvednout.
Nikdy nepoužívejte nůž ani šroubovák.
Časté čištění zanechává ochrannou vrstvu, která je nezbytná k
ochraně před poškrábáním a opotřebením. Před opětovným
použitím varné desky se ujistěte, že je povrch čistý. Chcete-li
odstranit skvrny způsobené vodou, použijte několik kapek bílého
octa nebo citronové šťávy. Pak utřete absorpčním papírem a
několika kapkami speciální čisticí kapaliny.
Nepoužívejte příliš mokrou houbu.
POZN.:
8. ŘEŠENÍ PROBLÉMŮ
Používejte pouze pánve s plochým dnem. Je-li mezi pánví a
deskou vidět světlo, zóna nepřenáší správně teplo.
Vaření je příliš pomalé
Špatně ji čistíte nebo používáte pánve s hrubou spodní částí. Mezi
varnou desku a spodní část pánve se dostaly částice jako písek
nebo sůl. Viz kapitola „ČIŠTĚNÍ“. Před použitím se ujistěte, že
Varné zóny mají slabý výkon
Dno pánve by mělo zcela pokrýt průměr zvolené zóny.
Malé škrábance nebo oděrky na povrchu skla varné desky
Používáte nevhodné nádoby. Používejte pouze nádoby s plochým
dnem, které je těžké a má průměr přinejmenším stejný jako varná
zóna.

Používejte žiletku a postupujte podle kapitoly „ČIŠTĚNÍ“.
spodní část pánve je čistá, a používejte pouze pánve s hladkým
dnem. Škrábance lze správným čištěním omezit.
Používáte správné materiály, ale skvrny přetrvávají. Používejte
žiletku a postupujte podle kapitoly „ČIŠTĚNÍ“.
Tmavé skvrny
Neposunujte hliníkové nádobí po varné desce. Viz doporučení pro
čištění.
Stopy po kovu
Karamelizace nebo roztavený plast na varné desce.
Varná deska nefunguje nebo některé zóny nefungují
Stopy po hliníkovém nebo měděném nádobí, ale také zbytky
minerálů, vody nebo potravin. Lze je odstranit pomocí krémového
čisticího prostředku.
Světlé plošky na varné desce
Zkracovací propojky nejsou správně umístěny na svorkovnici.
Varná deska nelze vypnout.
Frekvence zapínání/vypínání varných zón
Cykly zapínání a vypínání závisí na požadované úrovni tepla:
Viz kapitola „ČIŠTĚNÍ“.
Ovládací panel je uzamčen. Odemkněte varnou desku.
Ujistěte se, že je správné zapojení. Ovládací panel je uzamčen.
Odemkněte varnou desku.
9. NÁSLEDNÁ PÉČE
Dříve, než zavoláte servisního technika, zkontrolujte
následující:
— zda je zástrčka správně vložena a opatřena pojistkou.
Pokud nelze zjistit vadu, vypněte zařízení — neupravujte ho —
zavolejte servisní středisko následné péče. Zařízení je dodáváno s
garančním certifikátem, který zajišťuje, že bude bezplatně opraveno
v servisním středisku.
F0
Fc
Ft
FE
Fb
FU / FJ
FA
FC / Fd
Fr
Pokud došlo k chybě, varnou desku odpojte a znovu připojte k napájení. Pokud chyba přetrvává, zavolejte
poprodejní servis. Pokud se chyba náhle objeví během běžného provozu, zavolejte poprodejní servis.
Chyba softwaru dotykového
ovládání.
Počkejte, dokud neklesne teplota; až teplota dosáhne normální hodnoty, obnoví se čnnost horního panelu.
Až hlášení zmzí, bude možné znovu používat varnou desku.
Zóna dotykového ovládání je
příliš horká a vypnula všechny
plotýnky.
Počkejte, až teplota poklesne. Pokud upozornění přetrvává, když teplota dosáhne teploty okolního prostředí,
zavolejte poprodejní servis.
Počkejte, až teplota poklesne. Pokud upozornění přetrvává, když teplota dosáhne teploty okolního prostředí,
zavolejte poprodejní servis.
Může být poškozeno čidlo
teploty dotykového ovládání.
Podívejte se, zda je varná deska správně nainstalovaná. Ujistěte se, že se tlačítka správně dotýkají
skleněného povrchu.
Nadměrná citlivost na
některém tlačítku.
Tato chyba je automatickou kontrolou tlačítek. Zmizí, když se automatická kontrola navrátí na bezpečnou
hodnotu. Pokud chyba přetrvává, zavolejte poprodejní servis.
Chyba tlačítek
Tato chyba je automatickou kontrolou softwaru. Zmizí, když se automatická kontrola navrátí na bezpečnou
hodnotu. Pokud chyba přetrvává, zavolejte poprodejní servis.
Chyba tlačítek
Tato chyba je automatickou kontrolou softwaru. Zmizí, když se automatická kontrola navrátí na bezpečnou
hodnotu. Pokud chyba přetrvává, zavolejte poprodejní servis.
Chyba tlačítek
Problém může být u kteréhokoli reléového článku. Odpojte varnou desku od napájení, chvilku počkejte a
znovu ji připojte. Pokud chyba přetrvává, zavolejte poprodejní servis.
Chyba bezpečnosti relé
PoruchaKrok
Displej plotýnky
Může být poškozeno čidlo teploty
dotykového ovládání.
34 CZ
Došlo k náhodnému doteku hlavního spínače (tlačítko
zapnutí/vypnutí) nebo je na nějakém tlačítku nějaký předmět.
Znovu spotřebič zapněte bez předmětu na tlačítkách. Znovu
zadejte své nastavení.
Pokud se na displeji objeví F a čísla, spotřebič zjistil závadu. V
následující tabulce jsou uvedeny kroky k odstranění problému.
Varná deska nefunguje.
- vysoká úroveň: dlouhá doba provozu.
Varná deska se sama vypne.
Zkontrolujte stav pojistek/jističů. Zkontrolujte, zda nedošlo k
výpadku proudu.
F a čísla na displeji
- nízká úroveň: krátká doba provozu,

Wir empfehlen, diese Anleitung für die Montage
sowie zum späteren Nachschlagen aufzubewahren.
Notieren Sie sich vor der Montage des Kochfelds die
Seriennummer für den Fall, dass Sie die Hilfe des
Kundendienstes in Anspruch nehmen müssen.
WARNUNG: Verwenden Sie ausschließlich einen
Kochfeldschutz, der vom Hersteller des
Kochgeräts entwickelt wurde, vom Gerätehersteller
in der Bedienungsanleitung als geeignet genannt
wird oder Bestandteil des Kochfelds ist. Die
Benutzung eines ungeeigneten Kochfeldschutzes
kann zu Unfällen führen.
WARNUNG: Brandgefahr: Legen Sie niemals
Gegenstände auf den Kochflächen ab.
ACHTUNG: Der Kochvorgang muss beaufsichtigt
werden. Ein kurzzeitiger Kochvorgang muss
permanent überwacht werden.
WARNUNG: Während des Gebrauchs werden
das Gerät und dessen zugänglichen Teile heiß. Es
muss darauf geachtet werden, die Heizelemente
nicht zu berühren. Kinder unter 8 Jahren müssen
vom Gerät ferngehalten oder permanent
beaufsichtigt werden.
WARNUNG: Falls die Oberfläche zerbrochen ist,
dürfen Sie das Glas keinesfalls anfassen.
Schalten Sie das Gerät aus, um die Möglichkeit
eines Stromschlags zu vermeiden.
WARNUNG: Unbeaufsichtigtes Kochen auf
einem Kochfeld mit Fett oder Öl kann gefährlich
sein und zu einem Brand führen. Versuchen Sie
NIEMALS, einen Brand mit Wasser zu löschen,
sondern schalten Sie das Gerät aus und ersticken
Sie die Flamme dann (z. B. mit einem Deckel oder
einer Feuerlöschdecke).
Es wird dringend empfohlen, Kinder von den
Kochzonen fernzuhalten, wenn diese in Betrieb
sind oder nachdem sie ausgeschaltet wurden,
solange die Restwärmeanzeige noch aktiv ist, um
die Gefahr schwerer Verbrennungen zu vermeiden.
Das Gerät ist nicht dafür vorgesehen, mit Hilfe
einer externen Zeitschaltuhr oder einer separaten
Fernsteuerung betrieben zu werden.
Vermeiden Sie es, in die Halogenlampenelemente
des Kochfelds (sofern vorhanden) zu blicken.
Schließen Sie einen Stecker an das Stromkabel
an, der für die auf dem Typenschild angegebenen
Spannungs-, Strom- und Belastungswerte
geeignet ist und einen Schutzkontakt hat. Die
Steckdose muss für die auf dem Typenschild
angegebene Last geeignet sein und über einen
funktionsfähigen Schutzkontakt verfügen. Der
Schutzleiter hat die Farbe Gelb-Grün. Diese
Arbeit darf nur von qualifiziertem Personal
durchgeführt werden. Falls Steckdose und
Dieses Gerät darf von Kindern ab 8 Jahren und
Personen mit eingeschränkten körperlichen,
sensorischen oder geistigen Fähigkeiten oder
ohne Erfahrung und Wissen benutzt werden,
wenn sie beaufsichtigt werden oder Anweisungen
für den sicheren Gebrauch des Geräts erhalten
und die damit verbundenen Gefahren verstanden
haben. Kinder sollten beaufsichtigt werden, um
sicherzugehen, dass sie nicht am Gerät
herumspielen. Kinder dürfen das Gerät nur unter
Beaufsichtigung reinigen und instandhalten.
SICHERHEITSHINWEISE
35 DE
Das Kochfeld muss nach jeder Benutzung
gereinigt werden, damit sich kein Schmutz und
Fett ablagert. Andernfalls werden solche Reste
bei der nächsten Benutzung erhitzt und können
verbrennen, was zu Rauchentwicklung und
unangenehmen Gerüchen, schlimmstenfalls
sogar zur Brandentwicklung führen kann.
Reinigen Sie das Gerät keinesfalls mit einem
Dampf- oder Hochdruckspray.
Benutzen Sie stets geeignetes Kochgeschirr.
Metallobjekte wie Messer, Gabeln, Löffel und
Deckel dürfen nicht auf der Kochfläche abgelegt
werden. Sie könnten heiß werden.
Auf den Kochzonen dürfen weder Aluminiumfolie
noch Kunststoffschalen abgelegt werden.
Der gelb-grüne Schutzleiter darf nicht vom
Trennschalter unterbrochen werden. Die für den
Anschluss verwendete Steckdose bzw. der
allpolige Trennschalter muss leicht erreichbar
sein, wenn das Gerät installiert ist.
Ein beschädigtes Netzkabel muss durch den
Hersteller, seinen Wartungstechniker oder
ähnlich qualifizierte Personen ausgetauscht
werden, um mögliche Gefahren zu vermeiden.
Der Schutzleiter (gelb-grün) muss auf der
Klemmleistenseite länger als 10 mm sein. Der
interne Leiterabschnitt muss für die (auf dem
Typenschild angegebene) vom Kochfeld
absorbierte Leistung ausgelegt sein. Das
Stromkabel muss vom Typ HO5V2V2-F sein.
Gerätestecker nicht kompatibel sind, wenden Sie
sich an einen qualifizierten Elektriker, um einen
entsprechenden Austausch vorzunehmen.
Stecker und Steckdose müssen den geltenden
Vorschriften des jeweiligen Landes entsprechen.
Der Anschluss an die Spannungsversorgung kann
auch erfolgen, indem ein allpoliger Trennschalter
zwischen Gerät und Spannungsquelle installiert
wird, der für die maximale angeschlossene Last
geeignet ist und den geltenden Vorschriften
entspricht.
Die Trennung kann durch einen zugänglichen
Stecker oder einen vorschriftsmäßig in die
Festverdrahtung eingebundenen Schalter erfolgen.
Während des Betriebs sowie für eine gewisse Zeit
danach dürfen die Kochzonen nicht berührt
werden.
Lebensmittel dürfen keinesfalls direkt auf dem
Glaskeramik-Kochfeld gegart werden.
Benutzen Sie das Kochfeld nicht als Arbeitsfläche.
Benutzen Sie das Kochfeld nicht als
Schneidunterlage.
Lagern Sie keine schweren Gegenstände über
dem Kochfeld. Beim Herunterfallen könnten Sie
das Kochfeld beschädigen.
Benutzen Sie das Kochfeld nicht als
Ablagefläche.
Stellen Sie das Kochgefäß immer in die Mitte des
jeweiligen Kochfelds. Stellen Sie nichts auf das
Bedienfeld.
Schieben Sie Kochtöpfe nicht über das Kochfeld.

Lassen Sie mindestens 55
mm Abstand zwischen
Kochfeld und Rückwand
sowie mindestens 150 mm
Abstand zwischen Kochfeld
und vertikalen Möbeln oder
Wänden an der Lateralseite.
Über dem Kochfeld
angebrachte
Einrichtungsgegenstände
müssen einen Abstand von
mindestens 700 mm haben.
Falls über dem Kochfeld eine
Haube installiert werden soll,
beachten Sie bitte die
entsprechenden
Installationsanforderungen. In
jedem Fall darf der Abstand
zwischen Kochfeld und Haube
jedoch nicht geringer als 700
mm sein.
PRODUCT CODE
Typenschild (am Gehäuseunterteil des Kochfelds angebracht)
1. ALLGEMEINE WARNHINWEISE
Mit der Verwendung des -Kennzeichens auf diesem Produkt
bestätigen wir, dass sämtliche relevanten Sicherheits-, Gesundheits-
und Umweltvorschriften eingehalten werden, die für dieses Produkt in
Europa gesetzlich festgelegt sind.
2. UMWELTSCHUTZ
Elektro- und Elektronik-Altgeräte enthalten sowohl
umweltschädliche Stoffe (die negativen Folgen für die
Umwelt verursachen) als auch wiederverwendbare
Grundstoffe. Es ist wichtig, Elektro- und Elektronik-
Altgeräte spezifischen Behandlungen zu unterziehen,
um alle Schadstoffe zu entfernen und ordnungsgemäß zu
entsorgen sowie alle Materialien zu recyceln.
Dieses Gerät ist entsprechend der EU-Richtlinie
2012/19/EC für Elektro- und Elektronik-Altgeräte
(WEEE) gekennzeich-net.
In vielen Ländern können beim Kauf eines neuen Geräts Altgeräte
an Händler, die einen kostenlosen 1-zu-1-Umtausch vornehmen
müssen, zurückgegeben werden, solange das Gerät demselben
Typ entspricht und über die gleichen Funktionen wie das
bereitgestellte Gerät verfügt.
• Elektro- und Elektronik-Altgeräte müssen den entsprechenden
Sammelstellen der Gemeinde oder davon registrierten
Unternehmen übergeben. In vielen Ländern kann es für große
Elektro- und Elektronik-Altgeräte spezielle Sammelstellen geben.
Jeder kann dazu beitragen, dass Altelektrogeräte nicht zu einem
Umweltproblem werden. Daher sollten unbedingt einige
Grundregeln beachtet werden:
• Elektro- und Elektronik-Altgeräte dürfen nicht als Hausmüll
entsorgt werden.
Die Montage eines Haushaltsgeräts kann ein komplexer Vorgang
sein, der bei unsachgemäßer Ausführung ernsthafte Folgen für die
Sicherheit von Gütern, Sachwerten oder Personen haben kann. Aus
diesem Grund muss diese Arbeit von einer professionell geschulten
Person und in Übereinstimmung mit den geltenden technischen
Vorschriften durchgeführt werden.
Sollte dieser Hinweis ignoriert und die Montage durch eine
unqualifizierte Person durchgeführt werden, lehnt der Hersteller
jegliche Haftung für den technisch bedingten Ausfall des Produkts ab,
unabhängig davon, ob dieser Ausfall Schäden an Gütern oder
Sachwerten oder Verletzungen von Personen oder Tieren nach sich
zieht.
Vergewissern Sie sich nach dem Entfernen der Verpackung, dass das
Gerät unbeschädigt ist. Andernfalls wenden Sie sich bitte an den
Verkäufer oder den Kundendienst des Herstellers.
Darüber hinaus müssen alle dekorativen Laminate mit hitzebeständigem
Kleber befestigt sein.
Das Gerät kann auf standardmäßige oder bündige Art eingebaut
werden.
Achten Sie darauf, dass der Einrichtungsgegenstand, in das Kochfeld
eingebaut wird, sowie sonstiges angrenzendes Mobiliar aus
Materialien besteht, das hohen Temperaturen (min. 100 °C)
widerstehen kann.
700 mm
55 mm
150 mm
490 mm
+ 2
- 0
560 mm
+ 2
- 0
Mn. 70 mm
Flächenbündige
Installation
Hinweis: Der Innendurchmesser ist derselbe wie bei der
Standardinstallation.
703 mm (70 cm hob)
+ 2
- 0
523 mm
+ 2
- 0
593 mm (60 cm hob)
+ 2
- 0
Schlitztiefe 5 mm
Flächenbündige
Installation
Die Arbeitsplatte sollte zwischen 25 mm und 45 mm dick sein.
Falls die untere Fläche des Kochfelds an einen Bereich grenzt, der
beim Hantieren oder Reinigen normalerweise zugänglich ist, ist unter
dem Unterteil des Kochfelds eine Abtrennung von 20 mm
vorzusehen.
mn 20 mm
3- INSTALLATION
Falls unter dem Kochfeld ein Ofen installiert wird, darf die Abtrennung
nicht angebracht werden, und der Mindestabstand zwischen dem
unteren Teil des Kochfelds und dem Ofen darf nicht kleiner als 10 mm
sein. Unter diesem Kochfeld darf kein ungekühlter Ofen installiert
werden. Bei der Montage sind die Installationsanforderungen des
Ofens zu berücksichtigen.
10
mm
min
36 DE
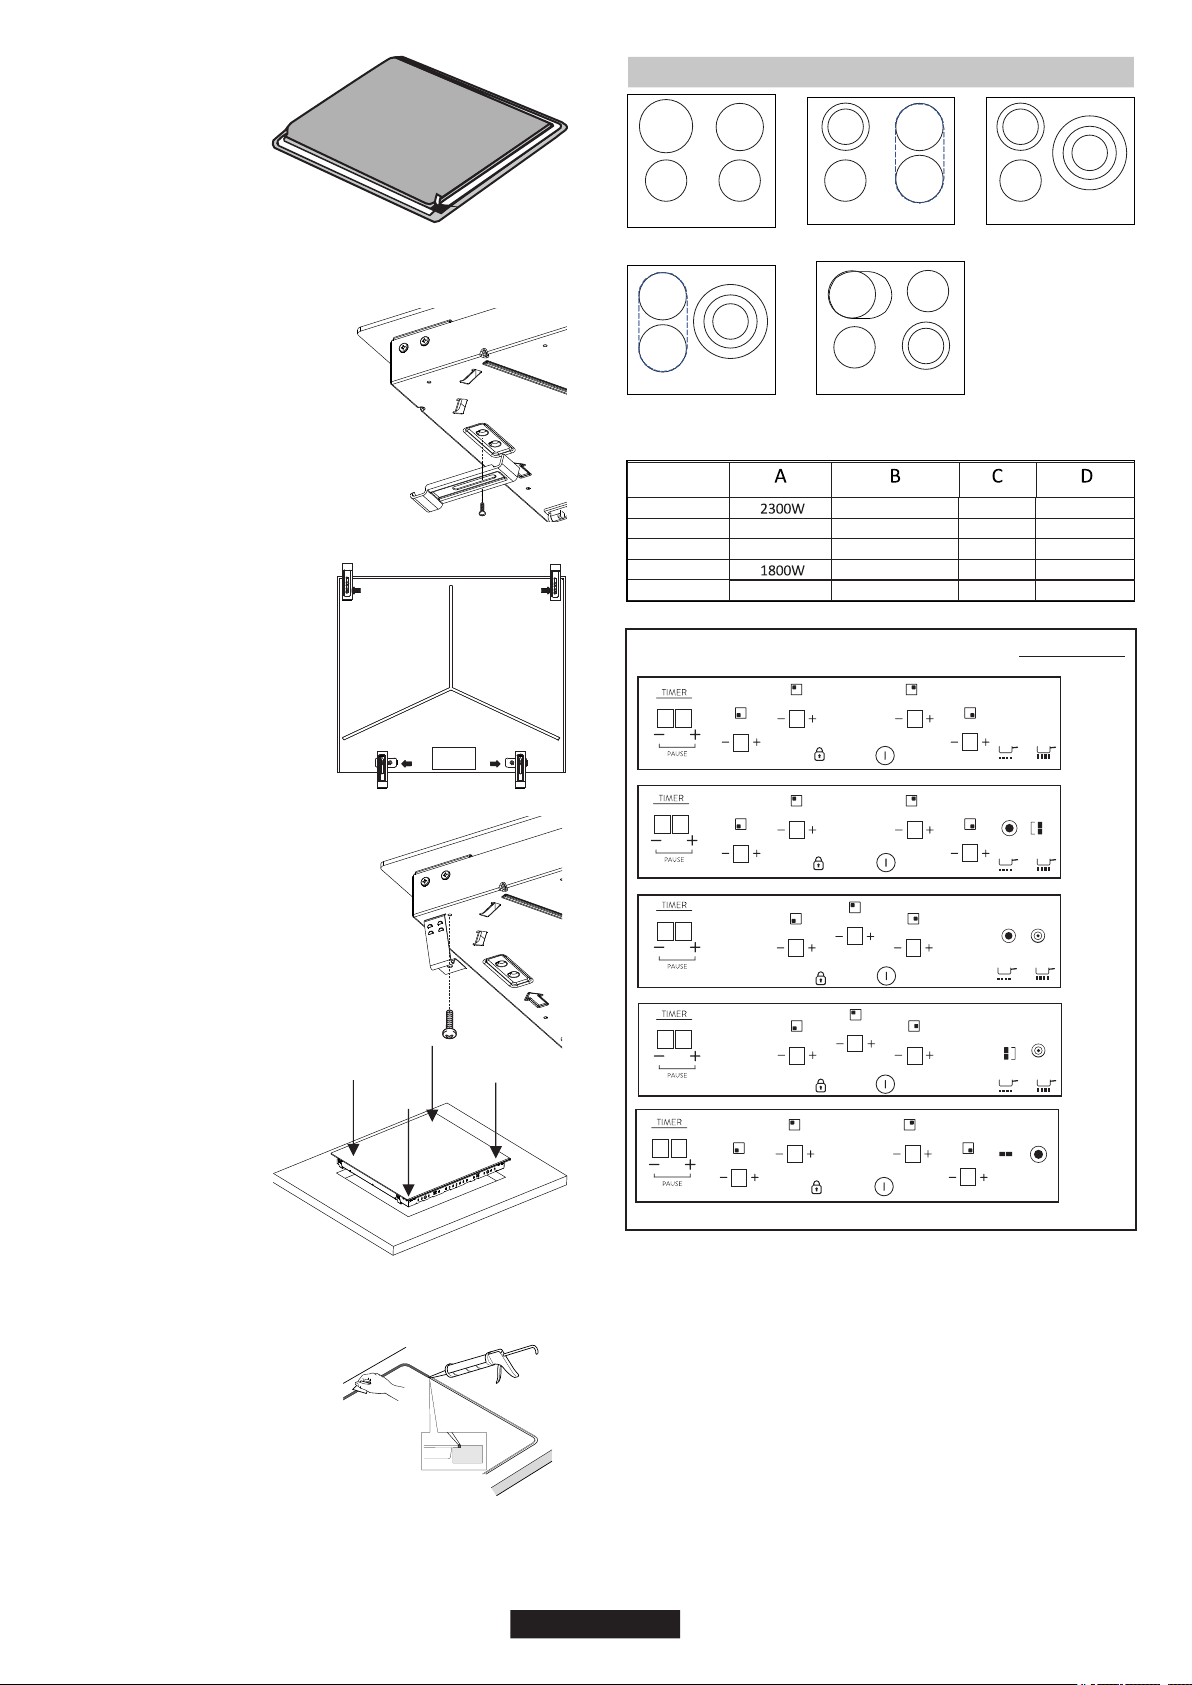
Nachdem Sie überprüft haben,
dass das Kochfeld korrekt
positioniert ist, füllen Sie den
Spalt zwischen Arbeitsplatte und
Kochfeld mit Silikonkleber.
Glätten Sie die Silikonschicht mit
einem Schaber oder einem
Finger und etwas Seifenlauge,
bevor es aushärtet.
Benutzen Sie das Kochfeld erst,
wenn die Silikonschicht
ausgehärtet ist.
FLÄCHENBÜNDIGE INSTALLATION
Normal Befestigung:
- Nehmen Sie die
Befestigungsclips aus dem
Zubehörbeutel und schrauben
Sie sie an der am Unterkasten
markierten Position fest.
(Ziehen Sie die Schrauben nur
so fest an, dass sich die Clips
noch frei bewegen können.)
- Setzen Sie das Kochfeld in
die Mitte der Aussparung ein.
- Drehen Sie die Clips und
ziehen Sie sie vollständig fest.
Schnellbefestigung: (Je nach
Modell)
Nehmen Sie vier Federn aus dem
Zubehörbeutel und schrauben Sie
sie wie in der Abbildung gezeigt am
Unterkasten fest.
Drücken Sie auf die Seiten
des Kochfelds, bis es am
gesamten Umfang aufliegt.
Zentrieren Sie das Kochfeld und
setzen Sie es ein.
4. ELEKTRISCHER ANSCHLUSS
Zum Lieferumfang des
Kochfelds gehört eine
wasserundurchlässige
Abdichtung. Bringen Sie
die Abdichtung wie
beschrieben um das
Unterteil herum an und
achten Sie darauf, dass
sie korrekt sitzt, damit
keine Flüssigkeiten in die
tragenden Möbelstücke eindringen können.
Unterseite
37 DE
8. Kindersicherung
10. Kochen
1. EIN/AUS
4. TIMER
Je nach Modell
6. Kochzonen-Programmieranzeige
5. Zusätzliche Kochzonen-LED
3. „-“
2. „+“
7. Brücke
9. Schmelzen
1
2
3
4
ANORDNUNG
8
88
8
2
22
23
33
3
6
1
8
9
10
8 8
4
8
88
8
5
7
23
23
23
23
1
8
6
8 8
4
9
10
8
8
8
57
23
23
23
1
8
6
8 8
4
9
10
8
8
8
55
23
23
23
1
8
6
8 8
4
9
10
5
B
CD
BA
C
B
C
D
A
C
B
B
D
A
ANORDNUNG 1ANORDNUNG 2ANORDNUNG 3
ANORDNUNG 4ANORDNUNG 5
AA
C
ANORDNUNG 1
ANORDNUNG 2
ANORDNUNG 3
ANORDNUNG 4
ANORDNUNG 5
1000+700 W
1000+700 W
1500+900 W1200 W
1050+900+750 W
1050+900+750 W
1200 W
1200 W
1200 W
1800 W
1200 W
1200 W
1800 W
1000+700 W
-
-
1800 W
1800 W
8
88
8
5
5
23
23
23
23
1
8
6
8 8
4
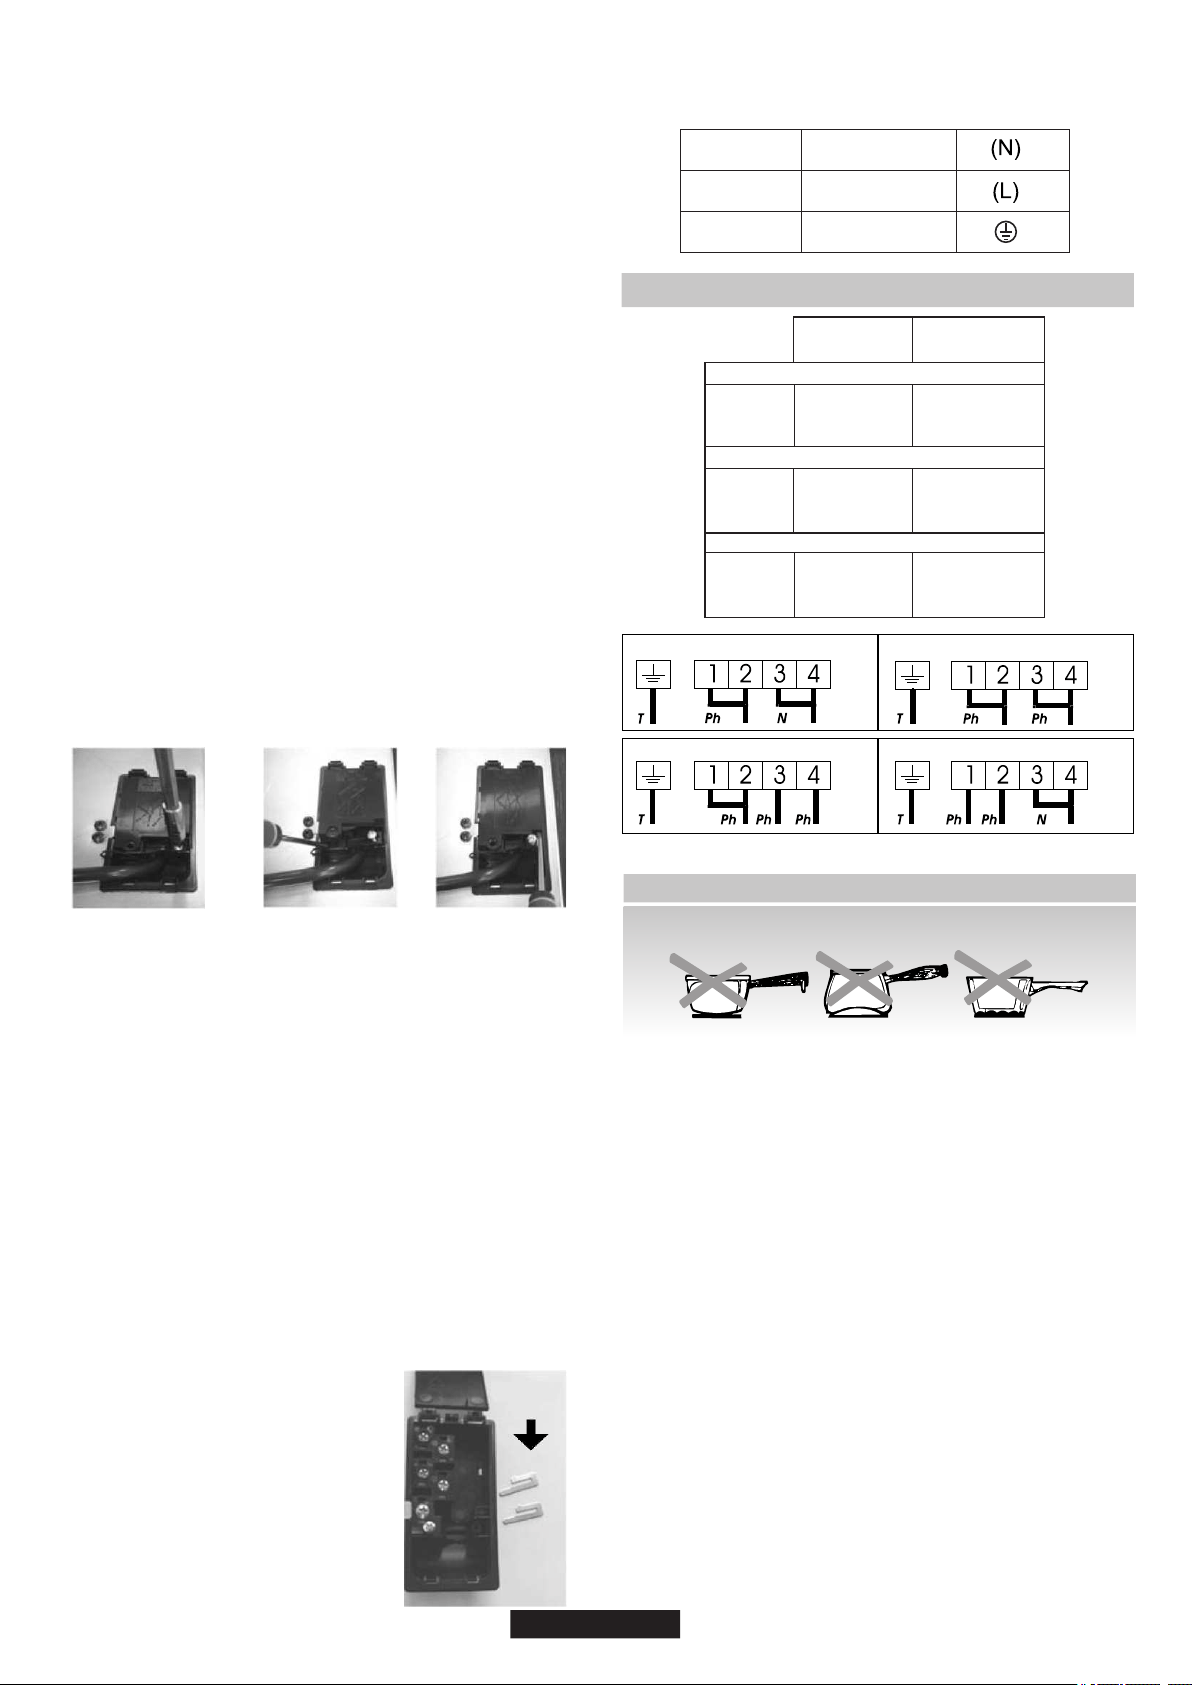
Die Montage muss den geltenden Richtlinien entsprechen.“ Der
Hersteller lehnt jede Verantwortung für Schäden ab, die sich auf eine
ungeeignete oder unsachgemäße Benutzung zurückführen lassen.
Überprüfen Sie vor dem elektrischen Betrieb stets die auf dem
Stromzähler angegebene Versorgungsspannung, die Einstellung des
Trennschalters, die Durchgängigkeit der Masseverbindung zum Gerät und
die Eignung der Sicherung.
WARNUNG: Der Hersteller haftet nicht für Vorkommnisse oder deren
Folgen, die möglicherweise bei der Benutzung eines Geräts auftreten, das
nicht an Masse angeschlossen ist oder eine fehlerhafte Masseverbindung
aufweist.
Der elektrische Anschluss der Installation muss in Übereinstimmung mit
der Nennleistung des Geräts erfolgen. Dies sollte über einen allpoligen
Trennschalter erfolgen.
Falls das Gerät eine Steckdose hat, muss diese so installiert sein, dass sie
jederzeit zugänglich ist.
Der gelb-grüne Leiter des Netzkabels muss mit Masse sowohl an der
Netzstromversorgung als auch an den Geräteanschlüssen verbunden
werden.
Bei Fragen zum Netzkabel wenden sich Sie bitte an den Kundendienst
oder einen qualifizierten Techniker.
Das Kochfeld kann auch wie folgt angeschlossen werden:
Legen Sie das Kochfeld mit der Glasseite auf die Arbeitsfläche. Achten Sie
darauf, dass das Glas geschützt ist.
Für den neuen Anschluss sind folgende Anweisungen zu beachten:
3 Phasen 220-240 V3
3 Phasen 380-415 V2N
Achten Sie vor dem Herstellen des Anschlusses darauf, dass das Gerät
durch eine geeignete Sicherung geschützt ist und die Anschlussleitungen
für eine normale Versorgung des Geräts ausgelegt sind.
Das Kochfeld hat ein Netzkabel, mit dem es nur an eine
Spannungsversorgung mit 220-240 V zwischen den Phasen oder
zwischen Phase und Nullleiter angeschlossen werden kann..
231
- Setzen Sie einen Schlitzschraubendreher vorn an jeder Lasche an („2“
und „3“) und drücken Sie.
- Schrauben Sie die Kabelklemme „1“ los.
- Innen befinden sich zwei seitliche Laschen.
Netzkabel entfernen:
- Lösen Sie die Schrauben des Klemmenblocks mit den Abzweigspangen
und den Leitern des Netzkabels.
- Ziehen Sie das Netzkabel heraus.
- Nehmen Sie ein Netzkabel, das den Angaben in der Tabelle entspricht.
- Schließen Sie die Leiter entsprechend der jeweiligen Installation und mit
Hilfe der zuvor beiseitegelegten Abzweigspangen wie in der Tabelle
gezeigt an.
- Bringen Sie die Abdeckung wieder an.
Einen neuen Anschluss herstellen:
- Führen Sie das Netzkabel in die Klemme ein.
- Entfernen Sie 10 mm der Isolierung an jedem
Leiterende des Netzkabels; berücksichtigen Sie
dabei die erforderliche Länge des Kabels für den
Anschluss am Klemmenblock.
Hinweis: Achten Sie darauf, dass die Schrauben der Klemmleiste
fest angezogen sind.
- Bringen Sie die Abdeckung wieder an.
- Schrauben Sie die Kabelklemme wieder fest.
- Schrauben Sie die Kabelklemme wieder fest.
- Entfernen Sie 10 mm der Isolierung an jedem Leiterende des
Netzkabels; berücksichtigen Sie dabei die erforderliche Länge des Kabels
für den Anschluss am Klemmenblock.
- Schließen Sie die Leiter entsprechend der
jeweiligen Installation und mit Hilfe der zuvor
beiseitegelegten Abzweigspangen wie in der
Tabelle gezeigt an.
- Entfernen Sie die Abdeckung.
- Führen Sie das Netzkabel in die Klemme ein.
Einen neuen Anschluss herstellen:
- Nehmen Sie ein Netzkabel, das den Angaben in
der Tabelle entspricht.
Öffnen Sie die Abdeckung in der nachstehenden Reihenfolge:
ABZWEIG
N
=
NullleiterT
=
Masse
Ph = Phase
ACHTUNG:
Falls das Netzkabel ausgetauscht werden muss, schließen Sie die
Leiter entsprechend folgendem Farbcode an:
ANORDNUNG
"1-3"
ANORDNUNG
"2-4"
EINPHASIG oder ZWEIPHASIG 220-240 V~
Kabel
HO5V2V2F
Kabel
HO5V2V2F
Kabel
HO5V2V2F
2
3x2,5 mm
2
3x4 mm
2
4x1,5 mm
2
4x1,5 mm
2
4x1,5 mm
2
4x1,5 mm
DREIPHASIG 220-240 V3~
DREIPHASIG 380-415 V2N~
BLAU
BRAUN
GELB GRÜN
Nullleiter
Spannungsführend
Masse
( )
Anschluss an den Klemmen des Klemmenblocks
1 Phase 220-240 V~2 Phasen 220-240 V2~
3 Phasen 220-240 V3~3 Phasen 380-415 V2N~
38 DE
5. TIPPS ZUM KOCHGESCHIRR
Voraussetzung für eine optimale Nutzung Ihres Kochfelds ist
die Verwendung hochwertigen Kochgeschirrs.
Gusseisen: benutzbar, aber nicht empfohlen. Schlechtes
Leistungsverhalten. Kann die Oberfläche zerkratzen.
Kupferboden / Steinzeug: hohes Gewicht empfehlenswert. Gutes
Leistungsverhalten, wobei Kupfer Rückstände hinterlassen kann, die als
Kratzer erscheinen. Diese Rückstände lassen sich entfernen, wenn das
Kochfeld umgehend gereinigt wird. Allerdings darf bei diesen Töpfe die
Flüssigkeit niemals vollständig verdampfen. Überhitztes Metall kann am
Glaskeramik-Kochfeld haften bleiben. Ein überhitzter Kupfertopf hinterlässt
dauerhafte Rückstände auf dem Kochfeld.
• Achten Sie darauf, dass der Boden des Topfs oder der Pfanne
trocken ist: wenn Sie Kochgeschirr mit Flüssigkeit füllen oder Kochgeschirr
benutzen, das im Kühlschrank stand, müssen Sie darauf achten, dass der
Boden des Kochgeschirrs vollständig trocken ist, bevor Sie es auf das
Kochfeld stellen. So vermeiden Sie eine Verschmutzung des Kochfelds.
Edelstahl: sehr empfehlenswert. Insbesondere mit einem Sandwich-
Boden. Der Sandwich-Boden vereint die Vorteile von Edelstahl
(Erscheinungsbild, Haltbarkeit und Stabilität) mit denen von Aluminium oder
Kupfer (Wärmeleitung, gleichmäßige Wärmeverteilung).
Wegen seines niedrigen Schmelzpunkts sollte kein dünnes Aluminium-
Kochgeschirr verwendet werden.
Aluminium: hohes Gewicht empfehlenswert. Gute Leitfähigkeit. Mitunter
sind Aluminiumrückstände als Kratzer auf dem Kochfeld zu sehen, die sich
jedoch bei umgehender Reinigung entfernen lassen.
• Benutzen Sie stets qualitativ gutes Kochgeschirr mit einem
absolut planen und dicken Boden: Diese Art von Kochgeschirr hat keine
so genannten „Hot Spots“, die ein Anhaften des Garguts verursachen.
Metalltöpfe und -pfannen mit einem dicken Boden sorgen für eine
gleichmäßige Hitzeverteilung.
WAHL DES KOCHGESCHIRRS – Die folgenden Hinweise sollen Ihnen bei
der Wahl des geeigneten Kochgeschirrs helfen.
• Benutzen Sie Kochgeschirr, dessen Durchmesser der jeweiligen
Kochzone entspricht: das Kochgeschirr sollte nicht kleiner als der
Heizbereich sein. Bei einem größeren Durchmesser wird mehr Energie
aufgewendet, um den maximalen Wirkungsgrad zu erreichen.
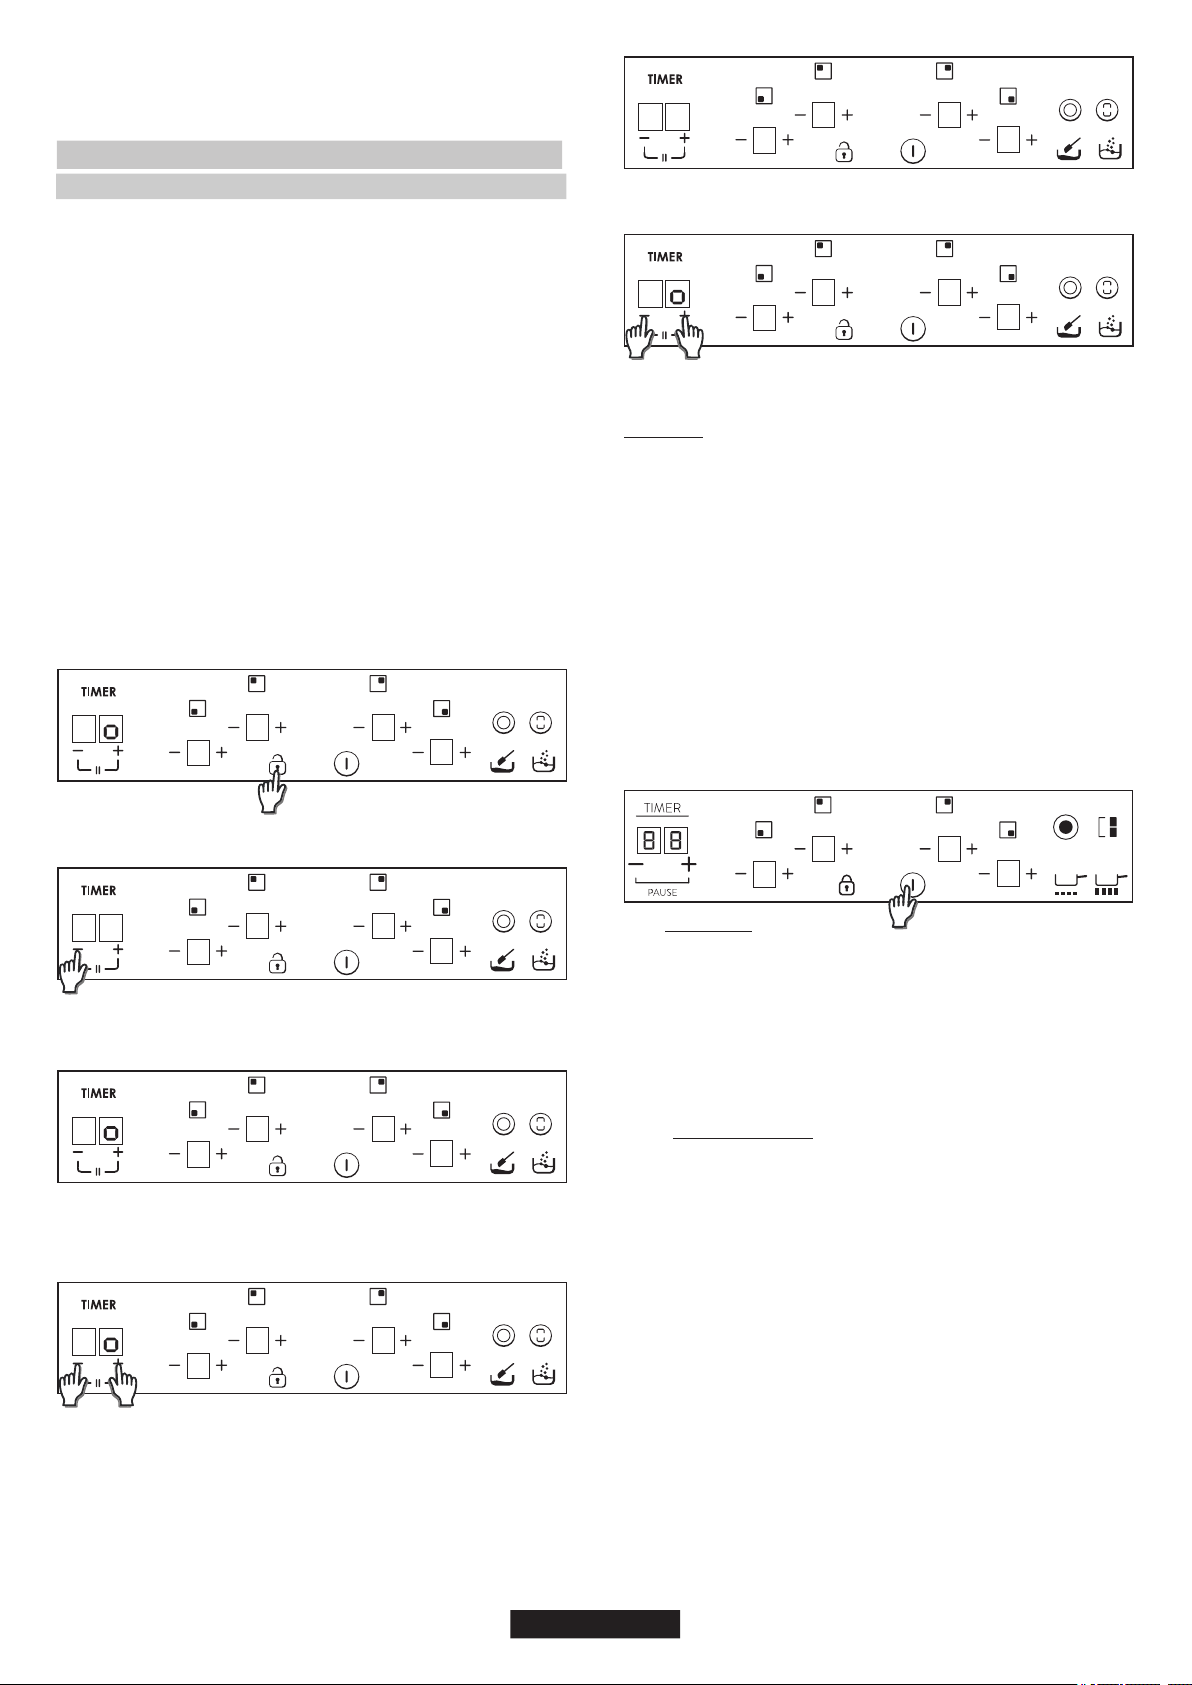
6. BENUTZUNG
39 DE
Porzellan/Emaille: Gutes Leistungsverhalten nur bei glattem, flachem
Boden.
Glaskeramik: nicht empfehlenswert. Schlechtes Leistungsverhalten. Kann
die Oberfläche zerkratzen.
2.- Warten, bs das Touch-Bedenfeld senen Intalserungsprozess
abgeschlossen hat.
Über de Funkton „Lestungsregulerung“ kann der Benutzer de vom
Kochfeld errechbare Maxmallestung enstellen. De Funkton der
Lestungsregulerung st nur während der ersten 30 Sekunden nach
Anschalten des Kochfelds verfügbar. Durch Ab- und Zuschalten der
Stromversorgung kann dese Funkton wederholt verwendet werden.
1.- Das Kochfeld enschalten.
Wurde ene Maxmallestung engestellt, passt das Kochfeld de
Energevertelung für de enzelnen Kochzonen automatsch an,
sodass der engestellte Grenzwert nemals überschrtten wrd. Dank
deser Funkton werden alle Zonen glechzetg gesteuert, ohne dass
es zu Überlastproblemen kommen kann. Der Benutzer kann de
Maxmallestung des Kochfelds zwschen 2,5 kW und der je nach
Modell verfügbaren Maxmallestung des Kochfelds enstellen (Wenn
bespelswese de maxmale Lestung des Kochfeldes 7 kW beträgt,
legt de maxmale Lestungsstufe zur Enstellung zwschen 2,5 kW
und 7 kW.). Verkauft wrd das Produkt mt enem auf Maxmallestung
engestellten Kochfeld. Nach Zuschalten der Stromversorgung kann
de Lestungsstufe gemäß den nachfolgend dargestellten Punkten
nnerhalb von 30 Sekunden engestellt werden:
3.- Fregabe des Bedenfelds.
P
8
8
8
8
Wahl der Lestungsverwaltungsstufe
8 8
8
8
8
8
5.- Anschleßend erschent de Meldung “Po” auf dem Dsplay der
Tmeranzege. Lestungsstufe getelt durch 100 n der Anzege des
Kochfelds.
6.- Mthlfe der Tmer-Tasten "+" und "-" last sch de Lestungsstufe
anpassen, wenn der gewünschte Wert ausgewählt st, berühren Se
glechzetg de Tasten "+" und "-" für 5 Sekunden.
4.- Vor Ablauf von 30 Sekunden nach dem Enschalten des
Kochfeldes; 5 Sekunden lang de Taste "-" des Tmers berühren.
P
6
0
0
5
P
4
0
0
5
7.- Sobald der Vorgang abgeschlossen st, ertönt en langer Pepton und
ene Zurücksetzung erfolgt. Der Start-Vorgang wrd erneut ausgeführt.
8 8
8
8
8
8
Danach erlaubt das Touch-Bedenfeld kenerle Kombnaton
mehr, de desen Grenzwert überschretet.
a) Deses Lestungsmanagement steht nur während der ersten 30
Sekunden nach dem Enschalten des Kochfeldes zur Verfügung.
b) Ist dese Lestungsmanagement-Opton EIN geschaltet, und wenn
mehr als 90 Sekunden nach dem Enschalten des Kochfeldes
vergangen snd, wrd deser Vorgang beendet, ohne dass en neuer
Lestungswert aufgezechnet wrd.
c) Wenn dese Auswahl des Power Managements EIN geschaltet
wurde, und ene belebge Taste mt Ausnahme der Tastenkombnaton
aus Tmer "+" und "-" berührt wrd, wrd der Prozess beendet, ohne
dass en neuer Lestungswert aufgezechnet wrd, und de
Berührungssteuerung nmmt hren normalen Betreb weder auf, ohne
dass en Zurücksetzen erfolgt.
d) Wenn de Auswahl des Power Managements auf EIN steht und de
Tastenkombnaton aus Tmer "+" und "-" berührt, wrd der Prozess mt
enem neuen Lestungswert abgeschlossen, zurückgesetzt und de
Berührungssteuerung nmmt hren normalen Betreb weder auf.
Hnwese:
8.- Nach dem Startvorgang wrd m Tmer-Dsplay das Powermanagement
angezegt.
P
4
0
0
5
Kochzonen ein-/ausschalten
Zum Einschalten einer Kochzone berühren Sie das
entsprechende Bedienfeld für 400 msec. Es erfolgt ein langer
Piepton, und in der Kochzonenanzeige erscheint der Wert „0“ als
Hinweis auf die Leistungsstufe.
3) Bei aktivierter Sperrfunktion kann eine Kochzone nicht
eingeschaltet werden.
1) Falls eine Kochzone in der Position „0“ verbleibt, schaltet sich
diese Anzeige nach 10 Sekunden automatisch AUS und die Zone-
AUS-Tonfolge ertönt.
Zum AUSSCHALTEN einer Kochzone berühren Sie das
entsprechende Bedienfeld für 1,2 Sekunden. Daraufhin sind drei kurze
Pieptöne zu hören, und auf der zugehörigen Anzeige erscheint
entweder kein Wert oder „H“, falls noch Restwärme vorhanden ist. Die
Kochzone ist damit ausgeschaltet.
2) Falls bei ausgeschalteter Kochzone (Leistungsstufe „0“) noch
Restwärme vorhanden ist, wird wechselnd „0“ will angezeigt.
3) Auch bei aktivierter Sperrfunktion kann eine Kochzone
ausgeschaltet werden.
1) Falls eine Kochzone in der Position „0“ verbleibt, schaltet sich
diese Anzeige nach 10 Sekunden automatisch AUS und die Zone-
AUS-Tonfolge ertönt.
4) Falls nur eine Kochzone aktiv ist und diese ausgeschaltet wird,
sind vier kurze Pieptöne als Hinweis darauf zu hören, dass das
gesamte Kochfeld ausgeschaltet ist.
2) Falls bei ausgeschalteter Kochzone noch Restwärme vorhanden
ist, wird „H“ will angezeigt.
8
8
8
8
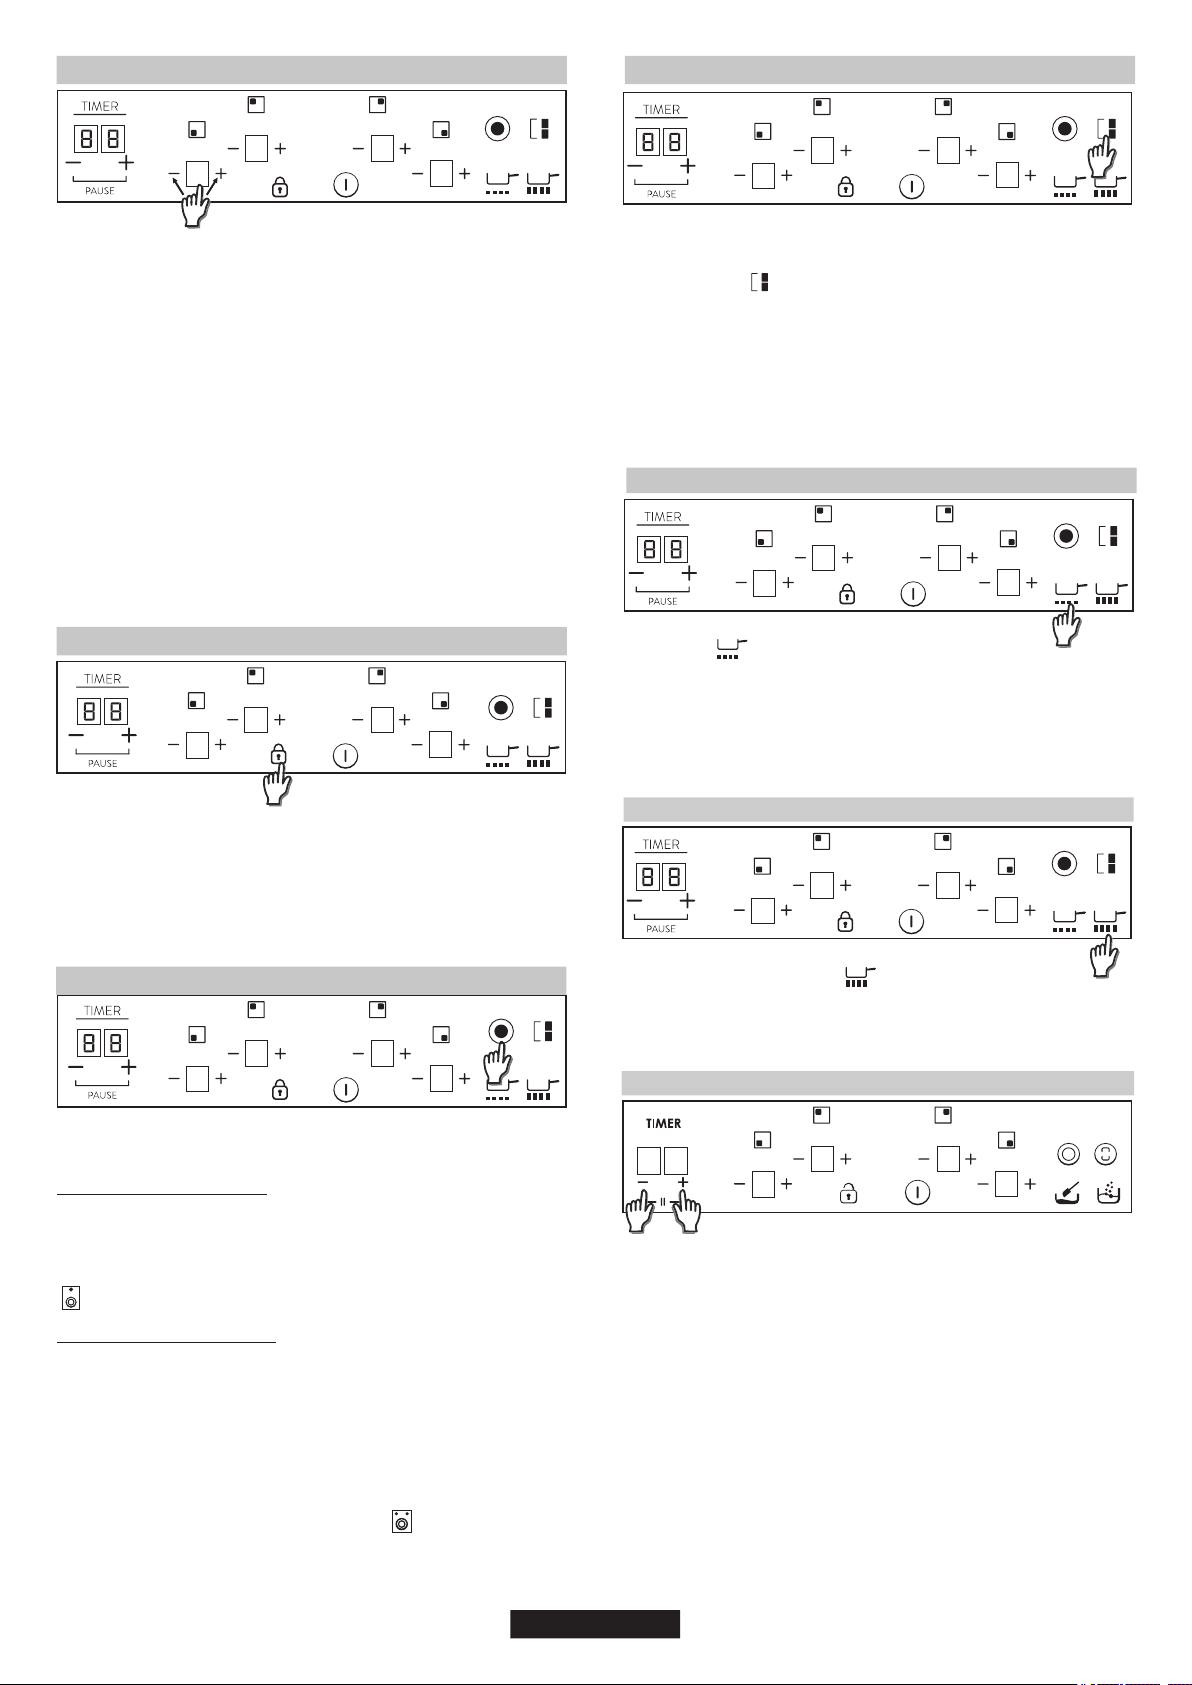
8.1 - Doppelzone einschalten
2. Ein kurzer Druck auf die Erweiterungsringtaste schaltet die
zusätzliche Kochzone wieder aus.
Um den Erweiterungsring einzuschalten, muss die zugehörige
Hauptzone bereits eingeschaltet sein und eine höhere Leistungsstufe
als „0“ angezeigt werden.
1. Ein kurzer Druck auf die Erweiterungstaste schaltet die zusätzliche
Kochzone ein. Die LED über der Erweiterungstaste leuchtet, wenn der
Erweiterungsring eingeschaltet ist.
Bei jeder Betätigung auf die Erweiterungstaste ist ein Piepton zu
hören.
1. Ein kurzer Druck auf die Erweiterungstaste schaltet die erste
zusätzliche Kochzone ein. Wenn der erste Erweiterungsring
eingeschaltet ist, leuchtet 1 LED über der Erweiterungstaste (bei einer
Dreifachzone die linke LED; bei einer Doppelzone nur die mittlere LED).
8.2 - Dreifachzone einschalten
3. Ein kurzer Druck auf die Erweiterungsringtaste schaltet den ersten
und den zweiten Erweiterungsring wieder aus.
Bei jeder Betätigung auf die Erweiterungstaste ist ein Piepton zu hören.
2. Ein kurzer Druck auf die Erweiterungsringtaste schaltet die zweite
zusätzliche Kochzone ein. Wenn der erste und der zweite
Erweiterungsring eingeschaltet sind, leuchten 2 LEDs über der
Erweiterungstaste.
Doppel-/Dreifachzonen
8
8
8
8
Brückenfunktion
Die Brücke kann nur aktiviert werden, wenn beide Kochzonen
ausgeschaltet sind. Nachdem eine Kochzone der Brücke ausgewählt
wurde, kann durch Betätigen der Brückentaste die Brückenfunktion
aktiviert werden.
Für beide Brückenkochzonen wird dieselbe Leistungsstufe
angezeigt. Die Funktion wird beendet:
Wenn die Kochzone aktiviert ist, ertönt ein Piepton, und die
Kochzonen-LED wird eingeschaltet.
- wenn die Brückentaste im Einstellmodus betätigt wird
Beide Brückenkochzonen werden gleichzeitig ausgewählt.
- wenn die Leistungsstufe „0“ gewählt wird
Nach Auswahl der Kochzonen kann mit der Taste „+“ bzw. „-“ die
gewünschte Leistungsstufe eingestellt werden.
Schmelzfunktion
Die Kochzone ist ausgewählt. Die Schmelzfunktion wird beendet:
So aktivieren Sie nach Auswahl der Kochzone die Schm
elzfunktion:
- Betätigen Sie die Schmelztaste .
Es ertönt ein Piepton, und die Kochzone zeigt „U“. Die Kochzone
arbeitet mit Leistungsstufe „2“.
- wenn Sie ausgeschaltet wird
- wenn eine andere Leistungsstufe gewählt wird.
8
8
8
8
8
8
8
8
1. Durch langes Drücken auf „+“ oder „-“ wird die Leistungsstufe
kontinuierlich erhöht/verringert. Bei rascher Erhöhung stoppt die
Leistungsstufe bei „9“; für mehr Leistung ist ein weiterer Druck auf die Taste
„+“ erforderlich. Bei einer raschen Erhöhung/Verringerung ist kein Piepton
zu hören.
3. Wenn eine eingeschaltete Kochzone auf Leistungsstufe „0“ gestellt wird
und noch heiß ist, blinkt die Anzeige „0“ abwechselnd. Nach 10 Sekunden
verschwindet die Anzeige „0“ und es erscheint der Buchstabe “H“.
4. Wenn eine Kochzone ausgewählt ist und die Tasten „+“ und „-“
gleichzeitig betätigt werden, wechselt die Leistungsstufe auf „0“, wobei die
Kochzone jedoch für weitere 10 Sekunden ausgewählt bleibt. Falls die
Kochzone zeitgeschaltet war, geht der Timer aus. Je nach Konfiguration der
Berührungssteuerung ist dieser Vorgang nur in bestimmten Fällen möglich.
Die folgenden Beispiele dienen lediglich zur Information. Nutzen Sie dann
Ihre persönliche Erfahrung, um diese Einstellungen an Ihre
Kochgewohnheiten und -vorlieben anzupassen.
Durch einen kurzen Druck auf die Taste „+“ oder „-“ erhöhen bzw. verringern
Sie die Leistungsstufe der gewählten Kochzone schrittweise: 0-1-2-3...9-P
2. Wenn die Leistungsstufe „P“ erreicht ist, erfolgt durch erneutes
Betätigen der Taste „+“ kein Wechsel zur Leistungsstufe „0“. Desgleichen
erfolgt bei Erreichen der Leistungsstufe „0“ durch erneutes Betätigen der
Taste „-“ kein Wechsel zur Leistungsstufe „P“.
Wird daraufhin eine beliebige Taste gedrückt, zeigt die
Anzeige zwei Sekunden lang den Buchstaben „L“, wobei die jeweilige
Leistungsstufe bestehen bleibt.
Um die Kindersicherung wieder auszuschalten, führen Sie denselben
Vorgang erneut aus. Daraufhin ist ein kurzer Piepton zu hören, und die
Anzeige zeigt den Buchstaben „n“. Das Kochfeld bleibt entsperrt.
Hinweis: 15 Minuten, nachdem das Kochfeld komplett ausgeschaltet
wurde, wird eine automatische Kindersicherung aktiviert.
Diese Funktion wird aktiviert, wenn man die Sperrtaste drückt.
Leistungsstufe erhöhen/verringern
Kindersicherung
8
8
8
8
8
8
8
8
Kochfunktion
So aktivieren Sie nach Auswahl der Kochzone die Kochfunktion:
- Betätigen Sie die Kochtaste .
Es ertönt ein Piepton, und die Kochfeldanzeige zeigt „P“.
Die Kochzone arbeitet nun 10 Minuten lang auf der maximalen
Leistungsstufe. Nach Ablauf dieser 10 Minuten ertönt ein Piepton, und
die Kochzone geht zurück auf Leistungsstufe „9“
8
8
8
8
Pausenfunktion
Mit Hilfe der Pausenfunktion lässt sich der Kochvorgang vorübergehend
anhalten, so dass der Benutzer zur Tür gehen oder einen Anruf
annehmen kann, ohne fürchten zu müssen, dass das Wasser
überkocht. Diese Funktion ist auch nützlich, um die Oberfläche zu
reinigen, ohne die Kocheinstellungen zu verändern.
Die Pausenfunktion wird durch das Symbol II angezeigt. Um diese
Funktion auszuwählen, berührt der Benutzer gleichzeitig die Tasten „+“
und „–“ unterhalb des Timers.
Hinweis: Es ist nicht möglich, die Pausenfunktion nur auf eine Zone
anzuwenden. Wenn Sie die Pausenfunktion aktivieren, betrifft dies das
gesamte Kochfeld.
Wie funktioniert die Pausenfunktion?
Um die Pausenfunktion zu aktivieren, drücken Sie die Tasten „+“ und „-“
unter dem Timer gleichzeitig für eine halbe Sekunde.
- Daraufhin wird die Pausenfunktion aktiviert und das Kochfeld
8 8
8
8
8
8
40 DE
Überhitzungsschutz
Etwas (ein Gegenstand oder Flüssigkeit) „betätigt“ eine Taste länger als
fünf Sekunden. Alle 30 Sekunden sind zwei kurze Pieptöne und ein langer
Piepton zu hören. Das Kochfeld wird ausgeschaltet.
Solange die Situation anhält, blinkt dieses Symbol.
Tmer
Um den Timer einzuschalten, muss eine Kochzone ausgewählt und
die Leistungsstufe größer als „„0“ sein ”.
Wählen Sie die gewünschte Kochzone. Die Leistungsstufe muss
größer als „0“ sein. Für die gewählte Kochzone wird angezeigt.
Die Felder „0 0“ sind für den Timer reserviert.
3) Zur Schnelleinstellung des Timers wird die Taste „+“ oder „-“
gedrückt gehalten.
1) Mit der Taste „+“ oder „-“ stellen Sie die gewünschte Zeit ein. Bei
Einstellungsänderungen ist kein Piepton zu hören.
4) Beim Einstellen des Timers können Sie mit der Taste „-“ von „00“
zu „99“ und mit der Taste „+“ von „99“ zu „00“ wechseln.
5) Die maximale Timereinstellung beträgt 99 Minuten.
6) Wenn die Zeit abgelaufen ist und das Kochfeld piept, drücken Sie
eine beliebige Taste, um den Alarm und die Timerfunktion zu
deaktivieren.
7) Es ist möglich, eine bereits vorgenommene Timereinstellung
später noch zu ändern.
8) Die Leistungsstufe der gewählten Kochzone kann verändert
werden, ohne dass sich dies auf die Timerprogrammierung auswirkt.
9) Die letzte Minute wird in Sekunden angezeigt (Varianten sind nur
zu sehen, wenn die Timerprogrammierung während der letzten
Minute des Countdown aufgerufen wird).
10) Wird die Timertaste gedrückt, wenn keine Kochzone
ausgewählt wurde und keine Kochzone programmiert ist, geschieht
nichts.
11) Wird die Timertaste gedrückt, wenn keine Kochzone
ausgewählt ist und mehrere Kochzonen programmiert sind, ändert
sich die Zeitanzeige der Reihe nach und es wird die Zeit angezeigt,
bei deren Leistungsstufe der Dezimalpunkt eingeschaltet ist.
2) Durch gleichzeitiges Betätigen der Tasten wird der Timer storniert
(geht zu „00“).
12) Alternativ wird die Leistungsstufe (5 s) und (0,5 s) in der
programmierten Kochzone angezeigt.
Die verbleibende Zeit wird in den für den Timer reservierten Feldern
angezeigt. Wenn mehrere Kochzonen programmiert sind, wird die
kürzeste verbleibende Zeit angezeigt, wobei der Dezimalpunkt in der
entsprechenden Kochzone angezeigt wird.
Restwärmeanzeige
Dieselben Anzeigen können auch als Restwärmeanzeige benutzt
werden. Diesbezüglich muss eine Zeittabelle definiert werden:
Restwärmedauer=f (Leistungsstufe, Betriebsdauer).
°
Wenn die Temperatur auf der Glasoberfläche höher als 65 C
(theoretischer Wert) ist, wird dieser Zustand im zugehörigen Display
durch ein „H“ angezeigt.
°
Damit die Temperatur mehr als 65C erreicht, muss ein Heizelement
eine gewisse Zeit lang in Betrieb gewesen sein. Dies ist von der
Automatische Sicherheitsabschaltung
Wenn sich die Leistungsstufe für eine vorgegebene Dauer nicht
ändert, wird die entsprechende Kochzone automatisch abgeschaltet.
Die maximale Dauer, für die eine Kochzone eingeschaltet sein kann,
hängt von der gewählten Leistungsstufe ab.
Livello
di potenza
Tempo massimo
di attivazione (ore)
1
2
3
4
5
6
7
8
9
10
5
5
4
3
2
2
2
2
HINWEIS: Sollte es während des Betriebs mit der höchsten
Leistungsstufe zu einer Überhitzungssituation kommen, wird die
Leistungsstufe von der Kochfeldsteuerung automatisch angepasst,
um das Kochfeld vor einer Überhitzung zu schützen.
7. REINIGUNG UND WARTUNG
. Verwenden Sie ausschließlich Produkte (Reinigungsmittel und
Schaber), die speziell für Glaskeramikflächen vorgesehen sind.
Solche Produkte finden Sie im Fachhandel.
- Entfernen Sie Rückstände mit einem weichen Tuch oder
angefeuchtetem Küchenpapier.
INSTANDHALTUNG:
- Wischen Sie mit einem trockenen Tuch oder Küchenpapier nach,
bis die Oberfläche sauber ist.
Falls immer noch Rückstände vorhanden sind:
- Geben Sie etwas von der speziellen Reinigungsflüssigkeit auf die
Kochfeldoberfläche.
- Fahren Sie mit einen Kochfeldschaber im Winkel von 30° über das
Kochfeld, bis die Rückstände verschwunden sind.
- Wischen Sie mit einem trockenen Tuch oder Küchenpapier nach,
bis die Oberfläche sauber ist.
- Wiederholen Sie den Vorgang bei Bedarf.
- Geben Sie einige Tropfen einer speziellen Reinigungsflüssigkeit
auf die Kochfeldoberfläche.
EINIGE TIPPS:
Häufiges Reinigen hinterlässt eine Schutzschicht, die wesentlich ist,
um Kratzer und Verschleißspuren zu verhindern. Achten Sie darauf,
dass die Oberfläche sauber ist, bevor Sie das Kochfeld wieder
benutzen. Wasserspuren entfernen Sie mit ein paar Tropfen
Haushaltsessig oder Zitronensaft. Wischen Sie anschließend mit
einem saugfähigen Papiertuch und einigen Tropfen spezieller
Reinigungsflüssigkeit nach.
. Daher sollten alle Materialien vom Kochfeld ferngehalten werden,
die schmelzen könnten, wie beispielsweise Kunststoffe, Zucker oder
zuckerbasierte Produkte.
Die Glaskeramikoberfläche hält ebenbödigem Kochgeschirr zwar
stand, dennoch sollte Kochgeschirr stets angehoben werden, um es
auf eine anderen Kochzone zu stellen.
Hinweis:
. Lassen Sie das Kochfeld abkühlen, bevor Sie irgendwelche
Maßnahmen treffen.
. Vermeiden Sie Verschüttungen, weil alles, was auf die Oberfläche
des Kochfelds gerät, rasch einbrennt und das Reinigen erschwert.
Benutzen Sie keinen zu nassen Schwamm.
Ein Schaber mit einer Rasierklinge verursacht keine Schäden auf
der Oberfläche, solange er in einem Winkel von 30° gehalten
wird.
Benutzen Sie niemals ein Messer oder einen Schraubendreher.
41 DE
- Die automatische Abschaltzeit wird angehalten.
ausgeschaltet.
- Die derzeitigen Kocheinstellungen werden gespeichert und alle
eingeschalteten Kochfelder auf Null gestellt.
- Alle laufenden Countdowns werden gestoppt.
Hinweis: Es gibt keine LED-Anzeige dafür, dass die Pausenfunktion
aktiviert ist. Wenn die Tastenkombination „+“ und „-“ ein zweites Mal
betätigt wird, endet die Pausenfunktion.
- Alle Tasten werden gesperrt, ausgenommen die Pausenfunktion
(Tastenkombination „+“ und „–“ unter dem Timer) und der EIN/AUS-
Schalter.
Deaktivieren der Pausenfunktion:
- Die Timer-Anzeige ist leer, und auf den Kochfeldanzeigen ist „0“ zu
sehen; sie werden gegen den Uhrzeigersinn nacheinander eingeschaltet
und anschließend in umgekehrter Richtung ausgeschaltet.
Um die Pausenfunktion zu beenden, berühren Sie die Tasten „+“ und „–“
des Timers erneut gleichzeitig für eine halbe Sekunde. Die
Pausenfunktion wird deaktiviert und das Kochfeld wieder eingeschaltet
(Sie hören einen Piepton). Die vorherigen Kocheinstellungen werden
wiederhergestellt.
Hinweis: Wenn das Kochfeld länger als 10 Minuten gestoppt wird,
schaltet es sich automatisch ab.
Leistungsstufe abhängig. Nachdem diese Zeit abgelaufen ist, wird die
Restwärmewarnung angezeigt, wenn das Heizelement ausgeschaltet
wird.
30°
Maxi
Farbveränderungen der Glaskeramikoberfläche haben
keinerlei Auswirkung auf deren Funktion oder Stabilität.
Derartige Verfärbungen sind in der Regel auf
angebrannte Lebensmittelreste oder die Verwendung
von Kochgeschirr zurückzuführen, das aus Materialien
wie Aluminium oder Kupfer besteht. Diese Rückstände
sind schwer wieder zu entfernen.
Benutzen Sie niemals abrasive Produkte oder Scheuerpulver.
Die Metalleinfassung: Reinigen Sie die Metalleinfassung mit
Haushaltsreiniger und Wasser und wischen Sie sie dann mit einem
weichen Tuch trocken.
Halten Sie Kochfeldschaber immer außerhalb der Reichweite
von Kindern.
8. PROBLEMBEHEBUNG
Schieben Sie Aluminiumkochtöpfe nicht über das Kochfeld. Beachten
Sie die Reinigungshinweise.
Die Kochzonen werden nicht oder nur mäßig heiß.
Benutzen Sie ausschließlich ebenbödiges Kochgeschirr. Wenn
zwischen Kochgeschirr und Kochzone Licht zu sehen ist, findet keine
korrekte Hitzeübertragung statt.
Das Kochgeschirr sollte denselben Durchmesser wie die benutzte
Kochzone haben.
Unsachgemäße Reinigung oder Benutzung von Kochgeschirr mit
rauem Boden; Partikel (Sand, Salz usw.) zwischen Kochfeld und
Boden des Kochgeschirrs. Siehe Abschnitt „REINIGUNG“. Achten
Sie vor der Benutzung darauf, dass der Boden des Kochgeschirrs
sauber ist, und benutzen Sie nur Kochgeschirr mit einem glatten,
planen Boden. Durch ordnungsgemäße Reinigung lassen sich
Kratzer vermeiden.
Der Garvorgang dauert zu lange
Es wurde ungeeignetes Kochgeschirr benutzt. Verwenden Sie nur
ebenbödiges, schweres Kochgeschirr mit mindestens demselben
Durchmesser wie die Kochzone.
Kleine Kratzer oder Abnutzung auf der Glasfläche des Kochfelds
Metallspuren
Verwenden Sie geeignete Materialien. Sollten Rückstände bleiben,
benutzen Sie einen speziellen Kochfeldschaber. Befolgen Sie die
Hinweise unter „REINIGUNG“.
Benutzen Sie einen speziellen Kochfeldschaber und befolgen Sie die
Hinweise unter „REINIGUNG“.
Dunkle Rückstände
Der Hauptschalter (EIN/AUS-Taste) wurde versehentlich betätigt
oder ein Gegenstand auf einer Taste abgestellt. Entfernen Sie
eventuelle Gegenstände vom Bedienfeld und schalten Sie das Gerät
wieder ein. Nehmen Sie die gewünschten Einstellungen erneut vor.
Wenn das Display „F“ und Zahlen anzeigt, liegt eine Gerätestörung
vor. Die nachstehende Tabelle enthält Maßnahmen, um das Problem
zu beheben.
Spuren von Aluminium- oder Kupferkochgeschirr sowie Mineral-, Wasser-
oder Lebensmittelrückstände können mit einem Kochfeldreiniger entfernt
werden.
Karamelisation oder geschmolzener Kunststoff auf dem
Kochfeld.
Befolgen Sie die Hinweise unter „REINIGUNG“.
Die Anschlüsse an der Klemmleiste wurden nicht korrekt vorgenommen.
Helle Flächen auf dem Kochfeld
Überprüfen Sie, ob die Anschlüsse entsprechend den Hinweise
ausgeführt wurden oder das Bedienfeld gesperrt ist. Heben Sie die
Sperre auf.
Das Kochfeld lässt sich nicht abschalten.
Kochzonen schalten sich wiederholt ein und aus
Das Kochfeld bzw. bestimmte Kochzonen funktionieren nicht
Das Bedienfeld ist gesperrt. Heben Sie die Sperre auf.
- geringe Hitze: kurze Betriebsdauer
Das Kochfeld funktioniert nicht.
- starke Hitze: lange Betriebsdauer
Überprüfen Sie den Zustand der Sicherungen / Trennschalter. Prüfen
Sie, ob ein Stromausfall vorliegt.
Die Ein/Ausschaltzyklen variieren je nach erforderlicher Hitze:
Das Kochfeld hat sich selbständig abgeschaltet.
Auf dem Display wird „F“ und Zahlen angezeigt
9. KUNDENDIENST
Bevor Sie sich an einen Wartungstechniker wenden, überprüfen
Sie bitte:
– ob der Netzstecker korrekt an einer abgesicherten Steckdose
angeschlossen ist.
Falls sich der Fehler nicht feststellen lässt, schalten Sie das Gerät aus
und wenden sich umgehend an den Kundendienst. Das Gerät wird mit
einer Garantie ausgeliefert, die sicherstellt, dass es kostenlos vom
Kundendienst repariert wird.
F0
Fc
Ft
FE
Fb
FU / FJ
FA
FC / Fd
Fr
Bei einer Störung das Gerät von der Spannungsversorgung abtrennen und erneut wieder anschließen.
Sollte die Störung bestehen bleiben, den Kundendienst benachrichtigen. Falls die Störung unvermittelt
bei normalem Betrieb auftritt, den Kundendienst benachrichtigen.
Berührungssteuerungs-Softwarefehler
Warten bs de Temperatur snkt, de Kochfläche wrd wederhergestellt, wenn de Temperatur enen
normalen Wert errecht. Wenn de Meldung ncht mehr angezegt wrd, kann das Kochfeld weder
verwendet werden.
Die Berührungssteuerungszone ist zu heiß
und hat alle Kochzonen abgeschaltet.
Warten Sie, bis die Temperatur sinkt. Sollte die Störung bestehen bleiben, nachdem die Temperatur den
normalen Wert erreicht hat, den Kundendienst benachrichtigen.
Warten Sie, bis die Temperatur sinkt. Sollte die Störung bestehen bleiben, nachdem die Temperatur den
normalen Wert erreicht hat, den Kundendienst benachrichtigen.
Der Berührungssteuerungs-
Temperatursensor ist eventuell beschädigt.
Prüfen Sie, ob das Kochfeld korrekt montiert ist. Stellen Sie sicher, die Tasten auf der Glasoberfläche
korrekt zu berühren.
Außergewöhnliche Tastenreaktion.
Dieser Fehler ist eine automatische Bedienfeldprüfung. Er verschwindet, sobald die automatische
Prüfung wieder einen sicheren Wert ergibt. Sollte der Fehler bestehen bleiben, den Kundendienst
benachrichtigen.
Bedienfeldsicherheitsfehler
Dieser Fehler ist eine automatische Softwareprüfung. Er verschwindet, sobald die automatische Prüfung
wieder einen sicheren Wert ergibt. Sollte der Fehler bestehen bleiben, den Kundendienst
benachrichtigen.
Bedienfeldsicherheitsfehler
Dieser Fehler ist eine automatische Softwareprüfung. Er verschwindet, sobald die automatische Prüfung
wieder einen sicheren Wert ergibt. Sollte der Fehler bestehen bleiben, den Kundendienst
benachrichtigen.
Bedienfeldsicherheitsfehler
Eventuell liegt ein Relaisproblem vor. Trennen Sie das Kochfeld von der Spannungsversorgung, warten
Sie eine Minute, und schalten Sie es dann wieder ein. Sollte der Fehler bestehen bleiben, den
Kundendienst benachrichtigen.
Relaissicherheitsfehler
Störung
Maßnahme
Kochfeldanzeige
Der Berührungssteuerungs-
Temperatursensor ist eventuell beschädigt.
42 DE

Bu cihaz, gözetim altında veya cihazın güvenli bir
şekilde kullanımına ilişkin talimatların verilmesi ve
ilgili tehlikelerin anlaşılması halinde 8 yaşından
büyük çocuklar ve fiziksel, duyusal ya da zihinsel
engeli bulunan veya yeterli deneyim ve bilgiye
sahip olmayan kişiler tarafından kullanılabilir.
Çocuklar, cihaz ile oynamadıklarından emin olmak
amacıyla gözetim altında tutulmalıdır. Temizlik ve
kullanıcı bakımı işlemleri, gözetim altında olmayan
çocuklar tarafından yapılmamalıdır.
UYARI: Gözetimsiz bir şekilde, katı veya sıvı yağ
ile ocağın üzerinde yapılan pişirme işlemleri
tehlikeli olabilir ve yangına neden olabilir. Yangını
HİÇBİR ZAMAN suyla söndürmeyi denemeyin;
bunun yerine cihazı kapatın ve kapak ya da
yangın battaniyesi gibi bir aletle alevlerin üzerini
örtün.
UYARI: Cihaz ve erişilebilir parçaları kullanım
sırasında sıcak olur. Isıtma elemanlarına
dokunmamaya dikkat edilmelidir. 8 yaşından
küçük çocuklar, sürekli olarak gözetim altında
olmadıkları sürece cihazdan uzak tutulmalıdır.
Kurulum ve kullanım talimatlarını daha sonra
başvurmak üzere saklamanızı ve ocağın
kurulumunu gerçekleştirmeden önce, satış
sonrası servis almanız gerektiğinde kullanmak
üzere seri numarasını not etmenizi tavsiye ederiz.
UYARI: Yalnızca pişirme cihazının Üreticisi
tarafından tasarlanmış veya kullanım talimatlarında
Üretici tarafından belirtilen ocak korumalarını ya da
cihazla birlikte verilen ocak korumalarını kullanın.
Uygun olmayan korumaların kullanılması kazalara
neden olabilir.
UYARI: Yüzeyde çatlak varsa cama dokunmayın
ve elektrik çarpması olasılığını önlemek için
cihazı kapatın.
DİKKAT: Pişirme işlemi gözetim altında
yapılmalıdır. Kısa süreli bir pişirme işlemi sürekli
olarak gözetim altında tutulmalıdır.
UYARI: Yangın tehlikesi: Pişirme yüzeylerinde
eşya bırakmayın.
Ciddi yanık riskini önlemek için pişirme bölgeleri
çalışır durumdayken veya kapalıyken, kalıntı ısı
göstergesi açık olduğu sürece çocukların bu
bölgelerden uzak tutulmaları önemle tavsiye
edilir.
Bu cihaz, harici zamanlayıcı veya ayrı bir uzaktan
kumanda sistemi yoluyla kullanılmak için değildir.
Varsa, halojen lambalı ocak elemanlarına
doğrudan bakmayın.
Besleme kablosuna etikette belirtilen gerilimi,
akımı ve yükü kaldırabilecek, toprak bağlantısı
olan bir fiş takın. Prizin etikette belirtilen yüke
uygun, toprak bağlantısı yapılmış ve çalışır
durumda olması gerekir. Topraklama iletkeni sarı-
yeşil renklidir. Bu işlem yalnızca uygun yetkinliğe
GÜVENLİK TALİMATLARI
sahip personel tarafından gerçekleştirilmelidir.
Prizle cihazın fişi arasında uyumsuzluk olması
durumunda, yetkin bir elektrik ustasından prizi
uygun tipte bir prizle değiştirmesini isteyin. Fiş ve
priz kurulumun yapıldığı ülkede geçerli olan
normlara uygun olmalıdır.
Güç kaynağı bağlantısı, cihazla güç kaynağı
arasına maksimum bağlı yükü kaldırabilecek ve
geçerli mevzuata uygun olan omnipolar bir devre
kesici yerleştirilerek de yapılabilir.
Sarı-yeşil topraklama kablosu devre kesici
tarafından kesintiye uğratılmamalıdır. Priz veya
bağlantı için kullanılan omnipolar devre kesici,
cihazın kurulumu yapıldığında kolayca erişilebilir
durumda olmalıdır.
Bağlantı, fişin erişilebilir durumda tutulması veya
kablolama kurallarına uygun şekilde sabit kablo
tesisatına bir anahtarın eklenmesi yoluyla
kesilebilir.
Besleme kablosu hasarlıysa tehlikeyi önlemek
amacıyla Üretici, Üreticinin servis temsilcisi veya
benzeri bir yetkin kişi tarafından değiştirilmelidir.
Toprak iletkeni (sarı-yeşil) uç bloğu tarafında 10
mm'den uzun olmalıdır. İç iletkenler bölümü,
ocağın aldığı güce uygun olmalıdır (alınan güç
etikette belirtilir). Güç kablosu HO5V2V2-F tipi
olmalıdır.
Bıçak, çatal, kaşık veya kapak gibi metal
nesneleri ocağın üzerine koymayın. Bu gibi
nesneler ısınabilir.
Alüminyum folyo ve plastik kaplar ısıtma
bölgelerine yerleştirilmemelidir.
Pişirme gereçlerini ocağın üzerinde kaydırmayın.
Her kullanımdan sonra kir ve yağ birikimini
önlemek için ocağın temizlenmesi gerekir. Bu gibi
kalıntılar, ocağın üzerinde bırakılırsa ocak
kullanıldığında tekrar pişerek duman ve hoş
olmayan kokuların oluşmasına, ayrıca alevin
yayılması riskine neden olur.
Cihazı temizlemek için hiçbir zaman buhar veya
yüksek basınçlı sprey kullanmayın.
Ocağın üst kısmında ağır eşyalar saklamayın.
Ocağın üzerine ağır bir şeyin düşmesi hasara
neden olabilir.
Ocağı çalışma yüzeyi olarak kullanmayın.
Hiçbir zaman yemekleri doğrudan cam seramik
ocağın üzerinde pişirmeyin.
Ocağı çalışma kesme tahtası olarak kullanmayın.
Her zaman uygun pişirme gereçleri kullanın.
Ocağı hiçbir eşyayı saklamak için kullanmayın.
Çalışma sırasında veya kullanımdan kısa bir süre
sonra ısıtma bölgelerine dokunmayın.
Tencereyi her zaman yemek pişirmek için üzerine
koyduğunuz birimin ortasına yerleştirin. Kontrol
panelinin üzerine hiçbir şey koymayın.
43 TR
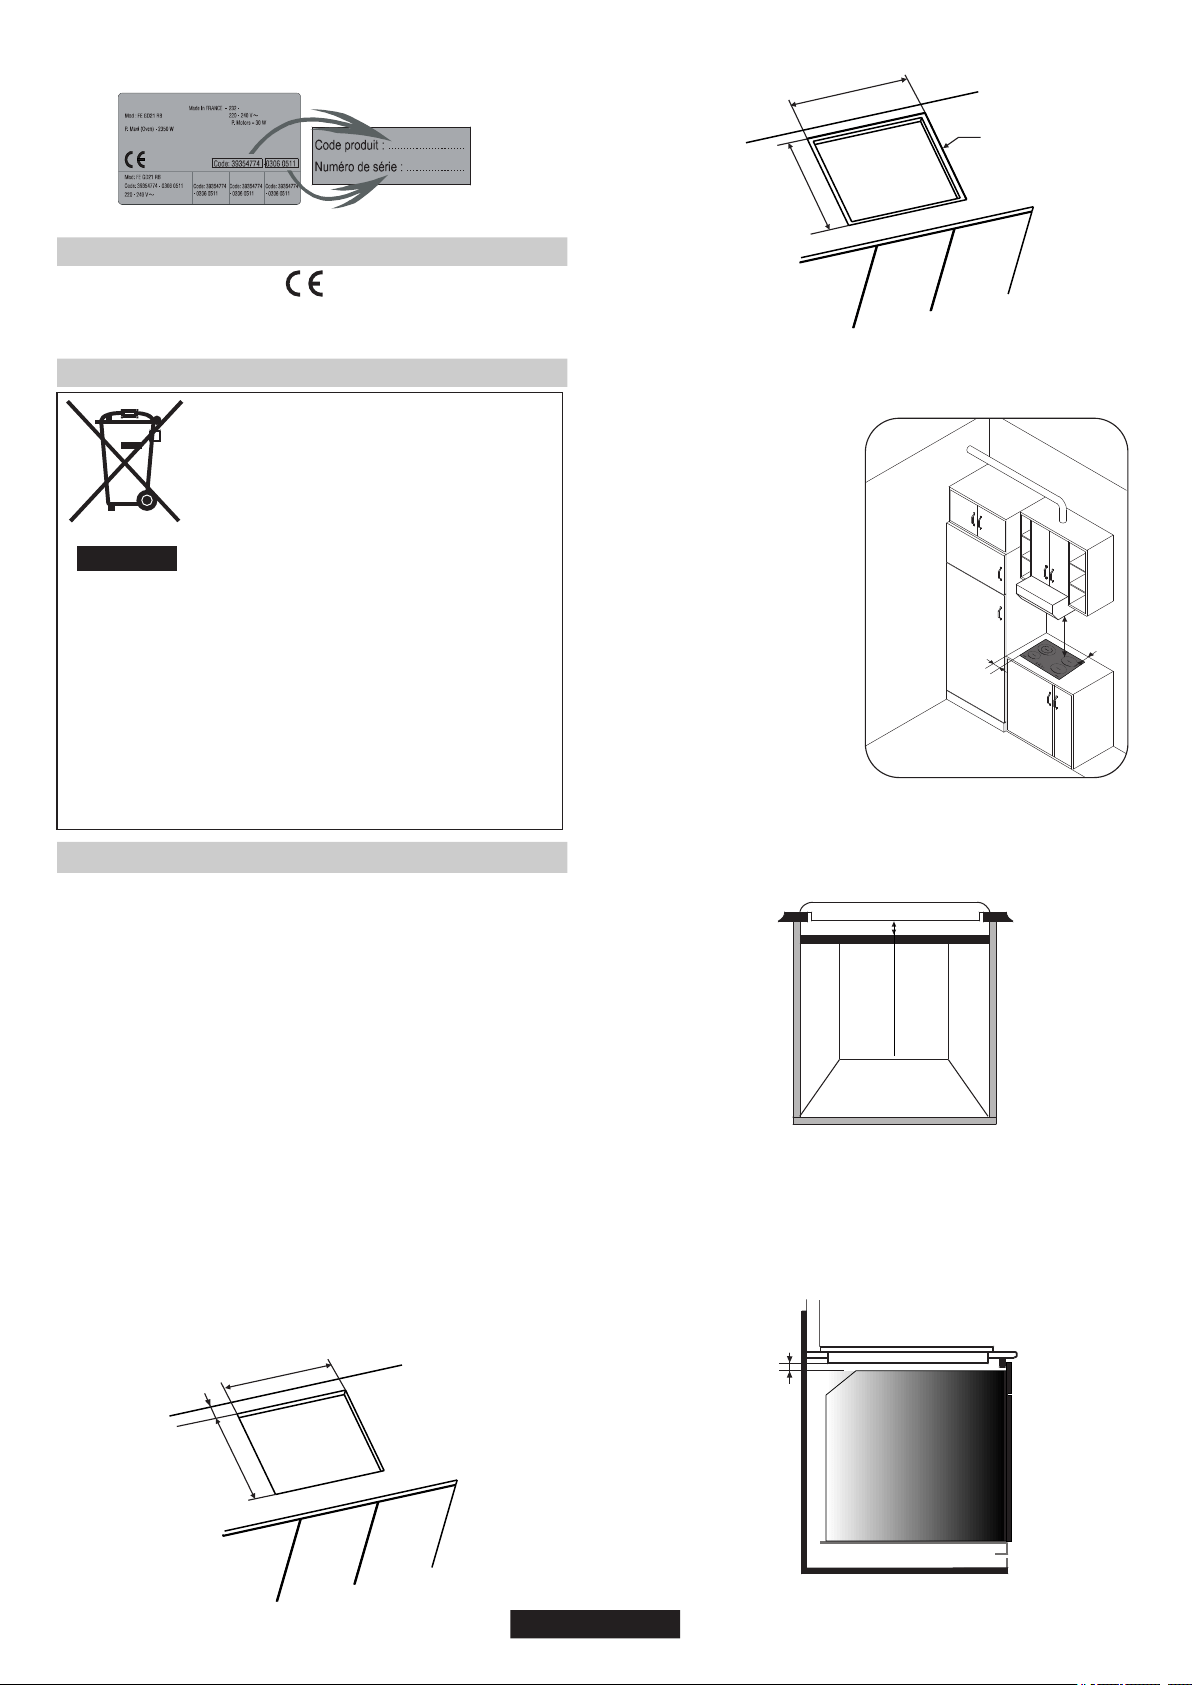
Ocakla arka duvar arasında en
az 55 mm, yan taraflarda da
ocakla dikey mobilya veya
duvarlar arasında en az 150
mm mesafe bırakın. Ocağın
üzerine bir mobilya monte
edilecekse gereken minimum
mesafe 700 mm'dir.
Ocağın üzerine davlumbaz
monte ederken, lütfen
davlumbaz için belirtilen
kurulum gereksinimlerine
başvurun; ancak her durumda
ocakla davlumbaz arasındaki
mesafe en az 700 mm
olmalıdır.
PRODUCT CODE T
Kimlik Plakası (ocağın alt muhafazasının altında bulunur)
1. GENEL UYARILAR
Bu cihazın üzerinde bulunan işareti, bu ürün kategorisi için
geçerli olan tüm Avrupa Güvenlik, Sağlık ve Çevre gereksinimlerine
uygunluğun garanti edildiği anlamına gelir.
2. ÇEVRENİN KORUNMASI
Bu cihaz, Atık Elektrikli ve Elektronik Teçhizatlar
(WEEE) hakkında Avrupa Parlamentosu ve
Konsey Direktifine 2012/19/AB uygunluk işareti
taşımaktadır.
WEEE hem kirletici maddeleri (çevre üzerinde
olumsuz etkilere neden olabilecek maddeleri)
hem de tekrar kullanılabilecek temel bileşenleri
kapsar. Tüm kirleticilerin düzgün şekilde çıkarılıp
atılması ve tüm malzemelerin geri kazanılıp geri
dönüştürülmesi için WEEE'nin belirli işlemlerden
geçirilmesi önemlidir.
• WEEE belediye veya tescilli şirketler tarafından yönetilen ilgili
toplama noktalarına teslim edilmelidir. Birçok ülkede büyük
WEEE'ler için evden teslim alma hizmeti sunulmaktadır.
• Birçok ülkede, yeni bir cihaz satın aldığınızda eski cihaz satıcıya
iade edilebilir; cihaz, sağlanan yeni cihazla bire bir aynı tipte olması
ve aynı fonksiyonları taşıması şartıyla satıcı tarafından ücretsiz
teslim alınabilir.
• WEEE evsel atık olarak muamele görmemelidir.
Kişiler, WEEE'nin çevreye yönelik bir sorun teşkil etmemesini
sağlama konusunda önemli bir rol oynayabilirler; bazı temel
kurallara uyulması temel önem taşır:
3. KURULUM
Cihazın monte edileceği mobilyanın ve yakındaki diğer tüm
mobilyaların yüksek sıcaklığa (min. 100ºC) dayanıklı malzemelerden
üretildiğinden emin olun.
Buna ek olarak, tüm dekoratif laminatlar yüksek dayanıklılığa sahip
yapıştırıcıyla sabitlenmiş olmalıdır.
Ambalajı çıkardıktan sonra lütfen cihazın hasarlı olmadığından emin
olun; hasar varsa Satıcıyla veya Üreticinin Satış Sonrası Servis
bölümüyle iletişime geçin.
Bir beyaz eşyanın kurulumu, doğru şekilde yapılmazsa eşyaların,
malların veya insanların güvenliğini ciddi biçimde etkileyebilecek
karmaşık bir işlemdir. Bu nedenle teknik yönetmeliklere uygun
şekilde, profesyonel yetkinliğe sahip bir kişi tarafından
gerçekleştirilmelidir.
Cihaz “Standart” veya “Gömme” modunda ankastre mobilya içine
kurulabilir.
Üretici; bu tavsiyenin göz önünde bulundurulmaması ve kurulumun
yetkin olmayan bir kişi tarafından gerçekleştirilmesi halinde, eşya ya
da malların hasar görmesi veya insan ya da hayvanların yararlanması
ile sonuçlanıp sonuçlanmadığına bakılmaksızın, cihazla ilgili teknik
arızalara ilişkin hiçbir sorumluluk kabul etmez.
700 mm
55 mm
150 mm
490 mm
+ 2
- 0
560 mm
+ 2
- 0
Min. 70 mm
Gömme kurulum çevresi
Not: İç çevre boyutları standart kurulum ile aynıdır
703 mm (70 cm hob)
+ 2
- 0
523 mm
+ 2
- 0
593 mm (60 cm hob)
+ 2
- 0
Yuva derinliği 5 mm
Gömme kurulum çevresi
Tezgah kalınlığı 25 ile 45 mm arasında olmalıdır.
Ocağın alt bölümü normalde kullanım veya temizlik işlemleri için
erişilebilir bir alana bitişikse ocağın alt bölümünün 20 mm altına bir
separatör yerleştirilmelidir.
min 20 mm
Ocağın altına fırın monte edilirken separatör kullanılmamalıdır ve
ocağın alt bölümüyle fırın arasındaki minimum mesafe en az 10 mm
olmalıdır. Bu ocağın altına soğutmalı fırın monte etmeyin ve fırın
kurulumunu kendi kurulum gereksinimlerine göre gerçekleştirin.
10
mm
min
44 TR
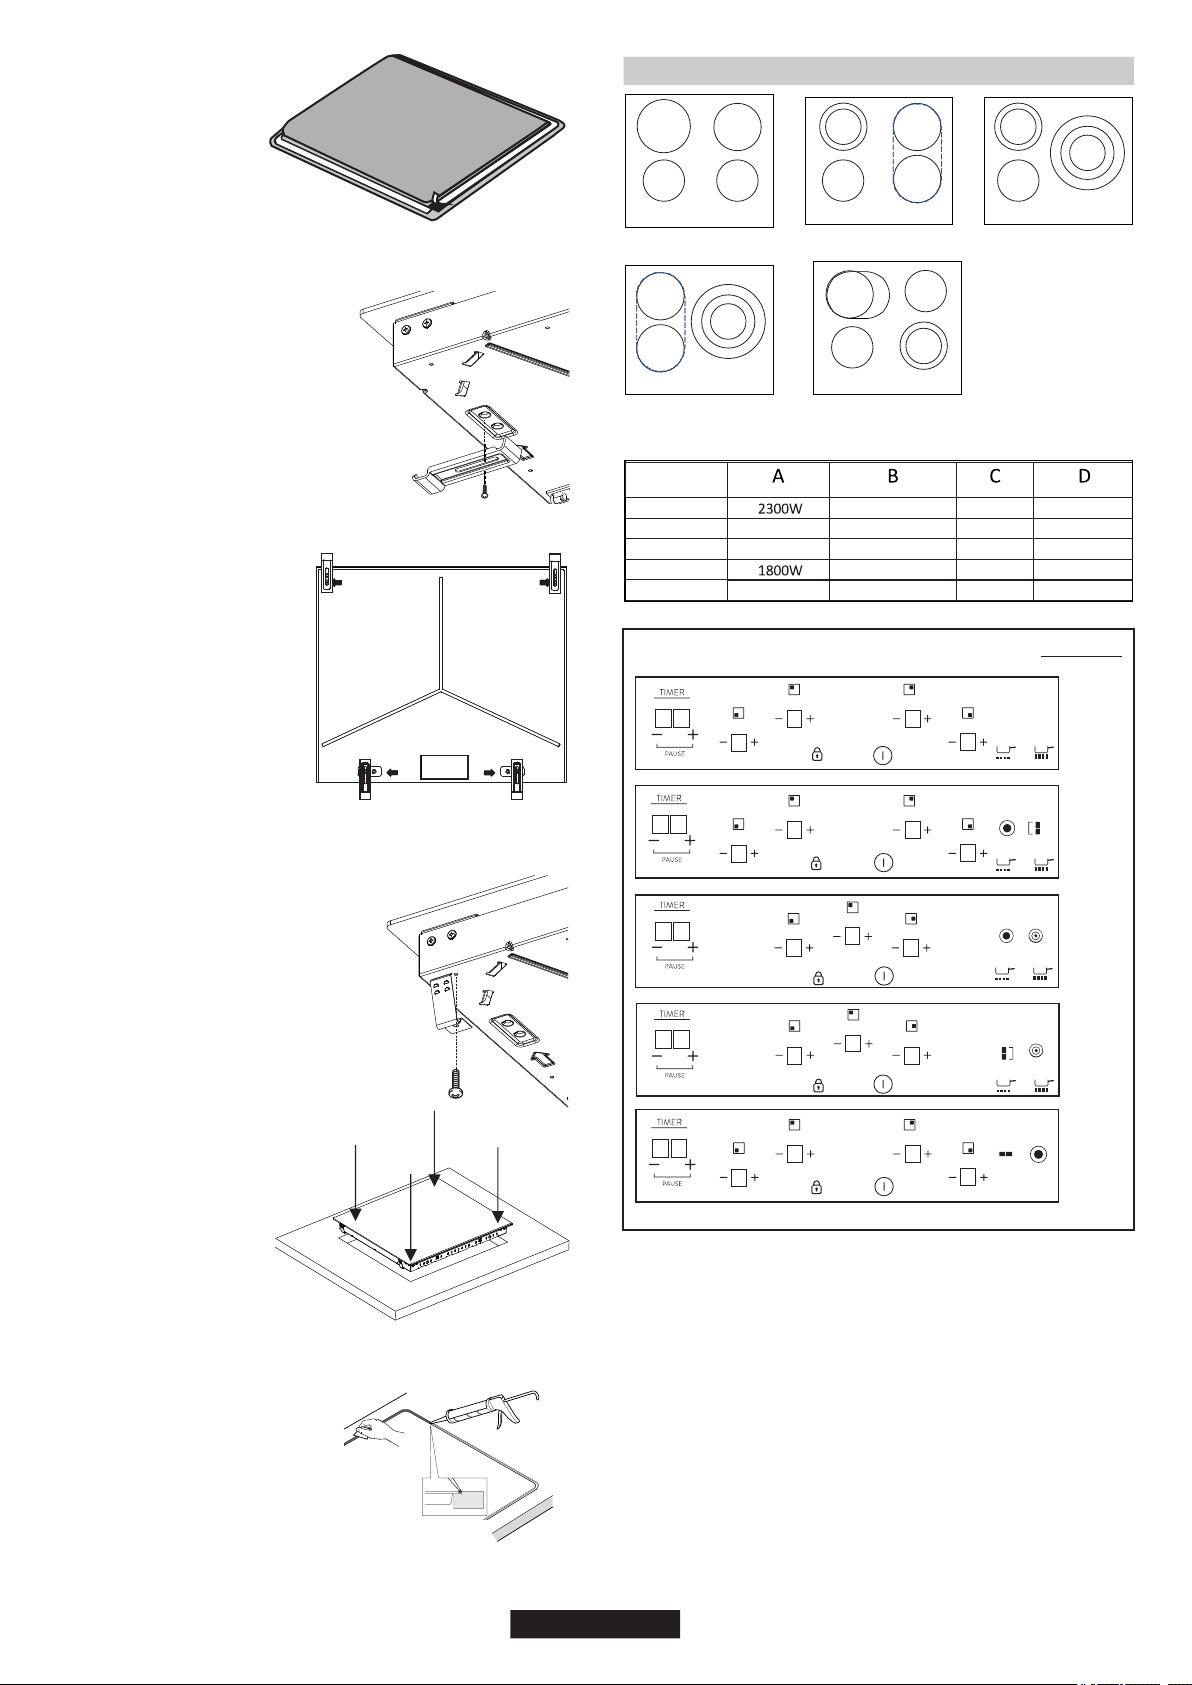
GÖMME KURULUM
Silikon katman tamamen
kuruyana kadar ocağı
kullanmayın.
Ocağın konumunun doğru
olduğunu kontrol ettikten sonra,
tezgahla ocak arasındaki boşluğu
silikon yapıştırıcıyla doldurun.
Silikon katmanı donmadan önce
bir spatulayla veya suya ve
sabuna batırdığınız ıslak
parmaklarınızla düzleştirin.
Ocakla birlikte su geçirmez
bir conta verilir. Contayı
açıklanan şekilde ocağın
alt kısmının etrafına takın
ve destekleyen mobilyaya
sızıntı olmasını önlemek
için düzgün takıldığından
emin olun.
Alt
Normal Sabitleme:
- Aksesuar poşetinden sabitleme
klipslerini alın ve alttaki kutuda
gösterilen şekilde yerine vidalayın.
(Vidaları klipsleri engelleyecek şekilde
sıkmayın; bunların serbestçe hareket
edebilmeleri gerekir)
- Ocağı oyuk alanın
ortasına yerleştirin.
- Klipsleri döndürerek
tamamen sıkın.
Ocağı ortalayıp yerleştirin.
Aksesuar poşetinden dört yay alın ve
bunları şekilde gösterildiği gibi alttaki
kutuya vidalayın.
Hızlı Sabitleme: (Modele bağlı olarak)
Tüm çevresi desteklenene
kadar ocağın kenarlarına
bastırın.
45 TR
Modele Göre
3- “-”
2- “+”
4- Zamanlayıcı
6- Isıtıcı bölge seviye göstergesi
10- Kaynatma
1- Açma - Kapama
9- Eritme
5- İkili / Üçlü bölge
8- Çocuk kilidi
7- Köprü fonksiyonu
4. ELEKTRİK BAĞLANTISI
1
2
3
4
YERLEŞİM
8
88
8
2
22
23
33
3
6
1
8
9
10
8 8
4
8
88
8
5
7
23
23
23
23
1
8
6
8 8
4
9
10
8
8
8
57
23
23
23
1
8
6
8 8
4
9
10
8
8
8
55
23
23
23
1
8
6
8 8
4
9
10
5
B
CD
BA
C
B
C
D
A
C
B
B
D
A
YERLEŞİM 1 YERLEŞİM 2 YERLEŞİM 3
YERLEŞİM 4 YERLEŞİM 5
AA
C
YERLEŞİM 1
YERLEŞİM 2
YERLEŞİM 3
YERLEŞİM 4
YERLEŞİM 5
1000+700 W
1000+700 W
1500+900 W1200 W
1050+900+750 W
1050+900+750 W
1200 W
1200 W
1200 W
1800 W
1200 W
1200 W
1800 W
1000+700 W
-
-
1800 W
1800 W
8
88
8
5
5
23
23
23
23
1
8
6
8 8
4
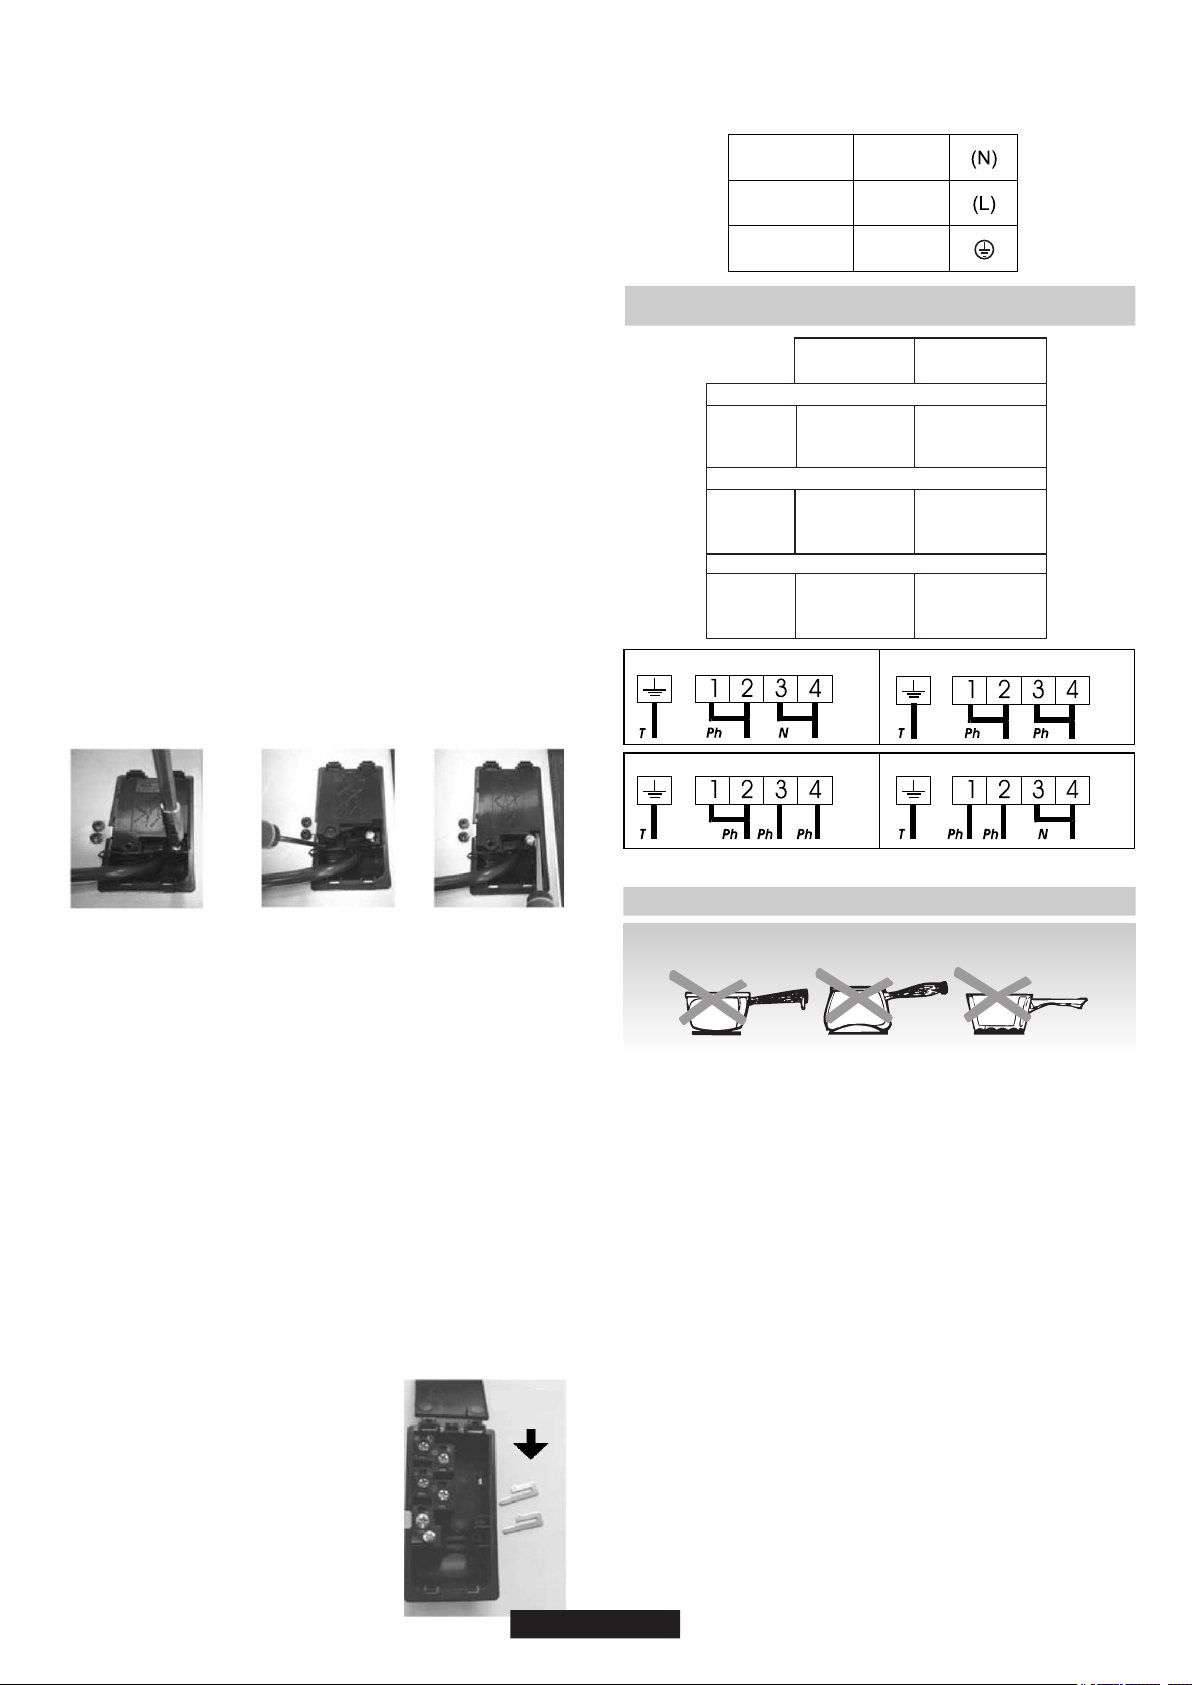
Kapağı aşağıdaki sırayla açın:
Güç besleme kablosuyla ilgili tüm sorular için Satış Sonrası Servis
bölümüne veya yetkin bir teknisyene danışın.
Cihazda priz çıkışı varsa kurulum prizin erişilebilir olmasını sağlayacak
şekilde yapılmalıdır.
Camı korumaya dikkat ederek, ocağı cam yüzeyi tezgaha gelecek
şekilde baş aşağı çevirin.
Ancak ocak aşağıdakilere de bağlanabilir:
Kurulumun elektrik bağlantısı, Cihazın nominal gücüne göre
yapılmalıdır; bağlantı, çok kutuplu kesme şalteriyle sağlanmalıdır.
Ocak güç besleme kablosuyla donatılmışsa bu kablo yalnızca faz ile nötr
arasında 220-240 V güç beslemesine bağlanmalıdır.
Elektrikle çalıştırmadan önce lütfen elektrik ölçerde gösterilen besleme
gerilimini, kurulumun toprak bağlantısının devamlılığını ve sigortanın
uygunluğunu kontrol edin.
Yeni bağlantıyla devam etmek için lütfen aşağıdaki talimatları uygulayın:
Üç Faz 220-240 V3
Güç besleme kablosunun sarı/yeşil kablosu, güç kaynağı ve cihaz
uçlarının toprağına bağlanmalıdır.
"Kurulum standartlara ve direktiflere uygun şekilde yapılmalıdır."
Üretici, uygunsuz veya makul olmayan kullanımdan
kaynaklanabilecek hasarlara ilişkin tüm sorumlulukları reddeder.
Bağlantıyı yapmadan önce kurulumun uygun bir sigortayla
korunduğundan ve cihaza normal besleme sağlamak için yeterli
genişlikte bir bölüme sahip kablolarla donatıldığından emin olun.
UYARI: Toprak bağlantısı yapılmamış veya devamlılığı kusurlu olacak
şekilde toprağa bağlanmış bir cihazın kullanımı sırasında oluşabilecek
olaylardan veya bunların sonuçlarından üretici sorumlu tutulamaz.
Üç Faz 380-415 V2N
231
- Kablo kelepçesi "1"i sökün;
- Kapağı çıkarın.
- Kenarlarda bulunan iki çıkıntıyı bulun;
- Düz bir tornavidanın ağzını çıkıntı "2" ve "3"ün önüne yerleştirin, itin
ve bastırın;
Güç besleme kablosunu çıkarmak için:
- Besleme kablosunun paralel çubuklarını ve iletkenlerini içeren uç
bloğunu tutan vidaları sökün;
- Besleme kablosunu çekerek çıkarın.
Yeni bağlantı yapmak için gerçekleştirilecek işlemler:
- Tablodaki tavsiyelere uygun güç besleme kablosunu seçin;
- Güç besleme kablosunu kelepçeden geçirin;
- Uç bloğuna bağlantı için gereken kablo uzunluğunu da göz önünde
bulundurarak, besleme kablosunun her bir iletkeninin ucunu 10 mm
uzunlukta sıyırın;
- Tablodaki tavsiyelere uygun güç besleme kablosunu seçin;
- Güç besleme kablosunu kelepçeden
geçirin;
Yeni bağlantı yapmak için gerçekleştirilecek işlemler:
Uç bloğuna bağlantı için gereken kablo
uzunluğunu da göz önünde bulundurarak,
besleme kablosunun her bir iletkeninin ucunu
10 mm uzunlukta sıyırın;
Not: Terminal kutusu vidalarının sıkı olduğundan emin olun
- Kuruluma uygun şekilde ve ilk işlemde
açığa çıkardığınız paralel çubukların
yardımıyla iletkeni tabloda gösterilen şekilde
sabitleyin;
- Kapağı takın;
- Kablo kelepçesi vidalayarak takın.
- Kapağı takın;
- - Kuruluma uygun şekilde ve ilk işlemde açığa çıkardığınız paralel
çubukların yardımıyla iletkeni tabloda gösterilen şekilde sabitleyin;
- Kablo kelepçesi vidalayarak takın.
N
=
NötrT
=
Toprak
Ph = Faz
DİKKAT:
Güç besleme kablosunun değiştirilmesi gerekirse kabloyu aşağıdaki
renklere/kodlara uygun şekilde bağlayın:
YERLEŞİM
"1-3"
YERLEŞİM
"2-4"
TEK FAZ veya İKİ FAZ 220-240 V~
Kablo
HO5V2V2F
Kablo
HO5V2V2F
Kablo
HO5V2V2F
2
3x2,5 mm
2
3x4 mm
2
4x1,5 mm
2
4x1,5 mm
2
4x1,5 mm
2
4x1,5 mm
ÜÇ FAZ 220-240 V3~
ÜÇ FAZ 380-415 V2N~
( )
PARALEL
ÇUBUKLAR
MAVİ
KAHVERENGİ
SARI YEŞİL
Nötr
Akım
Toprak
Uç bloğundak uçlara bağlantı
Tek faz 220-240 V~
İk faz 220-240 V2~
Üç faz 380-415 V2N~Üç faz 220-240 V3~
5. OCAK İÇİN PİŞİRME GERECİ TAVSİYESİ
Ocağınızdan en iyi performansı almak için iyi kalitede pişirme
gereçlerinin kullanılması çok önemlidir.
• Tencere veya tavanın tabanının kuru olduğundan emin olun:
Tencerelere sıvı doldururken veya buzdolabında saklanmış bir tencere
kullanırken tencereyi ocağın üzerine yerleştirmeden önce tabanının
tamamen kuru olduğundan emin olun. Böylece ocağın lekelenmesini
önleyebilirsiniz.
• Çapı, yüzey birimini tamamen kaplayacak kadar geniş olan
tencereler kullanın: Tencerenin boyutu ısıtma alanından küçük
olmamalıdır. Tencere ısıtma alanından biraz daha büyük olduğunda enerji
maksimum verimlilikle kullanılır.
Düşük erime noktası nedeniyle ince alüminyum kullanılmamalıdır.
Dökme Demir: Kullanılabilir, ancak tavsiye edilmez. Düşük performans
verir. Yüzeyde çizilmeye neden olabilir.
Alüminyum: Ağır gereçler tavsiye edilir. İyi iletim sağlar. Alüminyum
kalıntıları bazen ocağın üzerinde çizik olarak görünebilir ancak hemen
temizlenirse giderilebilir.
PİŞİRME GERECİ SEÇİMİ: Aşağıdaki bilgiler iyi performans sağlayacak
pişirme gereçleri seçmeniz konusunda yardımcı olacaktır.
Bakır Tabanlı / Taş Pişirme Gereçleri: Ağır gereçler tavsiye edilir. İyi
performans sağlar ancak bakır çizik gibi görünebilecek kalıntılar
bırakabilir. Kalıntılar, ocak hemen temizlendiğinde giderilebilir. Ancak bu
tür tencerelerin kaynayıp kurumasına izin vermeyin. Aşırı ısınan metal
cam ocağa yapışabilir. Aşırı ısınmış bakır tencere ocağın üzerinde kalıcı
lekelere neden olacak kalıntılar bırakabilir.
• Her zaman tamamen düz ve kalın tabanlı, iyi kalitede pişirme
gereçleri kullanın: Bu tür pişirme gereçlerinin kullanılması yemeğin
yapışmasına neden olan sıcak noktaların oluşmasını önler. Kalın metal
tencereler ve tavalar eşit ısı dağılımı sağlar.
Paslanmaz Çelik: Kesinlikle tavsiye edilir. Sandviç tipi kaplama tabanlı
pişirme gereçleri özellikle iyi sonuç verir. Sandviç tipi taban, paslanmaz
çeliğin avantajlarını (görünüş, dayanıklılık ve kararlılık) alüminyum veya
bakırın avantajlarıyla (ısı iletimi, eşit ısı dağılımı) bir araya getirir.
46 TR
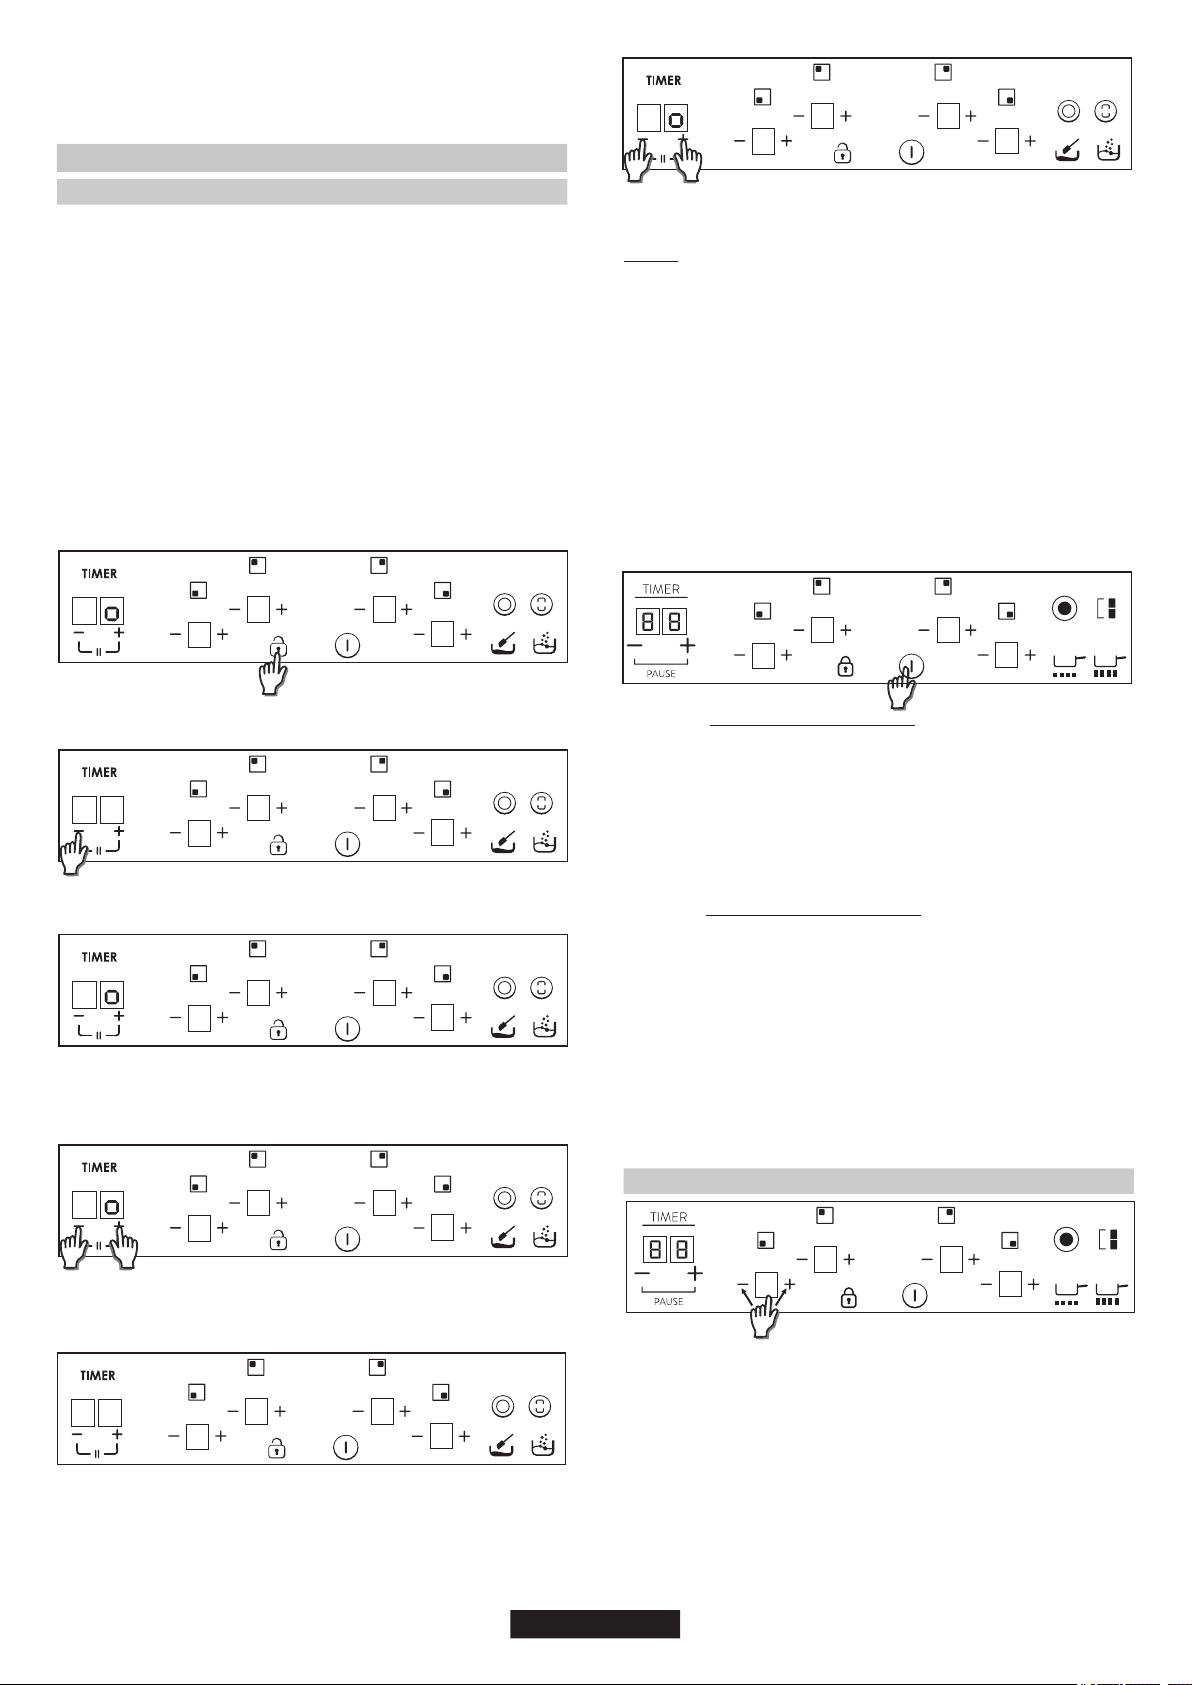
6. KULLANIM
47 TR
Porselen/emaye: Bu tür gereçler yalnızca ince, pürüzsüz ve düz tabanlı
olduklarında iyi performans sağlar.
Cam-seramik: Tavsiye edilmez. Düşük performans verir. Yüzeyde
çizilmeye neden olabilir.
"Güç yönetm" şlevyle, kullanıcı ocağın ulaşableceğ maksmum
gücü ayarlayablr. Güç yönetm şlev, yalnızca ocak açıldıktan
sonrak lk 30 sanye boyunca kullanılablr. Bu ayar güç fş çıkarılıp
takılarak da yneleneblr. İstenen maksmum gücü ayarlayarak, aşırı
yük sorunu olmadan tüm bölgeler aynı anda yöneteblme avantajıyla,
ocak çeştl pşrme bölgelernde dağıtımı bu sınır asla geçlmeyecek
şeklde otomatk olarak ayarlayablr. Müşter ocağın maksmum
gücünü 2,5 kW le ocağın maksmum anma gücü (modele göre farklı
olablr) arasında ayarlayablr (Örneğn, ocağın maksmum gücü 7 kW
se ayar çn maksmum güç sevyes 2,5 kW le 7 kW arasındadır. ).
3.- Kontrolün kldn açın.
Satın alma tarhnde, ocak maksmum güce ayarlıdır. Chazı elektrk
gücüne bağladıktan sonra, 30 sanye çnde güç sevyesn aşağıda
gösterlen noktalara göre ayarlayablrsnz:
1.- Ocağı açın.
2.- Dokunmatk kontrolün başlatma şlemn tamamlamasını bekleyn.
P
8
8
8
8
Güç yönetm düzeynn seçlmes
8 8
8
8
8
8
5.- Bundan sonra zamanlayıcı ekranında Po mesajı görüntülenr.
Isıtıcı ekranlarında güç sevyes 100’e bölünerek gösterlr.
6.- Zamanlayıcının ‘+’ ve ‘-‘ düğmelern kullanarak Güç Yönetm
değern ayarlayablrsnz. Gerekl değer seçldğnde “+” ve “–”
düğmelern aynı anda 5 sanye basılı tutun.
4.- Ocağı açtıktan sonra 30 sanye geçmeden zamanlayıcının “-”
düğmesn 5 sanye basılı tutun.
P
6
0
0
5
P
4
0
0
5
7.- Bu şlem tamamlandığında, uzun br bp ses duyulur ve şlem
sıfırlama gerçekleştrlr. Başlatma şlem yenden gerçekleştrlr.
8 8
8
8
8
8
Daha sonra, dokunmatk kontrol bu sınırı aşablecek herhang
br kombnasyona zn vermeyecektr.
a) Bu güç yönetm ayarı, yalnızca ocağın açılmasından tbaren lk 30
sanye boyunca kullanılablr.
Notlar:
d) Bu güç yönetm seçm AÇIK durumdayken, zamanlayıcının “+” ve
“–” düğmelerne beraber basıldığında şlem yen br güç değernn
kaydedlmesyle sonlandırılır, sıfırlama yapılır ve dokunma kontrolü
normal şeklde çalışmaya başlar.
c) Bu güç yönetm seçm AÇIK durumdaysa ve zamanlayıcının “+” ve
“–” düğmelerne aynı anda basılması dışında herhang br düğmeye
basılırsa şlem yen br güç değer kaydedlmeden sonlandırılır ve
dokunma kontrolü sıfırlama olmaksızın normal şeklde çalışmaya
başlar.
b) Bu güç yönetm seçm AÇIK durumdaysa ve ocak açıldıktan sonra
90 sanye geçmşse, yen br güç değer kaydedlmeden bu şlem
sonlandırılır.
8.- Başlatma şlemnden sonra zamanlayıcı ekranında güç yönetm
gösterlr.
P
4
0
0
5
Isıtıcı bölgesini Açma/Kapama
Bir ısıtıcıyı AÇIK duruma getirmek için açma-kapama butonuna 1-2
saniye boyunca dokunun. Uzun bir bip sesi duyulur ve hedef bölgenin
hanesinde güç seviyesini gösteren "0" değeri görünür.
1) Herhangi bir pişirme aşaması 0 konumundaysa bu ekran 10 saniye
sonra otomatik olarak KAPALI duruma geçer ve bölge için KAPALI
sekansı duyulur.
2) Ekranda AÇIK durumda olup 0 güç konumunda bulunan kalıntı ısı
göstergesi varsa "0" bilgisi yanıp söner.
2) Ekranda KAPALI durumdayken kalıntı ısı göstergesi varsa "H" bilgisi
yanıp söner.
3) Kilit fonksiyonu etkin olduğunda bile bir bölgeyi KAPALI duruma
getirebilirsiniz.
1) Herhangi bir pişirme aşaması 0 konumundaysa bu ekran 10 saniye
sonra otomatik olarak KAPALI duruma geçer ve bölge için KAPALI
sekansı duyulur.
Bir ısıtıcıyı KAPALI duruma getirmek için açma-kapama butonuna 1-2
saniye boyunca dokunun. 3 kısa bip sesi duyulur ve hedef bölge
hanesinde hiçbir bilgi görünmez ya da kalıntı ısı mevcutsa "H" değeri
gösterilir. Bölge KAPALI duruma geçer
.
3) Kilit fonksiyonu etkinse bir bölgeyi AÇIK duruma getiremezsiniz.
4) Sadece bir ısıtıcı etkinse ve bu ısıtıcı kapalı duruma getirilirse 4 kısa
bip sesi duyulur ve tüm pişirme yüzeyinin Kapalı duruma geçtiğini belirtir.
Güç seviyesini artırma / azaltma
2. P güç seviyesine gelindiğinde, + tuşuna tekrar basarsanız güç
seviyesi 0'a getirilmez. 0 güç seviyesine gelindiğinde - tuşuna tekrar
basarsanız güç seviyesi P'ye getirilmez.
'+' veya '-' tuşlarına kısaca basarak seçili bölgenin hanesindeki güç
seviyesini artırıp azaltabilirsiniz: 0-1-2-3...9-P
3. 0 güç seviyesinde AÇIK durumda olan bir bölge sıcaksa 0 bilgisi
yanıp söner. 10 saniye sonra 0 kaybolur ve ekranda sürekli olarak 'H'
harfi gösterilir.
1. + veya - tuşlarına uzun basıldığında güç seviyesi sürekli olarak
artar/azalır. Güç seviyesi hızlı artırıldığında güç seviye 9'da durur ve
daha yüksek güç için + tuşuna bir kez daha kısaca basılması gerekir.
Hızlı artırma / azaltma sırasında bip sesi duyulmaz.
8
8
8
8
8
8
8
8
İkili genişletme halkasını AÇIK duruma getirmek için ilgili ana bölgenin
AÇIK ve gösterilen güç seviyesinin 0'dan yüksek olması gerekir.
1. genişletme tuşuna ilk kez kısaca basıldığında genişletme halkası
AÇIK duruma gelir. 1. genişletme halkası AÇIK durumdaysa
genişletme tuşunun üzerindeki 1 LED YANAR (üçlü bölge için soldaki
LED, ikili bölge için sadece ortadaki tek LED)
Genişletme tuşuna tekrar kısaca basıldığında 2. genişletme halkası
AÇIK duruma gelir. 1. ve 2. genişletme halkaları AÇIK durumdaysa
genişletme tuşunun üzerindeki 2 LED YANAR
Genişletme tuşuna ilk kez kısaca basıldığında genişletme halkası
AÇIK duruma gelir. Genişletme halkası AÇIK durumdayken
genişletme tuşunun üzerindeki LED yanar.
8.2- Üçlü bölge AÇIK
Genişletme tuşuna üçüncü kez kısaca basıldığında 1. ve 2.
genişletme halkaları KAPALI duruma gelir.
Genişletme tuşuna her basıldığında kısa bir bip sesi duyulur.
Genişletme tuşuna tekrar kısaca basıldığında genişletme halkası
KAPALI duruma gelir. Genişletme tuşuna her basıldığında kısa bir
bip sesi duyulur.
8.1- İkili bölge AÇIK
İkili / Üçlü bölgeler
8
8
8
8
Köprü fonksiyonu
- Ayar modunda köprü tuşuna dokunulduğunda
Köprü, yalnızca iki ısıtıcı da kapalıyken etkinleştirilebilir. Köprü
fonksiyonunun dokunmatik köprü tuşunu etkinleştirmek için köprünün
bir ısıtıcısı seçilir.
Aynı anda iki köprü ısıtıcısı birden seçilecektir.
Bir bip sesi duyulur ve bölge etkinleştirildiyse bölge LED'i yanar.
İki köprü ısıtıcısı da aynı güç seviyesini gösterir. Fonksiyon aşağıdaki
durumlarda kapatılır:
- Kullanıcı “0” güç seviyesini seçtiğinde
Isıtıcılar seçildikten sonra güç seviyesi istenen ayarda değilse + ve -
tuşlarını kullanarak ayarlayın.
Ertme fonksyonu
- Bir ısıtıcı seçildikten sonra, eritme fonksiyonunu çalışt
ırmak için;
Eritme tuşuna basınız.
Bip sesi duyulur ve ısıtıcı göstergesi “U” olarak görünür.
Isıtıcı 2. seviyede çalışır.
- Seçilen ısıtıcıda eritme fonksiyonu aşağıdaki durumlarda sonlandırılır;
- Ya da ısıtıcı farklı bir seviyeye ayarlandığında.
- Ocak kapatıldığında
8
8
8
8
8
8
8
8
Çocuk Kilidi
Bu işlem kilit tuşuna basıldığında yapılır.
Bundan sonra herhangi bir tuşa dokunulduğunda ekranda 2
saniye boyunca "L" harfi gösterilir. Isıtıcı aynı durumda kalır.
Çocuk Kilidini devre dışı bırakmak için daha önce açıklanan işlemi
uygulayın. Ardından kısa bir bip sesi duyulur ve ekranda "n" harfi
gösterilir. Ocağın kilidi açık kalır.
Not: Ocak tamamen Kapalı duruma getirildikten 15 dakika sonra
otomatik çocuk kilidi devreye girer.
8
8
8
8
4. Bir ısıtıcı seçili olduğunda ve '+' ile '-' tuşlarına aynı anda
basıldığında güç seviyesi '0'a gelir ama ısıtıcı 10 saniye boyunca seçili
kalır. Isıtıcı süresi uzatıldıysa zamanlayıcı Kapalı durumuna geçer. Bu
işlem dokunmayla kontrol yapılandırmasına bağlı olarak çeşitli
durumlarda oluşabilir. Aşağıda verilen örnekler yalnızca bilgi amaçlıdır.
Kişisel deneyimleriniz bu ayarları zevkinize ve alışkanlıklarınıza göre
uyarlamanızı sağlayacaktır.
DURAKLAT (DURDUR VE ÇIK) İŞLEVİ
Duraklatma şlev pşrme şlemnn geçc olarak duraklatılmasını
sağlayarak kullanıcıların suyun fazla kaynadığından endşelenmeden
kapıya veya telefona bakablmelerne zn verr. Bu şlev, pşrme
ayarını değştrmeden kullanıcı arabrm yüzeyn temzlemek çn de
faydalıdır.
“Zamanlayıcı +/- tuşları”na ½ sanye dokunulursa :
Bu şlev seçmek çn, kullanıcı “zamanlayıcı +/- tuşlarına” brlkte
dokunmalıdır.
• Bp ses duyulur ve setüstü ocak durur,
• Isıtıcıların otomatk kapanma saat duraklatılır,
• Gerye sayım yapan tüm zamanlayıcılar duraklatılır,
Durdurma şlev şunları sonlandıracaktır:
• "Zamanlayıcı +/- tuşları”na (brlkte) ½ sanyeden fazla dokunulursa,
br bp ses duyulur ve ısıtıcıların gerçek güç ayarı ve zamanlayıcı ger
sayımları ger yüklenr veya
• Setüstü ocak 10 dakkadan fazla durdurulursa, setüstü ocak
otomatk olarak kapatılır.
• Zamanlayıcı hçbr şey göstermez ve tüm ısıtıcıların göstergeler
açılır ve "0"ı göstererek segment segment sol yönde açılır ve ardından
segment segment sürekl olarak sağ yönde kapatılır.
• Isıtıcının gerçek güç ayarı saklanır ve tüm etkn ısıtıcıların gücü 0 güç
sevyesne ayarlanır,
• “Zamanlayıcı +/- tuşları” ve “açma/kapatma tuşu” dışındak tüm
tuşlar kltlenr (Zamanlayıcı tuşları yalnızca duraklatma şlevn devre
dışı bırakmak çn brlkte kullanılırlarsa etknleşr),
8 8
8
8
8
8
Kaynatma fonksiyonu
Kaynatma tuşuna basınız.
Isıtıcı maksimum seviyede 10 dk boyunca çalışır. Isıtıcı 10dk sonunda
bip sesi ile 9. seviyeye düşer.
- Ocak kapatıldığında
- Seçilen ısıtıcıda kaynatma fonksiyonu aşağıdaki durumlarda
sonlandırılır;
Bir ısıtıcı seçildikten sonra, kaynatma fonksiyonunu
çalıştırmak için;
Bip sesi duyulur ve ısıtıcı göstergesi “P” olarak görünür.
- Ya da ısıtıcı farklı bir seviyeye ayarlandığında.
8
8
8
8
Taşma güvenliği
Bir şey (bir nesne veya sıvı) herhangi bir tuşa 5 saniyeden uzun süre
bastığında devreye girer. Tuşa basılırken her 30 saniyede bir 2 Kısa
bip sesi + 1 Uzun bip sesi duyulur. Pişirme yüzeyi Kapalı duruma
geçer. Sorun devam ettiği sürece bu sembol yanıp sönmeyi
sürdürür.
48 TR
Zamanlayıcı
9) Son dakika saniye olarak gösterilir (Bazı modellerde yalnızca
son dakika geri sayımı sırasında zamanlayıcı programına girildiğinde
gösterilir)
5) Maksimum süre 99 dakikadır.
Zamanlanacak bölgeyi seçin. Bölgenin güç seviyesi 0'dan büyük
olmalıdır. Zamanlanan bölgede sürekli olarak görüntülenir.
Hanelerdeki "0 0" zamanlayıcı için ayrılmıştır.
Zamanlayıcı fonksiyonu kendine ait tuşa ya da aynı anda '+' ve '-'
tuşlarına dokunarak etkinleştirilebilir.
1) "+" veya "-" tuşlarını kullanarak zamanlayıcı süresi seçilebilir.
Süre değiştirildiğinde bip sesi duyulmaz.
2) Zamanlayıcıdaki tuşa aynı anda basıldığında zamanlayıcı iptal
edilir (00 değerine döner).
3) Zamanlayıcının "+" veya "-" tuşları TBD süresi boyunca basılı
tutulursa hızlı bir ayar yapılır.
İki durumda da ısıtıcının seçili olması ve güç seviyesinin 0'dan büyük
olması gerekir.
6) Süre dolduğunda ve ocaktan bip sesi gelmeye başladığında
herhangi bir tuşa basarak alarm ve hane sekansını sonlandırabilirsiniz.
7) Zamanlayıcı çalışırken zamanlayıcı süresini ayarlamak mümkündür.
8) Zamanlanmış bölgenin gücü, zamanlayıcı programını
etkilemeden değiştirilebilir.
4) Zamanlayıcı süresi ayarlanırken "-" tuşuyla "00"dan "99"a, "+"
tuşuyla da "99"dan "00"a geçilebilir.
11) Hiçbir bölge seçili değilken ve birden çok bölge
zamanlandığında, Zamanlayıcı tuşuna basarsanız süre hanelerinde
gösterilen süre dönüşümlü şekilde değişir ve güç göstergesinde
ondalık noktasının AÇIK olduğu bölgenin süresi gösterilir.
Kalan süre zamanlayıcı için ayrılan hanelerde görüntülenir. Birden
çok bölge zamanlamışsa kalan en kısa süre görüntülenir ve ondalık
noktası ilgili bölgede gösterilir.
10) Hiçbir bölge seçili değilken ve hiçbir bölge zamanlanmadığında,
Zamanlayıcı tuşuna basarsanız hiçbir şey olmaz.
12) Zamanlanan bölgede dönüşümlü olarak Güç (5s) ve (0,5s)
gösterilir.
Kalıntı Isı Göstergesi (Radyan ısıtıcılarda -> hesaplanır)
º
Ocağın cam yüzeyindeki sıcaklık 65 C'nin (teorik değer)
üzerindeyse, bu durum ilgili ekranda “H” harfiyle gösterilir.
º
65C'nin üzerinde bir sıcaklık oluşması için bir ısıtma elemanının bir
süredir çalışıyor olması gerekir; bu süre güç seviyesine bağlı olarak
değişir. Bu süre dolduğunda, ısıtma elemanı kapatıldıktan sonra
kalıntı ısı uyarısı gösterilir.
“Kalıntı ısı” gösterimi için de aynı göstergeler kullanılabilir. Bu amaçla
bir süre tablosu tanımlanmalıdır: Kalıntı Isı süresi=f (güç seviyesi,
çalışma süresi).
Otomatik Güvenlik Kapatma
Isıtıcının açık kalabileceği maksimum süre seçilen pişirme
seviyesine göre değişir.
Güç seviyesi önceden ayarlanmış süre boyunca değişmezse ilgili
ısıtıcı otomatik olarak kapanır.
Güç seviyesi
Max. süre (saat)
1
2
3
4
5
6
7
8
9
10
5
5
4
3
2
2
2
2
NOT: En yüksek güç seviyeleri kullanılırken aşırı ısınma durumu
oluşursa Ocak kontrolü ocağı aşırı ısınmaya karşı korumak için güç
seviyesini otomatik olarak ayarlar.
7TEMİZLİK VE BAKIM.
. Ocakta herhangi bir bakım işlemi yapmadan önce soğumasını
bekleyin.
. Yalnızca cam seramik yüzeyler için özel olarak tasarlanmış ürünler
(kremler ve spatulalar) kullanılmalıdır. Bu ürünler nalburdan satın
alınabilir.
. Plastik eşyalar, şeker veya şeker bazlı ürünler gibi eriyebilecek tüm
maddelerin ocaktan uzak tutulması tavsiye edilir.
BAKIM:
- Birkaç damla özel temizlik ürününü ocak yüzeyine damlatın.
- Yüzey temizlenene kadar yumuşak bir bez veya kuru kağıt
havluyla silin.
Hâlâ inatçı lekeler varsa:
- Birkaç damla daha özel temizlik sıvısını yüzeye damlatın.
- Ocağa 30° açıyla tuttuğunuz bir spatula kullanarak leke çıkana
kadar kazıyın.
- Yüzey temizlenene kadar yumuşak bir bez veya kuru kağıt
havluyla silin.
- Gerekirse bu işlemi tekrarlayın.
. Ocak yüzeyine düşen her şey hızla yanacağı ve temizliği
zorlaştıracağı için dökülmelerden kaçının.
- İnatçı lekeleri yumuşak bir bezle veya hafifçe nemlendirilmiş kağıt
havluyla ovun.
BİRKAÇ İPUCU:
Metal çerçeve: Metal çerçeveyi güvenli şekilde temizlemek için su ve
sabunla yıkayın, durulayın ve yumuşak bir bezle kurulayın.
Bıçaklı spatulayı kesinlikle çocukların erişebileceği bir yerde
bırakmayın.
Sıkça temizleme, çizilmeyi ve aşınmayı önlemek için gerekli olan
koruyucu bir katman oluşturur. Ocağı tekrar kullanmadan önce
yüzeyin temiz olduğundan emin olun. Su lekelerini çıkarmak için
birkaç damla beyaz sirke veya limon suyu kullanın. Ardından emici
kağıtla ve birkaç damla özel temizleme sıvısıyla silin.
Hiçbir zaman bıçak veya tornavida kullanmayın.
Çok ıslak bir sünger kullanmayın.
Hiçbir zaman aşındırıcı ürünler veya ovma tozları kullanmayın.
NOT:
Cam seramik yüzey düz tabanlı tencerelerin sürtünmesine karşı
dayanıklıdır, ancak tencereleri bir yüzeyden diğerine taşımanın en iyi
yolu tencereyi kaldırarak taşımaktır.
30° açıyla tutulduğu sürece bıçaklı bir spatula yüzeye zarar
vermez.
49 TR
30°
Maxi
Cam seramik yüzeydeki renk değişiklikleri yüzeyin
çalışmasını veya kararlılığını etkilemez. Bu gibi renk
değişimleri, genellikle yanmış yemek kalıntılarından veya
alüminyum veya bakır gibi malzemelerden yapılmış pişirme
gereçlerinin kullanılmasından kaynaklanır. Bu lekelerin
çıkarılması zordur.
8. SORUN GİDERME
Pişirme çok yavaş
Ocağın cam yüzeyinde küçük çizikler ve aşınmalar var
Pişirme bölgeleri hafifçe kaynatmıyor veya kızartmıyor
Yalnızca düz tabanlı tencereler kullanın. Tencereyle ocak
arasında ışık görünüyorsa bölge ısıyı doğru iletmemektedir.
Tencere tabanının seçili bölgenin çapını tamamen kaplaması
gerekir.
Yanlış temizleme yöntemleri veya sert tabanlı tencereler
kullanılmıştır; ocakla tencerenin tabanı arasında kum veya tuz gibi
parçacıklar kalmıştır. "Temizlik" bölümüne bakın. Kullanmadan önce
tencere tabanlarının temiz olduğundan emin olun ve yalnızca
pürüzsüz tabanlı tencereler kullanın. Çizikler ancak temizliğin doğru
Uygun olmayan tencereler kullanılmaktadır. Yalnızca düz tabanlı,
ağır ve en az pişirme bölgesininkine eşit çapta pişirme gereçleri
kullanın.

Isıtıcı ekranı
F0
Fc
Ft
FE
Fb
FU / FJ
FA
FC / Fd
Fr
Hata oluştuysa pişirme yüzeyinin güç beslemesini kesip tekrar bağlayın. Hata devam ederse satış
sonrası servisi arayın. Hata normal çalışma sırasında aniden oluşursa satış sonrası servisi arayın.
Dokunmatik kontrol yazılım
hatası.
Sıcaklık düşene kadar bekleyin, sıcaklık normal değere ulaştığında set üstü ocak düzelecektir.
Mesaj kaybolduğunda, ocak tekrar kullanılabilir.
Dokunmatik kontrol bölgesi
çok sıcaktır ve tüm ısıtıcıları
kapatmıştır.
Sıcaklık düşene kadar bekleyin. Mesaj devam ederse sıcaklık normal değere ulaştığında satış
sonrası servisi arayın.
Dokunmatik kontrol sıcaklık
sensörü hasar görmüş olabilir.
Sıcaklık düşene kadar bekleyin. Mesaj devam ederse sıcaklık normal değere ulaştığında satış
sonrası servisi arayın.
Dokunmatik kontrol sıcaklık
sensörü hasar görmüş olabilir.
Pişirme yüzeyinin doğru monte edildiğini kontrol edin. Tuşların cam yüzeye doğru şekilde
dokunduğundan emin olun.
Herhangi bir tuşta aşırı
hassasiyet vardır.
Bu, otomatik klavye kontrolüdür. Otomatik kontrol güvenli değere geri döndüğünde hata kaybolur.
Hata devam ederse satış sonrası servisi arayın.
Güvenlik klavyesi hatası
Bu, otomatik yazılım kontrolüdür. Otomatik kontrol güvenli değere geri döndüğünde hata kaybolur.
Hata devam ederse satış sonrası servisi arayın.
Güvenlik klavyesi hatası
Bu, otomatik yazılım kontrolüdür. Otomatik kontrol güvenli değere geri döndüğünde hata kaybolur.
Hata devam ederse satış sonrası servisi arayın.
Güvenlik klavyesi hatası
Herhangi bir röle sürücüsünde sorun olabilir. Pişirme yüzeyini güç beslemesinden çıkarın, bir
dakika bekleyin ve tekrar açın. Hata devam ederse satış sonrası servisi arayın.
Röle güvenlik hatası
9. SATIŞ SONRASI BAKIM
Servis Mühendisi çağırmadan önce lütfen aşağıdakileri kontrol
edin:
Arızanın nedeni belirlenemiyorsa cihazı kapatın, kurcalamayın ve
Satış Sonrası Servis Merkezi'ni arayın. Cihaz Servis Merkezi'nde
ücretsiz onarılmasını sağlayan bir garanti belgesiyle birlikte verilir.
— fişin takılı ve sigortalı olduğundan emin olun;
Ocağın üzerindeki açık renkli yüzeyler
Bağlantının doğru yapılıp yapılmadığını kontrol edin. Kontrol paneli
kilitlidir. Ocağın kilidini açın.
Paralel çubuklar terminal kutusunda doğru yerleştirilmemiştir.
Ocağın üzerinde karamelizasyon veya erimiş plastik
- düşük seviye: kısa çalışma süresi,
Alüminyum veya bakır tencerelerin yanı sıra mineral, su veya yiyecek
kalıntıları olabilir; bu lekeler krem temizleyici kullanılarak temizlenebilir.
- yüksek seviye: uzun çalışma süresi,
Metal kalıntıları
"TEMİZLİK" bölümüne bakın.
yapılmasıyla azaltılabilir.
Doğru malzemeleri kullandığınız halde lekeler çıkmıyorsa: Bıçak
kullanın ve "TEMİZLİK" bölümüne bakın.
Koyu renkli lekeler
Bıçak kullanın ve "TEMİZLİK" bölümüne bakın.
Alüminyum tencereleri ocağın üzerinde kaydırmayın. Temizlik
tavsiyelerine bakın.
Ocak veya belirli bölgeler çalışmıyor
Ocak kapanmıyor
Kontrol paneli kilitlidir. Ocağın kilidini açın.
Pişirme bölgeleri için açma/kapama işlemlerinin sıklığı
Açma-kapama döngüleri gerekli ısı seviyesine göre değişir:
50 TR
İşlem
Arıza
Yanlışlıkla ana düğmeye (AÇMA/KAPAMA tuşuna) dokunulmuş veya
bir tuşun üzerine bir nesneyle basılıyor olabilir. Tuşlara hiçbir şeyin
basmadığından emin olarak birimi tekrar açın. Ayarlarınızı tekrar girin.
Bulunduğunuz yerdeki sigortaların / devre kesicilerin durumunu
kontrol edin. Elektrik kesintisi olup olmadığını kontrol edin.
Pişirme yüzeyi çalışmıyor.
Pişirme yüzeyi kendi kendine kapandı.
Ekranda F ve sayılar görünüyor
Ekranda F ve sayılar gösteriliyorsa biriminiz bir arıza algılamıştır.
Sorunu düzeltmek için aşağıda verilen işlemler listesine bakın.
ÜRETİCİ FİRMA:
CANDY HOOVER GROUP
Via Privata E. Fumagalli 20861 Brugherio (MB) - ITALY
Tel: 039.2086.1 • Fax: 039.2086.403
www.candy-group.com
İTHALATCI FİRMA:
CANDY HOOVER EUROASIA EV GEREÇLERİ SAN. VE TİC. A.Ş.
İçerenköy Mh. Hal Yolu Cd. Çayır Yolu Sk. No: 11
Sayar İş Merkezi Kat: 7 34752 Ataşehir / İSTANBUL/ TÜRKİYE
Tel: 0216 466 42 42 • Fax: 0216 466 15 45
www.hoover.com.tr • servis@hoover.com.tr
ANKASTRE OCAK
Malın bütün parçaları dahil olmak üzere tamamı garanti kapsamındadır.
• Garanti süresi içinde tekrar arızalanması,
• Tamiri için gereken azami sürenin aşılması,
Malın ayıplı olduğunun anlaşılması durumunda tüketici, 6502 sayılı Tüketicinin Korunması Hakkında Kanunun 11 inci maddesinde yer alan;
a) Satılanı geri vermeye hazır olduğunu bildirerek sözleşmeden dönme,
c) Aşırı bir masraf gerektirmediği takdirde, bütün masrafları satıcıya ait olmak üzere satılanın ücretsiz onarılmasını istem,
ç) İmkan varsa, satılanın ayıpsız bir misli ile değiştirilmesini isteme, seçimlik haklarından birini kullanabilir.
b) Satılanı alıkoyup ayıp oranında satış bedelinde indirim isteme,
Tüketicinin, Kanunun 11. maddesinde yer alan seçimlik haklarından ücretsiz onarım hakkını seçmesi durumunda satıcı; işçilik masrafı, değiştirilen
parça bedeli ya da başka herhangi bir ad altında hiçbir ücret talep etmeksizin malın onırımını yapmak veya yaptırmakla yükümlüdür. Tüketici ücretsiz
onarım hakkını üretici veya ithalatçıya karşı da kullanılabilir. Satıcı, üretici ve ithalatçı tüketicinin bu hakkını kullanmasından müteselsilen sorumludur.
Ankastre ocak kullanma kılavuzunda gösterildiği şekilde kullanılması ve yetkili kıldığımız servis elemanları dışındaki şahıslar tarafından bakımı, onarımı
veya başka bir nedenle müdahale edilmemiş olması şartıyla bütün parçaları dahil olmak üzere tamamı malzeme, işçilik ve üretim hatalarına karşı
ürünün teslim tarihinden itibaren 3 ( ÜÇ ) YIL SÜRE İLE CANDY HOOVER EUROASIA A.Ş. TARAFINDAN GARANTİ EDİLMİŞTİR.
Tüketicinin, ücretsiz onarım hakkını kullanması halinde malın;
Garanti uygulaması sırasında değiştirilen malın garanti süresi, satın alınan malın kalan garanti süresi ile sınırlıdır.
Malın tamir süresi 20 iş gününü geçemez. Bu süre, garanti süresi içerisinde mala ilişkin arızanın yetkili servis istasyonuna veya satıcıya bildirimi
tarihinde, garanti süresi dışında ise malın yetkili servis istasyonuna teslim tarihinden itibaren başlar. Malın arızasının 10 iş günü içerisinde
giderilememesi halinde, üretici veya ithalatçı; malın tüketicinin kullanımına tahsis etmek zorundadır. Malın garanti süresi içerisinde arızalanması
durumunda, tamirde geçen süre garanti süresine eklenir.
Malın kullanma kılavuzunda yer alan hususlara uykırı kullanılmasından kaynaklanın arızalar garanti kapsamı dışındadır.
tüketici malın bedel iadesini alıp, ayıp oranında beden indirimini veya imkan varsa malın ayıpsız misli ile değiştirilmesini satıcıdan talep edebilir. Satıcı,
tüketicinin talebini reddetmez. Bu talebin yerine getirilmemesi durumunda satıcı, üretici ve ithalatçı müteselsilen sorumludur.
Garanti belgesinin tekemmül ettirilerek tüketiciye verilmesi ve bu yükümlülüğün yerine getirildiğinin ispatı satıcıya aittir.
Tüketici, garantiden doğan haklarının kullanılması ile ilgili olarak çıkabilecek uyuşmazlıklarda yerleşim yerinin bulunduğu veya tüketici işleminin
yapıldığı yerdeki Tüketici Hakem Heyetine veya Tüketici Mahkemesine başvurabilir.
Satıcı tarafından bu Garanti Belgesinin verilmemesi durumunda, tüketici Gümrük ve Ticaret Bakanlığı Tüketicinin Korunması ve Piyasa Gözetimi Genel
Müdürlüğüne başvurabilir.
• Tamirinin mümkün olmadığının, yetkili servis istasyonu, satıcı, üretici veya ithalatçı tarafından bir raporla belirlenmesi durumlarında;
Satılan mala ilişkin olarak düzenlenen faturalar garanti belgesi yerine geçmez.
Bu bölümü, ürünü aldığınız Yetkili Satıcı imzalayacak ve kaşeleyecektir.
Bu garanti belgesi ile kesilen fatura garanti süresi boyunca garanti belgesi ile muhafaza edilmesi önerilir.
CANDY-HOOVER-EUROASIA EV GEREÇLERİ SAN VE TİC. A.Ş.
Yetkili servislerimizden hizmet talebiniz olduğunda veya ürünlerimizle ilgili genel öneri ve talepleriniz için aşağıdaki numaradan ulaşabilirsiniz.
Ürününüzü kullanmadan önce montaj ve kullanma kılavuzunu mutlaka okuyunuz. Ürünün montaj ve kullanım kılavuzunda yer alan hususlara aykırı
kullanılması, kullanım hataları ve cihazın standart kullanım şartları / amaçları haricinde kullanılması halinde ürün garanti kapsamı dışında kalacaktır.
• Kullanım kılavuzunda belirtilen hususlara aykırı kullanılmasından kaynaklanan arızalar ve hasarlar.
Candy Hoover Euroasia tarafından sağlanan garanti şartları aşağıdaki koşullarda geçersiz olacaktır.
Yukarıda belirtilen arızaların giderilmesi ücret karşılığı yapılır.
Ürünün kullanım ömrü 10 (on) yıldır. Bu ürünün tanımlandığı şekilde çalışabilmesi için gerekli yedek parçaları bulundurma süresidir.
Üretim yeri Türkiye 'dir.
• Kullanım hatalarından dolayı oluşan arıza ve hasarlar, elektrik-gaz -su tesisatı ve / veya tesisat ekipmanları nedeniyle meydana gelebilecek arızalar garanti
kapsamı dışındadır.
•Ürünün, müşteriye ulaştırılması sonrası yapılan taşıma işlemine bağlı arıza ve hasarlar, tüketici tarafından yapılan yanlış depolama ve ortam koşulları
nedeniyle cihazda meydana gelen hasarlar ve arızalar garanti kapsamı dışındadır.
• Ürüne, yetkili servis dışındaki kişiler tarafından müdahale edilmesi, elektrik-su kesintisi ve üründen kaynaklanmayan kaçaklar garanti kapsamı dışındadır.
Ürünün standart ve sorunsuz çalışma koşullarının sağlanması için gerekli / zorunlu olan montaj ve kullanım kılavuzunda belirtilen teknik özelliklerinin (su
basıncı, voltaj değeri, gaz besleme basıncı, sigorta değeri, topraklama, yakıt cinsi, yakıt kalitesi vb.) uygun olmaması, sabit olmaması ve/veya değişken
olması halinde, cihazda meydana gelebilecek arızalar ve sorunlar garanti kapsamı dışında kalacaktır.
Sabit telefonlardan veya cep telefonlarından alan kodu çevirmeden arayınız.
• Hatalı elektrik tesisatı, ürünün üzerinde belirtilen voltajdan farklı voltajda kullanılması veya şebeke voltajındaki dalgalanmalar sonucu oluşan arıza ve
hasarlar, doğal afetler, üründen kaynaklanmayan harici/fiziki dış etkenler, mevsimsel hava şartları ve çevresel etkenler (deprem, yangın, sel, su basması,
şiddetli rüzgar, yıldırım düşmesi, kireç, nem, rutubet, toz, nakliye, taşıma, ürünün dona maruz kalması, susuz çalışma vb.) nedeniyle oluşan arızalar garanti
kapması dışında kalacaktır.
TÜKETİCİ HİZMETLERİ
TÜKETİCİ HATTI: 444 03 98
GARANTİ BELGESİ
Model:...............................................
Bandrol ve Seri No:............................
Teslim Tarihi Yeri: ...............................
Fatura Tarihi No: ..............................................
Satıcı Firma Ünvanı: ........................................
Adres: .........................................................
...................................................................
Tel - Fax: .....................................................
Satıcı Firma (Kaşe ve İmza):........................
Genel Müdür:
51 TR

GB
The manufacturer will not be responsible for any inaccuracy resulting from printing or transcript errors contained in this brochure. We reserve the right
to carry out modifications to products as required, including the interests of con sumption, without prejudice to the characteri stics relating to safety or
function.
IT
Il Produttore non si assume responsabilità per eventuali errori di stampa o errori di trascrizione all'interno di questa brochure. Ci riserviamo il diritto di apportare
modifiche ai prodotti a seconda delle necessità, compresi gli interessi di consumo, senza influenza alcuna sulle caratteristiche relative a sicurezza o funzionamento.
FR
Le fabricant ne pourra être tenu pour responsable de toute inexactitude résultant d'erreurs d'impression ou de transcription contenues dans cette brochure. Nous nous
réservons le droit d'apporter, le cas échéant, des modifications aux produits, y compris dans l'intérêt de la consommation et sans préjudice des caractéristiques
relatives à la sécurité et aux fonctions.
CZ
Výrobce nezodpovídá za nepřesnosti vyplývající z případných chyb při tisku nebo překlepů v této brožuře. Vyhrazujeme si právo provádět úpravy produktů podle
potřeby, včetně oblasti spotřeby, aniž by byly dotčeny vlastnosti týkající se bezpečnosti nebo funkce.
DE
Der Hersteller haftet nicht für Ungenauigkeiten aufgrund von Fehlern bei Druck oder Niederschrift, die in dieser Broschüre enthalten sein können. Wir behalten uns das
Recht vor, je nach Bedarf Veränderungen am Produkt vorzunehmen, einschließlich Belange des Verbrauchs, unbeschadet der Sicherheits- oder Funktionsmerkmale.
TR
Bu broşürde bulunan baskı veya yazım yanlışlarına bağlı oluşablecek hatalardan üretc sorumlu değldr. Güvenlk veya şlevsellk özellkler etk altında kalmaksızın,
tüketclern menfaatler dâhl olmak üzere, ürünlermzde değşklk yapma hakkımız saklıdır.
42828712 • A4 • 07.2022 • Rev_A