User Manual
VA81-01146B-00
NSPBI01270A-00
SWA-9200S
© 2022 Samsung Electronics Co., Ltd. All rights reserved.
Contact SAMSUNG WORLD WIDE
If you have any questions or comments relating to Samsung products, please contact the SAMSUNG customer care Center.
HEADQUARTERS
Samsung Electronics Canada Inc. 2050 Derry Road West, Mississauga, Ontario L5N 0B9 Canada
TEL: 1-800-SAMSUNG (1-800-726-7864)
www.samsung.com/ca/support
Country Samsung Service Center
Web Site
CANADA
1-800-SAMSUNG(726-7864)
1-844-SAM-PAYS (726-7297)
www.samsung.com/ca/support(English)
www.samsung.com/ca_fr/support(French)
U.S.A
1-800-SAMSUNG (726-7864)
1-844-SAM-PAYS (726-7297)
www.samsung.com/us/support
SAFETY INFORMATION
Thank you for purchasing this
product (SWA-9200S).
CAUTION
RISK OF ELECTRIC SHOCK. DO NOT
OPEN.
CAUTION:TOREDUCETHERISKOFELECTRICSHOCK,
DO NOT REMOVE THE COVER (OR BACK). NO USER-
SERVICEABLEPARTSAREINSIDE.REFERSERVICING
TOQUALIFIEDSERVICEPERSONNEL.Refertothetable
below for an explanation of symbols which may be on
your Samsung product.
This symbol indicates that high voltage is
present inside. It is dangerous to make any
kind of contact with any internal part of this
product.
This symbol indicates that this product has
included important literature concerning
operation and maintenance.
Class II product : This symbol indicates that
it does not require a safety connection to
electrical earth (ground).
If this symbol is not present on a product
with a power cord, the product MUST have
a reliable connection to protective earth
(ground).
AC voltage : This symbol indicates that the
rated voltage marked with the symbol is AC
voltage.
DC voltage : This symbol indicates that the
rated voltage marked with the symbol is DC
voltage.
Caution, Consult instructions for use : This
symbol instructs the user to consult the user
manual for further safety related information.
• The slots and openings in the cabinet and in the back or
bottom are provided for necessary ventilation. To ensure
reliable operation of this apparatus, and to protect it
from overheating, these slots and openings must never
be blocked or covered.
• Donotplacethisapparatusinacon�nedspace,
such as a bookcase, or built-in cabinet, unless proper
ventilation is provided.
• Do not place this apparatus near or over a radiator
or heat register, or where it is exposed to direct
sunlight.
• Do not place vessels (vases etc.) containing water
onthisapparatus.Awaterspillcancausea�reor
electric shock.
• Do not expose this apparatus to rain or place it near
water (near a bathtub, washbowl, kitchen sink, or
laundry tub, in a wet basement, or near a swimming
pool, etc.). If this apparatus accidentally gets wet,
unplug it and contact an authorized dealer immediately.
• Do not overload wall outlets, extension cords or
adaptors beyond their capacity, since this can result in
�reorelectricshock.
• Route power-supply cords so that they are not likely to
be walked on or pinched by items placed on or against
them. Pay particular attention to cords at the plug end,
at wall outlets, and the point where they exit from the
apparatus.
• To protect this apparatus from a lightning storm, or
when it is left unattended and unused for long periods
of time, unplug it from the wall outlet and disconnect
the antenna or cable system. This will prevent damage
to the set due to lightning and power line surges.
• Before connecting the AC power cord to the DC adaptor
outlet, make sure the voltage designation of the DC
adaptor corresponds to the local electrical supply.
• Never insert anything metallic into the open parts of
this apparatus. Doing so may create a danger of electric
shock.
• To avoid electric shock, never touch the inside of this
apparatus.Onlyaquali�edtechnicianshouldopenthis
apparatus.
• Makesuretoplugthepowercordinuntilitis�rmly
seated. When unplugging the power cord from a wall
outlet, always pull on the power cord’s plug. Never
unplug by pulling on the power cord. Do not touch the
power cord with wet hands.
• If this apparatus does not operate normally - in
particular, if there are any unusual sounds or smells
coming from it - unplug it immediately and contact an
authorized dealer or service center.
• Maintenance of Cabinet.
• Before connecting other components to this product,
be sure to turn them off.
• Be sure to pull the power plug out of the outlet if the
product is to remain unused or if you are leaving the
house for an extended period of time (especially when
children, elderly, or disabled people will be left alone in
the house).
• Accumulated dust can cause an electric shock, an
electricleakage,or a�rebycausingthepowercord
to generate sparks and heat or the insulation to
deteriorate.
• Contact an authorized service center for information
if you intend to install your product in a location with
heavy dust, high or low temperatures, high humidity,
chemical substances, or where it will operate 24 hours a
day such as in an airport, a train station, etc.
Failingtodosomaycauseseriousdamagetoyour
product.
• Use only a properly grounded plug and wall outlet.
• An improper ground may cause electric shock or
equipment damage. (Class l Equipment only.)
• To turn this apparatus off completely, you must
disconnect it from the wall outlet.
Consequently, the wall outlet and power plug must be
readily accessible at all times.
• Do not allow children to hang on the product.
• Store the accessories (battery, etc.) in a location safely
out of the reach of children.
• Do not install the product in an unstable location such
asashakyself,aslantedoor,oralocationexposedto
vibration.
• Do not drop or strike the product. If the product is
damaged, disconnect the power cord and contact a
service center.
• To clean this apparatus, unplug the power cord from
the wall outlet, and then wipe the product using a
soft, dry cloth. Do not use any chemicals such as wax,
benzene, alcohol, thinners, insecticide, air fresheners,
lubricants, or detergent. These chemicals can damage
the appearance of the product or erase the printing on
the product.
• Do not expose this apparatus to dripping or splashing.
Donotputobjects�lledwithliquids,suchasvases,on
the apparatus.
• Do not plug multiple electric devices into the same wall
socket. Overloading a socket can cause it to overheat,
resultingina�re.
WARNING
• TOPREVENTTHESPREADOFFIRE,
KEEP CANDLES AND OTHER ITEMS WITH
OPENFLAMESAWAYFROM
THIS PRODUCT AT ALL TIMES.
• Toreducetheriskof�reorelectricshock,donotexpose
this appliance to rain or moisture.
CAUTION (for Canada)
Thisdevicecontainslicence-exempttransmitter(s)/
receiver(s) that comply with Innovation, Science and
Economic Development Canada’s licence-exempt RSS(s).
Operation is subject to the following two conditions:
(1) This device may not cause interference.
(2) This device must accept any interference, including
interference that may cause undesired operation of the
device.
This device and its antenna(s) must not be colocated
or operation in conjunction with any other antenna or
transmitter.
This device may automatically discontinue transmission
if there is no information to transmit, or an operational
failure. Note that this is not intended to prohibit the
transmission of control or signaling information or the use
of repetitive codes where required by the technology.
This Class B digital apparatus complies with
Canadian ICES-003.
Radiation Exposure Statement
This equipment complies with IC RSS-102 radiation
exposure limits set forth for an uncontrolled environment.
This equipment should be installed and operated with
minimum distance 20 cm between the radiator & your bo dy.
Precautions
1. Ensure that the AC or DC power supply in your house
complies with the power requirements listed on the
identi�cationstickerlocatedontherearofyourproduct.
Install your product horizontally, on a suitable base
(furniture), with enough space around it for ventilation
(3~4 inches). Make sure the ventilation slots are not
covered.Donotplacetheunitonampli�ersorother
equipment which may become hot. This unit is designed
for continuous use. To fully turn off the unit, disconnect
the AC plug from the wall outlet.
2. Do not expose the unit to direct sunlight or other heat
sources. This could lead to overheating and cause the
unit to malfunction.
3. Unplug the Power cord from the AC wall socket if the
unit malfunctions. Your product is not intended for
industrial use. It is for personal use only. Condensation
may occur if your product has been stored in cold
temperatures. If transporting the unit during the winter,
wait approximately 2 hours until the unit has reached
room temperature before using it.
4. If the electricity supplied to your home is rated at 240V
AC, use a suitable plug adapter to connect this unit to
your electrical outlets.
Important Safety Instructions
Read these operating instructions carefully before using
theunit.Followallthesafetyinstructionslistedbelow.
Keep these operating instructions handy for future
reference.
1. Read these instructions.
2. Keep these Instructions.
3. Heed all warnings.
4. Followallinstructions.
5. Do not use this apparatus near water.
6. Clean only with dry cloth.
7. Do not block any ventilation openings.
Install in accordance with the manufacturer’s
instructions.
8. Do not install near any heat sources such as radiators,
heat registers, stoves, or other apparatus (including AV
receivers) that produce heat.
9. Do not defeat the safety purpose of the polarized or
grounding-type plug.
A polarized plug has two blades with one wider than the
other. A grounding type plug has two blades and a third
grounding prong. The wide blade or the third prong are
providedforyoursafety.Iftheprovidedplugdoesnot�t
into your outlet, consult an electrician for replacement
of the obsolete outlet.
10. Protect the power cord from being walked on or pinched
particularly at plugs, convenience receptacles, and the
point where it exits the apparatus.
11. Onlyuseattachments/accessoriesspeci�edbythe
manufacturer.
12. Use only with the cart, stand, tripod,
bracket,ortablespeci�edbythe
manufacturer, or sold with the apparatus.
When a cart is used, use caution when
movingthecart/apparatuscombination
to avoid injury from tip-over.
13. Unplug this apparatus during lightning storms or when
you intend to leave it unused for long periods of time.
14. Referallservicingtoquali�edservicepersonnel.
Servicing is required when the apparatus has been
damaged in any way, such as power-supply cord or
plug is damaged, liquid has been spilled or objects
have fallen into the apparatus, the apparatus has been
exposed to rain or moisture, does not operate normally,
or has been dropped.
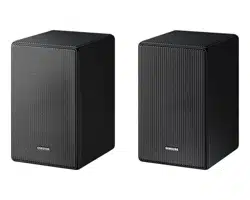
01 CHECKING THE
COMPONENTS
SurroundSpeakerX2/SpeakerCable/AC/DCAdapter
/PowerCord
NOTE
• Formoreinformationaboutthepowersupplyand
power consumption, refer to the label attached to the
product. (Label: Rear of the Main Unit)
• Designandspeci�cationsaresubjecttochangewithout
prior notice.
02 CONNECTING THE
SWA-9200S TO A
SOUNDBAR
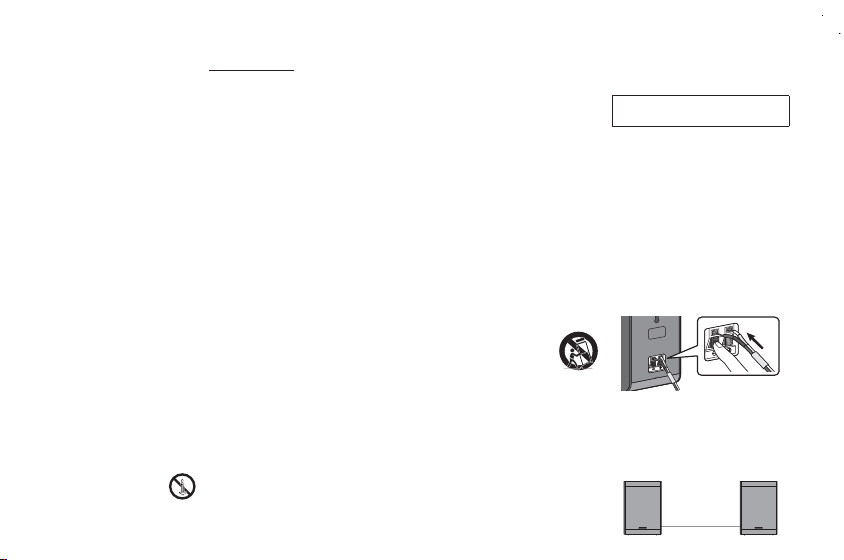
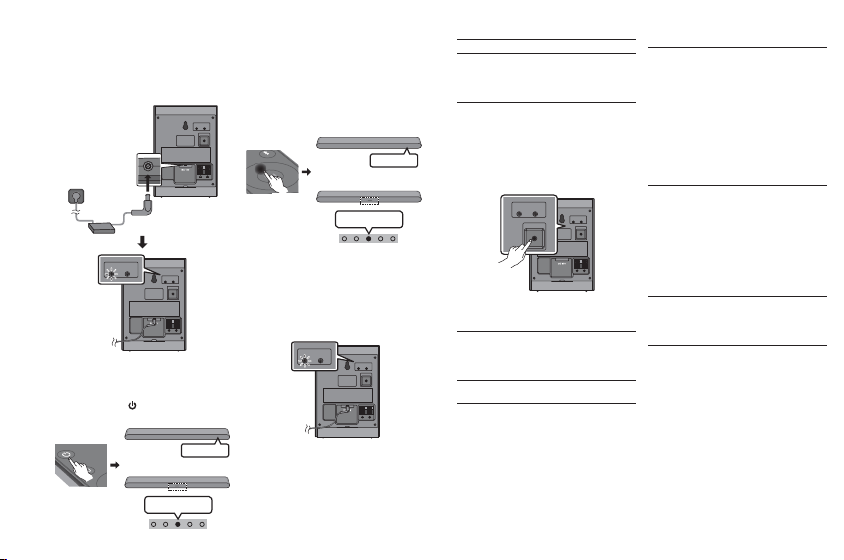
1. Connect the Surround speaker cables
Use the speaker cables to connect the two surround sound
speakers.
• When connecting the speaker cable, connect the core
wire to the speaker.
• Insert the wire fully, taking care not to insert beyond
the wire insulation.
Insert the wire fully.
+ : Red
- : Black
• When connecting the speaker cables to the surround
speakers, follow these steps:
• Insert the red and black colored ends of each
speaker cable into the red and black jacks of the
appropriate speaker.
• The labels are on the backs of the speakers.
Audio cable
• The length of the speaker audio cable: 6 m
User Manual
VA81-01146B-00
NSPBI01270A-00
SWA-9200S
© 2022 Samsung Electronics Co., Ltd. All rights reserved.
Contact SAMSUNG WORLD WIDE
If you have any questions or comments relating to Samsung products, please contact the SAMSUNG customer care Center.
HEADQUARTERS
Samsung Electronics Canada Inc. 2050 Derry Road West, Mississauga, Ontario L5N 0B9 Canada
TEL: 1-800-SAMSUNG (1-800-726-7864)
www.samsung.com/ca/support
Country Samsung Service Center
Web Site
CANADA
1-800-SAMSUNG(726-7864)
1-844-SAM-PAYS (726-7297)
www.samsung.com/ca/support(English)
www.samsung.com/ca_fr/support(French)
U.S.A
1-800-SAMSUNG (726-7864)
1-844-SAM-PAYS (726-7297)
www.samsung.com/us/support
SAFETY INFORMATION
Thank you for purchasing this
product (SWA-9200S).
CAUTION
RISK OF ELECTRIC SHOCK. DO NOT
OPEN.
CAUTION:TOREDUCETHERISKOFELECTRICSHOCK,
DO NOT REMOVE THE COVER (OR BACK). NO USER-
SERVICEABLEPARTSAREINSIDE.REFERSERVICING
TOQUALIFIEDSERVICEPERSONNEL.Refertothetable
below for an explanation of symbols which may be on
your Samsung product.
This symbol indicates that high voltage is
present inside. It is dangerous to make any
kind of contact with any internal part of this
product.
This symbol indicates that this product has
included important literature concerning
operation and maintenance.
Class II product : This symbol indicates that
it does not require a safety connection to
electrical earth (ground).
If this symbol is not present on a product
with a power cord, the product MUST have
a reliable connection to protective earth
(ground).
AC voltage : This symbol indicates that the
rated voltage marked with the symbol is AC
voltage.
DC voltage : This symbol indicates that the
rated voltage marked with the symbol is DC
voltage.
Caution, Consult instructions for use : This
symbol instructs the user to consult the user
manual for further safety related information.
• The slots and openings in the cabinet and in the back or
bottom are provided for necessary ventilation. To ensure
reliable operation of this apparatus, and to protect it
from overheating, these slots and openings must never
be blocked or covered.
• Donotplacethisapparatusinacon�nedspace,
such as a bookcase, or built-in cabinet, unless proper
ventilation is provided.
• Do not place this apparatus near or over a radiator
or heat register, or where it is exposed to direct
sunlight.
• Do not place vessels (vases etc.) containing water
onthisapparatus.Awaterspillcancausea�reor
electric shock.
• Do not expose this apparatus to rain or place it near
water (near a bathtub, washbowl, kitchen sink, or
laundry tub, in a wet basement, or near a swimming
pool, etc.). If this apparatus accidentally gets wet,
unplug it and contact an authorized dealer immediately.
• Do not overload wall outlets, extension cords or
adaptors beyond their capacity, since this can result in
�reorelectricshock.
• Route power-supply cords so that they are not likely to
be walked on or pinched by items placed on or against
them. Pay particular attention to cords at the plug end,
at wall outlets, and the point where they exit from the
apparatus.
• To protect this apparatus from a lightning storm, or
when it is left unattended and unused for long periods
of time, unplug it from the wall outlet and disconnect
the antenna or cable system. This will prevent damage
to the set due to lightning and power line surges.
• Before connecting the AC power cord to the DC adaptor
outlet, make sure the voltage designation of the DC
adaptor corresponds to the local electrical supply.
• Never insert anything metallic into the open parts of
this apparatus. Doing so may create a danger of electric
shock.
• To avoid electric shock, never touch the inside of this
apparatus.Onlyaquali�edtechnicianshouldopenthis
apparatus.
• Makesuretoplugthepowercordinuntilitis�rmly
seated. When unplugging the power cord from a wall
outlet, always pull on the power cord’s plug. Never
unplug by pulling on the power cord. Do not touch the
power cord with wet hands.
• If this apparatus does not operate normally - in
particular, if there are any unusual sounds or smells
coming from it - unplug it immediately and contact an
authorized dealer or service center.
• Maintenance of Cabinet.
• Before connecting other components to this product,
be sure to turn them off.
• Be sure to pull the power plug out of the outlet if the
product is to remain unused or if you are leaving the
house for an extended period of time (especially when
children, elderly, or disabled people will be left alone in
the house).
• Accumulated dust can cause an electric shock, an
electricleakage,or a�rebycausingthepowercord
to generate sparks and heat or the insulation to
deteriorate.
• Contact an authorized service center for information
if you intend to install your product in a location with
heavy dust, high or low temperatures, high humidity,
chemical substances, or where it will operate 24 hours a
day such as in an airport, a train station, etc.
Failingtodosomaycauseseriousdamagetoyour
product.
• Use only a properly grounded plug and wall outlet.
• An improper ground may cause electric shock or
equipment damage. (Class l Equipment only.)
• To turn this apparatus off completely, you must
disconnect it from the wall outlet.
Consequently, the wall outlet and power plug must be
readily accessible at all times.
• Do not allow children to hang on the product.
• Store the accessories (battery, etc.) in a location safely
out of the reach of children.
• Do not install the product in an unstable location such
asashakyself,aslantedoor,oralocationexposedto
vibration.
• Do not drop or strike the product. If the product is
damaged, disconnect the power cord and contact a
service center.
• To clean this apparatus, unplug the power cord from
the wall outlet, and then wipe the product using a
soft, dry cloth. Do not use any chemicals such as wax,
benzene, alcohol, thinners, insecticide, air fresheners,
lubricants, or detergent. These chemicals can damage
the appearance of the product or erase the printing on
the product.
• Do not expose this apparatus to dripping or splashing.
Donotputobjects�lledwithliquids,suchasvases,on
the apparatus.
• Do not plug multiple electric devices into the same wall
socket. Overloading a socket can cause it to overheat,
resultingina�re.
WARNING
• TOPREVENTTHESPREADOFFIRE,
KEEP CANDLES AND OTHER ITEMS WITH
OPENFLAMESAWAYFROM
THIS PRODUCT AT ALL TIMES.
• Toreducetheriskof�reorelectricshock,donotexpose
this appliance to rain or moisture.
CAUTION (for Canada)
Thisdevicecontainslicence-exempttransmitter(s)/
receiver(s) that comply with Innovation, Science and
Economic Development Canada’s licence-exempt RSS(s).
Operation is subject to the following two conditions:
(1) This device may not cause interference.
(2) This device must accept any interference, including
interference that may cause undesired operation of the
device.
This device and its antenna(s) must not be colocated
or operation in conjunction with any other antenna or
transmitter.
This device may automatically discontinue transmission
if there is no information to transmit, or an operational
failure. Note that this is not intended to prohibit the
transmission of control or signaling information or the use
of repetitive codes where required by the technology.
This Class B digital apparatus complies with
Canadian ICES-003.
Radiation Exposure Statement
This equipment complies with IC RSS-102 radiation
exposure limits set forth for an uncontrolled environment.
This equipment should be installed and operated with
minimum distance 20 cm between the radiator & your bo dy.
Precautions
1. Ensure that the AC or DC power supply in your house
complies with the power requirements listed on the
identi�cationstickerlocatedontherearofyourproduct.
Install your product horizontally, on a suitable base
(furniture), with enough space around it for ventilation
(3~4 inches). Make sure the ventilation slots are not
covered.Donotplacetheunitonampli�ersorother
equipment which may become hot. This unit is designed
for continuous use. To fully turn off the unit, disconnect
the AC plug from the wall outlet.
2. Do not expose the unit to direct sunlight or other heat
sources. This could lead to overheating and cause the
unit to malfunction.
3. Unplug the Power cord from the AC wall socket if the
unit malfunctions. Your product is not intended for
industrial use. It is for personal use only. Condensation
may occur if your product has been stored in cold
temperatures. If transporting the unit during the winter,
wait approximately 2 hours until the unit has reached
room temperature before using it.
4. If the electricity supplied to your home is rated at 240V
AC, use a suitable plug adapter to connect this unit to
your electrical outlets.
Important Safety Instructions
Read these operating instructions carefully before using
theunit.Followallthesafetyinstructionslistedbelow.
Keep these operating instructions handy for future
reference.
1. Read these instructions.
2. Keep these Instructions.
3. Heed all warnings.
4. Followallinstructions.
5. Do not use this apparatus near water.
6. Clean only with dry cloth.
7. Do not block any ventilation openings.
Install in accordance with the manufacturer’s
instructions.
8. Do not install near any heat sources such as radiators,
heat registers, stoves, or other apparatus (including AV
receivers) that produce heat.
9. Do not defeat the safety purpose of the polarized or
grounding-type plug.
A polarized plug has two blades with one wider than the
other. A grounding type plug has two blades and a third
grounding prong. The wide blade or the third prong are
providedforyoursafety.Iftheprovidedplugdoesnot�t
into your outlet, consult an electrician for replacement
of the obsolete outlet.
10. Protect the power cord from being walked on or pinched
particularly at plugs, convenience receptacles, and the
point where it exits the apparatus.
11. Onlyuseattachments/accessoriesspeci�edbythe
manufacturer.
12. Use only with the cart, stand, tripod,
bracket,ortablespeci�edbythe
manufacturer, or sold with the apparatus.
When a cart is used, use caution when
movingthecart/apparatuscombination
to avoid injury from tip-over.
13. Unplug this apparatus during lightning storms or when
you intend to leave it unused for long periods of time.
14. Referallservicingtoquali�edservicepersonnel.
Servicing is required when the apparatus has been
damaged in any way, such as power-supply cord or
plug is damaged, liquid has been spilled or objects
have fallen into the apparatus, the apparatus has been
exposed to rain or moisture, does not operate normally,
or has been dropped.
01 CHECKING THE
COMPONENTS
SurroundSpeakerX2/SpeakerCable/AC/DCAdapter
/PowerCord
NOTE
• Formoreinformationaboutthepowersupplyand
power consumption, refer to the label attached to the
product. (Label: Rear of the Main Unit)
• Designandspeci�cationsaresubjecttochangewithout
prior notice.
02 CONNECTING THE
SWA-9200S TO A
SOUNDBAR
1. Connect the Surround speaker cables
Use the speaker cables to connect the two surround sound
speakers.
• When connecting the speaker cable, connect the core
wire to the speaker.
• Insert the wire fully, taking care not to insert beyond
the wire insulation.
Insert the wire fully.
+ : Red
- : Black
• When connecting the speaker cables to the surround
speakers, follow these steps:
• Insert the red and black colored ends of each
speaker cable into the red and black jacks of the
appropriate speaker.
• The labels are on the backs of the speakers.
Audio cable
• The length of the speaker audio cable: 6 m
English
LIMITED WARRANTY TO ORIGINAL PURCHASER
Samsung Electronics Canada Inc.(SECA), warrants that this product is free from defective material and
workmanship.
SECAfurtherwarrantsthatifthisproductfallstooperateproperlywithinthespeci�edwarrantyperiod
and the failure is due to improper workmanship or defective materials, SECA will repair or replace the
product at its option.
All warranty repairs must be performed by a SECA Authorized Service Center. (The name and address of
the location nearest you can be obtained by calling toll free: 1- 800- SAMSUNG)
LABOR PARTS
One year (Carry-
in)
One year
On carry-in models, transportation to and from the service center is the customer’s responsibility.
The original dated sales receipt must be retained by the customer and is the only acceptable proof of
purchase. It must be presented to the authorized service center at the time service is requested.
EXCLUSIONS (WHAT IS NOT COVERED)
Thiswarrantydoesnotcoverdamageduetoaccident,�re,oodand/orotheractsofGod;misuse,
incorrect line voltage, improper installation, improper or unauthorized repairs, commercial use or
damagethatoccursinshipping.Exteriorandinterior�nish,lamps,glassarenotcoveredunderthis
warranty. Customer adjustments which are explained in the instruction manual are not covered under
the terms of this warranty. This warranty will automatically be voided for any unit found with a missing
or altered serial number. This warranty is valid only on products purchased and used in Canada.
Samsung Electronics Canada Inc
2050 Derry Rd West
Mississauga, On. L5N 0B9
Tel: 1-800-SAMSUNG (726-7864)
Fax: (905) 542- 1199
Website: www.samsung.com/ca
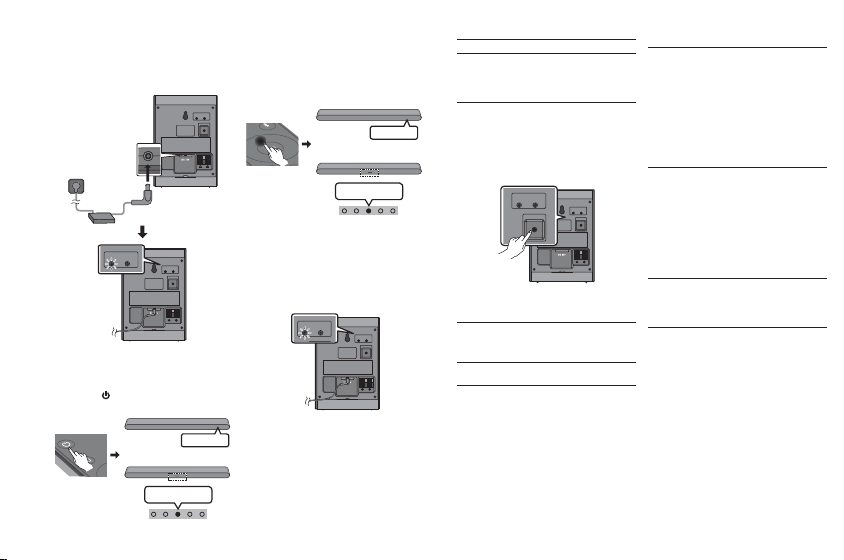
2. Turn on the Surround speakers
Plug the Surround speakers’ power cord into an electrical
outlet to turn on the Surround speakers. The LINK LED
indicator(blue LED) on the rear of left surround speaker will
blink quickly.
If the LINK LED does not blink, please see step 6.
LINK STANDBY
ID SET
Rear of Left
Surround
LINK STANDBY
ID SET
LINK STANDBY
Rear of Left Surround
"Blue
blinking"
3. Turn off the Soundbar
If the Soundbar is turned on, please turn off the Soundbar
by pressing the (Power) button on the Soundbar or
remote control.
BYE
OR
Red BlinksX3
• The image of the Soundbar may differ from your
Soundbar, depending on the model.
4. Connect Soundbar and Surround Speakers
Press the Up button on the remote control for more than
5 seconds until the “ID SET” message appears on the
Soundbar’s display. The message will disappear shortly.
(If your Soundbar does not have a display window and only
LED indicators, please refer to the LED information below.)
• After the ID SET process is successful, the Soundbar will
turn on automatically.
OR
S
O
U
N
D
P
A
I
R
5 sec
ID SET
Red→Green→
Blue Blinks
• The image of the Soundbar may differ from your
Soundbar, depending on the model.
5. Check the connection complete
The LINK LED stops blinking and changes to solid blue
when the Soundbar and surround speakers are successfully
linked.
PleaseturnofftheSoundbarandturnitbackon.Con�rm
that the LINK LED is blue.
(It may take a minute depending on the environment.)
LINK STANDBY
ID SET
LINK STANDBY
Rear of Left Surround
“Blue is On”
• If the LINK LED does not turn to solid blue in a minute,
please repeat from step 2 through 5 referring to step 6
(LED indicator’s status).
6. LED Indicator’s status
LINK (Blue) On : Connected with the Soundbar.
LINK (Blue) Blinking fast (at an interval of around
0.5 second) : Surround speakers are in ID SET mode.
• Check if the Soundbar is turned on and in ID SET
mode.
• Repeat steps 3 through 5.
LINK (Blue) Blinking slow (at an interval of around
1 second) : Previously connected to a Soundbar but
cannotcurrently�ndit.
• Check if the Soundbar is turned on.
• If the LINK LED keeps blinking slowly even when the
Soundbar is turned on,
1. Press the ID SET button on the rear of the left
surround for more than 5 seconds until the LINK
LED starts blinking fast in blue.
LINK STANDBY
ID SET
LINK STANDBY
ID SET
5 sec
Rear of Left Surround
2. Repeat steps 3 through 5.
STANDBY (Red) On : When the Soundbar turns off or
connection has failed.
• Followtheinstructionsfor“Link (Blue) Blinking slow
(at an interval of around 1 second)” above.
Others : Errors
• Contact a Samsung Service Center.
03 TROUBLE SHOOTING
There is no sound from Surround Speakers
• If the Surround speakers are successfully paired and
connected to a Soundbar, the LINK LED indicator on
the rear of the Left Surround is on and solid blue.
Please reconnect the Surround speakers to your
Soundbar referring to 02-6, LED Indicator’s status.
• Other devices sending radio frequency signals in
proximity may interrupt the connection. Please keep
your speaker away from such devices.
• The content you are playing may have no surround
track but only stereo. Please change the sound mode
to Surround by pressing SOUND MODE button on the
remote control.
There is sound jitter, delays, noise or dropout from the
sound of Surround Speakers.
• There may be sound jitter or delays when the Surround
Speakers are far from the Soundbar. Please place
them near the Soundbar.
• There may be sound jitter or delays when the
Soundbar is near an electrical device that can cause
radio interference. Please place the Soundbar far from
such devices that can cause radio interference
(e.g. wireless router).
• Please change the TV network connection status from
wireless to wired.
The volume of Surround Speakers is too low
• Please increase the rear level referring to the manual
of your Soundbar.
(You can download the manual of your Soundbar from
www.samsung.com/support)
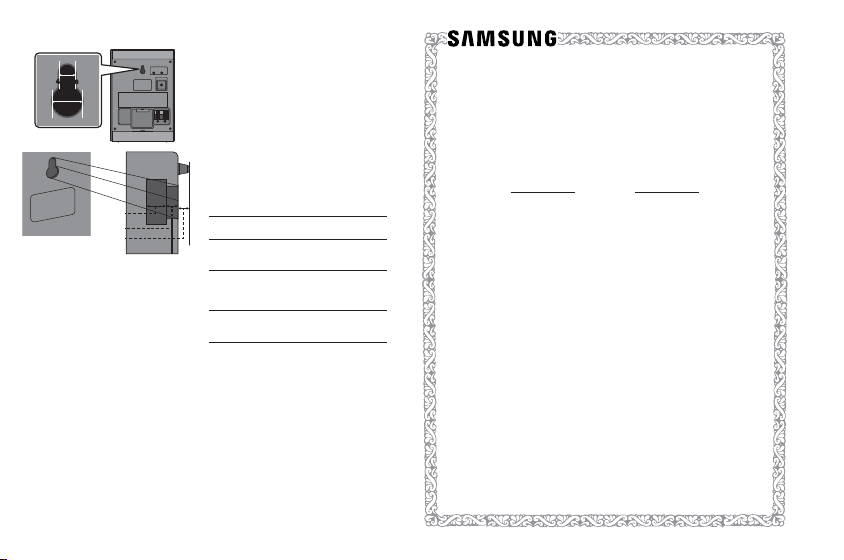
04 MOUNTING ON A WALL
8.2 mm
4.2 mm
7.9 mm
4.6 mm
4.0 mm
• Be sure the wall is stable. If the wall is weak, reinforce
it before installation.
• Take care not to install the speakers sideways or upside
down.
• Samsung Electronics is not liable for any damage to the
product due to improper installation.
• Wall mounts aren’t sold by Samsung Electronics.
05 COMPATIBLE MODELS
• Compatible with select Samsung Soundbar. Please visit
the Soundbar product page at www.samsung.com/
support for more information.
• Compatible model list is subject to change without
further notice.
06 OPEN SOURCE LICENSE
NOTICE
To send inquiries and requests for questions regarding
open sources, contact Samsung Open Source
(http://opensource.samsung.com)
07 SPECIFICATIONS AND
GUIDE
Speci�cations
Subwoofer Name
SWA-9200S(LEFT/RIGHT)
Weight
3.7 lbs (1.7 kg)
Dimensions (W x H x D)
4.1 x 6.0 x 4.3 inches
(105.0 x 152.8 x 109.0 mm)
Operating Temperature
Range
50℉to104℉
(10℃to40℃)
Operating Humidity Range
10 % ~ 80 %,
non-condensing
AMPLIFIER
Rated Output power
60 W x 2
NOTE
• Samsung Electronics Co., Ltd reserves the right to
changethespeci�cationswithoutnotice.
• Weight and dimensions are approximate.
English
LIMITED WARRANTY TO ORIGINAL PURCHASER
Samsung Electronics Canada Inc.(SECA), warrants that this product is free from defective material and
workmanship.
SECAfurtherwarrantsthatifthisproductfallstooperateproperlywithinthespeci�edwarrantyperiod
and the failure is due to improper workmanship or defective materials, SECA will repair or replace the
product at its option.
All warranty repairs must be performed by a SECA Authorized Service Center. (The name and address of
the location nearest you can be obtained by calling toll free: 1- 800- SAMSUNG)
LABOR PARTS
One year (Carry-
in)
One year
On carry-in models, transportation to and from the service center is the customer’s responsibility.
The original dated sales receipt must be retained by the customer and is the only acceptable proof of
purchase. It must be presented to the authorized service center at the time service is requested.
EXCLUSIONS (WHAT IS NOT COVERED)
Thiswarrantydoesnotcoverdamageduetoaccident,�re,oodand/orotheractsofGod;misuse,
incorrect line voltage, improper installation, improper or unauthorized repairs, commercial use or
damagethatoccursinshipping.Exteriorandinterior�nish,lamps,glassarenotcoveredunderthis
warranty. Customer adjustments which are explained in the instruction manual are not covered under
the terms of this warranty. This warranty will automatically be voided for any unit found with a missing
or altered serial number. This warranty is valid only on products purchased and used in Canada.
Samsung Electronics Canada Inc
2050 Derry Rd West
Mississauga, On. L5N 0B9
Tel: 1-800-SAMSUNG (726-7864)
Fax: (905) 542- 1199
Website: www.samsung.com/ca
2. Turn on the Surround speakers
Plug the Surround speakers’ power cord into an electrical
outlet to turn on the Surround speakers. The LINK LED
indicator(blue LED) on the rear of left surround speaker will
blink quickly.
If the LINK LED does not blink, please see step 6.
LINK STANDBY
ID SET
Rear of Left
Surround
LINK STANDBY
ID SET
LINK STANDBY
Rear of Left Surround
"Blue
blinking"
3. Turn off the Soundbar
If the Soundbar is turned on, please turn off the Soundbar
by pressing the (Power) button on the Soundbar or
remote control.
BYE
OR
Red BlinksX3
• The image of the Soundbar may differ from your
Soundbar, depending on the model.
4. Connect Soundbar and Surround Speakers
Press the Up button on the remote control for more than
5 seconds until the “ID SET” message appears on the
Soundbar’s display. The message will disappear shortly.
(If your Soundbar does not have a display window and only
LED indicators, please refer to the LED information below.)
• After the ID SET process is successful, the Soundbar will
turn on automatically.
OR
S
O
U
N
D
P
A
I
R
5 sec
ID SET
Red→Green→
Blue Blinks
• The image of the Soundbar may differ from your
Soundbar, depending on the model.
5. Check the connection complete
The LINK LED stops blinking and changes to solid blue
when the Soundbar and surround speakers are successfully
linked.
PleaseturnofftheSoundbarandturnitbackon.Con�rm
that the LINK LED is blue.
(It may take a minute depending on the environment.)
LINK STANDBY
ID SET
LINK STANDBY
Rear of Left Surround
“Blue is On”
• If the LINK LED does not turn to solid blue in a minute,
please repeat from step 2 through 5 referring to step 6
(LED indicator’s status).
6. LED Indicator’s status
LINK (Blue) On : Connected with the Soundbar.
LINK (Blue) Blinking fast (at an interval of around
0.5 second) : Surround speakers are in ID SET mode.
• Check if the Soundbar is turned on and in ID SET
mode.
• Repeat steps 3 through 5.
LINK (Blue) Blinking slow (at an interval of around
1 second) : Previously connected to a Soundbar but
cannotcurrently�ndit.
• Check if the Soundbar is turned on.
• If the LINK LED keeps blinking slowly even when the
Soundbar is turned on,
1. Press the ID SET button on the rear of the left
surround for more than 5 seconds until the LINK
LED starts blinking fast in blue.
LINK STANDBY
ID SET
LINK STANDBY
ID SET
5 sec
Rear of Left Surround
2. Repeat steps 3 through 5.
STANDBY (Red) On : When the Soundbar turns off or
connection has failed.
• Followtheinstructionsfor“Link (Blue) Blinking slow
(at an interval of around 1 second)” above.
Others : Errors
• Contact a Samsung Service Center.
03 TROUBLE SHOOTING
There is no sound from Surround Speakers
• If the Surround speakers are successfully paired and
connected to a Soundbar, the LINK LED indicator on
the rear of the Left Surround is on and solid blue.
Please reconnect the Surround speakers to your
Soundbar referring to 02-6, LED Indicator’s status.
• Other devices sending radio frequency signals in
proximity may interrupt the connection. Please keep
your speaker away from such devices.
• The content you are playing may have no surround
track but only stereo. Please change the sound mode
to Surround by pressing SOUND MODE button on the
remote control.
There is sound jitter, delays, noise or dropout from the
sound of Surround Speakers.
• There may be sound jitter or delays when the Surround
Speakers are far from the Soundbar. Please place
them near the Soundbar.
• There may be sound jitter or delays when the
Soundbar is near an electrical device that can cause
radio interference. Please place the Soundbar far from
such devices that can cause radio interference
(e.g. wireless router).
• Please change the TV network connection status from
wireless to wired.
The volume of Surround Speakers is too low
• Please increase the rear level referring to the manual
of your Soundbar.
(You can download the manual of your Soundbar from
www.samsung.com/support)
04 MOUNTING ON A WALL
8.2 mm
4.2 mm
7.9 mm
4.6 mm
4.0 mm
• Be sure the wall is stable. If the wall is weak, reinforce
it before installation.
• Take care not to install the speakers sideways or upside
down.
• Samsung Electronics is not liable for any damage to the
product due to improper installation.
• Wall mounts aren’t sold by Samsung Electronics.
05 COMPATIBLE MODELS
• Compatible with select Samsung Soundbar. Please visit
the Soundbar product page at www.samsung.com/
support for more information.
• Compatible model list is subject to change without
further notice.
06 OPEN SOURCE LICENSE
NOTICE
To send inquiries and requests for questions regarding
open sources, contact Samsung Open Source
(http://opensource.samsung.com)
07 SPECIFICATIONS AND
GUIDE
Speci�cations
Subwoofer Name
SWA-9200S(LEFT/RIGHT)
Weight
3.7 lbs (1.7 kg)
Dimensions (W x H x D)
4.1 x 6.0 x 4.3 inches
(105.0 x 152.8 x 109.0 mm)
Operating Temperature
Range
50℉to104℉
(10℃to40℃)
Operating Humidity Range
10 % ~ 80 %,
non-condensing
AMPLIFIER
Rated Output power
60 W x 2
NOTE
• Samsung Electronics Co., Ltd reserves the right to
changethespeci�cationswithoutnotice.
• Weight and dimensions are approximate.
Manuel utilisateur
VA81-01146B-00
NSPBI01270A-00
SWA-9200S
© 2022 Samsung Electronics Co., Ltd. Tous droits réservés.
Comment contacter Samsung dans le monde
Si vous avez des suggestions ou des questions concernant les produits Samsung, veuillez contacter le Service Consommateurs
Samsung.
SIÈGE SOCIAL
Samsung Electronics Canada Inc. 2050 Derry Road West, Mississauga, Ontario L5N 0B9 Canada
TEL: 1-800-SAMSUNG (1-800-726-7864)
www.samsung.com/ca/support
Pays Centre de service de Samsung
Site Web
CANADA
1-800-SAMSUNG(726-7864)
1-844-SAM-PAYS (726-7297)
www.samsung.com/ca/support (English)
www.samsung.com/ca_fr/support (French)
U.S.A
1-800-SAMSUNG (726-7864)
1-844-SAM-PAYS (726-7297)
www.samsung.com/us/support
INFORMATIONS RELATIVES À
LA SÉCURITÉ
Nous vous remercions d’avoir fait
l’acquisition de ce produit (SWA-9200S).
MISE EN GARDE
RISQUE DE CHOC ÉLECTRIQUE NE
PAS OUVRIR
ATTENTION : POUR ÉVITER LES RISQUES DE CHOC
ÉLECTRIQUE, NE DÉMONTEZ PAS LE CAPOT. L’APPAREIL NE
CONTIENT PAS DE PIÈCES RÉPARABLES PAR L’UTILISATEUR.
S’ADRESSER À UN SERVICE APRÈSVENTE QUALIFIÉ.
Reportez-vous au tableau ci-dessous pour comprendre les
symbolespouvant�gurersurvotreproduitSamsung.
Ce symbole indique la présence d’une haute
tension à l’intérieur. Tout contact avec une pièce
interne de l’appareil présente un danger.
Ce symbole vous informe qu’une documentation
importante relative au fonctionnement et à
l’entretien est fournie avec le produit.
Produit de catégorie II : Ce symbole indique qu’il
ne nécessite pas une connextion de sécurité à la
terre (masse).
Si ce symbole n’est pas présent sur un produit
équipé d’un cordon d’alimentation, le produit
DOITêtreraccordéàlaterredemanière�ableà
des�nsdeprotection.
Tension CA : Ce symbole indique que la tension
nominale est la tension CA.
Tension CC : Ce symbole indique que la tension
nominale est la tension CC.
Attention,consultezlesinstructionsaux�ns
d’utilisation : Ce symbole indique à l’utilisateur
qu’il doit consulter le guide d’utilisation pour
avoir de l’information au sujet de la sécurité.
• Les fentes et évents présents à l’arrière et sous le boîtier
sontfournisàdes�nsdeventilation.A�ndegarantirle
bon fonctionnement de l’appareil et d’éviter les risques
de surchauffe, ces fentes et ouvertures ne doivent être ni
obstruées ni couvertes.
• L’appareil ne doit pas être placé dans un environnement
clos tel qu’une bibliothèque ou une armoire encastrée,
sauf si une ventilation adéquate est prévue.
• L’appareil ne doit pas être placé à proximité ou au-dessus
d’un radiateur ou d’une grille d’air de chauffage, ni dans
un endroit exposé à la lumière directe du soleil.
• Aucun récipient contenant de l’eau (vase, etc.) ne doit
être placé sur l’appareil. L’eau peut causer un incendie ou
une électrocution.
• L’appareil ne doit pas être exposé à la pluie ni placé à
proximité d’une source d’eau, par exemple une baignoire,
un lavabo, un évier, un bac de lavage, un sous-sol humide,
une piscine, etc. Si l’appareil est mouillé par accident,
débranchez-le et appelez immédiatement un revendeur
agréé.
• Évitez de surcharger les prises murales, les rallonges et
les adaptateurs, car cela présente un risque d’incendie ou
d’électrocution.
• Disposez les cordons d’alimentation de façon à éviter que
l’on ne marche dessus ou qu’un objet s’y accroche. Portez
une attention particulière aux cordons près de l’extrémité
dela�che,àproximitédesprisesdesortiemuralesetàleur
point de sortie sur l’appareil.
• En cas d’orage, ou bien lorsque vous vous absentez ou
n’utilisez pas votre appareil pendant une longue période,
débranchez celui-ci de la prise murale et débranchez
également l’antenne ou le connecteur au réseau câblé. Ces
précautions éviteront que l’appareil ne soit endommagé par
la foudre ou par des surtensions.
• Avant de raccorder le cordon d’alimentation CA à la prise
del’adaptateurCC,véri�ezquelatensionindiquéesurce
dernier correspond bien à la tension délivrée par le réseau
électrique local.
• N’insérez jamais d’objet métallique dans les parties ouvertes
de cet appareil, car vous pourriez recevoir une décharge
électrique.
• Pour éviter tout risque d’électrocution, ne mettez jamais les
doigtsàl’intérieurdel’appareil.Seuluntechnicienquali�é
est habilité à ouvrir cet appareil.
• Veillez à brancher le cordon d’alimentation de sorte qu’il
soit correctement inséré dans la prise. Pour débrancher le
cordond’alimentationd’uneprisemurale,tenezla�che.Ne
débranchez jamais le cordon en tirant sur ce dernier. Évitez
de toucher le cordon avec les mains mouillées.
• Si l’appareil ne fonctionne pas normalement, surtout s’il
émet des odeurs ou des sons anormaux, débranchez-le
immédiatement et appelez un revendeur ou un centre de
dépannage agréé.
• Entretien du boîtier.
• Éteignez les composants avant de les brancher à ce
produit.
• Si vous envisagez de ne pas utiliser le produit ou de vous
absenter de chez vous pendant une période prolongée,
veillezàretirerla�ched’alimentationdelaprise(en
particulier si des enfants, des personnes âgées ou des
personnes handicapées restent seuls à la maison sans
supervision).
• L’accumulation de poussière peut provoquer une
électrocution, une perte d’énergie ou un incendie induit
par le cordon d’alimentation dû à des variations, une
surchauffe ou une détérioration de l’isolation.
• Communiquez avec un centre de service homologué
lorsque vous installez le produit dans un endroit exposé à
la poussière, à des températures faibles ou élevées, à des
produits chimiques et s’il doit fonctionner continuellement
24 heures sur 24, comme dans un aéroport, une gare, etc.
Le non-respect de ces consignes peut causer de sérieux
dommages au produit.
• N’utilisezquedesprisesdesortiemuraleetdes�ches
correctement mises à la terre.
• Une mise à la terre incorrecte peut entraîner des
électrocutions ou endommager l’appareil. (appareil de
classe I uniquement.)
• Pour mettre cet appareil totalement hors tension, il doit être
débranché de la prise murale.
Parconséquent,laprisemuraleetla�chedoiventêtre
accessibles en tout temps.
• Ne laissez pas les enfants se suspendre à l’appareil.
• Gardez les petits accessoires (piles, etc.) dans un endroit
hors de portée des enfants.
• Évitez d’installer l’appareil dans un endroit instable, comme
sur une étagère branlante, sur une surface inclinée ou à un
endroit exposé à des vibrations.
• Veillez à ne pas échapper ni plier les lunettes. Si le produit
est endommagé, débranchez le cordon d’alimentation et
communiquez avec un centre de service.
• Pour nettoyer l’appareil, débranchez le cordon
d’alimentation de la prise murale, puis nettoyez l’appareil
à l’aide d’un chiffon doux et sec. N’utilisez pas de produits
chimiques tels que la cire, le benzène, l’alcool, des solvants,
desinsecticides,desdésodorisants,deslubri�antsoudes
détergents. Ces produits peuvent endommager la surface du
produit ou effacer les parties imprimées.
• Veillez à éviter toute projection sur l’appareil. Ne placez
jamais de récipients contenant un liquide (ex. : vase) dessus.
• Évitez de brancher plusieurs appareils électriques dans la
même prise murale. Si elle est surchargée, la prise peut
subir une surchauffe, ce qui pourrait causer un incendie.
AVERTISSEMENT
• POUR ÉVITER TOUT RISQUE D’INCENDIE,
TENEZ TOUJOURS CE PRODUIT À DISTANCE DES
BOUGIES OU AUTRES ARTICLES COMPORTANT
UNE FLAMME NUE.
• A�ndediminuerlesrisquesd’incendieoudechoc
électrique, n’exposez pas cet appareil à la pluie ou à
l’humidité.
ATTENTION (Pour le Canada)
L’émetteur/récepteur exempt de licence contenu dans le
présent appareil est conforme aux CNR d’Innovation, Sciences
et Développement économique Canada applicables aux
appareils radio exempts de licence. L’exploitation est autorisée
aux deux conditions suivantes :
1) L’appareil ne doit pas produire de brouillage;
2) L’appareil doit accepter tout brouillage radioélectrique subi,
même si le brouillage est susceptible d’en compromettre le
fonctionnement.
Cet appareil et son ou ses antennes ne doivent pas etre installés
a proximité ou etre utilisés conjointement avec une autre
antenne ou un autre émetteur.
Le dispositif pourrait automatiquement cesser d’émettre en
cas d’absence d’informations à transmettre, ou une défaillance
opérationnelle.
Notez que ce n’est pas l’intention d’interdire la transmission des
informations de contrôle ou de signalisation ou l’utilisation de
codes répétitifs lorsque requis par la technologie.
Cet appareil numerique de la classe B est conforme a la norme
NMB-003 du Canada.
Déclaration d’exposition aux radiations:
Cet equipement est conforme aux limites d’exposition aux
rayonnements IC RSS-102 établies pour un environnement non
contrôlé. Cet équipement doit etre installé et utilisé avec un
minimum de 20 cm de distance entre la source de rayonnement
et votre corps.
Précautions
1. Assurez-vous que le bloc d’alimentation CA ou CC de votre
demeureestconformeauxexigencesdepuissance�gurant
surlaplaqued’identi�cationsituéeàl’arrièredevotre
produit. Installez votre produit horizontalement, sur un socle
approprié(meuble),enlaissantunespacesuf�santpour
la ventilation sur le pourtour (3 ou 4 po). Faites attention
ànepasobstruerlesori�cesdeventilation.Neposez
pasl’ensemblesurunampli�cateurouunautreappareil
susceptible de chauffer. Cet ensemble est conçu pour une
utilisation en continu. Pour éteindre totalement l’appareil,
débranchezla�chec.a.delaprisemurale.
2. N’exposez pas l’ensemble aux rayons directs du soleil ou
à toute autre source de chaleur. Cela pourrait causer une
surchauffedu�letcauserundysfonctionnementdel’unité.
3. En cas de dysfonctionnement, débranchez le cordon
d’alimentation. Votre produit n’est pas prévu pour un usage
industriel.Ceproduitnepeutêtreutiliséqu’àdes�ns
personnelles. Une condensation peut se former si le produit
ou un disque a été stocké à basse température. Si vous devez
transporter l’appareil pendant l’hiver, attendez environ
2 heures que l’appareil ait atteint la température de la pièce
avant de l’utiliser.
4. Si la tension nominale de l’électricité distribuée dans votre
demeure est de 240 Vca, utilisez un adaptateur approprié
pour brancher cet appareil à vos prises électriques.
Consignes de sécurité importantes
Lisez attentivement ces consignes avant d’utiliser l’appareil.
Veillez à respecter toutes les consignes répertoriées ci-après.
Conservez ces instructions à portée de main pour vous y référer
ultérieurement.
1. Lisez attentivement ces consignes.
2. Conservez-les précieusement.
3. Tenez compte de tous les avertissements mentionnés.
4. Respectez toutes les instructions sans exception.
5. N’utilisez pas cet appareil à proximité de l’eau.
6. Nettoyez-le à l’aide d’un tissu sec.
7. Ne bloquez pas les ouvertures de ventilation.
Installez l’appareil conformément aux instructions du
fabricant.
8. N’installez pas l’appareil à proximité d’une source de chaleur
de type radiateur, registre de chaleur, cuisinière ou tout
autre appareil (y compris les récepteurs A/V) générateur de
chaleur.
9. Nedésactivezpasledispositifdesécuritédela�chedemise
àlaterreoudela�chepolarisée.
Une�chepolariséecomportedeuxlamesdontl’uneestplus
largequel’autre.Une�chedemiseàlaterrecomportedeux
lames et une troisième broche de mise à la terre. La lame
la plus large et la troisième broche sont destinées à assurer
votresécurité.Sila�chefournienes’insèrepasdanslaprise
utilisée, faites appel à un électricien pour faire remplacer
celle-ci.
10. Placez le cordon d’alimentation de sorte qu’il ne puisse être
nipiétinénipincé,particulièrementauniveaudela�che,de
la prise de courant et du point de sortie de l’appareil.
11. Utilisezexclusivementles�xations/accessoiresspéci�és
par le fabricant.
12. Utiliser uniquement avec le chariot, la base,
letrépied,lesupportoulatablespéci�épar
le fabricant ou vendu avec l’appareil. Si
l’appareil est posé sur un meuble à roulettes,
déplacez l’ensemble avec précaution pour
éviter de faire tomber le lecteur et de vous
blesser.
13. Débranchez l’appareil en cas d’orage ou si vous prévoyez une
longue période d’inactivité.
14. Con�eztouteslesréparationsàuntechnicienquali�é.Votre
appareil doit impérativement être réparé lorsqu’il a été
endommagé de quelque manière que ce soit : détérioration
ducordonoudela�ched’alimentation,projectionde
liquide sur l’appareil, chute d’objets à l’intérieur de l’appareil,
exposition à la pluie ou à l’humidité, dysfonctionnement,
chute.
01 VÉRIFICATION DES
COMPOSANTS
Haut-parleur ambiophonique X 2 / Câble de haut-parleur /
Adaptateur CA/CC / Cordon d'alimentation
REMARQUE
• Pour plus d’informations sur l’alimentation et la
consommation électriques, reportez-vous à l’étiquette
apposée sur le produit (Étiquette : Arrière de l'unité
principale)
• La conception et les caractéristiques techniques sont
susceptiblesd’êtremodi�éessanspréavis.
02 CONNEXION DU
SWA-9200S À UN
SOUNDBAR
1. Connecter les câbles du haut-parleur
ambiophonique
Utilisez les câbles des haut-parleurs pour connecter les deux
haut-parleurs ambiophoniques.
• Lors du branchement du câble du haut-parleur, connectez le
�lcentralsurlehaut-parleur.
• Insérezentièrementle�lenveillantànepasl'insérerau-
delà de l'isolation.
Insérez entièrement le
câble.
+ : Rouge
- : Noir
• Pour la connexion des câbles du haut-parleur aux haut-
parleurs ambiophoniques, procédez comme suit :
• Insérez les extrémités de couleur rouge et noire de
chaque câble dans les prises rouge et noire du haut-
parleur approprié.
• Les étiquettes se trouvent au dos des haut-parleurs.
Câble audio
• La longueur du câble audio du haut-parleur : 6 m
Français (Canada)
GARANTIE LIMITÉE À L’ACHETEUR INITIAL
Samsung Electronics Canada Inc. (SECA) garantit ce produit contre tout défaut de fabrication.
SECA garantit aussi que si cet appareil ne fonctionne pas convenablement durant la période de garantie SECA
se réservera le droit de réparer ou de remplacer l’appareil défectueux.
Toutes les réparations sous garantie doivent être effectuées par un Centre de service autorisé SECA. Le nom
et l’adresse du Centre de service le plus près de chez vous peut être obtenu en composant sans frais le 1- 800-
SAMSUNG ou en visitant notre site web au www.samsung.ca
MAIN-D’OEUVRE PIÈCES
UN (1) AN (AU COMPTOIR) UN (1) AN
Pour tous les modèles portatifs, le transport de l’appareil sera la responsabilité du client.
Le reçu de vente original doit être conservé par le client car cela constitue la seule preuve d’achat acceptée.
Le client doit le présenter au Centre de service agréé au moment où il fait la demande d’une réparation sous
garantie.
EXCLUSIONS (CE QUI N’EST PAS COUVERT)
Cette garantie ne couvre pas les dommages causés par un accident, un incendie, une inondation, un cas de force
majeure, un mauvais usage ou une tension incorrecte.
La garantie ne couvre pas une mauvaise installation, une mauvaise réparation, une réparation non autorisée
ettoutusagecommercialoudommagessurvenusdurantletransport.Le�niextérieuretintérieurdemême
que les lampes ne sont pas couverts par cette garantie. Les ajustements par le client qui sont expliqués dans
le guide de l’utilisateur ne sont pas couverts en vertu de cette garantie. Cette garantie sera automatiquement
annuléepourtoutappareilquiauraitunnumérodesériemanquantoumodi�é.Cettegarantieestvalable
seulement sur les appareils achetés et utilisés au Canada.
Samsung Electronics Canada Inc
2050 Derry Rd West
Mississauga, On. L5N 0B9
Tel: 1-800-SAMSUNG (726-7864)
Fax: (905) 542- 1199
Website: http://www.samsung.com/ca_fr
2. Mettez les haut-parleurs ambiophoniques sous
tension
Branchez le cordon d'alimentation des haut-parleurs
ambiophoniques sur une prise électrique pour les activer.
Le voyant DEL LINK (bleu) situé à l'arrière du haut-parleur
ambiophonique gauche clignotera rapidement.
Si le voyant DEL LINK ne clignote pas, reportez-vous à l'étape 6.
LINK STANDBY
ID SET
Arrière du
haut-parleur
ambiophonique
gauche
LINK STANDBY
ID SET
LINK STANDBY
Arrière du haut-parleur
ambiophonique gauche
Voyant bleu
clignotant
3. Éteignez le Soundbar.
Si le Soundbar est mis sous tension, mettez-le hors tension
en appuyant sur le bouton (Alimentation) situé sur la
télécommande du Soundbar.
BYE
OU
Le voyant rouge
clignote 3 fois
• L’image du Soundbar peut différer de votre Soundbar, selon
le modèle.
4. Connecter le Soundbar et les haut-parleurs
ambiophoniques
Appuyez sur le bouton Haut de votre télécommande pendant
plus de 5 secondes jusqu'à ce que le message « ID SET »
s'af�chesurl'écranduSoundbar.Lemessagedisparaît
rapidement.
(Si votre Soundbar n'a pas d'écran, mais seulement des voyants
DEL, veuillez consulter les renseignements sur les voyants DEL
ci-dessous.)
• Une fois le processus ID SET terminé avec succès, le
Soundbar est automatiquement mis sous tension.
OU
S
O
U
N
D
P
A
I
R
5 sec
ID SET
LesvoyantsRouge→
Vert→Bleuclignotent
• L’image du Soundbar peut différer de votre Soundbar, selon
le modèle.
5. Véri�ezquelecâbleestbienbranché.
Le voyant LINKcessedeclignoterets'allumeenbleu�xe
lorsque la connexion est établie entre le Soundbar et les haut-
parleurs ambiophoniques.
Veuillez mettre le Soundbar hors tension, puis le remettre sous
tension.Con�rmezquelevoyantDELLINK s'allume en bleu.
(Cela pourrait prendre une minute selon l'environnement.)
LINK STANDBY
ID SET
LINK STANDBY
Arrière du haut-parleur
ambiophonique gauche
« Le voyant
bleu est
allumé »
• Si le voyant DEL LINKnes'allumepasenbleu�xedansun
délai d'une minute, veuillez répéter les étapes 2 à 5 en vous
reportant à l'étape 6 (État du voyant DEL).
6. État du voyant DEL
Voyant LINK (bleu) allumé : Connecté au Soundbar.
Le voyant LINK (bleu) clignote rapidement (à un intervalle
d'environ 0,5 seconde) : Les haut-parleurs ambiophoniques
sont en mode ID SET.
• Véri�ezsileSoundbarestsoustensionetenmodeID SET.
• Répétez les étapes 3 et 5.
Le voyant LINK (bleu) clignote lentement (à un intervalle
d'environ 1 seconde) : Déjà connecté à un Soundbar, mais
introuvable pour le moment.
• Véri�ezsileSoundbarestsoustension.
• Si le voyant DEL LINK continue à clignoter lentement
lorsque le Soundbar est sous tension,
1. appuyez sur le bouton ID SET situé à l’arrière du
haut-parleur ambiophonique gauche pendant plus de
5 secondes jusqu'à ce que le voyant DEL LINK commence
à clignoter en bleu.
LINK STANDBY
ID SET
LINK STANDBY
ID SET
5 sec
Arrière du haut-parleur
ambiophonique gauche
2. Répétez les étapes 3 et 5.
Voyant STANDBY (rouge) allumé : Une fois le Soundbar mis
hors tension ou en cas d'échec de la connexion.
• Suivez les instructions de la section « Le voyant LINK
(bleu) clignote lentement (à un intervalle d’environ
1 seconde) » ci-dessus.
Autres : Erreurs
• Communiquez avec un centre de service Samsung.
03 DÉPANNAGE
Aucun son ne sort des haut-parleurs ambiophoniques
• Si les haut-parleurs ambiophoniques sont bien jumelés
et connectés à un Soundbar, le voyant DEL LINK situé
à l'arrière du haut-parleur ambiophonique gauche est
alluméenbleu�xe.Veuillezreconnecterleshaut-parleurs
ambiophoniques à votre Soundbar en vous reportant à la
section 02-6, État du voyant DEL.
• D’autres appareils envoyant des signaux radioélectriques
à proximité peuvent interrompre la connexion. Veuillez
garder votre haut-parleur à l'écart de ces appareils.
• Le contenu que vous êtes en train de lire pourrait ne pas
avoir de piste ambiophonique, mais seulement stéréo.
Veuillez régler le mode du son sur ammbiophonique
en appuyant sur le bouton SOUND MODE de la
télécommande.
Instabilité du son, retards, bruit ou chute du son provenant
des haut-parleurs ambiophoniques.
• Le son pourrait être instable ou retardé lorsque les haut-
parleurs ambiophoniques sont éloignés du Soundbar.
Veuillez les rapprocher du Soundbar.
• Le son pourrait être instable ou retardé lorsque le
Soundbar est proche d’un appareil électrique pouvant
provoquer des interférences radio. Veuillez placer le
Soundbar à l'écart de ces appareils qui peuvent provoquer
desinterférencesaudio(parexemple,routeursans�l).
• Veuillezmodi�erl’étatdelaconnexionauréseauTVde
sans�là�laire.
Le volume haut-parleurs ambiophoniques est trop faible
• Veuillez augmenter le niveau arrière en vous reportant au
manuel du Soundbar.
(vous pouvez télécharger le manuel de votre Soundbar sur
www.samsung.com/support)
04 MONTAGE SUR UN MUR
8,2 mm
4,2 mm
7,9 mm
4,6 mm
4,0 mm
• Assurez-vous que le mur est stable. Si le mur n'est pas
solide, renforcez-le avant d'installer le support.
• Veillez à ne pas installer les haut-parleurs sur le côté ou à
l’envers.
• Samsung Electronics n’est pas responsable des dommages
causés au produit suite à une installation inappropriée.
• Samsung Electronics ne vend pas de supports muraux.
05 MODÈLES COMPATIBLES
• Compatibilité avec certains modèles de Soundbar Samsung.
Consultez la page du Soundbar à l’adresse www.samsung.
com/support pour plus d’informations.
• La liste des modèles compatibles peut faire l’objet de
modi�cationssanspréavis.
06 AVIS CONCERNANT LES
LICENCES LIBRES
Pour envoyer des demandes de renseignements et questions
concernant les sources libres, communiquez avec Samsung
Open Source (http://opensource.samsung.com)
07 SPÉCIFICATIONS ET GUIDE
Caractéristiques techniques
Nom du caisson de basses
SWA-9200S (GAUCHE/DROITE)
Poids
3,7 lb (1,7 kg)
Dimensions (L × H × P)
4,1 x 6,0 x 4,3 pouces
(105,0 x 152,8 x 109,0 mm)
Plage de températures de
fonctionnement
50℉À104℉
(10℃À40℃)
Plage d’humidité de
fonctionnement
10 % à 80 %, sans
condensation
AMPLIFICATEUR
Puissance de sortie nominale
60 W x 2
REMARQUE
• SamsungElectronicsCo.,Ltdseréserveledroitdemodi�er
lesspéci�cationssanspréavis.
• Le poids et les dimensions sont approximatifs.
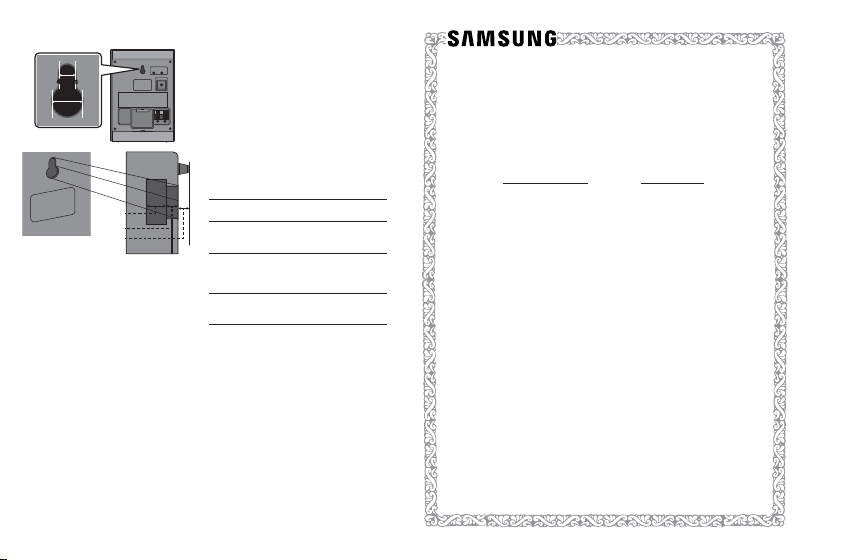