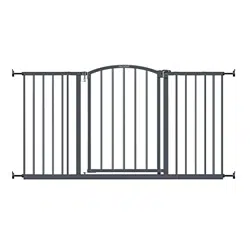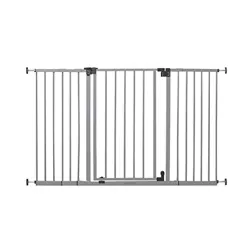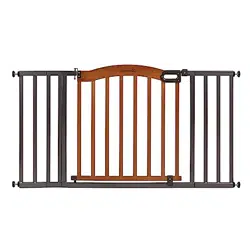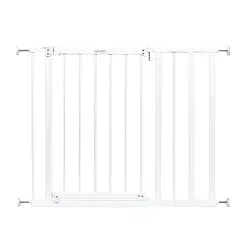
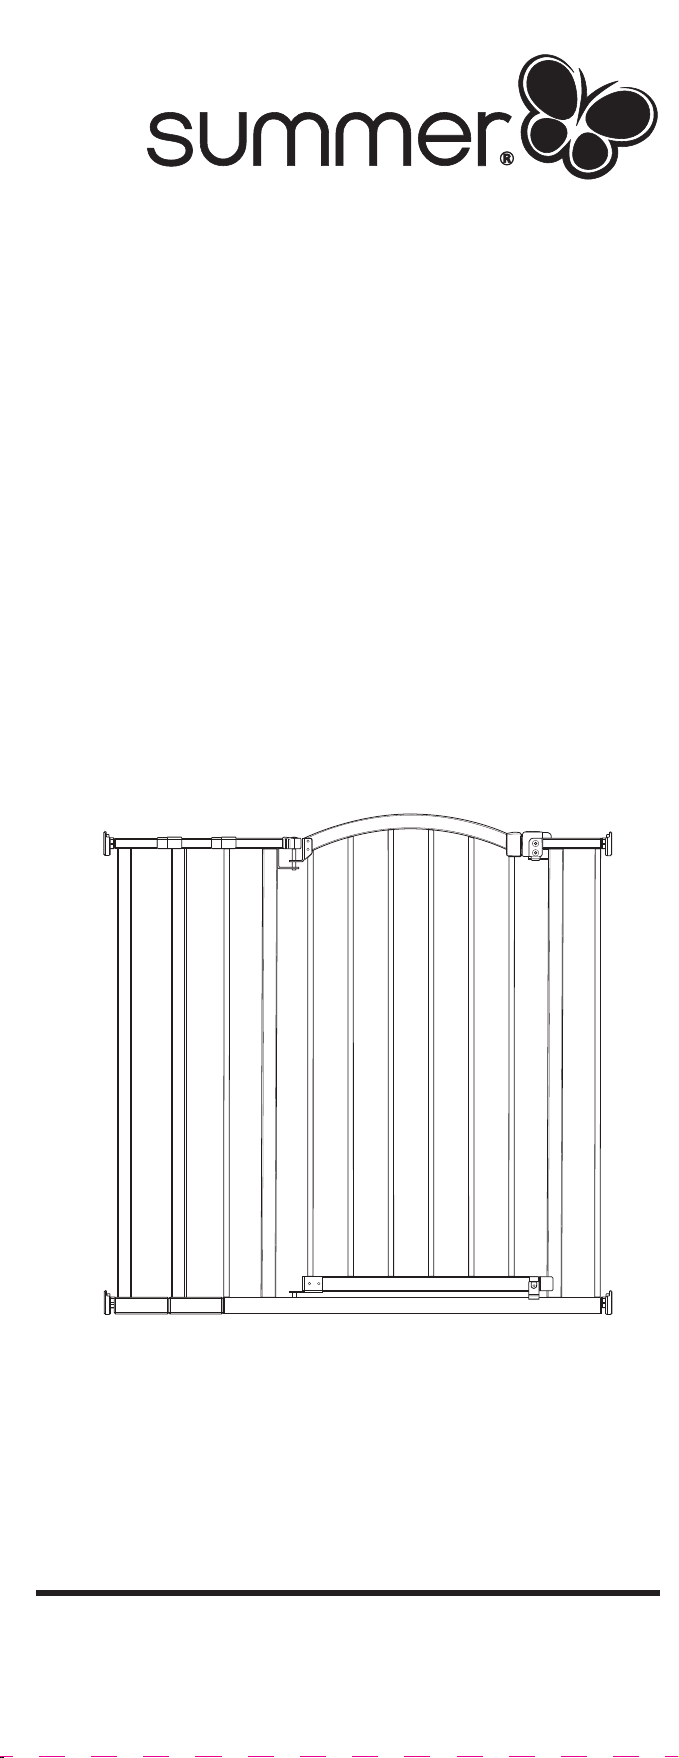
Extra Tall Decor
Safety Gate
USER MANUAL
Children have died or been seriously injured
when gates are not securely installed.
• ALWAYS install and use gate as directed using all
required parts.
• Install according to manufacturer’s instructions.
• Stop using when a child can climb over or
dislodge the gate.
• Use only with the locking/latching mechanism
securely engaged.
• To prevent falls, never use at top of stairs without
wall mounting cups and door stopper.
• NEVER use a gate to keep child away from pool.
• NEVER leave child unattended.
• ALWAYS close and lock the gate behind you.
• This product will not necessarily prevent all
accidents. Proper adult supervision is required at
all times.
• Do not use if any components are missing or
damaged.
• Adult assembly required. Exercise care when
unpacking and assembling product.
CAUTION: KEEP SMALL PARTS OUT OF
CHILD’S REACH.
WARNING
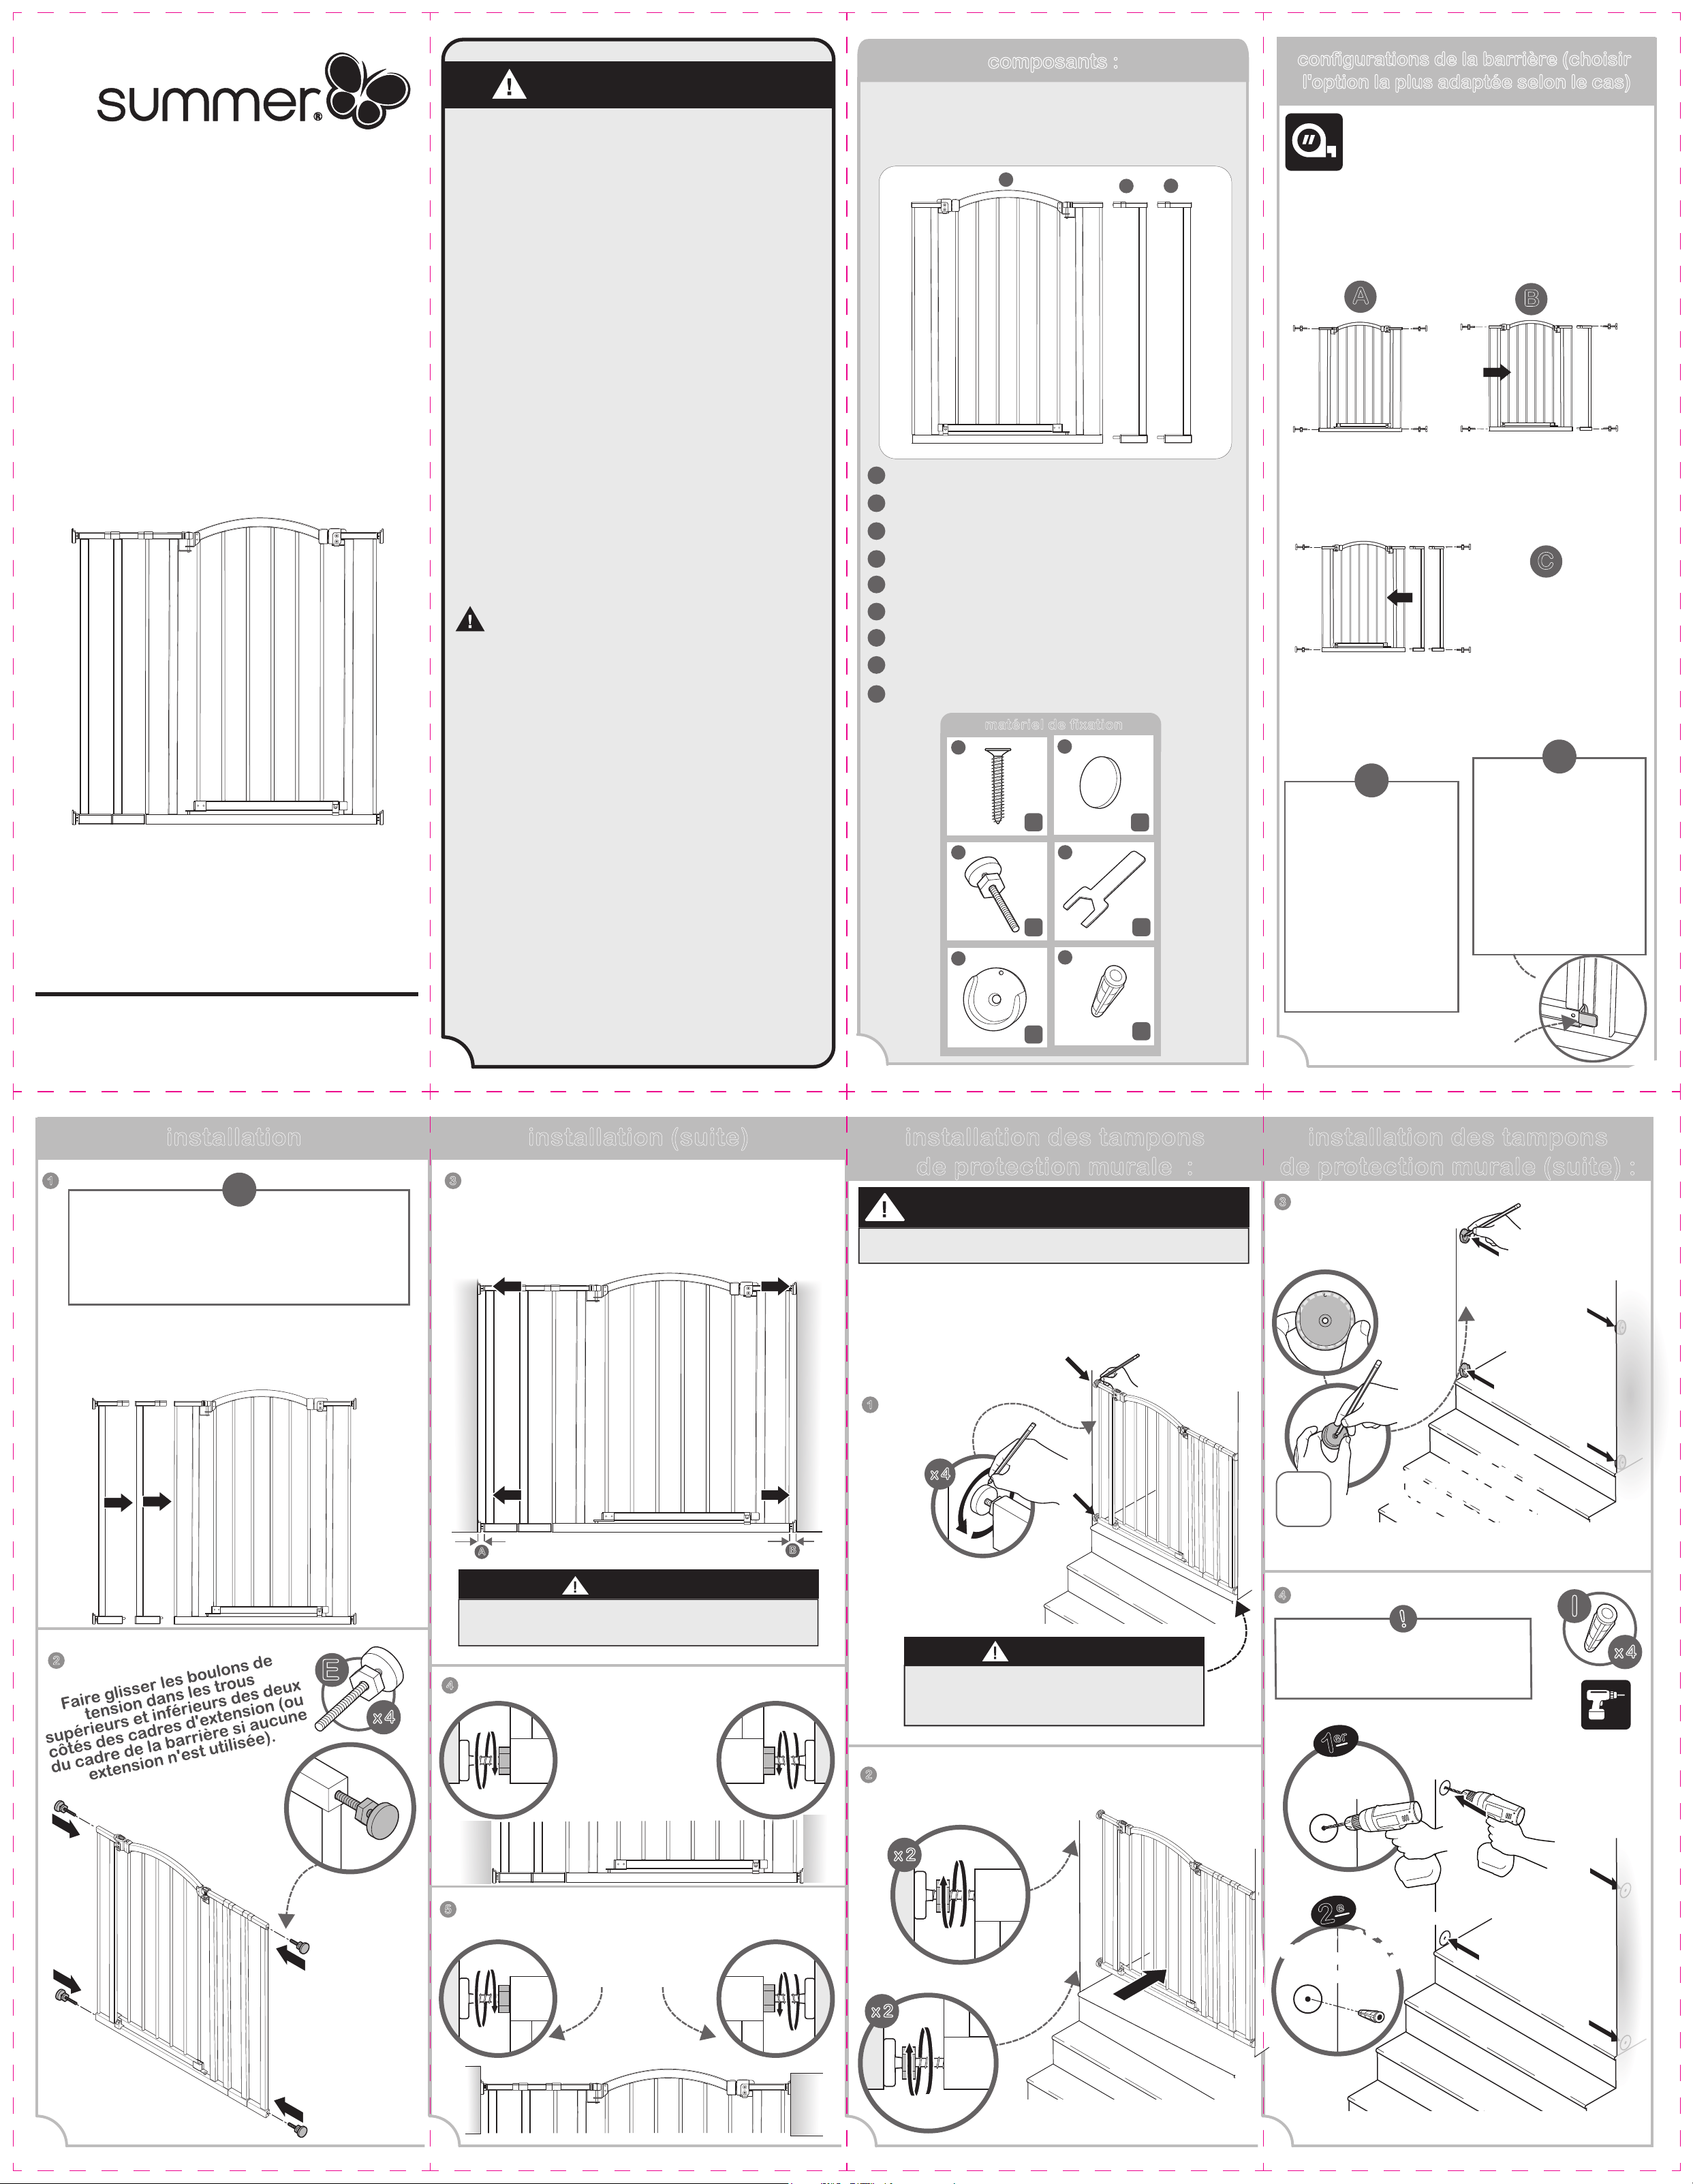
components:
installation: installation (continued): STOP! wall cup/top of
stairs installation:
wall cup/top of stairs
installation (continued):
gate configurations (choose
which best fits your scenario)
2
4
5
6
7
8
Please read the following instructions carefully.
Keep this instruction manual and
save for future reference.
For technical support, contact us at 1-401-671-6551
or www.summerinfant.com/contact
Tools required: Phillips-head screwdriver,
measuring tape (not included),
and wrench (included).
For use with children from 6 - 24 months.
Keep small parts away from children.
Adult assembly required.
Fits openings from 28.75" - 39.75" wide.
3
NOTE:
Gate will appear as though door is o-center when
taken out of the package until you mount it into the
doorframe and tighten the bolts according to the instructions.
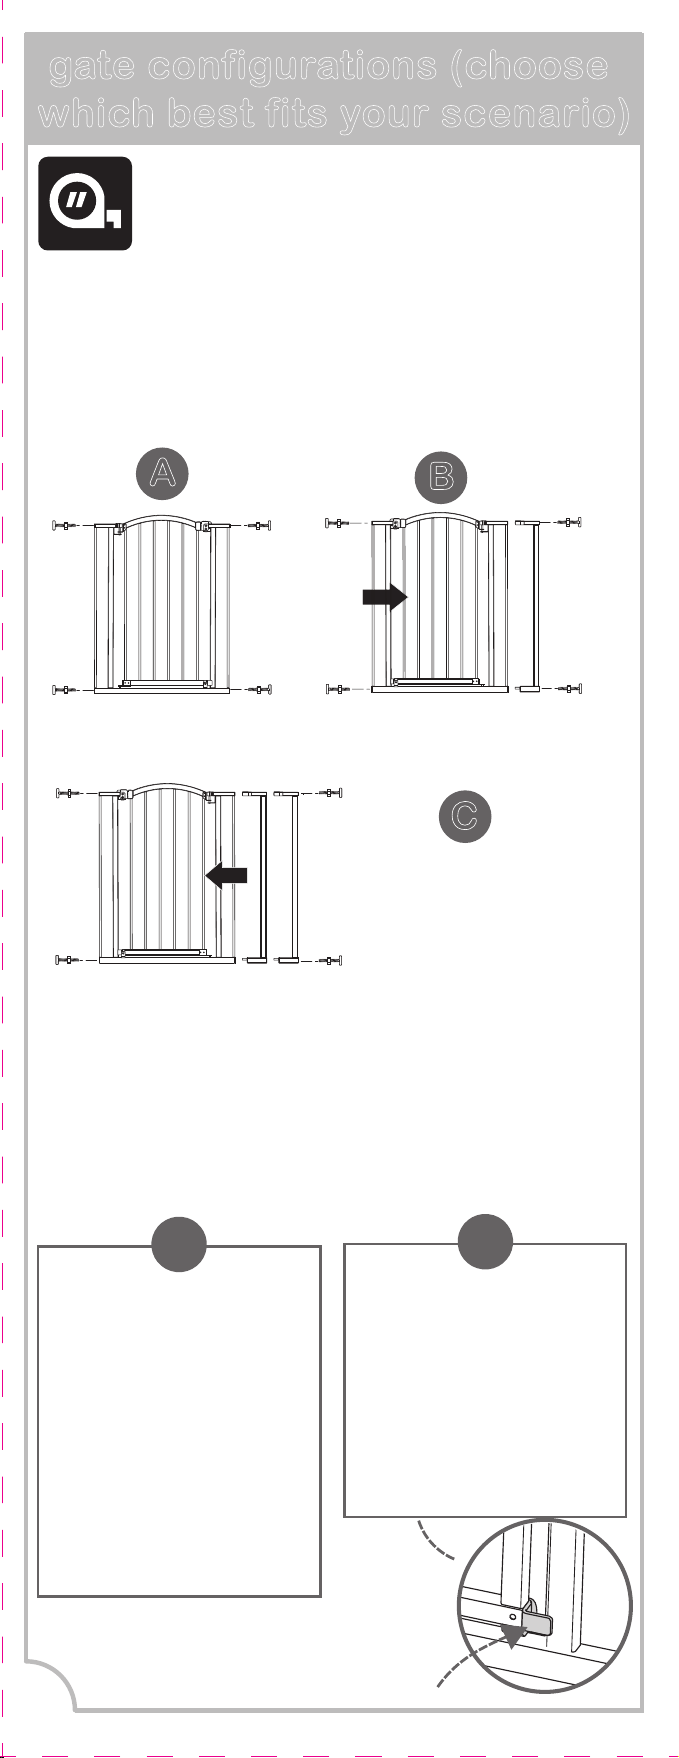
Measure the width of the opening where you
intend to install the gate. Refer to the
following illustrations to determine the correct
installation conguration. Baseboard molding
may change which conguration is
appropriate.
A
(28.75"- 32.25") without
extension frames
B
(32.75"- 35.75") with 4”
extension frame
Note: This instruction
book illustrates
installation of gate
conguration D.
If choosing gate
conguration A, skip
ahead to step 2.
Otherwise, follow step 1
using the appropriate
extension frames that
best t your scenario.
!
Important: Gate
includes a door stop
which prevents the gate
from swinging open in
one direction. When
installing the gate at the
top of stairs, be sure that
the door stop is used so
the door cannot open
over the stairs.
!
C
(36.6"- 39.75") with two 4”
extension frames
Door stop
!
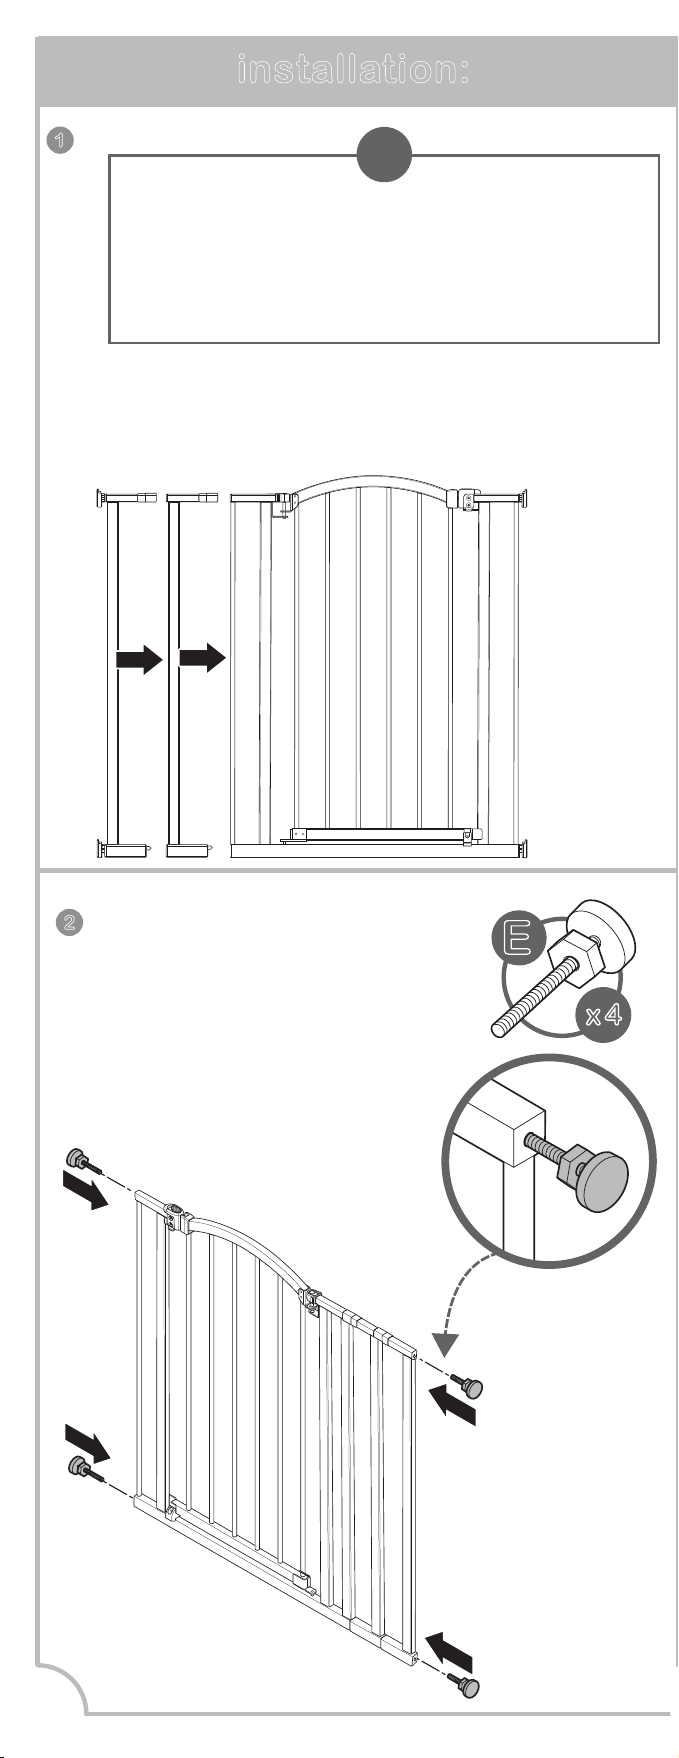
• If choosing gate conguration A, skip this step.
• If choosing gate conguration B or C, add the desired
extension frame to either side of the gate frame.
1
2
E
x 4
Slide tension bolts into
upper and lower holes on
both sides of extension
frames (or into the gate
frame if no extensions are
being used).
Connect the extension
frames to gate frame
by inserting extension
pins into the holes.
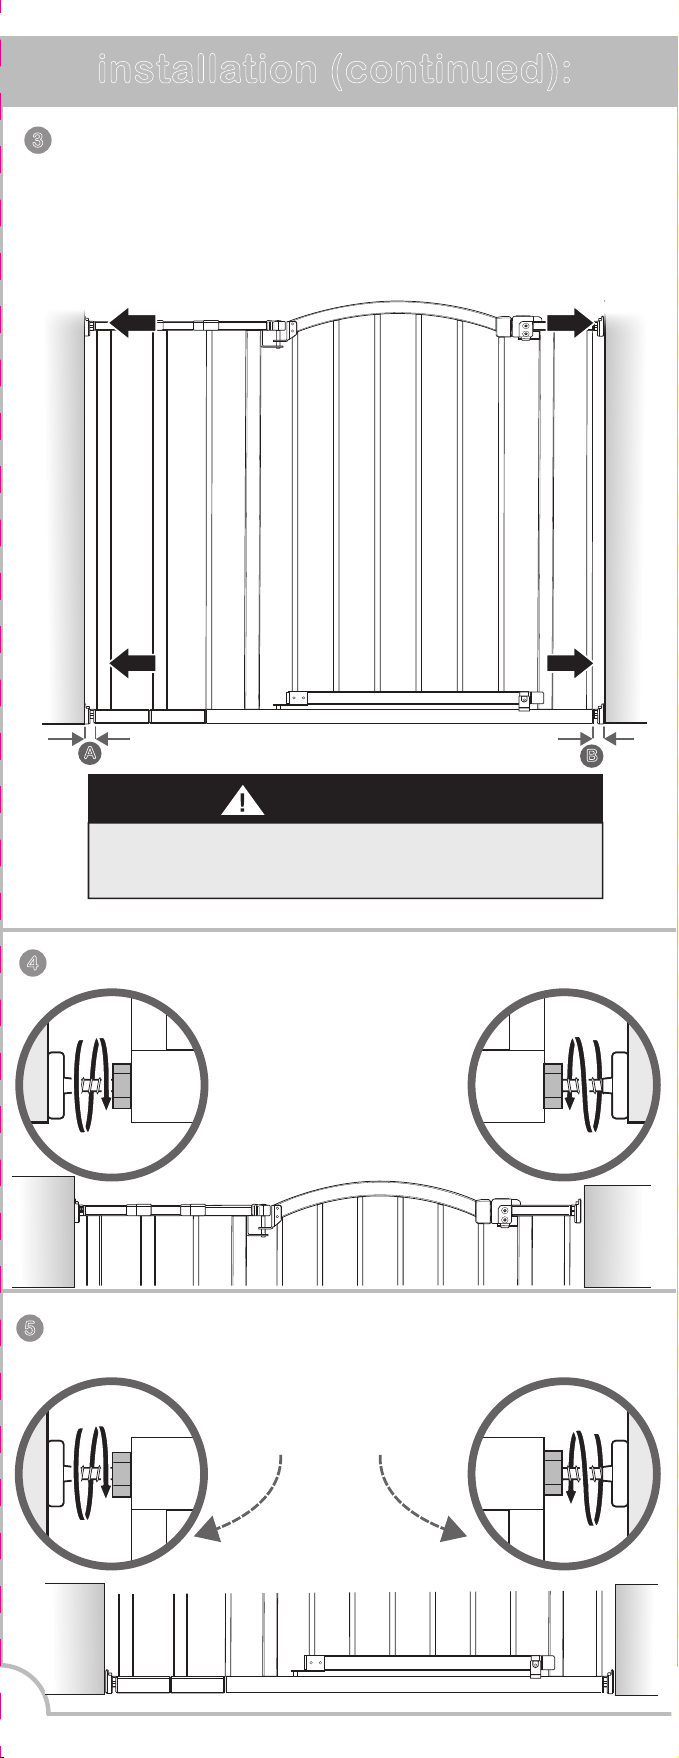
A. Stand the gate in the center of the
opening. Make sure the bottom of the gate is
completely flush to the floor.
B. Slide tension bolts out until they contact
the door frame or wall on both sides.
A
B
3
4
Use the tension nuts to tighten both of the
bottom tension bolts.
tighten!
tighten!
5
Use the tension nuts to tighten both of
the top tension bolts.
tighten!
tighten!
Check distances A & B. The distance between the
gate and the wall should never exceed 2.75 in.
IMPORTANT
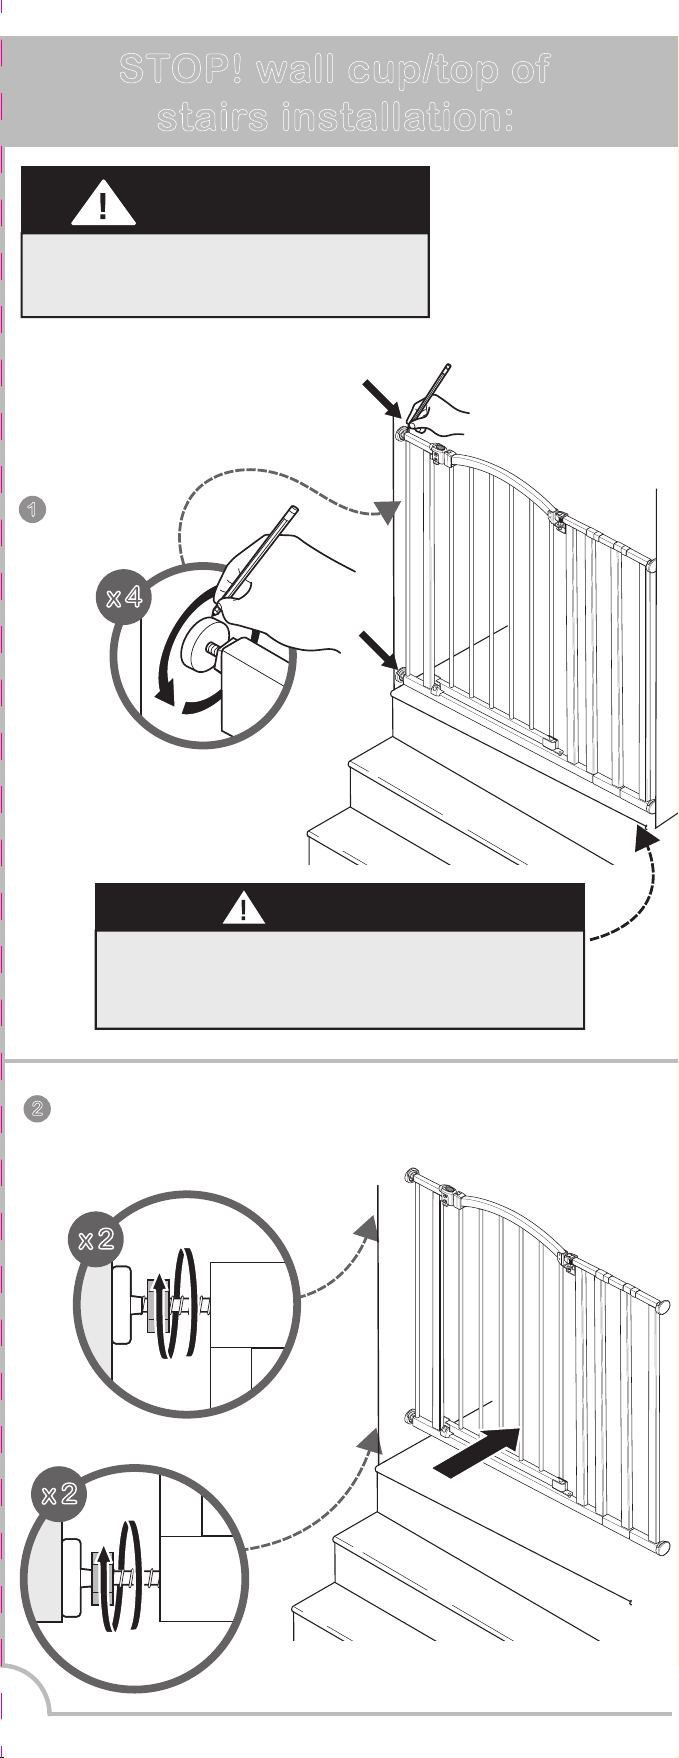
WARNING
For use at top of stairs, wall cup
installation is MANDATORY.
Follow these wall cup installation
instructions when using gate at TOP
OF STAIRS (MANDATORY), or if
using wall cups for a standard opening
(optional). If opting not to use wall cups
for a standard opening, skip ahead to
step 9.
1
With a pencil, trace the
entire outline of each
tension bolt directly
onto the wall.
x 4
At the top of the landing, position the gate a
minimum of 3-6 inches (8-15cm) away from
the top step.
IMPORTANT
2
Loosen the lower and upper tension nuts and
remove gate.
loosen!
x 2
loosen!
x 2
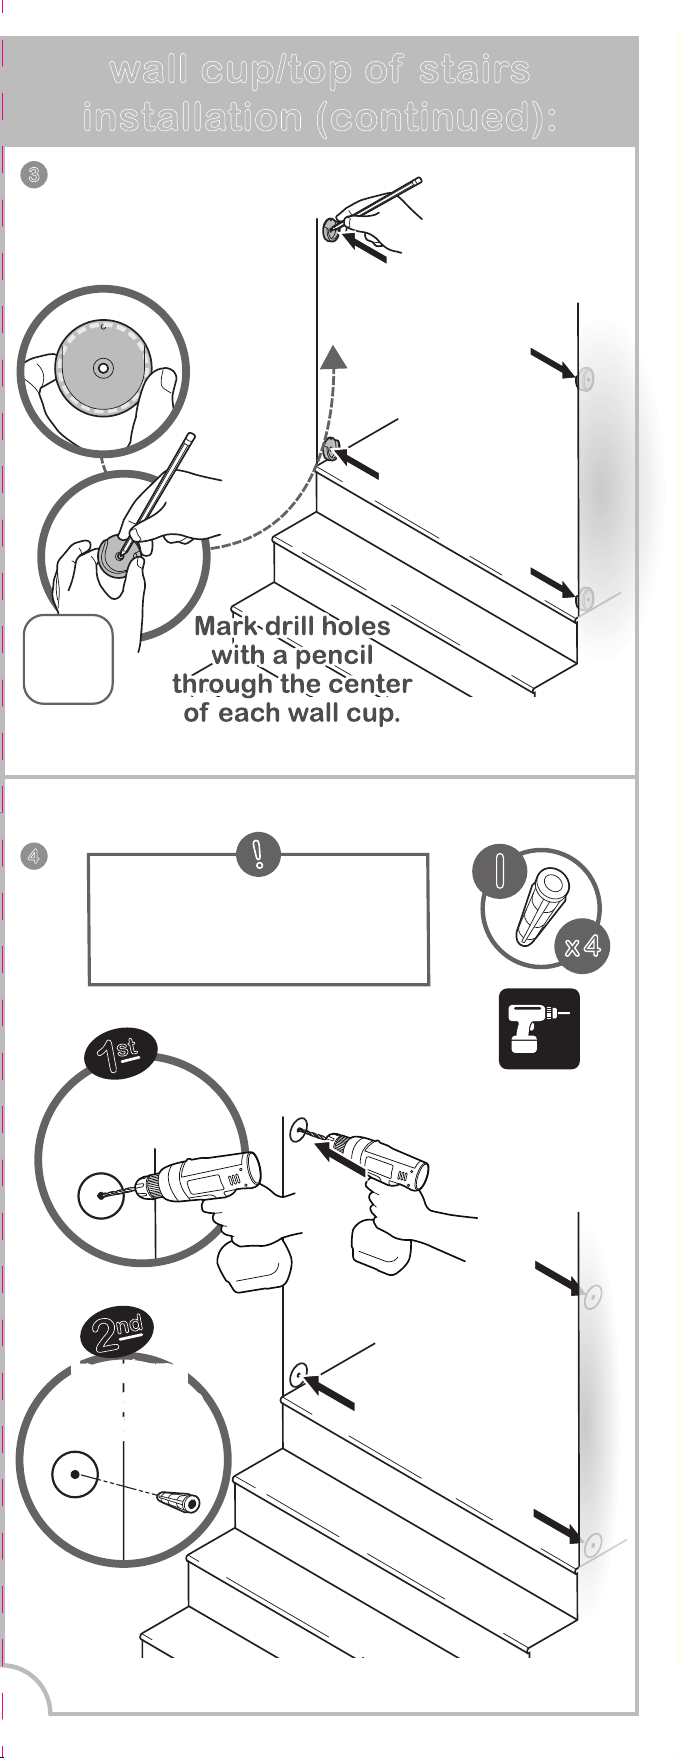
3
x4
Place a wall cup
over the center of
each circular
outline on the wall.
4
NOTE: Skip this step if:
- mounting directly into
wood,
!
x 4
I
1
st
Drill a 7/32
'
'
pilot hole
into each of the 4
center marks.
Drill a 7/32'' pilot hole
into each of the 4
center marks.
Insert wall
anchors into
pilot holes.
Insert wall
anchors into
pilot holes.
2
nd
Gate Door
4” extension
A
B
4” extension
C
D
I
E
F
G
H
Tension Bolts with Tension Nuts (4)
Wall Cups (4)
Wall Anchors (4)
Screws (4)
Wrench
Adhesive Mounting Pads (4)
hardware
E
x4
I
D
x4
x1
H
F
G
x4
x4
x4
B
C
A
Extra Tall Decor
Safety Gate
USER MANUAL
Children have died or been seriously injured
when gates are not securely installed.
• ALWAYS install and use gate as directed using all
required parts.
• Install according to manufacturer’s instructions.
• Stop using when a child can climb over or
dislodge the gate.
• Use only with the locking/latching mechanism
securely engaged.
• To prevent falls, never use at top of stairs without
wall mounting cups and door stopper.
• NEVER use a gate to keep child away from pool.
• NEVER leave child unattended.
• ALWAYS close and lock the gate behind you.
• This product will not necessarily prevent all
accidents. Proper adult supervision is required at
all times.
• Do not use if any components are missing or
damaged.
• Adult assembly required. Exercise care when
unpacking and assembling product.
CAUTION: KEEP SMALL PARTS OUT OF
CHILD’S REACH.
WARNING
components:
installation: installation (continued): STOP! wall cup/top of
stairs installation:
wall cup/top of stairs
installation (continued):
gate configurations (choose
which best fits your scenario)
2
4
5
6
7
8
Please read the following instructions carefully.
Keep this instruction manual and
save for future reference.
For technical support, contact us at 1-401-671-6551
or www.summerinfant.com/contact
Tools required: Phillips-head screwdriver,
measuring tape (not included),
and wrench (included).
For use with children from 6 - 24 months.
Keep small parts away from children.
Adult assembly required.
Fits openings from 28.75" - 39.75" wide.
3
NOTE:
Gate will appear as though door is o-center when
taken out of the package until you mount it into the
doorframe and tighten the bolts according to the instructions.
Measure the width of the opening where you
intend to install the gate. Refer to the
following illustrations to determine the correct
installation conguration. Baseboard molding
may change which conguration is
appropriate.
A
(28.75"- 32.25") without
extension frames
B
(32.75"- 35.75") with 4”
extension frame
Note: This instruction
book illustrates
installation of gate
conguration D.
If choosing gate
conguration A, skip
ahead to step 2.
Otherwise, follow step 1
using the appropriate
extension frames that
best t your scenario.
!
Important: Gate
includes a door stop
which prevents the gate
from swinging open in
one direction. When
installing the gate at the
top of stairs, be sure that
the door stop is used so
the door cannot open
over the stairs.
!
C
(36.6"- 39.75") with two 4”
extension frames
Door stop
!
• If choosing gate conguration A, skip this step.
• If choosing gate conguration B or C, add the desired
extension frame to either side of the gate frame.
1
2
E
x 4
Slide tension bolts into
upper and lower holes on
both sides of extension
frames (or into the gate
frame if no extensions are
being used).
Connect the extension
frames to gate frame
by inserting extension
pins into the holes.
A. Stand the gate in the center of the
opening. Make sure the bottom of the gate is
completely flush to the floor.
B. Slide tension bolts out until they contact
the door frame or wall on both sides.
A
B
3
4
Use the tension nuts to tighten both of the
bottom tension bolts.
tighten!
tighten!
5
Use the tension nuts to tighten both of
the top tension bolts.
tighten!
tighten!
Check distances A & B. The distance between the
gate and the wall should never exceed 2.75 in.
IMPORTANT
WARNING
For use at top of stairs, wall cup
installation is MANDATORY.
Follow these wall cup installation
instructions when using gate at TOP
OF STAIRS (MANDATORY), or if
using wall cups for a standard opening
(optional). If opting not to use wall cups
for a standard opening, skip ahead to
step 9.
1
With a pencil, trace the
entire outline of each
tension bolt directly
onto the wall.
x 4
At the top of the landing, position the gate a
minimum of 3-6 inches (8-15cm) away from
the top step.
IMPORTANT
2
Loosen the lower and upper tension nuts and
remove gate.
loosen!
x 2
loosen!
x 2
3
x4
Place a wall cup
over the center of
each circular
outline on the wall.
4
NOTE: Skip this step if:
- mounting directly into
wood,
!
x 4
I
1
st
Drill a 7/32
'
'
pilot hole
into each of the 4
center marks.
Drill a 7/32'' pilot hole
into each of the 4
center marks.
Insert wall
anchors into
pilot holes.
Insert wall
anchors into
pilot holes.
2
nd
Gate Door
4” extension
A
B
4” extension
C
D
I
E
F
G
H
Tension Bolts with Tension Nuts (4)
Wall Cups (4)
Wall Anchors (4)
Screws (4)
Wrench
Adhesive Mounting Pads (4)
hardware
E
x4
I
D
x4
x1
H
F
G
x4
x4
x4
B
C
A
wall cup/top of stairs
installation (continued):
wall cup/top of stairs
installation (continued):
wall cup/top of stairs
installation (continued):
Colors and styles may vary.
MADE IN CHINA.
D0000000854 1/21
Summer Infant (USA), Inc.
1275 Park East Drive
Woonsocket, RI 02895 USA
401-671-6551
© 2020 Summer Infant, Inc.
Summer Infant stands behind all of its products.
If you are not completely satisfied or have any
questions, please contact our Consumer Relations
Team at 401-671-6551 or
www.summerinfant.com/contact
• Regularly check tension bolts to make sure the gate is securely
in place.
• Do not use the gate if any components are damaged or
missing.
• Surface-clean with a damp cloth or sponge using mild
detergent and warm water.
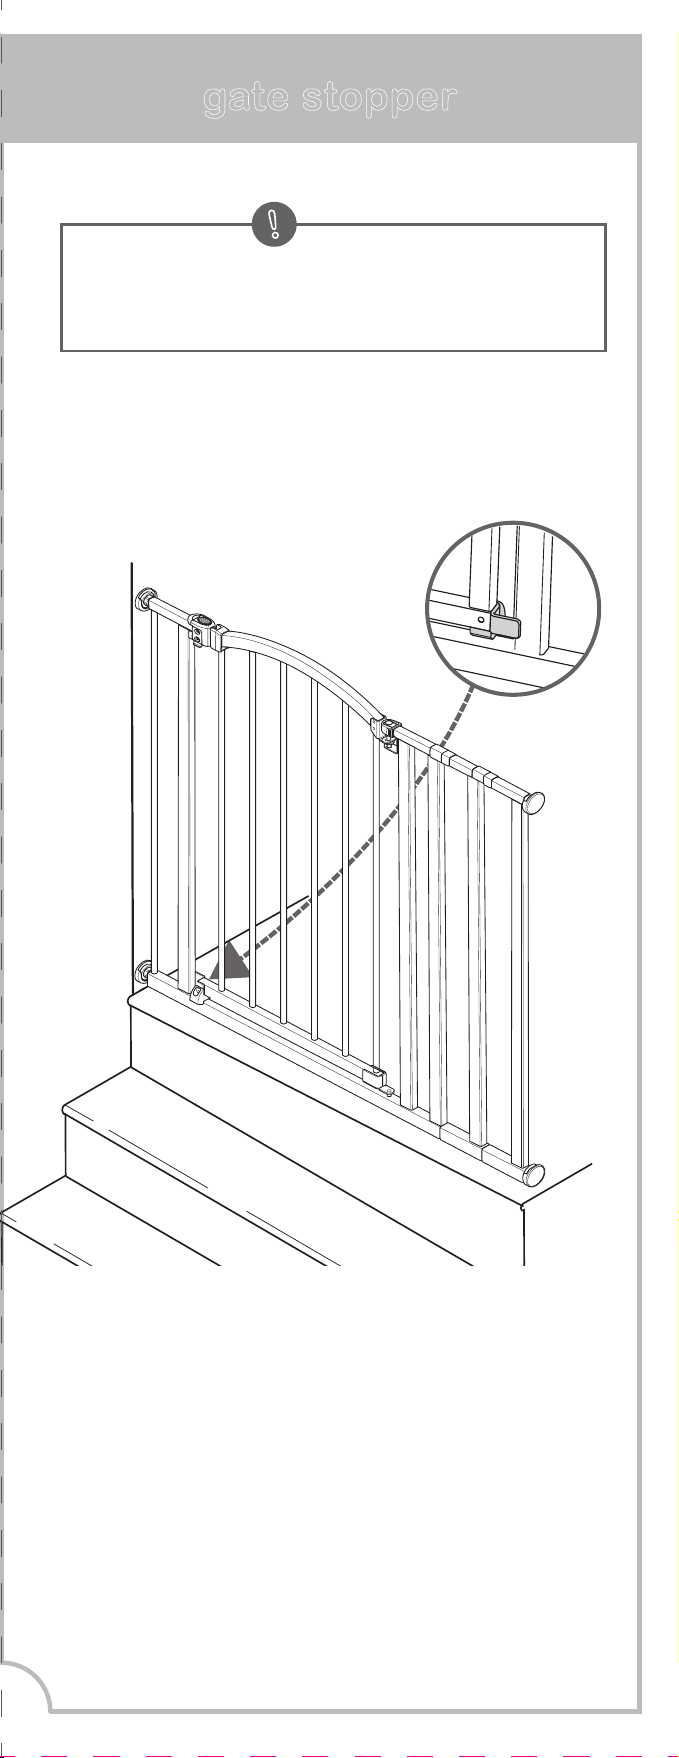
gate stopper
removing fabric seat:removing fabric seat:removing fabric seat:attach to adult chair (cont.):
13
14
15
9
10
11
12
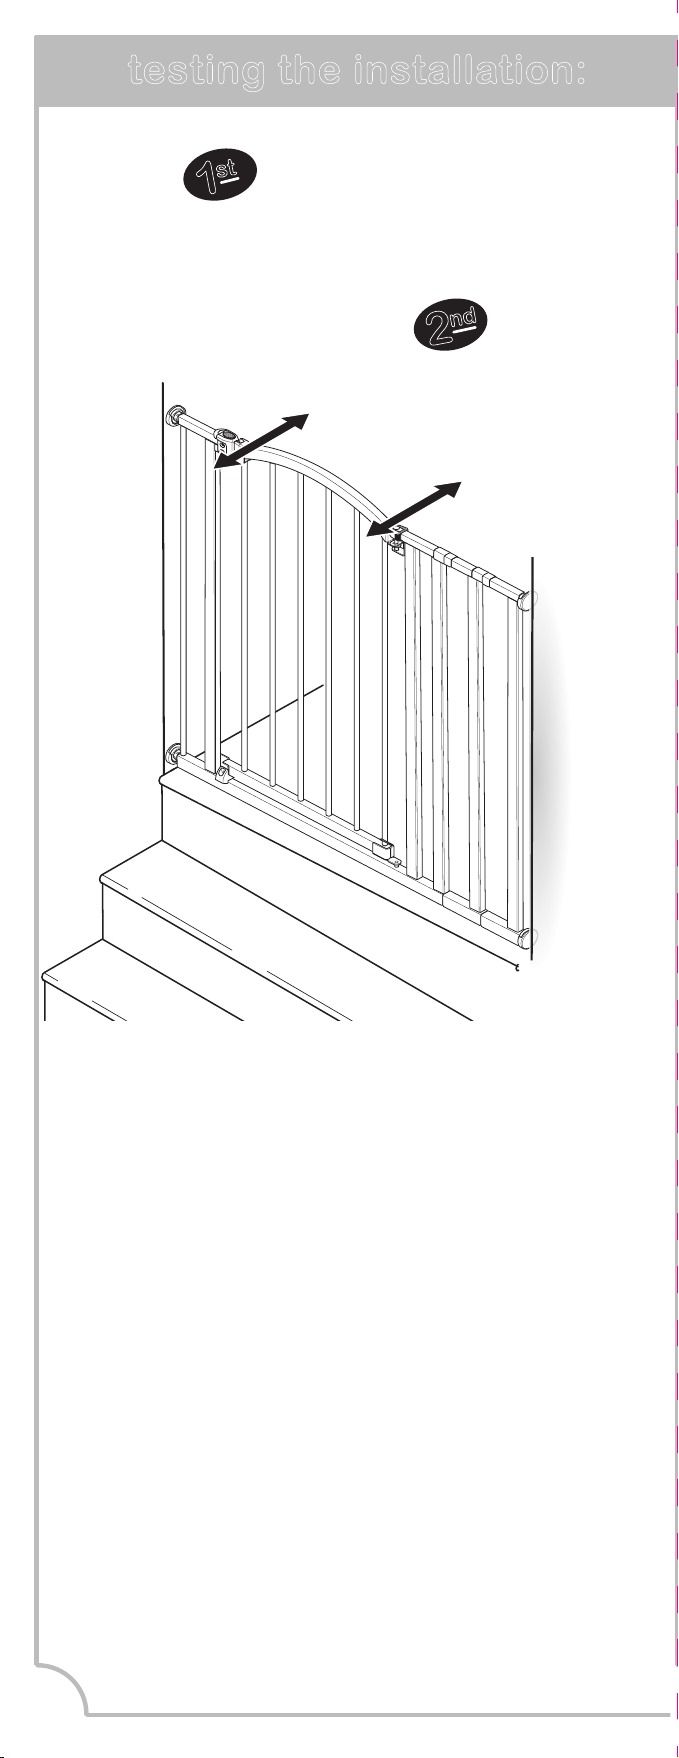
testing the installation:
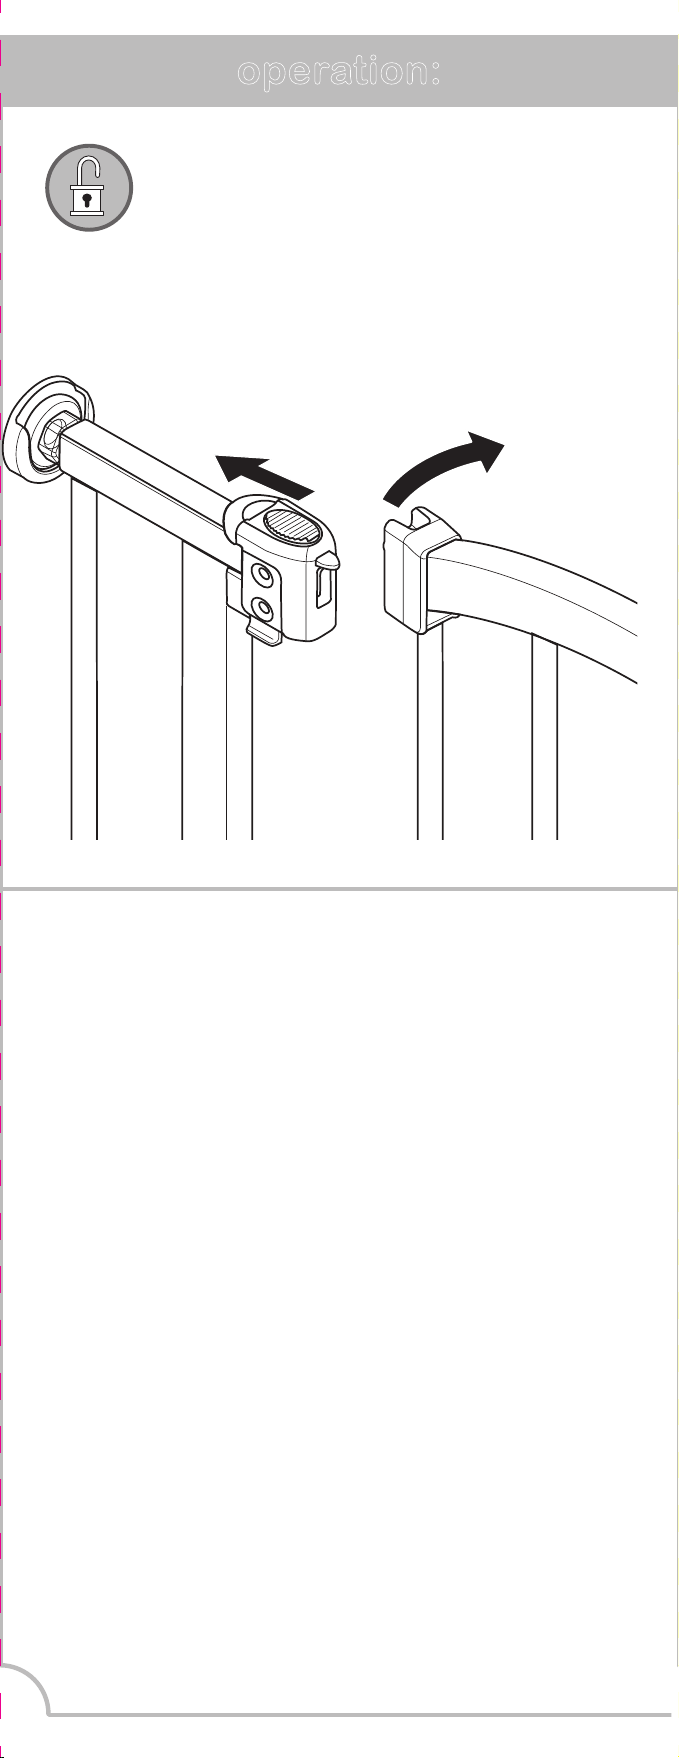
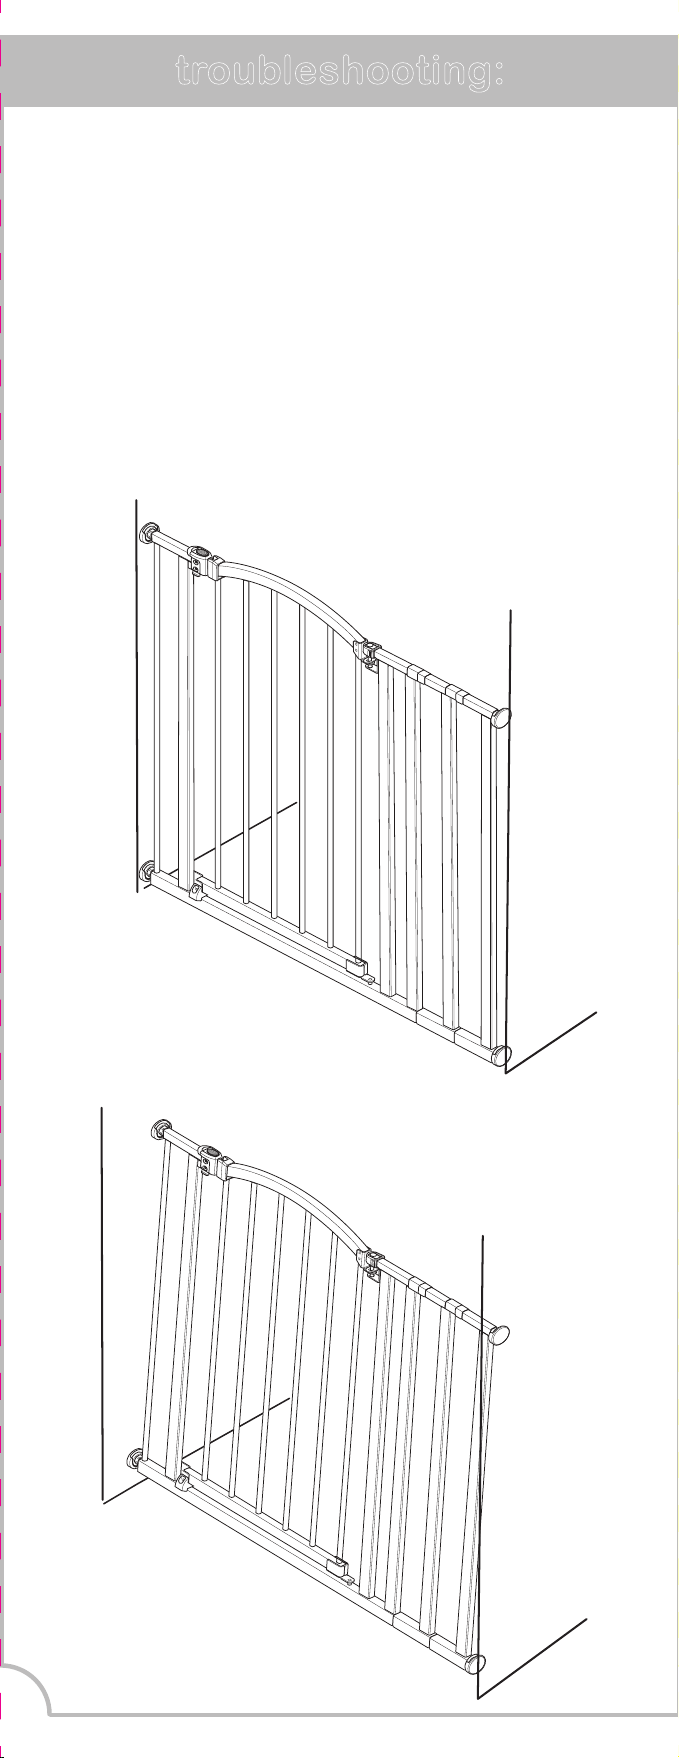
operation: troubleshooting:
If the gate does not close properly:
1. Gate is not properly aligned in the door frame.
Solution: To adjust the gate’s alignment, loosen all four
tension bolts and reposition gate so that it matches the
“correct” image. Re-tighten tension nuts.
2. Pressure of tension bolts needs adjusting.
Solution: Loosen or tighten the upper tension nuts.
Ensure the upper latch handle always remains below the
release button. Ensure the upper latch handle engages
securely when the gate swings closed and that it releases
properly when the release button is pressed.
correct!
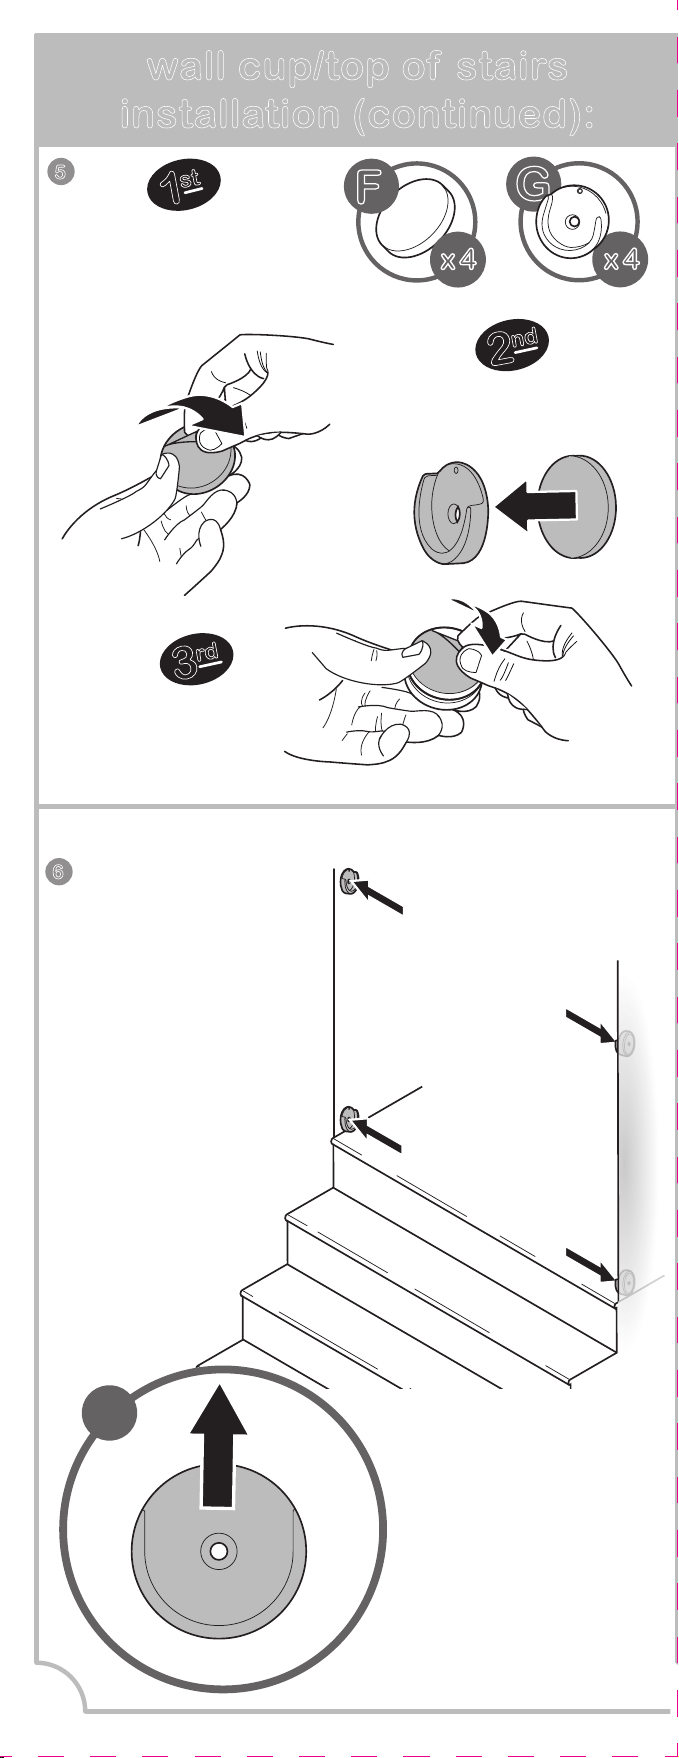
5
1
st
Remove backing
from one side of
each adhesive
mounting pad.
2
nd
Attach one pad to the
back of each wall cup.
x 4
G
x 4
F
peel!
peel!
3
rd
Remove backing.
6
Align the wall
cups so the
center hole is
placed directly
over the wall
anchor. Stick
the wall cups to
the wall.
press!
press!
press!
press!
Make sure all
wall cups are
facing up.
!
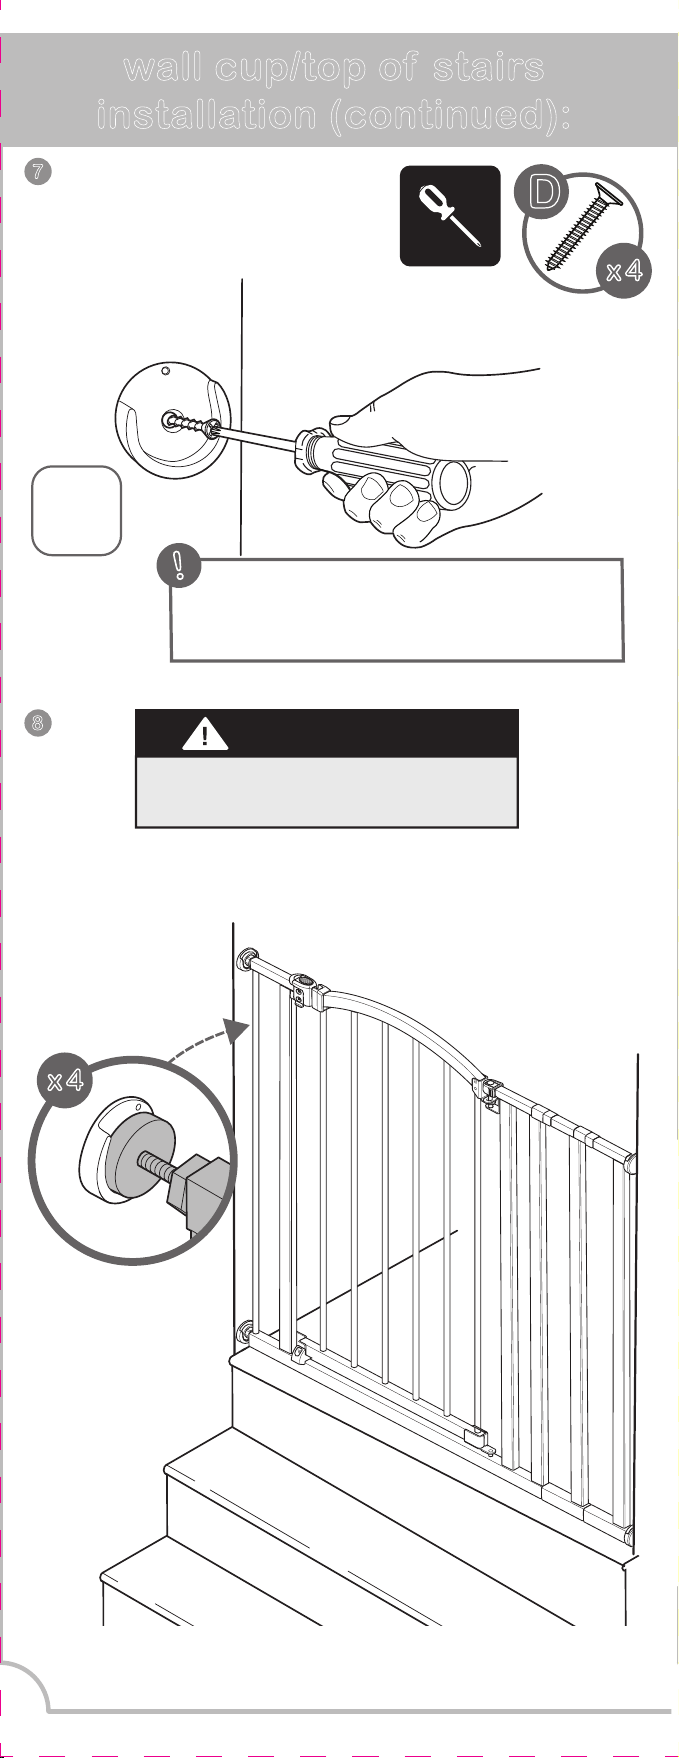
7
x 4
D
x4
Screw wall
cups into wall.
8
NEVER open the gate door over
the stairs.
IMPORTANT
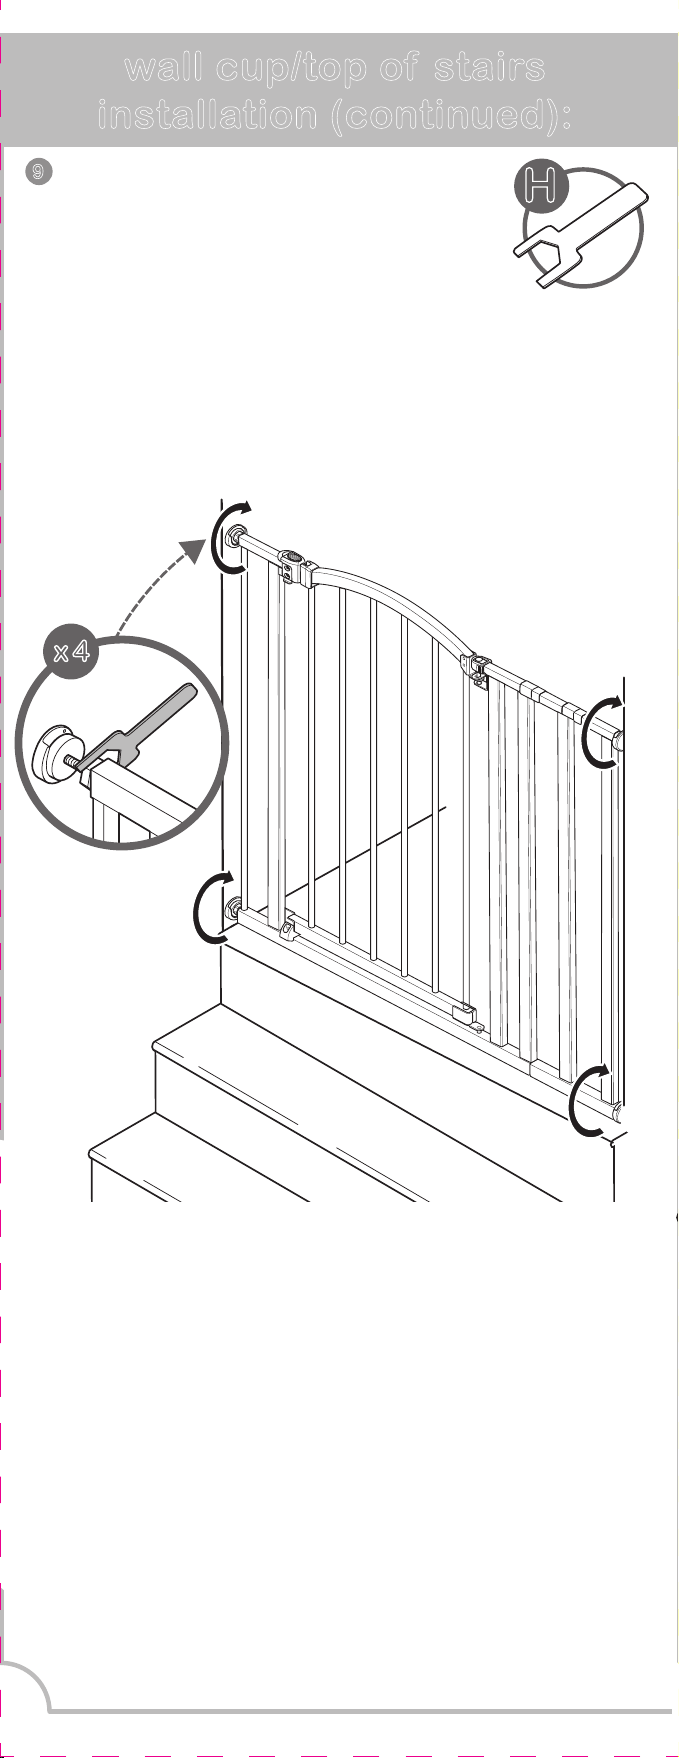
x 4
Repeat "installation" steps on page 5. The 4
tension bolts will rest within each wall cup.
x 4
Tighten all 4 tension
nuts with the
provided wrench.
9
H
FINISHED!
Note: This gate includes a gate stopper which
prevents the gate door from swinging open in
one direction when used at the top of the stairs.
!
When mounting this product at the top of
the stairs, locate the door stopper that is
on the opposite side of the stairs.
maintenance:
1
st
2
nd
Close the gate.
Make sure the upper
and lower latches
lock securely.
Push the gate
and frame to
check stability.
push!
push!
to unlock gate:
First, slide locking tab
back to release.
Second, lift gate door
open.
incorrect!
NOTE:
Screws are ONLY required
for top of stair use.
!
wall cup/top of stairs
installation (continued):
wall cup/top of stairs
installation (continued):
wall cup/top of stairs
installation (continued):
Colors and styles may vary.
MADE IN CHINA.
D0000000854 1/21
Summer Infant (USA), Inc.
1275 Park East Drive
Woonsocket, RI 02895 USA
401-671-6551
© 2020 Summer Infant, Inc.
Summer Infant stands behind all of its products.
If you are not completely satisfied or have any
questions, please contact our Consumer Relations
Team at 401-671-6551 or
www.summerinfant.com/contact
• Regularly check tension bolts to make sure the gate is securely
in place.
• Do not use the gate if any components are damaged or
missing.
• Surface-clean with a damp cloth or sponge using mild
detergent and warm water.
gate stopper
removing fabric seat:removing fabric seat:removing fabric seat:attach to adult chair (cont.):
13
14
15
9
10
11
12
testing the installation:
operation: troubleshooting:
If the gate does not close properly:
1. Gate is not properly aligned in the door frame.
Solution: To adjust the gate’s alignment, loosen all four
tension bolts and reposition gate so that it matches the
“correct” image. Re-tighten tension nuts.
2. Pressure of tension bolts needs adjusting.
Solution: Loosen or tighten the upper tension nuts.
Ensure the upper latch handle always remains below the
release button. Ensure the upper latch handle engages
securely when the gate swings closed and that it releases
properly when the release button is pressed.
correct!
5
1
st
Remove backing
from one side of
each adhesive
mounting pad.
2
nd
Attach one pad to the
back of each wall cup.
x 4
G
x 4
F
peel!
peel!
3
rd
Remove backing.
6
Align the wall
cups so the
center hole is
placed directly
over the wall
anchor. Stick
the wall cups to
the wall.
press!
press!
press!
press!
Make sure all
wall cups are
facing up.
!
7
x 4
D
x4
Screw wall
cups into wall.
8
NEVER open the gate door over
the stairs.
IMPORTANT
x 4
Repeat "installation" steps on page 5. The 4
tension bolts will rest within each wall cup.
x 4
Tighten all 4 tension
nuts with the
provided wrench.
9
H
FINISHED!
Note: This gate includes a gate stopper which
prevents the gate door from swinging open in
one direction when used at the top of the stairs.
!
When mounting this product at the top of
the stairs, locate the door stopper that is
on the opposite side of the stairs.
maintenance:
1
st
2
nd
Close the gate.
Make sure the upper
and lower latches
lock securely.
Push the gate
and frame to
check stability.
push!
push!
to unlock gate:
First, slide locking tab
back to release.
Second, lift gate door
open.
incorrect!
NOTE:
Screws are ONLY required
for top of stair use.
!

wall cup/top of stairs
installation (continued):
wall cup/top of stairs
installation (continued):
wall cup/top of stairs
installation (continued):
Colors and styles may vary.
MADE IN CHINA.
D0000000854 1/21
Summer Infant (USA), Inc.
1275 Park East Drive
Woonsocket, RI 02895 USA
401-671-6551
© 2020 Summer Infant, Inc.
Summer Infant stands behind all of its products.
If you are not completely satisfied or have any
questions, please contact our Consumer Relations
Team at 401-671-6551 or
www.summerinfant.com/contact
• Regularly check tension bolts to make sure the gate is securely
in place.
• Do not use the gate if any components are damaged or
missing.
• Surface-clean with a damp cloth or sponge using mild
detergent and warm water.
gate stopper
removing fabric seat:removing fabric seat:removing fabric seat:attach to adult chair (cont.):
13
14
15
9
10
11
12
testing the installation:
operation: troubleshooting:
If the gate does not close properly:
1. Gate is not properly aligned in the door frame.
Solution: To adjust the gate’s alignment, loosen all four
tension bolts and reposition gate so that it matches the
“correct” image. Re-tighten tension nuts.
2. Pressure of tension bolts needs adjusting.
Solution: Loosen or tighten the upper tension nuts.
Ensure the upper latch handle always remains below the
release button. Ensure the upper latch handle engages
securely when the gate swings closed and that it releases
properly when the release button is pressed.
correct!
5
1
st
Remove backing
from one side of
each adhesive
mounting pad.
2
nd
Attach one pad to the
back of each wall cup.
x 4
G
x 4
F
peel!
peel!
3
rd
Remove backing.
6
Align the wall
cups so the
center hole is
placed directly
over the wall
anchor. Stick
the wall cups to
the wall.
press!
press!
press!
press!
Make sure all
wall cups are
facing up.
!
7
x 4
D
x4
Screw wall
cups into wall.
8
NEVER open the gate door over
the stairs.
IMPORTANT
x 4
Repeat "installation" steps on page 5. The 4
tension bolts will rest within each wall cup.
x 4
Tighten all 4 tension
nuts with the
provided wrench.
9
H
FINISHED!
Note: This gate includes a gate stopper which
prevents the gate door from swinging open in
one direction when used at the top of the stairs.
!
When mounting this product at the top of
the stairs, locate the door stopper that is
on the opposite side of the stairs.
maintenance:
1
st
2
nd
Close the gate.
Make sure the upper
and lower latches
lock securely.
Push the gate
and frame to
check stability.
push!
push!
to unlock gate:
First, slide locking tab
back to release.
Second, lift gate door
open.
incorrect!
NOTE:
Screws are ONLY required
for top of stair use.
!
Barrière en forme d'arc extra
haute Décor
MODE D'EMPLOI
Des enfants sont morts ou ont été grièvement
blessés lorsque les barrières n'étaient pas
installées de façon sécuritaire.
• TOUJOURS installer et utiliser la barrière selon les
instructions en utilisant toutes les pièces
nécessaires.
• Installer selon les instructions du fabricant.
• Arrêter de l'utiliser lorsqu'un enfant peut grimper
par-dessus ou déplacer la barrière.
• Utiliser uniquement lorsque le mécanisme de
verrouillage ou blocage est bien bloqué.
• An d’éviter les chutes, ne jamais l’utiliser en haut
des escaliers sans les capuchons de montage
muraux et la butée de porte.
• NE JAMAIS utiliser une barrière pour tenir l'enfant
éloigné de la piscine.
• NE JAMAIS laisser l’enfant sans surveillance.
• TOUJOURS fermer et verrouiller la barrière derrière
vous.
• Ce produit ne préviendra pas nécessairement tous
les accidents. La supervision par un adulte est
impérative en tout temps.
• Ne pas utiliser si des éléments sont manquants ou
endommagés.
• Doit être assemblée par un adulte. Prendre les
précautions nécessaires lors du déballage et de
l’assemblage du produit.
ATTENTION : GARDER LES
PETITES PIÈCES HORS DE LA PORTÉE DES
ENFANTS.
composants :
installation installation (suite) installation des tampons
de protection murale :
installation des tampons
de protection murale (suite) :
configurations de la barrière (choisir
l'option la plus adaptée selon le cas)
2
4
5
6
7
8
Lire a�en�vement les instruc�ons et les
aver�ssements suivants.
Conserver ce mode d'emploi pour toute
consulta�on ultérieure.
Pour obtenir une assistance technique,
il vous suffit de communiquer avec nous au
1-905-456-8484 ou d’aller sur le site
www.summerinfant.com/contact.
Ou�ls nécessaires : Tournevis cruciforme,
mètre à ruban (non fourni)
et clé (fournie). Pour une u�lisa�on avec
des enfants de 6 à 24 mois.
Garder les pe�tes pièces à l’écart des enfants.
Doit être assemblée par un adulte.
Convient aux ouvertures d'une largeur
de 73 à 101 cm (28,75 à 39,75 po).
3
REMARQUE : La barrière apparaîtra comme si elle était
décentrée lorsqu'on la sort du paquet jusqu'à ce qu'on la
monte dans l'armature de la porte et qu'on serre les boulons
selon les instruc�ons.
Mesurer la largeur de l'ouverture dans
laquelle la barrière va être installée. Se
reporter aux illustrations qui suivent pour
déterminer la conguration d'installation
adaptée. Les plinthes peuvent modier la
conguration appropriée.
Remarque : Ce manuel
d'instructions illustre
l'installation de la
conguration de la
barrière D.
En cas de choix de
conguration de la
barrière A, passer à
l'étape 2. Sinon, suivre
l'étape 1, en utilisant les
cadres d'extension
appropriés qui
correspondent le mieux
au scénario souhaité.
!
IMPORTANT:
La barrière comprend une
butée de porte qui
empêche la barrière de
s'ouvrir dans un sens.
• Lors de l'installation de la
barrière en haut des
escaliers, s'assurer que la
butée de la porte se trouve
du côté de l'escalier an
que la porte ne puisse pas
s'ouvrir par-dessus les
escaliers.
!
Butée de porte
!
• En cas de choix de conguration de la barrière A, sauter cette
étape.
• Si vous choisissez la conguration de porte B ou C, ajoutez le
cadre d'extension souhaité de chaque côté du cadre de porte.
• Si vous choisissez la conguration de porte D, ajoutez les deux
extensions au cadre de porte.
1
2
E
x 4
A. Placer la barrière au centre de l'ouverture.
Vérifier que le bas de la barrière est complètement
de niveau avec le sol.
B. Faire glisser les boulons de tension vers
l'extérieur jusqu'à ce qu'ils touchent l'armature de la
porte ou le mur des deux côtés.
Connecter les cadres d’extension au cadre
de la barrière en insérant les chevilles dans
les orifices de la barrière et des cadres
d’extension.
A
B
3
4
Utiliser les écrous de tension pour serrer
les deux boulons de
tension inférieurs.
serrer!
serrer!
5
Utiliser les écrous de tension pour serrer
les deux boulons de tension supérieurs.
serrer!
serrer!
Vérier les emplacements A et B. La distance entre la
barrière et le mur ne doit jamais dépasser 7 cm (2,75 po).
IMPORTANT
Pour une utilisation en haut d’un escalier, l’installation
avec des supports de xation est obligatoire.
1
À l'aide d'un crayon, tracer
le contour complet de
chaque boulon de tension
directement sur le mur.
Au sommet du palier, installer la barrière au
minimum de 8 à 15 cm (3 à 6 po) de la marche
supérieure.
IMPORTANT
2
Desserrer les écrous de tension inférieurs
et supérieurs et retirer la barrière.
desserrer!
x 2
desserrer!
x 2
3
x4
Placer un tampon de
protection murale au
centre de chaque
contour circulaire sur
le mur.
4
REMARQUE : Sauter cette
étape si :- le montage est
effectué directement sur du bois,
!
x 4
I
1
er
Drill a 7/32
'
'
pilot hole
into each of the 4
center marks.
Percer un trou pilote de
0,56 cm (7/32 po) dans
chacune des 4
marques centrales.
2
e
matériel de fixation
E
x4
I
D
x4
x1
H
F
G
x4
x4
x4
AVERTISSEMENT
Porte de la barrière
cadre d'extension 4
po
A
B
C
D
I
E
F
G
H
Boulons de tension avec écrous de tension (4)
Tampons de protection murale (4)
Ancrages muraux (4)
Vis
(4)
Clé hexagonale
Coussinets de montage adhésifs (4)
AVERTISSEMENT
Marquer les orifices
de perçage avec un
crayon à travers le
centre de chaque
tampon de protection.
Marquer les orifices
de perçage avec un
crayon à travers le
centre de chaque
tampon de protection.
Insérer les ancrages
muraux dans les
trous pilotes.
Insérer les ancrages
muraux dans les
trous pilotes.
Suivez les instructions suivantes d’installation des coupes murales
lorsque la barrière est installée EN HAUT D’UN ESCALIER
(OBLIGATOIRE), ou si vous utilisez les coupes murales pour une
ouverture ordinaire (usage facultatif). Si vous choisissez de ne pas
utiliser les coupes murales pour une ouverture ordinaire, passez
aux instructions sur l’installation de la porte de la barrière à la
page 9.
B
C
A
cadre d'extension 4po
A
73 à 82 cm
(28.75 po- 32.25 po)
sans cadre d'extension
B
83.2 à 91 cm
(32.75 po - 35.75 po) avec
un cadre d'extension 4 po
C
93 à 101 cm
(36.6 po- 39.75 po) avec
deux cadre d'extensions
4 po
x 4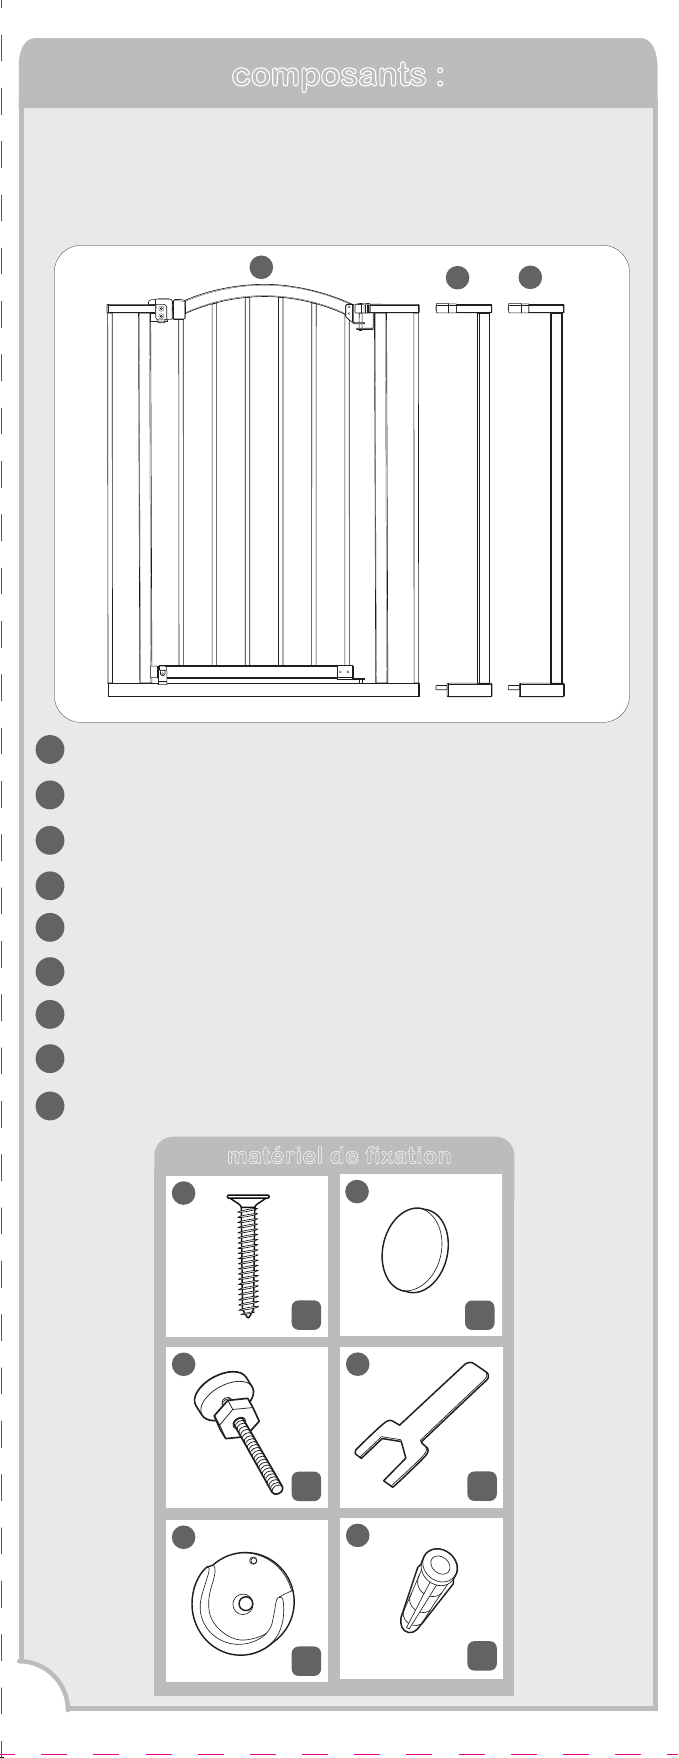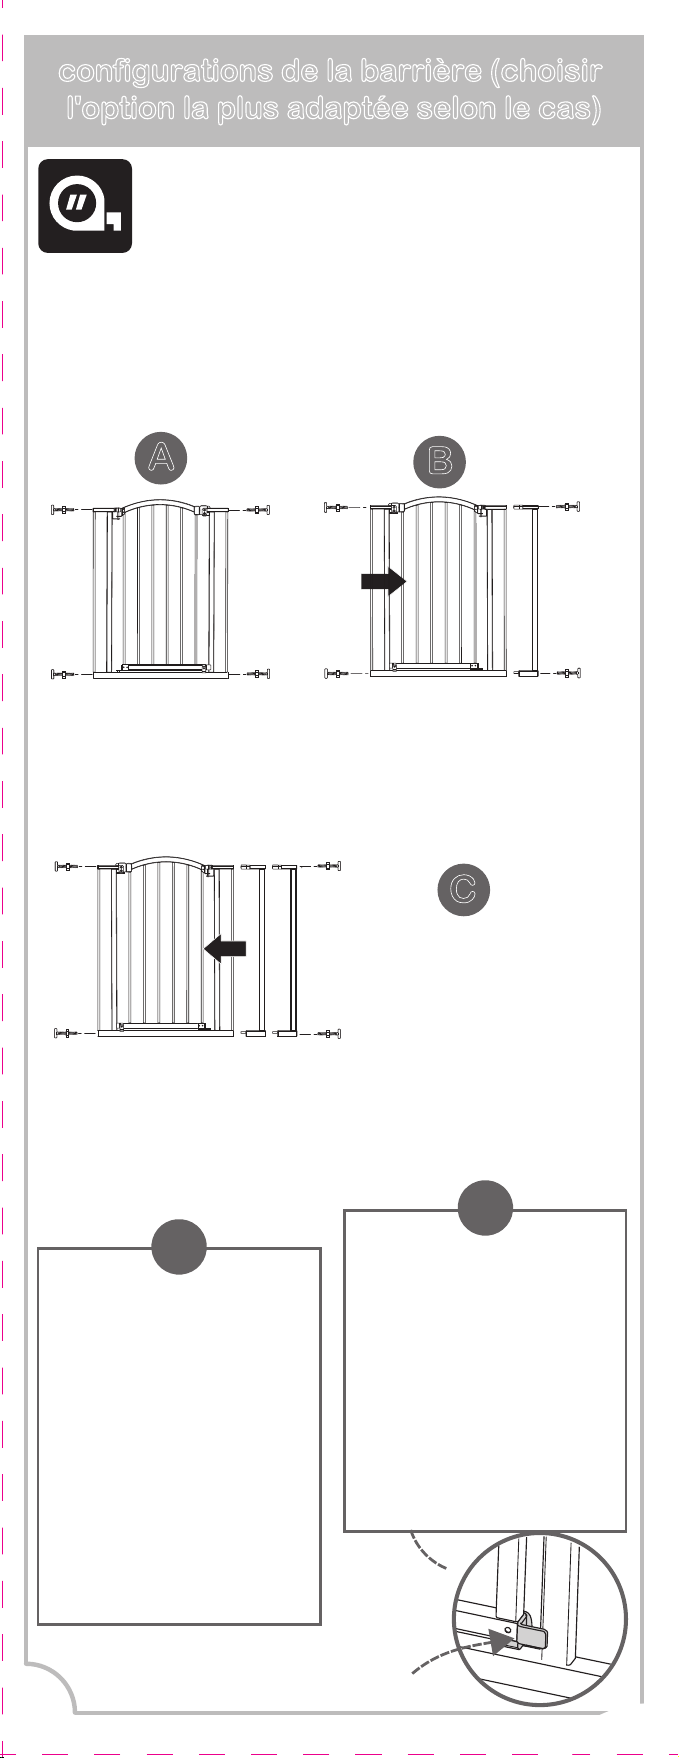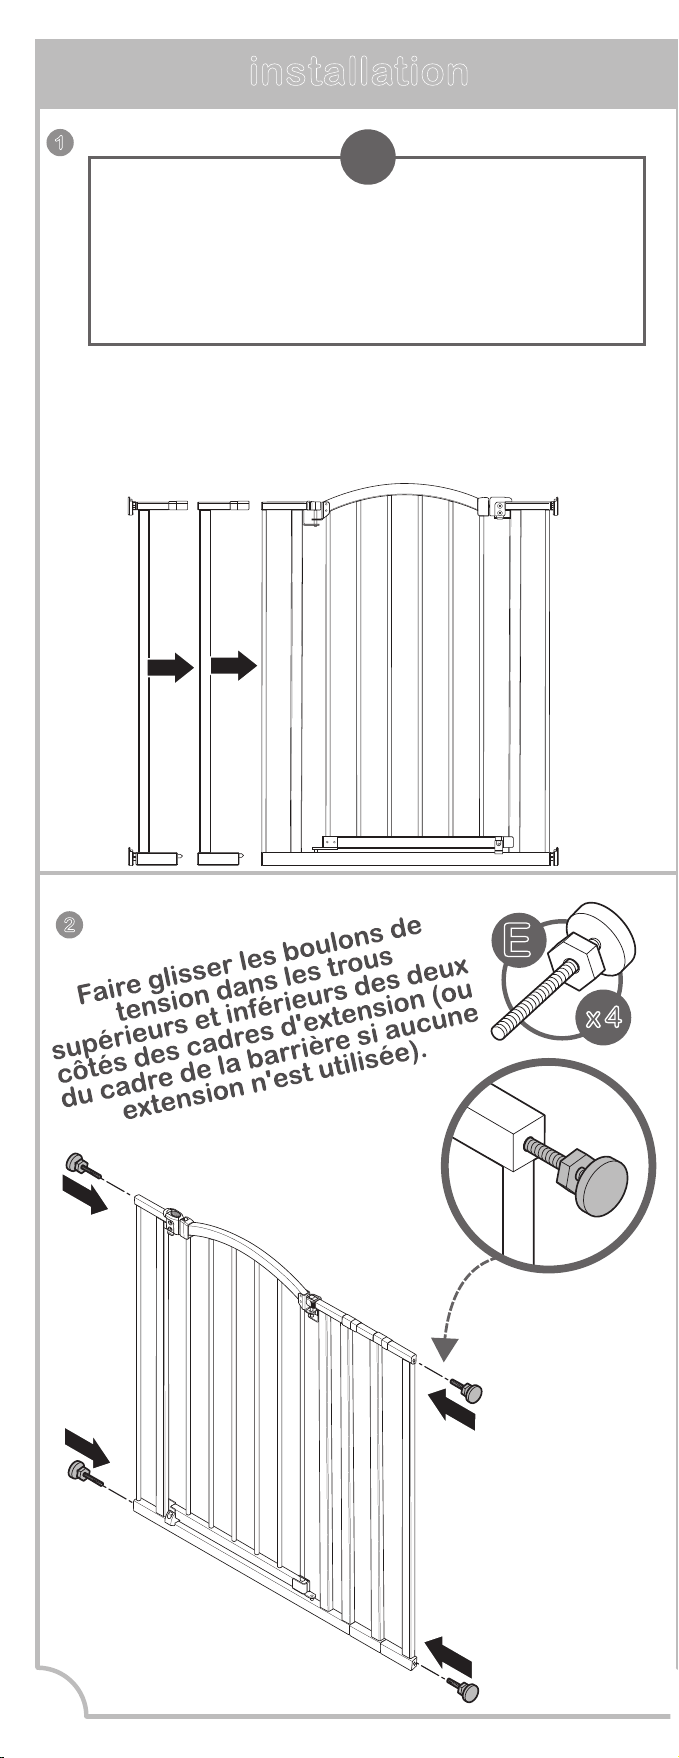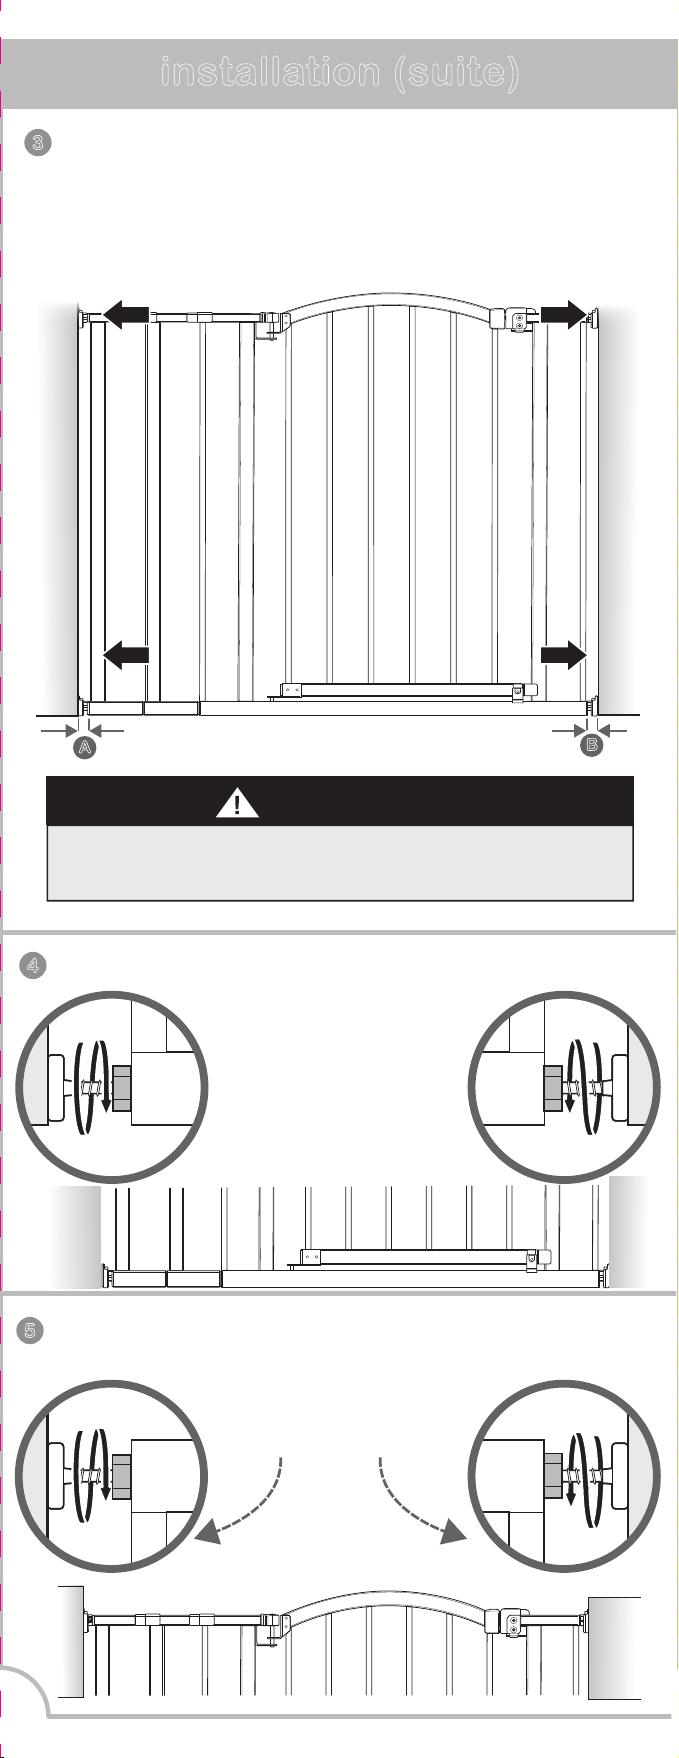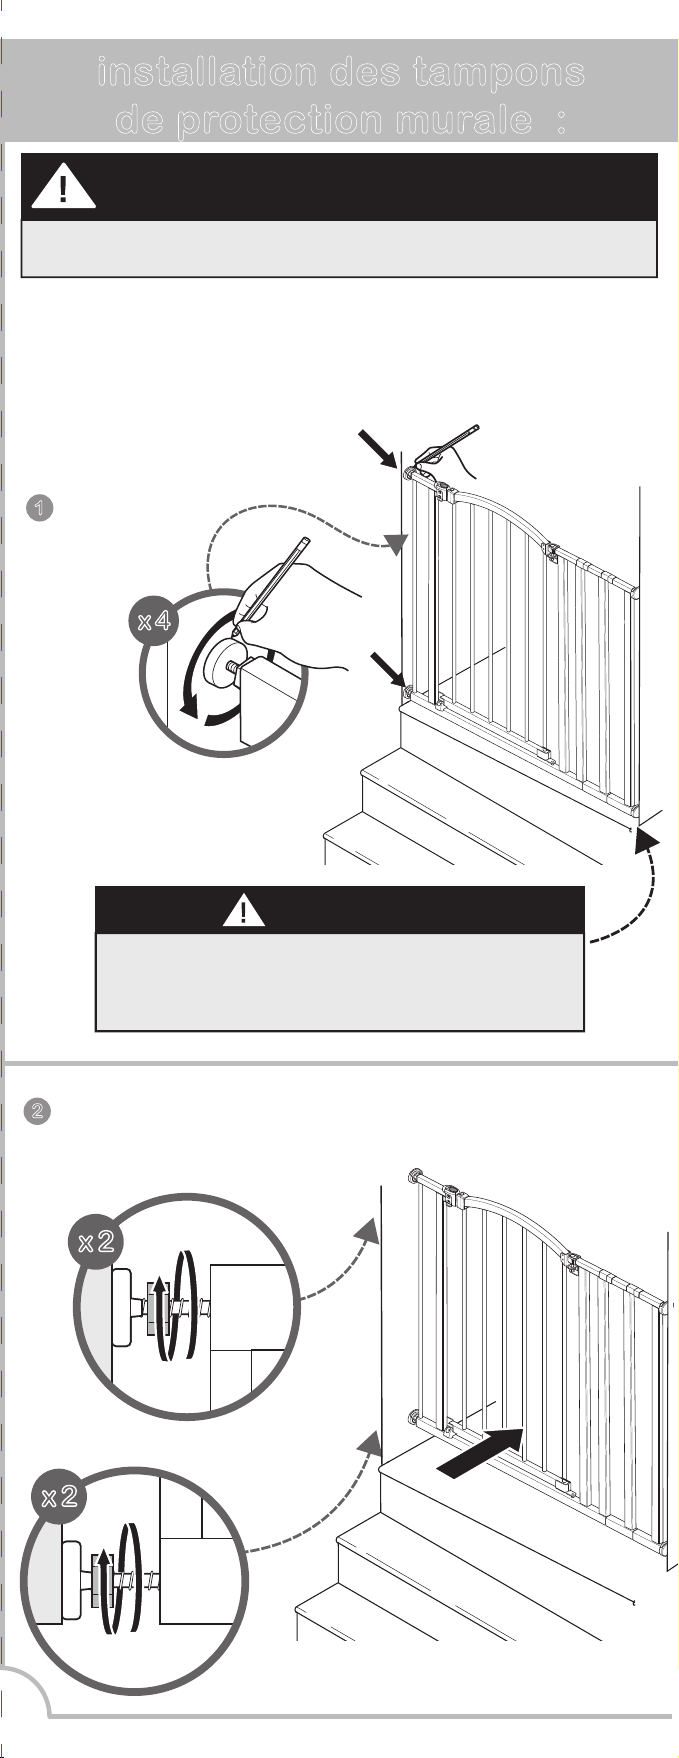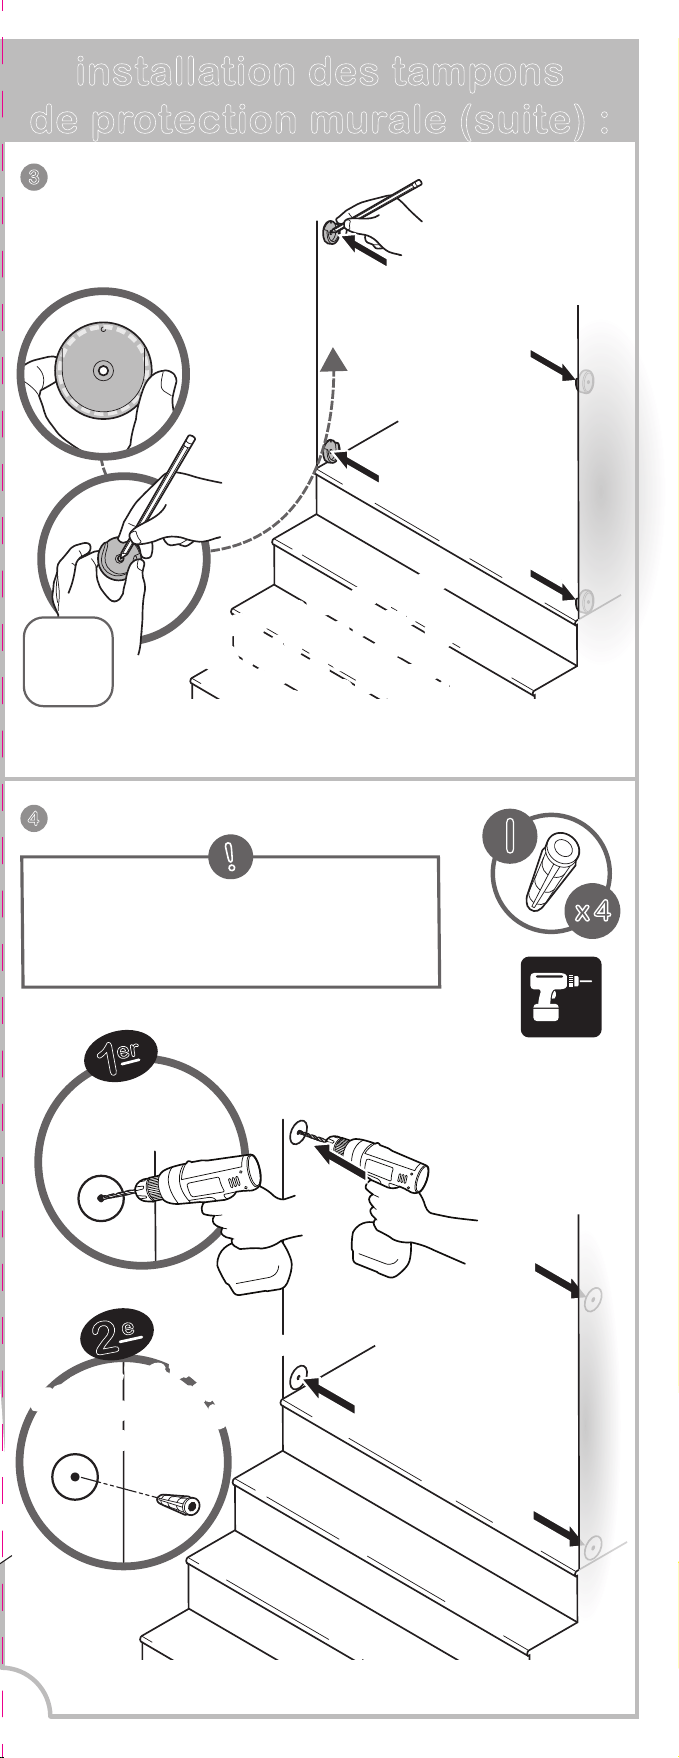
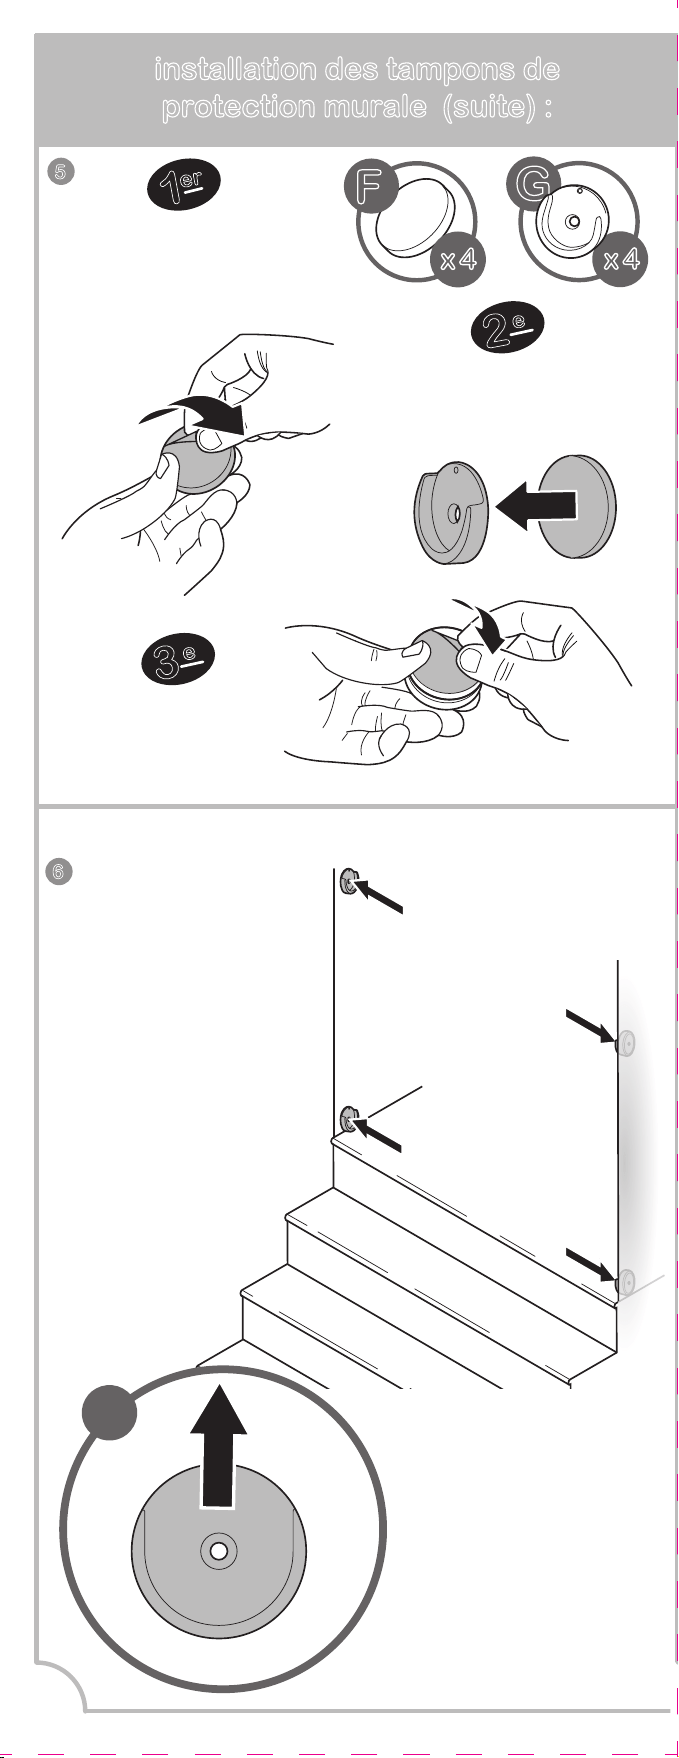
installation des tampons de
protection murale (suite) :
installation des tampons de
protection murale (suite) :
installation des tampons de
protection murale (suite) :
Les couleurs
et modèles peuvent varier.
FABRIQUÉ EN CHINE.
D0000000854 1/21
Summer Infant Canada
200 First Gulf Blvd., Unit C
Brampton, Ontario, Canada, L6W 4T5
1-905-456-8484
© 2020 Summer Infant (É.-U.), Inc.
• Vérier régulièrement les boulons de tension pour
s'assurer que la barrière est bien en place.
• Ne pas utiliser la barrière si des pièces sont endom
magées ou manquantes.
• Essuyer la surface avec un linge ou une éponge
légèrement humectés de savon doux et d'eau tiède.
butée de porte :
removing fabric seat:removing fabric seat:removing fabric seat:attach to adult chair (cont.):
13
14
15
9
10
11
12
vérification de l'installation :
fonctionnement : dépannage :
Si la barrière ne se ferme pas correctement :
1. La barrière n'est pas correctement alignée dans
l'armature de la porte.
Solution :
Pour ajuster l'alignement de la barrière, desserrer les
quatre boulons de tension et repositionner la barrière pour
qu'elle corresponde à l'image « correcte ».
Serrer de nouveau les boulons de tension.
2. La pression des boulons de tension doit
être ajustée.
Solution :
Desserrer ou resserrer les boulons de tension supérieurs.
S'assurer que le loquet supérieur s'enclenche bien lorsque
la barrière est fermée et qu'il peut être libéré correctement
lorsque la languette de verrouillage est repoussée.
correcte!
incorrecte!
5
1
er
Enlever la pellicule
protectrice sur chaque
côté du coussinet
de montage adhésif.
2
e
Fixer un coussinet au
dos de chaque tampon
de protection murale.
x 4
G
x 4
F
décoller
décoller
3
e
Retirer la
pellicule
protectrice.
6
Aligner les
tampons de
protection
afin que l'orifice
central se trouve
directement sur
l'ancrage mural.
Coller les
tampons de
protection
murale sur le
mur.
appuyer
appuyer
appuyer
appuyer
Vérifier que tous
les tampons
de protection
murale soient
orientés vers le
haut.
!
7
x 4
D
x4
Visser les tampons
de protection murale
dans le mur.
8
NE JAMAIS ouvrir la porte de la
barrière par-dessus les escaliers.
IMPORTANT
Répéter les étapes d'installation de la page 6.
Les 4 boulons de tension reposeront à l'intérieur
de chaque tampon de protection murale.
Serrer les 4 boulons
de tension à l'aide
de la clé appropriée.
9
H
TERMINÉ!
Remarque : Cette barrière comprend des
butées de porte qui empêchent la
barrière de s'ouvrir dans un sens.
!
Lors de l'installation de ce produit en haut
des escaliers, disposer la butée de porte
sur le côté opposé des escaliers.
entretien :
1
er
2
e
Fermer la
barrière.
S'assurer que
les loquets
supérieur et
inférieur se
verrouillent
solidement.
Poussez la barrière et
le cadre pour vérifier la
stabilité.
pour déverrouiller la barrière :
Tout d'abord, faire glisser la
languette de verrouillage
vers l'arrière pour la libérer.
Ensuite, laisser la porte de la
barrière ouverte.
x 4
x 4
pousser!
pousser!
Summer Infant ore un service après-vente pour
tous ses produits. Si vous n’êtes pas pleinement
satisfait(e) ou si vous avez des questions,
communiquez avec notre équipe Relations
Clientèle
au 1-401-671-6551
ou sur
www.summerinfant.com/contact
REMARQUE :
Les vis ne sont requises QUE
pour une installation en haut
d’un escalier.
!

installation des tampons de
protection murale (suite) :
installation des tampons de
protection murale (suite) :
installation des tampons de
protection murale (suite) :
Les couleurs
et modèles peuvent varier.
FABRIQUÉ EN CHINE.
D0000000854 1/21
Summer Infant Canada
200 First Gulf Blvd., Unit C
Brampton, Ontario, Canada, L6W 4T5
1-905-456-8484
© 2020 Summer Infant (É.-U.), Inc.
• Vérier régulièrement les boulons de tension pour
s'assurer que la barrière est bien en place.
• Ne pas utiliser la barrière si des pièces sont endom
magées ou manquantes.
• Essuyer la surface avec un linge ou une éponge
légèrement humectés de savon doux et d'eau tiède.
butée de porte :
removing fabric seat:removing fabric seat:removing fabric seat:attach to adult chair (cont.):
13
14
15
9
10
11
12
vérification de l'installation :
fonctionnement : dépannage :
Si la barrière ne se ferme pas correctement :
1. La barrière n'est pas correctement alignée dans
l'armature de la porte.
Solution :
Pour ajuster l'alignement de la barrière, desserrer les
quatre boulons de tension et repositionner la barrière pour
qu'elle corresponde à l'image « correcte ».
Serrer de nouveau les boulons de tension.
2. La pression des boulons de tension doit
être ajustée.
Solution :
Desserrer ou resserrer les boulons de tension supérieurs.
S'assurer que le loquet supérieur s'enclenche bien lorsque
la barrière est fermée et qu'il peut être libéré correctement
lorsque la languette de verrouillage est repoussée.
correcte!
incorrecte!
5
1
er
Enlever la pellicule
protectrice sur chaque
côté du coussinet
de montage adhésif.
2
e
Fixer un coussinet au
dos de chaque tampon
de protection murale.
x 4
G
x 4
F
décoller
décoller
3
e
Retirer la
pellicule
protectrice.
6
Aligner les
tampons de
protection
afin que l'orifice
central se trouve
directement sur
l'ancrage mural.
Coller les
tampons de
protection
murale sur le
mur.
appuyer
appuyer
appuyer
appuyer
Vérifier que tous
les tampons
de protection
murale soient
orientés vers le
haut.
!
7
x 4
D
x4
Visser les tampons
de protection murale
dans le mur.
8
NE JAMAIS ouvrir la porte de la
barrière par-dessus les escaliers.
IMPORTANT
Répéter les étapes d'installation de la page 6.
Les 4 boulons de tension reposeront à l'intérieur
de chaque tampon de protection murale.
Serrer les 4 boulons
de tension à l'aide
de la clé appropriée.
9
H
TERMINÉ!
Remarque : Cette barrière comprend des
butées de porte qui empêchent la
barrière de s'ouvrir dans un sens.
!
Lors de l'installation de ce produit en haut
des escaliers, disposer la butée de porte
sur le côté opposé des escaliers.
entretien :
1
er
2
e
Fermer la
barrière.
S'assurer que
les loquets
supérieur et
inférieur se
verrouillent
solidement.
Poussez la barrière et
le cadre pour vérifier la
stabilité.
pour déverrouiller la barrière :
Tout d'abord, faire glisser la
languette de verrouillage
vers l'arrière pour la libérer.
Ensuite, laisser la porte de la
barrière ouverte.
x 4
x 4
pousser!
pousser!
Summer Infant ore un service après-vente pour
tous ses produits. Si vous n’êtes pas pleinement
satisfait(e) ou si vous avez des questions,
communiquez avec notre équipe Relations
Clientèle
au 1-401-671-6551
ou sur
www.summerinfant.com/contact
REMARQUE :
Les vis ne sont requises QUE
pour une installation en haut
d’un escalier.
!
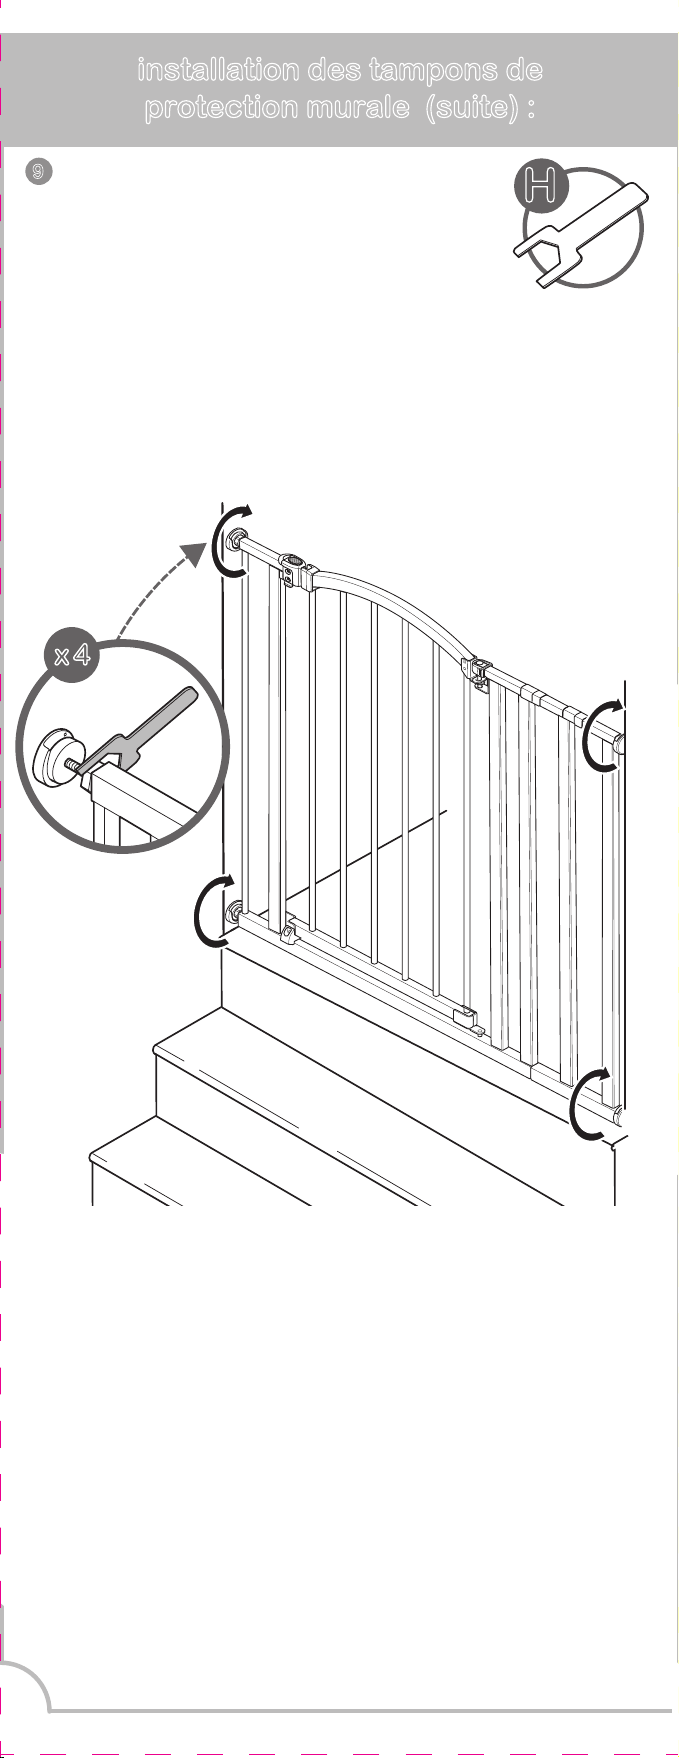
installation des tampons de
protection murale (suite) :
installation des tampons de
protection murale (suite) :
installation des tampons de
protection murale (suite) :
Les couleurs
et modèles peuvent varier.
FABRIQUÉ EN CHINE.
D0000000854 1/21
Summer Infant Canada
200 First Gulf Blvd., Unit C
Brampton, Ontario, Canada, L6W 4T5
1-905-456-8484
© 2020 Summer Infant (É.-U.), Inc.
• Vérier régulièrement les boulons de tension pour
s'assurer que la barrière est bien en place.
• Ne pas utiliser la barrière si des pièces sont endom
magées ou manquantes.
• Essuyer la surface avec un linge ou une éponge
légèrement humectés de savon doux et d'eau tiède.
butée de porte :
removing fabric seat:removing fabric seat:removing fabric seat:attach to adult chair (cont.):
13
14
15
9
10
11
12
vérification de l'installation :
fonctionnement : dépannage :
Si la barrière ne se ferme pas correctement :
1. La barrière n'est pas correctement alignée dans
l'armature de la porte.
Solution :
Pour ajuster l'alignement de la barrière, desserrer les
quatre boulons de tension et repositionner la barrière pour
qu'elle corresponde à l'image « correcte ».
Serrer de nouveau les boulons de tension.
2. La pression des boulons de tension doit
être ajustée.
Solution :
Desserrer ou resserrer les boulons de tension supérieurs.
S'assurer que le loquet supérieur s'enclenche bien lorsque
la barrière est fermée et qu'il peut être libéré correctement
lorsque la languette de verrouillage est repoussée.
correcte!
incorrecte!
5
1
er
Enlever la pellicule
protectrice sur chaque
côté du coussinet
de montage adhésif.
2
e
Fixer un coussinet au
dos de chaque tampon
de protection murale.
x 4
G
x 4
F
décoller
décoller
3
e
Retirer la
pellicule
protectrice.
6
Aligner les
tampons de
protection
afin que l'orifice
central se trouve
directement sur
l'ancrage mural.
Coller les
tampons de
protection
murale sur le
mur.
appuyer
appuyer
appuyer
appuyer
Vérifier que tous
les tampons
de protection
murale soient
orientés vers le
haut.
!
7
x 4
D
x4
Visser les tampons
de protection murale
dans le mur.
8
NE JAMAIS ouvrir la porte de la
barrière par-dessus les escaliers.
IMPORTANT
Répéter les étapes d'installation de la page 6.
Les 4 boulons de tension reposeront à l'intérieur
de chaque tampon de protection murale.
Serrer les 4 boulons
de tension à l'aide
de la clé appropriée.
9
H
TERMINÉ!
Remarque : Cette barrière comprend des
butées de porte qui empêchent la
barrière de s'ouvrir dans un sens.
!
Lors de l'installation de ce produit en haut
des escaliers, disposer la butée de porte
sur le côté opposé des escaliers.
entretien :
1
er
2
e
Fermer la
barrière.
S'assurer que
les loquets
supérieur et
inférieur se
verrouillent
solidement.
Poussez la barrière et
le cadre pour vérifier la
stabilité.
pour déverrouiller la barrière :
Tout d'abord, faire glisser la
languette de verrouillage
vers l'arrière pour la libérer.
Ensuite, laisser la porte de la
barrière ouverte.
x 4
x 4
pousser!
pousser!
Summer Infant ore un service après-vente pour
tous ses produits. Si vous n’êtes pas pleinement
satisfait(e) ou si vous avez des questions,
communiquez avec notre équipe Relations
Clientèle
au 1-401-671-6551
ou sur
www.summerinfant.com/contact
REMARQUE :
Les vis ne sont requises QUE
pour une installation en haut
d’un escalier.
!
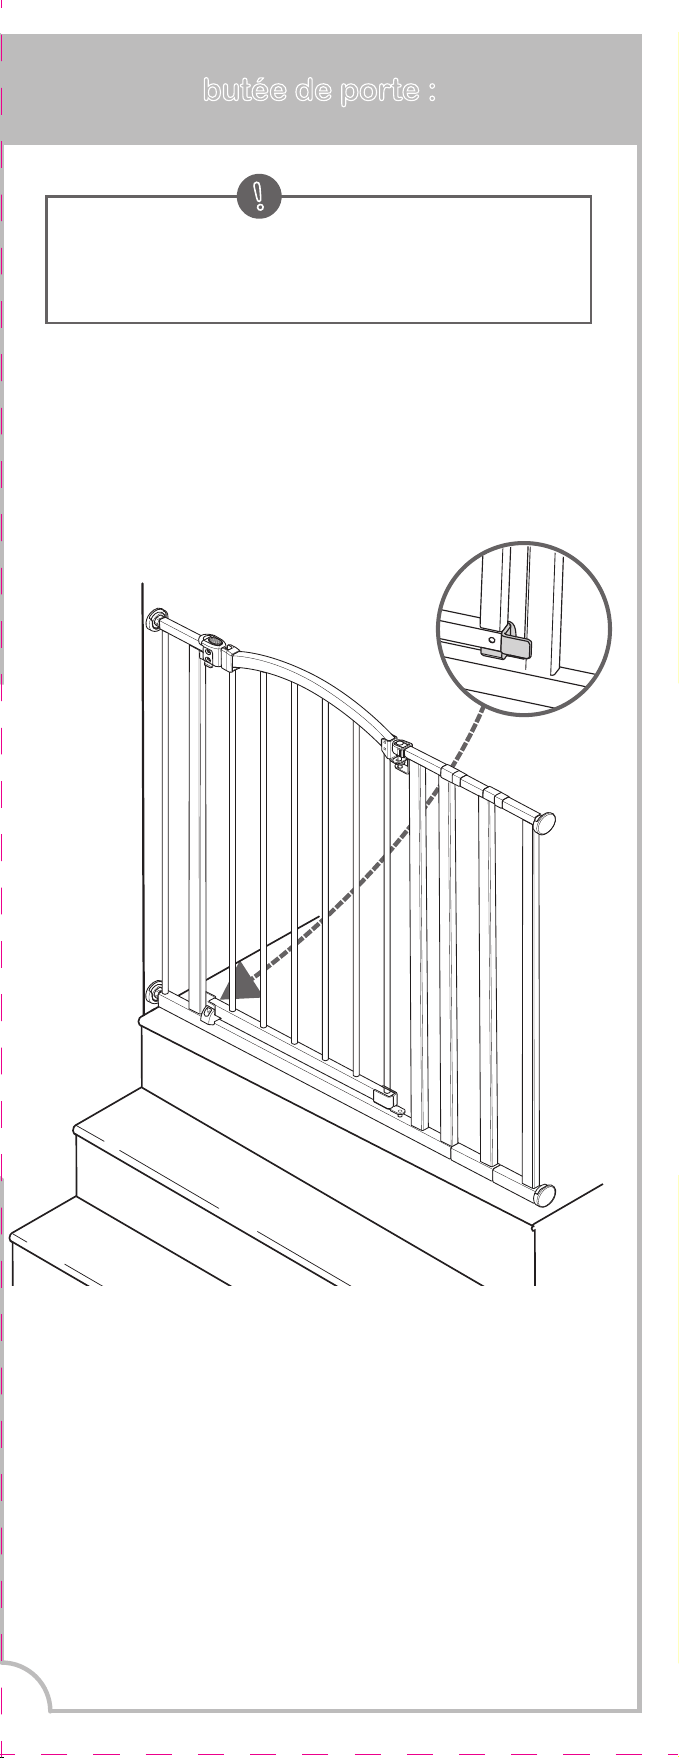
installation des tampons de
protection murale (suite) :
installation des tampons de
protection murale (suite) :
installation des tampons de
protection murale (suite) :
Les couleurs
et modèles peuvent varier.
FABRIQUÉ EN CHINE.
D0000000854 1/21
Summer Infant Canada
200 First Gulf Blvd., Unit C
Brampton, Ontario, Canada, L6W 4T5
1-905-456-8484
© 2020 Summer Infant (É.-U.), Inc.
• Vérier régulièrement les boulons de tension pour
s'assurer que la barrière est bien en place.
• Ne pas utiliser la barrière si des pièces sont endom
magées ou manquantes.
• Essuyer la surface avec un linge ou une éponge
légèrement humectés de savon doux et d'eau tiède.
butée de porte :
removing fabric seat:removing fabric seat:removing fabric seat:attach to adult chair (cont.):
13
14
15
9
10
11
12
vérification de l'installation :
fonctionnement : dépannage :
Si la barrière ne se ferme pas correctement :
1. La barrière n'est pas correctement alignée dans
l'armature de la porte.
Solution :
Pour ajuster l'alignement de la barrière, desserrer les
quatre boulons de tension et repositionner la barrière pour
qu'elle corresponde à l'image « correcte ».
Serrer de nouveau les boulons de tension.
2. La pression des boulons de tension doit
être ajustée.
Solution :
Desserrer ou resserrer les boulons de tension supérieurs.
S'assurer que le loquet supérieur s'enclenche bien lorsque
la barrière est fermée et qu'il peut être libéré correctement
lorsque la languette de verrouillage est repoussée.
correcte!
incorrecte!
5
1
er
Enlever la pellicule
protectrice sur chaque
côté du coussinet
de montage adhésif.
2
e
Fixer un coussinet au
dos de chaque tampon
de protection murale.
x 4
G
x 4
F
décoller
décoller
3
e
Retirer la
pellicule
protectrice.
6
Aligner les
tampons de
protection
afin que l'orifice
central se trouve
directement sur
l'ancrage mural.
Coller les
tampons de
protection
murale sur le
mur.
appuyer
appuyer
appuyer
appuyer
Vérifier que tous
les tampons
de protection
murale soient
orientés vers le
haut.
!
7
x 4
D
x4
Visser les tampons
de protection murale
dans le mur.
8
NE JAMAIS ouvrir la porte de la
barrière par-dessus les escaliers.
IMPORTANT
Répéter les étapes d'installation de la page 6.
Les 4 boulons de tension reposeront à l'intérieur
de chaque tampon de protection murale.
Serrer les 4 boulons
de tension à l'aide
de la clé appropriée.
9
H
TERMINÉ!
Remarque : Cette barrière comprend des
butées de porte qui empêchent la
barrière de s'ouvrir dans un sens.
!
Lors de l'installation de ce produit en haut
des escaliers, disposer la butée de porte
sur le côté opposé des escaliers.
entretien :
1
er
2
e
Fermer la
barrière.
S'assurer que
les loquets
supérieur et
inférieur se
verrouillent
solidement.
Poussez la barrière et
le cadre pour vérifier la
stabilité.
pour déverrouiller la barrière :
Tout d'abord, faire glisser la
languette de verrouillage
vers l'arrière pour la libérer.
Ensuite, laisser la porte de la
barrière ouverte.
x 4
x 4
pousser!
pousser!
Summer Infant ore un service après-vente pour
tous ses produits. Si vous n’êtes pas pleinement
satisfait(e) ou si vous avez des questions,
communiquez avec notre équipe Relations
Clientèle
au 1-401-671-6551
ou sur
www.summerinfant.com/contact
REMARQUE :
Les vis ne sont requises QUE
pour une installation en haut
d’un escalier.
!
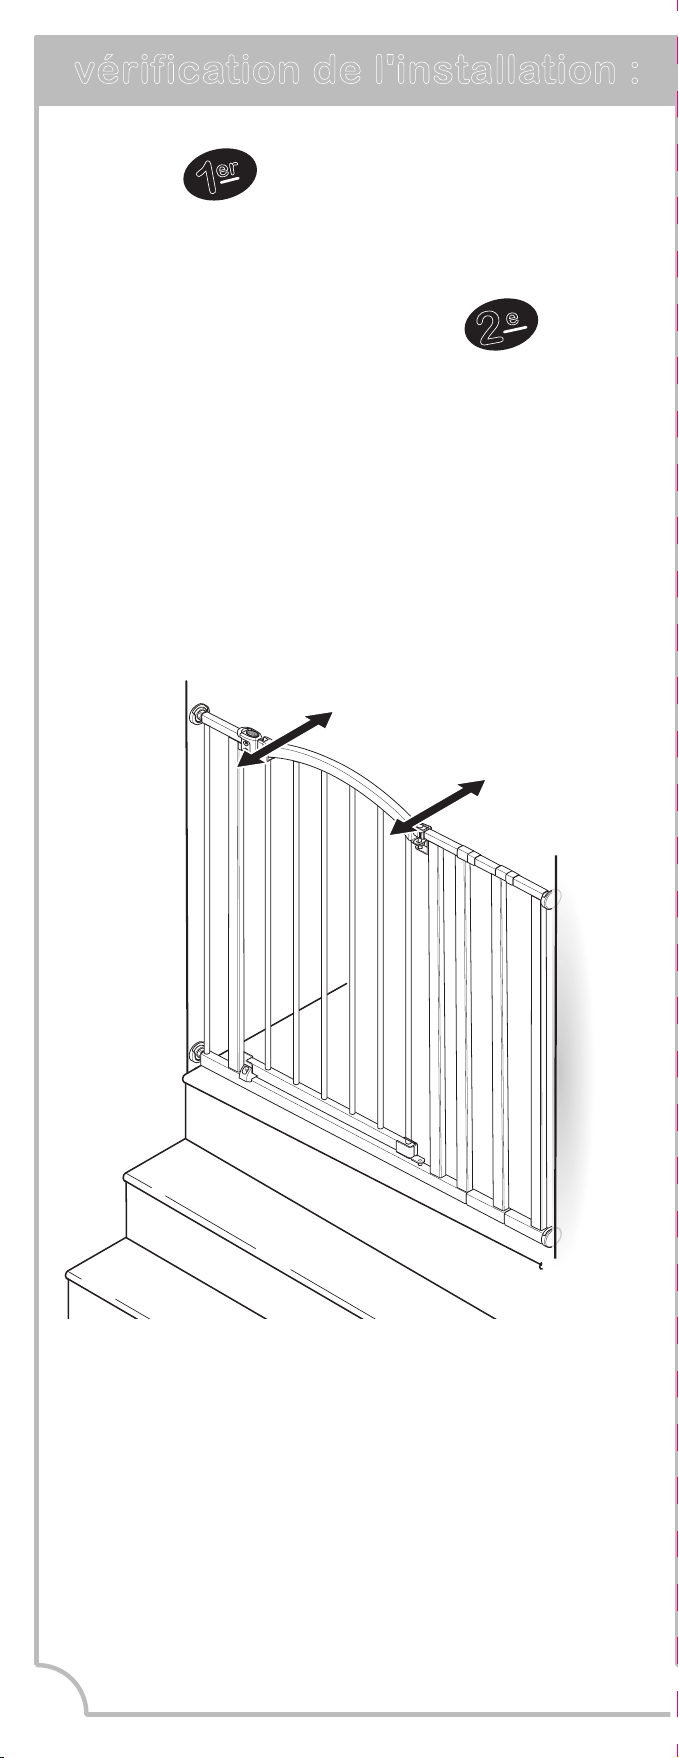
installation des tampons de
protection murale (suite) :
installation des tampons de
protection murale (suite) :
installation des tampons de
protection murale (suite) :
Les couleurs
et modèles peuvent varier.
FABRIQUÉ EN CHINE.
D0000000854 1/21
Summer Infant Canada
200 First Gulf Blvd., Unit C
Brampton, Ontario, Canada, L6W 4T5
1-905-456-8484
© 2020 Summer Infant (É.-U.), Inc.
• Vérier régulièrement les boulons de tension pour
s'assurer que la barrière est bien en place.
• Ne pas utiliser la barrière si des pièces sont endom
magées ou manquantes.
• Essuyer la surface avec un linge ou une éponge
légèrement humectés de savon doux et d'eau tiède.
butée de porte :
removing fabric seat:removing fabric seat:removing fabric seat:attach to adult chair (cont.):
13
14
15
9
10
11
12
vérification de l'installation :
fonctionnement : dépannage :
Si la barrière ne se ferme pas correctement :
1. La barrière n'est pas correctement alignée dans
l'armature de la porte.
Solution :
Pour ajuster l'alignement de la barrière, desserrer les
quatre boulons de tension et repositionner la barrière pour
qu'elle corresponde à l'image « correcte ».
Serrer de nouveau les boulons de tension.
2. La pression des boulons de tension doit
être ajustée.
Solution :
Desserrer ou resserrer les boulons de tension supérieurs.
S'assurer que le loquet supérieur s'enclenche bien lorsque
la barrière est fermée et qu'il peut être libéré correctement
lorsque la languette de verrouillage est repoussée.
correcte!
incorrecte!
5
1
er
Enlever la pellicule
protectrice sur chaque
côté du coussinet
de montage adhésif.
2
e
Fixer un coussinet au
dos de chaque tampon
de protection murale.
x 4
G
x 4
F
décoller
décoller
3
e
Retirer la
pellicule
protectrice.
6
Aligner les
tampons de
protection
afin que l'orifice
central se trouve
directement sur
l'ancrage mural.
Coller les
tampons de
protection
murale sur le
mur.
appuyer
appuyer
appuyer
appuyer
Vérifier que tous
les tampons
de protection
murale soient
orientés vers le
haut.
!
7
x 4
D
x4
Visser les tampons
de protection murale
dans le mur.
8
NE JAMAIS ouvrir la porte de la
barrière par-dessus les escaliers.
IMPORTANT
Répéter les étapes d'installation de la page 6.
Les 4 boulons de tension reposeront à l'intérieur
de chaque tampon de protection murale.
Serrer les 4 boulons
de tension à l'aide
de la clé appropriée.
9
H
TERMINÉ!
Remarque : Cette barrière comprend des
butées de porte qui empêchent la
barrière de s'ouvrir dans un sens.
!
Lors de l'installation de ce produit en haut
des escaliers, disposer la butée de porte
sur le côté opposé des escaliers.
entretien :
1
er
2
e
Fermer la
barrière.
S'assurer que
les loquets
supérieur et
inférieur se
verrouillent
solidement.
Poussez la barrière et
le cadre pour vérifier la
stabilité.
pour déverrouiller la barrière :
Tout d'abord, faire glisser la
languette de verrouillage
vers l'arrière pour la libérer.
Ensuite, laisser la porte de la
barrière ouverte.
x 4
x 4
pousser!
pousser!
Summer Infant ore un service après-vente pour
tous ses produits. Si vous n’êtes pas pleinement
satisfait(e) ou si vous avez des questions,
communiquez avec notre équipe Relations
Clientèle
au 1-401-671-6551
ou sur
www.summerinfant.com/contact
REMARQUE :
Les vis ne sont requises QUE
pour une installation en haut
d’un escalier.
!
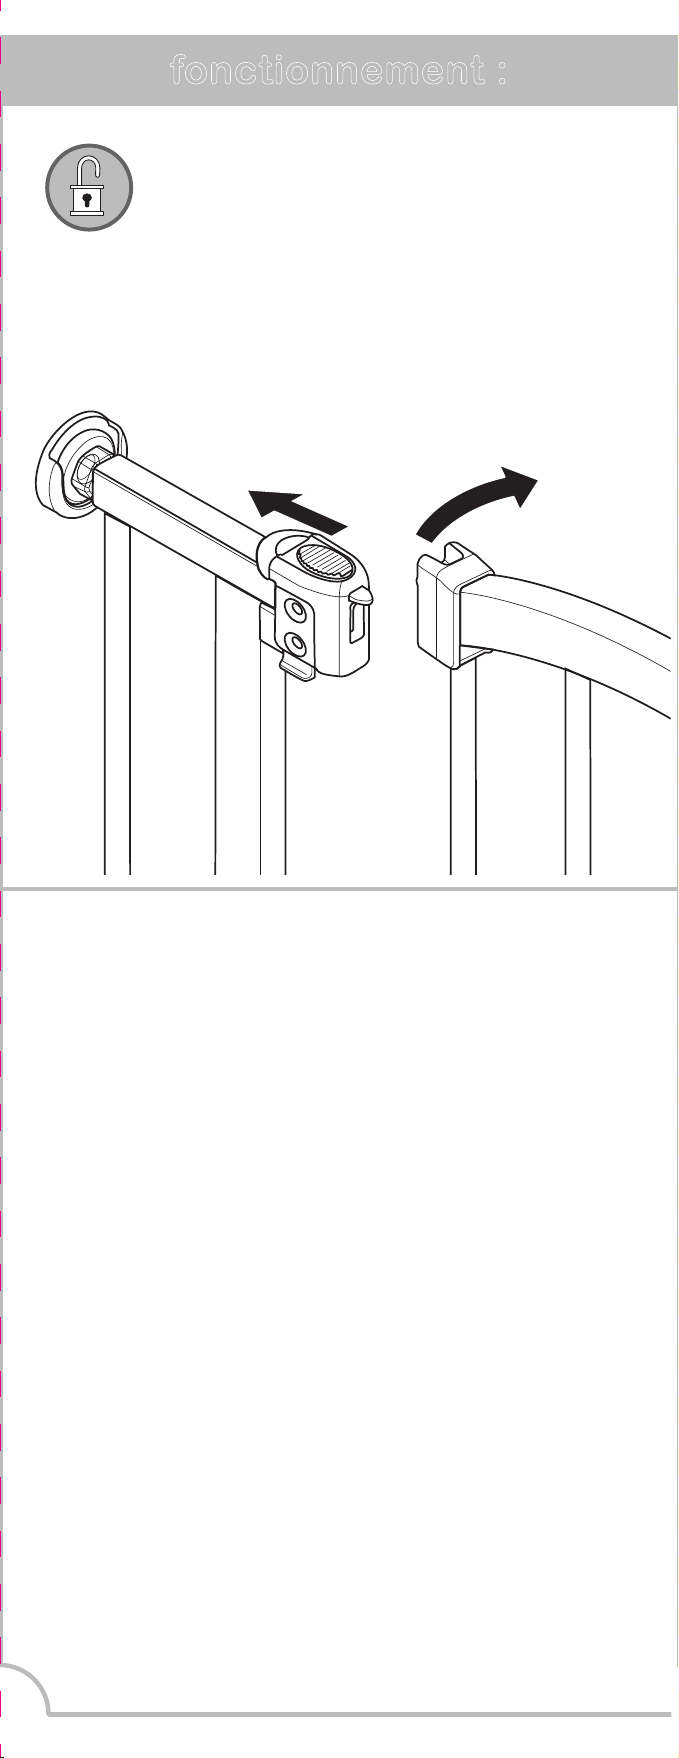
installation des tampons de
protection murale (suite) :
installation des tampons de
protection murale (suite) :
installation des tampons de
protection murale (suite) :
Les couleurs
et modèles peuvent varier.
FABRIQUÉ EN CHINE.
D0000000854 1/21
Summer Infant Canada
200 First Gulf Blvd., Unit C
Brampton, Ontario, Canada, L6W 4T5
1-905-456-8484
© 2020 Summer Infant (É.-U.), Inc.
• Vérier régulièrement les boulons de tension pour
s'assurer que la barrière est bien en place.
• Ne pas utiliser la barrière si des pièces sont endom
magées ou manquantes.
• Essuyer la surface avec un linge ou une éponge
légèrement humectés de savon doux et d'eau tiède.
butée de porte :
removing fabric seat:removing fabric seat:removing fabric seat:attach to adult chair (cont.):
13
14
15
9
10
11
12
vérification de l'installation :
fonctionnement : dépannage :
Si la barrière ne se ferme pas correctement :
1. La barrière n'est pas correctement alignée dans
l'armature de la porte.
Solution :
Pour ajuster l'alignement de la barrière, desserrer les
quatre boulons de tension et repositionner la barrière pour
qu'elle corresponde à l'image « correcte ».
Serrer de nouveau les boulons de tension.
2. La pression des boulons de tension doit
être ajustée.
Solution :
Desserrer ou resserrer les boulons de tension supérieurs.
S'assurer que le loquet supérieur s'enclenche bien lorsque
la barrière est fermée et qu'il peut être libéré correctement
lorsque la languette de verrouillage est repoussée.
correcte!
incorrecte!
5
1
er
Enlever la pellicule
protectrice sur chaque
côté du coussinet
de montage adhésif.
2
e
Fixer un coussinet au
dos de chaque tampon
de protection murale.
x 4
G
x 4
F
décoller
décoller
3
e
Retirer la
pellicule
protectrice.
6
Aligner les
tampons de
protection
afin que l'orifice
central se trouve
directement sur
l'ancrage mural.
Coller les
tampons de
protection
murale sur le
mur.
appuyer
appuyer
appuyer
appuyer
Vérifier que tous
les tampons
de protection
murale soient
orientés vers le
haut.
!
7
x 4
D
x4
Visser les tampons
de protection murale
dans le mur.
8
NE JAMAIS ouvrir la porte de la
barrière par-dessus les escaliers.
IMPORTANT
Répéter les étapes d'installation de la page 6.
Les 4 boulons de tension reposeront à l'intérieur
de chaque tampon de protection murale.
Serrer les 4 boulons
de tension à l'aide
de la clé appropriée.
9
H
TERMINÉ!
Remarque : Cette barrière comprend des
butées de porte qui empêchent la
barrière de s'ouvrir dans un sens.
!
Lors de l'installation de ce produit en haut
des escaliers, disposer la butée de porte
sur le côté opposé des escaliers.
entretien :
1
er
2
e
Fermer la
barrière.
S'assurer que
les loquets
supérieur et
inférieur se
verrouillent
solidement.
Poussez la barrière et
le cadre pour vérifier la
stabilité.
pour déverrouiller la barrière :
Tout d'abord, faire glisser la
languette de verrouillage
vers l'arrière pour la libérer.
Ensuite, laisser la porte de la
barrière ouverte.
x 4
x 4
pousser!
pousser!
Summer Infant ore un service après-vente pour
tous ses produits. Si vous n’êtes pas pleinement
satisfait(e) ou si vous avez des questions,
communiquez avec notre équipe Relations
Clientèle
au 1-401-671-6551
ou sur
www.summerinfant.com/contact
REMARQUE :
Les vis ne sont requises QUE
pour une installation en haut
d’un escalier.
!
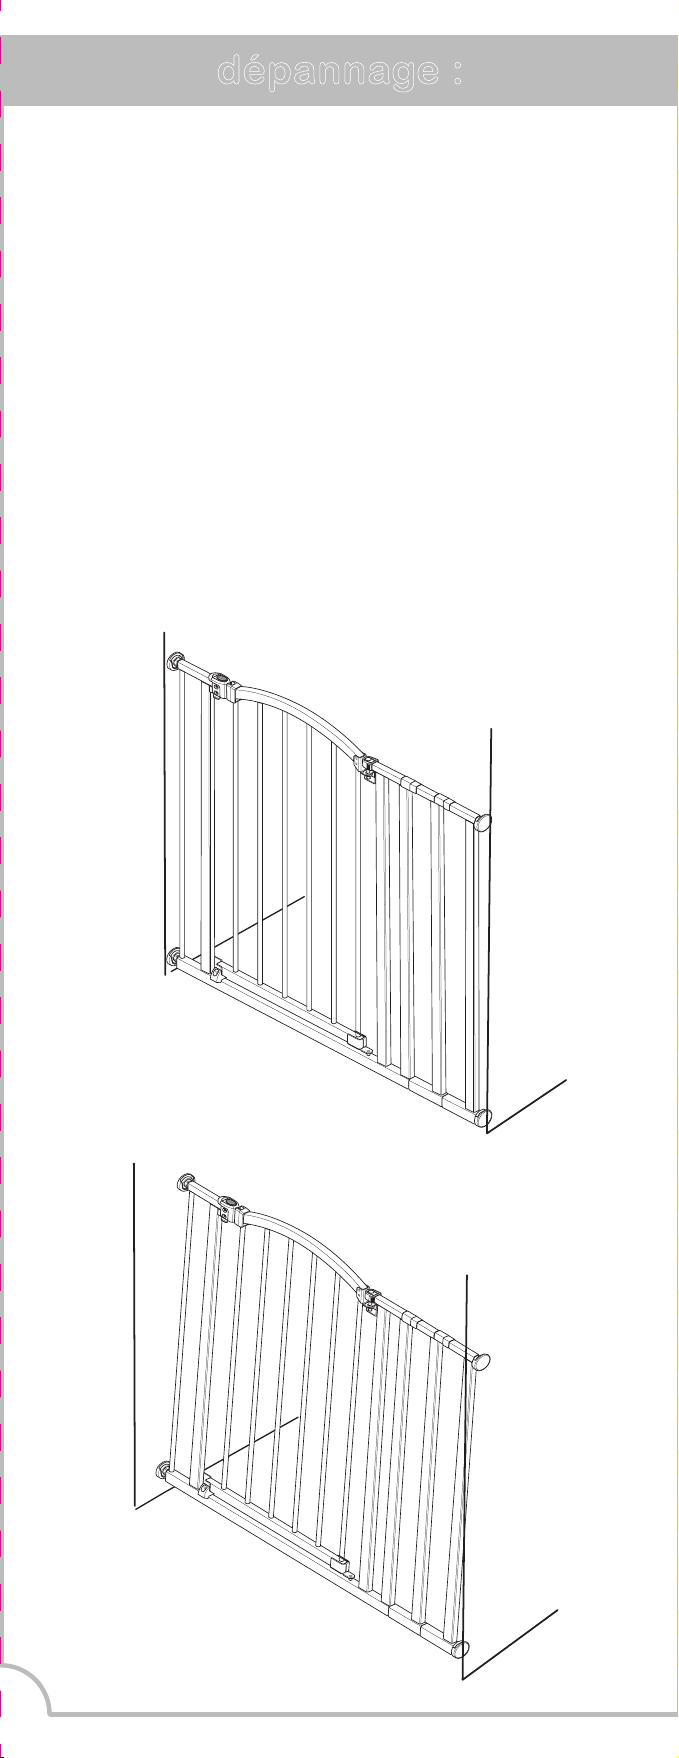
installation des tampons de
protection murale (suite) :
installation des tampons de
protection murale (suite) :
installation des tampons de
protection murale (suite) :
Les couleurs
et modèles peuvent varier.
FABRIQUÉ EN CHINE.
D0000000854 1/21
Summer Infant Canada
200 First Gulf Blvd., Unit C
Brampton, Ontario, Canada, L6W 4T5
1-905-456-8484
© 2020 Summer Infant (É.-U.), Inc.
• Vérier régulièrement les boulons de tension pour
s'assurer que la barrière est bien en place.
• Ne pas utiliser la barrière si des pièces sont endom
magées ou manquantes.
• Essuyer la surface avec un linge ou une éponge
légèrement humectés de savon doux et d'eau tiède.
butée de porte :
removing fabric seat:removing fabric seat:removing fabric seat:attach to adult chair (cont.):
13
14
15
9
10
11
12
vérification de l'installation :
fonctionnement : dépannage :
Si la barrière ne se ferme pas correctement :
1. La barrière n'est pas correctement alignée dans
l'armature de la porte.
Solution :
Pour ajuster l'alignement de la barrière, desserrer les
quatre boulons de tension et repositionner la barrière pour
qu'elle corresponde à l'image « correcte ».
Serrer de nouveau les boulons de tension.
2. La pression des boulons de tension doit
être ajustée.
Solution :
Desserrer ou resserrer les boulons de tension supérieurs.
S'assurer que le loquet supérieur s'enclenche bien lorsque
la barrière est fermée et qu'il peut être libéré correctement
lorsque la languette de verrouillage est repoussée.
correcte!
incorrecte!
5
1
er
Enlever la pellicule
protectrice sur chaque
côté du coussinet
de montage adhésif.
2
e
Fixer un coussinet au
dos de chaque tampon
de protection murale.
x 4
G
x 4
F
décoller
décoller
3
e
Retirer la
pellicule
protectrice.
6
Aligner les
tampons de
protection
afin que l'orifice
central se trouve
directement sur
l'ancrage mural.
Coller les
tampons de
protection
murale sur le
mur.
appuyer
appuyer
appuyer
appuyer
Vérifier que tous
les tampons
de protection
murale soient
orientés vers le
haut.
!
7
x 4
D
x4
Visser les tampons
de protection murale
dans le mur.
8
NE JAMAIS ouvrir la porte de la
barrière par-dessus les escaliers.
IMPORTANT
Répéter les étapes d'installation de la page 6.
Les 4 boulons de tension reposeront à l'intérieur
de chaque tampon de protection murale.
Serrer les 4 boulons
de tension à l'aide
de la clé appropriée.
9
H
TERMINÉ!
Remarque : Cette barrière comprend des
butées de porte qui empêchent la
barrière de s'ouvrir dans un sens.
!
Lors de l'installation de ce produit en haut
des escaliers, disposer la butée de porte
sur le côté opposé des escaliers.
entretien :
1
er
2
e
Fermer la
barrière.
S'assurer que
les loquets
supérieur et
inférieur se
verrouillent
solidement.
Poussez la barrière et
le cadre pour vérifier la
stabilité.
pour déverrouiller la barrière :
Tout d'abord, faire glisser la
languette de verrouillage
vers l'arrière pour la libérer.
Ensuite, laisser la porte de la
barrière ouverte.
x 4
x 4
pousser!
pousser!
Summer Infant ore un service après-vente pour
tous ses produits. Si vous n’êtes pas pleinement
satisfait(e) ou si vous avez des questions,
communiquez avec notre équipe Relations
Clientèle
au 1-401-671-6551
ou sur
www.summerinfant.com/contact
REMARQUE :
Les vis ne sont requises QUE
pour une installation en haut
d’un escalier.
!