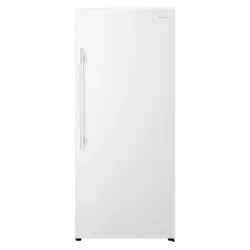
Model: FC-1591W
5.9 CU. FT Upright Freezer - User Manual
Manual de usuario
Manuel de l’utilisateur
www.impecca.com
v 1.6

TABLE OF CONTENTS
Important Safety Guidelines ...............................................................................................................3
Getting Started
.......................................................................................................................................4
Installing Your Appliance
.....................................................................................................................4
Unit Overview and Featues...................................................................................................................5
Initial Operation
.....................................................................................................................................6
Cleaning & Caring Your Appliance
......................................................................................................6
Door Reversal
.........................................................................................................................................7
Additional Tips & Best Practices
.........................................................................................................9
Troubleshooting
................................................................................................................................. 10
Product Specifications
...................................................................................................................... 11
Customer Support
.............................................................................................................................. 11
One Year Limited Warranty
............................................................................................................... 12
Spanish.................................................................................................................................................14
–6–
ENGLISH ESPAÑOL FRANÇAIS
INITIAL OPERATION
Instructions in this guide generay appy to both modes uness otherwise noted. Clean the unit before first use (see
the next section for cleaning instructions). Aer cleaning, plug the unit into its power source. Do not turn on the unit if
it has been moved within the past 2 hours, as the cooling fluid needs time to settle.
When the freezer is plugged in for the first time, or after defrosting, adjust the thermostat control knob to the highest
setting Dyfor at least 2 hours before adding food.
After it is fully cooled, adjust the knob to best suit your needs. D/E is the least cool and Dy is the coolest setting. A
setting of EKZD> should be appropriate for most home or office use. Warmer environments may be more likely to
require higher settings. Cooler or winter environments may be better suited to a lower setting.
NOTE: Turning the thermostat control knob to the D/E or “OFF” position may stop the cooling cycle but does
not shut off the power to the unit.
CLEANING & CARING FOR YOUR APPLIANCE
Always disconnect the power before cleaning the appliance.
Wipe the inside of the unit with a weak solution of baking soda (bicarbonate). Then rinse with warm water (never hot
or boiling) using a damp sponge or cloth. For the 1110 freezer, wash the shelf and tray in warm soapy water and dry
them completely before putting them back in the unit. Clean the exterior of the unit with a damp cloth. Carefully clean
the door gasket/seal as well. Do not splash water on the outside or inside of the unit when cleaning it. The appliance
should be cleaned oen enough for it not to accumulate any significant buildup of debris.
Defrosting the freezer
Over time, the freezer may require manual defrosting due to frost or ice building up inside of the freezer compartment.
It should be defrosted in the following scenarios:
• The freezer will not be used for an extended period of time.
• An ice layer is built-up inside the unit that is thicker than 1/4 inch.
To defrost the freezer:
1. Turn the thermostat knob to 0 or “O”
2. Unplug the unit from the wall socket.
3. Remove all food. Ideally, the food should be placed in another freezer.
4. Place a towel or two under the freezer to collect the water from the melting frost.
5. Leave the door open until all the frost is melted. Usually, several hours (or overnight) will suice.
6. Clean and wipe out the interior of the unit using the cleaning instructions just mentioned above. Do not use any
metal tools or abrasive cleaners to remove the frost as this can damage the unit. A plastic scraper is ok.
7. Reconnect power when cleaning is complete.
–iii–
ENGLISHESPAÑOLFRANÇAIS
PLEASE READ ALL OF THESE
INSTRUCTIONS,
AS THEY MAY NOT ALL
BE OBVIOUS
INITIAL SAFETY GUIDELINES
• Do not install, transport or reverse the door of
the appliance if you feel uncomfortable or un-
able to do so.
• This freezer must be properly installed and
located in accordance with the installation in-
structions in this guide before it is used.
• Turning the temperature control dial to the “0”
position will stop cooling and may turn o the
compressor, but does not cut o power to the
freezer.
• This appliance is not intended for use by per-
sons (including children) with reduced physical,
sensory or mental capabilities that may lead
to improper use or injury from operating the
appliance.
• Do not allow children to climb, stand or hang on
the shelves in the freezer. They could damage
the freezer and seriously injure themselves or
become entrapped in the appliance.
• Do not allow children to hang on the doors, as
the freezer may be tipped over, causing serious
injury. Children should be supervised to ensure
that they do not play with the appliance.
• Keep all packaging material away from children.
• Do not store any explosive items or contents
under pressure which could explode.
• Do not leave the freezer in extremely cold or
warm temperatures.
• Make sure that any ventilation openings on the
unit are free of obstruction at all times.
• Do not clean the unit with industrial-grade
solvents, or abrasive chemicals. Clean the unit
before first use, using the instructions in this
guide.
• Do not place heavy items on top of the freezer.
• Never install the freezer where there is a lot of
moisture, or in areas where water can splash.
• Never eat food that may have spoiled because
it was stored too long before eating, or if the
freezer has lost power or malfunctioned.
• Do not use sharp metal tools inside the freezer
(such as an ice pick to remove ice), as damage
may occur.
• If the freezer is not used for a long period of
time, empty it completely and unplug it.
• This freezer should not be recessed or built into
an enclosed cabinet. It is designed for free-
standing installation only
• Do not lubricate any part of the freezer.
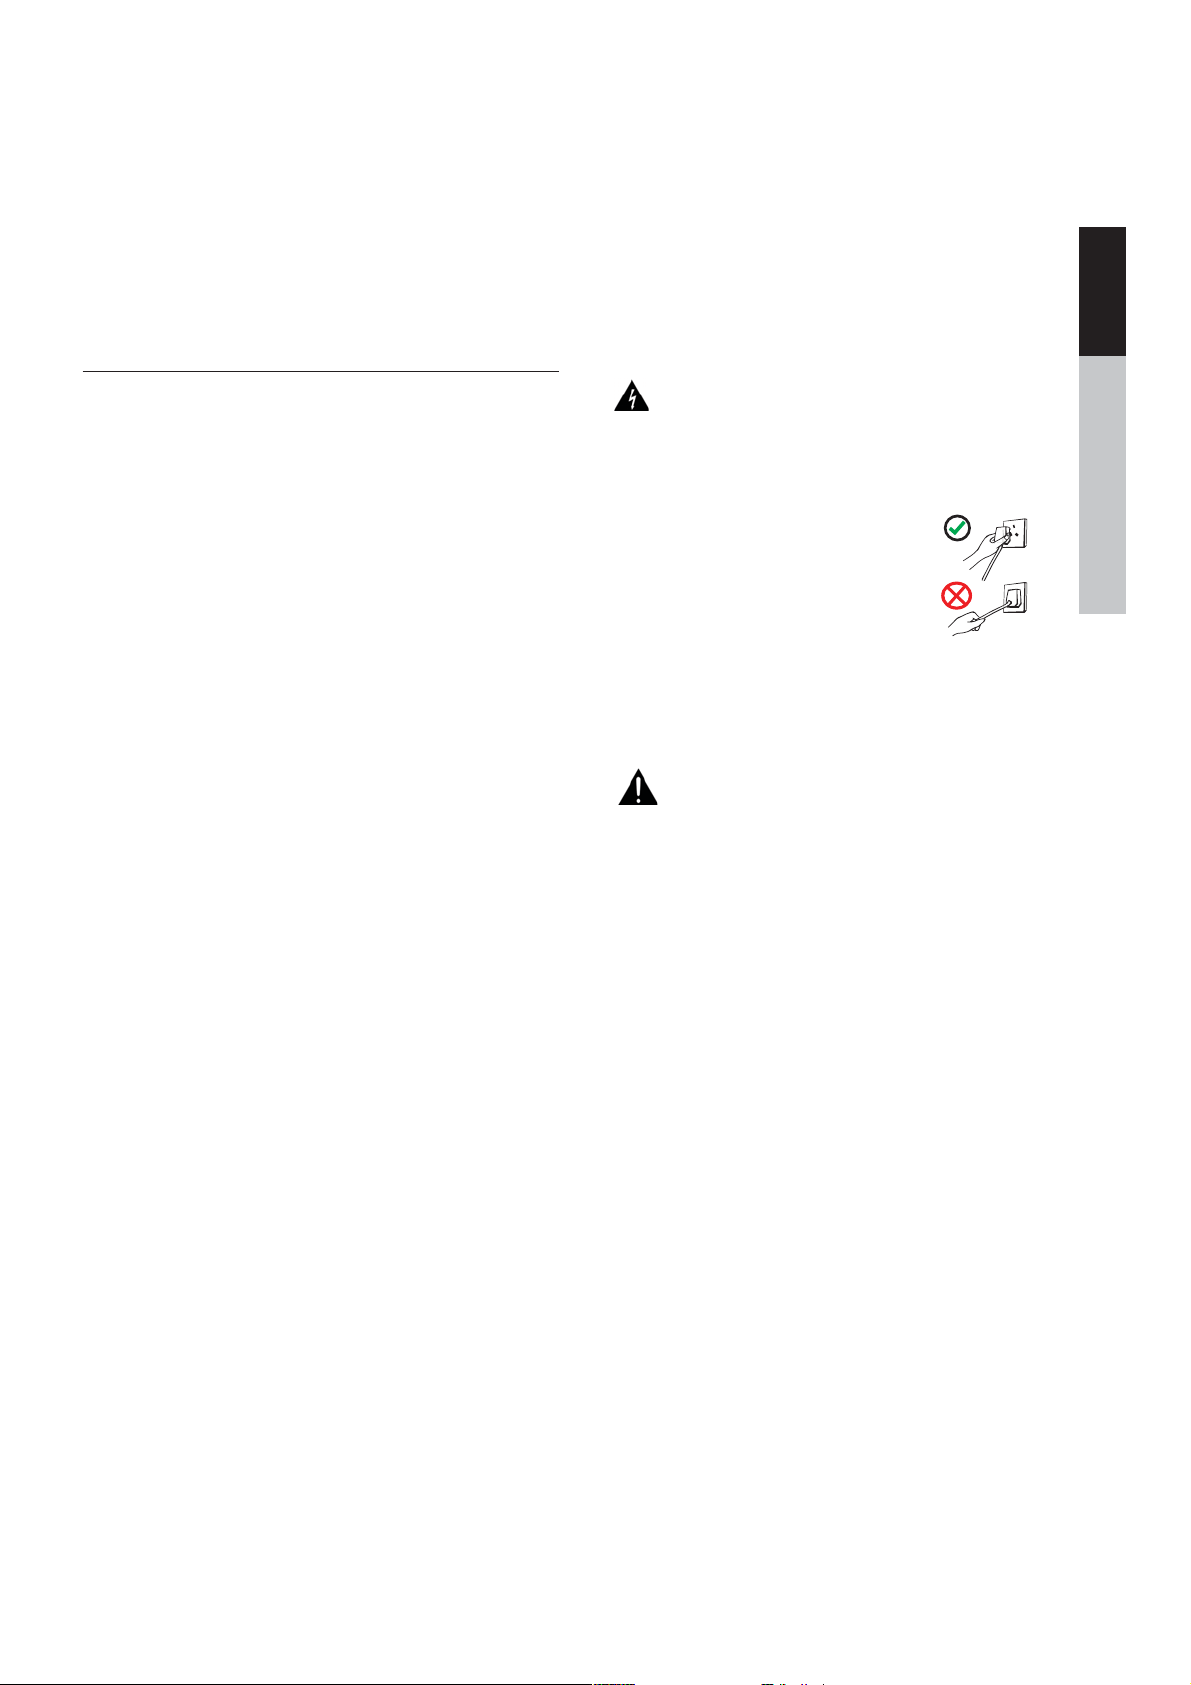
RISK OF ELECTRIC SHOCK
• Unplug the freezer before any cleaning.
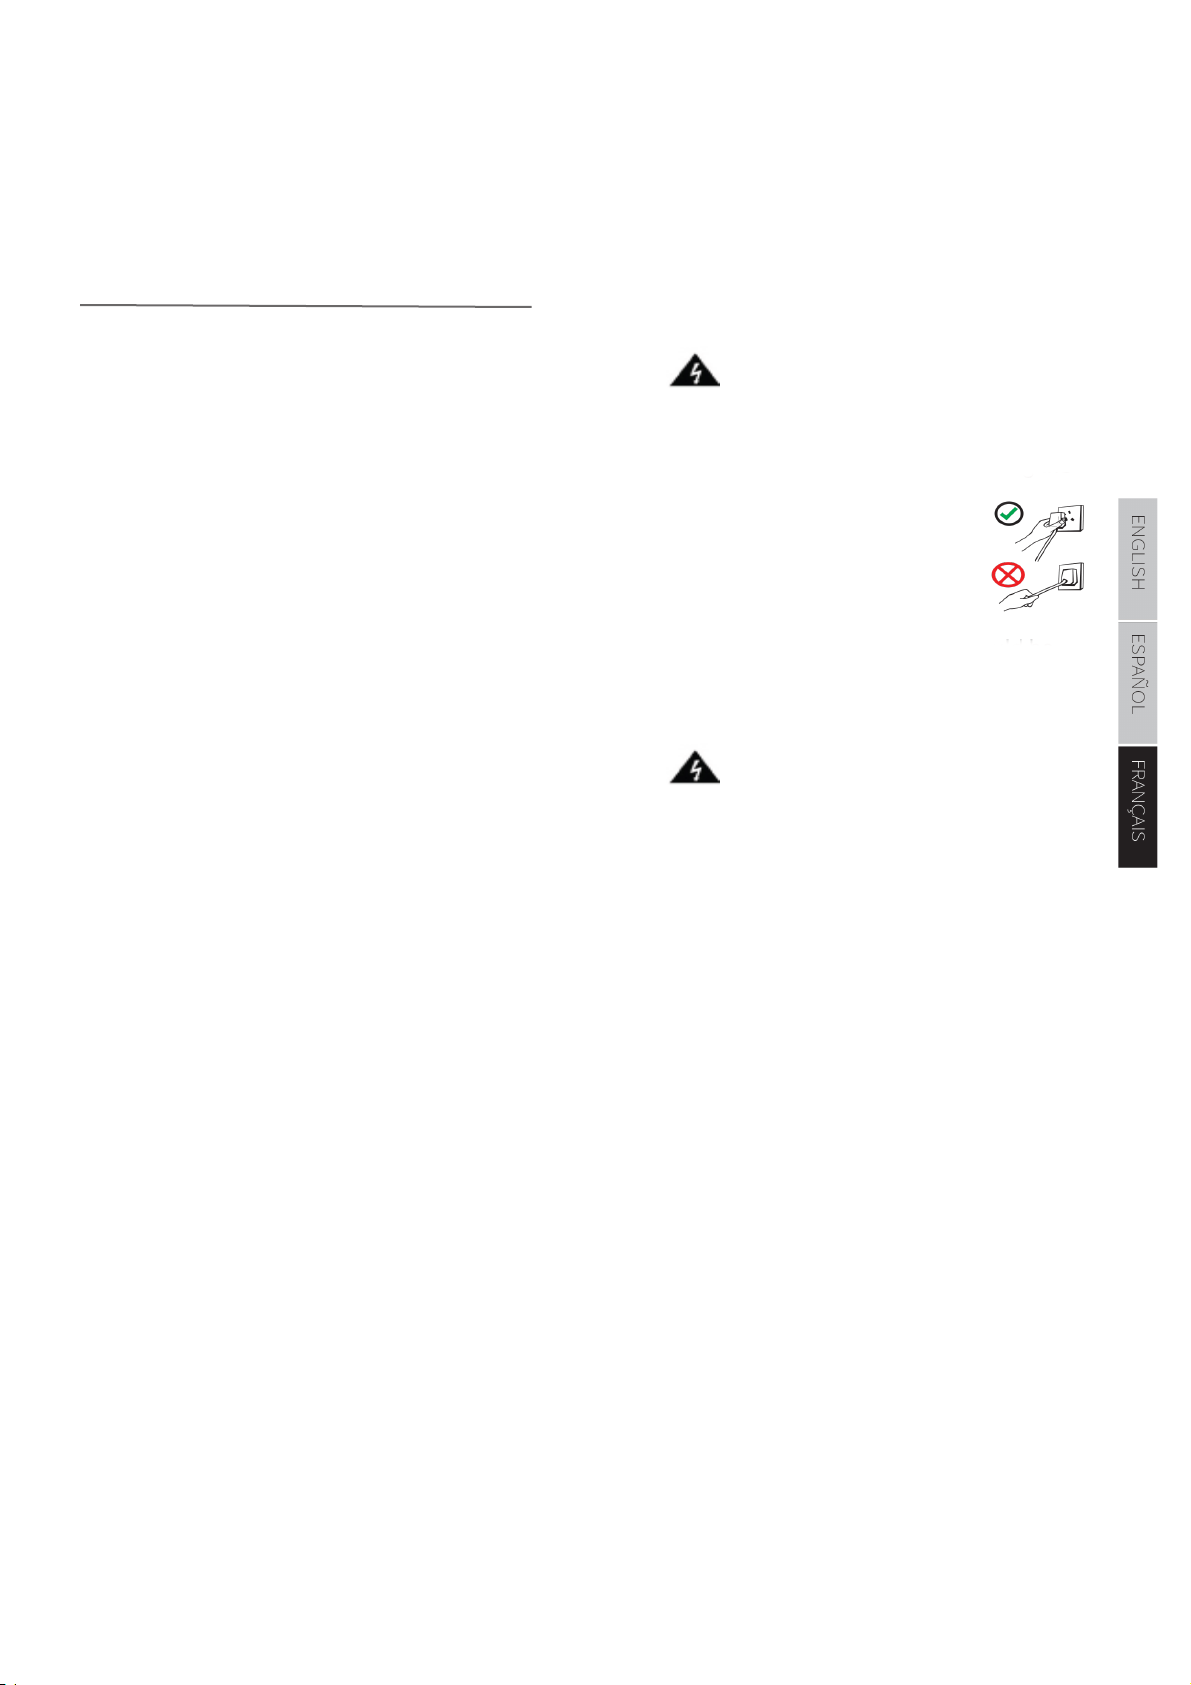
• Do not pull on the power cord to unplug the
appliance. Pull on the plug itself.
• This appliance should only be
serviced by an authorized tech-
nician using genuine spare parts.
To avoid the risk of electric shock,
do not attempt to repair the unit
yourself.
• If the power cord is damaged, it should be
replaced by the manufacturer or a qualified ser-
vice technician. Do not use the appliance if the
cord is damaged.
FLAMMABLE REFRIGERANT GAS
• Do not puncture the refrigerant tubing.
• Do not use any electrical devices anywhere
inside the unit unless they are recommended
by the manufacturer. This includes devices kept
in the food storage compartment, or to aid in
defrosting.
• Do not store or use gasoline or other flammable
vapors and liquids in the vicinity of this or any
other appliance.
• Do not place the freezer near any heat sources
or open flames. Do not place any other appli-
ances on top of this freezer.
CAUTION: Do not use an extension cord
with this applianc
e
FOR INDOOR USE ONLY
SAVE THESE
INSTRUCTIONS
–4–
ENGLISH ESPAÑOL FRANÇAIS
GETTING STARTED
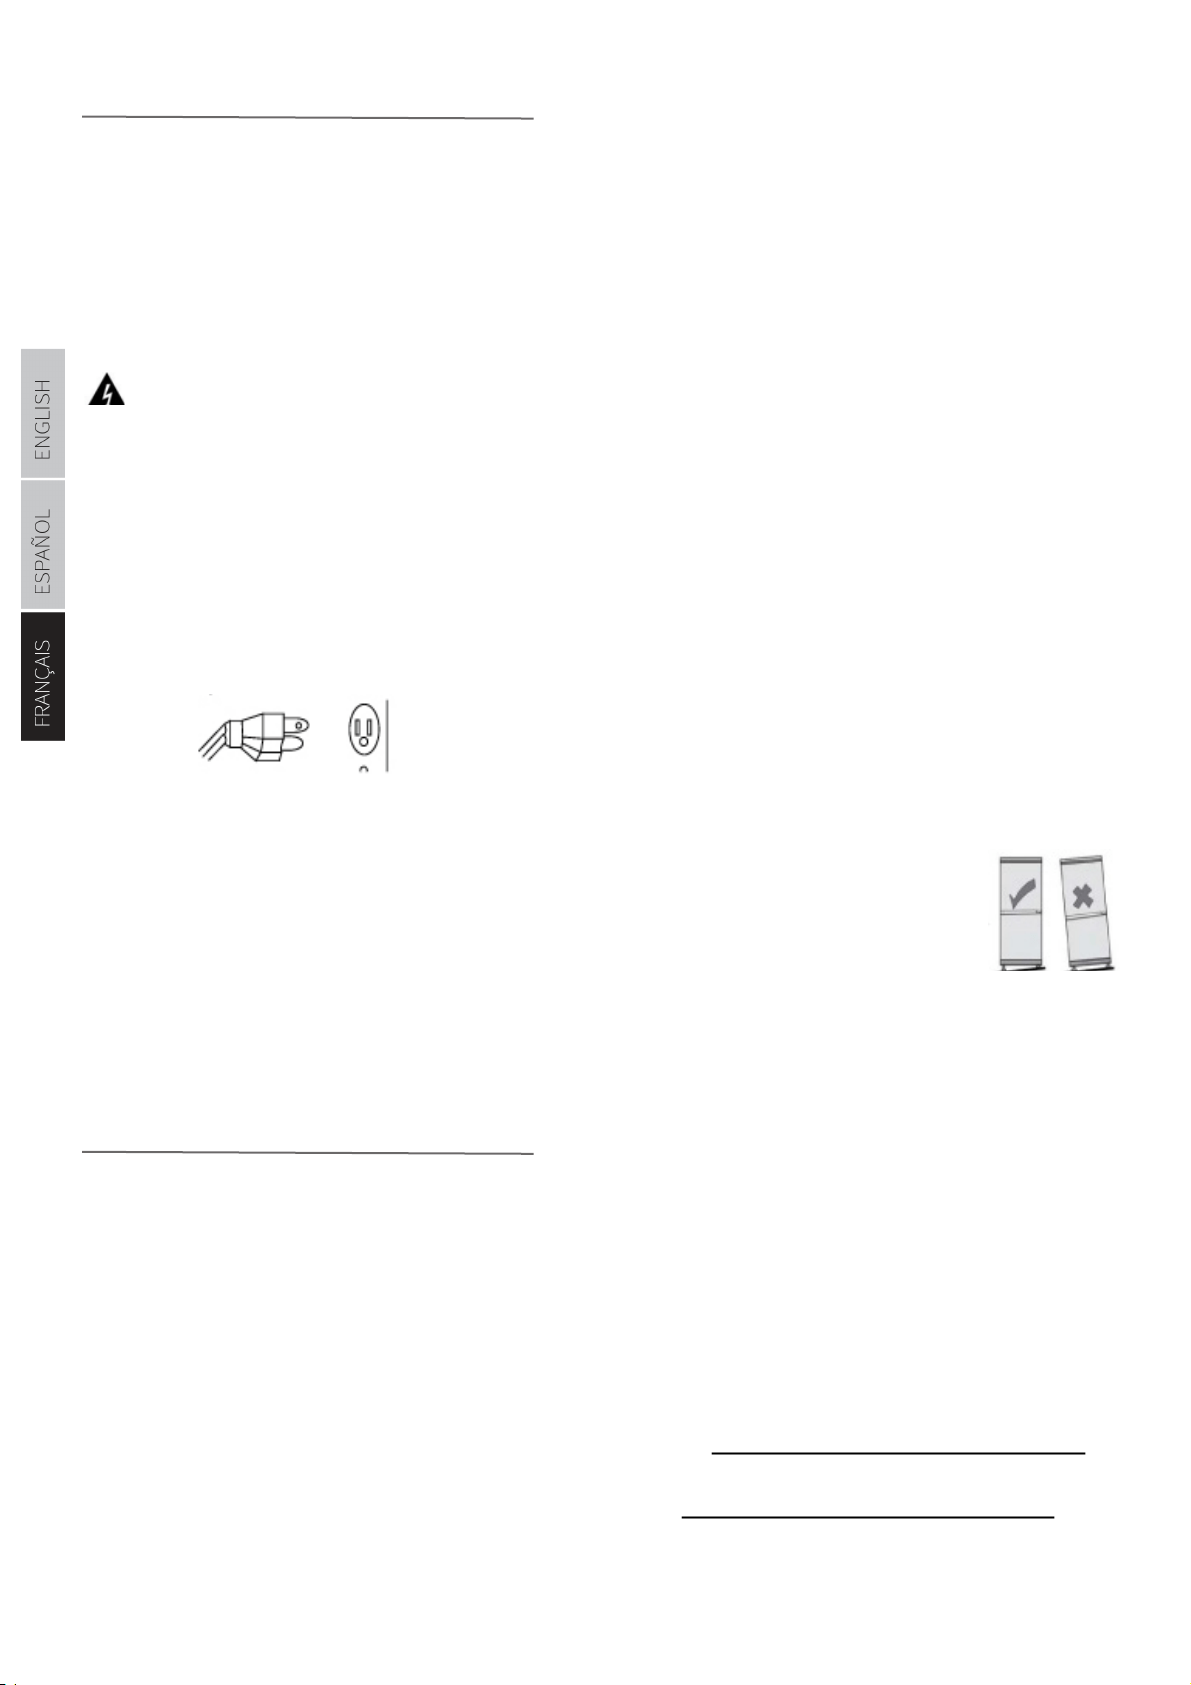
Grounding Instructions
This appliance must be grounded. This is accomplished by
ensuring the plug is inserted into a properly grounded outlet.
The appliance is equipped with a cord that has a grounding
wire and plug. When grounded, the risk of electric shock is
reduced by providing an escape wire for the electrical current.
WARNING: Improper use of the grounding plug can re-
sult in electric shock. Consult a qualified electrician or
service person if the grounding instructions are not completely
understood, or if there is any doubt that the appliance or outlet
is not properly grounded.
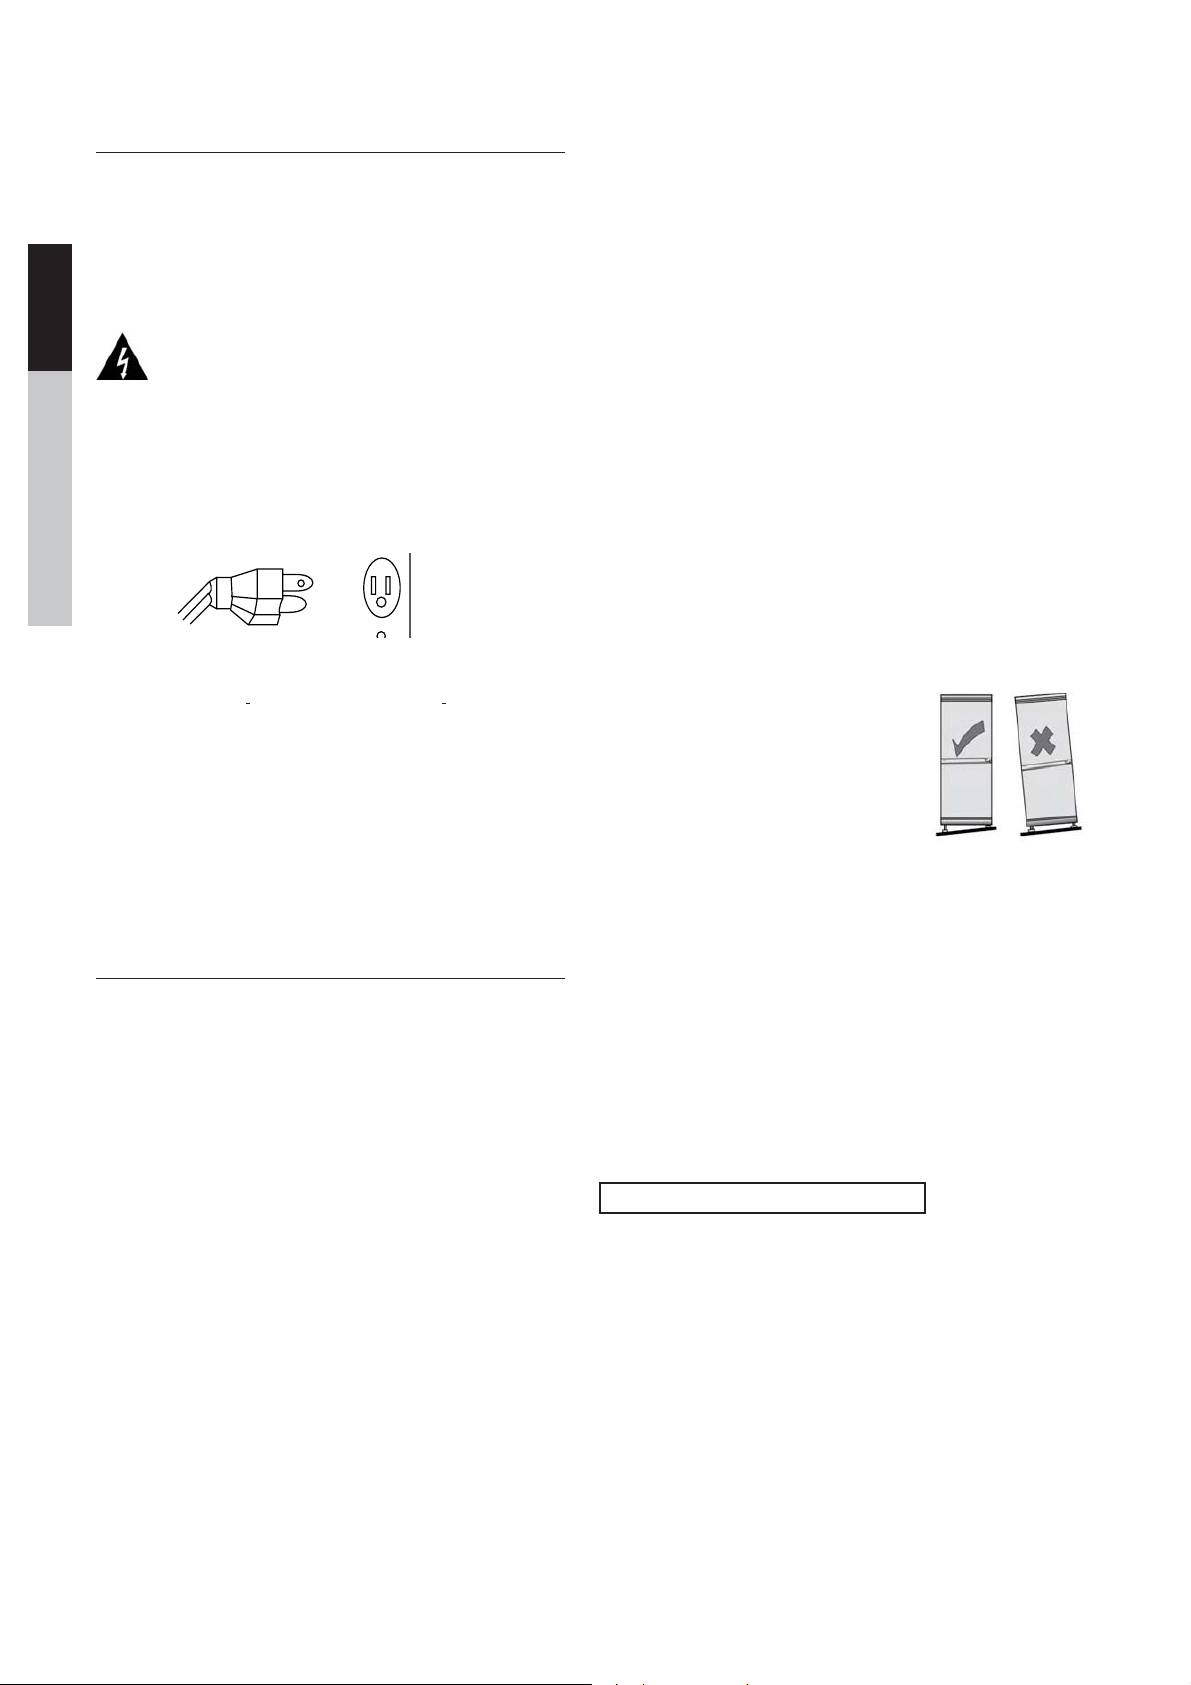
Power Supply
You must plug the appliance into a dedicated 110V-120V (60Hz)
3-pronged, grounded outlet. Do not use an extension cord.
Before discarding your old freezer:
Remove the door(s), leave any shelves in place (to help prevent
children from crawling in) and have it removed from your prem-
ises by a qualified technician, in accordance with the instruc-
tions provided with the old unit.
• Confirm with your retailer if they’ll remove and respon-
sibly dispose of (or recycle) your old freezer.
• Visit www.epa.gov/rad for more information on re-
sponsible appliance disposal.
INSTALLING YOUR APPLIANCE
Moving the appliance
CAUTION: To avoid serious injury, always ensure that any relo-
cation of the unit is always performed by two people. Use cau-
tion when moving the unit to ensure that the refrigeration cir-
cuit is not damaged. Never allow the unit to be tilted more than
45°, as this will damage the appliance. Handle the unit around
its sides and base. Never li the unit by holding the edges of the
top surface. If the unit has been tilted, it should be given ade-
quate time to settle in its upright position before use.
Install Location
When selecting a location for your unit, ensure the floor is a
flat, level surface (indoors) and that the room is well ventilated,
maintaining a temperature between 60.8°F and 90°F. Avoid lo-
cating your unit near a heat source such as an oven, stovetop,
boiler, or radiator. Avoid exposure to direct sunlight, as this may
increase electrical consumption. This unit is not designed for
use in a garage, or for outdoor installation. Extremely cold am-
bient temperatures may also prevent the unit from operating
eectively. This appliance is intended to be used in household
and similar applications, such as individual use in hotel rooms.
in kitchen areas inside shops and oices, or for catering and
other non-retail applications.
When installing the unit, ensure that there is adequate space for
the front door to fully open. Ensure that a minimum of 4 inch-
es of free space is le at the sides, front and rear. At the top of
the unit, ensure there is a minimum of 8 inches free space. This
will allow cold air to circulate through the freezer and improve
the eiciency of the cooling process. Do not place any covering
such as a drape or sheet on the unit. Clean the appliance before
first use.
Leveling the Unit
It’s very important to keep the unit level to
prevent unnecessary movement and vi-
bration. This also helps to ensure that the
door closes properly. If the door does not
close securely, this will prevent eective
cooling and possibly damage the freezer.
To level the unit, turn the adjustable feet at
the front of the freezer clockwise or coun-
terclockwise to raise or lower the corner respectively.
Having a second person push carefully against the top of the
freezer will relieve some weight o of the leveling legs and
make them easier to adjust. However, ensure that the unit
has a wall to rest against so that it does not tip over and cause
damage or injury.
Serial and model number
Please record your model number and serial number below.
You can find the serial number on a sticker on the back of the
freezer, or on the product box.
Serial Number: ______________________________
Date of Purchase: ____________________________
Model #: &Ͳϭϱϵ1t
ENGLISHESPAÑOLFRANÇAIS
–5–
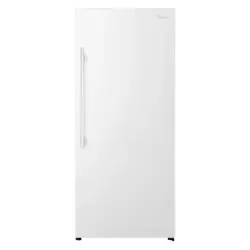
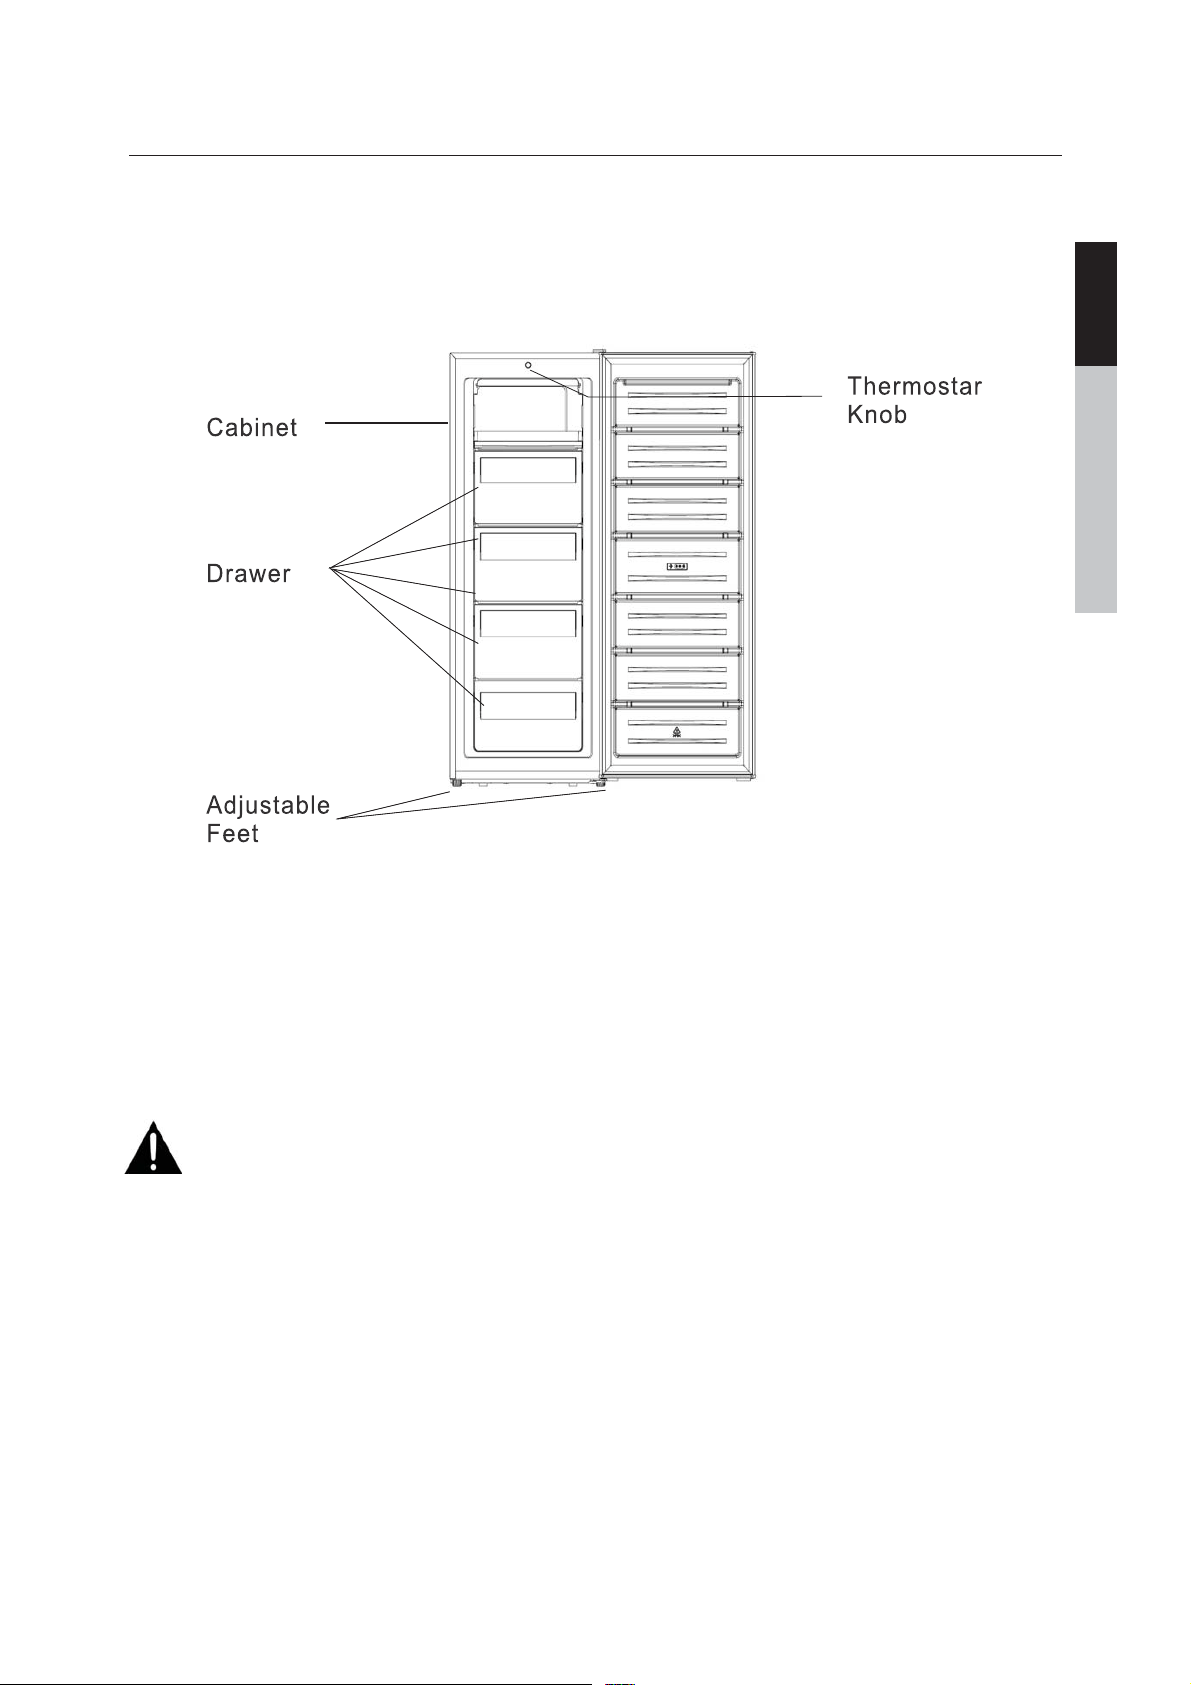
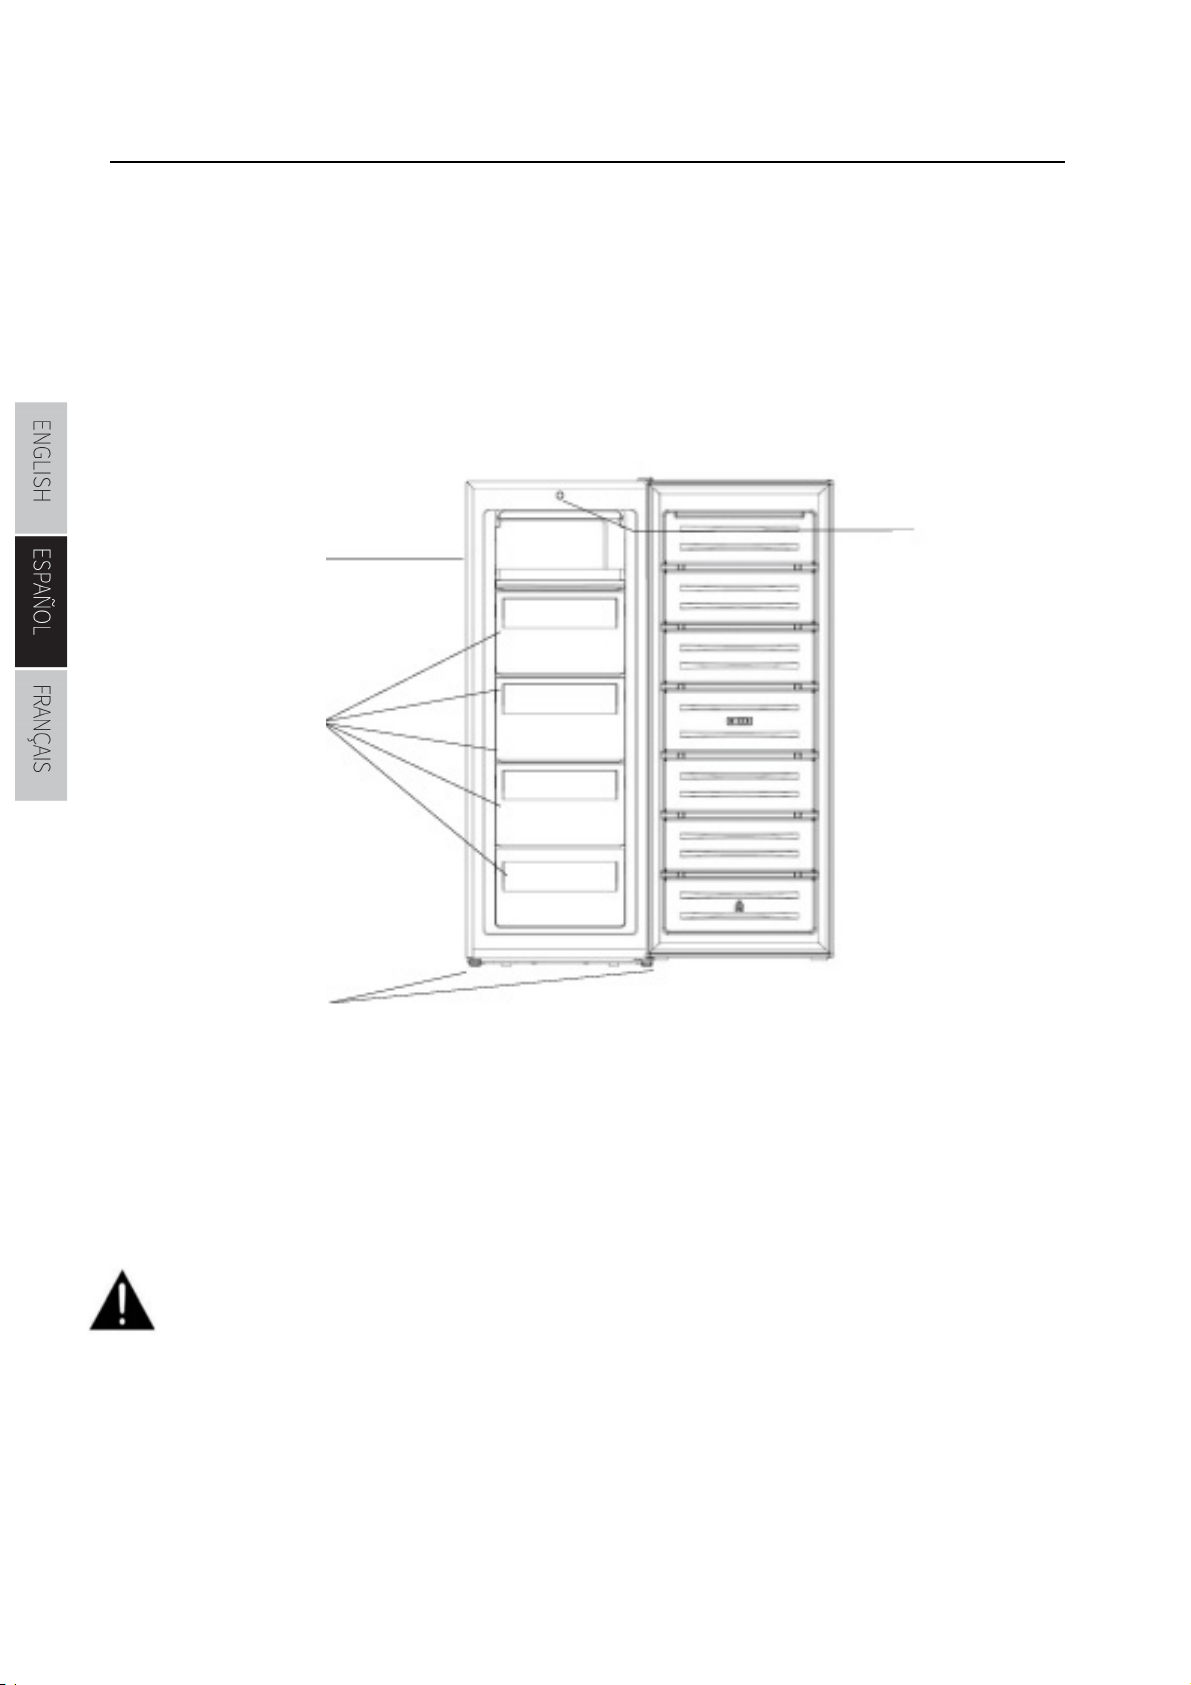
UNIT OVERVIEW AND FEATURES
The images in this instruction manual are for illustrative purposes.
The physical appearance and options on your particular model may vary.
Carefully remove all packaging material. This includes the foam base and all adhesive tape holding the freezer
accessories inside and outside. Inspect and remove any remains of packing, tape or printed materials before
plugging in the freezer. Dispose of the packing materials so they are not played with by children or pets.
–6–
ENGLISH ESPAÑOL FRANÇAIS
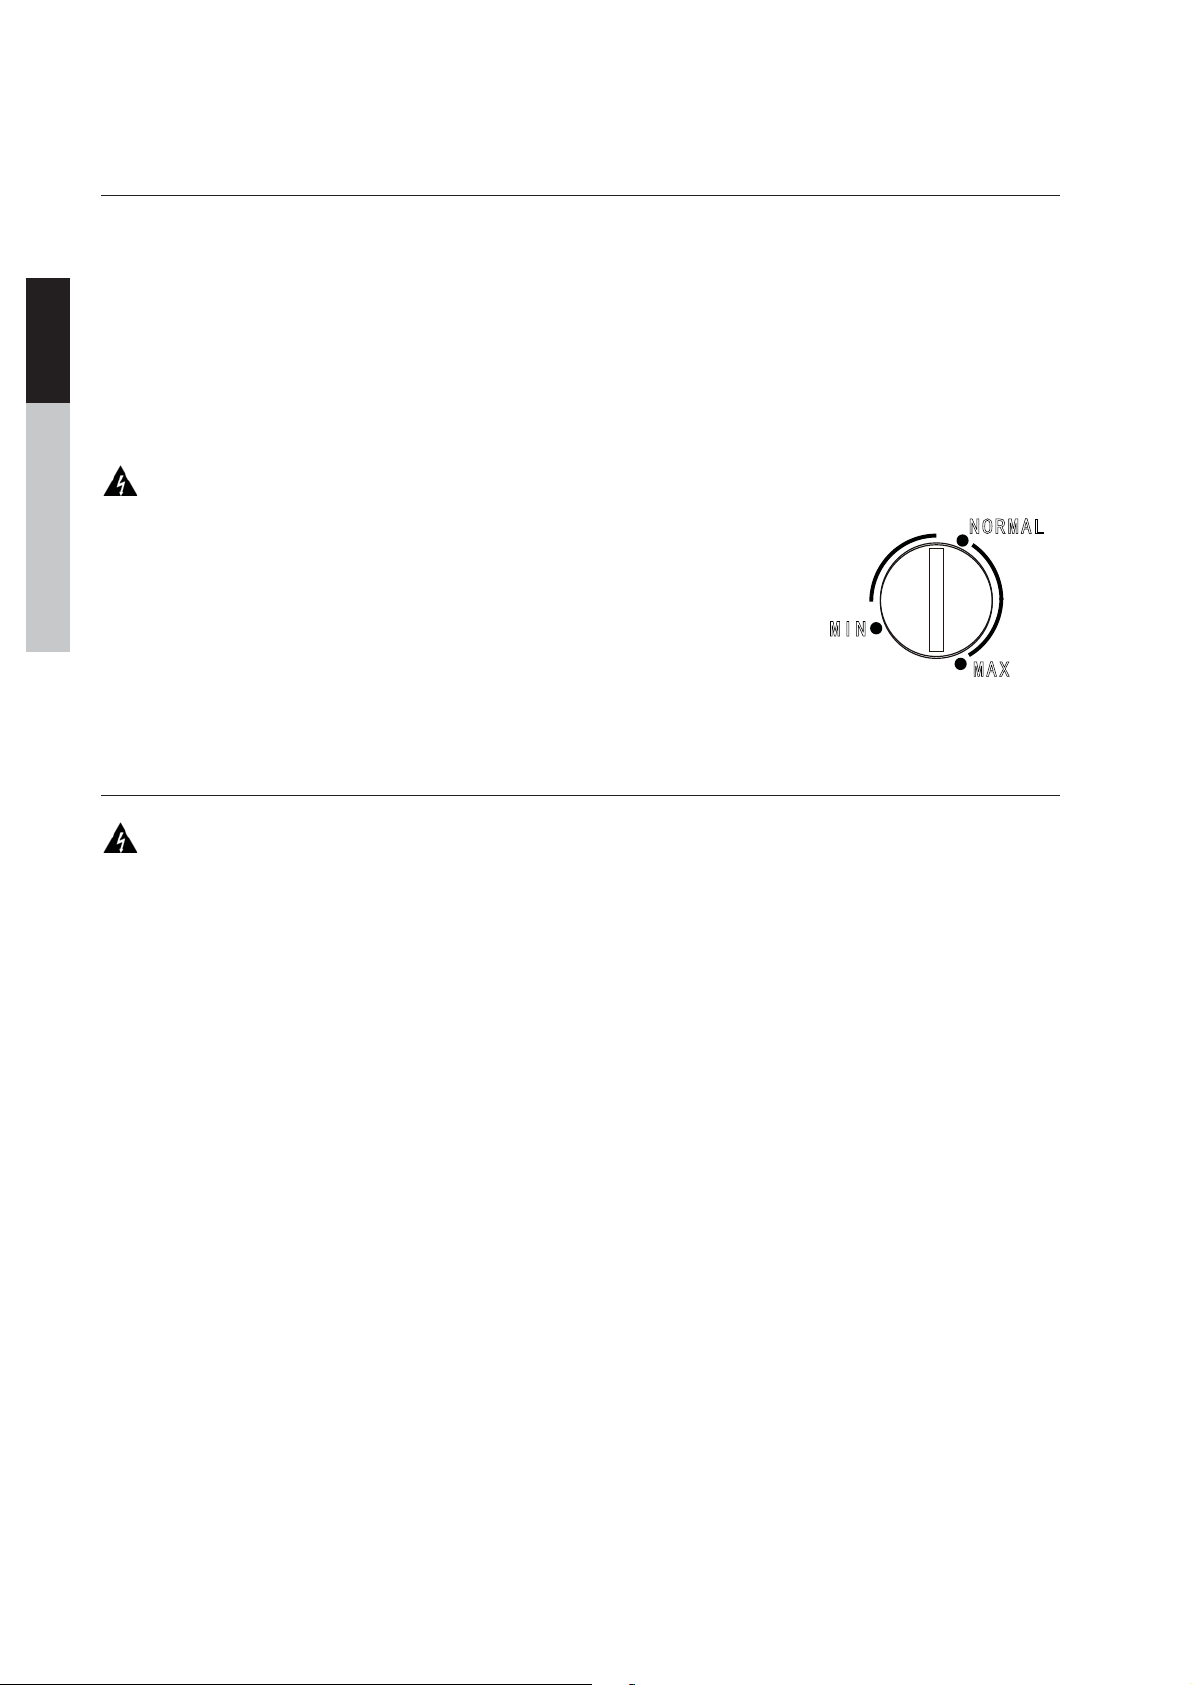
INITIAL OPERATION
Instructions in this guide generay appy to both modes uness otherwise noted. Clean the unit before first use (see
the next section for cleaning instructions). Aer cleaning, plug the unit into its power source. Do not turn on the unit if
it has been moved within the past 2 hours, as the cooling fluid needs time to settle.
When the freezer is plugged in for the first time, or after defrosting, adjust the thermostat control knob to the highest
setting Dyfor at least 2 hours before adding food.
After it is fully cooled, adjust the knob to best suit your needs. D/E is the least cool and Dy is the coolest setting. A
setting of EKZD> should be appropriate for most home or office use. Warmer environments may be more likely to
require higher settings. Cooler or winter environments may be better suited to a lower setting.
NOTE: Turning the thermostat control knob to the D/E or “OFF” position may stop the cooling cycle but does
not shut off the power to the unit.
CLEANING & CARING FOR YOUR APPLIANCE
Always disconnect the power before cleaning the appliance.
Wipe the inside of the unit with a weak solution of baking soda (bicarbonate). Then rinse with warm water (never hot
or boiling) using a damp sponge or cloth. For the 1110 freezer, wash the shelf and tray in warm soapy water and dry
them completely before putting them back in the unit. Clean the exterior of the unit with a damp cloth. Carefully clean
the door gasket/seal as well. Do not splash water on the outside or inside of the unit when cleaning it. The appliance
should be cleaned oen enough for it not to accumulate any significant buildup of debris.
Defrosting the freezer
Over time, the freezer may require manual defrosting due to frost or ice building up inside of the freezer compartment.
It should be defrosted in the following scenarios:
• The freezer will not be used for an extended period of time.
• An ice layer is built-up inside the unit that is thicker than 1/4 inch.
To defrost the freezer:
1. Turn the thermostat knob to 0 or “O”
2. Unplug the unit from the wall socket.
3. Remove all food. Ideally, the food should be placed in another freezer.
4. Place a towel or two under the freezer to collect the water from the melting frost.
5. Leave the door open until all the frost is melted. Usually, several hours (or overnight) will suice.
6. Clean and wipe out the interior of the unit using the cleaning instructions just mentioned above. Do not use any
metal tools or abrasive cleaners to remove the frost as this can damage the unit. A plastic scraper is ok.
7. Reconnect power when cleaning is complete.
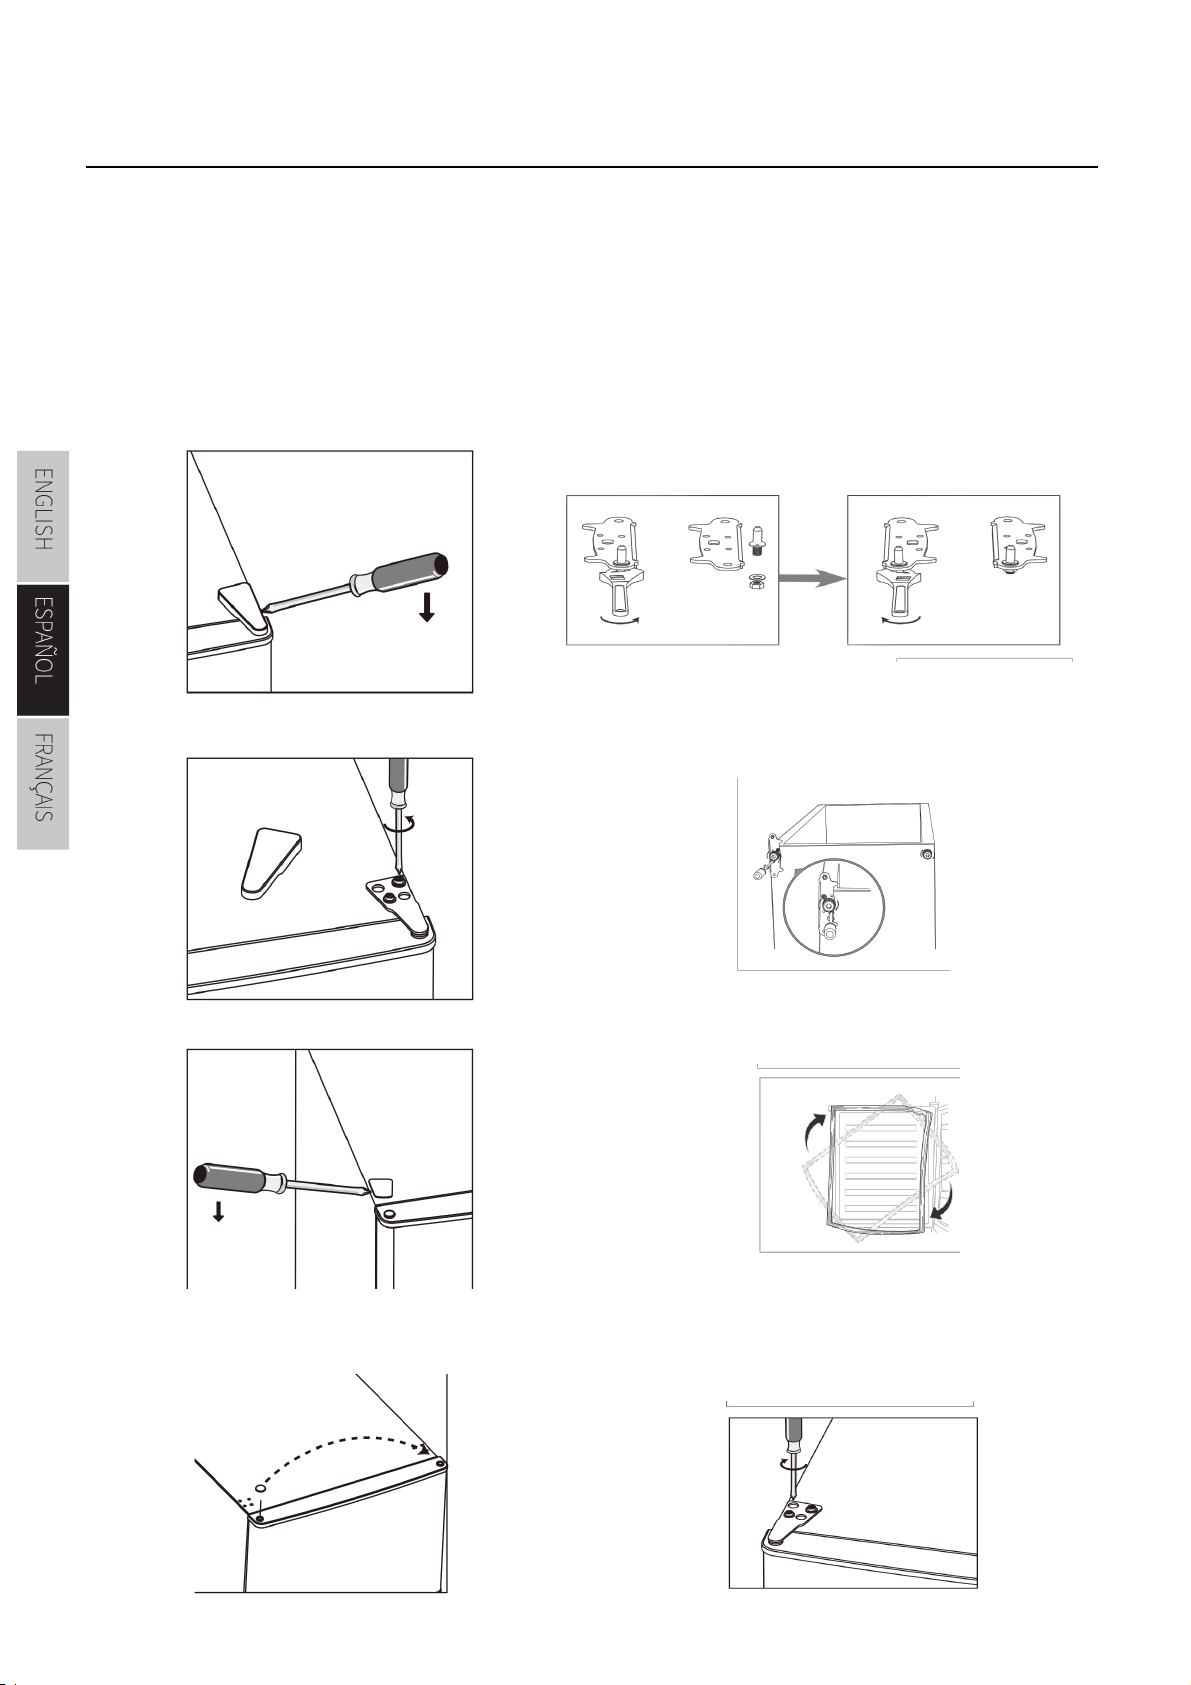
Door Reversal
• Ensure the unit is unplugged and empty
• To take the door o, it is necessary to tilt the unit backwards. You should rest the unit on something solid so that it will not
slip during the door reversing process
• All parts removed must be saved to do the reinstallation of the door.
• Do not lay the unit flat as this may damage the cooling system
• It’s better that 2 people handle the unit during assembly
Tool Required: Philips’s screwdriver, flat bladed screwdriver, Hexagonal spanner.
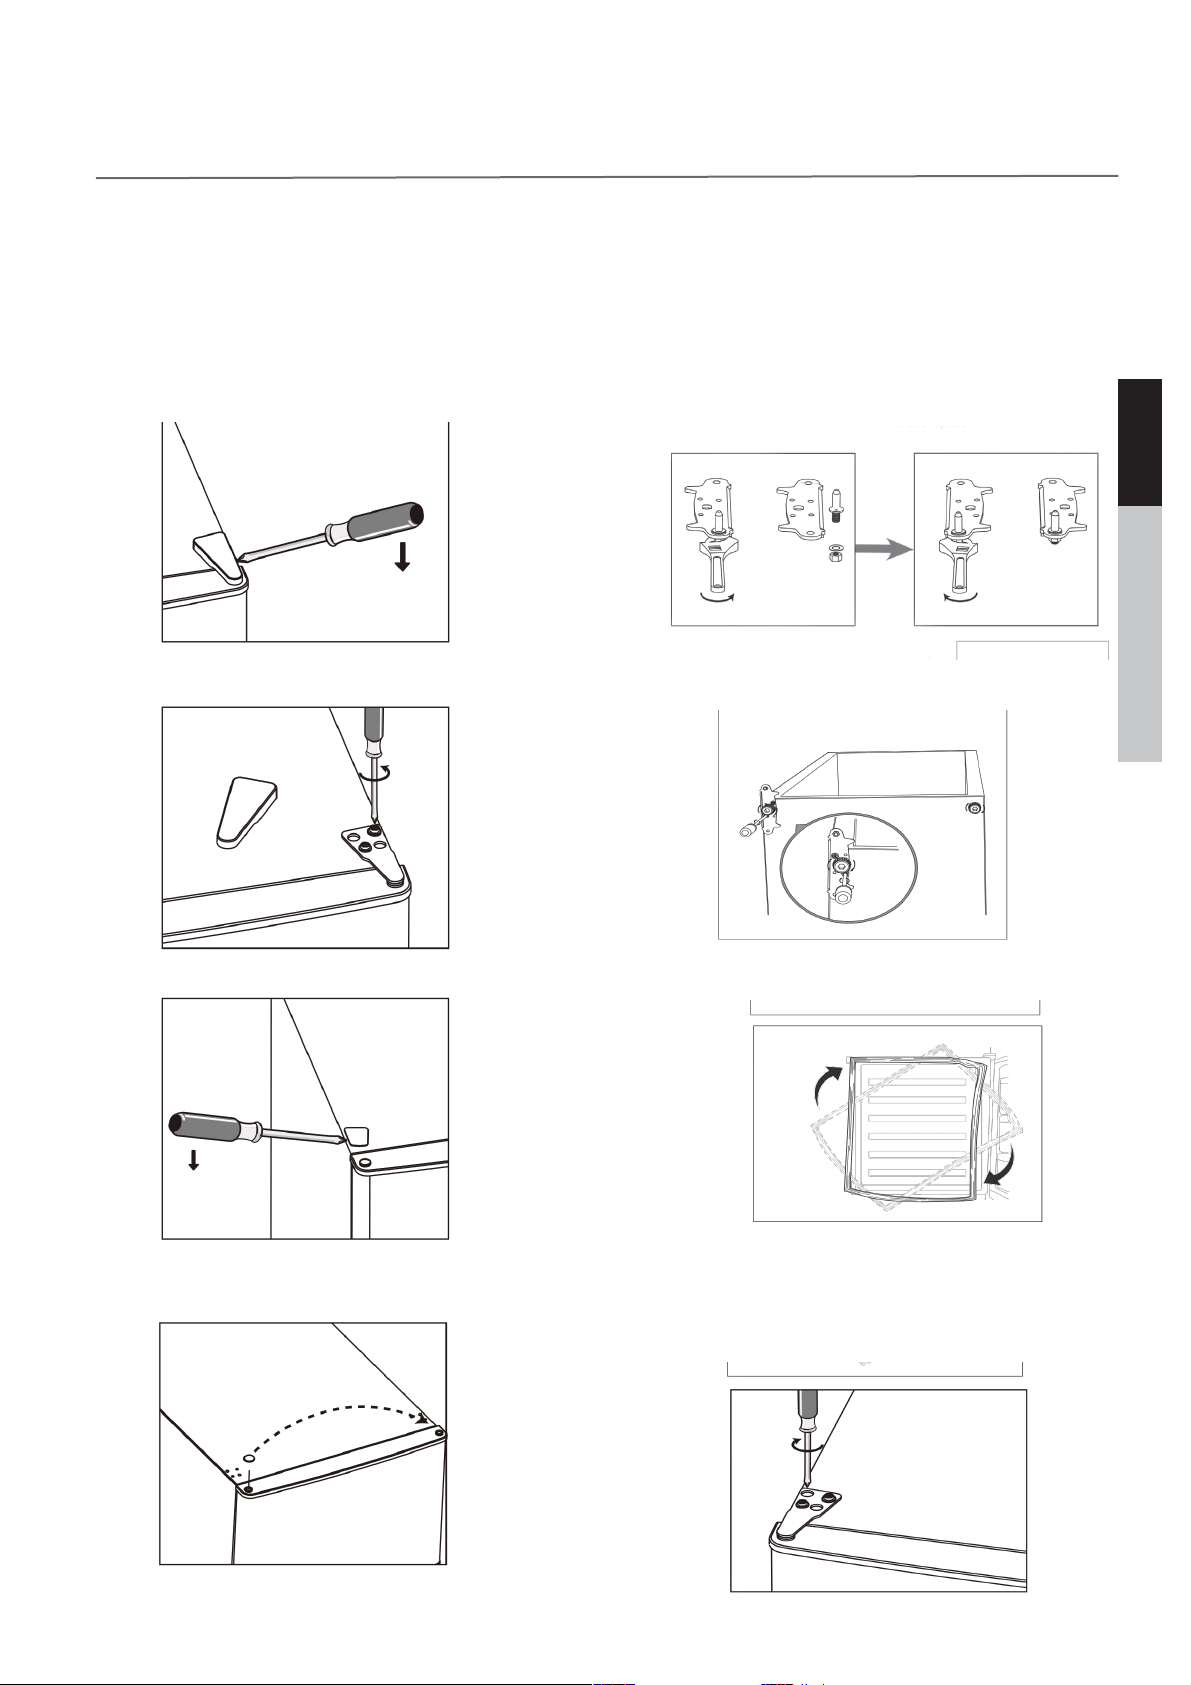
1. Remove the top right hinge cover{
2. Undo the screws. Then remove the hinge bracket.
3. Remove the top le screw cover.
4. Move the core cover from le side to right side. And then li
the upper door and place it on a padded surface to prevent it
from scratching.
5. Unscrew and remove the bottom hinge pin, turn the
bracket over and replace it.
6. Refit the bracket fitting the bottom hinge pin. Replace
both adjustable feet.
7. Detach the Fridge and the Freezer door gaskets and then
attach them aer rotating.
8. Place the upper door back on. Ensure the door is aligned
horizontally and vertically so that the seals are closed on all
sides before finally tightening the top hinge.
9. Insert the hinge bracket and screw it to the top of the
unit
–ϭϬ–
ENGLISH ESPAÑOL FRANÇAIS
ADDITIONAL TIPS AND BEST PRACTICES
• Aer purchasing frozen food and bringing it back from the store, place it in the freezer as soon as possible
if it is to remain frozen.
• Do not overfill the freezer, as this blocks proper circulation and increases the consumption of energy.
Leave space around the food to allow proper air circulation.
• To maintain temperature, only open the door to put food in or take food out. Allow hot food to cool
down before putting it into the freezer.
• Freeze larger amounts of food by packing it into separate meal-sized portions.
• Glass and plastic bottles should not be placed in the freezer unless recommended by the product manu-
facturer. Do not place carbonated beverages in the freezer.
• Do not put fresh food directly in contact with already-frozen food. The storage life of frozen foods tends
to vary and the recommended storage time should not be exceeded. Carefully select the food you intend
to freeze, it should be of adequate quality and suitable for freezing.
• When emptying the freezer for cleaning, defrosting, transportation or other means, do not allow that food
to spoil or develop bacteria. Food that has been le at room temperature for a prolonged period can
cause the food to develop bacteria.
• Aer transporting the unit or reversing the door, the gasket/seal on the doors may have to be reset. This
is done to prevent the cool air from escaping. If there is a gap between the door gasket and the cabinet,
reset the gasket by gently pulling it out to seal the gap.
• During a power outage, do not open the freezer unless necessary. Do not place additional food into the
unit. Take good care in examining the food before preparing and eating it, as there is a health risk of eat-
ing spoiled food that has not been refrigerated properly. Some food may need to be prepared and eaten
before it spoils. If the unit is unplugged or has lost power, wait 3 to 5 minutes before restarting the unit.
Otherwise, the unit may not start.
• Keep foods well-sealed to prevent them from drying out and to keep odors from mixing.
• Store raw meat and fish on the lowest shelf to prevent contamination.
• Do not let any fats come into contact with the plastic parts of the freezer.
• Do not store canned items, as they can expand and burst.
• Ensure that any containers are clean and dry before storing them in the freezer.
• Turning the temperature control dial to the “0” position may stop cooling but it does not cut o power to
the freezer.
• When the appliance is not in use for a long period of time (such as more than a month, or several
months), turn down the thermostat and disconnect the appliance from the power supply. Empty all food
items and clean the appliance using the instructions in this manual. Leave the door ajar to prevent odors
from being trapped in.

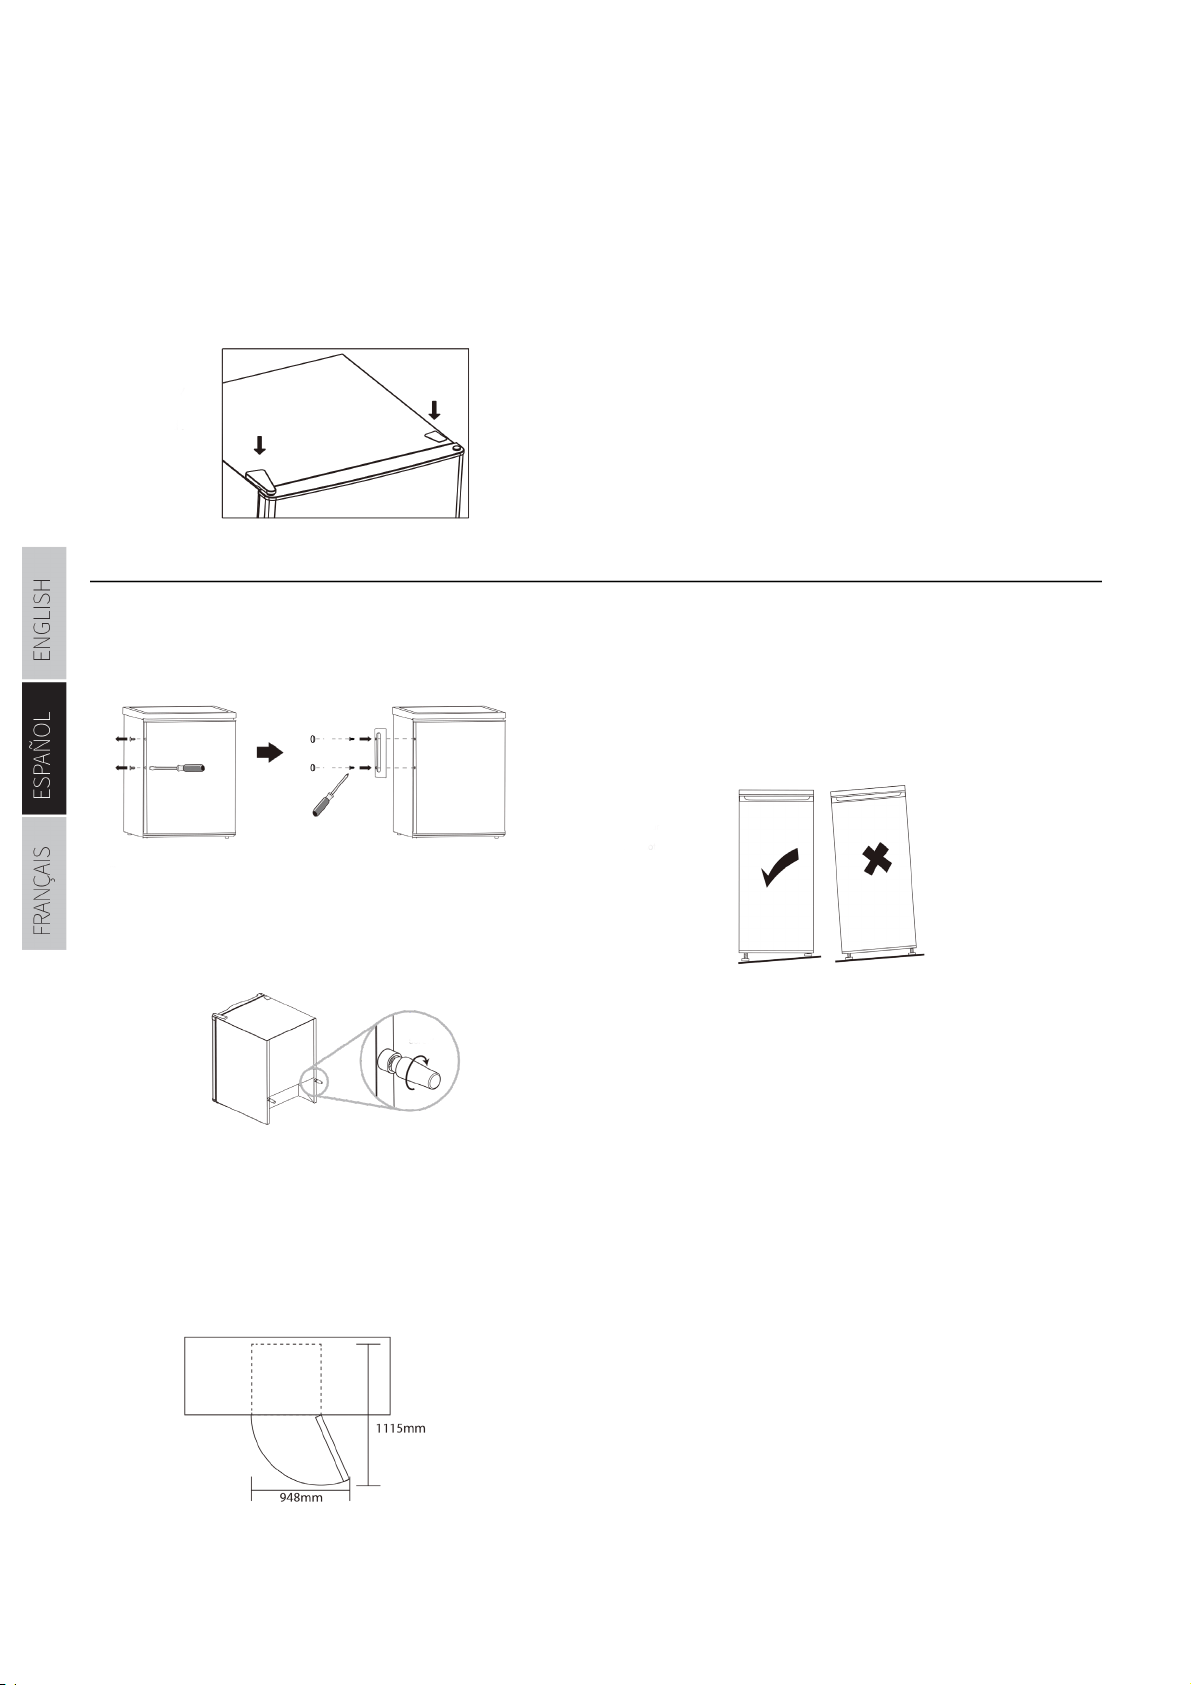
11. Put the hinge cover and the screw cover back.
12. With the doors closed, check that the doors are aligned
horizontally and vertically and that the seal is closed on all sides
before finally tightening the bottom hinge. Re-adjust the levelling
feet as needed
Install door handle
Rear spacer
Screw the rear spacers at the rear of the unit.
Leveling the unit
To do this adjust the two leveling feet at front of the unit.
If the unit is not level, the doors and magnetic seal align-
ments will not be covered properly.
INSTALLATION
Space Requirement
Keep enough space of door open.
Keep at least 50mm gap at two sides.
–6–
ENGLISH ESPAÑOL FRANÇAIS
INITIAL OPERATION
Instructions in this guide generay appy to both modes uness otherwise noted. Clean the unit before first use (see
the next section for cleaning instructions). Aer cleaning, plug the unit into its power source. Do not turn on the unit if
it has been moved within the past 2 hours, as the cooling fluid needs time to settle.
When the freezer is plugged in for the first time, or after defrosting, adjust the thermostat control knob to the highest
setting Dyfor at least 2 hours before adding food.
After it is fully cooled, adjust the knob to best suit your needs. D/E is the least cool and Dy is the coolest setting. A
setting of EKZD> should be appropriate for most home or office use. Warmer environments may be more likely to
require higher settings. Cooler or winter environments may be better suited to a lower setting.
NOTE: Turning the thermostat control knob to the D/E or “OFF” position may stop the cooling cycle but does
not shut off the power to the unit.
CLEANING & CARING FOR YOUR APPLIANCE
Always disconnect the power before cleaning the appliance.
Wipe the inside of the unit with a weak solution of baking soda (bicarbonate). Then rinse with warm water (never hot
or boiling) using a damp sponge or cloth. For the 1110 freezer, wash the shelf and tray in warm soapy water and dry
them completely before putting them back in the unit. Clean the exterior of the unit with a damp cloth. Carefully clean
the door gasket/seal as well. Do not splash water on the outside or inside of the unit when cleaning it. The appliance
should be cleaned oen enough for it not to accumulate any significant buildup of debris.
Defrosting the freezer
Over time, the freezer may require manual defrosting due to frost or ice building up inside of the freezer compartment.
It should be defrosted in the following scenarios:
• The freezer will not be used for an extended period of time.
• An ice layer is built-up inside the unit that is thicker than 1/4 inch.
To defrost the freezer:
1. Turn the thermostat knob to 0 or “O”
2. Unplug the unit from the wall socket.
3. Remove all food. Ideally, the food should be placed in another freezer.
4. Place a towel or two under the freezer to collect the water from the melting frost.
5. Leave the door open until all the frost is melted. Usually, several hours (or overnight) will suice.
6. Clean and wipe out the interior of the unit using the cleaning instructions just mentioned above. Do not use any
metal tools or abrasive cleaners to remove the frost as this can damage the unit. A plastic scraper is ok.
7. Reconnect power when cleaning is complete.

–ϭϬ–
ENGLISH ESPAÑOL FRANÇAIS
ADDITIONAL TIPS AND BEST PRACTICES
• Aer purchasing frozen food and bringing it back from the store, place it in the freezer as soon as possible
if it is to remain frozen.
• Do not overfill the freezer, as this blocks proper circulation and increases the consumption of energy.
Leave space around the food to allow proper air circulation.
• To maintain temperature, only open the door to put food in or take food out. Allow hot food to cool
down before putting it into the freezer.
• Freeze larger amounts of food by packing it into separate meal-sized portions.
• Glass and plastic bottles should not be placed in the freezer unless recommended by the product manu-
facturer. Do not place carbonated beverages in the freezer.
• Do not put fresh food directly in contact with already-frozen food. The storage life of frozen foods tends
to vary and the recommended storage time should not be exceeded. Carefully select the food you intend
to freeze, it should be of adequate quality and suitable for freezing.
• When emptying the freezer for cleaning, defrosting, transportation or other means, do not allow that food
to spoil or develop bacteria. Food that has been le at room temperature for a prolonged period can
cause the food to develop bacteria.
• Aer transporting the unit or reversing the door, the gasket/seal on the doors may have to be reset. This
is done to prevent the cool air from escaping. If there is a gap between the door gasket and the cabinet,
reset the gasket by gently pulling it out to seal the gap.
• During a power outage, do not open the freezer unless necessary. Do not place additional food into the
unit. Take good care in examining the food before preparing and eating it, as there is a health risk of eat-
ing spoiled food that has not been refrigerated properly. Some food may need to be prepared and eaten
before it spoils. If the unit is unplugged or has lost power, wait 3 to 5 minutes before restarting the unit.
Otherwise, the unit may not start.
• Keep foods well-sealed to prevent them from drying out and to keep odors from mixing.
• Store raw meat and fish on the lowest shelf to prevent contamination.
• Do not let any fats come into contact with the plastic parts of the freezer.
• Do not store canned items, as they can expand and burst.
• Ensure that any containers are clean and dry before storing them in the freezer.
• Turning the temperature control dial to the “0” position may stop cooling but it does not cut o power to
the freezer.
• When the appliance is not in use for a long period of time (such as more than a month, or several
months), turn down the thermostat and disconnect the appliance from the power supply. Empty all food
items and clean the appliance using the instructions in this manual. Leave the door ajar to prevent odors
from being trapped in.
–ϭϭ–
ENGLISHESPAÑOLFRANÇAIS
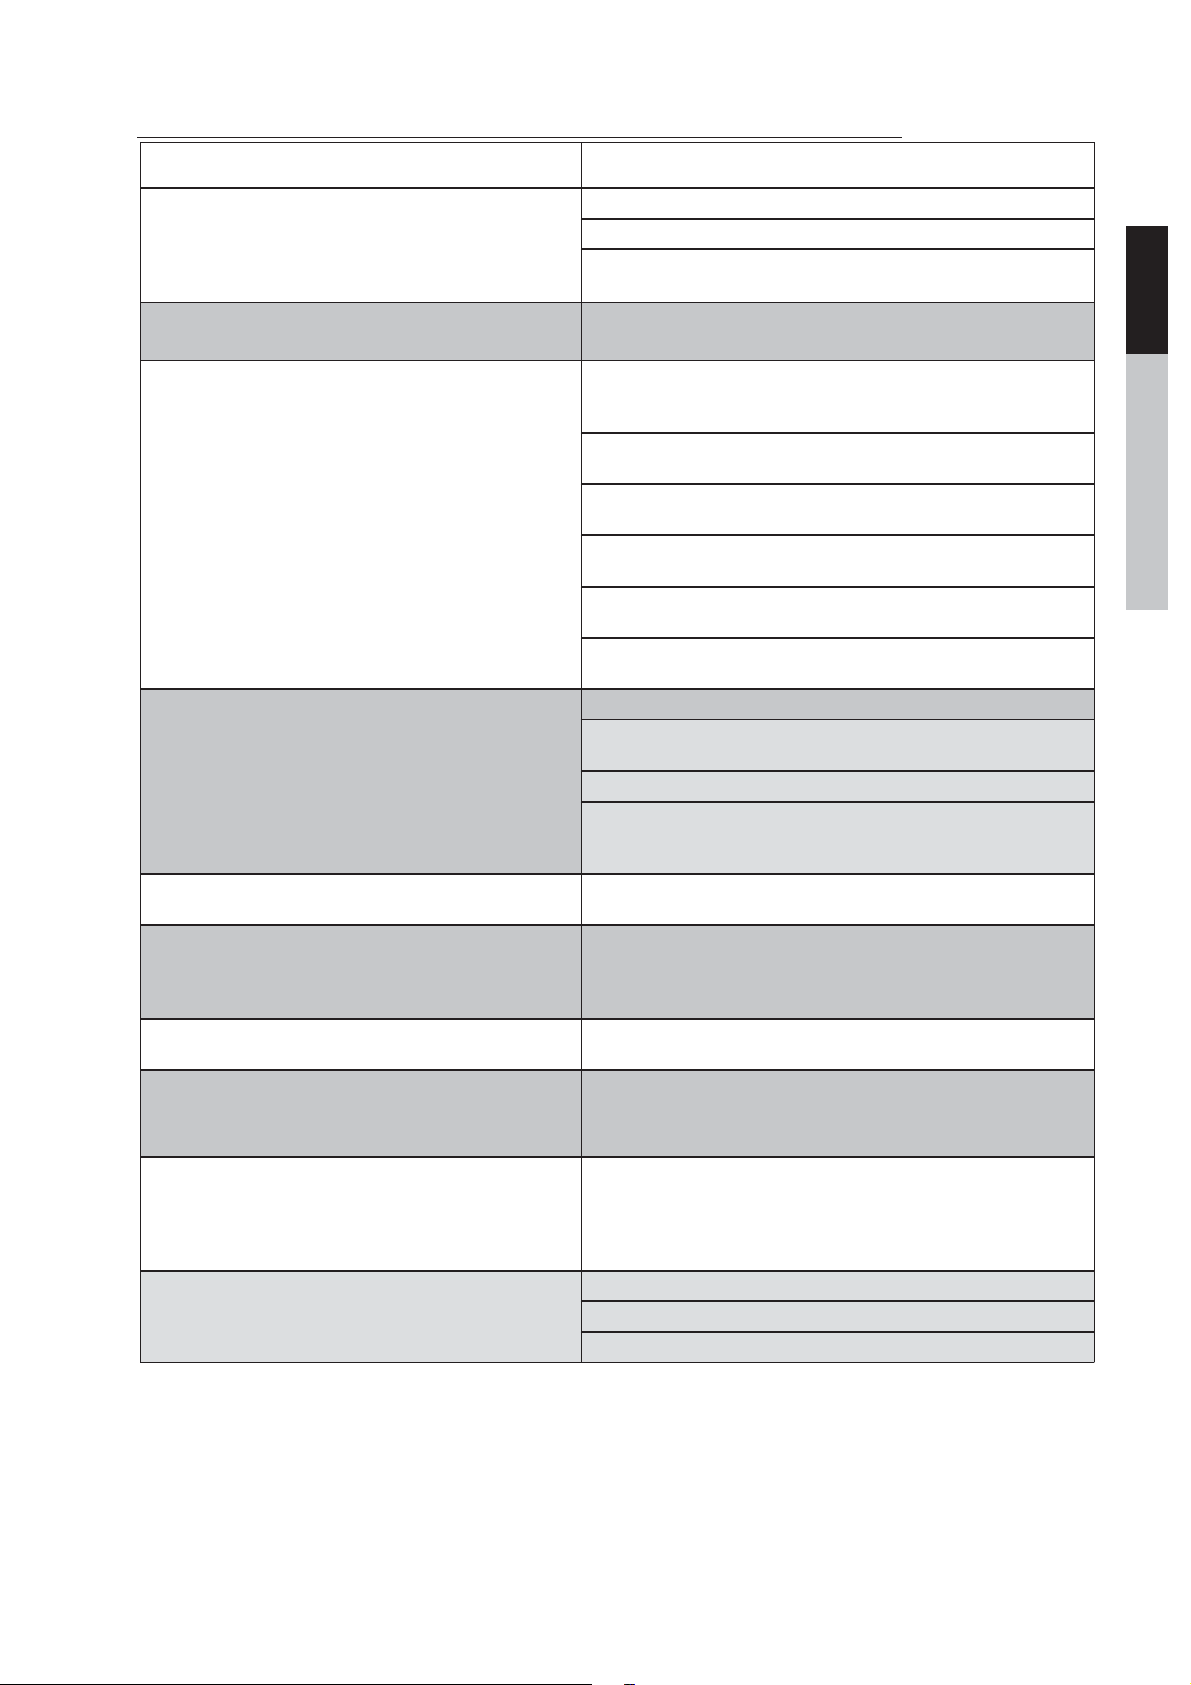
TROUBLESHOOTING
Problem Solution
Freezer is not getting any power (no hum, etc.)
Make sure that the plug is in all the way into the wall socket.
Make sure that the thermostat knob is not set to 0 or o.
Check that the fuse hasn’t blown, or that a household fuse or
circuit breaker hasn’t tripped.
Food in the freezer is freezing when it shouldn’t.
Lower the number of the thermostat (higher numbers are colder).
It may only be necessary to lower it temporarily.
Food in the freezer is not cold enough.
Make sure that the door to the freezer is closed all the way and
that the freezer is level. Also, do not open the door more oen
than necessary.
Check the ambient temperature of the room. If it’s very warm, this
may be expected. Avoid placing the appliance near a heat source.
If you recently put a lot of very warm food in the freezer, this is
normal.
Make sure that the gasket/seal around the door is free of debris. If
the seal is not tight, warm air from the environment may seep in.
This is normal when the unit is turned on aer being o for an
extended time.
If food is tightly packed, make sure the food is more evenly distrib-
uted. Do not over pack the freezer.
The temperature inside the freezer is too warm.
Make sure that the temperature setting is at the desired selection.
This could be caused by opening the door too frequently and
letting in too much warm air.
This can be caused by warm food.
It can take a few hours for your freezer to get to its target tempera-
ture setting if it is being used for the first time or has been o for
an extended period of time.
The outside of the unit is warm.
This is normal and expected behavior. Warmth prevents the for-
mation of moisture.
Dierent noises heard from the freezer at dierent times.
This includes loud sounds when it is first turned on, fans
running, popping, boiling, gurgling or cracking sounds
All of these noises are typical during normal operation and cycles,
especially when the door has been opened. These noises are
caused by the compressor motor and the refrigerant which is
circulated through the system.
The vibrating or rattling sounds seem to be excessive.
Make sure the unit is level and that is not touching a wall. See the
“Leveling the Unit” near the beginning of this guide..
There is moisture appearing on the inside of the freezer
walls.
This can be caused by debris in the door gasket/seal preventing
a tight seal. As well, it is a normal occurrence if the ambient air is
humid. This can also occur if the door is opened frequently.
There is moisture appearing on the outside of the freez-
er walls.
Make sure that your door is closing properly and that there is no
debris in the door gasket/seal. This may also be normal and due
to a fluctuation in room temperature. Wipe the residue away. If
this continues to happen, contact a qualified technician for assis-
tance.
The door will not close completely.
Make sure that the unit is not overstued with food.
Make sure that the shelf is properly in position (FC-1110).
Make sure the door gasket/seal is clean and the unit is level.

–ϭϮ–
ENGLISH ESPAÑOL FRANÇAIS
PRODUCT SPECIFICATIONS
WŽǁĞƌ
ŝŵĞŶƐŝŽŶƐ;,пtпͿ
ĂƉĂĐŝƚLJ
^ƚŽƌĂŐĞdĞŵƉĞƌĂƚƵƌĞ
EĞƚtĞŝŐŚƚ
ϭϭϱsΕϲϬ,njϯϭϮŬtŚLJĞĂƌ
ϱϳϴΗdžϮϮϳΗdžϮϯϰΗ
ϱϵĐƵĨƚ
ƉƉͲϭϭϮΣ&ƚŽϭϬϰΣ&
ƉƉƌŽdžϵϱůďƐ
CUSTOMER SUPPORT
Before contacting customer support, please see the troubleshooting section
on the previous page.
Visit our website to contact us, find answers to Frequently Asked Questions, and for other re-
sources which may include an updated version of this user’s manual.
ú
www.impecca.com
If you wish to contact us by phone, please be sure to have your model number and serial number
ready and call us between 9:00am and 6:00pm ET, at +1 866-954-4440.
Keep tabs on Impecca’s newest innovations and enter contests via our social network feeds:
www.facebook.com/Impecca/
Řwww.instagram.com/impecca/
@impeccausa
FC-1591W
–14–
ENGLISH ESPAÑOL FRANÇAIS
Impecca
®
warrants this product against defects in
material and workmanship to the original purchaser as
specified below. Please register your product online
within fourteen (14) days of purchase.
PARTS – if the product is determined to have a
manufacturing defect, within a period of six (6)
months from the date of the original purchase,
Impecca
®
will repair or replace the product parts
at no charge (for parts) to consumers in the U.S.A.
and Canada.
LABOR – if the product is determined to have a
manufacturing defect, within a period of thirty
(30) Days from the date of the original purchase,
Impecca
®
will repair or replace the product at no
charge to consumers in the U.S.A. and Canada.
After thirty (30) Days, it will be the responsibility
of the consumer.
Shipping costs to and from our warranty service center
are the sole responsibility of the consumer.
To obtain warranty service by an authorized
Impecca
®
service center,
please email us
at: [email protected] to obtain a Repair
and Maintenance Authorization (RMA) number and to
locate the Warranty Service Center nearest
you. Once authorized, you must mail the
product to the authorized Impecca
®
service
center in its original product packaging materials
or equivalent, to prevent damage while in transit.
Further, should Impecca
®
determine that the product
is outside of the Warranty terms, Impecca
®
will return
the product to sender at sender’s expense without
being repaired or replaced, unless authorized by the
consumer to service the out-of-warranty product at
consumer’s expense. All handling or restocking charges
for returns and/or replacements shall be non-
refundable.
Impecca
®
specifically excludes from this warranty any
non-electric/mechanical attachments, accessories, and
disposable parts including, but not limited to,
outside case, connecting cables, batteries, and AC
adapters. Impecca
®
reserves the right to repair
or replace defective products with the same,
equivalent, or newer models.
We reserve the right to either repair or replace
product at our discretion. Replacement may be either
new or refurbished and while every endeavor will be
made to ensure it is the same model, if same model is
not available, it will be replaced with a model of equal
or higher specification.
Normal “Wear and Tear” is not covered by this, or any
other, warranty. Further, Impecca
®
hereby reserves
the right to determine “Wear and Tear” on any and
all products. Tampering or opening the product
casing or shell will void this warranty in its entirety.
In addition, this warranty does not apply if the
product has been damaged by accident, abuse,
misuse, or misapplication; has been altered or
modified without the written permission
of Impecca
®
; has been serviced by a non-
authorized repair center of Impecca
®
; has not
been properly maintained or operated according
to the operation manual; has been used for
commercial, non-household purposes; has
been cosmetically damaged; was not imported
by Impecca
®
; was not manufactured according to
specification of the United States market; was
damaged due to improper installation or neglect
by the consumer; was damaged due to
improper packaging in shipment to the Warranty
Service Center; was damaged due to natural
disasters; or if the serial number for the
product has been removed or defaced.
ALL IMPLIED WARRANTIES, INCLUDING IMPLIED
WARRANTIES OF MERCHANTABILITY AND FITNESS FOR A
PARTICULAR PURPOSE ARE LIMITED IN DURATION TO
SIX (6) MONTHS PARTS AND THIRTY (30) DAYS LABOR
FROM THE DATE OF THE ORIGINAL RETAIL PURCHASE OF
THIS PRODUCT.
THESE WARRANTIES AND REMEDIES ARE THE SOLE AND
EXCLUSIVE WARRANTIES AND REMEDIES IN CONNECTION
WITH THE SALE AND USE OF THE PRODUCT. NO OTHER
WARRANTIES, ORAL OR WRITTEN, EXPRESSED OR
IMPLIED, ARE GIVEN.
IMPECCA
®
IS NOT RESPONSIBLE OR LIABLE FOR ANY
DAMAGE, WHETHER SPECIAL, INCIDENTAL,
CONSEQUENTIAL, DIRECT OR OTHERWISE, OR WHETHER
KNOWN OR SHOULD HAVE BEEN KNOWN TO IMPECCA
®
,
INCLUDING LOST PROFITS, GOODWILL, AND PROPERTY
AND PERSONAL INJURY RESULTING FROM ANY BREACH
OF WARRANTY, THE INABILITY TO USE THE PRODUCT OR
UNDER ANY LEGAL THEORY IN CONTRACT OR TORT.
IMPECCA LIABILITY IS LIMITED TO THE ACTUAL
PURCHASE PRICE PAID TO THE RETAIL SELLER OF THE
DEFECTIVE PRODUCT.
No Impecca
®
dealer, agent, or employee is
authorized to make any modification,
extension, change or amendment to this warranty
without the written consent and authorization from
Impecca
®
.
Some states do not allow the exclusion or limitation
of implied warranties or liability for incidental
or consequential damages, or do not allow a
limitation on how long an implied warranty lasts, so
the above limitations or exclusions may not apply
to you. This warranty gives you specific legal rights,
and you may have other rights, which vary from
state to state.
Note: Our Warranty Service Center ships only within
Continental U.S.A., excluding Alaska and Hawaii.
Important: Be Sure to Register Your Product at WWW.IMPECCA.COM within 14 Days
Impecca® USA PA 18711 www.impecca.com
*Do not send any returns to this address, as they may be lost and this will delay your repair and service process.
SIX MONTH LIMITED WARRANTY {36590}
LIMITED WARRANTY (US)


TABLA DE CONTENIDO
Reglamento inicial de seguridad.............................................................................................15
Guia de inicio .............................................................................................................................. 16
Instalando su Aparato ............................................................................................................... 16
Descripción general y caracteristicas......................................................................................17
Operación Inicial.........................................................................................................................18
Limpieza y cuidado de su aparato ..........................................................................................18
Puerta Invertida..........................................................................................................................19
Consejos y mejores prácticas adicionales ............................................................................21
Solución de problemas..............................................................................................................22
Especificaciones del producto..................................................................................................23
Soporte al cliente....................................................................................................................... 23
Garantia Limitada por un año ................................................................................................. 24
Français ........................................................................................................................................26

POR FAVOR LEA TODAS LAS
INSTRUCCIONES
YA QUE ALGUNAS COSAS PUEDEN
NO SER OBVIAS
REGLAMENTO INICIAL DE SEGURIDAD
• No instale, transporte ni invierta la puerta del aparato si se
siente incómodo o no puede hacerlo.
• Este congelador debe instalarse correctamente y ubicado
de acuerdo con las instrucciones de instalación de esta guía
antes de su uso.
• Girar el dial de control de temperatura a la posición “0”
dejará de enfriar y puede apagar el compresor, pero no corta
la corriente al congelador.
• Este aparato no está diseñado para ser utilizado por per-
sonas (incluidos los niños) con discapacidad física, capaci-
dades sensoriales o mentales que pueden conducir a un uso
inapropiado o lesiones por operar el operador.
• No permita que los niños trepen, se paren o cuelguen de
los estantes del congelador. Podrían dañar el congelador y
lesionarse gravemente o quedar atrapado en el aparato.
• No permita que los niños se cuelguen de las puertas, ya
que el congelador puede volcarse y causar lesiones graves
lesión. Los niños deben ser supervisados para asegurar que
no jueguen con el aparato.
• Mantenga todo el material de embalaje fuera del alcance de
los niños.
• No almacene artículos o contenidos explosivos bajo presión
que puedan explotar
• No deje el congelador en lugares extremadamente fríos o
temperaturas cálidas.
• Asegúrese de que las aberturas de ventilación de la unidad
estén libres de obstrucciones en todo momento.
• No limpie la unidad con productos de grado industrial disol-
ventes o productos químicos abrasivos. Limpiar la unidad
antes del primer uso, siguiendo las instrucciones de esta
guía.
• No coloque objetos pesados encima del congelador.
• Nunca instale el congelador donde haya mucha humedad o
en áreas donde el agua pueda salpicar.
• Nunca coma alimentos que puedan haberse echado a per-
der si se almacenaron demasiado tiempo antes de comer-
los, o si el el congelador ha perdido energía o no funciona
correctamente.
• No utilice herramientas metálicas afiladas dentro
del congelador (como un picahielo para quitar el
hielo), ya que algun daño puede ocurrir.
• Si el congelador no se utiliza durante un largo
período de tiempo, vacíelo por completo y des-
enchúfelo.
• Este congelador no debe estar empotrado ni
empotrado
• Este congelador no debería estar empotrado o
construido en un gabinete cerrado. Esta diseñado
solo para estar instalado independientemente.
• No lubrique ninguna parte del congelador.
RIESGO DE DESCARGA ELÉCTRICA
• Desenchufe el congelador antes de cualquier
limpieza.
• No tires del cable eléctrico para desenchufar el
aparato. Jala del enchufe mismo
• Este aparato solo deveria ser rep-
arado por un técnico autorizado
que utilice repuestos originales.
Para evitar el riesgo de descarga
eléctrica, no intente reparar la
unidad usted mismo.
• Si el cable eléctrico está dañado, debe ser
reemplazado por el fabricante o un técnico de
servicio garantizado. No utilice el aparato si el el
cable está dañado.
GAS REFRIGERANTE INFLAMABLE
• No perfore la tubería de refrigerante.
• No utilice ningún dispositivo eléctrico en
ningún lugar dentro de la unidad a menos que
se recomienden por el fabricante. Esto incluye
dispositivos guardados en el compartimiento de
almacenamiento de alimentos, o para ayudar a
descongelar.
• No guardes o uses gasolina u otro vapor y liqui-
do inflamable en la vecinidad de este o cualqui-
er otro aparato.
• No pongas el congelador cerca de ninguna
fuente de calor o llamas abiertas. No pongas
cualquier otro aparato arriba del congelador.
PRECAUCIÓN: NO USES UN CABLE DE EX-
TENSIÓN CON ESTE APARATO
SOLO PARA USO EN
INTERIORES.
GUARDA ESTAS
INSTRUCCIONES

ADVERTENCIA: El uso inadecuado del enchufe
con conexión a tierra puede provocar una descarga
eléctrica. Consulte a un electricista calificado o a una
persona de servicio si no entiende completamente las
instrucciones de conexión a tierra o si tiene alguna duda
de que el aparato o el tomacorriente no están correcta-
mente conectados a tierra
GUIO DE INICIO
Instrucciones de conexión a tierra
El aparato debe estar conectado a tierra. Esto se logra
asegurándose de que el enchufe esté insertado en un
tomacorriente correctamente conectado a tierra. El
electrodoméstico está equipado con un cable que tiene
un alambre de conexión y un enchufe a tierra. Cuando
está conectado a tierra, el riesgo de descarga eléctrica
se reduce al proporcionar un cable de escape para la
corriente eléctrica.
Fuente de electricidad
Debe enchufar el electrodoméstico en un tomacorriente
dedicado de 110 V-120 V (60 Hz) de 3 clavijas con conex-
ión a tierra. No utilice un cable de extensión.
Antes de desechar su viejo congelador:
Retire la(s) puerta(s), deje los estantes en su lugar
(para ayudar a evitar que los niños entren) y haga que
un técnico calificado lo retire de sus instalaciones, de
acuerdo con las instrucciones provistas con la unidad
anterior.
• Confirme con su distribuidor si retirará y eliminará
(o reciclará) de manera responsable su congelador
viejo.
• Visite www.epa.gov/rad para obtener más infor-
mación sobre el desecho responsable de electro-
domésticos.
INSTALACIÓN DE SU APARATO
Moviendo el aparato
PRECAUCIÓN: Para evitar lesiones graves, siempre
asegúrese de que cualquier reubicación de la unidad
sea realizada por dos personas. Tenga cuidado al mover
la unidad para asegurarse de que el circuito de refrig-
eración no se dañe. Nunca permita que la unidad se
incline más de 45°, ya que esto dañará el aparato. Ma-
nipule la unidad por los lados y la base. Nunca levante
la unidad sujetando los bordes de la superficie superior.
Si la unidad se ha inclinado, se le debe dar el tiempo
suficiente Para que se asiente en su posición vertical
antes de su uso.
Ubicación de instalación
Al seleccionar una ubicación para su unidad, asegúrese de que el piso
sea una superficie plana y nivelada (interior) y que la habitación esté
bien ventilada, manteniendo una temperatura entre 60.8 °F y 90 °F.
Evite ubicar su unidad cerca de una fuente de calor, como un horno,
una estufa, una caldera o un radiador. Evite la exposición a la luz solar
directa, ya que esto puede aumentar el consumo eléctrico. Esta uni-
dad no está diseñada para su uso en un garaje ni para su instalación
al aire libre. Las temperaturas ambientales extremadamente frías
también pueden impedir que la unidad funcione de manera efec-
tiva. Este aparato está diseñado para uso doméstico y aplicaciones
similares, como uso individual en habitaciones de hotel. en áreas de
cocina dentro de tiendas y oficinas, o para catering y otras aplica-
ciones no minoristas.
Al instalar la unidad, asegúrese de que haya suficiente espacio para
que la puerta frontal se abra por completo Asegúrese de dejar un
mínimo de 4 pulgadas de espacio libre a los lados, adelante y atrás.
En la parte superior de la unidad, asegúrese de que haya un mínimo
de 8 pulgadas de espacio libre. Esto permitirá que el aire frío circule a
través del congelador y mejorará la eficiencia del proceso de enfri-
amiento. No coloque ninguna cubierta, como cortinas o sábanas,
sobre la unidad. Limpie el aparato antes del primer uso.
Nivelación de la unidad
Es muy importante mantener la unidad nivelada para
evitar vibraciones y movimientos innecesarios. Esto
también ayuda a garantizar que la puerta se cierre
correctamente.
Si la puerta no cierra bien, esto impedirá un enfriamiento efectivo y
posiblemente dañará el congeladorrior. Si la unidad se ha inclinado,
se le debe dar el tiempo suficiente Para que se asiente en su posición
vertical antes de su uso.
Para nivelar la unidad, gire las patas ajustables en la parte delantera
del congelador en sentido horario o antihorario para subir o bajar la
esquina respectivamente.
Hacer que una segunda persona empuje con cuidado contra la parte
superior del congelador aliviará un poco el peso de las patas nivela-
doras y hará que sea más fácil ajustarlas. Sin embargo, asegúrese de
que la unidad tenga una pared contra la cual apoyarse para que no
se vuelque y cause daños o lesiones.
Número de serie y modelo
Registre su número de modelo y número de serie a continuación.
Puede encontrar el número de serie en una etiqueta en la parte poste-
rior del congelador o en la caja del producto.
Model Number: FC-1591W
Serial Number:
Date of Purchase:
DESCRIPCIÓN GENERAL Y CARACTERÍSTICAS DE LA UNIDAD
Gabinete
Cajones
Patas
Ajustables
Perilla del
Termostato
Las imágenes de este manual de instrucciones tienen fines ilustrativos.
La apariencia física y las opciones de su modelo en particular pueden variar
Retire con cuidado todo el material de embalaje. Esto incluye la base de espuma y toda la cinta adhesiva que sujeta
los accesorios del congelador por dentro y por fuera. Inspeccione y elimine cualquier resto de embalaje, cinta o
materiales impresos antes de enchufar el congelador. Deseche los materiales de embalaje para que los niños o las
mascotas no jueguen con ellos.

OPERACIÓN INICIAL
Las instrucciones de esta guía generalmente se aplican a ambos modelos a menos que se indique lo contrario. Limpie la unidad
antes del primer uso (consulte la siguiente sección para obtener instrucciones de limpieza). Después de limpiar, conecte la
unidad a su fuente de electricidad. No encienda la unidad si se ha movido en las últimas 2 horas, ya que el líquido refrigerante
necesita tiempo para asentarse.
Cuando se enchufa el congelador por primera vez, o después de descongelar, ajuste la perilla de control del termostato al ajuste
más alto D y durante al menos 2 horas antes de agregar alimentos.
Después de que se haya enfriado por completo, ajuste la perilla para que se adapte mejor a sus necesidades. D/E es el ajuste
menos frío y D y es el ajuste más frío. Una configuración de EKZD > debería ser apropiada para la mayoría de los usos domésti-
cos o de oficina. Es más probable que los entornos más cálidos requieran configuraciones más altas. Los ambientes más fríos o
invernales pueden ser más adecuados para una configuración más baja.
NOTA: Girar la perilla de control del termostato a la posición D/E o “APAGADO” puede detener el ciclo de enfriamiento,
pero no desconecta la electricidad de la unidad.
LIMPIEZA Y CUIDADO DE SU APARATO
Desconecte siempre la conexión antes de limpiar el aparato.
Limpie el interior de la unidad con una solución débil de bicarbonato de sodio (bicarbonato). Luego enjuague con agua tibia
(nunca caliente o hirviendo) utilizando una esponja o paño húmedo. Para el congelador 1110, lave el estante y la bandeja con
agua jabonosa tibia y séquelos completamente antes de volver a colocarlos en la unidad. Limpie el exterior de la unidad con
un paño húmedo. Limpie también con cuidado la junta/junta de la puerta. No salpique agua en el exterior ni en el interior de la
unidad cuando la limpie. El electrodoméstico debe limpiarse con la suficiente frecuencia para que no acumule una acumulación
significativa de desechos.
Descongelar el congelador
Con el tiempo, el congelador puede requerir una descongelación manual debido a la formación de escarcha o hielo dentro del
compartimiento del congelador. Debe descongelarse en los siguientes escenarios:
• El congelador no se utilizará durante un período de tiempo prolongado.
• Se ha acumulado una capa de hielo dentro de la unidad de más de 1/4 de pulgada de espesor
Para descongelar el congelador
1. Gire la perilla del termostato a 0 o “O”
2. Desenchufe la unidad del tomacorriente de pared
3. Retire todos los alimentos. Lo ideal es colocar los alimentos en otro congelador.
4. Coloque una toalla o dos debajo del congelador para recoger el agua de la escarcha que se está derritiendo.
5. Deje la puerta abierta hasta que se derrita toda la escarcha. Por lo general, varias horas (o toda la noche) serán suficientes.
6. Limpie y seque el interior de la unidad siguiendo las instrucciones de limpieza que se acaban de mencionar. No use ninguna
herramientas de metal o limpiadores abrasivos para eliminar la escarcha, ya que esto puede dañar la unidad. Un raspador
de plástico está bien.
7. Vuelva a conectar la energía cuando termine la limpieza.
PUERTA INVERTIDA
Herramienta requerida: Destornillador de estrella, destornillador de punta plana, llave hexagonal estándar.
• Asegurese de que la unidad esta desconectada y vacia
• Para quitar la puerta, es necesario inclinar a unidad hacia atrás. Debe dejar la unidad en un lugar solido para que no se res-
bale durante el proceso de invertir la puerta.
• Todas las partes removidas deben guardarse para hacer la reinstalación de la puerta.
• No deje la unidad en un lugar plano para no dañar el sistema de enfriado.
• Es mejor si dos personas manejen la unidad durante el ensamblado.
1. Remueva la tapa de la bisagra superior derecha
2. Deshaga los tornillos. Luego, retire el soporte de
la bisagra.
3. Retire la cubierta superior del tornillo
4. Mueva la cubierta del núcleo del lado izquierdo
al lado derecho. Y luego levante la puerta superior y
colóquela sobre una superficie acolchada para evitar
que se raye.
5. Desenrosque y retire el pasador de la bisagra inferior, gire el
soporte y vuelva a colocarlo.
6. Volver a montar el estribo, encajando el eje de la bisagra inferior.
Reemplace ambas patas ajustables.
7. Separe los cajones de las puertas del frigorífico y del congelador
y fíjelas después de invertirlas.
8. Vuelva a colocar la puerta superior. Asegúrese de que la puerta
esté alineada horizontal y verticalmente para que los sellos estén
cerrados por todos lados antes de apretar finalmente la bisagra
superior.
9. Inserte el soporte de la bisagra y atorníllelo a la parte superior de
la unidad.
11. Vuelva a colocar la cubierta de la bisagra y la cubierta del
tornillo.
12. Con las puertas cerradas, compruebe que las puertas
estén alineadas horizontal y verticalmente y que la junta esté
cerrada por todos los lados antes de apretar finalmente la
bisagra inferior. Vuelva a ajustar las patas niveladoras según
sea necesario.
INSTALACIÓN
Instalando la manija de la puerta
Parte Trasera
Atornille los espaciadores traseros en la parte trasera de
la unidad.
Mantenga suficiente espacio con la puerta abierta.
Mantenga un espacio de al menos 50 mm en ambos
lados.
Espacio requerido
Nivelando la unidad
Para hacer esto, ajuste las dos patas niveladoras en el frente
de la unidad.
Si la unidad no está nivelada, las puertas y las alineaciones
del sello magnético no se cubrirán adecuadamente.

CONSEJOS Y MEJORES PRACTICAS ADICIONALES
• Después de comprar alimentos congelados y traerlos de la tienda, colóquelos en el congelador lo antes posible si desea
que permanezcan congelados.
• No llene en exceso el congelador, ya que esto bloquea la circulación adecuada y aumenta el consumo de energía. Deje
espacio alrededor de los alimentos para permitir la circulación de aire adecuada.
• Para mantener la temperatura, abra la puerta solo para introducir o sacar alimentos. Permita que los alimentos calientes se
enfríen antes de colocarlos en el congelador.
• Congele grandes cantidades de alimentos empacándolos en porciones separadas del tamaño de una comida.
• Las botellas de vidrio y plástico no deben colocarse en el congelador a menos que lo recomiende el fabricante del produc-
to. No coloque bebidas carbonatadas en el congelador.
• No ponga alimentos frescos directamente en contacto con alimentos ya congelados. La vida de almacenamiento de los
alimentos congelados tiende a variar y no se debe exceder el tiempo de almacenamiento recomendado. Seleccione con
cuidado los alimentos que desea congelar; debe ser de calidad adecuada y apto para la congelación.
• Cuando vacíe el congelador para limpiarlo, descongelarlo, transportarlo u otros medios, no permita que los alimentos se
echen a perder o desarrollen bacterias. Los alimentos que se han dejado a temperatura ambiente durante un período pro-
longado pueden hacer que se desarrollen bacterias.
• Después de transportar la unidad o invertir la puerta, es posible que se deba restablecer la junta/sello de las puertas. Esto
se hace para evitar que el aire frío se escape. Si hay un espacio entre la junta de la puerta y el gabinete, vuelva a colocar la
junta tirando suavemente hacia afuera para sellar el espacio.
• Durante un corte de energía, no abra el congelador a menos que sea necesario. No coloque alimentos adicionales en la
unidad. Tenga mucho cuidado al examinar los alimentos antes de prepararlos y comerlos, ya que existe un riesgo para la
salud al comer alimentos en mal estado que no se han refrigerado adecuadamente. Es posible que sea necesario preparar y
comer algunos alimentos antes de que se echen a perder. Si la unidad está desenchufada o ha perdido energía, espere de 3
a 5 minutos antes de reiniciar la unidad. De lo contrario, es posible que la unidad no arranque.
• Mantenga los alimentos bien sellados para evitar que se sequen y que los olores no se mezclen.
• Guarde la carne y el pescado crudos en el estante más bajo para evitar la contaminación.
• No permita que ninguna grasa entre en contacto con las piezas de plástico del congelador.
• No almacene artículos enlatados, ya que pueden expandirse y reventar.
• Asegúrese de que todos los recipientes estén limpios y secos antes de guardarlos en el congelador.
• Girar el dial de control de temperatura a la posición “0” puede detener el enfriamiento, pero no corta la energía al congela-
dor.
• Cuando el electrodoméstico no esté en uso durante un período prolongado (como más de un mes o varios meses), baje el
termostato y desconecte el electrodoméstico de la fuente de alimentación. Vacíe todos los alimentos y limpie el aparato
siguiendo las instrucciones de este manual. Deje la puerta entreabierta para evitar que los olores queden atrapados
SOLUCIÓN DE PROBLEMAS
Problema Solución
El congelador no recibe energía (no hay zumbidos, etc.)
Asegúrese de que el enchufe esté completamente dentro del tomacorriente de pared.
Asegúrese de que la perilla del termostato no esté en 0 o o.
Verifique que el fusible no se haya quemado o que no se haya disparado un fusible
doméstico o un disyuntor.
La comida en el congelador se está congelando cuando no
Baje el número del termostato (los números más altos son más fríos).
Puede que solo sea necesario bajarlo temporalmente.
La comida en el congelador no está lo suficientemente fría.
Asegúrese de que la puerta del congelador esté completamente cerrada y que el
congelador
Compruebe la temperatura ambiente de la habitación. Si hace mucho calor, esto
puede esperarse.
Si recientemente puso muchos alimentos muy calientes en el congelador, esto es
normal.
Asegúrese de que la junta/sello alrededor de la puerta no tenga residuos. Si el sello
no es
Esto es normal cuando la unidad se enciende después de haber estado apagada durante
un tiempo prolongado.
Si los alimentos están muy apretados, asegúrese de que estén distribuidos más
uniformemente.
La temperatura dentro del congelador es demasiado alta.
Asegúrese de que el ajuste de temperatura esté en la selección deseada.
Esto podría deberse a que abre la puerta con demasiada frecuencia y deja entrar
demasiado aire caliente.
Esto puede ser causado por alimentos calientes.
Su congelador puede tardar algunas horas en llegar a la configuración de temperatura
objetivo
si se usa por primera vez o si ha estado apagado durante un período prolongado.
El exterior de la unidad está caliente.
Asegúrese de que la unidad esté nivelada y que no esté tocando una pared. Consulte
la sección “Nivelación de la unidad” cerca del comienzo de esta guía.
Esto puede deberse a residuos en la junta/sello de la puerta que impiden un sellado
hermético.
Además, es normal que el aire ambiente esté húmedo. Esto también puede ocurrir si
la puerta
Aparece humedad en el exterior de las paredes del congelador.
Aparece humedad en el exterior de las paredes del congelador.
Aparece humedad en el interior de las paredes del congelador.
Se escuchan diferentes ruidos del congelador en diferentes mo-
mentos.
Esto incluye sonidos fuertes cuando se enciende por primera vez,
ventiladores funcionando, estallando, hirviendo, gorgoteando o
Los sonidos de vibración o traqueteo parecen ser excesivos.
Este es un comportamiento normal y esperado. El calor impide la formación de
Todos estos ruidos son típicos durante el funcionamiento y los ciclos normales, espe-
cialmente cuando se ha abierto la puerta. Estos ruidos son causados por el motor del
compresor y el refrigerante que circula por el sistema.
Asegúrese de que la puerta se cierre correctamente y de que no haya residuos en la
junta/ sello de la puerta. Esto también puede ser normal y deberse a una fluctu-
ación en la temperatura ambiente. Limpia los residuos. Si esto continúa ocurriendo,
comuníquese con un técnico calificado para obtener ayuda.
Asegúrese de que la unidad no esté llena de comida.
Asegúrese de que el estante esté correctamente colocado (FC-1110).
Asegúrese de que la junta/sello de la puerta esté limpio y que la unidad esté nivelada.
ESPECIFICACIONES DEL PRODUCTO
FC-1591W
Energia: 115V-60Hz, 312kWh/year
Dimensiones(HxWxD): 57.8’’ x 22.7’’ x23.4’’
Capacidad: 5.9 cu.
Temperatura de contenedor: App -11.2°F to 10.4°F
Peso Neto: Aprox. 95 lbs
SOPORTE AL CLIENTE
Antes de contactar al servicio al cliente, por favor vea la sección de Solucion de Problemas en la página
anterior.
Visita nuestra página web para contactarnos, encuentre respuestas a Preguntas Frecuentes, y para
otros recursos que pueden incluir versiones actualizadas de este manual de usuario.
Si desea comunicarse con nosotros por teléfono, asegúrese de tener su número de modelo y número
de serie listo y llámenos entre las 9:00 am y las 6:00 pm ET, al +1 866-954-4440.
Manténgase al tanto de las innovaciones más recientes de Impecca y participe en concursos a través
de nuestras redes sociales:
www.impecca.com
www.facebook.com/impecca/
www.instagram.com/impecca/
@impeccausa
–27–
ENGLISHESPAÑOLFRANÇAIS
GARANTÍA LIMITADA POR UN AÑO
Impecca
®
garantiza este producto contra defectos en
material y obra al comprador original como se especifica
abajo siempre y cuando el producto este registrado en
línea dentro de los catorce (14) días de compra.
PARTES – Si se determina que el producto tiene defecto de
fábrica, dentro de seis (6) meses a partir de la fecha de
compra original, Impecca
®
reparará o reemplazará las
partes del producto sin costo alguno (de las
partes) para consumidores en Estados Unidos y Canadá.
LABOR – Si se determina que el producto tiene un defecto
de fabrica, dentro de un periodo de treinta (30) días a
partir de la fecha de compra original,, Impecca
®
reparará o reemplazará el producto sin costo
alguno para consumidores en Estados Unidos y Canadá.
Después de treinta (30) días será responsabilidad del
consumidor.
Costos de embarque hacia y desde el Centro de Servicio
de Garantía son la completa responsabilidad del
consumidor.
Para obtener servicio de garantía por un centro de servicio
autorizado de Impecca, por favor envíenos un correo
electrónico a: [email protected] para obtener un
numero de Autorización de Reparación y Mantenimiento y
para localizar el Centro de Servicio de Garantía mas cerca
de usted. Una vez autorizado, usted debe enviar el
artículo por correo al centro de servicios autorizado
Impecca
®
en sus materiales de empaque de producto
originales o equivalente, para prevenir daño en tránsito.
Además, si Impecca
®
determina que el producto está
fuera de los términos de Garantía, Impecca
®
retornará el
producto al remitente a cargo del remitente sin ser
reparado o reemplazado, salvo que haya sido autorizado
por el consumidor a dar servicio al producto fuera de
garantía al costo del consumidor. Todos los cargos de
manejo o por reposición por devoluciones y/o reemplazos
no serán reembolsables.
Impecca
®
específicamente excluye de esta garantía
aditamentos no-eléctricos/mecánicos, accesorios, y partes
desechables incluyendo, pero no limitados a, caja
externa, cables de conexión, baterías, y adaptadores AC.
Impecca
®
se reserva el derecho a reparar o reemplazar
productos con el mismo, equivalente, o modelo más
nuevo.
Nos reservamos el derecho a reparar o reemplazar el
producto a nuestra discreción. El reemplazo puede ser
nuevo o reparado y aunque se hará todo lo posible por que
sea el mismo modelo, si el mismo modelo no está
disponible, será reemplazado con un modelo de la misma
mayor especificación.
Desgaste normal no es cubierto por esta garantía.
Además, Impecca
®
se reserva el derecho a determinar el
“desgaste” en cualquier y todos los productos.
Manipulación o apertura de la cubierta o tapadera del
producto anulará esta garantía completamente.
La garantía no aplica si el producto ha sido dañado por
accidente, abuso, mal uso, o mala aplicación; ha sido
alterado o modificado sin el permiso expreso de
Impecca
®
; ha recibido servicio por un centro de
reparación no autorizado por Impecca
®
; no ha sido
mantenido u operado de forma apropiada de acuerdo al
manual de operación; ha sido usado para propósitos
comerciales, no domésticos; ha sido dañado
cosméticamente; no fue importado por Impecca
®
; no
fue fabricado de acuerdo a especificación del mercado
de Estados Unidos; fue dañado debido a instalación no
apropiada o negligencia del consumidor; fue dañado por
empaque no apropiado en el embarque al Centro de
Servicio de Garantía; fue dañado por desastre natural; o
si el número de serie del producto ha sido removido o
desfigurado.
TODAS LAS GARANTÍAS IMPLÍCITAS, INCLUYENDO
GARANTÍAS DE COMERCIALIZACIÓN Y ADECUACIÓN
IMPLÍCITAS PARA UN PROPÓSITO PARTICULAR SON
LIMITADAS EN DURACIÓN SEIS (6) MESES EN PARTES Y
TREINTA (30) DÍAS EN LABOR DE LA FECHA DE LA
COMPRA ORIGINAL AL DETALLE DE ESTE PRODUCTO.
ESTAS GARANTÍAS Y REMEDIOS SON LAS ÚNICAS Y
EXCLUSIVAS GARANTÍAS Y REMEDIOS EN CONEXIÓN CON
LA VENTA Y USO DEL PRODUCTO. NINGUNA OTRA
GARANTÍA, ORAL O ESCRITA, EXPRESA O IMPLÍCITA SON
DADAS.
IMPECCA
®
NO ES RESPONSABLE POR NINGÚN DAÑO, YA
SEA ESPECIAL, A
CCIDENTAL, CONSECUENTE, DIRECTO O
DE OTRA MANERA, O YA SEA CONOCIDO O TUVO QUE
HABER SIDO CONOCIDO POR IMPECCA
®
, INCLUYENDO
GANANCIAS PERDIDAS, BUENA VOLUNTAD, Y LESIÓN
PERSONAL O DE PROPIEDAD RESULTANTE DE CUALQUIER
ROMPIMIENTO DE GARANTÍA, LA INHABILIDAD DE USAR
EL PRODUCTO, O BAJO CUALQUIER TEORÍA LEGAL EN
CONTRATO O AGRAVIO. LA RESPONSABILIDAD DE
IMPECCA
®
ES LIMITADA AL PRECIO DE COMPRA ACTUAL
PAGADO AL VENDEDOR DETALLISTA DEL PRODUCTO
DEFECTUOSO.
Ningún comerciante, agente, o empleado de Impecca
®
está autorizado para hacer ninguna modificación,
extensión, cambio o enmienda a esta garantía sin el
consentimiento escrito y autorización de Impecca
®
.
Algunos estados no permiten la exclusión o limitación
de garantías implícitas o responsabilidad por daños
accidentales o consecuentes, o no permiten una
limitación en el tiempo de duración de una garantía
implícita, así que es posible que las limitaciones o
exclusiones anteriores no apliquen a usted. Esta
garantía le da a usted derechos legales específicos, y es
posible que usted tenga otros derechos que varían de
estado a estado.
Nota: Nuestro Centro de Servicio de Garantía embarca
solamente dentro de Estados Unidos Continental,
excluyendo Alaska y Hawái.
GARANTÍA LIMITADA DE SEIS MESES {36590}
Impecca
®
No envíe devoluciones a esta dirección ya que se pueden perder y esto atrasara el proceso de reparación y servicio.
Im
portante: Asegúrese de Registrar su producto en WWW.IMPECCA.COM dentro de 14 Días.


TABLE DES MATIÈRES
Consignes de sécurité initiales.................................................................................................27
Commencer ................................................................................................................................ 28
Installation de votre appareil .................................................................................................. 28
Vue d’ensemble et caractéristiques de l’unité .....................................................................29
Opération initiale ........................................................................................................................30
Nettoyage et entretien de votre appareil................................................................................30
Inversion de porte.......................................................................................................................31
Conseils supplémentaires et bonnes pratiques...................................................................33
Dépannage ..................................................................................................................................34
Spécifications du produit......................................................................................................... 35
Service client............................................................................................................................... 35
Garantie limitée d’un an sur l’appareil....................................................................................36
VEUILLEZ LIRE TOUT CECI DES IN-
STRUCTIONS, COMME ILS NE PEU-
VENT PAS TOUS SOYEZ ÉVIDENT
DIRECTIVES DE SÉCURITÉ INITIALES
• N’installez, ne transportez ou n’inversez pas la porte de
l’appareil si vous vous sentez mal à l’aise ou incapable de le
faire.
• Ce congélateur doit être correctement installé et situé con-
formément aux instructions d’installation de ce guide avant
de l’utiliser.
• Tourner le cadran de contrôle de la température à la position
“0” arrêtera le refroidissement et peut éteindre le com-
presseur, mais ne coupe pas l’alimentation du congélateur.
• Cet appareil n’est pas destiné à être utilisé par fils (y com-
pris les enfants) ayant une déficience physique, capacités
sensorielles ou mentales pouvant entraîner à une mauvaise
utilisation ou à des blessures causées par l’utilisation du
appareil.
• Ne laissez pas les enfants grimper, se tenir debout ou s’ac-
crocher aux clayettes du congélateur. Ils pourraient endom-
mager le congélateur et se blesser gravement ou se coincer
dans l’appareil.
• Ne laissez pas les enfants se suspendre aux portes, car le
congélateur pourrait se renverser, causant de graves bless-
ure. Les enfants doivent être surveillés pour s’assurer qu’ils
ne jouent pas avec l’appareil.
• Gardez tout le matériel d’emballage hors de portée des
enfants
• Ne stockez pas d’objets ou de contenus explosifs sous pres-
sion qui pourraient exploser.
• Ne laissez pas le congélateur dans des endroits extrêmement
froids ou températures chaudes.
• Assurez-vous que toutes les ouvertures de ventilation de
l’appareil sont libres d’obstruction à tout moment.
• Ne nettoyez pas l’appareil avec un produit de qualité in-
dustrielle solvants ou produits chimiques abrasifs. Nettoyer
l’appareil avant la première utilisation, en suivant les instruc-
tions de ce guide.
• Ne placez pas d’objets lourds sur le dessus du congélateur.
• N’installez jamais le congélateur là où il y a beaucoup de
l’humidité ou dans des endroits où l’eau peut éclabousser.
• N’utilisez pas d’outils métalliques tranchants à
l’intérieur du congélateur (comme un pic à glace
pour enlever la glace), car des dommages peut se
produire.
• Si le congélateur n’est pas utilisé pendant une
longue période, videz-le complètement et débran-
chez-le.
• Ce congélateur ne doit pas être encastré ou encas-
tré dans une armoire fermée. Il est conçu pour une
installation autonome uniquement
RISQUE DE CHOC ELECTRIQUE
• Débranchez le congélateur avant tout nettoyage.
• Ne tirez pas sur le cordon d’alimentation pour
débrancer
• Cet appareil ne doit être entretenu
que par un technicien agréé utilisant
des pièces de rechange d’origine.
Pour éviter tout risque d’électro-
cution, n’essayez pas de réparer
l’appareil toi-même.
• Si le cordon d’alimentation est endommagé, il
doit être remplacé par le fabricant ou un tech-
nicien qualifié. N’utilisez pas l’appareil si le le
cordon est endommagé.
GAZ RÉFRIGÉRANT INFLAMMABLE
• Ne percez pas le tuyau de réfrigérant.
• N’utilisez aucun appareil électrique où que
ce soit à l’intérieur de l’unité à moins qu’ils ne
soient recommandés par le fabricant. Cela inclut
les appareils conservés dans le compartiment
de stockage des aliments, ou pour aider à dé-
givrage.
• N’entreposez pas et n’utilisez pas d’essence
ou d’autres vapeurs et liquides inflammables
à proximité de cet appareil ou de tout autre
appareil.
• Ne placez pas le congélateur à proximité de
sources de chaleur ou de flammes nues. Ne
placez aucun autre appareil sur ce congélateur.
ATTENTION : N’utilisez pas de rallonge
avec cet appareil
POUR UNE UTILISATION EN
INTÉRIEUR UNIQUEMENT.
CONSERVEZ CES
DES INSTRUCTIONS
COMMENCER
Instructions de mise à la terre
Cet appareil doit être mis à la terre. Ceci est accompli
en s’assurant que la fiche est insérée dans une prise
correctement mise à la terre. Veuillez enregistrer votre
numéro de modèle et votre numéro de série ci-des-
sous.L’appareil est équipé d’un cordon doté d’un fil et
d’une fiche de mise à la terre. Lorsqu’il est mis à la terre,
le risque de choc électrique est réduit en fournissant un
fil d’échappement pour le courant électrique.
AVERTISSEMENT: Une mauvaise utilisation de la
fiche de mise à la terre peut entraîner un choc élec-
trique. Consultez un électricien qualifié ou une per-
sonne de service si les instructions de mise à la terre ne
sont pas complètement comprises, ou s’il y a le moindre
doute que l’appareil ou la prise n’est pas correctement
mis à la terre.
Source de courant
Vous devez brancher l’appareil dans une prise de terre
dédiée à 3 broches de 110 V-120 V (60 Hz) . N’utilisez pas
de rallonge
Avant de jeter votre ancien congélateur:
Retirez la ou les portes, laissez les tablettes en place
(pour empêcher les enfants de s’y glisser) et faites-les re-
tirer de vos locaux par un technicien qualifié, conformé-
ment aux instructions fournies avec l’ancien appareil.
• Confirmez auprès de votre revendeur s’il retirera et
éliminera (ou recyclera) de manière responsable
votre ancien congélateur.
• Visitez www.epa.gov/rad pour plus d’informations
sur l’élimination responsable des appareils.
INSTALLATION DE VOTRE APPAREIL
Déplacement de l’appareil
ATTENTION : Pour éviter des blessures graves, as-
surez-vous toujours que tout déplacement de l’unité est
toujours eectué par deux personnes. Soyez prudent
lorsque vous déplacez l’unité pour vous assurer que le
circuit de réfrigération n’est pas endommagé. Ne jamais
incliner l’appareil à plus de 45°, car cela endommagerait
l’appareil. Manipulez l’unité autour de ses côtés et de sa
base. Ne soulevez jamais l’appareil en tenant les bords
de la surface supérieure. Si l’appareil a été incliné, il faut
lui laisser suisamment de temps pour s’installer dans
sa position verticale avant utilisation.
Emplacement d’installation: Lors de la sélection d’un emplacement
pour votre appareil, assurez-vous que le sol est une surface plane
et de niveau (à l’intérieur) et que la pièce est bien ventilée, en main-
tenant une température entre 60,8 °F et 90 °F. Évitez de placer votre
appareil près d’une source de chaleur telle qu’un four, une cuisinière,
une chaudière ou un radiateur. Évitez l’exposition à la lumière directe
du soleil, car cela peut augmenter la consommation électrique. Cet
appareil n’est pas conçu pour être utilisé dans un garage ou pour une
installation à l’extérieur. Des températures ambiantes extrêmement
froides peuventégalement empêcher l’unité de fonctionner eica-
cement. Cet appareil est destiné à être utilisé dans des applications
domestiques et similaires, telles que l’utilisation individuelle dans des
chambres d’hôtel. dans les cuisines à l’intérieur des magasins et des
bureaux, ou pour la restauration et d’autres applications non com-
merciales.
Lors de la sélection d’un emplacement pour votre appareil, as-
surez-vous que le sol est une surface plane et de niveau (à l’intérieur)
et que la pièce est bien ventilée, en maintenant une température
entre 60,8 °F et 90 °F. Évitez de placer votre appareil près d’une source
de chaleur telle qu’un four, une cuisinière, une chaudière ou un radi-
ateur. Évitez l’exposition à la lumière directe du soleil, car cela peut
augmenter la consommation électrique. Cet appareil n’est pas conçu
pour être utilisé dans un garage ou pour une installation à l’extérieur.
Des températures ambiantes extrêmement froides peuvent égale-
ment empêcher l’unité de fonctionner eicacement. Cet appareil est
destiné à être utilisé dans des applications domestiques et similaires,
telles que l’utilisation individuelle dans des chambres d’hôtel. dans
les cuisines à l’intérieur des magasins et des bureaux, ou pour la
restauration et d’autres applications non commerciales.
Mise à niveau de l’unité
Il est très important de maintenir l’unité à niveau pour
éviter les mouvements et les vibrations inutiles. Cela
permet également de s’assurer que la porte se ferme
correctement. Si la porte ne se ferme pas correctement,
cela empêchera un refroidissement eicace et pourrait
endommager le congélateur.
Pour niveler l’appareil, tournez les pieds réglables à l’avant du
congélateur dans le sens des aiguilles d’une montre ou dans le sens
inverse des aiguilles d’une montre pour élever ou abaisser le coin
respectivement.
Le fait qu’une deuxième personne pousse soigneusement contre le
haut du congélateur soulagera un peu le poids des pieds de nivelle-
ment et facilitera leur réglage. Cependant, assurez-vous que l’appar-
eil repose contre un mur afin qu’il ne bascule pas et ne cause pas de
dommages ou de blessures.
Numéro de série et de modèle
Veuillez enregistrer votre numéro de modèle et votre numéro de
série ci-dessous. Vous pouvez trouver le numéro de série sur un
autocollant à l’arrière du congélateur ou sur la boîte du produit.
Numéro de modèle: FC-1591W
Numéro de série:
Date d’achat:
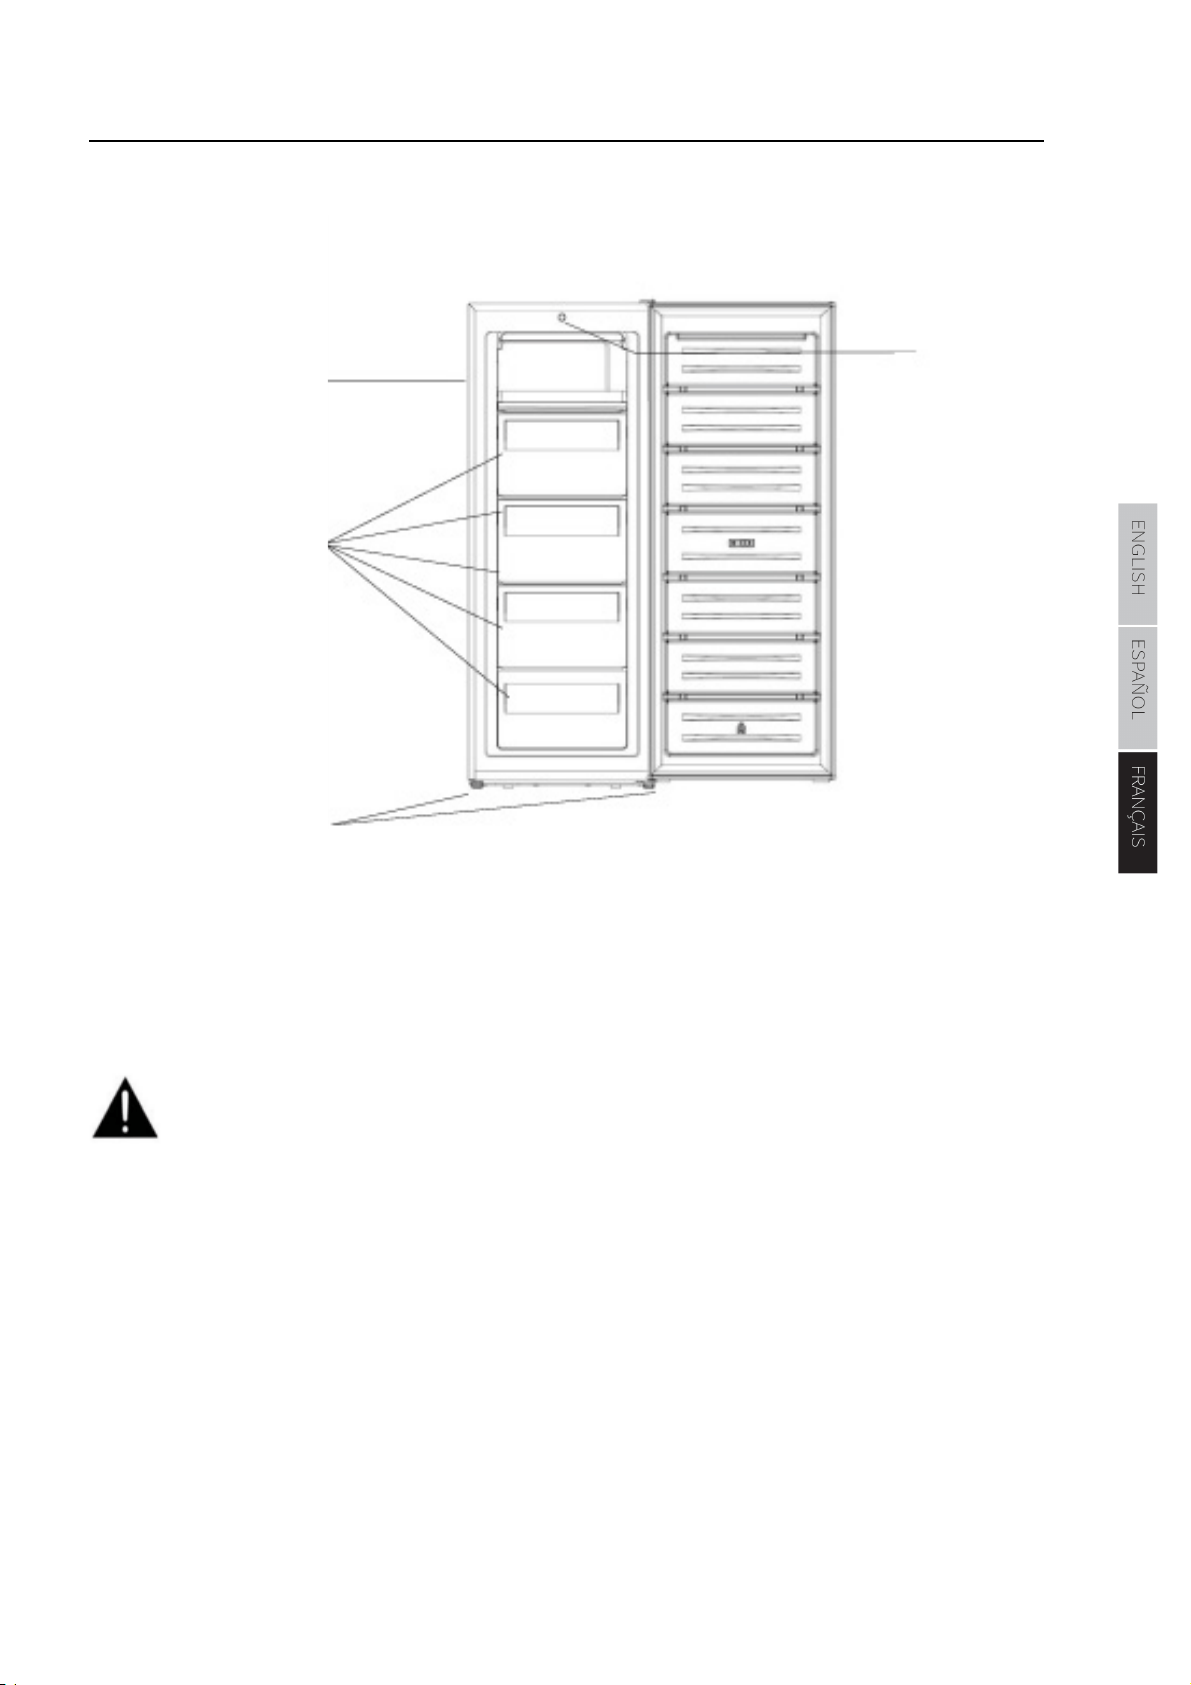
APERÇU ET CARACTÉRISTIQUES DE L’UNITÉ
Cabinet
Tiroir
Pieds ajustables
Les images de ce manuel d’instructions sont fournies à titre indicatif.
L’apparence physique et les options de votre modèle particulier peuvent varier.
Retirez soigneusement tous les matériaux d’emballage. Cela comprend la base en mousse et tout le ruban adhésif
maintenant les accessoires du congélateur à l’intérieur et à l’extérieur. Inspectez et enlevez tout reste d’emballage,
de ruban adhésif ou de documents imprimés avant de brancher le congélateur. Jetez les matériaux d’emballage afin
qu’ils ne soient pas utilisés par des enfants ou des animaux domestiques.
Le bouton du
thermostat
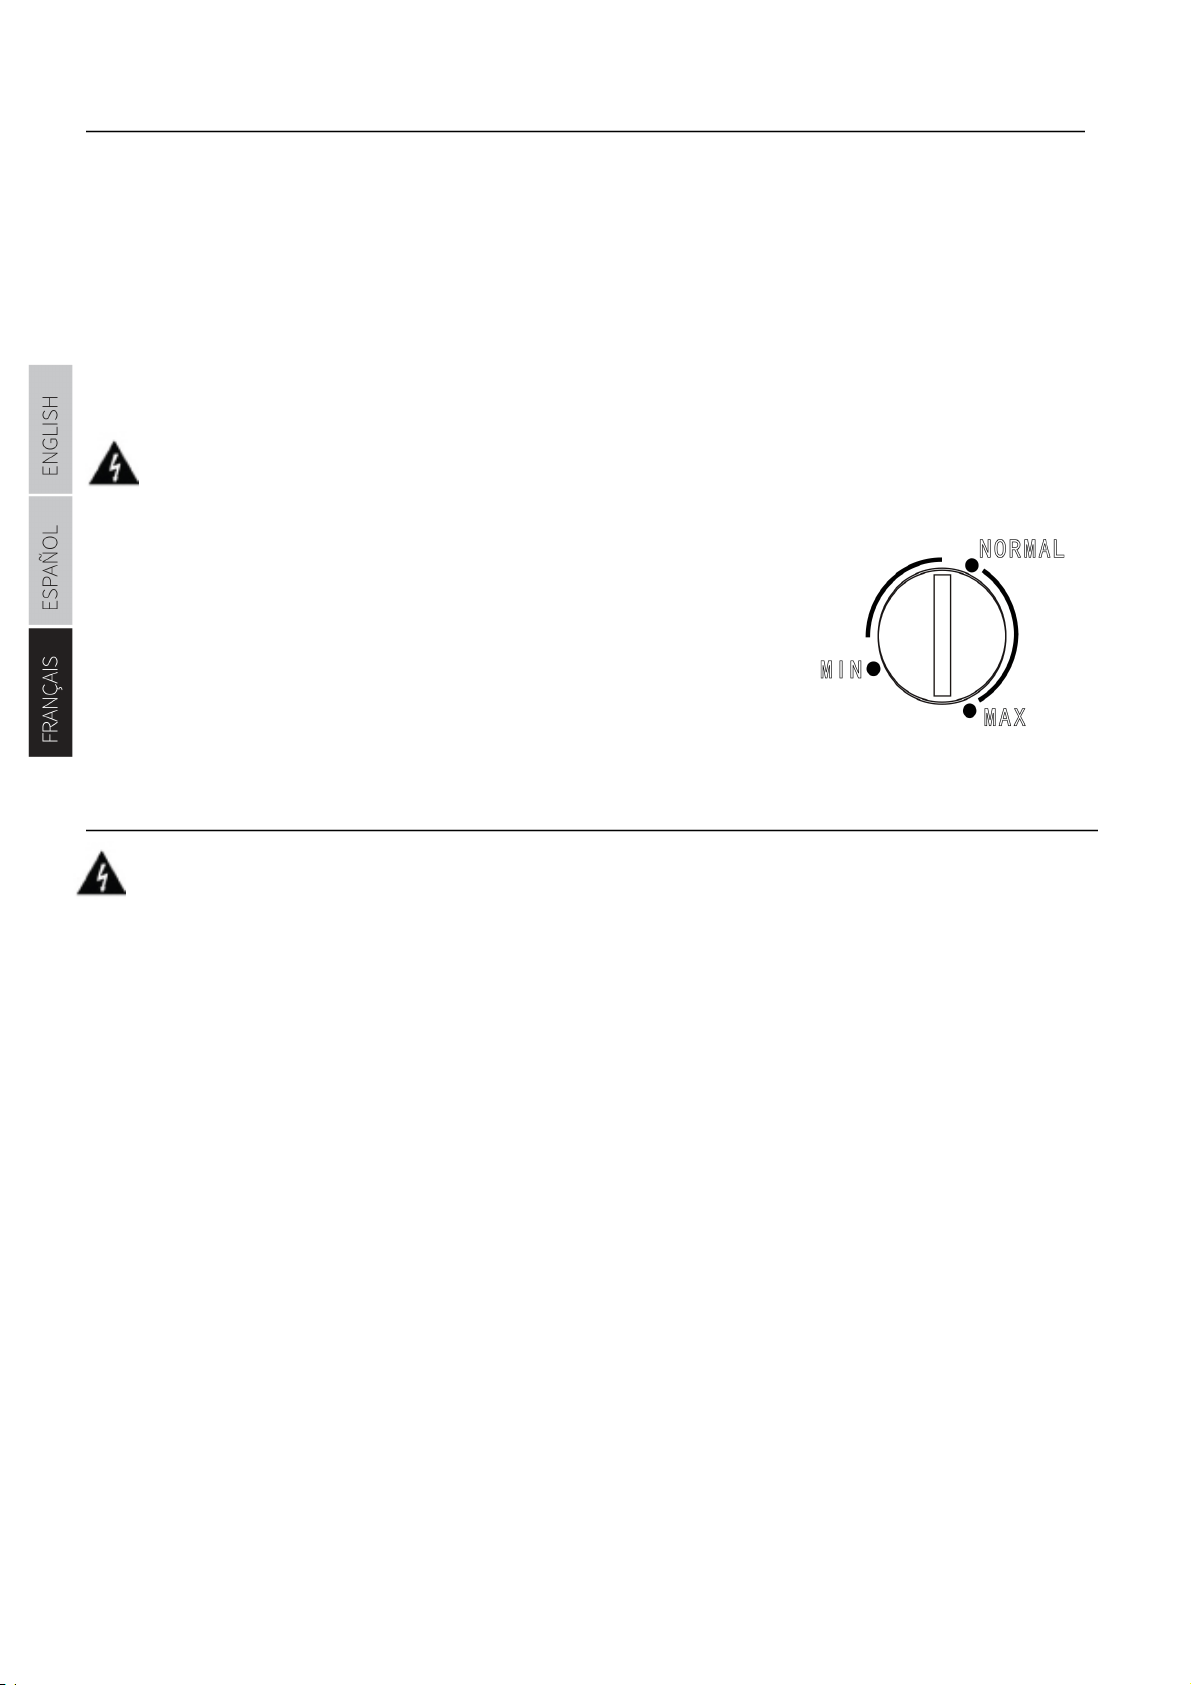
Opération initiale
Les instructions de ce guide s’appliquent généralement aux deux modèles, sauf indication contraire. Nettoyez l’appareil avant
la première utilisation (voir la section suivante pour les instructions de nettoyage). Après le nettoyage, branchez l’appareil à sa
source d’alimentation. N’allumez pas l’appareil s’il a été déplacé au cours des 2 dernières heures, car le liquide de refroidissement
a besoin de temps pour se stabiliser
Lorsque le congélateur est branché pour la première fois ou après le dégivrage, réglez le bouton de commande du thermostat sur
le réglage le plus élevé D y pendant au moins 2 heures avant d’ajouter des aliments.
Une fois qu’il est complètement refroidi, ajustez le bouton pour répondre au mieux à vos besoins. D/E est le réglage le moins
froid et D y est le réglage le plus froid. Un réglage de EKZD > devrait convenir à la plupart des utilisations à domicile ou au bureau.
Les environnements plus chauds peuvent être plus susceptibles de nécessiter des réglages plus élevés. Les environnements plus
frais ou hivernaux peuvent être mieux adaptés à un réglage plus bas.
REMARQUE : Le fait de tourner le bouton de commande du thermostat sur la position D/E ou « OFF » peut arrêter le cycle
de refroidissement mais ne coupe pas l’alimentation de l’appareil.
Nettoyage et entretien de votre appareil
Débranchez toujours l’alimentation avant de nettoyer l’appareil.
Essuyez l’intérieur de l’appareil avec une solution diluée de bicarbonate de soude (bicarbonate). Rincez ensuite à l’eau tiède
(jamais chaude ou bouillante) à l’aide d’une éponge ou d’un chion humide. Pour le congélateur 1110, lavez l’étagère et le pla-
teau dans de l’eau chaude avonneuse et séchez-les complètement avant de les remettre dans l’appareil. Nettoyez l’extérieur de
l’appareil avec un chion humide. Nettoyez soigneusement le joint de la porte également. Ne pas projeter d’eau sur l’extérieur ou
l’intérieur de l’appareil lors du nettoyage. L’appareil doit être nettoyé assez souvent pour qu’il n’y ait pas d’accumulation impor-
tante de débris.
Dégivrage du congélateur
Au fil du temps, le congélateur peut nécessiter un dégivrage manuel en raison de l’accumulation de givre ou de glace à l’intérieur
du compartiment congélateur. Il doit être décongelé dans les scénarios suivantsÿ:
• Le congélateur ne sera pas utilisé pendant une période prolongée.
• Une couche de glace s’est accumulée à l’intérieur de l’appareil et est plus épaisse que 1/4 de pouce.
Pour dégivrer le congélateur :
1. Tournez le bouton du thermostat sur 0 ou “O”
2. Débranchez l’appareil de la prise murale.
3. Retirez tous les aliments. Idéalement, les aliments doivent être placés dans un autre congélateur.
4. Placez une serviette ou deux sous le congélateur pour recueillir l’eau du givre qui fond.
5. Laissez la porte ouverte jusqu’à ce que tout le givre ait fondu. Habituellement, plusieurs heures (ou toute la nuit) suiront.
6. Nettoyez et essuyez l’intérieur de l’appareil en suivant les instructions de nettoyage mentionnées ci-dessus. N’utilisez aucun
des outils métalliques ou des nettoyants abrasifs pour enlever le givre car cela peut endommager l’appareil. Un grattoir en
plastique est ok.
7. Rebranchez l’alimentation lorsque le nettoyage est terminé.
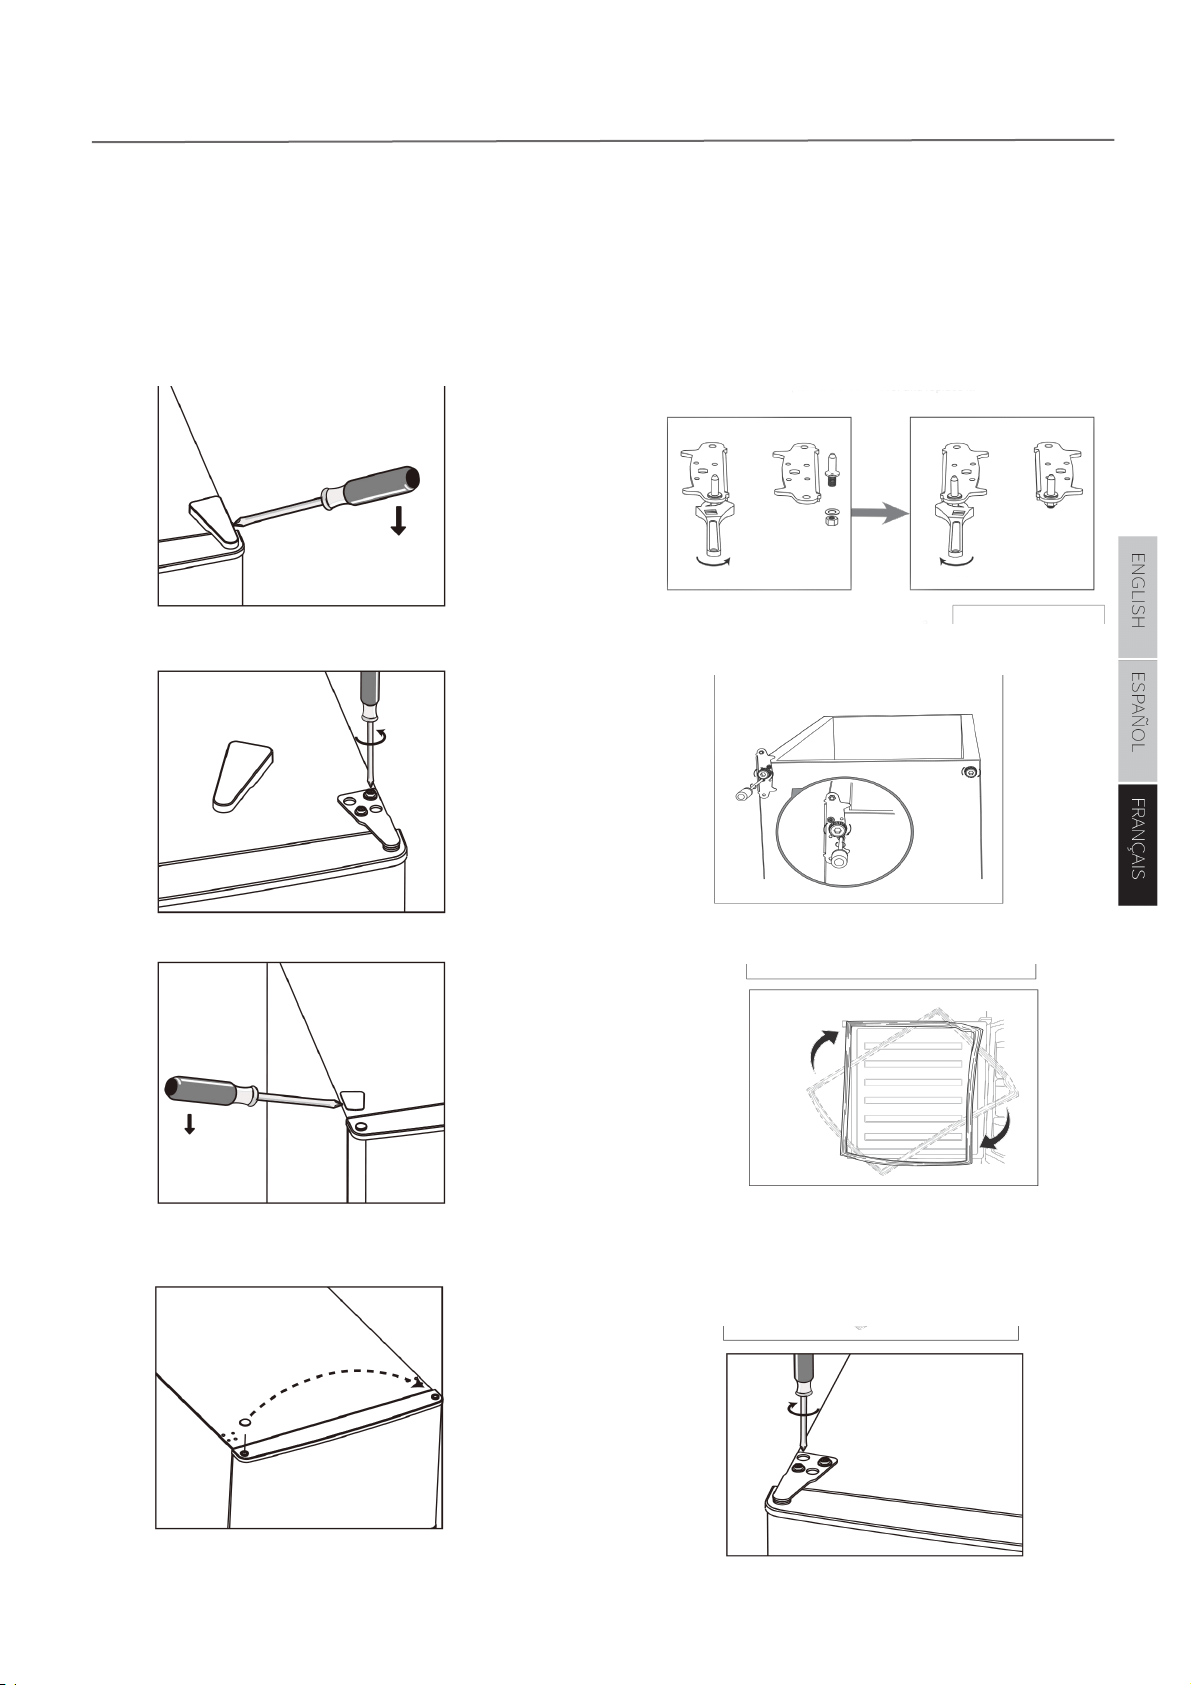
REVERSE DOOR
• Ensure the unit is unplugged and empty
• To take the door o, it is necessary to tilt the unit backwards. You should rest the unit on something solid so that it will not
slip during the door reversing process
• All parts removed must be saved to do the reinstallation of the door.
• Do not lay the unit flat as this may damage the cooling system
• It’s better that 2 people handle the unit during assembly
Tool Required: Philips’s screwdriver, flat bladed screwdriver, Hexagonal spanner.
1. Remove the top right hinge cover{
2. Undo the screws. Then remove the hinge bracket.
3. Remove the top le screw cover.
4. Move the core cover from le side to right side. And then li
the upper door and place it on a padded surface to prevent it
from scratching.
5. Unscrew and remove the bottom hinge pin, turn the
bracket over and replace it.
6. Refit the bracket fitting the bottom hinge pin. Replace
both adjustable feet.
7. Detach the Fridge and the Freezer door gaskets and then
attach them aer rotating.
8. Place the upper door back on. Ensure the door is aligned
horizontally and vertically so that the seals are closed on all
sides before finally tightening the top hinge.
9. Insert the hinge bracket and screw it to the top of the
unit
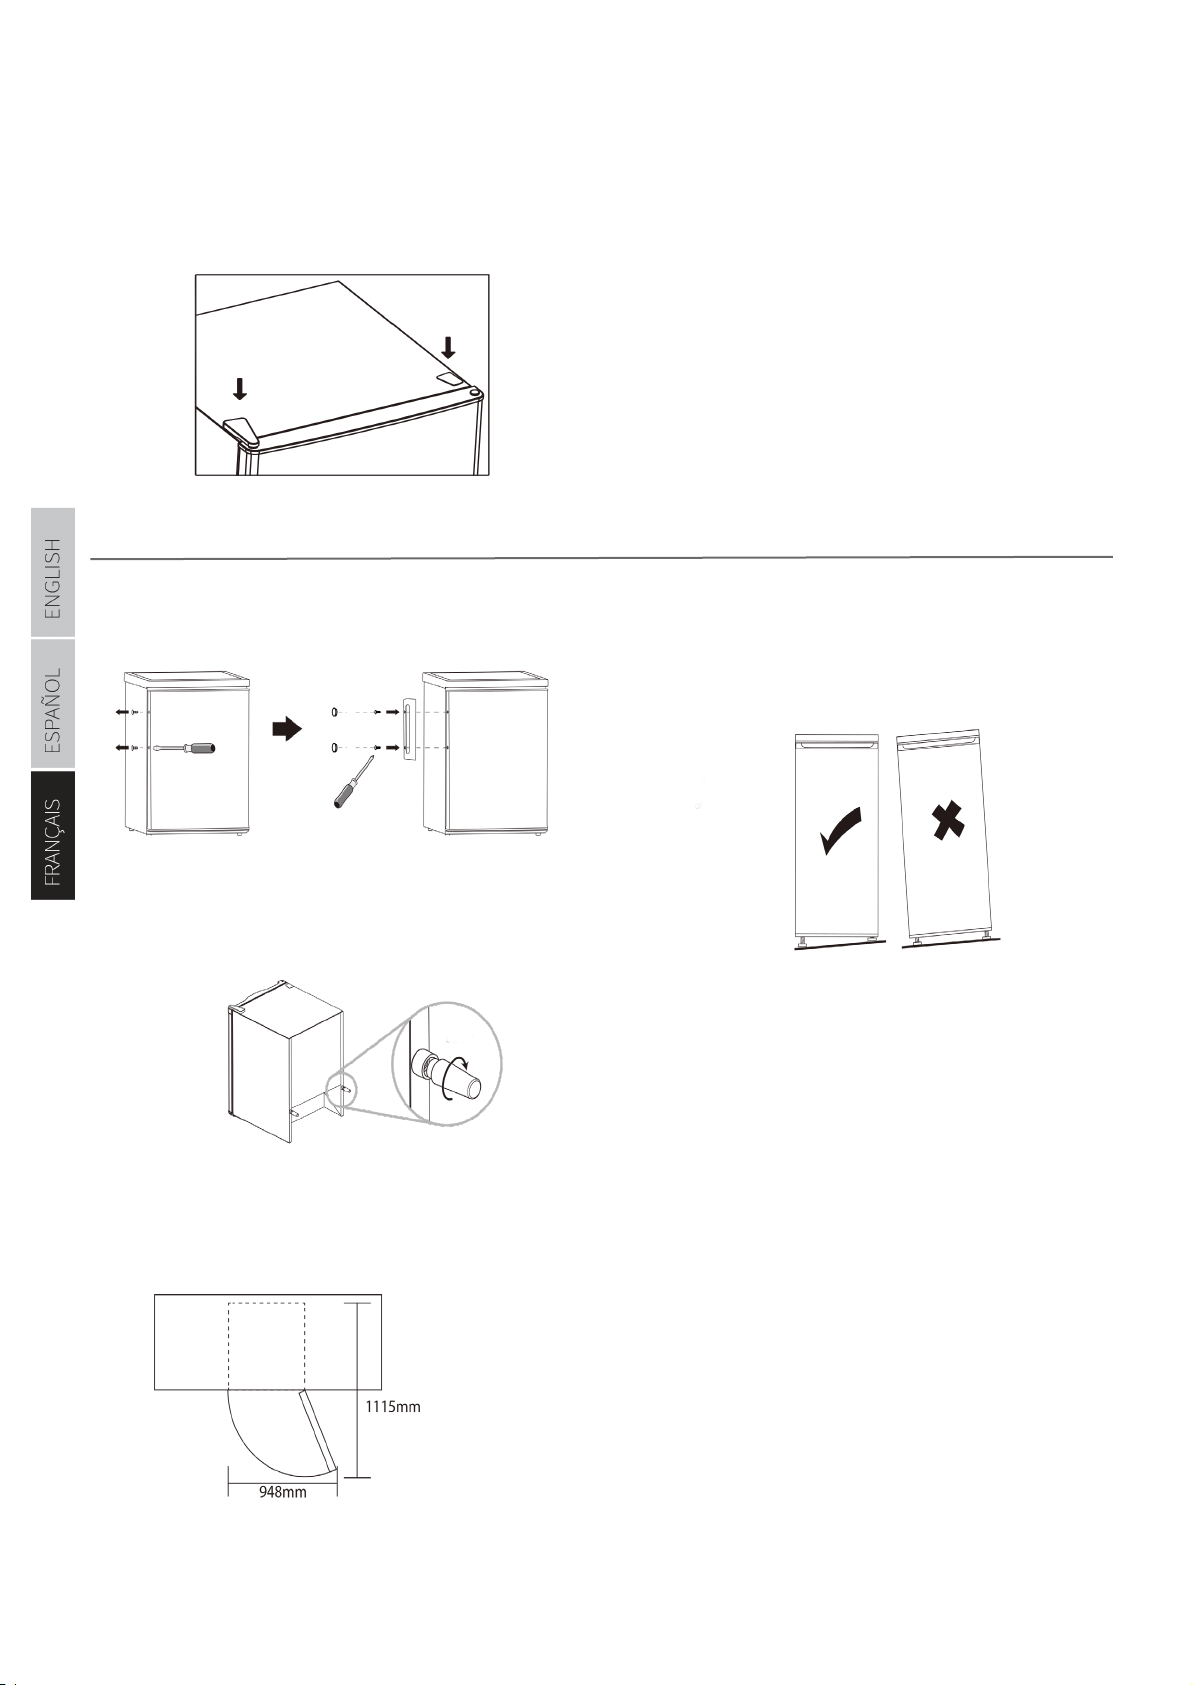
11. Put the hinge cover and the screw cover back.
12. With the doors closed, check that the doors are aligned
horizontally and vertically and that the seal is closed on all sides
before finally tightening the bottom hinge. Re-adjust the levelling
feet as needed
Install door handle
Rear spacer
Screw the rear spacers at the rear of the unit.
Leveling the unit
To do this adjust the two leveling feet at front of the unit.
If the unit is not level, the doors and magnetic seal align-
ments will not be covered properly.
INSTALLATION
Space Requirement
Keep enough space of door open.
Keep at least 50mm gap at two sides.

CONSEJOS Y MEJORES PRACTICAS ADICIONALES
• Después de comprar alimentos congelados y traerlos de la tienda, colóquelos en el congelador lo antes posible si desea
que permanezcan congelados.
• No llene en exceso el congelador, ya que esto bloquea la circulación adecuada y aumenta el consumo de energía. Deje
espacio alrededor de los alimentos para permitir la circulación de aire adecuada.
• Para mantener la temperatura, abra la puerta solo para introducir o sacar alimentos. Permita que los alimentos calientes
se enfríen antes de colocarlos en el congelador.
• Congele grandes cantidades de alimentos empacándolos en porciones separadas del tamaño de una comida.
• Las botellas de vidrio y plástico no deben colocarse en el congelador a menos que lo recomiende el fabricante del pro-
ducto. No coloque bebidas carbonatadas en el congelador.
• No ponga alimentos frescos directamente en contacto con alimentos ya congelados. La vida de almacenamiento de los
alimentos congelados tiende a variar y no se debe exceder el tiempo de almacenamiento recomendado. Seleccione con
cuidado los alimentos que desea congelar; debe ser de calidad adecuada y apto para la congelación.
• Cuando vacíe el congelador para limpiarlo, descongelarlo, transportarlo u otros medios, no permita que los alimentos
se echen a perder o desarrollen bacterias. Los alimentos que se han dejado a temperatura ambiente durante un período
prolongado pueden hacer que se desarrollen bacterias.
• Después de transportar la unidad o invertir la puerta, es posible que se deba restablecer la junta/sello de las puertas. Esto
se hace para evitar que el aire frío se escape. Si hay un espacio entre la junta de la puerta y el gabinete, vuelva a colocar la
junta tirando suavemente hacia afuera para sellar el espacio.
• Durante un corte de energía, no abra el congelador a menos que sea necesario. No coloque alimentos adicionales en la
unidad. Tenga mucho cuidado al examinar los alimentos antes de prepararlos y comerlos, ya que existe un riesgo para la
salud al comer alimentos en mal estado que no se han refrigerado adecuadamente. Es posible que sea necesario prepa-
rar y comer algunos alimentos antes de que se echen a perder. Si la unidad está desenchufada o ha perdido energía,
espere de 3 a 5 minutos antes de reiniciar la unidad. De lo contrario, es posible que la unidad no arranque.
• Mantenga los alimentos bien sellados para evitar que se sequen y que los olores no se mezclen.
• Guarde la carne y el pescado crudos en el estante más bajo para evitar la contaminación.
• No permita que ninguna grasa entre en contacto con las piezas de plástico del congelador.
• No almacene artículos enlatados, ya que pueden expandirse y reventar.
• Asegúrese de que todos los recipientes estén limpios y secos antes de guardarlos en el congelador.
• Girar el dial de control de temperatura a la posición “0” puede detener el enfriamiento, pero no corta la energía al conge-
lador.
• Cuando el electrodoméstico no esté en uso durante un período prolongado (como más de un mes o varios meses), baje
el termostato y desconecte el electrodoméstico de la fuente de alimentación. Vacíe todos los alimentos y limpie el apara-
to siguiendo las instrucciones de este manual. Deje la puerta entreabierta para evitar que los olores queden atrapados
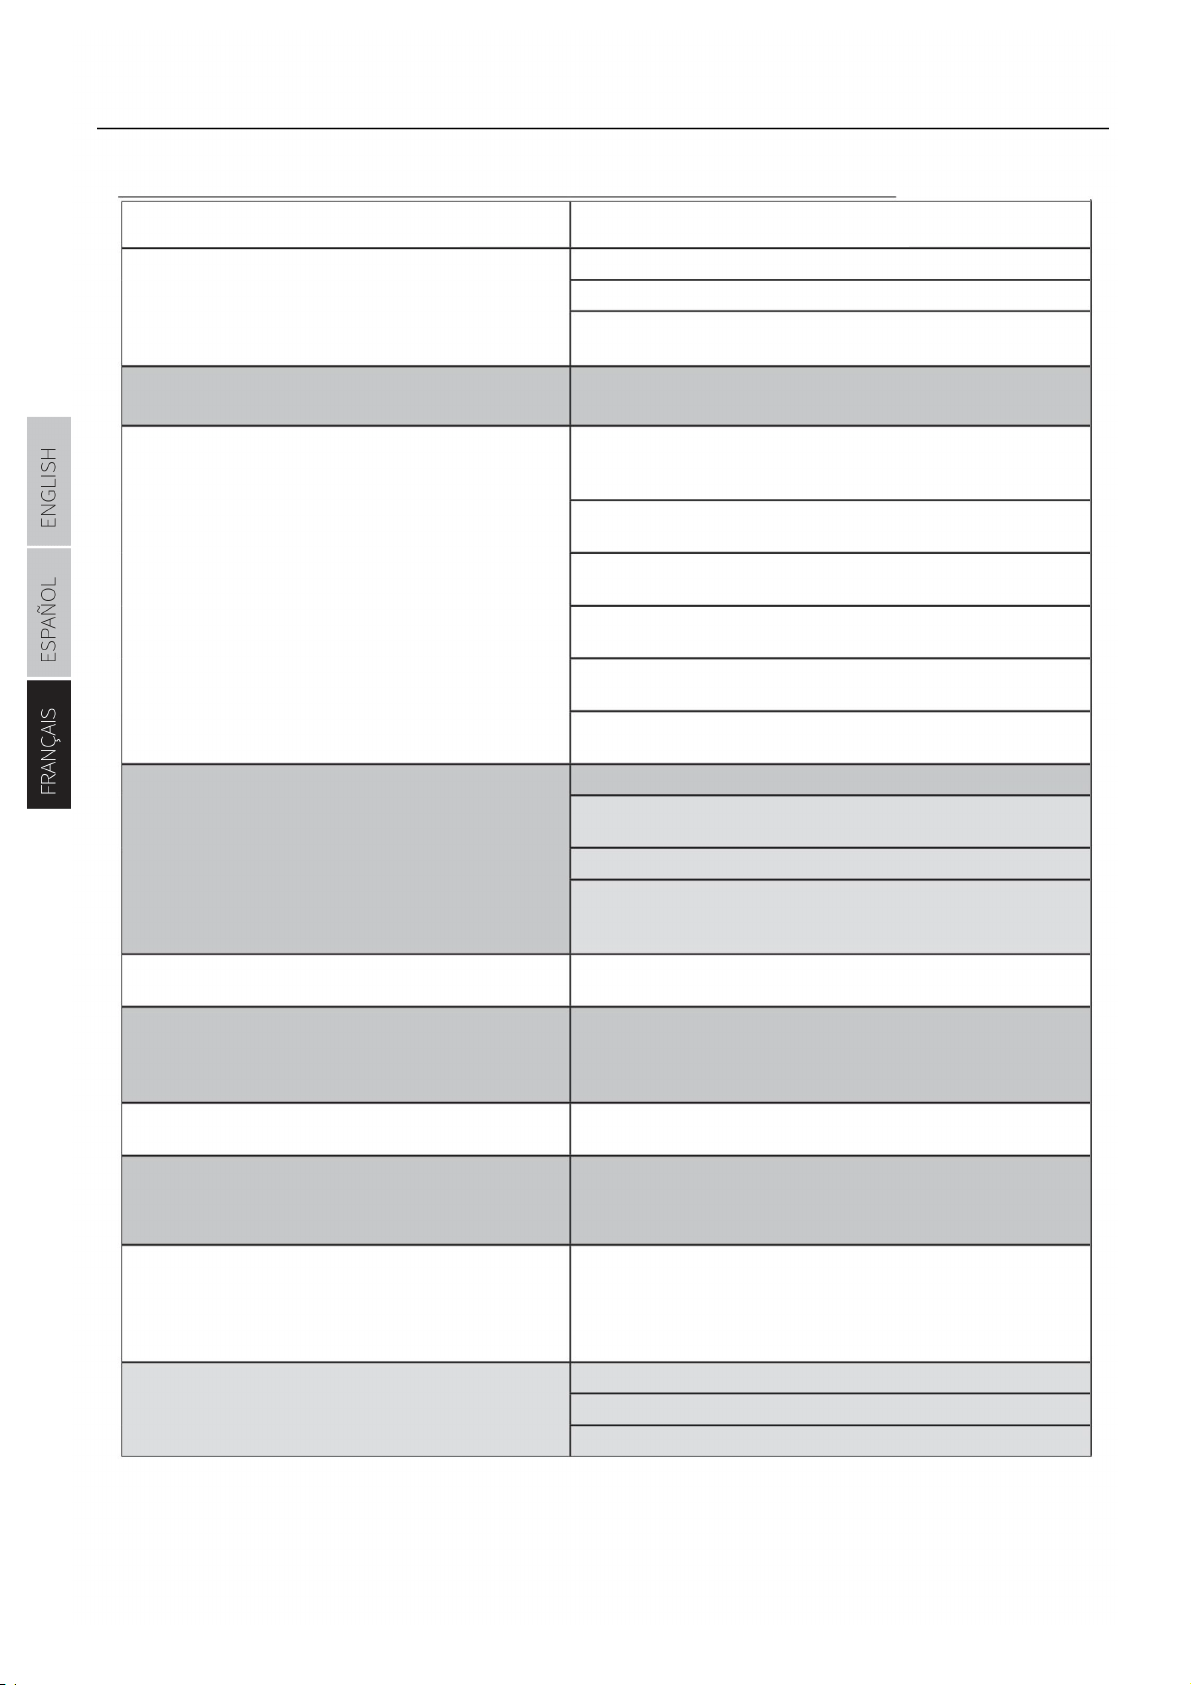
DÉPANNAGE
Problème
La solution
Le congélateur n’est pas alimenté (pas de bourdonnement, etc.)
Assurez-vous que la fiche est bien enfoncée dans la prise murale.
Assurez-vous que le bouton du thermostat n’est pas réglé sur 0 ou éteint.
Vérifiez que le fusible n’a pas sauté ou qu’un fusible domestique ou un disjoncteur n’a
pas
Les aliments dans le congélateur gèlent alors qu’ils ne le devraient
pas.
Diminuez le numéro du thermostat (les numéros plus élevés sont plus froids).
Il peut seulement être nécessaire de l’abaisser temporairement.
Les aliments dans le congélateur ne sont pas assez froids.
Assurez-vous que la porte du congélateur est complètement fermée et que le con-
gélateur
Vérifiez la température ambiante de la pièce. S’il fait très chaud, on peut s’y attendre.
Évitez de placer l’appareil près d’une source de chaleur.
Si vous avez récemment mis beaucoup d’aliments très chauds dans le congélateur,
c’est normal.
Assurez-vous que le joint d’étanchéité autour de la porte est exempt de débris. Si le joint n’est
pas étanche, l’air chaud de l’environnement peut s’inltrer.
Ceci est normal lorsque l’appareil est allumé après avoir été éteint pendant une
période prolongée.
Si les aliments sont bien emballés, assurez-vous qu’ils sont répartis plus uniformé-
ment. Ne surchargez pas le congélateur.
La température à l’intérieur du congélateur est trop élevée.
Assurez-vous que le réglage de la température correspond à la sélection souhaitée.
Cela peut être dû à une ouverture trop fréquente de la porte et à une trop grande
quantité d’air chaud.
Cela peut être causé par des aliments chauds.
Cela peut prendre quelques heures pour que votre congélateur atteigne son réglage
de température cible s’il est utilisé pour la première fois ou s’il a été éteint pendant
une période prolongée.
L’extérieur de l’appareil est chaleureux.
Assurez-vous que l’appareil est de niveau et qu’il ne touche pas un mur. Reportez-vous
à la section « Mise à niveau de l’appareil » au début de ce guide.
Cela peut être causé par des débris dans le joint d’étanchéité de la porte qui
empêchent un joint étanche. De plus, c’est normal si l’air ambiant est humide. Cela
peut également se produire si la porte est ouverte fréquemment.
De l’humidité apparaît à l’ extérieur des parois du congélateur.
La porte ne se fermera pas complètement.
De l’humidité apparaît à l’ intérieur des parois du congélateur.
Diérents bruits entendus du congélateur à diérents moments.
Cela inclut les sons forts lors de la première mise en marche, les ven-
tilateurs en marche, les claquements, les ébullitions, les gargouillis
ou les craquements.
Les bruits de vibration ou de cliquetis semblent excessifs.
C’est un comportement normal et attendu. La chaleur empêche la formation d’hu-
midité.
Tous ces bruits sont typiques pendant le fonctionnement et les cycles normaux, en
particulier lorsque la porte a été ouverte. Ces bruits sont causés par le moteur du com-
presseur et le réfrigérant qui circule dans le système.
Assurez-vous que votre porte se ferme correctement et qu’il n’y a pas de débris dans le
joint d’étanchéité de la porte. Cela peut également être normal et dû à une fluctuation
de la température ambiante. Essuyez les résidus. Si cela continue à se produire,
contactez un technicien qualifié pour obtenir de l’aide.
Assurez-vous que l’appareil n’est pas surchargé de nourriture.
Assurez-vous que l’étagère est bien en place (FC-1110).
Assurez-vous que le joint de la porte est propre et que l’appareil est de niveau.
SPÉCIFICATIONS DU PRODUIT
Courant : 115V-60Hz, 312kWh/year
Dimensions(HxLxP): 57.8’’ x 22.7’’ x23.4’’
Capacité: 5.9 cu.
Température d’entreposage: App -11.2°F to 10.4°F
Poids net: Apprx. 95 lbs.
Service Client
Avant de contacter le service client, veuillez consulter la section de dépannage de la page
précédente.
Visitez notre site Web pour nous contacter, trouver des réponses aux questions fréquemment posées et
pour d’autres ressources qui peuvent inclure une version mise à jour de ce manuel de l’utilisateur.
Si vous souhaitez nous contacter par téléphone, assurez-vous d’avoir votre numéro de modèle et votre
numéro de série à portée de main et appelez-nous entre 9h et 18h ET, au +1 866-954-4440.
Gardez un œil sur les dernières innovations d’Impecca et participez à des concours via nos flux de
réseaux sociauxÿ:
www.impecca.com
www.facebook.com/impecca/
www.instagram.com/impecca/
@impeccausa
FC-1591W

ENGLISH ESPAÑOL FRANÇAIS
–40–
GARANTIE LIMITÉE DE SIX MOIS {36590}
Impecca
®
garantit ce produit contre les défauts de matériaux
et de fabrication à l’acheteur original tel que spécifié ci-
dessous à condition que le produit soit enregistré en ligne dans
les quatorze (14) jours suivants l’achat.
PIÈCES — Si le produit a un défaut de fabrication dans un
délai six (6) mois à compter de la date d’achat
initiale, Impecca
®
réparera ou remplacera les pièces du
produit sans frais (pour les pièces) pour les
consommateurs aux États-Unis et au Canada.
MAIN-D’OEUVRE — Si le produit a un défaut de fabrication
dans un délai de trente (30) jours à compter de la date
d’achat initiale, Impecca
®
réparera ou
remplacera les pièces du produit sans frais (pour
les pièces) pour les consommateurs aux États-Unis et
au Canada. Après trente (30) jours, il en sera de la
responsabilité du consommateur.
Les frais d’expédition à destination et à partir de notre centre
de service de garantie sont à la charge du consommateur.
Pour obtenir le service de garantie par un centre de
service autorisé Impecca
®
, veuillez nous
écrire à : [email protected] pour obtenir une
autorisation de réparation et d’entretien (ARE) ainsi
que pour localiser le centre de service de garantie le
plus près de vous. Une fois autorisé, vous devez envoyer
le produit au centre de service autorisé Impecca
®
dans
ses matériaux d’emballage d’origine ou l’équivalent,
pour éviter tout dommage pendant le transport.
De plus, si Impecca
®
devait déterminer que le produit est en
dehors des conditions de la garantie, Impecca
®
retournera le
produit à l’expéditeur aux frais de celui-ci sans être réparé ou
remplacé, sauf s’il est autorisé par le consommateur à
servir le produit à garantie expiré aux frais du
consommateur. Tous les frais de manutention ou de
réapprovisionnement pour les retours et/ou les
remplacements seront non remboursables.
Impecca
®
exclut expressément de cette garantie toutes pièces
jointes non électriques/mécaniques, accessoires et
pièces jetables, y compris, mais non limité à, l’extérieur du
boîtier, les câbles de connexion, batteries et adaptateurs
secteur. Impecca
®
se réserve le droit de réparer ou de
remplacer les produits défectueux avec des modèles
identiques, équivalents ou plus récents.
Nous nous réservons le droit de réparer ou de remplacer
le produit à notre discrétion. Le remplacement peut être
soit neuf ou remis à neuf et alors que tous les efforts seront
faits pour s’assurer qu’il s’agit du même modèle, si le
même modèle n’est pas disponible il sera remplacé par un
modèle équivalent ou supérieur.
L’usure « normale » n’est pas couverte par la présente,
ou toute autre garantie. De plus, Impecca
®
se réserve
le droit de déterminer l’usure « normale » sur
tous les produits. L’altération ou l’ouverture du boîtier ou
de la coquille du produit annulera cette garantie dans son
intégralité.
De plus, cette garantie ne s’applique pas si le produit a été
endommagé par accident, abus, mauvaise utilisation ou
mauvaise application, a été altéré ou modifié
sans l’autorisation écrite de Impecca
®
, a été réparé
par un centre de réparation Impecca
®
non agréé, n’a
pas été correctement entretenu ou utilisé conformément
au manuel d’utilisation, a été utilisé à des fins
commerciales ou autres que personnelles, a été
esthétiquement endommagé, n’a pas été importé par
Impecca
®
, n’a pas été fabriqué selon les spécifications
du marché des États-Unis, a été endommagé suite
à une mauvaise installation ou à une négligence de la
part des consommateurs, a été endommagé suite à un
mauvais emballage lors de l’expédition au centre de
service de garantie, a été endommagé en raison de
catastrophes naturelles ou si le numéro de série du produit
a été retiré ou rendu illisible.
TOUTE GARANTIE IMPLICITE, Y COMPRIS TOUTE GARANTIE
IMPLICITE DE QUALITÉ MARCHANDE ET D’ADAPTATION À UN
USAGE PARTICULIER, EST LIMITÉE À SIX (6) MOIS POUR
LES PIÈCES ET TRENTE (30) JOURS POUR LA MAIN-
D’OEUVRE À PARTIR DE LA DATE D’ACHAT INITIALE DE CE
PRODUIT.
CES GARANTIES ET RECOURS SONT LES SEULS ET
UNIQUES GARANTIES ET RECOURS CONCERNANT LA
VENTE ET L’UTILISATION DU PRODUIT. AUCUNE AUTRE
GARANTIE, ORALE OU ÉCRITE, EXPLICITE OU IMPLICITE,
N’EST DONNÉE.
IMPECCA
®
N’EST PAS RESPONSABLE DE TOUT DOMMAGE,
QU’IL SOIT PARTICULIER, ACCIDENTEL, INDIRECT, DIRECT OU
AUTRE ÉTANT CONNU OU QUI AURAIT DU ÊTRE
CONNU D’IMPECCA
®
, Y COMPRIS LA PERTE DE PROFITS, LA
BONNE VOLONTÉ ET LA PROPRIÉTÉ AINSI QUE LES
BLESSURES PERSONNELLES RÉSULTANTES D’UNE RUPTURE DE
GARANTIE, DE L’INCAPACITÉ D’UTILISER LE PRODUIT OU
SOUS TOUTE AUTRE THÉORIE JURIDIQUE
CONTRACTUELLE OU DÉLICTUELLE. LA RESPONSABILITÉ
D’IMPECCA EST LIMITÉE AU PRIX D’ACHAT PAYÉ AU
DÉTAILLANT DU PRODUIT DÉFECTUEUX.
Aucun revendeur, agent ou employé Impecca
®
n’est
autorisé à faire quelques modifications,
extension, changement ou amendement que ce soit de
cette garantie sans le consentement écrit et l’autorisation
d’Impecca
®
.
Certains États ne permettent pas l’exclusion ou la limitation
des garanties implicites ou de la responsabilité pour
les dommages directs ou indirects, ou ne permettent pas
de limitation sur la durée d’une garantie implicite.
Les limitations ou exclusions ci-dessus peuvent donc ne
pas s’appliquer à vous. Cette garantie vous donne des
droits légaux spécifiques et vous pouvez avoir d’autres
droits, qui varient d’un État à l’autre.
Note : Notre centre de service de garantie expédie
seulement à l’intérieur des États-Unis contigus,
excluant l’Alaska et Hawaï.
Important : Assurez-vous d’enregistrer votre produit sur WWW.IMPECCA.COM dans les 14 jours
Impecca
®
USA
PA 18711
www.impecca.com
*N’envoyez pas de retour à cette adresse, car ils risquent d’être perdus et cela va retarder votre processus de réparation et de service.
GARANTIE LIMITÉE D’UN AN