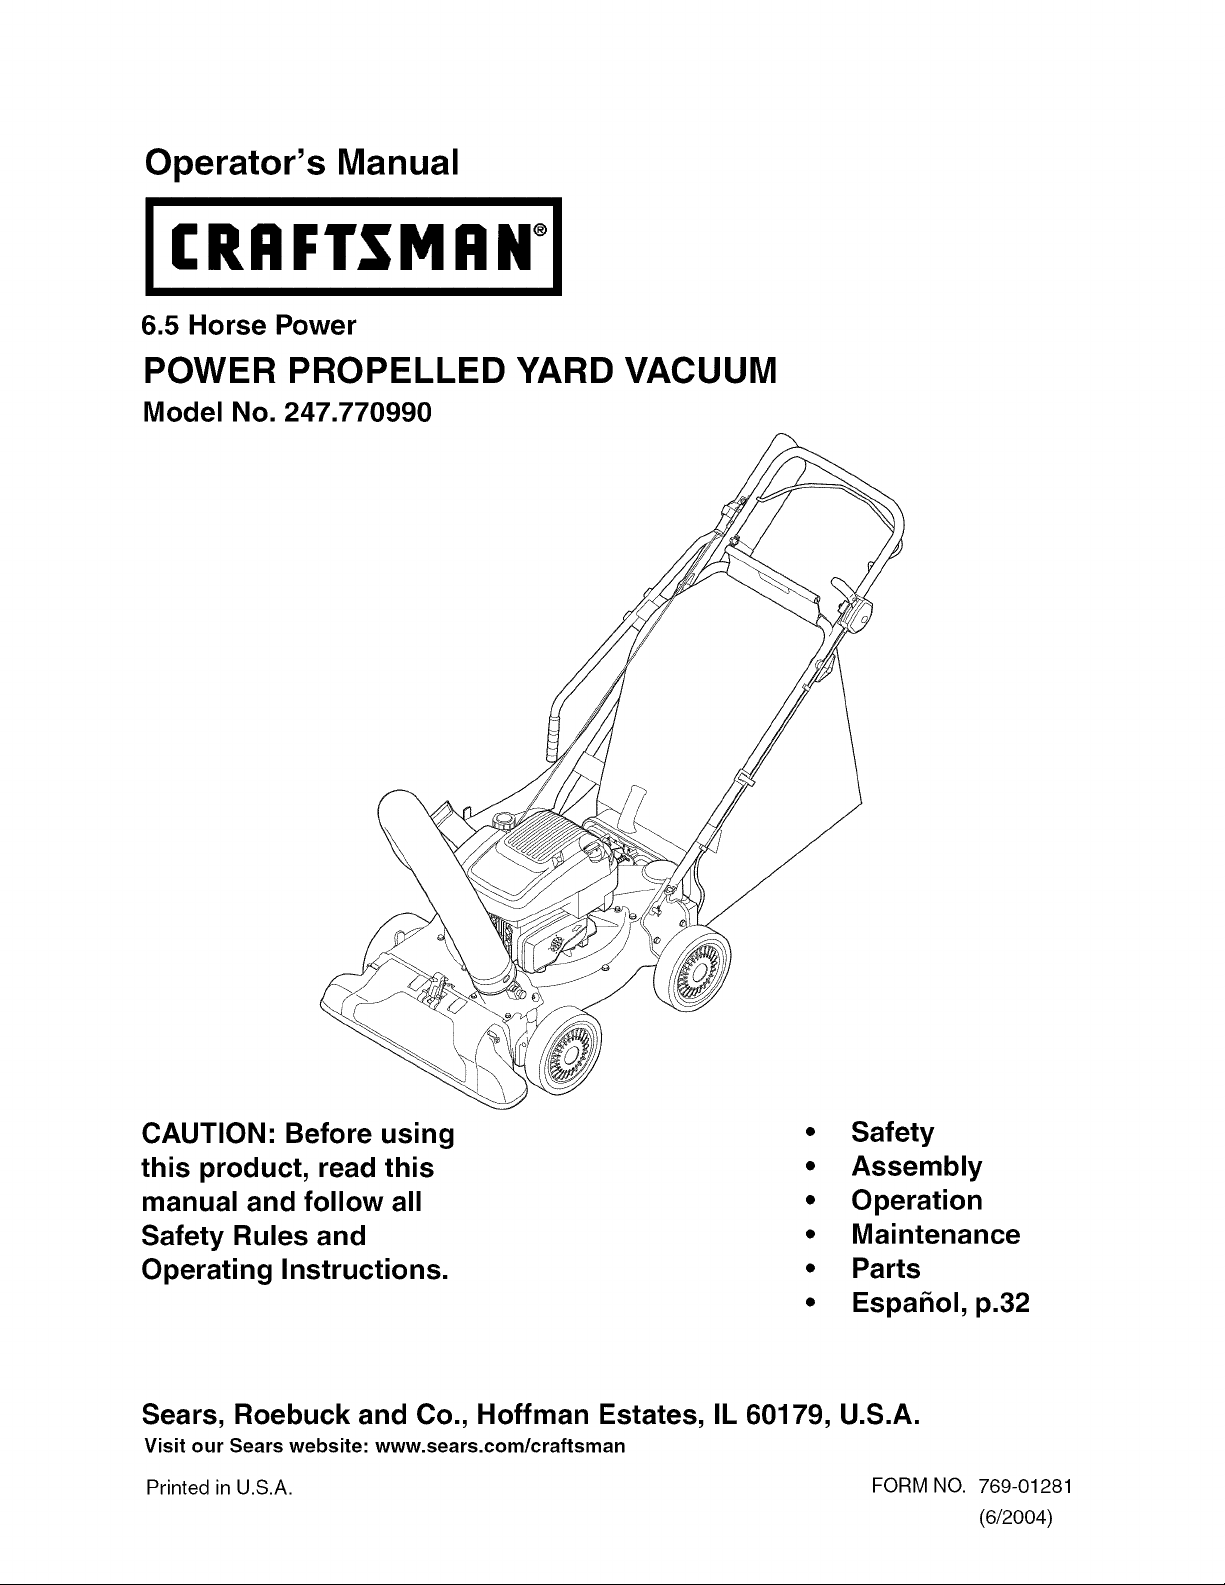
Operator's Manual
I CRFIFTSM I_N°I
6.5 Horse Power
POWER PROPELLED YARD VACUUM
Model No. 247.770990
CAUTION: Before using
this product, read this
manual and follow all
Safety Rules and
Operating Instructions.
Safety
Assembly
Operation
Maintenance
Parts
Espahol, p.32
Sears, Roebuck and Co., Hoffman Estates, IL 60179, U.S.A.
Visit our Sears website: www.sears.com/craftsman
Printed in U.S.A.
FORM NO. 769-01281
(6/2004)

Content Page Content Page
Warranty 2 Service and Adjustments 15
Safety 3 Storage 18
Assembly 6 Troubleshooting 19
Operation 9 Parts List 20
Maintenance 13 Espanol 32
One Year Full Warranty on Craftsman Yard Vacuum
This equipment is covered by a one-year warranty, provided that it is maintained, lubricated, and tuned up
according to the instructions in the operator's manual. During the warranty year, if this equipment experiences any
failure due to defects in material or workmanship, RETURN IT TO YOUR NEAREST SEARS PARTS & REPAIR
CENTER, and Sears will repair it, free of charge. In-home warranty service is available, but you will have to pay a
trip charge.
This Warranty does not cover:
• Expendable items which become worn during normal use, such as spark plugs, air cleaners, belts, and oil
filters.
• Tire replacement or repair caused by punctures from outside objects, such as nails, thorns, stumps, or glass.
• Repairs necessary because of operator abuse, including but not limited to, damage caused by objects, such
as stones, metal debris or oversized pieces of wood, or impacting objects that bend the frame or crankshaft,
or over-speeding the engine.
• Repairs necessary because of operator negligence, including but not limited to, electrical and mechanical
damage caused by improper storage, failure to use the proper grade and amount of engine oil, or failure to
maintain the equipment according to the instructions contained in the operator's manual.
• Engine (fuel system) cleaning or repairs caused by fuel determined to be contaminated or oxidized (stale). In
general, fuel should be used within 30 days of its purchase date.
• Equipment if used for commercial or rental purposes.
TO LOCATE THE NEAREST SEARS PARTS & REPAIR CENTER OR TO SCHEDULE SERVICE, SIMPLY
CONTACT SEARS AT 1-800-4-MY-HOME®.
This warranty gives you specific legal rights and you may also have other rights, which vary from state to state.
Sears, Roebuck and Co., Dept. 817WA, Hoffman Estates, IL 60179
PRODUCT SPECIFICATION
Horse Power
Engine Oil Type
Engine Oil Capacity
Fuel Capacity:
Spark Plug
Spark Plug Gap
6.5
SAE 30
18 Ounces
1 1/2 Quarts
Champion RJ-19LM
.030"
Model Number ....... ..2..4..7..,.7..7...0..9...9..0............................
Serial Number ...........................................................
Date of Purchase ......................................................
Record both serial number and date of purchase and
keep in a safe place for future reference.

WARNING: This symbol points out important safety instructions which, if not followed, could
endanger the personal safety and/or property of yourself and others. Read and follow all
instructions in this manual before attempting to operate this machine. Failure to comply with these
instructions may result in personal injury. When you see this symbol - heed its warning.
WARNING: Engine Exhaust, some of its constituents, and certain vehicle
components contain or emit chemicals known to State of California to cause cancer
and birth defects or other reproductive harm.
DANGER: This machine was built to be operated according to the rules for safe operation in this
manual. As with any type of power equipment, carelessness or error on the part of the operator can
result in serious injury. This machine is capable of amputating hands and feet and throwing objects.
Failure to observe the following safety instructions could result in serious injury or death.
TRAINING
1. Read, understand, and follow all instructions on
the machine and in the manual(s) before
attempting to assemble and operate. Keep this
manual in a safe place for future and regular
reference and for ordering replacement parts.
2. Be familiar with all controls and their proper
operation. Know how to stop the machine and
disengage them quickly.
3. Never allow children under 16 years old to
operate this machine. Children 16 years old and
over should read and understand the operation
instructions and safety rules in this manual and
should be trained and supervised by a parent.
4. Never allow adults to operate this machine
without proper instruction.
5. Keep bystanders, helpers, pets, and children at
least 75 feet from the machine while it is in
operation. Stop machine if anyone enters the
area.
6. Never run an engine indoors or in a poorly
ventilated area. Engine exhaust contains carbon
monoxide, an odorless and deadly gas.
7. Do not put hands and feet near rotating parts or in
the feeding chambers and discharge opening.
Contact with the rotating impeller can amputate
fingers, hands, and feet.
8. Never attempt to unclog either the feed intake or
discharge opening, remove or empty vacuum
bag, or inspect and repair the machine while the
engine is running. Shut the engine off and wait
until all moving parts have come to a complete
stop. Disconnect the spark plug wire and ground
it against the engine.
PREPARATION
1. Thoroughly inspect the area where the
equipment is to be used. Remove all rocks,
bottles, cans, or other foreign objects which could
be picked up or thrown and cause personal injury
or damage to the machine.
,
,
,
,
6.
Always wear safety glasses or safety goggles
during operation or while performing an
adjustment or repair, to protect eyes. Thrown
objects which ricochet can cause serious injury to
the eyes.
Wear sturdy, rough-soled work shoes and close-
fitting slacks and shirts. Loose fitting clothes or
jewelry can be caught in movable parts. Never
operate this machine in bare feet or sandals.
Wear leather work gloves when feeding material
in the chipper chute.
Before starting, check all bolts and screws for
proper tightness to be sure the machine is in safe
working condition. Also, visually inspect machine
for any damage at frequent intervals.
Maintain or replace safety and instructions labels,
as necessary.
To avoid personal injury or property damage use
extreme care in handling gasoline. Gasoline is
extremely flammable and the vapors are
explosive. Serious personal injury can occur
when gasoline is spilled on yourself or your
clothes which can ignite. Wash your skin and
change clothes immediately.
a. Use only an approved gasoline container.
b. Extinguish all cigarettes, cigars, pipes, and
other sources of ignition.
c. Never fuel machine indoors.
d. Never remove gas cap or add while the
engine is hot or running.
e. Allow engine to cool at least two minutes
before refueling.
f. Never over fill fuel tank. Fill tankto no more
than 1/2 inch below bottom of filler neck to
provide space for fuel expansion.
g. Replace gasoline cap and tighten securely.
h. If gasoline is spilled, wipe it off the engine
and equipment. Move machine to another
area. Wait 5 minutes before starting the
engine.

i. Neverstorethemachineorfuelcontainer
insidewherethereisanopenflame,spark,
orpilotlight(e.g.furnace,waterheater,
spaceheater,clothesdryer,etc.)
j. Toreduceafirehazard,keepmachinefree
ofgrass,leaves,orotherdebrisbuild-up.
Cleanupoilfuelspillageandremoveanyfuel
soakeddebris.
k. Allowmachinetocoolatleast5 minutes
beforestoring.
OPERATION
1. Do not put hands and feet near rotating parts or in
the feeding chambers and discharge opening.
Contact with the rotating impeller can amputate
fingers, hands, and feet.
2. Before starting the machine, make sure the chipper
chute, feed intake, and cutting chamber are empty
and free of all debris.
3. Thoroughly inspect all material to be shredded and
remove any metal, rocks, bottles, cans, or other
foreign objects which could cause personal injury
or damage to the machine.
4. If the impeller strikes a foreign object or if your
machine should start making an unusual noise or
vibration, immediately shut the engine off. Allow the
impeller to come to a complete stop. Disconnect
the spark plug wire, ground it against the engine
and perform the following steps:
a. Inspect fordamage.
b. Repair or replace any damaged parts.
c. Check for any loose parts and tighten to
assure continued safe operation.
5. Do not allow an accumulation of processed
material to build up in the discharge area. This can
prevent proper discharge and result in kickback of
material through the feed opening.
6. Do not attempt to shred or chip material larger than
specified on the machine or in this manual.
Personal injury or machine damage could result.
7. Never attempt to unclog either the feed intake or
discharge opening while the engine is running.
Shut the engine off, wait until all moving parts have
stopped, disconnect the spark plug wire and
ground it against the engine before clearing debris.
8. Never operate without vacuum bag and discharge
chute properly attached to the machine. Never
empty or change vacuum bag while the engine is
running. Rear end of vacuum bag must be kept
closed at all times during operation.
9. Never operate without either the inlet nozzle or
optional hose attachment properly attached to the
machine. Never attempt to attach or change either
attachment while the engine is running.
10. Keep all guards, deflectors and safety devices in
place and operating properly.
11. Keep your face and body back and to the side of
the chipper chute while feeding material into the
machine to avoid accidental kickback injuries.
12. Never operate this machine without good visibility
or light. Always be sure of your footing and keep a
firm hold on the handles.
13. Do not operate this machine on a gravel surface.
14. Do not operate this machine while under the
influence of alcohol or drugs.
15. Muffler and engine become hot and can cause a
burn. Do not touch.
16. Never pick up or carry machine while the engine is
running.
MAINTENANCEANDSTORAGE
1. Never tamper with safety devices. Check their
proper operation regularly.
2. Check bolts and screws for proper tightness at
frequent intervals to keep the machine in safe
working condition. Also, visually inspect machine
for any damage and repair, if needed.
3. Before cleaning, repairing, or inspecting, stop the
engine and make certain the impeller and all
moving parts have stopped. Disconnect the spark
plug wire and ground it against the engine to
prevent unintended starting.
4. Do not change the engine governor settings or
overspeed the engine. The governor controls the
maximum safe operating speed of the engine.
5. Maintain or replace safety and instruction labels, as
necessary.
6. Follow this manual for safe loading, unloading,
transporting, and storage of this machine.
7. Never store the machine or fuel container inside
where there is an open flame, spark or pilot light
such as a water heater, furnace, clothes dryer, etc.
8. Always refer to the operator's manual for proper
instructions on off-season storage.
9. If the fuel tank has to be drained, do this outdoors.
10. Observe proper disposal laws and regulations for
gas, oil, etc. to protect the environment.

Congratulations on making a smart purchase.Your new
Craftsman® product is designed and manufactured for years of
dependable operation. But like all products, it may require repair
from time to time. That's when having a Repair Protection
Agreement can save you money and aggravation.
Here's what's included in the Agreement:
Expert service by our 12,000 professional repair
specialists
Unlimited service and no charge for parts and labor
on all covered repairs
Product replacement if your covered product can't be
fixed
Discount of 10% from regular price of service and
service-related parts not covered by the agreement;
also, 10% off regular price of preventive maintenance
check
Fast help by phone- phone support from a Sears
technician on products requiring in-home repair, plus
convenient repair scheduling
Once you purchase the Agreement, a simple phone call is all
that it takes for you to schedule service. You can call anytime
day or night, or schedule a service appointment online.
Sears has over 12,000 professional repair specialists, who have
access to over 4.5 million quality parts and accessories. That's
the kind of professionalism you can count on to help prolong the
life of your new purchase for years to come. Purchase your
Repair Protection Agreement today!
Some limitations and exclusions apply. For prices and
additional information call 1-800-827-6655.
Sears Installation Service
For Sears professional installation of home appliances, garage
door openers, water heaters, and other major home items, in the
U.S.A. call 1-800-4-MY-HOME®
Look For Relevant Emissions Durability Period and
Air Index Information On Your Engine Emissions Label
Engines that are certified to meet the California Air Resources Board (CARB)Tier 2 Emission Standards must display
information regarding the Emissions Durability Period and the Air Index. Sears, Roebuck and Co., U.S.A. makes this
information available to the consumer on our emission labels.
The Emissions Durability Period describes the number of hours of actual running time for which the engine is certified to be
emissions compliant, assuming proper maintenance in accordance with the Operating & Maintenance Instructions. The
following categories are used:
Moderate: Engine is certified to be emission compliant for 125 hours of actual engine running time.
Intermediate: Engine is certified to be emission compliant for 250 hours of actual engine running time.
Extended: Engine is certified to be emission compliant for 500 hours of actual engine running time.
For example, a typical walk-behind lawn mower is used 20 to 25 hours per year. Therefore, the Emissions Durability Period
of an engine with an intermediate rating would equate to 10 to 12 years.
The Air Index is a calculated number describing the relative level of emissions for a specific engine family. The lower the Air
Index, the cleaner the engine. This information is displayed in graphical form on the emissions label.
After July 1, 2000, Look For Emissions Compliance Period On
Engine Emissions Compliance Label
After July 1,2000 certain Sears, Roebuck and Co., U.S.A. engines will be certified to meet the United States Environmental
Protection Agency (USEPA) Phase 2 emission standards. For Phase 2 certified engines, the Emissions Compliance Period
referred to on the Emissions Compliance label indicates the number of operating hours for which the engine has been shown
to meet Federal emission requirements. For engines less than 225 cc displacement, Category C = 125 hours, B = 250 hours
and A = 500 hours. For engines of 225 cc or more, Category C = 250 hours, B = 500 hours and A = 1000 hours.
The displacement engines of Model Series 210000 is 344 cc, 280000 is 465 cc, 310000 engines is 501 cc.
This is a generic representation of the
emission label typically found on a
certified engine.

Bottle of
Engine Oil
Fresh StartTM
Cartridge
@
Safety Glasses
Assembly
Drive
Control
Rope
Guide
Up!er
Handle
Bracket
Upper
Handle
Speed
Control
Lower
Handle
Handle
Knobs
BIo
Chute
Cable
Guide
Lower j
Hose
Handle
Bracket
Screws
Wing
Nuts
Figure 1
IMPORTANT:This unit is shipped without gasoline or
oil in the engine. After assembly, see OPERATION
section of this manual for proper fuel and engine oil
fill-up.
NOTE: Reference to right and left hand side of the
Yard Vacuum is observed from the operating
position.
This Yard Vacuum has been completely assembled
at the factory, except for the handle, bag, and blower
chute. These parts are shipped loose in the carton.
A pair of safety glasses, the owner's manual, a bot-
tle of engine oil, and one FreshStart TM cartridge are
also included in the carton. See Figure 1.
OPENINGCARTON
• Cut each corner of the carton vertically from top
to bottom.
• Remove all loose parts.
• Remove loose packing material.
REMOVINGUNITFROMCARTON
• Lift unit from the rear to detach it from underlying
carton material and roll unit out of carton.
• Check carton thoroughly for any other loose
parts.
NOTE: Make sure not to crimp cables while
removing loose parts or the entire unit from the
carton.
LOOSEPARTSIN CARTON(SeeFigurel)
• Upper and Lower Handle
• Hose Assembly
• Bag
• Blower Chute
• Safety Glasses
• A Bottle of Engine Oil (may be located in bag)
• Operator's Manual
• FreshStart TM Cartridge
DISCONNECTINGSPARKPLUG
Before proceeding with assembly of your new Yard
Vacuum, disconnect the spark plug wire from the
spark plug and ground it onto the retaining post on
the engine. This will prevent accidental starting of
the engine. See Figure 2.
Retaining Spark
PlugWire
0 ©
Disconnect and Ground to
Figure 2

ATTACHINGTHE HANDLE
Remove the hairpin clips from the handle
brackets and remove the carriage screws and
wing nuts from the lower handle. See Figure 3A.
/z Carriage Cable
Screw Guide
Wing
Nut
B
Brac ket_
Cable
Tie
Lower
Guide
Knobs
Figure 3
• Place the bottom holes in lower handle over the
pins on the handle brackets and secure with
hairpin clips.
• Insert carriage screws through upper hole in
lower handle from the inside and secure with
wing nuts.
• Unfold the upper handle until it aligns with lower
handle. Make sure the rope guide is on the right
side of upper handle. See Figure 3B.
IMPORTANT:Make sure the cables are routed outside
the lower handle. Also, do not crimp the cables while
lifting up the handles.
• Secure the two handles by tightening the handle
knobs (carriage bolts must be seated properly
into the handle). See Figure 3B.
• Pull the two cable ties attached to the cables tight
approximately 8 inches from each cable end and
place the cables into the cable guide. See Figure
3A and B.
• Loosen the wing nut that secures the rope guide
to the right side of upper handle.
• Pull the starter rope out of the engine slowly and
slip the starter rope into the rope guide. Tighten
the wing nut. See Figure 5A.
ATTACHINGTHEHOSEASSEMBLY
• Slide hose adapter of hose assembly into the
base adapter located on the left front of the Yard
Vacuum. See Figure 4.
Hose
Spring
Pin
Figure 4
• Pull spring loaded pin out on the base and align
pin with the first hole (closest to the end of the
tube) in the hose adapter.
• Release the pin to lock the hose in place.
• Snap the hose handle first into the upper hose
handle bracket and then into the lower hose
handle bracket. Refer to Figure 5A.
A Starter
Bracket
Lower
Hose
Handle
Bracket
Hose
Handle
B
Chipper
Chute
Bracket
Figure 5
Lay hose tubing on hanger bracket next to
chipper chute. Refer to Figure 5B.

ATTACHINGTHEBAG
Grasp bag handle with one hand and slide locking
rod on mounting bracket with other hand toward
engine. Use the end of mounting bracket as
leverage when sliding the locking rod. See Figure 6.
Bag
Bag Handle
Stra
Stud
Locking_
Nod
Bag/Chute
Switch Stud
Button
Tab
Figure 6
• Slip bag over the rim of the discharge opening and
release locking rod to secure bag in place.
• Snap bag clip to the top of the lower handle.
• Place the lower straps on the bag over the top of
lower handle, hooking them on the studs.
NOTE: The bag/chute switch button attached to the
mounting bracket must be fully depressed by the tip of
front tab on bag handle when securing the bag or
engine will not start.
ATTACHINGTHEBLOWERCHUTE
NOTE: The bag must be removed before installing the
blower chute.
• Grasp blower chute with one hand and slide lock-
ing rod on mounting bracket with other hand
toward engine. Use the end of mounting bracket
as leverage when sliding the locking rod.
See Figure 7.
• Slip blower chute over rim of discharge opening
and release locking rod to secure chute in place.
• Raise the nozzle height to the highest setting
when using the blower chute. Refer to nozzle
height adjustment in the ADJUSTMENT section
on page 11.
NOTE: The bag/chute switch button attached to the
mounting bracket must be fully depressed by the tip of
front tab on the blower chute or engine will not start.
Front Blower
Tab
Bag/Chute
Switch
Button
Rod
Engine Removed
For Clarity
Figure 7

Know Your Yard Vacuum
Read this operator's manual and safety rules before operating your Yard Vacuum. Compare the illustrations
below with your equipment to familiarize yourself with the location of various controls and adjustments. Save
this manual for future reference.
The operation of any Yard Vacuum can result in foreign objects being thrown into the eyes,
which can result in severe eye damage. Always wear safety glasses, provided with the
Yard Vacuum, for operating this equipment or while performing any adjustments or repairs on
it.
Starter
Control
)eed Control
Throttle Control
Hose Handle...._
Lower
Hose Handl,
Bracket
Bag
Hose
Assembb
Choke Control
Chipper
Chute
Hang_
Bracket
g
Adjustment Lever
OPERATINGCONTROLS(seeFigure8)
Chipper Chute
Allows twigs and small branches up to 1-1/2" in
diameter to be fed into the impeller for chipping.
Drive Control
Located on the underside of the upper handle, the drive
control is used to engage/disengage wheels. Fully
squeeze the drive control against the upper handle to
engagethe wheels; release to disengage. (DO NOT slip
clutch).
Speed Control
Located on the left side of the upper handle, the
speed control is used to select the forward speed of
the yard vacuum.
IMPORTANT:Move the speed control only when the
engine is running. Changing the speed control setting
with the engine off can damage the yard vacuum.
Figure 8
Blower Chute
/
...................Spark Plug Wire
Nozzle/Hose
Vac Lever
Nozzle Height Adjustment Lever
Used to adjust the nozzle ground clearance ranging
from 5/8" to 4-1/8".
Throttle Control
This lever controls the engine speed and stop
function. Through three separate positions on the
lever from left to right, the operation is as follows:
Start/ Slow/ Engine
Run Idle Off
Choke Control
The choke control is used to choke the carburetor and
assist in starting the engine.
Starter Handle
Used to start the engine.
Meets ANSI safety standards
Craftsman Yard Vacuums conform to the safety standard of the American National Standards Institute (ANSI).
9

HoseAssembly
Usedasanalternativetothenozzletovacuumyard
wastesuchas leavesorpineneedlesinhardto
reachplaces.
HoseHandle
Usedtoguidehoseassemblywhenvacuuming.
BlowerChute
Whenattachedtounit,theblowerchuteisusedto
bloworscatteryardwastesuchasleaves,pine
needle,or smalltwigsacrossyard.
Nozzle
Yardwastesuchasleavesandpineneedlescanbe
vacuumedupthroughthenozzleforshredding.
BagHandle
Usedtograspbaginordertoassistinattaching,
removing,andemptyingbag.
Bag
Collectsshreddedmaterialfedinthroughthechipper
chuteorvacuumedinthroughthenozzle.
Nozzle/HoseVacLever
Thenozzle/hosevacleverislocatedontopofthe
nozzle.Useittoswitchvacuumsuctionbetweenthe
nozzleandthehoseassembly.
GASANDOILFILL-UP
Oil (one bottle shipped with unit)
First Time Use
• Remove oil fill dipstick.
• With the Yard Vacuum on level ground, use a
funnel to empty entire contents of oil bottle
provided into the engine.
• Replace oil fill dipstick and tighten.
Subsequent Uses
Only use high quality detergent oil rated with API
service classification SF, SG, or SH. Select the oil's
SAE viscosity grade according to the expected
operating temperature. Follow the chart below.
Colder _" 32°F ,,..-_ Warmer
5W30 SAE 30
y
Oil Viscosity Chart
Although multi-viscosity oils (5W30, 10W30, etc.)
improve starting in cold weather, they will result in
increased oil consumption when used above 32°F.
Check your engine oil level more frequently to avoid
possible engine damage from running low on oil.
• Check the oil level making certain not to rub the
dipstick along the inside walls of the oil fill tube.
This would result in a false dipstick reading. Refill
to FULL mark on dipstick, if necessary. Capacity
is approximately 18 oz. Overfilling will cause the
engine to smoke profusely and will result in poor
engine performance.
• Replace oil fill dipstick and tighten.
• Keep oil level at FULL. Running the engine with
too little oil can result in permanent engine
damage.
Gasoline
• Remove fuel cap from the fuel tank.
• Make sure the container from which you will pour
the gasoline is clean and free from rust or foreign
particles. Never use gasoline that may be stale
from long periods of storage in its container.
Gasoline that has been sitting for any period
longer than four weeks should be considered
stale.
• Fill fuel tank with clean, fresh, unleaded regular
gasoline only. Do not use gasoline containing
METHANOL. Replace fuel cap.
• To avoid engine problems, the fuel system should
be emptied before storage for 30 days or longer.
Drain the fuel from the tank by running the engine
until the fuel tank is empty. Use fresh fuel next
season. See STORAGE section for additional
information.
• Check the fuel level periodically to avoid running
out of gasoline while operating the Yard Vacuum.
If the unit runs out of gas as it is chipping, it may
be necessary to unclog the discharge area before
it can be restarted. Refer to SERVICE AND
ADJUSTMENT section on page 16.
FreshStart TM Gas Cap
This unit is equipped with a FreshStart TM continuous
fuel preserver gas cap which automatically drips
continuous fuel preserver into your fuel tank for up to
six months depending on conditions, such as
temperature, usage patterns, fuel type and blend. To
activate the gas cap, follow the instructions below:
1. Snap the fuel preserver cartridge that comes with
your unit into the fuel cap.
2. Peel off the white tab from the cartridge.
3. Twist the FreshStart TM cap onto the fuel tank.
When you visually see that the fuel preserver
cartridge is empty, replacement cartridges are
available through your local Sears Parts & Repair
Center and most Sears stores.
WARNING: Use extreme care when
handling gasoline. Gasoline is extremely
flammable and the vapors are explosive.
Never fuel machine indoors or while the
engine is hot or running. Extinguish
cigarettes, cigars, pipes, and other
sources of ignition.
10

TOSTOPENGINE
• Move throttle control lever to STOP or OFF
position.
Disconnect spark plug wire and ground it to the
retaining post to prevent accidental starting while
the equipment is unattended.
_, ARNING: When moving throttle
control lever, be careful of heated
surfaces and sharp edges on muffler
guard.
TOSTARTENGINE
1. Attach spark plug wire and rubber boot to spark
plug.
2. The bag/chute switch button must be fully
depressed by the tip of front tab on bag handle
or blower chute for engine to start.
3. Make sure bag/chute switch wire is connected to
engine and grounded to mounting bracket.
4. Gas tank should be filled 3/4 to full before start-
ing.
5. Move throttle control to START/RUN (Rabbit)
position. See Figure 9.
6. Move the choke control toward the throttle
control to choke the engine's carburetor. (A
warm engine may not require choking.) See
Figure 9.
Throttle Control
/
/
/
Control
Figure 9
7. Standing behind the unit, grasp starter handle
and pull rope out until you feel a drag.
8. Pull the rope with a rapid, continuous, full arm
stroke. Keep a firm grip on the starter handle.
Let the rope rewind slowly.
9. Repeat, if necessary, until engine starts. When
engine starts, move choke control gradually
away from the throttle control.
10. If engine falters, move choke control back
toward the throttle control and repeat steps 7
through 9.
11. ALWAYS keep the throttle control in the START/
RUN position when operating the Yard Vacuum.
TOEMPTYBAG
• Unhook bag straps from the lower handle and
unsnap bag clip from top of the lower handle. See
Figure 10.
• Grasp bag handle with one hand and pull lock rod
on mounting bracket with other hand toward
engine to release.
• Lift bag off back of unit. Refer to Figure 6.
• Twist the two buttons on the back of the bag to
unlock and empty contents. See Figure 10.
• Hold bag handle and bag clip while emptying the
contents.
• Compress bag opening and fold inner flap over
opening.
• Fold outer flap over inner flap and insert buttons
on the bag through metal outlets.
• Twist the buttons to lock bag.
Buttons
Inner Flap Bag
Clip
Bag Handle
Outer
Stra
Figure 10
TOREMOVEBLOWERCHUTE
• Grasp blower chute with one hand and pull lock
rod on mounting bracket with other hand toward
engine to release. Refer to Figure 7.
• Remove blower chute from over the rim of the
discharge opening.
NOZZLEHEIGHTADJUSTMENT
The nozzle can be adjusted to any of five positions,
ranging from 5/8" to 4-1/8" ground clearance. The
nozzle height has to be adjusted according to yard
conditions. Move the height adjustment levers
forward or backward to adjust the nozzle upwards or
downwards. See Figure 11.
11

NOTE: In general, raise the nozzle height to vacuum
a thick layer of leaves or to operate with the blower
chute. Lower the nozzle height for smoother surfaces.
Nozzle
4ozzle
,Height
Adjustment
Lever
Figure 11
USINGTHENOZZLEVACUUM
Place nozzle/hose vac lever in the top position on the
nozzle to vacuum through nozzle. See Figure 12.
Adapter
Spring
(First Hole)
Figure 12
• The spring loaded pin must be in the first hole
(closest to the end of the tube) of the hose adapter
to operate the nozzle vac.
• Place both hands on top of the upper handle and
fully lift the drive control against the upper handle to
propel the unit over yard.
• Use the speed control to choose either the high or
low speed. The speed control may be moved either
while the unit is propelling or before engaging the
wheels.
IMPORTANT:Move the speed control only when the
engine is running. Changing the speed control setting
with the engine off can damage the yard vacuum.
Yard waste such as leaves and pine needles can be
vacuumed up through the nozzle for shredding. After
material has been shredded by the flail blades on the
impeller assembly, it will be discharged into catcher bag
or through blower chute. Do not attempt to shred or chip
any material other than vegetation found in a normal
yard (i.e. branches, leaves, twigs, etc.) Avoid fibrous
plants such as tomato vines until they are thoroughly
dried out. Materials such as stalks or heavy branches
up to 1-1/2" in diameter may be fed into the chipper
chute.
_, WARNING: Do not attempt to shred,
chip, or vacuum any material larger than
specified on the machine or in this
manual. Personal injury or damage to the
machine could result.
IMPORTANT:The flail screen is located inside the
housing in the discharge area. If the flail screen
becomes clogged, remove and clean as instructed in
the Maintenance section on page 16. For best
performance, it is also important to keep the chipper
blade sharp.
WARNING: Do not at any time make any
adjustments without first stopping engine
and disconnecting spark plug wire.
USINGTHEHOSEASSEMBLY
• Place nozzle/hose vac handle in the bottom
position on the nozzle to redirect vacuum to the
hose assembly. See Figure 13.
• The spring loaded pin must be in the second hole of
the hose adapter to operate the hose assembly.
• Unhook the hose from upper handle bracket and
grasp the hose handle to guide while vacuuming
yard waste such as leaves or pine needles in hard
to reach places.
Nozzle/Hose
Vac Lever
(Bottom Position)
Hose
Spring Loaded Pin
(Second Hole)
Figure 13
12

Maint. Tasks
Product:
Lubrication
Clean Equipment
Engine:
Check engine oil
Change engine oil
Service Air Cleaner
Service spark plug
Service Muffler
Clean Engine
4
4
Maintenance Schedule
4
Every 25
hours
operation
4
4
4
4
4
4
4 4
4
4
4
Service Dates
GENERALRECOMMENDATIONS
• Always observe safety rules when performing any
maintenance.
• The warranty on this Yard Vacuum does not
cover items that have been subjected to operator
abuse or negligence. To receive full value from
the warranty, operator must maintain the
equipment as instructed in this manual.
• Some adjustments will need to be made
periodically to maintain your equipment properly.
• Follow the maintenance schedule.
• Periodically check all fasteners and make sure
they are tight.
WARNING: Always stop the engine and
disconnect and ground the spark plug
wire before performing any maintenance
or adjustments.
LUBRICATION
• Wheels- Place a few drops of SAE 30 oil on each
shoulder screw once a season.
Refer to Figure 8.
• Nozzle height adjustment levers- Lubricate
nozzle height adjustment levers with light oil.
Refer to Figure 8.
• Locking Rod- Lubricate the lock rod and
compression springs which attach to the
mounting bracket. Refer to Figure 7.
CLEANEQUIPMENT
• Clean the Yard Vacuum thoroughly after each
use.
• Wash the bag periodically with water. Allow to
dry thoroughly in the shade.
• If the flail screen becomes clogged, remove and
clean as instructed in the SERVICE AND
ADJUSTMENTS section.
NOTE: Cleaning with a forceful spray of water is not
recommended as # could contaminate the fuel
system.
CHECKENGINEOIL
• Stop engine and wait several minutes before
checking oil level. With engine on level ground,
the oil must be to FULL mark on dipstick.
• Remove oil fill dipstick.
• Check oil level on dipstick. Level should be at
FULL mark. (If not, see "Subsequent Uses" on
page 10).
• Replace oil fill dipstick and tighten.
CHANGEENGINEOIL
Only use high quality detergent oil rated with API
service classification SF, SG, or SH. Select the
oil's SAE viscosity grade according to the
expected operating temperature. Refer to
operation section for viscosity chart.
13

• Change engine oil after the first five hours of
operation, and every twenty-five hours thereafter.
TODRAINOIL
Drain oil while engine is warm. Follow the instructions
given below:
• Drain the fuel from the tank by running the engine
until the fuel tank is empty.
• Remove oil fill dipstick.
• Tip unit on its side to drain through the oil fill tube.
• When engine is drained of all oil, refill with
approximately 18 oz. of fresh oil. Refer to Gas
And Oil Fill-up in OPERATION section.
• Replace oil fill dipstick and tighten.
SERVICEAIRCLEANER
The air cleaner prevents damaging dirt, dust, etc.,
from entering the carburetor and being forced into the
engine and is important to engine life and
performance. The air cleaner consists of a pleated
filter. Never run the engine without an air cleaner
completely assembled.
To ServiceAir Cleaner:
• Loosen screw and tilt plastic housing cover on
side of engine down. See Figure 14.
• Remove pleated filter from plastic housing cover
and replace with clean or new filter.
• Tilt cover up into place and tighten screw.
Figure 14
NOTE: If the filter is torn or damaged in any way,
replace it.
_, ARNING: Temperature of muffler
and nearby areas may exceed 150° F
(65°O). Avoid these areas.
SERVICESPARKPLUG
• Clean the spark plug and reset the gap to.030" at
least once a season or every 50 hours of
operation. See Figure 15. Spark plug
replacement is recommended at the start of each
season. Refer to engine parts list for correct
spark plug type.
NOTE: Do not sandblast spark plug. Spark plug
should be cleaned by scraping or wire brushing and
washing with a commercial solvent.
.030"
Figure 15
SERVICEMUFFLER
Inspect muffler periodically, and replace if
necessary.
If your engine is equipped with a spark attester
screen assembly, remove after every 50 hours of
use for cleaning and inspection. Replace if
damaged.
WARNING: Do not operate the Yard
Vacuum without a muffler or tamper with
the exhaust system. Damaged mufflers
or spark arresters could create a fire
hazard.
CLEANENGINE
• Clean engine by removing dirt and debris with a
cloth or brush.
• Frequently remove grass clippings, dirt, and
debris from cooling fins, air intake screen, levers,
and linkage. This will help ensure adequate
cooling and engine speed.
14

_, WARNING: Do not at any time make any
adjustment to the unit without first
stopping engine and disconnecting
spark plug wire.
NOZZLEHEIGHTADJUSTMENT
The nozzle can be adjusted to any of five positions,
ranging from 5/8" to 4-1/8" ground clearance. The
nozzle height has to be adjusted according to yard
conditions. Move the height adjustment levers
forward or backward to adjust the nozzle upwards or
downwards. See Figure 16.
NOTE: In general, raise the nozzle height to
vacuum a thick layer of leaves or to operate with the
blower chute. Lower the nozzle height for smoother
surfaces.
Nozzle
_lozzle
,Height
Adjustment
Lever
Figure 16
DRIVECONTROLCABLEADJUSTMENT
Adjust the drive control cable if the yard vacuum does
not self propel with the drive control engaged, or if the
unit hesitates while the engine maintains the same
speed after approximately 20 hours of use.
To move the z-fitting of the drive control cable from its
factory set position in the front hole of the drive
control to the rear hole, proceed as follows:
• Remove the drive control by pushing the right
side of the control out of the right hole in the
upper handle. Pivot control down towards the
lower handle and then straight up to remove it
from the left hole in the upper handle. See Figure
17A.
• There is now sufficient slack in the drive control
cable to grasp the z-fitting with your hand and
move it from the front hole to the rear hole of the
drive control. See Figure 17B.
IMPORTANT: Make sure to insert the z-fitting into the
rear hole as it was inserted in the front hole, that is
from the outside of the drive control.
A
You may now carefully reinstall the drive control
by performing the previous steps in the opposite
order and manner of removal.
Drive
_Control
B
Drive Control
Figure 17
IMPORTANT:Once assembled and prior to restarting,
make sure that the cable is properly adjusted. With
the drive control disengaged, the unit should freely
pull in reverse.
CARBURETORADJUSTMENT
_ WARNING: If any adjustments (e.g.
carburetor) are made to the engine
while the engine is running, keep clear
of all moving parts. Be careful of heated
surfaces and muffler.
The carburetor has been pre-set at the factory and
should not require adjustment. If your engine does
not operate properly due to suspected carburetor
problems, take your Yard Vacuum to a Sears Parts &
Repair Center for repair and adjustment.
15

ENGINESPEED
The engine speed on your Yard Vacuum has been
set at the factory. Do not attempt to increase the
engine RPM. If you think that the engine is running
too fast or too slow, take your Yard Vacuum to the
nearest Sears Parts & Repair Center for repair and
adjustment.
WARNING: Do not attempt to alter
the engine speed by tampering with the
engine's governor linkage. Doing so
could result in serious personal injury
and damage to the engine. The engine
RPM has been set at the factory.
REMOVINGTHE FLAILSCREEN
If the discharge area becomes clogged, remove the
flail screen and clean area as follows.
• Stop the engine. Make certain the chipper
shredder vacuum has come to a complete stop.
• Before unclogging the discharge chute,
disconnect and ground the spark plug wire to
retaining post. See Figure 2.
• Remove the vacuum bag or blower chute from
the unit as instructed in the OPERATION section
to obtain access to flail screen. See Figure 18.
/
/
Flange/Lock Nut Flail Screen
REAR VIEW
Figure 18
Remove the two self tapping screws securing the
belt cover, and remove the belt cover. See Figure
19.
Self
Tapping
Screws
Figure 19
• Remove self tapping screw on right side of unit
that attaches to the flail screen. See Figure 20.
Remove _ _ _" ___
F°rB/adei_ _ __ _"_'_-"
-_Re_e_V_ping _
Figure 20
• Remove hex screw on top of rear housing near
mounting bracket and the flange lock nut that
secures flail screen. See Figure 17.
• Remove and clean the screen by scraping or
washing with water. Reinstall the screen.
SHARPENINGORREPLACINGCHIPPER
BLADE
NOTE: When tipping the unit, empty the oil and fuel
tank and keep engine spark plug side up.
• Disconnect and ground the spark plug wire to
retaining post. See Figure 2.
• Remove hose assembly and bag assembly.
• Remove the three bolts holding the hose hanger
bracket and chipper chute to the upper housing.
See Figure 20.
• Remove the front hubcaps, flange lock nuts, front
wheels, and wave washers that attach to the pivot
arm assemblies. See Figure 21.
16

• Remove the shoulder screws, thrust washers, and
bell washers that go through the pivot arms to the
front support brace. The front support brace and
lock nut can be removed at this time as well.
• Remove the four screws on the upper housing that
secure the nozzle cover. See Figure 22.
Housing
Nozzt
Screws
tousing
Screws
Figure 22
Carefully tilt and support the unit up to provide
access underneath to the nozzle mounting
hardware and impeller. Remove the three shoulder
bolts securing the black plastic nozzle to the lower
housing. Refer to Figure 23.
Black Plastic Nozzle
Figure 23
Tilt top of black plastic nozzle toward the engine to
remove.
Using a 3/16" allen wrench, remove the flat head
cap screws that hold the chipper blade to the
impeller. These screws are accessible through the
opening created when the chipper chute was
removed earlier. See Figure 24.
Flat Head
Chipper llade
\
\
Figure 24
The nuts on the flat head cap screws can be
reached from underneath using a 1/2-inch socket,
universal, and extension. See Figure 25.
Figure 25
• Replace or sharpen chipper blade. The blade can
be sharpened with a file or on a grinding wheel.
• When sharpening blade, protect hands by using
gloves and follow the original angle of grind.
• Reassemble by performing the previous steps in
the opposite order and manner of removal.
• Tighten blade screws to 210 - 250 in-lbs.
NOTE: Make certain chipper blade is reassembled
with the sharp edge facing upward. See Figure 26.
Chipper
Flail Blade
Blade
Impeller
Assembly
Figure 26
17

Prepare your Craftsman Yard Vacuum for storage at
the end of the season or if the unit will not be used for
30 days or longer. A yearly check-up by your local
Sears Parts & Repair Center is a good way to ensure
that the unit runs properly next season.
YardVacuum
• Clean the equipment thoroughly.
• Wipe equipment with an oiled rag to prevent rust.
Use a light oil or silicone to wipe.
• Service the engine following instructions below.
• Store unit in a clean, dry area. Do not store next to
corrosive materials such as fertilizer.
Engine
IMPORTANT:It is important to prevent gum deposits
from forming in essential fuel system parts such as
the carburetor, fuel filter, fuel hose, or tank during
storage. Also, alcohol blended fuels (called gasohol or
using ethanol or methanol) can attract moisture which
leads to separation and formation of acids during
storage. Acidic gas can damage the fuel system of an
engine while in storage.
NOTE: Fuel stabilizer is an acceptable alternative to
emptying the tank of fuel in minimizing the formation
of fuel gum deposits during storage.
• Add stabilizer to gasoline in fuel tank (if
FreshStart TM fuel preserver cartridge is empty) or
storage container.
• Do not drain the gas tank and carburetor if using
fuel stabilizer.
In all cases, drain all the oil from the crankcase (this
should be done after the engine has been operated
and is still warm) and refill the crankcase with fresh
oil.
When you visually see that the fuel preserver
cartridge is empty, replacement cartridges are
available through your local Sears Parts & Repair
Center and most Sears stores.
If you do not use FreshStartTM/Stabilizer, follow
these instructions:
• Drain the fuel from the tank by running the
engine until the fuel tank is empty.
• Remove spark plug, pour approximately 1/2
ounce (approximately one tablespoon) of engine
oil into cylinder and crank slowly to distribute oil.
• Replace spark plug.
Other
• Do not store gasoline from one season to
another.
• Replace the gasoline can if it starts to rust. Rust
and/or dirt inthe gasoline will cause problems.
• Store unit in a clean, dry area. Do not store next
to corrosive materials, such as fertilizer.
NOTE: If storing in an unventilated or metal storage
shed, be certain to rustproof the equipment by coat-
ing with a light oil or silicone.
18

Problem Possible Cause(s) Corrective Action
Engine fails to start 1. Fuel tank empty or stale fuel. 1.
Loss of power;
operation erratic
2. Spark plug wire disconnected.
3. Cannot pull recoil cord.
Engine overheats
Unit does not
discharge
4. Choke not in ON position.
5. Faulty spark plug.
6. Safety switch not depressed.
7. Safety switch wire is not
connected to engine or not
properly grounded.
1. Spark plug wire loose.
2. Unit running on CHOKE.
3. Blocked fuel line or stale fuel.
4. Water or dirt in fuel system.
5. Carburetor out of adjustment.
6. Low engine RPM.
1. Loose parts or damaged
impeller.
Too much vibration
1. Carburetor not adjusted 1.
2. Engine oil level low 2.
1. Discharge area clogged. 1.
Rate of discharge
slows considerably or
composition of
discharged material
changes
Unit fails to propel
itself or slips when
drive control is
engaged
2. Foreign object lodged in
impeller.
3. Low engine RPM.
4. Vacuum bag is full.
1. Low engine RPM.
2. Chipper blade dull.
1. Drive control cable out of
adjustment.
2. Drive belt worn or damaged.
Fill tank with clean, fresh gasoline. Fuel will not
last over thirty days unless a fuel stabilizer is
added.
2. Connect wire to spark plug.
3. Obstruction lodged in impeller. Disconnect
spark plug wire and remove lodged object.
4. Move CHOKE to ON position.
5. Clean, adjust gap or replace.
6. Safety switch must be depressed by the front
tab on the bag handle when securing the bag.
7. Connect safety switch wire to engine connector
and ground to mounting bracket.
1. Connect and tighten spark plug wire.
2. Move choke lever to OFF position.
3. Disconnect fuel line at carburetor to drain fuel
tank; fill tank with clean fresh gasoline. Fuel will
not last over thirty days unless a fuel stabilizer is
used.
4. Disconnect fuel line at carburetor to drain fuel
tank. Refill with fresh fuel.
5. Contact your Sears Parts & Repair Center.
6. Always run engine at full throttle.
1. Stop engine immediately and disconnect spark
plug wire. Have unit serviced by a Sears Parts &
Repair Center.
Contact your Sears Parts & Repair Center.
Fill crankcase with proper selection of oil.
Stop engine immediately and disconnect spark
plug wire. Clean flail screen and inside of
discharge opening. See Maintenance section of
this manual.
2. Stop engine immediately and disconnect spark
plug wire. Remove lodged object.
3. Always run engine at full throttle.
4. Empty bag.
1. Always run engine at full throttle.
2. Replace chipper blade or see your Sears Parts
& Repair Center.
1. Follow adjustment procedure in Service and
Adjustments section of manual.
2. Contact your Sears Parts & Repair Center.
NOTE: For repairs beyond the minor adjustments listed above, please contact your local Sears Parts & Repair
Center,
19

Sears Craftsman 6.5 H.P. Yard Vacuum Model 247.770990
57
7
12
47 46
48 _
\
51
2
/
14
45
40
15
/
7
13
19
44
43
41
5_
16
_1281
23
27
17
/
11
53
39
50
20
54

Sears Craftsman 6.5 H.P. Yard Vacuum Model 247.770990
Ref.
Part No.
No.
1. 736-0451
2. 749-04163
3. 720-0279
4. 631-04118
5. 710-1205
6. 781-1056
7. 710-0726
8. 720-0241
9. 710-1174
11. 710-1008
12. 731-04911
13. 749-04165
14. 711-1293
15. 710-0703
16. 712-0397
17. 751B790067
18. 725-1700
19. 725-3166
20. 731-1613
21. 710-0224
22. 629-0920A
23. 714-0104
24. 710-0599
25. 732-0962
26. 781-0778A
27. 747-1153
28. 710-3195
29. 710-3025
30. 712-0442
31. 710-0751
Part Description
Saddle Washer,.320 x.93
Upper Handle
Knob
Engine Spacer Ass'y
Eye Bolt
Upper Hose Handle Bracket
Hex Cap Screw 5/16-12 x.750
Handle Knob 5/16-18
Carriage Bolt
Screw, 3/8-16 x 1.875
Lower Hose Handle Bracket
Lower Handle
Studs
Carriage Screw 1/4-20 x.75
Ref.
Part No.
No.
32. 731-2484
33. 716-0104
34. 732-3035
35. 711-1571
36. 736-3020
37. 710-1220
38. 710-0351
39. 781-04069
40. 746-04156
41. 731-1820
42. 681-0122
43. 746-04155
44. 710-1122
45. 781-1058
Part Description
Hose Base Adapter
E Ring.500 Dia
Compression Spring
Clevis Pin
Flat Washer.271 ID x.630 OD
Screw #12-16 x.750
Screw #10 - 16 x.500
Flail Housing
Drive Control Cable
Cable Guide
Chipper Chute Assembly
Speed Control Cable
Hex Screw, 1/4-20 x 2.50
Hose Bracket Hanger
Wing Nut 1/4-20
Shroud
Switch Cover
Safety Switch
Safety Switch Cover
46. 712-04064
47. 748-0457
48. 731-2478
49. 710-3288
50. 723-0295
Flange Lock Nut, 1/4-20
Spacer
Hose Nozzle
Hex Cap Screw 1/4-20 x 2.625
Adjustment Clamp
Hex Washer Screw #10-16 x.50
Wire Harness
Cotter Pin
Screw, 1/4-20 x.500
Compression Spring
Switch Mounting Bracket
Lock Rod
Hex Cap Screw 5/16-18 x 4.5
Hex Cap Screw 5/16-18 x.625
Cap Lock Nut, 1/4-20
Hex Cap Screw 1/4-20 x.620
51. 749-1270
52. 764-0648
53. 07071
54. 731-2292
55. 736-0607
56. 726-0139
57. 747-04305
58. 725-0157
i 752B699886
i 723-0400
Nozzle Handle
Vacuum Hose
Handle Grip
Hose Adapter
External L-Washer 5/16
Speed Nut
Drive Control
Cable Tie
Fuel Cap (Not Shown)
Safety Glasses (Not Shown)
NOTE: For painted parts, please refer to the list of color codes below. Please add the applicable color code, wherever needed,
to the part number to order a replacement part. For instance, if a part, numbered 700-xxxx, is painted Sears Red, the part num-
ber to order would be 700-xxxx-0721.
Sears Red: 0721
Oyster Grey: 0662
Powder Black: 0637
21

Sears Craftsman 6.5 H.P. Yard Vacuum Model 247.770990
25
\
\
\
\
54 7_
80
45
\
53 42
55
44_
2
3
@ 5
33
64 14
15
49
23
.J
58
22

Sears Craftsman 6.5 H.P. Yard Vacuum Model 247.770990
Ref.
No.
1.
2.
3.
4.
5.
6.
7.
8.
9.
10.
11.
12.
13.
14.
15.
16.
17.
18.
19.
20.
21.
22.
23.
24.
25.
26.
27.
28.
29.
30.
31.
32.
33.
34.
35.
36.
37.
38.
39.
40.
Part No.
664-0094
681-0154
710-1054
781-0490
719-0530A
781-0735
719-0329
715-0166
711-1401
712-0411
736-0119
681-0152
710-1650
781-0721B
712-04063
710-0607
618-04175
681-04027
747-04297
731-2293A
781-1064
732-1156
726-0106
711-1551
710-0599
710-1220
731-2485A
710-1256
750-1294
732-3118
732-1151A
711-04245
731-2294A
715-0221
781-04082
781-04081
782-7598
714-0104
716-0104
736-0258
Ref.
Part Description No. Part No.
Bag Assembly 42. 736-0232
Screen Assembly 43. 738-1015
Hex Screw 5/16-24 x 1.0 44. 731-0981A
Chipper Blade 45. 734-2042
Impeller 46. 716-0865
Pin Clip 47. 741-0751
Flail 48. 687-02094
Spiral Pin 49. 720-0426
Clevis Pin 50. 732-1026
Lock Nut, 5/16-24 51. 736-0741
Lock Washer, 5/16 52. 738-1172
Impeller Assembly 53. 734-2004A
(Incl. Ref 3- Ref. 11) 54. 710-1652
Shoulder Screw, #12-24 x.30 x.46 55. 712-04065
Lower Flail Housing 56. 731-04879
Flange Lock Nut 5/16-18 57. 736-0314
Screw, 5/16-18 x.500 58. 631-0090
Transmission Assembly 59. 764-0631A
Idler Assembly (Incl. Ref. 37, 71-76) 60. 631-0083
Hinge Pin 61. 710-0726
Nozzle 62. 736-0247
Base Adapter Door 63. 736-0217
Torsion Spring 64. 710-1273
Cap Speed Nut 1/4 65. 731-2522
Pivot Rod 66. 732-04217
Screw, 1/4-20 x.500 67. 736-0369
Screw, #12-16 x.750 68. 738-0930
Nozzle Door Lever 69. 741-04108
Hex Screw, #8-18 x 1.25 70. 781-04078
Shoulder Spacer 71. 710-0597
Extension Spring 72. 712-04064
Nozzle Door Torsion Spring 73. 741-0124
Impeller Hub 74. 750-1050
Nozzle Door 75. 754-0369
Dowel Pin 76. 781-04077
Front Wheel Support Brace 77. 717-1762
Rear Wheel Support Brace 78. 717-1761
Belt Keeper 79. 681-0156A
Cotter Pin 80. 681-0155A
E - Ring -- 723-0400
Flat Washer,.385 x 1.00 x.135
Part Description
Wave Washer.531 ID x.781 OD
Shoulder Screw 3/8-16
Hubcap
Wheel 8 x 2.125
Snap Ring
Height Adjustment Bearing
Pivot Arm Assembly
Height Adjustment Knob
Spring Lever
Bell Washer.760 ID x.25 OD
Shoulder Screw,.750 x.500
Wheel 8 x 2.125
Screw, 1/4-20 x.625
Flange Lock Nut, 3/8-16
Belt Cover
Thrust Washer.375 ID x.70 OD
Blower Chute
Bag
Chute Assembly
Hex Index Screw, 5/16-12 x.750
Flat Washer.375 ID x 1.25 OD
Lock Washer 3/8
Hex Cap Screw 3/8-24 x 2.75
Wheel Cover
Extension Spring,.375 x 2.95
Flat Washer,.5081D x1.00OD x.020
Shoulder Screw,.560 x. 165
Drive Axle Bushing
Transmission Mounting Bracket
Screw, 1/4-20 x 1.00
Flange Lock Nut, 1/4-20
Ball Bearing
Flange Spacer,.260 x.659 x.517
Belt, 3/8 x 32.5
Idler Bracket
Spur Gear- RH
Spur Gear - LH
Handle Bracket Ass'y RH
Handle Bracket Ass'y LH
Safety Glasses (Not Shown)
NOTE: For painted parts, please refer to the list of color codes below. Please add the applicable color code, wherever needed,
to the part number to order a replacement part. For instance, if a part, numbered 700-xxxx, is painted Sears Red, the part num-
ber to order would be 700-xxxx-0721.
Sears Red: 0721
Oyster Grey: 0662
Powder Black: 0637
23

Sears Craftsman 6.5 H.P. Engine Model No. 123K02
For Yard Vacuum Model 247.770990
i1019 LABEL KI i
5O
51_
383_
7
635
584_ 4 _
585_
505 @
718_
287
11
i 1330 REPAIR MANUAL j
306
24

Sears Craftsman 6.5 H.P. Engine Model No. 123K02
For Yard Vacuum Model 247.770990
425
968
836
m
621 _
445
443_
81
843
613
977 CARBURETOR
GASKET SET
%
365
% 633A
633
61 276_
121 CARBURETOR OVERHAUL KIT
633
I b 276_
633A 8
159
970 %_
188
615 O
404
616_
104
137_
276 Q
_ 276 Q
692 j
633A ®
130 _
95
617
m
25

Sears Craftsman 6.5 H.P. Engine Model No. 123K02
For Yard Vacuum Model 247.770990
358 ENGINE GASKET SET
3_ 20 _ 842_ 524_ 668
163 _
1329 REPLACEMENT ENGINE]
969_
78
J
J
930
497_
0
332
324
305
67o@ 19o
957 _
601
1036 EMISSIONS LABEL i
1005
m
65
592
58
I
459
689 _ 60
I
26

Sears Craftsman 6.5 H.P. Engine Model No. 123K02
For Yard Vacuum Model 247.770990
Ref.
Part No.
No.
1. 697322
2. 399269
3. 299819t
4. 493279
5. 691160
7. 692249t
8. 695250
9. 699472
10. 691125
11. 691260
12. 692232t
13. 690912
15. 691680
16. 694478
20. 399781t
22. 691092
23. 692315
24. 222698
25. 697339
697341
26. 499425
499427
27. 691866
28. 499423
29. 499424
32. 691664
32A. 695759
33. 262651
34. 262652
35. 691270
36. 691270
37. 694086
40. 692194
43. 691997
45. 690548
46. 691449
48. 498828
50. 497465
51. 272199t
54. 691650
55. 691421
58. 697316
60. 281434
65. 690837
78. 691108
81. 691740
95. 691636
97. 493267
104. 691242tt
108. 691182
109. 498593
117. 498978
121. 498260
125. 499059
127. 694468tt
130. 691203
133. 398187
Ref.
Part Description No.
Cylinder Assembly 134.
Kit-Bushing/Seal 137.
Seal-Oil (Magneto Side) 146.
Sump-Engine 159.
Head-Cylinder 163.
Gasket-Cylinder Head 187.
Breather Assembly 188.
Gasket-Breather 190.
Screw (Breather Assembly) 202.
Tube-Breather 209.
Gasket-Crankcase 222.
Screw (Cylinder Head) 227.
Plug-Oil Drain 276.
Crankshaft 287.
Seal-Oil (PTO Side) 300.
Screw (Engine Sump) 304.
Flywheel 305.
Key-Flywheel 306.
Piston Assembly (Standard) 307.
Piston Assembly (.020" Oversize) 324.
Ring Set-Piston (Standard) 332.
Ring Set-Piston (.020" Oversize) 333.
Lock-Piston Pin 334.
Pin-Piston 337.
Rod-Connecting 347.
Screw (Connecting Rod) 356.
Screw (Connecting Rod) 358.
Part No.
398188tt
693981tt*
690979
691753
272653t*tt
691050
693399
690940
691829
691291
692150
690783
271716tt*
690940
692038
493294
691108
690450
690345
695161
690662
802574
691061
802592
691396
496381
497316
Part Description
Valve-Needle/Seat
Gasket-Float Bowl
Key-Timing
Bracket-Air Cleaner Primer
Gasket-Air Cleaner
Line-Fuel (Cut to Required Length)
Screw (Control Bracket)
Screw (Fuel Tank)
Link-Mechanical Governor
Spring-Governor
Bracket-Control
Control Lever-Governor
Sealing Washer
Screw (Dipstick Tube)
Muffler
Housing-Blower
Screw (Blower Housing)
Shield-Cylinder
Screw (Cylinder Shield)
Cup/Screen Assembly
Nut (Flywheel)
Armature-Magneto
Screw (Armature Magneto)
Plug-Spark
Switch-Rocker
Wire-Stop
Engine Gasket Set
Valve-Exhaust 363. 19069
Valve-I ntake 365. 692524
Spring-Valve (Intake) 383. 89838
Spring-Valve (Exhaust) 404. 690272
Guard-Flywheel 425. 690670
Retainer-Valve 443. 692523
Slinger-Governor/Oil 445. 491588
Tappet-Valve 456. 692299
Camshaft 459. 281505
Short Block 497. 690664
Manifold-Intake 505. 691251
Gasket-Intake 523. 495264
Screw (Intake Manifold) 524. 692296t
Housing-Rewind Starter 525. 495265
Rope-Starter (Cut to Required Length) 529. 691923
Flywheel Puller
Screw (Carburetor)
Wrench-Spark Plug
Washer (Governor Crank)
Screw (Air Cleaner Cover)
Screw (Air Cleaner Primer Base)
Filter-Air Cleaner Cartridge
Plate-Pawl Friction
PawI-Ratchet
Screw (Stopswitch)
Nut (Governor Control Lever)
Dipstick
Seal-Dipstick Tube
Tube-Dipstick
Grommet
Grip-Starter Rope 562.
Screw (Rewind Starter) 564.
Screw (Flywheel Guard) 584.
Lock-Muffler Screw 585.
Screw (Throttle Valve) 592.
Shaft-Throttle 597.
Pin-Float Hinge 601.
Valve-Choke 604.
Shaft-Choke 608.
Jet-Main (Standard) 613.
Kit-Carburetor Overhaul 615.
Carburetor 616.
Plug-Welch 617.
Valve-Throttle 621.
Float-Carburetor
92613
698589
697734
691879t
690800
691696
95162
698588
497680
691340
690340
698801
270344t*tt
692310
Bolt (Governor Control Lever)
Screw (Control Cover)
Cover-Breather Passage
Gasket-Breather Passage
Nut (Rewind Starter)
Screw (Pawl Friction Plate)
Clamp-Hose
Cover-Control
Starter-Rewind
Screw (Muffler)
Retainer-Governor Shaft
Crank-Governor
SeaI-O Ring (Intake Manifold)
Switch-Stop
27

Sears Craftsman 6.5 H.P. Engine Model No. 123K02
For Yard Vacuum Model 247.770990
Ref.
No.
627.
633.
633A.
635.
668.
670.
684.
689.
692.
718.
741.
832.
836.
842.
843.
847.
851.
868.
869.
870.
871.
Part No.
692872
691321tt*
693867tt*
66538
493823
692294
690345
691855
690579
690959
790345
499034
690664
691031t
691884
692017
493880
697338
691155
690380
262001
63709
Ref.
Part Description No.
Bracket-Stopswitch 921.
Seal-Choke/Throttle Shaft 930.
Seal-Choke/Throttle Shaft 957.
Boot-Spark Plug 966.
Spacer 968.
Spacer-Fuel Tank 969.
Screw (Breather Passage Cover) 970.
Spring-Friction 972.
Spring-Detent 975.
Pin-Locating 976.
Gear-Timing 977.
Guard-Muffler 1005.
Screw (Muffler Guard) 1019.
SeaI-O Ring (Dipstick Tube) 1036.
Sleeve-Lever 1058.
Assembly-Dipstick/Tube 1059.
Terminal-Spark Plug 1210.
Seal-Valve 1211.
Seat-Valve (Intake) 1329.
Seat-Valve (Exhaust)
Bushing-Guide (Exhaust) 1330.
Bushing-Guide (Intake)
Part No.
698587
691919
397974
496116
692298
690700
691669
699374
493640
694395
498261
691346
494256
697457
MS 5244
692311
498144
498144
123K02-0240-
E1
272147
Part Description
Cover-Blower Housing
Guard-Rewind
Cap-Fuel Tank
Base-Air Cleaner Primer
Cover-Air Cleaner
Screw (Blower Housing Cover)
Screw (Air Cleaner Primer Bracket)
Tank-Fuel
Bowl-Float
Primer-Carburetor
Set-Carburetor Gasket
Fan-Flywheel
Kit-Label
Label-Emission
Owner's Manual
Kit-Screw/Washer
Assembly-Pulley/Spring (Pulley)
Assembly-Pulley/Spring (Spring)
Replacement Engine
Repair Manual
tlncluded in Engine Gasket Set, Key. No. 358
ttlncluded in Carburetor Overhaul Kit, Key. No. 121
*Included in Carburetor Gasket Set, Key. No. 977
28

(ThispageapplicableintheU.S.A.andCanada0nly.)
Sears, Roebuck and Co., U.S.A. (Sears), the California Air Resources Board (CARB)
and the United States Environmental Protection Agency (U.S. EPA)
Emission Control System Warranty Statement (Owner's Defect Warranty Rights and Obligations)
EMISSION CONTROL WARRANTY COVERAGE IS APPLICABLE TO CERTIFIED MODEL YEAR 1997 AND LATER ENGINES WHICH ARE
CERTIFIED ENGINES PURCHASED IN CALIFORNIA IN 1995 AND PURCHASED AND USED ELSEWHERE IN THE UNITED STATES (AND
THEREAFTER, WHICH ARE USED IN CALIFORNIA, AND TO AFTER JANUARY1,2OOIlNCANADA).
California and United States Emission Control Defects Warranty Statement
The California Air Resources Board (CARB), U.S. EPA and Sears are
pleased to explain the Emission Control System Warranty on your model
year 2000 and later small off-road engine (SORE). In California, new small
off-road engines must be designed, built and equipped to meet the State's
stringent anti-smog standards. Elsewhere in the United States, new non-
road, spark-ignition engines certified for model year 1997 and later must
meet similar standards set forth by the U.S. EPA. Sears must warrant the
Sears Emission Control
Small off-road engines are warranted relative to emission control
parts defects for a period of two years, subject to provisions set forth
emission control system on your engine for the periods of time listed below,
provided there has been no abuse, neglect or improper maintenance of
your small off-road engine. Your emission control system includes parts
such as the carburetor, air cleaner, ignition system, muffler and catalytic
converter. Also included may be connectors and other emission related
assemblies. Where a warrantable condition exists, Sears will repair your
small off-road engine at no cost to you including diagnosis, parts and labor.
Defects Warranty Coverage
below. If any covered part on your engine is defective, the part will be
repaired or replaced by Sears.
Owner's Warranty Responsibilities
As the small off-road engine owner, you are responsible for the
performance of the required maintenance listed in your Operating and
Maintenance Instructions. Sears recommends that you retain all your
receipts covering maintenance on your small off-road engine, but Sears
cannot deny warranty solely for the lack of receipts or for your failure to
ensure the performance of all scheduled maintenance. As the small off-
road engine owner, you should however be aware that Sears may deny
you warranty coverage if your small off-road engine or a part has failed due
to abuse, neglect, improper maintenance or unapproved modifications.
You are responsible for presenting your small off-road engine to an
Authorized Sears Service Dealer as soon as a problem exists. The
undisputed warranty repairs should be completed in a reasonable amount
of time, not to exceed 30 days.If you have any questions regarding your
warranty rights and responsibilities, you should contact a Sears Service
Representative at 1--800--469--4663. The emission warranty is a defects
warranty. Defects are judged on normal engine performance. The warranty
is not related to an in-use emission test.
Sears Emission Control Defects Warranty Provisions
The following are specific provisions relative to your Emission Control Defects Warranty Coverage. It is in addition to the Sears engine warranty for non-
regulated engines found in the Operating and Maintenance Instructions.
1. Warranted Parts
Coverage under this warranty extends only to the parts listed below
(the emission control systems parts) to the extent these parts were
present on the engine purchased.
a. Fuel Metering System
• Cold start enrichment system
• Carburetor and internal parts
• Fuel Pump
b. Air Induction System
• Air cleaner
• Intake manifold
c. Ignition System
• Spark plug(s)
• Magneto ignition system
d. Catalyst System
• Catalytic converter
• Exhaust manifold
• Air injection system or pulse valve
e. Miscellaneous Items Used in Above Systems
• Vacuum, temperature, position, time sensitive valves
and switches
• Connectors and assemblies
2. Length of Coverage
Sears warrants to the initial owner and each subsequent purchaser
that the Warranted Parts shall be free from defects in materials and
workmanship which caused the failure of the Warranted Parts for a
period of two years from the date the engine is delivered to a retail
purchaser.
3. No Charge
Repair or replacement of any Warranted Part will be performed at no
charge to the owner, including diagnostic labor which leads to the
determination that a Warranted Part is defective, if the diagnostic
work is performed at an Authorized Sears Service Dealer. For
emissions warranty service contact your nearest Authorized Sears
Service Dealer as listed in the "Yellow Pages" under "Engines,
Gasoline," "Gasoline Engines," "Lawn Mowers," or similar category.
4. Claims and Coverage Exclusions
Warranty claims shall be filed in accordance with the provisions of the
Sears Engine Warranty Policy. Warranty coverage shall be excluded
for failures of Warranted Parts which are not original Sears parts or
because of abuse, neglect or improper maintenance as set forth in the
Sears Engine Warranty Policy. Sears is not liable to cover failures of
Warranted Parts caused by the use of add-on, non-original, or
modified parts.
5. Maintenance
Any Warranted Part which is not scheduled for replacement as
required maintenance or which is scheduled only for regular
inspection to the effect of "repair or replace as necessary" shall be
warranted as to defects for the warranty period. Any Warranted Part
which is scheduled for replacement as required maintenance shall be
warranted as to defects only for the period of time up to the first
scheduled replacement for that part. Any replacement part that is
equivalent in performance and durability may be used in the
performance of any maintenance or repairs. The owner is responsible
for the performance of all required maintenance, as defined in the
Sears Operating and Maintenance Instructions.
6. Consequential Coverage
Coverage hereunder shall extend to the failure of any engine
components caused by the failure of any Warranted Part still under
warranty.
In the USA and Canada, a 24 hour hot line, 1-800-469--4663, has a menu of pre-recorded messages offering you engine maintenance information.
29

NOTES
30

NOTES
31

Contenido Pag. Contenido Pag.
Garanfia 32 Servicio y ajustes 46
Seguridad 33 Almacenamiento 49
Montaje 37 Guia para la soluci6n de problemas 50
Funcionamiento 40 Listado de piezas 20
Mantenimiento 44 Espa_ol 32
Garantia completa de un aho para la aspiradora para patios Craftsman
Este equipo esta. cubierto por una garantia de un a_o, siempre que se mantenga, lubrique y ajuste de acuerdo
con las instrucciones del presente manual del operador. Durante el a_o de garantia, si este equipo sufre
cualquier falla producida por defectos en materiales o mano de obra, DEVUE_LVALO A SU CENTRO DE
PARTES & REPARACION SEARS MAS CERCANO, y Sears Io reparara, sin ningt_n cargo. El servicio de garantia
a domicilio esta. disponible pero se aplicara, un cargo de traslado.
Esta garantia no cubre:
• Articulos de duraci6n limitada que sufren desgaste bajo condiciones normales de uso, tales como bujias,
filtros de aire, correas y filtros de aceite.
• Reemplazo o reparaciones de Ilantas causadas por pinchaduras con objetos exteriores como, por ejemplo,
clavos, espinas, palos o vidrios, etc.
• Reparaciones necesarias debido a abuso del operador, incluyendo, pero sin limitarse a ellos, los daSos
causados por objetos, tales como piedras, desechos de metal o trozos de madera de un tamaSo demasiado
grande, objetos que hacen impacto que pueden doblar la estructura o el carter, o sobreacelerar el motor.
• Reparaciones necesarias debido a negligencia del operador, incluyendo entre otros, daSos meca.nico y
electrico ocasionado por un almacenamiento no apropiado, falla por el uso de aceite de grado y/o cantidad no
apropiada o falla por no dar mantenimiento al equipo de acuerdo con las instrucciones contenidas en el
manual del operador.
• Limpieza o reparaciones al motor (sistema de combustible) provocadas por un combustible contaminado u
oxidado (viejo). En general, el combustible debe utilizarse en un periodo no mayor de 30 dias a partir de la
fecha de su adquisici6n..
• Equipos utilizados para fines comerciales o de alquiler.
PARA UBICAR EL CENTRO DE SERVIClO TE_CNICO SEARS MAS CERCANO O PARA PROGRAMAR EL
SERVICIO TE_CNICO, SIMPLEMENTE COMUNfQUESE CON SEARS AL TELE_FONO 1-800-4-MY-HOME®.
ESPEClFICAClONES DEL PRODUCTO
Potencia
Tipo de aceite para motor
Capacidad de aceite para mc
Capacidad de combustible:
Buj_a
Separaci6n de la bujia
6.5 caballos de fuerza
SAE 30
_tor20 onzas
1 1/2 cuartos
Champion RJ-19LM
.030"
Numero de Modelo.2..4.7....7..7..0.9..9..0...........................
Nt_mero de Serie ......................................................
Fecha de compra .....................................................
Registre el nt_mero de serie y la fecha de compra y
conserve en un sitio seguro para referencia futura.
32

ADVERTENClA: La presencia de este simbolo indica que se trata de instrucciones importantes
de seguridad que debe respetar para evitar poner en riesgo su seguridad personal y / o material y
de otras personas. Lea y siga todas las instrucciones en este manual antes de iniciar la operaci6n
de esta ma.quina. En caso de no seguir estas instrucciones podria provocar lesiones personales.
Cuando encuentre este s[mbolo - respete la advertencia que aparece a continuaci6n del
mismo.
ADVERTENClA- El escape del motor de este producto, algunos de sus
componentes y algunos componentes del vehfculo contienen o emiten productos
qufmicos que el estado de California considera que pueden producir cancer,
defectos de nacimiento u otros problemas reproductivos.
PELIGRO: Esta ma.quina esta. diseSada para set utilizada respetando las reglas de seguridad
contenidas en este manual. AI igual que con cualquier tipo de equipo electrico, un descuido o error de parte del
operador puede producir lesiones graves. Esta ma.quina es capaz de amputar manos y pies y de arrojar objetos
con gran fuerza. De no respetar las instrucciones de seguridad siguientes se pueden producir lesiones graves o
la muerte.
CAPAClTAClON
1. Lea, entienda y siga todas las instrucciones
incluidas en la ma.quina yen el/los manual/es
antes de armarla y operarla. Guarde este manual
en un lugar seguro para referencias futuras y
regulates y para solicitar repuestos.
2. Familiaricese con todos los controles y su
operaci6n apropiada. Sepa c6mo detener la
ma.quina y c6mo desengranar los controles
ra.pidamente.
3. No permita nunca que los niSos menores de 16
aSos operen esta ma.quina. Los niSos de 16 aSos
y ma.s deben leer y comprender las instrucciones
de operaci6n y las reglas de seguridad
contenidas en este manual y deben set
capacitados y supervisados por uno de los
padres.
4. Nunca permita que los adultos operen esta
ma.quina sin recibir antes instrucci6n apropiada.
5. Mantenga a los observadores, ayudantes,
mascotas y a los niSos pot Io menos a 75 pies de
la ma.quina mientras la misma esta. en
funcionamiento. Detenga la ma.quina si alguien
entra en la zona.
6. Nunca encienda un motor en espacios cerrados
o en una zona con poca ventilaci6n. El escape
del motor contiene mon6xido de carbono, un gas
inodoro y letal.
7. No ponga las manos o los pies cerca de las
piezas rotatorias o en las ca.maras de
alimentaci6n ni en la abertura de descarga. El
contacto con el motor rotatorio puede producir la
amputaci6n de dedos, manos o pies.
8. Nunca trate de destapar la toma de alimentaci6n
o la abertura de descarga, nitrate de sacar o
vaciar la bolsa de la aspiradora, ni de revisar y
reparar la ma.quina mientras el motor esta. en
marcha. Apague el motor y espere hasta que
todas las piezas m6viles se hayan detenido por
completo. Desconecte el cable de la bujia y
p6ngalo de manera que haga masa contra el
motor.
PREPARAClON
1. Inspeccione minuciosamente el Area en donde
utilizara, el equipo. Retire todas las piedras,
botellas, latas u otros objetos extraSos que
puedan set levantados o arrojados causando
lesiones personales o daSos a la ma.quina.
2. Para protegerse los ojos utilice siempre anteojos
o antiparras de seguridad mientras opera la
ma.quina o mientras la ajusta o repara. Los
objetos arrojados que rebotan pueden lesionar
gravemente la vista.
3. Utilice zapatos de trabajo resistentes, de suela
fuerte y pantalones y camisas ajustados. Las
prendas sueltas o las alhajas pueden quedar
atrapadas en las piezas movibles. Nunca opere
esta ma.quina estando descalzo o con sandalias.
Utilice guantes de trabajo de cuero cuando
alimente material por el canal de la cortadora.
4. Antes de encender la ma.quina controle que
todos los pernos y tornillos esten bien ajustados
para comprobar que la ma.quina se encuentra en
condiciones seguras de operaci6n. Adema.s,
realice una inspecci6n visual de la ma.quina a
intervalos frecuentes para controlar si la misma
esta. daSada.
33

,
6.
Mantenga o reemplace las etiquetas de seguridad
e instrucciones segt_n sea necesario.
Para evitar lesiones personales o daSos materiales
sea sumamente cuidadoso al manipular la
gasolina. La gasolina es altamente inflamable y los
vapores son explosivos. Se puede lesionar
gravemente si derrama gasolina sobre usted o
sobre la ropa ya que se puede encender. La.vese la
piel y ca.mbiese de ropa de inmediato.
a. Utilice s61o recipientes para gasolina
autorizados.
b. Apague todos los cigarrillos, cigarros, pipas
y otras fuentes de combusti6n.
c. Nunca cargue combustible en la ma.quina en
un espacio cerrado.
d. Nunca extraiga la tapa de nafta o agregue
nafta mientras el motor esta. caliente o en
funcionamiento.
e. Deje que el motor se enfrie por Io menos dos
minutos antes de volver a cargar
combustible.
f. Nunca recargue el tanque de combustible.
Llene el tanque no ma.s de 1/2 pulgada por
debajo de la base del cuello del filtro para
dejar espacio para la dilataci6n del
combustible.
g. Vuelva a colocar la tapa de la gasolina y
ajt_stela bien.
h. Limpie la gasolina derramada sobre el motor
y el equipo. Traslade la ma.quina a otra zona.
Espere 5 minutos antes de encender el
motor.
i. Nunca almacene la ma.quina o el recipiente
de combustible en un espacio cerrado donde
haya fuego, chispas o luz piloto (por ejemplo,
hornos, calentadores de agua, calefactores,
secadores de ropa, etc.)
j. Para reducir el riesgo de incendio mantenga
la ma.quina limpia de pasto, hojas y de
acumulaci6n de otros desechos. Limpie los
derrames de aceite o combustible y saque
todos los desechos embebidos con
combustible.
k. Deje que la ma.quina se enfrie por Io menos
5 minutos antes de guardarla.
FUNCIONAMIENTO
1. No ponga las manos o los pies cerca de las piezas
rotatorias o en las ca.maras de alimentaci6n ni en la
abertura de descarga. El contacto con el motor
rotatorio puede producir la amputaci6n de dedos,
manos o pies.
2. Antes de encender la ma.quina compruebe que el
canal de la cortadora, la toma de alimentaci6n y la
ca.mara de corte esta.n vac_as y sin desechos.
3. Inspeccione minuciosamente todo el material que
desea triturar y saque los objetos meta.licos,
piedras, botellas, latas u otros objetos extraSos que
pueden ocasionar lesiones o daSar la ma.quina.
4. Si el motor golpea un objeto extraSo o si la
ma.quina empieza a producir un sonido poco
comt_n o una vibraci6n, apague el motor de
inmediato. Deje que el motor se detenga por
completo. Desconecte el cable de la bujia, p6ngalo
de manera que haga masa contra el motor y siga
estos pasos:
a. Inspeccione la ma.quina para vet siesta.
daSada.
b. Repare o reemplace las piezas daSadas.
c. Controle si hay piezas flojas y ajt_stelas para
asegurar que la ma.quina funcione de
manera segura y continua.
5. No permita que se acumule material procesado en
la zona de descarga. El mismo puede obstaculizar
la descarga adecuada y provocar el retorno del
material a traves de la abertura de alimentaci6n.
6. No intente triturar ni picar material de mayor
tamaSo al especificado en la ma.quina o en este
manual. Se podrian producir lesiones o daSos.
7. Nunca trate de destapar la toma de alimentaci6n o
la abertura de descarga mientras el motor esta. en
marcha. Apague el motor y espere hasta que todas
las piezas que se mueven se hayan detenido por
completo, desconecte el cable de la bujia y
p6ngalo de manera que haga masa contra el motor
antes de sacar los escombros.
8. Nunca opere la ma.quina sin que la bolsa de la
aspiradora y el canal de descarga esten
conectados a la ma.quina como corresponde.
Nunca vac[e ni cambie la bolsa de la aspiradora
mientras el motor esta. en marcha. El extremo
posterior de la bolsa de la aspiradora debe quedar
cerrado todo el tiempo mientras la ma.quina esta. en
funcionamiento.
9. Nunca ponga la ma.quina en funcionamiento si el
pico de ingreso o la uni6n opcional para la
manguera no esta.n conectados a la ma.quina
adecuadamente. Nunca intente conectar o cambiar
ninguna de estas uniones mientras el motor esta.
en marcha.
10. Mantenga todos los protectores, desviadores y
dispositivos de seguridad en su lugar y en buenas
condiciones.
11. Mientras alimenta material dentro de la ma.quina
mantenga su rostro y su cuerpo detra.s y hacia un
costado del canal de la cortadora para evitar
lesiones por retrocesos accidentales.
12. Nunca opere esta ma.quina sin buena visibilidad o
iluminaci6n. Siempre debe estar seguro de que
esta. bien afirmado y sostenga bien las manijas.
13. No opere esta ma.quina en superficies con grava.
34

14. No opere esta ma.quina estando bajo los efectos
del alcohol o de drogas.
15. El silenciador y el motor se calientan y pueden
producir quemaduras. No los toque.
16. Nunca levante o transporte la ma.quina cuando el
motor esta. encendido.
MANTENIMIENTOYALMACENAMIENTO
1. Nunca manipule los dispositivos de seguridad de
manera imprudente. Controle peri6dicamente que
funcionen de forma adecuada.
2. Controle frecuentemente que todos los pernos y
tornillos esten bien ajustados para comprobar que
la ma.quina se encuentra en condiciones seguras
de operaci6n. Adema.s, realice una inspecci6n
visual de la ma.quina para controlar si la misma
esta. daSada y repa.rela de ser necesario.
3. Antes de limpiar, reparar o inspeccionar la
ma.quina, detenga el motor y compruebe que el
mismo y que todas las piezas m6viles se hallan
detenido. Desconecte el cable de la bujia y p6ngalo
de manera que haga masa contra el motor para
evitar que se encienda de manera accidental.
4. No cambie la configuraci6n del regulador del motor
ni acelere demasiado el mismo. El regulador
controla la velocidad ma.xima segura de operaci6n
del motor.
5. Mantenga o reemplace las etiquetas de seguridad
e instrucciones segt_n sea necesario.
6. Siga las instrucciones de este manual para cargar,
descargar, transportar y almacenar de manera
segura esta ma.quina.
7. Nunca almacene la ma.quina o el recipiente de
combustible en un espacio cerrado donde haya
fuego, chispas o luz piloto como por ejemplo,
calentadores de agua, hornos, secadores de ropa,
etc.
8. Consulte siempre el manual de operaci6n para las
instrucciones adecuadas para el almacenamiento
fuera de temporada.
9. Si debe vaciar el tanque de combustible, ha.galo al
aire libre.
10. Respete las normas referentes a la disposici6n
correcta y las reglamentaciones sobre gas,
combustible, etc. para proteger el medio ambiente.
35

Felicitacionesporhaberrealizadounaadquisici6ninteligente.
ElproductoCraftsman@quehaadquiridoestadiseSadoy
fabricadoparabrindarmuchosaSosdefuncionamiento
confiable.Perocomotodoslosproductosavecespuede
requerirdereparaciones.Esenesemomentocuandoel
disponerdeunAcuerdodeprotecci6nparareparacionesle
puedeahorrardineroyproblemas.
Acontinuaci6nsedetallanlospuntosincluidosenelAcuerdo:
Servicioexpertoprestadopornuestros12,000
especialistasenreparacionesprofesionales
Servicioilimitadosincargoparalaspiezasylamano
deobraentodaslasreparacionescubiertas
Reemplazodelproductosinoesposiblerepararel
*/ productocubierto
Descuentode10%delprecionormaldelservicioyde
laspiezasrelacionadasconelmismoquenoest6n
cubiertasporelacuerdo;ademas,10%delprecio
normaldelaverificaci6ndemantenimientopreventivo
Ayudarapidapottel_fono- asistenciatelef6nicaa
cargodeunt6cnicodeSearsparalosproductosque
requierenreparaci6nadomicilio,ademasdeuna
programaci6nconvenienteparalareparaci6n
UnavezadquiridoelAcuerdo,puedeprograrnarelserviciocontans61o
realizarunaIlarnadatelef6nica.PuedeIlarnarencualquierrnornento
deldiaodelanocheoprograrnarunservicioenline&
Searsdisponedernasde12.000especialistasenreparaciones
profesionalesquetienenaccesoarnasde4.5rnillonesdepiezasy
accesoriosdebuenacalidad.Esteeseltipodeprofesionalisrnoenel
quepuedeconfiarparaqueleayudeaprolongarlavidautildel
productorecienternenteadquiridoenlosaSospotvenir,iAdquierahoy
suacuerdodeprotecci6nparareparaciones!
Seaplicandeterminadaslimitacionesyexclusiones.Para
obtenerinformacionadicionaly preciosIlameal1-800-827-
6655.
Servicio de instalacion de Sears
Si desea solicitar la instalaci6n profesional de Sears de
aparatos dom_sticos, dispositivos para abrir portones,
calentadores de agua y otros articulos dom_sticos importantes,
en los Estados Unidos Ilame al 1-800-4-MY-HOME®
Busque el periodo de duracion de emisiones importantes y
la informacion de clasificacion de aire en la etiqueta de emisiones de su motor
Los motores cuyo cumplimiento con los estandares de emisi6n Tier 2 de la Comisi6n de Recursos Ambientales de California (CARB)
est6 certificado deben exhibir la informaci6n relacionada con el periodo de duraci6n de las emisiones y la clasificaci6n de aire. Sears,
Roebuck and Co., de los Estados Unidos ponen esta informaci6n a disposici6n del consumidor en nuestras etiquetas de emisiones.
El periodo de duraci6n de las emisiones describe el nt]mero de horas de tiempo real de funcionamiento para el cual se certifica
que el motor cumple con las reglas de emisi6n, descontando el mantenimiento adecuado del mismo segt]n las instrucciones de
operaci6n y mantenimiento. Se utilizan las siguientes categorias:
Se certifica que el motor cumple con las reglas de emisi6n durante 125 horas de tiempo real de funcionamiento del
Moderado:
motor.
Inmediato:
motor.
Extendido:
motor.
Se certifica que el motor cumple con las reglas de emisi6n durante 250 horas de tiempo real de funcionamiento del
Se certifica que el motor cumple con las reglas de emisi6n durante 500 horas de tiempo real de funcionamiento del
Por ejemplo, una cortadora de c_sped que se empuja se usa entre 20 y 25 horas por aSo. Por Io tanto, el periodo de duracibn de
emisiones de un motor con una calificacion intermedia daria como resultado 10 a 12 aSos.
La clasificacion de aire es un nt]mero calculado que describe el nivel relativo de emisiones para una familia de motores especifica.
Cuanto menor sea la clasificacion de aire, mayor es la limpieza del motor. La informaci6n se presenta de forma grafica en la
etiqueta de emisiones.
Despu_s del 1 d.ejulio de 2000, busque el periodo de cump.limiento de las reglas de
emisiones en la etiqueta de cumplimiento de las reglas i:leemisiones del motor
Despu_s del 1 de julio de 2000 se certificara que determinados motores Sears, Roebuck and Co., de los Estados Unidos cumplen
con los estandares de emisiones de la fase 2 de la Agencia de Protecci6n Ambiental de los Estados Unidos (USEPA). Para los
motores certificados para la etapa 2, el periodo de cumplimiento con las reglas de emisiones al cual se hace referencia en la etiqueta
de cumplimiento con las reglas de emisiones indica el nt]mero de horas de funcionamiento para el cual se ha demostrado que el
motor cumple con los requerimientos federales de emisi6n. Para los motores con desplazamiento inferior a 225 cc, Categoria C =
125 horas, B = 250 horas y A = 500 horas. Para los motores con desplazamiento de 225 cc o mas, Categoria C = 250 horas, B = 500
horas y A = 1000 horas.
El desplazamiento de los motores de la serie 210000 es 344 cc, el de la serie 280000 es 465 cc, y el de la serie 310000 es 501 cc.
Lapresentees una representaci6n
gen6ricadela etiquetade emisi6nque
se encuentrageneralmenteen un
motorcerUficado.
36

Botella de
aceite del motor
Fresh StartTM
Cartucho
@
_afas de seguridad
Montaje de la manguera
Control
de transmision
Guia
de la cuerda
Tuerca
Manija
st}perior
Control /
de velocidad
Cana
de soplado
Manija
inferior
superior
de la manguer_
Perilla
de la manija
Guia
del cable
Soporte _
de la manija
superior
de la manguera
del carro
Tuercas
de mariposa
Figura 1
IMPORTANTE:Esta unidades enviadasin gasolina ni
aceite en el motor. Despu_s del m0ntaje, c0nsulte la
secci6n de FUNCIONAMIENTO para el correcto Ilenado de
combustible y aceite del motor.
NOTA: Las referenciasa los ladosderechoe izquierdode la
aspiradoraparapatiosse hacenobservandola maquinadesdela
posici6nde operaci6n.
Esta aspiradora para patios se ensambla por
completo en la fa.brica, excepto la manija, la bolsa y
el canal de soplado. Dichas partes se env_an sueltas
dentro de la caja de cart6n. En dicha caja de cart6n
tambien se incluyen un par de gafas de protecci6n,
el manual del operador, una botella de aceite para
motor, y uno cartucho FreshStart TM. Vea la Figura 1.
APERTURADELACAJADECARTON
• Corte cada una de las esquinas de la caja
verticalmente, de la parte superior a la base.
• Saque todas las piezas sueltas.
• Quite el material de empaque suelto.
COMOSACARLAUNLOADDELACAJA
• Eleve launidad desde la parte posterior para separarla
del material de la caja que quede debajo, y haga rodar
la unidadfuera de lacaja.
• Verifique cuidadosamente si en la caja queda
alguna parte suelta.
NOTA: AsegElrese de no doblar los cables mientras
extrae de la caja las partes sueltas o toda la unidad.
PIEZASSUELTASDENTRODELA CAJA
(veala Figura1).
• Montaje de la manija
• Montaje de la manguera
• Bolsa
• Canal de soplado
• Gafas de seguridad
• Una botella de aceite para motor (puede estar en
el interior de la bolsa)
• Manual del operador
• Cartucho FreshStart TM
DESCONEXIONDELABUJiA
Antes de proceder a ensamblar su nueva aspiradora para
patios, desconecte el cable de la bujia de la misma y
p6ngalo de manera que haga masa con el poste de
retenci6n del motor. De esta manera se evita el arranque
accidental del motor. Yea la Figura 2.
Poste Cable
de retencion © de la bujia ©
y conecte a tierra a/
Figura 2
37

MONTAJEDELAMANIJA
• Saque los broches de horquilla de los soportes
de la manija, y saque los pernos del carro y las
tuercas de mariposa de la manija inferior. Vea la
Figura 3A.
// Perno Guia
/ del cable
del
B
de Ia
Union
del cable
Manija
Gala/
del cable
de la man
Figura 3
• Sit0e los agujeros inferiores de la manija inferior
sobre los pernos de los soportes de la manija, y
aseg0relos con broches de horquilla.
• Inserte los pernos del carro desde el lado de
afuera a traves del agujero superior de la manija
inferior y aseg0relos con tuercas de mariposa.
• Despliegue la manija superior hasta que quede
alineada con la manija inferior. Aseg0rese que la
guia de la cuerda este situada a la derecha de la
manija superior. Vea la Figura 3B.
IMPORTANTE:Aseg0rese de enrutar los cables fuera
de la manija inferior. Asimismo, no prense los cables
mientras levanta la manija.
• Para sujetar las dos manijas ajuste las perillas de
la manija (los pernos del carro deben estar
colocados de forma adecuada en la manija).Vea
la Figura 3B.
• Tire de las dos uniones del cable unidas a los
cables, ajuste aproximadamente 8 pulgadas de
cada extremo de cable, y ubique los cables en su
guia. Vea la Figura 3A y B.
• Afloje la tuerca de mariposa que sostiene la guia
de la cuerda contra el lado derecho de la manija
superior.
• Tire despacio de la cuerda del arrancador hacia
fuera y deslice la cuerda del arrancador dentro
de la guia para la cuerda. Ajuste la tuerca a
mariposa. Vea la Figura 5A.
38
Instalaci6ndelmontajedela manguera
• Deslice el adaptador para manguera del montaje
de la misma hacia el interior del adaptador base
ubicado a la izquierda y al frente de la aspiradora
para patios. Vea la Figura 4.
Adaptador
;er_ nguera
con resorte
A
Figura 4
Tire del perno con resorte del lado exterior de la
base, y ponga el perno en linea con el primer
agujero (el ma.s cercano al extremo del tubo) del
adaptador para manguera.
Suelte el perno para ajustar la manguera en su
lugar.
Primero, una a presi6n la manija de la manguera
con el soporte para la manija de la manguera
superior, y despues con el soporte de la
manguera inferior. Consulte la Figura 5A.
Cuerda
del
de la
de la mar
Inferior
Mani
B
del
Canal
de la cortadora
Figura 5

• Sitt_e el caSo de la manguera en el gancho de
soporte junto al canal de la cortadora. Consulte la
Figura 5B.
MONTAJEDELABOLSA
Sostenga la manija de la bolsa con una mano y
deslice la varilla de seguridad del soporte de
montaje hacia el motor con la otra mano. Use el
extremo del soporte de montaje como palanca
cuando deslice la varilla de seguridad. Vea la
Figura 6.
Broched.e.
Manija de la bolsa
Tira
Perno \
Varilla_
Boton
interruptor Pe no
de bolsa / cana
Figura 6
• Deslice la bolsa por encima del borde de la
abertura de descarga y suelte la varilla de
seguridad para ajustar la bolsa en su lugar.
• Una el broche de la bolsa a presi6n con la parte
superior de la manija inferior.
• Coloque las tiras inferiores de la bolsa por encima
de la parte superior de la manija inferior,
engancha.ndolas en los pernos.
NOTA: El botSn interruptor de bolsa / canal, unido a la
mensula de montaje, debe quedar presionado
totalmente por la punta de la aleta delantera situada en
la manija de la bolsa cuando ajuste dicha bolsa, o el
motor no arrancar#.
INSTALARELCANALDESOPLADO
NOTA: hay que retirar la bolsa antes de instalar el
canal de soplado.
• Tome el canal de soplado con una mano y deslice
la varilla de seguridad del soporte de montaje
hacia el motor con la otra mano. Use el extremo
del soporte de montaje como palanca cuando
deslice la varilla de seguridad.
Vea la Figura 7.
• Deslice el canal de soplado pot encima del borde
de la abertura de descarga, y suelte la varilla de
seguridad para ajustar el canal en su lugar.
• Aumente la altura del pico al ma.ximo cuando
utilice el canal de soplado. Consulte las
instrucciones para ajustar la altura del pico en la
secci6n AJUSTE de la pa.gina 42.
NOTA: El botSn interruptor de bolsa / canal unido a la
m#nsula de montaje debe quedar presionado
totalmente por la punta de la aleta delantera situada en
el canal de soplado, o el motor no arrancar#.
Aleta Canal
so
)tor retirado
Paraunamejorclaridac
Figura 7
39

Conozca las propiedades de la aspiradora para patios
Lea este manual de operaci6n y las reglas de seguridad antes de poner la aspiradora para patios en funcionamiento.
Compare las ilustraciones que aparecen a continuaci6n con su equipo para familiarizarse con la
i ubicaci6n de los distintos controles y ajustes. Guarde este manual para referencias futuras.
AI operar la aspiradora para patios puede ser que objetos extraSos sean arrojados a los ojos, Io cual
puede daSarlos gravemente. Utilice siempre las gafas de seguridad, provistas con la aspiradora
para patios, para operar el equipo o mientras Io ajusta o Io repara.
de la transmision
Manija Control de velocidad
del
Control del estrangulador
Manija de la
M_nsula de I
pico
Manija de
Montaje
de la mane
Canal
de la cortadora
Control de cion
M_nsul
del ganch,
aj
de altura del pico
Figura 8
CONTROLESDEFUNCIONAMIENTO(Yea
la Figura8)
Canal de la cortadora
Permite que las ramas pequeSas de hasta 1 1/2" de
diametro ingresen al motor para picarlas.
Control de la transmisi6n
Ubicado sobre laparte de abajo del gancho superior, el control de
latransmisi6n se utiliza para engranar / desengranar las ruedas.
Apriete el control de la transmisi6n contra la manija superior para
engranar las ruedas, y su61telopara desengranarlas.
Control de velocidad
Situado en la parte izquierda de la manija izquierda, el
control de velocidad se utiliza para seleccionar la velocidad
de avance de la aspiradora para patios.
IMPORTANTE: Mueva el control de velocidad s61ocuando
el motor est6 en marcha. Si cambia el ajuste del control de
velocidad con el motor apagado, su aspiradora para patios
puede resultar daSada.
Bolsa
Canal de soplado
..........Cable de la bujia
Palanca de la aspiradora
pico / manguera
Palanca de ajuste de la altura del pico
Se utiliza para ajustar la distancia entre el suelo y el pico
que varia de 5/8" a 4 1/8".
Control del estrangulador
Esta palanca controla la velocidad del motor y la funci6n de
detenci6n. Mediante tres posiciones independientes de la
palanca, de izquierda a derecha, la operaci6n se realiza de
la siguiente forma:
Inicio / Lento / Motor
Funcionamiento Inactivo apagado
Control de obturaci6n
El control de obturaci6n se utiliza para cebar el
carburador y ayudar a que el motor arranque.
Manija del arrancador
Se utiliza para encender el motor.
Cumple con los est ndares de seguridad de ANSI
_as asp radorasDara patios de Craftsman cumplen con los esta.ndaresde seguridad del instituto estadounidense
e est_ndares n&clonAes (ANSI).
40

Montaje de la manguera
Se usa como alternativa del uso del pico para aspirar
los desechos que se acumulan en los patios como
por ejemplo las hojas o las agujas de los pinos que
se encuentran en lugares de dificil acceso.
Manija de la manguera
Se utiliza para guiar el montaje de la manguera
mientras se aspira.
Canal de soplado
Cuando se Io une a la unidad el canal de soplado se utiliza
parasoplar o esparcir por los patios los desechos que se
acumulan en los mismoscomo por ejemplo las hojas, las
agujas de los pinos o las ramas pequeSas.
Pico
El desecho que se acumula en los patios como por ejemplo
las hojas y las agujas de los pinos pueden aspirarse a
trav_s del pico para triturarlos.
Manija de la bolsa
Se utiliza para tomar la bolsa para colocarla, sacarla y
vaciarla.
Bolsa
Recoge el material triturado que se introduce a trav_s del
canal de picado o que se aspira a trav_s del pico.
Palanca del pico / manguera de la aspiradora
La palanca del pico / manguera de la aspiradora esta
situado en la parte superior del pico. Utilicela para alternar
la succi6n de la aspiradora entre el pico y el montaje de la
manguera.
LLENADODEGASOLINAYACEITE
Aceite (se envia una botella junto con la unidad)
Primer uso
• Saque la varilla del nivel de aceite.
• Con la aspiradora para patios al nivel del suelo, utilice
un embudo para vaciar dentro del motor todo el
contenido de la botella de aceite suministrada con la
unidad.
• Vuelva a colocar la varilla de Ilenado de aceite y
ajQstela.
Usos posteriores
Use solamente un aceite detergente de alta calidad cuya
clasificaci6n de servicio API sea SF, SG o SH. Seleccione
el grado de viscosidad SAE del aceite segQn la
temperatura esperada de funcionamiento. Cumpla la tabla
que aparece a continuaci6n.
Mas frio --.,,_" 32°F ,,..-"- Mas calie
5W30 SAE 30
v
Tabla de viscosidad del aceite
Aunque los aceites de viscosidad m#ltiple (5W30, 10W30,
etc.) mejoran el encendido cuando el clima esta fifo, los
mismos incrementan el consumo de aceite cuando se usan
a mas de 32°F. Compruebe el nivel de aceite con mayor
frecuencia para evitar dafios debido a que el motor trabaje
con un nivel de aceite bajo.
• Compruebe el nivel de aceite asegurandose que la varilla
del nivel de aceite no roce con las paredes interiores del
tubo de Ilenado de aceite. De hacerlo se puede producir
una lectura falsa de la varilla del nivel de aceite. Rellene
hasta la marca de FULL (lleno) de la varilla del nivel de
aceite, si es necesario. La capacidad es de
aproximadamente 18 oz. El Ilenado en exceso hace que el
motor emane mucho humo y que el rendimiento del
mismo no sea bueno.
• Vuelva a colocar la varilla de Ilenado de aceite y ajtJstela.
• Mantenga el nivel de aceite en la marca FULL. Si pone el
motor en marcha con muy poco aceite le puede causar
daSos permanentes.
Gasolina
• Saque la tapa del combustible del dep6sito del mismo.
• Verifique que el recipiente del que va a verter la gasolina
este limpio y libre de 6xido o de objetos extra_os. No use
nunca gasolina que pueda estar vieja por haber estado
almacenada en su recipiente por largos periodos. La
gasolina que ha estado estacionada por un periodo
superior a cuatro semanas debe considerarse vieja.
• Llene el tanque de combustible s61o con gasolina normal
sin plomo, limpia y fresca. No use gasolina que contenga
METANOL Vuelva a colocar la tapa de combustible en su
lugar.
• Para evitar problemas con el motor, el sistema del
combustible debe ser vaciado antes de almacenar la
maquina durante 30 dfas o mas. Vacie el combustible del
tanque haciendo funcionar el motor hasta que el tanque
de combustible este vado. La siguiente temporada use
combustible fresco. Consulte la secci6n de
almacenamiento si desea informaci6n adicional.
• Verifique peri6dicamente el nivel de combustible para
evitar quedarse sin gasolina mientras esta operando la
aspiradora para patios. Si la unidad se queda sin
combustible mientras esta triturando, puede resultar
necesario destapar el Area de descarga antes de poder
volver a encenderla. Consulte la secci6n SERVICIO Y
AJUSTES en la pagina 47.
Tapbn de Ilenado de combustible FreshStart TM
Esta unidad esta equipada con un tap6n para conservante de
combustible continuo FreshStart TM que gotea combustible
continuamente en su dep6sito de combustible hasta durante
seis meses, dependiendo de condiciones como la temperatura,
los patrones de uso, el tipo de combustible y la mezcla. Para
ajustar el tap6n para Ilenado de combustible, siga las
siguientes instrucciones:
1. Coloque el cartucho de conservante de combustible que
se entrega con su unidad en el tap6n para combustible.
2. Quite la aleta blanca del cartucho.
3. Gire el tap6n de FreshStart TM en el dep6sito de
combustible.
Cuando compruebe visualmente que el cartucho de
conservante de combustible esta vacio, hay cartuchos de
recambio disponibles a traves de su centro local de partes y
reparaci6n Sears, yen la mayoria de tiendas Sears.
,_ ADVERTENCIA: Sea sumamente
cuidadoso al manipular la gasolina. La gasolina
es altamente inflamable y los vapores son
explosivos. Nunca cargue combustible en la
m_quina en un espacio cerrado o cuando el
motor est_ caliente o en marcha. Apague
cigarrillos, cigarros, pipas y otras fuentes de
ignlclon.
41

PARADETENERELMOTOR
Mueva las palancas de control del regulador a la posici6n
STOP (detenci6n) u OFF (apagado).
Desconecte el cable de la bujia de la bujia y col6quelo a
masa contra el poste para evitar que se encienda
accidentalmente mientras no se est,. prestando atenci6n
al equipo.
ADVERTENCIA: Cuando mueva la
palanca del control del regulador tenga cuidado
con las superficies calientes y los hordes
afilados de la proteccibn del silenciador.
PARAENCENDERELMOTOR
1. Conecte el cable de la bujia y la manga de goma a la
misma.
2. El bot6n del interruptor de bolsa / canal debe quedar
presionado totalmentepor la punta de la aleta delantera
situadaen la manija de la bolsao en el canal de soplado,
ya que en caso contrarioel motorno arrancar&
3. Compruebe que el cable del interruptor de la bolsa /
canal este conectado al motor y que este conectado a
tierra mediantela mensulade montaje.
4. El tanque de combustibledebeIlenarsea 3/4 del total
antesde arrancar.
5. Mueva la palanca de control del estrangulador a la
posicidn START/RUN (encendido / funcionamiento,
representado por una liebre). Veala Figura 9.
6. Mueva el control del obturador hacia el control del
regulador para obturar el carburador del motor. (Si el
motor est,, tibio la obturaci6n puede no ser necesaria).
Veala Figura 9.
Control del estrangulador
/
/
)1de obturacion
Figura 9
7. Situado detr_.sde la unidad, tome la manija del arrancador y
tirede la cuerda hastaque sienta un tir6n.
8. Tire de la cuerda de manera rapida y continua.
Apriete bien la manija del arrancador. Deje que la
cuerda se enrosque lentamente.
9. Repita este paso, de ser necesario, hasta que se
encienda el motor. Cuando se enciende el motor
mueva el control de obturaci6n gradualmente lejos del
control del estrangulador.
10. Si el motor falla, mueva el control del obturador hacia
atr_.s, en direcci6n al control del estrangulador, y
repita los pasos 1 a 9.
11. Mantenga SlEMPRE el control del estrangulador en
posici6n START/RUN (encendido / funcionamiento)
mientras opere la aspiradora para patios.
DESCARGADELABOLSA
• Desenganche las tiras de la bolsa de la manija
inferior y desabroche el broche de la bolsa de la
parte superior de la manija inferior. Vea la Figura
10.
• Tome la manija de la bolsa con una mano y tire
de la varilla de seguridad del soporte de montaje
hacia el motor con la otra mano para soltarla.
• Saque la bolsa por encima del borde de la
abertura de descarga. Consulte la Figura 6.
• Gire los dos botones de la parte posterior de la
bolsa para abrirla y vaciar el contenido. Vea la
Figura 10.
• Sostenga la manija y el broche de la bolsa
mientras vacia el contenido.
• Comprima la abertura de la bolsa y doble la aleta
interior sobre la abertura.
• Doble la aleta exterior sobre la aleta interior e
inserte los botones de la bolsa a traves de las
salidas meta.licas.
• Gire los botones para cerrar la bolsa.
Botones
Aleta interior Broche
de la bolsa
Manija de la bolsa
Aleta
Tira
42
Figura 10
EXTRACCIONDELCANALDESOPLADO
• Tome el canal de soplado con una mano y tire de
la varilla de seguridad del soporte de montaje
hacia el motor con la otra mano para soltarlo.
Consulte la Figura 7.
• Saque el canal de soplado por encima del borde
de la abertura de descarga.
Ajustede la alturadel pico
Puede ajustar el pico en cinco posiciones que var_an
desde 5/8" a 4-1/8" de distancia del suelo. Debe
ajustar la altura del pico segt_n las condiciones del
patio. Mueva las palancas de ajuste de altura hacia
delante o hacia atra.s, para mover el pico arriba o
abajo. Vea la Figura 11.

NOTA: En general, levante la altura del pico para
aspirar una capa gruesa de hojas o para usar el canal
de soplado. Baje la altura del pico para superficies mas
lisas.
ajuste
de altura
del pico
Pico
Figura 11
Us0delpic0dela aspirad0ra
Coloque la palanca del pico / manguera de la
aspiradora en la posici6n superior del pico para aspirar
a traves del mismo. Vea la Figura 12.
de man(
Perno con
(Primer agujero)
Figura 12
• El perno con resorte debe estar en el primer
agujero de la adaptaci6n de la manguera para
operar el pico de la misma.
• Con ambas manos situadas en la parte superior de
la manija superior, eleve completamente el control
de transmisi6n contra la manija superior para
impulsar la unidad por el patio.
• Utilice el control de velocidad para elegir velocidad
alta o baja. El control de velocidad puede moverse
mientras la unidad se impulsa o antes de engranar
las ruedas.
IMPORTANTE:Mueva el control de velocidad s61o
cuando el motor este en marcha. Si cambia el ajuste
del control de velocidad, su aspiradora para patios
puede resultar daSada.
El desecho que se acumula en los patios como por
ejemplo las hojas y las agujas de los pinos pueden
aspirarse a traves del pico para triturarlos. Despues
que ha triturado el material con las hojas de desgranar
del montaje del motor, el mismo sera. descargado a la
bolsa colectora o a traves del canal de soplado. S61o
utilice la ma.quina para triturar o picar el material
integrante de la vegetaci6n que se encuentra en un
patio normal (es decir, ramas, hojas, ramas pequeSas,
etc.) Evite las plantas fibrosas como por ejemplo las de
tomates hasta que esten totalmente secas. Se pueden
introducir materiales como por ejemplo troncos o
ramas pesadas de hasta 1 -1/2" de dia.metro en el canal
de la cortadora.
ADVERTENCIA: No intente triturar,
picar ni aspirar material de mayor tamaSo
al especificado en la m_quina o en este
manual. Se podrian producir lesiones o
daSos a la m_quina.
IMPORTANTE:La pantalla de desgranado esta. ubicada
dentro de la caja en la zona de descarga. Si se tapa la
pantalla de desgranado, sa.quela y Ifmpiela como se
indica en la secci6n de mantenimiento de la pa.gina 47.
Para obtener el mejor resultado es importante tambien
mantener afilada la hoja de la cortadora.
ADVERTENCIA: Siempre detenga el
motor y desconecte el cable de la bujia
antes de realizar cualquier ajuste.
Usodel montajedela manguera
• Coloque la manija del pico / manguera de la
aspiradora en la posici6n de la base del pico para
volver a dirigir la aspiraci6n al montaje de la
manguera. Vea la Figura 13.
• Para operar el ensamblado de la manguera, el
perno con resorte debe estar en el segundo
agujero del adaptador de la misma.
• Desenganche la manguera del soporte de la
manija superior y tome la manija de la manguera
para dirigirla mientras aspira los desechos que se
acumulan en los patios como por ejemplo hojas o
agujas de pinos que se encuentran en lugares de
dificil acceso.
Palanca de la as
Perno con
(Segundo
Figura 13
43

Tareas de mant.
Calendario de mantenimiento
Producto:
Lubricaci6n
Limpie el equipo
Motor:
Compruebe el aceite
del motor
Cambie el aceite del
motor
Servicio del filtro de aire
Servicio a la bujia
Servicio al silenciador
4
4
4
Cada 25
RECOMENDAClONESGENERALES
horas de
funciona
miento
4
4
4
• Respete siempre las reglas de seguridad cuando
realice tareas de mantenimiento.
• La garantia de esta aspiradora para patios no
cubre elementos que han estado sujetos al real
uso o negligencia del operador. Para recibir el
reembolso total de la garantia, el operador
debera, realizar el mantenimiento del equipo tal y
como se indica en este manual.
• Hay que realizar algunos ajustes peri6dicamente
para mantener el equipo adecuadamente.
• Siga el calendario de mantenimiento.
• Revise peri6dicamente todos los sujetadores y
compruebe que esten bien ajustados.
,i_ ADVERTENCIA: Siempre detenga el
motor y desconecte y ponga a tierra el
cable de la bujia antes de realizar
cualquier tipo de mantenimiento o
ajustes.
LUBRICAClON
4 4
4
4
4 4
4
Fechas de los
servicios
Varilla de seguridad- Lubrique la varilla de
seguridad y los resortes de compresi6n que la
unen a la mensula de montaje. Consulte la
Figura 7.
LIMPIEZADELEQUIPO
• Limpie cuidadosamente la aspiradora para
patios despues de cada uso.
• Lave la bolsa con agua peri6dicamente. Permita
que se seque bien en un sitio a la sombra.
• Si se tapa la pantalla de desgranado, sa.quela y
limpiela como se indica en la secci6n SERVlClO
Y AJUSTES.
NOTA: La limpieza con un chorro de agua a
presidn no se recomienda, ya que el sistema de
combustible podrfa resultar contaminado.
COIVlPRUEBEELACEITEDELMOTOR
• Ruedas - Situe unas pocas gotas de aceite SAE
30 en cada tornillo con reborde una vez por
temporada.
Consulte la Figura 8.
• Palancas de ajuste de altura del pico- Lubrique
las palancas de ajuste de altura del pico con
aceite ligero.
Consulte la Figura 8.
• Detenga el motor y espere varios minutos antes
de verificar el nivel de aceite. Con el motor
ubicado en suelo parejo, el aceite debe estar en
la marca FULL (lleno) de la varilla del nivel de
aceite.
• Saque la varilla del nivel de aceite.
• Revise el nivel de aceite en la varilla del nivel de
aceite. El nivel deberia estar en la marca FULL
(En caso contrario, consulte "Usos posteriores"
en la pa.gina 41 )
• Vuelva a colocar la varilla de Ilenado de aceite y
ajt_stela.
44

CAMBIODELACEITEDELMOTOR
• Use solamente un aceite detergente de alta
calidad cuya clasificaci6n de servicio API sea SF,
SG o SH. Seleccione el grado de viscosidad SAE
del aceite segun la temperatura esperada de
funcionamiento. Consulte la secci6n de
funcionamiento para vet la tabla de viscosidad.
• Cambie el aceite del motor despues de las cinco
primeras horas de operaci6n, y a partir de
entonces cada veinticinco horas de operaci6n.
COMOVACIARELACEITE
Drene el aceite mientras el motor esta.caliente.
Cumpla las instrucciones que aparecen a
continuaci6n.
• Vacie el combustible del tanque haciendo
funcionar el motor hasta que el tanque de
combustible este vacio.
• Saque la varilla del nivel de aceite.
• Incline la unidad sobre un costado para drenar a
traves del tubo de Ilenado de aceite.
• Cuando se haya vaciado todo el motor de aceite,
vuelva a Ilenar con 18 oz. de aceite nuevo.
Consulte Llenado de gasolina y aceite en la
secci6n FUNCIONAMIENTO.
• Vuelva a colocar la varilla de Ilenado de aceite y
ajustela.
SERVIClODELFILTRODEAIRE
El filtro de aire evita el ingreso al carburador de
suciedad, polvo, etc. perjudiciales y evita que los
mismos sean introducidos dentro del motor. Adema.s,
dicho filtro es importante para la vida util y el
rendimiento del motor. El filtro de aire consta de un
filtro de espuma. No ponga nunca en
funcionamiento el motor sin haber montado
totalmente el filtro de aire.
C6m0realizar el servici0 delfiltr0 de aire
• Retire el filtrode espuma del alojamiento de
pla.stico en la parte superior del motor.
• Lave en una soluci6n de agua y detergente, y
apriete (no retuerza) hasta eliminar toda la
suciedad.
• Enjuague a fondo en agua limpia.
• Envuelva con un paso limpio y apriete (no
retuerza) hasta que este completamente seco, o
deje secar al aire.
• Sature con aceite de motor y apriete para
distribuir el aceite y eliminar el excedente.
• Reemplace el filtro de espuma en el alojamiento
pla.stico
NOTA: Si el filtro de espuma esta roto o dadado,
cambielo.
_, ADVERTENCIA: La temperatura delsilenciador y de las zonas cercanas
puede superar los 150° F (65°C). Evite
esas zonas.
SERVIClOA LABUJiA
Limpie las buj_as y ajuste el espacio a .030" al
menos una vez cada estaci6n, o cada 50 horas
de operaci6n. Vea la Figura 14. Se recomienda
reemplazar la bujia al inicio de cada temporada.
Consulte el listado de piezas del motor para
conocer el tipo correcto de bujia.
NOTA: No lije la bujfa. Se deben limpiar las bujfas
mediante raspado o tallado con cepillo de alambre y
lavado con un solvente comercial.
Calibre de
Figura 14
SERVlClOALSILENClADOR
• Inspeccione peri6dicamente el silenciador y
reempla.celo de ser necesario.
• Si su motor cuenta con un montaje de filtro
antichispas, refirelo cada 50 horas de uso para
limpieza e inspecci6n. Reemplace siesta.
da_ado.
_ ADVERTENCIA: No opere la
aspiradora para patios sin un silenciador
o apisonador en el sistema de escape.
Los silenciadores o los filtros
antichispas da_ados pueden crear
riesgo de incendio.
LIMPIEZADELMOTOR
Limpie el motor quitando la suciedad y los
desechos con un trapo o cepillo.
Frecuentemente extraiga los recortes de cesped,
la suciedad, los desechos de las aletas de
enfriamiento, la pantalla de toma de aire, las
palancas y el enlace. Esto ayudara, a garantizar
que el enfriamiento y la velocidad del motor sean
adecuados.
45

_ ADVERTENCIA: Bajo ninguna
circunstancia realice ningdn tipo de
ajuste a la unidad sin detener el motor y
desconectar el cable de la bujia con
anterioridad.
Ajustede la alturadel pic0
Puede ajustar el pico en cinco posiciones que var_an
desde 5/8" a 4 -1/8" de distancia del suelo. Debe
ajustar la altura del pico segt_n las condiciones del
patio. Mueva las palancas de ajuste de altura hacia
delante o hacia atra.s, para mover el pico arriba o
abajo. Vea la Figura 15.
NOTA: En general, levante la altura del pico para
aspirar una capa gruesa de hojas o para usar el canal
de soplado. Baje la altura del pico para superficies
mas lisas.
Pico
_alanca
de ajuste
de altura
del pico
Figura 15
AJUSTEDELCABLEDELCONTROLDE
TRANSMISION
Ajuste el cable de control de transmisi6n si la
aspiradora para patios no se autopropulsa con el
control de transmisi6n engranado, o si la correa de
transmisi6n se desliza (la unidad vacila mientras el
motor mantiene la misma velocidad).
Para mover el accesorio "Z" del cable de control de
transmisi6n de la posici6n configurada en fa.brica en
el orificio frontal del control de transmisi6n al orificio
posterior, realice Io siguiente:
• Retire el control de transmisi6n empujando el
lado derecho del control fuera del agujero del
lado derecho en la manija superior. Gire el
control hacia abajo, en direcci6n a la manija
inferior, y despues hacia arriba para retirarlo del
orificio izquierdo de la manija superior. Vea la
Figura 16A.
Ahora hay suficiente holgura en el cable de
control de transmisi6n para tomar el accesorio
"Z" con su mano y moverlo del orificio frontal al
posterior del control de transmisi6n. Vea la
Figura 16B.
IMPORTANTE:Asegurese de insertar el accesorio "Z"
en el orificio posterior tal y como se insert6 en el
orificio delantero: es decir, desde el exteriordel
control de transmisi6n.
Ahora puede volver a instalar el control de
transmisi6n con cuidado, realizando los pasos
anteriores en el orden y forma inversos a los de
su retirada.
A Control
_detransmisi_
B
Figura 16
AJUSTEDELCARBURADOR
_ ADVERTENCIA: Si se realizan
ajustes al motor mientras el mismo est_
en marcha (por ejemplo, al carburador),
aldjese de todas las piezas m6viles.
Tenga cuidado con las superficies
calientes y con el silenciador.
El carburador se ha preconfigurado en la fa.brica, y no
debe necesitar ma.s ajustes. Si su motor no opera
adecuadamente y se sospecha que es por culpa del
carburador, Ileve su aspiradora para patios a un
centro de partes y reparaciones Sears para que la
reparen y ajusten.
46

VELOCIDADDELMOTOR
La velocidad del motor de su aspiradora para patios
se ha establecido en la fa.brica. No intente aumentar
las RPM del motor. Si cree que su motor funciona
demasiado ra.pido o demasiado lento, Ileve su
aspiradora para patios a su centro de partes y
reparaciones Sears ma.s cercano para repararlo o
ajustarlo.
ADVERTENCIA: No intente alterar la
velocidad del motor alterando el enlace
del regulador del motor. Esto podria
ocasionar graves lesiones y dahos al
motor. Las RPM del motor se han
configurado en la f_brica.
EXTRACCIONDELAPANTALLADE
DESGRANADO
Si la zona de descarga se tapa, saque la pantalla de
desgranado y limpie la zona como se indica a
continuaci6n.
• Detenga el motor. Compruebe que el vacio de la
cortadora trituradora se haya detenido por
completo.
• Antes de destapar el canal de descarga,
desconecte el cable de la bujia y p6ngalo de
manera que haga masa contra el poste de
retencibn. Vea la Figura 2
• Saque la bolsa de la aspiradora o el canal de
soplado de la unidad, como se indica en la
secci6n de FUNCIONAMIENTO, para acceder a
la pantalla de desgranado. Vea la Figura 17.
'_'i I1"
/
/
uerca de seJguridadde la brida
Pantalla de desc
VISTA POSTERIOR
Figura 17
Retire los tres tornillos autosellantes que
aseguran la tapa de la correa y extraiga la
misma.
Saque
para retir_
la hoja
Saque el tornillo autosellante del lado derecho de
la unidad que se une a la pantalla de
desgranado. Vea la Figura 18.
ue
el
autosellante
Figura 18
• Saque el tornillo de cabeza hexagonal de la parte
superior de la caja posterior cerca del soporte de
montaje, y la tuerca de seguridad de la brida que
une la pantalla de desgranado. Vea la Figura 17.
• Saque la pantalla y limpiela con un cepillo o
la.vela con agua. Vuelva a colocar la pantalla.
AFILADO0 RECAMBIODELASHOJAS
DELA CORTADORA
NOTA: Cuando incline la unidad, vacfe el depSsito
de combustible y aceite, y mantenga el lado de la
bujfa hacia arriba.
• Desconecte el cable de la bujia y p6ngalo de
manera que haga masa contra el poste de
retenci6n. Vea la Figura 2.
• Retire el montaje de la manguera y el montaje de
la bolsa.
• Ajuste los tres pernos que sostienen la mensula
del gancho de la manguera y el canal de la
cortadora a la caja superior. Vea la Figura 18.
• Saque las tapas de buje delanteras, las tuercas
de seguridad de brida, las ruedas delanteras y
las arandelas ondulatorias que van unidas a los
montajes del brazo giratorio. Vea la Figura 19.
_guridad y traba
frontales
Arandela de campana
/
" _ _ ._ /Arandela ondulatoria
(__ / /Tapadelcubo
Arand " e/'_
Tornillo \_._ _ _'_'_
con reborde _ . _L/_/
Tuerca de seguridad de la brida
Figura 19
47

• Saque los tornillos con reborde, las arandelas de
arrastre y las arandelas de campana que pasan por
los brazos giratorios hasta la traba de sosten
delantera. La traba de sosten delantera y la tuerca
de seguridad pueden quitarse en este momento
tambien.
• Saque los cuatro tornillos de la caja superior que
ajustan la cubierta del pico. Vea la Figura 20.
Tornillos
de la ca_
Torni
del pico Tornilk
de la caja inferior
Figura 20
Incline la unidad con cuidado y ap6yela hacia
arriba para obtener acceso por la parte inferior al
material de montaje del pico y al motor. Retire las
tres tuercas que aseguran el pico de pla.stico negro
a la caja inferior. Consulte la Figura 21.
Mediante una Ilave Allen de 3/16", retire los
tornillos de cabeza plana que sujetan la hoja de la
cortadora al motor. Dichos tornillos son accesibles
a traves de la abertura que se cre6 cuando retir6 el
canal de la cortadora anteriormente. Vea la Figura
22.
Tornillo Hoja de cortadora
de cabeza
Figura 22
Es posible alcanzar las tuercas de los tornillos de
cabeza plana desde la parte inferior, mediante una
Ilave universal de 1/2 pulg. con extensi6n. Vea la
Figura 23.
Motor "
Pico de plastico nec
Figura 21
Incline la parte superior del pico de pla.stico negro
hacia el motor para retirarlo.
Figura 23
• Cambie o afile las hojas de la cortadora. Se puede
afilar la hoja con un afilador o con una rueda de
esmalte.
• Cuando afile las hojas, protejase las manos
mediante el uso de guantes y siga el a.ngulo
original de molido.
• Para realizar el reensamblado siga los pasos
anteriores en orden y manera inversos a la
extracci6n.
• Ajuste los tornillos de la hoja con un par de
torsi6n de 210 - 250 pulg-lb.
NOTA: Compruebe que se reensamblen las hojas de
la cortadora con el filo hacia arriba. Vea la Figura 24.
Hoja
de desgrar
Hoja
de la cortadora
Montaje
del motor
48
Figura 24

Prepare la aspiradora para patios Craftsman para su
almacenamiento al finalizar la temporada, o si no va a
utilizar la unidad durante 30 dias o ma.s. Un buen
metodo para asegurar que la unidad funcione
adecuadamente la siguiente temporada es realizar
una inspecci6n anual pot parte de su centro local de
partes y reparaciones Sears.
Aspiradoraparapatios
• Limpie el equipo pot completo.
• Limpie el equipo con un trapo con aceite para
evitar que se oxide. Utilice un aceite ligero o
silicona para limpiar.
• Prepare el motor siguiendo las instrucciones que
aparecen a continuaci6n.
• Almacene la unidad en una zona limpia y seca.
No la almacene cerca de materiales corrosivos
como por ejemplo fertilizantes.
Motor
IMPORTANTE: Es importante evitar que durante el
almacenamiento se formen dep6sitos de goma en las
piezas esenciales del sistema de combustible, pot
ejemplo, en el carburador, el filtro de combustible, la
manguera de combustible o el dep6sito. Asimismo,
los combustibles con mezcla de alcohol (que se
Ilaman gasohol, o que utilizan etanol o metanol)
pueden atraer la humedad, Io que conduce a la
separaci6n y formaci6n de a.cidos durante el
almacenamiento. El gas acidico puede daSar el
sistema del combustible de un motor durante el
almacenamiento del mismo.
Para evitar problemas con el motor, el sistema del
combustible debe ser vaciado (si el cartucho de
conservante de combustible FreshStart TM esta.vac[o)
antes de almacenar la ma.quina durante 30 dias o
ma.s. Siga estas instrucciones:
• Vac[e el combustible del tanque haciendo
funcionar el motor hasta que el tanque de
combustible este vac[o.
• En el dep6sito de combustible no use nunca
productos de limpieza para motores o
carburadores, o podria producir daSos
permanentes.
NOTA: El uso de estabilizadores de combustible
es una alternativa aceptable al vaciado del depSsito
de combustible para minimizar la formaciSn de
depSsitos de goma de combustible durante el
almacenamiento.
• Agregue el estabilizador a la gasolina que se
encuentra en el dep6sito de combustible (si el
cartucho de conservante de combustible
FreshStart TM esta. vac[o) o en el recipiente de
almacenamiento.
• No drene el dep6sito de combustible ni el
carburador si esta. utilizando un estabilizador de
combustible.
• En todos los casos, drene el aceite del carter (Io
que deber[a hacerse tras la operaci6n del motor,
mientras este todavia caliente) y rellene el carter
con aceite nuevo.
Si ha drenado el dep6sito de combustible, proteja el
interior del motor de la siguiente manera:
• Retire la buj_a,vierta aproximadamente 1/2 onza
(una cucharada, ma.s o menos) de aceite para
motor en el cilindro y de marcha al motor
lentamente para distribuir el aceite.
• Reemplace la buj_a.
Otros
• No almacene gasolina de una temporada a la
otra.
• Reemplace el recipiente de gasolina si
comienza a oxidarse. La presencia de 6xido o
polvo en la gasolina causa problemas.
• Almacene la unidad en una zona limpia y seca.
No la almacene cerca de materiales corrosivos
como por ejemplo fertilizantes.
NOTA: Si la almacena en un galpSn de depSsito
mal ventilado o metalico, aseg#rese de realizarle un
tratamiento anti- oxidante al equipo cubriendolo con
ace#e ligero o silicona.
49

Problema Causa(s) posibles Acciones correctivas
El motor no arranca 1.
Perdida de potencia;
operaci6n err_.tica
1. El tanque de combustible est_.vacio
o el combustible es viejo.
2. Se ha desconectado el cable de la
bujia.
3. No se puede tirar de la cuerda de
retroceso.
4. La palanca de obturaci6n no est,. en
la posici6n ON (encendido).
5. La bujia no funciona correctamente.
6. El interruptor de seguridad no est,.
presionado.
El cable del interruptor de seguridad
no est,. conectado al motor o no
est,. conectado a tierra como
corresponde.
1. El cable de la bujia est,. flojo.
2. La unidad est,. funcionando en la
posici6n CHOKE (obturaci6n).
3. Lalineadel combustible est,.
tapada o el mismo es viejo.
4. Agua o suciedad en el sistema del
combustible.
5. Es necesario ajustar el carburador.
6. RPM del motor son bajas.
Demasiada vibraci6n 1. Hay partes que est_.n flojas o el 1.
motor est,. da_ado.
El motor recalienta 1. El carburador no est,. ajustado 1.
correctamente.
2. El nivel de aceite del motor es bajo. 2.
La unidad no descarga 1. El canal de descarga est,. tapado. 1.
La tasa de descarga se
reduce considerablemente
o
la composici6n del
material descargado
cambia
La unidad no se
autopropulsa, o se desliza
cuando el control de
transmisi6n est,.
engranado
2. Hay un objeto extraSo en el motor.
3. RPM del motor bajas.
4. La bolsa de la aspiradora est,. Ilena.
1. RPM del motor bajas.
2. La hoja de la cortadora est,.
desafilada.
1. El cable del control de transmisi6n
est,. mal ajustado
2. Lacorreade transmisi6n est,.
desgastada o da_ada.
Llene el tanque con gasolina limpia y fresca. El
combustible no dura m_.s de treinta dias si no se agrega
estabilizador de combustible.
2. Conecte el cable a la bujia.
3. Hay una obstrucci6n en el motor. Desconecte el cable
de la bujia y retire el objeto atascado.
4. Ponga el interruptor en la posici6n CHOKE (obturaci6n)
5. Limpiela, ajuste la distancia disruptiva o c_.mbiela.
6. El interruptor de seguridad debe ser presionado por la
aleta delantera de la manija de la bolsa cuando se
asegura la bolsa.
7. Conecte el cable del interruptor de seguridad al
conector del motor, de manera que haga masa contra la
mensula de montaje.
1. Conecte y ajuste el cable de la bujia.
2. Cambie la palanca de obturaci6n a la posici6n OFF
(apagado).
3. Desconecte la linea del combustible en el carburador
para drenar el dep6sito; Ilene el dep6sito con gasolina
limpia y fresca El combustible no dura m_.s de treinta
dias si no se usa un estabilizador de combustible.
4. Desconecte la linea de combustible en el carburador
para drenar el dep6sito. Vuelva a Ilenarlo con
combustible limpio.
5. Contacte con su centro de partes y reparaciones Sears.
6. Siempre accione el motor con el estrangulador al
m_.ximo.
Detenga el motor de inmediato y desconecte el cable de
la bujia. Lleve la unidad a reparar a un centro de
reparaciones y partes Sears.
Contacte con su centro de reparaciones y partes de
Sears.
Llene el carter con la adecuada selecci6n de aceite.
Detenga el motor de inmediato y desconecte el cable de
la bujia. Limpie la pantalla de desgranado y el interior de
la abertura de descarga. Consulte la secci6n sobre
mantenimiento de este manual.
2. Detenga el motor de inmediato y desconecte el cable de
la bujia. Saque el objeto extra_o del motor.
3. Siempre accione el motor con el estrangulador al
m_.ximo.
4. Vacie la bolsa.
1. Siempre accione el motor con el regulador al m_.ximo.
2. Reemplace la hoja de la cortadora o consulte a su
centro de reparaciones y partes Sears.
1. Siga el procedimiento de ajuste en la secci6n sobre
ajustes y servicio del manual.
2. Contacte con su centro de partes y reparaciones Sears.
NOTA: Si debe realizar reparaciones mas importantes que las enunciadas anteriormente, pot favor, comunfquese
con el centro local de partes y reparaciones Sears.
50

(Esta paginaseaplica s610enEE.UU.y Canad4).
Sears, Roebuck and Co., U.S.A. (Sears), el Consejo de Recursos Ambientales de California (CARB)
y la Agencia de Protecci6n Ambiental de los Estados Unidos (EPA)
Declaraci6n de garantia del sistema de control de emisiones (derechos y obligaciones de la garantia de defectos del propietario)
LA COBERTURA DE LA GARANTIA DE CONTROL DE EMISIONES ES Y POSTERIORES, QUE SE COMPREN Y UTILICEN EN CUALQUIER
APLICABLE A LOS MOTORES CERTIFICADOS COMPRADOS EN PARTE DE LOS ESTADOS UNIDOS (Y A PARTIR DEL 1 DE ENERO DE
CALIFORNIA EN 1995 Y POSTERIORMENTE, QUE SE UTILIZAN EN 2001 EN CANADA).
CALIFORNIA, Y PARA LOS MODELOS CERTIFICADOS DEL ANO 1997
Declaraci6n de garantia sobre defectos en el control de emisiones para California y los Estados Unidos
El Consejo de Recursos Ambientales de California (CARB), la EPA
(Agencia de Protecci6n Ambiental de los EE.UU.) y Sears tienen el gusto
de explicar la garantia del sistema de control de emisiones para motores
del afio 2000 y para el futuro con relaci6n a motores pequefios todo
terreno (SORE). En California, los nuevos motores pequefios todo terreno
deben estar disefiados, construidos y equipados para cumplir con las
rigurosas normas anti-smog del estado. En el resto de los Estados Unidos,
los motores nuevos todo terreno de encendido por chispa certificados para
el afio 1997 deben cumplir estandares similares establecidos por la EPA.
Sears debe garantizar el sistema de control de emisiones de su motor para
los periodos de tiempo enumerados a continuaci6n, siempre que no haya
abuso, negligencia o mantenimiento indebido de su motor todo terreno
pequefio. Su sistema de control de emisiones puede incluir piezas tales
como el carburador, el filtro de aire, el sistema de encendido, el silenciador
y el conversor catalitico. Tambien puede incluir conectores y otras
unidades relacionadas con las emisiones. Donde exista una condici6n
cubierta por la garantia, Sears reparara su pequefio motor todo terreno sin
costo alguno incluyendo diagn6stico, piezas y mano de obra
Cobertura de la garantia Sears para defectos en el control de emisiones
Los motores todo terreno pequefios estan garantizados en Io relativo al disposiciones que se indiquen a continuaci6n. Si una parte de su motor
control de emisiones cubierta por la garantia es defectuosa, Sears reparara o sustituira dicha
para defectos en piezas durante un periodo de dos afios, sujeto alas parte.
Responsabilidades del propietario en relacion con la garantia
Como propietario del motor todo terreno pequefio, Ud. es responsable de
la realizaci6n del mantenimiento requerido que se incluye en las
instrucciones de operaci6n y mantenimiento. Sears recomienda que se
conserven todos los recibos relativos al mantenimiento de su motor todo
terreno pequefio, pero no pude denegar la garantia simplemente por la
falta de los mismos, o por su incumplimiento del mantenimiento
programado. Como propietario del motor pequefio todoterreno debe saber
que, sin embargo, Sears le puede negar la cobertura de la garantia si su
motor todoterreno pequefio o una pieza del mismo han fallado debido a
abuso, negligencia, mantenimiento indebido o a modificaciones no
aprobadas. Ud. es responsable de presentar su motor todoterreno
pequefio a un distribuidor de servicios Sears autorizado tan pronto como
aparezca un problema. Las reparaciones de la garantia sin conflicto deben
completarse en un plazo de tiempo razonable, no superior a 30 dias. Si
tiene alguna pregunta respecto a sus derechos y responsabilidades
referentes a la garantia, debe contactar con un representante de servicios
Sears al 1--800--469--4663. La garantia de emisiones es una garantia pot
defectos. Los defectos se juzgan de acuerdo con el funcionamiento normal
de un motor. La garantia no esta relacionada con una prueba de
emisiones en uso.
Disposiciones de la garantia Sears para defectos en el control de emisiones
Las siguientes son disposiciones especificas relacionadas con la cobertura de la garantia para defectos en el control de emisiones. Es un afiadido a la
garantia de motor Sears para motores no regulados que se encuentra en las instrucciones de funcionamiento y mantenimiento.
1. Piezas con garantia
La cobertura de esta garantia se extiende t_nicamente alas piezas
que aparecen a continuaci6n (las partes de los sistemas de control de
emisiones), siempre que dichas piezas estuvieran ya en el motor en
el momento de su compra.
a. Sistemade medici6n de combustible
• Sistema de enriquecimiento para arranque en frio
• Carburador y partes internas
• Bombade combustible
b. Sistema de inducci6n de aire
• Filtro de aire
• Colectorde admisi6n
c. Sistemade encendido
• Bujia(s) de encendido
• Sistema de encendido magneto
d. Sistemadelcatalizador
• Convertidor catalitico
• Colector de escape
• Sistema de inyecci6n de aire o valvula de impulsos
e. Elementos variados usados en los sistemas anteriores
• Valvulasde vado,sensiblesa temperatura,posici6ny tiempo
e interruptores
• Conectores y montajes
2. Alcance de la cobertura
Sears garantiza al poseedor inicial y a los compradores
subsiguientes que las piezas con garantia no tendran defectos en
materiales ni mano de obra que provoquen la falla de las mismas
durante un periodo de dos afios a partir de la fecha en que el motor
se entrega a un comprador particular.
3. Sin cargo
La reparaci6n o reemplazo de cualquier parte con garantia se
realizara sin cargo alguno para el poseedor, incluyendo tareas de
diagn6stico que permitan determinar si una parte con garantia es
defectuosa, siempre que dicho diagn6stico se realice en un
distribuidor de servicios Sears autorizado. Para el servicio de la
garantia de emisiones, contacte al distribuidor de servicios Sears
autorizado mas cercano incluido en las "Paginas amarillas" en las
categorias "Motores, gasolina", "Motores de gasolina", "Podadoras
de cesped", o similares.
4. Reclamaciones y exclusiones a la cobertura
Las reclamaciones de la garantia deben enviarse de acuerdo con las
disposiciones de la politica de garantia para motores Sears. La
cobertura de la garantia excluira defectos en piezas con garantia que
no sean partes originales Sears, o abuso, negligencia o
mantenimiento incorrecto, tal y como se establece en la politica de
garantia para motores Sears. Sears no es responsable de las fallas
en piezas con garantia provocadas por el uso de partes afiadidas,
que no sean originales o que se hayan modificado.
5. Mantenimiento
Cualquier parte con garantia que no este programada para ser
reemplazada como mantenimiento requerido, o que s61o deba
inspeccionarse regularmente al efecto de "inspeccione o reemplace
segun sea necesario", estara garantizada contra defectos durante el
periodo de la garantia. Todas las piezas garantizadas que esten
programadas para su reemplazo para cumplir con los requisitos de
mantenimiento estaran garantizadas s61o por el periodo anterior al
primer reemplazo programado para dicha pieza. Cualquier pieza de
recambio que sea equivalente en funcionamiento y du rabilidad puede
usarse para realizar mantenimiento o reparaciones. El propietario es
responsable de realizar todo el mantenimiento requerido, tal y como
se define en las instrucciones de funcionamiento y mantenimiento
Sears
6. Cobertura indirecta
Por la presente, la cobertura se extiende a la falla de cualquier
componente de motor provocada por la falla de una pieza con
garantia que este todavia en periodo de garantia.
En los Estados Unidos y Canada hay una linea de atenci6n de 24 horas, 1-800-469--4663, que cuenta con un ment_ con mensajes pre-grabados que
contienen informaci6n para el mantenimiento de motores.
51

Your Home
For repair-in your home-of all major brand appliances,
lawn and garden equipment, or heating and cooling systems,
no matter who made it, no matter who sold it!
For the replacement parts, accessories and
owner's manuals that you need to do-it-yourself.
For Sears professional installation of home appliances
and items like garage door openers and water heaters.
1-800-4-MY-HOME ® (1-800-469-4663)
Call anytime, day or night (U.S.A. and Canada)
www.sears.com www.sears.ca
Our Home
For repair of carry-in items like vacuums, lawn equipment,
and electronics, call or go on-line for the location of your nearest
Sears Parts & Repair Center.
1-800-488-1222
Call anytime, day or night (U.S.A. only)
www.sears.com
To purchase a protection agreement (U.S.A.)
or maintenance agreement (Canada) on a product serviced by Sears:
1-800-827-6655 (U.S.A.) 1-800-361-6665 (Canada)
Para pedir servicio de reparaci6n
a domicilio, y para ordenar piezas:
1-888-SU-HOGAR SM
(1-888-784-6427)
Au Canada pour service en fran_;ais:
1-800-LE-FOYER Mc
(1-800-533-6937)
www.sears.ca
SEARS
® Registered Trademark / TMTrademark / SM Service Mark of Sears, Roebuck and Co.
sM
® Mama Registrada / TM Marca de F&brica / Marca de Servicio de Sears, Roebuck and Co.
MCMarque de commerce / MD Marque depos6e de Sears, Roebuck and Co. © Sears, Roebuck and Co.

