
Operator's Manuam
GRIIFTSMIIN°
6.5 Horse Power
Yard Vacuum
Model No. 247.770120
CAUTION: Before using
this product, read this
manual and foN_ow aim
safety fumes and operating
instructions.
o SAFETY
ASSEMBLY
OPERATION
MAINTENANCE
PARTS LIST
ESPANOL
Sears, Roebuck and Co., Hoffman Estates, IL 60179, U.S.A.
Visit our web site: www.craftsman.com
FORMNO,769-03167
04/16/2007
OneYear FuimWarranty on Craftsman Yard Vacuum
Thisequipmentiscoveredbyaone=yearwarranty,providedthatitismaintained,lubricated,andtunedupaccordingtotheinstructionsinthe
operator'smanualDuringthewarrantyyear,ifthisequipmentexperiencesanyfailureduetodefectsinmaterialorworkmanship,RETURNiTTO
YOURNEARESTSEARSPARTS&REPAIRCENTER,andSearswillrepairit,freeofcharge,In=homewarrantyserviceisavailable,butyouwill
havetopayatripcharge,
Thiswarrantydoesnotcover:
, Expendabbitemswhichbecomewornduringnormaluse,suchassparkplugs,aircleaners,belts,andoilfilters,
, Tirereplacementorrepaircausedbypuncturesfromoutsideobiects,suchasnails,thorns,stumps,orglass,
Repairsnecessarybecauseofoperatorabuse,includingbutnotlimitedto,damagecausedbyobiects,suchasstones,metaldebrisor
oversizedpiecesofwood,orimpactingobjectsthatbendtheframeorcrankshaft,orover=speedingtheengine,
Repairsnecessarybecauseofoperatorne@gence,includingbutnotlimitedto,ebctrbalandmechanbaldamagecausedbyimproper
storage,failuretousethepropergradeandamountofengineoil,orfailuretomaintaintheequipmentaccordingtotheinstructionscontained
intheoperator'smanual,
• Engine(fuelsystem)cleaningorrepairscausedbyfueldeterminedtobecontaminatedoroxidized(stale),Ingeneral,fuelshouldbeused
within30daysofitspurchasedate,
Equipmentifusedforcommercialorrentalpurposes,
Thiswarrantyappliesforonly90daysifthisproductiseverusedforcommercialorrentalpurposes,
ThiswarrantyappliesonlywhilethisproductisusedintheUnitedStates,
Thiswarrantygivesyouspecificlegalrights,andyoumayalsohaveotherrightswhichvaryfromstatetostate,
Scars,RoebuckandCo.,HoffmanEstates,IL60179
HorsePower:
EngineOilType:
EngineOilCapacity:
FuelCapacity:
SparkPlug:
SparkPlugGap:
6,5
SAE3O
18ounces
11/2Quarts
Champion@RJ19LM
,020"
Recordthemodelnumber,serialnumber
anddateofpurchaseabove
@Sears Brands,LLC 2

Congratulationson makingasmartpurchase,YournewCraftsman®
productis designedandmanufacturedfor yearsof dependableopera-
tion,But likeall products,it mayrequirerepairfrom time to time,That's
whenhavinga RepairProtectionAgreementcansaveyou moneyand
aggravation,
Here'swhat'sincludedin the Agreement:
• Expertserviceby our 12,000professionalrepair specialists
• Unlimitedserviceand no chargefor partsandlaboronall covered
repairs
• Productreplacementif yourcoveredproductcan'tbe fixed
• Discountof 10%fromregularpriceof serviceand service-related
partsnotcoveredby the agreement;also, 10%off regularpriceof
preventivemaintenancecheck
• Fasthelpby phone- phonesupportfroma Searstechnicianon
productsrequiringimhomerepair,plus convenientrepair
scheduling
Purchasea RepairProtectionAgreementnowandprotectyourself
fromunexpectedhassleand expense,
Onceyou purchasethe Agreement,a simplephonecall is all that it
takesfor you toscheduleservice,Youcan call anytimeday ornight,or
schedulea serviceappointmentonline,
Searshas over12,000professionalrepairspecialists,who have
accesstoover 4,5millionquality partsand accessories,That'sthe
kindof professionalismyoucan counton to helpprolongthe lifeof
your newpurchasefor yearsto come,Purchaseyour RepairProtection
Agreementtoday!
Some limitations and exclusions apply. For prices and additional
information call 1-800-827o6655.
Sears Installation Service
ForSearsprofessionalinstallationof homeappliances,garagedoor
openers,waterheaters,andothermaiorhomeitems,in the U,S,A,call
1-800-4-MY-HOME®
Thissymbolpointsoutimportantsafetyinstructions
which,ifnotfollowed,couldendangerthepersona)
safetyand/orpropertyofyourselfandothers,Read
andfollowallinstructionsinthismanualbefore
attemptingtooperatethismachine,Failuretocomplywiththese
instructionsmayresultinpersona)iniury,Whenyouseethissymbol,
HEEDITSWARNING!
Thismachinewasbuilttobeoperatedaccordingtotherulesfor
safeoperationinthismanualAswithanytypeofpowerequipment,
carelessnessorerroronthepartoftheoperatorcanresultinserious
iniury,Thismachineiscapableofamputatinghandsandfeetand
throwingobiects,Failuretoobservethefollowingsafetyinstructions
couldresultinseriousiniuryordeath,
YourResponsibility:Restricttheuseofthispowermachineto
personswhoread,understand,andfollowthewarningsandinstruc-
tionsinthismanualandonthemachine,
EngineExhaust,someofitsconstituents,andcertainvehicle
componentscontainoremitchemicalsknowntoStateofCaliforniato
causecancerandbirthdefectsorotherreproductiveharm,
TRA(N(NG
o Read,understand,andfollowall instructionson the machineand in
the manual(s)beforeattemptingto assembleand operate.Keepthis
manualina safeplacefor future andregular referenceandfor ordering
replacementparts.
o Be familiarwith all controls andtheir properoperation.Know howto stop
the machineanddisengagethem quickly.
o Neverallowchildrenunder 16years oldto operatethis machine.Chil-
dren 16years old and overshould readand understandthe operation
instructionsand safetyrulesin this manualand shouldbe trained and
supervisedbya parent.
o Neverallowadultsto operatethis machinewithout properinstruction.
o Keepbystanders,helpers,pets,andchildrenat least75 feet fromthe
machinewhileit is inoperation.Stop machineif anyoneentersthe area.
o Neverrunan engineindoorsor in a poorlyventilatedarea.Engine
exhaustcontainscarbonmonoxide,anodorlessanddeadlygas.
o Donot put handsandfeet near rotatingparts or in the feedingchambers
anddischargeopening.Contactwiththe rotatingimpellercan amputate
fingers,hands,andfeet.
o Neverattemptto unclogeither the feed intakeor dischargeopening,
removeorempty vacuumbag,or inspectand repairthe machinewhile
theengineis running.Shutthe engineoff andwait untilall movingparts
havecometo acompletestop. Disconnectthe spark plug wire and
groundit againstthe engine.
PREPARAT(ON
Thoroughlyinspectthe areawherethe equipmentisto be used. Remove
all rocks,bottles,cans, orotherforeignobjectswhichcould bepickedup
or thrown andcausepersonalinjuryor damageto the machine.
o Alwayswearsafetyglassesorsafetygogglesduringoperationor while
performinganadjustmentor repair,to protecteyes.Thrownobjects
which ricochetcan causeserious injuryto the eyes.
o Wearsturdy,rough-soledwork shoesandclose-fittingslacksand shirts.
Loosefitting clothesorjewelry can be caughtin movableparts. Never
operatethis machinein barefeet or sandals.Wearleatherwork gloves
whenfeedingmaterialinthe chipperchute.
o Beforestarting,check all bolts andscrewsfor proper tightnessto be
sure the machineis in safe workingcondition.Also, visuallyinspect
machinefor any damageatfrequentintervals.
o Maintainor replacesafetyand instructionslabels,as necessary.
o To avoidpersonalinjury or propertydamageuse extremecare in
handlinggasoline.Gasolineis extremelyflammable andthe vapors are
explosive.Seriouspersonalinjury can occur whengasolineis spilled on
yourself oryour clotheswhichcan ignite.Washyour skinandchange
clothesimmediately.
o Useonly an approvedgasolinecontainer.
o Extinguishall cigarettes,cigars,pipes,and othersourcesof ignition.
o Neverfuel machineindoors.
o Neverremovegas cap or addfuel whilethe engine is hot or running.
o Allowengineto cool at least two minutesbefore refueling.
o Neveroverfill fuel tank.Fill tank to no morethan 1/2 inch below bottom
of filler neckto providespacefor fuel expansion.
o Replacegasolinecap andtightensecurely.
o If gasolineis spilled, wipeit off the engineandequipment.Move
machineto anotherarea.Wait5 minutesbeforestartingthe engine.
o Neverstore the machineor fuel container insidewherethere is an open
flame, spark,or pilot light (e.g.furnace, waterheater,spaceheater,
clothesdryer,etc.).
o To reduceafire hazard,keep machinefree of grass, leaves,or other
debris build-up.Clean up oil orfuelspillageand removeany fuel soaked
debris.
o Allowmachineto cool at least 5 minutes beforestoring.
4
OPERATmON
Do not puthands andfeet near rotatingparts or inthe feedingchambers
anddischargeopening.Contactwiththe rotatingimpellercan amputate
fingers,hands,and feet.
o Beforestartingthe machine,makesurethe chipperchute,feed intake,
andcutting chamberare empty andfree of all debris.
o Thoroughlyinspectall materialto be shreddedandremoveany metal,
rocks,bottles,cans,or otherforeignobjectswhichcouldcause personal
injuryor damageto the machine.
o If the impellerstrikesaforeign objector ifyour machineshould start
makingan unusualnoiseorvibration,immediatelyshut the engineoff.
Allowthe impellerto cometo a completestop. Disconnectthespark plug
wire, groundit againstthe engine and performthefollowingsteps:
1.Inspectfor damage.
2. Repairor replaceanydamagedparts.
3. Checkfor any loose partsandtightento assurecontinuedsafe
operation.
o Do not allowanaccumulationof processedmaterialto buildup inthe
dischargearea.This can preventproperdischargeand resultin kickback
of materialthrough thefeed opening.
o Do not attemptto shred or chip materiallargerthan specifiedon the
machineor in this manual.Personalinjury or machinedamagecould
result.
o Neverattemptto unclogeitherthefeed intakeor dischargeopening
whilethe engineis running.Shutthe engineoff, waituntil all moving
parts havestopped,disconnectthe sparkplug wire andground itagainst
theenginebeforeclearing debris.
o Neveroperatewithoutvacuumbag anddischargechuteproperly
attachedto the machine.Neveremptyor changevacuumbagwhilethe
engineis running.Zipperedendof vacuum bagmust be keptclosedat
all times duringoperation.
o Neveroperatewithouteitherthe inlet nozzle or optionalhoseattachment
properlyattachedto the machine.Neverattemptto attach orchange
either attachmentwhilethe engine is running.
o Keepall guards,deflectorsandsafetydevicesin placeandoperating
properly.
o Keepyourface andbody back andto the side of thechipperchute while
feedingmaterialinto the machineto avoid accidentalkickback injuries.
o Neveroperatethis machinewithoutgood visibilityor light. Alwaysbe
sureof your footing andkeepa firm hold on the handles.
o Do not operatethis machineon a gravelsurface.
o Do not operatethis machinewhile undertheinfluenceof alcoholor
drugs.
o Mufflerand enginebecomehotand can causea burn. Do nottouch.
o Neverpickup or carry machinewhilethe engineis running.
MAINTENANCE & STORAGE
, Nevertamperwith safetydevices.Checktheir properoperation
regularly.
o Check bolts andscrewsfor proper tightnessat frequentintervalsto keep
the machinein safe workingcondition.Also, visuallyinspectmachinefor
any damageand repair,if needed.
o Beforecleaning,repairing,or inspecting,stoptheengine and make
certain the impellerand all moving parts havestopped.Disconnectthe
spark plug wire andground itagainstthe engineto preventunintended
starting.
o Do notchangethe enginegovernorsettingsor overspeedthe engine.
The governorcontrolsthe maximumsafe operatingspeedof the engine.
o Maintainor replacesafetyand instructionlabels,as necessary.
o Followthis manualfor safe loading, unloading,transporting,and storage
of this machine.
o Neverstorethe machineorfuel container insidewherethere is an open
flame, sparkor pilot lightsuch asa water heater,furnace,clothes dryer,
etc.
o Alwaysreferto the operator'smanualfor properinstructionson
off-seasonstorage.
o Ifthe fuel tank hasto be drained,do this outdoors.
o Observeproperdisposallawsand regulationsfor gas, oil,etc. to protect
the environment.
Do not modify engine
Toavoidseriousinjuryor death,do notmodify'enginein anyway.Tampering
withthe governorsettingcan leadto a runawayengine andcauseitto operate
at unsafespeeds.Nevertamperwithfactorysettingof engine governor.

This page left intentionallyblank.
6

TO AVOID SERIOUSiNJURY
READ O PERATOR_S MANUAL
KEEP HANDS OUT OF UNLET AND DUBCHARGE OPENUNGS WHILE MACNUNE
USRUNNUNG_ ROTATUNO BLADES ARE UNSIDE
TURN ENGUNE OFF AND ALLOW UMPELLERTOCOME TO COMPLETE STOP /; J;
BEFORE REMOVING BAG,
DO NOTATTEMPTTO CLEAR A CLOG OR JAMWUTB THE ENGINE RUNNING
DO NOT OPERATE DN,T WITHOUT BAG OR OPT,ONAL RLOWER CHUTE ,N _ :_PLACE,
DO NOr B_ND OF_'A LK UNFRONTOF _WER CNLrrE OR AiM _ BYSTANDER& --
KEEP HANDS OUT OF DISCHARGE OPENING.
.DO NOT STAND OR WALK IR FRONT OF
DISCRARGE OPEninG OR AiM IT AT
BYSTARDER& OBJECTS TRROWR ORT OF
CHUTE CAR CAUSE PER_RAL IRJRRY
,, KEEP CHimER ARI) OTHERS AWAY s 3 o 2 7
7

IMPORTANT:This unit is shippedwithoutgasolineor oil in theengine,
Becertainto serviceenginewith gasolineandoil as instructedin the
Operationsectionof this manualbeforeoperatingyour machine,
NOTE:Referenceto rightand lefthandsideof the YardVacuumis
observedfromthe operatingposition,
OPENmNG CARTON
1, Cuteachcornerof the cartonverticallyfromtopto bottom,
2, Removeall looseparts,
3, Removeloosepackingmaterial,
REMOVmNG UNmT FROM CARTON
1, Liftunit from the rearto detach it fromunderlyingcartonmaterial
androll unitout of carton,
2, Checkcartonthoroughlyfor anyother looseparts,
NOTE:Makesure notto crimpcanes whileremovinglooseparts or
the entireunitfrom the carton,
LOOSE PARTS mNCARTON
(See Figure 1)
, UpperandLowerHandle
Bag
• BlowerChute
• SafetyGlasses
, EngineOil (Maybe locatedin bag)
• Operator'sManual
ff
_UpperHandle
Wing Nut
Star Knobs
Carriage
Bolts
Carriage
Wing Nuts Screws
Bag Blower Chute
SafetyGlasses Bottle of EngineOil
Operator'sManual
Figure1
J
8
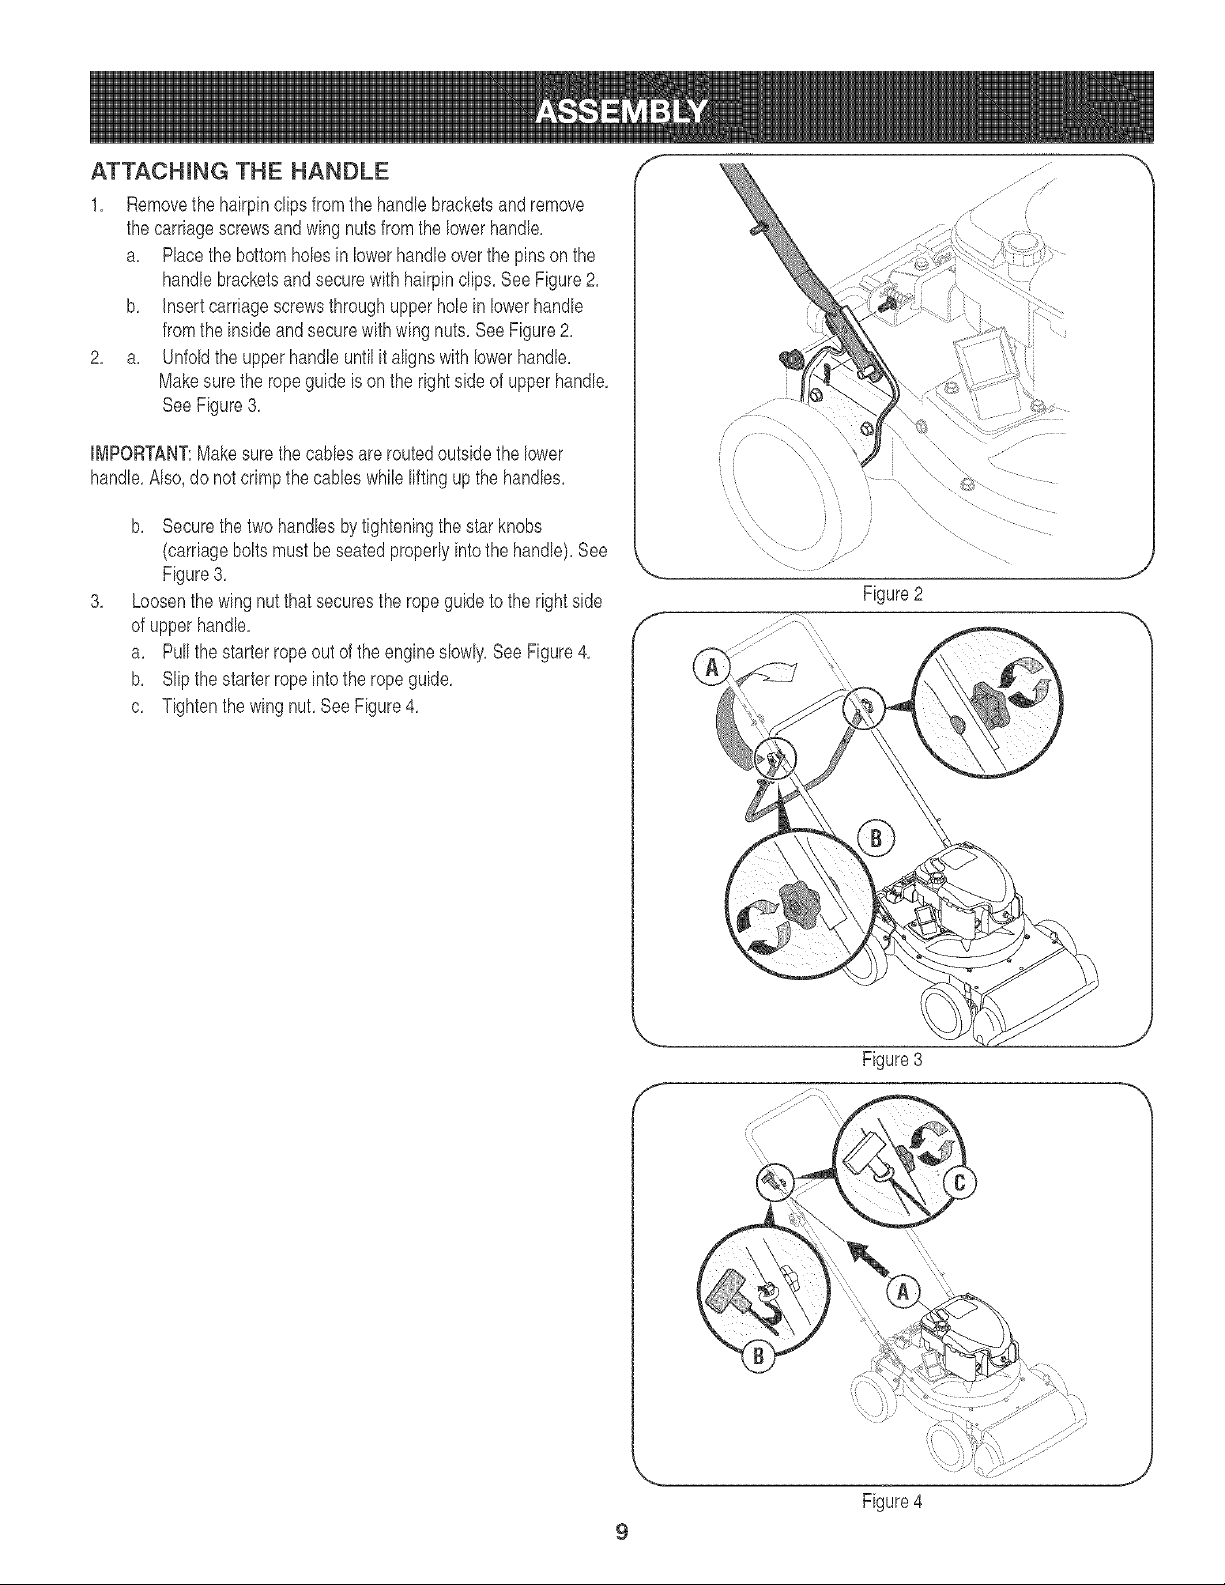
ATTACHING THE HANDLE
1, Removethe hairpinclipsfrom the handlebracketsandremove
the carriagescrewsandwingnutsfromthe lowerhandle,
a, Placethe bottomholesin lowerhandleoverthe pinson the
handlebracketsandsecurewith hairpinclips,SeeFigure2,
b, insertcarriagescrewsthroughupperhole in lowerhandle
fromthe insideand securewith wing nuts,SeeFigure2,
2, a, Unfoldthe upperhandle untilit alignswith lowerhandle,
Makesure the ropeguideis on the rightsideof upperhandle,
SeeFigure3,
I_,IPORTANT:Makesure thecables are routedoutsidethe lower
handle,Also, do not crimpthe cables whilelifting up the handles,
b, Securethe two handlesbytighteningthestar knobs
(carriagebolts mustbe seated properlyintothe handle),See
Figure3,
3, Loosenthe wingnutthat securesthe rope guideto the rightside
of upperhandle,
a, Pullthe starterropeout of the engineslowly,SeeFigure4,
b, S@the starterropeintothe rope guide,
c, Tighten thewing nut,SeeFigure4,
f
f
f
Figure2
Figure3
J
J
9
Figure4
J

f
\
\
\
Figure5
ATTACHING THE BAG
1, Graspbaghandb withone handandslide lockingrod on
mountingbracketwith otherhand towardengine,Usetheendof
mountingbracketas bverage whenslidingthe locking rod,
2, Slip bagoverthe rim of the dischargeopeningand release
lockingrodto securebag in place,See Figure5,
3, Snapbag clip to the topof the lowerhandb,
4, Placethe lowerstrapson the bagoverthe topof lowerhandb,
hookingthemon the studs,SeeFigure6,
NOTE:The bag/chuteswitch buttonattachedto the mountingbracket
mustbefullydepressedby thetip of fronttabon baghandb when
securingthe bag or enginewill not start,
J
Figure6
J
10
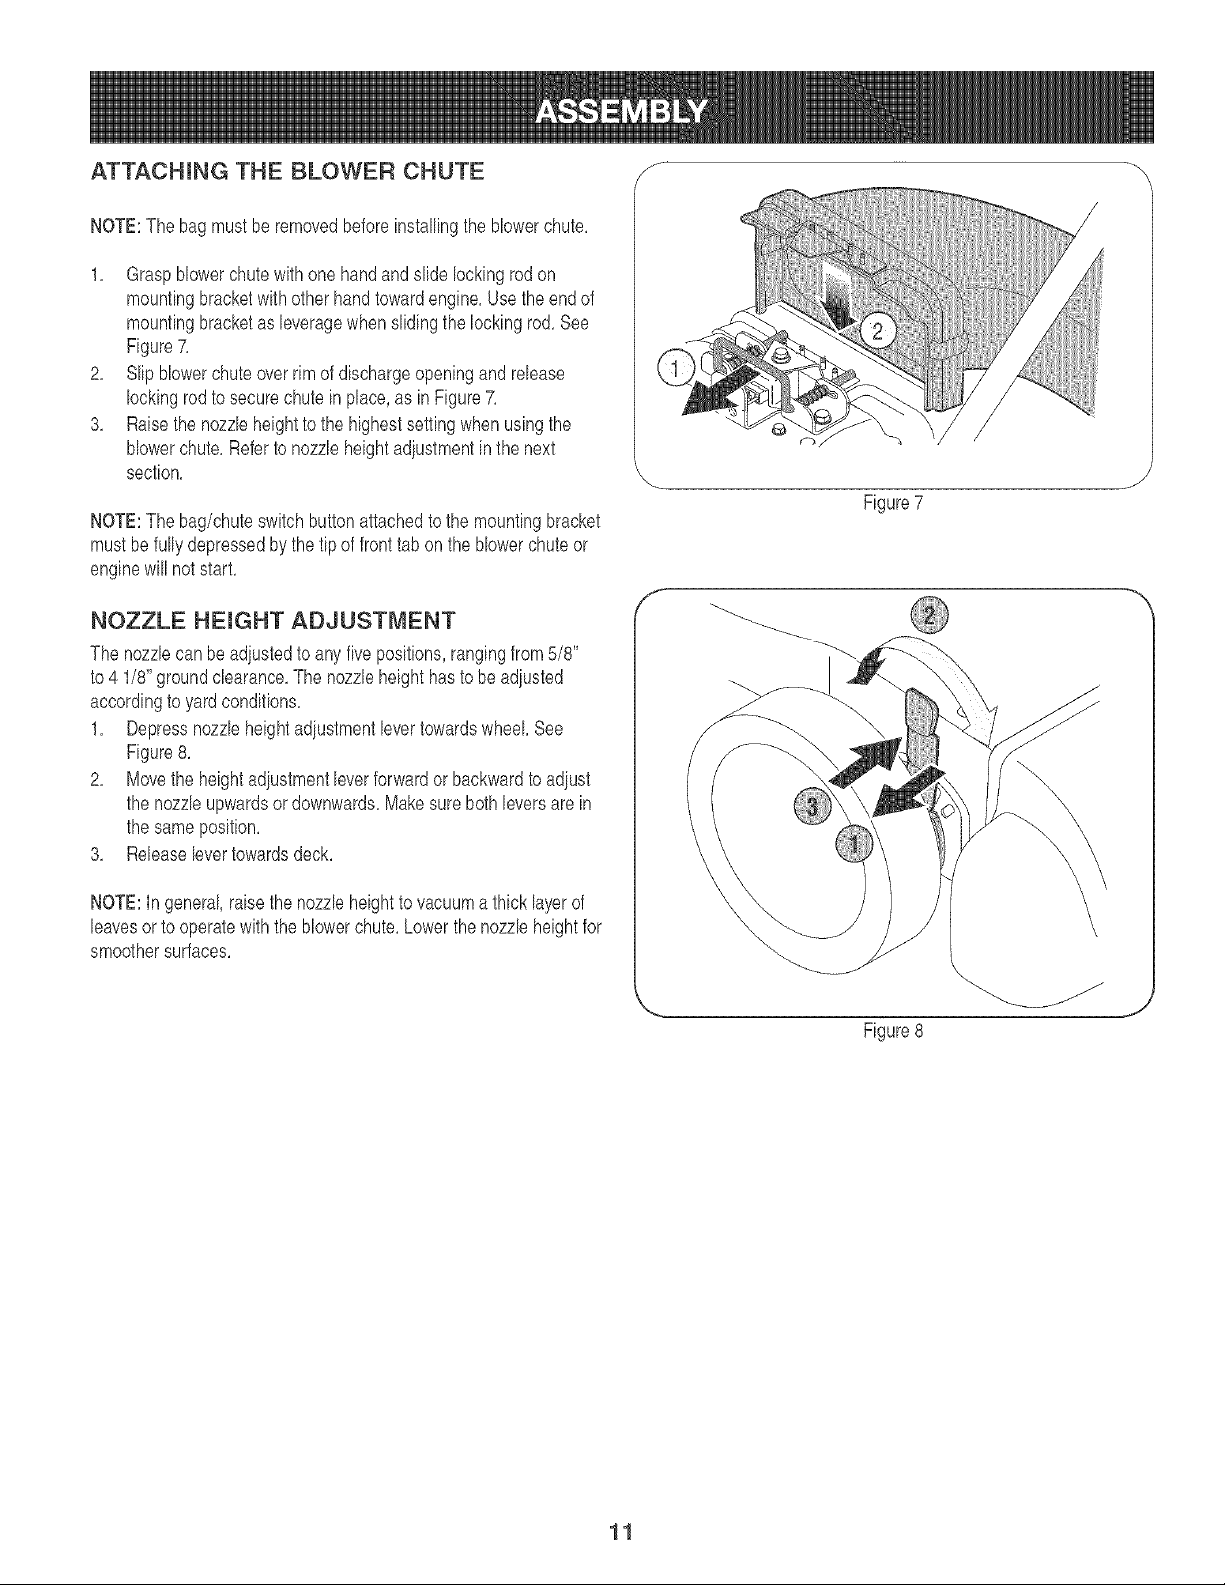
ATTACHING THE BLOWER CHUTE f- -4\
NOTE:The bagmust be removedbeforeinstallingthe blowerchute,
1, Graspblowerchute with one handand slide lockingrodon
mountingbracketwith other handtowardengine,Usethe endof
mountingbracketas leveragewhenslidingthe lockingrod, See
Figure7,
2, Slipblowerchute overrim of dischargeopeningand release
lockingrodto securechute in place,as in Figure7,
3, Raisethe nozzleheightto the highestsettingwhenusingthe
blowerchute,Referto nozzleheightadjustmentinthe next
section,
NOTE:The bag/chuteswitchbuttonattachedto the mountingbracket
mustbefullydepressedbythe tip of front tab onthe blowerchuteor
enginewill notstart,
NOZZLE HEmGHT ADJUSTMENT
The nozzlecan be adiustedto any five positions,rangingfrom5/8"
to 4 1/8" groundclearance,The nozzleheighthasto be adiusted
accordingto yardconditions,
1, Depressnozzleheightadiustmentlevertowardswheel See
Figure8,
2, Movethe heightadiustmentleverforwardor backwardto adiust
the nozzleupwardsor downwards,Makesureboth leversarein
the sameposition,
3, Releaselevertowardsdeck,
NOTE:In general,raisethe nozzleheightto vacuumathick layerof
leavesorto operatewith the blowerchute,Lowerthe nozzleheightfor
smoothersurfaces,
f
Figure7
Figure8
Y
11

Bag ThrottleControl ChokeControl
Starter
Handle
Bag Handle
Fiii
Fiii
Blower
Chute
Chippew
Chute
Nozzle Height
Adjustment Lever
Nozzle
Figure9
Nowthatyouhavesetup youryardvacuumfor operation,get
acquaintedwith itscontrolsand features,These are describedbelow
andillustratedon this page,This knowledgewill allowyouto use your
newequipmentto its fullestpotential
The operationof any yardvacuumcan resultinforeignobiectsbeing
thrownintothe eyes,whichcan damageyoureyesseverely,Always
wearthe safetyglassesprovidedwiththis unitor eyeshblds while
operatingor performingany adiustmentsor repairson it,
CHIPPER CHUTE
Allowstwigsandsmallbranchesupto 1=1/2"in diameterto be fed into
the impellerfor chipping,See Figure9,
NOZZLE
Yardwastesuch as leavesor pine needbs can be vacuumedup
throughthe nozzb for shredding,
BAG
Colbcts shreddedmaterialfedthroughthechipperchuteorvacuumed
throughthe nozzle,
BLOWER CHUTE
Whenattachedto unit,the blowerchuteis usedto dischargeyard
wastesuchas haves, pineneedle,or smalltwigs acrossyard,
BAG HANDLE
Usedto graspbag in orderto assistinattaching,removing,and
emptyingbag,SeeFigure9,
NOZZLE HEmGHT ADJUSTMENT LEVER
Usedto adiustthe nozzb groundcbarance rangingapproximately
from5/8" to 4 1/8",
Meets ANSi Safety Standards
CraftsmanYardVacuumsconformto the safety standardof the AmericanNationalStandardsinstitute(ANSI).
12

THROTTLE CONTROL
This levercontrolsthe enginespeedandstopfunction,Throughthree
separatepositionson the bver from left to right,theoperationisas
follows:
Start/Run Slow/Idle Engine Off
CHOKE CONTROL
The choke controlis usedto choke thecarburetorand assist in starting
the engine,
STARTER HANDLE
Usedto startthe engine,
GAS AND OIL FILL-UP
OH (one bottle shipped with unit)
First Time Use
1, Removeoil fill dipstick,
2, WiththeYardVacuumonbvel ground,usea funnelto empty
entirecontentsof oil bottb providedintothe engine,
3, Replaceoil fill dipstickand tighten,
Subsequent Uses
Onlyuse high qualitydetergentoil ratedwith APIserviceclassification
SF,SG,or SH,Selectthe oil's SAEviscositygradeaccordingto the
expectedoperatingtemperature,Followthe chart below,
r6'_6older_,_ 32°F
Oil Viscosity Chart
Althoughmulti-viscosityoils (5W30,10W30,etc,)improvestarting
incold weather,theywill result in increasedoil consumptionwhen
usedabove32°RCheckyourengineoil bvel morefrequentlyto avoid
possibleenginedamagefrom runninglowonoil
1, Checkthe oil levelmakingcertainnotto rub the dipstickalongthe
insidewallsof the oil fill tube,This wouldresult in a false dipstick
reading,Refill to FULLmarkondipstick,if necessary,Capacity
is approximately18 oz, Overfillingwill causethe engineto smoke
profuselyand will resultin poorengineperformance,
2, Replaceoil fill dipstickand tighten,
3, Keepoil levelat FULL,Runningtheenginewithtoo little oil can
resultinpermanentenginedamage,
Useextremecarewhen handlinggasoline,Gasolineisextremely
flammabbandthe vaporsare explosive,Neverfuel machineindoors
or whib theengineis hotor running,Extinguishcigarettes,cigars,
pipes,andothersourcesof ignition,
Gasoline
1, Removefuel capfromthe fueltank,
2, Makesurethe containerfrom whichyou will pourthe gasolineis
cleanandfree from rust or foreignparticles,Neverusegasoline
that maybestab fromlongperiodsof storagein its container,
Gasolinethat hasbeensitting forany period longerthanfour
weeksshouldbeconsideredstab,
3, Fill fuel tankwithcban, fresh,unleadedregulargasolineonly, Do
not use gasolinecontainingMETHANOL,Replacefuel cap,
UseAlcoholbbndedfuels (calbd gasoholor usingethanolor metha-
nol)can attract moisturewhichleadsto separationand formationof
acidsduringstorage,Acidicgas can damagethe fuelsystemof an
enginewhib instorage,
Toavoidengineproblems,thefuel systemshouldbeemptiedbefore
storagefor 30 days or longer,Drainthe gas tank,start theengine
andlet it run untilthe fuel finesand carburetorare empty,Use
freshfuel next season,See STORAGEInstructionsfor additional
information,
Neveruse engineor carburetorcbaner productsinthe fuel tankor
permanentdamagemay occur,
NOTE:Checkthe fuel levelperiodicallyto avoidrunningout of gaso-
linewhileoperatingthe YardVacuum,If the unitrunsout of gas as it
is chipping,it may be necessaryto unclogthe dischargearea beforeit
can be restarted,Referto SERVICEAND ADJUSTMENTsection,
13

f
ThrottleControl
ChokeControl
J
Figure 10
Figure11
Whenmovingthrottb control bver, be carefulof heatedsurfacesand
sharpedgeson mufflerguard,
TO START ENGINE
1, Attachsparkplugwire and rubber bootto sparkplug,
2, The bag/chuteswitchbuttonmustbefullydepressedbythe tip of
fronttab on bag handb or blowerchutefor engineto start,
3, Makesurebag/chuteswitchwire is connectedto engineand
groundedto mountingbracket,
4, Gas tank shouldbe filled3/4 to full beforestarting,
5, Movethrottlecontrolto START/RUN(Rabbit)_ position,See
Figure10,
6, Movethe chokecontrolI'_1 towardthe throttlecontrol to choke
the engine'scarburetor,(A warmengine maynot requirechoking,)
SeeFigure10,
7, Standingbehindthe unit,graspstarterhandleand pull ropeout
untilyoufeel a drag,See Figure11,
8, Pullthe ropewitha rapid,continuous,full arm stroke,Keepa firm
gripon the starterhandb, Let the roperewindslowly,
9, Repeat,if necessary,until enginestarts,When enginestarts,
movechokecontrolgraduallyawayfrom the throttlecontrol
10, if enginefalters,movechokecontrolbacktowardthethrottb
controlandrepeatsteps7 through9, ,,_,,,,_
11, ALWAYSkeepthe throttlecontrolin the START/RUN_ posi_
tion whenoperatingthe YardVacuum,
TO STOP ENGmNE
1, Movethrottb controlbver to slow (turtb) _ position,
Wheneverpossible,graduallyreduceenginespeedbefore
stoppingengine,
2, Movethrottlecontrol bver to STOP orOFFposition,
3, Disconnectsparkplugwire and groundit to the retainingpost to
preventaccidentalstartingwhib the equipmentis unattended,
14
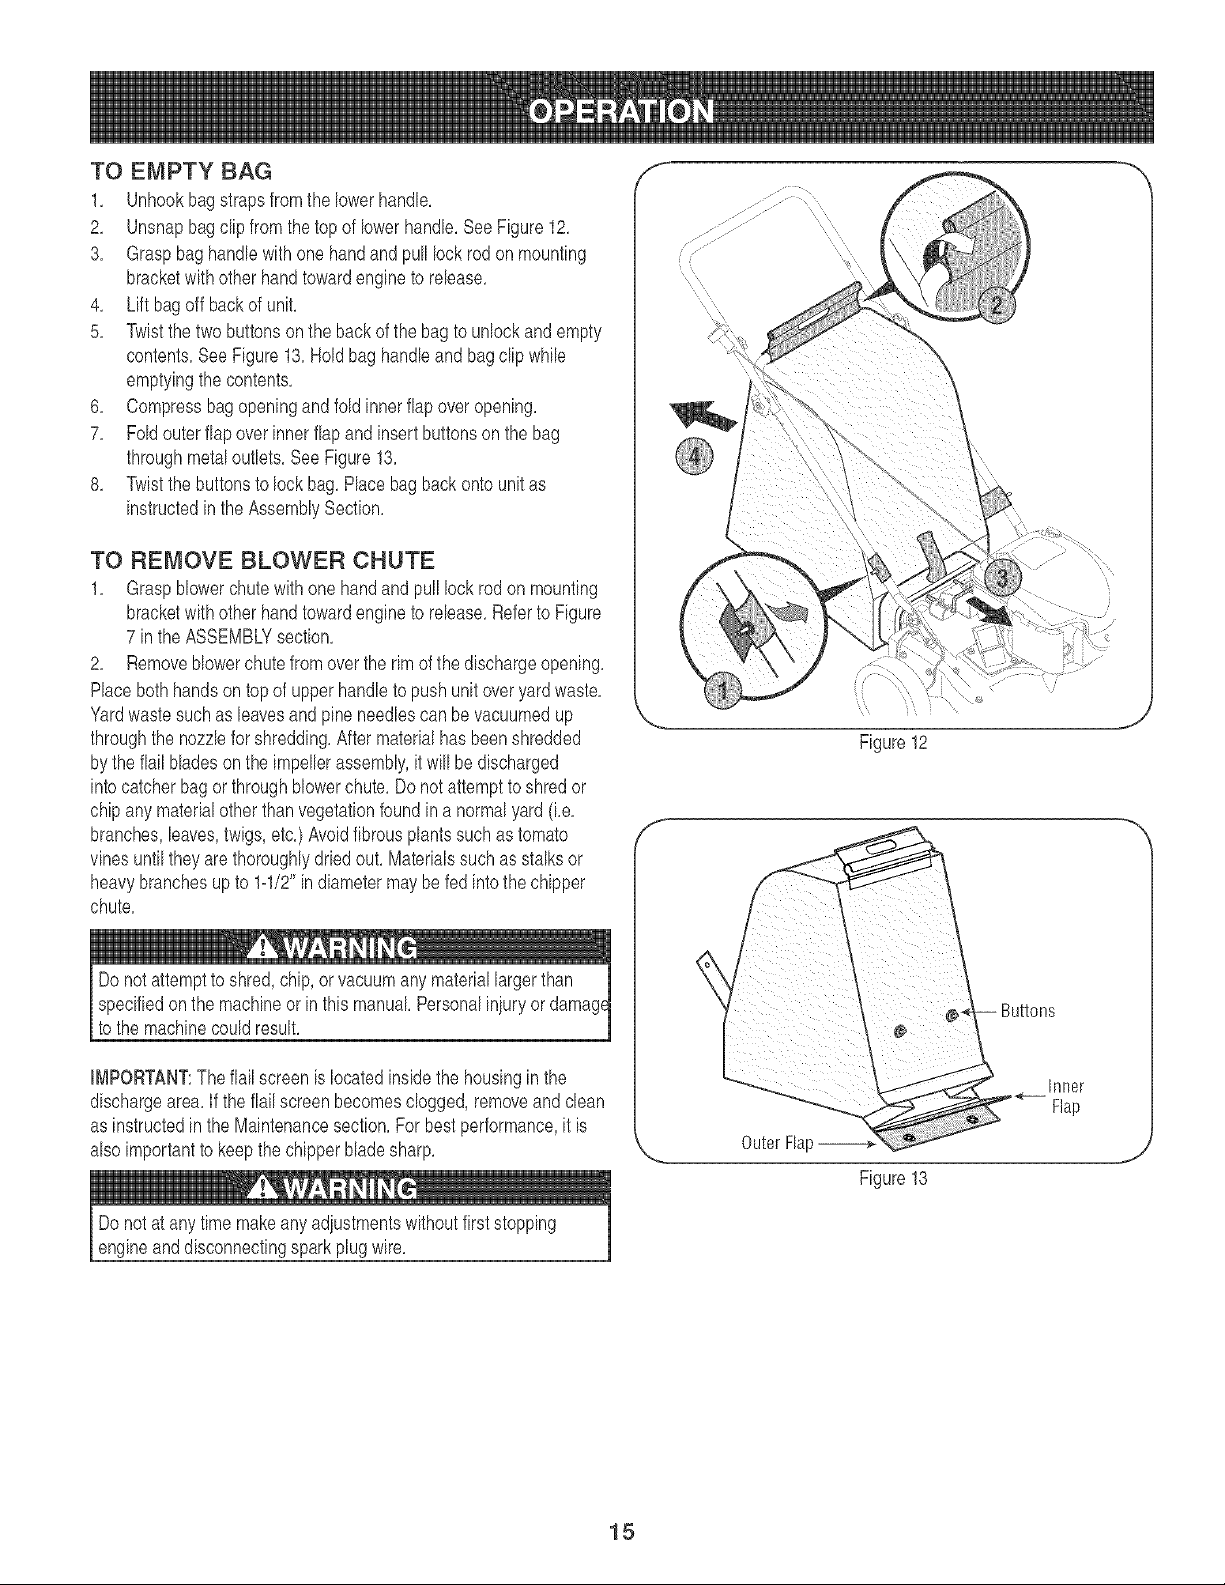
TO EMPTY BAG
1, Unhookbagstrapsfrom the lowerhandle,
2, Unsnapbagclipfromthe top of lowerhandle,SeeFigure12,
3, Graspbaghandlewithonehandand pulllockrodon mounting
bracketwith otherhand towardengine to release,
4, Lift bagoff backof unit,
5, Twistthetwo buttonson the backof the bagto unlock and empty
contents,See Figure13,Holdbaghandleandbagclip while
emptyingthe contents,
6, Compressbagopeningand foldinnerflapover opening,
7, Foldouterflap overinnerflap andinsertbuttonson the bag
throughmetal outlets,See Figure13,
8, Twistthebuttonsto lock bag,Placebag backonto unitas
instructedin the AssemblySection,
TO REMOVE BLOWER CHUTE
1, Graspblowerchute with one handand pull lock rod on mounting
bracketwith otherhand towardengine to release,Referto Figure
7 inthe ASSEMBLYsection,
2, Removeblowerchutefromoverthe rim of the dischargeopening,
Placebothhandsontop of upperhandleto pushunit overyardwaste,
Yardwastesuchas leavesand pine needlescan be vacuumedup
throughthe nozzlefor shredding,After materialhasbeenshredded
by theflail bladesonthe impellerassembly,it will be discharged
intocatcherbagorthroughblowerchute,Do notattemptto shredor
chipany materialother thanvegetationfoundin a normalyard (Le,
branches,leaves,twigs,etc,) Avoidfibrousplantssuchas tomato
vinesuntiltheyarethoroughlydriedout, Materialssuch as stalksor
heavybranchesupto 1-1/2"indiametermaybefed intothe chipper
chute,
Do notattemptto shred,chip,or vacuumanymateriallargerthan
specifiedon the machineorin thismanual Personaliniuryor damag_
to the machinecouldresult,
IMPORTANT:Theflail screenis locatedinsidethe housingin the
dischargearea,If the flailscreen becomesclogged,removeandclean
as instructedin the Maintenancesection,For bestperformance,it is
also importantto keepthechipperbladesharp,
Do notat any time makeanyadiustmentswithoutfirststopping
engineanddisconnectingsparkplug wire,
f
/
/
f
Figure12
Buttons
OuterFIaF
Figure13
Inner
Flap
J
J
15
Alwaysstop engineand disconnectspark plugwire beforeperformin{
anymaintenanceor adiustments.Alwayswearsafetyglassesduring
operationor whileperformingany adiustmentsor repairs.
GENERAL RECOMMENDATmONS
Alwaysobservesafetyrubs when performing
anymaintenance,
. Thewarrantyon thisyardvacuumdoes notcoveritemsthat have
beensubiectedto operatorabuseor negligence,To receivefull
valuefromwarranty,operatormust maintainthe equipmentas
instructedhere,
. Someadiustmentswill haveto be madeperiodicallyto maintain
yourunit properly.
Periodicallycheckall fastenersand makesuretheseare tight.
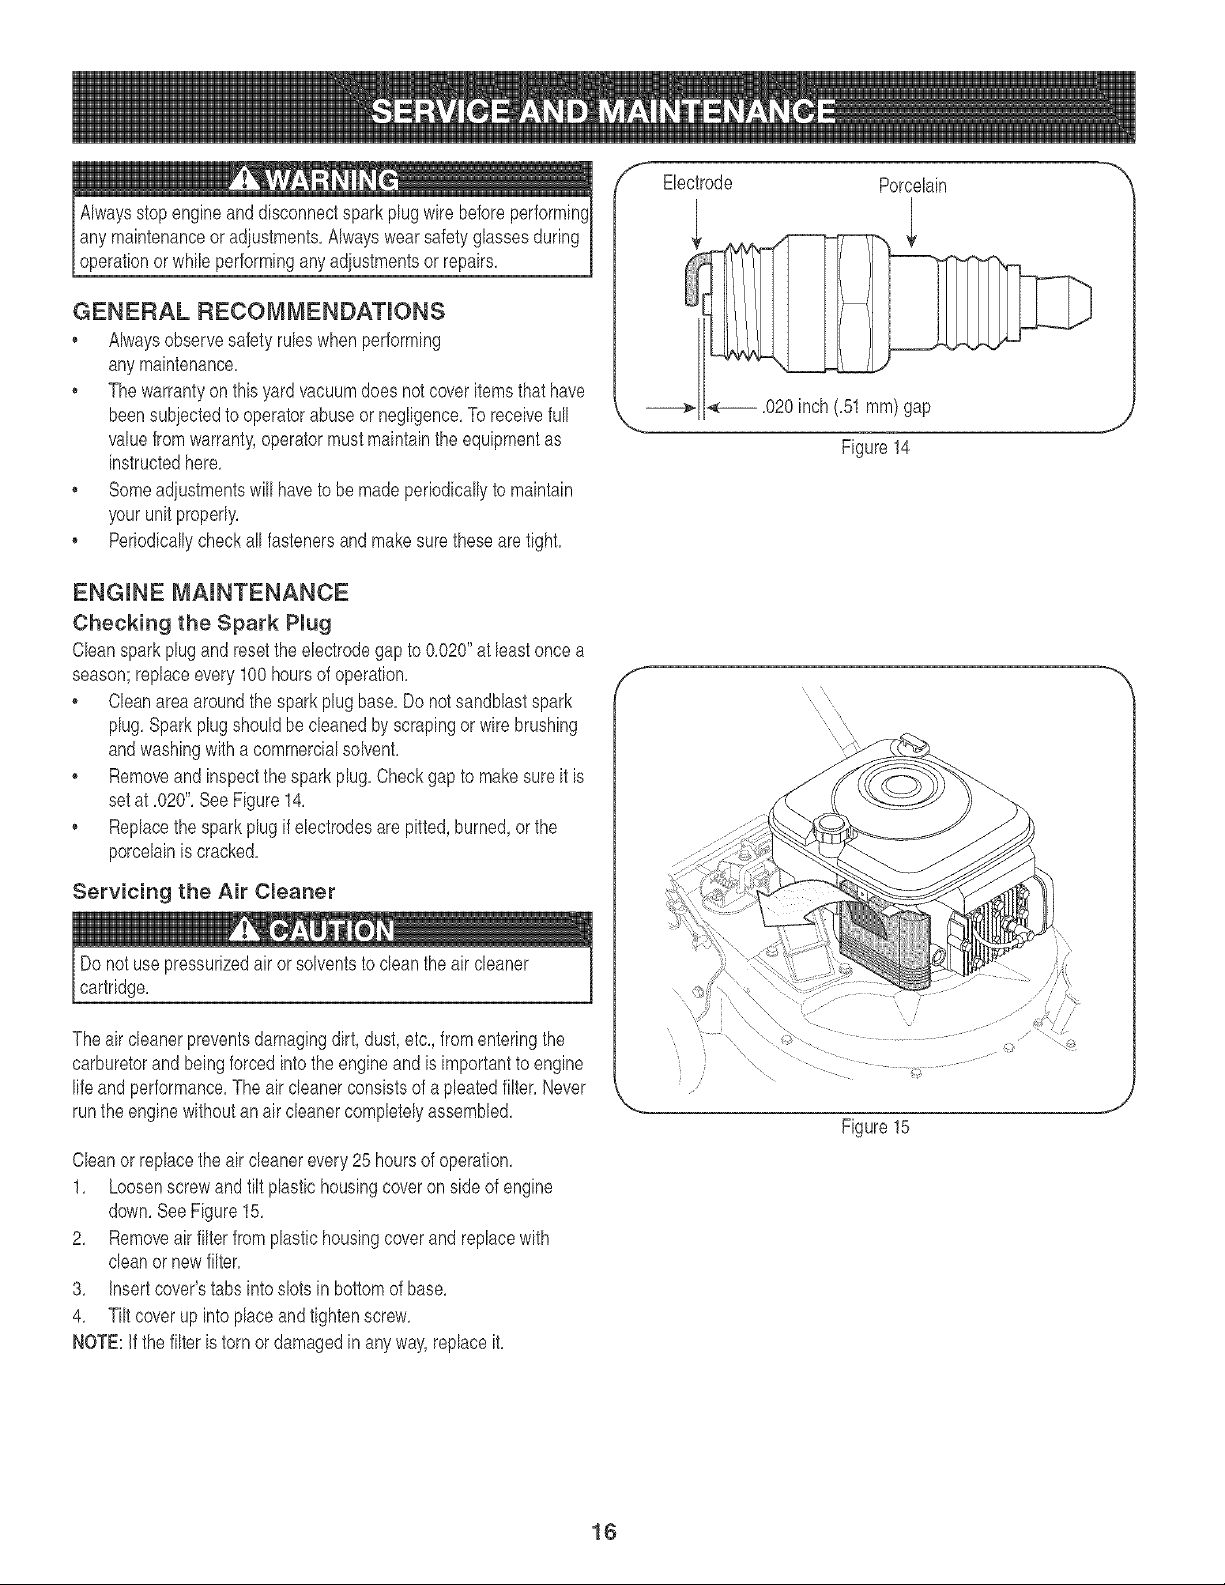
ENGmNE MAINTENANCE
Checking the Spark Pmug
Cban sparkplugandresettheelectrodegapto 0,020"at bast oncea
season;replaceevery 100hoursof operation,
• Cban areaaroundthe sparkplugbase,Do notsandblastspark
plug,Sparkplugshouldbecbaned byscrapingorwire brushing
andwashingwitha commercialsolvent,
• Removeand inspectthe sparkplug,Checkgap to makesureit is
setat ,020",SeeFigure14,
. Replacethe sparkplugif electrodesarepitted,burned,or the
porcelainis cracked,
Servicing the Air Cleaner
Do notuse pressurizedair or solventsto cleanthe air cleaner
cartridge.
Theair cleanerpreventsdamagingdirt, dust,etc,, fromenteringthe
carburetorandbeingforcedintothe engineandis importantto engine
lifeand performance,Theair cleanerconsistsof apbated filter,Never
runthe enginewithoutan air cbaner compbtelyassembled,
Cleanorreplacetheair cleanerevery 25 hoursof operation.
1. Loosenscrewand tilt plastb housingcoveronside of engine
down.SeeFigure15.
2. Removeair filter from plastb housingcoverandreplacewith
cleanor newfilter.
3. Insertcover'stabsintoslots in bottomof base.
4. Tiltcoverupinto placeandtighten screw.
NOTE:If thefilter istorn or damagedin anyway,replaceit.
f_ Electrode Porcelain
<------.020 inch(.51ram)gap
\
Figure14
Figure15
16

Check Engine OH
1, Stopengineandwaitseveralminutesbeforecheckingoillevel,
Withengineonlevelground,theoil mustbe to FULLmark on
dipstick,
2, Removeoil fill dipstickand wipecleanwithcloth,
3, Replaceand tightendipstick,Removeandcheckoil level,Level
shouldbeat FULL mark,
4, If needed,add oil slowly- recheck,Do not over%
5, Wipedipstickclean,replaceand tighten,Removeandcheckoil
level,Oil levelshouldbeat FULL lineon dipstick,
Do not overfil,Overfillingwith oil may causethe engineto not start,
or hardstarting,Ifoverthe FULL markon thedipstick,drain oil to
reduceoil levelto FULLmarkon dipstick,
Change Engine OH
, Onlyuse high qualitydetergentoil ratedwith AR service
classificationSF,SG,or SH,Selectthe oil'sSAEviscositygrade
accordingto the expectedoperatingtemperature,Referto opera-
tionsectionfor viscositychart,
, Changeengineoil after thefirst fiveto eight hoursof operation,
andeveryfifty hoursoreveryseasonthereafter,Changeoil every
twentyfivehourswhenoperatingengineunderheavyloador in
hightemperatures,
To Drain Oil
1, Drainthe fuelfrom the tankby runningthe engineuntilthe fuel
tankis empty,
2, Disconnectspark plug wireand keep it awayfromspark plug,
3, WithengineOFFbutstill warmremoveoil fill dipstick,
4, Tip uniton its side (sparkplugside up) to drainthroughthe oil fill
tube intoappropriatereceptacle,
Usedoilis a hazardouswasteproduct,Disposeof usedoil properly,
Do not discardwithhouseholdwaste,Checkwith yourlocalauthori-
tiesor SearsServiceCenterfor safedisposal/recyclingfacilities,
5, Whenengine is drainedof all oil, placeenginelevel,Refillwith
approximately18oz,of freshoil Fill to FULLlineon dipstick,Do
notoverfill,Referto Gas And Oil Fill-Up inOPERATIONsection,
6, Replaceoil fill dipstickand tighten,
7, Replacesparkplugwire beforestarting,
Clean Engine
, Dailyor beforeeveryuse,cleangrass,chaffor accumulated
debrisfromengine,Keeplinkage,spring,andcontrolsclean,
Keepareaaroundand behindmufflerfree of anycombustible
debris,
, Keepingenginecleanallowsair movementaroundengine,
• Engineparts shouldbe kept cleanto reducethe risk of over-
heatingandignitionof accumulateddebris,This is especially
importantif cuttingtall grass,
Donot usewater to cleanengineparts,Watercouldcontaminatefuel
system,Useabrushor dry cloth,
Carburetor Adjustment
The carburetoron this engine is notadiustable,
Do not attemptto alterthe enginespeedbytamperingwiththe
engine'sgovernorlinkage,Doingso couldresult in seriouspersonal
iniuryanddamageto theengine,The engineRPMhas beensetat
the factory,
LUBRICATmON
• Wheels- Placea fewdropsof SAE30 oiloneach shoulderscrew
once a season,
• Nozzle height adjustment levers- Lubricatenozzleheight
adjustmentleverswith lightoil
• Locking Rod- Lubricatethe lock rod and compressionsprings
whichattachto the mountingbracket,
CLEAN EQUmPMENT
Cleanthe YardVacuumthoroughlyafter eachuse,
, Washbagperiodicallywith water,Allowto drythoroughlyin
shade,
, If the flail screenbecomesclogged,removeandcleanas
instructedbelow,
NOTE:Cleaningwitha forcefulspray of wateris notrecommendedas
it couldcontaminatethe fuelsystem,
Temperatureof mufflerand nearbyareasmayexceed150° F (65°C),
Avoidthese areas,
Service Muffler
, Inspectmufflerperiodically,and replaceif necessary,Replace-
mentpartsfor the mufflermustbethe same and installedin the
samepositionas the originalparts,otherwisefire canoccur,
17
F 't -"
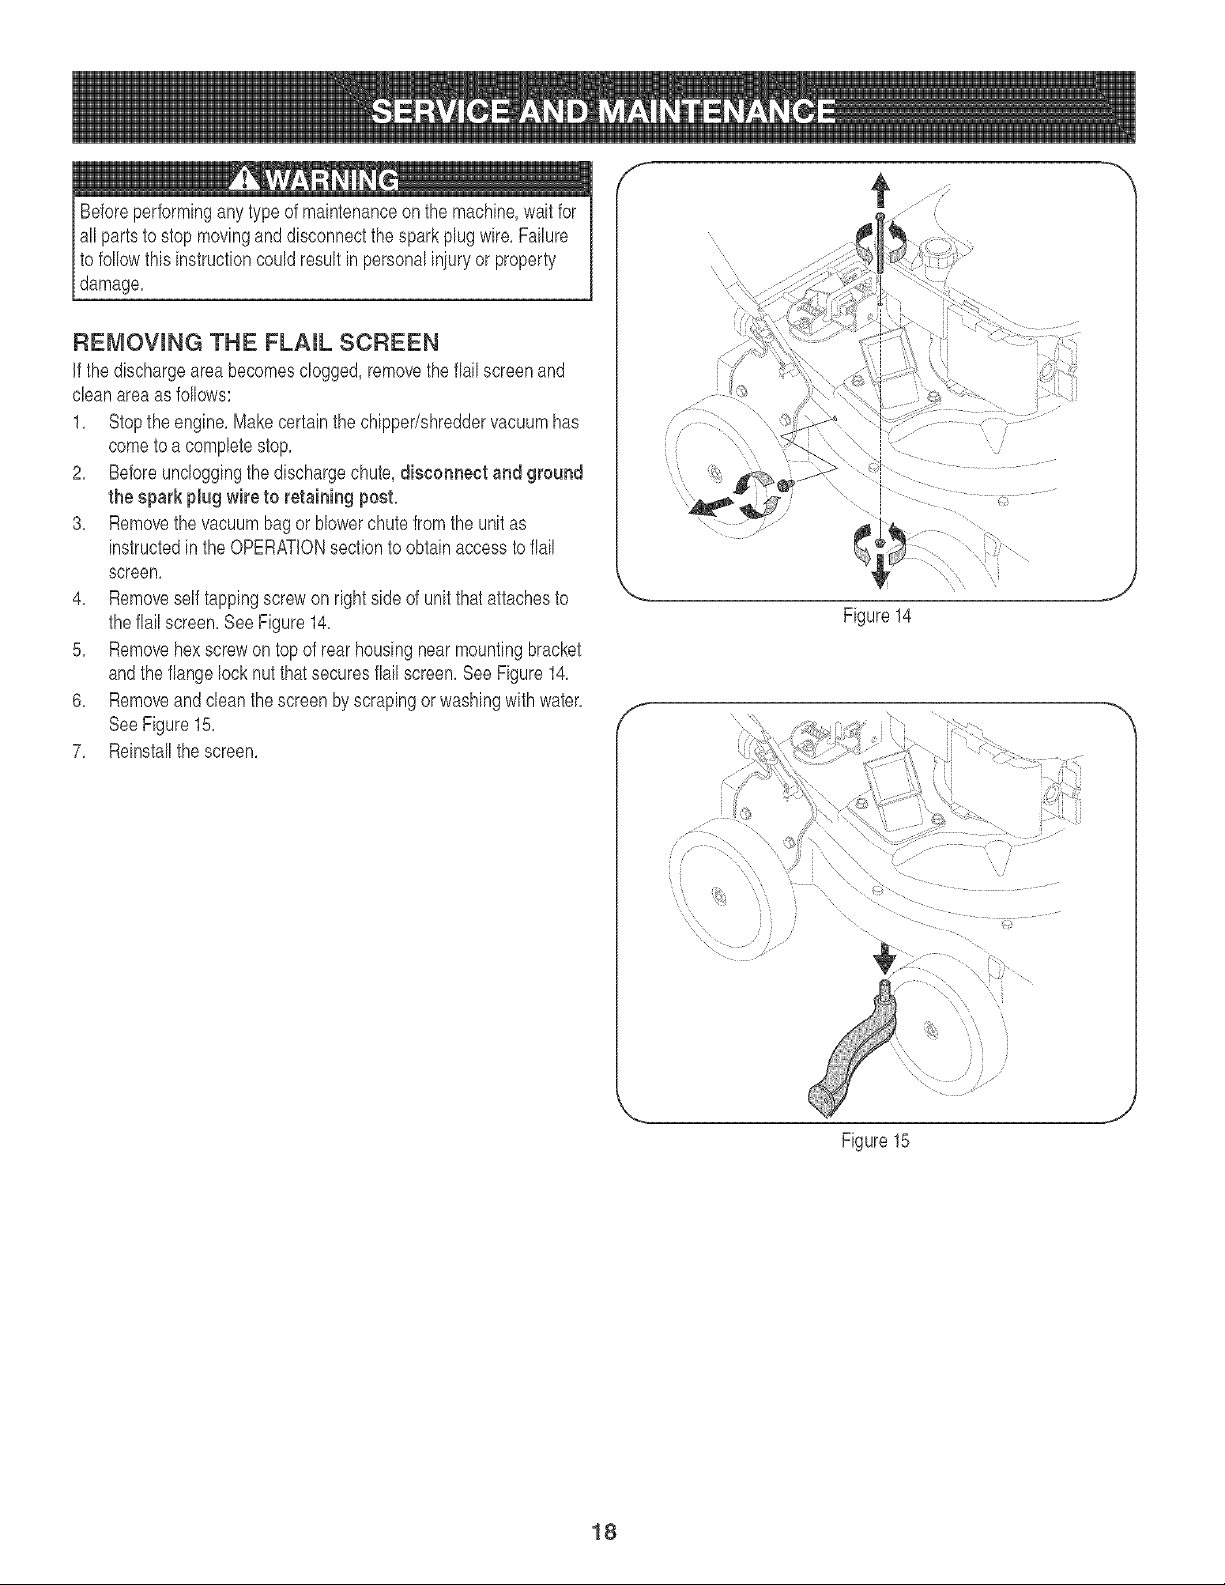
REMOVING THE FLAIL SCREEN
If the dischargearea becomesclogged,removetheflail screenand
cleanareaas follows:
1, Stopthe engine,Makecertainthe chipper/shreddervacuumhas
cometo a completestop,
2, Beforeuncloggingthe dischargechute,disconnect and ground
the spark plug wire to retaining pest,
3, Removethe vacuumbagor blowerchute from the unitas
instructedin the OPERATIONsectionto obtainaccess toflail
screen,
4, Removeself tappingscrewon rightside of unitthatattachesto
theflail screen,See Figure14,
5, Removehexscrewon top of rear housingnearmountingbracket
andthe flangelock nutthat securesflailscreen,SeeFigure14,
6, Removeand cleanthescreen byscrapingor washingwith water,
SeeFigure15,
7, Reinstallthescreen,
f
Figure14
Figure15
18
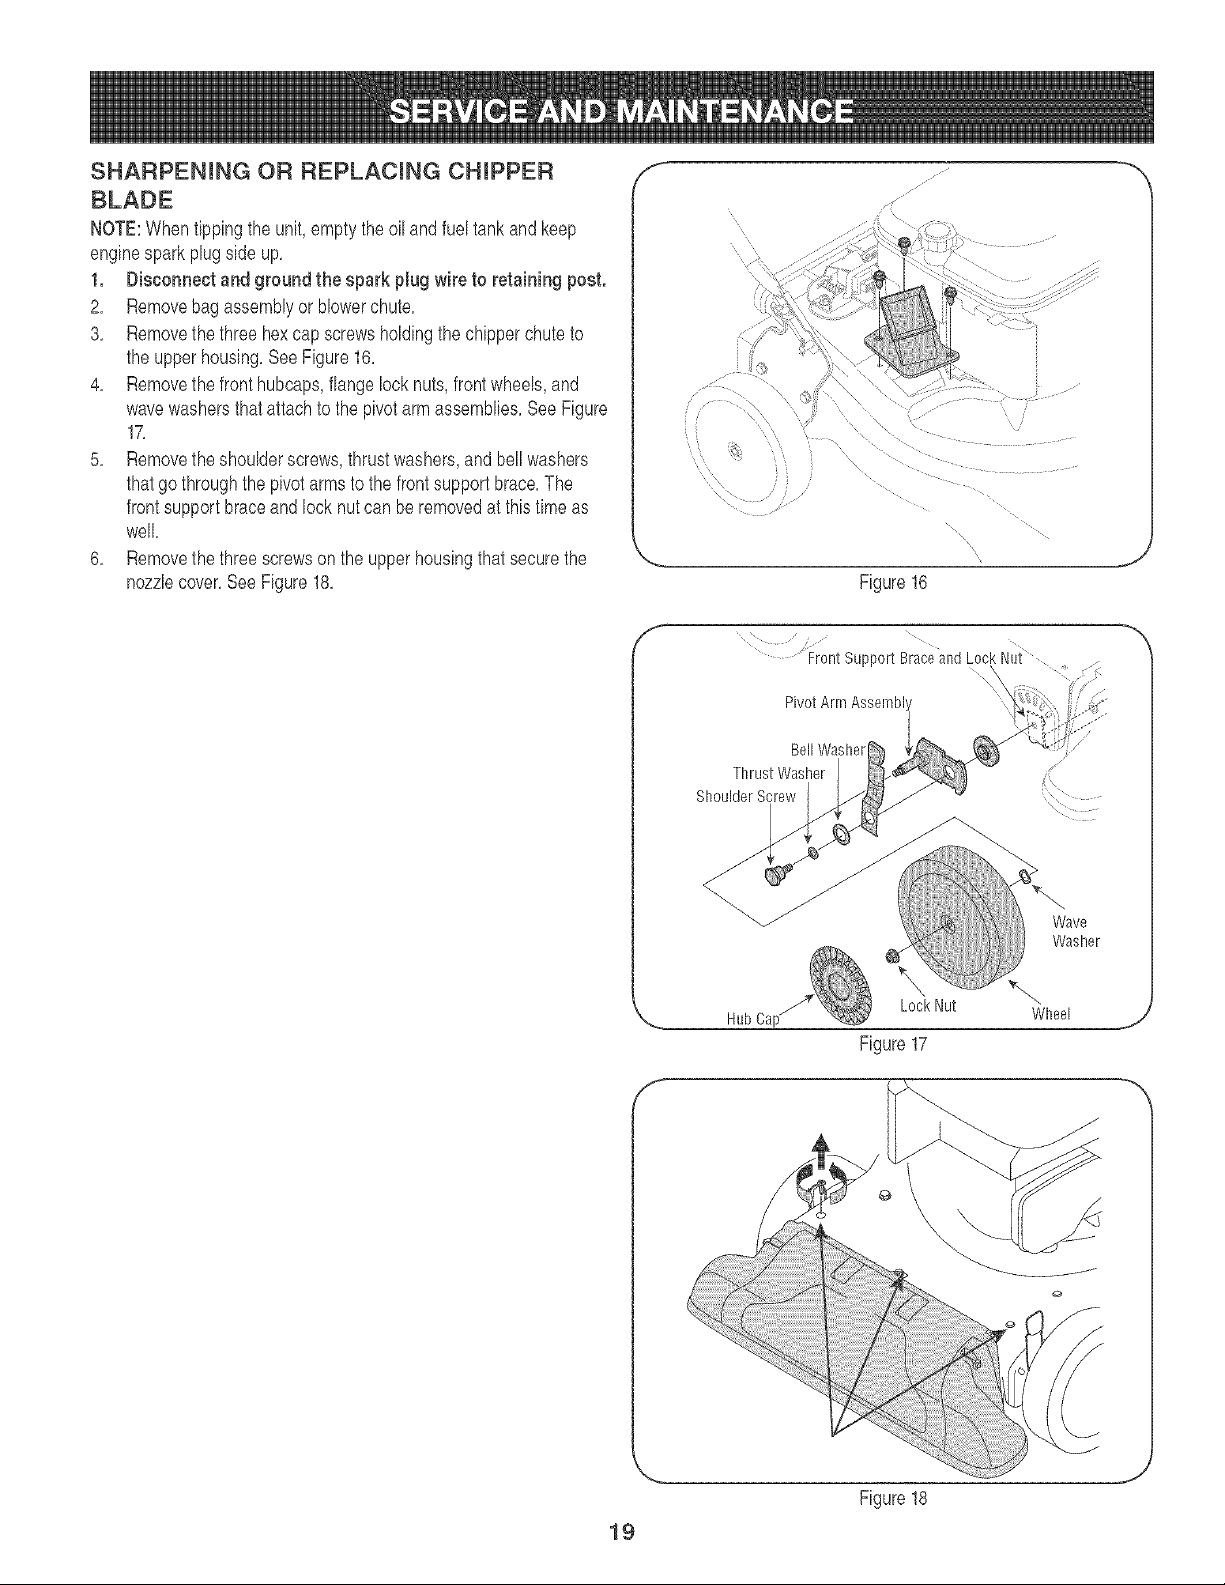
SHARPENmNGOF{REPLACmNGCHIPPER
NOTE:When tippingthe unit,emptythe oil and fuel tankandkeep
enginesparkplugside up,
1. Disconnect and ground the spark plug wire to retaining post.
2, Removebag assemblyor Newerchute,
3, Removethe three hexcap screwsholdingthe chipperchuteto
the upperhousing,See Figure16,
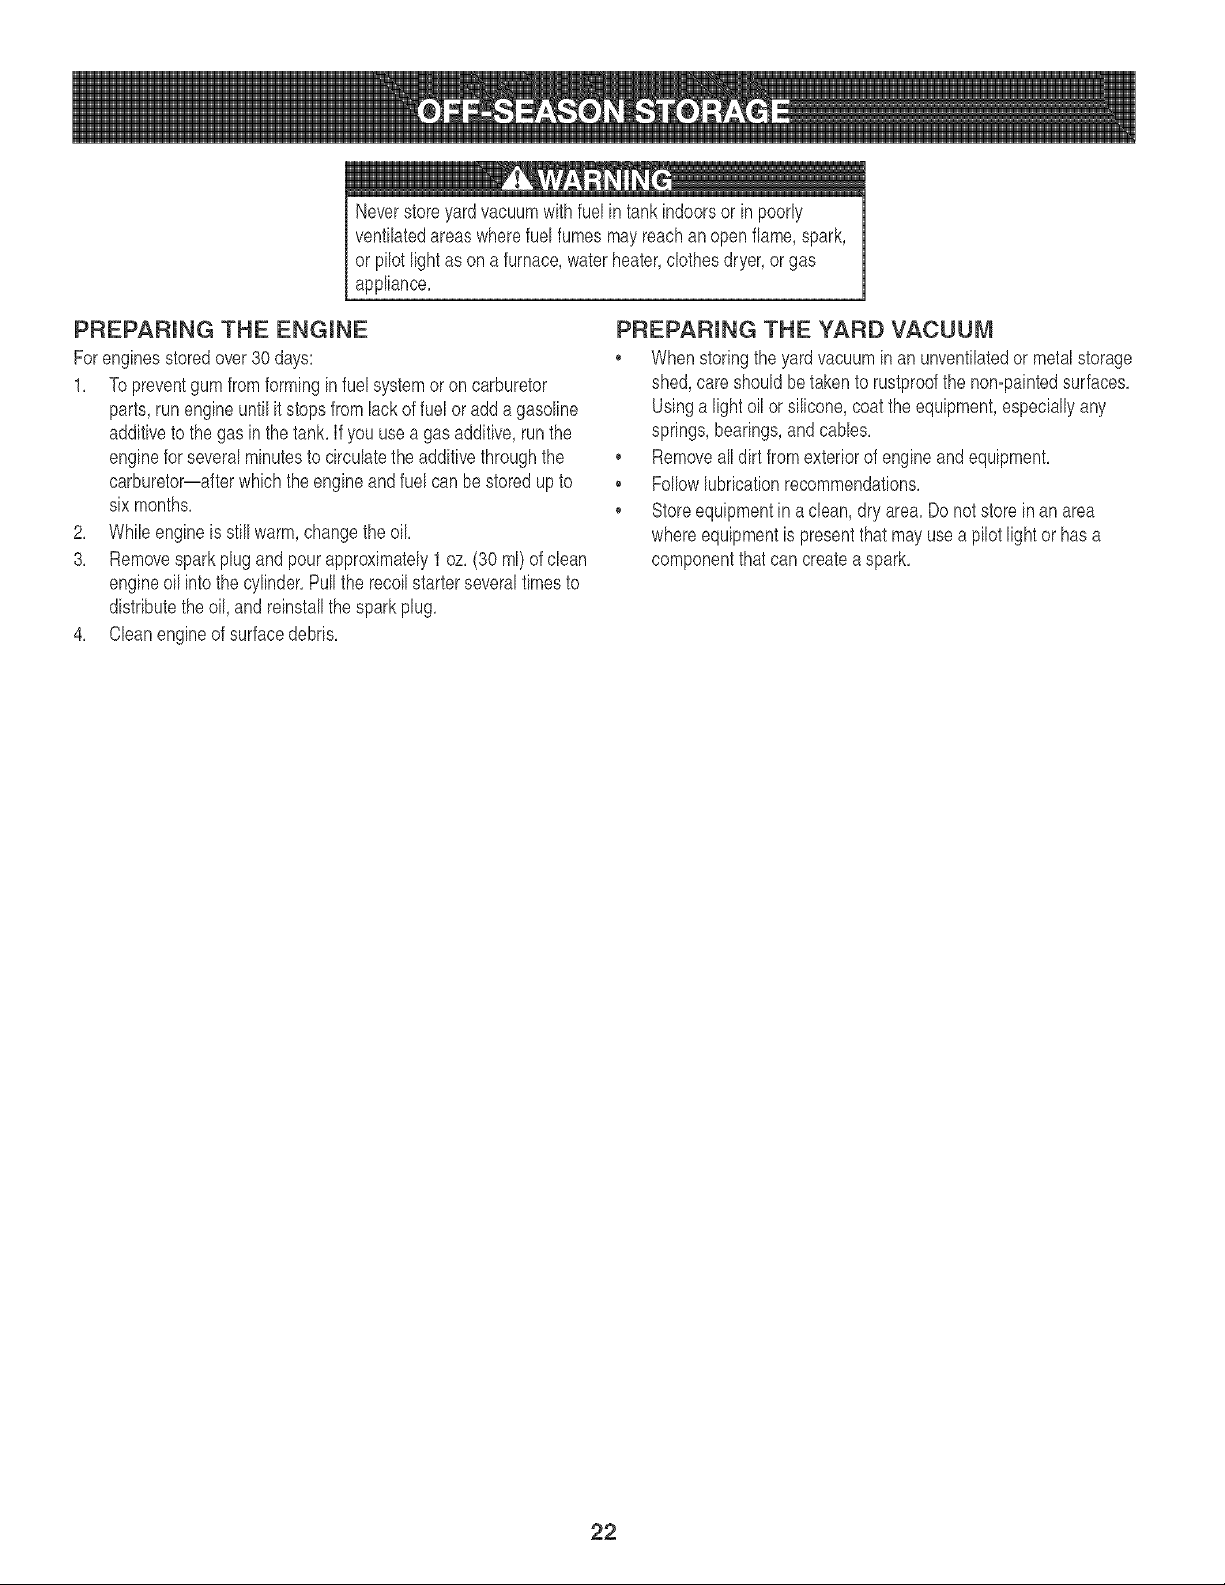
4, Removethe fronthubcaps,flangelock nuts,front wheels,and
wavewashersthat attachto the pivot armassemblies,SeeFigure
17,
5, Removethe shoulderscrews,thrustwashers,andbellwashers
thatgothroughthe pivotarms to the frontsupport brace,The
frontsupportbraceandlocknut can beremovedat this time as
well,
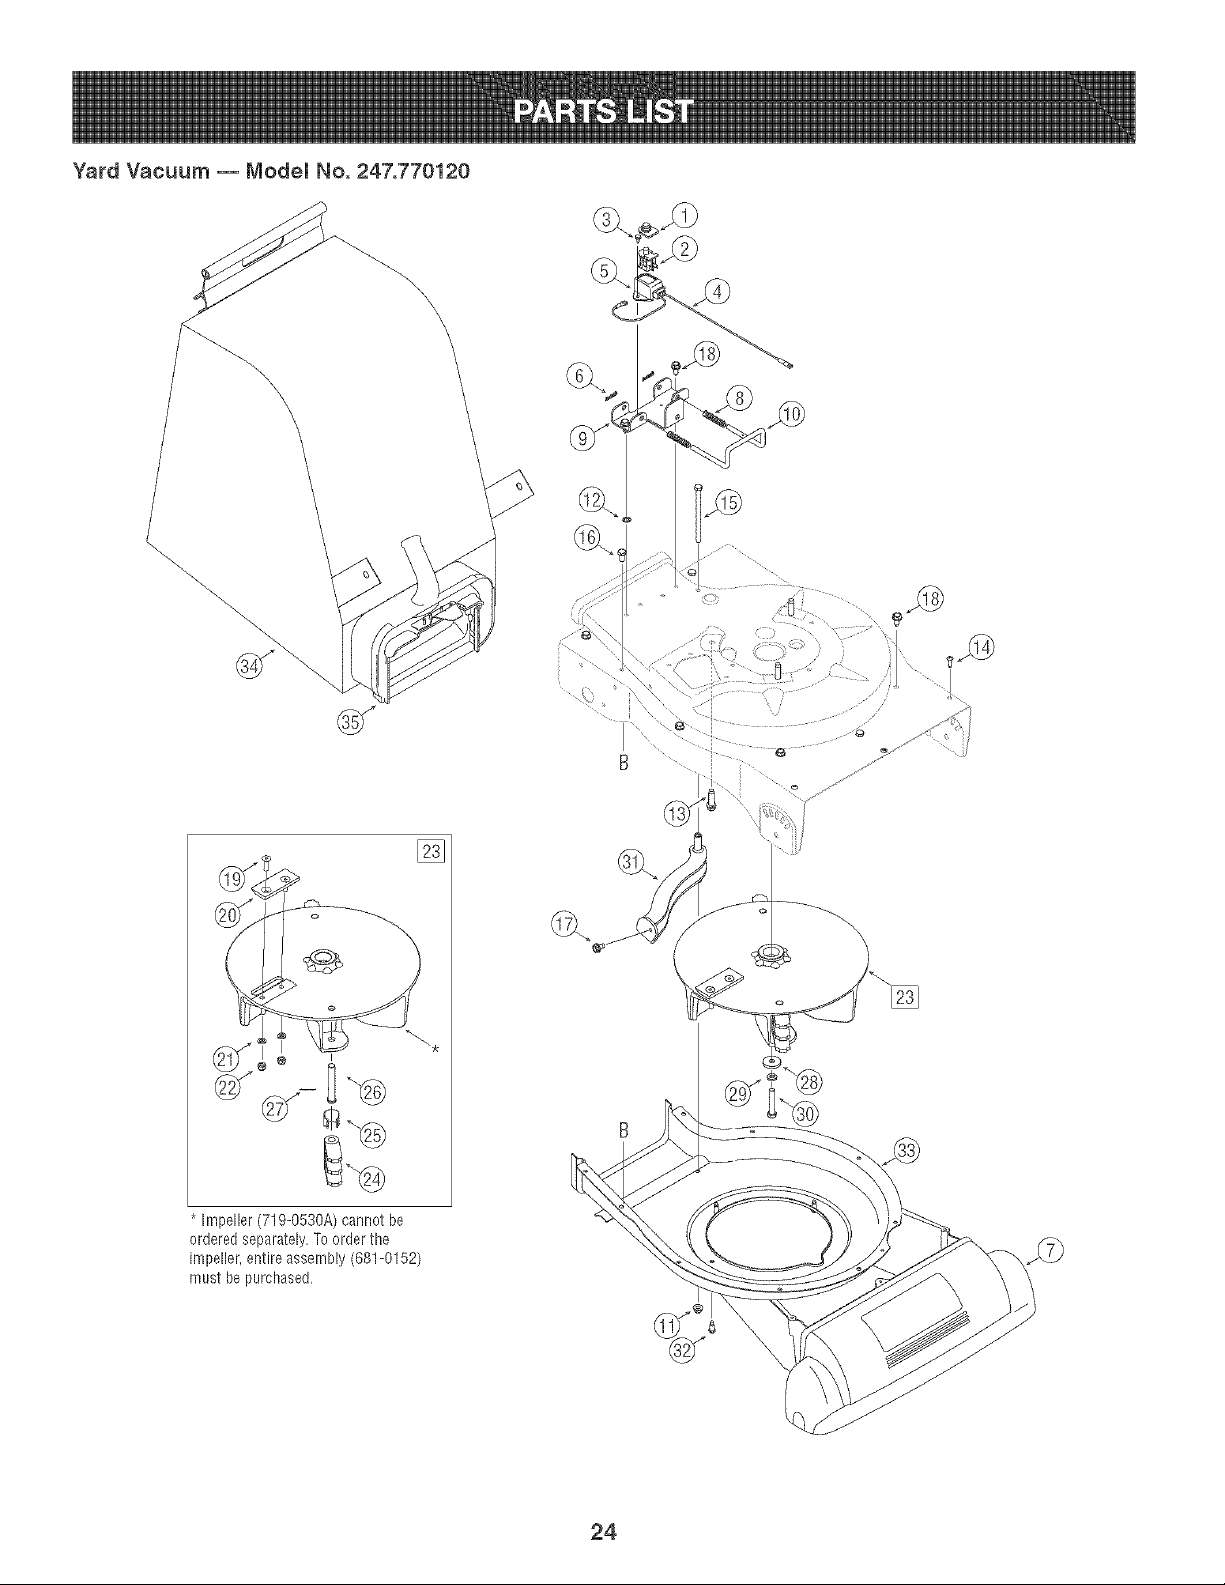
6, Removethe three screwson the upperhousingthat securethe
nozzlecover,See Figure18,
f
k.
f
jj
\
Figure16
....... front Support Brace and Lock Nui
Pivot
Bell Washer
Thrust Washer (\
Shoulder Screw
J
19
Wave
Washer
Lock Nut VV'heel
Hub Cap
Figure17
Figure18
J

7, Carefullyflit and support the unitupto provideaccessunderneath
to the nozzlemountinghardwareand impeller,Removethethree
shoulderbolts securingthe blackplasticlowerflail housingtothe
lowerhousing,Referto Figure19,
8, Tilttop of blackplasticlowerflail housingtowardthe engineto
remove,
9, Usinga 8/16"allenwrench,removethe flat headcap screwsthat
holdthe chipperbladeto the impeller,Thesescrewsareacces-
sibb throughthe openingcreatedwhenthe chipperchutewas
removedearlier,See Figure20,
10, The nutson the flat headcap screwscan be reachedfrom
underneathusinga 1/2-inchsocket,universal,andextension,
SeeFigure21,
11, Replaceor sharpenchipperblade,The bladecanbe sharpened
witha fib oron agrindingwheel
12, Whensharpeningblade,protecthandsby usingglovesand follow
theoriginalangleof grind,
18, Reassembbby performingthe previousstepsin the opposite
orderand mannerof removal,
NOTE:Tighten bladescrewsto 2SO-250 in-lbs,Makecertainchipper
bladeis reassembledwiththe sharpedge facingupward,
f
Black
Nozzle
f
............::
• / /
'i'i
,:: : .......... ...........
........... \
Shoulder Screws
Figure19
/i
Fiat Head Ca Screws
Chipper Blade
Figure20
J
f
Nuts
Impeller _\
\
2O
Figure21
J

MAINTENANCE SCHEDULE
Beforeperforminganytypeof maintenance/service,disengageall 1
controlsandstoptheengine,Waituntilall movingpartshavecometo
a completestop,Disconnectsparkplugwireandgroundit againstthe
enginetopreventunintendedstarting,Alwayswearsafetyglassesduring1
operationor whileperforminganyadiustmentsorrepairs, J
Followthe maintenanceschedulegivenbelow,Thischartdescribes
serviceguidelinesonly,Usethe ServiceLog columnto keeptrackof
completedmaintenancetasks,To locate the nearest Sears Service
Centeror to schedule service, simply contact Sears at
loS00o4oMYoHOME®.
EachUse
1st5= 8 hours
25 hours
50 hours
Annuallyor 100 hours
BeforeStorage
uUnderheavyload or in high temperatures
....! _:_
1, Engineoil level
2, Looseor missinghardware
3, Unitandengine,
1, Engineoil
1, Engineoilt
2, Aircleaner
3, Controllinkagesand pivots
1, Engineoil
1, Sparkplug
1, Fuelsystem
1, Check
2, Tightenorreplace
3, Clean
1, Change
1, Change
2, Cleanor replace
3, Lubewith light oil
1, Change
1, Clean,replace,re=gap
1, Runengineuntil it stopsfromlackof
fuelor addagasolineadditiveto the
gasin the tank,
21
Neverstoreyardvacuumwith fuel in tankindoorsor in poorly
ventilatedareaswherefuel fumesmay reachan openflame,spark,
or pilot lightas ona furnace,water heater,clothesdryer,or gas
appliance,
PREPARING THE ENGmNE
Forenginesstoredover30 days:
1, To preventgumfrom formingin fuelsystemor oncarburetor
parts,runengineuntil it stopsfromlackoffuel or add a gasoline
additiveto the gas in the tank, if you usea gas additive,run the
enginefor severalminutesto circulatethe additivethroughthe
carburetor--afterwhichtheengineandfuel can bestoredupto
six months,
2, Whib engineis still warm,changethe oil
3, Removesparkplugand pourapproximately1 oz,(30 ml)of clean
engineoil intothe cylinder,Pullthe recoilstarterseveraltimesto
distributethe oil, and reinstallthespark plug,
4, Cban engineof surfacedebris,
PREPARING THE YARD VACUUM
Whenstoringthe yardvacuumin an unventilatedor metalstorage
shed,careshouldbetakento rustproofthe non-paintedsurfaces,
Usinga lightoil orsilicone,coat the equipment,especiallyany
springs,bearings,andcabbs,
Removeall dirt fromexteriorof engineand equipment,
Followlubricationrecommendations,
Storeequipmentin a clean,dry area,Do not storein anarea
whereequipmentis presentthat may usea pilot lightor hasa
componentthat cancreatea spark,
22

Beforeperforminganytypeof maintenance/service,disengageall
controlsand stopthe engine,Waituntilallmovingpartshavecometo
acompletestop,Disconnectsparkplugwireandgroundit againstthe
I enginetopreventunintendedstarting,Alwayswearsafetyglassesduring
_operationorwhileperforminganyadiustmentsor repairs,
This section addresses minor service issues.To locatethe nearest Sears Service Center or to schedule service, simply contact Sears
at 1-800-4-MYoHOME®.
Enginefailsto start
Enginerunserratically
1, Throttle levernot in correctstartingposition
2, Chokenotin ON position
3, Sparkplugwire disconnected
4, Faultyspark plug
5, Fueltankemptyorstalefuel
6, Cannotpullrecoilcord
7, Safetyswitch notdepressed
8, Safetyswitch wireis not connectedto
engineor notproperlygrounded
1, UnitrunningonCHOKE
2, Sparkplugwire loose
3, Stalefuel
4, Waterordirt infuelsystem
5, Dirtyair cleaner
6, LowengineRPM
7, Carburetorout of adiustment
1, Engineoillevellow
2, Airflowrestricted
Engineoverheats
Enginehesitatesat highRPMs 1, Sparkpluggap settooclose 1,
Engineidles poorly 1, Fouledsparkplug 1,
2, Dirtyair cleaner 2,
Excessivevibration 1, Looseparts or damagedimpeller 1,
Unitdoesnot discharge 1, Dischargeareaclogged 1,
Rateof dischargeslows
considerablyor compositionof
dischargedmaterialchanges
2, Foreignobiectlodgedin impeller
3, LowengineRPM
4, Vacuumbag is full
1, LowengineRPM
2, Chipperbladedull
,,,,_{:,W_1__
1, Movethrottleleverto START/RUNposition,
2, MoveCHOKEto ON position,
3, Connectwireto spark plug,
4, Clean,adiustgap,or replace,
5, Filltank with clean, freshgasoline,
6, Obstructionlodgedin impeller,Disconnectspark
plugwireandremovelodgedobiect,
7, Safetyswitch mustbe depressedby the front tabon
the baghandlewhensecuringthe bag,
8, Connectsafetyswitchwire to engineconnectorand
groundto mountingbracket,
1, Movechokeleverto OFF position,
2, Connectandtightensparkplugwire,
3, Filltankwithfreshgasoline,
4, Drainfuel Refillwithfreshfuel
5, Cleanor replaceaircleanerfilter,
6, Alwaysrunengineat fullthrottle,
7, ContactyourSearsParts&RepairCenter,
1, Fillenginewithproperamountand typeof oil
2, Cleangrassclippingsanddebrisfromaroundthe
engine'scoolingfinsandblowerhousing,
Removespark plug and adiustgap,
Replacesparkplugandadiustgap,
Replaceair cleanercartridge,
Stopengineimmediatelyand disconnectspark plug
wire,ContactyourSearsParts & RepairCenter,
Stopengineimmediatelyand disconnectsparkplug
wire,Cleanflail screenand insideof dischargeopera
ing,
2, Stopengineand disconnectspark plug wire,Remove
lodgedobiect,
3, Alwaysrunengineat full throttle,
4, Emptybag,
1, Alwaysrunengineat full throttle,
2, Replacechipperbladeor contactyourSearsParts&
RepairCenter,
23
Yard Vacuum -- Model No. 247.770120
\
\
\
\
\
\
\.
* Impeller (719-0530A) cannot be
ordered separately•To order the
impeller, entire assembly (681-0152)
must be purchased,
[]
@.
24
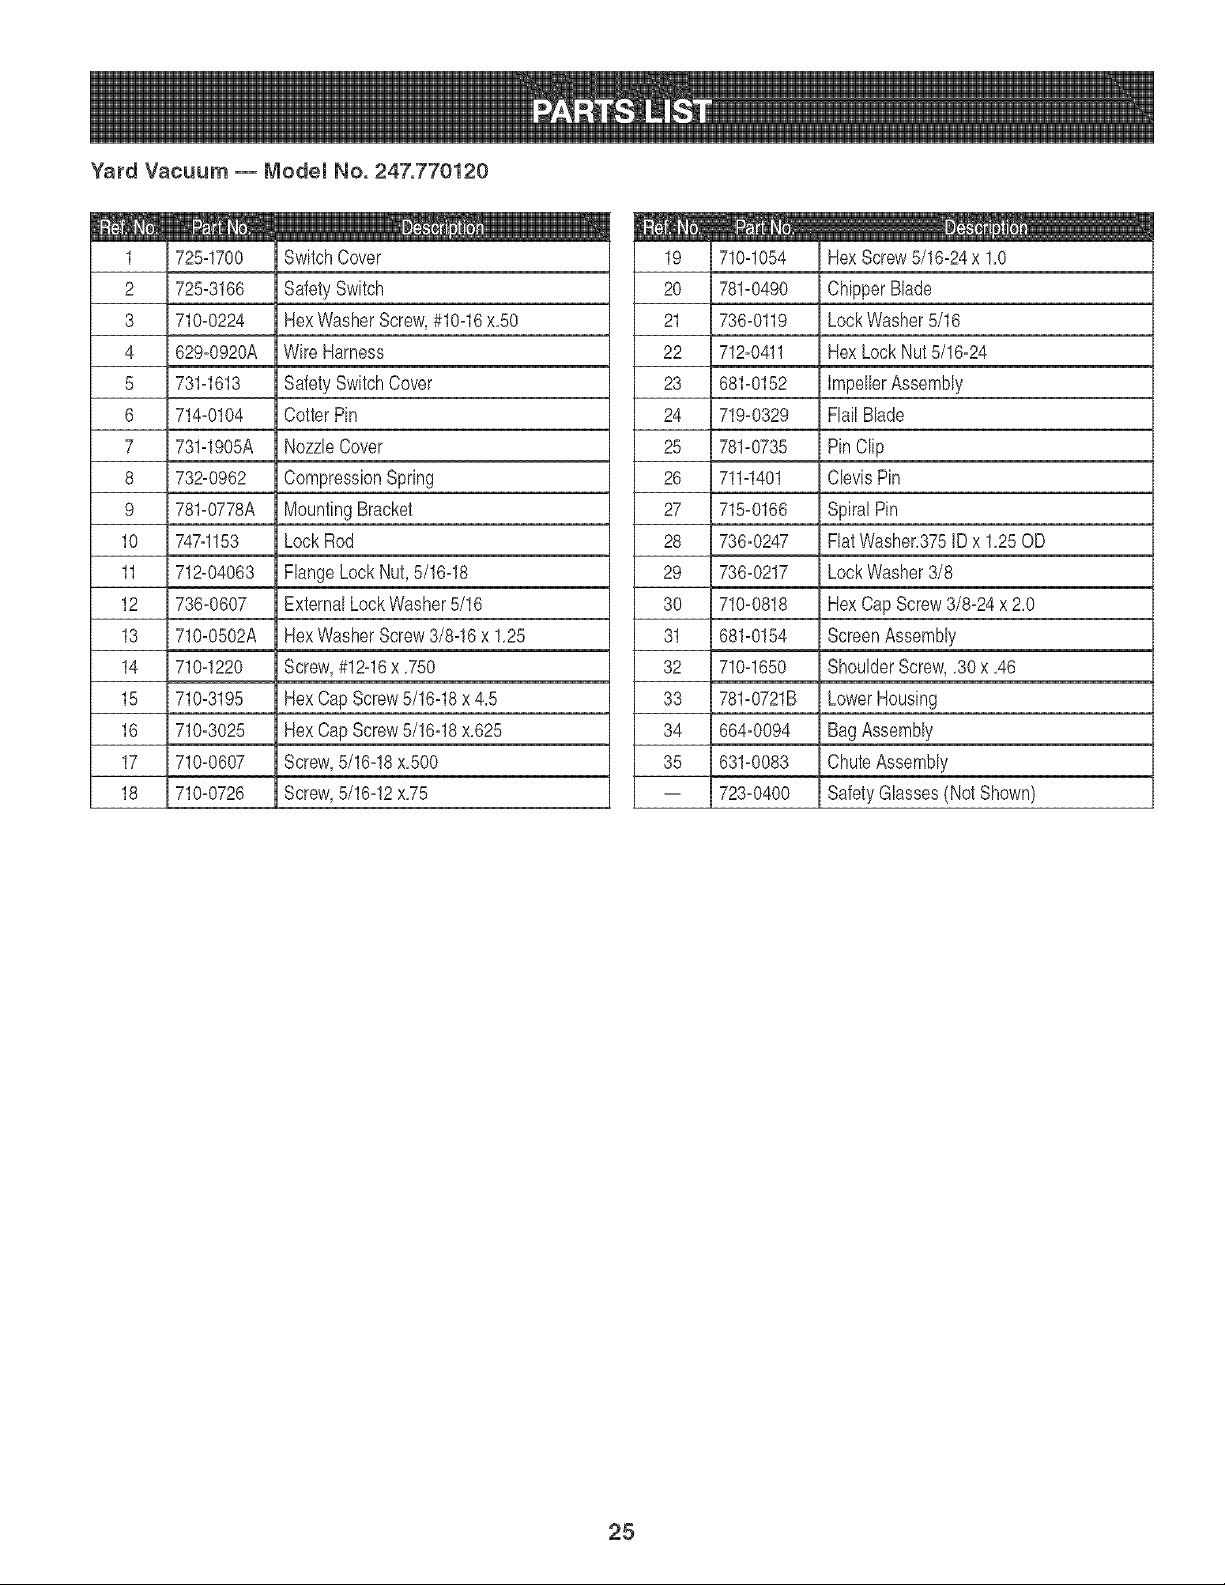
Yard Vacuum -- Model No. 247.770120
1 725q700 SwitchCover
2 725-3166 SafetySwitch
3 710-0224 HexWasherScrew,#10q6 x,50
4 629-0920A Wire Harness
5 731q613 SafetySwitchCover
6 714-0104 Cotter Pin
7 731q905A NozzleCover
8 732-0962 CompressionSpring
9 781-0778A MountingBracket
10 7474153 Lock Rod
11 712-04063 I FlangeLock Nut,5/16q8
12 736-0607 ExternalLockWasher5/16
13 710-0502A HexWasherScrew3/8q6 x 1,25
14 710q220 I Screw,#12q6x ,750
15 710-3195 HexCap Screw5/16q8 x 4,5
16 710-3025 HexCap Screw5/16q8 x,625
17 710-0607 I Screw,5/16q8 x,500
18 710-0726 Screw,5/16q2 x,75
19 710q054 HexScrew5/16-24x 1,0
20 781-0490 ChipperBlade
21 736-0119 Lock Washer5/16
22 712-0411 Hex Lock Nut 5/16-24
23 681-0152 ImpellerAssembly
24 719-0329 Flail Blade
25 781-0735 Pin Clip
26 711q401 ClevisPin
27 715_0166 Spiral Pin
28 736-0247 Flat Washer,375IDx 1,25OD
29 736-0217 Lock Washer3/8
30 710-0818 Hex Cap Screw3/8-24 x 2,0
31 681-0154 ScreenAssembly
32 710q650 ShoulderScrew,,30x ,46
33 781-0721B LowerHousing
34 664-0094 Bag Assembly
35 631-0083 ChuteAssembly
-- 723-0400 SafetyGlasses(Not Shown)
25
Yard Vacuum -- Model No. 247.770120
A
/
\
26
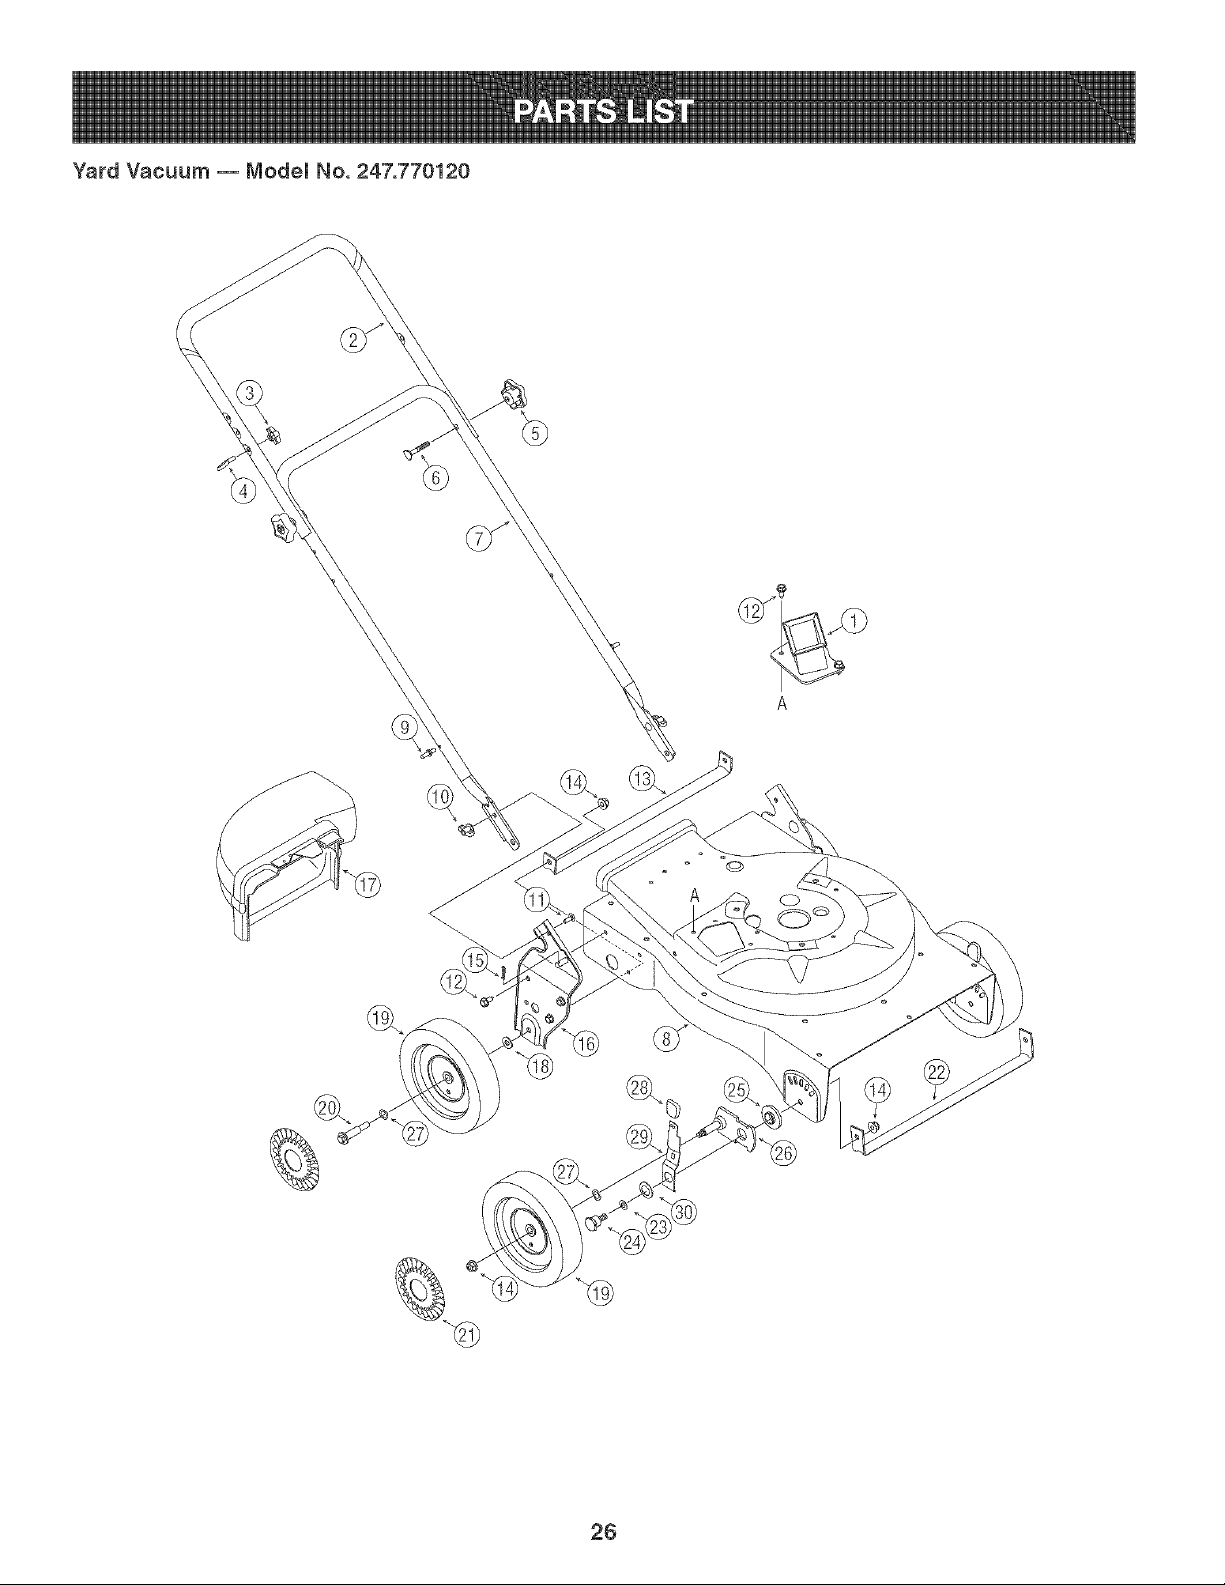
Yard Vacuum -- Model No. 247.770120
1
2
3
4
5
6
7
8
9
10
11
12
13
14
15
16
681-0122
749-04172
720-0279
710-1205
720-04072
710-1174
749-04165
781-04068
711-1293
712-0397
710-0703
710-0726
781-04081
712-04065
714-0104
681-0155A
ChipperChuteAssembly
UpperHandle
Knob
EyeBolt
StarKnob,5/16-18
CarriageBolt
LowerHandle
UpperHousing
Studs
Wing Nut 1/4-20
CarriageScrew1/4-20x,75
Screw,5/16-12x,750
RearWheel SupportBrace
FlangeLock Nut,3/8-16
Cotter Pin
HandleBracketAssy,LH
681-0156A HndleBrktAssy,RH (Not Shown)
17 631-0090 BlowerChute Assembly
18 736-0105 BellWasher,401[D x,870 OD
19 734-2004A Wheel,8x2,125
20 738-1015 ShoulderScrew3/8-16
21 731-0981A Hubcap
22 781-04082 FrontWheelSupportBrace
23 736-0314 ThrustWasher,375IDx,70OD
24 738-1172 ShoulderScrew,,750IDx ,500
25 741-0751 HeightAdiustmentBearing
26 687-02094 PivotArmAssembly
27 736-0232 WaveWasher,531IDx,781OD
28 720-0426 HeightAdiustmentKnob
29 732-1026 Spring Lever
30 736-0741 Bell Washer,760IDx,250D
27
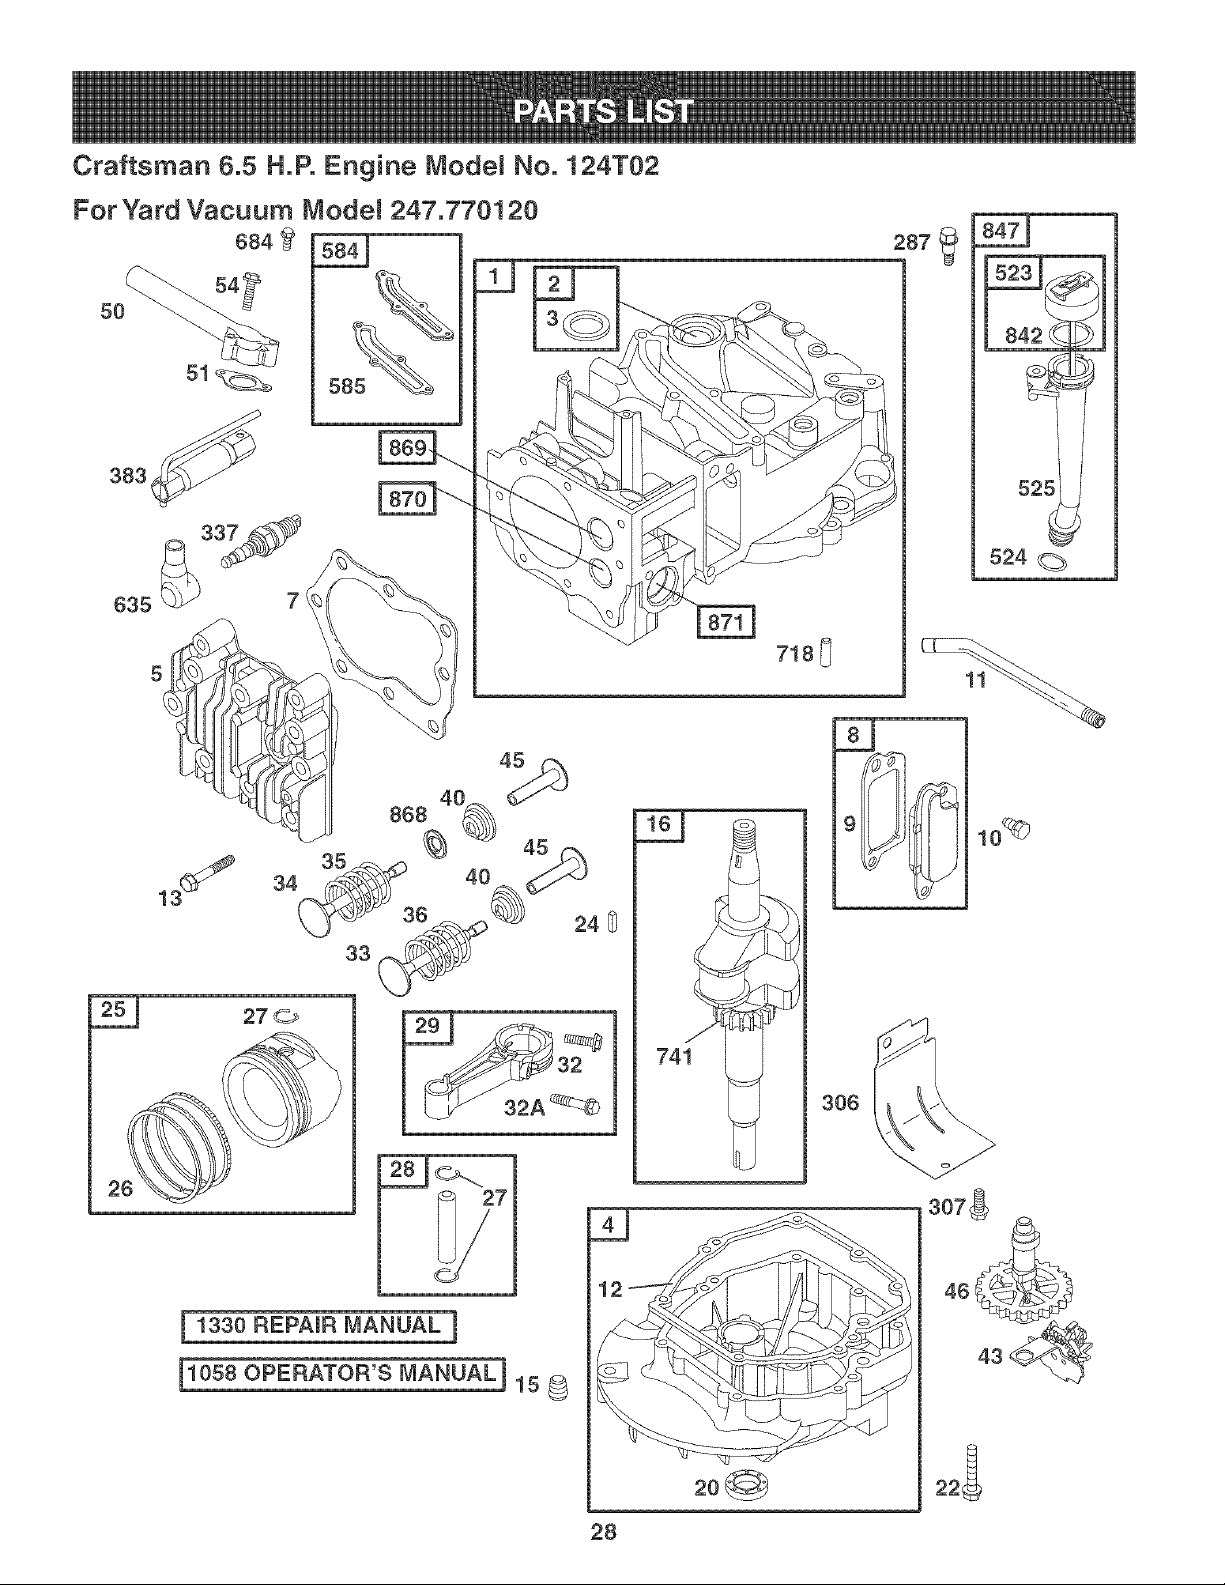
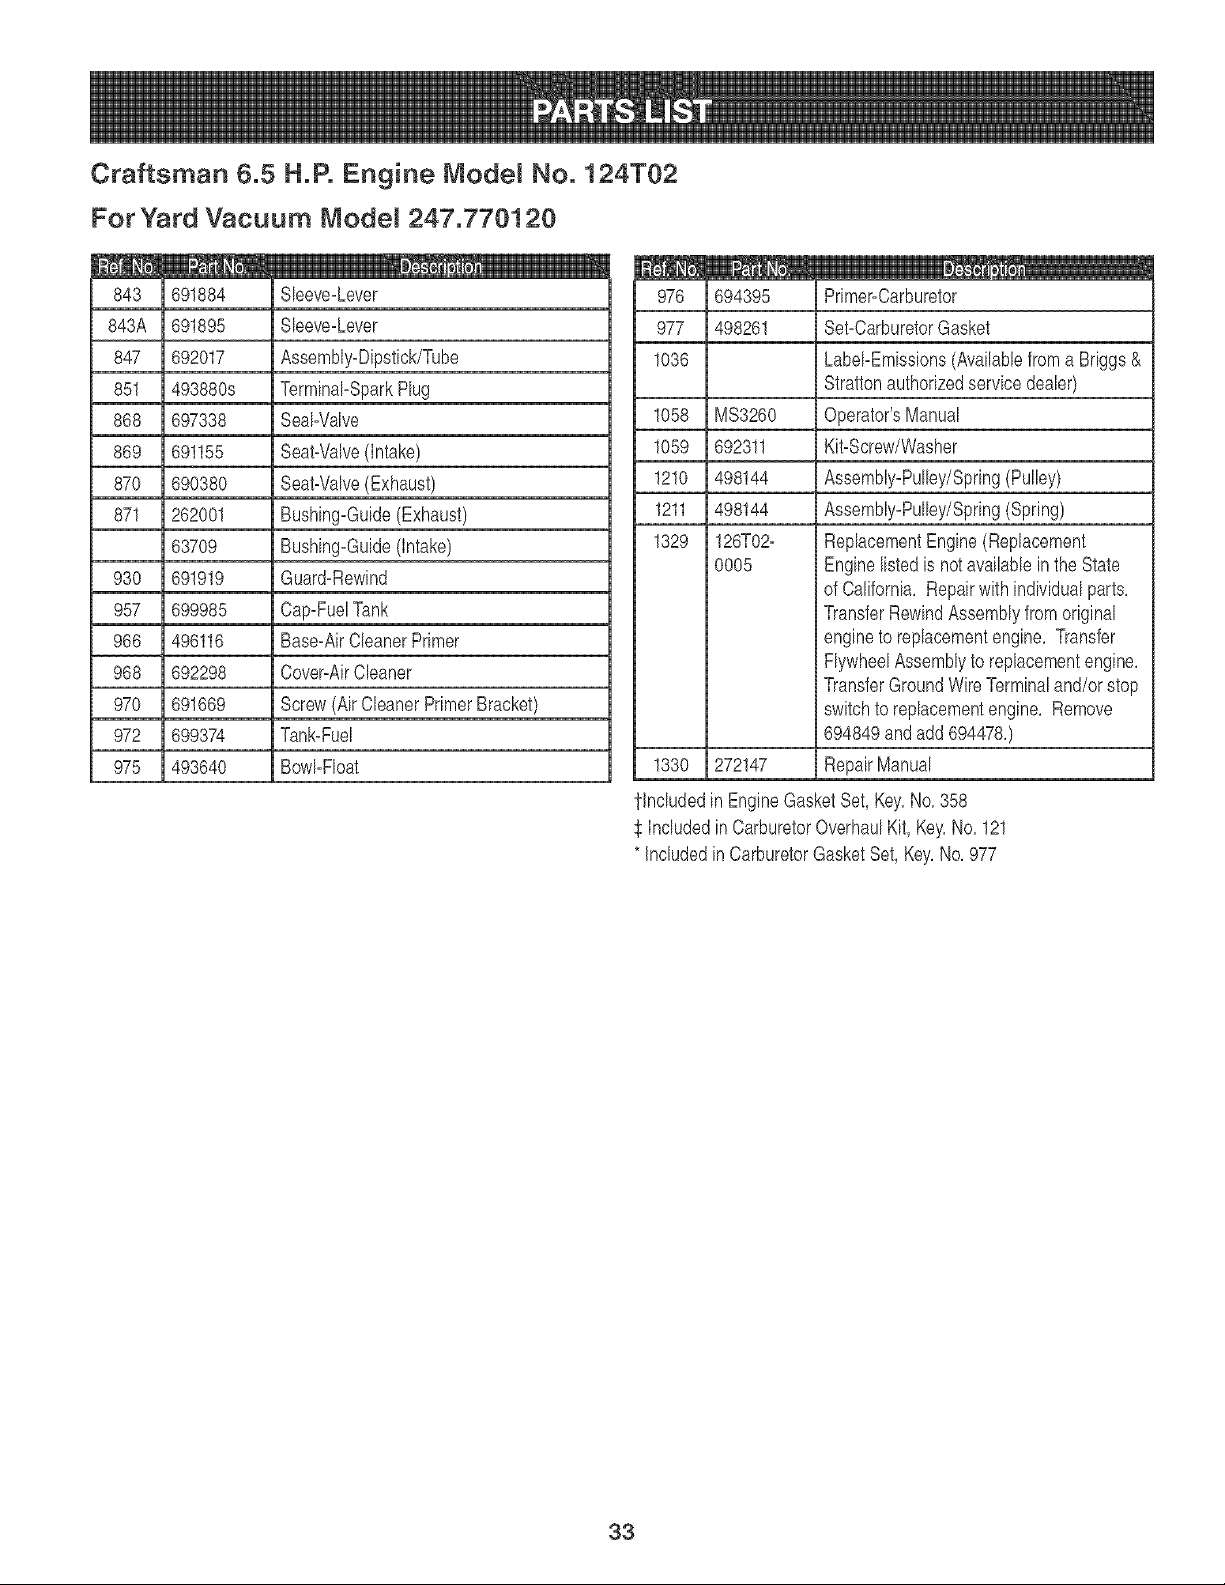
Craftsman 6.5 H.P. Engine IVlodel No. 124T02
For Yard Vacuum Model 247.770120
684
5O
383_
635
28
J
741 i
20@
306
Craftsman &5 H.P. Engine Model No. 124T02
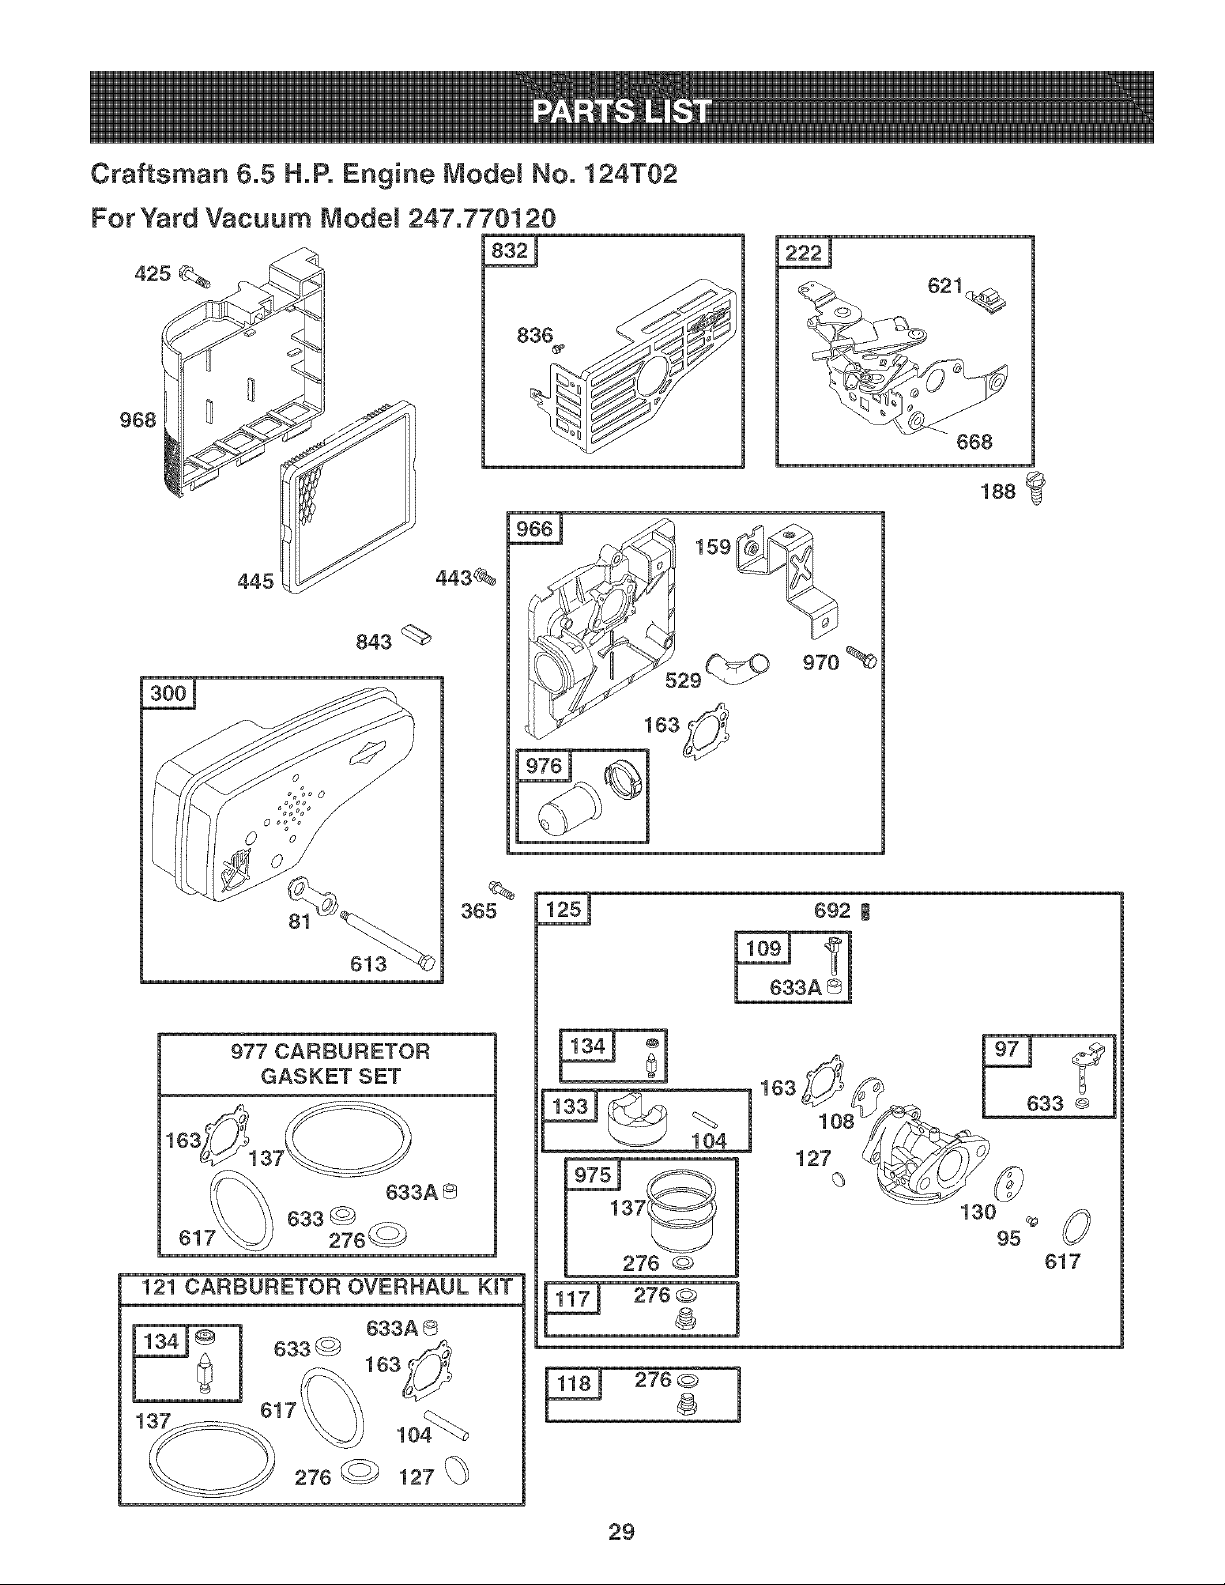
ForYard Vacuum Model 247.770120
425
968
668
188
445
443_
843
%
365
977 CARBURETOR
GASKET SET
163_137_
633A S
633 @
276@
121 CARBURETOR OVERHAUL KiT
633A ®
633 @
276 @ 127 (_
29_ 970%
692 I
1o4
276 @
29

Craftsman &5 H.P. Engine Model No. 124T02
For Yard Vacuum tVlodel 247.770120
358 ENGINE GASKET SET
3© 20@ 842_
163
304
334_
305
23
670@ 190_
1 1036 EMiSSiONS LABEL ]
65
58
592_
689 _C_
456 _
597 _
6O
3O

Craftsman 6.5 H.P. Engine Model No. 124T02
ForYard Vacuum Model 247.770120
1 697322 CylinderAssembly
2 399269 Kit-Bushing/Seal
3 299819St SeaFOil(MagnetoSide)
4 493279 Sump-Engine
5 691160 Head-Cylinder
7 692249t Gasket-CylinderHead
8 695250 BreatherAssembly
9 696125 Gasket-Breather
10 691125 Screw(BreatherAssembly)
11 691781 Tube-Breather
12 692232t Gasket-Crankcase
13 690912 Screw(CylinderHead)
15 691680 Plug-OilDrain
16 694478 Crankshaft
20 399781St SeaFOil(PTOSide)
22 691092 Screw(EngineSump)
23 691987 Flywheel
24 222698S Key-Flywheel
25 791097 PistonAssembly(Standard)
791326 PistonAssembly(,020"Oversize)
26 791098 RingSet (Standard)
791324 RingSet (,020"Oversize)
27 691866 Lock-PistonPin
28 499423 Pin-Piston
29 499424 Rod-Connecting
32 691664 Screw(ConnectingRod)
32A 695759 Screw(ConnectingRod)
33 262651S Valve-Exhaust
34 262652S Valve-intake
35 691270 Spring-Valve(intake)
36 691270 Spring-Valve(Exhaust)
37
4O
43
45
46
48
5O
51
54
55
58
6O
65
78
81
95
97
104
108
109
117
118
121
125
127
130
133
134
137
159
163
694086
692194
691997
690548
691449
790450
497465
272199St
691650
691421
697316
281434S
690837
691108
691740
691636
696565
6912425
691182
498593
498981
494870
498260
792253
6944685
696564
398187
3981885
6939815*
691753
272653St5"
Guard-Flywheel
RetaineFValve
SlingeFGovernor/Oil
Tappet-Valve
Camshaft
ShortBlock
Manifold-Intake
Gasket-Intake
Screw(intakeManifold)
Housing-RewindStarter
Rope-Starter(Cut to RequiredLength)
Grip-StarterRope
Screw(RewindStarter)
Screw(FlywheelGuard)
Lock-MufflerScrew
Screw(ThrottleValve)
Shaft-Throttle
Pin-FloatHinge
Valve-Choke
Shaft-Choke
Jet-Main(Standard)
Jet-Main(HighAltitude)
Kit-CarburetorOverhaul
Carburetor
Plug-Welch
Valve-Throttle
Float-Carburetor
Valve-Needle/Seat
Gasket-FloatBowl
Bracket-AirCleanerPrimer
Gasket-AirCleaner
31

Craftsman 6.5 H.P. Engine IVlodel No. 124T02
For Yard Vacuum Model 247.770120
187 691050 Line-Fuel(Cut to RequiredLength)
188 693399 Screw(ControlBracket)
190 690940 Screw(FuelTank)
202 691829 Link-MechanicalGovernor
209 691291 Spring-Governor
222 692150 Bracket-Control
227 690783 ControlLever-Governor
276 2717165" SealingWasher
287 690940 Screw(DipstickTube)
300 692038 Muffler
304 493294 Housing-Blower
305 691108 Screw(BlowerHousing)
306 690450 Shield-Cylinder
307 690345 Screw(CylinderShield)
332 690662 Nut(Flywheel)
333 802574 Armature-Magneto
334 691061 Screw(ArmatureMagneto)
337 802592S Plug-Spark
356 496381 Wire-Stop
358 497316 EngineGasketSet
363 19069 FlywheelPuller
365 692524 Screw(Carburetor)
383 89838s Wrench-SparkPlug
404 690272 Washer(GovernorCrank)
425 690670 Screw(AirCleanerCover)
443 692523 Screw(AirCleanerPrimerBase)
445 491588S Filter-AirCleanerCartridge
455 791960 Cup-Flywheel
456 692299 Plate-PawlFriction
459 281505 PawI-Ratchet
505
523
524
525
529
562
584
585
592
597
601
6O8
613
615
616
617
621
633
633A
635
668
670
684
689
692
718
741
832
838
842
691251
495264
692296f
495265
691923
691119
697734
691879f
690800
691696
791850
497680
691340
690340
698801
270344St_*
692310
6913215"
6938675"
66538S
493823
692294
690345
691855
690572
690959
790345
499034
690664
691031f
Nut(GovernorControlLever)
Dipstick
Seal-DipstickTube
Tube-Dipstick
Grommet
Bolt(GovernorControlLever)
Cover-BreatherPassage
Gasket-BreatherPassage
Nut(RewindStarter)
Screw(PawlFrictionPlate)
Clamp-Hose
Starter-Rewind
Screw(Muffler)
Retainer-GovernorShaft
Crank-Governor
Seal-ORing(intake Manifold)
Switch-Stop
Seal-Choke/ThrottleShaft
Seal-Choke/ThrottleShaft
Boot-SparkPlug
Spacer
Spacer-FuelTank
Screw(BreatherPassageCover)
Spring-Friction
Spring-Detent
Pin-Locating
Gear-Timing
Guard-Muffler
Screw(MufflerGuard)
Seal-ORing(DipstickTube)
32
Craftsman 6.5 H.P. Engine Model No. 124T02
ForYard Vacuum Model 247.770120
843 691884 Sleeve-Lever
843A 691895 Sleeve-Lever
847 692017 Assembly-Dipstick/Tube
851 493880s Terminal-SparkPlug
868 697338 Seal-Valve
869 691155 Seat-Valve(intake)
870 690380 Seat-Valve(Exhaust)
871 262001 Bushing-Guide(Exhaust)
63709 Bushing-Guide(intake)
930 691919 Guard-Rewind
957 699985 Cap-FuelTank
966 496118 Base-AirCleanerPrimer
968 692298 Cover-AirCleaner
970 691669 Screw(AirCleanerPrimerBracket)
972 699374 Tank-Fuel
975 493640 Bowl-Float
976 694395
977 498261
1036
1058 MS3260
1059 692311
1210 498144
1211 498144
1329 126T02-
0005
Primer-Carburetor
Set-CarburetorGasket
Label-Emissions(Availablefrom a Briggs&
Strattonauthorizedservicedealer)
Operator'sManual
Kit-Screw/Washer
Assembly-Pulley/Spring(Pulley)
Assembly-Pulley/Spring(Spring)
ReplacementEngine(Replacement
Enginelistedis notavailableinthe State
of California, Repairwithindividualparts,
TransferRewindAssemblyfromoriginal
engineto replacementengine, Transfer
FlywheelAssemblyto replacementengine,
TransferGroundWireTerminaland/or stop
switchto replacementengine, Remove
694849andadd 694478,)
1330 272147 RepairManual
tlncluded in EngineGasketSet, Key,No,358
$ Includedin CarburetorOverhaulKit, Key,No, 121
* Includedin CarburetorGasketSet,Key,No,977
33

(This page applicable in the U.S.A. and Canada only.)
Sears, Roebuck and Co., U.S.A. (Sears}, the California Air Resources Board (CARB)
and the United States Environmenta! Protection Agency (U.S. EPA)
Emission Control System Warranty Statement (Owner's Defect Warranty Rights and Obligations)
EMISSIONCONTROLWARRANTYCOVERAGEISAPPLICABLETOCERT!- YEAR 1997AND LATERENGINESWHICHARE PURCHASEDAND USED
FlED ENGINESPURCHASEDIN CALIFORNIAIN 1995ANDTHEREAF- ELSEWHEREINTHE UNITEDSTATES(ANDAFTERJANUARY1,2001 IN
TER,WHICHARE USED IN CALIFORNIA,ANDTOCERTIFIEDMODEL CANADA).
California and United States Emission Control Defects Warranty Statement
The CaliforniaAir ResourcesBoard(CARB),U.S.EPAandSearsare pleased enginefor the periodsof timelistedbelow,providedthere has beenno abuse,
to explainthe EmissionControlSystemWarrantyon your modelyear2000 and neglector impropermaintenanceof your smalloff-roadengine.Youremis-
latersmalloff-roadengine(SORE).In California,newsmall off-roadengines sion controlsystemincludespartssuch as thecarburetor,air cleaner,ignition
mustbe designed,builtand equippedto meettheState'sstringentanti-smog system,mufflerand catalyticconverter.Also includedmay be connectorsand
standards.Elsewhereinthe UnitedStates,newnon-road,spark-ignition otheremissionrelatedassemblies.Wherea warrantableconditionexists,Sears
enginescertifiedfor modelyear 1997and latermustmeetsimilarstandardsset will repairyour smalloff-roadengine at no cost to you includingdiagnosis,parts
forth bythe U.S.EPA.Sears mustwarranttheemissioncontrol systemonyour and labor.
Sears Emission Control Defects Warranty Coverage
Smalloff-roadenginesarewarrantedrelativeto emissioncontrolpartsdefects part onyour engineis defective,the part will be repairedor replacedbySears.
fora periodof oneyear,subjectto provisionsset forth below.Ifany covered
Owner's Warranty Responsibilities
Asthe smalloff-roadengineowner,you are responsiblefor theperformanceof provedmodifications.Youare responsiblefor presentingyour smalloff-road
therequiredmaintenancelistedinyour Operatingand MaintenanceInstruc- engineto an AuthorizedSearsService Dealeras soonas a problemexists.The
tions.Searsrecommendsthatyouretainallyour receiptscoveringmaintenance undisputedwarrantyrepairsshouldbe completedina reasonableamountof
on yoursmall off-roadengine,butSearscannotdenywarrantysolelyforthe time,not to exceed30 days.Ifyou haveanyquestionsregardingyourwarranty'
lackof receiptsor for yourfailureto ensurethe performanceof all scheduled rightsand responsibilities,you shouldcontacta SearsServiceRepresentative
maintenance.Asthe smalloff-roadengineowner,you shouldhoweverbe at 1--800--469--4663.Theemissionwarrantyis a defectswarranty.Defectsare
awarethat Sears maydenyyou warrantycoverageifyour smalloff-roadengine judgedon normalengineperformance.The warrantyis notrelatedto an in-use
ora part hasfailed dueto abuse,neglect,impropermaintenanceor unap- emissiontest.
Sears Emission Control Defects Warranty Provisions
Thefollowingare specificprovisionsrelativeto your EmissionControlDefectsWarrantyCoverage.It is in additionto the Searsenginewarrantyfor non-regulated
enginesfoundin theOperatingandMaintenanceInstructions.
1. WarrantedParts 3. NoCharge
Coverageunderthis warrantyextendsonly to the parts listed below(the Repairor replacementof any WarrantedPartwill be performedat no
emissioncontrol systemsparts)to the extentthese parts werepresenton chargeto the owner,includingdiagnosticlabor whichleadsto the
theenginepurchased, determinationthata WarrantedPartis defective,ifthe diagnosticwork is
a. FuelMeteringSystem performedat an AuthorizedSears ServiceDealer.For emissionswarranty
oColdstart enrichmentsystem servicecontact your nearestAuthorizedSears Service Dealeras listed in
oCarburetorand internalparts the "YellowPages"under"Engines,Gasoline,""GasolineEngines,""Lawn
oFuelPump Mowers,"or similarcategory.
b. Air InductionSystem 4. Claimsand CoverageExclusions
oAir cleaner Warrantyclaimsshall be filed in accordancewiththe provisionsofthe
oIntakemanifold Sears EngineWarrantyPolicy.Warrantycoverageshall be excludedfor
c. IgnitionSystem failures of WarrantedPartswhichare not originalSears parts or because
of abuse, neglector impropermaintenanceas setforth in the Sears
oSparkplug(s) EngineWarrantyPolicy.Searsis not liable to coverfailuresof Warranted
oMagnetoignitionsystem Partscausedby the useof add-on,non-original,or modifiedparts.
d. CatalystSystem 5. Maintenance
oCatalyticconverter Any WarrantedPartwhich is notscheduledfor replacementas required
oExhaustmanifold maintenanceor which is scheduledonly for regularinspectionto the effect
oAir injectionsystemor pulsevalve of repair or replaceas necessary"shall be warrantedas to defectsfor the
e. MiscellaneousItemsUsed inAboveSystems warrantyperiod.Any WarrantedPartwhich is scheduledfor replacement
oVacuum,temperature,position,time sensitivevalves
as requiredmaintenanceshallbe warrantedasto defectsonly for the
andswitches periodof time upto the first scheduledreplacementforthat part. Any
* Connectorsand assemblies replacementpart that is equivalentin performanceand durabilitymay
2. Lengthof Coverage be usedin the performanceof any maintenanceor repairs.The owneris
Searswarrantsto the initialownerand eachsubsequentpurchaserthat responsibleforthe performanceof all requiredmaintenance,as definedin
theWarrantedParts shall befree from defectsin materialsandworkman- the SearsOperatingandMaintenanceInstructions.
ship whichcausedthe failureof the WarrantedPartsfor a periodof one 6. ConsequentialCoverage
yearfrom the datethe engineis deliveredto a retailpurchaser. Coveragehereundershallextend to the failure of any engine components
caused bythefailure of anyWarrantedPart still underwarranty.
Inthe USAand Canada,a 24 hour hot line, 1-800-469-4663,has a menuof pre-recordedmessagesofferingyou engine maintenanceinformation.
34

Look For Relevant Emissions E)urabHity Period and
Air hde× mnformation On Your Engine Emissions Labe_
Engines that are certified to meet the California Air Resources Board (CARB) Tier 2 Emission Standards must
display information regarding the Emissions Durability Period and the Air index. Sears, Roebuck and Co., U.S.A.
makes this information available to the consumer on our emission labels.
The Emissions Durability Period describes the number of hours of actual running time for which the engine is
certified to be emissions compliant, assuming proper maintenance in accordance with the Operating & Mainte-
nance Instructions. The following categories are used:
Moderate: Engine is certified to be emission compliant for 125 hours of actual engine running time.
Intermediate: Engine is certified to be emission compliant for 250 hours of actual engine running time.
Extended: Engine is certified to be emission compliant for 500 hours of actual engine running time.
For example, a typical walk-behind lawn mower is used 20 to 25 hours per year. Therefore, the Emissions
Durability Period of an engine with an intermediate rating would equate to 10 to 12 years.
The Air Index is a calculated number describing the relative level of emissions for a specific engine family. The
lower the Air Index, the cleaner the engine. This information is displayed in graphical form on the emissions label.
After Ju_y 1,2000, Look For Emissions Compliance Period
On Engine Emissions Compliance Labe_
After July 1, 2000 certain Sears, Roebuck and Co., U.SoA. engines will be certified to meet the United States
Environmental Protection Agency (USEPA) Phase 2 emission standards. For Phase 2 certified engines, the Emis-
sions Compliance Period referred to on the Emissions Compliance label indicates the number of operating hours
for which the engine has been shown to meet Federal emission requirements.
For engines less than 225 cc displacement, Category C = 125 hours, B = 250 hours and A = 500 hours.
For engines of 225 cc or more, Category C = 250 hours, B = 500 hours and A = 1000 hours.
This is a generic representation of the emission labeltypically found on a certified engine.
35
Deciaraci6n de garantia ...................... PSgina 36
Acuerdo de Protecci6n Para
Reparaciones ....................................... PSgina 37
Practicas operaci6n seguras ............... Paginas 38-39
Montaje ................................................ Paginas 40-43
Operaci6n ............................................ PSginas 44-47
Servicio y Mantenimiento .................... Paginas 48-53
Aimacenamiento fuera de temporada__ P_gina 54
Soluci6n de problemas ...................... Pagina 55-56
Etiquetas de seguridad ....................... Pagina 7
Lista de piezas .......................................... Pagina 24
Nqmero de servicio ..................... Cubierta posterior
Garant_a completa de un afio para la aspiradora para patios Craftsman
Esteequipoestb,cubiertopor una garantiade unaho,sbmpre quese mantenga,lubriquey aiustede acuerdoconlas instruccionesdel presente
manualdel operador.Durantcel aho de garanfia,si esteequiposufrc cualqubr fallaproducidapordefectosen materiabso manodeobra,
DEVUCLVALOA SUCENTRODE PARTES& REPARAClONSEARSMASCERCANO,y ScarsIoreparar_sin ningOncargo.Elserviciode
garanfiaa domicilioestAdisponibleperose aplicar_,un cargode traslado.
Esta garantia no cubre:
. Artfculosde duraci6nlimitadaquc sufrcndcsgastebaio condicioncsnormabs de uso, tabs como buiiasde cnccndido,purificadorcsde
aire,correasy filtrosde aceite.
. Rcemplazoo reparacionesde Ilantascausadasporpinchadurasconobietosexteriorescomo,poreiemplo,clavos,espinas,paloso vidrios,etc.
• Reparacionesnecesariasdebidoa abusodel operador,incluyendo,perosin limitarsea ellos,losdahoscausadospor obietos,tabs como
pbdras, desechosde metalo trozosde maderade untamahodemasiadogrande,obietosque hacenimpactoque puedendoblar la
estructurao el cSrter,o sobreaccbrarel motor.
Reparacionesnecesariasdebidoa negligenciadel operador,incluyendoentre otros,dahosmecb,nicoy electricoocasionadopor un
almacenamientonoapropiado,falla porel usode aceitede gradoy/o cantidadnoapropiadao fallapot nodar mantenimientoal equipode
acuerdocon las instruccionescontenidasen el manualdel operador.
. Limpbzao reparacionesal motor(sistemade combustible)provocadasporuncombustibbcontaminadou oxidado(vieio). Engeneral,el
combustibbdebeutilizarseen un periodono mayorde 30 diasa partir desu adquisici6n.
. Equiposutilizadosparafines comcrcialcso de alquiler.
Estagarantfas61otendr&validezdurante90 dias si este productose utilizaen cualquiermomentoparafines comerciabs o de alquiler.
Estagaranfias61otendrAvalidezmbntras el productose utiliceen los EstadosUnidos.
Estagaranfiale otorgaderechoslegalesespecificos,peroustedpodriagozarde otros derechosen raz6nde su lugarde residencia.
Sears, Roebuck and Co., Hoffman Estates, IL 60179
Caballosdefuerza:
Tipo de aceite del motor:
Capacidadde aceitedel motor:
Capacidadde combustible:
Buiias:
Separaci6nde lasbuiias:
6.5
SAE30
18onzas
1 1/22 cuartos
Champion@RJ19LM
.020"
Np3merode modelo ..........................................................
Np3merode serie ..............................................................
Fechade compra.............................................................
Registrearribael nOmerodel modelo,el nOmerode serb y la fecha
de compra
@Sears Brands,LLC 3(}

Felicitacionesper haberrealizadounaadquisici6ninteligente.El
productoCraftsman@que haadquiridoestAdisehadoy fabficado
parabfindar muchosahosde funcionamientoconfiable.Perocome
todoslosproductosa vecespuederequefirde reparaciones.Esen
ese mementocuandoel disponerde unAcuerdode protecci6npara
reparacionesle puedeahorrardineroy problemas.
Acontinuaci6nse detallanlos puntosincluidosen el Acuerdo:
• Sertdcio experto prestadopernuestros12,000especialistasen
reparacionesprofesionales
• Servicio ilimitadosin cargo paralas piezasy la manedeobraen
todaslas reparacionescubiertas
. Reemplazodel producto si noes posiblerepararel producto
cubierto
. Descuentode 10%del precionormaldelservicioy delas piezas
relacionadascon el mismoquenoest6ncubiertasper el acuerdo;
adem_,s,10%delprecionormalde lavefificaci6nde manten-
imientopreventive
• Ayuda r_pida por tel_fono- asistenciatelef6nicaa cargode un
t6cnicode Searsparalos productosque requierenreparaci6n
a domicilio,adem_sde una programaci6nconvenienteparala
reparaci6n
Unavez adquiridoel Acuerdo,puedeprogramarelserviciocon
tan s61orealizaruna Ilamadatelef6nica,Puede Ilamaren cualquier
mementodel dia o de la nocheo programarunservicioen linea,
Searsdisponede m_,sde 12,000especialistasenreparaciones
profesionalesque tienenaccesoa m_sde4,5 millonesde piezasy
accesoriosde buenacalidad,Estees el ripe de profesionalismoen
el quepuedeconfiarparaque leayudea prolongarla vida Otildel
productorecientementeadquiridoen losahos pervenir,iAdquierahey
su acuerdode protecci6nparareparaciones!
Se aplican determinadas limitacionee y e×clusiones. Para obtener
informaciSn adicional y precios Ilame al 1-800-827o6655.
Se_icio de instalaci6n de Sears
Sideseasolicitarla instalaci6nprofesionalde Searsde aparatos
dom6sficos,dispositivospara abfir portones,calentadoresde aguay
otrosarticulosdom6sticosimportantes,en losEstadosUnidosIlame
al 1-800-4-MY-HOME®.
37
La presenciade estesfmboloindicaque se trata de
instruccionesimportantesde seguridadquese deben
respetarparaevitar poneren peligro su seguridad
personaly/o materialy lade otras personas.Leay siga
todaslas instruccionesde estemanualantesde porter
en funcionamientoesta maquina.Si no respetaestas instruccionespodr[a
provocarlesionespersonales.Cuandoyea estesimbolo,ipreste atenci6na
la advertencia!
Su responsabilidad: Restrinia el uso de esta m_quina motorizada
a las personas que lean, comprendan y respeten las advertencias e
instrucciones que aparecen en este manual yen la m_,quina.
Esta m;Jquinafueconstruidaparaser operadade acuerdocon las reglas
de seguridadcontenidasen este manual.AI igual quecon cualquiertipo
de equipo motorizado,un descuidoo error por partedel operadorpuede
producirlesionesgraves.Esta maquinaes capazde amputarmanosy pies
y dearrojarobjetoscon gran fuerza. Deno respetarlas instruccionesde
seguridadsiguientesse puedenproducirlesionesgraveso lamuerte.
El escapedel motorde este producto,algunosde suscomponentesy
algunoscomponentesdelvehfculocontieneno liberansustanciasqdmicas
que el estadode Californiaconsideraque puedenproducircancer,defectos
de nacimientou otros problemasreproductivos.
CAPACITACION
o Lea,entienday cumplatodas las instruccionesincluidasen la m;Jquina
yen los manualesantesde montarlay utilizarla.Guardeestemanual
en un lugarseguroparaconsultasfuturasy regulares,asi como para
solicitarrepuestos.
o Familiar[cesecon todos loscontrolesy su operaci6nadecuada.Sepa
c6modetener la maquinay c6modesengranarlos controlesrapidam-
ente.
o No permitanuncaque losniRosmenoresde 16 afrosutilicen esta
m_.quina.Los nif_osde 16afrosy mas mayoresdebenleery comprender
las instruccionesde operaciony las reglasde seguridadcontenidasen
estemanual,y tambi6ndebensercapacitadosy estarsupervisadospor
unode los padres.
o Nuncapermitaquelos adultosoperen estamaquinasinrecibir antesla
instruccionapropiada.
o Mantengaa los transeOntes,ayudantes,mascotasy niRosal menosa
75 pies de lamaquinamientrasesta operando.Detengala maquinasi
alguienentraen lazona.
Nuncaenciendaun motoren espacioscerradoso en unazonacon poca
ventilaci6n.Elescapedel motorcontienemonoxidode carbono,un gas
inodoroy letal.
o No pongalas manoso los pies cerca de las piezasrotatoriaso en las
camarasde alimentaci6nni en laabertura de descarga.Elcontactocon
el motorrotatoriopuedeproducir la amputacionde dedos, manoso pies.
o Nuncatrate de destaparla toma de alimentaci6no la aberturade
descarga,ni tratede sacar ovaciar la bolsadela aspiradora,nide
revisary repararla maquinamientrasel motoresta en marcha.Apague
el motory espere hastaquetodas las piezasmovilesse hayandetenido
por completo.Desconecteel cablede labujfay pongalode maneraque
haga masacontrael motor.
PREPARATIVOS
o Inspeccioneminuciosamenteelareaderideutilizar;Jelequipo.Retire
todaslaspiedras,botellas,latasu otrosobjetosextrafiosquepuedanser
levantadosoarrojadoscausandolesionespersonaleso daRosa lamaquina.
o Paraprotegerselos ojosutilice siempreanteojoso antiparrasde
seguridadmientrasopera la m;Jquinao mientrasla ajustao repara.Los
objetos arrojadosque rebotanpuedenlesionargravementelavista.
o Utilicezapatosde trabajo resistentes,de suelafuerte, as[ como
pantalonesy camisasajustados.Las prendassueltaso las alhajas
puedenquedaratrapadasen laspiezasm6viles.Nuncautilice la
mb.quinadescalzoo con sandalias.Utilice guantesde trabajode cuero
cuandoalimentematerialper el canal de la cortadora.
o Antesde encenderla maquinacontrolequetodoslospernosy tornillos
est6nbienajustadosparacomprobarquelamaquinaseencuentraen
condicionessegurasde operaci6n.Ademas,realiceunainspecci6nvisual
de la maquinaa intervalosfrecuentesparacontrolarsi lamismaesta
daFlada.
o Mantengao reemplacelas etiquetasde seguridade instruccionessegOn
sea necesario.
o Paraevitar lesionespersonaleso dares materialessea sumamente
cuidadosoal manipularlagasolina.Lagasolinaes altamenteinflamable
y sus vaporespuedencausar explosiones.Se puedelesionargrave-
mentesi derramagasolina sobre ustedo sobrela ropaya que se puede
encender.Lavesela piely cambiesede ropa de inmediato.
o Utilices61orecipientespara gasolinaautorizados.
o Apaguetodosloscigarrillos,cigarros,pipasy otrasfuentesde combusti6n.
o Nuncacarguecombustibleen la maquinaen un espaciocerrado.
o Nuncasaque latapa del gas niagreguecombustiblemientrasel motor
estacaliente o en marcha.
o Dejequeel motorse enfriepor Io menosdos minutosantesde volvera
cargar combustible.
o Nuncarecargueeltanque de combustible.Lleneel tanqueno m;Jsde
1/2pulgadapor debajode la basedel cuello del filtro para dejar espacio
para ladilataci6ndel combustible.
o Vuelvaa colocar latapa de lagasolinay ajListelabien.
o Limpielagasolinaderramadasobre el motory el equipo.Trasladela
maquinaa otra zona. Espere5 minutos antesde encenderel motor.
o Nuncaalmacenela m;Jquinao el recipientede combustibleen un
espaciocerrado dondehayafuego,chispaso luz piloto (porejemplo,
hornos,calentadoresde agua,calefactores,secadoresde ropa,etc.)
o Parareducirel riesgo de incendiomantengalamaquinalimpia de
pasto,hojasy de acumulaci6nde otros desechos.Limpielosderrames
de aceiteo combustibley saquetodos los desechosembebidoscon
combustible.
o Dejequela maquinase enfr[eper Io menos5 minutesantes de
guardarla.
38
OPERACION
, No pongalas manoso los piescerca de las piezas rotatoriaso en las
camarasde alimentacionni en laabertura de descarga.El contactocon
el motorrotatoriopuedepro@@ la amputacionde de@s, manoso pies.
o Antesde encenderla maquinacompruebeque el canal de lacortadora,
latoma de alimentaciony la camarade corte estanvacias y sin
desechos.
o Inspeccioneminuciosamentetodo el materialque @sea triturar y saque
losobjetos metalicos,piedras,botellas,latasu otrosobjetosextra_os
que puedenocasionarlesioneso da_arla maquina.
o Siel motorgolpea unobjetoextra_oo si la maquinaempiezaa producir
un sonidopococomOno unavibraci6n,@agueel motorde inmediato.
Dejequeel motorse detengapor completo.Desconecteel cablede la
bujfa,pongalode maneraquehagamasacontrael motory sigaestos
pasos:
1. Inspeccionela ma.quinaparaversiesta da_ada.
2. Repareo reemplacelas piezasdaF_adas.
3. Controlesi hay piezasflojasy ajListelaspara asegurarquela maquina
funcionedemaneraseguray continua.
o No permitaque se acumulematerialprocesadoen lazona de descarga.
El mismopuedeobstaculizarla descargaadecuaday provocarel
retornodel materiala traves de la aberturade alimentaci6n.
o No intentetriturar ni picarmaterialde mayortama_o al especificadoen
la maquinao en estemanual.Se podr[anproducirlesioneso da_os.
o Nuncatrate de destaparlatoma de alimentaci6no la aberturade
descargamientrasel motorestaen marcha.Apagueel motory espere
hastaquetodas las piezasquese muevense hayan detenidopor
completo,desconecteel cable de la buj[ay pongalode maneraque
haga masacontrael motorantesde sacar losescombros.
o Nuncaoperela maquinasin que la bolsa de la aspiradoray el canal de
descargaest@ conectadosa la maquinacomo corresponde.Nunca
vac[enicambie la bolsa de la aspiradoramientrasel motorestb,en
marcha.El extremoconcierrede la bolsa de la aspiradoradebe quedar
cerradotodo el tiempo mientraslaopera.
o Nuncaoperela maquinasi el pico de ingresoo la uni6nopcionalpara la
manguerano estanconectadosa la maquinaadecuadamente.Nunca
intenteconectaro cambiarningunade estas unionesmientrasel motor
estb,en marcha.
o Mantengatodos losprotectores,desviadoresy dispositivosde seguridad
en su hgary en buenascondiciones.
o Mientrasalimentamaterialdentrode lamaquinamantengasu rostro
y sucuerpodetrasy hacia un costadodel canalde lacortadora para
evitarlesionespor retrocesosaccidentales.
o Nuncaopereesta maquinasin buenavisibilidado ihminaci6n. Siempre
debe estarsegurode queesta bienafirmadoy sostengabienlas
manijas.
o Noopere estam_Jquinaen superficiescongrava.
o Noopere estamaquinaestandobajolosefectos del alcoholo de
drogas.
o El silenciadory el motorse calientany puedenproducir quemaduras.No
lostoque.
o Nuncalevanteotransporte la maquinacuandoel motorestaencendido.
MANTENJMJENTO Y ALMACENAMmENTO
, Nuncamanipulelosdispositivosde seguridadde manera imprudente.
Controleperiodicamenteque funcionende formaadecuada.
o Controlefrecuentementequetodos lospernosy tornillosesten bien
ajustadosparacomprobarque la maquinase encuentraen condiciones
segurasde funcionamiento.Ademas,realiceuna inspeccionvisual de
la maquinapara controlarsi la mismaestadaRaday reparelade ser
necesario.
o Antesde limpiar,repararo inspeccionarla maquina,detengael motor
y compruebequeel mismoy quetodas las piezasm6vilesse hallan
detenido. Desconecteel cabledela bujfay pongalode maneraque
haga masacontrael motorpara evitar quese enciendade manera
accidental.
o No cambiela configuraciondel reguladordel motorni acelerede-
masiadoel mismo.El reguladorcontrolala velocidadmaximasegurade
operaci6ndel motor.
o Mantengao reemplacelas etiquetasde seguridade instruccionessegOn
sea necesario.
o Siga lasinstruccionesde estemanualparacargar,descargar,transpor-
tary almacenardemaneraseguraesta maquina.
o Nuncaalmacenelamb,quinao el recipientede combustibleen un
espaciocerrado dondehayafuego,chispaso hz piloto como por
ejemplo,calentadoresde agua, hornos,secadoresde ropa,etc.
o Consultesiempreel manualdel operador paraconocerlas instrucciones
adecuadasparael almacenamientofueradetemporada.
o Si debe vaciareltanque de combustible,hagaloal airelibre.
o Respetelas normasreferentesa la disposici6ncorrectay las reglamen-
tacionessobre gas, combustible,etc. paraprotegerel medioambiente.
No modifique el motor
Paraevitarlesionesgraveso la muerte,no modifiqueelmotorbajoninguna
circunstancia.Si cambialaconfiguraci6ndel reguladorel motorpuededescon-
trolarsey operara velocidadesinseguras.Nuncacambielaconfiguraci6nde
fabricadel reguladordel motor.
39
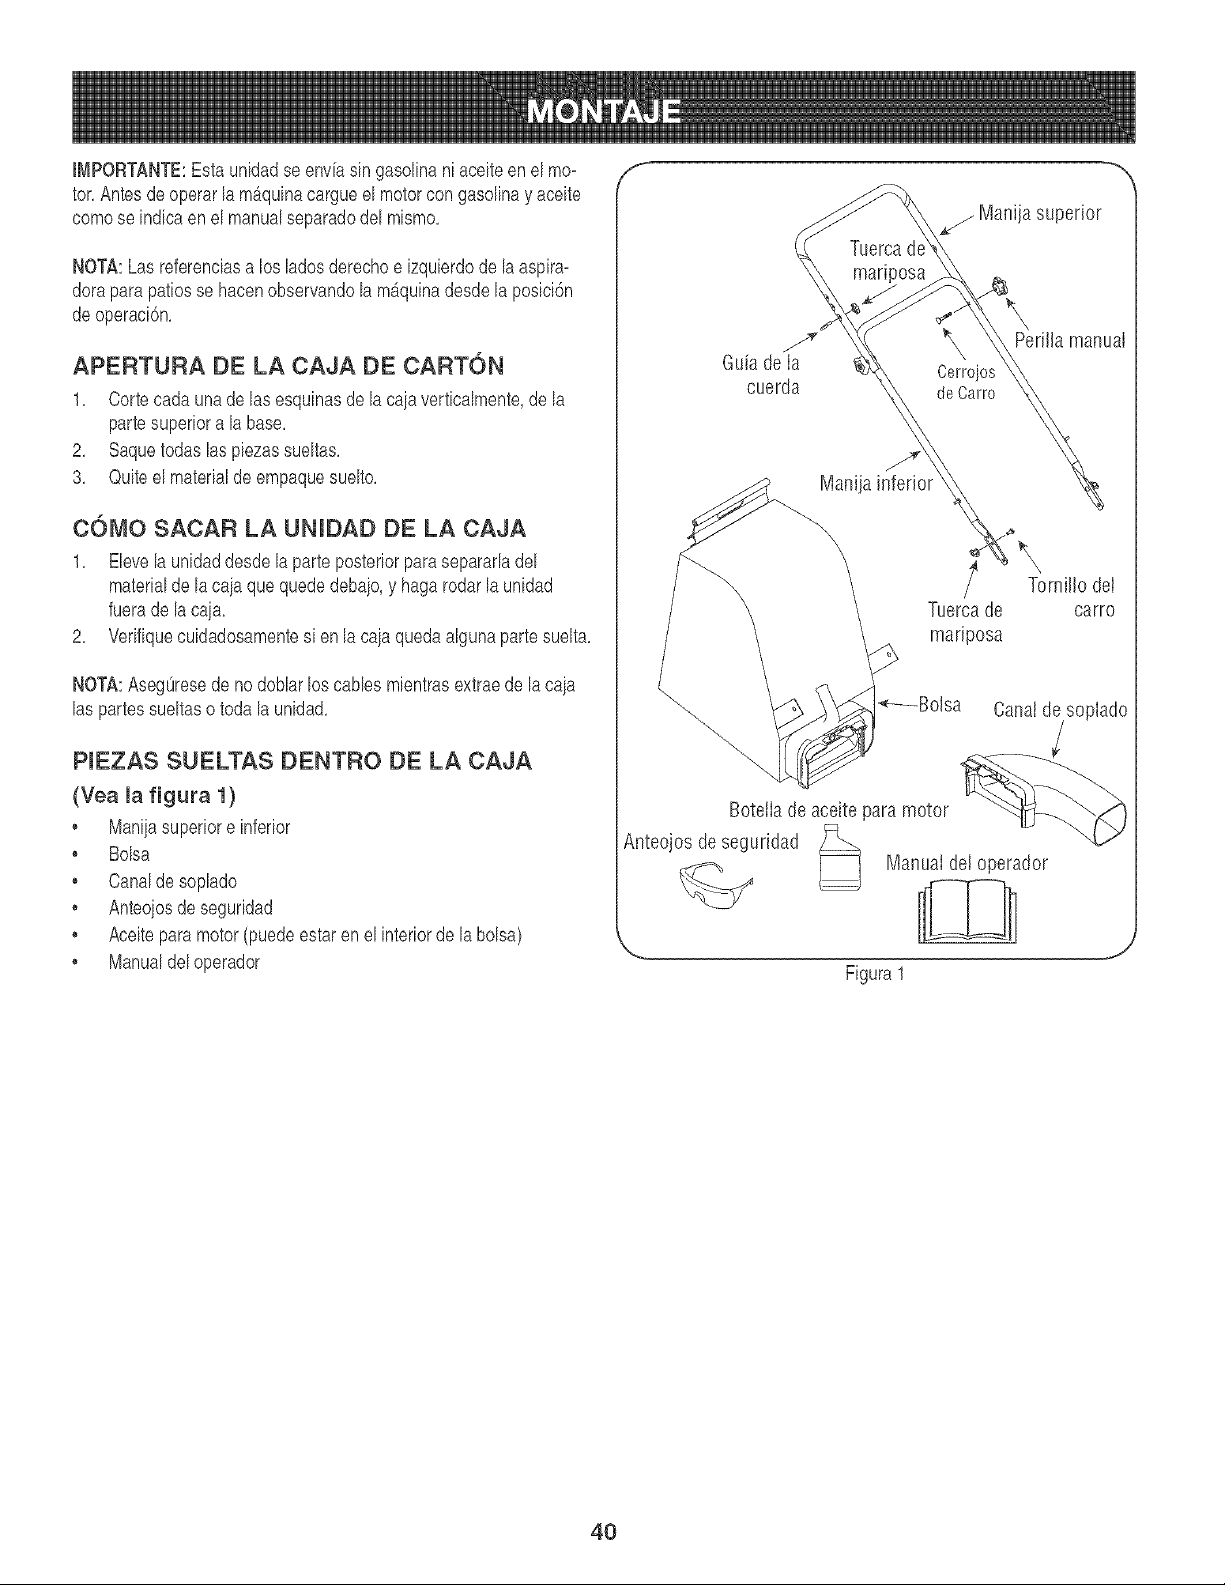
I[_IPORTANTE:Estaunidadse envfasin gasolinani aceiteen el mo_
tor,AntesdeoperarlamAquinacargueel motorcongasolinay aceite
comose indicaen el manualseparadodel mismo,
NOTA:Las referenciasa los ladosderechoe izqubrdo de laaspira-
doraparapatiosse hacenobservandolam_quinadesdela posici6n
deoperaci6n,
APERTURA DE LA CAJA DE CART6N
1, Cortecada una de las esquinasdela caiavertbalmente,de la
partesuperiora la base,
2, Saquetodaslas pbzas sueltas,
3, Quiteel materialde empaquesuelto,
C6MO SACAR LA UNIDAD DE LA CAJA
1, Elevela unidaddesdela parteposteriorparasepararladel
materialde lacaja que quede debajo,y haga rodar la unidad
fuerade la caja,
2, Verifiquecuidadosamentesi en la cajaquedaalgunaparte suelta,
NOTA:AsegOresede no doblar loscanes mientrasextraede lacaja
las partessueltaso todala unidad,
PIEZAS SUELTAS DENTRO DE LA CAJA
(Vea la figura 1)
,, Maniiasuperiore inferior
• Bolsa
, Canaldesoplado
, Anteoiosde seguridad
• Aceitepara motor(puedeestar en el interiorde la boBa)
, Manualdel operador
ff
S
GuJade Ia
cuerda
mariposa
j Manija superior
Cerroios
de Carro
Manija
\
X
Tuercade
mariposa
Tornillo deI
oarro
BotelIade aceite para motor
Anteojos deseguridad
Manual del operador
Figura1
J
40
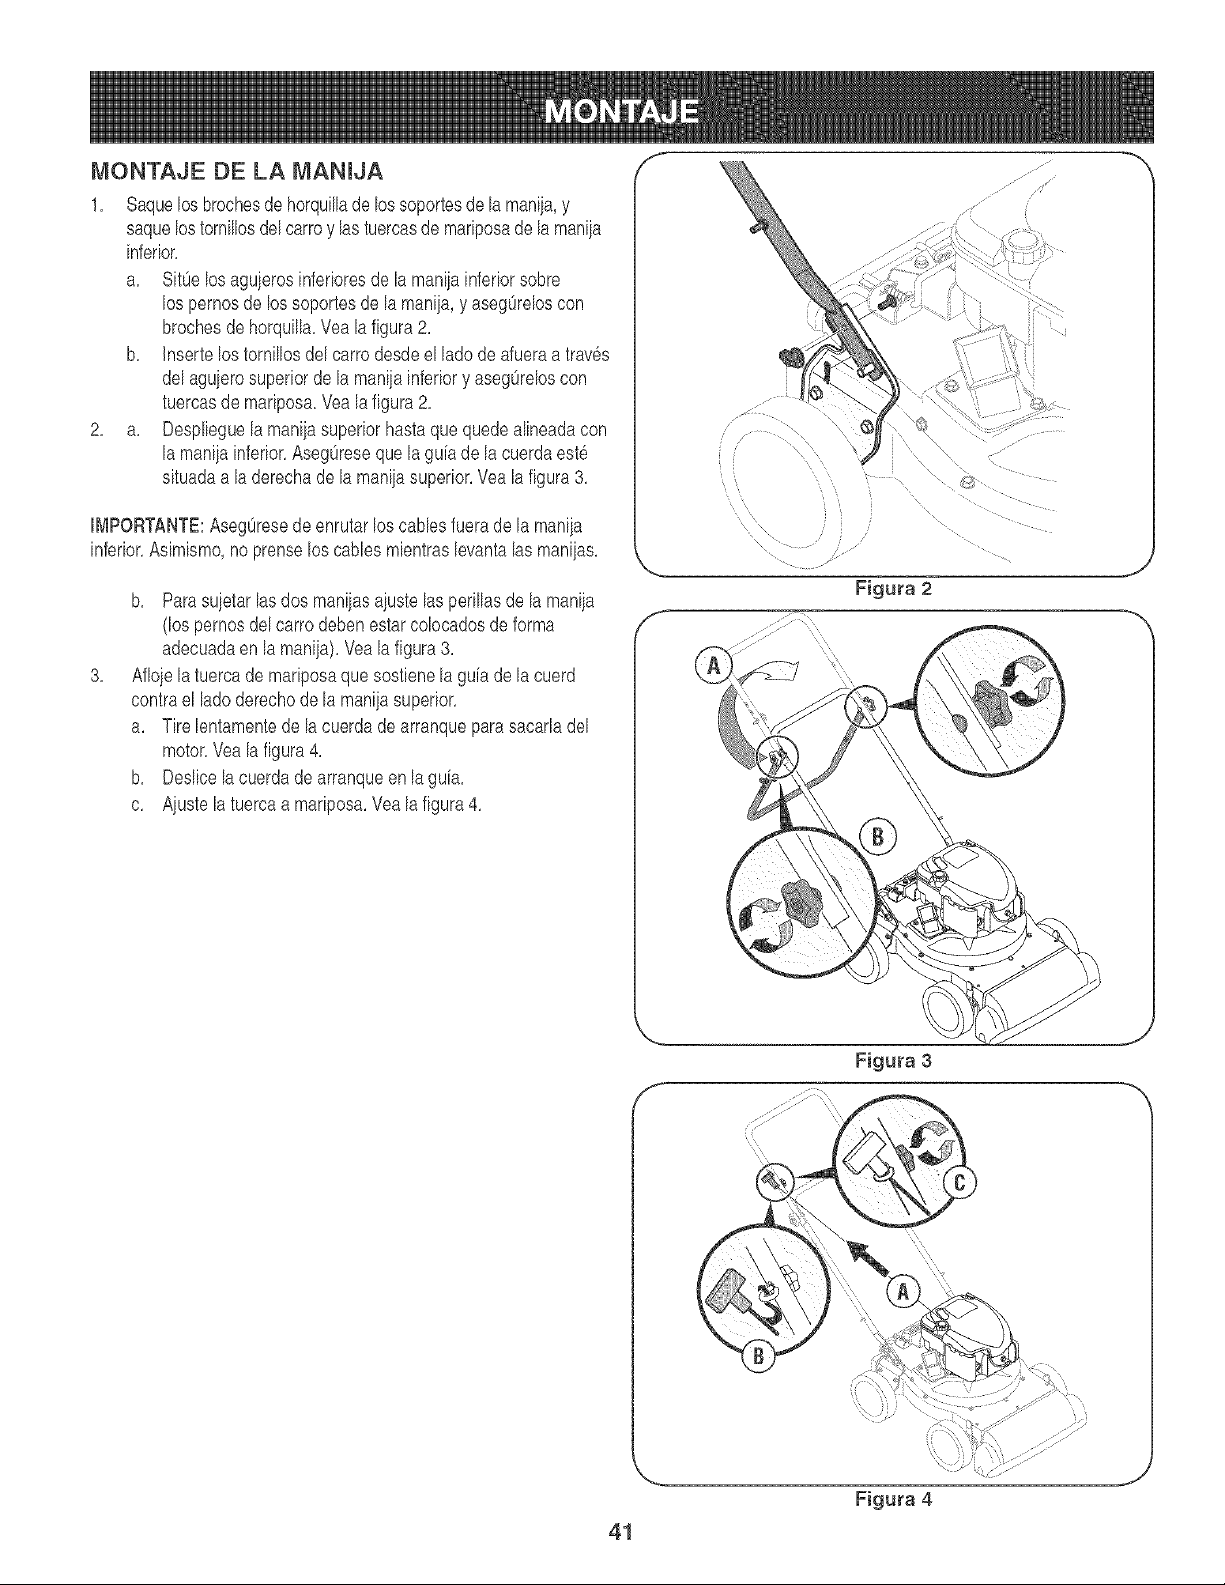
MONTAJE DE LA MANIJA
1. Saquelos brochesde horquillade lossoportesde lamaniia,y
saquelostornillosdel carroy las tuercasde ma@osade la maniia
inferior.
a. Sit@ los aguierosinferioresde lamaniiainferiorsobre
los pernosde los soportesde lamaniia,y asegOreloscon
brochesdehorquilla.Vea la figura2.
b. Insertelostornillosdel carrodesdeel ladode afueraa traves
delaguierosuperiorde la maniiainferiory asegOreloscon
tuercasde mariposa.Veala figura2.
2. a. Desplieguelamaniiasuperiorhastaquequedealineadacon
la maniiainferior.AsegOreseque la gu[ade la cuerdaest6
situadaa laderechade la maniiasuperior.Veala figura3.
IMPORTANTE:AsegOresede enrutarlos canes fuerade la maniia
inferior.Asimismo,no prenseloscanes mientraslevantalasmaniias.
3,
b. Parasuietarlasdos maniiasaiustelas perillasde la manija
(los pernosdelcarro debenestar colocadosde forma
adecuadaen la maniia).Veala figura3.
Aflojela tuercade mariposaque sostienela guia de la cuerd
contrael ladoderechode la maniiasuperior,
a, Tire lentamentede lacuerdade arranqueparasacarladel
motor.Vea la figura4.
b. Deslicela cuerdade arranqueen la gu[a.
c. Aiustela tuercaa ma@osa.Veala figura4.
41
f-
f
L ••X
Figura 2
Figura 3
Figura 4
J
m
J
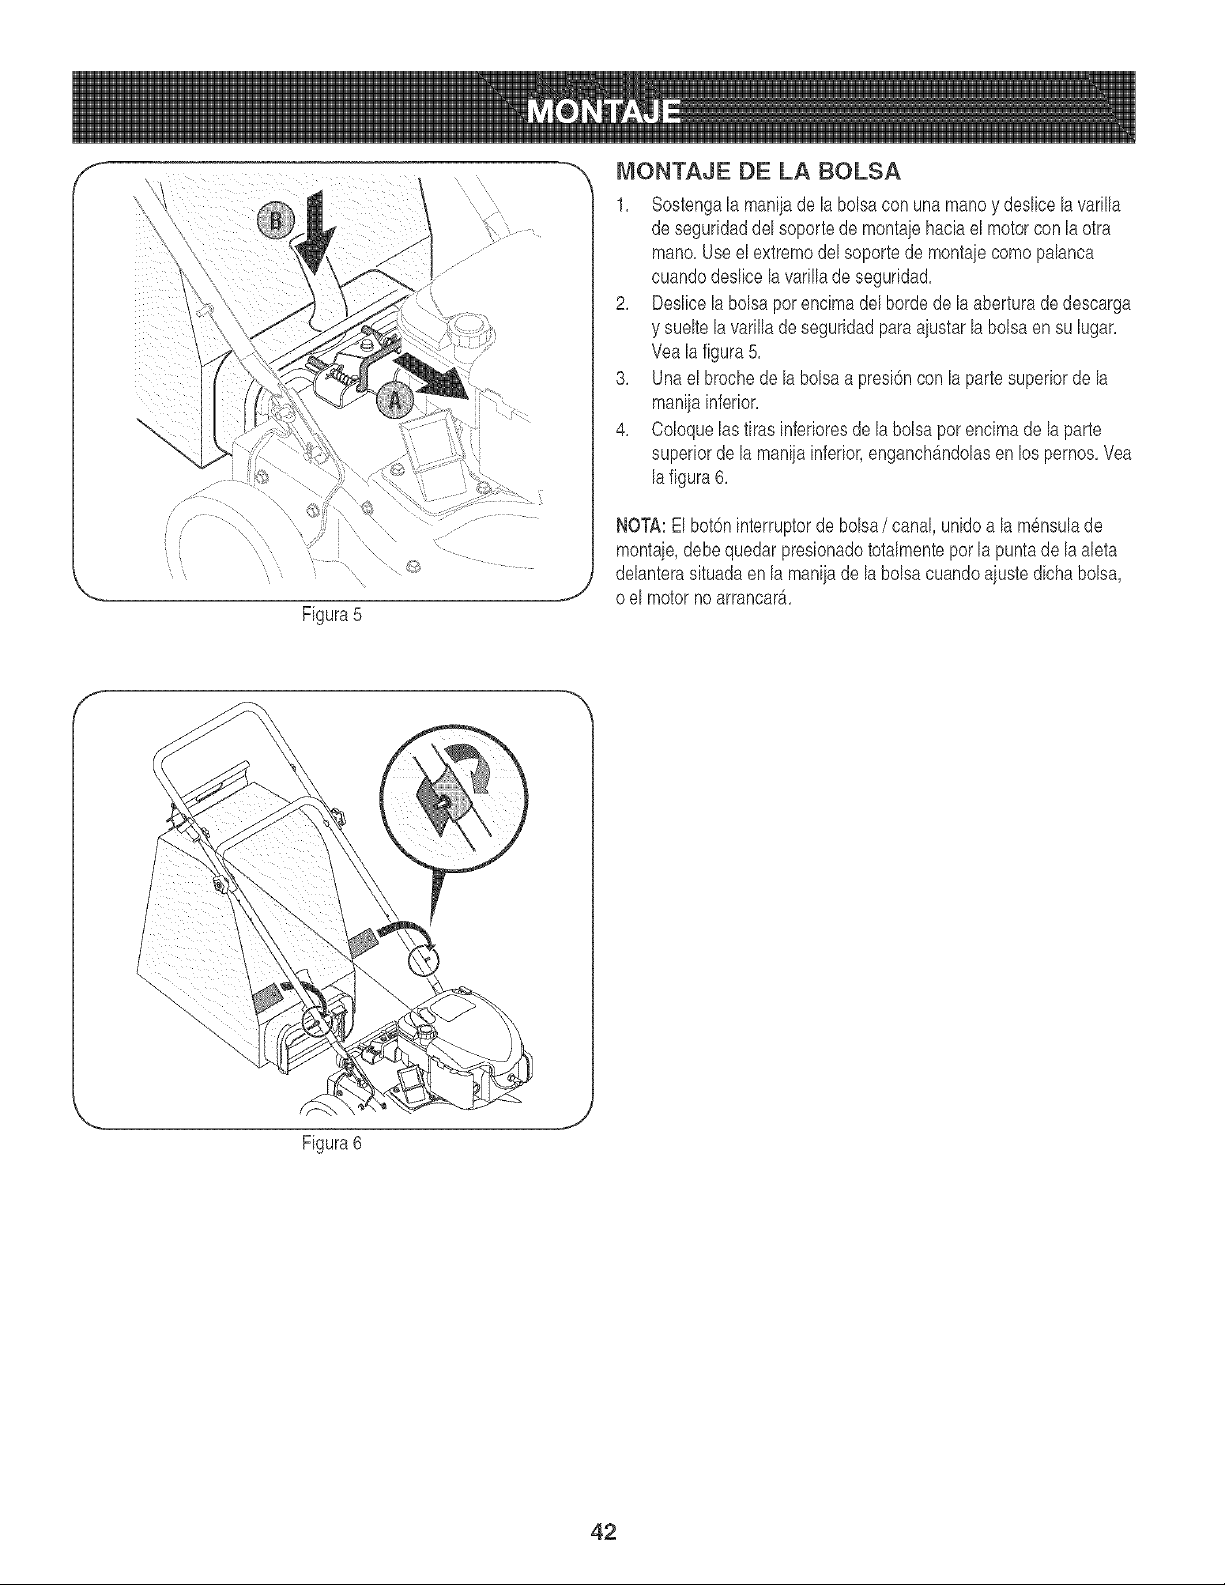
f
\
/ \ ",, ,,,, ,,# i ",,\\\\ ,,,y
Figura5
MONTAJE DE LA BOLSA
1, Sostengala maniiade la bolsacon unamanoy deslicelavarilla
de seguridaddel soportede montaiehaciael motorcon laotra
mano,Useel extremodel soporte de montaiecomo palanca
cuandodeslicela varillade seguridad,
2, Deslbe la bolsapor encimadel borde de la aberturade descarga
y sueltela varilladeseguridadparaaiustar la bolsaen su lugar,
Veala figura5,
3, Unael brochede la bolsaa presi6ncon lapartesuperiorde la
maniiainferior,
4, Coloquelastiras inferioresde la bolsapor eneimade laparte
superiorde la maniiainferior,enganch_ndolasen lospernos,Yea
lafigura6,
NOTA:El bot6ninterruptorde bolsa/ canal,unidoa la mensulade
montaie,debe quedarpresionadototalmenteporla puntade la aleta
delanterasituadaen la maniiade la bolsaeuandoaiuste dichabolsa,
o el motornoarranear_,
Figura6
J
42
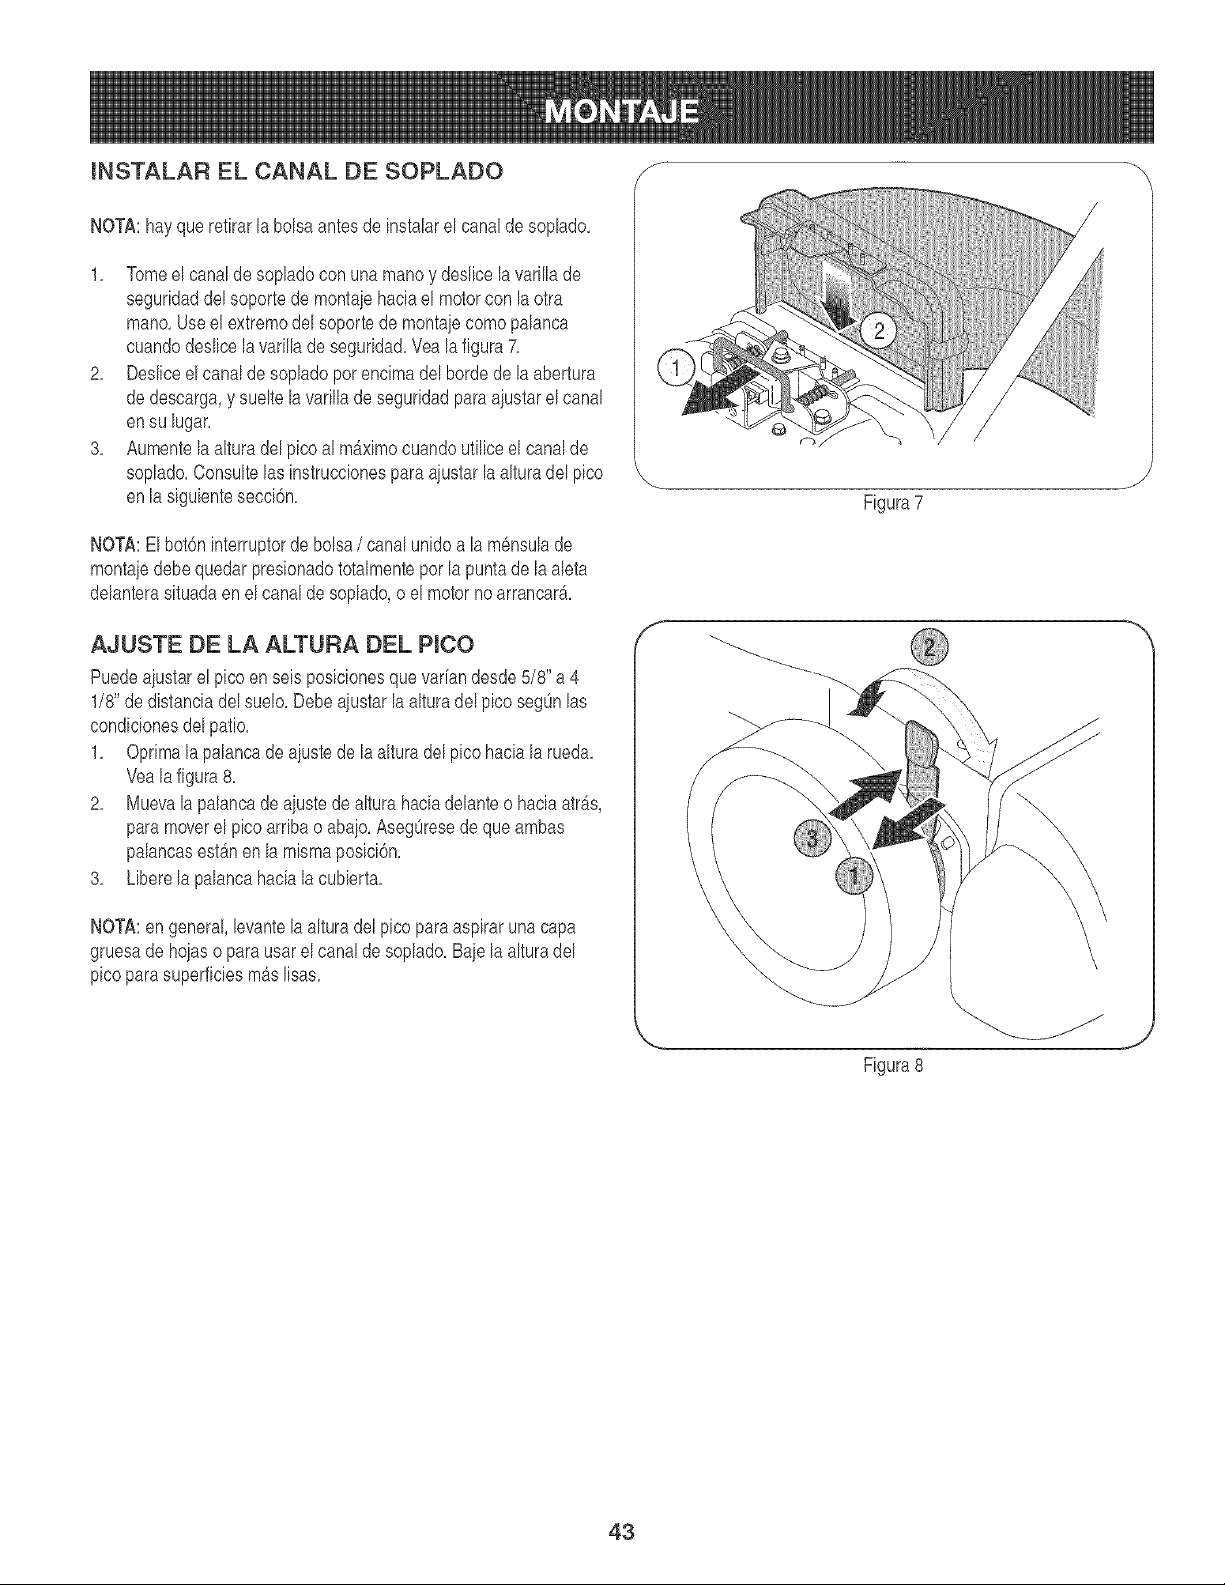
INSTALAR EL CANAL DE SOPLADO f_ -_\
NOTA:hayque retirarla bolsaantes de instalarel canalde soplado,
1, Tomeel canalde sopladocon unamanoy deslicelavarillade
seguridaddel soportede montajehaciael motorcon laotra
mano,Useel extremodel soportede montaiecomo palanca
cuandodeslice la varillade seguridad,Vea la figura 7,
2, Desliceel canalde sopladoporencimadel bordede laabertura
dedescarga,y sueltelavarillade seguridadparaaiustarel canal
ensu lugar,
3, Aumentela alturadel picoal m_ximocuandoutiliceelcanalde
soplado,Consultelas instruccionespara ajustarla alturadel pico
enla siguientesecci6n,
NOTA:El bot6ninterruptorde bolsa/ canalunidoa la mensulade
montajedebequedarpresionadototalmentepor la puntade la aleta
delanterasituadaen el canalde soplado,o el motor no arrancar_,
AJUSTE DE LA ALTUFIA DEL PICO
Puedeaiustarel picoen seis posicionesquevarfandesde5/8" a 4
1/8" de distanciadel suelo,Debeaiustarla alturadelpico segOnlas
condicionesdel patio,
1, Oprimala palancade aiustede laalturadel picohaciala rueda,
Vealafigura8,
2, Muevalapalancade ajustede alturahaciadelanteo haciaatrAs,
paramoverel picoarribao abajo,AsegOresede queambas
palancasestb<nen lamismaposici6n,
3, Liberela palancahaciala cubierta,
NOTA:en general,levantelaalturadel picopara aspiraruna capa
gruesade hojaso para usarel canal desoplado,Baielaalturadel
picopara superficiesm_slisas,
f
Figura7
Y
Figura8
43
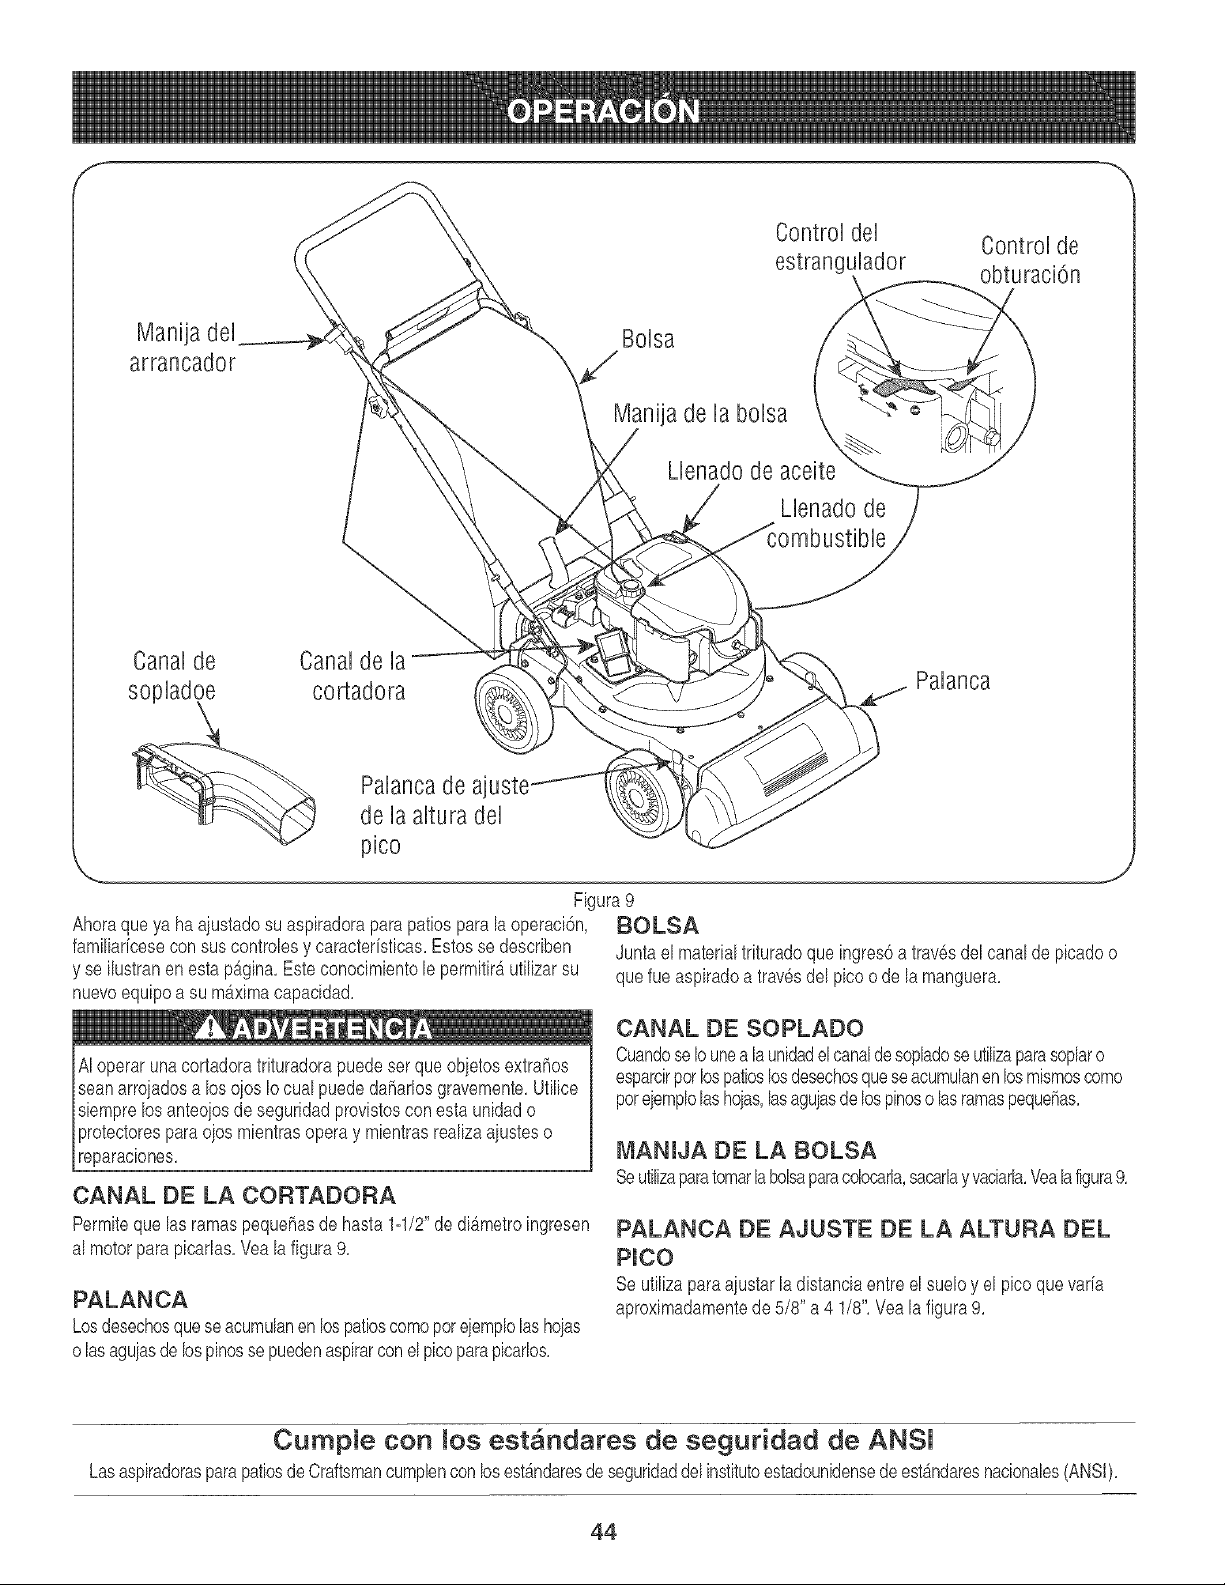
Control del
estrangulador
Control de
obturaciOn
Manija dei
arrancador
Boisa
Manija de la bolsa
Llenadode aceite
Llenado de
Canalde
sopladoe
Canalde la
cortadora
Palancade ajuste
de la altura del
pico
Palanca
Figura9
Ahoraqueya ha aiustadosu aspiradorapara patios para la operaci6n, DO LDA
familiarieesecon suscontrolesy earaeterisficas,Estosse deserben Juntael materialtrituradoqueingres6a travesdel canalde picadoo
y se ilustranen estap_gina,Este conocimientole permitir_ufilizarsu que fue aspiradoa trav6sdel pieoode la manguera,
nuevoequipoa su m_ximaeapaeidad,
AIoperar unacortadoratrituradorapuedeser queobietosextrahos
seanarroiadosa losojos Ioeual puededaharlosgravemente,Utiliee
siemprelosanteoiosde seguridadprovistoscon esta unidado
Iproteetoresparaoiosmientrasopera y mientrasrealizaaiusteso
[reparaciones,
CANAL DE LA CORTADORA
Permiteque lasramaspequeSasde hasta lq/2" de di_metroingresen
al motorparapicarlas,Vea la figura9,
PALANCA
Losdesechosqueseacumulanen lospatioscomoporeiemplohs hoias
olasaguiasde lospinosse puedenaspirarconel pbo parapicarlos,
CANAL BE SOPLADO
Cuandose Iounea launidadel canaldesopladoseutilizaparasoplaro
esparcirporlospatioslosdesechosqueseacumulanen losmismoscomo
poreiemplolashoias,lasaguiasdelospinosolasramaspequehas,
MANmJA DE LA BOLSA
Seutilizaparatomarh bolsaparacolocarh,sacarlayvaciarla,Yealafigura9,
PALANCA DE AJUSTE DE LA ALTURA DEL
PmCO
Seutilizaparaajustarla distanciaentreel sueloy el picoque varb
aproximadamentede 5/8" a 4 1/8",Vealafigura9,
Cumpie con tos est_ndares de seguddad de ANSi
Lasaspiradorasparapatiosde Craftsmancumpbncon losestbadaresde seguridaddelinstitutoestadounidensede est_.ndaresnacionales(ANSt),
44

CONTROL DEL ESTRANGULADOR
Estapalancacontrolala velocidaddel motory la funci6n de detenci6n.
Mediantetresposiciones[ndependientesde lapalanca,de [zquierdaa
derecha a operaci6nse realizade la siguienteforma:
2,
3.
Vuelvaa colocar la varillade Ilenadode aceitey aiOstela.
Mantengael n[velde ace[teen la marca FULL.S[poneel motor
en marchaconmuy pocoaceite le puede causardahospermam
entes.
Arranque / nento/ Motor apagado
marcha nenta
CONTROL DE OBTURACI6N
Elcontroldeobturaci6nse ufil[zaparacebarel carburadory ayudara
queel motorarranque.
MANIJA DEL ARRANCADOR
Seutilizaparaencenderel motor.
LLENADO DE GASOUNA Y ACEITE
Aceite (se envia una boteHa junto con maunidad)
Primer uso
1. Saquela varilladel nivelde aceite.
2. Conla aspiradoraparapatiosal niveldel suelo,utiliceunembudo
paravadar dentrodel motortodoel conten[dode la botellade
aceitesuministradacon la unidad.
3. Vuelvaa colocarla varillade Ilenadode aceite y a]Ostela.
Uses posteriores
Usesolamenteun aceitedetergentede alta calidadcuya clasificaci6n
deservicioAPIsea SF,SGo SH.Seleccioneel gradode viscosidad
SAEdel ace[tesegOnla temperaturade operaci6nesperada.Cumpla
latabla que aparecea cont[nuaci6n.
fr[o _ 32° _ M_s calient_
Tabla de viscosidad del aceite .ji
Aunquelosace[tesde viscosidadmOlt[pie(5W30,10W30,etc.)
meioranel encendidocuandoel dima est,.fr[o,los mismos[ncremem
tan el consumode aceitecuandose usana m_sde 32°RCompruebe
el n[veldeace[tecon mayorfrecuenc[aparaevitardares deb[doa que
el motortraba]econ un n[velde ace[teba]o.
1. Compruebeel nivelde aceiteasegur_ndosequelavarilladel
n[veldeace[teno roce con lasparedesinter[oresdeltubode
Ilenadode ace[te.De hacerlose puedeprodudrunalectura
falsade la var[lladeln[velde ace[te.Rellenehastala marcade
FULL(lleno)dela varilh delnivelde aceite,s[ es necesario.La
capac[dades deaproximadamente18oz.ElIlenadoen exceso
haceque el motoremanemuchohumoy queel rendim[entodel
mismonoseabueno.
Tengaextremocu[dadocuandomanipulegasol[na.Lagasol[naes
altamente[nflamabley sus vaporespuedencausar explosiones.
Nuncacarguecombustibleen lamb,qu[naen un espaciocerrado
o cuandoel motorestb,cal[enteo en march& Apaguecigarrillos,
lc garros,p pasy otrasfuentesde combust6n.
GASOUNA
1. Saquelatapadel combustibledel dep6sitodel mismo.
2. Verifiquequeel recipientedel que vaa verterla gasolinaeste
limpioy librede 6xidoo de obietosextraRos.No usenunca
gasolinaquepuedaestarvieiaperhaberestadoalmacenadaensu
recipienteporlargosperiodos.La gasolinaquehaestadoestacio-
nadaperun per[odosuperiora cuatrosemanasdebe considerarse
v[eia.
3. Lleneel tanquede combustibles61ocongasol[nanormalsin
plomo,I[mp[ay fresca.No usegasol[naque contengaMETANOL.
Vuelvaa colocar la tapa decombustibleensu lugar.
Los combustiblesconmezclade alcohol(quese Ilamangasohol,
o queufil[zanetanolo metanol)puedenatraerhumedad,Io que
conducea laseparaci6ny formaci6nde b,cidosduranteel almace-
namiento.El gas addico puededaRarel s[stemade combustibledel
motormientrasla m_quinaest_almacenada.
Paraevitarproblemascon el motor,se debe vaciarel sistemade
combustibleantesdealmacenarlam_quinadurante30 dhs om_s.
Vacieel tanquede nafta,enciendael motory deielofuncionarhasta
quelas lineasde combustibley el carburadorest6nvac[os.La
siguientetemporadausecombustiblefresco.ConsultelasInstruc-
c[onesde ALMACENAMIENTOs[desea[nformaci6nadicionaL
No use nuncaproductosde limpiezaparamotoreso carburadores
enel dep6sitodecombustible,se puedenocasionardares perma-
nentes.
NOTA:Verifiqueperi6dicamenteel nivelde combustiblepara evitar
quedarsesin gasolinamientrasest,,operandolaaspiradorapara
patios.S[ la unidadse queda sin combustiblemientrasest_ triturando,
puederesultarnecesar[odestaparel _rea de descargaantesde poder
volvera encenderla.Consultela secci6nSERVlCIOY MANTEN-
IMIENTO.
45
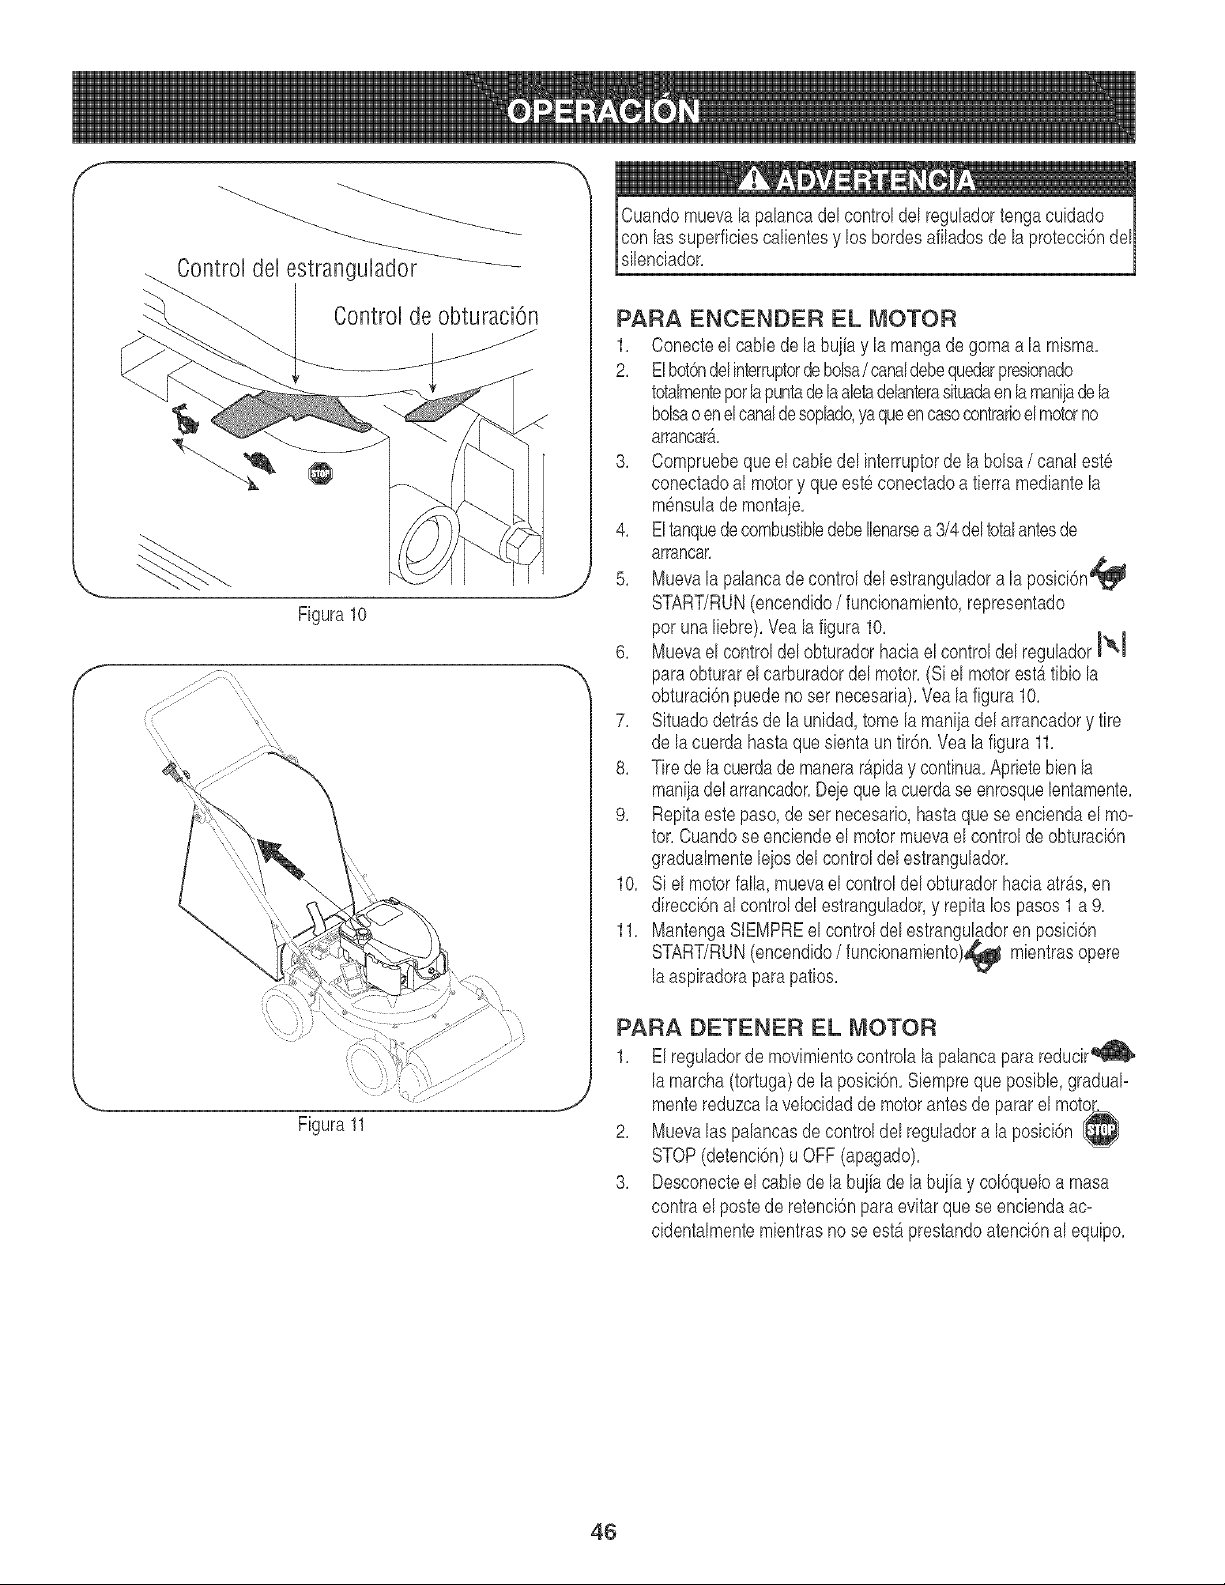
f
.... Controldelestrangulador ---_----
6ontrol de obturaci6n
@
Figura !0
Figura11
Cuandomuevala palancadelcontroldel reguladortengacuidado
con lassuperficiescalientesy los bordesafiladosde la protecci6ndel
silenciador,
PARA ENCENDER EL MOTOR
1, Conecteel cabb de la bqia y la mangade gomaa la misma,
2, Elbot6ndelinterruptordebolsa/ canaldebequedarpresionado
totalmenteporlapuntade laabtadelanterasituadaenlamanijadela
bolsao enel canaldesoplado,yaqueencasocontrarioelmotorno
arrancarb,,
8, Compruebequeelcable del interruptorde la bolsa/ canalest6
coneetadoal motory que est6 conectadoa tierramediantela
mensulademontaie,
4, EltanquedecombustibbdebeIbnarsea3/4del totalantesde
arrancar,
5, Muevala palancade controldelestranguladora la posiei6n_
START/RUN(eneendido/ funcionamiento,representado
porunaliebre),Yea la figura10,
6, Muevael controldel obturadorhaciael controldelreguladorI1&l
paraobturarel carburadordel motor,(Si el motorestb.tibiola
obturaci6npuedenoset necesaria),Yea la figura10,
7, 8ituadodetMsde la unidad,tomela maniiadel arrancadory tire
de lacuerdahastaquesientaun tir6n,Yealafigura 11,
8, Tirede lacuerdade manerar@iday continua,Aprietebienla
maniiadel arraneador,Deiequelacuerdase enrosquebntamente,
9, Repitaeste paso, de ser neeesario,basraque se enciendael mo-
tor,Cuandose enciendeel motormuevael controlde obturaci6n
gradualmenteleiosdel controldel estrangulador,
10, 8i el motorfalla, muevael controldel obturadorhaeiaatMs,en
direcci6nal controldelestrangulador,y repitalos pasos1a 9,
11, Mantenga8tEMPREel controldel estrangu_dorenposiei6n
START/RUN(encendido/ funeionamiento)_ mientrasopere
laaspiradorapara patios,
PARA DETENER EL MOTOR
1, Elreguladorde movimientocontrolalapalancapara reducir_
lamareha(tortuga)de la posici6n,8iempreque posible,graduaP
mentereduzcalaveloeidadde motorantesde pararel motor,
2, Muevalas palaneasde controldel reguladora la posiei6n
STOP(detenci6n)u OFF (apagado),
8, Deseonecteel cablede la buiiade la buiiay col6queloa masa
contraelpostederetenci6nparaevitarquese enebnda ae-
cidentalmentemientrasno se estb.prestandoatenci6nal equipo,
46

DESCARGA DE LA BOLSA
1. Desenganchelas tirasde labolsade la maniiainferior.
2. Suelteel brochede la bolsaa presi6nde la partesuperiorde la
manijainferior.Veala figura12.
3. Tomela manijade la bolsacon unamanoy tire dela varillade
seguridaddel soportede montajehaciael motorcon laotra mano
parasoltarla.
4. Elevela bolsafuerade la parte posteriorde la unidad.
5. Girelosdos botonesdela parteposteriorde la bolsapara abrirla
y vaciarel contenido.Veala figura13.Sostengala maniiay el
brochede la bolsamientrasvach el contenido.
6. Comprimalaaberturadelabolsay donelaaletainteriorsobrela
abertura.
7. DoNelaaleta exteriorsobrela aleta interiore [nsertelos botones
de labolsaa trav6sdelas salidasmetb,licas.Vea la figura13.
8. Girelos botonespara cerrarla bolsa. Ubiquela bolsade nuevo
enla unidadcomose [ndicaen la Secci6nde Asamblea.
EXTRACCKSN DEL CANAL DE SOPLADO
1. Tomeel canalde sopladocon unamanoy tire dela varillade
seguridaddel soportede montaiehaciael motorcon laotra mano
parasoltarlo.Consultelafigura 7 en la Secci6nde Asamblea.
2. Saqueelcanaldesophdoporencimadelbordedelaaberturade
descarga.
Coloqueambasmanosencimadelmangosuperiorparaempuiarlaunidad
sobreh basuradeyard&Eldesechoquese acumulaenlospatioscomo
porejemplolashoiasy lasagujasdelospinospuedenaspirarsea traves
delpicoparatriturarlos.Despuesquehatrituradoel materialconlashoias
dedesgranardel montaiedel motor,elmismoserb,descargadoa la bolsa
colectorao a travesdelcanalde soplado.S61outilicela m_quinapara
trituraro picarel material[ntegrantedelavegetaci6nquese encuentra
enunpationormal(esdecir,ramas,hoias,ramaspequeRas,etc.)Evite
lasplantasfibrosascomopore]emplolasde tomateshastaqueest6n
totalmentesecas.Sepueden[ntroducirmaterialescomoporeiemplo
troncoso ramaspesadasde hasta1 -1/2"de di_metroen el canalde la
cortadora.
No [ntentetriturar,picarn[aspirarmaterialde mayortamahoal
especificadoen lam_quinao en este manual Sepodrianproducir
lesioneso dahosa la m_quina.
f
/
/
\
\
Figura12
J
Buttons
IMPORTANTE:La pantalladedesgranadoest_ ubicadadentrode la
cajaen lazona dedescarga.S[ setapa la pantalladedesgranado,
s_quelay limpielacomose [ndicaen la secci6nde mantenimiento.
Paraobtenerel mejor resultadoes [mportantetambi6nmantener
afiladala hoja de lacortadora.
Siempredetengael motory desconecteel camede la buiia antesde
real[zarcualqu[eraiuste.
47
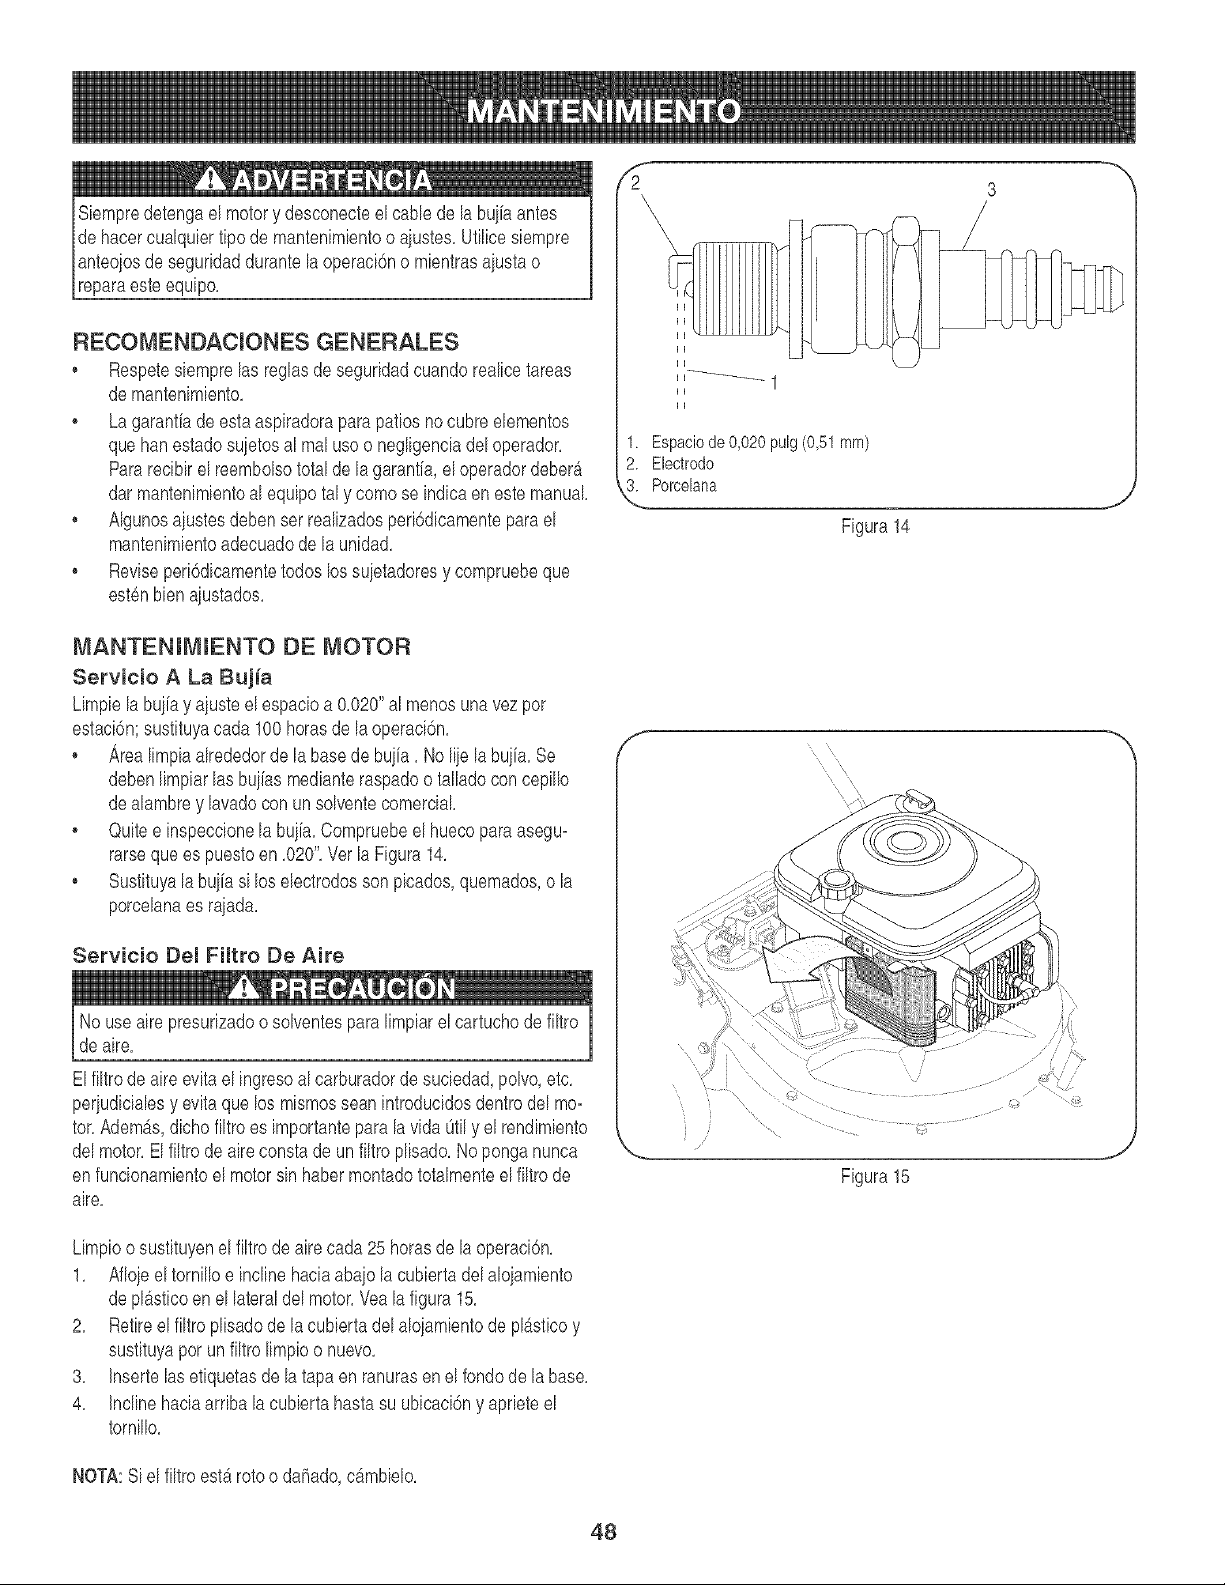
2_
uridaddurantela operaci6no mientrasaiustao
reparaesteequipo,
RECOMENDACIONES GENERALES
Respetesiemprelas reglasde seguridadcuandorealicetareas
demantenimiento,
Lagaranfiade esta aspiradoraparapatiosnocubreelementos
quehanestadosuietosal real usoo negligeneiadel operador,
Parareeibirel reemboBototal de la garanfia,el operadordeber_
darmantenimientoal equipotal y comose indicaen este manual
AIgunosaiustes@ben ser realizadosperi6dicamenteparael
mantenimientoadecuadode la unidad,
Reviseperi6dieamentetodos lossuietadoresy compruebeque
est6nbienaiustados,
MANTENIMIENTO DE MOTOR
Servicio A La Bu)_a
Limpiela buiiay aiusteel espacioa 0,020"al menosuna vezpor
estaci6n;sustituyacada 100horasde la operaci6n,
• Area limpiaalrededordela basede buiia, No liie la buiia, Se
debenlimpiarlas buiiasmedianteraspadoo talladoconcepillo
dealambrey lavadocon un solventecomerciaL
. Quitee inspeccionela buiia,Compruebeel huecoparaasegu-
rarseque es puestoen ,020",Ver la Figura14,
. Sustituyala buiia si los electrodessonpicados,quemados,o la
porcelanaes rajada,
Servicio Del Fiitro De Aire
Nouse airepresurizadoo solventesparalimpiarel cartuchode filtro
de aire,
Elfiltrode aireevitael ingresoal carburadorde sucbdad, polvo,etc,
periudieialesy evitaque los mismosseanintroducidosdentrodel mo-
tor,Adem_s,dicho filtroes importantepara la vidaOtily el rendimiento
delmotor,El filtrodeaireconstade un filtro plisado,Noponga nunca
enfuncionamientoel motorsin habermontadototalmenteel filtro de
aire,
Limpioo sustituyenel filtrode airecada25 horasdela operaci6n,
1, Afloieel tornilloe inclinehaciaabaio la cubiertadel aloiamiento
depl_sticoen el lateraldel motor,Yealafigura 15,
2, Retireel filtroplisadode la eubiertadel aloiamientode plgsticoy
sustituyapor un filtro limpioo nuevo,
3, Insertelasetiquetasde latapa en ranurasenel fondodela base,
4, Inclinehaciaarriba la cubierta hastasu ubieaci6ny aprieteel
tornillo,
NOTA:Si el filtroest_rotoo dahado,c_mbblo,
II
II
1. Espaciode 0,020pulg(0,51ram)
2. Electrodo
3. Porcelana
Figura 14
f
\ \
\ \
\\ \
\\
Figura15
J
48
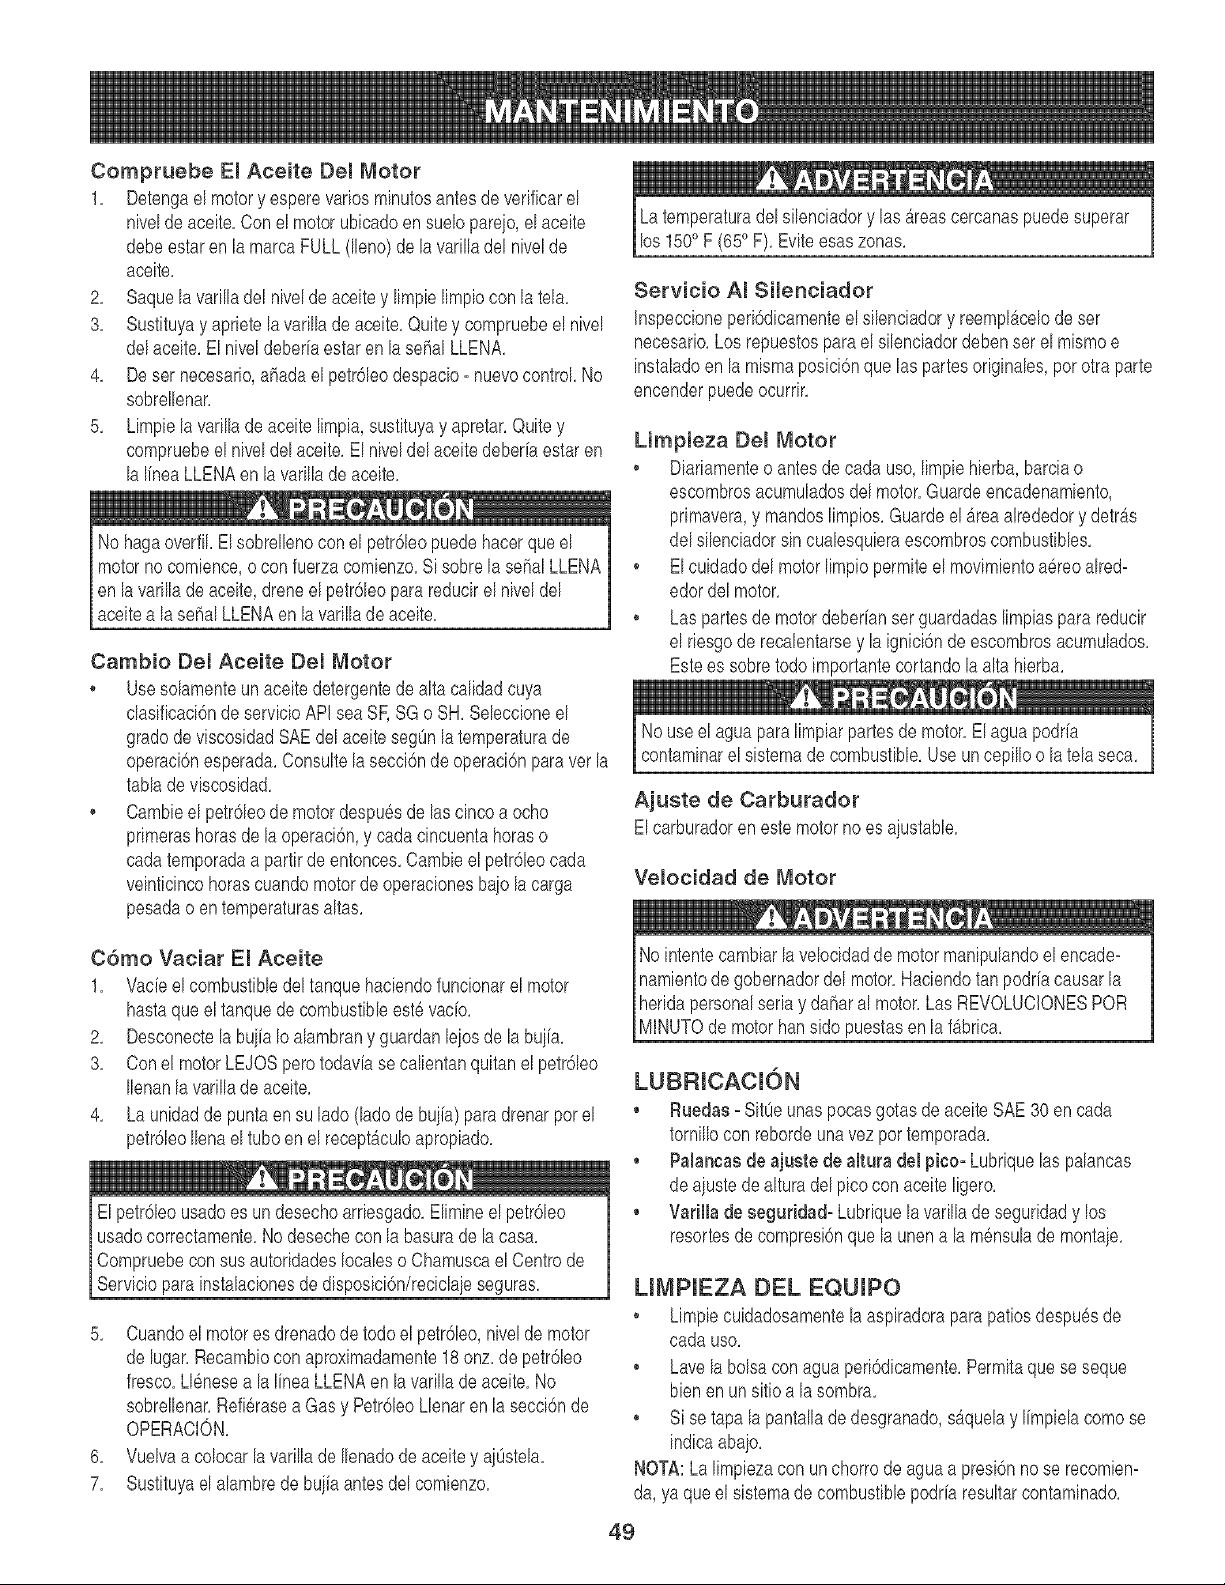
Compruebe El AceJte Del Motor
1. Detengael motory esperevarios minutosantesdeverificarel
nivelde aceite.Conel motor ubbado en suelo pareio,el aceite
debeestaren lamarcaFULL(lleno)dela varilladel nivelde
aceite.
2. Saquela varilladel nivelde aceite y limpielimpiocon la tela.
3. Susfituyay aprbte la varillade aceite.Quitey compruebeel nivel
delaceite.El nb'eldeberiaestar en la sehal LLENA.
4. De ser necesario,ahadael petr61eodespacio- nuevocontrol.No
sobrellenar.
5. Limpiela varillade aceite limpia,sustituyay apretar.Quitey
compruebeel nkteldelaceite.El niveldel aceite deberiaestar en
la lineaLLENAen la varillade aceite.
No hagaoverfil.El sobrellenocon el petr61eopuedehacerque el
motornocombnce,o con fuerzacombnzo. Si sobrela sehalLLENA
en la varilladeaceite,dreneel petr61eopara reducirel niveldel
aceitea lasehal LLENAenla varillade aceite.
Cambio Del Aceite Del Motor
Usesolamenteun aceite detergentede alta calidadcuya
clasificaci6nde servbio API seaSE SGo SH. Sebccioneel
gradode viscosidadSAEdel aceitesegOnla temperaturade
operacbnesperada.Consultelasecci6ndeoperaci6npara ver la
tablade viscosidad.
. Cambbel petr61eode motordespu6sde lascinco a ocho
primerashorasde laoperaci6n,y cadacincuentahoraso
cadatemporadaa partirde entonces.Cambb el petr6bo cada
veintbincohorascuandomotordeoperacionesbajolacarga
pesadao en temperaturasaltas.
Como Vaciar El Aceite
1. Vacb elcombustibbdeltanquehacbndo funcionarel motor
hastaqueel tanquede combustbb est6 vacio.
2. Desconectela buiia Ioalambrany guardanbios de la buiia.
3. Conel motorLEJOSperotodaviase calbntan quitanel petr61eo
Ilenanla varillade aceite.
4. La unidadde puntaen su lado (hdo de buiia)paradrenarporel
petr61eoIlenael tubo enel recept_culoapropiado.
El petr6bo usadoes undesechoarrbsgado.Elimineel petr6bo
usadocorrectamente.Nodesechecon labasurade lacasa.
Compruebecon susautoridadesIocabs o Chamuscael Centrode
Servbio parainstalacionesde disposici6n/reciclaieseguras.
5. Cuandoel motores drenadode todoel petr6bo, nivelde motor
de lugar.Recambiocon aproximadamente18onz. de petr6bo
fresco.Llenesea la linea LLENAenla varilladeaceite.No
sobrellenar.Refi6rasea Gas y Petr6bo Lbnar en lasecci6nde
OPERACION.
6. Vuelvaa colocarla varillade Ilenadode aceite y ajOstela.
7. Sustituyael alambrede buiia antes del comienzo.
La temperaturadel silendadory las Areascercanaspuedesuperar
los 1500F (650F). Eviteesaszonas.
Servicio AI Silenciador
Inspeccioneperi6dicamenteel silenciadory reempl_celodeser
necesario.Losrepuestosparael silenciadordebenserel mismoe
instaladoen lamismaposici6nque las partesoriginales,porotraparte
encenderpuede ocurrL
Limpieza Del Motor
Diariamenteo antesde cadauso, limpiehierba,barda o
escombrosacumuladosdel motor.Guardeencadenambnto,
primavera,y mandoslimpios.GuardeelAreaalrededory detrAs
del silenciadorsincuabsqubra escombroscombustibbs.
• El cuidadodel motorlimpiopermiteel movimbntoa6reoaired=
edordel motor.
= Las partesde motordeberfanser guardadaslimpiaspara reducir
el rbsgo de recalentarsey la ignbi6n de escombrosacumulados.
Estees sobretodo importantecortandola altahierba.
No useel agua para limpiarpartesde motor,El aguapodrfa
contaminarel sistemade combustible,Useuncepilloo la telaseca,
Ajuste de Carburador
Elcarburadoren este motorno es aiustable.
VelocJdad de Motor
No intentecambiarla velocidadde motormanipulandoelencade-
nambntodegobernadordel motor.Hacbndo tan podriacausarla
heridapersonalseriay daharal motor.Las REVOLUCIONESPOR
MINUTOde motor hansido puestasen la f_brica.
LUBRICACKSN
• Ruedas - Sit_eunaspocasgotas de aceiteSAE30 en cada
tornillocon rebordeunavezpor temporada.
• Palancas de ajuste de altura del pico- Lubriquelas palancas
de aiustedealturadel pbo con aceiteligero.
• Varilla de seguridad- Lubriquela varillade seguridady los
resortesde compresi6nque launena lam6nsulademontaie.
UMPIEZA DEL EQUIPO
Limpiecuidadosamentela aspiradoraparapatiosdespuesde
cada uso.
Lave la bolsacon aguaperi6dicamente.Permitaquese seque
bienen unsitioa la sombra.
Si se tapa lapantallade desgranado,sAquelay limpbla como se
indicaabaio.
NOTA:La limpiezacon unchorrode aguaa presi6nnose recomiem
da, ya queel sistemade combusfibbpodriaresultarcontaminado.
49
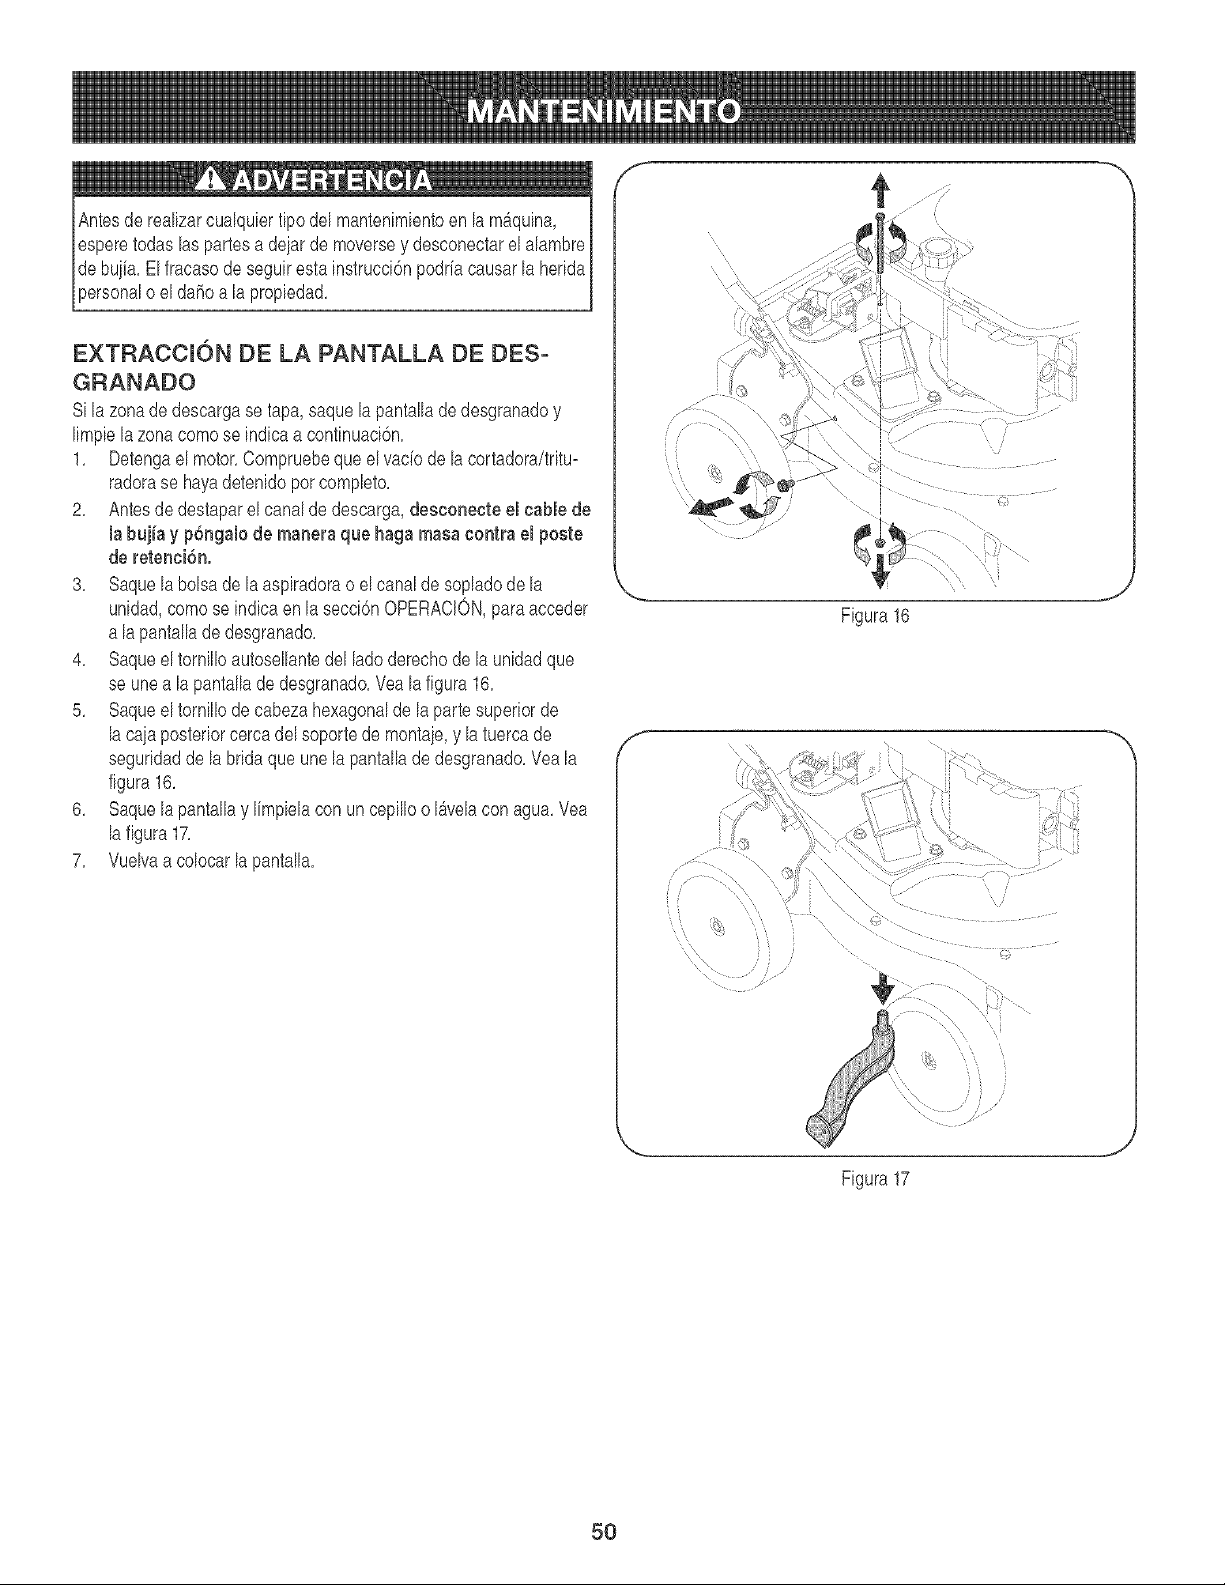
propiedad,
EXTRACCI6N DE LA PANTALLA DE DES-
GRANADO
Si lazonade descargase tapa, saquela pantallade desgranadoy
limpielazonacomo se indicaa continuaci6n,
1, Detengael motor,Compruebeque el vac[ode la cortadora/tritu_
radorase hayadetenidopot completo,
2, Antesdedestaparel canalde descarga,deecooecte el cable de
la bujia y p6ngalode manera que haga masacontra el poete
de retenci6n.
3, Saquelabolsa de la aspiradorao el canalde sopladode la
unidad,como se indicaen la secci6nOPERACION,paraacceder
a lapantalladedesgranado,
4, Saqueeltornilloautosellantedel ladoderechodela unidadque
se une a la pantallade desgranado,Vea la figura 16,
5, Saqueeltornillode cabezahexagonalde lapartesuperiorde
la cajaposteriorcercadelsoportede montaje,y h tuercade
seguridadde la bridaque une la pantallade desgranado,Veala
figura16,
6, Saquelapantallay limpielacon un cepilloo I_velacon agua,Vea
la figura17,
7, Vuelvaa colocarla pantalla,
F 't ................./
Figura16
i •
\
\\
Figura17
5O
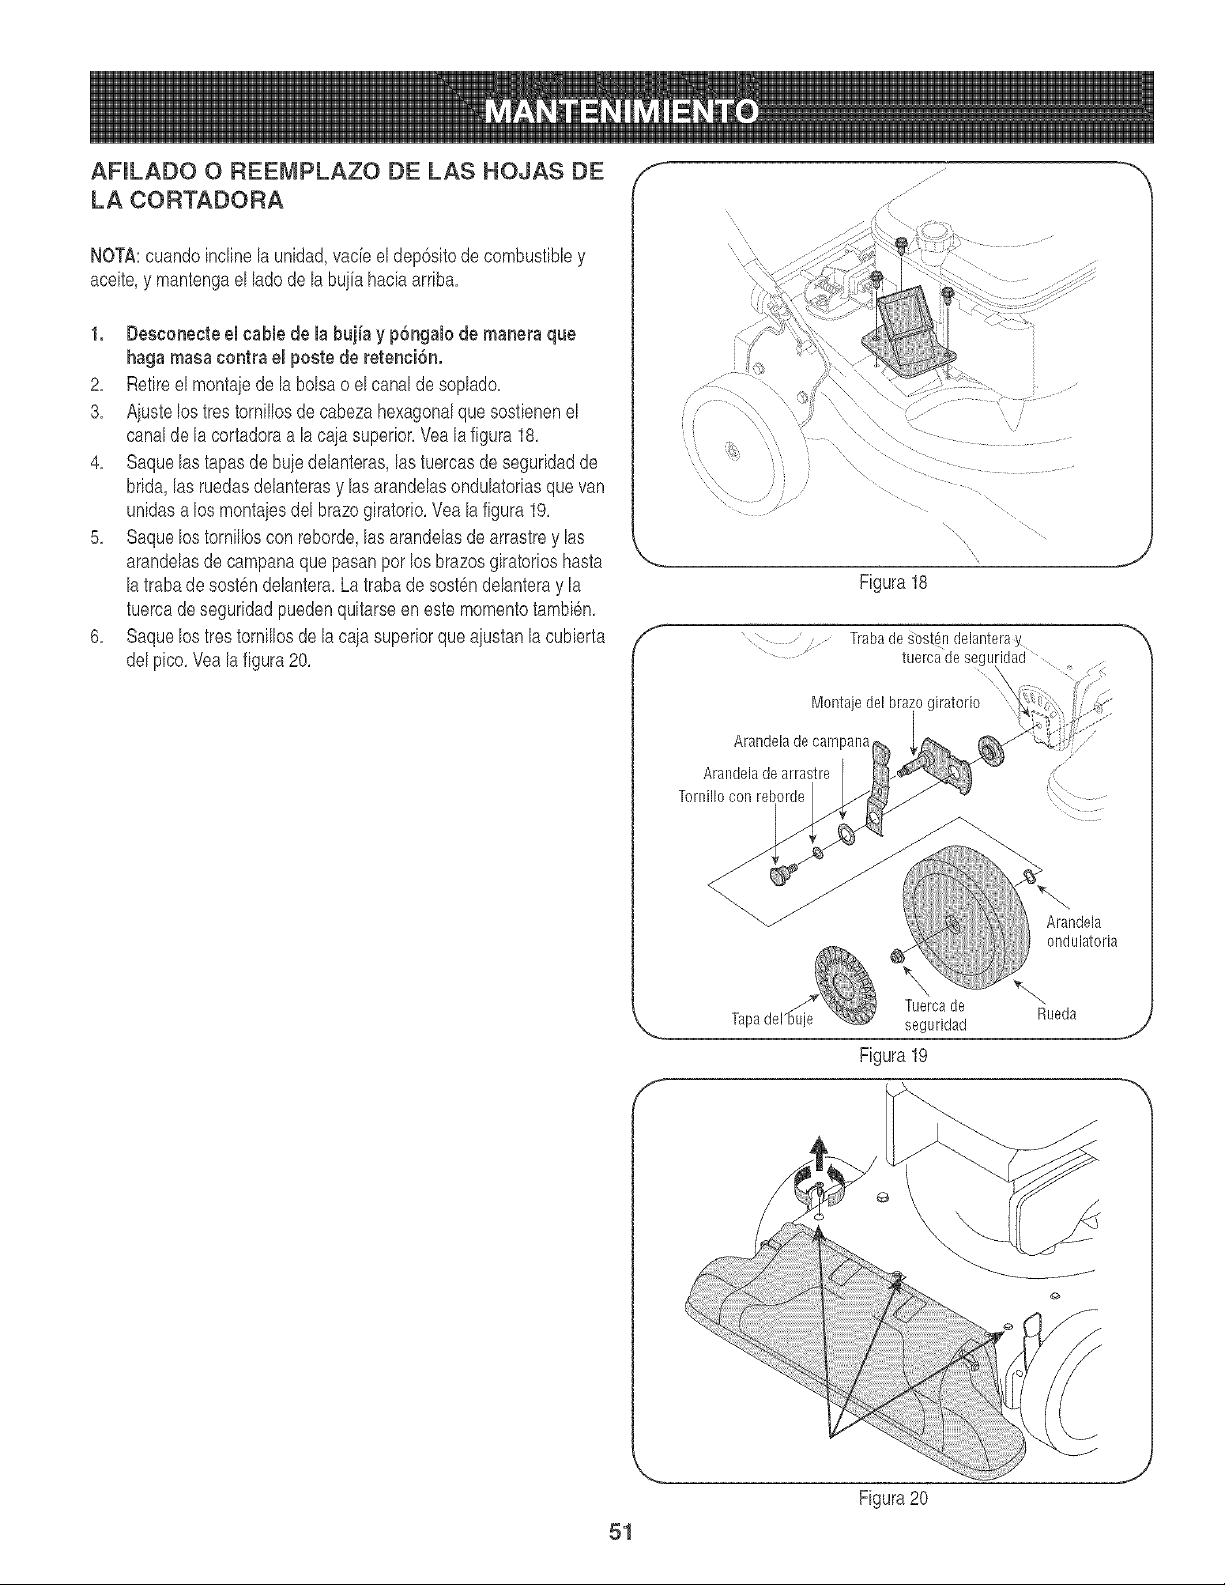
AFILADO O REEMPLAZO DE LAS HOJAS DE
LA CORTADORA
NOTA:cuandoinclinela unidad,vacieeldep6sitodecombus%b y
aceite,y mantengael ladede la buiia haciaarriba.
1. Deseonecteel cable de la bujia y p6ngalo de manera que
haga masacontra el poste de retenci6n.
2. Retireel montaiede la bolsao elcanalde soplado.
3. Aiustelos tres tornillosde cabezahexagonalque sostbnenel
canalde lacortadoraa la caia superior.Veala figura18.
4. Saquelas tapasde buie delanteras,las tuercasde seguridadde
brida,las ruedasdelanterasy lasarandelasondulatoriasque van
unidasa los montaiesdel brazegiratorio.Veala figura19.
5. Saquelos tornilloscon reborde,lasarandelasdearrastrey las
arandelasde campanaque pasanper los brazesgiratorioshasta
la trabadesostendelantera.La traba desostendelanteray la
tuercadeseguridadpuedenquitarseen este mementotambi6n.
6. Saquelos tres tornillosde la cajasuperiorque aiustanlacubbrta
delpico.Vealafigura20.
51
Figura18
f Traba de _ost@ delanteray
tuerca de segL idad
Montaie del brazo giratorio
Arandela de campana
Arandela de arrastre
Tornillo con reborde
Arandela
ondulatoria
Tueroade _'_
Rueda
,_ seguridad j
Figura19
J
Figura20
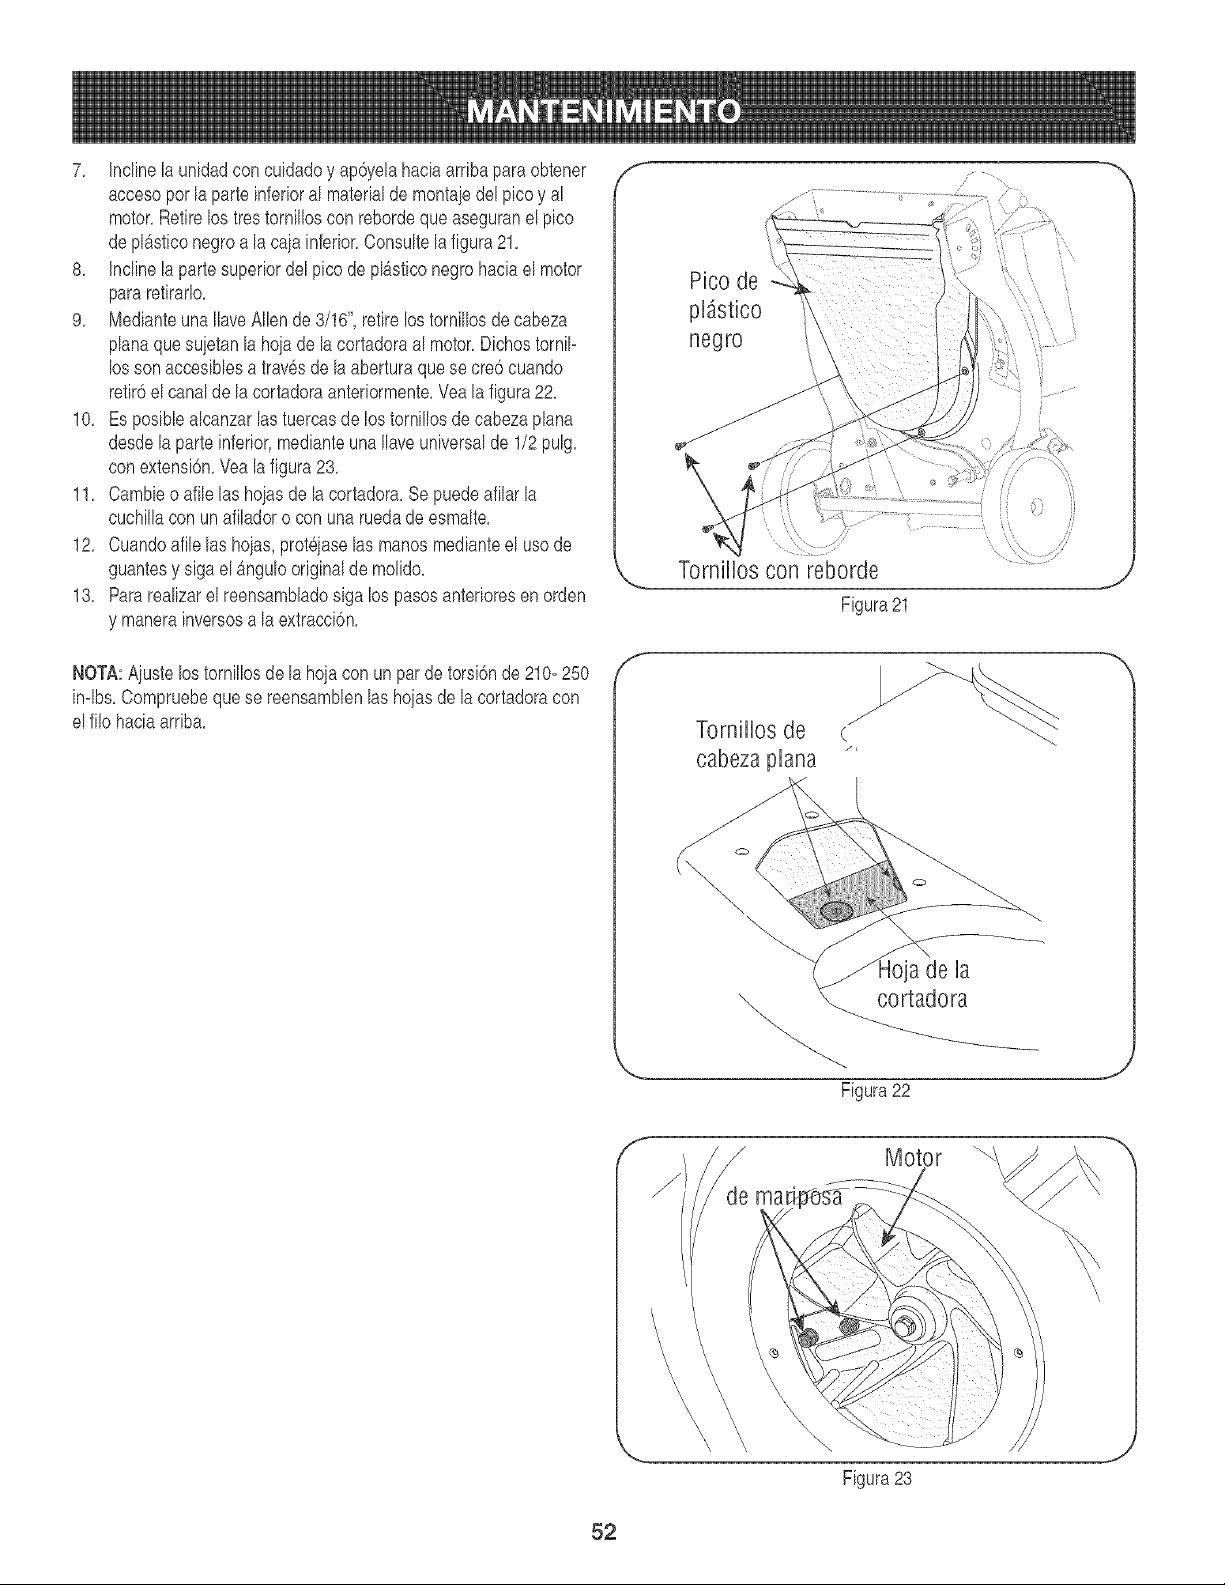
7, Inclinelaun[dadconcu[dadoyap6yelahac[aarribaparaobtener
accesoporlaparteinferioralmaterialdemontajedelpicoyal
motor,Retirelostrestorn[llosconrebordequeaseguranelp[co
depl_sticonegroalaca]ainferior,Consultelafigura21,
8, Inclinelapartesuperiordelpicodeplgsticonegrohac[aelmotor
pararet[rarlo,
9, MedianteunaIlaveAIbnde3/16",retirelostornillosdecabeza
planaquesuietanlahoiadelacortadoraalmotor,DichostorniP
lossonaccesibbsatravesdelaaberturaquesecre6cuando
ret[r6elcanaldelacortadoraanter[ormente,Vealafigura22,
10,Espos[blealcanzarlastuercasdelostorn[llosdecabezaplana
desdelaparteinferior,medianteunaIlaveuniversalde1/2pulg,
conextens[6n,Vealaf[gura23,
11,Cambboafiblasho]asdelacortadora,Sepuedeafilarla
cuch[llaconunaf[ladoroconunaruedadeesmalte,
12,Cuandoafiblashojas,prote]aselasmanosmedianteelusode
guantesysigael_ngulooriginaldemolido,
13,Pararealizarelreensambladosigalospasosanterioresenorden
ymanera[nversosalaextracci6n,
NOTA:Aiustelostornillosdelaho]aconunpardetorsi6nde210-250
in-lbs,Compruebequesereensamblenlashoiasdelacortadoracon
elf[Iohac[aarr[ba,
f
Pico de
plJstico
negro
Tornillos con reborde
F[gura21
f
Tornillos de
cabeza plana
( -..
/,
qoja de la
cortadora
F[gura22
f_ Motor
/
de
Figura23
52
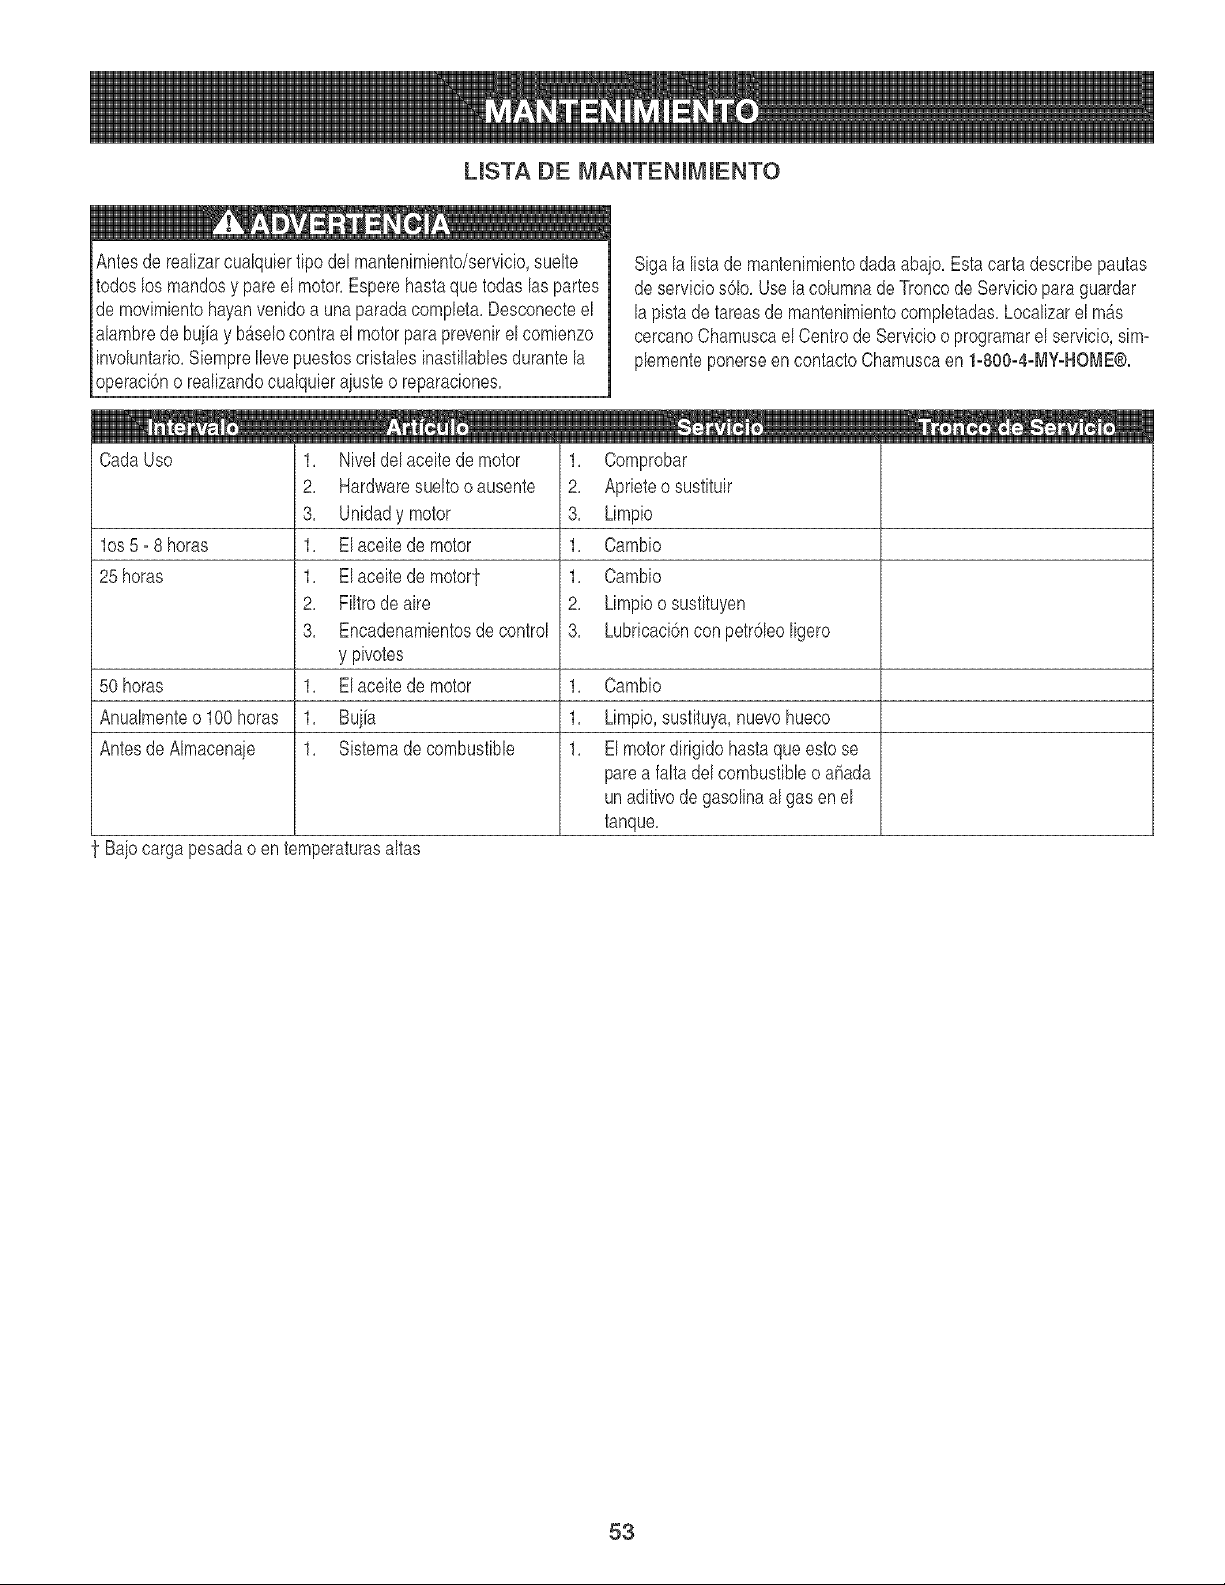
LmSTADE MANTENmMIENTO
Antesde realizarcualquiertipodel mantenimiento/servicio,suelte
todoslos mandosy pareel motor,Esperehastaque todaslaspartes
demovimientohayanvenidoa unaparadacompleta,Desconecteel
alambrede buiia y bAselocontrael motorparaprevenirel comienzo
involuntario,SiempreIlevepuestoscristales inastillablesdurantela
operaci6no realizandocualquieraiuste o reparaciones,
Sigala listade mantenimientodadaabajo,Estacarta describepautas
deservicios61o,Usela columnadeTroncode Servicioparaguardar
lapistade tareasdemantenimientocompletadas,Localizarel mAs
cercanoChamuscael Centrode Serviciooprogramarel servicio,sire=
plementeponerseen contactoChamuscaen 1-800-4-MY-HOME®.
los 5- 8 horas
25 horas
1, Niveldelaceite de motor
2, Hardwaresueltooausente
3, Unidady motor
1, Elaceite de motor
1, Elaceite de motort
2, Filtrodeaire
3, Encadenamientosdecontrol
y pivotes
Elaceitede motor
Bujh
S+stemade combusfib+e
1, Comprobar
2, Aprieteo sustituir
3, Limpio
1, Cambio
1, Cambio
2, Limpioosustituyen
3, Lubricaci6ncon petr61eoligero
50 horas 1, 1, Cambio
Anualmenteo100 horas 1, 1, Limpio,sustituya,nuevohueco
AntesdeAImacenaie 1, 1, Elmotordidgidohastaqueestose
parea faltadelcombustibleo aMada
unaditivode gasolinaal gas enel
tanque,
t Baio cargapesadao entemperaturasaltas
53

Nuncaalmaceneel \,'adodeyardaconel combustibleen el tanque
dentroo en Areasma)ventiIadasdondelos vaporesde combustible
puedenaIcanzaruna )lamaabierta,)achispa,o e) piIotocomo en un
homo,caIentadorde agua,secadorde ropa,o apIicaci6nde gas.
PREPARAC(ON DEL MOTOR
Yaquelos motoresaImacenaronmAsde 30 dias:
1. Paraimpedira la gomaformarseen elsistemade combustible
o enpartesde carburador,dirijase)motorhastaqueestose
parea faItade) combustibleo ahadirunaditivode gasoIinaa)
gasen e)tanque.Siustedusaun aditivo de gas, dirige e) motor
durantevariosminutosparaponerencircuIaci6ne)aditivopore)
carburador-- despuesquee)motory e) combustiblepuedenser
aImacenadoshastaseismeses.
2. Mientrase) motores todav(acaIiente,cambioe)petr6Ieo.
3. Quite)abuiia y viertaaproximadamente1onz.(30m))de)
petr6Ieode motor)impioen e) ciIindro.Tire e)iuez desa)idade
retrocesovariasvecesparadistribuire) petr6Ieo,e instaIarde
nuevo)abuiia.
4. Limpiee) motorde escombrossuperficiaIes.
LA PREPARAC(ON DEL VAC(O DE YARDA
AImacenandoel vado de yardaen un cobertizode aImacenaieno
ventiIadoo metAlico,el cuidadodeber(aser tornadoa inoxidable
)assuperficiesno pintadas.Usandoun petr6Ieoligeroo siIicona,
cubrae) equipo,sobretodocuaIquierprimavera,portes,y canes.
• Quitetoda )asuciedadde)exteriorde motory equipo.
, Sigarecomendacionesde lubricaci6n.
, Equipodefiendaen unArea)impia,seca. NoaImaceneen un
Areadondee)equipoestApresentequepuedeusarun piIotoo
tieneun componenteque puedecreeunachispa.
54
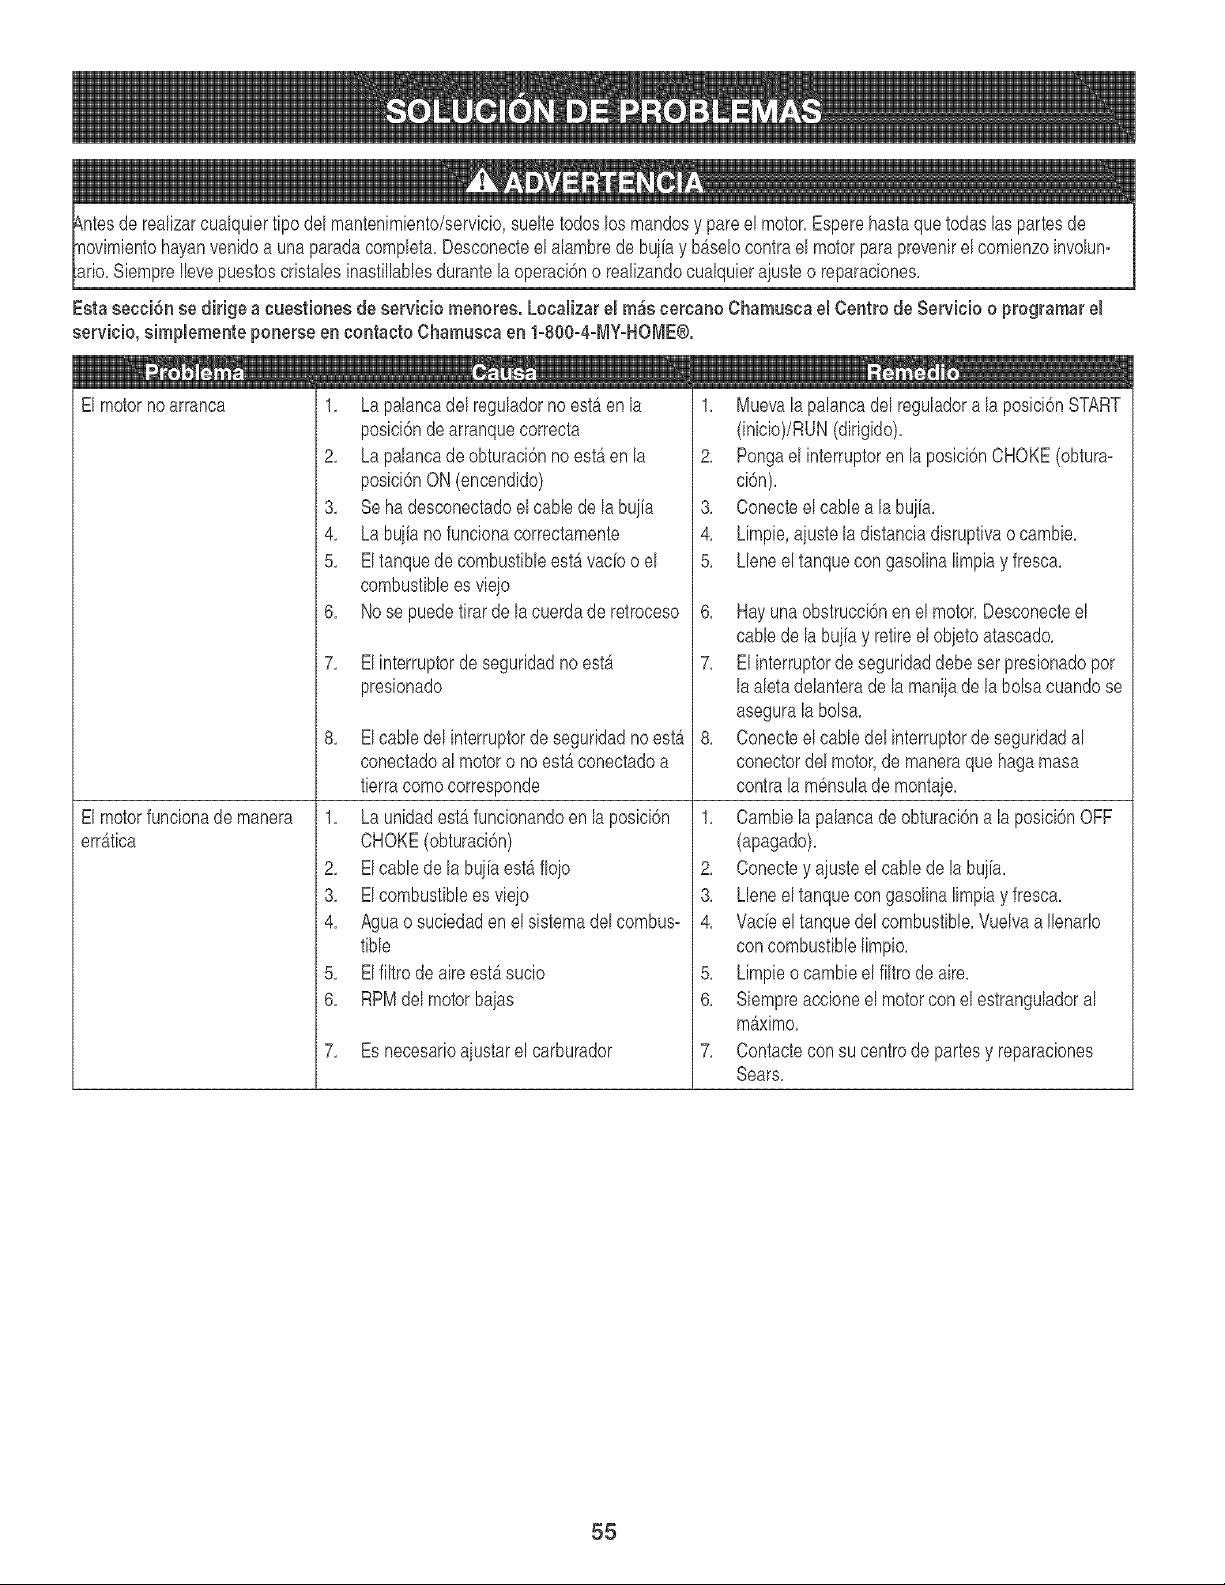
srio,SiempreIlevepuestoscristabs inastillablesdurantela operaci6no realizandocualquieraiusteo reparaciones,
Esta secci6n se dirige a cuestiones de servbio menores. Localizar el m_seercano Chamuscael Centre de Se_vbio o programarel
servicio, simplemente penerseen contacts Chamusea en 1-800-a-MY-HOME®.
El motornoarranca
El motorfuncionade manera
err_tica
Mill
1, Lapalancadel reguladorno est_en la
posbi6n de arranquecorrecta
2, Lapalaneade obturaei6nno est_ en la
posiei6nON(eneendido)
8, Sehadesconeetadoel cane de la buiia
4, La buiiano funcionaeorreetamente
5, Eltanquede combustibleest_ vaeb o el
combustiblees vieio
6, Nose puedetirarde la cuerdade retroeeso
7,
Elinterrupterde seguridadno est_
presionado
8, Elcane del interrupterde seguridadno est_
coneetadoal motoro noest_eoneetadoa
tierracomeeorresponde
1, La unidadest_funcionandoen laposiei6n
CHOKE(obturaci6n)
2, Elcane de la buiiaest_fioio
8, Eleombusfibleesvieio
4, Aguao suciedaden el sistemadel combus=
tible
5, Elfiltrode aireest,.sucio
6, RPMdelmotor baias
7, Es neeesarioaiustarelcarburador
1. Muevalapalancadel reguladora la posici6nSTART
(inbio)/RUN(dirigido).
2. Pongael interrupteren laposici6nCHOKE(obtura-
ci6n).
3. Conecteel cane a la bujia.
4. Limpb,ajusteladistanciadisruptivao cambb.
5. Lleneel tanquecon gasolinalimpiay fresca.
6. Hayunaobstrucci6nen el motor.Desconecteel
cane de labuiiay retireel objetoatascado.
7. Elinterrupterdeseguridaddebe serpresionadoper
laaletadelanterade la maniiade labolsacuandose
asegurala boB&
8. Conecteel cabledel interrupterde seguridadal
conectordel motor,de maneraque haga masa
contrala m6nsulade montaie.
1. Cambb lapalancade obturaci6na la posici6nOFF
(apagado).
2. Conectey ajusteel cane de labujia.
3. Lleneel tanquecon gasolinalimpiay fresca.
4. Vacieel tanquedel combustible.Vuelvaa Ilenarlo
concombustiblelimpio.
5. Limpieo cambb el filtro de aire.
6. Sbmpre accioneel motorcon el estranguladoral
m_ximo.
7. Contactecon sucentre de partesy reparaciones
Sears.
55
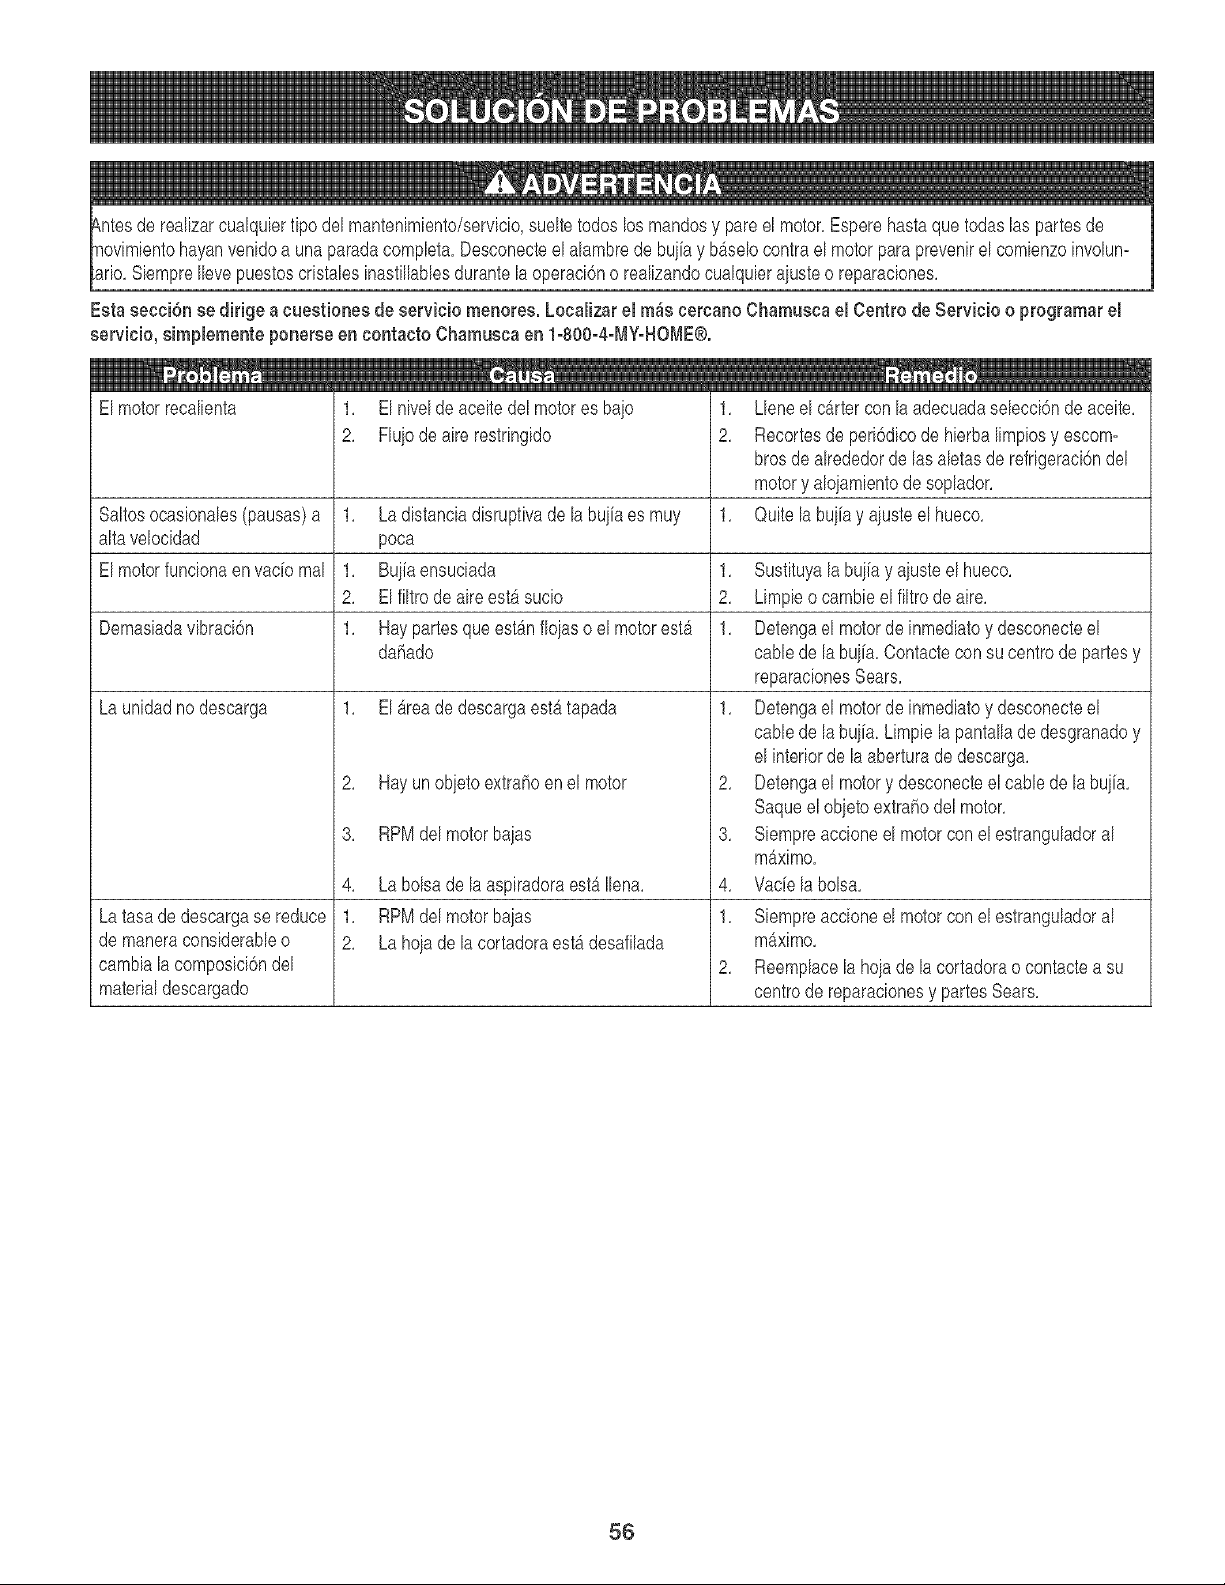
luier fipodel mantenimiento/servicio,sueltetodos los mandosy pareelmotor,Esperehastaquetodaslas partesde
Ilevepuestoscristalesinasfillablesdurantela operaci6no realizandocualquieraiusteo reparaciones,
Esta secci6n se dirige a cuestiones de servicio menores. Localizar el m_scercano Chamusca el Centro de Servicio o programar el
servicio, simplemente ponerse en contacto Chamuseaen 1-800-4-MYoHOME®.
El motorrecalienta
1, El nivelde aceitedel motores bale
2, Flu]odeaire restringido
1,
i2,
Saltosocasionales(pausas)a 1, Ladistanciadisruptivade labuiiaes muy 1,
alta velocidad poca
El motorfuncionaenvac[omal 1, Buiiaensuciada 1,
2, Elfiltrode aireestAsucio 2,
Demasiadavibraci6n 1, HaypartesqueestAnfioiaso el motorestA 1,
dahado
La unidadnodescarga 1, ElAreadedescargaestAtapada 1,
2, Hayunob]etoextrahoenel motor
3, RPMdelmotorba]as
4, La bolsade la aspiradoraestAIlena,
1, RPMdelmotorbaias
2, La hoiade lacortadoraestAdesafilada
La tasade descargase reduce
de maneraconsiderableo
cambiala composici6ndel
materialdescargado
2,
3,
4,
1,
2,
Lleneel cartercon la adecuadaselecci6nde aceite,
Recortesde peri6dicode hierbalimpiosy escom-
brosde alrededorde las aletasde refrigeraci6ndel
motory alojamientode soplador,
Quite la buiia y aiusteel hueco,
Sustituyalabuiia y aiusteel hueco,
Limpieo cambieel filtro de aire,
Detengael motorde inmediatoy desconecteel
cable de la bujia,Contacteconsu centredepartesy
reparacionesSears,
Detengael motorde inmediatoy desconecteel
cable de la buiia, Limpiela pantalladedesgranadoy
el interiorde la aberturade descarga,
Detengael motory desconecteel cablede la buiia,
Saqueelobjetoextrahodel motor,
Siempreaccioneel motorconel estranguladoral
mAximo,
Vacie la bolsa,
Siempreaccioneel motorconel estranguladoral
mAximo,
Reemplacela hojade la cortadorao contactea su
centrede reparacionesy partesSears,
56

(Esta p_gina se aplica s61oen EE,UU, y Canada),
Sears, Roebuck and Co°, U,S°A° (Sears}, emConsejo de F{ecursos Ambientales de California (OAF{B}
y la Agencia de Protecci6n Ambiental de los Estados Unidos (ERA}
Dectaraci6n de garantia demsistema de controm de emisiones (derechos y obmigaciones de la garantia de defectos del propi=
etario}
LA COBERTURADE LA GARANTfADE CONTROLDEEMISIONESES
APLICABLEA LOS MOTORESCERTIFICADOSCOMPRADOSENCALIFOR-
NIAEN 1995Y POSTERIORMENTE,QUE SE UTILIZANENCALIFORNIA,
Declaracion de garantia sobre defectos en el control
ElConsejode RecursosAmbientalesde California(CARB),laEPA(Agencia
de Protecci6nAmbientalde los EE.UU.)y Searstienen el gustode explicarla
garantiadel sistemade controlde emisionespara motoresdel argo2000y para
elfuturo con relaciona motorespequeSostodo terreno(SORE).En California,
los nuevosmotorespequer_ostodo terrenodebenestar disefiados,construidos
y equipadosparacumplircon las rigurosasnormasanti-smogdelestado.En
el restode losEstadosUnidos,losmotoresnuevostodoterrenodeencendido
perchispa certificadosparael afio 1997debencumplirestb,ndaressimilares
establecidospor la EPA.Searsdebegarantizarel sistemade control de emis-
Y PARALOS MODELOSCERTIFICADOSDELANO 1997Y POSTERIORES,
QUESE COMPRENY UTILICENEN CUALQUIERPARTEDE LOSESTADOS
UNIDOS(Y A PARTIRDEL 1 DEENERODE2001 ENCANAD,_).
de ernisiones para California y los Estados Unidos
Jonesde su motorparalosperiodosde tiempoenumeradosa continuacidn,
siemprequeno hayaabuso,negligenciao mantenimientoindebidode su
motortodoterrenopequer_o.Su sistemade controlde emisionespuedeincluir
piezastales comoel carburador,el filtro de aire, elsistemade encendido,el
silenciadory elconversorcatalitico.Tambi6npuedeincluirconectoresy otras
unidadesrelacionadascon las emisiones.Dondeexistaunacondici6ncubierta
potla garantia,Searsrepararasu pequefiomotortodo terrenosincostoalguno
incluyendodiagn6stico,piezasy manede obra
Cobertura de Bagarantla Sears para defectos en et control de emisiones
Los motorestodo tenenopequer_osestangarantizadosen Io relativoalcontrol a las disposicionesque se indiquena continuaci6n.Si una partedesu motor
de emisionesparadefectosenpiezasduranteun per[odode dos a[ios,sujeto cubiertapot la garantiaesdefectuosa,Sears repararao sustituiradicha parte.
F{esponsabHidades del propietario en remaci6n con Bagarantma
Comepropietariodel motortodo terrenopequer_o,Ud.es responsablede la
realizaci6ndel mantenimientorequeridoquese incluyeen las instrucciones
de operaciony mantenimiento.Sears recomiendaquese conserventodoslos
recibosrelativosal mantenimientode su motortodoterrenopequefio,pero
no pude denegarlagarantiasimplementeporla falta de losmismos,o por su
incumplimientodel mantenimientoprogramado.Comopropietariodel motor
peque5otodoterrenodebesaberque, sinembargo,Sears lepuedenegar
lacoberturade lagaranfiasi su motortodoterrenopequefioo una piezadel
mismohanfalladodebidoa abuso,negligencia,mantenimientoindebidoo
a modificacionesno aprobadas.Ud.es responsablede presentarsu motor
todoterrenopeque5oa un distribuidorde serviciosSearsautorizadotan pronto
comeaparezcaun problema.Lasreparacionesde la garantiasinconflicto
debencompletarseen un plazodetiemporazonable,no superiora 30 dias. Si
tienealguna preguntarespectoa sus derechosy responsabilidadesreferen-
tes a la garantia,debe contactarcon un representantede serviciosSears al
1--800--469--4663.La garantiade emisioneses unagarantiaper defectos.Los
defectossejuzgan de acuerdocon elfuncionamientonormalde unmotor.La
garanfia no esta relacionadacon unapruebade emisionesen uso.
Disposiciones de _agarantia Sears para defectos en el control de ernisiones
Las siguientesson disposicionesespecificasrelacionadascon la coberturade la garantiaparadefectosenel controlde emisiones.Esun afiadidoa lagarantiade
motorSearspara motoresno reguladosque seencuentraen lasinstruccionesde funcionamientoy mantenimiento.
1. Piezascon garantia
La coberturade estagarantiase extiende0nicamentealas piezas
que aparecena continuaci6n(las partesde los sistemasde control de
emisiones),siemprequedichaspiezasestuvieranya en el motoren el
momentode su compra.
a. Sistemade medici6n de combustible
oSistemade enriquecimientopara arranqueen fr[o
oCarburadory partesintemas
oBombade combustible
b. Sistemade inducci6nde aire
oFiltrode aire
oColectorde admisi6n
c. Sistemade encendido
oBuj[a(s)de encendido
oSistemade encendidomagneto
d. Sistemadelcatalizador
oConvertidorcatalitico
oColectorde escape
oSistemade inyecci6nde aireo valvula de impulses
e. Elementosvariadosusadosen los sistemasanteriores
oValvulasde vado, sensiblesa temperatura,posici6ny tiempo
e intenuptores
• Conectoresy montajes
2. Alcancede la cobertura
Searsgarantiza alposeedorinicialy a loscompradoressubsiguientes
que laspiezascon garantiano tendran defectosenmaterialesnimano
de obra que provoquenla falla de las mismasduranteun per[ode de
dos aSosa partirde la fecha en queel motorse entregaa un comprador
particular.
3. Sincargo
La reparaci6no reemplazode cualquierpartecon garantia se realizara
sin cargo alguno parael poseedor,incluyendotareas de diagnosticoque
permitandeterminarsi una parte con garantiaes defectuosa,siempreque
dicho diagn6sticose realiceen un distribuidorde serviciosSearsautoriza-
do. Parael servicio de lagarantia de emisiones,contacteal distribuidorde
serviciosSears autorizadomascercanoincluidoen las'P_.ginasamarillas"
en lascategorias"Motores,gasolina","Motoresde gasolina","Podadoras
de c6sped",o similares.
4. Reclamacionesy exclusionesa la cobertura
Las reclamacionesde lagaranfia debenenviarsede acuerdocon las
disposicionesde la politica de garantia para motoresSears.La cobertura
de la garantiaexcluiradefectosen piezascon garant[aque no seanpartes
originalesSears,o abuso,negligenciao mantenimientoincorrecto,tal y
como se estableceen la politica de garantiapara motoresSears. Searsno
es responsablede lasfallas en piezascon garant[aprovocadasperel use
de partesar_adidas,que no sean originaleso que se hayanmodificado.
5. Mantenimiento
Cualquierpartecon garantiaque no este programadaparaset reem-
plazadacomomantenimientorequerido,o que solo deba inspeccionarse
regularmenteal efectode "inspeccioneo reemplaceseg0n sea necesario",
estaragarantizadacontra defectosduranteel per[ode de la garantia.Todas
las piezas garantizadasqueest6n programadaspara su reemplazopara
cumplir con los requisitesde mantenimientoestarangarantizadass61o
por el periodoanterioral primerreemplazoprogramadopara dichapieza.
Cualquierpiezade recambioquesea equivalenteen funcionamientoy
durabilidadpuedeusarsepararealizarmantenimientoo reparaciones.El
propietarioes responsablede realizartodo el mantenimientorequerido,tal
y como sedefine en lasinstruccionesde funcionamientoy mantenimiento
Sears
6. Coberturaindirecta
Perla presente,la coberturase extiendea lafalla de cualquiercomponente
de motorprovocadaper lafalla de unapiezacon garantia queeste todav[a
en per[ododegarant[a.
En los EstadosUnidosy Canadahay unalineade atenci6nde24 horas,1-800=469=-4663,quecuentacon un men0con mensajespre-grabadosquecontienen
informaci6nparael mantenimientode motores.
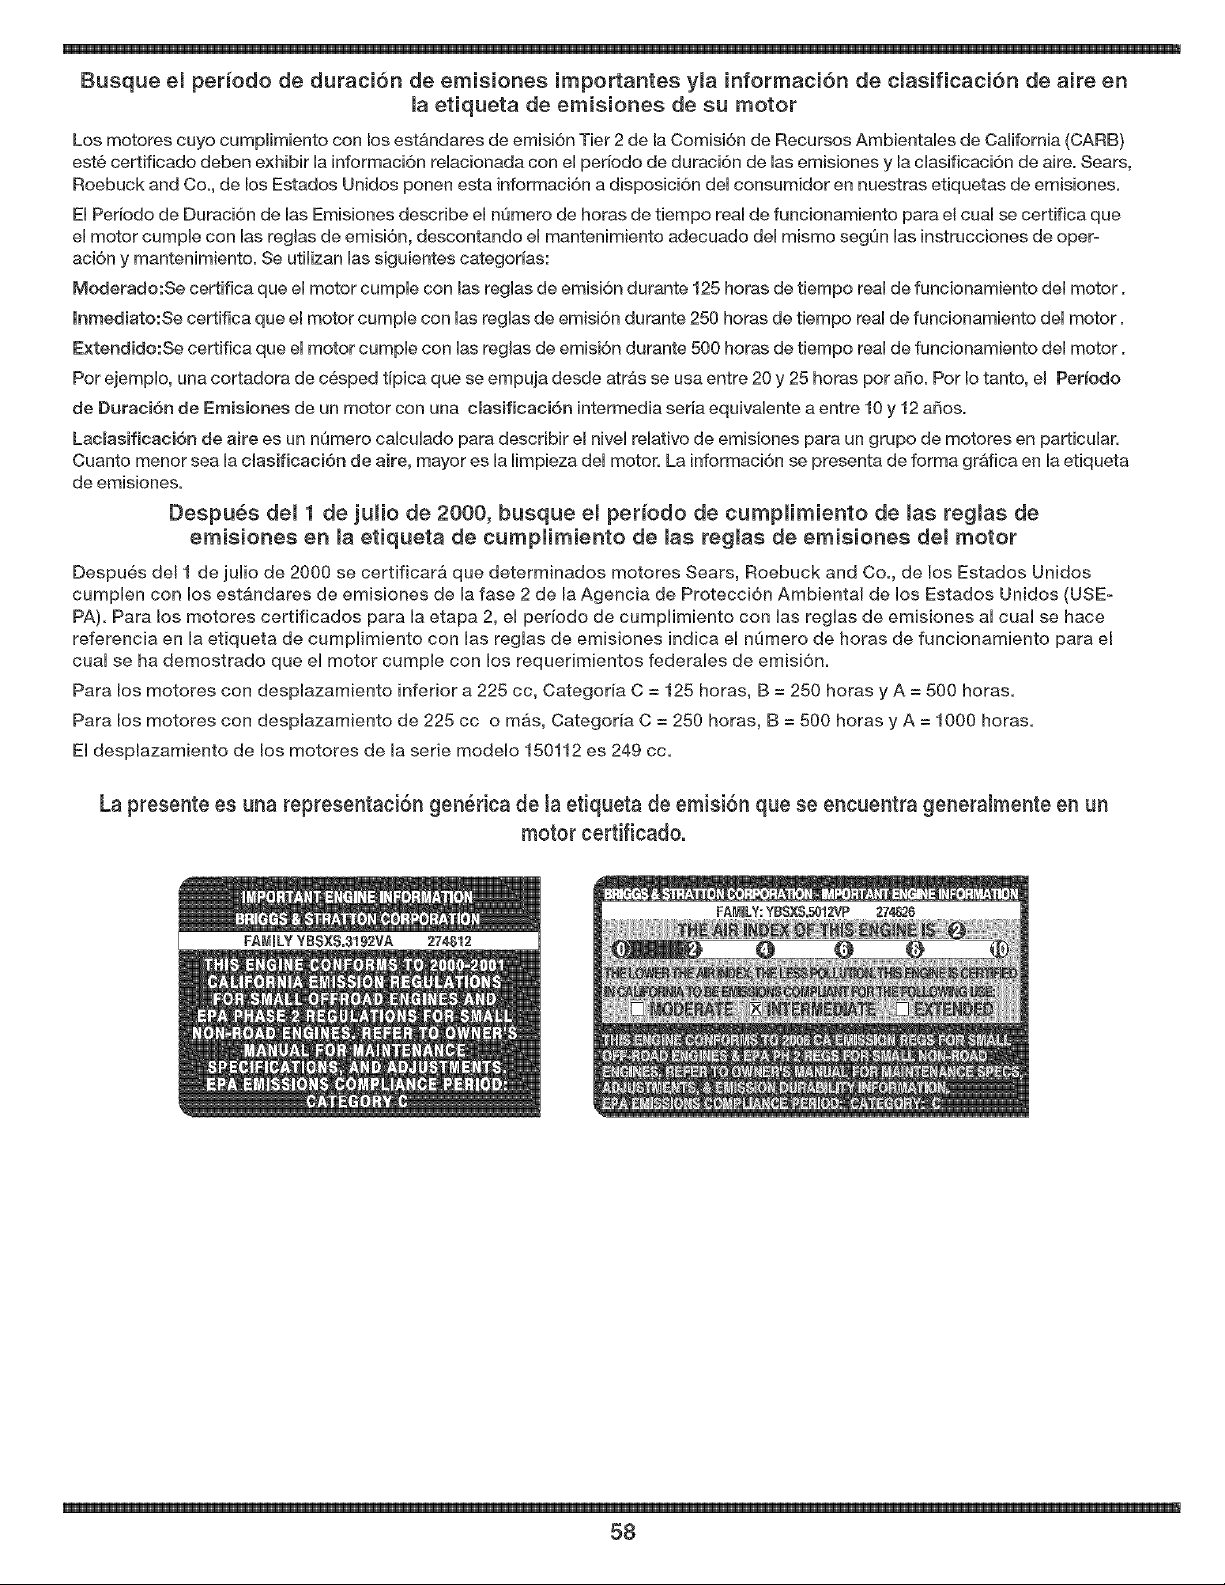
Busque el periodo de duraci6n de emisiones importantes y[a informacion de c[asificacion de aire en
la etiqueta de emisiones de su motor
Los motores cuyo cumplimiento con los est&ndares de emisi6n Tier 2 de la Comisi6n de Recursos Ambientales de Catifornia (CARB)
est6 certificado deben exhibir la informaci6n relacionada con el periodo de duraci6n de las emisiones y la clasificaci6n de aire. Sears,
Roebuck and Co., de los Estados Unidos ponen esta informac[6n a dispos[ci6n del consumidor en nuestras etiquetas de emisiones.
El Periodo de Duraci6n de [as Emisiones describe el n[imero de horas de tiempo real de funcionamiento para el cual se certifica que
el motor cumple con las reglas de emisi6n, descontando el mantenimbnto adecuado del mismo segQn las instrucciones de oper-
aci6n y mantenimiento. Se utilizan [as siguientes categorias:
Moderado:Se certifica que el motor cumple con [as reglas de emisi6n durante 125 horas de tiempo real de funcionamiento del motor.
[nmediato:Se certifica que el motor cumpJe con las reglas de emisi6n durante 250 horas de tiempo real de funcionamiento del motor.
Extendido:Se certifica que el motor cump{e con las reglas de emisi6n durante 500 horas de tiempo real de funcionamiento del motor.
Por ejemplo, una cortadora de c_sped tipica que se empuja desde atr&s se usa entre 20 y 25 horas pot afo. Por [o tanto, el Pedodo
de Duraci_Sn de Emisiones de un motor con una c[asificac{6n intermedia seria equivalente a entre 10 y 12 afros.
Lac[asificaci6n de aire es un nQmero calculado para describir el nivel relativo de emisiones para un grupo de motores en particular.
Cuanto menor sea la c{asfficaci6n de aire, mayor es la limpieza del motor. La informaci6n se presenta de forma gr&fica en la etiqueta
de emisiones.
Despues de[ 1 de ju[[o de 2000, busque e[ per[odo de cump[[m[ento de [as reg[as de
emisiones en la etiqueta de cumpiimiento de las reg[as de emisiones de[ motor
Despu6s del 1 de juiio de 2000 se certificar& que determinados motores Sears, Roebuck and Co., de los Estados Unidos
cumplen con los estb.ndares de emisiones de la fase 2 de la Agencia de Proteccidn Ambiental de los Estados Unidos (USED
PA). Para los motores certificados para la etapa 2, el periodo de cumplimiento con las reglas de emisiones al cual se hace
referencia en la etiqueta de cumplimiento con las reglas de emisiones indica el nQmero de horas de funcionamiento para el
cual se ha demostrado que el motor cumpJe con los requerimientos federales de emisi6n.
Para los motores con desplazamiento inferior a 225 cc, Categoria C = 125 horas, B = 250 horas y A = 500 horas.
Para los motores con desp[azamiento de 225 cc o m&s, Categoria C = 250 horas, B = 500 horas y A = 1000 horas.
El desplazamiento de los motores de la serie modelo 150112 es 249 cc.
La presente es una representaciSn gen_rica de [a etiqueta de emisiSn que se encuentra genera[mente en un
motor certificado.
58

59

Your Home
For repair - in your home - of all major brand appliances,
lawn and garden equipment, or heating and cooling systems,
no matter who made it, no matter who sold it!
For the replacement parts, accessories and
owner's manuals that you need to do-it-yourself.
For Sears professional installation of home appliances
and items like garage door openers and water heaters.
1-800-4-MY-HOME ® (1-800-469-4663)
Call anytime, day or night (U.S.A. and Canada)
www.sears.com www.sears.ca
For expert home solutions advice: www.managemyhome.com
Our Home
For repair of carry-in items like vacuums, lawn equipment,
and electronics, call or go on-line for the location of your nearest
Sears Parts & Repair Service Center
1-800-488-1222 (U.S.A./ 1-800-469-4663 (Canada/
Call anytime, day or night
www.sears.com www.sears.ca
To purchase a protection agreement on a product serviced by Sears:
1-800-827-6655 (U.S.A.) 1-800-361-6665 (Canada)
Para pedir servicio de reparaci6n Au Canada pour service en fran_ais:
a domicilio, y para ordenar piezas: 1-800-LE-FOYER Mc
1-888-SU-HOGAR ® (1-800-533-6937)
(1-888-784-6427) www.sears.ca
,Se- //rs
® Registered Trademark / Trademark / sM Service Mark of Sears Brands, LLC
T_,T
® Marca Registrada / ' Marca de F_brica / sM Marca de Servicio de Sears Brands, LLC
MC _,ID
Marque de commerce / _ Marque d_pos_e de Sears Brands, LLC © Sears Brands, LLC

