Loading ...
Loading ...
Loading ...

8
en Overview
Overview
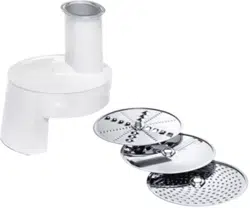
X Fig. A
1 Pusher
2 Lid with filling shaft
3 Cutting discs
a Reversible slicing disc – thick / thin
b Reversible shredding disc –
coarse / fine
c Grating disc – medium-fine
4 Drive shaft with driver
5 Housing with outlet opening
Special accessories
6 Chipper disc
7 Grating disc – coarse
8 Asian vegetable disc
9 Potato fritter disc
X Fig. B
Operating position
Cutting discs
Please note:
– Reversible discs: The side you require
must face upwards when inserted.
– Single-sided discs: The side with the
blade / serrations must face upwards
when inserted.
Reversible slicing disc –
thick / thin
For slicing fruit and vegetables. Processing
on setting 3
Marking on the disc:
1 = side for thick slicing
3 = side for thin slicing
Note: The reversible slicing disc is not
suitable for slicing hard cheese, bread, rolls
or chocolate. Slice boiled potatoes only
when they are cold.
Reversible shredding
disc – coarse / fine
For shredding vegetables, fruit and cheese,
except hard cheese (e.g. Parmesan).
Processing on setting 3 or 4
Marking on the disc:
2 = side for coarse shredding
4 = side for fine shredding
Note: The reversible shredding disc is
not suitable for shredding nuts.. Shred
soft cheese with the coarse side only on
setting 4.
Grating disc – medium-fine
For grating raw potatoes, hard
cheese (e.g. Parmesan), chilled chocolate
and nuts. Process on setting 4.
Note: The grating disc is not suitable for
grating soft cheese or cheese slices.
Working with the
continuous-feed shredder
X Fig. D
1. Press the release button and move the
swivel arm into the operating position.
2. Remove the drive protection cover
from the drive for the continuous-feed
shredder. Rotate drive protection cover
until the lock is released.
3. Grip drive shaft with the predetermined
breaking point face down with one hand
underneath. Attach required slicing or
shredding disc. In the case of reversible
discs, ensure that the required side is
face up.
4. Grip upper end of the drive shaft and
insert into the continuous-feed shredder.
5. Fit the lid (,).
6. Rotate in a clockwise direction as far as
possible (;).
7. Place the continuous-feed shredder on
the drive.
8. Rotate in a clockwise direction as far as
possible.
9. Place a bowl or plate under the
outlet opening of the continuous-feed
shredder.
10. Plug the mains plug into the mains. Turn
rotary switch to recommended setting.
11. Put food to be processed in the feed
tube and push down with the pusher.
Caution!
Prevent the cut ingredients from building up
in the outlet opening.
Loading ...
Loading ...
Loading ...