
LIVE STREAMING MIXER
EN
User Guide

Contents
Introduction 4
About this Guide.. ..................................................................................... 4
How the manuals are organized..................................................................6
Product features.......................................................................................7
Accessories.. ............................................................................................ 8
Component names and functions 9
Rear panel.. ............................................................................................. 9
Front side...............................................................................................11
Getting ready to use this product 17
Connecting to an iPhone/iPad.. ................................................................. 17
Connecting to Android devices..................................................................19
Connecting to your computer and configuring the settings (Windows)............21
Connecting to your computer and configuring the settings (Mac)...................23
Using this product for livestreaming (17LIVE, Twitch,
YouTube Live) 25
Using with an iPhone/iPad........................................................................25
Using this product with an Android device.................................................. 30
Using this product with your computer.. .................................................... 34
Operations while livestreaming.. .............................................................. 39
Connecting your musical instrument or music player.. ................................. 41
Using this product in a Web meeting 43
Using with an iPhone/iPad........................................................................43
Using this product with an Android device.................................................. 49
Using this product with your computer.. .................................................... 54
2
Contents

Using this product for a podcast 59
Using WaveLab Cast.................................................................................59
Using this product for recording 60
Using Rec’n’Share with an iPhone/iPad...................................................... 60
Using Cubase AI with your computer..........................................................61
Using this product in music production 62
Using Cubasis LE with an iPhone/iPad.. ...................................................... 62
Using Cubase AI with your computer..........................................................63
Troubleshooting 64
Power-related.. ...................................................................................... 64
Audio-related and other issues..................................................................65
Appendix 67
General specifications..............................................................................67
Input / Output characteristics................................................................... 71
Dimensions.. .......................................................................................... 74
Block and level diagrams..........................................................................76
3
Contents
Introduction
About this Guide
Notice regarding the contents of this guide
This user guide explains about connecting and operating this product for the user. The precautions and other
matters are classified as follows.
(
WARNING
This content indicates “risk of serious injury or death.”
(
CAUTION
This content indicates “risk of injury.”
(
NOTICE
Indicates points that you must observe in order to prevent product failure, damage or malfunction and
data loss, as well as to protect the environment.
(
NOTE
Indicates notes on instructions, restrictions on functions, and additional information that may be helpful.
(
All illustrations and screens shown in this guide are for explanatory purposes.
(
Any company names, product names or related names in this document are the registered trademarks or
trademarks of their respective owners.
(
Software may be revised and updated without prior notice.
(
Copying of the software or reproduction of this guide in whole or in part by any means is expressly
forbidden without the written consent of the manufacturer.
(
Steinberg Media Technologies GmbH and Yamaha Corporation make no representations or warranties
with regard to the use of the software and documentation and cannot be held responsible for the results
of the use of this guide and the software.
Protection of copyright
(
Do not use this product for any purpose that may infringe upon the rights of any third party including
copyrights, as established by law in each country or region.
(
Yamaha bears no responsibility for any infringement upon third party rights that may occur as a result of
using this product.
(
The copyright of the “content”*1 installed in this product belongs to Steinberg Media Technologies GmbH,
Yamaha Corporation, or its copyright holder. Except as permitted by copyright laws and other relevant
laws, such as copying for personal use, it is prohibited to “reproduce or divert”*2 without the permission
of the copyright holder. When using the content, consult with a copyright expert. If you create music or
perform with the contents through the original use of the product, and then record and distribute them,
4
Introduction > About this Guide

the permission of Yamaha Corporation is not required regardless of whether the distribution method is
paid or free of charge.
*1: The word “content” includes a computer program, audio data, Accompaniment Style data, MIDI data,
waveform data, voice recording data, music score, and score data, etc.
*2: The phrase “reproduce or divert” includes taking out the content itself in this product, or recording and
distributing it without changes in a similar manner.
Trademarks
The trademarks used in this guide are as follows.
(
Steinberg, Cubase, Cubasis and WaveLab Cast are registered trademarks of Steinberg Media Technologies
GmbH.
(
Windows, Teams and Skype are registered trademarks of Microsoft Corporation in the United States and
other countries.
(
Apple, Mac, iPad, iPhone, App Store, Lightning and FaceTime are trademarks of Apple Inc., registered in
the U.S. and in other countries.
(
Android, YouTube, and Google Play are trademarks of Google LLC.
All company names, product names and other such listings in this guide are the registered trademarks or
trademarks of their respective companies.
5
Introduction > About this Guide

How the manuals are organized
The manuals that cover this product are listed below.
Printed manuals
The manual that is included with this product.
(
Quick Guide
Explains the basic methods used to connect this product to external devices and how to configure the
settings, as well as the name and function of each part.
(
Safety Guide
Explains the safety-related points you must be aware of when using this product.
Online manuals
(
User Guide (this guide)
Explains the name and function of each part, how to connect to various devices and how to set things up
for making sound. This also explains how to use this product in different situations.
NOTE
You can download these manuals from the Yamaha website. The latest manual data is always available on the Yamaha website, so
please make use of these resources as necessary.
https://download.yamaha.com/
6
Introduction > How the manuals are organized

Product features
This is a Live streaming mixer that’s used for livestreaming and other uses via connection to your computer,
iPad or smartphone.
n
Features a built-in compressor, equalizer and reverb with adjustable tonal character
Use the dedicated “AG Controller” to make detailed adjustments to the tonal character. You can turn the
compressor, equalizer and reverb on/off on the product itself.
n
Useful loopback feature for livestreaming
This feature lets you send back the audio inputted into this product to your computer, iPad or smartphone,
mixed with the audio from your computer, iPad or smartphone.
n
Bundled with “WaveLab Cast,” useful for podcasting
A license for “WaveLab Cast” is included with this product. You can use this software for podcasting or for
editing the audio in your video contents.
n
Bundled with “Cubase AI” DAW software
A license for “Cubase AI” is included with this product. You can use this software for the tasks required in
basic music production, including recording, editing, mixing and more.
n
Operates using USB bus power
You can connect this product to your computer and power it via USB (a power supply of at least 5 V and 1 A is
required).
7
Introduction > Product features

Accessories
The following accessories are included with this product.
(
USB cable (USB-C to USB-A), 1.5 m × 1
(
Safety Guide × 1
(
Quick Guide × 1
(
WaveLab Cast Download Information × 1
(
Cubase AI Download Information × 1
8
Introduction > Accessories

Component names and functions
Rear panel
b a b a
a
[U] USB 2.0 jack (USB-C)
Connect your computer or iPhone/iPad here. When connecting a computer, power will be supplied from the
computer to this unit. When connecting an iPhone/iPad, connect a USB power adapter (sold separately) to the b [5V
DC] USB port.
NOTE
A dedicated driver is required to use this product with Windows® computers. Download and install the driver from the
following website.
AG03MK2 :
https://www.yamaha.com/2/ag03mk2/
AG06MK2 :
https://www.yamaha.com/2/ag06mk2/
NOTICE
(
Do not connect any other devices except for an iPhone, iPad or a computer to the USB 2.0 port.
(
A 5 V and 1 A power supply is required to operate this product on bus power. If a stable power supply cannot be
provided, supply power from the separately available [5V DC IN] USB port.
Points of caution when using the USB port
Observe the following points to prevent loss of data when connecting the USB port to other devices.
(
Make sure to use the USB cable packaged with this product.
(
Observe the following before inserting or unplugging the USB cable.
(
Quit all applications.
(
Make sure that no data is being transmitted from this product.
(
After you unplug the cable, make sure to wait for at least six seconds before plugging the cable in again. Rapidly
plugging in and unplugging the cable may cause a malfunction.
9
Component names and functions > Rear panel

b
[5V DC] USB port (USB-C)
Connect a commercially-available USB power adapter, USB mobile battery or similar device here. Use this with
devices that cannot supply power like an iPhone or iPad, or when connecting to computers that cannot supply ample
bus power. This product does not include a USB power adapter or USB mobile battery.
NOTICE
(
Before using this product, be sure to read the safety precautions for the USB power adapter or USB mobile battery that
you will use.
(
Use a USB mobile battery or USB power adapter with an output voltage of 4.8 V–5.2 V and an output current of at least 1
A.
10
Component names and functions > Rear panel

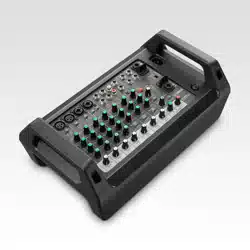
Front side
c c e d vu w
on
i
m
p
q
r
t
A
C
E
F
G
f
l
x
D
B
y
f
h
k
y
x
B
D
g f
z
d w
j
r
A
C
E
F
G
m
n
p
q
s
t
z
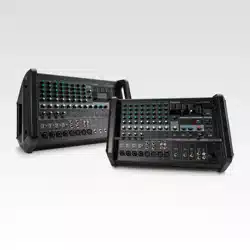
AG06MK2 AG03MK2
c
Mic/line input jack
Connect your mic, electronic instrument or other device here. You can insert an XLR type or phone (balanced/
unbalanced) plug into this jack.
XLR type (balanced)
Phone type (balanced)
Phone type (unbalanced)
Plug type
11
Component names and functions > Front side

d
Line [K (R)] input jack ([K] input jack on the AG03MK2)
AG06MK2
Connect an electronic keyboard, audio device or other line-level equipment here. Channels 3/4 use phone plugs, and
channels 5/6 use RCA pin type plugs. Use the channel 3 [L/MONO] jack to connect a device with a monaural output.
When doing so, the audio input from the [L/MONO] jack is output to both the L and R channels of the mixer output.
AG03MK2
Connect an electronic keyboard, audio device or other line-level equipment here. Use the channel 2 [L/MONO] jack to
connect a device with a monaural output. When doing so, the audio input from the [L/MONO] jack is output to both
the L and R channels of the mixer output. This does not work when the [GUITAR/LINE] selector switch is set to GUITAR
(O).
e
Guitar [G] input jack (AG03MK2 only)
Connect an electric guitar, bass guitar or similar instruments here. Compatible with phone plugs. This does not work
when the [GUITAR/LINE] selector switch h is set to LINE (N).
f
[LINE] switch
When this is set to on (O), the input sound is attenuated. If the sound distorts even when you turn the [GAIN] m
knob all the way to minimum, or if the [PEAK] LED r lights frequently, set this to on (O).
NOTE
Turn the faders and knobs to the minimum setting before you toggle the [LINE switch]. This is because you may hear a noise
when the [LINE switch] is toggled.
g
[GUITAR] switch (AG06MK2 only)
Use this switch to change the input impedance for channel 2, either on (O) or off (N). Set this to on when directly
connecting an instrument with high output impedance like an electric guitar or bass guitar to channel 2. If you will
use the “on” setting for this switch, connect your instrument to this product with an unbalanced phone connector.
The product will not work correctly if you use a balanced cable.
WARNING
(
Set the knobs for the speaker, headphone and other output controls to their minimum setting before toggling this
switch. This is because the levels may suddenly get loud, which could damage your hearing or cause external devices to
malfunction.
h
[GUITAR/LINE] selector switch (AG03MK2 only)
Use this switch to change the input for channel 2. Set this to GUITAR (O) when directly connecting an instrument
with high output impedance like an electric guitar or bass guitar to the guitar [G] input jack e. Set this to LINE
(N) when connecting a line-level device to the line [K] input jack d. If you will use the GUITAR setting for this
switch, connect your instrument to this product with an unbalanced phone connector. The product will not work
correctly if you use a balanced cable.
WARNING
(
Set the knobs for the speaker, headphone and other output controls to their minimum setting before toggling this
switch. This is because the levels may suddenly get loud, which could damage your hearing or cause external devices to
malfunction.
12
Component names and functions > Front side

i
Phantom [+48V CH1-2MIC] switch/[+48V CH1-2MIC] LED (AG06MK2 only)
When this switch is turned on (O), the [+48V CH1-2MIC] LED lights, and DC +48 V phantom power is supplied to the
XLR plug connected to the mic/line input jacks for channels 1 and 2 c. Turn this switch on when you are using a
condenser mic.
NOTICE
(
Turn the switch off if you don’t need phantom power.
(
To prevent this product or your external device from malfunctioning and to prevent noise, turn this switch off before
connecting a device that does not support phantom power to channels 1 or 2.
(
To prevent this product or your external device from malfunctioning and to prevent noise, do not unplug or insert a
cable into channels 1 and 2 while the switch is still on.
(
To prevent this product or your external device from malfunctioning and to prevent noise, turn phantom power on/off
only when the channel 1/2 level knobs are at minimum (0) setting.
j
Phantom [+48V] switch/[+48V] LED (AG03MK2 only)
When this switch is turned on (O), the [+48V] LED lights, and DC +48 V phantom power is supplied to the XLR plug
connected to the mic/line input jack c for channel 1. Turn this switch on when you are using a condenser mic.
NOTICE
(
Turn the switch off if you don’t need phantom power.
(
To prevent this product or your external device from malfunctioning and to prevent noise, set this switch to off before
connecting a device that does not support phantom power to channel 1.
(
To prevent this product or your external device from malfunctioning and to prevent noise, do not unplug or insert a
cable into channel 1 while the switch is still on.
(
To prevent this product or your external device from malfunctioning and to prevent noise, turn phantom power on/off
only when the level knob for channel 1 is at minimum (0) setting.
k
[GAIN HIGH LOW] switch (AG03MK2 only)
Determines the base volume for channels 2/3. Set this to LOW (O) if the sound is distorting.
NOTE
Turn the level knob to the minimum setting before you toggle the [GAIN HIGH LOW] switch. This is because you may hear a
noise when toggling the [GAIN HIGH LOW] switch.
l
[HIGH LOW] switch (AG06MK2 only)
Determines the base volume for channels 3/4 and 5/6. Set this to LOW (O) if the sound is distorting.
NOTE
Turn the level knob to the minimum setting before you toggle the [HIGH LOW] switch. This is because you may hear a noise
when toggling the [HIGH LOW] switch.
m
[GAIN] knob
Determines the base volume for the respective channel. Adjust the knob so that the [PEAK] LED r lights only briefly
when you sing loudly or play strongly.
n
[COMP/EQ] button
Turns the compressor and equalizer on (the LED lights up yellow). This is set at the optimal setting for livestreaming
by default. This keeps down unnecessary noise in the low end and helps smooth out differences in the input levels.
o
[AMP SIM] button (AG06MK2 only)
Turns the amp simulator on (the LED lights up yellow). The amp simulator recreates the sound of playing an electric
guitar through an amplifier. This simulates the characteristic “distorted” amp sound that’s heard when you directly
connect an electric guitar.
13
Component names and functions > Front side

p
[REVERB] button
Turns the reverb on (the LED lights up yellow). This gives a natural-sounding reverberation.
q
[MUTE] button
Turns the mute on (the LED lights up red). You can use this to silence the sound when you take a short break or in
similar situations while livestreaming.
r
[PEAK] LED
This lights up when the input sound is too loud. If this lights up, turn the [GAIN] knob m counterclockwise to lower
the volume.
s
Fader (AG03MK2 only)
Adjusts the output volume for the sound that’s inputted from a mic or other source connected to (M) channel 1.
t
Level knobs
Adjusts the volume balance between channels.
AG06MK2
Adjusts the output volume for the sound that’s inputted from a mic or other source connected to (M) channel 1.
Adjusts the output volume for the sound that’s inputted from a guitar, mic or other source connected to (G/M)
channel 2.
Adjusts the output volume for the sound that’s inputted from an electronic keyboard or other source connected to
(K) channel 3/4.
Adjusts the output volume for the sound that’s inputted from audio equipment or another source connected to (R)
channel 5/6.
Adjusts the output volume for the sound that’s inputted from the (C/P) [USB 2.0] port.
AG03MK2
Adjusts the output volume for the sound that’s inputted from a guitar, electronic keyboard or other source connected
to (G/K) channel 2/3.
Adjusts the output volume for the sound that’s inputted from the (C/P) [USB 2.0] port.
u
[STEREO OUT] jacks (AG06MK2 only)
Outputs the mixed sound in stereo. Use this when connecting to another mixer, recorder or other equipment.
Compatible with phone plugs. The sound output from these jacks is unaffected by the settings of the [STREAMING
OUT] selector switch D or the speaker [S] knob F.
v
[MONITOR OUT] jacks (RCA pin type, AG03MK2 only)
Connect your powered monitor speaker or similar equipment here.
w
[MONITOR OUT] jack (phone type)
Connect your powered monitor speaker or similar equipment here. Compatible with phone plugs (balanced/
unbalanced)
x
[FOOT SW] jack
Connect a footswitch (such as a Yamaha FC5, sold separately) here. You can use a footswitch to mute the reverb
sound when the LED for the [REVERB] button p is on. The [EFFECT] button LED flashes when the effect sound is
muted. You can use AG Controller to configure the footswitch to mute channel 1 when you operate it.
y
Headphones [H] output jack
Connect your headphones or earphones here. Compatible with stereo phone plugs. When using headphones or
earphones with a stereo mini-plug, you can also use the [HEADSET] headphones [H] output jack z.
14
Component names and functions > Front side

z
[HEADSET] mic [M] input jack
Connect a headset mic here. Normally, the plug is pink. The audio input from this jack is sent to channel 1.
NOTE
When you connect a mic plug into the [HEADSET] mic input jack, the audio from the device connected to channel 1 (mic/line
input jack) is muted.
[HEADSET] headphones [H] output jack
Connect the headset’s headphones here. Normally, the plug is light green. The audio that is outputted is the same as
that of the headphones [H] output jack y.
NOTE
When you connect a headphone plug into the [HEADSET] headphones output jack, the audio sent to the headphone output
jack is muted.
A
[z] (standby/on) switch
Toggles between power standby (N) and on (O).
NOTICE
(
Rapidly toggling this switch between standby and on may cause the product to malfunction. After you toggle the switch
to standby, make sure to wait for at least six seconds before toggling the switch on again.
B
[AUX (P)] smartphone input/output jack (compatible with four-conductor 3.5 mm stereo mini-
plugs)
This input/output jack can be used in many different situations. Compatible with four-conductor stereo mini-plugs
(CTIA-compliant). You can connect your smartphone or other device and use an application to add sound effects such
as audio cues or background music. Adjust the volume on the connected device.
The audio selected using the [STREAMING OUT] selector switch can be sent to the connected device. The audio that’s
sent is a monaural mix.
C
Level meters
To send audio at an appropriate volume to your computer, adjust the levels for each channel so that [SIG] lights up
and [PEAK] only briefly lights up when a loud sound is input.
[SIG] (green) lights up when the audio sent to your computer is at an appropriate level, meaning -20 dBFS (-10 dBu) or
greater
[PEAK] (red) lights up when the audio reaches the clip level of -3 dBFS (+7 dBu)
15
Component names and functions > Front side

D
STREAMING OUT selector switch
Selects the audio to send to your smartphone or computer.
WARNING
(
Adjust the volume before you change the setting of the selector switch.
(
This is because the levels may suddenly get loud depending on the device you’ve connected, which could damage your
hearing or cause external devices to malfunction.
[DRY CH 1-2G] (AG03MK2)
[DRY CH 1-2] (AG06MK2):
Sends the audio input from the mic/line input jack, line [K] input jack and guitar [G] input jack as separate audio
signals, directly to your smartphone or computer.
NOTICE
(
When setting the [DRY CH 1-2] (or [DRY CH 1-2G] on the AG03MK2), the audio signal that is sent to your smartphone or
computer is not muted even if the [MUTE] button is on. When muting voice chats or similar content, use the mute
function on the chat side so that the audio is not inadvertently sent to the other party.
NOTE
When recording to a DAW or other software, set this to [DRY CH 1-2] (or [DRY CH 1-2G] on the AG03MK2) to send the audio
signal without reverb or other effects added.
[INPUT MIX]:
This setting is appropriate for broadcasting conversations and voice chats. Sends the mixed audio from the mic/line
input jack, line [K (R)] input jack and guitar [G] input jack to your computer.
The BGM or effect sounds from the AUX input/output jack are mixed in with the audio sent to your smartphone or
computer.
[LOOPBACK]:
This setting is appropriate for broadcasting conversations and video game streaming.
Sends the mixed audio from the mic/line input jack, line [K (R)] input jack and guitar [G] input jack to your
smartphone or computer.
The BGM or game audio inputted from your smartphone or computer is mixed and returned to the smartphone or
computer.
NOTE
When using DAW software, set this to [DRY CH 1-2] or [INPUT MIX] to avoid feedback.
E
[MIX MINUS] switch
When this is turned on (O), the sound inputted to channels 1 and 2 (2G GUITAR on the AG03MK2) will stop being
output from the [MONITOR OUT] jack v, w, the headphone [H] output jack y and the [HEADSET] headphones [H]
output jack z.
F
Speaker [S] knob**
Adjusts the volume of audio sent to the device connected to the [MONITOR OUT] jack v, w.
G
Headphone [H] knob**
Adjusts the volume for the headphones connected to the headphones [H] output jack y or [HEADSET] headphones
[H] output jack z.
**The volume for the speaker [S] knob and headphones [H] knob can be adjusted separately.
16
Component names and functions > Front side

Getting ready to use this product
Connecting to an iPhone/iPad
This explains what to do to power this unit, up through connecting to an iPhone/iPad. An external power
supply is required to connect to an iPhone/iPad.
What you need
(
USB power adapter or USB mobile battery (at least 5 V, 1 A)
(
Apple Lightning-USB3 Camera Adapter (when using an iPhone/iPad with a Lightning connector)
(
USB-C charging cable included with the iPad, or a commercially available USB-C to USB-C cable (when
using an iPad with USB-C connector)
NOTE
(
When using this product for streaming or otherwise using it for long periods of time, have a power supply on hand to power your
iPhone/iPad.
(
For a list of compatible operating systems, see the following Yamaha website.
AG03MK2: https://www.yamaha.com/2/ag03mk2/
AG06MK2: https://www.yamaha.com/2/ag06mk2/
Connecting
1 Make sure that the volume on this product and on the connected device is turned
all the way down.
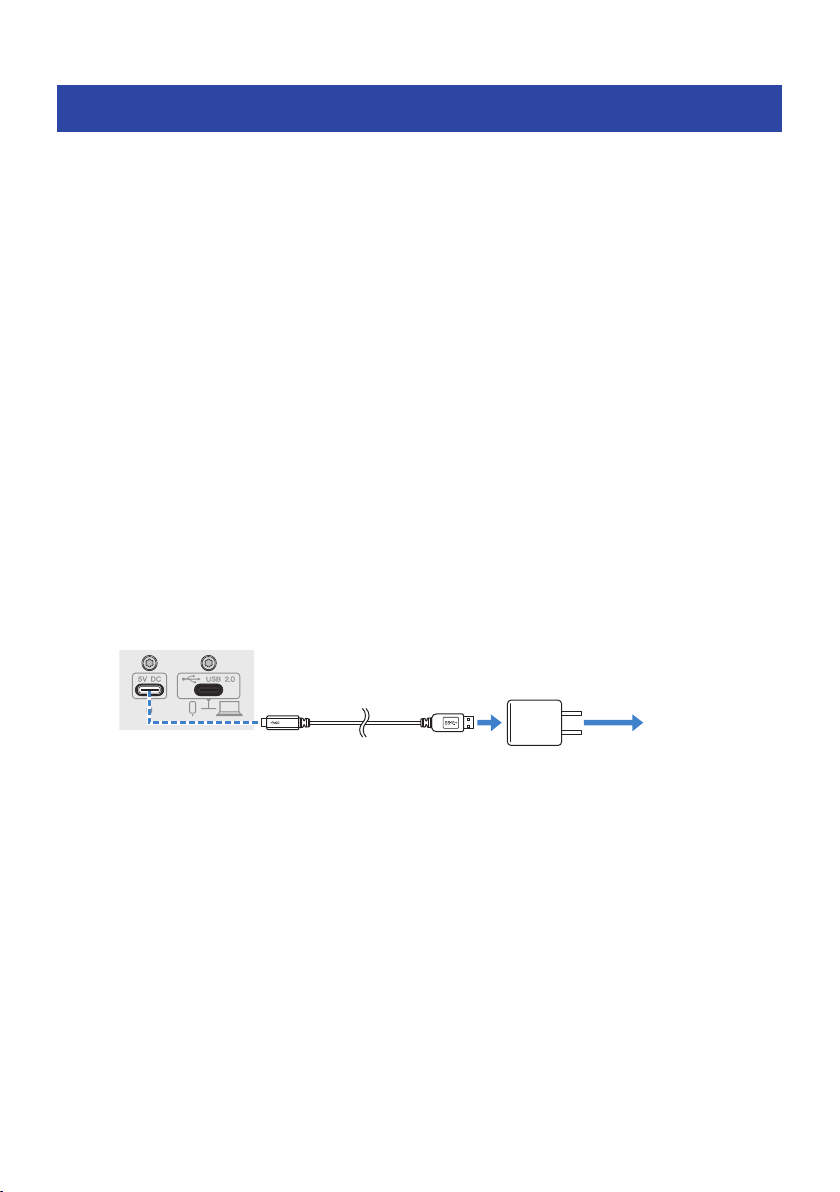
2 Connect a commercially-available USB power adapter, USB mobile battery or
similar device to the [5V DC IN] USB port on the rear of this unit.
To a
power supply
Rear panel
USB cable
(commercially available)
USB
power adapter
3 Turn the [z] (standby/on) switch on.
4 Check whether the LED of the [z] (standby/on) switch on this product is lit.
17
Getting ready to use this product > Connecting to an iPhone/iPad

5 Connect this product to an Apple Lightning to USB 3 Camera Adapter using the
included USB cable.
USB cable
(included)
Rear panel
NOTE
If you’re using an iPad that has a USB-C connector, use the Apple USB-C Digital AV Multiport Adapter. You can also use the
USB-C charging cable included with the iPad to connect directly to this product. However, the amount of time you can use
the iPad will be limited by how much battery charge remains.
6 Connect the Apple Lightning cable to the iPhone/iPad.
iPhone/iPad
This product is automatically recognized by the iPhone/iPad once connected.
There is no need to configure any settings on the iPhone/iPad.
18
Getting ready to use this product > Connecting to an iPhone/iPad
Connecting to Android devices
This explains what to do to power this unit, up through connecting to an Android device. An external power
supply is required to connect to an Android device.
What you need
(
USB power adapter or USB mobile battery (at least 5 V, 1 A)
(
USB cable (commercially available, for power supply)
(
3.5 mm 4-conductor stereo mini cable
NOTE
(
This product can’t input/output audio via the USB cable.
(
The audio signal sent to the Android device is monaural.
(
When using this product for streaming or otherwise using it for long periods of time, have a power supply on hand for powering
your Android device.
Connecting
1 Make sure that the volume on this product and on the connected device is turned
all the way down.
2 Connect a commercially-available USB power adapter, USB mobile battery or
similar device to the [5V DC IN] USB port on the rear of this unit.
To a
power supply
Rear panel
USB cable
(commercially available)
USB
power adapter
3 Check whether the power LED of this product is lit.
19
Getting ready to use this product > Connecting to Android devices

4 Using a 3.5 mm four-conductor stereo mini cable, connect the smartphone [P]
input/output jack on this product to the headset jack on your Android device.
4-conductor (TRRS), 3.5 mm
stereo mini cable
Android device
NOTE
(
You will need a conversion adapter cable if your Android device does not have a jack for connecting stereo mini plugs.
For example, for Android devices that use a USB-C port to input/output audio, you’ll need a USB-C to 3.5 mm four-
conductor (TRRS) earphone jack conversion adapter cable.
(
Use a four-conductor (TRRS) stereo mini cable, not a two- or three-conductor (TS/TRS) cable.
2-conductor (TS) 3-conductor (TRS) 4-conductor (TRRS)
No No Yes
One insulator band Two insulator bands Three insulator bands
Once connected, use your music playback or recording app to test whether the audio is being inputted and
outputted.
20
Getting ready to use this product > Connecting to Android devices

Connecting to your computer and configuring the
settings (Windows)
First, you will need to download and install the “Yamaha Steinberg USB Driver” from the following website,
so that your computer can recognize this product.
AG03MK2: https://www.yamaha.com/2/ag03mk2/
AG06MK2: https://www.yamaha.com/2/ag06mk2/
NOTE
(
For the installation steps, see the installation guide found in the compressed folder you downloaded.
(
For a list of compatible operating systems, see the Yamaha website listed above.
Connecting
1 Remove all USB devices from your computer except for the mouse and keyboard.
2 Make sure that the volume on this product and on the connected device is turned
all the way down.
3 After installing the driver, use the included USB cable to connect this product to
the computer.
Connect the devices directly without using a USB hub.
USB cable
(included)
Computer
Rear panel
4 Turn the [z] (standby/on) switch on.
5 Check whether the LED of the [z] (standby/on) switch on this product is lit.
If you’ve connected the devices before installing the driver, go ahead and install the driver.
Settings on the computer
Change the output/input setting on your computer to “AG03MK2” or “AG06MK2”.
1 Open the “Search” box from the “Taskbar”.
The method of opening the “Search” box may differ depending on the particular computer or
OS.
21
Getting ready to use this product > Connecting to your computer and configuring the settings (Windows)

2 Type “Sound” into the “Search” box screen, and then select “Sound Settings”
from the menu that appears.
3 Select [Yamaha AG03MK2] or [Yamaha AG06MK2] for “Output” and “Input” on the
“Sound” screen.
22
Getting ready to use this product > Connecting to your computer and configuring the settings (Windows)

Connecting to your computer and configuring the
settings (Mac)
A driver is required to connect your computer to this product.
The standard driver supplied with macOS can be used as-is, so there is no need to install the driver.
NOTE
For a list of compatible operating systems, see the following Yamaha website.
AG03MK2: https://www.yamaha.com/2/ag03mk2/
AG06MK2: https://www.yamaha.com/2/ag06mk2/
Connecting
1 Remove all USB devices from your computer except for the mouse and keyboard.
2 Make sure that the volume on this product and on the connected device is turned
all the way down.
3 Use the included USB cable or the USB-C charging cable that comes with your Mac
to connect this product to the computer.
Connect the devices directly without using a USB hub.
USB cable
(included)
Computer
Rear panel
NOTE
For Macs that feature a USB-C connector, use the USB-C charging cable that came with your Mac, or use a commercially
available USB-C to USB-C cable.
4 Check whether the LED of the [z] (standby/on) switch on this product is lit.
Settings on the computer
1 Open “Finder” → “Go” → “Applications” → “Utilities” → “Audio MIDI Setup”.
2 Select [Yamaha AG03MK2] or [Yamaha AG06MK2] from the list at the left side of the
Audio Devices screen.
If the Audio Devices screen is not shown, select “Show Audio Devices” from the “Window”
menu to make it appear.
23
Getting ready to use this product > Connecting to your computer and configuring the settings (Mac)

3 Click at the bottom left of the screen and select “Use This Device For Sound
Output”.
4 Similarly, select “Use This Device For Sound Input”.
Once you’ve finished steps 3 and 4, the mic and speaker icons at the bottom right of [Yamaha
AG03MK2] or [Yamaha AG06MK2] in the list will appear.
5 Quit “Audio MIDI Setup.”
24
Getting ready to use this product > Connecting to your computer and configuring the settings (Mac)

Using this product for livestreaming
(17LIVE, Twitch, YouTube Live)
Using with an iPhone/iPad
This explains how to use this product with your iPhone/iPad to configure the settings and make the
necessary operations to livestream your voice or your singing to 17LIVE, Twitch, YouTube Live or other such
services. (17LIVE, Twitch and YouTube Live are the names of streaming apps.) When using your iPhone/iPad
for these voice chat apps, the sound from this product will not be heard even when connected via USB cable.
You’ll need to connect using a 3.5 mm 4-conductor (TRRS) stereo mini cable.
What you need
(
This product
(
iPhone/iPad (on which the AG Controller and livestreaming apps are installed)
Search for the “AG Controller” app on the App Store and install it on your iPhone/iPad.
(
Headphones or earphones with a stereo mini-plug cable
(
Apple Lightning-USB3 Camera Adapter (when using an iPhone/iPad with a Lightning connector)
(
USB-C charging cable included with the iPad, or a commercially available USB-C to USB-C cable (when
using an iPad with USB-C connector)
(
USB power adapter
(
USB cable (included)
Steps to follow
1 Connect the iPhone/iPad
Make the necessary connections by referring to “Getting ready to use this product” →
“Connecting to an iPhone/iPad”.
(
“Connecting to an iPhone/iPad”(p.17)
USB power adapter
USB cable
(commercially available)
USB cable
(included)
Rear panel
25
Using this product for livestreaming (17LIVE, Twitch, YouTube Live) > Using with an iPhone/iPad

2 Connect headphones or earphones
Connect your headphones or earphones to the output jack.
26
Using this product for livestreaming (17LIVE, Twitch, YouTube Live) > Using with an iPhone/iPad

3 Connect the mic
Connect the mic to the channel 1 mic/line input jack.
Now that you’ve made these connections, configure the settings for this unit.
4 Turn the [z] (standby/on) switch on.
Turn the [z] (standby/on) switch on.
27
Using this product for livestreaming (17LIVE, Twitch, YouTube Live) > Using with an iPhone/iPad
5 Configure the settings for the AG
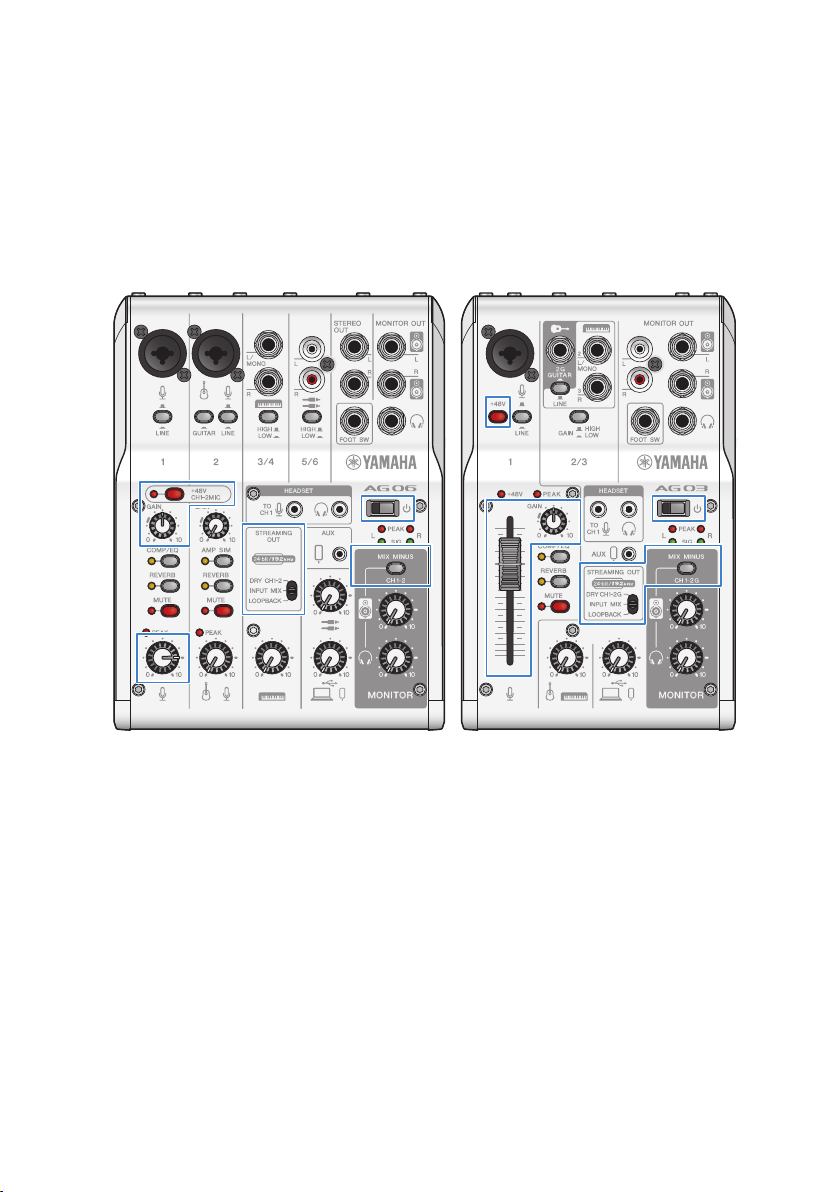
Make the settings for each switch on the front panel as follows.
(
[LINE] switch: off
(
Phantom [+48V] switch: on (when using a condenser mic)
(
Channel 1 [GAIN] knob, level knob, fader: as appropriate (see illustration)
(
[STREAMING OUT]: [INPUT MIX]
(
[MIX MINUS]: off
Once you’ve made the settings on this product, launch the “AG Controller” app and click
“Sound Check” at the bottom of the screen.
28
Using this product for livestreaming (17LIVE, Twitch, YouTube Live) > Using with an iPhone/iPad

Adjust the volume to check the sound on the “Sound Check” screen.
6 Adjust the headphone/earphone volume
Adjust the volume using the headphone [H] knob while speaking into the mic. Adjusting the
volume using the headphone [H] knob has no effect on the volume of the livestreaming
audio.
7 Starting the livestream
Use the fader (only on the AG03MK2) or the level knob to adjust the respective volumes.
Launch the livestreaming app and check the balance for the listeners.
NOTE
See “Audio-related and other issues”(p.65) if you don’t hear any sound.
29
Using this product for livestreaming (17LIVE, Twitch, YouTube Live) > Using with an iPhone/iPad

Using this product with an Android device
This explains how to use this product with your Android device to configure the settings and make the
necessary operations to livestream your voice or your singing to 17LIVE, Twitch, YouTube Live or other such
services. (17LIVE, Twitch and YouTube Live are the names of streaming apps.)
What you need
(
This product
(
Android device
(
Headphones or earphones with a stereo mini-plug cable
(
3.5 mm 4-conductor stereo mini cable
(
USB power adapter
(
USB cable (commercially available, for power supply)
Steps to follow
1 Connect to the Android device
Make the necessary connections by referring to “Getting ready to use this product” →
“Connecting to Android devices”.
“Connecting to Android devices”(p.19)
30
Using this product for livestreaming (17LIVE, Twitch, YouTube Live) > Using this product with an Android
device

2 Connect headphones or earphones
Connect your headphones or earphones to the headphones output jack.
31
Using this product for livestreaming (17LIVE, Twitch, YouTube Live) > Using this product with an Android
device

3 Connect the mic
Connect the mic to the channel 1 mic/line input jack.
Now that you’ve made these connections, configure the settings for this unit.
32
Using this product for livestreaming (17LIVE, Twitch, YouTube Live) > Using this product with an Android
device

4 Configure the settings for the AG
Make the settings for each switch on the front panel as follows.
(
Phantom [+48V] switch: on (when using a condenser mic)
(
Channel 1 [GAIN] knob: as appropriate (see illustration)
(
[STREAMING OUT]: [INPUT MIX]
(
[MIX MINUS]: off
5 Turn the [z] (standby/on) switch on.
Turn the [z] (standby/on) switch on.
6 Adjust the headphone volume
Adjust the volume using the headphone [H] knob while speaking into the mic. Adjusting the
volume using the headphone [H] knob has no effect on the volume of the livestreaming
audio.
7 Starting the livestream
Use the fader (only on the AG03MK2) or the level knob to adjust the respective volumes.
Launch the livestreaming app and check the balance for the listeners.
NOTE
See “Audio-related and other issues”(p.65) if you don’t hear any sound.
33
Using this product for livestreaming (17LIVE, Twitch, YouTube Live) > Using this product with an Android
device

Using this product with your computer
This explains how to use this product with your Windows PC or Mac to configure the settings and make the
necessary operations to livestream your voice or your singing to 17LIVE, Twitch, YouTube Live or other such
services. (17LIVE, Twitch and YouTube Live are the names of streaming apps.)
What you need
(
This product
(
Windows or Mac computer (on which the AG Controller and livestreaming apps are installed)
Install the “AG Controller” app from the following website.
(
AG03MK2: https://www.yamaha.com/2/ag03mk2/
(
AG06MK2: https://www.yamaha.com/2/ag06mk2/
(
Headphones or earphones with a stereo mini-plug cable
(
USB cable (included)
Steps to follow
1 Installing the driver (Windows only)
If you are using a Mac, no driver installation is required. Start from step 2.
If the driver hasn’t been installed yet, install by referring to “Getting ready to use this product”
→ “Connecting to your computer and configuring the settings (Windows)”.
(
“Connecting to your computer and configuring the settings (Windows)”(p.21)
2 Connecting to your computer
Connect by referring to “Getting ready to use this product” → “Connecting to your computer
and configuring the settings (Windows)/(Mac)”.
(
“Connecting to your computer and configuring the settings (Windows)”(p.21)
(
“Connecting to your computer and configuring the settings (Mac)”(p.23)
34
Using this product for livestreaming (17LIVE, Twitch, YouTube Live) > Using this product with your computer

3 Connect headphones or earphones
Connect your headphones or earphones to the headphones output jack.
Once you’ve made all the connections, let’s configure the settings for this product.
35
Using this product for livestreaming (17LIVE, Twitch, YouTube Live) > Using this product with your computer

4 Configure the settings for the AG
Make the settings for each switch on the front panel as follows.
(
Phantom [+48V] switch: on (when using a condenser mic)
(
Channel 1 [GAIN] knob, level knob, fader: as appropriate (see illustration)
(
[STREAMING OUT]: [INPUT MIX]
(
[MIX MINUS]: off
36
Using this product for livestreaming (17LIVE, Twitch, YouTube Live) > Using this product with your computer

5 Turn the [z] (standby/on) switch on.
Turn the [z] (standby/on) switch on.
Once you’ve made the settings on this product, launch the “AG Controller” app and click
“Sound Check” at the bottom of the screen.
Adjust the volume to check the sound on the Sound Check screen.
6 Adjust the headphone/earphone volume
Adjust the volume using the headphone [H] knob while speaking into the mic. Adjusting the
volume using the headphone [H] knob has no effect on the volume of the livestreaming
audio.
7 Starting the livestream
Use the fader (only on the AG03K2) or the level knob to adjust the respective volumes.
Launch the livestreaming app and check the balance for the listeners.
NOTE
See “Audio-related and other issues”(p.65) if you don’t hear any sound.
Livestreaming with OBS
Here, we explain how to use OBS, as an example of how to use livestreaming software. To download and
install OBS, see the official OBS website.
1 Launch OBS, and open the “Settings” screen from “File”.
37
Using this product for livestreaming (17LIVE, Twitch, YouTube Live) > Using this product with your computer

2 On the left-hand navigation menu, click “Audio”.
3 For the “Desktop Audio” settings in “Global Audio Devices”, use “Default” or
“Disabled”.
If you’ve set the [STREAMING OUT] selector switch on this product to [DRY CH 1-2] or to [INPUT
MIX], set this to “Default”; and if you’ve set the selector switch to [LOOPBACK], set this to
“Disabled”.
4 Also, set the “Mic/Auxiliary Audio” setting in “Global Audio Devices” to the line
setting, [Yamaha AG03MK2] or [Yamaha AG06MK2].
5 On the left-hand navigation menu, click “Steam”.
6 Select the streaming service to use, and input the stream key as necessary that you
received from the service.
7 Close the “Settings” screen.
8 Start the livestream.
38
Using this product for livestreaming (17LIVE, Twitch, YouTube Live) > Using this product with your computer

Operations while livestreaming
This explains the operations you can use while livestreaming.
n
Mute the mic
If you will be leaving your seat or otherwise taking a break during the livestream, turn the [MUTE] button on
(the LED lights up), so that the sound from the mic is not broadcasted.
n
Adding reverb to your voice
To add reverb to the mic audio, turn the [REVERB] button on (the LED lights up).
Using the AG Controller app
To make detailed settings for this product, use the AG Controller app. As an example, here are the settings
screens for EQ and reverb.
(
EQ settings screen
How to access: [Detail r] → click on the [EQ] graph for [CH 1] onscreen
39
Using this product for livestreaming (17LIVE, Twitch, YouTube Live) > Operations while livestreaming

(
Reverb settings screen
How to access: [Detail r] → click on the [Reverb] graph onscreen
NOTE
The AG Controller app is not available for Android devices.
40
Using this product for livestreaming (17LIVE, Twitch, YouTube Live) > Operations while livestreaming

Connecting your musical instrument or music player
This shows you how to connect your musical instrument or music player and configure the settings to add
background music or sound effects.
n
Connecting an instrument
AG06MK2
Connect the guitar to channel 2 using an unbalanced phone connector, and turn the [GUITAR] switch on
(O). Adjust the volume using the level knob for channel 2.
Connect your digital piano, synthesizer or other digital instrument to the channel 3/4 line input jack. Adjust
the volume using the level knob for channel 3/4.
AG03MK2
Connect the guitar to the guitar input jack using an unbalanced phone connector, and set the [GUITAR/LINE]
switch to GUITAR (O).
Connect your digital piano, synthesizer or other digital instrument to the channel 2 line input jack, and set
the [GUITAR/LINE] switch to LINE (N). Adjust the volume using the level knob for channel 2.
NOTE
You may need a conversion cable, an effects unit or other means to connect your instrument. Check the method for connecting that
applies to your instrument.
Guitar
Digital piano
Guitar
Digital piano
41
Using this product for livestreaming (17LIVE, Twitch, YouTube Live) > Connecting your musical instrument or
music player
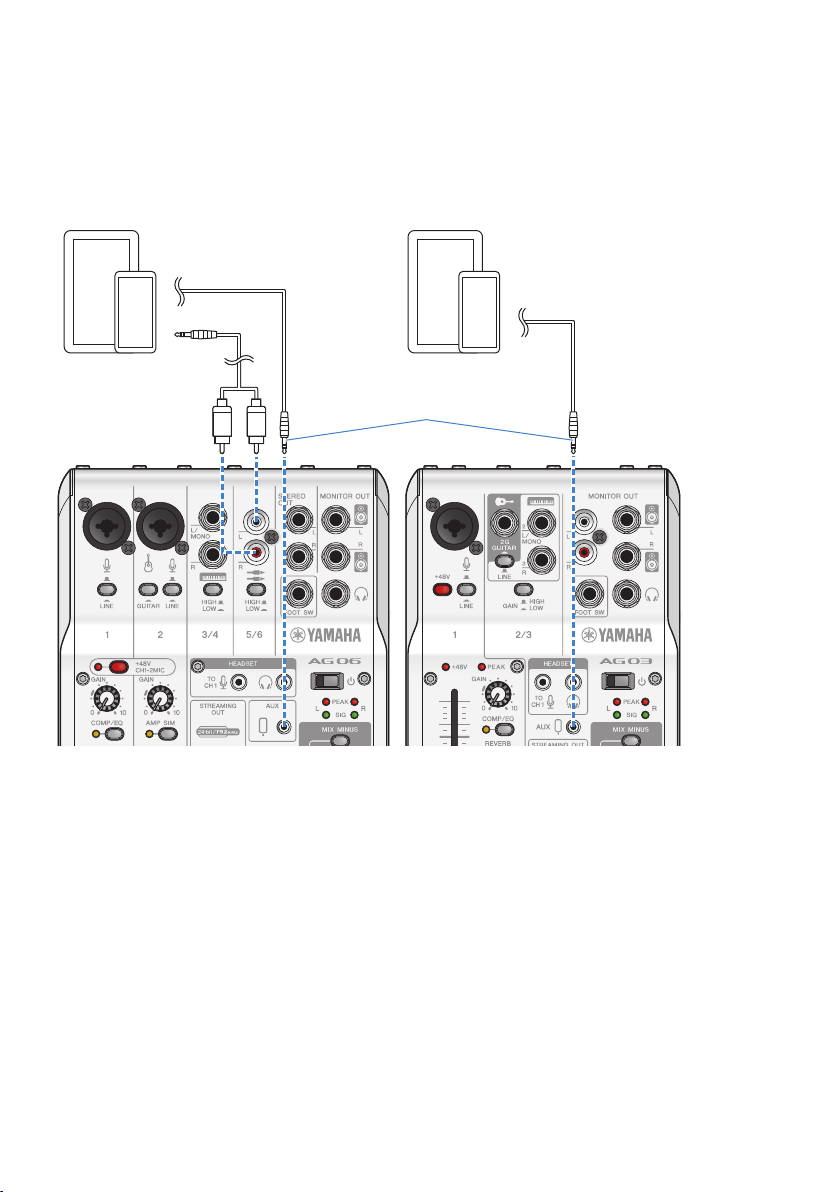
Adding background music and sound effects
To play back background music or sound effects, connect your music player to the [AUX (P)] smartphone
input/output jack.
Adjust the volume on the connected device.
When the AG06MK2 is input into channel 5/6, you can adjust the volume using the channel 5/6 level knob.
4-conductor (TRRS), 3.5 mm
stereo mini cable
Music playerMusic player
42
Using this product for livestreaming (17LIVE, Twitch, YouTube Live) > Connecting your musical instrument or
music player

Using this product in a Web meeting
Using with an iPhone/iPad
This explains the settings and operations to make when using this product with your iPhone/iPad to hold
Web meetings with apps such as Zoom, Skype, Teams, FaceTime and LINE. (Zoom, Skype, Teams, FaceTime
and LINE are the names of apps.) When using your iPhone/iPad for Skype, FaceTime and LINE, the sound
from this product will not be heard even when connected via USB cable. You’ll need to connect using a 3.5
mm 4-conductor (TRRS) stereo mini cable.
What you need
(
This product
(
iPhone/iPad (on which the various apps to use are installed)
(
Lightning - 3.5 mm headphone jack adapter (when using an iPhone/iPad with a Lightning connector. The
use of genuine Apple products is recommended.)
(
USB - 3.5 mm headphone jack adapter (when using an iPad with a USB-C connector. The use of genuine
Apple products is recommended.)
(
Headphones or earphones with a stereo mini-plug cable
(
3.5 mm 4-conductor stereo mini cable
(
USB power adapter
Steps to follow
1 Connect the iPhone/iPad
Make the necessary connections by referring to “Getting ready to use this product” →
“Connecting to an iPhone/iPad”.
(
“Connecting to an iPhone/iPad”(p.17)
2 Plug the Lightning or USB-C 3.5 mm headphone jack adapter into your iPhone/iPad.
43
Using this product in a Web meeting > Using with an iPhone/iPad

3 Connect the Lightning or USB-C 3.5 mm headphone jack adapter to the smartphone
[P] input/output jack of this product with a 3.5 mm 4-conductor (TRRS) stereo mini
cable.
2 2
33
3.5 mm
4-conductor (TRRS)
stereo mini cable
Lightning/USB-C
3.5 mm headphone
jack adapter
Lightning/USB-C
3.5 mm headphone
jack adapter
3.5 mm
4-conductor (TRRS)
stereo mini cable
NOTE
Use a four-conductor stereo mini cable, not a two- or three-conductor cable.
2-conductor (TS) 3-conductor (TRS) 4-conductor (TRRS)
No No Yes
One insulator band Two insulator bands Three insulator bands
44
Using this product in a Web meeting > Using with an iPhone/iPad

4 Connect headphones or earphones
Connect your headphones or earphones to the headphones output jack.
45
Using this product in a Web meeting > Using with an iPhone/iPad

5 Connect the mic
Connect the mic to the channel 1 mic/line input jack.
Now that you’ve made these connections, configure the settings for this unit.
6 Turn the [z] (standby/on) switch on.
Turn the [z] (standby/on) switch on.
46
Using this product in a Web meeting > Using with an iPhone/iPad

7 Configure the settings for the AG
Make the settings for each switch on the front panel as follows.
(
[LINE] switch: off
(
Phantom [+48V] switch: on (when using a condenser mic)
(
Channel 1 [GAIN] knob, level knob, fader: as appropriate (see illustration)
(
[STREAMING OUT]: [INPUT MIX]
(
[MIX MINUS]: off
8 Adjust the headphone/earphone volume
Adjust the volume using the headphone [H] knob while speaking into the mic. Adjusting the
volume using the headphone [H] knob has no effect on the volume of the livestreaming
audio.
9 Start the Web meeting.
Use the fader (only on the AG03MK2) or the level knob to adjust the respective volumes.
Launch the livestreaming app and check the balance for the listeners.
Operations during the conversation
(
Muting your own voice
To interrupt the conversation, turn the MUTE button on (the LED lights up).
47
Using this product in a Web meeting > Using with an iPhone/iPad


Using this product with an Android device
This explains the settings and operations to make when using this product with your Android device to hold
Web meetings with apps such as Zoom, Skype, Teams, FaceTime and LINE. (Zoom, Skype, Teams, FaceTime
and LINE are the names of apps.)
NOTE
When using an Android device, the audio from this product cannot be inputted via USB. You’ll need to connect using a 3.5 mm 4-
conductor (TRRS) stereo mini cable.
What you need
(
This product
(
Android device (on which the various apps to use are installed)
(
Headphones or earphones with a stereo mini-plug cable
(
3.5 mm 4-conductor stereo mini cable (CTIA)
(
USB power adapter
(
USB cable (commercially available, for power supply)
Steps to follow
1 Connect to the Android device
Make the necessary connections by referring to “Getting ready to use this product” →
“Connecting to Android devices”.
“Connecting to Android devices”(p.19)
49
Using this product in a Web meeting > Using this product with an Android device

2 Connect headphones or earphones
Connect your headphones or earphones to the headphones output jack.
50
Using this product in a Web meeting > Using this product with an Android device
3 Connect the mic
Connect the mic to the channel 1 mic/line input jack.
Now that you’ve made these connections, configure the settings for this unit.
51
Using this product in a Web meeting > Using this product with an Android device

4 Configure the settings for the AG
Make the settings for each switch on the front panel as follows.
(
Phantom [+48V] switch: on (when using a condenser mic)
(
Channel 1 [GAIN] knob: as appropriate (see illustration)
(
[STREAMING OUT]: [INPUT MIX]
(
[MIX MINUS]: off
5 Turn the [z] (standby/on) switch on.
Turn the [z] (standby/on) switch on.
6 Adjust the headphone volume
Adjust the volume using the headphone [H] knob while speaking into the mic. Adjusting the
volume using the headphone [H] knob has no effect on the volume of the livestreaming
audio.
7 Start the Web meeting.
Use the fader (only on the AG03MK2) or the level knob to adjust the respective volumes.
Launch the livestreaming app and check the balance for the listeners.
52
Using this product in a Web meeting > Using this product with an Android device


Using this product with your computer
This explains the settings and operations to make when using this product with your Windows PC or Mac to
hold Web meetings using Zoom, Skype, Teams, FaceTime or LINE. (Zoom, Skype, Teams, FaceTime and LINE
are the names of apps.)
What you need
(
This product
(
Windows PC or Mac (on which the various apps to use are installed)
(
Headphones or earphones with a stereo mini-plug cable
(
USB cable (included)
Steps to follow
1 Installing the driver (Windows only)
If you are using a Mac, no driver installation is required. Start from step 2.
If the driver hasn’t been installed yet, install by referring to “Getting ready to use this product”
→ “Connecting to your computer and configuring the settings (Windows)”.
(
“Connecting to your computer and configuring the settings (Windows)”(p.21)
2 Connecting to your computer
Connect by referring to “Getting ready to use this product” → “Connecting to your computer
and configuring the settings (Windows)/(Mac)”.
(
“Connecting to your computer and configuring the settings (Windows)”(p.21)
(
“Connecting to your computer and configuring the settings (Mac)”(p.23)
54
Using this product in a Web meeting > Using this product with your computer
3 Connect headphones or earphones
Connect your headphones or earphones to the headphones output jack.
55
Using this product in a Web meeting > Using this product with your computer

4 Connect the mic
Connect the mic to the channel 1 mic/line input jack.
Now that you’ve made these connections, configure the settings for this unit.
56
Using this product in a Web meeting > Using this product with your computer

5 Configure the settings for the AG
Make the settings for each switch on the front panel as follows.
(
Phantom [+48V] switch: on (when using a condenser mic)
(
Channel 1 [GAIN] knob, level knob, fader: as appropriate (see illustration)
(
[STREAMING OUT]: [INPUT MIX]
(
[MIX MINUS]: off
6 Configure the settings for the app
Launch the app you’ll use to hold the Web meeting, open the device settings in the app and
confirm that the sound input device and sound output device are both set to either [Yamaha
AG03MK2] or [Yamaha AG06MK2].
7 Adjust the headphone/earphone volume
Adjust the volume using the headphone [H] knob while speaking into the mic. Adjusting the
volume using the headphone [H] knob has no effect on the volume of the livestreaming
audio.
8 Start the Web meeting.
Use the fader (only on the AG03K2) or the level knob to adjust the respective volumes.
Launch the livestreaming app and check the balance for the listeners.
57
Using this product in a Web meeting > Using this product with your computer


Using this product for a podcast
Using WaveLab Cast
WaveLab Cast is an app for Windows and Mac that’s optimal for producing podcast audio/video contents.
The app allows you to easily record, edit and stream your content.
WaveLab Cast setup:
Refer to the following page to download the app and activate the license.
https://www.steinberg.net/getwavelabcast
NOTE
You will need a download access code to download this app. This code is listed on the printed WaveLab Cast Download Information
that’s included with this product.
The WaveLab Cast manual can be obtained by searching at the following website.
https://steinberg.help/
59
Using this product for a podcast > Using WaveLab Cast

Using this product for recording
Using Rec’n’Share with an iPhone/iPad
Use the Rec'n'Share app in combination with this product to record and edit audio and so on. The
Rec'n'Share app makes it easy to do everything from performing and recording your favorite songs to
recording and editing video of your performance, up through uploading the results.
For more details on Rec'n'Share, see the following website.
https://www.yamaha.com/2/rec_n_share/
NOTE
(
Check the App Store to see which OS versions are compatible with the app.
(
Data that can be uploaded is limited to your own original songs, sounds and content for which usage rights have been granted.
60
Using this product for recording > Using Rec’n’Share with an iPhone/iPad

Using Cubase AI with your computer
Use Cubase AI in combination with this product to record and edit audio and so on. Cubase AI is DAW
software for music production that lets you record, playback and edit audio using your computer.
Cubase AI setup:
Refer to the following page to download the app and activate the license.
https://www.steinberg.net/getcubaseai
NOTE
You will need a download access code to download this app. This code is listed on the printed Cubase AI Download Information that’s
included with this product.
The Cubase AI manual can be obtained by searching at the following website.
https://steinberg.help/
61
Using this product for recording > Using Cubase AI with your computer

Using this product in music production
Using Cubasis LE with an iPhone/iPad
Use Cubasis LE in combination with this product to record and edit audio. Cubasis LE is a basic version of the
mobile DAW Cubasis. As with Cubasis, this is a music production app that lets you record, play back and edit
audio from your iPhone/iPad.
To use this app, search for and download “Cubasis LE” from the App Store.
For more details on Cubasis LE, see the following Steinberg website.
https://www.steinberg.net/getcubasisle
62
Using this product in music production > Using Cubasis LE with an iPhone/iPad

Using Cubase AI with your computer
Use Cubase AI in combination with this product to record and edit audio and so on. Cubase AI is DAW
software for music production that lets you record, playback and edit audio using your computer.
Cubase AI setup:
Refer to the following page to download the app and activate the license.
https://www.steinberg.net/getcubaseai
NOTE
You will need a download access code to download this app. This code is listed on the printed Cubase AI Download Information that’s
included with this product.
The Cubase AI manual can be obtained by searching at the following website.
https://steinberg.help/
63
Using this product in music production > Using Cubase AI with your computer

Troubleshooting
Power-related
The power LED will not light up
(
Is the power of this product turned on?
The LED will not light up if this product is not turned on.
(
When using an iPhone, iPad or Android device: An external power supply is required, such as a USB
power adapter or USB mobile battery. You’ll need a USB power adapter or USB mobile battery that
can output at least 5 V and 1 A of power.
(
When using a Windows PC, Mac or iPad (USB-C connector): The unit operates on USB power (at
least 5 V and 1 A). If the power LED will not light up, there may not be enough bus power. Connect a
separate USB power adapter, USB mobile battery or similar device to supply external power.
The power LED is flashing, or lights only intermittently
(
There might be a problem with the power supply.
(
The LED flashes when there is some kind of problem with the power supply. Connect a commercially-
available USB power adapter or USB mobile battery to the [5V DC IN] USB port to supply power.
(
Are you using the appropriate USB cable?
(
Make sure to use the included USB cable.
(
When directly connecting the USB-C port of your iPad or computer to this product, you’ll need either
the USB-C charging cable that was included with the iPad, or a commercially available USB-C to USB-C
cable.
64
Troubleshooting > Power-related

Audio-related and other issues
Your Windows PC does not recognize this product
(
Have you installed the driver?
(
You must install the Yamaha Steinberg USB Driver if you wish to connect this product to a Windows PC.
See the following website for how to install the Yamaha Steinberg USB Driver.
AG03MK2:
https://www.yamaha.com/2/ag03mk2/
AG06MK2:
https://www.yamaha.com/2/ag06mk2/
No sound is heard
(
Are you using the appropriate settings for the [STREAMING OUT] selector switchD?
(
Referring to the names and functions of each component, set the [STREAMING OUT] selector switch as
appropriate for your use case.
(
Are any external devices (such as a mic) or powered monitor speakers connected correctly?
(
Are the connecting cables shorted out or otherwise disconnected?
(
Have you turned on the power of any connected electronic instruments or powered monitor
speakers?
(
Is the [GAIN] knob m, the level knob t, the fader s (AG03MK2 only), the speaker [S] knob F and
the headphone [H] knob G adjusted appropriately?
(
Is the [LINE] switch f, [GAIN HIGH LOW] switch k (AG03MK2 only) and the [HIGH LOW] switch l
(AG06MK2 only) set to on (O)?
(
Turn these switches off (N). If the volume from the sound source is too low, you may not be able to
hear the sound when these switches are set to on (O).
(
Is the [MIX MINUS] E switch turned on (O)?
(
If you are using Internet livestreaming software, have you adjusted the volume in the software?
Sound is distorted or noisy
(
Is the channel [PEAK] LED r on?
(
Try lowering the [GAIN] knob and turning the [PAD] switch on (O).
(
Are the [PEAK] indicators on the level meters C lit up red?
(
Adjust the level knobs for each channel. The [PEAK] indicator on the level meter will not go dark even if
you lower the levels of the speaker [S] knob or headphone [H] knob.
(
Are the levels set too high on the devices connected to this product?
(
Lower the volume of the connected devices.
(
Is the [LINE] switch f, [GAIN HIGH LOW] switch k (AG03MK2 only) and the [HIGH LOW] switch l
(AG06MK2) set to off (N)?
(
Turn these switches on (O). If the volume from the sound source is too high, the sound may distort
when these switches are set to off (N).
65
Troubleshooting > Audio-related and other issues

(
Is the [STREAMING OUT] selector switch D set to [LOOPBACK]?
(
If you are using DAW software and the [LOOPBACK] setting is used, a loop may occur depending on
your DAW software settings, which could cause feedback. To record while listening to the sound from
your computer, be sure to use a setting other than [LOOPBACK].
Making the vocals or speech sound clearer
(
Set the [COMP/EQ] button n to on (the button lights up yellow).
(
A parameter that’s appropriate for Internet livestreaming is already set for this button by factory
default, which keeps down unnecessary noise in the low end and helps smooth out differences in the
input levels.
Cannot adjust the volume
(
Are you adjusting the volume of the [AUX] input/output jack B on the connected device?
(
You cannot adjust the [AUX] input/output jack volume with the level knob. Adjust the volume from the
connected device.
Reverb is not applied
(
Is the [REVERB] button on (the button lights up yellow)?
66
Troubleshooting > Audio-related and other issues

Appendix
General specifications
AG06MK2
0 dBu = 0.775 Vrms, Output impedance of signal generator (Rs) = 150 Ω
All level controls are nominal if not specified.
(
Frequency response
(
Input (MIC) → MONITOR OUT via USB IN/OUT
+0.5 dB/−1.5 dB (20 Hz to 48 kHz @ Fs = 192 kHz) with a nominal output level reference @ 1 kHz, GAIN
knob: min, STREAMING OUT: DRY CH 1-2
(
Total harmonic distortion *1 (THD+N)
(
Input to MONITOR OUT
0.05 % @ 0 dBu (20 Hz to 20 kHz), GAIN knob: min
0.01 % @ +4 dBu (1 kHz), GAIN knob: min
(
Hum and noise *2 (20 Hz to 20 kHz)
(
Equivalent input noise
−128 dBu (mono input channel, Rs: 150 Ω, GAIN knob: max)
(
Residual output noise
−103 dBu (MONITOR OUT, MONITOR knob: min)
(
Crosstalk (1 kHz) *3
−80 dB
(
Input channels
Mono (MIC/LINE): 2, including HEADSET MIC (plug-in power;
CH 1 MIC and HEADSET MIC cannot be used simultaneously),
Stereo (LINE): 2, USB IN: 1, AUX INPUT: 1
(
Output channels
STEREO OUT: 1, MONITOR OUT: 1, PHONES: 2 (including HEADSET PHONES;
PHONES and HEADSET PHONES cannot be used simultaneously), AUX OUT: 1
(
Input channel function (CH 1, CH 2)
(
PAD
26 dB
(
DSP
CH1: COMP/EQ, REVERB, MUTE
CH2: COMP/EQ *4, AMP SIM, REVERB, MUTE
(
PEAK LED
LED turns on when the signal reaches 3 dB below clipping level.
(
Level meter
(
USB OUTPUT level
2 x 2 point LED meter [PEAK, SIG]
67
Appendix > General specifications

(
USB audio
(
2 IN / 2 OUT
USB Audio Class 2.0 compliant, Sampling frequency: up to 192 kHz, Bit depth: 24-bit
(
Phantom power voltage
+48 V
(
FOOT SW
REVERB ON/OFF or MUTE (CH 1) ON/OFF
(
Power requirements
DC 5 V, 900 mA
(
Power consumption
Max. 4.5 W
(
Dimensions (W × H × D)
152 mm × 63 mm × 201 mm (6.0" x 2.5" x 7.9")
(
Net weight
0.9 kg (2.0 lbs.)
(
Included accessories
USB 2.0 cable (1.5 m), Quick Guide, Safety Guide, Wavelab Cast Download Information, Cubase AI
Download Information
(
Optional accessories
Foot switch: FC5, Mic stand adaptor: BMS-10A
(
Operating temperature
0 to +40 ℃
AG03MK2
0 dBu = 0.775 Vrms, Output impedance of signal generator (Rs) = 150 Ω
All level controls are nominal if not specified.
(
Frequency response
(
Input (MIC) → MONITOR OUT via USB IN/OUT
+0.5 dB/−1.5 dB (20 Hz to 48 kHz @ Fs = 192 kHz) with a nominal output level reference @ 1 kHz, GAIN
knob: min, STREAMING OUT: DRY CH 1-2G
(
Total harmonic distortion*1 (THD+N)
(
Input to MONITOR OUT
0.05 % @ 0 dBu (20 Hz to 20 kHz), GAIN knob: min
0.01 % @ +4 dBu (1 kHz), GAIN knob: min
(
Hum and noise *2 (20 Hz to 20 kHz)
(
Equivalent input noise
−128 dBu (mono input channel, Rs: 150 Ω, GAIN knob: max)
(
Residual output noise
−103 dBu (MONITOR OUT, MONITOR knob: min)
(
Crosstalk (1 kHz) *3
−80 dB
68
Appendix > General specifications

(
Input channels
Mono (MIC/LINE): 1, including HEADSET MIC (plug-in power;
CH 1 MIC and HEADSET MIC cannot be used simultaneously),
Stereo (LINE) / Mono (guitar): 1, USB IN: 1, AUX IN: 1
(
Output channels
MONITOR OUT: 2, PHONES: 2 (including HEADSET PHONES;
PHONES and HEADSET PHONES cannot be used simultaneously), AUX OUT: 1
(
Input Channel Function (CH1, CH2G)
(
PAD
26 dB
(
DSP
CH1: COMP/EQ, REVERB, MUTE
CH2G *4: COMP/EQ, AMP SIM, REVERB
(
PEAK LED
LED turns on when the signal reaches 3 dB below clipping level.
(
Level meter
(
USB OUTPUT level
2 x 2 point LED meter [PEAK, SIG]
(
USB audio
(
2 IN / 2 OUT
USB Audio Class 2.0 compliant, Sampling frequency: up to 192 kHz, Bit depth: 24-bit
(
Phantom power voltage
+48 V
(
FOOT SW
REVERB ON/OFF or MUTE ON/OFF
(
Power requirements
DC 5 V, 900 mA
(
Power consumption
Max. 4.5 W
(
Dimensions (W × H × D)
126 mm × 63 mm × 201 mm (5.0" x 2.5" x 7.9")
(
Net weight
0.8 kg (1.8 lbs.)
(
Included accessories
USB 2.0 cable (1.5 m), Quick Guide, Safety Guide, Wavelab Cast Download Information, Cubase AI
Download Information
(
Optional accessories
Foot Switch: FC5, Mic Stand Adaptor: BMS-10A
(
Operating temperature
0 to +40 ℃
*1 Measured with 22 kHz LPF.
*2 Measured with A-weighting filter.
69
Appendix > General specifications

*3 Measured with 1 kHz band pass filter.
*4 No switch or knob on the front panel.
The contents of this guide apply to the latest specifications as of the publishing date.
70
Appendix > General specifications

Input / Output characteristics
Analog Input Characteristics (AG06MK2)
0 dBu = 0.775 Vrms
Input Jacks
PAD
26 dB
GAIN Trim/
SW
Position
Actual Load
Impedance
At Nominal
Level
Input level
Connectors
Sensitivity
*1
Nominal
Max.
before clip
MIC / LINE 1
– 2
HEADSET
MIC
OFF
10
3 kΩ
1.5 kΩ*4
50 Ω – 600 Ω
mic / line
−72 dBu
(0.195 mV)
−60 dBu
(0.775 mV)
−50 dBu
(2.451 mV)
Combo jack
*2
(balanced)
3.5 mm
phone jack
for CH 1
HEADSET
MIC
(plug-in
power /
unbalanced)
0
−26 dBu
(38.84 mV)
−14 dBu
(154.6 mV)
−4 dBu
(489.0 mV)
ON
10
−46 dBu
(3.884 mV)
−34 dBu
(15.46 mV)
−24 dBu
(48.90 mV)
0
0 dBu
(775.0 mV)
+12 dBu
(3.085 V)
+22 dBu
(9.757 V)
INPUT CH 2
GUITAR *5
OFF
10
1 MΩ -
−68 dBu
(3.085 mV)
−56 dBu
(1.228 mV)
−46 dBu
(3.884 mV)
Phone jack
*2
(unbalanced
)
0
−22 dBu
(61.56 mV)
−10 dBu
(245.1 mV)
0 dBu
(775.0 mV)
ON
10
−42 dBu
(6.153 mV)
−30 dBu
(24.51 mV)
−20 dBu
(77.50 mV)
0
+4 dBu
(1.228 V)
-
+10 dBu
(2.451 V)
LINE 3 / 4,
5 / 6
-
HIGH
10 kΩ 600 Ω lines
−20 dBu
(77.50 mV)
−8 dBu
(308.5 mV)
+2 dBu
(975.7 mV)
LINE 3/4
phone jack
*3
(unbalanced
)
LINE 5/6
RCA pin
(unbalanced
)
LOW
−10 dBu
(245.1 mV)
+2 dBu
(975.7 mV)
+12 dBu
(3.085 V)
AUX INPUT - - 10 kΩ 600 Ω lines
−14 dBu
(154.6 mV)
−8 dBu
(308.5 mV)
+2 dBu
(975.7 mV)
3.5 mm
phone Jack
*6
(CTIA)
*1 Sensitivity is the lowest level that will produce an output of +0 dBu (0.775 V) or the nominal output level
when the unit is set to maximum gain. (All level controls are at their maximum position.)
*2 1 & Sleeve = GND, 2 & Tip = HOT, 3 & Ring = COLD
*3 Tip = Signal, Sleeve = GND
*4 For CH 1, HEADSET MIC
*5 For CH 2, GUITAR switch is ON
*6 Tip = Signal L, Ring 1 = Signal R, Ring 2 = GND, Sleeve = Output for smartphone
71
Appendix > Input / Output characteristics

Analog Output Characteristics (AG06MK2)
0 dBu = 0.775 Vrms
Output Terminals
Actual Source
Impedance
At Nominal Level
Output level
Connectors
Nominal Max. before clip
STEREO OUT [L,
R]
150 Ω 10 kΩ lines
0 dBu
(0.775 V)
+10 dBu
(2.451 V)
Phone jack *7
(impedance
balanced)
MONITOR OUT [L,
R]
150 Ω 10 kΩ lines
0 dBu
(0.775 V)
+10 dBu
(2.451 V)
Phone jack *7
(impedance
balanced)
PHONES 120 Ω 40 Ω phone 1.5 mW + 1.5 mW 6 mW + 6 mW
Phone jack
3.5 mm phone jack
AUX OUT 150 Ω 1.5 kΩ line
−30 dBu
(24.51 mV)
−20 dBu
(77.50 mV)
3.5 mm phone jack
*8
(CTIA)
*7 Tip = HOT, Ring = COLD, Sleeve = GND
*8 Tip = Signal L, Ring 1 = Signal R, Ring 2 = GND, Sleeve = Output for smartphone
Digital Input / Output Characteristics (AG06MK2)
Terminals Format Data Length Fs Connectors
USB
USB Audio Class 2.0 /
Yamaha Steinberg USB
Driver
24-bit
44.1 kHz, 48 kHz,
88.2 kHz, 96 kHz,
176.4 kHz, 192 kHz
USB Type-C
Analog Input Characteristics (AG03MK2)
0 dBu = 0.775 Vrms
Input Jacks
PAD
26 dB
GAIN Trim /
SW
Position
Actual Load
Impedance
At Nominal
Level
Input level
Connectors
Sensitivity
*1
Nominal
Max.
before clip
MIC / LINE 1
HEADSET
MIC
OFF
10
3 kΩ
1.5 kΩ*4
50 Ω – 600 Ω
mic / line
−72 dBu
(0.195 mV)
−60 dBu
(0.775 mV)
−50 dBu
(2.451 mV)
Combo jack
*2
(balanced)
3.5 mm
phone jack
for
HEADSET
MIC
(plug-in
power /
unbalanced)
0
−26 dBu
(38.84 mV)
−14 dBu
(154.6 mV)
−4 dBu
(489.0 mV)
ON
10
−46 dBu
(3.884 mV)
−34 dBu
(15.46 mV)
−24 dBu
(48.90 mV)
0
0 dBu
(775.0 mV)
+12 dBu
(3.085 V)
+22 dBu
(9.757 V)
GUITAR 2G -
HIGH
1 MΩ -
−32 dBu
(19.5 mV)
−20 dBu
(77.5 mV)
−10 dBu
(245.1 mV)
Phone jack
*3
(unbalanced
)
LOW
−12 dBu
(194.7 mV)
0 dBu
(775.0 mV)
+10 dBu
(2.451 V)
72
Appendix > Input / Output characteristics

LINE 2 / 3 -
HIGH
10 kΩ 600 Ω lines
−20 dBu
(77.50 mV)
−8 dBu
(308.5 mV)
+2 dBu
(973.7 mV)
Phone jack
*3
(unbalanced
)
LOW
−10 dBu
(245.1 mV)
+2 dBu
(975.7 mV)
+12 dBu
(3.085 V)
AUX INPUT - - 10 kΩ 600 Ω lines
−14 dBu
(154.6 mV)
−8 dBu
(308.5 mV)
+2 dBu
(975.7 mV)
3.5 mm
phone jack
*5 (CTIA)
*1 Sensitivity is the lowest level that will produce an output of +0 dBu (0.775 V) or the nominal output level
when the unit is set to maximum gain. (All level controls are at their maximum position.)
*2 1 & Sleeve = GND, 2 & Tip = HOT, 3 & Ring = COLD
*3 Tip = Signal, Sleeve = GND
*4 For CH 1, HEADSET MIC
*5 Tip = Signal L, Ring 1 = Signal R, Ring 2 = GND, Sleeve = Output for smartphone
Analog Output Characteristics (AG03MK2)
0 dBu = 0.775 Vrms
Output Terminals
Actual Source
Impedance
For Use With
Nominal
Output level
Connector
Nominal Max. before clip
MONITOR OUT [L,
R]
150 Ω 10 kΩ lines
0 dBu
(0.775 V)
+10 dBu
(2.451 V)
Phone jack *6
(impedance
balanced)
RCA pin
(unbalanced)
PHONES 120 Ω 40 Ω phone 1.5 mW + 1.5 mW 6 mW + 6 mW
Phone jack
3.5 mm phone jack
AUX OUT 150 Ω 1.5 kΩ line
−30 dBu
(24.51 mV)
−20 dBu
(77.50 mV)
3.5 mm phone jack
*7
(CTIA)
*6 Tip = HOT, Ring = COLD, Sleeve = GND
*7 Tip = Signal L, Ring 1 = Signal R, Ring 2 = GND, Sleeve = Output for smartphone
Digital Input / Output Characteristics (AG03MK2)
Terminals Format Data Length Fs Connector
USB
USB Audio Class 2.0 /
Yamaha Steinberg USB
Driver
24-bit
44.1 kHz, 48 kHz,
88.2 kHz, 96 kHz,
176.4 kHz, 192 kHz
USB Type-C
The contents of this guide apply to the latest specifications as of the publishing date.
73
Appendix > Input / Output characteristics

Dimensions
AG06MK2
201
201
28
63
2.3
152
(Units: mm)
74
Appendix > Dimensions

AG03MK2
126
63
2.3
28
201
201
(Units: mm)
75
Appendix > Dimensions


Yamaha Pro Audio global website
https://www.yamahaproaudio.com/
Yamaha Downloads
https://download.yamaha.com/
© 2022 Yamaha Corporation
Published 04/2022 AM-B
0
Layout Folder: YMH_PDF_Manual_A5_PA
Stylesheet Name: 01_YMH_PDF_Manual_A5_PA_En-Multi
Stylesheet Version: 2022.03.29