ICED
COFFEEMAKER & TUMBLER
VCF155
VCF155_21EM1 (UK).indd 1VCF155_21EM1 (UK).indd 1 3/5/21 16:093/5/21 16:09

2
3
Never immerse the main body
of the appliance or power
cord and plug in water or
any other liquid. Wash brew
basket, re-usable lters,
Tumbler, lid and straw in a
solution of hot water and mild
liquid soap. Dry thoroughly.
See Routine Cleaning Section.
! This appliance generates heat during
use. Adequate precaution must be taken
to prevent the risk of burns, scalds, res
or other damage to persons or property
caused by touching the exterior whilst in
use or during cooling.
! Always ensure that hands are dry before
handling the plug or switching on the
appliance.
! Always use the appliance on a stable,
secure, dry and level surface.
! This appliance must not be placed on or
near any potentially hot surfaces (such
as a gas or electric hob).
! Do not use the appliance if it has been
dropped, if there are any visible signs of
damage or if it is leaking.
! Ensure the appliance is switched off and
unplugged from the supply socket after
use and before cleaning.
! Always switch off, unplug and allow
to cool before removing/tting parts,
cleaning or storing.
! Never let the power cord hang over the
edge of a worktop, touch hot surfaces or
become knotted, trapped or pinched.
! The heating element surface is subject
to residual heat after use
! The coffee-maker shall not be placed in
a cabinet when in use.
! Cleaning and user maintenance
shall not be made by children without
supervision.
PRODUCT SAFETY
READ CAREFULLY AND KEEP
FOR FUTURE REFERENCE
This appliance can be used
by children aged from 8 years
and above and persons with
reduced physical, sensory
or mental capabilities or
lack of experience and
knowledge if they have
been given supervision or
instruction concerning use
of the appliance in a safe
way and understand the
hazards involved. Children
shall not play with the
appliance. Cleaning and
user maintenance shall
not be made by children
unless they are older than
8 and supervised. Keep the
appliance and its cord out of
reach of children aged less
than 8 years.
If the supply cord is damaged,
it must be replaced by the
manufacturer, its service agent
or similarly qualied persons
in order to avoid a hazard.
Never use this appliance
for anything other than its
intended use. This appliance
is for household use only.
Do not use this appliance
outdoors.
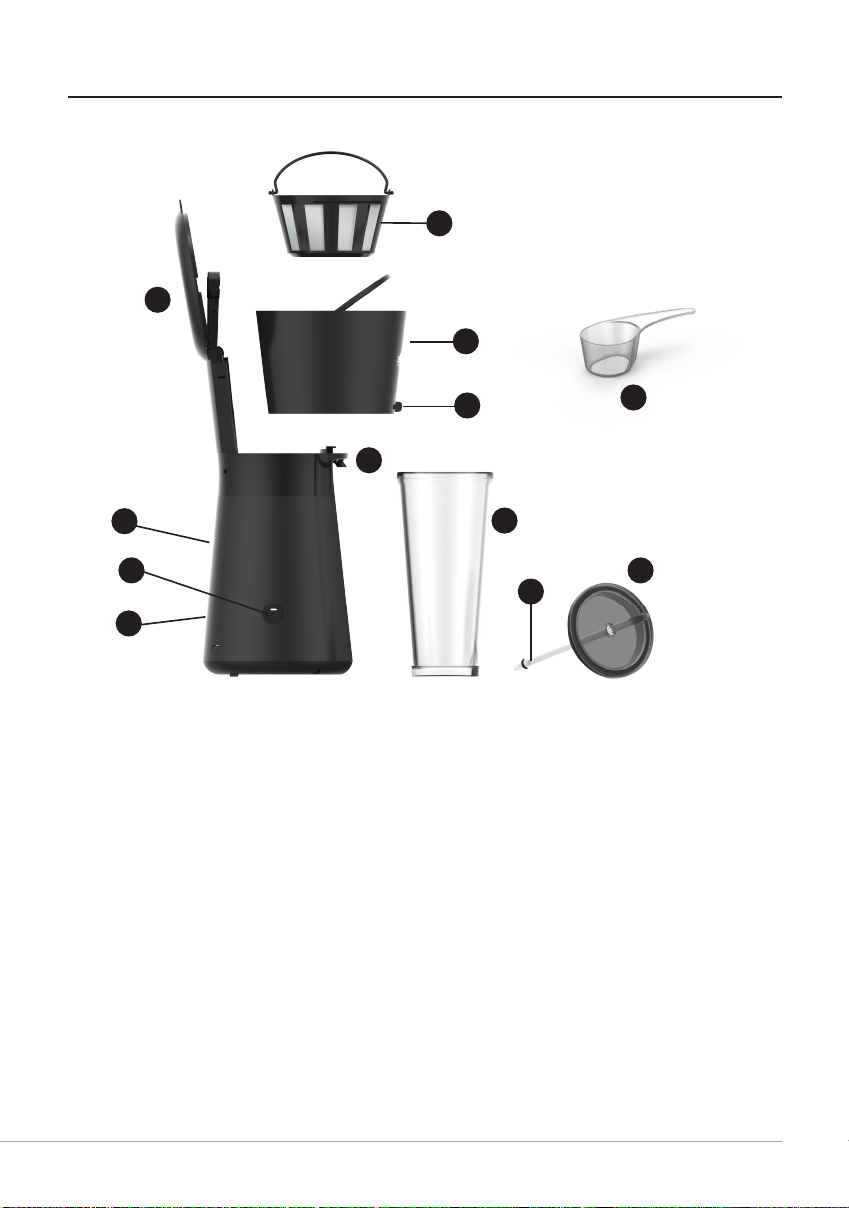
1. On / Off button – press to turn on the Iced
Coffeemaker
2. Start Button – press to start; use rear On/
Off button to pause brewing. Switching back
on will resume brewing and unit will turn off
automatically once brewing is complete
3. Base & water reservoir – pour water in here
(do not place ice in the water reservoir)
4. Brew Spout
5. Lid
6. Reusable coffee lter – is dishwashable
7. Brew basket – insert lter lled with grounds
here
8. Drip-stop – slides open to allow the ow
of coffee and closes to stop dripping on the
counter when brewing is nished
9. Scoop – use to measure coffee grounds
10. Tumbler – is 650ml double-wall insulated
and BPA free
11. Tumbler straw
12. Tumbler lid
10
9
5
4
6
12
11
3
1
7
8
GET TO KNOW YOUR ICED COFFEEMAKER
START
2
VCF155_21EM1 (UK).indd 2-3VCF155_21EM1 (UK).indd 2-3 3/5/21 16:093/5/21 16:09
2
3
Never immerse the main body
of the appliance or power
cord and plug in water or
any other liquid. Wash brew
basket, re-usable lters,
Tumbler, lid and straw in a
solution of hot water and mild
liquid soap. Dry thoroughly.
See Routine Cleaning Section.
! This appliance generates heat during
use. Adequate precaution must be taken
to prevent the risk of burns, scalds, res
or other damage to persons or property
caused by touching the exterior whilst in
use or during cooling.
! Always ensure that hands are dry before
handling the plug or switching on the
appliance.
! Always use the appliance on a stable,
secure, dry and level surface.
! This appliance must not be placed on or
near any potentially hot surfaces (such
as a gas or electric hob).
! Do not use the appliance if it has been
dropped, if there are any visible signs of
damage or if it is leaking.
! Ensure the appliance is switched off and
unplugged from the supply socket after
use and before cleaning.
! Always switch off, unplug and allow
to cool before removing/tting parts,
cleaning or storing.
! Never let the power cord hang over the
edge of a worktop, touch hot surfaces or
become knotted, trapped or pinched.
! The heating element surface is subject
to residual heat after use
! The coffee-maker shall not be placed in
a cabinet when in use.
! Cleaning and user maintenance
shall not be made by children without
supervision.
PRODUCT SAFETY
READ CAREFULLY AND KEEP
FOR FUTURE REFERENCE
This appliance can be used
by children aged from 8 years
and above and persons with
reduced physical, sensory
or mental capabilities or
lack of experience and
knowledge if they have
been given supervision or
instruction concerning use
of the appliance in a safe
way and understand the
hazards involved. Children
shall not play with the
appliance. Cleaning and
user maintenance shall
not be made by children
unless they are older than
8 and supervised. Keep the
appliance and its cord out of
reach of children aged less
than 8 years.
If the supply cord is damaged,
it must be replaced by the
manufacturer, its service agent
or similarly qualied persons
in order to avoid a hazard.
Never use this appliance
for anything other than its
intended use. This appliance
is for household use only.
Do not use this appliance
outdoors.
1. On / Off button – press to turn on the Iced
Coffeemaker
2. Start Button – press to start; use rear On/
Off button to pause brewing. Switching back
on will resume brewing and unit will turn off
automatically once brewing is complete
3. Base & water reservoir – pour water in here
(do not place ice in the water reservoir)
4. Brew Spout
5. Lid
6. Reusable coffee lter – is dishwashable
7. Brew basket – insert lter lled with grounds
here
8. Drip-stop – slides open to allow the ow
of coffee and closes to stop dripping on the
counter when brewing is nished
9. Scoop – use to measure coffee grounds
10. Tumbler – is 650ml double-wall insulated
and BPA free
11. Tumbler straw
12. Tumbler lid
10
9
5
4
6
12
11
3
1
7
8
GET TO KNOW YOUR ICED COFFEEMAKER
START
2
VCF155_21EM1 (UK).indd 2-3VCF155_21EM1 (UK).indd 2-3 3/5/21 16:093/5/21 16:09

4
5
INTRODUCTION
Congratulations on the purchase of
your new Breville Iced™ Coffeemaker.
The Breville Iced™ coffeemaker makes
refreshing iced coffee in minutes. In 3
simple steps brew hot concentrated coffee,
pour over ice to quickly cool, leaving you
with flavorful Iced™ coffee that’s never
watered down. Brewed to perfection in
under 4 minutes. The insulated Tumbler
allows you to enjoy at home or on-the-go.
Then add in your favorite syrups or milk for
Iced™ coffee your way!
GETTING STARTED
Unpack your coffee maker
1. Unpack your coffee maker and remove
plastic bags, cartons and any tape on
the unit.
IMPORTANT: KEEP PLASTIC BAGS
AWAY FROM CHILDREN.
CLEAN ICED COFFEEMAKER
BEFORE FIRST USE
Just follow these simple steps:
CAUTION: To avoid potential damage to
the unit, do not plug in machine without
water in unit.
1. Wash the tumbler, lid, straw, coffee
lter and brew basket in a mixture of
mild detergent and water. Rinse each
thoroughly.
2. Start with the unit unplugged. Fill
tumbler with water to the water line
and pour into reservoir. Replace brew
basket in position and nylon lter into
brew basket. Slide brew spout to open.
3. Place tumbler under drip spout and
plug in. Switch on the unit at the rear
and press the START button. Ensure
the LED is illuminated.
4. When brewing is complete, discard
water from tumbler and rinse tumbler
thoroughly with clean water.
5. Your Iced Coffeemaker is now ready for
use!
LET’S MAKE ICED COFFEE!
1. Start with the unit unplugged.
WARNING: To prevent injury from hot
steam or potential damage to the unit,
do not plug the unit in until the water is
in the reservoir and the tumbler is put in
place under the drip spout (Step 9).
2. Fill the tumbler
10
to the “WATER”
marking with clean, ltered water.
3. Lift the lid
5
of the unit and remove
the brew basket portion
7
, exposing
the water reservoir.
4. Pour the water into the reservoir
3
.
NOTE: Never ll water reservoir above
MAX ll line.
5. Place the brew basket back on top of
the reservoir. Place the reusable coffee
lter
6
into the brew basket.
6. Slide drip-stop switch to open
8
.
7. Using the coffee scoop
9
, pour 1 level
scoop of grounds into the provided
reusable coffee lter. Close the lid.
NOTE: If you want a bolder cup of iced
coffee, you can use 1½ - 2 scoops of
grounds.
8. Fill the tumbler with large ice cubes to
the “ICE” marking.
9. Place tumbler under drip spout and
plug unit in. Switch on the unit at the
rear and press the “START” button
2
.
Ensure the LED is illuminated.
10. Wait 3-4 minutes for brewing to
complete. Once dripping slows and
stops, slide the drip-stop to closed to
stop the ow of coffee.
11. Add in your favorite coffee mix-ins for
coffee just how you like it.
12. Insert straw
11
in lid
12
, place lid on
tumbler, and enjoy!
HOW TO CLEAN YOUR ICED
COFFEEMAKER
Minerals (like calcium and limestone) found
in water can leave deposits in your iced
coffeemaker and affect its performance.
Decalcifying your iced coffeemaker is an
important part of ensuring your coffee
always tastes great! We recommend
decalcifying your iced coffeemaker once
per month to keep it at peak performance.
It’s an easy process – see below:
1. Prepare 1 cup (235ml) of undiluted,
white household vinegar. Pour the
vinegar into the water reservoir.
2. Place the reusable coffee lter into the
brew basket and close the lid.
3. Place the tumbler under the spout and
press the START button to run a brew
cycle.
4. Once the iced coffeemaker has shut
off, discard the contents of the tumbler.
Remove the reusable coffee lter from
the brew basket.
5. Rinse out the tumbler, reusable coffee
lter and brew basket with clean water.
6. Fill tumbler to “WATER” marking with
clean water and pour water into the
water reservoir.
7. Place tumbler under spout and press
“START” button to run a brew cycle.
8. Discard water and rinse tumbler
thoroughly with clean water.
9. Repeat steps 6-8 one more time,
to ensure the iced coffeemaker is
thoroughly rinsed.
Your iced coffeemaker is now clean
and ready to brew delicious iced coffee
whenever you need a pick-me-up!
DISHWASHER SAFE PARTS OF
YOUR ICED COFFEEMAKER
To thoroughly clean your iced coffeemaker,
you can put the following parts into the top-
rack of the dishwasher:
1. Reusable coffee lter
2. Brew basket
CAUTION: THE ELECTRICAL BASE,
POWER CORD AND PLUG ARE NOT
DISHWASHER SAFE AND SHOULD
NEVER BE IMMERSED IN WATER OR
OTHER LIQUIDS.
FAQ
How does it work?
The Iced Coffeemaker brews hot
concentrated coffee directly over ice to
ensure the freshest flavour. By using just
the right amount of coffee, water and
ice, the iced coffee still tastes great even
as the ice melts. Iced coffee, brewed to
perfection.
My iced coffee is not strong enough for
my taste – how do I make stronger iced
coffee?
No problem – everyone’s tastes are
different! Add another half scoop of coffee
grounds into the reusable coffee filter next
time you make iced coffee. If that’s still not
strong enough, try a full extra scoop. Add
until you find the perfect ratio for you!
Is the tumbler dishwasher safe?
No, tumbler lid and straw should be hand-
washed only.
Why is there no ice left in my cup after I
brew my iced coffee?
Try using bigger ice cubes when making
your iced coffee – these will melt slower
and give you ice in your drink for longer!
Also, ensure you have filled the tumbler to
the ice marking.
VCF155_21EM1 (UK).indd 4-5VCF155_21EM1 (UK).indd 4-5 3/5/21 16:093/5/21 16:09

6
7
REPLACEMENT PARTS
For additional or replacement parts, please
visit www.breville.co.uk or call us on
0161 621 6900.
TROUBLESHOOTING
For troubleshooting and FAQs visit:
www.breville.co.uk/faqs
Why doesn’t the iced coffeemaker ll
the tumbler with iced coffee to the top?
We know many people like to customize
their coffee beverages. For this reason, we
designed the machine to leave a little extra
room for milks, cream, sugar or syrups!
However, for a more full tumbler, you can fill
the water reservoir to the “MAX FILL” line.
Can I use a different tumbler / cup for
making iced coffee?
Sure! Most cups should fit underneath the
spout of the iced coffeemaker – just ensure
you keep the same ratio of water-grounds-
ice to create the best tasting iced coffee!
Why isn’t the coffee dispensing into my
tumbler?
The drip-stop might be set to closed .
Slide the drip-stop over to open and your
coffee will flow through.
Why are there grounds in my iced
coffee?
You may have over-filled your reusable
coffee filter with grounds and they could
have spilled over the top. Although this is
uncommon, try using a little less grounds
next time and that will solve your grounds
issue!
How do I turn my iced coffeemaker off?
The Iced coffeemaker will turn off on its
own after the brewing cycle has completed.
If you would like to pause or stop the
brewing cycle you can switch the unit off at
the rear using the On/Off button
1
.
ELECTRICAL SAFETY
This appliance must be earthed.
If the plug is not suitable for the socket
outlets in your home, it can be removed
and replaced by a plug of the correct type.
If the fuse in a moulded plug needs to be
changed, the fuse cover must be retted.
The appliance must not be used without
the fuse cover tted.
If the plug fuse requires replacement, a
fuse of the same rating as that tted by
the manufacturer must be used. In order
to prevent a hazard do not t a fuse of a
lower or higher rating.
If the terminals in the plug are not marked
or if you are unsure about the installation
of the plug please contact a qualied
electrician.
Blue
(Neutral)
Brown
(Live)
Green/Yellow
(Earth)
Plug should be ASTA approved to BS1363
Fuse should be ASTA approved to BS1362
Ensure that the outer sheath of
the cable is firmly held by the cord grip
Waste Disposal
Waste electrical products should not be
disposed of with household waste. Please
recycle where facilities exist. E-mail us at
[email protected] for further
recycling and WEEE information.
After sales service & replacement
parts
In the case the appliance does not
operate but is under warranty, return the
product to the place it was purchased for a
replacement. Please be aware that a valid
form of proof of purchase will be required.
For additional support, please contact our
Consumer Service Department at 0800 028
VCF155_21EM1 (UK).indd 6-7VCF155_21EM1 (UK).indd 6-7 3/5/21 16:093/5/21 16:09

VCF155_21EM1 (UK) P.N. ART0000912809
GCDS-BRE-JC
Jarden Consumer Solutions (Europe) Limited
5400 Lakeside, Cheadle Royal Business Park,
Cheadle, SK8 3GQ, United Kingdom
Newell Poland Services Sp. z o.o.,
Plac Andersa 7, Poznan, 61-894, Poland.
e-mail: [email protected]
UK Telephone: 0800 028 7154
© 2021 Jarden Consumer Solutions (Europe) Limited. All rights reserved.
Jarden Consumer Solutions (Europe) Limited, 5400 Lakeside, Cheadle Royal Business Park, Cheadle, Cheshire, SK8 3GQ, United
Kingdom.
Newell Poland Services Sp. z o.o., Plac Andersa 7, Poznan, 61-894, Poland.
Jarden Consumer Solutions (Europe) Limited and Newell Poland Services Sp. z o.o. are subsidiaries of Newell Brands Inc.
The product you buy may differ slightly from the one shown on this carton due to continuing product development.
Made in China.
VCF155_21EM1 (UK).indd 8VCF155_21EM1 (UK).indd 8 3/5/21 16:093/5/21 16:09