
en Safety
2
Table of contents
USER MANUAL
1 Safety....................................................................2
2 Preventing material damage ...............................6
3 Environmental protection and saving en-
ergy .......................................................................7
4 Installation and connection.................................8
5 Familiarising yourself with your appliance ......11
6 Accessories........................................................13
7 Before using for the first time ...........................14
8 Cookware............................................................14
9 Operating the hotplate.......................................15
10 Basic operation ..................................................17
11 Time-setting options..........................................18
12 Cleaning and servicing......................................18
13 Rails ....................................................................20
14 Appliance door...................................................22
15 Top cover............................................................23
16 Troubleshooting.................................................24
17 Transportation and disposal .............................25
18 Customer Service...............................................26
19 How it works.......................................................26
20 INSTALLATION INSTRUCTIONS .......................29
20.1 General information ........................................
...29
1 Safety
Observe the following safety instructions.
1.1 Intended use
Read the information on intended use to en-
sure that you use the appliance correctly and
safely.
Appliance class: Class 1
The figures in these instructions are intended
for information purposes.
ATTENTION: Observe the applicable regula-
tions and only set up the appliance in well-
ventilated rooms. Read through the instruc-
tions before setting up and using the appli-
ance.
Warning: The appliance is only used for cook-
ing. Do not use the appliance for other pur-
poses, e.g. for heating up rooms.
Only allow a trained professional to connect
the appliance and to convert the appliance to
a different type of gas.
The appliance must be installed and the elec-
tric and gas connections must be implemen-
ted in accordance with the instruction and in-
stallation manual.
An incorrect connection or incorrect settings
may lead to serious accidents and damage to
the appliance.
The appliance manufacturer accepts no liabil-
ity for damage of this kind.
The appliance's warranty becomes void.
Only a licensed professional may connect ap-
pliances without plugs. Damage caused by in-
correct connection is not covered under the
warranty.
Only use the appliance as follows:
¡ To prepare meals and drinks.
¡ Under supervision. Never leave the appli-
ance unattended when cooking for short
periods.
¡ In private households and in enclosed
spaces in a domestic environment.
¡ Up to an altitude of max. 2000m above
sea level.
Do not use the appliance:
¡ On boats or in vehicles.
¡ as a room heater.
Call the after-sales service if you want to con-
vert your appliance to a different type of gas.
You cannot operate the appliance with a timer
or remote control.
Always place accessories in the cooking com-
partment the right way round.
1.2 Restriction on user group
This appliance may be used by children aged
8 or over and by people who have reduced
physical, sensory or mental abilities or inad-
equate experience and/or knowledge,
provided that they are supervised or have

Safety en
3
been instructed on how to use the appliance
safely and have understood the resulting
dangers.
Children must not play with the appliance.
Children must not perform cleaning or user
maintenance unless they are at least 15 years
old and are being supervised.
Keep children under the age of 8 years away
from the appliance and power cable.
1.3 Safe use
WARNING‒Risk of explosion!
Escaping gas may cause an explosion. WHAT
TO DO IF YOU SMELL GAS OR IF THERE
ARE FAULTS IN THE GAS INSTALLATION
▶
Immediately shut off the gas supply or
close the gas cylinder valve.
▶
Immediately extinguish all naked flames
and cigarettes.
▶
Do not operate any light switches or appli-
ance switches.
▶
Do not pull any plugs out of any sockets.
▶
Do not use any telephones or mobile
phones within the building.
▶
Open windows and ventilate the room.
▶
Call the after sales service or the gas sup-
plier.
Escaping gas may cause an explosion. Small
amounts of gas can collect over a longer
period of time and ignite.
▶
Close the safety valve for the gas supply
when the appliance is out of use for pro-
longed periods.
Escaping gas may cause an explosion. If the
liquefied gas bottle is not upright, liquefied
propane/butane can enter the appliance. In-
tense darting flames may therefore escape
from the burners. Components may become
damaged and start to leak over time so that
gas escapes uncontrollably.
▶
Always use liquefied gas bottles in an up-
right position.
Escaping gas may cause an explosion. If the
gas pressure in your distributing pipes is
more than 20% higher than the values spe-
cified on the appliance's rating plate, a gas
leak can occur.
▶
For your own safety, it is imperative that
you operate the appliance with a suitable
gas governor.
▶
If you do not know what the gas pressure
in your gas distributing pipes is, please ask
your local gas company.
▶
Connection, maintenance and setting of the
gas governor must be carried out by an au-
thorised installation specialist.
WARNING‒Risk of suffocation!
Using the gas cooking appliance leads to a
build-up of heat, moisture and combustion
products in the room where the appliance is
installed.
▶
Ensure that the kitchen is sufficiently ventil-
ated, in particular when operating the gas
cooking appliance.
▶
If the appliance is used intensively and for
prolonged periods, ensure that there is ad-
ditional ventilation so that the combustion
products are safely fed to the outside, e.g.
if using existing ventilation equipment, set a
higher performance level and, at the same
time, ensure that the air is replaced with
fresh air in the room where the appliance is
installed.
▶
Consult specialist personnel when installing
additional ventilation equipment.
WARNING‒Risk of fire!
The appliance will become hot.
▶
Do not keep combustible objects or aero-
sol cans in drawers directly underneath the
hob.
▶
Never store or use combustible materials
(e.g. spray cans or cleaning agents) under
the appliance or in its immediate vicinity.
Hob covers can cause accidents, for example
due to overheating, catching fire or materials
shattering.
▶
Do not use hob covers.

en Safety
4
The appliance becomes very hot, fabrics and
other objects may ignite.
▶
Keep fabrics (e.g. garments or curtains)
away from the flames.
▶
Never reach over the flames.
▶
Do not place combustible objects (e.g. tea
towels or newspapers) on, next to or be-
hind the appliance.
Escaping gas may ignite.
▶
If the burner does not ignite after
15seconds, turn the control knob to the
"Off" position and open the door or window
in the room. Wait at least one minute be-
fore igniting the burner again.
▶
In the event of the burner flames being ac-
cidentally extinguished, turn off the burner
control and do not attempt to re-ignite the
burner for at least one minute.
Opening the appliance door creates a
draught. Greaseproof paper may come into
contact with the heating element and catch
fire.
▶
Never place greaseproof paper loosely
over accessories when preheating the ap-
pliance and while cooking.
▶
Always cut greaseproof paper to size and
use a plate or baking tin to hold it down.
Combustible objects that are left in the cook-
ing compartment may catch fire.
▶
Never store combustible objects in the
cooking compartment.
▶
If smoke is emitted, the appliance must be
switched off or the plug must be pulled out
and the door must be held closed in order
to stifle any flames.
The rear of the appliance becomes very hot.
▶
This may cause damage to the power
cables.
▶
Electricity and gas lines must not come into
contact with the rear of the appliance.
WARNING‒Risk of burns!
The accessible parts can become hot during
operation.
▶
Small children should be kept away from
the appliance.
Hob protective grilles may cause accidents.
▶
Never use hob protective grilles.
Accessories and cookware get very hot.
▶
Always use oven gloves to remove ac-
cessories or cookware from the cooking
compartment.
Empty cookware becomes extremely hot
when set on gas burners that are operating.
▶
Never heat up empty cookware.
The appliance becomes hot during operation.
▶
Allow the appliance to cool down before
cleaning.
When the cooking compartment is hot, any al-
coholic vapours inside may catch fire.
▶
Only use small quantities of drinks with a
high alcohol content in food.
▶
Open the appliance door carefully.
The appliance and its parts that can be
touched become hot during use.
▶
Caution should be exercised here in order
to avoid touching heating elements.
▶
Young children under 8 years of age must
be kept away from the appliance.
Accessible points may be hot when using the
grill.
▶
Keep small children away from the appli-
ance.
WARNING‒Risk of electric shock!
Incorrect repairs are dangerous.
▶
Repairs to the appliance should only be
carried out by trained specialist staff.
▶
Only use genuine spare parts when repair-
ing the appliance.
▶
If the power cord of this appliance is dam-
aged, it must be replaced by the manufac-
turer, the manufacturer's Customer Service
or a similarly qualified person in order to
prevent any risk.
If the appliance or the power cord is dam-
aged, this is dangerous.
▶
Never operate a damaged appliance.
▶
Never operate an appliance with a cracked
or fractured surface.
▶
Never pull on the power cord to unplug the
appliance. Always unplug the appliance at
the mains.
▶
If the appliance or the power cord is dam-
aged, immediately unplug the power cord
or switch off the fuse in the fuse box and
turn off the gas supply.
▶
Call customer services. →Page26
An ingress of moisture can cause an electric
shock.
▶
Do not use steam- or high-pressure clean-
ers to clean the appliance.
Safety en
5
The insulation on cables of electrical appli-
ances may melt if it touches hot parts of the
appliance.
▶
Never bring electrical appliance cables into
contact with hot parts of the appliance.
If the insulation of the power cord is dam-
aged, this is dangerous.
▶
Never let the power cord come into contact
with hot appliance parts or heat sources.
▶
Never let the power cord come into contact
with sharp points or edges.
▶
Never kink, crush or modify the power
cord.
WARNING‒Risk of injury!
Faults or damage to the appliance and re-
pairs that have not been carried out correctly
are dangerous.
▶
Never switch on the appliance if there is a
fault with it.
▶
If the appliance is faulty, unplug the mains
plug or switch off the fuse in the fuse box.
Shut off the gas supply and call the after
sales service.
▶
Always have repairs carried out to the ap-
pliance and damaged gas lines replaced
by trained, specialist personnel.
Cookware that is not the right size, or that is
damaged or incorrectly positioned may cause
serious injuries.
▶
See the notes on cookware.
When switching on the burner, sparks are
generated in the ignition plugs.
▶
Never touch the ignition plugs while the
burner is being lit.
A scratched upper glass cover may break
and fragment.
▶
Do not use a glass scraper or any harsh or
abrasive cleaning products.
The hinges on the appliance door move when
the door is opened and closed, which could
trap your fingers.
▶
Keep your hands away from the hinges.
Scratched glass in the appliance door may
develop into a crack.
▶
Do not use any harsh or abrasive cleaners
or sharp metal scrapers to clean the glass
on the oven door, as they may scratch the
surface.
If you leave the appliance door open, people
may bump into it, resulting in injury.
▶
Always keep the appliance door closed
during and after operation.
WARNING‒Risk of scalding!
The accessible parts of the appliance become
hot during operation.
▶
Never touch these hot parts.
▶
Keep children at a safe distance.
Hot steam may escape when you open the
appliance door. Steam may not be visible, de-
pending on the temperature.
▶
Open the appliance door carefully.
▶
Keep children at a safe distance.
If there is water in the cooking compartment
when it is hot, this may create hot steam.
▶
Never pour water into the cooking compart-
ment when the cooking compartment is
hot.
WARNING‒Risk of suffocation!
Children may put packaging material over
their heads or wrap themselves up in it and
suffocate.
▶
Keep packaging material away from chil-
dren.
▶
Do not let children play with packaging ma-
terial.
Children may breathe in or swallow small
parts, causing them to suffocate.
▶
Keep small parts away from children.
▶
Do not let children play with small parts.
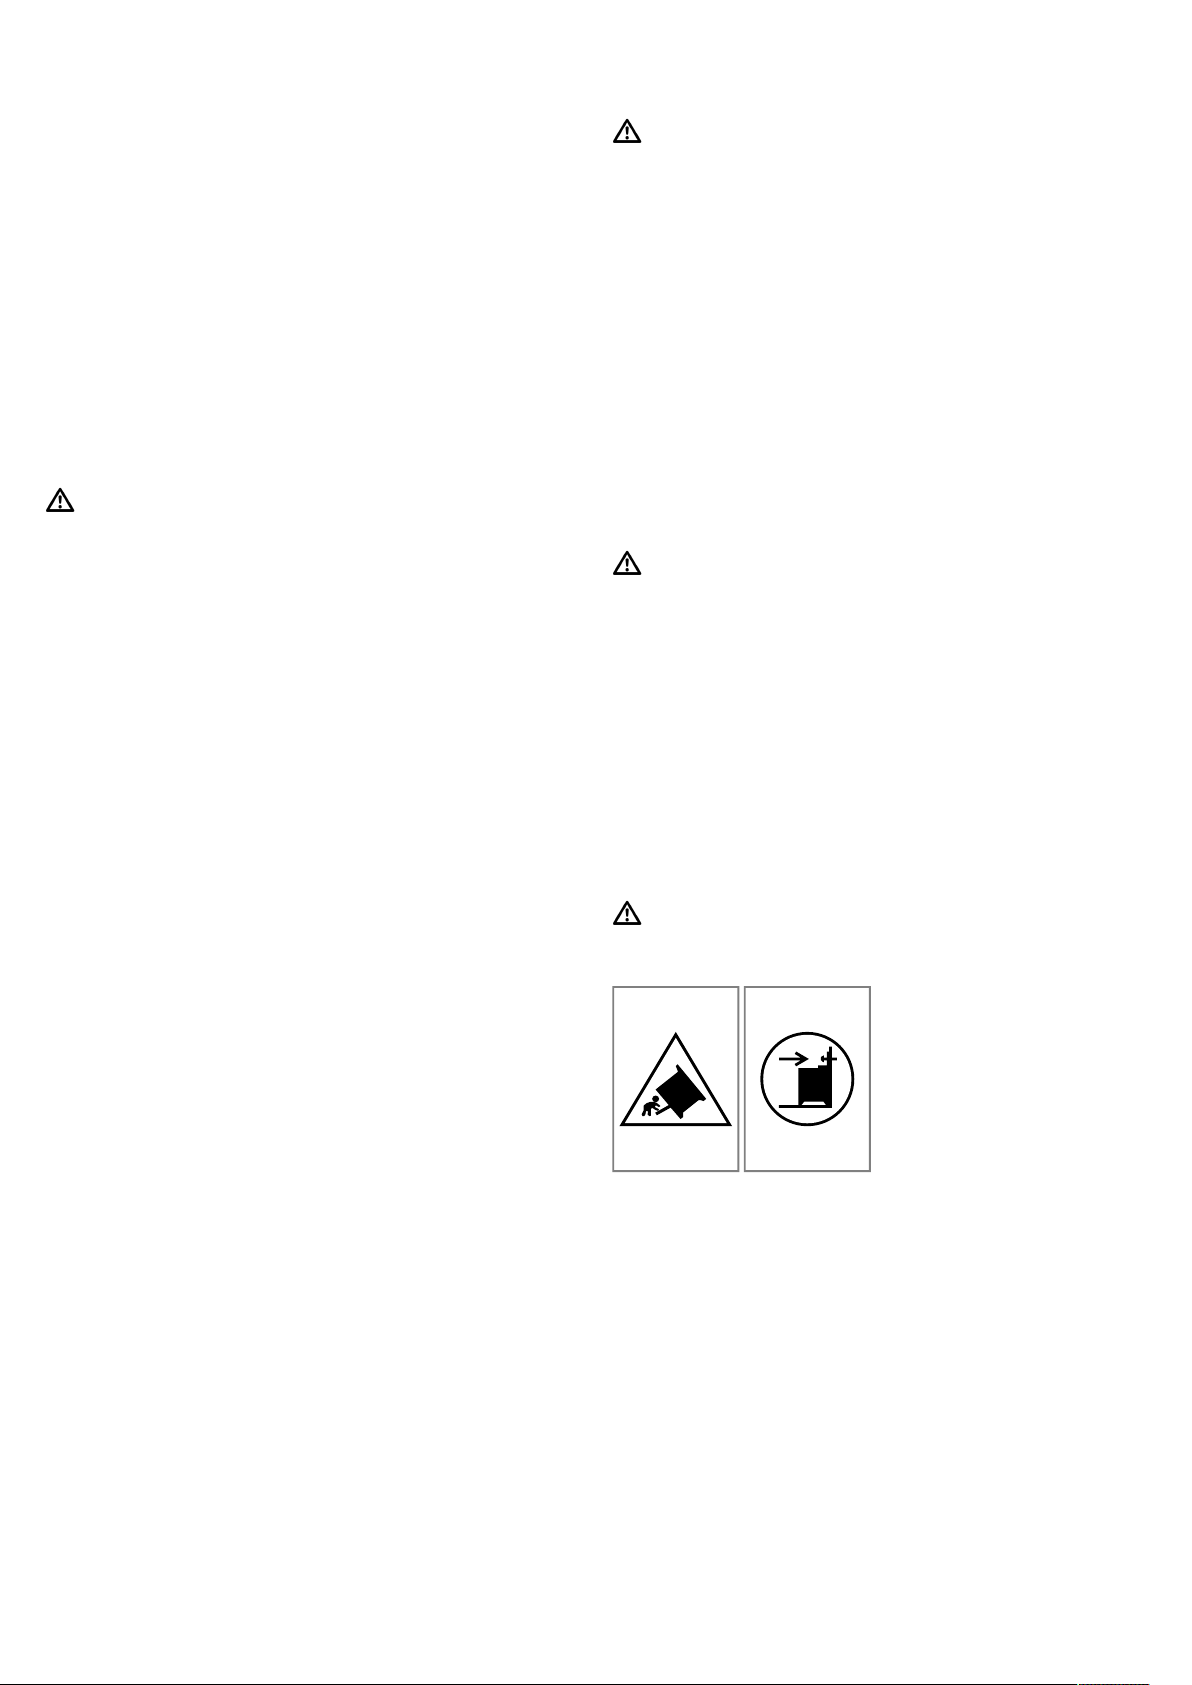
WARNING‒Risk of tipping!
If the appliance is placed on a base and is
not secured, it may slide off the base.
▶
Connect the appliance securely to the
base.
▶
Warning: To prevent the appliance from tip-
ping over, attach a compensation device.
▶
Observe the instructions for the installation.
en Preventing material damage
6
1.4 Glass cover
WARNING‒Risk of injury!
The glass cover may crack due to heat.
▶
Before closing the cover, switch off all of
the burners.
▶
Wait until the oven has cooled down before
closing the glass cover.
▶
Before opening the top cover, remove any
spills with a cloth and dry the cover.
1.5 Plinth drawer
WARNING‒Risk of fire!
The surfaces of the plinth drawer may be-
come very hot.
▶
Only store oven accessories in the drawer.
▶
Do not keep any flammable or combustible
objects in the plinth drawer.
2 Preventing material damage
2.1 Oven area
Follow the corresponding instructions when using the
oven.
ATTENTION!
Objects on the cooking compartment floor at over
50°C will cause heat to build up. The baking and
roasting times will no longer be correct and the enamel
will be damaged.
▶
Do not place any accessories, greaseproof paper or
foil of any kind on the cooking compartment floor.
▶
Only place cookware on the cooking compartment
floor if a temperature above 50°C has been set.
If aluminium foil comes into contact with the door pane,
it could cause permanent discolouration.
▶
Do not allow aluminium foil in the cooking compart-
ment to come into contact with the door pane.
When the cooking compartment is hot, any water in-
side it will create steam. The change in temperature
may cause damage.
▶
Never pour water into the cooking compartment
when it is still hot.
▶
Never place cookware containing water on the
cooking compartment floor.
The prolonged presence of moisture in the cooking
compartment leads to corrosion.
▶
Allow the cooking compartment to dry after use.
▶
Do not keep moist food in the cooking compartment
for a long time with the door closed.
▶
Do not store food in the cooking compartment.
Leaving the appliance to cool down with the door open
will damage the front of neighbouring kitchen units over
time.
▶
Always allow the cooking compartment to cool
down with the door closed after cooking at high
temperatures.
▶
Take care not to trap anything in the appliance
door.
▶
Only leave the cooking compartment to dry with the
door open if a lot of moisture was produced during
operation.
Fruit juice dripping from the baking tray leaves stains
that cannot be removed.
▶
When baking very juicy fruit flans, do not pack too
much on the baking tray.
▶
If possible, use the deeper universal pan.
Using oven cleaner in a hot cooking compartment
damages the enamel.
▶
Never use oven cleaner in the cooking compartment
when it is still warm.
▶
Remove all food remnants from the cooking com-
partment and the appliance door before you next
heat up the appliance.
If the seal is very dirty, the appliance door will no
longer close properly during operation. This may dam-
age the front of adjacent kitchen units.
▶
Keep the seal clean at all times.
▶
Never operate the appliance if the seal is damaged
or missing.
Sitting or placing objects on the appliance door may
damage it.
▶
Do not place or hang objects on the appliance door.
▶
Do not place cookware or accessories on the appli-
ance door.
With certain models, accessories may scratch the door
pane when closing the appliance door.
▶
Always push accessories fully into the cooking com-
partment.
If you carry or move the appliance by the handle on the
cover or move, the handle may break off and cause
damage to the hinges. The handle of the cover is not
designed for the weight of the appliance.
▶
Do not carry or move the appliance by the handle
on the cover.
When grilling, due to high temperatures, the baking tray
or universal pan may become deformed and damage
the enamel coating when they are removed.
▶
When grilling, do not insert the baking tray or univer-
sal pan higher than level 3.
▶
Above shelf position 3, only grill directly on the wire
insert.

Environmental protection and saving energy en
7
2.2 Hob with gas
Follow the corresponding instructions when using the
appliance.
ATTENTION!
A build-up of heat may damage the appliance.
▶
Never cover the stainless steel hob, for example
with aluminium foil or oven protectors.
▶
Only use the accessories specified.
Heat can cause damage to adjacent appliances or kit-
chen units. If the appliance is in operation for an exten-
ded period, heat and moisture will be generated.
▶
Open a window or switch on an extractor hood lead-
ing to the outside.
A build-up of heat may damage the appliance.
▶
Do not heat roasters, frying pans or grill stones us-
ing more than one burner at a time.
If a control knob is in the wrong position, this could
lead to malfunctions.
▶
Always turn the control knob to the "Off" position
when the appliance is not being used.
Aluminium foil and plastic containers will melt and ad-
here to hot cooking zone.
▶
Observe the manufacturer's instructions for special
containers.
▶
No not use oven liners.
The burner may not ignite or the burner flame is not
even.
▶
Ensure that the hotplate burners are clean and dry.
▶
The burner cup and burner cover must be in exactly
the right position.
Food may spill.
▶
Remove spills immediately.
▶
Use deep pots for dishes with a lot of liquid.
▶
This prevents overflowing.
Penetrating liquid may cause damage to the appliance.
▶
The area around the appliance must be clean and
dry.
▶
Always keep the appliance and the area around it
clean and dry after cleaning.
▶
Ensure that there are no cleaning materials, clean-
ing products or water marks on any of the appli-
ance's surfaces.
The glass lid may crack.
▶
Ensure that the upper cover is not closed, e.g. by
playing children, while you are using the hotplate.
The handles or grips on pots or pans may be dam-
aged.
▶
Place the pot or pan precisely in the centre of the
steel grid of the burner.
▶
This will optimise transfer of the heat from the
burner flame to the pot or ban base.
▶
The handle or grip does is not damaged, and
greater energy savings are guaranteed.
The base of the pot or pan may be damaged.
▶
Cookware that is used on the hotplate must be se-
curely in place.
▶
Only use pots and pans with an even base.
▶
Do not heat up empty pots or pans.
Damage may occur if hard or pointed objects fall on
the hob.
▶
Do not let hard or pointed objects fall onto the hob.
Do not hold and move the appliance at the gas pipe
(collector). Damage to the gas pipe may lead to gas
leak. The gas pipe is not designed for the weight of the
appliance.
▶
Do not hold and move the appliance at the gas
pipe.
If you are cleaning food remnants or residue liquids
that are penetrating below the hotplates into the the
burner seat using lyes or similar chemicals, this may
lead to damage to the gas components.
▶
If you remove the food remnants or residue liquids
from the burner seat, do not use lye or similar effect-
ive chemicals.
2.3 Drawer area
Follow the corresponding instructions when using the
drawer.
ATTENTION!
Do not place hot objects in the plinth drawer. The plinth
drawer may be damaged.
▶
Do not place hot objects in the plinth drawer.
Do not place oven accessories that exceed the height
of the drawer into the plinth drawer. Otherwise, this
may damage the appliance.
▶
Do not place oven accessories that exceed the
height of the drawer into the plinth drawer.
3 Environmental protection and saving energy
3.1 Disposing of packaging
The packaging materials are environmentally compat-
ible and can be recycled.
▶
Sort the individual components by type and dispose
of them separately.
3.2 Saving energy
If you follow these instructions, your appliance will use
less energy.
Only preheat the appliance if the recipe or the recom-
mended settings tell you to do so.
¡
Not preheating the appliance can reduce the en-
ergy used by up to 20%.
Use dark-coloured, black-coated or enamelled baking
tins.
¡
These types of baking tin absorb the heat particu-
larly well.
Open the appliance door as little as possible during
operation.
¡
This will maintain the temperature in the cooking
compartment and eliminate the need for the appli-
ance to reheat.
When baking multiple dishes, do so in succession or
in parallel.
¡
The cooking compartment is heated after baking
the first dish. This reduces the baking time for the
second cake.

en Installation and connection
8
If the cooking time is relatively long, you can switch
the appliance off 10minutes before the cooking time
ends.
¡
There will be enough residual heat to finish cooking
the dish.
Remove any accessories that are not being used from
the cooking compartment.
¡
Accessories that are not being used do not need to
be heated.
Allow frozen food to defrost before cooking.
¡
This will save the energy that would otherwise be
required to defrost it.
Saving energy
If you follow these instructions, your appliance will use
less energy.
Choose a burner roughly the same size as your pan.
Centre the cookware on the hob.
Select the cooking zone to match the size of your
pan. Centre the cookware on the hob.
Use cookware whose base diameter is the same dia-
meter as the hotplate.
Tip:Cookware manufacturers often give the upper
diameter of the saucepan. It is often larger than the
base diameter.
¡
Unsuitable cookware or incompletely covered cook-
ing zones consume a lot of energy.
Cover saucepans with suitable lids.
¡
Cooking without a lid consumes considerably more
energy.
Lift lids as infrequently as possible.
¡
When you lift the lid, a lot of energy escapes.
Use a glass lid.
¡
You can see into the pan through a glass lid
without having to lift it.
Use pots and pans with flat bases.
¡
Uneven bases increase energy consumption.
Use cookware suited to the quantity of food.
¡
Large items of cookware containing little food need
more energy to heat up.
Cook with only a little water.
¡
The more water that is contained in cookware, the
more energy is required to heat it up.
Turn down to a lower power level early on. Use a suit-
able ongoing power level.
¡
If you use an ongoing power level that is too high,
you will waste energy.
4 Installation and connection
You can find out where and how best to install your ap-
pliance here. You will also learn how to connect your
appliance to the power supply.
4.1 Gas connection
Only an authorised expert or a licensed customer ser-
vice technician may install the appliance in accordance
with the instructions specified under "Gas connection
and conversion to a different gas type".
¡ The settings for configuring your appliance can be
found on the rating plate on the rear of the appli-
ance. The gas type set at the factory is marked with
an asterisk (*).
¡ Find out about the local supply conditions regarding
the gas type and gas pressure before installing the
appliance, and ensure that the gas setting for the
appliance complies with this information.
¡ Connect and install this appliance in accordance
with the applicable to the installation instructions.
¡ Do not connect this appliance to a waste gas main
on the combustion products. Do not connect this
appliance to an exhaust gas outlet. Comply with all
ventilation regulations.
¡ Establish the gas supply using a permanent, non-
elastic connection, such as a gas pipe or a flexible
safety gas hose.
¡ If a flexible safety gas hose is used, ensure that the
hose is not jammed or squeezed. Keep the hose
away from hot surfaces.
¡ On some appliances, you can connect the gas pipe
to the gas pipe or flexible safety gas hose on the
right-hand or the left-hand side of the appliance. If
necessary, you can change the connection side.
The connection must have a free-standing and eas-
ily accessible locking device.
Target appliance operating pressure
¡ You can find the target operating pressure for your
appliance on the rating plate on the rear of the ap-
pliance.
¡ All the data on your appliance's rating plate relates
to these pressure values.
¡ The manufacturer is not responsible for results, per-
formance or any risk caused by operating the appli-
ance at different values.
WARNING‒Risk of explosion!
Escaping gas may cause an explosion. If the gas pres-
sure in your distributing pipes is more than 20% higher
than the values specified on the appliance's rating
plate, a gas leak can occur.
▶
For your own safety, it is imperative that you operate
the appliance with a suitable gas governor.
▶
If you do not know what the gas pressure in your
gas distributing pipes is, please ask your local gas
company.
▶
Connection, maintenance and setting of the gas
governor must be carried out by an authorised in-
stallation specialist.
A gas leak could occur. If you move the appliance after
the gas supply has been established, a gas leak could
occur.
▶
Do not move the appliance once the gas supply is
connected.
▶
If you move the appliance, check that the connec-
tions are not leaking.
Installation and connection en
9
4.2 Electrical connection
The appliance must be connected by an authorised
specialist. You must comply with the requirements of
your electricity supplier.
¡ Your appliance is designed to operate at 220–
240V. A 16A fuse is required for connection.
¡ If the electricity supply drops below 180 V, the elec-
trical ignition system does not work.
¡ If the power cord of this appliance is damaged, it
must be replaced by the manufacturer, the manufac-
turer's Customer Service or a similarly qualified per-
son in order to prevent any risk.
¡ Any damage arising from the appliance being con-
nected incorrectly will invalidate the warranty.
Information on electrical connection by our customer
service:
¡ Connect the appliance in accordance with the spe-
cifications on the rating plate.
¡ The appliance must only be connected to an elec-
trical connection that corresponds to the applicable
regulations. The socket must be easily accessible
so that you can disconnect the appliance from the
electricity supply if necessary.
¡ Ensure that a multi-pin disconnecting system is
available.
¡ For safety reasons, this appliance must only be con-
nected to an earthed connection. If the safety earth
terminal does not comply with regulations, protec-
tion against electrical risks is not guaranteed.
¡ To connect the appliance, use H05VV-F cables or
other equivalent cables.
Important information about the electrical
connection
Note the following information and ensure that:
WARNING‒Risk of electric shock!
There is a risk of electric shock if you touch live com-
ponents.
▶
Hold the mains plug with dry hands only.
▶
Never pull out the mains plug from the socket while
the appliance is in operation.
▶
Pull out the power cable directly at the plug and
never by pulling the power cable as this may be-
come damaged.
¡ Fit the mains plug and socket together.
¡ The mains plug can be accessed at all times.
¡ The cross section of the cable is sufficient.
¡ The mains cable is not kinked, crushed, modified or
severed.
¡ If required, the mains cable must only be replaced
by a qualified electrician. A replacement mains
cable is available from the after-sales service.
¡ Do not use any multiple plugs or multi-connectors
and extension cords.
¡ The earthing system is correctly installed.
¡ If using a residual current device, only use one that
bears the mark . The presence of this mark is the
only way to be sure that it fulfils all the applicable
regulations.
¡ The mains cable does not come into contact with
heat sources.
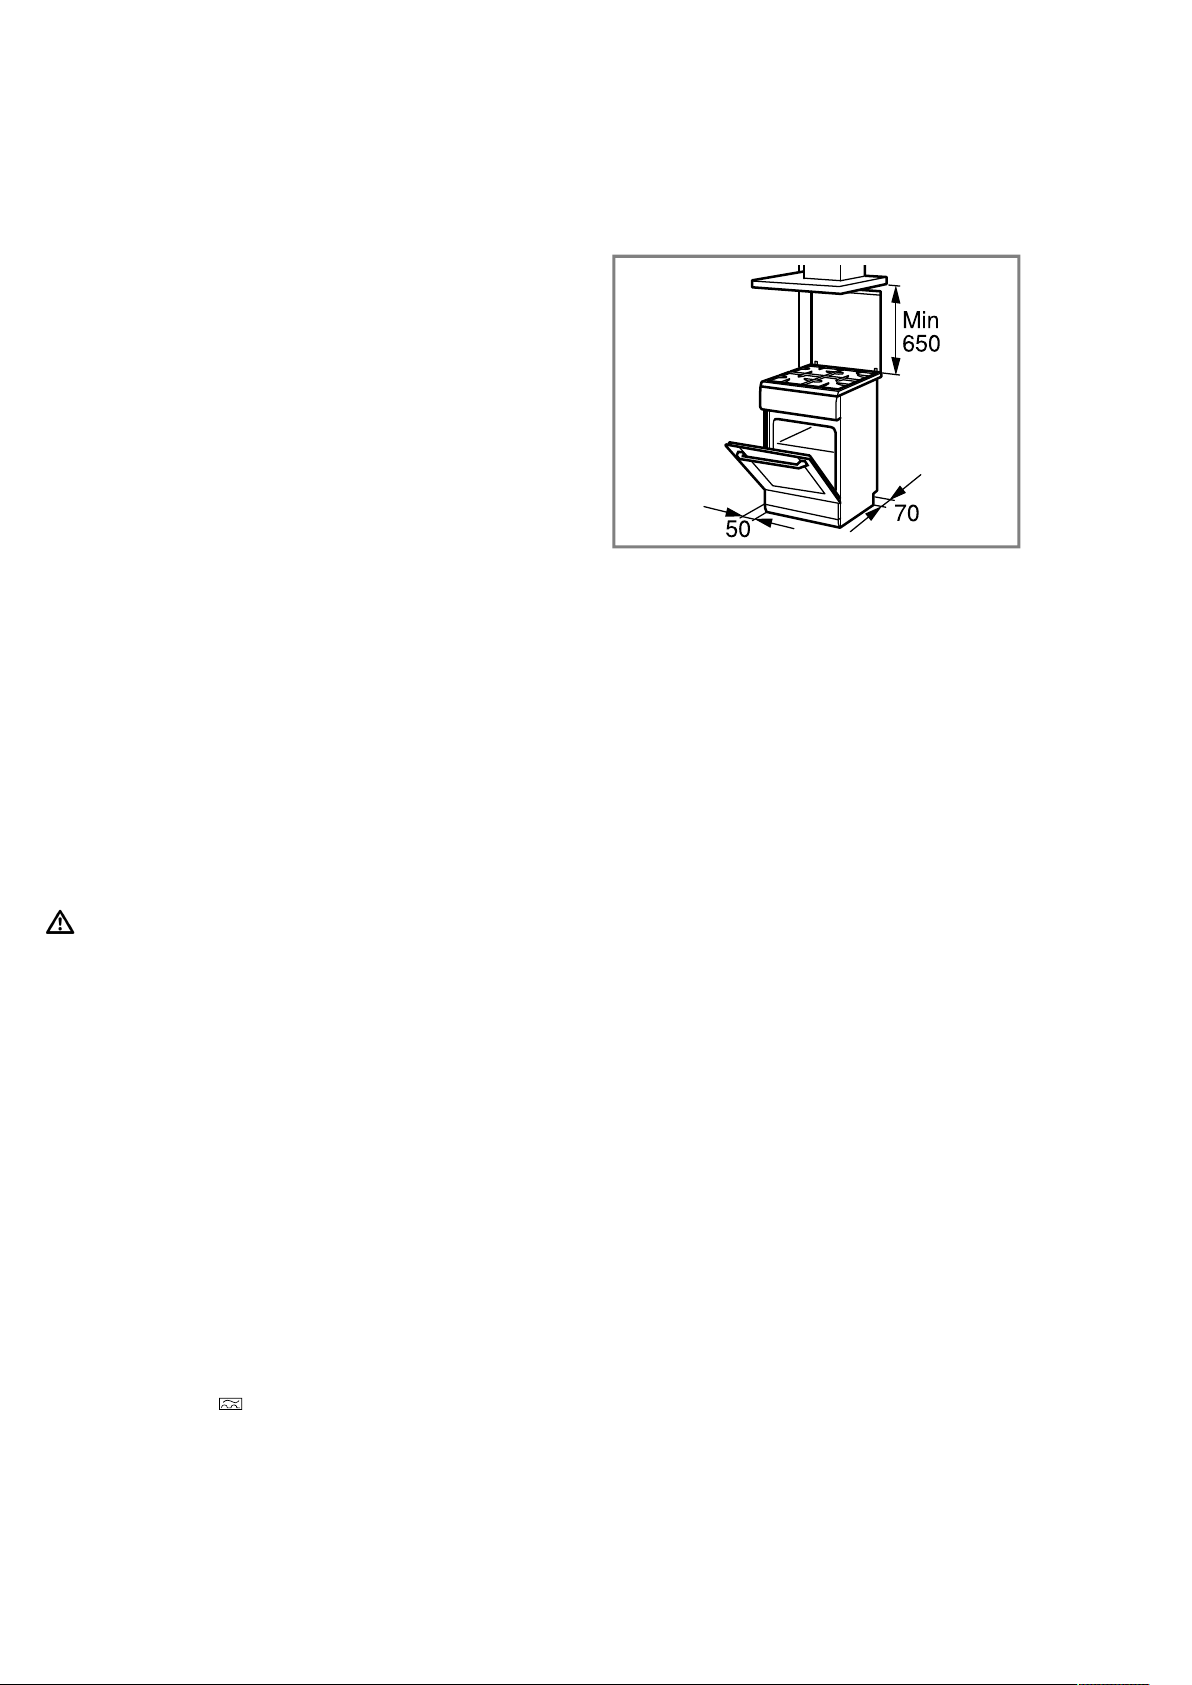
4.3 Setting up the appliance
Place the appliance on a smooth surface.
Never set up the appliance behind a decorative door or
the door of a kitchen unit. There is a risk of overheat-
ing.
Max
¡ Install the appliance in accordance with the spe-
cified dimensions.
¡ The distance between the top edge of the cooker
and the bottom edge of the extractor hood must
meet the requirements of the extractor hood manu-
facturer.
¡ Ensure that the appliance is not moved again after it
is set up.
¡ In particular, the distance from the high-output
burner or wok burner to the fronts of adjacent units
or from the wall must be at least 50 mm.
Setting the base height of the appliance
Set the base height in accordance with the functions of
your appliance.
Adjusting the height of the appliance with fixed
drawers
If your appliance has fixed drawers, set the base height
of your appliance as follows.
Note:
The appliance has height-adjustable feet. This allows
the appliance to be raised approx. 15 mm from the
ground.
¡ The feet are located at the front and rear on the un-
derside of the appliance.
¡ Raise or lower the feet by turning the feet with an Al-
len key until the appliance is in a horizontal position.
Setting the base height of the appliance with a
removable drawer
If your appliance does not have height-adjustable feet
and the drawer is removable, set the base height of
your appliance as follows.
1.
Pull out the plinth drawer and lift it up and out. There
are adjustable feet at the front and rear on the in-
side of the plinth.
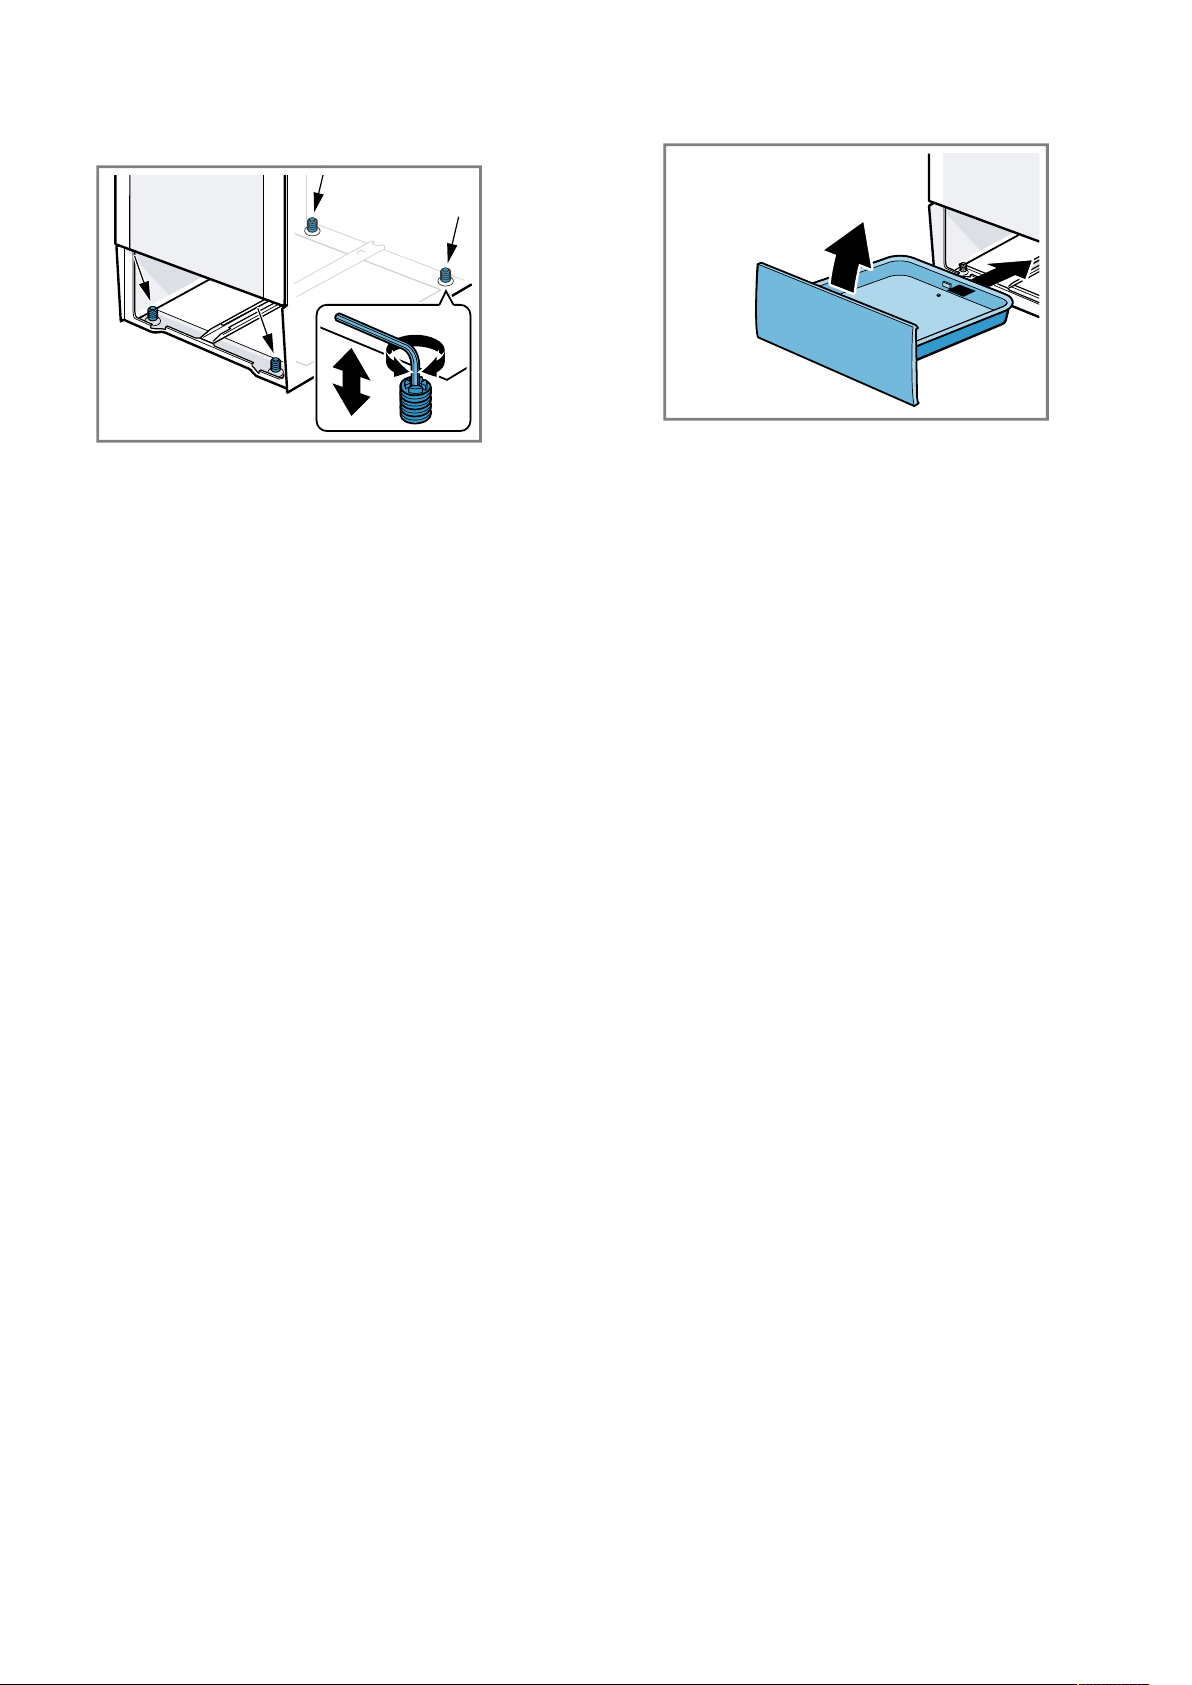
en Installation and connection
10
2.
Use an Allen key to raise or lower the adjustable
feet until the cooker is level.
3.
Push in the plinth drawer.
Adjacent units
Any adjacent units must not be made of flammable ma-
terials. The fronts of any adjacent units must be heat-
resistant up to at least 90 °C.
Wall fixing
To prevent the appliance from tipping over, you must
fix it to the wall using the enclosed brackets. To secure
the appliance to the wall, follow the installation instruc-
tions.
Familiarising yourself with your appliance en
11
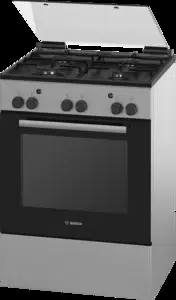
5 Familiarising yourself with your appliance
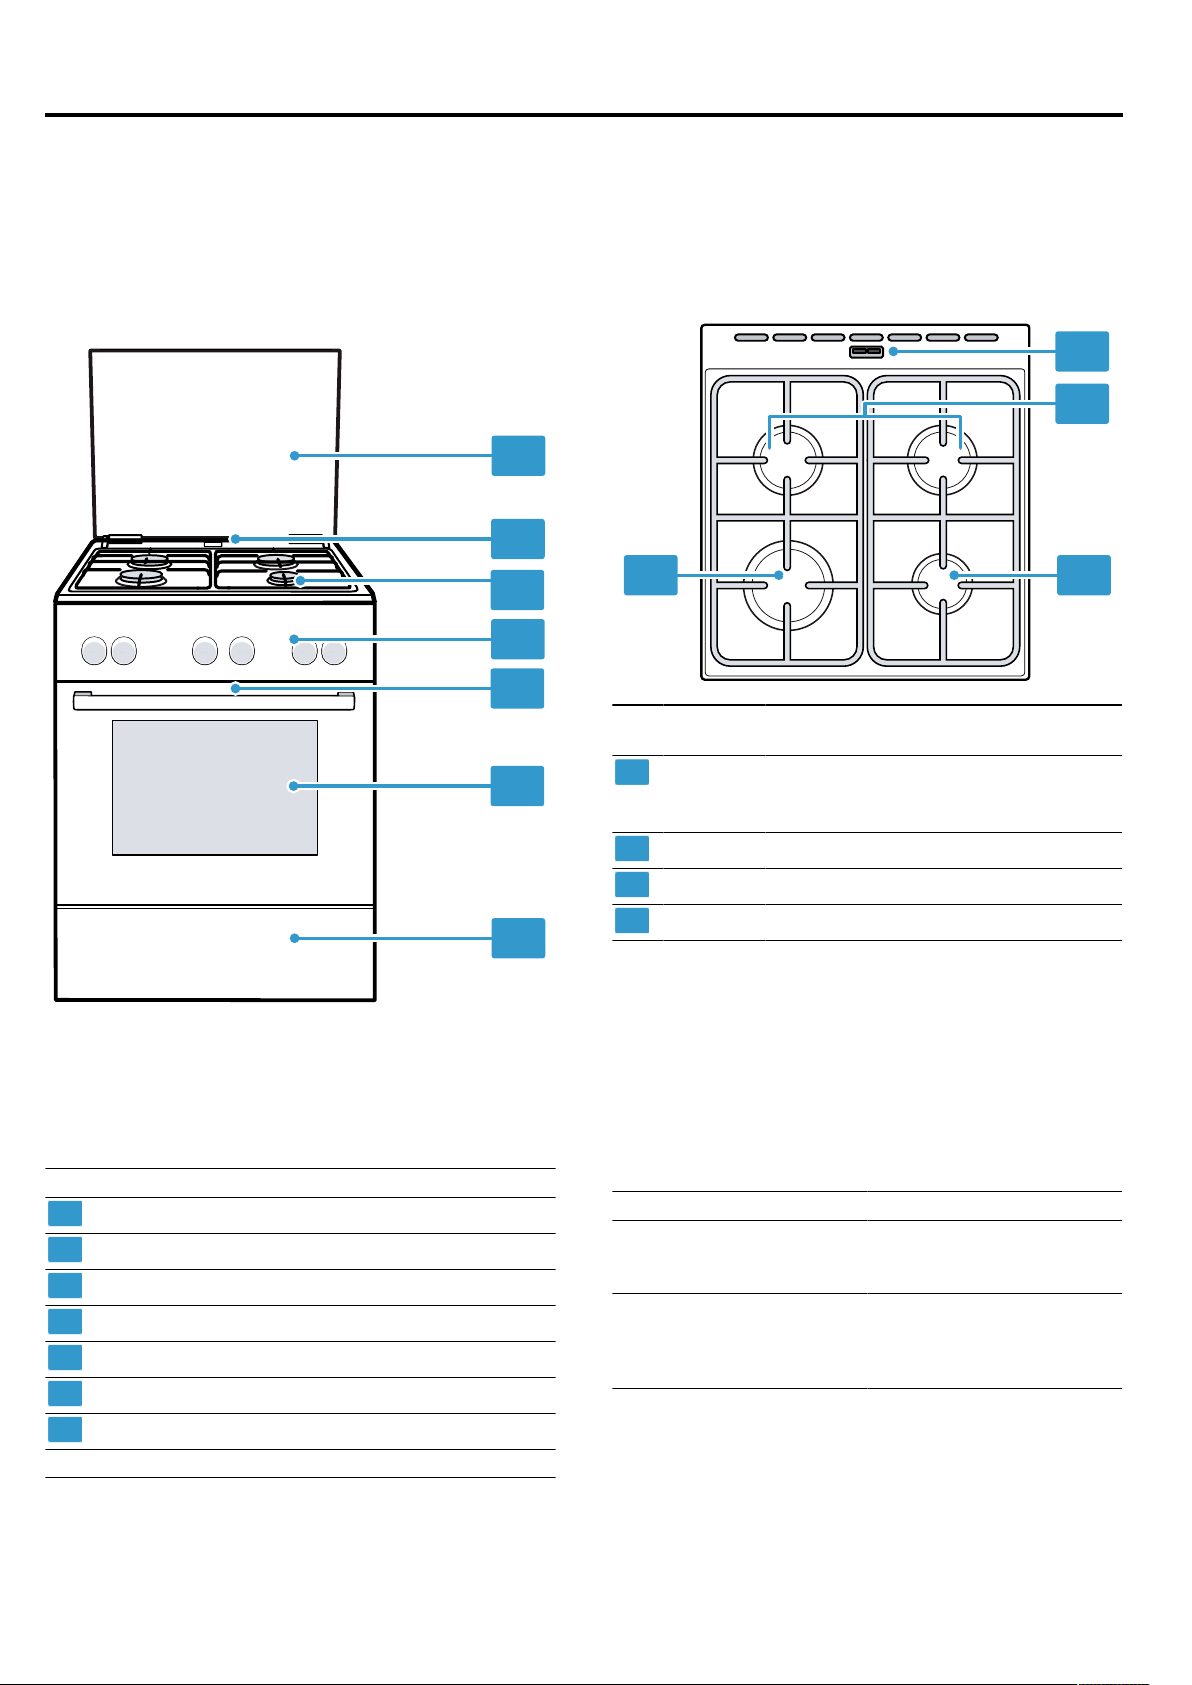
5.1 Your appliance
You can find an overview of the parts of your appliance
here.
Note:On certain models, specific details such as col-
our and shape may differ from those pictured.
1
2
3
4
5
6
7
Explanation
1
Top cover
1
2
Steam outlet
1
3
Hob
4
Control panels
5
Cooling fan
1
6
Appliance door
7
Plinth drawer
1
1
Depending on the appliance specifications
5.2 Hob
You can view an overview of the hob here.
Note:On certain models, specific details such as col-
our and shape may differ from those pictured.
1
2
34
Power
kW
Burner/hotplate
1
Steam outlet
Note:When the oven is operating,
hot steam escapes here.
2
1,7kW Standard-output burner
3
1kW Economy burner
4
3kW High-output burner
5.3 Control panels
You can use the control panel to configure all functions
of your appliance and to obtain information about the
operating status.
Controls
You can use the controls to configure all functions of
your appliance and to obtain information about the op-
erating status.
Control Explanation
Timer You can use the timer to
set a cooking time.
→"Timer", Page12
Function selector Use the function selector
to set the type of heating.
→"Function selector",
Page12
en Familiarising yourself with your appliance
12
Control Explanation
Hotplate control You can use the four hot-
plate switches to control
the output provided by
each individual hotplate.
The symbol above each
of the switches shows
you which hotplate is set
using that switch.
→"Gas hob selector",
Page12
Control Explanation
Ignition button To switch on the elec-
tronic ignition system.
→"Ignition button",
Page12
Lamp button Press the button to switch
on the oven light.
→"Lamp key", Page12
Function selector
Turn the function selector for the oven temperature anti-
clockwise or clockwise for the grill function.
Position Power kW Function Explanation
Zero setting The oven is switched off.
170–270 3kW Temperature setting
range
Heat generated by the lower oven gas burner in ºC for
preparing cakes in tins, pizza on a baking tray, baked
goods, etc.
2.1kW Grill position Position of the grill burner for grilling food at max. tem-
perature
Timer
You can use the timer to set the cooking time up to
60minutes.
Note:The timer has no effect on how the oven works. It
can only be used as a kitchen timer.
Position Function Explanation
Zero setting Off
End of the programmed cooking
time
A signal sounds at the end of the set cooking time.
-60 Time period Time scale in minutes
Gas hob selector
The gas hotplate selector is used to set the heat set-
ting for the hotplates.
Position Function Explanation
Zero setting The hotplate is switched off.
Settings range Large flame=highest setting
Small flame=lowest setting
There is a limit stop at the end of the settings range.
Do not turn the gas hotplate selector beyond the end
stop.
Lamp key
To illuminate the cooking compartment, press the lamp
button.
Use Activating and deactivating
Lamp button Switch on the oven light. Press the button to switch on.
Press the button to switch the machine off.
Ignition button
Button for switching on the electronic ignition system
Use Explanation
Ignition knob Ignite the hotplate burners.
Ignite the gas grill.
Ignite the lower oven gas burner.
If you press the button, all igniters create sparks at the
same time.
Accessories en
13
5.4 Cooking compartment
The functions in the cooking compartment make your
appliance easier to use.
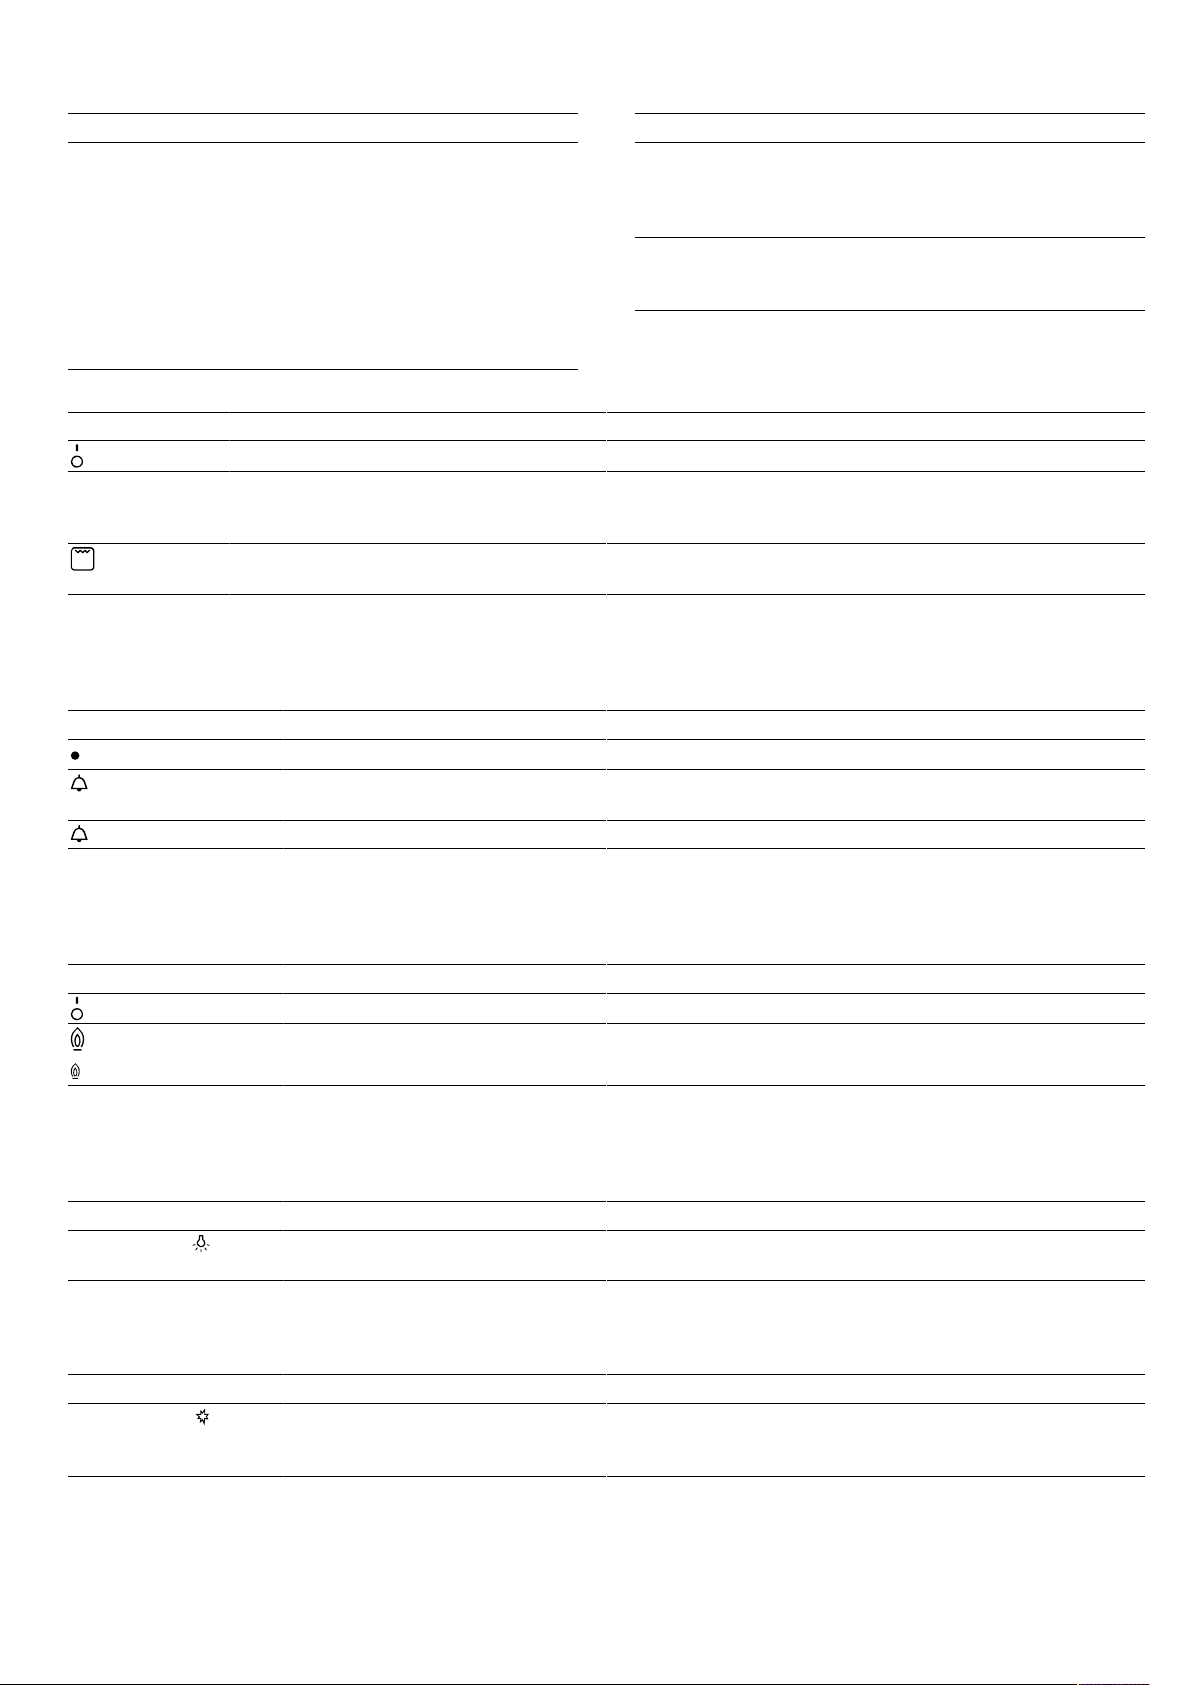
Rails
The rails in the cooking compartment enable you to
place accessories at different heights.
The cooking compartment has five shelf positions. The
shelf positions are numbered from bottom to top.
You can remove the rails, e.g. for cleaning.
→"Rails", Page20
Lighting
The oven light lights up the cooking compartment.
To illuminate the cooking compartment, press the lamp
button.
Steam outlet
The hot air from the cooking compartment escapes at
the rear of the hob.
ATTENTION!
Covering the ventilation slots will cause the appliance
to overheat.
▶
Do not cover the ventilation slots.
Appliance door
If you open the appliance door during operation, the
operation continues.
Condensation
Condensation can occur in the cooking compartment
and on the appliance door when cooking. Condensa-
tion is normal and does not adversely affect appliance
operation. Wipe away the condensation after cooking.
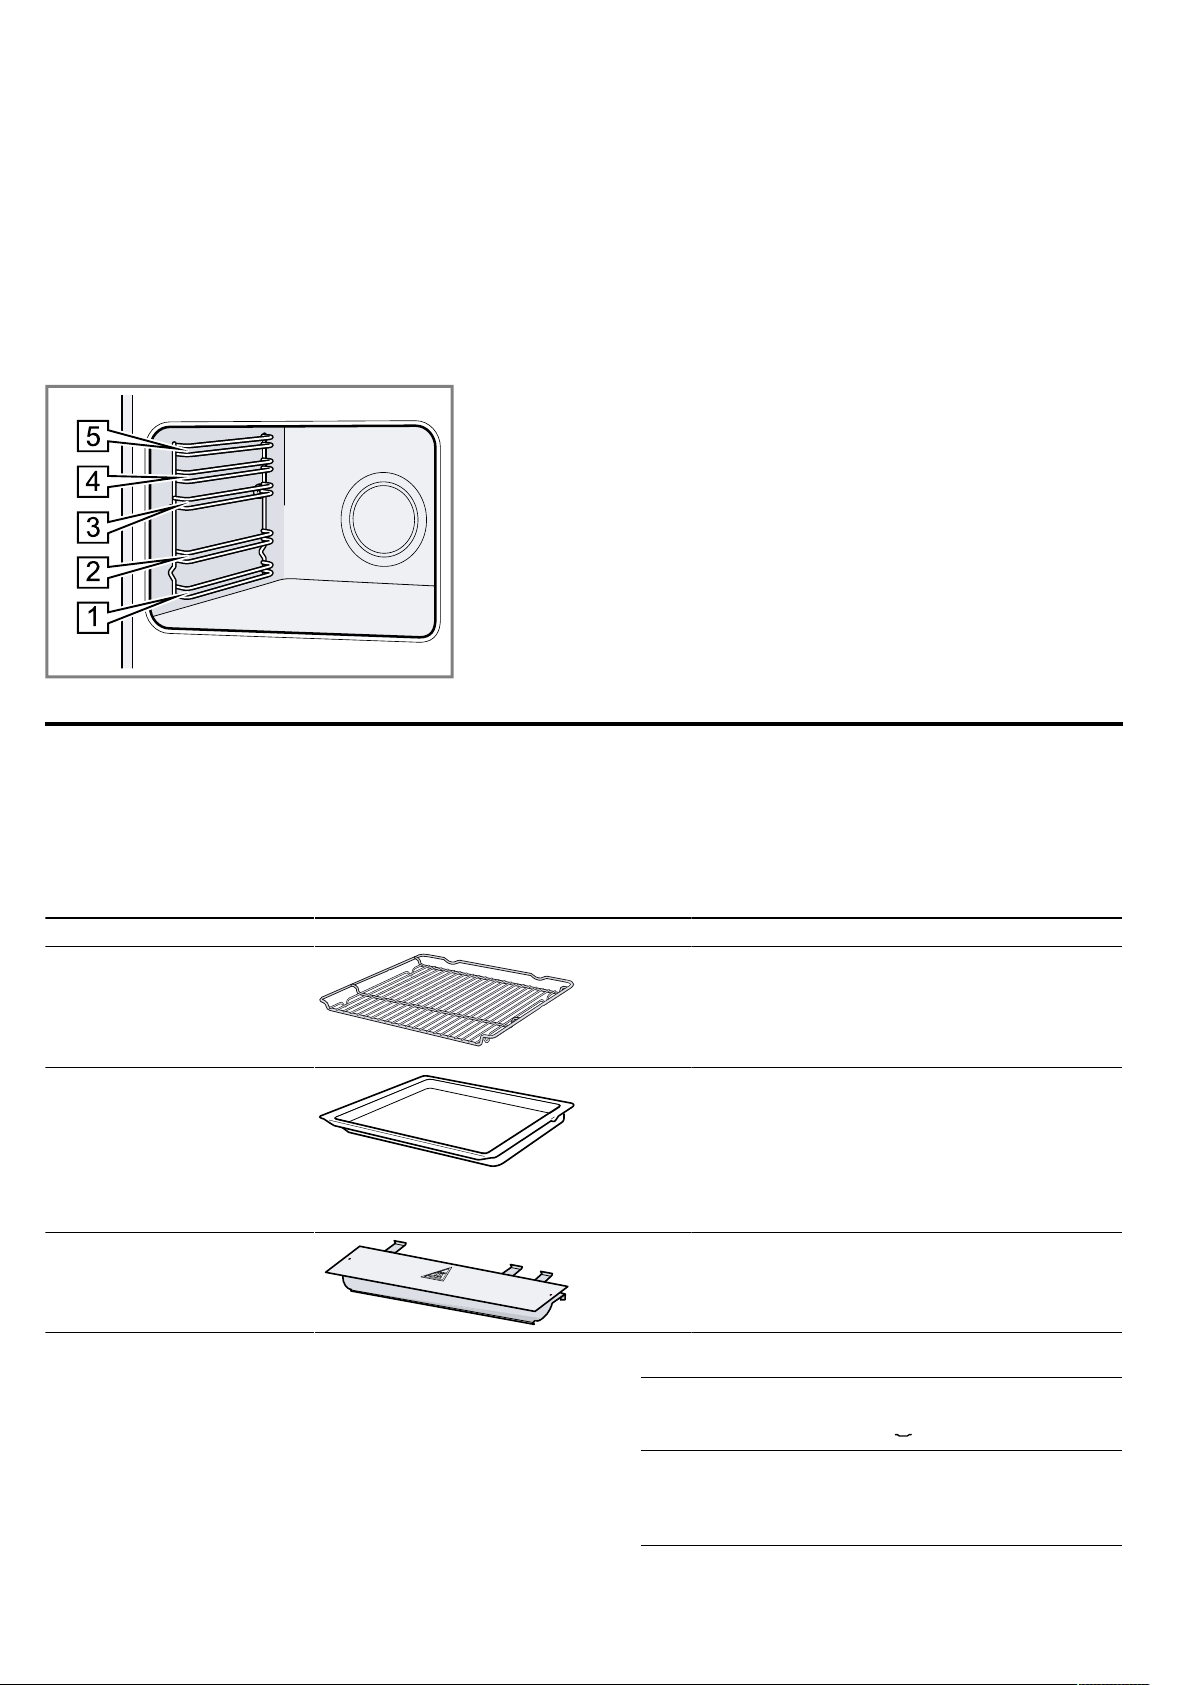
6 Accessories
Use original accessories. These have been made espe-
cially for your appliance.
Note:Heat may deform the accessory. This deforma-
tion has no effect on the function. When the accessory
cools down, it will regain its original shape.
The accessories supplied may differ depending on the
appliance model.
Accessories Use
Wire rack ¡ Baking tins
¡ Ovenproof dishes
¡ Cookware
¡ Meat, e.g. roasting joints or steak
¡ Frozen meals
Universal pan ¡ Moist cakes
¡ Biscuits
¡ Bread
¡ Large roasts
¡ Frozen meals
¡ Catching dripping liquids, e.g. fat when
grilling food on the wire rack.
Protecting plate ¡ When grilling
¡ Protects the control panel and control
knobs against high temperatures when
grilling
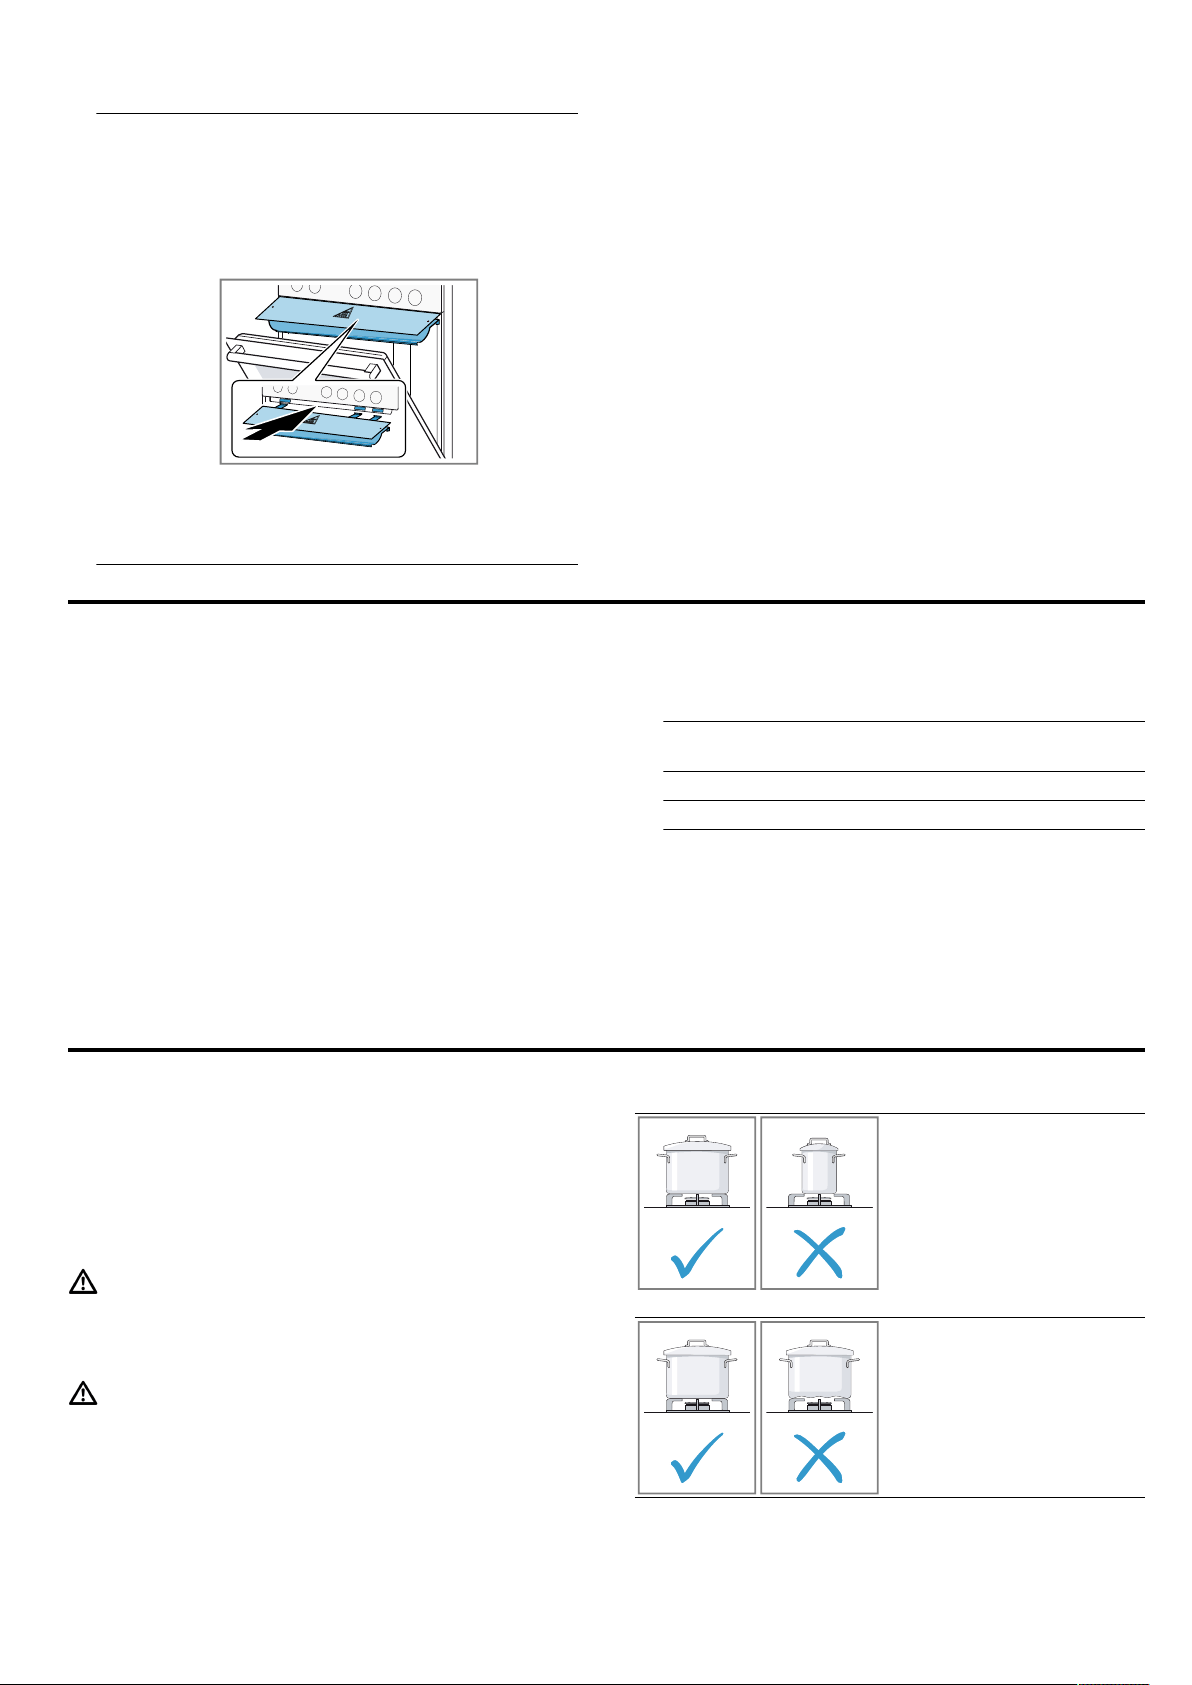
6.1 Using the accessory
Always slide the accessory into the cooking compart-
ment correctly. This is the only way that you can re-
move the accessory halfway without it tipping.
1.
Insert the accessory between the two guide rods for
a shelf position.
Wire rack Insert the wire rack with the open
side facing the appliance door and
the curved lip facing downwards.
Baking tray
E.g. univer-
sal pan or
baking tray
Slide the tray in with the sloping
edgefacing the appliance door.
en Before using for the first time
14
2.
Protecting
plate
The protecting plate is kept in the
bottom drawer or on the rear of the
appliance.
Insert the protecting plate with the
symbol facing upwards in such a way
that the lugs lie completely in the
notches.
Note:There are three notches below
the control panel. Insert the three
lugs on the protecting plate into the
three notches.
3.
Slide the accessory all the way in, making sure that
the accessory does not touch the appliance door.
Note:Take any accessories that you will not be using
out of the cooking compartment while the appliance is
in operation.
6.2 Other accessories
You can purchase other accessories from our after-
sales service, specialist retailers or online.
You will find a comprehensive range of products for
your appliance in our brochures and online:
www.bosch-home.com
Accessories vary from one appliance to another. When
purchasing accessories, always quote the exact
product number (E no.) of your appliance.
You can find out which accessories are available for
your appliance in our online shop or from our after-
sales service.
7 Before using for the first time
Configure the settings for initial start-up. Clean the ap-
pliance and accessories.
7.1 Cleaning the appliance before using it
for the first time
Clean the cooking compartment and accessories be-
fore using the appliance to prepare food for the first
time.
1.
Remove the accessory and the leftover packaging,
such as polystyrene pellets, from the cooking com-
partment.
2.
Before heating, wipe the smooth surfaces in the
cooking compartment with a soft, damp cloth.
3.
Ventilate the room while the appliance is heating.
4.
Set the type of heating and the temperature.
→"Basic operation", Page17
Type of heat-
ing
Lower oven gas burner/gas grill
Temperature Maximum
Cooking time 30 minutes
5.
Switch off the appliance after the specified cooking
time.
6.
Wait until the cooking compartment has cooled
down.
7.
Clean the smooth surfaces with soapy water and a
dish cloth.
8.
Clean the accessory with soapy water and a dish
cloth or a soft brush.
8 Cookware
This information has been provided to help you save
energy and avoid damaging your cookware.
8.1 Using cookware
The selection and positioning of the cookware affects
the safety and energy efficiency of your appliance.
WARNING‒Risk of fire!
Flammable objects may ignite.
▶
Maintain a distance of at least 50mm between the
cookware and flammable objects.
WARNING‒Risk of injury!
An incorrectly positioned wok may cause injuries. The
wok is not stable and may overturn.
▶
Use the wok only on the wok burner and the wok
ring. Never set the wok ring and wok on the stand-
ard output burner and high-output burner.
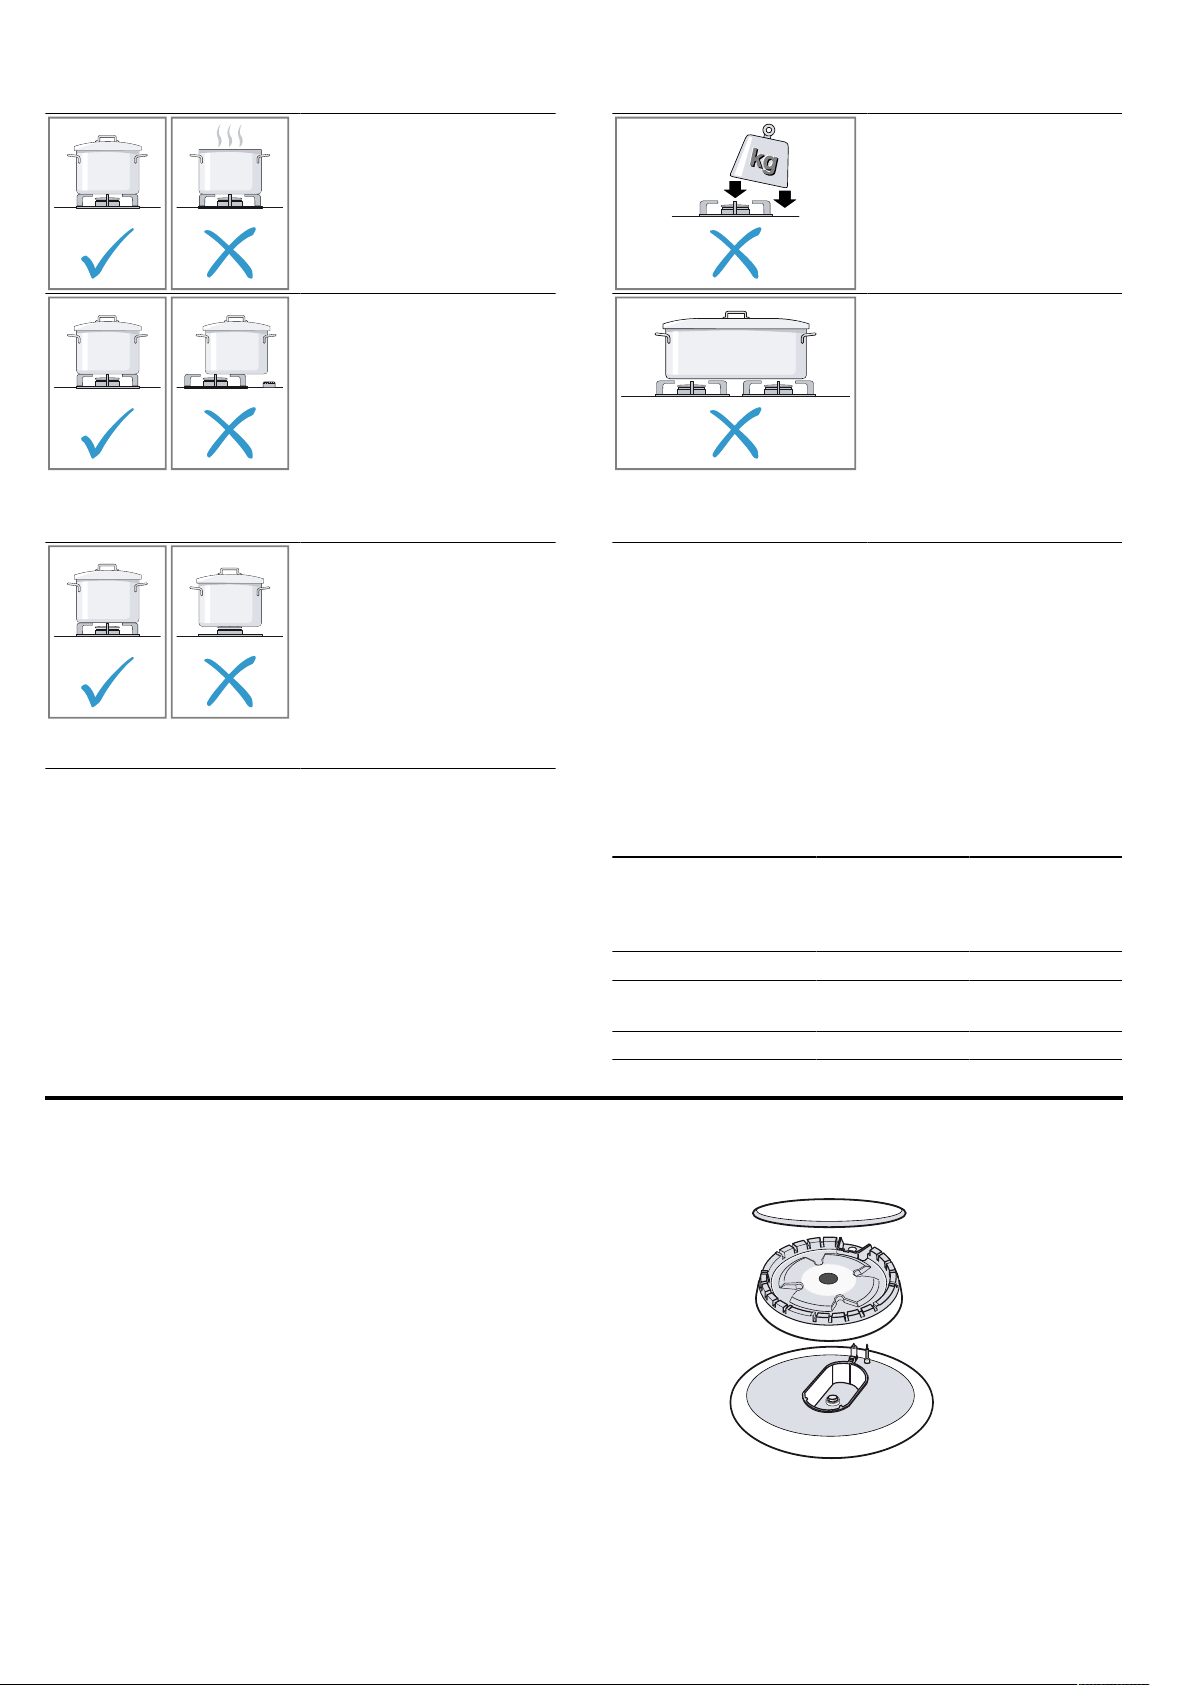
¡ Ensure that the size of
the cookware is suit-
able for the burner
size.
¡ Never use small cook-
ware on large burners.
¡ Ensure that the flame
does not touch the
sides of the cookware.
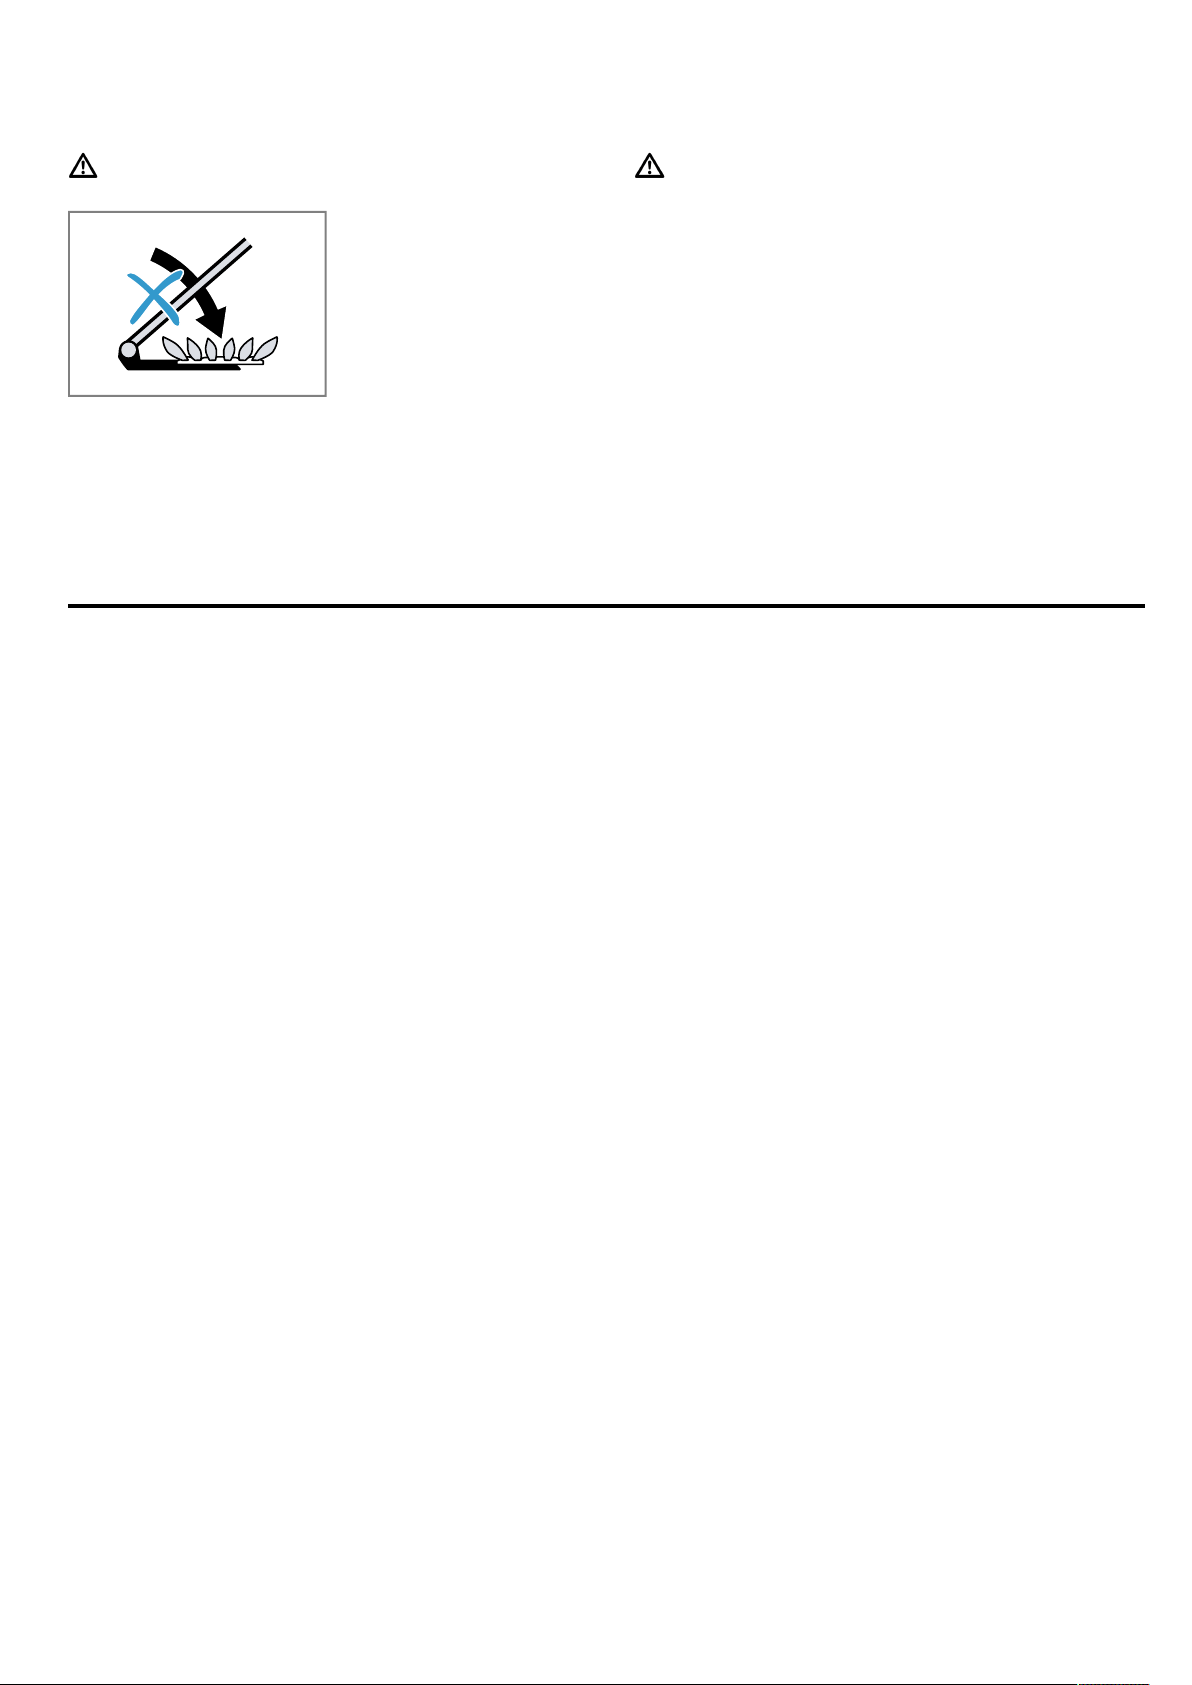
¡ Do not use deformed
cookware.
¡ Deformed cookware is
not stable on the cook-
top and may tip over.
¡ Use cookware with a
thick, flat base.
Operating the hotplate en
15
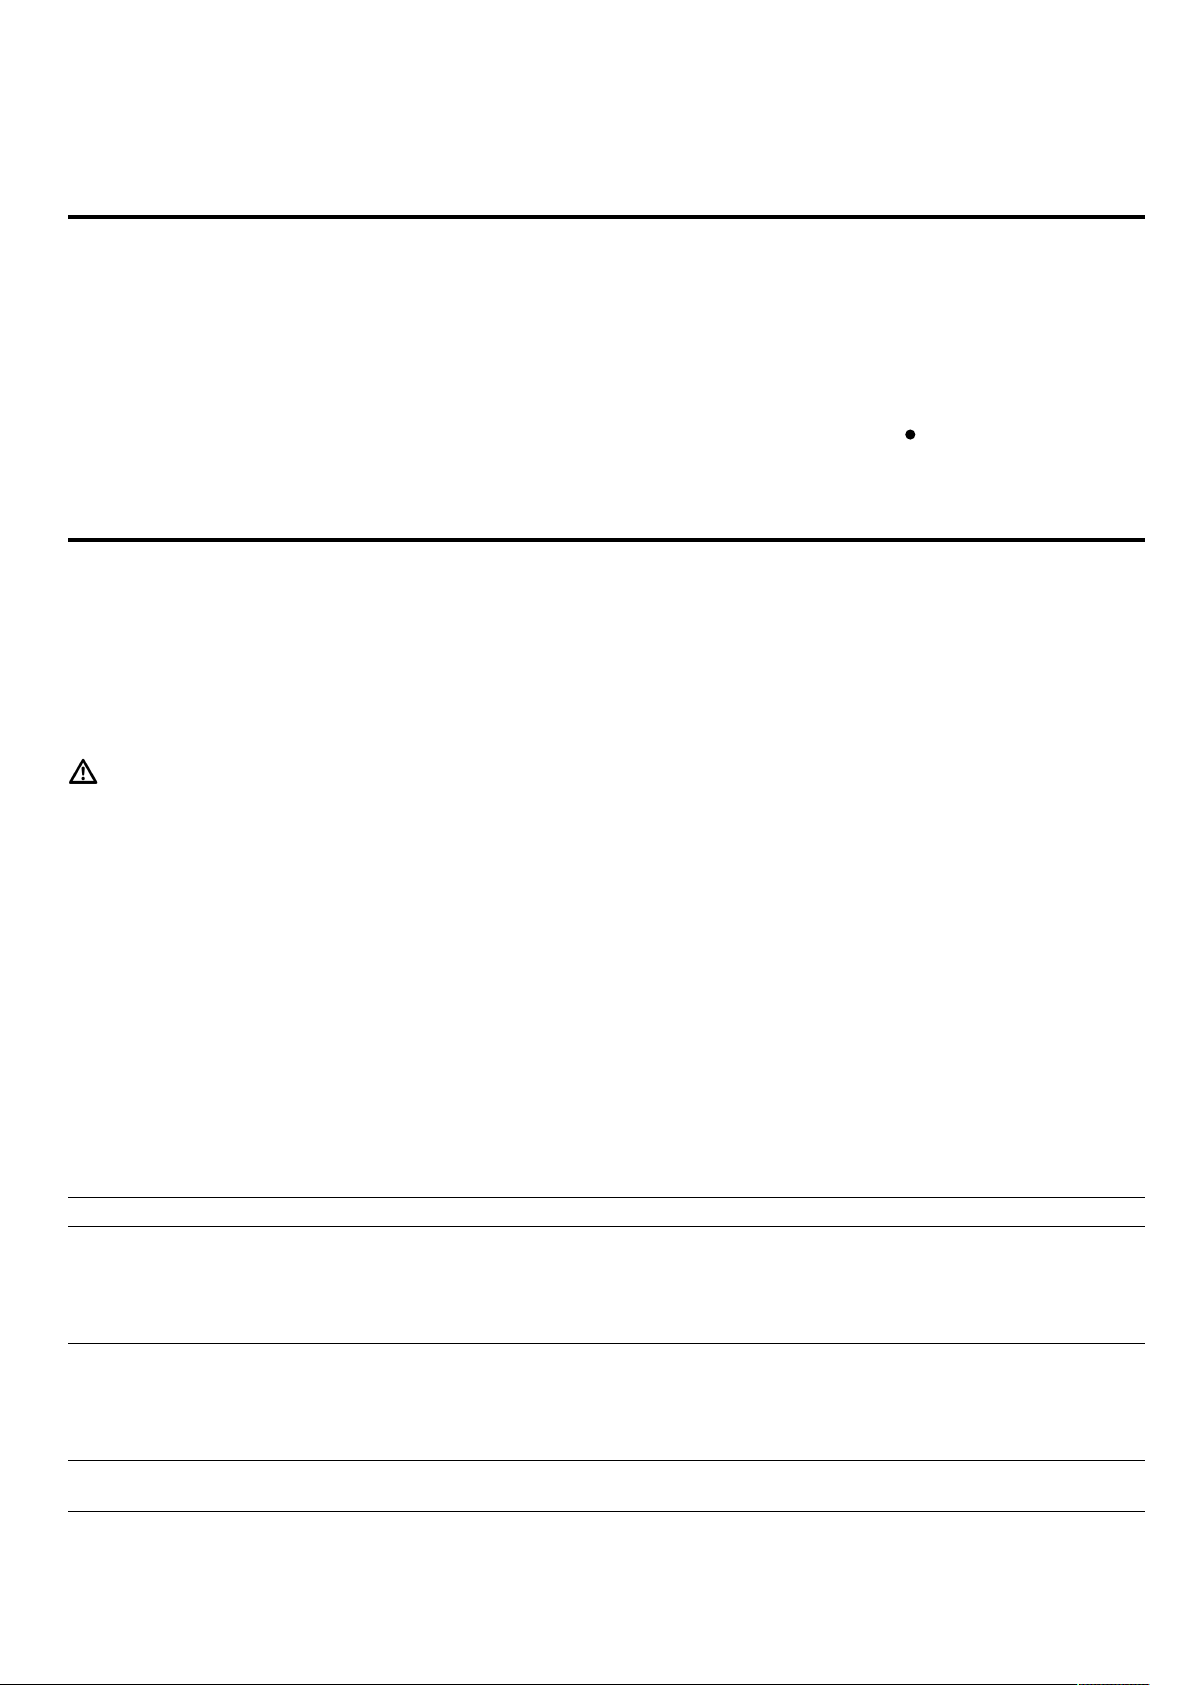
¡ Do not cook without a
lid.
¡ Ensure that the lid
does not move.
¡ When cooking without
a lid, a large amount
of the energy escapes.
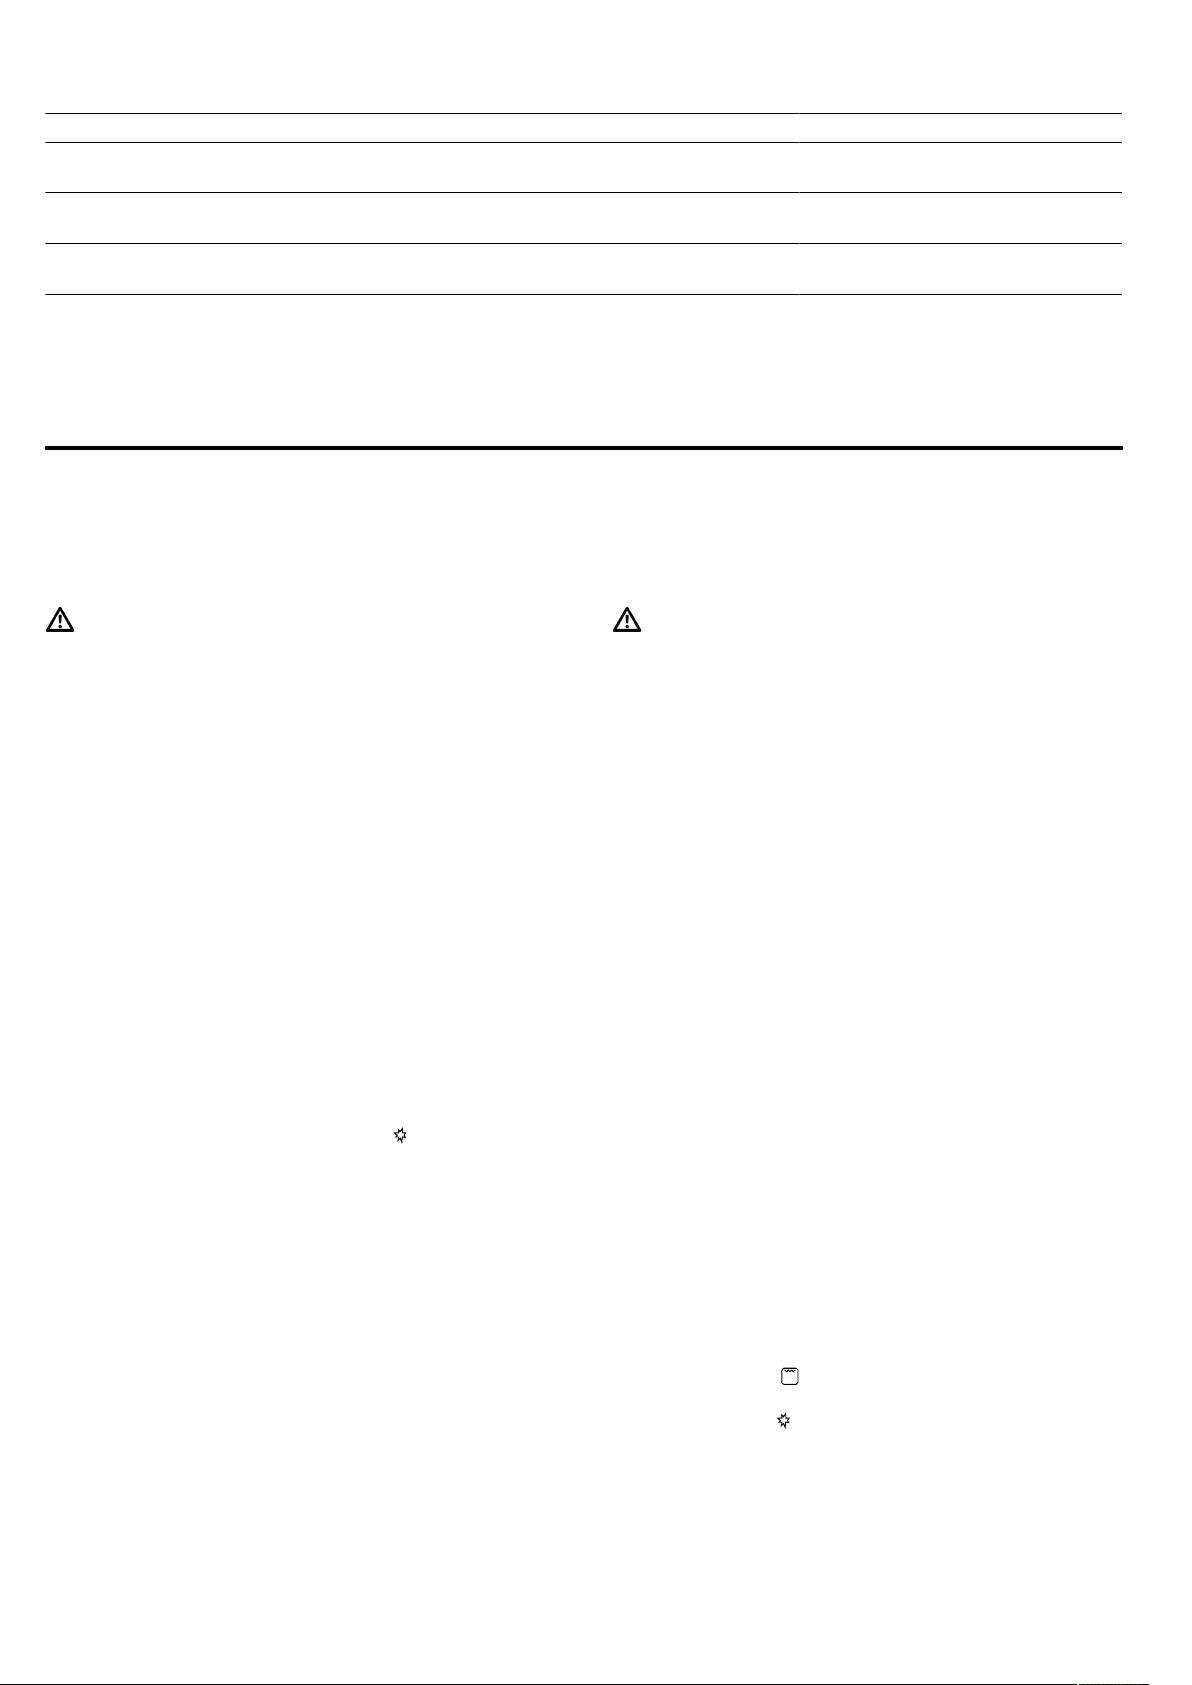
¡ Position the cookware
in the middle of the
burner, otherwise it
may tip over.
¡ Do not position large
cookware on the burn-
ers close to the con-
trols.
¡ The controls may be
damaged due to over-
heating.
¡ Place the cookware on
the pan supports.
¡ Never place the cook-
ware directly on the
burner.
¡ Before using the appli-
ance, ensure that the
pan supports and the
gas burner covers are
positioned correctly.
¡ Handle the cookware
that is on the hob
carefully.
¡ Do not bang on the
hob.
¡ Do not place heavy
weights on the hob.
¡ Never use multiple
burners to heat up
cookware. The build-
up of heat that results
from this will damage
the appliance.
¡ Do not heat grill
stones or paella pans.
¡ Only use cookware up
to the maximum per-
missible diameter.
8.2 Suitable cookware
1.
Only use cookware with a suitable diameter.
→"Suitable cookware", Page15
2.
Ensure that the cookware does not protrude over
the edge of the hob.
Suitable cookware
Only use cookware with a suitable diameter. The cook-
ware must not protrude over the edge of the hob.
Burner/hotplate Maximum dia-
meter of the
base of the
cookware
Minimum dia-
meter of the
base of the
cookware
High output burner 280mm 240mm
Standard output
burner
240mm 180mm
Economy burner 180mm 120mm
9 Operating the hotplate
You can find out everything you need to know about
operating your hotplate here.
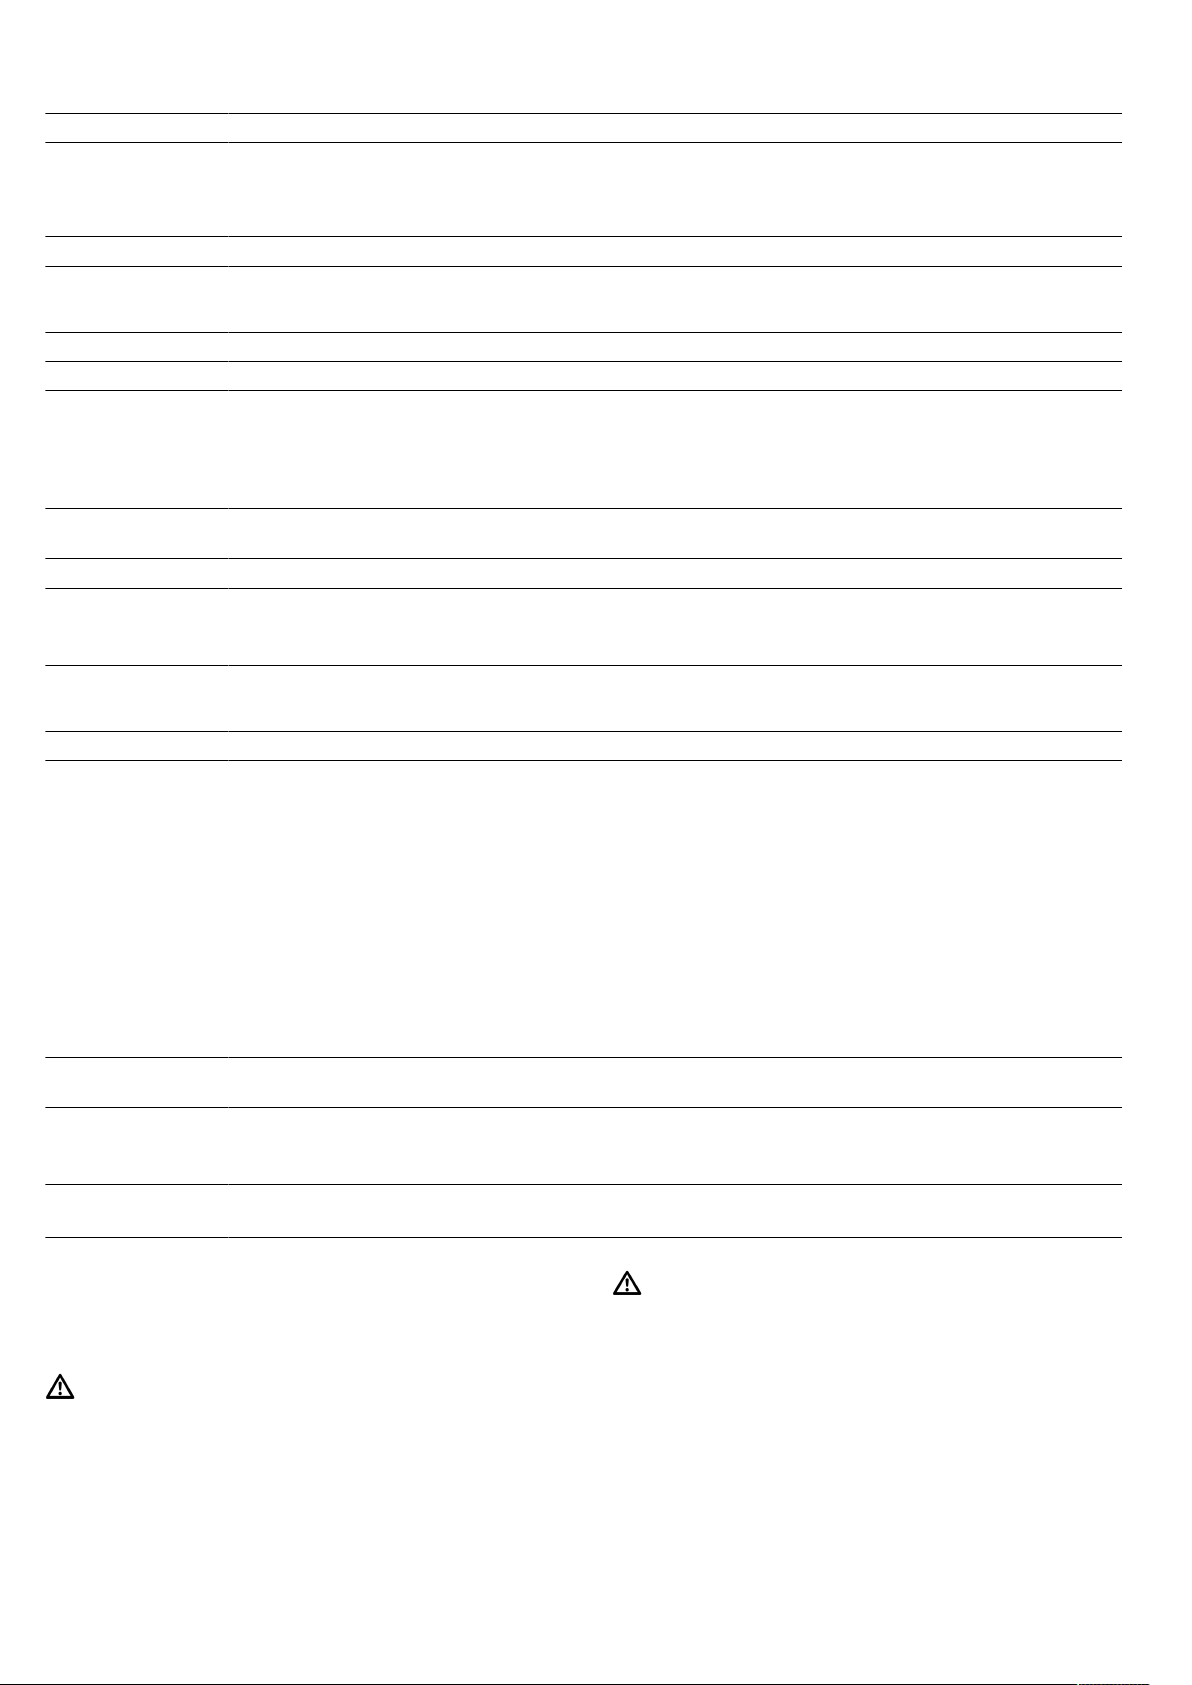
9.1 Fitting burner parts
You can find out how to correctly position the burner
parts here.
Requirement:Ensure that the burner parts are clean
and dry.
1.
Ensure that the individual parts of the burners are fit-
ted in their exact position and are straight; other-
wise, this may result in ignition problems or prob-
lems during operation.
2.
Position the burner lid precisely on the burner head.

en Operating the hotplate
16
9.2 Important information about the gas hob
Follow these instructions when using your gas hob.
¡ A slight whistling when operating the burner is nor-
mal.
¡ Odour formation during the first uses is normal. This
does not indicate a risk or malfunction. It will stop
after a while.
¡ An orange flame is normal. This is caused by dust
in the air, overflowing liquids, etc.
¡ If the burner's flame accidentally goes out, switch off
the burner's selector and wait at least 1 minute be-
fore igniting the burner again.
¡ A few seconds after switching off the hob, you may
hear noises, such as a slight clicking, from the
burner. This is not unusual, but shows that the pilot
is deactivated.
¡ Keep the ignition plugs clean. If the ignition plugs
are dirty, the igniter is damaged. Clean the ignition
plugs regularly with a small, metal-free brush. En-
sure that the ignition plugs are not exposed to any
heavy knocks.
9.3 Operating the hotplate
You can ignite the gas burner as follows.
WARNING‒Risk of fire!
Escaping gas may ignite.
▶
If the burner does not ignite after 15seconds, turn
the control knob to the "Off" position and open the
door or window in the room. Wait at least one
minute before igniting the burner again.
▶
In the event of the burner flames being accidentally
extinguished, turn off the burner control and do not
attempt to re-ignite the burner for at least one
minute.
ATTENTION!
The burner may not ignite or the burner flame is not
even.
▶
Ensure that the hotplate burners are clean and dry.
▶
The burner cup and burner cover must be in exactly
the right position.
The burner may go out accidentally.
▶
If the burner's flame accidentally goes out, switch off
the burner's selector and wait at least one minute
before igniting the burner again.
1.
Open the top cooker cover.
The top cover must remain open for as long as the
hotplate is in operation.
2.
Place suitable cookware on the pan support.
→"Suitable cookware", Page15
3.
Press and hold the selector for the required burner
and turn it to .
4.
With the hotplate selector pushed in, press .
a The gas begins to flow out and the gas burner ig-
nites.
5.
Press and hold the hotplate selector for approx. 1–3
seconds.
a The safety pilot is therefore activated. If the gas
flame goes out, the gas supply is automatically shut
off by the safety pilot.
6.
Set the desired flame size.
The flame is not stable between settings Off and .
You must therefore always choose a position
between the large flame and small flame.
7.
Check whether the flame is burning.
If the flame is not burning, repeat the steps.
8.
To end the cooking process:
‒ Turn the hotplate selector clockwise to .
9.4 Manually igniting the appliance
Note:In the event of a power cut, you can light the
burners manually.
1.
Place suitable cookware on the pan support.
2.
Push in the selector for your chosen burner and turn
it anti-clockwise to the power level you require.
Press and hold the selector.
3.
Light the burner with a gas lighter or a match. Keep
the selector pressed in for a few seconds after igni-
tion.
9.5 Recommended cooking settings
You can find an overview of different foods with appropriate heat settings here.
Notes
¡ The cooking time will vary depending on the type, weight, thickness and quality of the food.
¡ Select the right cookware size for each hotplate. The diameter of the cookware base should be the same size as
the hotplate.
¡ Use as little water as possible when cooking, so that the food retains its vitamins and minerals.
– Use as little water as possible when cooking, so that the food retains its vitamins and minerals.
– Select short cooking times so that the vegetables remain firm and full of nutrients.
Example Food Hotplate Power level
Melting Chocolate, butter, margarine Economy burner Small flame
Warming Stock, tinned vegetables Standard output
burner
Small flame
Heating and keeping
warm
Soups Economy burner Small flame
Steaming* Fish Standard output
burner
Between large and small flame
Basic operation en
17
Example Food Hotplate Power level
Braising* Potatoes and miscellaneous ve-
getables, meat
Standard output
burner
Between large and small flame
Boiling* Rice, vegetables, meat dishes
(with sauces)
Standard output
burner
Large flame
Frying Pancakes, potatoes, schnitzel,
fish fingers
Large burner**
Wok burner**
Between large and small flame
Between large and small flame
Note:
Information
¡ * If you are using a pan with a lid, turn the flame
down as soon as the food starts to boil.
¡ ** Optional. Available for some appliances. Depend-
ing on the appliance type. (For frying on the wok
burner, we recommend that you use a wok.)
10 Basic operation
10.1 Setting the lower oven gas burner
When the lower gas burner is lit, you can start to bake
on a baking tray with the oven door closed.
WARNING‒Risk of fire!
Escaping gas may ignite.
▶
If the burner does not ignite after 15seconds, turn
the control knob to the "Off" position and open the
door or window in the room. Wait at least one
minute before igniting the burner again.
▶
In the event of the burner flames being accidentally
extinguished, turn off the burner control and do not
attempt to re-ignite the burner for at least one
minute.
ATTENTION!
The burner may go out accidentally.
▶
If the burner's flame accidentally goes out, switch off
the burner's selector and wait at least one minute
before igniting the burner again.
1.
Open the top cover, if available.
The top cover must remain open while the appli-
ance is running.
2.
Turn on the main gas supply to the appliance. Insert
the plug in the socket. Open the oven door.
3.
Push in the function selector and turn it anti-clock-
wise to set the desired temperature. Keep the func-
tion selector pressed in and press at the same
time.
a Use the igniter to ignite the gas that escapes from
the lower gas burner.
4.
To activate the safety pilot, press and hold the func-
tion selector for 10seconds.
a The safety pilot is therefore activated. If the gas
flame goes out, the gas supply is automatically shut
off by the safety pilot.
5.
Check through the opening in the oven's bottom
panel that the flame is burning.
If the flame is not burning, repeat the steps.
6.
Close the oven door carefully.
7.
Note:Preheat the empty oven for 15minutes and
then start the preparation.
You can change the temperature at any time.
Once the food is cooked, switch off the function se-
lector.
10.2 Setting the oven gas grill
If the gas burner for the gas grill is lit, you can grill in
the oven.
WARNING‒Risk of fire!
Escaping gas may ignite.
▶
If the burner does not ignite after 15seconds, turn
the control knob to the "Off" position and open the
door or window in the room. Wait at least one
minute before igniting the burner again.
▶
In the event of the burner flames being accidentally
extinguished, turn off the burner control and do not
attempt to re-ignite the burner for at least one
minute.
ATTENTION!
The burner may go out accidentally.
▶
If the burner's flame accidentally goes out, switch off
the burner's selector and wait at least one minute
before igniting the burner again.
The gas grill only works when the protective plate is in-
serted.
▶
Ensure that the protective plate has been inserted
correctly.
1.
Open the top cover, if available.
The top cover must remain open while the appli-
ance is running.
2.
Turn on the main gas supply to the appliance. Insert
the plug in the socket. Open the oven door.
3.
Insert the protective plate with the symbol facing up-
wards in such a way that the lugs lie completely in
the notches.
There are three notches below the control panel. In-
sert the three lugs on the protective plate into the
three notches.
4.
Close the oven door so that it is as close as pos-
sible to the protective place.
5.
Push in the function selector and turn it clockwise to
the grill setting .
6.
Keep the function selector pressed in and press the
ignition button at the same time.
Keep the function selector pushed in for 10
seconds so that the safety pilot starts up.
a The safety pilot is activated. If the gas flame goes
out, the gas supply is automatically shut off by the
safety pilot.
7.
Check whether the flame is burning.
en Time-setting options
18
If the flame is not burning, repeat the steps.
8.
Once the food is cooked, switch off the function se-
lector. Once the oven has cooled down, remove the
protective plate.
11 Time-setting options
Your appliance is equipped with a time-setting option
that can be used to set the timer.
11.1 Timer
The timer can be used as a kitchen timer.
The timer runs alongside other settings. The timer can
be set at any time, even if the appliance is switched off.
Note:The timer has no effect on how the oven works. It
can only be used as a kitchen timer.
Setting the timer
The timer can be set up to 60 minutes regardless of
whether the appliance is on or off.
1.
Set the timer to the required cooking time.
2.
Once the timer duration has elapsed
‒ An audible signal sounds. The timer automatic-
ally switches to the Off position.
12 Cleaning and servicing
To keep your appliance working efficiently for a long
time, it is important to clean and maintain it carefully.
12.1 Cleaning agent
To avoid damaging the different surfaces of the appli-
ance, do not use unsuitable cleaning agents.
WARNING‒Risk of electric shock!
An ingress of moisture can cause an electric shock.
▶
Do not use steam- or high-pressure cleaners to
clean the appliance.
ATTENTION!
Unsuitable cleaning agents damage the surfaces of the
appliance.
▶
Do not use aggressive or abrasive cleaning agents.
▶
Do not use cleaning products with a high alcohol
content.
▶
Do not use hard scouring pads or cleaning
sponges.
▶
Do not use any special cleaners if the appliance is
still warm.
Using oven cleaner in a hot cooking compartment
damages the enamel.
▶
Do not use oven cleaner in the cooking compart-
ment when it is still warm.
▶
Remove all food remnants from the cooking com-
partment and the appliance door before you next
heat up the appliance.
New sponge cloths contain residues from production.
▶
Wash new sponge cloths thoroughly before use.
Suitable cleaning agents
Only use cleaning agents that are suitable for the differ-
ent surfaces on your appliance.
Follow the instructions on cleaning the appliance.
→"Cleaning the appliance", Page19
Appliance
Surface Suitable cleaning agents Information
Stainless steel ¡ Hot soapy water
¡ Special stainless steel
cleaning products
suitable for hot sur-
faces
To prevent corrosion, remove any limescale, grease, starch or albu-
min (e.g. egg white) stains on stainless steel fronts immediately.
Apply a thin layer of the stainless steel cleaning product with a soft
cloth.
Enamel, plastic,
painted, and
screen-printed
surfaces
E.g. control panel
¡ Hot soapy water Do not use glass cleaner or a glass scraper.
Knobs ¡ Hot soapy water Clean with a dish cloth and dry with a soft cloth.
Do not remove or scrub.
Cleaning and servicing en
19
Surface Suitable cleaning agents Information
Gas hotplate
burners and pan
supports
¡ Hot soapy water Clean the burner parts and pan support with a dish cloth.
Only use a little water. Water must not be allowed to enter the inside
of the appliance through the burner compartments.
Do not clean in the dishwasher.
Plinth drawer ¡ Hot soapy water Clean with a dishcloth.
Appliance door
Area Suitable cleaning agents Information
Door panels ¡ Hot soapy water Do not use a glass scraper or stainless steel wool.
Door panel ¡ Made of stainless
steel:
Stainless steel cleaner
¡ Made of plastic:
Hot soapy water
Do not use glass cleaner or a glass scraper.
Tip:Remove the upper door panel for thorough cleaning.
→"Appliance door", Page22
Door handle ¡ Hot soapy water In order to avoid stubborn dirt, remove descaling agents from the
door handle immediately.
Door seal ¡ Hot soapy water Do not remove or scrub.
Upper glass cover ¡ Glass cleaner Clean with a soft cloth.
Tip:Remove the upper glass cover for thorough cleaning.
→"Top cover", Page23
Cooking compartment
Area Suitable cleaning agents Information
Enamelled sur-
faces
¡ Hot soapy water
¡ Vinegar water
¡ Oven cleaner
Soak any heavily soiled areas and use a brush or steel wool.
Leave the appliance door open to dry the cooking compartment
after cleaning it.
Notes
¡ Enamel burns at very high temperatures, causing minor discol-
ouration. The functionality of your appliance is not affected by
this.
¡ The edges of thin baking trays cannot be completely enamelled
and may be rough. This does not impair corrosion protection.
¡ Food residues will leave a white coating on the enamel surfaces.
The coating does not pose a health risk. The functionality of your
appliance is not affected by this. Remove residues with lemon
juice.
Glass cover on
the oven light
¡ Hot soapy water Use oven cleaner to remove very heavy soiling.
Rails ¡ Hot soapy water Soak any heavily soiled areas and use a brush or steel wool.
Tip:Remove the shelf supports for cleaning.
→"Rails", Page20
Accessories ¡ Hot soapy water
¡ Oven cleaner
Soak any heavily soiled areas and use a brush or steel wool.
Enamelled accessories are dishwasher-safe.
12.2 Cleaning the appliance
In order to avoid damaging the appliance, clean your
appliance only as specified, and using suitable clean-
ing products.
WARNING‒Risk of burns!
The appliance and its parts that can be touched be-
come hot during use.
▶
Caution should be exercised here in order to avoid
touching heating elements.
▶
Young children under 8 years of age must be kept
away from the appliance.
WARNING‒Risk of fire!
Loose food remnants, fat and meat juices may catch
fire.
▶
Before using the appliance, remove the worst of the
food residues and remnants from the cooking com-
partment, heating elements and accessories.
Requirement:Read the information on cleaning
agents.
→"Cleaning agent", Page18
1.
Clean the appliance using hot soapy water and a
dish cloth.

en Rails
20
‒ For some surfaces, you can use alternative
cleaning agents.
→"Suitable cleaning agents", Page18
2.
Dry with a soft cloth.
12.3 Cleaning controls
WARNING‒Risk of electric shock!
An ingress of moisture can cause an electric shock.
▶
Do not detach the control knobs to clean them.
▶
Do not use wet sponge cloths.
1.
Observe the information regarding the cleaning
agents.
2.
Clean using a damp sponge cloth and hot soapy
water.
3.
Dry with a soft cloth.
12.4 Discoloration of the burners
After long use, the brass burner parts become darker
due to natural oxidation. This discolouration does not
affect their usability.
12.5 Cleaning the pan support manually
WARNING‒Risk of burns!
The appliance becomes hot during operation.
▶
Allow the appliance to cool down before cleaning.
1.
Carefully remove the pan support.
2.
Soak the pan support in the sink.
3.
Clean the pan support using a scrubbing brush and
washing-up liquid.
4.
Rinse the pan support rinse with clean water.
5.
Dry the pan support with a kitchen towel.
12.6 Using cleaning gel for burnt-on dirt
For hard-to-remove, burnt-on dirt, you can order a
cleaning gel from our online shop, from your specialist
retailer or via our after-sales service.
1.
Follow the instructions on the cleaning product.
2.
Remove the pan supports and the burner parts.
3.
ATTENTION!
On the burner parts, the controls and the aluminium
surfaces, the cleaning gel leads to damage.
▶
Only use the cleaning gel on the pan supports
and stainless steel surfaces.
Apply the cleaning gel to the burnt-on dirt.
4.
If necessary, let the dirt soak overnight.
12.7 Cleaning the stainless steel surfaces
1.
Observe the information regarding the cleaning
agents.
2.
Clean using a sponge cloth and hot soapy water in
the direction of the finish.
3.
Dry with a soft cloth.
4.
Apply a thin layer of the stainless steel cleaning
product with a soft cloth.
Tip:You can obtain stainless steel cleaning products
from after-sales service or the online shop.
12.8 Cleaning the burners
After long use, the brass burner parts become darker
due to natural oxidation. This discolouration does not
affect their usability.
WARNING‒Risk of burns!
The appliance becomes hot during operation.
▶
Allow the appliance to cool down before cleaning.
1.
Carefully remove the pan support.
2.
Carefully remove the burner parts.
3.
Clean the burner parts using a scrubbing brush and
washing-up liquid.
4.
Rinse the burner parts with clean water.
5.
Ensure that the burner parts are completely dry be-
fore fitting them; otherwise, there may be ignition
problems or problems during operation.
12.9 Cleaning the cooking zone switch
Clean the cooking zone switch after use if it is dirty or
stained.
Note:
¡ Read the information on unsuitable cleaning agents.
¡ Do not use a glass scraper.
¡ Do not use a glass ceramic cleaner.
¡ Do not remove the cooking zone switch.
1.
Clean the cooking zone switch using hot soapy wa-
ter and a soft cloth.
– Wring out the cloth well. The cloth must not be
too wet.
– Wash new sponge cloths thoroughly before use.
2.
Dry with a soft cloth.
13 Rails
To clean the rails and cooking compartment thor-
oughly, you can remove the shelf supports.
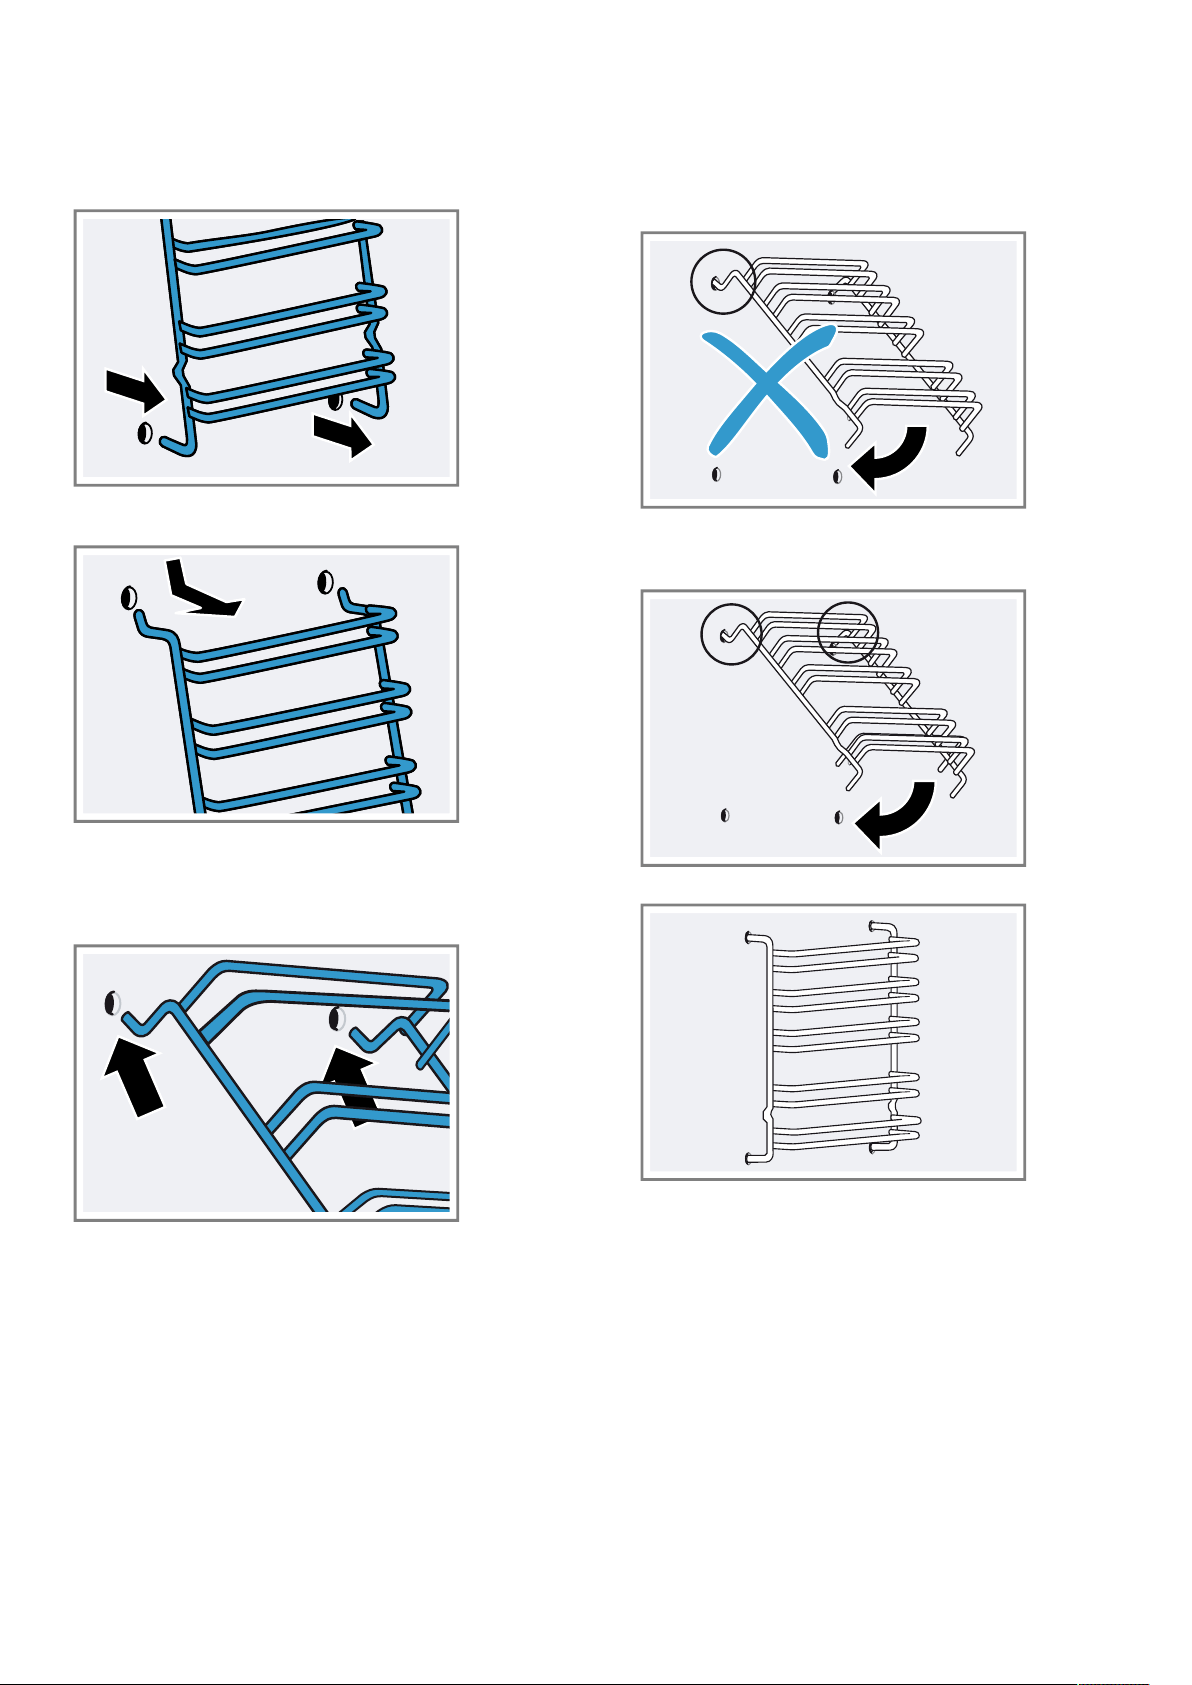
13.1 Unhooking the rails
WARNING‒Risk of burns!
The rails can be very hot.
▶
Never touch the rails when they are hot.
▶
Allow the appliance to cool down.
▶
Keep children at a safe distance.
Rails en
21
1.
Hold the bottom of the shelf support and pull it
slightly towards the front. Pull the extension pins in
the lower section of the rails out of the mounting
openings.
2.
Pull the entire shelf support downwards first and
then pull it forwards and remove it.
13.2 Attaching the rails
1.
Place the two hooks at the top of the rail into the up-
per holes.
2.
ATTENTION!
Incorrect assembly
▶
Never move the rail before the two hooks are se-
cured fully in the upper holes. Otherwise the
enamelled coating may be damaged and break.
3.
Both hooks must be inserted fully into the upper
holes. Move the rail down slowly and carefully, and
hook it into the lower holes.
4.
Hook both rails into the side walls of the oven.
If the rails are fitted correctly, the distance between
the two upper shelf positions is greater.

en Appliance door
22
14 Appliance door
It is normally sufficient if you clean the outside of the
appliance door. If the appliance door is very dirty on
the inside and outside, you can remove the appliance
door and clean it.
14.1 Door hinges
WARNING‒Risk of injury!
When the hinges are not secured, they can snap shut
with great force.
▶
If you open the appliance door, ensure that the lock-
ing levers are fully open or fully closed.
1.
The oven door hinges each have a locking lever.
When the locking levers are closed, the oven door
is secured in place.
It cannot be detached.
2.
When the locking levers are open in order to detach
the oven door, the hinges are secured.
The hinges cannot snap shut.
14.2 Removing the appliance door
1.
Open the oven door fully.
2.
Open the locking levers on the left- and right-hand
hinges.
3.
Close the oven door as far as the limit stop. Grip
the left and right hand sides of the door with both
hands. Close the door slightly more and remove it.
14.3 Attaching the appliance door
Reattach the oven door in the reverse sequence to re-
moval.
WARNING‒Risk of injury!
The oven door might accidentally fall or a hinge may
suddenly snap shut.
▶
In this case, do not hold onto the hinge. Call cus-
tomer service.
1.
When attaching the oven door, ensure that both
hinges are inserted in the opening direction.
Top cover en
23
2.
The notch on the hinge must engage on both sides.
3.
Close both locking levers again.
4.
Close the appliance door.
14.4 Additional door safety
Additional safety devices have been fitted to prevent
contact with the oven doors. Always attach these safety
devices when children could come near the oven. You
can purchase this special accessory from after-sales
service. 11023590
WARNING‒Risk of burns!
During long cooking times, the oven door may become
very hot.
▶
Supervise small children when the oven is in opera-
tion.
15 Top cover
For cleaning, remove the top cover.
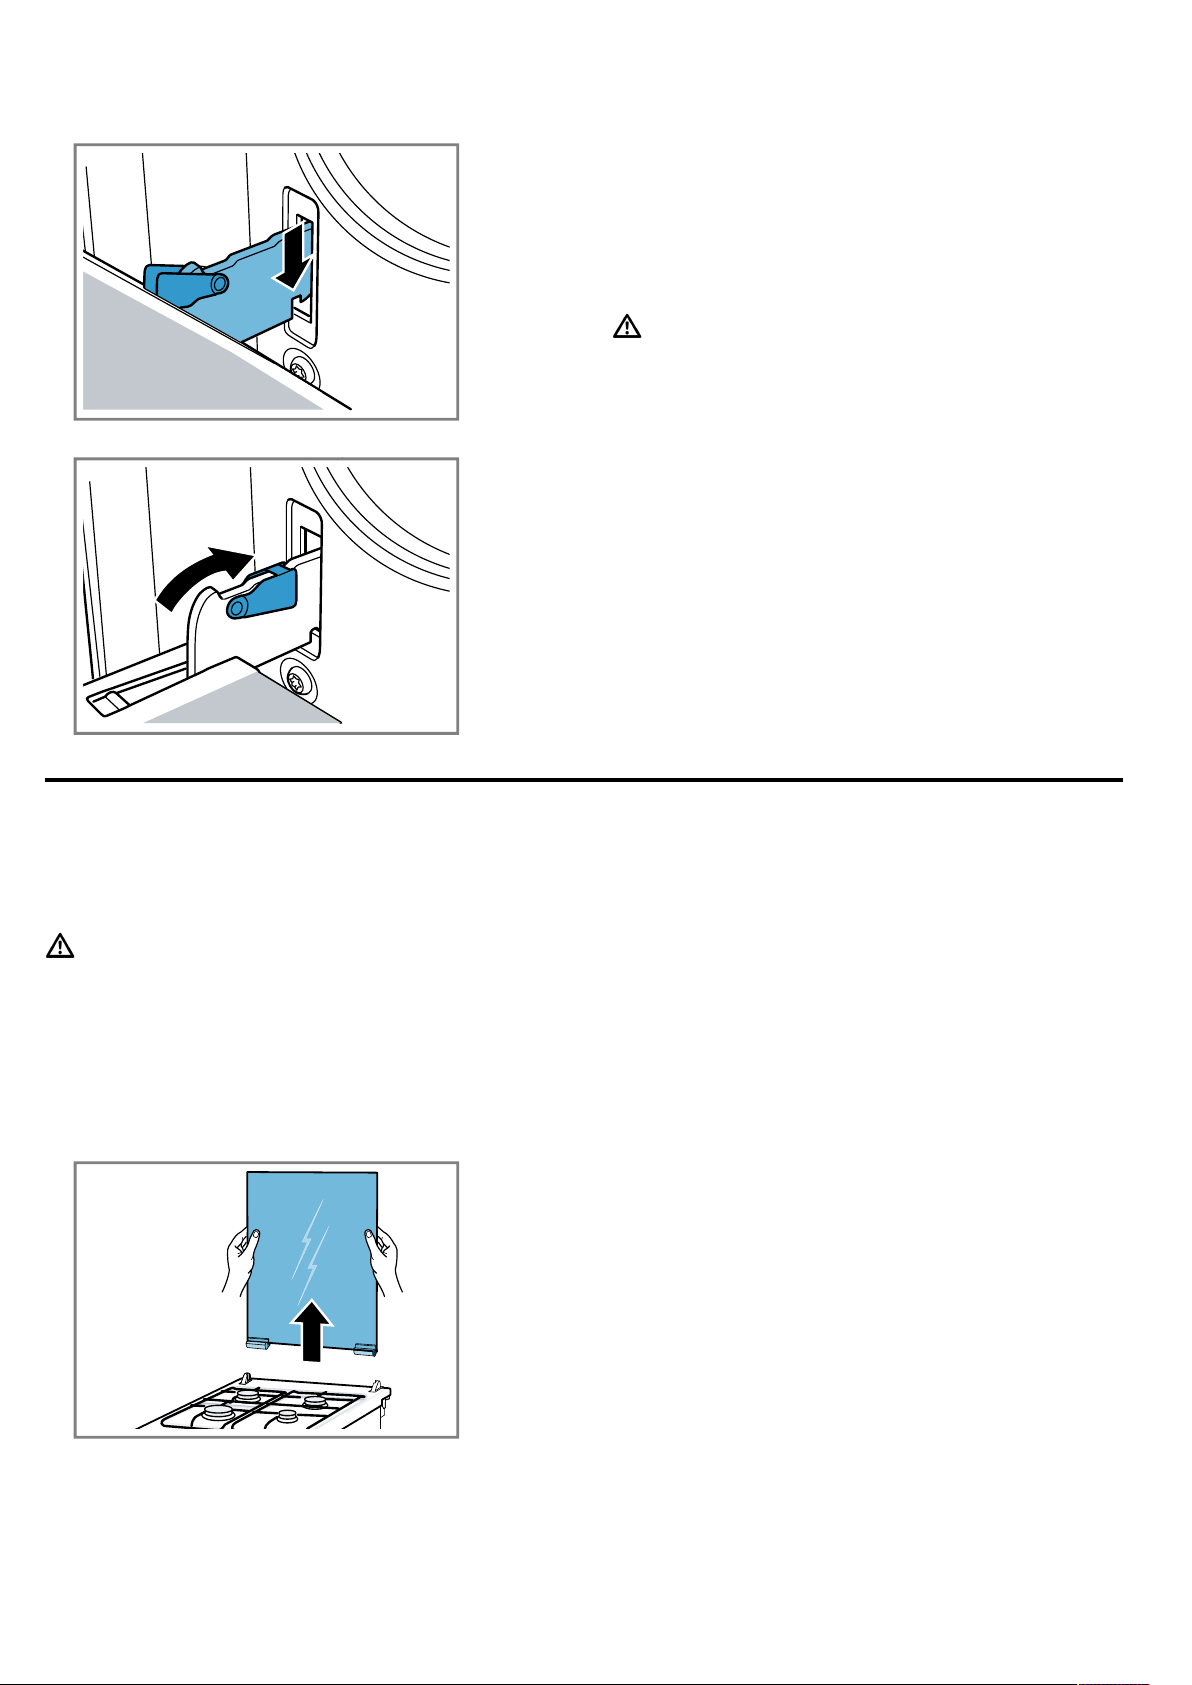
15.1 Removing the upper cover
WARNING‒Risk of injury!
A scratched upper glass cover may break and frag-
ment.
▶
Do not use a glass scraper or any harsh or abrasive
cleaning products.
Requirement:Before opening the top cover, remove
any spills with a cloth.
1.
Take hold of the sides of the cover with both hands
and pull the cover upwards.
2.
Use a glass cleaner for cleaning.
Note:If the cover hinges become loose, note the let-
ters marked on them.
The hinge with the letter R must be fitted on the right,
and the hinge with the letter L must be fitted on the left.
15.2 Installing the top cover
▶
After cleaning, install the top cover following the
same procedure in reverse order.
Note:Only close the top cover once the hotplates have
cooled down.
en Troubleshooting
24
16 Troubleshooting
You can rectify minor faults on your appliance yourself. Read the troubleshooting information before contacting after-
sales service. This will avoid unnecessary costs.
WARNING‒Risk of injury!
Improper repairs are dangerous.
▶
Repairs to the appliance should only be carried out
by trained specialist staff.
▶
If the appliance is defective, call Customer Service.
WARNING‒Risk of electric shock!
Incorrect repairs are dangerous.
▶
Repairs to the appliance should only be carried out
by trained specialist staff.
▶
Only use genuine spare parts when repairing the
appliance.
▶
If the power cord of this appliance is damaged, it
must be replaced by the manufacturer, the manufac-
turer's Customer Service or a similarly qualified per-
son in order to prevent any risk.
16.1 Malfunctions
Fault Cause and troubleshooting
The appliance is not
working.
The mains plug of the power cord is not plugged in.
▶
Connect the appliance to the power supply.
The circuit breaker is faulty.
▶
Check the circuit breaker in the fuse box.
There has been a power cut.
▶
Check whether the lighting in your kitchen or other appliances are working.
There is a smell of
gas in the kitchen.
The gas cylinder connection is leaking.
1.
Ventilate the room.
2.
Check the gas cylinder connection.
The gas pipe to the appliance is leaking.
1.
Ventilate the room.
2.
Call the gas supplier.
Burner does not ig-
nite.
There has been a power cut.
▶
Light the burner with a gas lighter or a match.
The burner parts are positioned incorrectly.
1.
Position the burner parts precisely and evenly.
2.
Ensure that the locking catches click into place in the recesses.
Burner parts are wet.
▶
Carefully dry the burner parts.
Food remnants or dirt are located between the ignition plug and the burner.
▶
Clean the space between the ignition plugs and burners.
The safety valve for the gas line is closed.
▶
Open the safety valve for the gas line.
Gas cylinder is empty.
▶
Replace the gas cylinder.
There is air in the gas line following initial connection or a cylinder change.
1.
Turn the control knob to 0.
2.
Ignite the burner again.
3.
If necessary, repeat the ignition several times.
Burner goes out
straight after being ig-
nited.
The control knob was not held down for long enough.
1.
Keep the control knob pressed in for a few seconds after ignition.
2.
Push the control knob in firmly.
Openings on the burner are soiled.
▶
Clean and dry the openings on the burner.
The burner flame is
not uniform.
The burner parts are positioned incorrectly.
1.
Position the burner parts precisely and evenly.
2.
Ensure that the locking catches click into place in the recesses.
Transportation and disposal en
25
Fault Cause and troubleshooting
The burner flame is
not uniform.
Openings on the burner are soiled.
▶
Clean and dry the openings on the burner.
The burner flame
goes out while the
appliance is in opera-
tion.
Gas cylinder is empty.
▶
Replace the gas cylinder.
The gas grill does not
work.
The protective plate is incorrectly inserted.
1.
Ensure that the protective plate has been inserted correctly.
2.
Remove the protective plate and reinsert it.
16.2 Replacing the oven light bulb
If the light in the cooking compartment fails, change
the oven light bulb.
Note:Heat-resistant, 25-watt bulbs are available from
the after-sales service or specialist retailers. Only use
these bulbs.
WARNING‒Risk of burns!
The appliance and its parts that can be touched be-
come hot during use.
▶
Caution should be exercised here in order to avoid
touching heating elements.
▶
Young children under 8 years of age must be kept
away from the appliance.
WARNING‒Risk of electric shock!
When changing the bulb, the bulb socket contacts are
live.
▶
Before replacing the bulb, ensure that the appliance
is switched off in order to prevent a potential electric
shock.
▶
Also unplug the appliance from the mains or switch
off the circuit breaker in the fuse box.
Requirements
¡ The appliance is disconnected from the power sup-
ply.
¡ The cooking compartment has cooled down.
¡ A new halogen bulb to replace the old one is avail-
able.
1.
Place a tea towel in the cooking compartment to
prevent damage.
2.
Turn the glass cover anti-clockwise to remove it.
3.
Remove the oven light bulb.
4.
Replace the oven light bulb with the same type of
bulb.
5.
Screw in the glass cover.
6.
Remove the tea towel from the cooking compart-
ment.
7.
Connect the appliance to the power supply.
16.3 Glass cover
If the glass cover is damaged, replace it immediately.
Suitable glass covers are available from the after-sales
service.
Specify the E number and FD number of your appli-
ance.
17 Transportation and disposal
You can find out here how to prepare your appliance
for transportation. You will also find out how to dispose
of old appliances.
17.1 Disposing of old appliance
Valuable raw materials can be reused by recycling.
1.
Unplug the appliance from the mains.
2.
Cut through the power cord.
3.
Dispose of the appliance in an environmentally
friendly manner.
This appliance is labelled in accord-
ance with European Directive
2012/19/EU concerning used elec-
trical and electronic appliances
(waste electrical and electronic equip-
ment - WEEE).
The guideline determines the frame-
work for the return and recycling of
used appliances as applicable
throughout the EU.
en Customer Service
26
17.2 Transporting the appliance
Keep the original appliance packaging. Only transport
the appliance in the original packaging. Observe the
transport arrows on the packaging.
1.
Secure all moving parts in and on the appliance us-
ing adhesive tape that can be removed without leav-
ing any traces.
2.
Slide all accessories, such as baking trays, into the
corresponding slots with thin cardboard at the
edges, in order to avoid damaging the appliance.
3.
Place cardboard or similar between the front and
rear side to prevent knocks against the inside of the
door glass.
4.
Secure the door and, if available, the top cover to
the appliance sides using adhesive tape.
If the original packaging is no longer available
1.
In order to guarantee sufficient protection against
any transport damage, pack the appliance in pro-
tective packaging.
2.
Always transport the appliance upright.
3.
Do not hold the appliance by the door handle or the
connections on the rear, as these could be dam-
aged.
4.
Do not place any heavy objects on the appliance.
18 Customer Service
If you have any queries on use, are unable to rectify
faults on the appliance yourself or if your appliance
needs to be repaired, contact Customer Service.
Detailed information on the warranty period and terms
of warranty in your country is available from our after-
sales service, your retailer or on our website.
If you contact Customer Service, you will require the
product number (E-Nr.) and the production number
(FD) of your appliance.
The contact details for Customer Service can be found
in the enclosed Customer Service directory or on our
website.
18.1 Product number (E-Nr.) and production
number (FD)
You can find the product number (E-Nr.) and the pro-
duction number (FD) on the appliance's rating plate.
You will see the rating plate with these numbers if you
open the appliance door.
Make a note of your appliance's details and the Cus-
tomer Service telephone number to find them again
quickly.
19 How it works
Here, you can find the ideal settings for various types
of food as well as the best accessories and cookware.
These recommendations are perfectly tailored to your
appliance.
19.1 Proceed as follows:
Note:
If you are using the appliance for the first time, follow
this important information:
¡ →"Safety", Page2
¡ →"Saving energy", Page7
¡ →"Preventing material damage", Page6
1.
Select a suitable type of food from the overview of
food.
Note:If you do not find the exact food or application
that you want to prepare or implement, look for a
similar dish and take the general information into
consideration.
2.
Remove any accessories from the cooking compart-
ment.
3.
Select suitable cookware and accessories.
Use the cookware and the accessory listed in the
recommended settings.
4.
Only preheat the appliance if the recipe or the re-
commended settings tell you to do so.
5.
Use the recommended settings when configuring
the appliance settings.
6.
WARNING‒Risk of scalding!
Hot steam may escape when you open the appli-
ance door. Steam may not be visible, depending on
the temperature.
▶
Open the appliance door carefully.
▶
Keep children at a safe distance.
When the dish is ready, switch off the appliance.
19.2 Condensation
This section tells you how condensation is formed, how
you can prevent damage, and how you can prevent
condensation from forming.
When you are cooking food in the cooking compart-
ment, a lot of steam may form in the cooking compart-
ment. Since your appliance is extremely energy-effi-
cient, only a small amount of heat escapes during op-
eration. Due to the significant differences in temperat-
ure between the appliance interior and the external
parts of the appliance, condensation may build up on
the appliance door, the control panel or the front pan-
els of adjacent kitchen cabinets. The formation of con-
densation is a normal physical phenomenon.
In order to prevent damage, wipe away the condensa-
tion.
When you preheat the appliance, you reduce the build-
up of condensation.

How it works en
27
19.3 Cooking tips
Observe this information when preparing food.
¡ The temperature and cooking time depend on the
amount of food and the recipe. Settings ranges are
specified for this reason. Select the lower value first.
¡ The setting values apply to food placed in the cook-
ing compartment while the cooking compartment is
still cold.
Do not place accessories into the cooking compart-
ment until it has finished preheating.
¡ Remove any accessories that are not being used
from the cooking compartment.
¡ Ensure that the accessory slides in the right way
round.
Reference gases
Unsuitable gas mixtures may impair the cooking power
level.
Note:The appliance was manufactured in accordance
with the reference gases specified in the standards. If
you use gas that does not correspond to the specified
gas mixture and gas pressure, under certain circum-
stances, the power level and the heat output do not de-
liver the desired result.
Gas designation Gas mixture in %
G20 CH
4
=100
G25 CH
4
=86, N
2
=14
G30 n-C
4
H
10
=50, i-C
4
H
10
=50
19.4 Initial baking
When baking, use the shelf positions indicated.
By burning the gas from the lower burner, heat is dis-
tributed in the oven. For this reason, the base of the
food is baked better.
Recommended settings
Dish selection for the lower gas burner
Meal Accessory/cookware Shelf posi-
tion
Temperature in
°C/grill setting
Cooking time,
minutes
Sponge cake Bundt cake tin 3 180 60–80
Sponge cake Springform cake tin, dia-
meter 26 cm
2 180 60–80
Basbousa (semolina cake with sugar
syrup)
Ovenproof dish 3 180 60–80
Pasta bake Ovenproof dish 2 190 60–80
Potato gratin, raw ingredients, 4cm
deep
Ovenproof dish 2 180 60–80
Vegetable terrine Clay pot with lid 2 220 80–100
Small cakes Universal pan
or
Baking tray
4 170 60–80
Biscuits Universal pan
or
Baking tray
3 180 30–50
Simit (sesame-encrusted bread rings) Universal pan
or
Baking tray
4 190 50–70
Puff pastry Universal pan
or
Baking tray
4 180 40–60
Pies and tarts made from yufka dough Universal pan
or
Baking tray
3 190 50–70
Pastries made from yeast dough Universal pan
or
Baking tray
4 170 60–80
Pizza Universal pan
or
Baking tray
3 190 40–60
en How it works
28
19.5 Roasting and grilling
The setting values are based on the assumption that
unstuffed, chilled, ready-to-roast poultry, meat or fish is
placed into a cold cooking compartment.
¡ Turn the poultry, meat or fish after approx. 1/2 to
2/3 of the time listed.
¡ When you turn poultry, ensure that the breast side
or skin side is underneath to begin with.
¡ Use tongs to turn the pieces of food you are grilling.
If you pierce the meat with a fork, the juices will run
out and it will become dry.
¡ Only add salt to steaks once they have been grilled.
Salt draws water from the meat.
Roasting and grilling on the wire rack
Roasting on the wire rack works particularly well for
large poultry or for multiple pieces at the same time.
¡ Depending on the size and type of the food to be
roasted, add up to 1/2litre water to the universal
pan.
You can make a sauce from the juices that are col-
lected. This also means that less smoke is pro-
duced and the cooking compartment does not be-
come as dirty.
¡ Use the protecting plate with the gas grill.
The gas grill cannot be used without the protecting
plate.
¡ Place the food to be grilled on the wire rack. In ad-
dition, slide the universal pan in at least one shelf
position lower, with the slanted edge facing the ap-
pliance door. This means that any dripping fat is
caught.
Recommended settings
Dish selection for electric grill
Meal Accessory/cookware Shelf posi-
tion
Temperature in
°C/grill setting
Cooking time,
minutes
Steak, 2 cm thick, x 2 Wire rack 4 30–40
1
Steak, 2 cm thick, x 2 Wire rack 4 30–40
1
Grilled sausages Wire rack 4 10–20
1
Chicken leg, x4 Wire rack 4 40–50
1
Fish, whole, grilled, 1kg Wire rack 4 35–45
1
Fish steak, grilled Wire rack 4 35–45
1
Toasting bread, 4 slices Wire rack 4 2–4
Toast with topping, x 4 Wire rack 4 3–5
1
Slide the universal pan underneath the wire rack.
19.6 Yoghurt
You can also use your appliance to make your own
yoghurt.
Making yoghurt
1.
Remove the accessories and shelves from the
cooking compartment.
2.
Heat 1litre of milk (3.5% fat) to 90°C on the hob
and then leave it to cool down to 40°C. Only heat
UHT milk to 40°C.
3.
Stir 30g yoghurt into the milk.
4.
Pour the mixture into small containers, e.g. small
jars with lids.
5.
Cover the containers with film, e.g. cling film.
6.
Place the containers on the cooking compartment
floor.
7.
Press the illuminated button.
8.
After making the yoghurt, leave it to cool in the refri-
gerator.
Recommended settings
Yoghurt
Meal Accessory/cookware Shelf position Type of
heating/
function
Temperature
in°C
Cooking
time,
minutes
Yoghurt Cup/jar Cooking compartment
floor
- 4–5 hours
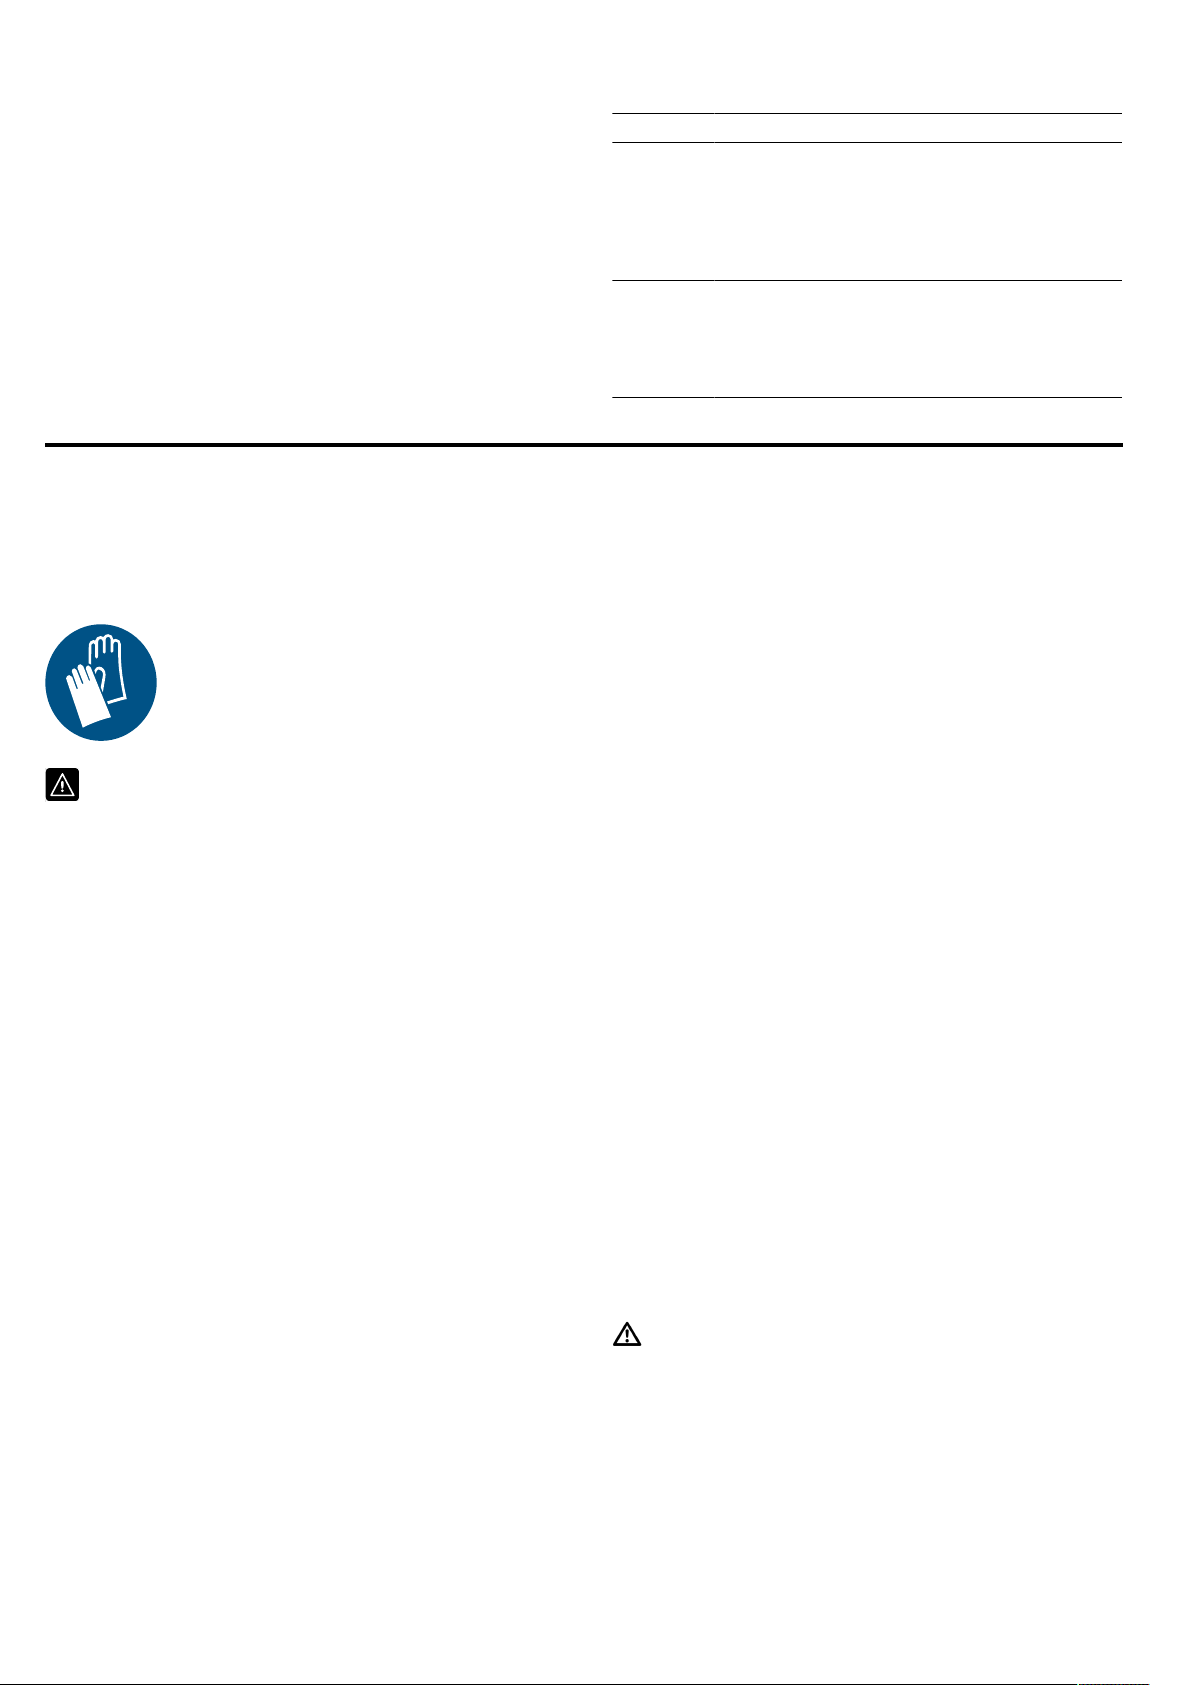
Installation instructions en
29
19.7 Tips for keeping acrylamide levels to a
minimum when cooking
Acrylamide is dangerous to your health and is pro-
duced in particular when you cook cereal and potato
products at high temperatures.
Meal Tip
General
informa-
tion
¡ Keep cooking times as short as pos-
sible.
¡ Cook food until it is golden brown, but
not too dark.
¡ Use large, thick pieces of food. These
contain less acrylamide.
Oven
chips
¡ Spread the chips out evenly and in a
single layer on the baking tray.
¡ Cook at least 400g at once on a bak-
ing tray so that the chips do not dry
out.
20 Installation instructions
The installation instructions contain instructions for
the gas connection and for the gas conversion's as-
sembly .
Note:For after-sales service only.
20.1 General information
Your appliance must only be converted from
one gas type to another by authorised per-
sonnel who have received appropriate train-
ing. The procedure must always be carried
out in accordance with the instructions in
this manual.
Incorrect connection and incorrect settings
may damage the appliance. The appliance
manufacturer shall accept no liability for in-
correct connections or incorrect settings.
¡ Wear protective gloves so that you do not
cut yourself. Accessible parts may have
sharp edges.
¡ Do not place the appliance behind a decor-
ative door or the door of a kitchen unit.
There is a risk of overheating.
¡ Never install the appliance in boats or in
vehicles.
¡ Always closely observe the symbols on the
rating plate. If there is no symbol that is rel-
evant to your country, comply with the tech-
nical guidelines in force in your country
when configuring the appliance settings.
¡ Find out which gas type and which gas
pressure your local gas supply network
uses before installing the appliance. Before
using the appliance, ensure that all settings
have been set correctly.
¡ Always comply with local and national
guidelines and regulations.
¡ The settings for configuring your appliance
can be found on the rating plate on the
rear of the appliance. The gas type set at
the factory is marked with an asterisk (*).
¡ After converting the appliance from one
gas type to another, the new gas type must
be labelled on the rating plate.
– Use the gas conversion label to do this.
– (*) is used to indicate the gas type on the label.
– Stick the label on which the gas conversion is
marked with a star (*) in the designated location
on the rating plate.
¡ The changes made to the appliance and
the type of connection are essential to en-
abling the appliance to work safely and in
accordance with the relevant regulations.
¡ Switch off the power supply and gas supply
before carrying out any work.
¡ After working on the gas connection, al-
ways check that the connection is not leak-
ing. The manufacturer accepts no respons-
ibility for a gas leak at a manipulated gas
connection.
WARNING‒Risk of explosion!
A gas leak could occur. If you move the appli-
ance after the gas supply has been estab-
lished, a gas leak could occur.
▶
Do not move the appliance once the gas
supply is connected.
▶
If you move the appliance, check that the
connections are not leaking.
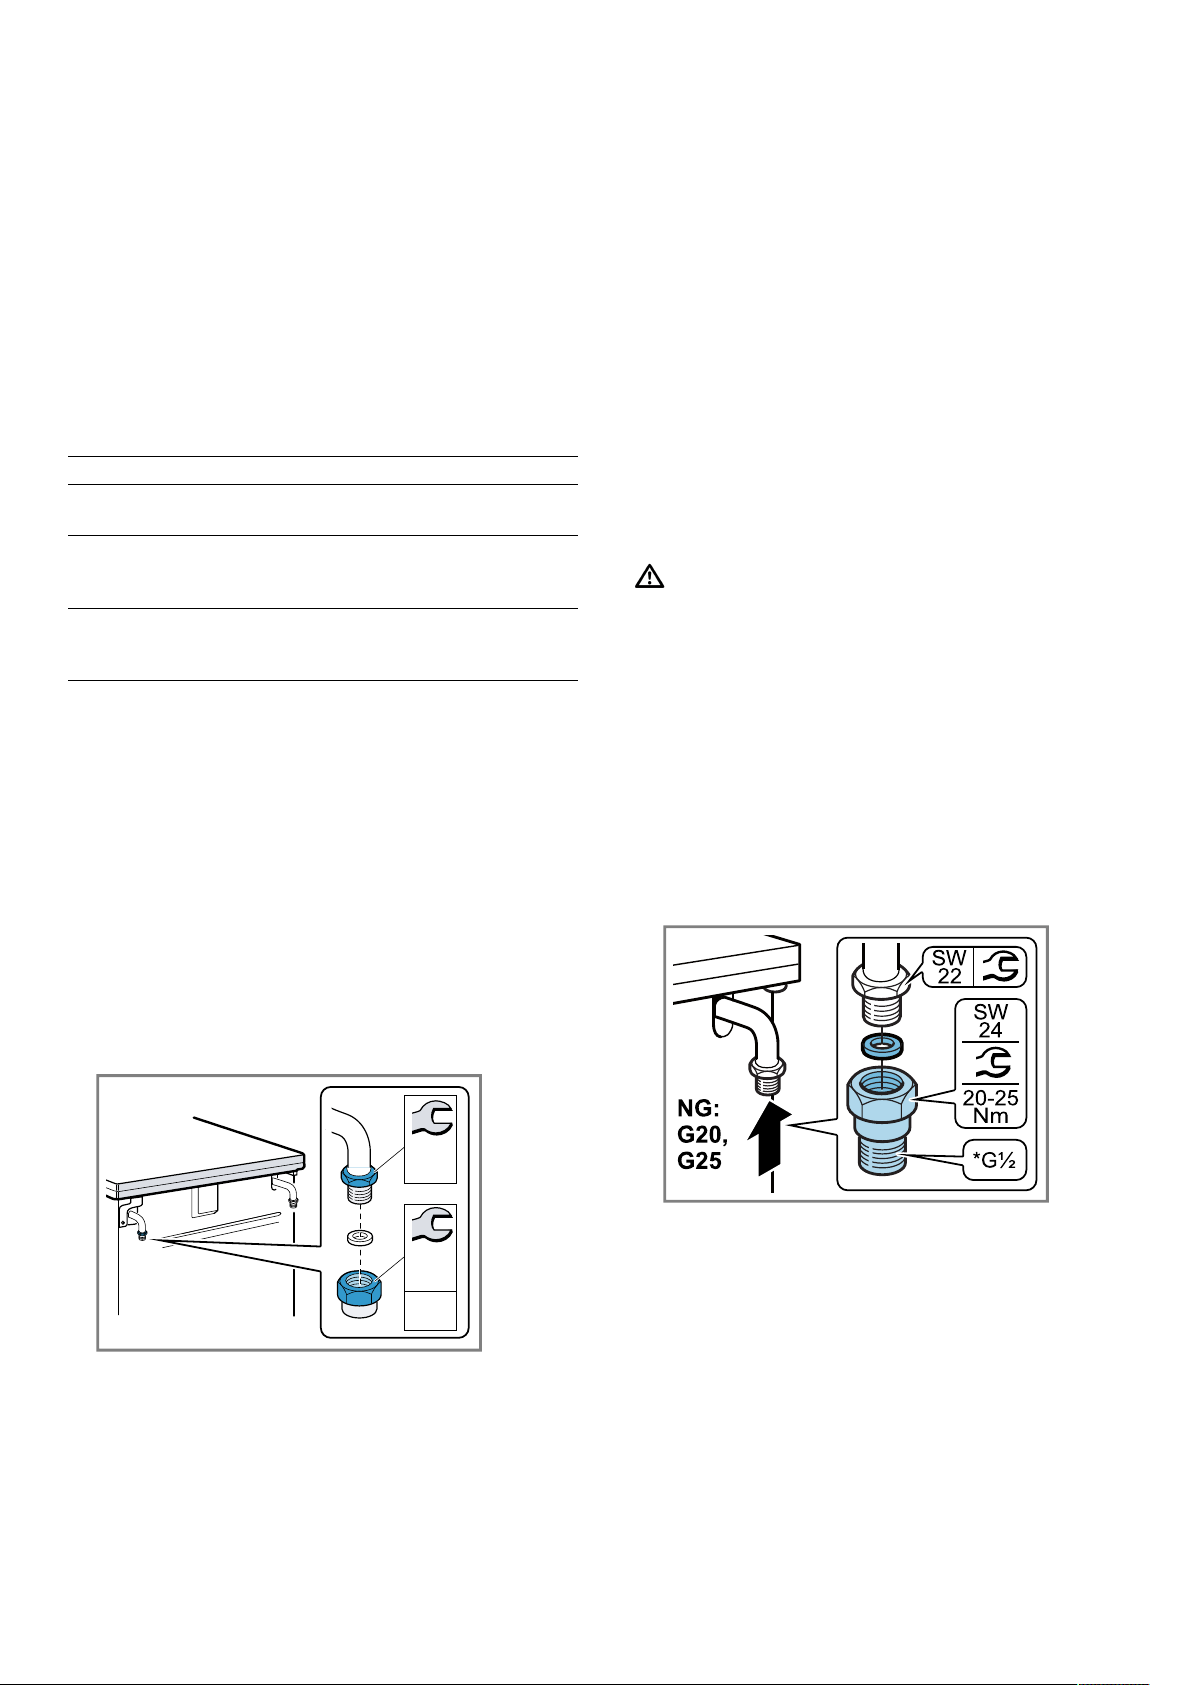
en Installation instructions
30
ATTENTION!
Do not hold and move the appliance at the
gas pipe (collector). Damage to the gas pipe
may lead to gas leak. The gas pipe is not de-
signed for the weight of the appliance.
▶
Do not hold and move the appliance at the
gas pipe.
20.2 Appliance information
Enter the factory settings for the gas type and gas
pressure in the table below and then add the applic-
able gas type and gas pressure settings for once con-
version has been carried out.
E no. FD
After-sales service tele-
phone number
Type of gas/gas pressure
The data can be found on
the rating plate.
Type of gas/gas pressure
Data following gas con-
version
20.3 Selecting the gas connection side
On many appliances, you can carry out the gas con-
nection on the right- or left-hand side. If necessary, you
can change the connection side.
Requirements
¡ Shut off the main gas line.
¡ Seal the gas connecting piece on the side that is not
being used with a blind plug.
1.
Place the new seal in the blind plug. Ensure that the
seal is seated correctly.
2.
Note:Use a torque wrench when connecting the ap-
pliance.
Secure the gas connecting piece to the appliance
using a 22 mm spanner and place the blind plug
onto the connecting piece using a 24 mm spanner.
20-25
Nm
SW
22
SW
24
3.
After changing the connection side, carry out a leak
test. You can find additional information about this in
the section entitled "Leak and function test"
→Page36.
20.4 Gas connection
These instructions apply only if the appliance is in-
stalled in countries that are specified on the rating
plate.
If the appliance is installed and used in a country that
is not specified on the rating plate, add installation and
assembly instructions that contain the necessary in-
formation for the connection conditions for the appli-
ance in the respective country.
Note:Use a torque wrench when connecting the appli-
ance.
Natural gas connection (NG)
If you are using natural has (NG), the gas supply
should be connected via a gas pipe or a safety gas
hose with threaded fittings at both ends.
Connection types:
¡ *G½: EN ISO 228 G½ (TS EN ISO 228 G½)
¡ *R½: EN 10226 R½ (TS 61-210 EN 10226 R½)
WARNING‒Risk of explosion!
A gas leak may occur due to a damaged connection
nozzle.
▶
When connecting the gas pipe or safety gas hose,
never tighten the gas connecting piece on the appli-
ance using a 22 m spanner. This may damage the
connecting piece.
Connection in accordance with EN ISO 228-1 G½ (TS
EN ISO 228-1 G½)
1.
Insert the new seal in the connecting piece. Ensure
that the seal is seated correctly.
2.
Secure the gas connecting piece to the appliance
using a 22 mm spanner and place the connecting
piece into the connecting piece using a 24 mm
spanner.
3.
Place the new seal into the gas pipe or safety gas
hose. Ensure that the seal is seated correctly.
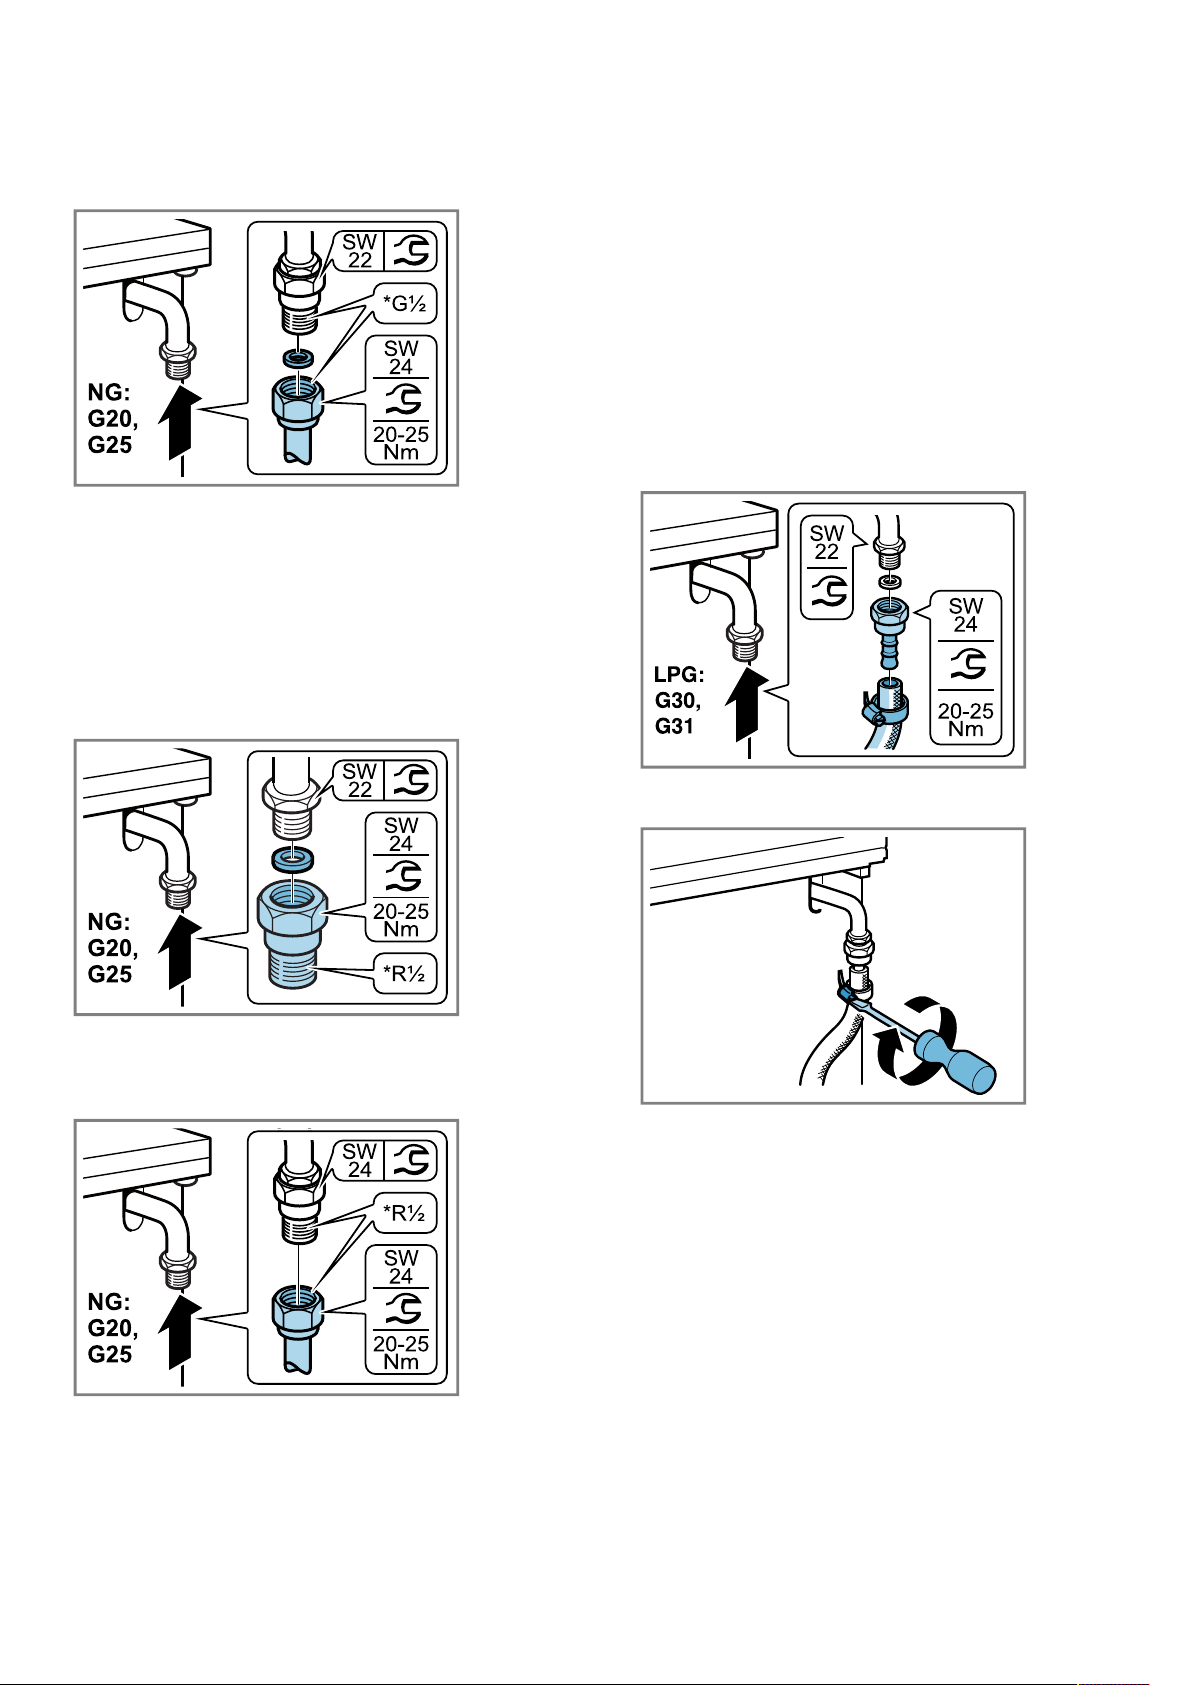
Installation instructions en
31
4.
Secure the connecting piece using a 24 mm span-
ner. Use a 24 mm spanner to place the threaded fit-
ting of the gas pipe or safety gas hose on the con-
necting piece and tighten it firmly.
5.
Open the gas connection shut-off. Carry out a leak
test →Page36.
Connection in accordance with EN 10226-1 R½ (TS
61-210 EN 10226-1 R½)
1.
Insert the new seal in the connecting piece. Ensure
that the seal is seated correctly.
2.
Secure the gas connecting piece to the appliance
using a 22 mm spanner and place the connecting
piece into the connecting piece using a 24 mm
spanner.
3.
Secure the connecting piece using a 24 mm span-
ner. Use a 24 mm spanner to place the threaded fit-
ting of the gas pipe or safety gas hose on the con-
necting piece and tighten it firmly.
4.
Open the gas connection shut-off. Carry out a leak
test →Page36.
Liquefied gas connection (LPG)
If you use liquefied gas (LPG), establish the gas con-
nection via a gas hose or a fixed connection.
Observe the specific guidelines for each country.
If you are using a gas hose, observe the following:
¡ Use a safety gas hose or a plastic gas hose with a
diameter of 8 or 10mm.
¡ Secure the hose to the gas connection using an ap-
proved connecting device, e.g. a hose clamp.
¡ The hose must be short and completely leak-tight.
The hose must not be longer than 1.5m. Observe
the applicable guidelines.
¡ Replace the gas hose once a year.
Connection with the gas hose
1.
Insert the new seal in the connecting piece. Ensure
that the seal is seated correctly.
2.
Secure the gas connecting piece to the appliance
using a 22 mm spanner and place the connecting
piece into the connecting piece using a 24 mm
spanner.
3.
Fit the safety gas hose and use a pipe union or
cable clamp to tighten it securely.
4.
Open the gas connection shut-off. Carry out a leak
test →Page36.
20.5 Converting the gas type
You can convert the type of gas that has been set for
the appliance.
Note:You can find more information about which gas
types can be used with the appliance and the appropri-
ate gas nozzles in the section entitled "Technical data –
Gas" →Page37. The numbers on the burners refer to
their diameter.
Converting the gas type
¡ Replacing the gas connection part.
¡ Replace the burner nozzles.
¡ Depending on the gas setting that is configured at
the factory, replace or tighten the bypass nozzles of
the burner taps.
¡ If the nozzles for the oven burner and the grill
burner are present, replace these.
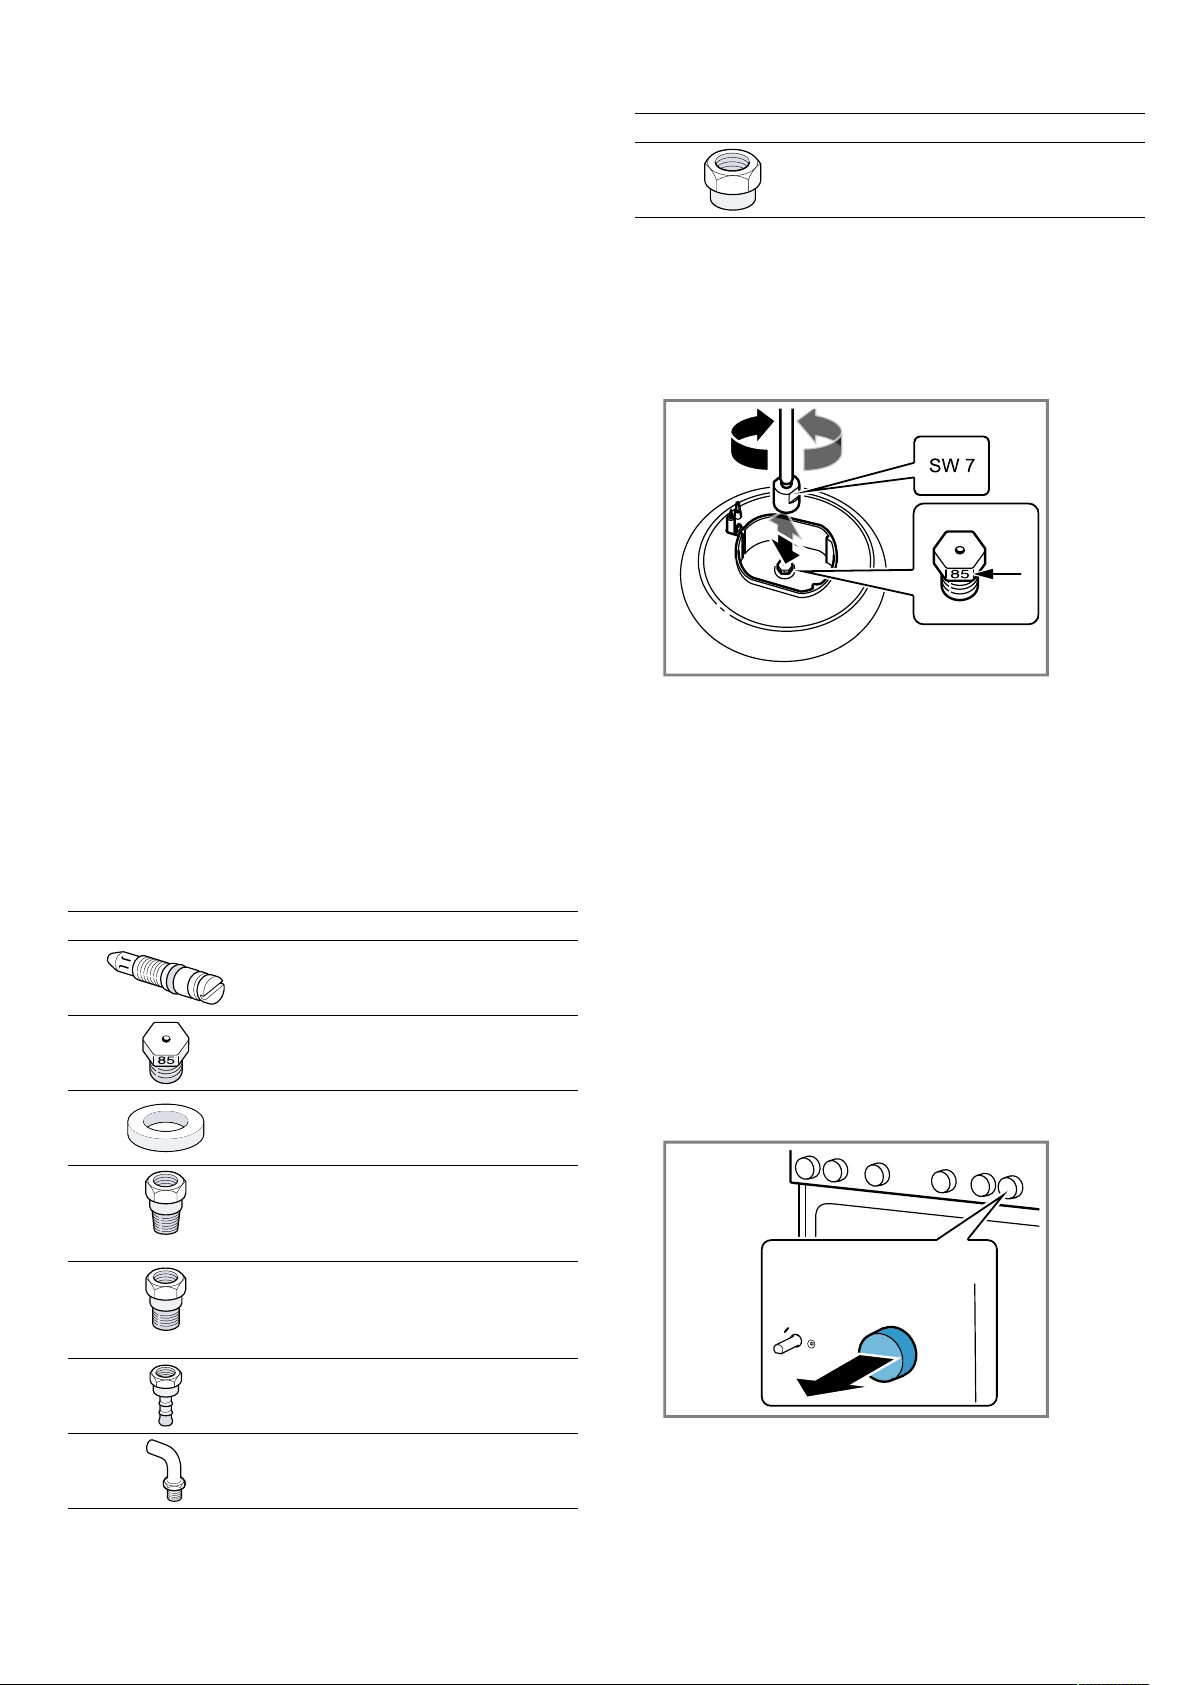
en Installation instructions
32
After conversion
¡ Always test for leaks after converting the appliance
to a different gas type. You can find additional in-
formation about this in the section entitled "Leak
and function test" →Page36.
¡ The burning behaviour must be checked after the
product has been converted to a different gas type.
You can find additional information about this in the
section entitled "Checking the correct burner beha-
viour" →Page37.
¡ Enter the newly set type of gas and gas pressure in
the table. You can find additional information about
this in the section entitled "Appliance information"
→Page30.
ATTENTION!
After converting the type of gas, label the type of gas
that is now set.
▶
After converting the type of gas, affix the label with
the specification of the gas type and the star shape
at the designated location on the appliance's rating
plate.
Parts for the gas conversion
The parts that you need for the gas conversion proced-
ure described here are listed below.
Note:
The accessories supplied may differ depending on the
appliance model.
¡ The gas connecting piece may vary depending on
the gas type and the country-specific regulations.
¡ In the "Technical data – Gas" →Page37 table, de-
termine the correct nozzle diameter.
¡ Always use a new seal.
¡ (*) Never establish a gas connection without these
parts.
Explanation
Bypass nozzle
Burner nozzle
(*) Seal
(*) Connecting piece for nat-
ural gas (NG: G20, G25)
¡ TS 61-210 EN 10226 R½
¡ EN 10226 R½
(*) Connecting piece for nat-
ural gas (NG: G20, G25)
¡ TS EN ISO 228 G½
¡ EN ISO 228 G½
(*) Connecting piece for lique-
fied gas (LPG: G30, G31)
Connecting piece
Explanation
Blind plugs (closure part)
Replacing the cooker burner nozzles
1.
Switch off all of the knobs on the control panel.
2.
Close the gas connection shut-off.
3.
Remove the pan support grids or the pan support
racks and the burner parts.
4.
Use the socket wrench 7 to remove the cooker
burner nozzles.
5.
Look up the burner nozzles in the table. You can
find additional information about this in the section
entitled "Technical data – Gas" →Page37.
‒ Fit the new nozzles into the appropriate burners.
6.
After replacing the nozzles, check that there are no
leaks. You can find additional information about this
in the section entitled "Leak and function test"
→Page36.
Adjusting or replacing bypass nozzles (small
flame setting)
You can set the minimum flame height for the burners
via the bypass nozzles.
Requirements
¡ Close the gas isolating equipment.
¡ Disconnect the appliance from the power supply.
1.
Switch off all of the knobs on the control panel.
2.
Remove the knobs one by one by holding them
tightly against the control panel and pulling them to-
wards you slightly.
Converting the appliance from natural gas to
liquefied gas
If the appliance was set to natural gas at the time of
delivery (factory setting) (NG: G20, G25) and is now
being converted to liquefied gas for the first time (LPG:
G30, G31):
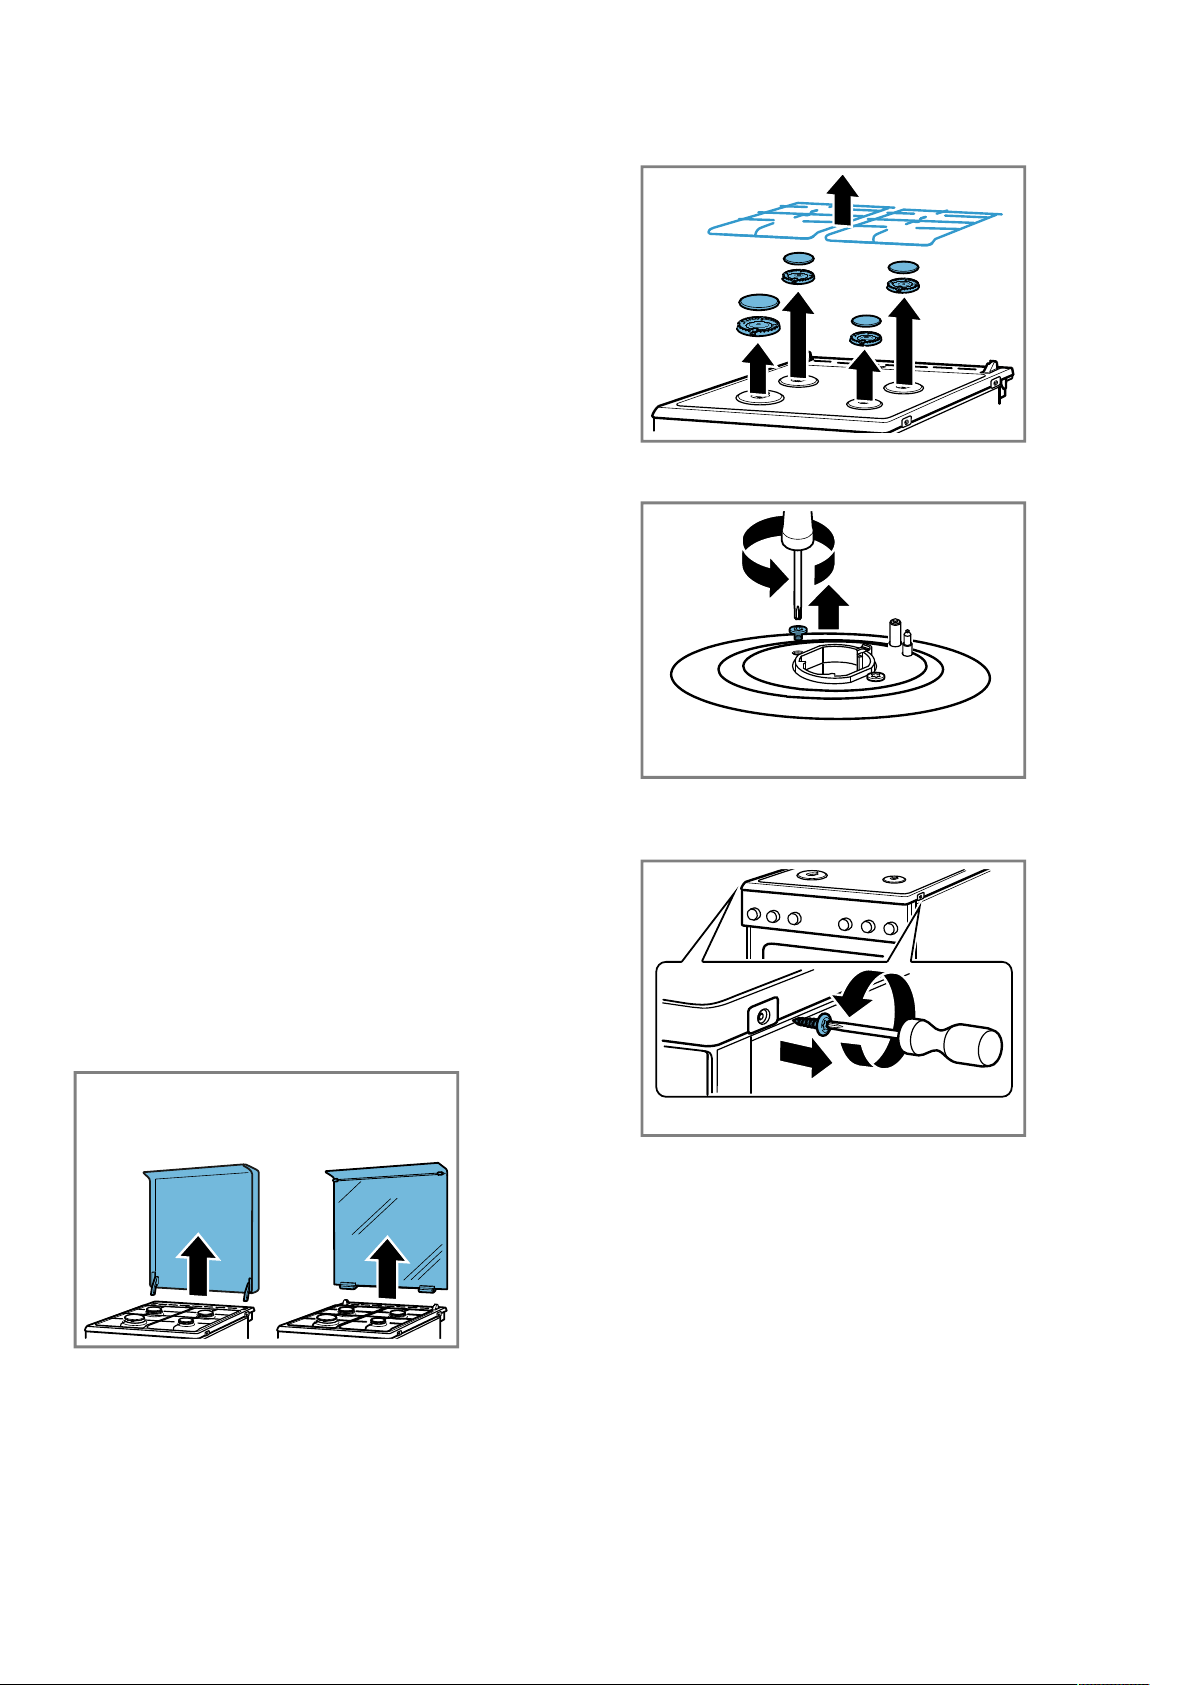
Installation instructions en
33
1.
In order to gain access to the bypass nozzles, re-
move the control panel. You can find additional in-
formation about this in the section entitled "Remov-
ing the control panel" →Page33.
2.
Tighten the bypass nozzles as far as it will go.
3.
Then carry out the steps described in the section
entitled "Installing the control panel" →Page35.
For ovens – converting the appliance from
natural gas to liquefied gas
If the appliance was set to natural gas at the time of
delivery (factory setting) (NG: G20, G25) and is now
being converted to liquefied gas for the first time (LPG:
G30, G31):
1.
In order to gain access to the bypass nozzles below
the burner tap, remove the control panel. You can
find additional information about this in the section
entitled "Removing the control panel" →Page33.
2.
Then tighten the bypass nozzle on the oven burner
as far as it will go.
3.
Then carry out the steps described in the section
entitled "Installing the control panel" →Page35.
Converting the appliance from liquid gas to
natural gas
If you convert the appliance from liquefied gas
(LPG:G30,G31) to natural gas (NG:G20,G25) or if
you already carried out this conversion and then undo
this:
1.
Replace all of the bypass nozzles in the appliance.
You can find additional information about this in the
section entitled "Removing the control panel"
→Page33.
2.
Then carry out the steps in the section entitled "Re-
placing the bypass nozzles" →Page34.
3.
Then carry out the steps described in the section
entitled "Installing the control panel" →Page35.
Removing the control panel
1.
If the appliance has an upper cover, remove this.
‒ To do this, open the hob cover, grip the sides
with both hands and pull it upwards. Ensure that
you do not lose the hinges.
2.
Remove the pan support grids or the pan support
racks and the burner parts.
3.
If burner connection screws are present on the hob,
remove all of these.
4.
Remove the two screws (T20) at the front right and
left of the hob panel. Do not remove the plastic
parts that are located below these.
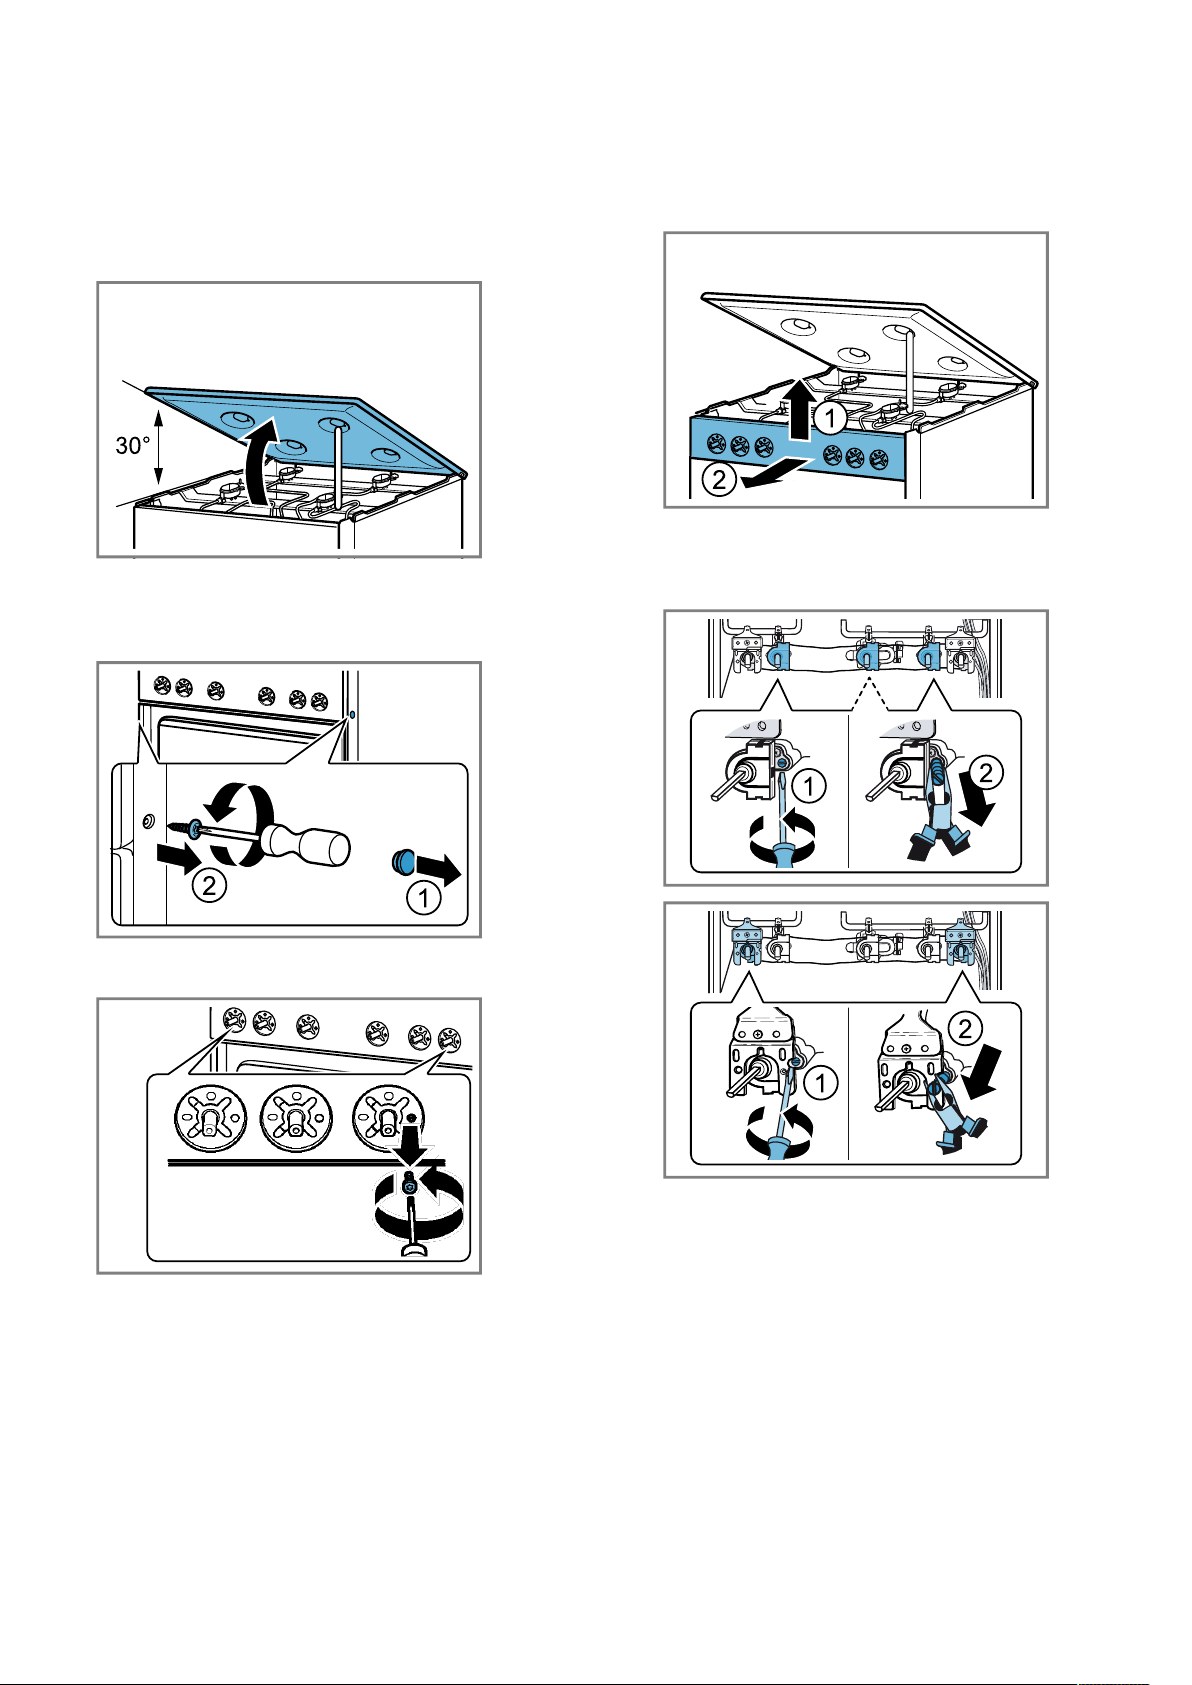
en Installation instructions
34
5.
Note:To ensure that no scratches are formed on
the matte glass plate, do not allow the underside of
the hob to come into contact with objects.
Hold the front section of the hob and tilt it upwards
at a maximum angle of 30°. Secure the hob with
the profile bar by placing it vertically on the front
burner mount.
6.
Remove the plastic covers from the front profiles on
the right and left. Ensure that the covers are not
damaged or scratched. Unscrew the screws (T20)
below these.
7.
Remove the two screws (M4) that are uncovered
when you remove the control knobs (T15).
8.
Grip the panel with both hands and slowly pull it up-
wards. Remove the panel from the fastening lugs.
Then carefully pull the panel forwards to remove it.
Ensure that the cables are not damaged and that
the connections do not come loose.
Replacing bypass nozzles
1.
Use a flat-head screwdriver (no. 2) to unscrew the
bypass nozzles. Remove the bypass nozzles.
2.
Select the appropriate replacement bypass nozzles
from the table. You can find additional information
about this in the section entitled "Technical data –
Gas" →Page37.
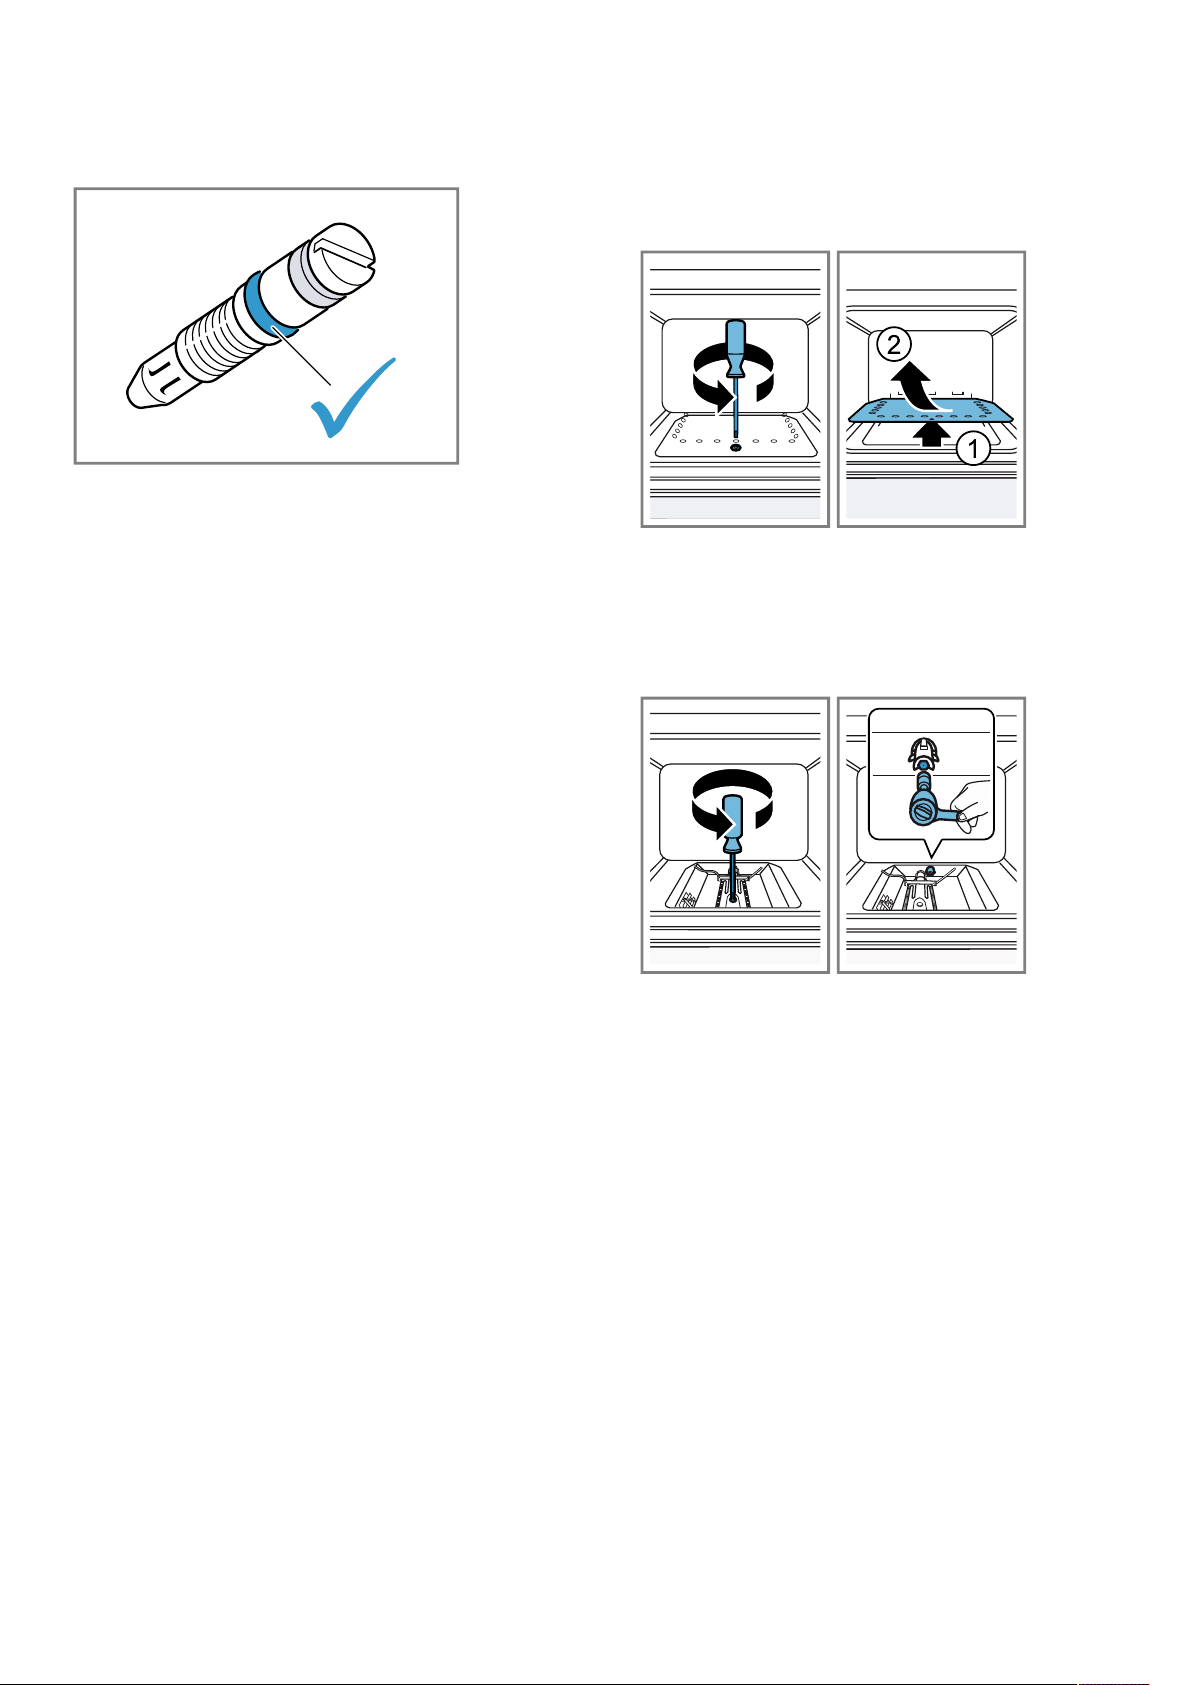
Installation instructions en
35
3.
Check that the seals on the bypass nozzles are
seated correctly and work properly. Only use by-
pass nozzles with absolutely faultless seals.
4.
Insert the new bypass nozzles and tighten them se-
curely. Ensure that all bypass nozzles have been
fastened to the correct taps.
5.
At this stage, it is important to test for leaks. You
can find additional information about this in the sec-
tion entitled "Leak and function test" →Page36.
Fitting the control panel
To reassemble, proceed in the reverse order of disas-
sembly.
1.
Take hold of the front panel with both hands and
carefully fit it into place. Ensure that the cables are
not damaged and the connections do not come
loose. Lower it slightly and insert it into the front
panel.
2.
Insert the screws (T15) (M4) that were removed
from the control panel.
3.
Insert and tighten the screws (T20) that were re-
moved from the front profiles on the right and left.
Attach the plastic covers.
4.
Carefully install the hob. Ensure that the plastic
parts which must remain underneath the screws do
not fall out. Unscrew the two screws (T20) on the
front left and right on the hob. If there are any
burner connection screws, screw them all into the
cooktop.
5.
Install the burner bases in their respective positions
according to their size. Make sure that the ignition
plugs are placed in the appropriate openings next
to the burner bases. Place the enamelled burner
lids onto the centre of the appropriate lower parts of
the burner and, in doing so, note the sizes.
‒ Fit the pan support grids and the pan support
racks. Ensure that the 80 mm pan support is fit-
ted on the auxiliary burner.
6.
If the appliance has a covering plate, hold it vertic-
ally by both sides and slowly reinsert it into the
holder.
7.
Carefully insert the knobs.
‒ At this stage, it is important to check that the gas
burners are burning correctly. You can find addi-
tional information about this in the section en-
titled "Checking the correct burner behaviour"
→Page37.
8.
Check whether the appliance is working correctly.
Replacing the oven gas burner
Preparation
¡ Switch off all of the knobs on the control panel.
¡ Close the gas connection shut-off.
¡ Disconnect the appliance from the mains.
Replacing the oven's lower gas burner nozzle
1.
Open the appliance door.
2.
Undo the front screw on the appliance base plate.
‒ Raise the front of the tray, pull it and remove it.
3.
Undo the screw on the burner and carefully pull the
burner forwards. You should now be able to access
the burner nozzle. Ensure that the connections for
the thermocouple and the spark plugs are not dam-
aged.
‒ Remove the nozzle on the burner input in the
rear area of the oven using the socket wrench 7.
4.
Select the appropriate nozzle from the table de-
pending on the new gas type. You can find addi-
tional information about this in the section entitled
"Technical data – Gas" →Page37.
‒ Insert and tighten the new nozzle.
‒ At this stage, it is important to test for leaks. You
can find additional information about this in the
section entitled "Leak and function test"
→Page36.
5.
Insert the oven burner, making sure that the connec-
tions for the thermocouple and the spark plugs are
not damaged. Screw in the loosened screw.
6.
At this stage, it is important to check that the burner
is burning correctly. You can find additional informa-
tion about this in the section entitled "Checking the
correct burner behaviour →Page37".
7.
Insert the bottom panel of the oven's housing and
screw it firmly in place.
Replacing the gas grill burner nozzle on the oven
1.
Open the appliance door.
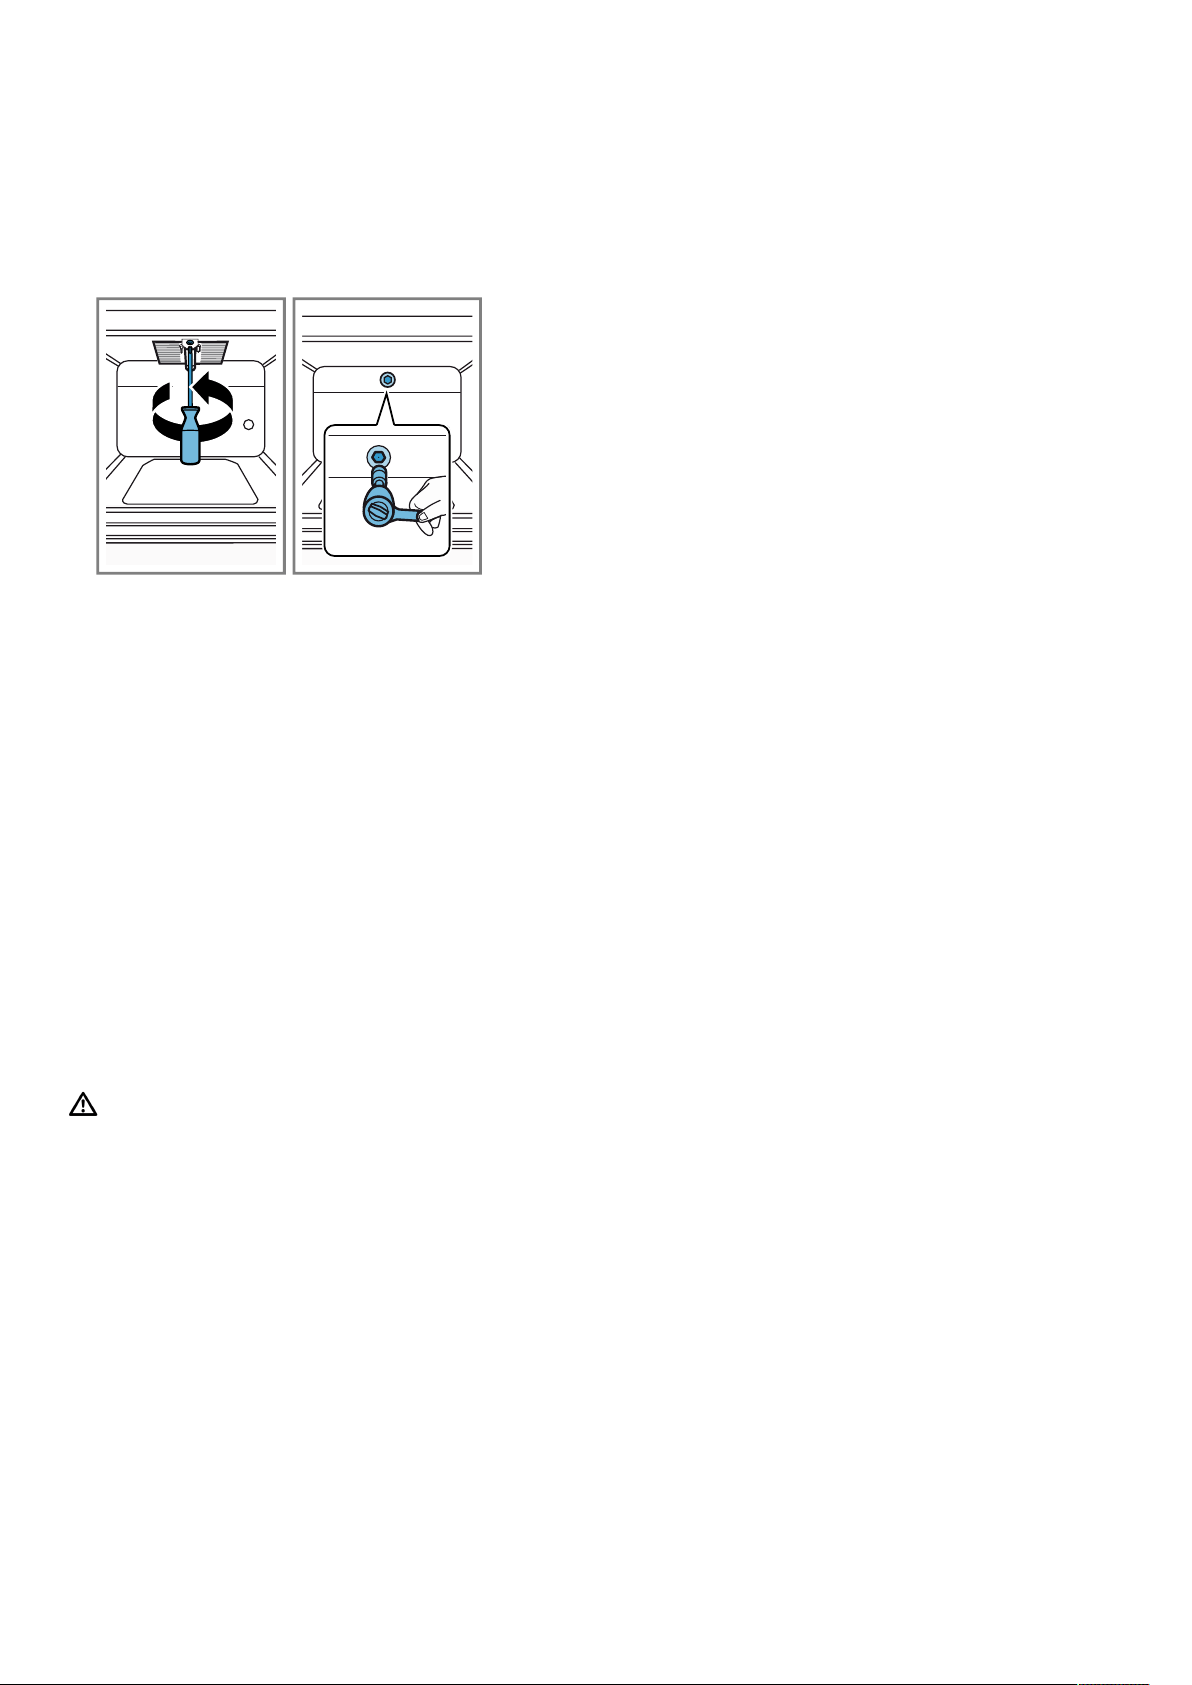
en Installation instructions
36
2.
Undo the screw that holds the grill burner fastening
plate and the grill burner together, then carefully pull
the burner out towards the front. You should now be
able to access the burner nozzle. Ensure that the
connections for the thermocouple and the spark
plugs are not damaged.
‒ Remove the nozzle for the gas grill burner in the
oven using the socket wrench 7.
3.
Select the appropriate nozzle from the table de-
pending on the new gas type. You can find addi-
tional information about this in the section entitled
"Technical data – Gas" →Page37.
‒ Insert and tighten the new nozzle.
‒ At this stage, it is important to test for leaks. You
can find additional information about this in the
section entitled "Leak and function test"
→Page36.
4.
Reinsert the oven's grill burner, making sure that the
connections for the thermocouple and the spark
plugs are not damaged. Screw in the loosened
screw.
5.
Push in the seal on the burner until it is situated on
the rear housing.
6.
At this stage, it is important to check that the burner
is burning correctly. You can find additional informa-
tion about this in the section entitled "Checking the
correct burner behaviour →Page37".
20.6 Leak test and function test
The leak test must be carried out by two people.
WARNING‒Risk of explosion!
Sparks, flames or open flames may cause explosions
during the leak and function test.
▶
Ensure that no sparks are produced.
▶
Do not use any fire or naked flames.
▶
Only check the leak tightness using a suitable foam.
Gas leak
¡ Close the gas connection locking device.
¡ Ventilate the relevant location sufficiently.
¡ Check the gas and nozzle connections once more.
¡ Repeat the leak test →Page36.
Checking the gas connection
1.
Open the gas connection shut-off.
2.
Apply suitable foam around the gas connection.
a If dispersions and bubbles occur on the foamy sur-
face and these indicate that gas is escaping, follow
the instructions in the section entitled "What to do if
there is a gas leak" →Page36.
3.
Follow the same instructions for the part that is
sealed with the blind plug.
Checking the cooker burner nozzles
Check the leak tightness of each nozzle.
1.
Open the gas connection shut-off.
2.
To check, carefully cover the hole in the burner
nozzle with your finger or a special device.
3.
Apply suitable foam around the nozzle.
4.
Press on the burner knob and turn the knob anti-
clockwise. Gas therefore comes to the nozzle.
a If dispersions and bubbles occur on the foamy sur-
face and these indicate that gas is escaping, follow
the instructions in the section entitled "What to do if
there is a gas leak" →Page36.
Checking the bypass nozzles
Check the leak tightness of each bypass nozzle.
1.
Open the gas connection shut-off.
2.
To check, carefully cover the hole in the burner
nozzle with your finger or a special device.
3.
Apply suitable foam around the bypass nozzle on
the burner that is to be checked.
4.
Press on the tap spindle and turn it anti-clockwise.
Gas therefore comes to the nozzle.
a If dispersions and bubbles occur on the foamy sur-
face and these indicate that gas is escaping, follow
the instructions in the section entitled "What to do if
there is a gas leak" →Page36.
Checking the lower oven gas burner nozzle
Check the leak tightness of each bypass nozzle.
1.
Open the gas connection shut-off.
2.
To check, carefully cover the hole for the burner
nozzle in the oven's lower gas burner with your fin-
ger or a special device.
3.
Apply suitable foam around the nozzle.
4.
Press the function control knob for the oven and
turn the knob anti-clockwise. Gas therefore comes
to the nozzle.
a If dispersions and bubbles occur on the foamy sur-
face and these indicate that gas is escaping, follow
the instructions in the section entitled "What to do if
there is a gas leak" →Page36.
Checking the lower oven gas grill nozzle
Check the leak tightness of each bypass nozzle.
1.
Open the gas connection shut-off.
2.
To check, carefully cover the hole for the burner
nozzle in the oven's lower gas grill burner with your
finger or a special device.
3.
Apply suitable foam around the nozzle.
4.
Press the function control knob for the oven and
turn the knob anti-clockwise. Gas therefore comes
to the nozzle.
a If dispersions and bubbles occur on the foamy sur-
face and these indicate that gas is escaping, follow
the instructions in the section entitled "What to do if
there is a gas leak" →Page36.

Installation instructions en
37
20.7 Checking the correct burner behaviour
Check the burning and soot formation of each burner
after the product has been converted to a different gas
type. If there is a problem, compare the nozzle values
with the values in the table.
Checking the correct burner behaviour of the
cover burner
1.
Ignite the gas cooker burners in accordance with
the instructions in the operating manual.
→"Operating the hotplate", Page15
2.
Set the gas cooker knob to the small flame setting.
Check whether the flame safety system is working
by keeping the flame at the "small flame" setting for
one minute.
3.
Check that the burners are burning correctly with
both large and small flames.
a The flame must burn evenly and steadily.
4.
Turn the burner knob back and forth quickly
between the large flame setting and the small flame
setting. Repeat this process several times.
a The gas flame must not flicker or go out.
Checking the correct burner behaviour for the
lower oven gas burner
1.
Ignite the lower oven gas burner in accordance with
the instructions in the operating manual.
→"Basic operation", Page17
2.
Open the oven door and observe the flame.
a The flame must burn evenly.
a The flame may fail during the first few minutes. How-
ever, the flame must stabilise after a few minutes.
3.
Switch on the appliance for a few minutes to check
whether the thermocouple becomes sufficiently
warm.
a Adjust the settings, if required. If the bypass nozzle
on the burner is faulty, replace this.
Checking the correct burner behaviour for the
lower oven gas burner
1.
Ignite the gas grill burner in the oven in accordance
with the instructions in the operating instructions.
→"Basic operation", Page17
2.
Open the oven door and observe the flame.
a The flame must burn evenly.
a The flame may fail during the first few minutes. How-
ever, the flame must stabilise after a few minutes.
3.
Switch on the appliance for a few minutes to check
whether the thermocouple becomes sufficiently
warm.
a Adjust the settings, if required. If the bypass nozzle
on the burner is faulty, replace this.
20.8 Technical data – Gas
The different types of gas and the corresponding val-
ues are listed.
Information on some types of gas
Note the following information for the gas types that are
listed in the table for some burners.
Type of gas Explanation
G20/25
(20/25mbar)
For France and Belgium
G2.350
(13mbar)
For Poland
G30 (50mbar) The after-sales service must order
the nozzle set HEZ298070.
Nozzle values for the auxiliary burner
Note the following information for the gas types that are listed in the table for some burners.
G20/
G25
G20 G20 G25 G25 G25.3 G30/G31 G30 G30 G27
Gas pressure (mbar) 20/25 20 25 20 25 25 28–
30/37
50 37 20
Nozzle (mm) 0.72 0.72 0.68 0.77 0.72 0.72 0.50 0.43 0.47 0.77
Bypass nozzle (mm) 0.50 0.50 0.50 0.50 0.50 0.50 0.30 0.30 0.30 0.50
Max. input power (kW) 1 1 1 1 1 1 1 1 1 1
Min. input power (kW) ≤0.55 ≤0.55 ≤0.55 ≤0.55 ≤0.55 ≤0.55 ≤0.55 ≤0.55 ≤0.55 ≤0.55
Gas flow at 15°C and
1013mbarm
3
/h
0.095/
0.111
0.095 0.095 0.111 0.111 0.108 - - - 0.116
Gas flow at 15°C and
1013mbarg/h
- - - - - - 73/71 73 73 -
Nozzle values for the standard-output burner
Note the following information for the gas types that are listed in the table for some burners.

en Installation instructions
38
G20/
G25
G20 G20 G25 G25 G25.3 G30/G31 G30 G30 G27
Gas pressure (mbar) 20/25 20 25 20 25 25 28–
30/37
50 37 20
Nozzle (mm) 0.97 0.97 0.91 1 0.94 0.94 0.65 0.58 0.62 1
Bypass nozzle (mm) 0.58 0.58 0.58 0.58 0.58 0.58 0.38 0.38 0.38 0.58
Max. input power (kW) 1.75 1.75 1.75 1.75 1.75 1.75 1.75 1.75 1.75 1.75
Min. input power (kW) ≤0.9 ≤0.9 ≤0.9 ≤0.9 ≤0.9 ≤0.9 ≤0.9 ≤0.9 ≤0.9 ≤0.9
Gas flow at 15°C and
1013mbarm
3
/h
0.167/
0.194
0.167 0.167 0.194 0.194 0.190 - - - 0.203
Gas flow at 15°C and
1013mbarg/h
- - - - - - 127/125 127 127 -
Nozzle values for the high-output burner
Note the following information for the gas types that are listed in the table for some burners.
G20/
G25
G20 G20 G25 G25 G25.3 G30/G31 G30 G30 G27
Gas pressure (mbar) 20/25 20 25 20 25 25 28–
30/37
50 37 20
Nozzle (mm) 1.16 1.16 1.10 1.34 1.26 1.26 0.85 0.75 0.80 1.38
Bypass nozzle (mm) 0.75 0.75 0.75 0.75 0.75 0.75 0.46 0.46 0.46 0.75
Max. input power (kW) 3 3 3 3 3 3 3 3 3 3
Min. input power (kW) ≤1.3 ≤1.3 ≤1.3 ≤1.3 ≤1.3 ≤1.3 ≤1.3 ≤1.3 ≤1.3 ≤1.3
Gas flow at 15°C and
1013mbarm
3
/h
0.285/
0.332
0.285 0.285 0.332 0.332 0.325 - - - 0.348
Gas flow at 15°C and
1013mbarg/h
- - - - - - 218/214 218 218 -
Nozzle values for the lower burner in the gas oven with thermostat
Note the following information for the gas types that are listed in the table for some burners.
G20/G25 G20 G20 G25 G25 G25.3 G30 G30
Gas pressure (mbar) 20/25 20 25 20 25 25 28–
30
50
Nozzle (mm) 1.16 1.16 1.10 1.34 1.21 1.21 0.85 0.75
Bypass nozzle (mm) 0.76 0.76 0.67 0.80 0.70 0.70 0.48 0.45
Max. input power (kW) 3 3 3 3 3 3 3 3
Min. input power (kW) - - - - - - - -
Gas flow at 15°C and 1013mbarm
3
/h 0.285/0.332 0.285 0.285 0.332 0.332 0.325 - -
Gas flow at 15°C and 1013mbarg/h - - - - - - 218 218
Nozzle values for the gas grill burner – gas oven
Note the following information for the gas types that are listed in the table for some burners.
G20/G25 G20 G20 G25 G25 G25.3 G30 G30
Gas pressure (mbar) 20/25 20 25 20 25 25 28–
30
50
Nozzle (mm) 1.00 1.00 0.98 1.13 1.10 1.10 0.70 0.62
Bypass nozzle (mm) - - - - - - - -
Max. input power (kW) 2.1 2.1 2.1 2.1 2.1 2.1 2.1 2.1
Min. input power (kW) - - - - - - - -

Installation instructions en
39
G20/G25 G20 G20 G25 G25 G25.3 G30 G30
Gas flow at 15°C and 1013mbarm
3
/h 0.2/0.233 0.2 0.2 0.233 0.233 0.228 - -
Gas flow at 15°C and 1013mbarg/h - - - - - - 153 153

Thank you for buying a
Bosch Home Appliance!
Register your new device on MyBosch now and profit directly from:
• Expert tips & tricks for your appliance
• Warranty extension options
• Discounts for accessories & spare-parts
• Digital manual and all appliance data at hand
• Easy access to Bosch Home Appliances Service
Free and easy registration – also on mobile phones:
www.bosch-home.com/welcome
Looking for help?
You'll find it here.
Expert advice for your Bosch home appliances, help with problems
or a repair from Bosch experts.
Find out everything about the many ways Bosch can support you:
www.bosch-home.com/service
Contact data of all countries are listed in the attached service directory.
*9001695682*
9001695682 (011025)
en
Robert Bosch Hausgeräte GmbH
Carl-Wery-Straße 34
81739 München
GERMANY
www.bosch-home.com