0
og
4.z
¢2
i
i
|
C2.
0
GEAppliances.corn
Safety Instructions ............................ 2-5
Operating Instructions
Kitchen Timer .......................................... 11
Oven ............................................... 10-27
Adjust Oven Thermostat .............................. 15
Baking or Roasting .................................... 15
Broiling, Broiling Guide ................................ 14
Controls ............................................... 10
Convection Oven ................................. 16, 17
Preheating and Pan Placement ....................... 13
Probe ................................................. 18
Sabbath Feature ...................................... 27
Self-Cleaning ...................................... 22,23
SlowCookand Warming Features ....................... 20
Special Features .................................. 25,26
Steam Clean.......................................... 24
Timed Baking and Roasting........................... 19
Warming Drawer ..................................... 21
Surface Units ......................................... 6-9
Cookware .............................................. 9
Glass Cooktop ......................................... 8
Warming Zone ......................................... 7
Care and Cleaning
Aluminum Foil..................................... 3,S,15
Control Panel ......................................... 28
Glass Cooktop ..................................... 33, 54
Lift-Off Oven Door ..................................... 50
Light ................................................... 29
Oven Floor ............................................. 32
Oven Heating Elements ................................ 32
Racks ................................................. 31
RemovableWarming Drawer/Drawer Pan................ 32
Storage Drawer ....................................... 32
Surfaces .............................................. 28
Vent................................................... 32
Troubleshooting Tips .......................... 35-39
Accessories ........................................ 41
Consumer Support
Consumer Support ........................... Back Cover
Warranty .............................................. 45
Next Step Control
EspaBol
For a Spanish version ofthis manual, visit
our Websiteat GEAppliances.com.
Paraconsultar una version en espaflol
de este manual de instrucciones, visite
nuestro sitio de internet
GEAppliances.com.
In Canada:
www. GEAppliances.ca
Printed in the United States
Write the model and serial
numbers here:
Model #
Serial #
You canfind them on a label
behind the drawer or behind the
lower oven door on the front of
the range frame.
Printe( on
Recycled Paper
49-80665-110-12GE
IMPORTANT SAFETY INFORMATION.
READALL INSTRUCTIONS BEFORE USING.
[A WARNING ]
Read all safety instructions before using the product. Failure to follow these instructions may result in fire, electric shock,
serious injury or death.
ANTI-TIP DEVICE
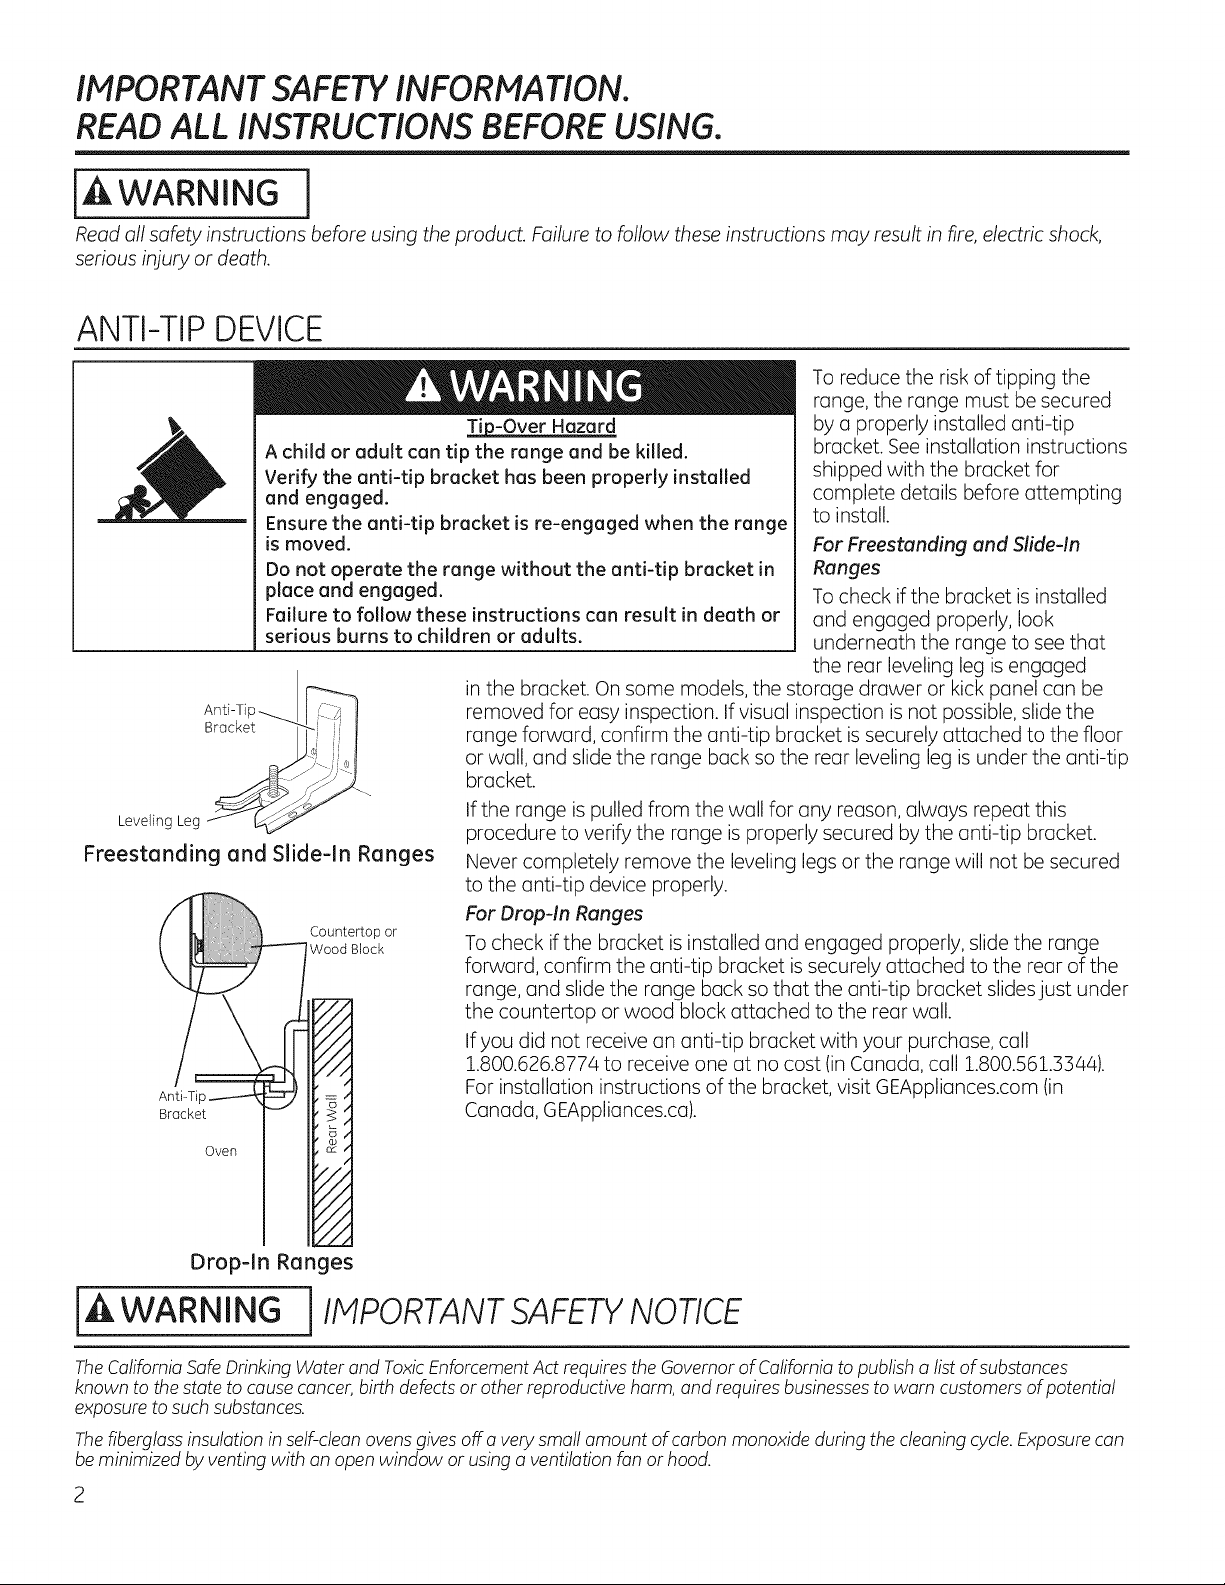
_p-Over Hazard
A child or adult can tip the range and be killed.
Verify the anti-tip bracket has been properly installed
and engaged.
Ensure the anti-tip bracket is re-engaged when the range
is moved.
Do not operate the range without the anti-tip bracket in
place and engaged.
Failure to follow these instructions can result in death or
serious burns to children or adults.
Toreduce the risk of tipping the
range, the range must be secured
by a properly installed anti-tip
bracket. See installation instructions
shipped with the bracket for
complete details before attempting
to install.
For Freestanding and Slide-in
Ranges
Tocheck ifthe bracket isinstalled
and engaged properly, look
underneath the range to see that
the rear leveling leg isengaged
in the bracket. On some models, the storage drawer or kick panel can be
AntPTip_ I !' _ I removed for easy inspection. If visual inspection isnot possible, slide the
Bracket -_-- ; !
i i range forward, confirm the anti-tip bracket issecurely attached to the floor
.J---...,_,I or wall, and slidethe range back sothe rear leveling leg isunder the anti-tip
__// If the range ispulled from the wall for any reason, always repeat this
Leveling Leg _ _ procedure to verify the range is properly secured by the anti-tip bracket.
Freestanding and Slide-In Ranges Never completely remove the leveling legs or the range will not be secured
to the anti-tip device properly.
For Drop-In Ranges
Countertop or
WoodBlock TOcheck ifthe bracket isinstalled and engaged properly, slide the range
forward, confirm the anti-tip bracket is securely attached to the rear of the
range, and slide the range back so that the anti-tip bracket slides just under
the countertop or wood block attached to the rear wall.
If you did not receive an anti-tip bracket with your purchase, call
1.800.626.8774 to receive one at no cost (in Canada, call 1.800.561.3344).
Anti-T-- Forinstallation instructions of the bracket, visit GEAppliances.com (in
Bracket Canada, GEAppliances.ca).
Oven
Drop-In Ranges
iAWARNINOj IMPOnTANTSAFmYNOTICE
The CaliforniaSafe Drinking Water and ToxicEnforcementAct requires theGovernor ofCaliforniatopublisha list ofsubstances
known to the statetocausecancer, birthdefectsor otherreproductiveharm, and requiresbusinessestowarn customersof potential
exposure to such substances.
The fiberglassinsulation in self-cleanovens givesoff a very small amount ofcarbonmonoxide during thecleaningcycle.Exposurecan
be minimizedbyventing with an open window or using a ventilationfanor hood.
GEAppliances.com
jA WARNING j GENERAL SAFETYINSTRUCTIONS
For your safety, the information in this manual must be followed to minimize the risk of fire, explosion, electric shock, or to
prevent property damage, personal injury, or loss of life.
This unit has been tested and found to comply with the limits for a class B digital device, pursuant to Part 18 of the
FCCrules. These limits are designed to provide reasonable protection against harmful interference in a residential
installation. This unit generates, uses and can radiate radio frequency energy and, if not installed and used in
accordance with the instructions, may cause harmful interference to radio communications. However, there is no
guarantee that interference will not occur in a particular installation. If this unit does cause harmful interference to
radio or television reception, which can be determined by turning the unit off and on, the user is encouraged to try
to correct the interference by one or more of the following measures:
oReorient or relocate the receiving antennae.
oIncrease the distance between the unit and receiver.
• Connect the unit into an outlet or a circuit different from that to which the receiver is connected.
CAUTION!
Persons with a pacemaker or similar medical device should exercise caution when using or standing near an
induction unit while it is in operation. The electromagnetic field may affect the working of the pacemaker or similar
medical device. It is advisable to consult your doctor or the pacemaker manufacturer about your particular situation.
Usethis applianceforits intended purposeas describedinthis
Owner'sManual.
Besureyourapplianceis properly installedand grounded by a
qualified installerin accordancewith the provided installation
instructions.
Do notattempt torepairor replaceanypart of yourrange unless
itis specificallyrecommendedin this manual.Allotherservicing
should betransferredto a qualifiedtechnician.
Beforeperforminganyservice,unplug the range or disconnect
thepower supplyat thehouseholddistribution panelbyremoving
the fuse or switchingoff thecircuit breaker.
Do notleavechildrenalone-children should notbeleft alone
or unattended inan area where an appliance is in use.They
should neverbe allowedtoclimb, sitor stand on anypart ofthe
appliance.
A CAUTION:Donotstoreitemsofinteresttochildren
above a range or onthebackguardofa range-children climbing
on therangetoreach items could beseriouslyinjured.
Useonly drypotholders-moist or damppotholderson hot
surfacesmay resultin burnsfrom steam.Do not letpotholders
touch hotsurface unitsor heating elements.Do not use a towel
or otherbulkycloth in placeofpotholders.
Neveruseyour appliance for warming or heating theroom.
Do not touch thesurface units,the heatingelementsor the
interior surfaceofthe oven.Thesesurfacesmay be hot enough
toburn eventhoughthey aredarkin color.Duringand after use,
do nottouch,or let clothingor other flammablematerialscontact
the surface units,areas nearbythesurface unitsor anyinterior
area of theoven;allow sufficienttime for cooling first.Other
surfacesofthe appliance may becomehotenoughtocause
burns.Potentiallyhotsurfacesincludethecooktop,areasfacing
the cooktop,oven vent opening,surfacesneartheopeningand
crevicesaround the oven door.
Do notheat unopenedfood containers.Pressurecould build up
and the container could burst,causingan injury.
Do notusealuminum foil tolinethedrip pansor anywhere inthe
oven,except as describedin this manual.Misusecould resultin
damage totherangeand shockor firehazard.
Avoidscratchingor impactingglassdoors,cooktopsor control
panels.Doingso may leadto glassbreakage.Donotcookon a
product with brokenglass.Shock,fire or cutsmayoccur.
Cookmeatand pou!trythoroughly-meat toatleastan internal
temperature of160 F and poultrytoatleastan internal
temperature of180°F.Cookingtothesetemperaturesusually
protectsagainst foodborne illness.
[A WARNING j KEEPFLAMMABLEMATERIALSAWAY FROM THE RANGE.
Do not storeor useflammable materials in an ovenor near
thecooktop,includingpaper,plastic,pot holders,linens,wall
coverings,curtains,drapes and gasolineor other flammable
vaporsand liquids.
Neverwearloose-fittingor hanginggarments while using
theappliance.Thesegarmentsmay ignite if they contact hot
surfaces,causingsevereburns.
Do not let cookinggreaseor other flammable materials
accumulate in or neartherange.Greaseintheoven or onthe
cooktop may ignite.
_, Cleanventilating hoodsfrequently.Greaseshouldnotbe allowed
toaccumulate onthehood or filter.
3
IMPORTANT SAFETY INFORMATION.
READALL INSTRUCTIONS BEFORE USING.
JA J
In WARNING 1IN THEEVENTOFA FIRE,TAKETHEFOLLOWING STEPS
TO PREVENT THEFIRE FROM SPREADING:
, Donot use water on grease fires.Never pick up a flaming
pan.Turnthe controls off. Smother a flaming pan on a
surface unit bycovering the pan completely with a well-
fitting lid, cookie sheet or flat tray. Use a multi-purpose dry
chemical or foam-type fire extinguisher.
, If there is a fire in the oven during baking, smother the
fire byclosing the oven door and turning the oven off or
byusing a multi-purpose dry chemical or foam-type fire
extinguisher.
, If there is a fire in the oven during self-clean, turn the oven
off and wait for thefire to go out. Donot force the door
og.p__.Introduction of flesh air at self-clean temperatures
may lead to a burst of flame from the oven. Failure to
follow this instruction may result in severe burns.
iA WARNING j COOKTOPSAFETYINSTRUCTIONS
Never leave the surface units unattended at medium or
high heat settings. Boilovers cause smoking and greasy
spillovers that may catch on fire.
Never leave oil unattended while frying. If allowed to
heat beyond its smoking point, oil may ignite, resulting
in fire that may spread to surrounding cabinets. Use a
deep fat thermometer whenever possible to monitor oil
temperature.
Toavoid oil spillover and fire, use a minimum amount of
oil when shallow pan-frying and avoid cooking frozen
foods with excessive amounts of ice.
Only certain typesofglass,glass/ceramic, earthenware
or other glazed containersaresuitable for cooktop
service; others may break because ofthe sudden
change in temperature.
To minimize the possibilityof burns,ignition of
flammable materialsand spillage,thehandle ofa
container should be turned toward the center of the
range without extendingover nearby surface units.
When preparing flaming foods under a hood, turn the
fan on.
[A WARNING JGLASS COOKTOPSAFETYINSTRUCTIONS
(some models)
Use care when touching the cooktop. The glass surface
of the cooktop will retain heat after the controls have
been turned off.
Do not cook on a broken cooktop. If glass cooktop
should break, cleaning solutions and spillovers
may penetrate the broken cooktop and create a
risk of electric shock. Contact a qualified technician
immediately.
Avoid scratching the glass cooktop. The cooktop can be
scratched with items such as knives, sharp instruments,
rings or other jewelry and rivets on clothing.
iiiiiiiiiiii_i;i
UseCERAHABRYTE®ceramic Cooktop Cleaner and
CERAHABRYTE®Cleaning Pad tocleanthe cooktop.
Waituntilthe cooktopcoolsand the indicator light
goes out beforecleaning.A wet sponge or clothon a
hot surface cancause steam burns.Some cleaners
canproduce noxious fumesif appliedto ahotsurface.
NOTE:Sugar spillsareanexception. They should be
scraped offwhile stillhot using an oven mittand a
scraper. Seethe Cleaning the glass cooktop section for
detailedinstructions.
Read and follow all instructions and warnings on the
cleaning cream label.
GEAppliances.com
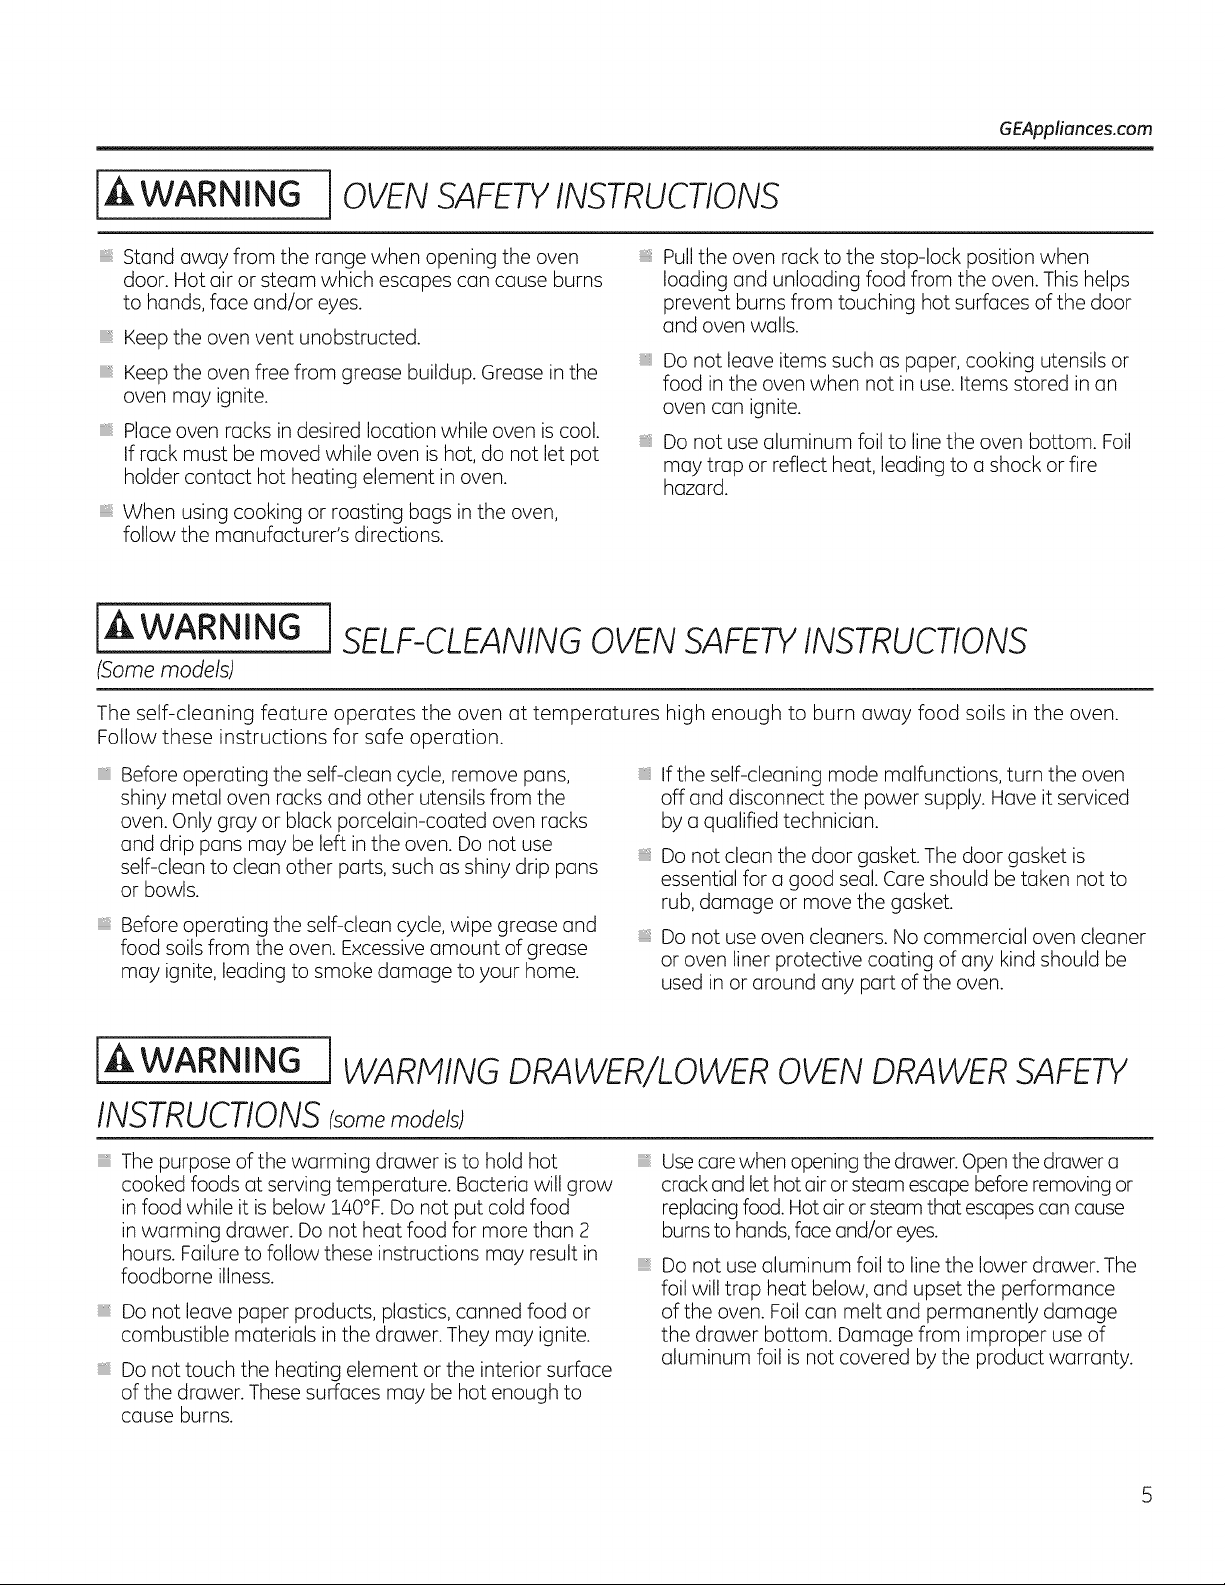
[A WARNING [ OVEN SAFETYINSTRUCTIONS
Stand away from the range when opening the oven
door. Hot air or steam which escapes can cause burns
to hands, face and/or eyes.
Keep the oven vent unobstructed.
Keep the oven free from grease buildup. Grease in the
oven may ignite.
Place oven racks in desired location while oven iscool.
If rack must be moved while oven is hot, do not let pot
holder contact hot heating element in oven.
When using cooking or roasting bags in the oven,
follow the manufacturer's directions.
Pull the oven rack to the stop-lock position when
loading and unloading food from the oven. This helps
prevent burns from touching hot surfaces of the door
and oven walls.
Do not leave items such as paper, cooking utensils or
food in the oven when not in use. Items stored in an
oven can ignite.
Do not use aluminum foil to line the oven bottom. Foil
may trap or reflect heat, leading to a shock or fire
hazard.
[,& WARNING
(Some models)
] SELF-CLEANING OVEN SAFETYINSTRUCTIONS
The self-cleaning feature operates the oven at temperatures high enough to burn away food soils in the oven.
Follow these instructions for safe operation.
Before operating the self-clean cycle, remove pans,
shiny metal oven racks and other utensils from the
oven. Only gray or black porcelain-coated oven racks
and drip pans may be left in the oven. Do not use
self-clean to clean other parts, such as shiny drip pans
or bowls.
Before operating the self-clean cycle, wipe grease and
food soils from the oven. Excessive amount of grease
may ignite, leading to smoke damage to your home.
If the self-cleaning mode malfunctions, turn the oven
off and disconnect the power supply. Have it serviced
by a qualified technician.
Do not clean the door gasket. The door gasket is
essential for a good seal. Care should be taken not to
rub, damage or move the gasket.
Do not use oven cleaners. No commercial oven cleaner
or oven liner protective coating of any kind should be
used in or around any part of the oven.
WARNING JWARIVllNGDRAWER/LOWEROVENDRAWERSAFETY
INSTRUCTIONS(somemode sl
The purpose ofthe warming drawer is to hold hot
cooked foods at serving temperature. Bacteria will grow
in food while it isbelow 140°F. Do not put cold food
in warming drawer. Do not heat food for more than 2
hours. Failure to follow these instructions may result in
foodborne illness.
Do not leave paper products, plastics, canned food or
combustible materials in the drawer. They may ignite.
Do not touch the heating element or the interior surface
of the drawer. These surfaces may be hot enough to
cause burns.
Usecare when opening the drawer. Open the drawer a
crack and lethot air or steam escape before removing or
replacing food. Hot air or steam that escapescan cause
burnsto hands, face and/or eyes.
Do not usealuminum foil to line the lower drawer. The
foil will trap heat below, and upset the performance
of the oven. Foilcan melt and permanently damage
the drawer bottom. Damage from improper use of
aluminum foil isnot covered by the product warranty.
Usingthe surface units,
How Induction Surface Cooking Works
Induction coils under the glass cooking surface produce
a magnetic field that generates heat in ferrous metals
that are in close proximity. The glass cooking surface is
not heated directly since it is not a ferrous metal, but the
glass may eventually become hot from the pan. Induction
surface coils are more efficient and willheat much faster
than conventional electric and gas cooking surface cooking
products.
CAUTION:
. Theinduction cooking elementsmay appear to be cool while
turned ON and after they havebeen turned OFF.The glass
surfacemay be HOTfrom residual heattransferredfrom the
cookware and burns may occur.
. DO NOTTOUCHHOTCOOKWAREor PANSdirectlywith hands.
Alwaysusemitts or potholders to protect handsfrom burns.
. DO NOTSLIDEcookware across thecooktop surface. Doing
so may permanently damagethe appearance oftheceramic
cooktop.
[A WARNING i IRE HAZARD: Never leave the range unattended with the cooktop on medium or highsettings. Keep flammable items away from the cooktop. Turn off all controls when
done cooking. Failure to follow these instructions can result in fire, serious injury or
death.
Throughout this manual, features and appearance may vary from your model.
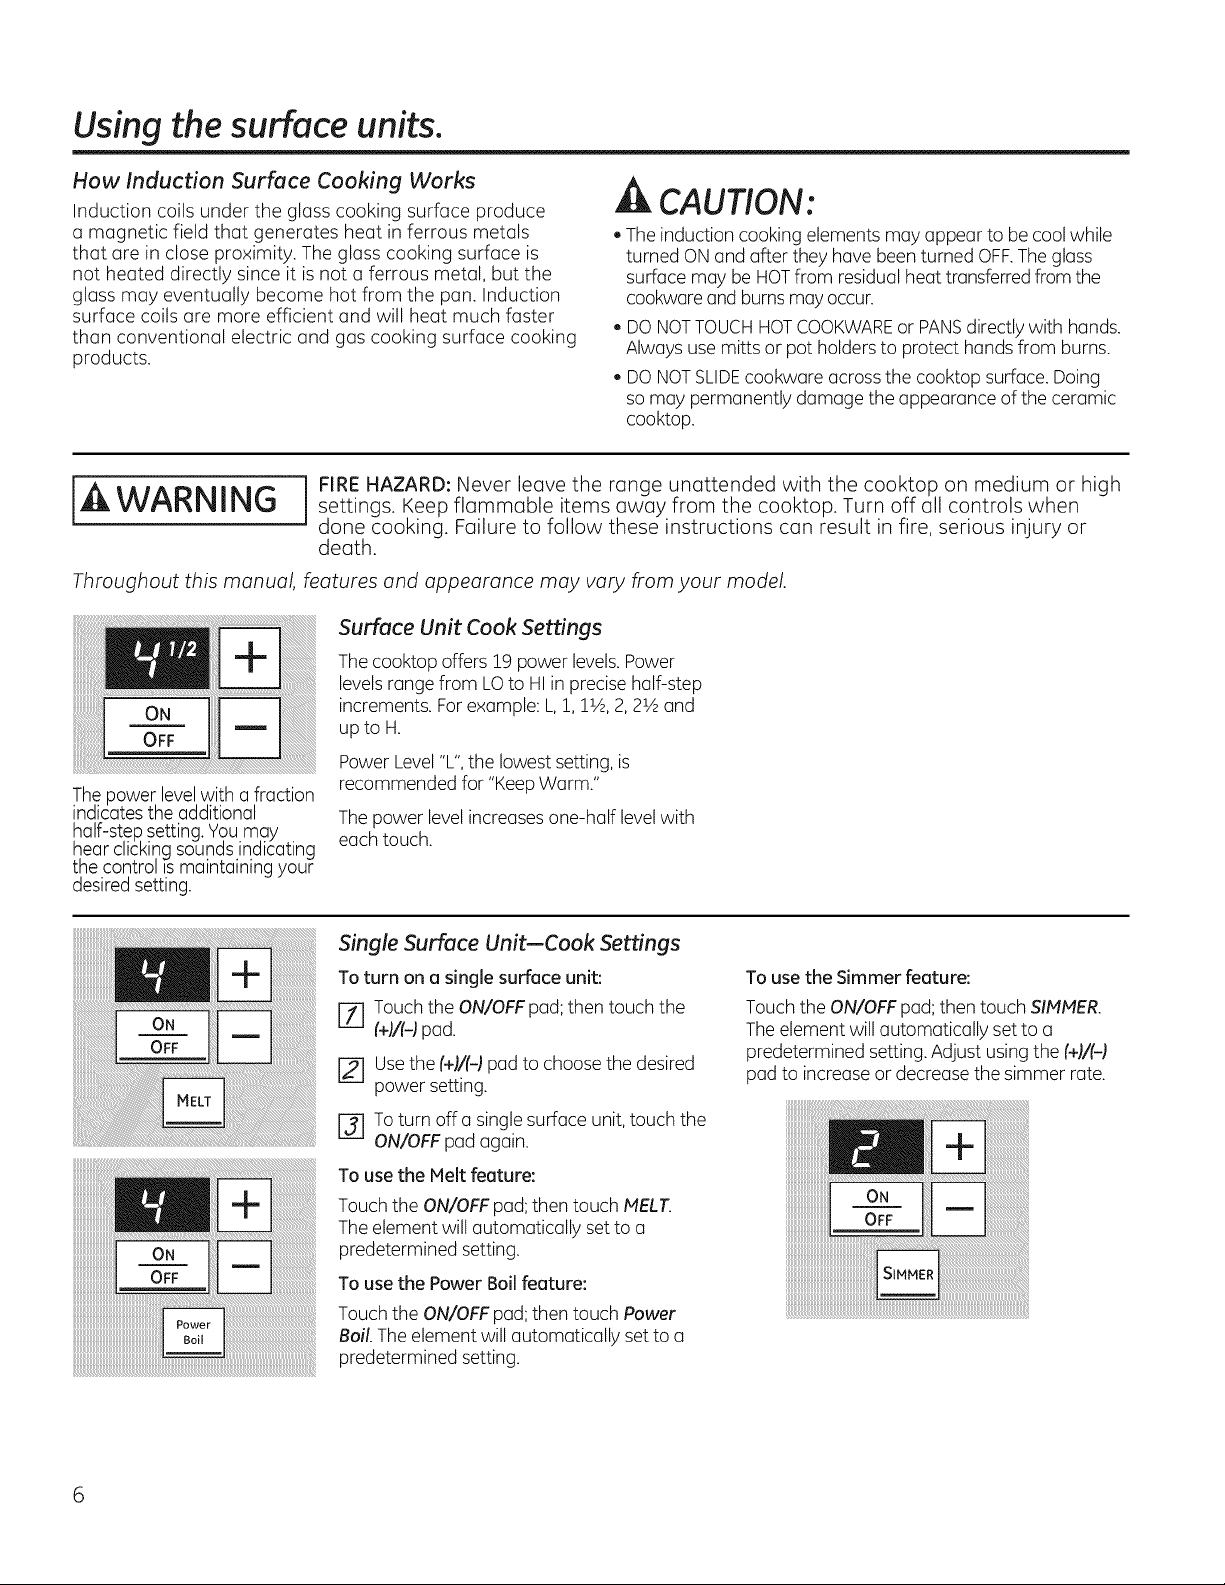
The powerlevel with a fraction
indicates the additional
half-stepsetting. Youmay
hear clickingsounds indicating
thecontrol is maintaining your
desired setting.
Surface Unit Cook Settings
Thecooktop offers!9 power levels.Power
levelsrange from LOto HI in precise half-step
increments.For example:L, 1, 11/2,2, 21/2and
upto H.
PowerLevel"L",thelowestsetting, is
recommended for "KeepWarm."
The power level increases one-half level with
eachtouch.
Single Surface Unit--Cook Settings
Toturn one single surface unit:
[] Touch the ON/OFFpad; then touch the
(+1/(-1pad.
[] Usethe(+)/10pad tochoose the desired
power setting.
r3] To turn off a single surfaceunit, touch the
ON/OFFpad again.
To use the Melt feeture:
Touch theON/OFFpad; then touch MELT.
Theelement willautomatically setto a
predetermined setting.
To use the PowerBoil feature:
Touch theON/OFFpad; then touch Power
Boil. The element willautomatically set toa
predetermined setting.
To use the Simmer feature:
Touch theON/OFF pad; thentouch SIMMER.
The element willautomatically set to a
predetermined setting. Adjust usingthe(+)/(-)
pad to increase or decrease thesimmer rate.

SELECT
GEAppliances.com
Using the Warming Zone
The WARMING ZONEislocated in the back
center of the glass surface.
To use the WARMING ZONE:
[-_ Touch the WARMING ZONE ON/OFF pad.
[27 To select the desired control setting, touch
the SELECT pad once for low(L),twice for
medium (M)or three times for high (HI.
To turn off the WARMING ZONE:
Touch the WARNING ZONE ON/OFF pad.
Forbest results, all foods on the WARHING
ZONEshould be covered with a lid or aluminum
foil.
Alwaysusepotholdersor oven mitts when
removing foodfrom the WARMINGZONE,as
cookware will be hot.
, Do not use plasticwrap tocover food. Plastic
may melt onto thesurfaceand be very
difficult to clean.
. Useonlycookware recommended fortop-of-
range cooking.
IAWARNING FOOD POISON HAZARD: Bacteria may grow in food at temperatures below 140°F.
Alwuys sturt with hot food. Do not use wurm settings to heut cold food.
Do not wurm food for more then 2 hours.
Fuilure to follow these instructions muy result in foodborne illness.
Usingthe surface units.
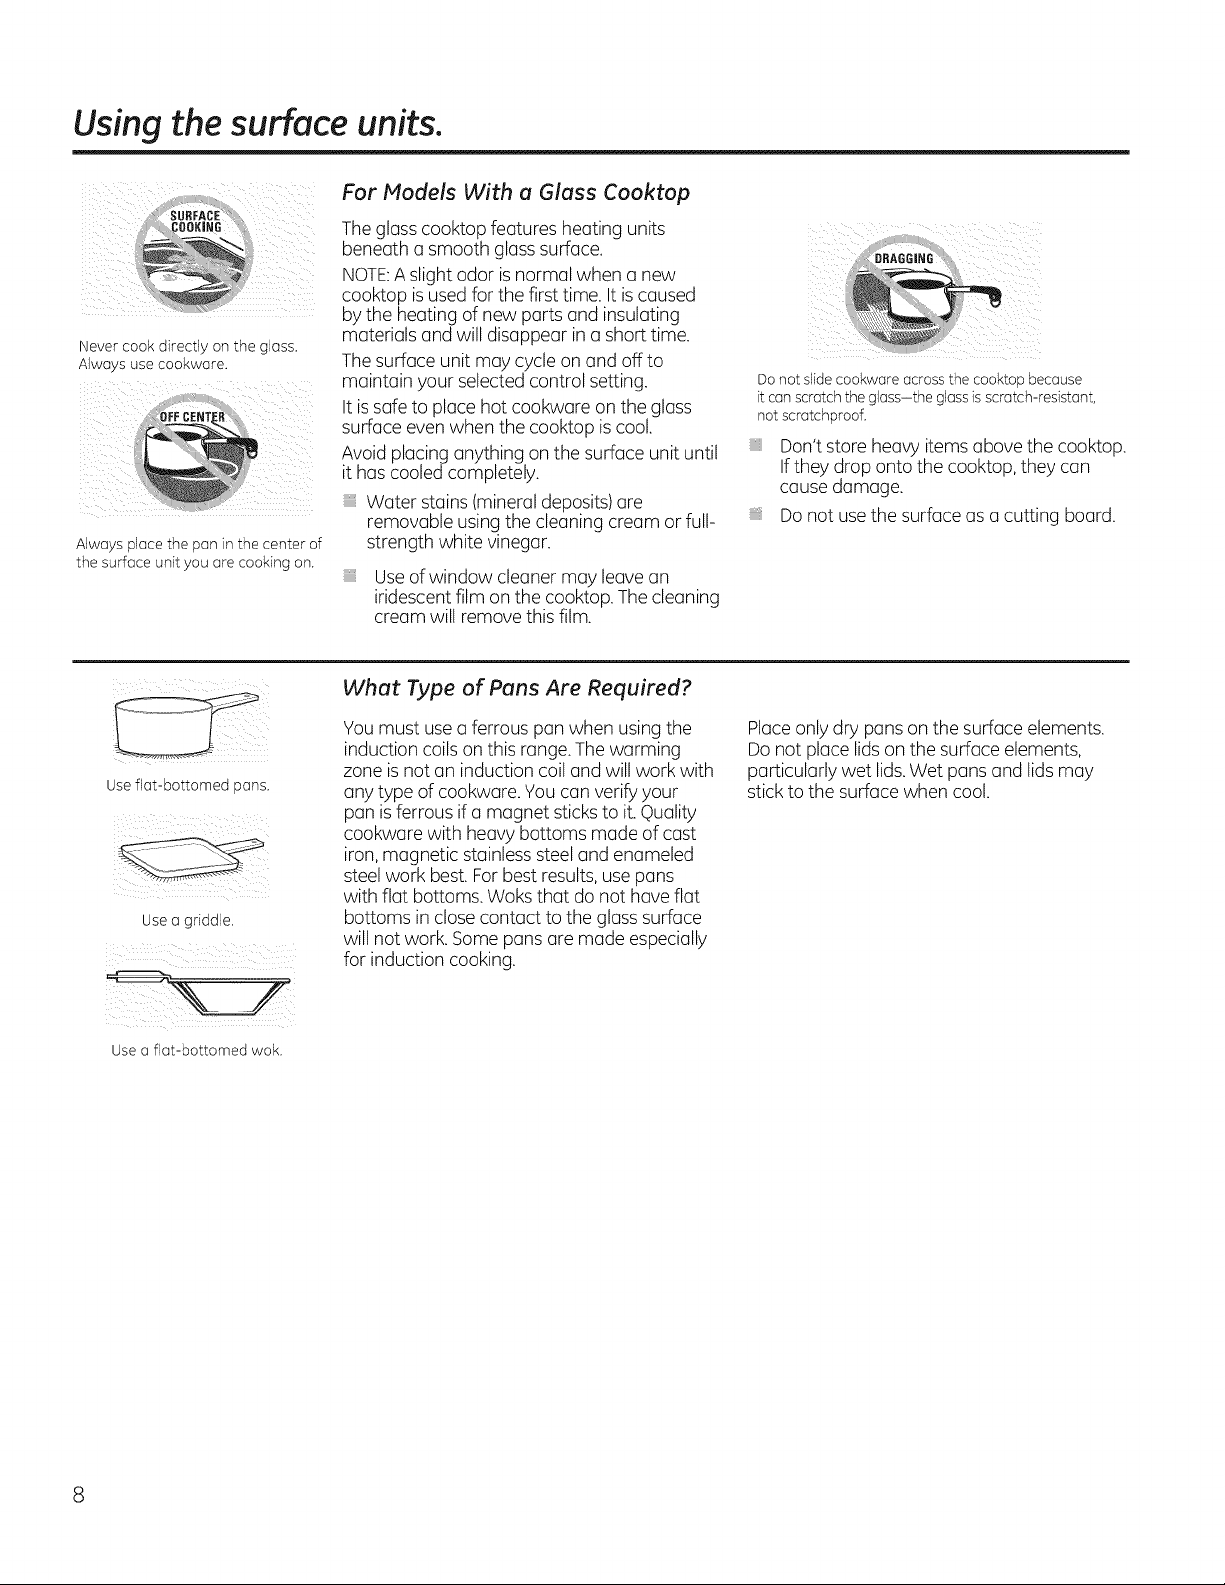
XJever COOK 3irect, )n _ne gloss
Alwa_ s use COOKwore.
Always place the pan in the center of
the surface unit you are cooking on.
For Models With a Glass Cooktop
The glass cooktop features heatingunits
beneatha smooth glass surface.
NOTE:Aslight odor is normal when a new
cooktop is used forthe firsttime.It is caused
by the heating ofnewparts and insulating
materialsand willdisappear in a short time.
The surface unitmay cycleon and off to
maintain your selected control setting.
It is safe to placehotcookware on theglass
surfaceeven when thecooktop is cool.
Avoidplacing anything on the surfaceunit until
ithascooled completely.
Water stains(mineral deposits) are
removable usingthecleaning cream or full-
strength white vinegar.
Useofwindow cleanermay leavean
iridescent film on thecooktop. The cleaning
cream willremove this film.
Donot slide cookware across the cooktop because
it canscratch the glass-the glassisscratch-resistant,
not scratchproof.
Don'tstore heavy itemsabovethecooktop.
Ifthey drop onto thecooktop, they can
cause damage.
Do not use thesurfaceasa cutting board.
Use flat-bottomed pans.
Use a griddle.
i_111%x_i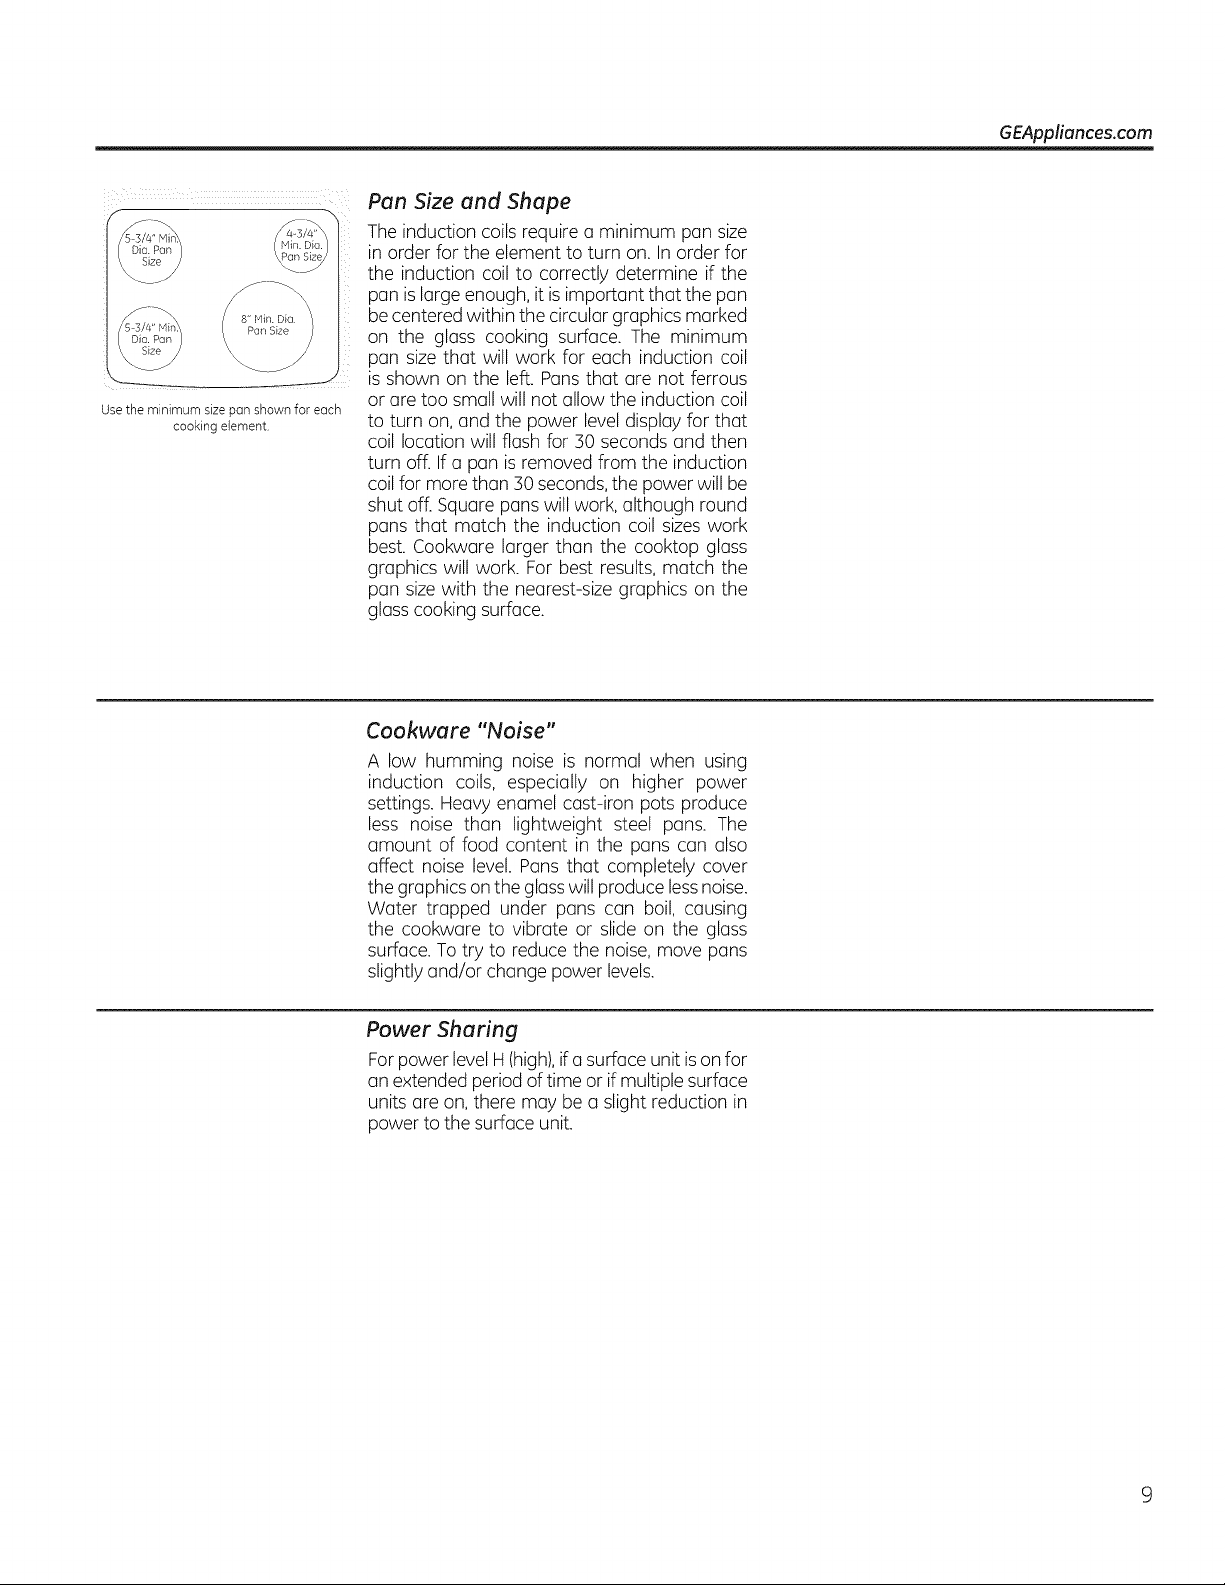
GEAppliances.com
Use the minimum sizepunshown foreach
cooking element
Pan Size and Shape
Theinduction coils require a minimum pan size
in order for the element to turn on.Inorder for
the induction coilto correctly determine if the
pan is large enough,itis important that the pan
be centered within thecircular graphics marked
on the gloss cooking surface. The minimum
pan size that will work for each induction coil
isshown on the left.Pans that are not ferrous
or are too small willnot allowthe induction coil
to turn on,and the power level display for that
coillocation will flash for 30 secondsand then
turn off.If a pan is removed from the induction
coil for more thon 30 seconds,the powerwillbe
shut off. Square pans will work,although round
pans that motch the induction coil sizes work
best.Cookwore larger than the cooktop gloss
graphics will work. Forbest results, match the
pan sizewith the nearest-size graphics on the
glosscooking surface.
Cookware "Noise"
A low humming noise is normal when using
induction coils, especially on higher power
settings.Heavyenamel cost-iron pots produce
less noise than lightweight steel pans. The
amount of food content in the pans can also
affect noise level. Pansthat completely cover
thegraphics onthe glosswillproducelessnoise.
Water trapped under pans con boil, cousing
the cookware to vibrote or slideon the gloss
surface. To try to reducethe noise, move pans
slightly and/or change powerlevels.
Power Sharing
For powerlevel H (high),ifa surfaceunitis on for
an extended period oftime or ifmultiple surface
units are on, there may be a slight reduction in
powerto thesurfaceunit.
Usingtheoven controls.
Throughout this manual, features and appearance may vary from your model
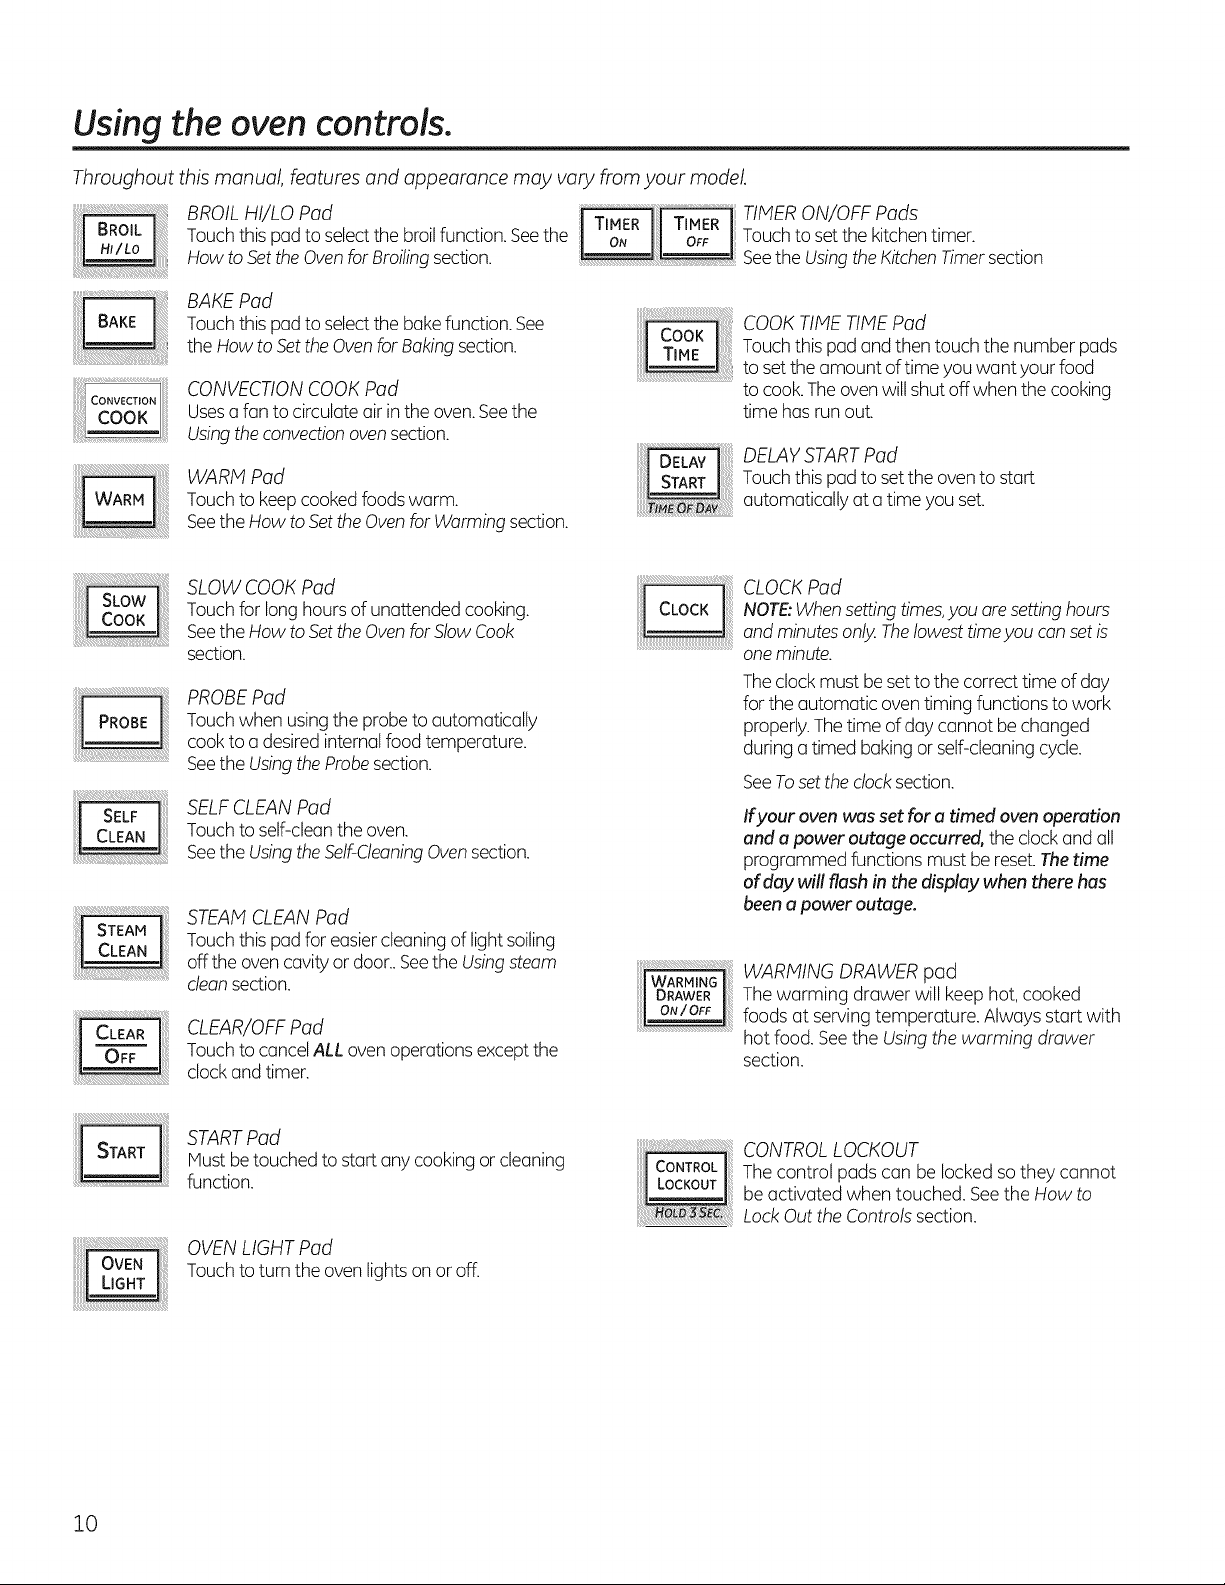
_BROILHI/LOPod __TIMERON/OFFPods
Touchthis pad toselectthebroilfunction. Seethe Touchtosetthekitchen timer.
How to Setthe OvenforBroilingsection. SeetheUsingthe KitchenTimersection
iiii ii ii!! ii!!iiiiiliii ii!! ii!!iiiiiiiii!
BAKE Pad
Touchthis pad toselectthebake function. See
theHow toSetthe Ovenfor Baking section.
CONVECTIONCOOK Pad
Usesa fantocirculate air in the oven.Seethe
Usingthe convectionoven section.
WARMPad
Touchtokeep cookedfoods warm.
SeetheHow toSetthe OvenforWarmingsection.
COOK TIMETIMEPad
Touchthis pad and thentouch thenumberpads
............................................................tosettheamount of time you want yourfood
tocook.The ovenwillshut offwhen thecooking
time hasrun out.
DELAYSTARTPad
Touchthis pad tosettheoven tostart
automaticallyata time youset.
iiiiiiii_!i!i!i!il
SLOWCOOK Pad
Touchforlong hours ofunattended cooking.
SeetheHow toSetthe Ovenfor Slow Cook
section.
PROBE Pad
Touchwhenusing theprobeto automatically
cook toa desired internalfoodtemperature.
SeetheUsingthe Probesection.
SELFCLEAN Pad
Touchtoself-cleantheoven.
SeetheUsingthe Self-CleaningOvensection.
STEAM CLEANPad
Touchthis pad foreasiercleaning oflight soiling
off theoven cavity or door..SeetheUsingsteam
clean section.
CLEAR/OFFPad
TouchtocancelALL oven operationsexcept the
clock and timer.
WARMmNG
I DRAWER I
ON/O_FJ
CLOCKPad
NOTE:Whensetting times,youaresetting hours
and minutesonly.Thelowest timeyoucan setis
oneminute.
Theclock mustbe settothecorrect time ofday
forthe automatic oven timing functions towork
properly.The time ofday cannot be changed
during a timed baking or self-cleaningcycle.
See To set the clock section.
Ifyour oven was set for atimed oven operation
and a power outage occurred, theclockand all
programmed functions mustbe reset.Thetime
of day will flash inthe display when there has
been a power outage.
WARMING DRAWER pod
The warming drawer willkeephot, cooked
foods atserving temperature. Alwaysstartwith
hotfood. Seethe Usingthewarming drawer
section.
STARTPad
Must betouched tostartanycookingor cleaning
function.
OVENLIGHTPad
Touchtoturntheoven lightson or off.
CONTROLLOCKOUT
The control padscan be locked so they cannot
be activated whentouched. SeetheHow to
LockOuttheControlssection.
10

Usingthe clock, kitchen timer, and control lockout. GEAppliances.com
To Set the Clock
The clockmust be set tothecorrect time ofday
forthe Delay Start functions towork properly.
The time ofdaycannot be changed during
a delayed cooking or a delayedself-cleaning
cycle.
%
r21
Touch theCLOCKpad.
Touch thenumber pads until the correct
time ofday is shown in thedisplay.Ifthe
number padsare nottouched within one
minute after you touch theCLOCKpad,
thedisplay reverts to theoriginal setting. If
this happens,touch theCLOCKpad and
enterthetime ofday.
r-_ Touch theSTARTpad untilthe time ofday
showsin the display.This enters thetime
and starts the clock.
To checkthetime ofdaywhen thedisplay is
showing other information, touch the CLOCK
pad. The time of dayshowsuntilanother pad
is touched.To change thetime format or turn
off theclockdisplay, see theSpecialFeatures
section.
TIMER
ON
TIMER
OFF
TheKitchenTimer isinhours and
minutes.
TheKitchenTimerdoesnot controloven
operations.Themaximum settingonthe
KitchenTimeris9hoursand59 minutes.
]
To Set the Kitchen Timer
%
[]
Touch theTIMERONpad.
Touch thenumber pods until the amount
oftime youwont showsin the display. For
example, to set 2 hoursand 45 minutes,
touch 2,4 and 5 in that order. If youmake
a mistake, touch the TIMEROFFpad and
begin again.
r_ Touch theSTARTpad.
After touching the STARTpod,SETdisappears;
this tellsyouthetime is counting down, although
thedisplay does notchangeuntilone minute
haspassed.Secondswillnotbe shown inthe
display until the lost minute iscounting down.
[] Whenthekitchen timer reaches:00,the
control willbeep 3 times followed byone
beep every 6 secondsuntil the TIMEROFF
pad is touched.
The 6-second tone can be cancelled by
following the steps in theSpecial features of
your oven control sectionunder Tonesatthe
Endofo TimedCycle.
TIMER
ON
To Reset the Kitchen Timer
If the display is still showing thetime remaining,
youmay change itbytouching the TIMERON
pad, then touching the number padsso that the
time youwant appearsin the display.
If the remainingtime is notin the display (clock,
delaystart or cooking time are inthe display),
recalltheremaining time bytouching the
TIMERON pad and thentouch thenumber
padstoenterthe newtime youwant.
To Cancel the Kitchen Timer
TIMER Touch theTIMEROFFpad.
OFF
i:ii_!!!!!_!_'i!!!!ii_i!i!iiii!!ili;i;iiiiiiii!!!ill¸i!!!IJilil;i;i;ilili!_i¸ii!;i;i;i;i;i;i;iiii!!i;i¸i¸i!;iiiii!!ii!i
,s,
How to Lock Out the Controls
Control Lockout will allow you to lock outthe
touch pads sothey cannot be activated when
touched.
To lock/unlock the controls:
[Z] Touch and hold the Control Lockout pad
for3 seconds. The ovendisplay willshow
"LocOn Loc".
To unlock the control,touch and hold the
Control Lockout pad for 3 seconds.The
ovendisplay willshow "LocOFFLoc".
Whenthis feature is on, thetouch padswillnot
respondexceptforthe Clear/Off pad.
11
Using the oven.
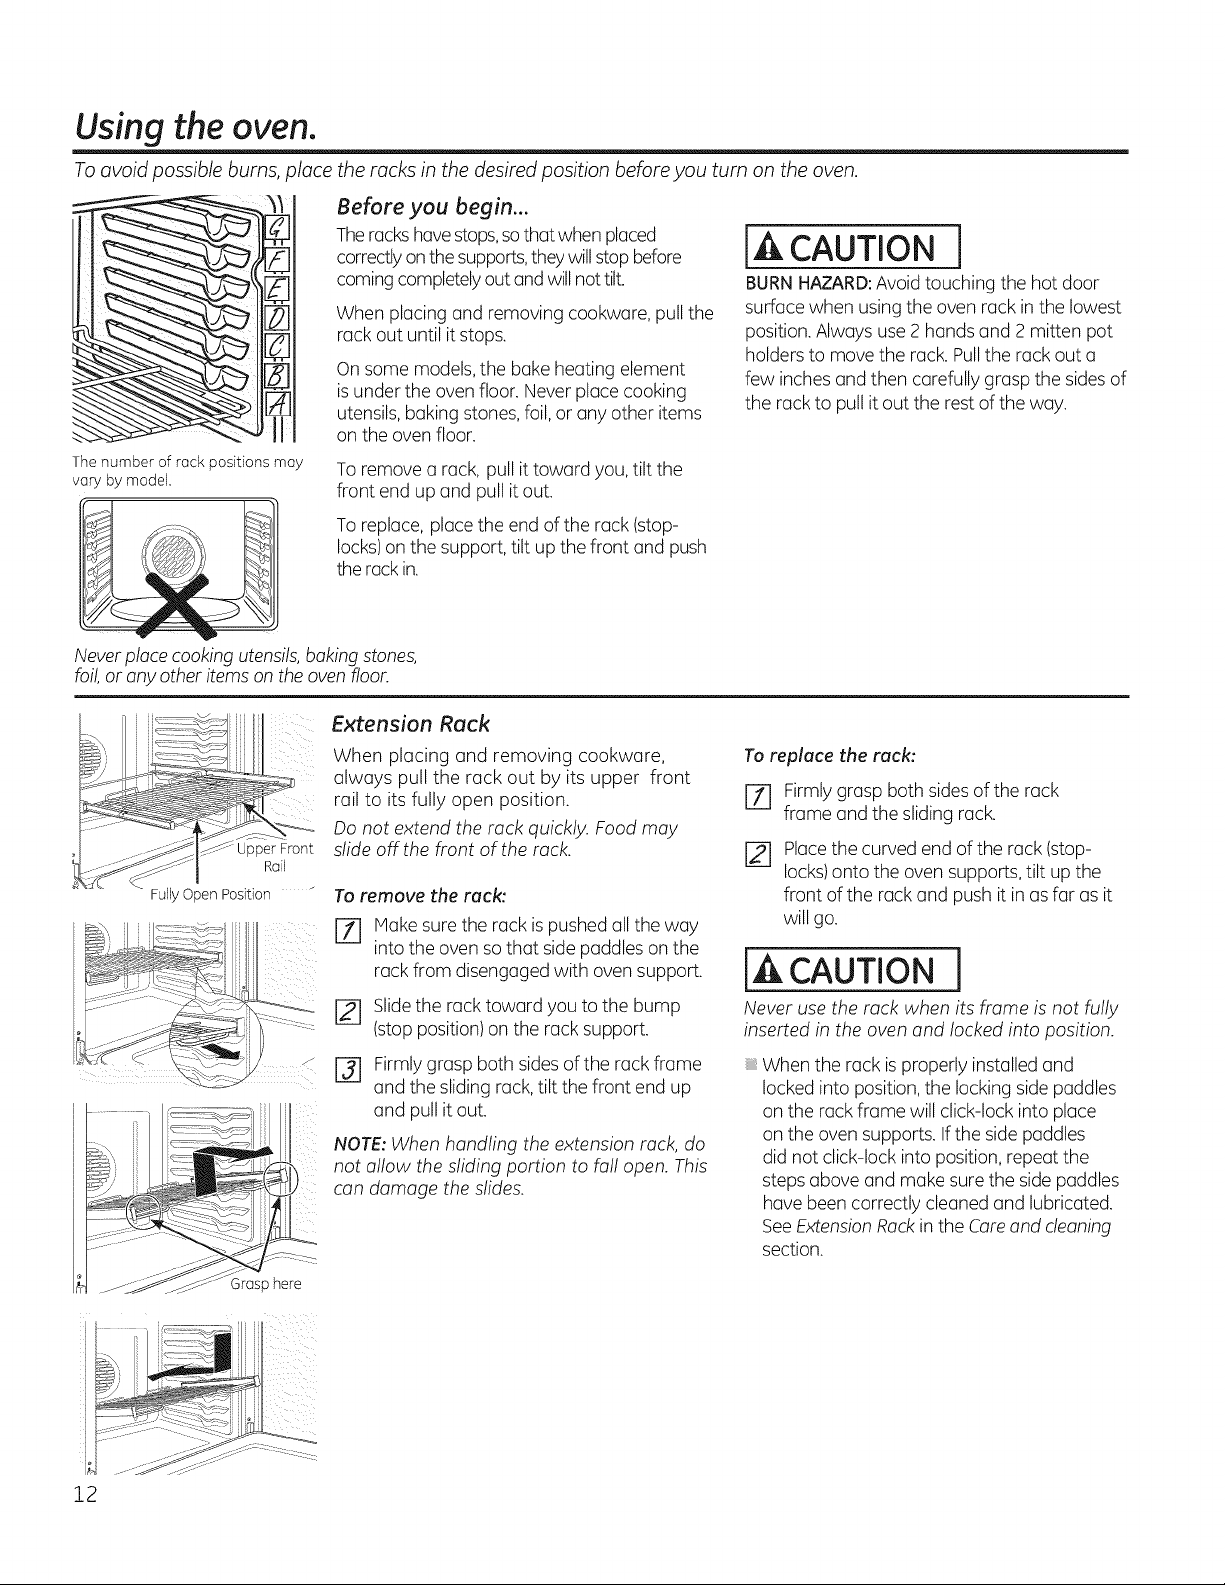
To avoid possible burns,place the racks in the desired positionbefore you turn on the oven.
Thenumber of rack positions may
vary by model.
Before you begin...
Therackshave stops,sothat whenplaced
correctlyonthe supports,theywill stop before
comingcompletelyoutandwill not tilt.
Whenplacing and removing cookware, pull the
rack outuntil it stops.
On some models,the bakeheating element
is under theovenfloor. Never place cooking
utensils,bakingstones, foil,or anyother items
on the oven floor.
To remove a rack,pull ittoward you, tilt the
front end up and pull itout.
[A CAUTION
BURN HAZARD:Avoidtouching the hotdoor
surfacewhen using the ovenrack in thelowest
position. Alwaysuse2 handsand 2 mitten pot
holderstomove the rack. Pulltherack outa
few inches and then carefullygrasp the sidesof
the rack to pull itoutthe rest oftheway.
To replace, place the end ofthe rack (stop-
locks)on the support,tilt up thefront and push
the rack in.
Neverplacecooking utensils,baking stones,
foil,or anyotheritems on theoven floor.
12
Front
Rail
Fully Open Position "
3rasp here
Extension Rack
When placing and removing cookware,
always pull the rack out by its upper front
rail to its fully open position.
Donot extend therack quickly. Foodmay
slide off the front ofthe rack.
Toremove the rack:
[Z] Hake sure the rack ispushedall theway
_ntotheovenso that sidepaddleson the
rack from disengaged with ovensupport.
r_ Slidethe rack toward youtothe bump
(stop position) on the rack support.
[] Firmly graspboth sidesofthe rack frame
and the sliding rack, tilt thefront end up
and pull itout.
NOTE: Whenhandling the extension rack, do
not allow thesliding portion to fall open. This
candamage the slides.
To replace the rack:
[Z] Firmly graspboth sidesofthe rack
frame and the slidingrack.
r21
Placethecurved end oftherack (stop-
locks)onto theoven supports,tilt up the
front oftherack and pushitin as far asit
willgo.
[A CAUTION
Never usethe rack when its frame isnot fully
inserted in the oven and locked into position.
Whentherack is properly installed and
locked into position, thelocking side paddles
on the rack frame willclick-lock intoplace
on the ovensupports. If thesidepaddles
did notclick-lockintoposition,repeatthe
steps above and make sure the sidepaddles
havebeen correctly cleanedand lubricated.
SeeExtensionRackin the Careand cleaning
section.
GEAppliances.com
Aluminum Foil
Donot usealuminum foil to line oven bottoms.
The foil will trap heat below and upset the
performance of the oven. Foil can melt
and permanently damage the oven bottom.
Damage from improper useofaluminum foilis
notcovered bytheproduct warranty.
Foilmay be used to catch spills by placing a
sheet on a lower rack, several inches below
the food. Donot usemore foil than necessary
and never entirely cover on oven rack with
aluminum foil. Keep foil at least 1-1/2" from
oven walls to prevent poor heat circulation.
/xTlZllflll_S_iflflrl[irlriil_iill_i\i\_X,
EP
%-
Rockposition for baking 4 oyer
cokes.
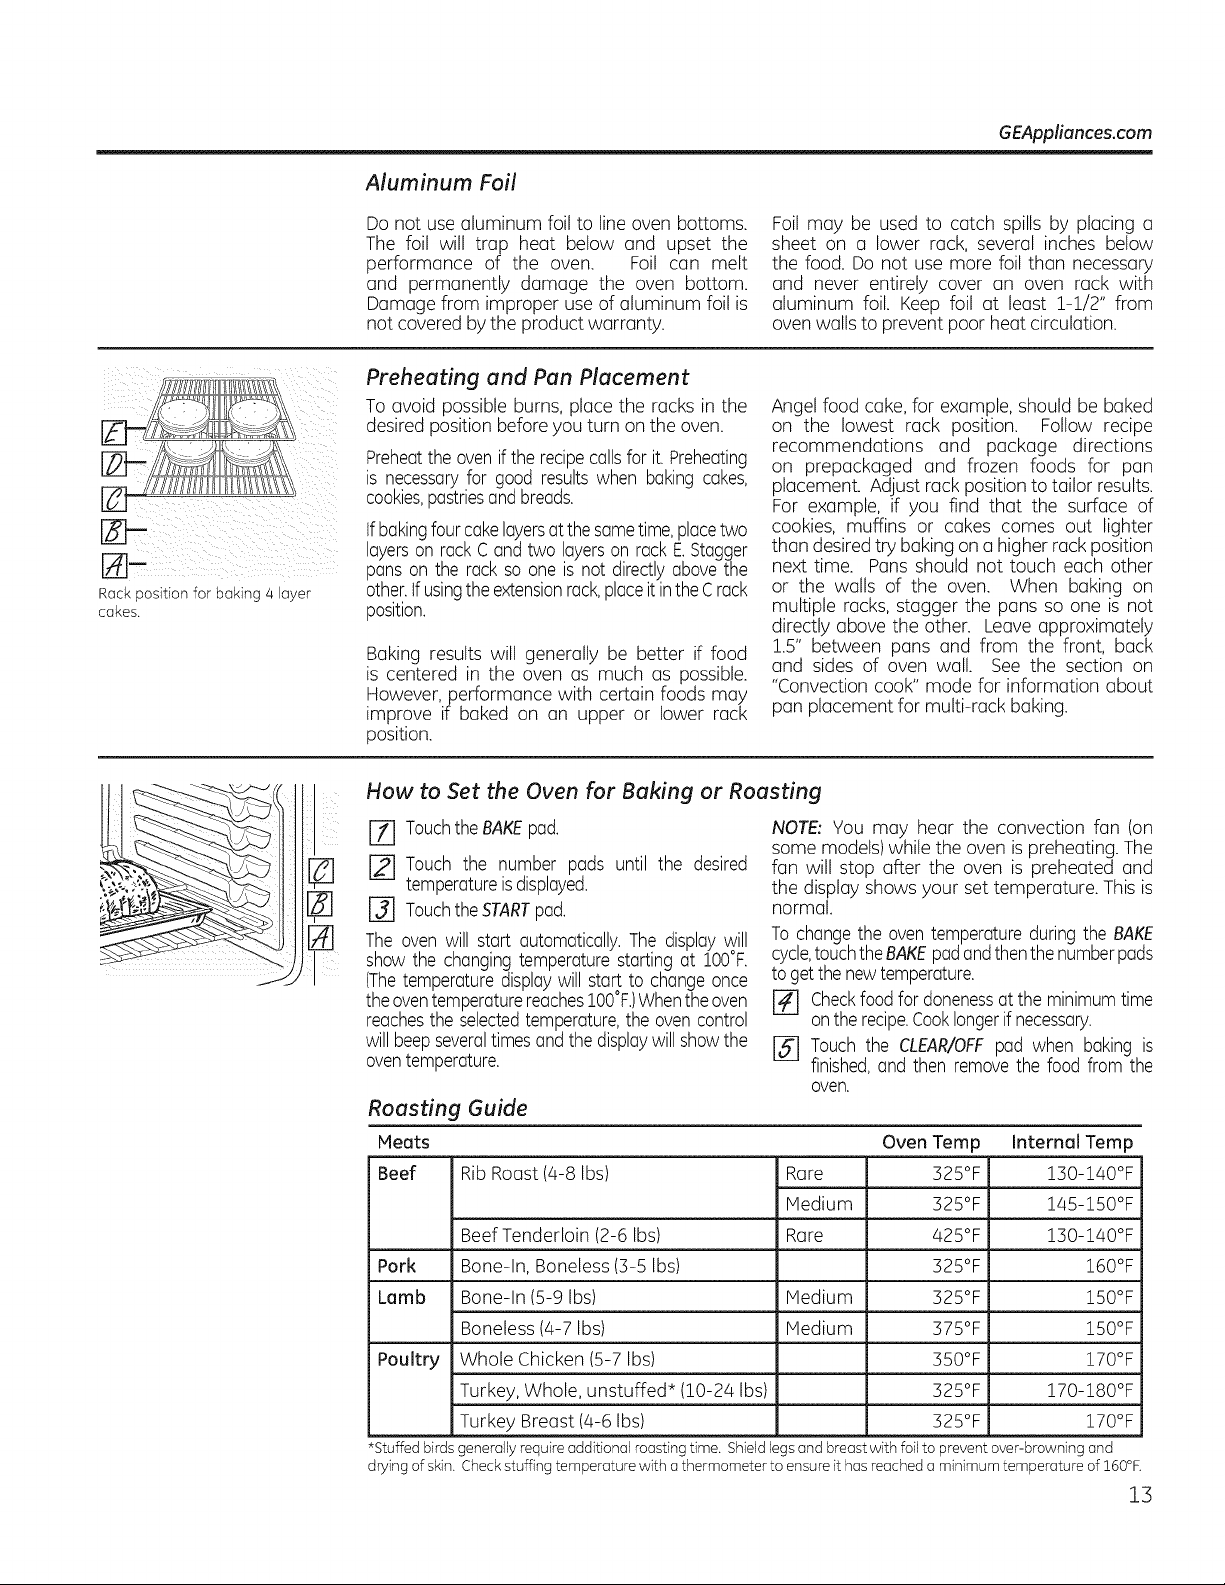
Preheating and Pan Placement
To avoid possible burns, place the racks in the
desired position before you turn on the oven.
Preheattheoven if therecipecallsforit.Preheating
isnecessaryfor good results when baking cakes,
cookies,pastriesandbreads.
tfbakingfour cakelayersat the sametime,placetwo
layerson rackC and two layerson rackE.Stagger
pans on the rack soone isnot directly abovethe
other,tf usingthe extensionrack,placeit inthe Crack
position.
Baking results will generally be better if food
is centered in the oven as much as possible.
However, performance with certain foods may
improve if baked on an upper or lower rack
position.
Angel food cake, for example, shouldbe baked
on the lowest rack position. Follow recipe
recommendations and package directions
on prepackaged and frozen foods for pan
placement. Adjust rack position totailor results.
For example, if you find that the surface of
cookies, muffins or cakes comes out lighter
than desired try bakingon a higher rack position
next time. Pansshould not touch each other
or the walls of the oven. When baking on
multiple racks, stagger the pans soone is not
directly abovethe other. Leave approximately
1.5" between pans and from the front, back
and sides of oven wall. See the section on
"Convection cook"mode for information about
pan placementfor multi-rack baking.
How to Set the Oven for Baking or Roasting
rTl Touchthe BAKEpad.
[] Touch the number pads until the desired
temperatureis displayed.
[] TouchtheSTARTpad.
[_ Theovenwill start automatically.Thedisplaywill
show the changingtemperaturestartingat IO0°F.
(Thetemperaturedisplaywill startto changeonce
the oventemperaturereachesIO0°F.)Whentheoven
reachestheselectedtemperature,the oven control
willbeepseveraltimesand the displaywillshowthe
oventemperature.
Roasting Guide
Meots
Beef
Pork
Lomb
NOTE: You may hear the convection fan (on
some models) whilethe ovenispreheating. The
fan will stop after the oven is preheated and
the display showsyour set temperature. This is
normal.
Tochangethe oven temperatureduring theBAKE
cycle,touchtheBAKEpadandthenthe numberpads
togetthe newtemperature.
[] Checkfood foralonenessattheminimumtime
onthe recipe.Cooklongerif necessary.
r_ Touch the CLEAR/OFFpad when baking is
finished,and thenremovethe foodfrom the
oven.
Oven Temp Internal Temp
Rib Roast (4-8 Ibs) Rare 325°F 130-140°F
Medium 325°F 145-150°F
BeefTenderloin (2-6 Ibs)
Bone-In, Boneless (3-5 Ibs)
Bone-In (5-9 Ibs)
Boneless (4-7 Ibs)
Whole Chicken(5-7 Ibs)
Poultry
Turkey, Whole, unstuffed* (10-24 Ibs)
Turkey Breast (4-6 Ibs)
Rare
Medium
Medium
425°F
325°F
325°F
375°F
350°F
325°F
325°F
130-140°F
160°F
150°F
150°F
170°F
170-180°F
170°F
*Stuffedbirdsgenerally require additional roostingtime. Shield les and breast with foilto prevent over-browning and
dryingofskin. Check stuffing temperature with othermometer to ensureit hasreached o minimum temperature of 160°F.
13
Usingtheoven.
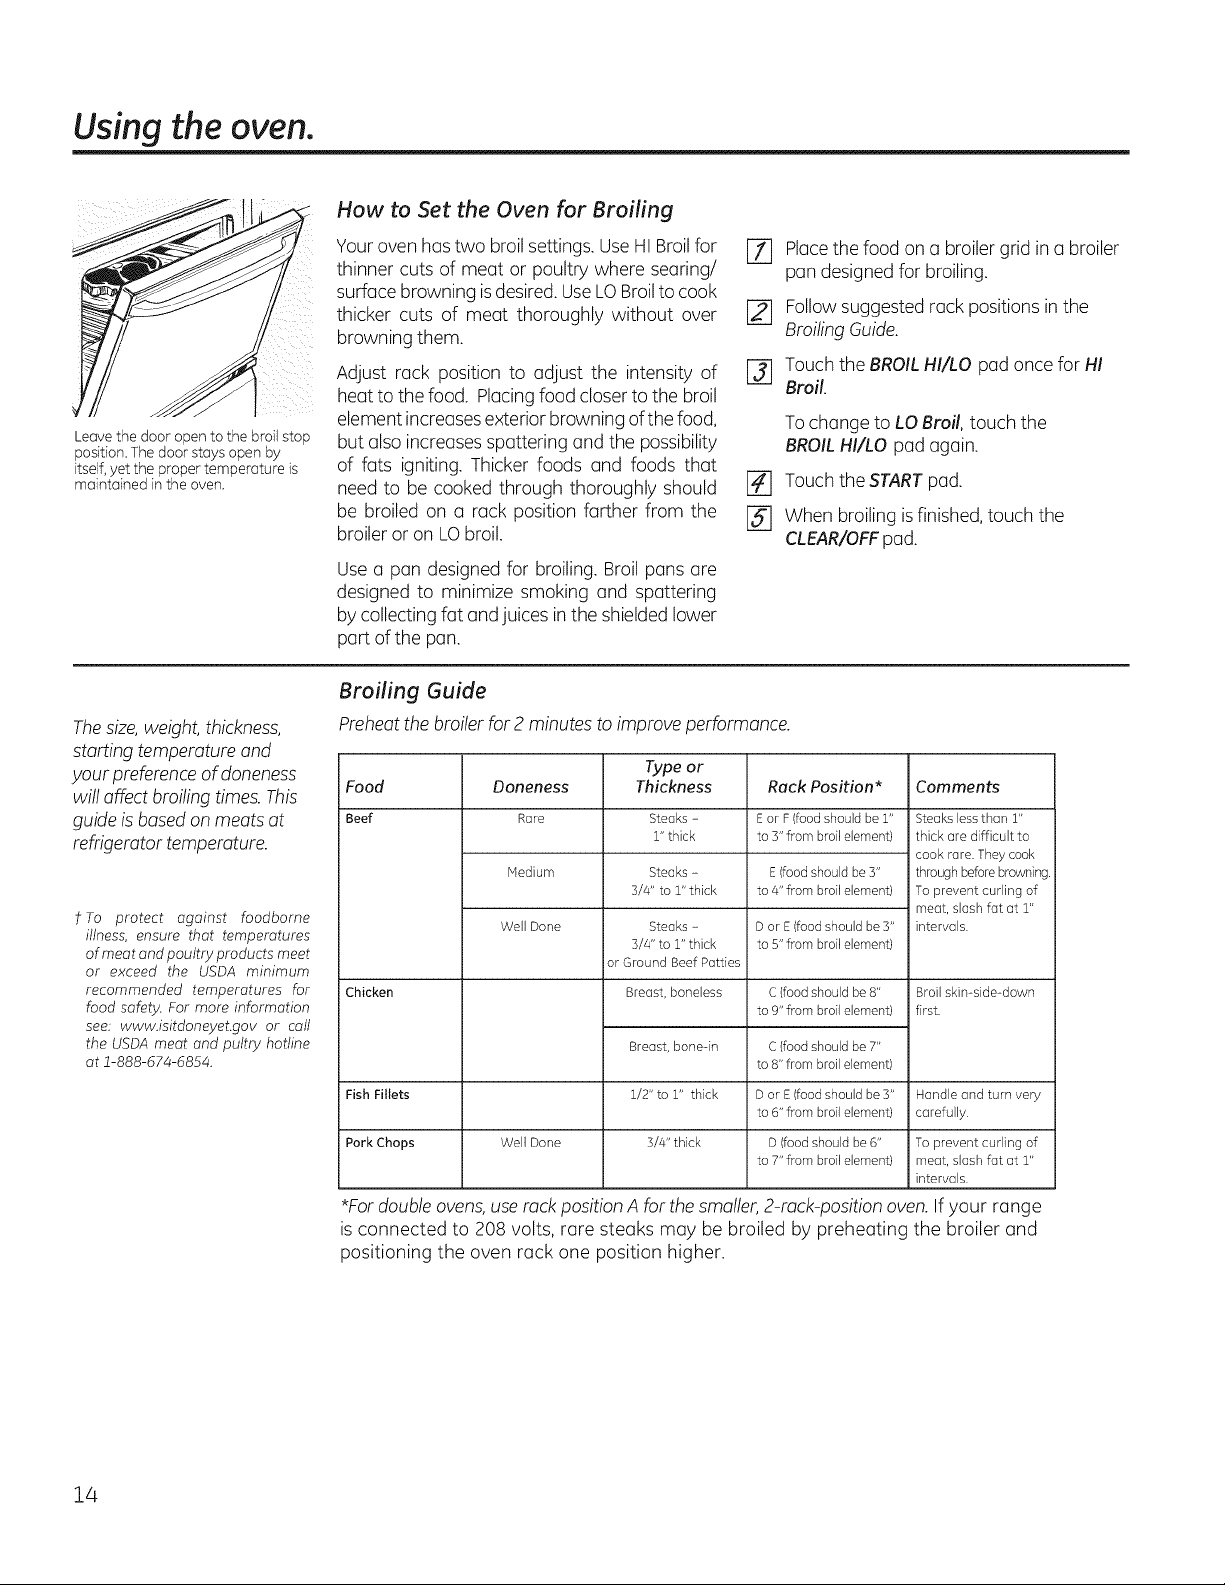
Leavethe door open to the broil stop
position,Thedoorstays open by
itself,yet the proper temperature is
maintained in the oven.
How to Set the Oven for Broiling
Yourovenhastwo broil settings.UseHI Broilfor
thinner cuts of meat or poultry where searing/
surfacebrowning isdesired. UseLOBroiltocook
thicker cuts of meat thoroughly without over
browning them.
Adjust rack position to adjust the intensity of
heattothe food. Placingfoodcloser tothe broil
element increasesexterior browning of thefood,
but alsoincreases spattering and the possibility
of fats igniting. Thicker foods and foods that
need to be cooked through thoroughly should
be broiled on a rack position farther from the
broiler or on LObroil.
Use a pan designed for broiling. Broil pans are
designed to minimize smoking and spattering
bycollectingfat and juices in theshieldedlower
part ofthe pan.
[] Placethefood on a broiler grid in a broiler
pan designedforbroiling.
[] Followsuggestedrack positionsin the
Broiling Guide,
r_ Touch theBROILHI/LO pad oncefor HI
Broil.
To changeto LOBroil, touch the
BROILHI/LO pad again.
[] Touch theSTARTpad.
[] When broiling is finished, touch the
CLEAR/OFFpad.
The sRe,weight, thickness,
starting temperatureand
your preferenceofdoneness
will affect broiling times. This
guide isbased on meatsat
refrigerator temperature.
t To protect against foodborne
illness, ensure that temperatures
ofmeat and poultry products meet
or exceed the USDA minimum
recommended temperatures for
food safety. For more information
see: www.isitdoneyet.gov or call
the USDA meat and pultry hodine
at1-888-674-6854.
Broiling Guide
Preheat thebroiler for 2 minutestoimprove performance.
Typeor
Food Doneness Thickness Rack Position* Comments
Beef Rare Steaks - Eor F (foodshould be 1"
1"thick to 3"from broilelement}
Chicken
Medium Steaks - E(food should be 3"
3/4" to 1"thick to 4"from broilelement}
Well Done Steaks -
3/4" to 1"thick
ior Ground Beef Patties
Breast, boneless
Dor E(food should be S"
to 5"from broilelement}
Breast, bone-in
1/2" to 1" thick
3/4" thick
C(food should be 8"
to 9"from broilelement}
C(food should be 7"
to 8"from broilelement)
Steaks less than 1"
thick are difficult to
cook rare. They cook
through beforebrowning.
To prevent curling of
meat, slash fat at 1"
intervals.
Broil skin-side-down
first.
Fish Fillets Dor E(food should be 3" Handle and turn very
to 6"from broilelement/ carefully.
Pork Chops Well Done D(food should be 6" To prevent curling of
to 7"from broilelement} meat, slash fat at 1"
intervals.
*For double ovens,use rack position A forthesmaller,2-rock-position oven. If your range
isconnected to 208 volts, rare steaks may be broiled by preheating the broiler and
positioning the oven rack one position higher.
14
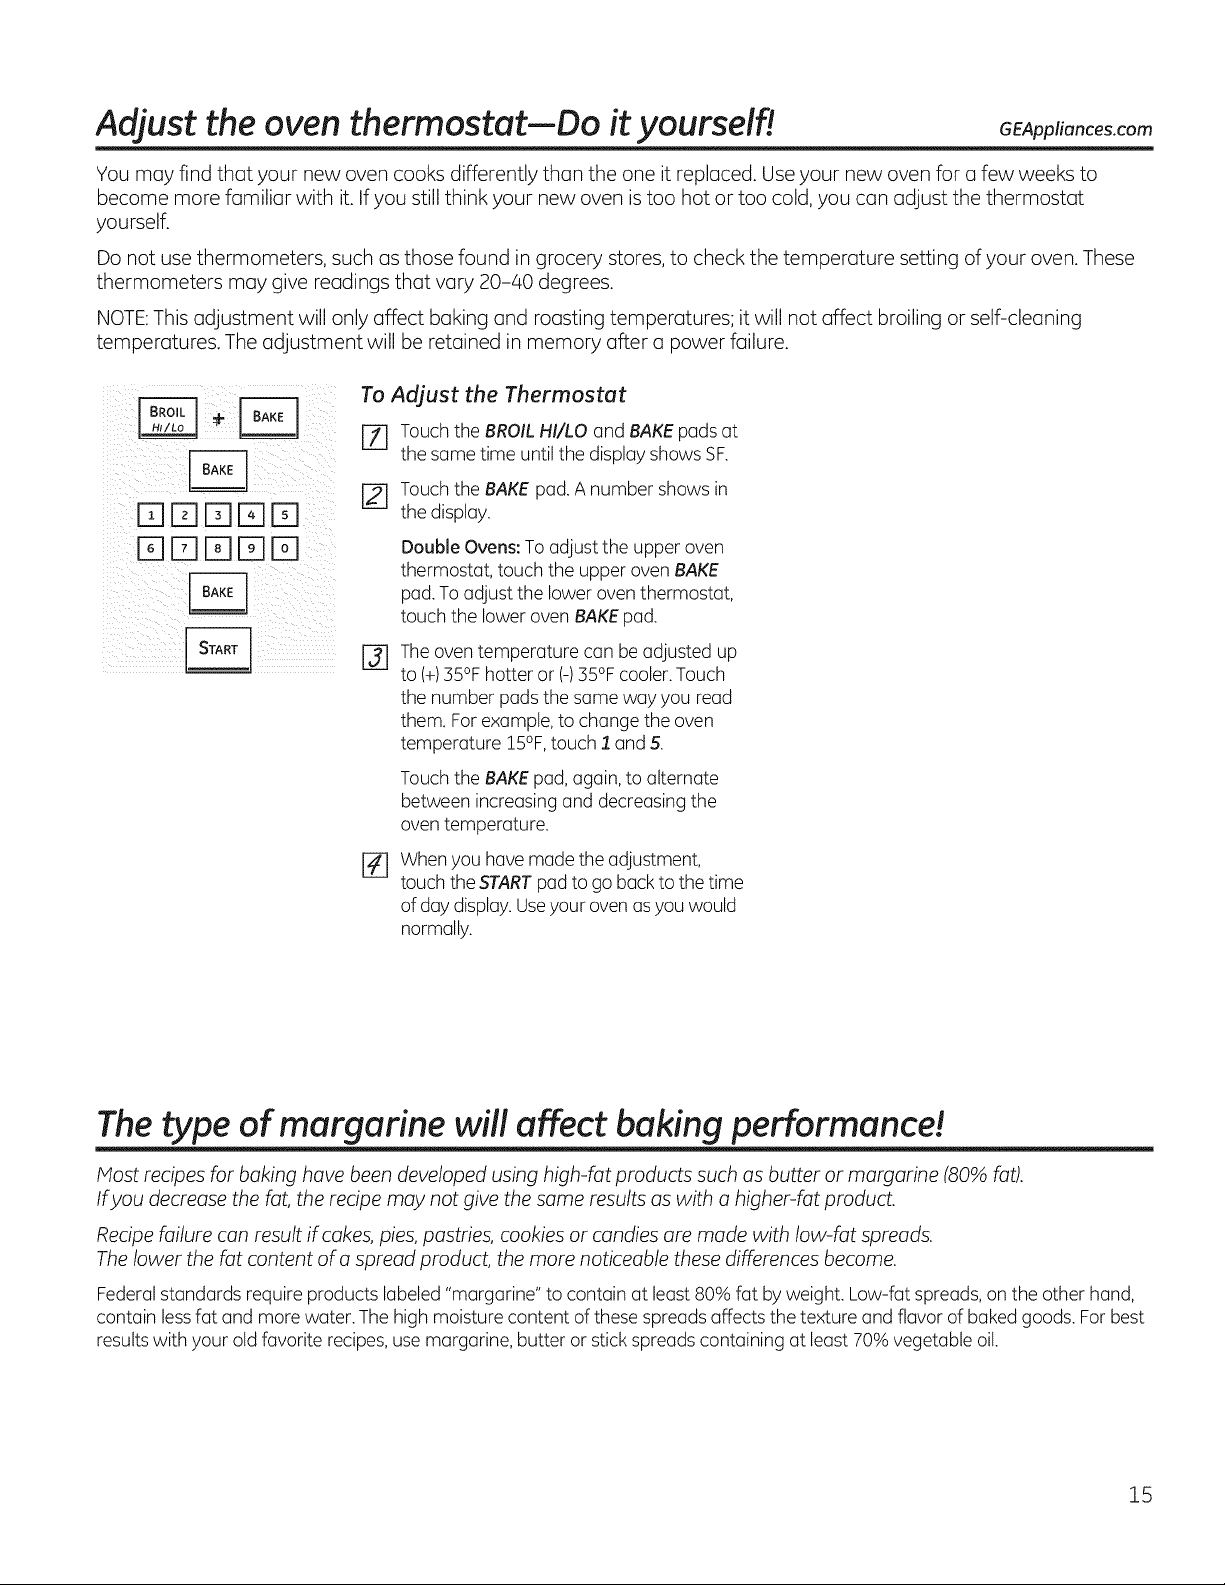
Adjust the oven thermostat--Do it yourself! GEApplionces.com
You may find that your new oven cooks differently than the one it replaced. Use your new oven for a few weeks to
become more familiar with it. If you still think your new oven istoo hot or too cold, you can adjust the thermostat
yourself.
Do not use thermometers, such as those found in grocery stores, to check the temperature setting of your oven. These
thermometers may give readings that vary 20-40 degrees.
NOTE:This adjustment will only affect baking and roasting temperatures; it will not affect broiling or self-cleaning
temperatures. The adjustment will be retained in memory after a power failure.
[]DDDD
[]DDDD
To Adjust the Thermostat
r!] Touch theBROILHI/LO and BAKEpads at
thesame time untilthedisplay showsSF.
r_ Touch theBAKEpad.A number showsin
thedisplay.
Double Ovens: To adjust the upper oven
thermostat, touch the upper ovenBAKE
pad. To adjust the loweroven thermostat,
touch the lowerovenBAKEpad.
@
The oven temperature can be adjusted up
to(+)35°F hotter or (-)35°F cooler.Touch
thenumber padsthesame way you read
them.For example, to changethe oven
temperature !5°F, touch 1 and 5.
Touch theBAKEpad,again, to alternate
between increasing and decreasing the
oventemperature.
%
When youhavemadetheadjustment,
touch theSTARTpad togo back tothetime
ofdaydisplay.Useyourovenas youwould
normally.
The type of margarine will affect baking performance!
Most recipes for baking have been developed using high-fat products such as butter or margarine (80% fat).
Ifyou decrease the fat, the recipe may not give the same results as with a higher-fat product.
Recipe failure can result if cakes, pies, pastries, cookies or candies are made with low-fat spreads.
Thelower the fat content of a spread product, the more noticeable these differences become.
Federal standards require products labeled "margarine" to contain at least 80% fat by weight. Low-fat spreads, on the otherhand,
contain lessfat and morewater.Thehigh moisturecontent of these spreads affectsthetexture and flavor ofbakedgoods. For best
results with your old favorite recipes, use margarine, butter or stick spreads containing at least 70% vegetable oil.
15
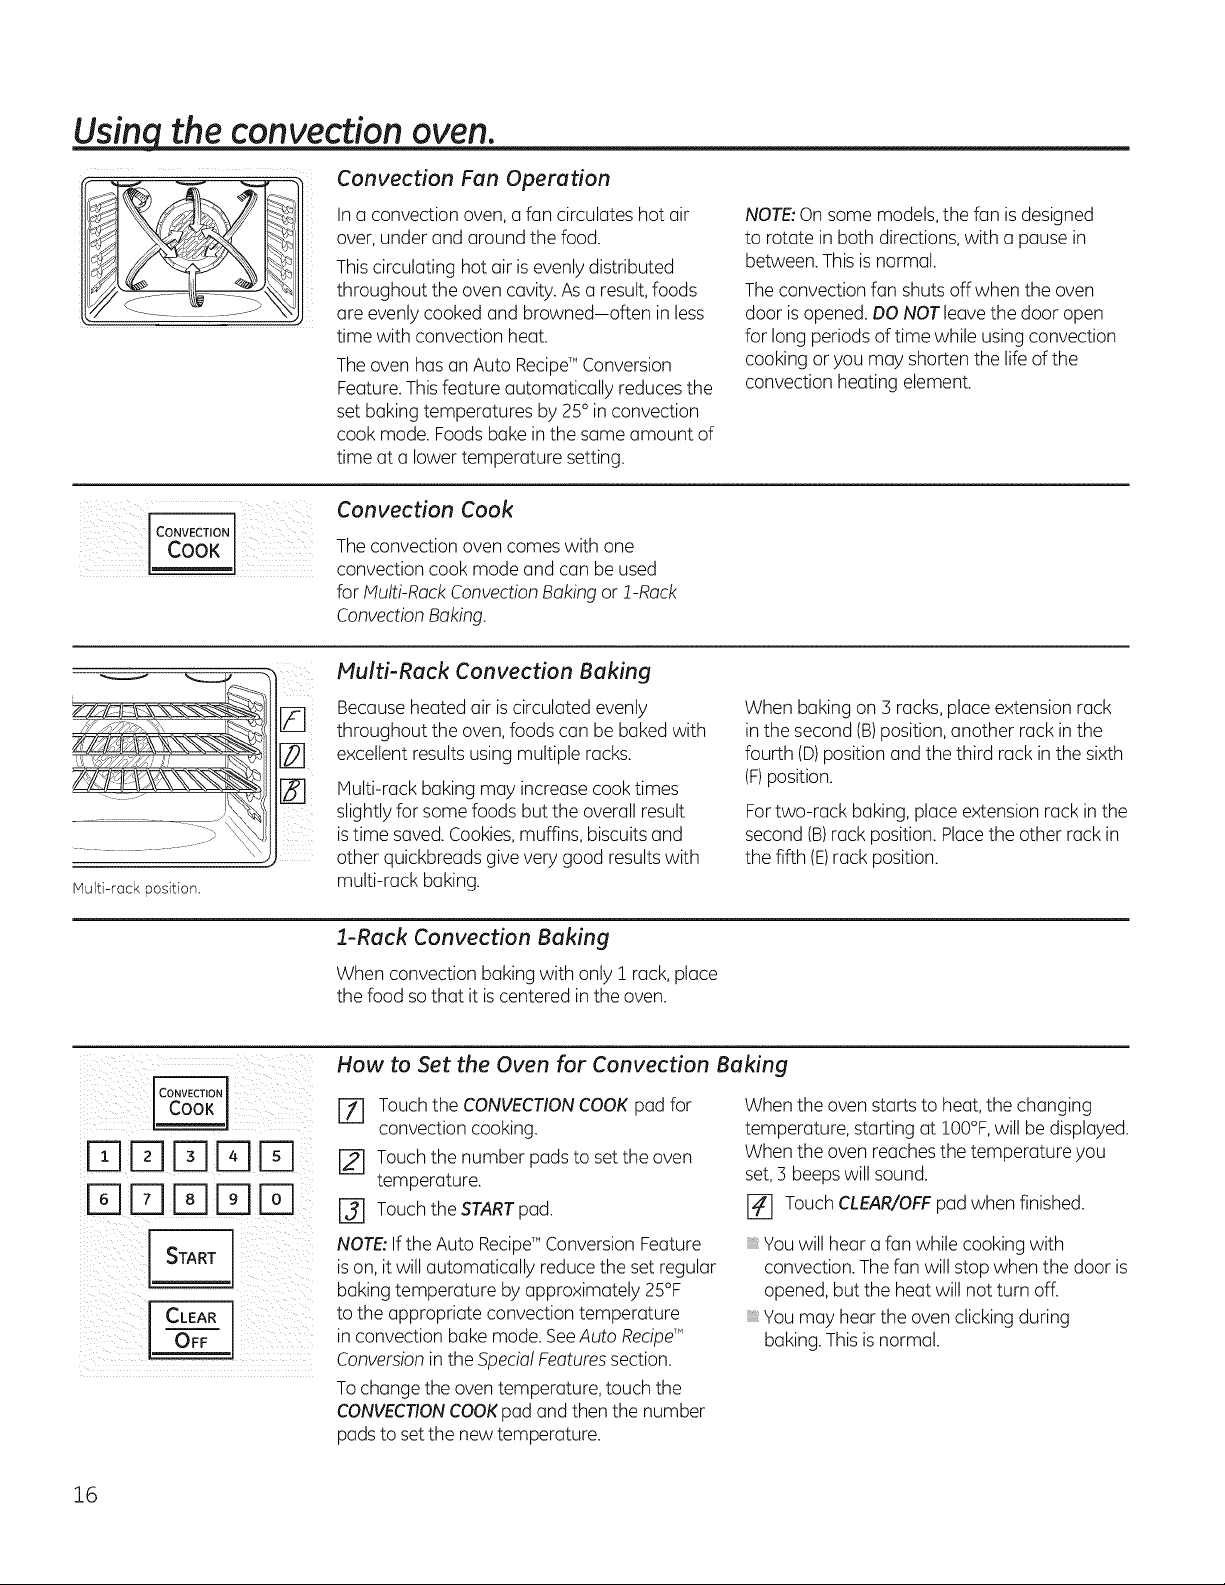
Usinq the convection oven.
Convection Fun Operation
Ina convection oven, a fun circulates hotair
over, under and around the food.
Thiscirculating hotair is evenly distributed
throughout the ovencavity. As a result,foods
(Ireevenlycooked and browned-often in less
time with convection heat.
The ovenhasan Auto Recipe'_Conversion
Feature. Thisfeature automatically reduces the
set bakingtemperatures by25° in convection
cook mode. Foods bake in the same amount of
time ata lowertemperature setting.
NOTE:On some models, thefan is designed
to rotate in both directions,with a pausein
between. This isnormal.
The convection fanshutsoff whenthe oven
door is opened.DO NOTleave the door open
forlong periodsoftime whileusingconvection
cooking or you may shorten the life ofthe
convection heating element.
CONVECTION
_!i__i___!i_i_i_i!_i_i!_i_CO__OKii_I__i_i_i_i__i_(_
Convection Cook
The convection oven comes with one
convection cook mode and can be used
for Multi-Rock Convection Baking or !-Rock
Convection Baking.
............................. " \4
Multi-rack aosition.
i-F]_i
@
iii_!ii
Multi-Reck Convection Baking
Because heatedair is circulatedevenly
throughout the oven,foods canbe bakedwith
excellentresults usingmultiple racks.
ivlulti-rack baking may increase cook times
slightlyforsome foods but theoverallresult
is time saved. Cookies,muffins,biscuits and
other quickbreadsgive very good results with
multi-rack baking.
Whenbakingon :3racks,placeextensionrack
in thesecond (B)position, another rack in the
fourth (D)position and thethird rack in thesixth
(F)position.
For two-rack baking, place extension rack in the
second (B)rack position. Placethe other rack in
thefifth (E)rack position.
1-Reck Convection Baking
Whenconvection bakingwith onlyI rack, place
thefood so that itis centered in the oven.
ilT1!p-IrqFqI-q ¸
i i!i
i¸ / CLEARIi¸
OFF ! ¸¸
How to Set the Oven for Convection Baking
[Z] Touch theCONVECTIONCOOK pad for
convection cooking.
[_ Touch thenumber padsto set theoven
temperature.
r3] Touch theSTARTpad.
NOTE:IftheAuto Recipe'_'ConversionFeature
is on,itwillautomatically reduce the set regular
bakingtemperature byapproximately 25°F
tothe appropriate convection temperature
in convection bakemode. SeeAutoRecipeM
Conversionin theSpecial Featuressection.
To changetheoven temperature, touch the
CONVECTIONCOOKpad and then thenumber
padstoset thenewtemperature.
Whentheovenstarts to heat,the changing
temperature, starting at 100°F,willbe displayed.
Whentheoven reachesthe temperature you
set, 3 beepswill sound.
r_ Touch CLEAR/OFFpad whenfinished.
You willhear a fanwhile cooking with
convection. The fan willstop when thedoor is
opened, butthe heatwillnot turnoff.
You may hear the ovenclickingduring
baking.This is normal.
16
GEAppliances.com
Cookware for Convection Cooking
Before using your convection oven, check to see
ifyour cookware leaves room for air circulation
in the oven. Ifyou are baking with several pans,
leave space between them. Also, be sure the
pansdo nottouch eachotheror thewalls ofthe
oven.
Paper and Plastic
Heat-resistant paper and plasticcontainersthat
are recommended for use in regular bakingcan
also be used for convection baking but should
not be used at temperatures higher than the
temperature recommended by the cookware
manufacturer. Plastic cookware that is heat-
resistant to temperatures of 400°F can also be
used.
Metal and Glass
Anytype of cookwarewill work inyourconvection
oven; however,metal pansheatthe fastestand
are recommended forconvection baking.
Darkened or matte-finished pans will bake
faster than shiny pans.
Glassor ceramic panscook more slowly.
Forrecipes likeoven-baked chicken, usea pan
with low sides. Hot air cannot circulate well
around food in a pan with high sides.
Use panswith low or no sides when baking
in convection cook mode. Hot air cannot
circulate well around food in a pan with high
sides. When baking cookies, you will get the
best results if you use a flat cookie sheet
instead ofa pan with lowsides.
17
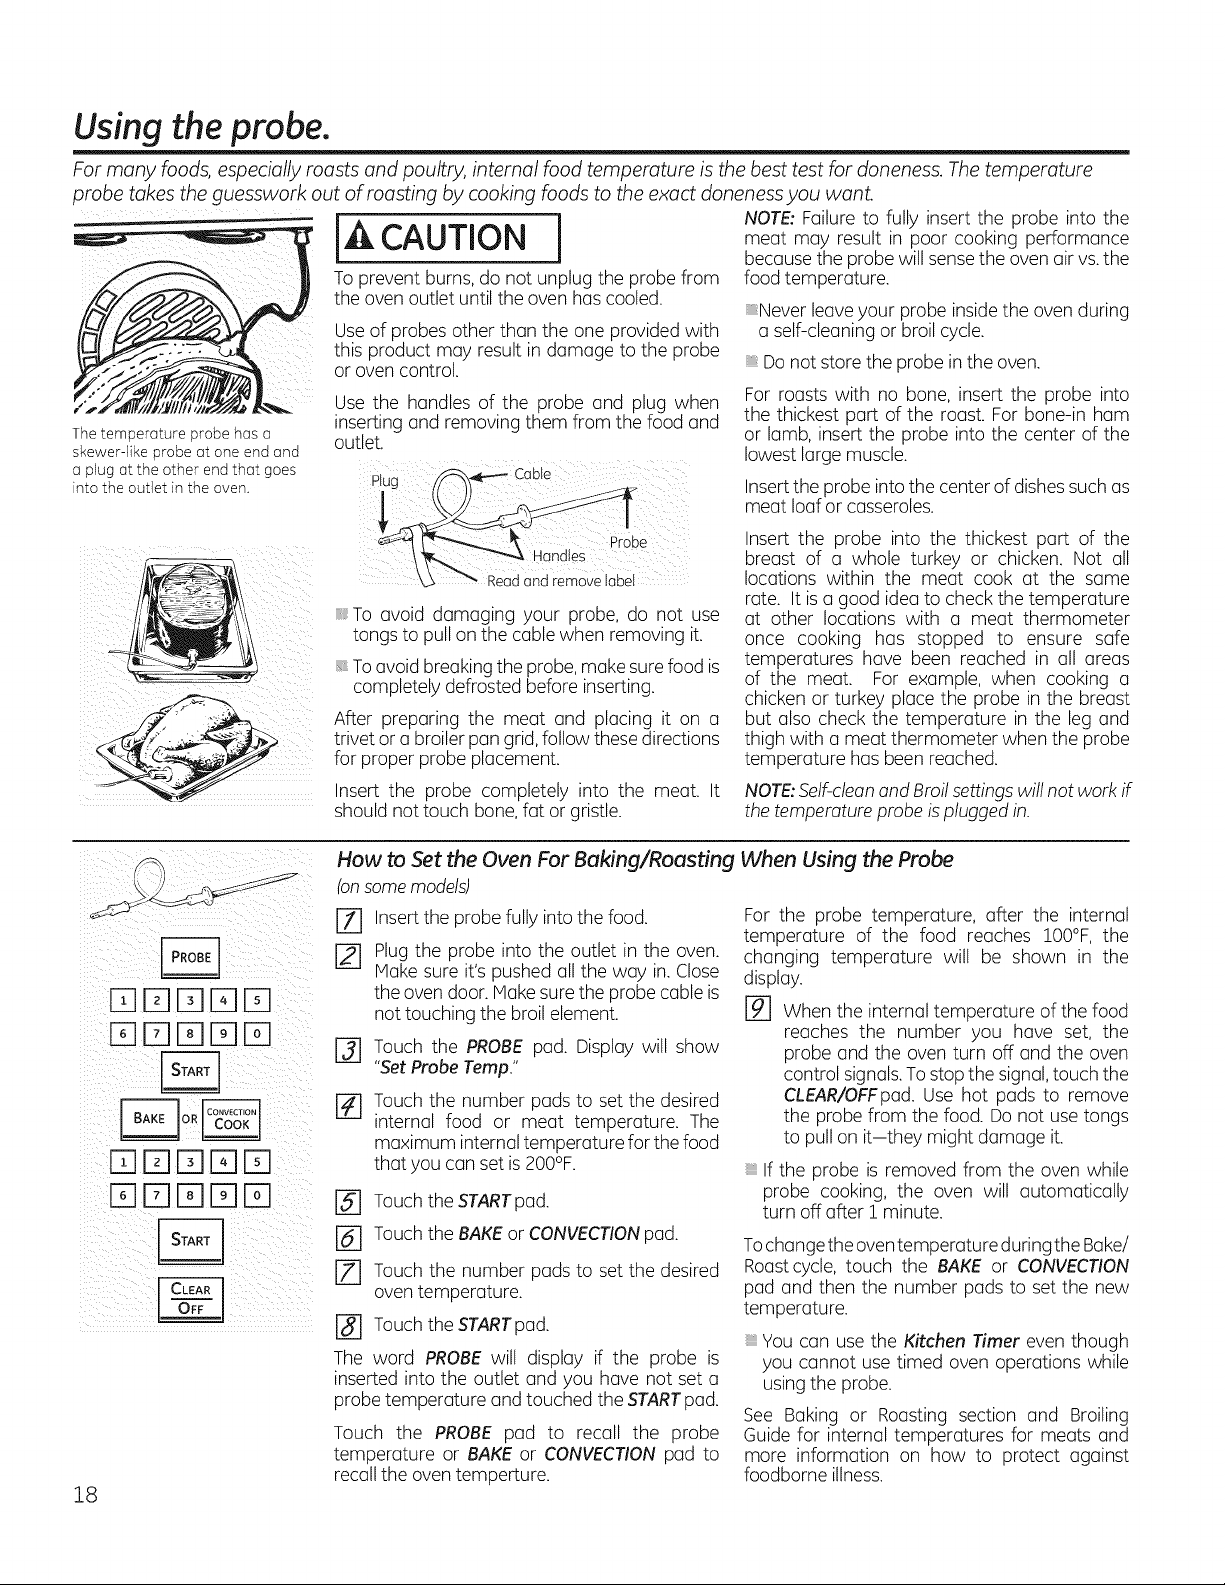
Using the probe.
For many foods, especially roasts and poultry, internal food temperature is the best test for doneness. Thetemperature
probe takes the guesswork out of roasting by cooking foods to the exact alonenessyou want.
[A CAUTION
Toprevent burns, do not unplug the probe from
theovenoutlet untilthe ovenhas cooled.
Use ofprobes otherthan the one providedwith
this product may result in damage to the probe
or ovencontrol.
Thetemperature probe has a
skewer-like probe at one end and
aplug at the other end that goes
into the outlet in the oven.
Use the handles of the probe and plug when
inserting and removing them from the food and
outlet.
Pli
/
and remove label
To avoid damaging your probe, do not use
tongs topull on the cable when removing it.
Toavoidbreakingtheprobe, make sure food is
completely defrosted beforeinserting.
After preparing the meat and placing it on a
trivetor a broiler pan grid,follow these directions
forproper probe placement.
NOTE: Failureto fully insert the probe into the
meat may result in poor cooking performance
because theprobe willsensetheovenair vs. the
food temperature.
Never leave your probe inside the ovenduring
a self-cleaningor broil cycle.
Do not store the probe in the oven.
For roasts with no bone, insert the probe into
the thickest part of the roast. Forbone-in ham
or lamb, insert the probe into the center of the
lowestlarge muscle.
Insert theprobe intothecenter ofdishes such as
meat loafor casseroles.
Insert the probe into the thickest part of the
breast of a whole turkey or chicken. Not all
locations within the meat cook at the same
rate. It isa good idea to checkthe temperature
at other locations with u meat thermometer
once cooking has stopped to ensure safe
temperatures have been reached in all areas
of the meat. For example, when cooking a
chickenor turkey placethe probe in the breast
but alsocheck the temperature in the leg and
thighwith u meat thermometer when the probe
temperature hasbeen reached.
Insert the probe completely into the meat. It NOTE:Self-cleanand Broilsettings willnotwork if
shouldnottouch bone, fat or gristle, thetemperatureprobe is plugged in.
18
IT1ITIE] I-qE]
IT1E] ITIFTIE]
IT1ra E] rq E]
DE]DE]E]
How to Set the OvenFor Baking/Roasting
(onsomemodels)
Ell Insert the probe fully intothefood.
[] Plug the probe into the outlet in the oven.
Make sure it's pushedall the way in.Close
the oven door.Make sure theprobe cable is
nottouching thebroil element.
@
%
Touch the PROBE pad. Displaywill show
"Set Probe Temp."
Touch the number pads to set the desired
internal food or meat temperature. The
maximum internal temperature forthefood
that youcan set is 200°F.
[] Touch theSTARTpad.
r6l Touch the BAKEor CONVECTIONpad.
r_ Touch the number pads to set the desired
oven temperature.
[] Touch theSTARTpad.
The word PROBE will display if the probe is
inserted into the outlet and you have notset a
probe temperature and touched theSTARTpad.
Touch the PROBE pad to recall the probe
temperature or BAKE or CONVECTION pad to
recall the oven temperture.
When Using the Probe
For the probe temperature, after the internal
temperature of the food reaches 100°F, the
changing temperature will be shown in the
display.
[] When the internaltemperature of thefood
reaches the number you have set, the
probe and the oven turn off and the oven
control signals.To stop the signal,touch the
CLEAR/OFFpad. Use hot pads to remove
the probe from the food. Do not usetongs
to pull on it-they might damage it.
If the probe isremoved from the oven while
probe cooking, the oven will automatically
turn off after I minute.
Tochange the oven temperature duringtheBake/
Roastcycle, touch the BAKE or CONVECTION
pad and then the number pads to set the new
temperature.
You can usethe Kitchen Timer even though
you cannot usetimed oven operations while
using the probe.
See Baking or Roasting section and Broiling
Guide for internal temperatures for meats and
more information on how to protect against
foodborne illness.
Usingthe timed baking and roasting features. GEAppliances.com
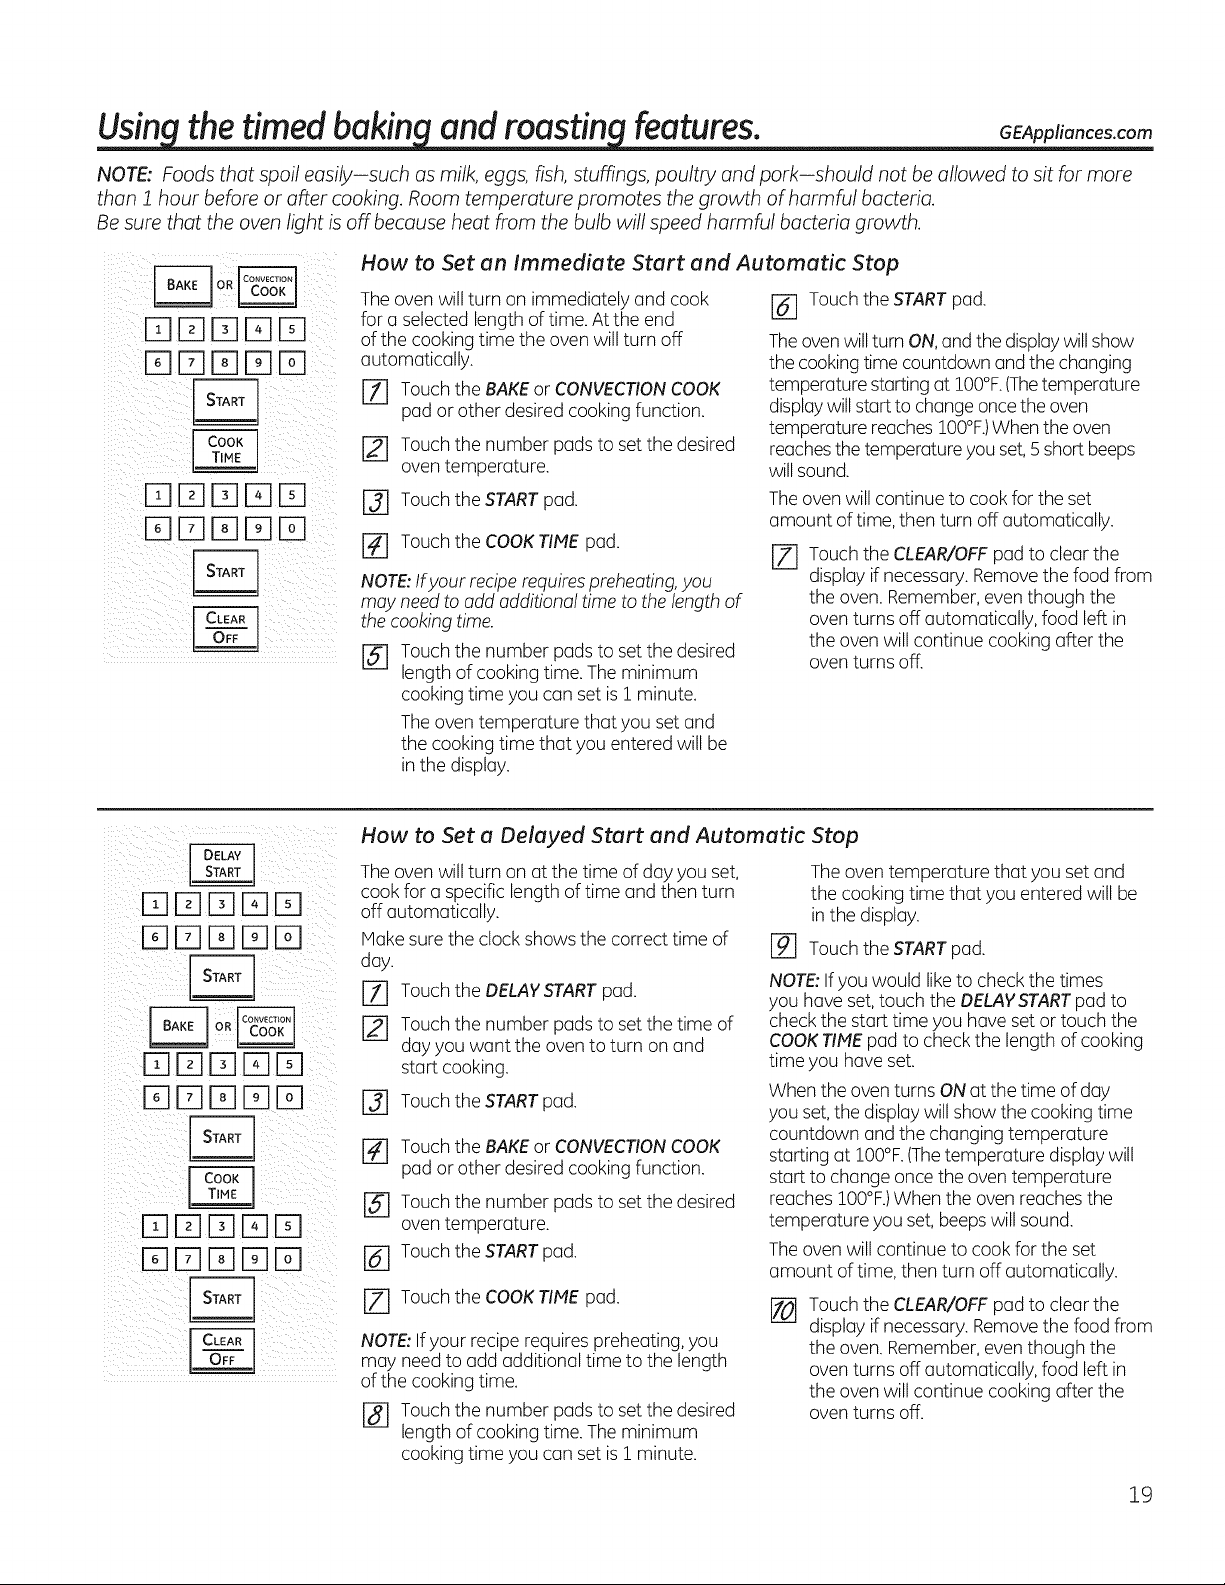
NOTE: Foods that spoil easily-such as milk, eggs, fish,stuffings, poultry and pork-should not be allowed to sit for more
than 1 hour before or after cooking. Room temperature promotes the growth of harmful bacteria.
Be sure that the oven light isoff because heat from the bulb will speed harmful bacteria growth.
How to Set an Immediate Start and Automatic Stop
The ovenwillturnon immediately and cook
fora selectedlengthoftime. Atthe end
ofthecooking time theovenwillturn off
automatically.
[Z] Touch theBAKEor CONVECTIONCOOK
pad or other desiredcooking function.
[] Touch thenumber padsto set thedesired
oventemperature.
r3] Touch theSTARTpad.
[] Touch theCOOKTIME pad.
NOTE:Ifyour recipe requires preheating, you
may need to add additional time to the length of
the cooking time.
[] Touch the number pads to set the desired
length ofcooking time. The minimum
cooking time you can set is! minute.
The oven temperature that you set and
the cooking time that you entered willbe
in the display.
r6] Touch the START pad.
Theoven will turn ON,and thedisplaywill show
thecookingtime countdown and thechanging
temperaturestarting at 100°F.(Thetemperature
displaywill starttochange once theoven
temperaturereaches100°F.)Whentheoven
reachesthetemperature youset, 5short beeps
will sound.
The oven willcontinue tocook fortheset
amount of time,thenturn off automatically.
r_ Touch theCLEAR/OFFpad toclearthe
display if necessary. Remove thefoodfrom
theoven. Remember,even though the
oventurns off automatically, food left in
theovenwillcontinue cooking after the
oventurns off.
DDD[]D
DDD D
DDDD[]
E]DDD[]
DDD D
[]DD[]D
How to Set a Delayed Start and Automatic Stop
The ovenwillturnon atthe time ofdayyouset,
cook for a specific lengthoftime and thenturn
off automatically.
Make sure the clockshows the correct time of
day.
[] Touch theDELAYSTARTpad.
Touch thenumber padsto set thetime of
dayyouwant theoventoturn on and
start cooking.
[] Touch theSTARTpad.
Touch theBAKEor CONVECTIONCOOK
pad or other desiredcooking function.
Touch thenumber padsto set thedesired
oventemperature.
[-_ Touch theSTARTpad.
[Z] Touch theCOOKTIME pad.
NOTE:Ifyour reciperequires preheating, you
may need to add additionaltime to thelength
ofthecooking time.
r_] Touch thenumber padsto set thedesired
length ofcooking time.The minimum
cooking time you canset is i minute.
The oventemperature that youset and
thecooking time that you enteredwillbe
in the display.
rg] Touch theSTARTpad.
NOTE:Ifyouwould liketo checkthetimes
youhaveset, touch the DELAYSTARTpad to
checkthestarttime you haveset or touch the
COOKTIMEpad to check the length ofcooking
time you haveset.
Whentheoven turns ON atthe time of day
youset,the displaywillshow the cooking time
countdown and thechangingtemperature
startingat 100°F.(Thetemperature displaywill
starttochange once theoventemperature
reaches 100°F.)Whentheovenreaches the
temperature youset, beeps willsound.
The ovenwillcontinue tocook fortheset
amount oftime,thenturn off automatically.
[] Touch theCLEAR/OFFpad toclearthe
display if necessary. Remove thefoodfrom
theoven. Remember,even though the
oventurns off automatically, food left in
theovenwillcontinue cooking after the
oventurns off.
19
Usingthe slow cookand warming features.
r-qFqFqr-qD3
r-qr-qD3Fqr-q
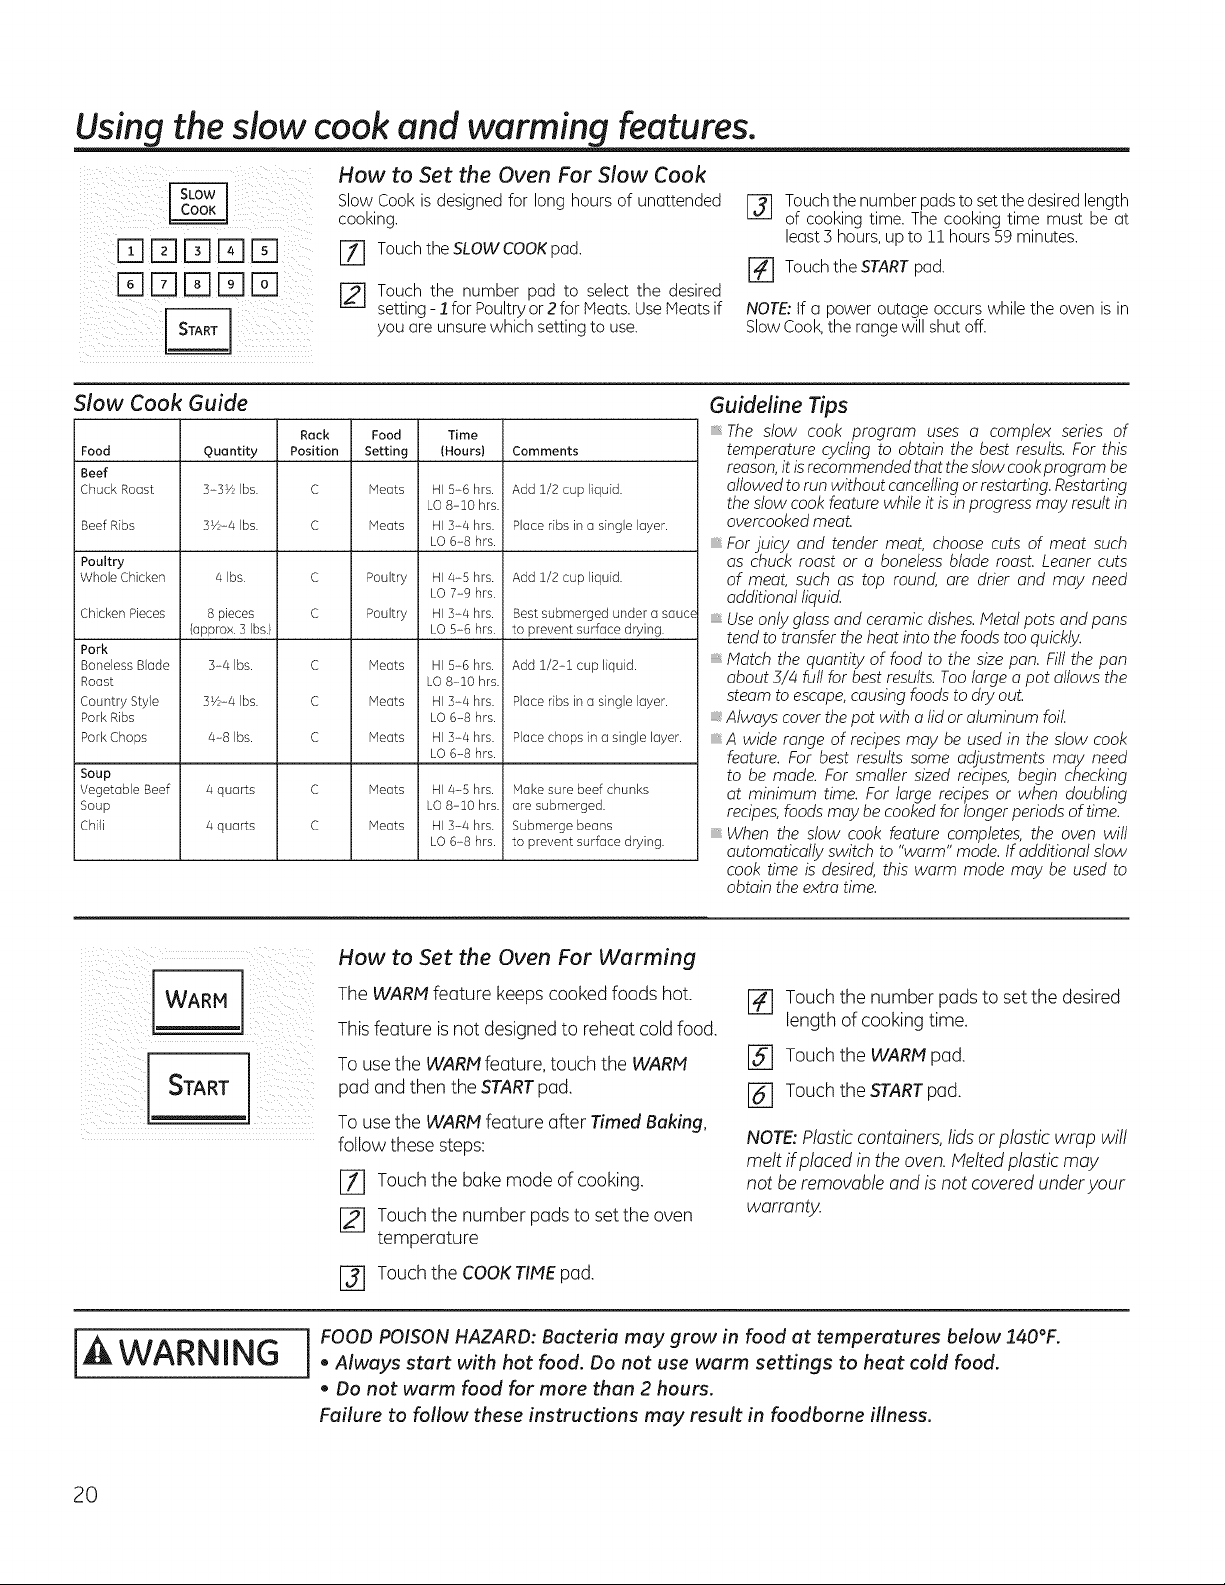
How to Set the Oven For Slow Cook
Slow Cook is designed for long hours of unattended
cooking.
FY] Touch the SLOW COOK pad.
[-_ Touch the number pod to select the desired
setting - 1 for Poultryor 2 for Meats.UseMeatsif
you are unsure which setting to use.
I-_ Touch thenumber pads toset the desiredlength
of cooking time. Thecooking time must be at
least3hours,up to !! hours 59minutes.
[-_ Touch the STARTpad.
NOTE: If a power outage occurs while the oven isin
Slow Cook, the range will shut off.
Slow Cook Guide
Food
Beef
Chuck Roast
Beef Ribs
Poultry
Whole Chicken
Chicken Pieces
Pork
Boneless Blade
Roast
Country Style
Pork Ribs
Pork Chops
Soup
Vegetable Beef
Soup
Chili
Rack Food Time
Quantity Position Setting (Hours)
3-3_/2Ibs. C Meats HI 5-6 hrs.
LO8-10 hrs.
3_Yz-4Ibs. C Meats HI3-4 hrs.
LO6-8 hrs.
4 Ibs.
8 pieces
(approx. 3 Ibs.)
3-4 Ibs.
3V_-4 Ibs.
4-8 Ibs.
4 quarts
4 quarts
C
C
c
c
c
c
c
Poultry HI4-5 hrs.
LO 7-9 hrs.
Poultry HI3-4 hrs.
LO5-6 hrs.
Meats HI5-6 hrs.
LO8-10 hrs.
Meats HI3-4 hrs.
LO6-8 hrs.
Meats HI3-4 hrs.
LO6-8 hrs.
Meats HI4-5 hrs.
LO8-10 hrs.
Meats HI3-4 hrs.
LO6-8 hrs.
Comments
Add 1/2 cup liquid.
Place ribs in o single layer.
Add 1/2 cup liquid.
Best submerged under osauce
to prevent surface drying.
Add 1/2-2 cup liquid.
Place ribs in o single layer.
Place chops in o single layer.
Make sure beef chunks
are submerged.
Submerge beans
to prevent surface drying.
Guideline Tips
The slow cook program uses o complex series of
temperature cycling to obtain the best results.For this
reason,it isrecommended that theslow cookprogram be
allowed torunwithout cancellingor restarting. Restarting
the slaw cookfeature while itisin progressmay result in
overcooked meat.
Forjuicy and tender meat, choose cuts of meat such
as chuck roost or o bonelessblade most. Leaner cuts
of meat, such as top round, ore drier and may need
additional liquid.
Useonly gloss and ceramic dishes.Metalpats and pans
tendto transfer theheatintothe foods too quickly.
Match the quantity of food to the size pan. Fill the pan
about 3/4 futl forbest results. Toolargeo pot allows the
steamtoescape,causing foodsto dryout.
Always cover thepot with o lidor aluminum fail.
A wide range of recipes may be used in the slaw caak
feature. For best results some adjustments may need
to be mode. For smaller sized recipes,begin checking
at minimum time. For large recipesor when doubling
recipes,foodsmay becooked forlongerperiods of time.
When the stow cook feature completes, the oven will
automatically switch to "warm" made. If additional stow
caak time isdesired, this worm mode may be used to
obtainthe extratime.
[WARM] [Ti
iii ii[ START iii
How to Set the Oven For Worming
The WARM feature keeps cooked foods hot.
This feature isnot designed to reheat cold food.
To use the WARM feature, touch the WARM
pad and then the START pad.
To use the WARM feature after Timed Buking,
follow these steps:
[Z] Touch the bakemodeofcooking.
[] Touch the number pads to set theoven
temperature
I-_ Touch the COOKTIME pad.
[] Touch the number pads to set thedesired
lengthofcooking time.
[] Touch the WARM pad.
[] Touch theSTARTpad.
NOTE: Plastic containers, lids or plastic wrap will
melt #placed in the oven. Melted plastic may
not be removable and isnot covered under your
warranty.
iA WARNING i FOOD POISON HAZARD: Becterie mey grow in food et temperetures below 140°F.
• Alweys stert with hot food. Do not use worm settings to heet cold food.
Do not worm food for more then 2 hours.
Feilure to follow these instructions mey result in foodborne illness.
20
Using the warming drawer. GEAppliances.com
j ,_ FOODPOISONHAZARD.Bacteriamay grow in food at temperatures below!40°K
WARNING . AlwaysstartwithhotfoodDonotusewarmsettingstoheatcoldfood
, Do not warm food for more than 2 hours.
Failure to follow these instructions may result in foodborne illness.
Thewarming drawer will keephot, cooked foods at serving temperature. Always start with hot food.
Donot usetoheat cold food other than crisping crackers,chips or dry cereal.
WARMING iiiii
I DRAWER liiiii
_iiii
........ iiii
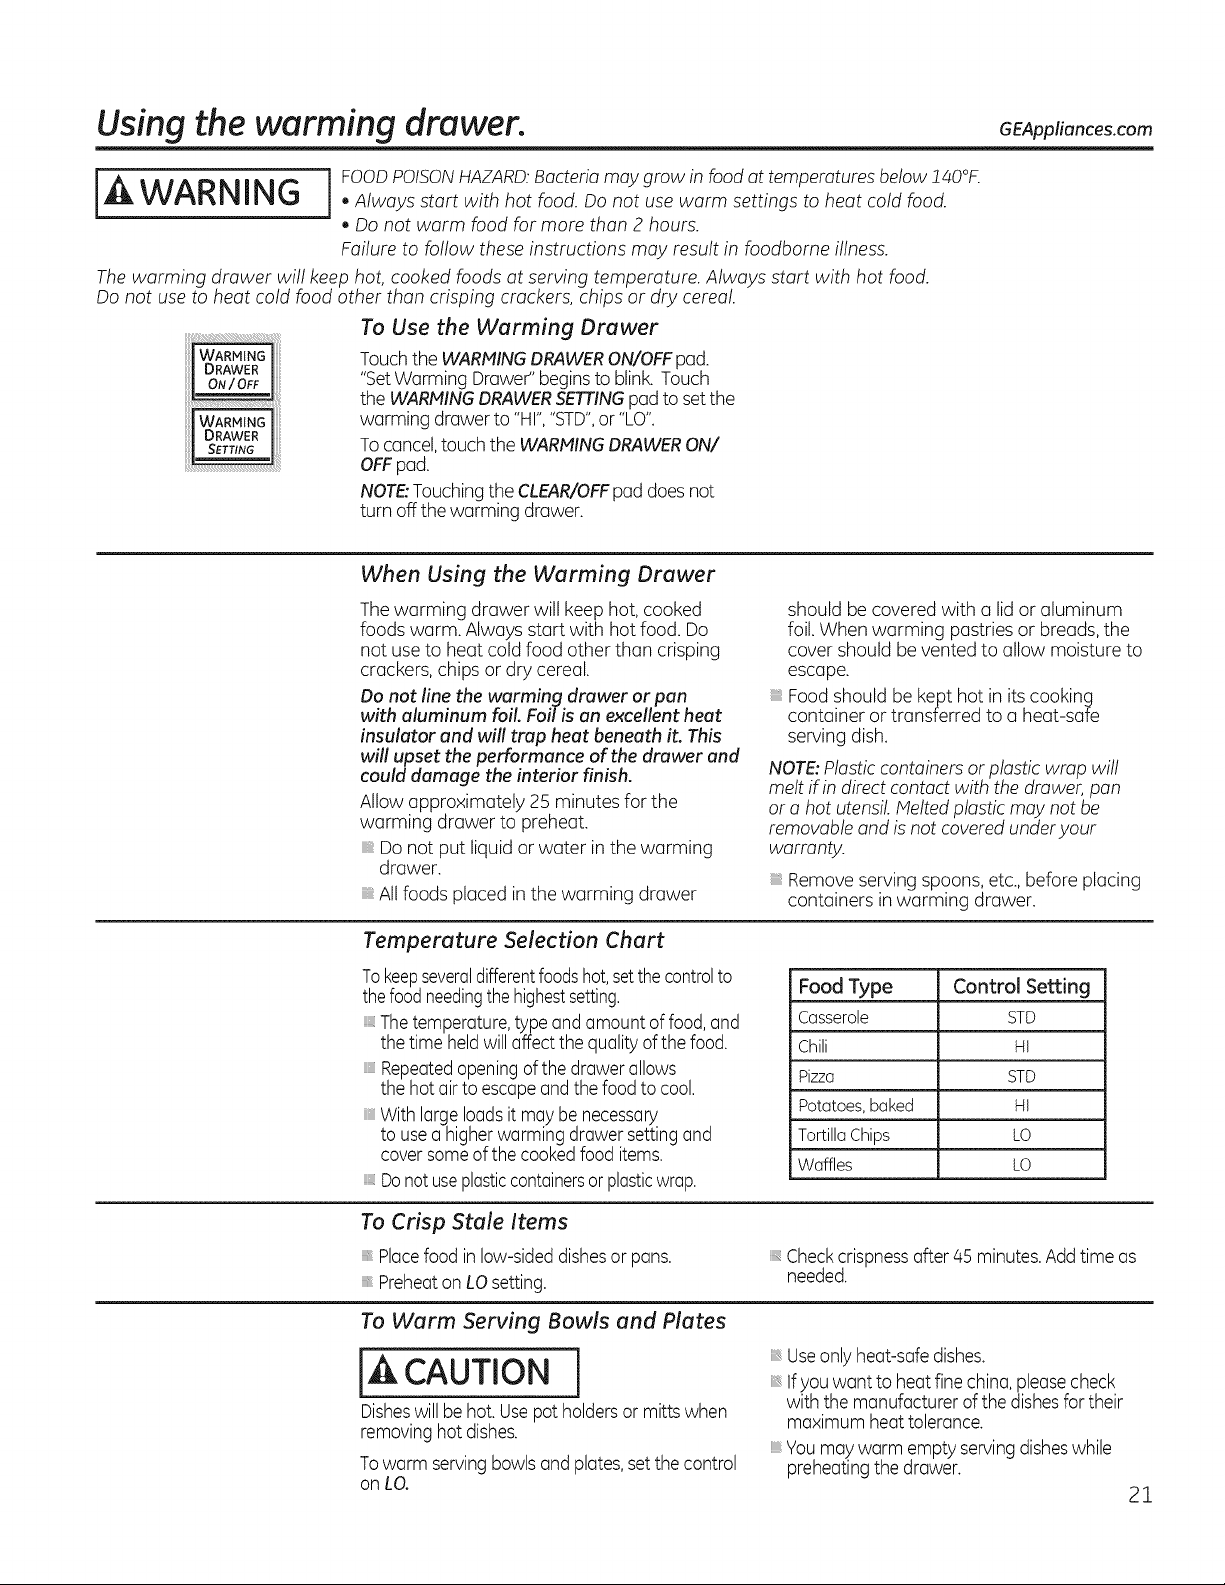
To Use the Warming Drawer
Touchthe WARMING DRAWERON/OFF pad.
"Set Warming Drawee' begins to blink.Touch
the WARMING DRAWERSETTING pad to set the
warming drawer to "HI","STD",or "LO".
Tocancel,touch the WARMINGDRAWERON/
OFFpad.
NOTE:Touchingthe CLEAR/OFFpad does not
turnoff the warming drawer.
When Using the Warming Drawer
The warming drawer will keephot, cooked
foods warm. Always startwith hotfood. Do
not use to heatcoldfood other than crisping
crackers, chips or dry cereal.
Do not line the warming drawer or pan
with aluminum foiL Foilis an excellent heat
insulator and will trap heat beneath it. This
willupset the performance of the drawer and
could damage the interior finish.
Allow approximately 25 minutes for the
warming drawer to preheat.
Donot put liquid or water inthe warming
drawer.
Allfoods placed in the warming drawer
should be covered with a lid or aluminum
foil. Whenwarming pastriesor breads, the
cover should be vented to allow moistureto
escape.
Food should be kept hot in its cooking
container or transferred to a heat-safe
serving dish.
NOTE:Plastic containersor plasticwrap will
melt ifin direct contact with thedrawer, pan
or a hot utensil Melted plasticmay not be
removable and isnotcovered underyour
warranty.
Remove serving spoons,etc.,before placing
containers in warming drawer.
Temperature Selection Chart
To keepseveraldifferentfoodshot,setthe controlto
thefood needingthe highestsetting.
Thetemperature,type andamount offood,and
the time heldwill affect thequalityof the food.
Repeatedopeningof thedrawer allows
the hotairtoescapeandthe foodtocool.
With largeloadsitmay be necessary
tousea higherwarming drawer setting and
coversomeof thecookedfooditems.
Donot useplasticcontainersorplasticwrap.
Food Type Control Setting
Casserole STD
Chili HI
Pizza STD
Potatoes,baked HI
TortillaChips LO
Waffles LO
To Crisp Stale Items
Placefoodin low-sideddishesor pans.
Preheaton LOsetting.
To Warm Serving Bowls and Plates
{, CAUTION j
Disheswill be hot.Usepotholdersor mitts when
removinghotdishes.
Towarm servingbowlsand plates,set the control
on LO.
Checkcrispnessafter 45 minutes.Addtime as
needed.
Useonlyheat-safedishes.
Ifyouwant to heat fine china,pleasecheck
with themanufacturer of thedishesfor their
maximum heat tolerance.
Youmaywarm emptyservingdisheswhile
preheatingthedrawer.
21

the sdf-clean feature.
Wipe up heavy soil on the oven
bottom.
Before a Self-Clean Cycle
[A WARNING i
FIREHAZARD:Wipe greaseand heavy soilfrom
theoven bottom before self-cleaning.Failure to
do somay result in an ovenfire.
We recommend ventingyourkitchenwith an
openwindow or usinga ventilation fanor hood
duringthefirst self-cleancycle.
Removeanybroilerpan, broilergrid, probe,all
cookware and any aluminum foil from theoven.
NOTE:
Ifyouroven is equippedwith shiny,silver-
colored oven racks,werecommend you
removethem beforeyoubeginthe self-clean
cycle.Theymay remain intheoven duringthe
self-cleancycle,but they willdarken,losetheir
lusterand become hardtoslide.
Ifyouroven is equippedwith grayporcelain-
coated oven racks,they may beleft in theoven
during the self-cleancycle.
Soilon thefront frame of therange and outside
the gasket on the door willneedtobecleaned by
hand. Cleantheseareaswith hot water,soap-filled
steel-wool padsor cleanserssuch as SoftScrub_.
Rinsewell with cleanwater and dry.
Do notcleanthegasket.Thefiberglassmaterialof
the oven door gasket cannotwithstand abrasion.
It is essentialforthe gasket toremain intact. Ifyou
notice it becomingwornor frayed,replace it.
Hake suretheoven lightbulbcover isin place and
the ovenlight isoff.
IMPORTANT:Thehealth ofsomebirds is
extremelysensitivetothe fumesgivenoff during
the self-cleaningcycleofanyrange.Hove birdsto
another well-ventilatedroom.
Thesurface unitsare automatically disabled
duringtheself-cleancycle.
DN1D ID
@DD N1
How to Set the Oven for Self-Cleaning
Theovendoorsmustbe closedandallcontrolsset
correctlyfor the cycleto workproperly.
[] TouchtheSELFCLEANpad.
[] If a time other thanthe default time is
needed,usethenumberpads and enter the
desiredcleantime.
Youcan change the clean time toany time
between3 hoursand 5hours,dependingon how
dirtyyouroven is.
r_ TouchtheSTARTpad.
Theoven door locksautomatically.The display
will show the clean time remaining.Itwillnot
be possibletoopen the oven door until the
temperature drops below thelocktemperature
and LOCKED/DOOR_ goesoff inthecontrol
display.
ThewordLOCKED/DOOR_ willflash and a
beepwillsound ifyou settheclean cycleand
forget toclosetheoven door.
Tostop a clean cycle,touch theCLEAR/
OFFpad.When LOCKED/DOOR_ goesoff,
indicatingtheoven has cooledbelow the
lockingtemperature,youwill be abletoopen
thedoor.
22
GEAppliances.com
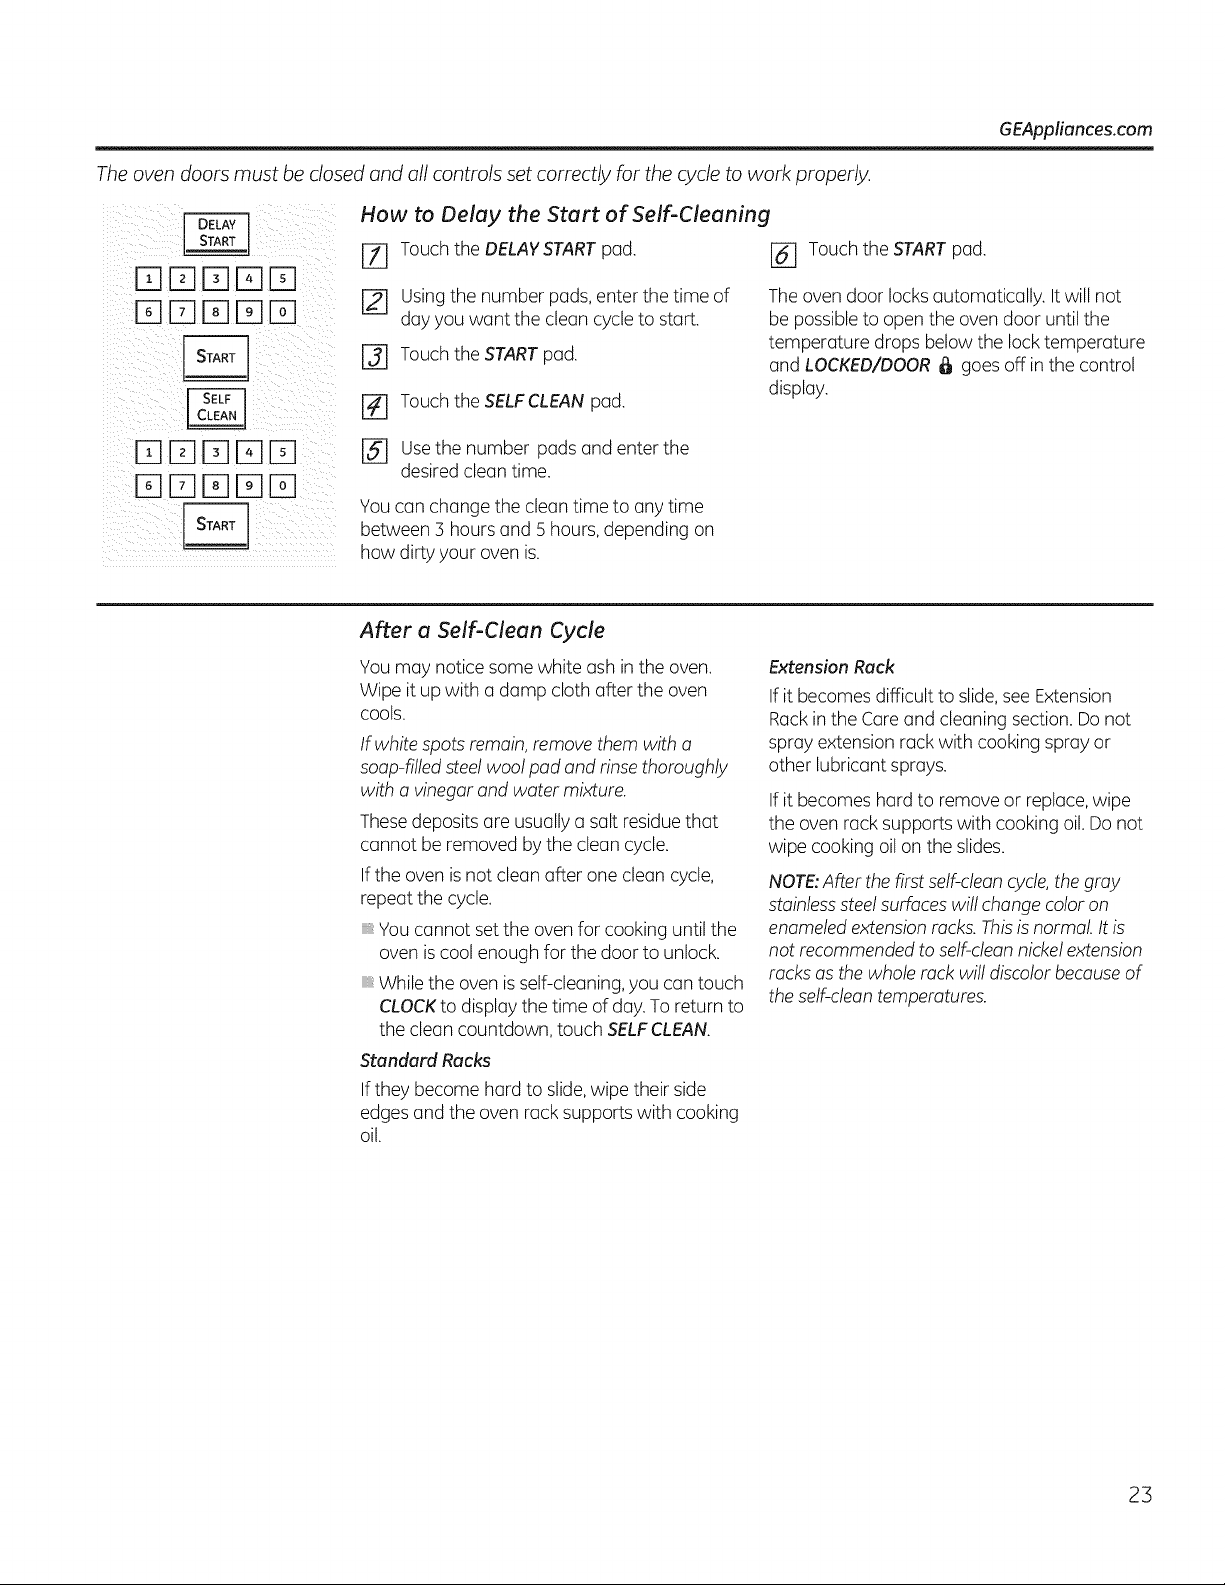
The oven doors must be closed and all controls set correctly for the cycle to work properly.
DDD[]D
DDDDD
DDDDD
DDDDD
How to Delay the Start of Self-Cleaning
[Z] Touch the DELAYSTART pad. [] Touch the START pad.
[]
@
%
Usingthe number pads, enterthetime of
day you want thecleancycle to start.
Touch theSTARTpad.
Touch theSELFCLEANpad.
The ovendoor locks automatically. It willnot
be possible toopen theovendoor untilthe
temperature dropsbelowthe locktemperature
and LOCKED/DOOR_ goesoff inthe control
display.
[] Usethe number padsand enterthe
desired cleantime.
Youcanchange thecleantime to any time
between 3 hours and 5 hours,depending on
howdirty your ovenis.
After a Self-Clean Cycle
Youmay notice some white ashin theoven.
Wipeitup with a damp cloth after the oven
cools.
If white spotsremain, remove them with a
soap-filledsteel woolpad and rinsethoroughly
with a vinegar and water mixture.
Thesedepositsare usually a salt residue that
cannot be removed by the cleancycle.
If theovenisnotcleanafter one cleancycle,
repeatthecycle.
You cannot set the oven for cooking untilthe
oveniscoolenough for thedoor tounlock.
Whiletheovenis self-cleaning, youcantouch
CLOCKtodisplay the time ofday.Toreturnto
thecleancountdown, touch SELFCLEAN.
Standard Racks
If they become hard toslide,wipetheirside
edges and theoven rack supportswith cooking
oil.
Extension Rack
If itbecomesdifficult to slide,see Extension
Rack in theCare and cleaningsection. Do not
spray extensionrack with cooking spray or
other lubricant sprays.
If itbecomes hard to remove or replace, wipe
theovenrack supportswith cooking oil. Donot
wipecooking oil on the slides.
NOTE:After thefirst self-clean cycle,the gray
stainlesssteel surfaceswillchangecoloron
enameled extension rocks.Thisis normal. It is
notrecommendedtoself-dean nickel extension
racks asthe whole rock willdiscolor becauseof
the self-clean temperatures.
23
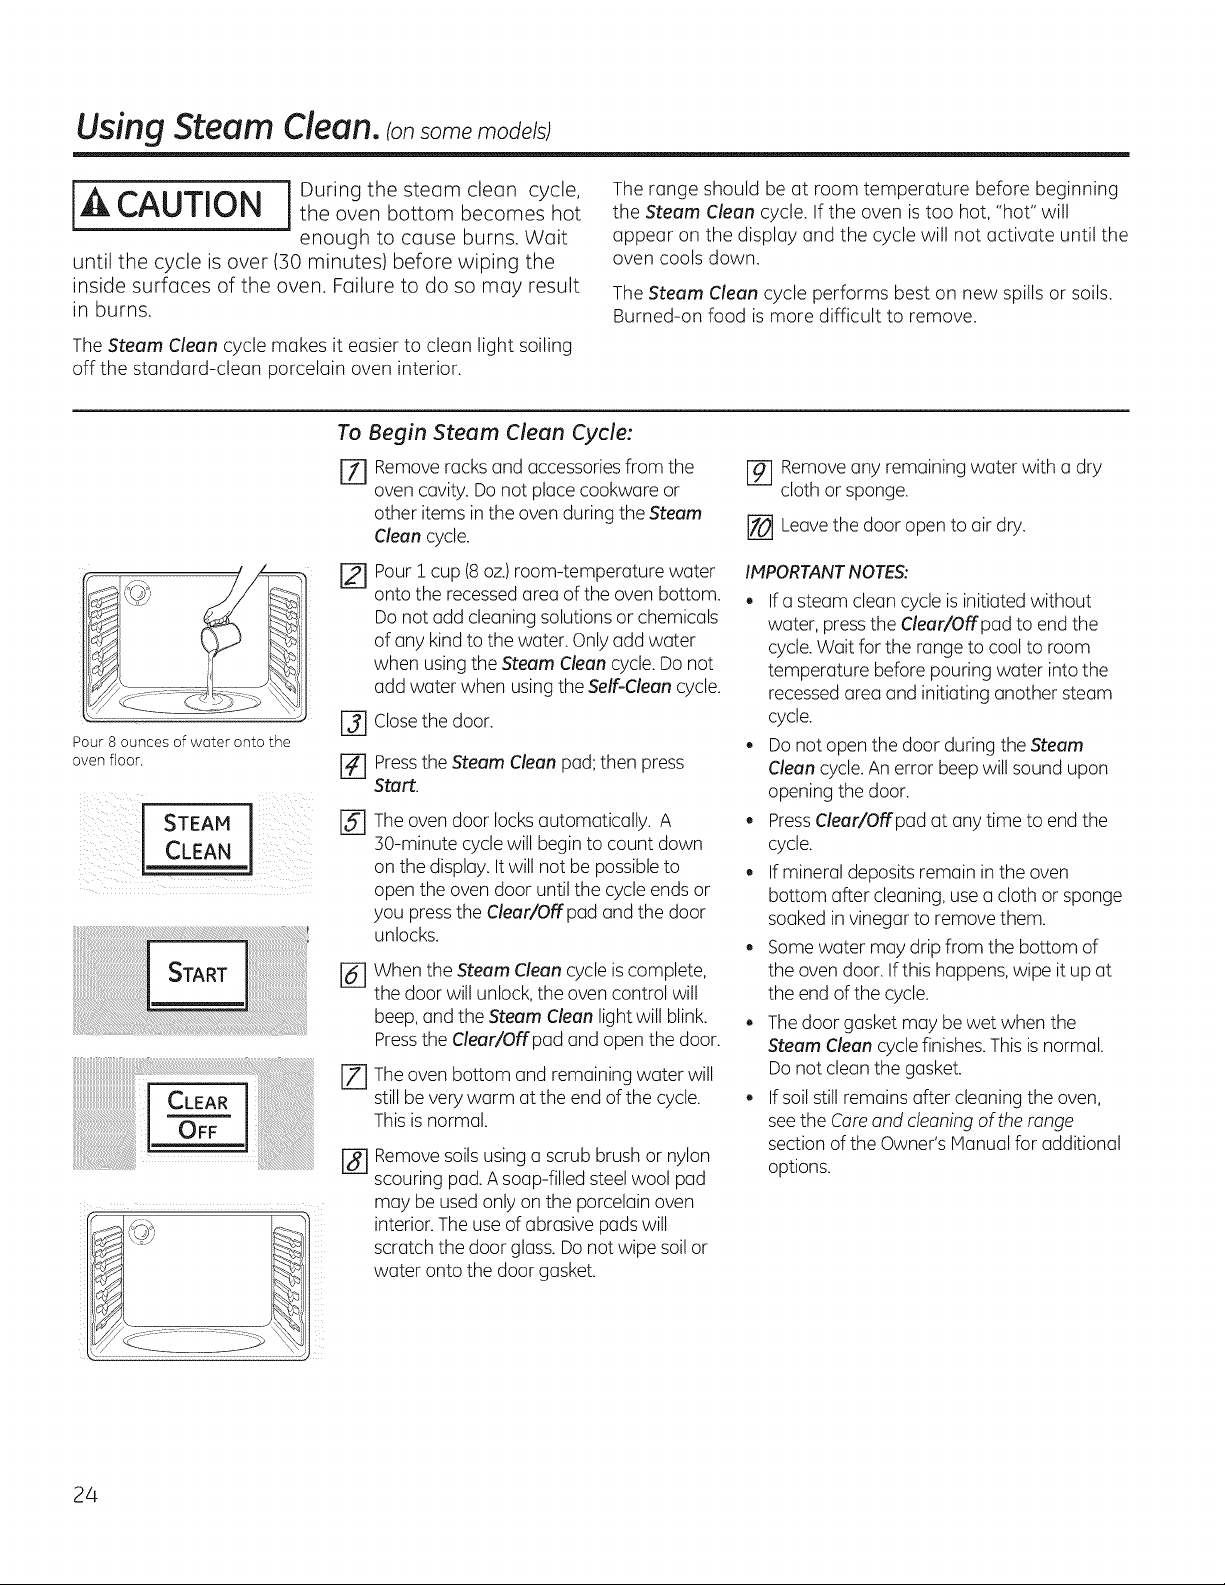
UsingSteam Clean.ransomemode s
[_ ] During the steam clean cycle,
CAUTION the oven bottom becomes hot
enough to cause burns. Wait
until the cycle isover (30 minutes) before wiping the
inside surfaces of the oven. Failure to do so may result
in burns.
TheSteam Clean cycle makes it easier to clean light soiling
off the standard-clean porcelain oven interior.
Therange should be at room temperature before beginning
the Steam Clean cycle. If the oven is too hot, "hot" will
appear on the display and the cycle will not activate until the
oven cools down.
TheSteam Clean cycle performs best on new spills or soils.
Burned-on food is more difficult to remove.
Pour 8 ounces of water onto the
oven floor.
iSTEAMiCLEAN
To Begin Steam Clean Cycle:
[Z] Remove racksand accessoriesfrom the
ovencavity.Do not place cookware or
otheritems in theovenduring theSteam
Cleancycle.
[21
@
%
@
Pour i cup(8oz.)room-temperature water
ontothe recessed area ofthe ovenbottom.
Donotadd cleaningsolutionsor chemicals
ofanykindtothewater. Only add water
when using theSteam Cleancycle. Do not
add water when using the Self-Clean cycle.
Closethe door.
PresstheSteam Clean pad;thenpress
Start.
Theovendoor locks automatically. A
30-minute cycle will begin tocount down
on the display. It willnot be possibleto
open the ovendoor untilthecycleends or
you press theClear/Off pad and the door
unlocks.
@
D
When theSteam Cleancycleiscomplete,
the door willunlock, theoven control will
beep, and the Steam Cleanlightwillblink.
Pressthe Clear/Offpad and open thedoor.
Theovenbottom and remainingwater will
still be very warm atthe end ofthe cycle.
This is normal.
r?l
Remove soilsusinga scrub brushor nylon
scouring pad. A soap-filled steel wool pad
may be used onlyon the porcelainoven
interior.Theuse ofabrasive pads will
scratch thedoor glass. Do notwipe soil or
water onto thedoor gasket.
[] Remove anyremaining water with a dry
cloth or sponge.
[] Leave thedoor open to air dry.
IMPORTANTNOTES:
. If a steam cleancycleis initiated without
water, pressthe Clear/Offpad to end the
cycle.Wait forthe range to cool to room
temperature beforepouring water intothe
recessed area and initiating anothersteam
cycle.
. Do not open thedoor during the Steam
Clean cycle.An error beep willsoundupon
opening the door.
. PressClear/Offpad atanytime to end the
cycle.
. If mineraldepositsremain in theoven
bottom after cleaning, usea cloth or sponge
soaked in vinegarto remove them.
. Somewater may drip from the bottom of
the ovendoor.Ifthis happens, wipe it up at
the end ofthe cycle.
. The door gasketmay bewet whenthe
Steam Cleancycle finishes.This is normal.
Do not clean the gasket.
. If soil still remains after cleaningtheoven,
seethe Careand cleaning oftherange
section ofthe Owner'sHanual foradditional
options.
24
Special features of your oven control. GEApp,ancoscom
Your new touch pad control has additional features that you may choose to use. Thefollowing are the features and how
you may activate them.
Thespecial feature modes can only be activated while the display isshowing the time of day. They remain in the control's
memory until the steps are repeated.
Toenter a special feature for either oven, you must first touch the upper oven BROIL HI/kO and BAKE pads at the same
time. Thelower oven BROIL HI/kO and BAKE pads will not activate special features.
When the display shows your choice, touch the START pad.
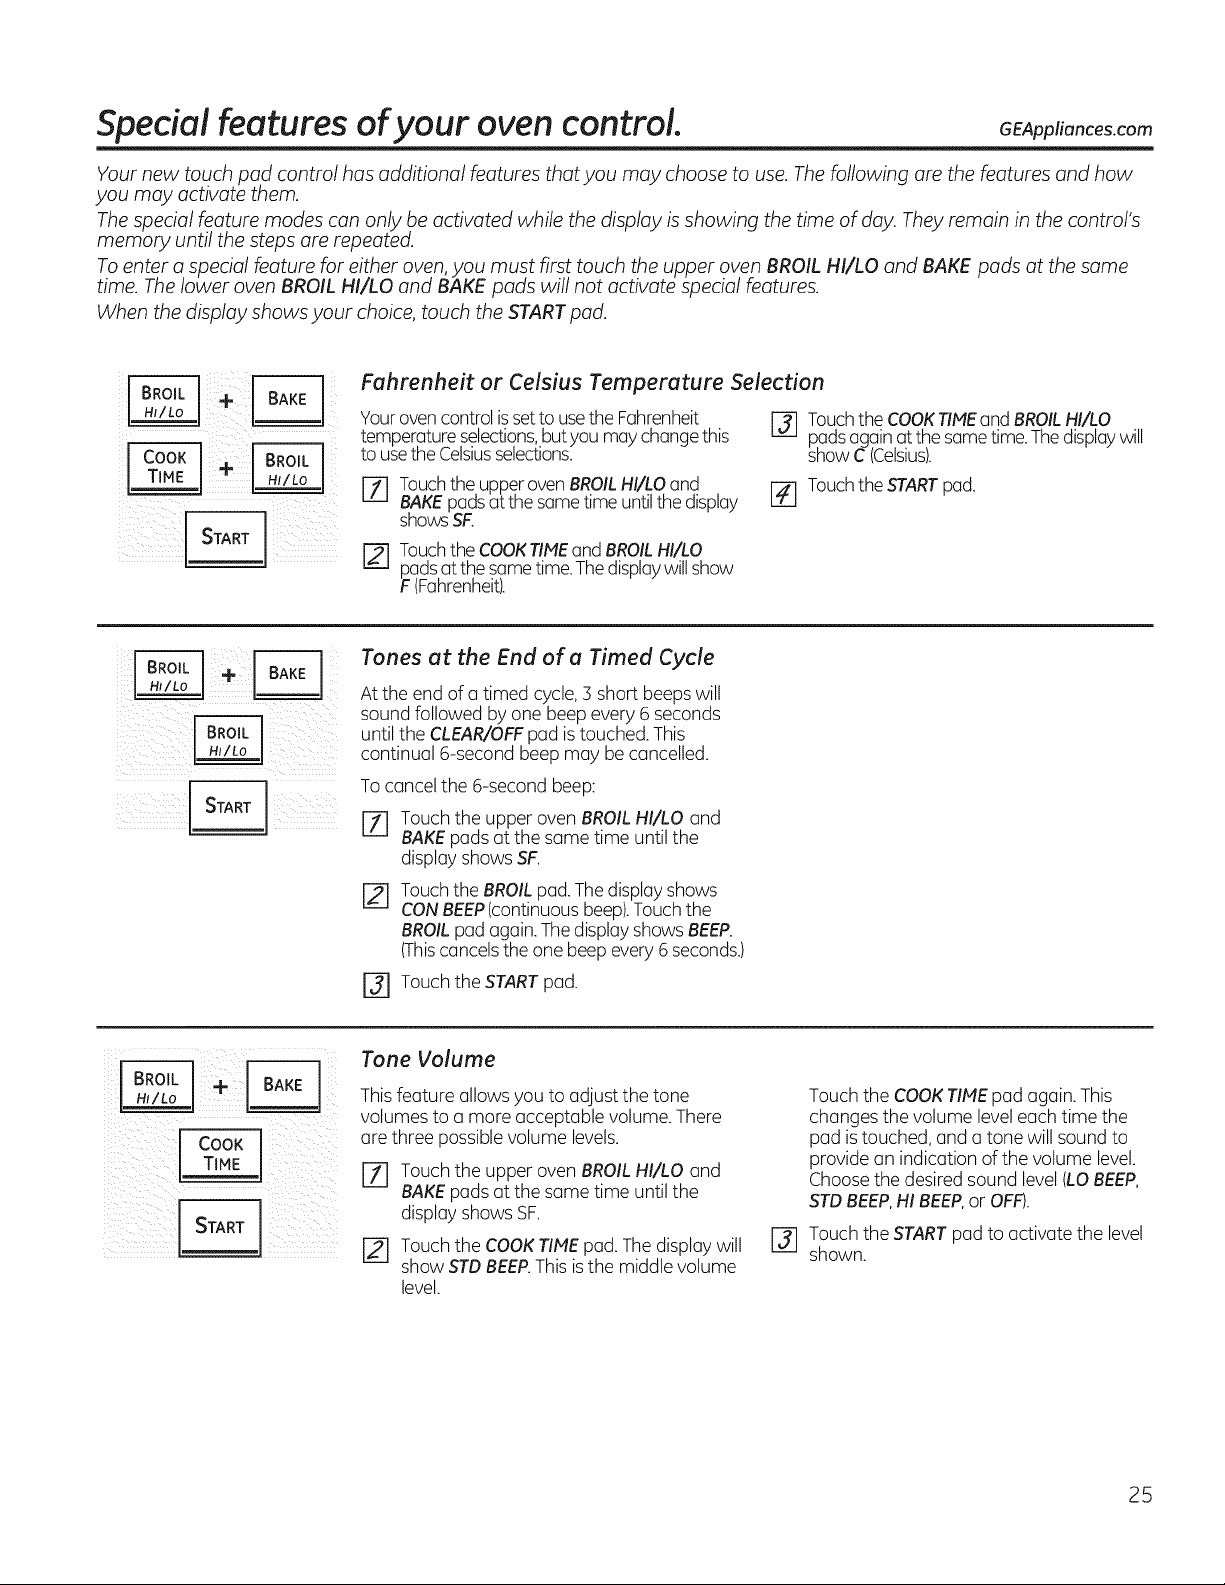
Fahrenheit or Celsius Temperature Selection
Youroven controlis set tousetheFahrenheit
temperature selections,but youmay changethis
tousethe Celsiusselections.
[] Touchtheupperoven BROILHI/L.Oand
BAKEpads utthe sametime until the display
shows SF.
I-ffl TouchtheCOOKTIMEand BROILHI/LO
padsat thesgmetime.Thedisplaywill show
F(Fahrenheit/.
[] TouchtheCOOKTIMEand BROILHI/LO
padsagain at thesametime.Thedisplaywill
show C(Celsius).
[-_ TouchtheSTARTpad.
_i_I_!!I__i!i_i!_:_i_ _iii_i_i__i_i:_i_ill_ii
Tones at the End of a Timed Cycle
Attheend of a timed cycle, 3 short beeps will
soundfollowed byone beep every 6 seconds
untilthe CLEAR/OFFpad is touched.This
continual 6-second beep may be cancelled.
To cancel the 6-second beep:
Touch theupper ovenBROILHI/LO and
BAKEpads at thesame time untilthe
display showsSF.
[]
TouchtheBROILpad. Thedisplay shows
CONBEEP(continuousbeep).Touchthe
BROILpad again. The displayshows BEEP.
(Thiscancels theone beep every 6 seconds.)
r_ Touch the START pad.
(_ii_ii_iI _i__-_ !_iiiiii_ii__ii__ii
Tone Volume
This feature allows you to adjust the tone
volumes to a more acceptable volume. There
are three possible volume levels.
[Z] Touch theupper ovenBROILHI/LO and
BAKEpads at thesame time untilthe
display showsSF.
r_ Touch theCOOKTIMEpad.The display will
show STDBEEP.This isthe middlevolume
level.
Touch theCOOKTIMEpad again. This
changes thevolume level eachtime the
pad is touched, and a tone willsoundto
providean indication ofthe volume level.
Choosethe desired soundlevel(LOBEEP,
STDBEEP,HI BEEP,or OFF).
r_ Touch theSTARTpad to activate thelevel
shown.
25
Special features of your oven control.
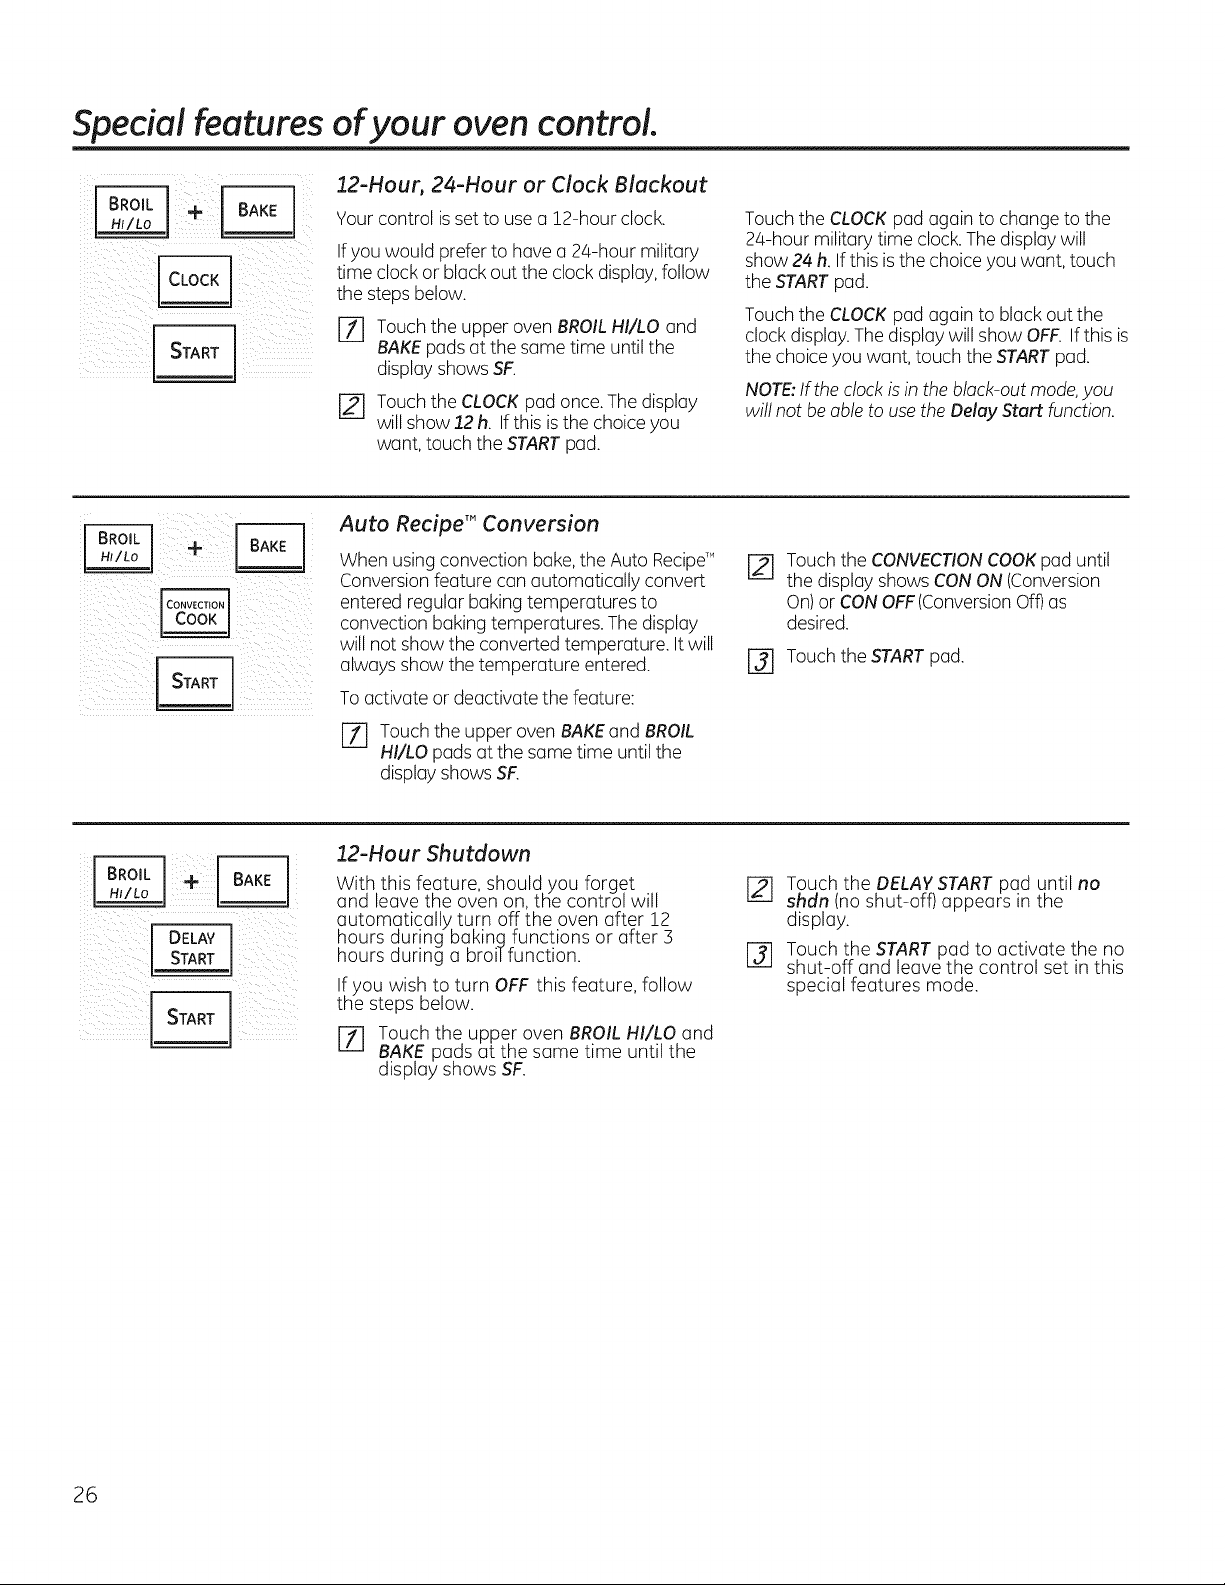
12-Hour, 24-Hour or Clock Blackout
Your control is set to use a 12-hour clock.
If youwould preferto havea 24-hour military
time clockor black outthe clockdisplay,follow
thestepsbelow.
[Z] Touch theupper ovenBROILHI/LO and
BAKEpads at thesame time untilthe
display showsSF.
r2]
Touch theCLOCKpad once.The display
willshow 12h. Ifthis is thechoice you
want,touch theSTARTpad.
Touch theCLOCKpad again to changetothe
2Q-hour militarytime clock.The display will
show 24 h.Ifthis is thechoice you want,touch
theSTARTpad.
Touch theCLOCKpad again to black out the
clockdisplay.Thedisplay willshow OFF.If this is
thechoice youwant, touch the STARTpad.
NOTE:If theclock is in theblack-outmode,you
willnot beable to use the Delay Start function.
_ _ ii i ii iii
i_ilii__i__ ii: i_ii_
_!_!i_ ii_illi_ _ i _i_ii_
Auto Recipe T"Conversion
When usingconvection bake,the AutoRecipe,M
Conversionfeature canautomatically convert
enteredregular bakingtemperatures to
convection bakingtemperatures.Thedisplay
will notshow theconverted temperature. Itwill
alwaysshow thetemperature entered.
Toactivate or deactivate the feature:
r_ Touchthe upper ovenBAKEand BROIL
HI/LOpadsatthe same time untilthe
display showsSF.
r_ Touch theCONVECTIONCOOKpad until
thedisplay showsCONON(Conversion
On)or CONOFF(ConversionOff)as
desired.
r-_ Touch theSTART pad.
_ii¸ :4 DELAyli5:/
ill:i__!iii__:i_ !::__i_i!ill
12-Hour Shutdown
With this fe.ature, should you forget
and leave the oven on,the control will
automatically turn off the oven after 12
hours during baking functions or atter 3
hours during a broil function.
If you wish to turn OFF this feature, follow
the steps below.
I-f] Touch the upper oven BROIL HI/LO and
BAKE pads at the same time until the
display shows SF.
[_ Touch the DELAY START pad until no
shdn (no shut-off) appears in the
display.
[] Touch the START pad to activate the no
shut-off and leavethe control set in this
special features mode.
26
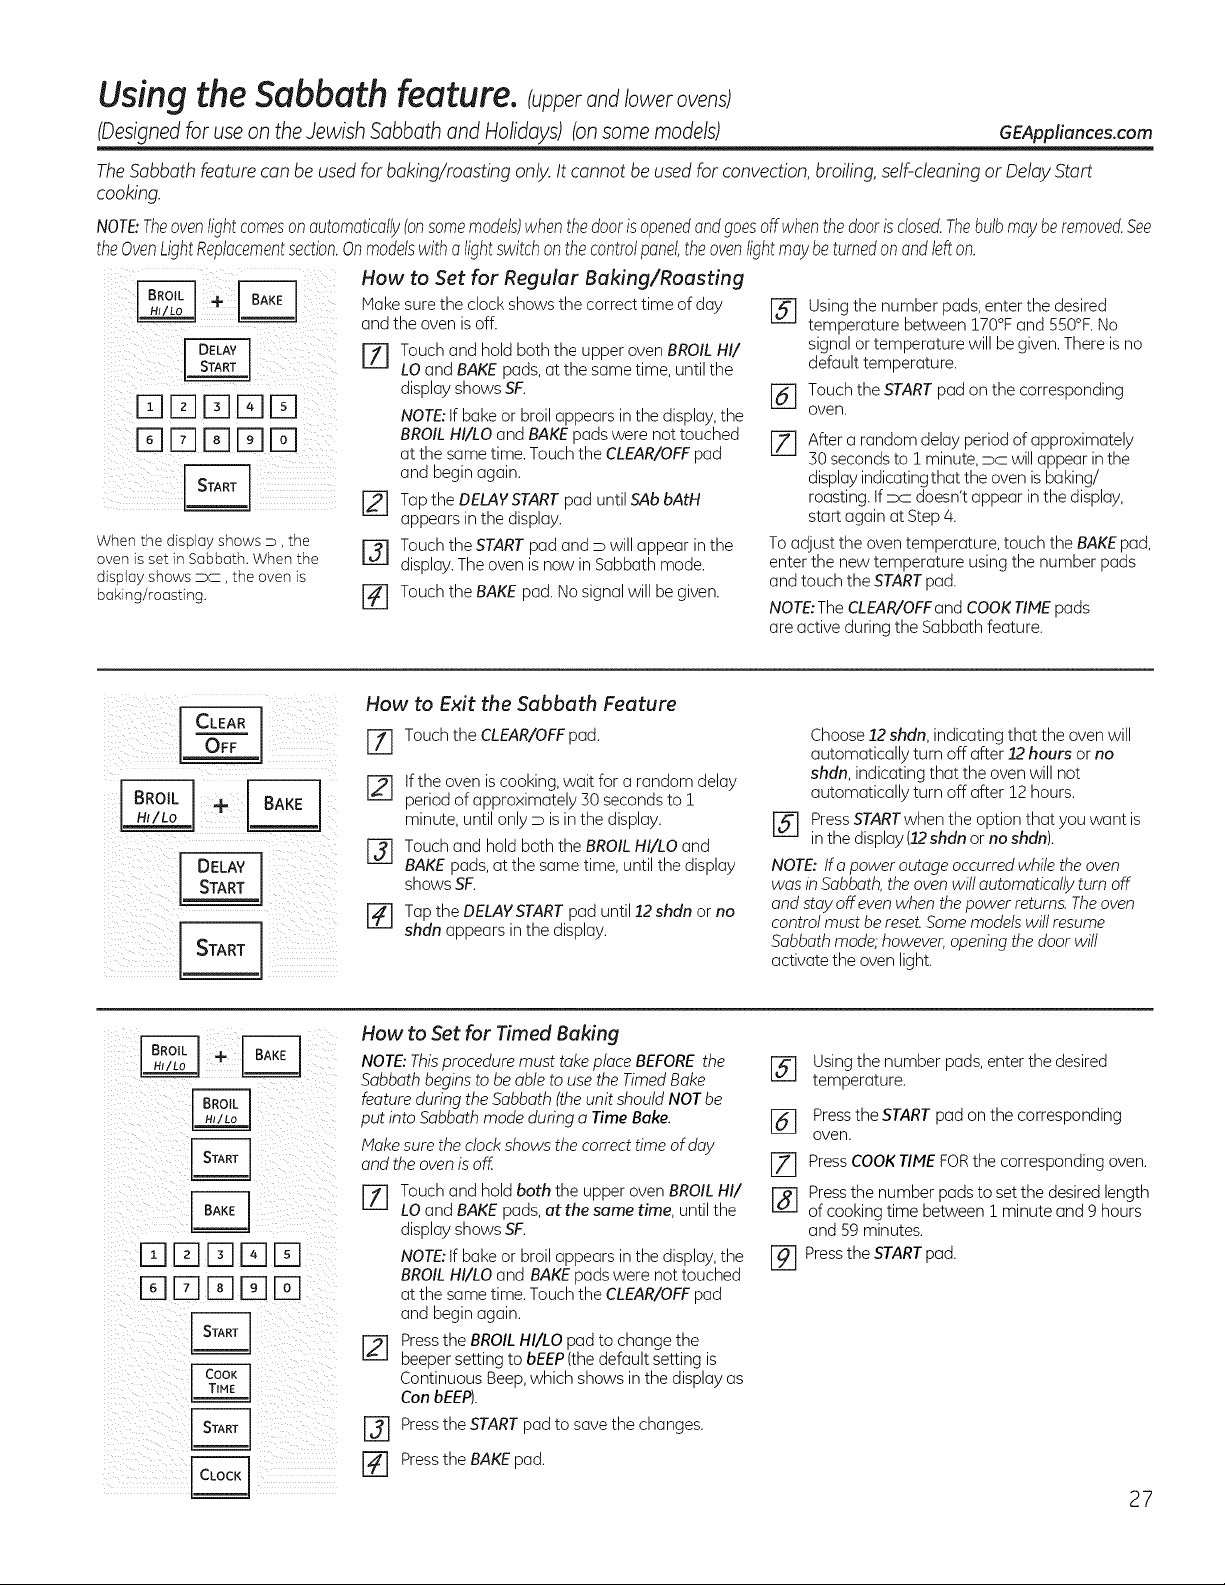
Using the Sabbath feature. (u erand/owerovensl
(Designedfor useon theJewish Sabbathand Holidays)(onsomemodels) GEAppliances.com
TheSabbathfeature canbe used forbaking/roasting only. It cannot be used forconvection,broiling, self-cleaning or Delay Start
cooking.
NOTE:Theovenlightcomesonautomatically(onsomemodels)whenthedoorisopenedandgoesoffwhenthedoorisclosed.Thebulbmayberemoved.See
theOvenLightReplacementsection.Onmodelswitha lightswitchonthecontrolpanel,theovenlightmaybeturnedonandIdt on.
) 16-1FTiI-qEZ]I-q5 ¸
When the display shows D, the
oven isset in Sabbath. When the
display shows DC, the oven is
baking/roasting.
How to Set for Regular Baking/Roasting
Hake sure the clock showsthe correct time ofday
and the oven is off.
[] Touchandhold both the upper oven BROILHI/
LO and BAKE pads,at the same time, untilthe
displayshowsSK
NOTE:tf bake or broilappears in the display, the
BROILHI/LO and BAKEpads were nottouched
atthe same time. Touch the CLEAR/OFFpad
and beginagain.
[] Tap the DELAYSTARTpad untilSAbbAtH
appears inthe display.
r-_ Touch the STARTpad and Dwill appear in the
display.Theoven is now in Sabbath mode.
[] Touchthe BAKE pad. No signalwill begiven.
[_ Using the number pads, enter the desired
temperature between !70°F andS50°F.No
signalor temperature will be given. Thereis no
default temperature.
[] Touch theSTARTpad onthe corresponding
oven.
[] After a random delayperiod of approximately
50secondsto ! minute,DC will appearin the
displayindicating that the oven is baking/
roasting.If _ doesn'tappear in the display,
startagain atStep 4.
To adjust the oven temperature, touch the BAKEpad,
enter the newtemperature using the number pads
and touch the STARTpad.
NOTE:The CLEAR/OFFand COOKTIMEpads
areactive during the Sabbathfeature.
i ji[ii[ CLEAR5C5
ilI_ iii _!i ii_ i _i:
I OELAvI
How to Exit the Sabbath Feature
Z] Touch the CLEAR/OFFpad.
If the oven is cookinq,wait for a random delay
period ofapproximately 50secondsto !
minute, untilonly D isinthe display.
J-_ Touch and hold boththe BROILHI/LOand
BAKE pads, atthe same time, untilthe display
showsSF.
Tapthe DELAYSTARTpaduntil 12 shdn orno
shdn appears inthe display.
Choose 12 shdn, indicating that the oven will
automatically turn off after22hours or no
shdn,indicating that the oven will not
automatically turn off after !2 hours.
r-_
PressSTARTwhen the option that you want is
'"' in the display(22shdn or no shdn).
NOTE: Ira power outage occurredwhile the oven
was in Sabbath,the oven will automatically turn off
and stay offeven when thepower returns.Theoven
control must be reset.Somemodelswill resume
Sabbathmode;however, opening thedoor will
activatethe oven light.
DD[]DD
DD[]DD
How to Set for Timed Baking
NOTE:Thisprocedure must take place BEFOREthe
Sabbath begins tobe able to use the Timed Bake
feature during the Sabbath (the unit should NOT be
put into Sabbath mode during a Time Bake.
lake sure the clock shows the correct time ofday
and the oven is off.
77 Touch and hold both the upper oven BROILHI/
LO and BAKE pads,at the same time, untilthe
displayshowsSK
NOTE:tf bake or broilappears in the display, the
BROILHI/LO and BAKEpads were not touched
atthe same time. Touch the CLEAR/OFFpad
and beginagain.
Pressthe BROILHI/LO pad tochange the
beepersettingto bEEP(thedefault setting is
Continuous Beep,which shows in the displayas
Con bEEP).
r-_ press the START pad to save the changes.
r_ press the BAKE pad.
[_ Using the number pads, enter the desired
temperature.
[_ Pressthe STARTpad onthe corresponding
oven.
[Z] PressCOOKTIMEFORthecorresponding oven.
[-_-] Pressthenumber pads tosetthe desired length
ofcooking time between 1 minute and 9 hours
and 59minutes.
E_ press theSTARTpad.
27
Care and cleaning of the range,
Be sure all controls are off and all surfaces are cool before cleaning any part of the range.
[A WARNING l
Ifyour range isremoved forcleaning, servicing or anyreason, be
surethe anti-tip device is reengaged properly when therange is
replaced. Failuretotake this precaution could result in tipping of
the range and canresult in death or serious bums to children or
adults.
How to Remove Protective Shipping Film
Carefullygrasp acorner of the protectiveshipping
filmwith your fingersand slowlypeelitfromthe
appliance surface. Do notuseany sharp items to
removethe film.Removeallof the filmbefore using
the appliance for the firsttime.
and Packaging Tape
Toensure no damage isdone to thefinish ofthe
product, the safest wayto removethe adhesive from
packagingtape on newappliances isan application
of a household liquiddishwashing detergent.Apply
with a soft clothand allow to soak.
NOTE:Theadhesivemust beremovedfromallparts.
Itcannotberemovedif it is bakedon.
Control Panel
tfdesired,thetouch padsmay bedeactivatedbefore
cleaning.
SeeHowto LockOuttheControlsin the Usingthe
clock,kitchentimerandcontrollockoutsectioninthis
manual.
Cleanupsplatterswith a dampcloth.
Youmayalsousea glasscleaner.
Removeheaviersoilwith warm,soapywater. Donot
useabrasivesof any kind.
Reactivatethetouch _adsaftercleaning.
Painted Surfaces
Paintedsurfacesincludethe sidesof the rangeand
the door,top ofcontrolpanelandthe drawerfront.
Cleanthesewith soapandwater or avinegarand
watersolution.
Donot usecommercialovencleaners,cleaning
powders,steelwool or harshabrasiveson any
paintedsurface.
Stainless Steel Surfaces (on some models)
Do not use a steel wool pad; itwill scratch the
surface.
Toclean the stainlesssteel surface, use warm,
sudsy water or a stainlesssteel cleaneror
polish.Always wipe thesurfacein the direction
ofthegrain.Followthe cleanerinstructionsfor
cleaningthestainless steelsurface.
To inquire about purchasing stainless steel
appliancecleaneror polish or tofindthe
location ofa dealer nearest you, please
callour toll-free number:
National Parts Center 1.800.626.2002
GEApplianceParts.com
Porcelain Enamel Cooktop (onsome models)
The porcelain enamelfinish is sturdy but
breakableifmisused.This finish isacid-
resistant. However, anyacidic foods spilled
(such as fruit juices,tomato or vinegar) should
notbe permittedto remain on thefinish.
If acids spill on the cooktopwhile itis hot, use
a drypaper towel or cloth towipe itup right
away. When thesurfacehascooled, wash with
soapand water. Rinsewell.
For otherspills such asfat spatterings, wash
with soapand water or cleansing powders
after thesurfacehascooled. Rinsewell. Polish
with a drycloth.
28
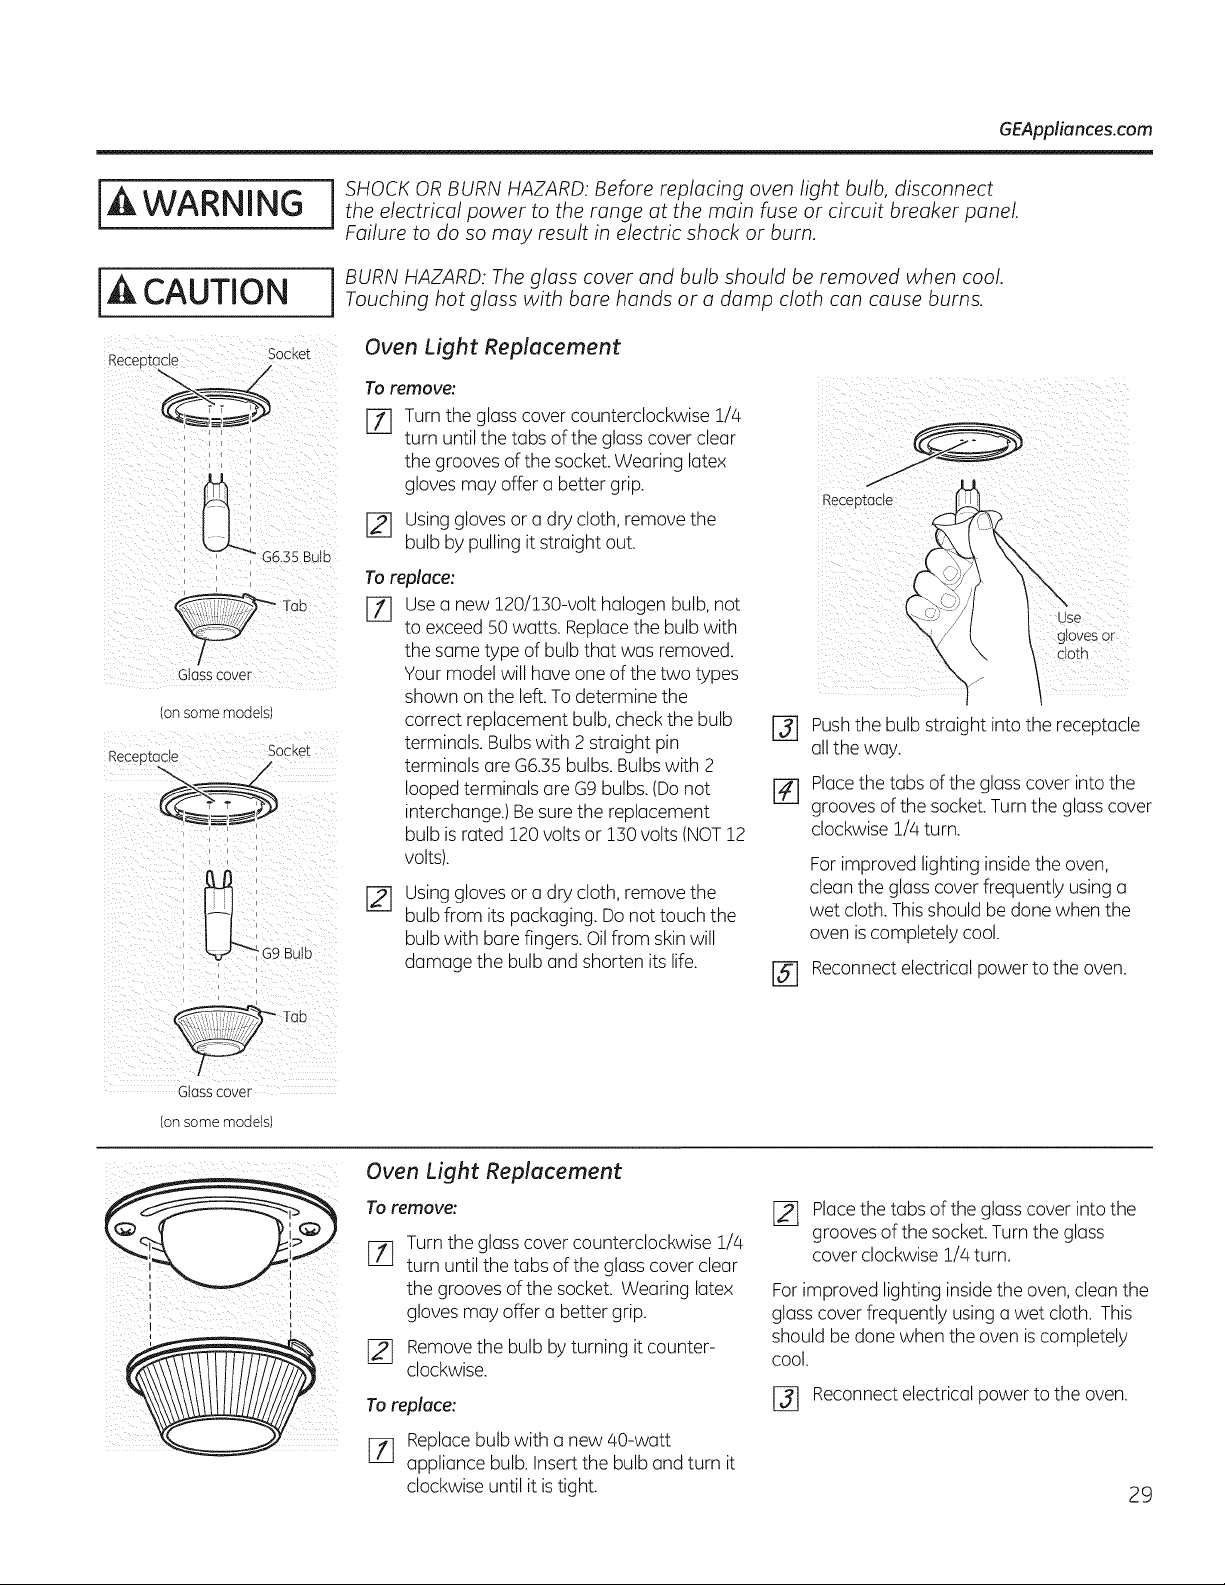
GEAppliances.com
iAWARNING
iA CAUTION
Socke_
Recep_a_@_
/
Glasscover
(onsome models)
i k i ' x ¸¸
SHOCK OR BURN HAZARD: Before replacing oven light bulb, disconnect
the electrical power to the range at the main fuse or circuit breaker panel.
Failure to do so may result in electric shock or burn.
i BURN HAZARD: Theglass cover and bulb should be removed when cool.
Touching hot glass with bare hands or a damp cloth can cause burns.
Oven Light Replacement
Toremove:
[] Turnthe glass cover counterclockwise 1/4
turn until the tubs of the glass cover clear
the grooves of the socket. Wearing latex
gloves may offer a better grip.
[] Usinggloves or a drycloth,remove the
bulb bypulling itstraightout.
Toreplace:
F-_ use a new 120/130-volt halogen bulb, not
to exceed 50 watts. Replace the bulb with
the same type of bulb that was removed.
Your model willhave one of the two types
shown on the left. To determine the
correct replacement bulb, check the bulb
terminals. Bulbswith 2straight pin
terminals are G6,35 bulbs.Bulbs with 2
looped terminals are G9bulbs. (Do not
interchange.)Besure the replacement
bulb is rated !20 voltsor !30 volts(NOT!2
volts).
r21
Usinggloves or a drycloth,remove the
bulb from its packaging.Do nottouch the
bulb with bare fingers. Oilfrom skinwill
damage the bulb and shorten its life.
@
%
Rece
gloves or
Pushthebulb straight intothe receptacle
all theway.
Placethetabs oftheglass cover intothe
grooves ofthe socket.Turntheglass cover
clockwise1/4turn.
For improved lighting inside theoven,
cleanthe glass cover frequently usinga
wet cloth. Thisshouldbe done when the
oven is completely cool.
[] Reconnectelectricalpowerto theoven.
Glasscover
(onsome models)
iiii_ I_ i _ _
i i i i i
ii
Oven Light Replacement
Toremove:
rf] Turn the glasscover counterclockwise 1/4
turn untilthetabs oftheglass cover clear
thegrooves ofthesocket. Wearing latex
gloves may offer a better grip.
r2] Removethe bulb byturning itcounter-
clockwise.
To replace:
Eli Replacebulb with a new40-watt
appliance bulb. Insert the bulb and turn it
clockwiseuntilitis tight.
[] Placethetabs ofthe glass cover intothe
grooves ofthesocket. Turntheglass
cover clockwise1/4turn.
For improved lighting inside theoven, clean the
glass cover frequently using a wet cloth. This
shouldbe done when theovenis completely
cool.
[] Reconnect electrical power to the oven.
29

Care and cleaning of the range.
Thegasket isdesignedwith o gap
atthe bottom to allowfor properair
circulation.
Donot rubor cleon the doorgasket-it
hasan extremelylow resistanceto
abrasion.
Ifyounotice the gasket becoming
worn,frayed ordamagedin anyway
or if it hasbecomedisplaced on the
door,youshould haveit replaced.
Cleaning the Oven Door
Tocleanthe insideof the door:
Becausethe area insidethe gasketiscleaned
duringthe self-cleancycle,you do not needto
cleanthis by hand.
Theareaoutsidethe gasketandthe doorliner
can becleanedwith a soap-filledor plastic
scouringpad,hot wateranddetergent.Rinsewell
with avinegarandwatersolution.
To clean the outside of the doon
Usesoapandwatertothoroughlycleanthe top,
sidesandfront of the ovendoor.Rinsewell.You
mayalsouseaglasscleanertocleanthe glasson
the outsideof the door.Donot letwaterdrip into
theventopenings.
': tfany stainonthe doorventtrim ispersistent,use
a softabrasivecleaner
anda sponge-scrubberfor bestresults.
Spillageof marinades,fruitjuices,tomato sauces
andbastingmaterialscontainingacidsmay
causediscolorationandshouldbewipedup
immediately.Whensurfaceis cool,cleanand
rinse.
': Donot useovencleaners,cleaningpowdersor
harshabrasivesonthe outsideof the door.
(
Pull hinge locks down to unlock.
Removal position
Lift-Off Oven Door (on some models)
Thedoorisveryheavy.Becarefulwhenremoving
and lifting the door.
Donot liftthe doorbythehandle.
Toremovethe door:
[] Fullyopenthe door.
[] Pullthe hingelocksdowntowardthe door
frame,to the unlockedposition.Atool,suchas
asmallflat-bladescrewdriver,mayberequired.
[] Firmlygraspboth sidesof the doorat thetop.
[_ Closedoorto the doorremovalposition,which
ishalfwaybetweenthe broilstoppositionand
fullyclosed.
[]_] Liftdoor upandout untilthe hingearm isclear
of theslot.
Toreplacethe door:
[-71 Firmlygraspboth sidesof the doorat thetop.
@
%
Withthe Bottom
doorat the same edge
angle ofslot
\
astheremoval
position,seatthe
indentationof the hinge
arm into the bottomedge
of the hingeslot.Thenotch
in the hingearm mustbefull
bottom of the slot.
I| | Hingearm
seated intothe
Fullyopenthe door.tfthe doorwill notfully
open,the indentationis notseatedcorrectlyin
the bottomedgeoftheslot.
Pushthe hingelocksupagainstthe frontframe
of the ovencavityto the lockedposition.
Hint
lock
Pushhinge locks up to lock.
[_] Closetheovendoor.
30
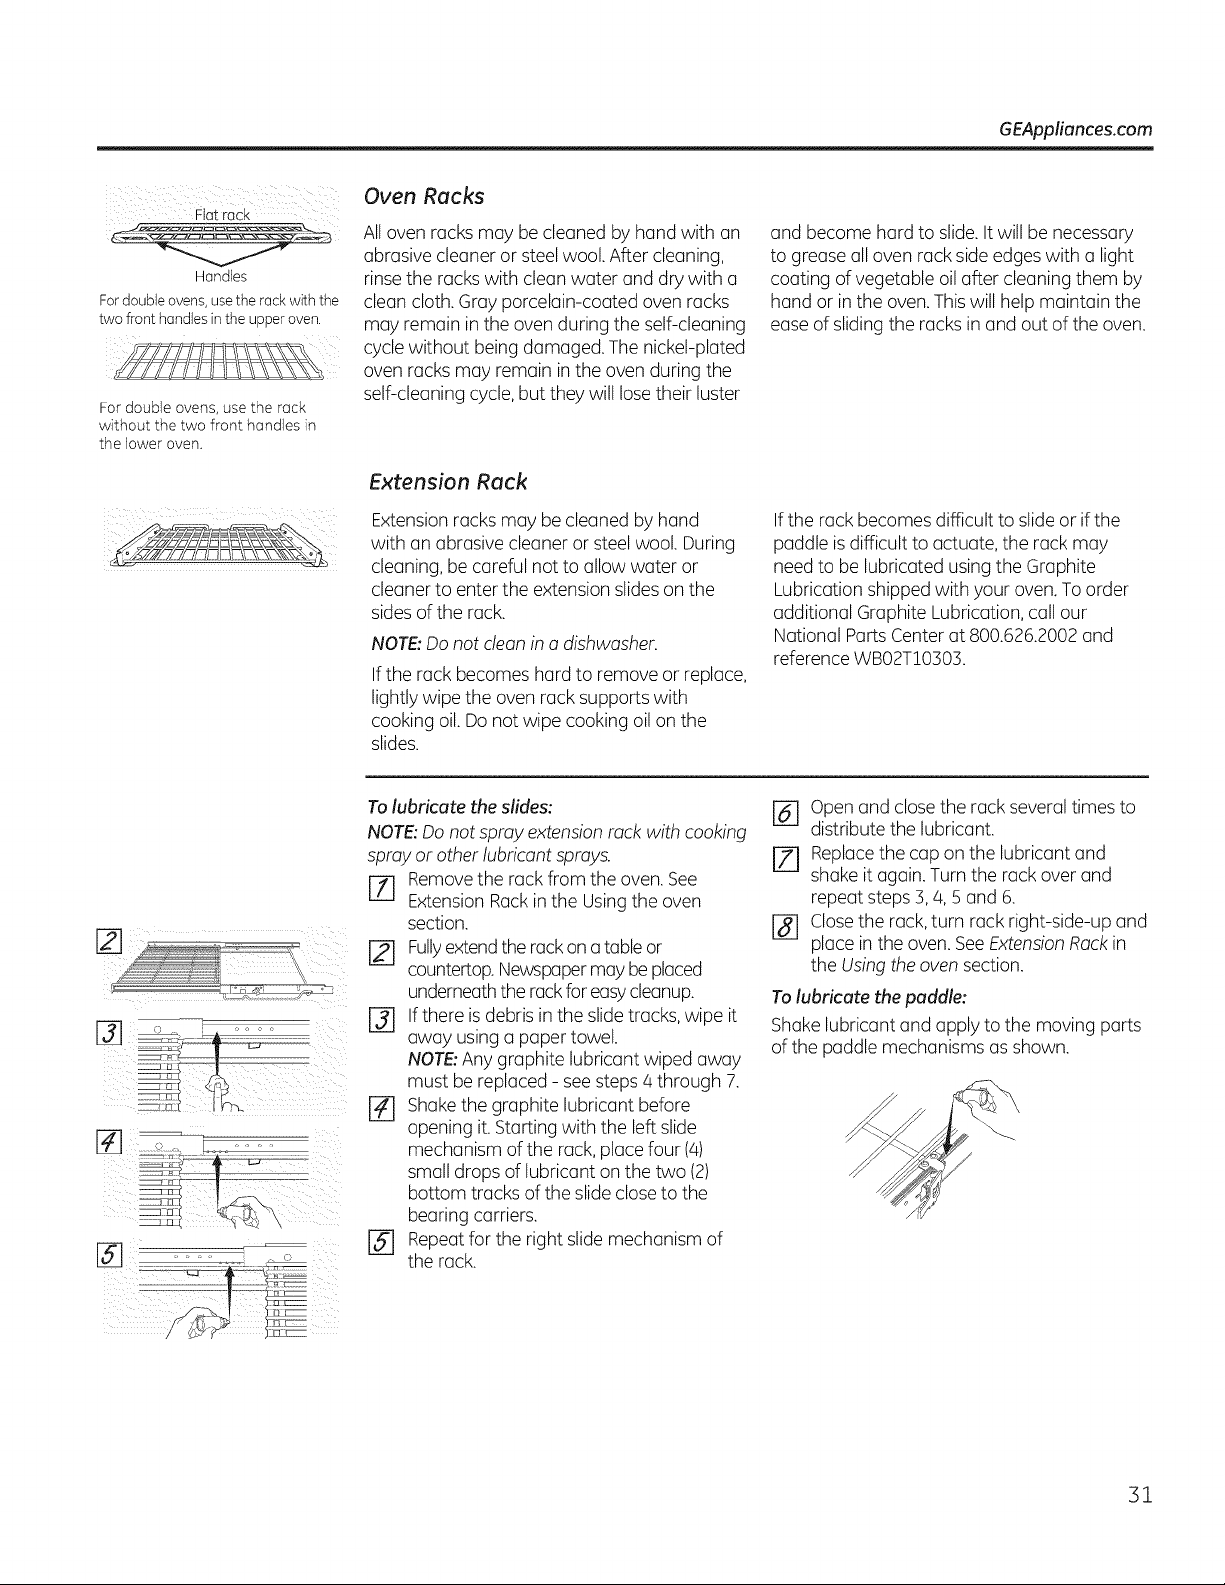
GEAppliances.com
Handles
Fordoubleovens,usethe rackwith the
twofront handles in the upperoven.
For double ovens, use the rock
without the two front handles in
the lower oven.
Oven Racks
All ovenracksmay be cleanedbyhand with an
abrasive cleaneror steel wool. After cleaning,
rinse therackswith cleanwater and dry with a
cleancloth.Grayporcelain-coated ovenracks
may remainin the oven during the self-cleaning
cyclewithout being damaged. The nickel-plated
oven racks may remain in theovenduring the
self-cleaningcycle, butthey willlose their luster
Extension Rack
Extensionracksmay be cleaned byhand
with an abrasive cleaneror steel wool. During
cleaning, be careful nottoallow water or
cleanerto entertheextensionslideson the
sides ofthe rack.
NOTE:Do notcleanin a dishwasher.
Ifthe rack becomeshard to remove or replace,
lightly wipethe ovenrack supportswith
cooking oil.Do notwipecooking oil on the
slides.
and become hard to slide.It willbe necessary
to greaseall ovenrack sideedges with a light
coating ofvegetable oil after cleaningthem by
hand or inthe oven.Thiswill help maintain the
ease ofslidingtheracksin and outofthe oven.
Ifthe rack becomesdifficult to slide or if the
paddle is difficult to actuate, the rack may
need to be lubricated using the Graphite
Lubrication shippedwith your oven.To order
additional GraphiteLubrication,call our
National PartsCenter at800.626.2002and
reference WB02T!0303.
r21
%
%% j.---
[]
:Z.2ZK
Tolubricate the slides:
NOTE: Donot spray extension rock with cooking
spray or other lubricant sprays.
[Z] Remove the rack from the oven. See
Extension Rackinthe Usingthe oven
section.
Fullyextend the rack on atable or
countertop. Newspaper may be placed
underneath the rack for easy cleanup.
[-_ Ifthere isdebris inthe slidetracks, wipe it
away using a paper towel.
NOTE:Any graphite lubricant wiped away
must be replaced -see steps 4 through 7.
[_ Shake the graphite lubricant before
opening it.Starting with the left slide
mechanism of the rack, place four (4)
small drops oflubricant on the two (2)
bottom tracks ofthe slide close to the
bearing carriers.
Repeat forthe right slide mechanism of
the rack.
Open and closethe rack several timesto
distributethe lubricant.
Replacethecapon thelubricant and
shake itagain. Turntherack overand
repeatsteps3,/4,5 and 6.
r_ close the rack, turn rack right-side-up and
placein theoven. SeeExtensionRack in
theUsing the ovensection.
To lubricate the paddle:
Shake lubricant and applyto themoving parts
ofthe paddle mechanismsasshown.
31
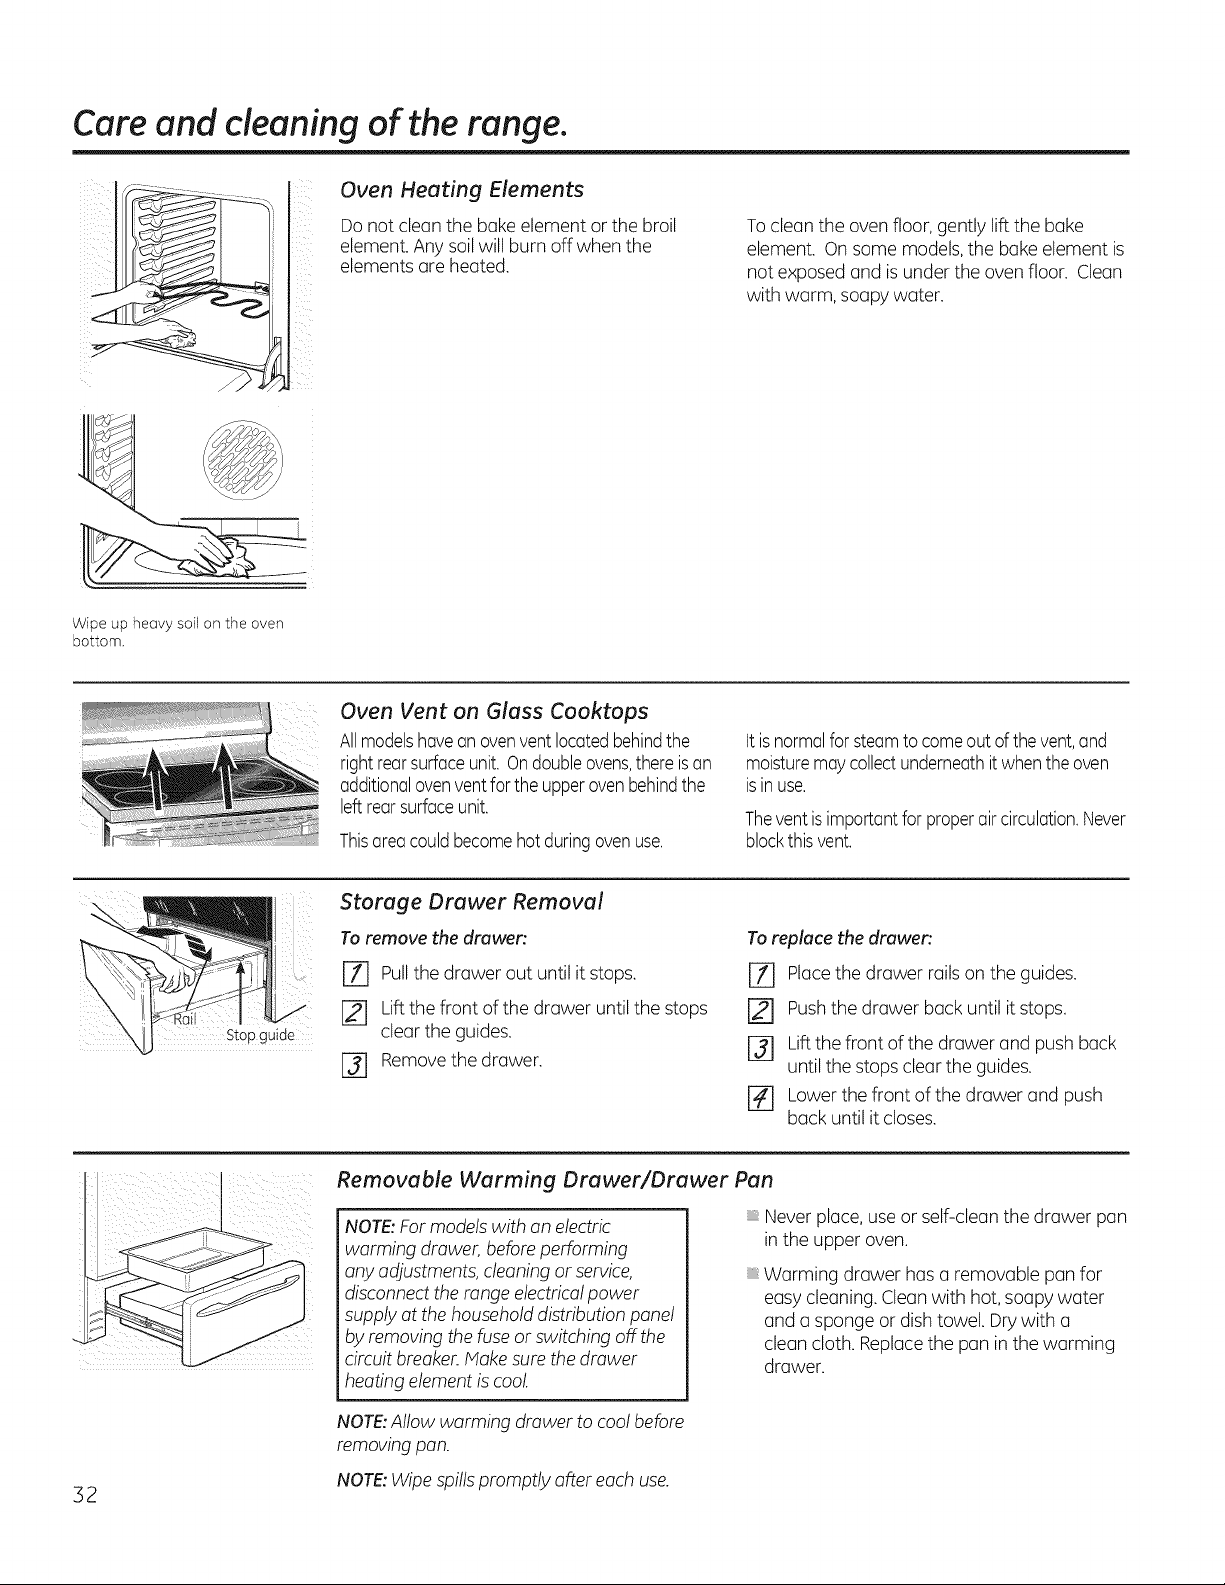
Care and cleaning of the range,
Wipe up heavy soil on the oven
bottom.
Oven Heating Elements
Donotclean the bakeelement or the broil
element. Anysoil willburn off whenthe
elementsare heated.
To clean the ovenfloor, gently lift the bake
element. On some models, the bakeelement is
notexposed and is under the oven floor. Clean
with warm, soapy water.
Oven Vent on Glass Cooktops
Allmodelshavean ovenventlocatedbehindthe
rightrearsurfaceunit. Ondoubleovens,there ison
additionalovenventfor the upperovenbehindthe
leftrearsurfaceunit.
Thisore(]could becomehot duringovenuse.
tt is normalfor steamto comeout of thevent,and
moisturemaycollectunderneathit whenthe oven
is inuse.
Theventis importantforproperair circulation.Never
blockthisvent.
Stop guide
Storage Drawer Removal
To remove thedrawer:
rT] Pullthe drawerout until it stops.
[-2-1Liftthefront ofthedrawer until the stops
cleartheguides.
[] Removethedrawer.
To replace the drawer:
r_ Placethedrawer railson the guides.
r_ Pushthedrawer back until it stops.
r_ Liftthefront ofthedrawer and pushback
untilthestopsclear theguides.
r_ Lower thefront ofthedrawer and push
back untilitcloses.
Removable Warming Drawer/Drawer Pan
NOTE:Formodels with an electric
warming drawer, before performing
anyadjustments,cleaningor service,
disconnecttherange electricalpower
supply atthehousehold distributionpanel
byremoving thefuse or switching off the
circuitbreaker.Make surethe drawer
heatingelement is cool.
Never place,useor self-cleanthedrawer pan
in theupper oven.
Warming drawer hasa removable pan for
easycleaning. Clean with hot, soapy water
and a spongeor dish towel.Dry with a
clean cloth. Replacethe pan inthe warming
drawer.
NOTE:Allow warming drawer tocoolbefore
removing pan.
NOTE:Wipe spillspromptly after eachuse.
32
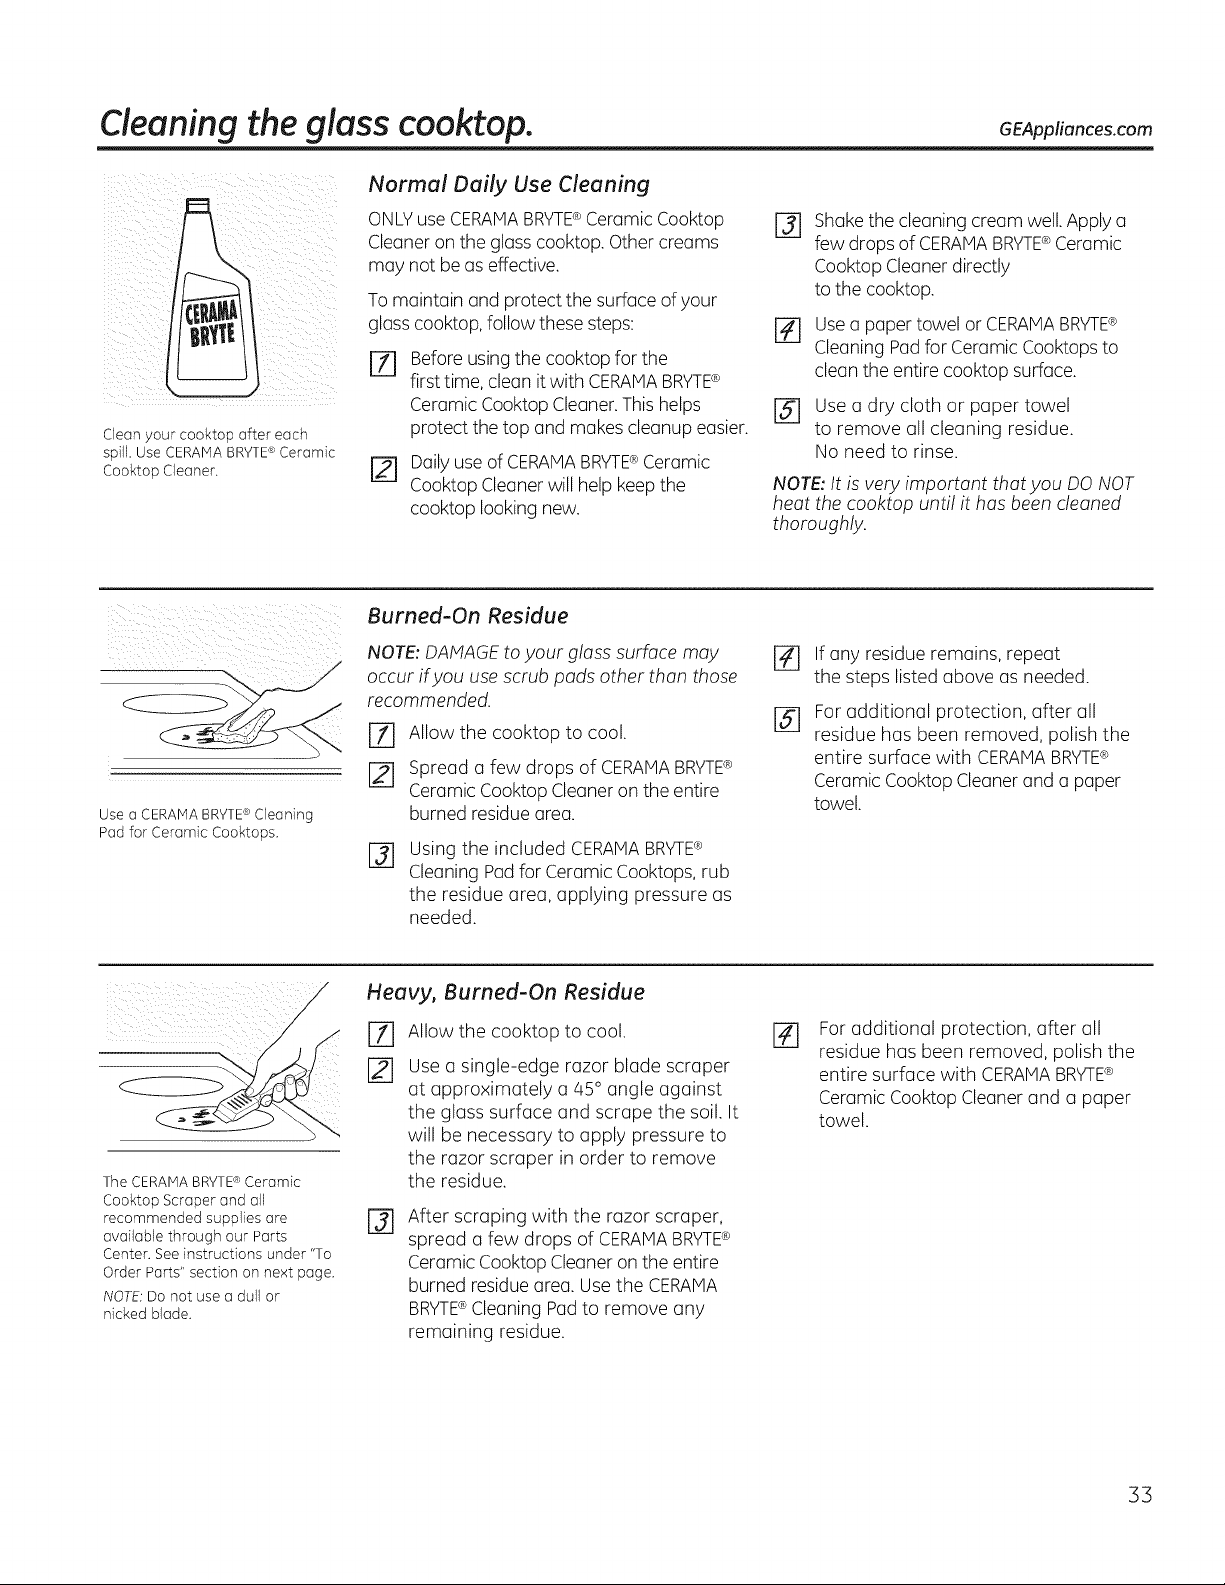
Cleaning the glass cooktop, GEAppliances.com
Clean your cooktop after each
spill, Use CERAMABRVTE®Ceramic
Cooktop Cleaner.
Normal Daily Use Cleaning
ONLVuseCERANABRVTE® Ceramic Cooktop
Cleaner on the glass cooktop. Othercreams
may not be aseffective,
Tomaintain and protectthe surfaceofyour
glass cooktop, follow these steps:
[]
Beforeusing thecooktop forthe
first time,cleanit with CERAIVlABRYTE®
Ceramic CooktopCleaner.This helps
protect thetop and makes cleanup easier.
r_ Daily use ofCERAMABRYTE®Ceramic
Cooktop Cleaner will help keep the
cooktop lookingnew.
@
Shakethe cleaningcream well. Apply a
few dropsofCERAMABRVTE®Ceramic
CooktopCleanerdirectly
tothecooktop.
r-_ usea paper towel or CERAMABRYTE®
Cleaning Pad forCeramicCooktopsto
cleantheentirecooktop surface.
r51 use a dry cloth or paper towel
to remove all cleaning residue.
No need to rinse.
NOTE: It isvery important that you DO NOT
heat the cooktop until ithas been cleaned
thoroughly.
Use a CERAMA BRYTE®Cleaning
Pad for Ceramic Cooktops.
Burned-On Residue
NOTE: DAMAGEto your glass surface may
occur if you usescrub pads other than those
recommended.
rT] Allow the cooktop to cool.
[] Spread a few drops of CERAiVlABRYTE®
CeramicCooktopCleaneron theentire
burned residuearea.
%
Using the included CERAMABRYTE®
CleaningPadforCeramicCooktops, rub
the residue area, applying pressure as
needed.
%
@
If any residue remains, repeat
the steps listed above asneeded.
Foradditional protection, after all
residue has been removed, polish the
entire surface with CERAMABRVTE®
Ceramic CooktopCleaner and a paper
towel.
The CERAMABRVTE®Ceramic
Cooktop Scraper and all
recommended supplies are
available through our Parts
Center. Seeinstructions under "To
Order Parts" section on next page.
NOTE:Do not use a dull or
nicked blade.
Heavy, Burned-On Residue
F71
Allow the cooktop to cool.
Use a single-edge razor blade scraper
at approximately a a,5°angle against
the glass surface and scrape the soil. It
will be necessary to apply pressure to
the razor scraper in order to remove
the residue.
%
After scraping with the razor scraper,
spread a few drops of CERAMABRYTE®
Ceramic CooktopCleaner on the entire
burned residue area. Usethe CERAMA
BRVTE®CleaningPadto remove any
remaining residue.
%
Foradditional protection, after all
residue hasbeen removed, polish the
entire surface with CERAMABRYTE®
Ceramic CooktopCleaner and a paper
towel.
33
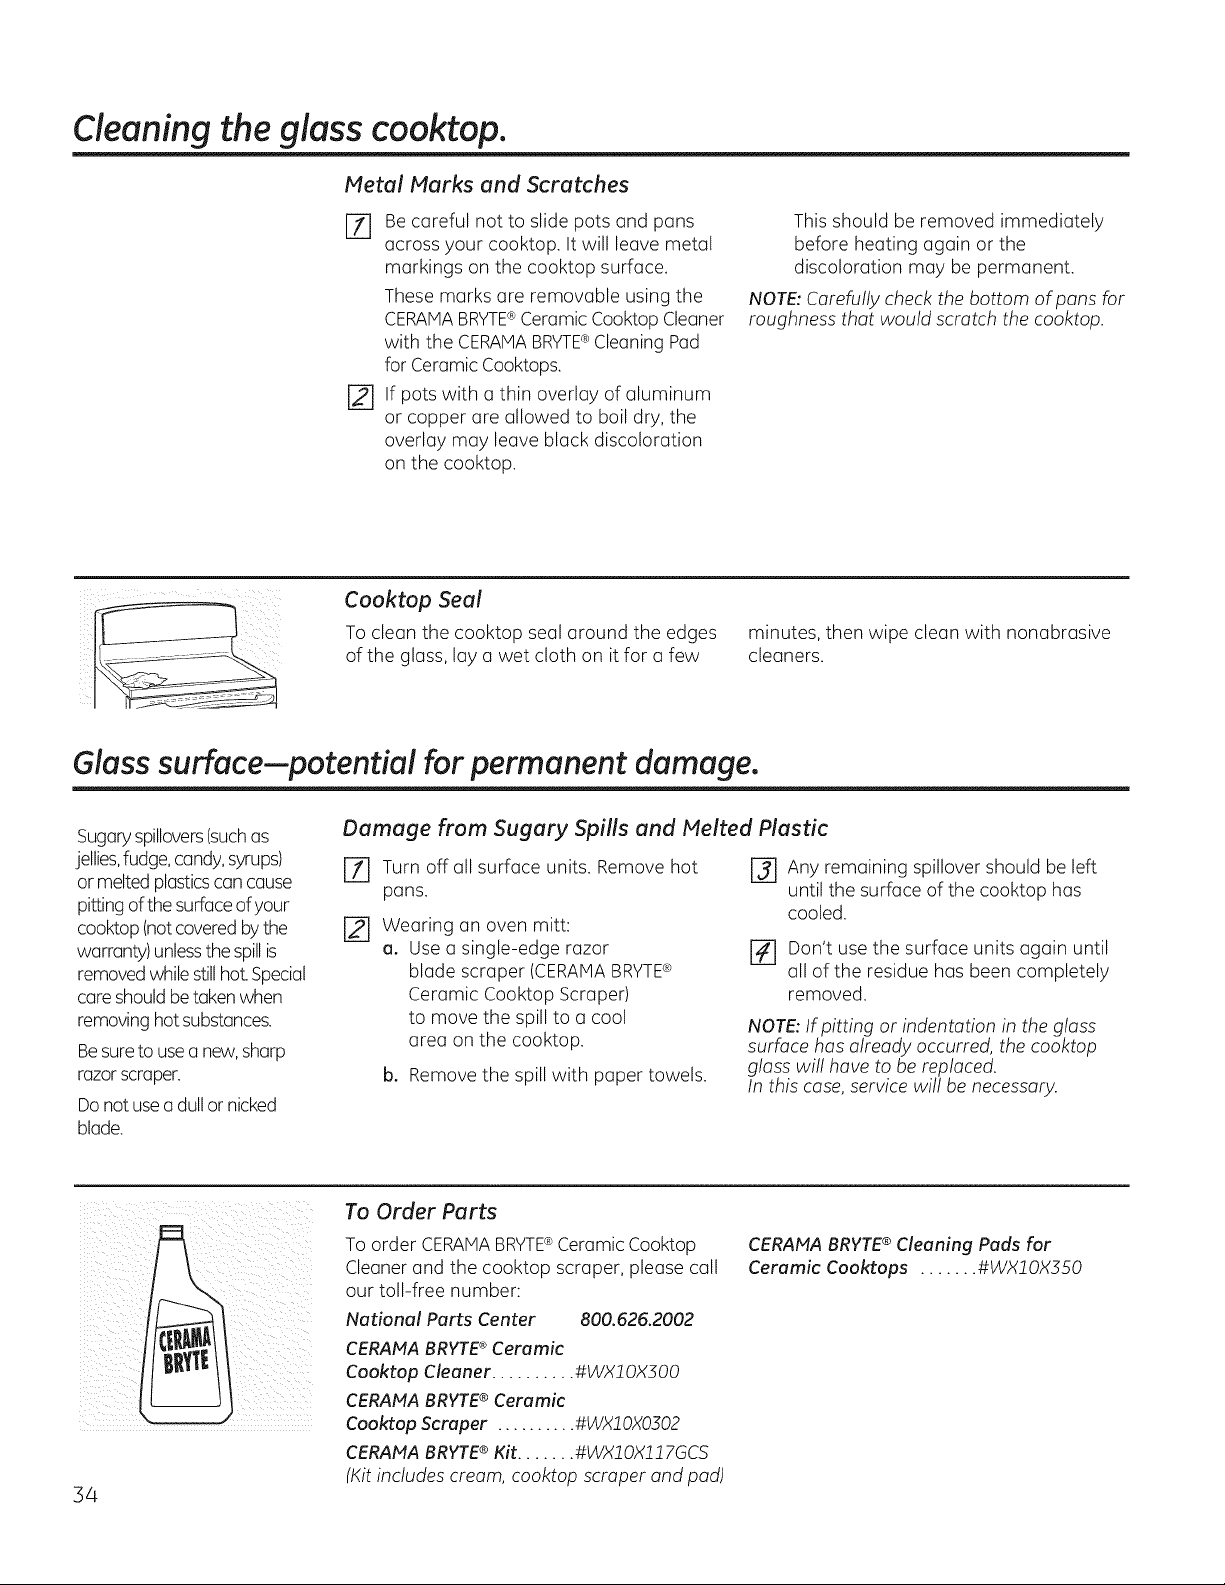
Cleaning the glass cooktop.
Metal Marks and Scratches
J-_ Be careful not to slide pots and pans
across your cooktop. It will leave metal
markings on the cooktop surface.
These marks are removable using the
CERAMABRYTE®Ceramic CooktopCleaner
with the CERAMABRYTE®Cleaning Pad
forCeramicCooktops.
[] If pots with o thin overlay ofaluminum
or copper are allowed to boil dry, the
overlay may leave block discoloration
on the cooktop.
This should be removed immediately
before heating again or the
discoloration may be permanent.
NOTE',Carefully checkthe bottom ofpans for
roughness that would scratch thecooktop.
Cooktop Seal
To cleon the cooktop seal around the edges
of the gloss, lay a wet cloth on itfor a few
minutes, then wipe clean with nonabrasive
cleaners.
Glass surface--potential for permanent damage.
Sugaryspillovers(suchas
jellies,fudge,candy,syrups)
or melted plasticscan cause
pittingof thesurfaceofyour
cooktop (notcoveredby the
warranty) unlessthespillis
removedwhile still hot.Special
care should betakenwhen
removinghot substances.
Besuretouse a new,sharp
razorscraper.
Do not usea dullor nicked
blade.
Damage from Sugary Spills and Melted Plastic
I-f] Turn off all surface units. Remove hot
pans.
Wearing an oven mitt:
o. Use a single-edge razor
blade scraper (CERAIVlABRYTE®
Ceramic Cooktop Scraper)
to move the spillto a cool
area on the cooktop.
b. Removethe spill with paper towels.
r_ Any remaining spillover should be left
until the surface ofthe cooktop has
cooled.
r_ Don't usethe surface units again until
all ofthe residue hasbeen completely
removed.
NOTE: If pitting or indentation in the glass
surface hasalready occurred, the cooktop
glass will have to be replaced.
In this case, service will be necessary.
34
I
To Order Parts
To order CERAI4ABRYTE®Ceramic Cooktop
Cleaner and the cooktop scraper, please call
our toll-free number:
National Parts Center 800.626.2002
CERAMA BRYTE®Ceramic
Cooktop Cleaner .......... #WX! OX300
CERAIWABRYTE®Ceramic
Cooktop Scraper .......... #WXff 0){0302
CERAMA BRYTE®Kit....... #WX! OX!;i7GCS
(Kitincludes cream, cooktop scraper and pod)
CERAMA BRYTE ®Cleaning Pads for
Ceramic Cooktops ....... #WX!OX350

Before You Call For Service... GEAppliances.com
Troubleshooting Tips
Savetime and money! Review the charts on the following
pages first and you may not need to call for service.
Possible Causes What To Do
at Improper cookware , Wrong pan type. Use a magnet to check that cookware is
work properly or being used. induction-compatible. Use a flat induction-capable pan that meets
flashing power setting the minimum size for the element being used. See the Pansize and
shape section.
Pan is too small , Pan size isbelow the minimum sizefor the element. See the Pansize
and shape section.
• Usesmaller element.
Pan not positioned correctly. • Center the pan inthe cooking zone.
Cooktop control improperly set. • Check to see that the control is set properly. Press ON then +or -
Pan is not infullcontact with , Pan must be flat.
glass surface
Surface unit setting High cooktop temperature. , Allowthe internal fan to cool the cooktop.
changed or turned , Check if pan boiled dry.
off unexpectedly
Scratches (may appear Incorrect cleaning , Scratches are not removable. Tinyscratches willbecome
as cracksl on cooktop methods being used. less visible intime as a result of cleaning.
glass surface Cookware with rough bottoms , Toavoid scratches, use the recommended cleaning
being used or coarse particles procedures. Hake sure bottoms of cookware are clean
(salt or sand} were between before use, and use cookware with smooth bottoms.
the cookware and the surface
of the cooktop.
Cookware has been slid
across the cooktop surface.
Areas of discoloration Food spillovers not cleaned • See the Cleaning the glass cooktop section.
on the cooktop before next use.
Hot surface on a model , This is normal. Thesurface may appear discolored
with a light-colored cooktop, when it ishot. This is temporary and will disappear
asthe glass cools.
Plastic melted to Hot cooktop came into , See the Glass surface potential for permanent damage
the surface contact with plastic placed section in the Cleaning the glass cooktop section.
on the hot cooktop.
_r indentation) Hot sugar mixture spilled , Calla qualified technician for replacement.
of the cooktop on the cooktop.
Oven light does Light bulb is loose. , Tighten or replace the bulb.
not work
Ovenwill not work Plug on range is not completely , Hake sure electrical plug is plugged into a live, properly
inserted inthe electrical outlet, grounded outlet.
A fuse in your home may , Replace the fuse or reset the circuit breaker.
be blown or the circuit
breaker tripped.
Oven controls improperly set. • See the Using the oven section.
Oven too hot. , Allow the oven to cool to below locking temperature.
35
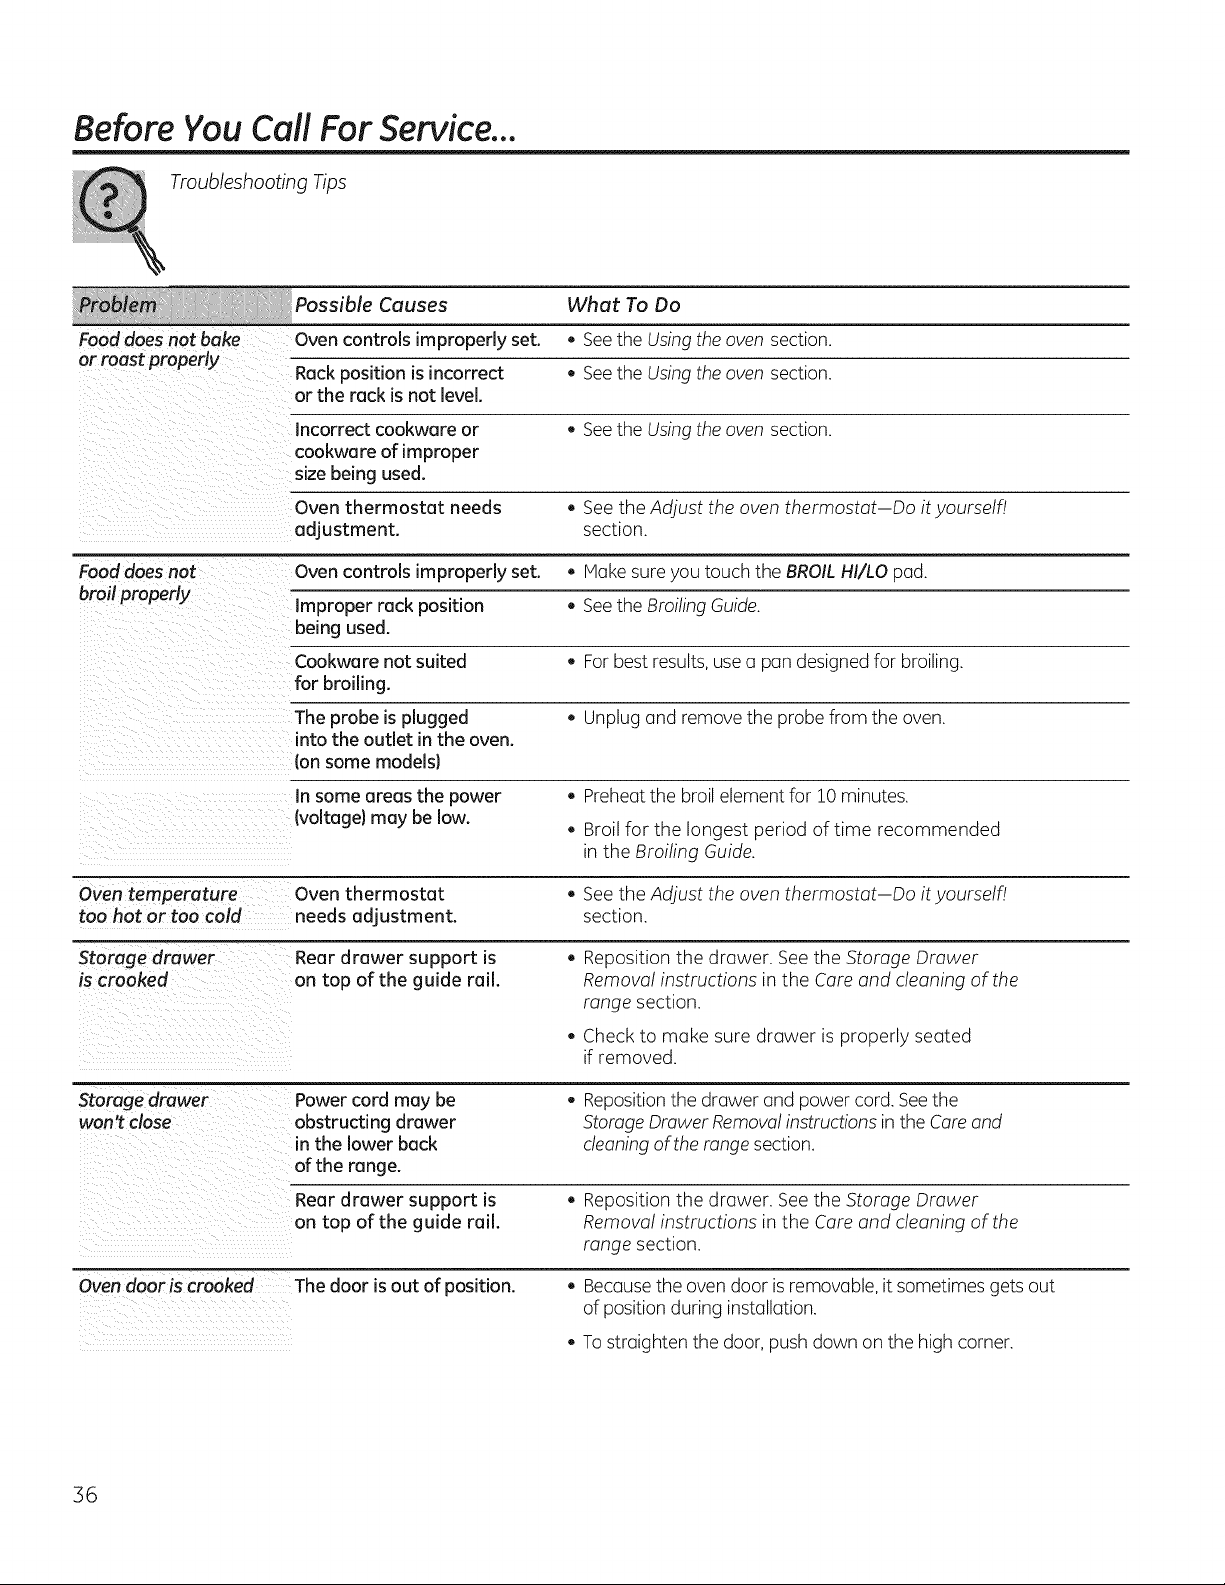
BeforeVou CallFor Service...
Troubleshooting Tips
Possible Causes What To Do
Fooddoes not bake Ovencontrols improperly set. • SeetheUsing the oven section,
or roast properly
Rackposition isincorrect • SeetheUsing the oven section.
or the rack isnot level.
Incorrect cookware or • SeetheUsing the oven section.
cookware of improper
size being used.
Oven thermostat needs , See theAdjust theoven thermostat Doityourself!
adjustment, section.
Fooddoes not Ovencontrols improperly set. , Hake sure you touch theBROILHI/LOpad.
broil properly Improper rack position • SeetheBroiling Guide.
being used.
Cookware not suited • Forbest results,use a pan designed for broiling.
for broiling.
Theprobe is plugged • Unplug and remove theprobe from the oven.
into the outlet in the oven.
ion some models}
Insome areas the power . Preheatthe broil element for 10 minutes.
(voltage} may be low.
Broil for the longest period oftime recommended
in the Broiling Guide.
Oven temperature Oven thermostat . See theAdjust theoven thermostat Doityourself!
too hot or too cold needs adjustment, section.
Storage drawer Rear drawer support is , Repositionthe drawer. Seethe Storage Drawer
iscrooked on top ofthe guide rail. Removal instructions in the Careand cleaning of the
range section.
Checkto make sure drawer is properly seated
if removed.
Storage drawer Powercordmay be • Repositionthedrawer and power cord. Seethe
won't close obstructing drawer Storage Drawer Removalinstructionsin theCare and
in the lower back cleaning oftherange section.
ofthe range.
Rear drawer support is . Repositionthe drawer. Seethe Storage Drawer
on top of the guide rail. Removal instructions in the Careand cleaning of the
range section.
Oven door iscrooked Thedoor isout of position. . Becausethe ovendoor is removable, itsometimesgets out
ofposition during installation.
To straighten thedoor,pushdown on the high corner.
36
Possible Causes What To Do
Clockand timer do Plug on range isnot completely . Hake sureelectricalplug is plugged intoa live,properly
not work inserted in the electrical outlet, grounded outlet.
A fuse in your home • Replacethefuse or reset the circuitbreaker.
may be blown or the
circuit breaker tripped.
Oven controls improperly set. . See the Using the kitchen timer section.
Oven willnotself-cleon The oven temperature is • Allowthe range to cool and reset the controls.
too high to set oself-cleon
operation.
Oven controls improperly set. • See the Using the self-cleaning oven section.
The probe is plugged into . Remove the probe from the oven.
the outlet in the oven.
(on some models)
"Crackling" or This is the sound of the . Thisisnormal.
"popping" sound metal heating and cooling
during both the cooking and
cleaning functions.
GEApplionces.com
, Touch the CLEAR/OFFpad. Open the windows to
rid the room of smoke. Wait until LOCKED/DOOR
goes off. After the oven cools,wipe up the
excess soil and reset the clean cycle.
_moking Excessive soil.
during a clean
Oven dOorwill not Oven too hot. , Allow the oven to cool below locking temperature.
open after a Cleancycle
Oven not clean after a oven controls not properly set. • See the Using the self-cleaning oven or Using steam clean section.
Oven was heavily soiled. , Clean up heavy spillovers before starting the clean
cycle. Heavilysoiled ovens may need to be cleaned again.
,LOCKED, flashes The self-cleon cycle has been . Close the oven door.
in the display selected but the door is not
closed.
'LOC_EDi i ison The oven door is locked . Touch the CLEAR/OFF pad. Allow the oven to cool.
when you want because the temperature
to cook inside the oven has not
dropped below the
locking temperature.
F-- and a number
or letter flash
in the display
............................
You hovea function error code. , Disconnect oil power to the range for at least
30 seconds and then reconnect power. If the function
error code repeats, cull for service.
37

BeforeYou CallFor Service...
Troubleshooting Tips
Possible Causes What To Do
Control signals after You forgot to enter a _ Touch the BAKEpad and desired temperature or
entering cooking time bake temperature or the SELFCLEAN pad and desired clean time.
or start time cleaning time.
Display goesblank A fuse in your home may be , Replacethefuse or reset the circuitbreaker.
blown or the circuit
breaker tripped.
The clock isin the _ See the Specialfeatures ofyour ovencontrol section.
black-out mode.
Display flashes Power failure. . Reset the clock.
Unable to get the Oven control pads were _ TheBROIL HI/LO and BAKE pads must be touched at
display to show SF" not touched properly, the same time and held for :3seconds.
" " TM
Probe appears m s isreminding you to . Entera probe temperature.
the display enter a probe temperature
(onsome models) after plugging in the probe.
Power outage, Power outage or surge. . Reset the clock. Ifthe oven was in use, you must reset
clock flashes it bytouching the CLEAR/OFFpad, setting the clock
and resetting any cooking function.
Steam from the vent When using the ovens, * This is normal.
it is normal to seesteam
coming out of the oven
vents. Asthe number of racks
or amount of food being
cooked increases, the amount
of visible steam will increase.
"Burning" or "oily"
odor emitting from
the vent
Strong odor
This isnormal in a new oven . Tospeedthe process, set a self-clean cycle for a
and will disappear in time. minimum of 3 hours. See the Using the self-cleaning
oven section.
An odor from the insulation _ This is temporary.
around the inside of the oven
is normal for the first few times
the oven is used.
Fan noise
(onsome models)
A convection fan may
automatically turn on
and off.
This is normal. Thefan is designed to operate intermittently
to maximize cooking evenness.
Theconvection fan will operate during preheat
of the bake cycle. Thefan will turn off after the oven
isheated to the set temperature. This isnormal.
A cooling fan may _ This is normal on some models. Thecooling fan will turn off and
automatically turn on and off. on to cool internal parts. It may run after the oven is
turned off.
Oven or cooktop will
not stay set
Function error
Disconnect all power for at least 30 seconds and then
reconnect power. If repeating, callfor service.
38
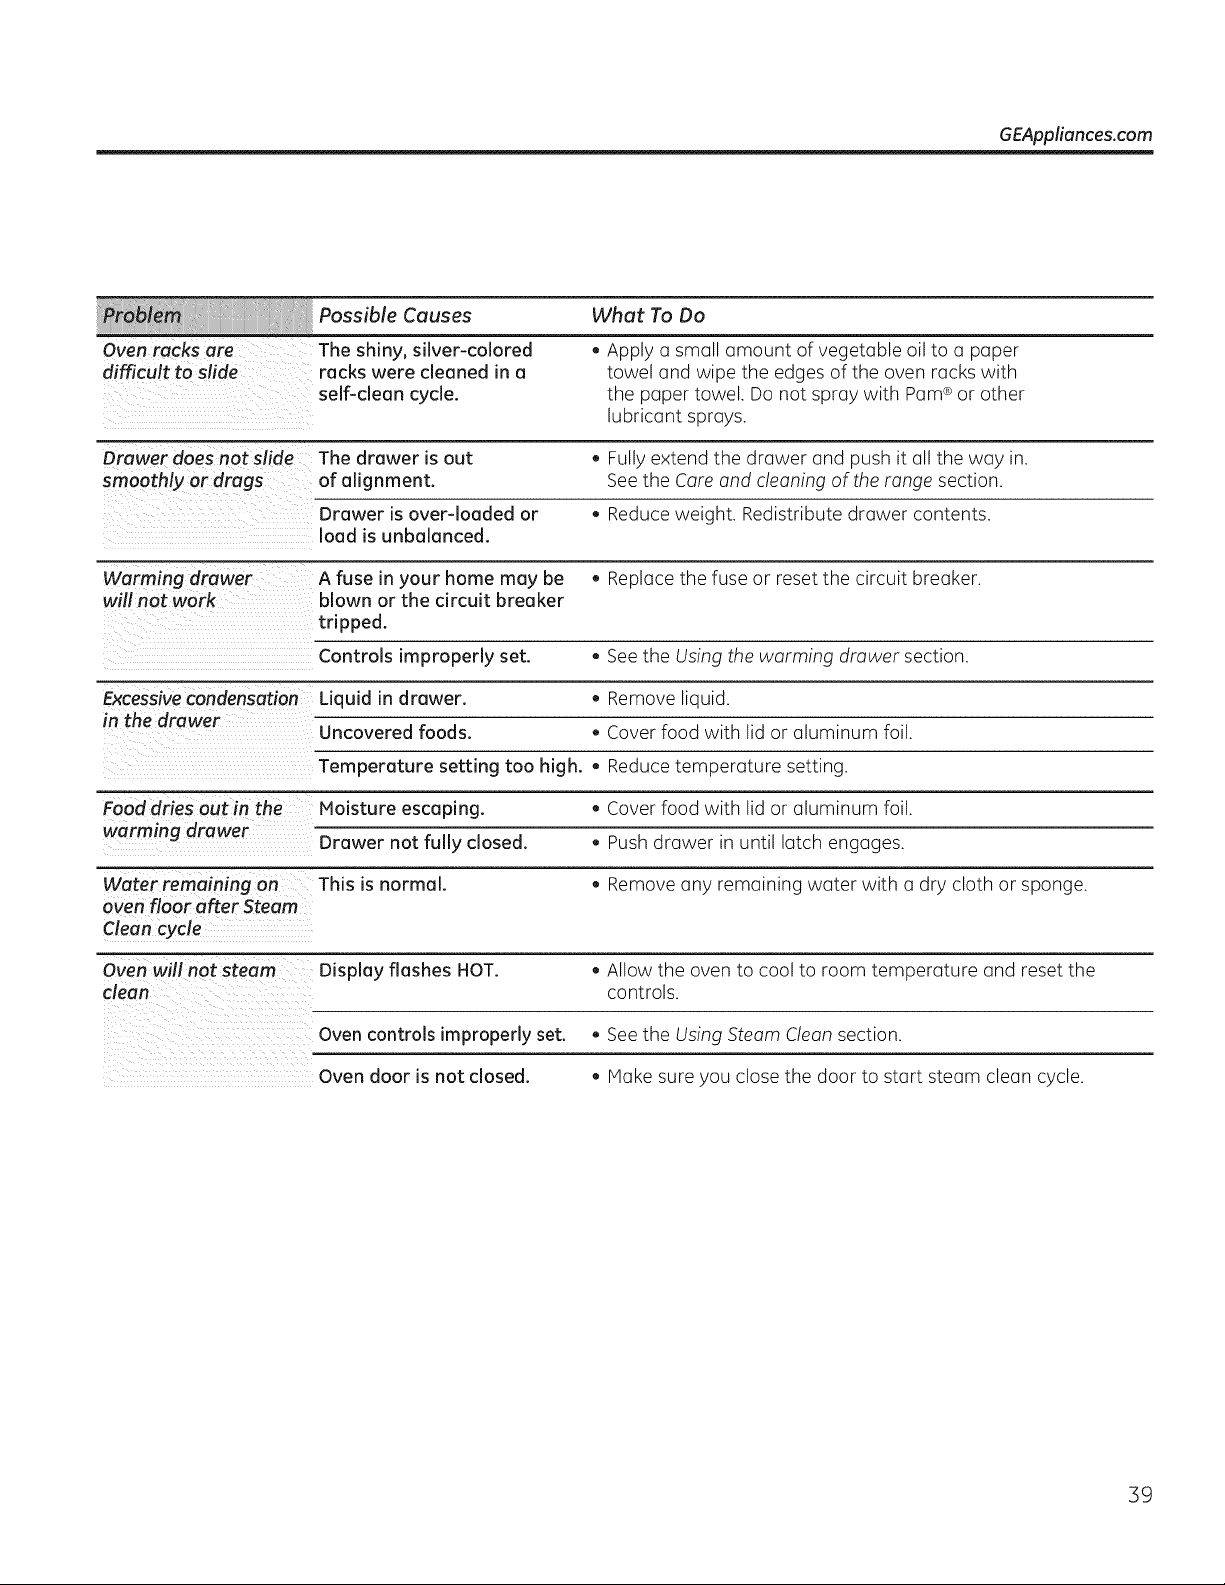
Oven racks are
difficult to slide
GEAppliances.com
Drawer does not slide
smoothly or drags
Warming drawer
will not work
Possible Causes
The shiny, silver-colored
racks were cleaned in a
self-clean cycle.
What To Do
Apply a small amount ofvegetable oil to a paper
towel and wipe the edgesof the oven racks with
the paper towel. Donot spray with Pam®or other
lubricant sprays.
The drawer is out
of alignment.
Drawer isover-loaded or
load is unbalanced.
• Fully extend the drawer and push it all the way in.
See the Careand cleaning of the range section.
, Reduce weight. Redistribute drawer contents.
A fuse in your home may be • Replace the fuse or reset the circuit breaker.
blown or the circuit breaker
tripped.
Controls improperly set. . See the Using the warming drawer section.
Excessive condensation Liquid in drawer. • Removeliquid.
in the drawer
Uncovered foods. • Cover food with lid or aluminum foil.
Temperature setting too high. , Reduce temperature setting.
Food dries out in the Moisture escaping. , Cover food with lid or aluminum foil.
warming drawer
Drawer not fully closed. , Push drawer in until latch engages.
Water remaining on This is normal. , Removeany remaining water with a dry cloth or sponge.
oven floor after Steam
Clean cycle
Oven will not steam Display flushes HOT. , Allow the oven to cool to room temperature and reset the
clean controls.
Oven controls improperly set. . See the Using Steam Clean section.
Oven door is not closed.
, Make sureyou close the door to start steam clean cycle.
39

Notes.
40
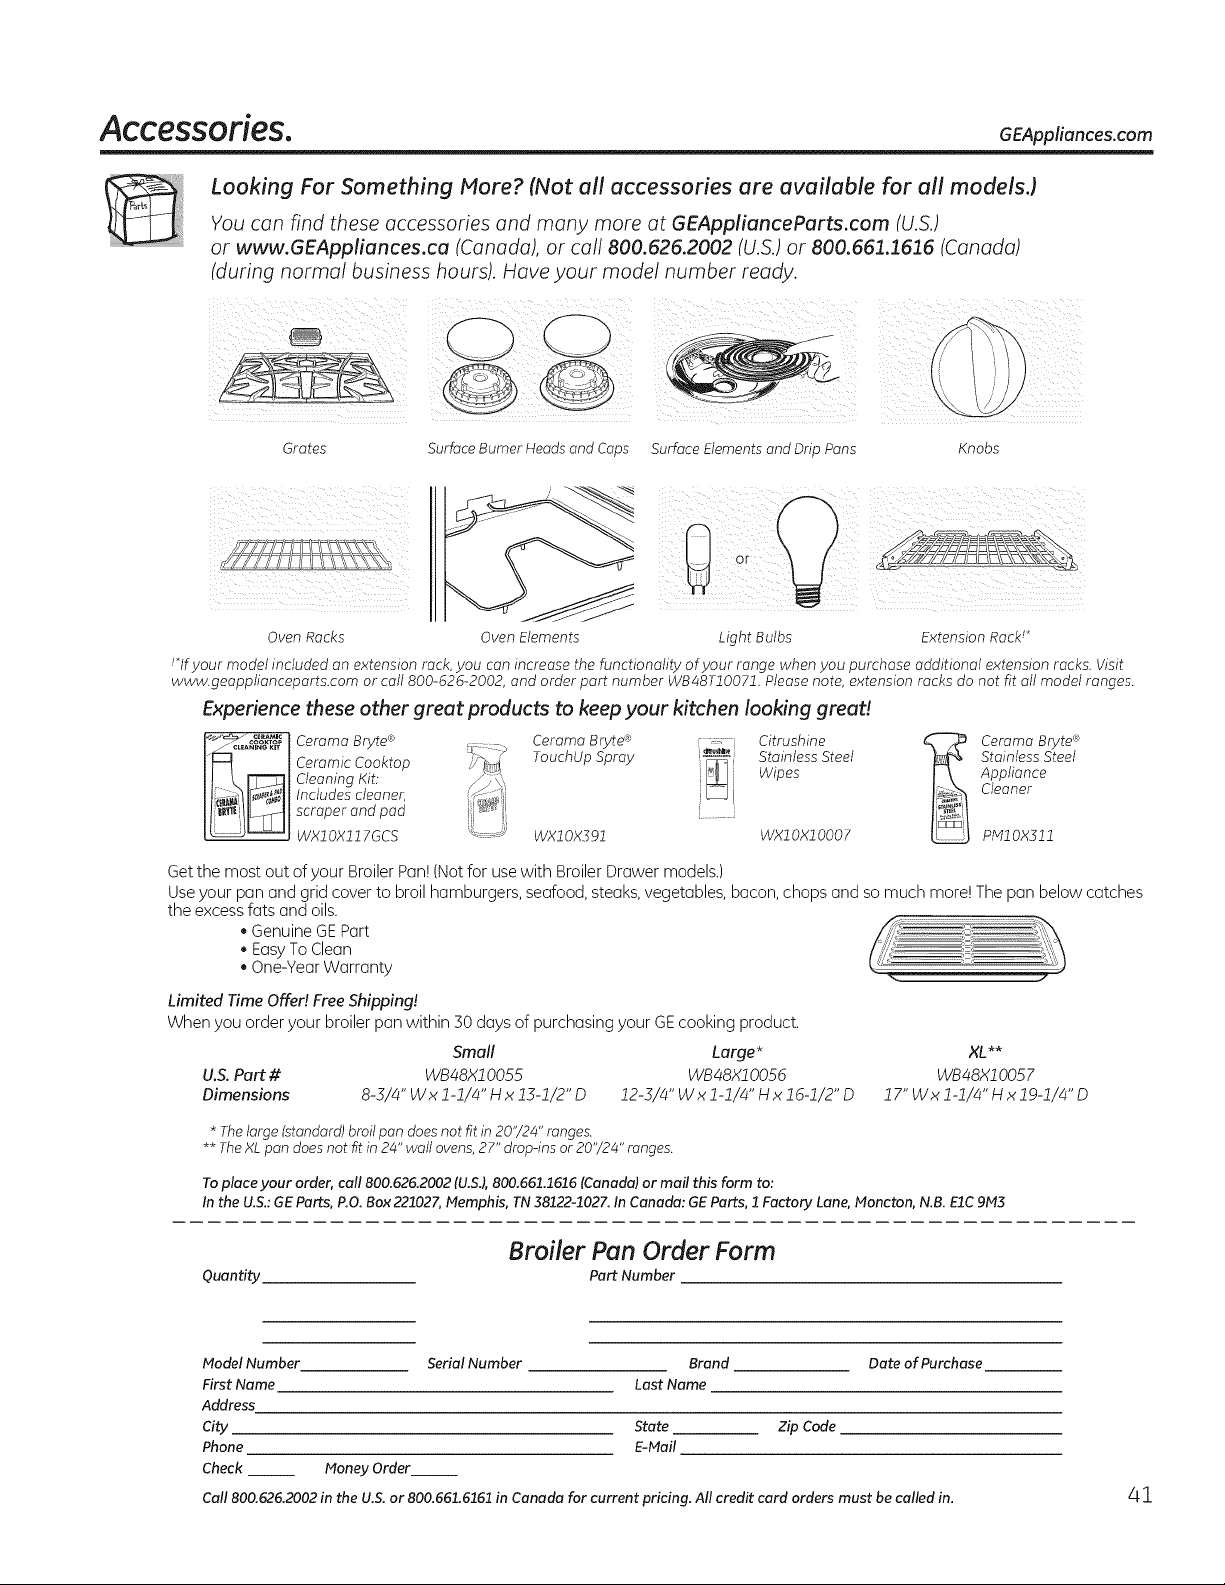
Accessories, GEAppliances.com
Looking For Something More? (Not all accessories are available for all models.)
You can find these accessories and many more at GEApplianceParts.com (U.S.)
or www.GEAppliances.ca (Canada), or call 800.626.2002 (U.S.) or 800.661.1616 (Canada)
(during normal business hours). Have your model number ready.
Grates SurfaceBurnerHeadsandCaps Surfacedements and Drip Pans Knobs
Oven Racks
......
P,, S
Oven Elements
Light Bulbs Extension Rack !*
!*If your model included on extension rack,you con increase thefunctionality ofyour range when you purchase additional extension racks. Visit
www.geopplianceports.com or call 800-626-2002, and order part number WB¢8TlO071. Please note, extension racks do not fit oil model ranges.
Experience these other great products to keep your kitchen looking great!
j coo_ToP
/ CLEANIN_KIT
Ceroma Bryte®
Ceramic Cooktop
Cleaning Kit:
Includes cleaner,
scraper and pad
WX1 OX117GCS
Ceromo Bryte® Citrushine _ Ceromo Bryte®
TouchUp Spray Stainless Steel _ Stainless Steel
Wipes Appliance
Cleaner
WX1OX591 WX1OXlO007 PM1OX511
Getthe most out ofyour BroilerPan!(Not for usewith Broiler Drawermodels.)
Useyour pan and grid cover to broil hamburgers, seafood, steaks, vegetables,bacon, chops and so much more! Thepan belowcatches
the excessfats and oils.
* Genuine GEPart
* EasyTo Clean
* One-YearWarranty
Limited Time Offe!! Free Shipping!
When you order your broiler pan within 50 days of purchasing your GEcooking product.
Small Large*
U.S. Pert # WB/48X1005 5 WB/48X10056
Dimensions 8-3/¢'Wxl-1/¢'Hxl3-1/2"D 12-3/¢'Wxl-1/¢'HxlG-1/2"D
XL**
WB¢8X20057
17" Wx 2-2/z#" H x 19-1/¢" D
* Thelarge (standard) broilpandoesnot fit in20"/24" ranges.
** TheXL pan doesnotfit in2¢" wallovens, 27" drop-insor 20"/2¢" ranges.
Toplace your order, call 800.626.2002 (U.S.),800.661.1616 (Canada) or mail this form to:
Inthe U.S.:GEParts, P.O. Box221027, Memphis, TN38122-1027. In Canada: GEParts, 1 Factory Lane, Moncton, N.B. EIC 9M3
Quantity
Broiler Pan Order Form
Part Number
Model Number
First Name
Address
City
Phone
Check
Money Order
Serial Number Brand Date of Purchase
Last Name
State Zip Code
E-Mail
Call 800.626.2002 in the U.S. or 800.661.6161 in Canada for current pricing. Allcredit card orders must be called in. /41

Notes.
/42
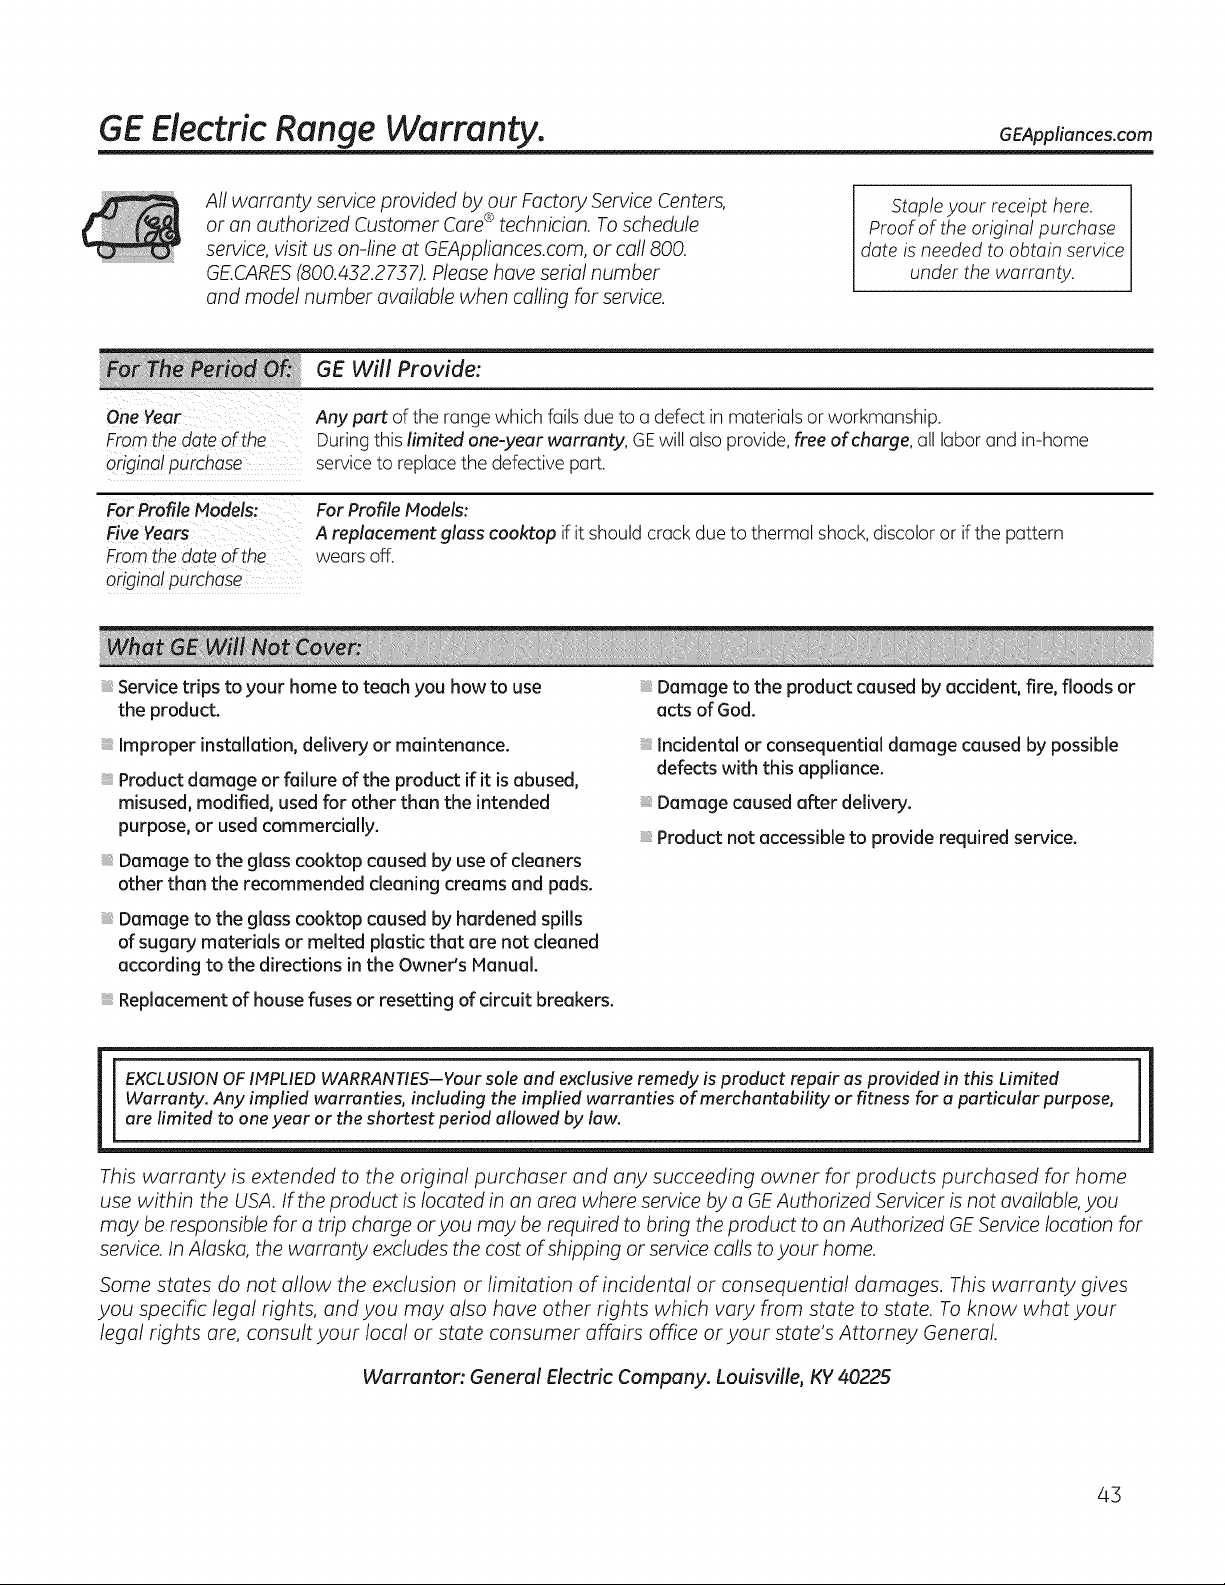
GE Electric Range Warranty. GEApplionces.com
All warranty service provided byour Factory Service Centers,
or an authorized Customer Care® technician. Toschedule
service, visit uson-line at GEAppliances.com, or call 800.
GE.CARES(800.432.2737). Pleasehave serial number
and model number available when calling for service.
Stapleyour receipt here.
Proof ofthe original purchase
date is needed to obtain service
under the warranty.
One Year
Fromthe date of the
original purchase
For Profile Models:
Five Years
Fromthe date of the
original purchase
GE Will Provide:
Anypart ofthe range which fails due toa defectin materialsor workmanship.
During this limited one-year warranty, GEwillalsoprovide,free ofcharge, all labor and in-home
service toreplacethe defective part.
For Profile Models:
A replacement glass cooktop if itshould crack due to thermal shock, discolor or ifthe pattern
wears off.
Service trips toyour home to teach you how to use
the product.
Improper installation, delivery or maintenance.
Product damage or failure ofthe product if it is abused,
misused, modified, usedfor other than the intended
purpose, or usedcommercially.
Damage to the glass cooktop caused byuseofcleaners
other than the recommended cleaning creams and pads.
Damage to the glass cooktop caused byhardened spills
ofsugary materials or melted plastic that are not cleaned
according to the directions in the Owner's Manual.
Replacement ofhouse fusesor resetting ofcircuit breakers.
Damage tothe product caused byaccident, fire, floods or
acts ofGod.
Incidental or consequential damage caused bypossible
defects with this appliance.
Damage caused after delivery.
Product not accessible to provide required service.
EXCLUSION OFIMPLIED WARRANTIES--Your sole and exclusive remedy is product repair as provided in this Limited
Warranty. Any implied warranties, including the implied warranties of merchantability or fitness for a particular purpose,
are limited to oneyear or the shortest period allowed by law.
This warranty is extended to the original purchaser and any succeeding owner for products purchased for home
use within the USA. If the product islocated in an area where service bya GEAuthorized Servicer isnot available, you
may be responsible for a trip charge or you may be required to bring the product to an Authorized GEService location for
service. InAlaska, the warranty excludes the cost ofshipping or service calls toyour home.
Some states do not allow the exclusion or limitation of incidental or consequential damages. This warranty gives
you specific legal rights, and you may also have other rights which vary from state to state. To know what your
legal rights are, consult your local or state consumer affairs office or your state's Attorney General.
Warranton General Electric Company. Louisville, KY 40225
43
Consumer Support.
GEAppliances Website GEAppliances.com
Have a question or need assistance with yourappliance? Try the GEAppliancesWebsite 24 hoursa day,
anydayoftheyear! Forgreater convenienceand faster service,you cannow download Owner's Manuals,
order parts or evenschedule service on-line.
Schedule Service GEAppliances.com
Expert GErepair service isonly one step away from your door. Get on-line and schedule your service at
your convenience any day of the year! Or call 800.GECARES (800.432.2737) during normal business hours.
Real Life Design Studio GEAppliances.com
GEsupportsthe UniversalDesignconcept-products, servicesand environments that can be usedby
people of all ages,sizesand capabilities. Werecognizethe need to design for a wide range of physical and
mental abilities and impairments.For details ofGE'sUniversal Designapplications, includingkitchendesign
ideas for people with disabilities,checkout our Websitetoday. Forthe hearing impaired, please call800.TDD.
GEAC(800.833.4322).
Extended Warranties
GEAppliances.com
Purchase a GEextended warranty and learn about special discounts that are availablewhileyourwarranty
is still in effect.You canpurchase iton-line anytime, or call800.626.2224during normal business hours.
GEConsumerHome Serviceswillstill be thereafter yourwarranty expires.
Parts andAccessories
GEApplia nceParts.com
Individualsqualifiedtoservice their ownappliances canhaveparts or accessoriessent directlytotheir homes
(VISA,MasterCard and Discovercards are accepted).Order on-line today,24 hoursevery dayor by phone at
800.626.2002during normal business hours.
Instructions contained in this manual cover procedures to be performed by any user. Other servicing
generally should be referred to qualified service personnel. Caution must be exercised, since improper
servicing may cause unsafe operation.
Contact Us
GEAppliances.com
If youare notsatisfied with theservice you receivefrom GE,contact us on our Websitewith all thedetails
includingyour phone number, or write to: General Manager, Customer Relations
GEAppliances,Appliance Park
Louisville,KY40225
] RegisterYourAppliance GEAppliances.cam
Registeryaur new appliance an-line--at your convenience! Timely product registration willallowforenhanced
communication and prompt serviceunder theterms ofyourwarranty, shouldtheneed arise.
You may alsomail inthe pre-printed registration card includedin thepacking material.
44
GEAppliances.com
En Canadd:
www. GEAppliances.ca
Impreso en los Estados Unidos
O
iiiiiiiiiiiiiiiiiiii
1:I
0
E
iii
0
..Q
!:I
0
Instrucciones de Seguridad ................... 2-s
Instrucciones de Operaci6n
Homo .............................................. 10-27
Ajuste del termostato del homo ...................... 15
Asado, Guia de asado ................................ 14
Auto-limpieza ..................................... 22,23
Caj6n calentador ..................................... 21
Caracterfsticas de cocci6n lenta, calentamiento
y leudado ............................................. 20
Caracteristicas especiales ........................ 25,26
Controles ......................................... 10, 11
Funci6n Sabbath ..................................... 27
Homeado o rostizado ................................ 13
Homeado y rostizado con temporizador ............. 19
Homo de convecci6n ............................. 16, 17
Precalentamiento ..................................... 13
Sonda ................................................. 18
Temporizador de cocina ............................... Zl
Unidades de superficie .............................. 6-11
Ouemador del Puente ................................ 7
Seleccionar tipos de utensilios ......................... 9
Zona de calentamiento ................................ 7
•_ Cuidado y limpieza
t_
0
"0
0
"0
0
0
U
,0
•i
U
U
Bandejas .............................................. 31
Caj6ncalentador desmontable/Recipiente
del caj6n del homo .................................... B2
caj6n de almacenamiento ........................... B2
Elementos calentadores del homo .................... 32
Estufa de vidrio .................................... 33,34
Luz .................................................... 29
Panel de control ...................................... 28
Papel de aluminio ................................. 3,5,,13
Pisodel homo .......................................... 32
Puerto del homo desmontable ....................... 32
Superficies ............................................ 28
Ventilaci6n ............................................ 32
Consejgs para la identificaci6n
y so_uaon ae proo_emas ..................... SS-S9
Accesofios .......................................... 41
Apoyo al cliente
Apoyo al cliente ....................................... 44
Garantia .............................................. 43
Escriba los nElmeros de modelo y de serie aquk
Modelo #
Serie #
Puede encontrarlos en una etiqueta ubicada detrds
del coj6n o detrds de la puerto del homo inferior en
el frente del marco de la cocina.
Control del Siguiente
Pasol
@
Impreso en
papel reciclado
49-80665-1 09-12 GE
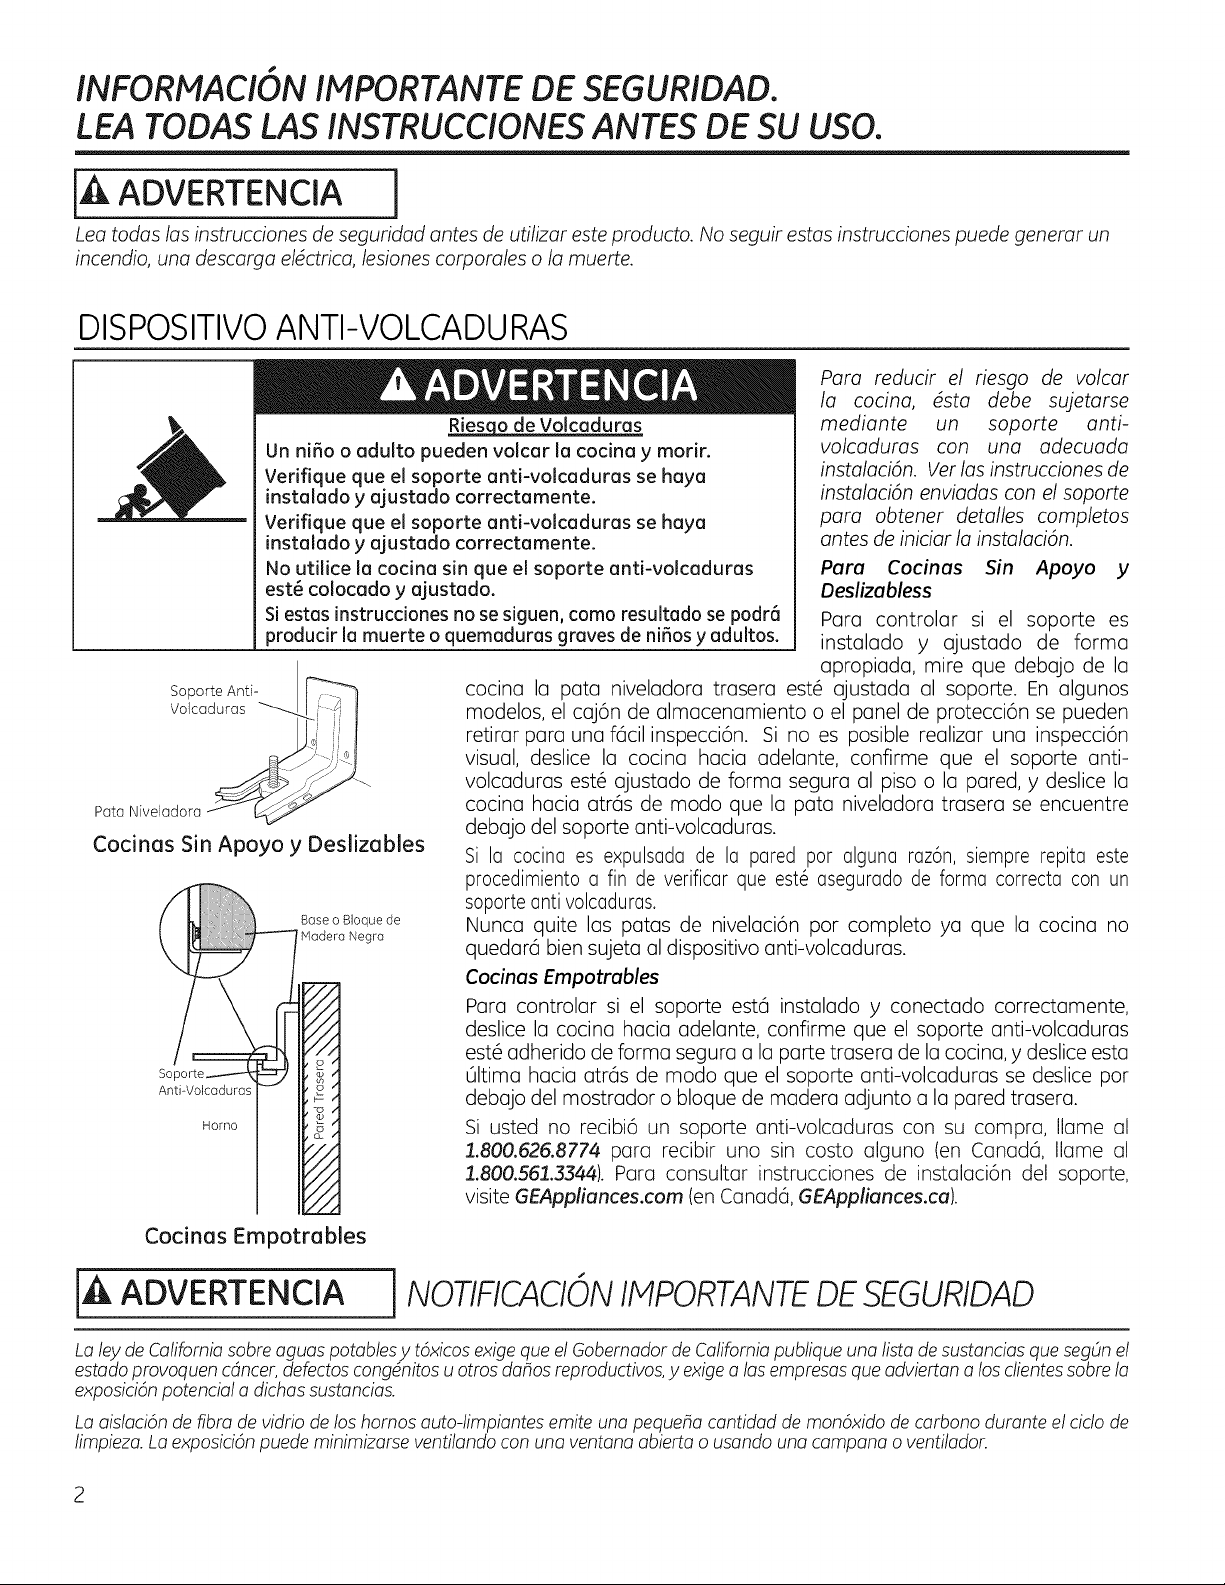
s
INFORMACiON IMPORTANTE DE SEGURIDAD.
LEA TODAS LAS INSTRUCCIONES ANTES DE SU USO.
jA ADVERTENCIA i
Lea todas los instrucciones de seguridad antes de utilizar este producto. No seguir estas instrucciones puede generar un
incendio, una descarga el@ctrica,lesiones corporales o la muerte.
DISPOSITIVO ANTI-VOLCADURAS
de Volcaduras
Un niffo o adulto pueden volcar la cocina y morir.
Verifique que el soporte anti-volcaduras se haya
instalado y ajustado correctamente.
Verifique que el soporte anti-volcaduras sehaya
instalado y ajustado correctamente.
No utilice la cocina sin que el soporte anti-volcaduras
est_ colocado y ajustado.
Siestas instrucdones no sesiguen, coma resultado sepodrd
produdr la muerte o quemaduras graves de niffosy adultos.
Soporte Anti- r_,,,_,_ ,_
volcaduras _L_ _ I
0
Cocinas Sin Apoyo y Deslizables
Base oBloque de
Ivladera Negro
So
Anti-Volcaduras
Homo
%
//4
//,4
//,4
!//1
//,4
/.4Z_.,d
Cocinas Empotrables
Para reducir el riesgo de volcar
la cocina, @sta debe sujetarse
mediante un soporte anti-
volcaduras con una adecuada
instalaci6n. Vet losinstrucciones de
instalaci6n enviadas con el soporte
para obtener detalles completos
antes de iniciar la instalaci6n.
Para Cocinas Sin Apoyo y
Deslizabless
Pora controlor si el soporte es
instolodo y ojustodo de formo
opropiodo, mire que debajo de Io
cocino Io poto nivelodoro trosero est6 ojustodo ol soporte. En olgunos
modelos, el coj6n de olmocenomiento o el panel de protecci6n se pueden
retiror poro uno fBcil inspecci6n. Si no es posible reolizor uno inspecci6n
visual, deslice la cocino hocia odelonte, confirme que el soporte onti-
volcoduros est6 ojustodo de formo seguro ol piso o Io pored, y deslice Io
cocino hocio otr6s de modo que Io poto nivelodoro trosero se encuentre
debojo del soporte onti-volcoduros.
Sila cocina es expulsada de la pared par alguna raz6n, siempre repita este
procedimiento a fin de verificar que est_ asegurado de forma correcta con un
soporte antivolcaduras.
Nunco quite los paros de niveloci6n par completo yo que Io cocino no
quedor6 bien sujeto ol dispositivo onti-volcoduros.
Cocinas Empotrables
Poro controlor si el soporte est6 instolodo y conectodo correctomente,
deslice Io cocino hocio odelonte, confirme que el soporte onti-volcoduros
est6 odherido de formo seguro o Io porte trosero de Io cocino, y deslice esto
OItimo hocio otr6s de modo que el soporte onti-volcoduros se deslice par
debojo del mostrodor o bloque de modero odjunto o Io pored trosero.
Si usted no recibi6 un soporte onti-volcoduros con su compro, IIome ol
1.800.626.8774 poro recibir uno sin costa olguno (en ConodB, Ilome ol
"L800.561.3344). Poro consultor instrucciones de instoloci6n del soporte,
visite GEAppliunces.com (en Canod6, GEAppliunces.cu).
iA ADVERTENCIA i NOTIFICACIONIlvlPORTANTEDE SEGURIDAD
Lo lay de Californiasabreoguos potoblesy tBxicosexige qua el Gobemodor de Californiapublique uno listo de sustoncios qua segOnel
estodo provoquencdncer,defectoscong_nitosuarrasdohos reproductivos,y exige o los empresos qua odvierton o losclientessabre Io
exposiciBnpotenciol o dichos sustoncios.
Laaislaci6n de fibra de vidrio de los homos auto-limpiantes emite una pequeha cantidad de mon6xido de carbono durante el ciclo de
limpieza. Laexposici6n puede minimizarse ventilando con una ventana abierta o usando una campana o ventilador.
GEAppliances.com
[A ADVERTENCIA ] INSTRUCCIONESGENERALESDE SEGURIDAD
Para su seguridad, la informaci6n de este manual debe seguirse al pie de la letra a fin de minimizar el riesgo de incendio o explosi6n,
descarga el_ctrica, o para prevenir dafios, lesiones personales o la muerte.
Esta unidad se ha puesto a prueba y se ha determinado que cumple con los limites de un dispositivo digital de clase B, de
conformidad con la Parte 18 de las normas de la FCC. Estos limites est_n disefiados para brindar una protecci6n razonable contra
interferencia dafiina dentro de una instalaci6n residenciaL Esta unidad genera, utiliza y puede irradiar energia de frecuencia de
radio y, si no se instala y usa de acuerdo con las instrucciones, puede provocar una interferencia dafiina alas comunicaciones de
radio. Sin embargo, no hay garanda de que no haya interferencia en una instalaci6n determinada. Si la unidad provoca interferencia
nociva a la recepci6n de radio y televisi6n, Io que puede determinarse encendiendo y apagando la unidad, el usuario puede corregir
la interferencia a tray, s de una o mSs de las siguientes medidas:
• Reoriente o cambie la posici6n de las antenas receptoras.
• Incremente la distancia entre la unidady el receptor.
• Conecte la unidad a un tomacorriente o un circuito diferente del que est5 usando el receptor.
A iPRECAUCI6N!
Laspersonas que utilicen un marcapasos o un dispositivo m_dico similar deben tener cuidado cuando utilicen y seencuentren
cerca de una unidad par inducci6n. Elcampo electromagnSticopuede afectar el funcionamiento del marcapasos o del dispositivo
m_dico similar. Esrecomendable consultar a su mSdico o al fabricante del marcapasos sabresusituaci6n particular.
iii_Useesteaparato s61ocon elobjetivopara elquefue creado,coma
se describeen esteManualdel Propietario.
Aseg0rese de que un t6cnico calificado realice una correcta
instalaci6ny puesta a tierra del artefacto de acuerdo con las
instruccionesde instalaci6nprovistas.
No intente reparar o cambiar ninguna piezade su cocina a
menos que est6 especfficamenterecomendado en este manual.
Cualquierotroserviciodeberealizarlount6cnicocalificado.
Antes de realizarcualquierclase de reparaci6n, desenchufela
cocina o desconecte el suministro el6ctrico desdeel panel de
distribuci6ndom6stico quitando el fusible o desconectando el
interruptor de circuitos.
No deje a los niflos solos; 6stos no deben quedar solos o sin
atenci6n en un 6rea donde un aparatoest6 en uso.Nunca debe
permitirse que sesuban, sienteno paren en cualquierpartede
esteaparato.
PRECAUCION: Noalmacene elementosde inter6s
para ninossabreuna cocina o en la protecci6n trasera de una
cocina:losninosque setrepan a la cocinaparaalcanzarelementos
puedenresultargravementeheridos.
,$61o use agarraderas secas: las agarraderas h0medas
o mojadas colocadas en superficies calientes pueden
provocar quemaduras de vapor. No permita que las
agarraderas entrenen contacto con unidades de superficie
o los elementos calentadores calientes. No utilice toallas
u otras telasgruesasen lugar de una agarradera.
Nunca usesu electrodom6sticopara calentar la habitaci6n.
iii,Notoquelos unidades de superficie,loselementoscalentadores
o la superficie interiordel homo. Estassuperficiespueden estar
Io suficientemente calientespara quemar a0n cuandotengan
un color oscuro. Durantey despu_sdel usa,no toqueo dejeque
su vestimentau otros materiales inflamablesentrenen contacto
con unidadesde superficie,6reascercanasalas unidades de
superficieo cualquier6rea interiordelhomo;dejepasar untiempo
prudencial para que seenfrbn. Otras superficiesdel @arab
puedencalentarseIosuficientecoma para provocarquemaduras.
Las superficies potencialmente calientesincluyen la estufa, las
6reasorientadas hacia la estufa, la abertura de ventilaci6n del
homo, las superficiescercanasa la abertura y lashendiduras
ubicadasalrededorde la puerta delhomo.
Nocaliente recipientescerradosde alimentos.Podrfahaber una
acumulaci6nde presi6nen el recipientey _ste podrfaexplotar,
provocandolesiones.
No utilicepapelde aluminio para revestirlas bandejascolectoras
o ningunapartedel homo,conexcepci6nde Iodescripto en este
manual. Un uso inadecuadopuede provocardaflos a la cocinay
una descargael6ctricao un riesgode incendio.
Trate de no rayar o golpear las puertas, estufas o paneles
de control de vidrio. Si Io hace podrfa romperse el vidrio. No
cocinesiun producto tiene un vidrioroto. Puedeprovocarseuna
descarga,un incendioo heridas.
Cocinecamesde resydeaveporcompleto:Lascamesde resbasra
alcanzaruna temperaturaintema de par Iomenos160°F(71°C)y
lascamesdeave a unatemperaturaintemade porIo menos180°F
(82°C).La cocci6na estas temperaturasgeneralmenteprotege de
enfermedadestransmitidaspor losalimentos.
ilk ADVERTENCIA j MANTENGALOS MATERIALESINFLAIVlABLES
"ALEJADOSDE LA COCINA.
iii,Noalmaceneo utilice materialesinflamablesdentrode un horno
o cercade laestufa,talescomo papel,pl6stico,agarraderas,telas,
recubrimientos de pared, cortinasy gasolinau otros vapores y
liquidosinflamables.
Nunca usevestimentas holgadaso amplias mientras utilice el
aparato. Estasvestimentaspuedenprendersefuegosi entranen
contactocon superficiescalientes,provocandoquemadurasgraves.
iii_,No permita que la grasa de la cocci6n u otros materiales
inflamablesse acumulendentrode la cocinao en su cercanfa.La
grasa dentro del homoo sobrela estufa puedeencenderse.
Limpie las campanas de ventilaci6ncon frecuencia. No debe
permitirsela acumulaci6n degrasa en la campana o en elfiltro.
INFORMACiON IMPORTANTE DE SEGURIDAD.
LEA TODAS LAS INSTRUCCIONESANTES DE SU USO.
IA ADVERTENCIA j
ENCASO DE INCENDIO, SIGALOS
SIGUIENTES PASOS PARAEVITAR
LA PROPAGACION DEL FUEGO:
iii,Noutiliceagua en incendiosde grasa.Nunca levanteuna sart6n
en llamas.Apague loscontroles.Apague una sart6n en llamas
sabre una unidad de superficiecubriendo la sart6n par completo
con una tapa que ajuste bien, una planchapara galletas o una
bandeja plana. Utilice un qufmico seco multiuso o un extintorde
incendiosde espuma.
Si hay un incendio en el homo duranteel horneado, ap6guelo
cerrandola puerta del homoyapagando el control o usando un
qufmico secomultiusoo un extintor de incendiosdeespuma.
Sihay unincendioenel hornodurante laauto-limpieza,apague el
homo yesperea que el incendiose consuma.No abra la puerta
del homoa la fuerza.Elingreso deaire fresco a temperaturasde
auto-limpieza puede provocar una e×plosi6nde llamas desde el
homo. Noseguiresta instrucci6n puede provocar quemaduras
graves.
[A ADVERTENCIA [ INSTRUCCIONESDE SEGURIDADDE LAESTUFA
Nunca deje las unidades de superficie sin atenci6n
en configuraciones de calor media o alta. Los alimentos que
hierveny se derraman pueden provocar humo y derrames
grasosos que pueden prenderse fuego.
Nunca deje aceite sin atenci6n mientras frie. Si se deja
calentar mc_s al16 del punto de humeo, el aceite puede
encenderse, provocando un incendioque podria propagarse
a losgabinetes cercanos. Utiliceun term6metro para grasa
cuandoseaposible para controlar la temperatura del aceite.
Para evitar el derrame de aceite y un incendio, utilice una
cantidad minima de aceite cuando fria en sartenes poco
profundas yevite lacocci6n de alimentoscongelados conuna
cantidad excesiva de hielo.
S61ociertos tipos de recipientes de vidrio, vidrio/cerc_mico,
cerc_mica,u otros recipientes vidriados pueden utilizarse sabre
la estufa; otros pueden romperse debido al cambio repentino
de temperatura.
Para minimizar la posibilidad de quemaduras, el encendido
de materiales inflamables y los derrames, la manija de los
recipientes deben girarse hacia el centro de la cocina sin
extendersesabreninguna unidad de superficiecercana.
Si flambea alimentos bajo la campana, encienda
el ventilador.
IA ADVERTENCIA INSTRUCCIONESDE SEGURIDADDE LA SUPERFICIE
DE COCCIONDE VIDRIO (algunosmode/as)
Tengacuidado al tocar la estufa. La superficiede vidrio de la
estufa retendrc_calor despu6s de que loscontroles sehayan
apagado.
No cocine sobre una estufa rota. Si la estufa se rompe,
las soluciones de limpieza y los derrames pueden penetrar
en la estufa rota y crear un riesgo de descarga el6ctrica.
Comuniquese conun t6cnicocalificado de inmediato.
Evite rayar la estufa de vidrio. La estufa puede rayarse con
elementostales como cuchillos, instrumentos filosos, anillosu
otrasjoyas,yremachesde la ropa.
iiiiiiiiiiii_iii
Use el limpiador de estufas cerc_micas CERAMA BRYTE®
y la esponjilla de limpieza CERAMA BRYTE® para limpiar
la estufa. Espere hasta que la estufa se enfrie y la
luz indicadora se apague antes de limpiar. Una esponja
o un pa_o h0medos sobre una superficie caliente pueden
provocar quemaduras de vapor. Algunoslimpiadores pueden
producir humos t6xicos si se los aplica a una superficie
caliente. NOTA: Los derrames de az0car son la excepci6n.
_stosdeben quitarse mientras est@ncalientes utilizando una
agarradera y un raspador. Para instrucciones detalladas,ver
la secci6n C6mo limpiar la estufade vidrio.
GEAppliances.com
[A ADVERTENCIA l INSTRUCCIONESDE SEGURIDADDEL HORNO
Mant6ngase alejado de la cocina cuando abra
la puerta del horno.Elaire yel vapor calientesque salende la
cocina pueden provocar quemaduras en manos, rostro y/o
OJOS.
iVlantengasin obstrucciones la ventilaci6ndel horno.
ivlantenga el horno libre de acumulaciones de grasa.
Lagrasu dentrodel horno puede prendersefuego.
Siemprecoloquelas bandejas del homoen laposici6n deseadu
mientrasel homo est6fr[o. Sila bandeja debe quitarse cuando
el homo todav[a estc_caliente,no permita que la agarradera
toque el elemento calentador del horno.
Cuandoutilice bolsas de cocci6no de asadoen el homo, siga
las instruccionesdel fabricante.
Tire de la bandeja del horno hasta la posici6n de tope
de detenci6n cuando cargue o descargue alimentos
del horno. Estoayudaa evitar quemaduras portocar superficies
calientesde la puertaylasparedes del horno.
No deje productos como papel, utensilios de cocina
o alimentos en el homo cuando no Io est6 usando.
Los elementos guardados en el homo pueden prenderse
fuego.
Nouse papel de aluminio para cubrir el fondo del horno. El
aluminio puede atrapar el calor o derretirse, Io cual puede
dahar el producto y provocar riesgo de descarga el6ctrica o
un incendio.
ADVERTENCIA
i
J lNSTRUCCIONES DE SEGURIDAD DEL
HORNO AUTO-LIh'IPIANTE u gunosmodelos)
La caracteristica de auto-limpieza funciona en el homo a temperaturas Iosuficientemente elevadas como para quemar los
restos de alimentos que quedaron dentro del homo. Siga estas instrucciones para una operaci6n segura.
Antes de iniciar el ciclo de auto-limpieza, quite las ollas,
bandejas del homo de metal brillante y otros utensilios del
homo. $61opueden dejarse en elhomo las bandejas revestidas
de porcelana gris o negro. No utilice la auto-limpieza para
limpiarotras piezas,como bandejas colectoras o tazones.
Antes de utilizar el ciclo de auto-limpieza, limpiela grasay los
derrames de alimentos del homo. Unacantidad excesiva de
grasa puede encenderse,generando da_os pot el humo en
su hogar.
Si el modo de auto-limpieza no funciona, apague el homo
y desconecte el suministro de energia, dame a un t6cnico
calificadopara solicitarel arreglo.
Nolimpie la empacadura de la puerta. La empacadura de la
puertaes esencial para un buen sellado.Debetenerse cuidado
de no refregar, dahar o mover la empacadura.
No utilice limpiadores de horno. No debe utilizarse ningQn
limpiador comercial o revestimiento protector de ninguna
clasedentro o alrededor de ninguna pieza del horno.
lk ADVERTENCIA .s ._
CAJON CALENTADOR/CAJONDEL HORNO
INFERIOR INSTRUCCIONE5 DE5EGURIDAD
(algunos modelos)
El objetivo del caj6n calentador es mantener alimentos
cocidos calientes a la temperatura de servicio. Por
debajo de los 140°F (60°0 puede producirse crecimiento
de bacterias en los alimentos. No coloque alimentos fr[os
en el caj6n calentador. No caliente alimentos por mSs
de 2 horas. No seguir estas instrucciones puede provocar
enfermedades transmitidas por los alimentos.
No deje productos de papel, pl5sticos, comida enlatada
o materiales combustibles en el caj6n. Pueden prenderse
fuego.
No toque el elemento calentador o la superficie interna
del caj6n. Estassuperficies pueden estar Io suficientemente
calientes como para provocar quemaduras.
Tengacuidado al abrir el caj6n. Abra un poco el caj6ny deje
salir elaire caliente yelvaporantes de quitaro volver a colocar
losalimentos. El aire y el vapor calientes que salen pueden
provocar quemaduras en manos,rostro y/o ojos.
Nouse papel de aluminio para cubrir el caj6n inferior. Elpapel
atrapar6 en calor del fondo y alterarc_el funcionamiento del
homo. Elpapel se podrc_derretir ydahar de forma permanente
la parte inferiordel caj6n. Cualquier da_o pot uso inadecuado
del papel de aluminio no estarc_cubierto por la garantia del
producto.
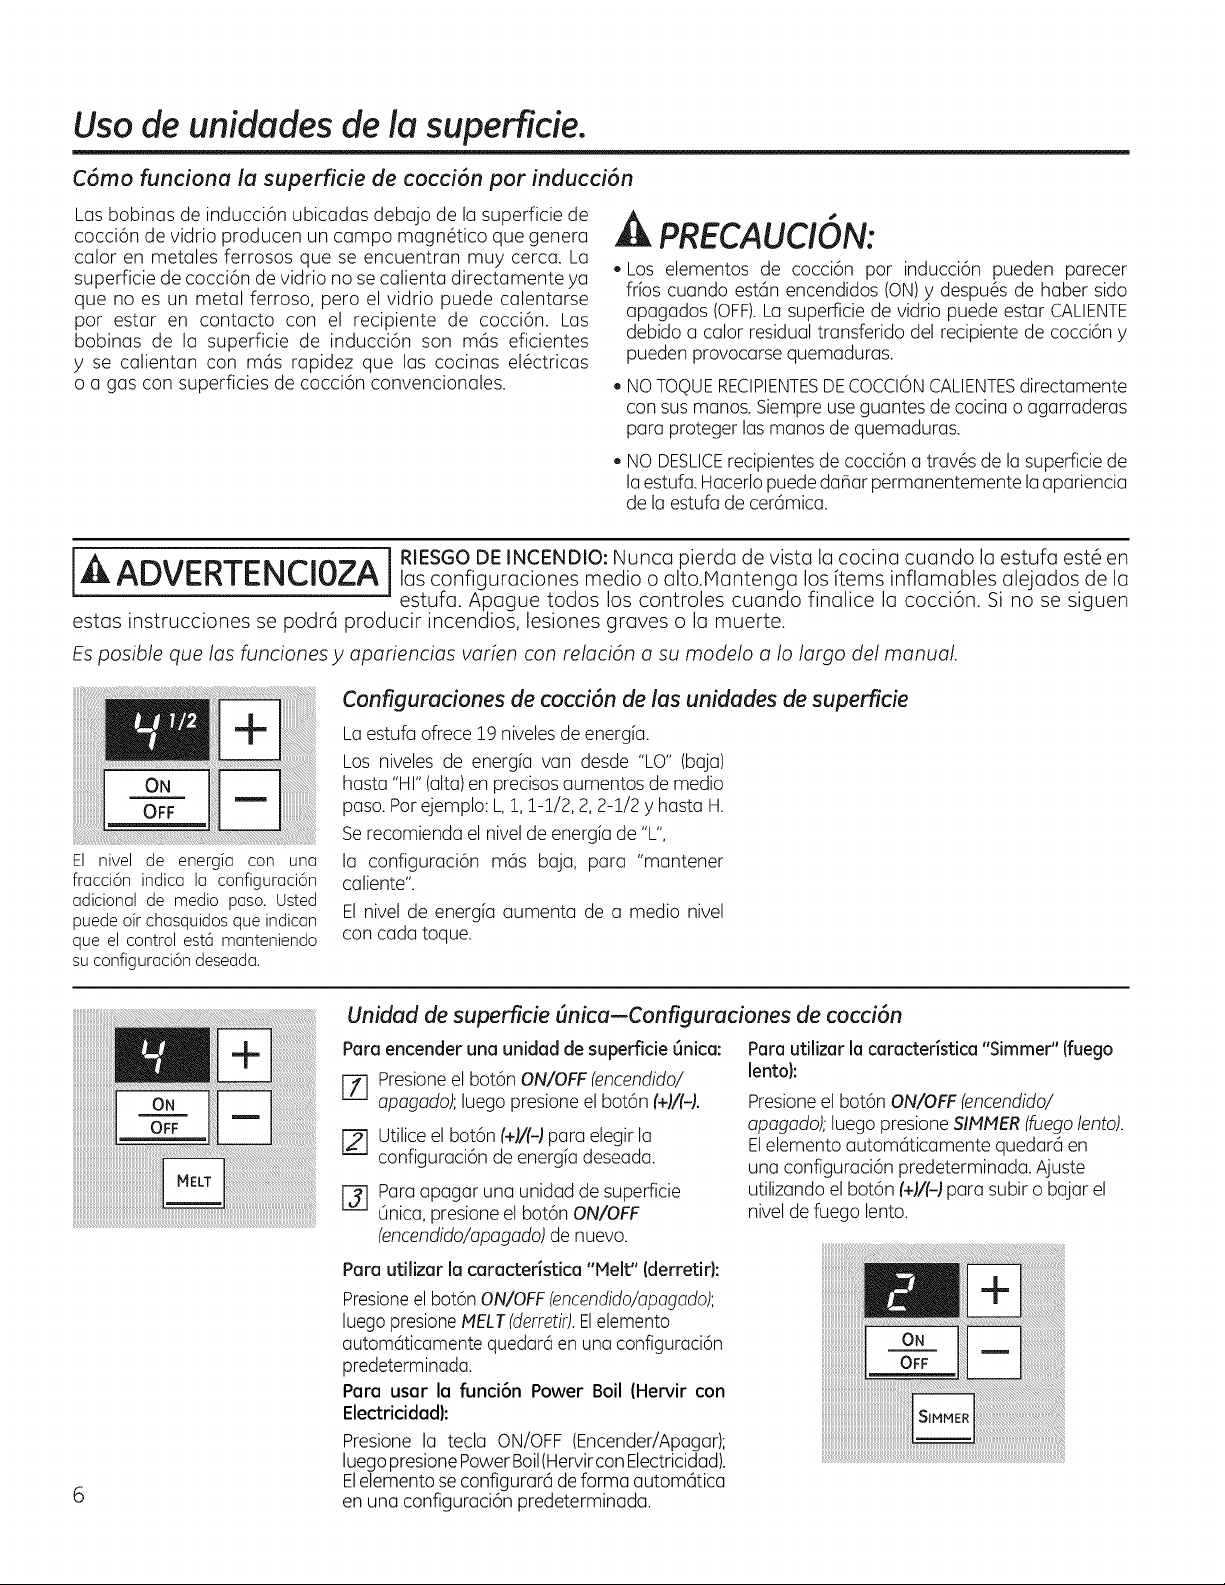
Usa de unidades de la superficie.
C6mo funciona la superficie de cocci6n par inducci6n
Lasbobinus de inducci6n ubicadus debajo de lu superficie de
cocci6n de vidrio producen un campo magn6tico que genera
calor en metales ferrosos que seencuentran muy cerca. La
superficie de cocci6n de vidrio no secalienta directamente yu
que no es un metal ferroso, pero el vidrio puede calentarse
par estur en contucto con el recipiente de cocci6n. Las
bobinas de lu superficie de inducci6n son mc_s eficientes
y se calientan con mc_srapidez que lus cocinus el6ctricas
o a gas con superficies de cocci6n convencionales.
PRECAUCiON:
* Los elementos de cocci6n par inducci6n pueden parecer
fibs cuundo estc_nencendidos (ON)y despu_s de huber sido
apugudos (OFF).La superficie de vidrio puede estar CALIENTE
debido a calor residualtransferido del recipiente de cocci6n y
pueden provocarsequemaduras.
* NOTOQUERECIPIENTESDECOCCIONCALIENTESdirectamente
consus manos.Siempre use guuntes de cocinu o agarraderas
para proteger las manos de quemaduras.
* NODESLICErecipientesde cocci6na trav6s de la superficiede
laestufa. Hacerlo puededahar permanentemente la apariencia
de la estufade cerc_mica.
L__ ^r_ ar'_r-_, ,r_,_"_^ ] RIESGO DEINCENDIO: Nunca pierda de vista la cocina cuando la estufa est6 en
/_IJVP_i_/_I_i_,IUL/_ las configuraciones mectio o alto.lVlantenga los items inflamables alejados de la
...... estufa. Apague todos los controles cuando finalice la cocci6n. Si no se siguen
estas instrucciones se podr6 producir incendios, lesiones graves o la muerte.
Es posible que los funciones y opariencias varien con relaci6n a su modelo a Io largo del manual.
El nivel de energia con una
fracci6n indica la configuraci6n
adicional de media paso. Usted
puede air chasquidos que indican
que el control est6 manteniendo
su configuraci6n deseada.
Configuraciones de cocci6n de las unidades de superficie
La estufaofrece 19 niveles de energ[a.
Los niveles de energ[a van desde "LO"(baja)
hasta "HI" (alta)enprecisos aumentos de media
paso. Parejemplo: L, 1, 1-1/2, 2, 2-1/2y hasta H.
Serecomienda el nivel de energ[ade "L",
la configuraci6n mc_s baja, para "mantener
caliente".
El nivelde energ[a aumenta de a media nivel
concadatoque.
Unidad de superfcie (lnica-Configuraciones de cocci6n
Para encender una unidad de supefficie _nica:
[7] Presioneel bot6n ON/OFF(encendido/
apagado);luego presione el bot6n (+)/(-).
Utilice el bot6n _+]/(-]para elegir la
configuraci6n de energ[adeseada.
Pa[aapagar una unidad de superficie
unlca, presione el bot6nON/OFF
(encendido/apagado)de nuevo.
Para utilizer la caractedstica"Simmer"(fuego
lento):
Presioneel bot6n ON/OFF(encendido/
apagado); luego presione SIMMER(fuegolento).
Elelemento automcXicamente quedarc_en
una configuraci6n predeterminada.Ajuste
utilizando el bot6n (+)/(-) para subiro bajar el
nivel de fuego lento.
Poro utilizar la caracteristica "Helt" (derretir):
Presioneel bot6nON/OFF(encendido/apagado);
luego presioneMELT(derretir).Elelemento
autom6ticamente quedarc_en una configuraci6n
predeterminada.
Para usar la funci6n Power Boil (Hervir con
Electricidad):
Presione la teclu ON/OFF (Encender/Apugur);
luegopresione PowerBoil(Hervircon Electricidud).
Elelemento se configurar6 de forma uutom6tico
en una configuroci6n predeterminado.
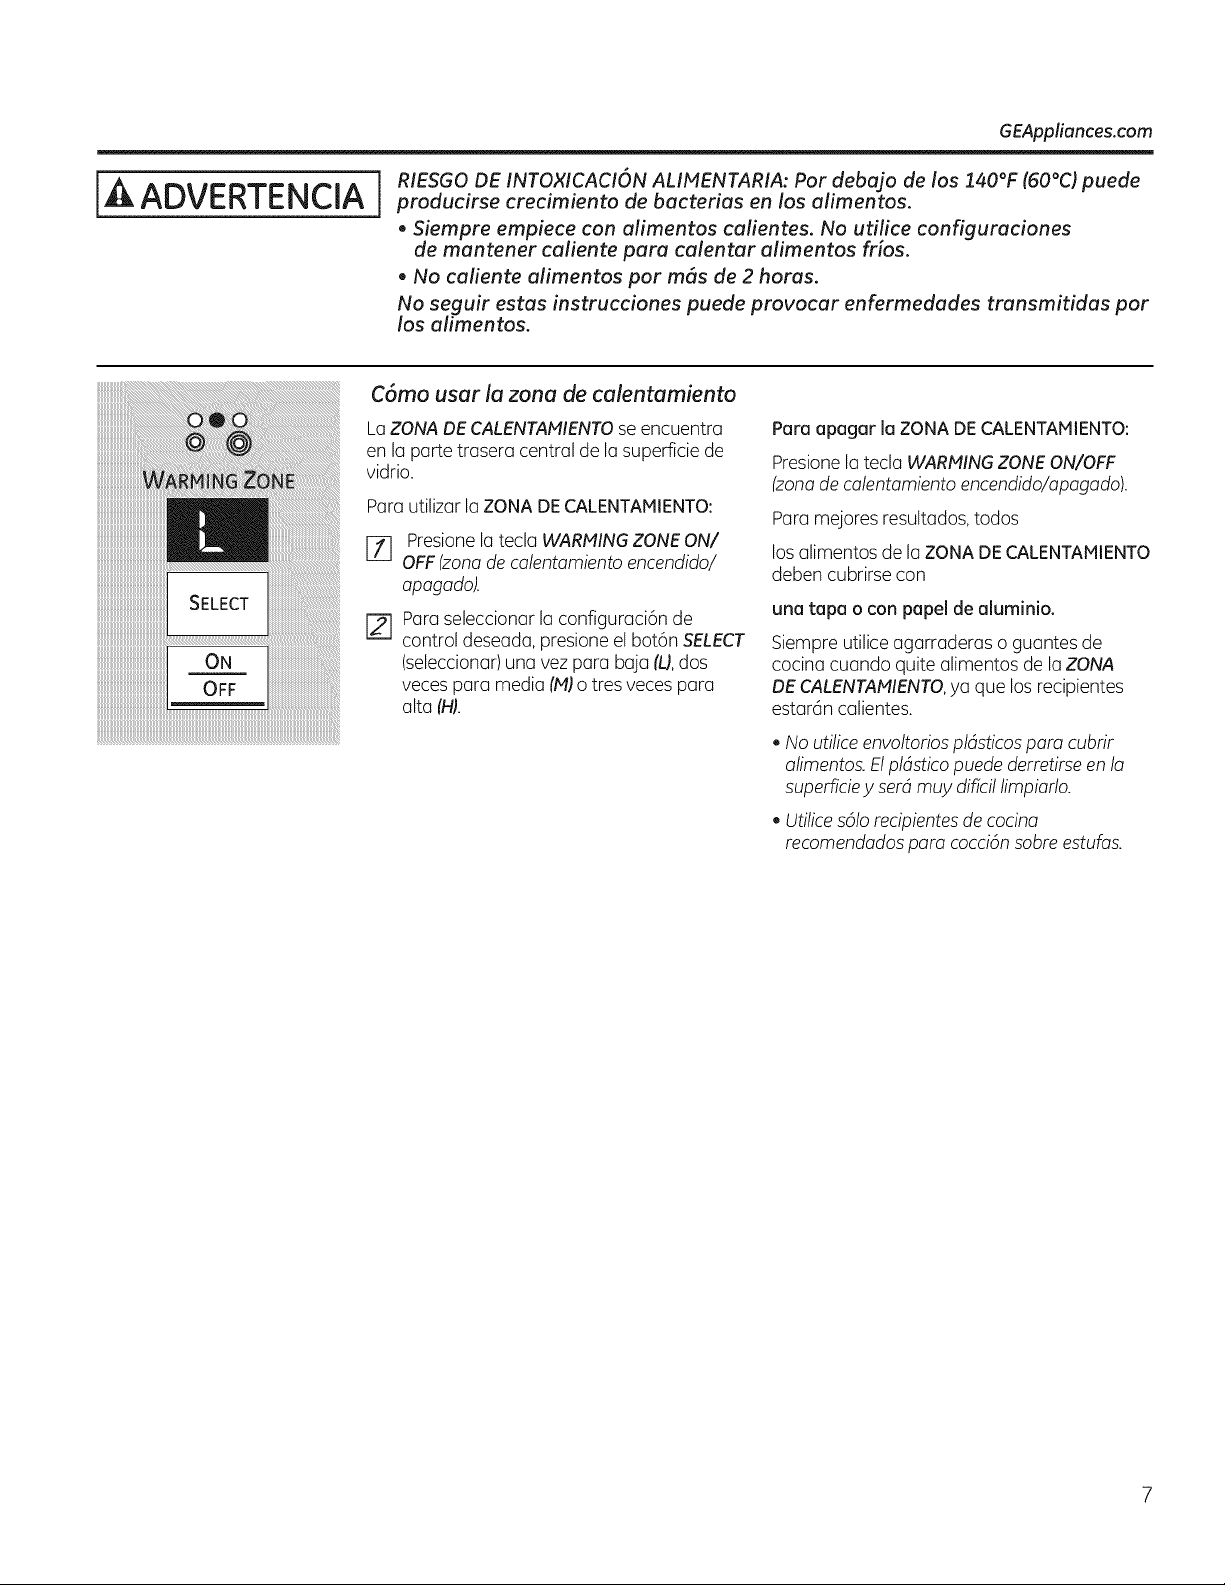
GEAppliances.com
ADVERTENCIAi
RIESGO DE INTOXICACI6N ALIIENTARIA: Por debajo de los 140°F (60°C) puede
producirse crecimiento de bacterias en los alimentos.
• Siempre empiece con alimentos calientes. No utilice configuraciones
de mantener caliente para calentar alimentos frios.
• No caliente alimentos por m_s de 2 horus.
No seguir estas instrucciones puede provocar enfermedades transmitidas por
los alimentos.
C6mo usar la zona de calentamiento
La ZONA DECALENTANIENTO se encuentra
en la parte trasera central de la superficie de
vidrio.
Para utilizar la ZONA DE CALENTAMIENTO:
[71 Presionela tecla WARMINGZONEON/
OFF(zona de calentamiento encendido/
apagado).
[] Para seleccionarla configuraci6n de
control deseada, presione el bot6n SELECT
(seleccionar)una vez para buja (L),dos
vecespara media(N) o tres vecespara
alta(H).
Para apagar la ZONA DE CALENTANIIENTO:
Presionela tecla WARMINGZONEON/OFF
(zonade calentamiento encendido/apagado).
Para mejores resultados,todos
los alimentosde la ZONA DECALENTANIIENTO
deben cubrirse con
una tapa o con papel de aluminio.
Siempreutilice agarraderas o guantes de
cocina cuando quitealimentos de la ZONA
DE CALENTANIENTO,ya que losrecipientes
estardn calientes.
, Noutilice envoltorios pldsticospara cubrir
alimentos. Elpldstico puede derretirseen la
superficieyserdmuy diffcillimpiarlo.
, Utilice s61orecipientes de cocina
recomendados para cocci6n sobre estufas.
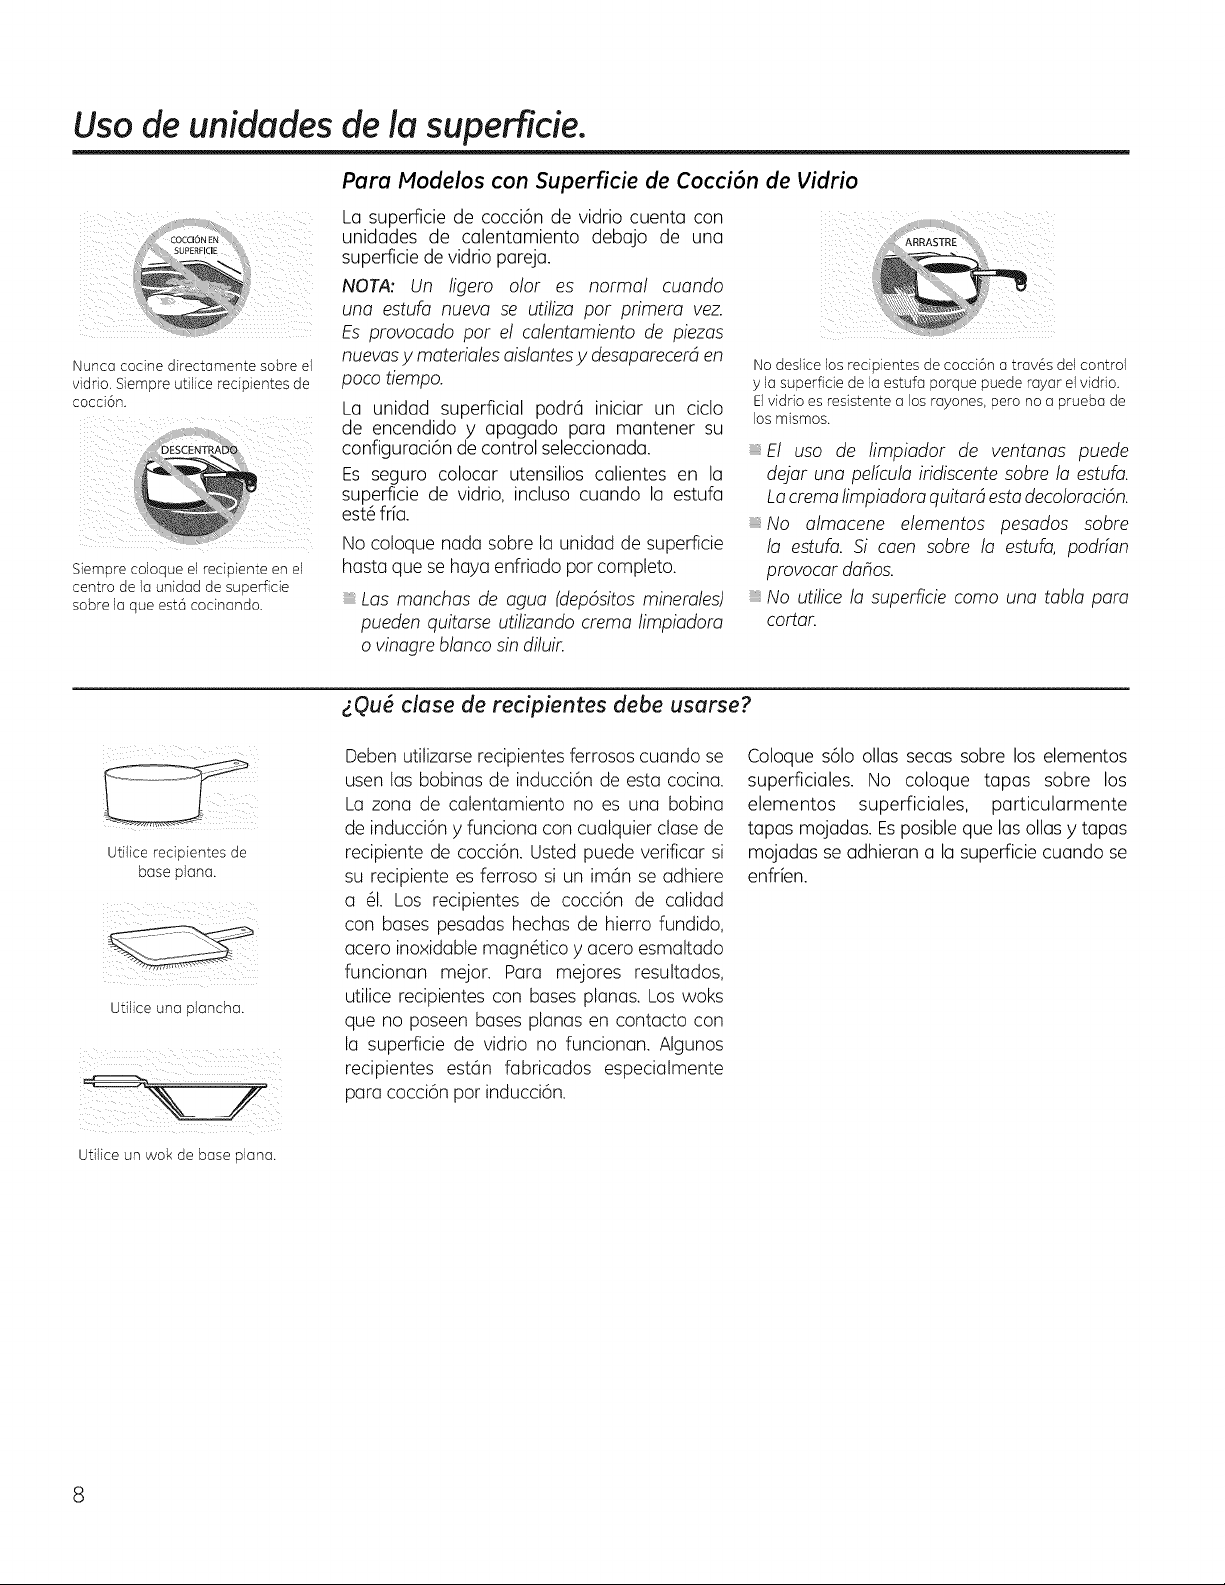
Usa de unidades de la superficie.
/ _i_ii¸¸co_c__i!,ii_
!iljli i i i 1411ilil
Nunca codne directamente sabre el
vidfio. Siempre utilice redpientes de
cocd6n.
@
Siempre coloque el redpiente en el
centro de la unidad de superficie
sabre la que est6 cocinando.
Para !odelos con Superficie de Cocci6n de Vidrio
LGsuperficie de cocci6n de vidrio cuenta con
unidades de calentamiento debujo de una
superficie de vidrio pareja.
NOTA: Un ligero olor es normal cuando
una estufa nueva se utiliza par primem vez.
Esprovocado par el calentamiento de piezas
nuevasy materialesaislantesy desaparecerden
pocotiempo.
La unidad superficial podr_ iniciar un ciclo
de encendido y apagado para mantener su
configuraci6n de control seleccionada.
Es seguro colocar utensilios calientes en la
superficie de vidrio, incluso cuando la estufa
est6frfa.
Nocoloque nada sabrela unidad de superficie
hasta que sehayaenfriado par completo.
Las manchas de agua (dep6sitosminemles)
pueden quitarse utilizando crema limpiadom
o vinagreblancosin diluir.
Nodeslice los redpientes de cocd6n atrav6s del control
y la superficie de la estufa porque puede rayar el vidrio.
Elvidrio es resistente a losrayones, pero no aprueba de
losmismos.
El usa de limpiador de ventanas puede
dejar una pelfcula iridiscentesabrela estufa.
Lacremalimpiadom quitardestadecolomci6n.
No almacene elementos pesados sabre
la estufa. Si caen sabre la estufa, podfian
provocar dahos.
No utilice la superficiecoma una tabla pare
cortar.
Utilicerecipientesde
baseplana.
Utilice una plancha.
gQu6 clase de recipientes debe usarse?
Deben utilizarserecipientes ferrososcuando se
usen lasbobinas de inducci6n de esta cocina.
La zona de calentamiento no es una bobina
de inducci6n yfunciona concualquier clase de
recipiente de cocci6n. Ustedpuede verificar si
su recipiente esferroso siun imhn seadhiere
a 61. Los recipientes de cocci6n de calidad
con bases pesadas hechas de hierro fundido,
acero inoxidablemagn@ico yacero esmaltado
funcionan mejor. Para mejores resultados,
utilice recipientes con bases planas. Los woks
que no poseen bases planas en contacto con
la superficie de vidrio no funcionan. Algunos
recipientes esthn fabricados especialmente
para cocci6n par inducci6n.
Coloque s61o ollas secas sobre los elementos
superficiales. No coloque tapas sobre los
elementos superficiales, particularmente
tapas mojadas.Es posible que lasollasytapas
mojadas seadhieran a la superficiecuando se
enfrien.
Utilice unwok de base plana.
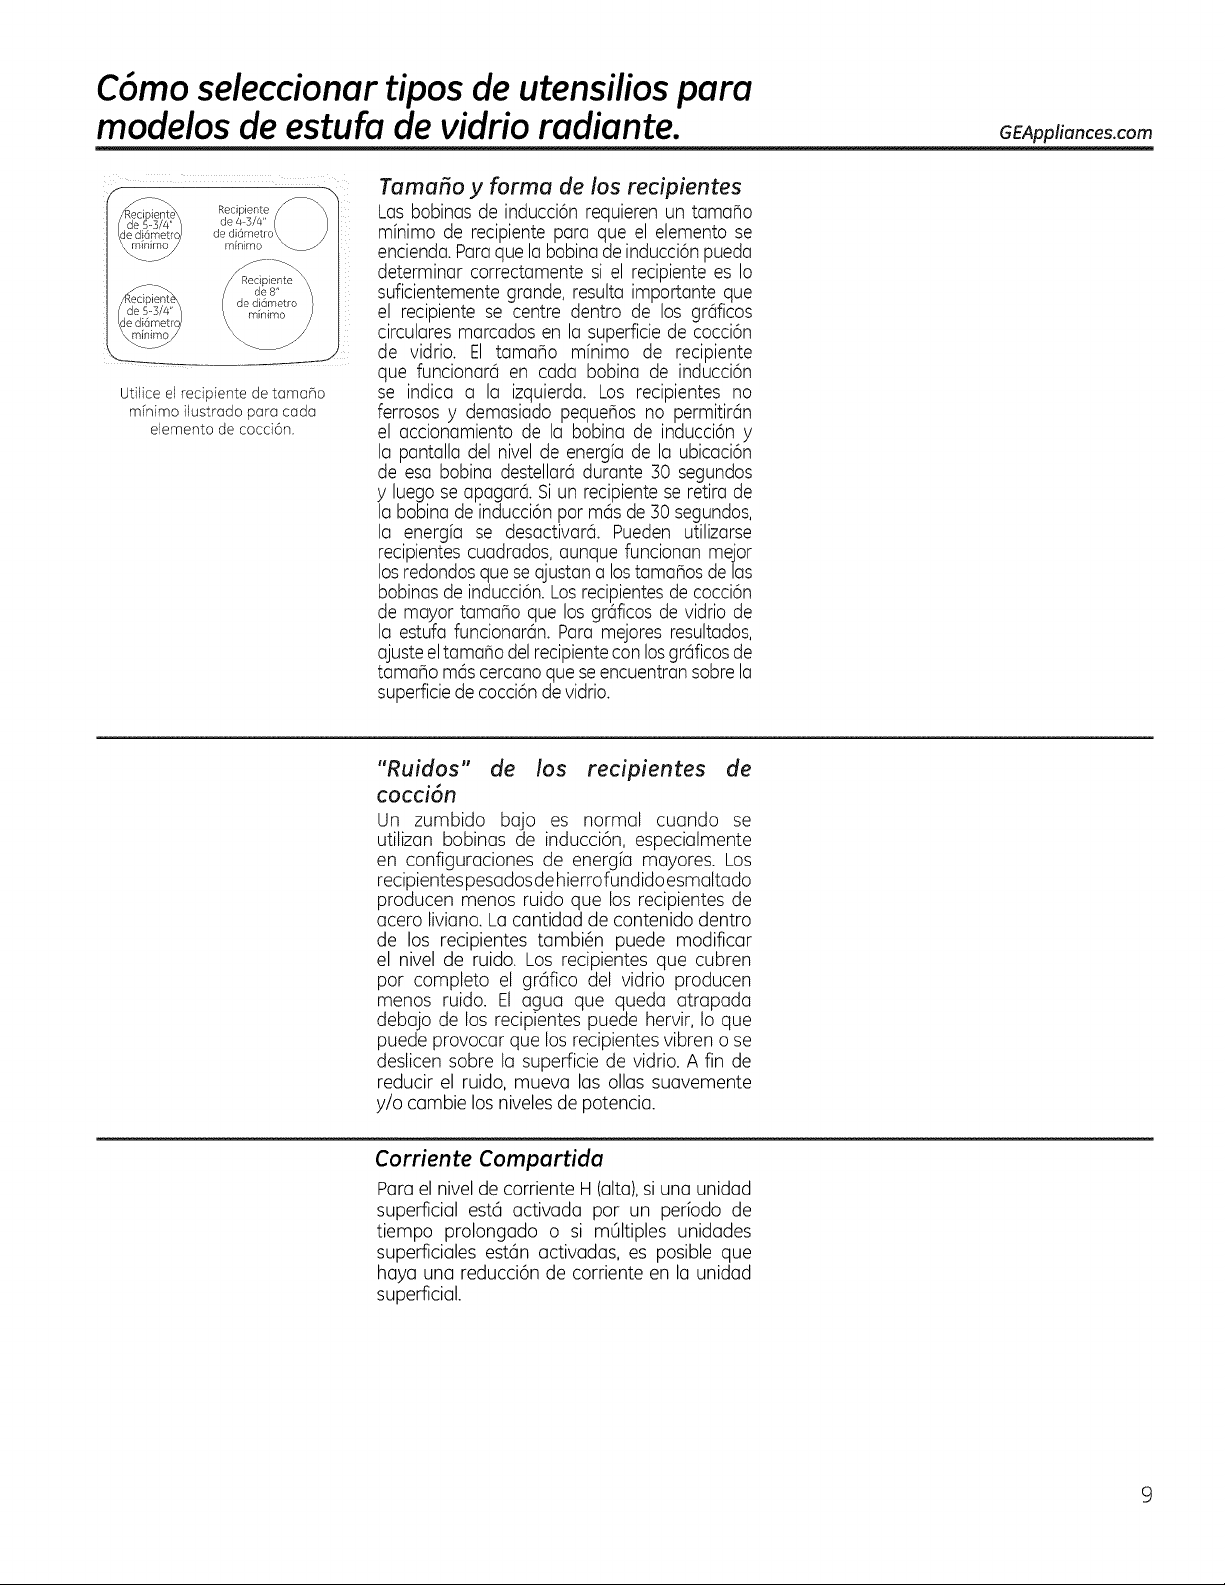
C6moseleccionar tipos de utensilios para
modelos deestufa de vidrio radiante.
Utilice el recipiente de tama_o
mfnimo ilustrado para cada
elemento de cocd6n.
Tamafio y forma de los recipientes
Las bobinasde inducci6n requieren un tama_o
minimo de recipiente para que el elemento se
encienda.Paraque la bobinadeinducci6npueda
determinar correctamentesi el recipiente es Io
suficientemente grande,resulta importante que
el recipiente se centre dentro de los grdicos
circularesmarcados en la superficiede cocci6n
de vidrio. El tama_o mfnimo de recipiente
que funcionar6 en cada bobina de inducci6n
se indica a la izquierda. Los recipientes no
ferrososy demasiado pequenosno permitir6n
el accionamiento de la bobina de inducci6n y
la pantalla del nivelde energfa de la ubicaci6n
de esa bobina destellar6 durante 30 segundos
y luego se apagar6.Siun recipienteseretirade
la bobina de inducci6npor m6s de 30 segundos,
la energfa se desactivar& Pueden utilizarse
recipientescuadrados, aunque funcionan mejor
losredondos quese ajustana lostama_os de las
bobinasde inducci6n.Losrecipientesde cocci6n
de mayor tama_o que los grdicos de vidriode
la estufa funcionar6n.Para mejores resultados,
ajusteeltama_o del recipientecon losgrdicos de
tama_o m6scercanoque se encuentransobre la
superficiede cocci6nde vidrio.
GEAppliances.com
"Ruidos" de los recipientes de
cocci6n
Un zumbido bajo es normal cuando se
utilizan bobinas de inducci6n, especialmente
en configuraciones de energ[a mayores. Los
recipientespesadosde hierrofundidoesmaltado
producen menos ruido que los recipientesde
acero liviano. La cantidad de contenido dentro
de los recipientes tambi6n puede modificar
el nivel de ruido. Losrecipientes que cubren
por completo el gr6fico del vidrio producen
menos ruido. El agua que queda atrapada
debajo de los recipientes puede hervir, Ioque
puede provocar que losrecipientes vibren o se
deslicen sobre la superficiede vidrio. A fin de
reducir el ruido, mueva las ollassuavemente
y/o cambie losnivelesde potencia.
Corriente Compartida
Para el nivelde corriente H (alta),siuna unidad
superficial est6 activada por un perbdo de
tiempo prolongado o si m01tiplesunidades
superficiales est6n activadas, es posible que
haya una reducci6n de corriente en la unidad
superficial.
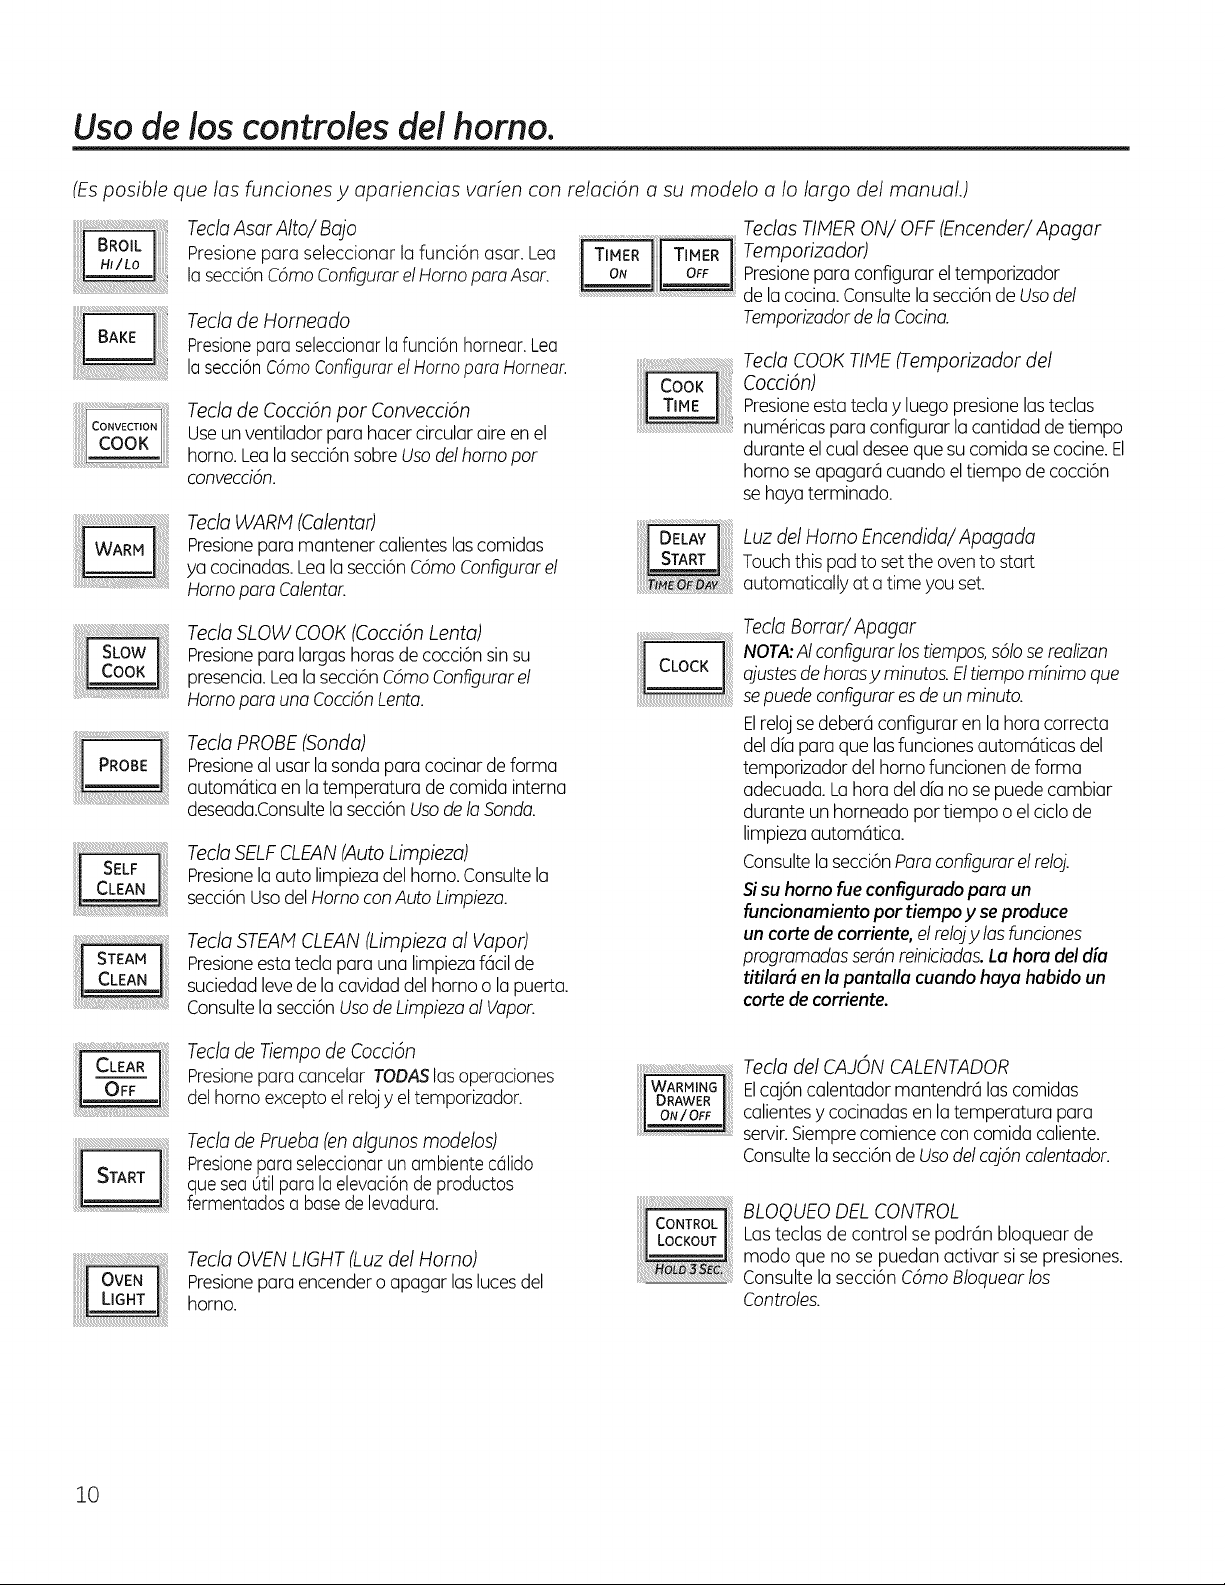
Uso de los controles de! homo.
(Es posible que los funciones y apariencias varien con relaci6n a su moddo a Io largo del manual.)
TeclaAsarAlto/Bajo
presione para seleccionar la funci6n asar. Lea
lasecci6nC6moConfigurarelHomo paraAsan
Tecla de Horneado
Presioneparaseleccionarla funci6nhornear.Lea
lasecci6nCdmoConfigurarelHomopara Hornear.
Tecla de Cocci6n pot Convecci6n
Useun ventilador para hacercircularaire enel
horno.Leala secci6nsobre Usodelhomopor
conveccian.
TeclaWARM (Calentar)
presionepara mantener calientes lascomidas
yacocinadas.Lealasecci6n C6moConfigurarel
Homo para Calentar.
Teclas TIMERON/OFF (Encender/ Apagar
Temporizador)
Presionepara configurar el temporizador
de la cocina.Consultela secci6nde Usodel
Temporizadorde la Cocina.
Tecla COOK TIMEFFemporizador del
Cocci6n)
Presioneesta teclayluego presionelasteclas
num@icaspara configurar lacantidad detiempo
duranteelcualdeseeque su comida se cocine. El
homose apagarc_cuando eltiempo de cocci6n
se haya terminado.
Luzdel Homo Encendida/Apagada
Touchthis pad tosettheoven tostart
automaticallyata time youset.
Tecla SLOWCOOK (Cocci6n Lento)
Presionepara largas horas de cocci6n sin su
presencia.Leala secci6nC6moConfigurarel
Homo para una Cocci6nLenta.
Tecla PROBE (Sonda)
Presioneal usar lasondapara cocinar deforma
autom6tica en la temperaturade comida interna
deseada.Consultela secci6n Usode laSonda.
TeclaSELFCLEAN(AutoLimpieza)
Presionelaautolimpiezadel horno.Consultela
secci6n UsodelHomo con Auto Limpieza.
Tecla STEAMCLEAN (Limpieza al Vapor)
Presioneesta tecla para una limpiezaf6cil de
suciedad levede la cavidad del homo o la puerta.
Consultela secci6nUsode Limpiezaal Vapor.
TeclaBorrar/Apagar
NOTA:AI configurorlos tiempos,s61ose realizan
ajustesdehorasyminutos.Eltiempomfnimoque
sepuede configuraresde un minuto.
Elrelojsedeberc_configurar en la hora correcta
deld[apara que lasfunciones autom@icasdel
temporizador del homofuncionen deforma
adecuada. Lahora deld[ano se puedecambiar
duranteun horneado por tiempo o elciclode
limpiezaautom@tica.
Consultela secci6nParoconfigurarelreloj.
Sisuhomo fue configurado para un
funcionamiento por tiempa y se produce
un corte de corriente,el relojy las funciones
programadasserdn reiniciadas.La hora deldia
titilar6 en la pantalla cuandohaya habido un
corte de corriente.
Teclade Tiempode Coccidn
Presionepara cancelar TODASlos operaciones
del homoexcepto el relojyel temporizador.
Teclade Prueba(enalgunosmodelos)
Presionepara seleccionarun ambiente c61ido
ue sea Otilpara la elevaci6nde productos
ermentadosa basede levadura.
Tecla OVEN LIGHT(Luzdel Homo)
Presionepara encendero apagar los lucesdel
horno.
WARMING
DRAWER
!i!];i!!!i!¸¸!_!_!!_!_!i!!_ii!_!i_!iiiiii_i_!!!_!_ii!iiiiiiiii_iiiiiiiiiiiiiiiiiii_iii!iiiii_¸i!iiiiiii_iil
JCO,TROLI
Tecla del CAJONCALENTADOR
Elcaj6ncalentador mantendr6 lascomidas
calientesycocinadas en la temperatura para
servir.Siemprecomience concomida caliente.
Consultela secci6nde Usodelcaj6n calentador.
BLOOUEO DELCONTROL
Lasteclasde control sepodrc_nbloquear de
modo que no se puedan activar si sepresiones.
Consulte la secci6nC6mo Bloquear los
Controles.
10
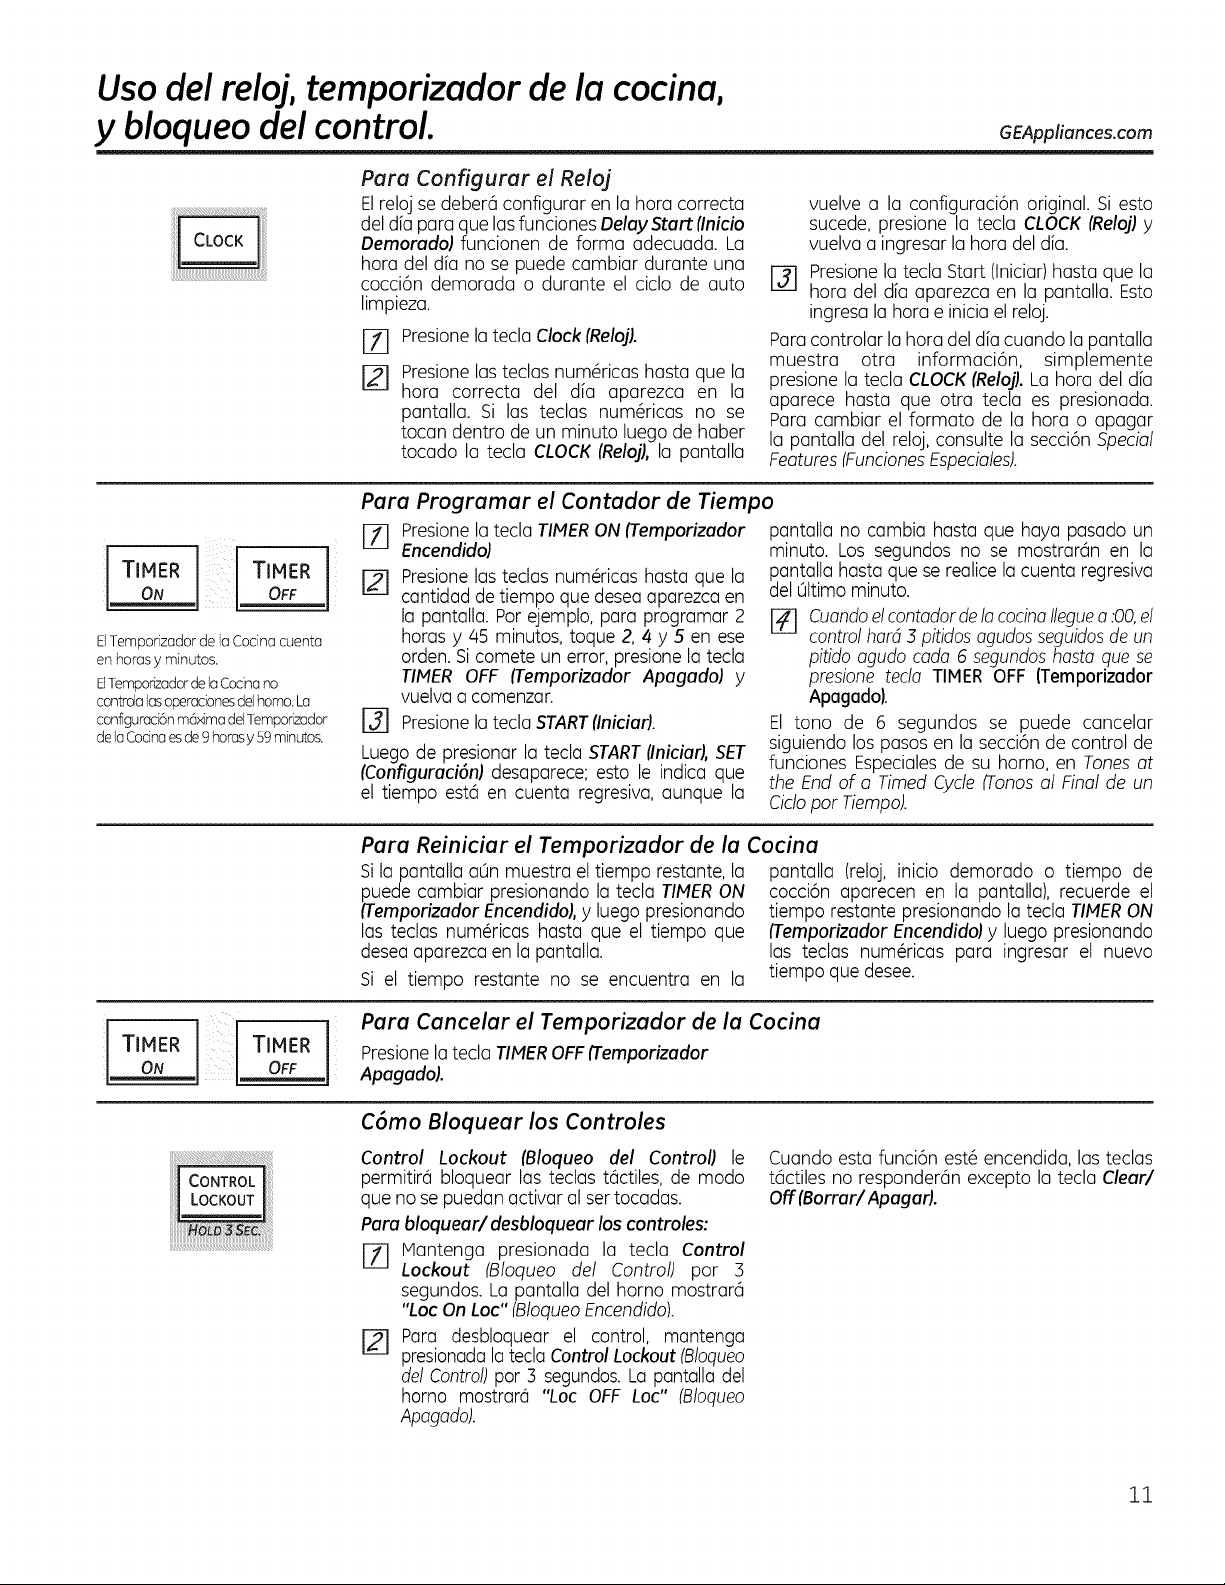
Usa del reloj, temporizador de lacocina,
y bloqueo del control.
GEAppliances.com
Pare Configurar el Reloj
Elreloj se deber6 configurar en la hera correcta
del d[a para que las funcionesDelay Start (Inicio
DemoradoJ funcionen de forma adecuada. La
hera del d[a no sepuede cambiar durante una
cocci6n demorada o durante el ciclo de auto
limpieza.
FT] Presionela tecla Clock (Reloj).
r_ Presione las teclas num@icas hasta que la
hera correcta del d[a aparezca en la
pantalla. Si las teclas num@icas no se
tocan dentro de un minute luego de haber
tocado la tecla CLOCK (RelojJ,la pantalla
vuelve a la configuraci6n original. Si esto
sucede, presione la tecla CLOCK (Relojl y
vuelva a ingresarla hera del d[a.
r-_ Presionela tecla Start (Iniciar)hasta que la
hera del d[a aparezca en la pantalla. Esto
ingresala hera e inicia el reloj.
Para controlar la hera del d[a cuando la pantalla
muestra otra informaci6n, simplemente
presione la tecla CLOCK {Reloj}. Lahera del d[a
aparece hasta que otra tecla es presionada.
Para cambiar el formato de la hora o apagar
la pantalla del reloj, consulte la secci6nSpecial
Features(FuncionesEspeciales).
TIMER TIMER ]
ON OFF
ElTemporizador de la Cocinacuenta
en haresy minutes.
ElTemporizadorde laCodnano
contrda losoperacbnesdelhomo.La
configurad6nm6×imadelTemporizador
delaCodnaesde 9herosy 59 minutes.
Pare Programar el Contador de Tiempo
FT] Presionela tecla TIMERON iTemporizador
Encendido)
[] Presionelasteclasnum_ricas hasta que la
cantidad de tiempo que desea aparezca en
la pantalla. Perejemplo, para programar 2
horas y 45 minutes, toque 2,4 y 5 en ese
arden.Sicomete un error,presione la tecla
TIMER OFF {Temporizador Apegedo) y
vuelva a comenzar.
_-] Presionela tecla START(Iniciar}.
Luego de presionar la tecla START(Iniciar), SET
(Configuraci6n) desaparece; esto le indica que
el tiempo estd en cuenta regresiva, aunque la
pantalla no cambia hasta que haya pasado un
minuto. Los segundos no se mostrardn en la
c_antallahasta que se realicela cuenta regresiva
el Oltimominuto.
[] CuandoelcontadordelacocinaIleguea :00,el
control hard 3 pitidos agudosseguidosde un
pitidoagudo cada6 segundoshasta que se
presione tecla TIMER OFF (Temporizador
Apagado).
El tone de 6 segundos se puede cancelar
siguiendo lospasos en la secci6nde control de
funciones Especiales de su homo, en Tones at
the End of a Timed Cycle(Tonesal Finalde un
Ciclopar Tiempo).
Para Reiniciar el Temporizador de la
Si la pantalla aOnmuestra el tiempo restante, la
puede cambiar presionando la tecla TIMERON
(TemporizadorEncendidol, y luego presionando
las teclas num@icas hasta que el tiempo que
desea aparezca en la pantalla.
Si el tiempo restante no se encuentra en la
Cocina
pantalla (reloj, inicio demorado o tiempo de
cocci6n aparecen en la pantalla), recuerde el
tiempo restantepresionando la tecla TIMERON
_Temporizador Encendido] y luego presionando
las teclas num@icas para ingresar el nuevo
tiempo que desee.
[
TIMER
ON
TIMER
OFF
Para Canceler el Temporizador de la
Presione la tecla TIMEROFF ffemporizador
Apagado}.
Cocina
ii!ii!ili!ii_i!i_ii_iii!i!i¸_!!_!i_i_i_ii_ii_ii_!i_ii!ii!!!i!i_i_i_i_i!i_!_i_i_i_ii_iiiii!ii!i!_¸iiii_iiiiiiiiiiiiiiiii!i!i!i!_i!i!!i!i!_i_ii_i_i_ii_ii_ii_ii_i_il
CONTROL
LOCKOUT
C6mo Bloquear los Controles
Control Lockout (Bloqueo del Contrail le
permitird bloquear las teclas tdctiles, de mode
que no se puedan activaral sertocadas.
Pare bloquear/ desbloquear los controles:
[] Hantenga presionada la tecla Control
Lockout (Bloqueo del Control) par 3
segundos. Lapantalla del homo mostrar6
"LocOn Loc" (Bloqueo Encendido).
Para desbloquear el control, mantenga
presionada la tecla Control Lockout (Bloqueo
del Control)par 3 segundos. La pantalla del
homo mostrar6 "Loc OFF Loc" (Bloqueo
Apagado).
Cuando esta funci6n est6 encendida, lasteclas
t6ctiles no responder6n excepto la tecla Clear/
Off {Borrar/Apagar).
11
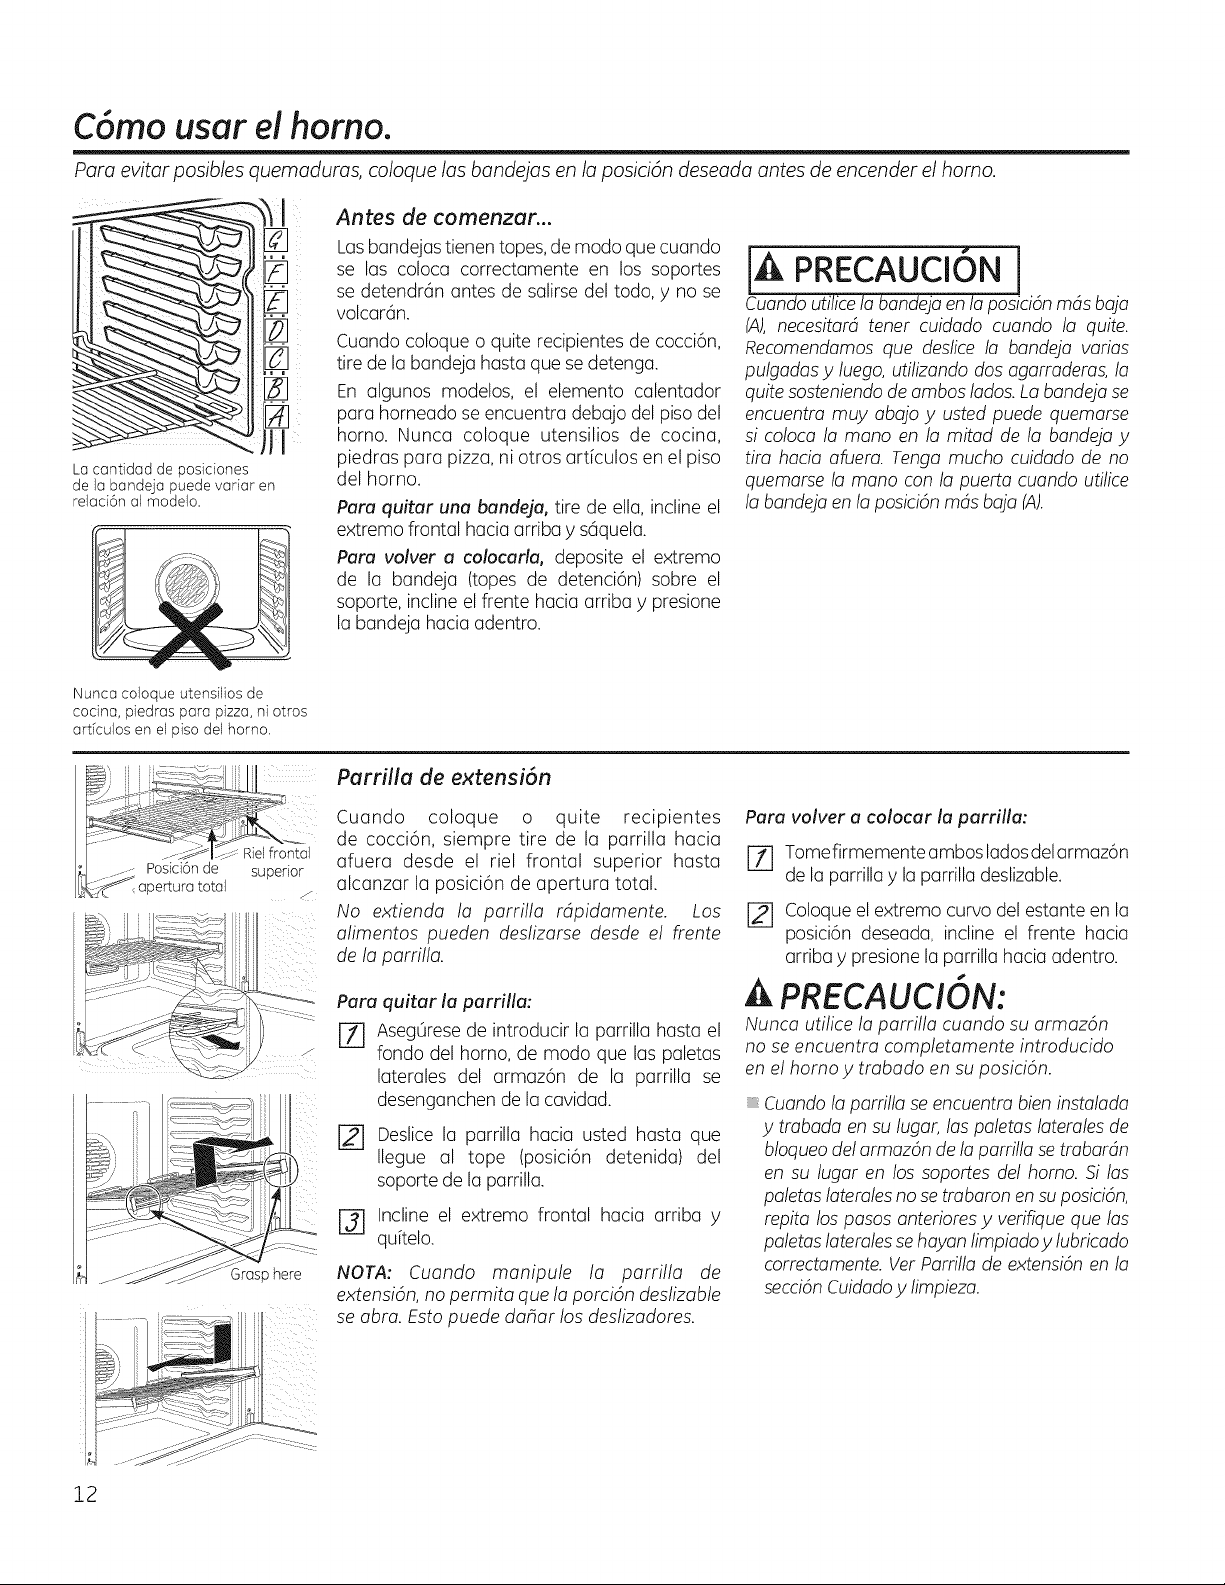
C6mousarel homo.
Para evitar posibles quemaduras, coloque las bandejas en la posici6n deseada antes de encender el homo.
La cantidad de posiciones
de la bandeja puede variar en
relaci6n aJmodelo.
Antes de comenzar...
Las bandejas tienentopes, de modoque cuando
se las coloca correctamente en los soportes
sedetendrc_nantes de salirse del todo, y no se
volcarc_n.
Cuandocoloque o quite recipientesde cocci6n,
tirede la bandeja hasta que sedetenga.
En algunos modelos, el elemento calentador
para horneado seencuentra debajo del piso del
homo. Nunca coloque utensilios de cocina,
piedras para pizza,ni otros articulos en el piso
del homo.
Para quitar una bandeja, tire de ella,inclineel
extremo frontal haciaarriba ys@quela.
Para volver a colocarla, deposite el extremo
de la bandeja (topes de detenci6n) sobre el
soporte,inclineel frente hacia arriba y presione
la bandeja haciaadentro.
Cuando utilicela bandejaen la posici6n rods baja
(A), necesitard tenet cuidado cuando la quite.
Recomendamos que deslice la bandeja varias
pulgadas y luego, utilizando dos agarradems,la
quite sosteniendo de ambos lados.La bandeja se
encuentm muy abajo y usted puede quemarse
si coloca la mano en la mitad de la bandeja y
tim hacia afuem. Tenga mucho cuidado de no
quemarse la mano con la puerta cuando utilice
la bandejaen la posici6n rods baja (A).
Nunca coloque utensilios de
cocina, piedras para pizza, ni otros
articulos en elpiso del horno.
Parrilla de extensi6n
Cuando coloque o quite recipientes
de cocci6n, siempre tire de la parrilla hacia
afuera desde el riel frontal superior hasta
alcanzar la posici6n de apertura total.
No extienda la parrilla rdpidamente. Los
alimentos pueden deslizarse desde el frente
de la parrilla.
Para quitar la parrilla:
EZ] Aseg6rese de introducir la parrilla hasta el
fondo del homo, de modo que las paletas
laterales del armaz6n de la parrilla se
desenganchen de la cavidad.
r_ Deslicela parrilla hacia usted hasta que
Ilegue al tope (posici6n detenida) del
soporte de la parrilla.
[_] Incline el extremo frontal hacia arriba y
qu[telo.
NOTA: Cuando manipule la parrilla de
extensi6n, no permita que la porci6n deslizable
seabra. Estopuede dahar los deslizadores.
Para volver a colocar la parrilla:
[] Tomefirmemente ambos lados delarmaz6n
de la parrilla y la parrilla deslizable.
[-2--1Coloque el extremo curvo del estanteen la
posici6n deseada incline el frente hacia
arriba ypresionela parrilla haciaadentro.
Ik PRECAUCidN:
Nunca utilice la parrilla cuando suarmaz6n
no seencuentra completamente introducido
en el homo y trabado en suposici6n.
Cuando la parrilla seencuentm bien instalada
y tmbada en su lugar,las paletas latemlesde
bloqueodel armaz6n de la parrilla se tmbardn
en su lugar en lossoportes del homo. 5i las
paletas latemles no se trabamn ensu posici6n,
repita los pasos anteriores y verifique que las
paletas latemles se hayanlimpiado ylubricado
correctamente. VetParrilla de extensi6nen la
secci6n Cuidadoy limpieza.
12

GEAppliances.com
Papal de aluminio
No use papel de aluminio para cubrir el fondo del
horno. Elaluminioatrapar6 el calor enla parte inferior
y alterar6 el funcionamiento del horno. El aluminio
se puede derretir y dar_ar de forma permanente el
fondo delhorno.Cualquier dar_oporusoinadecuado
del aluminio no estar6 cubierto por la garantia del
producto.
El aluminiose puede usarpara retenerderrames,
colocando una hoja en el estanteinferior,varias
pulgadaspordebajodelacomida.Nousem6saluminio
queelnecesarioynuncacubratotalmenteunestante
delhomoconpapeldealuminio.Mantengaelaluminio
porIomenosaunapulgaday mediadelasparedesdel
homoparaevitarunamalacirculaci6ndelcalor.
Precalentamiento y colocaci6n de recipiente
Pare evitar posibtes quemaduras, coloque las
bandejas en laposici6n deseada antes de encender
elhomo.
Precalientedel homosiasi1oindica ta receta.Et
precatentamientoesnecesarioparaobtenerbuenos
resultadoscuando homeepasteles,galtetas,pastelitos
Z_-- ypanes.
Sivaa hornearcuatrocapas de pastel at mismotiempo,
r-/-_- coloquedos capas enta bandeja Cydoscapas enta
bandejaE.Distribuyalos recipientesdemodo queno
queden directamenteuno encimadelotto. Siuser6el
estante extensibte,coloqueetmismo enla posici6nC.
Losresultadosdelhorneado ser6n mejores si la
comida se encuentra enel centro tanto como sea
posible.Sin embargo, elrendimiento con ciertas
comidas se puedemejorar si se hornea enuna
posici6n superior o inferior delestante.
Por ejemplo, el pastel de 6ngel deberfa ser
horneado enel estante ubicado m6s abajo.Siga las
recomendaciones de la receta y las instrucciones
delpaquete sobrela ubicaci6n de las bandejas para
comidas pre empaquetadas y congeladas. Ajuste
la posici6n del estante para ajustar los resultados.
Por ejemplo, si encuentra que las superficies de
las galletas, panecillos o tortas tardan m6s de Io
deseado en hornearse, la pr6xima vez intente usar
un estante ubicado en una posici6n superior. Las
bandejas no deben tocarse mutuamente ni tocar
las paredes del horno. AI hornear en estantes
m01tiples,escalone las bandejas de modo que una
nose encuentre directamente encima delaotra. Deje
aproximadamente 1.5"entre las bandejas ydesdelas
partes frontal, trasera y laterales de las paredes del
horno. Consulte la secci6n "cocci6n por convecci6n"
para obtener informaci6n sobre la ubicaci6n de
bandejas para el horneado de estantes mOltiples.
*Las aves rellenas generalmente
requieren tiempo adicional de dorado.
Cubra lasparas y pechuga con papel
de aluminio para evitar dorados
excesivos y resecamiento de la piel.
Controle la temperatura del relleno
con un term6metro para asegurar
que haya alcanzado una temperatura
mfnima de 260°R
C6mo configurar el homo para horneado o rostizado
r_ Presioneelbot6nBAKE(homear).
r-_ Presione las almohadillasnum@icashaste qua
aparezcalatemperaturedeseada.
r_ Presioneelbot6nSTART(iniciar).
El homo se iniciar6 automaticamente. La pantalta
mostrar0 PrE mientras reatiza el precaientamiento.
Cuandoel homoatcanza ta temperatura seleccionada,
el control del homo emitird varios pitidos y la pantalta
mostrar6 latemperaturadelhomo.
NOTA: Ustedescuchar6 el ventilador de convecd6n
(an atgunos modelos) mientras el homo realize el
Gu[a pare dorar
precalentamiento. El ventilador se detendr6 cuando
el homo se hoyaprecalentado y lapantalla mostrar6
la temperaturo configurada. Esto es normal. Pore
combior Iotemperaturedelhomodumnteel cido BAKE
(horneor),presioneel bat@ BAKEy luego losolmohodillos
numdficospareconfigumrIo nuevotemperature.
[_ Verifiqueelniveldecocci6nde losalimentoscuando
haya abanzado el tiempo mfnimo indicadoen la
receta.Cocinelosm6ssi fuesenecesario.
[_ Presione el bot6n CLEAR/OFF(borrar/apagado)
cuandosehayafinalizadoelhomeadoyluegoquite
losalimentosdelhomo.
Carnes Temperatura Temperatura
delHomo Interior
Bile
Jugoso 425OF
Jugoso 425OF
Cerdo A Punto 525OF
Cordero A Punto 525OF
A Punto 575OF
Ave 550°F
525°F
325°F
325°F
Asado de Costilla (/4a8 lb.)
Deshuesada y Con Huesos
Asado de Costilla (4a8 lb.)
Deshuesada y Con Huesos
Con Huesos 15a 9 Lbs.)
Con Huesos (5 a 9 Lbs.)
Deshuesada (/4a 7lb.)
Polio Entero (5a7lb.)
Pavo, Entero*
SinRelleno (i0a16 lb.)
SinRelleno (18a2/4lb.)
Pechuga dePavo (/4a 6 lb.)
Jugoso 525OF 145°F
A Punto 525OF 160°F
145°F
145°F
160°F
165°F
165°F
170°F
170-180°F
170-180°F
170°F
13
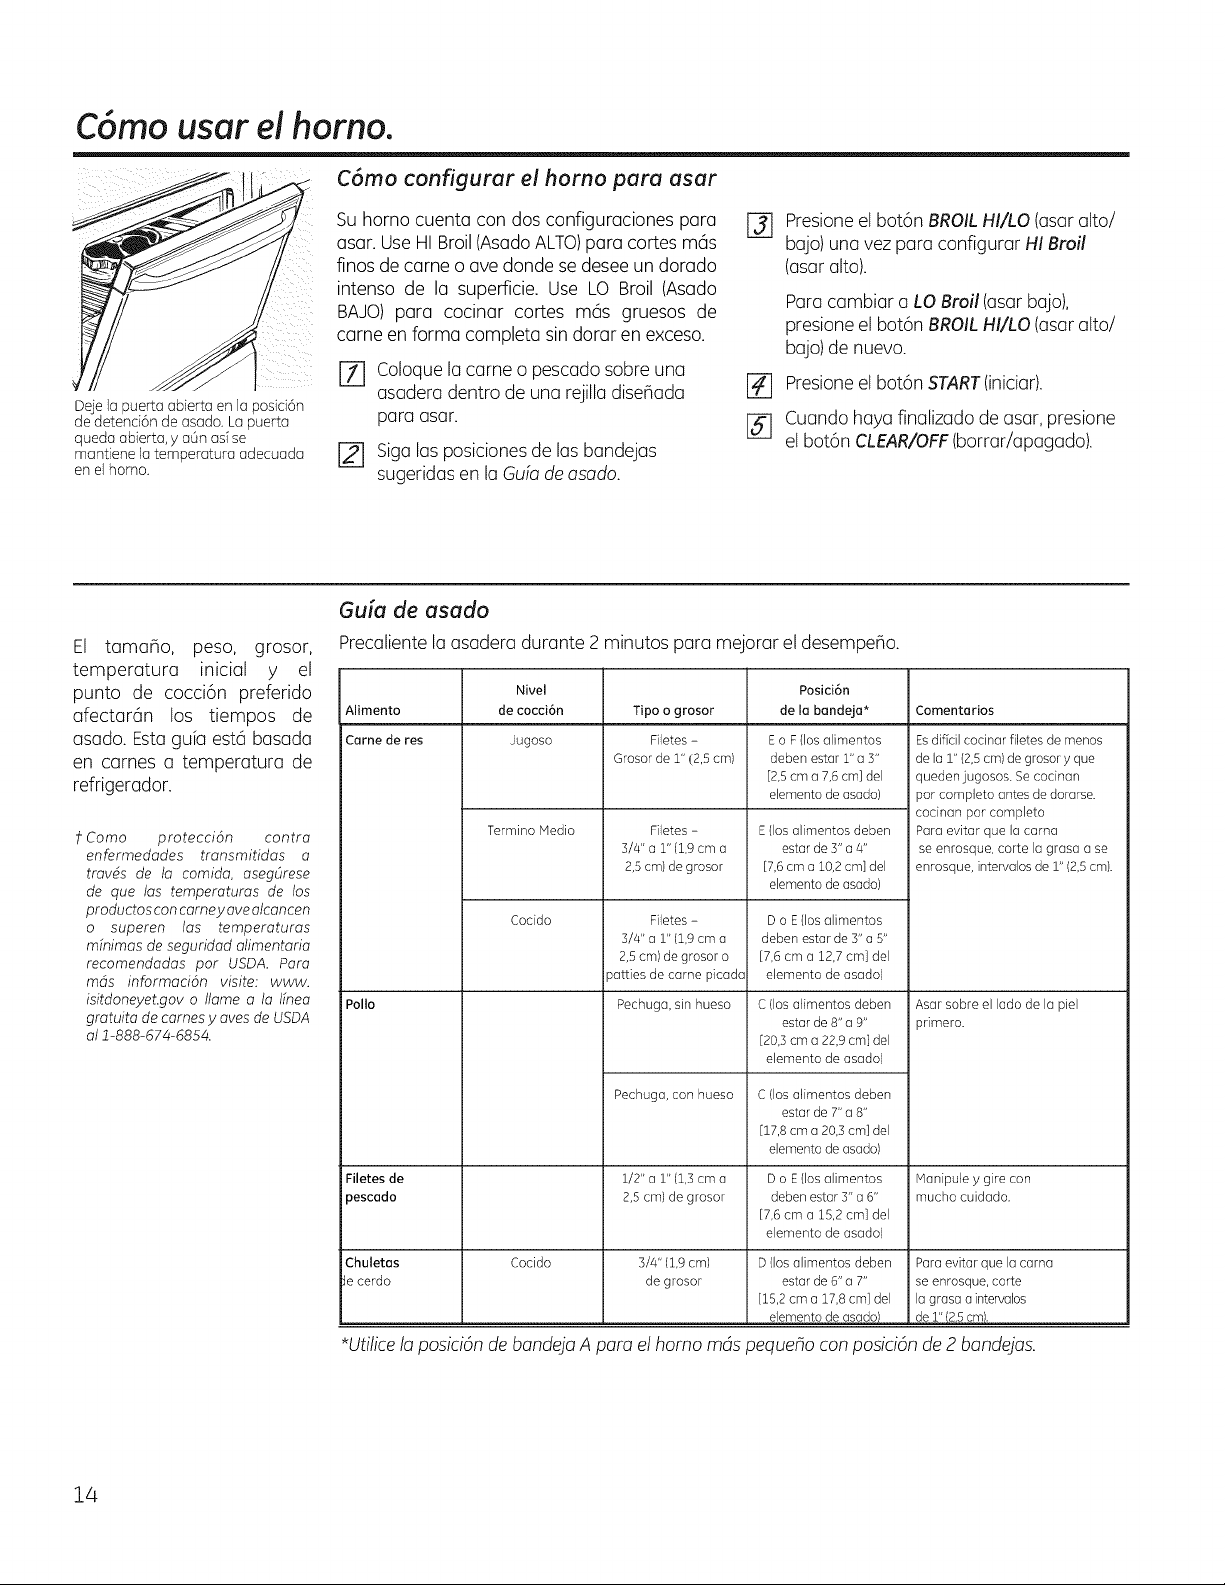
C6mo usar elhorno.
Deje la puerta abierta en la posid6n
de detend6n de asado. La puerta
quedaabierta,ya_nasTse
mantiene la temperatura adecuada
en el homo.
C6mo configurar el horno para asar
Su homo cuenta condosconfiguraciones para
asar. Use HI Broil(AsadoALTO)para cortes m6s
finos de came o avedonde se desee un dorado
intenso de la superficie. Use LO Broil (Asado
BAJO)para cocinar cortes m6s gruesos de
came en forma completa sindorar en exceso.
@
rT] Coloque la came o pescado sabreuna
asaderadentro de una rejilla diseflada []
para asar. []
[] Siga las posiciones de las bandejas
sugeridas en la Gala deasado.
Presioneel bot6nBROILHI/LO(asar alto/
bajo) una vez para configurar HI Broil
(asar alto).
Paracambiar a LO Broil (asar bajo),
presioneel bot6nBROILHI/LO(asar alto/
bajo) de nuevo.
Presioneel bot6nSTART(iniciar).
Cuandohayafinalizado de asar, presione
el bot6n CLEAR/OFF(borrar/apagado).
El tamaflo, peso, grosor,
temperatura inicial y el
punto de cocci6n preferido
afectar6n los tiempos de
asado. Estagu[a est@basada
en carnes a temperatura de
refrigerador.
f Coma protecci6n contra
enfermedades transmitidas a
travds de la comida, asegOrese
de que los temperaturas de los
produetosconcarney avealeaneen
o superen los temperaturas
m[nimas de seguridad alimentaria
reeomendadas par USDA. Para
rods in{ormaciOn @site: www.
isitdoneyet.gov o Ilame a la Ifnea
gmtuita decarnes y ayes de USDA
al 1-888-674-685¢.
Guia de asado
Precaliente la asaderadurante 2 minutospara mejorarel desempeho.
Nivel
Alimento de cocci6n Comentarios
Came de res Jugoso
Polio
Termino Media
Cocido
Tipo ogrosor
Filetes -
Grosor de r' (2,5cm)
Filetes -
3/4" a r' (1,9cm a
2,5 cm) de grosor
Filetes -
3/4" a r' (1,9cm a
2,5cm) de grosor o
aatties de carne picada
Pechuga, sin hueso
Pechuga, con hueso
Posici6n
de la bandeja*
Eo F{los alimentos
deben estar r' a3"
[2,5cm a7,6cm] del
elemento de asado}
E{los alimentos deben
estar de Y'a4"
[7,6 cm a 10,2 cm] del
elemento de asado}
Do E(los alimentos
deben estar de 3"a 5"
[7,6 cm a 12,7cm] del
elemento de asado)
C{los alimentos deben
estar de 8"a9"
[20,3cm a22,9 cm] del
elemento de asado)
C{los alimentos deben
estar de 7"a8"
[17,8cm a20,3 cm] del
elemento deasado)
Esdificil cocinar filetes de menos
de la r' (2,5cm) de grosor y que
queden jugosos. Secocinan
par completo antes de dorarse.
cocinan par completo
Para evitar que la carna
seenrosque, carte lagrasa ase
enrosque, intervalos de r' (2,5cm).
Asar sabre el lado de la piel
primero.
Filetes de 1/2" a r' (1,3cm a Do E(los alimentos Manipule y gire con
pescado 2,5cm) de grosor deben estar Y' a 6" mucho cuidado.
[7,6 cm a 15,2cm] del
elemento de asado)
Chutetas Coddo 3//4"(1,9cm) D(los alimentos deben Para evitar que lacarna
Jecerdo de grosor estar de 6"a 7" seenrosque, carte
[15,2 cm a17,8 cm] del la grasa aintervalos
elemento deasado) de r' (2,5cm).
*Utilicela posici6n de bandejaA pare el homo mds pequeho conposici6n de2 bandejas.
14
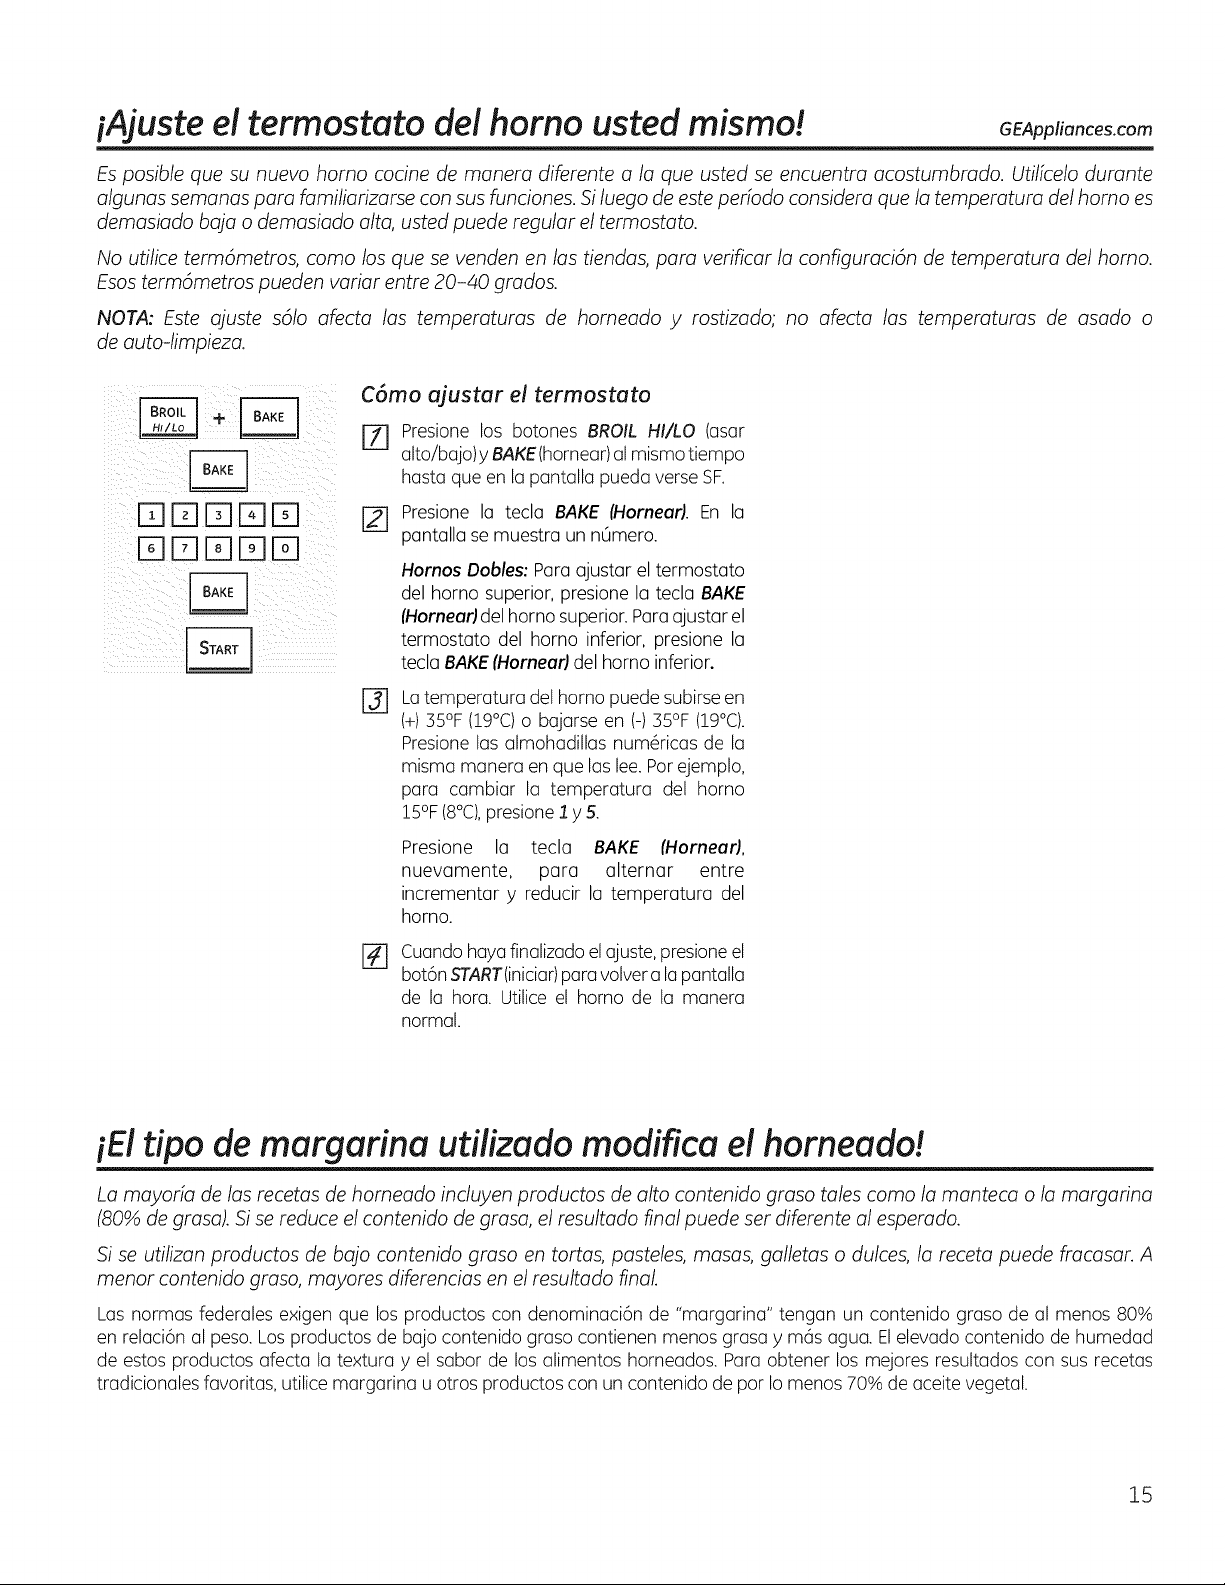
iAjuste el termostato de! homo usted mismo! GEApU °. . om
Esposible que su nuevo homo cocine de monera diferente o Io que usted se encuentro ocostumbrodo. Utificelo durante
olgunos semonos poro fomiliorizorse consus funciones. Si luego de este periodo considero que Iotemperoturo del homo es
demosiodo bojo o demosiodo alto, usted puede regular el termostoto.
No utilice termdmetros, coma los que se venden en los tiendas, para verificar la configuracidn de temperoturo del homo.
Esos termdmetros pueden vorior entre 20-40 grodos.
NOTA: Este qjuste sdlo ofecto los temperoturos de homeado y rostizodo; no ofecto los temperoturos de osodo o
de outo-limpiezo.
DDDD[]
DDDD
C6mo ajustar el termostato
[Z] Presione los botones BROIL HI/LO (asar
alto/bajo)y BAKE(hornear)al mismo tiempo
hasta queen la pantalla pueda verse SF.
[] Presione la tecla BAKE (Horneafl. En la
pantalla se muestra un nOmero.
@
Hornos Dobles: Para ajustar el termostato
del horno superior, presionela tecla BAKE
[Horneafl del horno superior. Paraajustar el
termostato del homo inferior, presione la
tecla BAKE[Horneafl del homo inferior.
Latemperatura del homopuede subirse en
(+)55°F (!9°C)o bajorse en (-) 35°F (!9°C).
Presione lasalmohadillas num@icasde la
misma manera en que las lee. Parejemplo,
para cambiar la temperatura del homo
15°F(8°C),presione I y5.
Presione la tecla BAKE (Horneofl,
nuevamente, para alternar entre
incrementar y reducir la temperatura del
horno.
%
Cuando haya finalizado elajuste, presioneel
bot6nSTART(iniciar)para volvera lapantalla
de la hora. Utiliceel homo de la manera
normal.
iE!tipo de margarina utilizado modifica el horneado!
La moyorfo de las recetas de homeodo incluyen productos de alto contenido groso tales coma Iomonteco o Iomorgarino
(80% de grasa). Si sereduce el contenido de grosa, el resultodo final puede ser diferente al esperodo.
Si se utilizon productos de bqjo contenido graso en tortos, posteles, mosas, golletos o dulces, Io receto puede ffocosar. A
menor contenido groso, moyores diferencios en el resultodo final.
Lasnormas federales exigen que losproductos con denominaci6n de "margarina" tengan un contenido graso de al menos 80%
en relaci6nal peso. Los productos de bajo contenido grasocontienen menos grasaymc_sagua. Elelevadocontenido de humedad
de estos productos afecta la textura y el sabor de losalimentos horneados. Para obtener losmejores resultados con sus recetas
tradicionalesfavoritas, utilice margarina u otros productoscon un contenido de par Io menos 70% de aceite vegetal.
15
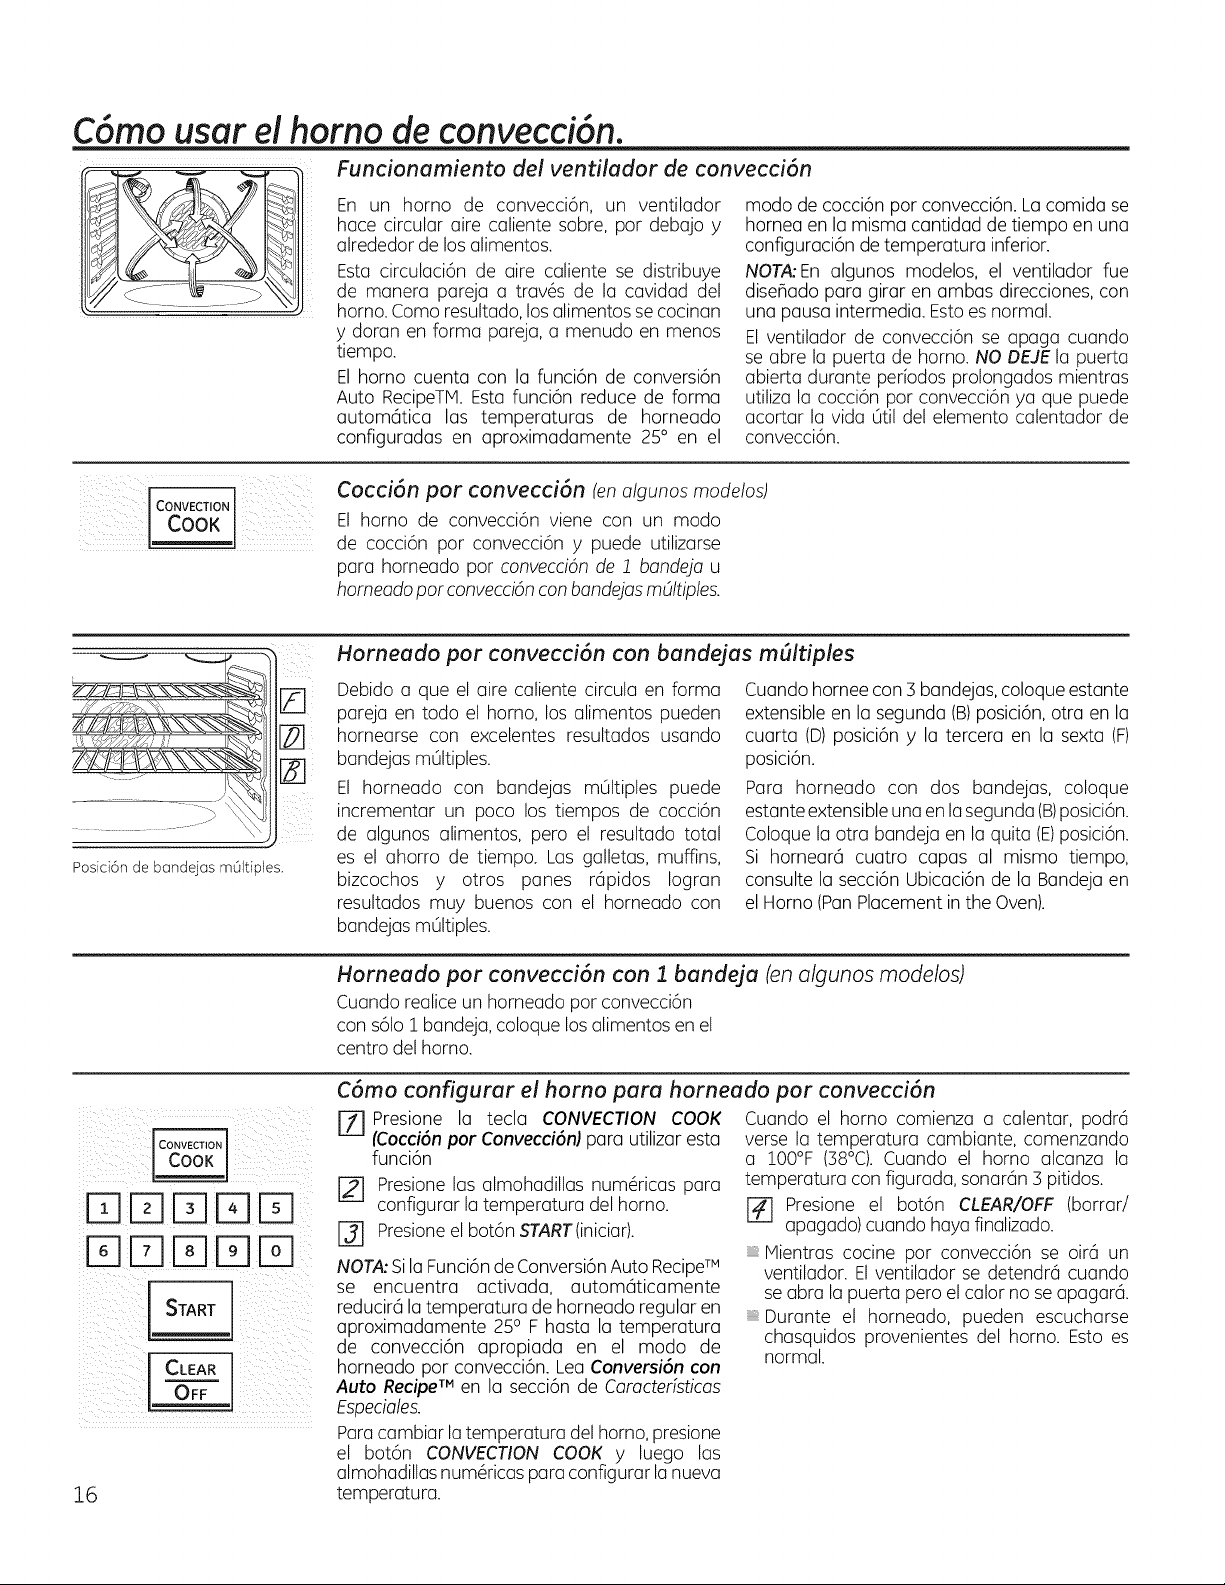
C6mo usar el homo de convecci6n.
Funcionamiento del ventilador de convecci6n
En un horno de convecci6n, un ventilador
huce circular aire caliente sabre, par debajo y
alrededor de los alimentos.
Esta circulaci6n de aire caliente se distribuye
de munera pareja a trav6s de la cavidad del
horno.Coma resultado, los alimentosse cocinan
y doran en forma pareja,a menudo en menos
tiempo.
El horno cuenta con la funci6n de conversi6n
Auto RecipeTIVl.Esta funci6n reduce de forma
autom6tica las temperaturas de horneado
configuradas en aproximadamente 25° en el
modo de cocci6npar convecci6n.La comida se
hornea en la misma cantidad de tiempo en una
configuraci6n de temperatura inferior.
NOTA:En algunos modelos, el ventilador fue
diseBadopara girar en ambas direcciones, con
una pausaintermedia. Estoes normal.
El ventilador de convecci6n se apaga cuando
seabre la puerta de homo. NODEJEla puerta
abierta durante per[odos prolongados mientras
utiliza la cocci6n par convecci6n ya que puede
acortar la vida Otil del elemento calentador de
convecci6n.
Cocci6n par convecci6n (enalgunos modelos)
CONVECTION
El homo de convecci6n viene con un modo
de cocci6n par convecci6n y puede utilizarse
para horneado par convecci6n de 1 bandeja u
homeadopar convecci6ncon bandejas mOItiples.
Posici6n de bandejas mOltiples.
Horneado par convecci6n con bandejas m(_ltiples
Debido a que el aire caliente circula en forma Cuando hornee con 5 bandejas, coloque estante
pareja en todo el homo, los alimentos pueden extensible en la segunda (B)posici6n, otra en la
hornearse con excelentes resultados usando cuarta (D) posici6n y la tercera en la sexta (F)
bandejas m01tiples, posici6n.
El horneado con bandejas mOItiples puede Para horneado con dos bandejas, coloque
incrementar un poco los tiempos de cocci6n estanteextensible una en lasegunda(B) posici6n.
de algunos alimentos, pero el resultado total Coloquela otra bandeja en la quita (E)posici6n.
es el ahorro de tiempo. Las galletas, muffins, Si hornear6 cuatro capas al mismo tiempo,
bizcochos y otros panes rc_pidos Iogran consulte la secci6n Ubicaci6nde la Bandeja en
resultados muy buenos con el horneado con el Homo (PanPlacementin theOven).
bandejasmOItiples.
Horneado par convecci6n con :1 bandeja (en algunos modelos)
Cuando realice un horneado par convecci6n
con s61o1bandeja, coloque los alimentos en el
centro del homo.
i ilii ii!//[
irTI!FqrTlirclrq t
irq ilT118--1iFq!D i¸
C6mo configurar el horno para horneado par convecci6n
[Z] Presione la tecla CONVECTION COOK
(Cocci6n par Convecci6n) para utilizar esta
funci6n
r_ Presione las almohadillas num6ricas para
configurar la temperatura del horno.
I-_ Presioneel bot6nSTART(iniciar).
NOTA:Sila Funci6nde Conversi6n AutoRecipeTM
se encuentra activada, autom@ticamente
reducirc_la temperatura de horneado regular en
aproximadamente 250 Fhasta la temperatura
de convecci6n apropiada en el modo de
I CLEAR j horneado par convecci6n. Lea Conversi6n con
I OFF ! Auto Recipe TM en la secci6n de Caracteristicas
.......... Especiales.
Paracambiar latemperatura del homo, presione
el bot6n CONVECTION COOK y luego las
almohadillas num6ricaspara configurar lanueva
16 temperatura.
Cuando el homo comienza a calentar, podr6
verse la temperatura cambiante, comenzando
a Z00°F (38°0. Cuando el homo alcanza la
temperatura configurada, sonar@n:3pitidos.
r_ Presione el bot6n CLEAR/OFF (borrar/
apagado) cuando haya finalizado.
Mientras cocine par convecci6n se oirc_un
ventilador. El ventilador se detendr@cuando
se abra la puerta pero el calorno seapagarc_.
Durante el horneado, pueden escucharse
chasquidos provenientes del homo. Esto es
normal.
GEAppliances.com
Cuando homee galletas, obtendr6
mejores resultados si usa una
plancha plana para galletas en
lugar de un recipiente de lados
bajos.
Recipientes para cocci6n por convecci6n
Antesde utilizurel homode convecci6n, verifique
que sus elementos de cocci6ndejen espacio
suficiente para la circuluci6nde aire en el horno.
Sivua horneur con varios recipientes,deje un
espacioentre elias.Ademc_s,asegSresede que
los recipientes no se toquen entres[o toquen las
paredes del horno.
Papely pldstico
Los recipientes de papel ypldstico resistentes
al calor recomendudospara utilizar en
horneado normal tambi6n pueden utilizurse
para horneado par convecci6n,pero no deben
utilizarse a temperaturas mas elevadusque lu
temperatura recomenduda par elfabricante
de loselementosde cocci6n.Tambi6n pueden
utilizurse elementosde cocci6n pk_sticos
resistentes a temperaturas de 400°F(204,4°C).
Metal y vidrio
Cualquier tipo de recipiente de cocci6nfunciona
en suhomo de convecci6n;sin embargo,
losrecipientes de metal secalientan mc_s
r(_pidamentey se recomiendanpar(] horneado
par convecci6n.
Las bandejas oscuraso conacabado mate
hornean alimentosmc_sr@ido que las
brillantes.
Los recipientes de vidrioo cerc_micacocinan
m@sdespacio.
Para recetascoma polio horneado,utilice un
recipientecon ladosbajos.Elairecalienteno puede
circular bien alrededor de losalimentos en un
recipiente de ladosaltos.
Use bandejas con laterales bajos o sin los
mismos al hornear en el modo de cocci6n
par convecci6n. Elaire no puede circular bien
alrededor de la comida en una bandeja con
laterales altos. AI cocinar galletas, obtendr(_
mejores resultados siusa una bandeja plana
para galletas en lugar de una conloslaterales
bajos.
17
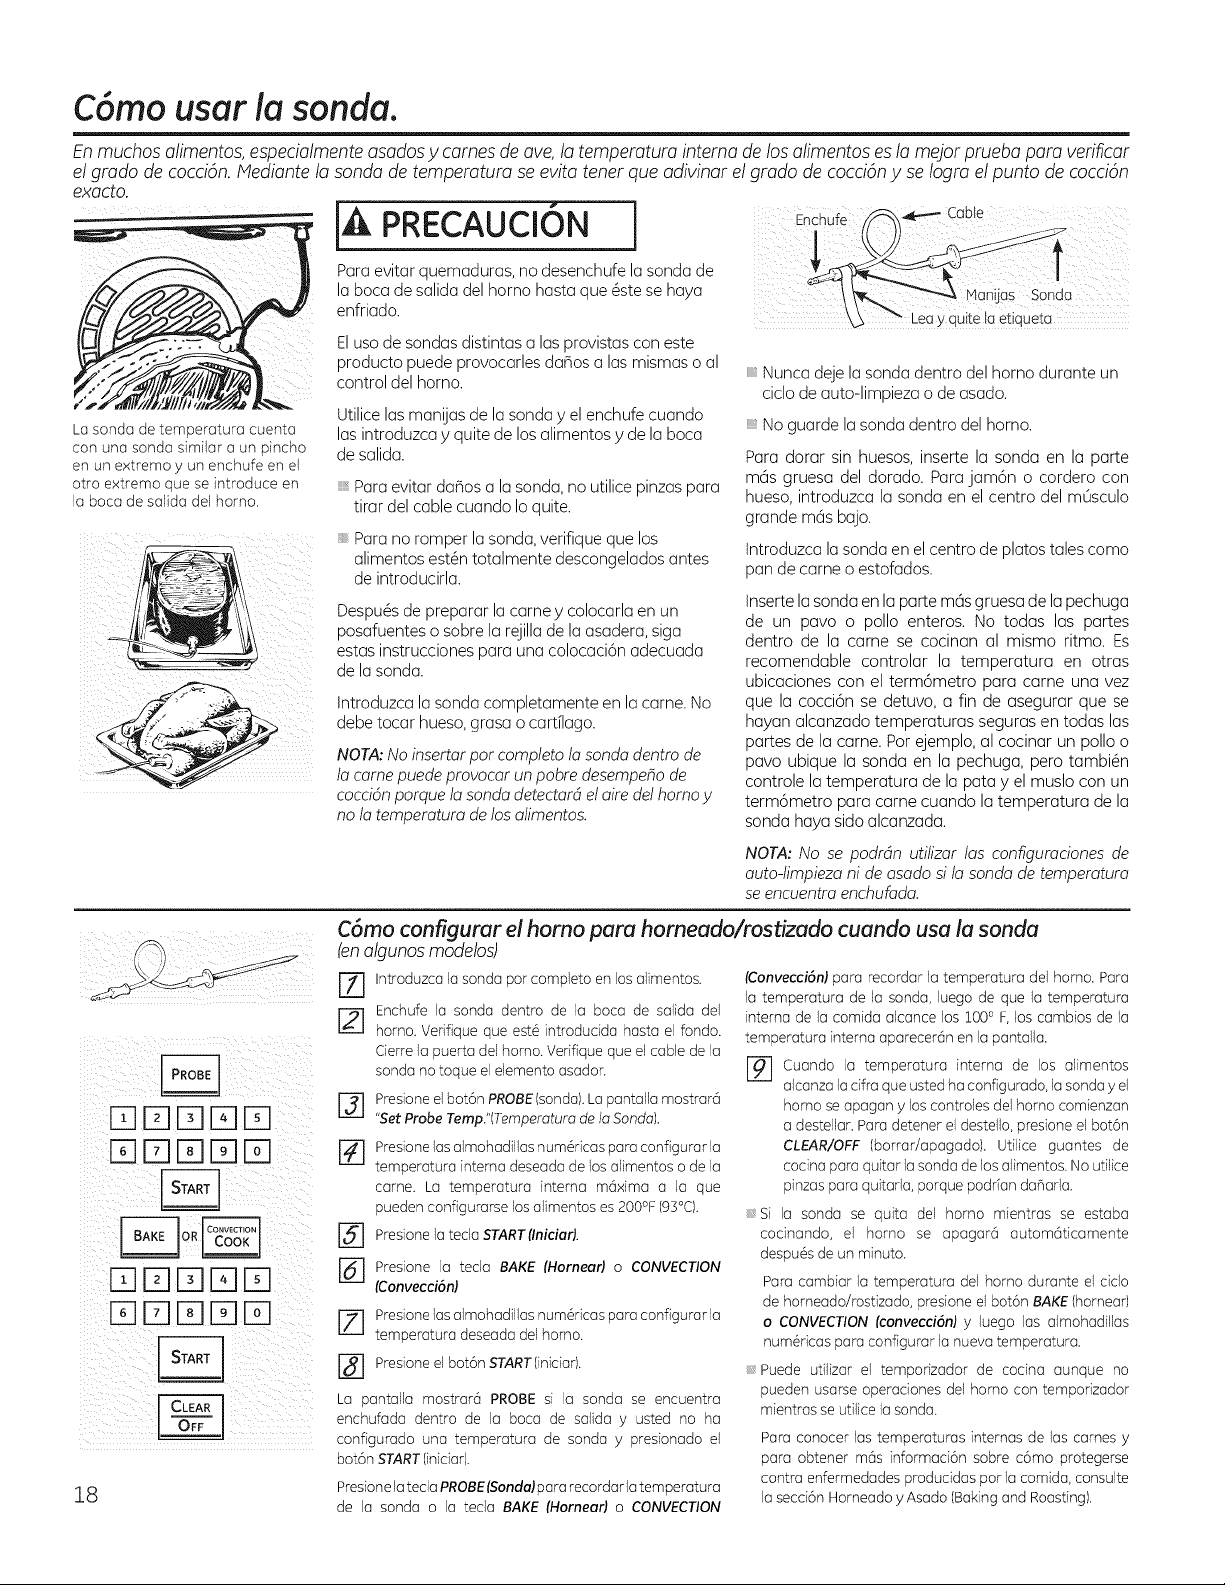
C6mousarlasonda.
Enmuchosalimentos, especialmenteasadosy cames de ave, la temperatura intema de los alimentosesla mejor prueba para verificar
el grado de cocci6n.Mediante la sondade temperatura seevita tenet que adivinar elgrado de cocci6ny se!ograelpunto de cocci6n
exacto.
La sonda de temperatura cuenta
con una sonda similar a un pincho
en un e×tremo y un enchufe en el
otro e×tremo que se introduce en
la boca de salida del homo.
IA_....PRECAUCI6 I
Para evitar quemaduras, no desenchufe la sonda de
la boca de salida del homo hasta que 6ste se haya
enfriado.
Elusodesondasdistintas a lasprovistas con este
producto puede provocarles dafios a las mismas o al
control delhorno.
Utilicelas manijasde lasonda yel enchufe cuando
las introduzca y quite de losalimentos ydela boca
desalida.
Paraevitar dafios a la sonda, no utilice pinzaspara
tirar delcable cuando Io quite.
{i Paranoromper la sonda, verifique que los
alimentos est6n totalmente descongelados antes
deintroducirla.
Despu6s depreparar la came y colocarla en un
posafuentes o sobre la rejilladela asadera,siga
estas instrucciones para una colocaci6n adecuada
dela sonda.
Introduzca la sondacompletamente enla carne. No
debetocar hueso,grasa o cartilago.
NOTA:No insertarpot compteto la sondadentrode
la camepuede provocar un pobre desempehode
coccidn porquela sondadetectard elaim del homoy
nola temperatura delos alimentos.
Ei i!i:¸ tble? ¸/ i% :
Nunca deje la sondadentro delhorno durante un
ciclode auto-limpieza o deasado.
No guarde la sonda dentro delhorno.
Para dorar sin huesos, inserte la sonda en la parte
m6s gruesa deldorado. Parajam6n o cordero con
hueso, introduzca la sonda en el centro delm0sculo
grande m6s bajo.
)ntroduzca la sondaen el centro deplatos talescomo
pan decame o estofados.
)nsertela sondaenla parle m6sgruesa dela pechuga
de un pavo o polio enteros. No todas las partes
dentro de la came se cocinan al mismo ritmo. Es
recomendable controlar la temperatura en otras
ubicaciones con el term6metro para came una vez
que la cocci6n sedetuvo, a fin de asegurar que se
hayan alcanzado temperaturas segurasentodas las
partes de la carne. Por ejemplo, al cocinar un polioo
pavo ubique la sonda en la pechuga, pero tambi6n
controle la temperatura dela pata y el muslo con un
term6metro para came cuando la temperatura de la
sonda haya sido alcanzada.
NOTA: No se podrdn utilizar las configuraciones de
auto-limpieza ni deasadosila sondadetemperatura
se encuentra enchufada.
18
r-qF-1l-flr-ql-fl
IZ]E]lZ]rs]lS]
DDrT1FqD
FqDDF-qD
C6mo configurar el homo para horneado/rostizado cuando usa la sonda
(enalgunos moddos)
F_ Introduzca la sonda porcompleto en los alimentos.
r_ Enchufe la sonda dentro de la boca de salida del
homo. Verifique que est6 introdudda hasta el fondo.
Cierrela puerta del homo. Verifique que el cable dela
sonda no toque elelemento asador.
[] resioneelbot6n PROBElsonda).Lapantalla mostrar6
"SetProbe Temp."(Temperatura de la Sonda).
r_ Presione losalmohadillas num@icaspara configurar la
temperatura interna deseada de losalimentos ode la
carrie. La temperatura interna m6×ima a la que
pueden configurarse losalimentos es200%195°C1.
Presione la teda START(Iniciafl.
@
@
Presione la teda BAKE (Horneafl o CONVECTION
(Convecci6nl
r_ Presione lasalmohadillas num@icaspara configurar la
temperatura deseada del homo.
r_ Presione el bot6n STARTliniciar).
La pantalla mostrar6 PROBE si la sonda se encuentra
enchufada dentro de la boca de salida y usted no ha
configurado una temperatura de sonda y presionado el
bot6n START(iniciar).
Presionela teda PROBEfSonda)pararecordarla temperatura
de la sonda o la teda BAKE fHornear) o CONVECTION
(Convecci6N para recordar la temperatura del homo. Para
la temperatura de la sonda, luego de que la temperatura
interna de la comida alcance los 1000 F,los cambios de la
temperatura interna aparecer6n en la pantalla.
[] Cuando la temperatura interna de los aFmentos
alcanza la cifraqueustedha configurado, la sonday el
homo se apagan y loscontroles del homo comienzan
adestellar. Para detener el destello,presione el bot6n
CLEAR/OFF (borrar/apagado). Utilice guantes de
cocina para quitar la sonda de losalimentos. Noutilice
pinzas paraquitarla, porque podffan daflafla.
Si la sonda se quita del horno mientras se estaba
cocinando, el homo se apagar6 autom6ticamente
despu6s de un minuto.
Para cambiar la temperatura del homo durante el cido
de horneado/rostizado, presioneel bot6n BAKE(hornear)
o CONVECTION (convecci6nl y luego las almohadillas
num6ricas para configurar la nueva temperatura.
Puede utilizar el temporizador de cocina aunque no
pueden usarse operaciones del homo con temporizador
mientrasse utilice la sonda.
Para conocer las temperaturas internas de las carnes y
para obtener m6s informad6n sobre c6mo protegerse
contra enfermedades produddas por la comida, consulte
la secd6n Horneado y Asado (Baking and Boasting).
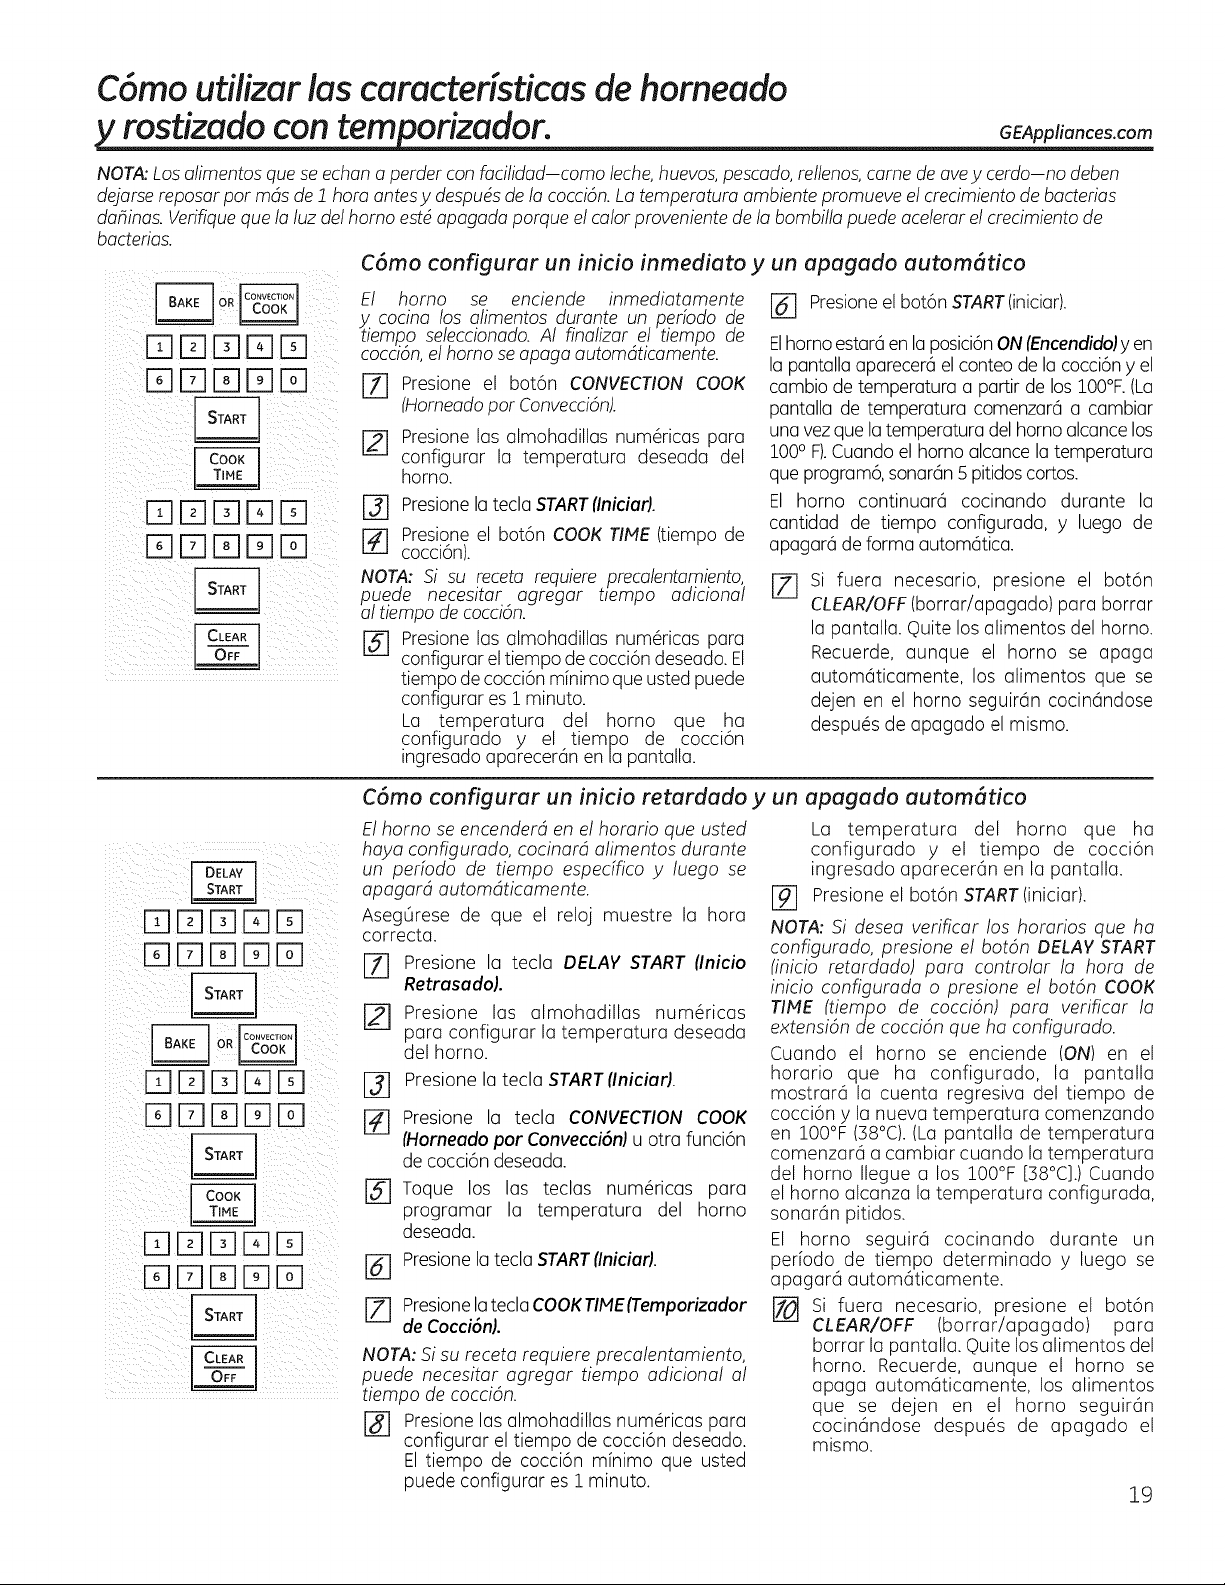
C6mo utilizar ias caracteristicas de horneado
y rostizado con temporizador. GEAppliances.com
NOTA:Los alimentosque se echan a perder con facilidad-como leche,huevos,pescado,rellenos,came de ave ycerdo-no deben
dejarse reposar pot rodsde! hora antesy despudsde la cocci6n.La temperatura ambiente promueve el crecimientode bacterias
dahinas. Verifiqueque la luzdel homoestd apagada porque el calorproveniente de la bombillapuede acelerar el crecimiento de
bacterias.
C6mo configurar un inicio inmediato y un upagado autom_tico
iiiii i;i i ii
<<DE]DE]D4
El homo se enciende inmediatamente
y cocina los alimentos durante un periodo de
tiempo seleccionado. AI finalizar el tiempo de
cocci6n,el homose apaga automdticamente.
[Z] Presione el bot6n CONVECTION COOK
(Homeado pot Convecci6n).
r_ Presione las almohadillas num@icas para
configurar la temperatura deseada del
horno.
[] Presionela tecla START (Iniciafl.
r_ Presione el bot6n COOK TIME (tiempo de
cocci6n).
NOTA: Si su receta requiere precalentamiento,
puede necesitar agregar tiempo adicional
al tiempo de cocci6n.
r_ Presione las almohadillas num@icas para
configurar el tiempo de cocci6n deseado. El
tiempo decocci6n m[nimo que usted puede
configurar es ! minuto.
La temperatura del homo que ha
configurado y el tiempo de cocci6n
ingresado aparecerdn en Lapantalla.
[_ Presioneel bot6nSTART(iniciar).
Elhomoestar5 en laposici6nON(Encendidoly en
la pantalla aparecer6el conteo de la cocci6n yel
cambio de temperatura a partirde los 100°F.(La
pantalla de temperatura comenzar_ a cambiar
una vezque latemperatura del homoalcancelos
100°F).Cuandoel homo alcance la temperatura
que program6, sonar_n S pitidoscortos.
El homo continuar6 cocinando durante la
cantidad de tiempo configurada, y luego de
apagar6 de forma autom6tica.
Fi-1
Si fuera necesario, presione el bot6n
CLEAR/OFF(borrar/apagado) para borrar
la pantalla. Ouite losalimentos del homo.
Recuerde, aunque el homo se apaga
automdticamente, los alimentos que se
dejen en el homo seguirdn cocin6ndose
despu_s de apagado el mismo.
DDDDE[]
DDDD
BDDDD
%DE]DEE]
DDDD[]
DDE]DE[]
C6mo configurar un inicio retardado y un apagado autom6tico
El homo seencenderd en el horatio que usted
haya configurado, cocinard alimentos durante
un perfodo de tiempo espedfico y luego se
apagard automdticamente.
AsegOrese de que el reloj muestre la hora
correcta.
[Z] Presione la tecla DELAY START (Inicio
RetrasadoL
[] Presione las almohadillas num@icas
para configurar la temperatura deseada
del homo.
r-_ Presione la tecla START (Iniciafl.
[]
Presione la tecla CONVECTION COOK
(Horneado pot Convecci6nJ u otra funci6n
de cocci6n deseada.
[] Toque los las teclas num@icas para
programar la temperatura del homo
deseada.
[] Presione la tecla START(Iniciafl.
[_ Presione la tecla COOKTIMEiTemporizador
de Cocci6nL
NOTA: Si su receta requiere precalentamiento,
puede necesitar agregar tiempo adicional al
tiempo de cocci6n.
[] Presione lasalmohadillas num@icas para
configurar el tiempo de cocci6n deseado.
El tiempo de cocci6n minimo que usted
puede configurar es1 minuto.
La temperatura del horno que ha
configurado y el tiempo de cocci6n
ingresado aparecer@n en la pantalla.
[_] Presioneel bot6n START(iniciar).
NOTA:Si desea verificar los horarios que ha
configurado, presione el bot6n DELAY START
(inicio retardado) para controlar la hora de
inicio configurada o presione el bot6n COOK
TIME (tiempo de cocci6n) para verificar la
extensi6n de cocci6n que ha configurado.
Cuando el homo se enciende (ON) en el
horario que ha configurado, la pantalla
mostrar6 la cuenta regresiva del tiempo de
cocci6n yla nueva temperatura comenzando
en 100°F (38°0. (La pantalla de temperatura
comenzar5 a cambiar cuando la temperatura
del homo Ilegue a los !00°F [38°C].)Cuando
el homo alcanza la temperatura configurada,
sonar6n pitidos.
El homo seguir6 cocinando durante un
periodo de tiempo determinado y luego se
apagar6 autom6ticamente.
j_ Si fuera necesario, presione el bot6n
CLEARIOFF (borrar/apagado) para
borrar la pantalla. Quite losalimentos del
homo. Recuerde, aunque el homo se
apaga automcXicamente, los alimentos
que se dejen en el homo seguirc_n
cocin@ndose despu6s de apagado el
mismo.
19
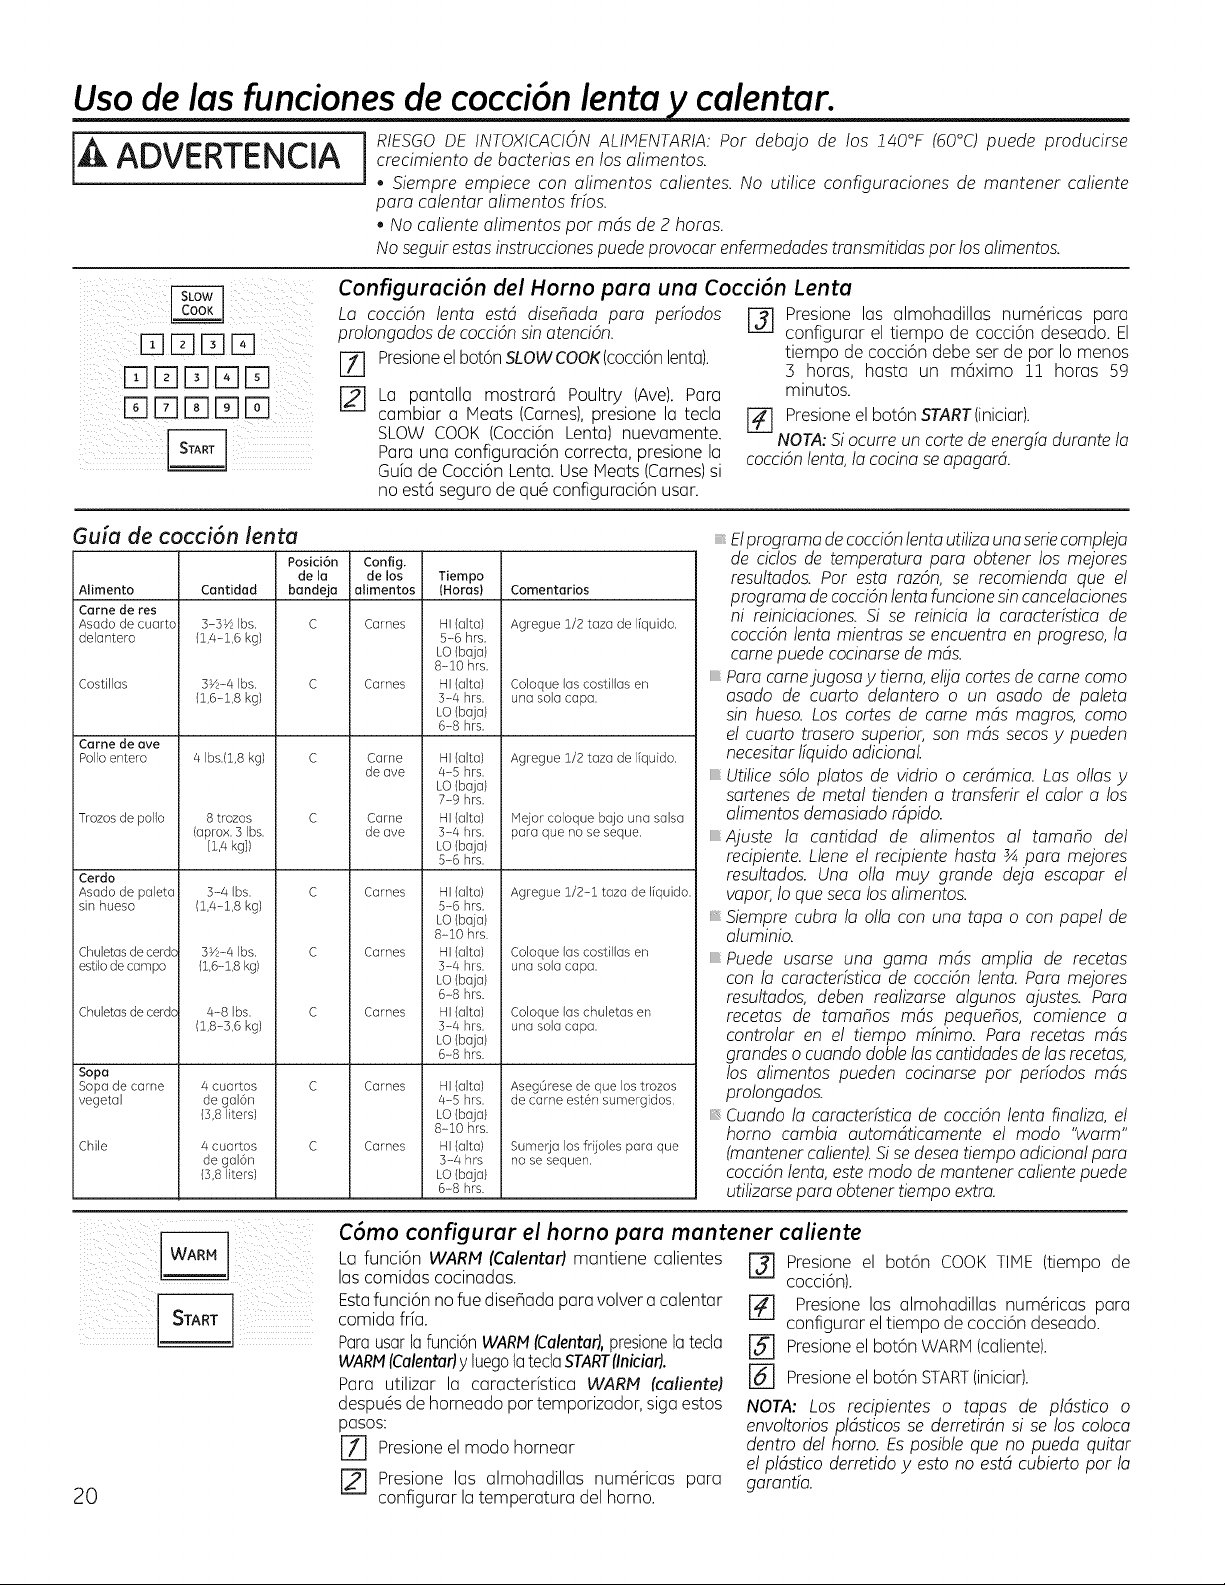
Usode las funciones de cocci6n lenta y calentar.
ADVERTENCIA crecimiento de bacteriasen losafimentos.
• Siempreempiece con afimentos calientes. No utilice configuraciones de mantener caliente
para calentar alimentosfrios.
• No caliente alimentospar mds de 2 horas.
No seguirestasinstruccionespuedeprovocarenfermedadestransmitidaspar los alimentos.
r-qEEEEEE
DE]DEED
EEEEEEEEFq
Configuraci6n del Horno para una Cocci6n Lenta
La cocci6n fenta estd disehada para perfodos
prolongados decocci6n sin atenci6n.
17] Presioneel bot6n SLOW COOK(cocci6nlento).
r_ La pantalla mostrar6 Poultry (Ave). Para
cambiar a Meats (Carnes), presione la tecla
SLOW COOK (Cocci6n Lenta) nuevamente.
Para una configuraci6n correcta, presione la
Guia de Cocci6n Lenta. Use Meats (Carnes)si
no est6 seguro de qu6 configuraci6n usar.
[] Presionelas almohadillas num@icas para
configurar el tiempo de cocci6ndeseado.El
tiempo de cocci6ndebeser de par Io menos
] horas, hasta un m6ximo ii horas 59
minutos.
F_ Presione el bot6n START(iniciar).
NOTA: Siocurre un carte de energfa durante la
cocci6n lenta,la cocina se apagard.
Guia de cocci6n lento
Alimento
Carne de res
Asado de cuarto
delantero
Costillas
Came de ave
Polioentero
Trozosde polio
Cerdo
] Asado de paleta
i sin hueso
Chuletas de cerdc
i estilo decampo
Chuletas de cerdc
Sopa
Sopa de came
vegetal
Chile
Cantidad
Posici6n Config.
de la de los Tiempo
bandeja alimentos (Horas) Comentarios
3-3Yz Ibs. C Carnes
(1,4-1,6 kg)
3b-4 Ibs. C Carnes
(1,6-1,8 kg)
HI (olta) Agregue 1/2 taza de liquido.
5-6 hrs.
LO(baja}
8-10 hrs.
HI (alta) Coloque las costillas en
3-4 hrs. una sola capa.
LO(baN}
6-8 hrs.
4 Ibs.(1,8 kg) C Came HI (alta) Agregue 1/2 taza de liquido.
de ave 4-5 hrs.
LO(baN}
7-9 hrs.
8trozos C Came HI (alta) Hejor coloque bajo una salsa
(oprox. B Ibs. de ave 3-4 hrs. para que no seseque.
[1,4 kg]) LO(baN}
5-6 hrs.
3-4 Ibs. C Carnes HI (olta} Agregue 1/2-1 taza de liquido.
(1,4-1,8 kg) 5-6 hrs.
LO(baja}
8-10 hrs.
Bb-4 Ibs. C Carnes HI (alta) Coloque las costillas en
(1,6-1,8 kg) 3-4 hrs. una sola capa.
LO(baN}
6-8 hrs.
4-8 Ibs. C Carnes HI (alta) Coloque las chuletas en
(1,8-3,6 kg) 3-/4hrs. una sola capa.
LO(baN}
6-8 hrs.
4 cuartos C Carnes HI (alta) AsegOrese de que lostrozos
de gai6n 4-5 hrs. de came est6n sumergidos.
(3,8 liters) LO(baN}
8-10 hrs.
4 cuartos C Carnes HI (alta} Sumerja los frijoles para que
de gal6n 3-4 hrs no se sequen.
(3,8 liters) LO(baN}
6-8 hrs.
Elprograma decocci6nfentautiliza una seriecompteja
de ciclos de temperatura para obtener losmejores
resultados. Par esta raz6n, se recomienda que el
programa de cocci6nlento funcionesin cancefaciones
ni reiniciaciones. Si se reinicia fa caracterfstica de
cocci6n fenta mientras se encuentra en progreso, la
came puede cocinarsede mds.
Para camejugosa y tierna,efijacortes de came coma
asado de cuarto delantero o un asado de paleta
sin hueso. Los cortes de came mds magros, coma
el cuarto trasero superior, son mds secos y pueden
necesitar ffquidoadicional.
orifice s6Io platos de vidrioo cerdmica.Losalias y
sartenes de metal tiendeno tronsferir el coloro los
alimentosdemasiadordpido.
_Ajuste fa cantidad de alimentos al tamaho del
recipiente. Llene el recipiente hasta ¾ para mejores
resultados. Una olfa muy grande deja escapar el
vapor,fo quesecalos alimentos.
Siempre cubrala ofla conuna tapa o conpapel de
aluminio.
Puede usarse una gama rods ampfia de recetas
confacaracteristicade cocci6n fenta. Para mejores
resultados,deben realizarse algunos ajustes. Para
recetas de tamafios mds pequehos, comience a
controlar en el tiempo minima. Para recetas mds
grandeso cuandodone lascantidadesde fasrecetas,
los alimentospueden cocinarse par periodosmds
prolongados.
Cuandofacaracteristicade cocci6n fenta finaliza, el
homo cambia automdticamente el modo "warm"
(mantenercaliente).Sisedeseatiempoadicionalpara
cocci6nfenta,estemododemantenercalientepuede
utilizarsepara obtenertiempoextra.
i ¸ 81) !
i i i La funci6n WARn (Calentad mantiene calientes
las comidas cocinadas.
comidaffia.Estafunci6n nofue disefladaparavolveracalentar
Parausarlafunci6nWARN(Calentar),presionelatecta
WARN(Calentady luegotatectaSTART(Iniciar).
Para utilizar la caracteristica WARn (caliente)
despu6sdehorneadopar temporizador,sigaestos
pasos:
[] Presioneel modohornear
[] Presionelas almohadillas num@icas para
20
configurarla temperatura del homo.
C6mo configurar el horno pure mantener caliente
[] Presione el bot6n COOK TIME (tiempo de
cocci6n).
[] Presione las almohadillas num@ricas para
configurar el tiempo de cocci6n deseado.
[] Presioneel bot6n WARM (caliente).
[] Presioneel bot6n START(iniciar).
NOTA: Los recipientes o tapas de p!dstico o
envoltorios p!dsticos se derretirdn si se los co!oca
dentro de! homo. Es posible que no pueda quitar
e!p!dstico derretido y esto no estd cubierto par la
garanda.
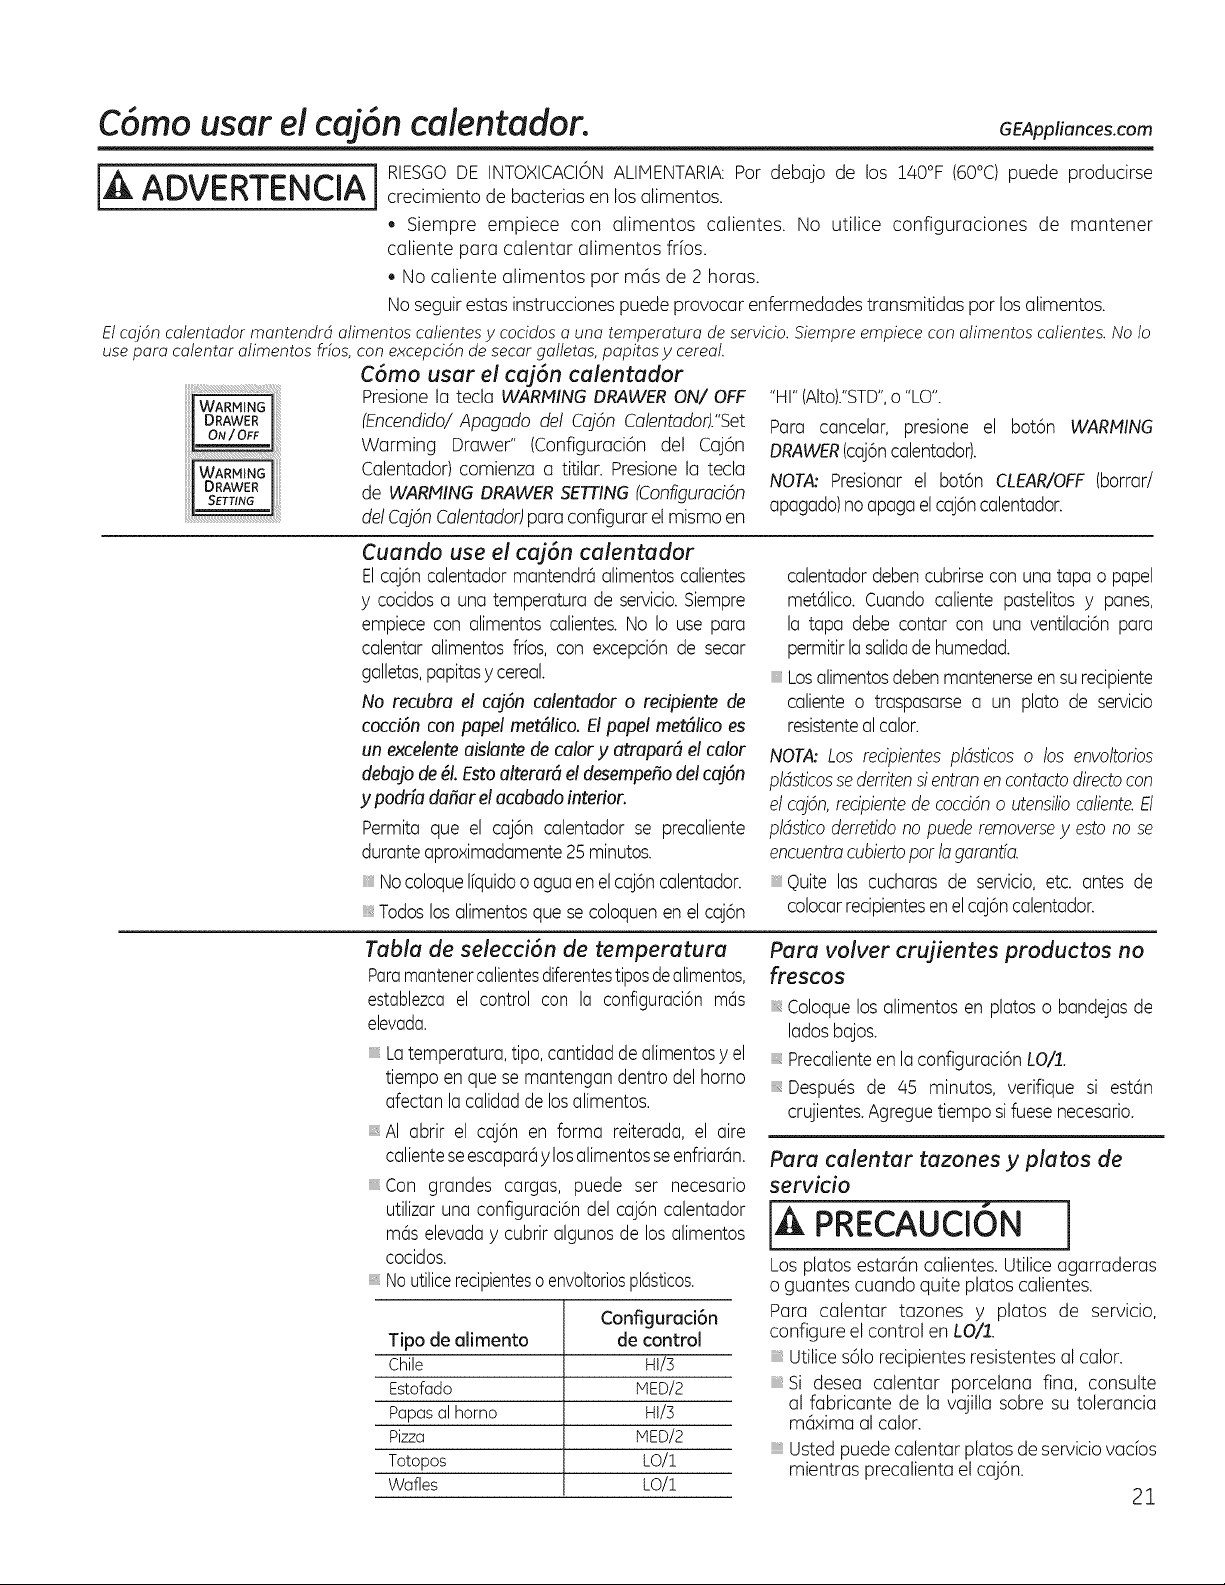
C6mo usar el caj6n calentador. GEAppliances.com
I_ j RIESGODE INTOXICACIONALIMENTARIA:Por debajo de los !40°F (60°C) puede producirse
ADVERTENCIA crecimiento de bacteriasen los alimentos.
I
, Siempre empiece con alimentos calientes. No utilice configuraciones de mantener
caliente para calentar alimentos fr[os.
, Nocaliente alimentos por mc_sde 2 horas.
No seguir estas instruccionespuede provocar enfermedades transmitidaspor los alimentos.
Elcojdncolentodormontendrdolimentoscotientesycocidoso uno temperoturodeservicio.Siempreempiececon olimentoscolientes.No Io
useporo colentarolimentosfffos,con excepcidndesecorgolletos,popitosy cereol.
iiiii
C6mo usar el caj6n calentador
Presione la teda WARMING DRAWER ON/OFF
(Encendido/ Apagado del Caj6n Calentadod.'Set
Warming Orawer" (Configuraci6n del Caj6n
Calentador) comienza a titilar. Presione la teda
de WARMING DRAWER SETTING (Configumci6n
de/Caj6n Calentadod para configurar el mismo en
"HI" (Alto).'STD",o "LO".
Para cancelar, presione el bot6n WARMING
DRAWER(caj6ncalentador).
NOTA"Presionarel bot6n CLEAR/OFF(borrar/
apagado)noapagaelcaj6ncalentador.
Cuando use el caj6n calentador
Elcaj6n calentador mantendr6 alimentos calientes
y cocidos a una temperatura de servicio.Siempre
empiece con alimentos calientes.NoIo usepara
calentar alimentosfrbs, con excepci6n de secar
galletas,papitasycereal.
No recubra el caj6n calentador o recipiente de
cocci6nconpapal met6lico. Elpape/met6licoes
un excelente aislante de cdor y atrapar_ el ca/or
debajo de _I. Estoaltemr_ eldesempeffo del caj6n
y podria da_ar el acabado interior.
Permita que el caj6n calentador se precaliente
durante aproximadamente25minutos.
NocoloqueI[quidoo aguaen elcaj6ncalentador.
Todoslosalimentosque se coloquenen el caj6n
calentadordebencubrirseconuna tapao papel
met61ico.Cuando caliente pastelitos y panes,
la tapa debe contar con una ventilaci6npara
permitirlasalidade humedad.
Losalimentosdebenmantenerseensu recipiente
caliente o traspasarsea un plato de servicio
resistentealcalor.
NOTA: Los recipientesptdsticos o los envoftofios
ptdsticosse derritensi entronencontactodirectocon
el cajdn,recipientede cocddno utensitiocatiente.Et
ptdsticoderretidono puede removersey estono se
encuentracubiertoporto garontia.
9uite las cucharas de servicio,etc. antes de
colocarrecipientesenelcaj6ncalentador.
Tabla de selecci6n de temperatura
Paramantenercalientesdiferentestiposdealimentos,
establezcael control con la configuraci6nmds
elevada.
Latemperatura,tipo,cantidad dealimentosyel
tiempo en que se mantengandentrodel homo
afectanlacalidad de losalimentos.
iii_AIabrir el caj6n en forma reiterada, el aire
calienteseescapar6y losalimentosseenfriardn.
,Con grandes cargas, puede ser necesario
utilizar una configuraci6n del caj6n calentador
mds elevaday cubrir algunos de los alimentos
cocidos.
Noutilicerecipienteso envoltoriospl6sticos.
Configuraci6n
TOo de alimento de control
Chile HI/5
Estofado MED/2
Papas al homo HI/5
Pizza MED/2
Totopos LO/!
Wafles LO/!
Para volver crujientes productos no
frescos
Coloque los alimentos en platos o bandejas de
ladosbajos.
precalienteen laconfiguraci6n LO/1.
Despu@sde 45 minutos, verifique si est6n
crujientes.Agreguetiempo si fuesenecesario.
Para calentar tazones y platos de
servicio
PRECAUaON
Los platos estarc_ncalientes. Utilice agarraderas
o guantes cuandoquite platos calientes.
Para calentar tazones y platos de servicio,
configure el control en LOll.
Utilice s61orecipientesresistentes al calor.
Si desea calentar porcelana fina, consulte
al fabricante de la vajilla sobre su tolerancia
mc_ximaal calor.
Ustedpuede calentar platos de servicio vacbs
mientras precalienta el caj6n.
21
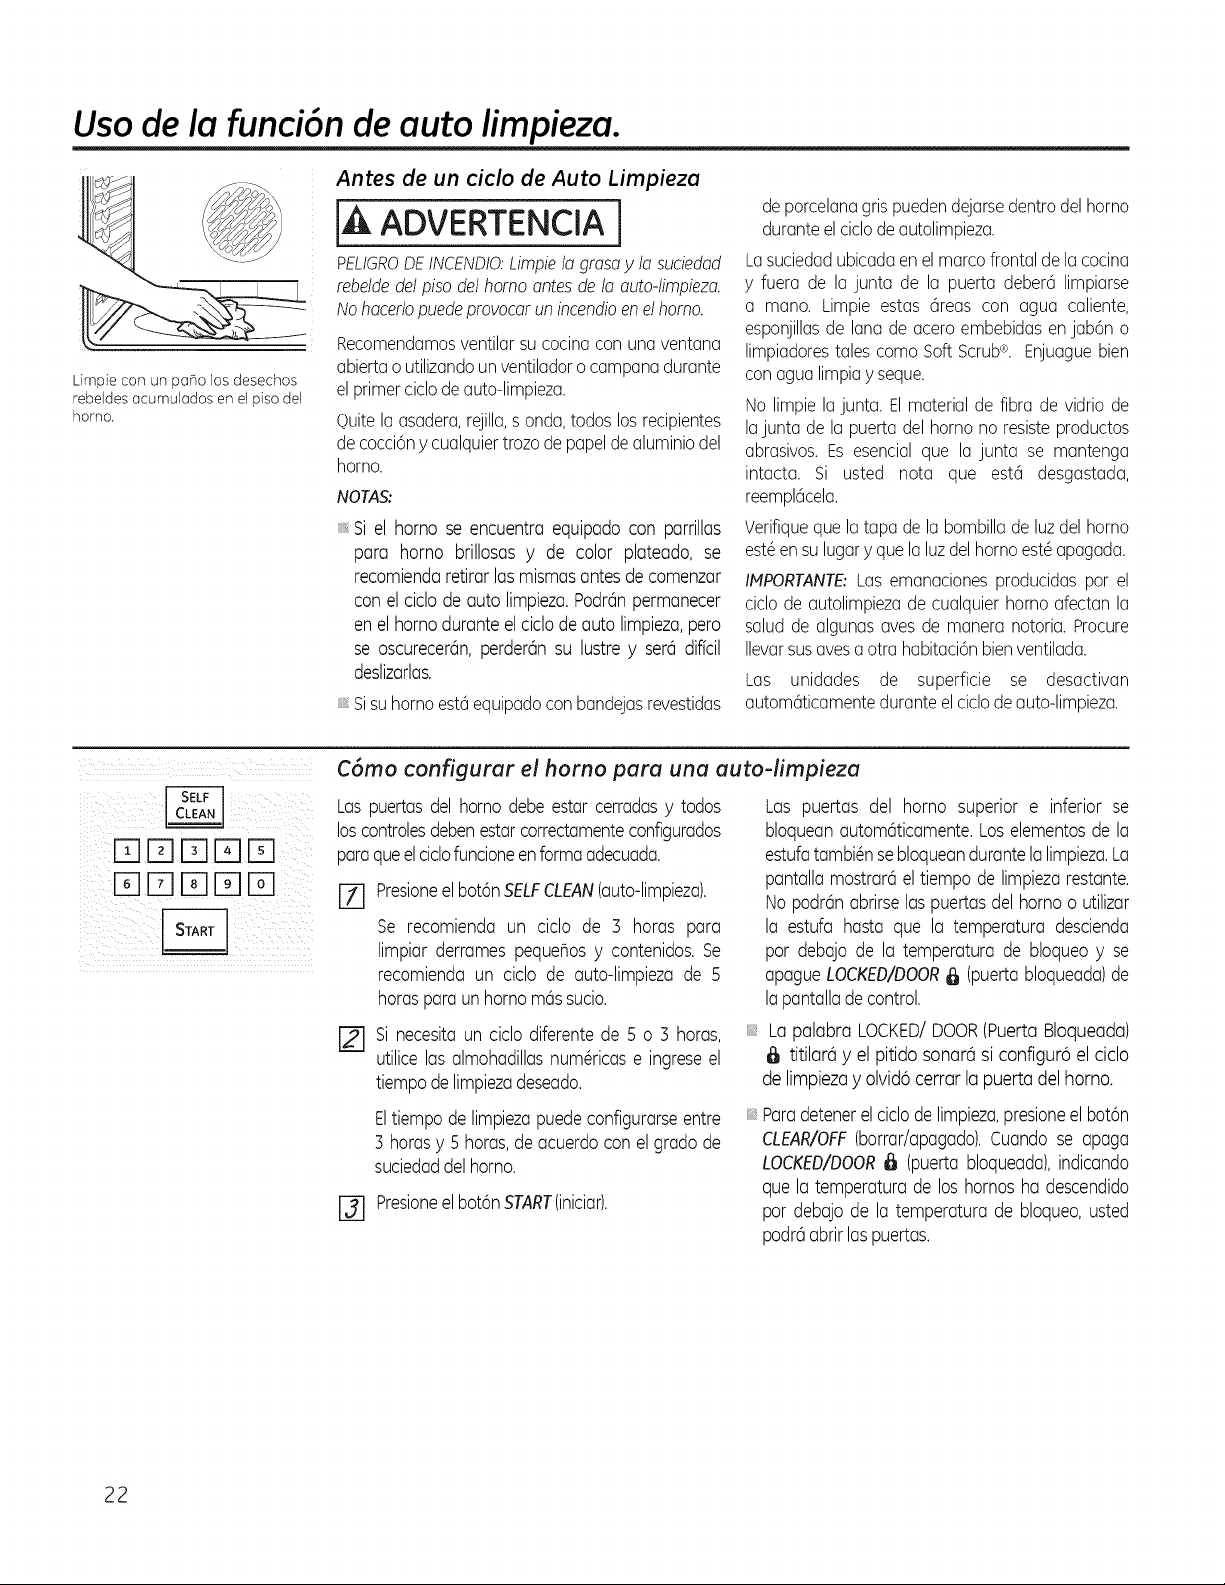
Uso de la funci6n de auto limpieza.
Limpie con un patio losdesechos
rebeldes acumulados en elpisodel
horno.
Antes de un ciclo de Auto Limpieza
PELIGRODEINCENDIO:kimpiela grasay la suciedad
rebeldedelpiso del homo antesde la auto-limpieza.
Nohacerlopuedeprovocarunincendioenelhomo.
Recomendamosventilarsu cocinacon una ventana
abiertaoutilizandounventiladorocampanadurante
elprimerciclodeauto-limpieza.
Quitela asadera,rejilla,s onda,todoslos recipientes
decocci6ny cualquiertrozode papeldealuminiodel
homo.
NOTAS:
'_Si el homoseencuentra equipadocon parrillas
para homo brillosas y de color plateado, se
recomiendaretirar lasmismasantesde comenzar
con el ciclode autolimpieza.Podrdnpermanecer
enel homo duranteelciclodeautolimpieza,pero
seoscurecer6n,perder6nsu lustrey ser6dificil
deslizarlas.
'_Sisuhomo est6equipadocon bandejasrevestidas
deporcelanagris puedendejarsedentrodel homo
duranteel ciclodeautolimpieza.
Lasuciedadubicadaenel marcofrontalde lacocina
y fuerade la junta de la puerta deber6 limpiarse
a mano. Limpieestas6reas con agua caliente,
esponjillasde lana de acero embebidasenjab6n o
limpiadorestales comoSoft Scrub¢_.Enjuaguebien
con agualimpiay seque.
Nolimpie lajunta. El materialde fibrade vidrio de
lajuntade la puerta del homo no resisteproductos
abrasivos.Esesencialque la junta se mantenga
intacta. Si usted nota que est6 desgastada,
reempl6cela.
Verifiqueque latapadela bombillade luzdel homo
est@ensu lugaryquelaluzdelhomoest@apagada.
IIPORTANTE;Las emanacionesproducidaspor el
ciclode autolimpiezade cualquierhomoafectan la
salud de algunasayesde manera notoria.Procure
Ilevarsus ayesa otra habitaci6nbienventilada.
Las unidades de superficie se desactivan
autom6ticamenteduranteelciclodeauto-limpieza.
ITII-qFqr-qI-q
l-qi-qITIrq l-q
C6mo configurar el horno para una auto-limpieza
Las puertasdel homodebe estarcerradasy todos
loscontrolesdebenestarcorrectamenteconfigurados
paraqueelciclofuncioneenformaadecuada.
[Z] Presioneel bot6nSELFCLEAN(auto-limpieza).
[]
Se recomienda un ciclo de 3 horas para
limpiar derrames pequehosy contenidos.Se
recomiendaun ciclo de auto-limpiezade 5
horasparaun homom@ssucio.
Si necesitaun ciclo diferentede 5 o 3 horas,
utilicelasalmohadillasnum@ricase ingreseel
tiempodelimpiezadeseado.
Eltiempo delimpiezapuedeconfigurarseentre
3 horasy 5 horas,de acuerdoconelgrado de
suciedaddelhomo.
[] Presioneelbot6nSTART(iniciar).
Las puertas del homo superior e inferior se
bloqueanautom@ticamente.Loselementosde la
estufatambi@nsebloqueandurantelalimpieza.La
pantallamostrar@eltiempo de limpiezarestante.
Nopodr@nabrirselas puertasdel homo o utilizar
la estufa hasta que la temperaturadescienda
por debajo de la temperatura de bloqueoy se
apagueLOCKED/DOOR_ (puertabloqueada)de
la pantalladecontrol.
La palabra LOCKED/DOOR(PuertaBloqueada)
titilar@y el pitidosonar@siconfigur6 el ciclo
de limpiezayolvid6 cerrar la puerta del horno.
Paradetenerelciclode limpieza,presioneel bot6n
CLEAR/OFF(borrar/apagado).Cuando seapaga
LOCKED/DOOR_ (puerta bloqueada),indicando
que la temperaturade loshornosha descendido
por debajo de la temperatura de bloqueo,usted
podr@abrirlaspuertas.
22
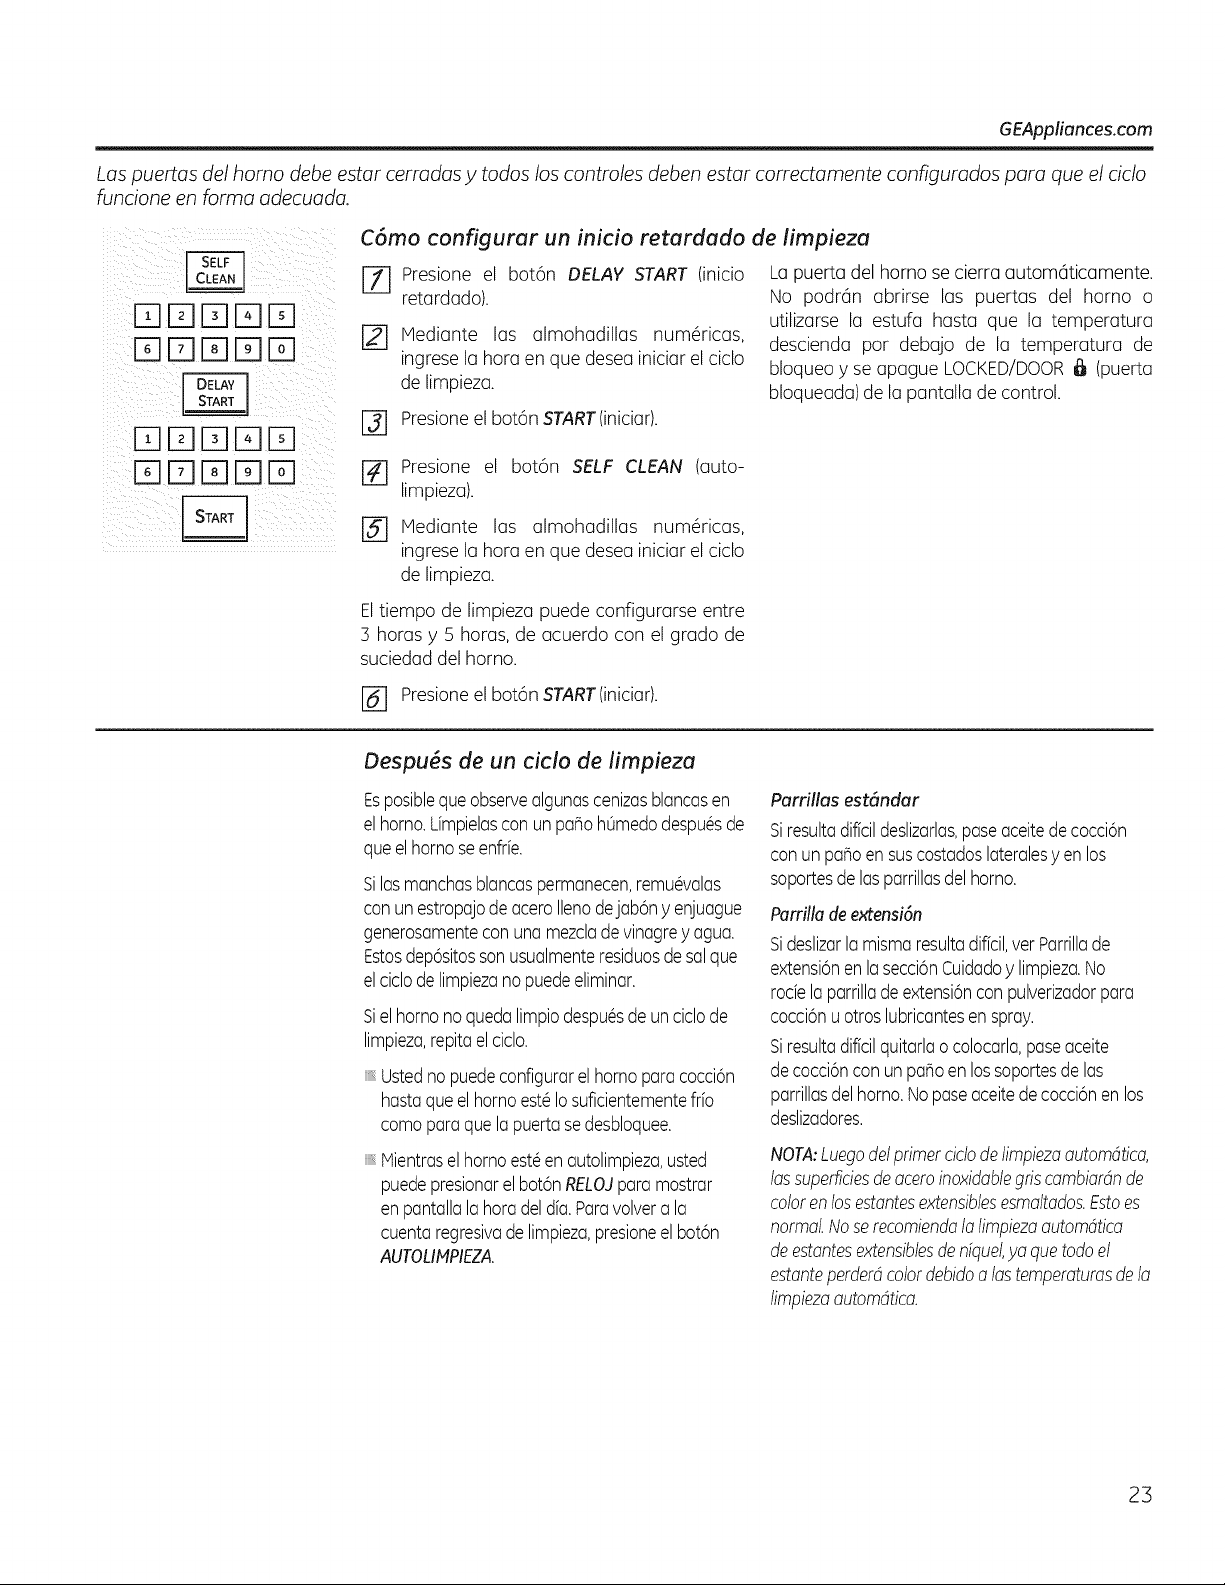
GEAppliances.com
Las puertas del homo debe estar cerradas y todos los controles deben estar correctamente configurados para que elciclo
funcione en farina adecuada.
/_ i/ (
ii/¸Fq 53 Fq53rq :
ii__i!!_i_i_i_I_iI_ !i!_[_!ii_i_i_
if] 53 53 53Fqi; ¸
i_i[iilii_il_ _i!II_i_iIII__
C6mo configurar un inicio retardado de limpieza
FY] Presione el bot6n DELAY' START (inicio La puerta del homo se cierra autom6ticamente.
retardado). No podr_n abrirse las puertas del homo o
utilizarse la estufa hasta que la temperatura
[2-1 Hediante las almohadillas numericas, descienda par debajo de la temperatura de
ingrese la hora en que desea iniciar el ciclo bloqueo y se apague LOCKED/DOOR_ (puerta
de limpieza, bloqueada) de la pantalla de control.
F-_ Presione el bot6n START (iniciar).
r_ Presione el bot6n SELF CLEAN (auto-
limpiezu).
[-5--1Hediunte lus ulmohudillus numericus,
ingreselu horu en que deseuiniciarel ciclo
de limpiezu.
Eltiempo de limpiezu puede configururse entre
3 horusy 5 horus, de acuerdo con el grudo de
suciedud del horno.
[] Presioneel bot6nSTART(iniciur).
Despu#s de un ciclo de limpieza
Esposiblequeobservealgunascenizasblancasen
el homo.L[mpielascon un pa_ohOmedodespu@sde
queelhomo seenfr[e.
Silasmanchasblancaspermanecen,remu@alas
con unestropajodeaceroIlenodejab6nyenjuague
generosamentecon unamezcladevinagrey agua.
Estosdep6sitossonusualmenteresiduosdesalque
el ciclodelimpiezanopuedeeliminar.
Sielhornono quedalimpiodespu@sde unciclode
limpieza,repitaelciclo.
:: Ustedno puedeconfigurarel homoparacocci6n
hastaqueel homoest@Iosuficientementefr[o
comaparaquelapuertasedesbloquee.
Hientrasel homoest6enautolimpieza,usted
puedepresionarelbot6nRELOJpara mostrar
enpantallalahoradeld[a.Paravolvera la
cuentaregresivade limpieza,presioneelbot6n
AUTOLIIPIEZA
Parrillas est6ndar
Siresultadiffcildeslizarlas,paseaceitedecocci6n
conun pa_oen suscostadoslateralesyenlos
soportesdelasparrillasdelhomo.
Parrilladeextensi6n
Sideslizarla mismaresultadificil,ver Parrillade
extensi6nen lasecci6nCuidadoylimpieza.No
rode laparrilladeextensi6ncon pulverizadorpara
cocci6nuotroslubricantesenspray.
Siresultadificilquitarlao colocarla,paseaceite
decocci6ncon un pa_oen lossoportesdelas
parrillasdelhomo.No paseaceitedecocci6nenlos
deslizadores.
NOTA:Luegodelprimerciclodelimpiezaautomdtica,
lossuperficiesdeaceroinoxidablegriscambiardnde
colorenlosestantesextensiblesesmaltados.Estoes
normal.Noserecomiendalalimpiezaautomdtica
deestantesextensiblesdenfquel,yaquetodoel
estanteperderdcolordebidoa lostemperaturasdela
limpiezaautomdtica.
23
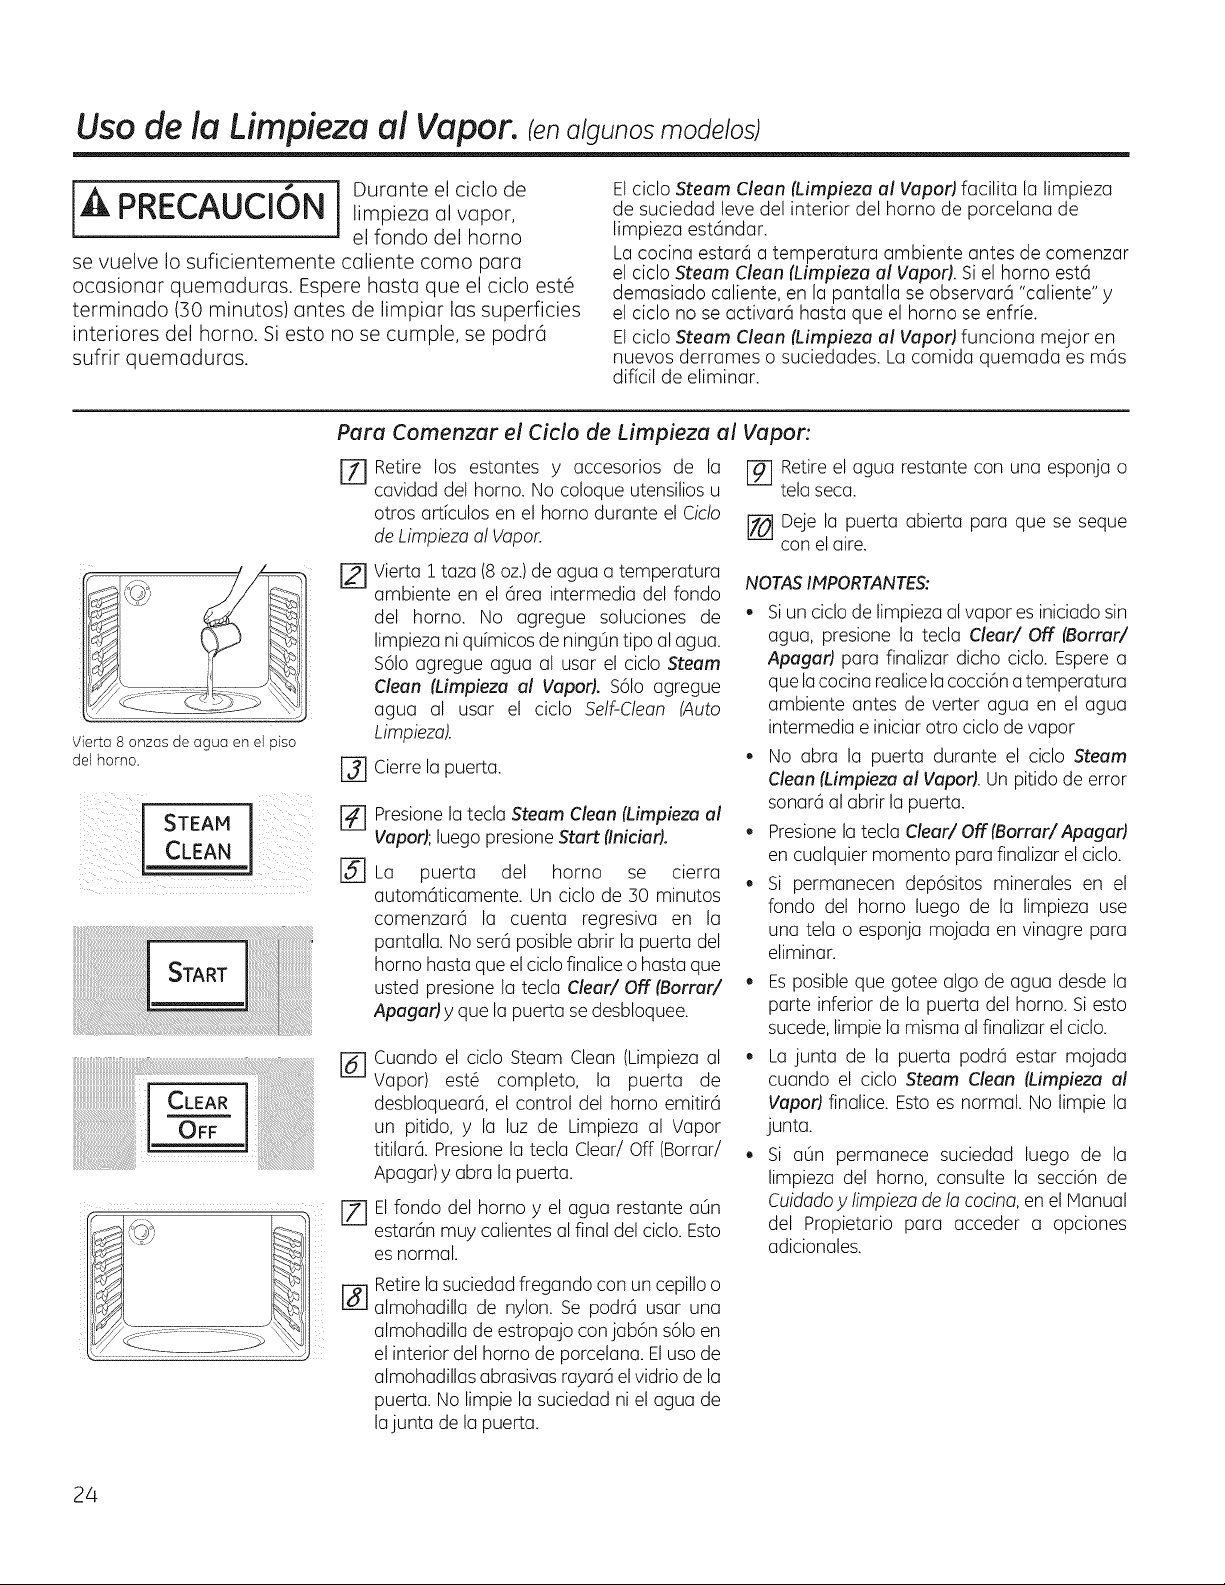
Usa de la Limpieza al Vapor. (enalgunos moddos)
[,_ 6 ] Durante el ciclo de
PRECAUCl N limpieza al vapor,
el rondo del homo
se vuelve Io suficientemente caliente coma para
ocasionar quemaduras. Espere hasta que el ciclo est6
terminado (30 minutos) antes de limpiar las superficies
interiores del horno. Si esto no se cumple, se podr6
sufrir quemaduras.
El ciclo Steam Clean (Limpieza al Vapor) facilita la limpieza
de suciedad levedel interior del homo de porcelana de
limpieza est6ndar.
La cocina estard a temperatura ambiente antes de comenzar
el ciclo Steam Clean (Limpieza al Vapor).Si el homo est6
demasiado caliente, en la pantalla seobservard "caliente" y
el ciclo no seactivar6 hasta que el horno seenfrfe.
El ciclo Steam Clean (Limpieza al Vapor) funciona me)oren
nuevos derrames o suciedades. La comida quemada es m6s
dificil de eliminar.
Para Comenzar el Ciclo de
E]
[]
Vierta 8 onzas de agua enel piso
delbarrio. []
j D
CLEAN []
@
Limpieza al Vapor:
Retire los estantes y accesorios de la
cavidad del homo. No coloque utensiliosu
otros articulos en el homo durante el Ciclo
de Limpiezaal Vapor.
[] Retire el agua restante con una esponja o
telaseca.
[] Deje la puerta abierta para que se seque
conel aire.
Vierta I taza (8 oz.)de agua a temperatura
ambiente en el 6rea intermedia del rondo
del homo. No agregue soluciones de
limpieza ni quimicosde ning0n tipoal agua.
$61oagregue agua al usar el ciclo Steam
Clean (Limpieza al Vapor). $61oagregue
agua al usar el ciclo Self-Clean (Auto
Limpieza).
Cierre la puerta.
Presione la tecla Steam Clean (Limpieza al
Vapor); luego presioneStart (Iniciar).
La puerta del homo se cierra
autom6ticamente. Unciclo de 30 minutos
comenzar6 la cuenta regresiva en la
pantalla. Noser6posible abrir la puerta del
homo hasta que el ciclo finalice o hasta que
usted presionela tecla Clear/Off (Barrar/
Apagar) yque la puertase desbloquee.
Cuando el ciclo Steam Clean (Limpieza al
Vapor) est6 completo, la puerta de
desbloquear6, el control del homo emitir6
un pitido, y la luz de Limpieza al Vapor
titilar6. Presione la tecla Clear/Off (Borrar/
Apagar) yabra la puerta.
El fondo del horno y el agua restante a6n
estar6n muy calientesal finaldel ciclo. Esto
es normal.
NOTASIMPORTANTES:
. Siun ciclo de limpieza al vaporesiniciadosin
agua, presione la tecla Clear/Off (Borrar/
Apagar) para finalizar dicho ciclo. Esperea
que lacocina realice lacocci6n a temperatura
ambiente antes de verter agua en el agua
intermedia e iniciarotro ciclo de vapor
No abra la puerta durante el ciclo Steam
Clean (Limpieza al Vapor).Un pitido de error
sonar6al abrir la puerta.
Presione la tecla Clear/Off(Barrar/Apagar)
en cualquier momenta para finalizar el ciclo.
Si permanecen dep6sitos minerales en el
fondo del homo luego de la limpieza use
una tela o esponja mojada en vinagre para
eliminar.
Es posibleque gotee alga de agua desde la
parte inferior de la puerta del homo. Si esto
sucede, limpiela mismaal finalizar el ciclo.
La junta de la puerta podr6 estar mojada
cuando el ciclo Steam Clean (Limpieza al
Vapor) finalice. Esto esnormal. No limpie la
junta.
Si a6n permanece suciedad luego de la
limpieza del homo, consulte la secci6n de
Cuidadoy limpieza de la cocina,en el Manual
del Propietario para acceder a opciones
adicionales.
Retirela suciedad fregando conun cepilloo
almohadilla de nylon. Se podr6 usar una
almohadilla de estropajo conjab6n s61oen
el interiordel homo de porcelana. Elusade
almohadillas abrasivas rayar6el vidriode la
puerta. Nolimpie la suciedad ni el agua de
lajunta de la puerta.
24
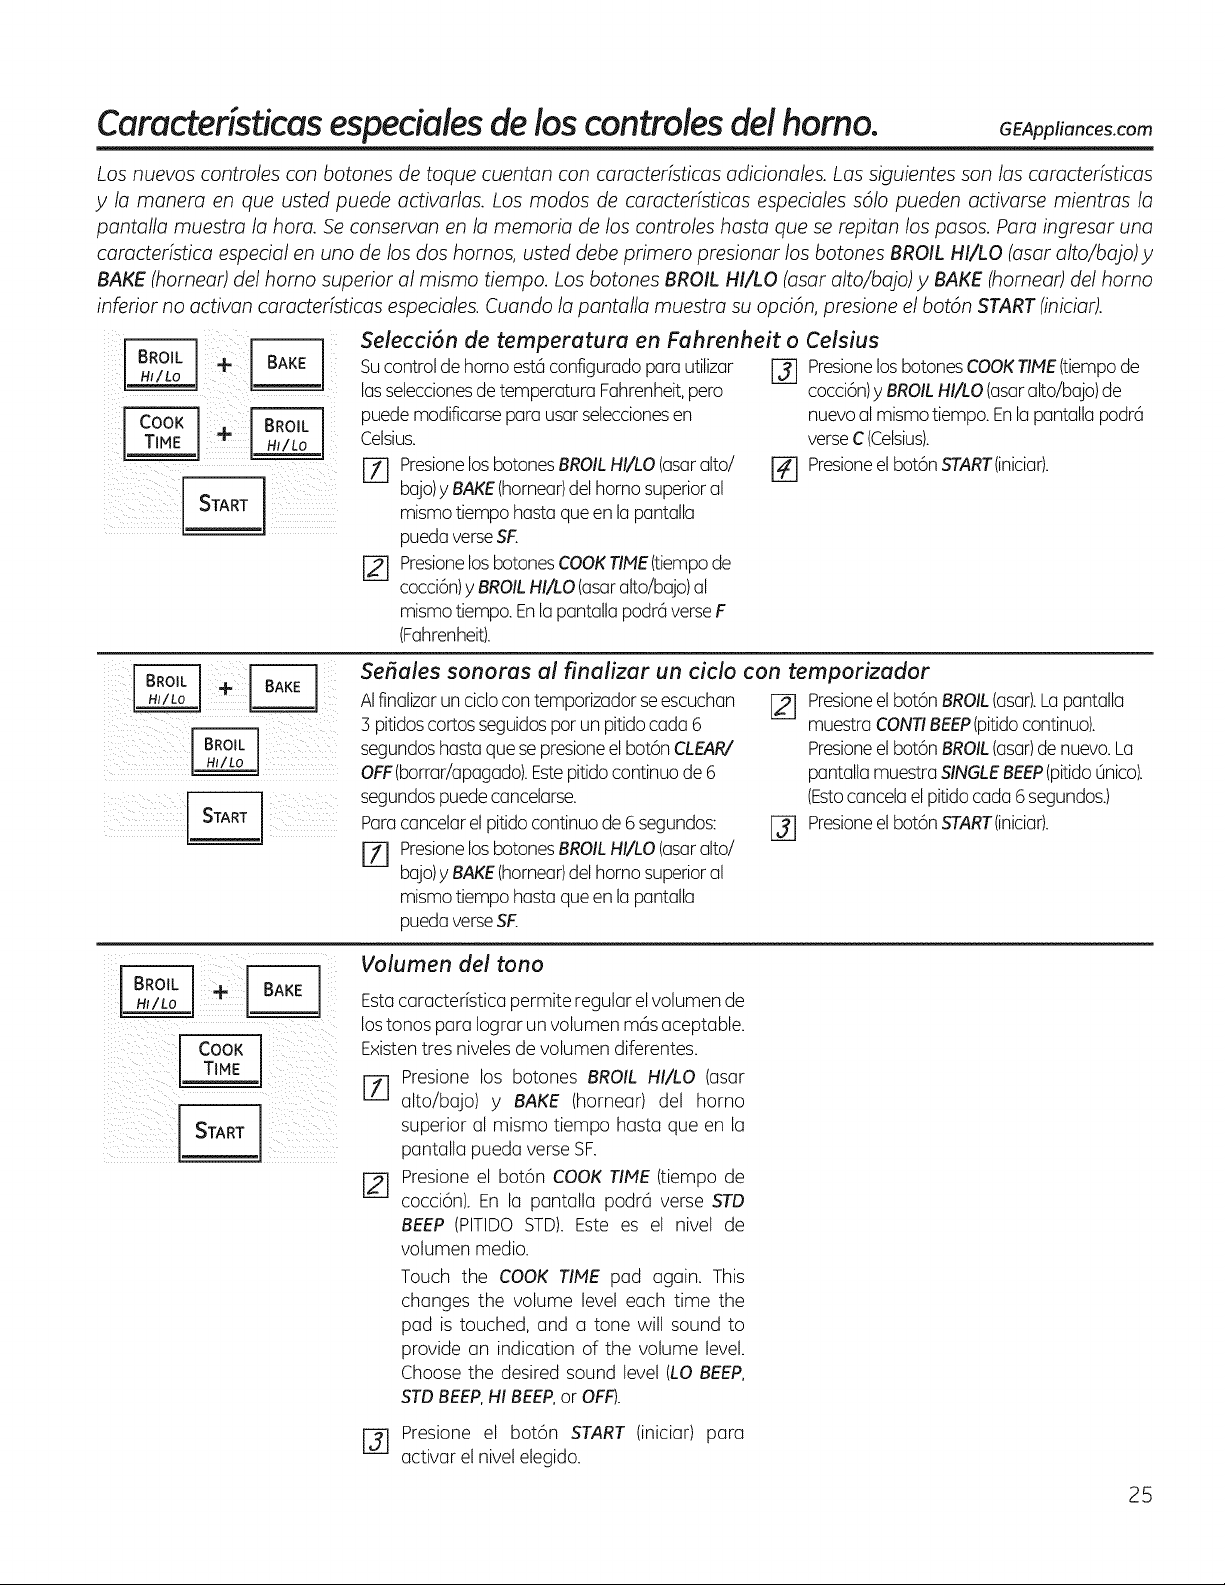
Caracteristicas especialesdeloscontroles de! homo. GEAppliances.com
Los nuevos controlesconbotones detoque cuentan concaracteristicas adicionales.Las siguientesson las caracteristicas
y la manera enque usted puede activarlas. Los modos decaracteristicas especialess61opueden activarse mientras la
pantalla muestrala hora. Seconservan enla memoria de los controles hasta que se repitanlos pasos. Para ingresar una
caracteristica especialenuno delos dos hornos, usteddebeprimero presionarlos botones BROILHI/LO [asaralto/bajo) y
BAKE[hornear)clelhomosuperior al mismo tiempo. LosbotonesBROILHI/LO[asar alto/bajo)y BAKE[homear)delhomo
inferior noactivan caracteristicasespeciales.Cuandola pantalla muestra su opci6n,presione el bot6n START flniciar).
i i
i ii ili i ii
Selecci6n de temperatura en Fahrenheit o Celsius
Sucontrolde homo est@configuradopara utilizar
lasseleccionesde temperaturaFahrenheit,pero
puedemodificarsepara usar seleccionesen
Celsius.
[Z] PresionelosbotonesBROILHI/LO(asaralto/
bajo)yBAKE(hornear)delhomosuperioral
mismotiempo hasta queen la pantalla
puedaverseSF.
[] PresionelosbotonesCOOKTIPIE(tiempode
cocci6n)yBROILHI/LO (asaralto/bajo)al
mismotiempo. Enla pantalla podraverseF
(Fahrenheit).
r_ PresionelosbotonesCOOKTIME(tiempode
cocci6n)yBROILHI/LO (asaralto/bajo)de
nuevoal mismotiempo. Enlapantalla podra
verseC(Celsius).
r_ Presioneelbot6n START(iniciar).
Seflales sonoras al finalizar un ciclo con temporizador
[] Presioneelbot6n BROIL(asar).Lapantalla
muestraCONTIBEEP(pitidocontinuo).
Presioneelbot6n BROIL(asar)de nuevo.La
pantallamuestra SINGLEBEEP(pitidoQnico).
(Estocancelael pitido cada 6 segundos.)
r_ Presioneelbot6n START(iniciar).
AIfinalizarun ciclocon temporizador seescuchan
3 pitidoscortos seguidospotun pitidocada 6
segundoshastaque se presioneelbot6n CLEAR/
OFF(borrar/apagado).Estepitido continuode 6
segundospuedecancelarse.
Paracancelarel pitidocontinuode 6 segundos:
[] PresionelosbotonesBROILHI/LO(asaralto/
bajo)yBAKE(hornear)delhomosuperioral
mismotiempo hasta queen la pantalla
puedaverseSF.
[ cook J
Volumen del tono
Estacaracter[sticapermite regular elvolumen de
lostonos para Iograr un volumen mc_saceptable.
Existentres nivelesde volumen diferentes.
j-_ Presione los botones BROIL HI/LO (asar
alto/bajo) y BAKE (hornear) del homo
superior al mismo tiempo hasta que en la
pantalla pueda verse SF.
Presione el bot6n COOK TIME(tiempo de
cocci6n). En la pantalla podra verse STD
BEEP (PITIDO STD).Este es el nivel de
volumen medio.
Touch the COOK TINE pad again. This
changes the volume level each time the
pad istouched, and a tone will sound to
provide an indication of the volume level.
Choose the desired sound level (LOBEEP,
STDBEEP,HI BEEP,or OFF).
r_ Presione el bot6n START (iniciar) para
activar el nivel elegido.
25
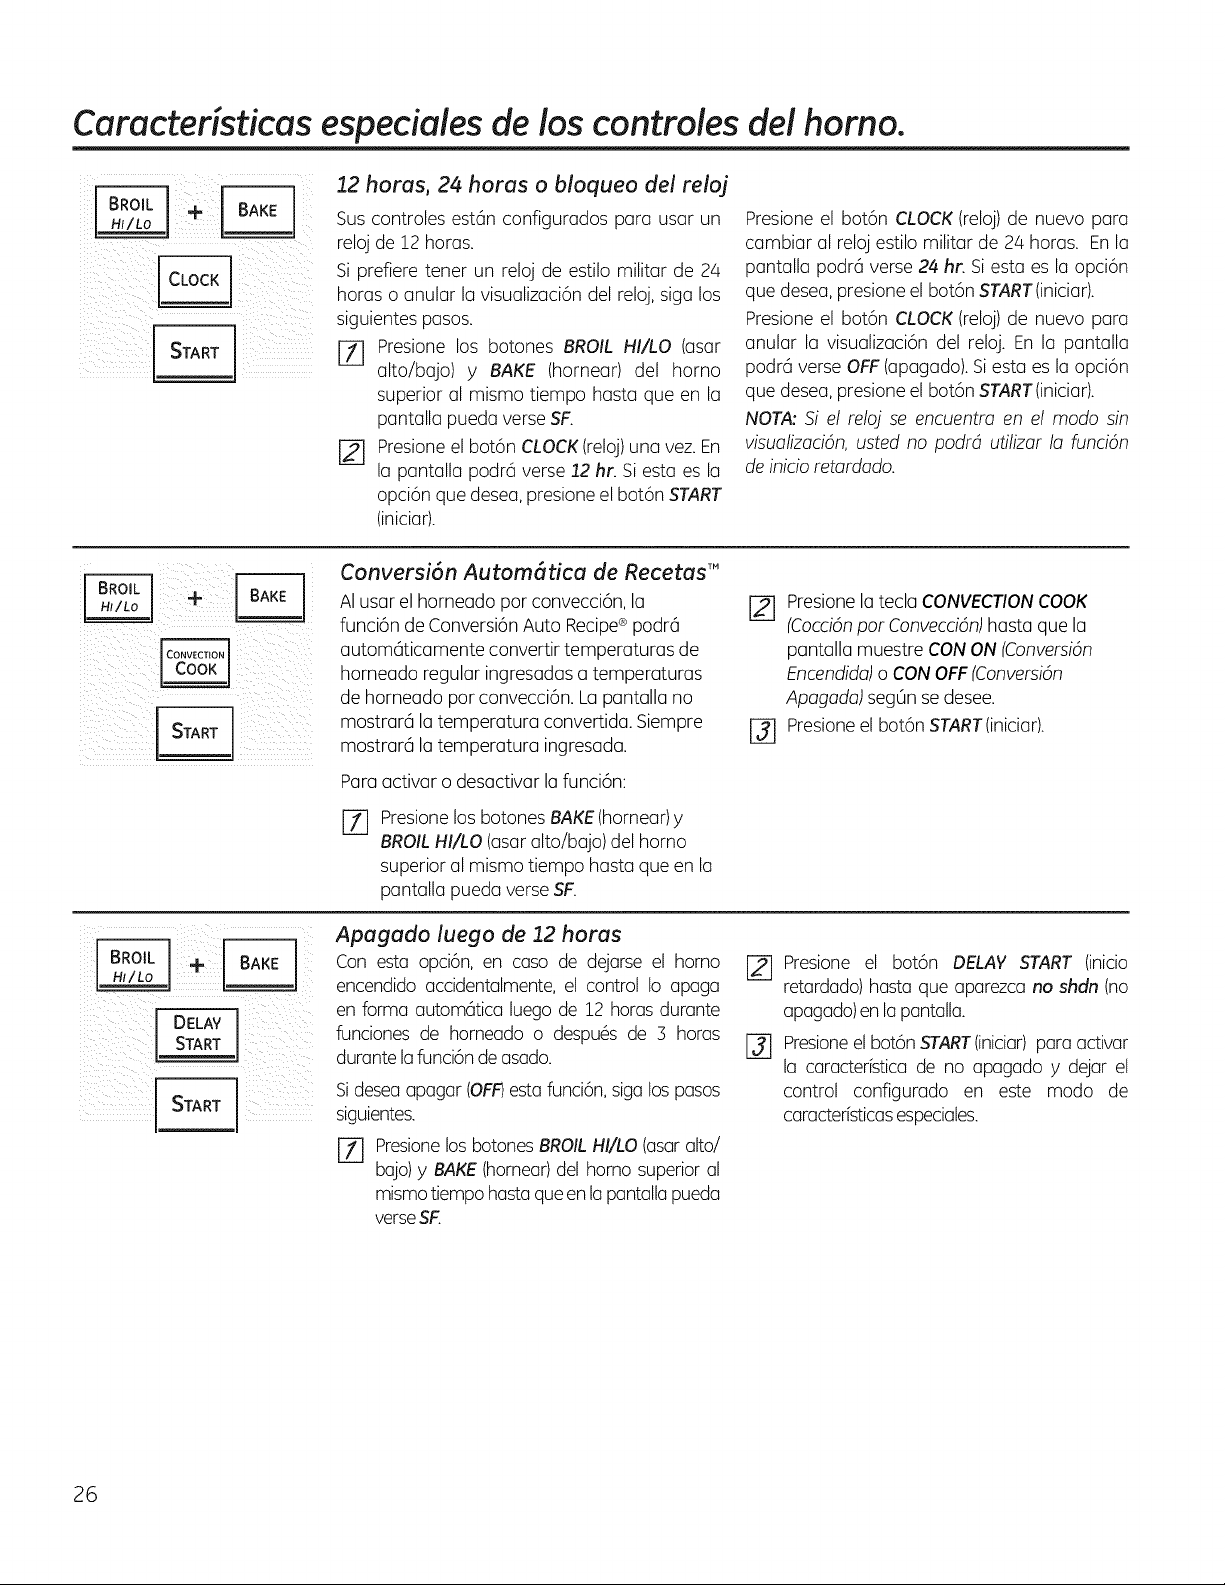
Caracter&ticas especialesde los controlesdd homo.
i( _ i_i i _ i
12 horas, 24 horas o bloqueo de! reloj
Sus controles est6n configurados para usar un
reloj de 12 horas.
Si prefiere tener un reloj de estilo militar de 2/4
horas o anular la visualizaci6n del reloj,sigalos
siguientespasos.
r-f] Presione los botones BROIL 141/LO(asar
alto/bajo) y BAKE (hornear) del horno
superior al mismo tiempo hast(]queen I(]
p(]nt(]ll(] pued(]verse SF.
Presioneel bot6n CLOCK(reloj)un(]vez. En
[] I(] p(]nt(]ll(] podr6 verse 12 hr. Si est(]esla
opci6nque dese(],presione el bot6n START
(inici(]r).
Presioneel bot6n CLOCK(reloj)de nuevo par(]
c(]mbiar (]1reloj estilo milit(]rde 2/4horas. Enla
pant(]ll(] podr6 verse 24 hr. Siesta esI(] opci6n
que dese(],presione el bot6nSTART(inici(]r).
Presioneel bot6n CLOCK(reloj)de nuevo p(]ra
(]nul(]r I(] visu(]liz(]ci6n del reloj. En I(] p(]nt(]ll(]
podr6 verse OFF((]p(]g(]do).Siesta esI(] opci6n
que dese(],presione el bot6nSTART(inici(]r).
NOTA:Si el reloj se encuentra en el modo sin
visualizacidn,usted no podrd utilizar la funcidn
de inicio retardado.
ilii iii iiii i
ii ill i
Conversi6n Autom(Ttica de Recetas'"
AIusar el horneado por convecci6n,la r_
funci6n de Conversi6n Auto Recipe® podr6
autom6ticamente convertir temperoturas de
horneodo regular ingresados a temperaturas
de horneado por convecci6n.La pantalla no
mostrar6 la temperatura convertida. Siempre r_
mostrur6 lu temperuturu ingresadu.
Para activaro desactivar la funci6n:
Presione la tecla CONVECTIONCOOK
(Cocci6npor Convecci6n)hasta que la
pantalla muestreCON ON (Conversi6n
Encendida)o CONOFF(Conversi6n
Apagada) segOnse desee.
Presioneel bot6nSTART(iniciar).
%
Presione los botones BAKE(hornear)y
BROILHI/LO(asar alto/bajo) del homo
superioral mismo tiempo hasta queen la
pantalla pueda verse SF.
¸!%¸ s .T i!50)
Apagado luego de 12 horas
Con est(] opci6n, en c(]so de dej(]rse el homo
encendido(]ccidentalmente, el control Io (]pag(]
en form(] autom6tica luego de 12 hor(]sdur(]nte
funciones de horne(]do o despu6s de 3 horas
durante la funci6n deasado.
Sidesea apagar (OFF)esta funci6n, siga los pasos
siguientes.
r_ PresionelosbotonesBROILHI/LO (asaralto/
bajo)y BAKE(hornear)del homosuperioral
mismo tiempo hastaqueen la pantallapueda
verseSF.
r_ Presione el bot6n DELAY START (inicio
retardado) hasta que aparezca no shdn (no
apagado)en la pantalla.
[] Presioneel bot6n START(iniciar)para activar
la caracter[stica de no apagado y dejar el
control configurado en este modo de
caracter[sticasespeciales.
26
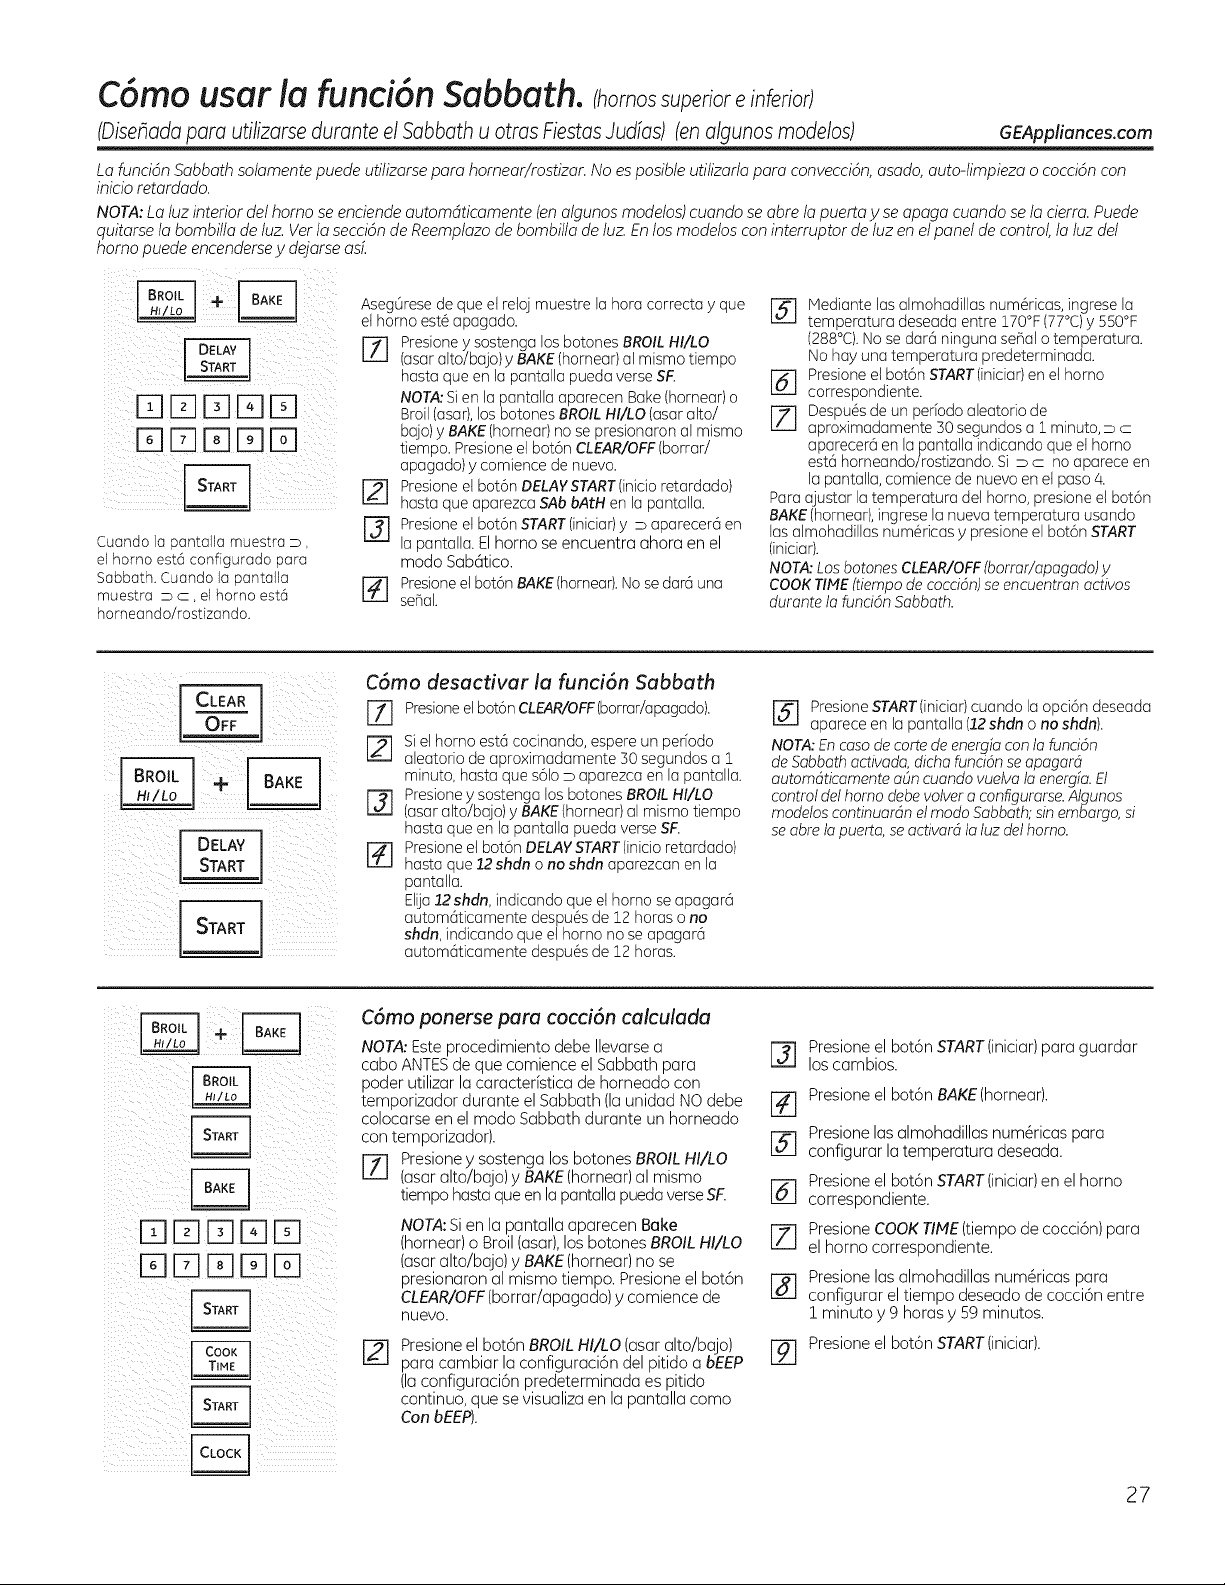
C6mo usar la funci6n Sabbath. Chomossu er o e
(Disehadaparautilizarsedurante el Sabbathuotras FiestasJudfas) (enalgunosmodelos) GEAppliances.com
La funci6n Sabbath solamente puede utilizarse para hornear/rostizar. No es posible utilizarla para convecci6n, asado, auto-limpieza o cocci6n con
inicio retardado.
NOTA: La luz interior del homo se enciende automdticamente (en algunos modetos) cuando se abre la puerta y se apaga cuando se la cierra. Puede
quitarse la bombilla de luz. Vet la secci6n de Reemptazo de bombilla de luz. En los modelos con interruptor de luz en elpanel de control, la luz del
homo puede encendersey dejarse asL
Cuando la pantalla muestra D,
el homo est6 configurado para
Sabbath. Cuando la pantalla
muestra D c, el homo est6
horneando/rostizando.
Aseg0rese de que et reloj muestre la hora correcta y que
el homo est@apagado.
Z] Presione y sostenga los botones BROILHI/LO
(asaralto/bajo)y BAKE (hornear) al mismo tiempo
hasta queen la pantalla pueda verse SIR
NOTA: Sien la pantalla aparecen Bake (hornear) o
Broil(asar),los botones BROILHI/LO (asar alto/
halo) y BAKE (hornear) nose presionaron al mismo
tiempo. Presione el bot6n CLEAR/OFF(borrar!
apagado) y comience de nuevo.
r_ Presione el bot6n DELAYSTART(inicio retardado)
hasta que aparezca SAb bAtH en la pantalla.
r_ Presione el bot6n START(iniciar) y D aparecer@ en
la pantalla. Elhomo se encuentra ahora en el
modo Sab@ico.
r_ Presione et bot6n BAKE (hornear). No sedar6 una
seF_aL
r_ Mediante lasalmohadillas num@icas, ingrese la
temperatura deseada entre 170°F (77°C)y 550°F
(288°C).Nose dar6 ninguna seflal o temperatura.
Nohay una temperatura predeterminada.
r_ Presione el bot6n START(iniciar) en el homo
correspondiente.
r_ Despu_s de un perYodoaleatorio de
apro×imadamente 30 segundos a 1minuto, D c
aparecer6 en lapantalla indicando que et homo
est6 horneando/rostizando. Si D c no aparece en
la pantalla, comience de nuevo en el paso 4.
Para ajustar la temperatura del homo, presione el bot6n
BAKE (hornear), ingrese la nueva temperatura usando
las almohadillas num6ricas y presione el bot6n START
(iniciar).
NOTA: Losbotones CLEAR/OFF(borrar/apagado) y
COOK TIME (tiempo de cocci6n)se encuentron octivos
duronte Iofunci6n Sabbath.
C6mo desactivar la funci6n Sabbath
r_ Presione elbot6n CLEAR/OFF(borrar!apagado).
[] i elhomo est6 cocinando, espere un perfodo
aleatorio de aproximadamente 30 segundos a :1
minuto, hasta que s61oD aparezca enla pantalla.
r_ Presione y sostenga los botones BROILHI/LO
(asaralto/bajo) y BAKE (hornear) al mismo tiempo
hasta queen la pantalla pueda verse SiR
r_ Presione el bot6n DELAY START (inicio retardado)
hasta que 12 shdn o no shdn aparezcan en la
pantalla.
Elija12shdn, indicando qua el homo se apagar6
autom6ticamente despu@sde :12 horas o no
shdn, indicando que el homo no se apagar6
autom6ticamente despu6s de :12 horas.
r_ PresioneSTART(iniciar)cuando la opci6n deseada
apareceenlapantalla (12shdn o noshdn).
NOTA:Encasodecartede energfaconla funci6n
deSabbathactivada,dichafunci6n seapagard
automd_ticamenteaOncuandovuelvala energfa.El
controldel homodebevolvera conflgurarse.Algunos
modeloscontinuar@el modoSabbath;sinembargo,si
seabrela puerto,seactivardla luzdel homo.
DD DD
DD DD
C6mo ponerse para cocci6n calculada
NOTA: Este procedimiento debe Ilevarse a
cabo ANTES de que comience el Sabbath para
poder utilizar la caracter[stica de horneado con
temporizador durante el Sabbath (la unidad NO debe
colocarse en el modo Sabbath durante un horneado
con temporizador).
[] resione y sostenga los botones BROIL HI/LO
(asar alto/bajo) y BAKE (hornear) al mismo
tiempo hasta queen la pantalla pueda verse SF.
NOTA:SienlapantallaaparecenBake
(hornear)o Broil(asar),losbotonesBROILHI/LO
(asaralto/bajo)y BAKE(hornear)nose
presionaronal mismotiempo.Presioneelbot6n
CLEAR/OFF(borrar/apagado)ycomiencede
nuevo.
Presione el bot6n BROILHI/LO (asar alto/bajo)
para cambiar la configuraci6n delpitido a bEEP
(laconfiguraci6n predeterminada es pitido
continua, que se visualiza enla pantalla coma
Con bEEP).
[] Presione el bot6n START(iniciar)para guardar
los cambios.
r_ Presione el bot6n BAKE(hornear).
r_ Presionelas almohadillas num@icaspara
configurar latemperatura deseada.
Presione el bot6n START(iniciar)en elhomo
correspondiente.
r7---1Presione COOKTIME(tiempo decocci6n) para
el homo correspondiente.
Presione las almohadillas num@icaspara
configurar el tiempo deseado decocci6n entre
i minuto y9horasy 59minutos.
E_ Presione el bot6n 5TART(iniciar).
27
Cuidadoy limpiezade lacocina,
AsegOresedequetodoslos controlesestdnapagadosy quelassuperficiesestdnfriasantesde limpiarcualquierparte dela cocina.
j,A ADVERTENCIA S/sequita lacocinapara efectuaruna limpieza,reparaciones o
cualquier otra raz6n,verifique que el dispositivo anti-volcaduras se
coloquedemanera adecuada cuando vuelva a instalarse la cocina.
5i no toma estaprecaud6n, la cocina puede volcarsey provocar
lesiones.
C6mo quitar el envoltorio de protecci6n y la cinta de embalaje
Con cuidado,tomeuna punta del envoltorio de
protecci6nconsus dedosy lentamente quitelo de ta
superficiedetaparato. No useelementos filosospara
quitarel envoltorio.Quitetodo elenvoltorioantes de
usaret aparato por primeravez.
ParaasegurarsedenodaBarel acabadodelproducto,
la mejor formadequitarel pegamento dela cintade
empaque delosaparatos nuevosconsisteenaplicar
detergente para vajillasI[quido.Aplique conunpaBo
suaveydeje remojar.
NOTA:Deberetirorseel adhesivodetodas lospartes.Si
se coliento,serd imposibfedequitor.
Panel de control
Siasi Io desea,puededesactivar losbotones de toque
antesde la limpieza.
Ver la informaci6n sobreBloqueode controtesenla
secci6nCdmousor el reloj,el temporizodory elbfoqueo
decontrotesdeestemanual.
Limpielosderrames conunpatio h0medo.
Tambi@npuede utitizarunlimpiador devidrios.
Quitesuciedadesm6srebetdesconagua tibia
jabonosa. No utilice abrasivosde ninguna clase.
Vuelvaa activar losbotones detoque despu@sde la
limpieza.
Superficies pintadas
Lassuperficiespintadasincluyenlostadosdelacocina
y lapuerta,lapartesuperiordetpaneldecontrolyet
frentedelcaj6n.Limpielasconjab6nyaguao conuna
soluci6ndeaguay vinagre.
No utilice limpiadoresde homocomerciales,polvos
limpiadores,esponjillasdeaceroo abrasivospotentes
sobrecualquier superficiepintada.
Superficies de acero inoxidable (en algunos modelos)
Noutilice almohadillas de acero porque rayan
la superficie.
Paralimpiar la superficiede acero inoxidable,
utiliceagua tibiajabonosa o un limpiadoro
lustradorde acero inoxidable.Siemprelimpie
la superficieen direcci6nde laveta. Sigalas
instruccionesdel productopara limpiar la
superficiede acero inoxidable.
Para consultar sobre la compra de limpiadores
o lustradores deaparatos de acero inoxidable, o
para encontrar la ubicaci6n del distribuidor m6s
cercano a su domicilio, Ilamea nuestro nOmero
gratuito:
Centro naciona! de repuestos
1.800.626.2002
GEAppliances.com
Estufa de esmalte de porcelana (en algunos modelos)
El acabado de esmalte de porcelana es resistente
pero puede romperse si se utiliza incorrectamente.
Esteacabado esresistente al 6cido. Sin embargo,
no debe permitirse que algunos alimentos 6cidos
que se derraman (como jugos de fruta, tomate o
vinagre) permanezcan en el acabado.
Si sederraman 6cidos en la estufa mientras est6
caliente, utilice una toalla de papel o un paho
secos para limpiarlo en el momento. Cuando
la superficie se haya enfriado, limpie con agua
jabonosa. Enjuague bien.
Enel casode otros derrames,como salpicaduras
de grasa,etc.,limpie con agua jabonosao polvos
limpiadorescuando la superficiesehaya enfriado.
Enjuaguebien. Pulacon un pano seco.
28
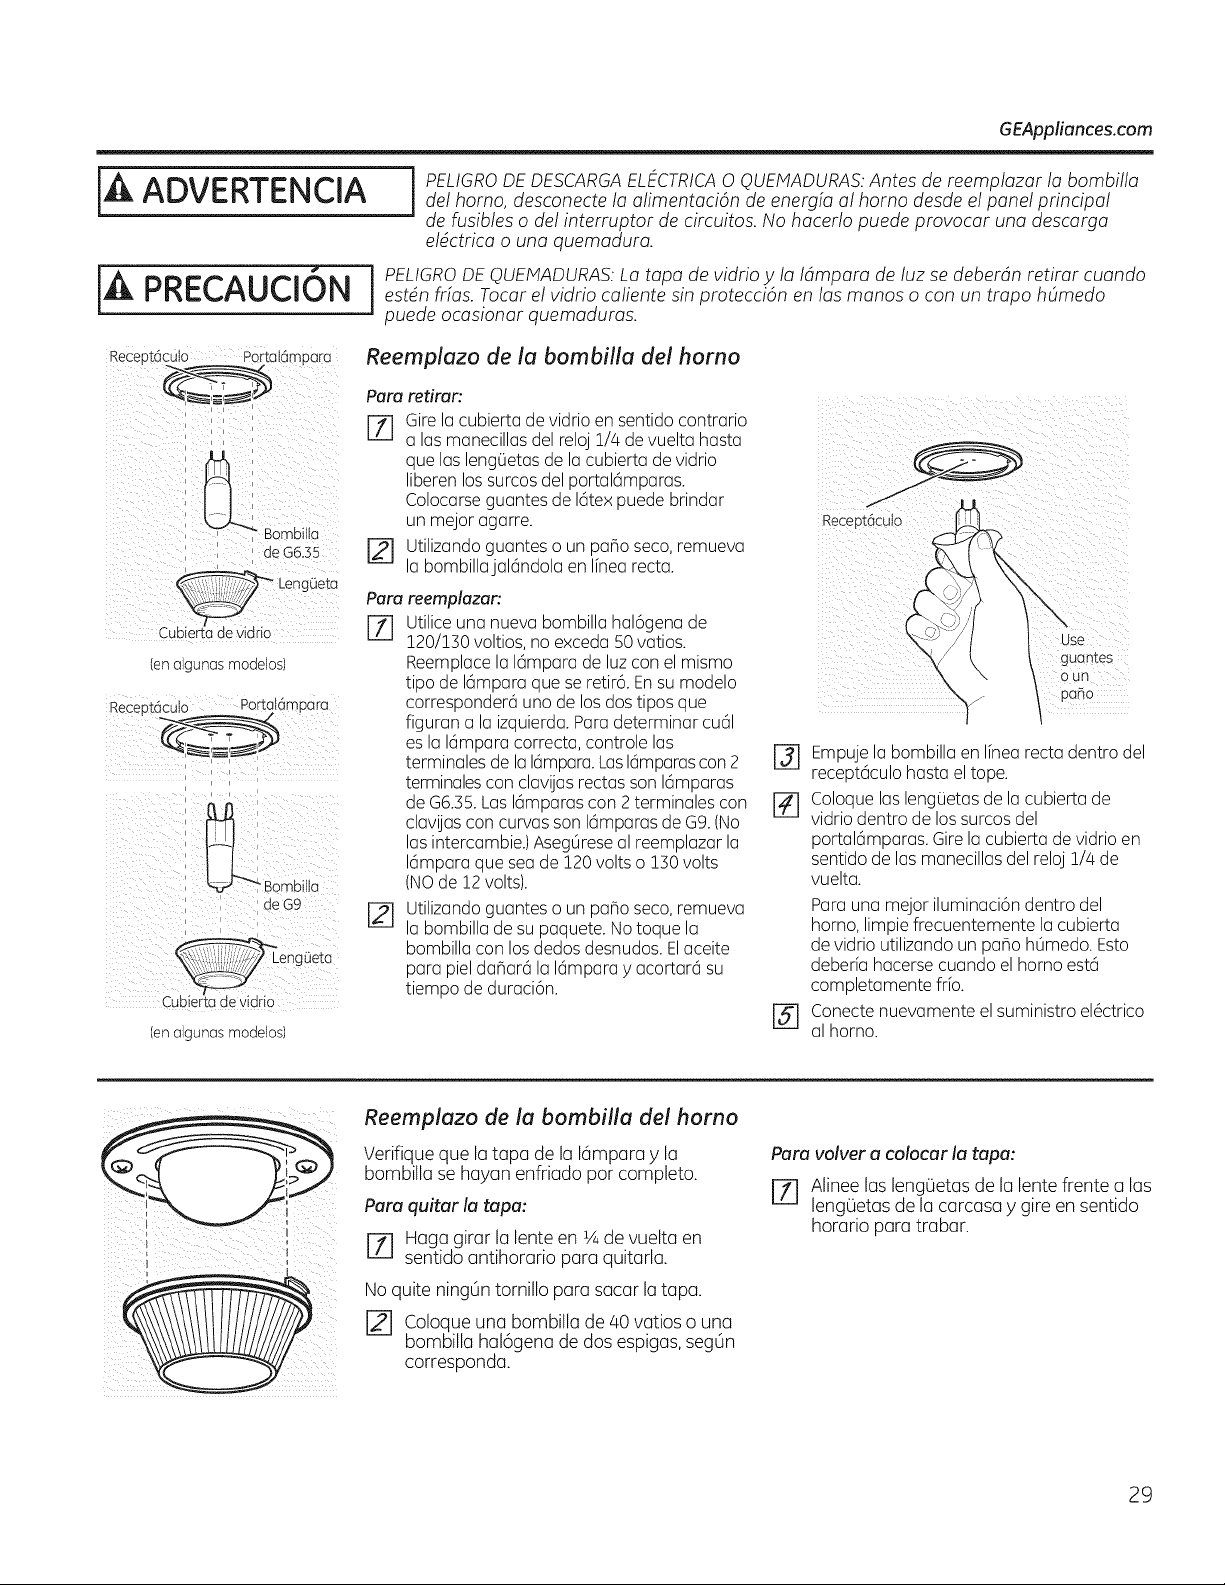
GEAppliances.com
[A ADVERTENCIA
PRECAUCI
PELIGRODE DESCARGAELECTRICA0 QUEMADURAS:Antes de reemplazar la bombilla
del homo, desconecte la alimentaci6n de energfa al homo desdeel panel principal
de fusibles o del interruptor de circuitos. Nohacerlo puede provocar una descarga
eldctrica o una quemadura.
PELIGRODE QUEMADURAS:La tapa de vidfio y la Idmpara de luzsedeberdn retirar cuando
estdn frfas. Tocar el vidfio caliente sinprotecci6n en lasmanos o con un trapo hOmedo
puede ocasionar quemaduras.
_eceo_OcL,lo por_o,amooro Reemplazo de la bombilla del horno
en o gunasmoaelosJ
Receo_dlcuto _ortatamoarc
_ BomoIlla
de G9
(enalgunas modelos)
Para retirar:
queG relacub ertadev dr oeoseot docontrar oleogOetas
[Z] o los monecillos del reloj 1/4 de vuelta husta
,as de,acubiertadevidrio
liberenlossurcosdel portal6mparas.
Colocarseguantes de I@expuedebrindar
un mejot agarre. RecePt6cut0
Utilizandoguantes o un panoseco,remueva '
r21
la bombillajal6ndola en Ifnearecta.
Para reemplazan
[] Utiliceuna nueva bombilla hal6genade
!20/!S0 voltios,no excedaSOratios.
Reemplacela 16mparade luzcon el mismo
tipode 16mparaque se retir6.Ensu modelo
corresponder6uno de losdos tiposque
figurana la izquierda.Paradeterminar cu61
es la16mparacorrecta,controle las
terminales de la16mpara.Las16mparascon 2
terminalesconclavijasrectasson 16mparas
deG6.35.Las 16mparascon 2 terminalescon
clavijascon curvasson16mparasde G9.(No
las intercambie.)AsegOreseal reemplazar la
16mparaque seade 120volts o 130volts
(NOde 12volts).
Utilizandoguantes o un pahoseco,remueva
[] la bombillade su paquete.No toque la
bombillaconlosdedos desnudos.Elaceite
para pieldahar6 la 16mparayacortar6 su
tiempo de duraci6n.
guantes
pano
r31 Empuje la bombilla en Ifnearecta dentro del
recept6culo hasta el tope.
[] Coloque las lengOetas de la cubierta de
vidrio dentro de los surcos del
portal6mparas. Girela cubierta devidrio en
sentido de las manecillas del reloj 1/4 de
vuelta.
@
Para una mejor iluminaci6n dentro del
homo, limpie frecuentemente la cubierta
devidrio utilizando un pano h0medo. Esto
deber[a hacerse cuando el homo est6
corn pleta mente fib.
Conecte nuevamente el suministro el6ctrico
al homo.
Reemplazo de la bombilla del homo
Verifiqueque la tapa de la 16mparay la
bombillasehayanenfriado por completo.
Para quitar la tapa:
Haga girar la lente en _Ade vuelta en
sentido antihorario para quitarla.
No quite ningOntornillopara sacar la tapa.
Coloque una bombilla de a0 ratios o una
bombilla hal6gena de dosespigas,seg0n
corresponda.
Para volver a colocar la tapa:
Alinee los leng0etas de la lente frente alas
leng0etas de la carcasay gire en sentido
horario para trabar.
29
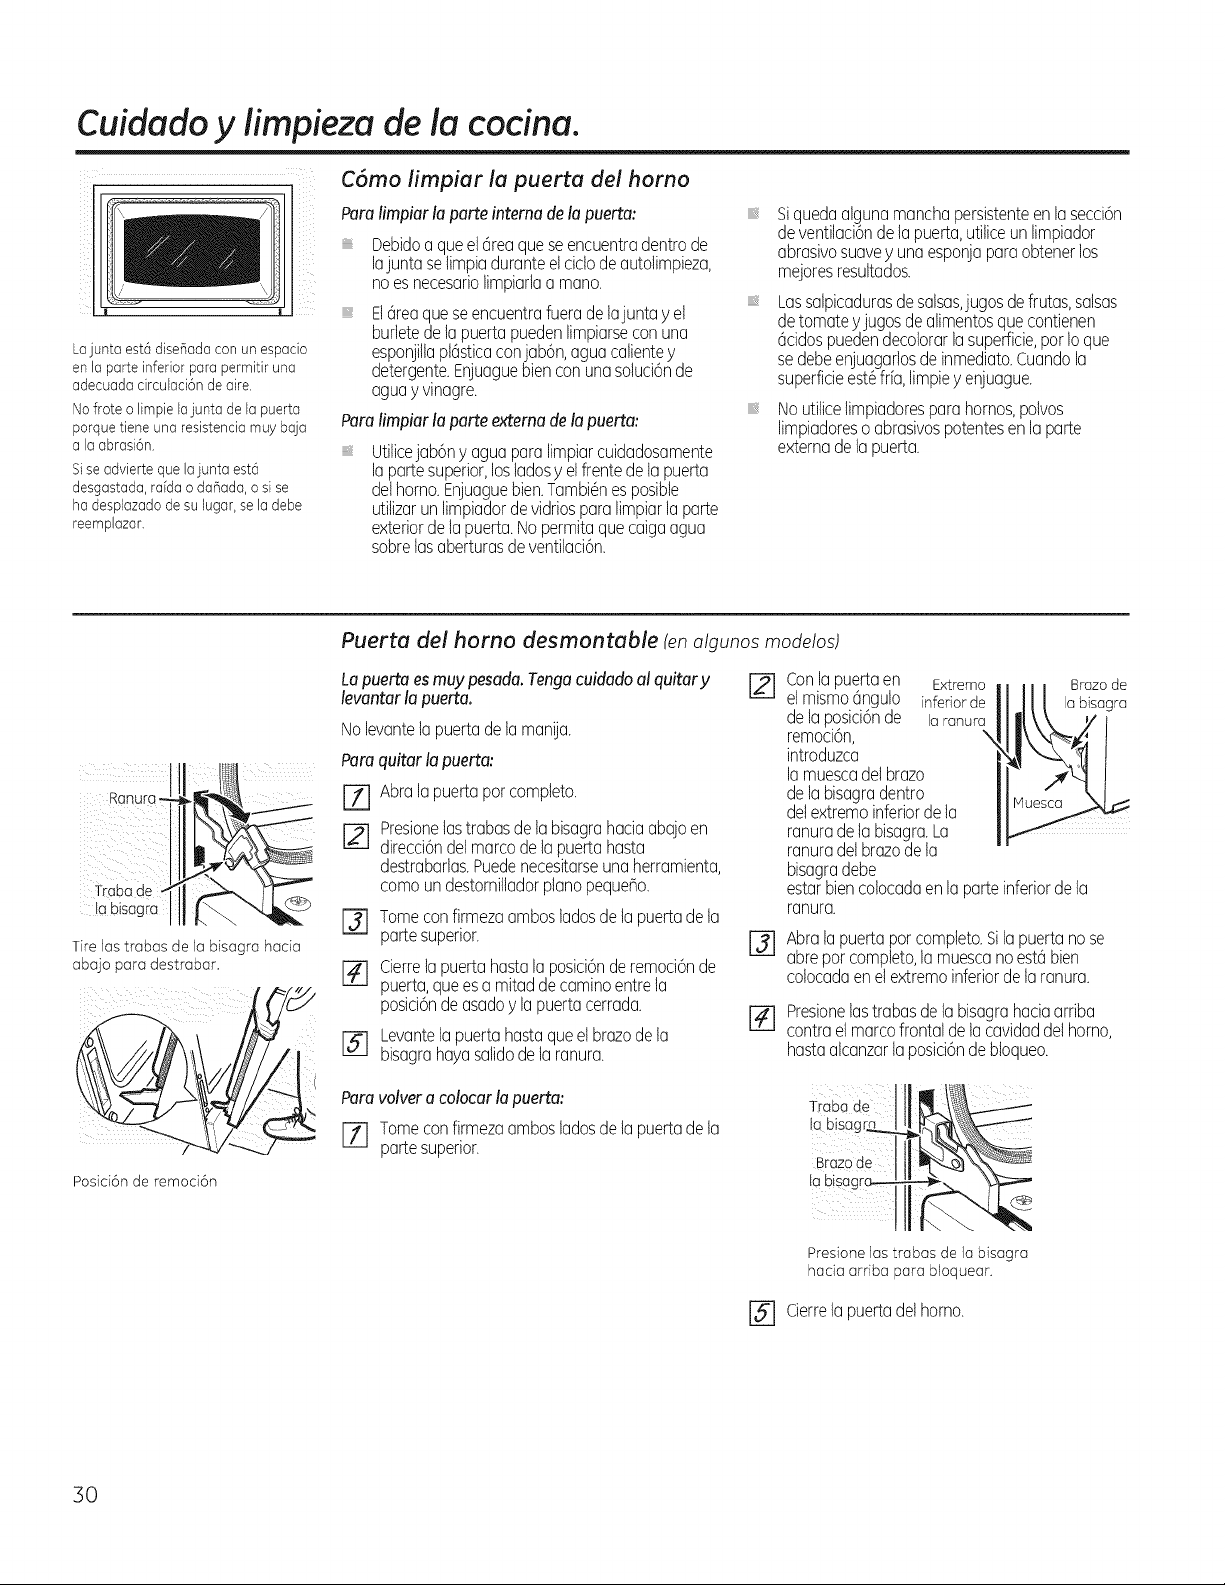
Cuidado y limpieza de la cocina,
Lajunta est6diseflodaconunespacio
enIo parteinferiorparapermitir una
adecuada circuloci6nde aire.
Nofrote o limpie Iojunta de la puerta
porquetiene uno resistenciamuy bajo
alaabrasi6n.
Sise advierte que lajunta est6
desgastada,raida odaBada,o sEse
ha desplazadodesulugor, seladebe
reemplozor.
C6mo limpiar la puerta del homo
Para limpiar laparte interna de la puerta:
Debidoa que el 6reaque se encuentra dentrode
lajunta selimpiadurante el ciclodeautolimpieza,
noes necesariolimpiarlaa mano.
El6reaqueseencuentrafueradelajuntay et
burletedetapuertapuedenlimpiarseconuna
esponjillapl6sticaconjab6n,aguacalientey
detergente.Enjuaguebienconunasoluci6nde
aguay vinagre.
Para limpiar laparte externa de lapuerta:
Utilicejab6ny aguaparalimpiarcuidadosamente
lapartesuperior,losladosyetfrentedeiapuerta
delhomo.Enjuaguebien.Tambi_nesposible
utilizarunlimpiadordevidriosparalimpiarla parte
exteriordela puerta.Nopermitaquecaigaagua
sobrelasaberturasdeventilaci6n.
iiiiii_
Siquedaalgunamanchapersistenteenlasecci6n
deventilaci6ndelapuerta,utiliceunlimpiador
abrasivosuavey unaesponjaparaobtenerlos
mejoresresultados.
Lassalpicadurasdesalsas,jugosdefrutas,salsas
detomateyjugosdealimentosquecontienen
6cidospuedendecolorarlasuperficie,potIoque
sedebeenjuagarlosdeinmediato.Cuandola
superficieest@fria,limpiey enjuague.
Noutiticelimpiadoresparahornos,polvos
limpiadoreso abrasivospotentesenla parte
extemadelapuerta.
la bisagra
TireJastrabas dela bisagra hacia
abajo paradestrabar.
Posici6n de remoci6n
Puerta del homo desmontable (en algunos modelos)
Lapuertaesmuypesada.Tengacuidadoalquitary
levantarlapuerta.
Nolevantelapuertadelamania.
Paraquitarlapuerta:
[Z] Abralapuertaporcompleto.
r21
[2]
%
Presionelastrabasdelabisagrahaciaabajoen
direcci6ndetmarcodelapuertahasta
destrabarlas.Puedenecesitarseunaherramienta,
comoundestornittadorpianopequer]o.
Tomeconfirmezaambosladosdela puertadela
partesuperior.
Cierretapuertahastalaposici6nderemoci6nde
puerta,queesa mitaddecaminoentreta
posici6ndeasadoylapuertacerrada.
[] Levantelapuertahastaqueetbrazodela
bisagrahayasalidodelaranura.
r21
@
%
Conla puertaen E×tremo
elmismo6ngulo inferiorde
delaposici6nde laranura
remoci6n,
introduzca
lamuescadelbrazo
delabisagradentro
detextremoinferiordela
ranuradela bisagra.La
ranuradelbrazodela
bisagradebe
estarbiencolocadaenlaparteinferiordela
ranura.
Abrala puertaporcompleto.Silapuertanose
abrepor completo,lamuescanoest6bien
colocadaenetextremoinferiordela ranura.
Brazode
la bisagra
Presionelastrabasdeiabisagrahaciaarriba
contraetmarcofrontaldetacavidaddelhorno,
hastaalcanzarlaposici6ndebtoqueo.
Paravolver a colocarlapuerta:
[Z] Tome confirmezaambosladosdela puertadela
parte superior.
Traba de
Ia bi._
Brazode
la bisagr
Presione Jastrabas de la bisagra
hacia ardba para bloquear.
[] Cierrelapuertadethorno.
3O
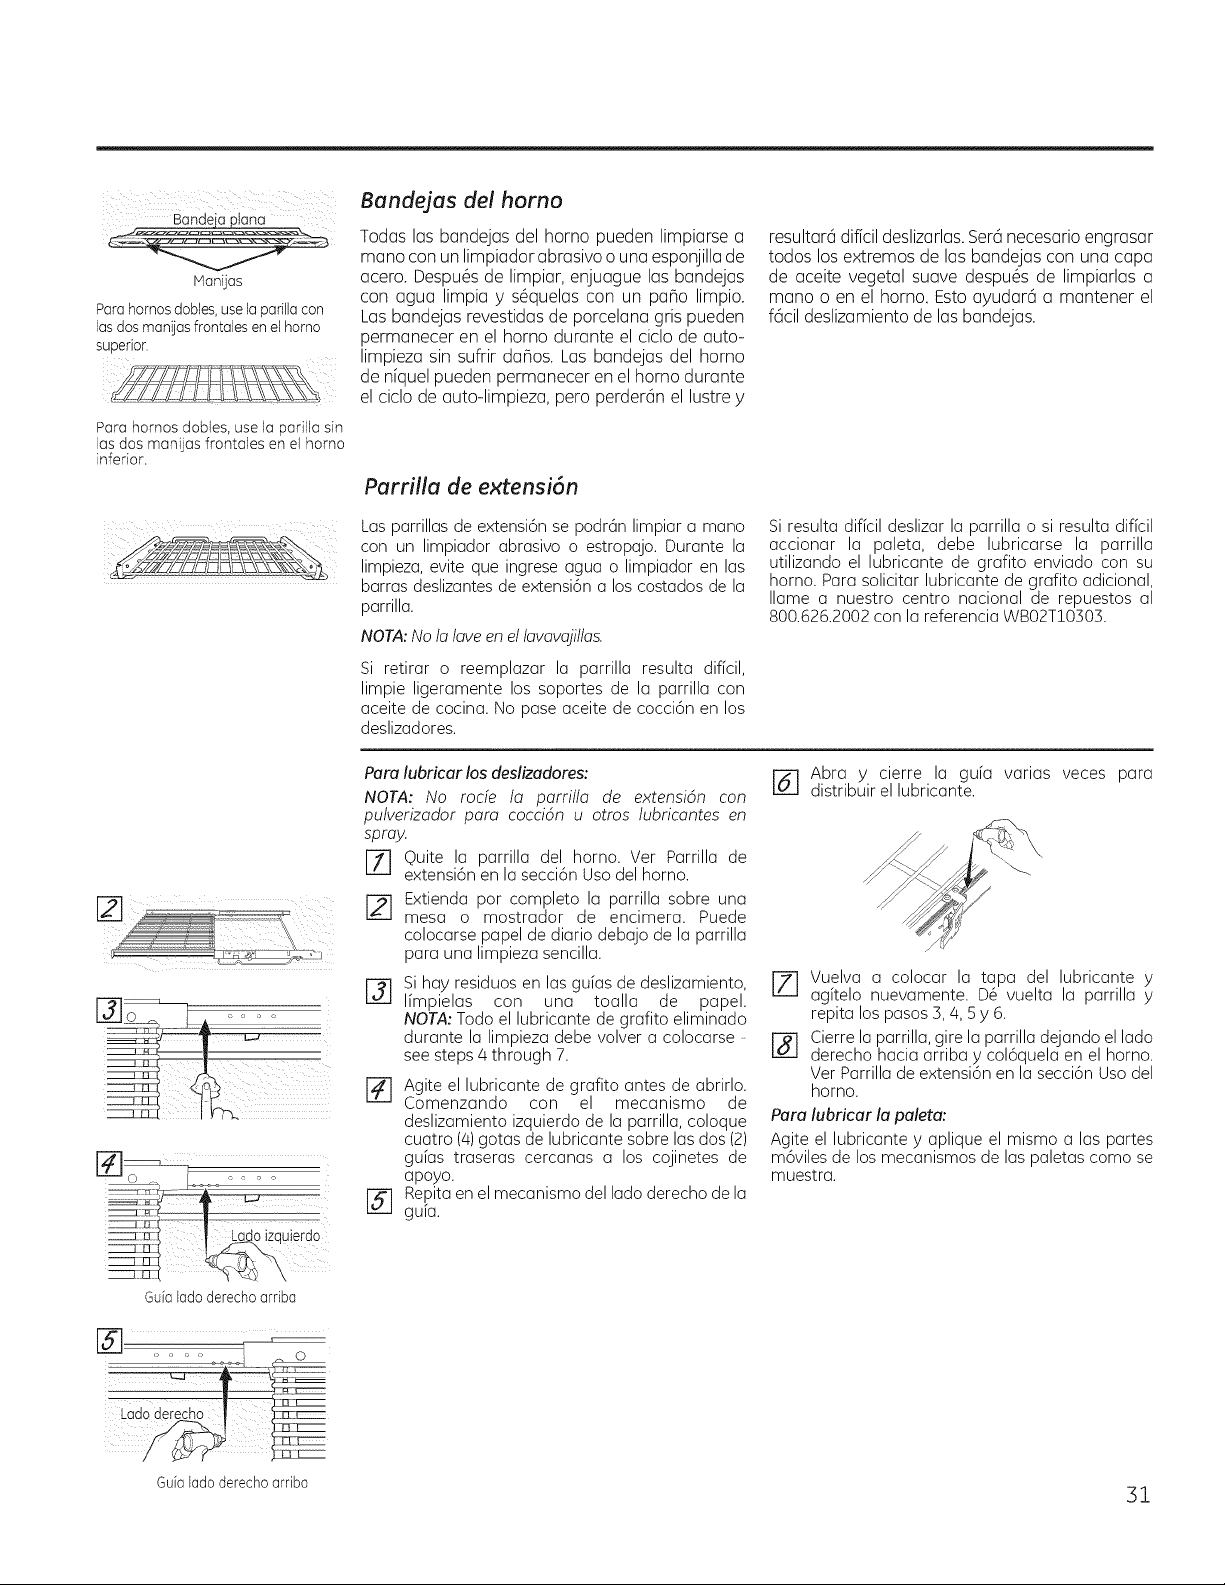
Bandejaplana
Nanijas
Parahornosdobles,use la parilla con
lasdosmanijasfrontales en elhorno
superior.
Parahornosdobles,usela parilla sin
lasdosmanUasfrontales en el homo
inferior.
; 11¸11¸1
Bande]as del homo
Todas las bandejas del homo pueden limpiarse a
mano con unlimpiador abrasivo o una esponjilla de
acero. Despu6s de limpiar, enjuague las bandejas
con agua Iimpia y s6quelas con un pano Iimpio.
Las bandejas revestidas de porcelana gris pueden
permanecer en el homo durante el ciclo de auto-
limpieza sin sufrir danos. Las bandejas del homo
de n[quel pueden permanecer enel homo durante
el ciclo de auto-limpieza, pero perder6n el lustre y
resultar6 dificil deslizarlas. Ser6necesario engrasar
todos los extremos de las bandejas con una capa
de aceite vegetal suave despu6s de limpiarlas a
mano o en el horno. Esto ayudar6 a mantener el
f6cil deslizamiento de las bandejas.
Parrilla de extensi6n
Lasparrillasdeextensi6nse podr6nlimpiara mano
con un limpiador abrasivoo estropajo.Durante la
limpieza,eviteque ingreseagua o limpiadoren las
barrasdeslizantesdeextensi6na loscostadosde la
parrilla.
NOTA:No la lave enel lavavajillas.
si retirar o reemplazar la parrilla resulta dificil,
limpie ligeramente los soportes de la parrilla con
aceite de cocina. No pase aceite de cocci6n en los
cteslizadores.
Siresultadificil deslizarla parrilla o siresultadificil
accionar la paleta, debe lubricarse la parrilla
utilizando el lubricante de grafito enviadoconsu
horno. Parasolicitar lubricantede grafito adicional,
Ilame a nuestro centro nacionalde repuestos al
800.626.2002conla referenciaWB02T!0303.
Paralubricar los deslizadores:
NOTA: No rode la parrilla de extensi6n con
putverizador para coccidn u otros lubricantes en
spray.
[Z] Quite la parrilla del homo. Ver Parrilla de
extensi6n en la secci6n Uso del homo.
[-_ Extienda por completo la parrilla sobre una
mesa o mostrador de encimera. Puede
eolocarse papel de diario debajo de la parrilla
para una limpieza seneilla.
@
Si hay residuos en las guias de deslizamiento,
limpielas con una toalla de papel.
NOTA: Todo el lubricante degrafito eliminado
durante la limpieza debe volver a eoloearse
seesteps 4through 7.
[_] Agite el lubricante de grafito antes de abrirlo.
Comenzando con el mecanismo de
deslizamiento izquierdo de la parrilla, eoloque
euatro (4) gotas de lubricante sobre las dos (2)
gu[as traseras eereanas a los eojinetes de
apoyo.
Repita enel meeanismo dellado dereeho dela
gu[a.
r2-i Abra y cierre la guia varias veces para
distribuir el lubricante.
J-71 Vuelva a colocar la tapa del lubricante y
it i
agitelo nuevamente. D6 vuelta la parrilla y
repita los pasos ], 4, 5 y 6.
Cierrela parrilla, gire la parrilla dejando el lado
derecho haeia arriba y eol6quela en el homo.
Ver Parrilla deextensi6n en la seeei6n Usodel
homo.
Para lubricar la paleta:
Agite el lubricante y aplique el mismo alas partes
m6viles de los mecanismos de las paletas como se
muestra.
Guialadoderechoarriba
@ ,
2
Ladodeiech0 .!
Guialadoderechoarriba
]1
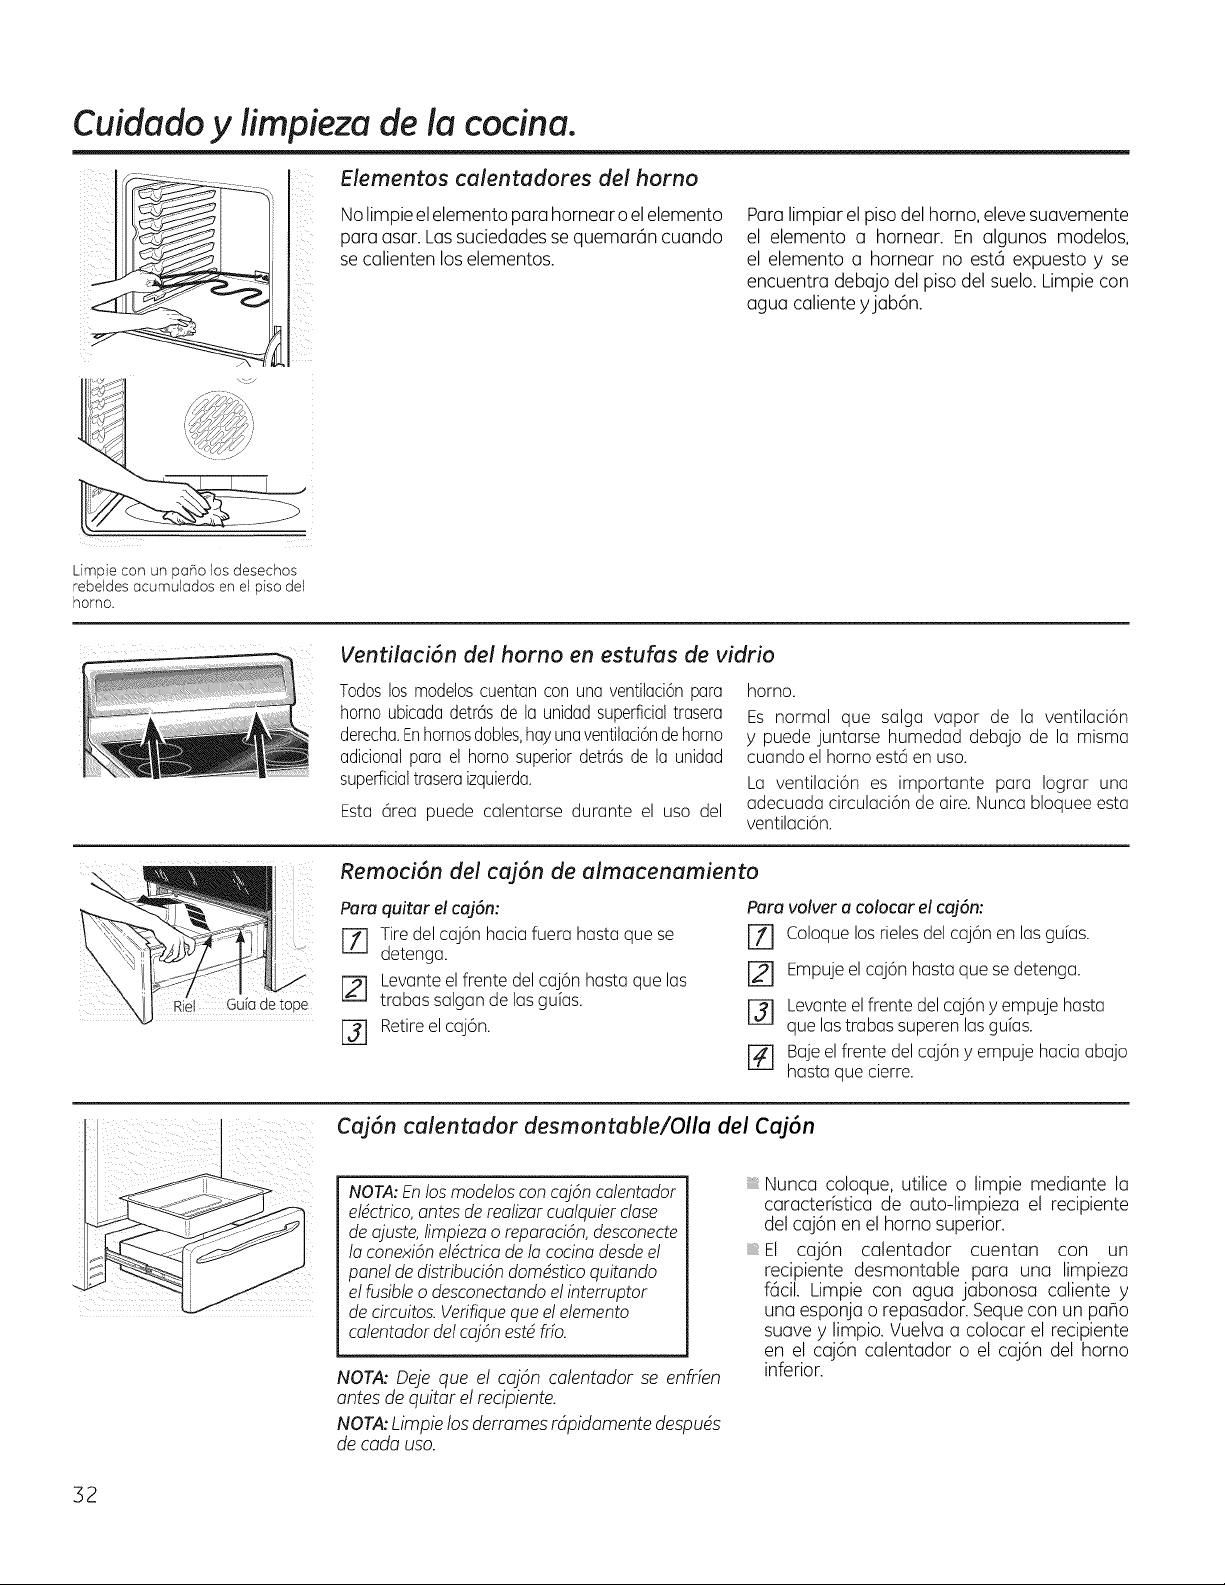
Cuidado y limpieza de la cocina.
7,.....................
i
Elementos calentadores de! horno
No limpie elelemento para hornear o elelemento
para asar.Las suciedades se quemar6n cuando
se calienten los elementos.
Para limpiarel piso del homo, eleve suavemente
el elemento a hornear. En algunos modelos,
el elemento a hornear no est6 expuesto y se
encuentra debajo del pisodel suelo. Limpie con
agua caliente yjab6n.
Limpie con un patio losdesechos
rebeldes acumulados en el piso del
horno.
Ventilaci6n del horno en estufas de vidrio
Todoslos modeloscuentanconunaventitaci6npara
hornoubicadadetr6sde la unidadsuperficialtrasera
derecha.Enhornosdobtes,hayunaventilaci6ndehomo
adicionalpara el homo superiordetr6sde la unidad
superficialtraseraizquierda.
Esta 6rea puede calentarsedurante el uso del
horno.
Es normal que salga vapor de la ventilaci6n
y puede juntarse humedad debajo de la misma
cuando el homo est6 en uso.
La ventilaci6n es importante para Iograr una
adecuada circulaci6nde aire.Nunca bloqueeesta
ventilaci6n.
Gufade tope
Remoci6n del caj6n de almacenamiento
Para quitar elcaj6n:
[Z] Tiredelcaj6nhaciafuerahasta quese
detenga.
[] Levanteel frente delcaj6n hasta que las
trabassalgan de las guias.
[] Retireelcaj6n.
Para volver a colocar el caj6n:
[Z] Coloque los rieles del caj6n en lasgulas.
F_ Empuje el caj6n basra que se detenga.
[] Levante elfrente delcaj6n y empuje basra
que las trabas superen las guias.
[] Baje el frente delcaj6n y empuje hacia abajo
basra que cierre.
Caj6n calentador desmontable/Olla del caj6n
NOTA:Enlos modefoscon caj6ncatentador
efdctrico,antesderealizarcualquierclase
de ajuste,fimpiezao reparaci6n,desconecte
la conexi6nefdctricade lacocinadesdeel
panelde distribuci6ndomdsticoquitando
elfusibleo desconectandoelinterruptor
de circuitos.Verifiquequeelefemento
calentadordelcaj6n estdfrio.
NOTA:Dejeque el caj6n calentador se enfrfen
antes de quitarel recipiente.
NOTA:Limpie los derramesrdpidamente despuds
de cadauso.
Nunca coloque, utilice o limpie mediante la
caracter[stica de auto-limpieza el recipiente
del caj6nen el homosuperior.
El caj6n calentador cuentan con un
recipiente desmontable para una limpieza
f6cil. Limpie con agua jabonosa caliente y
una esponjao repasador. Sequecon un pa_o
suave y limpio. Vuelvaa colocar el recipiente
en el caj6n calentador o el caj6n del homo
inferior.
32
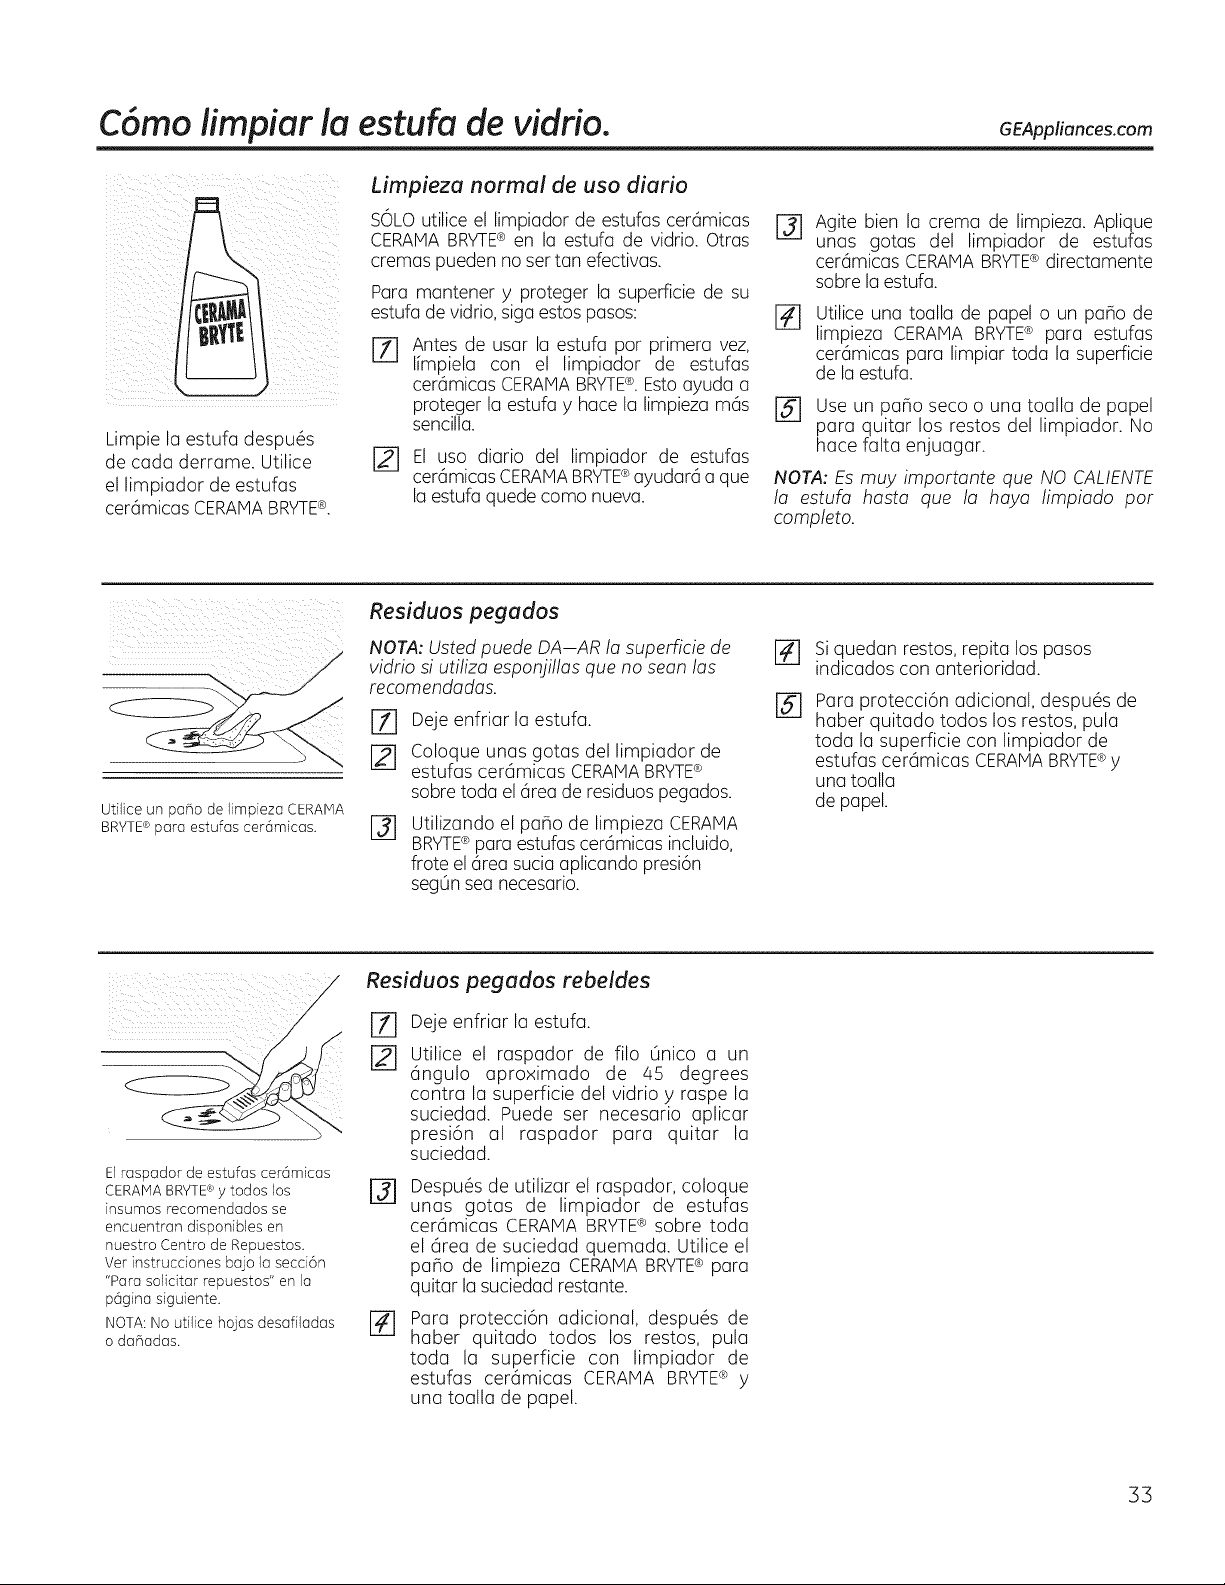
C6mo limpiar ia estufa de vidfio. GEAppliances.com
Limpie la estufa despu6s
de cada derrame. Utilice
el limpiador de estufas
cerdmicas CERAMABRVTE®.
Limpieza normal de uso diario
SOLOutilice el limpiador de estufas cerBmicas
CERAMABRYTE®en la estufa de vidrio. Otras
cremaspueden no ser tan efectivas.
Para mantener y proteger la superficie de su
estufade vidrio, sigaestospasos:
%
Antes de usar la estufa por primera vez,
limpiela con el limpiador de estufas
cer6micas CERAMA BRYTE®.Esto ayuda a
proteger la estufa y hacela limpieza mds
sencilla.
[2-1 El uso diario del limpiador de estufas
cer6micas CERAMABRYTE®ayudar6 a que
la estufaquede como nueva.
@
Agite bien la crema de limpieza.Aplique
unas gotas del limpiador de estufas
cer@micas CERAMA BRV-rE®directamente
sobrela estufa.
%
Utiliceuna toalla de papel o un patio de
limpieza CERAMABRYTE® para estufas
cer6micas para limpiar toda la superficie
de la estufa.
[] Use un patio seco o una toalla de papel
para quitar los restos del limpiador. No
hace falta enjuagar.
NOTA: Esmuy importante que NOCALIENTE
la estufa hasta que la haya limpiado pot
completo.
Residuos pegados
NOTA:Ustedpuede DA--AR la superficie de
vidrio siudliza esponjillas que no sean las
recomendadas.
%
[]
Utilice un patio de limpieza CERAMA
BRYTE®para estufas cer6micas.
Dejeenfriar la estufa,
Coloque unas gotas del limpiador de
estufas cerc_micasCERAMABRYTE®
sobretoda el @reade residuos pegados.
Utilizando el patio de limpieza CERAMA
BRYTE®para estufas ceramicas incluido,
frote el 6rea sucia aplicando presi6n
seg0nseanecesario.
%
@
Siquedan restos, repita lospasos
indicados con anterioridad.
Para protecci6n adicional, despu6s de
haber quitado todos losrestos, pula
toda la superficie con limpiador de
estufas ceramicas CERAMABRVTE®y
una toalla
de papel.
Residuos pegados rebeldes
%
Elraspador deestufas cer6micas
CERAMA BRYTE®y todos los r_
insumos recomendados se
encuentran disponibles en
nuestro Centro de Repuestos.
Ver instrucdones bajo la secd6n
"Para solidtar repuestos" en la
p6gina siguiente.
NOTA:No utilice hojas desafiladas r_
o datiadas.
Dejeenfriar la estufa.
Utilice el raspador de filo 0nico a un
c_ngulo aproximado de q5 degrees
contra la superficie del vidrio y raspe la
suciedad. Puede ser necesario aplicar
presi6n al raspador para quitar la
suciedad.
Despu6s de utilizar el raspador, coloque
unas gotas de limpiador de estufas
cerc_micasCERAMA BRYTE®sobre toda
el @ea de suciedad quemada. Utilice el
patio de limpieza CERAIVlABRYTE®para
quitar la suciedad restante.
Para protecci6n adicional, despu6s de
haber quitado todos los restos, pula
toda la superficie con limpiador de
estufas cerc_micas CERAMA BRVTE® y
una toalla de papel.
33

C6mo limpiar la estufa de vidrio.
Narcas de metal y rayones
%
[]
Tengu cuidudo de no deslizor olios y
sortenes u trovOs de su estufu. Dejur6
morcos de metal sobre Io superficie de Io
estufo.
Estus marcas pueden quiturse utilizondo
limpiudor de estufos cer6micos CERANA
BRYTE®con el porto de limpiezo CERANA
BRYTE®puro estufus cer6micos.
Si se permite que olios con uno copo fino
de uluminio o cobre hiervon en seco, lu
copo puede dejur uno decoloroci6n negro
en Ioestufo.
Esto debe quitorse de inmedioto antes
de colentor de nuevo o lu decoloroci6n
puede Ilegur oser permonente.
NOTA: Verifiquecon detenimiento qua la base
de fas ollas no sea dspera para no rayar la
estufa.
Sellado de la estufa
Para limpiar el sellado de la estufa alrededor de
los bordes de vidrio, coloque un paBo h0medo
sobre los mismos durante unos minutos y luego
limpie con limpiadores no abrasivos.
Superficie de vidfio: posibilidades de dafio permanente.
Losderromes azucarados
(como gelutinus, dulce,
curumelo, jurobes)o pl6sticos
derretidos pueden morcur
Io superficie de Ioestufu (no
cubierto por Iogorontfo) o
menos que el derrome se
quite mientros est6 coliente.
Debe tenerse mucho cuidudo
ol remover sustuncius
colientes.
Aseg0rese de utilizor un
rospodor nuevo y ofilodo.
No utilice hojus desofiludus o
dunudus.
Dafios por derrames azucarados y plOstico derretido
m Apogue todos los unidudes de superficie.
Quite los olios colientes.
j-_ Utilizondo un guonte de cocino:
a. Use un rospodor de filo 0nico (rospodor
poro estufos cer6micos CERANA
BRYTE®)poro desplozor el derrome o un
6reo frfu de Io estufo.
[] No use los unidodes de superficie de nuevo
hostu que todos los restos se hoyon
eliminudo por completo.
NOTA: Sila superficie de vidrio ya ha sufrido
marcas o hendiduras, el vidrio de fa estufo
deberd cambiarse. Enese caso, serd necesaria la
otenci6n de un tdcnico.
b. Quite el derrome con toullus de popel.
[] Cuolquier derrome restonte debe dejorse
hostu que Iosuperficie de Ioestufo se huyo
enfriudo.
Para solicitar repuestos
Poro solicitor el limpiudor de estufos
cer6micos CERANA BRYTE®y el rospodor de
estufos, Ilome onuestro n0mero grotuito:
Centro nacional de piezas 800.626.2002
Limpiador de estufas cer_micas CERANA
BRYTE®................... #WXIOX300
Raspador de estufas cer_micas
CERANA BRYTE®.......... #WXI OX0302
Kit....................... #WXJOXJJ7GCS
(Elkitincluyecremo,rospodorporoestufos,y lo
almohadilla)
Patios de limpieza CERAMA BRYTE®para
estufas cerSmicas ........ #WXl OX350
]4
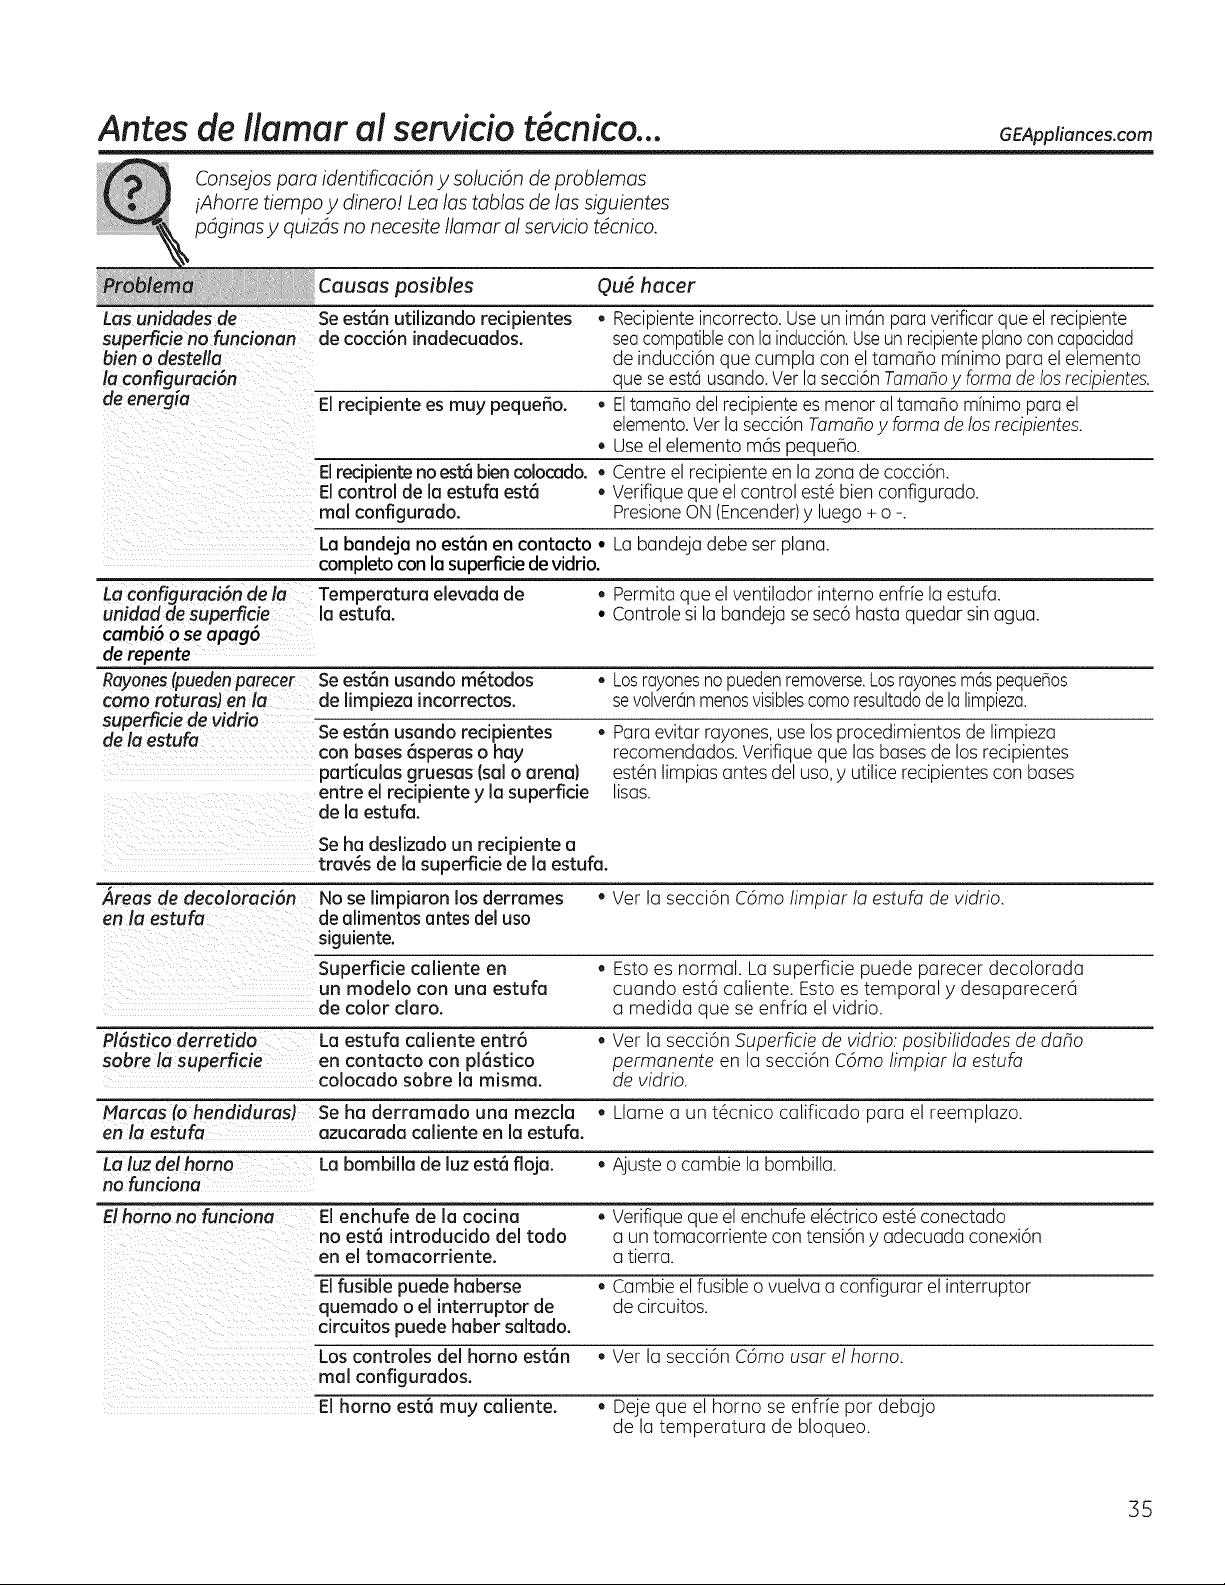
Antes de llamar a! serviciot cnico... GEAppliances.com
consejos para identificaci6n y soluci6n de problemas
iAhorre tiempo y dinero! Lea lostobias de lossiguientes
p@inas y quizds no necesite Ilamar al servicio tdcnico.
Causas posiNes (?u6 hacer
Losunidades de Seest6n utilizando recipientes _ Recipienteincorrecto. Useun imdnpara verificar que el recipiente
superficieno funcionan de cocci6n inadecuados, seacompatiblecon lainducci6n.Useunrecipientepianoconcapacidad
bien o destella de inducci6n que cumpla conel tamaho minima para el elemento
?aconfiguraci6n que se est6 usando.Ver la secci6n Tamahoy farinade los recipientes.
de energ[a El recipiente esmuy peque_o. _ Eltama_o del recipientees menor al tama_o minima para el
elemento.Ver la secci6nTamahoyfarina de losrecipientes.
Use elelemento m@spequeBo.
Elrecipientenoest_ biencolocado. • Centre el recipiente en la zonade cocci6n.
EJcontrol de la estufa est@ • Verifique que el control est6 bien configurado.
mal configurado. PresioneON(Encender)yluego + o -.
La bandeja no est6n en contacto • La bande]adebe serpiano.
completoconla superficie devidrio.
anCanfiguraci6nde la Temperatura elevada de . Permita que el ventilador interno enfriela estufa.
idad de superficie la estufa. • Controle sila bande]ase sec6 hasta quedar sin agua.
cambi6 o seapag6
de repente
Rayones(puedenparecer Seest(_nusando m6todos • Losrayonesnopuedenremoverse.Losrayonesm6speque_os
coma roturasJ en la de limpieza incorrectos, sevolver@nmenosvisiblescomaresultadodela limpieza.
superficie de vidrio
de la estufa Seest(_nusando recipientes _ Para evitar rayones, uselos procedimientos de limpieza
con bases _speras o hay recomendados. Verifique que los bases de losrecipientes
particulas gruesas (sol o arena} est6n limpias antes del usa,y utilice recipientesconbases
entre el recipientey la superfide lisas.
de la estufa.
Seha deslizado un redpiente a
trav6s de la superfidede la estufa.
Areas de decoloraci6n Nose limpiaron losderrames • Ver la secci6n C6mo limpiar la estufa de vidrio.
en la estufa de alimentosantes del usa
siguiente.
Superficie caliente en , Esto es normal, La superficie puede parecer decolorada
un modelo con una estufa cuando estc_caliente. Esto es temporal y desaparecerc_
de color clara, a medida que seenfr[a el vidrio.
PI6stico derretida La estufa caliente entr6 _ Ver la secci6n Superficie de vidrio: posibilidades de daho
sabre la superficie en contacto con pl6stico permanente en la secci6n C6mo limpiar la estufa
colocado sabre la misma, de vidrio.
Marcas fohendiduras) Se ha derramado una mezcla _ Llame a un t6cnico calificado para el reemplazo.
en la estufa azucarada calienteen la estufa.
La luzdel homo La bombilla de luzest8 floja. _ Ajuste o cambie la bombilla.
no funciona
Elhomo no funciana El enchufe de la coci na _ Verifique que el enchufe el6ctricoest6 conectado
no est8 introducido del todo a un tomacorriente contensi6n yadecuada conexi6n
en el tomacorriente, a tierra.
Elfusible puede haberse _ Cambie el fusible o vuelva a configurar el interruptor
quemado o el interruptor de de circuitos.
circuitos puede haber saltado.
Loscontroles del horno estSn _ Ver la secci6n C6mo usarel homo.
real configurados.
El homo est8 muy caliente. _ Dejeque el horno seenfr[e par debajo
de la temperatura de bloqueo.
35
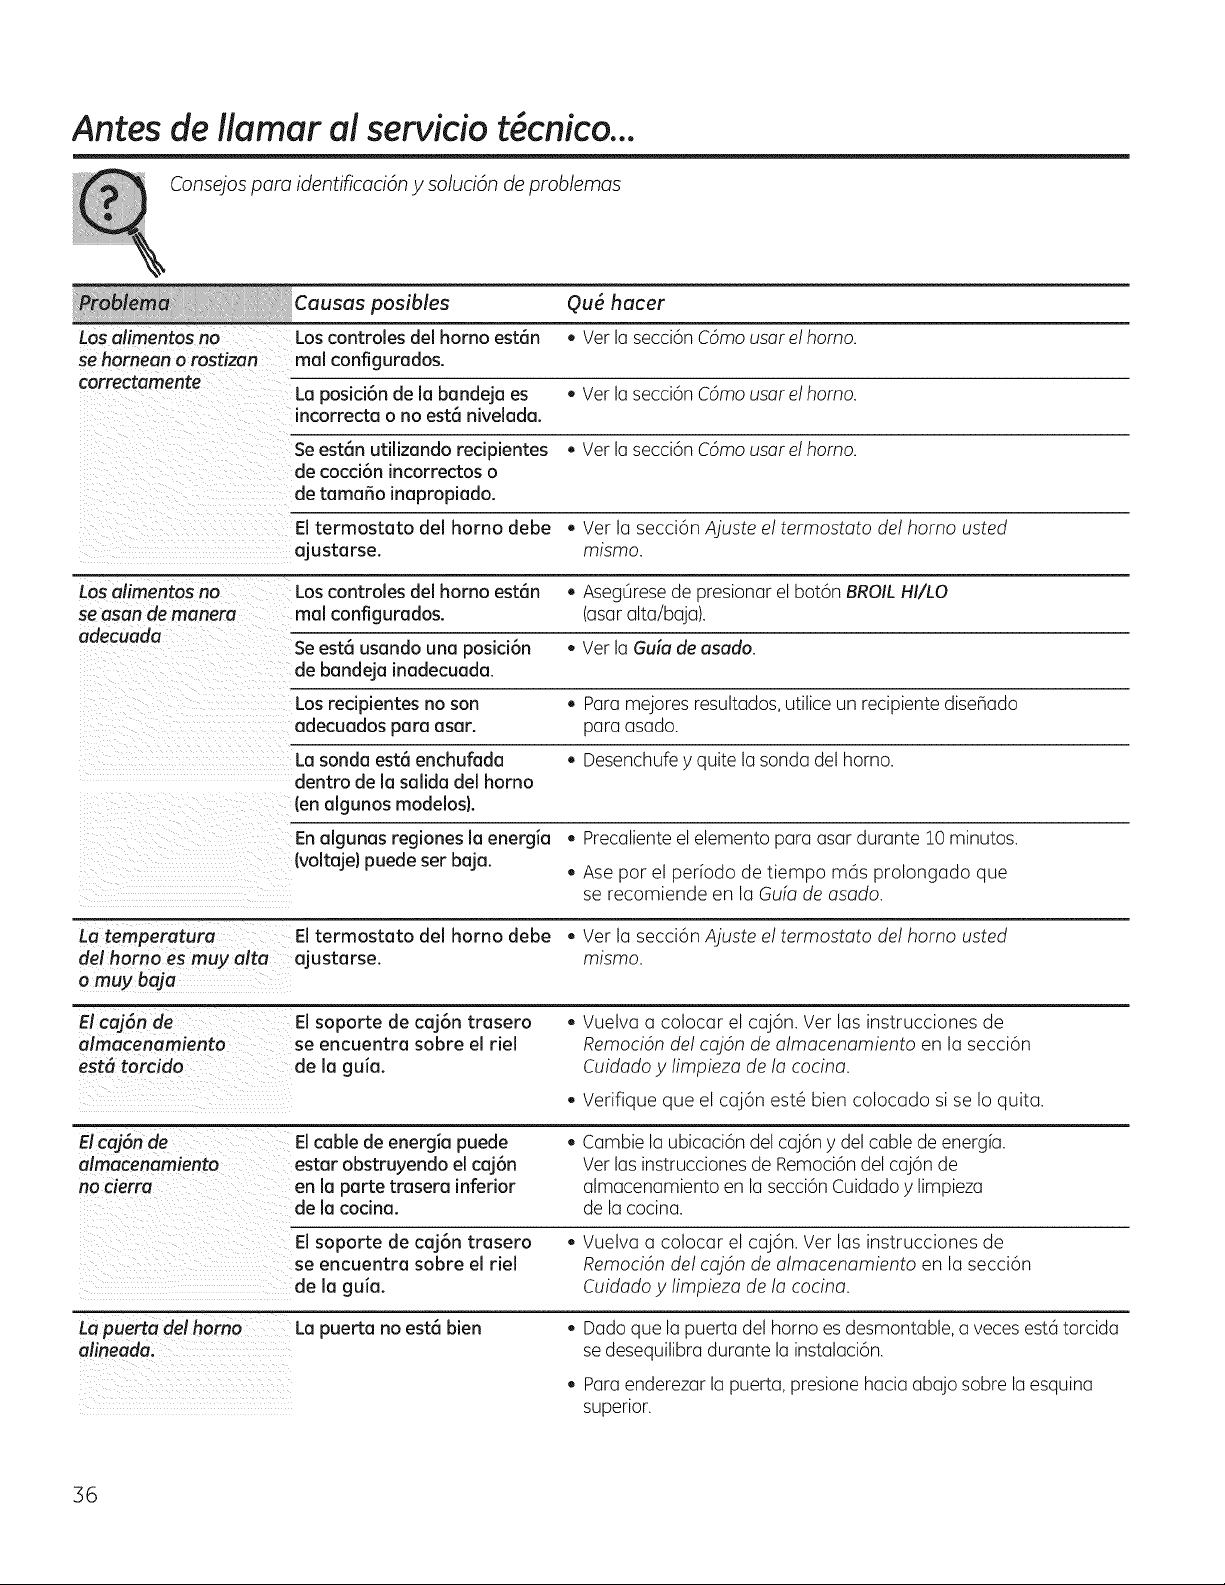
Antes de llamar al serviciot cnico...
Consejospara identificaci6n ,vsoluci6n de problemas
Causas posibles Qu6 hacer
Los alirnentos no Los controles del homo est6n • Ver la secci6n C6mo usarel homo.
se harnean orastizan mal configurados.
correctamente
La posici6n de la bandeja es • Vetla secci6n C6mo usarel homo.
incorrecta o no est6 nivelada.
Seest6n utilizando redpientes . Ver la secci6n C6mo usarel homo.
de cocci6nincorrectos o
de tamaSo inapropiado.
El termostato del horno debe . Ver la secci6n Ajuste el termostato del homo usted
ajustarse, mismo.
Los alimentos no Los controles del homo est_n . Aseg0rese de presionar el bot6n BROIL HI/LO
se asan de manera mal configurados. (asar alta/baja).
adecuada
Seest_ usando una posici6n • Ver la Guia de asada.
de bandeja inadecuada.
Losredpientes no son . Paramejores resultados,utilice un recipiente dise_ado
adecuados para asar. para asado.
La sonda est6 enchufada . Desenchufe yquitela sonda del homo.
dentro de la salida del homo
len algunos modelos).
En algunas regiones la energia . Precaliente el elemento para asardurante !0 minutos.
{voltaje)puede serbaja. . Asepot el periodo de tiempo m6s prolongado que
serecomiende en la Guia de asado.
La temperatura El termostato del horno debe . Ver la secci6n Ajuste el termostato del homo usted
del homo es muy alta ajustarse, mismo.
o muy baja
El caj6n de El soporte de caj6n trasero . Vuelva a colocar el caj6n. Ver las instrucciones de
almacenamiento se encuentra sobre el riel Remoci6n del caj6n de almacenamiento en la secci6n
est6 torcido de la guia. Cuidado 7 Iimpieza de la cocina.
. Verifique que el caj6n est6 bien colocado siseIoquita.
=
Elcaj6n de Elcable de energia puede . Cambie la ubicaci6n del caj6n y del cablede energia.
almacenamiento estar obstruyendo el caj6n Ver las instruccionesde Remoci6n del caj6nde
no cierra en la parte trasera inferior almacenamiento en la secci6nCuidado ylimpieza
de la cocina, de la cocina.
El soporte de caj6n trasero . Vuelva a colocar el caj6n. Ver las instrucciones de
se encuentra sobre el riel Remoci6n del caj6n de almacenamiento en la secci6n
de la guia. Cuidado y limpieza de la cocina.
La puerta del homo La puerta no est8 bien . Dado que la puerta del homo es desmontable, a veces est6 torcida
alineada, se desequilibra durante la instalaci6n.
Paraenderezarla pue_a, presionehaciaaba]o sobrela esquina
superior.
36
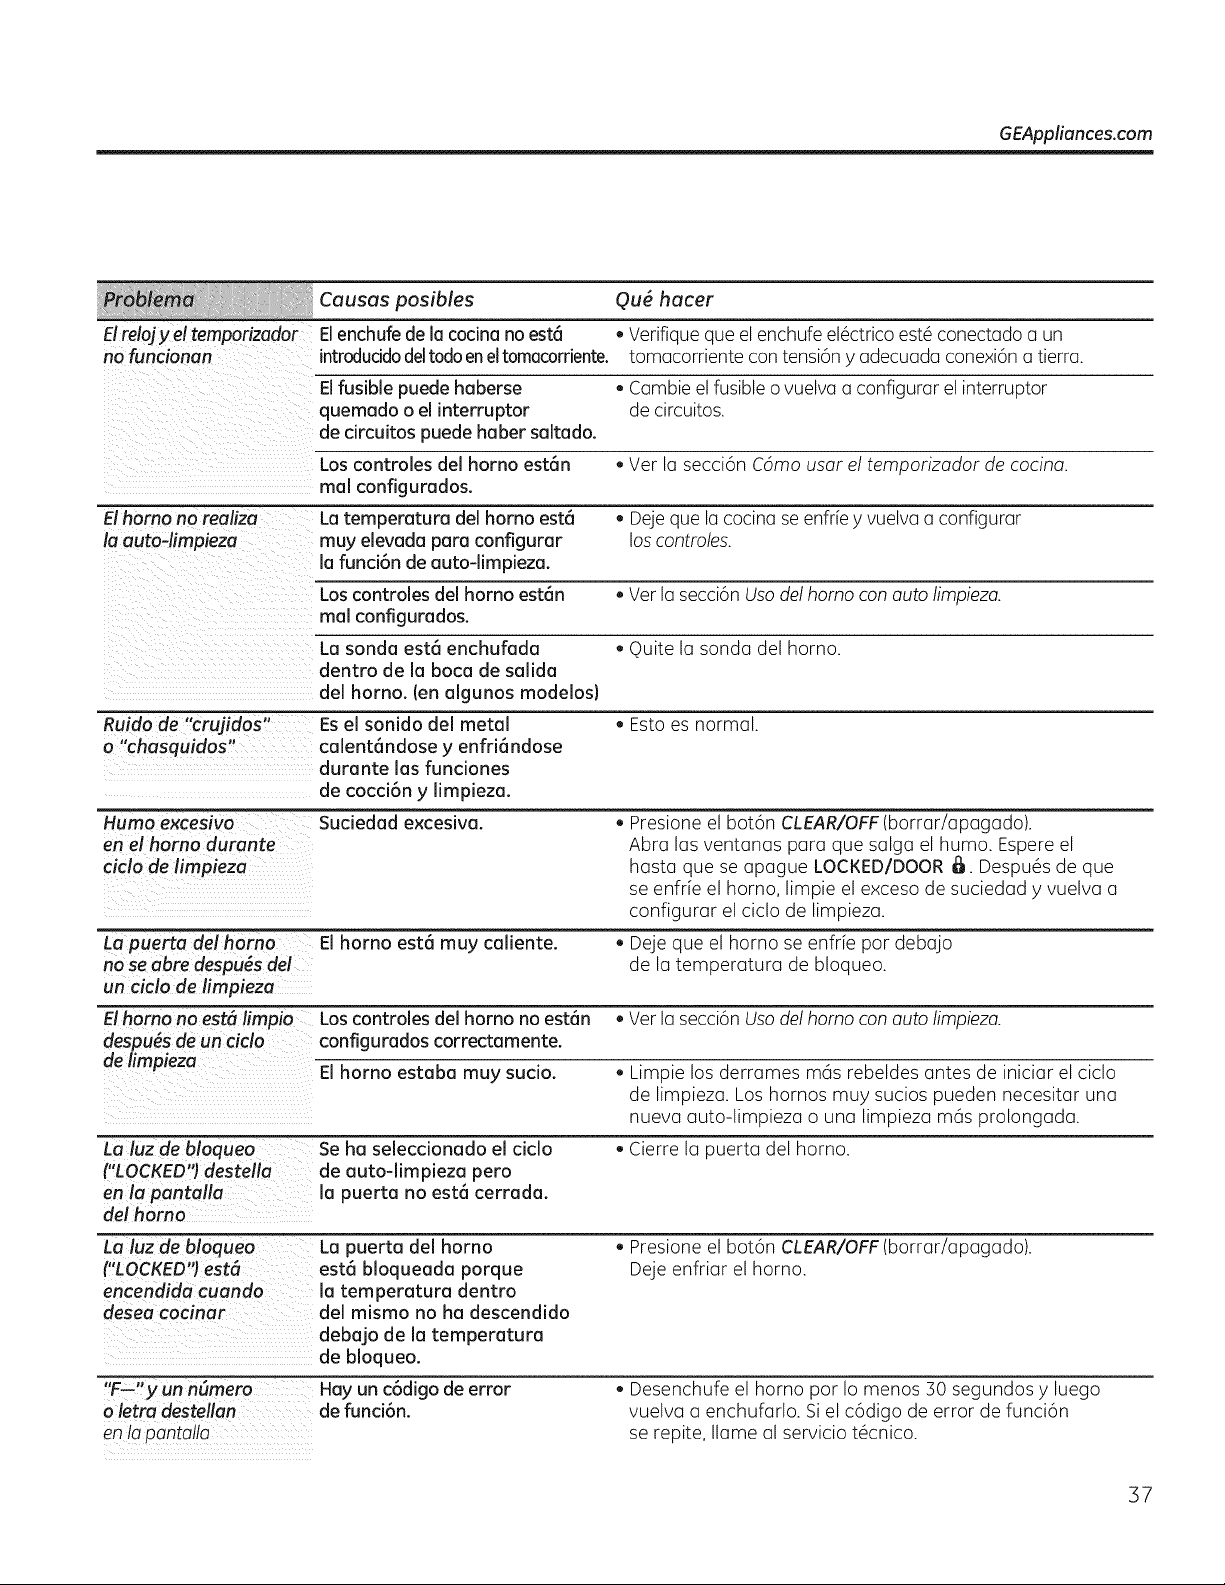
GEAppliances.com
Causas posibles (2u6 hacer
Elrelojy eltemporizador Elenchufe de la cocina no estc_ • Verifique que el enchufe el6ctrico est6 conectado a un
no funcJonan introduddo deltodoenel tomacorriente, tomacorriente con tensi6n y adecuada cone×i6n a tierra.
Elfusible puede haberse , Cambie el fusible o vuelva a configurar el interruptor
quemado o el interruptor de circuitos.
de drcuitos puede haber saltado.
Los controles del horno est6n , Ver la secci6n C6mo usarel temporizador de cocina.
mal configurados.
El homo no realiza La temperatura del homo est6 , Dejeque la cocina se enfrie y vuelva a configurar
la auto-limpieza muy elevada para configurar los controles.
la funci6n de auto-limpieza.
Los controles del homo est6n • Ver la secci6n Usodel homo con auto limpieza.
mal configurados.
La sonda est6 enchufada , Quite la sonda del homo.
dentro de la boca de salida
del homo. (en algunos modelos)
Ruido de "crujidos" Es el sonido del metal , Esto esnormal.
o "chasquidos" calent6ndose y enfri6ndose
durante las funciones
de cocci6n y limpieza.
Humo excesivo Suciedad excesiva. , Presioneel bot6n CLEAR/OFF(borrar/apagado).
en el horno durante Abra lasventanas para que salga el humo. Espere el
ciclo de limpieza hasta que seapague LOCKED/DOOR_. Despu6sde que
seenfrie el homo, limpie el exceso de suciedad y vuelva a
configurar el ciclo de limpieza.
_rta del homo El horno est_ muy caliente. , Dejeque el horno seenfrie pot debajo
no seabredespu_sdel de la temperatura de bloqueo.
un ciclo de limpieza
El homo no estH limpio Los controles del homo no est@n • Verla secci6n Usodel homo con auto limpieza.
despu#s de un ciclo configurados correctamente.
de limpieza El homo estaba muy sudo. , Limpie los derrames m6s rebeldes antes de iniciar elciclo
de limpieza. Los hornos muy sucios pueden necesitar una
nueva auto-limpieza o una limpieza mas prolongada.
Laluz_o Se ha seleccionado el ciclo , Cierre la puerta del homo.
( LOCKED _ destella de autodimpieza pero
en la pantalla la puerta no est6 cerrada.
de!homo
de bloqueo La puerto del homo
(LOCKED!') estH est6 bloqueada porque
encendidacuando la temperatura dentro
desea cocinar del mismo no ha descendido
debajo de la temperatura
de bloqueo.
F-- y un numero Hay un c6digo de error
oletradestellan de fund6n.
en !a panta!!a
Presioneel bot6n CLEAR/OFF(borrar/apagado).
Dejeenfriar el homo.
, Desenchufe el horno por Iomenos 30 segundos y luego
vuelva a enchufarlo. Si el c6digo de error de funci6n
serepite, Ilame al servicio t6cnico.
37
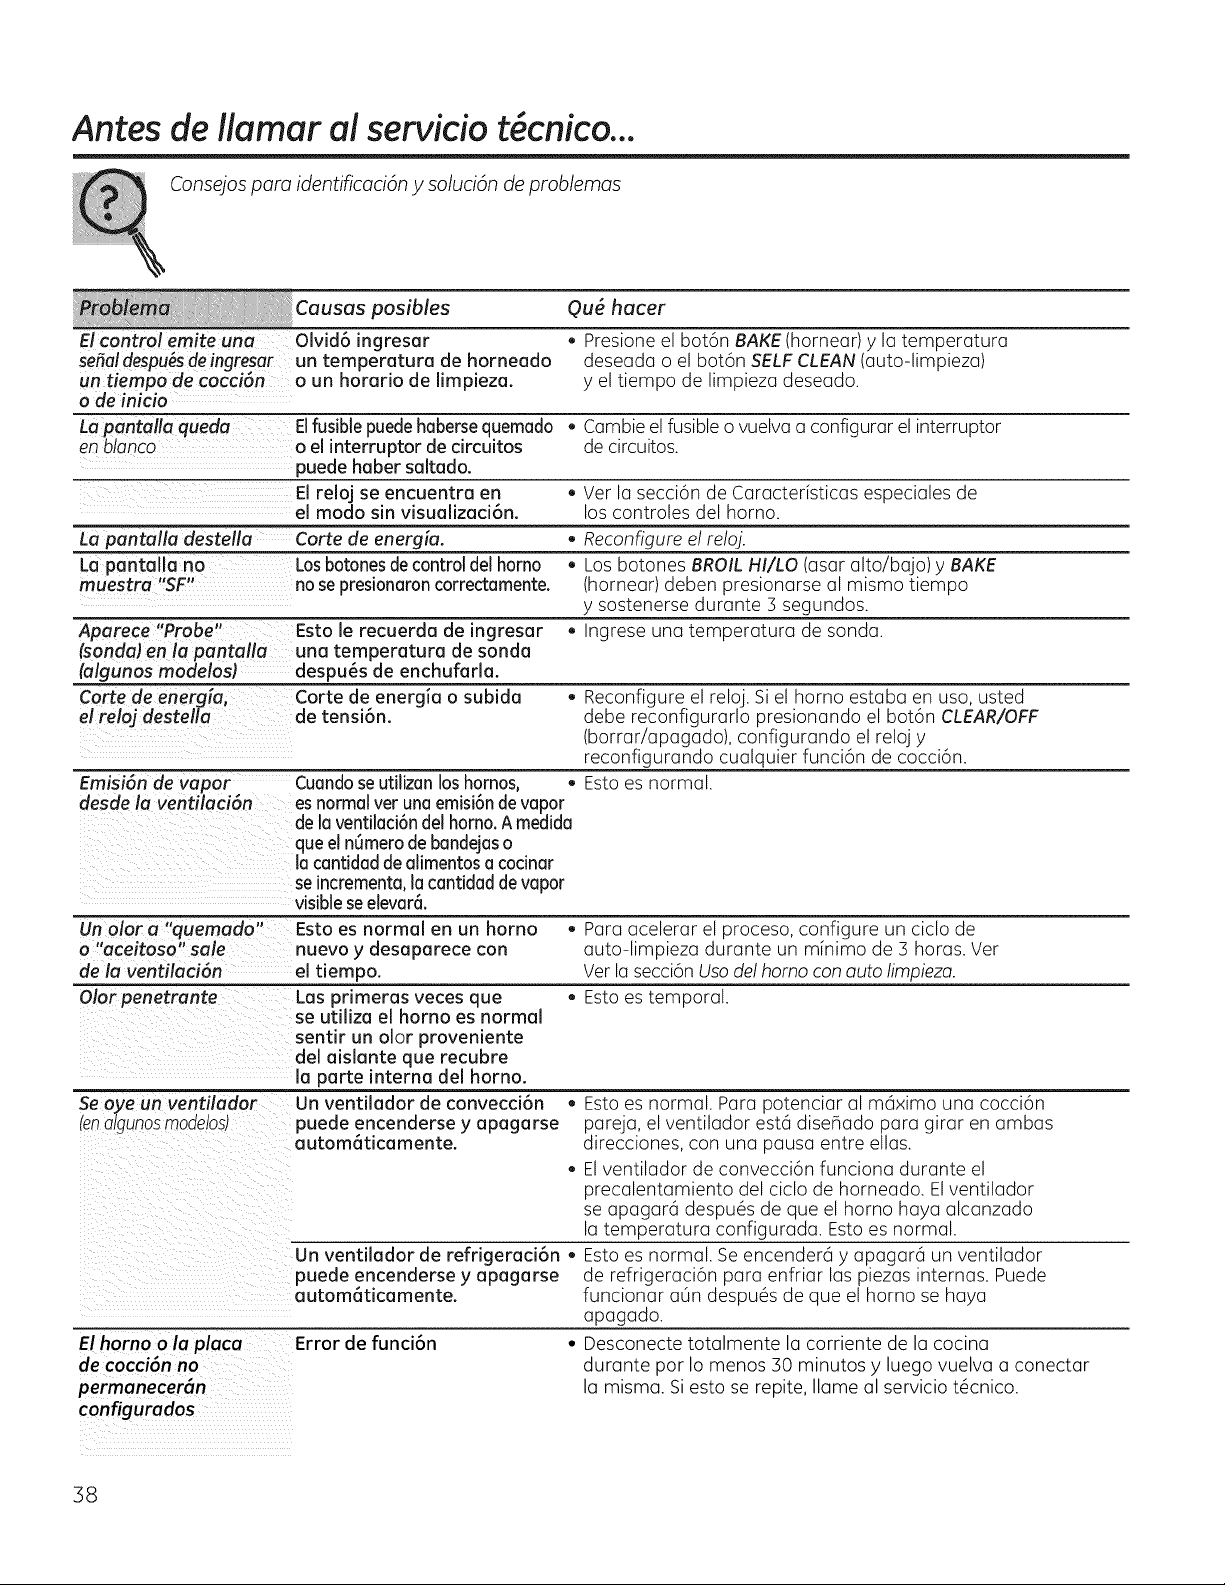
Antes de llamar al serviciot cnico...
Consejospara identificaci6n y soluci6n de problemas
Causas posibles Qu6 hacer
El control emite una OIvid6 ingresar , Presioneel bot6n BAKE(hornear) y la temperatura
seflaldespu_sdeingresar un temperatura de horneado deseada o el bot6n SELFCLEAN (auto-limpieza)
un tiempo de cacci6n o un horatio de limpieza, y el tiempo de limpieza deseado.
ode inicio
La pantalla queda Elfusiblepuedehabersequemado , Cambie el fusible o vuelva a configurar el interruptor
en blanco o el interruptor de circuitos de circuitos.
puede haber saltado.
El reloj seencuentra en _ Ver la secci6n de Caracter[sticas especiales de
el modo sin visualizaci6n, loscontroles del horno.
La pantalla destella Corte de energia. _ Reconfigure el reloj.
La pantalla no Losbotonesdecontroldet horno , Los botones BROIL HI/LO (asar alto/bajo) yBAKE
muestra "SF" no sepresionaroncorrectamente. (hornear) deben presionarse al mismo tiempo
y sostenerse durante 3 segundos.
Aparece "Probe" Esto le recuerda de ingresar , Ingrese una temperatura de sonda.
SaOndaJen la pantalla una temperatura de sonda
Igunosmodelos) despu6s de enchufarla.
_, Corte de energia osubida . Reconfigure el reloj. Si el horno estaba en uso, usted
elreloj destella de tensi6n, debe reconfigurarlo presionando el bot6n CLEAR/OFF
(borrar/apagado), configurando el reloj y
reconfigurando cualquier funci6n de cocci6n.
Cuandoseutilizan loshornos, . Esto esnormal.
es normalverunaemisi6nde vapor
de laventilaci6ndel homo.A medida
queel ntimerode bandejaso
la cantidaddeatimentosacocinar
se incrementa,lacantidad devapor
visibleseetevar6.
Emisi6n de vapor
desde la ventilaci6n
Un olor a "quemado" Esto esnormal en un homo
o "aceitoso" sale nuevo y desaparece con
de la ventilaci6n el tiempo.
Olor penetrante Las primeras veces que
Se oye un ventilador
_enalgunos moddosl
El homo o laplaca
de cocci6nno
permanecer6n
configurados
se utiliza el horno esnormal
sentir un olor proveniente
del aislante que recubre
la parte interna del homo.
Unventilador de convecci6n
puede encenderse y apagarse
autom6ticamente.
Un ventilador de refrigerad6n,
puede encenderse y apagarse
autom6ticamente.
Error de funci6n •
Para acelerar el proceso, configure un ciclo de
auto-limpieza durante un m[nimo de 3 horas. Vet
Vetla secci6nUsodel homo con auto limpieza.
Esto estemporal.
Esto esnormal. Para potenciar al mc_ximouna cocci6n
pareja, el ventilador estc_diseBado para girar en ambas
direcciones, con una pausa entre elias.
Elventilador de convecci6n funciona durante el
precalentamiento del ciclo de horneado. Elventilador
seapagar6 despu6s de que el homo haya alcanzado
la temperatura configurada. Esto esnormal.
Esto esnormal. Se encenderd yapagard un ventilador
de refrigeraci6n para enfriar laspiezas internas. Puede
funcionar adn despu6s de que el homo sehaya
apagado.
Desconecte totalmente la corriente de la cocina
durante por Iomenos 30 minutos y luego vuelva a conectar
la misma. Siesto serepite, Ilame al servicio t6cnico.
38
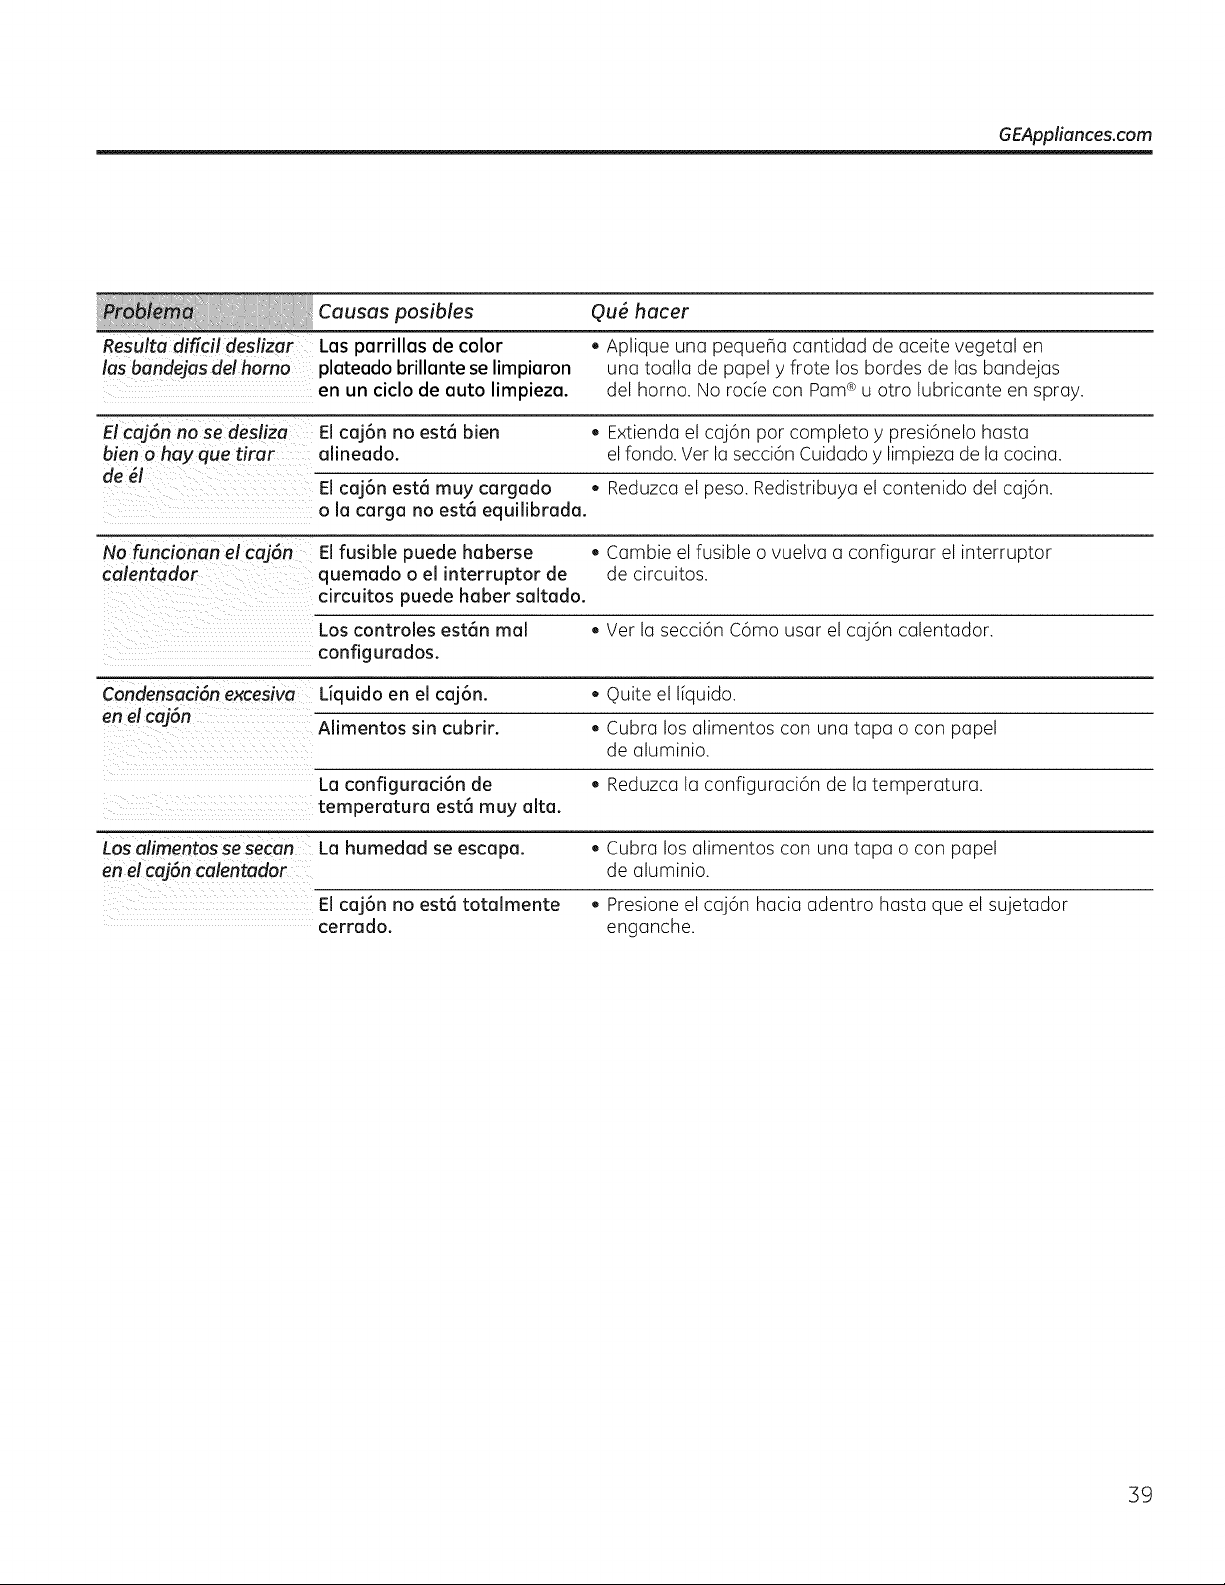
Resulta dificfl deslizar
lasbandejas de!homo
GEAppliances.com
El caj6n no se desliza
bien o hay que tirar
de _1
No funcionan el caj6--n
calentador
Causas posibles Ou6 hacer
Las parrillas de color . Aplique una pequeha cantidad de aceite vegetal en
plateaclo brillante selimpiaron una toalla de papel yfrote los bordes de lasbandejas
en un ciclo de auto limpieza, del homo. No rocie con Pare®u otro lubricante en spray.
El caj6n no est6 bien
alineado.
Extienda el caj6n por completo y presi6nelo hasta
el fondo. Ver la secci6nCuidadoy limpieza de la cocina.
El caj6n est6 muy cargado • Reduzcael peso. Redistribuya el contenido del caj6n.
o la carga no est@equilibrada.
El fusible puede haberse . Cambie el fusible o vuelva a configurar el interruptor
quemado o el interruptor de de circuitos.
circuitos puede haber saltado.
Loscontroles est@nmal . Ver la secci6n C6mo usar el caj6n calentador.
configurados.
Condensaci6n excesiva Liquido en el caj6n. • Quite el liquido.
en elcaj6n Alimentos sin cubrir. . Cubra los alimentos con una tapa o con papel
de aluminio.
La configuraci6n de . IReduzcala configuraci6n de la temperatura.
temperatura est@muy alta.
Los alimentas sesecan La humedad seescapa. . Cubra los alimentos con una tapa o con papel
en el caj6n calentador de aluminio.
El caj6n no est6 totalmente
cerrado.
Presione el caj6n hacia adentro hasta que el sujetador
enganche.
39

Notas.
40
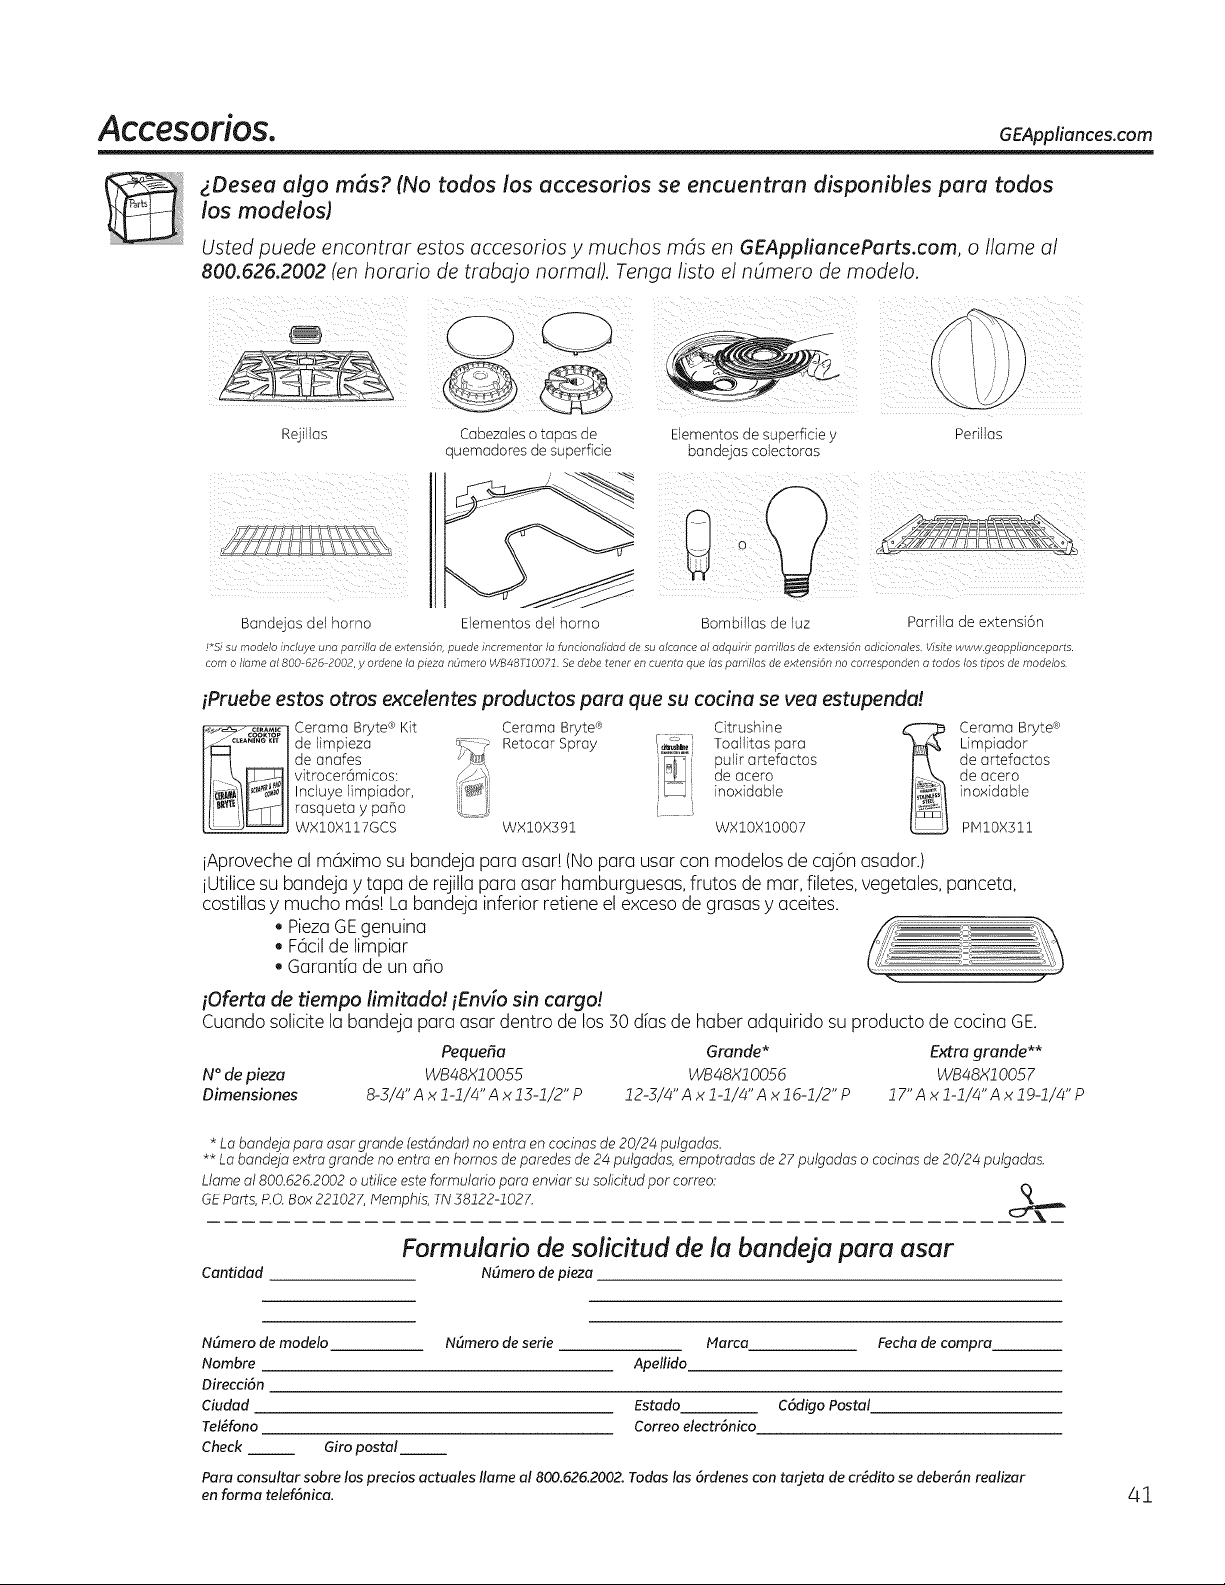
A ccesofi os. GEAppliances.com
_Deseaalga m6s? fNo todos los accesorios se encuentran disponibles para todos
los modelos)
Usted puede encontrar estos accesorios y muchos rods en GEApplianceParts.com, o Ilame al
800.626.2002 (en horario de trabajo normal). Tenga listo el nOrnero de rnodelo.
Rejillas
Bandejas del homo
Cabezaleso tapas de
uemadores de superficie
Elementosde superficiey
bandejascolectoras
Perillas
Elementos del homo
!*Si su modelo incluye una parrilla de extensi6n, puede incrementar la funcionalidad desu alcance al adquirir parrillos de extensidn adicionoles Visite www.geapplianceparts.
cam o Ilame o1800-626-2002, y ordene Io piezo ndmero WB48T20071 Sedebe tener en cuenta que los parrillas deextensi6n no corresponden atodos los tipos de modelos
iPruebe estos arras excelentes productos para que su cocina se yea estupenda!
_f,g_,_ Cerama Bryte®Kit Cerama Bryte° Citrushine _'_
........... de limpieza <.::=;_ Retocar Spray [_i;_, Toallitas para
Jde anafes "P_, J°........
t, k _l vitrocer6micos: ,_-:-_i I
puff
artefactos
de acero
Induye limpiador, _<qj
inoxidable
_ _, ....
J WXIOXll7GCS WXIOX]91 WXIOXIO007
Cerama Bryte®
Limpiador
de artefactos
de acero
ino×idable
PMlOX]22
iAproveche al m6ximo subandeja para asar! (No para usar con modelos de caj6nasador.)
iUtilice subandeja ytapa de rejilla para asarhamburguesas, frutos de mar, filetes,vegetales, panceta,
costillasy mucho mc_s!La bandeja inferiorretieneel exceso de grasasy aceites.
PiezaGEgenuina
Fckil de limpiar
Garantiade un a_o
iOferta de tiempo limitado! iEnvio sin cargo!
Cuandosolicite la bandeja para asardentro de los 30 alasde haber adquirido su producto de cocina GE.
Pequefla Grande*
N°depieza WB48X10055 WB48X10056
Dimensiones 8-3/4"A x 1-1/4"A x13-1/2" P 12-3/4" A x 1-1/4"A x 16-1/2" P
Extra grande**
WB48XJ 0057
J7"A x J-J/4"A x 19-l/4" P
* Labandeja pora asar grande (estdndor)no entroen cocinas de 20/24 pulgadas.
** Lo bondejoextra gronde no entro en homos de poredes de 2¢ pulgados, empotrodos de 27 pulgados o cocinas de20/2¢ pulgados.
Llameo1800.626.2002 o utiliceesteformulario poroenviar susolicitud par correo:
GEPorts,P.O.Box221027, IVlemphis,TN 38122-1027.
Cantidad
Formulario de solicitud de la bandeja para asar
N(lmero de pieza
N(lmero de modelo
Nombre
Direcci6n
Ciudad
Tel6fono
Check __ Giropostal
N_mero de serie Marca Fecha de compra
Apellido
Estado C6digo Postal
Correoelectr6nico
Para consultar sabre los precios actuales Ilame a1800.626.2002. Todas las 6rdenes con tarjeta de cr_dito se deber6n realizar
en forma telef6nica. 41

Notas.
42
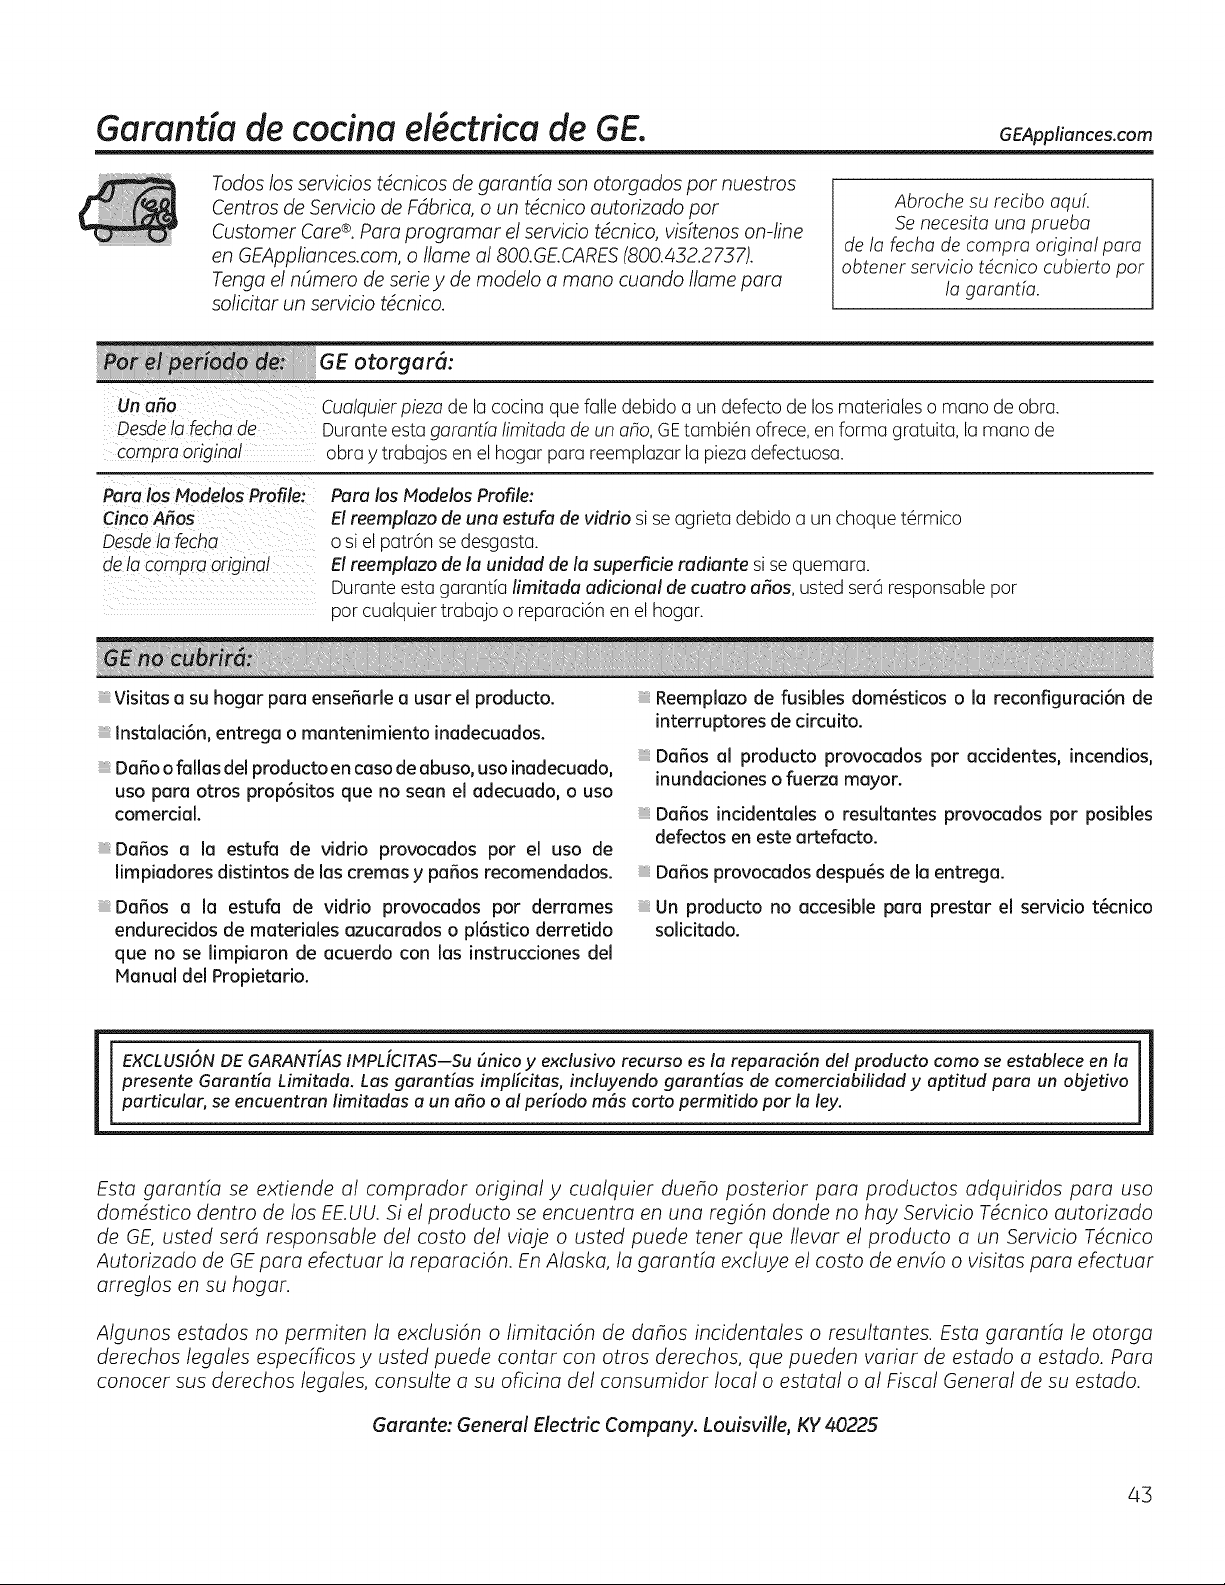
Garandade cocina el ctrica de GE. GEAppliances.com
Todos losservicios tdcnicos de garantfa son otorgados par nuestros
Centros de Servicio de Fdbrica, o un tdcnico autorizado par
Customer Care®,Para programar el servicio t4cnico, visftenos on-line
en GEAppliances.com, o Ilame a1800.GE.CARES(800.432.2737).
Tenga el nSmero de seriey de modelo a mona cuando Ilame para
solicitor un servicio tdcnico.
Abroche surecibo aquL
Se necesita una prueba
de la fecha de compra original para
obtener servicio tdcnico cubierto par
la garanda.
GE otorgar_:
Cualquierpieza de la cocina que falledebido a un defecto de losmaterialeso mano de obra.
Durante esta gamntla limitada de un aho, GEtambi6n ofrece,en forma gratuita, la manode
obra ytrabajos en el hogar para reemplazar la pieza defectuosa.
Unaria
Desdela fechade
compm original
Para losModelos Profile:
Cinco Arias
Oesdela fecha
de la compra onoinal
Para losModelas Profile:
El reemplaza de una estufa de vidrio sise agrietadebido a un choque t6rmico
o siel patr6n se desgasta.
El reemplaza de la unidad de la superficie radiante si sequemara.
Durante esta garantia limitada adicianal de cuatra arias, usted seraresponsable par
par cualquiertrabajo o reparaci6nen el hogar.
Visitas a su hogar para ense_arle a usarel producto.
Instalad6n, entrega o mantenimiento inadecuados.
Da_oo fallas del producto en caso deabuso, usa inadecuado,
usa para otros prop6sitos que no sean el adecuado, o usa
comerdal.
Daffos a la estufa de vidrio provocados par el usa de
limpiadores distintos de lascremas y paffos recomendados.
Daffos a la estufa de vidrio provocados par derrames
endureddos de materiales azucarados o pl6stico derretido
que no se limpiaron de acuerdo con las instrucdones del
Manual del Propietario.
Reemplazode fusibles dom6sticos o la reconfigurad6n de
interruptores de drcuito.
Da_os al producto provocados par accidentes, incendios,
inundaciones o fuerza mayor.
Daffos incidentales o resultantes provocados par posibles
defectos en este artefacto.
Da_os provocados despu6s de la entrega.
Un producto no accesible para prestar el servido t6cnico
solidtado.
EXCLUSIONDE GARANT[ASIMPLiCITAS--SuBnico y exclusiva recurso es la reparaci6n del producto coma seestableceen la
presente Garantia Limitada. Las garantias implicitas, incluyendo garantias de comerciabilidad y aptitud para un objetivo
particular, se encuentran limitadas a un aria o al periodo m6s corto permitido par la ley.
Esta garantia se extiende al comprador original y cualquier dueho posterior para productos adquiridos para usa
domdstico dentro de los EE.UU.Si el producto se encuentra en una regi6n donde no hay Servicio Tdcnico autorizado
de GE,usted serd responsable del costa del viaje ousted puede tenet que Ilevar el producto a un Servicio Tdcnico
Autorizado de GEpara efectuar la reparaci6n. En Alaska, la garantfa excluye el costa de envfo o visitas para efectuar
arreglos en su hogar.
Algunos estados no permiten la exclusi6n o limitaci6n de dahos incidentales o resultantes. Esta garantia le otorga
derechos legales espedficos y usted puede cantor con otros derechos, que pueden variar de estado a estado. Para
conocer sus derechos legales, consulte a su oficina del consumidor local o estatal o al Fiscal General de su estado.
Garante: General Electric Company. Louisville, KY 40225
43
Apoyo al cliente.
__ Web de GE_ GE4pplianc_s.cam
Jl J iTiene alguna pregunta sabre su electrodom6stico? iPruebe la p6gina Web de GEAppliances, 2a horas al dia,
| | cualquier dia del aho! Para mayor conveniencia y servicio m6s r6pido,ya puede descargar los Manuales de los
Propietarios, pedir piezas o incluso hacer una cita en linea para que vengan a realizar una reparaci6n.
Solicite una reparaci6n GEAppliances.com
Elservicio de expertos GEest6 a tan s61oun paso de su puerta, iEntre en linea y solicite su reparaci6n cuando le
venga cualquier dia del aho! O Ilame a1800.GE.CARES(800.432.2737) durante horas normales de oficina.
RealLifeDesignStudio(Estudiodedisehoparalavidareal) GE4ppliances.com
GEapoyael conceptode DiseBoUniversal-productos, serviciosyambientesque pueden usar gentede todas las
edades, tama_os y capacidades. Reconocemos la necesidad de diseBarpara una gran gama de habilidadesy
dificultades fisicasymentales. Para m6s detalles cobrelas aplicacionesde GEDiseBoUniversal,incluyendo ideas
de diseBopara lacocina para personascondiscapacidades, mirenuestra p6gina Webhaymismo. Parapersonas
condificultades auditivas, favor de Ilamar a1800.TDD.GEAC(800.833.4322).
Garantios amp/iadas GE4ppliances.com
Compre una garant[a ampliada y obtenga detalles sobre descuentos especiales disponibles mientras su garant[a
est6 a6n activa. Puede comprarla en I[nea en cualquier momento, o Ilamar al 800.626.222a durante horas
normales de oficina. GEConsumer Home Services estar6 a0n ah[ cuando su garant[a termine.
Piezas 2 accesorios GEApplianceParts.com
Aquellos individuos con la calificaci6n necesaria para reparar sus propios electrodom6sticos pueden pedir que
se les manden las piezas o accesorios directamente a sus hogares (aceptamos las tarjetas VISA,MasterCard y
Discover). Haga su pedido en linea hoy, 2a horas cada d[a o Ilamar por tel6fono al 800.626.2002 durante horas
normales de oficina.
Lasinstruccionesdescritas en este manual cubren losprocedimientos a seguirpar cualquier usuario. Cualquier
otra reparaci6n deberia, par regla general,referirsea personalcalificado autorizado.Debe ejercerse precauci6n
yaque las reparaciones incorrectas pueden causar condicionesde funcionamiento inseguras.
ase en contacto con nosotros GEAppliances.com
Si no est6 satisfecho con el servicio que recibe de GE,p6ngase en contacto con nosotros en nuestra p6gina
Web indicando todos los detalles asi como su n0mero de tel6fono o escribanos a:
General Manager, Customer Relations
GEAppliances,Appliance Park
Louisville,KY40225
£egistre su electrodomdstico GE4ppliances.com
iRegistre su nuevo electrodomdstico en Ifnea-cuando usted prefiera! El registrar su producto a tiempo le
proporcionar6, sisurgiera lanecesidad, una mejor comunicaci6n y un servicio m6s r6pido bajo los t6rminos de
su garant[a, mambi6n puede enviar su tarjeta de registro pre-impresa que se incluye en el material de embalaje.
aa

