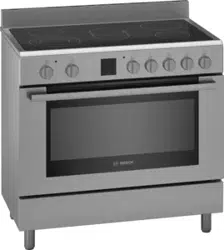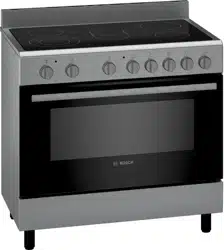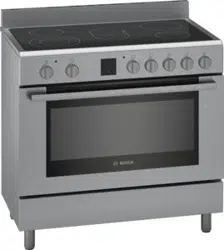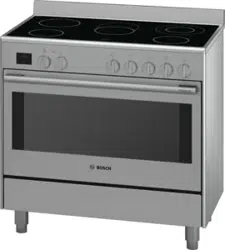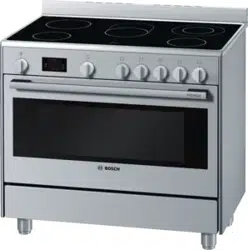
Free standing cooker
Cuisinière
HCB738356M
[en] Instruction manual ............. 3 [fr] Notice d’utilisation ........... 15
[ar]
π≤à°ùªdG óbƒªdG
∫
ɪ©à°S’G
π
«dO
........................ 3


3
Ú Table of contents
[en]Instruction manual
Important safety information.....................................................4
Causes of damage .............................................................................6
Your new appliance....................................................................7
The control panel................................................................................7
Control panel .......................................................................................8
Buttons and display............................................................................8
The hob.................................................................................................8
The oven...............................................................................................8
Cooling fan...........................................................................................8
The storage compartment.................................................................9
Accessories .........................................................................................9
Before using the oven for the first time..................................10
Setting the clock ..............................................................................10
Baking out the oven ........................................................................10
Cleaning the accessories............................................................... 10
Setting the hob .........................................................................10
Switching the hob on and off ........................................................10
Large dual-circuit hotplate and extended cooking zone.......... 10
How to operate your oven........................................................11
Oven lighting.....................................................................................11
Operating modes............................................................................. 11
Operating the oven.......................................................................... 11
Operating the rotary spit................................................................. 11
Setting the time-setting options..............................................12
Timer ..................................................................................................12
Cooking time ....................................................................................12
End time.............................................................................................13
Clock .................................................................................................. 14
Childproof lock .........................................................................14
Changing the basic settings ...................................................14
Care and cleaning ....................................................................14
Cleaning agents ...............................................................................15
Catalytic cooking compartment panels....................................... 15
Removing and fitting the appliance door....................................16
Removing and inserting the hook-in racks ................................. 16
Troubleshooting .......................................................................17
Error messages................................................................................ 17
Replacing the oven light bulb........................................................ 17
After-sales service ...................................................................18
Energy and environment tips..................................................18
Saving energy with your oven ....................................................... 18
Saving energy with the hob ........................................................... 18
Environmentally-friendly disposal.................................................. 18
Produktinfo
Additional information on products, accessories, replacement
parts and services can be found at
www.bosch-home.com and in the online shop
www.bosch-eshop.com

4
: Important safety information
Read these instructions carefully. Only then
will you be able to operate your appliance
safely and correctly. Retain the instruction
manual and installation instructions for
future use or for subsequent owners.
Check the appliance for damage after
unpacking it. Do not connect the appliance
if it has been damaged in transport.
Only a licensed professional may connect
appliances without plugs. Damage caused
by incorrect connection is not covered
under warranty.
This appliance is intended for domestic use
only. The appliance must only be used for
the preparation of food and drink. The
appliance must be supervised during
operation. Only use this appliance indoors.
This appliance is intended for use up to a
maximum height of 2000 metres above sea
level.
This appliance is not intended for operation
with an external clock timer or a remote
control.
Do not use covers. These can cause
accidents, due to overheating, catching fire
or materials shattering, for example.
Do not use inappropriate child safety
shields or hob guards. These can cause
accidents.
This appliance may be used by children
over the age of 8 years old and by persons
with reduced physical, sensory or mental
capabilities or by persons with a lack of
experience or knowledge if they are
supervised or are instructed by a person
responsible for their safety how to use the
appliance safely and have understood the
associated hazards.
Children must not play with, on, or around
the appliance. Children must not clean the
appliance or carry out general maintenance
unless they are at least 8 years old and are
being supervised.
Keep children below the age of 8 years old
at a safe distance from the appliance and
power cable.
Always slide accessories into the cooking
compartment correctly. See "Description of
accessories in the instruction manual.
Risk of fire!
■
Combustible items stored in the cooking
compartment may catch fire. Never store
combustible items in the cooking
compartment. Never open the appliance
door if there is smoke inside. Switch off
the appliance and unplug it from the
mains or switch off the circuit breaker in
the fuse box.
Risk of fire!
■
A draught is created when the appliance
door is opened. Greaseproof paper may
come into contact with the heating
element and catch fire. Do not place
greaseproof paper loosely over
accessories during preheating. Always
weight down the greaseproof paper with a
dish or a baking tin. Only cover the
surface required with greaseproof paper.
Greaseproof paper must not protrude over
the accessories.
Risk of fire!
■
Hot oil and fat can ignite very quickly.
Never leave hot fat or oil unattended.
Never use water to put out burning oil or
fat. Switch off the hotplate. Extinguish
flames carefully using a lid, fire blanket or
something similar.
Risk of fire!
■
The hotplates become very hot. Never
place combustible items on the hob.
Never place objects on the hob.
Risk of fire!
■
The hob switches off automatically and
can no longer be operated. It may switch
on unintentionally at a later point. Switch
off the circuit breaker in the fuse box.
Contact the after-sales service.
Risk of fire!
■
The appliance becomes very hot and
flammable materials could catch fire.
Never store or use flammable
objects (e.g. spray cans, cleaning agents)
under the appliance or in its immediate
vicinity. Never place flammable items on
or in the appliance.
Risk of fire!
■
The surfaces of the plinth drawer may
become very hot. Only store oven
accessories in the drawer. Flammable and
combustible objects must not be stored in
the plinth drawer.

5
Risk of burns!
■
The appliance becomes very hot. Never
touch the interior surfaces of the cooking
compartment or the heating elements.
Always allow the appliance to cool down.
Keep children at a safe distance.
Risk of serious burns!
■
Accessories and ovenware become very
hot. Always use oven gloves to remove
accessories or ovenware from the cooking
compartment.
Risk of burns!
■
Alcoholic vapours may catch fire in the hot
cooking compartment. Never prepare food
containing large quantities of drinks with a
high alcohol content. Only use small
quantities of drinks with a high alcohol
content. Open the appliance door with
care.
Risk of burns!
■
The hotplates and surrounding area
(particularly the hob surround, if fitted)
become very hot. Never touch the hot
surfaces. Keep children at a safe distance.
Risk of burns!
■
The hotplate heats up but the display does
not work. Switch off the circuit breaker in
the fuse box. Contact the after-sales
service.
Risk of scalding!
■
The accessible parts become hot during
operation. Never touch the hot parts. Keep
children at a safe distance.
Risk of scalding!
■
When you open the appliance door, hot
steam may escape. Open the appliance
door with care. Keep children at a safe
distance.
Risk of scalding!
■
Water in a hot cooking compartment may
create hot steam. Never pour water into
the hot cooking compartment.
Risk of injury!
■
Scratched glass in the appliance door
may develop into a crack. Do not use a
glass scraper, sharp or abrasive cleaning
aids or detergents.
Risk of injury!
■
Saucepans may suddenly jump due to
liquid between the pan base and the
hotplate. Always keep the hotplate and
saucepan bases dry.
Risk of injury!
■
If the appliance is placed on a base and is
not secured, it may slide off the base. The
appliance must be fixed to the base.
Risk of electric shock!
■
Incorrect repairs are dangerous. Repairs
may only be carried out and damaged
power cables replaced by one of our
trained after-sales technicians. If the
appliance is defective, unplug the
appliance from the mains or switch off the
circuit breaker in the fuse box. Contact the
after-sales service.
Risk of electric shock and serious injury!
■
The cable insulation on electrical
appliances may melt when touching hot
parts of the appliance. Never bring
electrical appliance cables into contact
with hot parts of the appliance.
Risk of electric shock!
■
Do not use any high-pressure cleaners or
steam cleaners, which can result in an
electric shock.
Risk of electric shock!
■
When replacing the cooking compartment
bulb, the bulb socket contacts are live.
Before replacing the bulb, unplug the
appliance from the mains or switch off the
circuit breaker in the fuse box.
Risk of electric shock!
■
A defective appliance may cause electric
shock. Never switch on a defective
appliance. Unplug the appliance from the
mains or switch off the circuit breaker in
the fuse box. Contact the after-sales
service.
Risk of electric shock!
■
Cracks or fractures in the glass ceramic
may cause electric shocks. Switch off the
circuit breaker in the fuse box. Contact the
after-sales service.

6
Causes of damage
Hob
Caution!
■ Rough pot and pan bases scratch the ceramic.
■ Avoid boiling pots dry. This may cause damage.
■ Never place hot pots or pans on the control panel, the
display area or the surround. This may cause damage.
■ Damage can occur if hard or pointed objects fall on the hob.
■ Aluminium foil and plastic containers melt on hot hotplates.
Oven protective foil is not suitable for your hob.
Overview
The following table provides an overview of the most frequent
kinds of damage:
Oven
Caution!
■ Accessories, foil, greaseproof paper or ovenware on the
cooking compartment floor: do not place accessories on the
cooking compartment floor. Do not cover the cooking
compartment floor with any sort of foil or greaseproof paper.
Do not place ovenware on the cooking compartment floor.
This will cause heat accumulation. The baking and roasting
times will no longer be correct and the enamel will be
damaged.
■ Inserting accessories: depending on the appliance model,
accessories can scratch the door panel when closing the
appliance door. Always insert the accessories into the
cooking compartment as far as they will go.
■ Water in a hot cooking compartment: do not pour water into
the cooking compartment when it is hot. This will cause
steam. The temperature change can cause damage to the
enamel.
■ Moist food: do not store moist food in the cooking
compartment when it is closed for prolonged periods This will
damage the enamel.
■ Fruit juice: when baking particularly juicy fruit pies, do not
pack the baking tray too generously. Fruit juice dripping from
the baking tray leaves stains that cannot be removed. If
possible, use the deeper universal pan.
■ Cooling with the appliance door open: only allow the cooking
compartment to cool when it is closed. Even if the appliance
door is only open a little, front panels of adjacent units could
be damaged over time.
■ Heavily soiled oven seal: if the oven seal is heavily soiled, the
oven door will no longer close properly when the oven is in
operation. The fronts of adjacent units could be damaged.
Always keep the oven seal clean.
■ Oven door as a bearing surface: do not stand or place
objects on the oven door when it is open. Do not hang
objects on the oven door.
■ Carrying the appliance: do not carry or hold the appliance by
the door handle. The door handle cannot support the weight
of the appliance and could break.
■ Heavy accessories: do not pull out heavily laden accessories
too far without first unloading them sufficiently. Heavy
accessories will tip when pulled out. This causes pressure to
be exerted on the shelf supports in the cooking compartment,
which can damage the enamel. Relieve the strain on the
accessories when they are pulled out by raising them slightly
with one hand. Caution: always use an oven cloth or oven
gloves when handling hot accessories.
Storage compartment
Caution!
Do not place hot objects in the storage compartment. It could
be damaged.
Damage Cause Action
Stains Food spills Remove spills immediately with a glass scraper.
Unsuitable cleaning agents Only use cleaning agents which are suitable for ceramic
Scratches Salt, sugar and sand Do not use the hob as a work surface or storage space.
Rough pot and pan bases scratch the
ceramic.
Check your cookware.
Discolouration Unsuitable cleaning agents Only use cleaning agents which are suitable for ceramic
Pan abrasion (e.g. aluminium) Lift the pots and pans when moving them.
Blisters Sugar, food with a high sugar content Remove spills immediately with a glass scraper.
7
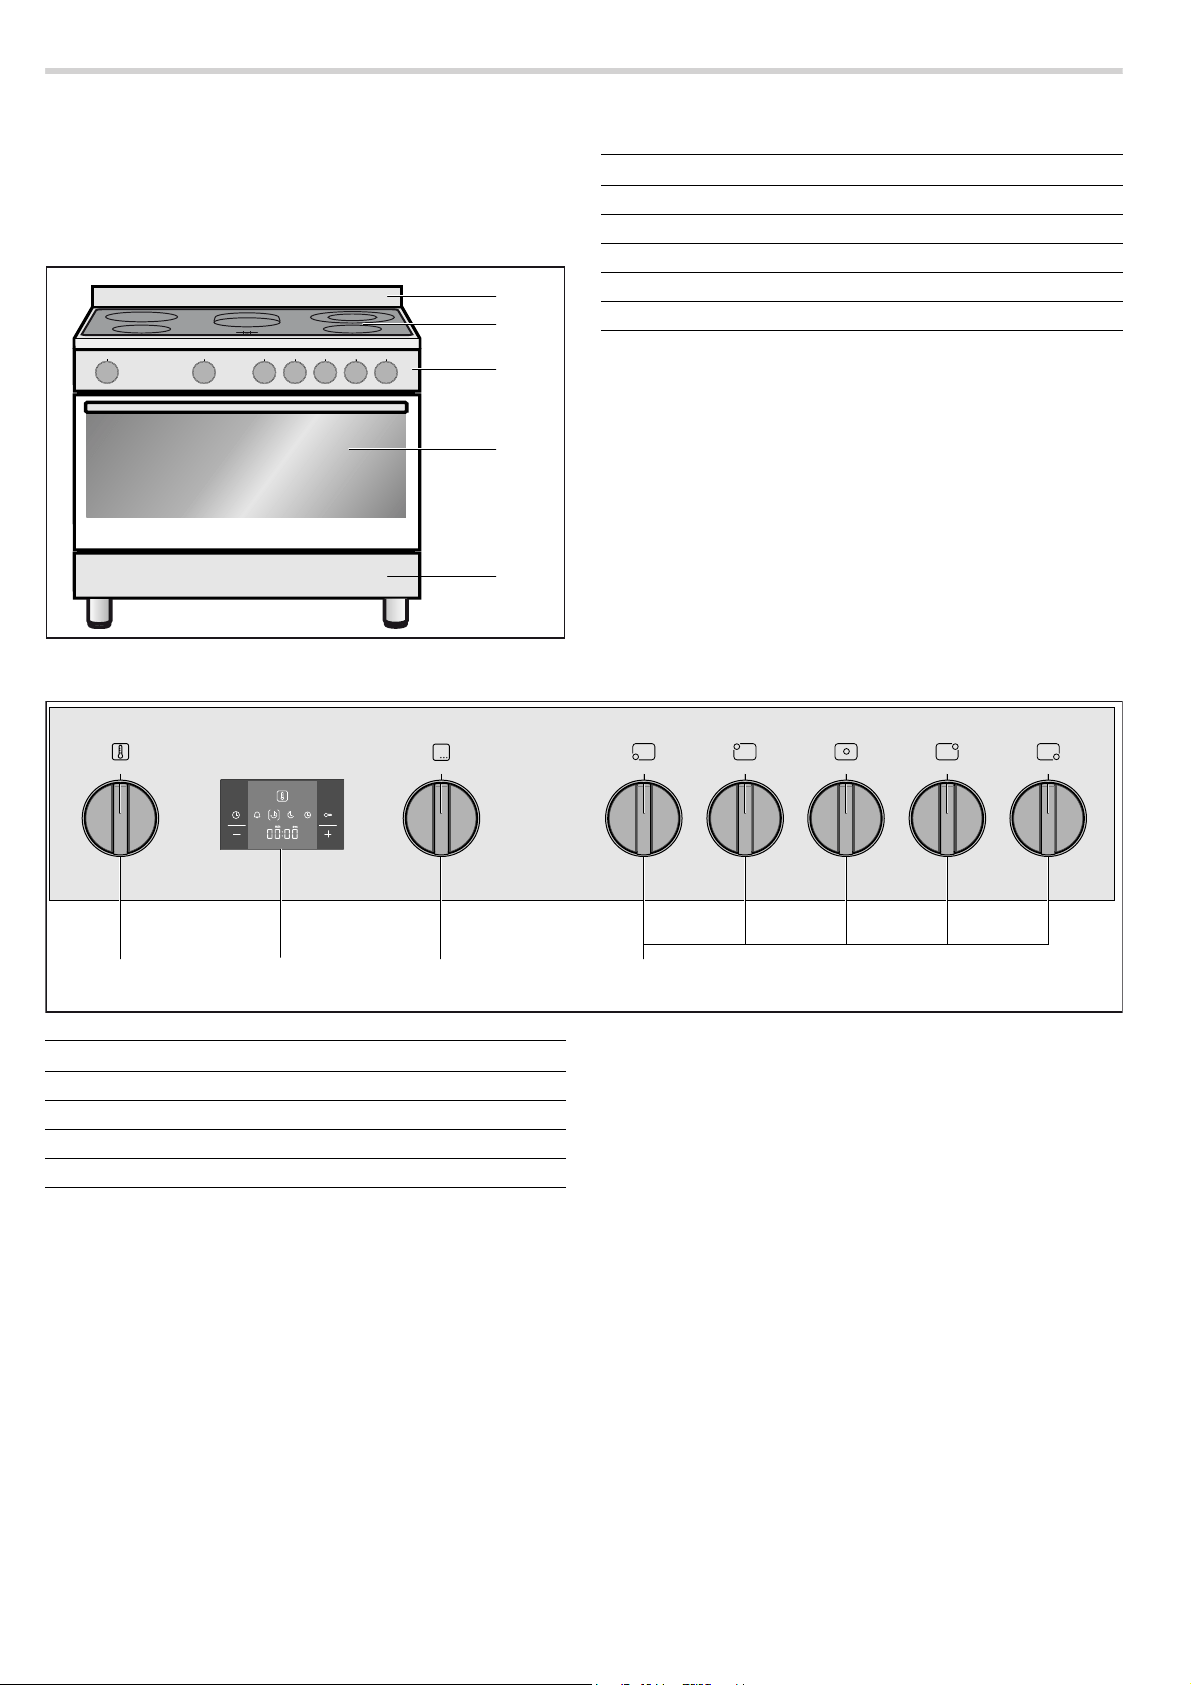
Your new appliance
Get to know your appliance. You will find information about the
control panel and hob, as well as the oven, types of heating
and accessories.
Depending on the appliance model, individual details may
differ.
The control panel
Explanation
1 Splatter guard
2 Hob
3 Control panel
4 Oven
5 Storage compartment
Explanation
1 Control knob for oven temperature
2 Control panel
3 Control knob for oven functions
4 Control knob for hotplates

8
Control panel
Here, you can see an overview of the control panel. All of the
symbols never appear in the display at the same time.
Depending on the appliance model, individual details may
differ.
Buttons
The sensors are located under the individual buttons. They
must not be pressed too firmly. Only touch the corresponding
symbol.
Buttons and display
You can use the buttons to set various additional functions. On
the display, you can read the values that you have set.
The time-setting option that is currently selected in the display
is indicated by brackets [ ] around the corresponding symbol.
Exception: For the clock, the
0 symbol only lights up if the time
is being changed.
The hob
Control knob for hotplates
The control knobs are used to set the heat setting of the
individual hotplates.
Residual heat indicator
The hob has a residual heat indicator for each hotplate. It
shows which hotplates are still hot. Even if the hob is switched
off, the display remains lit until the hotplate has cooled down
sufficiently.
You can save energy by using the residual heat to keep a small
dish warm, for example.
The oven
In order to operate the oven, you require two operating knobs:
The function selector and the temperature selector.
Control knob for oven
Function selector
Set the operating mode using the function selector.
Temperature selector
Set the temperature using the temperature selector.
There is a limit stop between settings 260 and
Û. Do not turn
the knob beyond this point.
Cooling fan
The cooling fan switches on and off as required. The hot air
escapes above the door. Caution: Do not cover the ventilation
slots. Otherwise the oven will overheat.
So that the cooking compartment cools down more quickly
after operation, the cooling fan continues to run for a certain
period afterwards.
Button Use
0
Time-setting options
Selects the timer
U, cooking
time
r, end time p and clock 0.
D
Childproof lock Locks and unlocks oven functions.
A
@
Minus
Plus
Decreases the set values.
Increases the set values.
Explanation
1 Hotplate 145 mm
2 Extended cooking zone 170 x 265 mm
3 Hotplate 180 mm
4 Dual-circuit hotplate 120 and 210 mm
5 Hotplate 145 mm
6 Residual heat indicator
Setting Meaning
Û
Off position The hotplate is switched off.
1-9 Heat settings 1 = lowest setting
9 = highest setting
ð, ç
Automatic zone
control
Switches on the large dual-circuit
hotplate or extended cooking
zone.
Symbol Meaning
Û
Off position
%
Top/bottom heating*
$
Bottom heating
G
Grill/rotary spit
(
Full-surface grill
7
Hot air grill
N
Top/bottom heating and hot air
<
Hot air
B
Defrost setting
* Type of heating used to determine the energy efficiency class
in accordance with EN50304.
Setting Meaning
Û
Off
50 - 260 Temperature range in °C

9
The storage compartment
Open the storage compartment by folding down the fascia
panel.
This compartment can be used to store hob or oven
accessories.
: Risk of fire!
Never leave combustible items in the storage compartment.
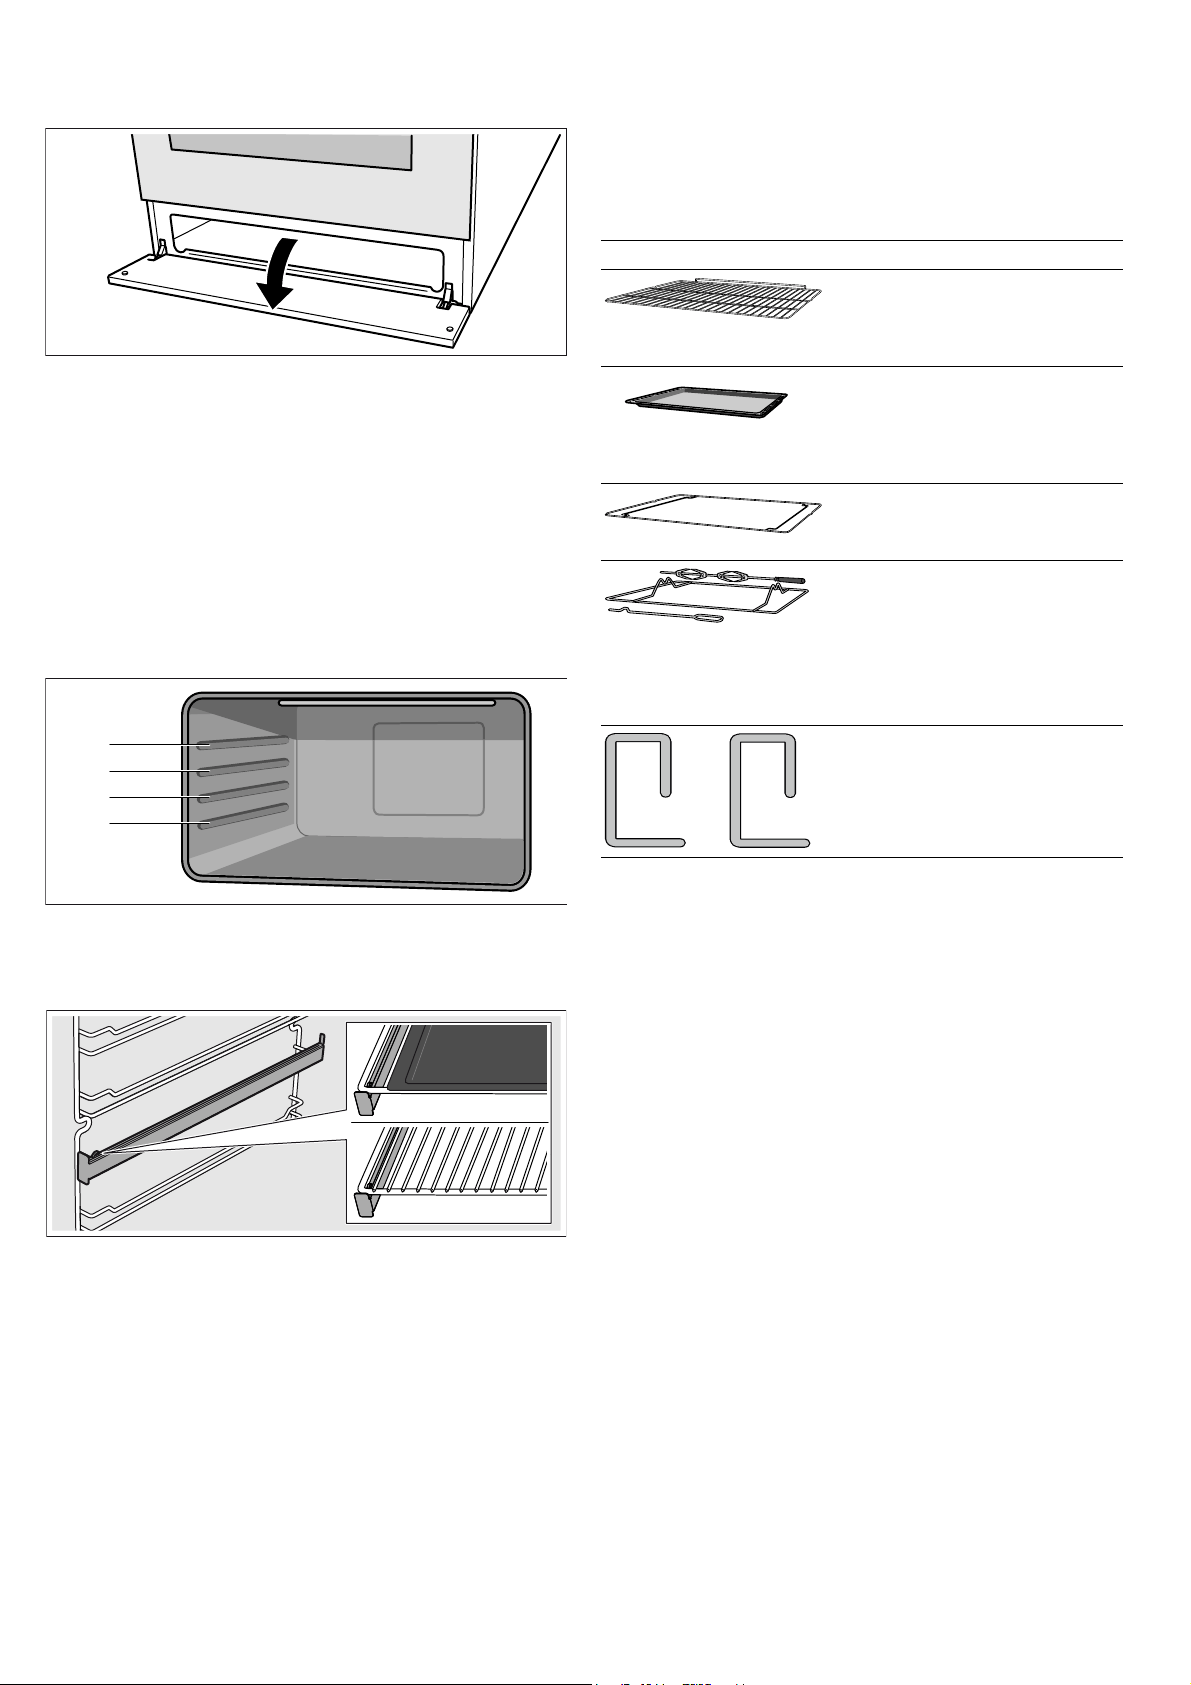
Accessories
The accessories can be inserted into the cooking compartment
at 4 different levels. Always insert them as far as they will go so
that the accessories do not touch the door panel. Ensure that
the accessories have always been inserted into the cooking
compartment correctly.
The pull-out rails allow you to pull accessories out completely.
When inserting the adapter for the baking and roasting shelf,
ensure that it latches into place behind the indentation on the
pull-out rails
: Risk of fire!
Under no circumstances should a baking sheet, a baking tray,
a pan or another form of cookware be placed directly on the
oven floor. This causes the floor of the appliance to overheat
and can seriously damage the bottom of the fitted unit.
You can pull out the accessories two thirds of the way without
them tipping. This allows dishes to be removed easily.
The accessories may become deformed when they become
hot. As soon as they have cooled down, the deformation
disappears with no effect on the function.
You can buy accessories from the after-sales service, from
specialist retailers or online.
--------
Accessories Description
Baking and roasting wire rack
For ovenware, cake tins, joints,
grilled items, frozen meals.
Enamelled baking tray
For moist cakes, pastries, frozen
meals and large roasts. Can also
be used as a drip tray to collect
dripping fat.
Support for baking tray
The baking tray can be inserted
into the oven with this support.
Rotary spit
With rotary spit support and metal
hook
For roasts and large pieces of
poultry. Only use in combination
with the enamelled baking tray.
Locking pins
For locking the hinges.

10
Before using the oven for the first time
In this section, you can find out what you must do before using
your appliance to prepare food for the first time. Read the
Safety information section beforehand.
Remove the appliance packaging and dispose of it
appropriately.
Setting the clock
After the appliance has been connected, the 0 symbol and
four zeros flash in the display. Set the clock.
1. Press the 0 button.
The clock in the display shows 12:00. The time symbols light
up and the brackets are around
0.
2. Use the @ or A button to set the clock.
After a few seconds, the time that has been set is adopted.
Baking out the oven
Precleaning the oven
1. Remove accessories and hook-in racks from the cooking
compartment.
2. Fully remove any remaining packaging, such as small pieces
of polystyrene, from the cooking compartment.
3. Some parts are covered with a protective film. Remove the
protective film.
4. Clean the outside of the appliance with a soft, damp cloth.
5. Clean the cooking compartment with hot soapy water.
Heating up the oven
To remove the new cooker smell, heat up the oven when it is
empty and closed.
1. Turn the temperature selector to the maximum temperature.
2. Switch off the oven after 45 minutes.
Recleaning the oven
1. Clean the cooking compartment with hot soapy water.
2. Fit the hook-in racks.
Cleaning the accessories
Before using the accessories, clean them thoroughly using a
cloth and warm soapy water.
Setting the hob
In this section, you can find out how to set the hotplates.
Switching the hob on and off
You can switch the hotplate on and off with the control knobs.
Setting a hotplate
You can set the heat setting for the hotplates using the hotplate
control knobs. Press the control knob for the required hotplate
and turn it to the required heat setting.
Heat setting 1 = lowest setting
Heat setting 9 = highest setting
Note: Hotplate temperature is regulated by the heat switching
on and off. The heat may also switch on and off at the highest
setting.
Large dual-circuit hotplate and extended
cooking zone
The size of these hotplates can be altered.
Switching on the large area
Turn the hotplate control to position 9 - where you will feel a
slight resistance - then continue turning to
õ/ç symbol = large
dual-circuit hotplate or extended cooking zone
Then immediately turn it back to the desired heat setting.
Switching back to the small area
Turn the hotplate control to
Û and reset.
The small dual-circuit hotplate is particularly good for heating
small amounts.
Caution!
Never turn the hotplate control beyond the
õ/ç symbol to Û.
11
How to operate your oven
You have the option of adjusting your oven to a range of
different settings. You can control the oven using the electronic
clock.
Oven lighting
Switching on the oven light
Turn the function selector to an operating mode.
The oven light also switches on when the oven door is opened.
Switching off the oven light
Turn the function selector to the off position.
Close the oven door.
Operating modes
The following operating modes are available.
Operating the oven
Switching on the oven
Note: Always keep the appliance door closed when it is in
operation.
1. Turn the function selector to the desired operating mode.
2. Turn the temperature selector to set the desired temperature.
The oven switches on.
The indicator lamp is lit when the oven is heating up. It goes out
during pauses in heating.
Note: The indicator lamp also lights up when the function
selector is in the off position and a temperature is set. The oven
only begins to heat up when an operating mode is set.
Switching off the oven
1. Turn the function selector to the Û position.
2. Turn the temperature selector to the Û position.
The oven switches off.
Operating the rotary spit
The rotary spit can be used with excellent results to cook joints,
such as rolled roasting joints and poultry. The meat is roasted
thoroughly and evenly.
The drive for the rotary spit is automatically activated as soon
as you switch on the grill.
Preparing roasts
1. Place the joint as centrally as possible on the rotary spit and
secure it at both ends with the retaining clips.
You can also secure the joint using kitchen twine.
2. With poultry, bind the ends of the wings underneath the back
and the thighs against the body. This prevents them from
overbrowning.
3. Pierce the skin on the underside of the wings to allow the fat
to escape.
Inserting the rotary spit
: Risk of burns!
Never touch the hot surfaces of the cooking compartment or
the heating elements. Children must be kept at a safe distance
from the appliance at all times. Open the appliance door
carefully. Hot steam may escape.
1. Slide the rotary spit shelf halfway in at shelf position 2.
2. Place the rotary spit on the rotary spit shelf and unscrew and
remove the handle.
3. Slide in the rotary spit shelf all the way.
4. Slide the rotary spit to the left into the motor mount.
5. Pour water into a baking tray and slide this into shelf position
1 to collect the dripping fat.
6. Close the appliance door.
Switching on the rotary spit
Turn the control knob for the oven to the
G position.
Note: Grill+ rotisserie cooking must never exceed 240°C.
Switching off the rotary spit
Turn the control knob for the oven to the
Û position.
Operating mode Use
%
Top/bottom heat-
ing*
For sponge cakes in tins, bakes, lean
joints of beef, veal and game.
$
Bottom heating For bain-marie applications such as
crema catalana, or for preserving.
Also improvement setting if the base
is not fully baked through
G
Grill/rotary spit Grill: For individual portions or small
quantities of steaks, sausages, fish
and toast.
Rotary spit: For roasts, rolled joints
and poultry
(
Full-surface grill For several steaks, sausages, fish and
pieces of toast.
7
Hot air grill For poultry and larger pieces of meat.
N
Top/bottom heat-
ing and hot air
For cakes with very moist toppings.
<
Hot air For cakes, pizza and items baked on
two levels, for roasting and drying.
B
Defrost setting For defrosting meat, poultry, fish and
pastries.
* Type of heating used to determine the energy efficiency class
in accordance with EN50304.
12
Removing the rotary spit
: Risk of burns!
Never touch the hot surfaces of the cooking compartment or
the heating elements. Children must be kept at a safe distance
from the appliance at all times. Open the appliance door
carefully. Hot steam may escape.
: Risk of burns!
Never touch the rotary spit or other accessories directly when
they are hot. Always wear oven gloves or heat-resistant gloves
when handling hot accessories.
1. Open the appliance door carefully.
2. Using the metal hook, pull the rotary spit to the right out of
the motor mount.
3. Pull the rotary spit shelf halfway out of the oven.
4. Hold the rotary spit in place on the left-hand side with an oven
glove and screw the handle onto the rotary spit.
5. Lift the rotary spit carefully out of the rotary spit shelf.
6. Remove the rotary spit shelf and the baking tray from the
oven.
Setting the time-setting options
Your oven has various time-setting options. You can use the 0
button to call up the menu and switch between the individual
functions. All the time symbols are lit when you can make
settings. The brackets [ ] show you which time-setting option
you have currently selected. A time-setting option which has
already been set can be changed directly with the
@ or A
button when the relevant time symbol is in brackets.
Timer
You can use the timer as a kitchen timer. It runs independently
of the oven. The timer has its own signal. In this way, you can
tell whether it is the timer or a cooking time which has elapsed.
1. Press the 0 button once.
The time symbols light up in the display and the brackets are
around
U.
2. Use the @ or A button to set the timer duration.
Default value for
@button = 10 minutes
Default value for
Abutton = 5 minutes
After a few seconds, the time setting is adopted. The timer
starts. The [
U] symbol lights up in the display and the timer
duration counts down. The other time symbols go out.
The timer duration has elapsed
A signal sounds. 00:00 is shown in the display. Use the
0
button to switch off the timer.
Changing the timer duration
Use the
@ or A button to change the timer duration. After a few
seconds, the change is adopted.
Cancelling the timer duration
Use the
A button to reset the timer duration to 00:00. The
change will be adopted after a few seconds. The timer is
switched off.
Checking the time settings
If several time-setting options are set, the relevant symbols are
illuminated on the display. The symbol for the time-setting
option that is visible in the display is shown in brackets.
To call up the
U timer, r cooking time, p end time or 0
clock, press the
0 button repeatedly until the brackets are
around the relevant symbol. The display shows the value for a
few seconds.
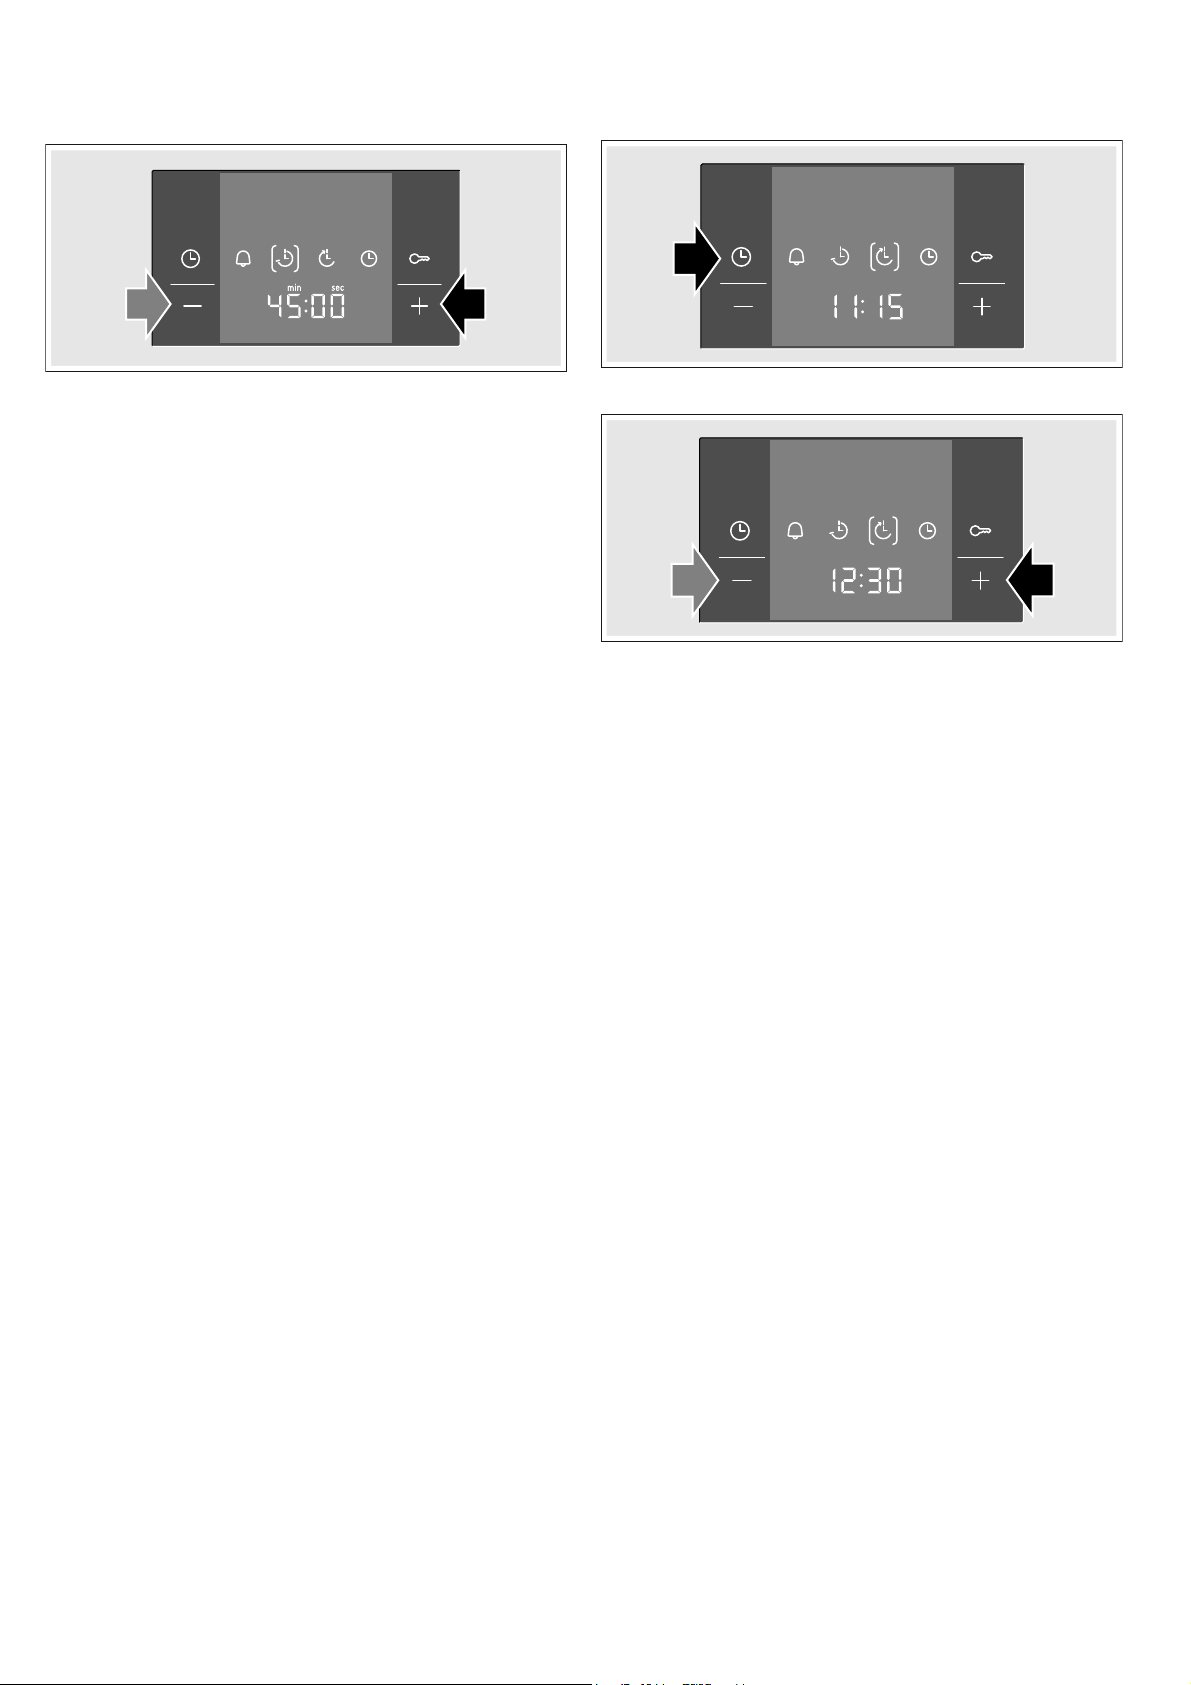
Cooking time
The cooking time for your dish can be set on the oven. When
the cooking time has elapsed, the oven switches itself off
automatically. This means that you do not have to interrupt
other work to switch off the oven. The cooking time cannot be
accidentally exceeded.
Example in the picture: cooking time 45 minutes.
1. Use the function selector to set the type of heating.
2. Set the temperature or grill setting using the temperature
selector.
3. Press the 0 button twice.
00:00 is shown in the display. The time symbols light up and
the brackets are around
r.
13
4. Use the @ or A button to set the cooking time.
Default value for
@ button = 30 minutes
Default value for
A button = 10 minutes
The oven will start up after a few seconds. The cooking time
counts down in the display and the [r] symbol lights up. The
other time symbols go out.
The cooking time has elapsed
A signal sounds. The oven stops heating. 00:00 is shown in the
display. Press the
0 button. You can set a new cooking time
using the
@ or A button. Or press the 0 button twice and turn
the function selector to the off position. The oven switches off.
Changing the cooking time
Use the
@ or A button to change the cooking time. After a few
seconds, the change is adopted. If the timer has been set,
press the
0 button beforehand.
Cancelling the cooking time
Use the
A button to reset the cooking time to 00:00. After a few
seconds, the change is adopted. The cooking time is
cancelled. If the timer has been set, press the
0 button
beforehand.
Checking the time settings
If several time-setting options are set, the relevant symbols are
illuminated on the display. The symbol for the time-setting
option that is visible in the display is shown in brackets.
To call up the
U timer, r cooking time, p end time or 0
clock, press the
0 button repeatedly until the brackets are
around the relevant symbol. The display shows the value for a
few seconds.
End time
You can change the time at which you wish your dish to be
ready. The oven starts automatically and finishes at the desired
time. You can, for example, put your dish in the cooking
compartment in the morning and set the cooking time so that it
is ready at lunch time.
Ensure that food is not left in the cooking compartment for too
long as it may spoil.
Example in the picture: it is 10:30 am, the cooking time is
45 minutes and the oven is required to finish cooking at
12:30 pm.
1. Adjust the function selector.
2. Set the temperature selector.
3. Press the 0 button twice.
4. Use the @ or A button to set the cooking time.
5. Press the 0 button.
The brackets are around
p. The time when the dish will be
ready is displayed.
6. Use the @ or A button to set a later end time.
After a few seconds, the oven adopts the settings and switches
to standby position. The time at which the dish will be ready is
shown in the display and the
p symbol is in brackets. The U
and
0 symbols go out. When the oven starts, you can see the
cooking time counting down in the display and the
r symbol is
in brackets. The
p symbol goes out.
The cooking time has elapsed
A signal sounds. The oven stops heating. 00:00 is shown in the
display. Press the
0 button. You can set a new cooking time
using the
@ or A button. Or press the 0 button twice and turn
the function selector to the off position. The oven switches off.
Changing the end time
Use the
@ or A button to change the end time. After a few
seconds, the change is adopted. If the timer has been set, first
press the
0 button twice. Do not change the end time if the
cooking time has already started to elapse. The cooking result
would no longer be correct.
Cancelling the end time
Use the
A button to reset the end time to the current time. After
a few seconds, the change is adopted. The oven starts. If the
timer has been set, first press the
0 button twice.
Checking the time settings
If several time-setting options are set, the relevant symbols are
illuminated on the display. The symbol for the time-setting
option that is visible in the display is shown in brackets.
To call up the
U timer, r cooking time, p end time or 0
clock, press the
0 button repeatedly until the brackets are
around the relevant symbol. The display shows the value for a
few seconds.

14
Clock
After the appliance is connected or following a power cut, the
0 symbol and four zeros flash in the display. Set the clock.
1. Press the 0 button.
The clock in the display shows 12:00. The time symbols light
up and the brackets are around
0.
2. Use the @ or A button to set the clock.
After a few seconds, the time that has been set is adopted.
Changing the clock
No other time-setting option should have been set.
1. Press the 0 button four times.
The time symbols light up in the display and the brackets are
around
0.
2. Use the @ or A button to change the clock.
After a few seconds, the time that has been set is adopted.
Hiding the clock
You can hide the clock. For more information, please refer to
the section Changing the basic settings.
Childproof lock
The oven has a childproof lock to prevent children from
switching it on by accident.
The oven will not respond to any settings.You can still set the
clock and the timer when the childproof lock is activated.
If the type of heating and temperature or grill setting are set, the
childproof lock interrupts the heater element.
Note: If a hob is connected, it will not be affected by the
childproof lock on the oven.
Activating the childproof lock
No cooking time or end time should be set.
Press and hold the
D button for approx. four seconds.
The
D symbol appears in the display. The childproof lock is
activated.
Deactivating the childproof lock
Press and hold the
D button for approx. four seconds.
The
D symbol goes out in the display. The childproof lock is
deactivated.
Changing the basic settings
Your oven has various basic settings. These settings can be
customised to suit your requirements.
No other time-setting option should have been set.
1. Press and hold the 0 button for approx. 4 seconds.
The current basic setting for the clock display is shown in the
display, e.g. c1 1 for selection 1.
2. Use the @ or A button to change the basic setting.
3. Confirm by pressing the 0 button.
The next basic setting appears in the display. You can scroll
through all levels with the
0 button and change the setting
with the
@ or A button.
4. To finish, press and hold the 0 button for approx. 4 seconds.
All basic settings are applied.
You may change the basic settings at any time.
Care and cleaning
With good care and cleaning, your oven will remain clean and
fully-functioning for a long time to come. Here we will explain
how to maintain and clean your oven correctly.
Notes
■ Slight differences in the colours on the front of the oven are
caused by the use of different materials, such as glass,
plastic and metal.
■ Shadows on the door panel which look like streaks, are
caused by reflections made by the oven light.
■ Enamel is baked on at very high temperatures. This can
cause some slight colour variations. This is normal and does
not affect their function. The edges of thin trays cannot be
completely enamelled. As a result, these edges can be
rough. This will not impair the anti-corrosion protection.
: Risk of electric shock!
Do not use any high-pressure cleaners or steam cleaners,
which can result in an electric shock.
: Risk of burns!
The appliance becomes very hot. Never touch the interior
surfaces of the cooking compartment or the heating elements.
Always allow the appliance to cool down. Keep children at a
safe distance.
Basic setting Selection 1 Selection 2 Selection 3
c1 Clock display always* only with
the
0 but-
ton
-
c2 Signal duration
upon completion of
a cooking time or
timer period
approx.
10 seconds
approx.
2 minutes*
approx.
5 minutes
c3 Waiting time until a
setting is applied
approx.
2 seconds
approx.
5 seconds*
approx.
10 seconds
* Factory setting

15
Cleaning agents
Observe the following information to ensure that the different
surfaces are not damaged by using the wrong type of cleaning
agent.
Do not
use
■ undiluted washing-up liquid or dishwasher detergent,
■ abrasive materials, scouring sponges,
■ aggressive cleaners such as oven spray or stain removers,
■ high-pressure cleaners or steam jet cleaners on the hob.
Clean the hob after each use. This will prevent spills from
burning onto the ceramic.
Only clean the hob when it has cooled down sufficiently.
Only use cleaning agents that are suitable for glass ceramic.
Follow the cleaning instructions on the packaging.
Ground-in dirt can be best removed with a glass scraper,
available from retailers. Please note the manufacturer's
instructions.
Only use
warm, soapy water
■ on the hob surround.
■ Do not use abrasive materials, scouring sponges,
■ aggressive cleaners such as oven spray or stain removers,
■ or glass scrapers.
Do not
use
■ any harsh or abrasive cleaning agents,
■ cleaning agents with a high concentration of alcohol,
■ hard scouring pads or sponges,
■ high-pressure cleaners or steam cleaners on the oven.
Wash new sponge cloths thoroughly before use.
Catalytic cooking compartment panels
The catalytic cooking compartment panels are coated with self-
cleaning enamel.
The surfaces clean themselves while the oven is in operation.
Larger splashes will only be removed after the oven has been
used several times.
The rear and side walls are covered with catalytic panelling.
Never clean these surfaces with oven cleaner. Slight
discolouration of the enamel does not affect self-cleaning.
Area Cleaning agents
Appliance exterior Hot soapy water:
Clean with a dish cloth and dry with a
soft cloth. Do not use glass cleaners or
glass scrapers.
Stainless steel Hot soapy water:
Clean with a dish cloth and dry with a
soft cloth. Remove flecks of limescale,
grease, starch and albumin (e.g. egg
white) immediately. Corrosion can form
under such residues.
Special stainless steel cleaning prod-
ucts suitable for hot surfaces are availa-
ble from our after-sales service or from
specialist retailers. Apply a very thin layer
of the cleaning product with a soft cloth.
Aluminium and
plastic
Glass cleaner:
Clean with a soft cloth.
Enamel surfaces
(smooth surfaces)
To facilitate cleaning, you can switch on
the interior lighting and detach the appli-
ance door if necessary. Apply commer-
cially available washing-up liquid or a
vinegar solution with a soft, damp cloth
or chamois; dry with a soft cloth. Soften
baked-on food residues with a damp
cloth and detergent. We recommend
using oven-cleaning gel if the oven is
very dirty. This can be applied to the
affected area. Leave the cooking com-
partment open to dry after cleaning.
Self-cleaning sur-
faces (rough sur-
faces)
Please see the notes in section: Self-
cleaning surfaces
Door panels Glass cleaner:
Clean with a soft cloth. Do not use a
glass scraper.
Glass cover for the
oven light
Hot soapy water:
Clean with a dish cloth.
Seal
Do not remove.
Hot soapy water:
Clean with a dish cloth. Do not scour.
Rails Hot soapy water:
Soak and clean with a dish cloth or
brush.
Accessories Hot soapy water:
Soak and clean with a dish cloth or
brush.
Area Cleaning agents

16
Removing and fitting the appliance door
You can remove the appliance door to clean it more
thoroughly.
Removing the appliance door
: Risk of injury!
Whenever the hinges are not locked, they snap shut with great
force. When removing the oven door, ensure that the locking
pins are fully inserted into the holes in the hinges.
1. Open the oven door fully.
2. Lock both hinges on the left and right using a locking pin (a).
Note: The locking pins must be fully inserted into the holes in
the hinges.
3. Grip the oven door on either side with both hands and close
the oven door by approx. 30° (b).
4. Raise the oven door slightly and pull it out.
Note: Do not fully close the oven door. The hinges may
become bent and the enamel may be damaged.
Fitting the appliance door
1. Grip the oven door on either side with both hands.
2. Slide the hinges into the slots in the oven (a).
Note: The notch below the hinges must engage into the
frame of the oven (b).
3. Lower the door downwards.
4. Remove the locking pins.
: Risk of injury!
If the oven door falls out accidentally or a hinge snaps shut, do
not reach into the hinge. Call after-sales service.
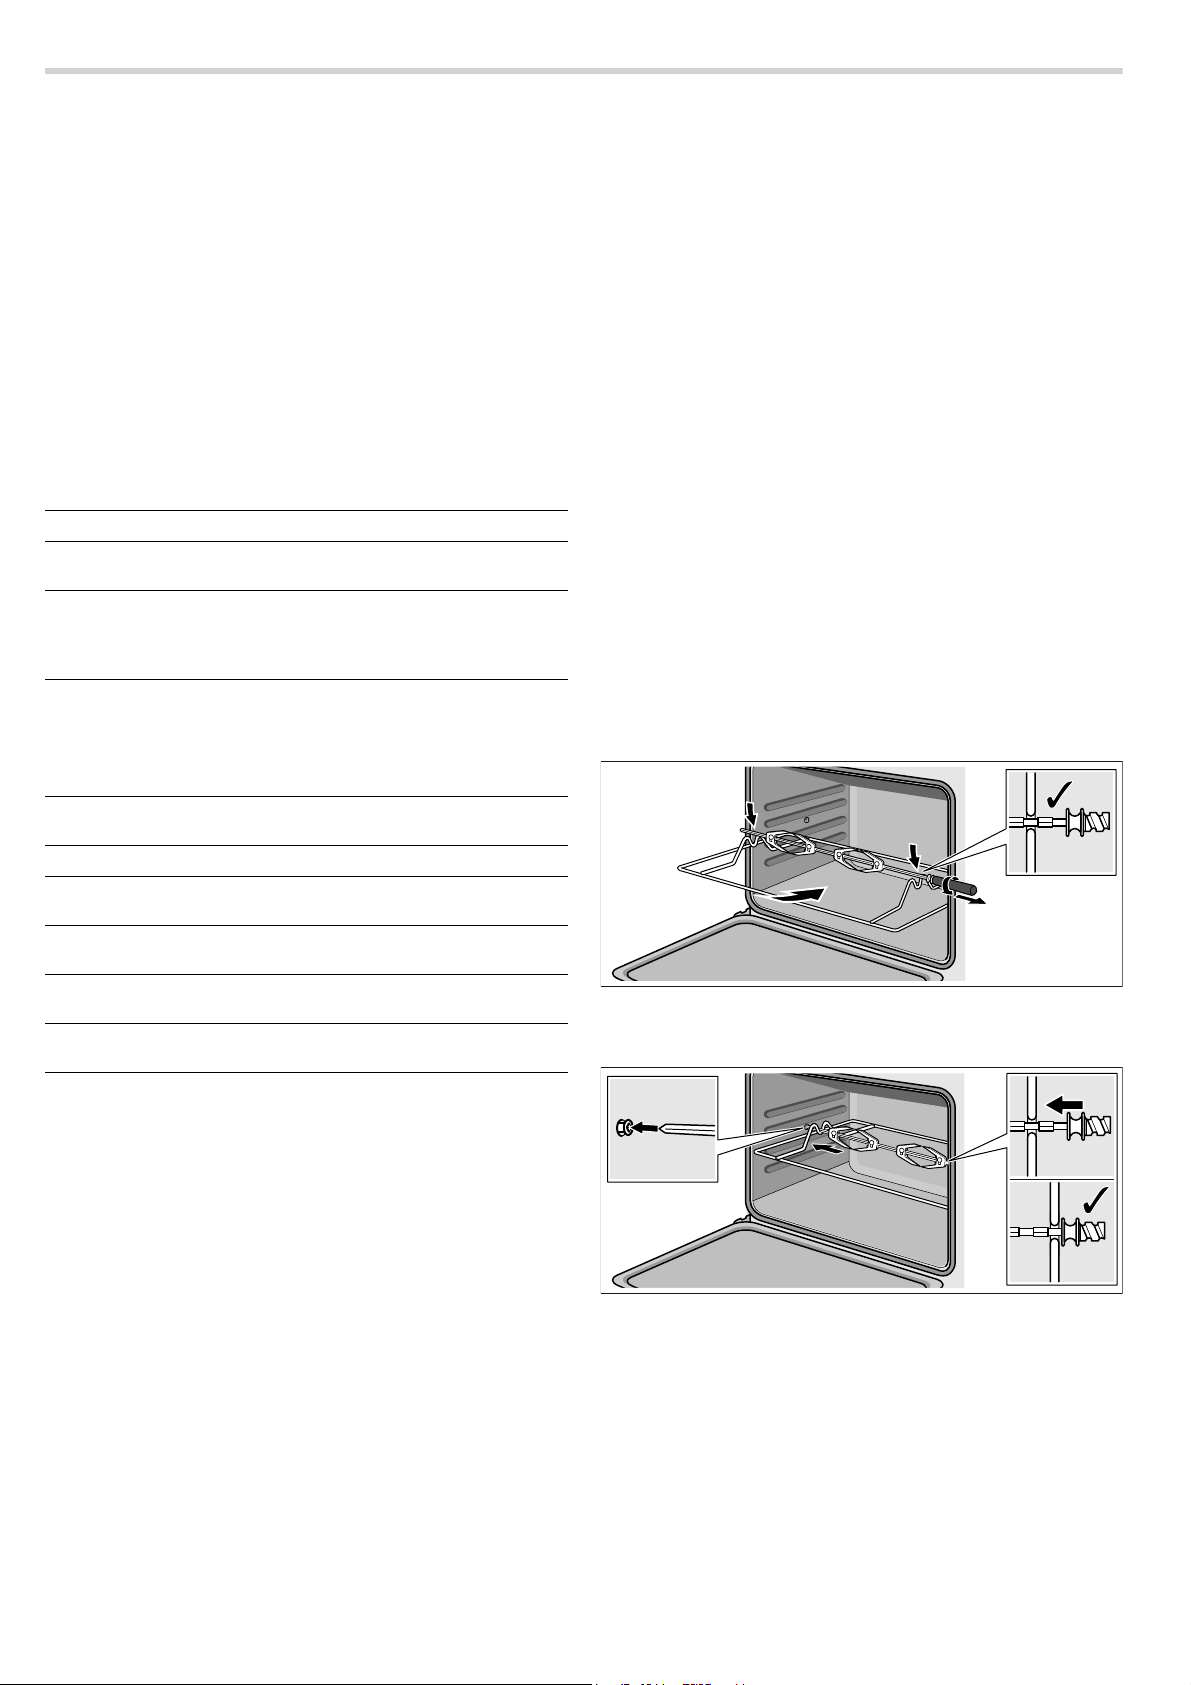
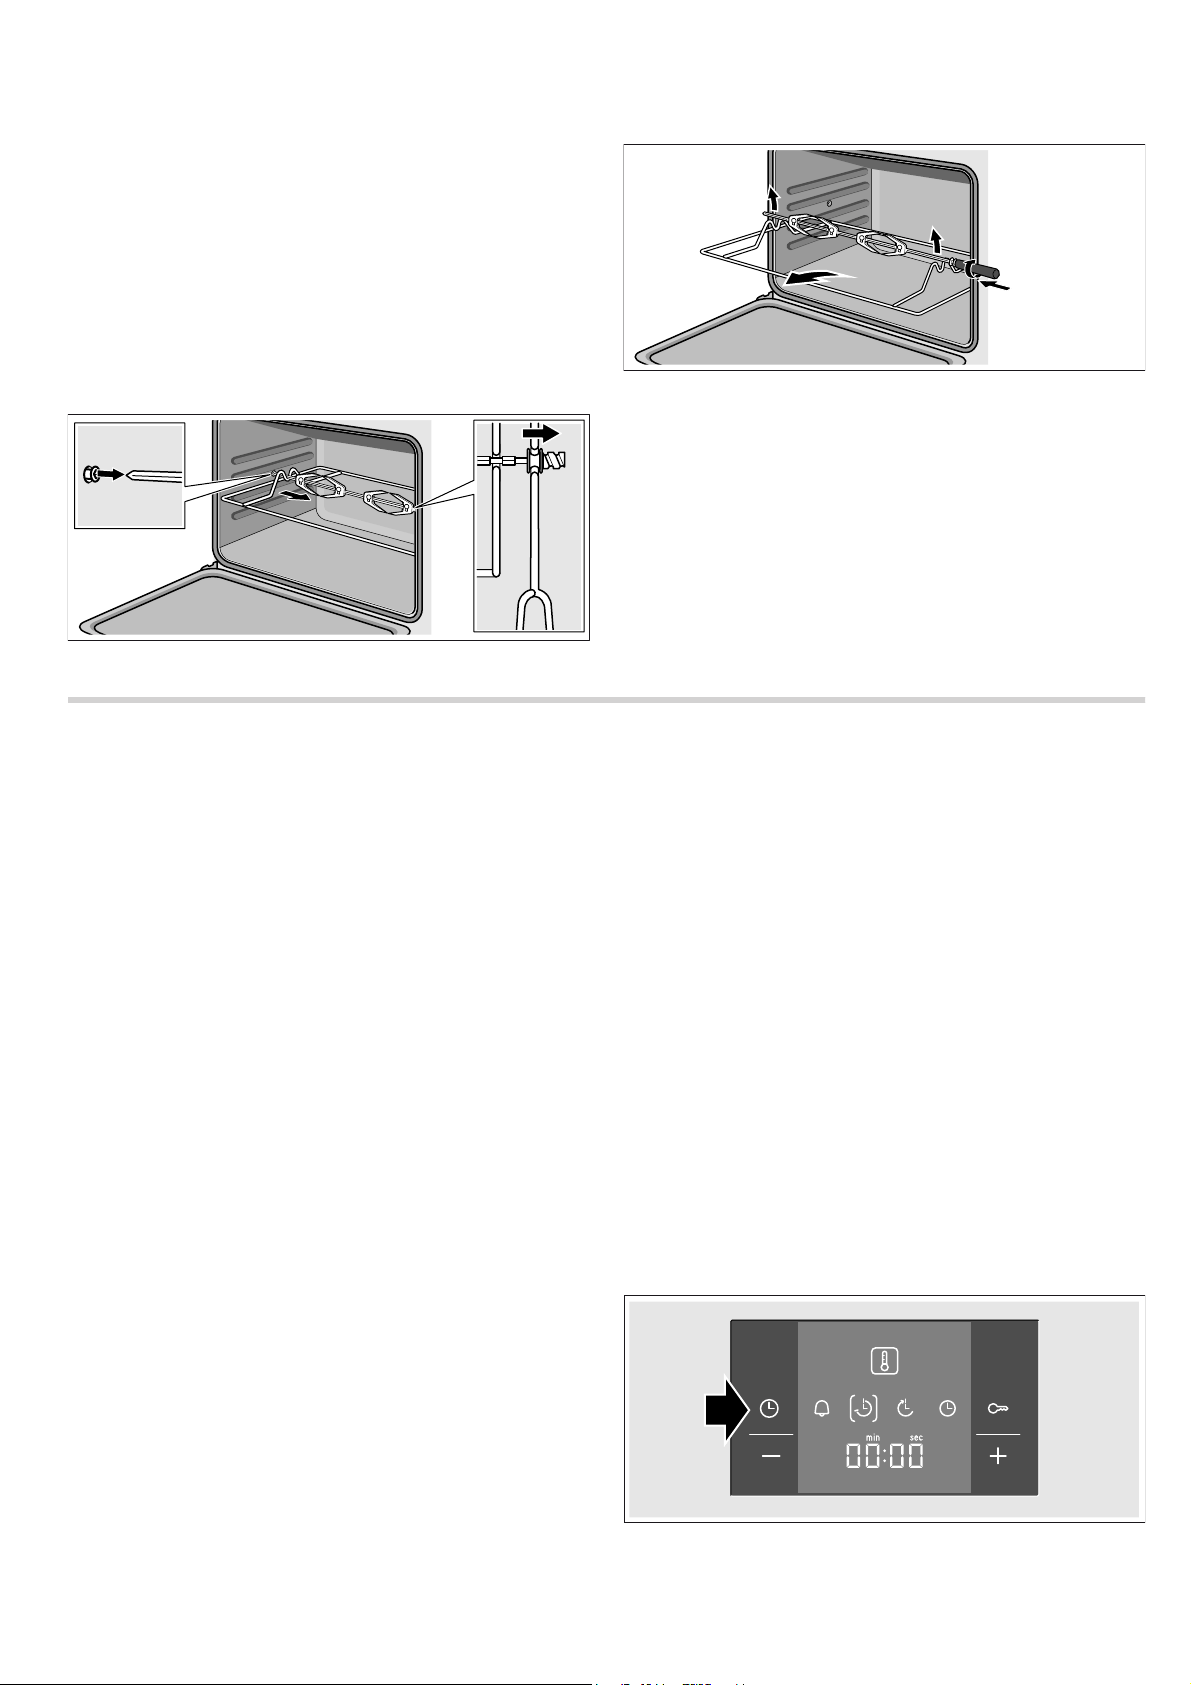
Removing and inserting the hook-in racks
You can remove the hook-in racks for easier cleaning.
Removing the hook-in racks
1. Unscrew the right and left-hand screws on the hook-in rack.
2. Remove the hook-in rack.
Inserting the hook-in rack
1. Hold the hook-in rack in front of the drill holes in the side
panel.
2. Screw in the hook-in rack tight again using the screws.
DE
ED

17
Troubleshooting
Malfunctions often have simple explanations. Refer to the table
before calling the after-sales service, as you may be able to
remedy the fault yourself.
: Risk of injury!
Incorrect repairs may cause serious hazards. Repairs to the
appliance may only be performed by a qualified technician. If
repairs are required, contact the after-sales service.
Fault table
Error messages
If an error message with “ appears, press the 0 button. The
message disappears. A time function that has been set is
cleared. If the error message does not disappear, please
contact the after-sales service.
You can take remedial action yourself if the following error
message is displayed.
: Risk of electric shock!
Incorrect repairs are dangerous. Repairs may only be carried
out by one of our trained after-sales engineers.
Replacing the oven light bulb
If the bulb in the oven light fails, it must be replaced.
Replacement heat-resistant bulbs can be obtained from the
after-sales service or from specialist retailers. Please supply
your appliance's E number and FD number. Do not use any
other type of bulb.
: Risk of electric shock!
When replacing the cooking compartment bulb, the bulb socket
contacts are live. Before replacing the bulb, unplug the
appliance from the mains or switch off the circuit breaker in the
fuse box.
1. Switch off the circuit breaker or unplug the mains plug.
2. Open the appliance door.
3. Place a tea towel in the cold cooking compartment to prevent
damage.
4. Unscrew the glass cover from the defective oven light bulb
inside the cooking compartment.
5. Replace the oven light bulb with a bulb of the same type.
Voltage: 230 V;
Power: 25 W;
Thread: E14;
Temperature resistance: 300°C
6. Screw the glass cover for the oven light back on.
7. Remove the tea towel and switch the circuit breaker back on
or plug in the mains plug.
8. Switch on the oven lighting and check that it is working
properly.
Fault Possible cause Remedy/information
The appliance is not functioning. Faulty fuse Look in the fuse box and check that the fuse
is in working order.
Power cut Check whether the kitchen light works.
0 and zeros flash in the display.
Power cut Reset the clock.
The oven light has failed. Faulty oven light Change the oven light bulb, (see section
"Replacing oven light")
The gas burner does not ignite. Power cut or damp ignition plugs Light the gas burner with a gas lighter or a
match.
The oven does not heat up. Faulty fuse. Check the fuse and replace if necessary.
The function selector has not been set. Set the function selector.
All dishes prepared in the oven burn
within a short period of time.
Faulty thermostat Call the after-sales service.
The door panel steams up when the
oven is hot.
Normal occurrence; caused by the differ-
ence in temperature.
Not possible; this has no effect on oven per-
formance.
Error message Possible cause Remedy/information
“‹‚‚
A button was
depressed for
too long or is
covered up.
Press all buttons individu-
ally. Check whether any but-
tons are jammed, covered
up or soiled.

18
After-sales service
Our after-sales service is there for you if your appliance needs
to be repaired. We will always find the right solution in order to
avoid unnecessary visits from a service technician.
When calling us, please give the product number (E no.) and
the production number (FD no.) so that we can provide you with
the correct advice. The rating plate and the relevant numbers
can be found on the inside of the storage compartment flap.
You can make a note of the numbers of your appliance and the
telephone number of the after-sales service in the space below
to save time should it be required.
Please be aware that a visit by an after-sales engineer will be
charged if a problem turns out to be the result of operator error,
even during the warranty period.
Please find the contact data of all countries in the enclosed
customer service list.
To book an engineer visit and product advice
Rely on the professionalism of the manufacturer. You can
therefore be sure that the repair is carried out by trained service
technicians who carry original spare parts for your appliances.
Energy and environment tips
Here you can find tips on how to save energy when baking and
roasting in the oven and when cooking on the hob, and how to
dispose of your appliance properly.
Saving energy with your oven
■ Only preheat the oven if this is specified in the recipe or in
the operating instruction tables.
■ Use dark, black lacquered or enamelled baking tins. They
absorb the heat particularly well.
■ Open the oven door as infrequently as possible while
cooking, baking or roasting.
■ It is best to bake more than one cake, one after the other.
The oven is still warm. This reduces the baking time for the
second cake. You can also place two loaf tins next to each
other.
■ For longer cooking times, you can switch the oven off
10 minutes before the end of the cooking time and use the
residual heat to finish cooking.
Saving energy with the hob
■ Use pots and pans with thick, even bases. Uneven bases
increase energy consumption.
■ The diameter of pan bases should be the same size as the
hotplate. In particular, small saucepans on the hotplate cause
energy losses. Note that cookware manufacturers often
indicate the upper diameter of the saucepan. This is usually
bigger than the diameter of the base of the pan.
■ Use a small saucepan for small quantities. A larger, less full
saucepan requires a lot of energy.
■ Always place suitable lids on saucepans. When cooking
without a lid, four times the energy is required.
■ Cook with only a little water. This will save energy. Vitamins
and minerals in vegetables are preserved.
■ Switch to a lower heat setting in good time.
■ Use the residual heat. For longer cooking times, you can
switch the hotplate off 5-10 minutes before the end of the
cooking time.
Environmentally-friendly disposal
Dispose of packaging in an environmentally-friendly manner.
E no. FD no.
After-sales service
O
GB 0344 892 8979
Calls charged at local or mobile rate.
IE 01450 2655
0.03 € per minute at peak. Off peak 0.0088 € per
minute.
This appliance is labelled in accordance with
European Directive 2012/19/EU concerning used
electrical and electronic appliances (waste electrical
and electronic equipment - WEEE). The guideline
determines the framework for the return and recycling
of used appliances as applicable throughout the EU.

19
Þ Table des matières
[fr]Notice d’utilisation
Précautions de sécurité importantes .....................................20
Causes de dommages ...................................................................22
Votre nouvel appareil ...............................................................23
Bandeau de commande................................................................. 23
Bandeau de commande................................................................. 24
Touches et affichage....................................................................... 24
La table de cuisson......................................................................... 24
Le four................................................................................................24
Ventilateur de refroidissement.......................................................24
Le compartiment de rangement.................................................... 25
Accessoire.........................................................................................25
Avant la première utilisation ...................................................26
Réglage de l'heure ..........................................................................26
Chauffe à vide du four .................................................................... 26
Nettoyer les accessoires................................................................ 26
Réglage de la table de cuisson ...............................................26
Allumer et éteindre la table de cuisson....................................... 26
Grand foyer à deux zones et zone pour poissonnière............. 26
Voici comment utiliser le four .................................................27
Eclairage............................................................................................27
Modes de fonctionnement .............................................................27
Utilisation du four.............................................................................27
Commande du tournebroche ........................................................ 27
Réglage des fonctions de temps ............................................28
Minuterie ............................................................................................28
Durée..................................................................................................28
Heure de la fin..................................................................................29
Heure..................................................................................................30
Sécurité-enfants .......................................................................30
Modifier les réglages de base .................................................30
Entretien et nettoyage..............................................................31
Nettoyants ......................................................................................... 31
Panneaux catalytiques du compartiment de cuisson............... 32
Décrocher et accrocher la porte de l'appareil ........................... 32
Retrait et montage des grilles supports ...................................... 32
Pannes et dépannage ..............................................................33
Messages d'erreur........................................................................... 33
Changer la lampe du four.............................................................. 33
Service après-vente .................................................................34
Conseils concernant l'énergie et l'environnement................34
Économiser de l'énergie dans le four.......................................... 34
Économiser de l'énergie sur la table de cuisson ...................... 34
Elimination écologique....................................................................34
Produktinfo
Vous trouverez des informations supplementaires concernant
les produits, accessoires, pièces de rechange et services sur
Internet sous :
www.bosch-home.com et la boutique en ligne :
www.bosch-eshop.com

20
: Précautions de sécurité importantes
Lire attentivement ce manuel. Ce n'est
qu'alors que vous pourrez utiliser votre
appareil correctement et en toute sécurité.
Conserver la notice d'utilisation et de
montage pour un usage ultérieur ou pour le
propriétaire suivant.
Contrôler l'état de l'appareil après l'avoir
déballé. Ne pas le raccorder s'il présente
des avaries de transport.
Seul un expert agréé peut raccorder
l'appareil sans fiche. La garantie ne couvre
pas les dommages résultant d'un mauvais
raccordement.
Cet appareil est conçu uniquement pour un
usage ménager privé et un environnement
domestique. Utiliser l'appareil uniquement
pour préparer des aliments et des
boissons. Surveiller l'appareil lorsqu'il
fonctionne. Utiliser l'appareil uniquement
dans des pièces fermées.
Cet appareil est conçu pour une utilisation
jusqu'à une altitude maximale de 2 000 m.
Cet appareil n'est pas conçu pour un
fonctionnement avec une minuterie externe
ou une commande à distance.
N'utilisez pas de recouvrements pour la
table de cuisson. Cela pourrait entraîner
des accidents, par ex. en raison de
surchauffe, inflammation ou d'éclats de
matériau.
N'utilisez pas de protections inappropriées
ou de grilles de protection enfants. Ces
dispositifs peuvent conduire à des
accidents.
Cet appareil peut être utilisé par des
enfants de 8 ans ou plus et par des
personnes dotées de capacités physiques,
sensorielles ou mentales réduites ou
disposant de connaissances ou
d’expérience insuffisantes, sous la
surveillance d'un tiers responsable de leur
sécurité ou bien lorsqu'ils ont reçu des
instructions liées à l'utilisation de l'appareil
en toute sécurité et qu'ils ont intégré les
risques qui en résultent.
Les enfants ne doivent pas jouer avec
l'appareil. Le nettoyage et l'entretien
effectué par l'utilisateur ne doivent pas être
accomplis par des enfants, sauf s'ils sont
âgés de 8 ans et plus et qu'un adulte les
surveille.
Les enfants de moins de 8 ans doivent être
tenus à distance de l'appareil et du cordon
d'alimentation.
Toujours insérer les accessoires à l'endroit
dans le four. Voir la description des
accessoires dans la notice d'utilisation.
Risque d'incendie !
■
Tout objet inflammable entreposé dans le
compartiment de cuisson peut
s'enflammer. Ne jamais entreposer
d'objets inflammables dans le
compartiment de cuisson. Ne jamais
ouvrir la porte de l'appareil lorsqu'il s'en
dégage de la fumée. Éteindre l'appareil et
débrancher la fiche secteur ou enlever le
fusible dans le boîtier à fusibles.
Risque d'incendie !
■
Il se produit un courant d'air lors de
l'ouverture de la porte de l'appareil. Le
papier sulfurisé peut toucher les
résistances chauffantes et s'enflammer.
Ne jamais poser de papier sulfurisé non
attaché sur un accessoire lors du
préchauffage. Toujours déposer un plat ou
un moule de cuisson sur le papier
sulfurisé pour le lester. Recouvrir
uniquement la surface nécessaire de
papier sulfurisé. Le papier sulfurisé ne doit
pas dépasser des accessoires.
Risque d'incendie !
■
L'huile et la graisse chaude s'enflamme
rapidement. Ne jamais laisser l'huile et la
graisse chaude sans surveillance. Ne
jamais éteindre le feu avec de l'eau.
Eteindre le foyer. Etouffer les flammes
prudemment avec un couvercle, une
couverture ou similaire.
Risque d'incendie !
■
Les foyers deviennent très chauds. Ne
jamais poser des objets inflammables sur
la table de cuisson. Ne pas conserver des
objets sur la table de cuisson.
Risque d'incendie !
■
La table de cuisson se coupe
automatiquement et ne peut plus être
réglée. Elle peut ultérieurement se mettre
en service involontairement. Couper le
fusible dans la boîte à fusibles. Appeler le
service aprèsvente.
Risque d'incendie !
■
L'appareil devient très chaud, des
matières inflammables peuvent
s'enflammer. Ne jamais ranger ou utiliser
des objets inflammables (p.ex. aérosols ,
nettoyants) en-dessous de l’appareil ou à
proximité. Ne jamais poser des objets
inflammables sur ou dans l'appareil.
Risque d'incendie !
■
Les surfaces du tiroir-socle peuvent
devenir particulièrement chaudes. Ne
conservez, dans le tiroir, que les
accessoires du four. Les objets
inflammables et combustibles ne doivent
pas être conservés dans le tiroir-socle.

21
Risque de brûlure !
■
L'appareil devient très chaud. Ne jamais
toucher les surfaces intérieures chaudes
du compartiment de cuisson ni les
résistances chauffantes. Toujours laisser
l'appareil refroidir. Tenir les enfants
éloignés
Risque de brûlure !
■
Les récipients ou les accessoires
deviennent très chaud. Toujours utiliser
des maniques pour retirer le récipient ou
les accessoires du compartiment de
cuisson.
Risque de brûlure !
■
Les vapeurs d'alcool peuvent s'enflammer
dans un compartiment de cuisson chaud.
Ne jamais préparer de plats contenant de
grandes quantités de boissons fortement
alcoolisées. Utiliser uniquement de petites
quantités de boissons fortement
alcoolisées. Ouvrir la porte de l'appareil
avec précaution.
Risque de brûlure !
■
Les foyers et leurs alentours (notamment
lorsque des cadres sont présents sur les
surfaces de cuisson), deviennent très
chauds. Ne jamais toucher les surfaces
chaudes. Éloigner les enfants.
Risque de brûlure !
■
Le foyer chauffe, mais l'affichage ne
fonctionne pas. Couper le fusible dans la
boîte à fusibles. Appeler le service
aprèsvente.
Risque de brûlures !
■
Les éléments accessibles deviennent
chauds pendant le fonctionnement. Ne
jamais toucher les éléments chauds.
Eloigner les enfants.
Risque de brûlure !
■
De la vapeur chaude peut s'échapper lors
de l'ouverture de la porte de l'appareil.
Ouvrir la porte de l'appareil avec
précaution. Tenir les enfants éloignés
Risque de brûlure !
■
La présence d'eau dans un compartiment
de cuisson chaud peut générer de la
vapeur d'eau chaude. Ne jamais verser
d'eau dans le compartiment de cuisson
chaud.
Risque de blessure !
■
Un verre de porte d'appareil rayé peut se
fendre. Ne pas utiliser de racloir à verre, ni
de produit de nettoyage agressif ou
abrasif.
Risque de blessure !
■
Les casseroles peuvent se soulever
brusquement dû à du liquide se trouvant
entre le dessous de la casserole et le
foyer. Maintenir toujours le foyer et le
dessous de casserole secs.
Risque de blessure !
■
Si l'appareil est posé sur un socle sans le
fixer, il peut glisser du socle. L'appareil
doit être relié solidement au socle.
Risque de choc électrique !
■
Tenter de réparer vous-même l'appareil
est dangereux. Seul un technicien du
service après-vente formé par nos soins
est habilité à effectuer des réparations et à
remplacer des câbles d'alimentation
défectueux. Si l'appareil est défectueux,
débrancher la fiche secteur ou enlever le
fusible dans le boîtier à fusibles. Appeler
le service après-vente.
Risque de choc électrique !
■
L'isolation des câbles des appareils
électroménagers peut fondre au contact
des pièces chaudes de l'appareil. Ne
jamais mettre le câble de raccordement
des appareils électroménagers en contact
avec des pièces chaudes de l'appareil.
Risque de choc électrique !
■
De l'humidité qui pénètre peut
occasionner un choc électrique. Ne pas
utiliser de nettoyeur haute pression ou de
nettoyer à vapeur.
Risque de choc électrique !
■
Lors du remplacement de l'ampoule du
compartiment de cuisson, les contacts du
culot de l'ampoule sont sous tension.
Retirer la fiche secteur ou couper le
fusible dans le boîtier à fusibles avant de
procéder au remplacement.
Risque de choc électrique !
■
Un appareil défectueux peut provoquer un
choc électrique. Ne jamais mettre en
service un appareil défectueux.
Débrancher la fiche secteur ou enlever le
fusible dans le boîtier à fusibles. Appeler
le service après-vente.
Risque de choc électrique !
■
Les fêlures et cassures dans la
vitrocéramique peuvent occasionner des
chocs électriques. Couper le fusible dans
la boîte à fusibles. Appeler le service
aprèsvente.

22
Causes de dommages
Table de cuisson
Attention !
■ Les dessous rugueux des casseroles et des poêles rayent la
vitrocéramique.
■ Evitez de faire chauffer à vide les casseroles. Des dommages
peuvent survenir.
■ Ne déposez jamais des poêles ou des casseroles chaudes
sur le bandeau de commande, la zone d'affichage ou le
cadre. Des dommages peuvent survenir.
■ Si des objets durs ou pointus tombent sur la table de
cuisson, ils peuvent occasionner des dommages.
■ Les feuilles en aluminium ou les récipients en plastique
fondent sur les foyers chauds. Les feuilles de protection pour
cuisinières ne sont pas appropriées pour votre table de
cuisson.
Vue d'ensemble
Dans le tableau suivant vous trouverez les dommages les plus
fréquents :
Four
Attention !
■ Accessoires, feuille, papier cuisson ou récipient sur le fond
du compartiment de cuisson : Ne posez pas d'accessoires
sur le fond du compartiment de cuisson. Ne recouvrez pas le
fond du compartiment de cuisson d'une feuille, quel que soit
le type, ni de papier cuisson. Ne pas placer de plat sur la
sole du compartiment de cuisson. Cela crée une
accumulation de chaleur. Le temps de cuisson n'est plus le
même et l'émail sera endommagé.
■ Introduire l'accessoire : Selon le modèle d'appareil, les
accessoires peuvent rayer la vitre en fermant la porte.
Introduire les accessoires toujours jusqu'en butée dans le
compartiment de cuisson.
■ Eau dans le compartiment de cuisson chaud : Ne versez
jamais d'eau dans le compartiment de cuisson chaud. Cela
produit de la vapeur d'eau. Le changement de température
peut occasionner des dommages sur l'émail.
■ Aliments humides : Ne conservez pas d'aliments humides
dans le compartiment de cuisson pendant une longue durée.
Cela endommage l'émail.
■ Jus de fruits : Ne garnissez pas trop la plaque à pâtisserie en
cas de gâteaux aux fruits très juteux. Le jus de fruits qui
goutte de la plaque laisse des taches définitives. Utilisez de
préférence la lèchefrite à bords hauts.
■ Refroidissement la porte de l'appareil ouverte : Laissez
refroidir le compartiment de cuisson uniquement la porte
fermée. Même si la porte de l'appareil n'est qu'entrouverte,
les façades des meubles voisins risquent d'être
endommagées au fil du temps.
■ Joint du four très encrassé : Si le joint du four est très
encrassé, la porte du four ne fermera plus correctement lors
du fonctionnement. Les façades des meubles voisins
risquent d'être endommagées. Veillez à ce que le joint du
four soit toujours propre.
■ Porte du four utilisée comme surface d'assise : Il est interdit
de grimper ou de s'asseoir sur la porte du four ouverte. Ne
pas se suspendre à la porte du four.
■ Transporter l'appareil : Ne transportez ou ne portez pas
l'appareil par la poignée de la porte. La poignée ne
supportera pas le poids de l'appareil et risque de se casser.
■ Accessoires lourds : Ne retirez pas trop loin les accessoires
lourdement chargés, sans les soulager. Un accessoire lourd
bascule en le retirant. Il exerce une pression sur les nervures
du compartiment de cuisson, ce qui risque d'endommager
l'émail. Soulagez l'accessoire retiré, en le relevant légèrement
avec une main. Attention ! Utilisez toujours des maniques en
cas d'accessoires chauds.
Compartiment de rangement
Attention !
Ne placez pas d'objets chauds dans le compartiment de
rangement. Il risque d'être endommagé.
Dommages Cause Mesure
Taches Aliments débordés Enlevez immédiatement les aliments débordés avec un racloir à verre.
Produits nettoyants inappropriés Utilisez exclusivement des nettoyants appropriés à la vitrocéramique
Rayures Sel, sucre et sable Ne vous servez pas de la table de cuisson comme surface de rangement
ou de travail
Les dessous rugueux des casse-
roles et des poêles rayent la vitrocé-
ramique
Vérifiez vos récipients.
Décolorations Produits nettoyants inappropriés Utilisez exclusivement des nettoyants appropriés à la vitrocéramique
Abrasion des récipients (p.ex. alumi-
nium)
Soulevez les casseroles et les poêles pour les déplacer.
Egratignure Sucre, aliments à forte teneur en
sucre
Enlevez immédiatement les aliments débordés avec un racloir à verre.
23
Votre nouvel appareil
Les informations qui suivent vont vous permettre de vous
familiariser avec votre nouvel appareil. Elles se rapportent au
bandeau de commande et à la table de cuisson ainsi qu'au
four, aux différents modes de cuisson et aux accessoires
fournis.
Des variations de détails sont possibles selon le modèle
d'appareil.
Bandeau de commande
Explication
1 Protection contre les éclaboussures
2 Table de cuisson
3 Bandeau de commande
4 Four
5 Compartiment de rangement
Explication
1 Manette de commande température du four
2 Bandeau de commande
3 Manette de commande Fonctions du four
4 Manettes de commande des foyers

24
Bandeau de commande
Ci-après l'aperçu du bandeau de commande. Les symboles
n'apparaissent jamais tous en même temps dans l'affichage.
Des variations de détails sont possibles selon le modèle
d'appareil.
Touches
Il y a de sondes sous les différentes touches. Vous n'avez pas
besoin d'appuyer fort. Effleurez simplement le symbole
respectif.
Touches et affichage
Avec les touches vous réglez différentes fonctions
additionnelles. Dans l'affichage vous pouvez lire les valeurs
réglées.
Les parenthèses [ ] autour du symbole correspondant
indiquent quelle fonction de temps est à l'avant-plan dans
l'affichage. Exception : pour l'heure, le symbole
0 s'allume
uniquement lorsque vous procédez à une modification.
La table de cuisson
Manettes de commande des foyers
Avec les manettes de commandes vous réglez la puissance de
chauffe des différents foyers.
Indicateur de chaleur résiduelle
La table de cuisson possède pour chaque foyer un indicateur
de chaleur résiduelle. Il indique quels foyers sont encore
chauds. Même si la table de cuisson est éteinte, l'indicateur est
allumé jusqu'à ce que le foyer soit suffisamment refroidi.
Vous pouvez utiliser la chaleur résiduelle en économisant de
l'énergie et par exemple maintenir un petit plat au chaud.
Le four
Pour utilisez le four vous avez besoin de deux manettes de
commande. Le sélecteur des fonctions et le thermostat.
Manette de commande du four
Sélecteur des fonctions
Avec le sélecteur des fonctions vous réglez le mode de
fonctionnement.
Thermostat
Avec le thermostat vous réglez la température.
Il y a une butée entre les positions 260 et
Û. Ne tournez pas la
manette plus loin.
Ventilateur de refroidissement
Le ventilateur de refroidissement se met en marche et se
coupe selon les besoins. L'air chaud s'échappe au-dessus de
la porte. Attention ! Ne pas couvrir les fentes d'aération. Sinon,
le four surchauffe.
Le ventilateur continue de fonctionner un certain temps, afin
que le compartiment de cuisson refroidisse plus vite après le
fonctionnement.
Touche Emploi
0
Fonctions de temps
Sélection du minuteur
U, d'une
durée
r, de l'heure de la fin p et
de l'heure
0.
D
Sécurité-enfants Verrouiller et déverrouiller les fonc-
tions du four.
A
@
Moins
Plus
Réduire les valeurs de réglage
Augmenter les valeurs de réglage
Explication
1 Foyer 145 mm
2 Zone pour poissonnière 170 x 265 mm
3 Foyer 180 mm
4 Foyer à deux zones 120 et 210 mm
5 Foyer 145 mm
6 Indicateur de chaleur résiduelle
Position Signification
Û
Position zéro Le foyer est éteint
1-9 Positions de
chauffe
1 = puissance minimale
9 = puissance maximale
ð, ç
Activation d'une
zone
Enclencher le grand foyer à deux
zones ou la zone pour poisson-
nière.
Symbole Signification
Û
Position zéro
%
Convection naturelle*
$
Chaleur de sole
G
Gril/tournebroche
(
Gril grande surface
7
Gril air pulsé
N
Convection naturelle & chaleur tournante
<
Chaleur tournante
B
Position décongélation
* Mode de cuisson ayant été utilisé pour déterminer la classe
d'efficacité énergétique selon EN50304.
Position Signification
Û
Arrêt
50 - 260 Plage de température en °C
25
Le compartiment de rangement
Ouvrez le compartiment de rangement en rabattant le cache.
Dans ce compartiment vous pouvez ranger les accessoires de
la table de cuisson ou du four.
: Risque d'incendie !
Ne jamais conserver des objets inflammables dans le
compartiment de rangement.
Accessoire
Les accessoires peuvent être enfournés à 4 niveaux différents.
Introduisez-le toujours jusqu'en butée, afin que l'accessoire ne
touche pas la vitre de la porte. Assurez-vous d'insérer les
accessoires toujours dans le bon sens dans le compartiment
de cuisson.
Les rails télescopiques permettent de retirer l'accessoire
complètement. Lors de la mise en place du support de la
plaque à pâtisserie et de la grille, veillez à ce qu'ils
s'encliquettent dans les rails devant l'indentation.
: Risque d'incendie !
Ne jamais mettre une grille, une plaque à pâtisserie, une poêle
ou un autre récipient directement sur la sole du four. Cela
conduit à une surchauffe du fond de l'appareil et peut
considérablement endommager le fond du meuble
d'encastrement.
Vous pouvez sortir l'accessoire aux deux tiers sans qu'il ne
bascule. Il est ainsi plus facile de retirer les plats du four.
Lorsque l'accessoire devient chaud il peut se déformer. Cela
n'a aucune influence sur le fonctionnement, il reprend sa forme
dès qu'il est refroidi.
Vous pouvez acheter des accessoires auprès du service après-
vente, dans le commerce spécialisé ou sur Internet.
--------
Accessoires Description
Grille à pâtisserie/de rôtissage
Pour des ustensiles, moules à
gâteau, rôtis, grillades, plats surge-
lés.
Plaque à pâtisserie émaillée
Pour des gâteaux fondants, pâtis-
series, plats surgelés et gros rôtis.
Egalement utilisable comme col-
lecteur de graisse.
Support de plaque à pâtisserie
Ce support permet d'enfourner la
plaque à pâtisserie.
Tournebroche
Avec porte-broche et étrier métal-
lique
Pour des rôtis et grosses volailles.
L'utiliser uniquement en combinai-
son avec la plaque à pâtisserie
émaillée.
Tiges de sécurité
Pour bloquer les charnières.

26
Avant la première utilisation
Vous apprendrez ici ce que vous devez faire avant d'utiliser
votre appareil pour la première fois pour préparer des mets.
Avant de commencer, lisez le chapitre Consignes de sécurité.
Retirez l'emballage de l'appareil et éliminez-le conformément
aux réglementations en la matière.
Réglage de l'heure
Après le raccordement de l'appareil, le symbole 0 et quatre
zéros clignotent dans l'affichage. Réglez l'heure.
1. Appuyer sur la touche 0.
L'heure 12:00 apparaît dans l'affichage. Les symboles de
l'heure sont allumés, les parenthèses renferment
0.
2. Régler l'heure au moyen de la touche @ ou A.
L'heure réglée sera validée au bout de quelques secondes.
Chauffe à vide du four
Premier nettoyage du four
1. Retirer les accessoires et les grilles supports du
compartiment de cuisson.
2. Enlever tous les résidus d'emballage, tels que des petits
morceaux de polystyrène, du compartiment de cuisson.
3. Certaines parties sont recouvertes d'un film protecteur.
Enlever le film protecteur.
4. Nettoyer l'extérieur de l'appareil avec un chiffon doux,
humide.
5. Nettoyer le compartiment de cuisson à l'eau chaude
additionnée de produit à vaisselle.
Chauffer le four
Pour éliminer l'odeur de neuf, chauffer le four vide et fermé.
1. Régler le thermostat sur la température maximale.
2. Eteindre le four au bout de 45 minutes.
Nettoyage ultérieur du four
1. Nettoyer le compartiment de cuisson à l'eau chaude
additionnée de produit à vaisselle.
2. Monter les grilles supports.
Nettoyer les accessoires
Avant d'utiliser les accessoires, nettoyez-les soigneusement
avec de l'eau additionnée de produit à vaisselle et une lavette.
Réglage de la table de cuisson
Dans ce chapitre vous apprendrez comment régler les foyers.
Allumer et éteindre la table de cuisson
Vous allumez et éteignez la table de cuisson au moyen des
manettes de commande des foyers.
Réglage d'un foyer
Avec les manettes de commande des foyers vous réglez la
puissance de chauffe des foyers. Appuyez sur la manette de
commande du foyer désiré et tournez-la sur la position désirée.
Position de chauffe 1 = puissance minimale
Position de chauffe 9 = puissance maximale
Remarque : Le foyer est régulé par l'enclenchement et l'arrêt
du chauffage. Même à la puissance maximale, le chauffage
peut s'allumer et s'éteindre.
Grand foyer à deux zones et zone pour
poissonnière
Vous pouvez modifier la dimension de ces foyers.
Enclenchement de la grande surface
Tourner l'interrupteur du foyer jusqu'à la position 9 - vous y
ressentirez une légère résistance - continuer à tourner jusqu'au
symbole
õ/ç = grand foyer à deux zones ou Zone pour
poissonnière
Ramener ensuite l'interrupteur à la position de chauffe désirée.
Ramener le réglage à la petite surface
Tourner l'interrupteur du foyer sur
Û et régler à nouveau.
Le petit foyer à deux zones est idéal pour réchauffer des petites
quantités.
Attention !
Ne jamais régler sur
Û en passant par-dessus le symbole õ/ç.

27
Voici comment utiliser le four
Vous avez la possibilité d'effectuer différents réglages de votre
four. Vous pouvez piloter le four par l'horloge électronique.
Eclairage
Allumer l'éclairage du four
Régler le sélecteur des fonctions sur un mode de
fonctionnement.
L'éclairage du four s'allume aussi lorsqu'on ouvre la porte du
four.
Eteindre l'éclairage du four
Tourner le sélecteur des fonctions sur la position zéro.
Fermer la porte du four.
Modes de fonctionnement
Les modes de fonctionnement suivants sont disponibles.
Utilisation du four
Allumer le four
Remarque . Maintenir toujours la porte de l'appareil fermée
pendant le fonctionnement.
1. Régler le sélecteur des fonctions sur le mode de
fonctionnement désiré.
2. Régler le thermostat sur la température désirée.
Le four se met en marche.
Le voyant lumineux est allumé lorsque le four chauffe. Il s'éteint
pendant les coupures de chauffe.
Remarque : Le voyant lumineux est également allumé lorsque
le sélecteur des fonctions est sur la position zéro et une
température est réglée. Le four commence seulement à
chauffer lorsqu'on règle un mode de fonctionnement.
Éteindre le four
1. Régler le sélecteur des fonctions sur la position Û.
2. Régler le thermostat sur la position Û.
Le four s'éteint
Commande du tournebroche
Le tournebroche est idéal pour le rôtissage, comme pour
préparer du rôti roulé et de la volaille. La viande sera cuite
uniformément.
L'entraînement du tournebroche est automatiquement activé
dès la mise en marche du gril.
Préparer le rôti
1. Embrocher le rôti sur le tournebroche en le centrant le mieux
possible et le fixer aux deux extrémités avec les crochets.
Le rôti peut être fixé en plus avec de la ficelle de cuisine.
2. En cas de volaille, fixer les extrémités des ailes sous le dos et
les cuisses au corps. De cette sorte, elles ne brunissent pas
trop.
3. Piquer la peau en-dessous des ailes, la graisse peut ainsi
s'écouler.
Mise en place de la broche
: Risque de brûlure !
Ne jamais toucher les surfaces chaudes du compartiment de
cuisson ni les éléments chauffants. Eloigner systématiquement
les enfants. Ouvrir prudemment la porte de l'appareil. De la
vapeur chaude peut s'échapper.
1. Introduire le support de la broche jusqu'à la moitié au niveau
d'enfournement 2.
2. Placer la broche sur son support et dévisser la poignée.
3. Introduire la broche jusqu'en butée.
4. Pousser la broche à gauche dans le logement du moteur.
5. Verser de l'eau sur la plaque à pâtisserie et l'enfourner au
niveau 1 comme collecteur de graisse.
6. Fermer la porte de l'appareil.
Activer le tournebroche
Régler la manette de commande du four sur la position
G.
Remarque : Les cuissons au gril et au tournebroche ne doivent
jamais depasser 240°C.
Désactiver le fonctionnement du tournebroche
Régler la manette de commande du four sur la position
Û.
Mode de fonction-
nement
Utilisation
%
Convection natu-
relle*
Pour des cakes dans des moules,
soufflés, pièces de rôtis maigres de
bœuf, veau et gibier.
$
Chaleur de sole Pour des préparations dans un bain-
marie tels que de la crème catalane,
ou pour la mise en conserve. Aussi
une position de correction si le fond
n'est pas bien cuit
G
Gril/tournebroche Gril : Pour des portions individuelles
ou de petites quantités de steaks,
saucisses, poisson et de toasts.
Tournebroche : Pour des rôtis, rôtis
roulés et des volailles
(
Gril grande surface Pour plusieurs steaks, saucisses,
poissons et toasts
7
Gril air pulsé Pour de la volaille et des grandes
pièces de viande
N
Convection natu-
relle & chaleur
tournante
Pour des gâteaux garnis très juteux.
<
Chaleur tournante Pour des gâteaux, pizzas et pâtisse-
ries cuits sur deux niveaux, pour le
rôtissage et la déshydratation.
B
Position décongé-
lation
Pour décongeler de la viande, de la
volaille, du poisson et des pâtisseries.
* Mode de cuisson ayant été utilisé pour déterminer la classe
d'efficacité énergétique selon EN50304.
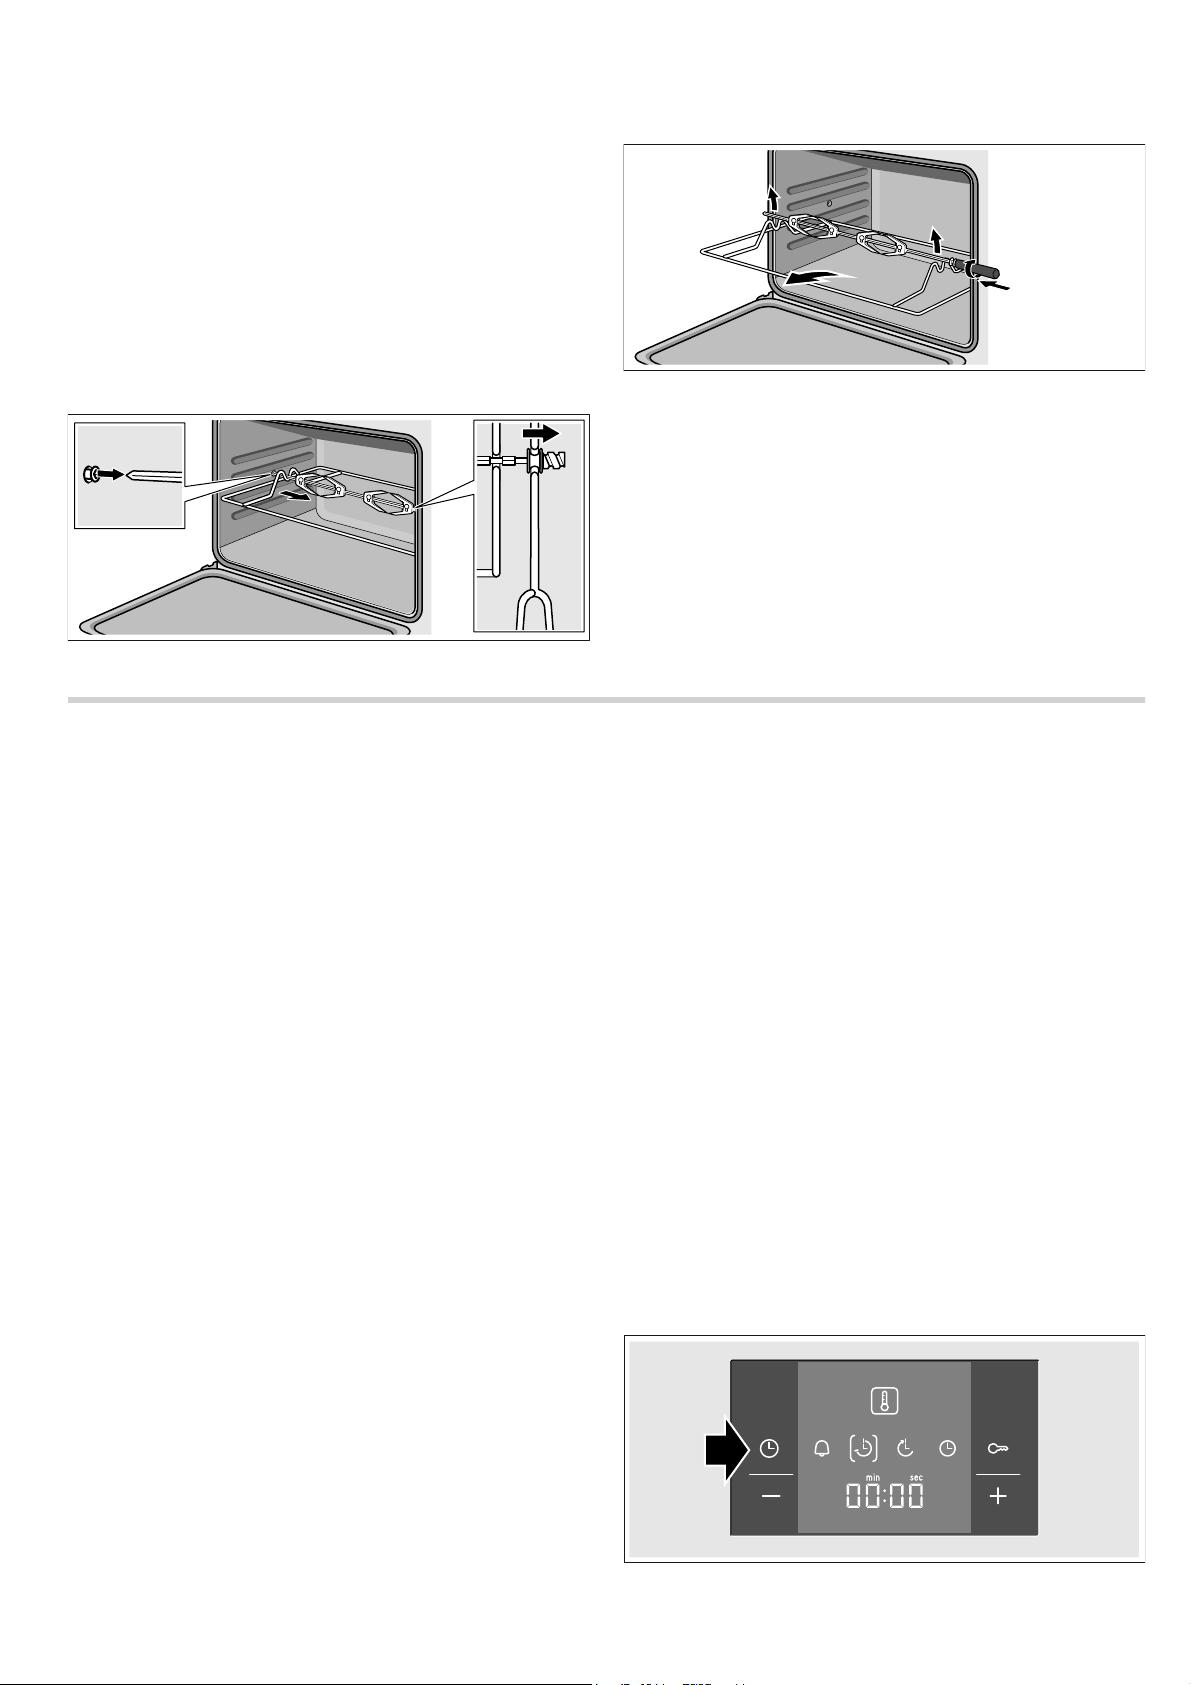
28
Retirer la broche
: Risque de brûlure !
Ne jamais toucher les surfaces chaudes du compartiment de
cuisson ni les éléments chauffants. Eloigner systématiquement
les enfants. Ouvrir prudemment la porte de l'appareil. De la
vapeur chaude peut s'échapper.
: Risque de brûlure !
Ne jamais toucher directement la broche chaude ou d'autres
accessoires chauds. Saisir un accessoire chaud uniquement
avec des maniques ou des gants thermoisolants.
1. Ouvrir prudemment la porte de l'appareil.
2. Enlever la broche du logement moteur en la retirant vers la
droite au moyen de l'étrier métallique.
3. Retirer le support de la broche jusqu'à la moitié du four.
4. Retenir la broche sur le côté gauche avec une manique et
visser la poignée dans la broche.
5. Lever la broche prudemment de son support.
6. Retirer le support de la broche et la plaque à pâtisserie du
four.
Réglage des fonctions de temps
Votre four possède différentes fonctions de temps. La
touche
0 permet d'appeler le menu et de commuter entre les
différentes fonctions. Les symboles de temps sont allumés
aussi longtemps que vous pouvez régler. Le parenthèses [ ]
vous indiquent sur quelle fonction de temps vous êtes
positionné. La touche
@ ou A vous permet de régler
directement une fonction de temps déjà réglée, lorsque le
symbole de temps figure entre parenthèses.
Minuterie
Vous pouvez utiliser la minuterie comme minuteur de cuisine.
Elle fonctionne indépendamment du four. Le minuteur émet un
signal sonore spécifique. De la sorte, vous pouvez distinguer si
c'est le minuteur ou une durée qui s'est écoulé.
1. Appuyer une fois sur la touche 0.
Les symboles de temps s'allument dans l'affichage,
U figure
entre les parenthèses.
2. Régler le temps de minuterie au moyen de la touche @ ou A.
Valeur de référence touche
@ = 10 minutes
Valeur de référence touche
A = 5 minutes
Le temps réglé est validé au bout de quelques secondes. Le
minuteur se met en marche. Dans l'affichage, le symbole [
U]
s'allume et le temps de minuterie s'écoule visiblement. Les
autres symboles de temps s'effacent.
Le temps de minuterie est écoulé
Un signal retentit. Dans l'affichage apparaît 00:00. Désactiver la
minuterie au moyen de la touche 0.
Modifier le temps de la minuterie
Modifier le temps de minuterie au moyen de la touche
@ ou A.
La modification sera validée après quelques secondes.
Annuler le temps de la minuterie
Au moyen de la touche
A, remettre le temps de minuterie
sur 00:00. La modification sera validée après quelques
secondes. La minuterie est désactivée.
Interroger les réglages de temps
Si plusieurs fonctions de temps sont réglées, les symboles
correspondants sont allumés dans l'affichage. Le symbole de la
fonction de temps à l'avant-plan figure entre parenthèses.
Pour interroger la minuterie
U, la durée r, l'heure de la fin p
ou l'heure
0, appuyer répétitivement sur la touche 0, jusqu'à
ce que le symbole respectif figure entre les parenthèses. La
valeur correspondante apparaît pour quelques secondes dans
l'affichage.
Durée
Vous pouvez régler au four la durée de cuisson pour votre
mets. Le four s'éteint automatiquement lorsque la durée est
écoulée. Donc pas besoin d'interrompre d'autres tâches pour
éteindre le four. Le temps de cuisson ne sera pas dépassé
involontairement.
Exemple dans l'illustration : Durée 45 minutes.
1. Régler le mode de cuisson à l'aide du sélecteur des
fonctions.
2. A l'aide du thermostat, régler la température ou la position
gril.
3. Appuyer deux fois sur la touche 0.
Dans l'affichage apparaît 00:00. Les symboles de temps sont
allumés,
r figure entre les parenthèses.

29
4. Régler la durée au moyen de la touche @ ou A.
Valeur de référence touche
@ = 30 minutes
Valeur de référence touche
A = 10 minutes
Le four se met en marche quelques secondes plus tard. La
durée s'écoule visiblement dans l'affichage et le symbole [r]
est allumé. Les autres symboles de temps s'éteignent.
La durée est écoulée
Un signal retentit. Le four s'arrête de chauffer. Dans l'affichage
apparaît 00:00. Appuyer sur la touche
0. Vous pouvez régler
une nouvelle durée au moyen de la touche
@ ou A. Ou
appuyer deux fois sur la touche
0 et régler le sélecteur des
fonctions sur la position zéro. Le four est éteint.
Modifier la durée
Modifier la durée au moyen de la touche
@ ou A. La
modification sera validée après quelques secondes. Si la
minuterie est réglée, appuyez auparavant sur la touche
0.
Annuler la durée
Remettre la durée sur 00:00 au moyen de la touche
A. La
modification sera validée après quelques secondes. La durée
est effacée. Si la minuterie est réglée, appuyez auparavant sur
la touche
0.
Interroger les réglages de temps
Si plusieurs fonctions de temps sont réglées, les symboles
correspondants sont allumés dans l'affichage. Le symbole de la
fonction de temps à l'avant-plan figure entre parenthèses.
Pour interroger la minuterie
U, la durée r, l'heure de la fin p
ou l'heure
0, appuyer répétitivement sur la touche 0, jusqu'à
ce que le symbole respectif figure entre les parenthèses. La
valeur correspondante apparaît pour quelques secondes dans
l'affichage.
Heure de la fin
Vous pouvez différer l'heure à laquelle votre mets doit être prêt.
Le four démarre automatiquement et la cuisson est terminée au
moment voulu. Vous pouvez p.ex. enfourner le mets le matin et
régler de telle manière qu'il sera prêt à midi.
Veillez à ce que les aliments ne restent pas trop longtemps
dans le compartiment de cuisson et s'avarient.
Exemple dans l'illustration : Il est 10:30 h, la durée est de
45 minutes et la cuisson doit être terminée à 12:30 h.
1. Régler le sélecteur du mode de cuisson.
2. Régler le thermostat.
3. Appuyer deux fois sur la touche 0.
4. Régler la durée au moyen de la touche @ ou A.
5. Appuyer sur la touche 0.
Les parenthèses sont autour de
p. Dans l'affichage apparaît
l'heure à laquelle le mets sera prêt.
6. Différer l'heure de la fin à l'aide de la touche @ ou A.
Après quelques secondes, le four valide les réglages et se met
en position d'attente. L'affichage indique l'heure à laquelle le
mets sera prêt et le symbole
p figure entre parenthèses. Le
symbole
U et 0 s'éteignent. Lorsque le four démarre, la durée
s'écoule visiblement et le symbole
r figure entre parenthèses.
Le symbole
p s'éteint.
La durée est écoulée
Un signal retentit. Le four s'arrête de chauffer. Dans l'affichage
apparaît 00:00. Appuyer sur la touche
0. Vous pouvez régler
une nouvelle durée au moyen de la touche
@ ou A. Ou
appuyer deux fois sur la touche
0 et régler le sélecteur des
fonctions sur la position zéro. Le four est éteint.
Modifier l'heure de la fin
Modifier l'heure de la fin au moyen de la touche
@ ou A. La
modification sera validée après quelques secondes. Si la
minuterie est réglée, appuyez auparavant deux fois sur la
touche
0. Ne modifiez plus l'heure de la fin si la durée
s'écoule déjà. Le résultat de cuisson ne correspondra plus.
Annuler l'heure de la fin
Remettre l'heure de la fin à l'heure actuelle au moyen de la
touche
A. La modification sera validée après quelques
secondes. Le four se met en marche. Si la minuterie est réglée,
appuyez auparavant deux fois sur la touche
0.
Interroger les réglages de temps
Si plusieurs fonctions de temps sont réglées, les symboles
correspondants sont allumés dans l'affichage. Le symbole de la
fonction de temps à l'avant-plan figure entre parenthèses.
Pour interroger la minuterie
U, la durée r, l'heure de la fin p
ou l'heure
0, appuyer répétitivement sur la touche 0, jusqu'à
ce que le symbole respectif figure entre les parenthèses. La
valeur correspondante apparaît pour quelques secondes dans
l'affichage.

30
Heure
Après avoir branché l'appareil ou après une panne de courant,
le symbole
0 et quatre zéros clignotent dans l'affichage.
Réglez l'heure.
1. Appuyer sur la touche 0.
L'heure 12:00 apparaît dans l'affichage. Les symboles de
l'heure sont allumés, les parenthèses renferment
0.
2. Régler l'heure au moyen de la touche @ ou A.
L'heure réglée sera validée au bout de quelques secondes.
Modifier l'heure
Aucune autre fonction de temps ne doit avoir été réglée.
1. Appuyer quatre fois sur la touche 0.
Les symboles de temps s'allument dans l'affichage,
0 figure
entre les parenthèses.
2. Modifier l'heure au moyen de la touche @ ou A.
L'heure réglée sera validée au bout de quelques secondes.
Masquer l'heure
Vous pouvez masquer l'heure. Pour cela, consultez le
chapitre Modifier les réglages de base.
Sécurité-enfants
Le four est équipé d'une sécurité-enfants, afin que les enfants
ne puissent pas le mettre en marche par mégarde.
Le four ne réagit à aucun réglage. Vous pouvez régler le
minuteur et l'heure même si la sécurité-enfants est activée.
Si un mode de cuisson et la température ou une position gril
sont réglés, la sécurité-enfants coupe le chauffage.
Remarque : La sécurité-enfants n'a pas d'impact sur une table
de cuisson éventuellement raccordée.
Activer la sécurité-enfants
Aucune durée ou heure de la fin ne doit être réglée.
Appuyer sur la touche
D pendant env. quatre secondes.
Le symbole
D apparaît dans l'affichage. La sécurité-enfants
est activée.
Désactiver la sécurité-enfants
Appuyer sur la touche
D pendant env. quatre secondes.
Le symbole
D s'éteint dans l'affichage. La sécurité-enfants est
désactivée.
Modifier les réglages de base
Votre four possède différents réglages de base. Vous pouvez
adapter ces réglages à vos habitudes.
Aucune autre fonction de temps ne doit avoir été réglée.
1. Appuyer sur la touche 0 pendant 4 secondes env.
Le réglage de base actuel pour la durée du signal, p.ex.
c1 1 pour la sélection 1 apparaît dans l'affichage.
2. Modifier le réglage de base au moyen de la touche @ ou A.
3. Confirmer au moyen de la touche 0.
Le réglage de base suivant apparaît dans l'affichage. Avec la
touche
0 vous pouvez parcourir tous les niveaux et modifier
à l'aide de la touche
@ ou A.
4. A la fin, appuyer sur la touche 0 pendant 4 secondes env.
Tous les réglages de base sont validés.
Vous pouvez remodifier vos réglages de base à tout moment.
Réglage de base Sélection 1 Sélection 2 Sélection 3
c1 Affichage heure permanent* unique-
ment avec
la
touche
0
-
c2 Durée du signal
après écoulement
d'une durée ou du
temps de la minute-
rie
env.
10 sec.
env.
2 min.*
env. 5 min.
c3 Temps d'attente
jusqu'à ce qu'un
réglage soit validé
env. 2 sec. env.
5 sec.*
env.
10 sec.
* Réglage usine

31
Entretien et nettoyage
Si vous entretenez et nettoyez soigneusement votre four il
gardera longtemps l'aspect du neuf et restera opérationnel.
Nous vous expliquons ici comment entretenir et nettoyer
correctement votre four.
Remarques
■ Les légères variations de couleur apparaissant sur la façade
du four sont dues aux différents matériaux tels que le verre,
le plastique et le métal.
■ Des ombres sur la vitre de la porte, qui ressemblent à des
stries, sont des reflets de lumière de la lampe du four.
■ L'émail est cuit à des températures très élevées. Ceci peut
engendrer des différences de teintes. Ce phénomène est
normal et n'a aucune incidence sur le fonctionnement du
four. Les bords de plaques minces ne peuvent pas être
émaillés complètement. Ils peuvent donc présenter des
aspérités. La protection contre la corrosion n'en est pas
compromise.
: Risque de choc électrique !
De l'humidité qui pénètre peut occasionner un choc électrique.
Ne pas utiliser de nettoyeur haute pression ou de nettoyer à
vapeur.
: Risque de brûlure !
L'appareil devient très chaud. Ne jamais toucher les surfaces
intérieures chaudes du compartiment de cuisson ni les
résistances chauffantes. Toujours laisser l'appareil refroidir.
Tenir les enfants éloignés
Nettoyants
Afin de ne pas endommager les différentes surfaces par des
nettoyants inappropriés, veuillez respecter les indications
suivantes.
N'utilisez pas
pour la table de cuisson
■ de produits à vaisselle non dilués ou de nettoyants pour lave-
vaisselle
■ de produits récurants, des éponges à dos récurant
■ de nettoyants agressifs tels que aérosol pour four ou des
détachants
■ de nettoyeurs haute pression ou nettoyeurs à jet de vapeur.
Nettoyez la table de cuisson après chaque utilisation. Cela évite
que des résidus alimentaires s'incrustent.
Nettoyez la table de cuisson uniquement lorsqu'elle est
suffisamment refroidie.
Utilisez exclusivement des nettoyants appropriés pour la
vitrocéramique. Respectez les consignes de nettoyage figurant
sur l'emballage.
Les fortes salissures s'enlèvent le mieux avec un racloir à verre
en vente dans le commerce. Respectez les recommandations
du fabricant.
Utilisez
pour le cadre de la table de cuisson
■ uniquement de l'eau chaude additionnée de produit à
vaisselle, n'utilisez pas
■ de produits récurants, des éponges à dos récurant
■ de nettoyants agressifs tels que aérosol pour four ou des
détachants
■ de racloirs à verre
N'utilisez pas
pour le four
■ de produits agressifs ou récurants
■ de nettoyants fortement alcoolisés
■ de tampons en paille métallique ni d'éponges à dos récurant
■ de nettoyeurs haute pression ni de nettoyeurs à vapeur.
Avant d'utiliser des lavettes éponges neuves, rincez-les
soigneusement.
Niveau Nettoyants
Extérieur de l'appa-
reil
Eau chaude additionnée de produit à
vaisselle :
Nettoyer avec une lavette et sécher avec
un chiffon doux. Ne pas utiliser de net-
toyant pour vitres ni de racloirs à verre.
Inox Eau chaude additionnée de produit à
vaisselle :
Nettoyer avec une lavette et sécher avec
un chiffon doux. Éliminer immédiatement
les dépôts calcaires, de graisse, de
fécule et de blanc d'œuf. De la corrosion
peut se former sous ces salissures.
Auprès du service après-vente et dans le
commerce spécialisé, vous pouvez vous
procurer des produits d'entretien spé-
ciaux pour inox qui sont appropriés pour
des surfaces chaudes. Appliquer avec
un chiffon doux une pellicule mince de
produit d'entretien.
Aluminium et plas-
tique
Nettoyant pour vitres :
Nettoyer avec un chiffon doux.
Surfaces émaillées
(surface lisse)
Pour faciliter le nettoyage vous pouvez
allumer l'éclairage du compartiment de
cuisson et décrocher la porte de l'appa-
reil, le cas échéant. Appliquer un produit
à vaisselle usuel du commerce ou de
l'eau au vinaigre avec un chiffon doux,
humide ou une peau de chamois ;
sécher avec un chiffon doux. Ramollis-
sez les résidus d'aliment incrustés avec
un chiffon humide et du produit à vais-
selle. En cas d'encrassement important,
nous recommandons d'utiliser un produit
de nettoyage pour four en gel. Il peut
être appliqué de façon précise. Après le
nettoyage, laisser le compartiment de
cuisson ouvert, afin qu'il sèche.
Surfaces autonet-
toyantes (surface
rugueuse)
Respectez les indications dans le cha-
pitre : Surfaces autonettoyantes
Vitres de la porte Nettoyant pour vitres :
Nettoyer avec un chiffon doux. Ne pas
utiliser de racloir à verre.
Couvercle en verre
de la lampe du four
Eau chaude additionnée de produit à
vaisselle :
Nettoyer avec une lavette.
Joint
Ne pas l'enlever !
Eau chaude additionnée de produit à
vaisselle :
Nettoyer avec une lavette. Ne pas récu-
rer.
Supports Eau chaude additionnée de produit à
vaisselle :
Mettre à tremper et nettoyer avec une
lavette ou une brosse.
Accessoires Eau chaude additionnée de produit à
vaisselle :
Mettre à tremper et nettoyer avec une
lavette ou une brosse.

32
Panneaux catalytiques du compartiment de
cuisson
Les panneaux catalytiques du compartiment de cuisson sont
revêtus d'un émail autonettoyant.
Les parois se nettoient automatiquement pendant le
fonctionnement du four. Les projections plus importantes
disparaissent seulement au bout de plusieurs utilisations du
four.
Les parois latérales et la paroi arrière sont dotées d'un
revêtement catalytique. Ne nettoyez jamais ces surfaces avec
un produit de nettoyage pour four. Une légère décoloration du
revêtement en émail n'a aucune influence sur l'autonettoyage.
Décrocher et accrocher la porte de l'appareil
Pour faciliter le nettoyage, vous pouvez décrocher la porte de
l'appareil.
Décrocher la porte de l'appareil
: Risque de blessure !
Les charnières peuvent se fermer violemment si elles ne sont
pas bloquées. En décrochant la porte du four, veillez à ce que
les tiges de sécurité soient complètement introduites dans les
trous des charnières.
1. Ouvrir complètement la porte du four.
2. Verrouiller les deux charnières à gauche et à droite au moyen
de la tige de sécurité (a).
Remarque : Les tiges de sécurité doivent être complètement
introduites dans les trous des charnières.
3. Saisir la porte du four sur les côtés avec les deux mains et la
fermer d'env. 30° (b).
4. Soulever légèrement la porte du four et la retirer.
Remarque : Ne pas fermer la porte du four complètement.
Cela risque de tordre les charnières et d'endommager
l'émail.
Accrocher la porte de l'appareil
1. Saisir la porte du four sur les côtés avec les deux mains.
2. Pousser les charnières dans les évidements du four (a).
Remarque : L'encoche en bas aux charnières doit
s'encranter dans le cadre du four (b).
3. Abaisser la porte.
4. Retirer les tiges de sécurité.
: Risque de blessure !
Si la porte du four tombe par inadvertance ou une charnière se
ferme, ne pas mettre la main dans la charnière. Appeler le
service après-vente.
Retrait et montage des grilles supports
Pour pouvez décrocher les grilles supports pour faciliter le
nettoyage.
Retrait des grilles supports
1. Dévisser les vis à gauche et à droite des grilles supports.
2. Enlever les grilles supports.
Mise en place de la grille support
1. Tenir la grille support devant les trous de la paroi latérale.
2. Revisser la grille support avec les vis.
DE
ED
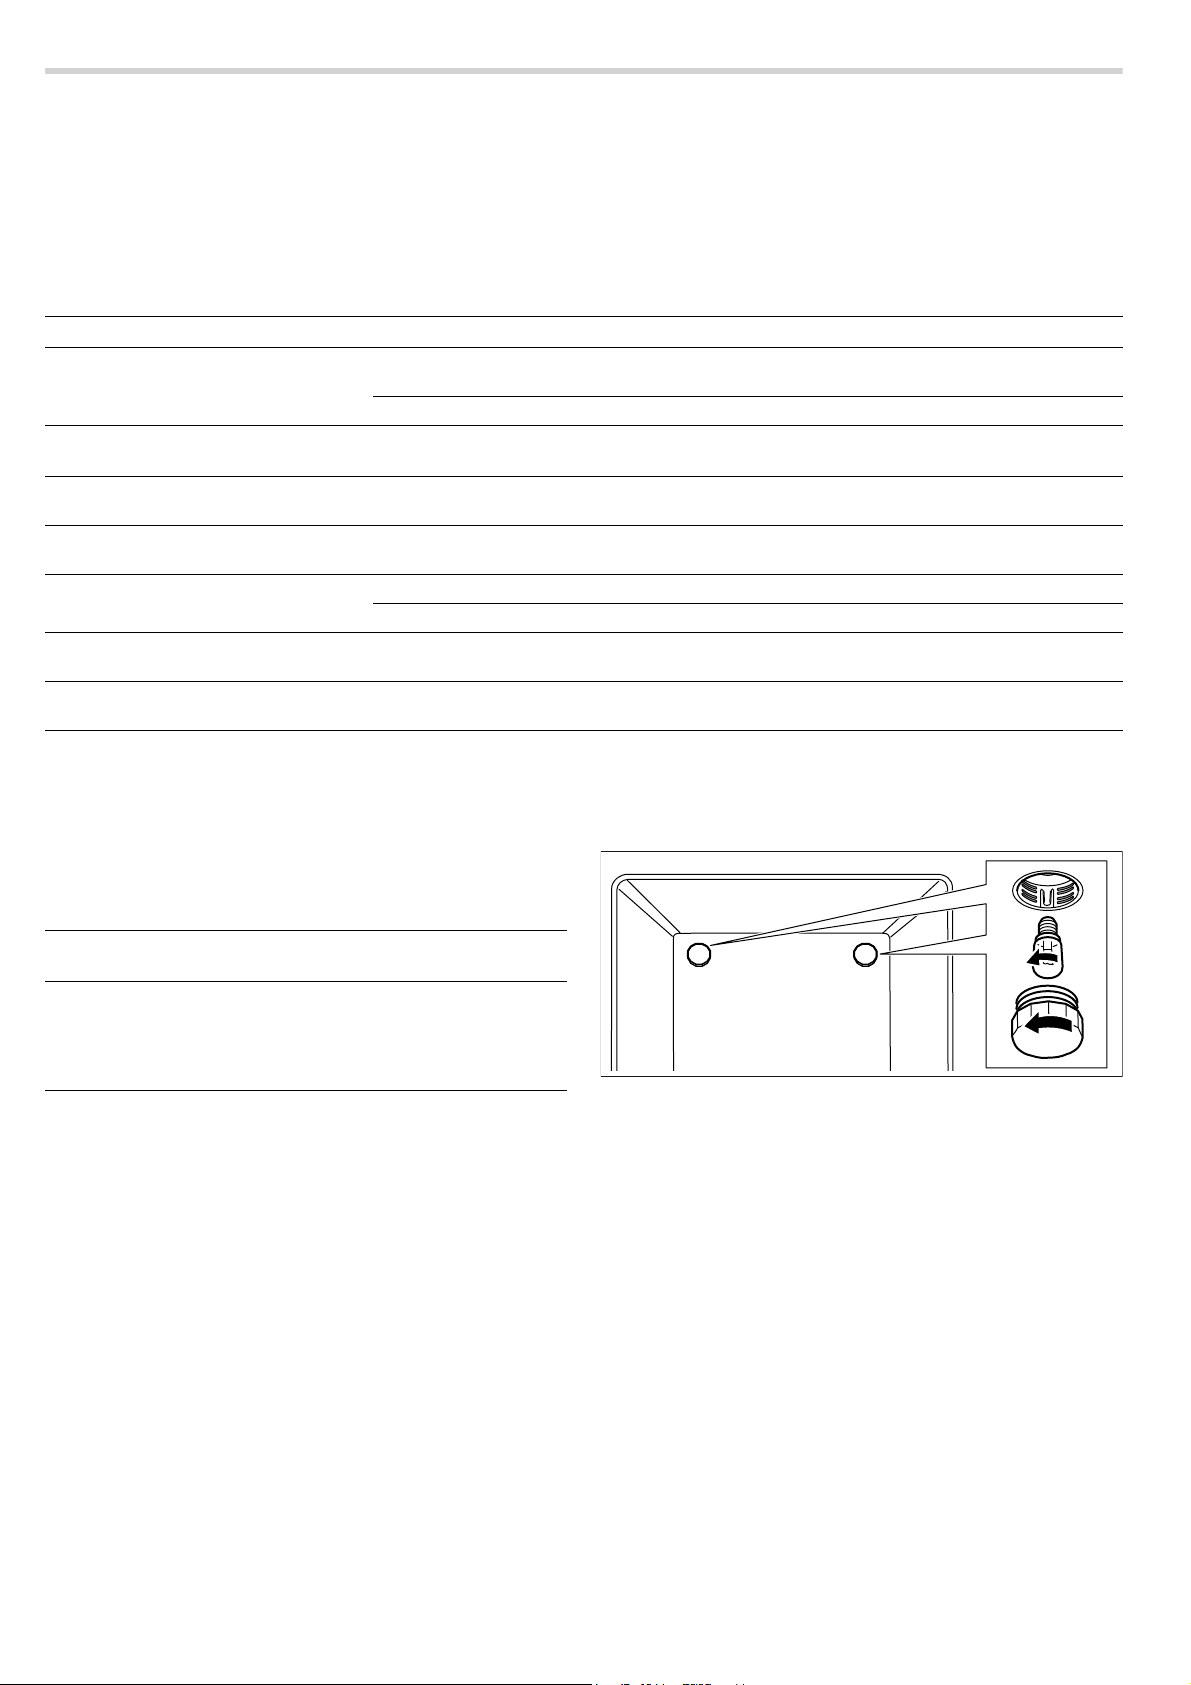
33
Pannes et dépannage
Il se peut qu'une petite panne gêne le bon fonctionnement de
votre appareil. Avant d'appeler le service après-vente, consultez
le tableau. Vous pouvez éventuellement remédier vous-même
au dérangement.
: Risque de blessure ! !
Des réparations inexpertes peuvent causer des dangers
considérables. Les réparations de l'appareil doivent
uniquement être effectuées par un spécialiste. En cas de
réparation, appeler le service après-vente.
Tableau des dérangements
Messages d'erreur
Si un message d'erreur accompagné de “ apparaît dans
l'affichage, appuyez sur la touche
0. Le message disparaît.
Une fonction de temps réglée sera effacée. Si le message
d'erreur ne disparaît pas, appelez le service après-vente.
Lors du message d'erreur suivant, vous pouvez y remédier
vous-même.
: Risque de choc électrique !
Les réparations inexpertes sont dangereuses. Seul un
technicien du service après-vente formé par nos soins est
habilité à effectuer des réparations.
Changer la lampe du four
Si la lampe du four ne fonctionne pas, vous devez la changer.
Des ampoules de rechange résistantes aux températures
élevées sont en vente au service après-vente ou dans le
commerce spécialisé. Veuillez indiquer les numéros E et FD de
votre appareil. N'utilisez pas d'autres ampoules.
: Risque de choc électrique !
Lors du remplacement de l'ampoule du compartiment de
cuisson, les contacts du culot de l'ampoule sont sous tension.
Retirer la fiche secteur ou couper le fusible dans le boîtier à
fusibles avant de procéder au remplacement.
1. Couper le courant par le fusible ou retirer la fiche de la prise
de courant.
2. Ouvrir la porte de l'appareil.
3. Etaler un torchon dans le compartiment de cuisson froid afin
d'éviter des endommagements.
4. Dévisser le cache en verre de la lampe du four défectueuse
située à l'intérieur du compartiment de cuisson.
5. Remplacer l'ampoule du four par une ampoule de type
identique.
Tension : 230 V ;
Puissance : 25 W ;
Culot : E14 ;
Résistance à la température : 300°C
6. Revisser le cache en verre de la lampe du four.
7. Enlever le torchon et réarmer le fusible ou rebrancher la fiche
secteur.
8. Allumer l'éclairage du four et vérifier le fonctionnement.
Dérangement Cause possible Remède / remarques
L’appareil ne fonctionne pas. Fusible grillé Vérifiez dans le boîtier à fusibles si le fusible
est en bon état.
Panne de courant. Vérifier si l'éclairage de la cuisine s'allume.
0 et des zéros clignotent dans l'affi-
chage.
Panne de courant Réglez à nouveau l'heure.
L'éclairage du four est en panne. Lampe du four défectueuse Remplacez la lampe du four. (Voir paragraphe
"Remplacement de la lampe du four")
Le brûleur à gaz ne s'allume pas. Panne de courant ou bougies d'allumage
humides
Allumez le brûleur avec un allume-gaz ou une
allumette.
Le four ne chauffe pas. Fusible grillé. Vérifier le fusible ou le remplacer.
Le sélecteur des fonctions n'est pas réglé. Régler le sélecteur des fonctions.
Tous les mets préparés au four brûlent
rapidement.
Thermostat défectueux Appelez le service aprèsvente.
De la buée se forme sur la vitre de la
porte lorsque le four chauffe.
C'est un phénomène normal dû à la diffé-
rence de température
Pas possible ; aucune influence sur le fonc-
tionnement.
Message
d'erreur
Cause possible Remède/Remarques
“‹‚‚
Une touche a
été pressée
trop longtemps
ou est couverte.
Appuyez sur toutes les
touches, l'une après l'autre.
Vérifiez si une touche est
bloquée, couverte ou
encrassée.
34
Service après-vente
Si votre appareil a besoin d'être réparé, notre service après-
vente se tient à votre disposition. Nous trouvons toujours une
solution appropriée pour éviter des visites inutiles d'un
technicien.
Lors de votre appel, veuillez indiquer le numéro de produit (n°
E) et le numéro de fabrication (n° FD), afin de nous permettre
de mieux vous aider. La plaque signalétique avec les numéros
est située à la face intérieure du volet du compartiment de
rangement.
Pour éviter d'avoir à les rechercher en cas de besoin, vous
pouvez inscrire ici les données de votre appareil et le numéro
de téléphone du service après-vente.
Tenez compte du fait que la visite d'un technicien du SAV n'est
pas gratuite en cas de manipulation incorrecte, même pendant
la période de garantie.
Vous trouverez les données de contact pour tous les pays dans
l'annuaire ci-joint du service après-vente.
Commande de réparation et conseils en cas de
dérangements
Faites confiance à la compétence du fabricant. Vous
garantissez ainsi que la réparation sera effectuée par des
techniciens de SAV formés qui disposent des pièces de
rechange d’origine adaptées à votre appareil.
Conseils concernant l'énergie et l'environnement
Vous trouverez ici des conseils sur la manière d'économiser de
l'énergie lors de la cuisson et du rôtissage dans le four et sur la
table de cuisson et d'éliminer correctement votre appareil.
Économiser de l'énergie dans le four
■ Préchauffez le four seulement si cela est indiqué dans la
recette ou dans les tableaux de la notice d'utilisation.
■ Utilisez des moules sombres, laqués noirs ou émaillés. Ces
types de moule absorbent bien la chaleur.
■ Pendant la cuisson ou le rôtissage, ouvrez la porte du four
aussi rarement que possible.
■ Si vous voulez faire cuire plusieurs gâteaux, faitesles cuire
les uns après les autres. Le four étant encore chaud. Le
temps de cuisson diminue au deuxième gâteau. Vous pouvez
également enfourner 2 moules à cake l'un à côté de l'autre.
■ Si les temps de cuisson sont assez longs, vous pouvez
éteindre le four 10 minutes avant la fin de la durée impartie
puis terminez la cuisson avec la chaleur résiduelle.
Économiser de l'énergie sur la table de
cuisson
■ Utilisez des casseroles et des poêles avec un fond épais plat.
Des fonds qui ne sont pas plans augmentent la
consommation d'énergie.
■ Le diamètre du fond de la casserole ou de la poêle doit
correspondre à la dimension du foyer. En particulier, de trop
petites casseroles sur le foyer conduisent à des pertes
d'énergie. Attention : les fabricants de récipients indiquent
souvent le diamètre supérieur. Il est généralement plus grand
que le diamètre du fond.
■ Pour des petites quantités, utilisez une petite casserole. Une
grande casserole, peu remplie, nécessite beaucoup
d'énergie.
■ Fermez toujours les récipients avec un couvercle approprié.
Une cuisson sans couvercle nécessite quatre fois plus
d'énergie.
■ Faites cuire avec peu d'eau. Vous économiserez de l'énergie.
Les vitamines et minéraux des légumes seront conservés.
■ Réglez à temps à une position de chauffe inférieure.
■ Utilisez la chaleur résiduelle. Si les temps de cuisson sont
assez longs, éteignez le foyer 5 à 10 minutes avant la fin de
la durée de cuisson.
Elimination écologique
N° E N° FD
Service après-vente
O
B 070 222 141
FR 01 40 10 11 00
CH 0848 840 040
Eliminez l'emballage en respectant l'environnement.
Cet appareil est marqué selon la directive
européenne 2012/19/UE relative aux appareils
électriques et électroniques usagés (waste electrical
and electronic equipment - WEEE).
La directive définit le cadre pour une reprise et une
récupération des appareils usagés applicables dans
les pays de la CE.


17
AÓª©dG áeóN
øëfh .áÑ°SÉæªdG ∂à¡Lh ƒg AÓª©dG áeóîd Éfõcôªa ,ìÓ°UEÓd ∑RÉ¡L êÉàMG GPEG
ô«Z äGQÉjR ájCG ∂Ñ«æéàd É°†jCGh ,á∏μ°ûª∏d Ö°SÉæªdG πëdG ≈dEG ɪFGO π°Uƒàf
.áeóîdG »æa øe ájQhô°V
™æ°üdG ºbQh
(E-Nr.) èàæªdG ºbQ ôcP ≈Lôj áeóîdG õcôªH ∫É°üJ’G óæY
™æ°üdG áMƒd óéJ ±ƒ°Sh .áë«ë°üdG IQƒ°ûªdG ∂d Ωó≤f ¿CG ™«£à°ùf ≈àM (FD-Nr.)
.ßØëdG êQO AÉ£Z øWÉH ≈∏Y ΩÉbQC’G É¡H ¿hóªdG
åëÑ∏d ô£°†J ’ »c ,AÓª©dG áeóN ∞JÉg ºbQh ∑RÉ¡L äÉfÉ«H øjhóJ Éæg ∂æμªj
.äÉfÉ«ÑdG √òg ≈dEG êÉ«àM’G óæY πjƒW âbƒd
E-Nr. èàæªdG ºbQFD-Nr. ™æ°üdG ºbQ
O
AÓª©dG áeóN
ÅWÉîdG ∫ɪ©à°S’G ádÉM »a ¿ÉéªdÉH â°ù«d AÓª©dG áeóN »æa IQÉjR ¿CG ≈YGôj
.¿Éª°†dG Iôàa AÉæKCG ≈àM
õcôe ÜôbCÉH ∫É°üJ’G äÉfÉ«H AÓª©dG áeóN õcGôªd ≥aôªdG π«dódG »a hCG Éæg óéJ
.¿Gó∏ÑdG ™«ªL »a AÓª©dG áeóîd
ä’ÓàN’G ádÉM »a IQƒ°ûªdGh ìÓ°UE’G Ö∏W
É°ùªædG
0810 550 511
ɫfɪdCG
089 69 339 339
Gô°ùjƒ°S
0848 840 040
áaô©ªH ºàj ±ƒ°S ìÓ°UE’G ¿CG ócCÉJ ºK øeh .á©fÉ°üdG á¡édG IôÑNh IAÉØc »a ≥K
.∑RÉ¡éd á«∏°UC’G QÉ«¨dG ™£b º¡jódh ø«HQóe áeóN »«æa
áÄ«ÑdGh ábÉ£dG ∫ƒM íFÉ°üf
»a AGƒ°ûdGh äGRƒÑîªdG OGóYEG AÉæKCG ábÉ£dG ô«aƒJ á«Ø«c ∫ƒM íFÉ°üf Éæg óéJ
.᪫∏°S á≤jô£H ∑RÉ¡L øe ¢ü∏îàdG á«Ø«c ∫ƒMh óbƒªdG ≈∏Y »¡£dG AÉæKCGh ¿ôØdG
¿ôØdG ΩGóîà°SG óæY ábÉ£dG ô«aƒJ
■ É
k
°Uƒ°üæe hCG ΩÉ©£dG OGóYEG áØ°Uh »a G
k
Qô≤e ∂dP ¿Éc GPEG ’EG ¿ôØdG AɪMEÉH º≤J ’
.∫ɪ©à°S’G π«dO ∫hGóL »a ¬«∏Y
■ á≤Ñ£H hCG AGOƒ°S á≤Ñ£H á«∏£ªdG hCG áªJÉ≤dG äGRƒÑîªdG OGóYEG »fGƒ°U Ωóîà°SG
.ájɨ∏d Ió«L IQƒ°üH IQGôëdG ¢üàªJ »¡a .(π«eÉæjE’G) É櫪dG
■ ≥«°VCG »a ’EG AGƒ°ûdG hCG äGRƒÑîªdG OGóYEG hCG »¡£dG AÉæKCG ¿ôØdG ÜÉH íàØJ ’
.OhóëdG
■ ¿ôØdG π¶j å«M .iôNC’G ó©H IóMGƒdG ôFÉ£ØdG øe ójó©dG õÑN π°†aC’G øe
Iô«£Ø∏d áÑ°ùædÉH äGRƒÑîªdG OGóYE’ ΩRÓdG âbƒdG π≤j ∂dòHh .¬àfƒî°ùH É
k
¶Øàëe
.ø«JQhÉéàe ø«à«æ«°U ™°Vh É
k
°†jCG ∂æμªj ɪc .á«fÉãdG
■ πÑb ≥FÉbO 10 Ióªd ¿ôØdG AÉØWEG ∂æμªj É
k
«Ñ°ùf á∏jƒ£dG »¡£dG äÉbhC’ áÑ°ùædÉH
.»¡£dG AÉ¡fE’ á«≤ÑàªdG IQGôëdG ΩGóîà°SGh ,»¡£dG øeR ájÉ¡f
óbƒªdG ΩGóîà°SG óæY ábÉ£dG ô«aƒJ
■ ô«Z óYGƒ≤dG ¿EG å«M .ájƒà°ùªdGh á쫪°ùdG óYGƒ≤dG äGP »dÉ≤ªdGh »fGhC’G Ωóîà°SG
.ábÉ£dG ∑Ó¡à°SG øe ójõJ ájƒà°ùªdG
■ áØ°üHh .»¡£dG ™°Vƒe ¢SÉ≤e ™e IÓ≤ªdG hCG AÉfE’G IóYÉb ô£b ≥HÉ£àj ¿CG »¨Ñæj
QGógEG ≈dEG »¡£dG ™°Vƒe ≈∏Y ájɨ∏d Iô«¨°üdG »fGhC’G ™°Vh …ODƒj á°UÉN
.…ƒ∏©dG »fGhC’G ô£b ôcòJ Ée Gô«ãc »fGhCÓd á©fÉ°üdG á¡édG :¿CG ≈YGôj .ábÉ£dG
.»fGhC’G IóYÉb ô£b øe ôÑcCG ¿ƒμj Ée ÉÑdÉZ …òdGh
■ ᫪μH IAƒ∏ªªdG Iô«ÑμdG »fGhC’G ¿CG PEG .Iô«¨°U »fGhCG Iô«¨°üdG äÉ«ªμ∏d Ωóîà°SG
.ábÉ£dG øe Gô«Ñc GQób ∂∏¡à°ùJ á∏«∏b
■ êÉàëJ AÉ£Z ™°Vh ¿hO »¡£dG óæ©a .Ö°SÉæe AÉ£¨H ɪFGO »fGhC’G á«£¨àH ºb
.ábÉ£dG ±É©°VCG á©HQC’
■ ßaÉëjh .ábÉ£dG ôaƒj Gò¡a .AɪdG øe á∏«∏b ᫪c ΩGóîà°SÉH »¡£dG ≈∏Y ¢UôMG
.äGhô°†îdG »a IOƒLƒªdG ¿OÉ©ªdGh äÉæ«eÉà«ØdG ≈∏Y
■ .≈fOCG »¡W áLQO ≈dEG ∫É≤àf’ÉH Ö°SÉæªdG âbƒdG »a ºb
■ äGôàa ádÉM »a ∂eÉ«b ∫ÓN øe ∂dPh .á«≤ÑàªdG IQGôëdG ΩGóîà°SG ≈∏Y ¢UôMG
»dGƒëH »¡£dG Iôàa ájÉ¡f πÑb »¡£dG ™°Vƒe AÉØWEÉH É«Ñ°ùf á∏jƒ£dG »¡£dG
.≥FÉbO 10-5
áÄ«ÑdÉH ô°†J ’ á≤jô£H äÉØ∏îªdG øe ¢ü∏îàdG
.áÄ«ÑdÉH ô°†J ’ á≤jô£H ∞«∏¨àdG OGƒe øe ¢ü∏îJ
2012/19/EU á«HhQhC’G áØ°UGƒª∏d É≤ÑW õ«ªe RÉ¡édG Gòg
áªjó≤dG á«fhôàμdE’Gh á«FÉHô¡μdG Iõ¡LC’ÉH ≥∏©àj ɪ«a
.(waste electrical and electronic equipment - WEEE)
OÉëJ’G ∫hO πNGO …QÉ°ùdG ΩÉ©dG QÉWE’G áØ°UGƒªdG √òg OóëJh
.É¡dÓ¨à°SG IOÉYEGh áªjó≤dG Iõ¡LC’G OGOôà°SG á«∏ª©d EU »HhQhC’G
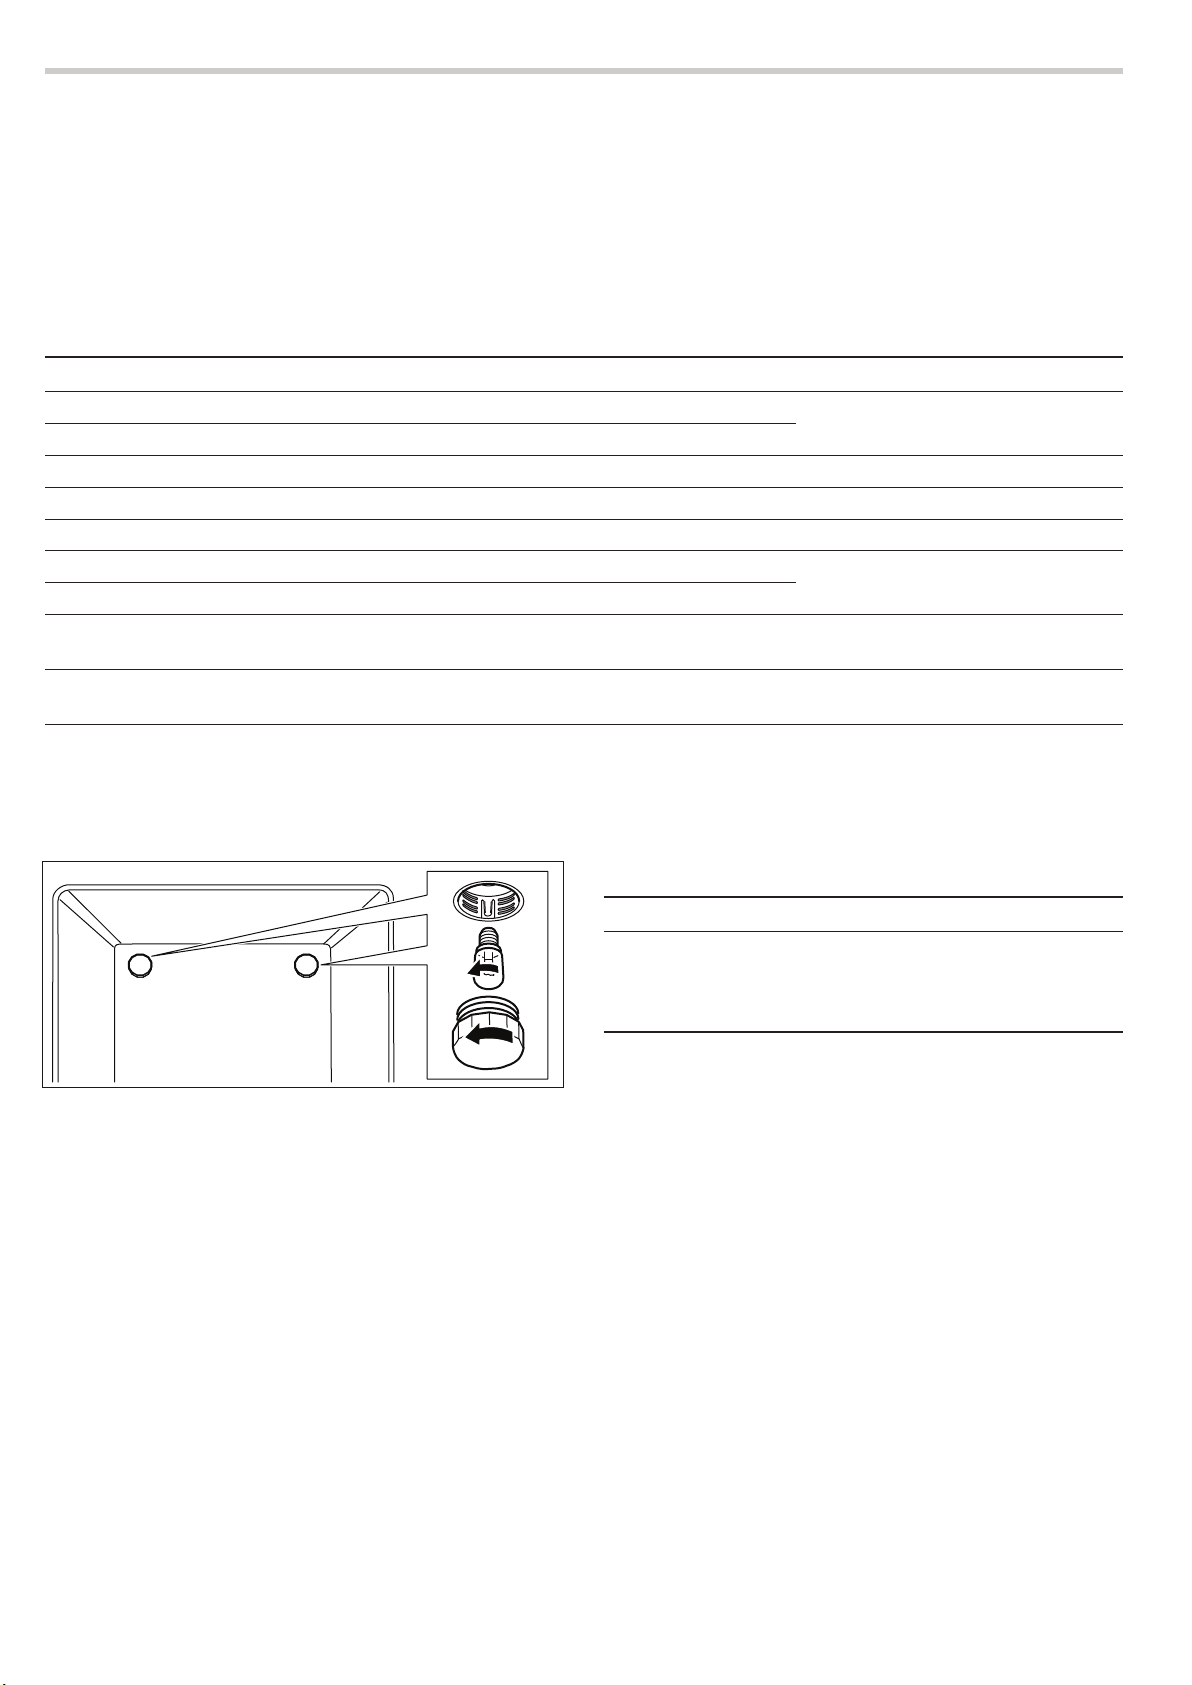
16
?π∏N çhóM óæY πª©dG Ée
∫hóédG ™LGQ .ᣫ°ùH AÉ«°TCG ≈dEG ¿É«MC’G Ö∏ZCG »a ∂dP Oƒ©j ,π∏N Qƒ¡X ádÉM »a
.∂°ùØæH π∏îdG ≈∏Y Ö∏¨àdG ∂fÉμeEÉH ¿ƒμj ɪHôa .AÓª©dG áeóîH π°üàJ ¿CG πÑb
:
!áHÉ°UE’G ô£N
’ Gòd .á¨dÉH QÉ£NCG »a ÖÑ°ùàj ¿CG øμªj ᪫∏°S ô«Z á≤jô£H äÉMÓ°UE’ÉH ΩÉ«≤dG
áLÉëdG óæYh .ø«°ü°üîàªdG ø««æØdG áaô©ªH ’EG RÉ¡édG ≈∏Y äÉMÓ°UEG AGôLEG Rƒéj
.AÓª©dG áeóN õcôªH π°üJG ,ìÓ°UEG AGôLE’
ä’ÓàN’G ∫hóL
π∏îdGπªàëªdG ÖÑ°ùdGäGOÉ°TQEG/±ô°üàdG á«Ø«c
.πª©j ’ RÉ¡édG∞dÉJ ô¡°üªdG
.ΩGôj Ée ≈∏Y ¿ôØdG ô¡°üe ¿CG ócCÉJh ôgÉ°üªdG ¥hóæ°U ¢üëaG
»FÉHô¡μdG QÉ«àdG ´É£≤fG.ïÑ£ªdG ìÉÑ°üe πªY øe ócCÉJ
.¢Vô©dG IóMh »a QÉØ°UC’Gh
0
õeôdG ¢†eƒj»FÉHô¡μdG QÉ«àdG ´É£≤fG.ójóL øe áYÉ°ùdG §Ñ°VG
.¿ôØdG IAÉ°VEG π£©JáØdÉJ ¿ôØdG áѪd(z¿ôØdG áѪd ô««¨J{ ´ƒ°Vƒe ô¶fG) .¿ôØdG áѪd ô««¨àH ºb
.RɨdG á∏©°T ∫É©°TEG ºàj ’∫É©°TE’G äÉ©ª°T »a áHƒWQ hCG »Hô¡μdG QÉ«àdG ´É£≤fG.ÜÉ≤K OƒY hCG RÉZ áY’h ΩGóîà°SÉH RɨdG á∏©°T ∫É©°TEÉH ºb
.ø«î°ùàdÉH ¿ôØdG Ωƒ≤j ’.∞dÉJ ô¡°üªdG.√ô««¨àH ºb hCG ô¡°üªdG ¢üëaG
.áØ«XƒdG QÉ«àNG ìÉàØe §Ñ°V ºàj ºd.áØ«XƒdG QÉ«àNG ìÉàØe §Ñ°VG
¿ôØdG »a ÉgOGóYEG ºàj »àdG ᪩WC’G ™«ªL
.Iô«°üb Iôàa ó©H ¥ôàëJ
∞dÉJ äÉà°SƒeôãdG.AÓª©dG áeóîH π°üJG
ø«î°ùJ óæY ÜÉÑdG êÉLR ≈∏Y AÉe QÉîH ∞ãμàj
.¿ôØdG
IQGôëdG áLQO ±ÓàN’ G
k
ô¶f ájOÉY IôgÉX.á«Ø«XƒdG IAÉØμdG ≈∏Y É¡d ô«KCÉJ ’ ,ìÉàe ô«Z
CÉ£îdG äÉZÓH
»Øàî«a .
0
QõdG ≈∏Y §¨°VG ,¢Vô©dG IóMh »a
“
õeôdG ™e CÉ£N ÆÓH ô¡X GPEG
,iôNCG Iôe CÉ£îdG ÆÓH »Øàîj ºd GPEG .áWƒÑ°†ªdG âbƒdG áØ«Xh ƒëe ºàjh .ÆÓÑdG
.AÓª©dG áeóîH π°üJG
.∂°ùØæH CÉ£îdG ìÓ°UE’ Ωõ∏j Ée AGôLEG ∂æμªj á«dÉàdG CÉ£îdG äÉZÓH Qƒ¡X ádÉM »a
CÉ£îdG ÆÓHπªàëªdG ÖÑ°ùdGäGOÉ°TQEG/±ô°üàdG á«Ø«c
“‹‚‚
QõdG ≈∏Y §¨°†dG ºJ
øe ∫ƒWCG IôàØd
á«£¨J ºJ hCG ΩRÓdG
.Ée A»°ûH QõdG
≈∏Y πc QGQRC’G ™«ªL ≈∏Y §¨°VG
QR ∑Éæg ¿Éc GPEG Ée ™LGQ .IóM
.ï°ùàe hCG ≈£¨e hCG ô°üëæe
:
!»FÉHô¡μdG ≥©°üdG ô£N
∫ɪYCG ò«ØæJ Rƒéj ’ .QÉ£NCG ≈∏Y É«æa ᪫∏°ùdG ô«Z ìÓ°UE’G ∫ɪYCG …ƒ£æJ
.Éæ∏Ñ
p
b øe ÜQóe AÓªY áeóN »æa πÑb øe ’EG ìÓ°UE’G
¿ôØdG áѪd ô««¨J
»àdG á∏jóÑdG äÉѪ∏dG ≈∏Y ∫ƒ°üëdG ∂æμªj .É¡Ø∏J ádÉM »a ¿ôØdG áѪd ô««¨J Öéj
ôcP ≈Lôjh .á°ü°üîàªdG ôLÉàªdG øe hCG AÓª©dG áeóN õcôe øe áfƒî°ùdG πªëàJ
.iôNCG ´GƒfCG øe äÉѪd Ωóîà°ùJ ’ .∑RÉ¡éd FD ™æ°üdG ºbQh E èàæªdG ºbQ
:
!»FÉHô¡μdG ≥©°üdG ô£N
QÉ«J É¡«a …ô°ùj áѪ∏dG IGhO äÉ°ùeÓe ¿CG »¡£dG õ«M áѪd ô««¨J óæY ≈YGôj
ô¡°üªdG π°üaG hCG ¢ùÑ≤ªdG øe »FÉHô¡μdG ¢ùHÉ≤dG ´õfG ,áѪ∏dG ô««¨J πÑb .»FÉHô¡c
.ôgÉ°üªdG ¥hóæ°U »a OƒLƒªdG
.1 .»FÉHô¡μdG ¢ùHÉ≤dG π°üaG hCG ô¡°üªdG π°üaG
.2 .RÉ¡édG ÜÉH íàaG
.3 .QGô°VCG çhóM Öæéàd OQÉH ƒgh »¡£dG õ«M »a »fGhCG áWƒa ™°V
.4 .»¡£dG õ«M πNGO áØdÉàdG ¿ôØdG áѪ∏d »LQÉîdG AÉ£¨dG ∂ØH ºb
.5 .´ƒædG ¢ùØf øe iôNCÉH ¿ôØdG áѪd ∫óÑà°SG
,§∏" 230 :»FÉHô¡μdG ó¡÷G
,•Gh 25 :IQó≤dG
,E14 :®hhÓ≤dG
Ω°300 :IQGô◊G áehÉ≤e
.6 .¿ôØdG áѪ∏d »LÉLõdG AÉ£¨dG Ö«côJ óYCG
.7 .»FÉHô¡μdG ¢ùHÉ≤dGh ô¡°üªdG π«°UƒJ óYCGh iôNCG Iôe »fGhC’G áWƒa êôNCG
.8 .áØ«XƒdG ¢üëØHh ¿ôØdG IAÉ°VEG 𫨰ûàH ºb
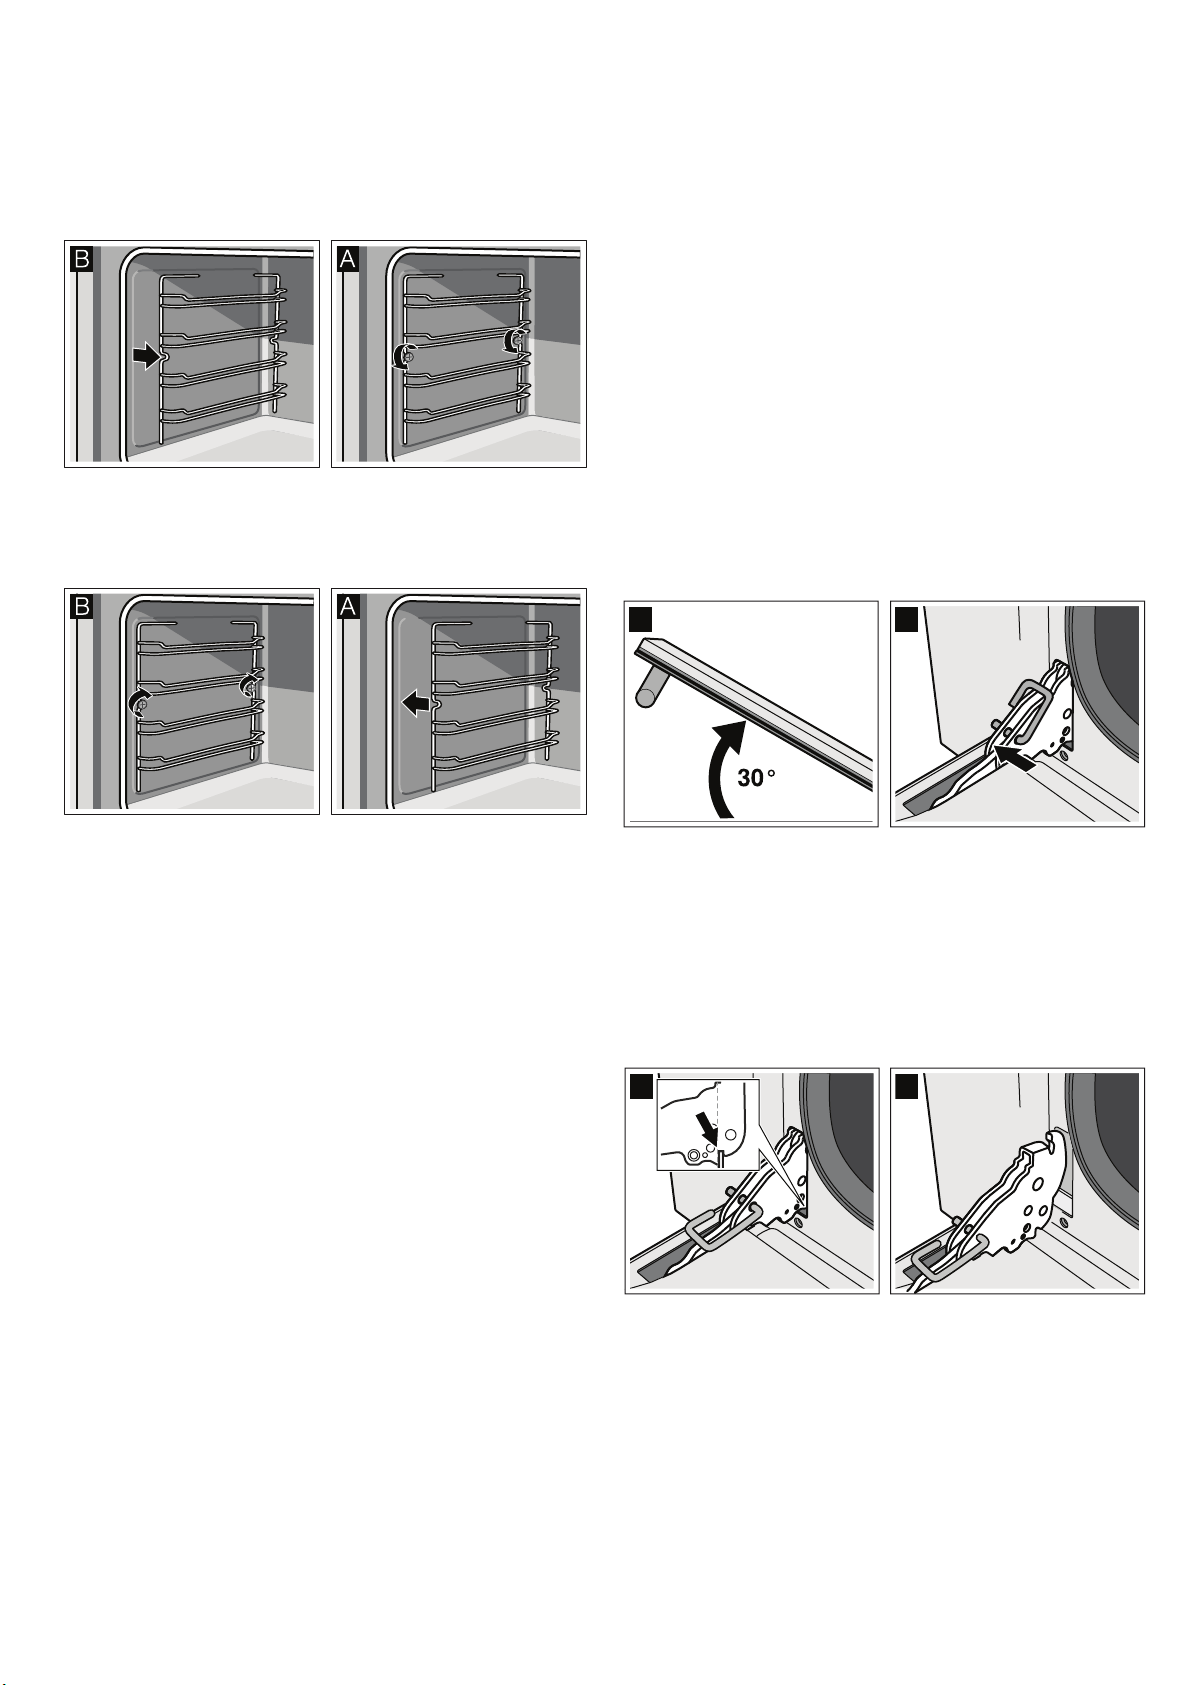
15
»¡£dG õ«ëd IRÉØëdG áfÉ£ÑdG
.(π«eÉæjE’G) É櫪dG øe ∞«¶æàdG á«JGP á≤Ñ£H IÉ£¨e »¡£dG õ«ëd IRÉØëdG äÉfÉ£ÑdG
PGPôdG äGô£b ¿CG ≈YGôjh .É
k
«JGP É
k
Ø«¶æJ í£°SC’G ∞«¶æJ ºàj ,¿ôØdG 𫨰ûJ AÉæKCÉa
.äGôe IóY ¿ôØdG 𫨰ûJ ó©H ’EG »ØàîJ ’ É
k
«Ñ°ùf Iô«ÑμdG
í£°SC’G √òg ∞¶æJ ’ .IRÉØM áfÉ£ÑH á«∏£e á«ÑfÉédG ¿GQóédGh »Ø∏îdG QGóédG
á≤ÑW ≈∏Y §«°ùH »fƒd ô«¨J Qƒ¡X ¿EÉa º∏©∏dh .¿GôaC’G ∞«¶æJ OGƒe ΩGóîà°SÉH
.»JGòdG ∞«¶æàdG á«°UÉN ≈∏Y ôKDƒj ’ (π«eÉæjE’G) É櫪dG
RÉ¡édG ÜÉH Ö«côJh ∂a
.π°†aCG πμ°ûH ∞«¶æà∏d RÉ¡édG ÜÉH ∂a ∂æμªj
RÉ¡édG ÜÉH ∂a
:
!áHÉ°UE’G ô£N
ô«eÉ°ùe ∫ÉNOEG øe ócCÉJ .Iô«Ñc Iƒ≤H óJôJ ób É¡fEÉa ,äÓ°üتdG ø«eCÉJ ºàj ºd GPEG
.¿ôØdG ÜÉH ∂a AÉæKCG ÉeɪJ äÓ°üتdG ∞jhÉéJ »a ø«eCÉàdG
.1 .ÉeɪJ ¿ôØdG ÜÉH íàaG
.2 .(a) ø«eCÉàdG QƒHÉîH ≈檫dGh iô°ù«dG ø«à∏°üتdG â«ÑãàH ºb
.ÉeÉ“ äÓ°üØŸG ∞jhÉŒ ‘ ÚeCÉàdG ÒHGƒN ∫ÉNOEG Öéj :á¶MÓe
.3 .(b) °30 ájhGõH ¬≤∏ZCG ºK ∂jój Éà∏μH ø«ÑfÉédG øe ¿ôØdG ÜÉH ∂°ùeCG
ab
.4 .êQÉî∏d ¬Ñë°SGh Ó«∏b ¿ôØdG ÜÉH ™aQG
ÖÑ°ùJh ≥∏¨dG ´QPCG »æãæJ ¿CG øμÁ å«M .É
k
eÉ“ ¿ôØdG ÜÉH ≥∏¨J ’ :á¶MÓe
.(π«eÉæjE’G) Éæ«ŸG á≤Ñ£H GQGöVCG
RÉ¡édG ÜÉH Ö«côJ
.1 .ø«ÑfÉédG øe ∂jój Éà∏μH ¿ôØdG ÜÉH ∂°ùeCG
.2 .(a) ¿ôØdG ∞jhÉéJ »a äÓ°üتdG πNOCG
.(b) ¿ôØdG QÉWEG ‘ âÑãj ¿CG Öéj äÓ°üØŸÉH »∏Ø°ùdG õ◊G :á¶MÓe
b a
.3 .πØ°SC’ ÜÉÑdG ∫õfCG
.4 .ø«eCÉàdG ô«HGƒN êôNCG
:
!áHÉ°UE’G ô£N
πμ°ûH á∏°üØe ¥Ó¨fG ádÉM »a hCG ó°üb ¿hO ¿ôØdG êQÉN ÜÉÑdG •ƒ≤°S ádÉM »a
.AÓª©dG áeóîH π°üJG .á∏°üتdG »a ∑ój πNóJ Óa ,…OGóJQG
≥«∏©àdG ¿ÉÑ°†b »àμÑ°T Ö«côJh ∂a
.π°†aCG πμ°ûH ∞«¶æà∏d ≥«∏©àdG äÉμÑ°T ∂a ∂æμªj
≥«∏©àdG ¿ÉÑ°†b »àμÑ°T ∂a
.1 .≥«∏©àdG äÉμÑ°ûd iô°ù«dGh ≈檫dG »ZGôÑdG ∂ØH ºb
.2 .≥«∏©àdG äÉμÑ°T ™∏NG
≥«∏©àdG ¿ÉÑ°†b »àμÑ°T Ö«côJ
.1 .»ÑfÉédG QGóédG ∞jhÉéJ ΩÉeCG ≥«∏©àdG äÉμÑ°T ∂°ùeCG
.2 .»ZGôÑdG ΩGóîà°SÉH ≥«∏©àdG äÉμÑ°T §HQ óYCG

14
∞«¶æàdGh ájÉæ©dG
á«Ø«XƒdG ¬JAÉØch ¬dɪL ≈∏Y ßaÉëJ ΩɪàgÉH ¬Ø«¶æJh ¿ôØdÉH Ió«édG ájÉæ©dG
á≤jô£H ¬Ø«¶æJh ¿ôØdÉH ájÉæ©dG á«Ø«c »∏j ɪ«a ∂d í°Vƒfh .á∏jƒW IôàØd
.áë«ë°U
äɶMÓe
■ πãe áØ∏àîe äÉeÉN ΩGóîà°S’ ™LôJ ¿ôØdG á¡LGh ¿GƒdCG »a áثأdG ¥hôØdG
.¿ó©ªdGh ∂«à°SÓÑdGh êÉLõdG
■ äÉ°SÉμ©fG ≈dEG ™LôJ •ƒ£îdÉc hóÑJ »àdGh ÜÉÑdG ìƒd ≈∏Y IOƒLƒªdG ∫Ó¶dG
.¿ôØdG IAÉ°VEG øY áéJÉf
■ óbh .ájɨ∏d á«dÉY IQGôM äÉLQO ≈∏Y (π«eÉæjE’G) É櫪dG á≤ÑW ∞«ØéJ ºàj
.É¡∏ªY ≈∏Y ôKDƒj ’h »©«ÑW ôeCG Gògh .áØ«ØW á«fƒd äÉaÓàNG »a ∂dP ÖÑ°ùàj
.πeÉc πμ°ûH (π«eÉæjE’G) É櫪dG á≤Ñ£H É¡FÓW øμªj ’ á©«aôdG ìGƒdC’G ±GƒM
¢üFÉ°üN ≈∏Y ∂dP ôKDƒj ’h .áæ°ûN ±GƒëdG √òg ¿ƒμJ ó≤a ,∂dòd
k
áé«àfh
.πcBÉàdG øe ájɪëdG
:
!»FÉHô¡μdG ≥©°üdG ô£N
Ωóîà°ùJ ’ .»FÉHô¡c ≥©°U çhóM »a ÖÑ°ùàJ ób RÉ¡édG »a πZƒàJ »àdG áHƒWôdG
.QÉîÑdÉH ∞«¶æJ Iõ¡LCG hCG »dÉ©dG §¨°†dÉH ∞«¶æJ Iõ¡LCG ájCG
:
!¥GôàM’G ô£N
hCG »¡£dG õ«ëd á«∏NGódG í£°SC’G GóHCG ¢ùª∏J ’ .ájɨ∏d ÉæNÉ°S RÉ¡édG íÑ°üj ób
∫ÉØWC’G ó©HCGh .OôÑj RÉ¡édG ∑ôJ ≈∏Y É
k
ªFGO ¢UôMG .áæNÉ°S »gh ø«î°ùàdG ô°UÉæY
.RÉ¡édG øY
äÉضæªdG
≈YGôJ ,áÑ°SÉæe ô«Z äÉضæe ΩGóîà°SG π©ØH áØ∏àîªdG í£°SC’G Qô°†àJ ’ ≈àM
.á«dÉàdG äɪ«∏©àdG
Ωóîà°ùJ ’
óbƒªdG ™e
■ ∞«ØîJ ¿hO ¥ÉÑWC’G ä’É°ùZ äÉضæe hCG »fGhCÓd …hó«dG π°ù¨dG äÉضæe
■ áæ°ûN äÉéæØ°SEG hCG ᣰTÉc OGƒe ájCG
■ ™≤ÑdG πjõe hCG ¿GôaC’G …GôÑ°SEG πãe ádÉ
s
cCG äÉضæe ájCG
■ .QÉîÑdÉH hCG »dÉ©dG §¨°†dÉH ∞«¶æJ Iõ¡LCG ájCG
»¡£dG ÉjÉ≤H ¢Vô©àJ ’ ∂dòHh .»¡£dÉH É¡«a Ωƒ≤J Iôe πc ó©H óbƒªdG ∞«¶æàH ºb
.¥GôàM’G ∫ÓN øe óªéà∏d
.á«aÉc áLQóH GOQÉH íÑ°üj ¿CG ó©H ’EG óbƒªdG ∞«¶æàH º≤J ’
≈∏Y ¢UôMG .»LÉLõdG ±õîdG ¢UGôbC’ áÑ°SÉæªdG äÉضæªdG ΩGóîà°SG ≈∏Y ô°üàbG
.IƒÑ©dG ≈∏Y áfhóªdG ∞«¶æàdG äGOÉ°TQEG IÉYGôe
.¥Gƒ°SC’G »a IôaGƒàªdG êÉLõdG ᣰTÉc »g Iójó°ûdG äÉNÉ°ùJ’G ádGRE’ IGOCG π°†aCG
.á©fÉ°üdG á¡édG øY IQOÉ°üdG äGOÉ°TQE’G ≈YGôJ
Ωóîà°ùJ ’
óbƒªdG QÉWEG ™e
■ ÅaGO »fƒHÉ°U ∫ƒ∏ëe ’EG
■ áæ°ûN äÉéæØ°SEG hCG ᣰTÉc OGƒe ájCG
■ ™≤ÑdG πjõe hCG ¿GôaC’G …GôÑ°SEG πãe ádÉ
s
cCG äÉضæe ájCG
■ êÉLR ᣰTÉc
Ωóîà°ùJ ’
¿ôØdG ™e
■ ,á°TOÉN hCG áæ°ûN äÉضæe ájCG
■ ∫ƒëμdG ≈∏Y …ƒàëJ ájƒb äÉضæe ájCG
■ áæ°ûN äÉéæØ°SEG hCG äÉØ«d ájCG
■ .QÉîÑdÉH hCG »dÉ©dG §¨°†dÉH ∞«¶æJ Iõ¡LCG ájCG
.É¡eGóîà°SG πÑb G
k
ó«L IójóédG á«éæØ°SE’G •ƒØdG π°ùZG
¥É£ædGäÉضæªdG
êQÉîdG øe RÉ¡édG :øNÉ°S »fƒHÉ°U ∫ƒ∏ëe
ó©H ∞«ØéàdÉH ºb ºK ,∞«¶æJ áWƒØH ∞«¶æàdÉH ºb
êÉLR ∞¶æe Ωóîà°ùJ ’ .ºYÉf πjóæe ΩGóîà°SÉH ∂dP
.êÉLR ᣰTÉc hCG
π«à°S ¢ù∏fÉà°S’G :øNÉ°S »fƒHÉ°U ∫ƒ∏ëe
ó©H ∞«ØéàdÉH ºb ºK ,∞«¶æJ áWƒØH ∞«¶æàdÉH ºb
ájô«édG ™≤ÑdG ádGREÉH ºb .ºYÉf πjóæe ΩGóîà°SÉH ∂dP
ó≤a .QƒØdG ≈∏Y ¢†«ÑdG ¢VÉ«Hh É°ûædG ™≤Hh á«ægódGh
.™≤ÑdG √òg âëJ CGó°üdG ¿
s
ƒμàj
á°ü°üîàªdG ôLÉàªdG hCG AÓª©dG áeóN iód ôaGƒàJ
í£°SC’G Ö°SÉæJ π«à°S ¢ù∏fÉà°SÓd á°UÉN äÉضæe
ᣰSGƒH ájÉæ©dG IOÉe øe á≤«bQ á≤ÑW ™°V .áæNÉ°ùdG
.áªYÉf áWƒa
∂«à°SÓÑdGh Ωƒ«æeƒdC’G :êÉLõdG äÉضæe
.ºYÉf πjóæe ΩGóîà°SÉH ∞«¶æàdÉH ºb
á≤Ñ£H á«∏£ªdG í£°SC’G
(π«eÉæjEG) Éæ«e
(¢ù∏eC’G í£°ùdG)
»¡£dG õ«M IAÉ°V
EG 𫨰ûJ ∂æμªj ,∞«¶æàdG π«¡°ùàd
ádhGóàªdG äÉضæªdG ™°V .Ωhõ∏dG óæY RÉ¡édG ÜÉH ∂ah
á©£b ΩGóîà°SÉH πîdGh AɪdG ∫ƒ∏ëe hCG ¥Gƒ°SC’G »a
,òaGƒædG ∞«¶æàd ó∏L á©£b hCG áÑWQh áæ«d ¢Tɪb
ÉjÉ≤H ájô£àH ºbh .∂dP ó©H áæ«d áWƒØH É¡ë°ùeGh
™e .∞¶æeh áÑWQ áWƒa ΩGóîà°SÉH ábôàëªdG ᪩WC’G
¿GôaCG ∞¶æe ΩGóîà°SÉH í°üæf ,Iójó°ûdG äÉNÉ°ùJ’G
ó©Hh .ô°TÉÑe πμ°ûH ¬©°Vh øμªjh .πédG πãe ΩGƒ≤H
.∞é«d ÉMƒàØe »¡£dG õ«M ∑ôJG ∞«¶æàdG
∞«¶æàdG á«JGP í£°SC’G
(áæ°ûîdG í£°SC’G)
á«JGP í£°SC’G :´ƒ°Vƒe »a IOQGƒdG äGOÉ°TQE’G ≈YGôJ
∞«¶æàdG
ÜÉÑdG êÉLR :êÉLõdG äÉضæe
Ωóîà°ùJ ’ .ºYÉf πjóæe ΩGóîà°SÉH ∞«¶æàdÉH ºb
.êÉLR ᣰTÉc
áѪ∏d »LÉLõdG AÉ£¨dG
¿ôØdG
:øNÉ°S »fƒHÉ°U ∫ƒ∏ëe
.∞«¶æJ áWƒØH ∞«¶æàdÉH ºb
ΩÉμME’G QÉWEG
!¬μØH º≤J ’
:øNÉ°S »fƒHÉ°U ∫ƒ∏ëe
.É¡μëH º≤J ’ .∞«¶æJ áWƒØH ∞«¶æàdÉH ºb
¿ÉÑ°†≤dG :øNÉ°ùdG π°ù¨dG ∫ƒ∏ëe
.IÉ°Tôa hCG áªYÉf »fGhCG áWƒØH É¡Ø«¶æàH ºb ºK É¡©≤fG
äÉ«dɪμdG :øNÉ°ùdG π°ù¨dG ∫ƒ∏ëe
.IÉ°Tôa hCG áªYÉf »fGhCG áWƒØH É¡Ø«¶æàH ºb ºK É¡©≤fG

13
AÉ¡àf’G âbh ô««¨J
OɪàYG ºàj á∏«∏b ¿GƒK ó©Hh .
A
hCG
@
QõdG ΩGóîà°SÉH AÉ¡àf’G âbh ô««¨àH ºb
ô««¨àH º≤J ’h .Éeó≤e ø«Jôe
0
QõdG ≈∏Y §¨°VG ,É
k
WƒÑ°†e ¬ÑæªdG ¿Éc GPEG .ô««¨àdG
≈∏Y π°üëJ ’ ó≤a .π©ØdÉH 𫨰ûàdG Ióªd »dRÉæàdG ó©dG AóH ó©H AÉ¡àf’G âbh
.áë«ë°U »¡W áé«àf
AÉ¡àf’G âbh ƒëe
¿GƒK ó©Hh .»dÉëdG âbƒdG ≈∏Y AÉ¡àf’G âbh §Ñ°V IOÉYEÉH ºb
A
QõdG Ωóîà°SÉH
≈∏Y §¨°VG ,É
k
WƒÑ°†e ¬ÑæªdG ¿Éc GPEG .¿ôØdG 𫨰ûJ CGóÑ«a .ô««¨àdG OɪàYG ºàj á∏«∏b
.Éeó≤e ø«Jôe
0
QõdG
âbƒdG §Ñ°V ´É°VhCG øY ΩÓ©à°S’G
IóMh »a á«æ©ªdG RƒeôdG A»°†J ,âbƒdG ∞FÉXh øe ójó©dG §Ñ°V ºàj ÉeóæY
.¢SGƒbCG ø«H âbƒdG áØ«Xh õeQ ô¡¶j .¢Vô©dG
Qôc
0
áYÉ°ùdG hCG
p
AÉ¡àf’G âbhh
r
𫨰ûàdG Ióeh
U
¬ÑæªdG øY ΩÓ©à°SÓd
º∏©à°ùªdG º«≤dG ô¡¶J .»æ©ªdG õeôdG ∫ƒM ¢SGƒbC’G ô¡¶J ¿CG ≈dEG
0
QõdG ≈∏Y §¨°†dG
.¢Vô©dG IóMh »a ¿GƒK ™°†Ñd É¡æY
âbƒdG
á©HQCGh
0
õeôdG A»°†j ,¬YÉ£≤fG ó©H QÉ«àdG IOƒY óæY hCG RÉ¡édG π«°UƒJ ó©H
.GOóée áYÉ°ùdG §Ñ°VG .¢Vô©dG IóMh »a QÉØ°UCG
.1 .
0
QõdG ≈∏Y §¨°VG
ô¡¶Jh âbƒdG RƒeQ A»°†J .
12:00 áYÉ°ùdG ¿É«H ¢Vô©dG IóMh »a ô¡¶j
.
0
∫ƒM ¢SGƒbC’G
.2 .
A
hCG
@
QõdG ΩGóîà°SÉH áYÉ°ùdG §Ñ°VG
.•ƒÑ°†ªdG âbƒdG OɪàYG ºàj á∏«∏b ¿GƒK ó©Hh
âbƒdG ô««¨J
.É¡£Ñ°V ºJ âbƒ∏d iôNCG áØ«Xh ájCG ∑Éæg ¿ƒμJ ’CG »¨Ñæj
.1 .äGôe ™HQCG
0
QõdG ≈∏Y §¨°VG
.
0
∫ƒM ¢SGƒbC’G ô¡¶Jh ¢Vô©dG IóMh »a âbƒdG RƒeQ A»°†J
.2 .
A
hCG
@
QõdG ΩGóîà°SÉH áYÉ°ùdG §Ñ°VG
.•ƒÑ°†ªdG âbƒdG OɪàYG ºàj á∏«∏b ¿GƒK ó©Hh
áYÉ°ùdG AÉØNEG
´É°VhCG ô««¨J
´ƒ°Vƒe ≈dEG ´ƒLôdG ≈Lôj ∂dòH ΩÉ«≤∏dh .áYÉ°ùdG AÉØNEG ∂æμªj
.
á«°SÉ°SC’G §Ñ°†dG
∫ÉØWC’G ¿ÉeCG πØb
.ó°üb ¿hO ¬∏«¨°ûJ øe ∫ÉØWC’G ™æªd ∫ÉØWCÓd ¿ÉeCG πØb ≈∏Y ¿ôØdG πªà°ûj
áYÉ°ùdGh ¬ÑæªdG øe πc §Ñ°V ∂fÉμeEÉH π¶jh .§Ñ°V äÉ«∏ªY ájC’ ¿ôØdG Ö«éà°ùj ’
.∫ÉØWC’G ¿ÉeCG πØb π«©ØJ ó©H
πØb ™£≤j ±ƒ°ùa ,ájGƒ°ûdG áLQO hCG IQGôëdG áLQO hCG ø«î°ùàdG ´ƒf §Ñ°V ºJ GPEG
.ø«î°ùàdG á«∏ªY ∫ÉØWC’G ¿ÉeCG
.¿ôØdÉH ∫ÉØWC’G ¿ÉeCG áØ«XƒH ôKCÉàj ’ Ó°Uƒe ¿ƒμj ób …òdG óbƒªdG
:á¶MÓe
∫ÉØWC’G ¿ÉeCG πØb 𫨰ûJ
.•ƒÑ°†e AÉ¡àfG âbh hCG áWƒÑ°†e 𫨰ûJ Ióe ∑Éæg ¿ƒμj ¿CG Rƒéj ’
.¿GƒK ™HQCG »dGƒM
D
QõdG ≈∏Y §¨°VG
.∫ÉØWC’G ¿ÉeCG πØb π«©ØJ ºàjh .
D
õeôdG á°TÉ°ûdG »a ô¡¶j
∫ÉØWC’G ¿ÉeCG πØb ±É≤jEG
.¿GƒK ™HQCG »dGƒM
D
QõdG ≈∏Y §¨°VG
.∫ÉØWC’G ¿ÉeCG πØb ±É≤jEG ºàjh .¢Vô©dG IóMh »a
D
õeôdG ÅØ£æj
á«°SÉ°SC’G §Ñ°†dG ´É°VhCG ô««¨J
§Ñ°†dG ´É°VhCG áeAGƒe øμªjh .áØ∏àîe á«°SÉ°SCG §Ñ°V ´É°VhCG ≈∏Y ¿ôØdG πªà°ûj
.á«°üî°ûdG ∂JGOÉY ™e √òg
»°SÉ°SC’G §Ñ°†dG ™°Vh1 QÉ«àN’G2 QÉ«àN’G3 QÉ«àN’G
c1
áYÉ°ùdG ¿É«H QÉ¡XEG*ɪFGO §≤a
ΩGóîà°SÉH
0
QõdG
-
c2
ó©H á«Jƒ°üdG IQÉ°TE’G Ióe
hCG 𫨰ûàdG Ióe AÉ¡àfG
¬ÑæªdG øeR
»dGƒM
¿GƒK 10
»dGƒM
*¿Éà≤«bO
»dGƒM
≥FÉbO 5
c3
OɪàYG ≈àM Qɶàf’G Iôàa
§Ñ°V ™°Vh
»dGƒM
¿Éà«fÉK
»dGƒM
*¿GƒK 5
»dGƒM
¿GƒK 10
™æ°üªdG §Ñ°V ™°Vh *
.É¡£Ñ°V ºJ âbƒ∏d iôNCG áØ«Xh ájCG ∑Éæg ¿ƒμJ ’CG »¨Ñæj
.1 .¿GƒK 4 »dGƒM
0
QõdG ≈∏Y §¨°VG
≈∏Y ,áYÉ°ùdG ¿É«Ñd »dÉëdG »°SÉ°SC’G §Ñ°†dG ™°Vh ¢Vô©dG IóMh »a ô¡¶j
.
1 QÉ«àNÓd 1 c1 ∫ÉãªdG π«Ñ°S
.2 .
A
hCG
@
QõdG ΩGóîà°SÉH »°SÉ°SC’G §Ñ°†dG ™°Vh ô««¨àH ºb
.3 .
0
QõdG ΩGóîà°SÉH AGôLE’G ócCG
™«ªL íØ°üJ ∂æμªj .¢Vô©dG IóMh »a »dÉàdG »°SÉ°SC’G §Ñ°†dG ™°Vh ô¡¶j
.
A
hCG
@
QõdG ΩGóîà°SÉH ô««¨J AGôLEGh
0
QõdG ΩGóîà°SÉH äÉjƒà°ùªdG
.4 .
m
¿GƒK 4 »dGƒM
0
QõdG ≈∏Y §¨°VG ájÉ¡ædG »a
.á«°SÉ°SC’G §Ñ°†dG ´É°VhCG ™«ªL OɪàYG ºà«a
.âbh …CG »a iôNCG Iôe á«°SÉ°SC’G §Ñ°†dG ´É°VhCG ô««¨J ∂æμªj
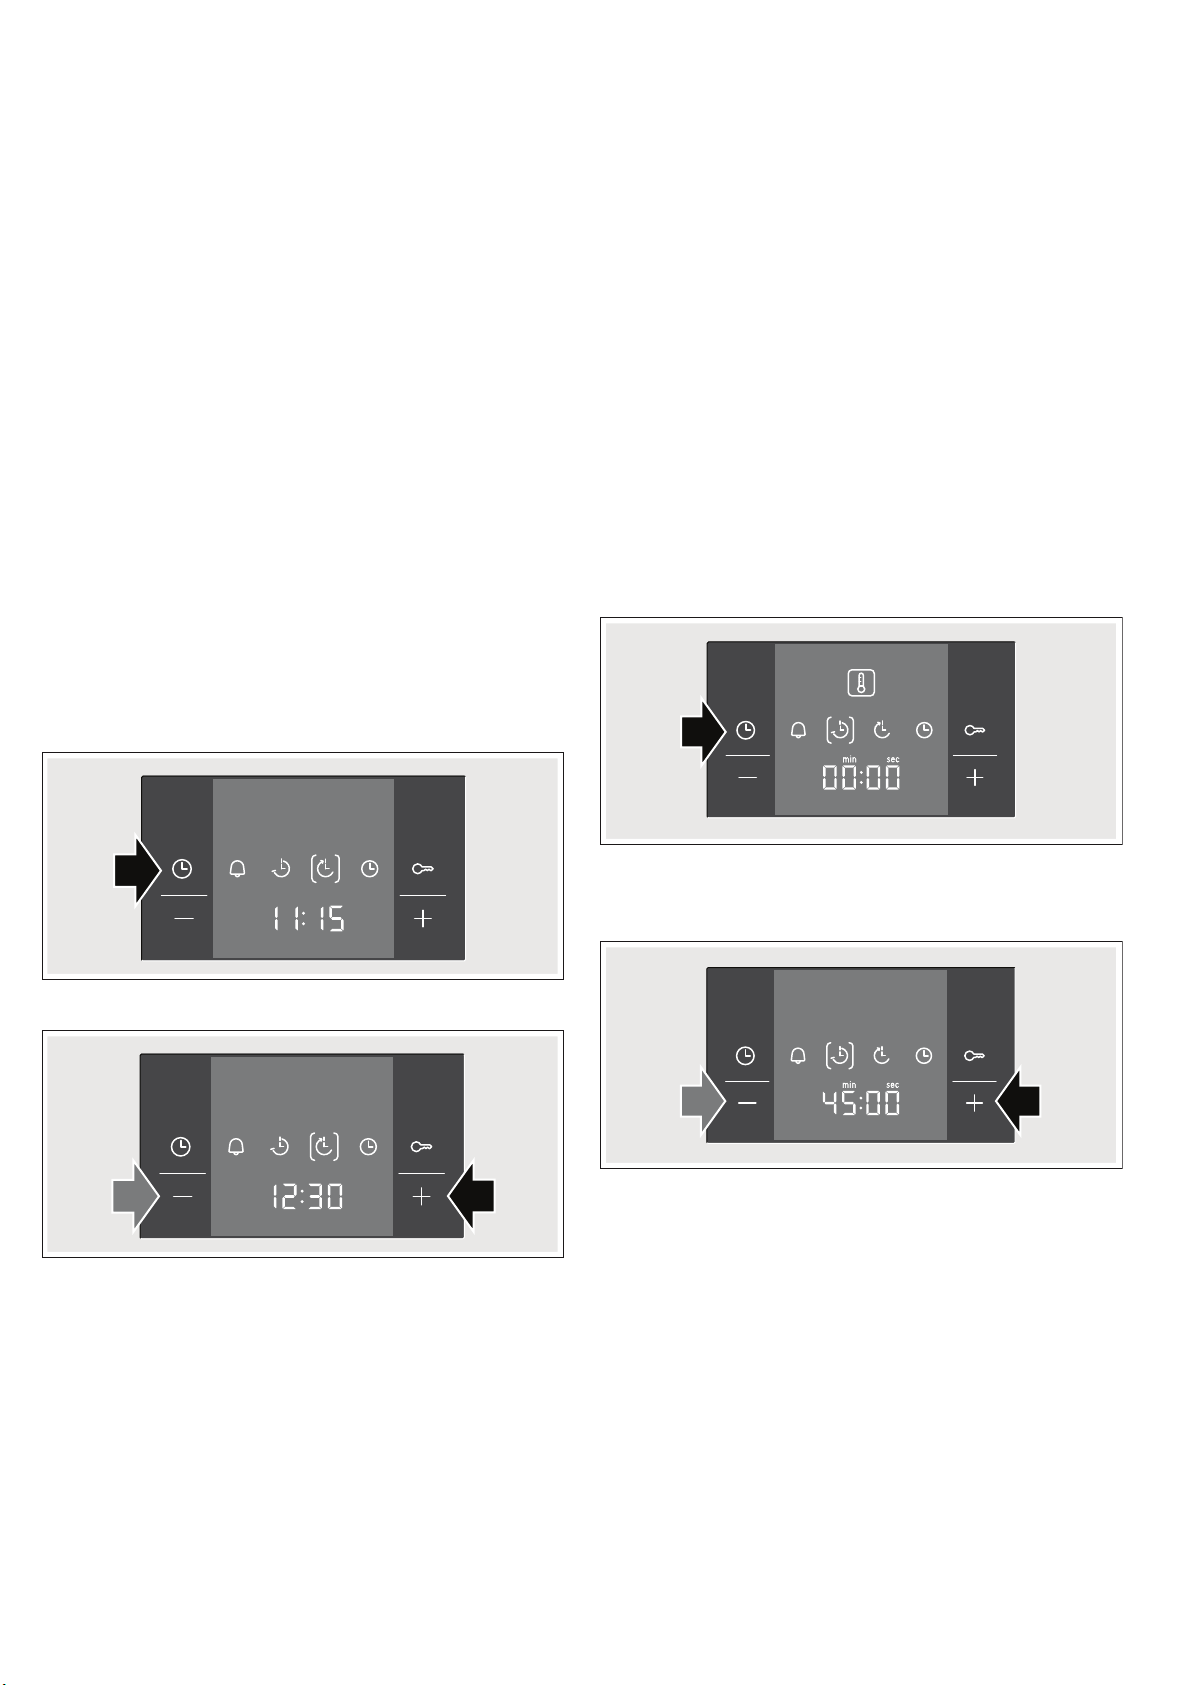
12
¬ÑæªdG øeR ƒëe
á∏«∏b ¿GƒK ó©Hh .00:00 ≈∏Y ¬£Ñ°Vh
A
QõdG Ωóîà°SÉH ¬ÑæªdG øeR ô«Ø°üàH ºb
.¬ÑæªdG ∞bƒàjh .ô««¨àdG OɪàYG ºàj
âbƒdG §Ñ°V ´É°VhCG øY ΩÓ©à°S’G
IóMh »a á«æ©ªdG RƒeôdG A»°†J ,âbƒdG ∞FÉXh øe ójó©dG §Ñ°V ºàj ÉeóæY
.¢SGƒbCG ø«H âbƒdG áØ«Xh õeQ ô¡¶j .¢Vô©dG
Qôc
0
áYÉ°ùdG hCG
p
AÉ¡àf’G âbhh
r
𫨰ûàdG Ióeh
U
¬ÑæªdG øY ΩÓ©à°SÓd
º∏©à°ùªdG º«≤dG ô¡¶J .»æ©ªdG õeôdG ∫ƒM ¢SGƒbC’G ô¡¶J ¿CG ≈dEG
0
QõdG ≈∏Y §¨°†dG
.¢Vô©dG IóMh »a ¿GƒK ™°†Ñd É¡æY
𫨰ûàdG Ióe
¿ôØdG ∞bƒàj 𫨰ûàdG Ióe »¡àæJ ÉeóæY .¿ôØdÉH ≥Ñ£dG »¡W Ióe §Ñ°V ∂æμªj
.¿ôØdG ±É≤jE’ iôNC’G ∂dɪYCG ™£b ≈dEG ô£°†J ød ∂fCG »æ©j Gògh .É
k
«μ«JÉeƒJhCG
.ó°üb ¿hO »¡£dG øeR RhÉéJ øμªj ’h
.á≤«bO
45 𫨰ûàdG Ióe :IQƒ°üdG »a ø«ÑªdG ∫ÉãªdG
.1 .áØ«XƒdG QÉ«àNG ìÉàØe ΩGóîà°SÉH ø«î°ùàdG ´ƒf §Ñ°VG
.2 .IQGôëdG áLQO QÉ«àNG ìÉàØe ≥jôW øY ájGƒ°ûdG áLQO hCG IQGôëdG áLQO §Ñ°VG
.3 .ø«Jôe
0
QõdG ≈∏Y §¨°VG
¢SGƒbC’G ô¡¶Jh âbƒdG RƒeQ A»°†J .0:00 ¿É«ÑdG ¢Vô©dG IóMh ‘ ô¡¶j
.
r
∫ƒM
.4 .
A
hCG
@
QõdG ΩGóîà°SÉH 𫨰ûàdG Ióe §Ñ°VG
á≤«bO 30 =
@
Qõ∏d áMÎ≤ŸG ᪫≤dG
≥FÉbO 10 =
A
Qõ∏d áMÎ≤ŸG ᪫≤dG
Ióªd »dRÉæàdG ó©dG ¢Vô©dG IóMh »a CGóÑj .á∏«∏b ¿GƒK ó©H ¿ôØdG 𫨰ûJ CGóÑj
.âbƒ∏d iôNC’G RƒeôdG »ØàîJ .[
r
] õeôdG A»°†jh »Fôe πμ°ûH 𫨰ûàdG
𫨰ûàdG Ióe AÉ°†≤fG
¿É«ÑdG ¢Vô©dG IóMh »a ô¡¶j .ø«î°ùàdG øY ¿ôØdG ∞bƒàj .á«Jƒ°U IQÉ°TEG Qó°üJ
𫨰ûJ Ióe §Ñ°V
A
hCG
@
QõdG ΩGóîà°SÉH ∂æμªj .
0
QõdG ≈∏Y §¨°VG .0:00
™°Vh ≈dEG áØ«XƒdG QÉ«àNG ìÉàØe QOCGh ø«Jôe
0
QõdG ≈∏Y §¨°VG hCG .IójóL
.∞bƒàe ¿ôØdG .ôØ°üdG
𫨰ûàdG Ióe ô««¨J
OɪàYG ºàj á∏«∏b ¿GƒK ó©Hh .
A
hCG
@
QõdG ΩGóîà°SÉH 𫨰ûàdG Ióe ô««¨àH ºb
.Éeó≤e
0
QõdG ≈∏Y §¨°VG ,É
k
WƒÑ°†e ¬ÑæªdG ¿Éc GPEG .ô««¨àdG
𫨰ûàdG Ióe ƒëe
á∏«∏b ¿GƒK ó©Hh .00:00 íÑ°üJ ≈àM
A
QõdG Ωóîà°SÉH 𫨰ûàdG Ióe ô«Ø°üàH ºb
≈∏Y §¨°VG ,É
k
WƒÑ°†e ¬ÑæªdG ¿Éc GPEG .𫨰ûàdG Ióe ƒëe ºàjh .ô««¨àdG OɪàYG ºàj
.Éeó≤e
0
QõdG
âbƒdG §Ñ°V ´É°VhCG øY ΩÓ©à°S’G
IóMh »a á«æ©ªdG RƒeôdG A»°†J ,âbƒdG ∞FÉXh øe ójó©dG §Ñ°V ºàj ÉeóæY
.¢SGƒbCG ø«H âbƒdG áØ«Xh õeQ ô¡¶j .¢Vô©dG
Qôc
0
áYÉ°ùdG hCG
p
AÉ¡àf’G âbhh
r
𫨰ûàdG Ióeh
U
¬ÑæªdG øY ΩÓ©à°SÓd
º∏©à°ùªdG º«≤dG ô¡¶J .»æ©ªdG õeôdG ∫ƒM ¢SGƒbC’G ô¡¶J ¿CG ≈dEG
0
QõdG ≈∏Y §¨°†dG
.¢Vô©dG IóMh »a ¿GƒK ™°†Ñd É¡æY
AÉ¡àf’G âbh
»¡àæjh É
k
«μ«JÉeƒJhCG ¿ôØdG 𫨰ûJ CGóÑjh .∂eÉ©W OGóYEG AÉ¡àfG âbh π«LCÉJ ∂æμªj
ìÉÑ°üdG »a »¡£dG õ«M »a ∂eÉ©W ™°†J ¿CG
k
Óãe ∂æμªj .܃ZôªdG âbƒdG »a
.AGó¨dG âbh »a G
k
õgÉL ¿ƒμj å«ëH »¡£dG øeR §Ñ°†Jh
k
áé«àf ó°ùØj ó≤a ΩRÓdG øe ∫ƒWCG IôàØd »¡£dG õ«M »a ΩÉ©£dG ∑ôJ ΩóY ≈YGôj
.∂dòd
¿ôØdG øe ܃∏£ªdGh á≤«bO
45 𫨰ûàdG Ióeh 10:30 áYÉ°ùdG :IQƒ°üdG »a ∫ÉãªdG
.12:30 áYÉ°ùdG »a ΩÉ©£dG OGóYEG øe »¡àæj ¿CG
.1 .áØ«XƒdG QÉ«àNG ìÉàØe §Ñ°VG
.2 .IQGôëdG áLQO QÉ«àNG ìÉàØe §Ñ°VG
.3 .ø«Jôe
0
QõdG ≈∏Y §¨°VG
.4 .
A
hCG
@
QõdG ΩGóîà°SÉH 𫨰ûàdG Ióe §Ñ°VG
.5 .
0
QõdG ≈∏Y §¨°VG
.≥Ñ£dG OGóYEG ¬«a »¡àæj …òdG âbƒdG ô¡¶jh .
p
õeôdG ∫GƒM ¢SGƒbC’G ô¡¶J
.6 .
A
hCG
@
QõdG ΩGóîà°SÉH ó©HCG AÉ¡àfG âbh §Ñ°VG
.Qɶàf’G ™°Vh ≈dEG ∫ƒëàjh §Ñ°†dG ´É°VhCG OɪàYÉH ¿ôØdG Ωƒ≤j á∏«∏b
m
¿GƒK ó©H
ø«H
p
õeôdG ô¡¶jh ≥Ñ£dG OGóYEG ¬«a »¡àæj …òdG âbƒdG ¢Vô©dG IóMh »a ô¡¶j
óªd »dRÉæàdG ó©dG CGóÑj »¡£dG ¿ôa CGóÑj ÉeóæY .
0
h
U
¿GõeôdG ÅØ£æjh .¢SGƒbCG
.
p
õeôdG ÅØ£æjh .¢SGƒbCG ø«H
r
õeôdG ô¡¶jh »Fôe πμ°ûH 𫨰ûàdG
𫨰ûàdG Ióe AÉ°†≤fG
¿É«ÑdG ¢Vô©dG IóMh »a ô¡¶j .ø«î°ùàdG øY ¿ôØdG ∞bƒàj .á«Jƒ°U IQÉ°TEG Qó°üJ
𫨰ûJ Ióe §Ñ°V
A
hCG
@
QõdG ΩGóîà°SÉH ∂æμªj .
0
QõdG ≈∏Y §¨°VG .0:00
™°Vh ≈dEG áØ«XƒdG QÉ«àNG ìÉàØe QOCGh ø«Jôe
0
QõdG ≈∏Y §¨°VG hCG .IójóL
.∞bƒàe ¿ôØdG .ôØ°üdG
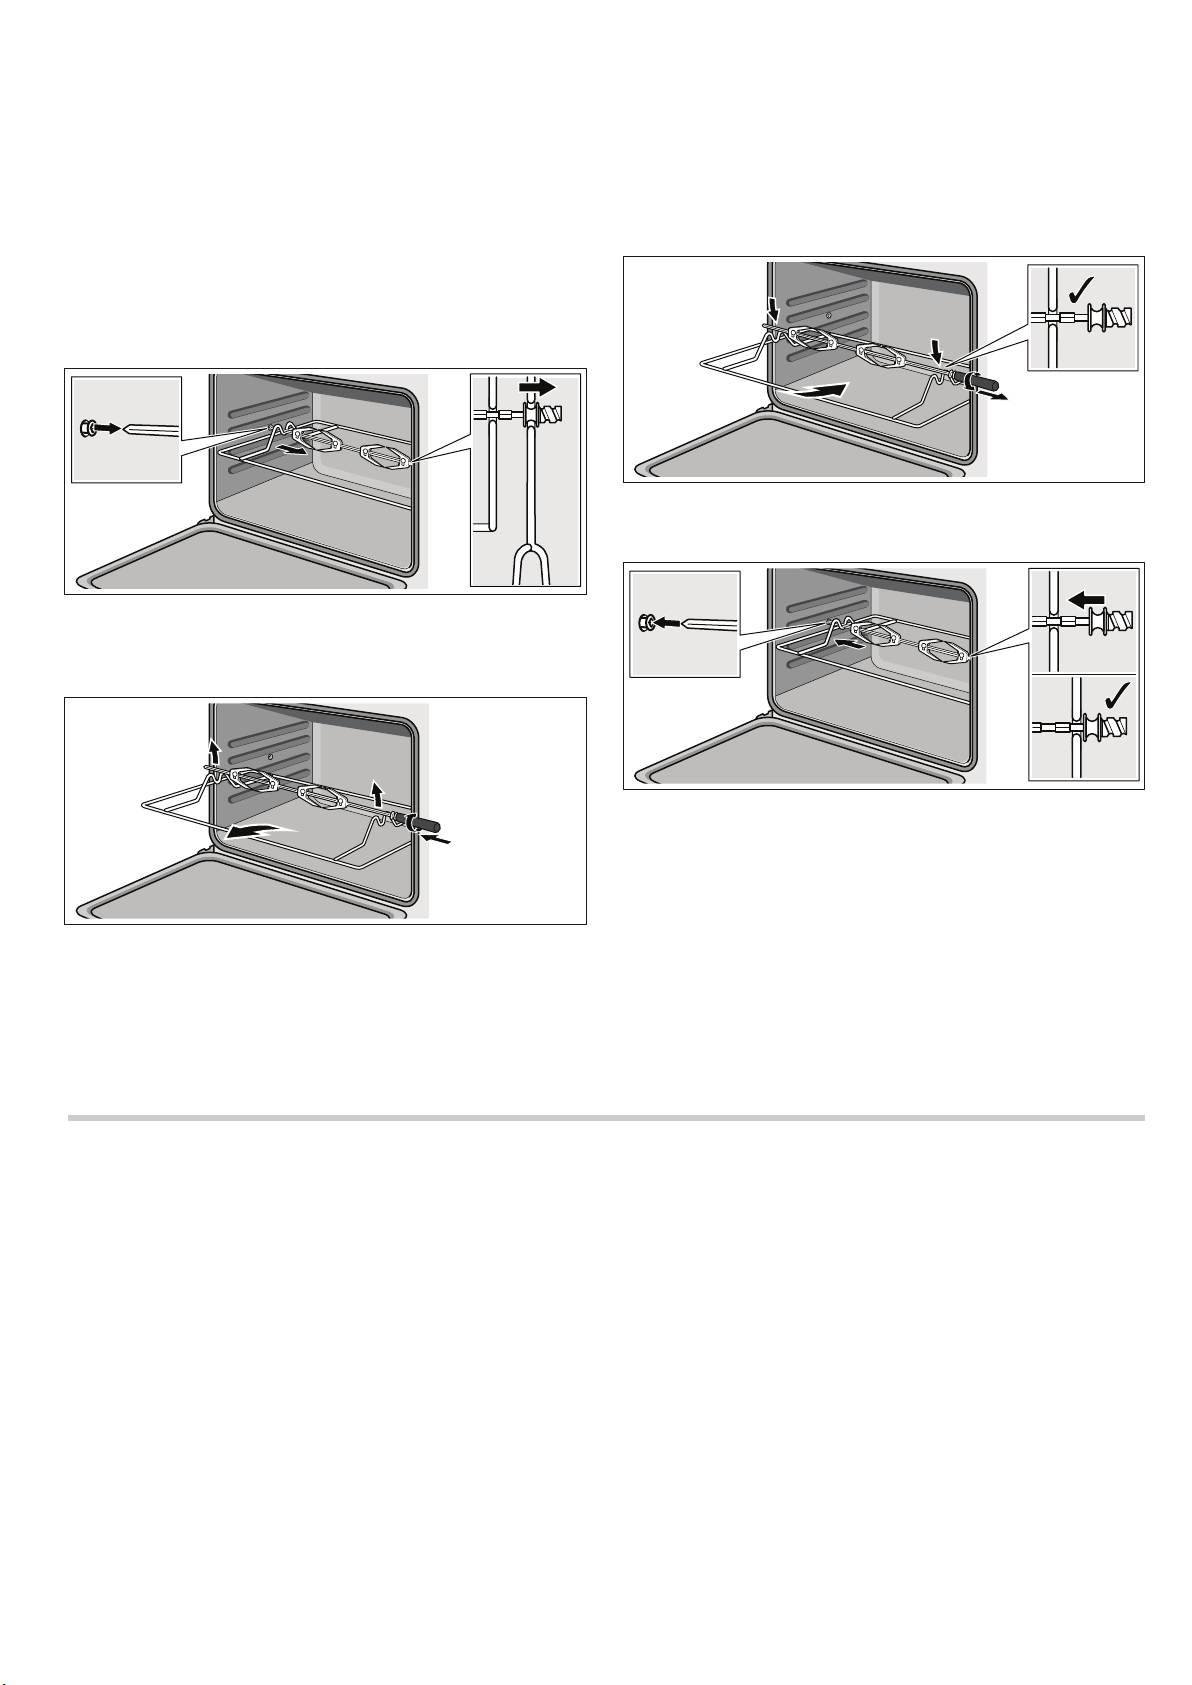
11
QGhódG ï«°ùdG Ö«côJ
:
!¥GôàM’G ô£N
∫ÉØWC’G ó©HCG .ø«î°ùàdG ô°UÉæY hCG »¡£dG õ«ëd áæNÉ°ùdG í£°SC’G ¢ùª∏H G
k
óHCG º≤J ’
.øNÉ°S QÉîH Üô°ùàj ó≤a .¢UôëH RÉ¡édG ÜÉH íàaG .RÉ¡édG øY É
k
ªFGO
.1 .¬Ø°üàæe ≈àM 2 ∫ÉNOE’G ´ÉØJQG ≈∏Y QGhódG ï«°ùdG πμ«g πNOCG
.2 .¢†Ñ≤ªdG ∂ØH ºbh QGhódG ï«°ùdG πμ«g ≈∏Y QGhódG ï«°ùdG Ö«côàH ºb
.3 .ájÉ¡ædG ≈àM QGhódG ï«°ùdG πμ«g πNOCG
.4 .∑ôëªdG â«Ñe »a QÉ°ù«dG ≈dEG QGhódG ï«°ùdG πNOCG
.5 AÉYƒc 1 ´ÉØJQ’G iƒà°ùe »a ¬Ñ«côàH ºb ºK õ«ÑîdG ìƒd »a AɪdG øe ™°V
.á£bÉ°ùàªdG ¿ƒgódG ™«ªéàd
.6 .RÉ¡édG ÜÉH ≥∏ZCG
QGhódG ï«°ùdG á≤jôW 𫨰ûJ
.
G
™°VƒdG ≈dEG ¿ôØdG ∫ɪ©à°SG IQÉW QOCG
ájGƒ°ûdG ∫ɪ©à°SÉH »¡£dG äÉ«∏ªY RhÉéàJ ¿CG GóHCG Rƒéj ’ :á¶MÓe
.Ω°240 QGhódG ï«°ùdGh
QGhódG ï«°ùdG á≤jôW ±É≤jEG
.
Û
™°VƒdG ≈dEG ¿ôØdG ∫ɪ©à°SG IQÉW QOCG
QGhódG ï«°ùdG êGôNEG
:
!¥GôàM’G ô£N
∫ÉØWC’G ó©HCG .ø«î°ùàdG ô°UÉæY hCG »¡£dG õ«ëd áæNÉ°ùdG í£°SC’G ¢ùª∏H G
k
óHCG º≤J ’
.øNÉ°S QÉîH Üô°ùàj ó≤a .¢UôëH RÉ¡édG ÜÉH íàaG .RÉ¡édG øY É
k
ªFGO
:
!¥GôàM’G ô£N
.áæNÉ°S »gh ô°TÉÑe πμ°ûH iôNC’G äÉ«dɪμdG hCG QGhódG ï«°ùdG ¢ùª∏H G
k
óHCG º≤J ’
.…QGôM RÉØb hCG »fGhCÓd ¢Tɪb á©£b ΩGóîà°SÉH ’EG áæNÉ°ùdG äÉ«dɪμdG ∂°ùªJ ’h
.1 .¢UôëH RÉ¡édG ÜÉH íàaG
.2 ÖfÉédG ≈dEG ∑ôëªdG â«Ñe øe »fó©ªdG ∂Ñ°ûªdG ΩGóîà°SÉH QGhódG ï«°ùdG Öë°SG
.øªjC’G
.3 .¬Ø°üàæe ≈àM ¿ôØdG øe QGhódG ï«°ùdG πμ«g Öë°SG
.4 §HQG ºK »fGhCÓd ¢Tɪb á©£≤H ô°ùjC’G ÖfÉédG ≈∏Y QGhódG ï«°ùdG â«ÑãàH ºb
.QGhódG ï«°ùdG ≈∏Y ¢†Ñ≤ªdG
.5 .QGhódG ï«°ùdG πμ«g øe ¬©∏îd ¢UôëH QGhódG ï«°ùdG ™aQG
.6 .¿ôØdG øe õ«ÑîdG ìƒdh QGhódG ï«°ùdG πμ«g êôNCG
âbƒdG ∞FÉXh §Ñ°V
AÉYóà°SG
0
QõdG ΩGóîà°SÉH ∂æμªj .âbƒdÉH á°UÉN áØ∏àîe ∞FÉXh ¿ôØdÉH ôaƒàj
¿Éc ɪdÉW âbƒdG RƒeQ ™«ªL A»°†Jh .áØ∏àîªdG ∞FÉXƒdG ø«H πjƒëàdGh áªFÉ≤dG
óLGƒàJ »àdG âbƒdG áØ«Xh ≈dEG [ ] ¢SGƒbC’G ô«°ûJ .§Ñ°†dG ´É°VhCG AGôLEG ∂fÉμeEÉH
ΩGóîà°SÉH π©ØdÉH É¡£Ñ°V ºJ »àdG âbƒdG áØ«Xh ô««¨J ô°TÉÑe πμ°ûH ∂æμªjh .É¡«a
.¢SGƒbCG ø«H âbƒdG õeQ ¿ƒμj ÉeóæY
A
hCG
@
QõdG
¬ÑæªdG
ɪc .¿ôØdG øY π≤à°ùe πμ°ûH πª©j ƒgh .ïÑ£ª∏d »JÉ≤«ªc ¬ÑæªdG ΩGóîà°SG ∂æμªj
¬ÑæªdG øeR AÉ¡àfG ø«H õ««ªàdG ∂æμªj ∂dòHh .¬H á°UÉN á«Jƒ°U IQÉ°TEG ¬d ¬ÑæªdG ¿CG
.𫨰ûàdG Ióe AÉ¡àfGh
.1 .IóMGh Iôe
0
QõdG ≈∏Y §¨°VG
.
U
∫ƒM ¢SGƒbC’G ô¡¶Jh ¢Vô©dG IóMh »a âbƒdG RƒeQ A»°†J
.2 .
A
hCG
@
QõdG ΩGóîà°SÉH ¬ÑæªdG øeR §Ñ°VG
≥FÉbO 10 =
@
Qõ∏d áMÎ≤ŸG ᪫≤dG
≥FÉbO 5 =
A
Qõ∏d áMÎ≤ŸG ᪫≤dG
A»°†j .¬ÑæªdG 𫨰ûJ CGóÑjh .•ƒÑ°†ªdG âbƒdG OɪàYG ºàj á∏«∏b ¿GƒK ó©Hh
.»Fôe πμ°ûH ¬ÑæªdG øeõd »dRÉæàdG ó©dG CGóÑjh ¢Vô©dG IóMh »a
[
U
] õeôdG
.âbƒ∏d iôNC’G RƒeôdG »ØàîJ
¬ÑæªdG øeR AÉ°†≤fG
¬ÑæªdG ±É≤jEÉH ºb .0:00 ¿É«ÑdG ¢Vô©dG IóMh »a ô¡¶j .á«Jƒ°U IQÉ°TEG Qó°üJ
.
0
QõdG ΩGóîà°SÉH
¬ÑæªdG øeR ô««¨J
.ô««¨àdG OɪàYG ºàj á∏«∏b ¿GƒK ó©Hh .
A
hCG
@
QõdG ΩGóîà°SÉH ¬ÑæªdG øeR ô««¨àH ºb

10
óbƒªdG §Ñ°V
.»¡£dG ™°VGƒe §Ñ°V á«Ø«c ≈∏Y π°üØdG Gòg »a ±ô©àJ
óbƒªdG AÉØWEGh 𫨰ûJ
.»¡£dG ™°VGƒe ∫ɪ©à°SG äGQÉW ᣰSGƒH óbƒªdG AÉØWEGh 𫨰ûJ ºàj
»¡£dG ™°Vƒe §Ñ°V
™°VGƒe ø«î°ùJ IQób §Ñ°V »¡£dG ™°VGƒe ∫ɪ©à°SG äGQÉW ΩGóîà°SÉH ∂æμªj
»¡£dG áLQO ≈dEG ÉgQOCGh ܃ZôªdG »¡£dG ™°Vƒe ∫ɪ©à°SG IQÉW §¨°VG .»¡£dG
.áHƒZôªdG
IQób ≈fOCG =
1 »¡£dG áLQO
IQób ≈∏YCG =
9 »¡£dG áLQO
.ø«î°ùàdG á«∏ªY ±É≤jEGh 𫨰ûJ ∫ÓN øe IQó≤dG »¡£dG ™°Vƒe §Ñ°†j :á¶MÓe
.ø«î°ùàdG á«∏ªY ±É≤jEGh 𫨰ûJ ºàj ¿CG øμªj iƒ°ü≤dG IQó≤dG πX »a ≈àMh
ádBG ¥É£fh IôFGódG »FÉæK ô«ÑμdG »¡£dG ™°Vƒe
»¡£dG
.√òg »¡£dG ™°VGƒe ºéM ô«¨J øμªj
ô«ÑμdG õ«ëdG 𫨰ûJ
π°UGh - áØ«ØN áehÉ≤ªH ô©°ûà°S å«M - 9 ™°VƒªdG ≈dEG »¡£dG ™°VGƒe ìÉàØe QOCG
»¡£dG ádBG ¥É£f hCG IôFGódG »FÉæK ô«ÑμdG »¡£dG ™°Vƒe =
õ
/
ç
õeôdG ≈àM IQGOE’G
.áHƒZôªdG »¡£dG áLQO ≈dEG GQƒa ìÉàتdG ™LQCG ºK
ô«¨°üdG õ«ëdG ≈dEG ´ƒLôdG
.ójóL øe §Ñ°VGh
Û
»¡£dG ™°VGƒe ìÉàØe QOCG
»FÉæK ô«¨°üdG »¡£dG ™°Vƒe ≈∏Y ó«L πμ°ûH Iô«¨°üdG äÉ«ªμdG ø«î°ùJ ∂æμªj
.IôFGódG
!¬«ÑæJ
.
Û
≈dEG
õ
/
ç
õeôdG É«£îàe GóHCG ìÉàتdG QóJ ’
¿ôØdG ∫ɪ©à°SG á≤jôW
≥jôW øY ¿ôØdG »a ºμëàdG ∂æμªj .¿ôØ∏d áØ∏àîe §Ñ°V ´É°VhCG AGôLEG ∂æμªj
.á«fhôàμdE’G áYÉ°ùdG
¿ôØdG IAÉ°VEG
¿ôØdG IAÉ°VEG 𫨰ûJ
.𫨰ûàdG á≤jôW ≈dEG ∞FÉXƒdG QÉ«àNG ìÉàØe QOCG
.¿ôØdG ÜÉH íàa óæY É°†jCG ¿ôØdG IAÉ°VEG 𫨰ûJ ºàj
¿ôØdG IAÉ°VEG AÉØWEG
.ôØ°üdG ™°Vh ≈∏Y áØ«XƒdG QÉ«àNG ìÉàØe QOCG
.¿ôØdG ÜÉH ≥∏ZCG
𫨰ûàdG ¥ôW
.á«dÉàdG 𫨰ûàdG ¥ôW ∂eÉeCG ìÉàJ
𫨰ûàdG á≤jôWΩGóîà°S’G
%
/…ƒ∏©dG ø«î°ùàdG
*»∏Ø°ùdG
äGRƒÑîªdG ,»fGƒ°üdG »a »éæØ°SE’G ∂«μ∏d
øe ¿ƒgódG øe á«dÉîdG ºë∏dG ™£bh ,Iƒ°ûëªdG
.ájôÑdG äÉfGƒ«ëdGh ∫ƒé©dGh QÉ≤HC’G
$
»∏Ø°ùdG ø«î°ùàdG hCG ¿’ÉJÉc ºjôc πãe »FɪdG ΩɪëdG äÉ≤«Ñ£àd
ΩóY óæY ,á≤MÓdG ìÓ°UE’G á∏Môe É°†jCG .ßØë∏d
IóYÉ≤dG è°†f
G
QGhódG ï«°ùdG/ájGƒ°ûdG Iô«¨°üdG äÉ«ªμdG hCG óMGƒdG OôØdG áÑLƒd :ájGƒ°ûdG
∂ª°ùdGh (≥fÉ≤ædG) ≥é°ùdGh ∂«à°S’G ™£b øe
.â°SƒàdGh
±ƒØ∏ªdG ºë∏dG ,ºë∏dG ™£≤d :QGhódG ï«°ùdG
Qƒ«£dGh
(
Iô«ÑμdG ájGƒ°ûdG ∑ɪ°SC’Gh (≥fÉ≤ædG) ≥é°ùdGh ºë∏dG íFGô°ûd
.â°SƒàdGh
7
AGƒ¡dG ôjhóàH ájGƒ°T.Iô«ÑμdG ºë∏dG ™£bh Qƒ«£∏d
N
/ájƒ∏©dG áfƒî°ùdG
øNÉ°ùdG AGƒ¡dGh á«∏Ø°ùdG
.ô«°ü©dÉH ÉeɪJ Üô°ûªdG ∂«μ∏d
<
øNÉ°ùdG AGƒ¡dG ø«à≤ÑW ≈∏Y äGRƒÑîªdGh Gõà«ÑdGh ∂«μ∏d
.∞«ØéàdGh ô«ªëàdGh
Ö°ùM ábÉ£dG ∫Ó¨à°SG IAÉØc áÄa ójóëJ ¬dÓN øe ºJ ø«î°ùJ ´ƒf
*
.EN50304 áØ°UGƒªdG
𫨰ûàdG á≤jôWΩGóîà°S’G
B
óªéàdG áHGPEG á∏Môe ∂ª°ùdGh Qƒ«£dGh ºë∏dG øY óªéàdG áHGPE’
.äGRƒÑîªdGh
Ö°ùM ábÉ£dG ∫Ó¨à°SG IAÉØc áÄa ójóëJ ¬dÓN øe ºJ ø«î°ùJ ´ƒf
*
.EN50304 áØ°UGƒªdG
¿ôØdG ∫ɪ©à°SG
»¡£dG ¿ôa 𫨰ûJ
.𫨰ûàdG AÉæKCG ɪFGO É≤∏¨e RÉ¡édG ÜÉÑH ßØàMG :á¶MÓe
.1 .áHƒZôªdG 𫨰ûàdG á≤jôW ≈∏Y ∞FÉXƒdG QÉ«àNG ìÉàØe §Ñ°VG
.2 .áHƒZôªdG IQGôëdG áLQO ≈∏Y IQGôëdG áLQO QÉ«àNG ìÉàØe §Ñ°VG
.¿ôØdG 𫨰ûJ ºàj
∞bƒàdG äGôàa ∫ÓN ÅØ£æJh .ø«î°ùàdÉH »¡£dG ¿ôa ΩÉ«b AÉæKCG ¿É«ÑdG áѪd A»°†J
.ø«î°ùàdG øY
™°Vh ≈∏Y ∞FÉXƒdG QÉ«àNG QR ¿ƒμj ÉeóæY É°†jCG ¿É«ÑdG áѪd A»°†J :á¶MÓe
ó©H ’EG ø«î°ùàdG á«∏ªY »a »¡£dG ¿ôa CGóÑj ’ .IQGôëdG áLQO §Ñ°V ºJ ɪæ«H ôØ°üdG
.𫨰ûJ á≤jôW QÉ«àNG
¿ôØdG ±É≤jEG
.1 .
Û
™°VƒdG ≈∏Y ∞FÉXƒdG QÉ«àNG QR §Ñ°VG
.2 .
Û
™°VƒdG ≈∏Y IQGôëdG áLQO QÉ«àNG ìÉàØe §Ñ°VG
.¿ôØdG AÉØWEG ºàj
QGhódG ï«°ùdG ∫ɪ©à°SG
Qƒ«£dGh ±ƒØ∏ªdG ºë∏dG É
k
°Uƒ°üN ,ºë∏dG ™£b »¡W QGhódG ï«°ùdG ΩGóîà°SÉH ∂æμªj
.¢ùfÉéàe πμ°ûH ºë∏dG »¡W ºàj å«M .G
k
óL ó«L πμ°ûH
.ájGƒ°ûdG 𫨰ûJ OôéªH QGhódG ï«°ùdG IQGOEG IóMh π«©ØJ É«μ«JÉeƒJhCG ºàj
ºë∏dG ™£b OGóYEG
.1 ¬Ø°üàæe »a ºë∏dG ™£b ¿ƒμJ å«ëH ºë∏dG ™£b »a QGhódG ï«°ùdG ∫ÉNOEÉH ºb
.â«ÑãàdG ∂HÉ°ûe ΩGóîà°SÉH ¬«aôW øe ¬àÑKh ¿ÉμeE’G Qób
.ïÑ£ŸG •ƒ«N ΩGóîà°SÉH ºë∏dG ™£b â«ÑãJ ∂dP ¤EG áaÉ°VE’ÉH ∂æμÁ
.2 ∂dòHh .´òédG ≈∏Y πLQC’Gh ô¡¶dG πØ°SCG áëæLC’G ±GôWCG §HQG Qƒ«£dG ™e
.ΩRÓdG øe ôãcCG áæcGO íÑ°üJ ’
.3 .É¡LQÉN ¿ƒgódG π«°ùJ ¿CG øμªj ∂dòHh ,áëæLC’G πØ°SCG ó∏édG Ö≤KG
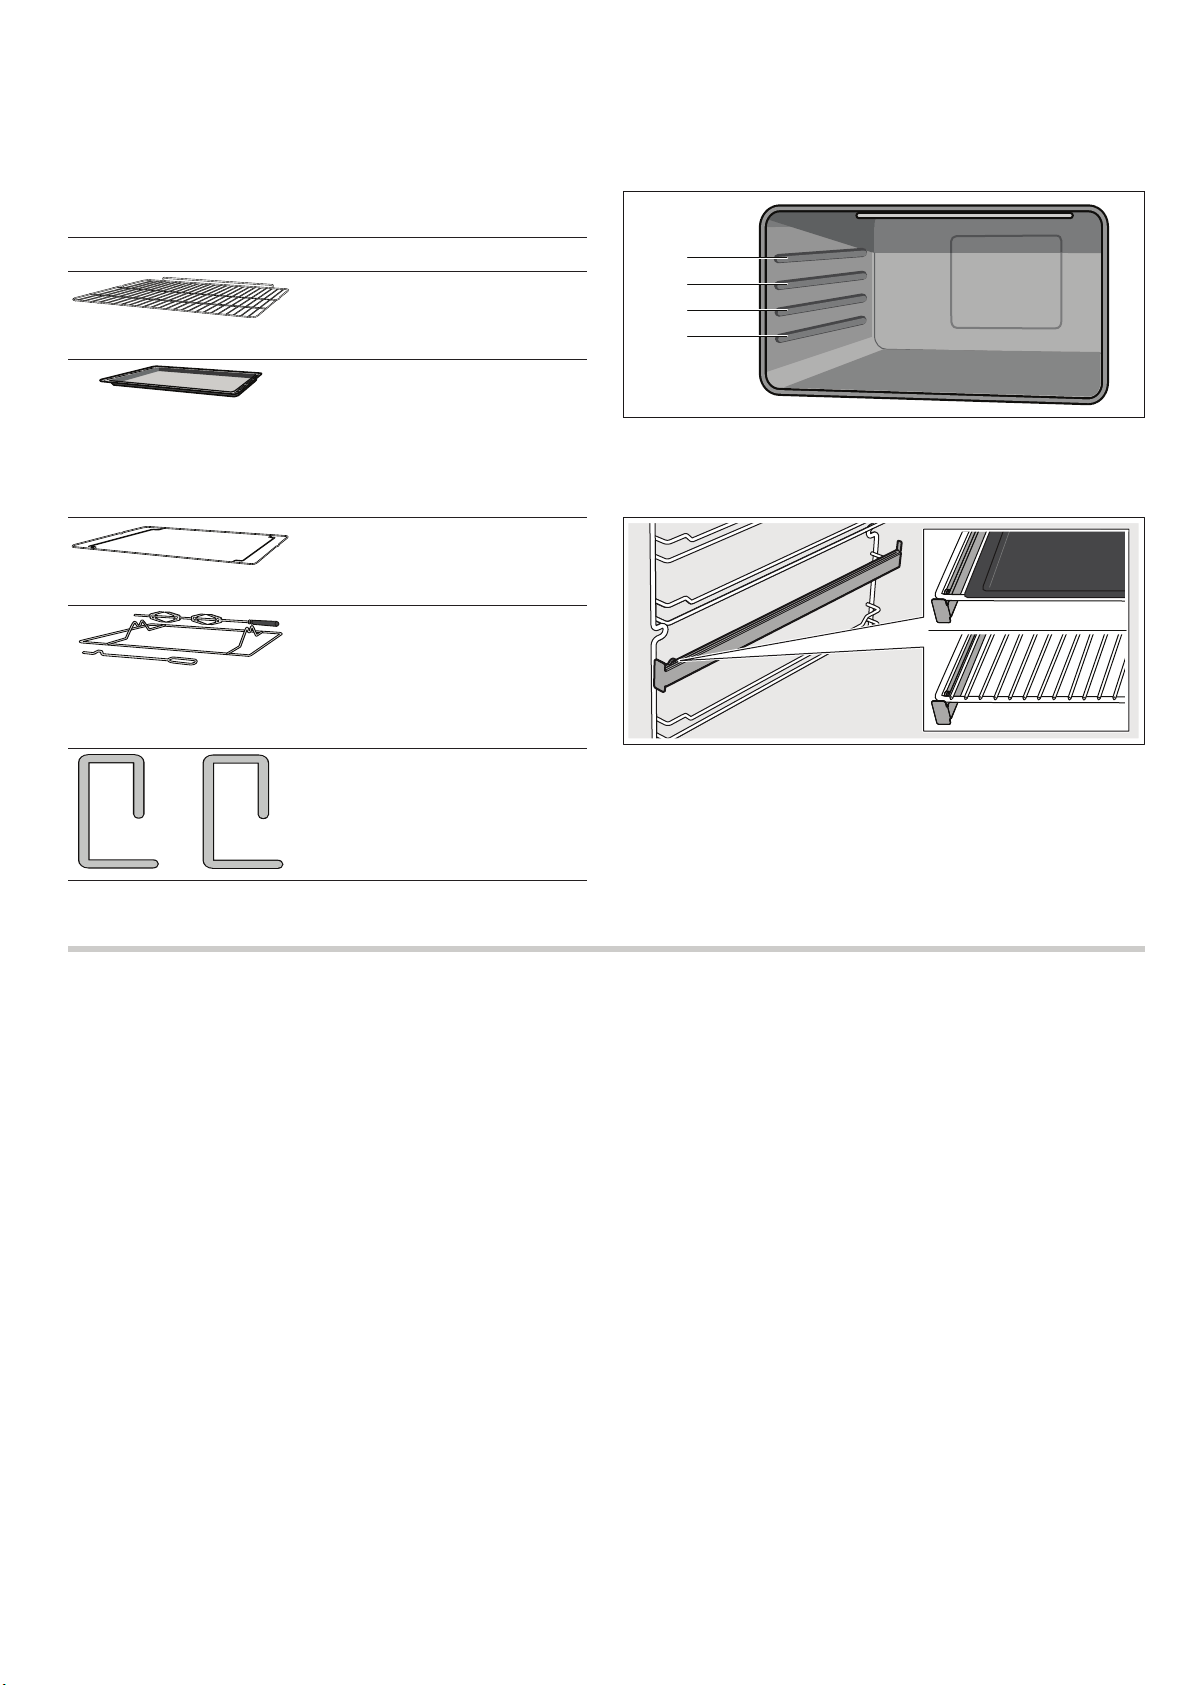
9
äÉ«dɪμdG
¢UôMG .áØ∏àîªYÉØJQG äÉjƒà°ùe 4 ≈∏Y »¡£dG õ«M »a äÉ«dɪμdG ∫ÉNOEG øμªj
≈YGôj .ÜÉÑdG êÉLR ¢ùeÓJ ’ ≈àM ájÉ¡ædG ≈àM äÉ«dɪμdG ∫ÉNOEG ≈∏Y ɪFGO
.í«ë°U πμ°ûH »¡£dG õ«M »a äÉ«dɪμdG ∫ÉNOEG ɪFGO
4
3
2
1
óæY ≈YGôj .ÉeɪJ äÉ«dɪμdG êGôNEG øμªj êGôNEÓd á∏HÉ≤dG ¿ÉÑ°†≤dG ΩGóîà°SÉH
¿ÉÑ°†≤dG õM ΩÉeCG Gô≤à°ùe â«ÑªdG ¿ƒμj ¿CG AGƒ°ûdG áμÑ°Th õ«ÑîdG ìƒd â«Ñe Ö«côJ
.êGôNEÓd á∏HÉ≤dG
:
!≥jôëdG ô£N
≈∏Y ôNBG »¡W AÉYh …CG hCG IÓ≤e hCG õ«ÑN ìƒd ™°Vh ∫GƒMC’G øe ∫ÉM …CÉH Rƒéj ’
RÉ¡édG á«°VQCG áfƒî°S •ôa ≈dEG …ODƒj ∂dP ¿EG å«M .ô°TÉÑe πμ°ûH ¿ôØdG á«°VQCG
.áéeóªdG ïÑ£ªdG äGóMh á«°VQCÉH Gô«Ñc GQô°V ≥ë∏j ¿CG øμªjh
∂d ìÉàj ∂dòHh .Ö∏≤æJ ¿CG ¿hO ø«ã∏ãdG QGó≤ªH êQÉî∏d äÉ«dɪμdG Öë°S ∂æμªj
.ádƒ¡°ùH ᪩WC’G êGôNEG
Gòg »Øàîj ,iôNCG Iôe OôÑJ ¿CG OôéªHh .øî°ùJ ÉeóæY äÉ«dɪμ∏d √ƒ°ûJ çóëj ób
.É¡àØ«Xh ≈∏Y ô«KCÉJ …CG ∑ôJ ¿hóH √ƒ°ûàdG
ôÑY hCG á°ü°üîàªdG ôLÉàªdG øe hCG AÓª©dG áeóN øe äÉ«dɪμdG AGô°T É
k
≤M’ ∂æμªj
.âfôàfE’G
äÉ«dɪμdG ìô°ûdG
AGƒ°ûdGh õ«ÑîdG áμÑ°T
ºë∏dG ™£bh ∂«μdG »fGƒ°Uh »fGhCÓd
.IóªéªdG äÉÑLƒdGh ájƒ°ûªdG ᪩WC’Gh
É櫪dG á≤Ñ£H »∏£ªdG õ«ÑîdG ìƒd
(π«eÉæjE’G)
äÉÑLƒdGh äGRƒÑîªdGh ÖWôdG ∂«μ∏d
øμªj .Iô«ÑμdG ºë∏dG ™£bh IóªéªdG
¿ƒgódG ™«ªéàd AÉYƒc É
k
°†jCG ¬eGóîà°SG
.á£bÉ°ùàªdG
õ«ÑîdG ìƒ∏d â«Ñe
ìƒd ∫ÉNOEG øμªj â«ÑªdG Gòg ΩGóîà°SÉH
.¿ôØdG »a õ«ÑîdG
QGhódG ï«°ùdG
»fó©ªdG ∂Ñ°ûªdGh QGhódG ï«°ùdG â«Ñe ™e
Ωóîà°ù
o
j .ºéëdG Iô«Ñc Qƒ«£dGh ºë∏dG ™£≤d
É櫪dG á≤Ñ£H »∏£ªdG õ«ÑîdG ìƒd ™e §≤a
.(π«eÉæjE’G)
ø«eCÉàdG ô«HGƒN
.äÓ°üتdG â«Ñãàd
Iôe ∫hC’ ΩGóîà°S’G πÑb
»a ∑RÉ¡L ΩGóîà°SG πÑb ¬H ΩÉ«≤dG Öéj Ée ≈∏Y AõédG Gòg ∫ÓN øe ±ô©àà°S
.
¿ÉeC’G äGOÉ°TQEG
´ƒ°Vƒe
k
’hCG CGôbG .≈dhC’G Iôª∏d ΩÉ©£dG OGóYEG
.᪫∏°S á≤jô£H É¡æe ¢ü∏îJh RÉ¡édG øY ∞«∏¨àdG OGƒe ádGREÉH ºb
âbƒdG §Ñ°V
§Ñ°VG .QÉØ°UCG á©HQCGh
0
õeôdG ¢Vô©dG IóMh »a ¢†eƒj RÉ¡édG π«°UƒJ ó©H
.GOóée áYÉ°ùdG
.1 .
0
QõdG ≈∏Y §¨°VG
ô¡¶Jh âbƒdG RƒeQ A»°†J .
12:00 áYÉ°ùdG ¿É«H ¢Vô©dG IóMh »a ô¡¶j
.
0
∫ƒM ¢SGƒbC’G
.2 .
A
hCG
@
QõdG ΩGóîà°SÉH áYÉ°ùdG §Ñ°VG
.•ƒÑ°†ªdG âbƒdG OɪàYG ºàj á∏«∏b ¿GƒK ó©Hh
¿ôØdG ø«î°ùJ
¿ôØ∏d ≥Ñ°ùªdG ∞«¶æàdG
.1 .»¡£dG õ«M øe ≥«∏©àdG áμÑ°Th äÉ«dɪμdG êôNCG
.2 »¡£dG õ«M øe ,øjô«à°ù«dƒÑdG äÉÄjõL πãe ,∞«∏¨àdG OGƒe ÉjÉ≤H ádGREÉH ºb
.ÉeɪJ
.3 .ájɪëdG ábÉbQ ádGREÉH ºb .ájɪM ábÉbôH IÉ£¨e AGõLC’G ¢†©H
.4 .ÖWQ ºYÉf πjóæªH êQÉîdG øe RÉ¡édG ∞«¶æàH ºb
.5 .øNÉ°S ʃHÉ°U ∫ƒ∏ëà »¡£dG õ«M ∞«¶æàH ºb
¿ôØdG ø«î°ùJ
≥∏¨e ƒgh ¿ôØdG ø«î°ùàH ºb ,IójóédG AÉ«°TCÓd áÑëà°ùªdG ô«Z íFGhôdG øe ¢ü∏îà∏d
.ÆQÉah
.1 .iƒ°ü≤dG IQGôëdG áLQO ≈∏Y IQGôëdG áLQO QÉ«àNG ìÉàØe QOCG
.2 .á≤«bO 45 ó©H ¿ôØdG AÉØWEÉH ºb
¿ôØ∏d ≥MÓdG ∞«¶æàdG
.1 .øNÉ°S »fƒHÉ°U ∫ƒ∏ëªH »¡£dG õ«M ∞«¶æàH ºb
.2 .≥«∏©àdG äÉμÑ°T Ö«cÎH ºb
äÉ«dɪμdG ∞«¶æJ
.ïÑ£e áWƒah ÅaGO »fƒHÉ°U ∫ƒ∏ëªH G
k
ó«L É¡Ø«¶æàH ºb äÉ«dɪμdG ΩGóîà°SG πÑb
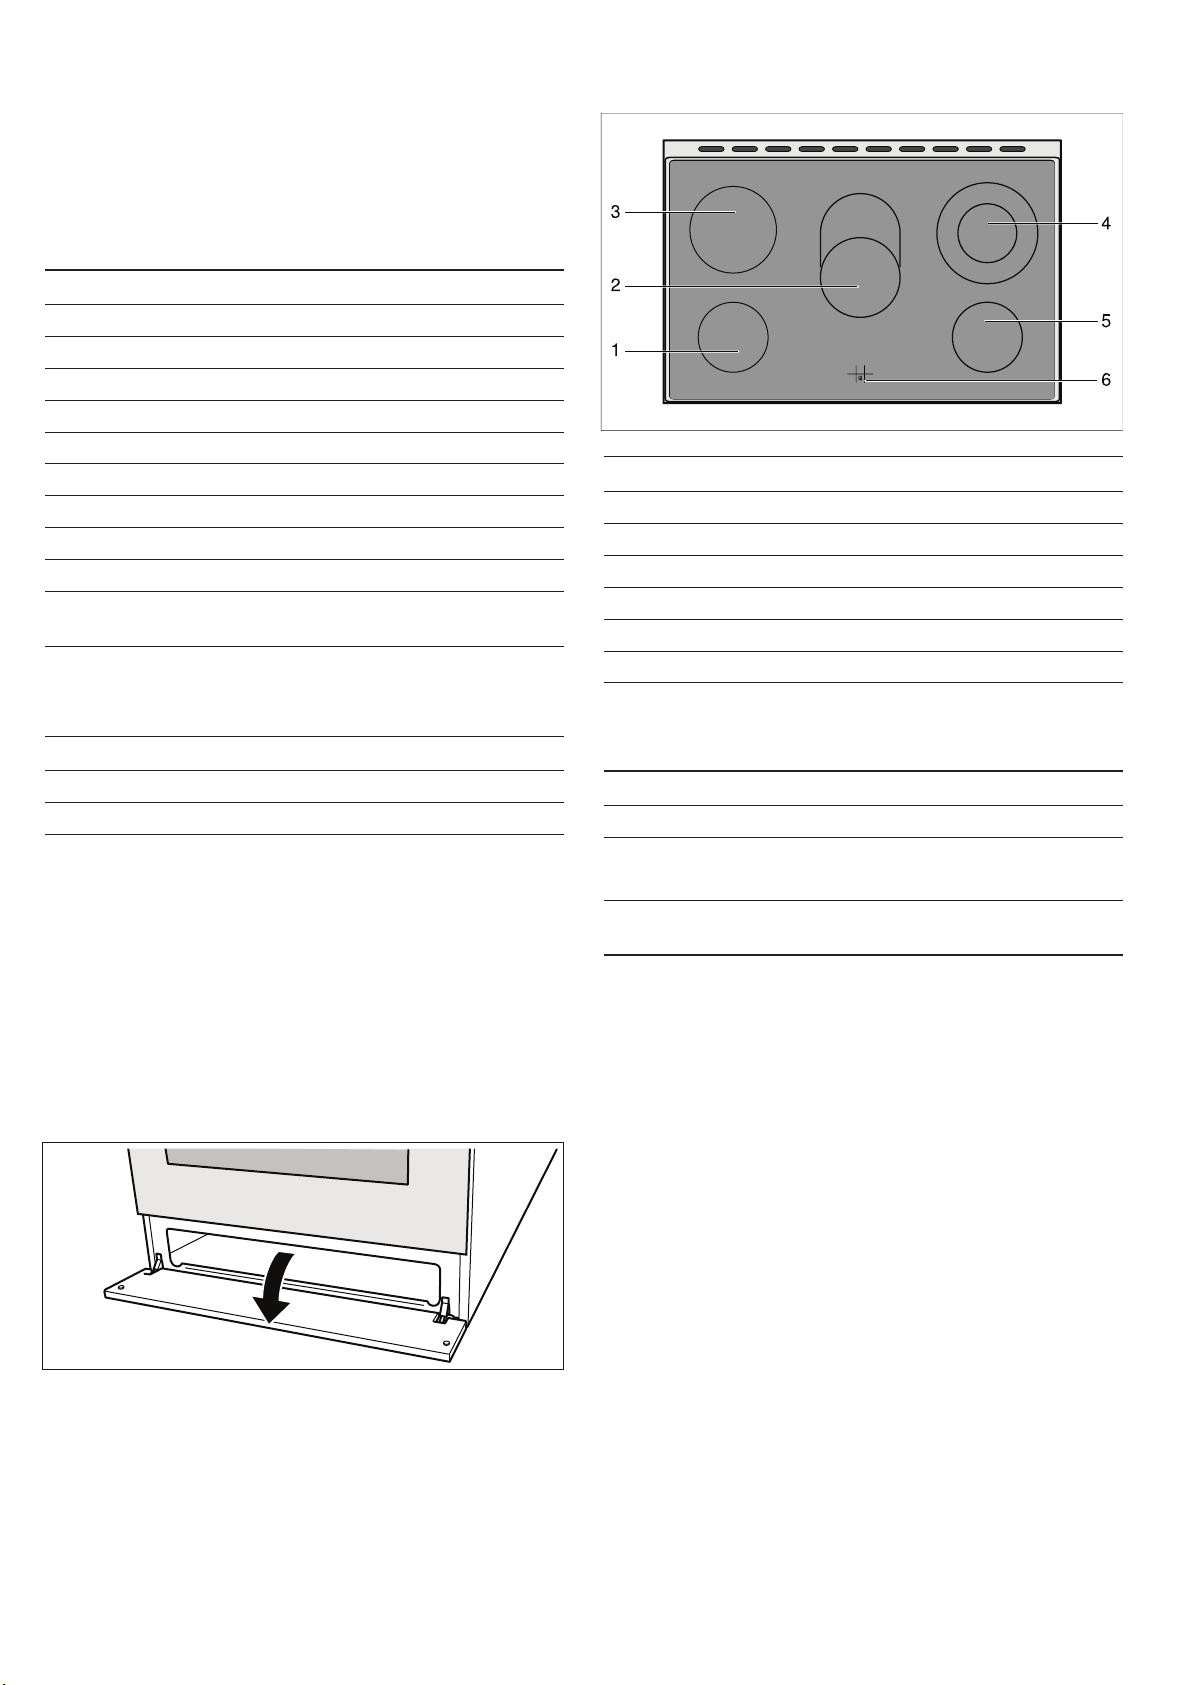
8
óbƒªdG
ìô°ûdG
1
ºe 145 »¡£dG ™°Vƒe
2
ºe 265 x 170 »¡£dG ádBG ¥É£f
3
ºe 180 »¡£dG ™°Vƒe
4
ºe 210 h 120 IôFGódG »FÉæK »¡£dG ™°Vƒe
5
ºe 145 »¡£dG ™°Vƒe
6
á«≤ÑàªdG IQGôëdG ¿É«H
»¡£dG ™°VGƒe ∫ɪ©à°SG IQÉW
.IóM ≈∏Y »¡W ™°Vƒe πc ø«î°ùJ IQób §Ñ°V ∫ɪ©à°S’G äGQÉW ΩGóîà°SÉH ∂æμªj
™°VƒdG≈橪dG
Û
ôØ°üdG ™°Vh.»¡£dG ™°Vƒe ±É≤jEG ºàj
9-1
»¡£dG äÉLQOIQób ≈fOCG = 1
IQób ≈∏YCG = 9
ç
,
ð
äÉbÉ£ædG 𫨰ûJ hCG IôFGódG »FÉæK ô«ÑμdG »¡£dG ™°Vƒe 𫨰ûJ
.»¡£dG ádBG ¥É£f
á«≤ÑàªdG IQGôëdG ¿É«H
™°Vƒªd ¿É«ÑdG ô«°ûj å«M .á«≤ÑàªdG IQGôë∏d ¿É«H »¡W ™°Vƒe πμd óbƒªdÉH óLƒj
¿CG ≈dEG ¿É«ÑdG A»°†j ,CÉØ£e óbƒªdG ¿ƒμj ÉeóæY É°†jCG .ÉæNÉ°S ∫GR Ée …òdG »¡£dG
.±Éc πμ°ûH »¡£dG ™°Vƒe OôÑj
≈∏Y ®ÉØë∏d ∫ÉãªdG π«Ñ°S ≈∏Y ábÉ£dG ô«aƒàd á«≤ÑàªdG IQGôëdG ΩGóîà°SG ∂æμªj
.Iô«¨°U áÑLh A±O
¿ôØdG
∞FÉXƒdG QÉ«àNG ìÉàØe .∫ɪ©à°SG »JQÉW ≈dEG êÉàëJ »¡£dG ¿ôa ΩGóîà°S’
.IQGôëdG áLQO QÉ«àNG ìÉàØeh
¿ôØdG ∫ɪ©à°SG IQÉW
áØ«XƒdG QÉ«àNG ìÉàØe
.∞FÉXƒdG QÉ«àNG ìÉàØe ΩGóîà°SÉH 𫨰ûàdG á≤jôW §Ñ°V ∂æμªj
õeôdG≈橪dG
Û
ôØ°üdG ™°Vh
%
*»∏Ø°ùdG/…ƒ∏©dG ø«î°ùàdG
$
»∏Ø°ùdG ø«î°ùàdG
G
QGhódG ï«°ùdG/ájGƒ°ûdG
(
Iô«ÑμdG ájGƒ°ûdG
7
AGƒ¡dG ôjhóàH ájGƒ°T
N
øNÉ°ùdG AGƒ¡dGh á«∏Ø°ùdG/ájƒ∏©dG áfƒî°ùdG
<
øNÉ°ùdG AGƒ¡dG
B
óªéàdG áHGPEG á∏Môe
Ö°ùM ábÉ£dG ∫Ó¨à°SG IAÉØc áÄa ójóëJ ¬dÓN øe ºJ ø«î°ùJ ´ƒf
*
.EN50304 áØ°UGƒªdG
IQGôëdG áLQO QÉ«àNG ìÉàØe
.IQGôëdG áLQO QÉ«àNG ìÉàØe ΩGóîà°SÉH IQGôëdG áLQO §Ñ°V ∂æμªj
™°VƒdG≈橪dG
Û
CÉØ£e
260 - 50
Ω° IQGôëdG áLQO ¥É£f
.ó°üªdG G
k
RhÉéàe IQÉ£dG IQGOEÉH º≤J Óa .
Û
h 260 ø«©°VƒdG ø«H ó°üe óLƒj
ójôÑàdG áMhôe
¥ƒa øe øNÉ°ùdG AGƒ¡dG êôîjh .áLÉëdG óæY ójôÑàdG áMhôe ±É≤jEGh 𫨰ûJ ºàj
•ôØd ¿ôØdG ¢Vô©àj ±ƒ°ùa ’EGh .ájƒ¡àdG äÉëàa á«£¨àH º≤J ’ !¬«ÑæJ .ÜÉÑdG
.áfƒî°ùdG
ójôÑàdG áMhôe 𫨰ûJ ôªà°ùj ,𫨰ûàdG ó©H ´ô°SCG πμ°ûH »¡£dG õ«M ójôÑJ ºàj ≈àM
.áæ«©e IôàØd
ßØëdG êQO
.πØ°SC’ ìƒ∏dG »W ∫ÓN øe ßØëdG êQO íàaG
.êQódG Gòg »a ¿ôØdG hCG óbƒªdG í£°S äÉ«dɪμH ®ÉØàM’G ∂æμªj
:
!≥jôëdG ô£N
.ßØëdG êQO »a ∫É©à°TÓd á∏HÉb OGƒªH GóHCG ßØàëJ ’
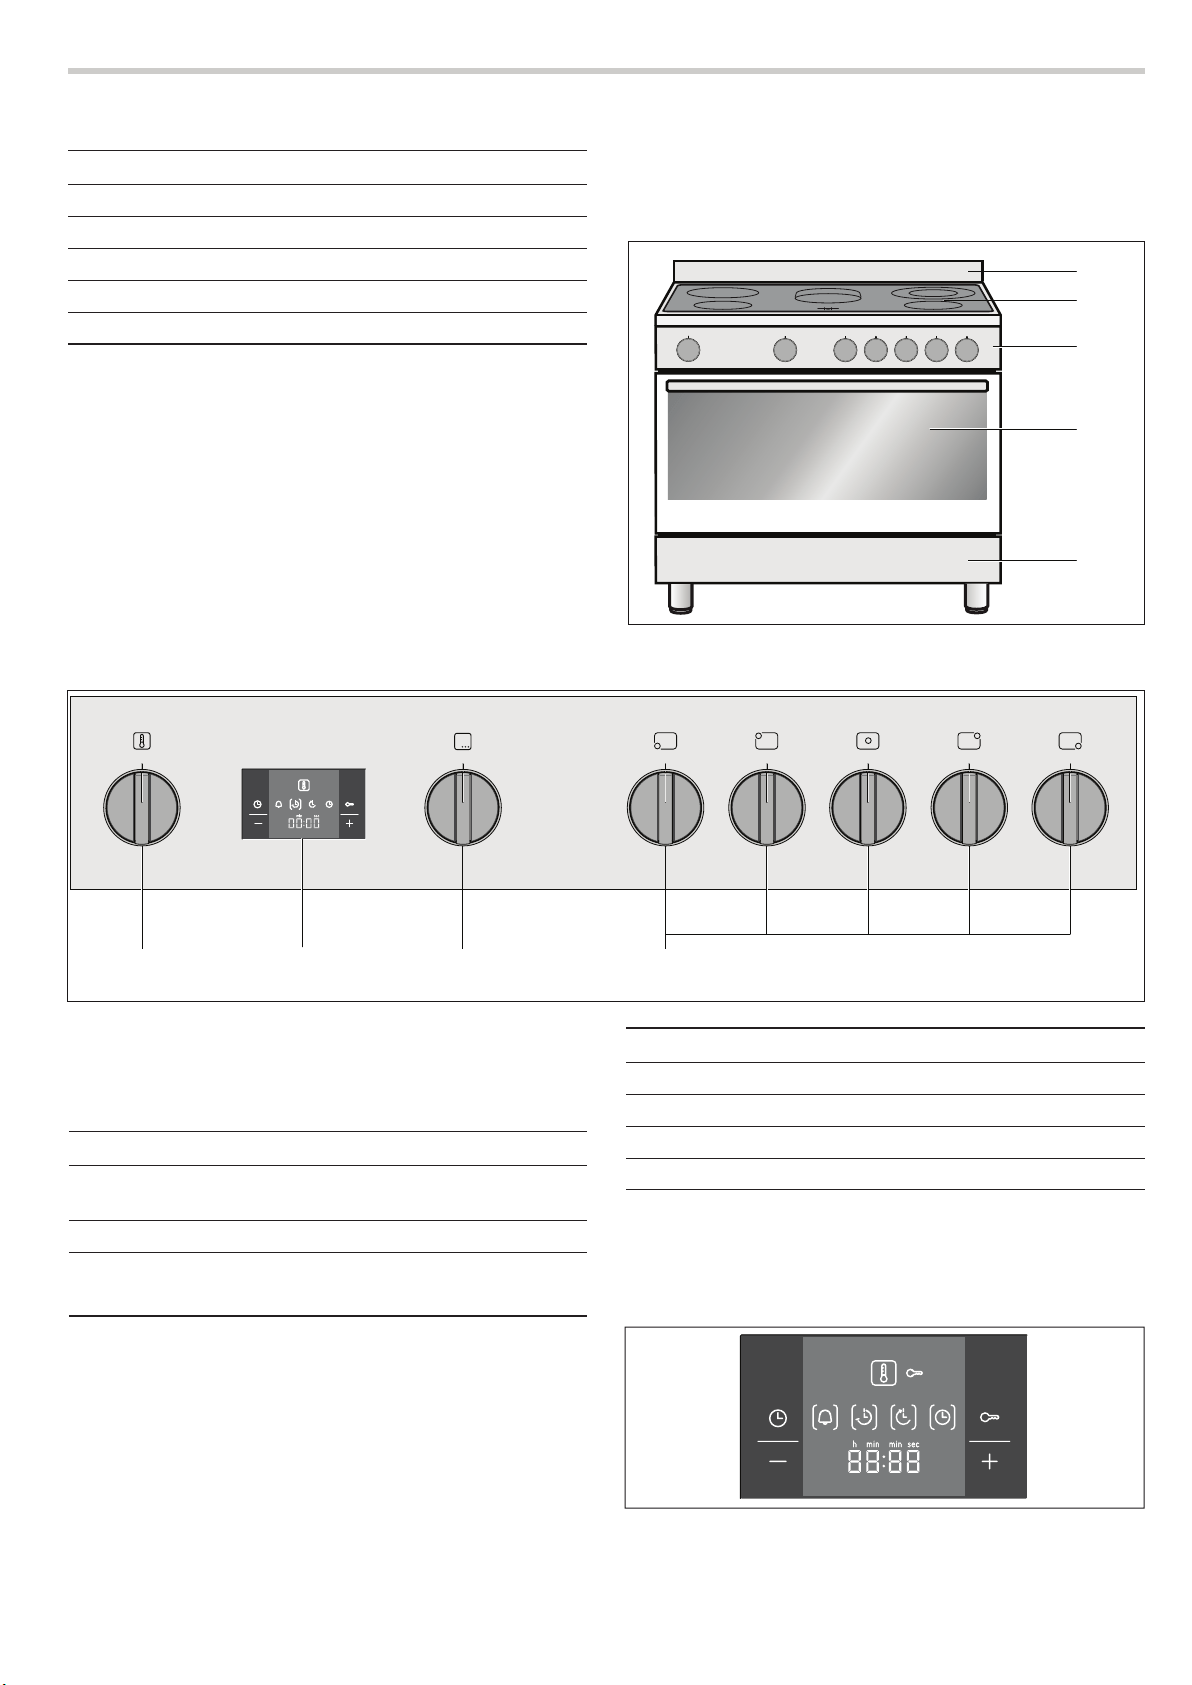
7
ójóédG ∑RÉ¡L
áMƒd ∫ƒM äÉeƒ∏©ªdG øe ójõªdG Éæg óéJ ɪc .ójóédG ∑RÉ¡L ≈∏Y Éæg ±ô©àJ
.äÉ«dɪμdGh ø«î°ùàdG ´GƒfCGh ¿ôØdGh óbƒªdG í£°Sh ∫ɪ©à°S’G
.RÉ¡édG πjOƒe Ö°ùM π«°UÉØàdG »a äÉaÓàN’G ¢†©H ∑Éæg ¿ƒμJ ¿CG OQGƒdG øe
1
2
3
4
5
ìô°ûdG
1
PGPôdG á«bGh
2
óbƒªdG
3
∫ɪ©à°S’G áMƒd
4
¿ôØdG
5
ßØëdG êQO
∫ɪ©à°S’G áMƒd
13
4
2
ìô°ûdG
1
¿ôØdG IQGôM áLQO ∫ɪ©à°SG IQÉW
2
∫ɪ©à°S’G ¥É£f
3
¿ôØdG ∞FÉXh ∫ɪ©à°SG IQÉW
4
»¡£dG ™°VGƒe ∫ɪ©à°SG IQÉW
∫ɪ©à°S’G ¥É£f
¢Vô©dG IóMh »a RƒeôdG ™«ªL ô¡¶J ’h .∫ɪ©à°S’G ¥É£æd É
k
eÉY É
k
°VôY Éæg iôJ
π«°UÉØàdG »a äÉaÓàN’G ¢†©H ∑Éæg ¿ƒμJ ¿CG OQGƒdG øe .G
k
óHCG óMGh âbh »a
.RÉ¡édG πjOƒe Ö°ùM
QGQRC’G
õeôdG §≤a ¢ùªdG .É¡«∏Y Iƒ≤H §¨°†J ’CG »¨Ñæj .QR πc âëJ äGô©°ûà°ùe óLƒJ
.»æ©ªdG
¢Vô©dG IóMhh QGQRC’G
º«≤dG IAGôb ∂æμªjh .áØ∏àîªdG á«aÉ°VE’G ∞FÉXƒdG §Ñ°V QGQRC’G ΩGóîà°SÉH ∂æμªj
.¢Vô©dG IóMh »a áWƒÑ°†ªdG
QõdGΩGóîà°S’G
0
âbƒdG ∞FÉXh âbhh
r
IóªdGh
U
¬ÑæªdG QÉ«àNG
.
0
áYÉ°ùdGh
p
AÉ¡àf’G
D
∫ÉØWC’G ¿ÉeCG πØb.¿ôØdG ∞FÉXh ΩGóîà°SG áMÉJEG hCG ™æe
A
@
¢übÉf
óFGR
.§Ñ°†dG º«b π«∏≤J
.§Ñ°†dG º«b IOÉjR
Qƒ¡X ∫ÓN øe ¢Vô©dG IóMh »a É«dÉM á°Vhô©ªdG âbƒdG áØ«Xh áaô©e ∂æμªj
âæc GPEG §≤a
0
õeôdG A»°†j áYÉ°ùdG ™e :AÉæãà°SG .»æ©ªdG õeôdG ∫ƒM [ ] ¢SGƒbC’G
.ô««¨J AGôLEG Oó°üH

6
QGô°VC’G ÜÉÑ°SCG
óbƒªdG
!¬«ÑæJ
■ .»LÉLõdG ±õîdG ¢UGôbCÉH É°ThóN ÖÑ°ùJ áæ°ûîdG »dÉ≤ªdGh »fGhC’G óYGƒb
■ »a ∂dP ÖÑ°ùàj ó≤a .ÉgGƒàëe ÆGôa ≈àM óbƒªdG ≈∏Y »fGhC’G ø«î°ùJ ÖæéJ
.QGô°VCG çhóM
■ IóMh ¥É£f hCG ∫ɪ©à°S’G ¥É£f ≈∏Y áæNÉ°ùdG »fGhC’Gh »dÉ≤ªdG GóHCG ™°†J ’
.QGô°VCG çhóM »a ∂dP ÖÑ°ùàj ó≤a .óbƒªdG QÉWEG hCG ¢Vô©dG
■ .QGô°VCG çóëJ ó≤a ,óbƒªdG ≈∏Y IOÉM hCG áÑ∏°U AÉ«°TCG •ƒ≤°S ádÉM »a
■ ≈∏Y É¡©°Vh óæY QÉ¡°üfÓd á«μ«à°SÓÑdG á«YhC’G hCG Ωƒ«æeƒdC’G ≥FÉbôdG ¢Vô©àJ
.∑óbƒªd áÑ°SÉæe â°ù«d óbƒªdG ájɪM ábÉbQ ¿CG ɪc .áæNÉ°ùdG »¡£dG ™°VGƒe
ΩÉY ¢VôY
:ÉKhóM ôãcC’G QGô°VC’G »dÉàdG ∫hóédG »a óéJ
QGô°VC’GÖÑ°ùdGAGôLE’G
™≤ÑdG᪩WC’G ¿GQƒa.êÉLR ᣰTÉc ΩGóîà°SÉH QƒØdG ≈∏Y IôKÉæàªdG ᪩WC’G ádGREÉH ºb
áÑ°SÉæe ô«Z äÉضæe ΩGóîà°SG.»LÉLõdG ±õîdG ¢UGôbC’ áÑ°SÉæªdG äÉضæªdG ΩGóîà°SG ≈∏Y ô°üàbG
¢ThóîdGπeôdGh ôμ°ùdGh í∏ªdG.¬«∏Y AÉ«°TC’G ™°Vƒd hCG πª©∏d í£°ùc óbƒªdG Ωóîà°ùJ ’
É°ThóN ÖÑ°ùJ áæ°ûîdG »dÉ≤ªdGh »fGhC’G óYGƒb
»LÉLõdG ±õîdG ¢UGôbCÉH
.É¡eóîà°ùJ »àdG »fGhC’G ádÉM ¢üëaG
¿ƒ∏dG äGô«¨JáÑ°SÉæe ô«Z äÉضæe ΩGóîà°SG.»LÉLõdG ±õîdG ¢UGôbC’ áÑ°SÉæªdG äÉضæªdG ΩGóîà°SG ≈∏Y ô°üàbG
(Óãe Ωƒ«æeƒdC’G) »fGhC’G …ôH.É¡∏≤f óæY »dÉ≤ªdGh »fGhC’G ™aQG
á«aó°U Qƒ°ûb ¿ƒμJôμ°ùdG øe á«dÉY áÑ°ùf ≈∏Y ájƒàëªdG ᪩WC’G ,ôμ°ùdG.êÉLR ᣰTÉc ΩGóîà°SÉH QƒØdG ≈∏Y IôKÉæàªdG ᪩WC’G ádGREÉH ºb
¿ôØdG
!¬«ÑæJ
■ õ«M á«°VQCG ≈∏Y »fGhC’G hCG äGRƒÑîªdG OGóYEG ¥Qh hCG ≥FÉbôdG hCG äÉ«dɪμdG
õ«M á«°VQCG á«£¨àH º≤J ’ .»¡£dG õ«M á«°VQCG ≈∏Y äÉ«dɪc ájCG ™°†J ’ :»¡£dG
ájCG ™°†J ’ .äGRƒÑîªdG OGóYEG ¥Qh hCG Ωƒ«æeƒdC’G ≥FÉbQ øe ´ƒf …CÉH »¡£dG
¿CG ɪc .áfƒî°ùdG ºcGôJ ≈dEG …ODƒj ∂dP ¿EG å«M .»¡£dG õ«M á«°VQCG ≈∏Y »fGhCG
»a ∂dP ÖÑ°ùàj ±ƒ°Sh ,áë«ë°U ¿ƒμJ ød ¢ü«ªëàdGh äGRƒÑîªdG OGóYEG áæeRCG
.(π«eÉæjE’G) É櫪dG á≤Ñ£H Qô°†dG ¥ÉëdEG
■ êÉLR ¢TóN »a äÉ«dɪμdG ÖÑ°ùàJ ób RÉ¡édG RGôW Ö°ùM :äÉ«dɪμdG ∫ÉNOEG
õ«M »a äÉ«dɪμdG ∫ÉNOEG ≈∏Y ɪFGO ¢UôMÉa .RÉ¡édG ÜÉH ≥∏Z óæY ÜÉÑdG
.ájÉ¡ædG ≈àM »¡£dG
■ .øNÉ°ùdG »¡£dG õ«M »a AɪdG Ö°üH G
k
óHCG º≤J ’ :øNÉ°ùdG »¡£dG õ«M »a AɪdG
≥ë∏j ób IQGôëdG áLQO ô«¨J ¿CG ɪc .AÉe QÉîH ó«dƒJ ≈dEG …ODƒj ∂dP ¿EG å«M
.(π«eÉæjE’G) É櫪dG á≤Ñ£H Qô°†dG
■ ÖÑ°ùàj ±ƒ°ùa .á∏jƒW äGôàØd ≥∏¨e ƒgh »¡£dG õ«M »a áÑWQ ᪩WCÉH ßØàëJ ’
.(π«eÉæjE’G) É櫪dG á≤Ñ£H Qô°†dG ¥ÉëdEG »a ∂dP
■ º≤J ’ ,Iô«Ñc ᫪μH á¡cÉa IQÉ°üY ≈∏Y …ƒàëJ »àdG ôFÉ£ØdG OGóYEG óæY :á¡cÉØdG
ìƒd øe ôWÉ≤àj …òdG ¬cGƒØdG ô«°ü©a .óëdG øY óFGR πμ°ûH õ«ÑîdG ìƒd AπªH
Qób äÉeGóîà°S’G Oó©àe ìƒ∏dG Ωóîà°SG .É¡àdGREG Qò©àj É
k
©≤H ∑ôàj õ«ÑîdG
.É
k
≤ªY ôãcCG ƒ¡a ,´É£à°ùªdG
■ .≥∏¨e ƒgh ’EG »¡£dG õ«M ójôÑàH º≤J ’ :ìƒàØe RÉ¡édG ÜÉH ɪæ«H ójôÑàdG
äÉMƒ∏dG ¿EÉa ,§≤a §«°ùH QGó≤ªH ƒdh É
k
MƒàØe ¿Éc GPEG RÉ¡édG ÜÉH ¿CG ≈YGôjh
.âbƒdG QhôªH Qô°†àJ ¿CG øμªj IQhÉéªdG äGóMƒ∏d á«eÉeC’G
■ É
k
î°ùàe ¿ôØdG ≥∏Z ΩÉμMEG QÉWEG ¿Éc GPEG :Ió°ûH ï°ùàªdG ¿ôØdG ≥∏Z ΩÉμMEG QÉWEG
QGô°VCG ≥ë∏J óbh .π¨°ûe ¿ôØdGh í«ë°U πμ°ûH ≥∏¨æj ød ¿ôØdG ÜÉH ¿EÉa ,Ió°ûH
QÉWEG áaɶf ≈∏Y É
k
ªFGO á¶aÉëªdG Öéj ∂dòd .IQhÉéªdG çÉKC’G äGóMh äÉ¡LGƒH
.¿ôØdG ≥∏Z ΩÉμMEG
■ .¬«∏Y õμJôJ hCG ìƒàتdG ¿ôØdG ÜÉH ≈∏Y É
k
Ä«°T ™°†J ’ .RÉμJQG í£°ùc ¿ôØdG ÜÉH
.¿ôØdG ÜÉH ≈∏Y AÉ«°TCG ájCG ≥«∏©àH º≤J ’h
■ ÜÉÑdG ¢†Ñ≤ªa .ÜÉÑdG ¢†Ñ≤e øe ¬àÑãJ hCG RÉ¡édG πªëJ ’ :RÉ¡édG π≤f
.∂dòd
k
áé«àf ô°ùμæj óbh ,RÉ¡édG ¿Rh πªëàj ¿CG ™«£à°ùj ’
■ Iô«Ñc áLQóH êQÉî∏d ΩÉ©£dÉH á∏≤ã
o
ªdG äÉ«dɪμdG Öë°ùJ ’ :á∏«≤ãdG äÉ«dɪμdG
É¡Ñë°S óæY Ö∏≤æJ ¿CG øμªj á∏«≤ãdG äÉ«dɪμdÉa .É¡æY πªëdG ∞«ØîJ ¿hO
É櫪dG á≤Ñ£H QGô°VE’G ≈dEG …ODƒj »¡£dG õ«M RhõM ≈∏Y §¨°V CÉ°ûæj ɪc .êQÉî∏d
êQÉî∏d É¡Ñë°S AÉæKCG äÉ«dɪμdG ≈∏Y ™bGƒdG πªëdG ∞«ØîàH ºb .(π«eÉæjE’G)
™e »fGhCÓd ¢Tɪb á©£b É
k
ªFGO Ωóîà°SG !¬«ÑæJ .
k
Ó«∏b ∑ó«H Égóæ°S ∫ÓN øe
.áæNÉ°ùdG äÉ«dɪμdG
ßØëdG êQO
!¬«ÑæJ
.¬H Qô°†dG ≥ë∏j ó≤a .ßØëdG êQO »a áæNÉ°S AÉ«°TCG ájCG ™°†J ’

5
!¥GôàM’G ô£N
■ í£°SC’G GóHCG ¢ùª∏J ’ .ájɨ∏d ÉæNÉ°S RÉ¡édG íÑ°üj ób
»gh ø«î°ùàdG ô°UÉæY hCG »¡£dG õ«ëd á«∏NGódG
ó©HCGh .OôÑj RÉ¡édG ∑ôJ ≈∏Y É
k
ªFGO ¢UôMG .áæNÉ°S
.RÉ¡édG øY ∫ÉØWC’G
■ .ájɨ∏d áæNÉ°S íÑ°üJ ób ¿ôØdG »fGhCGh äÉ«dɪμdG
»fGhCG hCG äÉ«dɪμdG êGôNE’ ¿ôØ∏d áWƒa ɪFGO Ωóîà°SG
.»¡£dG õ«M øe ¿ôØdG
■ ƒgh »¡£dG õ«M »a π©à°ûJ ¿CG øμªj ∫ƒëμdG IôîHCG
≈∏Y …ƒàëJ ᪩WCG ô«°†ëàH G
k
óHCG º≤J ’ .øNÉ°S
á«dÉY áÑ°ùf ≈∏Y á∏ªà°ûªdG πFGƒ°ùdG øe Iô«Ñc äÉ«ªc
øe á∏«∏b äÉ«ªc ΩGóîà°SG ≈∏Y ô°üàbG .∫ƒëμdG øe
.¢UôëH RÉ¡édG ÜÉH íàaG .IõcôªdG äÉHhô°ûªdG
■ É¡H ᣫëªdG á≤£æªdGh ø«î°ùàdG í£°SCG íÑ°üJ ób
∫ÉM »a óbƒªdG QÉWEG É°Uƒ°üN ,ájɨ∏d áæNÉ°S
∫ÉØWC’G ó©HCGh .GóHCG áæNÉ°ùdG í£°SC’G ¢ùª∏J ’ .√OƒLh
.RÉ¡édG øY
■ IóMh ∞bƒàJh ,ø«î°ùàdÉH Ωƒ≤j »¡£dG ™°Vƒe
¥hóæ°U »a OƒLƒªdG ô¡°üªdG π°üaG .¢Vô©dG
.AÓª©dG áeóîH π°üJG .ôgÉ°üªdG
!¥hôëH áHÉ°UE’G ô£N
■ AÉæKCG øî°ùJ É¡«dEG ∫ƒ°UƒdG øμªj »àdG AGõLC’G
∫ÉØWC’G ó©HCGh .áæNÉ°ùdG AGõLC’G GóHCG ¢ùª∏J ’ .𫨰ûàdG
.RÉ¡édG øY
■ íàaG .RÉ¡édG ÜÉH íàa óæY øNÉ°ùdG QÉîÑdG Üô°ùàj ób
.RÉ¡édG øY ∫ÉØWC’G ó©HCGh .¢UôëH RÉ¡édG ÜÉH
■ øμªj øNÉ°S ƒgh »¡£dG õ«M »a AɪdG ¢†©H OƒLh
»a AɪdG Ö°üH G
k
óHCG º≤J ’ .ÉæNÉ°S AÉe QÉîH ódƒj ¿CG
.øNÉ°ùdG »¡£dG õ«M
!áHÉ°UE’G ô£N
■ .äÉ≤≤°ûJ ≈dEG Qƒ£àJ ób RÉ¡édG ÜÉH êÉLR ¢ThóN
hCG áæ°ûN ∞«¶æJ OGƒe hCG êÉLR ᣰTÉc Ωóîà°ùJ ’
.πcBÉà∏d áÑÑ°ùe
■ øe ¢†©H ∫ƒ°Uh ÖÑ°ùH ICÉéa õØ≤J ¿CG øμªj »fGhC’G
¢UôMG ∂dòd .»¡£dG ™°Vƒeh AÉfE’G IóYÉb ø«H πFÉ°ùdG
»a AÉfE’G IóYÉbh »¡£dG ™°Vƒe ¿ƒμj ¿CG ≈∏Y ɪFGO
.áaÉL ádÉM
■ ¬fEÉa ,¬à«ÑãJ ¿hO IóYÉb ≈∏Y RÉ¡édG ™°Vh ádÉM »a
RÉ¡édG â«ÑãJ Öéj Gòd .IóYÉ≤dG øY Éaôëæe ≥dõæj ób
.IóYÉ≤dG ™e
!ÜÓ≤f’G ô£N
á∏«°Sh Ö«côJ Öéj ,RÉ¡édG ÜÓ≤fG ô£N Öæéàd :ôjòëJ
.äGOÉ°TQE’G ô¶fG ,Ö«côà∏d .√òg ¿GõJ’G
!»FÉHô¡μdG ≥©°üdG ô£N
■ .QÉ£NCG ≈∏Y É«æa ᪫∏°ùdG ô«Z ìÓ°UE’G ∫ɪYCG …ƒ£æJ
äÓ«°UƒJ ô««¨Jh ìÓ°UE’G ∫ɪYCG ò«ØæJ Rƒéj ’
AÓªY áeóN »æa áaô©ªH ’EG IQô°†àªdG AÉHô¡μdG
´õfÉa ,RÉ¡édÉH π£Y ∑Éæg ¿Éc GPEG .Éæ∏Ñ
p
b øe ÜQóe
¥hóæ°U »a ô¡°üªdG π°üaG hCG »FÉHô¡μdG ¢ùHÉ≤dG
.AÓª©dG áeóîH π°üJG .ôgÉ°üªdG
■ á«FÉHô¡μdG Iõ¡LC’G äÓHÉμd ádRÉ©dG IOɪdG ô¡°üæJ ób
π©éJ ’ .RÉ¡é∏d áæNÉ°ùdG AGõLC’G á°ùeÓe ádÉM »a
AGõLC’G ¢ùeÓJ á«FÉHô¡μdG Iõ¡LC’G π«°UƒJ äÓHÉc
.GóHCG RÉ¡é∏d áæNÉ°ùdG
■ »a ÖÑ°ùàJ ób RÉ¡édG »a πZƒàJ »àdG áHƒWôdG
∞«¶æJ Iõ¡LCG ájCG Ωóîà°ùJ ’ .»FÉHô¡c ≥©°U çhóM
.QÉîÑdÉH ∞«¶æJ Iõ¡LCG hCG »dÉ©dG §¨°†dÉH
■ IGhO äÉ°ùeÓe ¿CG »¡£dG õ«M áѪd ô««¨J óæY ≈YGôj
,áѪ∏dG ô««¨J πÑb .»FÉHô¡c QÉ«J É¡«a …ô°ùj áѪ∏dG
ô¡°üªdG π°üaG hCG ¢ùÑ≤ªdG øe »FÉHô¡μdG ¢ùHÉ≤dG ´õfG
.ôgÉ°üªdG ¥hóæ°U »a OƒLƒªdG
■ ≥©°U çhóM »a ÖÑ°ùàj ób π∏N ¬H …òdG RÉ¡édG
π°üaGh .π£Y ¬H RÉ¡L 𫨰ûàH GóHCG º≤J ’ .»FÉHô¡c
ô¡°üªdG π°üaG hCG QÉ«àdG áμÑ°T øY »FÉHô¡μdG ¢ùHÉ≤dG
.AÓª©dG áeóîH π°üJG .ôgÉ°üªdG ¥hóæ°U »a OƒLƒªdG
■ ¿CG øμªj »LÉLõdG ±õîdG »a Qƒ°ùμdG hCG äÉ≤≤°ûàdG
ô¡°üªdG π°üaG .á«FÉHô¡μdG äÉ≤©°üdG »a ÖÑ°ùàJ
.AÓª©dG áeóîH π°üJG .ôgÉ°üªdG ¥hóæ°U »a OƒLƒªdG

4
᪡ªdG ¿ÉeC’G äGOÉ°TQEG
ΩGóîà°SG ∂æ쪫°S §≤a òFóæY .ájÉæ©H π«dódG Gòg CGôbG
∫ɪ©à°S’G π«dóH ßØàMG .øeBGh í«ë°U πμ°ûH RÉ¡édG
.ójóédG ∂dɪ∏d ¬ª«∏°ùàd hCG É≤M’ ¬eGóîà°S’ Ö«côàdGh
º≤J ’h .∞«∏¨àdG OGƒe øe ¬LGôNEG ó©H RÉ¡édG ¢üëaG
øY áéJÉf QGô°VCG OƒLh ádÉM »a RÉ¡édG π«°UƒàH
.π≤ædG á«∏ªY
¿hóH Iõ¡LC’G π«°UƒàH óªà©e »æa Ωƒ≤j ¿CG ø«©àj
ádÉM »a ¿Éª°†dG ¥ƒ≤ëH áÑdÉ£ªdG ≥ëj ’ å«M .¢ùHGƒb
.í«ë°U ô«Z πμ°ûH RÉ¡édG π«°UƒJ øY áéJÉædG QGô°VC’G
ô°üàbG .§≤a »dõæªdG ΩGóîà°SÓd ¢ü°üîe RÉ¡édG Gòg
.äÉHhô°ûªdGh ᪩WC’G OGóYEG »a RÉ¡édG ΩGóîà°SG ≈∏Y
Gòg Ωóîà°SG .𫨰ûàdG AÉæKCG RÉ¡édG áÑbGôe ø«©àjh
.§≤a á≤∏¨ªdG øcÉeC’G »a RÉ¡édG
≈àM ´ÉØJQG ≈∏Y ΩGóîà°SÓd Ö°SÉæe RÉ¡édG Gòg
.≈°übCG óëH ôëÑdG í£°S ¥ƒa ôàe
2000
»LQÉN »JÉ≤«e ™e 𫨰ûà∏d ɪª°üe ¢ù«d RÉ¡édG Gòg
.ó©H øY 𫨰ûJ RÉ¡L ᣰSGƒH hCG
´ƒbh ≈dEG …ODƒJ ób É¡fEG å«M .óbƒª∏d á«£ZCG Ωóîà°ùJ ’
QÉ°ùμfG hCG ∫É©à°T’G hCG áfƒî°ùdG •ôa ÖÑ°ùH çOGƒM
.Óãe äÉeÉîdG
ô«Z ∫ÉØWCG ájɪM áμÑ°T hCG ájɪM äGõ«¡éJ Ωóîà°ùJ ’
.çOGƒM ´ƒbh ≈dEG …ODƒJ ó≤a .áÑ°SÉæe
ôªY øe ∫ÉØWC’G π
n
Ñ
p
b øe RÉ¡édG Gòg ΩGóîà°SG øμªj
»a ¢ü≤f øe ¿ƒfÉ©j øjòdG ¢UÉî°TC’G hCG äGƒæ°S
8
¢UÉî°TC’G hCG á«∏≤©dG hCG á«°ùëdG hCG ájó°ùédG äGQó≤dG
¿CG á£jô°T áaô©ªdG hCG IôÑîdG »a Qƒ°üb º¡jód øjòdG
hCG º¡«∏Y ±Gô°TE’ÉH º¡àeÓ°S øY ∫hDƒ°ùe ¢üî°T Ωƒ≤j
ócCÉàdG ™e RÉ¡é∏d øeB’G ΩGóîà°S’G á«Ø«c ≈dEG º¡¡«LƒJ
.∂dòH á£ÑJôªdG QÉ£NCÓd º¡cGQOEG øe
∫ÉØWCÓd Rƒéj ’ .RÉ¡édÉH åÑ©dG ∫ÉØWCÓd Rƒéj ’
áWƒæªdG áfÉ«°üdG ∫ɪYCG AGôLEG hCG RÉ¡édG ∞«¶æJ
≈∏Y ,ôãcCG hCG äGƒæ°S
8 ø°S »a Gƒfƒμj ºd Ée Ωóîà°ùªdÉH
.∂dP AÉæKCG º¡àÑbGôe ºàj ¿CG
RÉ¡édG øY ºgOÉ©HEG Öéj äGƒæ°S
8 ø°S ¿hO ∫ÉØWC’G
.AÉHô¡μdG πHÉch
»¡£dG õ«M »a äÉ«dɪμdG ∫ÉNOEG ≈∏Y ɪFGO ¢UôMG
.∫ɪ©à°S’G π«dO »a äÉ«dɪμdG ìô°T ô¶fG
.í«ë°U πμ°ûH
!≥jôëdG ô£N
■ õ«M »a É¡æjõîJ ºàj »àdG ∫É©à°TÓd á∏HÉ≤dG OGƒªdG
á∏HÉb OGƒªH GóHCG ßØàëJ ’ .π©à°ûJ ¿CG øμªj »¡£dG
»a G
k
óHCG RÉ¡édG ÜÉH íàØJ ’ .»¡£dG õ«M »a ∫É©à°TÓd
¢ùHÉ≤dG ´õfGh RÉ¡édG ∞bhCG .¬∏NGóH áæNOCG OƒLh ádÉM
.ôgÉ°üªdG ¥hóæ°U »a ô¡°üªdG π°üaG hCG »FÉHô¡μdG
■ çóëj óbh .RÉ¡édG ÜÉH íàa óæY »FGƒg QÉ«J CÉ°ûæj
,ø«î°ùàdG ô°UÉæYh äGRƒÑîªdG OGóYEG ¥Qh ø«H ¢ùeÓJ
äGRƒÑîªdG OGóYEG ¥Qh ™°†J ’ .¬dÉ©à°TG ≈dEG …ODƒj ɪe
¢UôMG .AɪME’G AÉæKCG äÉ«dɪμdG ≈∏Y ¬à«ÑãJ ¿hO
¬fÉμe »a äGRƒÑîªdG OGóYEG ¥Qh â«ÑãJ ≈∏Y ɪFGO
í£°ùdG á«£¨àH ºbh .¬«∏Y õ«ÑN á«æ«°U hCG ≥ÑW ™°VƒH
¿CG Rƒéj ’h .äGRƒÑîªdG OGóYEG ¥QƒH §≤a ܃ZôªdG
.äÉ«dɪμdG ¥ƒa äGRƒÑîªdG OGóYEG ¥Qh RôÑj
■ .áYô°ùH π©à°ûJ ¿CG øμªj áæNÉ°ùdG ¿ƒgódGh äƒjõdG
.áÑbGôe ¿hO GóHCG áæNÉ°ùdG äƒjõdG hCG ¿ƒgódG ∑ôàJ ’
Gòg øe ≥FGôëdG AÉØWEG »a AɪdG ΩGóîà°SÉH G
k
óHCG º≤J ’h
Ö¡∏dG AÉØWEÉH ºb .ø«î°ùàdG í£°S AÉØWEÉH ºbh .´ƒædG
hCG ≥jôëdG AÉØWE’ á«fÉ£H hCG AÉ£Z ΩGóîà°SÉH ¢UôëH
.¬HÉ°T Ée
■ ájCG GóHCG ™°†J ’ .ájɨ∏d áæNÉ°S íÑ°üJ ø«î°ùàdG í£°SCG
AÉ«°TCG ájCG ™°†J ’h .óbƒªdG ≈∏Y ∫É©à°TÓd á∏HÉb AÉ«°TCG
.óbƒªdG ≈∏Y GóHCG
■ πª©j óbh .¬dɪ©à°SG Qò©àjh É«FÉ≤∏J óbƒªdG ∞bƒàj
»a OƒLƒªdG ô¡°üªdG π°üaG .≥M’ âbh »a ó°üb ¿hO
.AÓª©dG áeóîH π°üJG .ôgÉ°üªdG ¥hóæ°U
■ ¿EÉa »dÉàdÉHh ,ájɨ∏d É
k
æNÉ°S RÉ¡édG íÑ°üj ¿CG øμªj
GóHCG º≤J ’ .π©à°ûJ ¿CG øμªj ∫É©à°TÓd á∏HÉ≤dG OGƒªdG
≈∏Y) ∫É©à°TÓd á∏HÉb AÉ«°TCG ájCG ΩGóîà°SG hCG øjõîàH
(∞«¶æàdG OGƒe hCG ä’ƒ°ShôjE’G äGƒÑY ∫ÉãªdG π«Ñ°S
AÉ«°TCG ájCG øjõîàH º≤J ’h .¬æe Üô≤dÉH hCG ¿ôØdG πØ°SCG
.¬bƒa hCG RÉ¡édG πNGO ∫É©à°TÓd á∏HÉb
■ áæNÉ°S »∏Ø°ùdG êQó∏d á«LQÉîdG í£°SC’G íÑ°üJ ób
.êQódG »a §≤a ¿ôØdG äÉ«dɪc øjõîàH ºb .ájɨ∏d
»a ¥GôàM’Gh ∫É©à°TÓd á∏HÉ≤dG AÉ«°TC’G ßØM Rƒéj ’
.»∏Ø°ùdG êQódG

3
äÉjƒàëªdG ¢Sô¡a
4 ............................................................................................᪡ªdG ¿ÉeC’G äGOÉ°TQEG
6 ...........................................................................................................QGô°VC’G ÜÉÑ°SCG
7 ............................................................................................................ójóédG ∑RÉ¡L
7 .........................................................................................................∫ɪ©à°S’G áMƒd
7 ......................................................................................................... ∫ɪ©à°S’G ¥É£f
7 ................................................................................................¢Vô©dG IóMhh QGQRC’G
8 .......................................................................................................................... óbƒªdG
8 ...........................................................................................................................¿ôØdG
8 ............................................................................................................ójôÑàdG áMhôe
8 .................................................................................................................. ßØëdG êQO
9 ....................................................................................................................äÉ«dɪμdG
9 ......................................................................................... Iôe ∫hC’ ΩGóîà°S’G πÑb
9 .................................................................................................................âbƒdG §Ñ°V
9 ..............................................................................................................¿ôØdG ø«î°ùJ
9 ....................................................................................................... äÉ«dɪμdG ∞«¶æJ
10 ............................................................................................................ óbƒªdG §Ñ°V
10 .............................................................................................. óbƒªdG AÉØWEGh 𫨰ûJ
10 ...........................................»¡£dG ádBG ¥É£fh IôFGódG »FÉæK ô«ÑμdG »¡£dG ™°Vƒe
10 ..........................................................................................¿ôØdG ∫ɪ©à°SG á≤jôW
10 ............................................................................................................ ¿ôØdG IAÉ°VEG
10 ........................................................................................................... 𫨰ûàdG ¥ôW
10 .........................................................................................................¿ôØdG ∫ɪ©à°SG
10 ..............................................................................................QGhódG ï«°ùdG ∫ɪ©à°SG
11 ..............................................................................................âbƒdG ∞FÉXh §Ñ°V
11 ....................................................................................................................... ¬ÑæªdG
12 .............................................................................................................𫨰ûàdG Ióe
12 ............................................................................................................AÉ¡àf’G âbh
13 ........................................................................................................................âbƒdG
13 ....................................................................................................∫ÉØWC’G ¿ÉeCG πØb
13 ........................................................................á«°SÉ°SC’G §Ñ°†dG ´É°VhCG ô««¨J
14 ..................................................................................................∞«¶æàdGh ájÉæ©dG
14 ................................................................................................................. äÉضæªdG
15 ..................................................................................»¡£dG õ«ëd IRÉØëdG áfÉ£ÑdG
15 ..........................................................................................RÉ¡édG ÜÉH Ö«côJh ∂a
15 .......................................................................≥«∏©àdG ¿ÉÑ°†b »àμÑ°T Ö«côJh ∂a
16 ................................................................................. ?π∏N çhóM óæY πª©dG Ée
16 ..........................................................................................................CÉ£îdG äÉZÓH
16 ......................................................................................................¿ôØdG áѪd ô««¨J
17 ..........................................................................................................AÓª©dG áeóN
17 ..............................................................................áÄ«ÑdGh ábÉ£dG ∫ƒM íFÉ°üf
17 ............................................................................¿ôØdG ΩGóîà°SG óæY ábÉ£dG ô«aƒJ
17 .......................................................................... óbƒªdG ΩGóîà°SG óæY ábÉ£dG ô«aƒJ
17 .....................................................áÄ«ÑdÉH ô°†J ’ á≤jô£H äÉØ∏îªdG øe ¢ü∏îàdG
äÉeóîdGh QÉ«¨dG ™£bh äÉ«dɪμdGh äÉéàæªdG ∫ƒM äÉeƒ∏©ªdG øe ójõªdG óéJ
≈∏Y »fhôàμdE’G ôéàªdG »ah www.bosch-home.com :âfôàfE’G ™bƒe ≈∏Y
www.bosch-eshop.com :âfôàfE’G ™bƒe
áeRÓdG äÉéàæªdG äÉeƒ∏©eh IQƒ°ûªdG ∂d Ωó≤j ¿CG
¢TƒH äÉeÓ©à°SG ≥jôa ô°ùj
ºbQ ≈∏Y Iõ¡LC’G äÉeGóîà°SGh äÉ≤«Ñ£àH ≥∏©àj ɪ«a ºμJGQÉ°ùØà°SG ≈∏Y OôdGh
≈dEG 8.00 áYÉ°ùdG øe :ᩪédG ≈dEG ø«æK’G øe ∂dPh) 089 69 339 339 :∞JÉg
.É«fɪdCG ≈∏Y §≤a …ô°ùj (18.00 áYÉ°ùdG

914775336
950623
*9000892056*
9000892056

Robert Bosch Hausgeräte GmbH
Carl-Wery-Straße 34
81739 München
Germany
www.bosch-home.com
914775336
950623
*9000892056*
9000892056