Loading ...
Loading ...
Loading ...

ENGLISH
12
OPERATION
WARNING: To reduce the risk of serious personal
injury, turn unit off and keep away from the
power button before making any adjustments or
removing/installing attachments or accessories.
An accidental start‑up can causeinjury.
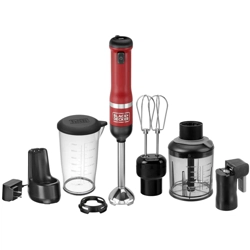
FOOD CHOPPER
BCKM101FP
Intended Use
This food chopper is intended for residential use only.
It can be used for chopping, dicing, pureeing and mincing
tomatoes, onions, garlic, crackers, ginger, and for grinding meat.
DO NOT let children come into contact with theappliance.
Attaching and Removing Blender Guard
(Fig. K)
CAUTION: Do not attach or remove immersion blender
guard
18
while the immersion blender attachment
is installed to the motor. Avoid contact with the blade
while attaching and removing the blender guard.
1. To attach the blender guard, align the immersion blender
guard detents
19
with the immersion blender slots
17
on the immersion blender attachment. Slide the blender
guard onto the immersion blender attachment. Ensure
the guard clicks firmly into the detents.
2. To remove, depress the detents and slide the guard off.
3. Clean the blender guard as needed. For more
information, refer to Cleaning section.
WARNING: Ensure the immersion blender attachment
head is assembled to the motor as detailed in the
Installing and Removing Attachmentssection.
NOTE: Do not use the immersion blender
14
with non‑stick
cookware as it may scratch or mark nonstickcoatings.
Blending (Fig. J)
1. Place food to be processed in mixing cup
8
. The
container should only be 1⁄2 full or less when blending
liquids or when making a puree of fruit and/or
vegetables to prevent food fromoverflowing.
2. Immerse the blender head
15
as deeply as possible into
the mixingcup.
3. Set the variable‑speed dial
4
to 1 and increase speed
by turning thedial. This will help avoid splattering and
overprocessing.
4. Turn the unit on as described in the On/Off section.
5. Blend the ingredients by moving the appliance up and
down and in circles. Do not pull immersion blender head
out of food.
IMPORTANT: The continuous operating time must be less
than 30seconds. Never blend hot oil, fat, ormeat.
6. After you have completed blending, release the unlock
button
2
and power button
3
to stop the motor
6
.
7. If the immersion blender blade
16
becomes blocked:
‑ Turn unit off while keeping the blender
headsubmerged,
‑ Allow the blade to stop,
‑ Wait until the LEDs
5
turn off,
‑ Lift the blender out of the container,
‑ Disassemble the blender from the motor by turning
the attachment counterclockwise,
‑ Remove blockage,
‑ Securely reattach theblender.
NOTE: Do not pull blender out quickly. Blending creates
suction at the bottom of the cup, which can cause contents
to splatter.
8. Keep blender attachment inside the mixing cup to
prevent dripping oncounter.
9. After processing, disassemble the immersion blender from
the motor by turning the attachment counterclockwise.
10. Clean the attachment as needed. For more information,
refer to Cleaning section.
Immersion Blender Tips and Tricks
• The immersion blender blends foods and liquids
rapidly, therefore, it is easy to overprocess. Stop the
motor and check food throughout the operation to
avoidoverprocessing.
• When pureeing and blending, cut food into uniform
sizes. This will ensure smooth and consistentresults.
• Allow hot food to cool slightly beforeblending.
WARNING: Do not touch blade. It is sharp and may
cause seriousinjury.
WARNING: Ensure the food chopper attachment head
is assembled to the motor as detailed in the Installing
and Removing Attachmentssection.
Using the Food Chopper (Fig. L - O)
1. Place the food chopper cylinder
24
on a flat surface.
NOTE: The ring around the bottom of the cylinder will help
keep it from sliding while in use.
2. Remove blade guards
27
before use as shown in Fig. L.
3. Slide the blade shaft
28
onto the cylinder nub
25
as
shown in Fig. M.
4. Add ingredients to the cylinder. Do not fill past the top
measurement line
29
marked "Max."
5. Place the food chopper lid
21
on the cylinder and twist
clockwise until it securely locks as shown in Fig. N. You
will feel the blade shaft and lid click into place.
6. Ensure the liquid port cover
23
is seated in the liquid
port
22
. The cover should always be in place while using
the food chopper, except when adding liquid ingredients.
7. Attach the motor
6
as described in the INSTALLING
AND REMOVING ATTACHMENTS section.
Loading ...
Loading ...
Loading ...