[en] Instruction manual
Built-in oven
HVA541NS0
[ar] ∫ɪ©à°S’G π«dO
. . . . .
. . . . . . . . 3
. . . . . . . . 3


3
Ú Table of contents
[en]Instruction manual
Important safety information.....................................................3
Causes of damage .............................................................................4
Your new appliance ....................................................................5
Function selector.................................................................................5
Temperature selector .........................................................................5
The electronic clock ...........................................................................5
Accessories .........................................................................................6
Before using the oven for the first time....................................6
Setting the clock .................................................................................6
Baking out the oven ...........................................................................6
Cleaning the accessories..................................................................6
How to operate your oven..........................................................7
Switching on the oven........................................................................7
Operating the electronic clock .........................................................7
Setting the automatic timer ...............................................................7
Displaying and changing set values ...............................................8
Care and cleaning ......................................................................8
Cleaning agents ..................................................................................8
Catalytic cooking compartment panels ..........................................9
Removing and installing the door panels ......................................9
Removing and fitting the appliance door.................................... 10
Removing and inserting the hook-in racks ................................. 10
Troubleshooting ....................................................................... 11
Replacing the oven light bulb........................................................ 11
After-sales service ...................................................................11
E number and FD number ............................................................. 11
Energy and environment tips..................................................12
Saving energy................................................................................... 12
Environmentally-friendly disposal.................................................. 12
Acrylamide in foodstuffs .........................................................12
Tips for using your appliance .................................................13
Baking ................................................................................................13
Roasting and grilling ....................................................................... 13
Tested for you in our cooking studio. .......................................... 14
Produktinfo
Additional information on products, accessories, replacement
parts and services can be found at www.bosch-home.com and
in the online shop www.bosch-eshop.com
: Important safety information
Read these instructions carefully. Only then
will you be able to operate your appliance
safely and correctly. Retain the instruction
manual and installation instructions for
future use or for subsequent owners.
This appliance is only intended to be fully
fitted in a kitchen. Observe the special
installation instructions.
Check the appliance for damage after
unpacking it. Do not connect the appliance
if it has been damaged in transport.
Only a licensed professional may connect
appliances without plugs. Damage caused
by incorrect connection is not covered
under warranty.
This appliance is intended for domestic use
only. The appliance must only be used for
the preparation of food and drink. The
appliance must be supervised during
operation. Only use this appliance indoors.
This appliance is intended for use up to a
maximum height of 2000 metres above sea
level.
This appliance may be used by children
over the age of 8 years old and by persons
with reduced physical, sensory or mental
capabilities or by persons with a lack of
experience or knowledge if they are
supervised or are instructed by a person
responsible for their safety how to use the
appliance safely and have understood the
associated hazards.
Children must not play with, on, or around
the appliance. Children must not clean the
appliance or carry out general maintenance
unless they are at least 8 years old and are
being supervised.
Keep children below the age of 8 years old
at a safe distance from the appliance and
power cable.
Always slide accessories into the cooking
compartment correctly. See "Description of
accessories in the instruction manual.

4
Risk of fire!
■
Combustible items stored in the cooking
compartment may catch fire. Never store
combustible items in the cooking
compartment. Never open the appliance
door if there is smoke inside. Switch off
the appliance and unplug it from the
mains or switch off the circuit breaker in
the fuse box.
Risk of fire!
■
A draught is created when the appliance
door is opened. Greaseproof paper may
come into contact with the heating
element and catch fire. Do not place
greaseproof paper loosely over
accessories during preheating. Always
weight down the greaseproof paper with a
dish or a baking tin. Only cover the
surface required with greaseproof paper.
Greaseproof paper must not protrude over
the accessories.
Risk of burns!
■
The appliance becomes very hot. Never
touch the interior surfaces of the cooking
compartment or the heating elements.
Always allow the appliance to cool down.
Keep children at a safe distance.
Risk of serious burns!
■
Accessories and ovenware become very
hot. Always use oven gloves to remove
accessories or ovenware from the cooking
compartment.
Risk of burns!
■
Alcoholic vapours may catch fire in the hot
cooking compartment. Never prepare food
containing large quantities of drinks with a
high alcohol content. Only use small
quantities of drinks with a high alcohol
content. Open the appliance door with
care.
Risk of scalding!
■
The accessible parts become hot during
operation. Never touch the hot parts. Keep
children at a safe distance.
Risk of scalding!
■
When you open the appliance door, hot
steam may escape. Open the appliance
door with care. Keep children at a safe
distance.
Risk of scalding!
■
Water in a hot cooking compartment may
create hot steam. Never pour water into
the hot cooking compartment.
Risk of injury!
Scratched glass in the appliance door may
develop into a crack. Do not use a glass
scraper, sharp or abrasive cleaning aids or
detergents.
Risk of electric shock!
■
Incorrect repairs are dangerous. Repairs
may only be carried out by one of our
trained after-sales engineers. If the
appliance is faulty, unplug the mains plug
or switch off the fuse in the fuse box.
Contact the after-sales service.
Risk of electric shock and serious injury!
■
The cable insulation on electrical
appliances may melt when touching hot
parts of the appliance. Never bring
electrical appliance cables into contact
with hot parts of the appliance.
Risk of electric shock!
■
Do not use any high-pressure cleaners or
steam cleaners, which can result in an
electric shock.
Risk of electric shock!
■
When replacing the cooking compartment
bulb, the bulb socket contacts are live.
Before replacing the bulb, unplug the
appliance from the mains or switch off the
circuit breaker in the fuse box.
Risk of electric shock!
■
A defective appliance may cause electric
shock. Never switch on a defective
appliance. Unplug the appliance from the
mains or switch off the circuit breaker in
the fuse box. Contact the after-sales
service.
Causes of damage
Caution!
■ Accessories, foil, greaseproof paper or ovenware on the
cooking compartment floor: do not place accessories on the
cooking compartment floor. Do not cover the cooking
compartment floor with any sort of foil or greaseproof paper.
Do not place ovenware on the cooking compartment floor if a
temperature of over 50 ºC has been set. This will cause heat
to accumulate. The baking and roasting times will no longer
be correct and the enamel will be damaged.
■ Water in a hot cooking compartment: do not pour water into
the cooking compartment when it is hot. This will cause
steam. The temperature change can cause damage to the
enamel.
■ Moist food: do not store moist food in the cooking
compartment when it is closed for prolonged periods This will
damage the enamel.
■ Fruit juice: when baking particularly juicy fruit pies, do not
pack the baking tray too generously. Fruit juice dripping from
the baking tray leaves stains that cannot be removed. If
possible, use the deeper universal pan.
■ Cooling with the appliance door open: only allow the cooking
compartment to cool when it is closed. Even if the appliance
door is only open a little, front panels of adjacent units could
be damaged over time.
■ Very dirty door seal: If the door seal is very dirty, the
appliance door will no longer close properly when the
appliance is in use. The fronts of adjacent units could be
damaged.Always keep the door seal clean.
■ Appliance door as a seat, shelf or worktop: Do not sit on the
appliance door, or place or hang anything on it. Do not place
any cookware or accessories on the appliance door.
■ Inserting accessories: depending on the appliance model,
accessories can scratch the door panel when closing the
appliance door. Always insert the accessories into the
cooking compartment as far as they will go.
■ Carrying the appliance: do not carry or hold the appliance by
the door handle. The door handle cannot support the weight
of the appliance and could break.
5
Your new appliance
Get to know your appliance. You will find information on the
control panel, the oven, types of heating and accessories.
Function selector
Use the function selector to set the heating function.
Note: When you set the heating function, the oven light in the
cooking compartment switches on.
Note: With the "Hot air eco" heating function, the oven lighting
remains switched off.
Temperature selector
Set the temperature or grill setting using the temperature
selector.
The indicator light is lit when the oven is heating up. It goes out
during pauses in heating.
The electronic clock
You can use the electronic clock to control your oven. You can
therefore preselect, for example, the time at which the oven is
to switch on or at which time the automatic timer is to end the
baking or cooking process. The electronic clock can also be
used as a timer.
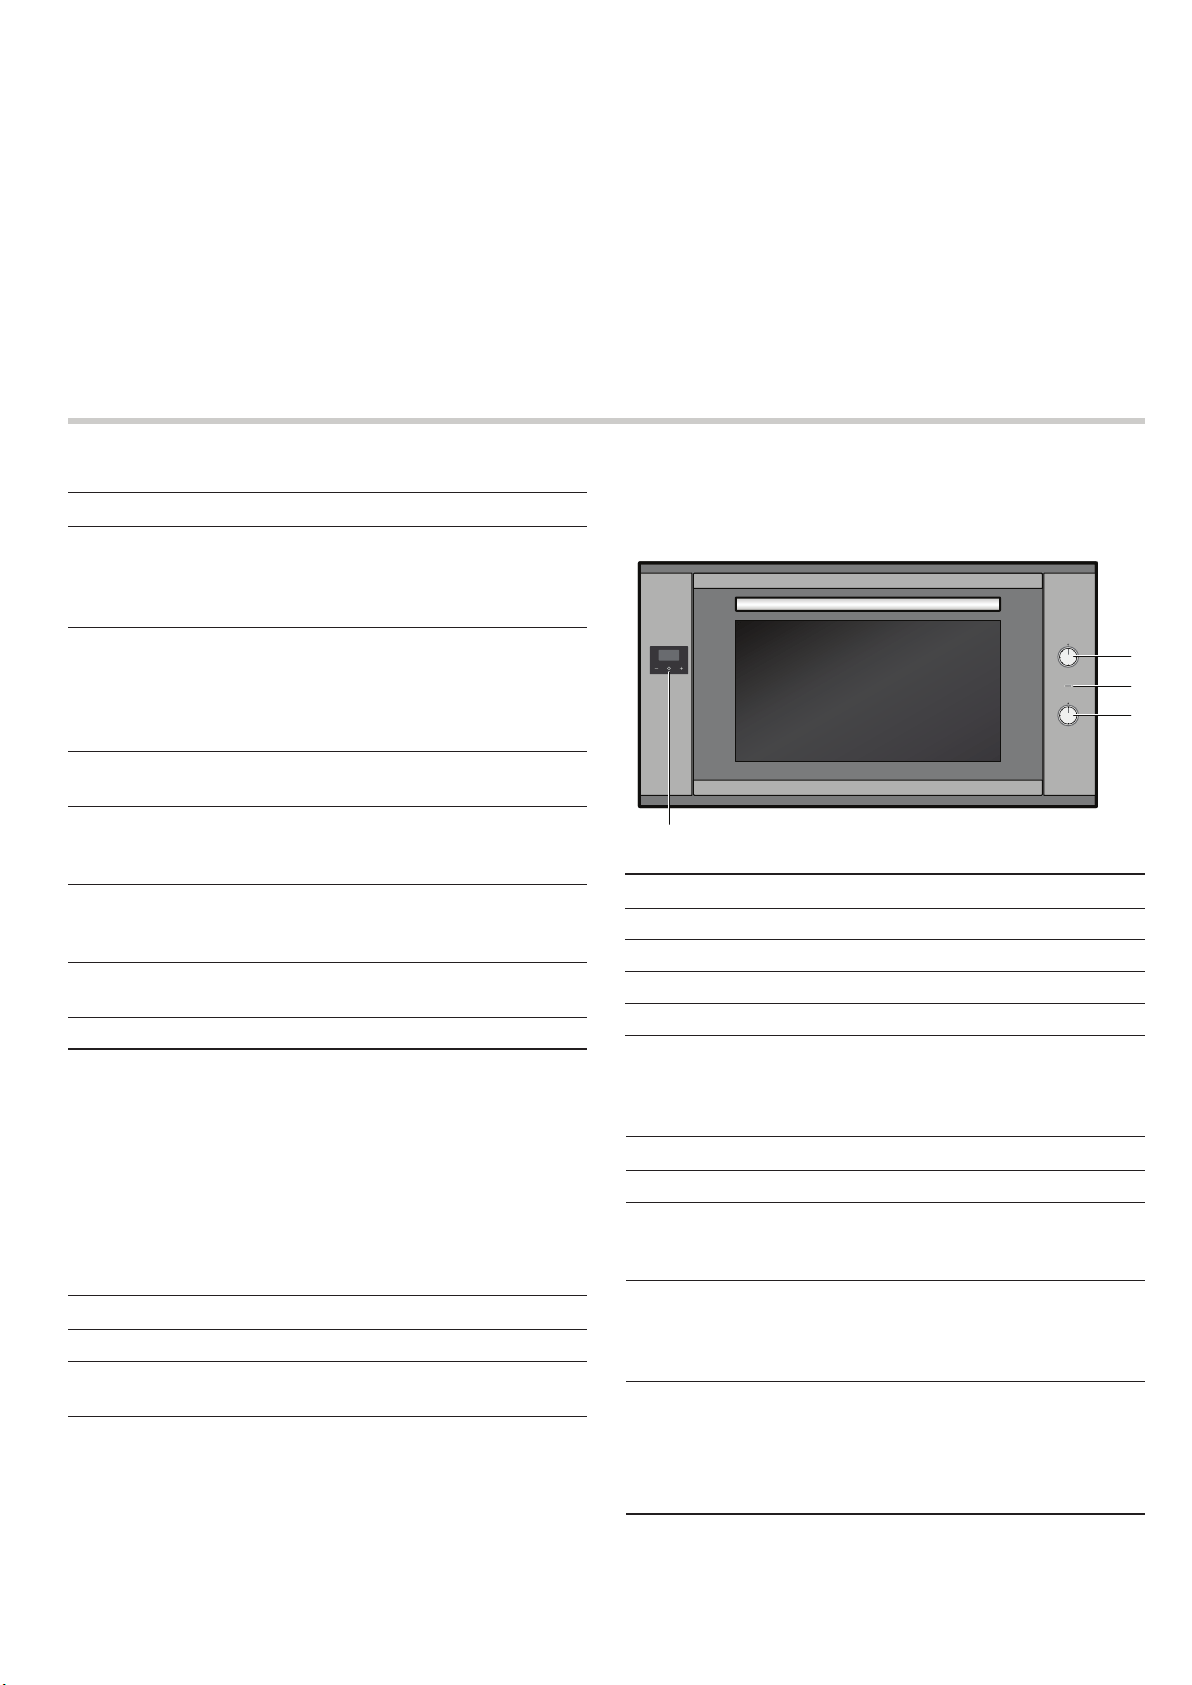
Function buttons for the electronic clock
Explanation
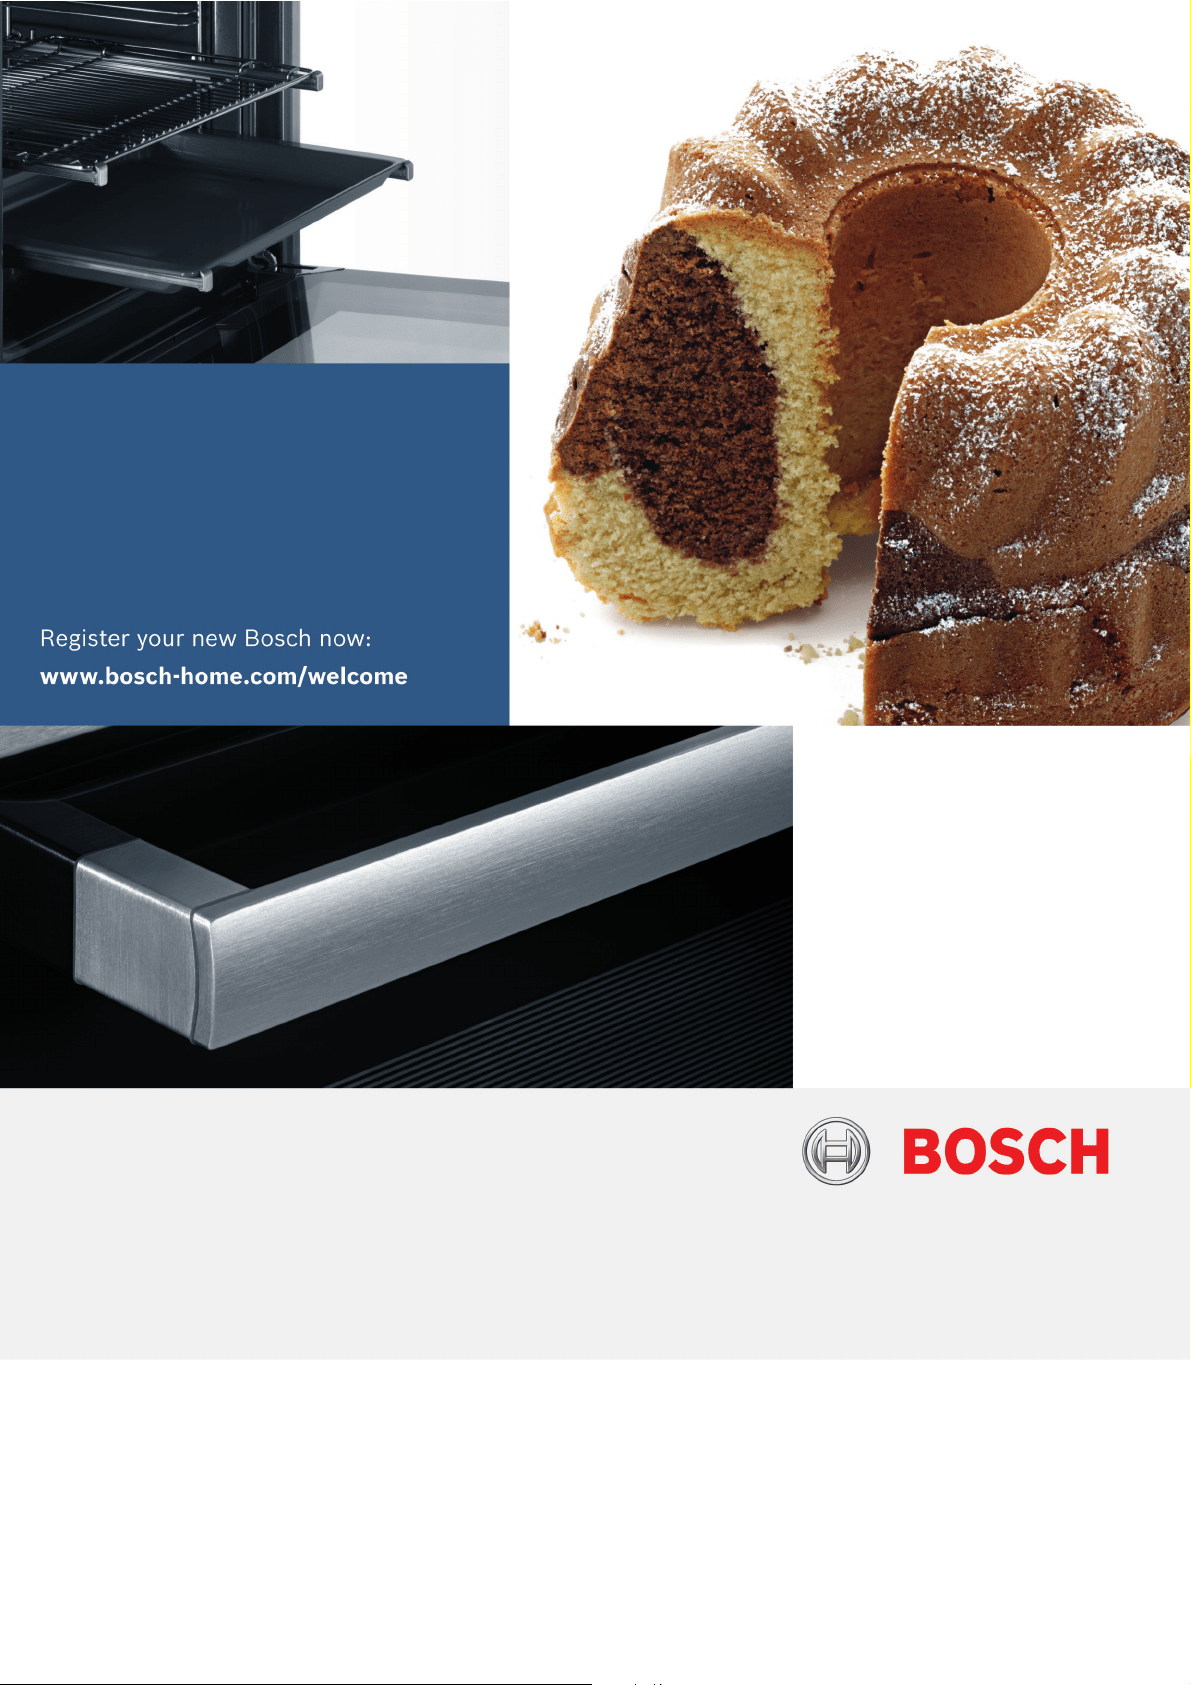
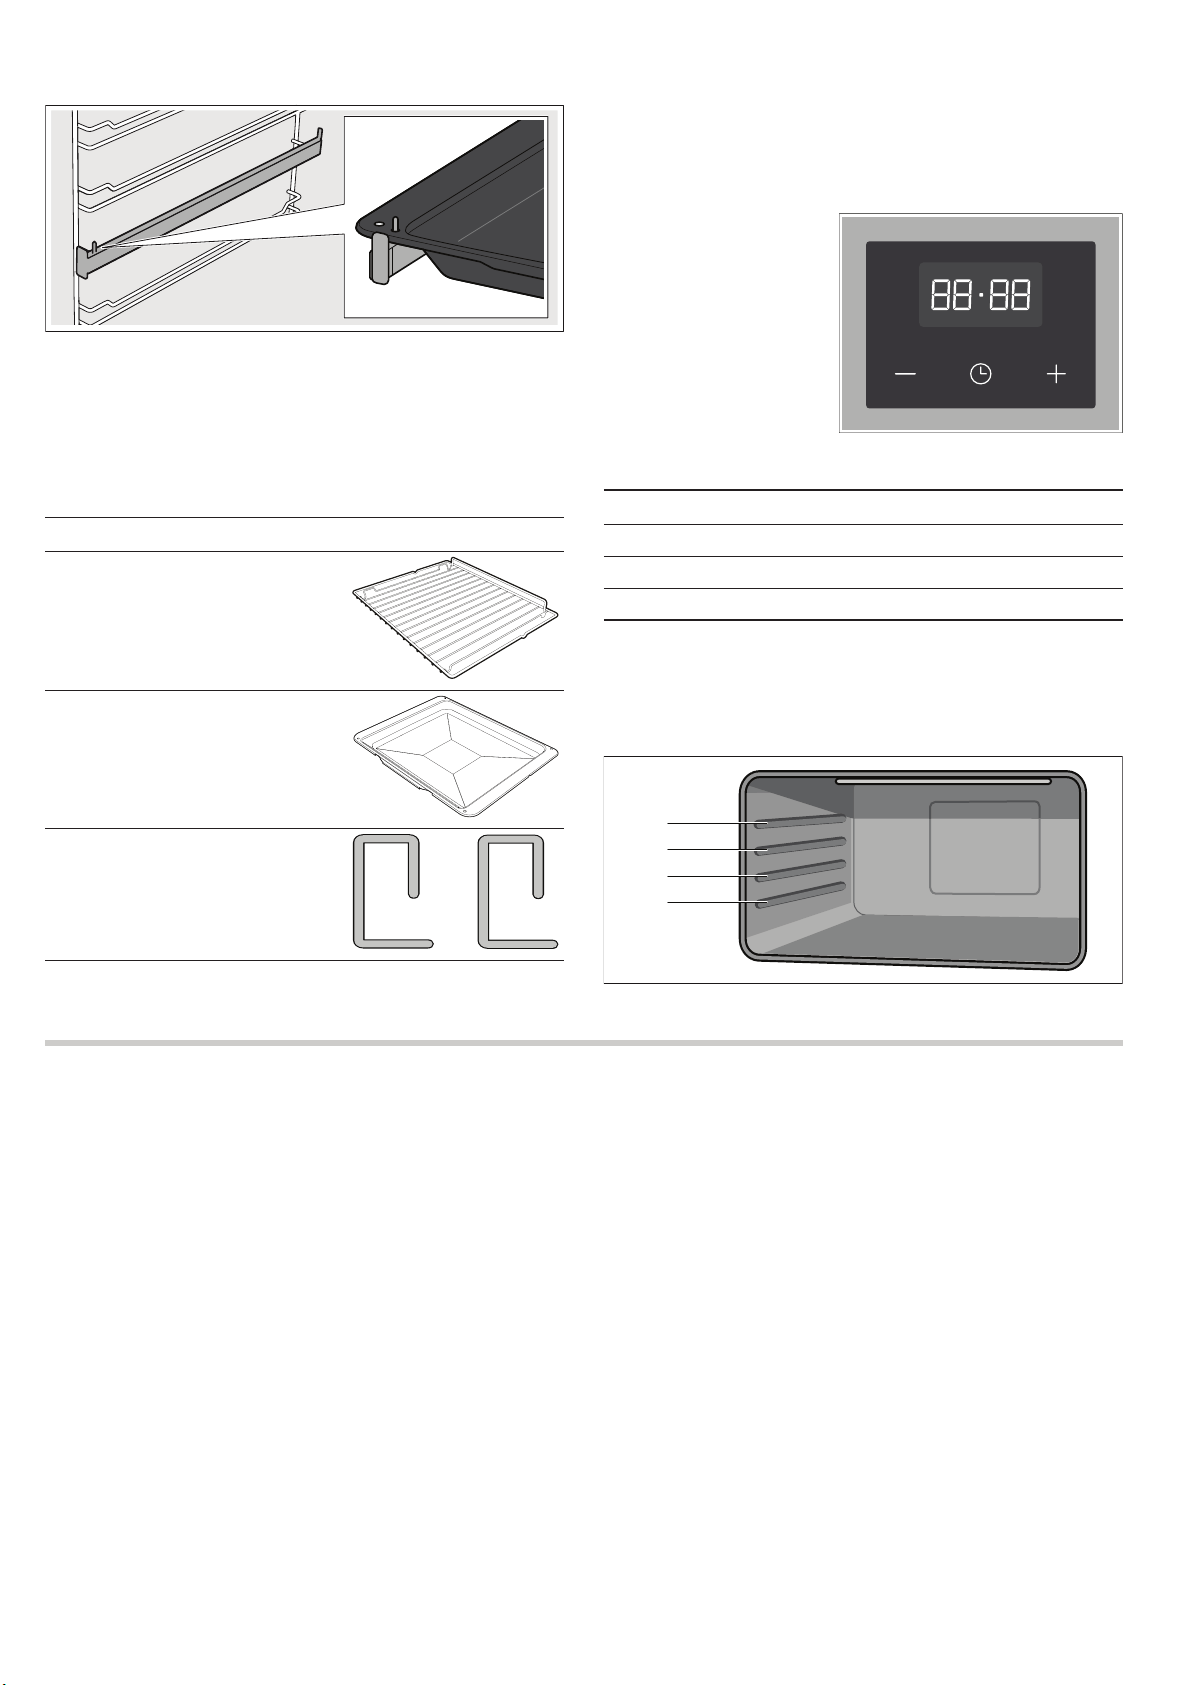
1 Electronic clock
2 Function selector
3 Indicator light
4 Temperature selector
Setting Use
Û
Off position The oven is switched off.
%
Top/bottom heating For cakes, bakes and lean joints.
Heat is emitted evenly from the top
and bottom.
<
Hot air For cakes and pastries on one or
two levels. The fan distributes the
heat from the ring heating element in
the back panel evenly around the
cooking compartment.
’
Hot air eco* For cakes and pastries on one or
two levels. The fan distributes the
heat from the ring heating element in
the back panel evenly around the
cooking compartment.
With this heating function, the oven
lighting remains switched off.
N
Air recirculation For cakes, pastries and fresh pizza
on one or two levels. The fan distrib-
utes heat from the heating elements
evenly around the cooking compart-
ment.
;
Pizza setting Quick preparation of frozen products
without preheating, e.g. pizza, chips
or strudel. The bottom heating ele-
ment and the ring heating element in
the back panel heat up.
7
Hot air grill For baking or roasting meat, poultry
and whole fish. The fan causes the
hot air to circulate around the dish.
(
Full-surface grill For grilling steaks, sausages, toast
and pieces of fish. The whole area
below the grill element becomes hot.
* Heating function used to determine the energy efficiency
class in accordance with EN 50304.
*
Centre-area grill For grilling small amounts of steak,
sausages, toast and pieces of fish.
The centre part of the grill heating
element becomes hot.
$
Bottom heating For extending the cooking time.The
heat is emitted only from below.
^
Lighting The oven lighting is switched on.
Setting Meaning
Ú
Off position The oven does not heat up.
50-250 Temperature
range
The temperature in the cooking
compartment in °C.
Symbol Meaning Use
0
Electronic clock Sets the cooking time or
the time
- Minus Reduces the cooking time
or the time
+ Plus Increases the cooking time
or the time
Setting Use
* Heating function used to determine the energy efficiency
class in accordance with EN 50304.
6
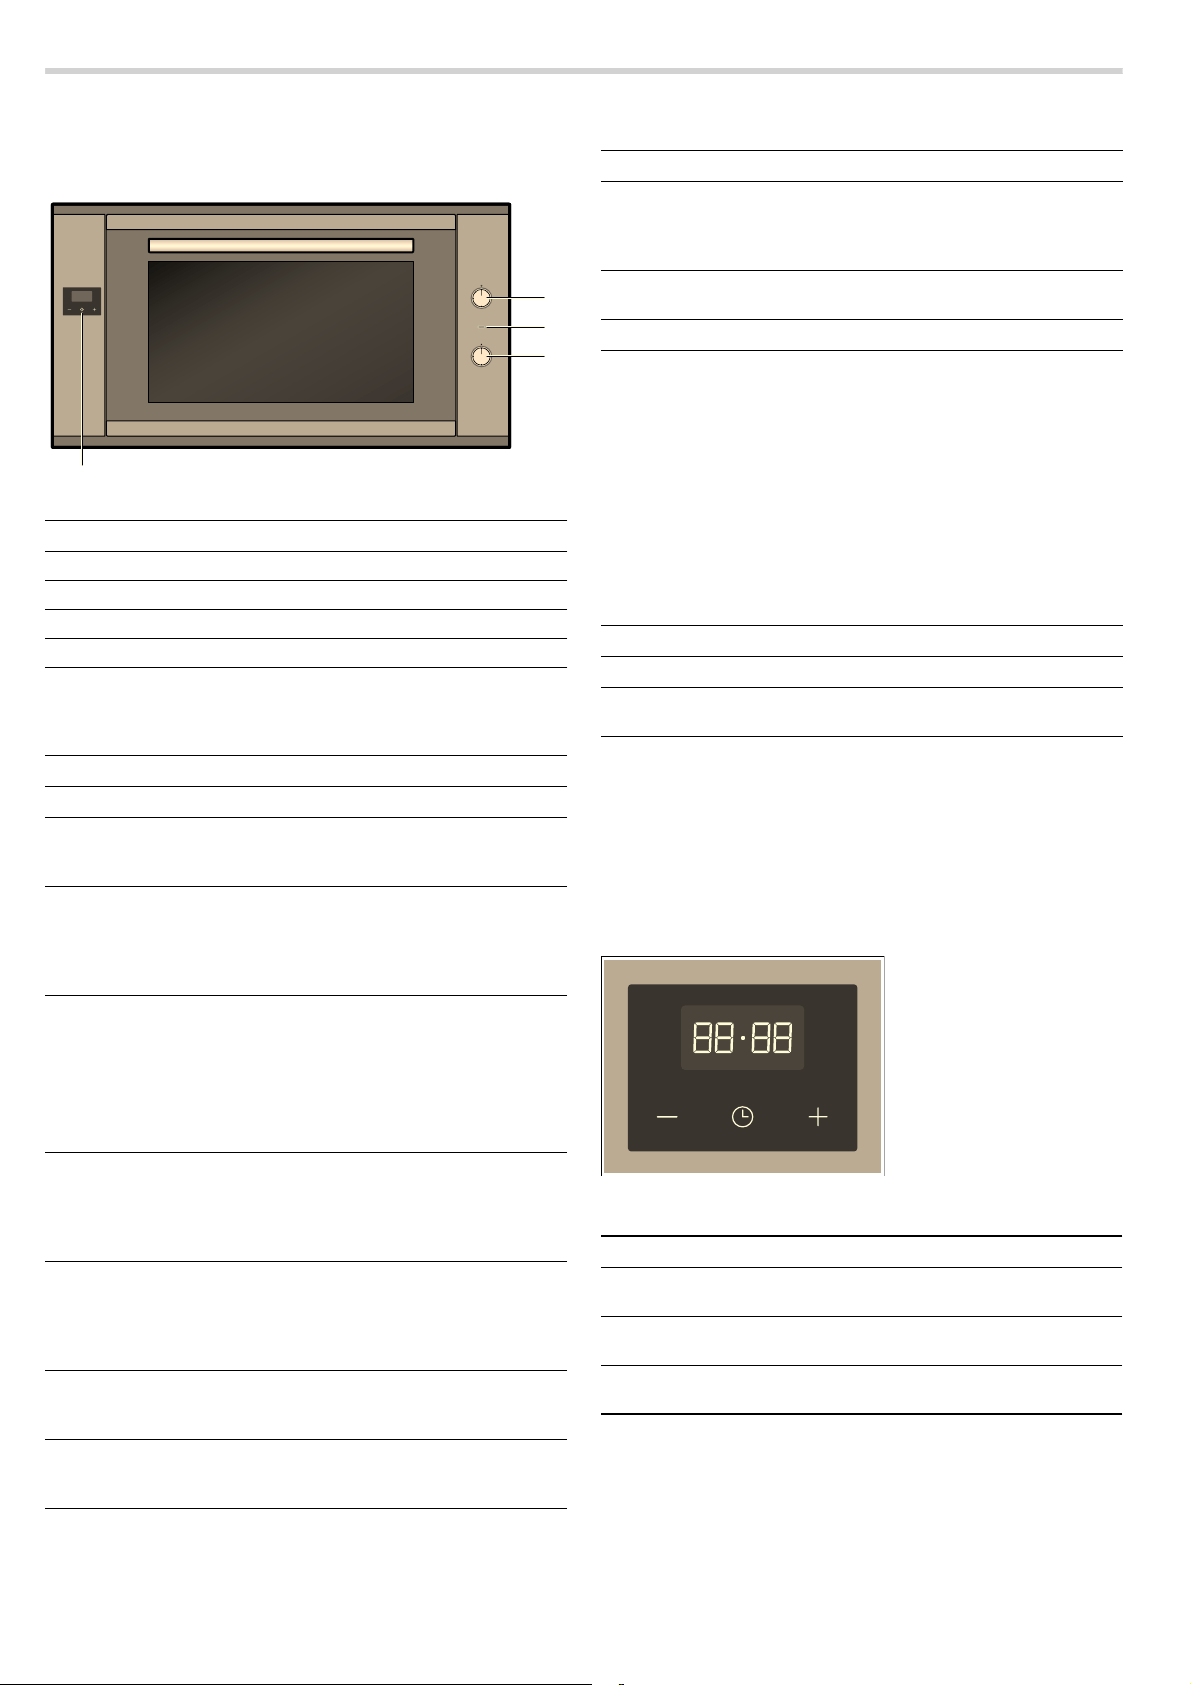
Accessories
The accessories can be inserted into the cooking compartment
at 4 different levels. Always insert them as far as they will go so
that the accessories do not touch the door panel. Ensure that
the accessories have always been inserted into the cooking
compartment correctly.
The pull-out rails allow you to pull accessories out completely.
You can pull out the accessories two thirds of the way without
them tipping. This allows dishes to be removed easily.
The accessories may become deformed when they become
hot. As soon as they have cooled down, the deformation
disappears with no effect on the function.
You can buy accessories from the after-sales service, from
specialist retailers or online.
--------
Before using the oven for the first time
In this section, you can find out what you must do before using
your appliance to prepare food for the first time. Read the
Safety information section beforehand.
Remove the appliance packaging and dispose of it
appropriately.
Setting the clock
After the appliance has been connected to the mains or after a
power cut, three zeros and the "A" symbol flash on the display.
1. Press the 0 button until the dot flashes on the display.
2. Set the current time with the "+" and "-" buttons.
After seven seconds, the time that has been set is adopted.
Note: To change the set time, press the "+" and "-" buttons until
the dot flashes on the display. Then set the current time with the
"+" and "-" buttons.
Baking out the oven
Precleaning the oven
1. Remove the accessories and the hook-in racks from the
cooking compartment.
2. Completely remove any leftover packaging, e.g. small pieces
of polystyrene, from the cooking compartment.
3. Some parts are covered with a protective film. Remove this
scratch protection film.
4. Clean the outside of the appliance with a soft, damp cloth.
5. Clean the cooking compartment with hot soapy water.
Heating up the oven
To remove the new cooker smell, heat up the oven when it is
empty and closed.
1. Turn the function selector to the Top/bottom heating
operating mode.
2. Turn the temperature selector to the maximum temperature.
3. Switch the oven off after 40 minutes.
Note: When the appliance is heating up for the first time, you
may hear crackling noises coming from the oven.
Recleaning the oven
1. Clean the cooking compartment with hot soapy water.
2. Refit the hook-in racks.
Cleaning the accessories
Before using the accessories, clean them thoroughly using a
cloth and warm soapy water.
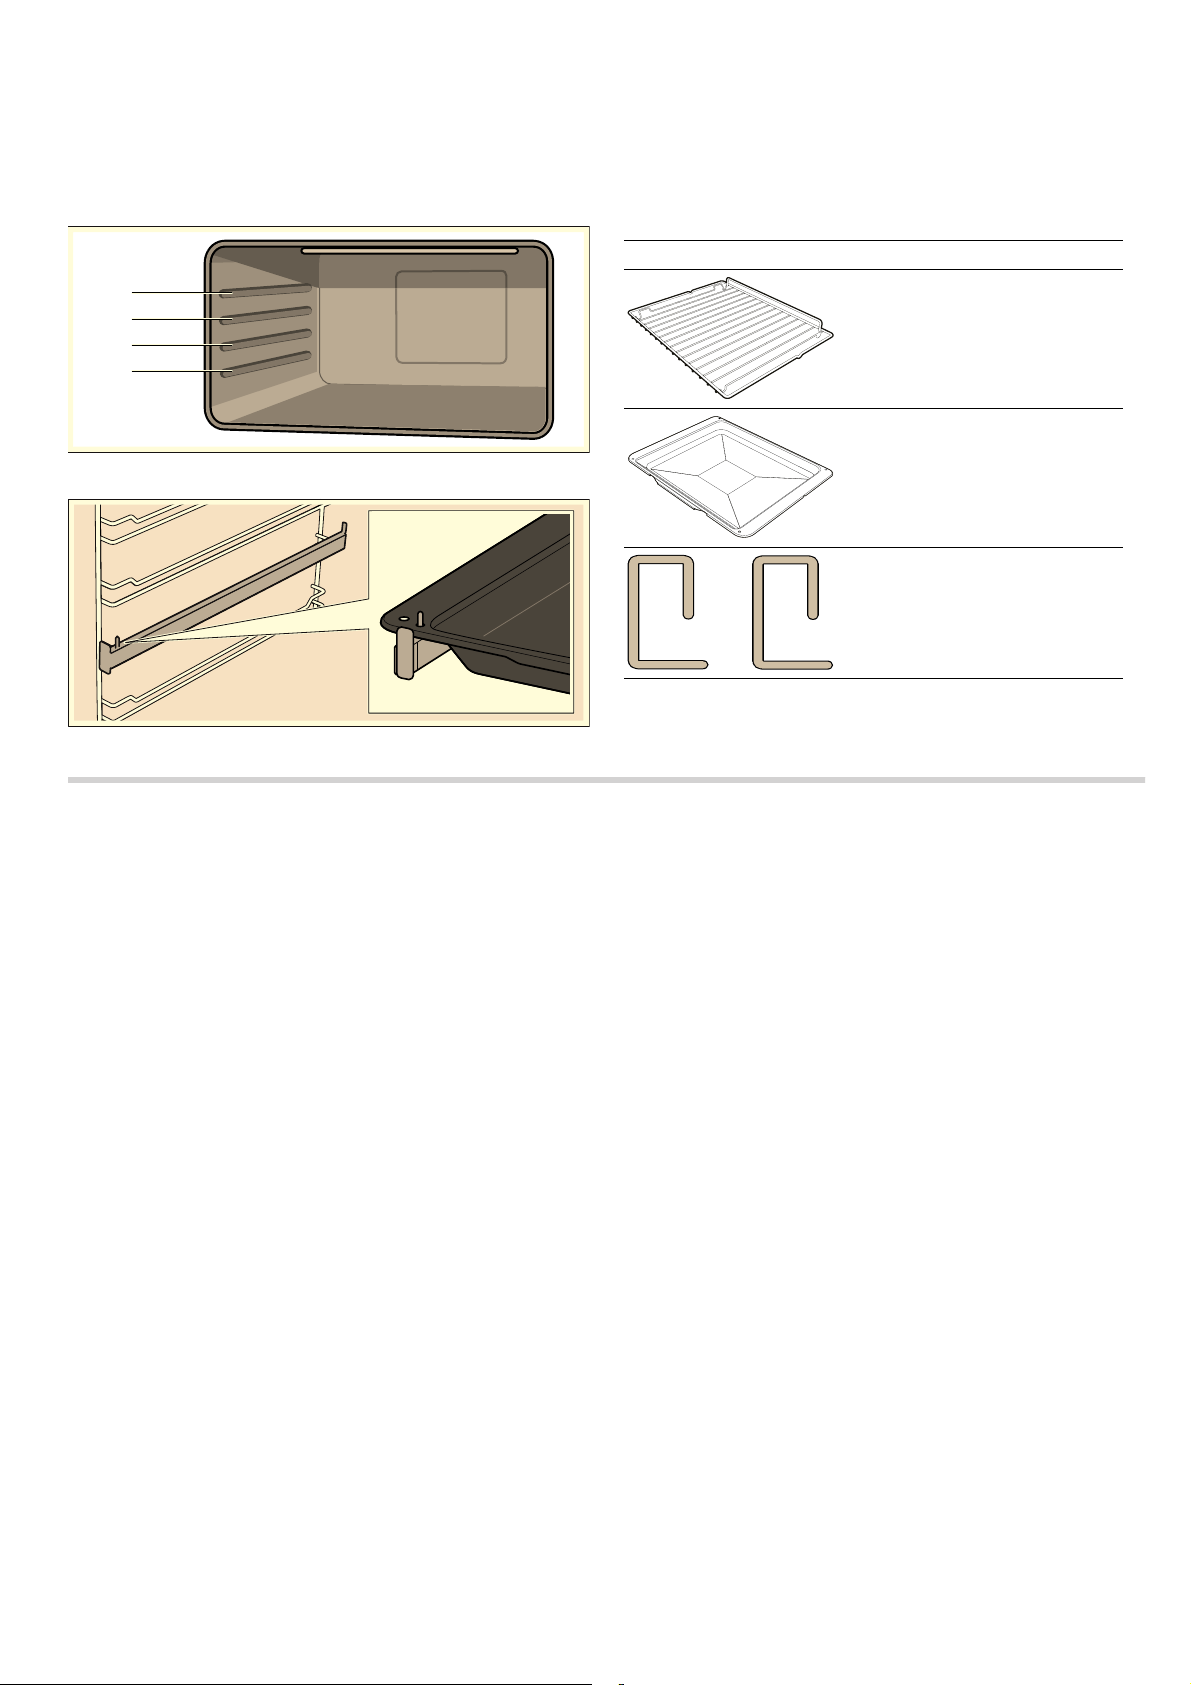
Accessories Description
Baking and roasting shelf
For ovenware, cake tins, joints,
grilled items, frozen meals.
Enamel baking tray
For moist cakes, pastries, frozen
meals and large roasts. Can also
be used as a drip tray to collect
run-off fat.
Locking pins
For locking the hinges.

7
How to operate your oven
Pop-out operating controls
The function selector and the temperature selector can be
popped out. Press the operating control in question to pop it in
or out.
Switching on the oven
1. Use the function selector to set the heating function.
2. Use the temperature selector to set the temperature.
The oven begins to heat up.
Switching off the oven
Turn the function selector and temperature selector to the off
position.
Changing settings
The heating function and temperature or grill setting can be
changed at any time using their respective selectors.
Heating up
To heat up the cooking compartment as quickly as possible,
use the "Circulated air" heating function. If the set temperature
has been reached (indicator light has gone out), set the
required heating function.
Operating the electronic clock
In addition to the clock time and remaining time, the following
symbols may appear on the display:
Setting the time on the clock
After the appliance has been connected to the mains or after a
power cut, three zeros and the "A" symbol flash on the display.
1. Press the 0 button until the dot flashes on the display.
2. Set the current time with the "+" and "-" buttons.
After seven seconds, the time that has been set is adopted.
Note: To change the set time, press the "+" and "-" buttons until
the dot flashes on the display. Then set the current time with the
"+" and "-" buttons.
Setting the timer
The timer has no influence on the functions of the oven. The
duration of the timer can be set to between 1 minute and
23 hours and 59 minutes.
1. Press the 0 button until the V symbol flashes on the display
and three zeros are displayed.
2. Set the required cooking time with the "+" and "-" buttons.
An audible signal sounds once the time has elapsed.
Notes
■ To change the remaining time, press the 0 button until the
V symbol flashes on the display. Then change the remaining
time with the "+" and "-" buttons.
■ To cancel the setting, press the 0 button until the symbol
flashes on the display. Then press the "+" and "-" buttons at
the same time.
Switching off the acoustic signal
Press the "
0" button until the V symbol disappears.
After seven minutes, the signal switches off automatically.
Changing the audible signal
Three different audible signals are available.
1. Press the "+" and "-" buttons simultaneously.
2. Press the 0 button.
The current audible signal is shown in the display panel, e.g.
"Tone 1".
3. Press the "-" button to select a different audible signal.
Setting the automatic timer
The electronic clock can be used to switch the oven on or off
automatically.
Automatic switch-off
1. Press the 0 button until the V symbol flashes on the display
and three zeros are displayed.
2. Press the 0 function button again until "dur" and "0.00" flash
alternately on the display panel and the "A" symbol flashes.
3. Set the cooking time with the "+" and "-" buttons.
The cooking time can be set to between 1 minute and
10 hours.
4. Set the required heating function and temperature.
The oven starts and the A symbol and the current clock time
appear on the display panel.
The cooking time has elapsed
An audible signal sounds, the
Û symbol disappears from the
display panel and the A symbol flashes.
1. Switch off the temperature selector and function selector.
2. Press the 0 button until the Û symbol appears.
The oven switches back to manual mode.
Automatic switch-on and switch-off
Baking or roasting starts for the set duration at a later time
which you chose.
1. Press the 0 button until the V symbol flashes on the display
and three zeros are displayed.
2. Press the 0 function button again until "dur" and "0.00" flash
alternately on the display panel and the "A" symbol flashes.
The current time may be 17:30, for example.
3. Set the cooking time (e.g. 1 hour) with the "+" and "-" buttons.
The cooking time can be set to between 1 minute and
10 hours.
4. Press the 0 function button again until "End" and the switch-
off time "18:30" (i.e. the current time plus the set cooking
time) flash alternately on the display panel.
5. Set the switch-off time (e.g. 19:30) using the "+" and "-"
buttons.
The switch-off time can be set to up to 23 hours and
59 minutes.
6. Set the required heating function and temperature.
The
Û symbol disappears from the display panel.
In this example, the oven starts at 18:30 and switches off
again at 19:30.
Symbol Meaning
û
Dot between the displayed hours and minutes.
Flashes when it is possible to set the clock time.
V
Timer
Displays the operating statuses for the timer.
A Automatic mode
Displays the operating statuses for Automatic
mode.
Û
Operating readiness
If this symbol is displayed, the oven is ready to
use.

8
The cooking time has elapsed
An audible signal sounds, the
Û symbol disappears from the
display panel and the A symbol flashes.
1. Switch off the temperature selector and function selector.
2. Press the 0 button until the Û symbol appears.
The oven switches back to manual mode.
Displaying and changing set values
The set values and the remaining time for the various operating
modes of the electronic clock can be viewed and changed on
the display panel at any time.
Displaying the remaining time for the timer
Press the
0 button until the V symbol flashes on the display.
The remaining time appears on the display and can be
changed with the "+" and "-" buttons.
Displaying and changing the cooking time and switch-off
time.
1. Press the 0 button until the V symbol flashes on the display
panel.
2. Press the 0 button again until "dur" and the remaining
cooking time flash alternately on the display panel and the A
symbol flashes.
The cooking time can be changed with the "+" and "-"
buttons. Press the "+" and "-" buttons at the same time to
switch off the automatic timer.
3. Press the 0 button again until "End" and the set switch-off
time flash alternately on the display panel.
The switch-off time can be changed with the "+" and "-"
buttons. Press the "+" and "-" buttons at the same time to
switch off the automatic timer.
Care and cleaning
With good care and cleaning, your oven will remain clean and
fully-functioning for a long time to come. Here we will explain
how to maintain and clean your oven correctly.
Notes
■ Slight differences in the colours on the front of the oven are
caused by the use of different materials, such as glass,
plastic and metal.
■ Shadows on the door panel which look like streaks, are
caused by reflections made by the oven light.
■ Enamel is baked on at very high temperatures. This can
cause some slight colour variations. This is normal and does
not affect their function. The edges of thin trays cannot be
completely enamelled. As a result, these edges can be
rough. This will not impair the anti-corrosion protection.
: Risk of electric shock!
Do not use any high-pressure cleaners or steam cleaners,
which can result in an electric shock.
: Risk of burns!
The appliance becomes very hot. Never touch the interior
surfaces of the cooking compartment or the heating elements.
Always allow the appliance to cool down. Keep children at a
safe distance.
Cleaning agents
Damage to the various different surfaces caused by using the
wrong cleaning agent can be avoided by observing the
following instructions.
Do not use
■ harsh or abrasive cleaning agents
■ cleaning agents with high concentrations of alcohol
■ hard scouring pads and sponges
■ high-pressure cleaners or steam cleaners.
Wash new sponge cloths thoroughly before use.
Area Cleaning agents
Appliance exterior Hot soapy water:
Clean with a dish cloth and dry with a
soft cloth. Do not use glass cleaners or
glass scrapers.
Stainless steel Hot soapy water:
Clean with a dish cloth and dry with a
soft cloth. Remove flecks of limescale,
grease, starch and albumin (e.g. egg
white) immediately. Corrosion can form
under such residues.
Special stainless steel cleaning prod-
ucts suitable for hot surfaces are availa-
ble from our after-sales service or from
specialist retailers. Apply a very thin layer
of the cleaning product with a soft cloth.
Aluminium and
plastic
Glass cleaner:
Clean with a soft cloth.
Enamel surfaces
(smooth surfaces)
To facilitate cleaning, you can switch on
the interior lighting and detach the appli-
ance door if necessary. Apply commer-
cially available washing-up liquid or a
vinegar solution with a soft, damp cloth
or chamois; dry with a soft cloth. Loosen
baked-on food residues with a damp
cloth and detergent. We recommend
using oven cleaning gel if the oven is
very dirty. This can be applied to the
affected area. Leave the cooking com-
partment open after cleaning to allow it
to dry.
Self-cleaning sur-
faces (rough sur-
faces)
Please see the notes in section: Self-
cleaning surfaces
Door panels Glass cleaner:
Clean with a soft cloth. Do not use a
glass scraper.
Glass cover for the
oven light bulb
Hot soapy water:
Clean with a dish cloth.
Seal
Do not remove.
Hot soapy water:
Clean with a dish cloth. Do not scour.
Shelves Hot soapy water:
Soak and clean with a dish cloth or
brush.
Accessories Hot soapy water:
Soak and clean with a dish cloth or
brush.
9
Catalytic cooking compartment panels
The catalytic cooking compartment panels are coated with self-
cleaning enamel.
The surfaces clean themselves while the oven is in operation.
Larger splashes will only be removed after the oven has been
used several times.
Self-cleaning surfaces
The side walls are covered with catalytic panelling. Never clean
these surfaces with oven cleaner. Slight discolouration of the
enamel does not affect automatic self-cleaning.
Removing and installing the door panels
To facilitate cleaning, you can remove the glass panels from the
oven door.
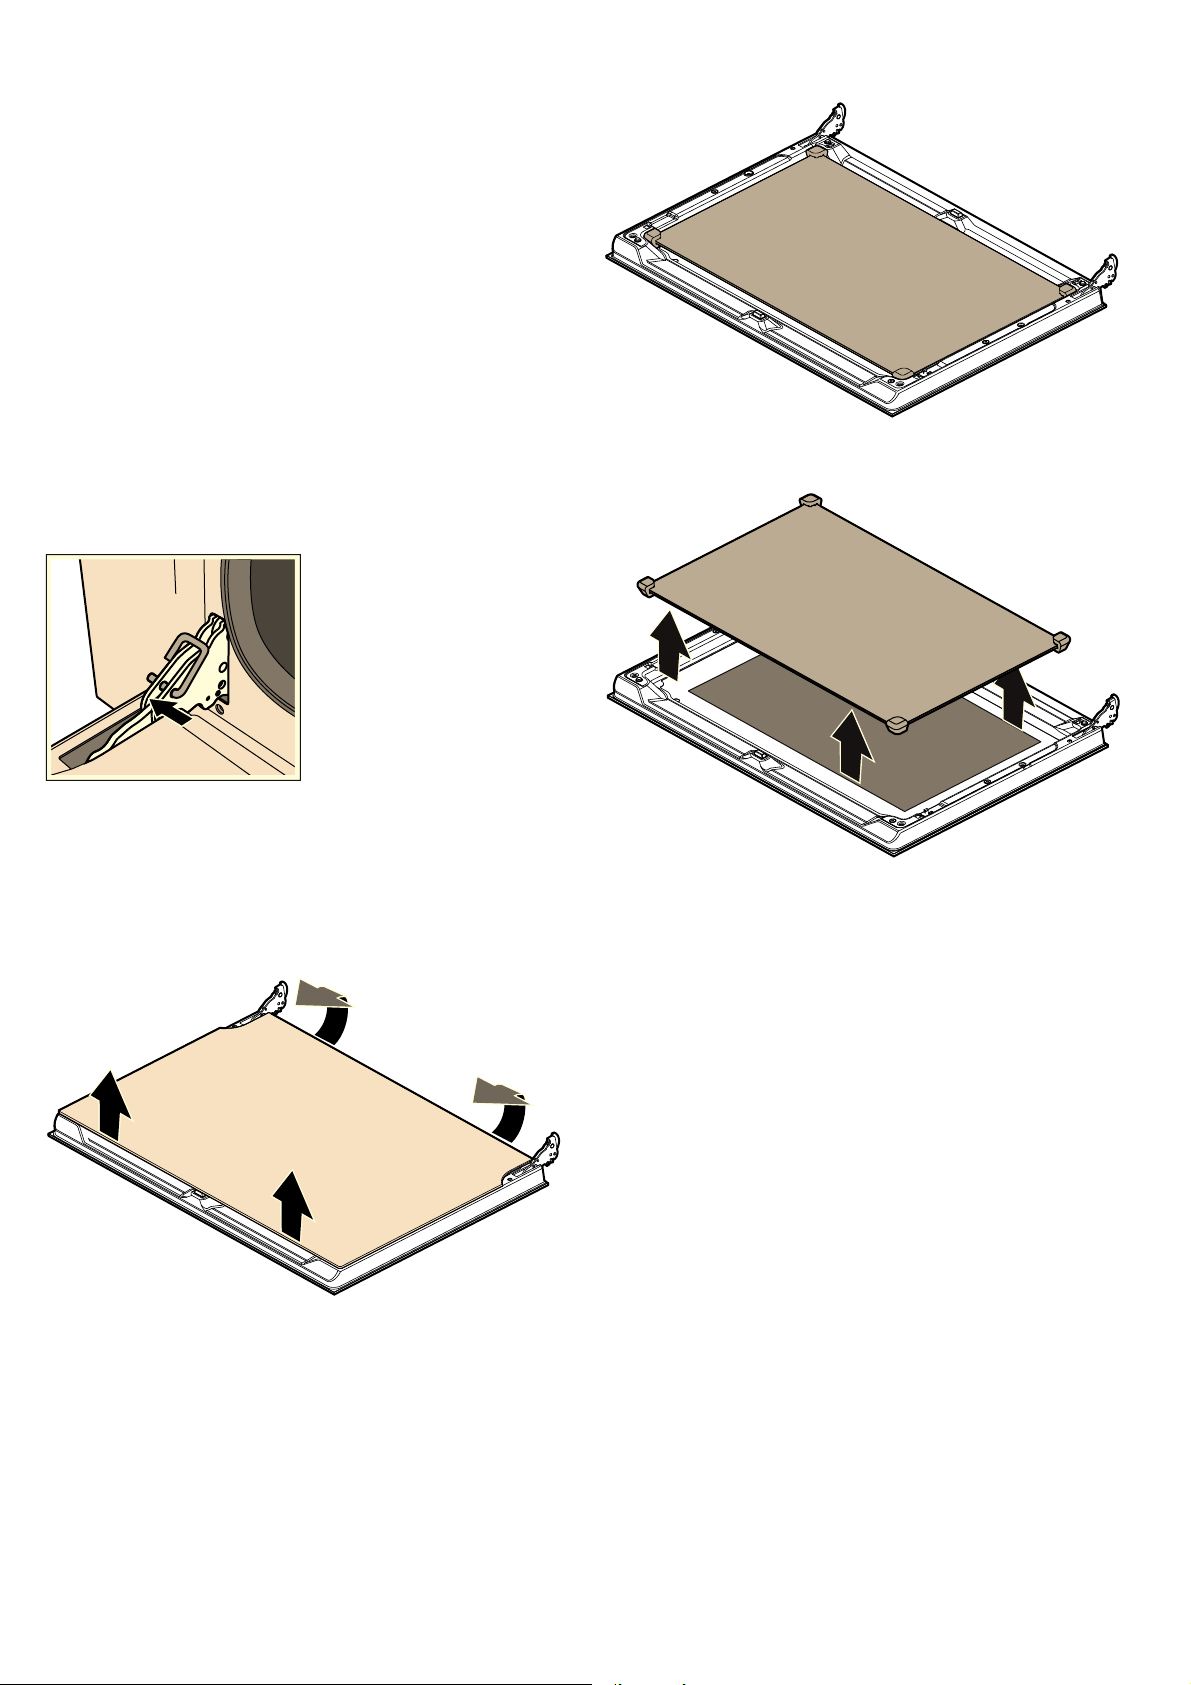
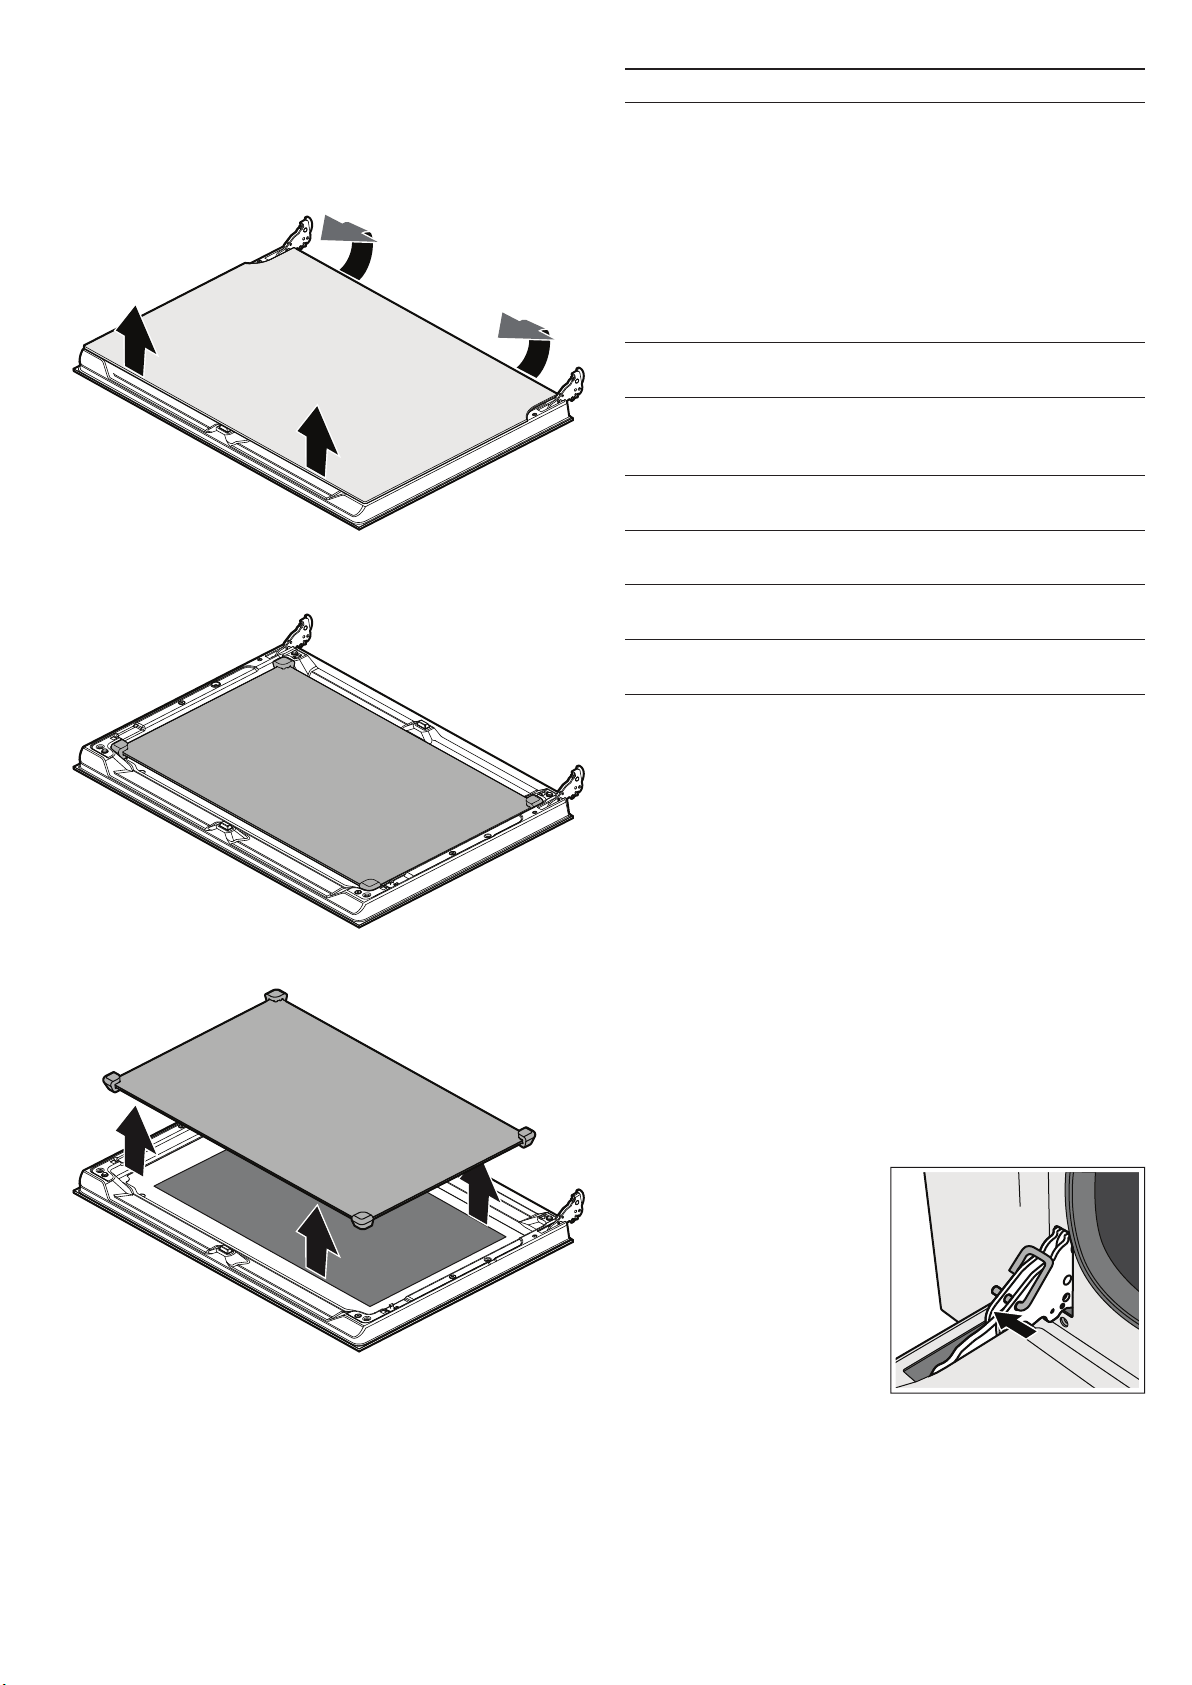
Removing the door panels
1. Open the oven door fully.
2. Lock both hinges on the left and right using the locking pin.
Note: The locking pins must be fully inserted into the holes in
the hinges.
3. Lift the bottom of the inner panel slightly until the fastening
pins come out of the holder (1).
4. Carefully lift the top of the inner panel until the fastening pins
come out of the holder (2).
Caution!
When lifting the inner panel, the middle panel may stick to the
inner panel. Make sure that the middle panel does not fall.
5. Remove the inner panel.
6. Remove the middle panel.
Note: The middle panel is kept in place with rubber bushings
rather than retaining pins.
Clean the panels with glass cleaner and a soft cloth.
: Risk of injury!
Scratched glass in the appliance door may develop into a
crack. Do not use a glass scraper, sharp or abrasive cleaning
aids or detergents.
Fitting the door panels
1. Reinsert the middle panel.
Notes
■ If the Low-E symbol can be read, the middle panel is
inserted correctly.
■ Make sure that the panel is seated correctly. All rubber
mounts must lay flat against the outer panel.
2. Reinsert the inner panel.
Note: All four fastening pins must engage in the holders
provided for them.
3. Remove the locking pins and close the oven door.
10
Removing and fitting the appliance door
If the oven is very heavily soiled, the oven door can be removed
for easier cleaning. Normally, however, this is not necessary.
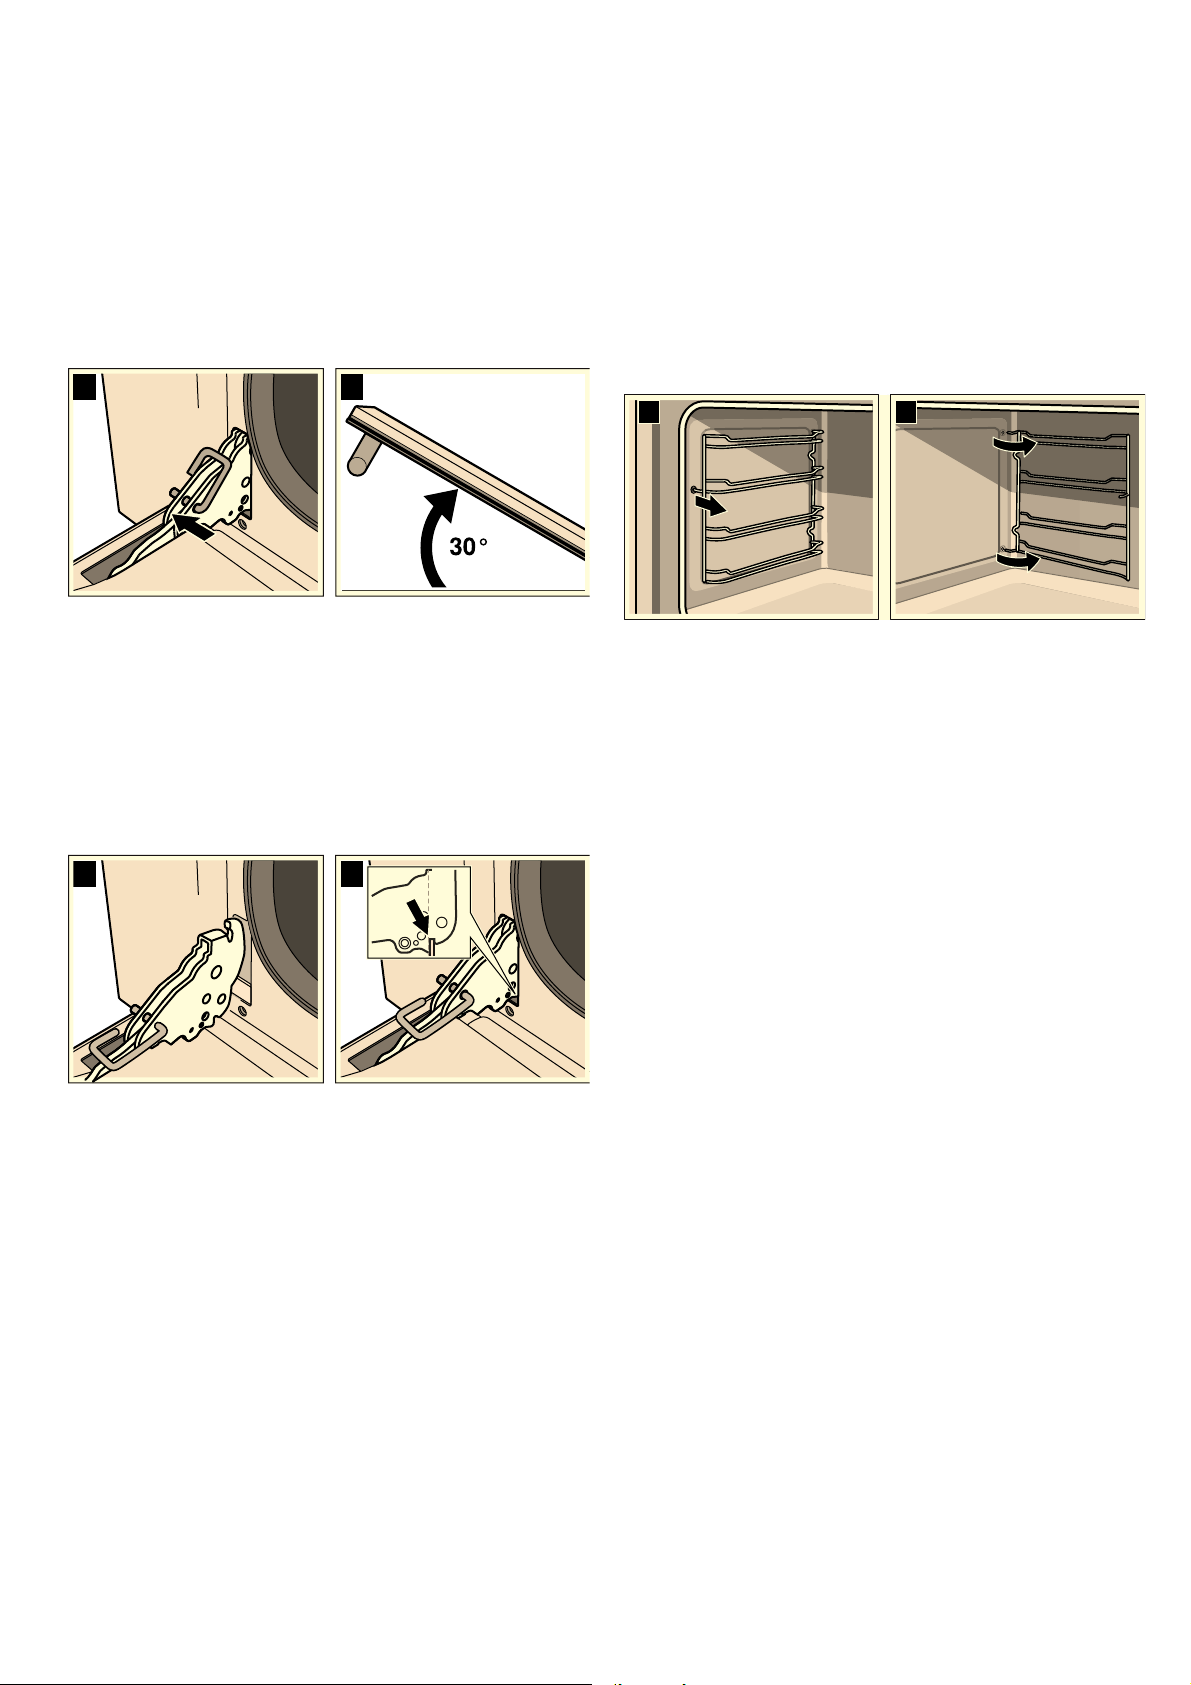
Removing the appliance door
1. Open the oven door fully.
2. Lock both hinges on the left and right using the locking pin
(a).
Note. The locking pins must be fully inserted into the holes in
the hinges.
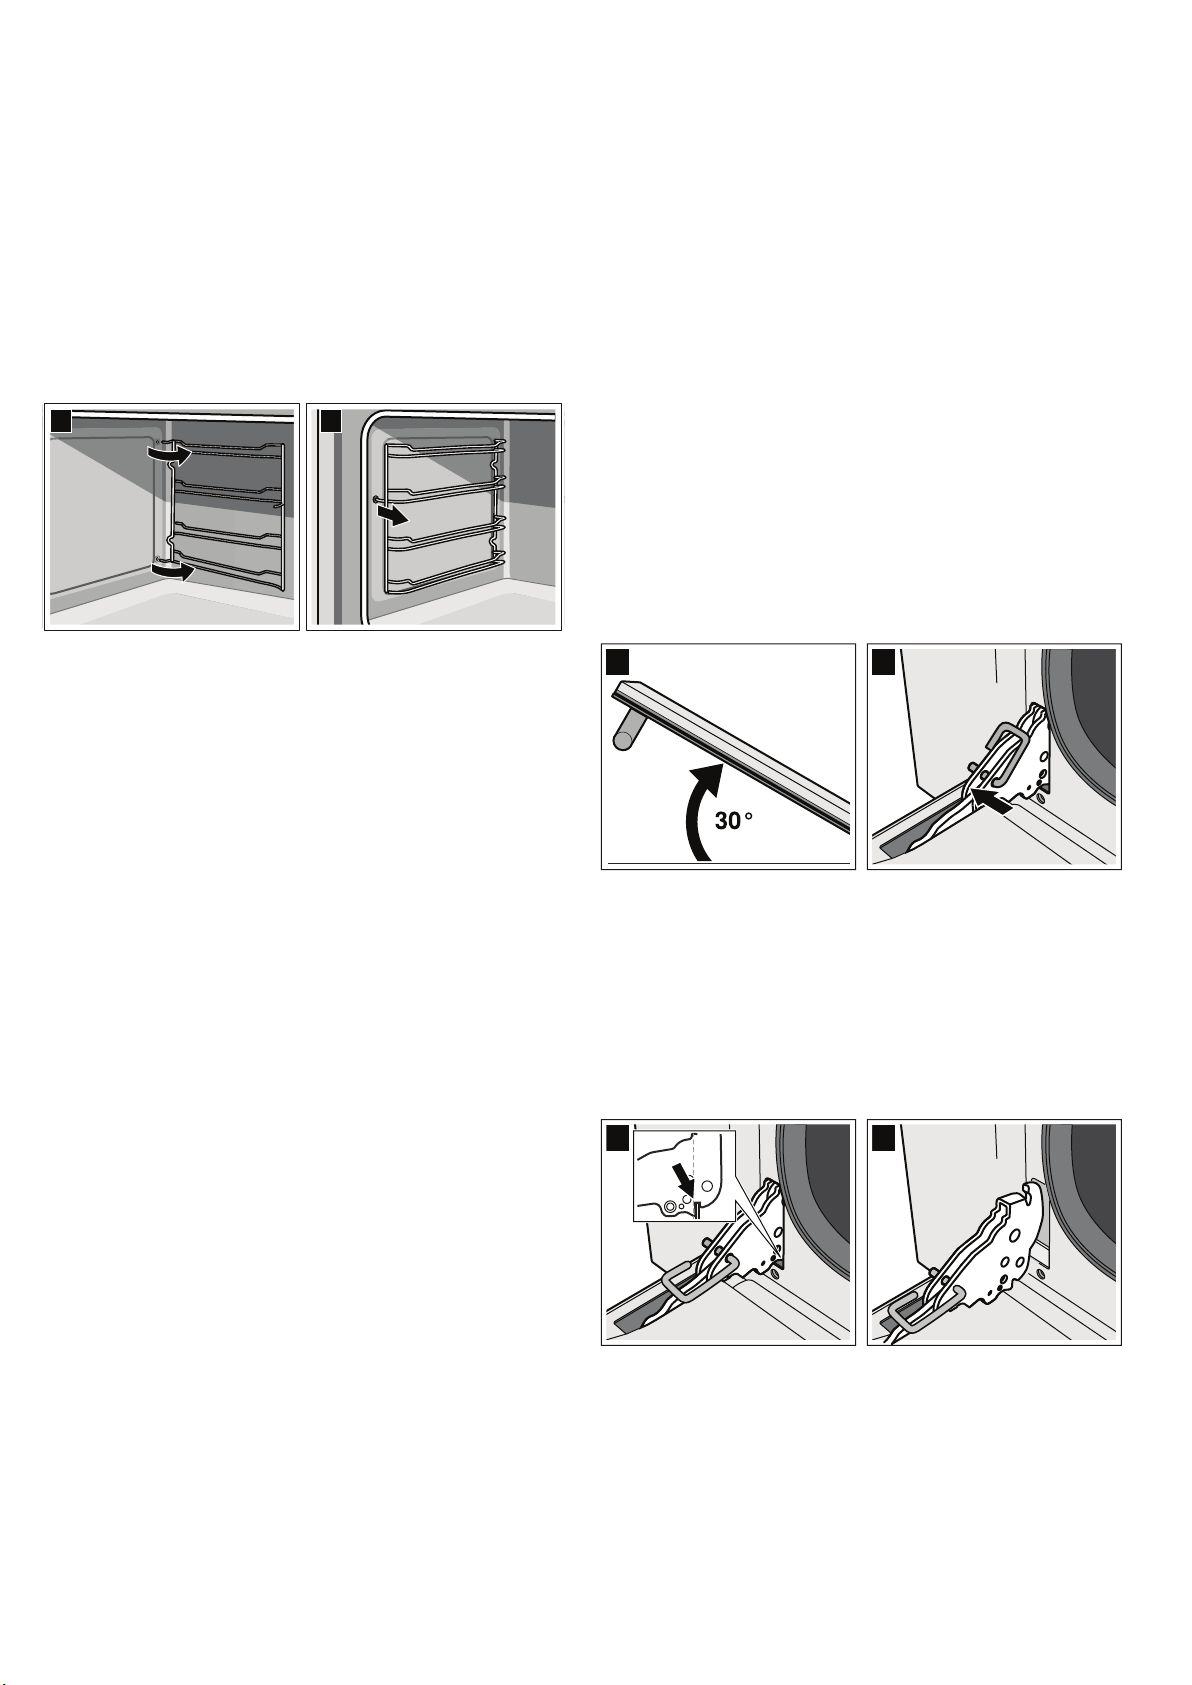
3. Grip the oven door on either side with both hands and close
the oven door by approx. 30° (b).
4. Raise the oven door slightly and pull it out.
Note. Do not fully close the oven door. The hinges could
become bent and the enamel could be damaged.
Fitting the appliance door
1. Grip the oven door on either side with both hands.
2. Slide the hinges into the slots in the oven (a).
Note. The notch below the hinges must engage into the
frame of the oven (b).
3. Lower the door downwards.
4. Remove the locking pins.
: Risk of injury!
Do not reach into the hinge if the oven door falls out
unintentionally or a hinge snaps closed. Call after-sales service.
Removing and inserting the hook-in racks
You can remove the hook-in racks for easier cleaning.
Removing the hook-in racks
The hook-in racks are each fixed to the side panels of the
cooking compartment at three points.
1. Grip the front of the hook-in rack and pull it to the middle of
the cooking compartment.
The front hook of the hook-in rack will release from the hole.
2. Fold out the hook-in rack further and pull it from the rear
holes of the side panel.
3. Hold the catalytic cooking compartment panel in place.
4. Remove the hook-in rack from the cooking compartment.
Inserting the hook-in rack
1. Hold the catalytic cooking compartment panel in place.
2. Insert the hooks of the hook-in rack into the rear holes in the
side panel.
3. Press the front hook of the hook-in rack into the hole.
DE
ED
D
E
11
Troubleshooting
Malfunctions often have simple explanations. Please read the
following notes before calling the aftersales service.
: Risk of electric shock!
Incorrect repairs are dangerous. Repairs may only be carried
out by one of our trained after-sales engineers.
Incorrect repairs may result in significant risk to the user.
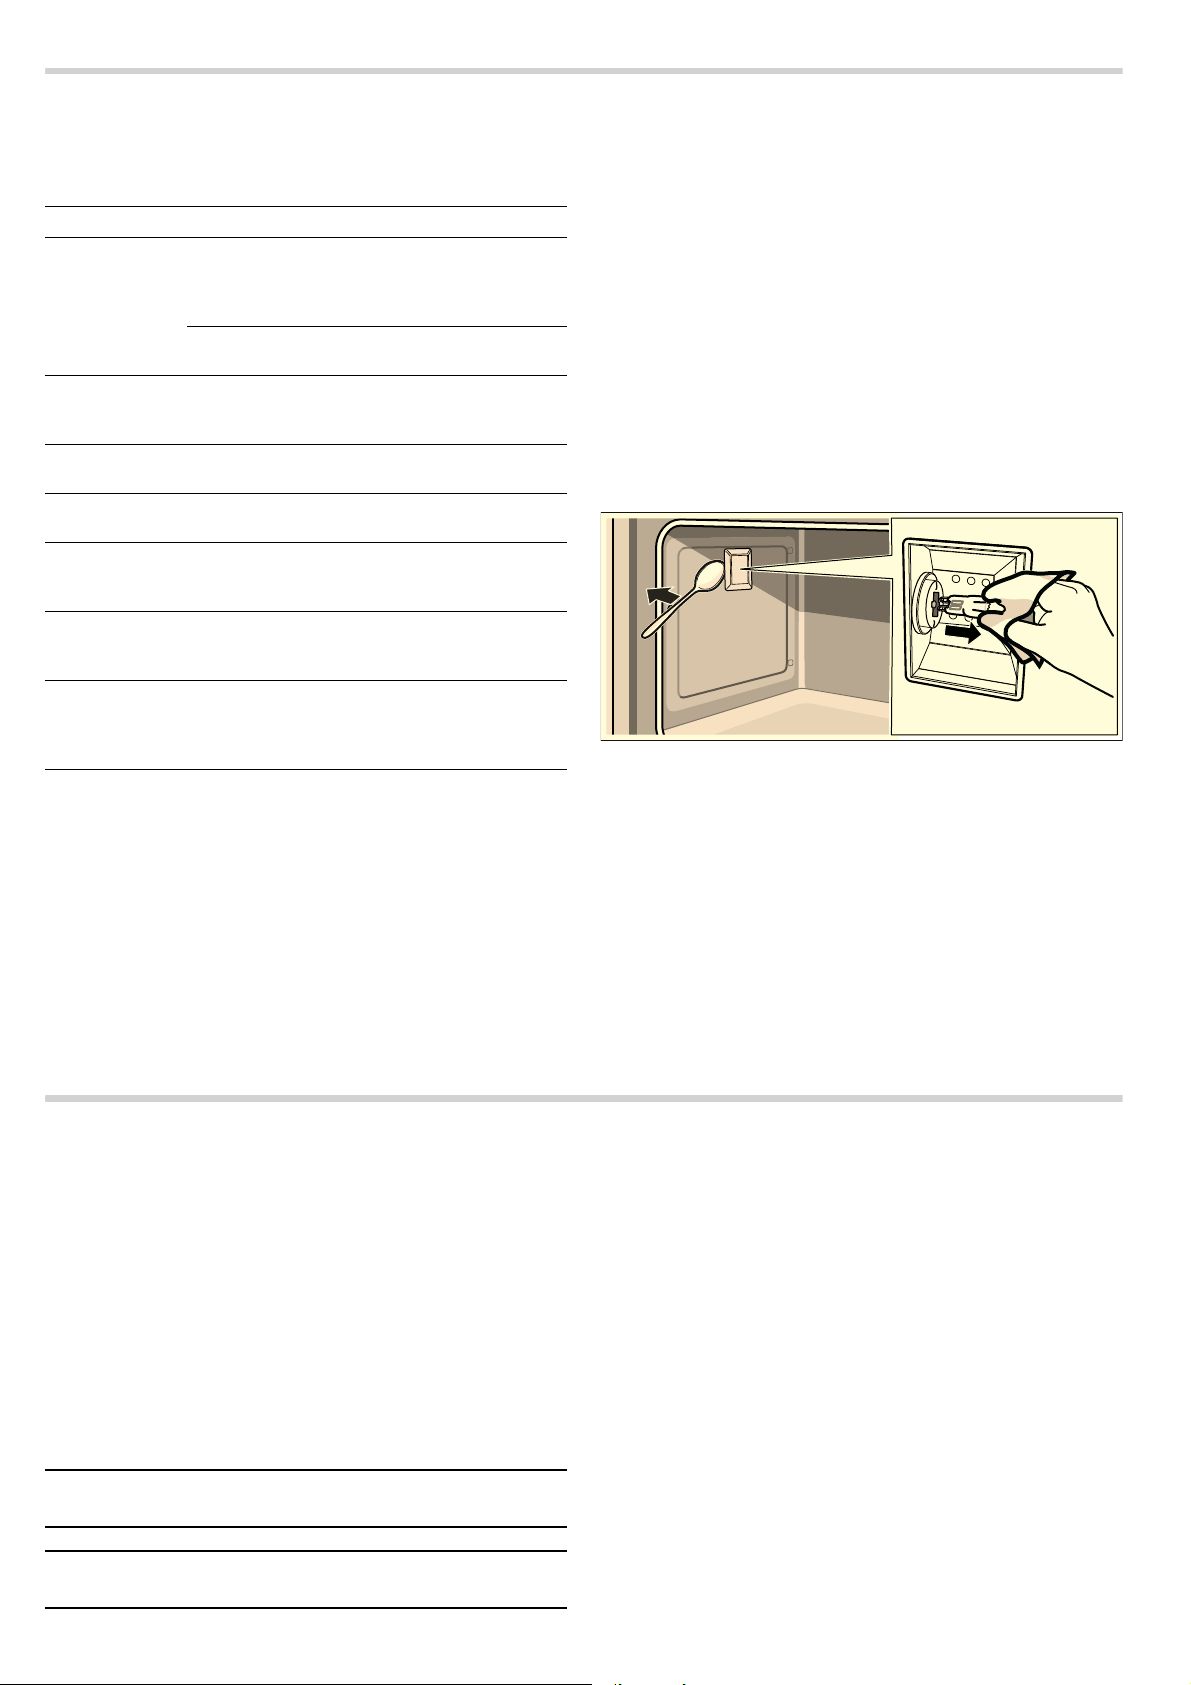
Replacing the oven light bulb
If the oven light bulb fails, it must be replaced. Replacement
heat-resistant bulbs can be obtained from the after-sales
service or from specialist retailers. Please specify the E number
and FD number of your appliance. Do not use any other type of
bulb.
: Risk of electric shock!
When replacing the cooking compartment bulb, the bulb socket
contacts are live. Before replacing the bulb, unplug the
appliance from the mains or switch off the circuit breaker in the
fuse box.
1. Allow the cooking compartment to cool down.
2. Open the appliance door.
3. Place a tea towel in the cooking compartment to prevent
damage.
4. Remove the hook-in racks.
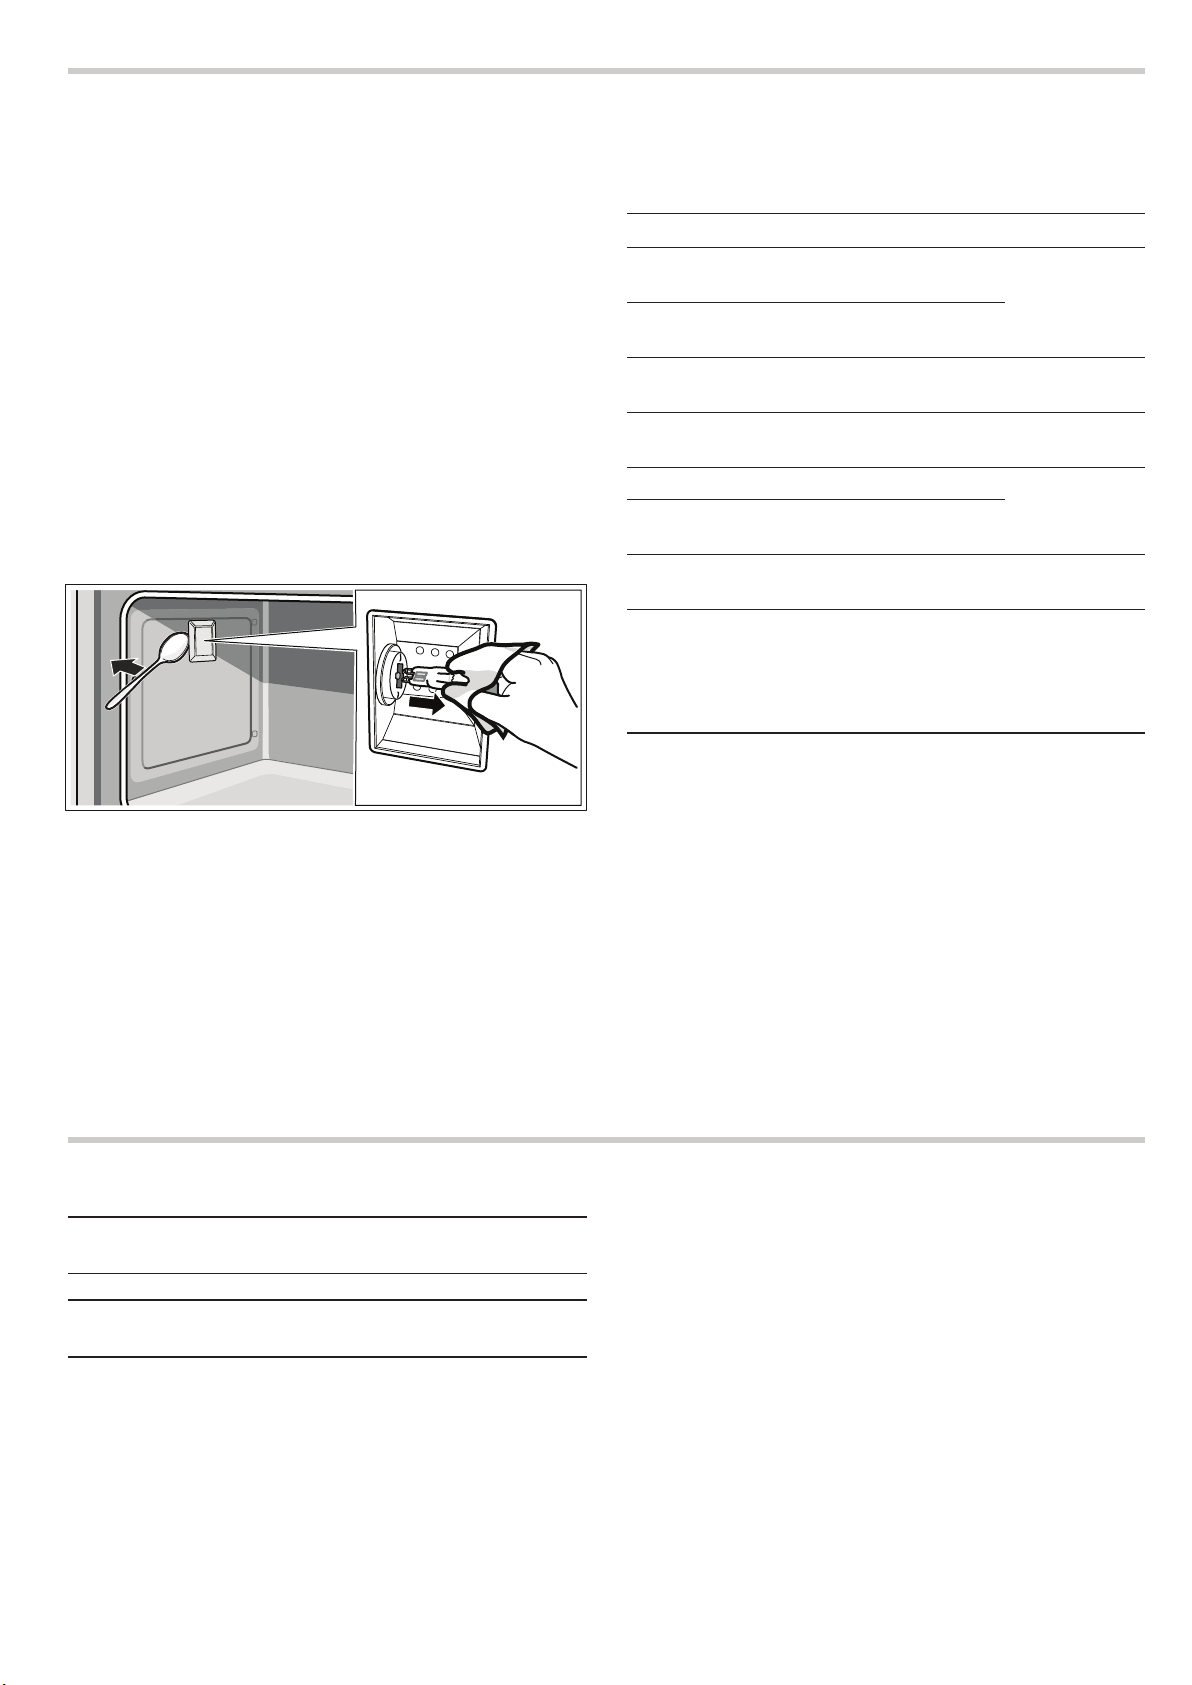
5. Remove the glass cover. To do this, open the glass cover at
the front with your hand. Should you experience difficulties
removing the glass cover, use a spoon to help.
6. Remove the oven light bulb.
7. Replace the oven light bulb with a bulb of the same type:
Voltage: 230 V;
Power: 40 W;
Fitting: G9;
Temperature resistance: 300 °C
8. Refit the glass cover for the oven light bulb.
9. Refit the hook-in racks.
10.Remove the tea towel.
11.Switch the circuit breaker back on.
12.Check that the oven lighting is working again.
After-sales service
Our after-sales service is there for you if your appliance needs
to be repaired. We will always find the right solution in order to
avoid unnecessary visits from a service technician.
E number and FD number
When calling us, please give the product number (E no.) and
the production number (FD no.) so that we can provide you with
the correct advice. To find the identification plate with the
numbers, open the oven door and look at the front of the
bottom of the cooking compartment. To save time, you can
make a note of the number of your appliance and the
telephone number of the after-sales service in the space below,
should it be required.
Please note that there will be a fee for a visit by a service
technician in the event of a malfunction, even during the
warranty period.
You can find the contact information for your nearest after-sales
service in all countries here or in the attached after-sales
service directory.
Repair order and advice if faults occur
Put your trust in the expertise of the manufacturer. You can then
be sure that the repair work is carried out by trained service
technicians who can supply original spare parts for your
household appliance.
Problem Possible cause Notes/remedy
The appliance
does not work.
Circuit breaker
faulty.
Look in the fuse box and
check that the circuit
breaker for the cooker is in
working order.
Power cut Check whether the kitchen
light works.
The oven can-
not be switched
off.
The electronics
are faulty.
Switch off the circuit
breaker. Contact the after-
sales service.
The clock dis-
play flashes.
Power cut Reset the clock.
The oven does
not heat up.
Circuit breaker
faulty.
Check the circuit breaker
and replace if necessary.
The function
selector has not
been set.
Set the function selector.
The door glass
is broken.
Switch off the appliance.
Contact the after-sales ser-
vice.
Fruit juice or
albumen stains
on enamelled
surfaces.
Moist cake or
meat juices.
Harmless change in the
enamel, cannot be
removed.
E no. FD no.
After-sales service
O
A 0810 240 260
D 01801 22 33 55
(€0.039/min. from a landline,
max. €0.42/min. from a mobile phone)
CH 0848 840 040

12
Energy and environment tips
Here you can find tips on how to save energy when baking and
roasting and how to dispose of your appliance properly.
Saving energy
■ Only preheat the oven when it is specified in the recipe that
you should do so.
■ Use dark, black lacquered or enamelled baking tins. They
absorb the heat particularly well.
■ Open the oven door as infrequently as possible while you are
cooking, baking or roasting.
■ It is best to bake several cakes one after the other. The oven
is still warm. This reduces the baking time for the second
cake. You can also place two loaf tins next to each other.
■ For longer cooking times, you can switch the oven off
10 minutes before the end of the cooking time and use the
residual heat to finish cooking.
Environmentally-friendly disposal
Dispose of packaging in an environmentally-friendly manner.
Acrylamide in foodstuffs
Acrylamide is mainly produced in grain and potato products
prepared at high temperatures, such as potato crisps, chips,
toast, bread rolls, bread or fine baked goods (biscuits,
gingerbread, cookies).
This appliance is labelled in accordance with
European Directive 2012/19/EU concerning used
electrical and electronic appliances (waste electrical
and electronic equipment - WEEE). The guideline
determines the framework for the return and recycling
of used appliances as applicable throughout the EU.
Tips for keeping acrylamide to a minimum when preparing food
General
■ Keep cooking times to a minimum.
■ Cook meals until they are golden brown, but not too dark.
■ Large, thick pieces of food contain less acrylamide.
Baking With Top/bottom heating max. 200 °C.
With 3D hot air or hot air max.180 °C.
Biscuits With Top/bottom heating max. 190 °C.
With 3D hot air or hot air max. 170 °C.
Egg or egg yolk reduces the production of acrylamide.
Oven chips Spread out a single layer evenly on the baking tray. Cook at least 400 g at once on a
baking tray so that the chips do not dry out.

13
Tips for using your appliance
Here you will find a selection of tips on ovenware and
preparation methods.
Notes
■ Use the accessories provided. Additional accessories may
be obtained as special accessories from specialist retailers
or from the after-sales service.
Before using the oven, remove any unnecessary accessories
and ovenware from the cooking compartment.
■ Always use an oven cloth or oven gloves when taking
accessories or cookware out of the cooking compartment.
Baking
Baking tins
■ Use light-coloured baking tins and trays wherever possible.
■ Always place the baking tins on the middle of the baking and
roasting wire rack.
Baking tips
Roasting and grilling
Ovenware
You may use any heatresistant ovenware. Always place the
ovenware in the middle of the wire rack. The enamelled baking
tray is also suitable for large roasts.
Roasting tips
■ A a lower temperature produces more even browning.
■ Depending on the size of the joint, add 2 or 3 tablespoons of
liquid to lean meat and 8 to 10 tablespoons of liquid to pot
roasts.
■ When cooking duck or goose, pierce the skin on the
underside of the wings to allow the fat to run out.
■ Poultry will turn out particularly crispy and brown if you baste
it towards the end of the roasting time with butter, salted
water or orange juice.
■ Turn pieces of meat halfway through the cooking time.
■ When the roast is ready, turn off the oven and allow it to rest
for an additional 10 minutes. This will allow the meat juices to
distribute themselves better inside the roast.
■ When roasting large pieces of meat, you may find that the
amount of steam and condensation on the oven door is more
than usual. This is a normal occurrence which has no effect
on the oven's performance. Once roasting is complete, dry
the oven door and window with a cloth.
■ If you are roasting on the wire rack, insert the enamelled
baking tray into shelf position 1 to collect the drips of fat.
Grilling tips
■ If possible, grill items should be of equal thickness. They
should be at least 2 to 3 cm thick. This ensures that they
brown evenly while also remaining succulent.
■ Place the food to be grilled in the centre of the wire rack.
Pour a little water into the enamelled baking tray and insert
this into the shelf position underneath the grill to collect the
drips of fat. Never place it on the cooking compartment floor.
■ Drizzle some oil over the food to be grilled before you place it
on the wire rack under the grill.
■ If the food to be grilled is thin, turn it over halfway through
grilling; if it is thick, turn it over several times during grilling.
Use tongs when turning the food to avoid piercing it and, in
the case of meat, to keep the meat juices inside the meat.
■ Dark meats such as lamb and beef brown better and more
quickly than light meats such as pork and veal.
How to establish whether sponge cake
is baked through.
Approx. 10 minutes before the end of the baking time stated in the recipe, insert a cock-
tail stick into the cake at its deepest point. If no cake mixture sticks to the wood, the cake
is ready.
The cake collapses. Use less fluid next time or set the oven temperature 10 degrees lower. Note the stirring
times indicated in the recipe.
The cake has risen high in the middle
and less around the edges.
Do not grease the sides of the springform cake tin. After baking, carefully loosen the
cake using a knife.
The cake is too dark on the top. Place it lower in the oven, select a lower temperature and bake the cake for a little
longer.
The cake is too dry. When it is done, make small holes in the cake using a cocktail stick. Then drizzle fruit
juice or an alcoholic drink over it. Next time, set the temperature 10 degrees higher and
reduce the baking time.
The bread or cake (e.g. cheesecake)
looks good but is sticky on the inside
(soggy with wet streaks).
Next time, use less liquid and bake at a lower temperature for slightly longer. For cakes
with a moist topping, bake the base first. Sprinkle it with almonds or bread crumbs and
then place the topping on top. Take care to follow recipes and baking times.
The pastries are not evenly browned. Select a slightly lower temperature to ensure that the cake is baked more evenly. Excess
greaseproof paper can affect the air circulation. Always cut the greaseproof paper to suit
the size of the baking tray.
The bottom of a fruit flan is too light. Place the cake one level lower the next time.
The fruit juice overflows. Next time, use the deeper universal pan, if you have one.
Small baked items made out of yeast
dough stick to one another during bak-
ing.
There should be a gap of approx. 2 cm around each item. This gives enough space for
the baked items to expand and turn brown on all sides.
Condensation forms when you bake
moist cakes.
Baking may create water vapour, which escapes above the door. The steam may settle
and form water droplets on the control panel or on the fronts of adjacent units. This is a
natural process.

14
Roasting tips
Tested for you in our cooking studio.
Here, you can find a selection of dishes and the ideal settings
for them. We will show you which type of heating, temperature
and shelf position are best suited for your dish.
Notes
■ The times specified in the tables are only guidelines. They will
depend on the quality and composition of the food.
■ Use the accessories provided. Additional accessories may
be obtained as optional accessories from specialist retailers
or from the after-sales service.
Before using the oven, remove any unnecessary accessories
and ovenware from the cooking compartment.
■ Always use an oven cloth or oven gloves when taking hot
accessories or cookware out of the cooking compartment.
All values refer to a preheated oven.
How can you tell when the roast is
ready?
Use a meat thermometer (available from specialist retailers) or carry out a "spoon test".
Press down on the roast with a spoon. If it feels firm, it is ready. If the spoon can be
pressed in, it needs to be cooked for a little longer.
The roast is too dark and the crackling
is burnt in places.
Check the shelf position and temperature.
The roast looks good but the juices are
burnt.
Next time, use a smaller roasting dish and add more liquid.
The roast looks good, but the juices are
too clear and watery.
Next time, use a larger roasting dish and add less liquid.
Dish Weight (kg) Shelf posi-
tion
Type of
heating
Temperature in °C Cooking time in minutes
Lasagne 3-4 1
%
200-230 50-60
Pasta bake 2 1
%
220-230 40-45
Joint of veal 1.5 2
N
180-190 70-80
Pork loin 1 2
N
180-190 50-60
Joint of hare 1.5 2
’
180-190 70-80
Grilled chicken 1 2
N
180-190 50-60
Grilled chicken 2 2
N
180-190 80-90
Sausage 1 3
7
max. 7-9 first side
5-6 second side
Pork chop 2 4
(
max. 12-15 first side
5-7 second side
Fresh fish 1.5 2
;
160-170 50-60
Fresh pizza 2 1
N
max. 9-11
Bread 2 2
<
190-200 40-50
Sponge cake 1 2
<
150-160 50-60
Jam tarts 1 2
%
160-170 40-50
Brioche 1 2
’
160-170 25-30
Muffins x 15, 30 g each 2
N
170 25

14
AGƒ°ûdG ¢Uƒ°üîH äGOÉ°TQEG
■ »a ájhÉ°ùàe É¡FGƒ°ûH Ωƒ≤J »àdG ΩÉ©£dG ™£b ¿ƒμJ ¿CG ¿ÉμeE’G Qób ¢UôMG
Égô«ªëJ ºàj ∂dòHh .πbC’G ≈∏Y º°S 3 ≈dEG 2 øe É¡μª
o
°S ¿ƒμj ¿CG ø«©àjh .∂ª
o
°ùdG
.á°†Zh Iô°†f ≈≤ÑJh ¢ùfÉéàe πμ°ûH
■ ≈∏Y AɪdG øe
k
Ó«∏b ™°V .AGƒ°ûdG áμÑ°T ∞°üàæe ≈∏Y √DhGƒ°T OGôªdG ΩÉ©£dG ™°V
≈∏Y »aÉ°VEG πμ°ûH ¬£Ñ°VGh ,(π«eÉæjE’G) É櫪dG á≤Ñ£H »∏£ªdG õ«ÑîdG ìƒd
õ«M á«°VQCG ≈∏Y G
k
óHCG ¬©°†J ’h .¿ƒgódG ™«ªéàd »∏Ø°ùdG ´ÉØJQ’G iƒà°ùe
.»¡£dG
■ áμÑ°T ≈∏Y ¬©°Vh πÑb √DhGƒ°T OGôªdG ΩÉ©£dG ≈∏Y âjõdG øe π«∏≤dG ¢TôH ºb
.ájGƒ°ûdG πØ°SCG AGƒ°ûdG
■ ¬©£≤dG ÉeCG ,AGƒ°ûdG øeR ∞°üf AÉ°†≤fG ó©H ÉgDhGƒ°T OGôªdG á©«aôdG ™£≤dG Ö∏bG
á°TÉe ∂dP »a Ωóîà°SG .AGƒ°ûdG øeR AÉæKCG IójóY äGôe É¡Ñ«∏≤J Öé«a á쫪°ùdG
á¶Øàëe
k
Óãe ºë∏dG ™£b π¶Jh √DhGƒ°T OGôªdG ΩÉ©£dG Ö≤K ºàj ’ ∂dòHh ,AGƒ°û∏d
.ºë∏dG ¢Uƒ°üH
■ »æÑdG ¿ƒ∏dG Ö°ùàμJ …ô≤ÑdG ºë∏dGh ¿CÉ°†dG ºëd πãe ¿ƒ∏dG áªJÉb Ωƒë∏dG ±Éæ°UCG
.íJÉØdG ¿ƒ∏dÉH õ«ªàJ »àdG ƒ∏àÑdG Ωƒëd øe π°†aCG IQƒ°üHh ´ô°SCG πμ°ûH
ô«ªëàdG ¢Uƒ°üîH äGOÉ°TQEG
.ºë∏dG ™£b è°†f øe ≥≤ëàdG ∂æμªj ∞«c á©£b ≈∏Y á≤©∏ªdÉH §¨°VG .zá≤©∏ªdG QÉÑàNG{ πª©H ºb hCG (á°ü°üîàªdG ôLÉàªdG »a ôaƒàe) Ωƒë∏dG ôàeƒeôJ Ωóîà°SG
¢†©Ñd êÉàëJ âdGR ’ É¡fCG »æ©j Gò¡a ,ºë∏dG á©£b â£Ñg GPEG .è°†f ób ºë∏dG ¿CG »æ©j Gò¡a ,É¡«a â∏ZƒJ GPEÉa .ºë∏dG
.âbƒdG
âbôàMGh ájɨ∏d É
k
ªJÉb É
k
fƒd ºë∏dG á©£b âÑ°ùàcG
.»LQÉîdG ɡ룰S øe ™°VGƒªdG ¢†©H
.IQGôëdG áLQOh ∫ÉNOE’G iƒà°ùe øe ≥≤ëJ
¢Uƒ°üdG øμdh ,Ió«L ádÉëH hóÑJ ºë∏dG á©£b
.¥ôàëe
.πFGƒ°ùdG øe ójõªdG ∞°VCGh AGƒ°û∏d ô¨°UCG
k
AÉfEG ôàNG ,áeOÉ≤dG IôªdG »a
íJÉa ¢Uƒ°üdG øμdh ,Ió«L ádÉëH hóÑJ ºë∏dG á©£b
.ájɨ∏d ∞Øîeh ájɨ∏d ¿ƒ∏dG
.πFGƒ°ùdG øe πbC
G ᫪c ∞°VCGh AGƒ°û∏d ôÑcCG
k
AÉfEG ôàNG ,áeOÉ≤dG IôªdG »a
»¡£dG ƒjOƒà°S »a ÉgQÉÑàNG ºJ »àdG ¥ÉÑWC’G
ÉæH ¢UÉîdG
´ƒf ∂d ¢Vô©f ±ƒ°Sh .É¡d á«dÉãªdG §Ñ°†dG ´É°VhCGh ¥ÉÑWC’G øe ábÉH Éæg óéà°S
.√ó©J …òdG ≥Ñ£∏d Ö°ùfC’G ´ÉØJQ’G iƒà°ùeh IQGôëdG áLQOh ø«î°ùàdG
äɶMÓe
■ ≈∏Y óªà©J »gh .ájOÉ°Tôà°SG ɪ«b ∫hGóédG »a IOQGƒdG âbƒdG äÉfÉ«H ôÑà©J
.᪩WC’G ¢üFÉ°üNh IOƒL
■ äÉ«dɪμdG ≈∏Y ∫ƒ°üëdG ∂æμªjh .RÉ¡édG ™e IOQƒªdG äÉ«dɪμdG Ωóîà°SG
.AÓª©dG áeóN øe hCG á°ü°üîàªdG ôLÉàªdG øe á°UÉN äÉ«dɪμc á«aÉ°VE’G
■.»¡£dG õ«M øe »fGhC’Gh ájQhô°†dG ô«Z äÉ«dɪμdG êôNCG ,¿ôØdG ΩGóîà°SG πÑb
■ õ«M øe áæNÉ°ùdG »fGhC’G hCG äÉ«dɪμdG êGôNEG óæY »fGhCG áWƒa É
k
ªFGO Ωóîà°SG
.»¡£dG
.√DhɪMEG ºJ …òdG ¿ôØdG ≈dEG ô«°ûJ äÉfÉ«ÑdG ™«ªL
≥Ñ£dG(ºéc) ¿RƒdGiƒà°ùªdGø«î°ùàdG ´ƒfΩ° IQGôëdG áLQO≥FÉbódÉH IóªdG
É«fGR’
4-31
%
230-20060-50
¿ôa áfhôμ©e
21
%
230-22045-40
…ƒ°ûe πéY ºëd
1.52
N
190-18080-70
…ƒ°ûe ÖfQCG
1.52
’
190-18080-70
…ƒ°ûe êÉLO
12
N
190-18060-50
…ƒ°ûe êÉLO
22
N
190-18090-80
ájƒ°ûe ≥fÉ≤f
13
7
≈°übC’G óëdG∫hC’G ÖfÉédG 9-7
»fÉãdG ÖfÉédG 6-5
êRÉW ∂ª°S
1.52
;
170-16060-50
áLRÉW Gõà«H
21
N
≈°übC’G óëdG
11-9
õÑN
22
<
200-19050-40
»éæØ°SEG ∂«c
12
<
160-15060-50
≈HôªdG äQÉJ
12
%
170-16050-40
¢TƒjôH
12
’
170-16030-25
øaɪdGΩGôL 30 πμd á©£b 15
2
N
17025

13
ΩGóîà°S’G íFÉ°üf
.ô«°†ëàdG ¥ôWh »¡£dG »fGhCG ∫ƒM íFÉ°üædG øe áYƒªée Éæg óéJ
äɶMÓe
■ äÉ«dɪμdG ≈∏Y ∫ƒ°üëdG ∂æμªjh .RÉ¡édG ™e IOQƒªdG äÉ«dɪμdG Ωóîà°SG
.AÓª©dG áeóN øe hCG á°ü°üîàªdG ôLÉàªdG øe á°UÉN äÉ«dɪμc á«aÉ°VE’G
.»¡£dG õ«M øe »fGhC’Gh ájQhô°†dG ô«Z äÉ«dɪμdG êôNCG ,¿ôØdG ΩGóîà°SG πÑb
■ õ«M øe áæNÉ°ùdG »fGhC’G hCG äÉ«dɪμdG êGôNEG óæY »fGhCG áWƒa É
k
ªFGO Ωóîà°SG
.»¡£dG
äGRƒÑîªdG OGóYEG
äGRƒÑîªdG OGóYEG »fGƒ°U
■.¿ƒ∏dG áëJÉa á«fó©ªdG äGRƒÑîªdG OGóYEG äÉLÉ°Uh »fGƒ°U ΩGóîà°SG π°†Ø
o
j
■.AGƒ°ûdGh õ«ÑîdG áμÑ°T ∞°üàæe »a É
k
ªFGO äGRƒÑîªdG »fGƒ°U ™°V
äGRƒÑîªdG OGóYE’ íFÉ°üf
.»éæØ°SE’G ∂«μdG è°†f øe ≥≤ëàJ ∞«c ºd GPEG .á£≤f ≈∏YCG øe ∂«μdG »a á«Ñ°ûN á∏N ¢SôZG áØ°UƒdG »a OóëªdG õ«ÑîdG âbh ájÉ¡f øe ≥FÉbO 10 »dGƒM πÑb
.âé°†f ób ∂«μdG ¿ƒμJ ,á∏îdÉH ø«é©dG ≥°üà∏j
.§Ñ¡j ∂«μdG ≈YGôJ .äÉLQO
10 QGó≤ªH πbCG IQGôM áLQO ≈∏Y ¿ôØdG §Ñ°VG hCG áeOÉ≤dG IôªdG »a πFGƒ°ùdG øe πbCG ᫪c Ωóîà°SG
.áØ°UƒdG »a IOóëªdG ≥ØîdG äÉbhCG
óæY ¢†Øîæe ¬æμdh ∞°üàæªdG øe ™ØJôe ∂«μdG
.±GƒëdG
ΩGóîà°SÉH ¢UôëH ∂«μdG π°üaG ,õ«ÑîdG ó©H .IóHõdÉH ÖfGƒédG π°üØd á∏HÉ≤dG ∂«μdG á«æ«°U ÖfGƒL øgóH º≤J ’
.ø«μ°S
.≈∏YCG øe G
k
óL É
k
ªJÉb É
k
fƒd Ö°ùàμj ∂«μdG.
k
Ó«∏b õÑîdG øeR πWCGh πbCG IQGôM áLQO ôàNGh ,¿ôØdG »a É
k
°VÉØîfG ôãcCG iƒà°ùe ≈∏Y ¬©°V
.G
k
óL ±ÉL ∂«μdG ≈∏Y Ühô°ûe …CG hCG ¬cGƒa ô«°üY ¢TôH ºb ºK .á«Ñ°ûN á∏
N ᣰSGƒH √õ«¡éJ ó©H ∂«μdG »a Iô«¨°U ܃≤K πª©H ºb
.õÑîdG áæeRCG π∏bh äÉLQO
10 QGó≤ªH ≈∏YCG IQGôM áLQO ôàNG áeOÉ≤dG IôªdG »a .∂«μdG
øe G
k
ó«L hóÑj (
k
Óãe ∂«c õ«°ûàdG) ∂«μdG hCG õÑîdG
,É
k
Lõd) É
k
ÑWQ ∫Gõj ’ πNGódG øe øμdh ,êQÉîdG
(AɪdÉH É
k
©Ñ°ûe
.πbCG IQGôM áLQO ≈∏Y A»°ûdG ¢†©H õ«ÑîdG øeR ádÉWEÉH ºbh ,áeOÉ≤dG IôªdG »a πFGƒ°ùdG øe πbCG ᫪c Ωóîà°SG
õÑîdG hCG Rƒ∏dÉH ¬°TôH ºb .∂«μdG IóYÉ≤d ≥Ñ°ùe OGóYEG AGôLEÉH ’hCG ºb áÑWôdG ájƒ∏©dG á≤Ñ£dG …P ∂«μ∏d áÑ°ùædÉH
.õÑîdG áæeRCGh äÉØ°UƒdG IÉYGôe ≈Lôj .≈∏YCÉH ájƒ∏©dG á≤Ñ£dG ™°V ºK ¥ƒbóªdG
.
m
hÉ°ùàe ô«Z πμ°ûH Iôªëe äGRƒÑîªdG ≈∏Y ôKDƒj ¿CG øμªj RQÉÑdG äGRƒÑîªdG ¥Qh .
m
hÉ°ùàe πμ°ûH äGRƒÑîªdG è°†æàa A»°ûdG ¢†©H πbCG IQGôM áLQO ôàNG
.õ«ÑîdG ìƒd ™e Ö°SÉæàj ɪH äGRƒÑîªdG OGóYEG ¥Qh ™£≤H É
k
ªFGO ºb Gòd .AGƒ¡dG ôjhóJ
.πØ°SCG øe G
k
óL íJÉa ¬cGƒØdG ∂«c.áeOÉ≤dG IôªdG »a óMGh iƒà°ùe QGó≤ªH ∂«μdG ¢†ØNCG
.¢†«Øj ¬cGƒØdG ô«°üY.äÉeGóîà°S’G Oó©àe ≥«ª©dG ìƒ∏dG ΩGóîà°SG áeOÉ≤dG IôªdG »a
ø«é©dG øe áYƒæ°üªdG ºéëdG Iô«¨°U äGRƒÑîªdG
.ÉgõÑN óæY É¡°†©ÑH ≥°üà∏J ôªîªdG
™£b Oóªàd ±Éc õ«M OƒLƒH íª°ùj Gògh .iôNC’Gh á©£b πc ø«H É
k
Ñjô≤J º°S
2 QGó≤ªH π°UÉa ∑Éæg ¿ƒμj ¿CG »¨Ñæj
.äÉ¡édG ™«ªL øe É¡fƒd ¢ùfÉéJh ó«L πμ°ûH äGRƒÑîªdG
.ÖWôdG ∂«μdG ´GƒfCG OGóYEG óæY ∞ãμàe AÉe ¿ƒμàj ∞ãμàe AÉe äGô£b ¿ƒμjh QÉîÑdG Gòg ∞ãμàj óbh .ÜÉÑdG ¥ƒa øe êôîj QÉîÑdG Gògh .õ«ÑîdG øY AÉe QÉîH èàæj ób
.»©«ÑW ôeCG Gògh .IQhÉéªdG äGóMƒdG äÉ¡LGh ≈∏Y hCG ∫ɪ©à°S’G ¥É£f ≈∏Y
AGƒ°ûdGh ô«ªëàdG
AÉfE’G
áμÑ°T ∞°üàæe »a É
k
ªFGO »fGhC’G ™°V .áfƒî°ù∏d áehÉ≤e »fGhCG …CG ΩGóîà°SG ∂æμªj
ºë∏dG ™£≤d É
k
Ñ°SÉæe (π«eÉæjE’G) É櫪dG á≤Ñ£H »∏£ªdG õ«ÑîdG ìƒd ó©jh .AGƒ°ûdG
.Iô«ÑμdG
ô«ªëàdG ¢Uƒ°üîH äGOÉ°TQEG
■.äGRƒÑîª∏d »æÑdG ¿ƒ∏dG ¢ùfÉéJ ≈∏Y πª©J á°†ØîæªdG IQGôëdG áLQO
■ øe ∞°VCGh ,¿ƒgódG øe É«dÉN ºë∏dG ¿Éc GPEG πFGƒ°ùdG øe áKÓK hCG ø«à≤©∏e ∞°VCG
.É¡ªéM Ö°ùM ,á∏M ÜÉÑμdG ™e ≥YÓe 10 ≈dEG 8
■ ¿ƒgódG π«°ùJ ¿CG øμªj ∂dòHh ,áëæLC’G πØ°SCG ó∏édG Ö≤KG ,RhC’G hCG §ÑdG ™e
.É¡LQÉN
■ hCG IóHõdG øe π«∏≤H É¡àægO GPEG ájɨ∏d á°ûeô≤e á«æH á≤Ñ£H Qƒ«£dG Ωƒëd »°ùàμJ
.»¡£dG øeR AÉ¡àfG π«Ñb ∫É≤JôH ô«°üY hCG »ë∏e ∫ƒ∏ëe
■.»¡£dG øeR ∞°üf AÉ°†≤fG ó©H ºë∏dG ™£b Ö∏bG
■ ¿ôØdG πNGO á«aÉ°VEG ≥FÉbO 10 Ióªd CGó¡j ¬côJ Öéj ,â°ShôdG ºëd è°†æj ¿CG ó©H
.π°†aCG πμ°ûH ºë∏dG ¢Uƒ°U ´Rƒàj ∂dòHh .≥∏¨eh CÉØ£e ƒgh
■ ÜÉH ≈∏Y ∞«ãc πμ°ûH AɪdG QÉîH ¿ƒμàj ób ºë∏dG øe Iô«Ñc ™£b »¡W óæY
ó©H .á«Ø«XƒdG IAÉØμdG ≈∏Y ô«KCÉJ …CG É¡d ¢ù«d á«©«ÑW IôgÉX ƒgh .¿ôØdG
.¢Tɪb á©£≤H ájDhôdG IòaÉfh ¿ôØdG ÜÉH ∞«ØéàH ºb ,»¡£dG á«∏ªY øe AÉ¡àf’G
■ É櫪dG á≤Ñ£H »∏£ªdG õ«ÑîdG ìƒd §Ñ°VG ,AGƒ°ûdG áμÑ°T ≈∏Y »¡£dG óæY
.¿ƒgódG ™«ªéàd
1 ´ÉØJQ’G iƒà°ùe ≈∏Y (π«eÉæjE’G)
12
ä’ÓàN’G ádÉM »a IQƒ°ûªdGh ìÓ°UE’G Ö∏W
É°ùªædG
0810 240 260
ɫfɪdCG
01801 22 33 55
,âHÉãdG ∞JÉ¡dG øe á≤«bO/hQƒj 0,039)
(.á≤«bO/hQƒj 0,42 ≈°übCG óëH ∫GƒédG ∞JÉ¡dG
Gô°ùjƒ°S
0848 840 040
áaô©ªH ºàj ±ƒ°S ìÓ°UE’G ¿CG ócCÉJ ºK øeh .á©fÉ°üdG á¡édG IôÑNh IAÉØc »a ≥K
.»dõæªdG ∑RÉ¡éd á«∏°UC’G QÉ«¨dG ™£≤H øjOhõeh ø«HQóe áeóN »«æa
áÄ«ÑdGh ábÉ£dG ∫ƒM íFÉ°üf
∫ƒMh AGƒ°ûdGh äGRƒÑîªdG OGóYEG AÉæKCG ábÉ£dG ô«aƒJ á«Ø«c ∫ƒM íFÉ°üf Éæg óéJ
.᪫∏°S á≤jô£H ∑RÉ¡L øe ¢ü∏îàdG á«Ø«c
ábÉ£dG ô«aƒJ
■.áØ°UƒdG »a GQƒcòe ∂dP ¿Éc GPEG ’EG ¿ôØdG AɪMEÉH º≤J ’
■ á≤Ñ£H hCG AGOƒ°S á≤Ñ£H á«∏£ªdG hCG áªJÉ≤dG äGRƒÑîªdG OGóYEG »fGƒ°U Ωóîà°SG
.ájɨ∏d Ió«L IQƒ°üH IQGôëdG ¢üàªJ »¡a .(π«eÉæjE’G) É櫪dG
■ ≥«°VCG »a ’EG AGƒ°ûdG hCG äGRƒÑîªdG OGóYEG hCG »¡£dG AÉæKCG ¿ôØdG ÜÉH íàØJ ’
.OhóëdG
■ ¿ôØdG π¶j å«M .iôNC’G ó©H IóMGƒdG ôFÉ£ØdG øe ójó©dG õÑN π°†aC’G øe
Iô«£Ø∏d áÑ°ùædÉH äGRƒÑîªdG OGóYE’ ΩRÓdG âbƒdG π≤j ∂dòHh .¬àfƒî°ùH É
k
¶Øàëe
.ø«JQhÉéàe ø«à«æ«°U ™°Vh É
k
°†jCG ∂æμªj ɪc .á«fÉãdG
■ øeR ájÉ¡f πÑb ¿ôØdG AÉØWEG ∂æμªj É
k
«Ñ°ùf á∏jƒ£dG »¡£dG äÉbhC’ áÑ°ùædÉH
.»¡£dG AÉ¡fE’ á«≤ÑàªdG IQGôëdG ΩGóîà°SGh ,≥FÉbO ô°û©H »¡£dG
áÄ«ÑdÉH ô°†J ’ á≤jô£H äÉØ∏îªdG øe ¢ü∏îàdG
.áÄ«ÑdÉH ô°†J ’ á≤jô£H ∞«∏¨àdG OGƒe øe ¢ü∏îJ
≥∏©àj ɪ«a 2012/19/EU á«HhQhC’G áØ°UGƒª∏d É≤ÑW õ«ªe RÉ¡édG Gòg
áªjó≤dG á«fhôàμdE’Gh á«FÉHô¡μdG Iõ¡LC’ÉH
.
(waste electrical and electronic equipment - WEEE)
»HhQhC’G OÉëJ’G ∫hO πNGO …QÉ°ùdG ΩÉ©dG QÉWE’G áØ°UGƒªdG √òg OóëJh
.É¡dÓ¨à°SG IOÉYEGh áªjó≤dG Iõ¡LC’G OGOôà°SG á«∏ª©d
EU
á«FGò¨dG OGƒªdG »a ó«eÓjôcC’G
äÉLQO »a Ió©
o
ªdG ¢ùWÉ£ÑdGh ܃ÑëdG äÉéàæe »a »°ù«FQ πμ°ûH ó«eÓjôcC’G èàæj
±ƒØ∏ªdG õÑîdGh ¢üªëªdG õÑîdGh …ôa ΩƒÑdGh ¢ùWÉ£ÑdG ≥FÉbQ πãe ,á«dÉY IQGôM
.(πÑàªdG âjƒμ°ùÑdGh ,π«ÑéfõdG õÑNh ,âjƒμ°ùÑdG) áªYÉædG äGRƒÑîªdG hCG õÑîdGh
ΩÉ©£dG ô«°†ëJ óæY ≈fOC’G óëdG ≈dEG ó«eÓjôcC’G π«∏≤àd íFÉ°üf
áeÉY •É≤f ■.≈fOC’G óëdG ≈dEG »¡£dG äÉbhCG π∏b
■.ájɨ∏d ɪJÉb ¢ù«dh »ÑgP »æH É¡fƒd íÑ°üj ≈àM äÉÑLƒdG »¡£H ºb
■.πbCG ó«eÓjôcCG ≈∏Y …ƒàëJ ΩÉ©£dG øe Iô«ÑμdG ™£≤dG
äGRƒÑîªdG OGóYEG.Ω
°200 ≈°übCG óëH »∏Ø°ùdG/…ƒ∏©dG ø«î°ùàdÉH
.≈°übCG óëH Ω
°180 IQGôM áLQO ≈∏Y øNÉ°ùdG AGƒ¡dG hCG äÉgÉéJ’G »KÓK øNÉ°ùdG AGƒ¡dG ΩGóîà°SÉH
âjƒμ°ùH.Ω
°190 ≈°übCG óëH »∏Ø°ùdG/…ƒ∏©dG ø«î°ùàdÉH
.≈°übCG óëH Ω
°170 IQGôM áLQO ≈∏Y øNÉ°ùdG AGƒ¡dG hCG äÉgÉéJ’G »KÓK øNÉ°ùdG AGƒ¡dG ΩGóîà°SÉH
.ó«eÓjôcC’G IOÉe êÉàfEG øe π∏≤j ¢†«ÑdG QÉØ°U hCG ¢†«ÑdG
¿ôØdÉH …ôa ΩƒÑdG ¢ùWÉ£H ≈àM ∂dPh ,ìƒd πc ≈∏Y πbC’G ≈∏Y ºL 400 OGóYEÉH ºb .õ«ÑîdG ìƒd ≈∏Y …hÉ°ùàdÉH É¡æe IóMGh á≤ÑW ™jRƒàH ºb
…ôa ΩƒÑdG ¢ùWÉ£H ∞éJ ’
11
?π∏N çhóM óæY πª©dG Ée
¿CG πÑb .ᣫ°ùH QƒeCG Oôée ≈dEG ¿É«MC’G Ö∏ZCG »a ∂dP Oƒ©j ,π∏N Qƒ¡X ádÉM »a
.á«dÉàdG äGOÉ°TQE’G ´ÉÑJG ≈Lôj AÓª©dG áeóN õcôªH π°üàJ
π£©dGπªàëªdG ÖÑ°ùdG∫ƒ∏M/äGOÉ°TQEG
.πª©j ’ RÉ¡édG.∞dÉJ ô¡°üªdG ¿CG ócCÉJh ôgÉ°üªdG ¥hóæ°U ¢üëaG
.ΩGôj Ée ≈∏Y óbƒªdG ô¡°üe
QÉ«àdG ´É£≤fG
.»FÉHô¡μdG
.ïÑ£ªdG ìÉÑ°üe πªY øe ócCÉJ
±É≤jEG øμªj ’
.¿ôØdG
IóMƒdÉH π£Y
.á«fhôàμdE’G
áeóîH π°üJG .ô¡°üªdG ±É≤jEÉH ºb
.AdG
¿É«H ¢†eƒj
.áYÉ°ùdG
QÉ«àdG ´É£≤fG
»FÉHô¡μdG
.ójóL øe âbƒdG §Ñ°VG
¿ôØdG Ωƒ≤j ’
.ø«î°ùàdÉH
.∞dÉJ ô¡°üªdG.√ô««¨àH ºb hCG ô¡°üªdG ¢üëaG
ìÉàØe §Ñ°V ºàj ºd
.áØ«XƒdG QÉ«àNG
.áØ«XƒdG QÉ«àNG ìÉàØe §Ñ°VG
.ÜÉÑdG êÉLR ô°ùμfG áeóîH π°üJG .RÉ¡édG 𫨰ûJ ∞bhCG
.AdG
¬cGƒa ô«°üY OƒLh
¢†«ÑdG ∫’R ™≤H hCG
í£°SC’G ≈∏Y
É櫪dÉH á«∏£ªdG
.(π«eÉæjE’G)
¢Uƒ°U h
CG ÖWQ ∂«c
.ºëd
É櫪dG AÓ£H QÉ°V ô«Z ô«¨J
.¬«∏Y Ö∏¨àdG øμªj ’ ,(π«eÉæjE’G)
:
!»FÉHô¡μdG ≥©°üdG ô£N
∫ɪYCG ò«ØæJ Rƒéj ’ .QÉ£NCG ≈∏Y É«æa ᪫∏°ùdG ô«Z ìÓ°UE’G ∫ɪYCG …ƒ£æJ
.Éæ∏Ñ
p
b øe ÜQóe AÓªY áeóN »æa πÑb øe ’EG ìÓ°UE’G
QÉ£NC’ ∂°†jô©J »a ∂dP ÖÑ°ùàj ó≤a ,º«∏°S ô«Z πμ°ûH ∑RÉ¡L ìÓ°UEG ºJ GPEG
.᪫°ùL
¿ôØdG áѪd ô««¨J
»àdG á∏jóÑdG äÉѪ∏dG ≈∏Y ∫ƒ°üëdG ∂æμªj .É¡Ø∏J ádÉM »a ¿ôØdG áѪd ô««¨J Öéj
ôcP ≈Lôjh .á°ü°üîàªdG ôLÉàªdG øe hCG AÓª©dG áeóN õcôe øe áfƒî°ùdG πªëàJ
.iôNCG ´GƒfCG øe äÉѪd Ωóîà°ùJ ’ .∑RÉ¡éd FD ºbQh E ºbQ
:
!»FÉHô¡μdG ≥©°üdG ô£N
QÉ«J É¡«a …ô°ùj áѪ∏dG IGhO äÉ°ùeÓe ¿CG »¡£dG õ«M áѪd ô««¨J óæY ≈YGôj
ô¡°üªdG π°üaG hCG ¢ùÑ≤ªdG øe »FÉHô¡μdG ¢ùHÉ≤dG ´õfG ,áѪ∏dG ô««¨J πÑb .»FÉHô¡c
.ôgÉ°üªdG ¥hóæ°U »a OƒLƒªdG
.1 .OôÑj ≈àM »¡£dG õ«M ∑ôJG
.2 .RÉ¡édG ÜÉH íàaG
.3 .QGô°VCG çhóM Öæéàd »¡£dG õ«M »a »fGhCG áWƒa ™°V
.4 .≥«∏©àdG ¿ÉÑ°†b äÉμÑ°T ™∏NG
.5 »a .∂jó«H ΩÉeC’G øe »LÉLõdG AÉ£¨dG íàaG ∂dòH ΩÉ«≤∏d .»LÉLõdG AÉ£¨dG ™∏NG
.á≤©∏ªH ø©à°SG »LÉLõdG AÉ£¨dG ™∏N Qò©J ádÉM
.6 .êQÉî∏d ¿ôØdG áѪd ÜòLG
.7 :´ƒædG ¢ùØf øe iôNCÉH ¿ôØdG áѪd ∫óÑà°SG
,§∏"
230 :»FÉHô¡μdG ó¡÷G
,•Gh 40 :IQó≤dG
,G9 :IGhódG
Ω°300 :IQGô◊G áehÉ≤e
.8 .¿ôØdG áѪ∏d »LÉLõdG AÉ£¨dG Ö«côJ óYCG
.9 .≥«∏©àdG ¿ÉÑ°†b äÉμÑ°T Ö«côàH ºb
.10 .iôNCG Iôe »fGhC’G áWƒa êôNCG
.11 .ô¡°üªdG π«°UƒJ óYCG
.12 .ójóL øe πª©J ¿ôØdG IAÉ°VEG ¿CG ócCÉJ
AÓª©dG áeóN
øëfh .áÑ°SÉæªdG ∂à¡Lh ƒg AÓª©dG áeóîd Éfõcôªa ,ìÓ°UEÓd ∑RÉ¡L êÉàMG GPEG
ájQhô°V ô«Z äGQÉjR ájCG Öæéàd É°†jCGh ,á∏μ°ûª∏d Ö°SÉæªdG πëdG ≈dEG ɪFGO π°Uƒàf
.áeóîdG »æa øe
FD ™æ°üdG ºbQh E èàæªdG ºbQ
™æ°üdG ºbQh (E-Nr.) èàæªdG ºbQ ôcP ≈Lôj áeóîdG õcôªH ∫É°üJ’G óæY
™æ°üdG áMƒd óLƒJh .áë«ë°üdG IQƒ°ûªdG ∂d Ωó≤f ¿CG ™«£à°ùf ≈àM
(FD-Nr.)
¿ôØdG ÜÉH ¿ƒμj ÉeóæY »¡£dG õ«ëd »∏Ø°ùdG AõédG ΩÉeCG ΩÉbQC’G É¡H ¿hóªdG
»c ,AÓª©dG áeóN ∞JÉg ºbQh ∑RÉ¡L äÉfÉ«H øjhóJ Éæg ∂æμªj .ÉMƒàØe
.äÉfÉ«ÑdG √òg ≈dEG êÉ«àM’G óæY πjƒW âbƒd åëÑ∏d ô£°†J ’
E-Nr. èàæªdG ºbQFD-Nr. ™æ°üdG ºbQ
O
AÓª©dG áeóN
≈àM ÅWÉîdG ∫ɪ©à°S’G ádÉM »a ¿ÉéªdÉH â°ù«d áeóîdG »æa IQÉjR ¿CG ≈YGôj
.¿Éª°†dG Iôàa AÉæKCG
õcôe ÜôbCÉH ∫É°üJ’G äÉfÉ«H AÓª©dG áeóN õcGôªd ≥aôªdG π«dódG »a hCG Éæg óéJ
.¿Gó∏ÑdG ™«ªL »a AÓª©dG áeóîd
10
ÜÉÑdG êÉLR Ö«côJ
.1 .§°ShC’G êÉLõdG Ö«côàH ºb
äɶMÓe
■.GAhô≤e »∏Ø°ùdG E õeQ ¿Éc GPEG ,í«ë°U πμ°ûH É
k
Ñcôe §°ShC’G êÉLõdG ¿ƒμj
■ πeÉëŸG ™«ªL õμJôJ ¿CG Öéj .í«ë°U πμ°ûH êÉLõdG QGô≤à°SG øe ócCÉJ
.ƒà°ùe πμ°ûH êÉLõdG í£°S ≈∏Y á«WÉ£ŸG
.2 .»∏NGódG êÉLõdG Ö«côJ óYCG
â«ÑãàdG ™°VGƒe ‘ á©HQC’G â«ÑãàdG ÒHGƒN ™«ªL ô≤à°ùJ ¿CG Öéj
:á¶MÓe
.É¡d á°ü°üîŸG
.3 .¿ôØdG ÜÉH ≥∏ZCGh ø«eCÉàdG ô«HGƒN ádGREÉH ºb
RÉ¡édG ÜÉH Ö«côJh ∂a
.π°†aCG ∞«¶æJ iƒà°ùe ¿Éª°†d Ió«æ©dG äÉNÉ°ùJ’G ádÉM »a ¿ôØdG ÜÉH ™∏N øμªj
.ájOÉ©dG äÉNÉ°ùJ’G ™e ∂dòH í°üæf ’h
RÉ¡édG ÜÉH ∂a
.1 .ÉeɪJ ¿ôØdG ÜÉH íàaG
.2 .(a) ø«eCÉàdG QƒHÉîH ≈檫dGh iô°ù«dG ø«à∏°üتdG â«ÑãàH ºb
.ÉeÉ“ äÓ°üØŸG ∞jhÉŒ ‘ ÚeCÉàdG ÒHGƒN ∫ÉNOEG Öéj
:á¶MÓe
.3 .(b) °30 »dGƒM ájhGõH ¬≤∏ZCG ºK ∂jój Éà∏μH ø«ÑfÉédG øe ¿ôØdG ÜÉH ∂°ùeCG
ab
.4 .êQÉî∏d ¬Ñë°SGh Ó«∏b ¿ôØdG ÜÉH ™aQG
ÖÑ°ùJh äÓ°üØŸG »æãæJ ¿CG øμÁ å«M .É
k
eÉ“ ¿ôØdG ÜÉH ≥∏¨J ’
:á¶MÓe
.(π«eÉæjE’G) Éæ«ŸG á≤Ñ£H GQGöVCG
RÉ¡édG ÜÉH Ö«côJ
.1 .ø«ÑfÉédG øe ∂jój Éà∏μH ¿ôØdG ÜÉH ∂°ùeCG
.2 .(a) ¿ôØdG ∞jhÉéJ »a äÓ°üتdG πNOCG
.
(b) ¿ôØdG QÉWEG ‘ âÑãj ¿CG Öéj äÓ°üØŸÉH »∏Ø°ùdG õ◊G :á¶MÓe
b a
.3 .πØ°SC’ ÜÉÑdG ∫õfCG
.4 .ø«eCÉàdG ô«HGƒN êôNCG
:
!áHÉ°UE’G ô£N
πμ°ûH á∏°üØe ¥Ó¨fG ádÉM »a hCG ó°üb ¿hO êQÉî∏d ¿ôØdG ÜÉH •ƒ≤°S ádÉM »a
.AÓª©dG áeóîH π°üJG .á∏°üتdG »a ∑ój πNóJ ’ ,…OGóJQG
≥«∏©àdG ¿ÉÑ°†b äÉμÑ°T Ö«côJh ∂a
.π°†aCG πμ°ûH ∞«¶æà∏d ≥«∏©àdG ¿ÉÑ°†b äÉμÑ°T ∂a ∂æμªj
≥«∏©àdG ¿ÉÑ°†b äÉμÑ°T ∂a
øjQGóédG ≈∏Y •É≤f çÓK ≈∏Y áàÑãe ≥«∏©àdG ¿ÉÑ°†b äÉμÑ°T øe áμÑ°T πc
.»¡£dG õ«M πNGO ø««ÑfÉédG
.1 .»¡£dG õ«M ∞°üàæe ≈dEG É¡Ñë°SGh ΩÉeC’G øe ≥«∏©àdG ¿ÉÑ°†b áμÑ°T ∂°ùeCG
.∞jƒéàdG øe ≥«∏©àdG ¿ÉÑ°†b áμÑ°ûd »eÉeC’G ±É£îdG ∂Øæ«a
.2 QGóé∏d á«Ø∏îdG ∞jhÉéàdG øe É¡Ñë°SGh ,™°ShCG πμ°ûH ≥«∏©àdG ¿ÉÑ°†b áμÑ°T íàaG
.»ÑfÉédG
.3 .»¡£dG õ«ëd IRÉØëdG áfÉ£ÑdG ∂°ùeCG
.4 .»¡£dG õ«M øe ≥«∏©àdG ¿ÉÑ°†b áμÑ°T êôNCG
b
a
≥«∏©àdG ¿ÉÑ°†b äÉμÑ°T Ö«côJ
.1 .»¡£dG õ«ëd IRÉØëdG áfÉ£ÑdG ∂°ùeCG
.2 .»ÑfÉédG QGóé∏d á«Ø∏îdG ∞jhÉéàdG »a ≥«∏©àdG ¿ÉÑ°†b áμÑ°T äÉaÉ£N πNOCG
.3 .∞jƒéàdG »a ≥«∏©àdG ¿ÉÑ°†b áμÑ°ûd »eÉeC’G ±É£îdG §¨°VG
9
¥É£ædGäÉضæªdG
á≤Ñ£H á«∏£ªdG í£°SC’G
í£°ùdG) (π«eÉæjEG) Éæ«e
(¢ù∏eC’G
»¡£dG õ«M IAÉ°VEG 𫨰ûJ ∂æμªj ,∞«¶æàdG π«¡°ùàd
äÉضæªdG ™°V .Ωhõ∏dG óæY RÉ¡édG ÜÉH ∂ah
πîdGh AɪdG ∫ƒ∏ëe hCG ¥Gƒ°SC’G »a ádhGóàªdG
ó∏L á©£b hCG áÑWQh áæ«d ¢Tɪb á©£b ΩGóîà°SÉH
ºbh .∂dP ó©H áæ«d áWƒØH É¡ë°ùeGh ,òaGƒædG ∞«¶æàd
áWƒa ΩGóîà°SÉH ábôàëªdG ᪩WC’G ÉjÉ≤H ájô£àH
í°üæf ,Iójó°ûdG äÉNÉ°ùJ’G ™e .∞¶æeh áÑWQ
øμªjh .πédG πãe ΩGƒ≤H ¿GôaCG ∞¶æe ΩGóîà°SÉH
»¡£dG õ«M ∑ôJG ∞«¶æàdG ó©Hh .ô°TÉÑe πμ°ûH ¬©°Vh
.∞é«d ÉMƒàØe
∞«¶æàdG á«JGP í£°SC’G
(áæ°ûîdG í£°SC’G)
á«JGP í£°SC’G :´ƒ°Vƒe »a IOQGƒdG äGOÉ°TQE’G ≈YGôJ
∞«¶æàdG
ÜÉÑdG êÉLR :êÉLõdG äÉضæe
Ωóîà°ùJ ’ .ºYÉf πjóæe ΩGóîà°SÉH ∞«¶æàdÉH ºb
.êÉLR ᣰTÉc
áѪ∏d »LÉLõdG AÉ£¨dG
¿ôØdG
:øNÉ°S »fƒHÉ°U ∫ƒ∏ëe
.∞«¶æJ áWƒØH ∞«¶æàdÉH ºb
ΩÉμME’G QÉWEG
!¬μØH º≤J ’
:øNÉ°S »fƒHÉ°U ∫ƒ∏ëe
.¬μëH º≤J ’ .∞«¶æJ áWƒØH ∞«¶æàdÉH ºb
¿ÉÑ°†≤dG :øNÉ°S »fƒHÉ°U ∫ƒ∏ëe
.IÉ°Tôa hCG ∞«¶æJ áWƒØH É¡Ø«¶æàH ºb ºK É¡©≤fG
äÉ«dɪμdG :øNÉ°S »fƒHÉ°U ∫ƒ∏ëe
.IÉ°Tôa hCG ∞«¶æJ áWƒØH É¡Ø«¶æàH ºb ºK É¡©≤fG
»¡£dG õ«ëd IRÉØëdG áfÉ£ÑdG
.(π«eÉæjE’G) É櫪dG øe ∞«¶æàdG á«JGP á≤Ñ£H IÉ£¨e »¡£dG õ«ëd IRÉØëdG äÉfÉ£ÑdG
PGPôdG äGô£b ¿CG ≈YGôjh .É
k
«JGP É
k
Ø«¶æJ í£°SC’G ∞«¶æJ ºàj ,¿ôØdG 𫨰ûJ AÉæKCÉa
.äGôe IóY ¿ôØdG 𫨰ûJ ó©H ’EG »ØàîJ ’ É
k
«Ñ°ùf Iô«ÑμdG
∞«¶æàdG á«JGP í£°SC’G
í£°SC’G √òg ∞¶æJ ’ .∞«¶æàdG á«JGP IRÉØM áfÉ£ÑH á«∏£e á«ÑfÉédG ¿GQóédG
á≤ÑW ≈∏Y §«°ùH »fƒd ô«¨J Qƒ¡X ¿EÉa º∏©∏dh .¿GôaC’G ∞«¶æJ OGƒe ΩGóîà°SÉH
.»JGòdG ∞«¶æàdG á«°UÉN ≈∏Y ôKDƒj ’ (π«eÉæjE’G) É櫪dG
ÜÉÑdG êÉLR Ö«côJh ∂a
.π°†aCG πμ°ûH ∞«¶æàdG á«∏ªY AGôLE’ ¿ôØdG ÜÉH øe á«LÉLõdG ìGƒdC’G ∂a ∂æμªj
ÜÉÑdG êÉLR ∂a
.1 .ÉeɪJ ¿ôØdG ÜÉH íàaG
.2 .ø«eCÉàdG QƒHÉîH ≈檫dGh iô°ù«dG ø«à∏°üتdG â«ÑãàH ºb
.ÉeÉ“ äÓ°üØŸG ∞jhÉŒ ‘ ÚeCÉàdG ÒHGƒN ∫ÉNOEG Öéj
:á¶MÓe
.3 â«ÑãàdG ô«HGƒN ∂ØæJ ¿CG ≈dEG A»°ûdG ¢†©H »∏NGódG êÉLõ∏d »∏Ø°ùdG AõédG ™aQG
.(1) â«ÑãàdG ™°Vƒe øe
.4 øe â«ÑãàdG ô«HGƒN ∂ØæJ ¿CG ≈dEG ¢UôëH »∏NGódG êÉLõ∏d …ƒ∏©dG AõédG ™aQG
.(2) â«ÑãàdG ™°Vƒe
!ΩÉg ¬«ÑæJ
.»∏NGódG êÉLõdÉH É≤°üà∏e §°ShC’G êÉLõdG π¶j ób »∏NGódG êÉLõdG ™aQ óæY
.§≤°ùj ød §°ShC’G êÉLõdG ¿CG ócCÉJ
1.
2.
.5 .»∏NGódG êÉLõdG ™∏NG
.6 .§°ShC’G êÉLõdG ™∏NG
.á«WÉ£e πeÉëà πH ,â«ÑãJ ÒHGƒîH âÑãe ÒZ §°ShC’G êÉLõdG :á¶MÓe
.áªYÉf áWƒah êÉLR ∞¶æe ΩGóîà°SÉH á«LÉLõdG ìGƒdC’G ∞«¶æàH ºb
:
!áHÉ°UE’G ô£N
êÉLR ᣰTÉc Ωóîà°ùJ ’ .äÉ≤≤°ûJ ≈dEG Qƒ£àJ ób RÉ¡édG ÜÉH êÉLR ¢ThóN
.πcBÉà∏d áÑÑ°ùe hCG áæ°ûN ∞«¶æJ OGƒe hCG

8
»μ«JÉeƒJhC’G ±É≤jE’Gh 𫨰ûàdG
≥M’ âbh »a É¡£Ñ°†J »àdG á«æeõdG IôàØdG ≈∏Y AÉæH ô«ªëàdG hCG õ«ÑîdG á«∏ªY CGóÑJ
.∂°ùØæH √QÉàîJ
.1 ô¡¶Jh
V
õeôdG ¢Vô©dG IóMh »a ¢†eƒj ¿CG ≈dEG
0
QõdG ≈∏Y §¨°VG
.QÉØ°UCG 3
.2
¿É«ÑdG á°TÉ°T »a ¢†eƒJ ¿CG ≈dEG iôNCG Iôe
0
»Ø«XƒdG QõdG ≈∏Y §¨°VG
.“A” õeôdG ¢†eƒj ɪc ÜhÉæàdÉH “0.00” h “dur”
.17:30 ∫ÉãŸG π«Ñ°S ≈∏Y ‹É◊G âbƒdG
.3 𫨰ûà∏d á«æeõdG IôàØdG §Ñ°†H ºb “-” h “+” QGQRC’G ΩGóîà°SÉH
.(IóMGh áYÉ°S ,∫ÉãªdG π«Ñ°S ≈∏Y)
.äÉYÉ°S 10 ≈àM IóMGh á≤«bO øe 𫨰ûà∏d á«æeõdG IÎØdG §Ñ°V øμÁ
.4 ¿É«ÑdG á°TÉ°T »a ¢†eƒj ¿CG ≈dEG ,iôNCG Iôe
0
»Ø«XƒdG QõdG ≈∏Y §¨°VG
IôàØdG ≈dEG áaÉ°VE’ÉH »dÉëdG âbƒdG) “18:30” ±É≤jE’G âbh ¢†eƒjh “End”
.ÜhÉæàdÉH (𫨰ûà∏d áWƒÑ°†ªdG á«æeõdG
.5 ∫ÉãªdG π«Ñ°S ≈∏Y) ±É≤jE’G âbh §Ñ°†H ºb - h + QGQRC’G ΩGóîà°SÉH
.(19:30 áYÉ°ùdG
.á≤«bO 59 h áYÉ°S 23 ≈àM ±É≤jE’G âbh §Ñ°V øμÁ
.6 .áHƒZôªdG IQGôëdG áLQOh ø«î°ùàdG ´ƒf §Ñ°VG
.
Û
õeôdG »Øàîj ¿É«ÑdG á°TÉ°T ‘
.iôNCG Iôe 19:30 áYÉ°ùdG ∞bƒàjh 18:30 áYÉ°ùdG ∫ÉãŸG Gòg ‘ ¿ôØdG πª©j
𫨰ûà∏d á«æeõdG IôàØdG AÉ¡àfG
.A õeôdG ¢†eƒjh ¿É«ÑdG á°TÉ°T øe
Û
õeôdG »Øàîjh ,á«Jƒ°U IQÉ°TEG Qó°üJ
.1 ™°Vh ≈∏Y áØ«XƒdG QÉ«àNG ìÉàØeh IQGôëdG áLQO QÉ«àNG ìÉàØe §Ñ°VG
.±É≤jE’G
.2 .
Û
õeôdG ô¡¶j ¿CG ≈dEG
0
QõdG ≈∏Y §¨°VG
.ájhó«dG á≤jô£dG ¤EG iôNCG Iôe ¿ôØdG π≤àæj
áWƒÑ°†ªdG º«≤dG ô««¨Jh ¢VôY
𫨰ûàdG ¥ô£H »≤ÑàªdG 𫨰ûàdG âbhh áWƒÑ°†ªdG º«≤dG ô««¨Jh ¢VôY øμªj
.âbh …CG »a ¿É«ÑdG á°TÉ°T »a á«fhôàμdE’G áYÉ°ù∏d áØ∏àîªdG
ô«°ü≤dG âbƒdG »JÉ≤«ªd »≤ÑàªdG 𫨰ûàdG âbh ¢VôY
.¢Vô©dG IóMh »a
V
õeôdG ¢†eƒj ¿CG ≈dEG
0
QõdG ≈∏Y §¨°VG
ΩGóîà°SÉH √ô««¨J øμªjh »≤ÑàªdG 𫨰ûàdG âbh ¢Vô©dG IóMh »a ô¡¶j
.
“-” h “+” QGQRC’G
.±É≤jE’G âbhh 𫨰ûà∏d á«æeõdG IôàØdG ô««¨Jh ¢VôY
.1 .¿É«ÑdG á°TÉ°T »a
V
õeôdG ¢†eƒj ¿CG ≈dEG
0
QõdG ≈∏Y §¨°VG
.2 IôàØdGh “dur” ¿É«ÑdG á°TÉ°T »a ¢†eƒj ¿CG ≈dEG iôNCG Iôe
0
QõdG ≈∏Y §¨°VG
.A õeôdG ¢†eƒj ɪc ÜhÉæàdÉH 𫨰ûà∏d á«≤ÑàªdG á«æeõdG
á«dBG ±É≤jEG ºàj .
“-” h “+” QGQRC’G ≥jôW øY 𫨰ûà∏d á«æeõdG IôàØdG ô««¨J øμªj
.âbƒdG ¢ùØf »a “-” h “+” øjQõdG ≈∏Y §¨°†dG ∫ÓN øe á«æeõdG 𫨰ûàdG
.3 âbhh “End” ¿É«ÑdG á°TÉ°T »a ¢†eƒj ¿CG ≈dEG iôNCG Iôe
0
QõdG ≈∏Y §¨°VG
.ÜhÉæàdÉH •ƒÑ°†ªdG ±É≤jE’G
𫨰ûàdG á«dBG ±É≤jEG ºàj .
“-” h “+” QGQRC’G ΩGóîà°SÉH ±É≤jE’G âbh ô««¨J øμªj
.âbƒdG ¢ùØf »a “-” h “+” øjQõdG ≈∏Y §¨°†dG ∫ÓN øe á«æeõdG
∞«¶æàdGh ájÉæ©dG
á«Ø«XƒdG ¬JAÉØch ¬dɪL ≈∏Y ßaÉëJ ΩɪàgÉH ¬Ø«¶æJh ¿ôØdÉH Ió«édG ájÉæ©dG
á≤jô£H ¬Ø«¶æJh ¿ôØdÉH ájÉæ©dG á«Ø«c »∏j ɪ«a ∂d í°Vƒfh .á∏jƒW IôàØd
.áë«ë°U
äɶMÓe
■ πãe áØ∏àîe äÉeÉN ΩGóîà°S’ ™LôJ ¿ôØdG á¡LGh ¿GƒdCG »a áثأdG ¥hôØdG
.¿ó©ªdGh ∂«à°SÓÑdGh êÉLõdG
■ äÉ°SÉμ©fG ≈dEG ™LôJ •ƒ£îdÉc hóÑJ »àdGh ÜÉÑdG ìƒd ≈∏Y IOƒLƒªdG ∫Ó¶dG
.¿ôØdG áѪd øY áéJÉf á«Fƒ°V
■ óbh .ájɨ∏d á«dÉY IQGôM äÉLQO ≈∏Y (π«eÉæjE’G) É櫪dG á≤ÑW ∞«ØéJ ºàj
.É¡∏ªY ≈∏Y ôKDƒj ’h »©«ÑW ôeCG Gògh .áØ«ØW á«fƒd äÉaÓàNG »a ∂dP ÖÑ°ùàj
.πeÉc πμ°ûH (π«eÉæjE’G) É櫪dG á≤Ñ£H É¡FÓW øμªj ’ á©«aôdG ìGƒdC’G ±GƒM
¢üFÉ°üN ≈∏Y ∂dP ôKDƒj ’h .áæ°ûN ±GƒëdG √òg ¿ƒμJ ó≤a ,∂dòd
k
áé«àfh
.πcBÉàdG øe ájɪëdG
:
!»FÉHô¡μdG ≥©°üdG ô£N
Ωóîà°ùJ ’ .»FÉHô¡c ≥©°U çhóM »a ÖÑ°ùàJ ób RÉ¡édG »a πZƒàJ »àdG áHƒWôdG
.QÉîÑdÉH ∞«¶æJ Iõ¡LCG hCG »dÉ©dG §¨°†dÉH ∞«¶æJ Iõ¡LCG ájCG
:
!¥hôëH áHÉ°UE’G ô£N
ô°UÉæY hCG »¡£dG õ«ëd á«∏NGódG í£°SC’G GóHCG ¢ùª∏J ’ .ájɨ∏d ÉæNÉ°S RÉ¡édG íÑ°üj
øY ∫ÉØWC’G ó©HCGh .OôÑj RÉ¡édG ∑ôJ ≈∏Y É
k
ªFGO ¢UôMG .áæNÉ°S »gh ø«î°ùàdG
.RÉ¡édG
äÉضæªdG
≈YGôJ ,áÑ°SÉæe ô«Z äÉضæe ΩGóîà°SG π©ØH áØ∏àîªdG í£°SC’G Qô°†àJ ’ ≈àM
.á«dÉàdG äɪ«∏©àdG
Ωóîà°ùJ ’
■,á°TOÉN hCG áæ°ûN äÉضæe ájCG
■∫ƒëμdG øe á«dÉY áÑ°ùf ≈∏Y …ƒàëJ äÉضæe ájCG
■áæ°ûN ∞«¶æJ äÉéæØ°SEG hCG äÉØ«d ájCG
■.QÉîÑdÉH hCG »dÉ©dG §¨°†dÉH ∞«¶æJ Iõ¡LCG ájCG
.É¡eGóîà°SG πÑb G
k
ó«L IójóédG á«éæØ°SE’G •ƒØdG π°ùZG
¥É£ædGäÉضæªdG
êQÉîdG øe RÉ¡édG :øNÉ°S »fƒHÉ°U ∫ƒ∏ëe
ó©H ∞«ØéàdÉH ºb ºK ,∞«¶æJ áWƒØH ∞«¶æàdÉH ºb
êÉLR ∞¶æe Ωóîà°ùJ ’ .ºYÉf πjóæe ΩGóîà°SÉH ∂dP
.êÉLR ᣰTÉc hCG
π«à°S ¢ù∏fÉà°S’G :øNÉ°S »fƒHÉ°U ∫ƒ∏ëe
ó©H ∞«ØéàdÉH ºb ºK ,∞«¶æJ áWƒØH ∞«¶æàdÉH ºb
ájô«édG ™≤ÑdG ádGREÉH ºb .ºYÉf πjóæe ΩGóîà°SÉH ∂dP
ó≤a .QƒØdG ≈∏Y ¢†«ÑdG ¢VÉ«Hh É°ûædG ™≤Hh á«ægódGh
.™≤ÑdG √òg âëJ CGó°üdG ¿
s
ƒμàj
á°ü°üîàªdG ôLÉàªdG hCG AÓª©dG áeóN iód ôaGƒàJ
í£°SC’G Ö°SÉæJ π«à°S ¢ù∏fÉà°SÓd á°UÉN äÉضæe
ᣰSGƒH ájÉæ©dG IOÉe øe á≤«bQ á≤ÑW ™°V .áæNÉ°ùdG
.áªYÉf áWƒa
∂«à°SÓÑdGh Ωƒ«æeƒdC’G :êÉLõdG äÉضæe
.ºYÉf πjóæe ΩGóîà°SÉH ∞«¶æàdÉH ºb

7
¿ôØdG ø«î°ùJ
≥∏¨e ƒgh ¿ôØdG ø«î°ùàH ºb ,IójóédG AÉ«°TCÓd áÑëà°ùªdG ô«Z íFGhôdG øe ¢ü∏îà∏d
.ÆQÉah
.1 .»∏Ø°ùdG/…ƒ∏©dG ø«î°ùàdG 𫨰ûJ á≤jôW ≈∏Y áØ«XƒdG QÉ«àNG ìÉàØe QOCG
.2 .iƒ°ü≤dG IQGôëdG áLQO ≈∏Y IQGôëdG áLQO QÉ«àNG ìÉàØe QOCG
.3 .á≤«bO 40 ó©H ¿ôØdG ±É≤jEÉH ºb
.á≤£≤W äGƒ°UCG ¿ôØdG øe Qó°üJ ¿CG øμªj ≈dhC’G ø«î°ùàdG á«∏ªY AÉæKCG
:á¶MÓe
¿ôØ∏d ≥MÓdG ∞«¶æàdG
.1 .øNÉ°S »fƒHÉ°U ∫ƒ∏ëªH »¡£dG õ«M ∞«¶æàH ºb
.2 .≥«∏©àdG äÉμÑ°T Ö«cÎH ºb
äÉ«dɪμdG ∞«¶æJ
.∞«¶æJ áWƒah ÅaGO »fƒHÉ°U ∫ƒ∏ëªH G
k
ó«L É¡Ø«¶æàH ºb äÉ«dɪμdG ΩGóîà°SG πÑb
¿ôØdG ∫ɪ©à°SG á≤jôW
πNGó∏d ∂jôëà∏d á∏HÉ≤dG ∫ɪ©à°S’G ô°UÉæY
.πNGó∏d ∂jôëà∏d ¿ÓHÉb IQGôëdG áLQO QÉ«àNG ìÉàØeh áØ«XƒdG QÉ«àNG ìÉàØe
.»æ©ªdG ∫ɪ©à°S’G ô°üæY ≈∏Y §¨°VG »LQÉîdG hCG »∏NGódG ™°VƒdG ≈∏Y â«Ñãà∏d
»¡£dG ¿ôa 𫨰ûJ
.1 .áØ«XƒdG QÉ«àNG ìÉàØe ΩGóîà°SÉH ø«î°ùàdG ´ƒf §Ñ°VG
.2 .IQGôëdG áLQO QÉ«àNG ìÉàØe ΩGóîà°SÉH IQGôëdG áLQO §Ñ°VG
.ø«î°ùàdÉH ¿ôØdG CGóÑ«a
¿ôØdG ±É≤jEG
.ôØ°üdG ™°Vh ≈∏Y IQGôëdG áLQO QÉ«àNG ìÉàØeh áØ«XƒdG QÉ«àNG ìÉàØe QOCG
§Ñ°†dG ´É°VhCG ô««¨J
≥jôW øY âbh …CG »a ájGƒ°ûdG áLQO hCG IQGôëdG áLQOh ø«î°ùàdG ´ƒf ô««¨J ∂æμªj
.»æ©ªdG QÉ«àN’G ìÉàØe
ø«î°ùàdG
»a .zAGƒ¡dG ôjhóJ{ ø«î°ùàdG ´ƒf Ωóîà°SG ,øμªj Ée ´ô°SCÉH »¡£dG õ«M ø«î°ùàd
´ƒf §Ñ°†H ºb ,(¿É«ÑdG áѪd AÉØ£fG) áWƒÑ°†ªdG IQGôëdG áLQO ≈dEG ∫ƒ°UƒdG ádÉM
.܃ZôªdG ø«î°ùàdG
á«fhôàμdE’G áYÉ°ùdG ΩGóîà°SG
:á«dÉàdG RƒeôdG ¢Vô©dG IóMh »a ô¡¶J ób »≤ÑàªdG âbƒdGh áYÉ°ùdG ¿É«H ≈∏Y IhÓY
õeôdG≈橪dG
Ú
.≥FÉbódGh äÉYÉ°ùdG ¿É«H ø«H á£≤f
.âbƒdG §Ñ°V ø쪪dG øe ¿ƒμj ÉeóæY ¢†eƒJ
V
ô«°ü≤dG âbƒdG »JÉ≤«e
.ô«°ü≤dG âbƒdG »JÉ≤«e 𫨰ûJ ä’ÉM ¢Vô©j
A
á«μ«JÉeƒJhC’G á≤jô£dG
.á«μ«JÉeƒJhC’G á≤jô£dG 𫨰ûJ ä’ÉM ¢Vô©j
Û
𫨰ûàdG ájõgÉL
.𫨰ûà∏d GõgÉL ¿ôØdG ¿ƒμj áeÓ©dG √òg Qƒ¡X ádÉM »a
âbƒdG §Ñ°V
IóMh »a ¢†eƒj »FÉHô¡μdG QÉ«àdG ´É£≤fG hCG AÉHô¡μdÉH RÉ¡édG π«°UƒJ ó©H
.“A” õeôdGh QÉØ°UCG áKÓK ¢Vô©dG
.1 .¢Vô©dG IóMh »a á£≤ædG ¢†eƒJ ¿CG ≈dEG
0
QõdG ≈∏Y §¨°VG
.2 .»dÉëdG âbƒdG §Ñ°VG “-” h “+” QGQRC’G ΩGóîà°SÉH
.•ƒÑ°†ªdG âbƒdG OɪàYG ºàj ¿GƒK
7 ó©Hh
¢†eƒJ ¿CG ≈dEG
“-” h “+” QGQRC’G ≈∏Y §¨°VG •ƒÑ°†ªdG âbƒdG ô««¨àd :á¶MÓe
“+” QGQRC’G ΩGóîà°SÉH »dÉëdG âbƒdG §Ñ°†H ºb òFóæY .¢Vô©dG IóMh »a á£≤ædG
.
“-” h
ô«°ü≤dG âbƒdG »JÉ≤«e §Ñ°V
Ióe §Ñ°V øμªj .¿ôØdG ∞FÉXh πªY ≈∏Y ô«KCÉJ …CG ô«°ü≤dG âbƒdG »JÉ≤«ªd ¿ƒμj ’
.á≤«bO
59 h áYÉ°S 23 ≈dEG IóMGh á≤«bO øe ô«°ü≤dG âbƒdG »JÉ≤«e
.1 ô¡¶Jh
V
õeôdG ¢Vô©dG IóMh »a ¢†eƒj ¿CG ≈dEG
0
QõdG ≈∏Y §¨°VG
.QÉØ°UCG
3
.2
.áHƒZôªdG IóªdG §Ñ°VG “-” h “+” QGQRC’G ΩGóîà°SÉH
.á«Jƒ°U IQÉ°TEG Qó°üJ âbƒdG AÉ°†≤fG ó©H
äɶMÓe
■ IóMh »a ¢†eƒj ¿CG ≈dEG
0
QõdG ≈∏Y §¨°VG »≤ÑàªdG 𫨰ûàdG âbh ô««¨àd
“+” QGQRC’G ΩGóîà°SÉH »≤ÑàªdG 𫨰ûàdG âbh ô««¨àH ºb ºK .
V
õeôdG ¢Vô©dG
.“-” h
■ .¢Vô©dG IóMh »a õeôdG ¢†eƒj ¿CG ≈dEG
0
QõdG ≈∏Y §¨°VG §Ñ°†dG ™°Vh ƒëªd
.âbƒdG ¢ùØf »a “-” h “+” QGQRC’G ≈∏Y §¨°VG ºK
á«Jƒ°üdG IQÉ°TE’G ±É≤jEG
.
V
õeôdG »Øàîj ¿CG ≈dEG “
0
” QõdG ≈∏Y §¨°VG
.É«μ«JÉeƒJhCG IQÉ°TE’G ∞bƒàJ ≥FÉbO ™Ñ°S ó©H
á«Jƒ°üdG IQÉ°TE’G ô««¨J
.áØ∏àîe á«Jƒ°U äGQÉ°TEG 3 ôaGƒàJ
.1 .âbƒdG ¢ùØf »a “-” h “+” QGQRC’G ≈∏Y §¨°VG
.2 .
0
QõdG ≈∏Y §¨°VG
.
“ton.1” ∫ÉãªdG π«Ñ°S ≈∏Y ,á«dÉëdG á«Jƒ°üdG IQÉ°TE’G ¿É«ÑdG á°TÉ°T »a ô¡¶J
.3 .iôNCG á«Jƒ°U IQÉ°TEG QÉ«àN’ “-” QõdG ≈∏Y §¨°VG
á«æeõdG 𫨰ûàdG á«dBG §Ñ°V
.É«μ«JÉeƒJhCG ¿ôØdG ±É≤jEGh 𫨰ûJ á«fhôàμdE’G áYÉ°ùdG ≥jôW øY ∂æμªj
»μ«JÉeƒJhC’G ±É≤jE’G
.1 ô¡¶Jh
V
õeôdG ¢Vô©dG IóMh »a ¢†eƒj ¿CG ≈dEG
0
QõdG ≈∏Y §¨°VG
.QÉØ°UCG 3
.2
¿É«ÑdG á°TÉ°T »a ¢†eƒJ ¿CG ≈dEG iôNCG Iôe
0
»Ø«XƒdG QõdG ≈∏Y §¨°VG
.
“A” õeôdG ¢†eƒj ɪc ÜhÉæàdÉH “0.00” h “dur”
.3
.𫨰ûà∏d á«æeõdG IôàØdG §Ñ°†H ºb - h + QGQRC’G ΩGóîà°SÉH
.äÉYÉ°S 10 ≈àM IóMGh á≤«bO øe 𫨰ûà∏d á«æeõdG IÎØdG §Ñ°V øμÁ
.4 .áHƒZôªdG IQGôëdG áLQOh ø«î°ùàdG ´ƒf §Ñ°VG
.»dÉëdG âbƒdGh
A õeôdG ¿É«ÑdG á°TÉ°T »a ô¡¶jh ¿ôØdG 𫨰ûJ CGóÑj
𫨰ûà∏d á«æeõdG IôàØdG AÉ¡àfG
.A õeôdG ¢†eƒjh ¿É«ÑdG á°TÉ°T øe
Û
õeôdG »Øàîjh ,á«Jƒ°U IQÉ°TEG Qó°üJ
.1 ™°Vh ≈∏Y áØ«XƒdG QÉ«àNG ìÉàØeh IQGôëdG áLQO QÉ«àNG ìÉàØe §Ñ°VG
.±É≤jE’G
.2 .
Û
õeôdG ô¡¶j ¿CG ≈dEG
0
QõdG ≈∏Y §¨°VG
.ájhó«dG á≤jô£dG ≈dEG iôNCG Iôe ¿ôØdG π≤àæj
6
á«fhôàμdE’G áYÉ°ùdG
≥Ñ°ùe πμ°ûH Óãe ∂æμªj .á«fhôàμdE’G áYÉ°ùdG ≥jôW øY ¿ôØdG »a ºμëàdG ∂æμªj
á«æeõdG 𫨰ûàdG á«dBG ¬«a Ωƒ≤J …òdG hCG ¿ôØdG 𫨰ûJ ¬«a ºàj …òdG âbƒdG QÉ«àNG
»JÉ≤«ªc á«fhôàμdE’G áYÉ°ùdG ΩGóîà°SG É°†jCG øμªj .»¡£dG hCG õ«ÑîdG á«∏ªY AÉ¡fEÉH
.ô«°üb âbh
á«fhôàμdE’G áYÉ°ù∏d á«Ø«XƒdG QGQRC’G
õeôdG≈橪dGΩGóîà°S’G
0
á«fhôàμdE’G áYÉ°ùdGâbƒdG hCG IóªdG §Ñ°V
-
¢übÉfâbƒdG hCG IóªdG π«∏≤J
+óFGRâbƒdG hCG IóªdG IOÉjR
äÉ«dɪμdG
¢UôMG .áØ∏àîe ´ÉØJQG äÉjƒà°ùe 4 ≈∏Y »¡£dG õ«M »a äÉ«dɪμdG ∫ÉNOEG øμªj
≈YGôj .ÜÉÑdG êÉLR ¢ùeÓJ ’ ≈àM ájÉ¡ædG ≈àM äÉ«dɪμdG ∫ÉNOEG ≈∏Y ɪFGO
.í«ë°U πμ°ûH »¡£dG õ«M »a äÉ«dɪμdG ∫ÉNOEG ɪFGO
4
3
2
1
.ÉeɪJ äÉ«dɪμdG êGôNEG øμªj êGôNEÓd á∏HÉ≤dG ¿ÉÑ°†≤dG ΩGóîà°SÉH
∂d ìÉàj ∂dòHh .Ö∏≤æJ ¿CG ¿hO ø«ã∏ãdG QGó≤ªH êQÉî∏d äÉ«dɪμdG Öë°S ∂æμªj
.ádƒ¡°ùH ᪩WC’G êGôNEG
Gòg »Øàîj ,iôNCG Iôe OôÑJ ¿CG OôéªHh .øî°ùJ ÉeóæY äÉ«dɪμ∏d √ƒ°ûJ çóëj ób
.É¡àØ«Xh ≈∏Y ô«KCÉJ …CG ∑ôJ ¿hóH √ƒ°ûàdG
ôÑY hCG á°ü°üîàªdG ôLÉàªdG øe hCG AÓª©dG áeóN øe äÉ«dɪμdG AGô°T É
k
≤M’ ∂æμªj
.âfôàfE’G
äÉ«dɪμdGìô°ûdG
AGƒ°ûdGh õ«ÑîdG áμÑ°T
᪩WC’Gh ºë∏dG ™£bh ∂«μdG »fGƒ°Uh »fGhCÓd
.IóªéªdG äÉÑLƒdGh ájƒ°ûªdG
É櫪dG á≤Ñ£H »∏£ªdG õ«ÑîdG ìƒd
(π«eÉæjE’G)
IóªéªdG äÉÑLƒdGh äGRƒÑîªdGh ÖWôdG ∂«μ∏d
É
k
°†jCG ¬eGóîà°SG øμªj .Iô«ÑμdG ºë∏dG ™£bh
.á£bÉ°ùàªdG ¿ƒgódG ™«ªéàd AÉYƒc
ø«eCÉàdG ô«HGƒN
.äÓ°üتdG â«Ñãàd
Iôe ∫hC’ ΩGóîà°S’G πÑb
»a ∑RÉ¡L ΩGóîà°SG πÑb ¬H ΩÉ«≤dG Öéj Ée ≈∏Y AõédG Gòg ∫ÓN øe ±ô©àà°S
.
¿ÉeC’G äGOÉ°TQEG
π°üa
k
’hCG CGôbG .≈dhC’G Iôª∏d ΩÉ©£dG OGóYEG
.᪫∏°S á≤jô£H É¡æe ¢ü∏îJh RÉ¡édG øY ∞«∏¨àdG OGƒe ádGREÉH ºb
âbƒdG §Ñ°V
IóMh »a ¢†eƒj »FÉHô¡μdG QÉ«àdG ´É£≤fG hCG AÉHô¡μdÉH RÉ¡édG π«°UƒJ ó©H
.
“A” õeôdGh QÉØ°UCG áKÓK ¢Vô©dG
.1 .¢Vô©dG IóMh »a á£≤ædG ¢†eƒJ ¿CG ≈dEG
0
QõdG ≈∏Y §¨°VG
.2 .»dÉëdG âbƒdG §Ñ°VG “-” h “+” QGQRC’G ΩGóîà°SÉH
.•ƒÑ°†ªdG âbƒdG OɪàYG ºàj ¿GƒK
7 ó©Hh
¢†eƒJ ¿CG ≈dEG
“-” h “+” QGQRC’G ≈∏Y §¨°VG •ƒÑ°†ªdG âbƒdG ô««¨àd :á¶MÓe
“+” QGQRC’G ΩGóîà°SÉH »dÉëdG âbƒdG §Ñ°†H ºb òFóæY .¢Vô©dG IóMh »a á£≤ædG
.“-” h
¿ôØdG ø«î°ùJ
¿ôØ∏d ≥Ñ°ùªdG ∞«¶æàdG
.1 .»¡£dG õ«M øe ≥«∏©àdG äÉμÑ°Th äÉ«dɪμdG êôNCG
.2 »¡£dG õ«M øe ,øjô«à°ù«dƒÑdG äÉÄjõL πãe ,∞«∏¨àdG OGƒe ÉjÉ≤H ádGREÉH ºb
.ÉeɪJ
.3 á«bGƒdG ábÉbôdG √òg ádGREÉH ºb .¢TóîdG øe á«bGh ábÉbôH IÉ£¨e AGõLC’G ¢†©H
.¢ThóîdG øe
.4 .ÖWQ ºYÉf πjóæªH êQÉîdG øe RÉ¡édG ∞«¶æàH ºb
.5 .øNÉ°S ʃHÉ°U ∫ƒ∏ëà »¡£dG õ«M ∞«¶æàH ºb
5
■ ΩÉμMEG QÉWE’ ójó°ûdG ñÉ°ùJ’G ádÉM »a :ÜÉÑdG ΩÉμMEG QÉWE’ ójó°ûdG ñÉ°ùJ’G
óbh .𫨰ûàdG AÉæKCG øμªe ô«Z í«ë°U πμ°ûH RÉ¡édG ÜÉH ¥ÓZEG íÑ°üj ÜÉÑdG
ɪFGO á¶aÉëªdG Öéj ∂dòd .IQhÉéªdG ïÑ£ªdG äGóMh äÉ¡LGƒH QGô°VCG ≥ë∏J
.ÜÉÑdG ΩÉμMEG QÉWEG áaɶf ≈∏Y
■ hCG RÉ¡édG ÜÉH ≈∏Y óæà°ùJ ’ :AÉ«°TC’G ™°Vƒd hCG ¢Sƒ∏é∏d í£°ùc RÉ¡édG ÜÉH
ÜÉH ≈∏Y äÉ«dɪc hCG »fGhCG ájCG ™°†J ’h .¬«∏Y AÉ«°TC’G ≥∏©J hCG ¬«∏Y ¢ù∏éJ
.RÉ¡édG
■ êÉLR ¢TóN »a äÉ«dɪμdG ÖÑ°ùàJ ób RÉ¡édG RGôW Ö°ùM :äÉ«dɪμdG ∫ÉNOEG
õ«M »a äÉ«dɪμdG ∫ÉNOEG ≈∏Y ɪFGO ¢UôMÉa .RÉ¡édG ÜÉH ≥∏Z óæY ÜÉÑdG
.ájÉ¡ædG ≈àM »¡£dG
■ ÜÉÑdG ¢†Ñ≤ªa .ÜÉÑdG ¢†Ñ≤e øe ¬μ°ùªJ hCG RÉ¡édG πªëJ ’ :RÉ¡édG π≤f
.∂dòd
k
áé«àf ô°ùμæj óbh ,RÉ¡édG ¿Rh πªëàj ¿CG ™«£à°ùj ’
ójóédG ∑RÉ¡L
áMƒd ∫ƒM äÉeƒ∏©ªdG øe ójõªdG Éæg óéJ ɪc .ójóédG ∑RÉ¡L ≈∏Y Éæg ±ô©àJ
.äÉ«dɪμdGh ø«î°ùàdG ´GƒfCGh ¿ôØdGh ∫ɪ©à°S’G
1
2
3
4
ìô°ûdG
1
á«fhôàμdE’G áYÉ°ùdG
2
áØ«XƒdG QÉ«àNG ìÉàØe
3
¿É«ÑdG áѪd
4
IQGôëdG áLQO QÉ«àNG ìÉàØe
áØ«XƒdG QÉ«àNG ìÉàØe
.áØ«XƒdG QÉ«àNG ìÉàØe ΩGóîà°SÉH ø«î°ùàdG ´ƒf §Ñ°V ∂æμªj
™°VƒdGΩGóîà°S’G
Û
ôØ°üdG ™°Vh.∞bƒàe ¿ôØdG
%
»∏Ø°ùdG/…ƒ∏©dG ø«î°ùàdG øe á«dÉîdG ºë∏dG ™£bh ƒ°ûëªdGh IOÉ°ùdG ∂«μ∏d
πØ°SCG øeh ≈∏YCG øe áfƒî°ùdG å©ÑæJh .¿ƒgódG
.…hÉ°ùàdÉH
<
øNÉ°ùdG AGƒ¡dG .ø«jƒà°ùe hCG iƒà°ùe ≈∏Y äGRƒÑîªdGh ∂«μ∏d
ø«î°ùàdG º°ùL áfƒî°S ™jRƒàH áMhôªdG Ωƒ≤Jh
»¡£dG õ«M »a »Ø∏îdG QGóédÉH »≤∏ëdG
.…hÉ°ùàdÉH
’
øNÉ°ùdG AGƒ¡dG
*…OÉ°üàb’G
.ø«jƒà°ùe hCG iƒà°ùe ≈∏Y äGRƒÑîªdGh ∂«μ∏d
ø«î°ùàdG º°ùL áfƒî°S ™jRƒàH áMhôªdG Ωƒ≤Jh
»¡£dG õ«M »a »Ø∏îdG QGóédÉH »≤∏ëdG
.…hÉ°ùàdÉH
.ICÉØ£e ¿ôØdG IAÉ°VEG π¶J Gòg ø«î°ùàdG ´ƒf ™e
áØ°UGƒªdG Ö°ùM ábÉ£dG ∫Ó¨à°SG IAÉØc áÄa ójóëJ ¬dÓN øe ºJ ø«î°ùJ ´ƒf
*
.EN50304
™°VƒdGΩGóîà°S’G
N
AGƒ¡dG ôjhóJ ≈∏Y áLRÉ£dG Gõà«ÑdGh äGRƒÑîªdGh ∂«μ∏d
™jRƒàH áMhôªdG Ωƒ≤Jh .ø«jƒà°ùe hCG iƒà°ùe
»¡£dG õ«M »a ø«î°ùàdG ô°UÉæY áfƒî°S
.…hÉ°ùàdÉH
;
Gõà«ÑdG iƒà°ùe ¿hO IóªéªdG ᪩WCÓd ™jô°ùdG ô«°†ëàdG
hCG …ôa ΩƒÑdG hCG Gõà«ÑdG πãe ,≥Ñ°ùe ø«î°ùJ
º°ùL ∫ÓN øe ø«î°ùàdG ºàjh .ôFÉ£°ûdG
»≤∏ëdG ø«î°ùàdG º°ùLh »∏Ø°ùdG ø«î°ùàdG
.»Ø∏îdG QGóédÉH
7
AGƒ¡dG ôjhóàH ájGƒ°T Ωƒ≤Jh .á∏eÉμdG ∑ɪ°SC’Gh Qƒ«£dGh Ωƒë∏dG AGƒ°T
.ΩÉ©£dG ∫ƒM øNÉ°ùdG AGƒ¡dG ™jRƒàH áMhôªdG
(
Iô«ÑμdG ájGƒ°ûdG â°SƒàdGh (≥fÉ≤ædG) ≥é°ùdGh ∂«à°S’G ™£b AGƒ°T
πeÉμdÉH í£°ùdG øî°ùjh .Iô«¨°üdG ∂ª°ùdG ™£bh
.ájGƒ°ûdG ø«î°ùJ º°ùL πØ°SCG
*
Iô«¨°üdG ájGƒ°ûdG (≥fÉ≤ædG) ≥é°ùdGh Iô«¨°üdG ∂«à°S’G äÉ«ªc AGƒ°T
íÑ°üjh .Iô«¨°üdG ∂ª°ùdG ™£bh â°SƒàdG õÑNh
.ÉæNÉ°S ájGƒ°ûdG ø«î°ùJ º°ùL øe §°ShC’G AõédG
$
»∏Ø°ùdG ø«î°ùàdG øe áfƒî°ùdG å©ÑæJ .ΩÉ©£∏d ≥MÓdG ø«î°ùàdG
.§≤a πØ°SCG
^
IAÉ°VE’G.á∏¨°ûe ¿ôØdG IAÉ°VEG
áØ°UGƒªdG Ö°ùM ábÉ£dG ∫Ó¨à°SG IAÉØc áÄa ójóëJ ¬dÓN øe ºJ ø«î°ùJ ´ƒf
*
.EN50304
.»¡£dG õ«M »a ¿ôØdG áѪd 𫨰ûJ ºàj ø«î°ùàdG ´ƒf §Ñ°†H Ωƒ≤J ÉeóæY :á¶MÓe
¿ôØdG IAÉ°VEG π¶J Gòg z…OÉ°üàbG-øNÉ°S AGƒg{ ø«î°ùàdG ´ƒf ™e :á¶MÓe
.ICÉØ£e
IQGôëdG áLQO QÉ«àNG ìÉàØe
.ájGƒ°ûdG áLQO hCG IQGôëdG áLQO §Ñ°V IQGôëdG áLQO QÉ«àNG ìÉàØe ≥jôW øY øμªj
™°VƒdG≈橪dG
Ú
ôØ°üdG ™°Vh.ø«î°ùàdÉH ¿ôØdG Ωƒ≤j ’
250-50IQGôëdG áLQO ¥É£f áLQódÉH »¡£dG õ«M »a IQGôëdG áLQO
.Ω
° ájƒÄªdG
øY ∞bƒàdG äGôàa ∫ÓN ÅØ£æJh .¿É«ÑdG áѪd A»°†J ø«î°ùàdÉH ¿ôØdG Ωƒ≤j ÉeóæY
.ø«î°ùàdG

4
!≥jôM ܃°ûf ô£N
■ õ«M »a É¡æjõîJ ºàj »àdG ∫É©à°TÓd á∏HÉ≤dG OGƒªdG
á∏HÉb AÉ«°TCÉH GóHCG ßØàëJ ’ .π©à°ûJ ¿CG øμªj »¡£dG
GóHCG RÉ¡édG ÜÉH íàØJ ’ .»¡£dG õ«M »a ∫É©à°TÓd
´õfGh RÉ¡édG ∞bhCG .¬∏NGóH áæNOCG OƒLh ádÉM »a
ô¡°üªdG π°üaG hCG ¢ùÑ≤ªdG øe »FÉHô¡μdG ¢ùHÉ≤dG
.ôgÉ°üªdG ¥hóæ°U »a OƒLƒªdG
■ çóëj óbh .RÉ¡édG ÜÉH íàa óæY »FGƒg QÉ«J CÉ°ûæj
,ø«î°ùàdG ô°UÉæYh äGRƒÑîªdG OGóYEG ¥Qh ø«H ¢ùeÓJ
OGóYEG ¥Qh GóHCG ™°†J ’h .¬dÉ©à°TG ≈dEG …ODƒj ɪe
.AɪME’G AÉæKCG äÉ«dɪμdG ≈∏Y ¬à«ÑãJ ¿hO äGRƒÑîªdG
»a äGRƒÑîªdG OGóYEG ¥Qh â«ÑãJ ≈∏Y ɪFGO ¢UôMG
á«£¨àH ºbh .¬«∏Y õ«ÑN á«æ«°U hCG ≥ÑW ™°VƒH ¬fÉμe
.äGRƒÑîªdG OGóYEG ¥QƒH §≤a ܃∏£ªdG í£°ùdG
¥ƒa äGRƒÑîªdG OGóYEG ¥Qh RôÑj ¿CG Rƒéj ’h
.äÉ«dɪμdG
!¥hôëH áHÉ°UE’G ô£N
■ í£°SC’G GóHCG ¢ùª∏J ’ .ájɨ∏d ÉæNÉ°S RÉ¡édG íÑ°üj
»gh ø«î°ùàdG ô°UÉæY hCG »¡£dG õ«ëd á«∏NGódG
ó©HCGh .OôÑj RÉ¡édG ∑ôJ ≈∏Y É
k
ªFGO ¢UôMG .áæNÉ°S
.RÉ¡édG øY ∫ÉØWC’G
■ Ωóîà°SG .ájɨ∏d áæNÉ°S íÑ°üJ »fGhC’Gh äÉ«dɪμdG
»fGhC’G hCG äÉ«dɪμdG êGôNEG óæY »fGhCG áWƒa É
k
ªFGO
.»¡£dG õ«M øe áæNÉ°ùdG
■ ƒgh »¡£dG õ«M »a π©à°ûJ ¿CG øμªj ∫ƒëμdG IôîHCG
≈∏Y …ƒàëJ ᪩WCG ô«°†ëàH GóHCG º≤J ’ .øNÉ°S
á«dÉY áÑ°ùf ≈∏Y á∏ªà°ûªdG πFGƒ°ùdG øe Iô«Ñc äÉ«ªc
øe á∏«∏b äÉ«ªc ΩGóîà°SG ≈∏Y ô°üàbG .∫ƒëμdG øe
.¢UôëH RÉ¡édG ÜÉH íàaG .IõcôªdG äÉHhô°ûªdG
!äGAGƒàcÉH áHÉ°UE’G ô£N
■ AÉæKCG øî°ùJ É¡«dEG ∫ƒ°UƒdG øμªj »àdG AGõLC’G
∫ÉØWC’G ó©HCGh .áæNÉ°ùdG AGõLC’G GóHCG ¢ùª∏J ’ .𫨰ûàdG
.RÉ¡édG øY
■ íàaG .RÉ¡édG ÜÉH íàa óæY øNÉ°ùdG QÉîÑdG Üô°ùàj ób
.RÉ¡édG øY ∫ÉØWC’G ó©HCGh .¢UôëH RÉ¡édG ÜÉH
■ øμªj øNÉ°S ƒgh »¡£dG õ«M »a AɪdG ¢†©H OƒLh
»a AɪdG Ö°üH GóHCG º≤J ’ .øNÉ°S AÉe QÉîH ódƒj ¿CG
.øNÉ°ùdG »¡£dG õ«M
!áHÉ°UE’G ô£N
.äÉ≤≤°ûJ ≈dEG Qƒ£àJ ób RÉ¡édG ÜÉH êÉLR ¢ThóN
hCG áæ°ûN ∞«¶æJ OGƒe hCG êÉLR ᣰTÉc Ωóîà°ùJ ’
.πcBÉà∏d áÑÑ°ùe
!»FÉHô¡μdG ≥©°üdG ô£N
■ .QÉ£NCG ≈∏Y É«æa ᪫∏°ùdG ô«Z ìÓ°UE’G ∫ɪYCG …ƒ£æJ
áeóN »æa πÑb øe ’EG ìÓ°UE’G ∫ɪYCG ò«ØæJ Rƒéj ’
,RÉ¡édÉH π£Y ∑Éæg ¿Éc GPEG .Éæ∏Ñ
p
b øe ÜQóe AÓªY
π°üaG hCG ¢ùÑ≤ªdG øe »FÉHô¡μdG ¢ùHÉ≤dG ´õfÉa
áeóîH π°üJG .ôgÉ°üªdG ¥hóæ°U »a OƒLƒªdG ô¡°üªdG
.AdG
■ á«FÉHô¡μdG Iõ¡LC’G äÓHÉμd ádRÉ©dG IOɪdG ô¡°üæJ ób
π©éJ ’ .RÉ¡é∏d áæNÉ°ùdG AGõLC’G á°ùeÓe ádÉM »a
AGõLC’G ¢ùeÓJ á«FÉHô¡μdG Iõ¡LC’G π«°UƒJ äÓHÉc
.GóHCG RÉ¡é∏d áæNÉ°ùdG
■ »a ÖÑ°ùàJ ób RÉ¡édG »a πZƒàJ »àdG áHƒWôdG
∞«¶æJ Iõ¡LCG ájCG Ωóîà°ùJ ’ .»FÉHô¡c ≥©°U çhóM
.QÉîÑdÉH ∞«¶æJ Iõ¡LCG hCG »dÉ©dG §¨°†dÉH
■ IGhO äÉ°ùeÓe ¿CG »¡£dG õ«M áѪd ô««¨J óæY ≈YGôj
,áѪ∏dG ô««¨J πÑb .»FÉHô¡c QÉ«J É¡«a …ô°ùj áѪ∏dG
ô¡°üªdG π°üaG hCG ¢ùÑ≤ªdG øe »FÉHô¡μdG ¢ùHÉ≤dG ´õfG
.ôgÉ°üªdG ¥hóæ°U »a OƒLƒªdG
■ .»FÉHô¡c ≥©°U çhóM »a ÖÑ°ùàj ób 𣩪dG RÉ¡édG
¢ùHÉ≤dG ´õfGh .π£©e RÉ¡L 𫨰ûàH GóHCG º≤J ’
»a OƒLƒªdG ô¡°üªdG π°üaG hCG ¢ùÑ≤ªdG øe »FÉHô¡μdG
.AÓª©dG áeóîH π°üJG .ôgÉ°üªdG ¥hóæ°U
QGô°VC’G ÜÉÑ°SCG
!ΩÉg ¬«ÑæJ
■ õ«M á«°VQCG ≈∏Y »fGhC’G hCG äGRƒÑîªdG OGóYEG ¥Qh hCG ≥FÉbôdG hCG äÉ«dɪμdG
õ«M á«°VQCG á«£¨àH º≤J ’ .»¡£dG õ«M á«°VQCG ≈∏Y äÉ«dɪc ájCG ™°†J ’ :»¡£dG
»fGhCG ájCG ™°†J ’ .äGRƒÑîªdG ¥Qh hCG Ωƒ«æeƒdC’G ≥FÉbQ øe ´ƒf …CÉH »¡£dG
¿EG å«M .Ω°50 øe ≈∏YCG IQGôM áLQO §Ñ°V ádÉM »a »¡£dG õ«M á«°VQCG ≈∏Y
ød ô«ªëàdGh äGRƒÑîªdG OGóYEG áæeRCG ¿CG ɪc .áfƒî°ùdG ºcGôJ ≈dEG …ODƒj ∂dP
.(π«eÉæjE’G) É櫪dG á≤Ñ£H Qô°†dG ¥ÉëdEG »a ∂dP ÖÑ°ùàj ±ƒ°Sh ,áë«ë°U ¿ƒμJ
■ .øNÉ°ùdG »¡£dG õ«M »a AɪdG Ö°üH G
k
óHCG º≤J ’ :øNÉ°ùdG »¡£dG õ«M »a AɪdG
≥ë∏j ób IQGôëdG áLQO ô«¨J ¿CG ɪc .AÉe QÉîH ó«dƒJ ≈dEG …ODƒj ∂dP ¿EG å«M
.(π«eÉæjE’G) É櫪dG á≤Ñ£H GQGô°VCG
■ äGôàØd ≥∏¨e ƒgh »¡£dG õ«M »a áÑWQ ᪩WCÉH ßØàëJ ’ :áÑWôdG ᪩WC’G
.(π«eÉæjE’G) É櫪dG á≤Ñ£H Qô°†dG ¥ÉëdEG »a ∂dP ÖÑ°ùàj ±ƒ°ùa .á∏jƒW
■ ᫪μH á¡cÉa IQÉ°üY ≈∏Y …ƒàëJ »àdG ôFÉ£ØdG OGóYEG óæY :á¡cÉØdG IQÉ°üY
»àdG á¡cÉØdG IQÉ°ü©a .óëdG øY óFGR πμ°ûH õ«ÑîdG ìƒd AπªH º≤J ’ ,Iô«Ñc
Oó©àe ìƒ∏dG Ωóîà°SG .É¡àdGREG Qò©àj É
k
©≤H ∑ôàJ õ«ÑîdG ìƒd øe ôWÉ≤àJ
.É
k
≤ªY ôãcCG ƒ¡a ,´É£à°ùªdG Qób äÉeGóîà°S’G
■ .≥∏¨e ƒgh ’EG »¡£dG õ«M ójôÑàH º≤J ’ :ìƒàØe RÉ¡édG ÜÉH ɪæ«H ójôÑàdG
äÉ¡LGh ¿EÉa ,§≤a §«°ùH QGó≤ªH ƒdh É
k
MƒàØe ¿Éc GPEG RÉ¡édG ÜÉH ¿CG ≈YGôjh
.âbƒdG QhôªH Qô°†àJ ¿CG øμªj IQhÉéªdG äGóMƒdG

3
äÉjƒàëªdG ¢Sô¡a
Ñ
3 ............................................................................................᪡ªdG ¿ÉeC’G äGOÉ°TQEG
4 ...........................................................................................................QGô°VC’G ÜÉÑ°SCG
5 ............................................................................................................ójóédG ∑RÉ¡L
5 ............................................................................................... áØ«XƒdG QÉ«àNG ìÉàØe
5 ......................................................................................IQGôëdG áLQO QÉ«àNG ìÉàØe
6 ..................................................................................................... á«fhôàμdE’G áYÉ°ùdG
6 ....................................................................................................................äÉ«dɪμdG
6 ......................................................................................... Iôe ∫hC’ ΩGóîà°S’G πÑb
6 .................................................................................................................âbƒdG §Ñ°V
6 ..............................................................................................................¿ôØdG ø«î°ùJ
7 ....................................................................................................... äÉ«dɪμdG ∞«¶æJ
7 .............................................................................................¿ôØdG ∫ɪ©à°SG á≤jôW
7 ...................................................................................................... »¡£dG ¿ôa 𫨰ûJ
7 ...................................................................................... á«fhôàμdE’G áYÉ°ùdG ΩGóîà°SG
7 .........................................................................................á«æeõdG 𫨰ûàdG á«dBG §Ñ°V
8 .................................................................................. áWƒÑ°†ªdG º«≤dG ô««¨Jh ¢VôY
8 ..................................................................................................... ∞«¶æàdGh ájÉæ©dG
8 ....................................................................................................................äÉضæªdG
9 .....................................................................................»¡£dG õ«ëd IRÉØëdG áfÉ£ÑdG
9 ............................................................................................ÜÉÑdG êÉLR Ö«côJh ∂a
10 ..........................................................................................RÉ¡édG ÜÉH Ö«côJh ∂a
10 .......................................................................≥«∏©àdG ¿ÉÑ°†b äÉμÑ°T Ö«côJh ∂a
11 .................................................................................?π∏N çhóM óæY πª©dG Ée
11 ......................................................................................................¿ôØdG áѪd ô««¨J
11 ..........................................................................................................AÓª©dG áeóN
11 .............................................................................. FD ™æ°üdG ºbQh E èàæªdG ºbQ
12 ..............................................................................áÄ«ÑdGh ábÉ£dG ∫ƒM íFÉ°üf
12 ............................................................................................................ábÉ£dG ô«aƒJ
12 .....................................................áÄ«ÑdÉH ô°†J ’ á≤jô£H äÉØ∏îªdG øe ¢ü∏îàdG
12 ..........................................................................á«FGò¨dG OGƒªdG »a ó«eÓjôcC’G
13 .................................................................................................ΩGóîà°S’G íFÉ°üf
13 ......................................................................................................äGRƒÑîªdG OGóYEG
13 .......................................................................................................AGƒ°ûdGh ô«ªëàdG
14 ...................................ÉæH ¢UÉîdG »¡£dG ƒjOƒà°S »a ÉgQÉÑàNG ºJ »àdG ¥ÉÑWC’G
äÉeóîdGh QÉ«¨dG ™£bh äÉ«dɪμdGh äÉéàæªdG ∫ƒM äÉeƒ∏©ªdG øe ójõªdG óéJ
≈∏Y »fhôàμdE’G ôéàªdG »ah www.bosch-home.com :âfôàfE’G ™bƒe ≈∏Y
www.bosch-eshop.com :âfôàfE’G ™bƒe
äÉéàæªdG äÉeƒ∏©eh IQƒ°ûªdG ∂d Ωó≤j ¿CG
Bosch äÉeÓ©à°SG ≥jôa ô°ùj
Iõ¡LC’G äÉeGóîà°SGh äÉ≤«Ñ£àH ≥∏©àj ɪ«a ºμJGQÉ°ùØà°SG ≈∏Y OôdGh áeRÓdG
áYÉ°ùdG øe :ᩪédG ≈dEG ø«æK’G øe ∂dPh) 089 69 339 339 :∞JÉg ºbQ ≈∏Y
.É«fɪdCG ≈∏Y §≤a …ô°ùj (18.00 áYÉ°ùdG ≈dEG 8.00
᪡ªdG ¿ÉeC’G äGOÉ°TQEG
ΩGóîà°SG ∂æ쪫°S §≤a òFóæY .ájÉæ©H π«dódG Gòg CGôbG
∫ɪ©à°S’G π«dóH ßØàMG .øeBGh í«ë°U πμ°ûH RÉ¡édG
.ójóédG ∂dɪ∏d ¬ª«∏°ùàd hCG É≤M’ ¬eGóîà°S’ Ö«côàdGh
πNGO èeóe πμ°ûH Ö«côà∏d §≤a ¢ü°üîe RÉ¡édG Gòg
.Ö«côàdÉH á°UÉîdG äɪ«∏©àdG ≈YGôJ .ïÑ£ªdG äGóMh
º≤J ’h .∞«∏¨àdG OGƒe øe ¬LGôNEG ó©H RÉ¡édG ¢üëaG
øY áéJÉf QGô°VCG OƒLh ádÉM »a RÉ¡édG π«°UƒàH
.π≤ædG á«∏ªY
¿hóH Iõ¡LC’G π«°UƒàH óªà©e »æa Ωƒ≤j ¿CG ø«©àj
»a ¿Éª°†dG ¥ƒ≤ëH áÑdÉ£ªdG ≥ëj ’ å«M .¢ùHGƒb
ô«Z πμ°ûH RÉ¡édG π«°UƒJ øY áéJÉædG QGô°VC’G ádÉM
.í«ë°U
ô°üàbG .§≤a »dõæªdG ΩGóîà°SÓd ¢ü°üîe RÉ¡édG Gòg
.äÉHhô°ûªdGh ᪩WC’G OGóYEG »a RÉ¡édG ΩGóîà°SG ≈∏Y
Gòg Ωóîà°SG .𫨰ûàdG AÉæKCG RÉ¡édG áÑbGôe ø«©àjh
.§
≤a á≤∏¨ªdG øcÉeC’G »a RÉ¡édG
≈àM ´ÉØJQG ≈∏Y ΩGóîà°SÓd Ö°SÉæe RÉ¡édG Gòg
.≈°übCG óëH ôëÑdG í£°S ¥ƒa ôàe
2000
ôªY øe ∫ÉØWC’G π
n
Ñ
p
b øe RÉ¡édG Gòg ΩGóîà°SG øμªj
»a ¢ü≤f øe ¿ƒfÉ©j øjòdG ¢UÉî°TC’Gh äGƒæ°S 8
¢UÉî°TC’G hCG á«∏≤©dG hCG á«°ùëdG hCG ájó°ùédG äGQó≤dG
¿CG á£jô°T áaô©ªdG hCG IôÑîdG »a Qƒ°üb º¡jód øjòdG
hCG º¡«∏Y ±Gô°TE’ÉH º¡àeÓ°S øY ∫hDƒ°ùe ¢üî°T Ωƒ≤j
RÉ¡é∏d øeB’G ΩGóîà°S’G á«Ø«c ≈dEG º¡¡«LƒàH ΩÉb GPEG
.∂dòH á£ÑJôªdG QÉ£NCÓd º¡cGQOEG øe ócCÉàdG ™e
∫ɪYCGh ∞«¶æàdG ∫ɪYCG .RÉ¡édÉH åÑ©dG ∫ÉØWCÓd Rƒéj ’
øe É¡FGôLEÉH íª°ù
o
j ’ Ωóîà°ùªdÉH áWƒæªdG áfÉ«°üdG
hCG äGƒæ°S
8 ôª©dG øe ¿ƒ¨∏Ñj GƒfÉc GPEG ’EG ∫ÉØWC’G π
n
Ñ
p
b
.∂dP AÉæKCG º¡«∏Y ±Gô°TE’G ™e ôãcCG
RÉ¡édG øY ºgOÉ©HEG Öéj äGƒæ°S
8 ø°S ¿hO ∫ÉØWC’G
.AÉHô¡μdG á∏°Uhh
»¡£dG õ«M »a äÉ«dɪμdG ∫ÉNOEG ≈∏Y ɪFGO ¢UôMG
.∫ɪ©à°S’G π«dO »a
äÉ«dɪμdG ìô°T ô¶fG
.í«ë°U πμ°ûH


*9000971541*
9000971541
90