
NOTICE
• No user serviceable parts.
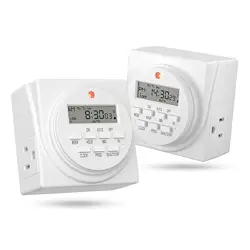
7-Day Digital Timer
User Instructions
Install setup:
1. Plug timer into wall outlet for a 5 minutes to charge internal battery. NOTE: You can unplug the timer to
set after initial battery charge.
2. Before programming all settings should be reset. Use a toothpick or pencil to push the “R” button.
3. Select AM/PM format:
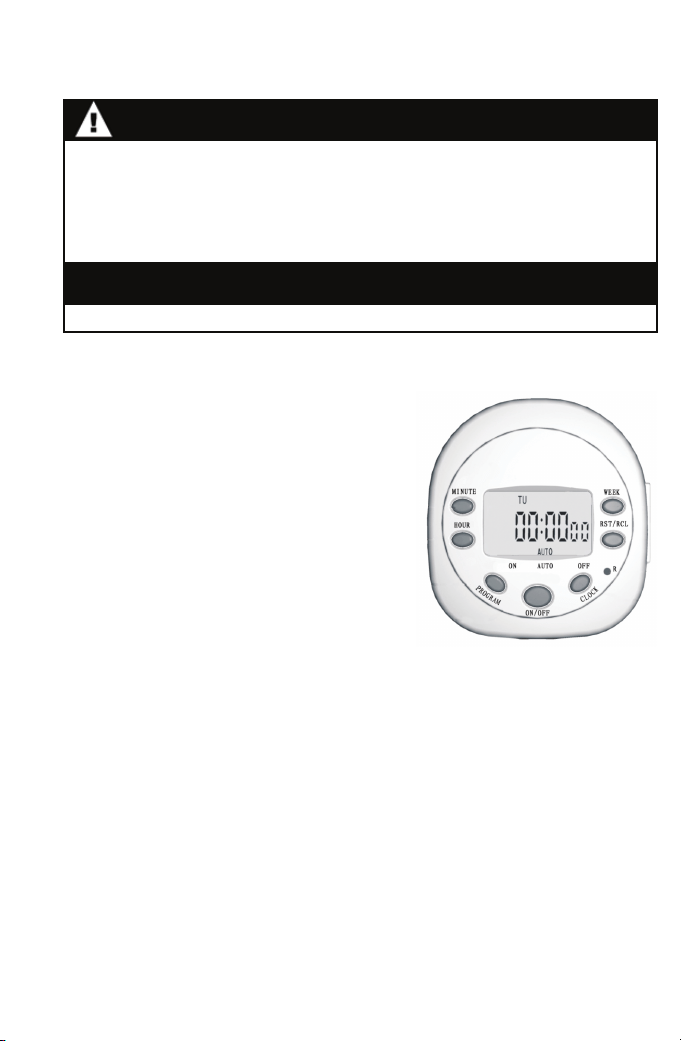
1. Press and hold the CLOCK button for 5 seconds until
display shows 24H or 12H, then release.
2. Press the HOUR button to change display to "12H".
3. Press the CLOCK button to restore the normal clock
display. The letters "AM" should show in upper left
corner of the display.
4. Set time of day:
1. Press and hold the CLOCK button throughout time
setting.
2. At the same time, press the HOUR button to advance
to the correct hour.
3. Continuing to push down the clock button, press the
MINUTE button to advance to the correct minute.
5. Set ON/OFF times
1. Press the PROGRAM button once to display the first ON
setting" 1 ON -- --:-- --".
2. Press the MINUTE and HOUR buttons as necessary to set the ON time you want.
3. Press the WEEK button as necessary to choose the day or group of days you want for the time setting.
4. Press the PROGRAM button again to display the first OFF setting-"1 OFF--:--".
5. Repeat the procedure to create the OFF setting.
6. Repeat Steps 1 thru 5 for additional ON/OFF settings.
7. Press the CLOCK button to exit from PROGRAM mode.
Things to know about ON/OFF times:
• Repeatedly pressing the PROGRAM button cycles through the possible 20 ON/OFF pairs: 2 ON, 2 OFF, 3
ON, 3 OFF, etc .
• The display panel automatically returns to time of day if you do not press any buttons for 15 seconds.
• If you are interrupted before completing a setting, simply press the PROGRAM button until you reach the
setting where you left off.
6. Review ON/OFF settings:
It is important to review all 20 settings, even if you only used a few, to make sure there are no extra,
unintended settings.
1. Press the PROGRAM button (hold down to scroll) until the display cycles through all 20 ON/OFF pairs.
2. Stop on any setting you want to remove or change.
To revise a setting:
1. Press the PROGRAM button (hold down to scroll) until the display shows the setting you want
to revise.
2. Press the HOUR, MINUTE and WEEK buttons as necessary to revise the displayed ON or OFF
time and day(s).
To remove or restore a setting:
1. Press the PROGRAM button (hold down to scroll) until the display shows the setting you want to
remove or restore.
2. Press the RCL button.
- If removing, the display will replace the setting with dashes. Pressing the RCL button again will restore
the previous setting.
To Operate the timer:
1. After setting the timer, plug it in and connect the device to be controlled.
2. Press the ON/AUTO/OFF button as necessary to display:
ON-The timer remains ON and ignores your settings.
OFF-The timer remains OFF and ignores your settings.
AUTO ON- The timer follows your settings and starts the device as on.
AUTO OFF- The timer follows your settings and starts the device as off.
This device complies with part 15 of the FCC rules. Operation is subject to the following two conditions: (1)
this device may not cause harmful interference, and (2) this device must accept any interference received,
including interference that may cause undesired operation.
FCC NOTE: The manufacturer is not responsible for any radio or TV interference caused by unauthorized
modifications to this equipment. Such modifications could void the user’s authority to operate the
equipment.
NOTE: This equipment has been tested and found to comply with the limits for a Class B digital device,
pursuant to Part 15 of the FCC Rules. These limits are designed to provide reasonable protection against
harmful interference in a residential installation. This equipment generates, uses and can radiate radio
frequency energy and, if not installed and used in accordance with the instructions may cause harmful
interference to radio communications. However, there is no guarantee that interference will not occur in a
particular installation. If this equipment does cause harmful interference to radio or television reception,
which can be determined by turning the equipment off and on, the user is encourage to try to correct the
interference by one or more of the following measures:
• Reorient or relocate the receiving antenna.
• Increase the separation between the equipment and receiver.
• Connect the equipment into an outlet on a circuit different from that to which the receiver is connected.
• Consult the dealer or an experienced radio/TV technician for help.
WARNING
Risk of electric shock
• Plug directly into an electrical outlet
• Do not use in wet locations
• Use indoors only
• Unplug timer before cleaning
• Keep children away
Risk of fire
• Do not use to control appliances that
contain heating elements (cooking
appliances, heaters, irons, etc.)
• Do not exceed electrical ratings
15150
Version 3
09/05/17 KM
MADE IN CHINA / HECHO EN CHINA
GE is a trademark of General Electric Company and
is under license by Jasco Products Company LLC,
10 E. Memorial Rd., Oklahoma City, OK 73114.
This Jasco product comes with a limited 1 year warranty.
Visit www.byjasco.com for warranty details.
Questions? Contact us at 1-800-654-8483
between 7:00AM—8:00PM CST.

NOTICE
• No user serviceable parts.
7-Day Digital Timer
User Instructions
Install setup:
1. Plug timer into wall outlet for a 5 minutes to charge internal battery. NOTE: You can unplug the timer to
set after initial battery charge.
2. Before programming all settings should be reset. Use a toothpick or pencil to push the “R” button.
3. Select AM/PM format:
1. Press and hold the CLOCK button for 5 seconds until
display shows 24H or 12H, then release.
2. Press the HOUR button to change display to "12H".
3. Press the CLOCK button to restore the normal clock
display. The letters "AM" should show in upper left
corner of the display.
4. Set time of day:
1. Press and hold the CLOCK button throughout time
setting.
2. At the same time, press the HOUR button to advance
to the correct hour.
3. Continuing to push down the clock button, press the
MINUTE button to advance to the correct minute.
5. Set ON/OFF times
1. Press the PROGRAM button once to display the first ON
setting" 1 ON -- --:-- --".
2. Press the MINUTE and HOUR buttons as necessary to set the ON time you want.
3. Press the WEEK button as necessary to choose the day or group of days you want for the time setting.
4. Press the PROGRAM button again to display the first OFF setting-"1 OFF--:--".
5. Repeat the procedure to create the OFF setting.
6. Repeat Steps 1 thru 5 for additional ON/OFF settings.
7. Press the CLOCK button to exit from PROGRAM mode.
Things to know about ON/OFF times:
• Repeatedly pressing the PROGRAM button cycles through the possible 20 ON/OFF pairs: 2 ON, 2 OFF, 3
ON, 3 OFF, etc .
• The display panel automatically returns to time of day if you do not press any buttons for 15 seconds.
• If you are interrupted before completing a setting, simply press the PROGRAM button until you reach the
setting where you left off.
6. Review ON/OFF settings:
It is important to review all 20 settings, even if you only used a few, to make sure there are no extra,
unintended settings.
1. Press the PROGRAM button (hold down to scroll) until the display cycles through all 20 ON/OFF pairs.
2. Stop on any setting you want to remove or change.
To revise a setting:
1. Press the PROGRAM button (hold down to scroll) until the display shows the setting you want
to revise.
2. Press the HOUR, MINUTE and WEEK buttons as necessary to revise the displayed ON or OFF
time and day(s).
To remove or restore a setting:
1. Press the PROGRAM button (hold down to scroll) until the display shows the setting you want to
remove or restore.
2. Press the RCL button.
- If removing, the display will replace the setting with dashes. Pressing the RCL button again will restore
the previous setting.
To Operate the timer:
1. After setting the timer, plug it in and connect the device to be controlled.
2. Press the ON/AUTO/OFF button as necessary to display:
ON-The timer remains ON and ignores your settings.
OFF-The timer remains OFF and ignores your settings.
AUTO ON- The timer follows your settings and starts the device as on.
AUTO OFF- The timer follows your settings and starts the device as off.
This device complies with part 15 of the FCC rules. Operation is subject to the following two conditions: (1)
this device may not cause harmful interference, and (2) this device must accept any interference received,
including interference that may cause undesired operation.
FCC NOTE: The manufacturer is not responsible for any radio or TV interference caused by unauthorized
modifications to this equipment. Such modifications could void the user’s authority to operate the
equipment.
NOTE: This equipment has been tested and found to comply with the limits for a Class B digital device,
pursuant to Part 15 of the FCC Rules. These limits are designed to provide reasonable protection against
harmful interference in a residential installation. This equipment generates, uses and can radiate radio
frequency energy and, if not installed and used in accordance with the instructions may cause harmful
interference to radio communications. However, there is no guarantee that interference will not occur in a
particular installation. If this equipment does cause harmful interference to radio or television reception,
which can be determined by turning the equipment off and on, the user is encourage to try to correct the
interference by one or more of the following measures:
• Reorient or relocate the receiving antenna.
• Increase the separation between the equipment and receiver.
• Connect the equipment into an outlet on a circuit different from that to which the receiver is connected.
• Consult the dealer or an experienced radio/TV technician for help.
WARNING
Risk of electric shock
• Plug directly into an electrical outlet
• Do not use in wet locations
• Use indoors only
• Unplug timer before cleaning
• Keep children away
Risk of fire
• Do not use to control appliances that
contain heating elements (cooking
appliances, heaters, irons, etc.)
• Do not exceed electrical ratings
15150
Version 3
09/05/17 KM
MADE IN CHINA / HECHO EN CHINA
GE is a trademark of General Electric Company and
is under license by Jasco Products Company LLC,
10 E. Memorial Rd., Oklahoma City, OK 73114.
This Jasco product comes with a limited 1 year warranty.
Visit www.byjasco.com for warranty details.
Questions? Contact us at 1-800-654-8483
between 7:00AM—8:00PM CST.
15150
15154
ADVERTENCIA - Riesgo de incendio o descarga eléctrica
AVISO
• Para uso exclusivo de interiores secos.
•No exceda la capacidad.
• No use el temporizador con dispositivos que pudieran tener consecuencias peligrosas debido a
una sincronización incorrecta, como por ejemplo las lámparas solares, calefactores, etc.
• Enchúfelo directamente en el tomacorriente.
• No contiene piezas que el usuario pueda reparar.
Temporizador digital de 7 días
Instrucciones del Usuario
Configuración de la instalación:
1. Enchufe el temporizador en el tomacorriente de pared durante 5 minutos para cargar la batería
interna. NOTA: Puede desenchufar el temporizador después de la carga inicial de la batería para
configurarlo.
2. Antes de realizar la programación, se deben restaurar
todos los valores a cero. Utilice un sujetapapeles o un
bolígrafo para empujar el botón “R”.
3. Seleccionar el formato AM/PM:
1. Pulse y no suelte el botón CLOCK (reloj) durante 5
segundos hasta que aparezca en la pantalla 24H o 12H,
luego suéltelo.
2. Pulse el botón HOUR (hora) para visualizar el modo "12H".
3. Pulse el botón CLOCK para restaurar el modo de reloj
normal. En la esquina superior izquierda de la pantalla
aparecerán las letras "AM".
4. Ajustar la hora del día:
1. Pulse y no suelte el botón CLOCK (reloj) mientras esté ajustando la hora.
2. Al mismo tiempo, pulse el botón HOUR (hora) para avanzar a la hora correcta.
3. Al tiempo que sigue pulsando el botón reloj, pulse el botón MINUTE (minuto) para avanzar al minuto
correcto.
5. Programación de las horas de encendido y apagado (ON/OFF)
1. Pulse el botón PROGRAM una vez y aparecerá el primer ajuste de ON (encendido) " 1 ON -- --:-- --".
2. Pulse los botones MINUTE (minuto) y HOUR (hora) lo que sea necesario para ajustar la hora de
encendido.
3. Pulse el botón WEEK (semana) lo que sea necesario para escoger el día o grupo de días que desea
para el ajuste de la hora.
4. Vuelva a pulsar el botón PROGRAM y aparecerá el primer ajuste de OFF (apagado)- "1 OFF--:--".
5. Repita el procedimiento para crear el ajuste de OFF.
6. Repita los Pasos 1 a 5 para establecer ajustes adicionales ON/OFF.
7. Pulse el botón CLOCK (reloj) para salir del modo programa.
Información que debe saber sobre las horas de encendido y apagado:
• La pulsación repetida del botón PROGRAM realiza la secuencia cíclica de los 20 pares posibles de
ON/OFF (encendido/apagado): 2 ON, 2 OFF, 3 ON, 3 OFF, etc .
• El panel de visualización vuelve de manera automática a la hora del día si no se pulsa ningún botón
durante 15 segundos.
• Si sufre una interrupción antes de completar un ajuste, simplemente pulse el botón PROGRAM hasta
que llegue al ajuste donde se había quedado.
6. Revisar los ajustes de encendido y apagado (ON/OFF):
Es importante revisar los 20 ajustes, aunque usted solo use unos cuantos, para asegurarse de que no se
han establecido ajustes extras o no deseados.
1. Pulse el botón PROGRAM (manténgalo pulsado para desplazarse) hasta que se realice la secuencia
cíclica de los 20 pares de ON/OFF (encendido/apagado).
2. Deténgase en cualquier ajuste que dese eliminar o cambiar.
Para revisar un ajuste:
1. Pulse el botón PROGRAM (manténgalo pulsado para desplazarse) hasta que
aparezca el ajuste que desea revisar.
2. Pulse los botones HOUR (hora), MINUTE (minuto) y WEEK (semana) lo que sea
necesario para revisar la hora y días de encendido y apagado.
Para eliminar o restaurar un ajuste:
1. Pulse el botón PROGRAM (manténgalo pulsado para desplazarse) hasta que aparezca el ajuste que
desea eliminar o restaurar.
2. Pulse el botón RST/RCL.
- Si se elimina el ajuste, en la pantalla aparecerán guiones en su lugar. Si se pulsa nuevamente el botón
RST/RCL, se restablecerá el ajuste anterior.
Para poner el temporizador en funcionamiento:
1. Después de configurar el temporizador, enchúfelo y conecte el dispositivo que se va a controlar.
2. Pulse el botón ON/AUTO/OFF lo que sea necesario para visualizar:
ON-El temporizador permanece encendido e ignora sus ajustes.
OFF-El temporizador permanece apagado e ignora sus ajustes.
AUTO-El temporizador sigue los ajustes establecidos.
Este dispositivo cumple con la Parte 15 de la normativa de la FCC. El funcionamiento está sujeto a las
siguientes dos condiciones: (1) este dispositivo no debe provocar interferencia perjudicial, y (2) este
dispositivo debe aceptar toda interferencia que reciba, incluso la que pudiera causar un funcionamiento
no deseado.
NOTA DE LA FCC: El fabricante no se hace responsable de ningua interferencia de radio o TV ocasionada
por modificaciones no autorizadas efectuadas a este equipo. Dichas modificaciones podrían anular la
autoridad del usuario para utilizar el equipo.
NOTA: este equipo ha sido probado y cumple con los límites para aparatos digitales de Clase B, de
conformidad con la Parte 15 de la normativa de la FCC. Estos límites están diseñados para proveer
protección razonable contra interferencias perjudiciales en una instalación residencial. Este equipo
genera, usa y puede irradiar energía de radiofrecuencias y, si no se instala y usa según las instrucciones,
puede provocar interferencia perjudicial a las radiocomunicaciones. No obstante, no hay garantías de
que no ocurrirá interferencia en una instalación en particular. Si este equipo provoca interferencia
perjudicial a la recepción de radio o televisión, lo que puede determinarse encendiendo y apagando el
equipo, se recomienda que el usuario intente corregir la interferencia por medio de la implementación de
una o más de las siguientes medidas:
• Reorientar o reubicar la antena receptora.
• Incrementar la separación entre el equipo y el receptor.
• Conectar el equipo a un tomacorriente de un circuito diferente del circuito al
que el receptor está conectado.
• Consultar al distribuidor o a un técnico con experiencia en radio/televisión
para solicitar asistencia.
Este producto de Jasco tiene una garantía limitada de 1 año. Visite
www.jascoproducts.com para obtener más información.

15150
15154
ADVERTENCIA - Riesgo de incendio o descarga eléctrica
AVISO
• Para uso exclusivo de interiores secos.
•No exceda la capacidad.
• No use el temporizador con dispositivos que pudieran tener consecuencias peligrosas debido a
una sincronización incorrecta, como por ejemplo las lámparas solares, calefactores, etc.
• Enchúfelo directamente en el tomacorriente.
• No contiene piezas que el usuario pueda reparar.
Temporizador digital de 7 días
Instrucciones del Usuario
Configuración de la instalación:
1. Enchufe el temporizador en el tomacorriente de pared durante 5 minutos para cargar la batería
interna. NOTA: Puede desenchufar el temporizador después de la carga inicial de la batería para
configurarlo.
2. Antes de realizar la programación, se deben restaurar
todos los valores a cero. Utilice un sujetapapeles o un
bolígrafo para empujar el botón “R”.
3. Seleccionar el formato AM/PM:
1. Pulse y no suelte el botón CLOCK (reloj) durante 5
segundos hasta que aparezca en la pantalla 24H o 12H,
luego suéltelo.
2. Pulse el botón HOUR (hora) para visualizar el modo "12H".
3. Pulse el botón CLOCK para restaurar el modo de reloj
normal. En la esquina superior izquierda de la pantalla
aparecerán las letras "AM".
4. Ajustar la hora del día:
1. Pulse y no suelte el botón CLOCK (reloj) mientras esté ajustando la hora.
2. Al mismo tiempo, pulse el botón HOUR (hora) para avanzar a la hora correcta.
3. Al tiempo que sigue pulsando el botón reloj, pulse el botón MINUTE (minuto) para avanzar al minuto
correcto.
5. Programación de las horas de encendido y apagado (ON/OFF)
1. Pulse el botón PROGRAM una vez y aparecerá el primer ajuste de ON (encendido) " 1 ON -- --:-- --".
2. Pulse los botones MINUTE (minuto) y HOUR (hora) lo que sea necesario para ajustar la hora de
encendido.
3. Pulse el botón WEEK (semana) lo que sea necesario para escoger el día o grupo de días que desea
para el ajuste de la hora.
4. Vuelva a pulsar el botón PROGRAM y aparecerá el primer ajuste de OFF (apagado)- "1 OFF--:--".
5. Repita el procedimiento para crear el ajuste de OFF.
6. Repita los Pasos 1 a 5 para establecer ajustes adicionales ON/OFF.
7. Pulse el botón CLOCK (reloj) para salir del modo programa.
Información que debe saber sobre las horas de encendido y apagado:
• La pulsación repetida del botón PROGRAM realiza la secuencia cíclica de los 20 pares posibles de
ON/OFF (encendido/apagado): 2 ON, 2 OFF, 3 ON, 3 OFF, etc .
• El panel de visualización vuelve de manera automática a la hora del día si no se pulsa ningún botón
durante 15 segundos.
• Si sufre una interrupción antes de completar un ajuste, simplemente pulse el botón PROGRAM hasta
que llegue al ajuste donde se había quedado.
6. Revisar los ajustes de encendido y apagado (ON/OFF):
Es importante revisar los 20 ajustes, aunque usted solo use unos cuantos, para asegurarse de que no se
han establecido ajustes extras o no deseados.
1. Pulse el botón PROGRAM (manténgalo pulsado para desplazarse) hasta que se realice la secuencia
cíclica de los 20 pares de ON/OFF (encendido/apagado).
2. Deténgase en cualquier ajuste que dese eliminar o cambiar.
Para revisar un ajuste:
1. Pulse el botón PROGRAM (manténgalo pulsado para desplazarse) hasta que
aparezca el ajuste que desea revisar.
2. Pulse los botones HOUR (hora), MINUTE (minuto) y WEEK (semana) lo que sea
necesario para revisar la hora y días de encendido y apagado.
Para eliminar o restaurar un ajuste:
1. Pulse el botón PROGRAM (manténgalo pulsado para desplazarse) hasta que aparezca el ajuste que
desea eliminar o restaurar.
2. Pulse el botón RST/RCL.
- Si se elimina el ajuste, en la pantalla aparecerán guiones en su lugar. Si se pulsa nuevamente el botón
RST/RCL, se restablecerá el ajuste anterior.
Para poner el temporizador en funcionamiento:
1. Después de configurar el temporizador, enchúfelo y conecte el dispositivo que se va a controlar.
2. Pulse el botón ON/AUTO/OFF lo que sea necesario para visualizar:
ON-El temporizador permanece encendido e ignora sus ajustes.
OFF-El temporizador permanece apagado e ignora sus ajustes.
AUTO-El temporizador sigue los ajustes establecidos.
Este dispositivo cumple con la Parte 15 de la normativa de la FCC. El funcionamiento está sujeto a las
siguientes dos condiciones: (1) este dispositivo no debe provocar interferencia perjudicial, y (2) este
dispositivo debe aceptar toda interferencia que reciba, incluso la que pudiera causar un funcionamiento
no deseado.
NOTA DE LA FCC: El fabricante no se hace responsable de ningua interferencia de radio o TV ocasionada
por modificaciones no autorizadas efectuadas a este equipo. Dichas modificaciones podrían anular la
autoridad del usuario para utilizar el equipo.
NOTA: este equipo ha sido probado y cumple con los límites para aparatos digitales de Clase B, de
conformidad con la Parte 15 de la normativa de la FCC. Estos límites están diseñados para proveer
protección razonable contra interferencias perjudiciales en una instalación residencial. Este equipo
genera, usa y puede irradiar energía de radiofrecuencias y, si no se instala y usa según las instrucciones,
puede provocar interferencia perjudicial a las radiocomunicaciones. No obstante, no hay garantías de
que no ocurrirá interferencia en una instalación en particular. Si este equipo provoca interferencia
perjudicial a la recepción de radio o televisión, lo que puede determinarse encendiendo y apagando el
equipo, se recomienda que el usuario intente corregir la interferencia por medio de la implementación de
una o más de las siguientes medidas:
• Reorientar o reubicar la antena receptora.
• Incrementar la separación entre el equipo y el receptor.
• Conectar el equipo a un tomacorriente de un circuito diferente del circuito al
que el receptor está conectado.
• Consultar al distribuidor o a un técnico con experiencia en radio/televisión
para solicitar asistencia.
Este producto de Jasco tiene una garantía limitada de 1 año. Visite
www.jascoproducts.com para obtener más información.