Model:
(NA) WP280013267
(EU) WP280013261
(UK) WP280013263
(JP) WP280013265
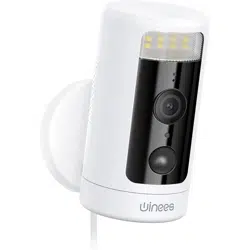
Winees Spotlight Cam
Winees Scheinwerfer Kamera

1
To avoid personal injury and/or possible product damage,
the following cautions must be followed:
1. Please use sorely the provided adapter instead of
others in case of any damage to the product.
2. Keep out of reach of children. This product contains
small magnets and other small parts, which can cause
choking or injury if ingested.
3. To prevent early failure,the camera should only be
installed in operating environments ranging between
-20°C ~ 50°C(-4°F ~ 122°F).
4. Do not install
- close to heat source
- near the metal objects and mirrors that cause radio
signal aenuation or shading.
5.Do not disassemble or reinstall the camera, otherwise
it may cause security risks.
6. Unplug the power cord before cleaning. Do not clean
the camera with any liquids, spray cleaner or wet cloth.
7. The slot and opening are used for ventilation, not
allowed to be blocked or covered.
CAUTIONS
2
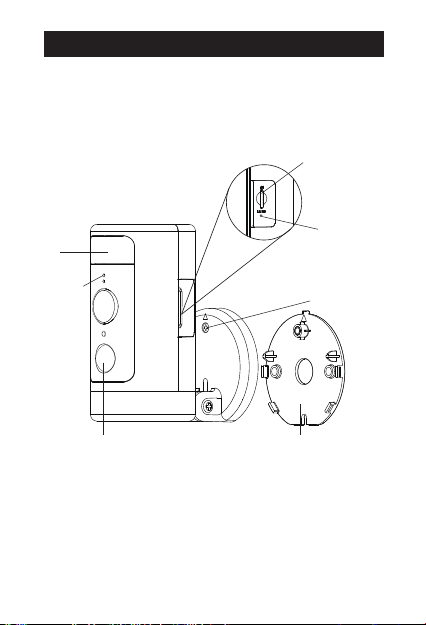
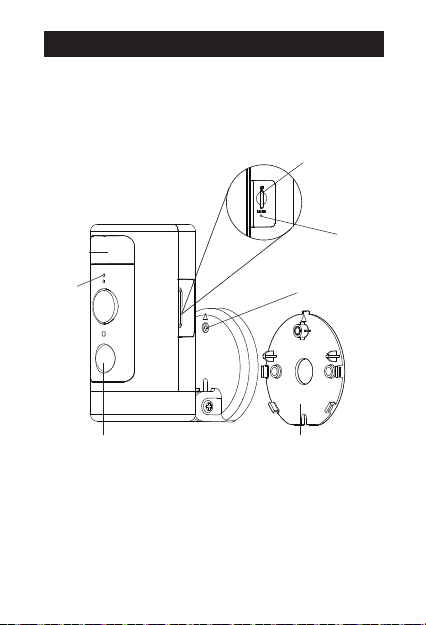
Security Screw
Mounting Bracket
Status LED
MicroSD Card Slot
Reset Buon
Motion Detector
Light
Introduction

Package Contents
Screw*2,
wall anchor*2
Status LED Description
Status Description
Flashing Green
Solid Green
Flashing Red
Solid Red Power on/System booting / Factory reseting
Wireless connected
System ready for WiFi setup / Firmware update
Red and Green
flashing alternately
Unable to connect to the cloud
Wireless connection
, cloud connecting fail
Winees
spotlight cam *1 AC adapter *1 Reset pin *1
3

4
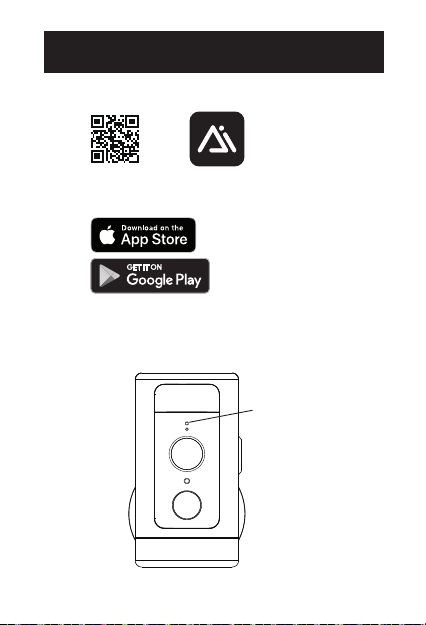
1. Scan the QR code below
LED indicator
flashing green
Set up Spotlight Cam in the AiDot App
2. Power on the camera, you will hear "Waiting for Wi-Fi
configuration" with the camera's indicator light flashing in
green.
Or search for“AiDot” in App Store or Google Play
5
3. In the AiDot app, press ‘+’ - “devices”, select Winees
Spotlight Cam, and follow the instructions on App.
4. Place the spotlight cam in the area where you plan to
install to test the video quality, ensure that the camera can
work normally after the final installation.
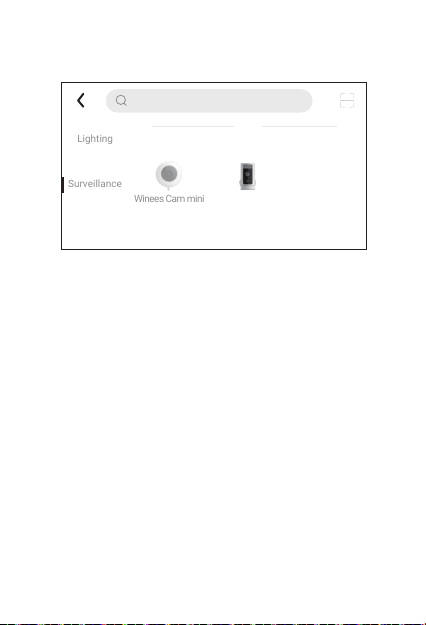
IPC
Lighting
Surveillance
Winees Cam mini
Winees Spotlight
Cam
Enter device name

6
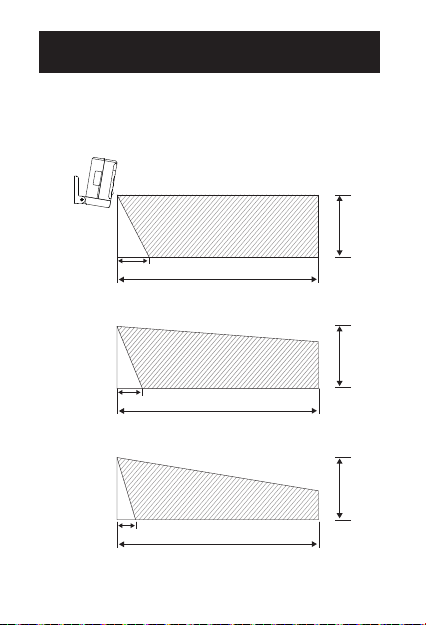
1. Placement
The recommended installation height is 2.5~3 meters (8.2~9
feet) above the ground. Either too high or too low height may
aect the operation of the motion detector.
8M
1.3M
1M
0.7M
2.5M
2.5M
2.5M
Install Spotlight Cam on the wall or celling
8M
8M
Depression
angle 10°
Depression
angle 15°
Depression
angle 20°
Motion detect area

7
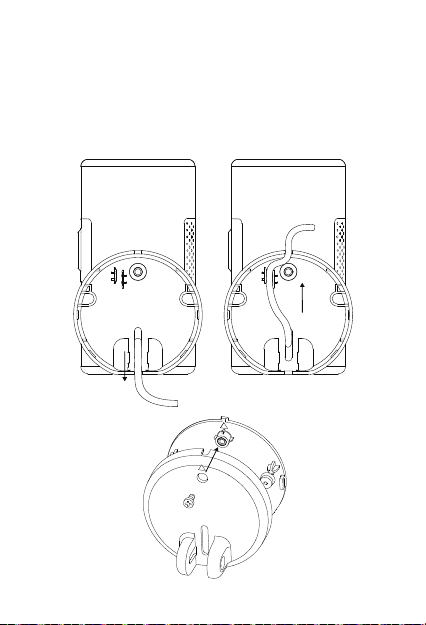
2. Install the bracket
When install the bracket on the wall/ceiling, please pay
aention to the installation direction of the base.
If installing on a masonry surface, drill holes on the wall first,
insert the anchor into the hole, and then install screw to fix the
base.
Note: When install it upside down on the ceiling, you’ll need to set
the image angle to 180° in the camera seings after adding the
camera on the app.
If installing on a wooden surface, install screw to fix the base
directly.
On the wall Ceiling

8
On a masonry surface
On a wooden surface
9
3. Tighten the camera.
Arrange the cables behind the camera. You can route the
wire from the top or boom. Align the arrow on the camera
base with that on the mounting bracket, snap it into place
with a clear ”click” sound, and then tighten it with the
Security Screw.

10
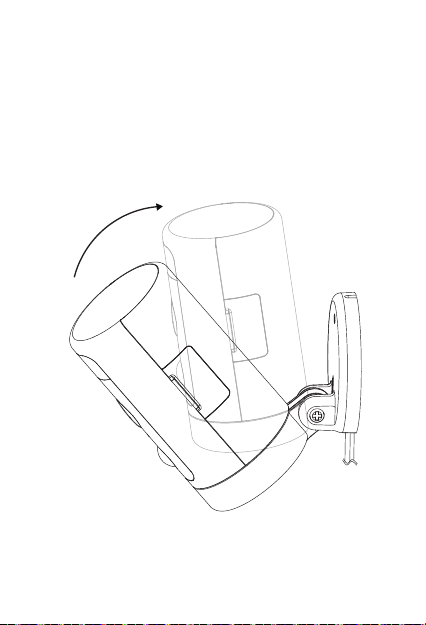
4. Adjust the camera angle
Manually adjust the up and down angle of the camera to obtain
an accurate monitoring image and motion detect range. The
tightness of the up and down rotation can be adjusted by the
screw at the connection.

11
5. Power on the camera
Power on the camera and wait for the camera to work.

Requirements and Tech Specs
Wi-Fi Network Requirements
- Supports IEEE 802.11b/g/n
- Your Wi-Fi network broadcasts at 2.4GHz. 5GHz band is not
supported
- Your network upload speed is suggested to be greater than 1
Mbps to
have fluent video streaming.
Power (Only for CE)
- 100~ 240VAC 50/60Hz power supply for the AC adapter
- DC 12V/1A input for the camera
- Max. power consumption: 10W
- Frequency range : 2412-2472MHz
- Maximum RF transmit power: 802.11b 16±2dBm, 802.11g 54M
14±2dBm, 802.11n HT20 12±2dBm, 802.11n HT40 12±2dBm
-Maximum radio-frequency power: 20 dBm
12

Camera
- 2K QHD @25 frames per second
- Maximum resolution: 2560*1440
- 1/3” Color CMOS sensor
- 135° (diagonal) wide angle lens
- Video compression: H.265/H.264
- Infra-red night vision: 10m(32.8ft)
- Motion detection: 7m Max.
- Rotation: 270° pan
Audio
- Built-in microphone and speaker
- Two-way talk
Lighting
- White light LED: 5000K, 400lm
Siren
- 100dB @10cm Max
Storage
- Micro SD card storage up to 128 GB (Micro SD card is not included)
Operating Environment
- Temperature: -20°C ~ 50°C(-4°F ~ 122°F)
- Humidity: ≤95% non-condensing
13

14
Trouble Shooting
If the default adding camera operation fails
- Make sure your wireless router has the Internet access, and the
Wi-Fi signal at the location where you install the camera is good.
- Make sure the camera is plugged in and the status LED is on
or flashing
- Reset the camera if the LED is NOT flashing green. Then follow
the App to add it.
- Make sure the camera is not added to other user’s account. If it is,
the owner of the camera has to unbind it first.
- When this step is done, the camera should be added to your account.
If the Micro SD card is not detected by the camera
- Make sure the card is good and format it again in the FAT-32 format.
How to do the forced reset?
- If you cannot reset the camera from the seing page, please hold
the reset buon in the pin hole with the reset pin for 3 seconds and
release. The camera will play a voice prompt” Restoring
factory seings”.
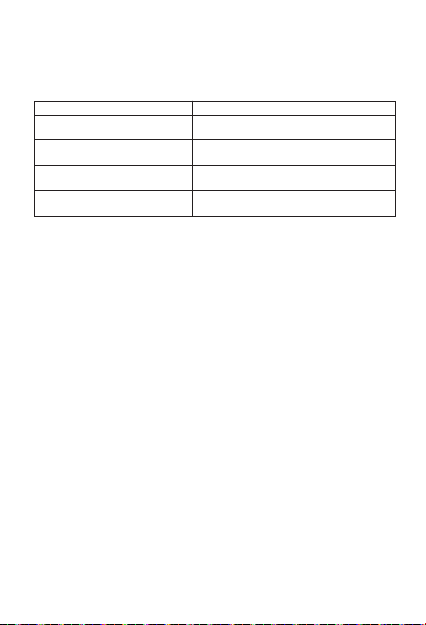
MicroSD card capacity Duration of video recording
128GB
64GB
32GB
16GB 25h
100h
200h
50h
15
The time of the camera video stamp is not right
- Please set the right time zone in the seings.
How long can a Micro SD card (not included) of dierent capacity record?
ISED Statement
This device contains licence-exempt transmier(s)/receiver(s) that
comply with Innovation, Science and Economic Development Canada’s
licence-exempt RSS(s). Operation is subject to the following two
conditions:
1. This device may not cause interference.
2. This device must accept any interference, including interference that
may cause undesired operation of the device.
L’émeeur/récepteur exempt de licence contenu dans le présent appareil
est conforme aux CNR d’Innovation, Sciences et Développement
économique Canada applicables aux appareils radio exempts de licence.
L’exploitation est autorisée aux deux conditions suivantes :
1. L’appareil ne doit pas produire de brouillage;
2. L’appareil doit accepter tout brouillage radioélectrique subi, même si le
brouillage est susceptible d’en compromere le fonctionnement.
This equipment complies with ISED RSS-102 radiation exposure limits set
forth for an uncontrolled environment. This equipment should be installed
and operated with a minimum distance of 20cm between the radiator and
any part of your body.
Pour se conformer aux exigences de conformité CNR 102 RF exposition,
une distance de séparation d'au moins 20 cm doit être maintenue entre
l'antenne de cet appareil eoutes les personnes.

This device complies with Part 15 of the FCC Rules.
Operation is subject to the following two conditions:
(1) This device may not cause harmful interference.
(2) This device must accept any interference received,
including interference that may cause undesired operation.
Note: The grantee is not responsible for any changes or modifications not
expressly approved by the party responsible for compliance. Such
modifications could void the user’s authority to operate the equipment.
NOTE: This equipment has been tested and found to comply with the limits
for a Class B digital device, pursuant to part 15 of the FCC Rules. These
limits are designed to provide reasonable protection against harmful
interference in a residential installation.
This equipment generates uses and can radiate radio frequency energy and,
if not installed and used in accordance with the instructions, may cause
harmful interference to radio communications. However, there is no
guarantee that interference will not occur in a particular installation. If this
equipment does cause harmful interference to radio or television reception,
which can be determined by turning the equipment o and on, the user is
encouraged to try to correct the interference by one or more of the following
measures:
- Reorient or relocate the receiving antenna.
- Increase the separation between the equipment and receiver.
- Connect the equipment into an outlet on a circuit dierent from that to
which the receiver is connected.
- Consult the dealer or an experienced radio/TV technician
for help.
FCC Statement
RF Exposure Statement
This equipment complies with FCC radiation exposure limits set forth for an
uncontrolled environment. This equipment should be installed and operated
with minimum distance of 20 cm between the radiator and your body.
16

17
Um Personenschäden und/oder mögliche
Produktschäden zu vermeiden, beachten Sie bie
folgende Warnung: :
1. Bie verwenden Sie nur den mitgelieferten Adapter
anstelle andere, die das Produkt beschädigen werden.
2. Außerhalb der Reichweite von Kindern aufbewahren.
Dieses Produkt enthält kleine Magnete und andere
Kleinteile, die beim Verschlucken zu Ersticken oder
Verletzungen führen können.
3. Um eine frühe Funktionsstörung zu vermeiden, sollte
die Kamera nur installiert in Betriebsumgebungen
zwischen -20 °C ~ 50 °C (-4 °F ~ 122 °F).
4. Nicht installieren
- in der Nähe der Wärmequelle
- in der Nähe von Metallgegenständen und Spiegeln, die
Funksignale dämpfen oder -schaieren können.
5. Zerlegen oder installieren Sie die Kamera nicht, da
sonst zu Sicherheitsrisiken führen kann.
6. Ziehen Sie vor der Reinigung den Netzstecker. Reinigen
Sie die Kamera nicht mit Flüssigkeiten, Sprühreiniger oder
feuchtem Tuch.
7. Der Schlitz und die Önung dienen der Belüftung und
dürfen nicht blockiert oder abgedeckt werden.
CAUTIONS
18
Montageschraube
Montagehalterung
Status LED
Micro SD-Kartensteckplatz
Zurücksetzen-Knopf
Bewegungsmelder
Beleuchtung
Introduction

Packungsinhalt
Schraube*2
Wandanker*2
LED-Status Beschreibung
Stauts Beschreibung
Grün blinkend
Einfarbig Grün
Rot blinkend
Einfarbig Rot
Einschalten / Systemstart /Zurücksetzen auf
Werkseinstellungen
Wireless verbunden
System bereit für WiFi-Setup / Firmware-Update
Rot und Grün
blinken abwechselnd
Verbindung zur Cloud nicht möglich
Wireless Verbindung, Cloud-Verbindung
fehlgeschlagen
AC adapter *1
Zurücksetzen-
Nadel *1
19
Winees Scheinwerfer
Kamera *1

20
1. 1. Scannen Sie den unten stehenden QR-Code
LED-Anzeige
blinkt grün
Wie einrichten Sie die Scheinwerfer
Kamera in der AiDot App
2. Schalten Sie die Kamera ein. Sie können „Warten auf
Wi-Fi-Konfiguration“ hören, und die Kontrollleuchte der
Kamera grün blinkt.
Oder suchen Sie nach „AiDot“ im App Store oder bei Google Play
21
3. Drücken Sie in der AiDot-App „+“ – „Geräte“, wählen Sie
Winees Scheinwerfer Kamera und befolgen Sie die Anweisungen
in der App
4. Platzieren Sie die Scheinwerfer Kamera in dem Bereich, in
dem Sie sie installieren möchten, um die Videoqualität zu
testen. Stellen Sie sicher, dass die Kamera nach der
endgültigen Installation normal funktioniert.
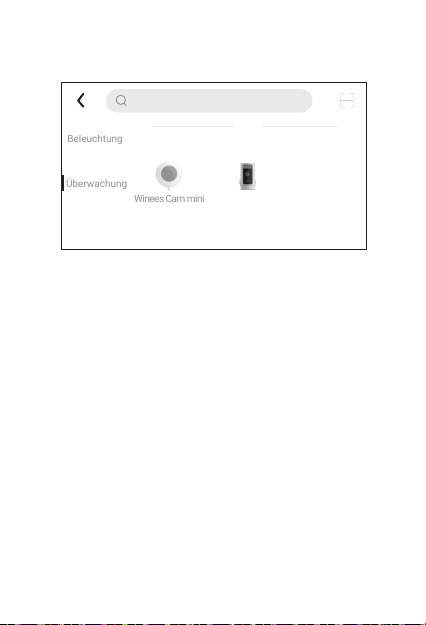
IPC
Beleuchtung
Überwachung
Winees Cam mini
Winees Spotlight
Cam
Gib einen Gerätenamen ein
22
1. Platzierung
Die empfohlene Installationshöhe beträgt 2.5~3 Meter
(8.2~9 Fuß) über dem Boden. Entweder eine zu hohe oder
eine zu niedrige Höhe kann die Funktion des Bewegung-
smelders beeinträchtigen.
Installieren Sie die Scheinwerfer Kamera
an der Wand oder Decke
Senkwinkel 10°
Senkwinkel 15°
Senkwinkel 20°
Bewegungserkennungsbereich
8M
1.3M
1M
0.7M
2.5M
2.5M
2.5M
8M
8M

23
2. Installieren Sie die Halterung
Wenn Sie die Halterung an der Wand oder Decke montieren,
achten Sie bie auf die Montagerichtung des Sockels. Wenn
es auf einer Mauerwerksoberfläche installiert wird, bohren Sie
zuerst ein Loch in die Wand, führen Sie den Anker in das Loch
ein und installieren Sie dann die Schraube, um die Basis zu
befestigen.
Hinweis: Wenn Sie es kopfüber an der Decke installieren, müssen
Sie den Bildwinkel in den Kameraeinstellungen auf 180°
einstellen, nachdem Sie die Kamera in der App hinzugefügt
haben.
Wenn es auf einer Holzoberfläche installiert wird, installieren
Sie bie Schrauben, um die Basis direkt zu befestigen.
An der Wand Decke

24
Auf einer Mauerwerksoberfläche
On a wooden surface

25
3. Ziehen Sie die Kamera fest.
Ordnen Sie die Kabel hinter der Kamera an. Sie können den
Draht von oben oder unten verlegen. Richten Sie den Pfeil an
der Kamerabasis mit dem an der Halterung aus, lassen Sie
ihn mit einem deutlichen „Klick“ einrasten und ziehen Sie ihn
dann mit der Sicherheitsschraube fest.
26
4. Passen Sie den Kamerawinkel an
Passen Sie den Auf- und Ab-Winkel der Kamera manuell an, um
ein genaues Überwachungsbild und einen Bewegungserken-
nungsbereich zu erhalten. Die Dichtheit der Auf- und Abwärts-
drehung kann durch die Schraube am Anschluss eingestellt
werden.

27
5. Schalten Sie die Kamera ein
Schalten Sie die Kamera ein und warten Sie, bis die Kamera
funktioniert.

Anforderungen und technische Daten
Wi-Fi-Netzwerk Anforderungen
- Unterstützt IEEE 802.11b/g/n
- Ihr Wi-Fi-Netzwerk sendet mit 2,4 GHz. 5-GHz-Band wird nicht
unterstützt
-Es wird empfohlen, dass Ihre Netzwerk-Upload-Geschwindigkeit
mehr als 1 Mbit/s beträgt, um einen reibungslosen Videostream
zu erhalten.
Leistung (nur für CE)
- 100~ 240VAC 50/60Hz Netzteil für das AC adapter
- DC 12V/1A Eingang für die Kamera
- max. Leistungsaufnahme: 10W
- Frequenzbereich: 2412-2472 MHz
- Maximale Radiofrequenz Sendeleistung: 802.11b 16±2dBm,
802.11g 54M 14±2dBm, 802.11n HT20 12±2dBm, 802.11n HT40
12±2dBm
-Maximale Radiofrequenz Leistung: 20 dBm
28

Kamera
- 2K QHD @25 Bilder pro Sekunde
- Maximale Auflösung: 2560 * 1440
- 1/3" Farb-CMOS-Sensor
- 135° (diagonal) Weitwinkelobjektiv
- Videokomprimierung: H.265/H.264
- Infrarot-Nachtsicht: 10 m (32,8 ft)
- Bewegungserkennung: 7m max.
- Drehung: 270° Schwenk
Audio
- Eingebautes Mikrofon und Lautsprecher
- Zwei-Wege-Gespräch
Beleuchtung
- Weißlicht-LED: 5000K, 400lm
Sirene
- 100dB @10cm Max
Lagerung
- Micro-SD-Kartenspeicher bis 128 GB (Micro-SD-Karte ist nicht
im Lieferumfang enthalten)
Betriebsumgebung
- Temperatur: -20 ° C ~ 50 ° C (-4 ° F ~ 122 ° F)
- Luftfeuchtigkeit:≤95% nicht kondensierend
29

30
Fehlerbehebung
Wenn das standardmäßige Hinzufügen einer Kamera fehlschlägt
- Stellen Sie sicher, dass Ihr WLAN-Router über einen Internetzugang
verfügt und das Wi-Fi-Signal am Installationsort der Kamera gut ist.
- Stellen Sie sicher, dass die Kamera eingesteckt ist und die Status-LED
leuchtet oder blinkt
- Setzen Sie die Kamera zurück, wenn die LED NICHT grün blinkt. Folgen
Sie dann der App, um sie hinzuzufügen.
- Stellen Sie sicher, dass die Kamera nicht dem Konto eines anderen
Benutzers hinzugefügt wurde. Ist dies der Fall, muss der Besitzer der
Kamera diese zuerst entbinden.
- Wenn dieser Schri abgeschlossen ist, sollte die Kamera Ihrem Konto
hinzugefügt werden.
Wenn die Micro-SD-Karte von der Kamera nicht erkannt wird
- Stellen Sie sicher, dass die Karte in Ordnung ist und formatieren Sie sie
erneut im FAT-32-Format.
Wie kann man den erzwungenen Zurücksetzen machen?
- Wenn Sie die Kamera nicht von der Einstellungsseite zurücksetzen
können, halten Sie bie die Reset-Taste 3 Sekunden lang im Stiftloch mit
dem Zurücksetzen-Stift und lassen Sie sie los. Die Kamera spielt die
Sprachansage „Werkseinstellungen wiederherstellen“ ab.

Kapazität der MicroSD-Karte Dauer der Videoaufnahme
128GB
64GB
32GB
16GB
25h
100h
200h
50h
31
Die Uhrzeit des Kamera-Video Stempels stimmt nicht
-Bie stellen Sie in den Einstellungen die richtige Zeitzone ein.
Wie lange kann eine Micro-SD-Karte (nicht im Lieferumfang enthalten)
unterschiedlicher Kapazität aufzeichnen?

32
Pour éviter des blessures corporelles et/ou des dommages
au produit, les précautions suivantes doivent être
respectées:
1. Veuillez utiliser l'adaptateur fourni au lieu d’autres afin de
ne pas endommager le produit.
2. Veuillez garder ce produit hors de portée des enfants. Ce
produit contient de petits aimants et d'autres petites pièces
qui peuvent provoquer une suocation ou des blessures en
cas d'ingestion.
3. Pour éviter une défaillance prématurée, la caméra ne doit
installé entre les environnements d'exploitation -20°C ~
50°C (-4°F ~ 122°F).
4. Ne pas installer
- près d'une source de chaleur
- près des objets métalliques et des miroirs qui provoquent la
radio aénuation ou ombrage du signal.
5.Ne démontez pas ou ne réinstallez pas la caméra, sinon
cela peut entraîner des risques pour la sécurité.
6.Débranchez le cordon d'alimentation avant de neoyer. Ne
neoyez pas l'appareil photo avec des liquides, un neoyant
en aérosol ou un chion humide.
7.Les fentes et les ouvertures sur la caméra sont prévues
pour la ventilation, ne doivent pas être obturées ni couvertes.
AVERTISSEMENT

33
Vis de Montage
Support de Montage
Témoins
d’état à LED
Emplacement de
Carte Micro-SD
Bouton de
Réinitialisation
Détecteur de Mouvement
Lumière
Introduction

Contenu du Colis
Vis*2
ancrage mural*2
Description de la Témoins LED d'état
Témoins d’état à LED Description
Vert(clignotant)
Vert
Rouge (clignotant)
Rouge
Démarrage/ Démarrage du système/ Restaurer
les paramètres d’usine
Connexion Wifi
Système prêt pour la configuration WiFi / Mise
à jour du firmware
Rouge et vert clignotant
alternativement
Impossible de se connecter au cloud
Échec de la connexion WiFi ou de la
connexion au cloud
Winees spotlight
camera *1 Adaptateur AC *1
Broche de
réinitialisation *1
34
35
1. Scannez le code QR ci-dessous
Le voyant LED
clignote en vert
Configurer Spotlight Cam dans
l'application AiDot
2. Allumez la caméra, vous entendrez «Waiting for Wi-Fi
configuration» avec le voyant de la caméra clignotant vert
Ou recherchez « AiDot » dans l'App Store ou Google Play

36
3. Dans l'application AiDot, appuyez sur « + » - « devices »,
sélectionnez Winees Spotlight Cam et suivez les instructions
sur App.
4. Placez la spotlight cam dans la zone où vous prévoyez de
installer pour tester la qualité vidéo, assurez-vous que la
camera peut fonctionner normalement après l'installation
finale.
IPC
Lighting
Surveillance
Winees Cam mini
Winees Spotlight
Cam
Enter device name

37
1. Placement
La hauteur d'installation recommandée est de 2.5~3 mètres
(8.2~9 pieds) au-dessus du sol. Une hauteur trop élevée ou
trop basse peut aecter le fonctionnement du détecteur de
mouvement.
Installer Spotlight Cam sur le mur ou le
plafond.
Angle de
dépression de 10°
Angle de
dépression de 15°
Angle de
dépression de 20°
Zone de détection de mouvement
8M
1.3M
1M
0.7M
2.5M
2.5M
2.5M
8M
8M

38
2. Installez le support
Lors de l'installation du support sur le mur/plafond, veuillez
faire aention à la direction d'installation de la base. En cas
d'installation sur une surface en maçonnerie, percez d'abord
des trous sur le mur, insérez l'ancrage dans le trou, puis
installez la base pour fixer la base.
Remarque : Lorsque vous l'installez à l'envers au plafond, vous
devrez régler l'angle d'image sur 180° dans les paramètres de la
caméra après avoir ajouté la caméra sur l'APP.
Si vous installez sur une surface en bois, installez une vis pour
fixer directement la base.
Sur le mur Plafond

39
Sur une surface en maçonnerie
Sur une surface en bois

40
3. Serrez la caméra.
Disposez les câbles derrière la caméra. Vous pouvez faire
passer les câbles par le haut ou par le bas. Alignez la flèche
sur la base de la caméra avec celle du support de montage,
enclenchez-la en place avec un " clic " clair, puis serrez-la
avec la vis de sécurité.

41
4. Ajustez l'angle de la caméra
Réglez manuellement l'angle de montée et de descente de la
caméra pour obtenir une image de surveillance précise et une
plage de détection des mouvements. L'étanchéité de la
rotation vers le haut et vers le bas peut être ajustée par la vis de
la connexion.
42
5. Allumez la caméra
Allumez la caméra et aendez qu'elle fonctionne.

Spécification des exigences techniques
Exigences du réseau Wi-Fi
- Supporte IEEE 802.11b/g/n
- Votre réseau Wi-Fi émet à 2,4 GHz. La bande 5GHz n'est
pas supporte.
- Il est suggéré que la vitesse de téléchargement de votre
réseau soit supérieure à 1 Mbps pour que le streaming
vidéo soit fluide.
Puissance (uniquement pour CE)
- Alimentation 100~ 240VAC 50/60Hz pour l'adaptateur secteur AC
- Entrée DC 12V/1A pour la camera
- Puissance électrique maximale : 10W
- Bande de fréquences : 2412-2472MHz
- Puissance de transmission RF maximale : 802.11b 16±2dBm,
802.11g 54M 14±2dBm, 802.11n HT20 12±2dBm, 802.11n HT40
12±2dBm
-Puissance radio-fréquence maximale : 20 dBm
43

Caméra
- 2K QHD @25 images par seconde
- Résolution maximale : 2560*1440
- Capteur CMOS couleur 1/3"
- Objectif grand angle 135° (diagonale)
- Compression vidéo : H.265/H.264
- Vision nocturne infrarouge : 10 m (32,8 ft)
- Détection de mouvement : 7m Max.
- Rotation : 270° pan
Audio
- Microphone et haut-parleur intégrés
- Conversation bidirectionnelle
Lumière
- LED lumière blanche : 5000K, 400lm
Sirène
- 100dB @10cm maximum
Stockage
- Stockage sur carte Micro SD jusqu'à 128 GB (la carte Micro
SD n'est pas incluse)
Environnement d'exploitation
- Température : -20°C ~ 50°C (-4°F ~ 122°F)
- Humidité : ≤95% sans condensation
44

45
Trouver & Régler le problème
Si l'opération d'ajout de caméra par échoue
- Assurez-vous que votre routeur wifi a accès à Internet et que le
le signal Wi-Fi à l'endroit où vous installez la caméra est bon.
- Assurez-vous que la caméra est branchée et que le voyant d'état
est allumé ou clignote.
- Réinitialisez la caméra si la LED ne clignote pas en vert. Puis
suivez l'application pour l'ajouter.
- Vérifiez que la caméra n'est pas ajoutée au compte d'un autre
utilisateur. Si c'est le cas,le propriétaire de la caméra doit d'abord la
délier.
- Une fois cee étape terminée, la caméra devrait être ajoutée à
votre compte.
Si la carte Micro SD n'est pas détectée par la camera
- Assurez-vous que la carte est bonne et formatez-la à nouveau
au format FAT-32.
Comment faire la réinitialisation forcée ?
- Si vous ne pouvez pas réinitialiser la caméra à partir de la page de
configuration, veuillez maintenir le bouton de réinitialisation dans
le trou de la broche avec la broche de réinitialisation pendant 3
secondes , puis libéré. La caméra émera une invite vocale «
Restoring factory seings».

Capacité de la carte micro SD Durée de l'enregistrement vidéo
128GB
64GB
32GB
16GB
25h
100h
200h
50h
46
L'heure du vidéo de la caméra n'est pas correcte
- Veuillez régler le bon fuseau horaire dans les paramètres.
Combien de temps une carte Micro SD (non incluse) de capacité diérente
peut-elle enregistrer ?

47
お使いになる人または他の人への危害、財産への損害を未然に防
止するため、必ずお守りいただくことを、次のように説明しています。
1.いかなる場合でも、必ず付属された電源アダプターをお使いくだ
さい。それ以外の給電装置を使用すると、火災・感電の原因となりま
す。
2.お子様の手が届かない場所でご使用・保管してください。小さな磁
石やその他の小さな部品を付属しているため、けがをしたり、飲み込
んで窒息を招いたりする恐れがあります
3.-20°C~50°Cの環境温度で本製品をご使用ください。初期不良の
原因となります。
4.下記の設置場所は避けてください。
-熱源に近い場所
-電波の減衰や遮光の原因となる金属物や鏡の近くには設置しない
でください。金属部品または鏡に近い場所(電波の減衰または遮断
の原因となります。)
5.カメラ本体分解をしたり、改造したりしないでください(故障の原因
となります)
6.お手入れの際は、必ず電源コードを抜いてください。また、液体や
スプレークリーナー、濡れた布などでカメラを拭かないでください
(故障や感電の恐れがあります)。
7.スロットや開口部は熱の蓄積を防ぐため、カメラ周辺の空気循環
を遮断しないでください。
安全上のご注意

48
取付ネジ
固定用カバー
状態表示
LEDライト
MicroSDメモリ
ーカード挿入口
リセットボタン
動体感知センサー
ライト
Introduction

パッケージ内容
ネジ*2
ウォールアンカー*2
状態表示LEDライト
状態
本体の状態
緑色で点滅
緑色で点灯
赤色で点滅
赤色で点灯 電源オン/システム起動/工場出荷時設定
無線接続成功
WiFi接続できる状態 / ファームウェア更新
赤と緑が交互に点滅 クラウドに接続できない
無線接続、クラウド接続ができない
Wineesスポット
ライトカメラ本体 *1 電源アダプター*1 リセットピン *1
49

50
1.下記のQRコードを読み取ってください。
本体のLED状態
ライトが緑に点滅
AiDotアプリの使用方法
2.カメラの電源を入れると、「WaitingforWi-Ficonfiguration」の
提示音が鳴り、本体のLED状態ライトが緑に点滅します。
または、App StoreまたはGoogle Playで「 AiDot」を 検 索 し て く だ
さい。

51
3.AiDotアプリで、「+」-「デバイス」を押し、「
スポットライト
Wineesカメラ
」を選択し、画面の指示に従って操作してくだい。
4.スポットライトカメラの設置位を決めたら、設置する前に
必ずアプリで画質の角度・画質をテストし、ニーズに応じて調
整してください。そうすることで、設置完成後の調整の手間を
省くことができます。
ネットワークカメラ
ライト
カメラ
Winees カムミニ
スポットライト
Wineesカメラ
デバイス名を入力ください

52
1.設置場所
推奨される高さは、地面から2.5~3メートル(8.2~9フィート)の場
所です。高すぎても低すぎても、動作感知センサーに影響を与え
る可能性があります。
壁や天井への設置方法
伏角10°
伏角15°
伏角20°
検知エリアを移す
8M
1.3M
1M
0.7M
2.5M
2.5M
2.5M
8M
8M
53
2.固定用カバーを取り付け
固定用カバーを壁や天井に取り付ける際は、カバーの取り付け方向
に注意してください。
ご注意:
天井に逆さまに取り付ける場合は、アプリの設定画面でカメラの画像
角度を180°に設定してください。(設定するには、お使いのカメラはあ
らかじめアプリ内に追加しておく必要があります。)
木材表面に設置する場合は、カバーを直接に固定ネジで取り付けて
ください。
壁に設置する 天井板
54
石の表面に
木の表面に

55
3.カメラを固定
カメラの後ろに電源ケーブルを配置してください。配線は上から
でも下からでも構いません。カメラ本体にある矢印と固定用カ
バーの矢印を合わせて、「カチッ」と音がするように回します。そ
の後、固定ネジで締めてください。

56
4.カメラの角度調整
より高質な画像と高精度の動きの検出範囲を得るために、カメラの
上下方向の角度を手動で微調整してください。上下の回転の締まり
具合は、接続部分のネジで調整できます。

57
5.カメラを起動
電源を接続して少し待つと、カメラが自動的に起動します。

作動環境と技術仕様
Wi-Fiネットワークの条件
-IEEE802.11b/g/n対応
-Wi-Fi(無線LAN)は2.4GHzの接続にしか対応しておらず、5Gでの
接続はできません。
-動画をスムーズに再生するには、ネットワークのアップロード速
度が1Mbps以上であることが推奨されます。
電源(CEのみ
-電源アダプター入力電源:100〜240V、50/60HzのAC電源
-カメラ入力電源:12V・1AのDC電源。
-最大消費電力:10W
-周波数帯域:2412-2472MHz
-最大RF送信電力:802.11b16±2dBm,802.11g54M
14±2dBm,802.11nHT2012±2dBm,802.11nHT4012±2dBm
-最大無線周波出力:20dBm
58

カメラ
-2KQHD@25フレーム/秒
-最大解像度:2560*1440
-1/3型カラーCMOSセンサー
-135°(対角線)の広角レンズ
-ビデオ圧縮形式:H.265/H.264
-赤外線暗距離:10m(32.8ft)
-動体検知距離:最大7M
-回転角度:270°パン
オーディオ
-マイクとスピーカーを内蔵
-双方向通話
照明
-ホワイトライトLED:5000K,400lm
サイレン
-100dB@最大10cm
ストレ ージ
-最大128GBのMicroSDカードストレージ(マイクロSDカードは
付属していません。)
動作環境
-温度:-20°C~50°C(-4°F~122°F)
-湿度:≤95%(結露しないこと
59

60
故障かな?
アプリでカメラの追加に失敗しました。
-無線LANルーターがインターネットに接続されていること、カメラ
を設置する場所でのWi-Fiの電波状況が良好であることを確認してく
ださい。
-カメラの電源が入っていること、状態表示LEDライトが点灯または
点滅していることを確認してください。
-状態表示LEDライト緑に点滅している場合は、カメラ設置を工場出
荷時にリセットしてください。その後、アプリの指示に従って再追加し
てください。
-カメラが他のユーザーのアカウントとのバインド状態をご確認くだ
さい。カメラを新しいアカウントにバインドする必要がある場合は、
既存のアカウントのバインドを解除する必要があります。
-バインドを解除してから、現在のアカウントにリバインドできます。
MicroSDカードが認識されない場合
-MicroSDカードが破損していないか、他の機器で正常に動作する
かを確認してください。その後、FAT-32形式にフォーマットしてくだ
さい。
工場出荷時に設置する方法
-アプリでカメラを操作できない場合、リセットボタンをリセットピン
でピンホールに3秒間押し続けます。リセット成功後、“Restoring
factorysettings”の提示音が鳴ります。

容量 時間
128GB
64GB
32GB
16GB
25h
100h
200h
50h
61
動画の時間透かしが間違った場合
-アプリの設定画面でタイムゾーンを正しく設定してください。
容量の異なるMicroSDカード(別売)の記録可能時間の目安
Linkzone Technology Co., Limited
ROOM 20 5/F WAYSON COMMERCIAL BLDG 28
CONNAUGHT ROAD WEST SHEUNG WAN HK
Phone: 1-855-334-9800
Website: www.iwinees.com
Email: [email protected]
Made in China
Contact Us / Kontaktieren Sie uns
62
Business name: APEX CE SPECIALISTS LIMITED
Business address: UNIT 3D NORTH POINT HOUSE,
NORTH POINT BUSINESS PARK, NEW MALLOW ROAD,
CORK, T23 AT2P, IRELAND
Email: info@apex-ce.com
Tel: +353212066339
EC REP
Business name: APEX CE SPECIALISTS LIMITED
Business address: 89 Princess Street,
Manchester, M1 4HT, UK
Email: info@apex-ce.com
Tel: +441616371080
UK REP